RCA TV/VCR Or DVD Combo Manual L0108121
User Manual: RCA RCA TV/VCR or DVD Combo Manual RCA TV/VCR or DVD Combo Owner's Manual, RCA TV/VCR or DVD Combo installation guides
Open the PDF directly: View PDF ![]() .
.
Page Count: 42
USER'S
GUIDE
TV/VCR CO
Important Information
TO REDUCE THE RISK OF ELECTRIC
SHOCK, DO NOT REMOVE COVER (OR
BACK), NO USER SERVICEABLE PARTS
INSIDE. REFER SERVICING TO QUALIFIED
SERVICE PERSONNEL,
,& This symbol _ndicams Mangerous
voltage _ inside {he product/hat
presents a risk of e]ectric shoifk or
personal inju Ey,
This symbol indicates important in°
structio11s ac_ompa_lying [_le pFod_ct.
WARNING I
To reduce the risk of fire or shock Eazard, do not expose
this product to rain or moisture,
CAUTION: To prevent electric shock, match wide blade of plug
to wide slot, fully insert.
A'II'ENTION: Pour Oviter les chocs Olectriques, introduire la
lame la plus large de la fiche darts la borne correspondante de la
prise et pousser jusqu'au fond.
Cautions
PCC regulations state that unauthorized changes or modifications to this
equipment ms_ void the user's authori_ to operate it.
Refer to the identification/rating label on the back of the product for the proper
operating voltage.
I
CAUTION: If fixed (non-moving) im_es are left on the screen for [
long periods, they ma}i be permanently imprinted on t_e screen. Such I
hnages include network logos, phone numbei_, and video games. Ex-
tended viewing of channels displaying these im_es should be avoided.
Note to Cable IV Installer
'[__lsreminder is provided m call your attention to Article 82040 of the National
Elec_ica! Code (Section 54 of the Canadian Electrical Code, Part i) which
provides guidelines for proper grounding and, in particular, specifies that the
cable ground shah be connected to the grounding aysmm of the building as
close to the point of cable entxLyas practical
Product Registration
Please fill out the product registration card and return it immediately.
Returning the card al!ows us to contact you if needed.
Keep your sales receipt to obtain wairan_ parts and service and for proof
of purchase. Attach it here and record the seria! and mode! nmnbers in
case you need them, The numbers are located on the back of the TV/VCR
combination.
Mode[ No,__
Serial No.
Purchase Date:
Dealer/Address/Phone:
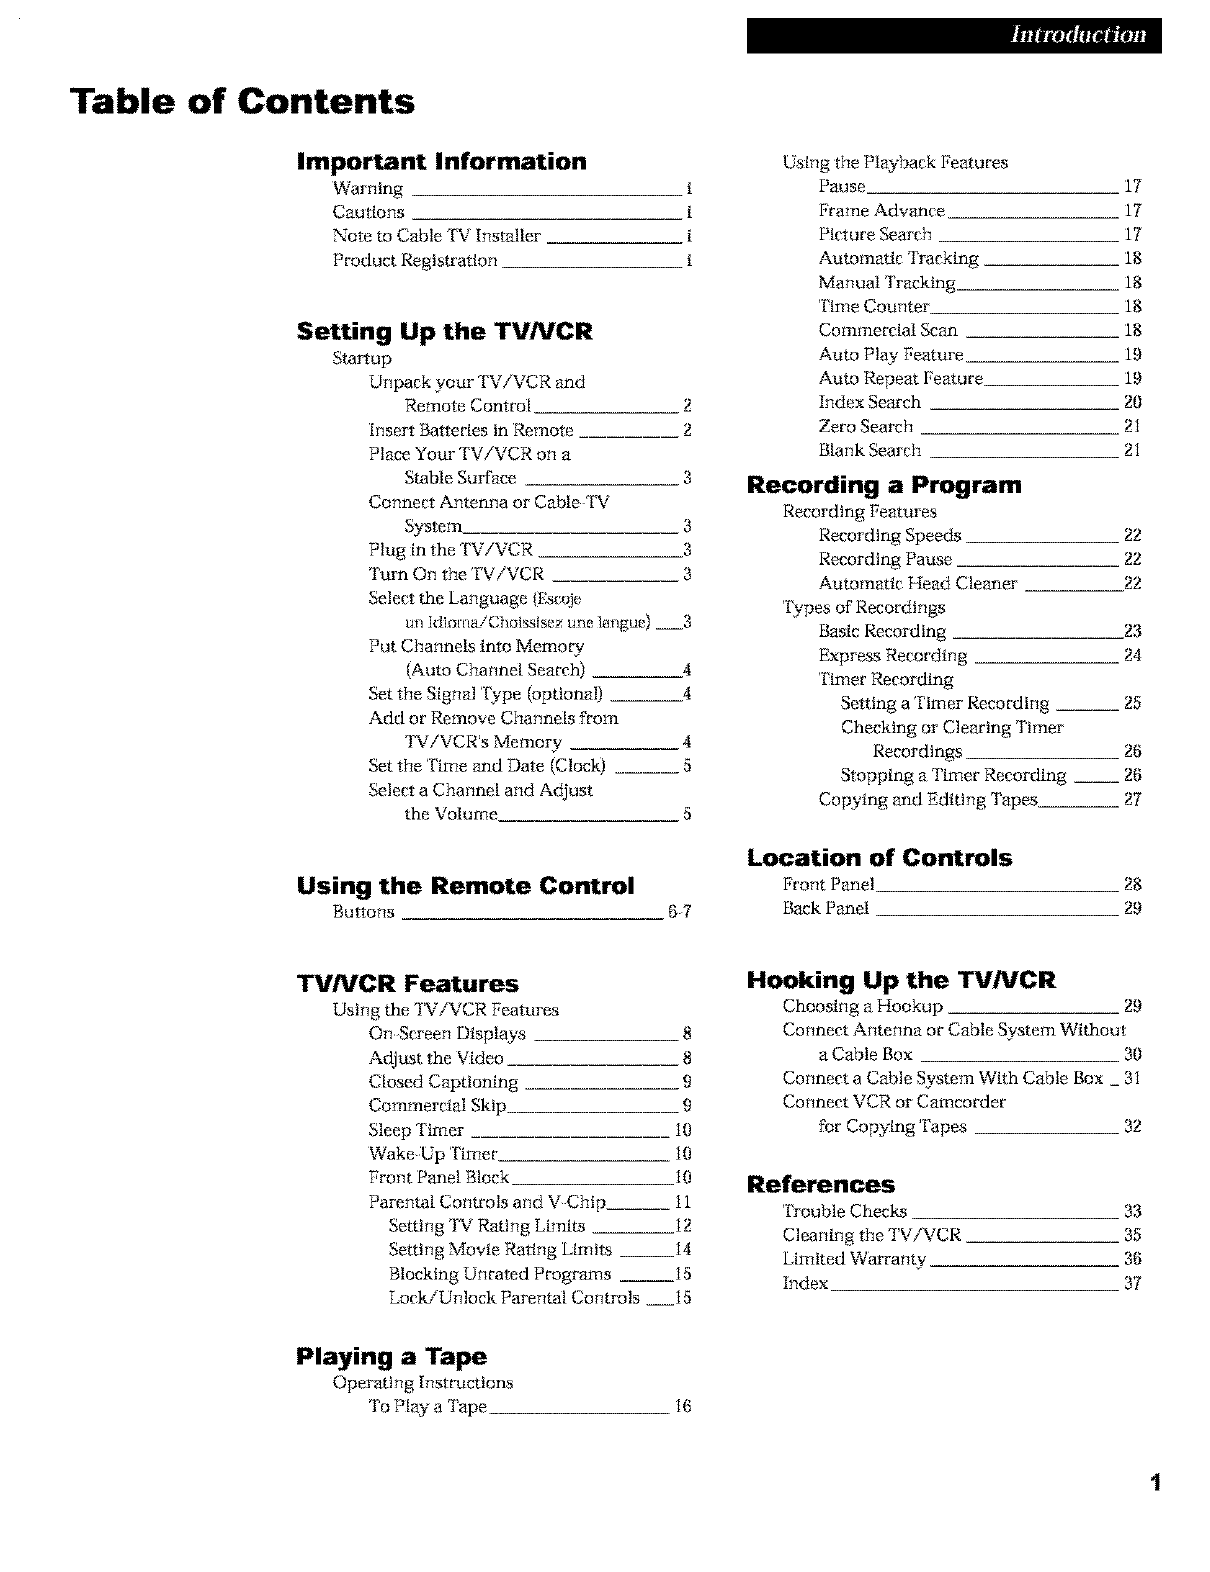
Table of Contents
Important Information
Warning i
Cautions i
Note to Cable '1%"Installer i
Product Registration __ i
Setting Up the TV/VCR
Stariup
Unpack your TV/VCR and
Remote Control 2
Inset* Batteries in Remote 2
PlaceYourTV/VCR on a
Stable Surface 3
Connect Antenna or Cable '1%'
System 3
Plug in the TV/VCR 3
Turn On the TV/VCR 3
Select the Language (t:_coje
un Idioma/Choissisez une langue) 3
Put ChanneN into Memo W
(Auto Channel Search) 4
Set the Signal Type {optional} 4
Add or Remove Channels from
TViVCR's Memo D' 4
Set the Time and Date (Clock} .... 5
Select a Channel and Adjust
the Volume 5
Using the Remote Control
Buttons 67
Using the Playback Features
Pause
Frame Advance
Picture Search
Automatic Tracking
Manual Tracking
Time Counter
Commercial Scan
Auto Play Feature
Auto Repeat Feature.
Index Search
Zero Semvh
Blank Search
17
17
17
18
18
18
18
19
19
20
21
21
Recording a Program
Recording Features
Recording Speeds 22
Recording Pause ___ 22
Automatic Head Cleaner 22
Types of Recordings
Basic Recording 23
Express Recording 24
Timer Recording
Setting a 'rimer Recording __ 25
Checking or Clearing Timer
Recordings 26
Stopping a Timer Recording __ 26
Copying and Editing Tapes 27
Location of Controls
Front Panel
Back Panel
28
29
TV/VCR Features
Using the TViVCR Features
On Screen Displays __ 8
Adjust the Video 8
Closed Captioning 9
Commercial Skip 9
Sleep 'rimer i0
Wake:Up Timer 10
Front Panel Block i0
Parental Controls and V Chip__ 11
Setting TV Rating Limlt_ 12
Setting Movie Rating Limits 14
Blocking Unrated Programs .... 15
Lock/Unlock Parental Controls 15
Hooking Up the TV/VCR
Choosing a Hookup 29
Connect Antenna or Cable System Without
a Cable Box 30
Connect a Cable System With Cable Box _ 3i
Connect VCR or Camcorder
for Copying 'rapes 32
References
Trouble Checks
Cleaning the TViVCR
Limited Warranty
Index
33
35
36
37
Playing a Tape
Oper_tng Instructions
To Play a Tape i6
1
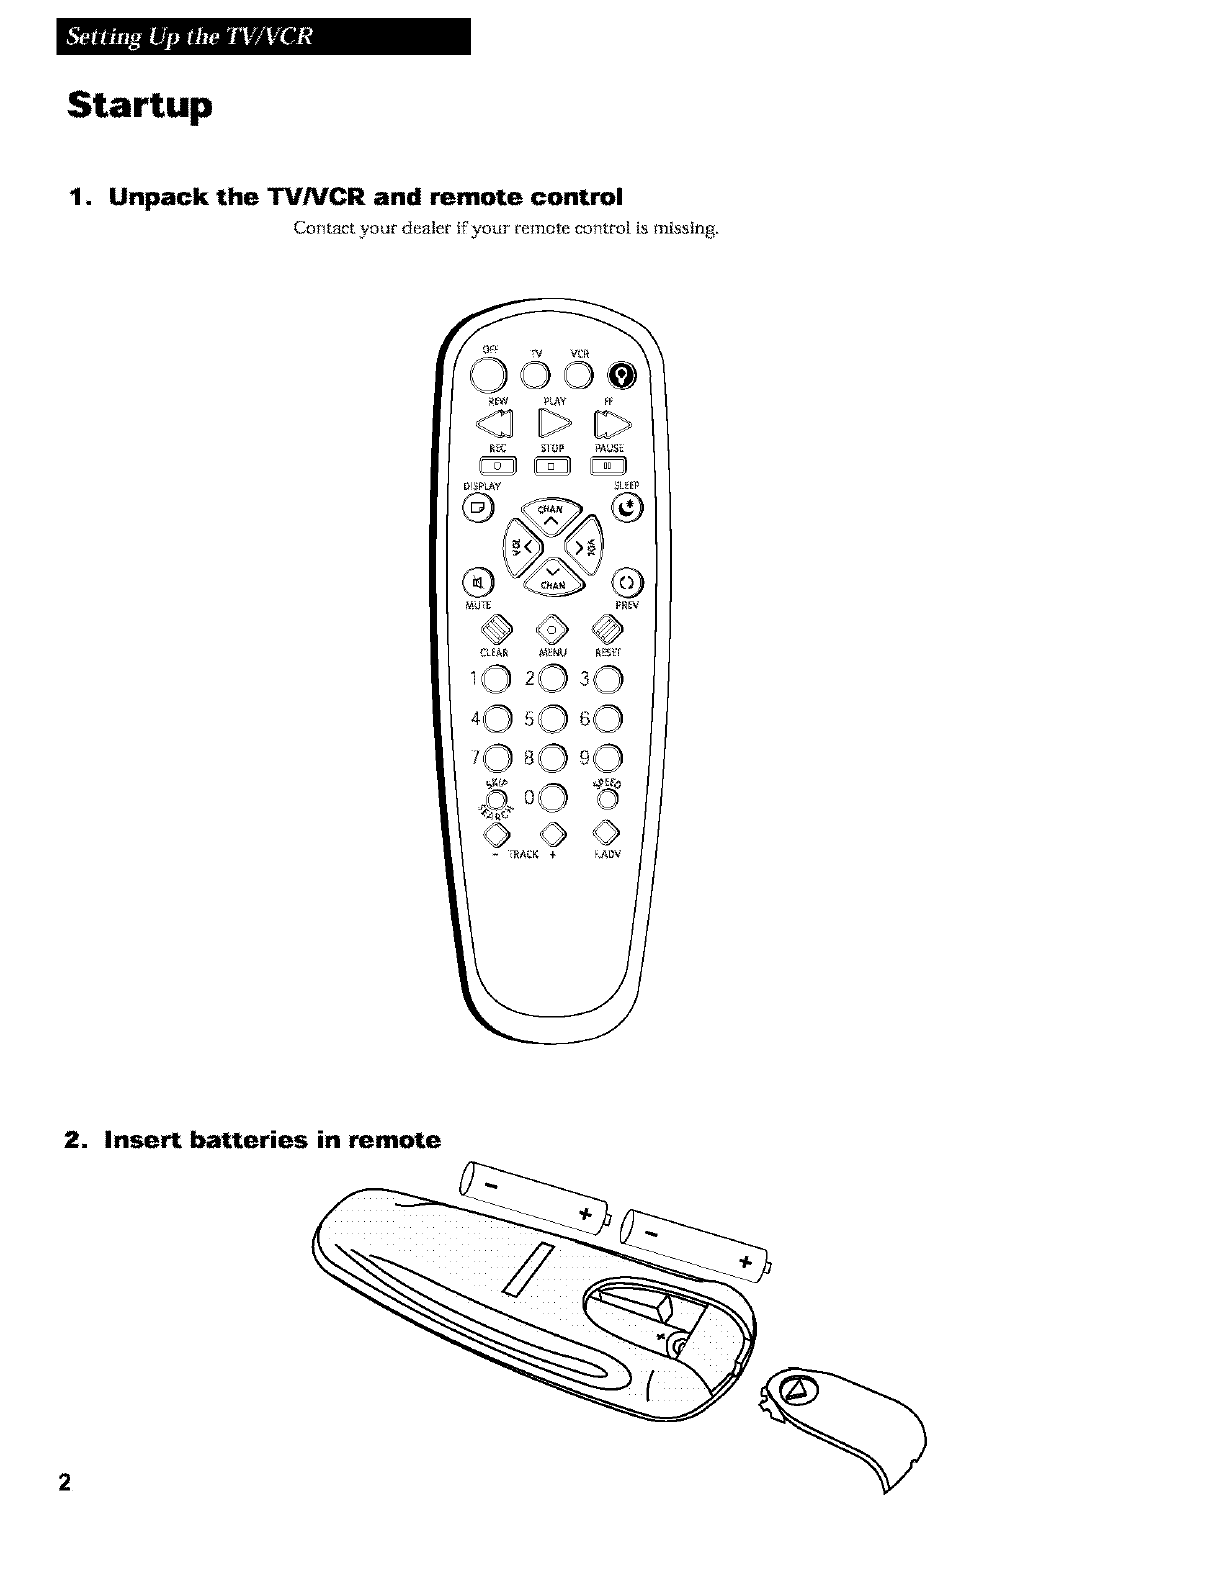
Startup
1. Unpack the TV/VCR and remote control
Contact your dealer tf your remote co_tro| is missing.
_W PLAY FF
® @
2. Insert batteries in remote
Startup
3. Place your TV/VCR on a stable surface
4. Connect antenna or cable-TV system
Connect a home antenna or a cable '1%' system. Details o_ _ges 293Z
5. Plug in the TV/VCR
Plug the power cord into the wall o_let, matching the wide blade of
the plug with the wide slot in the outlet. Be sure to insert the plug
completely.
6. Turn on the TVNCR
Press POWER on the front of the TViVCR or press IV or VCR on the
remote, The indicator in the POWER button on the front of the
TV/VCR will light when the TViVCR is on,
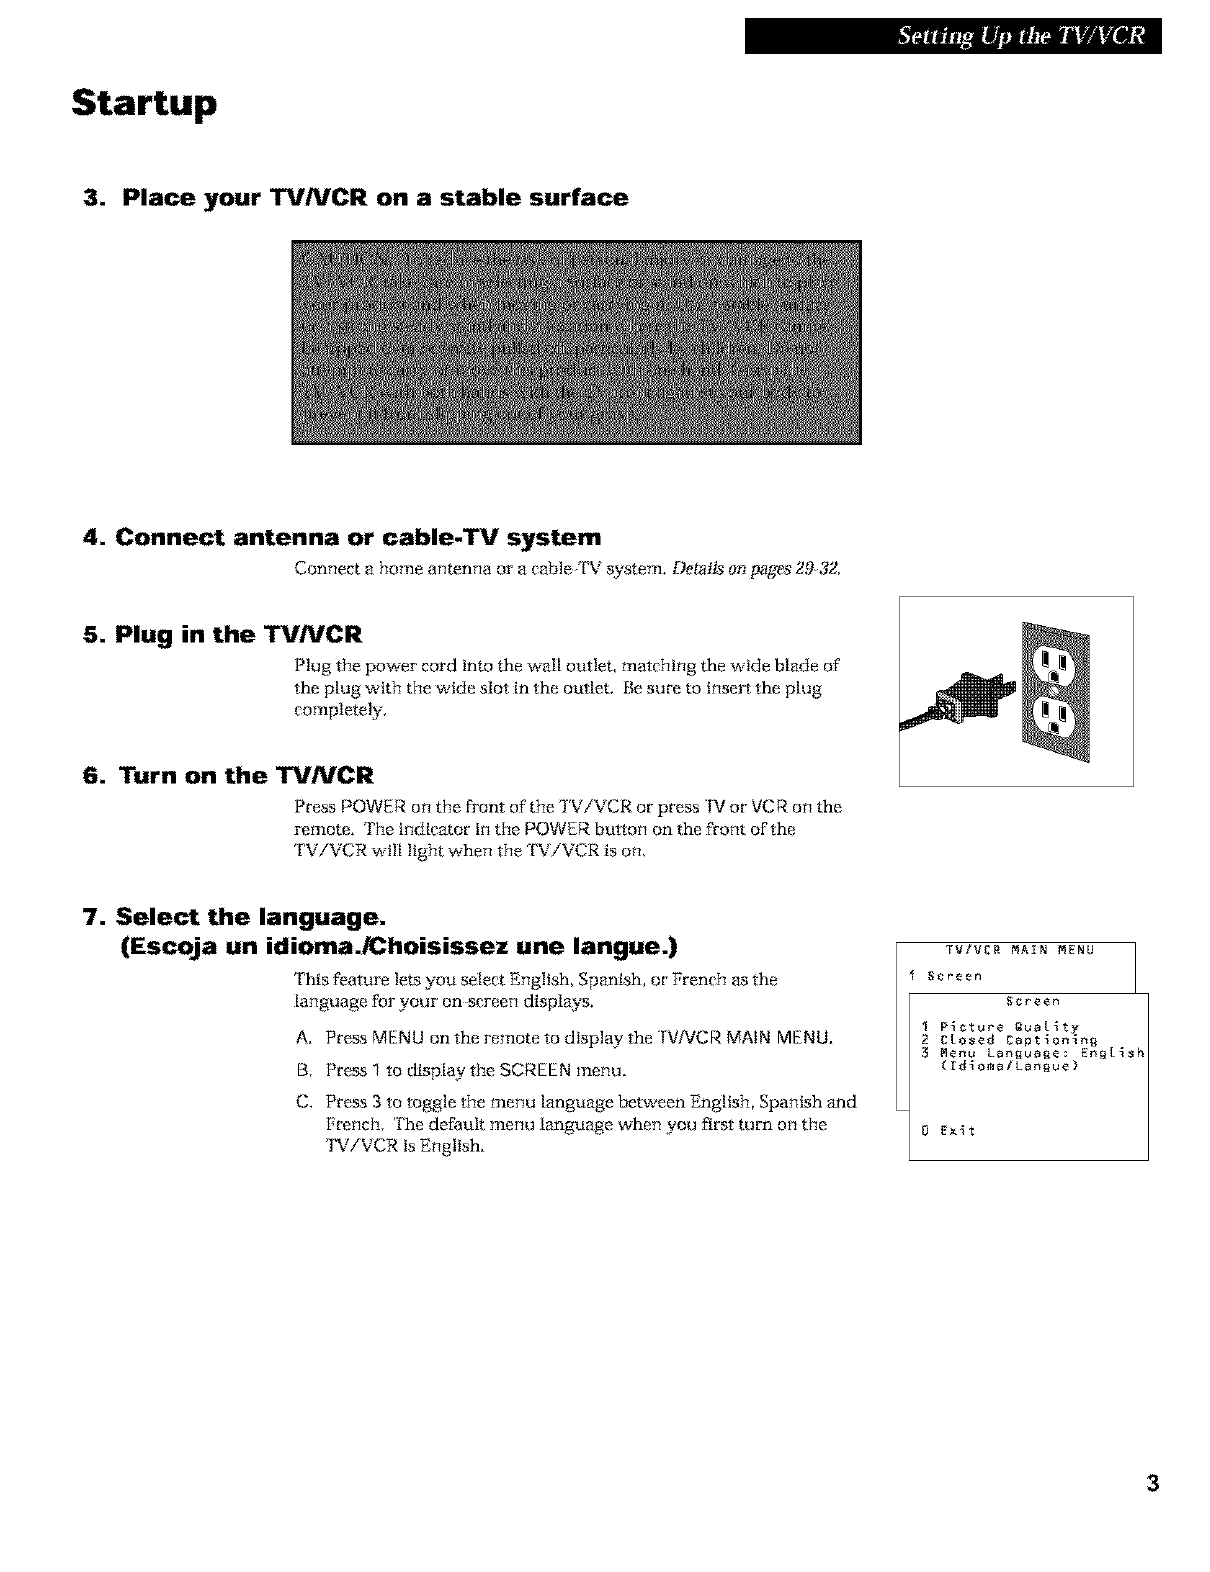
7. Select the language.
(Escoja un idioma./Choisissez une langue.)
This feature lets you select English, Spanish, or Prenc}_ as the
language for your on screen displa3*_.
A. PressMENU ontheremotetodtsplaytheTV/VCRMAIN MENU.
B. Press_ to display the SCREEN menu.
C. Press 3 to toggle the menu language betwean English, Spanish and
French. The default menu language when you first turn on the
TV/VCR is English.
TViVCR MAIN MENU
_reen
Screen
I P_ctur_ _uaL_ty
2 CLosed Capt_n_ng
3 M_nu Language: _n_[_sh
(rd_malLan_u_)
Startup
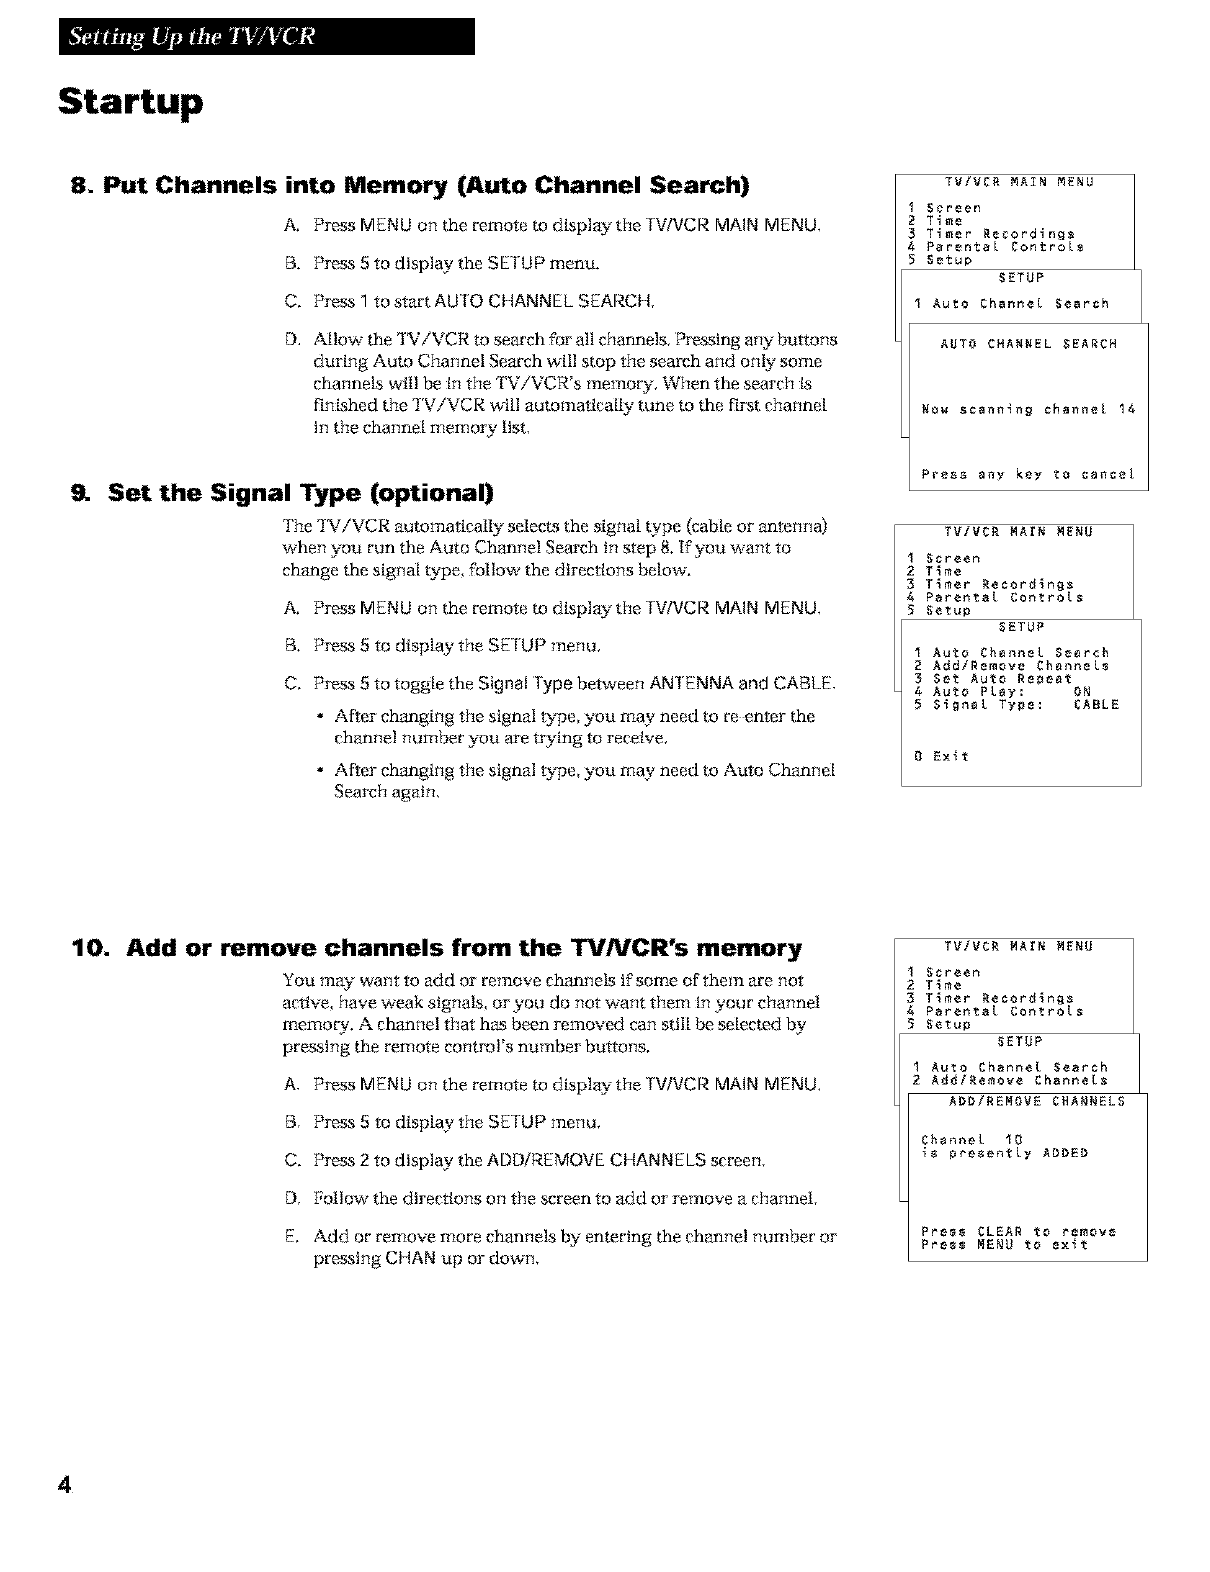
8. Put Channels into Memory (Auto Channel Search)
A, Press MENU on the remote to display the |V/VCR MAIN MENU,
B, Press 5 to display the SETUP menu,
C. Press 1 to start AUTO CHANNEL SEARCH,
O. Allow the 'KV/VCR to search for all channels, Pressing any buttons
during Auto Channel Search will stop the search and only some
channels will be in the TV/VCR's memory, When the search is
finished the TViVCR will automatlcal|y tune to the first channel
in the channel memo W list.
Set the Signal Type (optional)
The TViVCR autornaflca_ selects the signal _pe (cable or antenna)
when you run the Auto Channel Search in step 8. If you want to
change the signal ty>e, follow the directions below'.
A. Press MENU on the remote to display the TWVCR MAIN MENU,
B. Press 5 to display the SETUP menu,
C. Press 5 to toggle the Signal rype between AN1 ENNA and CABLE,
• After changing the signal type, you may need to reenter the
channel number you are trying to receive,
• After changing the signal type, you may need to Auto Channel
Search again,
TViVCB MAIN MENU
Screen
2 Tiae
3 Tiaer Be¢ordlnB_
Parental Contro[_
5 Setup
SETUP
I Auto Channel Search
AUTO CHARNEL SEARCH
BO_ $cenn_nN channel 14
Press any key _o cancel
TViVCB MAIN MENU
I Screen
2T_me
3T_mer Recordings
Parental Controls
5 Setup
SETUP
I Auto Channel Search
2 Add/Remove ChanneLs
3 Set Auto Repeat
4 Auto PLay: ON
5S_gnaL Type: CABLE
0Exlt
TViVCB PAIN MENU
I Screen
2 T_me
3 T_mer Becord_ng_
Parental Controls
5 Setup
SETUP
I Auto Channel Search
2 Add/Be€ova Channels
ABBiREPOVE CHANNELS
Channel I0
_¢ precentLy ABBEB
10. Add or remove channels from the TVNCR's memory
You m_ want to add or remove channels ff some of them are not
ac_ve, have weak signal, or you do not want them in your channel
memo W. A channel that has been removed can still be selec_d
pressing the remote control's number buttons.
A. Press MENU on the remote to display the TWVCR MAIN MENU,
B. Press 5 to display the SETUP menu,
C. Press 2to display the ADD/REMOVE CHANNELS screen,
D. Follow the dtrertlons on the screen to add or remove a channel,
E. Add or remove more channels by entering the channel number or
pressing CHAN up or down,
Press CLEAR to remove
Pre¢¢ MENU to exlt
4

Startup
11. Set the Time and Date (Clock)
To set the clock:
A, PressMENUontheremotetodtsplaytheTVWCRMAIN MENU,
B, Press 2 to display the TIME menu,
C, Press 1 to display the SET TIME and DATE screen,
D. Use the number buttons on the remote to enter the time.
• Press 0 before i; 0 is added automatically before all other
numbecs. Press 1 for AM or 2for PM. Example: For a time of
1:07 PM, press 0, then 1, then 0, then 7, then 2.
E. Use the number buttons on the remote to enter the date.
• The day of the week wt!l automatically appear after you enter
the year.
• Press CLEAR on the remote at any- time to change incorrect
entries.
F. Press MENU on the remote to start the clock.
G. To exit and return to '1%_v_ewing, follow'the on screen tns_cttons.
H. To display the time and date, press DISPLAY on the remote.
TViVCR MArN MENU
Screen
T_me
TIME
I Set Time and Date
SET TIME ARD DATE
Time ......
Dste --l--l--
Press MENU to csncet
SET TrME AND gATE
T_me 01:07 PM
gate 10/$1/9g Saturday
Press CLEAR to correct
Press MENU to set
Ch _
12. Select a channel and adjust the volume
A, Press CHANNEL up or down or press the number buttons on the
remote to select a channel.
Example: For channel 2, press 0 then 2. The channel number
is displayed on the screen.
For cable channels over 99, press and hold 1 until 1- - appears.
'Ihen enter the next two numbers. Example: For channel 102, press
and hold 1. When 1 appears, press 0, then press 2.
B, Press VOL left or right to adjust the volume, The volume display
appears on the screen,
Votume-..l ............ +
5
Buttons
This remote has a Light O feature that lets you use the remote in a dimly lit or dark room, The Light button glows in the dark. Pressing
this button lights some of the most commonly used remote buttons. The buttons remain lit as long as any button is pressed within
approximately four seconds of the last button pressed. Tim light times out if no buttons are pressed, which conserves the life of your
batteries. If the light times out, simply press the Light button to turn it on again.
CHAN nand v(Channel up and down)
Selects next higher or lower channel in
channel memory.
OFF IV VCR
00
R_ PLAY F_
REC STOP PAUSE
CLEAR
Removes all menus from the screen.
Allows you to change menu entries or
clear a timer recording.
Resets time counter to 0:00:00 when it
is displayed.
DISPLAY
13ispla2_ TViVCR's current status.
13ispla2_ time counter when a tape
is inserted,
Removes displays,
F. ADV (Frame Advance)
Fast forwards the tape through a
commercial when a tape is playing.
Advances the tape one video flame at a
time when the tape is in PAUSE mode.
FF (Fast Forward)
Fast forwards the tape when the
TViVCR is stopped.
Searches the picture in forward motion
during playback.
MENU
Display_ the TV/VCR MAIN MENU,
Advances to next program during
program review'.
MUTE
Reduces volume to a minimum level.
6
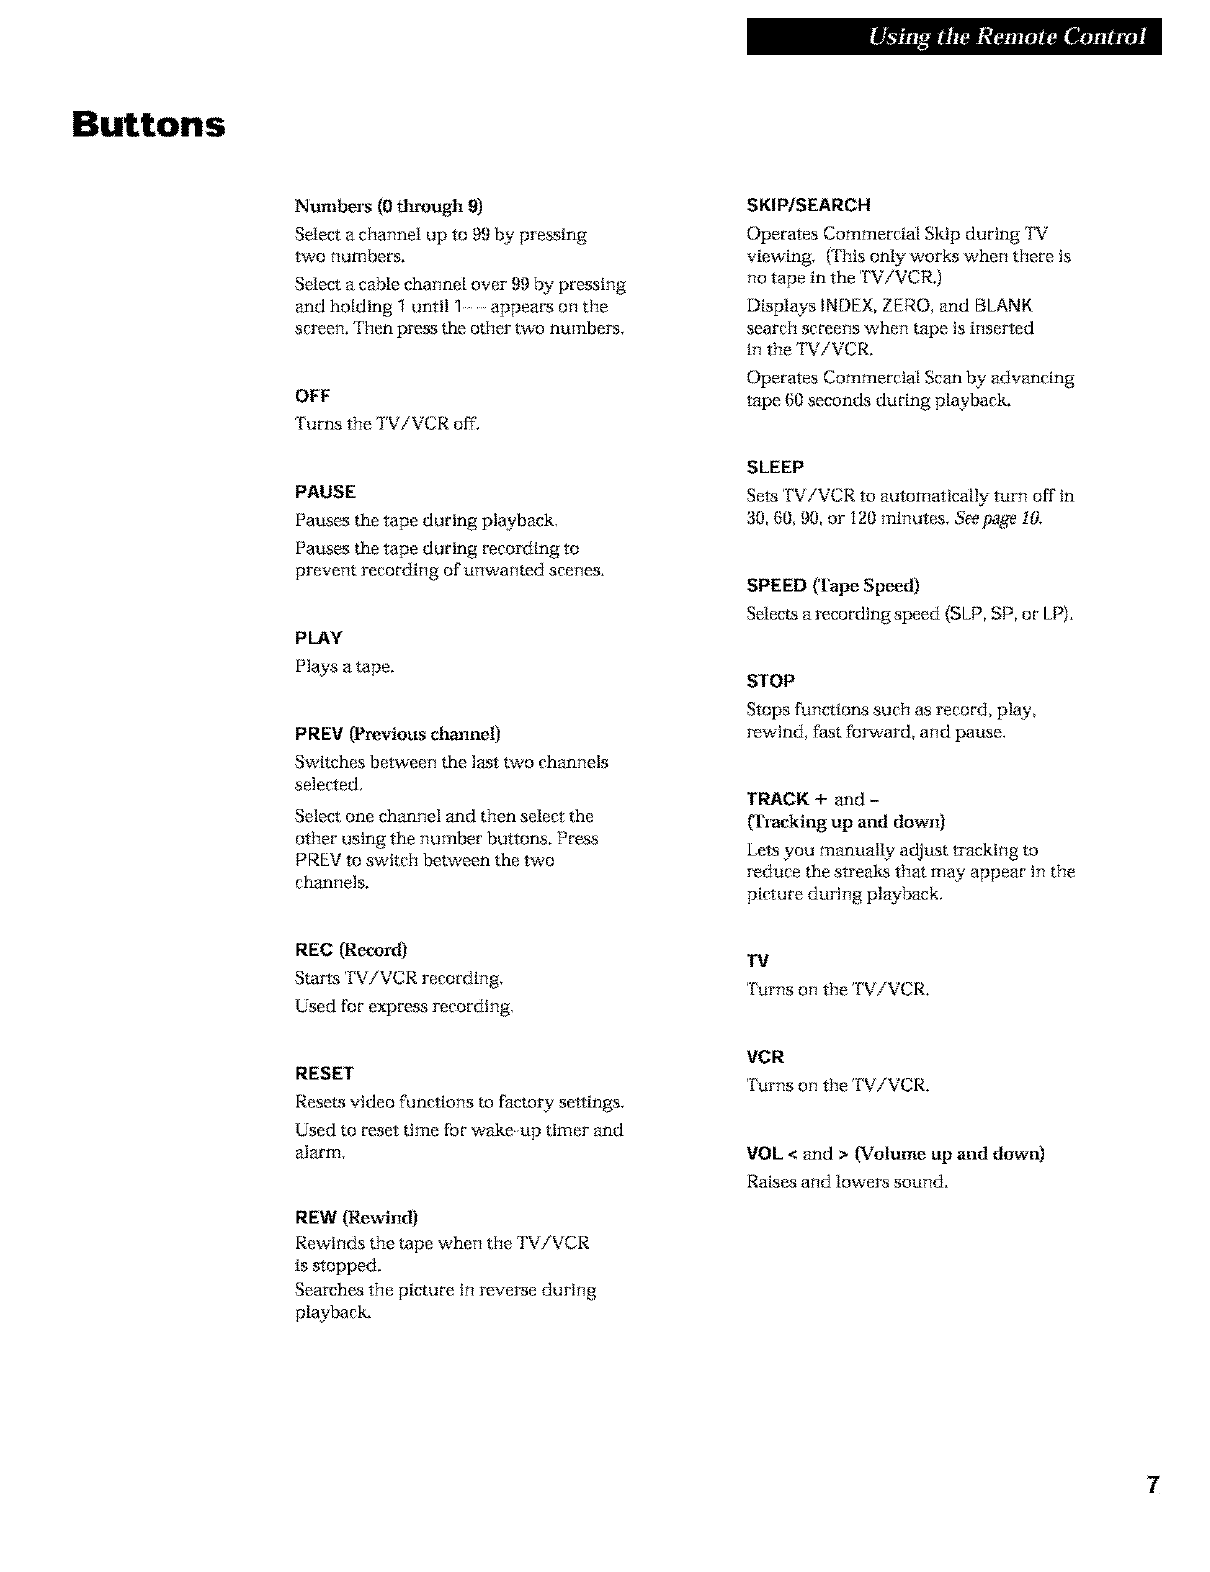
Buttons
Numbers (0 through 9)
Select a channel up to 99 by pressing
two numbers.
Select a cable channel over 99 by pressing
and holding 1 until "1 appears on the
screen. Then press the other two numbers.
OFF
Turns the TViVCR off.
PAUSE
Pauses the tape during playback.
Pauses the tape during recording to
prevent recording of unwanted scenes.
PLAY
Plays a tape.
PREV (Previous channel)
Switches between the last two chan_mls
selected.
Select one channel and then select the
other using the number buttons. Press
PREV to switch betwean the two
channels.
REC (Re_ard)
Starts TViVCR recording.
Used for express recording.
RESET
Resets video functions to factory settings.
Used to reset time for wake up timer and
alarm.
REW (Rewind)
Rewinds the tape when the TViVCR
is stopped.
Searches the picture in reverse during
playback,
SKIP/SEARCH
Operates Commercial Skip during 'KV
viewing. (This only works when there ts
no tape in the TV/VCR.)
Displays INDEX,ZERO, and BLANK
search screens when tape is inser*ed
in the 'IN_iVCR.
Operates Commercial Scan by advancing
tape (30seconds during playback.
SLEEP
Sells TV/VCR to automatically turn off in
30, 60, 90, or i20 minutes, Seepage 10,
SPEED {Tape Speed)
Selects a recording speed (SLP,SP, or LP),
STOP
Stops functions such as record, play,
rewind, fast forward, and pause.
TRACK + and -
(Tracking tip and down)
Le_syou manually adjust tracking m
reduce the streaks that may appear in the
picture during playback.
111
Turns on the TViVCR.
VCR
Turns on the TViVCR.
VOL <and >(Volume ttp and down)
Raises and lowers sound.
Using the TVNCR Features
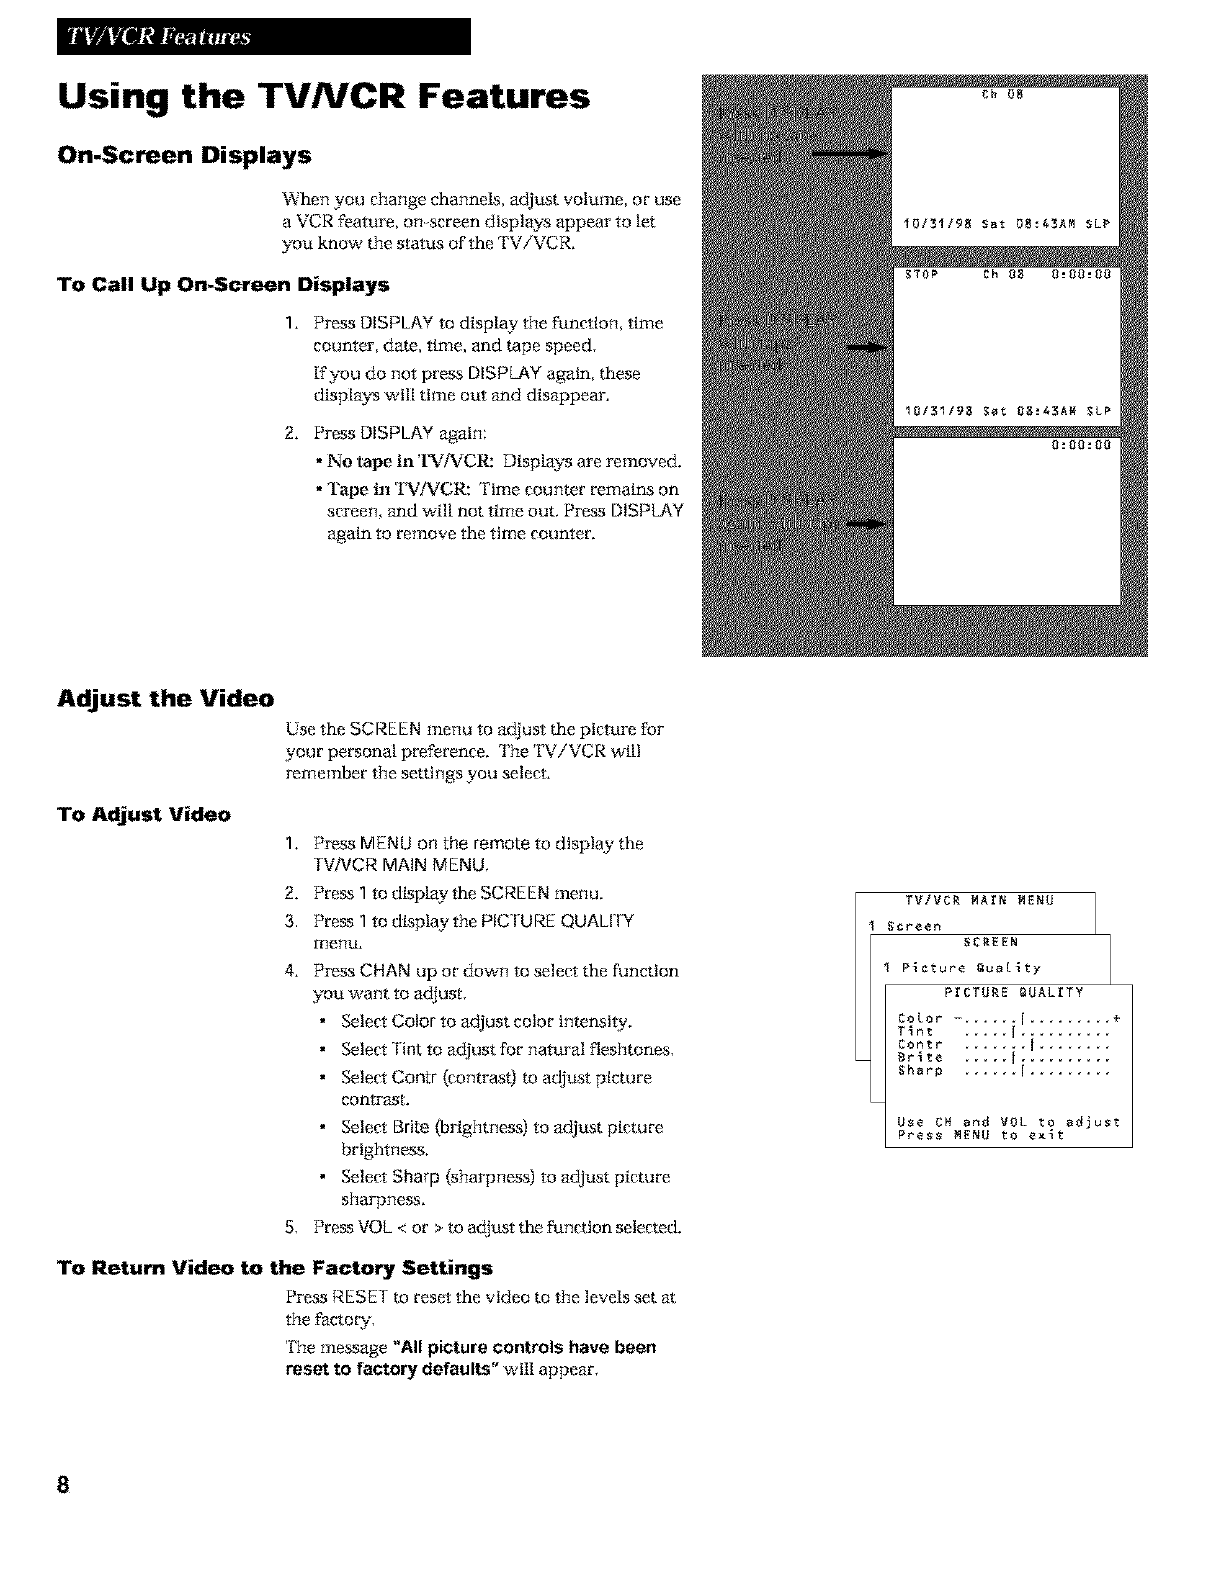
On-Screen Displays
When you change channels, adjust volume, or use
a VCR feature, on screen displays appear to let
you know the status of the TV/VCR.
To Call Up On-Screen Displays
1. Press DISPLAY to display the function, time
counter, date, time, and tape speed.
[fyou do not press DISPkAY again, these
display_ will time out and disappear.
2. Press DISPLAY again:
• No tape in 'I_iVCR: Display_ are removed.
•'rape in 'I_.1iVCR: 'rime counter remains on
screen, and will not time out. Press DISPLAY
again to remove the time counter.
Adjust the Video
Use the SCREEN menu to adjust the picture for
your personal preference. The 'IN'iVCR will
remember the settings you select.
To Adjust Video
1, Press MENU on the remote to display the
TVNCR MAIN MENU,
2. Press 1 to ¢[splay the SCREEN menu.
3. Press 1 to _Lsplay the PIC CURE QUALIfY
men!&
4. Press CHAN up or dow_ to select the function
you want to adjust.
• Select Color to adjust color tntanstty.
• Select Tint to adjust for natural fleshtones.
• Select Contr (contrastj m adjust picture
conn_ast.
• Select Brite {brightness) to adjust picture
brightness.
• Select Sharp (sharpness) to adjust picture
sharpness.
5. Press VOL < or > m adjust the function selected.
To Return Video to the Factory Settings
Press RESET m reset the video to the levels set
the factory.
The message "All picture controls have been
reset to factory defaults" wtl! appear,
TV/VCR MArN M_NU
Screen
_CREEN
P_cture _ua[_ty
PrCTUR_ _UAL_TY
to[or -. ..... I......... ÷
Tint ..... I..........
Comtr ....... I........
Sr_te ..... I ..........
Sharp ...... I.........
Use CH and VOL to adjust
Press M_NU to e×_t
8
Using the TVNCR Features
Closed Captioning
The closed captioning feature dtsplay_ the audio pmtion of a
program as text on the TV screen. 'IRis is useful to hearing
impaired or anyone who wants to watch a program without
sound.
There are four b'pes of closed captions: Caption 1, Caption 2,
Text 1 and Text 2. Caption i display_ the gul! translation of the
prima W language in your area. Caption 2 may be used as a
second source for secondaLv languages. Text i and Text 2 display
on screen boxes containing the text of general information not
necessarily related to the program being watched.
Closed captioning is not available on all channels. Cheek your
TV program listings for CC (closed caption) broadcasts,
To View Closed Captions
1, Press MENU on the rerno_ to display TV/VCR MAIN MENU,
2, Press 1 to display the SCREEN menu,
3. Press 2 to display the CLOSED CAPT!QNING menu,
4, Press 1 to change the Display,
• '[Rere are three choices: OFF, ON, and ON WHEN MU lED.
•Each time vou press 1 the Display will change on the
Closed C@tioning menu screen.
5. Press 2 to select the Mode.
• 'IRere are four choices: Caption 1, Caption 2, Text 1, and
Text 2,
• Each time you press 2 the Mode will change on the
Closed Captioning menu screen.
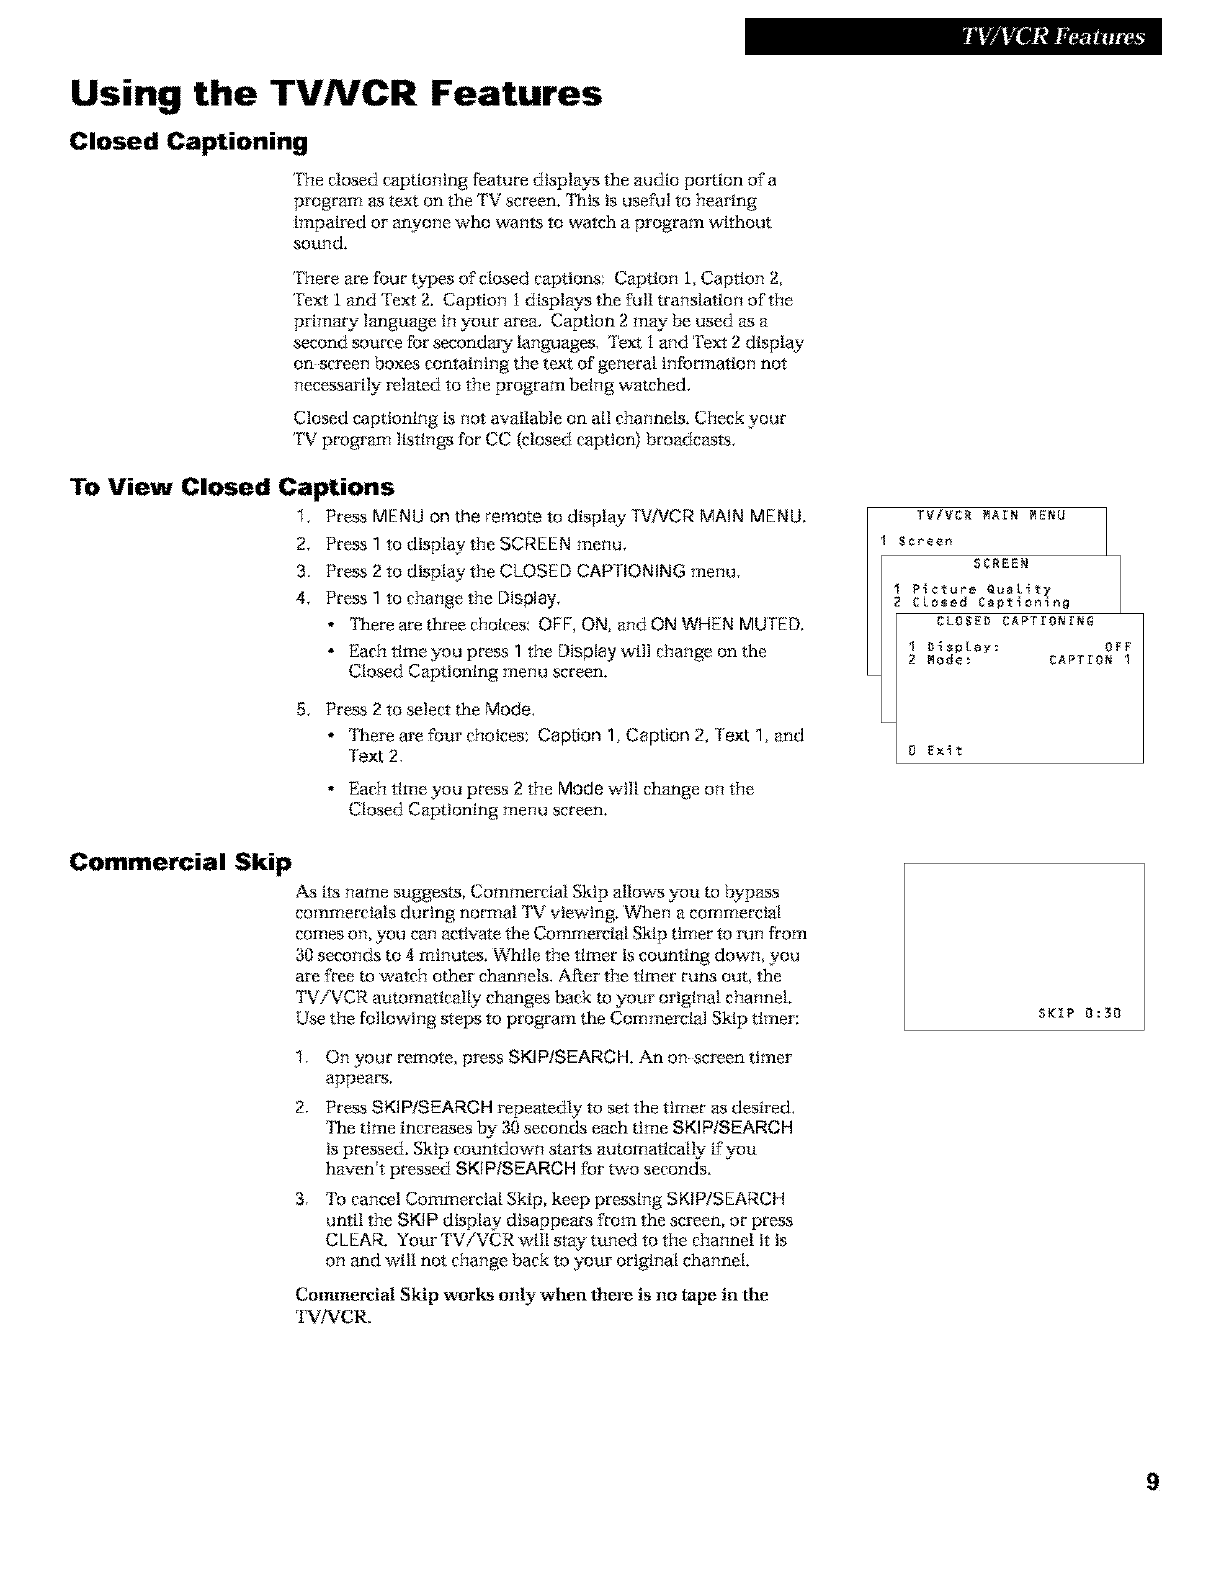
Commercial Skip
As its name suggests, Commercial Skip allows y-ou _ _pass
commercials during normal TV viewing. When a commercial
comes on, you can activate the Commercial Skip timer to run from
30 seconds to 4 minutes. While the timer is counting down, you
are free to watch other channels. After the timer runs out, the
TViVCR automatically changes back to your original channel.
Use the following steps to program the Commercial Skip timer:
2.
3,
On your remote, press SKIP/SEARCH, An on screen timer
appears.
Press SKIP/SEARCH repeatedly to setthe timer as desired,
'IRe time increases by 30 seconds each time SKIP/SEARCH
is pressed. Skip countdown sta1% automatically ffyou
haven't pressed SKIP/SEAROH for two seconds.
'[b cancel Commercial Skip, keep pressff_g SKIP/SEARCH
until the SKIP display disappears from the semen, or press
CLEAR. Your TV/VCR will stay tuned to the channel it is
on and will not change back to your original channel.
Commercial Skip works only when them is no tape i 1 the
TV/AiCR.
TV/VCR MArN M[NU
Screen
SCREEN
Picture Queki_y
CLosed Captlonlng
CLOSE# CAPTrONrNG
I D_sp[ay: OFF
2 Mode: CAPTrON I
8 E×_t
SKIP 0:30
9
Using the TVNCR Features
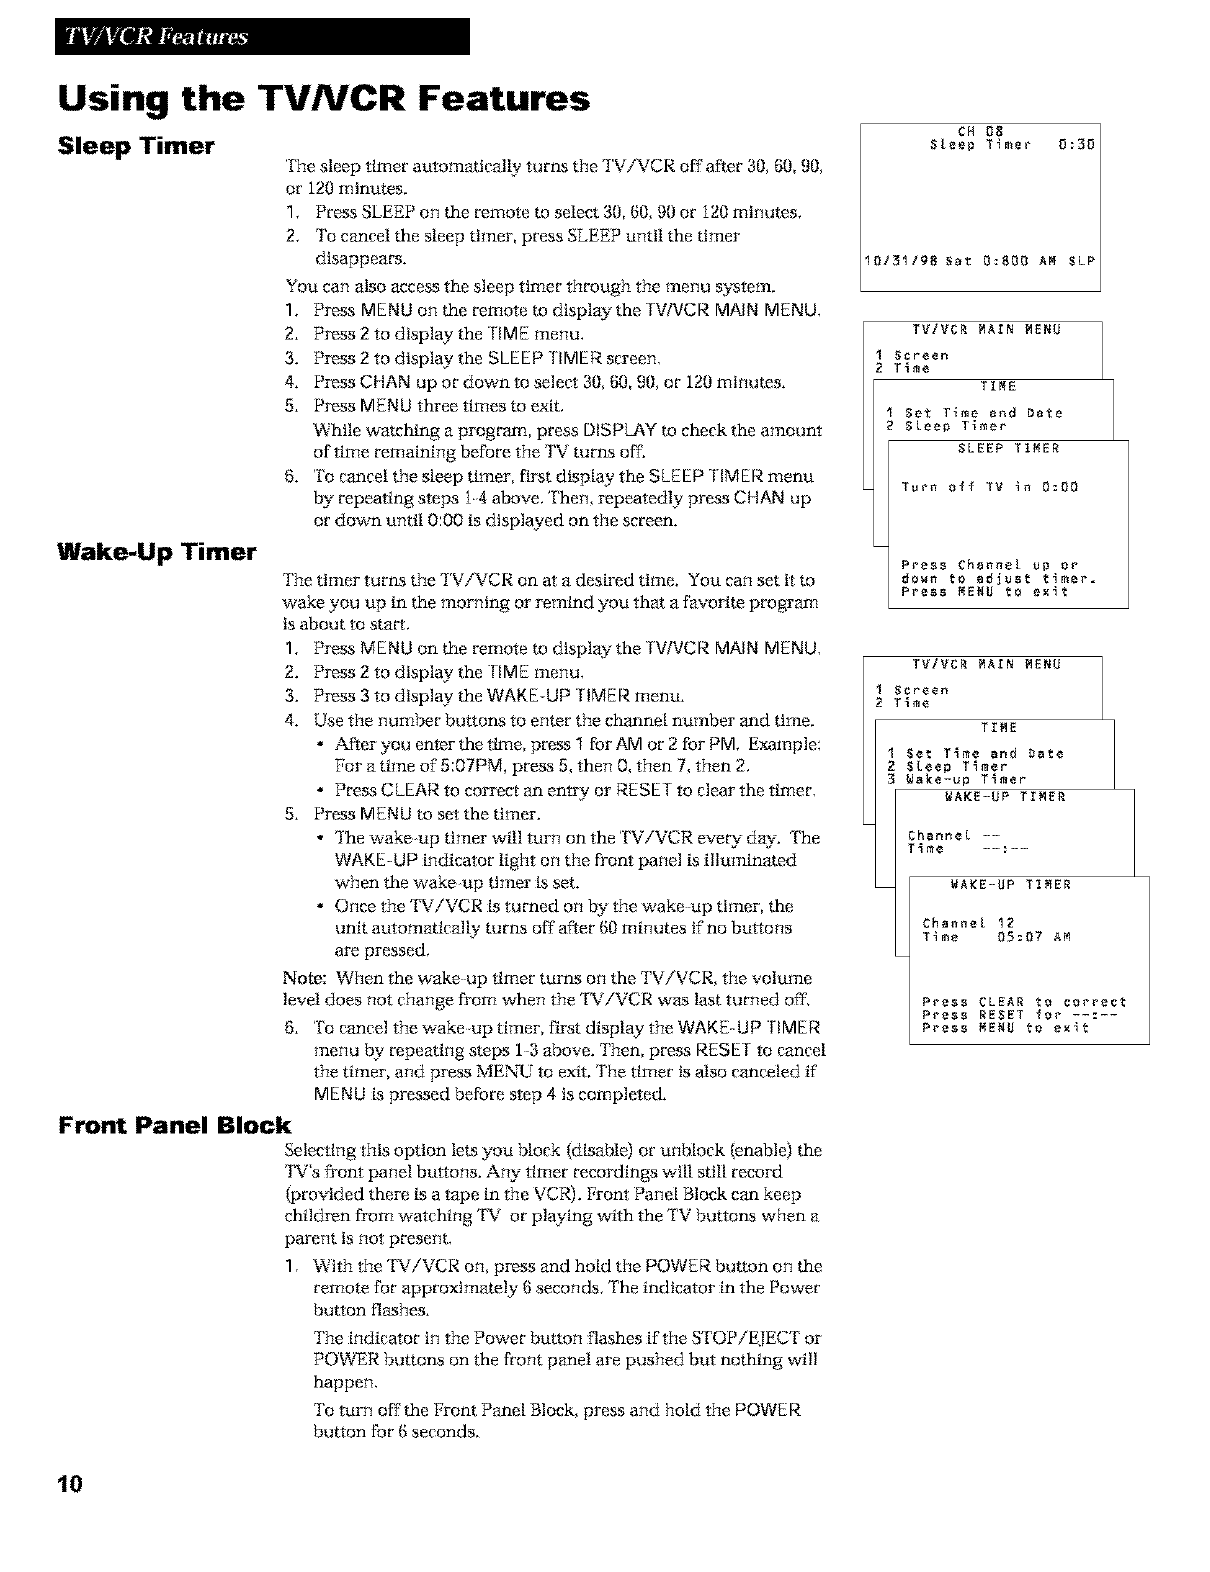
Sleep Timer
Wake-Up Timer
The sleep timer atttomattcal[y turns the TViVCR off after 30, 80, 90,
or 120 minutes.
1. Press SLEEP on the remote to select 30, 60, 90 or i20 minutes.
2. To cancel the sleep timer, press SLEEP until the timer
disappears.
You can also access the sleep timer through the menu system.
1. Press MENU on the remote m display the TV/VCR MAIN MENU.
2. Press 2to display the TIME menu.
3. Press 2to display the SLEEP TIMER screen.
4. Press CHAN up or down to select 30, 60, 90, or 120 minutes.
5. Press MENU three times to exit.
While watching a program, press DISPLAY to check the amount
of time remaining before the TV turns off.
6. To cancel the sleep timer, first display the SLEEP TIMER menu
by repeating steps i4 above. Then, repeatedly press CHAN up
or down unti| 0:00 is displayed on the screen.
The timer turns the TViVCR on at a desired time. You can set it m
wake you up in the morning or remind you that a favorite program
is about to start.
1. Press MENU on the remote m display the TV/VCR MAIN MENU.
2. Press 2to display the 11ME menu.
3. Press 3 to display the WAKE-UP TIMER menu.
4. Use the number buttons to enter the channel number and time.
• After you enter the time, press 1 for AM or 2 for PM Example:
For a time of 5:OTPM, press 5, then O,then 7, then 2.
• Press CLEAR to correct an entry or RESET to clear the timer.
5. Press MENU to set the timer.
•'IRe wake up timer will turn on the TV/VCR eve W day-. "['he
WAKE-UP indicator Ught on the front panel is illuminated
when the wake up timer N set.
• OncetheTV/VCRisturnedonbythewakeuptimer, the
unit atttomatical[y turns off after 60 minutes if no buttons
are pressed.
Note: When the wake up timer turns on the TViVCR, the volume
level does not change from when the TV/VCR was last turned off..
6. To cancel the wake up timer, FLrstdisplay the WAKE-UP TIMER
menu/!y repeating steps 13 above. Then, press RESET to cancel
the timer, and press MENU to exit. The timer is also canceled ff
MENU is pressed before step 4 is completed.
Front Panel Block
Selecting this option lets y-ou block {dis_le) or unblock {enable) the
'I_'v"sfront panel buttons. Any timer recordings will still record
{provided there is a tape in the VCR). Front Panel Block can keep
children from watching TV or playing with the TV buttons when a
parent is not present.
1. With the TViVCR on, press and hold the POWER button on the
remote for approximately 6 seconds. The indicator in the Power
button flashes.
The indicator in the Power button flashes if the S'fOPiEIECT or
POWER buttons on the front panel are pushed but nothing will
happen.
To turn off the Front Panel Block, press and hold the PQWE R
button for (3seconds.
CM 0E
Steep Timer 0:30
I0/31/9_ Sat B:8BB AM SLP
TV/VCR MArN M_NU
Screen
T_me
TIME
Set Time and Date
Skee_ Timer
SLEEP TIMER
Turn _ff ?v in 0:00
Pres_ Channel up or
do_n to adjust timer.
Press MENU to exit
TV/VCR MArN M_NU
Screen
T_me
T_ME
Set T_me and Date
SEeep T_mer
Wake-up T_mer
WAKE-UP TrMER
Channel --
T_me --:--
WA_E-UP TIMER
Channel I_
Ti_e 05:07 A_
Pre$_ CLEAR to correct
Press RESET for _-:-_
Press MENU to exit
I0
Using the TVNCR Features
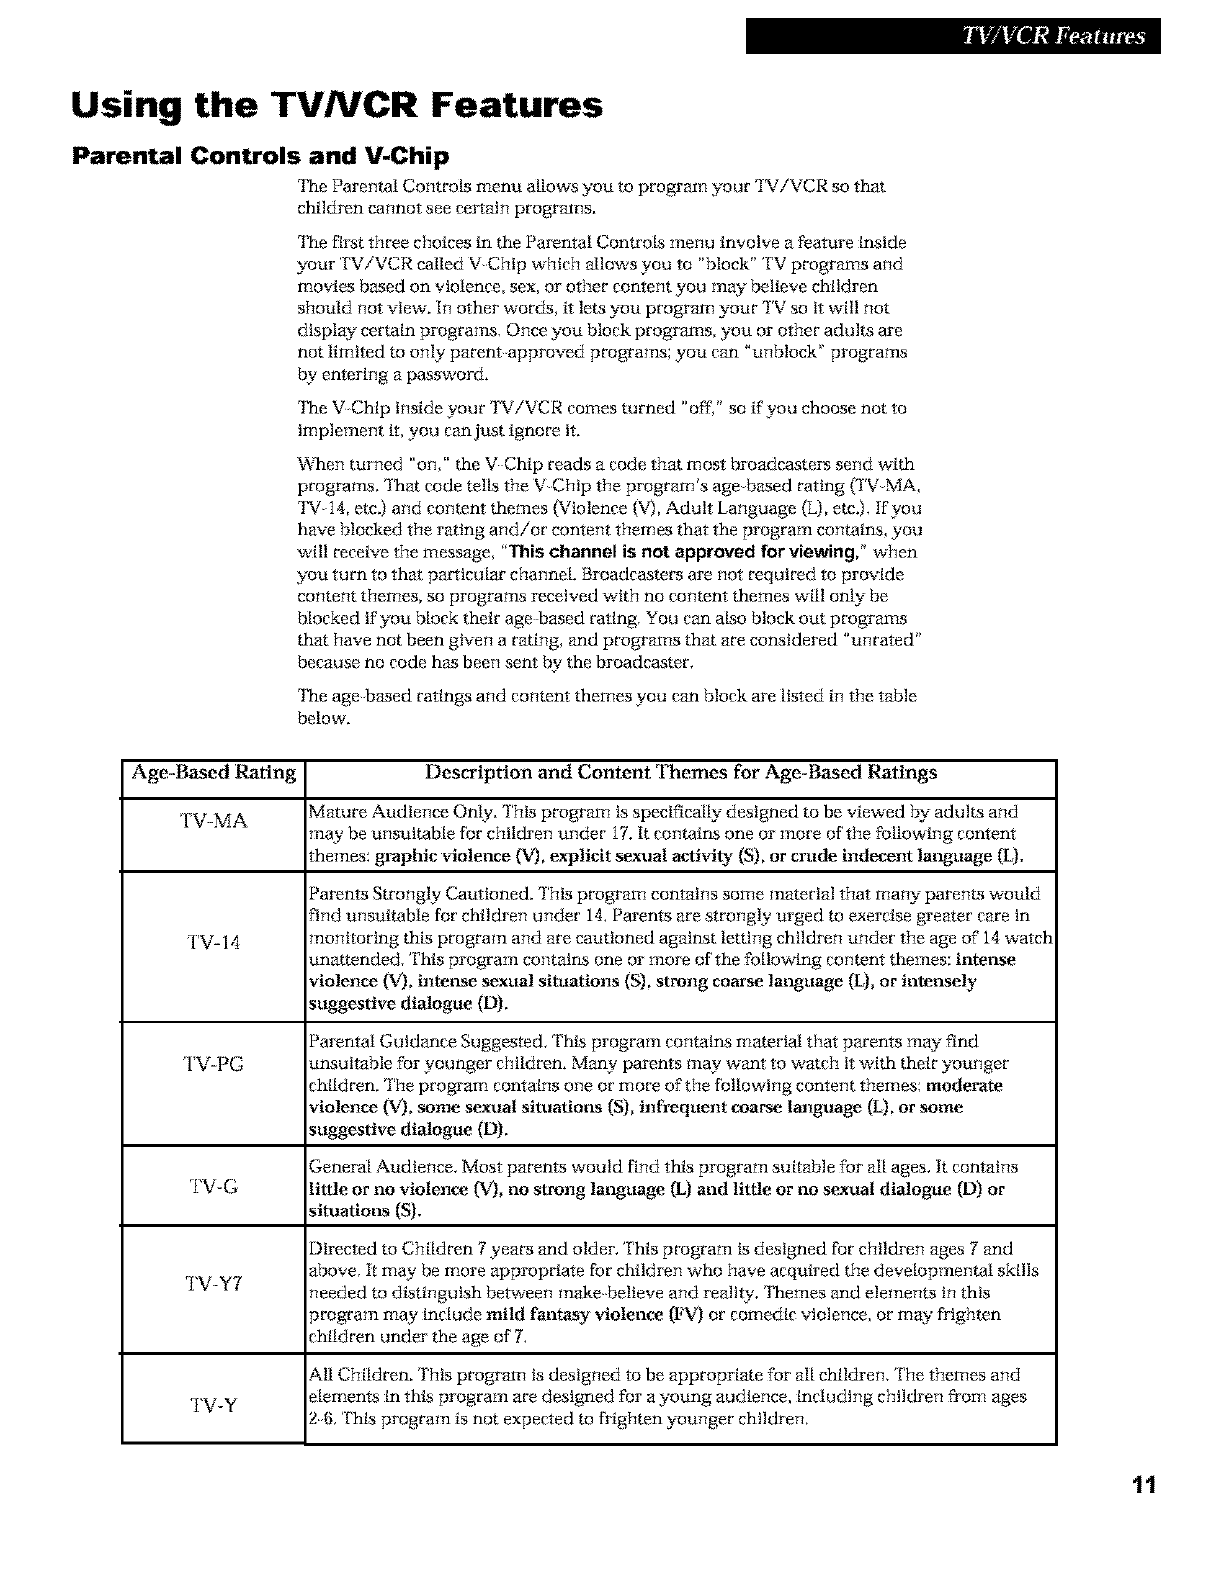
Parental Controls and V-Chip
The Parental Controls menu allows y-ou m progr_n your TViVCR so th_
children cannot see cer*atn programs.
'[he First three choices in the Parental Control_ menu involve a feature inside
your TV/VCR called VChtp which allows you to "block" TV programs and
movies based on violence, sex, or other content you may believe children
should not view'. In other words, it let_ you program your TV so it will not
display certain programs. Once you block programs, you or other adult_ are
not limited to only parent approved programs; you can "unbloek" programs
ICyentering a password.
'[he VChip inside your TViVCR comes turned "off," so ffyou choose not to
implement it, you can just ignore it.
When turned "on," the VChip reads a code that most broadcastei_ send with
programs. '[hat code tell_ the VChtp the program's age based rating U'V MA,
'Pv' i4, etc.) and content themes (Violance (V), Adult Language (12),etc.). If you
have blocked the rating and/or content themes that the program contains, you
will receive the message, "This channel is not approved for viewing," when
you turn to that particular ct_anneL Broadcasters are not required to provide
content themes, so programs received with no content themes will o@ be
blocked if you block their age based rating. You can alao block out programs
that have not been given a rating, and programs that are considered "unrated"
because no code h_s been sent/_y the broadcaster.
'[he age b_sed ratings and content themes you can block are listed in the table
below'.
Age-Based Rating Description and Content Themes for Age-Based Ratings
TV-MA Mature Audience Only. '['his program is specifically designed to be viewed by adult8 and
nay be unsuitable for children under i7. It contains one or more of the following content
heroes: gJ'aphic violence (V}, explicit sexual activity (S), or crude indecent language (L).
Parents Strongly Cautioned. '['his program contains some material that many parents would
'ind unsuitable for children under 14. Parents are strongly urged to exercise greater care in
TV-14 nonitoring this program and are cautioned against letting children under the age of 14 watch
anattended. 'rh_s program contains one or more of the following content themes: intense
violence O/J, intel_e sexual situations (S), strong coarse language (L), or intensely
_uggestive dialogue (D),
Parental Guidance Suggested. This program contains material that parents may find
TV-PG ansuitable for younger children. Many parents may want to watch it with their younger
;hlldren. '['he program contains one or more of the following content themes: moderate
violence 0/), some sexual situations (S), infrequent coarse language (L), or some
_uggestive dialogue (D),
3eneral Audience. Most parents would find thi_ program suitable for all ages. It contains
TV-G little or no violence (V), no strong language (L) and little or no sexual dialogue (D) or
_ituafions (S).
Directed to Children 7 years and older. This program is designed for children ages 7and
_bove. It may be more appropriate for children who have acquired the developmental skills
TV-Y7 '_eeded to distinguish bePween make believe and reality. 'Ihemes and elements in this
arogram may include mild fantasy violence (FV) or comedic violence, or may frighten
thlldren under the age of 7.
,MI Children. '['his progr_n is designed to be appropriate for all children. The themes and
TV-Y _lements in this program are designed for a young audience, including children from ages
.)_;. This program is not experted m frighten younger children.
11
Using the TVNCR Features
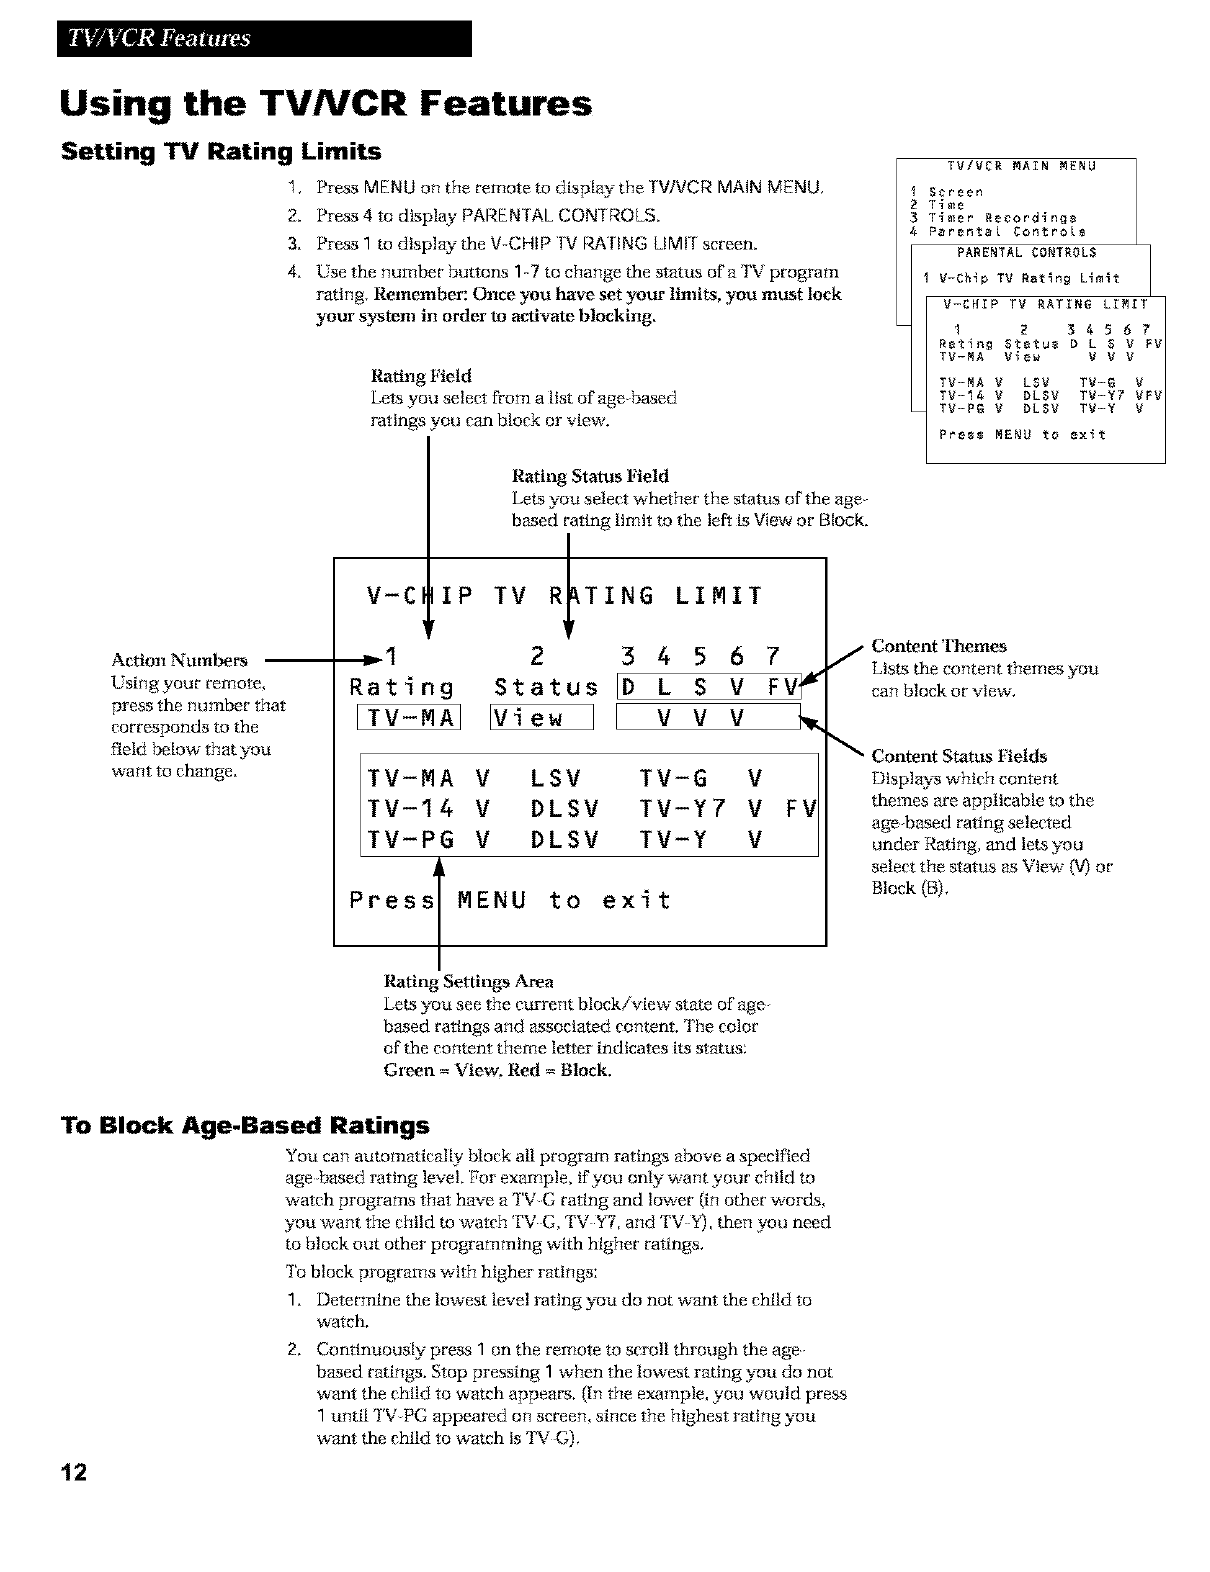
Setting TV Rating Limits
1. Prass MENU on the remote to d_play the TWVCR MAIN MENU,
2. Prass 4 to display PAREN [AL CON l ROLS.
3. Prassl todtspiay theV-CHIP TV RAIlNG LIMI! screen.
4, Use the number buttons 1-7 to change the status of a TV program
rating, Remember: Once you have set your limits, you must lock
yotn' s_tem in order to aclivaie blocking.
Rating Field
Lets you select from a list of age based
ratings you can block or view.
Action Numbers
Using your remote,
press the number that
corresponds to the
field below"that you
want to change.
V-C liP
=I
Rating
ITV-MAI
Rating Status Field
Lets you select whether the status of the age
based rating limit to the left is View or Block.
TV RITING LIMIT
2 34567
Status ID L S V FVf_"
_iew V V V _,
TV-MA V LSV TV-G V FV
TV-14 V DLSV TV-Y7 V
TV-PG V DLSV TV-Y V
PressT MENU to exit
I
Ratit__gSettit__gsArea
Lets you see the c_ent block/view state of age
based ratings and associated content. The color
of the content theme letter indicates its status:
Green --View, Red -- Block,
TV/VCM MAIN MENU
l$_reen
Time
3 Timer Recordings
Parental Controls
PARENTAL CONTROLS
i V-Chlp TV Ra_ing Limi_
V-CHIP TV RATING LIMIT
I 2 3 _ 5 6 7
Reltlng Sitetu$ D L S V FV
TV-MA V_ew V V V
TV-MA V LSV TV-G V
TV-I& V DLSV TV-Y7 VFV
TV-PG V DLSV TV-Y v
Pre_ MENU to exlt
Content Themes
Lists the content themes you
can block or view',
Content Status Fields
Display_ which content
themas are applicable to the
age based rating selected
under Rating, and let8 you
select the status as View ('4)or
Block (B).
To Block Age-Based Ratings
You can automatical_ block aH program ratings above aspecified
age based rating level. For example, if you only want your child m
watch programs that have a TVG rating and lower {in other word_,
you want the child to watch TVG, TV Y7, and 'fV Y}, then you need
to block out other programming with higher ratings.
To block programs with higher ratings:
1. Determine the lowest level rating you do not want the child to
watch.
2. Continuously press 1 on the remote to scroll through the age
based ratings. Stop pressing 1 when the lowest rating you do not
want the child to watch appears. (In the example, you would press
1 until TVPG appeared on screen, since the highest rating you
want the child to watch is TVG),
12

Using the TVNCR Features
3, Press 2 to change the rating status from View (V) to Block (B),
The status for this rating and all higher ratings automatically
changes to Block (B) {indicated l_y the rating limits in the rating
status area turning red). Note that all associated content is also
automatically blocked.
4. Press MENU to exit and return to the PARENrAL CON rROES
menu,
Viewing Age-Based Ratings
After you block age based ratings, y-ou have the option of going
back and changing some of the content ratings back to View" (V),
1, Determine the rating you want to view that ts cxtrrently blocked.
2. Press 1 to scroll to the rating, such as TV 14, whose status is
Block.
3, Press 2 to change the status to View. Your child would then be
able to watch all programs with a TV14, TVG, 'rvw, and
TVY rating
Note that TV 14's content status fields at the bottom of the screen
automatically change to a view" state, indicated by green letters.
'[hese are the only fields that automatically change back to green
when you complete this process.
V-CHIP TV RATING LIMIT
1 _ 3/#557
Rating Status b L S V FV
TV-PG Brock g g g g
TV-MA g LGV TV-G V
TV-14 g DLGV TV-Y7 VFV
TV-PG g DLGV TV-Y V
Press MENU to exlt
Chan_*N the TV..PGraU*N stat_s
h'om View(V) to Blu_'k(1{tcauses
*heNgher _atingsa_d rome*}tto
blockour aswell.
V-CHIP TV RATING LIMIT
2 34 $67
Mat_nR Status b L $ V FV
TV-1G V_e_ V V V V
TV-MA S LGV TV-G V
TV-I_ V RLGV TV-Y7 VFV
TV-PG S DLGV TV-Y V
Press MRNU to ¢×_t
Viewiz NAge-Ba_d Rat#Ns: P_ss
2to change the status back to View,
Blocking Specific Content Themes
You can block programs based on their content. (Content is
represented _ the D, L, S, V, and FV on your screen. See page 11 for
details.) When you block a content theme for a particular r_ing, you
automatically block that content theme for higher rated programs as
well,
For example, if you do not want your child to watch programs that
have adult language (L) rated TVPG or higher, then you would also
block out all programming TVPG and above containing adult
language.
To block program content;
1. Determine the lowest level age based content you do not want
the child to watch.
2, Press 1 until the lowest age based rating whose content theme
you do not want the child to watch appears on screen.
3. To change the content theme to Block (B), press the number on
the remote that corresponds with the content theme you want to
block;
• Sexually explicit dialogue (D) = 3 • \'tolence (V) = 6
• Adult language (L) = 4 • Fantasy violence (PV) = 7
• Sexual situations (S) = 5
4, Alter you press the number, the V for the content theme should
change to a B in the content status field. In the ratings settings
area, all higher ratings' content theme status will automatically
change to Block indicated by the letters turning red.
5, Press MENU to return to the PA[;_-EN[AL CON rR©LS menu.
• Press RESET to return all rating Itmlks to VIEW.
V-CHIP TV RATING LIMIT
I _ 34567
Rating Gtatus b L GV FV
TV-PG View V g V V
TV-MA V LGV TV-G V
TV-14 V DLGV TV-Y7 VFV
TV-PG V DLGV TV-Y V
Press MENU to exlt
Selecting T£_-PG and tlle co_ltenr
theme Adult language (L_ blocks all
pzvgr#ms _vir_ Adult language (LJ
ratedTV PG a_d ]_igher,
Remember: You nust Lock Parental Cont ols fol rati lg li nits to
take effect,
13
Using the TVNCR Features
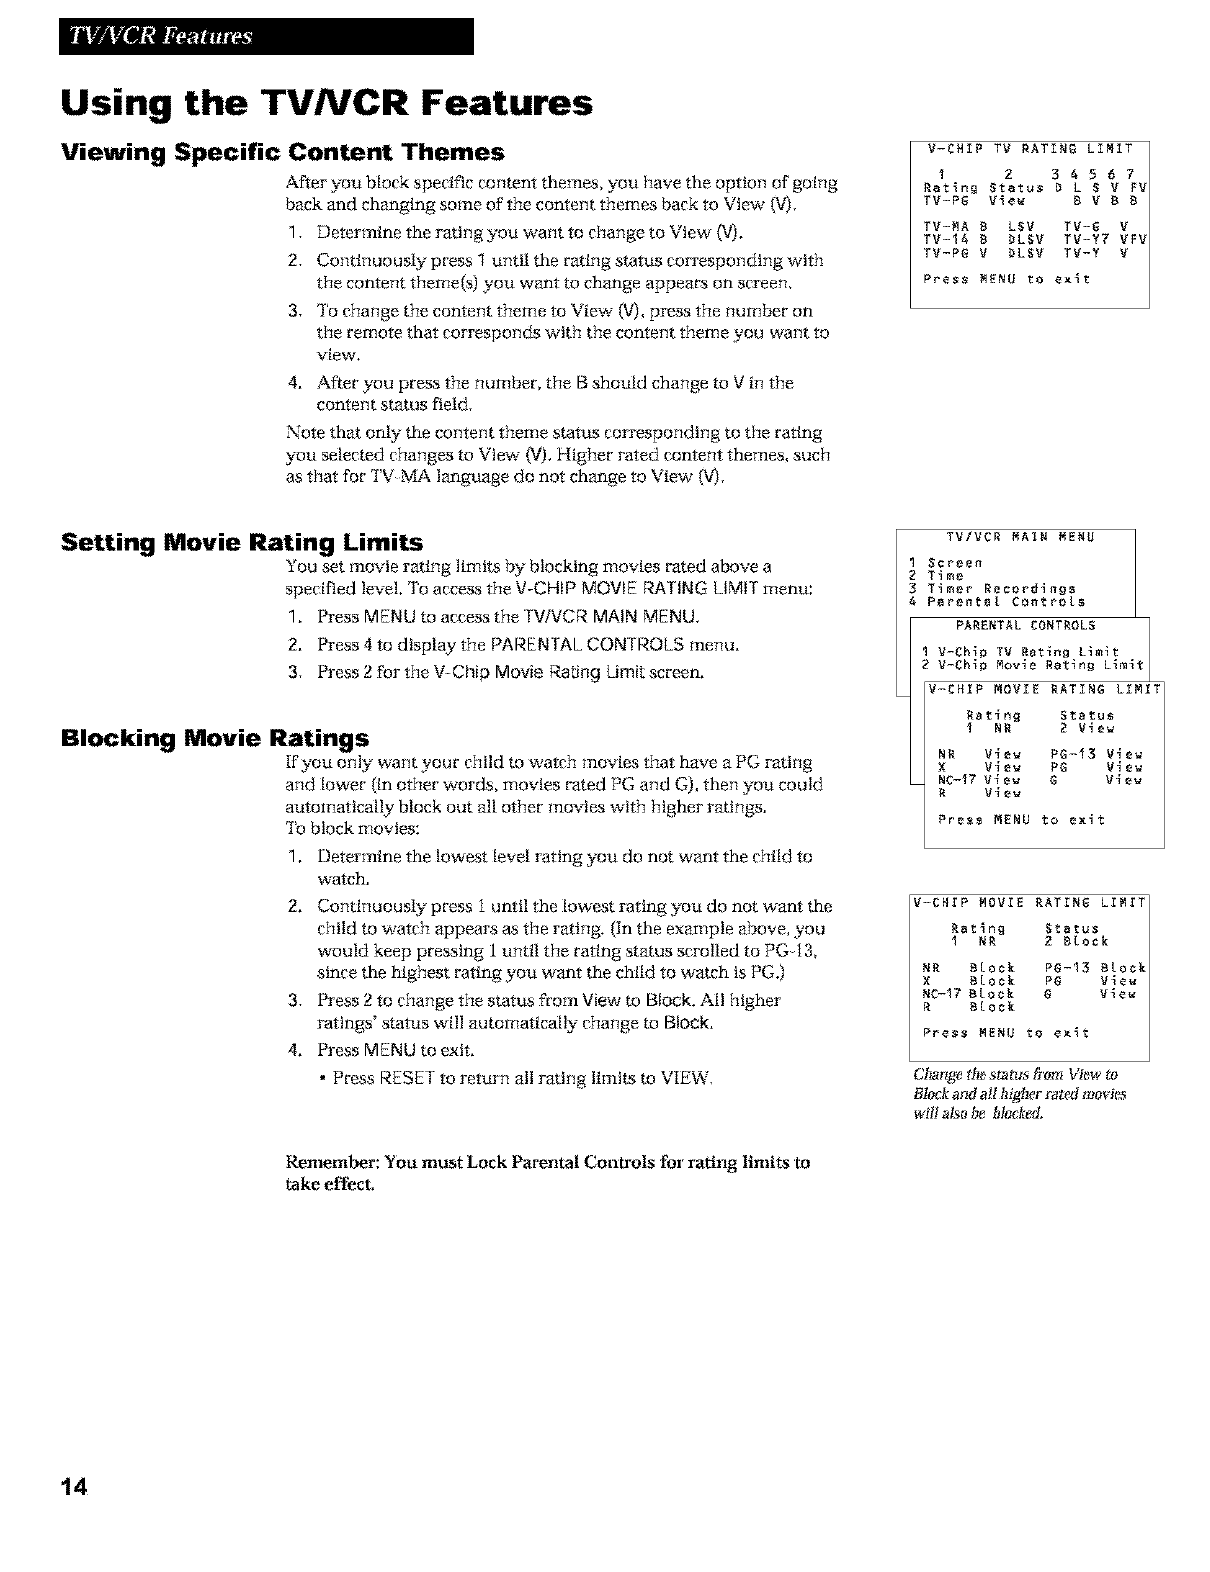
Viewing Specific Content Themes
After you block spec_c con_nt themes, you have the option of going
back and changing some of the content themes back to View ('4),
1. Determine the rating you want to change to View (V).
2. Continuously press1 untilthe rating status corresponding wtth
the content theme{a} you want to change appears on screen,
3. To change the content theme to View {V),press the number on
the remote that corresponds with the content theme you want to
view'.
4. After you press the number, the B should change to V in the
content status field,
Note that only the content theme status corresponding to the ratlng
you selected changes to View (V), Higher rated content themes, such
as that for TVMA language do not change to View (V),
V-CHIP TV RATING LIMIT
t G 3 4 5 1; 7
Rating Status D L S V FV
TV-PG Vie_ lib V lib S
TV-MA S LSV TV-G V
TV-14 S DLSV TV-Y7 VFV
TV-PG V DLSV TV-Y V
Press MENU to e×it
Setting Movie Rating Limits
You set movie rating limits by blocking movies rated above a
specified level To access the V-CHIP MOVIE RATING LIMIT menu:
1. Press MENU to accessthe TV/VCR MAIN MENU,
2. Press 4 to display the PARENTAL CONTROLS menu.
3, Press 2 for the V-Chip Movie f:._atingLimit screen,
Blocking Movie Ratings
If you only want your child m watch movies that have a PG rating
and lower {in other words, movies rated PG and G), then you could
atttomattcally block out all other movies with higher ratings.
To block movies:
1. Determine the lowest level rating you do not want the child to
watch.
2. Continuousl_ press 1 until the lowest rating you do not want the
child to watch appears as the rating. (In the exanple above, you
would keep pressing i unti! the rating status scrolled to PG13,
since the h_ghest rating you want the child to watch is PG.)
3. Press 2 to change the status from View to Block. AU higher
ratings' status will automatically change to Block.
4. Press MENU to exit.
• Press RESET to return all rating limiks to VIEW,
?VIVfiR MAIN MENU
Gc_8_n
Ti_e
Ti_e_ Recordings
ParenteL ControLs
PARENTAL CONTROLS
G V-Chip Movie Ra_inN Limi_
I V-Chip TV Rating Licit
V-CHIP MOVIE RATING LIMIt
NatinN Status
i NN 2 View
NN View PG-13 View
X View PG View
NC-I? View G View
N View
Pre_ MENU tO exit
V-CHIP MOVIE RATING LIMIT
RatinN Status
1 NR G BLOCk
NN BLock PG-13 BLock
X BLock PG Vice
NC-17 BLock G Vice
R BLock
Press MENU tO exit
Chartg_ the stat_s [ram View to
BIm'k and all higher rated movies
will al_o be blcck_.
Remember: You must Lock Parental Co xtrols fol latlng limits to
take effect,
14
Using the TVNCR Features
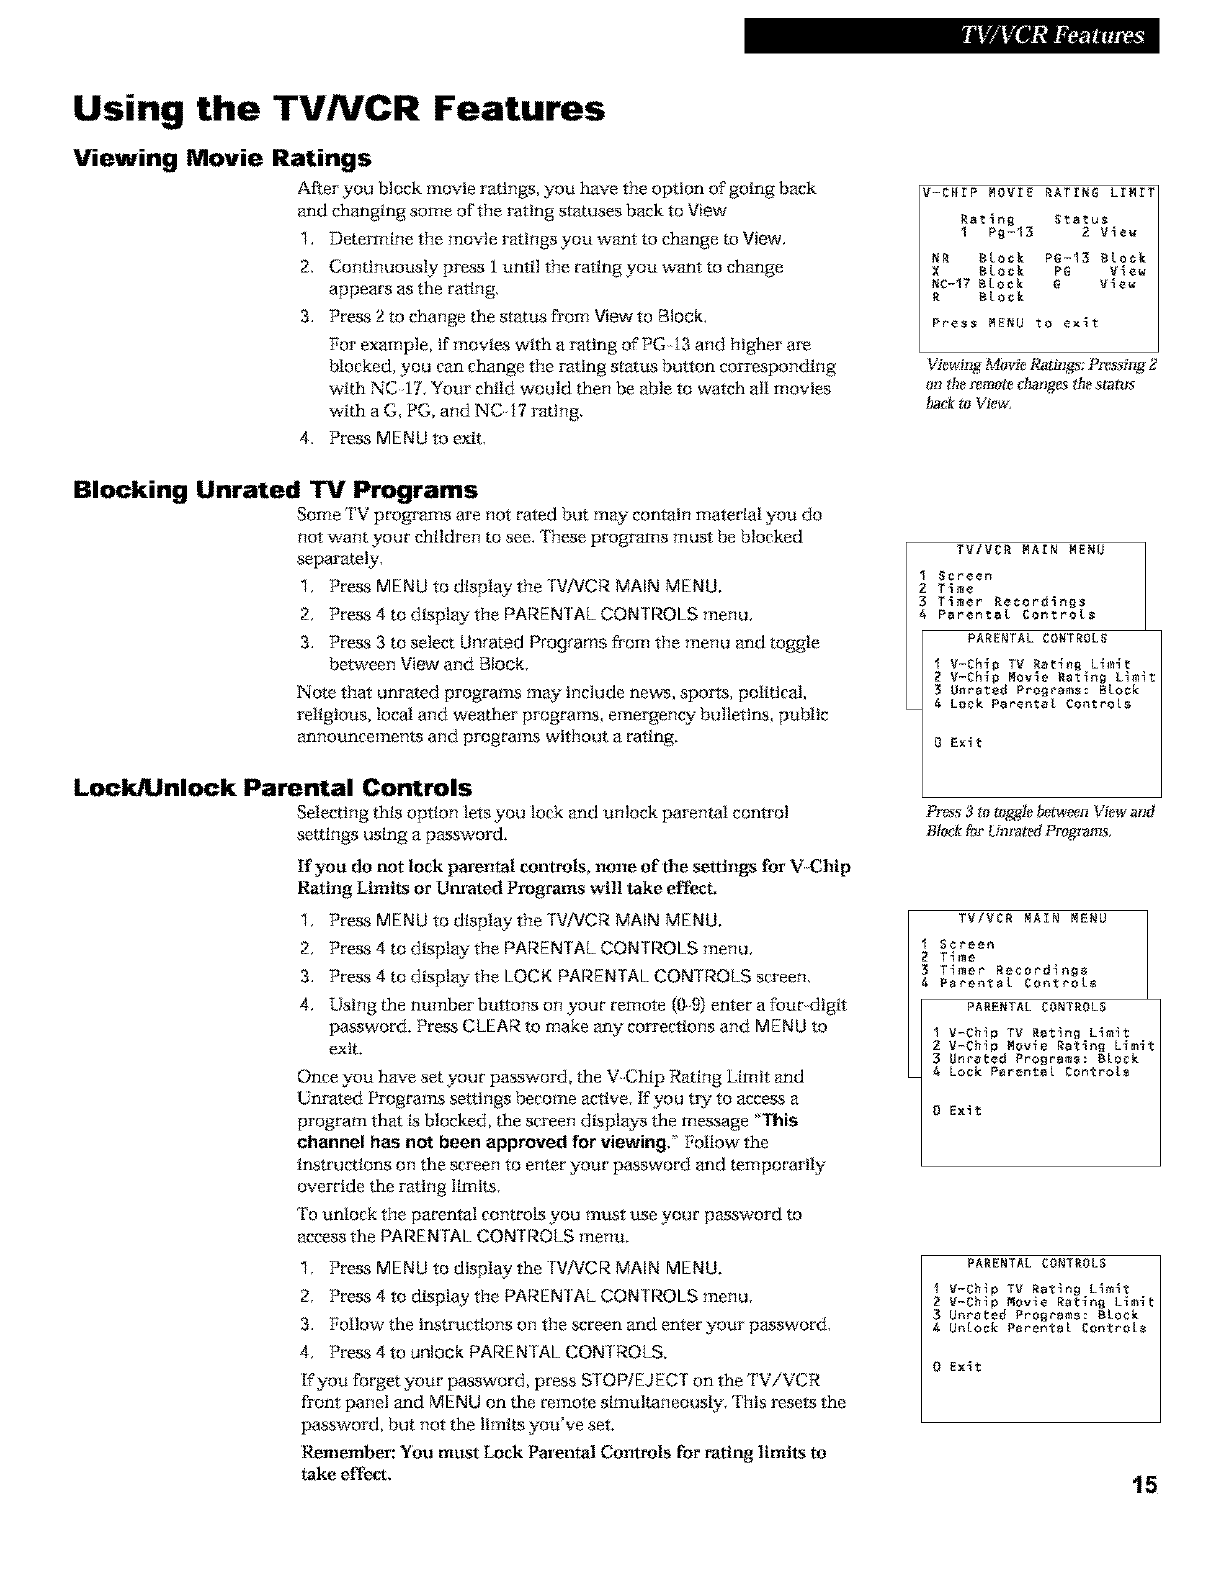
Viewing Movie Ratings
A_er you block movie ratings, you have the option of going back
and changing some of the rating statuses back to View
1. Determine the movie ratings you want to change to View.
2. Continuously press 1until the ratlngyou want to change
appears as the rating.
3. Press 2 to change the status from View to Block.
For example, if movies with a rating of PG-13 and higher are
blocked, you can change the rating status button corresponding
with NC1L Your child would then be able to watch all movies
with a G, PG, and NCI7 rating,
4. PressMENU to exit,
V-CHIP MOVIE RATING LIMIJ
Rating Status
1 PR-13 2 Vice
RR BLock PG-13 BLock
X BLock PG Vice
RC-I? BLock G Vice
R BLock
Press PERU to exlt
Wewi_&gMOvie Rat#lOS: Pressh N2
a_ the _mote cNlng_ the stattls
back tu View,
Blocking Unrated TV Programs
SomeTV programs are not rated but m_ contain material you do
not want your children to see. These programs must be blocked
separately.
1, PressMENU to display the TWVCRMAIN MENU,
2, Press4 to display the PARENl AL CONTROLSmenu,
3. Press3 to select Unrated Programs from the menu and to_le
between View ant{ Block,
Note that unrated programs may include news, spot%s, political,
religious, local and weather programs, emergency bulletins, public
announcements and programs without a rating.
Lock/Unlock Parental Controls
Selecting this option lets you lock and unlock parental control
settings using a password.
If you do not lock pm'ental controls, none of the settings for VChip
Rating Limits or Unrated Programs wil! take effect,
1, Press MENU to display the TWVCR MAIN MENU,
2, Press 4 to display the PARENTAL CON IROLS menu,
3. Press 4 to displa_ the LOCK PAREN [AL CONTROLS screen,
4, Using the number bu_ons on your remote (09) enter a four digit
password. Press CLEAR m make any- corrections and MENU m
exit.
Once you have set your password, the V Chip Rating Limit and
Unrated Programs settings become active. Fyou try to access a
program that is blocked, the screen display_ the message "This
channel has not been approved for viewing," Follow the
instructions on the screen to enter 3*our password and temporartl:,
ov-erride the rating limits,
To unlock the parental controls you must use your password to
access the PAREN [AL CON fROLS menu.
1, Press MENU to dtsplay the TV/VCR MAIN MENU,
2, Press 4 to display the PARENJAL CONTROLS menu,
3. Follow the instructions on the screen and enter your password,
4, Press 4 to unlock PARENTAL CONTROLS.
If you forget your password, press STOP/EJECT on the 'fV/VCR
front panel and MENU on the remote simultaneously. This resets the
password, but not the limit_ you've set.
Remember: YOU must Lock Parental Controls for rating limits to
take effe_,
TV/VCR PAIR PERU
Screen
Time
Timer RecordlnRs
Parental ControLs
PARENTAL CONTROLS
IV-Chip TV Rating Limit
2 V-Chip Movie Ratlmg Limit
3 Unrated Programs: BLock
Lo_k Parental Controls
0Exit
_s 3_toggle betw_n View and
Bl_k fbr Lm_ted Progt_#s,
TViVCR PAIN PERU
Screen
Time
Timer Re¢ordlng_
Parental ControL_
PARENTAL CONTROLS
I V-Chip TV Rating Limit
2 V-Chip Movie Ratlng Limit
3 Onrated Programs: Block
Lock Parental ControL_
OExit
PARENTAL CONTROLS
i V-Chlp TV Rating Limit
2V-Chip Movie Rating Limit
3 Onrated Programs: BLock
UnLock Parental ControL_
0Exlt
15
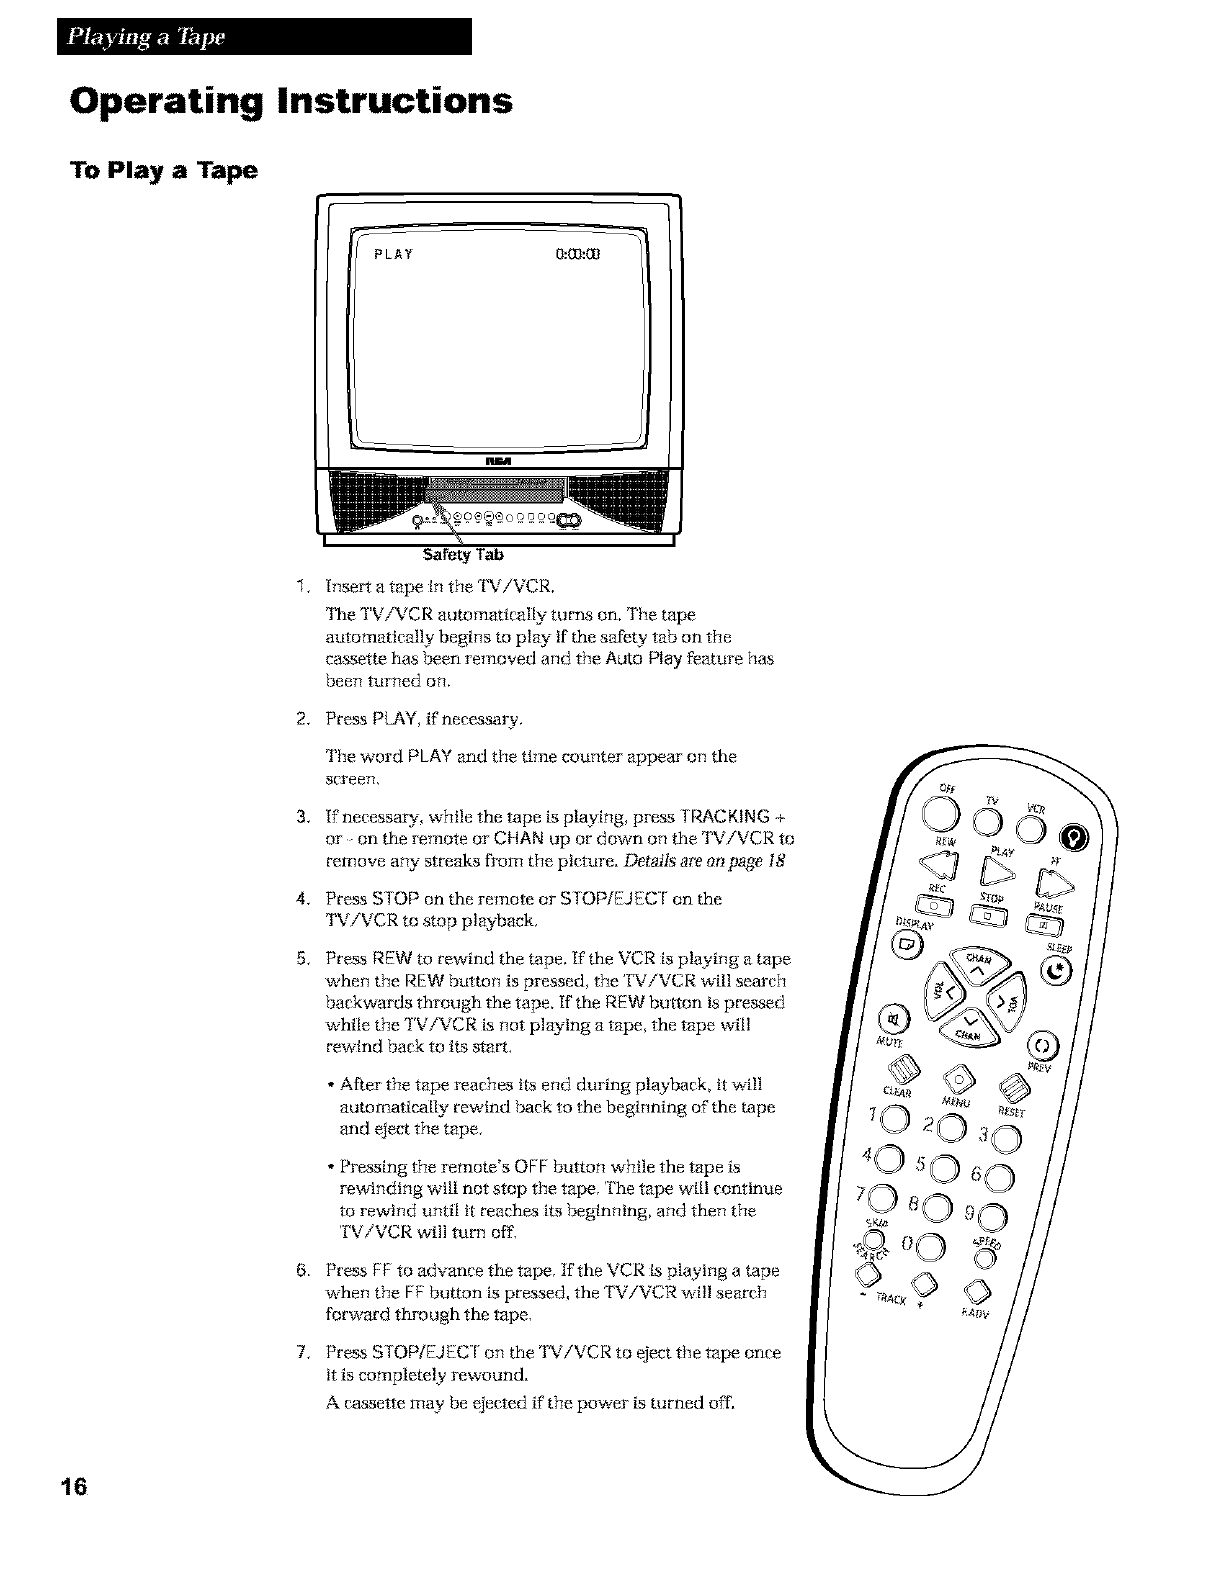
Operating Instructions
To Play a Tape
Safety Tab
Insert a tape in the TV/VCR.
'Ihe TViVCR automatically turns on. The tape
automatically begins m play if the safet_y tab on the
cassette has been removed and the Auto Play feature has
been turned on.
2. Press PLAY, if necessary.
The word PLAY and the time counter appear on the
screen,
4,
5,
[f necessary, while the tape is playing, press TRACKING +
or on the remote or CHAN up or down on the TViVCR to
remove any streaks from the picture. Details am o_ page 18
Press STOP on the remote or STOP/EJEC r on the
TViVCR to stop playback,
Press REW to rewind the tape. If the VCR is playing a tape
when the REW button is pressed, the 'I%_iVCR will search
backwards through the tape. If the f:_EWbutton is pressed
whte the TViVCR is not playing a tape, the tape will
rewind back to its start.
• After the tape reaches igs end dm-ing playback, it will
automatically rewind back to the beginning of the tape
and eject the tape.
• Pressing the remote's OFF button while the tape is
rewinding wit! not stop the tape. The tape wll continue
to rewind until it reaches its beginning, and then the
TV/VCR will turn off,
6. Press FF to advance the tape. If the VCR is playing a tape
when the FF button is pressed, the TV/VCR will search
forward through the tape.
7, Press STOP/EJEC I on the TViVCR to eieet the tape once
it is completely rewound.
A cassette may be ejected if the power is turned off.
16
Using the Playback Features
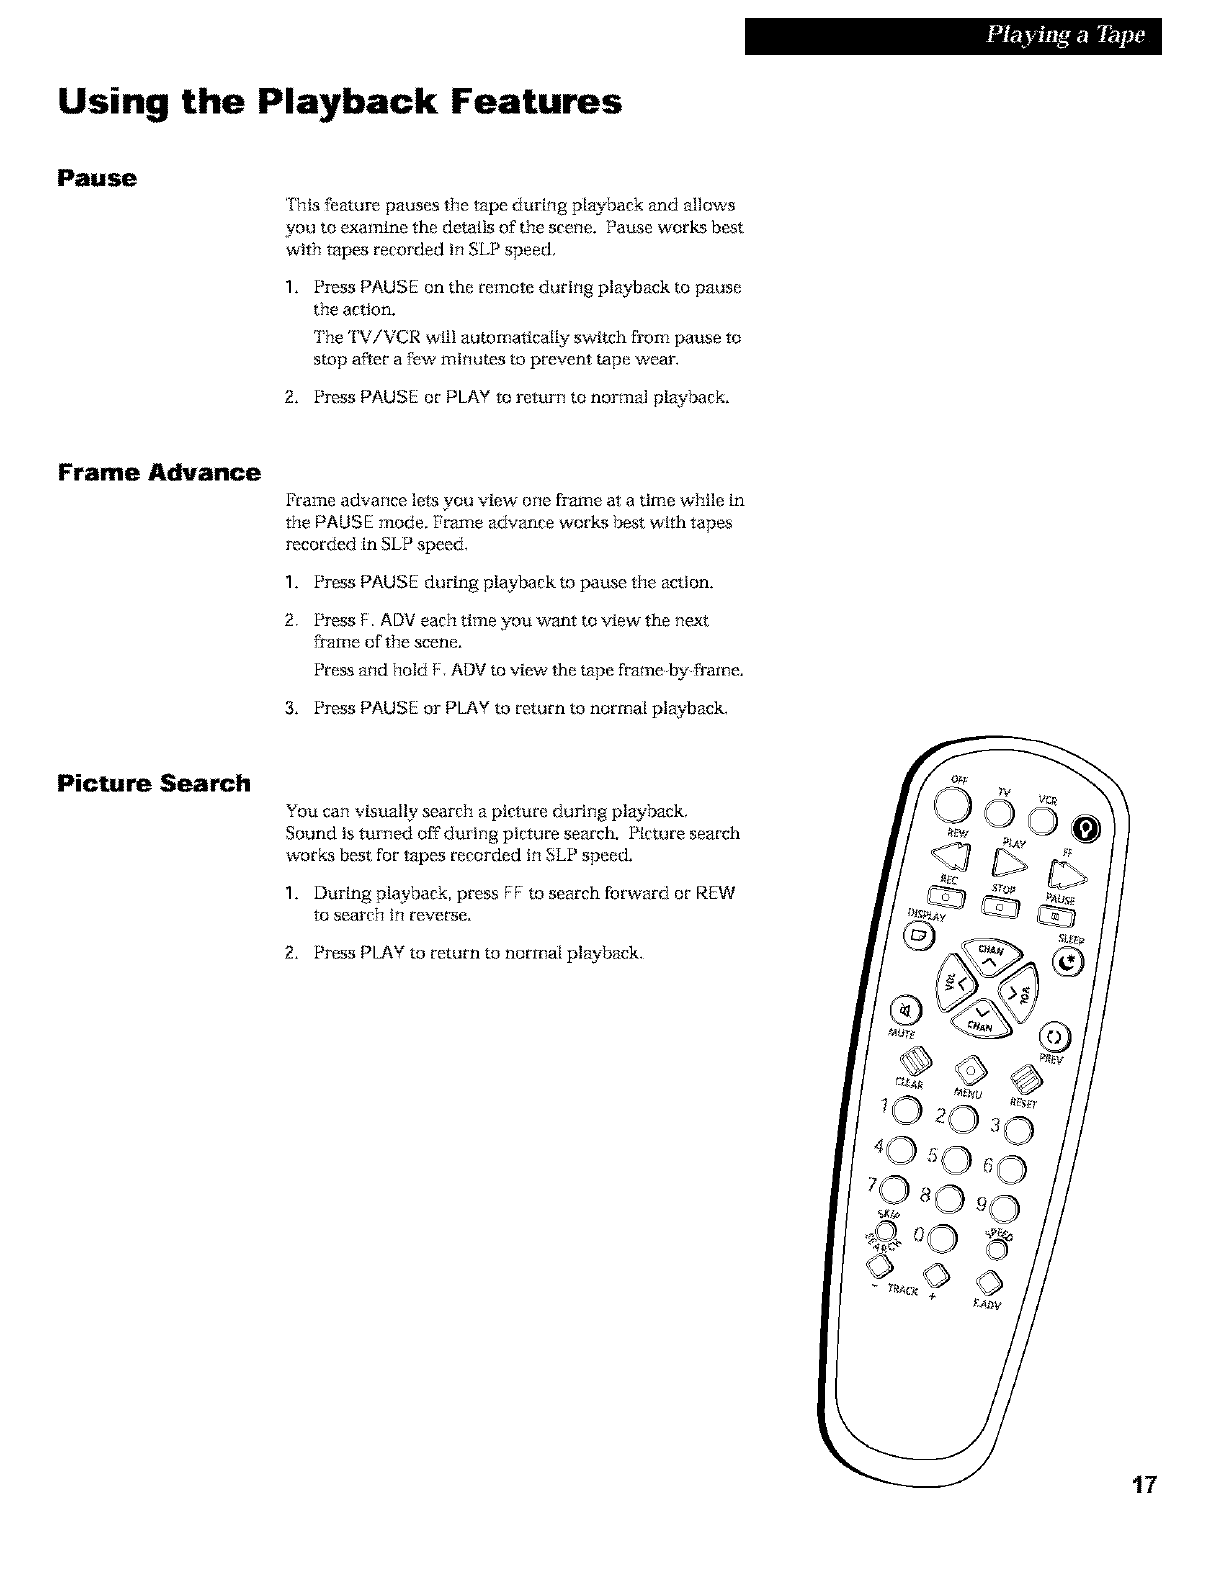
Pause
This feature pauses the tape during playback and allows
you to examine the detalls of the scene. Pause works best
with tapes recorded in SLP speed,
1. Press PAUSE on the remote during playback to pause
the action.
The 'I_iVCR wi|l automaticai|y switch from pause to
stop after a few minutes to prevent tape wear,
2, Press PAUSE or PLAY to return to normal playback,
Frame Advance
Frame advance legs you view" one frame at a time while in
the PAUSE mode. Frame advance works best with tapes
recorded in SLP speed,
1, Press PAUSE during playback mpause the action,
2, Press F. ADV each time you want to view" the next
frame of the scene.
Press and hold F, ADVm view the t_pe frame by @ame,
3, Press PAUSE or PLAY mreturn mnormal playback,
Picture Search
You can visually search a picture during playback,
Sound is turned off during picture search. Picture search
works best for tapes recorded in SLP speed,
1, During playback, press FF m search forward or REW
to search in reverse,
2, Press PLAY m return mnormal playback,
17
Using the Playback Features
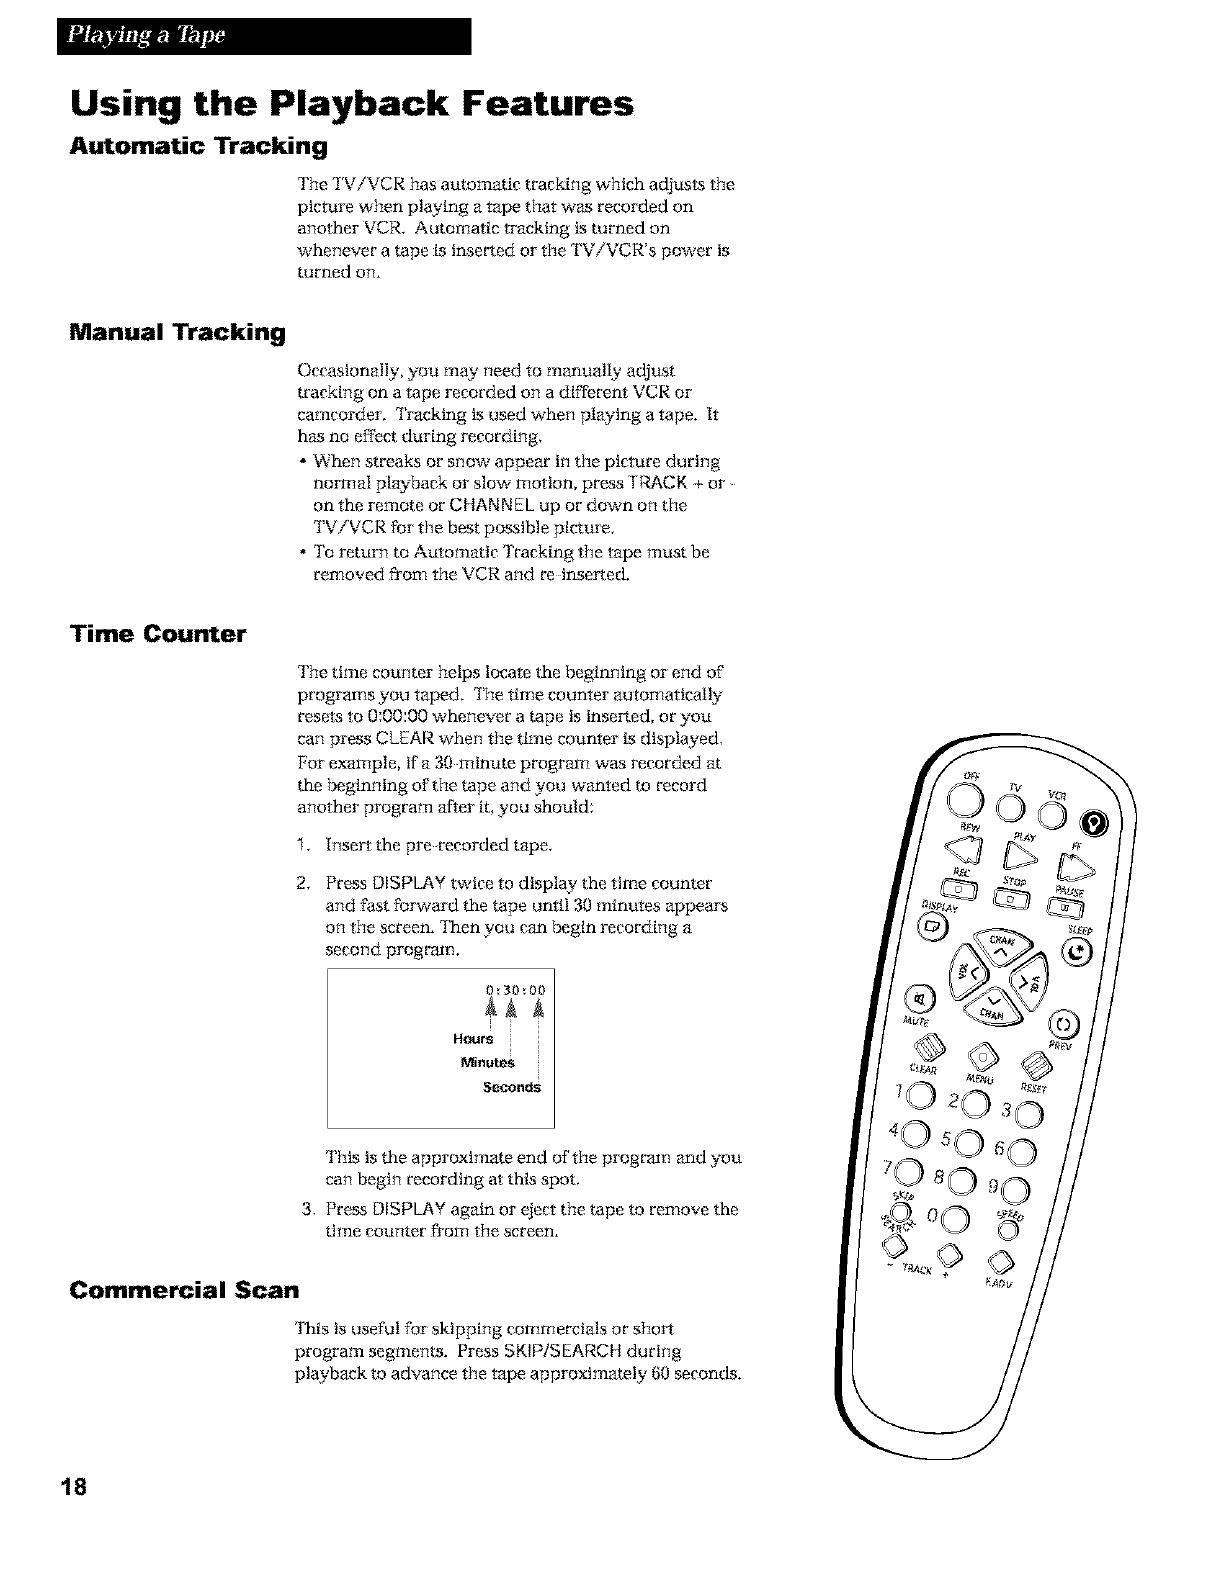
Automatic Tracking
The TViVCR has automatic tracking which adjusts the
picture whan playing a tape that was recorded on
another VCR. Automatic tracking is turned on
whenever a tape is inserted or the 'rV/VCR's power is
turned on.
Manual Tracking
Occasionally, you may need to manually adjust
tracking on a tape recorded on a different VCR or
camcorder. Tracking is used when playing a tape. It
has no effect during recording.
• When streaks or snow appear in the picture during
normal playback or slow motion, press TRACK + or
on the remote or CHANNEL up or down on the
TViVCR for the best possible picture.
• To return to Automatic Tracking the tape must be
removed from the VCR and re inserted.
Time Counter
The time counter helps locate the beginning or end of
programsyou taped. The time counter automatically
resets to 0:00:00 whenever a tape is inserted, or you
can press CLEAR when the time counter is displayed.
For example, if a 30 minute program was recorded at
the beginning of the tape and you wanted m record
another program after it, you should;
% Insert the prerecorded tape.
2. Press DISPLAY twice to display' the time counter
and fast forward the tape until 30 minutes appear8
on the screen. 'INan you can begin recording a
second program.
030_00
i
HOurs i
Minutes
Seconds
This is the approximate end of the progrmn and you
can begin recording at this spot.
3. Press DISPLAY again or eject the tape to remove the
time counter from the screen.
Commercial Scan
'INls is useful for skipping commercials or short
program segments. Press SKIP/SEARCH during
playback to advance the tape approximately 60 seconds.
18
Using the Playback Features
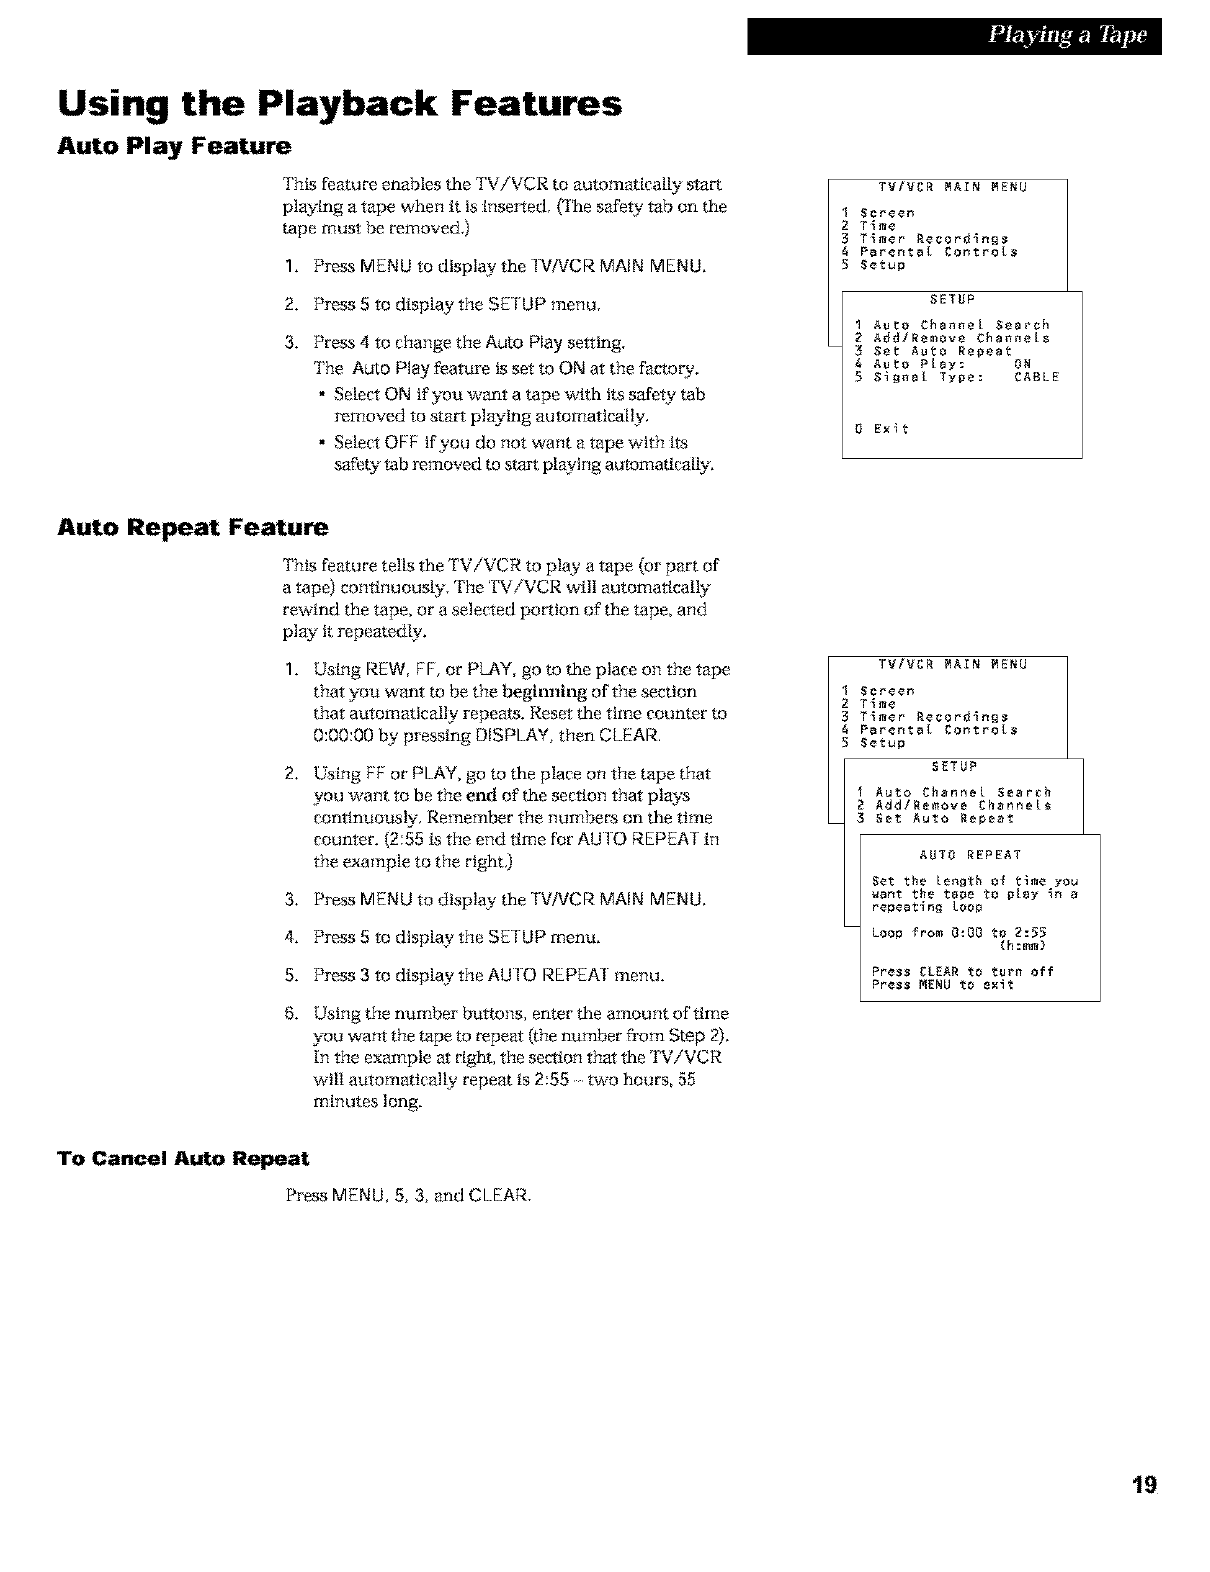
Auto Play Feature
This feature enables the TViVCR to automatica_ start
playing a tape when it is inserted. Uhe safe,D' tab on the
tape must be removed.)
1. Pmss MENU to dtsplay the TV/VCR MAIN MENU,
2, Press 5 to display the SETUP menu,
3, Press 4to change the Auto Play setting,
The Auto Play feature is set to ON at the facto W,
• Select ON if you want a tape with its safe,D' tab
removed to start playing automatically.
• Select OFF if you do not want a tape with its
safet3*tab removed to s_ playing automatically.
TV/VCB NArN MENU
I Screen
2 T_me
3T_mer Becord_nBs
4 Parental Controls
5 Setup
SETUP
1 Auto Channel Search
AddlRemove Charmers
3Set AUto Repeat
4AUto Play: OR
5$iBna[ Type: CABLE
0Exit
Auto Repeat Feature
This feature tells the TV/VCR to play a tape (or part of
a tape) conttnuousty. The 'W/VCR will automatically
rewind the tape, or a selected portion of the tape, and
play it repeatedly.
Using REW, FF, or PLAY, go to the place on the tape
that you want to be the beginning of the section
that atttomattcally repeats. Reset the time counter to
0:00:00 by pressing DISPLAY, then CLEAR.
2. Using FF or PLAY, go to the place on the tape that
you want to be the end of the section that plays
continuously. Remember the number_ on the time
counter. (2:55 is the end time for AUIO REPEAT in
the example to the right.)
3. Press MENU to display the TV/VCR MAIN MENU.
4. Press 5 to display the SETUP menu.
5. Press 3 to display the AUTO REPEAT menu.
Using the number buttons, enter the amount of time
you want the tape to re.pent {the number from Step 2).
In the example at right, the section that the 'KViVCR
wtl! automatical[y repeat is 2:55 two hours, 55
minutes long.
TV/VCB NArN MENU
Screen
T_me
T_mer Recordings
Parental Controls
Setup
SETUP
Auto Channel Search
Add/Remove ChanneL_
Set Auto Repeat
AUT0 REPEAT
Set the Length of time you
cant the tape _o play _n a
repeating Loop
Loop from 0:00 to 2:55
{h:mm)
Press CLEAR _o turn off
Press MENU to exit
To Cancel Auto Repeat
PressMENU, 5, 3, and CLEAR,
19
Using the Playback Features
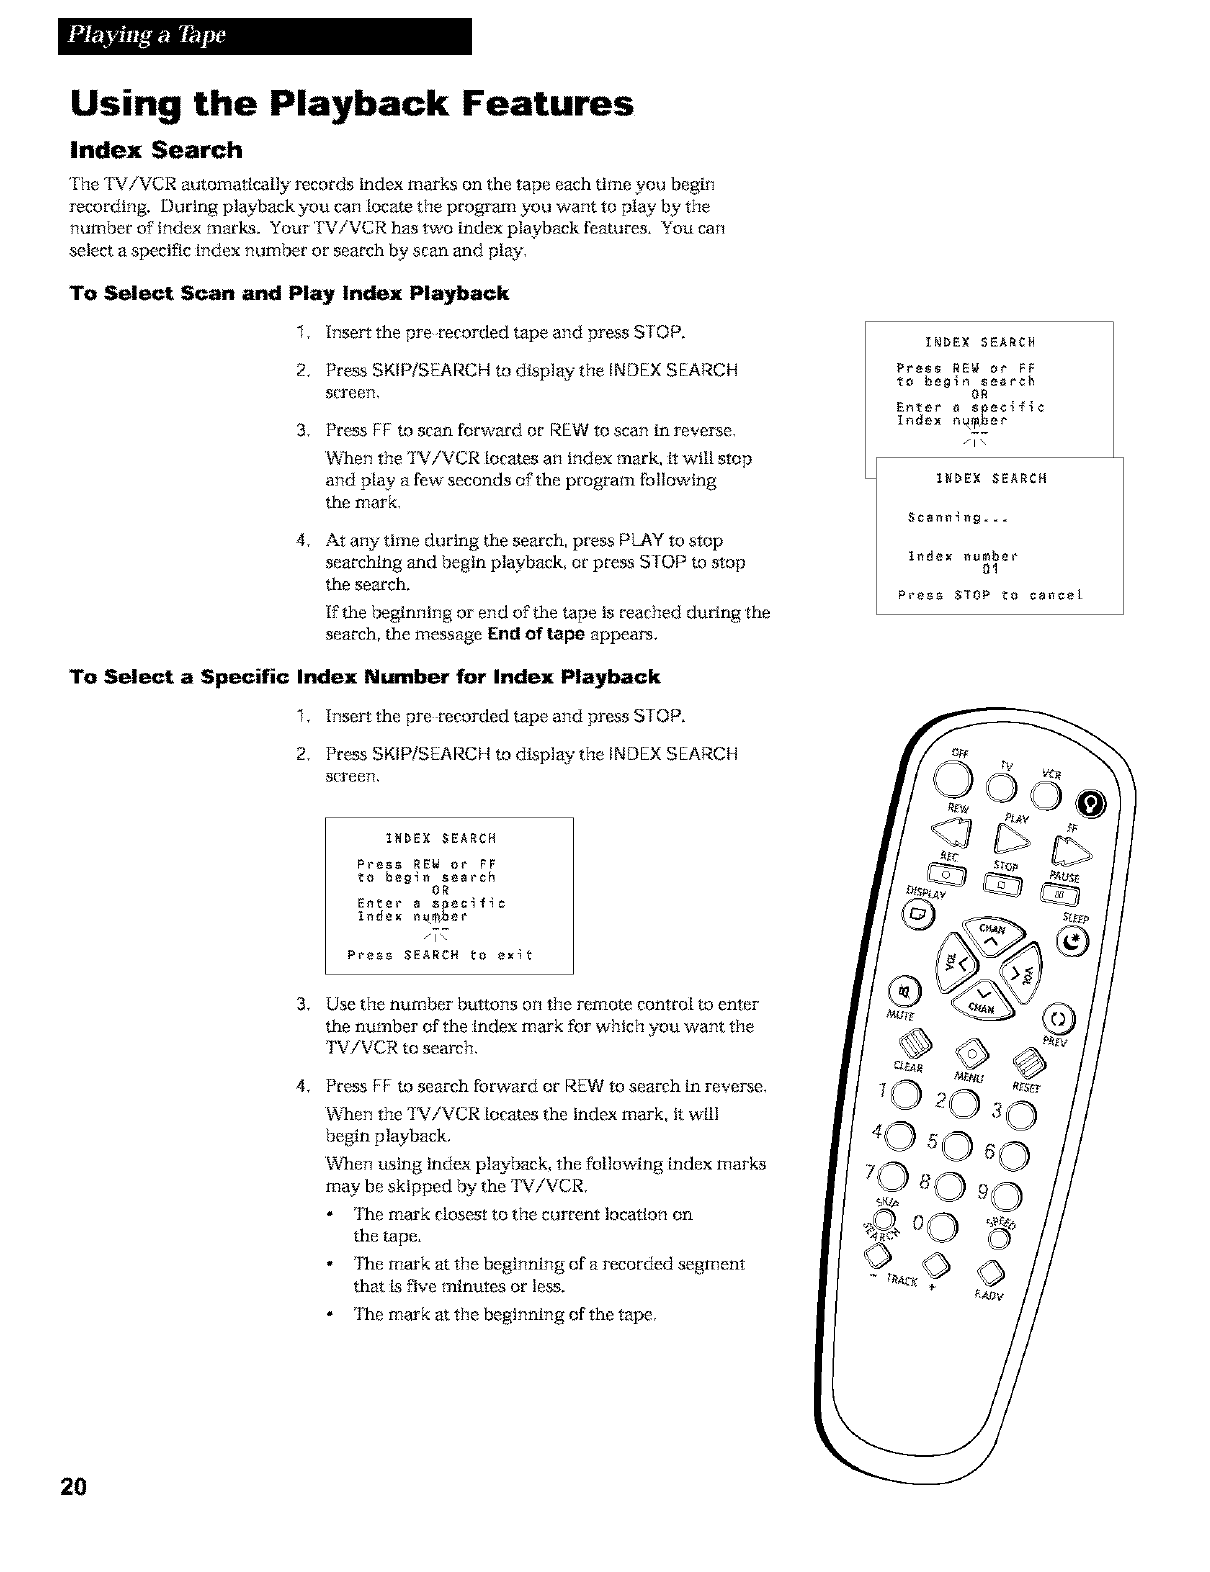
Index Search
The TV/VCR automatically records index marks on the tape each time you begin
recording. During playback you can locate the program you want to play by the
number of"index marks. Your TV/VCR has two index playback features. You can
select a specific index number or search by scan and plat .
To Select Scan and Play Index Playback
% [nser* the prerecorded tape and press STOP.
Z Press SKIP/SEARCH to displat the INDEX SEARCH
screen,
3, Press FF to scan forward or REWto scan in reverse,
When the TViVCR locates an index mark, it will stop
and play a few" seconds of the program following
the mark,
4, At any time during the search, press PLAY to stop
searching and begin playback, or press STOP to stop
the search.
If the beginning or end of"the tape is reached during the
search, the message End of tape appears.
To Select a Specific Index Number for Index Playback
1, Inset* the prerecorded tape and press STOP.
2. Press SKIP/SEARCH to displat the INDEX SEARCH
screen,
INDEX SEARCH
Press REN or FF
_o begin search
OR
En_e_ _ Specific
Index n_,ber
/IN
INDEX SEARCH
Scanning===
Index number
01
Press STOP to cancel
INDEX SEARCH
Press REN or FF
to begin search
OR
Enter a _peclflc
Index n_@_ber
_7C
Press SEARCH to exit
3. Use the number buttons on the remote control to enter
the number of the index mark for which you want the
TViVCR to search.
4, Press FF to search forward or REW to search in reverae.
When the TViVCR locates the index mark, it will
begin playback.
When using index playback, the following index marks
may be skipped/l t the TViVCR.
'INe mark closest to the current location on
the tape.
'INe mark at the beginning of a recorded segment
that is five minutes or less.
'INe mark at the beginning of the tape.
20
Using the Playback Features
This feature allows you to quickly remm to a time counter reading
of 0:00:00. This is especially convenient when you want to watch a
segment of the tape several times.
1. Insert the prerecorded tape and press STOP.
2. Press DISPLAY twice to display only the time counter.
3. Use PLAY, FF, or R_EWto locate the start ofthe segment you
want to repeat.
4. Press CLEAR to reset the time counter to 0:00:00.
5. Continue playing the tape and press STOP when you reach the
end of the segment you want to repeat.
6. Press SKIP/SEARCH twice to display the ZERO SEARCH screan.
The cztrrent time counter is displayed.
7. Press REW or FF to return to 0:00:00.
The tape rewinds or fast forwards to the 0:00:00 and begins
playing.
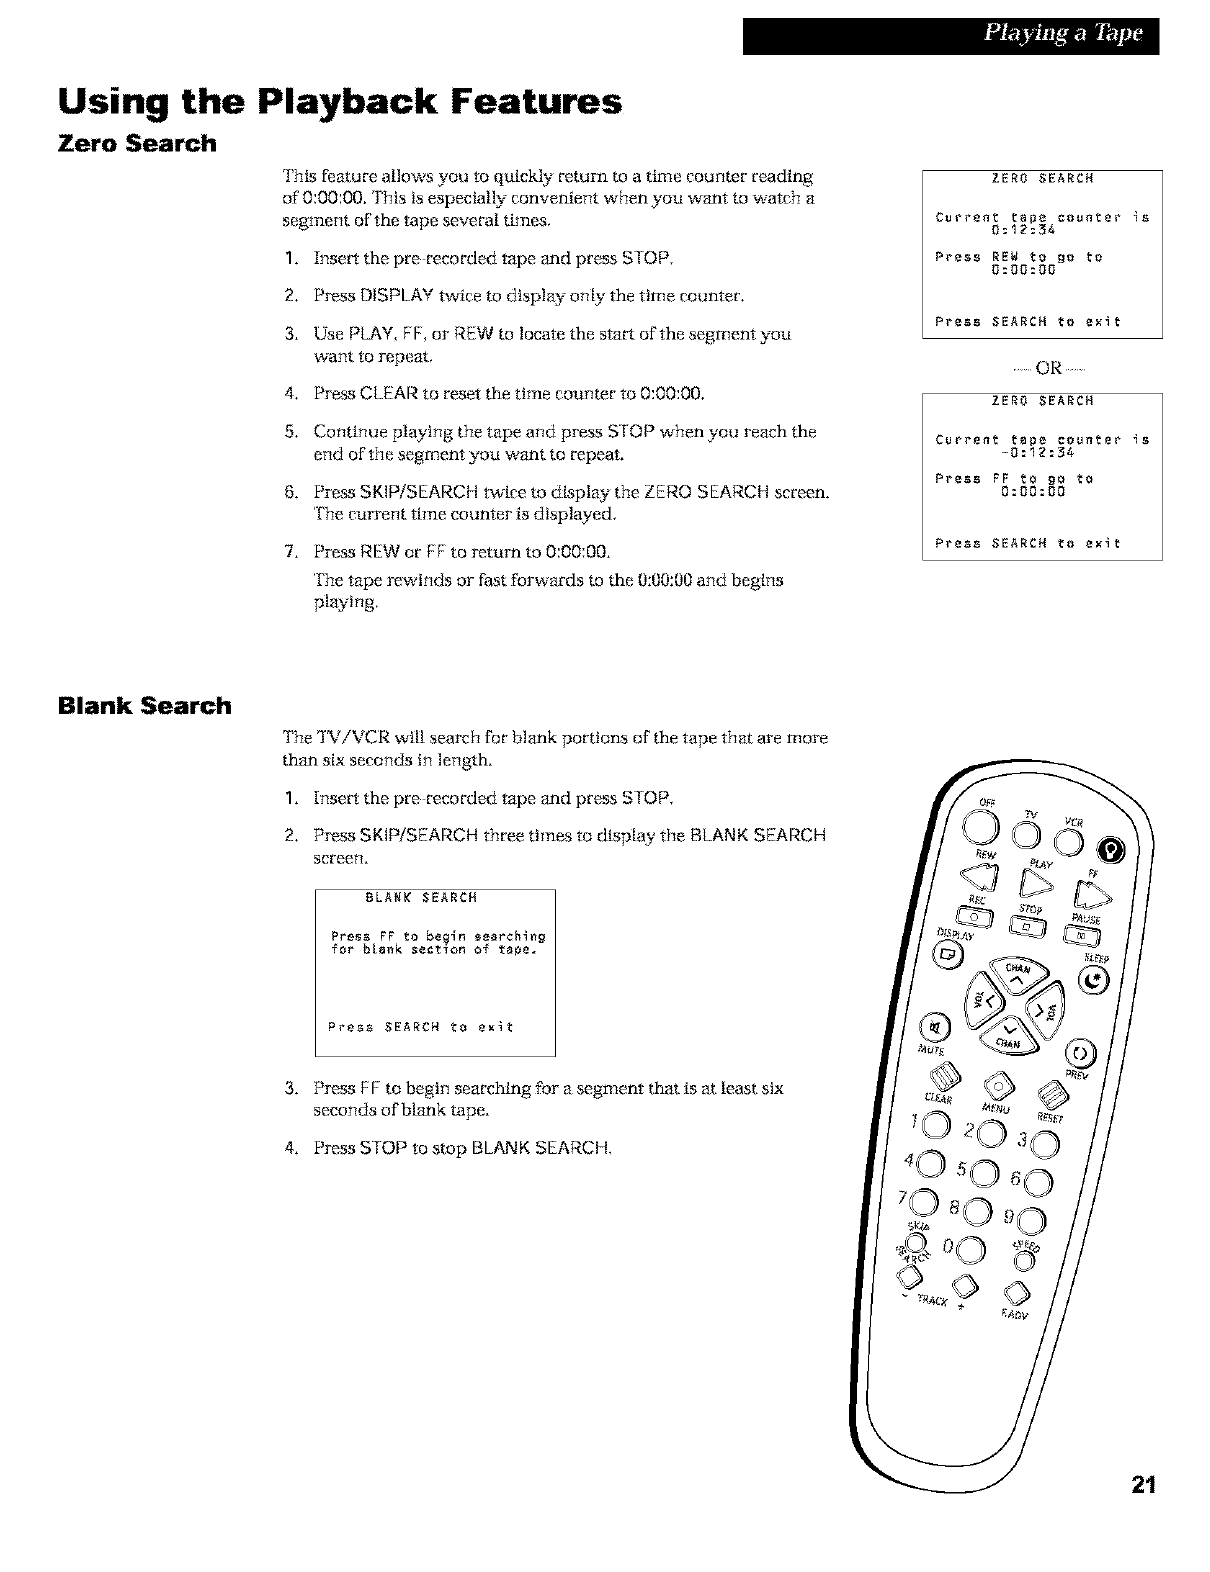
Zero Search
ZERO SEARCH
Current tape counter ig
0:I_:34
Press REW to go to
0:00:00
Press SEARCH to exlt
.....OR .....
ZERO SEARCH
Current tepe ceu_ter i_
-0:I_:34
Press FF to go to
0:00:00
Press SEARCH to exlt
Blank Search
The TViVCR wiU search for blank portions of the tape that are more
than six seconds tn length.
1. Insert the prerecorded tape and press STOP.
2. Press SKIP/SEA[;_CH three ttmes to display the BLANK SEARCH
screen.
BLAR_ SEARCH
Press FF to begin _earchlng
_or bleak section o_ tape.
Press SEARCH to exlt
3. Press FF to begin searching f'or a segment that is at least stx
seconds of blank tape.
4. Press S fOP to stop BLANK SEARCH.
21
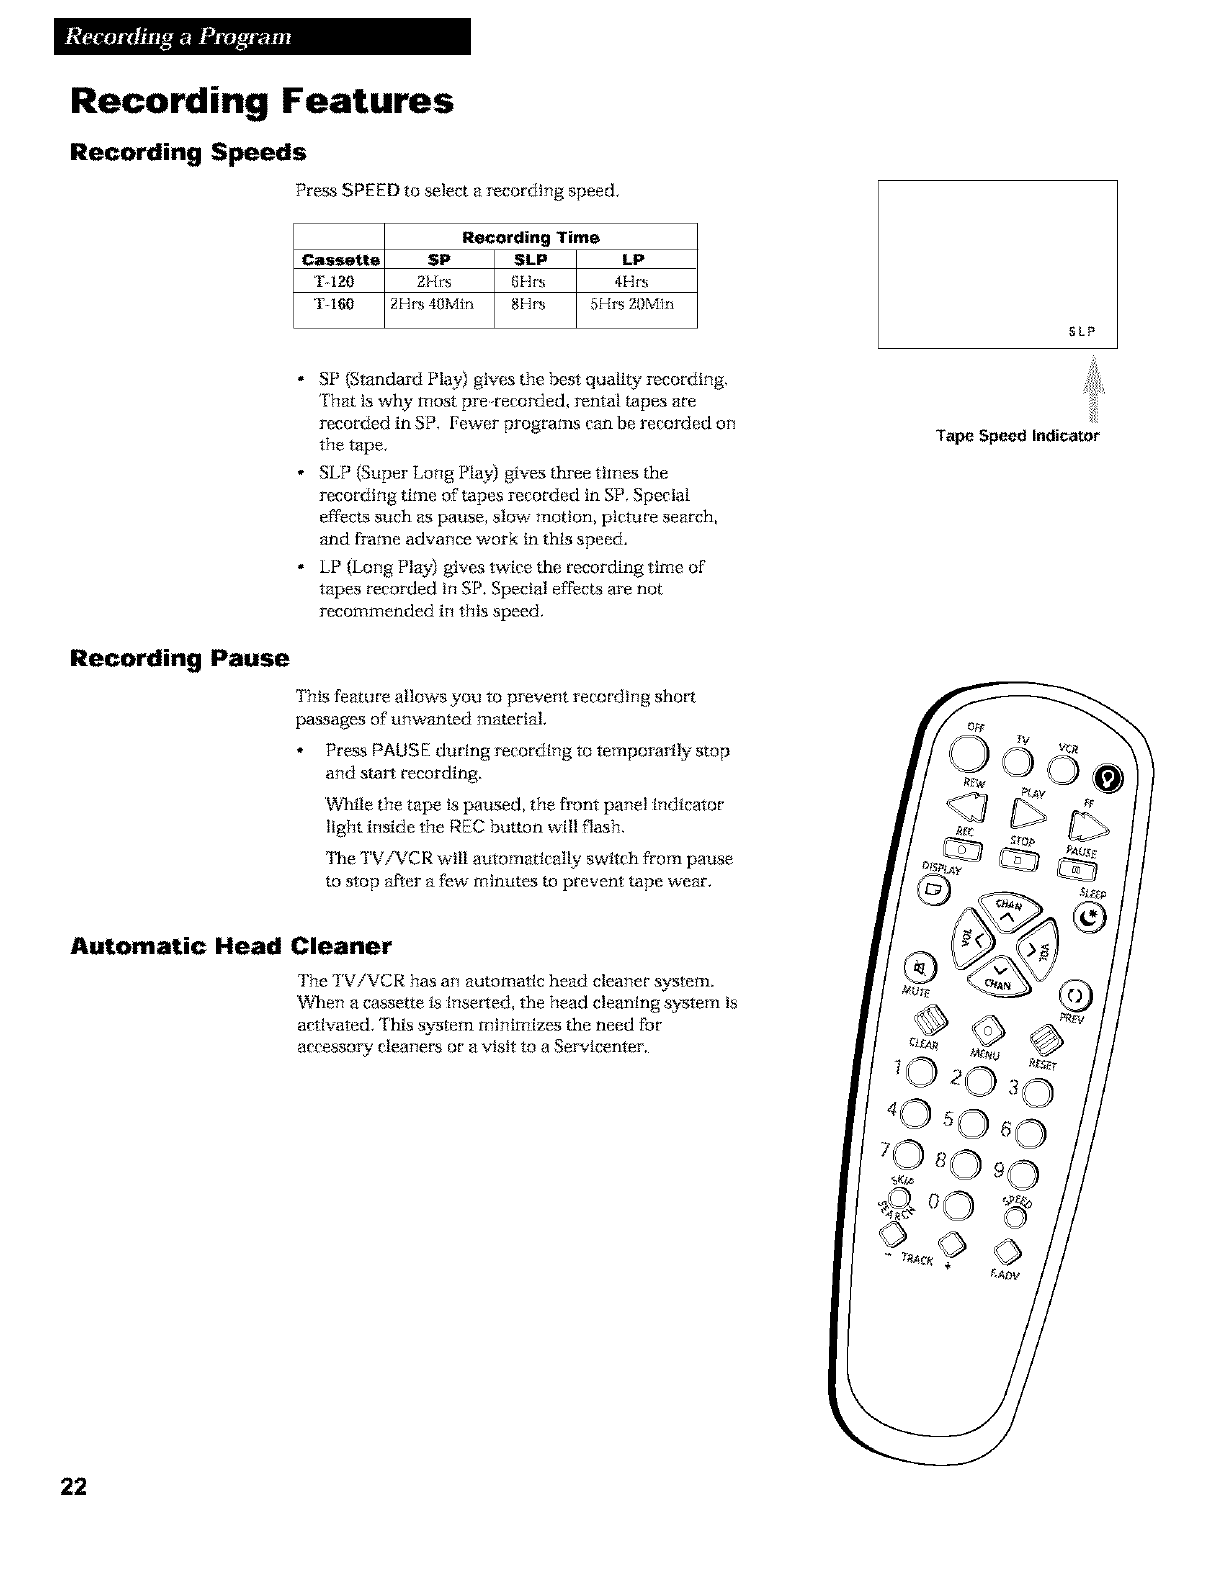
Recording Features
Recording Speeds
Press SPEED to select a recording speed,
Cassette
Td20
Td f.;O
Recording Time
SP SLP LP
2H_<s fiHrs 4Hrs
2Hrs 40Mir_ 8Hrs 5Hrs 20Min
SLP
•SP (Standard Play) gives the best quail Wrecording.
That is why most prerecorded, rental tapes are
recorded in SP. Fewer programs can be recorded on
tee tape.
• SLP (Super Long Play) gives three times the
recording time of tapes recorded in SP. Special
effects such as pause, slow motion, picture search,
and frame advance work in this speed.
• LP (Long Play) gives twice the recording time of
tapes recorded in SP. Special effects are not
recommended in this speed.
Recording Pause
This _ure allows you to prevent recording short
passa_s of unwan_d material,
Press PAUSE dud_ recording to temporarily stop
and sm_ records.
While the tape is paused, the front panel indicator
light inside the REC button will flash,
_-e TViVCR will a_om_cal_ switch from pause
_¢p after a _w" mtnu_s _ prevent tape wear,
Automatic Head Cleaner
The TViVCR has an automatic head cleaner s_tem,
When a cassette is inserted, the head cleaning system is
ac*lvated, This s_tem minimizes the need for
accesso<y eleanet:_ or a visit to a Servicenter.
Tape Speed Indicator
®
22
Types of Recordings
Your TViVCR provides different ways to record which are explained in the
following sections:
Bask Recording
Express Recording
Timer Recording
Copying and Editing Tapes
Basic Recording
How to Make a Recording
1. [nsetl a tape with safet:y tab in place,
2. Press SPEED m select a recording speed,
The tape speed indicator appeam,
3. Select the channel to be recorded,
To record from the AUDIONIDEO INjacks, press 00,
Two selections appear in the channel field, _ss 1 to select
VIDEO1,the rearAUDIO/VIDEOINjacks.Press2 to select
the frot_tpanel AUDIO/VIDEOINjacks.
4, Press t_EC to begin recording.
The indicator light in the REC button on the front of the
TViVCR turns on during recording,
5, Press STOP/EJ ECT on the TViVCR or STOP on the
remote to stop recording.
®
23
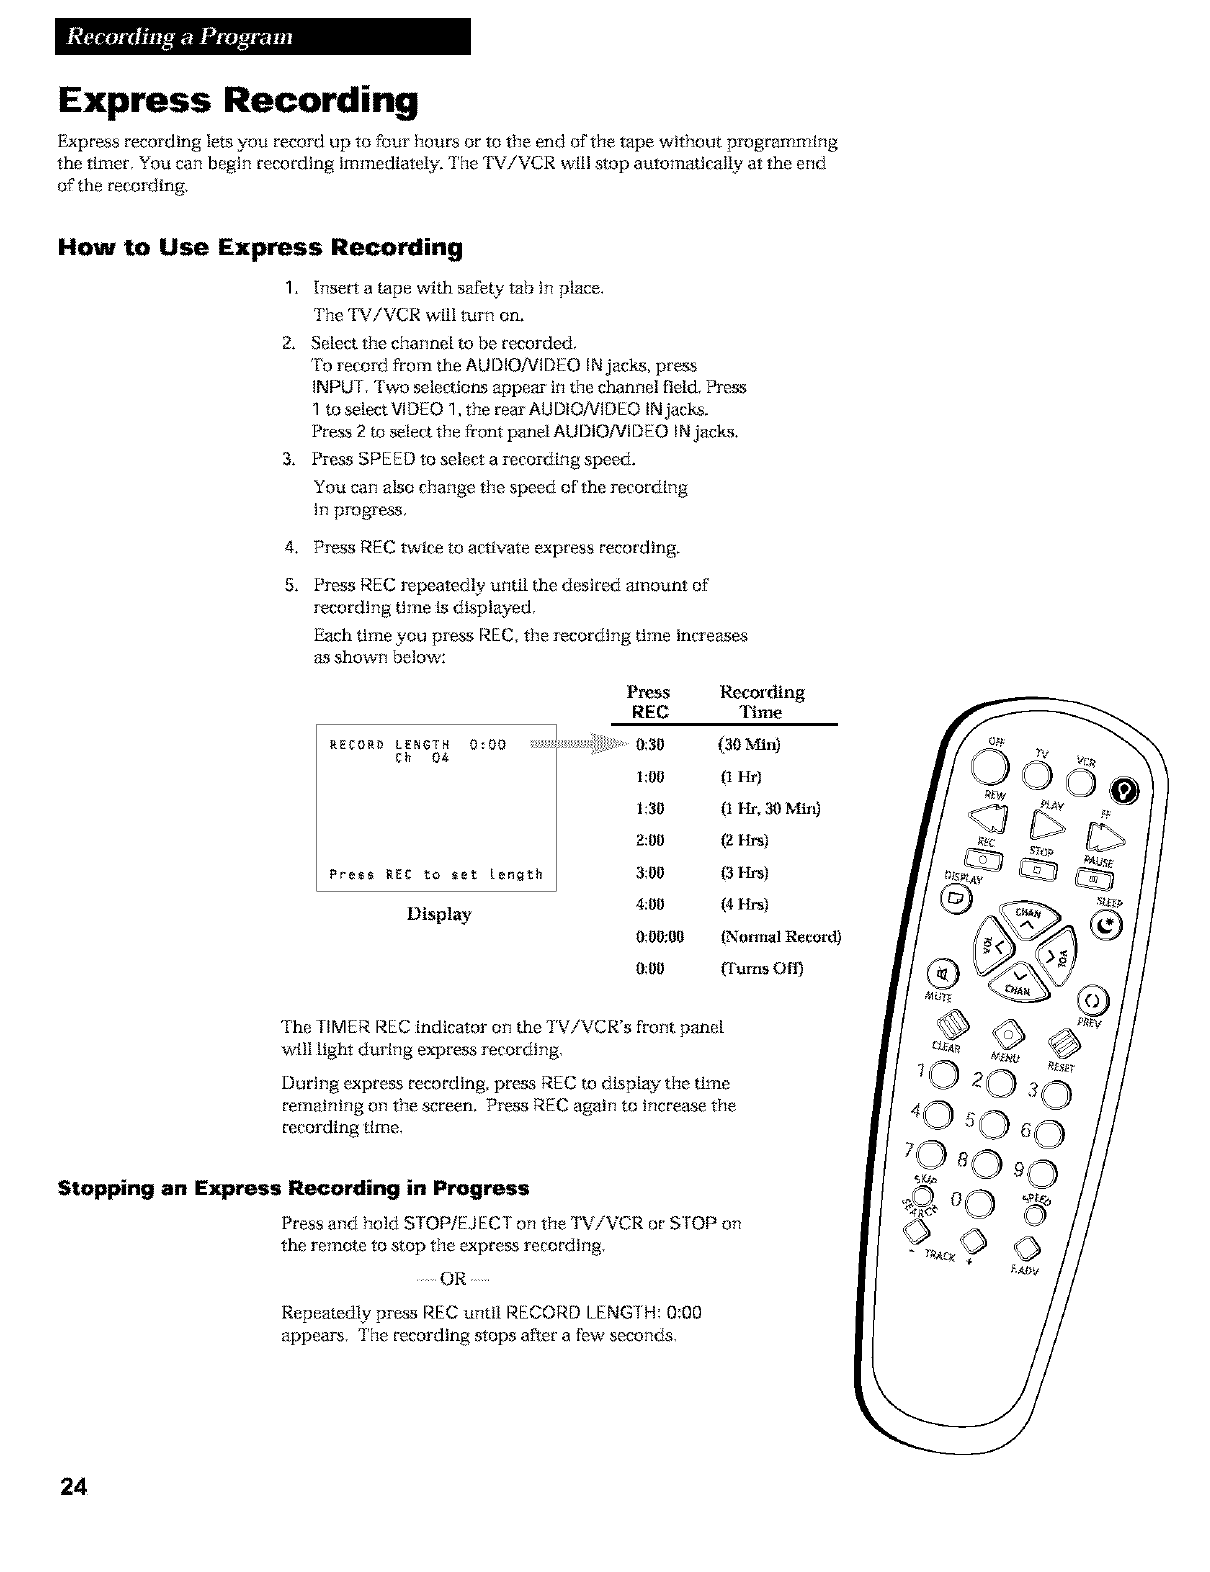
Express Recording
Express recording lets you record up to four hours or to the end of the tape without programming
the timer, You can begin recording immediately. '['he TViVCR wiU stop automatically at the end
of the recording,
How to Use Express Recording
1. Insert a tape with safely tab in place,
'['he TViVCR will turn on.
2. Select the channel to be recorded,
To record from the AUDIO/VIDEO INjacks, press
INPUR Two selections appear in the channel field, _ss
1 to select VIDEO 1, the rear AUDIO/VIDEO INjacks.
Press 2m select the front panel AU DIO/VI DKO IN jacks.
3. Press SPEED to select a recording speed.
You can also change the speed of the recording
in progress,
4. Press REC twice to activate express recording.
5. Press REC repeatedly until the desired mnount of
mcordtng time is displayed,
Each time you press REC, the mcordtng time tncre&ses
as shown below:
RECORb LENGTH 0:00
Ch 04
gre_ REC to _et Length
Display
Pmss Recording
REC Time
[&all (a0 Mm)
1;llll (1 _)
1;311 (1 Hr, 30 Min)
2:00 (2 _)
3:00 (3 _)
4:00 (4 _)
0;00:00 (Nol_al Record)
0:00 (Turns OlD
'The TIMER REC indicator on the TViVCR's front panel
will light during express recording,
During express recording, press REC to display the time
remaining on the screen. Press REC again to increase the
recording time,
Stopping an Express Recording in Progress
Press and hold srOP/EJECT on the TViVCR or STOP on
the remote to stop the express recording,
.....OR
Repeatedly press REC until RECORD LENGI H: 0:00
appears, '['he recording stops after a few seconds,
24
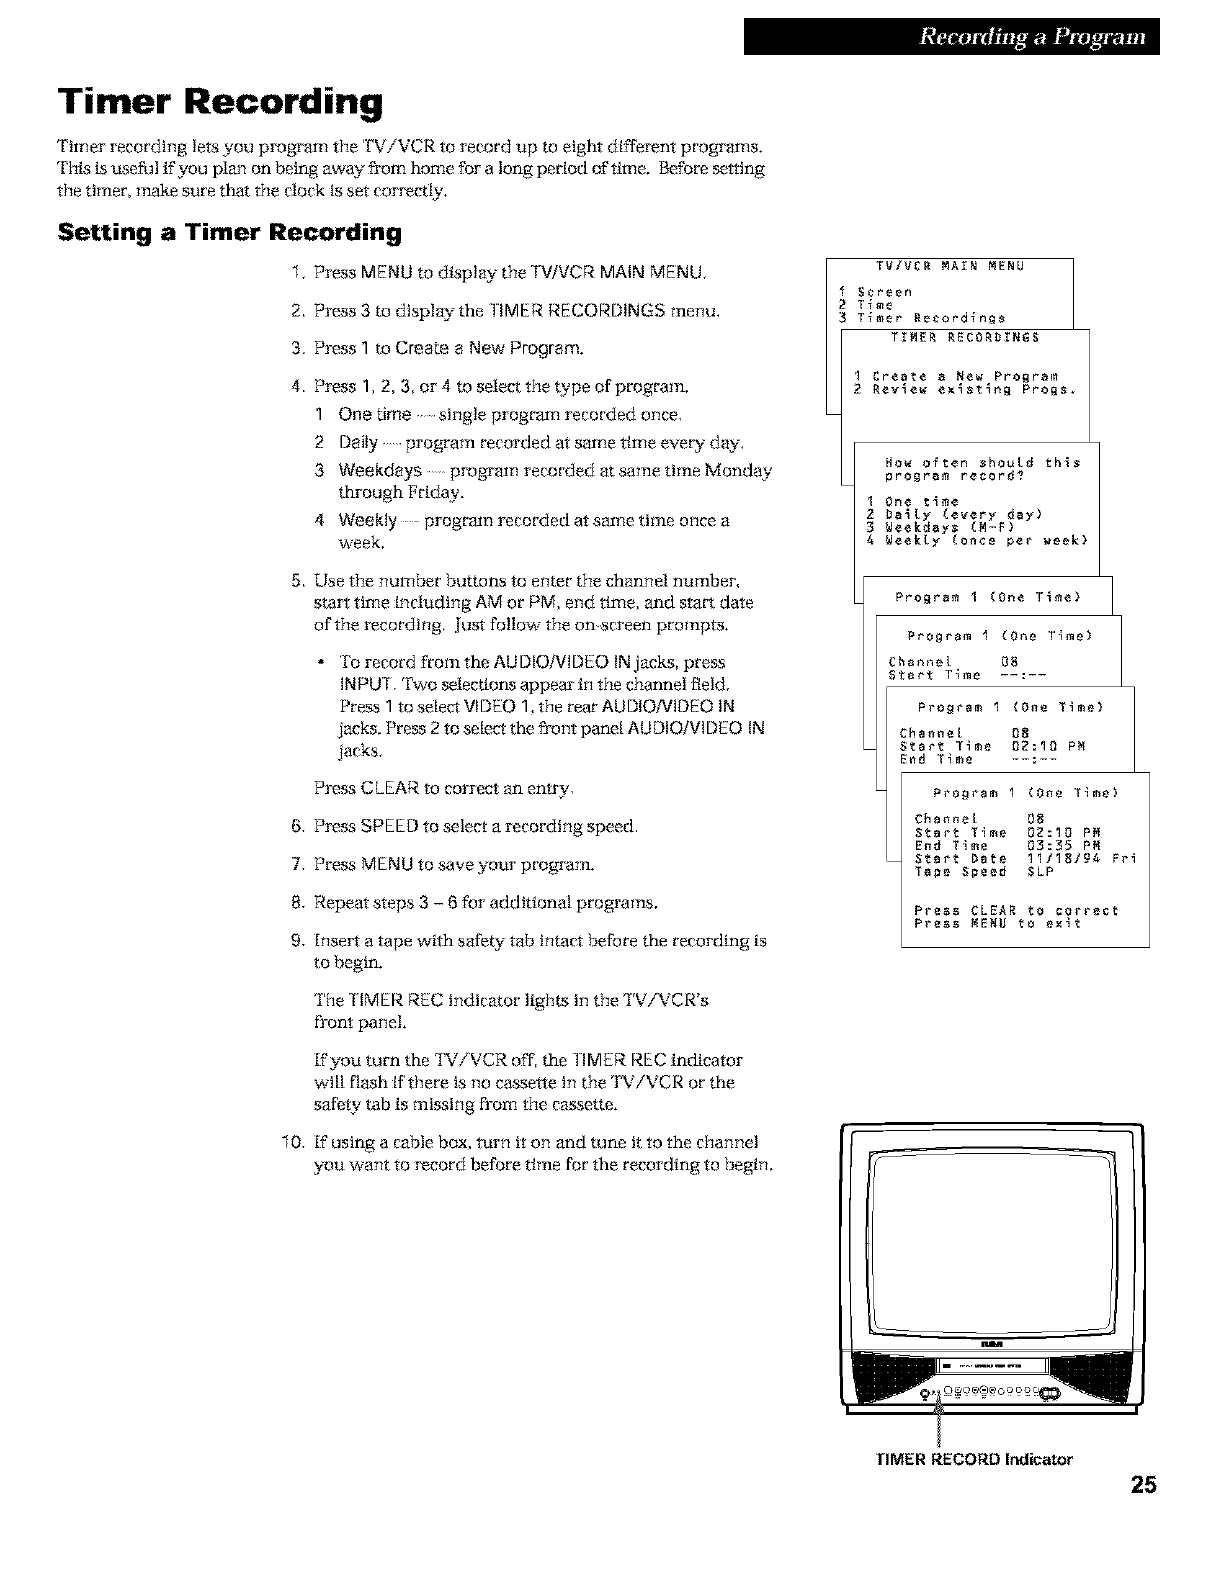
Timer Recording
Timer recording legs you program the TViVCR to record up to eight different programs.
T_Ls is useful ffyou plan on being away- from home for a long period of time. Before setting
the timer, make sure that the clock is set correct[y.
Setting a Timer Recording
1. Press MENU to display the TWVCR MAIN MENU.
2. Press 3 to display the TIMER RECORDINGS menu.
3. Press 1 to Create a New Program,
4. Press 1, 2, 3, or 4 to select the t:ype of program.
1One time single program recorded once.
2 Daily program recorded at same time eve W day.
3 Weekdays program recorded at same ttme Monday
through Friday.
4 Weekly program recorded at same ttme once a
week.
5. Use the number buttons to enter the channel number,
start time including AM or PM, end time, and start date
of the recording, Just follow the on screen prompts.
• To record fl'om the AUDIO/VIDEO INjacks, press
INPUT. Two selections appear in the channel field,
Press 1 to select VIDEO 1, the rear AUDIONIDEO IN
jacks. Press 2 to select the fro_t panel AUDIO/VIDEO IN
jacks,
Press CLEAR to correct an entry.
6. Press SPEED to select a recording speed.
7. Press MENU to save your program.
8. Repeat steps 3 - 8 for additional programs.
9. Insert a tape with safety tab intact before the recording is
to begin.
The TIMER REC indicator lights in the TViVCR's
front panel
If you mrn the 'FV/VCR off, the IlMER REC indicator
wil| flash if there is no cassette in the TViVCR or the
safety tab is missing from the cassette.
10. If using a cable box, turn it on and tune it to the channel
you want to record before time for the recording to begin.
Program I{One Time)
Channel 0B
Start Time 02:10 PM
End Time 0_:35 PM
Start bate 1111BI9_ Frl
T_pe Speed SLP
Press CLEAR to correct
Press MENU to exit
TIMER RECORD Indicator 25
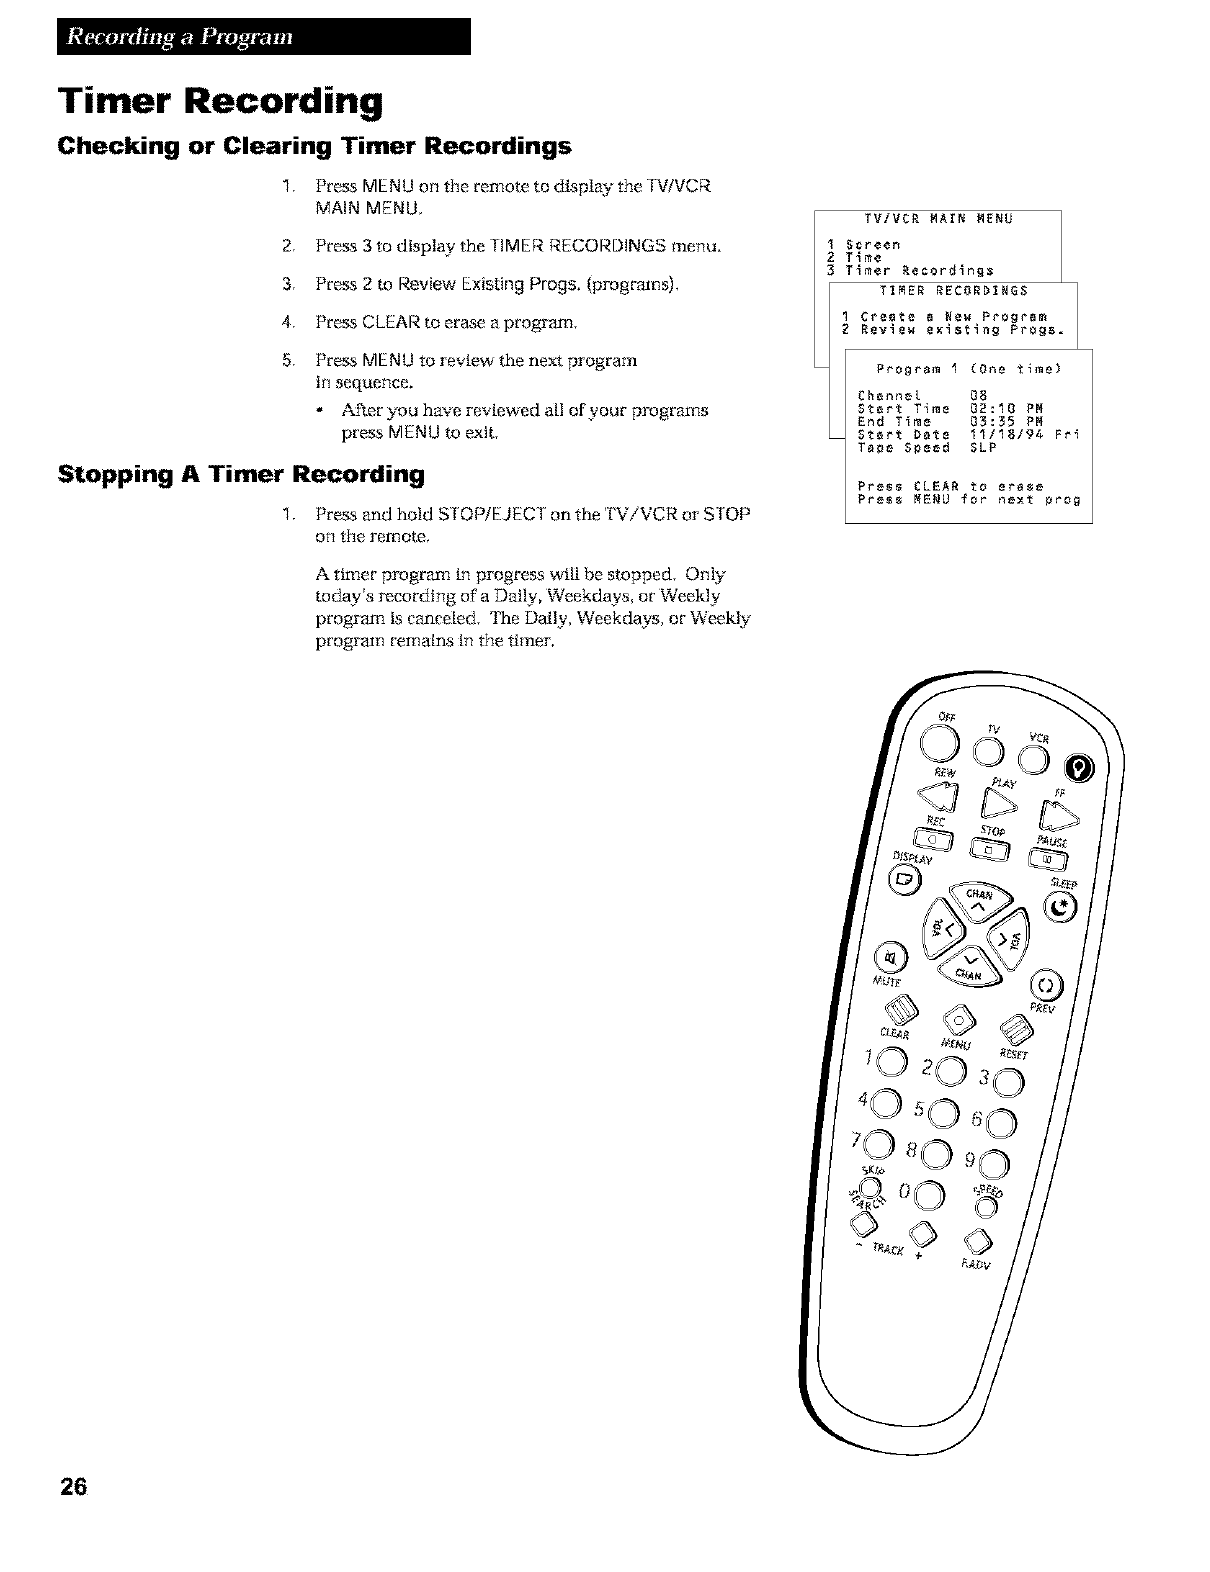
Timer Recording
Checking or Clearing Timer Recordings
1, PressMENU on the remo_ to d_pl_ the TWVCR
MAIN MENU,
2. Press 3 to display the TIMER RECORDINGS menu.
3. Press 2 m Review Existing Progs. (programs),
4. Press CLEAR to erase a program,
5. Press MENU to review" the next program
in sequence.
After you have reviewed all of your programs
press MENU to exit,
Stopping A Timer Recording
1. Press and hold STOP/EJECT on the TV/VCR or STOP
on the remote,
A timer program in progress will be stopped, Only
today's recording of a Dally, Weekdays, or Weekly
program is canceled, '[_-eDally, Weekdays, or Weekly
program remains in the timer.
TV/VCM MArN M_NU
Screen
T_me
T_mer Necord_nQs
TIMER RECORDINGS J
1 Creete e Ne_ Progre_
_ Revle_ exlstlng Progs.
Program I (One _ime)
Channel 08
Start Time 02:10 PM
End Time 03:35 PM
Start Dote 11/18/9_ Frl
Tape Speed SLP
Press CLEAR to erese
Pre_ MENU _or next prog
®
26
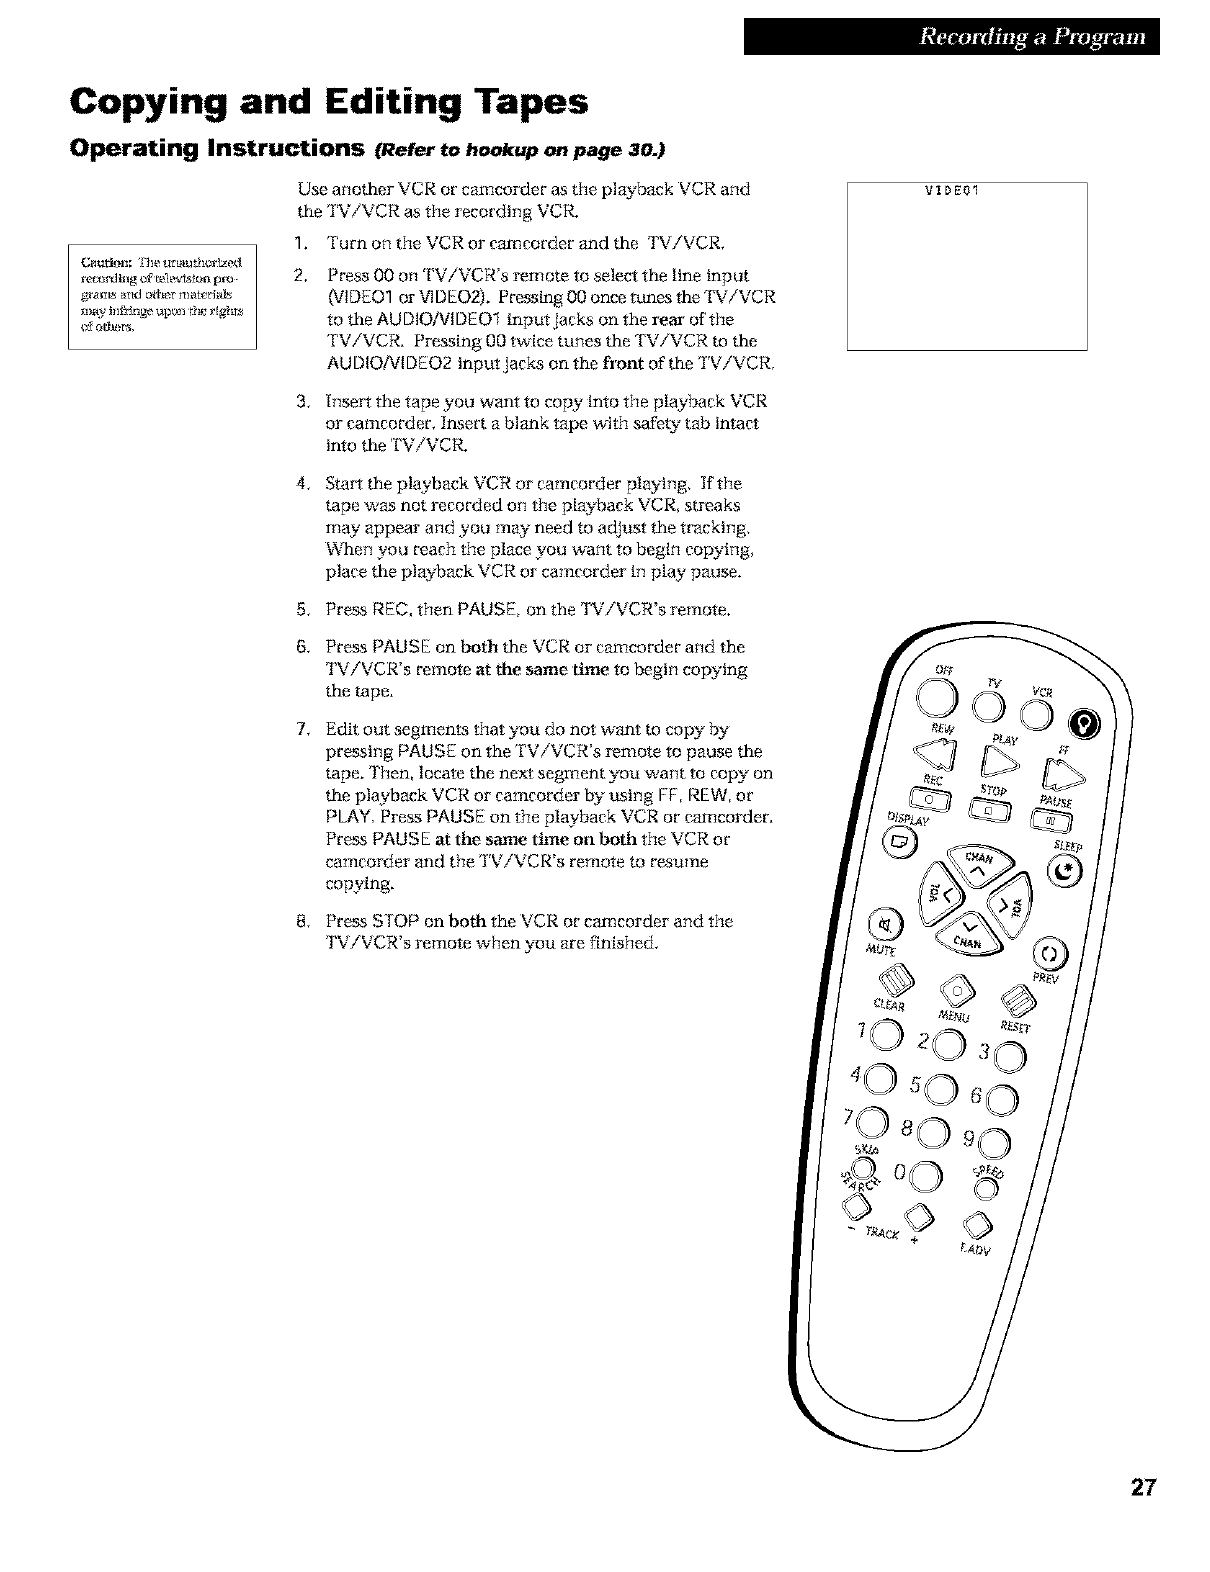
Copying and Editing Tapes
Operating Instructions (Refer to hookup on page 30.)
rc_rding of I#[e_l_n pro
rgrali_ actd o_her _rl_l_r_l_
_iLay In f_ n_ upon I_m rlghl_
of o_l_'r_,
Use another VCR or camcorder as the playback VCR and
the TV/VCR as the recording VCR.
1. 'Turn on the VCR or camcorder and the TViVCR.
2. Press O0 on TV/VCR's remote to select the line input
(VIDEO1 or VIDEO2). Pressing O0 once tunes the 'IN'/VCR
to the AUDIO/VIDEO1 input jacks on the real' of the
"PV/VCR. Pressing 00 twice tttnes the "PV/VCR to the
AU DIO/Vl DEO2 input jacks on the front of the TViVCR,
3. Insert the tape you want to copy into the playback VCR
or camcorder. Insert a blank tape with safett tab intact
into the TV/VCR.
4.
6,
7.
8.
StaYr the playback VCR or camcorder playing. If the
tape was not recorded on the playback VCR, streaks
may appear and you may need to adjust the tracking.
When you reach the place you want to begin copying,
place the playback VCR or camcorder in play pause.
Press REC, then PAUSE, on the TViVCR's remote.
Press PAUSE on both the VCR or camcorder and the
TViVCR's remote at the same time to begin copying
the tape.
Edit out segments that you do not want m copy- by
pressing PAUSE on the TV/VCR's remote to pause the
tape. Then, locate the next segment you want to copy- on
the playback VCR or camcorder by using FT, NEW, or
PLAY Press PAUSE on the playback VCR or camcorder.
Press PAUSE at the same time on both the VCR or
camcorder and the TViVCR's remote to resume
copying.
Press STOP on both the VCR or camcorder and the
TViVCR's remote when you are finished.
VI_E01
27
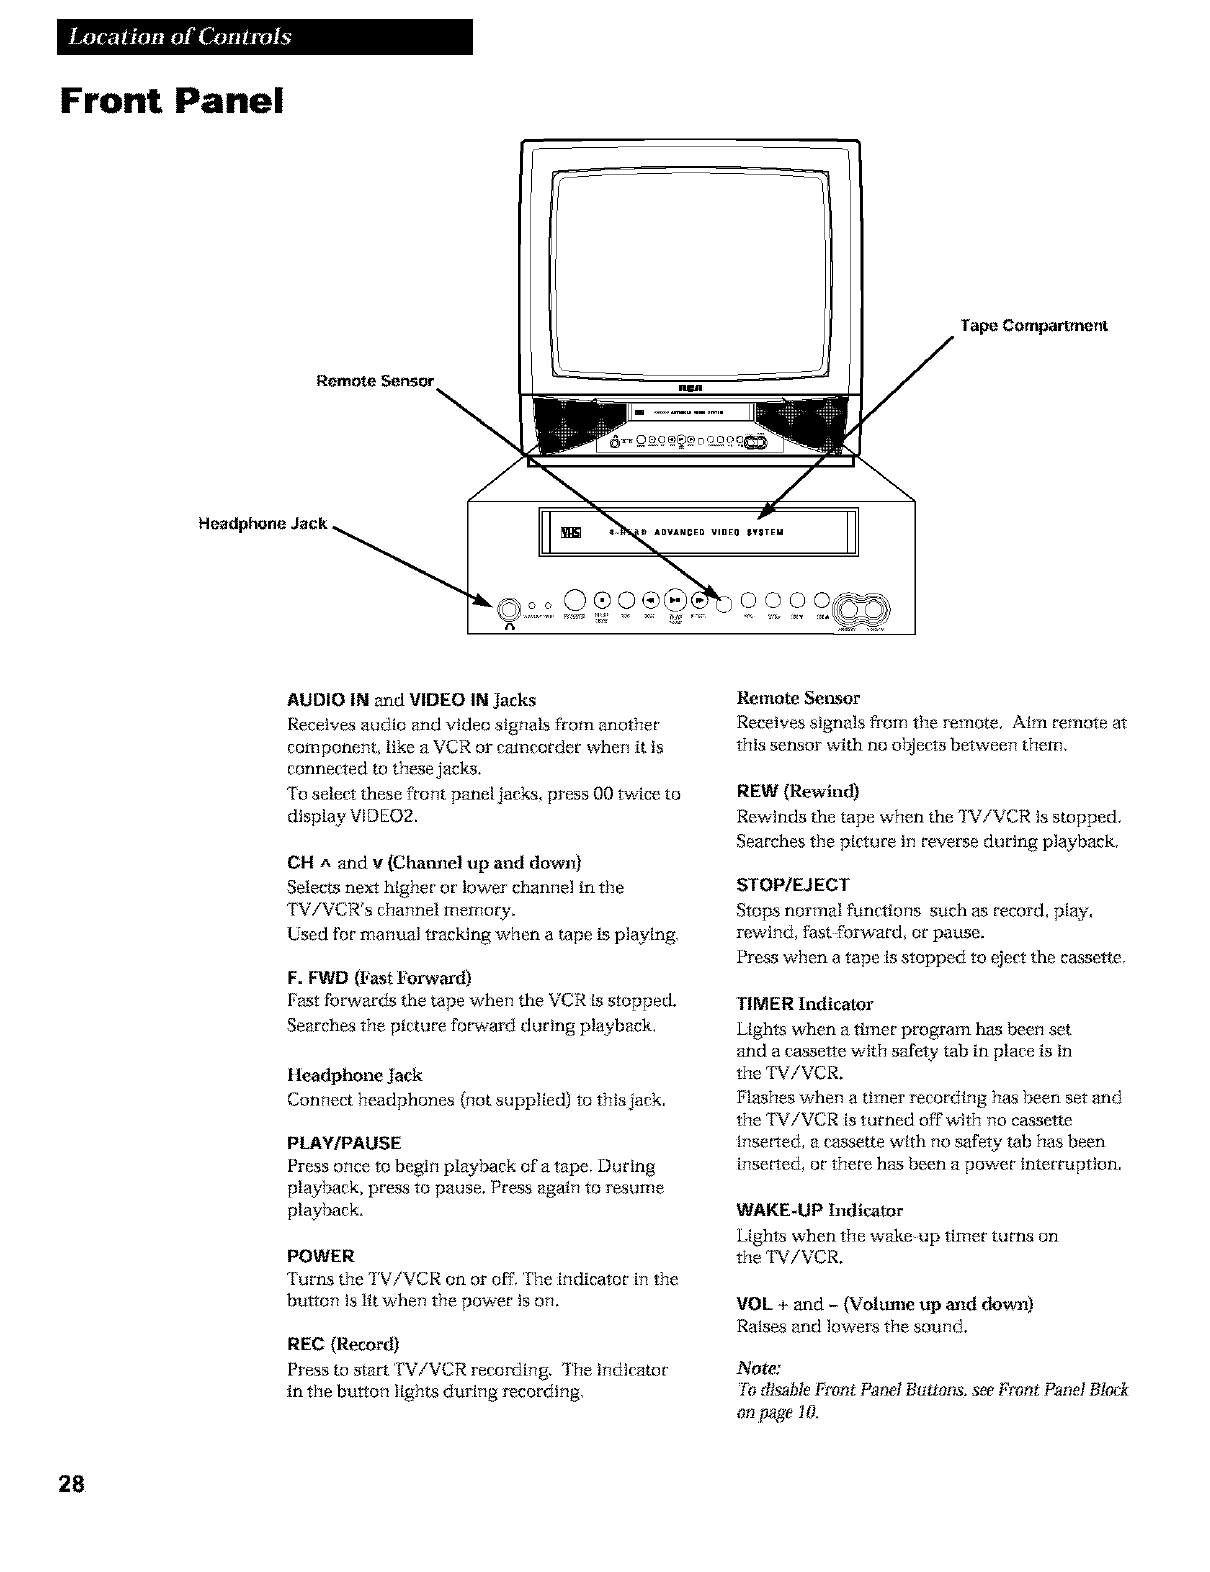
Front Panel
Remote Sensor
Tape Compartment
AUDIO IN and VIDEO IN Jacks
Receives audio and video signal8 from another
component, like a VCR or camcorder when it is
connected to thesejacks.
're select these front panel jacks, press 00 twice to
display VIDEO2.
CH ^and v(Cha=mel up and down)
Selects next higher or lower channel in the
TV/VCR's channel memo W.
Used for manual tracking when a tape is playing.
F. FWD (Fast Forwoa'd)
Fast forwards the tape when the VCR is stopped.
Searches the picture forward during playback.
1leadphone Jack
Connect headphones (not supplied} to this jack.
PLAY/PAUSE
Press once to begin playback of a tape. During
playback, press to pause. Press again to resume
playback.
POWER
Turns the TViVCR on or off. The indicator in the
button is lit when the power is on.
REC (Record)
Press to start TV/VCR recording. The indicator
in the button light8 during recording.
Remote Se_sor
Receives signals from the remote, Aim remote at
this sensor with no o/_iects between them,
REW (Rewind)
Rewinds the tape when the 'IV/VCR is stopped.
Searches the picture in reverse during playback.
STOP/EJECT
Stops normal functions such as record, play,
rewind, fast forward, or pause.
Press when a tape is stopped to eiect the cassette.
TIMER Indicator
Lights when a timer program has been set
and a cassette with safe. D' tab in place is in
the 'I%¢iVCR.
Flashes when a timer recording has been set and
the TViVCR is turned off with no cassette
inserted, a cassette with no safety tab has been
inserted, or there has been a power interruption.
WAKE-UP Indicator
IAghts when the wake up timer turns on
the TViVCR.
VOL + and -(Vob.mm up omd down)
Raises and lower8 the sound.
Note:
Ticdisable Front Panel B*ltta_s, see Front Panel BIo_
on page lg
28
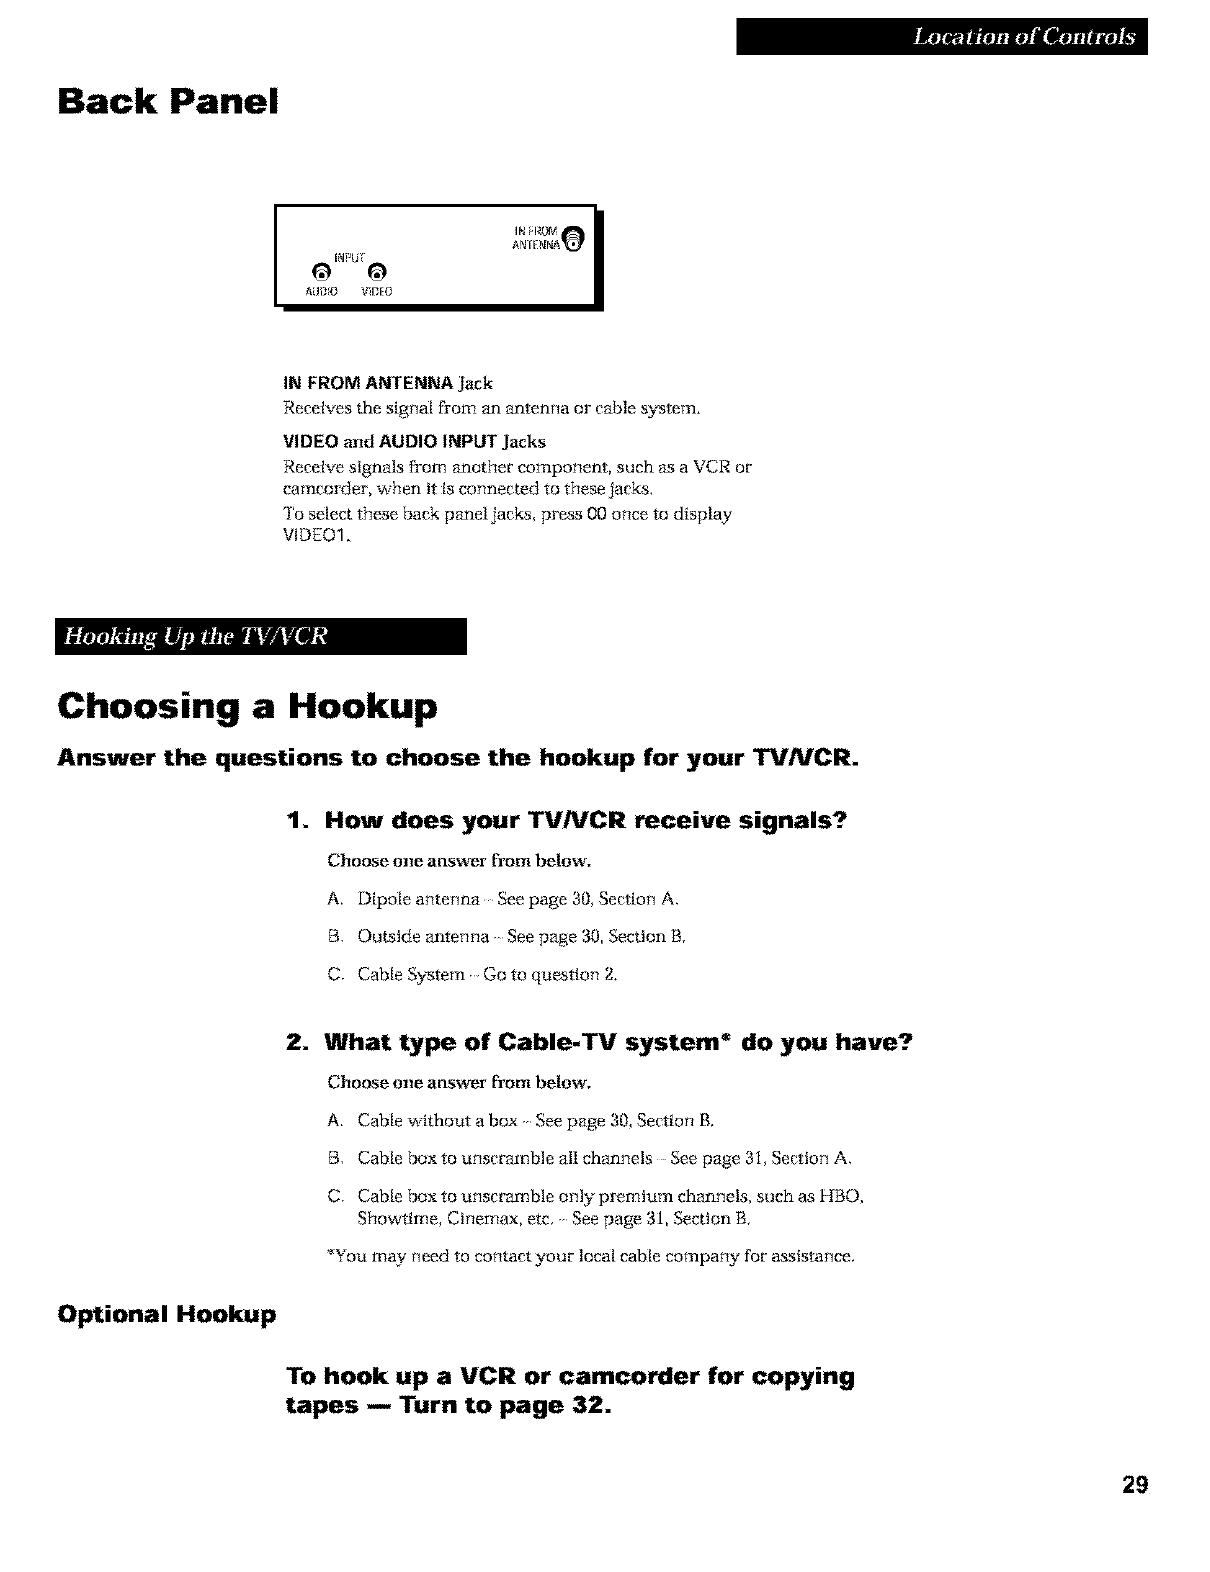
Back Panel
A_IE_NA_
IN FROM ANTENNA Jack
Receives the signal from an antenna or cable system.
VIDEO and AUDIO INPUT Jacks
Receive signals from another component, such _ a VCR or
camcorder, when it is connected to these jacks.
To select these back panel jacks, press {30once to display
VIDEQ1.
Choosing a Hookup
Answer the questions to choose the hookup for your TVNCR.
1. How does your TV/VCR receive signals?
Choose one answer _otn below,
A. Dipole antenna See page 30, Sectlo_ A.
B. Outside antenna See page 30, Section B.
C. Cable System Go to question 2.
Optional Hookup
2. What type of Cable-TV system* do you have?
Choose one answer _om below,
A. Cable without a box See page 30, Section g.
B, Cable box to unscramble all channels See page 3i, Section A.
C. Cable box to unscramble only premtum channels, such as HBO,
Show, line, Cinemax, etc. See page 31, Section B.
*You may need to contact your local cable company for assistance.
To hook up a VCR or camcorder for copying
tapes -- Turn to page 32.
29
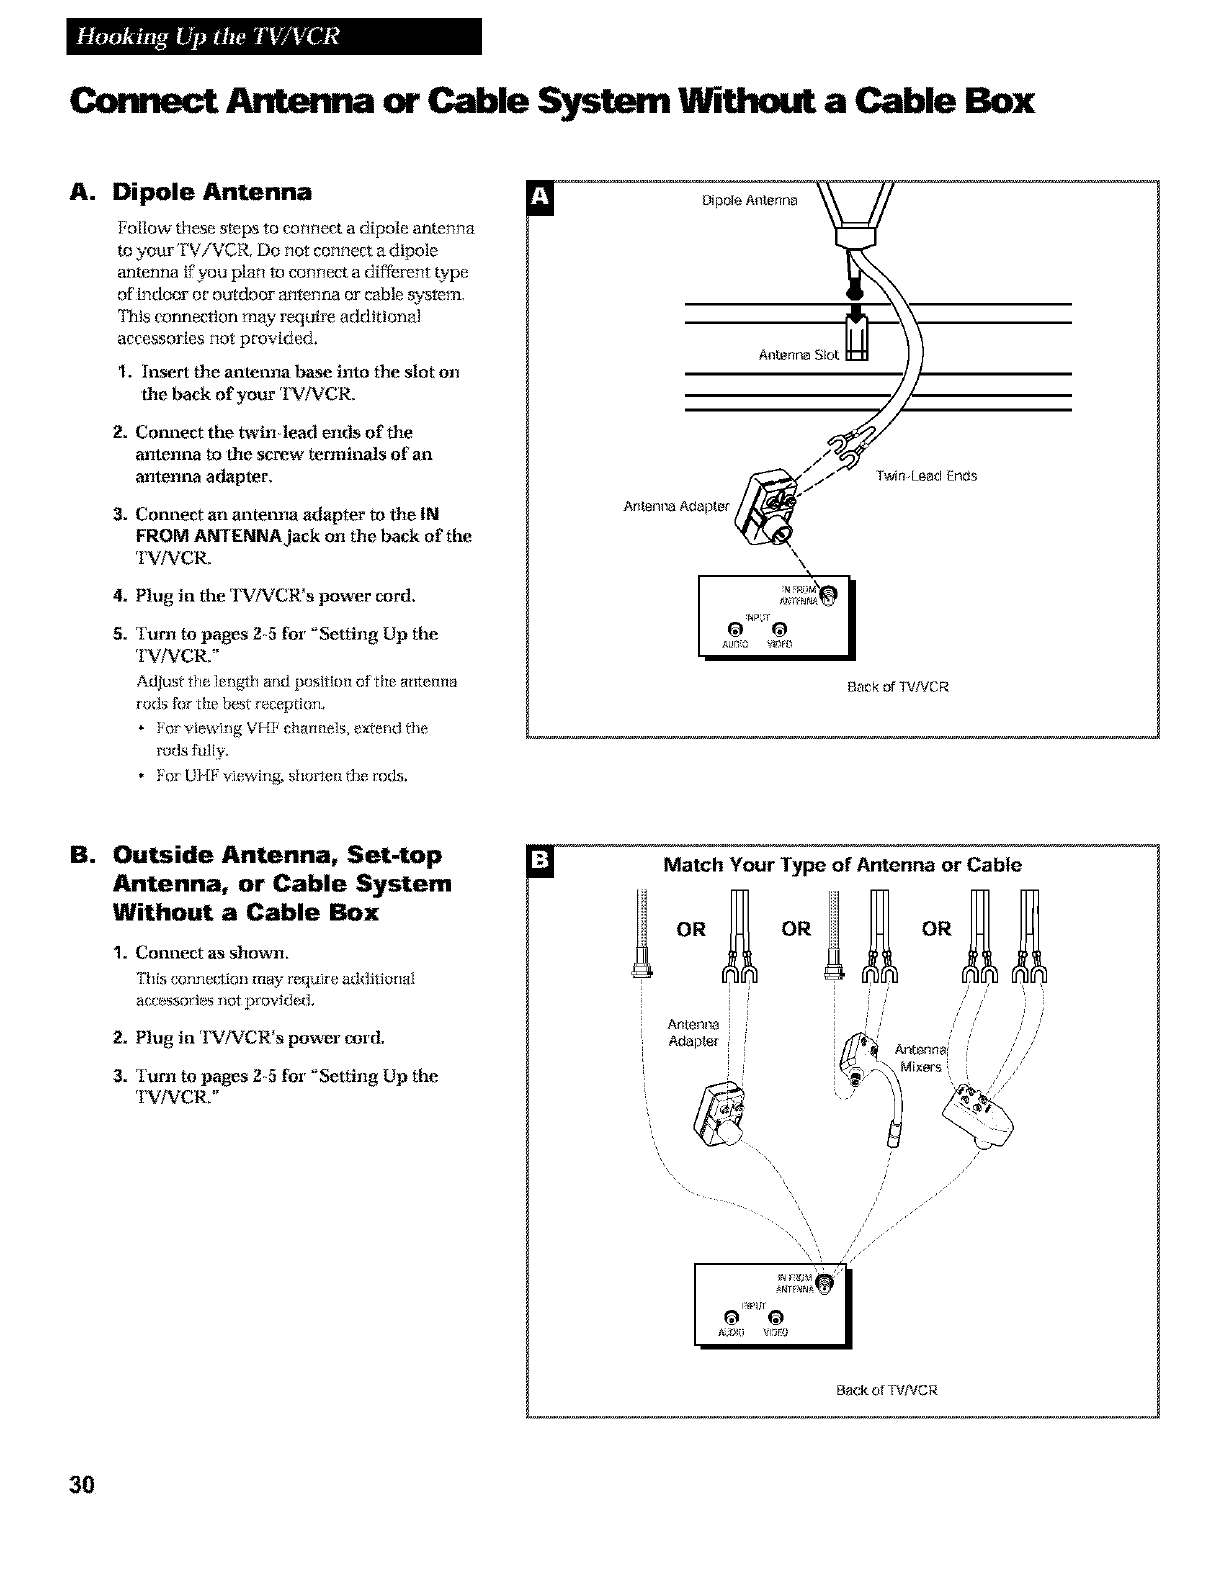
Connect Antmma or Cable System Without a Cable Box
A. Dipole Antenna
Follow these steps to connect a dipole antenna
m your TViVCR, Do not connect a dipole
antenna ffyou plan to connect a different t:ype
of indoor or outdoor antenna or cable system,
'INts connection mgy require additional
accessories not provided,
1, Insert the antenna base into the slot on
the back of your 'rv/_CR,
2. Connect the twin lead ends of the
ante_llla to the screw terminals of an
antenlla adapter.
3. Connect an anteima adapter to the IN
FROM ANTENNA jack on the back of the
'I'VP_*CR,
4. Plug in the 'DiIVCR'a power cord,
5. Turn to pages 25 for "Setting Up the
'I_iVCR."
Adjust/be ]erlgltl arid position of the antemm
rods for _lle best reception,
*For viewing VHF cham_els, extend the
rods fully.
* For UHF viewing, shorle_ the rods.
Dipole Antenna
Antenna Adapter
Twin Lead Ends
\\
AU2iO VID[O
Back of TV,_CR
B. Outside Antenna, Set-top
Antenna, or Cable System
Without a Cable Box
1. Connect as shown,
This connection ma N require additional
a(_sso_ies rlol provided.
2. Plug in 'I_]VCR'a power cord.
3. Turn to pages 25 for "Setting Up the
'I_iVCR,"
i
i
i
i
i
[
[
Match Your Type of Antenna or Cable
Back of TV/VCR
3O
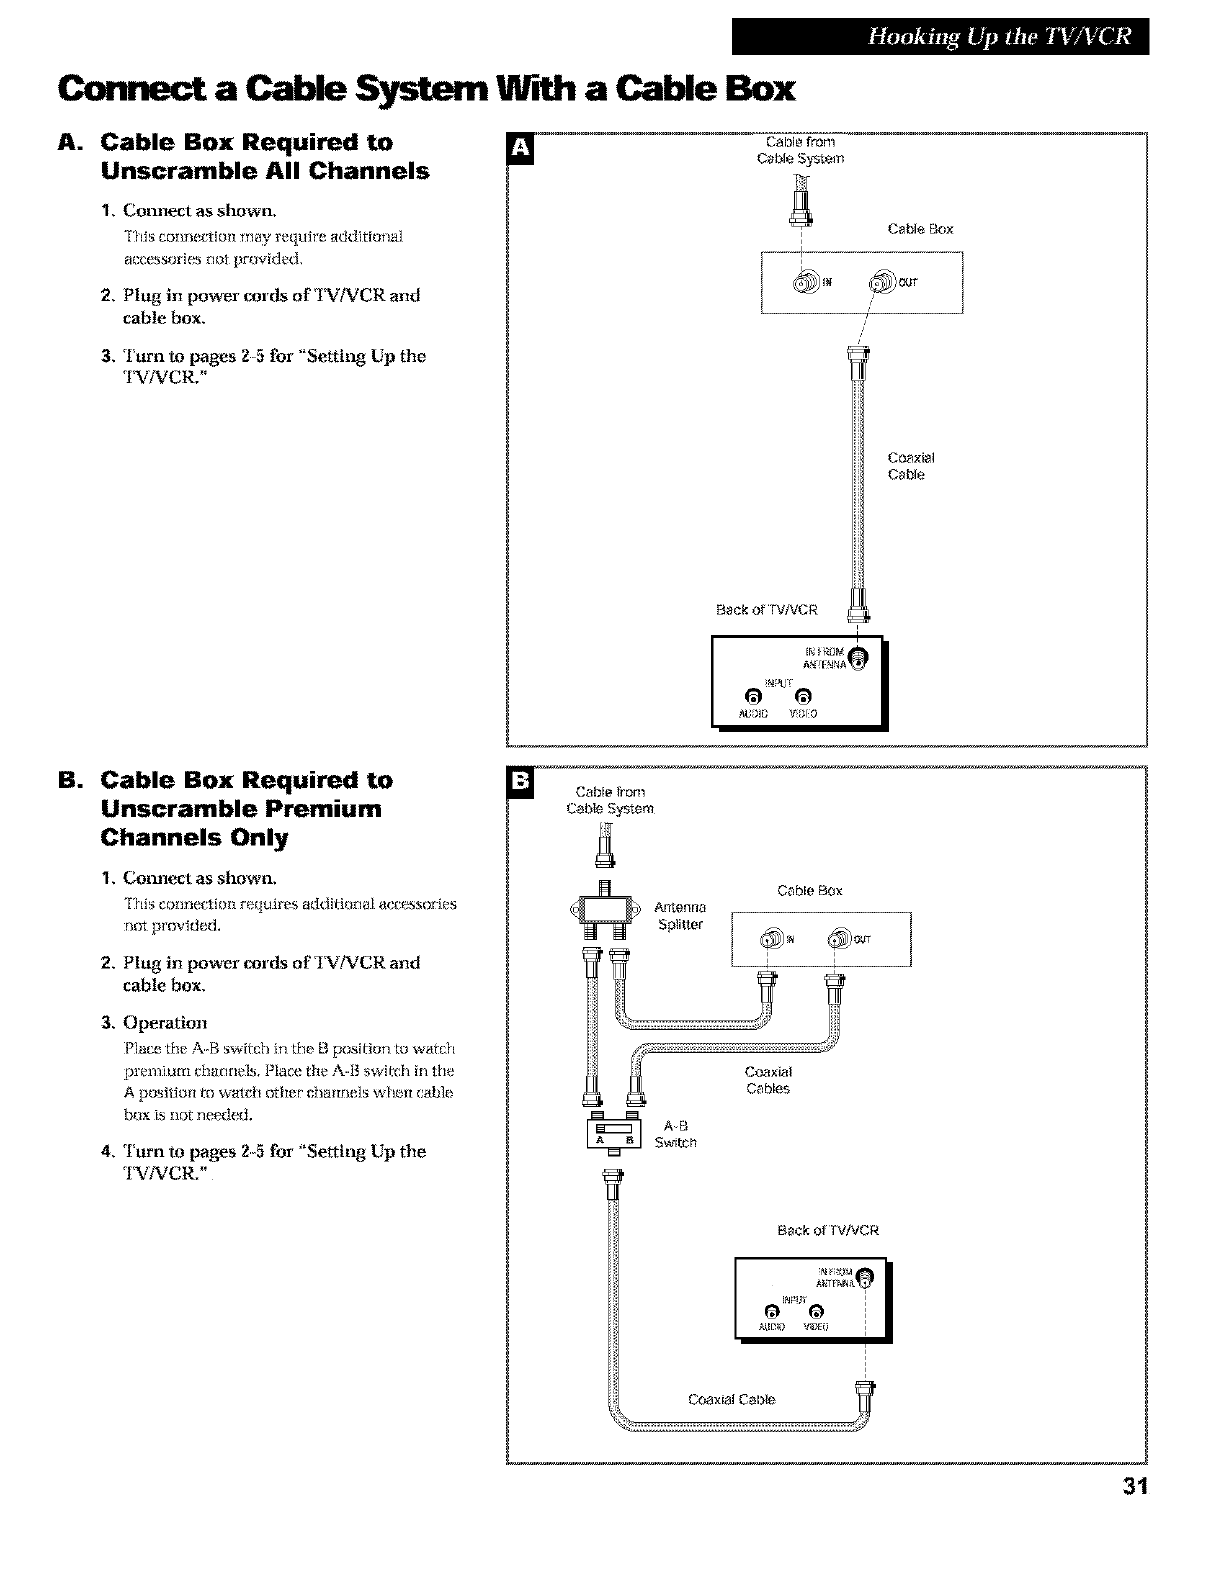
Connect a Cable System VtFd lla Cable Box
A. Cable Box Required to
Unscramble All Channels
I, Commct as shown.
Th_s co[_nectionmay re_uireaddit(onz_{
2. Plt_g in power cords of ]_]]VCR and
cable box.
3. 'I ttrn to pages 25 for "Setting Up the
,I,VcN_CR.,,
l_I CaI31efrom
Cable SysMm
Cable Rox
Coaxial
Cable
Back of fWVCR
B. Cable Box Required to
Unscramble Premium
Channels Only
1.
2.
Coll_]ect as shown,
T}ds connection rel]ubes additional ac{.essoMes
not provided.
Plttg in power cords of TVS_CR and
cable box.
3. Operation
Place the AB switch it, the B position to watch
pren{Jum {'hanr]e]s, Place _he AI_ switch in the
Aposition to watch other {iham_e]s _v[{e_ cable
box is not needed.
4. Tttrn to pages 25 for "Setting Up the
,I,VcN_CR.,,
:2 Cable item
Cable System
Cable Box
Antenna
_! COaxial
_ Cables
_ AB
Back of W/VCR
_I!BIO VI_Jf{i
I
1
31
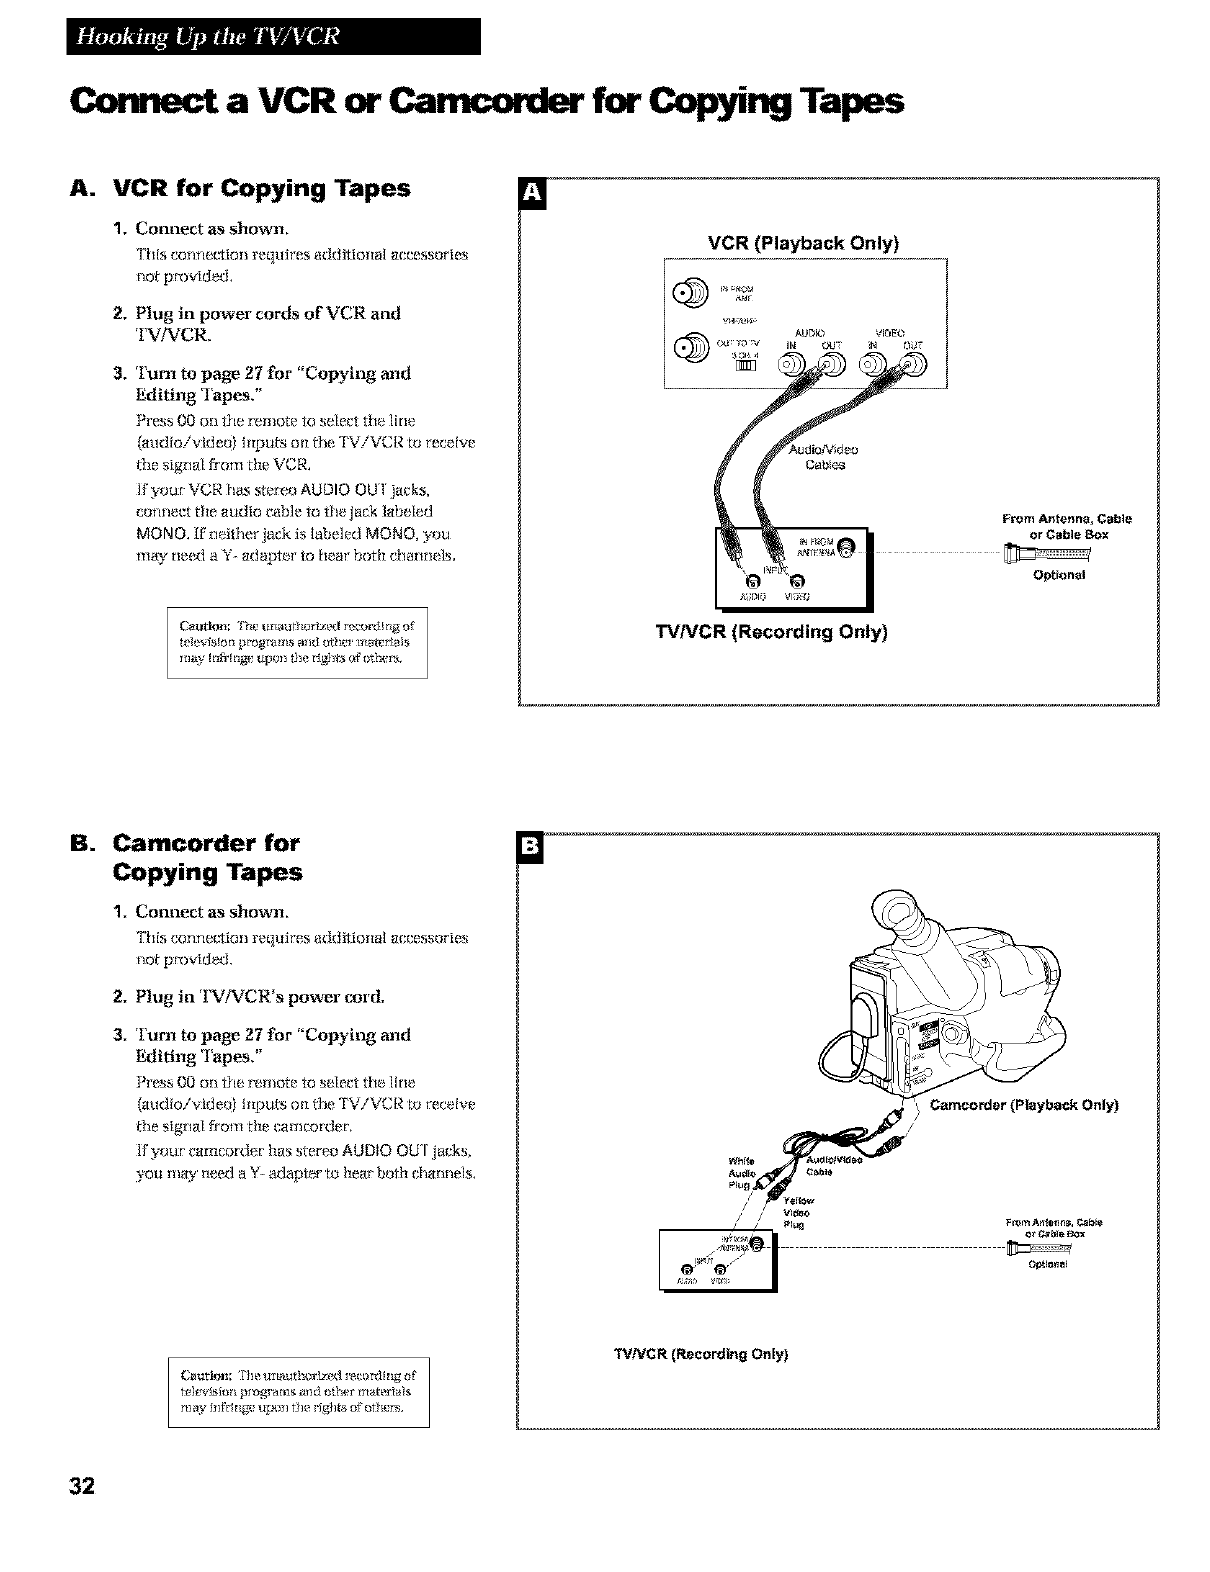
Connect a VCR or Camcorder for Copying Tapes
A. VCR for Copying Tapes
1, Connect as $tlowll,
'["[I[5cot _t_,Etiorl reqLlires add t[iona[ accessories
not provided.
2. Plug in powm' cords of VCR and
TVNCR.
3, Turn to page 27 for "Copying and
Editing Tapes,"
Press 00 (m the t_,more !o select the line
(audio/video) _iputs oil the TV/VCR to receive
the signal from tile VCR.
If _our VCR has sren-!o AUDIO OUI jacks,
connect tile audio cable to [hejack labeled
MONO. [f neither iack _s labeled MONO, _ou
may need a Y- adapter Io hear both channels.
tlq¢_'_slori pg_gg_ams an_l i;'r hf_r materials
yrl_ly In_lngf_ !Ilion tile t_g]l_ o_ I)thf_
VCR (Playback Only)
g_A!}_ AUD_ 1Vi_EQ
F_m Antet_na, C_ble
TVNCR (Recording Only)
B. Camcorder for
Copying Tapes
1, Connect as show_L
TIlls conn_,gtio rl reqLlires additional accessories
2. Plug ie_TV/_*CR's power cord.
3. Turn to page 27 for "Copying and
Editing Tapes,"
Press O0 cm the r_,more !o select the line
(audio/video) _iputs on the TV/VCR to receive
_-hesigilal from tile camcordec.
If _our camcorder has stereo AUDIO OU[ ja_iks,
_OIl 171111__ II_P,d _1 Y- _(]_pt(_ [O heKr IJoth IYhKr'ql_lS,
C_uflon: The !lruau Ihorkn_l iteco_ __g o_
[]
zl_lu_ F¢'l_mAnle_n_, P_bl_
Came;order(Playback Only)
W/VCR (Recording Only)
32
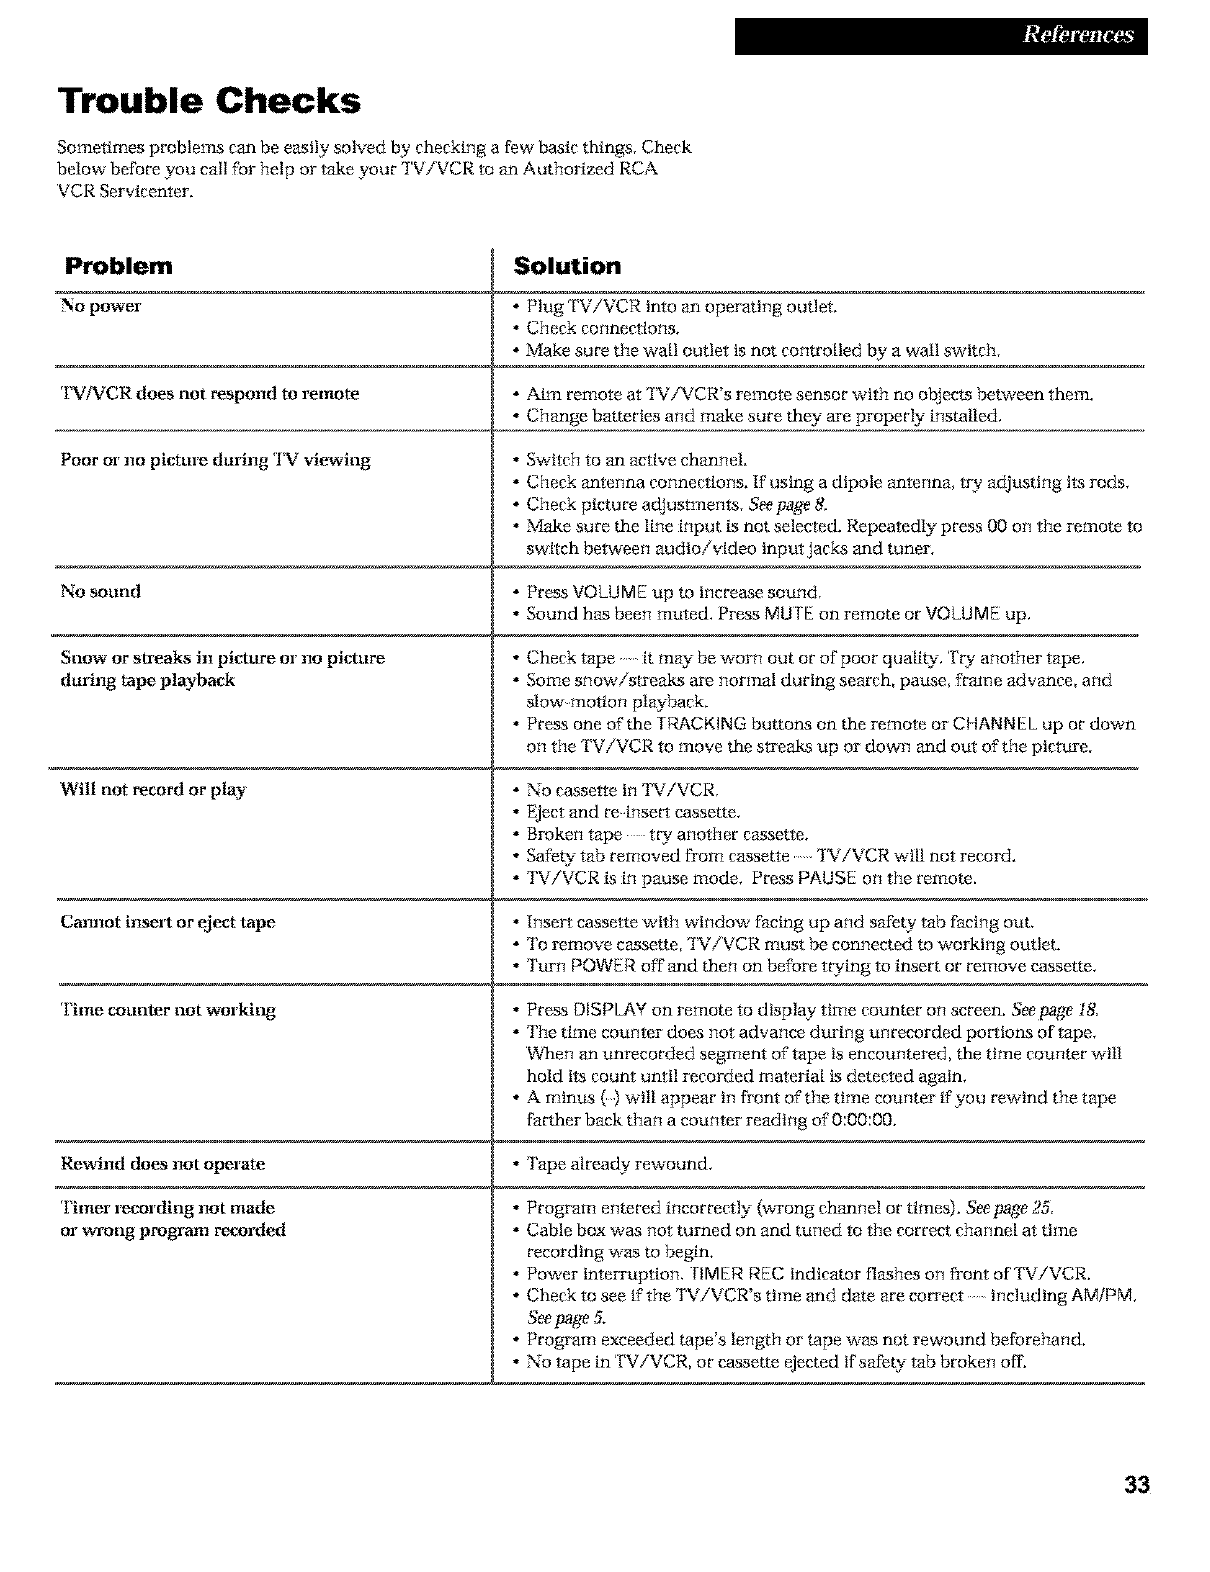
Trouble Checks
Sometimes problems can be easily solved by checking a few"basic things. Check
below"before you call for help or take your TViVCR to an Authorized RCA
VCR Servicenter.
Problem Solution
No power • Plug TV/VCR into an operating outlet.
• Check connections.
• Make sure the wall outlet is not controlled by a wall switch.
'I_!VCR does not respond to remote • Aim remote at TViVCR's remote sensor with no objects betwean them.
• Change batteries and make sure they are properly installed.
Poor or no picture during TV viewing * Switch to an active channel.
•Check antenna connections. If using a dipole antenna, try adjusting its rods.
•Check picture adjustmenrs. Seepage &
•Make sure the line input is not selected. Repeatedly press 00 on the remote to
switch between audio/video input jacks and tuner.
No sound • Press VOLUMEup to increase sound.
• Sound has been muted. Press MUtE on remote or VOLUME up.
Snow or streaks in picture or no picture • Check tape it may be worn out or of poor quality. TW aanther tape.
during t_pe playback • Some snow/streaks are normal during search, pause, frmne advance, and
slow motion playback.
• Press one of the If_ACKING buttons on the remote or CHANNELup or down
on the TV/VCR to move the streaks up or down and out of the pic_e.
Wil! not record or play • No cassette in TViVCR.
• Eject and re insert cassette.
• Broken tape try' another cassette.
•Safet 9 tab removed from cassette TViVCR wil! not record.
• TViVCR is in pause mode. Press PAUSE on the remote.
Cannot insert or eiect tape • Insert cassette with window facing up and safet_ytat) facing out.
• To remove cassette, TV/VCR must be connected to working outlet.
• Turn POWER off and then on before twing to insert or remove cassette.
'lime counter not working •Press DISPLAYon remote to display time counter on screen. Seepage 18.
•The time counter does not advance during unrecorded portions of tape.
When an unrecorded segment of tape is encountered, the time counter wil!
hold its count until recorded material is detected again.
• A minus _ ) will appear in front of the time counter if you rewind the tape
farther back than acounter reading of 0:00:00.
Rewind does not operate •Tape already rewound.
'Iimer recording not made
or wrong program recorded
" Program entered incorrectly (wrong channel or times). Seepage 2£
•Cable box was not turned on and tuned to the correct channel at time
recording was to begin.
• Power interruption. rIMER REC indicator flashes on front of'IN'iVCR.
• Check to see if tim TViVCR's time and date are cotTect including AM/PM.
Seepage £
•Program exceeded tape's length or tape was not rewound beforehand.
•No tape in TV/VCR, or cassette ejected if safe_ tab broken off.
33
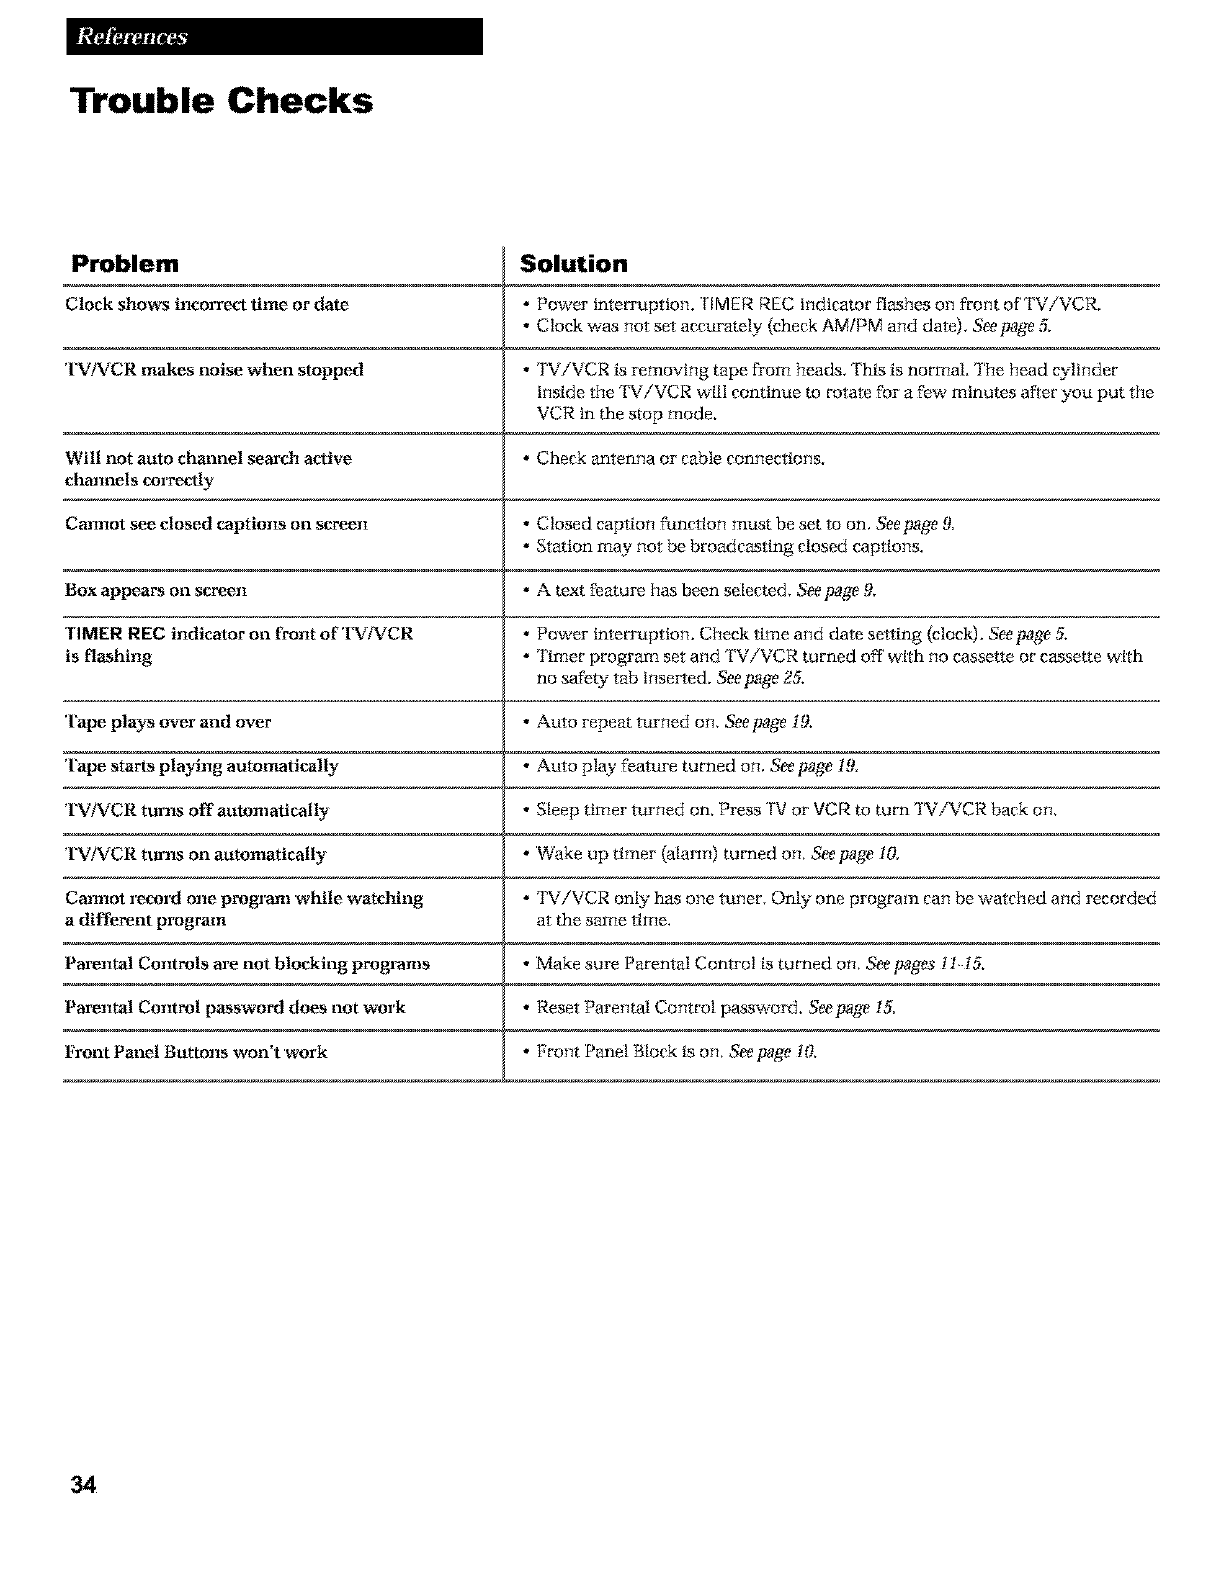
Trouble Checks
Problem Solution
Clock shows incolT_ time or date • Power interruption, TIMER REC indicator flashes on front of TV/VCR.
.' Clock was not set accxLrately (check AM/PM and date), Seepage 5.
TVIVCR makes noise when stopped *TViVCR is removing tape from head_, This is normal. The head c_linder
inside the 'I%'iVCR wiil continue to rotate for a few minutes alter you put the
VCR in the stop mode.
Wil! not attto channel search active * Check antenna or cable connections.
chamlels correctly
Cammt see closed captions on screen *Closed caption function must be set to on, Seepage 9
• Station may not be broadcasting closed captions.
Box appears on screen •A text feature has been selected, See page 9,
TIMER REC indicator on front of TViVCR * Power interruption. Check time and date setting (clock). See page 5,
is flashing •Timer program set and TV/VCR turned off with no cassette or cassette with
no safek_, tab tnseYred. &epage 25.
'rape plays over and over •Auto repeat turned on. See page 19.
'rape starts playing automatically • Auto play feature turned on. See page 19
TVNCR turns offautomafically • Sleep timer turned on. Press TV or VCR to turn TViVCR back on.
TVNCR tta'ns on atttomatically * Wake up timer (almm) turned on. See page 10.
Cammt record one pmgranl while watching •TViVCR on b has one tuner. O@ one program can be watched and recorded
a different program at the same time.
Parental Commls are not blocking programs • Make sum Parental Control is turned on. See pages 11 15.
Parenta! Control password does not work •Reset Parental Control password. Seepage 15.
Front Panel Buttons won't work * Front Panel Block is on, See page 10,
34
Cleaning the TVNCR
Turn offthe TV/VCR before cleaning.
You can clean the TV/VCR as required by using a soft cloth or the dusting
attachment of your vacuum cleaner. Be sure to occasionally vaccuum the
ventilation slots in the cabinet to help assure adequate ventilation.
To clean the TV/VCR screen, use a soft cloth dampened with a diluted soap
and water mixture. Do not use furniture polish on the 'l%'/VCR cabinet or screen.
While cLeaning, do not spray liquid directLy on the screen or allow liquid to
run down the sa'een or inside the 'I_NCR. Also, avoid placing oh'inks or
vases with water on top of the 'I_!VCR. This could increase the risk of flre.
shock hazard, or damage to the 'I_]VCR.
35
Limited Warranty
What your warranty covers:
A_ de_ in material or worMnanshtp.
For how long after your purchase:
NineW day_ for ;_¢r charges,
One _ar for par_.
Two years for picture tube.
_'be wa_anEv period for rental uni_ beans wt_ the first rental or 45 days from date of
shipment to the rental flrm_ whichever comes first,)
What we will do:
Pay any Authorized RCA VCR Service Center the labor charges to repair your
'rVtVCR.
Pay ar_y Authorized RCA VCR Service Center for the new or, at our option, rebuilt
replacement parts and picture tube required to repair your TV/VCR.
How you get service:
For screen sizes of 26" and smaller;
'rake your RCA 'I%_/VCR to any Authorized RCA VCR Service Center and pickup
when repairs are complete.
For screen sizes larger than 26":
Request home service from any Authorized RCA VCR Service Center, provided that
your TViVCR is located within the geographic tetTito W covered l_y an Authorized
RCA VCR Service Center. If not, you must take your TViVCR to the Service Center
location at your own expense, or pay for the cost the Service Center may charge to
transport your TViVCR to and from your home.
To identify your nearest Authorized RCA VCR Service Center, _sk your Dealer, look
in the Yellow" Pages, or cal! 18{103361900.
Show the Autlmrized Service Center Representative your sales receipt or other
evidence of pttrcEase date.
What your warranty does not cover:
Customer tns_on, _our Owner's Manual clearly describes how" to install _ust,
and operate your TViVCR. Any additional information should be obtained from
your Dealer.)
Installation and related adiustments.
Signal reception problems not caused by your 'YViVCR.
Damage from misuse or neglect.
Cleaning of video/audio head_.
Batteries.
A 'I%_iVCR that has been modified or incorporated into other product_ or is used for
institutional or other commeivial purposes.
Images burnt onto tee screen.
Acta of God, such as but not limited to lightning damage.
A TViVCR purchased or serviced outside the LISA.
Product Registration:
Please complete and mail the Produ_ Re_s_atton Card packed in with _ur set. It
w_l make. it easier to c¢_a_ _u shoed it ever be nece_a_. The return of the card is
not required for warranW coverage.
How state law relates to this warranty:
This warranty g_es _u specific legal rights_ and you also m_ have other righ_ that
va_ from state to _ate.
If you purchased your TV/VCR outside the United States:
This warranty- does not apply, C¢_a_ _ur dealer for warran_ informa_on,
36
Index
ADD/REMOVE CHANNELS Menu .............. 4
Adding Channels to Memory .................. 4
Adiusting the Picture ......................... 8
Adjusting Volume ........................... 5
Age based Ratings
Block ................................. 12
Defined ............................... i1
View. ................................. 13
Antenna Symtem, Connecting ................. 30
AUDIO/VIDEO IN Jacks ........ 23,24,25,27,28,29,32
AUTO CHANNEL SEARCH Menu .............. 4
Auto Play Feature ........................... 19
Auto Repeat Feature ......................... 19
Automatic Head Cleaner ..................... 22
Automatic "['racking ......................... 18
Back Panel Controls ......................... 29
Basic Recording ............................. 23
Batteries, Installing in Remote ................. 2
Blank Search Feature ........................ 21
BLANK SEARCH Serean ..................... 21
Block
Age-based Ratings ...................... 12
Content Themes ........................ 13
L,Tnrated Programs ...................... 15
Brite (Brightness) Function .................... 8
Buttons, Remote Control .................... 6,7
Csble System without Cable Box, Connecting ...30
Csble System with Cable Box, Connecting ...... 31
Cameorder, Connecting m TViVCR ........... 32
Captions, Closed ............................. 9
Cautions .................................... i
GUAm Buttons ............................. 5,6
Channel Memo:_y, Programming ............... 4
Channel, Selecting ........................... 5
Chart, Recording Speeds ..................... 22
Checking a Timer Recording ................. 2(3
Checking for Trouble ..................... 33,34
Choisissez une Langue ........................ 3
Choosing aHookup ......................... 29
Cleaning the TV/VCR ....................... 35
CLEAR Button ...................... 5,6,10,18,2(3
Clearing aTimer Recording .................. 26
Clock Setting (Setting Time and Date) ........... 5
CLOSED CAPTIONING Menu ................. 9
Closed Captions ............................. 9
Color Function ............................... 8
Comae(vial Scan ........................... 18
Commelvlal Skip ............................. 9
Connections
Antenna ............................... 30
Cable Symtem With Cable Box for
All Channel8 .......................... 31
Cable Symtem With Cable Box for
Premium Channels .................... 31
Cable Symtem With No Cable Box ......... 30
Camcorder to Copy-Tapes ............... 32
Choosing a Hookup ..................... 29
Dipole Antenna ........................ 30
VCR to Copy Tapes ..................... 32
Content Themes
Block ................................. 13
Defined ............................... i 1
View", ................................. i4
Contents .................................... 1
Contr (Contr&st) Function ..................... 8
Controls, Back Panel ......................... 29
Controls, Front Panel ........................ 28
Controls, Remote ........................... 6,7
Copying '['apes ........................... 27,32
Daily Programs, Recording ................... 25
Date, Setting ................................. 5
Dipole Antenna, Connecting .................. 30
DISPLAY Button ....................... 6,8,18,21
Displays, On-Screen .......................... 8
Editing '['apes ............................... 27
Electronic Program Indexing ................. 20
English Language ............................ 3
Escoje un Idtoma ............................. 3
Express Recording .......................... 24
Facto D Settings, Reset ........................ 8
Features, Playback ........................ 1721
Features, Recording ......................... 22
Features, TViVCR ......................... 8 i0
F.ADV (Frame Advance) Button ............. 6,17
FF (Fast Porward) Button ......... 6,17,20,21,27,28
First/rime Operation ....................... 2-5
French Language ............................ 3
Frame Advance ........................... 6,17
Front Panel Block ........................... l0
Front Panel Controls ........................ 28
Home Antenna System, Connecting ........... 30
Hookups
Antenna ............................... 30
Cable System With Cable Box for
All Channels .......................... 3i
Cable System With Csble Box for
Premium Channels .................... 31
Cable System With No Cable Box ......... 30
Camcorder to Copy- '['apes ............... 32
Dipole Antenna ........................ 30
VCR to Copy Tapes ..................... 32
Important Information ........................ i
Index Peature ............................... 20
Informstion, Impm±ant ........................ i
Language for Displays ........................ 3
LANG UAG E/IDIOMMLANG UE Menu ........... 3
Light huron ................................. 6
Limited Warranty ........................... 36
Location of Controls ...................... 28,29
Lock Parental Controls ....................... 15
LP Speed ................................... 22
Manual "['racking ............................ 18
MENU BuRon ..................... 36,810,19,25
Movie Rating Limits
Block ................................. 14
View". ................................. 15
MUTE Button ................................ 6
Note to Cable TV Installer ..................... i
37
Index
Number Buttons ............................. 7
On Screen Display_ .......................... 8
Operation
Express Record ......................... 24
Picture, Adjust .......................... 8
Play a '['ape ............................ i(3
Program Channel Memor3, ................ 4
Record a Program ...................... 23
Set the Sleep Timer ..................... i 0
Set the Time and Date (Clock) ............. 5
Set the Wake up Timer .................. l0
Timer Record .......................... 25
Parental Controls ......................... li i5
PAUSE Button ....................... 7,17,22,27
Pause During Playback ...................... 17
Pause During Recording ..................... 22
Picture, Adjusting ............................ 8
PICTURE QUAU [Y Menu ..................... 8
Picture, Reset to Facto W Settings ............... 8
Picture Search .............................. 17
Picture Settings .............................. 8
PLAY Button .............................. 7,28
Playback
Auto Play ............................. 19
Blank Search .......................... 21
Commercial Scan ....................... 18
Features ............................ 1721
Index ................................. 20
Pause ................................. 17
Play a '['ape ............................ 16
Repeat ................................ 19
Zero .................................. 21
POWER Button and Indicator ................ 28
PREV (Previous Channel) Butmn ............... 7
Problem Solving .......................... 33,34
Programming Channel Memor3, ............... 4
Rating Limits
TV ................................. 1214
Movie .............................. 14 15
REC (Record) gutmn and Indicaor ..... 7,23,24,27
Recording
Basic .................................. 23
Express ............................... 24
Features ............................... 22
Pause ................................. 22
Speeds and Chart ....................... 22
Timer ................................. 25
Remote Batteries, Installing .................... 2
Remote Control Butmns ..................... 6,7
Remote Sensor .............................. 26
Removing Channels from Memory ............. 4
RESET Button ............................. 7,10
Resetting Picture to Factor3* Settings ............ 8
REW (Rewind) Button ...................... 7,28
Safe,WTab .......................... i6,23,24,25
Scan and Play Index Feature .................. 20
Scan, Commercial ........................... 18
SEARCH
Blank ................................. 2i
Index ................................. 20
Picture ................................ 17
Zero .................................. 21
Selecting aChannel .......................... 5
Selecting a Language for Displays .............. 3
Sensor, Remote ............................. 28
Setting
a Timer Recording ...................... 25
an Express Recording ................... 24
Rating Limim ........................ 1115
the Clock ............................... 5
the Date ................................ 5
the Time ................................ 5
Up the TV/VCR ....................... 25
Sharp (Shaipness) Function ................... 8
Signal ty>e .................................. 4
SKIP/SEARCH Button ............... 7,9,i8,20,21
SLEEP Button ............................... 7
Sleep Timer ................................ 10
SLP Speed ................................. 22
Solving Problems ......................... ::13,34
SP Speed ................................... 22
Spanish Language ............................ 3
SPEED ffape Speed) Button ................... 7
Speeds, Recording .......................... 22
STOP Button .............................. 7,28
STOP/EJECT Button ................. 16,23,24,28
Stopping aTimer Recording .................. 26
Stopping Express Recording .................. 24
Tab, Safe,W.......................... 16,23,24,25
Table of Contents ............................ i
'['ape, How m Play .......................... 16
'['apes, Copying ............................. 27
'['apes, Editing .............................. 27
Text Mode, Closed Captioning ................. 9
Time Counter ............................ i8,22
TIME Menu ............................... 5,10
Time, Setting ................................ 5
TIMER REC Indicator ................... 24,25,28
Timer Recording
Checking .............................. 26
Clearing ............................... 26
Setting ................................ 25
Stopping .............................. 26
Tint Function ................................ 8
Tf_AC KING Buttons ........................ 7,16
Tracking, Automatic ......................... 18
Tracking, Manual ........................... 18
Trouble Checks .......................... 33,34
Turn on TV/VCR ............................ 3
TV Rating Limim
Block ................................. i2
Setting ................................ i2
View, ................................. 13
38
Index
1V/VCR MAIN MENU ..... 3,4,5,9,10,19,22,2325,26
TViVCR Setup ............................. 25
'T}'pes of Recordings ......................... 22
Unlock Parental Controls .................... 15
Unrated Programs, Block/View. .............. 15
VChip
Defined ............................... 1i
Movie Ratings ....................... i415
TV Ratings .......................... i214
Unrated Programs ...................... 15
VCR, Connecting to TViVCR ................. 32
VIDEO/AUD!O INJacks .......... 24,25,27,28,29,30
VOL (Voiumej Buttons ..................... 7,26
Volume, Adjusting ........................... 5
WAKE-UP Indicator ....................... i0,28
WAKE-UP Timer ............................ 10
Warnings .................................... i
Warranty, Limited .......................... 36
Weekdays (M-F), Recording .................. 25
Weekly Program, Recording .................. 25
ZERO SEARCH Screen ....................... 21
39
For your nearest Authorized Servicenter
call tel! free in the USA.
1800-3361900
Canadian Consumers .....
Your toll free numbers are:
English: i800-522-0338
French: 1800-522-0445
If your product needs service, please contact your dealer or
the nearest servicenter from the Yellow"Pages. Please do not
send any products to the Indianapolis address listed in this
manual or on the carton. 'IRis will only add delays in service
for your product.
le_]HOMSON CONSUMER ELECTRONICS
10330 N Meridian Street
Indianapolis, IN 46290
g'_L999 ]'homsen Consumer Electronics, _ne,
l'radmnarkfs't ® Regi_e*xal
Mates(}) Re_strada(s}
I_ted in Thailand.
15392160
