RCA Direct View Digital 27 To 40 TV Manual L0310132
User Manual: RCA RCA Direct View Digital 27 to 40 TV Manual RCA Direct View Digital 27 to 40 TV Owner's Manual, RCA Direct View Digital 27 to 40 TV installation guides
Open the PDF directly: View PDF ![]() .
.
Page Count: 64

mmpottant mnfotmation
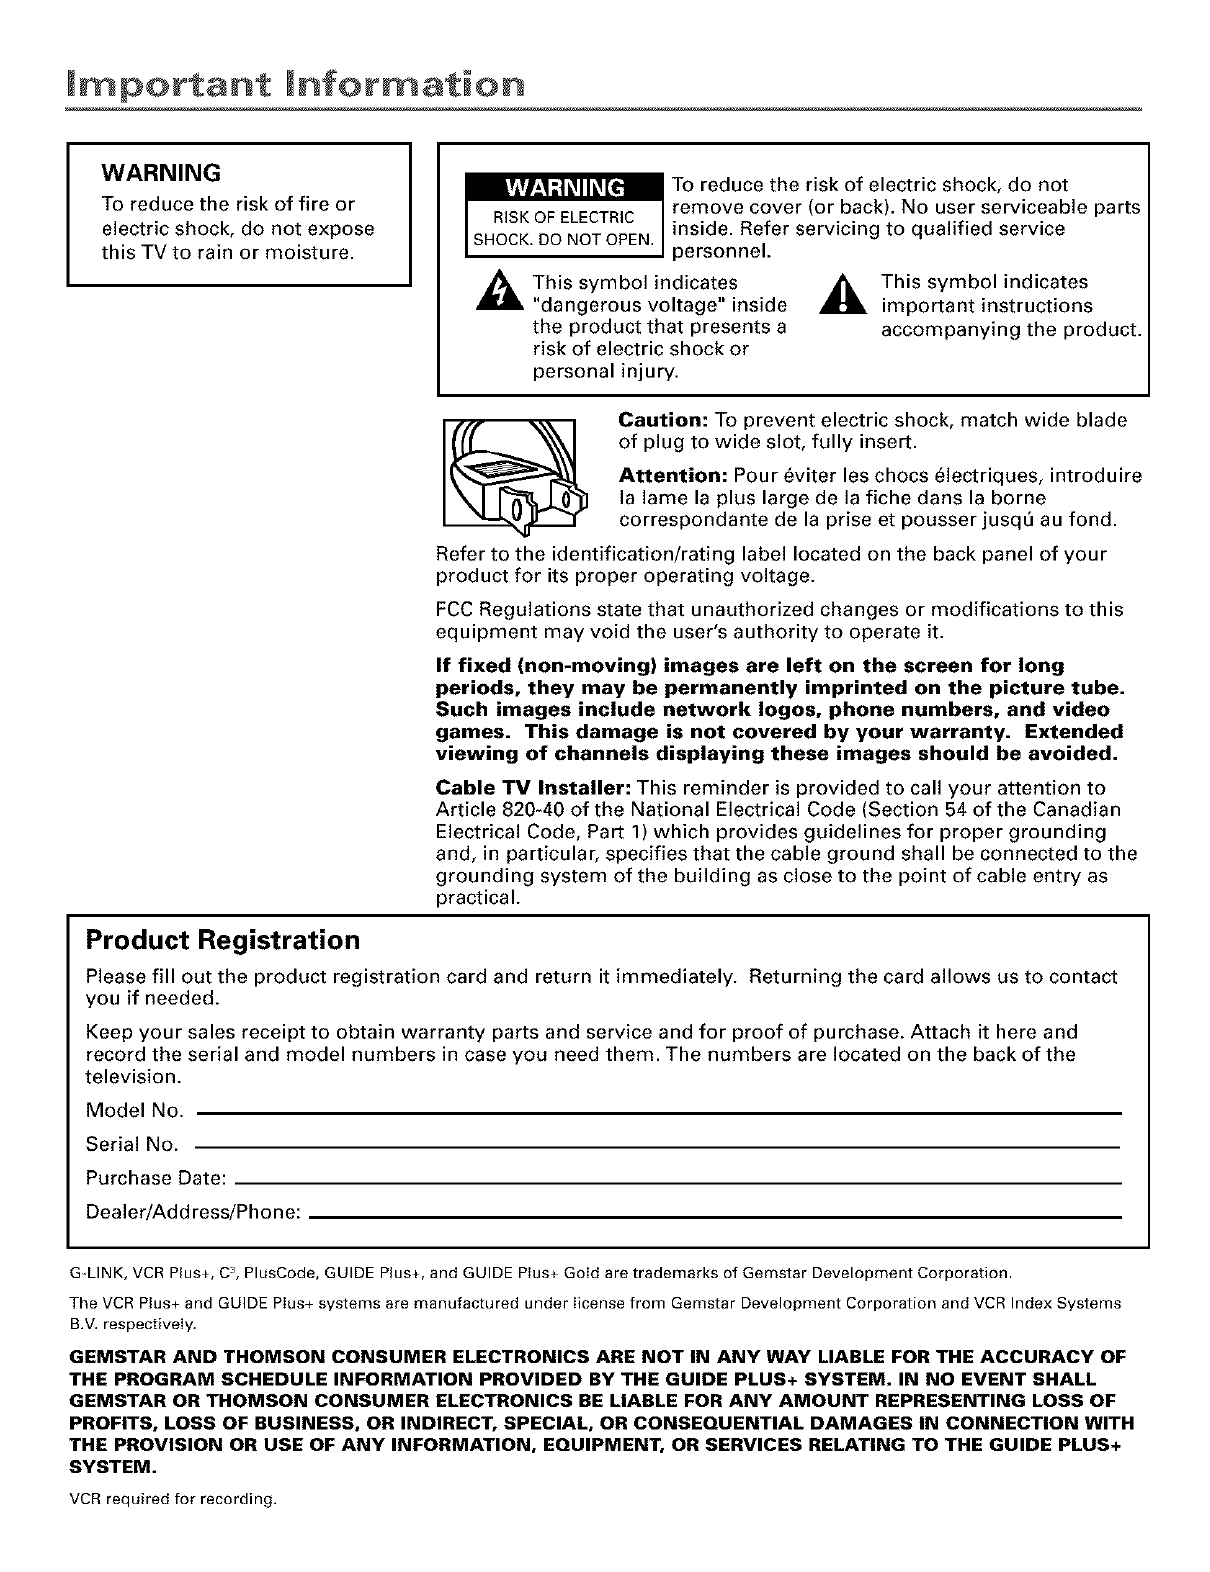
WARNING
To reduce the risk of fire or
electric shock, do not expose
this TV to rain or moisture.
_ °reducetvher r(ioSkb)fe/_c_jroC:she°rCked?cn°l_leparts
inside. Refer servicing to qualified service
personnel.
_This symbol indicates ,_ This symbol indicates
"dangerous voltage" inside important instructions
the product that presents a accompanying the product.
risk of electric shock or
personal injury.
Caution: To prevent electric shock, match wide blade
of plug to wide slot, fully insert.
Attention: Pour eviter les chocs _lectriques, introduire
la lame la plus large de la fiche dans la borne
correspondante de la prise et pousser jusq_ au fond.
Refer to the identification/rating label located on the back panel of your
product for its proper operating voltage.
FCC Regulations state that unauthorized changes or modifications to this
equipment may void the user's authority to operate it.
If fixed (non-moving) images are left on the screen for long
periods, they may be permanently imprinted on the picture tube.
Such images include network loges, phone numbers, and video
games. This damage is not covered by your warranty. Extended
viewing of channels displaying these images should be avoided.
Cable TV Installer: This reminder is provided to call your attention to
Article 820-40 of the National Electrical Code (Section 54 of the Canadian
Electrical Code, Part 1) which provides guidelines for proper grounding
and, in particular, specifies that the cable ground shall be connected to the
grounding system of the building as close to the point of cable entry as
practical.
Product Registration
Please fill out the product registration card and return it immediately. Returning the card allows us to contact
you if needed.
Keep your sales receipt to obtain warranty parts and service and for proof of purchase. Attach it here and
record the serial and model numbers in case you need them. The numbers are located on the back of the
television.
Model No.
Serial No.
Purchase Date:
Dealer/Address/Phone:
G-LINK, VCR Plus+, C3, PlusCode, GUIDE Plus+, and GUIDE Plus+ Gold are trademarks of Gemstar Development Corporation.
The VCR Plus+ and GUIDE Plus+ systems are manufactured under Iicense from Gemstar Development Corporation and VCR Index Systems
B.V. respectively.
GEMSTAR AND THOMSON CONSUMER ELECTRONICS ARE NOT IN ANY WAY LIABLE FOR THE ACCURACY OF
THE PROGRAM SCHEDULE INFORMATION PROVIDED BY THE GUIDE PLUS+ SYSTEM. IN NO EVENT SHALL
GEMSTAR OR THOMSON CONSUMER ELECTRONICS BE LIABLE FOR ANY AMOUNT REPRESENTING LOSS OF
PROFITS, LOSS OF BUSINESS, OR INDIRECT, SPECIAL, OR CONSEQUENTIAL DAMAGES IN CONNECTION WITH
THE PROVISION OR USE OF ANY INFORMATION, EQUIPMENT, OR SERVICES RELATING TO THE GUIDE PLUS+
SYSTEM.
VCR required for recording.
Key Features Overview
Your TV is equipped with f;eatnres that will add m your TV viewing experience. The fiMlowing
infbrmation summarizes a few of these features. Chapter 3 provides more infbrmation about the
rest of the TV's fi.atures and how to use them.
On-screen Program Guide
Description: The GUIDE Plus+ system is an on-screen interactive list of
programs and infbrmation that is buih into your TV. You can scroll through
the guide to see what's on and tune direcdy to that program from the guide.
You can also browse programs by categol T with the sort [i,ature.
When you access the New._ t_ature, MSNBC will appear in your video window
if it's avaihtble through your TV.
Oneqk_uch VCR Recording is another benefit of the GUIDE Plus+ system. You
don't have to remember to program your VCR or use the menus in your VCR
to set tip a recording.
Requirements:
• Remove the Demo Pin t_om the G-LINK jack.
• Complete the on-screen interactive setup. You'll find detailed instructions
in Chapter 1.
• One-Touch VCR Recording: You must connect the G-LINK cable to the TV
and place one of the wands in front of the remote sensor on the VCR.
• If you have a cable box, connect the G-LINK cable to the TV and place
one of the wands in fi'ont of the remote sensor on the cable box.
V-Chip: Parental Controls
Description: You can block programs and movies hy content, age-based
ratings, and/or movie ratings.
Requirements:
• SetuptheParemlalCor_lrohmenuintheTV'smainmenu (Chapter 3
has details).
• The broadcasters must use the rating system when they send the program
m your TV in order for your TV m block the program.
1
Auto Tuning
Description: Allows you to set up the TV to automatically tune to a specific
channel when you press a certain component (VCR, DVD Playe_, etc.) button on
the remote.
Requirements: Set up Auto Tur6ngin the TV's menu system. (Chapwr 3
has details).
2

Table of Contents
Introduction: Key Features Overview .................................................... 1
On-screen Program Guide ........................................................................................ 1
V-Chip: Parental Controls .......................................................................................... 1
Auto Tuning ................................................................................................................ 2
Chapter 1: Connections & Setup ............................................................ 5
Things to Consider Before You Connect ........................................................................
Protect Against Power Surges ..................................................................................
Protect Components from Overheating ...................................................................
Position Cables Properly to Avoid Audio Interference ...........................................
Important Stand and Base Safety Information .......................................................
Use Indirect Light .......................................................................................................
Connection Pictures ...................................................................................................
Demo Pin ....................................................................................................................
Choose Your Connection ................................................................................................. 7
Connection: TV + VCR ..................................................................................................... 8
Connection: TV Only ........................................................................................................ 9
Connection: TV + VCR + Satellite Receiver ................................................................. 11
Jacks on the Back of Your TV ....................................................................................... 12
Why You Should Connect This G-LINK Cable ............................................................. 13
How to Find the Remote Sensor ............................................................................ 13
Placing the G-LINK Wands ...................................................................................... 13
Complete Auto Channel Search ............................................................................. 15
The GUIDE Plus+ System Setup ............................................................................. 15
Complete the Interactive Setup .................................................................................... 15
Set the Menu Language .......................................................................................... 15
What to Expect ............................................................................................................... 20
Next Steps ...................................................................................................................... 20
Chapter 2: Using the Remote Control .................................................. 21
The Buttons on the Remote Control ............................................................................ 22
Using the WHO,INPUT Button ................................................................................ 23
Programming the Remote to Operate Other Components ....................................... 24
Find Out If You Need to Program the Remote ....................................................... 24
How to Program the Remote .................................................................................. 24
How to Use the Remote After You've Programmed It ............................................... 25
Chapter 3: Using the TV's Features ...................................................... 27
About the GUIDE Plus+ System ................................................................................... 28
Downloading Data ................................................................................................... 28
Getting In & Out of the GUIDE Plus+ System ........................................................ 29
The GUIDE Plus+ System Menus ........................................................................... 29
Grid Guide ................................................................................................................ 29
Sort ........................................................................................................................... 31
News ......................................................................................................................... 32
Schedule ................................................................................................................... 32
Messages .................................................................................................................. 33
Channels ................................................................................................................... 34
3
Table of Contents
Setup ......................................................................................................................... 34
How to Get More Information About an Advertisement or a Program ............... 35
GUIDE Plus+ Menu Items .............................................................................................. 35
Channel Banner .............................................................................................................. 36
Why You Should Use the Auto Tuning Feature .......................................................... 36
How to Set Up the Auto Tuning Feature ................................................................ 36
Parental Controls and V-Chip ........................................................................................ 38
How V-Chip Works ................................................................................................... 38
V-Chip TV Rating Limit ............................................................................................ 39
Blocking Specific Content Themes ......................................................................... 42
Viewing Specific Content Themes .......................................................................... 43
V-Chip Movie Rating Limit ...................................................................................... 43
V-Chip Unrated Program Block ............................................................................... 45
Channel Block .......................................................................................................... 45
Front Panel Block ..................................................................................................... 45
Lock!Unlock Parental Controls ................................................................................ 46
Chapter 4: Using the TV's Menu System ............................................. 47
How to Use Your TV's Menu System ........................................................................... 48
Audio Menu .................................................................................................................... 49
Picture Quality Menu ..................................................................................................... 49
Screen Menu ................................................................................................................... 50
Using Closed Captioning ............................................................................................... 51
Channel Menu ................................................................................................................ 52
Time Menu ...................................................................................................................... 52
Chapter 5: Other Information ................................................................ 53
Troubleshooting ............................................................................................................. 54
Care and Cleaning .......................................................................................................... 57
Front Panel Buttons ....................................................................................................... 57
GE TV Limited Warranty ............................................................................................... 58
4

Connections & Setup
Chapter Overview:
• Things to Consider Before You Connect
•Choose Your Connection
•Connections
•Jacks on the Back of Your TV
•Why You Should Connect This G-LINK Cable
•Plug in theTV
•Put Batteries in the Remote
•How to Use the Remote Control to Complete the
Interactive Setup
•Turn on the TV
•Complete the Interactive
Setup
Connections & Setup
Things to Consider Before You Connect
Protect Against Power Surges
• Connect all components before you plug any of their power cords into the wall outlet.
• Turn off the TV and/or component befbre you connect or disconnect any cables.
• Make sure all anwnnas and cables are properly grounded. Ref_,r to the Important
Sat_,guards sheet packed with your TV.
Protect Components from Overheating
• Don't block ventilation holes on any of the components. Arrange the components so that
air can circulaw fi-eely.
• Don't stuck components.
• When you place components in a stand, make sure you allow adequate ventilation.
• If you connect an audio receiver or amplifim; place it on the top shelf so the heawd air
from it won't flow around other components.
Position Cables Properly to Avoid Audio Interference
• Insert each cable firmly into the designawd.jack.
• If you place components above the TV, route all cables down the side of the back of the TV
instead of straight down the middle of the back of the TV.
• If your antenna uses 300-ohm twin lead cables, do not coil the cables. Also, keep the twin
lead cables away fi'om audio/video cables.
Important Stand and Base Safety Information
Choose the location fbr your TV carefully. Place the TV on a stand or base that is of adequate
size and strength m prevent the TV from being accidentally tipped ove_, pushed off; or pulled
off This could cause personal injury and/or damage the TV. Refi.r m the Important Sail.guards
sheet packed with your TV.
Use Indirect Light
Don't place the TV where sunlight or room lighting will be direcwd toward the screen. Use sof_
or indirect lighting.
Connection Pictures
Audio/video cables are usually bundled togethm: For better visibility, the connection pictures
in this book show" each cable separawly (audio lefL audio right, and video).
Demo Pin
You must remove the Demo Pin from the G-LINK jack on the back of your TV in order for your TV to
operaw properly and to connect the (;-LINK cable.
6Chapter I

Connections & Setup
Choose Your Connection
There are several ways to conlloct your WV.Please use the following chart to determine which
connection is best fbr you. Proceed to the appropriate page and connect your TV.
Components Cables
Needed
Coaxial
Audio/video
G-LINK cable
Coaxial
Coaxial
Audio/video
G-LINK cable
Connection
"title
TV + VCR
TV Only
TV + VCR +
Satellite Receiver
page 8
page 9
pages 10-11
Cables Needed to Connect Components to Your TV
The pictures below are the cables needed fbr the connections represented in this book.
Notes:A udb/V #leo_rd_ (A/V_zd_ /imstu_ I)arem_udly.s_hlasa l_rulMl _el,bta lh_
_z,r,ru,,*_,r,patur _ir, lhi_lxxkshmecuh*dde_x_My/iJrl_£ib_,
l@a_ekx_eIlu,(_lJJ\_*_d_.(y' _._lklql)Ju_n)wu9 eg_llir(_,recu_lo_u/Owltr7V .Ytntru_llo
_mrwz_lh*_,_ddeloy_no-TV ,a,_l>)'_mrVCarmd/or_zd_lelx_xinor dewfi_rgdlg_h{/e_*tur e_q'
G-LINK cable Audio/Video cables Coaxial cable
Cennectiens & Setup
TV(backpanel)
VIDEO RAlJfllO L IR
IN FROMANTCH3_ "_
OUT
FromCable
or Antenna
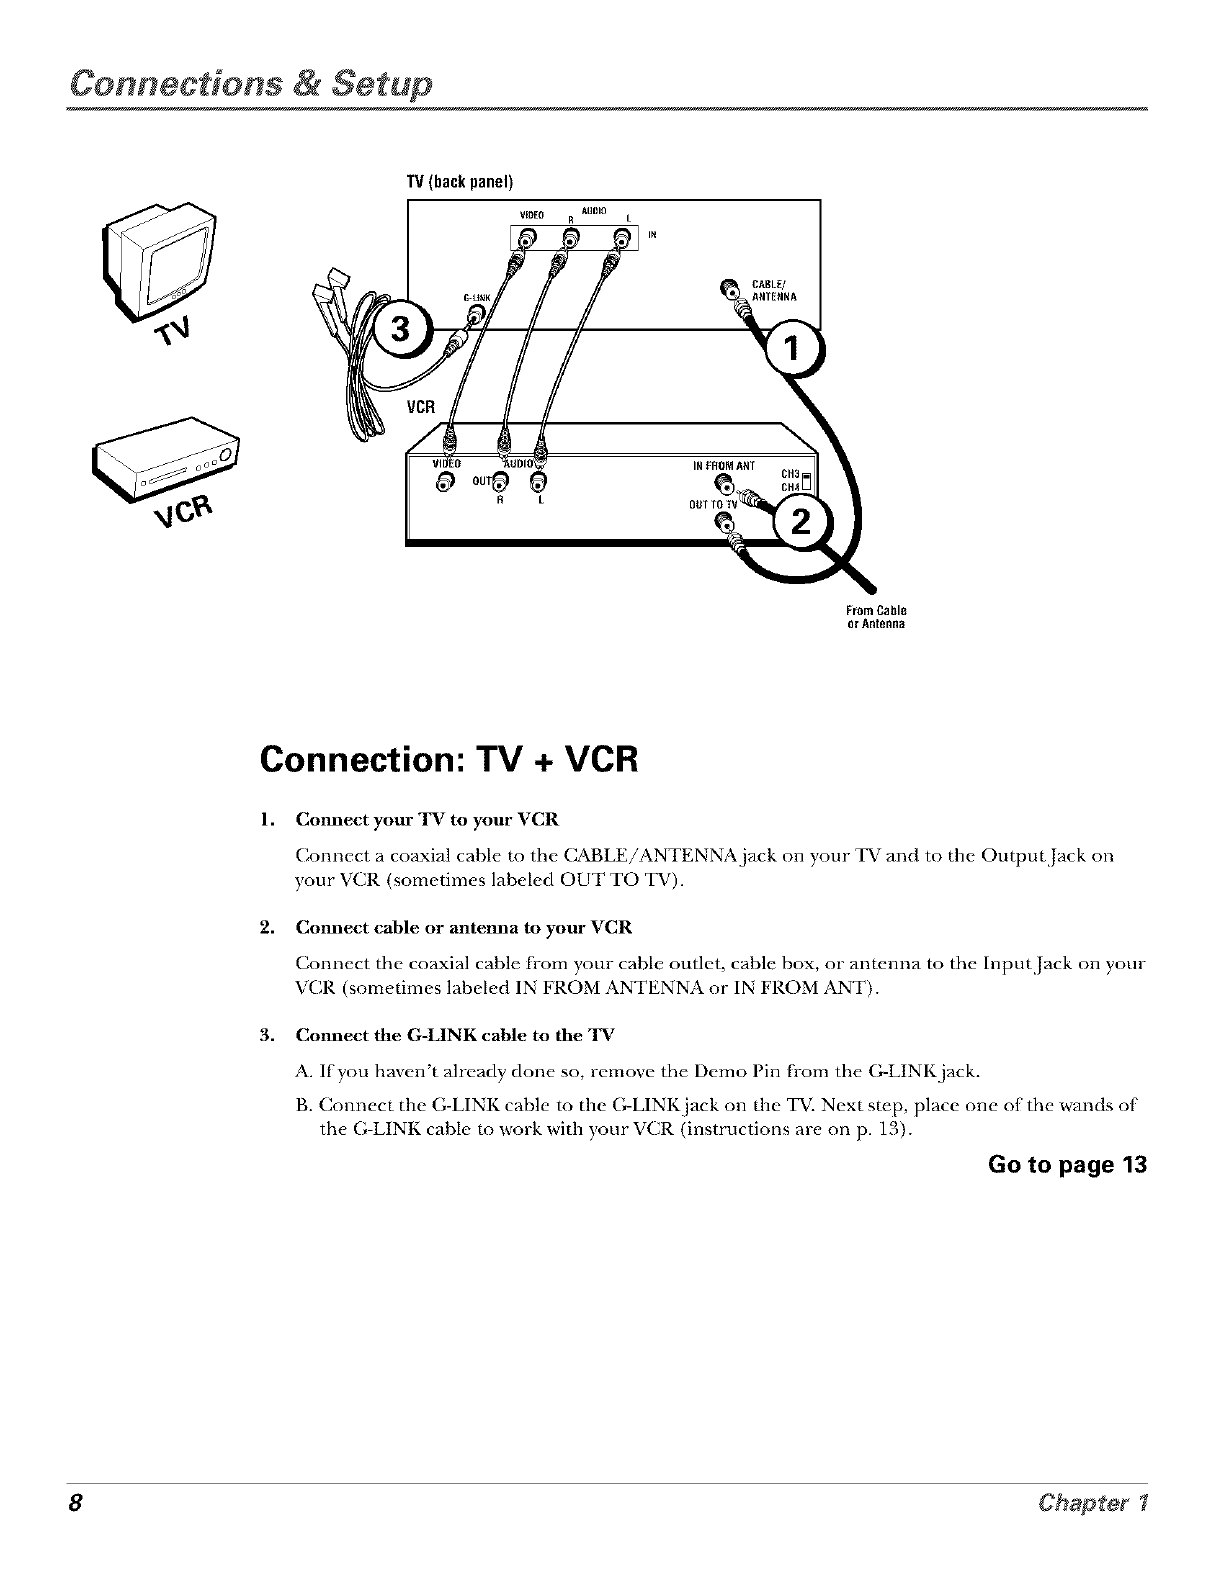
Connection: TV + VCR
1,
2,
Cmmect your TV to your VCR
TT T
Connect a coaxial cable to the CABLE/ANTENNA jack on ),our T_ mid to the Output Jack on
your VCR (sometimes labeled OUT TO TV).
Commct cable or antemla to your VCR
Connect the coaxial cable J[i-omyour cable outlet, cable box, or antenna to the Input Jack on your
Tv
'VCR (sometimes labeled IN FROM ANTENNA or IN FROM ANT).
3. Connect the G-LINK cable to the TV
A. If you haven't already done so, remove the Demo Pin from the G-LINK jack.
B. Connect the G-LINK cable m the G-LINK jack on the TV. Next step, place one of the wands of
the G-LINK cable to work with your VCR (instructions are on p. 13).
Go to page 13
8Chapter

Connections & Setup
TV (back panel)
VIDEO RAUDIO L
FromCable,
CableBox,
or Antenna
Connection: TV Only
1,
2,
Comzect the TV to your cable or antemza
Connect the coaxiM c_Jble fi'om your c_Jble or antenna to the (_BLE/ANTENNA.j_/ck on the
back of your TV.
Go to page 14
If you're connecting a cable box, connect the G-LINK cable
A. If you haven't Mre_Jdy done so, remove the Demo Pin fi'om the G-LINK jack.
B. Connect the G-LINK cable m the G-LINK jack on the TV. Next step, place the wands of the
G-LINK cable m the cable box (instructions are on p. 13).
Go to page 13
Chapter l9
Cennectiens & Setup
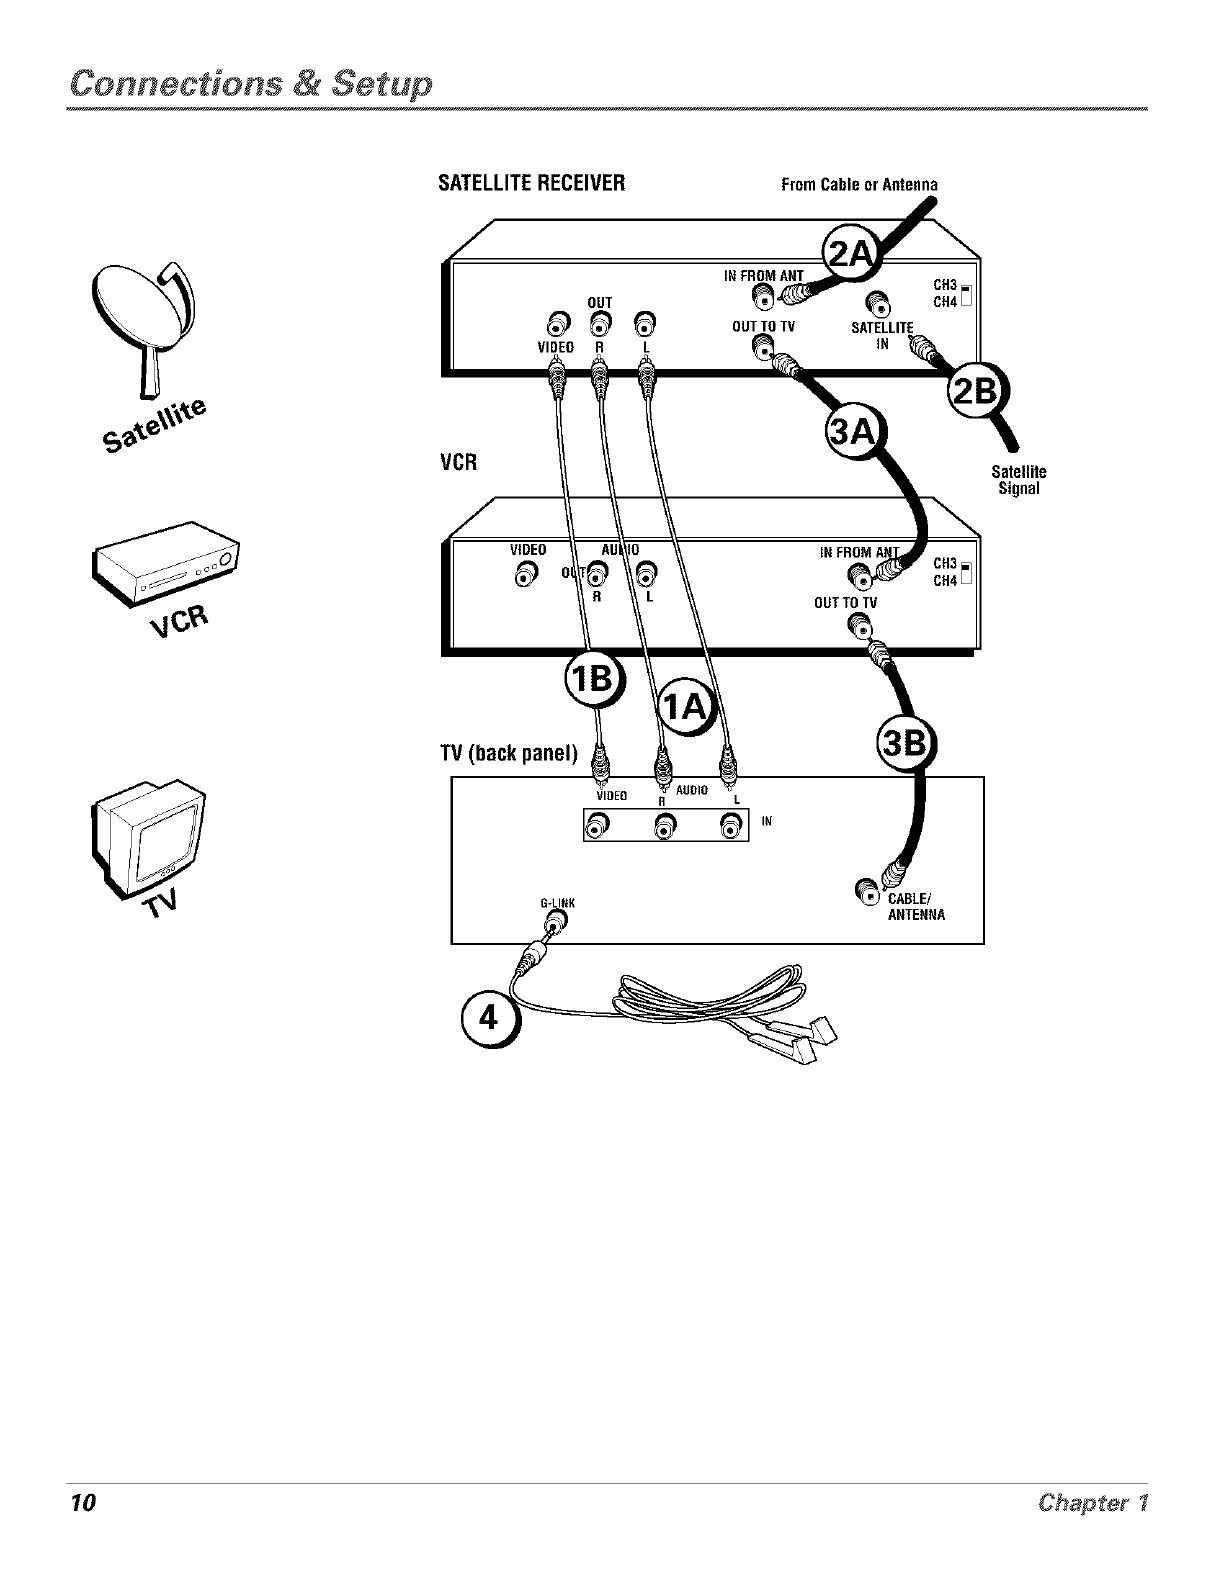
SATELLITERECEIVER FromCableorAntenna
IN FROM ANT
_ _ oo,,o,v SA,E,,,,E
VIDEO R L IN
CH3
CH4 [_
VCR Satellite
Signal
VIDEO
OUTTO TV
TV (back panel)
VIDEO RL
G-LINK
10 Chapter
Connections & Setup
Connection: TV + VCR + Satellite Receiver
1. Connect your Satellite Receiver to your TV
A. Connect the audio/video cables. Connect the audio cables (white and red) to the
AUDIO IN jacks on the back of the TV (R and L) and m the Audio Output Jacks on the
Satellite Receivm:
B. Connect the video cable (yellow) to the VIDEO IN jack on the back of the TV and to the
Video Output Jack on the satellite receivm_
2. Connect coaxial cables to the Satellite Receiver
A. Connect the coaxial cable li'om your cable outlet, cable box, or antenna to the Input
,lack on your satellite receiver (sometimes labeled IN FROM ANT).
g. Connect the coaxial cable fi'om your satellite dish antenna to the Input Jack on your
sar_,llit_, receiver (sometimes labeled SATELLITE IN).
3. Connect the Satellite Receiver to the VCR and to the TV
A. Connect a coaxial cable to the Output lack (sometimes labeled OUT TO TV) on the
satellite receiver and to the Input Jack on the VCR (sometimes labeled IN FROM ANT).
B. Connect a coaxial cable to the Output Jack on the VCR (sometimes labeled OUT TO
TV) and to the C&BLE/ANTENNAjack on the TV.
4. Connect G-LINK cable
A. If you haven't done so, remove the Demo Pin li'om the G-LINK jack.
B. Connect the G-LINK cable to the G-LINK jack on the TV. Next step, place one of the
wands of the G-LINK cable m work with your VCR (instructions are on p. 13).
Go to page 13
Chap_erl 11
Connections & Setup
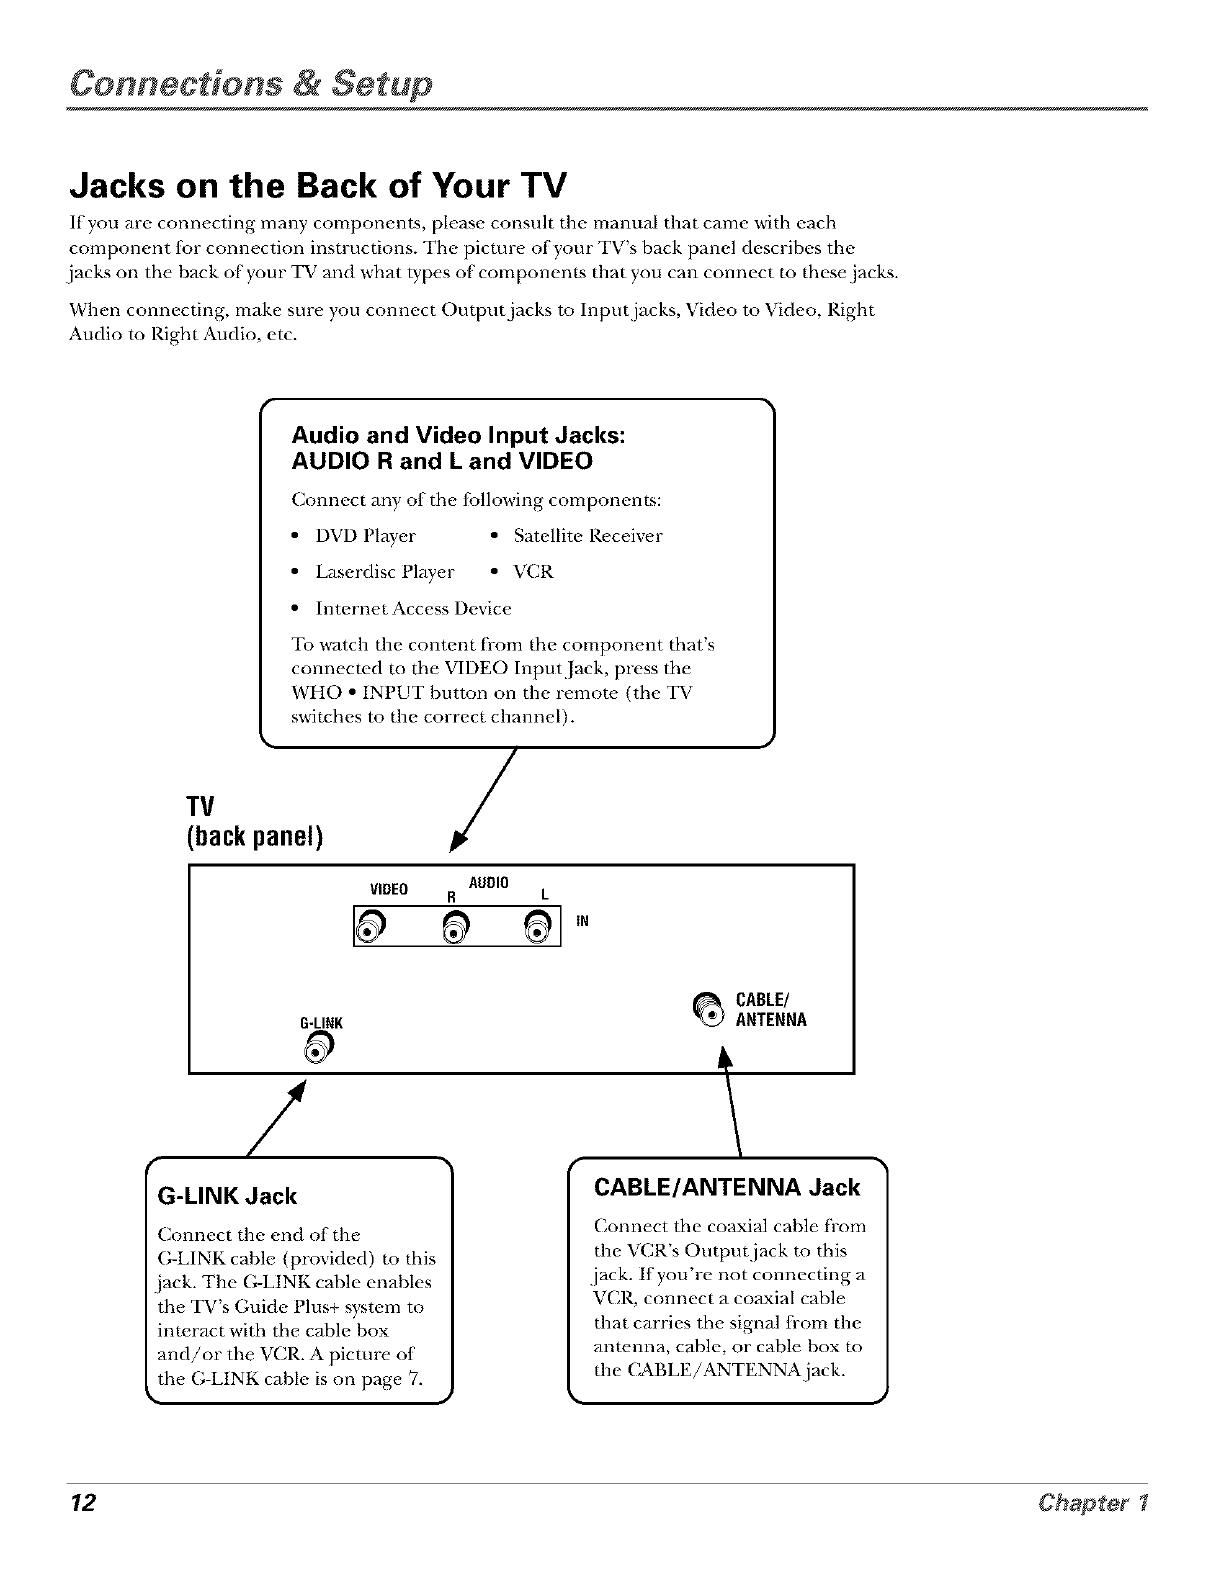
Jacks on the Back of Your TV
If you are connecting many components, please consuh the manual that came with each
component for connection instructions. The picture of your TV's back panel describes the
.jacks on the back of your TV and what types of components that you can connect to these jacks.
When connecting, make sure you connect Output jacks to Input jacks, Video to Video, Right
Audio to Right Audio, etc.
Audio and Video Input Jacks:
AUDIO R and L and VIDEO
Connect any of the {bllowing components:
• DVD Player • Satellite P,eceiver
• Laserdisc Player • VCR
• InternetAccess Device
To watch the content from the component that's
connected m the VIDEO Input Jack, press the
WHO • INPUT button on the remote. (the TV
switches to the correct channel).
TV
backpanel) /
AUDIO
VIDEO R L
G-LINK
/
1
G-LINK Jack
Connect the end of the
(;-LINK cable (provided) to this
_CABLE/
ANTENNA
CABLE/ANTENNA Jack
Connect the coaxial cable fl-om
the VCR's Output jack to this
.jack. If you're not connecting a
jack. The (;-LINK cable enables
the TV s Guide Plus+ s}stem to
interact with the cable box
and/or the VCR. A picture of
the G-LINK cable is on page 7.
VCR, connect a coaxial cable
that carries the signal from the
anr_.nna, cable, or cable box m
the (_BLE/ANTENNAjack.
12 Chapter
Connections & Setup
Why You Should Connect This G-LINK Cable
The (;-LINK cable enables the GUIDE Plus+ s}stem (the on-screen interactive program guide) to
work with your VCR and/or cable box.
Cable Box - If your TV is connected to a cable box you must connect the (;-LINK cable to receive
TV program listings f;:)r your area, and to tune directly to a channel when the program guide is ola
your TV screen.
VCR- If your TV is connected to a VCR and you don't connect the (;-LINK cable, one-touch VCR
recording won't work. The other f_,amres of"the guide will work properly.
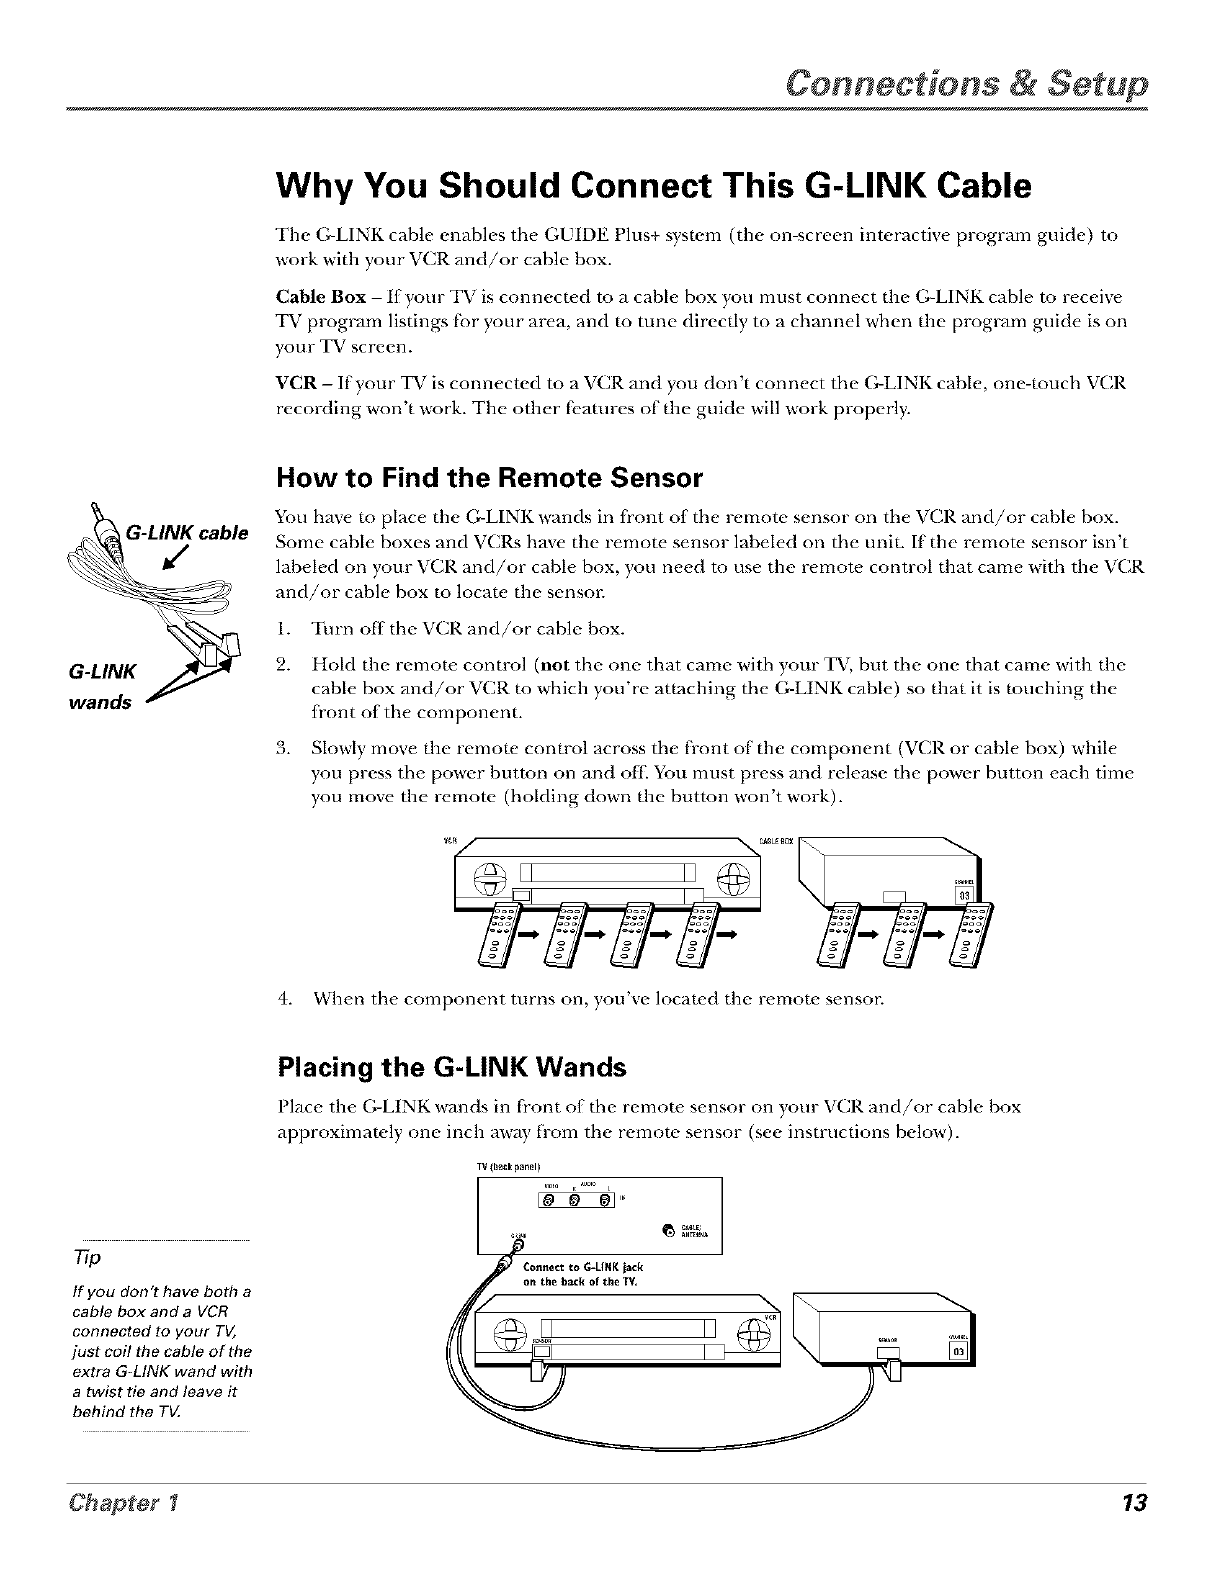
How to Find the Remote Sensor
You have to place the G-LINK wands in front ofthe remote sensor on the VCR and/or cable box.
Some cable boxes and VCILs have the remot_, sensor labeled on the unit. If the remote, sensor isn't
labeled on your VCR and/or cable box, you need m use the remote control that came with the VCR
and/or cable box to locaw the sensor.
1. Turn off the VCR and/or cable box.
2. Hold the remote control (not the one that came with your TV, but the one that came with the
cable box and/or VCR to which you're attaching the G-LINK cable) so that it is touching the
front of the component.
3. Slowly move the remow control across the front of the component (VCR or cable box) while
you press the power button on and oil You must press and release the power button each time
you move the remote (holding down the button won't work).
4.
II II .....
When the component turns on, }ou xe located the remote sensor.
77p
If you don't have both a
cable box and a VCR
connected to your TV,
just coil the cable of the
extra G-LINK wand with
a twist tie and leave it
behind the TV,
Placing the G-LINK Wands
Place the (;-LINK wands in fi'ont of the remote sensor on your VCR and/or cable box
approximately one incla away tYom the remote sensor (see instructions below).
IV (bagk panel)
IS...oo, _0G-U.Kiack _ _"%"
on the back of the TV,
Chapter I 13

Connections & Setup
Plug in the TV
Plug the end of the power cord into the wall outlet. Match the wide blade of the plug with the
wide slot in the outlet. Insert the plug completely into the outlet.
Put Batteries in the Remote
1. Remove the battery compartment cover on the remote.
2. Insert new batteries. Match the polarities (+ and -) on the batteries with the
diagram on the remow.
3. Put the battery compartment cover back on the remow.
Use the arrow buttons and the OK
button to move through the menu
system.
How to Use the Remote Control to
Complete the Interactive Setup
The technical term is "Navigation" - how you move through the on-screen
menus. The theory is the same throughout the menu screens: highlight },our
choice and select it.
To highlight a menu item, press the arrow buttons on the remote to highlight
one of the items listed on the screen. Use the up or down arrow button to move
up or down. Use the right or left arrow button to move right or left.
To select the item that you've highlighted, press OK.
No_e:Hi_,,,hliL,'hl_lrtu_±rL_llu_!llu_memtilemsg¢ndsoldie' wt_
Turn on the TV
Press the TV button on the remote control or the POWER button on the TV
(the first screen of the Interactive Setup appears). The menu screens "time out"
after a period of time if you don't make a selection. The tips in this section tell
you how to access the Setup menu screens manually.
77
Note:l+'_drNlheTWmltamru)lord)tur rL_onlheTV ,ImlpulslD._r emofein!s)
7gmo'_ _tVmo'l_"rtu_msthallDeb_/Ion.ordlu_ ertu_fsr_ _D_/De
7 _s fi_ru:tiam.
14 Chapter
Connections & Setup
Tip
To access the setup menus
manually, press MENU and choose
Setup.
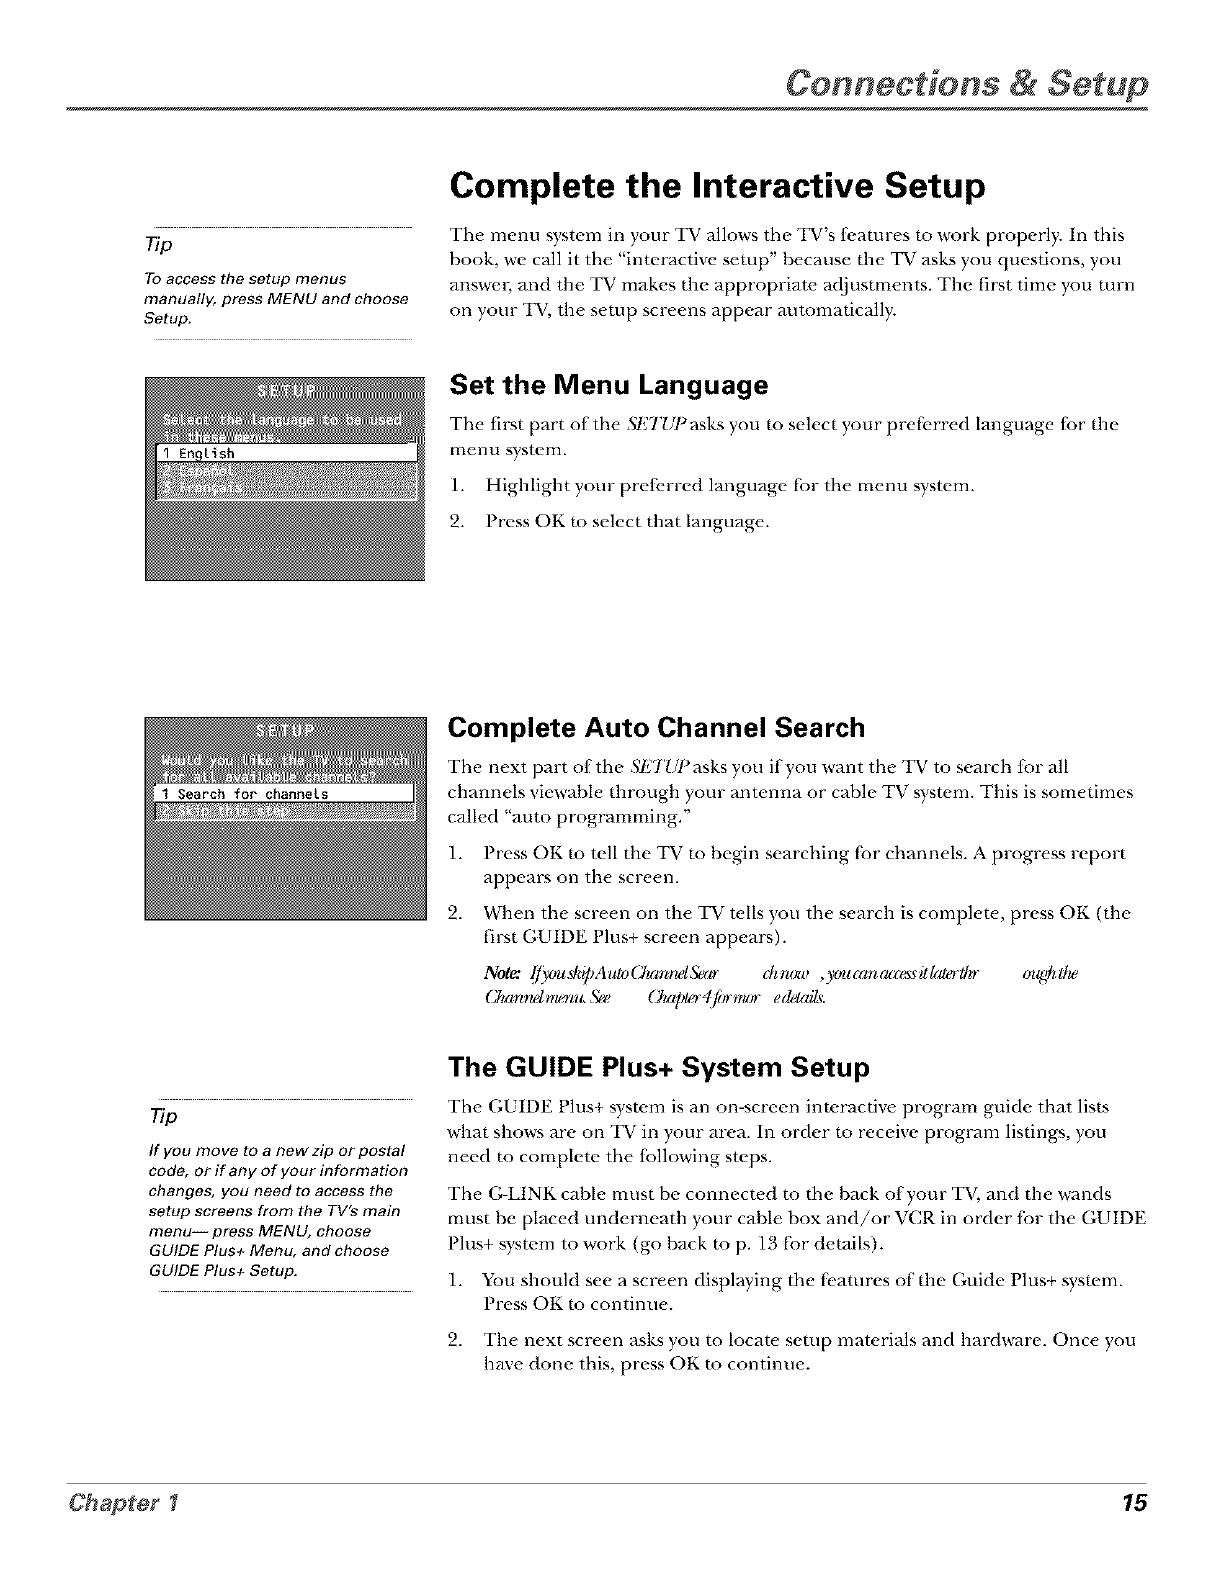
Complete the Interactive Setup
The menu system in your TV allows the TV's fbatures to work properly. In this
book, we call it the "interactive setup" because the TV asks you questions, you
answm, and the TV makes the appropriate, adjustments. The first time you turn
on your TV, the setup screens appear automatically.
Set the Menu Language
The fh-st part ofthe ,Sl'2TUPasks you to select your prefbrred language for the
menu system.
1. Highlight your prefi, rred language fbr the menu system.
2. Press OK to select that language.
Complete Auto Channel Search
The next part of the ,';I_TUPasks you if you want the TV to search for all
channels viewahle through your antenna or cable TV system. This is sometimes
called "auto programming."
T
1. Press OK to tell the T_ to begin searching fbr channels. A progress report
appears on the screen.
2. When the screen on the TV tells you the search is complete, press OK (the
first GUIDE Plus+ screen appears).
Chamugau_r**L_ (_ap>r4fi:r*_u. ed_dl_.
The GUIDE Plus+ System Setup
Tip The GUIDE Plus+ system is an on-screen interactive program guide that lists
If you move to a new zip or postal
code, or if any of your information
changes, you need to access the
setup screens from the TV's main
menu-- press MENU, choose
GUIDE Plus+ Menu, and choose
GUIDE Plus+ Setup.
what shows are on TV in your area. In order to receive proglwm listings, you
need to complete the {bllowing steps.
The (;-LINK cable must be connected to the back of your TV, and the wands
r
must be placed underneath your cable box and/or 'VCR in order for the GUIDE
Plus+ system to work (go back to p. 13 fbr details).
1. You should see a screen displaying the f_,atures of the Guide Plus+ system.
Press OK to continue.
2. The next screen asks you to locate setup materials and hardware. Once you
have done this, press OK to continue.
Chapter I 15
Connections & Setup
Step 1: Identifying Your TV's Location
1. Ifyour country is highlighted, press OK on the remote control.
If your country isn't highlighted, press the up or down arrow button on the
remow control to highlight your count W and press OK.
9. Use the number buttons on your remote to enter your zip code.
Press OK when you're finished.
No_e:lfjY_urlx_rl(d_*'le_drMWo_,pr asdu_uparuldowr_ar rawlx_alorL_m
)*na_,o_,t_leenlo-141os,go_'lpr _sl/_:r_&lar rt_dyz_llt_legelollu,ru_
,tpam.77_e_jtcw rawhldlgmmta_y_ulol/_e_jt,
Step 2: Configuring for Cable
The next series of screens asks you about your cable setup. To supply your TV
with the correct TV program listings, the GUIDE Plus+ system needs to know if
your TV is connected m cable.
1. If your TV is connected m cable, highlight Yesand press OK.
If your TV isn't connected to cable, highlight No and press OK (SJI?P 3:
Cor_fign_rlg fiyr a VCR appears).
9. If you have a cable box connecwd to this TV, highlight Yesand press OK on
your remote control.
NotaJl_ru,xl.ro_sqfso- _isver yi**qx_ lanll_z±lL_elheGUll)F,l_llt_+
wl_z,mLrlfirulll_mr re:lrd_lx_or v_ir_ar doa)r a_Jelhe_vr _1
7Vpr (_rmdisE_u.
If you don't have a cable box connected m this TV, highlight No and
press OK (STF,P 3: Cor_fig,_trirlgfi)ra VCR appears).
rio
If you're not sure which channel is the
cable box's output channel, consult
the book that came with your cable
box or contact your cable company,
16 Chapter I
Connections & Setup
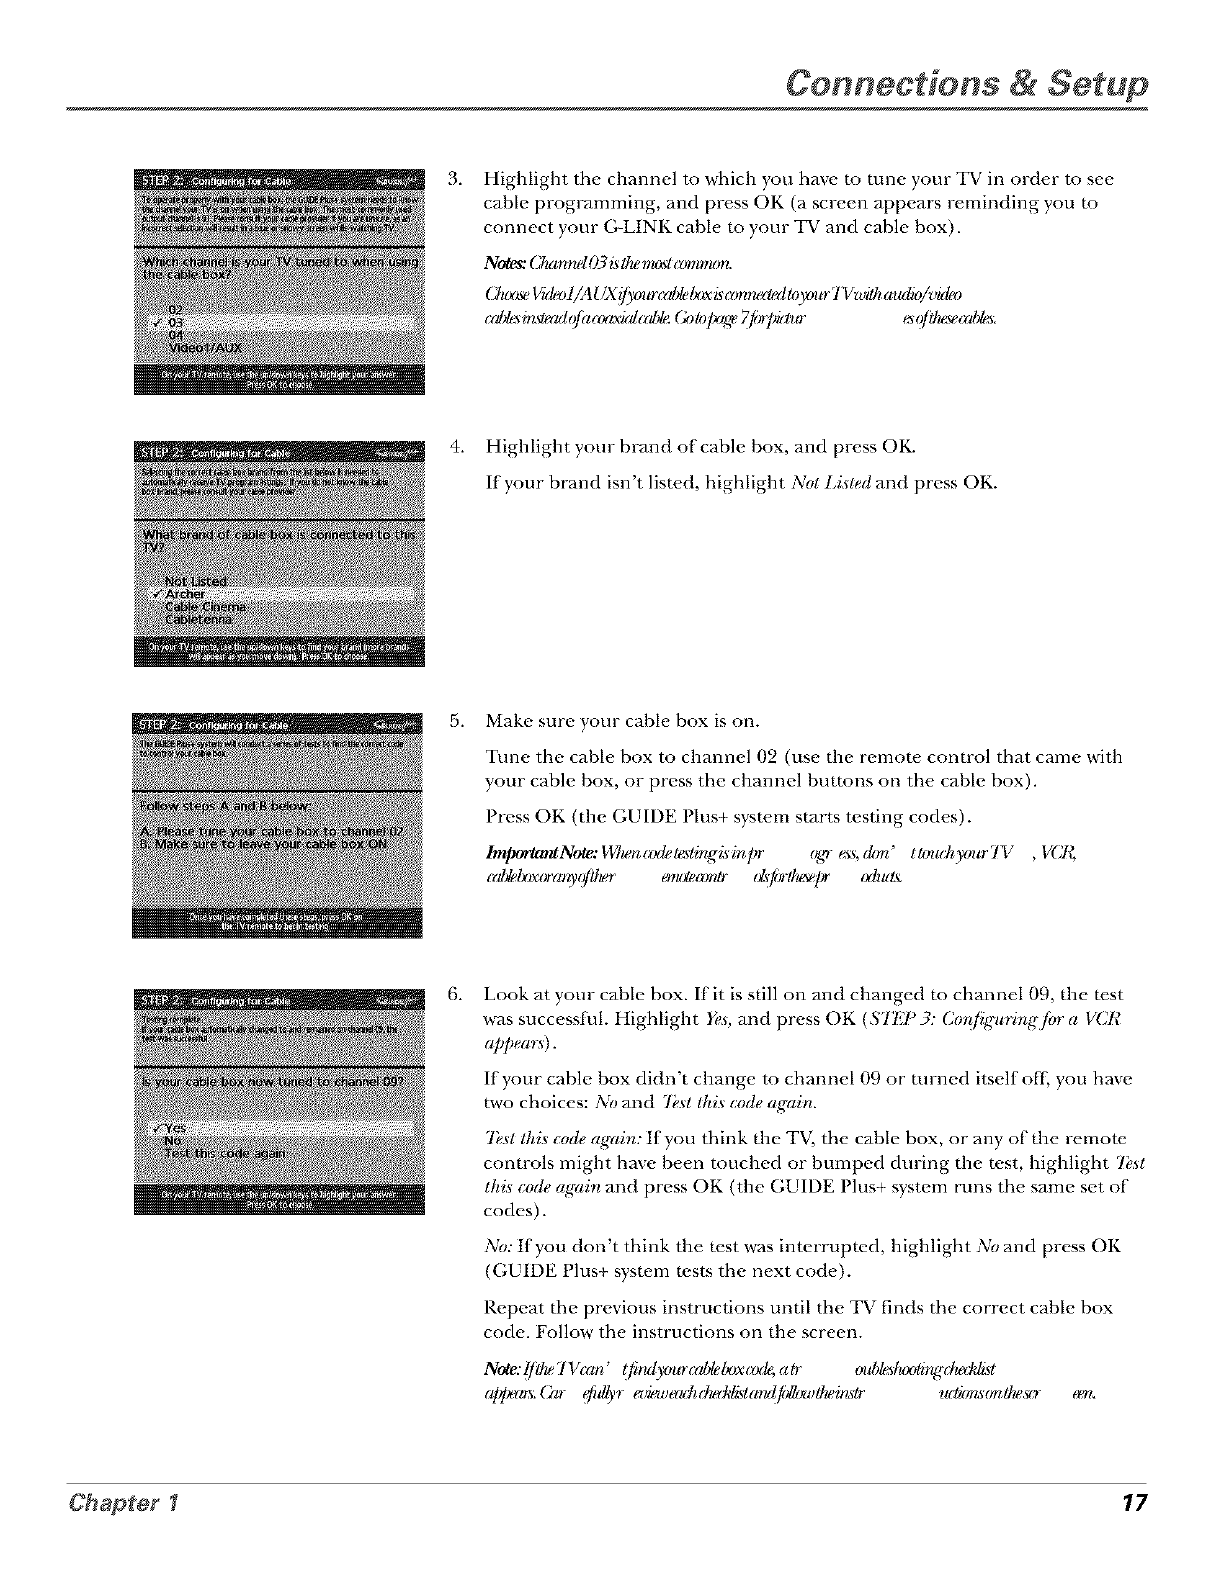
3, Highlight the channel mwhich you have m tune your TV in order msee
cable programming, and press OK (a screen appears reminding you m
connect your G-LINK cable m your TV and cable box).
No_s: (]_m_l O3£1he__l mm**u)rL
(]ux_e Vu_)l/A UX _'our _rd_ Ix_ ismnru_l loymr Tl Zwilh_tulk)/vk_
_rd;b_#tq_ulofiuz_rvkd_rd_ (;_Jlolx_e 7jbrl_klur _r?flhe_e_{d_.
4. Highlight your brand of cable box, and press OK.
If your brand isn't listed, highlight Not Lisled and press OK.
5, Make sure your cable box is on.
Tune the cable box to channel 02 (use the remote control that came with
your cable box, or press the channel buttons on the cable box).
Press OK (the GUIDE Plus+ system starts testing codes).
Importr_Note:14/lu_(_xI_l_ling,_inpr _g,_"ea_,(l_m' t&uchyour717 , VCI_
_rd_lx_xora_,_flher e_u_e_mtr ols_fl_lhe_pr rxhu_
6, Look at your cable box. If it is still on and changed to channel 09, the test
was successt_ll. Highlight Yes,and press OK (ST;_g_3: Cor{figurir_g/or a VCR
appears).
If your cable box didn't change tu channel 09 or turned itself oil; you have
two choices: No and 7/,._11hi._code agairl.
7_'._tIhi._code again: If you think the TV, the cable box, or any of the remote
controls might have been touched or bumped during the test, highlight 7_,st
this code again and press OK (the GUIDE Plus+ system runs the same set of
codes).
No: tfyou don't think the test was interrupted, highlight No and press OK
(GUIDE Plus+ system tests the next code).
Repeat the previous instructions until the TV finds the correct cable box
code. Follow the instructions on the screen.
Note:l/Ihe7Vrrm' (fi:rulymrrrd_Ix)xr_gNatr old)l_lux)li_du.::_l
a/q_s. (2*r Cdlyr e_i_,,eruhrheddi_larul_,,/heinstr ,uli_.s_/heso- een.
Chap_er_ 17
Connections & Setup
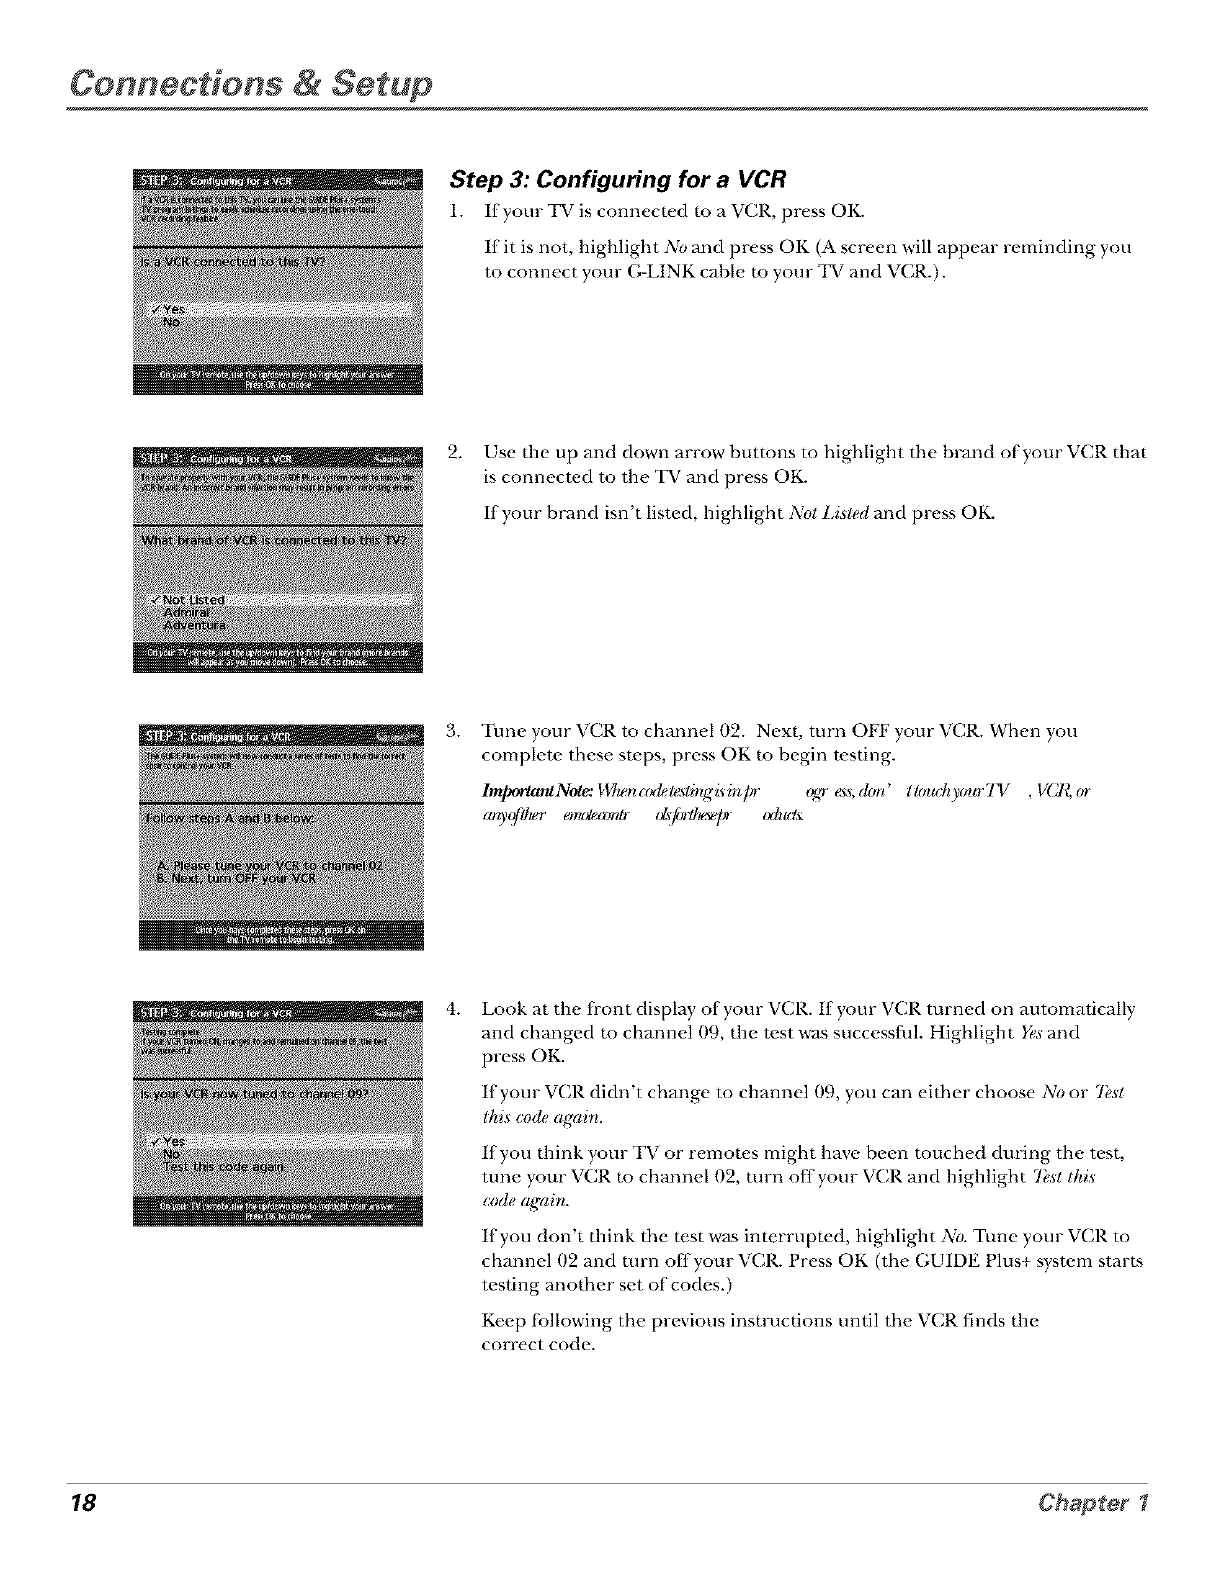
Step 3: Configuring for a VCR
1. Ifyour TV is connected to a VCR, press OK.
If it is not, highlight No and press OK (A screen will appear reminding you
to connect your (;-LINK cable to your TV and VCR.).
2. Use the up and down arrow buttons to highlight the brand of your VCR that
is connected to the TV and press OK.
If your brand isn't listed, highlight Not Lis/ed and press OK.
3. Tune your VCR to channel 02. Next, turn OFF your VCR. When you
complete these steps, press OK to begin testing.
l_Note..iUu_nadele_lingisinpr %_r _s,(hm' tt_nuily(mrTV ,V(l_(n
arg,(_tlu_r emt_a_tr ds:f_/hese]_ txhut'_
4. Look at the fi'ont display of your VCR. If your VCR turned on automatically
and changed mchannel 09, the test was successfld. Highlight Yes and
press OK.
If your VCR didn't change to channel 09, you can either choose No or 7bst
thi._ code agairl.
If you think your TV or remotes might have been touched during the test,
tune your VCR m channel 02, turn offyour VCR and highlight 7_,sttkis
code agairl.
If you don't think the test was interrupted, highlight No. Tune your VCR to
channel 02 and turn off your VCR. Press OK (the GUIDE Plus+ system starts
testing another set of codes.)
Keep l%llowing the previous instructions until the VCR finds the
correct code.
18 Chapter
Connections & Setup
77p
Leave your cable box turned ON to
download program information.
Leave your VCR turned OFF to record
programs.
No_e.'l/llu_GUll)l'21_lus+,systanrrm' thxv_lhe_vr re(lad_/ordxVCl_al£t
ofir ,,d_u_i_ia_r _¢uJm(q_Ur_lu_Jul_w ey_utr 5<_ir_
• 71yVCR(vrH/,_,'_rrUk,,n(_,ain:r qx_aVCtL_up.
•T_ta&r nt_axl_:le_tssd_lbrr±ruls(±rul[(&i_fldlgllu4,st(_Jali_;lu_
with(d_xd_ irlttu_s_m,
•Sl@lhi_s_z/h.,,(;Ull)l,_l_'h_s+syslemm,m'll_vd_aj(_t_mali_y
schahdepr %_rm_s'l(,_ e:_ deny)w-V(l_
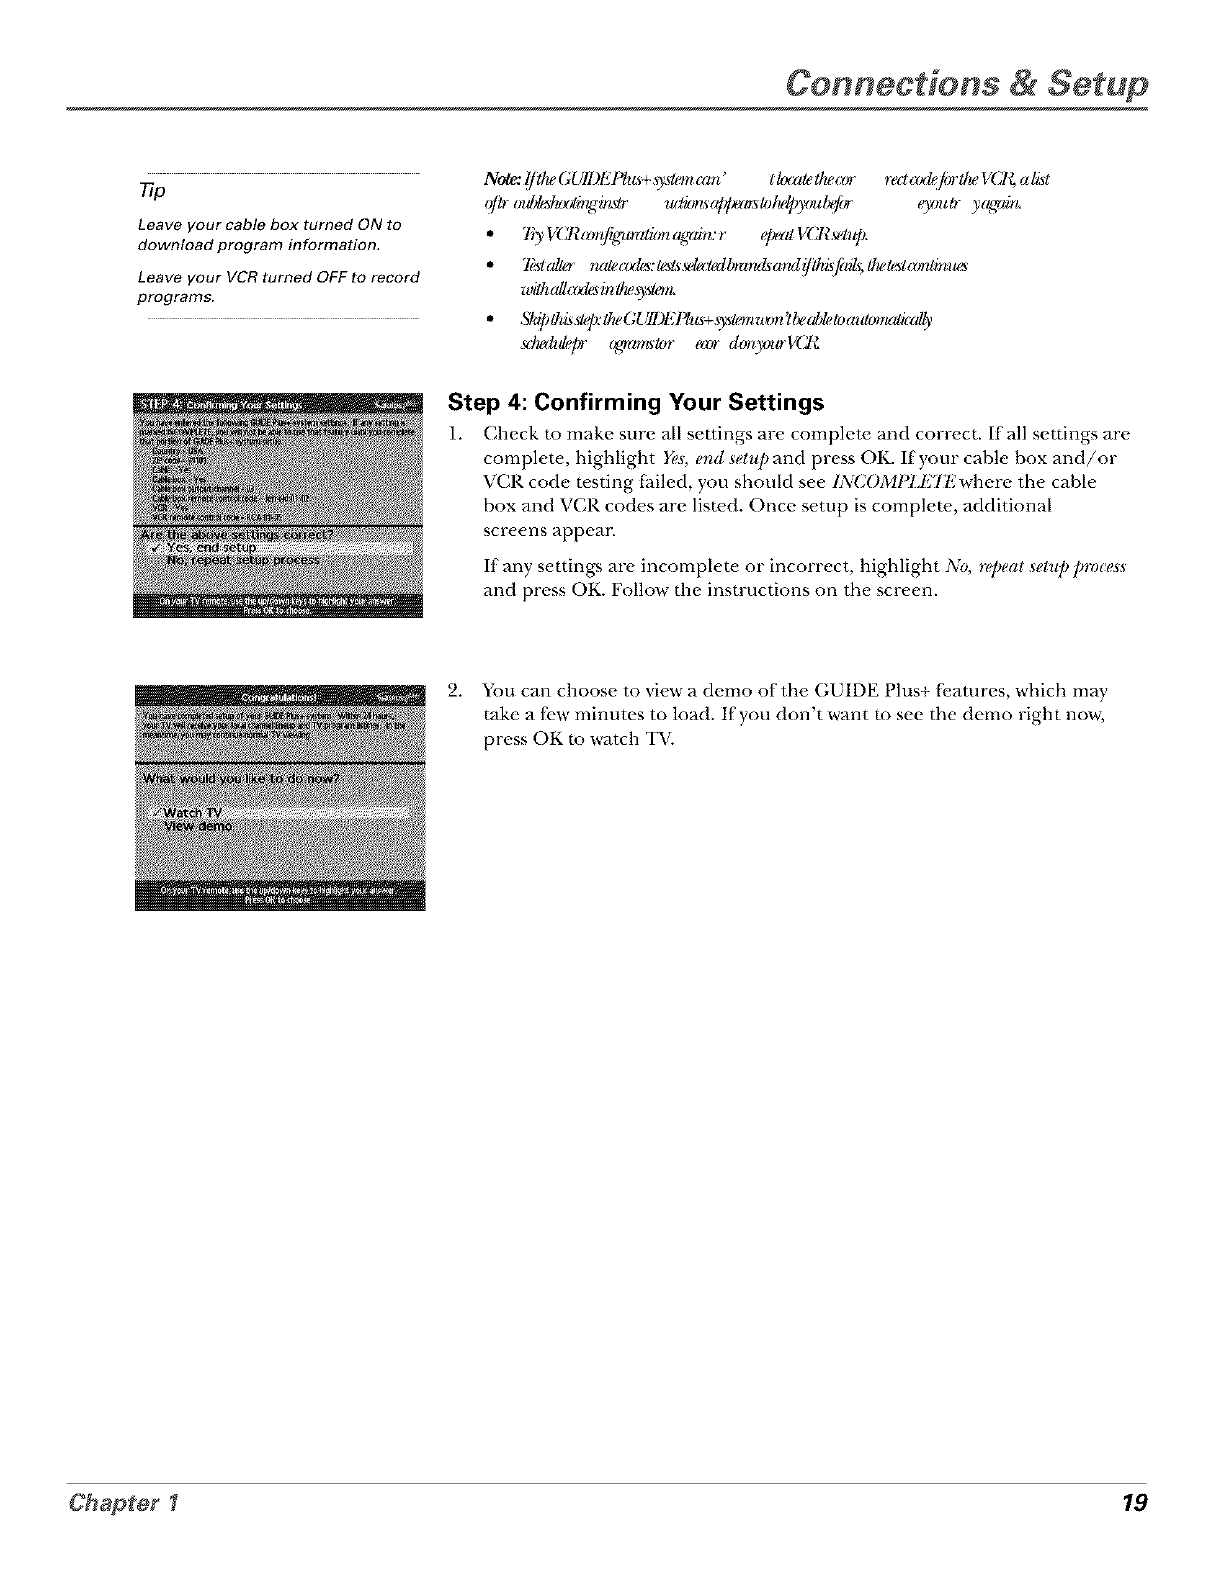
Step 4: Confirming Your Settings
1. Check to make sure all settings are complete and correct. If all settings are
complete, highlight Yes, end setup and press OK. If your cable box and/or
VCR code testing fhiled, you should see INCOMPld_Jl",where the cable
box and VCR codes are listed. Once setup is complete, additional
screens appea_
If any settings are incomplete or incorrect, highlight No, repeat setup process
and press OK. Follow the instructions on the screen.
2. You can choose to view a demo of the GUIDE Plus+ fbatures, which may
rake a fi.w minutes to load. If you don't want to see the demo right now,
press OK to watch TV.
Chapter I 19
Connections & Setup
What to Expect
The next time you turn on your TV, the GUIDE Plus+ system will appear on the screen. The
{Mlowing examples explain what you might see:
• If all of the program infi)rmation has been sent to your TV, the GUIDE Plus+ system
appears with all of your TV program listings.
• If the program infi)rmation hasn't been sent to your TV yet, an outline of the GUIDE
(without TV program listings) will appear on the screen. Program inf;:)rmation is usually
sent to your TV at night.
•If the TV detected that you have multiple c_d_le companies in your area, STFP 5: Choosing
Your Charlnel Lineup appears.
Features of the GUIDE Plus+ system are explained in Chapter 3.
To clear the guide t)com your screen, press CLEAR or GUIDE on the remow control.
Next Steps
Nov," that you've finished the Interactive Setup, you're ready to watch TV. This might be a good
time to program your remote control. The remote control that came with this TV can be
programmed to operate other components. Go to the next chapter to find out how to program
your remote.
20 Chapter I
Using the Remote Control
Chapter Overview:
• The Buttons on the Remote Control
•Programming the Remote to Operate Other Components
•How To Use the Remote After You've Programmed It
•Code List
21
Using the Remete Centrel
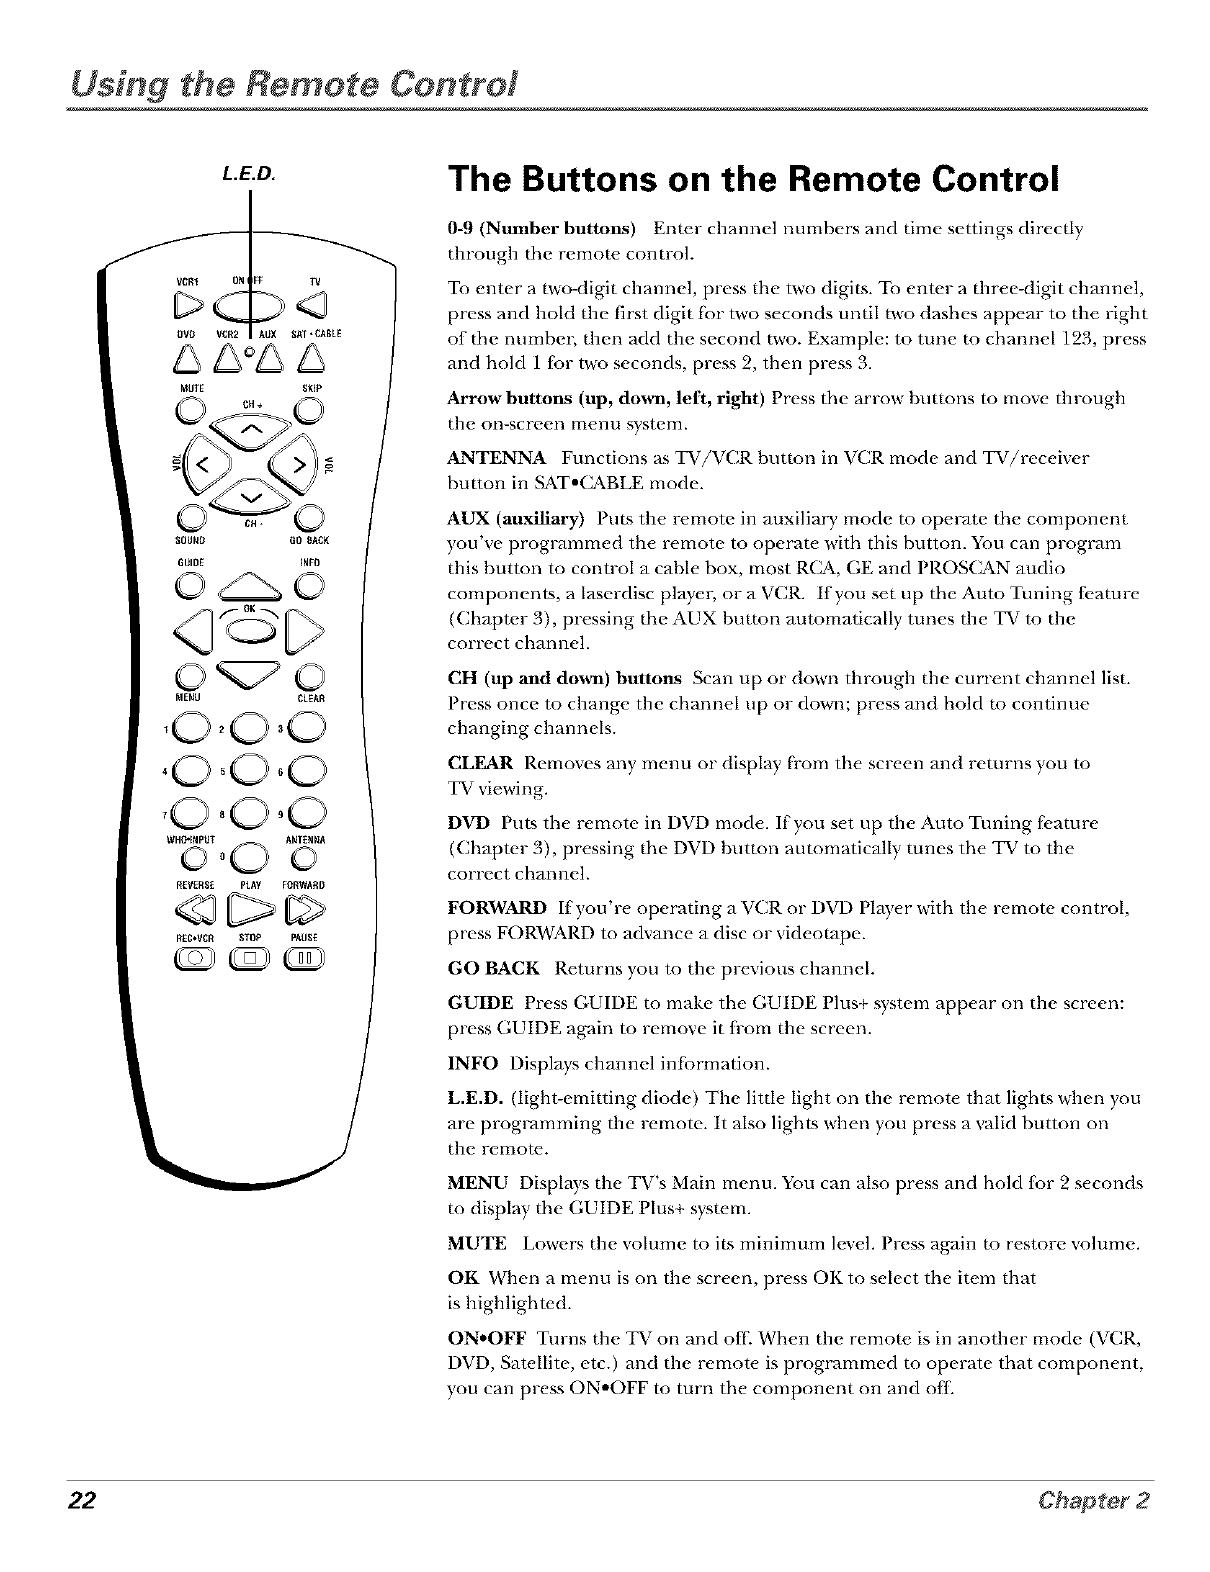
L.E.D.
gVE_ VCR2 AUX SAT ,CABLE
NUTE SKIP
SOUND GO SACK
GUIDE INFO
MEnU CLEAR
,0,0,0
,0.0°0
,0,0 00
WH_INPUT ANTEN_
o00 o
REVERSE PLAY FORWARD
DIP
REC*VCR STOP PAISE
The Buttons on the Remote Control
0-9 (Number buttons) Enter channel numbers and time settings directly
through the remow control.
To enter a two-digit channel, press the two digits. To enter a three-digit cbnnel,
press and hold the first digit for two seconds until two dashes appear to the right
of the numbe_; then add the second two. Example: to tune to channel 123, press
and hold 1 Ior two seconds, press 9, then press 3.
Arrow buttons (up, down, left, right) Press the arrow buttons to move through
the on-screen menu system.
ANTENNA Functions as TV/VCR button in VCR mode and TV/receiver
button in SAT°CABLE mode.
AUX (auxiliary) Puts the remote in auxiliary mode to operate the component
you've programmed the remote to operate with this button. You can program
this button to control a cable box, most R(_, GE and PROS(_N audio
components, a laserdisc pl_Jye_, or a VCR. If you set up the Auto Tuning fi.amre
(Chapter 3), pressing the AUX button automatically tunes the TV to the
correct channel.
CH (up and down) buttons Scan up or down through the current channel list.
Press once to change the channel up or down; press and hold to continue
changing channels.
CLEAR Removes any menu or display from the screen and returns you to
TV viewing.
DVD Puts the remote in DVD mode. If you set up the Auto Tuning fi.amre
(Chapter 3), pressing the DVD button automatically tunes the TV to the
correct chmmel.
FORWARD If you're operating a VCR or DVD Player with the remote control,
press FORWARD to advance a disc or videotape.
GO BACK Returns you to the previous channel.
GUIDE Press GUIDE m make the GUIDE Plus+ system appear on the screen:
press GUIDE again to remove it fi-om the screen.
INFO Displ_Jys channel inlormation.
L.E.D. (light-emitting diode) The little light on the remote that lights when you
are programming the remote. It also lights when you press a valid button on
the remoW.
MENU DispbJys the TV's Main menu. You can also press and hold fbr 2 seconds
m display the GUIDE Plus+ syswm.
MUTE Lowers the volume to its minimum level. Press again to restore volume.
OK When a menu is on the screen, press OK to select the item that
is highlighted.
ON*OFF Turns the TV on and oIl] When the remote is in another mode (VCR,
DVD, Sawllite, etc.) and the remote is programmed to operate that component,
you can press ONoOFF to turn the component on and off
22 Chapter 2
Using the Remete Centrel
Tip
To turn off a!l the
RCA, GE, and
PROSCAN
components that are
connected to the TV,
press ON,OFF twice
within two seconds.
This feature only
works with most RCA,
GE and PROSCAN
products.
PAUSE If you're operating aVCR or DVD Player with the remote control, press PAUSE when the disc
or videotape is playing ro pause playback.
PLAY If you're operating a VCR or DVD Playe_, plays the disc or videotape.
REC,VCR+ When the GUIDE Plus+ program guide is on the screen, press REC-VCR+ ro program
your VCR to record a program. If tlae remote is in VCR mode, press REC'VCR+ ro start recording.
REVERSE If you're operating a VCR or DVD Player with the remote, control, press REVERSE ro go
backwards on a disc or videotape.
SAT*CABLE Puts the remote in SAT-CABLE mode. If you set up the Auto Tuning f_.arure (Chapter
3), pressing the SAT-CABLE button automatically runes the TV to the correct channel.
SKIP If you press this button belbre you change the channel, the TVwmts 30 seconds and
automatically goes back to the original channel. Each time you press SKIP, you add 30 seconds (i.e, if
you press SKIP two times before you change the channel, the TV waits 60 seconds and automatically
turns back m the original channel).
SOUND Displays the A UI)IO Pt{OCI_SSOt¢ menu.
STOP If you're operating a VCR or DVD Playm, stops playing the disc or videotape.
TV Turns on the TV and puts the remote in TV mode. Also displays channel inlormation.
VCR1 Puts the remora, in VCR mode. If you set up the Auto Tuning ti,ature (Chapr_.r 3), pressing the
VCR1 button automatically tunes the TV to the correct channel.
VCR2 Puts the remote in VCR mode. If you set up the Auto Tuning ti,ature (Chapr_.r 3), pressing the
VCR2 button automatically tunes the TV to the correct channel.
VOL (up and down) buttons Decrease or increase the TV's volume.
WHO*INPUT In TV mode, press WHO'INPUT to toggle through the available Video Input
channels (VID and the current channel). In SAT mode, press to select available channel lists.
Using the WHO.INPUT Button
Use the WHO-INPUT button ro toggle through the availahle input sources (VID and the current
channel) and view the content from the component you have connecr_.d to the TV.
1. Press TV to place the remote, in TV mode. Make sure that the content from the component is
turned ON.
2. Press WHO.INPUT m tune to the available input source and view the component.
3. Press WHO.INPUT again to tune back to the channel you were previously watching.
23
Using the Remote Control
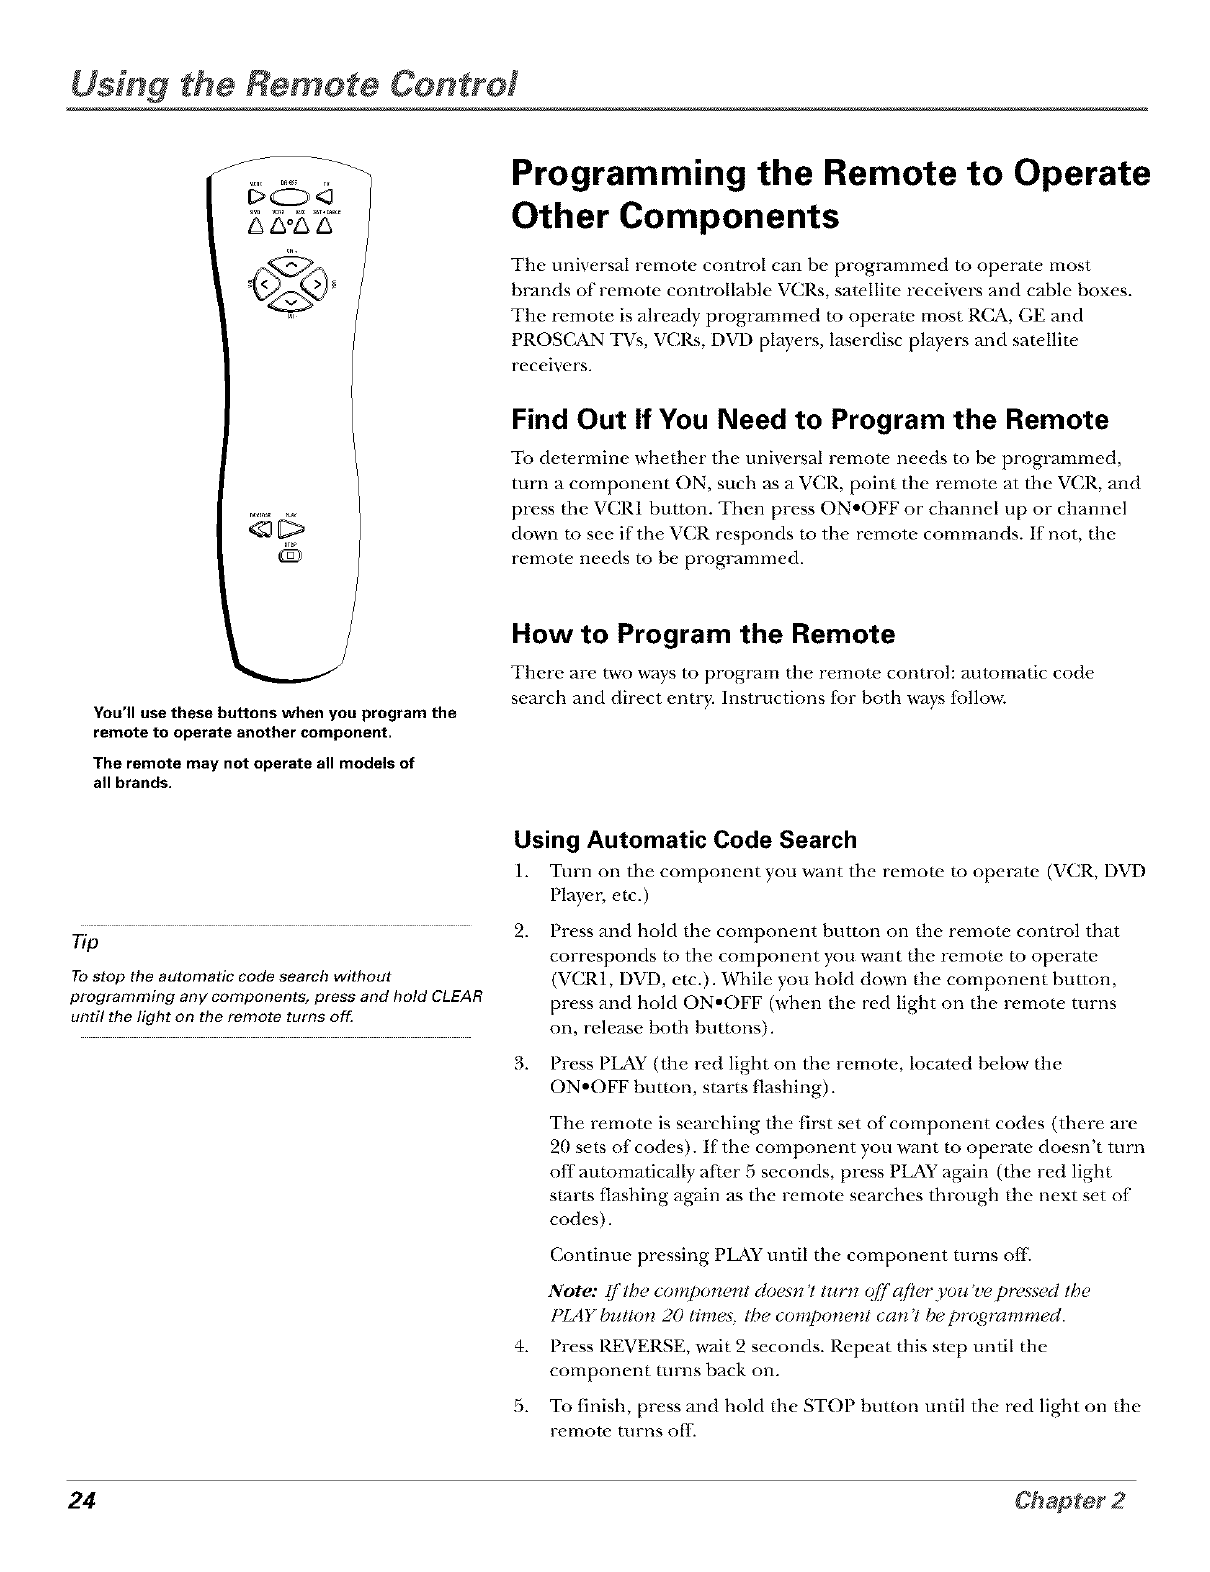
You'll use these buttons when you program the
remote to operate another component.
The remote may not operate all models of
all brands.
Programming the Remote to Operate
Other Components
The universal remote control can be proglvJmmed to operaw most
b_vmds of remote controllable VCRs, sawllite receivers and cable boxes.
The remote is already programmed m operate most R(_, GE and
PROS(_N TVs, VCRs, DVD plwers, laserdisc players and sawlliw
receivers•
Find Out If You Need to Program the Remote
To determine whether the uni_ ersal remote needs to be programmed,
turn a component ON, such as a VCR, point the remote at the VCR, and
press the VCR1 button. Then press ON.OFF or channel up or channel
down to see ff the _ CR responds to the remote commands. If not, the
remote needs to he programmed•
How to Program the Remote
There are two ways to program the remote control: automatic code
search and direct entry. Instructions {br both ways {bllow.
Tip
To stop the automatic code search without
prooramming any components, press and hold CLEAR
until the light on the remote turns off.
Using Automatic Code Search
1. Turn on the component you want the remote to operate (VCR, DVD
Player, etc.)
2•
3•
4•
5•
Press and hold the component button on the remote control that
corresponds m the component you want the remote to operate
(VCR1, DVD, etc.). While you hold down the component button,
press and hold ON.OFF (when the red light on the remow turns
on, release both buttons).
Press P_Y (the red light on the remote, located below the
ON.OFF button, starts flashing).
The remote is searching the first set of component codes (there are
20 sets of codes). If the component you want to operate doesn't turn
off automatically after 5 seconds, press PLAY again (the red light
starts flashing again as the remote searches through the next set of
codes)•
Continue pressing PLAY until the component turns off
Note: I/'the component cluesn 't turn t?[]'q/?er you >e pressed the
PlAY butto*_ 20 time._; the component can 'l be programmecl.
Press P.EVERSE, wmt 2 seconds. Repeat this step until the
component turns back on.
To finish, press and hold the STOI button until the red light on the
l-_'lllOt_' turns o[_.
24
Using the Remote Control
Using Direct Entry
1. Turn on the component you want the remow to operaw.
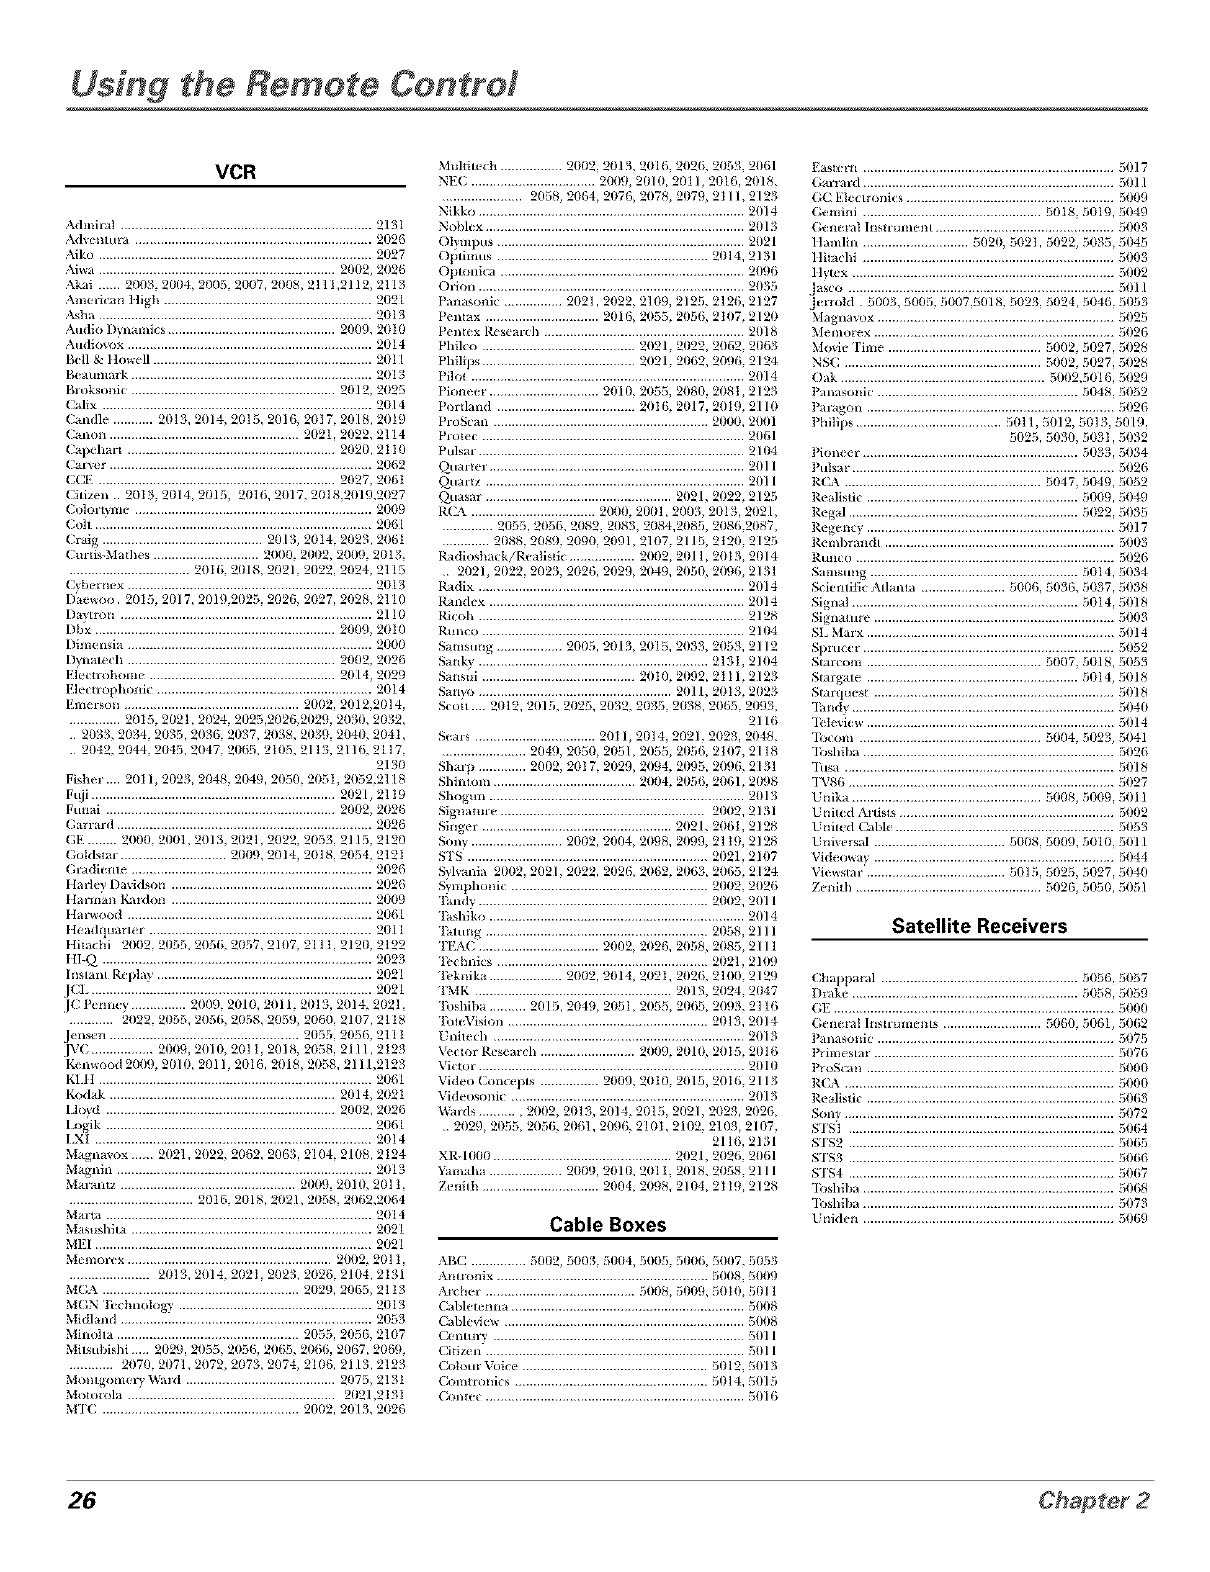
2. Look up the brand and code number(s) [br the component on the code list on page 26.
3. Press and hold the component button that corresponds to the component you want the
remote to opmvm. (VCR1, DVD, etc.)
4. Enwr the code {i'om the code list.
5. Release the component button.
6. Press ON.OFF to see ifthe component responds m the remow commands. If it doesn't, try
pressing the component button and then ON.OFF agvfin.
7. If you get no response, repeat these steps using the next code listed for your brand until the
component responds to the remote commands.
rip
The buttons might
operate differently for
other components,
especially when you're
using another
component's menu
system,
How to Use the Remote After You've
Programmed It
Once the remote has been programmed successfully, you are ready to use it to control your
components. To operate the component:
1. Press the component button (TV, VCR1, VCR2, DVD, AUX, or SAT.C&BLE) m set the
remote to operate the component.
2. Press ON.OFF to turn the component ON or OFE
3. Use the remote buttons that apply to that component.
Note: l/'you beep pressing bullorts and rlolhirlg happens, the remole is probabl); in Ihe wrorzg mode.
You mu._l press the compone/nt butlon thai malchea the compone/nt you want to operale (i e., !/you
wahl 1o opovlte the VCR, press VCRI on the r_mole control Io put the remole in VCR mode.)
25
Using the Remete Centre:
VCR
Admixal ..................................................................... 2131
Advemum ................................................................. 2026
Aiko ........................................................................... 21127
Aiwa ................................................................. 211112,21126
Akai .... 2003, 211114,2005, 21107, 2008, 2111,2112, 2113
American ltigh ......................................................... 2021
A_ha ........................................................................... 21113
Audio 1)ynainics .............................................. 2009, 21110
Audio_}x ................................................................... 21114
Bell & ltowell ............................................................ 2011
Beaumark .................................................................. 2013
BI oksonic ........................................................ 21112, 21125
(_lix .......................................................................... 21114
(_ndle ........... 2013, 2014, 2015, 2016, 211I 7, 21118, 2019
(_non .................................................... 21121, 21122, 2114
(_pehart ......................................................... 21120, 211 I1
(_r_:r ........................................................................ 21162
(;CE ................................................................. 21127, 206t
Citizen .. 21113, 21114, 2015, 2016, 21117, 2018,2019,2027
(;oloit_me ................................................................. 21109
Coh ............................................................................ 206¸1
(;i_g ............................................ 21113, 2014, 21123, 21161
Curtis-Mathes ............................. 21111//,211112,211//!),21113,
................................. 2016, 2018, 2021, 21/22, 2024, 2115
( yb_m_x ................................................................... 21113
Dae_oo. 2015, 21/17, 2019,2023, 2026, 2027, 21128, 2] 10
Da, tt on ..................................................................... 2110
Dbx .................................................................. 21111!I,2010
Dimensia ................................................................... 2000
Dynau ch ......................................................... 211112,2026
Elecuohom_ ................................................... 2/)[4, 2029
Elecuophonic ........................................................... 2014
Emerson ................................................ 21102, 2012,20] 4,
.............. 2015, 202], 2024, 2025,2026,2029, 2030, 2032,
2033, 2034, 21/35, 2036, 21/37, 2038, 21/39, 21141/,2041,
Muhitx_ch ................. 2002, 2013, 2016, 2026, 2053, 2061
NEC .................................. 211119,21/111,2011, 2016, 21118,
...................... 2058, 2064, 2076, 2078, 2(/79, 2I 11, 2123
Nikko ......................................................................... 21114
Nobkx ....................................................................... 2013
Olympus .................................................................... 2021
Oplimus .......................................................... 2(/14, 2131
Opmnica ................................................................... 211!16
Orion ......................................................................... 2035
Panasonic ................ 2(/21,21122, 2109, 2125, 2126, 2127
P_ntax ............................... 2016, 2055, 2056, 2107, 2120
PI ntlx R_ searc]l ....................................................... 2018
Philco .......................................... 2021, 2(/22, 2062, 2063
Philips .......................................... 2021, 2(/62, 20!16, 2[24
Pilot ........................................................................... 21114
Pione_ _. ............................. 2111(/,2055, 2080, 208t, 2123
POl tland ...................................... 20I 6, 2017, 2019, 2[ 10
ProScan ........................................................... 2(/00, 211111
Protl c ........................................................................ 2116[
Pulsar ......................................................................... 21(/4
_uartex ..................................................................... 2011
_uartz ....................................................................... 2011
Quasar ................................................... 2021, 2022, 2125
R(5\ .................................. 2000, 2(/1/1,2003, 2(/13, 21121,
.............. 2(/33, 2056, 2082, 2083, 2084,2085, 2086,2087,
............. 2(/88, 21189, 2090, 2091, 2107, 2113, 2t211, 2125
Radioshack/Realisfic .................. 2002, 21/11,20I 3, 2(114
2021, 2(/22, 2023, 2026, 21129, 2049, 2050, 2096, 2131
Radix ......................................................................... 21114
Randex ...................................................................... 21114
Ricoh ......................................................................... 2128
Runco ........................................................................ 21(/4
Samsung .................. 2003, 2013, 2015, 21133, 2053, 2112
Sank) ............................................................... 213t, 21114
Sansui .......................................... 2010, 21,_2, 2ii1, 2123
Sanyo ..................................................... 2011, 20t3, 21/23
Scou .... 2(/12, 2015, 2025, 2032, 2035, 21/38, 2063, 21,_3,
2116
S_ars ................................. 2011, 2(/14, 2021, 2023, 2048,
2042,2044,2045,2047,2065,2105,2113,2116,2117 ........................ 2049,2050,2051,2055,2056,2107,2118
2130
Fishex .... 2011, 21/23, 2048, 21/49, 2050, 205i, 21152,2118
Ft_i ................................................................... 2021, 21 I!}
Funai ............................................................... 2/102, 2026
Garrard ...................................................................... 2026
GE ........ 2000, 21/01,201L 21/21,21122, 2033, 2115, 2120
Goldstar ............................. 21/09, 2014, 2018, 21154, 212I
(hadi_ hie .................................................................. 21126
Harley Davidson ....................................................... 21126
t Iannan KaIdon ....................................................... 21/09
tIax_ood ................................................................... 2061
Headquarl_ r ............................................................. 21111
t Iitachi 2002,2033,2056,2037,2107,2111,2120,2122
tII-Q .......................................................................... 21/23
lnsmnt Replay ........................................................... 21/21
JCi .............................................................................. 21/21
JC PCnney ............... 2009, 2010, 2011, 21/13, 2014, 2021,
............ 2022, 21/33, 2056, 2058, 21159, 2060, 2107, 2118
J_ ns¢ n .................................................... 21/33, 21136, 2111
JV( ................. 2009, 21111/,201 I, 2018, 2058, 2111,2123
K¢m_ood 2009, 21/10, 2011, 2016, 2018, 2058, 2111,2123
KI.H ........................................................................... 21/61
Kodak .............................................................. 2/114, 2021
Lhud ............................................................... 2/)1/2, 2026
Logik ......................................................................... 2061
LXI ............................................................................ 2(/14
Magna_ox 2021,21122, 2062, 2063, 2104, 2108, 2124
Magnin ...................................................................... 2013
Max antz ................................................ 2009, 21110, 201 I,
.................................. 2016, 21/18, 2021, 21/38, 2062,2064
Maxta ......................................................................... 2014
M _sushim .................................................................. 21/21
MEI ............................................................................ 21/21
Me moxex ........................................................ 211112,201 I,
...................... 2013, 21114, 202I, 2023, 2026, 2104, 2131
MGA ...................................................... 21/29, 2065, 2113
MGN h chnok)gv ..................................................... 21/13
Midland ..................................................................... 21/53
Minolta .................................................. 21/55, 21156, 2107
Milsubishi 2029, 2055, 2056, 2065, 2066, 2067, 2060,
............ 2070, 21/71,2072, 2073, 21174, 2106, 2113, 2123
Momgomex y Wa_d ......................................... 2/175, 2131
Motoiola ......................................................... 202[,213t
MTC ...................................................... 21/02, 2013, 2026
Shaq} ............. 2/102, 20I 7, 21/29, 2094, 2095, 2096, 2131
Shimoin ....................................... 2004, 2056, 2061, 21_8
Shogun ...................................................................... 2//¸13
Signature ........................................................ 21/112,2131
Singei ¸ .................................................... 21121, 2061, 2128
Sony ......................... 20112, 211114,21198, 2//!19, 21 I!t, 2128
_S .................................................................. 2112l, 21117
_lvania 21/112,21121, 21122, 21126, 2062, 21163, 2063, 2¸124
Swnphonic ...................................................... 21102, 21126
Fandv ............................................................... 20112, 21111
Fashiko ...................................................................... 21114
llmmg ............................................................. 21138, 2111
FEA(; ................................. 211112,2026, 21158, 21185, 2111
Technics .......................................................... 21121,2111!)
Feknika .................... 21102, 21114, 202I, 21126, 2100, 212!}
FMK ...................................................... 21113, 21124, 21147
Foshiba .......... 2015, 2114!t,21151,2053, 2063, 2093, 2116
ForeVision ....................................................... 21113, 2014
Unilech ..................................................................... 21113
Vector Rt_search .......................... 21111!),20111, 2015, 21116
Victoi ........................................................................ 2/)¸111
Video Concepts ................ 21111!},20t0, 2015, 2016, 2113
Videosonic ................................................................ 21113
Wa_ls ........... 2002, 21113, 21114, 21115, 21121, 2023, 2026,
21129, 21153, 2056, 21161,21/!16, 210I, 21112, 21113, 21117,
2116, 2131
XR-1000 ................................................. 21121, 21126, 206¸1
Yainaha .................... 20119, 21110, 2111I, 2/118, 2058, 2111
Zenith ................................ 211114,20!18, 21114, 2I t!t, 2128
Cable Boxes
ABC ............... 5111/2,5003, 51/04, 5005, 5006, 5007, 5053
Anmmix .......................................................... 5008, 51111!)
At{ hel ........................................ 5008, 51/1/9, 50I 1), 51111
1 ablett mla ................................................................ 511118
1 able_iex_ .................................................................. 511118
1 entulv ..................................................................... 51111
1 ifizen ....................................................................... 5011
1 otom Voic( ................................................... 51/12, 51113
1 ommmics ..................................................... 51/14, 51115
Contec ....................................................................... 51)16
Eastetn ..................................................................... 51117
Gai mi_l ..................................................................... 51/¸11
GC Eleclronics ......................................................... 511119
Gemini ................................................. 3018, 51119, 51149
Geneml Instrumem ................................................. 511113
Itamlin ............................. 51121},302I, 51122, 3035, 51145
Ititachi ..................................................................... 511113
ltv_x ........................................................................ 51/I12
Jasco ......................................................................... 5{)11
.I_rold 5003, 5005, 5007,5018, 5023, 5024, 5046 5053
Magnavox ................................................................. 51)25
M_ rnm_ x.................................................................. 5026
Movie Fiml .......................................... 5002 5027, 5028
NSC ...................................................... 5002 5027, 5028
Oak ........................................................ 5002,5016, 5029
Panasolfic ....................................................... 5048, 51)52
Paxagon .................................................................... 5026
Philips ........................................ 5011,5012, 5013, 5019,
5025, 5030, 503I, 5032
Pion_ ( i. .......................................................... 5033, 5034
Pulsa_ ....................................................................... 51126
P.CA ...................................................... 5047, 5049, 5052
P.( alisfic .......................................................... 5009, 5049
P.( gal ............................................................... 5022, 51135
P.( g( n{v .................................................................... 5017
P.einbrandt ............................................................... 5003
Runco ....................................................................... 5026
Samstmg ......................................................... 5014, 5034
Sciemitic Adanta ....................... 5006, 5036, 5037, 5038
Signal .............................................................. 5014, 51118
Sign uure .................................................................. 511113
SL Maix .................................................................... 51114
Spmcer ..................................................................... 5052
Stai{ om ................................................ 5007, 5018, 5053
Stai g_tte .......................................................... 51/14, 5018
St.uquf st .................................................................. 5018
Iandy ........................................................................ 51)4t/
I_ k vi__ .................................................................... 5014
Ibcom .................................................. 3004, 5023, 5041
Ibshiba ..................................................................... 5026
Ihsa .......................................................................... 5018
I\'86 ......................................................................... 5027
Unika .................................................... 3008, 5009 5011
Unit{ d A_dsts ........................................................... 5002
United Cal)le ............................................................ 5053
Uni_rsal .................................... 5{}08 5000, 5010 5011
Vid_ otxm .................................................................. 5044
Vi('txgl21i ...................................... 5015 5025, 5027 5040
Zenith ................................................... 3026, 5050, 5051
Satellite Receivers
Chapparal ...................................................... 5056, 5057
Drake .............................................................. 5038, 51159
GE ............................................................................. 5111111
(;enei_I Instrumems ........................... 5060, 5061, 5062
Panasonic ................................................................. 51175
Primeslar. ................................................................. 5076
ProScan .................................................................... 511111}
P.C'A .......................................................................... 511111}
P.ealistic .................................................................... 5063
Sony .......................................................................... 51172
STSt ......................................................................... 50{_
STS2 ......................................................................... 5065
STS3 ......................................................................... 5066
STS4 ......................................................................... 5067
Ibshiba ..................................................................... 5068
Ibshiba ..................................................................... 51173
Uniden ..................................................................... 50_}
26 Chapter 2
Using the TV's Features
Chapter Overview:
• All About the GUIDE Plus+ System
•The Channel Banner
•Auto Tuning
•Parental Controls and V-Chip
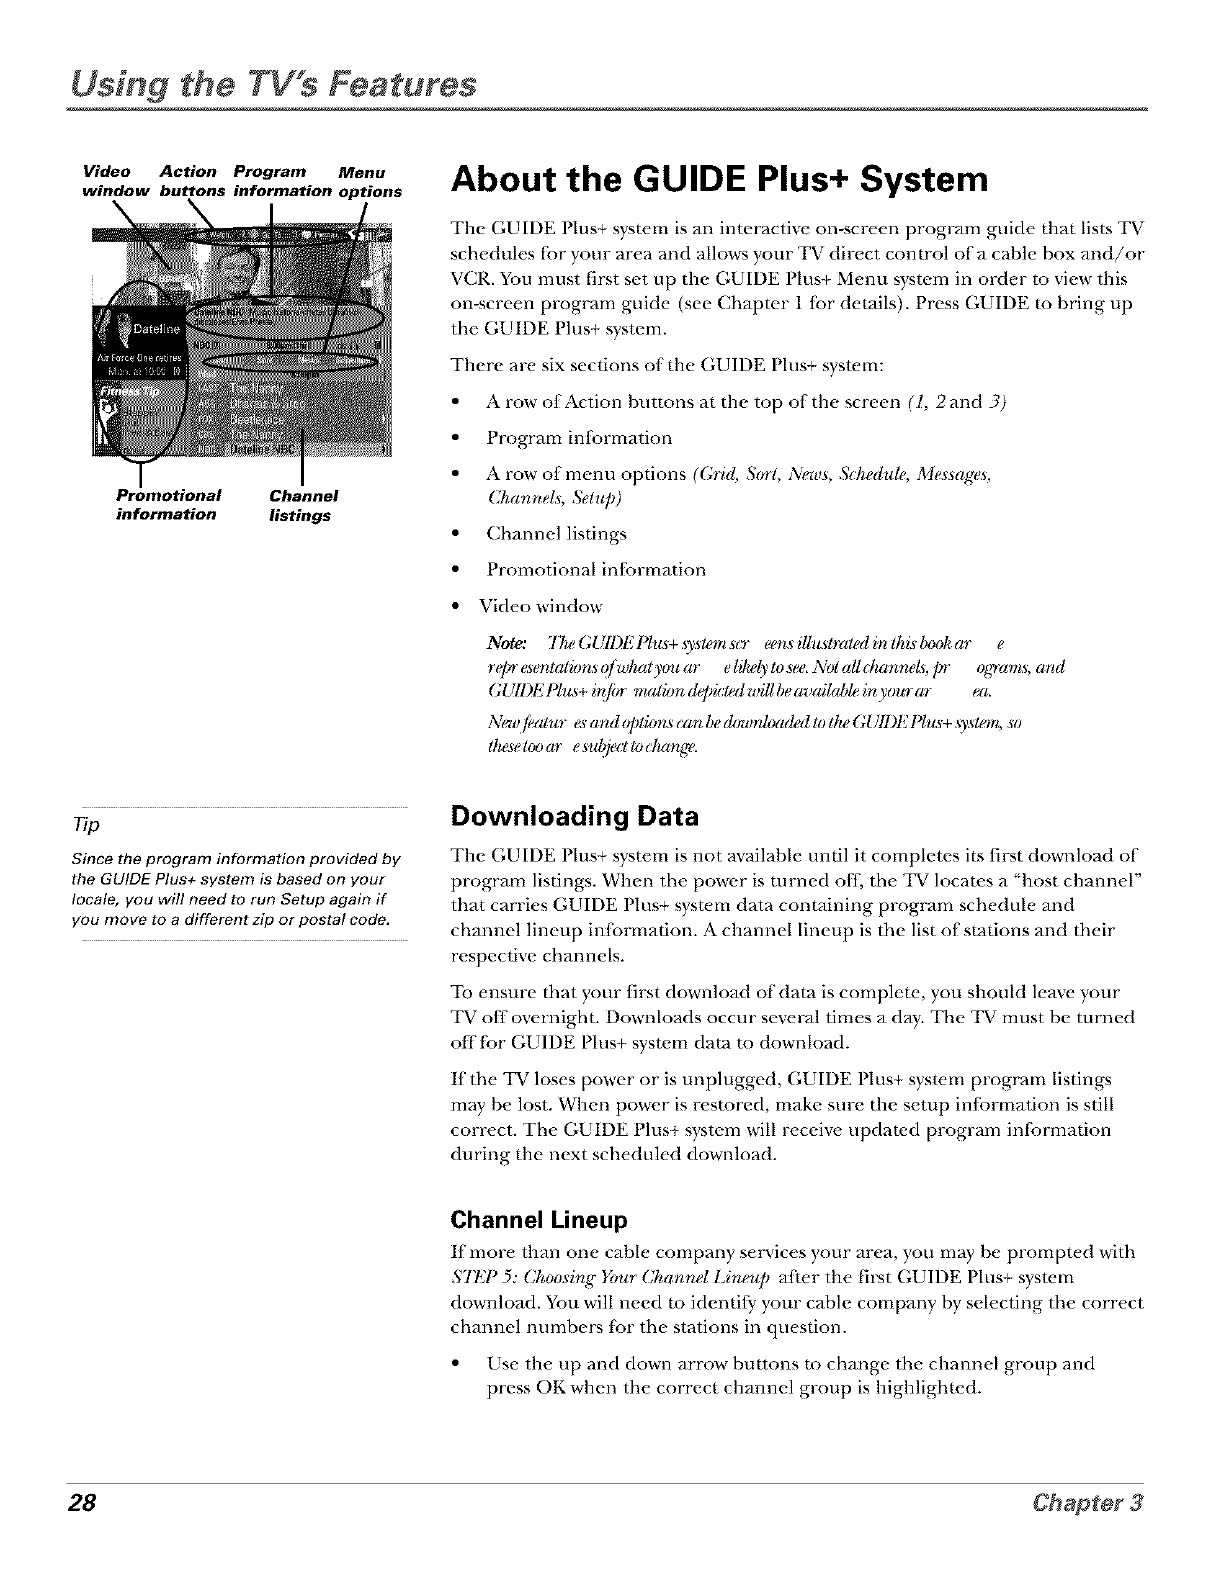
Usfng the TWs Features
Video Action Program Menu
window buttons information options
Promotional Channel
information listings
About the GUIDE Plus+ System
The GUIDE Plus+ system is an interactive on-screen program guide that lists TV
schedules fbr your area and allows your TV direct control of a cable box and/or
VCR. You must first set up the GUIDE Plus+ Menu system in order to view this
on-screen program guide (see Chapter 1 {or details). Press GUIDE m bring up
the GUIDE Plus+ system.
There are six sections of the GUIDE Plus+ system:
• A row of Action buttons at the top of the screen (l, 2 and 3)
• Program information
• A row of menu options (Grid, S(nl, News, Scheduh,, Messages,
Charlnels, Selup)
• Channel listings
• Promotional information
• Video window
Note: 7 7u,GUII)E Phi*+sys/on st)" eensi[htslraledin Ihi,sl)_ekar e
repr esenlathmsq/whz*l you ar elllMy!osee.iM)lall t:hanrwZs;pr og_'ams;and
GUll)l'21_hL_+in/g*rrl_,lhmd_ledwillbeavaikd>leinyourar ea.
New,aim esand@lizmscanberh, vlmhu_uledwlheGU1DElqu._+s),.slgm,so
Ihe_elgu)(o-eszd_j?cllod_mg,'e.
Since the program information provided by
the GUIDE Plus+ system is based on your
locale, you wil! need to run Setup again if
you move to a different zip or postal code.
Downloading Data
The GUIDE Plus+ system is not available until it completes its first download of
program listings. When the power is turned off., the TV locates a "host channel"
that carries GUIDE Plus+ system data containing program schedule and
channel lineup information. A channel lineup is the list of stations and their
respective channels.
To ensure that your first download of data is complete, you should leave your
TV off overnight. Downloads occur several times a day. The TV must be turned
offfbr GUIDE Plus+ system data m download.
If the TV loses power or is unplugged, GUIDE Plus+ system program listings
may be lost. When power is restored, make sure the setup information is still
correct. The GUIDE Plus+ system will receive updated program infbrmation
during the next scheduled download.
Channel Lineup
If more than one cable company services your area, you may be prompted witb
STEP 5: Choosing Yeur Channd Lirze_q_after the first GUIDE Plus+ system
download. You will need to identify your cable company by selecting the correct
channel numbers fbr the stations in question.
• Use the up and down arrow buttons to change the channel group and
press OK when the correct channel group is highlighted.
28 Chapter3

Using the TV s Features
9
Press GUIDE on the remote control to
see the GUIDE Plus+ system. To remove
the program guide from the screen,
press OK, GUIDE, or CLEAR.
Getting In & Out of the GUIDE Plus+ System
To enter the GUIDE Plus+ s}stem:
• Press GUIDE on the remote.
• Press and hold MENU for 2 seconds on the fi-ont panel.
To exit the GUIDE Plus+ system:
• Highlight a program and press OK to exit the GUIDE Plus+ system and rune
to the channel.
• Press GUIDE to exit the GUIDE Plus+ system and rune to the channel
displayed in the video window.
• Press CLEAR to exit the GUIDE Plus+ system and return to the original
channel.
The GUIDE Plus+ System Menus
The GUIDE Plus+ system offers seven different options on the Menu bar: (;*id,
S(yrl, _ws, Schedule, Mes.sag'e.s, Channel.s and Setup. To access the Menu bar:
) • T'T" ) , ,
1. I tess GUtDE to access the GUIDE I his+ system.
2. Press MENU or use the tip and down arrow buttons to select the Menu bar
(the ([;rid Guide appears by delimit).
3. Use the left and right arrow buttons to access other menus.
4. Press OK, or MENU, or use the down arrow button to see the menu options.
Grid Guide
The (,rid Guide appears each time you enter the GUIDE Plus+ s}stem. It
displays the cm'rent programming fbr each channel. The current program is
displayed in the video window.
• Press the tip and down arrow buttons on the remote to browse channel
listings and the channel up and down buttons to page through the listings.
Use the right and le{_ arrow buttons to browse future program listings.
To tune to a channel, highlight the program you want to view in the channel
listing and press OK. Press CLEAR to exit the GUIDE Plus+ system and
return m the original channel. Press GUIDE m exit the GUIDE Plus+ syswm
and tune to the channel in the video window.
Then use the (;rid Guide Action Buttons as described next.
29
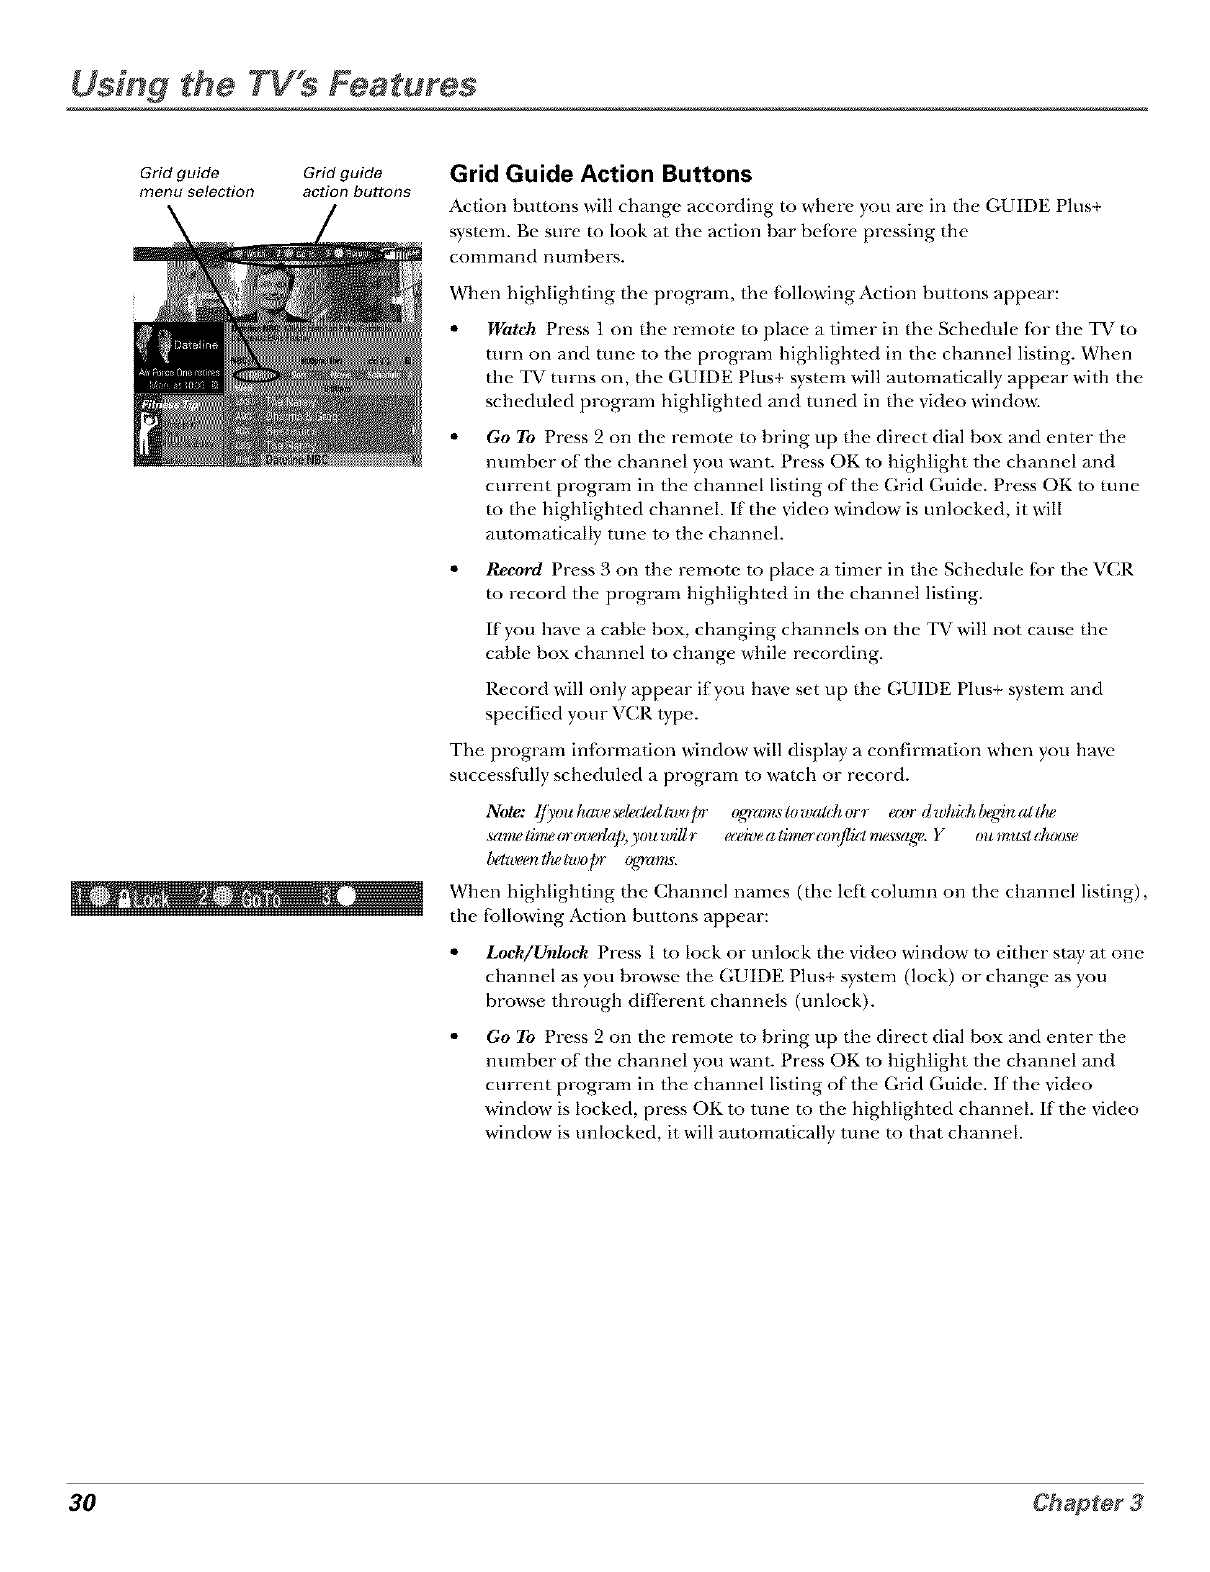
Using the TV's Features
Grid guide Grid guide
menu selection action buttons
\
Grid Guide Action Buttons
Action buttons will chm_ge according to where you are in the GUIDE Plus+
system. Be sure to look at the action bar before pressing the
command numbers.
When highlighting the program, the fbllowing Action buttons appear:
Watch Press 1 on the remote to place a timer in the Schedule {br the TV to
turn on and tune to the program highlighted in the channel listing. When
the TV turns on, the GUIDE Plus+ system will automatically appear with the
scheduled program highlighted and tuned in the video windm_:
Go To Press 2 on the remote m bring up the direct dial box and enter the
number of the channel you want. Press OK m highlight the channel and
current program in the channel listing of the Grid Guide. Press OK to rune
m the highlighted channel. If the video window" is unlocked, it will
automatically tune to the channel.
•Record Press 3 on the remote to place a timer in the Schedule for the VCR
to record the program highlighted in the channel listing.
If you have a cable box, changing channels on the ]Er will not cause the
cable box channel to change while recording.
Record will only appear if you have set up the GUIDE Plus+ system and
specified your VCR type.
The program inlormation window will display a confirmation when you have
successfully scheduled a program to watch or record.
Note: l/_,ouhazJesele(:ledlwopr ogn'amstowaldlorr ecor dzl&idd)eginatllw
same lb_ (n-(nJotap, you will r ecei_ea li**wrcon/licl message. Y ou mus¢ choose
1)_&_eenllwlwo]yr 0grams.
When highlighting the Channel names (the leti column on the channel listing),
the fbllowing Action buttons appear:
•Lock/Unloch Press 1 to lock or unlock the video window" m either stay at one
channel as you browse the GUIDE Plus+ system (lock) or change as you
browse through different channels (unlock).
Go To Press 2 on the remote m bring up the direct dial box and enter the
number of the channel you want. Press OK to highlight the channel and
current program in the channel listing of the Grid Guide. If the video
window is locked, press OK to tune to the highlighted channel. If the video
window is unlocked, it will automatically tune to that channel.
30 Chapter3
Using the TV's Features
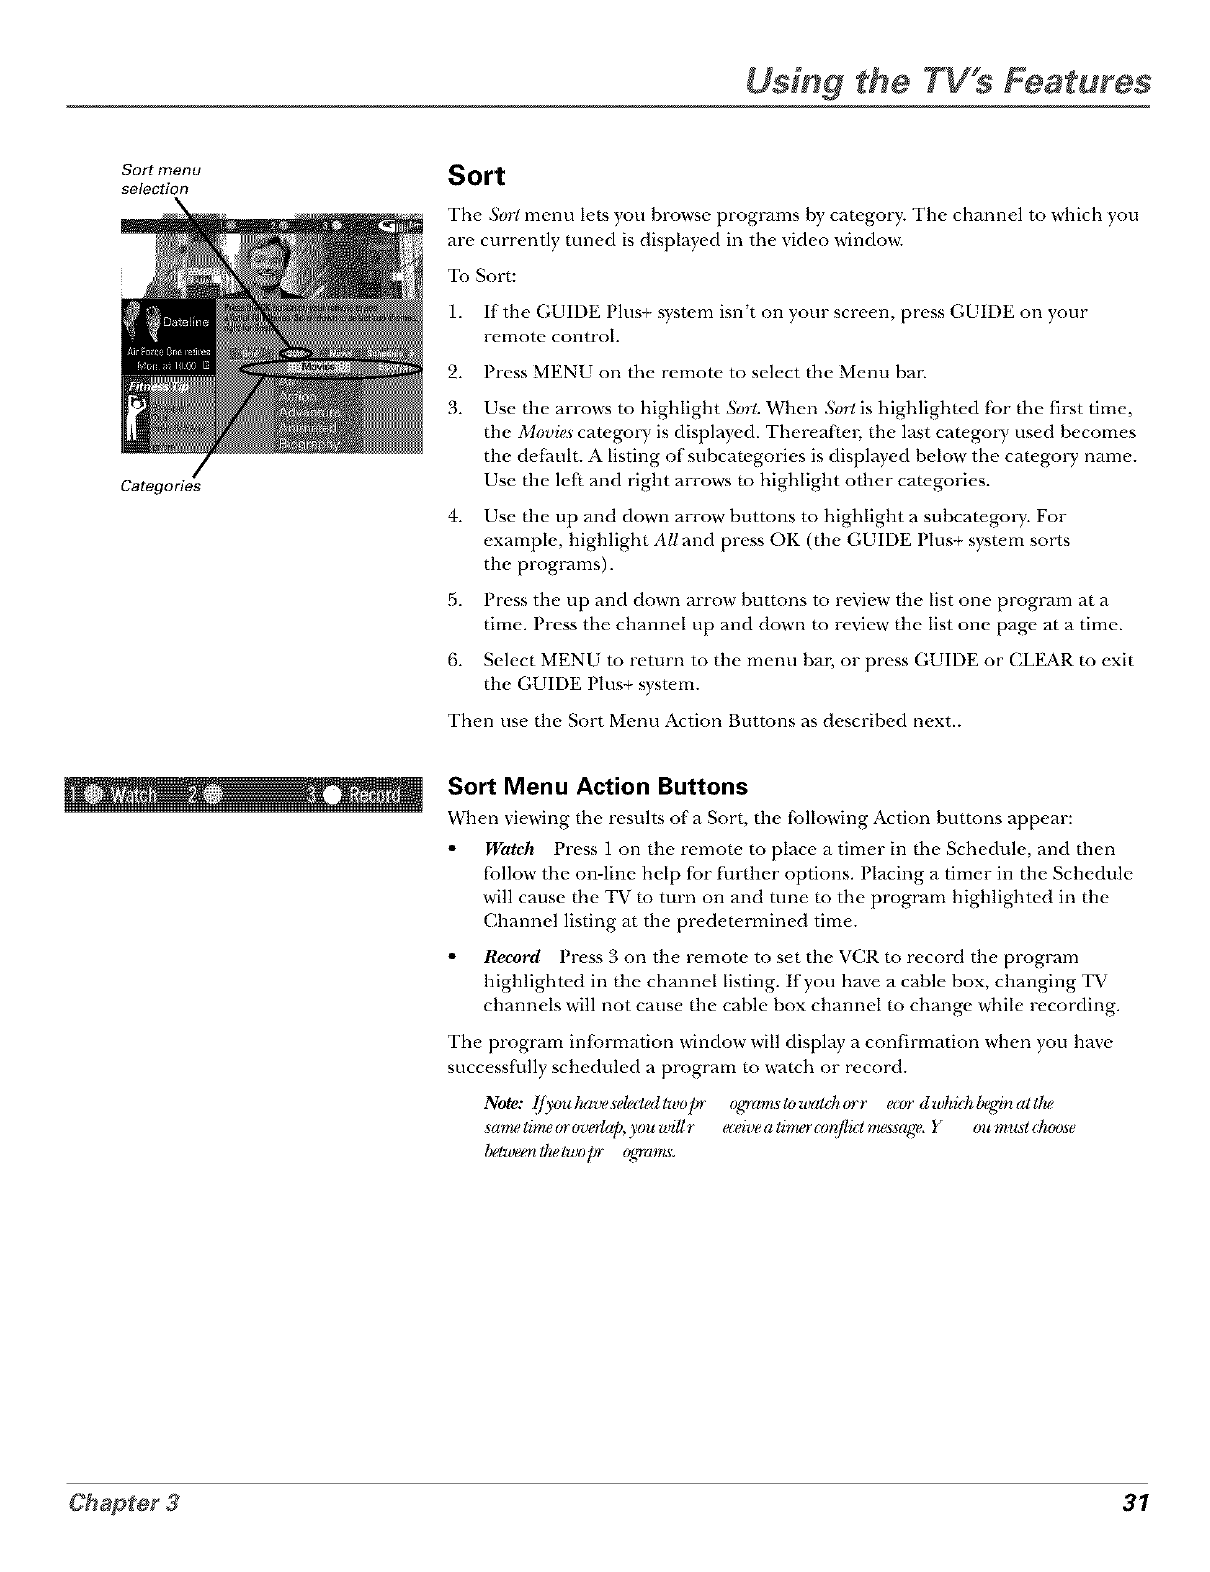
Sort menu
selection
Categories
Sort
The Sort menu lets you hrowse programs hy cat_,gory. The channel to which you
are currently tuned is displayed in the video windms:
To Sort:
1. If the GUIDE Plus+ system isn't on your screen, press GUIDE on your
remote control.
2. Press MENU on the remote to select the Menu ba_=
3. Use the arrows to highlight S0r/. When Sort is highlight_,d for the first time,
the Movies catego D, is displayed. Thereafter, the last cat_.goly, used becomes
the de[huh. A listing of subcategories is displayed below the care.go1T name.
Use the left and right arrows m highlight other cat¢.gories.
4. Use the up and down arrow buttons to highlight a subcategoD,. For
example, highlight All and press OK (the GUIDE Plus+ syst¢.m sorts
the programs).
5. Press the up and down arrow buttons to review the list one program at a
time. Press the channel up and down m review" the list one page at a time.
6. Select MENU to return to the menu bar, or press GUIDE or CLEAR m exit
the GUIDE Plus+ system.
Then use the Sort Menu Action Buttons as described next..
Sort Menu Action Buttons
When viewing the results of'a Sort, the fbllowing Action humms appear:
•Watch Press 1 on the remote, m place a timer in the Schedule, and then
tollow the on-line help fbr ti_rther options. Placing a timer in the Schedule
will cause the TV m turn on and tune m the program highlighted in the
Channel listing at the predetermined time.
•Record Press 3 on the remote to set the VCR m record the program
highlighted in the channel listing. If you have a cable box, changing TV
channels will not cause the cable box channel mchange while recording.
The program inlormation window will display a confirmation when you have
successfully scheduled a program to watch or record.
Note: l/ymhaveselgctgdtwopr qqr(m_slowalchorr ecer dzl&idd)winatllw
sanw tim,?(n-(n:o#q), you will r ecei_:ea linwr cor_/lk:lnwssage. You must chzx)se
lu_l_,_eertllwtwop- ogwams.
31
Using the TV s Features
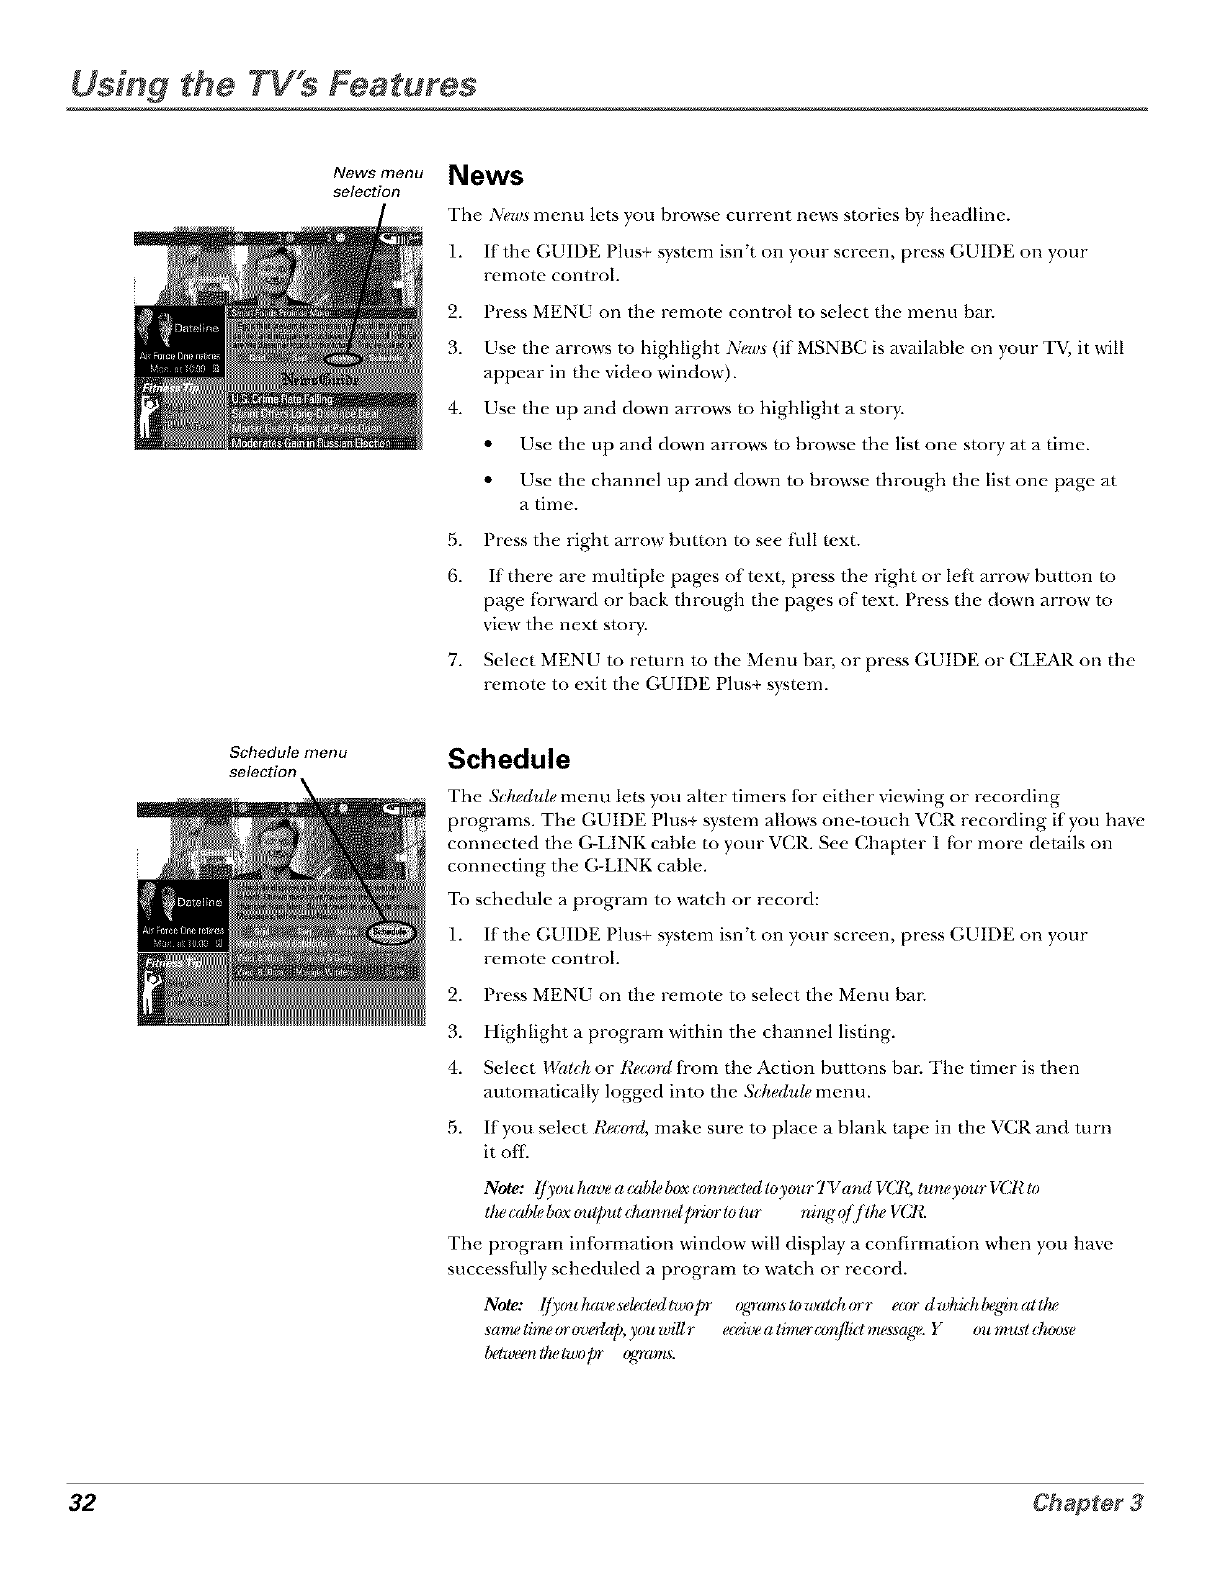
News menu
selection News
The News menu lets you browse current news stories hy headline.
1. If the GUIDE Plus+ system isn't on your screen, press GUIDE on your
remote control.
2. Press MENU on the remote, control to select the menu bar.
3. Use the arrows to highlight News (if MSNBC is available on your TV, it will
appear in the video window).
4. Use the up and down arrows m highlight a stol T.
• Use the up and down arrows m browse the list one story at a time.
• Use the channel up and down to browse through the list one page at
a time.
5. Press the right arrow button m see [_1lItext.
6. If there are multiple pages of text, press the right or leI} arrow button m
page [brward or back through the pages of text. Press the down arrow m
view the next stol T.
7. Select MENU to return to the Menu bal, or press GUIDE or CLEAR on the
remote to exit the GUIDE Plus+ system.
Schedule menu
selection Schedule
The Schedule menu lets you alter timers {br either viewing or recording
programs. The GUIDE Plus+ system allows one-touch VCR recording if you have
connected the G-LINK cable to your VCR. See Chapwr 1 tbr more details on
connecting the G-LINK cable.
To schedule a program to watch or record:
1. If the GUIDE Plus+ system isn't on your screen, press GUIDE on your
remote control.
2. Press MENU on the remote to select the Menu bat=
3. Highlight a program within the channel listing.
4. Select 147al('hor t_gcol_li]com the Action buttons bar. The timer is then
automatically logged into the &hedule menu.
5. If you select Record, make sure to place a blank tape in the VCR and turn
it ofl-
Note: I/youhaveacableboxconnectedtoygmrTVandVCl_, luneygmrVCl¢lo
Ihe cM_leboxoulput chzmr*ell_iz,r lolur nirtg'q/ f llu,VCl_.
The program inlormation window will display a confirmation when you have
successfldly scheduled a program to watch or record.
Note: Ify(mhzweselmledlwopr ogran_s/oTl_achorr ean dwhidlbeginat/lu,
_ametim,?orovoblp,)ou_,illr e_iveatinu_(zm/li_¢nu._agu'.Y oumus¢(_z_)se
lu_l_z_eenthe two/n" %_a,nL_.
32 Chapter 3
Using the TV s Features
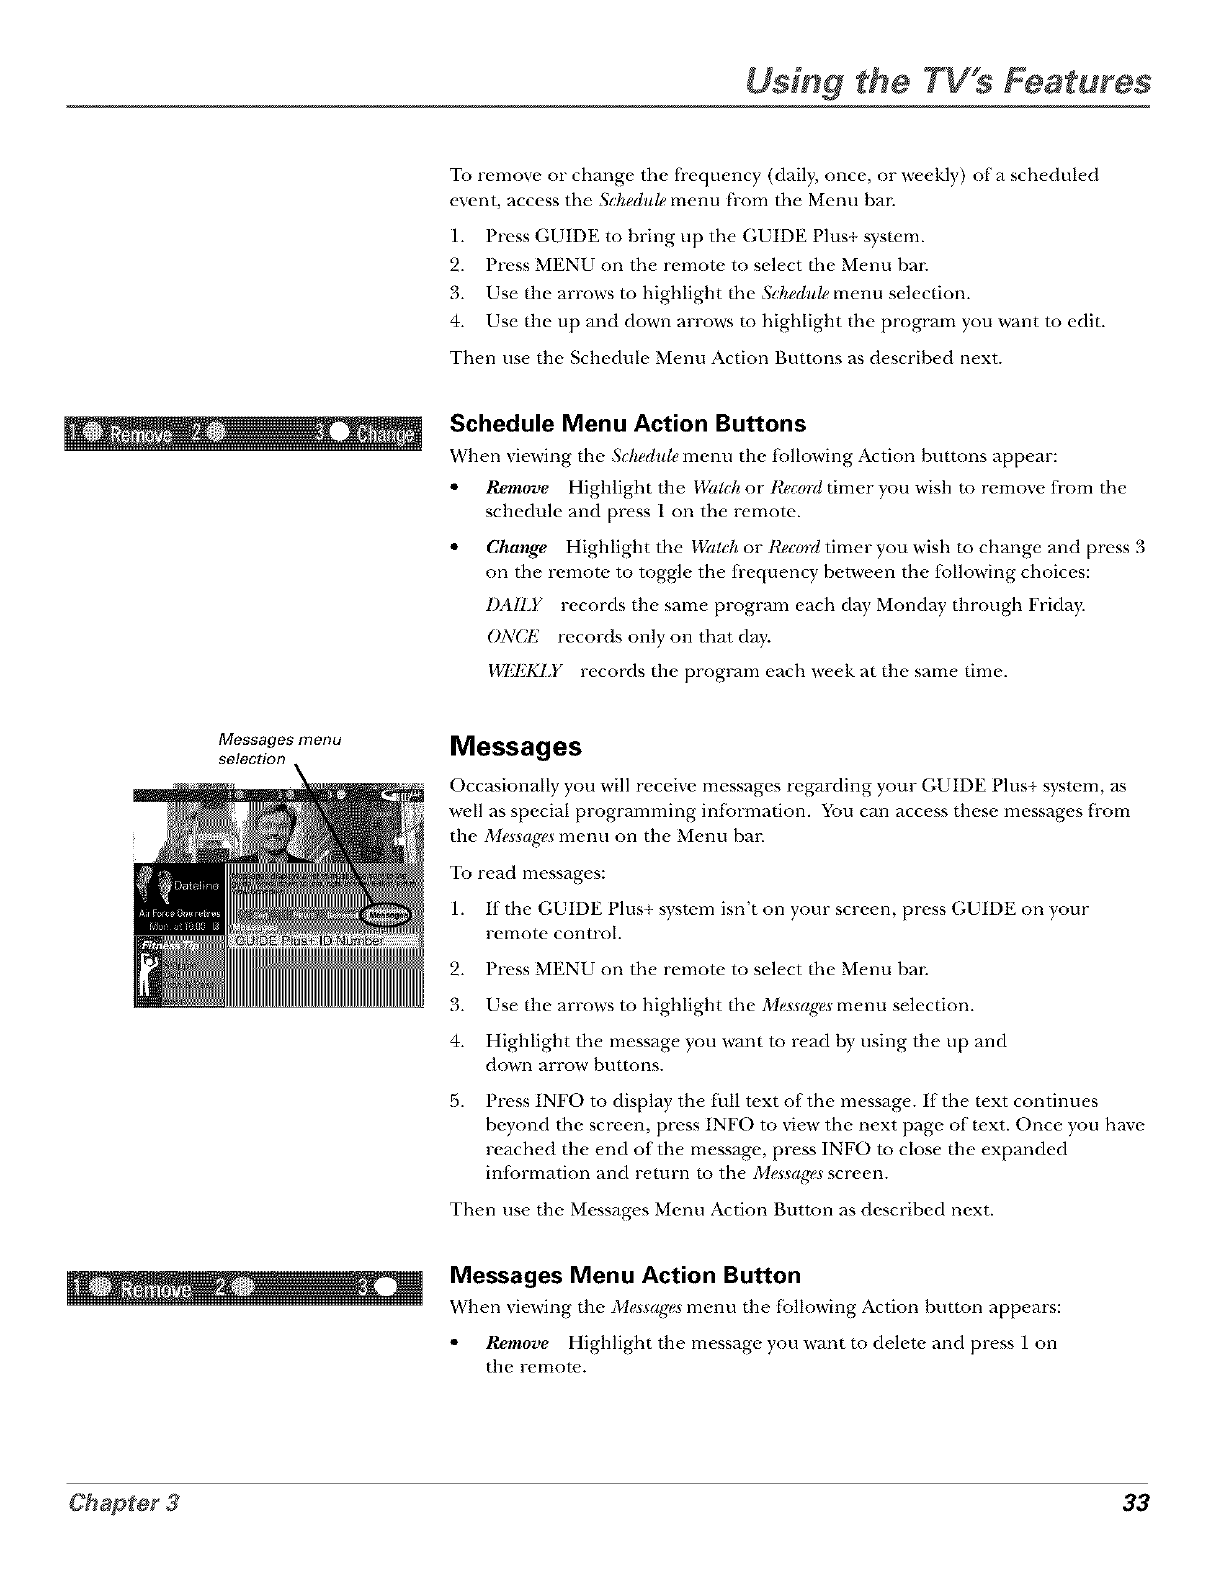
Messages menu
selection
To remove or change the frequency (daily, once, or weekly) of a scheduled
event, access the Schedult, menu from the Menu bar.
1. Press GUIDE to bring up the GUIDE Plus+ system.
2. Press MENU on the remote to select the Menu bar.
3. Use the arrows to highlight the Scheduh, menu selection.
4. Use the up and down arrows m highlight the program you want to edit.
Then use the Schedule Menu Action Buttons as described next.
Schedule Menu Action Buttons
When viewing the ,";_hedulemenu the following Action huttons appear:
•Remove Highlight the 1Xgll(ltor I?,ecmdtimer you wish to remove from the
schedule and press 1 on the remote.
•Change Highlight the 1X(ll(hor l¢,ec(,_-dtimer you wish to change and press 3
on the remote to toggle the fi-equency between the following choices:
DAILY records the same program each day Monday through Friday.
ONCI'2 records only on that day.
I'Iq'J_KLY records the proglvJm each week at the same time.
Messages
Occasionally you will receive messages regarding your GUIDE Plus+ system, &s
well as special programming infbrmation. You can access these messages from
the Messages menu on the Menu bar.
To read messages:
1. If the GUIDE Plus+ system isn't on your screen, press GUIDE on your
remote control.
2. Press MENU on the remote to select the Menu bar.
3. Use the arrows to highlight the Messages menu selection.
4. Highlight the message you want m read hy using the up and
down arrow buttons.
5. Press INFO to display the I_ll text of the message. If the text continues
beyond the screen, press INFO to view the next page of text. Once you have
reached the end of the message, press INFO m close the expanded
information and return to the Messages screen.
Then use the Messages Menu Action Button as described next.
Messages Menu Action Button
When viewing the Messages menu the fbllowing Action hutton appears:
•Remove Highlight the message you want m delete and press 1 on
the remote..
33
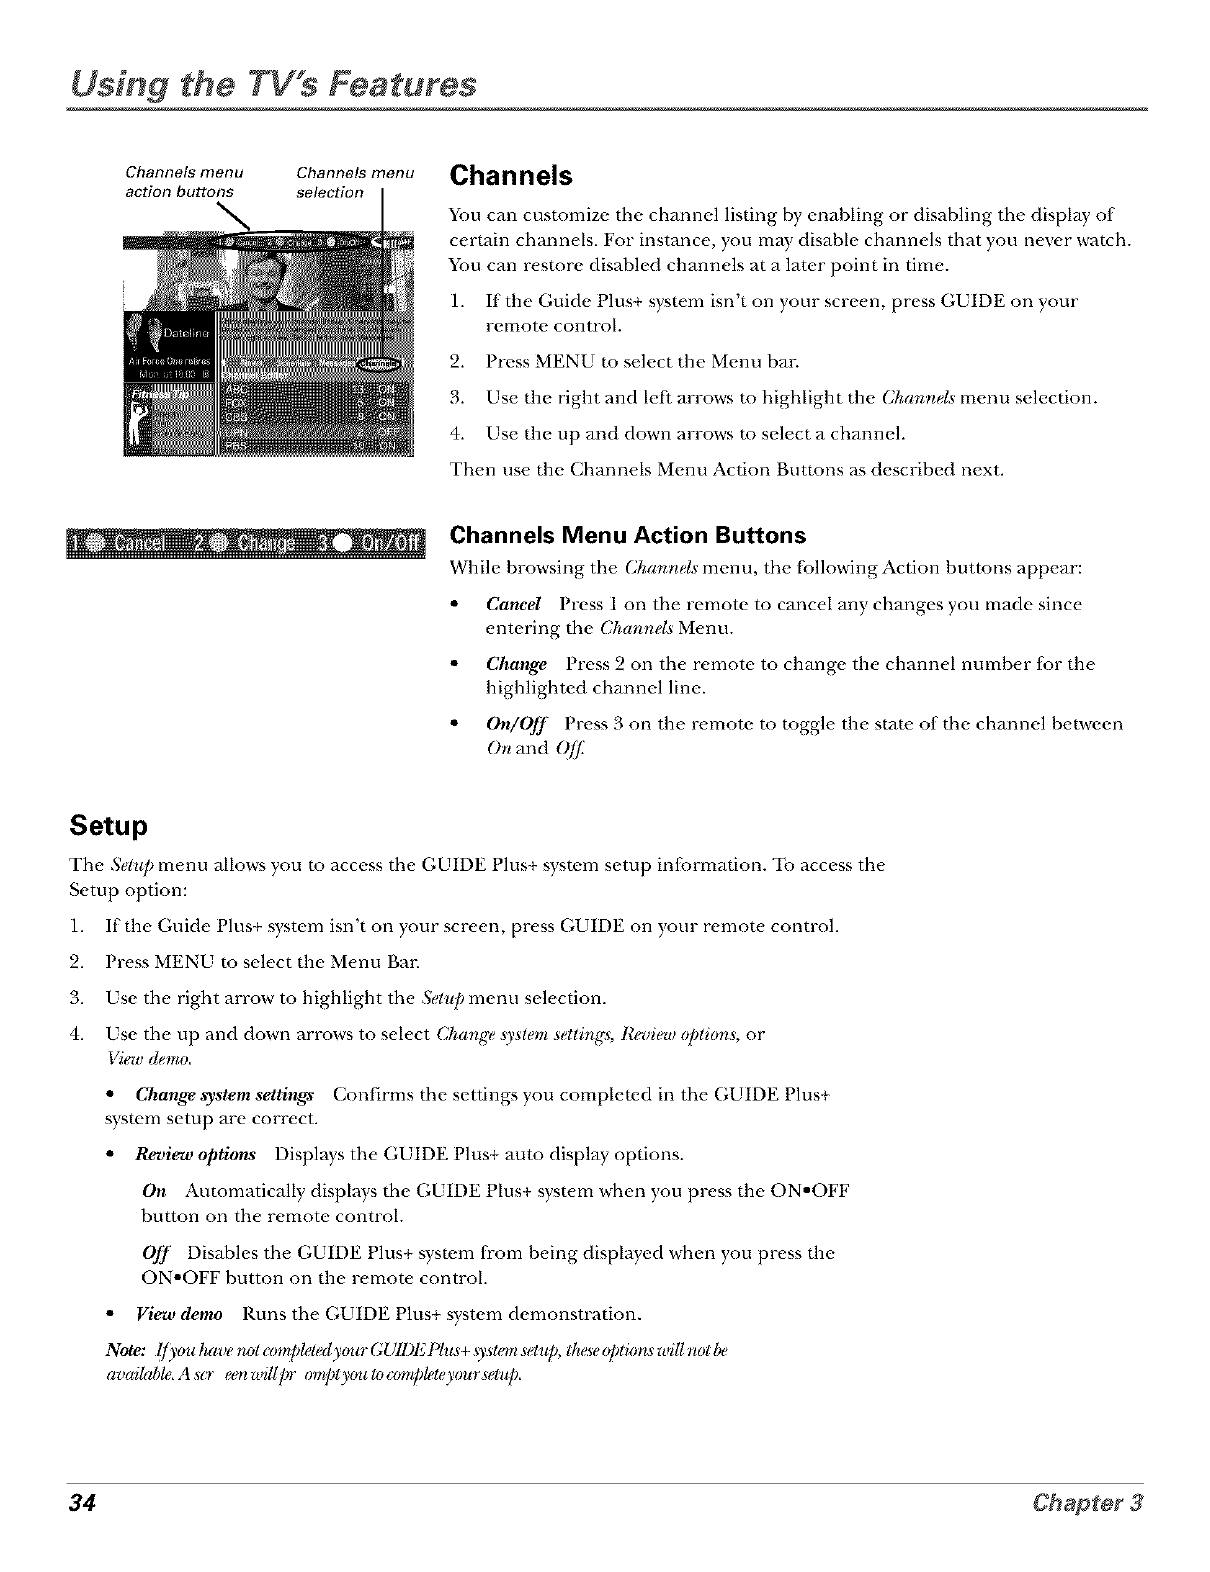
Using the TV s Features
Channe_ menu Channe_ menu
action buttons se_ction Channels
You can customize the channel listing by cnahling or disabling the display of
certain channels. For instance, you mW disable channels that you never watch.
You can restore disabled channels at a later point in time.
1. If the Guide Plus+ system isn't on your screen, press GUIDE on your
remote control.
2. Press MENU m select the Menu bar.
3. Use the right and let} arrows m highlight the Channel._menu selection.
4. Use the up and down arrows m select a channel.
Then use the Channels Menu Action Buttons as described next.
Channels Menu Action Buttons
While hrowsing the Channd._ menu, the [;:_llowing Action huttons appear:
•Cancel Press 1 on the remote to cancel any changes you made since
entering the Channd._ Menu.
•Change Press 2 on the remote to change the channel number for the
highlighted channel line.
•On/OJ] Press 3 on the remote to toggle the state of the channel between
On and 0//_
Setup
The Setup menu allows you to access the GUIDE Plus+ system setup
Setup option:
1.
2.
3.
4.
infbrmation. To access the
If the Guide Plus+ system isn't on your screen, press GUIDE on your remote control.
Press MENU to select the Menu Bar.
Use the right arrow to highlight the Sel*qJmenu selection.
Use the up and down arrows to select Change _),slemsettings, R_fiew @lions, or
View demo.
• Change system settings Confirms the settings you completed in the GUIDE Plus+
system setup are correct.
•Review options Displays the GUIDE Plus+ auto display options.
On Automatically displays the GUIDE Plus+ system when you press the ON'OFF
button on the remote control.
Off Disables the GUIDE Plus+ system fi-om being displayed when you press the
ON-OFF button on the remote control.
•View demo Runs the GUIDE Plus+ system demonstration.
Note: I/)'o_Jtaver_lr:omplelgdj,gnogl/1Dl'21_hL_+._),sl_._et_*/i,Ihese@li_r_*villnotbe
availrd)le,A so- eenwillpr oml)lygn_lo(znn!_lgle),ourselu/_,
34 Chapter 3
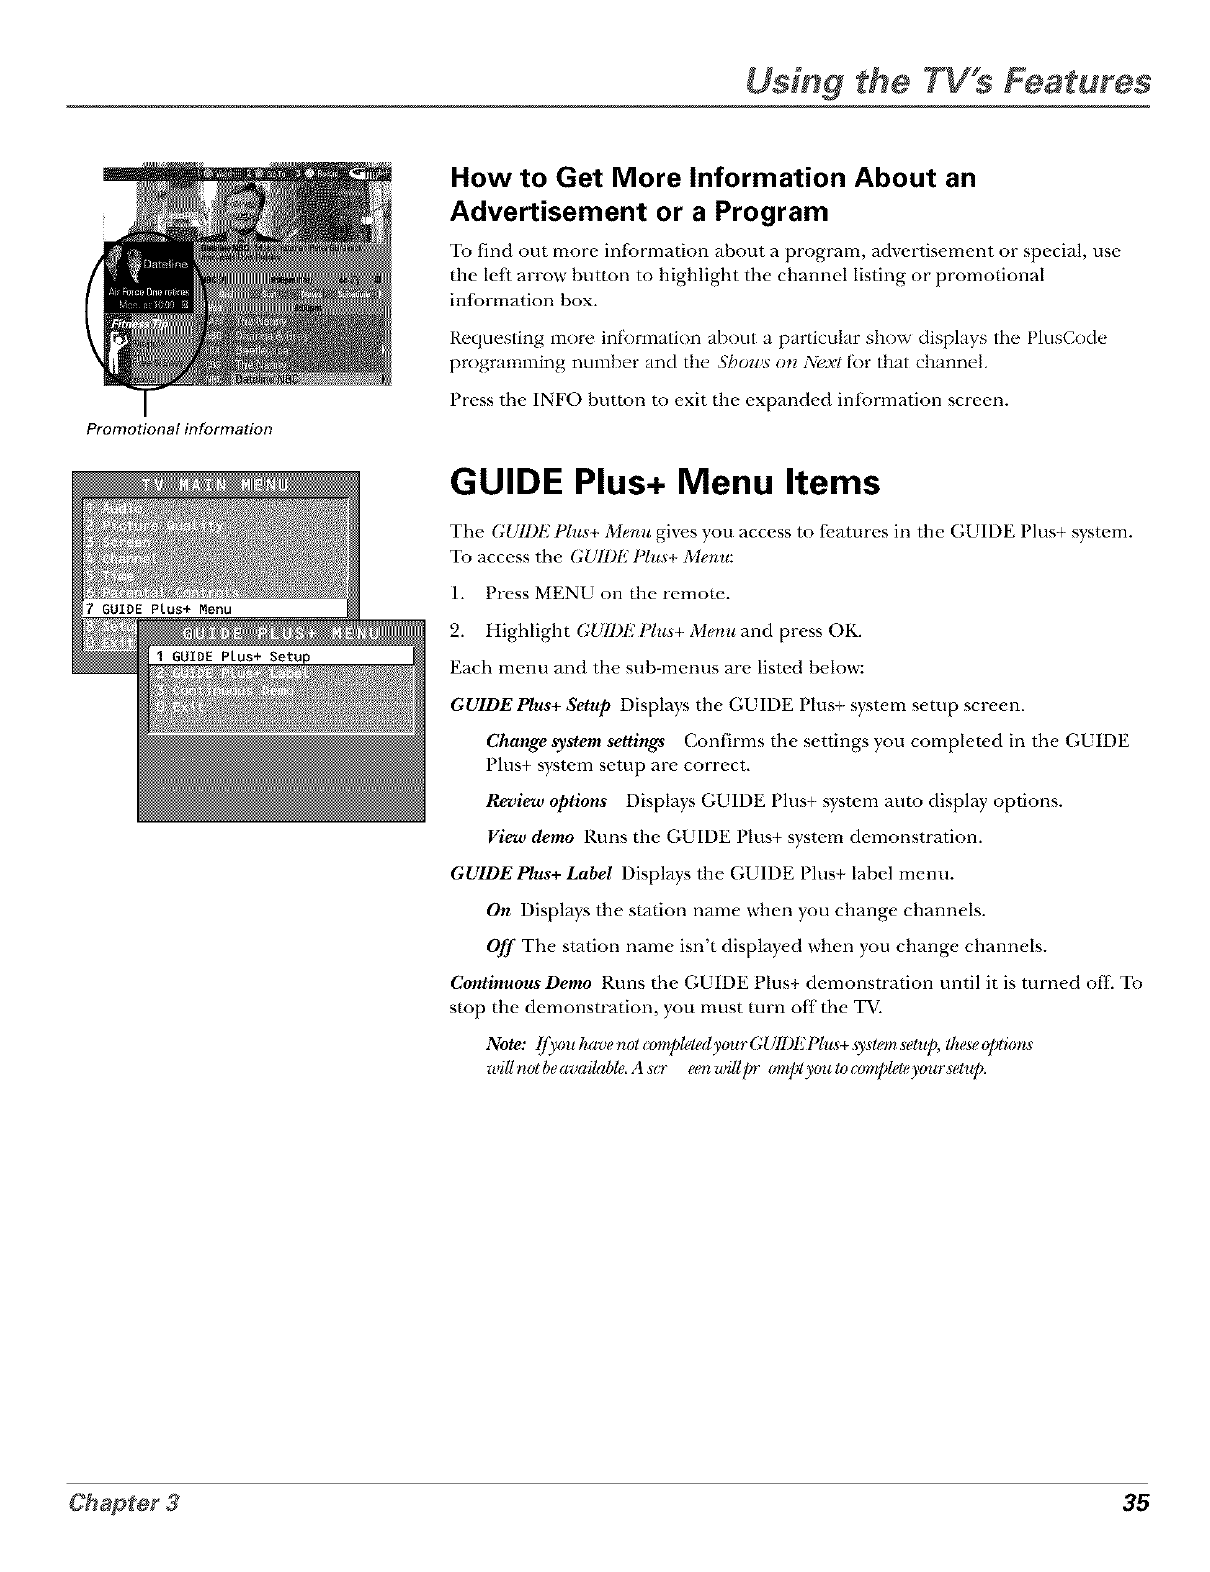
Promotional information
Using the TV,s Features
How to Get More Information About an
Advertisement or a Program
To find out more inlbrmation about a program, advertisement or special, use
the left arrow button to highlight the channel listing or promotional
infbrmation box.
Requesting more inlk)rmation about a particular show displays the PlusCode
programming number and the Shows on ?v?_xttk)r that channel.
Press the INFO button to exit the expanded inlormation screen.
GUIDE Plus+ Menu Items
The GUll)E Plu._+ Menu gives you access to {_,atures in the GUIDE Plus+ system.
To access the GUll)E l_lus+ Menu:
1. Press MENU on the remote.
2. Highlight GUII)E Plus+ Menu and press OK.
Each menu and the sub-menus are listed below:
GU1DEPlus+ Setup Displays the GUIDE I lus+ system setup screen.
Change system settings Confirms the settings you completed in the GUIDE
Plus+ system setup are correct.
Review options Displays GUIDE Plus+ system auto display options.
View demo Runs the GUIDE Plus+ system demonstration.
GU1DEPlus+ Label Displays the GUIDE Plus+ label menu.
On Displays the station name when you change channels.
Off The station name isn't displayed when you change channels.
ContinuousDemo Runs the GUIDE Plus+ demonstration until it is turned oft- To
stop the demonstration, you must rum off the TV.
Note: lf)_ouhzwenolcompleledy_mrGUll)l,2lqu._+.sy._l_tnseh,p, Ihese_q_lk_r_
wilI rlol beavai#d_le. A so- een willy' _mq_ly_m lo coml_lebsyo_r setup.
35
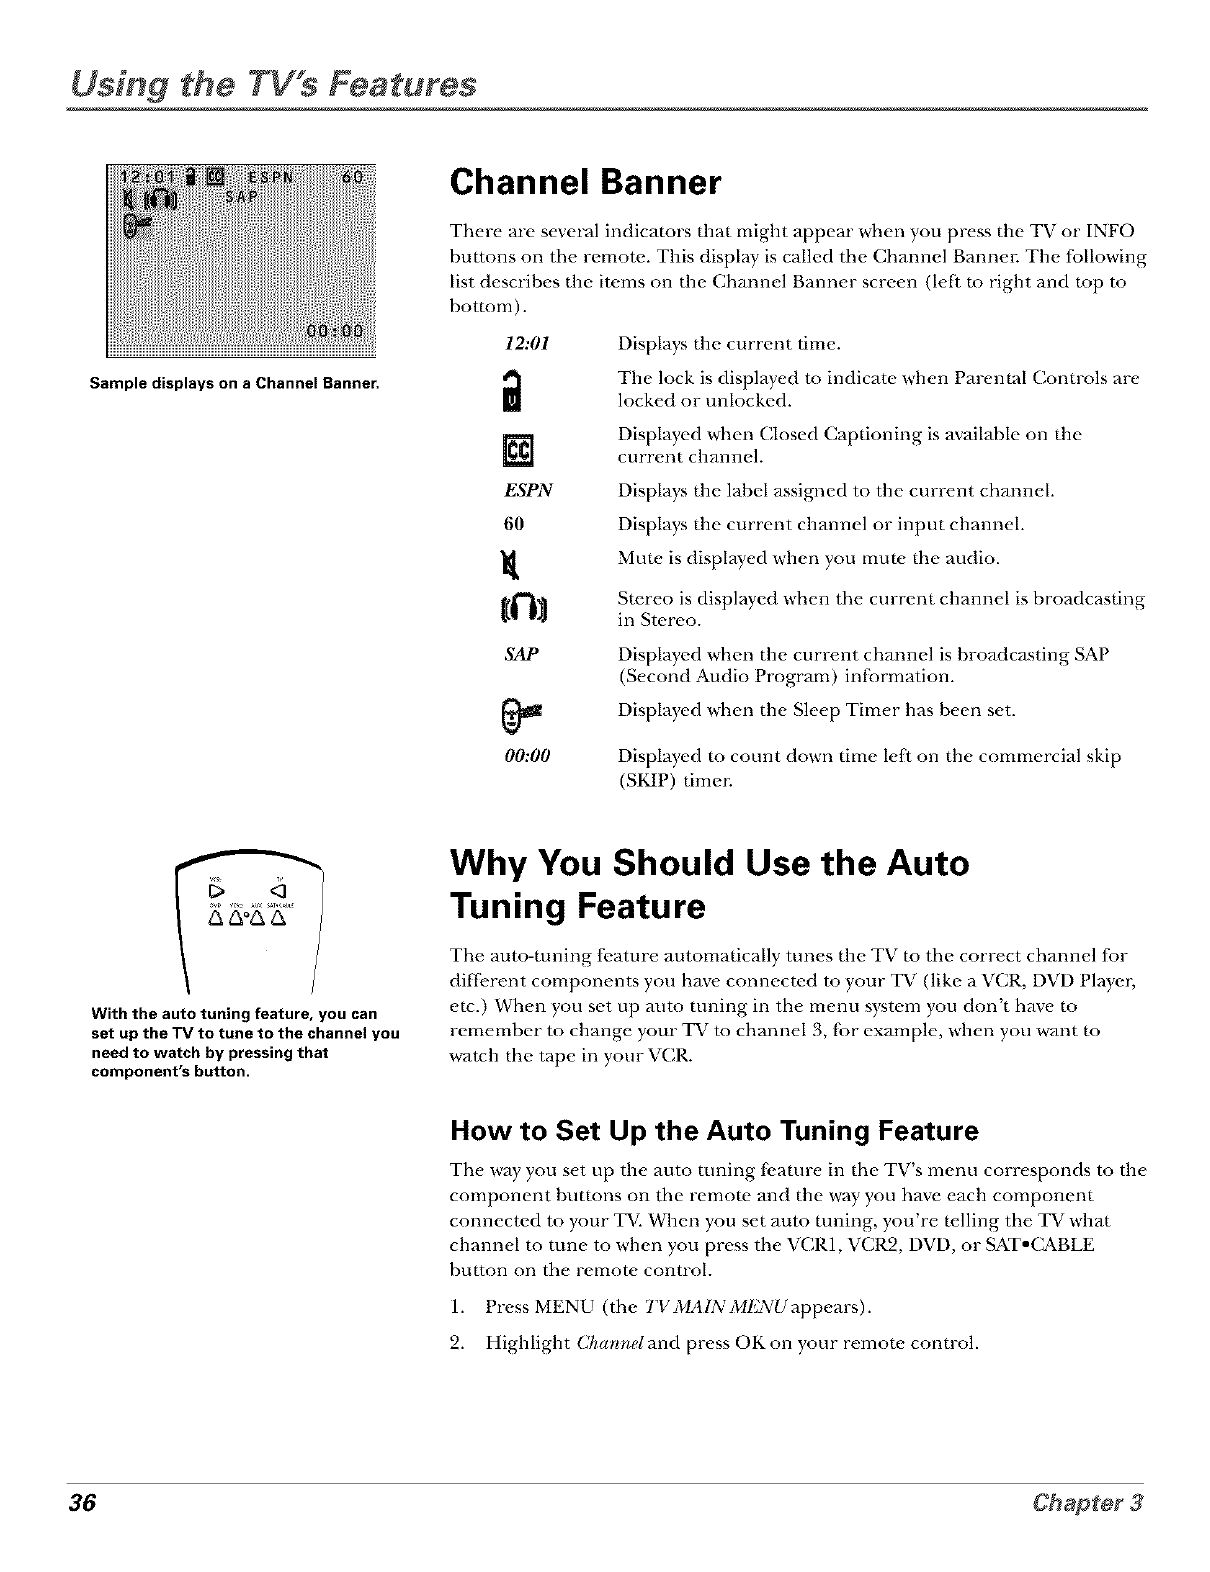
Using the TV s Features
Sample displays on a Channel Banner.
Channel Banner
There are several indicators that might appeal" when you press the TV or INFO
buttons on the remote. This display is called the Channel Bannel: The following
list describes the items on the Channel Banner screen (left to right and top to
bottom).
12:01
i
[]
ESPN
60
tl'i l
SAP
00:00
Displays the current time.
The lock is displfJyed m indicfJte when Parental Controls are
locked or unlocked.
Displayed when Closed Captioning is available on the
current chfmnel.
Displays the label assigned to the current chfmnel.
Displays the current chfmnel or input channel.
Muw is displayed when you mute the audio.
Stereo is displayed when the current channel is broadcasting
in Stereo.
Displayed when the current chfmnel is broadcfJsting SAP
(Second Audio Program) in[;:)rmation.
Displayed when the Sleep Timer has been set.
Displayed m count down time le{k on the commerciM skip
(SKIP) time_:
With the auto tuning feature, you can
set up the TV to tune to the channel you
need to watch by pressing that
component's button,
Why You Should Use the Auto
Tuning Feature
The auto-tuning fbature automatically tunes the TV to the correct channel for
different components you have connected to your TV (like a VCR, DVD Playe_;
etc.) When you set up auto tuning in the menu system you don't have to
remember to change your TV to channel 3, fbr example, when you want to
watch the tape in your VCR.
How to Set Up the Auto Tuning Feature
The way you set up the auto tuning Ibatore in the TV's menu corresponds to the
component bumms on the remote and the way you have each component
connected to your TV. When you set auto tuning, you're telling the TV what
channel to tune to when you press the VCR1, VCR2, DVD, or SAToCABLE
breton on the remote control.
7 7 _ r
1. Press MENU (the 7"1,MALN MEl\Uappears).
2. Highlight Channel and press OK on your remote control.
36 Chapter3
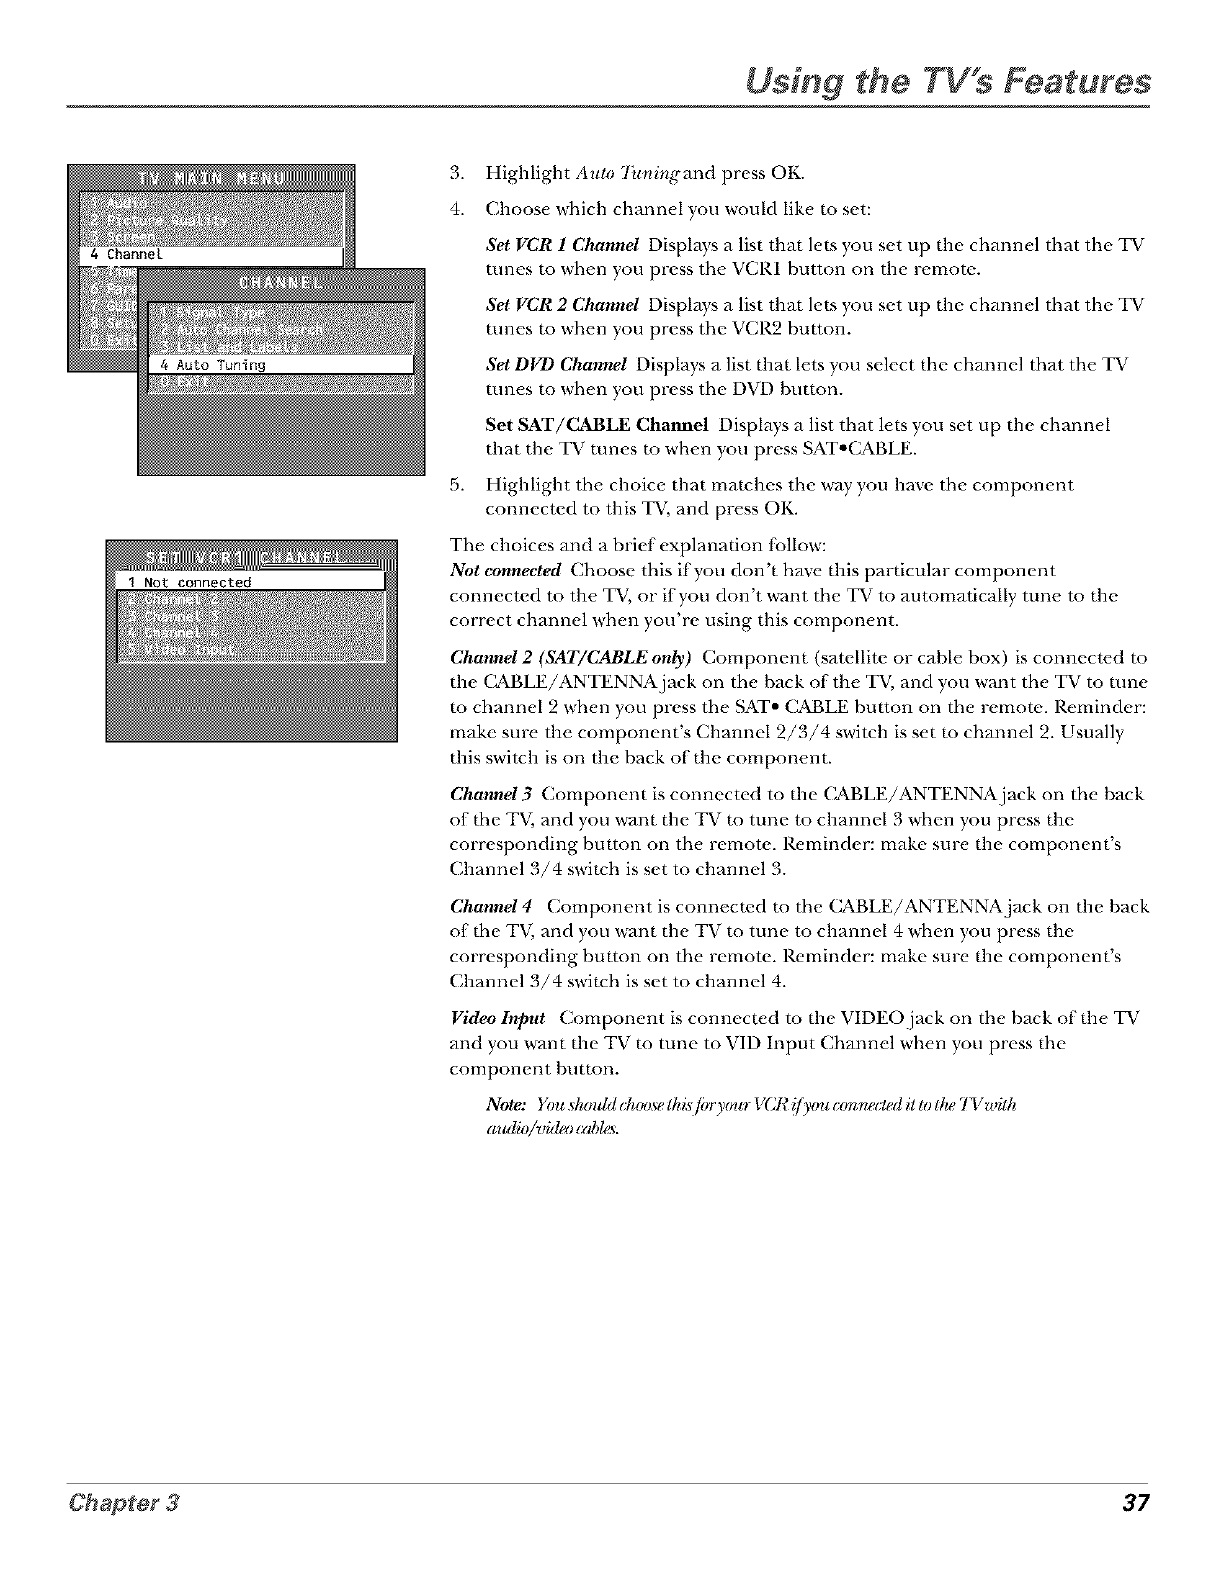
Using the TV s Features
3. Highlight Au/0 7hnirlg'and press OK.
4. Choose which channel you would like m set:
Set VCR 1 Channel Displays a list that lets you set up the channel that the TV
tunes to when you press the VCR1 button on the remote.
Set VCR 2 Channel Displays a list that lets you set up the channel that the TV
tunes to when you press the VCR2 bu_ton.
Set DVD Channel Displays a list that lets you select the channel that the TV
tunes to when you press the DVD button.
Set SAT/CABLE Channel Displays a list that lets you set up the channel
that the TV runes to when you press SAT°CABLE.
5. Highlight the choice that matches the way you have the component
connected to this TV, and press OK.
The choices and a brief explanation lbllow:
Not connected Choose this if you don't have this particular component
connected to the TV, or if you don't want the TV to automatically tune to the
correct channel when you're using this component.
Channel2 (SAT/CABLEonly) Component (satellite or cable box) is connect_.d to
the (_BLE/ANTENNA.jack on the back of the TV, and you want the TV to tune
to channel 2 when you press the SAT° CABLE bu_ton on the remote. P,eminder:
make sure the component's Channel 2/3/4 switeh is set to channel 2. Usually
this switch is on the back of the component.
Channel3 Component is connected to the (_BLE/ANTENNA.jack on the back
of the TV, and you want the TV to tune to channel 3 when you press the
corresponding bu_ton on the remote. P,eminder: make sure the component's
Channel 3/4 switch is set to channel 3.
Channel4 Component is connected m the C&BLE/ANTENNAjack on the back
of the TV, and you want the TV to tune to channel 4 when you press the
corresponding bu_ton on the remote. P,eminder: make sure the component's
Channel 3/4 switch is set to channel 4.
Video Input Component is connected to the VIDEO.jack on the back of the TV
and you want the TV to tune to VID Input Channel when you press the
component hutton.
Note: Yoush/mblcluu)selhisfiyry(mrVCl¢!/youc(,,nn_ct_dillolheTVwilh
audio/video cabl_.
37
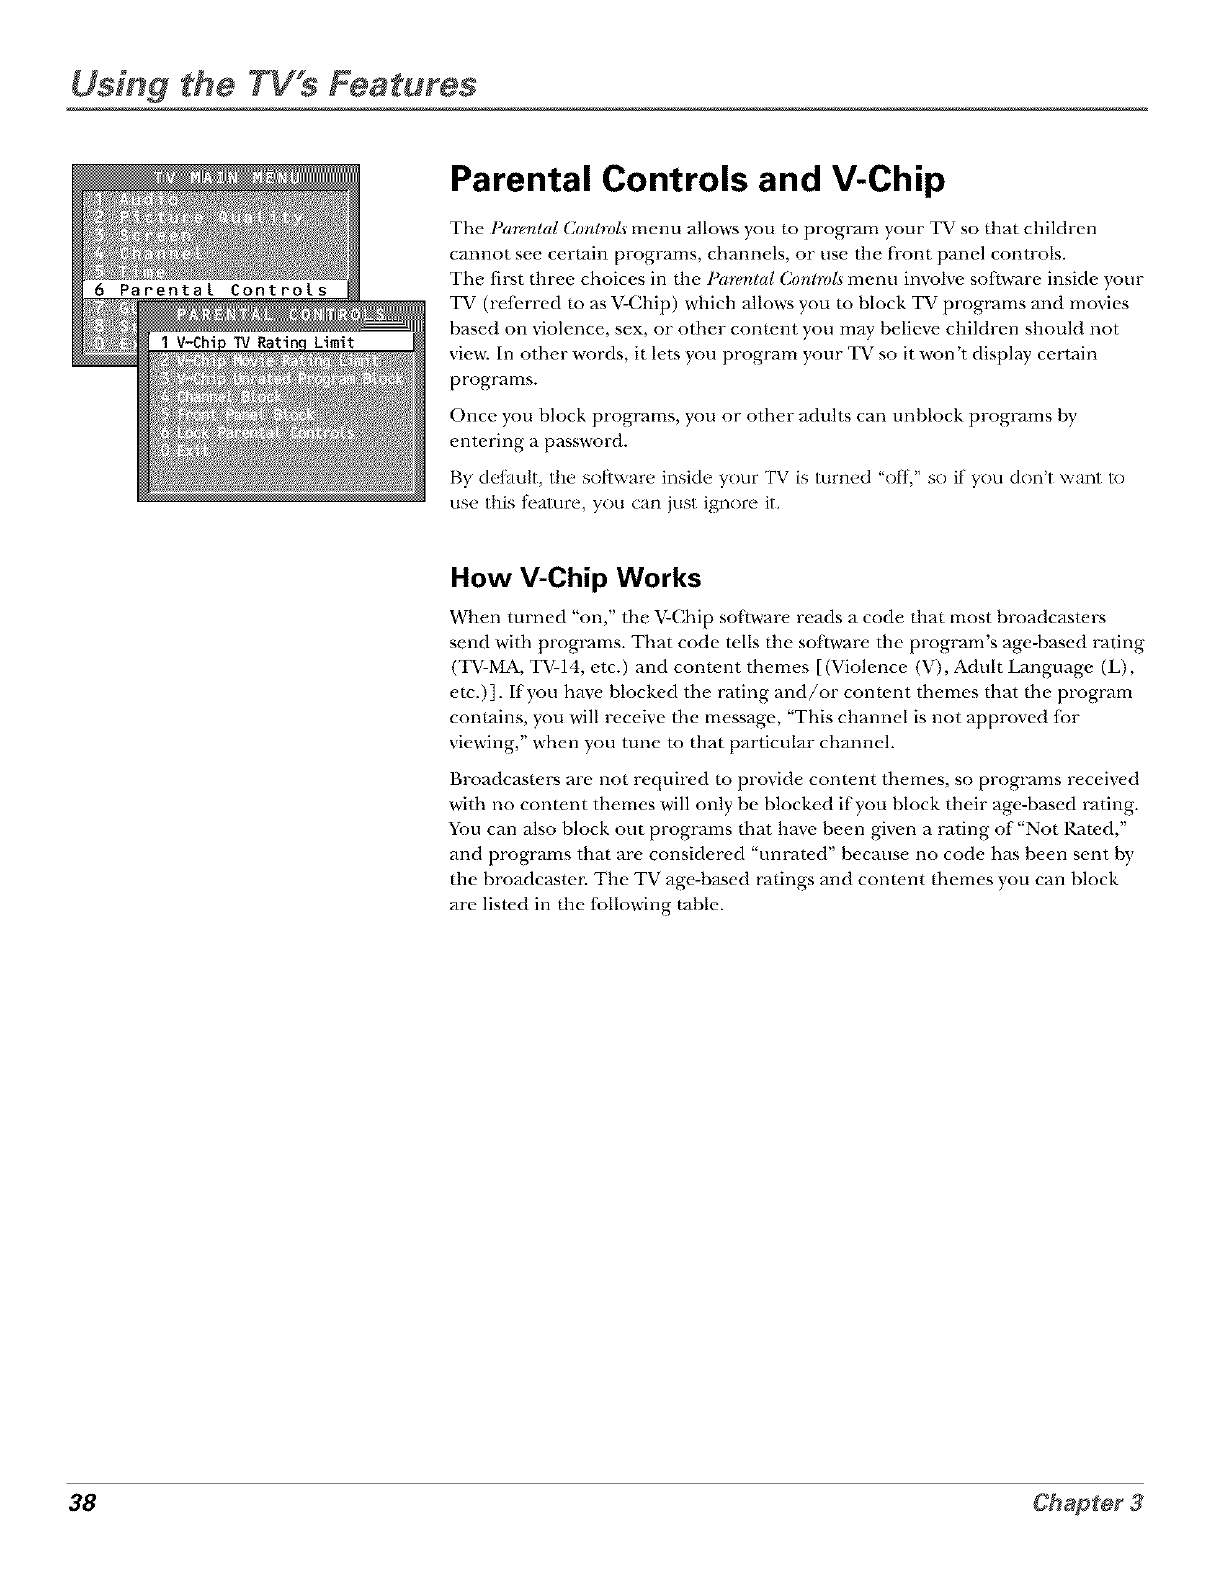
Using the TV s Features
Parental Controls and V-Chip
The l_'ar_mlal Conhola menu allows you to program your TV so that children
cannot see certain programs, channels, or use the front panel controls.
The first three choices in the Paremlal Controls menu involve software inside your
TV (refi.rred to as V-Chip) which allows you to block TV programs and movies
based on violence, sex, or other conwnt you may believe children should not
view. In other words, it lets you program your TV so it won't display certain
programs.
Once you block programs, you or other adults can unblock programs by
entering a password.
By default, the sol,ware inside your TV is turned "off,' so if you dont want to
use this teature, you can just ignore it.
How V-Chip Works
When turned "on," the V-Chip software reads a code that most broadcasWrs
send with programs. That code tells the software the program's age-based rating
(TV-MA, TV-14, etc.) and conwnt themes [(Violence (V), Adult Language (L),
etc.)]. If you have blocked the rating and/or content themes that the program
contains, you will receive the message, "This channel is not approved fbr
viewing," when you tune m that particular channel.
Broadcasters are not required m provide content themes, so programs received
with no content themes will only be blocked if you block their age-based lvJting.
You can also block out programs that have been given a rating of"Not Rawd,"
and progr_uns that are considered "unrated" because no code has been sent by
the broadcaste_: The TV age-based ratings and conwnt themes you can block
are listed in the following ruble.
38 Chapter3
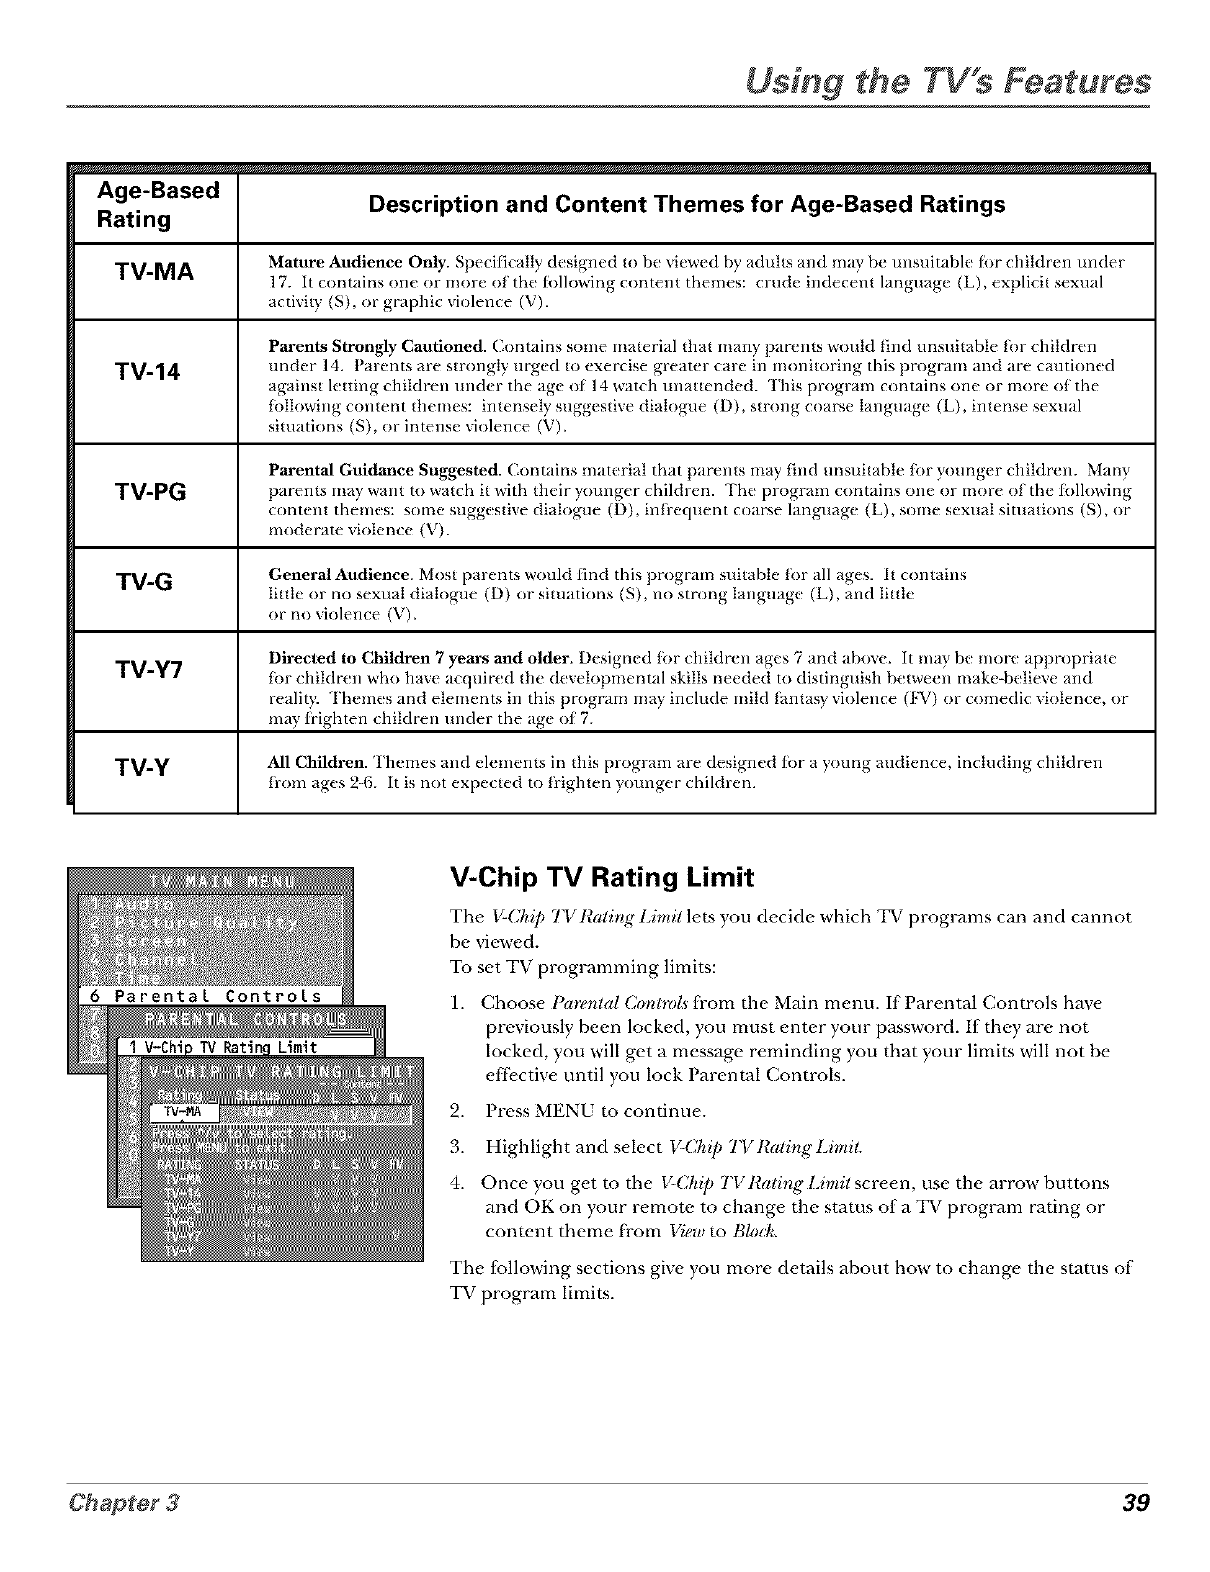
Using the TV"s Features
Age-Based Description and Content Themes for Age-Based Ratings
Rating
TM-MA Mature Audience Only. Specifically designed to be vk, wed by aduhs and may be unsuitable l_)r children under
17. It contains one or more of the li)llowing content themes: crude indecent hmguage (L), explicit sexual
activit} (S), or graphic violence (V).
Parents Strongly Cautioned./;ontains some material that man) parents would lind unsuitable tor children
TV-14 under 14. Parents are strongl} urged to exercise greater care in monitoring this progtutm and are cautioned
against letting children under the age of 14 watch unattended. 'Ihis program contains one or more of the
ti)llowing content themes: intensel} suggestive dialogue (D), strong coarse language (L), intense sexual
situations (S), or intense violence (V).
Parental Guidance Suggested. Contains material that parents ma) tind unsuitable ti)r younger children. Many
TV-PG parents ma} want to watch it with their }ounger children. The program contains one or more of the following
content themes: some suggestive dialogue (D), infrequent coarse language (L), some sexual situations (S), or
modetutte violence (V).
TV-G General Audience. Most parents would lind this program suitable ti)r all ages. It contains
little or no sexual dialogue (D) or situations (S), no strong language (L), and little
or no violence (V).
Directed to Children 7 years and older. Designed tor children ages 7 and above, it may be more appropriate
TV-Y7 ti)r children who have acquired the developmental skills needed to distinguish between make-believe and
l
reality. Themes and elements in this program ma) include mild fantasy violence (F\) or comedic violence, or
may frighten children under the age of 7.
TV-Y All Children. 'Ihemes and elements in this program are designed fi)r a young audience, including children
from ages 2-6. It is not expected to frighten younger children.
V-Chip TV Rating Limit
The $-(,hzp ! VRalzng L*mzl lets you decide which TV programs can and cannot
be viewed.
To set TV programming limits:
1.
2.
3.
4.
Choose Parental Conlro[s from the Main menu. If Parental Controls have
previously been locked, you must enter your password. If they are not
locked, you will get a messene reminding you that your limits will not be
effective until you lock Parental Controls.
Press MENU to continue.
Highlight and select V-Chip TV Rating" Limit.
Once you get to the V-Chip TVRating Limit screen, use the arrow" buttons
and OK on your remote to change the stares of a TV program rating or
conwnt theme from View to Blod¢.
The following sections give you more details about how to change the stares of
TV program limits.
39

Using the TV s Features
The V-Chip Rating Limit Screen
The fbllowing is an example ofwhere items are locawd within the Rating Limit screen.
Rating Status Field
Lets yon select whcthcl the status ot the agc-bascd rating limi_ to
the lclt is View tn" Block.
Rating Field
lx'l_ you select irom a
list of age-based i'afings
you tan block m view.
Content Themes
Lists the content themes _u
can block or view.
Content Status
Fields
Lets you select which
coIltt=II{ tht=tl'lt=S to vit=w lol"
tht" selected rating, and
whether the status of the
contort{ Ihcme is ct]rrently
View (V) or Block (B).
Rating Settings Area
Lets yon sec the cm'rcnt block/_icw slate of age-based Iating_ and
associalcd conlent. The View (V) scuing_ are coded in green, and the
Block (B) sctfing_ a_c toded in red.
Rating Rating status Content status
field field fields
Tip
When you change the status of a rating to
Block, the system will automatically block
higher ratings and al! corresponding
content themes.
Blocking Age-Based Ratings
You can automatically hlock all program lwtings ahove a specified age-based
rating level. For example, if you only want your child m watch programs that
have a TV-G rating and lower (in other words, you want the child to watch
TV-G, TV-Y7, and TV-Y), then you need m block out other programming with
higher ratings.
To block programs with higher ratings:
1. First, determine the lowest level rating you don't want the child m watch
(see chart of age-based ratings on next page).
40 Chapter3
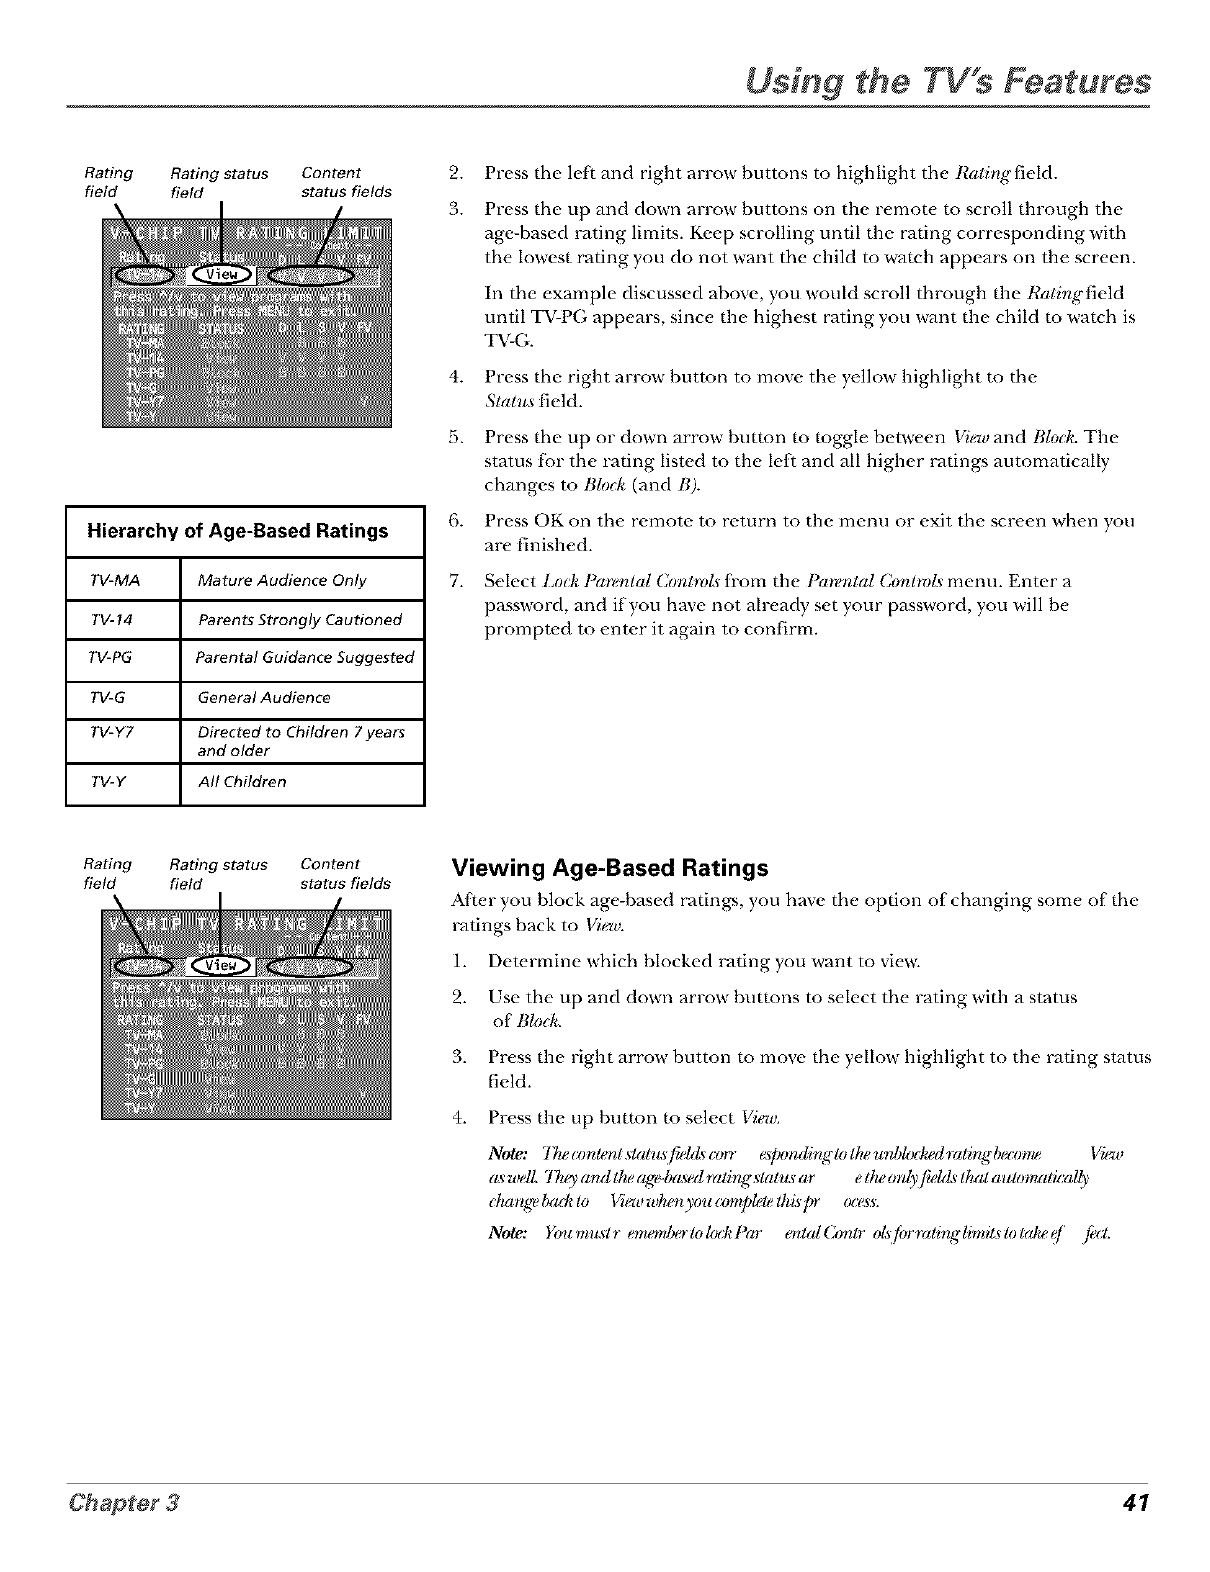
Using the TV s Features
Rating Rating status Content
field field status fields
Hierarchy of Age-Based Ratings
TV-MA Mature Audience Only
TV-14 Parents Strongly Cautioned
TV-PG Parental Guidance Suggested
TV-G General Audience
TV-Y7 Directed to Children 7 years
and older
TV-Y All Children
2.
3.
4.
5.
fi*
7.
Press the leff and right arrow buttons to highlight the Ratirlgfield.
Press the up and down arrow buttons on the remote to scroll through the
age-based rating limits. Keep scrolling until the rating corresponding with
the lowest rating you do not want the child to watch appears on the screen.
In the example discussed above, you would scroll through the Ratingfield
until TV-PG appears, since the highest rating you want the child to watch is
TV-G.
Press the right arrow button to move the yellow" highlight to the
Slatus field.
Press the up or down arrow button to toggle between Vigwand Bled< The
status f;:)rthe rating listed to the left and all higher ratings automatically
changes to Blo& (and B).
Press OK on the remote to return to the menu or exit the screen when you
are finished.
Select l,orl_ P(trenlal Conhols from the Pare"ntal Cenlrol._ menu. Enter a
password, and if you have not already set your password, you will be
prompwd to enter it again to confirm.
Rating Rating status Content
field field status fields Viewing Age-Based Ratings
After you block age-based ratings, you have the option of changing some of the
ratings back to View.
1. Determine which blocked rating you want to view.
2. Use the up and down arrow buttons to select the rating with a status
of l;/o&
3. Press the right arrow" button to move the yellow" highlight to the rating status
field.
4. Press the up button to select View.
Note: 77tet:ordentslatu,slfwl(Z_t:en_ _[xmdinglol/wurd)l(x:]wdralingbg(:omg Vk_v
(L_welL 77usand/heage-b(L_edralingstalmar e/heonlyfield,_lhalautomalically
clumge l)ad¢ le Vigwwh¢÷nyou (zmq)lete lhis pr ocg_s.
Note: Youmuslr emonlualek)':kl)(_r enlalCorllr olsifiJrralinglimil_lolalwe f /_'l.
41
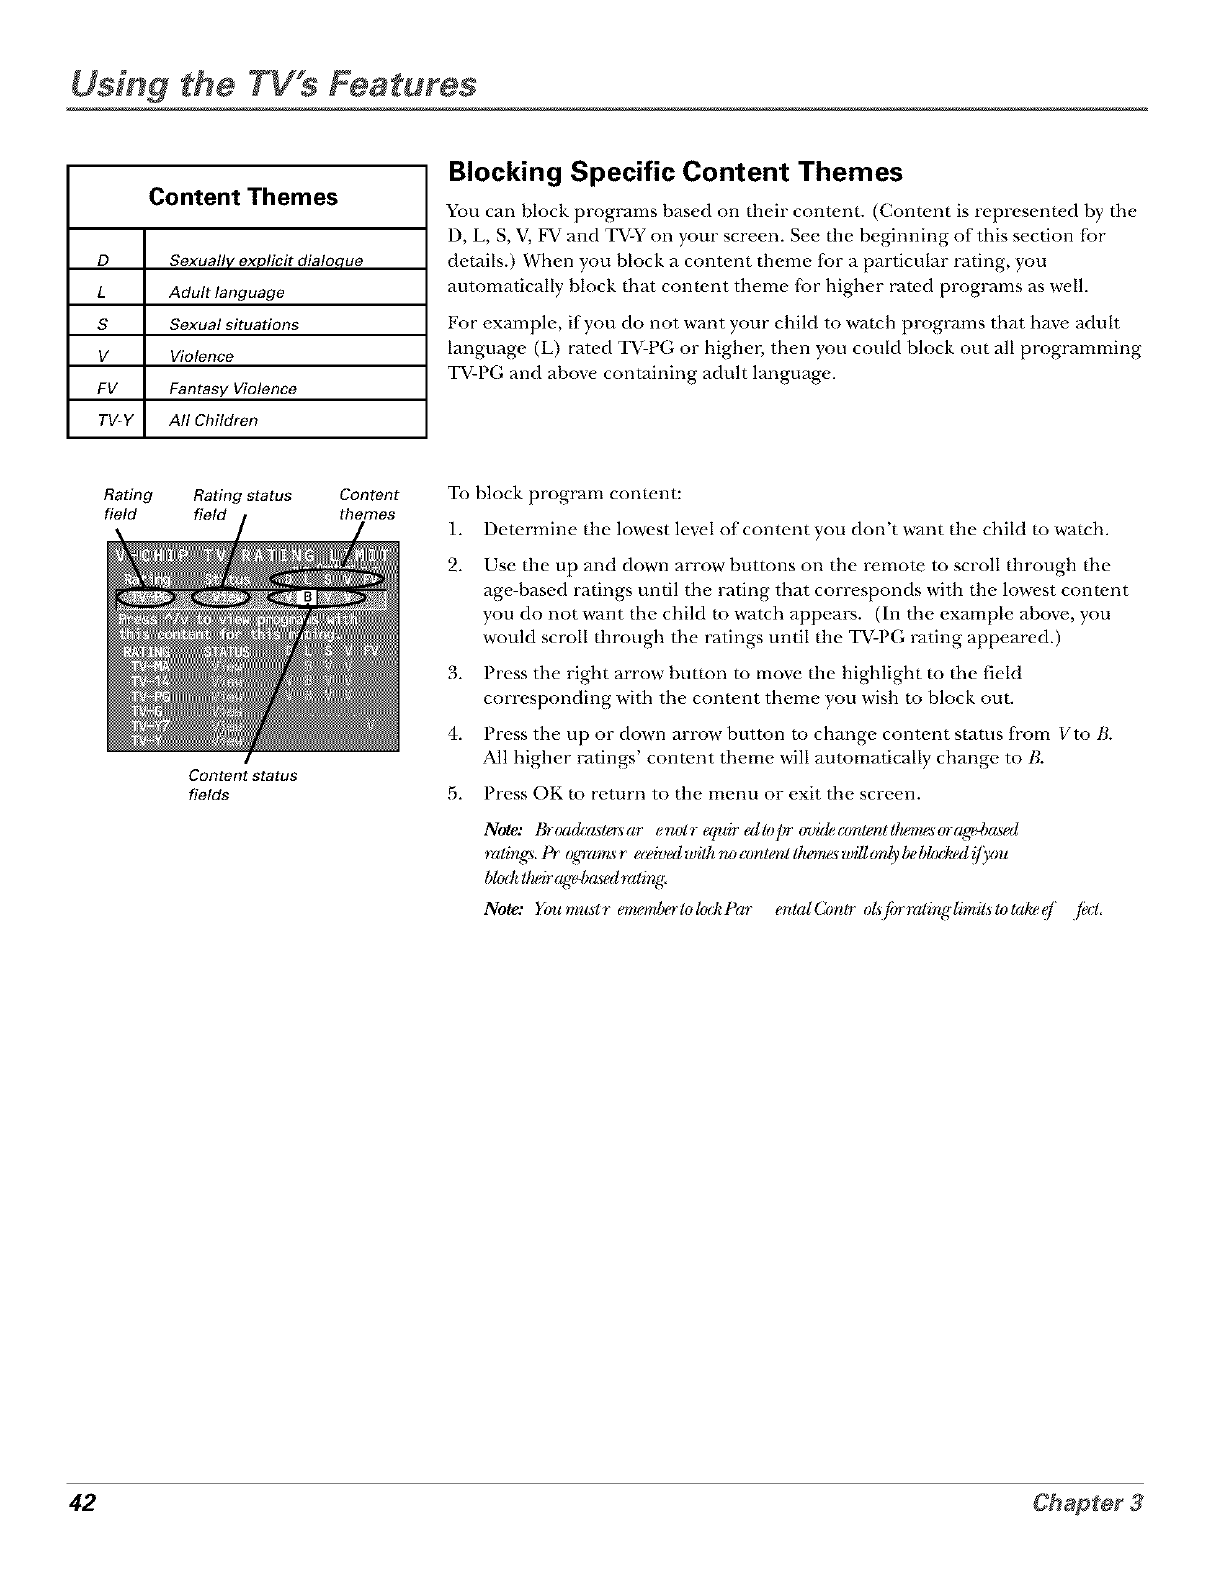
Usfng the TWs Features
Content Themes
D Sexually explicit dialoque
L Adult language
S Sexual situations
V Violence
FV Fantasy Violence
TV-Y All Children
Blocking Specific Content Themes
You can block programs based on their content. (Content is represented by the
D, L, S, V, FV and TV-Y on your screen. See the beginning of this section fi:>r
details.) When you block a content theme {k_r a particular rating, you
automatically block that content theme fbr higher rated programs as well.
For example, if you do not want your child to watch programs that have adult
language (L) rated TV-PG or higher, then you could block out all programming
TV-PG and above containing adult language.
Rating Rating status Content
field field themes
Content Status
fields
To block program content:
1. Determine the lowest level of content you don't want the child to watch.
2. Use the up and down arrow buttons on the remote to scroll through the
age-based ratings until the rating that corresponds with the lowest content
you do not want the child m watch appears. (In the example above, you
would scroll through the ratings until the TV-PG rating appeared.)
3. Press the right arrow button to move the highlight m the field
corresponding with the content theme you wish to block out.
4. Press the up or down arrow button to change content status fi'om Vto t;.
All higher ratings' content theme will automatically change to t;.
5. Press OK to return to the menu or exit the screen.
Note: th-oa&r_ste_ar enolr equir edlopr _nd&amlenltlu_,w.sorag_4)rL_ed
ratings, l'r oLdaresr e(_hJedwith ru)mnlent Ihemgs_*_ill(relybe bl(x:lwdi[_'o_t
bk)'t_tlwir(ge 4)gL*edrali_r_
Note: You m_l r ewu÷mlu#lok)':kl_ar enlaI ConIr oZs[brrad:nglimils _talw ef [_cl
42 Chapter3
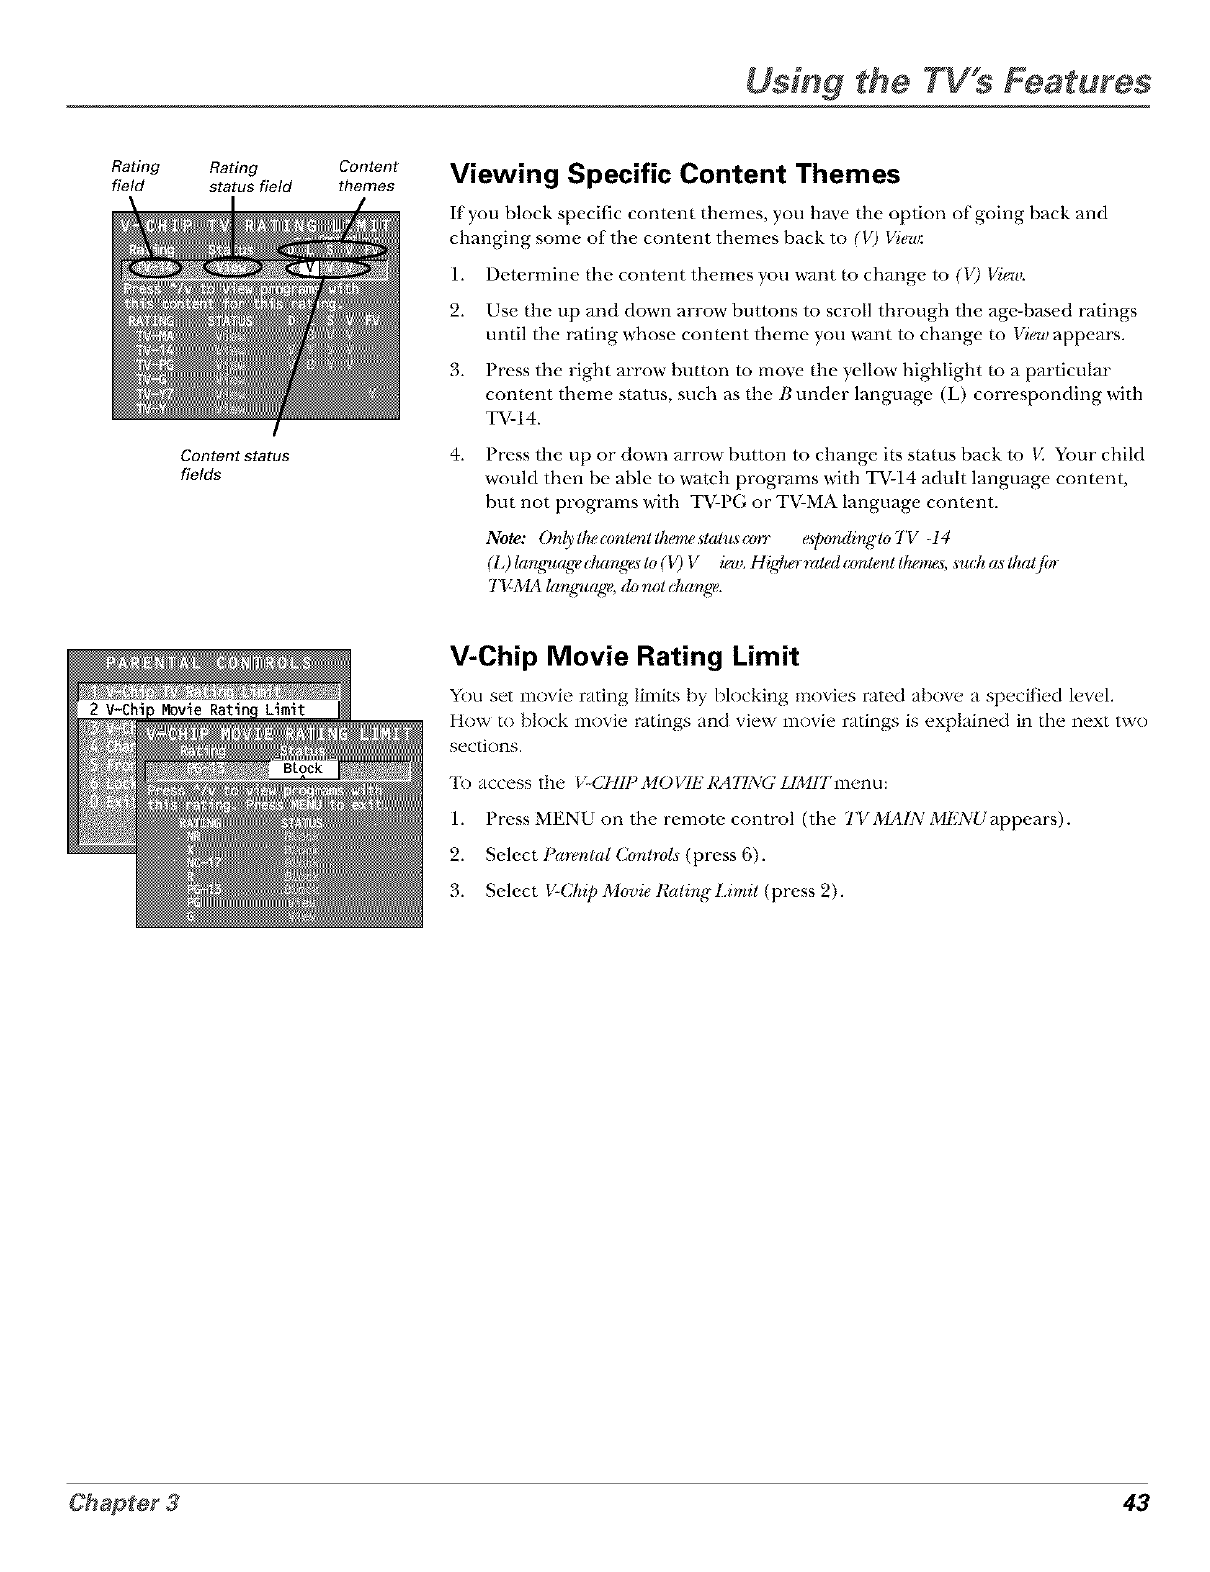
Using the TV s Features
Radng
field Rating
s_tusfield
Content Status
fields
Content
themes Viewing Specific Content Themes
If you block specific content themes, you have the option of going back and
changing some of the cont_,nt themes back to (V) VieT/r.
1. Determine the cont_.nt themes you want to change to (V) View.
2. Use the up and down arrow buttons to scroll through the age-based ratings
until the rating whose content theme you want to change to View appears.
3. Press the right arrow button m move the yellow highlight m a particular
content theme status, such as the Bunder language (L) corresponding with
TV-14.
4. Press the up or down arrow" button to change its status back to K Your child
would then be able to watch programs with TV-14 adult language cont_.nt,
but not programs with T_LPG or T_LMA language cont_.nt.
Note: Only Ilu,content Ihewwslalm (zyn" _]xmding lo 7'V -14
(L) langn_agedmnges _(V) V in_. H igdwrraled (zmlerlt Ih_÷mgs,_s_tuJtas Iha@yr
TV-MA langnulge, do not dmnge.
V-Chip Movie Rating Limit
You set movie rating limits by blocking movi_,s rated abnw, a sp_,cified ]ev_,].
How to block movie ratings and view movie ratings is explained in the next two
sections.
7k)access the V-CHIP MO VIE RATING LIMIT men LI:
1. Press MENU on the remote control (the TVMAINMENUappears).
2. Select Pare/ntal Cor_lro[s(press 6).
3. Select V-Chip Movie RalirlgLimil (press 2).
43

Using the TV s Features
Rating field Rating status
field Blocking Movie Ratings
If you only want your child to watch movies that have a PG rating and lower (in
other words, movies rated PG and G), then you could automatically block out
all other movies with higher ratings.
To block movies:
1.
2.
Highlight the Ratir_gfield and press the up and down arrow buttons to find
the rating that is the lowest rating you don't want the child to watch. (In
the example above, you would highlight the rating smtos bumm
corresponding to PG-13, since the highest rating you want the child to
watch is PG.)
Press the right arrow" button to highlight the rating Slatu,_field. Press the up
and down arrow buttons to change the button fi'om View to Blo&. All higher
ratings automatically change to Blo&.
3. Press OK to return m the menu or exit the screen.
4. If Parental Controls are not locked, you must lock them so the movie rating
limits will take effect.
Note: Some movies may be gi_tz a Not Ratt, d (NR) ratit_J4. Afler block#zg
moz,ie rat#z_,4._;.goJ_must set NR to Vieu separately to z,ieu NR moz,ies.
Rating field Rating status
field Viewing Movie Ratings
After you hlock movie ratings, you have the option of changing some of the
l-ating st_Jtus buttons back to Vieu_
1. Highlight the Ratir*gfield and press the up and down arrow buttons m find
the rating you want to view.
2. Press the right arrow button to highlight the rating Slatus field. Press the up
and down arrows to change the button fi'om Biotic to View.
For example, if movies with a rating of PG-13 and higher are blocked, you can
change the rating stares corresponding with NC-17. Your child would then be
able to watch all movies with a G, PG, and NC-17 Rating.
3. Press OK to exit the screen, and be sure parental controls are locked.
44 Chapter3
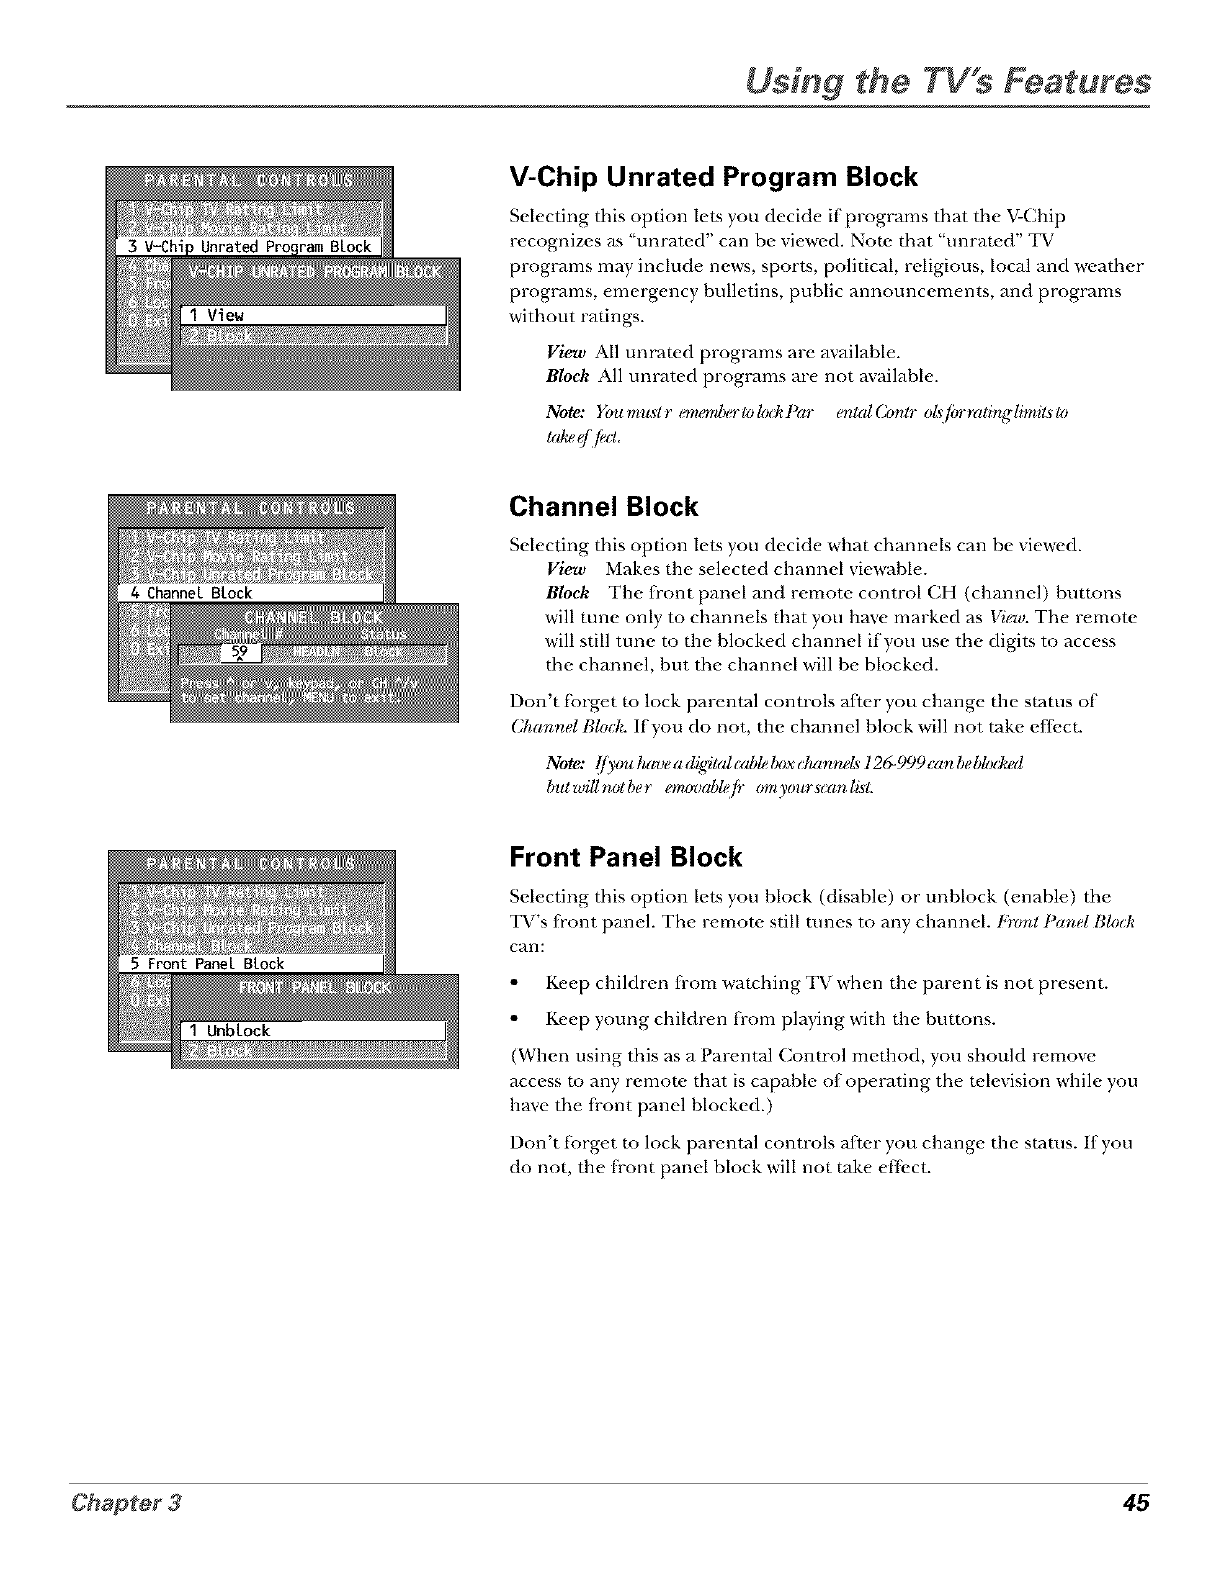
Using the TV's Features
V-Chip Unrated Program Block
Selecting this option lets you decide if programs that the V-Chip
recognizes as "unrated" can be viewed. Note that "unrated" TV
programs may include news, sports, political, religious, local and weather
programs, emergency bulletins, public announcements, and programs
without ratings.
View All unrated programs are available.
Block All unrated programs are not available.
Note: Youmu._tr em,emlu#-/oku:kl'ar en/MContr oZ_[iyrrali:nglimils/o
td_ q'[m
Channel Block
Selecting this option lets you decide what channels can be viewed.
View Makes the selected channel viewable.
Block The fi'ont panel and remote control CH (channel) bumms
will tune only to channels that you have marked as Vigw. The remote
will still tune to the blocked channel if you use the digits to access
the channel, but the channel will be blocked.
Don't l_i)rget to lock parental controls after you change the status of
(2hanr_el Block. If you do not, the channel block will not take effect.
Note: l/)_(mh{rtJea(F_tc_lcablelu)xcl_mneL_ 12(_999canbebl(u:lwd
bulwillm_lber em_)tJ{d/ep- (ymyours_anlisL
Front Panel Block
Selecting this option lets you block (disable) or unblock (enable) the
TV's fi'ont panel. The remote still runes to any channel. Front Panel Bhul¢
can:
• Keep children fi-om watching TV when the parent is not present.
• Keep young children from playing with the bumms.
(When using this as a Parental Control method, you should remove
access m any remote that is capable of operating the television while you
have the fi-ont panel blocked.)
Don't fi_rget to lock parental controls after you change the status. If you
do not, the front panel block will not take effect.
45
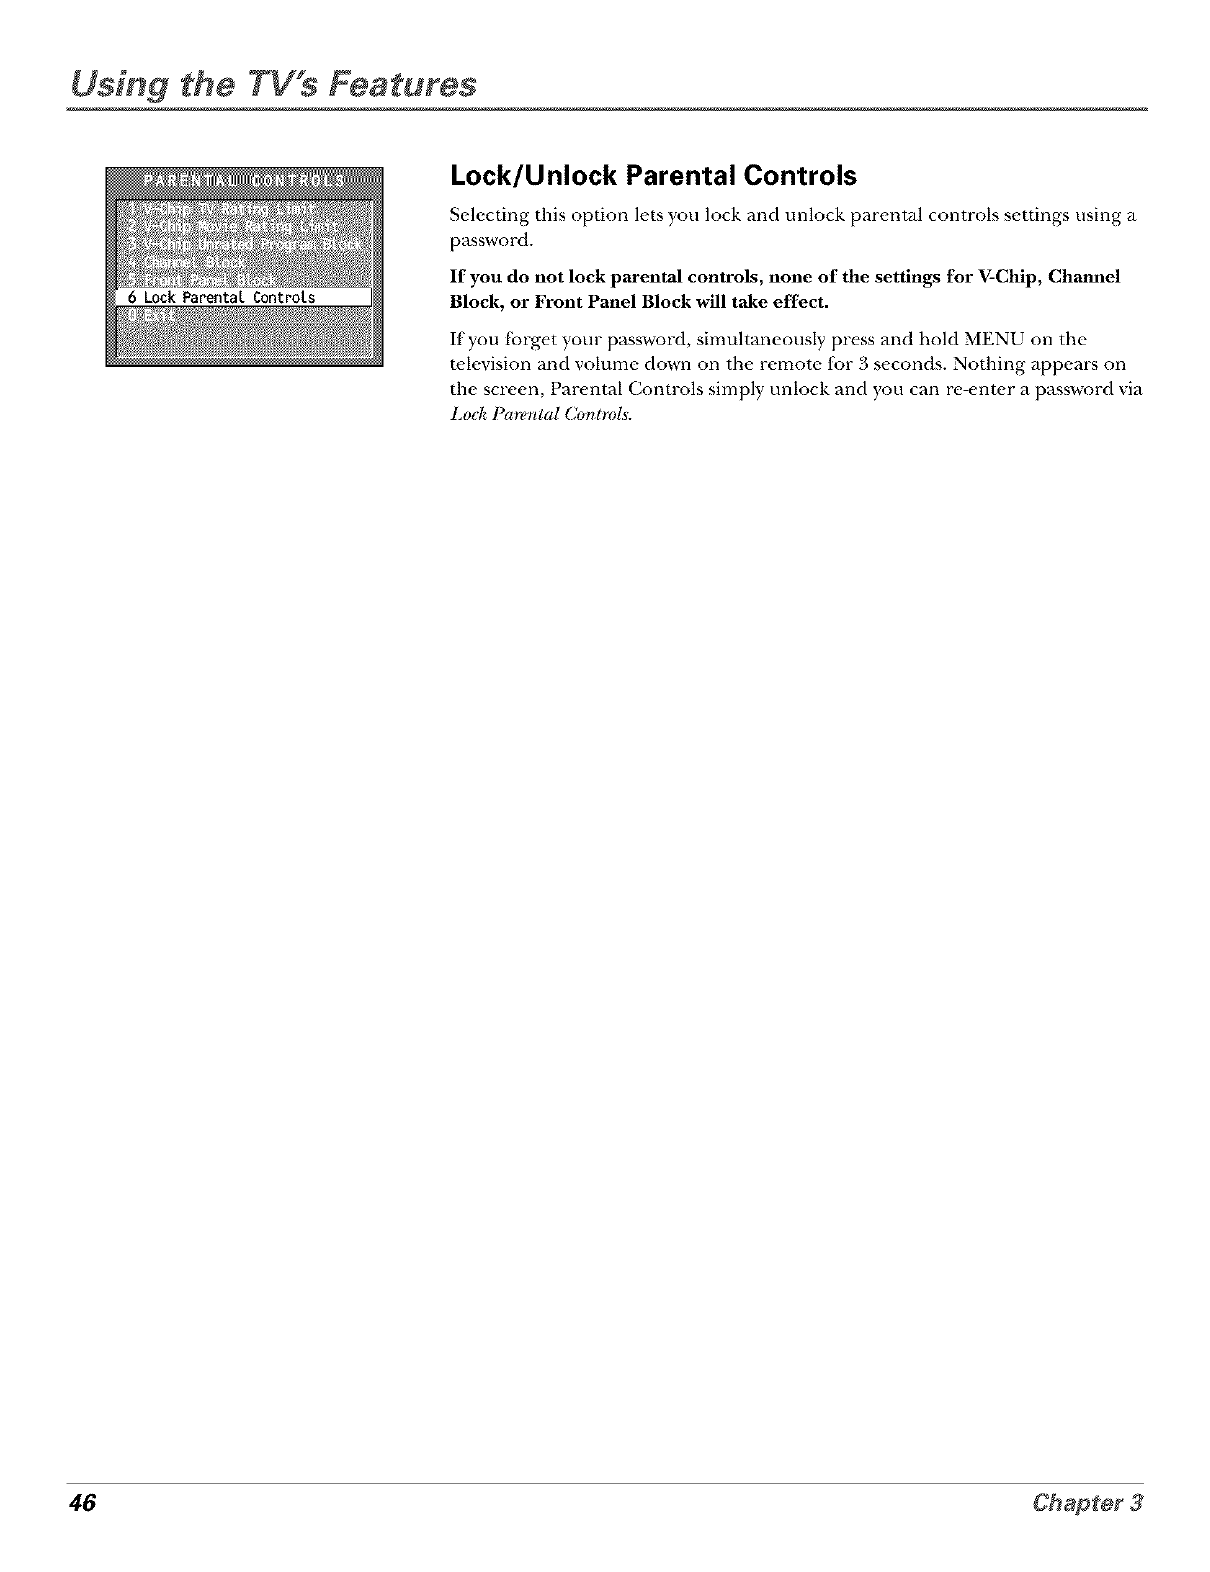
Using the TV s Features
Lock/Unlock Parental Controls
Selecting this option lets you lock and unlock parental controls settings using a
password.
If you do not lock parental controls, none of the settings for V-Chip, Chamml
Block, or Front Panel Block will take effect.
If you [brget your password, simultaneously press and hold MENU on the
t_,levision and volume down on the remote fbr 3 seconds. Nothing appears on
the screen, Parental Controls simply unlock and you can re-enter a password via
Lo& Paremtal Conlro[_.
46 Chapter3
Using the TV's
Menu System
Chapter Overview:
• How to Use the Different Types of Menus
•Audio Menu
•Picture Quality Menu
•Screen Menu
•Channel Menu
•Time Menu
47
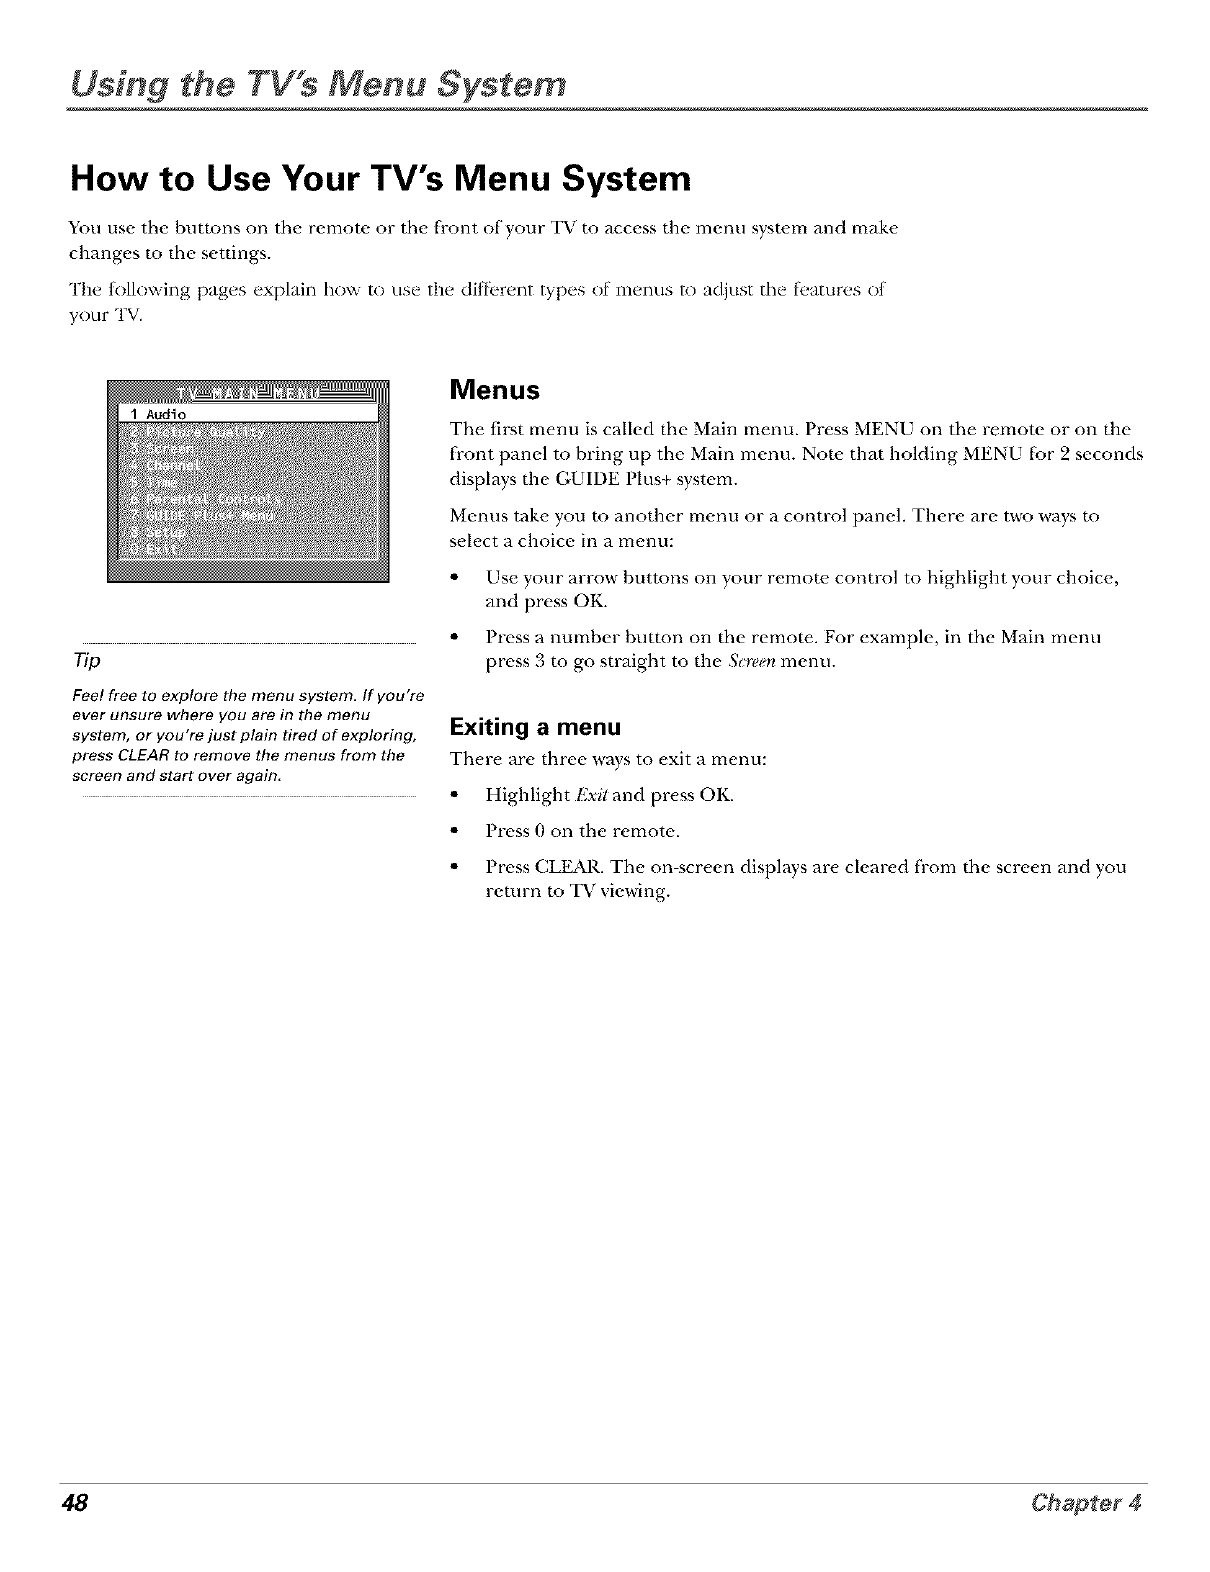
Using the TV s Menu System
How to Use Your TV's Menu System
You use the buttons on the remote or the front of your TV m access the menu system and make
changes to the settings.
The tk)llnwing pages explain how to use the dil;[)rent types of menus to adjust the tl.atures of
your TV.
Menus
The first menu is called the Main menu. Press MENU on the remote or on the
front panel to bring up the Main menu. Note. that holding MENU for 2 seconds
displays the GUIDE Plus+ system.
Menus take you m another menu or a control panel. There are two ways m
select a choice in a menu:
• Use your arrow buttons on your remote, control to highlight your choice,
and press OK.
rip
Fee! free to explore the menu system. If you're
ever unsure where you are in the menu
system, or you're just plain tired of exploring,
press CLEAR to remove the menus from the
screen and start over again,
• Press a number button on the remote. For example, in the Main menu
press 3 m go sUvdght to the &wee:r,menu.
Exiting a menu
There are three ways to exit a menu:
• Highlight Exit and press OK.
• Press 0 on the remote.
• Press CLEAR. The on-screen displays are cleared from the screen and you
return m TV viewing.
48
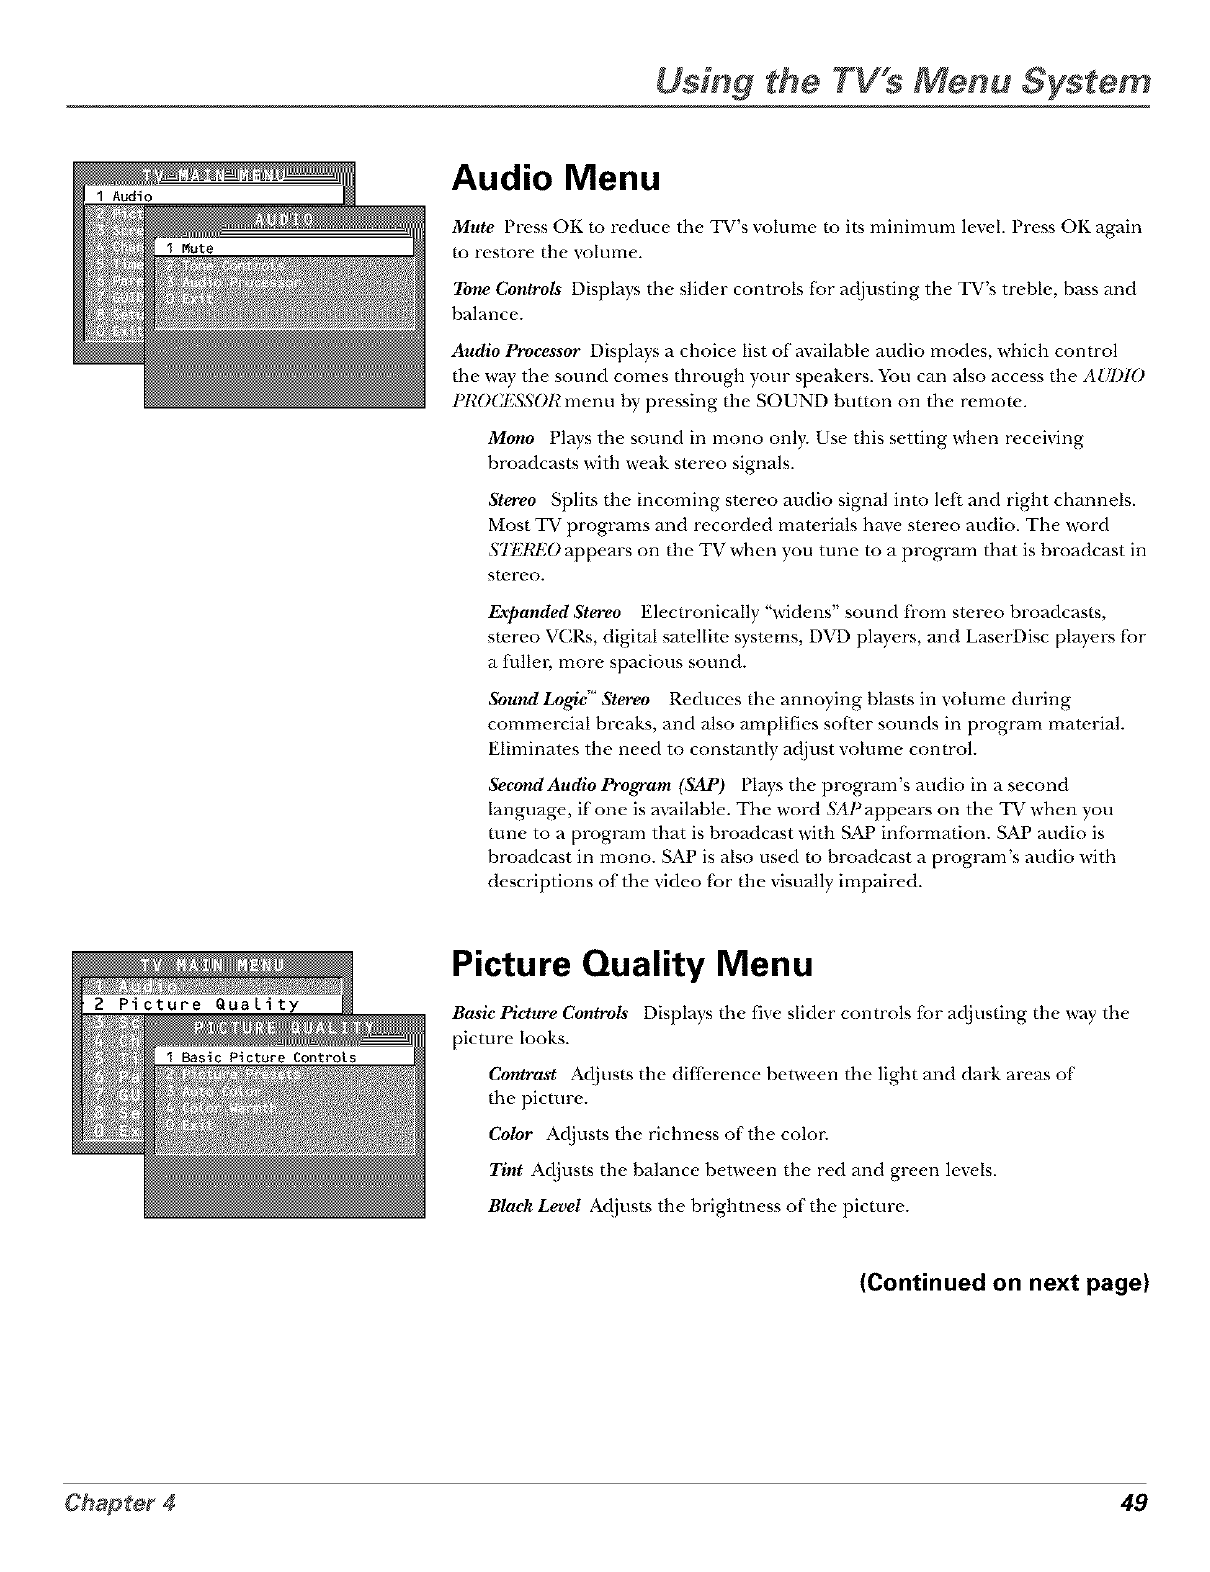
Using the TV s Menu System
I Audio Audio Menu
Mute Press OK to reduce the TV's volume to its minimum level. Press OK again
to restore the volume.
Tone Controls Displays the slider controls 5:)r adjusting the TV's treble, bass and
balance.
Audio Processor Displays a choice list of available audio modes, which control
the way the sound comes through your speakers. You can also access the AUDIO
l t_0C1_550R menu by pressing the SOUND button on the remote.
Mono Plays the sound in mono only. Use this setting when receiving
broadcasts with weak stereo signals.
Stereo Splits the incoming stereo audio signal into left and right channels.
Most TV programs and recorded materials have stereo audio. The word
STI_REO appears on the TV when you tune to a proglvJm that is broadcast in
Stl-_l-i-_O.
Expanded Stereo Electronically "widens" sound fi'om stereo broadcasts,
stereo VCRs, digital satellite systems, DVD players, and LaserDisc players 5:)r
a fullm; more spacious sound.
Sound Logic' Stereo Reduces the annoying blasts in volume during
commercial breaks, and also amplifies sof}er sounds in program material.
Eliminates the need to constmatly adjust volume control.
Second Audio Program (SAP) Plays the proglvJm's audio in a second
language, if one is available. The word SAPappears on the TV when you
rune to a proglvJm that is broadcast with S_ information. SAP audio is
broadcast in mono. SAP is also used ro broadcast a program's audio with
descriptions of the video 5:)r the visually impaired.
Picture Quality Menu
Basic Picture Controls Displays the five slider controls fbr adjusting the way the
picture looks.
Contrast Adjusts the difference between the light and dark areas of
the picture.
Color Adjusts the richness of the color.
Tint Adjusts the balance between the red and green levels.
Black Level Adjusts the brightness of the picture.
(Continued on next page)
Chapter 449
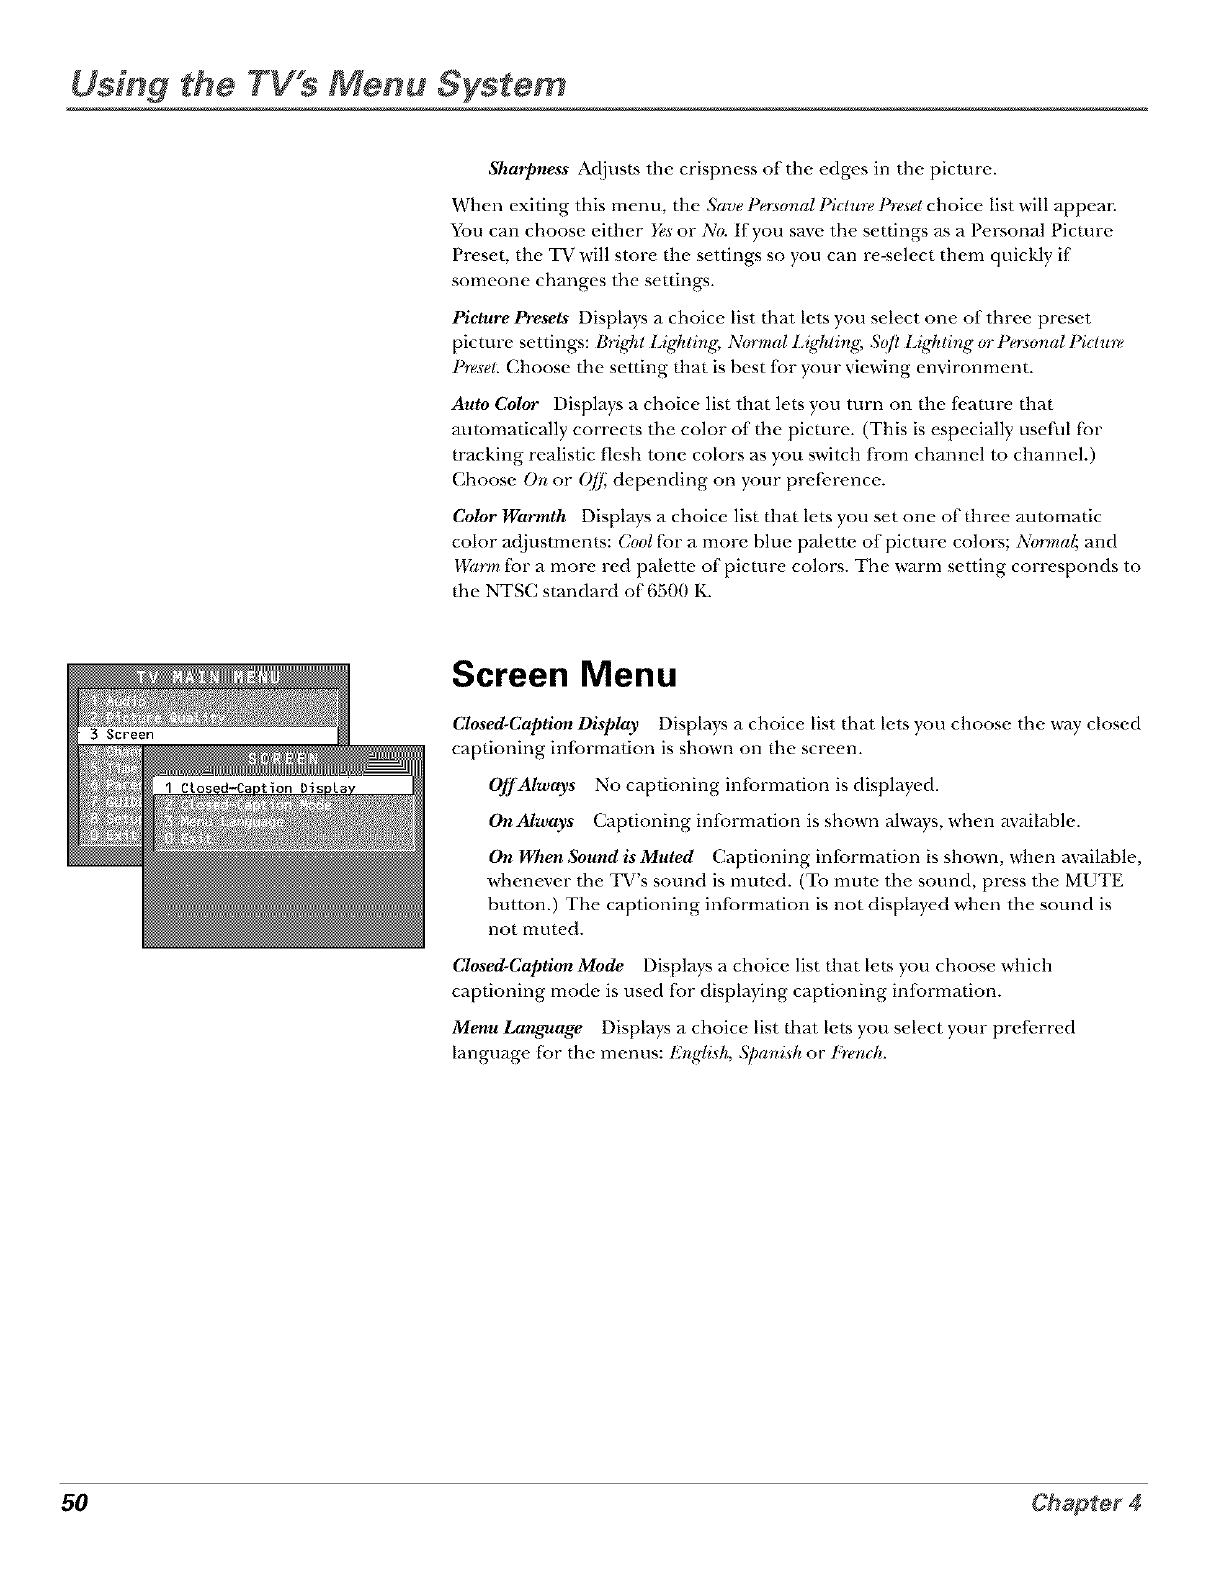
Using the TV's Menu System
Sharpness Adjusts the crispness of the edges in the picture.
When exiting this menu, the Save Personal Piclure Presetchoice list will appear.
You can choose either Yesor No. If you save the settings _s a Personal Picture
Preset, the TV will store the settings so you can re-select them quickly if
someone changes the settings.
Picture Presets Displays a choice list that lets you select one of three preset
picture settings: Bright Lighlir_g;NgyrmalLighlir_g, _Sq/tL*ghlzr_g(y_1 _onal l*_lu_
Presel. Choose the setting that is best tor your viewing environment.
Auto Color Displays a choice list that lets you turn on the ti.ature that
automatically corrects the color of the picture. (This is especially use[ill l'br
tracking realistic flesh tone colors as you switch from channel to channel.
Choose On or Oj[ depending on your pre[_,rence.
Color Warmth Displays a choice list that lets you set one of three automatic
color adjustments: Coolfbr a more blue palette of picture colors; Normal; and
Warm for a more red palette of picture colors. The warm setting corresponds to
the NTSC standard of 6500 K.
Screen Menu
Closed-Caption Display Displays a choice list that lets you choose the way closed
captioning inlormation is shown on the screen.
Off Always No captioning intbrmation is displayed.
On Always C,aptioning inlormation is shown ahvays, when available.
On When Sound is Muted Captioning intbrmation is shown, when available,
whenever the TV's sound is muted. (To mute the sound, press the MUTE
button.) The captioning infbrmation is not displayed when the sound is
not mut_,d.
Closed-Caption Mode Displays a choice list that lets you choose which
captioning mode is used fbr displaying captioning infbrmation.
Menu Lan_age Displays a choice list tbat lets you select your prefi.rred
language [br the menus: Er*glish, Spani.sh or l,}-e/ruh.
50
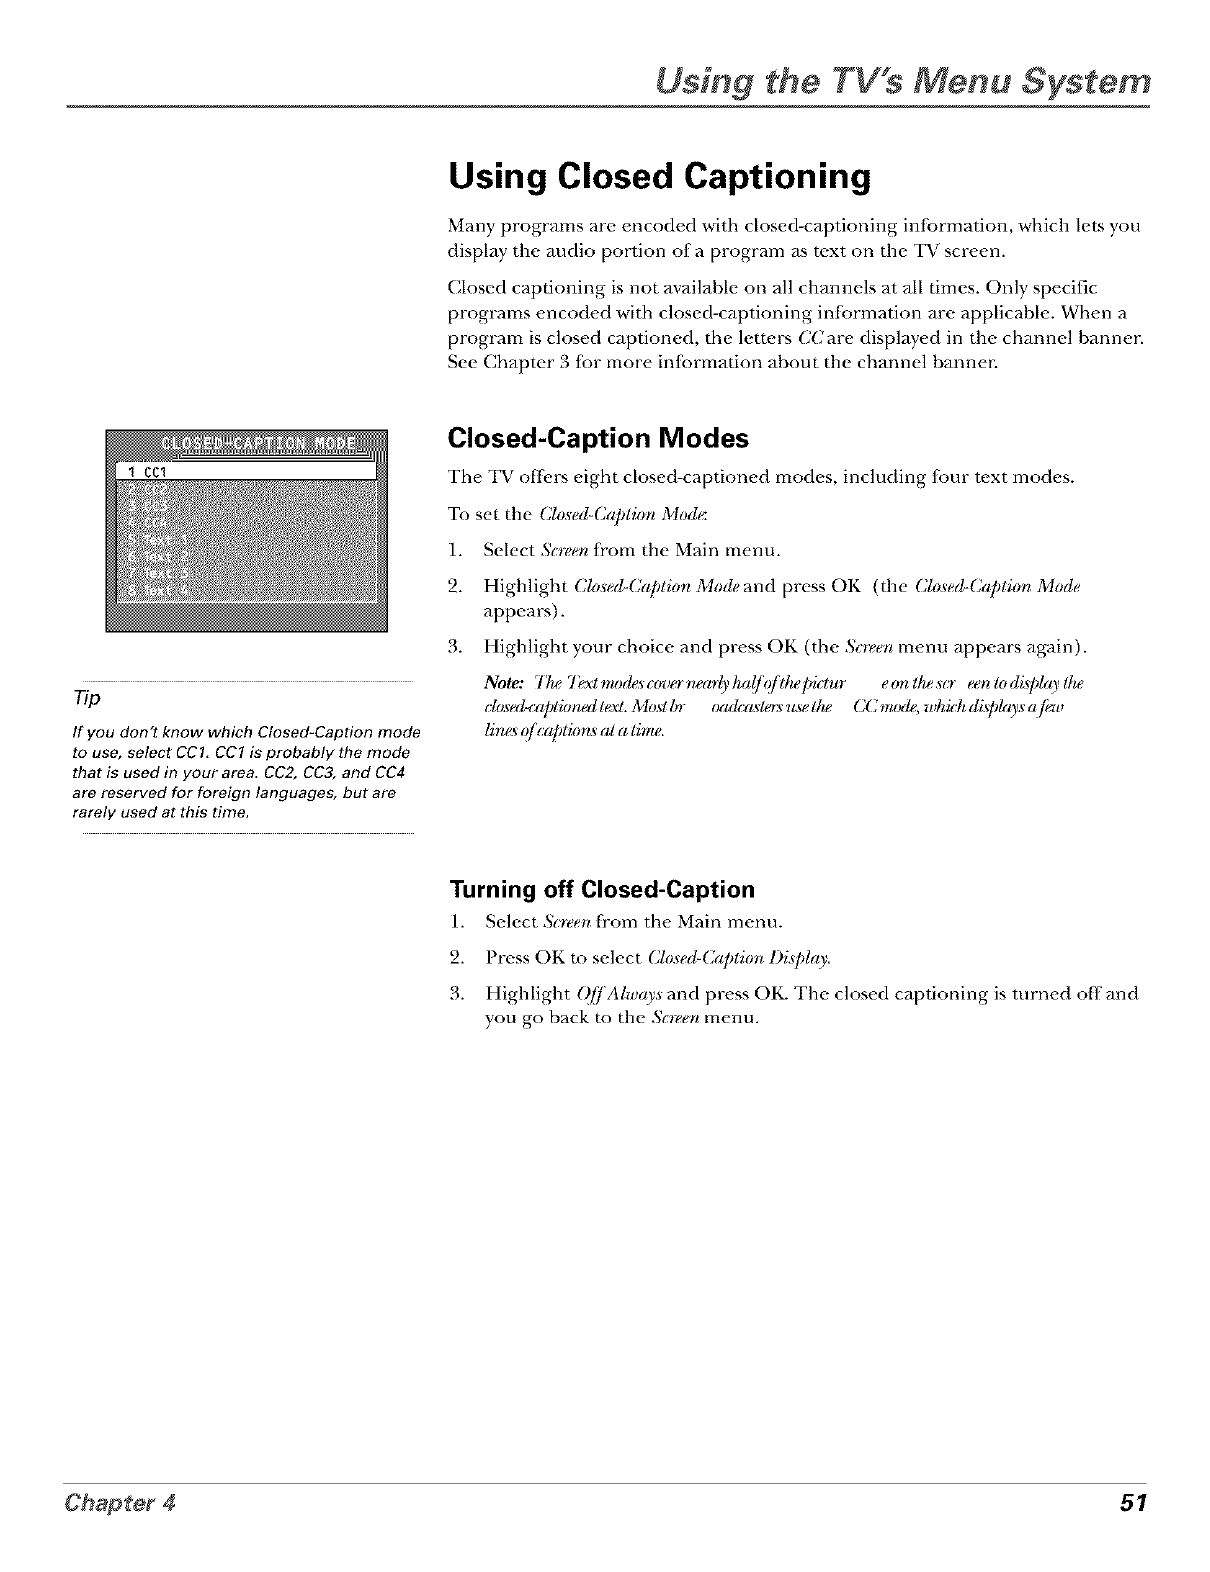
Using the TV s Menu System
Using Closed Captioning
Many programs are encoded with closed-captioning inlbrmation, which lets you
display the audio portion of a program as text on the TV screen.
Closed captioning is not available on all channels at all times. Only specific
programs encoded with closed-captioning inlbrmation are applicable. When a
program is closed captioned, the lem.rs CCare displayed in the channel bannm:
See Chapter 3 tbr more infbrmation about the channel bannm:
rip
If you don't know which Closed-Caption mode
to use, select CCI. CC1 is probably the mode
that is used in your area. CC2, CC3, and CC4
are reserved for foreign languages, but are
rarely used at this time.
Closed-Caption Modes
The TV offers eight closed-captioned modes, including fbur text modes.
To set the Closed-Capliorl Mod_
1. Select &teen fi'om the Main menu.
2. Highlight Clo,sed-Caption Mode and press OK (the Closed-Caption Mode
appears).
3. Highlight your choice and press OK (the Scr_em menu appears again).
Note: 77_ Textmod_sa_u'r_n_arlyha(/q/d_e]yktur eonllwscr eenlodgplaylhe
ch*_ed-captkmedtext. Mos! l,_r txMcaslers use dw CC m_xle,wh id_ di._plro_sajh,_
lim<_q/ c@lkms al a lime,
Turning off Closed-Caption
1. Select &teen fi'om the Main menu.
2. Press OK to select Closed-Coption Di,q_lay.
3. Highlight QffAlways and press OK. The closed captioning is turned off and
you go back to the Soecru menu.
Chapter 451
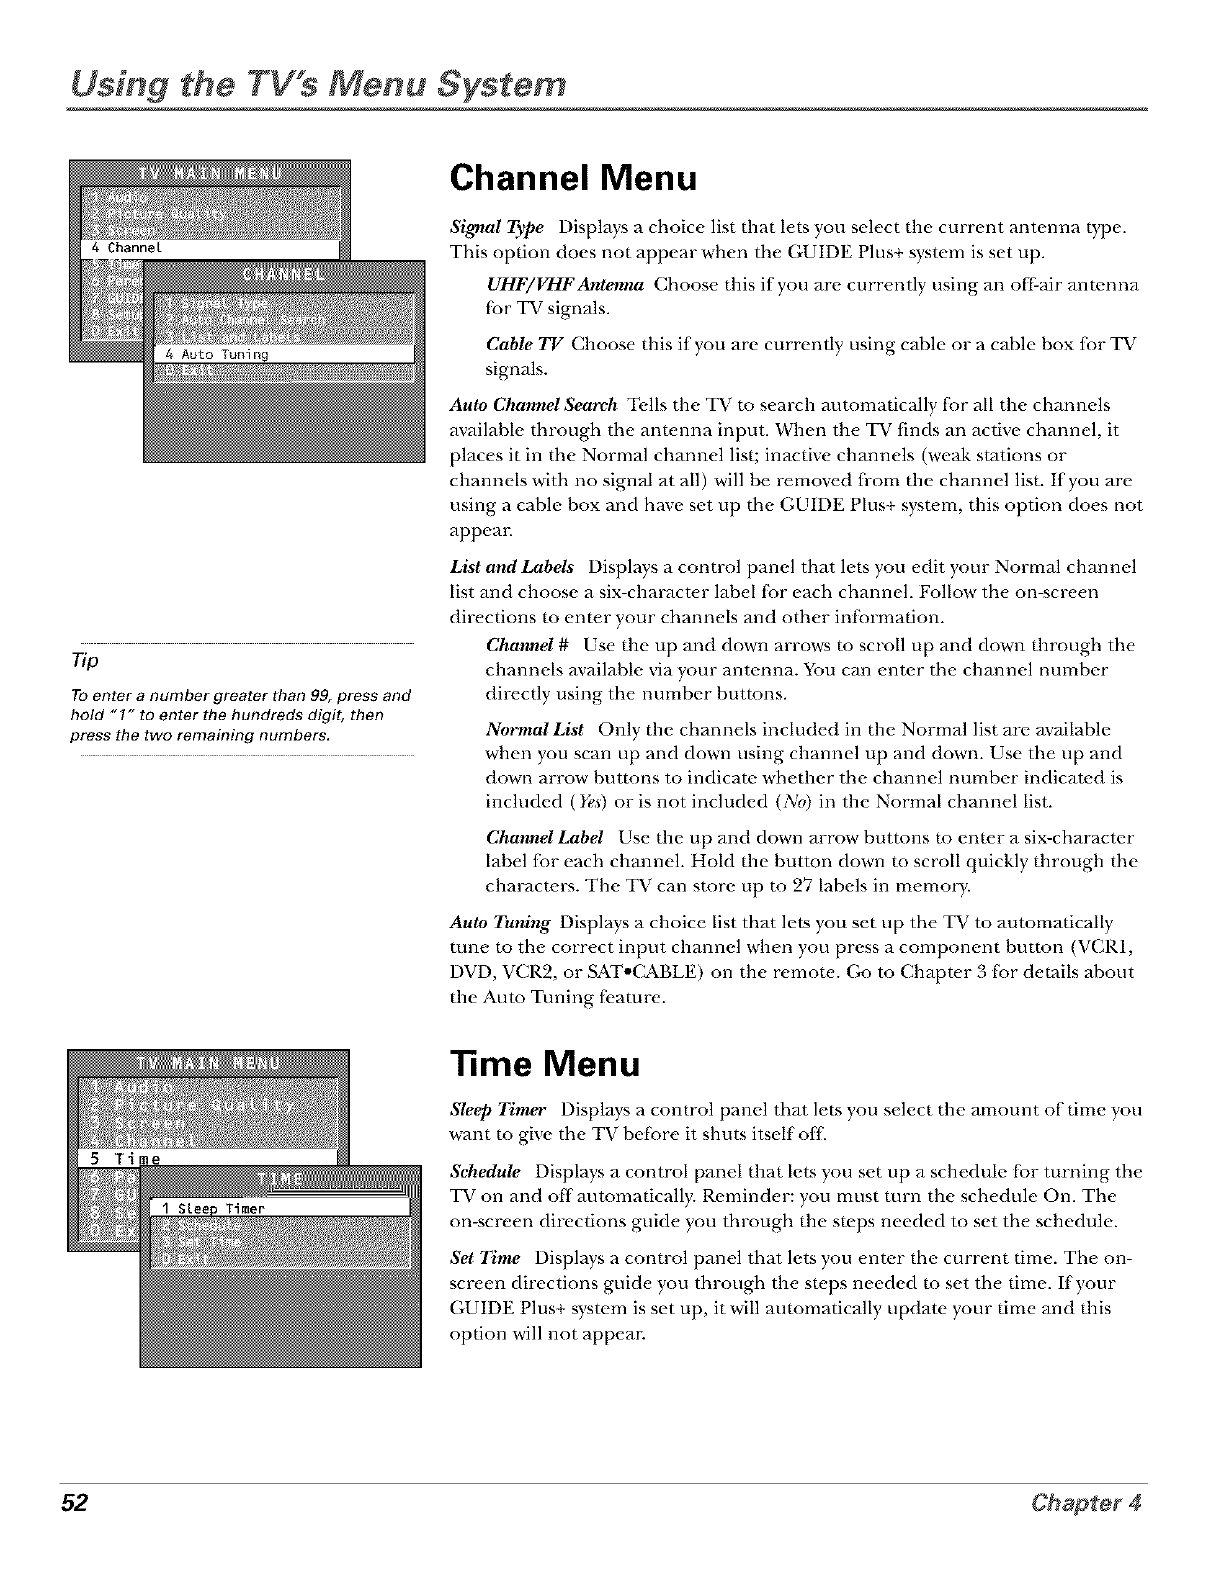
Using the TV's Menu System
Tip
To enter a number greater than 99, press and
hold "1" to enter the hundreds digit, then
press the two remaining numbers.
Channel Menu
Signal Type Displ_Jys a choice list that lets you select the current antenna type.
This option does not appear when the GUIDE Plus+ system is set up.
UHF/VttFAntenna Choose this if you are currently using an oil:air antenna
f;:)r TV signals.
Cable TV Choose this if you are currently using cable or a cable box for TV
signals.
Auto ChanneISeareh Tells the TV to search automatically li)r all the channels
available through the antenna input. When the TV finds an active channel, it
places it in the Normal channel list; inactive channels (weak stations or
channels with no signM at all) will be removed fi-om the channel list. If you are
using a cable box and have set up the GUIDE Plus+ system, this option does not
appeal:
List and Labels Displays a control panel that lets you edit your Normal channel
list and choose a six-character label li)r each channel. Follow the on-screen
directions to enter your channels and other inli)rmation.
Channel # Use the up and down arrows to scroll up and down through the
channels available via your antenna. You can enter the channel number
directly using the number buttons.
Normal List Only the channels included in the Normal list are available
when you scan tip and down using channel up and down. Use the tip and
down arrow buttons to indicate whether the channel number indicated is
included (Yes) or is not included (No) in the Normal channel list.
Channel Label Use the up and down arrow" buttons to enter a six-character
label {br each ch_mnel. Hold the button down to scroll quickly through the
characters. The TV can store up to 27 labels in memoly,.
Auto Tuning Displays a choice list that lets you set tip the TV to automatically
tune to the correct input channel when you press a component button (VCR1,
DVD, VCR2, or SAT°(_BLE) on the remote. Go to Chapter 3 f;:)r details about
the Auto Tuning fi.amre.
"time Menu
Sleep Timer Displays a control panel that lets you select the amount of time you
want to give the TV bet;:)re it shuts itself otT
Schedule Displays a control panel that lets you set up a schedule .¢i._rturning the
TV on and off automatically. Reminder: you must turn the schedule On. The
on-screen directions guide you through the steps needed to set the schedule.
Set Time Displays a control panel that lets you enter the current time. The on-
screen directions guide you through the steps needed to set the time. If your
GUIDE Plus+ system is set up, it will automatically update your time and this
option will not appea_:
52
Other Information
Chapter Overview:
• Troubleshooting
•Care and Cleaning
•Front Panel Buttons
•Limited Warranty
•Accessory Order Form
•Index
Troubleshooting
Most problems you encounter with your TV you can correct by consuhing the "Doubleshooting list that tk)llows.
TV Problems
TV won't tm on
• Press the _i_ buttom
• Make sure the TV is plugged in.
• (heck the wall receptacle (or extension cord) to make sure it is "live" by plugging in something else.
• Something might be wrong with your remote control. Press the POWER button on the ti-ont of the TV. If the 'I_ r turns on, check the
Felnote (Olltrol sollltiol]s on p, ._)(i,
•'Ihe ti-ont panel controls may be locked (disabled). Use the remote control to unlock the h-ont panel controls by selecting the l')_)nt
ParM BN& in the Par_ta! Controts menu and choosing View.
Buttons don't work
• If you're using the remote control, press the 'I_ r button lir_t to makt, sure the remote is in 'I_ r mode.
•'Ihe ti-ont pant, l controls may be lockt, d (disabk, d). Use the remote control to unlock the h-ont panel controls by sek, cting the l')_)rlt
ParM BN& in the Par_ta! Controts i'nell_.l and choosing View.
• Unplug the 'INz lor two minutes and then plug it back in. 'Ii_rn the 'IN z on and try again.
TV turns off while playing
•Sched'ul_d O]]lunction may hav_' bt'en activated. Go to p. 32 tor instH_ctions.
• Electronic protection circuit may have been activated because of a power surge. Wait 30 seconds and then turn the TV on again. If
this happens ti-equently, the voltage in your house may be abnormally high or low.
TV turns on unexpectedly
•Sdzed'ul_d ()_ or Watdl ti'om tht' (;UIDE Plus+ system may hav_' bt'en activated. Go to p. 32 lor instructions.
Blank screen
• Make sur_' tht' component connt, ctt, d to tht, TV is turnt, d on.
• Try another channd.
When I tun on the TVan icon is moving ae_ss the smen
• Make surc' you hart' rc,mo\ed tht, L)emo Pin ti-om tht, C.LINK jack on tht, back ot your TV.
No sound, picture okay
• Maybt' sound is mutt'd. Pr_'ss tht' volume up button to restore, sound.
54 Chapter 5
Other Information
Troubleshooting
Can't select certain channel
•Channel may be blocked or not appr*wed in the Par_ta! Conhv)Lsmenu.
• If using a VCR, make sure the TV/VCR button on the VCR is in the correct mode (press the TV/VCR button on your VCR).
Noisy stereo reception
• The station might hc weak. Press the SOUND button on your remote control to change lrom stereo to mono.
No picture, no sound but TV is on
• Ma)he the cahlc/air setting is set to the wror'lg position. Select (;UIDI_2Pl_s+ Mcr_'u ti-oi'n the Main merlu, select
the ,';el*@option, and provide the correct intbrmation on the lollowing screens. Go to pages 16-17 tor detailed instructions.
• The channel might be empty-- change channels.
• If you're watching your VCR and it's connected with coaxial cable to the CABLE/AN'I ENNAjack, tune the TV to channel 3 or 4
(whichever channel is selected on the 3/4 switch on the back of your VCR). Also check to make sure the TV/VCR button on the
VCR is in the correct mode (press the TV/VCR button on your VCR).
Sound okay, pictter poor
• Cht'ck antenna connections. Makt, sure all ot the cahk, s ar_, tirmly commctcd to the jacks.
• TtT adjusting sharpness flmction to bnprove weak signals. Go to page 50 tor more instructions.
Black box appears on the screen
• Close, d-captioning might be on. (heck tht, Clo_ed-Ca];tiorll)i_)_;laycontrol panel in tht, Screen menu. Go to page 50-51 tor mor_,
instructions.
Every time I tur on the TVthe Guide is on the s_n
• The GUIDE Plus+ _ystcm automaticall) appcar_ on the s_rcen when y(m use the remote control to turn it on. 'I_) turn ott this
t_'aturc, press GUIDE on )our remote control (the guide appears), and then press MENU (the mem] options har is lfighlightcd).
Press the right arrow button to lfighlight Set'u]).Choose Review and select ()/]2
GUIDE Plus+ System Problems
GUIDE Plus+ setup won't switch to channel 9 for VCR and/or channel 02 cable box
• Make sure you have removed the Demo Pin lrom the (;-LINK jack. (heck to sec iT the (;-LINK wands are positioned correctly in
ti'ollt Of components' remote sensors.
• GUIDE Plus+ system control of cable box is slower than direct control of the box itseltl Keep this in mind when changing channels.
• You may 1]aw_ an incorrect GUIDE Plus+ Ct]annel Map. 'Ihe guide may get out of sync with the cable provider: Use the GUIDE Ph_s+
,';¢,h@in the GUIDE Phzs+ Mcr_'u to change the zip code to 99999. Turn the TV off tor 10 minutes. Use Setup again to change the zip
code back to the correct value. If asked, be sure to select the correct channel lineup ti-om the on-screen list.
55

GUIDE Plus+ System Problems (continued)
Program infomation doesn't download
• Revk'w )our setup inlormadon and makt, sure it's corr_,ct. Press MENU on the rei_note and sek, ct (;UII)E P{u_+ Setup. Go to page 16
Tor detailed instructions about the GUIDE Plus+ Setup menus.
•'Ihe TV must be oTT to download intbrmation. Leave your TV oTT overnight, tor at least 10 hours, to receive the initial download lor
yotlr area.
• Tf you're using a cable box, leave it on so you can receive program intbrmation.
Scheduled Wtch or Rectal doesn't occur
• (beck Schedule' tor timer conlTicts. Go to page 32 lor instrt]ctions.
• Make sure the wands of the G-LINK cable are placed in front of the remote sensor(s) on the component(s).
• Make sure your V(R is turned off during the time you've scheduled to record a progt_un because the system turns the VCR on when
it starts recording (if it's already on when recording starts, the system will turn it off).
• Make sure there is a tape in the V(R and that the VCR is connected properl>
• Be sure that yon set up the V(R in the GUll)E Plu_+ &l**p menus. If yon don't complete the Co_q_gu_i'ng/br a VCR steps successthlly,
the Record option won't be available. Go to p. 18 lor detailed instlaictions.
• if a cable box is attached to your TV, make sure you set it up correctly in the GUII)E Plus+ Setup menus. Go to page 1(i-17 tor detailed
instructions.
The Remote Control Doesn't Work
• Something might be between the remote and the remote sensor on the component. Make sure there is a clear path.
• Maybe the remote isn't aimed directly at the component ('I_ r or VCR) that you're trying to operate.
• Maybe remote is not in 'I_ r Mode. Press the 'I_ r button so remote will control 'I_(
• Maybe batteries in remote are weak, dead or installed incorrectly. Put new batteries in the remote. (Note, if you remove the
batteries, you may have to reprogmm the remote to operate other components.)
• You might need to dt=tin the remote's microprocessor: remove batteries and press the number 1 button tor at least 60 seconds.
Release the I button, replace the batteries, and (if necessatT) progt=un the remote again.
Problems with V-Chip/Parental Controls
The rating limits don't work
• You must lock the settings. Go to the 7V MAINMENU (pr_'ss MENU on your remote), s_,lect l_ar_ta! C'onh_)Ls(press 6 on yore-
remote), select Lock Par_ta! Conhv)[s (press 6 on your remote).
I don't Bmember my passvdoend I want to unlock the TV
• if )ou lorget yore- password, simultant, ousl) press and hold MENU on the tek, vision and volmn_, down on the remote lor 3seconds.
Nothing appear_ on the screen, Parental ( ontrols simply unlock and you can re-enter a password via Lock Par_ta! C'onh_)Ls.
The VChip won't let me watch aq!_ram even though it's not rated as violent.
• MayTx' the movk' was givml an NP. (Not Rated) status. After you block movie ratings, you i_nust set NR to View separately in ord_,r to
view movies with an NR rating.
56 Chapter 5
Other Information
Care and Cleaning
CAUTION: Turn OFF your TV before cleaning.
You can clean the TV as required, using a soft lint-fi-ee cloth. Be sure to occasionally dust the ventilation slots in the cabinet
m help assure adequate ventilation.
The TV's screen may be demled with a soft, lint-free cloth as well. Take care not to scratch or mar the screen. If necessary,
you may use a cloth dampened with warm water.
Never use strong demting agents, such as ammonia-based cleaners, or abrasive powder. These types of cleaners will damage
the TV.
While cleaning do not spray liquid directly on the screen, or allow liquid to run down the screen and inside the TV. Also,
avoid placing drinks or v_ses with water on mp of the TV. This could increase the risk of fire or shock hazard or damage to
the T_
Caution: If fixed (non-moving) images are lel} on the screen {br long periods, they may be permanently imprinted on the
picture tube. Such images include network logos, phone numbers, and video games. This damage is not covered by your
warranty. Ext_.nded viewing of channels displaying these images should he avoided.
Front Panel Buttons
If you can't find your remote control you can use the buttuns on your TV m operate many of the TV's [_.atures.
MENU Brings up the TV MAIN MENU. When in the menu system, it selects highlighted items. Also returns you to the
previous menu. Press MENU and CH+ simultaneously to access the GUIDE Plus+ system.
CHv Scans down through the current channel list. When you're using the TV's menu system, it acts like the arrow down
button on the remote control.
CH ^ Scans up through the channel list. When you're using the TV's menu system, it acts like the arrow" up button on the
remote control. Press CH+ and MENU simuhaneously to access the GUIDE Plus+ system.
VOL -Decreases the volume. When you're using the TV's menu system, it acts like the left arrow button on the
remote control.
VOL + Increases the volume. When you're using the TV's menu system, it acts like the right arrow button on the
remote control.
POWER Turns the TV on and off
57
GE TV Limited Warranty
What your warranty covers:
• ,Mly deli, ct in materials or workmanship.
For how long after your purchase:
• 90 days l;:)rlabor ch_ges.
• One year for parts.
• Two years for the picmr e robes.
The warrant), period fbr rental units begins with the first rental or 45 days fi'om date of shipment m the rental firm,
whichever comes first.
What we will do:
• Pay any Authorized GE Television Service Center the labor charges to repair your television.
• Pay any Authorized GE Television Service Center for the new or, at our option, refiM_ished replacement parts and
picture tubes required m repair your television.
How you get service:
• For screen sizes of 26" and smaller: Take your GE television to any Authorized GE Television Service Center and pick
up when repairs are complete.
• For screen sizes larger than 26': Request home o_"pick up, repair, and retmn" ser\,ice fi-om an), Authorized" (E,
Television Smvice Centre; pl ........• "ovlded that your television is located within the geographic ternto_T covered by an
Authorized GE Television Sen'ice Centre: If not, you must take your television to the Service Center location at your
own expense, or pay for the cost the Service Center may charge m transport your television to and from your home.
• To identify your nearest Authorized GE Television Service Center, ask your dealer, look in the Yellow Pages, or call
1-800-447-1700.
• Show" the Authorized Sm_'ice Center Representative your sales receipt or other evidence of purchase date or first rental.
What your warrmlty does not cover:
• Customerinstr uction. (YourOvmer'sMmmalclearlydescribeshowtoinst_fll, adjust, madoperateyourtele_lsion. ,Mly
additional inR_rmation should be obtained from your dealer).
• Installation and related adjustments.
• Signal reception problems not caused by your tele_qlsion.
• Damage from misuse or neglect.
• t_atteries.
• Customer replacement li_ses.
• Images burned onto the screen.
• A television that h_s been moditied or incorporated into odmr products or is used tbr institutional or other commercial
pur_s.
• Atelevisionpur chasedorser _qlcedoutsidedmU.S.A.
• Acts of God, such _s but not limited m lightning &unage.
Product registration:
• PleasecompletemadmaiHhePr oductRegistmtionCar dpackedwidlyourTV . Itwillmakeite_siertocontactyou
shoulditeverbenecess_w y. Thereturnofthecardisnotrequiredtbrw_ mntycoverage.
How state law relates to this warraJlty:
• This war ranty gives you spc.cific leg-,Jlrights, mad you also may have other rights dlat var y li-om state to state.
If you purchased your television outside the United States:
•Thiswar rantydoesnotapply .Contactyourdealerlorwar rmltyinfbr marion.
Service calls which do not involve defective materials or workmanslfip are not covered by this warranty. Costs of such
service calls are the sole responsibility of the purchaser.
58 Chapter 5
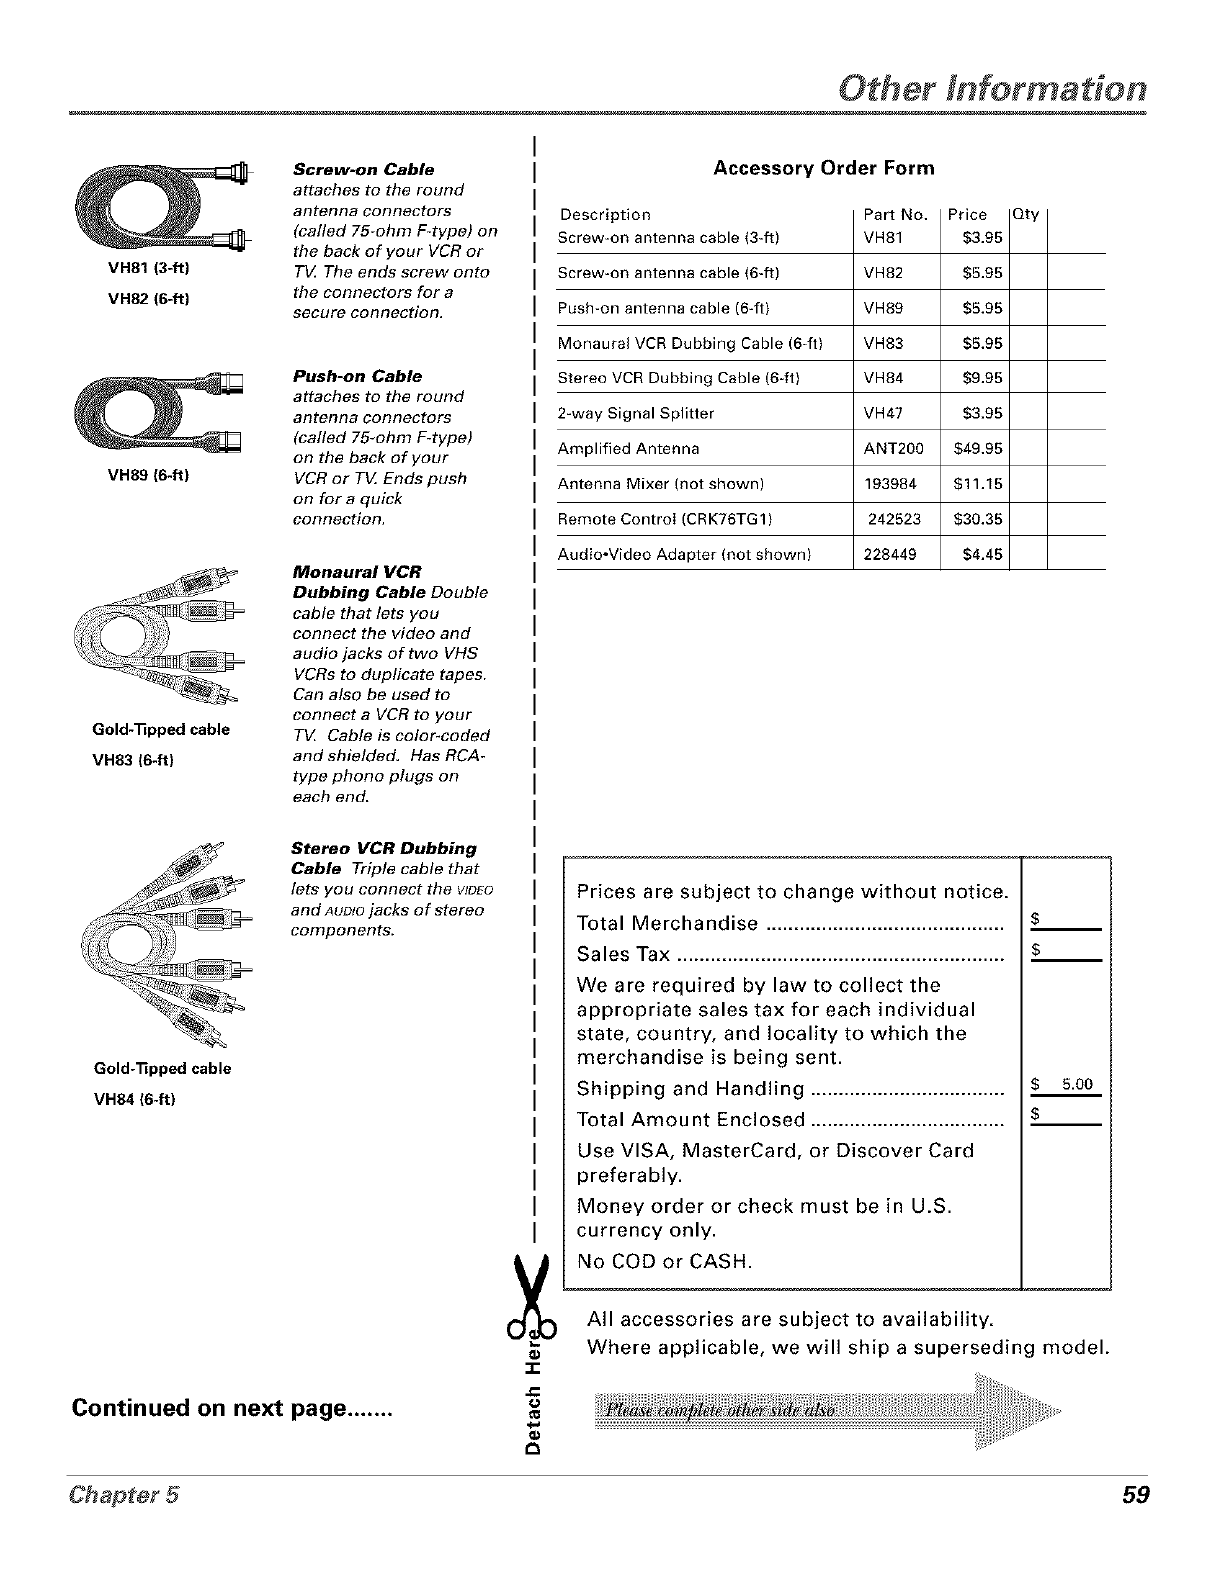
Other Information
VH81 (3-ft)
VH82 (6-ft)
Screw-on Cable
attaches to the round
antenna connectors
(cafled 75-ohm F-type) on
the back of your VCR or
TV The ends screw onto
the connectors for a
secure connection.
VH89 (6-ft)
Push-on Cable
attaches to the round
antenna connectors
(cafled 75-ohm F-type)
on the back of your
VCR or TV Ends push
on for a quick
connection.
Gold-13pped cable
VH83 (6-ft)
Monaural VCR
Dubbing Cable Double
cable that lets you
connect the video and
audio jacks of two VHS
VCRs to duplicate tapes.
Can also be used to
connect a VCR to your
TV Cable is color-coded
and shielded. Has RCA-
type phono plugs on
each end.
Stereo VCR Dubbing
Cable Triple cable that
lets you connect the vtaEo
and AUDIOjacks of stereo
components.
Gold-13pped cable
VH84 (6-ft)
Continued on next page .......
Accessory Order Form
Description
Screw-on antenna cable (3-ft)
Screw-on antenna cable (6-ft)
Push-on antenna cable (6-fl)
Monaural VCR Dubbing Cable (6-fl)
Stereo VCR Dubbing Cable (6-ft)
2-way Signal Splitter
Amplified Antenna
Antenna Mixer (not shown)
Remote Control (CR K76TG 1 )
Audio,Video Adapter (not shown)
Part No.
VH81
VH82 $5.95
VH89 $5.95
VH83 $5.95
VH84 $9.95
VH47 $3.95
ANT200 $49.95
193984 $11.15
242523 $30.35
228449 $4.45
-i-
.€
Prices are subject to change without notice.
Total Merchandise
Sales Tax ............................................................
We are required by law to collect the
appropriate sales tax for each individual
state, country, and locality to which the
merchandise is being sent.
Shipping and Handling 5.0o
Total Amount Enclosed
Use VISA, MasterCard, or Discover Card
preferably.
Money order or check must be in U.S.
currency only.
No COD or CASH.
All accessories are subject to availability.
Where applicable, we will ship a superseding model.
59
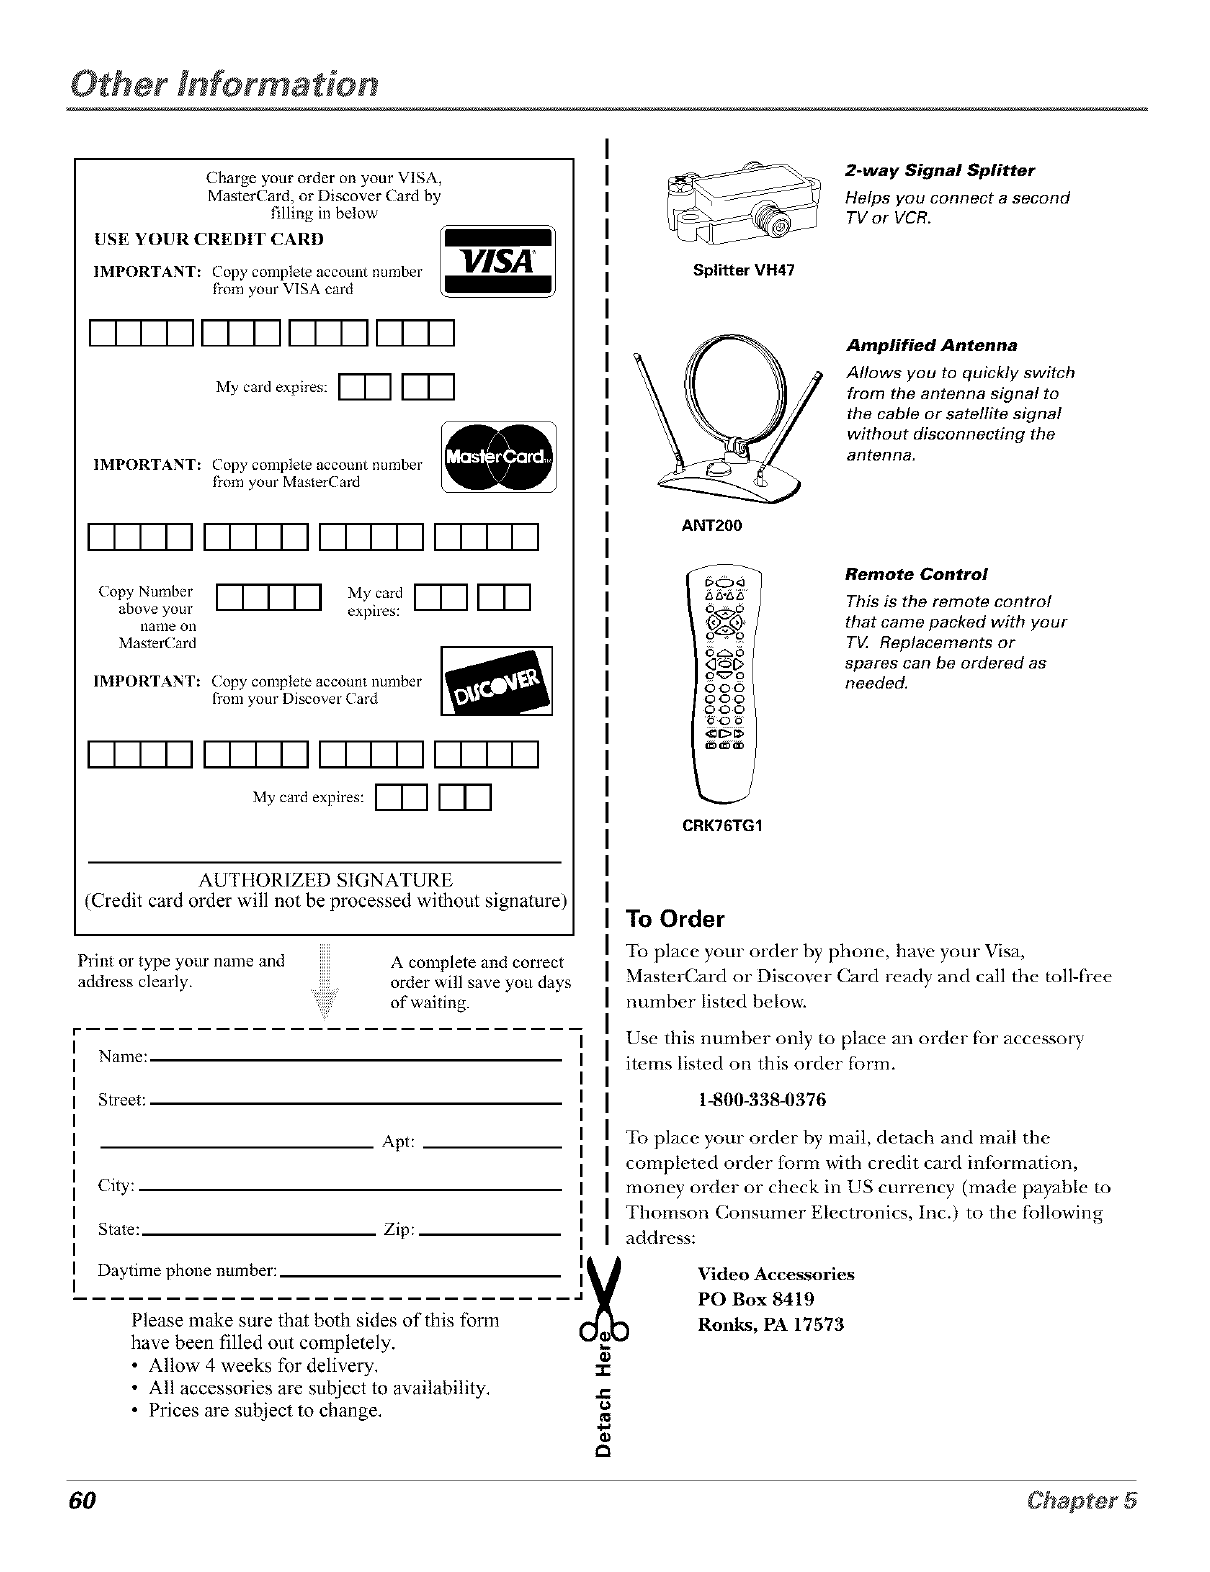
Charge your order on your VISA,
Master( ard, or Discover Card by
filling in below
USE YOUR CREDIT CARD
IMPORTANT: (opy complete account number
f}-om your VISA card
VISA
M,cal'doxpire :I--[--II--[--I
IMPORTANT: (opy complete account number
f}-om your Master( ard
F-F-F V-F-F F-F-F F-F-F
(opy Number
above your
name Oll
Master( ard
My,card [--T'-] [--T'-]
expires:
IMPORTANT: (opy complete account number
t?om your Discover (ard
F-F-F V-F-F F-F-F F-F-F
My card expires: _ F"T-']
AUTHORIZED SIGNATURE
(Credit card order will not be processed without signature)
Print o1"type your name and
address clearly. A complete and correct
order will save you days
of waiting.
Name:
Street:
City:
Apt:
State: Zip:
Daytime phone number:
Please make sure that both sides of this form
have been filled out completely.
• Allow 4 weeks for delivery,
• All accessories are subject to availability,
• Prices are subject to change,
2-way Signal Splitter
Helps you connect a second
TV or VCR.
Splitter VH47
Amplified Antenna
Allows you to quickly switch
from the antenna signal to
the cable or satellite signal
without disconnecting the
antenna.
ANT200
OO
OO
CRK76TG1
Remote Control
This is the remote control
that came packed with your
T_ Replacements or
spares can be ordered as
needed.
To Order
To place your order by pbone, have your Visa,
MasterCard or Discover Card ready and call the roll-free
number listed below.
Use this number only to place an order for accessory
items listed on this order fbrm.
1-800-338-0376
To place your order by mail, detach and mail the
completed order form with credit card information,
money order or check in US currency (made payable m
Thomson Consumer Electronics, Inc.) to the fbllowing
address:
]_ Video Accessories
PO Box 8419
Ronks, PA 17573
:I:
t_
60 Chapter 5
at
Age-Based Ratings, 39
ANTENNA button, 22
Arrow buttons, 22
Audio
Menu, 49
Pmccsso,, 49
A[ DIO IN jacks, 11
A[DIO Rjack, 12
Audio/Video cahle, 7
/hannelSearch, 15, 52
( olor, 50
Tuning, 36, 52
DVD Chal'_l'_el, 37
SXF//aBle / hannel, 37
VCRI (hannel, 37
VCR2 Channel, 37
AUX (auxiliary) hutton, 22
B
BatteIies lor the remote, 14
Black Level, 49
Block
Age-Based Rallng% 40
/ hannel, 45
Front Panel, 45
Movie Rallng_, 44
Speciilc Content Themes, 42
V-( hip Unrated Pi'ogmm, 45
Bottons
trout ofT\; 57
i't'lllote coIltI'ol, 22
C
Cable Box, code list, 26
CABI.E/ANTENNA jack,
8, 9, I1, 12
Cables
audio/_ idco, 7
coaxial, 7
/;dJNK, 7
_Video, 7
UU (/losed (aptiolfing), 50
UH +hutton, 22, 57
UH- button, 22, 57
Channel
BanneI; 36
Block, 45
Labels, 52
Lineop, 28
Map, 28
Menu, 52
Search, 15
Uhamml 2, 37
Channel 3, 37
Channels menu, 34
UI.EAR button, 22
Closed Caption
Display; 50
Mode, 51
Coaxial cahle, 7
(;()de list
(aBle Box, 26
Salcllite Receivei; 26
V/R, 26
Color Warmth, 50
Uol_nedioilS
TV +VIR, 8
-I_%V( R+Satellite Receiver, 11
U(mtent Themes, 39
Contrast, 49
D
DemoPin, 6, 8, 9, l1
DVD button, 22
DVI) ( hannel, 37
F
Finding the sensor, 13
Fixed
Images, 57
FI/RWARD button, 22
Front Panel
Nook, 45
G
G-LINK
cable, 7
connecting, 13
GO BA( K button, 22
Grid Guide, 29, 30
GUII)E button, 22
GUII)E Plus+ sy_lem
(;hmmel i.ineup, 28
Channels, 35
Do*_adoading lnlormation, 28
Setup, 15
/;uidel}lns+system, 15, 20
INF/) button, 22
INPLT l, 37
Interactive setup, 15
J
Jacks on the TV, 12
L
I-E.D. breton, 22
L/MONO jack, 12
Labels, 52
Language, 50
Languages, 15
Locating remou- sensor, 13
Lock. Parental Controls, 46
M
Memory; 52
MENU button, 22, 57
Mentls
Audio, 49
Uhmmel, 52
GUIDE Plus+
Chaimels, 34
(;rid, 29
initial setup, 15
Messages, 33
News, 32
Schedole, 32
Sort, 31
GUIDE Plus+ Melm, 35
Language, 50
Parental Controls, 38
Picture Qualit}, 49
Screen, 50
Setup, 15
Time, 52
Mono, 49
Mute, 49
MUTE btlttoil, 22
N
News l_enu, 32
Normal List, 52
Nmnber bottons, 22
O
OK buuon, 22
ON'OFF but(on, 22
P
Parental Uontrols
Locking, Unlocking, 46
Ii'tenil, 3_
PAUSE/mtton, 23
Picture
Presets, 50
Quality Meim, 49
PLAY but(on, 23
POWER button, 57
Program guide
after setup, 20
R
Rand L jacks, 12
Rating Limits
mo_Jes, 43
TV, 39
REU°V/]R+ botton, 23
Remote, batteries, 14
Remote sensoi; 13
REVERSE but(on, 23
S
_%VII)EO
cable, 7
SAP, 49
SAT°CABI.E botton, 23
SAT/(able Channel, 37
Satellite Receiw-r
code list, 26
connecting, II
Schedule menu, 32
Schedule time, 52
Screell menu, 50
Second Audio Program (SAP), 49
Set
DVI) (Naimel, 37
S,_fI/CABI.E Channel, 37
"lfme, 52
VCRI Channel, 37
VCR2 Channel, 37
Setup
GUIDE Phls+ system menus, 15
Illenu, 34
Sharpness, 50
Signal "l_,pe, 52
SKIP button, 23
Sleep Timer, 36, 52
Sort menu, 31
SO[ND buuon, 23
Slereo, 49
STOP buuon, 23
T
Time
(]urrcnL 36
Menu, 52
Tint, 49
"li)ne (_ontrols, 49
Troubleshooting, 54
TV button, 23
U
UHF/VHF Amenna, 52
Unlock, Parental Controls, 46
V
\=Chip, 38
Age-Based Rallng_, 38
Blocking Movies, 43
/ ontent Themes, 38
VCR
1 (hannel, 37
2 Channel, 37
code list, 26
connecting, 8
VCR1 button, 23
VCR2 button, 23
VIDEOINjack, II, 12
VOI. + button, 57
VOI.- button, 57
VOI.+ hutton, 23
VOL button, 23
W
Warranl}, 58
WHO°INPUT buuon, 23
81
Please do not send any products to the Indianapolis address listed in this manual or on the carton. This will only
add delays in service for your product.
_tHOMSON CONSUMER ELECTRONICS
10330 North Meridian Street
Indianapolis, IN 46290
©2000 Thomson Consumer Electronics, Inc.
Trademark(s)® Registered
Marca(s) Registrada(s)
Printed in USA
TOCOM 15605910
The following materials were used in
printing this publication:
60%
RECYCLEDPAPER
MINIMUM20%POSTCONSUMER
_PRINTEDWITHI
ISOYINK o
