RCA Direct View Digital 27 To 40 TV Manual L0404224
User Manual: RCA RCA Direct View Digital 27 to 40 TV Manual RCA Direct View Digital 27 to 40 TV Owner's Manual, RCA Direct View Digital 27 to 40 TV installation guides
Open the PDF directly: View PDF ![]() .
.
Page Count: 42
Television
User's Guide
Changing Entertainment.
Important +rfformat+or
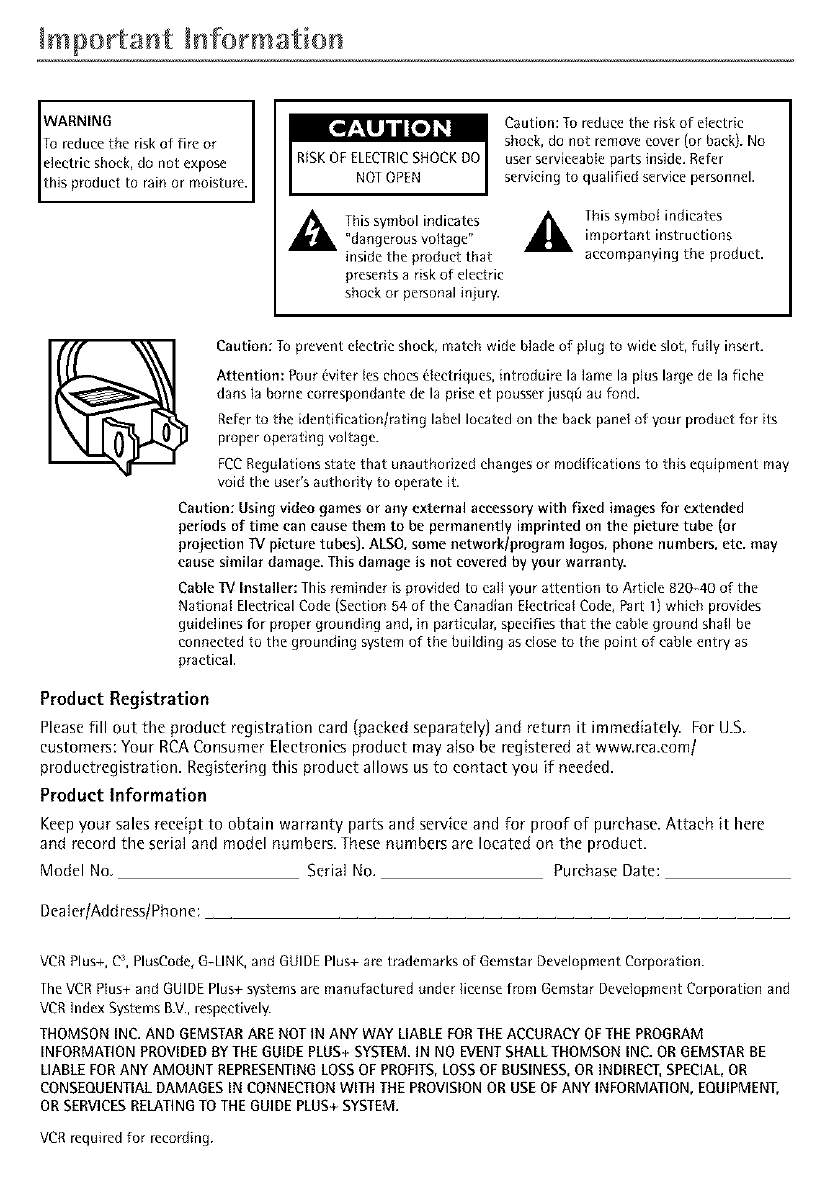
WARNING
To reduce the risk of fire or
this product to rain or moisture.
electric shock, do not expose RISKOF ELECTRICSHOCKDO
NOTOPEN
Caution: To reduce the risk of electric
shock, do not remove cover (or back). No
user serviceable parts inside. Refer
servicing to qualified service personnel.
,_1_ Thissymbol indicates
"dangerous voltage"
inside the product that
presents arisk of electric
shock or personal injury.
_. This symbol indicatesimportant instructions
accompanying the product.
Caution: To prevent electric shock, match wide blade of plug to wide slot, fully insert.
Attention: Pour 6viter los ehocs 61eetriques, introduire la lame la plus large de la fiche
duns la borne correspondante de la prise et pousser jusqR at+fond.
Refer to the identification/rating label located on the back panel of your product for its
proper operating voltage.
FCCRegulations state that unauthorized changes or modifications to this equipment may
void the user's authority to operate it.
Caution: Using video games or any external accessory with fixed images For extended
periods of time can cause them to be permanently imprinted on the picture tube (or
projection TVpicture tubes). ALSO,some network/program logos, phone numbers, etc. may
cause similar damage. This damage is not covered by your warranty.
Cable IV Installer: This reminder is provided to call your attention to Article 820-40 of the
National Electrical Code (Section 54 of the Canadian Electrical Code, Part 1) wh+ch provides
guidelines lor proper grounding and, in particular, specifies that the cable ground shall be
connected to the grounding system of the building as close to the point of cable entry as
practical.
Product Registration
Please fill out the product registration card (packed separately] and return it immediately. For U.S
customers: Your RCA Consumer Electronics product may also be registered at www.rca.com/
productregistration. Registering this product allows us to contact you if needed.
Product Information
Keep your sales receipt to obtain warranty parts and service and for proof of purchase. Attach it here
and record the serial and model numbers. These numbers are located on the product.
Model No. Serial No. Purchase Date:
Dealer/Address/Phone:
VCR Plus+, C;, PlusCode, G-LINK,and GUIDE Plus+ are trademarks of Gemstar Development Corporation.
TheVCR Plus+ and GUIDEPlus+ systems are manufactured under license from Gemstar Development Corporation and
VCR Index Systems B.V.,respectively.
THOMSON INC.AND GEMSTARARE NOT IN ANY WAY LIABLEFORTHE ACCURACYOF THE PROGRAM
INFORMATIONPROVIDEDBYTHE GUIDEPLUS+SYSTEM.IN NO EVENTSHALLTHOMSON INC. OR GEMSTARBE
UABLE FORANY AMOUNT REPRESENTINGLOSSOF PROFITS,LOSSOF BUSINESS,OR INDIRECT,SPECIAL,OR
CONSEQUENTIALDAMAGESIN CONNECTIONWITH THEPROVISIONOR USEOFANY INFORMATION,EQUIPMENT,
ORSERVICESRELATINGTO THE GUIDEPLUS+SYSTEM.
VCR required for recording.
Table of Cow,tents
Chapter 1: Connections & Setup
Things to Consider Before You Connect .................................................................... 3
Protect Against Power Surges ......................................................................... 3
Protect Corn ponents from Overheating ......................................................... 3
Position Cables Properly to Avoid Audio Interference .................................. 3
important Stand and Base Safety information .............................................. 3
Use indirect Light ............................................................................................. 3
Cables Needed to Connect Components to Your TV ..................................... 3
Demo Pin .......................................................................................................... 3
TV + VCR + DVD Player ............................................................................................... 4
Explanation of Jacks ......................................................................................... 5
The Front of Your TV ................................................................................................... 6
Front input Jacks .............................................................................................. 6
Front Panel Buttons ......................................................................................... 6
Why You Should Connect This G-LINK Cable ........................................................... 7
How to Find the Remote Sensor ..................................................................... 7
Placing the G-LINK Wands ............................................................................... 7
Plug in the TV ............................................................................................................... 8
Put batteries in the remote ........................................................................................ 8
How to Use the Remote Control to Complete the Initial Setup ............................. 8
Turn on the TV .............................................................................................................. 8
Set the Menu Language .................................................................................. 8
Complete Auto Channel Search ...................................................................... 9
The GUIDE Plus+ System Setup ........................................................................ 9
Downloading Data ........................................................................................... 10
What to Expect ............................................................................................................ 11
Chapter 2: Using the Remote Control
Button Descriptions for TV Mode ............................................................................... 12
Button Descriptions for DVD and VCR Modes ........................................................... 12
Using the iNPUT Button ................................................................................... 13
Programming the Remote to Operate Other Components ....................................... 13
Find Out If You Need to Program the Remote ............................................... 13
Programming the Remote ............................................................................... 13
How to Use the Remote After You've Programmed It .................................. 15
Remote Control Codes ................................................................................................. 15
Table of Contents
Chapter 3: Using the TV's Features
About the GUIDE Plus+ System .................................................................................. 17
Using the GUIDE Plus+ System ......................................................................... 17
The GUIDE Plus+ System Menu Bar ................................................................. 17
Grid Guide ........................................................................................................ 18
Sort .................................................................................................................... 19
News .................................................................................................................. 19
Schedule ............................................................................................................ 19
Messages ........................................................................................................... 20
Channels ........................................................................................................... 20
Setup ................................................................................................................. 20
Promotions and Advertising ............................................................................ 20
Channel Banner ............................................................................................................ 21
Why You Should Use the Auto Tuning Feature ........................................................ 21
How to Set Up the Auto Tuning Feature ........................................................ 21
Parental Controls and V-Chip ..................................................................................... 23
How V-Chip Works ........................................................................................... 23
V-Chip TV Rating Limit ..................................................................................... 24
Blocking Specific Content Themes .................................................................. 26
Viewing Specific Content Themes ................................................................... 26
V-Chip Movie Rating Limit ............................................................................... 26
V-Chip Unrated Program Block ....................................................................... 27
Channel Block ................................................................................................... 27
Front Panel Block ............................................................................................. 27
Lock/Unlock Parental Controls ........................................................................ 27
Chapter 4: Using the TV's Menu System
Audio Menu .................................................................................................................. 28
Picture Quality Menu .................................................................................................. 29
Screen Menu ................................................................................................................. 30
Using Closed Captioning .............................................................................................. 30
Closed-Caption Modes ..................................................................................... 30
Channel Menu .............................................................................................................. 31
Time Menu .................................................................................................................... 32
Chapter 5: Other Information
Troubleshooting ............................................................................................................ 33
Care and Cleaning ........................................................................................................ 36
Limited Warranty ......................................................................................................... 37
2
Things to Consider Before You Connect
Protect Against Power Surges
*Connect all components before you plug any of their power cords into the wall outlet
*Turn off the Wand/or component before you connect or disconnect any cables.
• Make sure all antennas and cables are properly grounded. Refer to the Important Safety Instructions
packed separately.
Protect Components from Overheating
•Don't block ventilation holes on any of the components Arrange the components so that air can
circulate freely.
• Don't stack components.
• If you place components in a stand, make sure you allow adequate ventilation.
• If you connect an audio receiver or amplifier, place it on the top shelf so the heated air from it
won't flow around other components.
Position Cables Properly to Avoid Audio Interference
•Insert each cable firmly into the designated jack
• If you place components above the IV, route all cables down the side of the back of the I1/instead
of straight down the middle of the IV.
• If your antenna uses 3OO-ohm twin lead cables, do not coil the canes. ABo, keep the twin lead
cables away from aud{olvideo cables.
Important Stand and Base Safety Information
Choose the location for your IV carefully. Place the IV on a stand or base that is of adequate size and
strength to prevent the IV from being accidentally tipped over, pushed off, or pulled off. This could
cause personal injury andlor damage the IV. Refer to the Important Safety Instructions packed
separately.
Use Indirect Light
Don't place the IV where sunlight or room lighting will be directed toward the screen. Use soft or
indirect lighting.
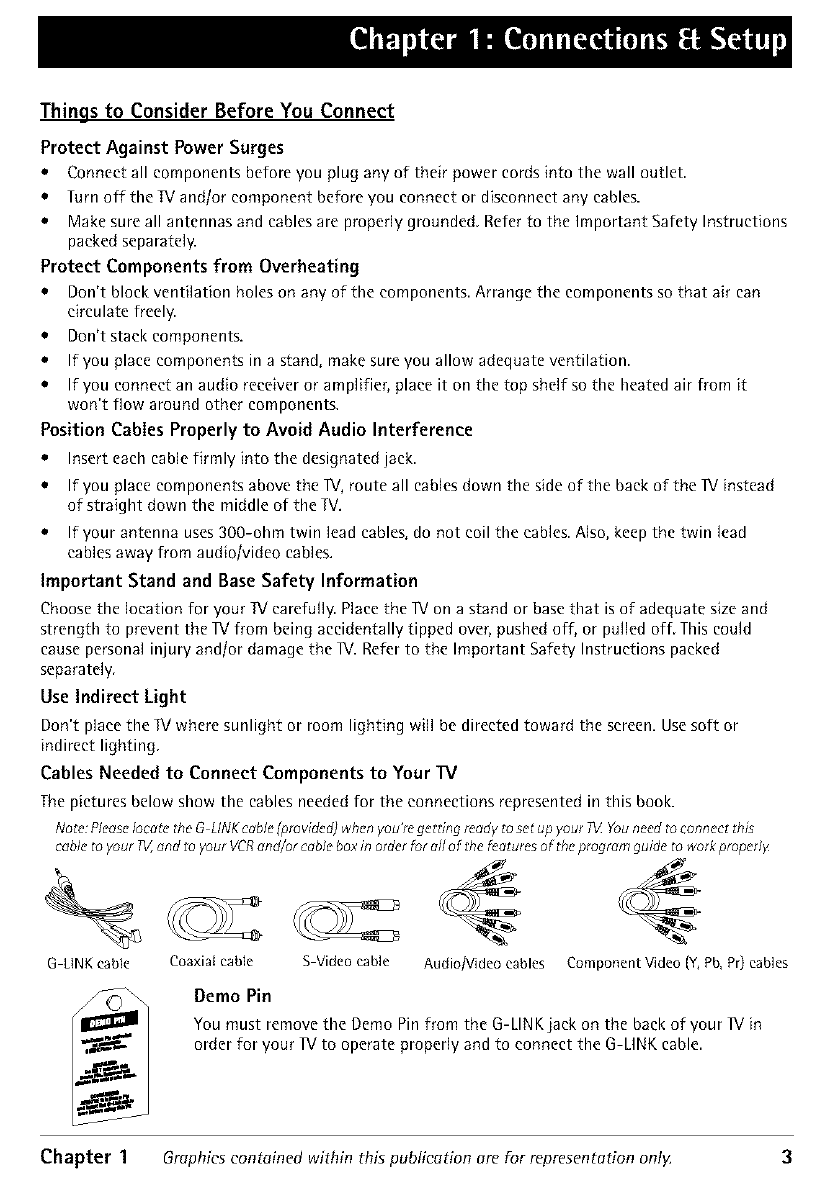
Cables Needed to Connect Components to Your TV
The pictures below show the cables needed for the connections represented in this book.
No_e:PIc,ase/oc_'tcthe G LINKcable (providcd) when you'r_ getting ready to set up your 71ZYouneedto connect this
cable _oyour #V,,_nd _oyour VCRand/or e_bleboxin order for dl of the features of lbe progrem guide _oworkproperly
G LtNKcable Coaxiai cable S Video cable AudioNideo cables Component Video (Y, Pb,Pr) cables
Demo Pin
You must remove the Demo Pin from the G-LINKjack on the back of your IV in
order for your IV to operate properly and to connect the G-LINK cable.
Chapter 1 Graphics contained within this publication are For representation only. 3
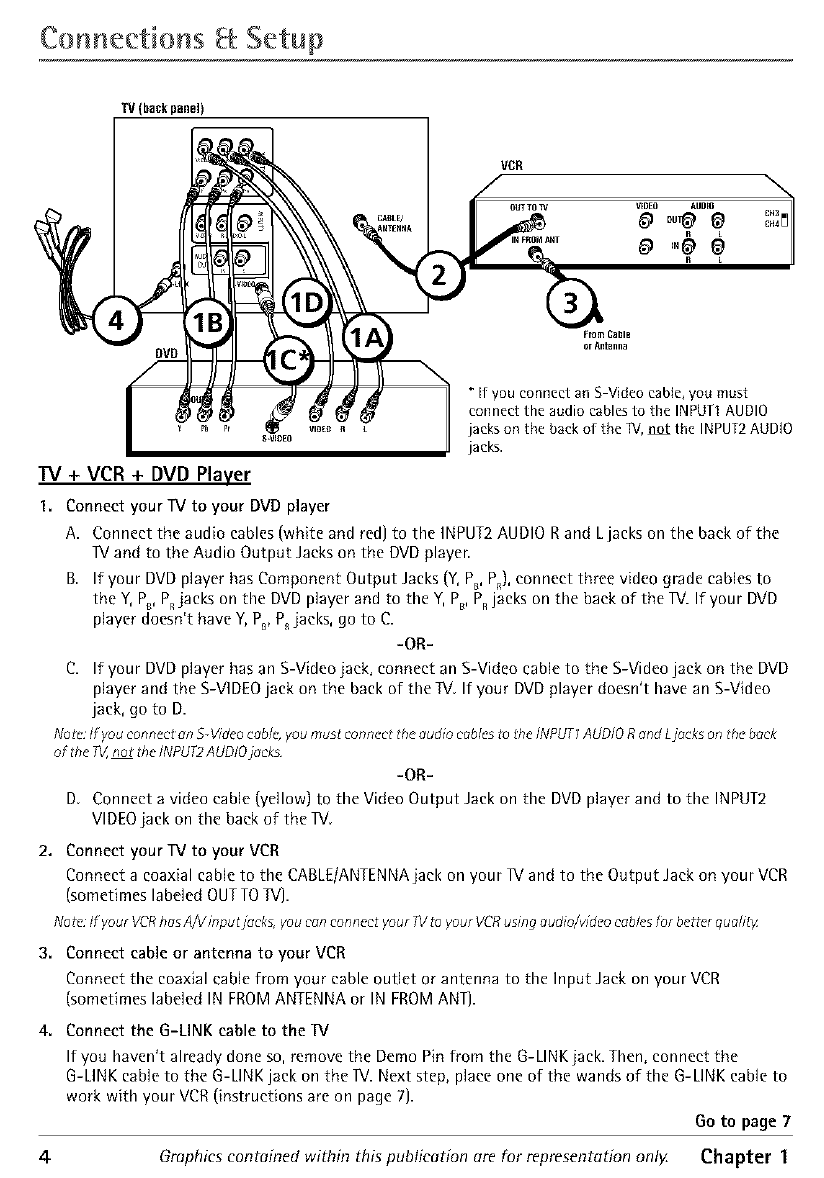
Connections getup
TV (Pack panel)
DVD
From Cable
orAfltanna
[f you connect an S Video cable, you must
connect the audio cables to the INPUTI AUDIO
jacks on the back of the TV, not the INPUT2 AUDIO
jacks.
TV + VCR + DVD Player
1. Connect your TV to your DVD player
A. Connect the audio cables (white and red) to the INPUT2 AUDIO Rand L jacks on the back of the
IV and to the Audio Output Jacks on the DVD player.
B. If your DVD player has Component Output Jacks (Y, PB,PR),connect three video grade cables to
the Y, PB,P, jacks on the DVD player and to the Y, P_,P, jacks on the back of the IV. If your DVD
player doesn't have Y, PB,P_ jacks, go to C.
-OR-
C. If your DVD player has an S-Video jack, connect an S-Video cable to the S-Video jack on the DVD
player and the S-VIDEO jack on the back of the IV. If your DVD player doesn't have an S-Video
jack, go to D.
No_c:If you connectan S-Videocable,you must connect the audio cablesto the INPUT1AUDIORand Ljacks on the back
of the _not the INPUT2AUDIOjack,
-OR-
D. Connect a video cable (yellow) to the Video Output Jack on the DVD player and to the INPUT2
VIDEO jack on the back of the IV.
2. Connect your TV to your VCR
Connect a coaxial cable to tbe CABLE/ANTENNA jack on your IV and to the Output Jack on your VCR
(sometimes labeled OUT TO TV}.
Note If your VCRhasA/V mputj_cks, youconconnect your 71/toyour VCRusing audio/wdeo cablesfor betterqudily
3. Connect cable or antenna to your VCR
Connect tbe coaxial cable from your cable outlet or antenna to tbe Input Jack on your VCR
(sometimes labeled IN FROM ANTENNA or IN FROM ANT].
4. Connect the G-LINK cable to the TV
If you baven't already done so, remove the Demo Pin from tbe G-LINK jack. Tben, connect the
G-LINK cable to the G-LINK jack on the IV. Next step, place one of the wands of tbe G-LINK cable to
work witb your VCR (instructions are on page 7}.
Go to page 7
4Graphics contained within this publication are for representation only. Chapter 1
Co mectio s getup
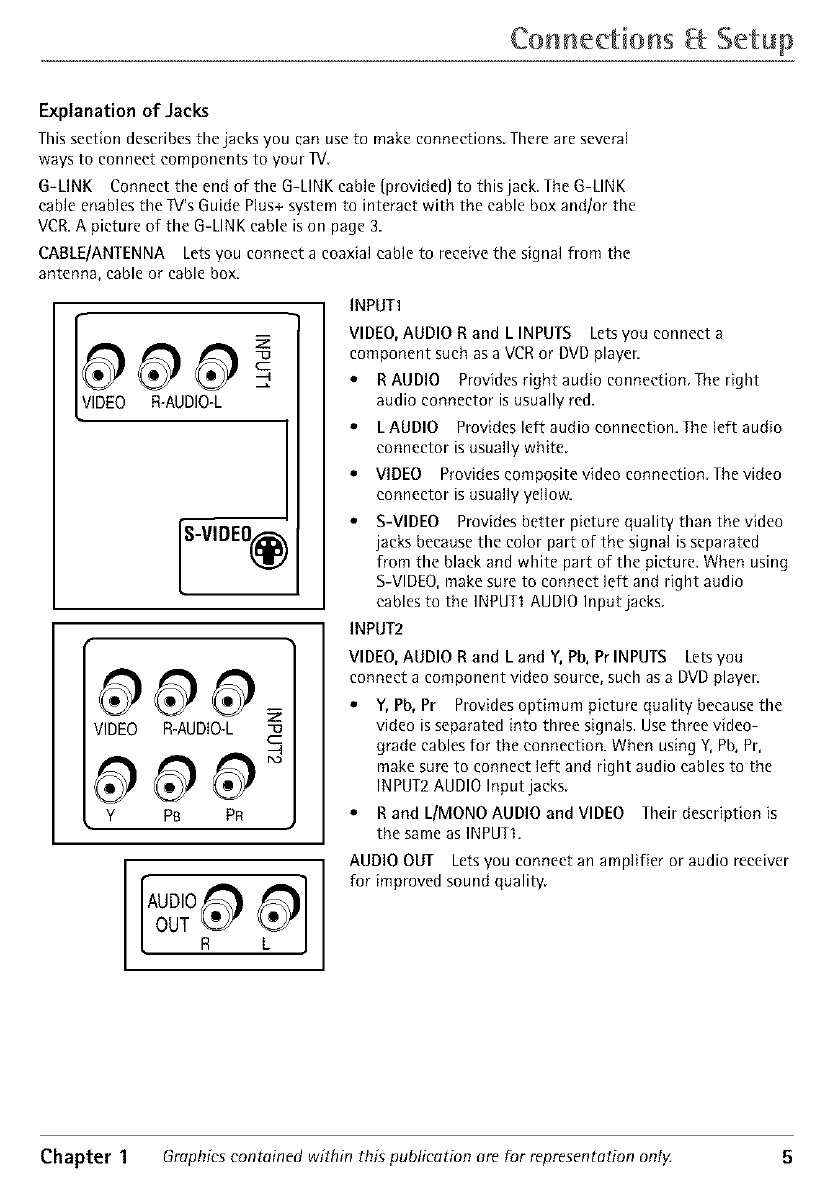
Explanation of Jacks
Thissection deseribesthe jacks you can use to make connections,Thereare several
ways to connect components to your IV,
G-LINK Connect the end of the G-LINKcane {provided) to this jack,TheG-LINK
cable enablesthe TV'sGuidePlus+ system to interactwith the cable box and/or the
VCR.A picture of the G-LINKcable ison page 3.
CABLE]ANTENNA Letsyou connect a coaxial cane to receive the signal from the
antenna, cable or cable box.
R-AUDIO-L
S-VIDEO@
VIDEO R-AUDIO-L c
Y PB PR
AUDIO
INPUTI
VIDEO,AUDIO Rand LINPUTS Letsyou connect a
component such asa VCRor DVD player.
• RAUDIO Providesright audio connection, The right
audio connector is usually red.
• L AUDIO Provides left audio connection. The left audio
connector is usually white.
• VIDEO Provides composite video connection. The video
connector is usually yellow.
S-VIDEO Provides better picture quality than the video
jacks because the color part of the signal is separated
from the black and white part of the picture When using
S-VIDEO,make sure to connect left and right audio
cablesto the INPUTI AUDIO Input jacks
INPUT2
VIDEO,AUDIO Rand L and Y, Pb,PrINPUTS Letsyou
connect a component video source,such as a DVDplayer.
•Y, Pb, Pr Provides optimum picture quality because the
video is separated into three signals. Use three video-
grade cables for the connection. When using Y, Pb, Pr,
make sure to connect left and right audio cables to the
INPUT2 AUDIO Input jacks.
• R and L/MONO AUDIO and VIDEO Their description is
the same as INPUTI.
AUDIO OUT Letsyou connect an amplifier or audio receiver
for improved sound quality.
Chapter 1 Graphics contained within this publication ore for representotion ontg 5

Connections getup
The Front of Your TV
Front Input Jacks
The 13/has one set of front audio/video input front input jacks for your
convenience. These jacks are on the front of the IV behind the access doon To
access the component you connected to the front of the IV, press the INPUT
button on your remote until FRNTappears on the screen The jacks are ideal for
connecting a video game console or a eamcorder.
No_c:Whenconnecting _ component thet only has one audiojack, such assomec_mcordcrs,
usethe W_ AUDIOL/MONOjock to hear zhceudio
L/MONO and R AUDIO Receives audio from another component such as a VCR,
eamcorder, or video game console.
VIDEO Receives video from another component such as a VCR, camcorder, or
video game console.
Front Panel Buttons
If you cannot locate your remote, you can use the front panel buttons of your IV
to operate many of the TV's features.
MENU Brings up the Main menu. Also returns you to the previous menu. Press
and hold for two seconds to access the GUIDE Plus+ system.
CH v Scans down through the current channel list. In the menu system, acts like
the down arrow button on the remote control and adjusts menu controls.
CH ^ Scans up through the channel list. In the menu system, acts like the up
arrow button on the remote control and adjusts menu controls.
VOL - Decreases the volume. In the menu system, acts like the left arrow button
on the remote control and adjusts menu controls.
VOL + Increases the volume. In the menu system, acts like the right arrow button
on the remote control and adjusts menu controls.
POWER Turns the IV on and off.
6Graphics contained within this publication are for representation only Chapter 1
Co meetio s getup
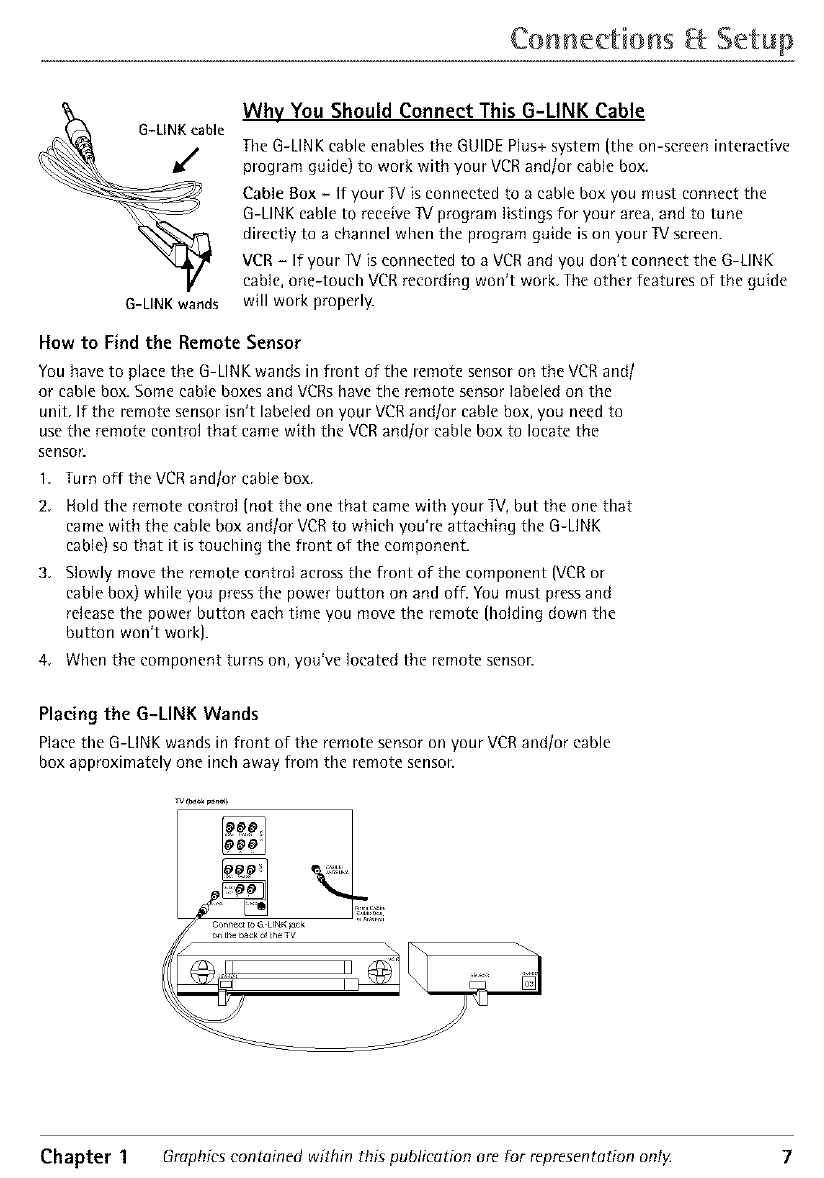
G-LINK wands
Why You Should Connect This G-LINK Cable
TheG-LINKcable enablesthe GUIDEPlus+system (the on-screen interactive
program guide) to work with your VCRand/or cane box
Cable Box - If your IV isconnected to a cable box you must connect the
G-LINK cable to receiveIV program listings for your area, and to tune
directly to a channel when the program guide ison your TVscreen.
VCR- If your IV isconnected to a VCRand you don't connect the G-LINK
cane, one-touch VCR recording won't work The other features of the guide
will work properly.
How to Find the Remote Sensor
You have to place the G-LIN K wands in front of the remote sensor on the VCR and/
or cable box. Some cable boxes and VCRs have the remote sensor labeled on the
unit. If the remote sensor isn't labeled on your VCR andtor cable box, you need to
use the remote control that came with the VCR and/or cable box to locate the
sensor.
1. Turn off the VCR and/or cable box.
2. Hold the remote control (not the one that came with your IV, but the one that
came with the cable box andtor VCR to which you're attaching the G-LINK
cable) so that it is touching the front of the component.
3. Slowly move the remote control across the front of the component (VCR or
cable box) while you press the power button on and off. You must press and
release the power button each time you move the remote (holding down the
button won't work).
4. When the component turns on, you've located the remote sensor.
Placing the G-LINK Wands
Place the G-LINK wands in front of the remote sensor on your VCR and/or cable
box approximately one inch away from the remote senson
Chapter 1 Graphics contained within this publication are for representation only. 7

Connections getup
Plug in the TV
Plug the end of the power cord into a grounded wall outlet. Insert the plug
completely into the outlet.
Put batteries in the remote
• Remove the battery compartment cover from the back of the remote by
pushing down on and sliding offthe cover.
• Insert 2 fresh "AAA" batteries Make sure the polarities (+ and -) are aligned
correctly.
• Replace the cover
How to Use the Remote Control to Complete the Initial Setup
The technical term is "Navigation"- how you move through the on-screen menus.
The method is the same throughout the menu screens: highlight your choice and
select it
To highlight amenu item, press the arrow buttons on the remote to highlight one
of the items listed on the screen Use the up or down arrow button to move up or
down. Use the right or left arrow button to move right or left.
To select the item that you've highlighted, press OK.
Nolo:Highlighzedmeansthut themenu izemstand, out from olhcr menu items on the list
(oppearsdarker,brighzer,or _ di_rcnt colo_
Turn on the TV
Press TV on the remote, or press POWER on the IV's front panel.
Nolo' Pressingthe TVbutton not only turnson ff_eT_,but pu_sthe remote,m_o?Vmode "71/
mode"means_hut the buttons on _he remo1ccontrol operate the 7V'sfunctions
Set the Menu Language
The first part of the SETUPasks you to select your preferred
language for the menu system.
I. Highlight your preferred language for the menu system.
2. Press OK to select that language.
8Graphics contained within this publication ure for representation onl ZChapter 1
Connections getup
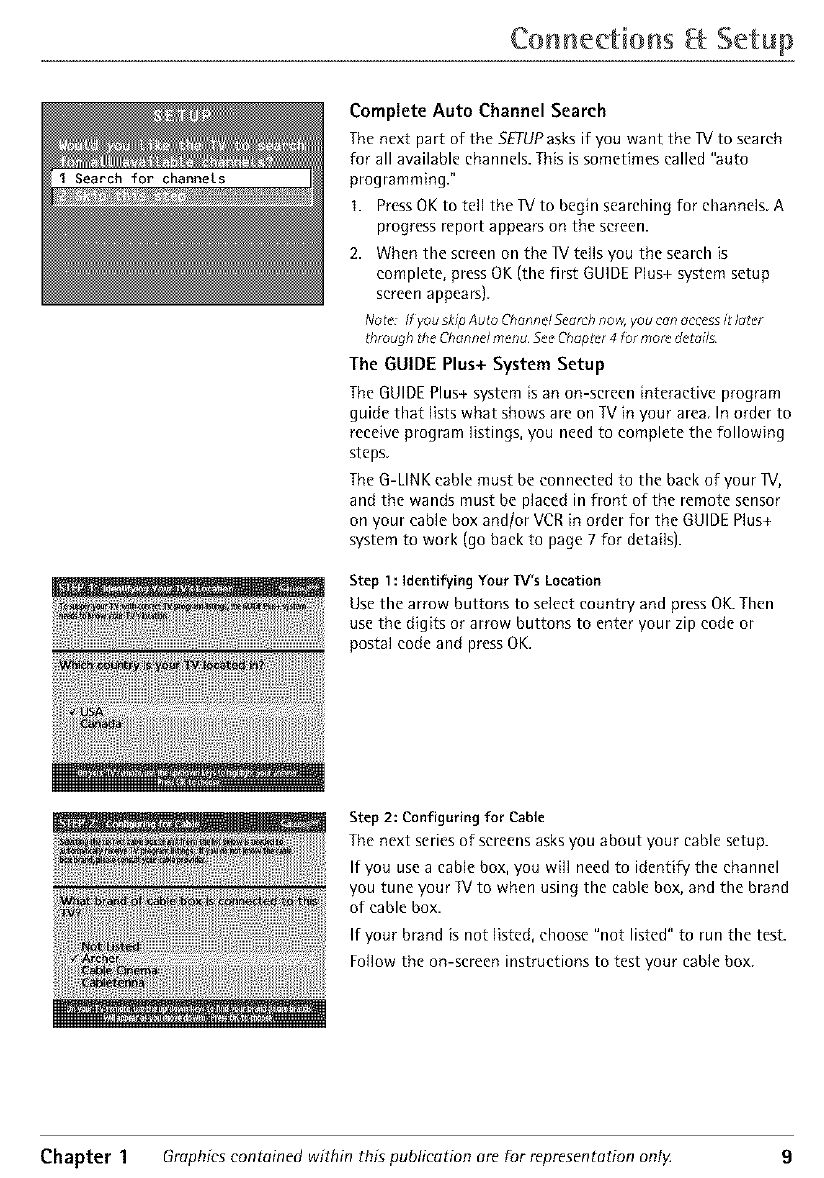
Compiete Auto Channel Search
The next part of the SETUP asks if you want the IX! to search
for all available channels. This is sometimes called "auto
programming."
I. Press OK to tell the IX! to begin searching for channels. A
progress report appears on the screen.
2. When the screen on the IX/tells you the search [s
complete, press OK (the first GUIDE Plus+ system setup
screen appears).
No_c*:If yousklp Auto Chonnd Scarch no_ youc_n accessit later
_hroughthe Channelmenu Scc,ChopPer4 for morndctoils
The GUIDE Plus+ System Setup
The GUIDE Plus+ system [s an on-screen interactive program
guide that lists what shows are on TV [n your area. In order to
receive program listings, you need to complete the following
steps.
The G-LIN K cable must be connected to the back of your IX/,
and the wands must be placed in front of the remote sensor
on your cable box and/or VCR [n order For the GUIDE Plus+
system to work (go back to page 7 for details}.
Step 1:Identifying Your TV's Location
Use the arrow buttons to select country and press OK. Then
use the digits or arrow buttons to enter your zip code or
postal code and press OK.
Step 2: Configuring for Cable
The next series of screens asks you about your cable setup.
If you use a cable box, you will need to identify the channel
you tune your IV to when using the cable box, and the brand
of cable box.
If your brand is not listed, choose "not listed" to run the test.
Follow the on-screen instructions to test your cable box.
Chapter 1 Graphics contained within this publication are for representation ont}4 9

Connections getup
Step 3: Configuring for a VCR
The next series of screens asks you about your VCR setup.
If you connected a VCR to the IV, you will need to follow the
on-screen instructions to select your brand of VCR and run a
system test so that the one-touch record feature will work
properly.
No tes: If your VCRbrand isn't listed, choose the No t Listcd ophon.
Lc_w* 1he cable box on _o download program hstmgs Lcow* your
VCR off to record programs wJzh thc Guide Plus+ One Touch Rccord
fcdtufc
Step 4: Confirming Your Settings
•Check to make sure all settings are complete and correct.
If all settings are complete, highlight Yes, end setup and
press OK. If your cable box and/or VCR code testing
failed, you should see INCOMPIETEwhere the cable
box and VCR codes are listed. Once setup is complete,
additional screens appear.
If any settings are incomplete or incorrect, highlight No,
repeat setup process and press OK. Follow the
instructions on the screen.
You can choose to view a demo of the GUIDE Plus+
features, which may take a few minutes to load. If you
don't want to see the demo right now, press OK to watch
13/.
Downloading Data
The GUIDE Plus+ system is not available until it completes its
first download of program information. To ensure that your
first download of data is complete, you should leave your IV
off overnight. If you use a cable box, be sure to leave it on.
Downloads occur several times a day. The IV must be turned
off for GUIDE Plus+ system data to download.
10 Graphics contained within this publication are for representation only Chapter 1
Connections Setup
What to Expect
The next time you turn on your IV, the GUIDE Plus+ system will appear on the
screen. The following examples explain what you might see:
If all of the program information hasbeen sent to your IV, the GUIDEPlus+
system appearswith all of your IV program listings
If the program information hasn't been sent to your IV yet, an outline of the
GUIDE(without IV program listings) will appear on the screen.Program
information is usually sent to your IV at night.
If the IV detected that you have multiple cable companies in your area, you
will need to select a channel lineup.
Features of the GUIDE Plus+ system are explained in Chapter 3.
To clear the guide from your screen, press CLEAR or GUIDE on the remote control.
Chapter 1 Graphics contained within this publication are for representation ont_ 1 1
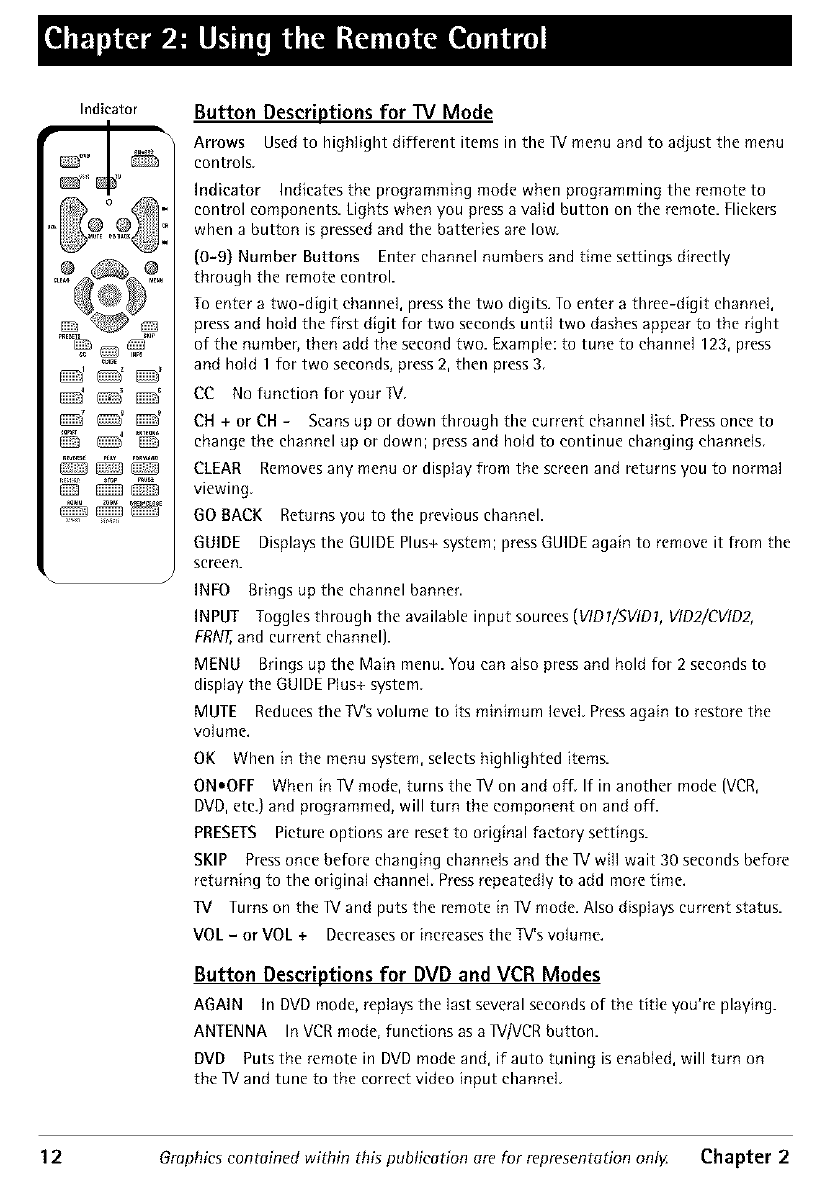
Indicator
C_:CZ2?C_?
Button Descriptions for TV Mode
Arrows Usedto highlight different items in the IX/menu and to adjust the menu
controls
Indicator Indicates the programming mode when programming the remote to
control components. Lights when you press a valid button on the remote. Flickers
when a button is pressed and the batteries are low.
(0-9} Number Buttons Enter channel numbers and time settings directly
through the remote control.
To enter a two-digit channel, press the two digits. To enter a three-digit channel,
press and hold the first digit for two seconds until two dashes appear to the right
of the number, then add the second two. Example: to tune to channel 123, press
and hold 1 for two seconds, press 2, then press 3.
CC No function for your IV,
CH + or CH -Scans up or down through the current channel list. Press once to
change the channel up or down; press and how to continue changing channels
CLEAR Removes any menu or display from the screen and returns you to normal
viewing.
GO BACK Returns you to the previous channel.
GUIDE Displays the GUIDE Plus+ system; press GUIDE again to remove it from the
screen.
INFO Brings up the channel banner.
INPUT Toggles through the available input sources (VIDl/SVIDl, VID2/CVID2,
FRNT,and current channel).
MENU Brings up the Main menu. You can also press and hold for 2 seconds to
display the GUIDE Plus+ system.
MUTE Reducesthe Iv's volume to itsminimum level. Pressagain to restorethe
volume.
OK When in the menu system, selects highlighted items.
ONoOFF When in IV mode, turns the IV on and off. If in another mode (VCR,
DVD, etc.) and programmed, will turn the component on and off.
PRESETS Picture options are reset to original factory settings.
SKIP Press once before changing channels and the IV will wait 30 seconds before
returning to the original channel. Press repeatedly to add more time.
lV Turns on the IV and puts the remote in IV mode. Also displays current status.
VOL -or VOL + Decreases or increases the TV'svolume.
Button Descriptions for DVD and VCR Modes
AGAIN In DVD mode, replays the last several seconds of the title you're playing.
ANTENNA In VCR mode, functions as a IViVCR button.
DVD Puts the remote in DVD mode and, if auto tuning is enabled, will turn on
the IV and tune to the correct video input channel.
12 Graphics contained within this publication are for representation only Chapter 2
Using the Remote Co trol
OPEN.CLOSE In DVD mode, opens or closes the DVD disc tray.
REVERSE, PLAY, FORWARD, RECORD, STOP, PAUSE If programmed, provides
transport control for some remote-controllable VCRs or DVD players.
SEARCH In VCR mode, accesses Index Search feature.
SPEED In VCR mode, selects a recording speed.
VCR Puts the remote in VCR mode and, if auto tuning is enabled, will turn on the
IX/and tune to the correct video input channel.
ZOOM In DVD mode, zooms in on the picture.
Using the INPUT Button
Use the INPUT button to scroll through the available video input channels and
view components you have connected to the IV
1 Make sure the component you want to view is turned ON.
2. Press INPUT to tune to an available video input source and view the
component.
3. To return to the previous channel, continue pressing INPUT.
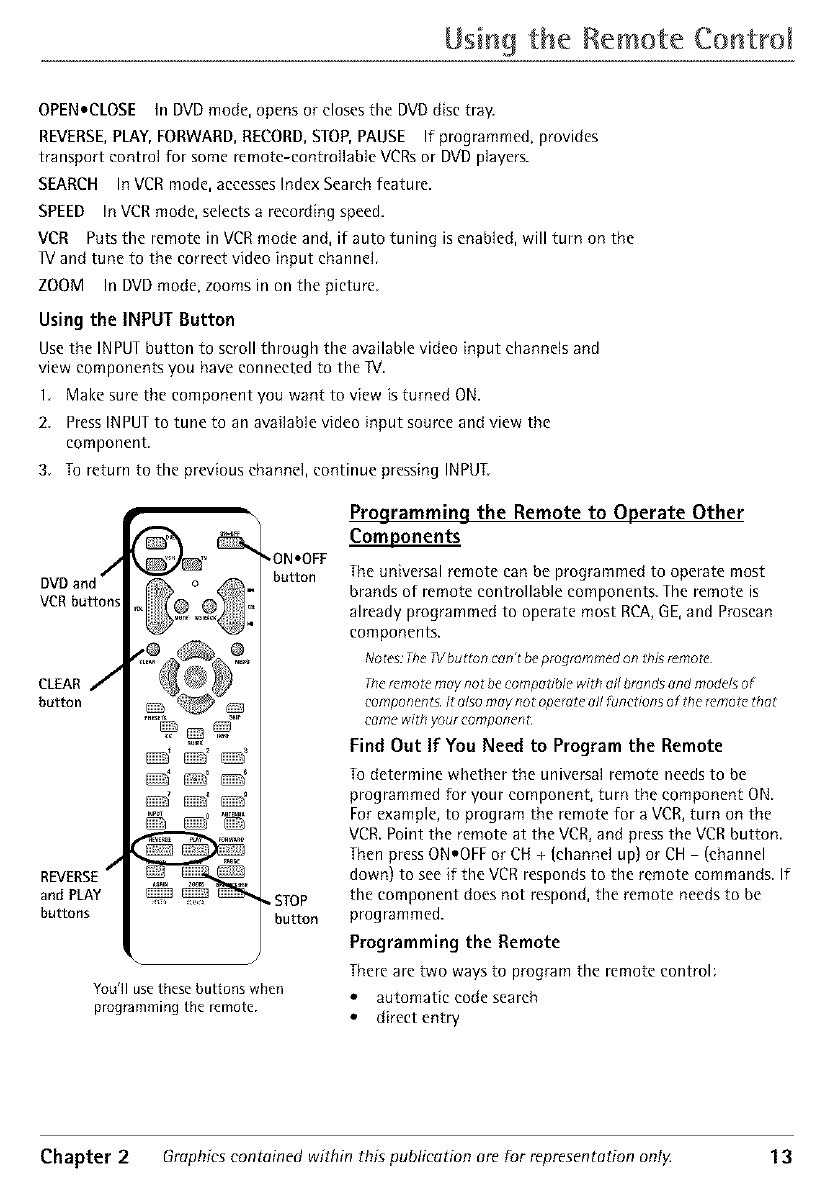
DVD and /
VCR buttons
CLEAR J
button
/
REVERSE
and PLAY
buttons
@@@
,ONeOFF
button
, STOP
button
You'H usethese buttons when
programming the remote.
Programming the Remote to Operate Other
Com Loonents
The universal remote can be programmed to operate most
brands of remote controllable components. The remote is
already programmed to operate most RCA, GE, and Proscan
components.
Notes: Tbc g/button can't be progrdmrned on this remozc
The mmote may no t be eompoz_ble with ell bronds end models of
componen ts. lt _lso moy not opcrate _l/ funczions of the remotc thdt
cemc* with your componcnL
Find Out If You Need to Program the Remote
To determine whether the universal remote needs to be
programmed for your component, turn the component ON.
For example, to program the remote for a VCR, turn on the
VCR. Point the remote at the VCR, and press the VCR button.
Then press ON.OFF or CH + (channel up) or CH - (channel
down) to see if the VCR responds to the remote commands. If
the component does not respond, the remote needs to be
programmed.
Programming the Remote
There are two ways to program the remote control:
• automatic code search
• direct entry
Chapter 2 Graphics contained within this publication ere for representetion only. 1 3
Using the Remote Co trol
Using Automatic Code Search
The following instructions can be used to program the remote to operate each of
your components. If you want to stop the automatic code search without
programming any of your components, press CLEAR until the indicator on the
remote turns off.
1. Turn on the component you want to operate (VCR or DVD player)
2. Press and hold the component button you want to program (VCR or DVD).
While holding the component button, press and hold ON.OFF until the
indicator on the remote turns on, then release both buttons.
3, Point the remote at the component. Press and release PLAY (the indieator light
on the remote flashes).
The remote is searching for the correct code to program. When the indicator
stops flashing ]after about 5 seconds], press PLAY again to tell the remote to
search the next set of codes.
Continue pressing PLAY until the component turns off or the indicator light on
the remote turns off. If the indicator light turns off, then all the codes for that
particular component have been tested once. If the component does not turn
off, then the remote can't be programmed to operate that component.
No_c:Eachtimeyou pressPLAY,the remotesendsabout 10sets of codes Therefore,you
might have_opressthe PLAYbudon up to 20 times¸
If the component you want to operate does turn off:
1. Press and release REVERSE,then wait 2 seconds. Repeat this step until the
device turns back ON.
2. To finish, press and hold STOPuntil the indicator on the remote turns off.
Using Direct Entry
1. Turn on the component to be programmed.
2. Look up the brand and code number(s) for the component on the code list in
this section.
3. Press and hold the component button you want to program on the remote.
4. Enter the code from the remote control code list on the following pages. If the
indicator flashes, you have either entered an invalid code or the button isn't
programmable.
5. Release the component button.
6. Point the remote at the component. Press ON.OFF to see if the component
responds to the command. If it doesn't, try pressing the component button and
then ON.OFF again.
• If you get no response, repeat these steps using the next code listed for your
brand, until the component responds to the remote commands.
• If you try all the codes for your component brand and none work, try the
automatic code search method. If automatic code search doesn't find the code,
the remote is not compatible with your component.
1 4 Graphics contained within this publication are for representation only Chapter 2
Using the Remote Cor troi
How to Use the Remote After You've Programmed It
Because this universal remote can operate several different components it uses
operational modes triggered by the component buttons. For example, if you want
the remote to operate the IV, you would press the IV button to put the remote
into IV mode before you could operate the IV.
1. Press the appropriate component button (DVD, IV, VCR} to set the remote to
operate the component.
2. Press ON_OFFto turn the component ON or OFE
3. Use the remote buttons that apply to that component.
No_c:If you keeppressingbuttons and naming happens, Me remo_cisprobably in th(, wrong
mod_ Youmust pressthe component button Mut motches Me component you wont to
operate_c, if you want to opemlc the VCR,pressVCRon the remote control toput Me female
in VCRmo_ )
Remote Control Codes
VCR Codes
Programmable for VCR button.
Admiral ........................................................................................... 2132 F@ ........................................................................................ 2021, 2119
Adven[u_ ....................................................................................... 2026 Funai ............................................................................................... 2026
Aiko ................................................................................................. 2027 Garmrd ............................................................................................ 2026
Aiwa ................................................................................................ 2026 GE .............................................................................. 2000,2001,2013,
Akal ........................ 2003,2004,2005,2007,2008,2111,2112,2113 .................................................... 2021,2022,2053,2115,2120,2131
Amebean High ............................................................................... 2021 Golds_ar .......................................................... 2009, 2014,2018,2054
Asba ................................................................................................ 2013 G_dlente ........................................................................................ 2026
Audio Dynamics .................................................................. 2009, 2010 Harley Davidson ............................................................................ 2026
Aud klvox ........................................................................................ 2014 Harman Kardon ............................................................................. 2009
Bell _!_Howell .................................................................................. 2011 Harwood ......................................................................................... 2061
Beaumark ....................................................................................... 2013 H_adllUa_er .................................................................................... 2011
Broksonic ............................................................................. 2012, 2025 Hilaebl ................................................................................ 2055, 2056,
Cali× ................................................................................................ 2014 ................................................................ 2057, 2107, 211I, 2120, 2122
Candle ............................................................ 2013, 2014, 2015, 2016, Hi Q................................................................................................. 2023
.................................................................................... 2017, 2018, 2019 Instan[ Replay ................................................................................ 2021
Canon ......................................................................... 2021,2022,2114 JCL ................................................................................................... 2021
Capehar[ ............................................................................... 2020, 2110 JCPenney ....................................................... 2009, 2010, 2011, 2013,
Carver .............................................................................................. 2062 ............................................................. 2014,2021,2022,2055,2056,
CCE ....................................................................................... 2027,2061 ............................................................... 2058,2059,2060,2107,2118
Ci[izen .................................................................................. 2013, 2014,
.................................................... 2015,2016,2017,2018,2019,2027
Colllrlyme ....................................................................................... 2009
Colt .................................................................................................. 206I
Craig ................................................................ 2013,2014,2023,2061
Curlls Malhes ........................................................... 2000, 2009, 2013,
.......................................... 2016, 2018, 2021,2022,2024,2115,2131
Cybernex ........................................................................................ 2013
Daewoo ................. 2015, 2017, 2019, 2025, 2026, 2027, 2028, 2110
Jensen ........................................................................ 2055,2056,2111
JVC .............................................. 2009,2010,2011,2018,2111,2123
Kenwood ........................... 2009, 2010, 2011, 2016, 2018, 2111, 2123
KLH ................................................................................................. 2061
Kodak ................................................................................... 2014,2021
Lloyd ............................................................................................... 2026
Logik ............................................................................................... 2061
LXI ................................................................................................... 2014
Magnavox ............................................................... 2021, 2022, 2062,
Daytrlnl ............................................................................................ 2110 ............................................................... 2063, 2104, 2105, 2108, 2124
DBX ....................................................................................... 2009, 2010
Dimensla ............................................................................... 2000, 213 I
Dynalech ........................................................................................ 2026
Electrobome ........................................................................ 2014, 2029
Electrophonic ................................................................................. 2014
Emerson .................................... 2012, 2014, 2015, 2021, 2024, 2025,
.......... 2026, 2029, 2030, 2031, 2032, 2033, 2034,2035, 2036,
.......... 2037, 2038, 2019, 2040, 204I, 2042,2044, 2045, 21)46,
............................................ 2047, 2065, 2113, 2116, 2117, 2130
Fislmr .................... 2011, 2023, 2048, 2049, 2050, 2051, 2052, 2118
Magnln ........................................................................................... 20I:1
Maramz ................ 2009, 2010, 20H, 2016, 2018, 2021, 2062, 2064
Marta ............................................................................................... 2014
Masusblta ....................................................................................... 2021
Mei .................................................................................................. 2021
Memor_x .............. 2011, 2013, 2014, 2021, 2023, 2026, 2104, 2132
MGA ........................................................................... 2029, 2065, 2111
MGN Tt'cbnology ........................................................................... 2013
Midland .......................................................................................... 2053
Minolla ...................................................................... 2055, 2056, 2107
Chapter 2 Graphics contained within this publication are for representation ant}4 1 5
Using the Remote Control
VCR Codes continued
Mil,ulllshi ........................... 2029, 2055, 2056, 2065, 2066, 2067, 2068, Vecfor Research ......................................... 2009, 2010, 2015, 2016
.......................... 2069, 2070, 2071, 2072, 2073, 2074, 2106, 2113, 2123 Victor .......................................................................................... 2010
Montgomery Ward ................................................................... 2075, 2132 Video Concepl, ................................ 2009, 2010, 2015, 2016, 2113
Molorola .................................................................................... 2021, 2112 Videosonlc .................................................................................. 2013
MTC ............................................................................................ 2013, 2126 Wards ......................................................... 2013, 2014, 2015, 2021,
Muldtecb ................................................... 2013, 2016, 2026, 2053, 2061 ............................................ 2023, 2026, 2029, 2055, 2056, 2061,
NEC ............................................................. 2009, 2010, 2011,2016, 2018, ..................................... 2096, 2101, 2102, 2103, 2107, 2116, 2132
........................................................... 2064, 20/'6, 2078, 2079, 2111, 2123
Nik£o ..................................................................................................... 2014
Noblex .................................................................................................. 2013
Olympus ................................................................................................ 2021
OpIifllus ..................................................................................... 2014, 2132
Oplonica ............................................................................................... 2096
Panasonlc ........................................ 2021, 2022, 2109, 2125, 2126, 2127
Pen[ax ......................................................... 2016, 2055, 205 f,, 2107, 2120
Pen[ex Research ................................................................................... 201{}
Philco ................................................................... 202h 2022, 2062, 2063
Philips ................................................................... 2021, 2062, 20_,, 2124
Pilo[ ....................................................................................................... 2014
Pioneer ....................................................... 2oio, 2055, 2080, 2081, 2123
Portland ................................................................. 2016, 2017, 2019, 2110
Proscan ............................................................................ 2000, 2001, 2131
Prolec .................................................................................................... 2061
Pulsar .................................................................................................... 2104
Quarter .................................................................................................. 2011
Quartz ................................................................................................... 2011
Quasar .............................................................................. 2021, 2022, 2125
RCA ..................................... 2000, 2001, 2003, 2013, 2021, 2055, 2056,
................................. 2082, 2083, 2084, 2085, 2086, 2087, 2088, 2089,
...................................... 20_Jo, 2091, 2107, 2115, 2120, 2125, 2131, 2133
Radiosback/Realislic ........................................... 2Oli, 2013, 2014, 2021,
.......................... 2022, 2023, 2026, 2029, 2049, 2050, 2096, 2132
Radix ..................................................................................................... 2014
Rande× .................................................................................................. 2014
Rieob ..................................................................................................... 2128
Runco .................................................................................................... 2104
Sarnsung .......................................... 2005, 2013, 2oi 5, 20_1, 2053, 2112
Sanky .......................................................................................... 2IO4, 2132
Sansul .................................................................... 2010, 2092, 2111, 2123
Sanyo ............................................................................... 2011, 2013, 2023
Scoll ........................... 2012, 2015, 2025, 2032, 2038, 2065, 2093, 2116
Sear, ........................................................... 2011, 2014, 202I, 2023, 2048,
.............................................. 2049, 2050, 2051, 2055, 2056, 2107, 2118
Sharp .................................... 2017, 2020, 2094, 2095, 2096, 2097, 2132
Shlntorn ............................................................... 2004, 2056, 2061, 2098
Shogun .................................................................................................. 2013
Signature .............................................................................................. 2132
Singer ............................................................................... 2021, 2061, 2128
Sony ...................................................................... 2004, 2008, 2099, 2119
STS .............................................................................................. 2021, 2107
Sylvania ............................... 2021, 2022, 2026, 2062, 2063, 2065, 2124
Symphonic ........................................................................................... 202_,
Tandy .................................................................................................... 2011
TasJllko .................................................................................................. 2014
Tamng .................................................................................................... 2111
T£AC ................................................................................ 2026, 2085, 2Ill
Technics ...................................................................................... 2021, 2109
Teknika ....................................................... 2014, 2021, 2026, 2100, 2129
TMK ................................................................................. 2013, 2024, 2047
Toshiba .................................. 2015, 2049, 2051, 2055, 2065, 209J, 2116
Tolevsion ................................................................................... 2013, 2014
Unileeh ................................................................................................. 2013
XRMO00 ............................................................... 2021,2026,2061
Yamaha .............................................. 2009,2010,2Oli, 2018,2111
Zenilh ............................................... 2004, 2098, 2104, 2119, 2128
DVD codes
Programmable for DVD button.
Aiwa ........................................................................................... 3009
Apex ................................................................................. 3023, 3024
GE ............................................................................................... 3000
Hilaebl ....................................................................................... 3008
JVC ................................................................................... 3002, 3010
Koilka ............................................................................... 3011, 1012
Magnavo× ................................................................................. _003
Milsubishl .................................................................................. 3004
Panasonie ................................................................................... 3013
Philips ........................................................ 3003, 3019, 3021, _022
Pioneer ....................................................................................... 3005
Prosean ...................................................................................... _000
RCA .................................................................................. 3000, 3001
Samsung .................................................................................... 3025
Sailyo .......................................................................................... 1014
Sony ...................................................................... 3006, 3oi5, 3016
Toshiba .................................................................. 3002, 3017, 3020
Zeililh .......................................................................................... ]018
16 Graphics contained within this publication are for representation only Chapter 2
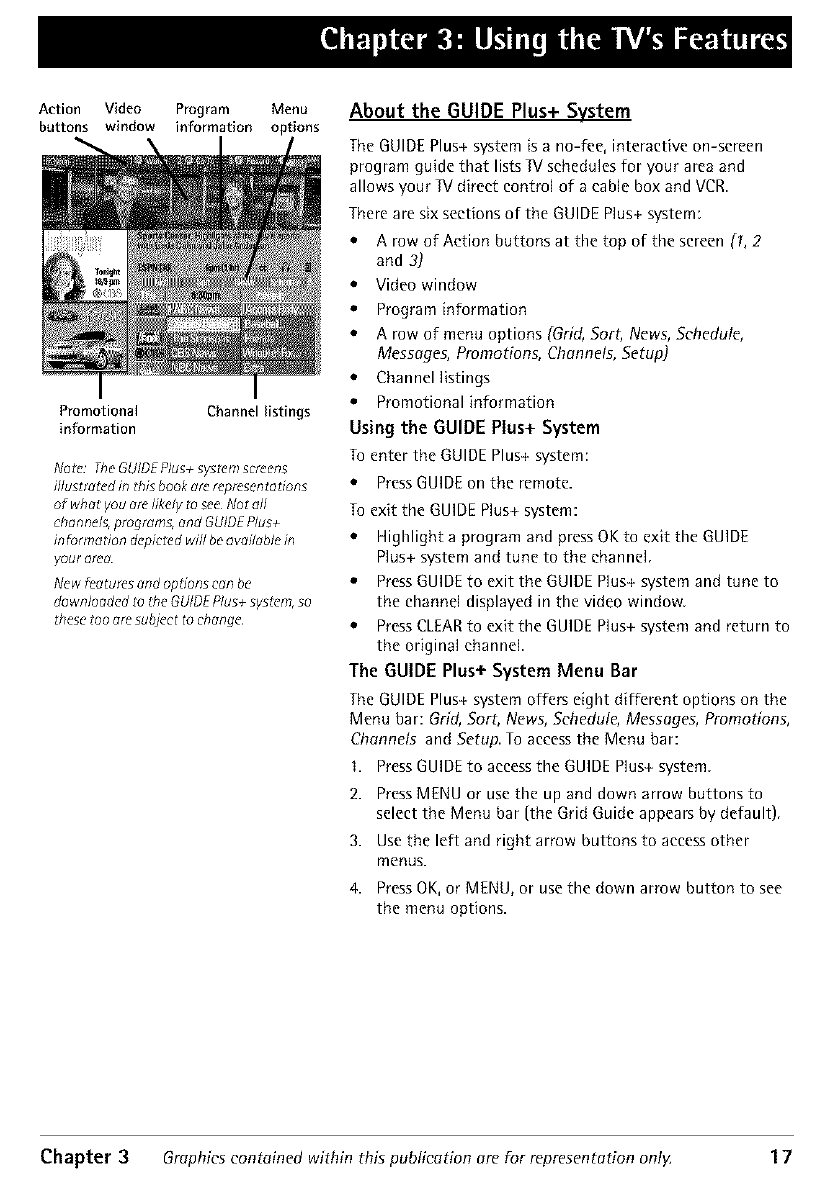
Action Video Program Menu
buttons window information options
Promotional Channel listings
information
Nolo: fhe GUIOE plus+ syszcm scmens
iflustm_cd in this book arc represd,ntations
of wh at you are likely _o see No t all
channels, programs, and GUIDE Plus+
information dcpicZed wi// be available
youl" (l_d
New f_atums and opbons can bd"
downloodcd zo the GUIDE Plus+ syslcm, so
these' too ore subject to chongc
About the GUIDE Plus+ System
The GUIDE Plus+ system is a no-fee, interactive on-screen
program guide that lists IV schedules for your area and
allows your IV direct control of a cable box and VCR.
There are six sections of the GUIDE Plus+ system:
*ArowofActionbuttonsatthetopofthescreen(1,2
and 3)
.Video window
e Program information
e A row of menu options (Grid, Sort, News, Schedule,
Messages, Promotions, Channels, Setup)
e Channel listings
e Promotional information
Using the GUIDE Plus+ System
To enter the GUIDE Plus+ system:
.Press GUIDE on the remote.
To exit the GUIDE Plus+ system:
e Highlight a program and press OK to exit the GUIDE
Plus+ system and tune to the channel
e Press GUIDE to exit the GUIDE Plus+ system and tune to
the channel displayed in the video window.
e Press CLEAR to exit the GUIDE Plus+ system and return to
the original channel.
The GUIDE Plus+ System Menu Bar
The GUIDE Plus+ system offers eight different options on the
Menu bar: Grid, Sort, News, Schedule, Messages, Promotions,
Channels and Setup. To access the Menu bar:
I. Press GUIDE to access the GUIDE Plus+ system.
2. Press MENU or use the up and down arrow buttons to
select the Menu bar (the Grid Guide appears by default).
3. Use the left and right arrow buttons to access other
m_nus.
4. Press OK, or MENU, or use the down arrow button to see
the menu options.
Chapter 3 Graphics contained within this publication are For representation ont}4 17
Grid guide Grid guide
menu selection action buttons
Network icons
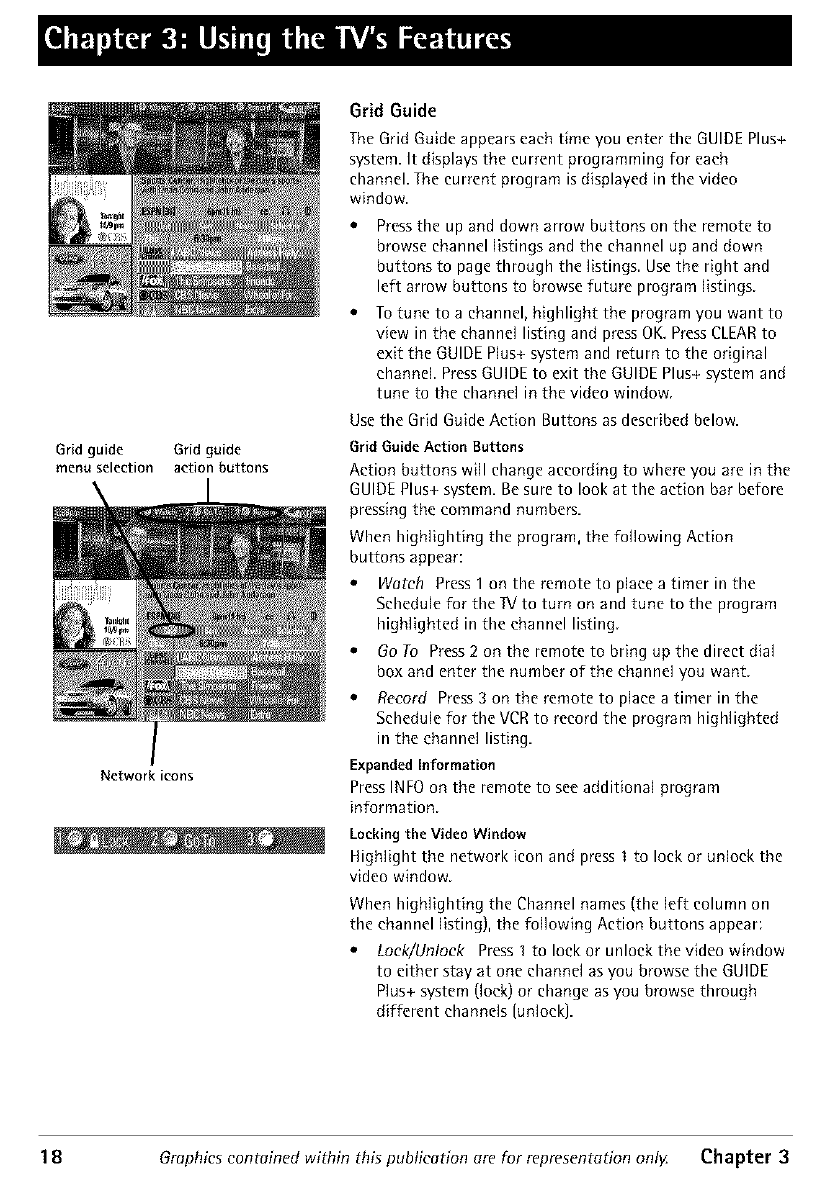
Grid Guide
TheGrid Guide appearseach time you enter the GUIDEPlus+
system. It displays the current programming for each
channel. The current program isdisplayed in the video
window.
*Press the up and down arrow buttons on the remote to
browse channel listings and the channel up and down
buttons to page through the listings. Use the right and
left arrow buttons to browse future program listings.
• To tune to a channel, highlight the program you want to
view in the channel listing and press OK. Press CLEAR to
exit the GUIDE Plus+ system and return to the original
channel Press GUIDE to exit the GUIDE Plus+ system and
tune to the channel in the video window.
Use the Grid Guide Action Buttons as described below.
Grid Guide Action Buttons
Action buttons will change according to where you are in the
GUIDE Plus+ system. Be sure to look at the action bar before
pressing the command numbers.
When highlighting the program, the following Action
buttons appear:
•Watch Press 1 on the remote to place a timer in the
Schedule for thelVto turn on and tune to the program
highlighted in the channel listing
• Go To Press 2 on the remote to bring up the direct dial
box and enter the number of the channel you want
•Record Press 3 on the remote to place a timer in the
Schedule for the VCR to record the program highlighted
in the channel listing.
Expanded Information
Press INFO on the remote to see additional program
information.
Locking the Video Window
Highlight the network icon and press I to lock or unlock the
video window.
When highlighting the Channel names (the left column on
the channel listing), the following Action buttons appear:
•Lock/Unlock Press I to lock or unlock the video window
to either stay at one channel as you browse the GUIDE
Plus+ system (lock) or change as you browse through
different channels (unlock].
18Graphics contained within this publication are for representation only Chapter 3
Using the W's Features
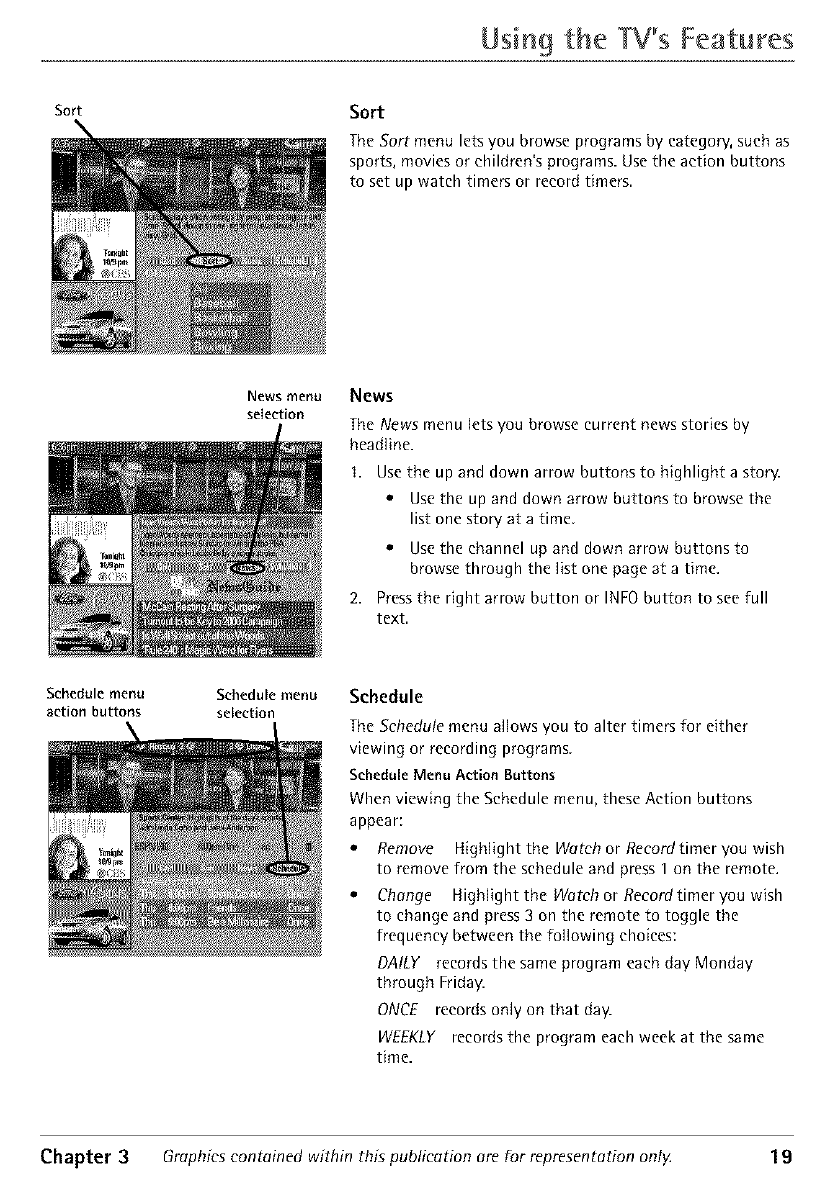
Sort Sort
The Sort menu lets you browse programs by category, such as
sports, movies or children's programs. Use the action buttons
to set up watch timers or record timers.
News menu
selection
News
The News menu lets you browse current news stories by
head]ine.
I. Use the up and down arrow buttons to highlight a story.
• Use the up and down arrow buttons to browse the
list one story at a time.
• Use the channel up and down arrow buttons to
browse through the list one page at a time.
2. Press the right arrow button or INFO button to see full
text,
Schedule menu Schedule menu
action buttons selection Schedule
The Schedule menu a]lows you to alter timers for either
viewing or recording programs
ScheduleMenu Action Buttons
When viewing the Schedule menu, these Action buttons
appear:
•Remove Highlight the Watch or Recordtimer you wish
to remove from the schedule and press 1 on the remote.
• Change Highlight the Watrh or Recordtimer you wish
to change and press 3 on the remote to toggle the
frequency between the following choices:
DALLY records the same program each day Monday
through Friday.
ONCE records only on that day.
WEEKLY records the program each week at the same
time.
Chapter 3 Graphics contained within this publication are for representation ont_ 19
Usin9 the W's Features
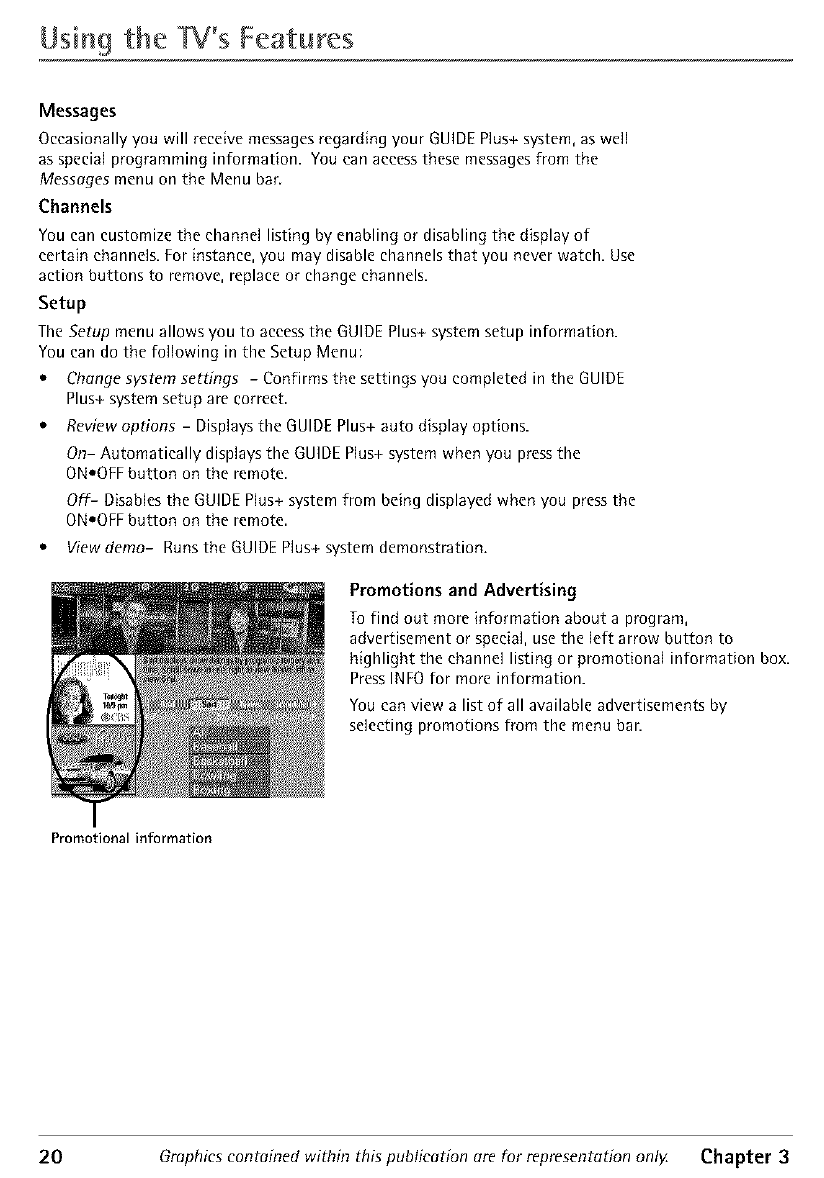
Messages
Occasionally you will receive messages regarding your GUIDE Plus+ system, as well
as special programming information. You can access these messages from the
Messages menu on the Menu bar.
Channels
You can customize the channel listing by enabling or disabling the display of
certain channels. For instance, you may disable channels that you never watch. Use
action buttons to remove, replace or change channels.
Setup
The Setup menu allows you to access the GUIDE Plus+ system setup information.
You can do the following in the Setup Menu:
•Change system settings - Confirms the settings you completed in the GUIDE
Plus+ system setup are correct.
•Review options - Displays the GUIDE Plus+ auto display options.
On- Automatically displays the GUIDE Plus+ system when you press the
ONeOFF button on the remote.
Off- Disables the GUIDE Plus+ system from being displayed when you press the
ONeOFF button on the remote.
•View demo- Runs the GUIDE Plus+ system demonstration.
Promotional information
Promotions and Advertising
To find out more information about a program,
advertisement or special, use the left arrow button to
highlight the channel listing or promotional information box.
Press INFO for more information.
You can view a list of all available advertisements by
selecting promotions from the menu ban
20 Graphics contained within this publication are for representation only Chapter 3
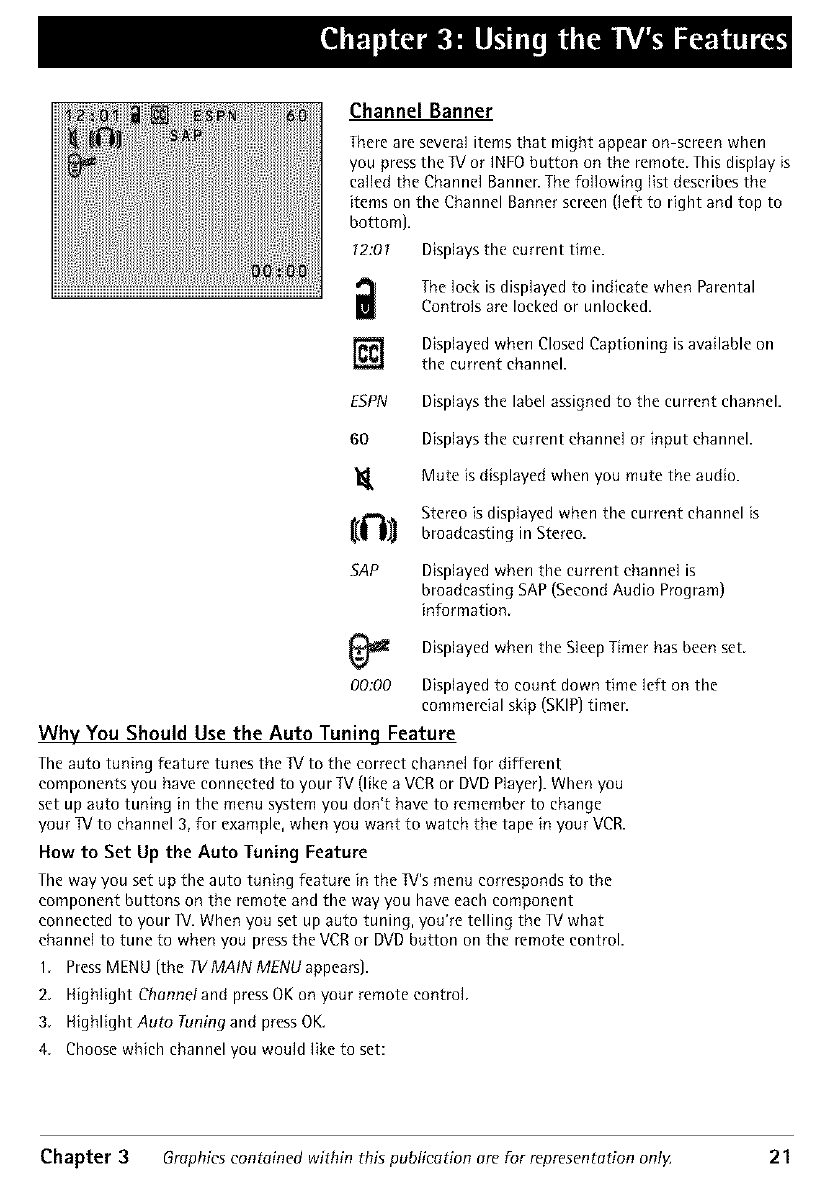
Channel Banner
There are several items that might appear on-screen when
you press the IV or INFO button on the remote This display is
cal[ed the Channel Banner. The fol[ow{ng list describes the
items on the Channel Banner screen (left to right and top to
bottom).
12:01 Displays the current time.
iThe lock is displayed to indicate when Parental
Controls are locked or unlocked.
] Displayed when Closed Captioning is available on
the current channel.
ESPN Displays the label assigned to the current channel.
60 Displays the current channel or input channel.
"1_ Mute is displayed when you mute the audio.
{(_11 StereObroadcastingiSdisp]ayedinStereo.Whenthe current channel is
SAP Displayed when the current channel is
broadcasting SAP (Second Audio Program)
information.
Displayed when the Sleep Timer has been set.
00:00 Displayed to count down time left on the
commercial skip (SKIP) timer.
Why You Should Use the Auto Tuning Feature
The auto tuning feature tunes the IV to the correct channel for different
components you have connected to your IV (like a VCR or DVD Player]. When you
set up auto tuning in the menu system you don't have to remember to change
your IV to channel 3, for example, when you want to watch the tape in your VCR.
How to Set Up the Auto Tuning Feature
The way you set up the auto tuning feature in the IV's menu corresponds to the
component buttons on the remote and the way you have each component
connected to your IV. When you set up auto tuning, you're telling the IX/what
channel to tune to when you press the VCR or DVD button on the remote control.
1. Press MENU (the IVMAINMENUappears).
2. Highlight Channetand press OK on your remote control.
3. H{ghlight Auto Tuningand pressOK.
4. Choose which channel you would like to set:
Chapter 3Graphics contained within this publication are for representation ontg 21
Usin9 the W% Features
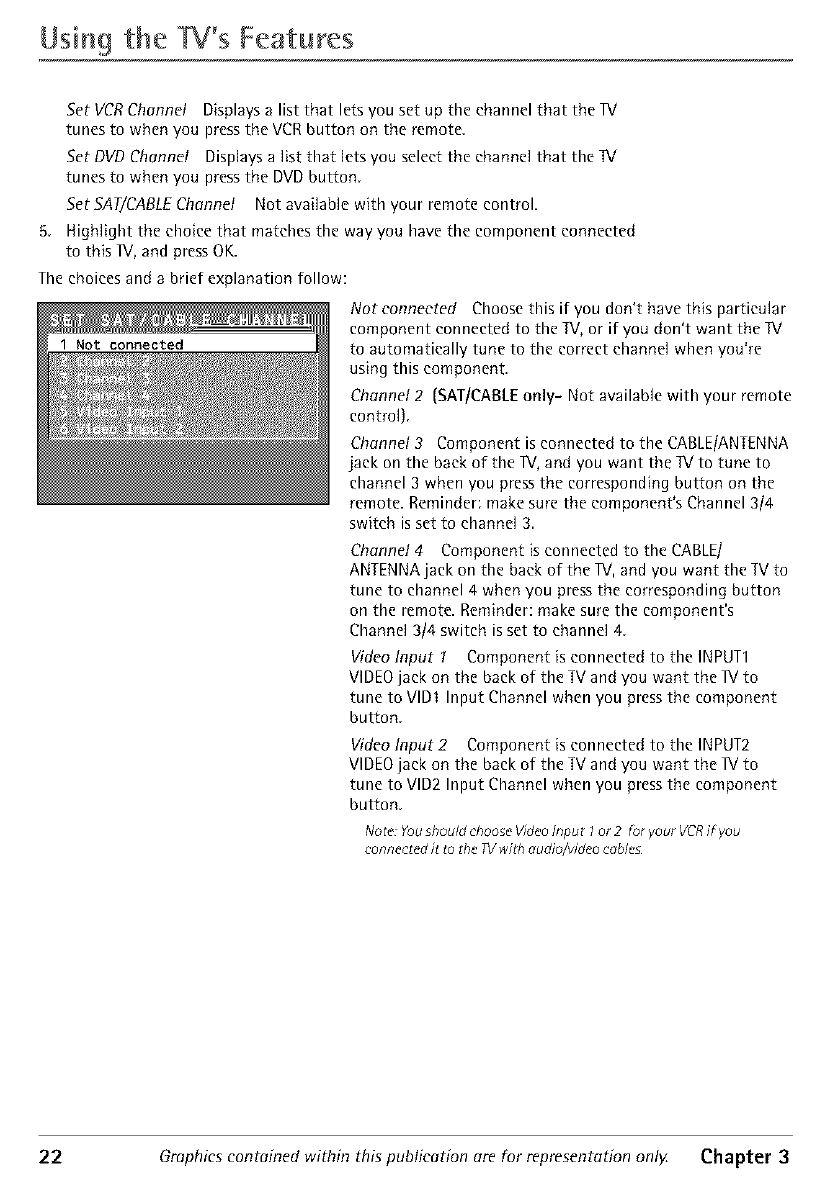
Set VCR Channel Displays a list that lets you set up the channel that the Ri
tunes to when you press the VCR button on the remote.
Set DVD Channel Displays a list that lets you select the channel that the IV
tunes to when you press the DVD button.
Set SAT/CABLE Channel Not available with your remote control.
5. Highlight the choice that matches the way you have the component connected
to this TV, and press OK.
The choices and abrief explanation follow:
Noteonneeted Choose this if you don't have this particular
component connected to the IV, or if you don't want the IV
to automatically tune to the correct channel when you're
using this component.
Channel 2 (SAT/CABLE only- Not available with your remote
control).
Channel3 Component is connected to the CABLE/ANTENNA
jack on the back of the IV, and you want the IV to tune to
channel 3 when you press the corresponding button on the
remote. Reminder: make sure the component's Channel 3/4
switch is set to channel 3.
Channel 4 Component is connected to the CABLE/
ANTENNA jack on the back of the IV, and you want the IV to
tune to channel 4 when you press the corresponding button
on the remote. Reminder: make sure the component's
Channel 3/4 switch is set to channel 4.
Video Input I Component is connected to the INPUT1
VIDEO jack on the back of the IV and you want the IV to
tune to VlDI Input Channel when you press the component
button.
Video Input 2 Component is connected to the INPUT2
VIDEO jack on the back of the IV and you want the IV to
tune to VlD2 Input Channel when you press the component
button.
Noto: Youshould chooseVideoInput I or 2 for your VCRif you
connectedit to the 7Vwi#_audio/video ceblcs
22 Graphics contained within this publication are for representation only Chapter 3
Using the Features
Parental Controls and V-Chip
The Parental Controls menu allows you to program your ]V so that children cannot see
certain programs, channels, or use the front panel controls. The first three choices in the
Parental Controls menu involve software inside your I1/(referred to as V-Chip) which
allows you to block TV programs and movies based on violence, sex, or other content
you may believe children should not view. In other words, it lets you program your IV so
it won't display certain programs.
Once you block programs, you or other adults can unbloek programs by entering a
password.
By default, the software inside your IV is turned "off," so if you don't want to use this
feature, you can just ignore it.
How V-Chip Works
V-Chip reads the program's age-based rating ITV-MA, IV-14, etc.) and content themes
[(Violence (V), Adult Language {L), etc.]],If you have blocked the rating andtor content
themes that the program contains, you will receive the message This ehannet is not
approved for viewing.
Broadcasters are not required to provide content themes, so programs received with no
content themes will only be blocked if you block their age-based rating. You can also
block out programs that have been given a rating of Not Rated, and programs that are
considered unrated. The I1/age-based ratings and content themes you can block follow:
]V-MA (Mature Audience Only) Specifically designed to be viewed by adults and may
be unsuitable for children under 17. It contains one or more of the following content
themes: crude indecent language (L), explicit sexual activity {S], or graphic violence (V).
11/-14 (Parents Strongly Cautioned) Contains some material that many parents would
find unsuitable for children under 14. Parents are strongly urged to exercise greater
care in monitoring this program and are cautioned against letting children under the
age of 14 watch unattended. This program contains one or more of the following
content themes: intensely suggestive dialogue {D), strong coarse language (k], intense
sexual situations (S), or intense violence (V).
1V-PG (Parental Guidance Suggested) Contains material that parents may find
unsuitable for younger children Many parents may want to watch it with their
younger children The program contains one or more of the following content themes:
some suggestive dialogue (D], infrequent coarse language (L], some sexual situations (S),
or moderate violence (V).
1V-G (General Audience) Most parents would find this program suitable for all ages. It
contains little or no sexual dialogue (D] or situations (S], no strong language (L], and
little or no violence (V).
1V-Y7 (Directed to Children 7 years and older) Designed for children ages 7 and above.
It may be more appropriate for children who have acquired the developmental skills
needed to distinguish between make-believe and reality. Themes and elements in this
program may include mild fantasy violence (FV] or eomedic violence, or may frighten
children under the age of 7.
lV-Y (All Children) Themes and elements in this program are designed for a young
audience, including children from ages 2-6. It is not expected to frighten younger
children.
Chapter 3 Graphics contained within this publication are Forrepresentation only. 23
Usin9 the Features
V-Chip W Rating Limit
The V-Chip IVRating Limit lets you decide which IV programs can and cannot be
viewed. To set IV programming limits:
1. Choose Parentat Controts from the Main menu. lf Parental Controls are locked,
you must enter your password. If they are not locked, you will get a message
reminding you that your limits will not be effective until you lock Parental
Controls.
2. Press MENU to continue.
3. Highlight and select V-Chip IVRating Limit.
4. Use the arrow buttons and the OK button on your remote to change the status
of a IV program rating or content theme from View to Block.
Changing the status of IV program limits is described in more detail later in the
chapter.
The V-Chip Rating Screen
The following is an example of where items are located within the TVRAT/NG LIMIT
screen.
Rating Field
Letsyou select from a list of age-
basedratings you can block or view.
Rating Status Field
Lets you select whether the status of the age
based rating limit to the left is View or Block.
Content Themes
Lists the content themes you
can block or view.
Content Status Fields
Letsyou select which content
themes to view for the selected
rating, and whether the status
of the content theme is
currently View (V)or Block (g).
f
Rating Settings Area
Letsyou seethe current bloek/view state of age based
ratings and associated content. The View (V}settings are
coded in green, and the Block (B)settings are coded in red.
24 Graphics contained within this publication are for representation onlg Chapter 3
Using the W% Features
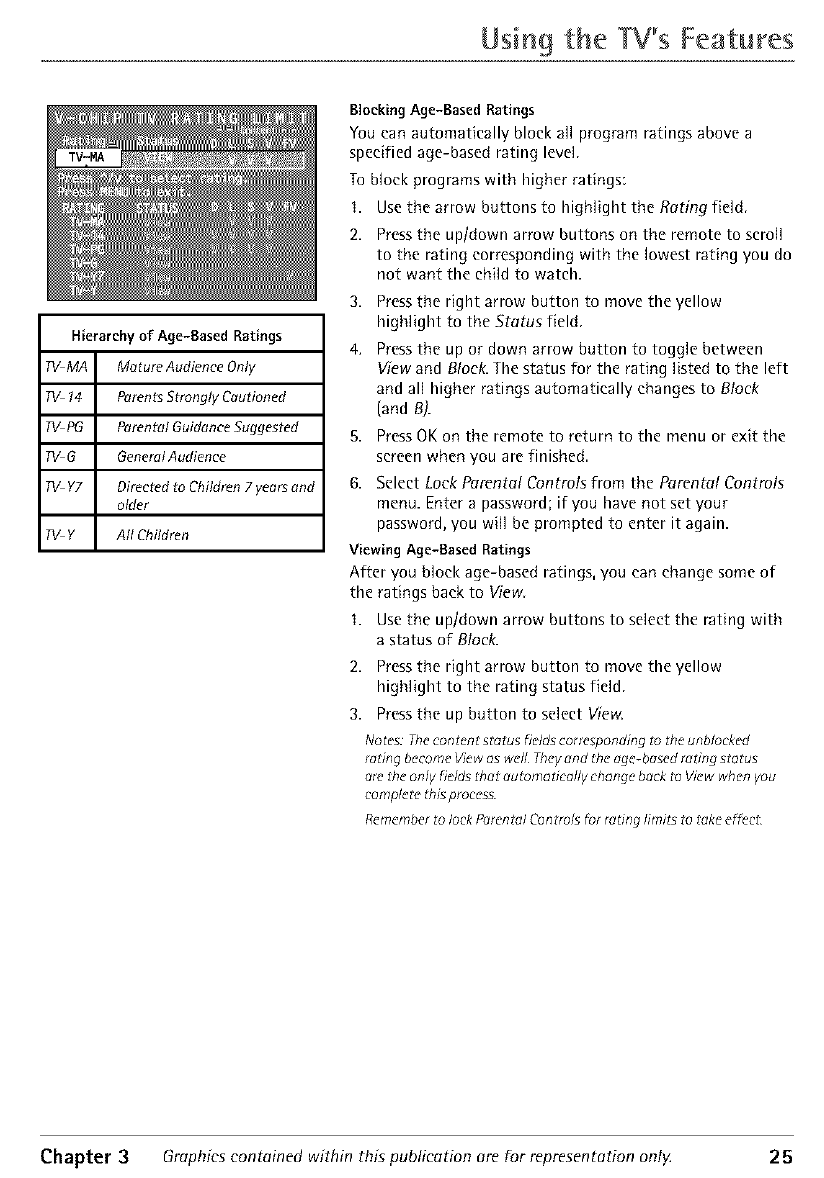
Hierarchy of Age-Based Ratings
TV MA Mature Audience Only
TV 14 Parents Strongly Cautioned
TV PG Porental Guidonce Suggested
TV G GeneralAudience
TV Y7 Directed to Children 7 years and
older
TV Y gfl Children
Blocking Age-Based Ratings
You can automatically block all program ratings above a
specified age-based rating level
To block programs with higher ratings:
I.
2.
Use the arrow buttons to highlight the Rating field.
Press the uptdown arrow buttons on the remote to scroll
to the rating corresponding with the lowest rating you do
not want the child to watch.
3. Press the right arrow button to move the yellow
highlight to the Status field.
4, Press the up or down arrow button to toggle between
View and Block. The status for the rating listed to the left
and all higher ratings automatically changes to Block
{and B).
5. Press OK on the remote to return to the menu or exit the
screen when you are finished.
6. Select Lock Parental Controtsfrom the Parental Controts
menu. Enter a password;if you have not set your
password, you will be prompted to enter it again.
Viewing Age-Based Ratings
After you block age-based ratings, you can change some of
the ratings back to View
I. Use the up/down arrow buttons to select the rating with
a status of Block.
2. Press the right arrow button to move the yellow
highlight to the rating status field.
3. Pressthe up button to select View.
Notes: The content status fie/d_ corresponding to the unb/ocked
_ing becot_e View as we_ _ey and the _g_-based r_ting st_ tus
are the only fields _at automatically change hack to View _en you
eomplet_ thisproeess.
Remember to lock P_renta/ Controls _r rating limits _o take e_e_
Chapter 3 Graphics contained within this publication are for representation only. 25
Usin9 the W's Features
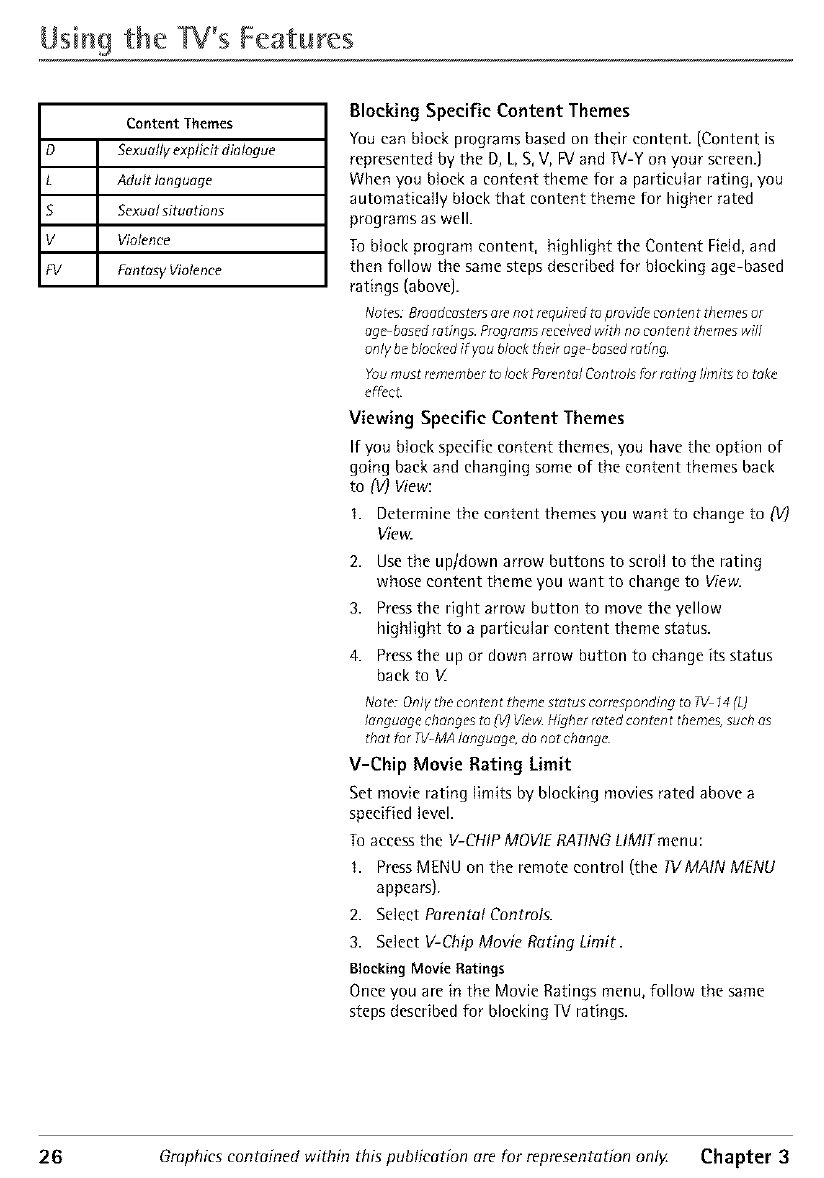
Content Themes
D Sexually explicit dialogue
L Adult language
S SexurII situations
V Violence
FV Frmtasy Violence
Blocking Specific Content Themes
You can block programs based on their content (Content is
represented by the D, L, S, V, FVand IV-Y on your screen.]
When you Mock a content theme for a particular rating, you
automatically block that content theme for higher rated
programs as well.
To block program content, highlight the Content Field, and
then follow the same steps described for blocking age-based
ratings (above].
Notes: Broedeasters ere not required to provide content zhemes or
ego based rating_ Programs rcceivcd wi_ no con_nt themes will
only be blocked if you block _eir age based rating.
You must remember to lock Porcnta/ Controls for rating limits to mkc
e_cL
Viewing Specific Content Themes
If you block specific content themes, you have the option of
going back and changing some of the content themes back
to (V) View:
I. Determine the content themes you want to change to IV)
W'e.z
2. Use the uptdown arrow buttons to scroll to the rating
whose content theme you want to change to View.
3. Press the right arrow button to move the yellow
highlight to a particular content theme status.
4. Press the up or down arrow button to change its status
back to V_
Note: Only the con_cntth('mc stotos correspondingto 71/14 (L)
language changcs to IV)Vie_ Higher ratedcontcnt themes,such as
that for TV-MAIonguage, do not chongc
V-Chip Movie Rating Limit
Set movie rating limits by blocking movies rated above a
specified level.
To access the V-CHIP MOVIE RATING LIMIT men u:
I. Press MENU on the remote control (the TVMAIN MENU
appears).
2. Select Parental Controls.
3. Select V-Chip Movie Rating Limit.
Blocking Movie Ratings
Once you are in the Movie Ratings menu, follow the same
steps described for blocking R/ratings.
26 Graphics contained within this publication are for representation onl}_ Chapter 3
Using the W's Features
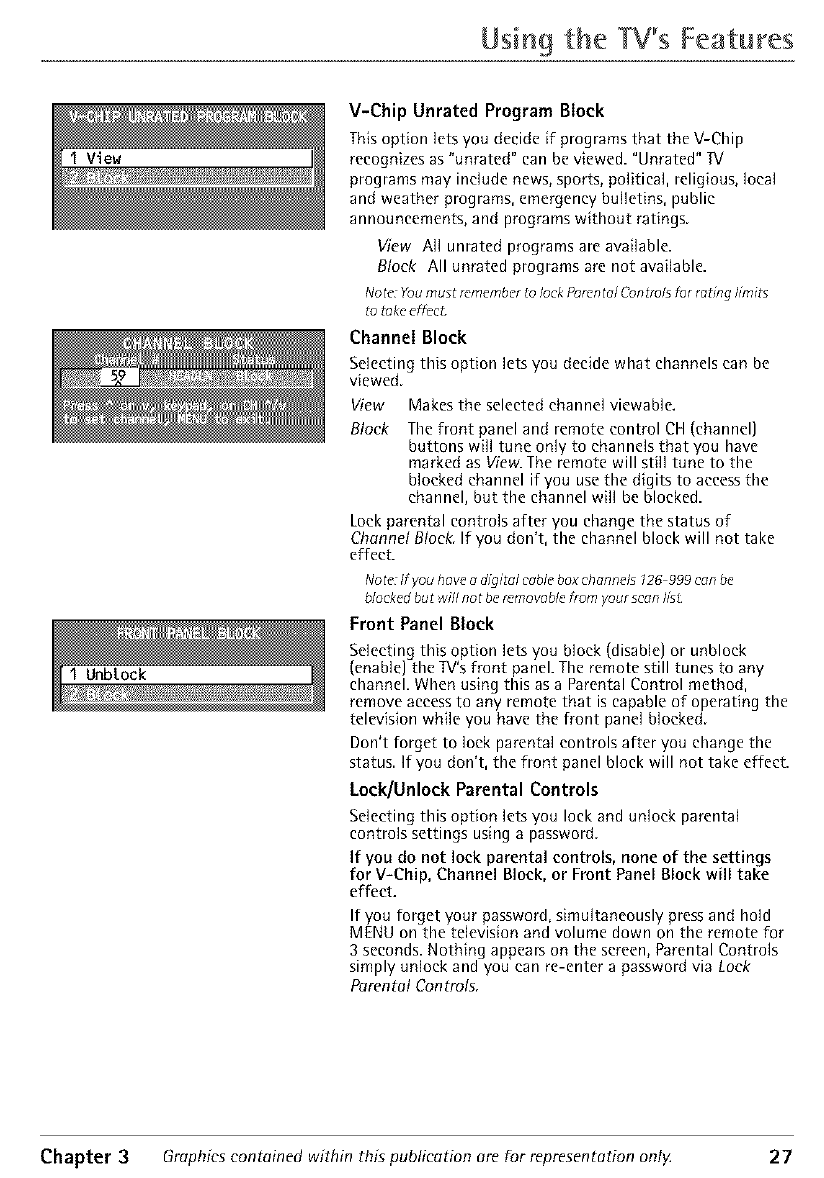
V-Chip Unrated Program Block
This option lets you decide if programs that the V-Chip
recognizes as "unrated" can be viewed. "Unrated" IV
programs may include news, sports, political, religious, local
and weather programs, emergency bulletins, public
announcements, and programs without ratings.
View All unrated programs are available.
Block All unrated programs are not available.
Note: Youmust rememberto lock PorentalControlsfor robng hmhs
to takeeffecL
Channel Block
Selecting this option lets you decide what channels can be
viewed.
View Makes the selected channel viewable.
Block The front panel and remote control CH (channel)
buttons will tune only to channels that you have
marked as View. The remote will still tune to the
blocked channel if you use the digits to access the
channel, but the channel will be blocked.
Lock parental controls after you change the status of
Channel Block. If you don't, the channel block will not take
effect.
Noto*:If you have _digital cableboxchannel_126 999 canbe
blockedbut will no t be removablefrom your scan flsL
Front Panel Block
Selecting this option lets you block (disable) or unbloek
(enable) the TV's front panel. The remote still tunes to any
channel. When using this as a Parental Control method,
remove access to any remote that is capable of operating the
television while you have the front panel blocked.
Don't forget to lock parental controls after you change the
status. If you don't, the front panel block will not take effect.
Lock/Unloek Parental Controls
Selecting this option lets you lock and unlock parental
controls settings using a password.
If you do not lock parental controls, none of the settings
for V-Chip, Channel Block, or Front Panel Block will take
effect.
If you forget your password, simultaneously press and hold
MENU on the television and volume down on the remote for
3 seconds. Nothing appears on the screen, Parental Controls
simply unlock and you can re-enter a password via Lock
Parental Controls.
Chapter 3Graphics contained within this publication are for representation ont}4 27
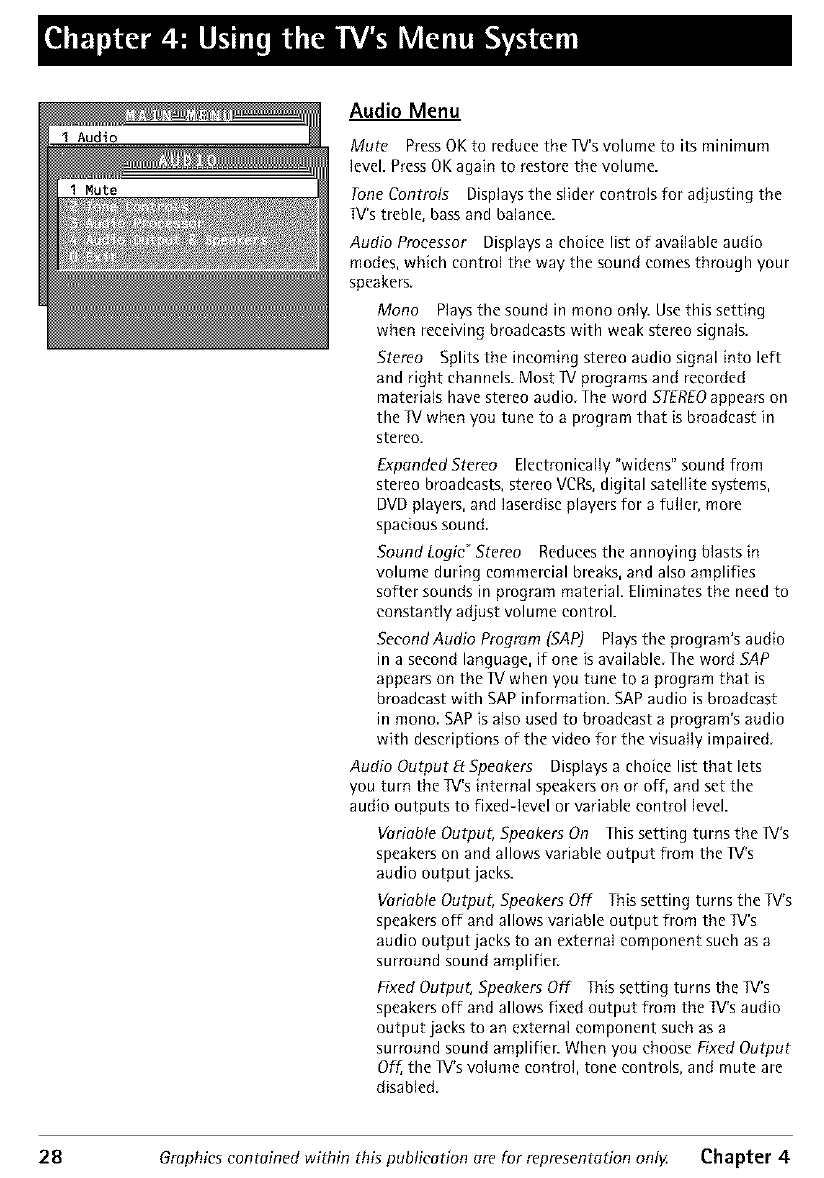
Audio Menu
Mute PressOK to reduce the 1V'svolume to its minimum
level. PressOKagain to restore the volume.
Tone Controls Displays the slider controls for adjusting the
W's treble, bass and balance.
Audio Processor Displaysa choice list of available audio
modes,which control the way the sound comes through your
speakers
Mono Playsthe sound in mono only. Usethis setting
when receiving broadcasts with weak stereo signals.
Stereo Splits the incoming stereo audio signal into left
and right channels. Most IV programs and recorded
materials have stereo audio The word STEREOappearson
the IV when you tune to a program that is broadcast in
stereo.
Expanded Stereo Electronically "widens" sound from
stereo broadcasts, stereo VCRs, digital satellite systems,
DVD players, and laserdisc players for afuller, more
spacious sound
Sound Logic _Stereo Reduces the annoying blasts {n
volume during commercial breaks, and also amplifies
softer sounds in program material. Eliminates the need to
constantly adjust volume control.
SeeondAudio Program [SAP) Plays the program's audio
in a second language, if one is available The word SAP
appears on the IX! when you tune to a program that is
broadcast with SAP information. SAP audio is broadcast
in mono SAP is also used to broadcast a program's audio
with descriptions of the video for the visually impaired
Audio Output E_Speakers Displays a choice list that lets
you turn the 1V's internal speakers on or off, and set the
audio outputs to fixed-level or variable control level.
Variable Output, Speakers On This setting turns the 1V's
speakers on and allows variable output from the lV's
audio output jacks.
Variable Output, Speakers Off This setting turns the TV's
speakers off and allows variable output from the 1V's
audio output jacks to an external component such as a
surround sound amplifier.
Fixed Output, Speakers Off This setting turns the IV's
speakers off and allows fixed output from the IM's audio
output jacks to an external component such as a
surround sound amplifien When you choose Fixed Output
Off, the IX/'s volume control, tone controls, and mute are
disabled.
28 Graphics contained within this publication are for representation only Chapter 4
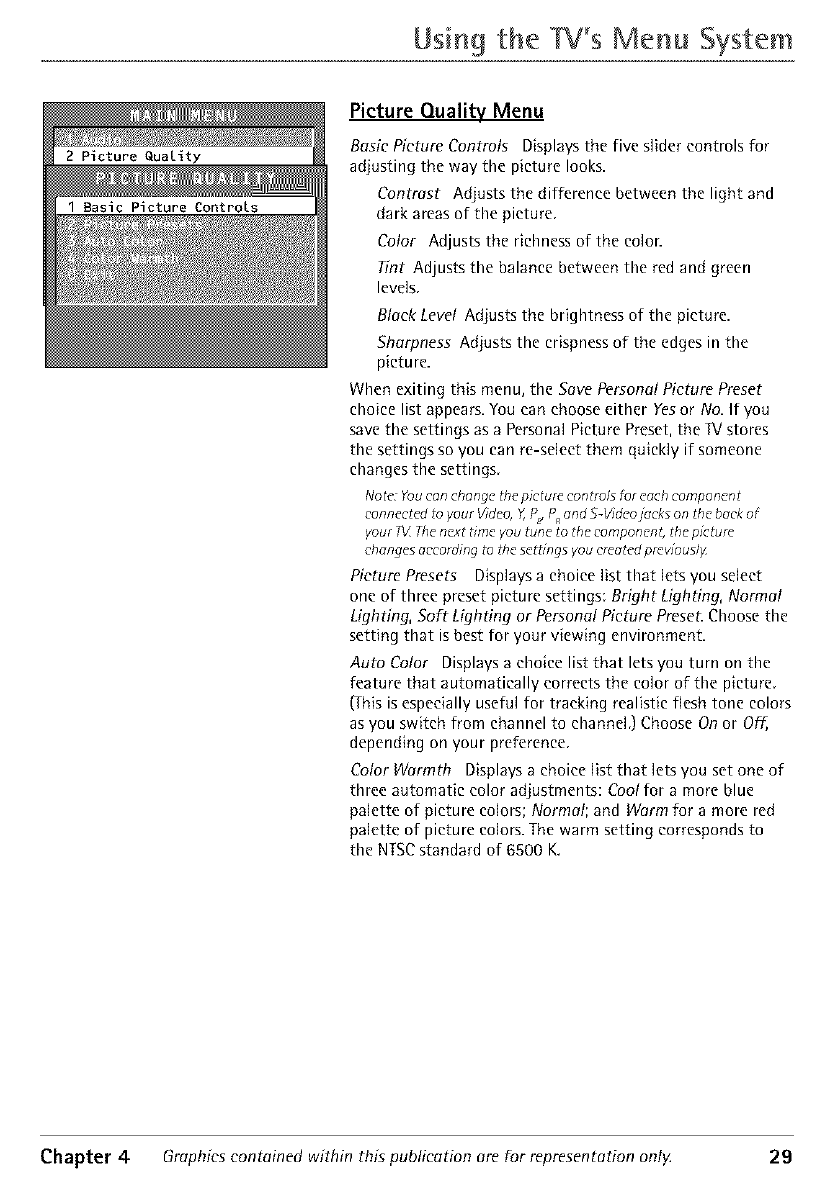
2 Picture Quality
Using the Menu System
Picture Quality Menu
Basic Picture Controls Displays the five slider controls for
adjusting the way the picture looks.
Contrast Adjusts the difference between the light and
dark areas of the picture
Color Adjusts the richness of the color.
Tint Adjusts the balance between the red and green
levels.
Black Level Adjusts the brightness of the picture.
Sharpness Adjusts the crispness of the edges in the
picture.
When exiting this menu, the Save Personal Picture Preset
choice list appears. You can choose either Yesor No. If you
save the settings as a Personal Picture Preset, the IV stores
the settings so you can re-select them quickly if someone
changes the settings.
Notc*:Youcan change Ulepicture control3 for eachcomponent
connected1oyour Video,Y,P_P end S-V;deoj_ekson the backof
your 7_XThenext time you tune to the componcnl, the p;czure
changesaccording_othe sctZ;ngsyou creotc*dprev;ously
Picture Presets Displays a choice list that lets you select
one of three preset picture settings: Bright Lighting, Normal
Lighting, Soft Lighting or Personal Picture PreseL Choose the
setting that is best for your viewing environment.
Auto Color Displays a choice list that lets you turn on the
feature that automatically corrects the color of the picture.
(This is especially useful for tracking realistic flesh tone colors
as you switch from channel to channel.) Choose On or Off,
depending on your preference.
Color Warmth Displays a choice list that lets you set one of
three automatic color adjustments: Cool for a more blue
palette of picture colors; Normal; and Warm for a more red
palette of picture colors. The warm setting corresponds to
the NTSCstandard of 6500 K.
Chapter 4Graphics contained within this publication are for representation ont}4 29
Using the W's Menu System
Sereen Menu
Closed-Caption Display Displays a choice list that lets you
choose the way closed captioning information is shown on
the screen.
Offatways No captioning information is displayed.
On always Captioning information is shown always,
when available.
On when sound is muted Captioning information is
shown, when available, whenever the Iv's sound is
muted. (Tomute the sound, pressthe MUTEbutton.) The
captioning information is not displayed when the sound
is not muted.
Closed-Caption Mode Displays a choice list that lets you
choose which captioning mode is used for displaying
captioning information.
Menu Language Displays a choice list that lets you select
your preferred language for the menus: English, Spanish or
French.
Picture Tilt Your IX/has an extra large picture tube that
makes it vulnerable to the effects of the Earth's magnetic
field. You may need to adjust the picture tilt.
Using Closed Captioning
Many programs are encoded with closed-captioning
information, which lets you display the audio portion of a
program as text on the IX/screen.
Closed captioning is not available on all channels at all times,
Only specific programs encoded with closed-captioning
information are applicable. When a program is closed
captioned, the CCicon is displayed in the channel banner
See Chapter 3 for more information about the channel
banner.
Closed-Caption Modes
The IV offers eight closed-captioned modes, including four
text modes.
To set the Closed-CapOn Mode:
I. Select Screen from the Main menu.
2. Highlight Closed-Caption Mode and press OK (the
Closed-Caption Mode appears),
3. Highlight your choice and press OK (the Screen menu
appears again),
No t_*:The Text modes cover nearly haft of the pJetore on [he screen
to display the dosed c@tioned texL Most bro_dcesters use the CC
me@, which displays a few lines of c_pdons at a time¸
30 Graphics contained within this publication are for representation only Chapter 4
Usin9 the Menu System
Turning off Closed-Caption
1 Select Screen from the Main menu
2. Press OK to select Closed-Caption Displa)_
3 High]ight OffAIways and press OK. The closed captioning is turned off and you
go back to the Screen menu.
Channel Menu
Signal Type Displays a choice list that lets you select the
current antenna type. This option does not appear when the
GUIDE Plus+ system is set up.
UHF/VHFAntenna Choose this if you are currently using
an off-air antenna for W signals.
Cable TV Choose this if you are currently using cable or
a cable box for IV signals.
Auto ChanneISearrh Tells the W to search automatically
for all the channels available through the antenna input.
When the W finds an active channel, it places it in the
Normal channel list; inactive channels (weak stations or
channels with no signal at all) will be removed from the
channel list. If you are using a cable box and have set up the
GUIDE Plus+ system, this option does not appear.
List and Labels Displays a control panel that lets you edit
your Normal channel list and choose a six-character label for
each channel. Follow the on-screen directions to enter your
channels and other information.
Channel #Use the up and down arrows to scroll up and
down through the channels available via your antenna.
You can enter the channel number directly using the
number buttons.
Normal List Only the channels included in the Normal
list are available when you scan up and down using
channel up and down. Use the up and down arrow
buttons to indicate whether the channel number
indicated is included (Yes) or is not included (No) in the
Normal channel list.
Channel Label Use the up and down arrow buttons to
enter a six-character label for each channel. Hold the
button down to scroll quickly through the characters. The
Wean store up to 27 labels in memory.
Auto Tuning Displays a choice list that lets you set up the
W to automatically tune to the correct input channel when
you press a component button (VCR or DVD) on the remote.
Go to Chapter 3 for details about the Auto Tuning feature.
Chapter 4 Graphics contained within this publication are for representation ontg 31
Usin9 the W's Menu System
Timer
Time Menu
Sleep Timer Displays a control panel that lets you select
the amount of time you want to give the IV before it shuts
itself off.
Schedule Displays a control panel that lets you set up a
schedule for turning the IV on and off automatically.
Reminder: you must turn the schedule On. The on-screen
directions guide you through the steps needed to set the
schedule.
Set Time Displays a control panel that lets you enter the
current time. The on-screen directions guide you through the
steps needed to set the time. If your GUIDE Plus+ system is
set up, it will automatically update your time and this option
will not appean
32 Graphics contained within this publication are for representation only Chapter 4
Troubleshooting
Most problems you encounter with your IV can be corrected by consulting the
following troubleshooting list
Nuzcfbr US cus[orners: If youprefer,we"canprovide you with the norne of onAuthorized Service
Representad_ who will visit your home for a _e _o instil your elecFonic enZertainment system
ond to insFuct youin i_ operation Fordevils about this service,call 1 888-206 3359¸ For
oddition_l assistancewhile using your RCAproducZ,please visit ww_rc&corn/cus_omersuppor_
TV Problems
TV won't turn on
• Pressthe IV button.
• Make sure the I_/is plugged in.
• Check the wall receptacle (or extension cord) to make sure it is "live" by plugging in
somethin 9 else.
• Somethin 9 might be wron 9 with your remote control. Pressthe POWERbutton on the
front of the IV. If the IV turns on, check the remote control solutions on page 35.
• The front panel controls may be locked (disabled). Use the remote control to unlock the
front panel controls by selecting the Front Punel Block in the Parental Controls menu
and choosing Unblock.
Controls don't work
• If you're using the remote control, pressthe TV button first to make sure the remote is
in Wmode.
• Phe front panel controls may be locked (disabled). Use the remote control to unlock the
front panel controls by selecting the Front Punel Block in the Parental Controls menu
and choosing Unblock.
• Unplug the IV for two minutes and then plug it back in. Turn the I_/on and try again.
TV turns off while playing
• Scheduled Off function may have been activated. Go to page 32 for instructions.
• Electronic protection circuit may have been activated because of a power surge. Wait
30 seconds and then turn the TV on again. If this happens frequently, the voltage in
your house may be abnormally high or low.
TV turns on unexpectedly
• Scheduled On or Watch from the GUIDE Pius+ system may have been activated. Go to
page 32 or 19 for instructions.
Blank screen
• Make sure the component connected to the IV is turned on.
• Pry another channel.
• Press PRESEI,in case the picture controls are set too low.
When I turn on the lV an icon is moving on the screen
• Make sure you have removed the Demo Pin from the G-LINK iack on the back of your
TV.
Chapter 5Graphics contained within this publication are for representation only. 33
Other Information
No sound, picture okay
•Maybe sound is muted. Press the volume up button to restore sound.
• Maybe speakers are turned off. Check the Audio Output and Speakers control panel in
the Audio menu. Go to page 28 for detailed instructions.
• If using S-VIDEO cables to connect a component, remember to also connect the
eomponent's left and right Audio Output Jacks to the TV's R-AUDIO-L INPUT1 Jacks.
Can't select certain channel
• Channelmaybeblockedor notapprovedin the ParentalControlsmenu.
• If usinga VCR,makesurethe W/VCRbutton on the VCRis in the correct mode(press
theIX//VCRbutton on your VCR].
Noisy stereo reception
• ;be station might be weak. Access the Audio menu, highlight Sound Type and then
choose Mono.
No picture, no sound but W is on
• Maybe the cable/air setting is set to the wrong position. Select Signal Typefrom the
Channel menu. Go to page 31 for more information.
• fhe channel might be empty- change channels.
• If you're watching your VCR and it's connected with coaxial cab{e to the CABLE/
ANTENNA jack, tune the TV to channel 3 or 4 (whichever channel is selected on the 3/4
switch on the back of your VCR}. Also check to make sure the 1V/VCR button on the
VCR is in the correct mode (press the TV/VCRbutton on your VCR).
• If you're trying to watch content from a component that's connected to the lV {like a
DVD prayer or VCR),press the INPUT button on the remote control until the content
appears.
Sound okay, picture poor
• Check antenna connections. Make sure aHof the cables are firmly connected to the
jacks.
• Pry adjusting sharpness function to improve weak signals. Go to page 29 for more
instructions.
Black box appears on the screen
• Closed-captioningmight beon.Checkthe Closed-CaptionDisplaycontrol panelin the
Screenmenu.Go to page30 for moreinstructions.
Every time I turn on the TV, the Guide is on the screen
• Phe GUIDE Plus+ system automatically appears on the screen when you use the W
button on the remote to turn on the W. You can turn off this feature by pressing
GUIDEon your remote control and then select the Menu bar. Pressthe right arrow
button to select Setup. Choose Review options and select OFF.
Can't see commercial skip timer
• If closed-captioning is on, skip timer does not stay on-screen. To turn off closed-
captioning, go to page 31.
34 Graphics contained within this publication are for representation only Chapter 5
Other Informatio
GUIDE Plus+ System Problems
GUIDE Plus+ setup won't switch to channel 9 for VCR and/or channel 02
cable box
• Make sure you have removed the Demo Pin from the G-LINK jack. Check to see if the
G-LINK wands are positioned correctly in front of components' remote sensors.
• GUIDEPlus+ system control of cable box is slower than direct contro{ of the box itset[.
Keep this in mind when changing channels.
• You may have an incorrect GUIDE Plus+ Channd Lineup. The guide may get out of sync
with the cable providen Use the GUIDE Plus+ Setup in the GUIDE Plus+ Menu to
change the zip code to 99999. Turn the IX/off for 10 minutes. Use Setup again to
change the zip code back to the correct value. If asked, be sure to select the correct
channel lineup from the on-screen list.
Program information doesn't download
• Review your setup information and make sure it's correct. Press MENU on the remote
and select GUIDE Plus+ Setup. Go to page 17 for detailed instructions about the GUIDE
Plus+ Setup menus.
• The ]V must be off to download information. Leave your IX/off overnight, for at least
10 hours, to receive the initial download for your area.
• I[ you're using a cable box, leave it on so you can receive program information.
Scheduled Watch or Record doesn't occur
• Check Schedule for timer conflicts. Go to page 19 for instructions.
• Make sure the wands of the G-LINK cable are placed in front of the remote sensor(s) on
the component(s).
• Make sure your VCR is turned off during the time you've scheduled to record a program
because the system turns the VCR on when it starts recording (if it's already on when
recording starts, the system will turn it off).
• Make sure there is a tape in the VCR and that the VCR is connected properly.
• Be sure that you set up the VCR in the GUIDEPlus+ Setup menus. If you don't
complete the Configuring for a VCRsteps successfully, the Record option won't be
available. Go to page 10 for detailed instructions.
• If a cable box is attached to your I¥, make sure you set it up correctly in the GUIDE
Plus+ Setup menus. Go to page 9for detailed instructions.
The Remote Control Doesn't Work
• Something might be between the remote and the remote sensor on the component.
Make sure there is a clear path.
• Maybe the remote isn't aimed directly at the component (TV or VCR)that you're trying
to operate.
• Maybe remote is not in I_I Mode. Press the I_I button so remote will control TV.
• Maybe batteries in remote are weak, dead or installed incorrectly. Put new batteries in
the remote. (Note, if you remove the batteries, you may have to reprogram the remote
to operate other components.)
• You might need to reset the remote: remove batteries and press the number 1 button
for at least 60 seconds. Release the 1 button, replace the batteries, and (if necessary)
program the remote again.
Chapter 5Graphics contained within this publication are for representation ont_ 35
Other Information
Problems with V-Chip/Parental Controls
The rating limits don't work
• You must lock the settings. Go to tile TVMAtN MENU (press MENU on your remote},
select Parental Controls (press 6 on your remote), select Lock Parental Controls (press 6
on your remote).
I don't remember my password and Iwant to unlock the TV
• if you forget your password, simultaneously press and hold MENU on the television and
volume down on the remote for 3 seconds. Nothing appears on the screen, Parental
Controls simply unlock and you can re-enter a password via Lock Pnrentel Controls.
The V-Chip won't let me watch a program even though it's not rated as
violent.
• Maybe the movie was given an NR{Not Rated) status. After you block movie ratings,
you must set NR to View separately in order to view movies with an NRrating.
Care and Cleaning
CAUTION: Turn OFF your IV before cleaning.
You can clean the TV as required, using a soft lint-free cloth. Be sure to occasionally
dust the ventilation slots in the cabinet to help assure adequate ventilation
The IV's screen may be cleaned with a soft, lint-free cloth as well. Take care not to
scratch or mar the screen. If necessary, you may use a cloth dampened with warm
water. Never use strong cleaning agents, such as ammonia-based cleaners, or
abrasive powder. These types of cleaners will damage the IV.
While cleaning do not spray liquid directly on the screen, or allow liquid to run down
the screen and inside the IV. Also, never place drinks or vases with water on top of the
IV. This could increase the risk of fire or shock hazard or damage to the IV.
Caution: Using video games or any external accessory with fixed images for extended
periods of time can cause them to be permanently imprinted on the picture tube (or
projection IV picture tubes). AtSO, some network/program logos, phone numbers, etc.
may cause similar damage. This damage is not covered by your warranty.
36 Graphics contained within this publication are for representation onlg Chapter 5
Other b formation
Limited Warranty
What your warranty covers:
Defects in material or workmanship,
For how long after your purchase:
Oneyear from date of purchase for labor charges
Oneyear from date of purchase for parts
Two yearsfrom date of purchasefor picture tube
Thewarranty period for rental units begins with the first rental or 45 days from date
of shipment to the rental firm whichever comes first
What we will do:
Pay any Authorized RCA Television Service Center the labor charges to repair your
television.
Pay any Authorized RCA Television Service Center for the new or, at our option,
rebuilt replacement parts and picture tube required to repair your television.
How you get service:
For 20" screen size: Take your RCA television to any Authorized RCA Television
Service Center and pickup when repairs are complete.
For screen sizes larger than 20": Request home or pick up, repair and return
service from any Authorized RCA Television Service Center, provided that your
television is located within the geographic territory covered by an Authorized RCA
Television Service Center. If not, you must take your television to the Service
Center location at your own expense, or pay for the cost the Service Center may
charge to transport your television to and from your home.
To identify your nearest Authorized RCA Service Center, ask your dealer, visit
www.rca.eom, look in the Yellow Pages, or call 1-800-336-1900.
Proof of purchase in the form of a bill of sale or receipted invoice which is
evidence that the product is within the warranty period must be presented to
obtain warranty service. For rental firms, proof of first rental is also required.
What your warranty does not cover:
Customer instruction. (Your Owner's Manual describes how to install, adjust, and
operate your product Any additional information should be obtained from your
dealer.]
Installation and related adjustments.
Signal reception problems not caused by your television.
Damage from misuse or neglect.
Batteries
Customer replacement fuses
Damage from images burnt onto the screen
A television that has been modified or incorporated into other products or is used
for institutional or other commercial purposes.
Acts of nature, such as but not limited to lightning damage.
A television purchased or serviced outside the US.A.
Chapter 5Graphics contained within this publication are for representation ont_ 37
Other Information
Product Registration:
Pleasecomplete and mail the Product Registration Card packed with your IX/or
register on-line at www.rca.eomlproduetregistration. It will make it easier to
contact you should it ever be necessary.The return of the card isnot required
for warranty coverage.
Limitation of Warranty:
THEWARRANTYSTATEDABOVEIS THEONLYWARRANTYAPPLICABLETO
THIS PRODUCT.ALL OTHERWARRANTIES,EXPRESSORIMPLIED(INCLUDING
ALL IMPLIED WARRANTIESOFMERCHANTABILITYORFITNESSFORA
PARTICULARPURPOSE)ARE HEREBYDISCLAIMED. NOVERBALOR WRITTEN
INFORMATIONGIVEN BY THOMSONINC., ITSAGENTSOR EMPLOYEESSHALL
CREATEA GUARANTYOR IN ANY WAY INCREASETHESCOPEOFTHIS
WARRANTY.
REPAIROR REPLACEMENTAS PROVIDEDUNDERTHIS WARRANTYIS THE
EXCLUSIVEREMEDYOFTHECONSUMER.THOMSON INC.SHALL NOT RE
LIABLEFORINCIDENTALORCONSEQUENTIALDAMAGESRESULTINGFROM
THEUSEOFTHISPRODUCTORARISING OUTOFANY BREACHOFANY
EXPRESSOR IMPLIEDWARRANTYONTHIS PRODUCETHIS DISCLAIMEROF
WARRANTIESAND LIMITEDWARRANTYAREGOVERNEDBYTHELAWS OF
THESTATEOF INDIANA. EXCEPTTOTHEEXTENTPROHIBITEDBYAPPLICABLE
tAW, ANY IMPLIEDWARRANTYOF MERCHANTABILITYOR FITNESSFORA
PARTICULARPURPOSEONTHIS PRODUCTIS LIMITEDTOTHEAPPLICABLE
WARRANTYPERIODSETFORTHABOVE.
How state law relates to this warranty:
Some states do not allow the exclusion nor limitation of incidental or
consequential damages, or limitations on how long an implied warranty lasts,
so the above limitations or exclusions may not apply to you.
This warranty gives you specific legal rights, and you also may have other
rights that vary from state to state
If you purchased your product outside the United States:
This warranty does not apply. Contact your dealer for warranty information
Service calls which do not involve defective materials or workmanship are not
covered by this warranty. Costs of such service calls are the sole responsibility
of the purchaser.
38 Graphics contained within this publication are for representation only Chapter 5
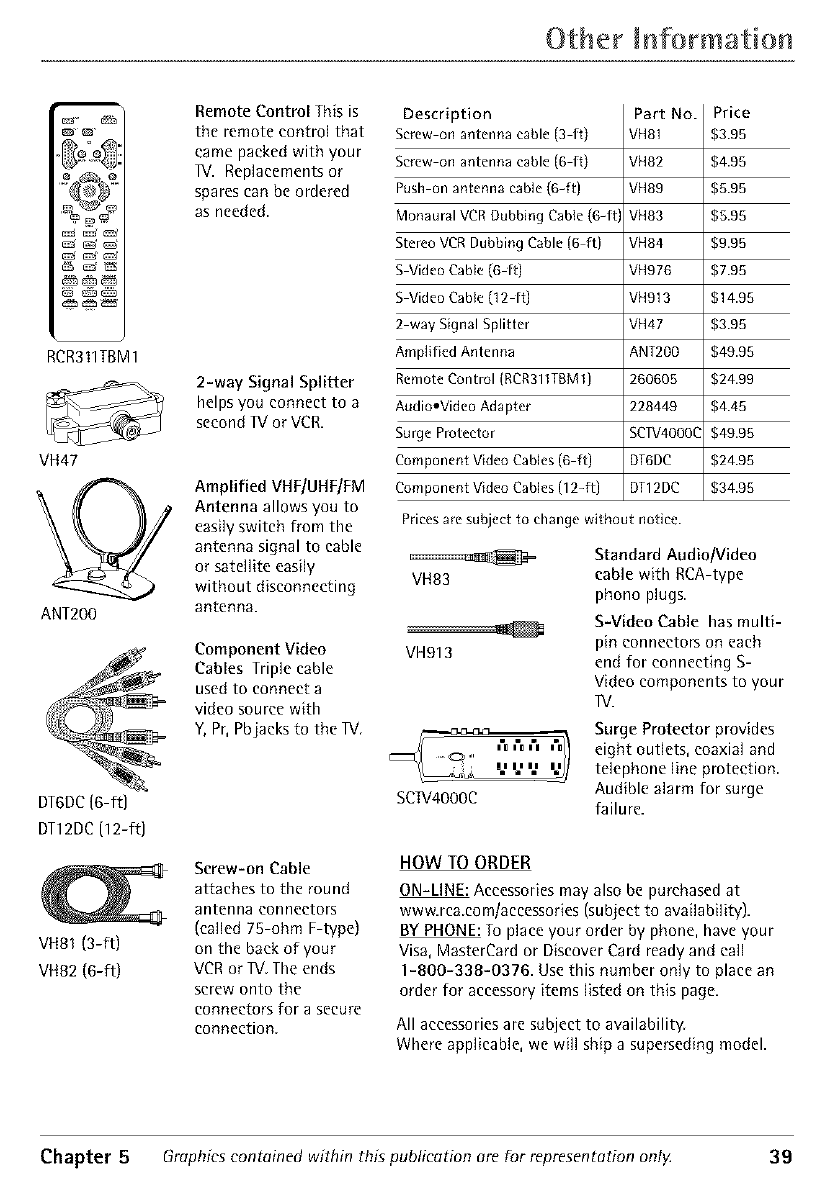
Other bfformatior
RCR311TBM1
VH47
ANT200
DT6DC(6-ft)
DT12DC(12-ft)
IDE
VH81(3-ft)
VH82 (6-ft)
Remote Control This is
the remote control that
came packed with your
IV. Replacements or
spares can be ordered
as needed.
2-way Signal Splitter
helps you connect to a
second IV or VCR.
Amplified VHF/UHF/FM
Antenna allows you to
easily switch from the
antenna signal to cable
or satellite easily
without disconnecting
antenna.
Component Video
Cables Triple cable
used to connect a
video source with
Y, Pr, Pbjaeks to the IV.
Screw-on Cable
attaches to the round
antenna connectors
(called 75-ohm F-type)
on the back of your
VCR or IV The ends
screw onto the
connectors for a secure
connection
Description
Screw on antenna cable {3 ft)
Screw on antenna cable {6 ft)
Push on antenna cane (6-ft)
Monaural VCR Dubbing Cable (6-ft)
Stereo VCR Dubbing Cable {6 ft)
S Video CaNe (6 ft)
S Video CaNe (12 ft)
2 way Signal Splitter
Amplified Antenna
RemoteControl (RCR311TBM1)
AudiooVideo Adapter
Surge Protector
Component Video Cables (6 ft)
Component Video Cables (12-ft)
Part No.
VH81
VH82
VH89
VH83
VH84
VH976
VH913
VH47
ANT200
260605
228449
SCIV4000(
DT6DC
DT12DC
Price
;3.95
;4.95
;5.95
;5.95
;9.95
;7.95
;14.95
;3.95
;49.95
;24.99
;4.45
;49.95
;24.95
;34.95
Prices are subject to change without notice.
Standard Audio/Video
VH83 cable with RCA-type
phono plugs.
VH913
SCIV4000C
S-Video Cable hasmulti-
pin connectors on each
end for connecting S-
Video components to your
IV.
Surge Protector provides
eight outlets, coaxial and
telephone line protection
Audible alarm for surge
failure.
HOWTO ORDER
ON-LINE: Accessories may also be purchased at
www.rca com/accessories (subject to availability).
BYPHONE: To place your order by phone, have your
Visa, MasterCard or Discover Card ready and call
1-8OO-338-O376. Use this number only to place an
order for accessory items listed on this page.
All accessories are subject to availability.
Where applicable, we will ship a superseding model.
Chapter 5 Graphics contained within this publication are for representation ontg 39
This equipment has been tested and found to comply with the limits for a Class B digital device,
pursuant to Part 15 of the FCCRules. These limits are designed to provide reasonable protection against
harmful interference in a residential installation. This equipment generates, uses, and can radiate radio
frequency energy and, if not installed and used in accordance with the instructions, may cause harmful
interference to radio communications. However, there is no guarantee that interference will not occur in
a particular installation. If this equipment does cause harmful interference to radio or television
reception, which can be determined by turning the equipment off and on, the user is encouraged to try
to correct the interference by one or more of the following measures:
• Reorient or relocate the receiving antenna,
• Increase the separation between the equipment and receiver.
• Connect the equipment into an outlet on a circuit different from that to which the receiver is
connected
• Consult the dealer or an experienced radio/1V technician for help.
This Class B digital apparatus complies with Canadian ICES-O03.
Visit the RCA web site at www.rea.eom
Please do not send any products to the Indianapolis address listed in this manual or on
the carton. This will only add delays in service for your product.
Thomson Inc.
10330 North Meridian Street
Indianapolis, IN 46290
@2003 Thomson Inc.
Trademark(s)® Registered
Marca(s) Registrada(s)
TOCOM 16261970
O
THOMSON
THOMSON t*_1_
