RCA DVD Systems Manual L0520813
User Manual: RCA RCA DVD Systems Manual RCA DVD Systems Owner's Manual, RCA DVD Systems installation guides
Open the PDF directly: View PDF ![]() .
.
Page Count: 63
m
ging Entertainment,
This symbol indicatesthat this product incorporates double
ins@adonbetween hazardousmainsvoltage and user
accessibleparts.
This symbol indicates"dangerous
voltage" insidethe product that
presents a risk of electric shock or
personal iqury.
This symbol indicates
important instructions
accompanyingthe product.
FCC JNFORHATmON
This equipment has been tested and found to comply with the limits for a Class B digital device,
pursuant to Part 15 of the FCC rules.These limits are designedto provide reasonableprotection
againstharmful interference in a residential installation.This equipment generates,usesand can radiate
radio frequency energy and, if not installed and usedin accordance with the instructions, maycause
harmful interference to radio communications. However,there is no guaranteethat interference
will not occur in a particular installation. If this equipment does causeharmful interference to radio
or television reception, which canbe determined by turning the equipment off and on, the user is
encouragedto try to correct the interference by one or more of the following measures,
Reorient or relocate the receivingantenna.
Increasethe separation between the equipment and receiver.
Connect this equipment into an outlet on a circuit different from that to which the receiver is
connected.
Consult the dealer or an experienced radio/TV technician for help.
This classB digital apparatusmeets al!requirements of the Canadian Interference - CausingEquipment
Regulations.ThisclassB digital apparatuscomplies with CanadianCES-O03.
Cet appareil num6rique de la classBest conforme _ lanorme du NHB-O03 du Canada.
ieferto the identification/rating label located on the back par@ ofpur product for its proper
operating voltage.
Product Registration
Pleasefill out the product registration card and return it immediately,Returning the product registration
card allows usto contact you if needed,
Keep},our salesreceipt to obtain warranty parts and service and for proof of purchase.Attach it here and
record the serial and model numbers in caseyou needthem,The numbers are located on the back of the
DVD Recorder,
Model No. DRC8:_eSN
Purchase Date:
Serial No.
Dealer/Address/Phone:
WARNIING
To reduce the risk of fire or shock hazard,do not expose
this DVD Recorder to rain or moisture,
CAUTION
THIS PRODUCT UTILIZESA LASER,USEOF
CONTROLS OR ADJUSTHENTS OR PERFORMANCE
OF PROCEDURESOTHERTHAN THOSE SPECIFIED
HEREIN HAY RESULTIN HAZARDOUS RADIATION
EXPOSURE.DO NOT OPEN COVERSAND DO NOT
REPAIRYOURSELEREFERSERVICJNGTOQUALIFIED
PERSONNEL.
CAUTION
FCC Regulationsstate that unauthorized changesor
modifications to this equipment mayvoid the user's
authority to operate it.
Note:
This DVD Recorder is designedand manufactured to
respond to the RegionNanagement Information. If the
Regionnumber of a DVD disc does not correspond to the
Regionnumber of this DVD Recorder this DVD Recorder
cannot play the disc.The Regionnumber for this DVD
Recorder is Region No I,
Note:
This device is protected by U.S.patent numbers4,631,603
and 4,577,216and 4,819,098 and other intellectual property
rights,The useof Macrovision'scopy protection technology
in the devicemust be authorized by !lacrovision and is
intended for home and other limited pay=per-viewusesonly,
unlessotherwise authorized in writing by Hacrovision.
Reverseengineeringor disassemblyis prohibited.
The apparatusshall not be exposed to dripping or splashing
and that no objects filled with liquids,such asvases,shallbe
placed on the apparatus.
Ventilation:
You must adequatelyventilate the product, Hake sure there is adequatespacearound the DVD
RecorderNCR to provide proper air flow for ventilation, Seediagram,
TheAC power cord ispolarized (one blade iswider than the other) and only fits
into AC outlets one way,If the plugwon't go into the outlet completely,turn the
plugover and try to insert it the other way,Ifit still won't fit, contact a qualified
electrician to changethe outlet or usea different one. Do not attempt to bypass
this safetyfeature,
Table of Contents
Chapter I: Connections and Setup
Types of Discs ....................................................... 2
Thin_s to consider before yoe connoct ................................. 2
UnpasB tho Box ..................................................... 2
Choose yoor connection .............................................. 3
E×plenetion of jacks end Cebles ....................................... `$
Back of the DVD/VCR ................................................ 5
Front of the DVD/VCR ............................................... 7
¢onnoctiom DVD/VCR ÷ TV ........................................... 8
Connection: DVD/VCR +TV +Coble Bo× .............................. 18
Connection: DVD!VCR ÷ TV ÷Satellite Receiver ........................ t2
Advanced Aedio Connection Information .............................. I`$
Instaff batteries in tho remote control ................................. t5
Turn on the TV and the DVD/VCR .................................... J5
Complete Intoractive Setup .......................................... 15
What to Expect ..................................................... i 7
How to find your TV_s Video Input Channel ............................ 18
Next Steps ........................................................ 18
Chapter 2: The Remote Controt
Explenetion of buttons .............................................. 28
Find oot if the remote can bo programmed to operate your TV ........... 21
Programming the remote to operate yoor TV .......................... 21
Programming the remote to operate other components ................. 22
Usin_ the remote to operate other components ........................ 28
Code list for programmin_ the remote control ......................... 23
Chapter 3: Using the Re¢order_s Features
Watching TV ...................................................... 28
The Chonne_ Banner ............................................. 28
DVD Recording ..................................................... 28
Express recording ................................................ 28
Watching one channol while you record another channel ............. 28
Watchin_ e xideocessette tape while you record to disc .............. 28
Copyin_ eDVD disc (DVD+R or DVD+RW) to tape ................... 29
Timer Recordings .................................................. 30
Disc Library ....................................................... 3 t
Editing the Genro of aTitle ....................................... 3l
Findin_ a title (movie_ pro_ram_ etco) by using tho 8oft Foeture ........3 i
DVD Playback ...................................................... 32
Editing DVD÷R and DVD+BW discs ................................ 33
Editin_ ti_esusin_ the Hide Chapter Feature ........................ 3`$
VCR Basics ........................................................ 3,$
Besic Playback .................................................. 3`$
Besic Rocording ................................................. 3`$
Advanced VCR Featoros ............................................. 35
Advenced Pleyback .............................................. 35
VCR Info Display ................................................ 35
VCR Recordin_ ..................................................... 36
Express Recordin_ ............................................... 36
Watchin_ one ¢hanno_whffe you recordanother channe_ ............. 36
WatchBt_ eDVD discwhile you record to tepe ...................... 38
¢opyin_ e videocessette tape to a DVD disc (DVD+R or DVD+RW) .....36
Chapter 4:Pi_yingDiscs
Be_ionel ¢odin_ .................................................... 38
Types of discs you can play .......................................... 38
How to Load end Pley Discs .......................................... 38
Usin_ Difforent Henus .............................................. 39
Search Options ..................................................... 39
Pleyback Options ................................................... 39
Usin_ the On-Screen Info Display ..................................... 39
Time Display ................................................... `$I
Selectin_ e Title on DVDs or eTrack on Audio CDs or VCDs ........... `$1
¢hepter Icon ................................................... `$I
SebDtle leon ................................................... `$I
Repeat Icon .................................................... `$_
Audio Icon ...................................................... 4;_
Demote Angle Icon ............................................... 43
PlayHods Icon ................................................. 4`$
IntroScan (Audio CD only) ........................................ 44
PieyBeckControl (PBC)_Video CD only ............................44
Pleyin_rap3end/orJPBG B_es ........................................44
Viewin_ _PEGfi_es .................................................. `$5
Chapter 5: The Hen_ System
Overview of the _onu System ....................................... `$7
The Moin Henu .................................................... 47
Watch TV ......................................................... `$8
Disc .............................................................. 48
Play Disc ....................................................... 48
Disc Title Hone ................................................. `$8
PleyerHenu .................................................... 48
Pleylist ........................................................ `$8
Copy Disc ...................................................... 48
Disc Options .................................................... `$9
Autoplay .................................................... 49
Screen Eormat ............................................... `$9
An_e Icon ................................................... 49
Tape .............................................................. 49
Pley Tape ...................................................... 49
P_eyfrom Stert ................................................. 49
Copy Tape ..................................................... 49
Review A-B Edits ................................................ `$9
De_ete A-B Edits ................................................ `$9
Tape Options ................................................... `$9
Tape AutoPIay ............................................... 49
Pleybeck Hode (Digitel or Analog) ............................... 49
AutoRewind .................................................. `$9
Disc Library ....................................................... 50
Timers ............................................................ 50
Setup ............................................................. 50
Parente_ Controls ............................................... 58
Lock/Un_ock ................................................. 50
Bering Limits ................................................. 50
Unreted Titles ............................................... 51
System Options ................................................. 5l
Digital Ootput ................................................ 5l
SR$/TroSurround ............................................. 5l
Block Level .................................................. 51
Display Dimmer ............................................... 5l
Audio Broadcast .............................................. 5l
Rocording Options .............................................. 5_
Becord Destination ........................................... 5:_
Becording Quelity ............................................. 5'_
Tape Speed .................................................. 52
Smart Record ................................................. $_
Disc Options ..................................... note to see pa_e `$_
Tape Options .................................... note to see pa_e 4_
Lan_ua_os ...................................................... 5'_
Display ...................................................... 5_
Aodio ....................................................... 5_
Subtitles .................................................... 5_
Disc ......................................................... 5'_
Instellation Heno ............................................... 53
Interactive Setop ............................................. 53
Channel Soorch ............................................... 53
Clock Sotop .................................................. 53
Channel List ................................................. 53
Chapter 6: Addition_()nfor_tion
TroobleshooDn_ .................................................... 55
Hendlin_ Ceutions .................................................. 58
Heintenanse of Cabinet ............................................. 58
Limited Werranty .................................................. 59
Accessories ........................................................ 80

Types of D_scs
_PHol OVlEVV
$o_e discs may not be compatible
due to I_ser pickup end disc design°
RECORDING; TYPES OF DISCS YOU CAN USE FOR RECORDING
DVD+R 2,4×_4×_ or 8x ONLY; DVD+RW 2Ax and 4× ONLY.
NOTES:
ItisNOT possibleto recordon CD-R orCD_RW discs.
IF_PORTANT:ItisNOT possibletorecordcontentthatiscopy-protected.Thisisusuallytrueformost premecordedDVD discsand
most pre-recordedVHS tapes.
PLAYBACK_ TYPES OF DISCS YOU CAN PLAY
DVD discs - DVD movie discs(DVD=ROH); DVD+R; DVD+RW; DVD=RW (must be recorded using video mode orVH)', DVD-R
(must be recorded using video mode orVH and mus_be finalized).
¢Ds (Audio ¢Ds, ODOR, ¢D-RW) -Audio CDs contain musicalor sound content only.rap3 discsare CDs (CDoR or CDoP,W)
thor contain rap3 files.Thisproduct also playsCDs that contain JPEGfilesand HuNisessionCDs.
Video ¢D O/¢D) and Super Video ¢D ($-VCD) discs - Like DVD video discs,VCDs contain picture and sound content.The
difference is sheamount of information thac canbe stored on the disc,VCDs typically havelower picture and sound quality than DVD
discs,SuperVideo CDs (S°VCDs) can be usedto record up _o 70 minutes of digital sound and video, wizh HPEGo:Zs_andardvideo
and HPEG-I s_andardaudie---bu_you must use DVD+R or DVD+RW discs to record on your DVD/VCR nor S-VCDs.Addizionally,
SoVCDdisc compatibility is dependenton which HPEG coding software, disc designsoftware, and discwriter software are used',and
the discs_hemselves,
Things to co_sid÷r before yo_ co_ect
Pro_ec_ components fr_r_ overhea_in_
Don'_ block ventilation holes on arty of the components.Arrange the components so that air cancirculate freely.
Don'_ stack components.
When you place components in a stan& make sure you allow adequateventilation.
If you connect an audio receiver or amplifien place i_on the top shelf.
P_si_ion ¢_b[_s properly _o avoid_udio interference
Insert eachcable firmly into _hedesignatedjack.
If you place components above the TV,rouEeall cablesdown the side of Eheback of the TV insteadof s_raigh_down Ehemiddle of the back of the TV_
If your TV hasan antenna_hat uses300oohmtwin leadcables,do no_coil the cables.Also,keep _he_win leadcablesawayfrom audio/video cables.
Con_ect4on Pictures
Audio/video cablesare usually bundled together. For better visibility, the connection pictures in this book show each cable separately (audio left, audio right, and video).
Graphics containedwithin this publication are for represenr4tion onl4
U_pack the Box
Your DVD/VCR camewith the following items:
:@L
Remote ¢or_tro[ and
batteries (p_rt Bumber
26 [387)
set of audio video c_bles (p_rt _u_ber _33086)
RF C@gxial c_ble(p_rt
number 2g [396)
P_wer cord (part _urnber _8_04)
Graphics contained within chis publication are for representation onJy.
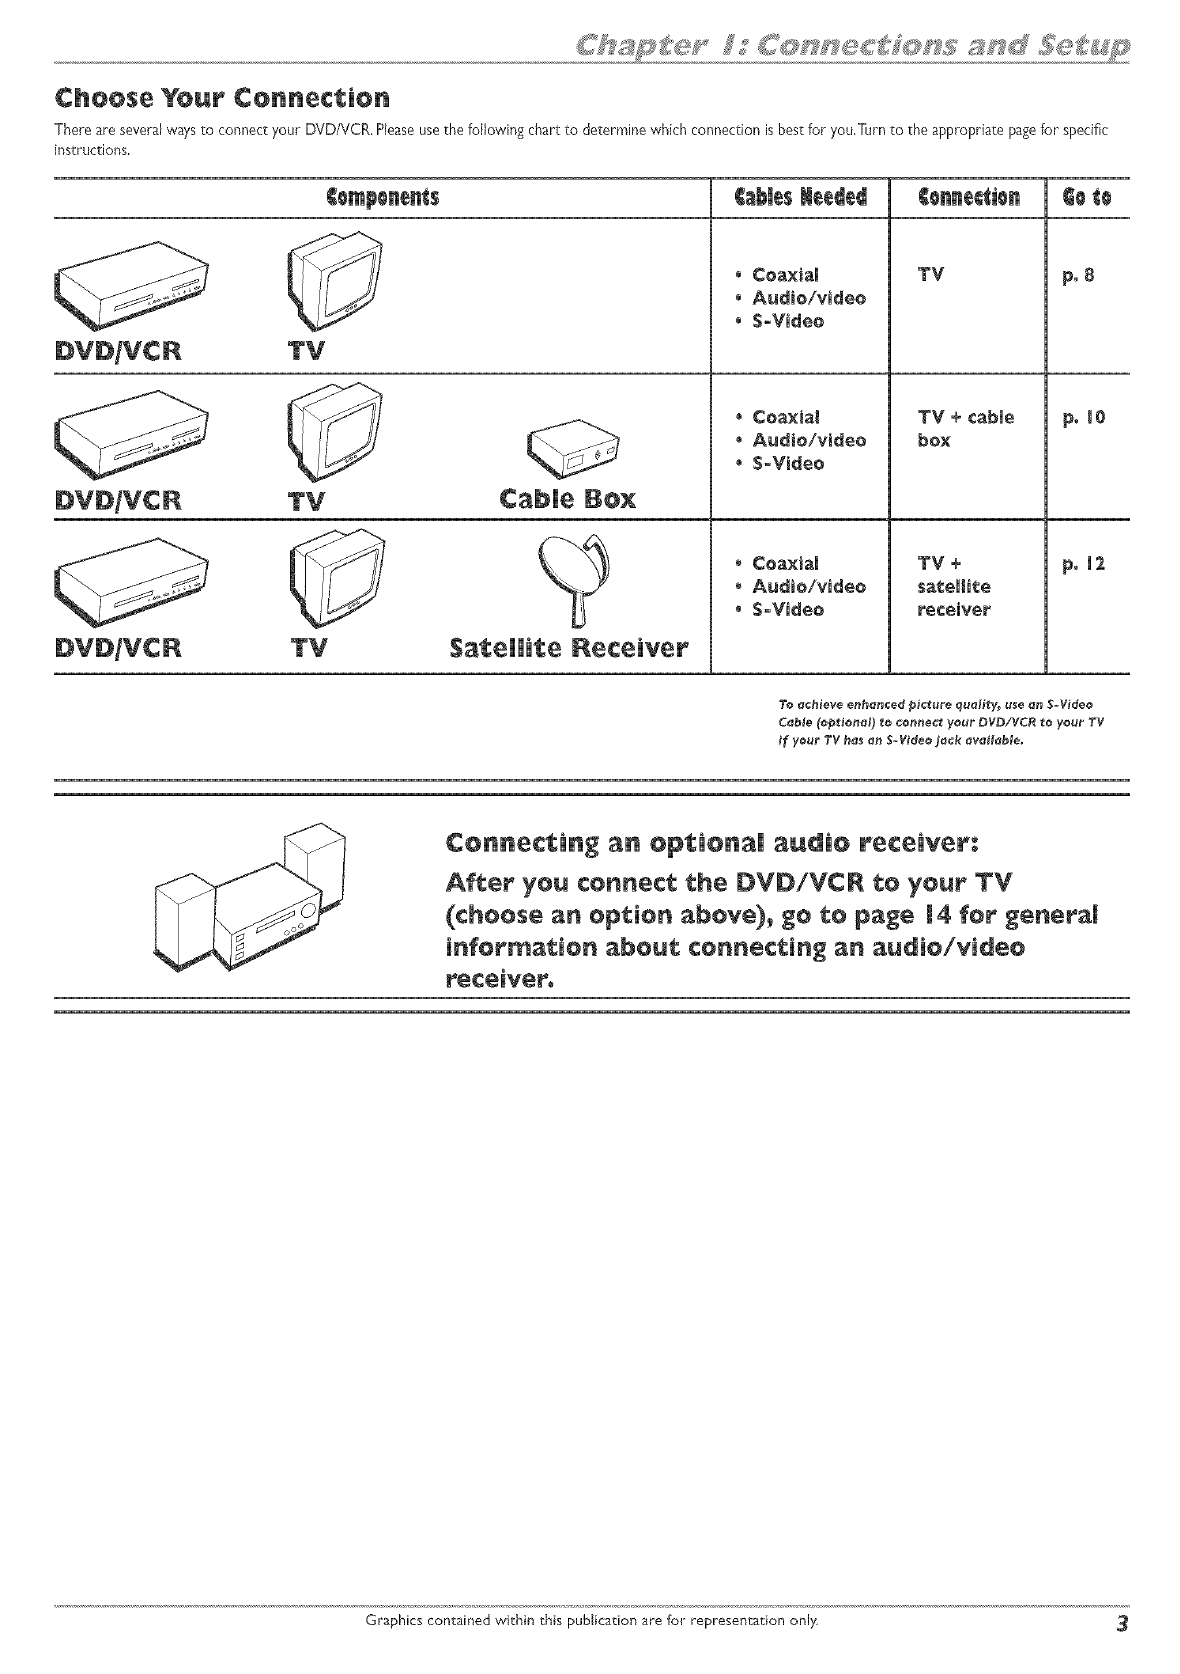
Choose Your Connection
There are several ways to connect your DVD/VCR, Please use the following chart to determine which connection is best for you,Turn to the appropriate page for specific
instructions,
TV
TV
TV Satellite Receiver
Cables Heeded OeOe
• Coaxial
• Audio/video
• S-Video
Coaxial
Audio/video
S-Video
,, Coaxial
,' Audio/video
• S-Video
YV
YV +
satellite
receiver
po8
p01e
po12
Connecting an opt;ionai audio receiver:
Aft:or yell connect the DVD/VCR to your YV
(choose an option abeve)_ ge te page 14 for generaH
information about; connecting an audio/video
receivero
Graphics contained within this publication are for representation only 3
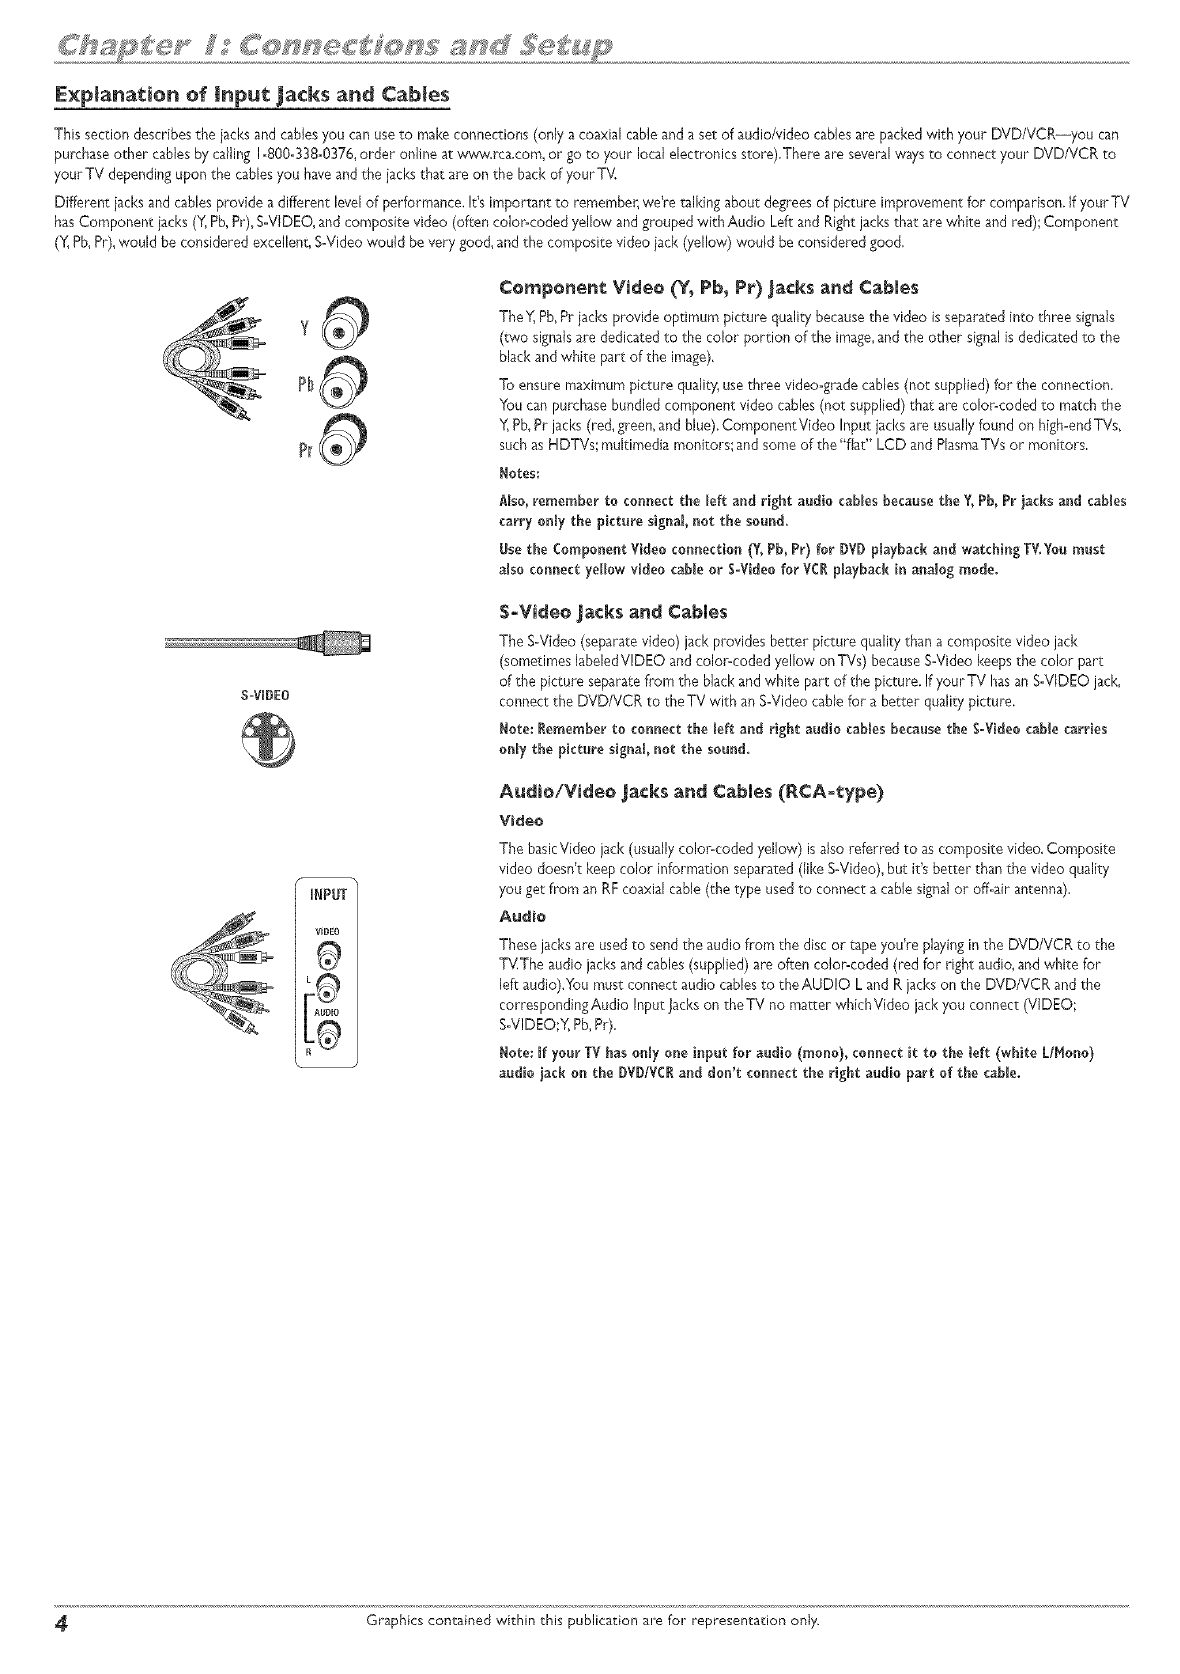
Explanation of mnput jacks and Cables
This section describes the jacks arid cablesyou can usetomake connections (only a coaxial cableand a set of audio/video cablesare packedwith your DVD/VCR--you can
purchase other cablesby calling 1-800-338-0376,order onfne at s_*w.rca,com, or go to your local electronics store),There are several 'waysto connect your DVD/VCR to
your TV dependingupon the cablesyou haveand the jacks that are on the back of your TV.
Different jacks and cablesprovide a different levelof performance, It's important to remember, we're r_lking about degrees of picture improvement for comparison. If your TV
hasComponent iacks (Y,Pb,Pr),S-VIDEO,and composite video (often color-coded yellow and grouped with Audio Left and Rightjacks that arewhite and red); Component
(Y,Pb,Pr),would be considered excellent, S-Video would be very good, and the composite video jack (yellow) would be considered good,
y
PI
P_
Component Video (Y_ Pb, Pr) Jacks and Cables
TheY, Pb,Pr iacks provide optimum picture qualitybecausethe video is separatedinto three signals
(two signalsare dedicatedto the color portion of the image,and the other signalisdedicated to the
black and white part of the image).
To ensure maximum picture quafty, usethree video-grade cables(no_ supplied)for the connection.
You can purchasebundled component video cables(not supplied) that are color-coded to match the
Y,Pb,Pr jacks (red,green, and blue),ComponentVideo Input iacks are usually found on high-endTVs,
such as HDTVs; multimedia monitors; and some of the"flat" LCD and PlasmaTVs or monitors,
Notes;
Also, remember to connect the left and right audio cablesbecause the Y, Pb, Pr jacks and cables
carry on_ythe picture signal, not the sound,
Nse the ComponentVideo connection (¥, Pb, Pr) for DVD playback a_d watching TV.Yo_must
a_soco_ect yelow video came or S-Video for VCRp_aybad_i_ analog mode,
S-WDEO
$=Vi_eo jacks a_ Cables
The S-Video (separatevideo) jack provides better picture quality than a composite video jack
(sometimes labeledVIDEO and color<oded yellow on TVs) becauseS-Video keepsthe color part
of the picture separatefrom the black and white part of the picture. If your TV hasan S-VIDEO jack,
connect the DVD/VCR to the TV with an S-Video cable for a better quality picture.
Note; ler_mmber to co_ect the left a_d right audio cables because tEe S-Video cable carries
o_y the picture signal, _ot the sound,
A_di_lVideo jacks a_d Cables (P,CA°_ype)
Video
The basicVideo jack (usua/y color-coded yellow) is also referred to as composite video. Composite
video doesn't keepcolor information separated (like S-Video),but it's better than the video quality
you get from an RF coaxial cable (the type usedto connect a cable signalor off-air antenna).
A_io
These jacksare usedto sendthe audio from the disc or tape you're playingin the DVD/VCR to the
TVThe audio jacks and cables(supplied) are often color-coded (red for right audio,and white for
left audio),You must connect audio cablesto the AUDIO L and R jacks on the DVD/VCR arid the
correspondingAudio Input Jackson theTV no matter whichVideo jackyou connect (VIDEO',
S-VIDEO;Y,Pb,Pr),
Note; If yOlr TV hasonly one input for audio (molo}, conlect it to the left (white L/Mono}
audio lack on the DVD/VCIa_d dol't collect the right audio part of the cable.
Graphics contained within _his publication are for representation only,
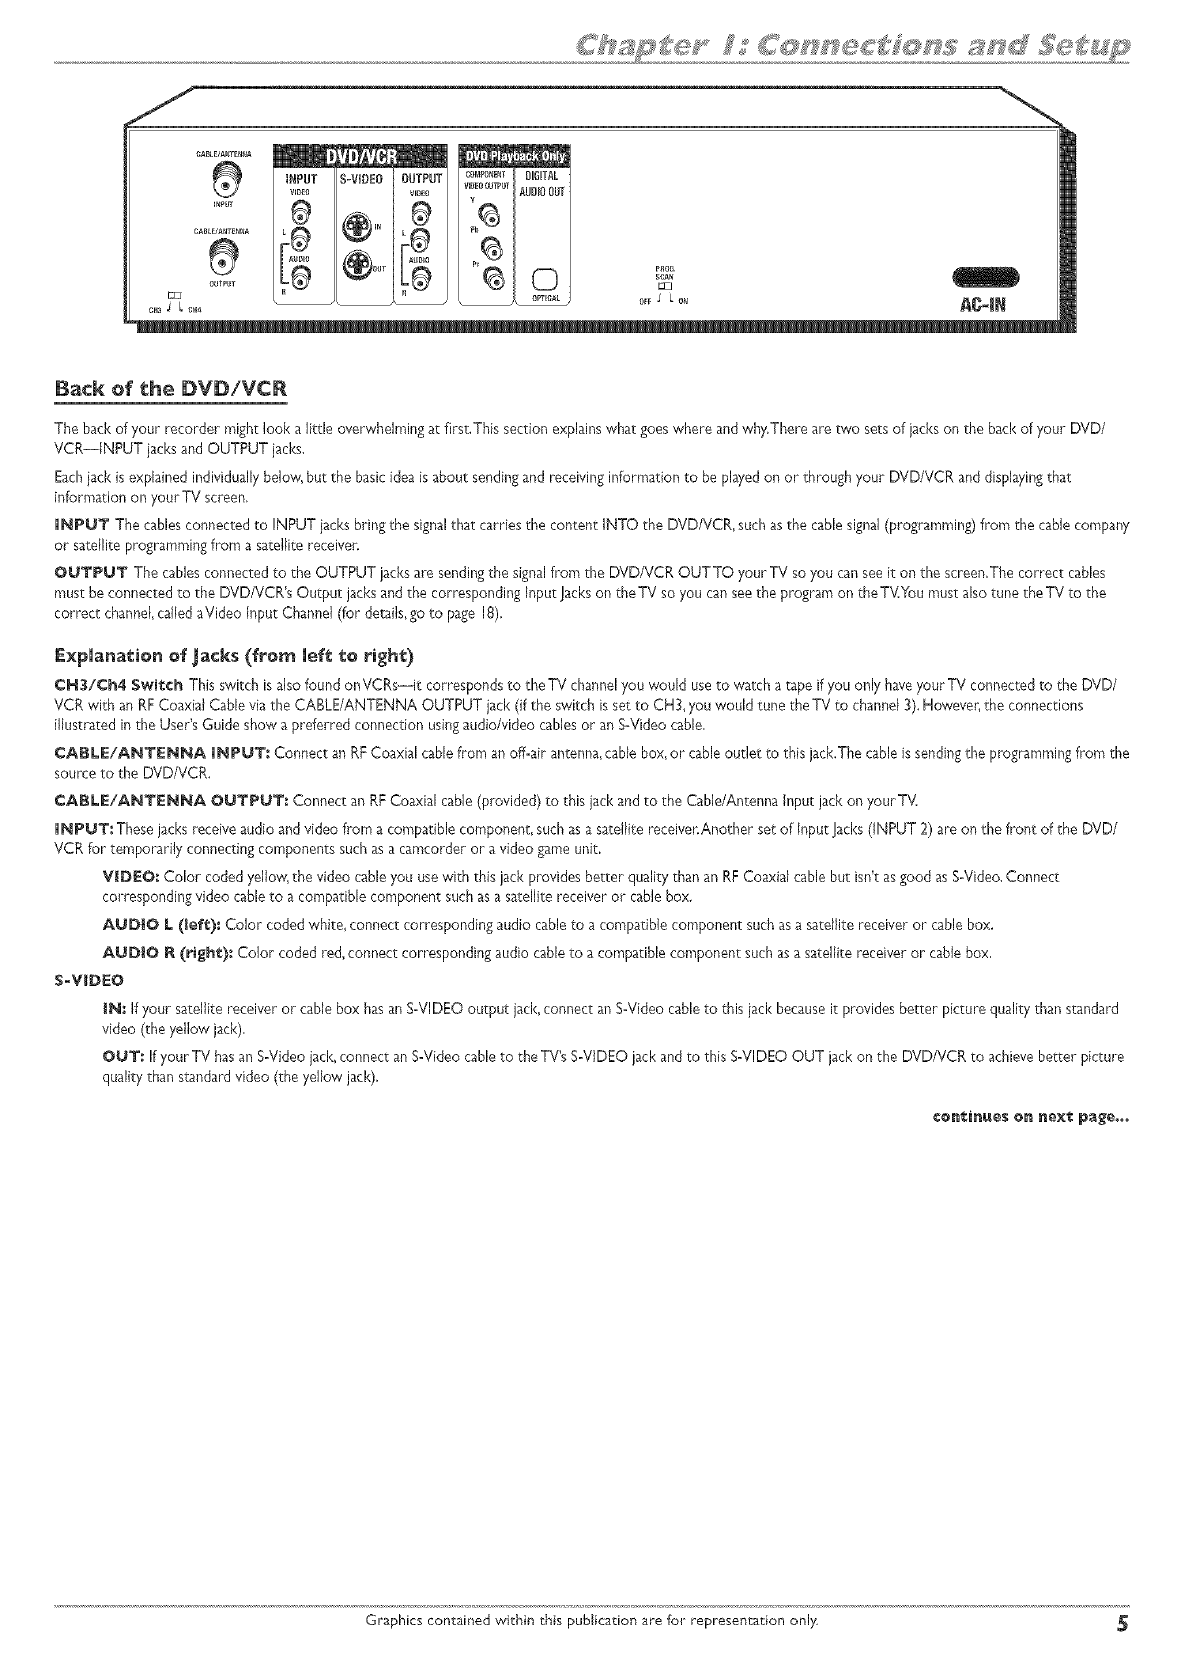
Back of the DVDiVCR
The back of your recorder might look a little overwhelming at first,This section explainswhat goes where and why.There are two sets of jacks on the back of your DVD/
VCR--INPUT jacks and OUTPUT jacks,
Eachjack is explained individuallybelow',but the basicidea is about sendingand receiving information to be playedon or through your DVD/VCR and displayingthat
information on your TV screen,
iNPUT The cablesconnected to INPUT jacks bring the signalthat carries the content INTO the DVD/VCR, such as the cable signal(programming) from the cable company
or satellite programming from a satellite receiver.
OUTPUT The cablesconnected to the OUTPUT jacksare sendingthe signalfrom the DVD/VCR OUTTO your TV so you can seeit on the screen,The correct cables
must be connected to the DVD/VCP.'sOutput jacks and the corresponding Input Jacl<son theTV so you canseethe program on theTKYou must also tune theTV to the
correct channel called aVideo Input Channel(for details,go to page 18),
Expmanationof_ack_ (fe_ meltto _i_h9
CH3/Ch4 Switch This switch is also found onVCRs--it corresponds to the TV channelyou would useto watch a tape if you only haveyour TV connected to the DVD/
VCR with an RFCoaxial Cable via the CABLE/ANTENNA OUTPUT iack (if the switch is set to CH3, you would tune the TV to channel3). However,the connections
illustrated in the User's Guide show a preferred connection usingaudio/video cables or an S-Video cable.
CABLE/ANTENNA INPUT: Connect an RFCoaxial cable from an off-air antenna,cable box,or cable outlet to this jack.The cable is sendingthe programming from the
source to the DVD/VCR.
CABLE/A_TE_A OU'|"POT: Connect an RFCoaxial cable (provided) to this jack and to the Cable/Antenna Input jack on your T_L
INPUT: Thesejacks receive audio and video from a compatible component, such asa satellite receiver.Another set of Input Jacks(INPUT 2) are on the front of the DVD/
VCR for temporarily connecting components such as a camcorder or a video game unit.
VIDEO, Color coded yeJJow_the video cableyou usewith this jack provides better quality than an RFCoaxial cable but isn't asgood as S-Video.Connect
corresponding video cable to a compatible component such as a satellite receiver or cablebox.
AgD|O L(lefe): Color coded white, connect corresponding audio cable to a compatible component such asa satellite receiver or cable box.
AUDIO _ (right.): Color coded red,connect corresponding audio cable to a compatible component such asa satellite receiver or cable box.
$_V_DEO
iN: If your satellite receiver or cable box hasan S-VIDEO output jack,cormect an S-Video cableto this jack becauseit provides better picture quality than standard
video (the yellow jack).
OUT: If your TV hasartS-Video jack,connect an S-Video cableto the TWsS-VIDEO jack and to this S-VlDEO OUT jack on the DVD/VCR to achieve berber picture
quality than sr4ndardvideo (the yellow lack).
Graphics contained within this publication are for representa':ion only.
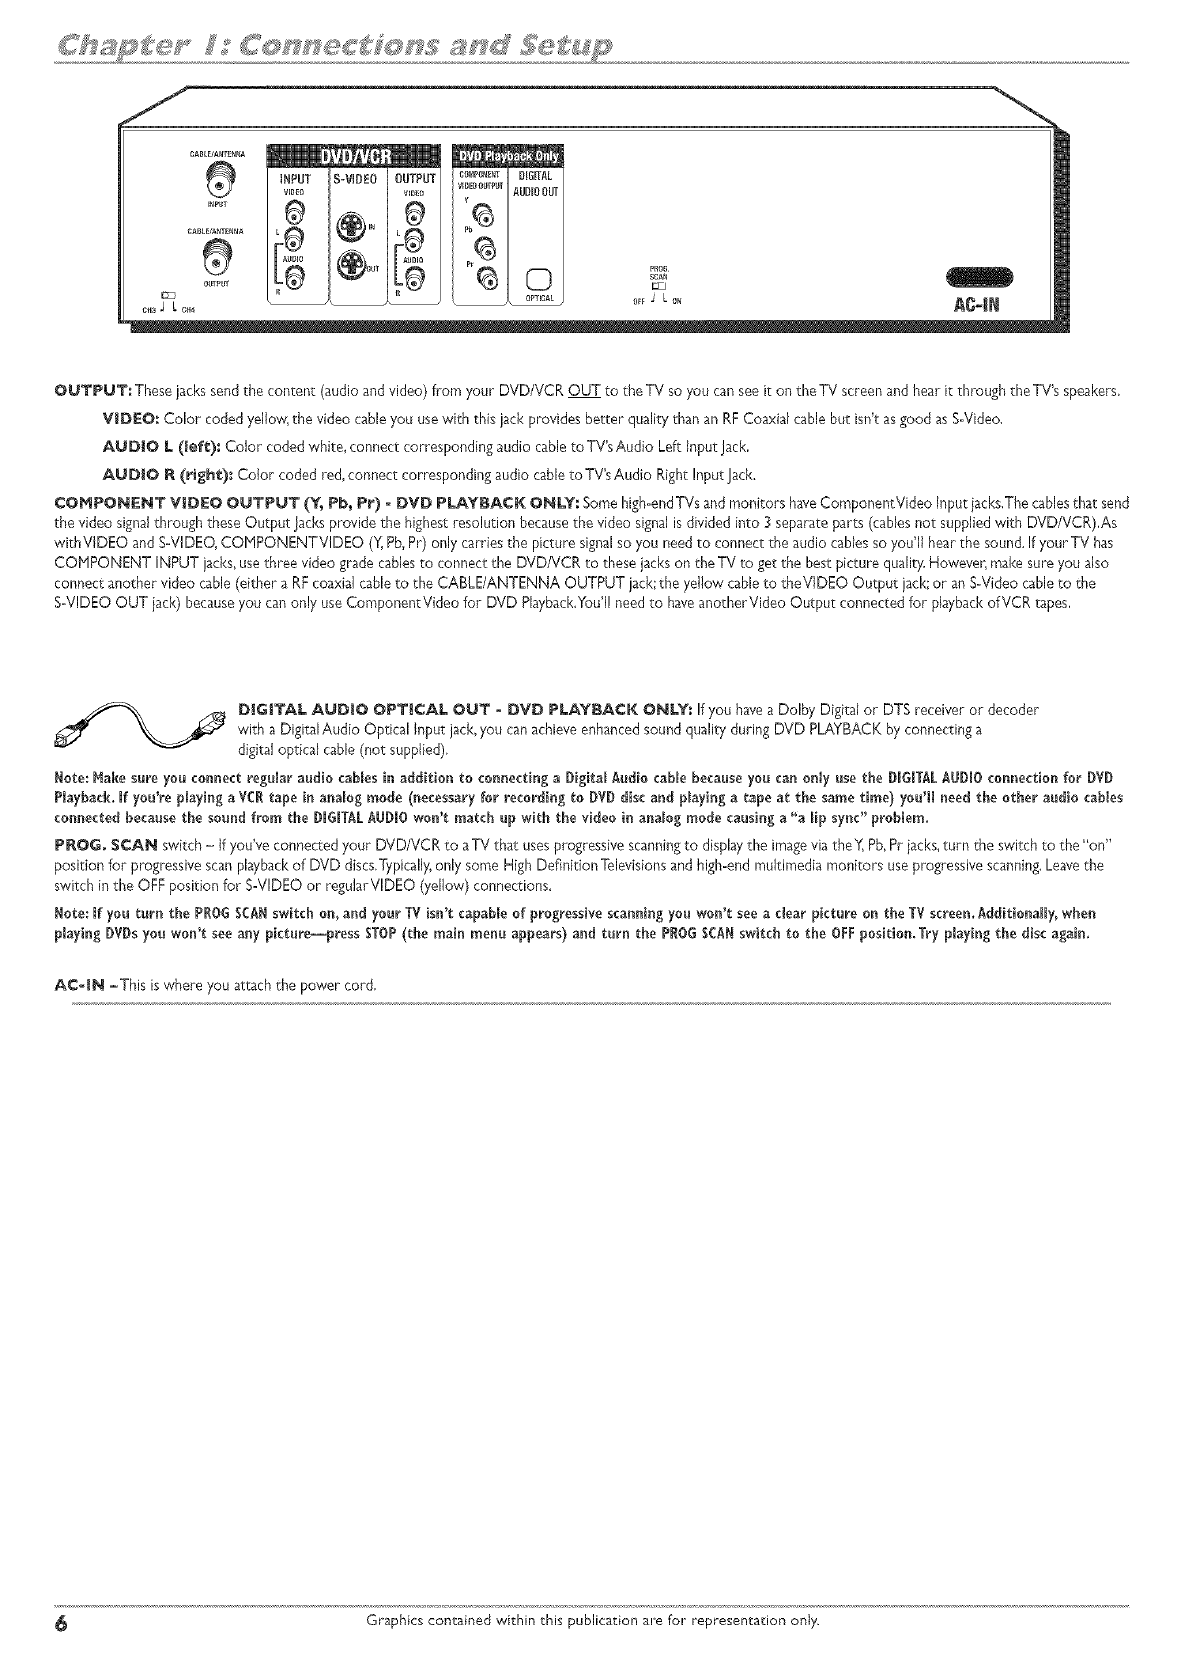
OUTPUT: These jacksseedthe content (audio and video) flora your DVD/VCR OUT to the TV so you can seeit on the TV screenand hear it through the TV's speakers.
VIDEO: Color coded yellow, the video cableyou usewith this jack provides better quality than an RFCoaxial cable but isn't asgood as S-Video.
AUB|O L (_ef_): Color coded white, connect corresponding audio cable to TV'sAudio Left Input Jack,
AUDIO R (right): Color coded red, connect corresponding audio cable toTV's Audio Right Input lack.
¢OHPON_T VJBEO OUTPUT (% Pb_ P_) - BVD PLAYBACK O_LY: Somehigh-endTVs and monitors haveComponentVideo input jacks.Thecablesthat send
the video signalthrough these Output lacks provide the highest resolution becausethe video signalis divided into ] separate parts (cablesnot suppliedwith DVD/VCR),As
withVlDEO and SoVIDEO,CONPONENTVIDEO (Y,Pb,Pr) only carries the picture signalso you need to connect the audio cablesso you'll hear the sound. If your TV has
COHPONENT INPUT jacks,usethree video grade cablesto connect _he DVDNCR to thesejacks on the TV to get the best picture quality.However, makesure you also
connect another video cable (either a RFcoaxial cable to the CABLE/ANTENNA OUTPUT jack;the yellow cable to theVlDEO Output bck; or an SoVideocable to the
SoVlDEOOUT jack) becauseyou can only use ComponentVideo for DVD Playback.You'llneed to haveanotherVideo Output connected for playbackof VCR tapes,
D|G|TAL AUDIO OPTICAL OUT -DVD PLAYBACK ONLY: If you havea Dolby Digital or DTS receiver or decoder
with a DigitalAudio Optical input bck, you canachieve enhancedsound quality during DVD PLAYBACK by connecting a
digital optical cable (not supplied),
Note: _ake sure you connect regn_araudio cables in addition to connecting a Digital Audio cable because you can on_yuse the D_G_TALAUD_Oconnection for DVD
Playback. Jf you're pJayinga VCRtape in analog mode (necessary for recording to DVD disc and p_ayinga tape at the same time) you'll need the other audio cables
connected because the sound from the D_G_TALAUDIOwon't match up with the video in analog mode causing a "a ffp sync" problem.
P_OG. SCAN switch - if you've connected your DVD/VCR to aTV thac usesprogressive scanningto displaythe imagevia the_ Pb,Pr bcks, turn the switch to the "on"
position for progressivescan playbackof DVD discs,Typically,only some High Definition Televisionsand high-end mukimedia monitors use progressivescanning.Leavethe
switch in the OFFposition for S-VIDEO or reguJarVlDEO(yellow') connections.
Note: Jf you tern the P_0G SCANswitch on, and your TV isn't capable of progressive scanning you won't see a dear picture on the TV screen.Additionally, when
ptayingDVDsyou won't see any pkture--press STOP(the main menu appears) and turn the PROGSCANswitch to the OFFposition.Try ptayingthe disc again.
A¢-_N -This is where you attach the power cord.
Graphics contained within this publication are for representation only.
6 6 6 6 o :Sc: 6666
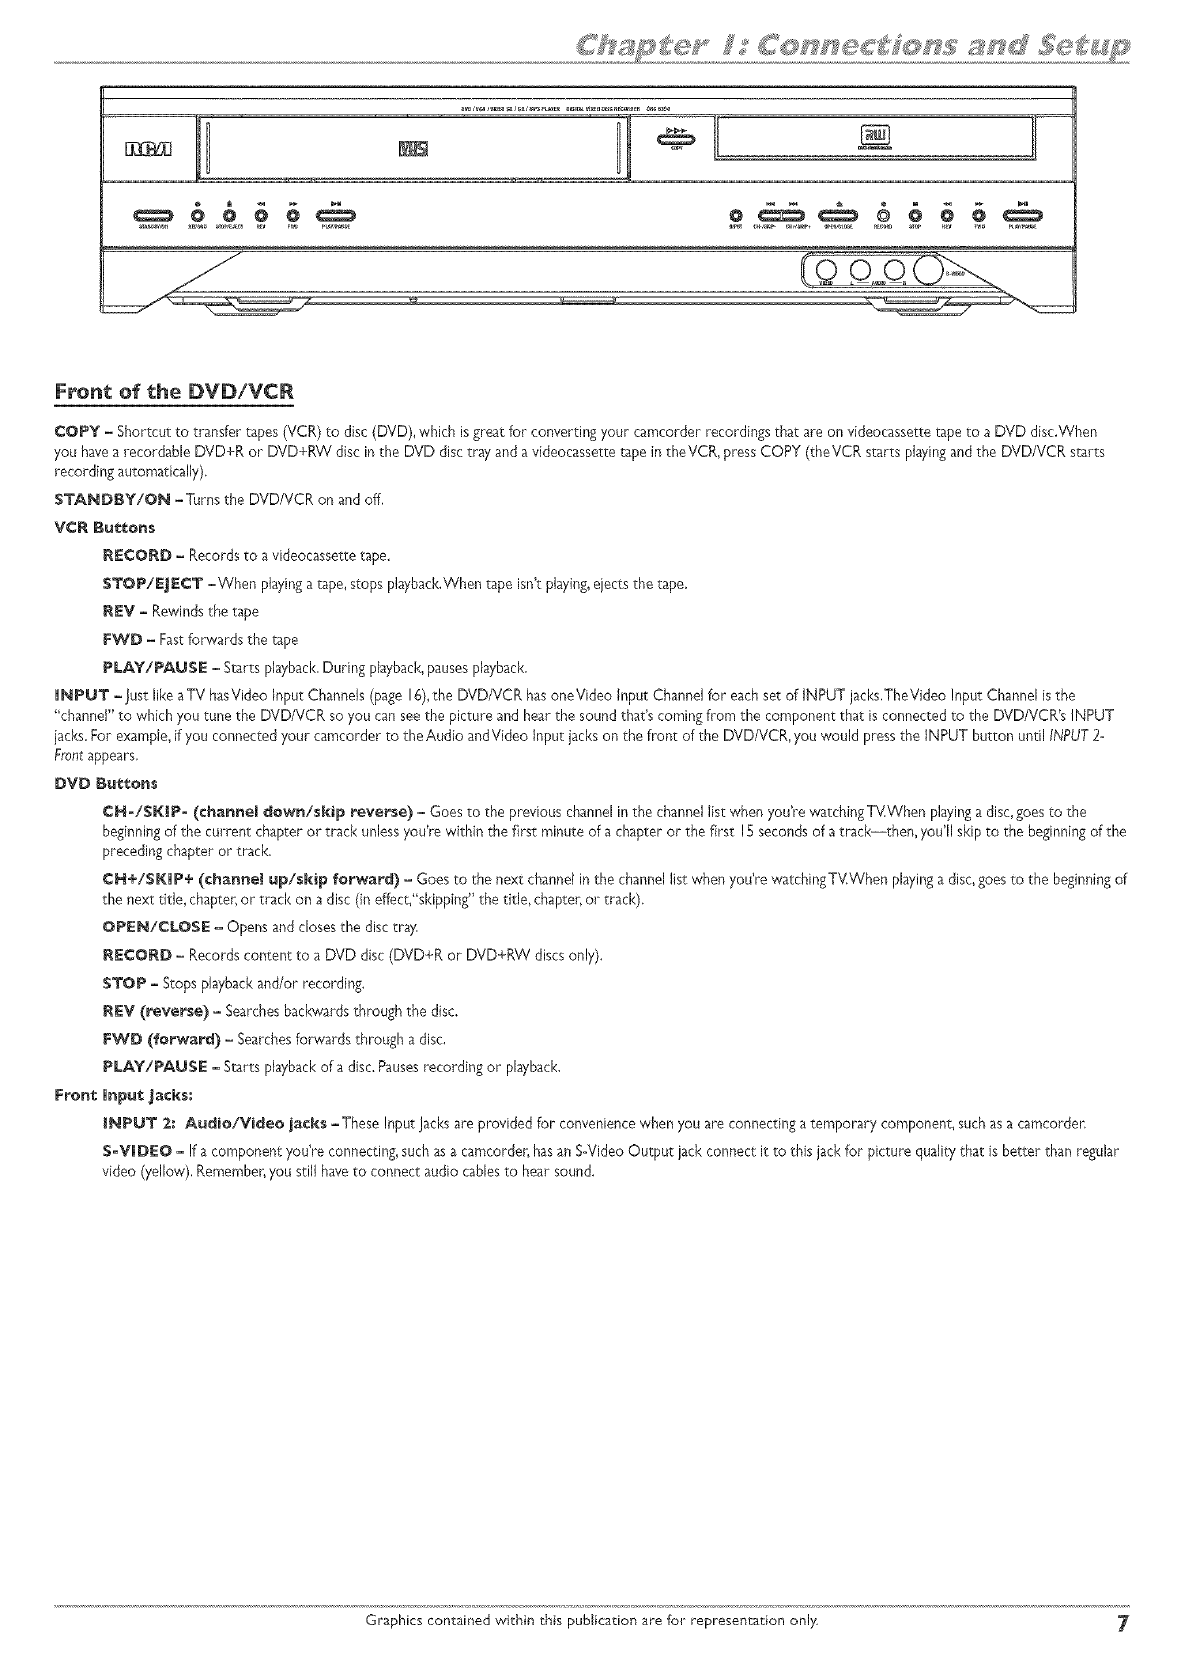
Front of the DVDiVCR
COPY - Shortcut to transfer tapes (VCR) to disc (DVD), which is great for converting your camcorder recordings that are on videocassette tape to a DVD disc,When
you have a recordable DVD+R or DVD+RW disc in the DVD disc tray and a videocassette tape in theVCR, press COPY (theVCR starts playing and the DVD/VCR starts
recording automatically).
$TAND_Y/O_ -Turns the DVD/VCR on and off,
V¢_ B_t_ons
_ECO_D - Records to a videocassette tape,
STOP/EJECT -When playinga tape, stops playback,When tape isn't playing,ejects the tape.
_EV - Rewindsthe tape
FWD - Fast forwards the tape
PLAY/PAUSE - Starts pbybacl<, During playback, pauses playback,
I_PUT -Just like a TV hasVideo Input Channels(page 16),the DVD/VCR hasoneVideo Input Channelfor eachset of INPUT jacks,TheVideo Input Channelis the
"channeF'to which you tune the DVD/VCR so you can seethe picture and hear the sound that%coming from the component that isconnected to the DVD/VCR's INPUT
jacks.For exampie_if you connected your camcorder to the Audio andVideo Input jacks on the front of the DVD/VDR, you *wouldpressthe INPUT button until INPUT2-
Frontappears,
_V_ _ttons
¢_°/SI(|P- (cha_el _ew_/skip reverse) - Goes to the previous channel in the channel list when you're watchingTV.When playing a disc, goes to the
beginning of the current chapter or track unless you're within the first minute of a chapter or the first IS seconds of a track--then, you'll skip to the beginning of the
preceding chapter or track_
CH÷/SKIP÷ (channel up/skip forward) - Goes to the next channel in the channel list when you're watchingTV.When playing a disc, goes to the beginning of
the next title, chapter,or track on a disc (in effect,"skipping" the title, chapter,or track).
OPEN/CLOSE -Opens and closesthe disc tray,
_E¢O_D - Records content to a DVD disc (DVD+R or DVD+RW discsonly).
STOP -Stops playback and/or recording.
_EV (reverse) - Searchesbackwards through the disc.
FWD (forward) - Searchesforwards through a disc.
PLAY/PAUSE -Starts playbackof a disc. Pausesrecording or playback.
Fron_ lnp_ Jacks:
_NPUT _.: Audio/Vi_eo jacks -These Input Jacksare provided for conveniencewhen you are connecting a temporary component, such as a camcorden
S-VIDEO - If a component youYeconnecting,such asa camcorder, hasan S-Video Output jack connect it to this jack for picture quality that is better than regular
video (yellow), Remember,you still haveto connect audio cablesto hear sound.
Graphics contained within this publication are for representation only 7
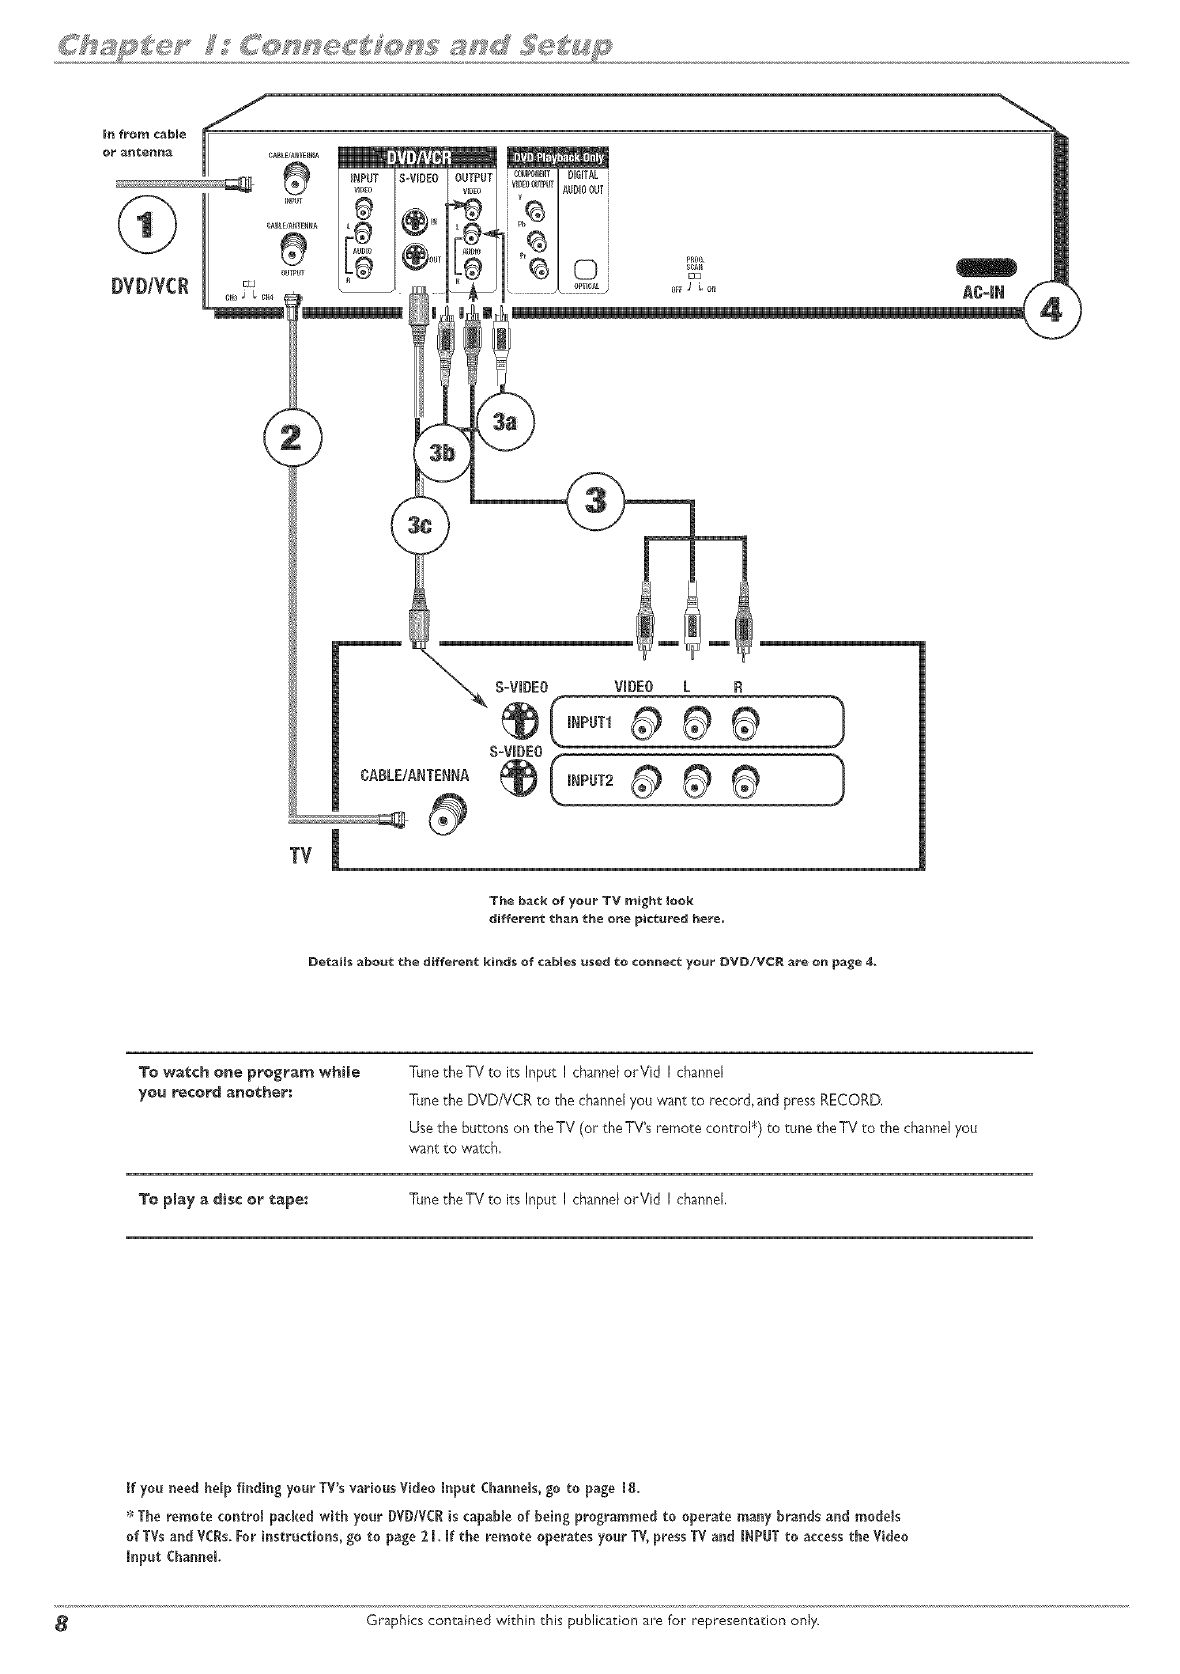
/
mnfro_ cable
OI = antenna
®
O_T
DVD/VC_
i
TV
CABLE!ANTENNA
The back of yo_ TV might look
diffe_'_ than _:be one pic_:ured here.
Deeaib; _bo_l_ the diffe_e_ kinds of ¢ab_e_ _ed 1_oco_e¢_: your DV_/V¢_ _e on page 4_
3=0wa_:¢h one prog_a_ while
yo_ record another:
TunetheTV to itsInput I channelorVid I channel
Tunethe DVD/VCR to the channelyou want to record, and press RECORD,
Use the buttons on the TV (or the TV_sremote control ¢) to tune the TV to the channel you
want to watch,
To play a _isc er ¢ape: TunetheTV to its Input I channelorVid I channel,
If yo_ need help finding your TV's various Video Input Cban_els, go to page 18.
_:_The remote control packed with your DVD/VC_ is capable of being programmed to operate many brands a_d models
of TVs and VCRs. _or i_structions, go to page 2 I. If the remote operates your TV, press TV and INPUT to access the Video
Input Channel
Graphics contained within this publication are for representation onJy.
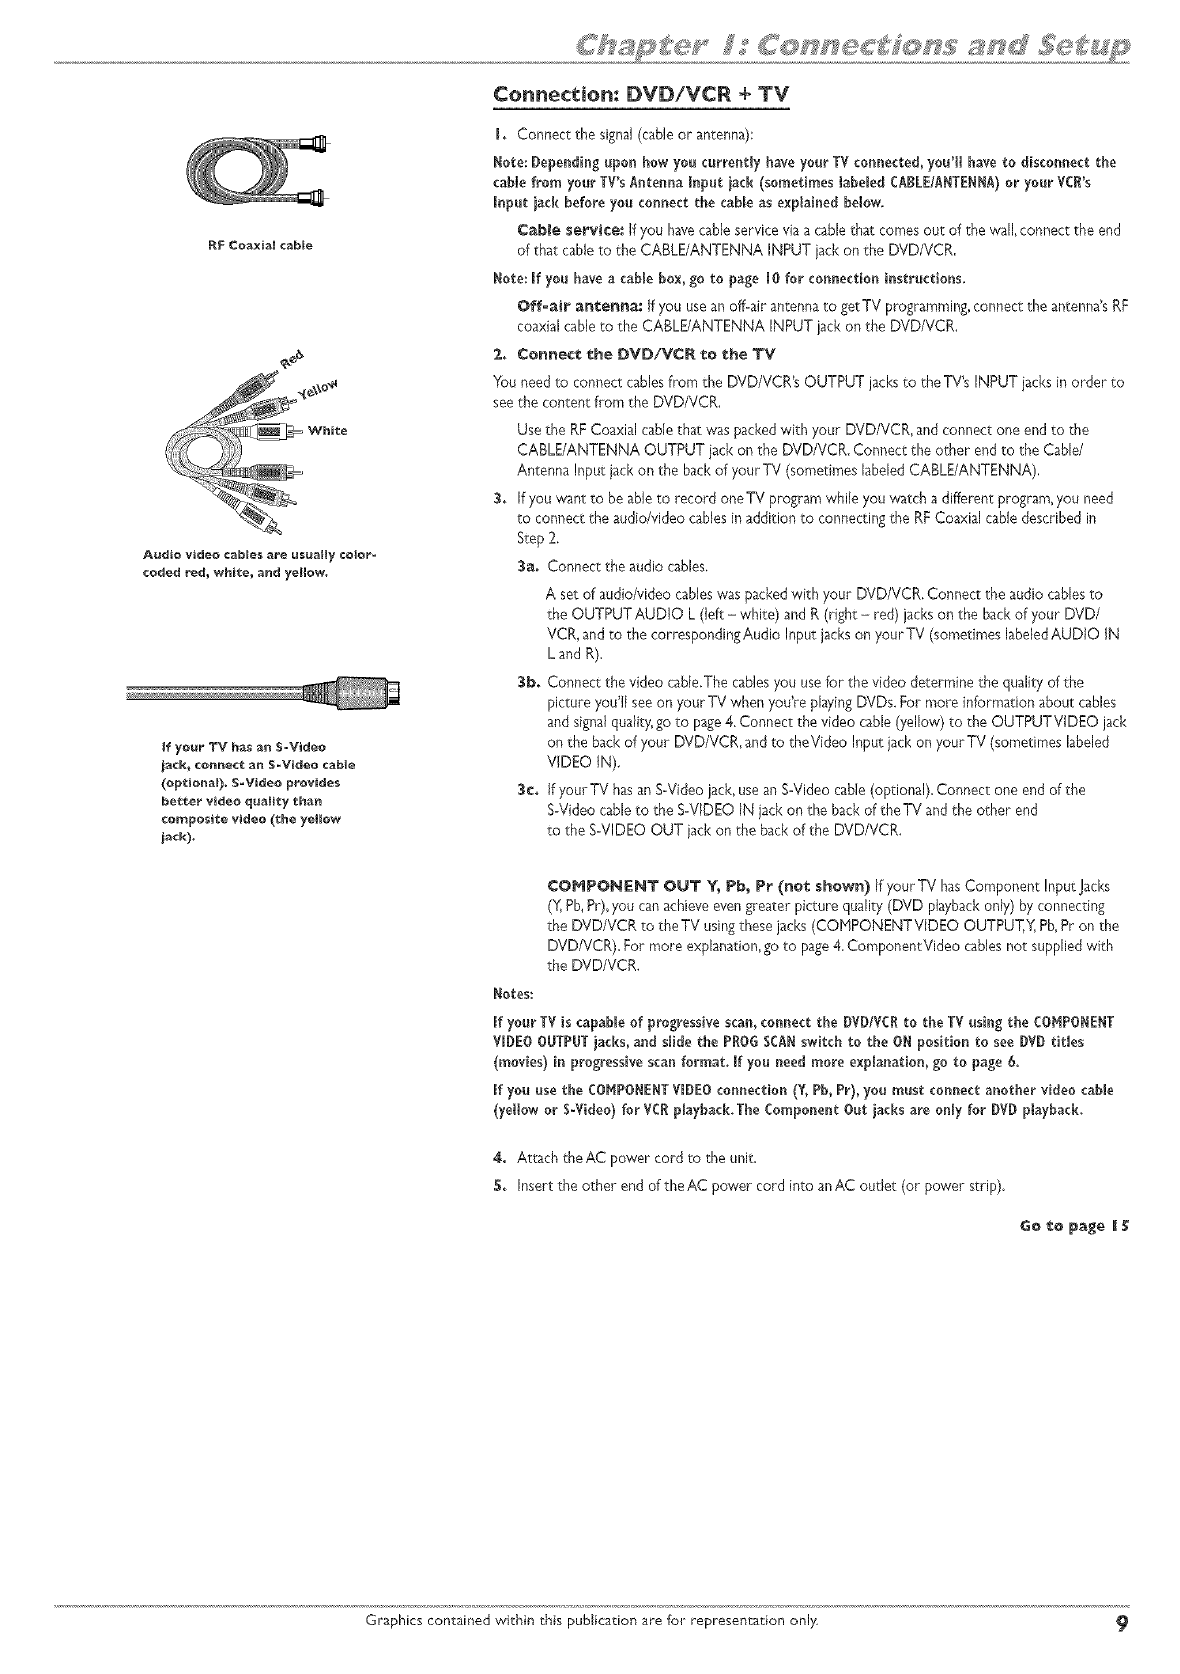
RF Co_ial cable
Audio video cables _re usually color_
coded _d_ white_ and yellow,
Connection: DVD/VCR ÷ TV
I. Connect the signaJ(cabJeor antenna):
Note: Depending upon how you currently have your TV connected,you'll have to disconnect the
came from yourTV'sAntenna Input iack (sometimes tabe_edCABLE/ANTENNA)or your VCR's
Input iad_ before you connect the cable as explained below.
Cable service." If you havecable service via a cablethat comes out of the wall,connect the end
of that cableto the CABLE/ANTENNA INPUT jack on the DVD/VCR.
Note: If you haveacable box, go to page l0 for comlection instructions.
Off-airant:enna: If you usean off=air antennato getTV prograrnrning,connect the antenna's RF
coaxial cable to the CABLE/ANTENNA INPUT jack on the DVD/VCR.
2. Connect the DVD/VCR 1:o the TV
You need to connect cablesfrom the DVD/VCR's OUTPUT jacksto the TV's INPUT jacksin order to
seethe content horn the D'v'D/VCR.
Use the RFCoaxial cable that was packedwith your DVD/VCR, and connect one end to the
CABLE/ANTENNA OUTPUT jack on the DVD/VCR. Connect the other end to the Cable/
Antenna Input iacl<on the back of your TV (sornetirnes labeled CABLE/ANTENNA).
3, If you want to be able to record oneTV program while you watch a different prograrn,you need
to connect the audio/video cablesinaddition to connecting the RFCoaxial cable described in
Step 2.
3a, Connect the audio cables.
A set of audio/video cableswas packedwith your DVD/VCR. Connect the audio cablesto
the OUTPUT AUDIO L (left - white) and R(right - red) jackson the back of your DVD/
VCR, and to the correspondingAudio Input jacks on your TV (sometimes labeledAUDIO IN
L and R).
3b. Connect the video cable.The cablesyou usefor the video determine the quality of the
picture you'll see on your TV when you're playingDVDs.For more information about cables
and signalquality,go to page4. Connect the video cable (yellow) to the OUTPUTVIDEO jack
on the back of your DVD/VCB, and to theVideo Input jack on your TV (sornetirnes labeled
VIDEO IN).
3e. if your TV hasan S-Video jack, usean S-Video cable(optional). Connect one end of the
S°Videocable to the S=VIDEOIN iack on the back of the TV and the other end
to the S=VIDEOOUT iack on the back of the DVD/VCR.
COHPONENT OUT % Pb, Pr (nee shown) If your TV has Cornponent Input Jacks
(Y,Pb,Pr),you canachieveevengreater picture quality (DVD playbackonly) by connecting
the DVD/VCR to theTV using these jacks (COHPONENTVIDEO OUTPUT,Y,Pb,Pr on the
DVD/VCR). For more explanation,go to page4. CornponentVideo cables not supplied with
the DVD/VCR.
Notes:
If your TV is capableof progressivescan, connect the DVD/VCRto the TV using the COHPONENT
VIDEOOUTPUTiacks, and slide the PROGSCANswitch to the ON position to see DVD tit_es
(movies) in progressivescan format. If you need more explanation, go to page 6,
If you use the COMPONENTVIDEOconnection (Y, Pb, Pr), you must connect another video cable
(yellow or S-Video)for VCRp_ayback.TheComponent Out iacks are only for DVD playback.
4, Attach theAC power cord to the unit.
5, Insert the other end of the AC power cord into an AC outlet (or power strip).
Go i:o page II_;
Graphics contained within this publication are for representa_:ion only 9
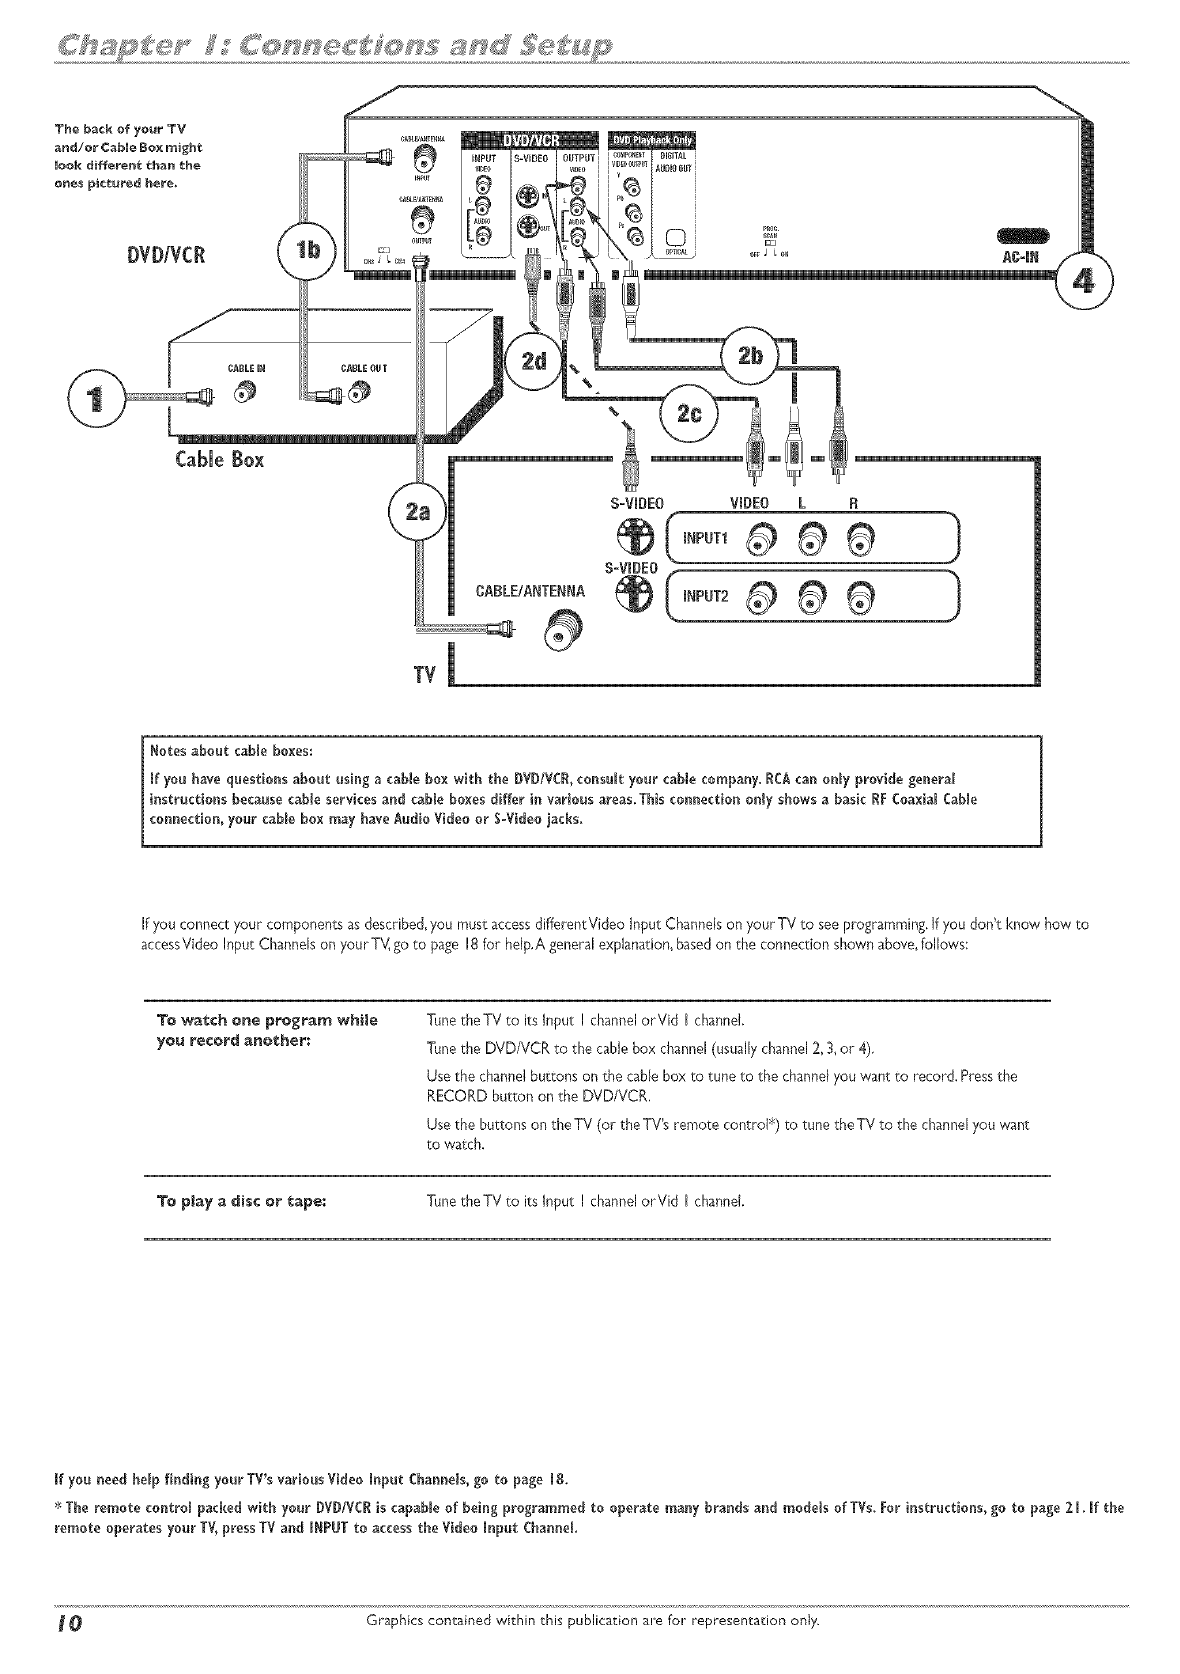
Box
Notesabout came boxes:
[f you have questionsaboutusing acablebox withtie DVDIVCI,consultyourcame company.IDA canonlyprovidegeneral
instructionsbecausecame servicesand cableboxesdifferinvariousareas.Thisconnectiono_[yshows a basicIF CoaxialCaMe
co_ectio_,},ourcab{ebox may haveAudioVideoor S-Videoiacks.
If you connect your components as described,you must accessdifferentVideo Input Channels onyour TV to see programming.If you don't know how to
aceessVideoInput Channels on your TV,go to page 18 for heIp,A general explanation, basedon the connection shown above,follows:
To watch one pro_ra_ whNe TunetheTV to its Input I channelorVid Ichannel.
Tune the DVDNCR to the cable box channel(usuallychannel 2, 3,or 4),
Use the channel buttons on the cable box to tune to the channelyou want to record. Pressthe
RECORD button on the DVD/VCR,
Use the buttons on theTV (or theTV's remote control _)to tune theTV to the channelyou 'want
to watch.
To play a _isc o_ tape: TunetheTV to its Input I channelorVid Ichannel.
Ifyou _eed helpD_di_gyour TV'svariousVideoI_putChar_eis,go topage Ig.
*The remotecontrolpackedwithyour DVDIVCRiscapableofbeingprogrammed tooperatema_y bra_dsa_d modelsofTVs.Fori_structio_s,go topage 21,Ifthe
remoteoperatesyourTV,pressTV a_d INPUT to accesstheVideoI_putCha_eL
OGraphics contained within this publication are for representation only.
Connection: DVDiVCR + TV + Basic Cable Box
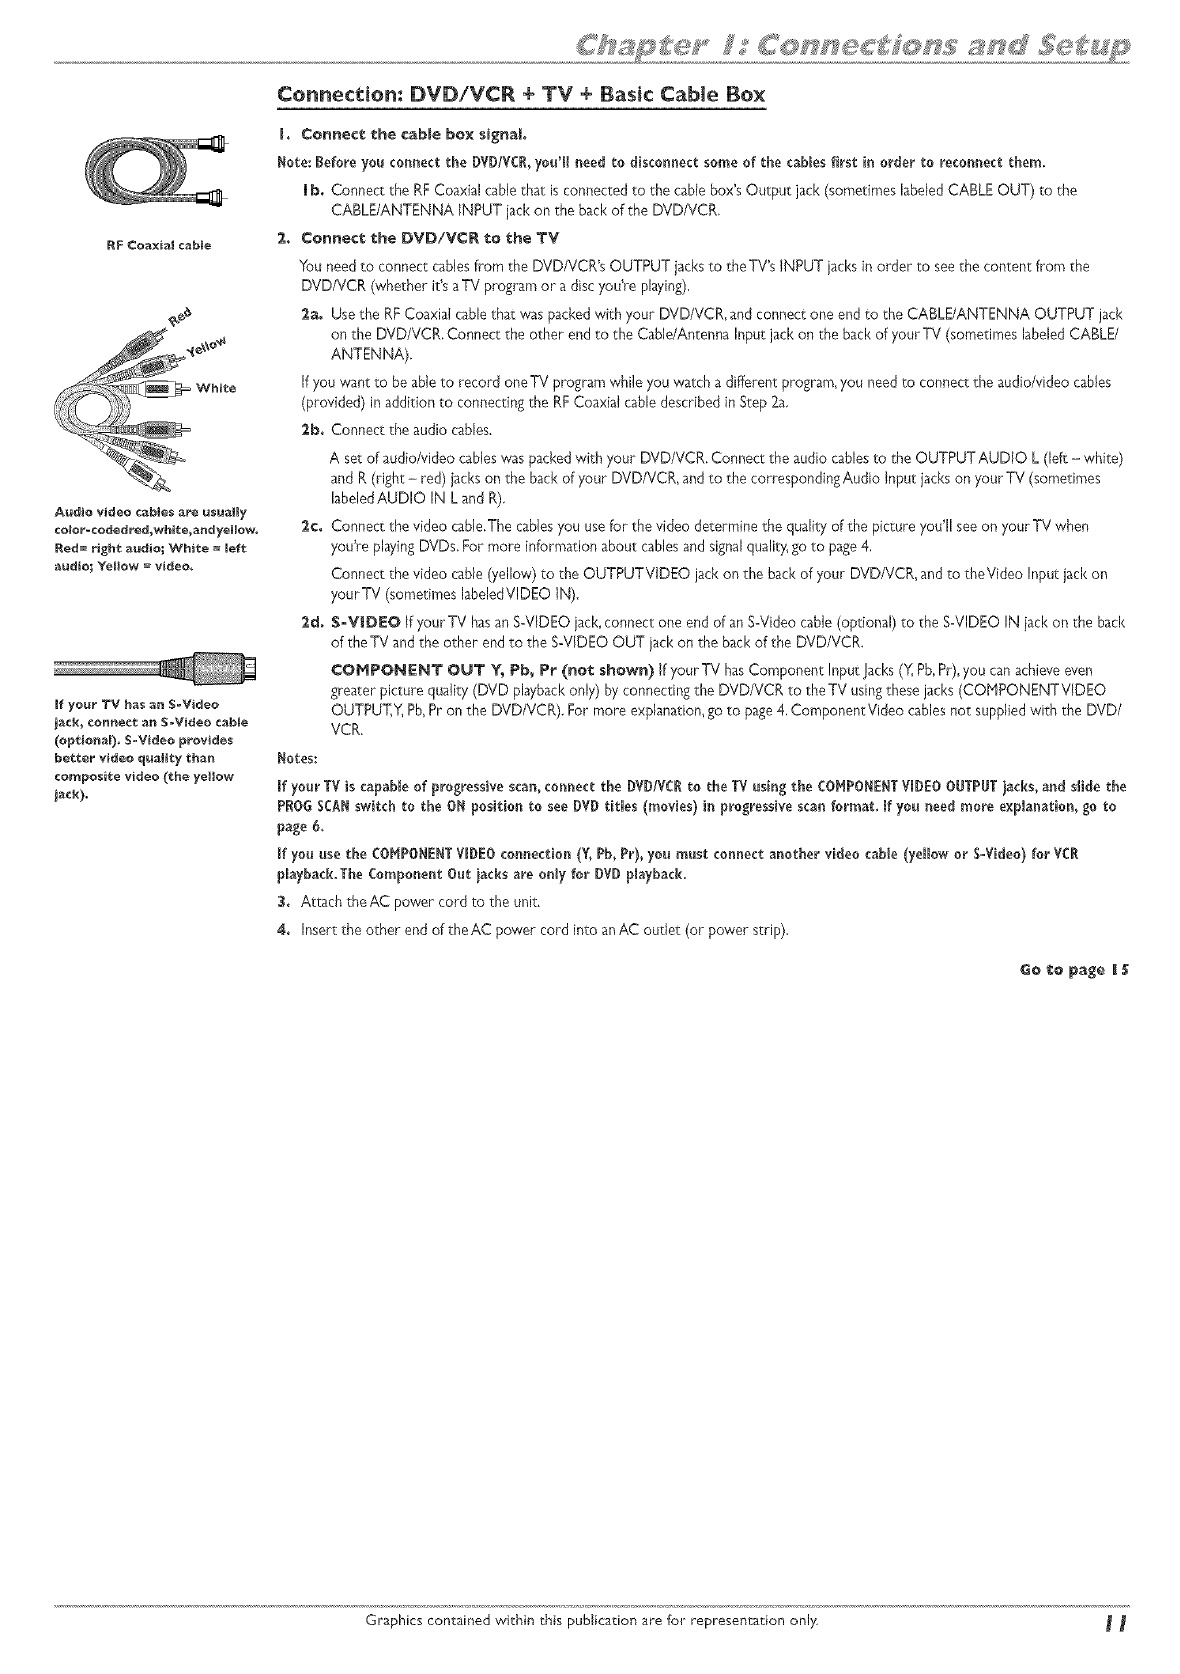
RF Coaxial cable
Audio video cables are usualy
color=coded red_whiee_ andyelow,
Red= righ_ audio; White = _eft
audio; Y_IIow = video.
ff your TV has an S-Video
jack_ ¢onne*:t an S-Video cable
(optional)o S=Video provides
better video qualty than
composite video (the yetow
inch).
I+ Connect the cable box signal
Note: tefore you connect the DVD/VCl, you'! need to tisconnect some of the cables first in order to reconnectthem.
i b. Connect the RFCoaxial cable that isconnected to the cable box's Output jack (sometimes labeledCABLE OUT) to the
CABLE/ANTENNA INPUT jack on the back of the DVD/VCR,
2+ Connect the DVD/VCR to the TV
You need to connect cablesfrom the DVD/VCRg OUTPUT jacksto theTV's INPUT jacksin order to seethe content from the
DVD/VCR (whether ifs aTV program or a disc you% pbying),
2a. Use the RFCoaxial cable that was packed with your DVD/VCR, and connect one end to the CABLE/ANTENNA OUTPUT jack
on the DVD/VCR. Connect the other end to the Cable/Antenna Input jack on the back of your TV (sometimes labeled CABLE/
ANTENNA).
If you want m be able to record oneTV program while you watch a different program, you need _o connect the audio/video cables
(provided) in addition to connecting the RFCoaxial cable described in Step 2a.
2b. Connect the audio cables.
A set of audio/video cableswas packedwith your DVD/VCR. Connect the audio cablesto the OUTPUTAUDIO L (left - white)
and R(right - red) jacks on the back of your DVD/VCR, and to the corresponding Audio Input jacks on your TV (sometimes
labeledAUDIO IN L and R).
2e. Connect the video cable.The cablesyou usefor the video determine the quality of the picture you'll seeon your TV when
you% playingDVDs. For more information about cablesand signalquality,go to page4,
Connect the video cable (yellow) to the OUTPUTVIDEO jack on the back of your DVD/VCR,and to theVideo Input iack on
yourTV (sometimes labeledVIDEO IN),
2d. S-VIDEO If your TV hasan S-VIDEO jacl<,connect one end of an S-Video cable (optional) to the S-VIDEO IN iack on the back
of the TV and the other end to the S-VIDEO OUT jack on the back of the DVD/VCR.
COMPONENT OUT ¥_ Pb_ Pr (not shown) if yourTV hasComponent Input Jacl<s('_',Pb,Pr),you can achieveeven
wearer picture quality (DVD playbackonly) by connecting the DVD/VCR to the TV usin_these jacks (COHPONENTVIDEO
OUTPUT,Y_Pb,Pr on the DVD/VCR). For more explanation,go to pa_e4,ComponentVideo cablesnot supplied with the DVD/
VCR,
Notes:
If your TV is capableof progressivescan, connect the DVI)/VCI to the TV using the COMPONENTVI)EO OUTPIT iacks, an_ slMe the
PBOGSCANswitch to the ON position to see DVD titles (movies) in progressivescan format. _fyou need more explanation, go to
page 6.
If you use the COMPONENTVIDEOconnection (V, Pb,Pr), you must connect another video cable (yelow or S-Video) for VC!
#aybaek.The Component Out iacks are only for DVD playback.
3. Attach theAC power cord to the unit.
4. k_sert the other end of the AC power cord into an AC outlet (or power strip).
Go to page _l$
Graphics contained within this publication are for representation only _
The back of your
satellite r_¢eiver might
look diffe_=en¢ than the
one pid:ured here,
DVDIVCR
The back of your TV _i_ht l_k
differ_mt _h_ _he o_e pict_r_ he_,
Details abo_ _he differem_ kimds of c_bles _sed to c_mmect your DVD/VCR are om page 4,
To w_:¢h TV (s;_eHi_;e TunetheTV to its Input I channel orVid I channeJ
Tunethe DVD/VCR _o the INPUT I channel(press the iNPUT bu[ton on _heremote).
Tune_he satellite receiver to the channelyou w_nt _o watch.
T_ w_:¢h TV (s_eHi_e
pro_rmmmim_) wi_h _he
DVD/VC_ _rmed off:
"Fdnethe TV to its CABLE/ANTENNA iNPUT channeJ(usu_Hy@anne} 2, 3, or 4).
Tune_he sateJJitereceiver to the channelyou w_nt _o watch.
T_ pJ_y _disc or _pe: :F_netheTV to Input I channel orVid I channel,
_ Graphics contained within this publication are for representation onJy.
RP ¢oa×ial cable
Audio video cables are usually
color-coded _d_ white_ and
yellow. Red =r+gh_ audio;
White = melt audio_ Y_IIow =
video.
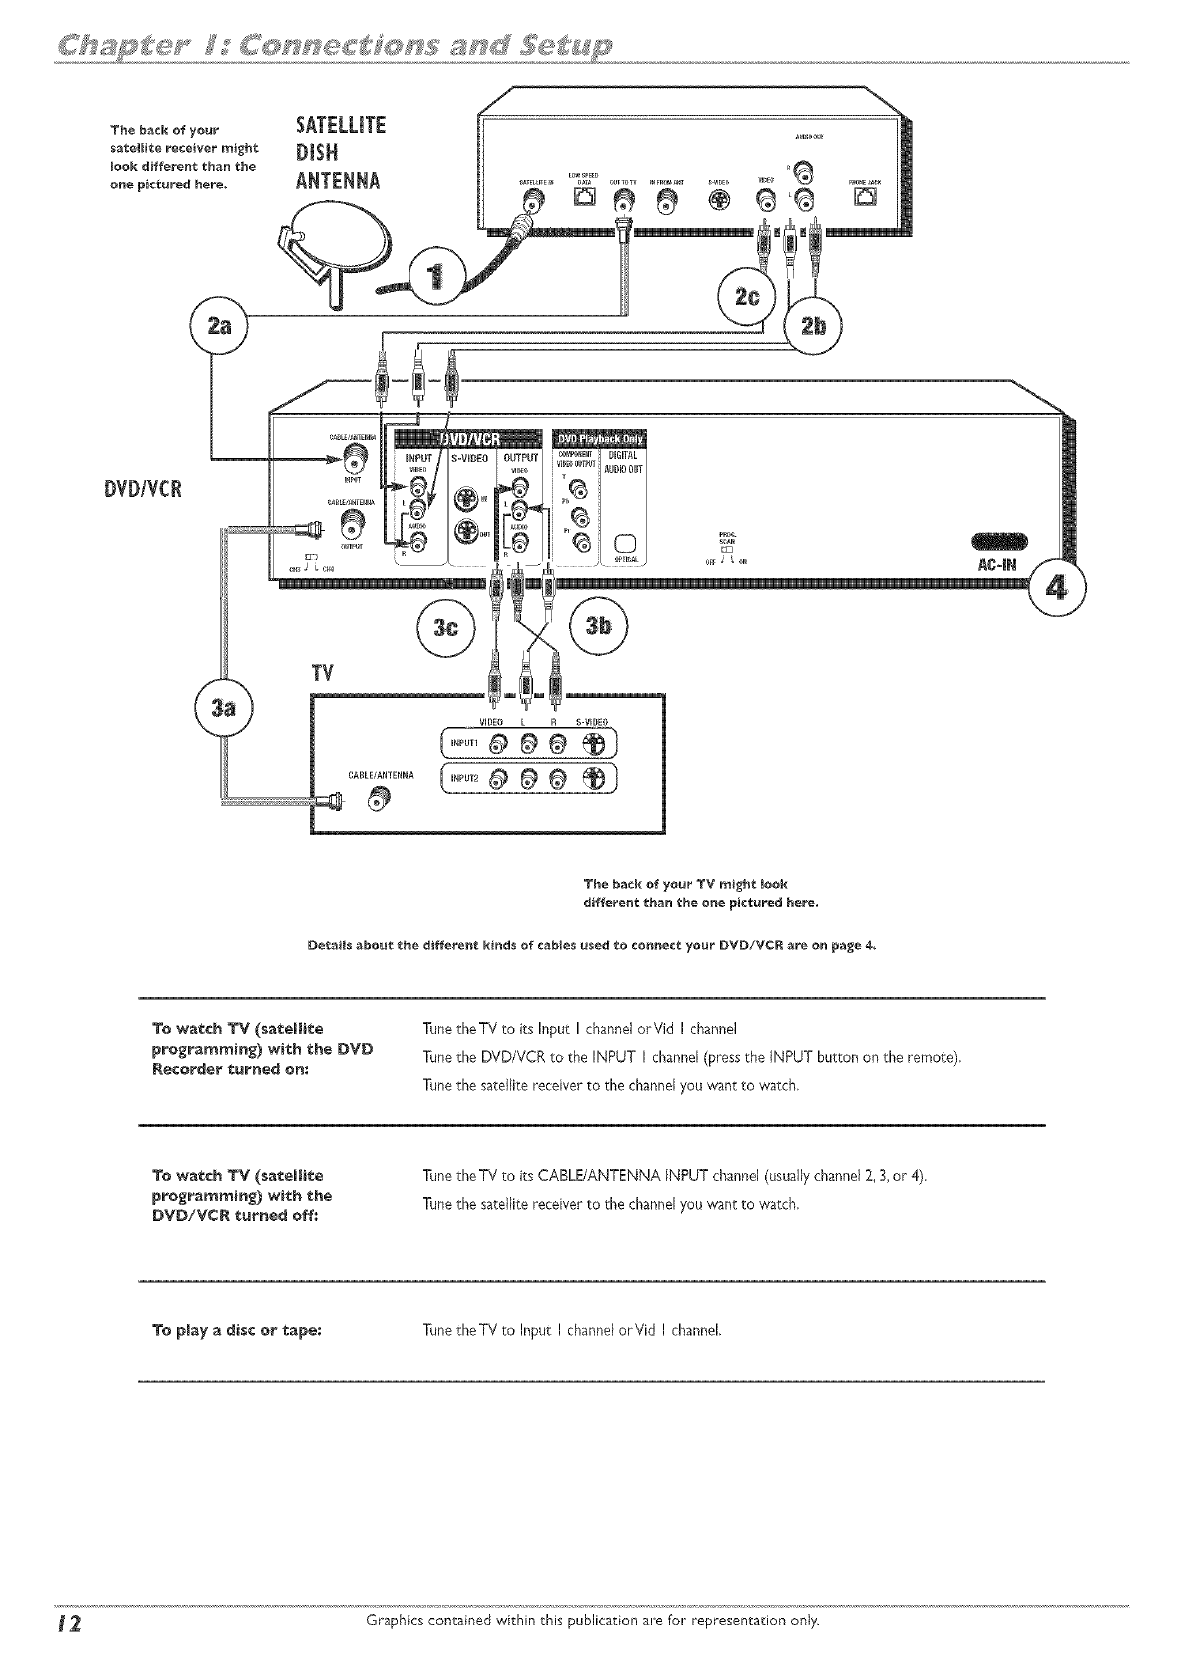
Connection: DVDiVCR + TV +Satellite Receiver
The foJJowinginstructions enable you to record the programs from your satellite receiver.Becausethe _ _uration and labelsvar4I
on different satellite receivers and televisions,the steps provided are _ guidelines.ConsuJtyour SateJJJteReceiver and/or Television
User's Guides for additional information. If you havecableTV service AND satellite TV]you canconnect the cable signalto the DVD/
VCR's CABLE/ANTENNA INPUT jack.
J. SateHit:e signah Leavethe cable in place that comes from the satellite dish and goesto the satellite receiver,
2,. Connect the satellite receiver to the DVD/VCR
2a. Connect a coaxial cable to the satellite receiver's OUT TO TV jack,and to the CABLE/ANTENNA INPUT jack on the
DVD/VCR.
2b. Connect audio cabJes(red and white) to the satellite receiveds output jacks [sometimes labeledAudio Left (white) andAudio
Right (red)], Connect the other endsof these cablesto the corresponding INPUT AUDIO L andAUDIO R jackson the back of
the DVD/VCR.
2c. Connect the video cabJe(yellow) to theVideo Output jack on the satellite receiver (sometimes labeledVIDEO) to the INPUT
VIDEO jack on the back of the DVD/VCR.
If your sateJJitereceiver, hasan S-VIDEO OUT jaclqconnect an SoVideocableto that jack and to the SoVIDEOIN jack on the
DVD/VCR for increasedpicture quality (not shown in connection diagram),
3. Connect the DVD/VCR to the TV
You need to connect cables from the DVD/VCR's OUTPUT jacks to theTV's INPUT jacks in order to see tile content from the
DVD/VCR (whether it's a satellite program or a disc you're playing).
3a. Connect an RFcoaxial cable to the DVD/VCR's CABLE/ANTENNA OUTPUT jack and to the TV'sAntenna Input jack
(sometimes labeled CABLE/ANTENNA),
3b. Connect the audio cables.
A set of audio/video cableswas packedwith your DVD/VCR. Connect the audio cablesto the OUTPUTAUDiO L (left - white)
and R(right - red) iacl<son the back of your DVD/VCR, and to the corresponding Audio Input jacks on your TV (sometimes
labeledAUDIO IN L and R),
3¢. Connect the video cable.The cablesyou usefor the video determine the quality of the picture you'll seeon your TV when
you're playingDVDs. For more information about cablesand signalqualit_ go to page4,
Connect the video cable (yellow) to the OUTPUTVlDEO jack on the back of your DVD/VCR,and to theVideo Input jack on
yourTV (sometimes laheledVIDEO IN),
S-VIDEO (not shown) If your TV hasan SoVlDEOinput iack,connect one end of an SoVideocable (optional) to the
S-VIDEO input jack on the back of the TV and the other end to the EoVlDEO OUT jack on the back of the DVD/VCR.
COMPONENT OUT Y_ Pb_ Pr (not shown) If your TV hasComponent Input Jacks(Y, Pb,Pr),you canachieveeven
greater picture quality (DVD playbackonly) by connecting the DVD/VCR to the TV usingthese jacks (COHPONENTVlDEO
OUTPUT,Y_Pb,Pr on the DVD/VCR), For more explanation,go to page4,ComponentVideo cablesnot supplied with the
DVD/VCR.
Notes:
If your TV is capableof progressivescan, connect the DVD/VCRto the TV usin_ the CO_,IPO_E_TVIDEOOUTPUTiac_s,a_d s_idethe
P_OG $CA_switch to the O_ position to see DVD¢it_es (movies} i_ p_egressive scan format. If you _eed moFe explanation, go to
pa_e 6.
If you use the COHPONE_TVIDEOconnection (¥, Pb, Pr), you mus_:connect a_ethe_ vi_ee cable (yellow or S-Vi_eo) for VC_
playback.The Co_ponent Out iaeks are on_yfor _V_ p_ayback.
8. Attach the AC power cord to the unit. Insert the other end of the AD power cord into anAD outlet (or power strip),
_o i:o p_e _
Impo_an_
You can't watch one satellite program and record another satellite program at the sametime,
This connection scenario illustrates a basic connection--you canachieve better video quality by connecting the components with
S-Video or ComponentVideo options, dependingupon the cablesyou haveand the jacksavailableon your components, Seepage4
for more information about acksand cables,
Graphics contained within this publication are for representation only _ 3
Advanced A_dio Connection Info_'mation
Both Dolby Digital® and DTS® are audio formats usedto record 5. I=channelaudio signalsonto the digital track of film (while the film is beingmade). Both of these formats
provide up to six separatechannels:left, right, center,left rear,right rear,and common subwoofer,The discwill play 5, !ochannelsound only if you've connected a DTS or
Dolby Digital receiver or decoder,and if the disc isencoded in the Dolby Digital or DTSformat.
PleaseReadThisBefore Bsing the DIGITALAUDIOjack!
Thisunit's digita_ audio output iack is designed for a connectionto a Bo_by BigRal or DTSrecdver or decoder. Older digital equipment may not be compatible with
the Dolby Digital hitstream. Sucha connectioncan create a high level of noise that may be harmful to your ears, and could damage headphones or speakers, it b
important to choosethe correct Digital Ootput setting in the System Options meno. For more information, go to page 51.
AdditionaBy, the DiGiTALABDIO OBTconnection is for DVDplaybackonly. Hake sore yon connect aodio cables (white and red) for VCRplayback.
Connecting your DVDiVCR to a_ audio/video receiver
Y_u'B need te consult instructions tha_ came with yo_ audio video receive_ in order to commect it prope_y_ The information below provides general
guidelinesfor the DVD/VCR'sAudio Output Jacks.
For a basicconnection, connect the left and right audio cables to your audio/video receiver and _o_he OUTPUT AUDIO L (left - white) and R (righ_- red) jackson the
back of },our DVD/VCR.
If you havea Dolby Digital or DTS receivecconnect an optical cable (SPDIF)_o the DIGITAL AUDIO OUT jack on the DVD/VCR and _he Digital Audio Input lack on the
receiver (cables not suppibd with DVD/VCR).You must also adjust _he D_'#_e_ Ou_pu_ setting (go _o page51 for information).
Rote: Removethe protecdve cover that's in the DIGITALABDIO OUTOPTICAL}ack before connectingthe cable,
Hanut_c_,ured under Icense flora E)ob XLaboratories "E)olbr" anti t_e cloub{e D s' mbol are nademarl, s of E)obr Laboratories C:onficlentia unpublis led wori<s
(<) c_c/21997 Do[b? Laboratores, nc Ai dghe reseP,,ed
DTS is a registered trademark of D gital HomeTl_eate_ Systems, nc
14 Graphics contained within this publication are for representation only.
install Batteries in the Remote
Is Removethe battery compartment cover on the back of the remote.
2. insert new batteries, Hatch the polarities (+ and -) on the batteries with the diagram on the remote,
3. Put the battery compartment cover back on the remote.
lmpor1:ant Ba1:tery Informal:ion
if you're not going 1:o use 1:he remo1:e for a mon1:h or more_ be sure 1:o remove 1:he hal:reties because they can leak an_ cause _ma_e,
* Dispose of b_;_eries in1:heproper manner, according 1:ofederal,s1:a1:e,and localregu|a1:ions.
, Anyba1:1:erymay_eake_ec1:roly1:eifmixedwi1:hadifferen1:ba1:1:ery1:ype_ifinse_edin¢orren1:ly,ifa_Iba_1:eriesareno1:rep_ateda1:1:hesame1:ime_if
disposed of infire_or ifan a_emp1: ismade I:ocharge aba%1:ery no1:in1:ended1:obe recharged.
*Discard leaky ba1:1:eries immedia1:ely, Leaking ba1:1:eries can cause skin burns or o1:her persona_ injury,
Poin% _he Remo_:e in _he Right: Direct:ion and P_ i_: in DVD/V¢_ Hode
Wben you want the remote to operate the DVD/VCR, point the remote _t the DVD/VCR, not the TV.The remote hasto be pointed in tbe correct direction and toward the
correct component in order for the remote control's signalto communicate with the sensor on the component. Hake sure there is a clear path between the remote control
and the component you want to operate, so the signalisn't blocked.
Hake sure the remote is in DVD/VCR mode--press the DVD/VCR button,
Turn on _he TV _d DVDiVCR
Is Turn on the DVD/VCg--press the DVDNCR button on the remote.
2. Turn on the TV and tune it to the correctVideo Input Channel--if you havean RCA, GE,or ProscanTV, pressthe TV button on the remote (if the TV doesn't turn on,
pressthe ON.OFF button) and then pressthe INPUT button on the remote until you get to theVideo Input Channelthat matches how the DVD/VCR is connected to
the T\{
If you haveanother brand of TViturn on the TV and tune the TV to the correct Video Input Channel (if you don't Imow how to accessthe Video Input Channelon your
TV,go to page 18for help).
Note:Youcan programyourremotetooperatemost brandsofremote controllableTVs.instructionsareon page2 i.
L@_ o ft_pa'
butto_
DoII/,I OtTOIi// --
button
O_-OFF
SAT A_X
O
ZO_ ANALO_ _PE_ A_ Up afro',,','bt,JttOl
Ri,_l_tarrow
button
_"OKbutton
Comple_ce _he interactive Setup
The next few pagesstepyou through the seriesof screensthat will appear the first time you turn on
your DVD/VCR,
Use the remote control to follow the omscreen instructions,The arrow buttons move the on-screen
highlight in the corresponding directions on the screen (up, down, left, right),
Pressthe OK button to seJecta highlighted item,
Notes:
You can accessthesetupscreens from themain menu.ifyou move,geta differentprogram
providerforTVshows,or changeyourconnections,you'llneed to completethe interactiveSetup
again.
if you don't seethe Languageselection screen (below) the first time you turn on the DVD/VCR,
make sureyou'vetunedyourTV to theVideoinputChannelthatcorrespondstotheway you've
connectedtheTV tothe DVD/VCR.if you need he_p,go topage 18.
Use the aF_ow buttons on the re_o%e to move %h_ou_h
on=screen menus and highlight different optio_, Press the
OK bu_ton to select a menu item Ichor:is highli_hted_
I) Selec* on-screen men_ ian_:_a_e
Hake sure the remote is in DVD/VCR mode (press the DVD/VCR button), If you want the on-
screen menusto appear in English,pressthe OK button on the remote control, If you prefer
another language,press the arrow' down button until that languageis highlighted.PressOK to
seJectthe language.Next, the connection screen appears,
Note: if you don't see the Languageselection screen the first time you t_rn on the DVD/VC_,
make sureyou'vetunedyourTVto theVideoinputCbanne}thatcorrespondstotheway you've
connectedtheTV tothe DVD/VCR.ifyou need he_p,go topage 18.
Graphics contained within chis publication are for representation only, _
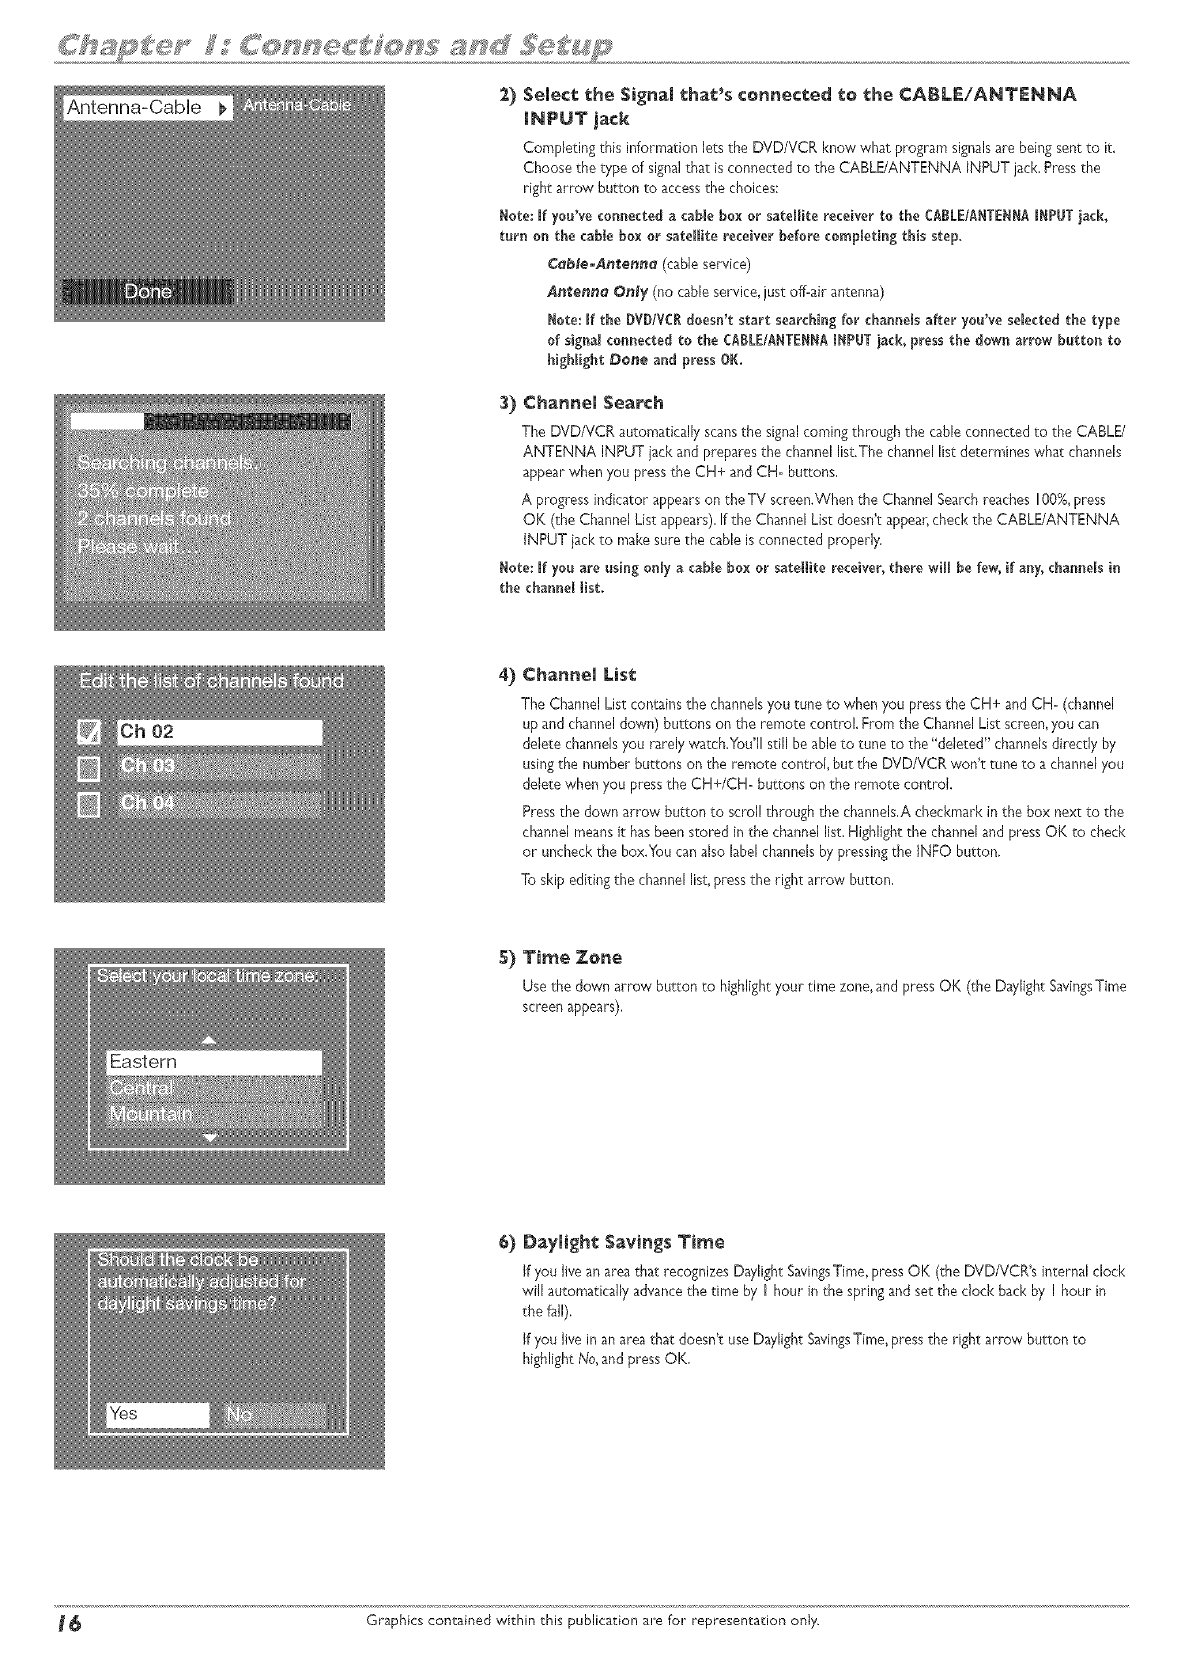
2) Semect the Signal that's connected _o _he CABLE/ANTENNA
_NPUT jack
Completing this information lets the DVD/VCR know what program signalsare being sent to it.
Choose the type of signalthat is connected to the CABLE/ANTENNA INPUT jack.Press the
right arrow button to accessthe choices:
Here: If you've connectedacable box or satellite receiver to the CABLEfAHTE_A I_PUT ]ack,
torn on the camebox or satellite receiver before completingthis step,
Co_le-An_enn_ (cableservice)
Antenno Only (no cable service, just off-air antenna)
_ote: If the DVDIVCBdoesn't start searching for channels after you've selected the type
of signa_connectedto the CA_LE/AHTE_A I_PUT iack, pressthe down arrow botton to
highlight Done and press OK.
3) Chan_el Search
The DVD/VCR automatically scansthe signalcoming through the cable connected to the CABLE/
ANTENNA INPUT jack and prepares the channel list.The channel list determines what channels
appear when you press the CH+ and CH- buttons.
A progressindicator appearson the TV screen.When the Channel Searchreaches lOB%,press
OK (the Channel List appears).If the Channel List doesn't appear,check the CABLE/ANTENNA
INPUT iack to make sure the cable is connected properly.
_ote: If yoo are osing on_ya came box or satellite receiver, there wi_ be few, if any,channels in
the channel list.
Chan_el Lis_:
The Channel List contains the channelsyou tune to when you pressthe CH+ and CH= (channel
up and channeldown) buttons on the remote control. From the Channel Lis; screen,you can
delete channelsyou rarely watch.You'Hstill be ableto tune to the "deJe;ed"channelsdirectly by
usingthe number buttons on the remote control, but the DVD/VCR won't tune to a channelyou
delete when you pressthe CH+/CH= buttons on the remote control.
Pressthe down arrow button to scrol! through the channels.A checkmark in the box next to the
channel meansit hasbeen stored in the channel list.Highlight the channeland press OK to check
or uncheck the box.You can also label channelsby pressingthe INFO button.
To skip editing the channel list,pressthe right arrow button.
5) Time Ze_e
Use the down arrow button to highlightyour time zone,and pressOK (the Daylight SavingsTime
screenappears).
6) Dayli_h_ Savi_s Ti_e
If you live an atea that recognizes Daylight SavingsTime,pressOK (the DVD/VCR's internal clock
will automatically advancethe time by I hour in the spring and set the clock back by I hour in
the f_ll).
If you live in an area that doesn't use Daylight SavingsTime, press the right arrow button to
highlight No,and press OK,
_ Graphics contained within chis publication are for representation only.
........ _ ___ ................%_
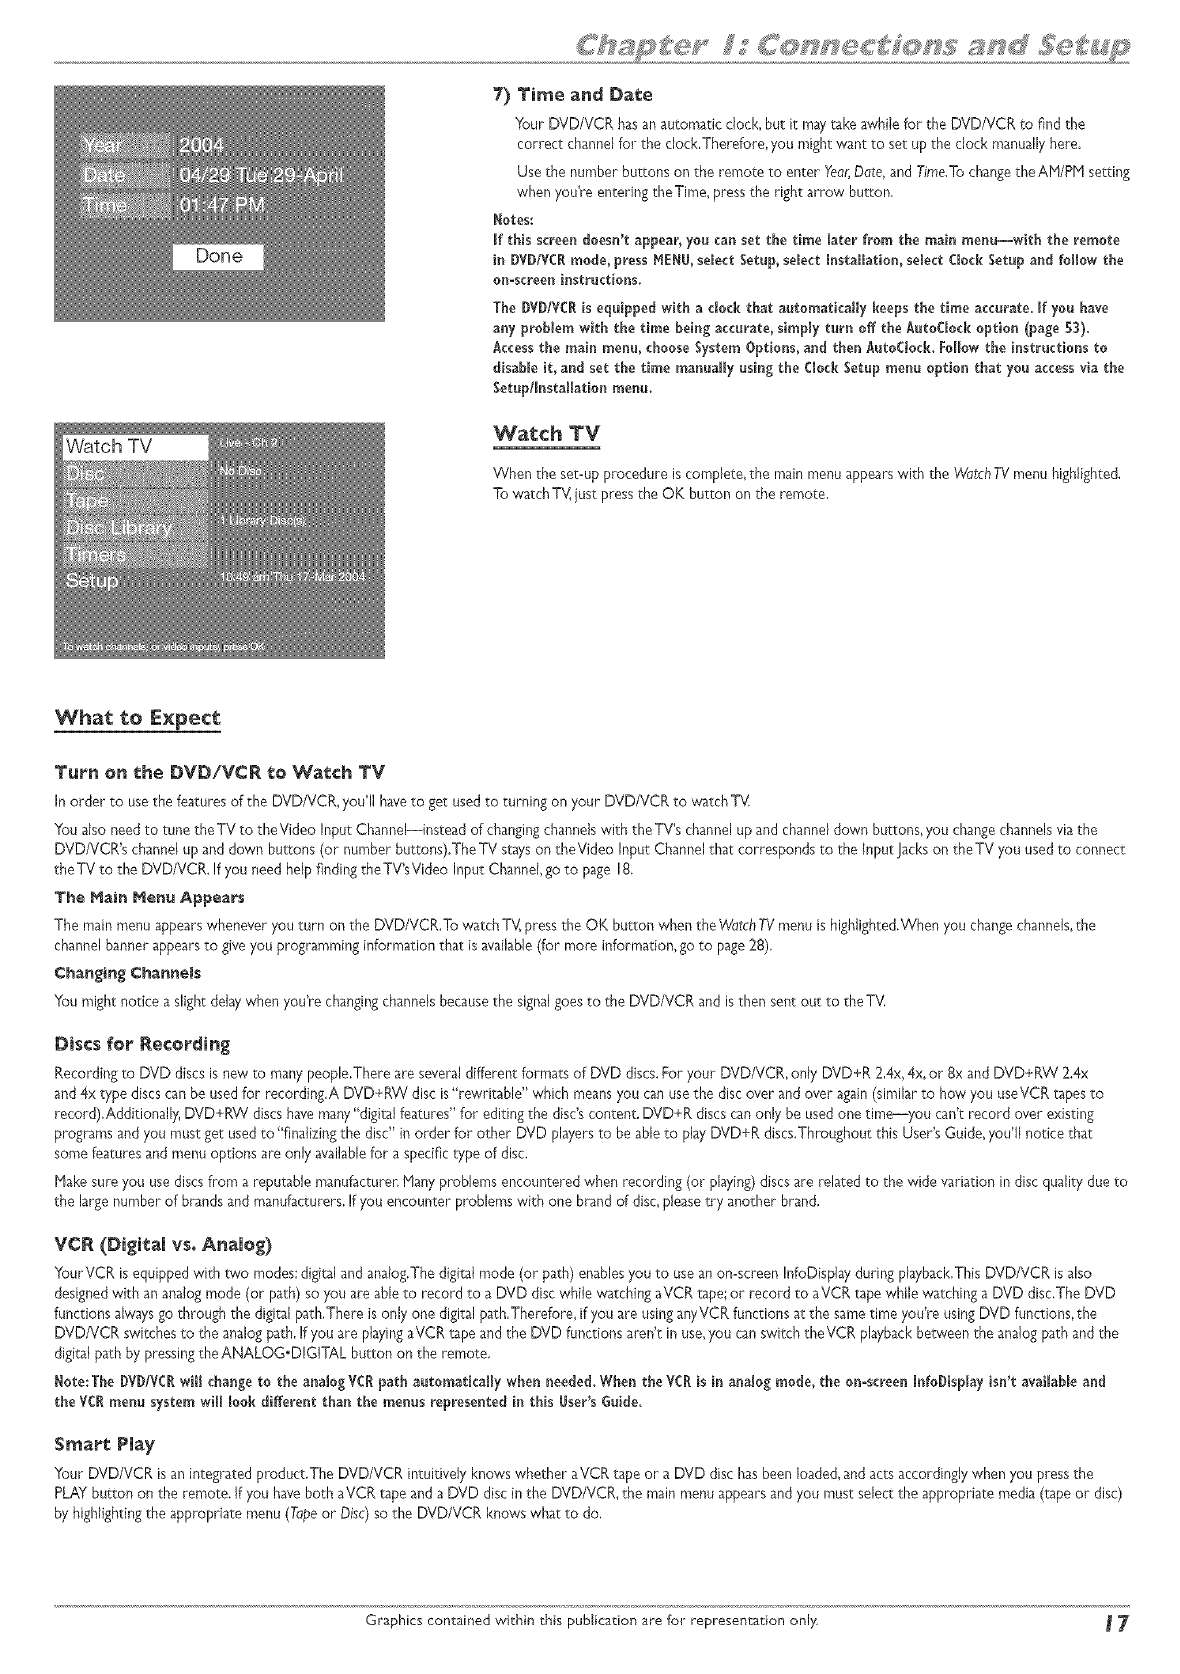
7) Time and Date
Your DVD/VCR hasan automatic clock, but it maytake awhile for the DVD/VCR to find the
correct channel for the dock.Therefore, you might want to set up the clock manuallyhere.
Use the number buttons on the remote to enter Yeor,Date, and Time.Tochangethe AM/PM setting
when you're entering theTime, press the right arrow button,
Notes:
If this screen doesn't appear, you can set the time later from the main menu--with the remote
in DVD/VCRmode, pressMENU,select Setup,select Installation, select Clock Setup and foffow the
on-screen instructions.
The DYD/VCRis equipped with a dod_ that automaticaffy keeps the time accurate. If you have
any problem with the time being accurate, simply turn off the AutoCJockoption (page 53).
Accessthe main menu, choose System Options, and then Auto(:Jock. FoWIowthe instructions to
disable it, and set the time manuaffy using the ClockSetup menu option that you access via the
Setup/Installation menu.
Watch TV
When the set-up procedure is complete, the mainmenu appearswith the WatchTVmenu highlighted,
To watchTV, just pressthe OK button on the remote,
What to E×pece
T_rn on the DVD/VCR _e Wa¢ch TV
In order to usethe features of the DVD/VCR, you'll haveto get usedto turning on your DVD/VCR to 'watchT_A
Youalso need to tune theTV to theVideo Input Channel--instead of changingchannels with theTV's channel up and channeldown buttons, you changechannelsvia the
DVD/VCR's channel up and down buttons (or number butmns).The TV stayson theVideo Input Channelthat corresponds to the Input Jackson theTV you usedto connect
theTV to the DVD/VCR, If you need helpfinding theTV'sVideo Input Channel,go to page 18.
The Hai_ _er_ Appears
The main menu appearswhenever you turn on the DVDIVCR,To watch TV_pressthe OK button when the WatchTV menu is highlighted.When you chan_echannels,the
channelbanner appearsto giveyou programming information that is available(for more information, go to page28),
Cha_ging ¢ha_e_s
You might notice a slight delaywhen you're changingchannelsbecausethe signalgoesto the DVD/VCR and isthen sent out to the T_A
Discs t_or Recording
Recording to DVD discs is new to manypeople,There are severaldifferent formats of DVD discs.For your DVD/VCR, only DVD+R 2,4x,4x, or 8x and DVD+RW 2.4x
and 4x type discscan be usedfor recording.A DVD+RW disc is"rewritable" which means you can usethe discover and over again(similar to how you useVCR tapesto
record),Additionall}; DVD+RW discs havemany"digital features" for editing the disc'scontent. DVD+R discs canonly be usedone time--you can'_record over existing
programs and you must get used to"finalizing the disc" in order for other DVD playersto be ableto play DVD+R discs.Throughout this User's Guide,you'll notice that
somefeatures and menu options are only availablefor aspecific type of disc.
Hake sure you use discsfrom a reputable manufacturen Many problems encountered when recording (or playing)discsare related to the wide variation in discquality due to
the large number of brandsand manufacturers,If you encounter problems with one brand of disc,pleasetry another brand.
VCA (Digital vs. Analog)
YourVCR is equipped with two modes:digital and analog,Thedigital mode (or path) enablesyou to use an on=screenInfoDisplay during playback,ThisDVD/VCR is also
designedwith an analog mode (or path) so you areable to record to a DVD disc while watching aVCR tape;or record to aVDR tape while watching a DVD disc.The DVD
functions alwaysgo through the digital path,There isonly one digital path,Therefore, if you are using anyVCR functions at the sametime you're using DVD functions,the
DVDNCR switches to the analog path, If you are playingaVDR tape and the DVD functions aren't in use,you can switch theVDR playback between the analog path and the
digital path by pressingthe ANALOG.DIGITAL button on the remote.
Note:The DVD!VCRwill change to the analog VCR path automatically when needed.When the VCR is in analog mode, the on-screen InfoDisplay isn't avaffab_eand
the VCRmenu systemwiff _ookdifferent than the menus represented in this _ser's _uide.
Smote Play
Your DVD/VCR is an integrated product,The DVD/VCR intuitively knows whether"aVCR tape or a DVD disc has been loaded,and acts accordingly when you pressthe
PLAY button on the remote. If you haveboth aVDR tape and a DVD disc in the DVD/VDR, the main menu appearsand you must select the appropriate media (tape or disc)
by highlightingthe appropriate menu (Tapeor Disc)so the DVD/VCR knows what to do,
Graphics contained within _his publication are for representation only _ 7'
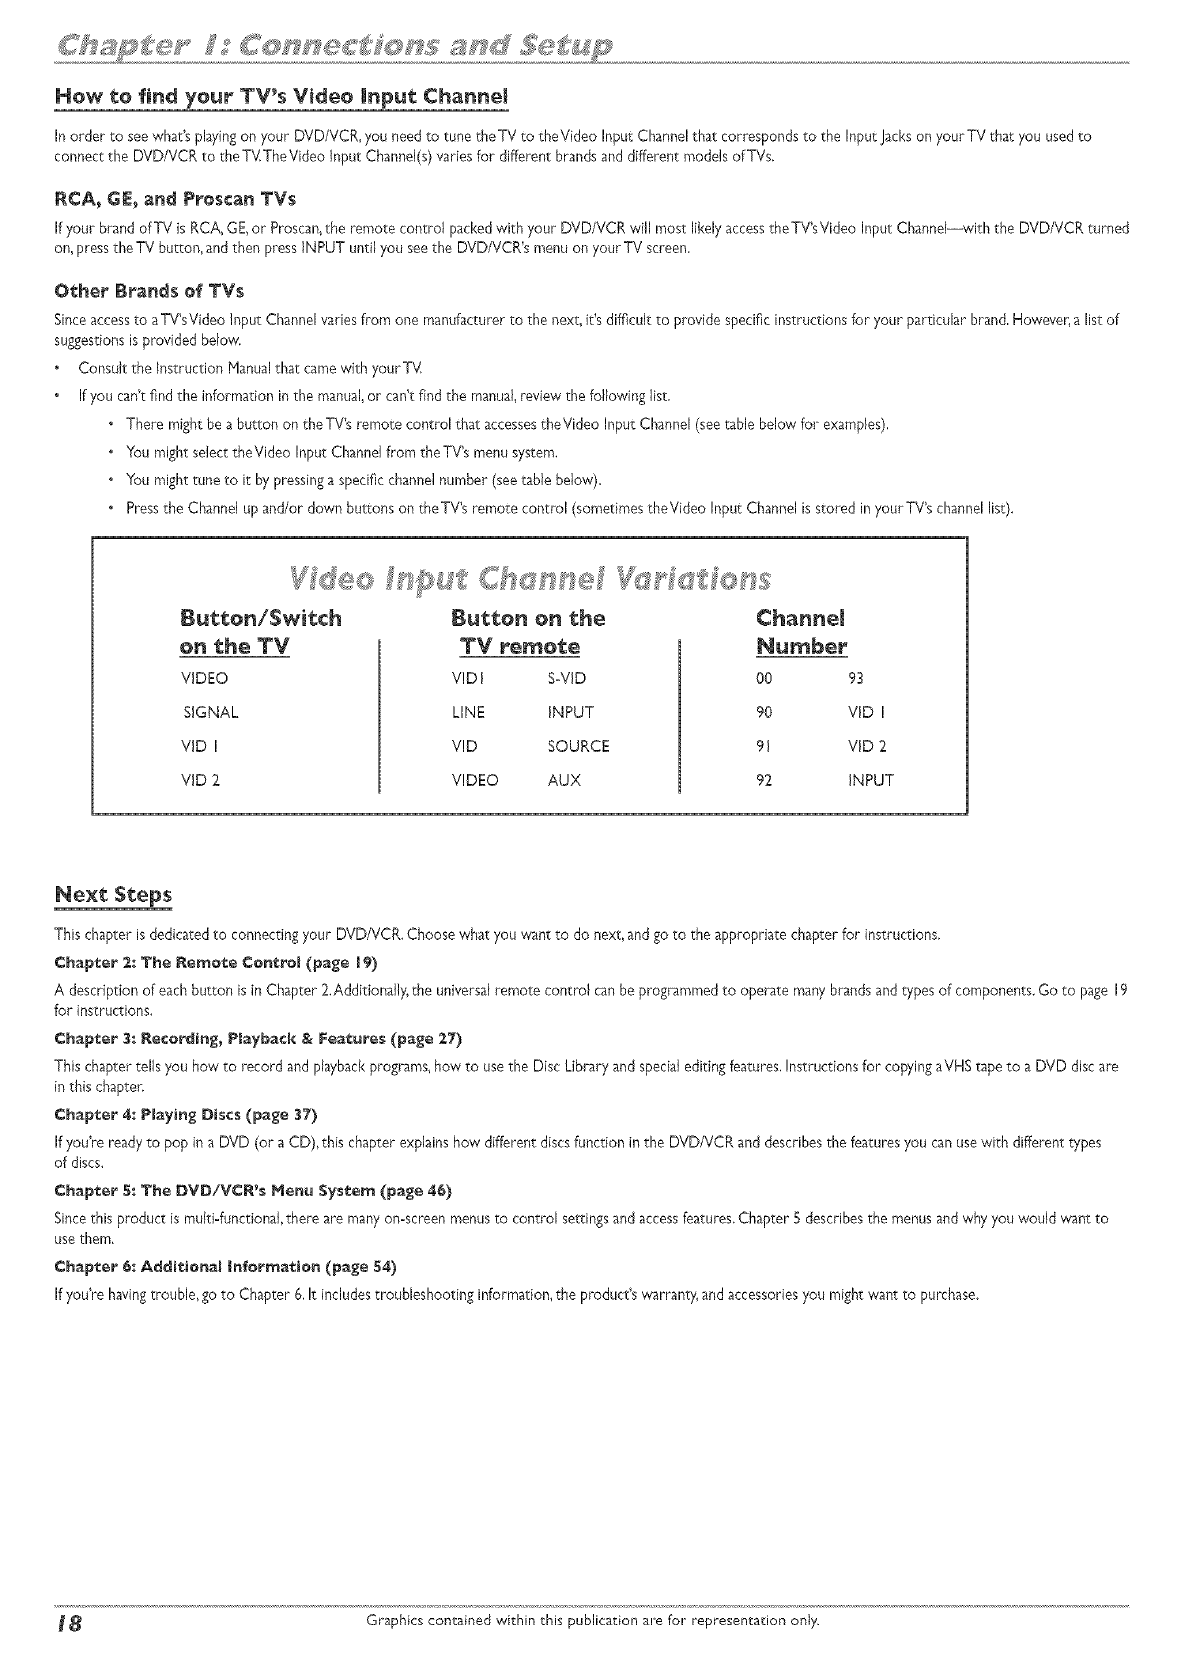
How to find your TV's V_deo input Channe!
In order to see what's pbying on your DVD/VCR, you need to tune theTV to theVideo Input Channelthat corresponds to the Input Jackson your TV that you usedto
connect the DVD/VCR to theTVTheVideo input Channel(s) varies for different brands and different models ofTVs.
P,CA_ GE_ and Proscan TVs
If ),our brand of TV is RCA, GE,or Proscan,the remote control packedwith your DVD/VCR will most likely accesstheTWsVideo Input Channel--with the DVD/VCR turned
on, pressthe TV button, and then pressINPUT until you seethe DVD/VCR's menu on your TV screen.
Other Brands of TVs
Sinceaccessto aTWsVideo Input Channelvaries from one manufacturer to the next, it's difficult to provide specific instructions for your particular brand, However,a list of
suggestionsis provided below.
Consult the Instruction lqanualthat came with your TV
If you can't find the information in the manual,or can't find the manual,review the following list,
• There might be a button on the TV's remote control that accessestheVideo Input Channel (see table below for examples),
• YOumight select theVideo Input Channel fl om the TWs menu system,
• You might tune to it by pressinga specific channelnumber (see table below).
•Pressthe Channel up and/or down buttons on theTV's remote control (sometimes theVideo Input Channelis stored in your TV's channellist).
o_ the TV
VIDEO
SIGNAL
VID I
VID 2.
B_tte_ e_ the
TV remete
VID I S-VlD
LINE INPUT
VID SOURCE
VIDEO AUX
Cha_eJ
Number
O0 93
90
91
92
VID I
VID 2
INPUT
_e×t Steps
This chapter isdedicacedto connecting your DVD/VCR. Choose what you want 1:odo next, and go to the appropriate chapter for instructions,
Chapter :_: The _e_ete Ce_reJ (page _9)
A description of eachbutton is in Chapter 2.Additionally, the universal remote control canbe programmedto operate many brandsand types of components.Go to page 19
for instructions,
Chapter 3: _ecor_i_g_ Ptayback &Features (page 27)
This chapter tells you how to record and playbackprograms, how to use the Disc Library and special editing features,Instructions for copyingaVHS tape to a DVD disc are
in this chapter.
Chapter 4: PJayi_g Discs (page 37)
If you're ready to pop in a DVD (or a CD), this chapter explains how different discsfunction in the DVD/VCR and describesthe featuresyou can usewith different types
of discs,
Chapter 5: The DVD/VCR's He_ Sys_e_ (page 46)
Sincethis product is muitiofunctionaJ,there are many on=screenmenus to control settingsand accessfeatures.Chapter S describes the menus and why you would want to
usethem.
Chapter €: Ad_i_ie_a_ |_formatie_ (page 54)
If you're havingtrouble, go to Chapter 6, It includes troubleshooting information, the product's warranty, and accessoriesyou might want to purchase.
_ Graphics contaMed within this publication are for representation only.
®
o
o
®
Graphicscontained within this User_ Guide are for representationoniy_Some
of the menu screens,buttons, and display messagesmight be different in your
product than they appear in this book. [he on-screenhelp text provides the
most current operational information_
19
ON-OFF
0
Z_}gM ANALO_ 0PEN AN_LE
_AL CLOSE
_MER_GUtBE _NE0
D
_°l ZJ ........
F_E%'ERS E PLAY FO_ARD
_E_RB STO_ PA_SE
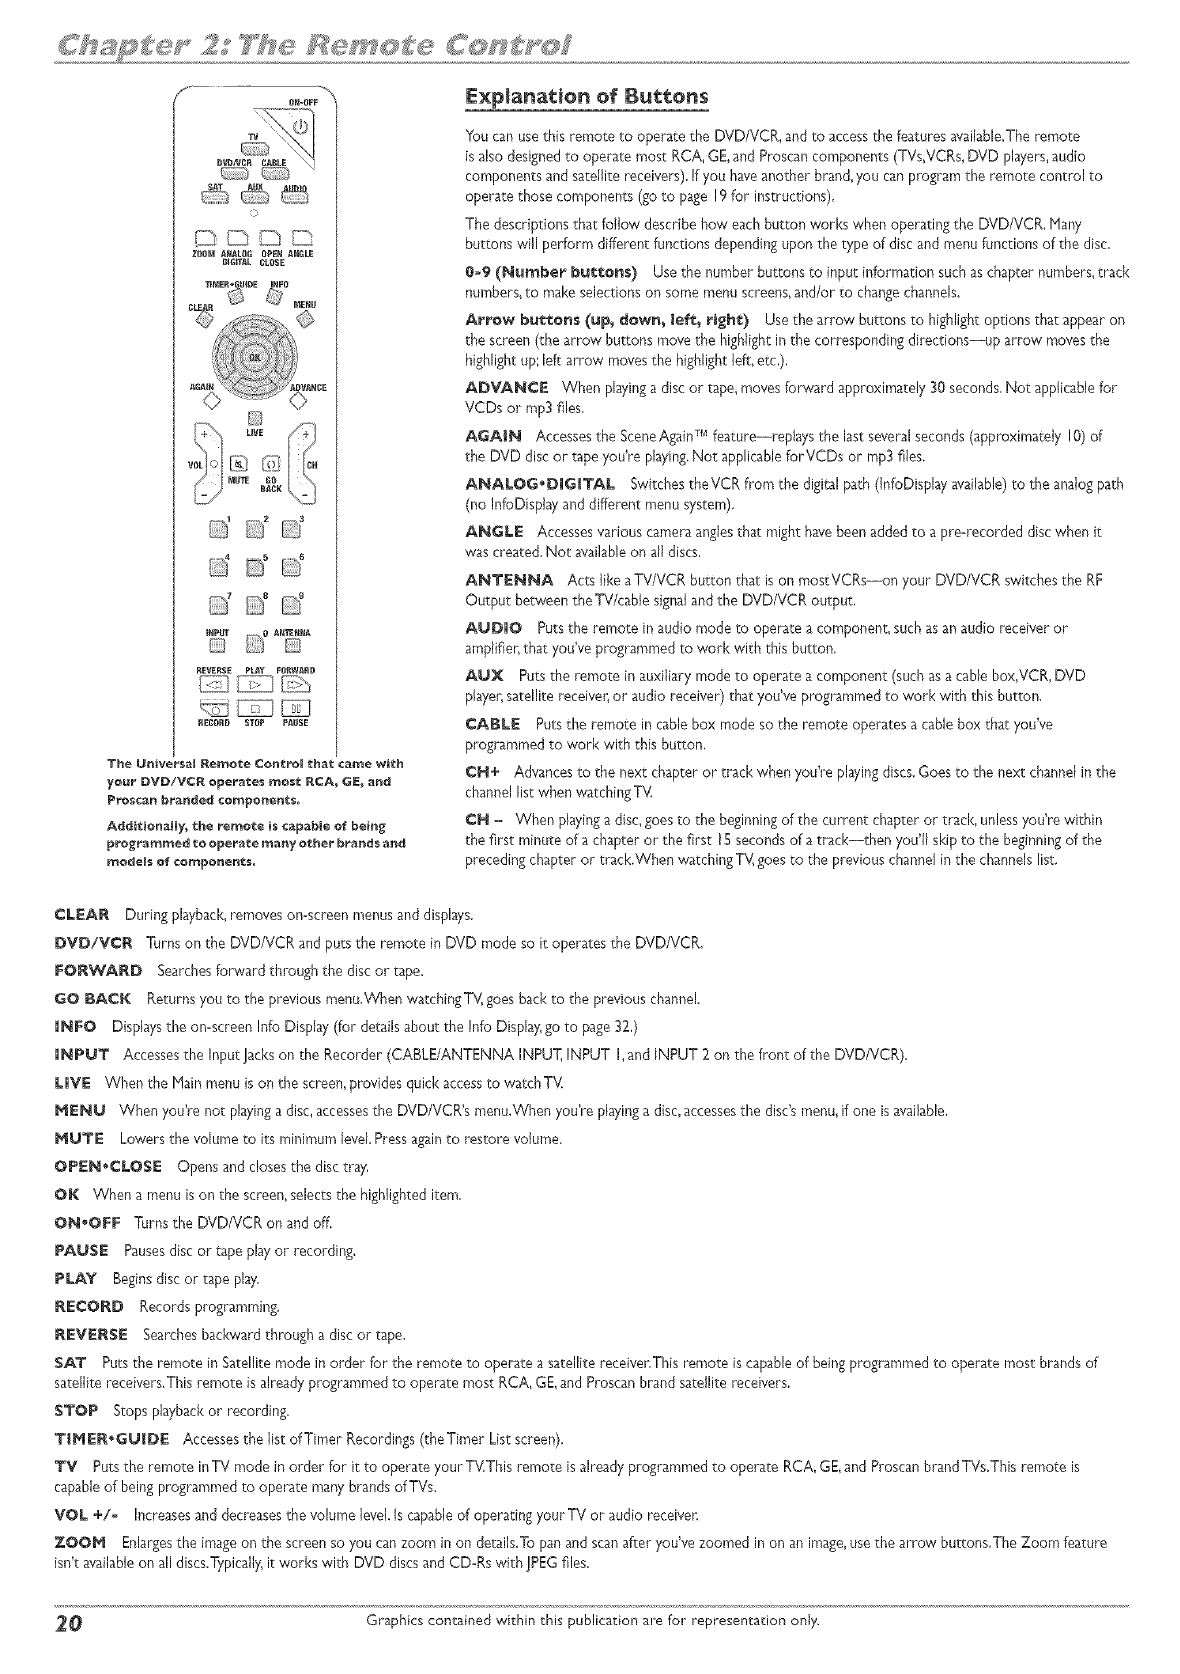
E×plana_ion of _t_ons
You can usethis remote to operate _he DVD/VCR, and to accessthe featuresavailable.The remote
is also designedto operate most RCA, GE,and Proscan components (TVs,VCRs,DVD pbyers, audio
components and satellite receivers),If you haveanother brand,you can program the remote control to
operate _hose components (go _o page 19for instructions),
The descriptions that follow describe how each button works when operating the DVD/VCR. Hany
bu_ons will perform differen_functions dependingupon the type of disc and menu functions of the disc,
0-9 (Number b_eon$) Use the number buttons _o input information suchas chapter numbers,track
numbers,to make selectionson some menu screens,and/or to changechannels.
A_w bu_to_ (up_ d_w_ [ef_ _igh_:) Usethe arrow bu_ons to highligh_options that appear on
the screen (_hearrow buttons move the highligh_in the corresponding directions--up arrow movesthe
highlight up'_left arrow moves_he highlightJeft_e_c,),
ADVANCE Vv'henplayinga disc or tape_movesforward approximately 30 seconds,No_ applicablefor
VCDs or mp3 files,
AGAIN Accessesthe SceneAgainTMfeature--repl@,s the last severalseconds(approximately 10)of
the DVD disc or r_peyou're pbying. Not applicableforVCDs or rap3files.
ANALOG'DIG|TAL Switches the VCR from the digital path (InfoDispby available)to the analog path
(rio InfoDisplay arid different menu system),
ANGLE Accessesvarious cameraanglesthat might havebeenadded to a pre-recorded disc when it
was created. Not availableon all discs,
ANTENNA Acts like aTV/VCR button that is on mostVCRs--on your DVD/VCR switches the RF
Output between _heTV/cable signaland _he DVD/VCR output,
A_DiO Pu_sthe remote in audio mode to operate a component_such asan audio receiver or
amplifier,that you've programmed to work with this button,
A_X Pu_sthe remote in auxiliary mode to operate a componen_(such as a cable box,VCR, DVD
player,satellite receiver_or audio receiver) that you've programmed to work with this button.
CABLE Putsthe remo_e in cablebox mode so the remote operates a cable box tha: you've
programmed to work with this button,
CN+ Advancesto the new chapter or track when you're playingdiscs.Goes to the next channel in the
channel list when watching T\,:
CH = When _layinga disc_g_est_ the beginning_f the current cha_ter _r track_ un_essy_u_rewithin
the first minute of a chapter or the first 15secondsof a track--then you'll skip to the beginningof the
preceding chapter or track.When watching TV_goesto the previous channel in the channels list.
CLEAR During playback,removes on=screenmenus and dispbys,
DVD/VCR "_drnson the DVD/VCR and puts the remote in DVD mode so it operates the DVD/VCR.
FO_W'ARD Searchesforward @-oughthe disc or tape_
GO BACK Returns you to the previous menu.When watchingTV, goesback to the previous channel.
iNFO Displaysthe on=screenInfo Display (for de_ailsabout the Info Displ@1go to page32,)
iNPUT Accessesthe Input Jackson the Recorder (CABLE/ANTENNA INPUT, INPUT I, and INPUT 2 on the fron; of the DVD/VCR).
LIVE When the Plain menu is on the screen,provides quick accessto watchT'_
_EN_ When you're not playinga disc,accesses_heDVD/VCR's menu.When you're playing a disc,accessesthe disc'smenu,if one is available,
_TE Lowers the volume to i_.sminimum JeveLPressagainto restore volume.
OPEN,CLOSE Opens and closes _hedisc tr_y,
OK When a menu is on the sa een,selec;sthe highlighted item,
ON,OFF Turns the DVD/VCR on and off.
PA_SE Pausesdisc or _apeplay or recording.
PLAY Beginsdisc or tape play.
RECOI_D Records programming.
REVE_S[[ Searchesbackward through a disc or tape.
SAT Pu;sthe remote in Satellite mode in order for _he remote _o operate a satellite receiver,This remote iscapable of beingprogrammed to operate most brands of
satellite receivers.This remote is alreadyprogrammed to operate most RCA, GE,and Proscanbrand satellite receivers,
STOP Stops playbackor recording_
TIPIER.G_JDE Accessesthe list of Timer Recordings(the Timer List screen),
TV Pu_sthe remo_e inTV mode in order for it ro operate your TV.This remote isalready programmed to operate RCA, GE,and ProscanbrandTVs.This remote is
capableof being programmed to operate many brands of TVs.
VOL +/o Increasesand decreasesthe volume level.Is capableof operating your TV or audio receiver.
Z@O_ Enlargesthe imageon the screen so you canzoom in on details.Topan and scan after you've zoomed in on an image_usethe arrow buttons,The Zoom feature
isn't availableon all discs.Typica]ly_it works with DVD discsand CD=Rswith ]PEG files.
_ Graphics contained within this publication are for representation onJy.
AUX
o
_DD_
ZOOM ANALOG OPEN ANGLE
DIG_AL CLOSE
TiMER*GUiDE INFO
0N-0FF
DDD_
Z00M A_LOG OPEN ANGLE
BiGrfAL CLOSE
TiMER*GUiDE JNFO
Q
ON,OFFbutton
-- T',/button
ONoOFFbt.Jtto!
T',,/btitto!
-Indicotor _gt!t
_PLAYbutto_
- RE"/ERFEbuttol
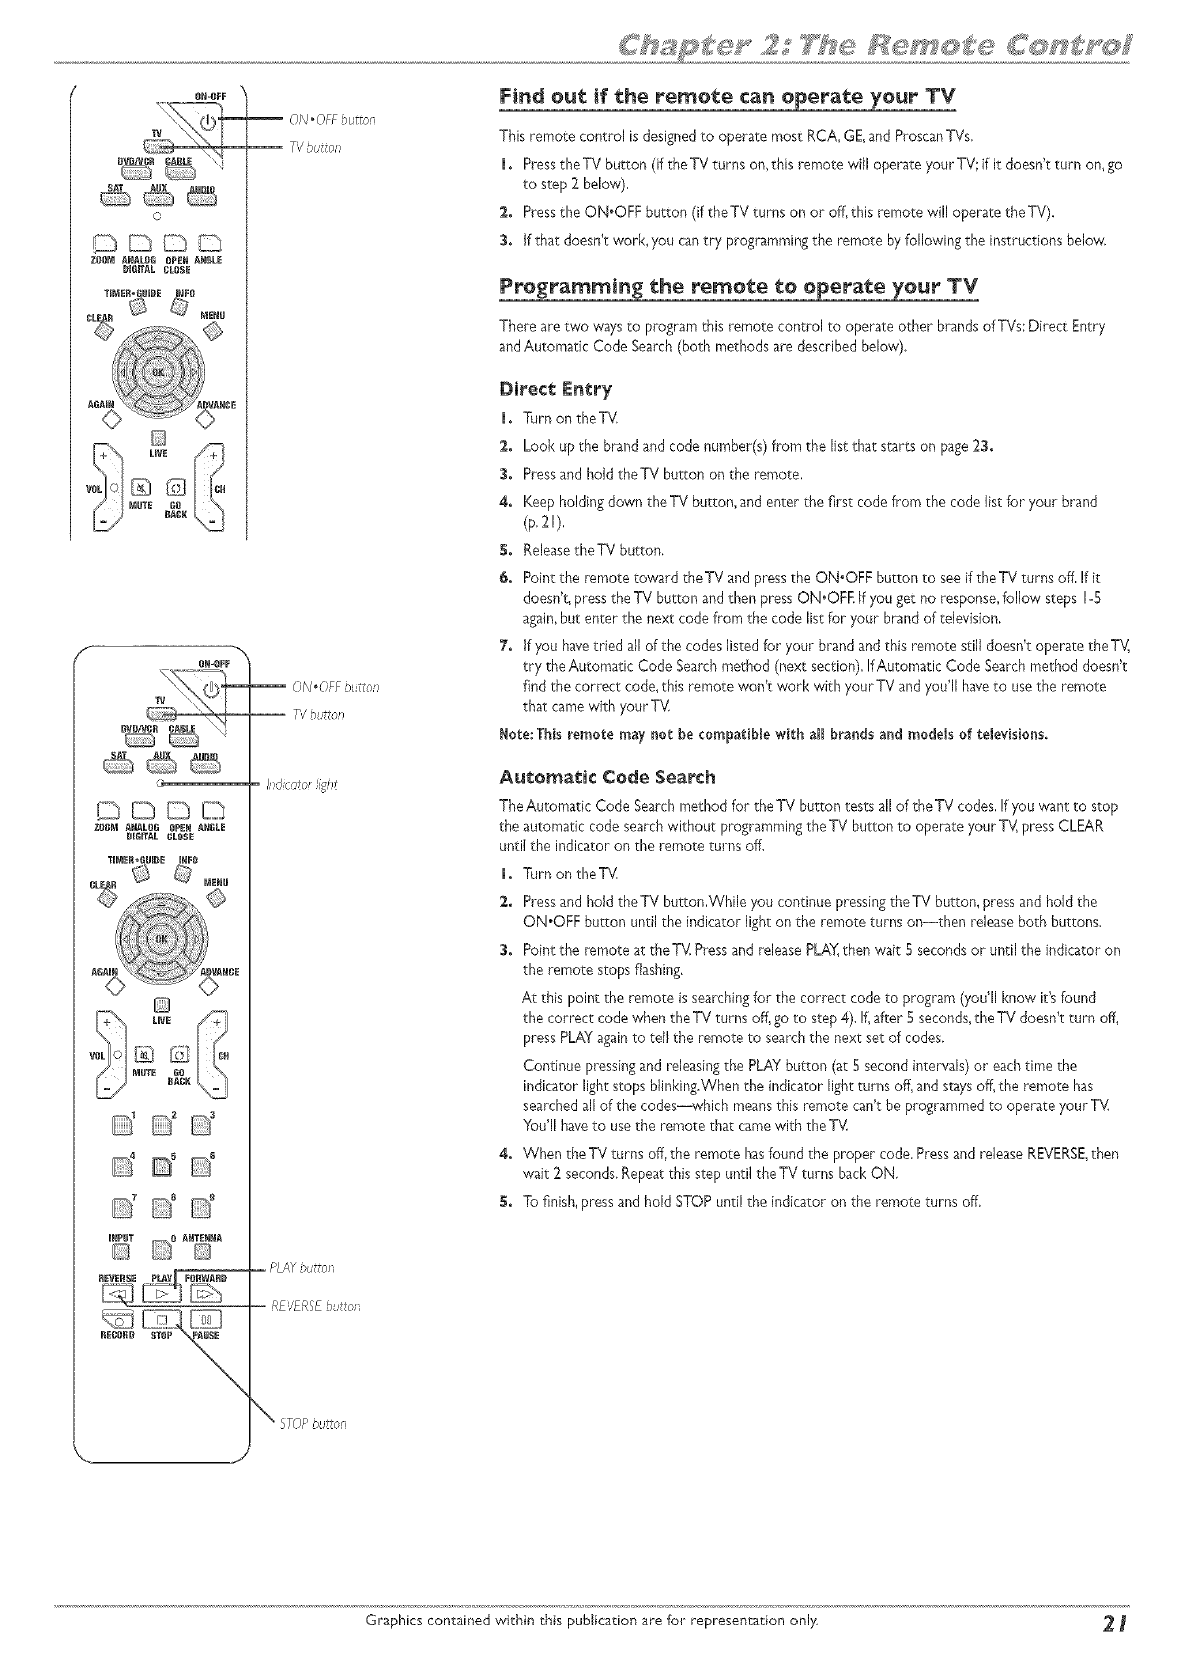
Find out if the remote can operate your TV
This remote control is designedto operate most RCA, GE, and ProscanTVs,
1. Pressthe TV button (if the TV turns on, this remote will operate your TV; if it doesn't turn on, go
to step 2 below),
2. Pressthe ON.OFF button (if theTV turns on or off, this remote will operate theTV).
3. If that doesn't work, you cantry programmingthe remote by following the instructions below,
Programming the remote to operate your TV
There are two waysto program this remote control to operate other brands of TVs:Direct Entry
andAutomatic Code Search(both methods are described below).
Direct Entry
1. Turn on theTV,
2. Look up the brand and code number(s) from the list that starts on page23.
3. Pressand hold theTV button on the remote,
4. Keep holding down the TV button, and enter the first code from the code list for your brand
(p,21),
S. ReleasetheTV button.
6. Point the remote toward theTV and press the ON.OFF button to seeif the TV turns off, If it
doesn't, press the TV button and then press ON.OFE if you get no response,follow steps 1-5
again,but enter the next code from the code list for your brand of television,
7. if you havetried all of the codes listedfor your brand and this remote still doesn't operate theTV,
try the Automatic Code Searchmethod (next section), If Automatic Code Searchmethod doesn't
find the correct code,this remote won't work with your TV and you'll haveto usethe remote
that came with your TV.
Note: Thisremote may not be compatible with al_ brands and models of televisions,
Automatic Code Search
TheAutomatic Code Searchmethod for the TV button tests all of the TV codes,If you want to stop
the automatic code searchwithout programmingtheTV button to operate your TV,press CLEAR
until the indicator on the remote turns off,
1. Turn on theTV:
2. Pressand hold the TV button,While you continue pressingthe TV button, press and hold the
ON.OFF button until the indicator light on the remote turns on--then releaseboth buttons.
3. Point the remote at the TV Pressand releasePLAY,then wait E secondsor until the indicatoron
the remote stops flashing.
At this point the remote issearchingfor the correct code to program (you'll know it'sfound
the correct code when the TV turns off, go to step 4). If,after 5 seconds,the TV doesn't turn off,
press PLAYagainto tell the remote to search the next set of codes.
Continue pressingand releasingthe PLAYbutton (at 5 second intervals) or eachtime the
indicator light stops blinking.When the indicator light turns off, and staysoff,the remote has
searched all of the codes--which meansthis remote can't be programmed to operate your TV:
You'll haveto usethe remote that camewith theTV.
4. When the TV turns off,the remote hasfound the proper code. Pressand release RE'v'ERSE,then
wait 2 seconds.Repeat this step until the TV turns back ON.
S. To finish,pressand hold STOP until the indicator on the remote turns off.
Graphics contained wkchin this publication are for representa_:ion only _
Programming the remote to operate other components
This remote is already programmed to operate most RCA, GE,and Proscancomponents--just pressthe applicablecomponent button to operate the component (for a
satellite receive_pressthe SATbutton', for an audio component, pressAUD!O, etc.),
There are two waysto program this remote control to operate other brandsof sare/ite receivers,cable boxes,and/or other compatible components:Direct Entry and
Automatic Code Search(both methods are described below),
Direct: l!!ntry
m. Turnon the component youwant to programthe DVD/VCRremote to operate (satellite receiver,VCR,etc,).
2. Lookup the component,brand,and code number(s)from the list (pages23-26).
3. Pressand hold the appropriate component button on the remote (Le,SATfor satelite receiver;CABLEfor cabb box;or AUDIOfor an audio component),TheAUX
button cancontrol many differenttypes of components indudingVCRs,TVs,audio components, sate/ite boxes,cableboxes,or DVDplayers.Youmust use the Direct
Entry method to program the AUXbutton unlessyou want to program itto operate aVCR (AutomaticCode Search for the AUXbutton onlyaccesses theVCR codes).
4. Keepholdingdownthe component button, and enter the first code from the code listfor your brand.Ifthe indicator lightflashes,you'veentered an invafdcode or the
button isn'tprogrammable.
_. Releasethe component button,
6. Pointtheremotetowardthe componentandpressthe ON*OFFbuttonto seeifit turns off,If it doesn't,pressthecomponentbuttonandthenpressON.OFEifyouget
noresponse,followsteps14again,butenterthe nextcodefromthe codelist.
Here:Thisremotemaynot be compatiMe withal brandsandmodelsof components.
Au_:omatic Code Search
TheAutomatic Code Searchmethod searchesa/of the codes for the default component of a specific component button, if you want to stop the automatic code search
without programming the remot< pressCLEAR untt the indicator on the remote turns of[,
Hote:You can only use Aitomatk Code Search f:o program the AUX button [f you want the button to operate aVCR--you mtst use Direct Eltry {above} [f you
want to program the AUX button to operate other components.
I. Turn on the component.
2. Pressand hold the component button (TV_SAT,CABLE, or AUD!O).While you continue pressingthe component button, press and hold the ON.OFF until the indicator
light on the remote toms on--then release both buttons.
3. Point the remote at the specific component you're programmingthe remote to operate (TV,satellite receiver,cable box,audio component, etc.). Pressand release PLAY,
then wait S secondsor until the indicator on the remote stops flashing.
At this point the remote is searchingfor the correct code (you'l! know it'sfound the correct code when the component turns off, go to step 4).if, after Sseconds,the
component doesn't turn off, pressPLAYagainto tell the remote to searchthe next set of codes,
Continue pressingand releasingthe PLAYbutton (at S second intervals)or each time the indicator light stops blinking,When the indicator light turns off, and staysoff,
the remote hassearched all of the codes--which meansthis remote can't be programmed to operate the particular brand/model of component,You'll haveto usethe
remote that camewith the component,
4. When the component turns off, the remote hasfound the proper code,Press and release REVERSE,then wait 2 seconds.Repeatthis step until the component turns
back ON.
5. Tofinish,press and hold STOPuntil the indicator on the remote turns off.
Using the remote's features
Know _:he mode
Once you've programmed the remote to operate other components, you need a basic understanding of how the remote control works.The codes in the remote control
that make a component act a specific way are mode dependent--if you want to change setdngs in your TV's menu, you must press theTV button before you press the
MENU button so the remote control knows that you want to access theTV's menu system,
To summarize, to operate the DVD/VCR you must press the DVD/VCR button; to operate the TV,you must press the TV button; to operate a satellite receiver, you must
press the SAT button; to operate the cable box, you must press the CABLE button; etc.
To let you know which mode you're in,the component button that is activelights when you pressa button.
Unders_:anding _:he _PUT bunt:on
Another important button is the INPUT button.The INPUT button accesses the programming from a specific component.We call these channels,Video Input Channels,
because you are telling the component to send the video (and audio) that corresponds to theVideo input iack you used to connect the component to the DVD/VCR, For
exampl< ifyou cormected a satellite receiver to your DVD/VCR by using the S-VIDEO IN iack, you would need to press DVD/VCR (to tel the temote you want to operate
the DVD/VCR) and then press INPUT until the S-Video Input Channel appears (if the satellite receiver is on, you'l! see the program it is tuned to, and S-VID appears in the
DVDNCR's channel banner to let you know which "channel" the DVD/VCR hasaccessed.
Low Bat_:ery lndica_o_
Whenthe batteriesarelow,the indicatorlightandthe componentbuttonlightflickers.
_ Graphics contained within this publication are for representation only.
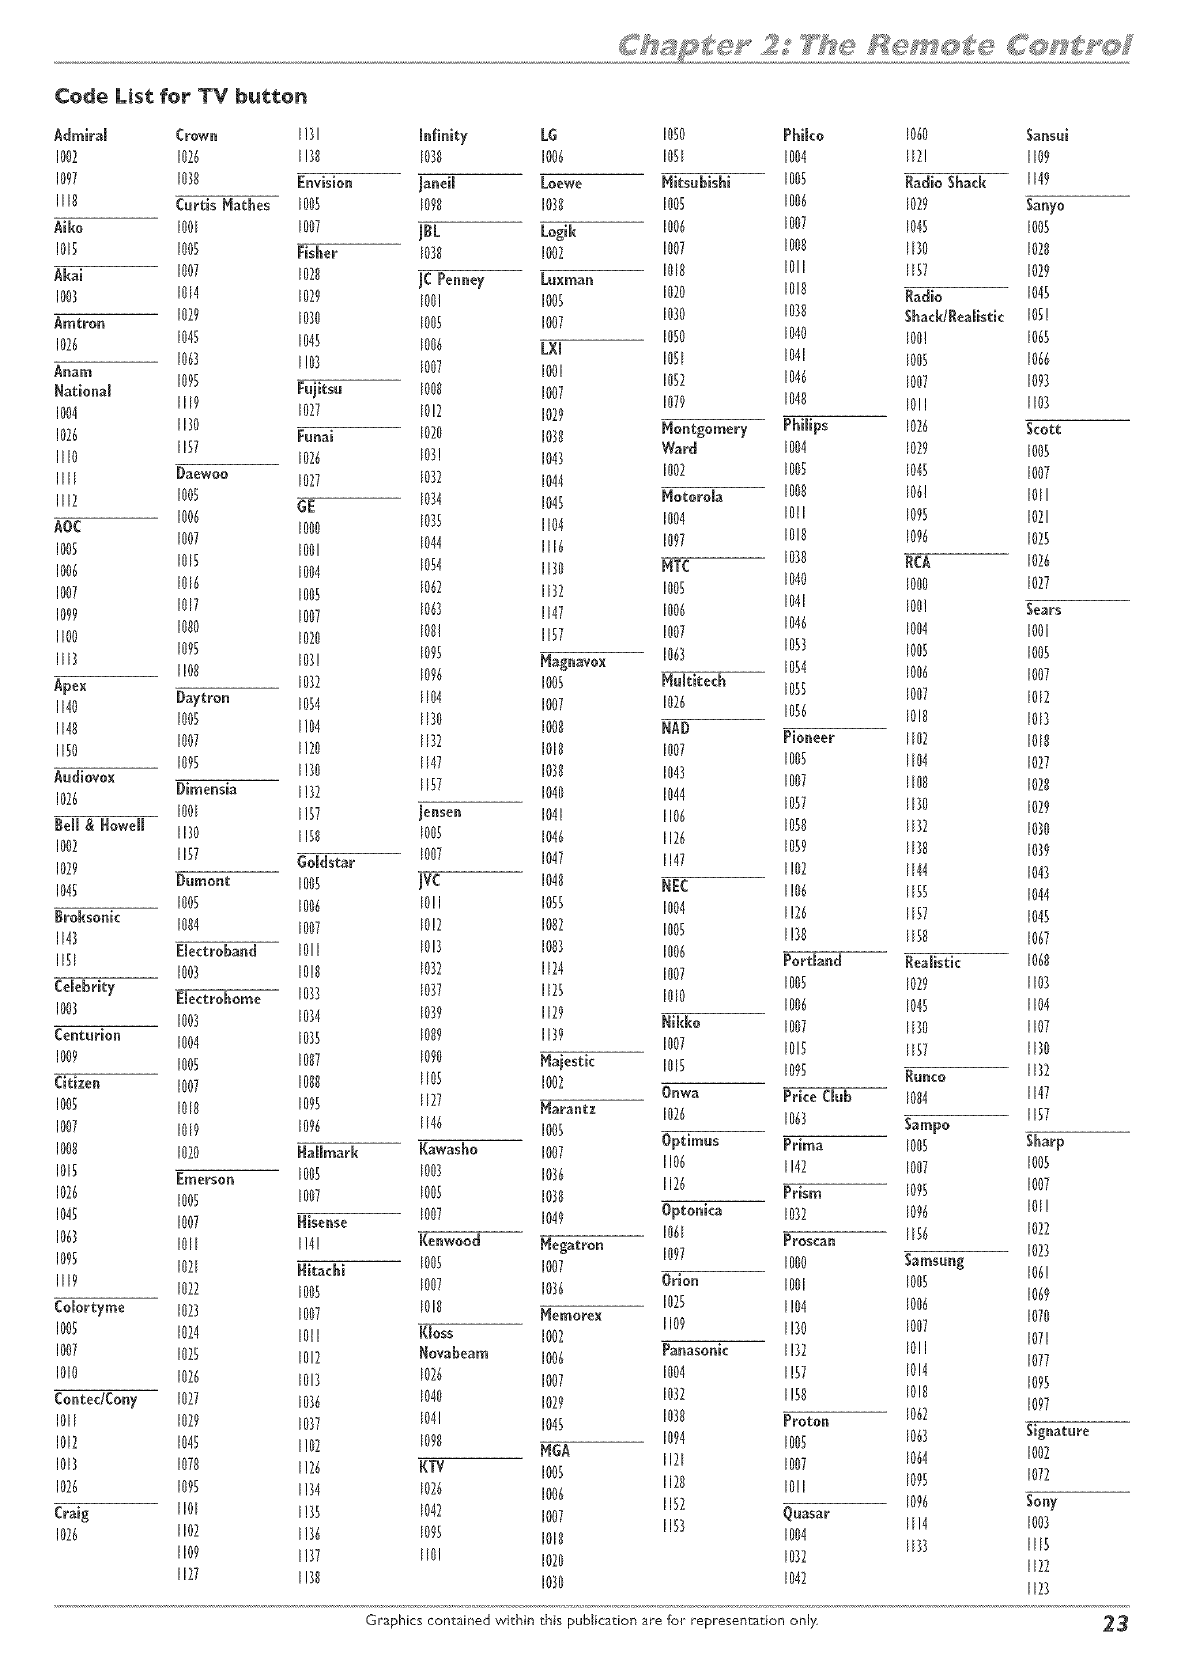
Code List for TV button
Admiram Crown 1!31 mnflnity LG 1050 Phiko 106t) Sansui
1002 1026 1!38 1030 1006 IOU 1004 liT! ll09
1097 1010 Envision janeim Loewe blitsubishi 1005 Radio Shack IN9
Ill0 Curtis Hathes 1005 1091/ 10711 I00S 100_ 1029 Sawo
Aiko 1001 1007 jBL Logik 1006 1007 1045 1005
101; 100; Fisher 10]1t 1007 1007 1000 liP0 10211
Akai 1007 107II jC Penney Luxman 1010 1011 1157 1029
1003 10N 1079 100! 1005 1020 1010 Radio 1045
Amtrou 1079 1030 1005 1007 10;10 1070 Shack/Realgtic 105!
1026 1045 1045 1006 L×I 1050 1040 100! 1065
1067 I!0} 1007 1001 1051 1041 1005 1066
Anam 1095 1052 1046 1007 1097
National Fujitsu 100It 1007 1079 1040 10!1 1107
1004 II 19 1077 10!2 1029
1026 1170 Funai 1070 10711 Montgomery Philips 1026 Scott
1if0 1157 1026 103! 104] Ward 1004 1029 1005
IIII Daewoo 1077 1032 1044 1002 1005 1045 1007
1If2 100_ !iE 1074 1045 blotorola 1000 106! 1011
AOC 1006 1000 1035 1104 1004 101l 10% 1021
1005 1007 1044 1097 1010 10% 10B
1006 1015 1001 1116
1007 1016 1004 1054 1170 HTC 1070 RCA 1026
1099 1017 1005 1067 1137 100S 1040 1000 1027
1100 1000 1007 106) 1147 1006 1041 100! Sears
1if3 10% 1070 101t! 1157 1007 1046 1004 1001
1100 107! 10% blagnavox 106] 105} 1005 1005
10% 1054 1006 1007
Apex 1037 1005 blultitech 105_ 1007 1017
1140 l)aytron 1054 1104 1007 1026 1056 10111 101}
1140 1005 1!04 1170 10011 NA9
1150 1007 1!20 1172 1011t 1007 Pioneer 1107 101It
1095 1147 1005 1104 1027
Audiovox I!}0 10711 1043 1007 1100 10211
1026 Dimensia 1!37 IB7 1040 1044 1057 1130 1029
100l 1!57 jensen 1041 1106 1050 1177 1030
Bell & !towell 1170 11511 1005 104{ 1126 1059 If}It 1079
1002 1157 1007
1029 lioldstar 1047 1147 1!02 1144 104]
104_ l)umont 1005 jVC 10411 ltEC 1!06 1155 1044
1005 1006 10!1 1055 1004 1!26 1157 1045
Itroksonk 1004 1007 10!2 1007 1005
1143 1!]0 llSIl 1067
Electroband 1011 10!7 1007 1006
IIU 1003 10!l/ 1077 1174 1007 Portland Realistic 1060
Celebrity 1005 1029 1107
1007 Electrohome 1033 1077 lib 1010 1006 1045 1104
1003 1074 1019 1129 Nikko 1007 1170 1107
Centurion 1004 1075 101t9 INl9 1007 10S IB7 1130
1009 100_ 1007 1090 blajestk 1015 1095 Runco 1177
Citizen 1007 1000 1105 1002 Onwa Prke Club 10114 1147
1005 1010 10% 1177 blarantx 1026 1063 Sampo 1157
1007 1019 10% 1146 1005
1000 1020 Hallmark Kawasho 1007 Optimus Prima 1005 Sharp
1106 1!42 1007 1005
1015 Emerson 1005 1007 1076 1126 1007
1026 100_ 1007 1005 1070 Prism 1095
1045 1007 ttisense 1007 1049 Optonica 1012 10% 101!
1061 Proscan 1156 1022
106} 1011 1!4! Renwood blegatron 1097 10B
1095 1021 ttitachi 1005 1007 1000 Samsung 106!
lifo 1072 1005 1007 1076 Orlon 1001 1005 1069
Colortyme 1023 1007 1011/ blemorex 1025 1!04 1006 1070
1005 1074 1011 I(Ioss 1007 1109 1!]0 1007 1071
1007 1025 1017 Rovabeam 1006 Panasonk 1!32 10!l 1077
1010 1026 10B 1026 1007 1004 1!57 10N 1095
ContedCo W1027 1036 1040 1029 1032 1!50 10!ll 1097
1011 1029 10)7 1041 1045 1030 Proton 1067
1094 1005 1067 Signature
1012 104_ 1!07 1090 MliA 1121 1007 1064 1007
1017 1070 1!26 I(TV 1005 1120 10!l 1095 1077
1026 10% 1!34 1076 1006 1152 Quasar 10% Sony
Craig 1101 1!35 1042 1007 1153 1114 1003
1026 1102 1!76 10% 1011t 1004 lI}} 1115
1109 1!77 If0! 1020 1072 1127
1127 1!70 1070 1042 lIB
Graphics contained within this publica'tion are for representation only 23
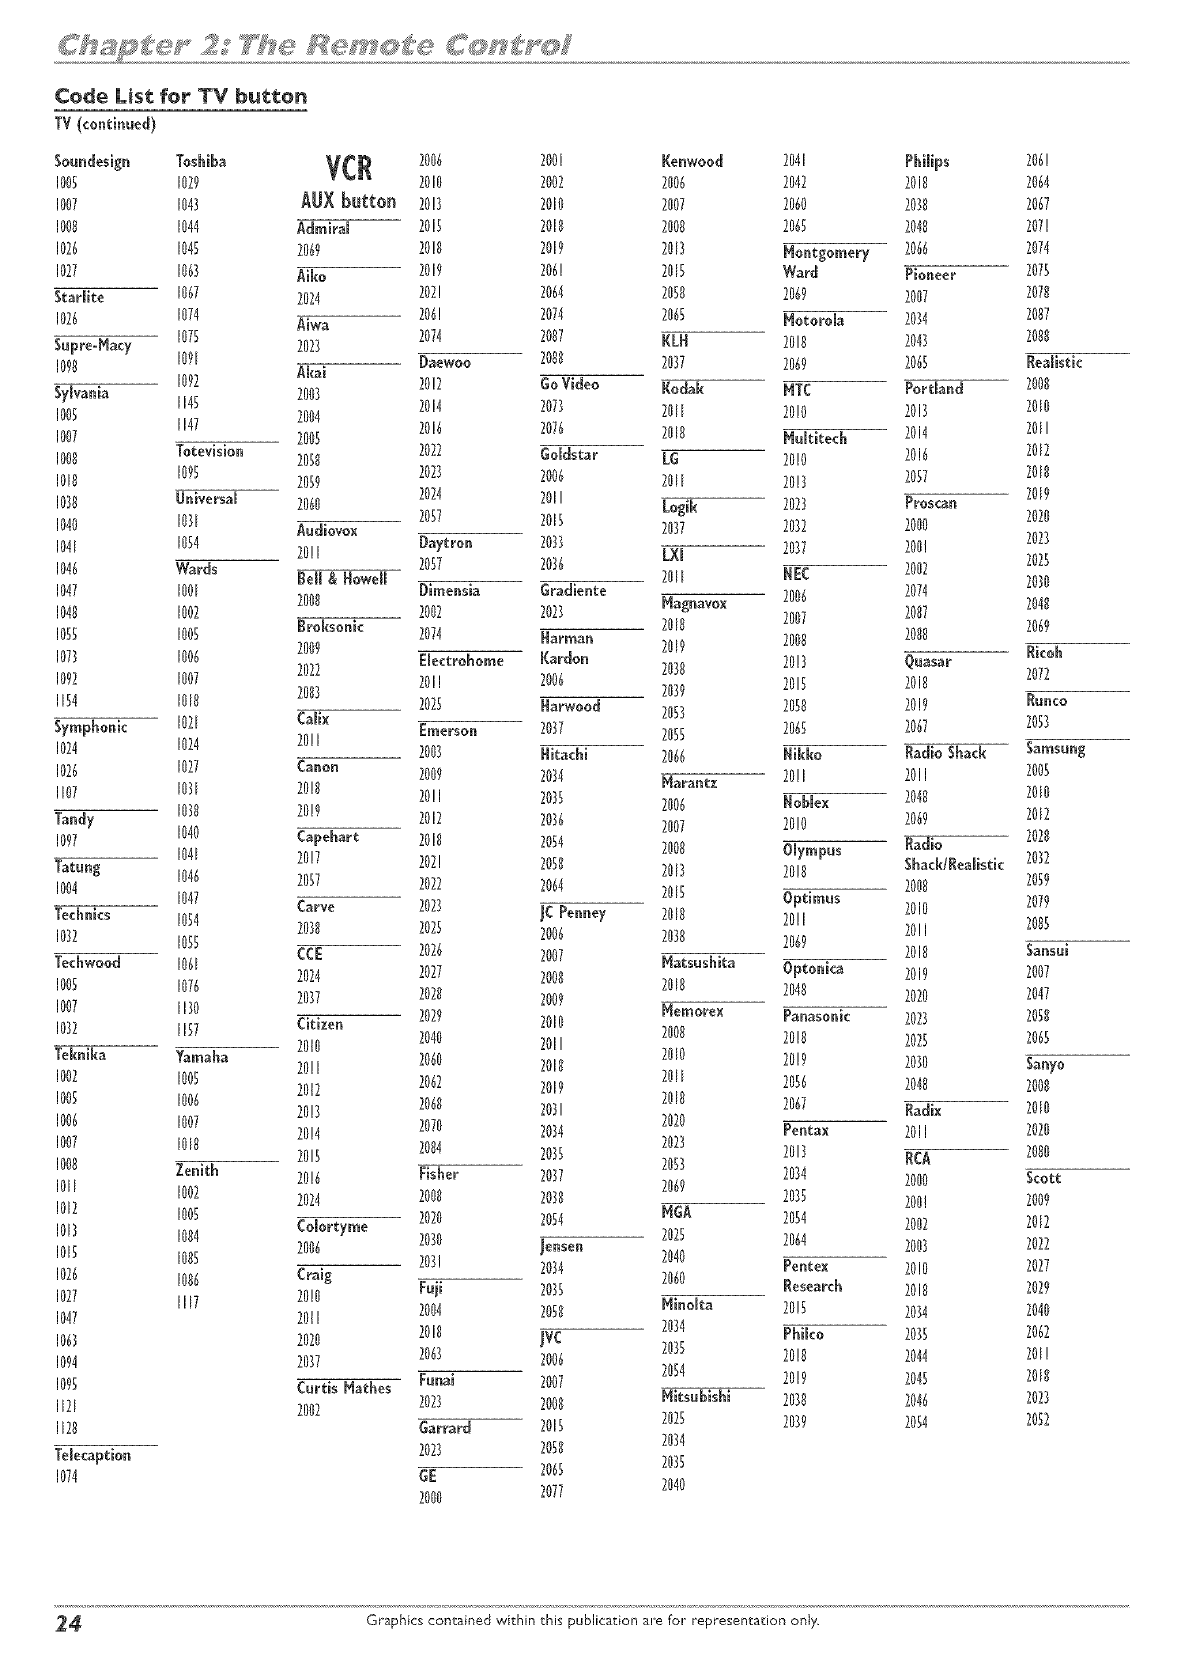
Code List for TV button
TV(continued)
So_de_ig_ Toshiba VCR
1005 1029
1007 1043 AUX button
1000 I044 Admiram
I026 I045 2069
1027 1063 Aiko
Starlite 1067 2024
1026 1074 Aiwa
Supre-Nacy 1075 2023
1070 1091
1092 Akai
Sylvania 1145 2003
1005 1147 2004
1007 2005
1000 lotevision 2058
1010 10g 2059
1030 Universal 2060
1040 1031 A@iovox
1041 1054 20!1
1046 Wards tell & Howell
1047 1001 2000
I040 I002
1055 1005 troksonk
1073 1006 2009
1092 1007 2022
1154 1010 2083
Symphonk 1021 Calix
1024 1024 20!1
1026 1027 Canon
1107 1031 20!0
Tandy I038 2019
I097 1040 Capehart
I041 2017
Tatung 1046 2057
1004 I047 Carve
Technics 1054 2038
1032 1055 CCE
Techwood I061 2024
1005 1076 2037
1007 1130
1032 1157 Citizen
2010
leknika Yamaha 20!1
I002 I005 2012
1005 1006 20!3
1006 1007 20!4
1007 1010 2015
1000 Zenith 20!6
1011 1002 2024
1012 1005
I013 I004 Colort#me
2006
1015 1005
1026 I006 Craig
1027 1117 20!0
1047 2011
1063 2020
1094 2037
1095 CurtisNathes
1121 2002
1120
lelecaption
1074
2006 2@ Kenwood 2041 Philips 206!
2010 2002 2006 2042 2018 2064
20!3 2010 2007 2060 2030 2067
2013 2010 2008 2065 2040 207!
20!0 2019 2013 Nontgomery 2066 2074
2019 206! 2015 Ward Pioneer 2075
202! 2064 2058 2069 2007 2070
206! 2074 2065 Notorola 2034 2007
2074 2007 RLN 2010 2043 2000
Daewoo 2000 2037 2069 2063 Realistic
2012 GoVideo Kodak NTC Portland 2000
2014 2073 2011 20!0 2013 2010
2016 2076 2018 bhltite& 2014 2011
2022 Goldstar LG 2010 2016 2012
2023 2006 2011 20!3 2057 2018
2024 2011 Logik 2023 Proscan 2019
2037 2015 2037 2032 2000 2020
Daytron 2033 2037 200! 2023
LXl 2025
2057 2036 2002
2011 NEC 2030
Dimensia @adiente 2006 2074
2002 2023 Nagnavox 2048
2018 2007 2007 2069
2074 Narman 2019 2000 2000
Elearohome Rardon 2038 20!3 Quasar Rkoh
2011 2006 2039 2015 2013 2072
2025 Narwood 2053 2050 2019 Runco
Emerson 2037 2055 2065 2067 2053
2003 Nitachi 2066 Nikko Radio Shack Samsung
2009 2034 Narantz 20!1 2011 2003
20!1 2035 2006 Noblex 2040 2010
2012 2036 2007 20!0 2069 2012
2018 2054 2000 Olympus Radio 2020
202! 2050 2013 20!0 Sha&/Realgtk 2032
2000 2059
2022 2064 2015 Optimus 2010 2079
2023 JC Penney 2010 20!1 2083
2023 2006 2030 2069 20!1
2010 Sansui
2026 2007 Natsushita Optonka 2019 2007
2027 2000 2018 2040
2020 2009 2020 2047
2029 2010 Nemorex Pa_asonk 2023 2050
2040 2011 2000 20!0 2023 2065
2060 2010 2010 20!9 2030 San#o
2062 2019 2011 2056 2040 2000
2060 2031 2018 2067 Radix 7010
2070 2034 7020 Pentax 2011 7020
2023 2013 2000
2004 2035 2053 RCA
Fisher 2037 2034
2069 2000 Scott
2008 2030 2035 200! 7009
2020 2054 NGA 2054 2002 2012
2030 Jensen 2025 2064 2003 2022
203! 7034 7040 Pe_tex 2010 7027
Fuji 2035 2060 Research 2010 2029
2004 2050 Ninolta 20!5 2034 2040
2013 JVC 2034 Phiko 2035 2062
2063 2006 2035 20!0 2044 201!
Funai 2007 2054 20!9 2043 2010
2023 2000 Nitsubishi 2030 2046 2023
Garrard 2013 2025 2039 2054 2052
2023 2050 2034
GE 2065 2035
2000 7077 2040
24 Graphics contained within this publication are for representation only,
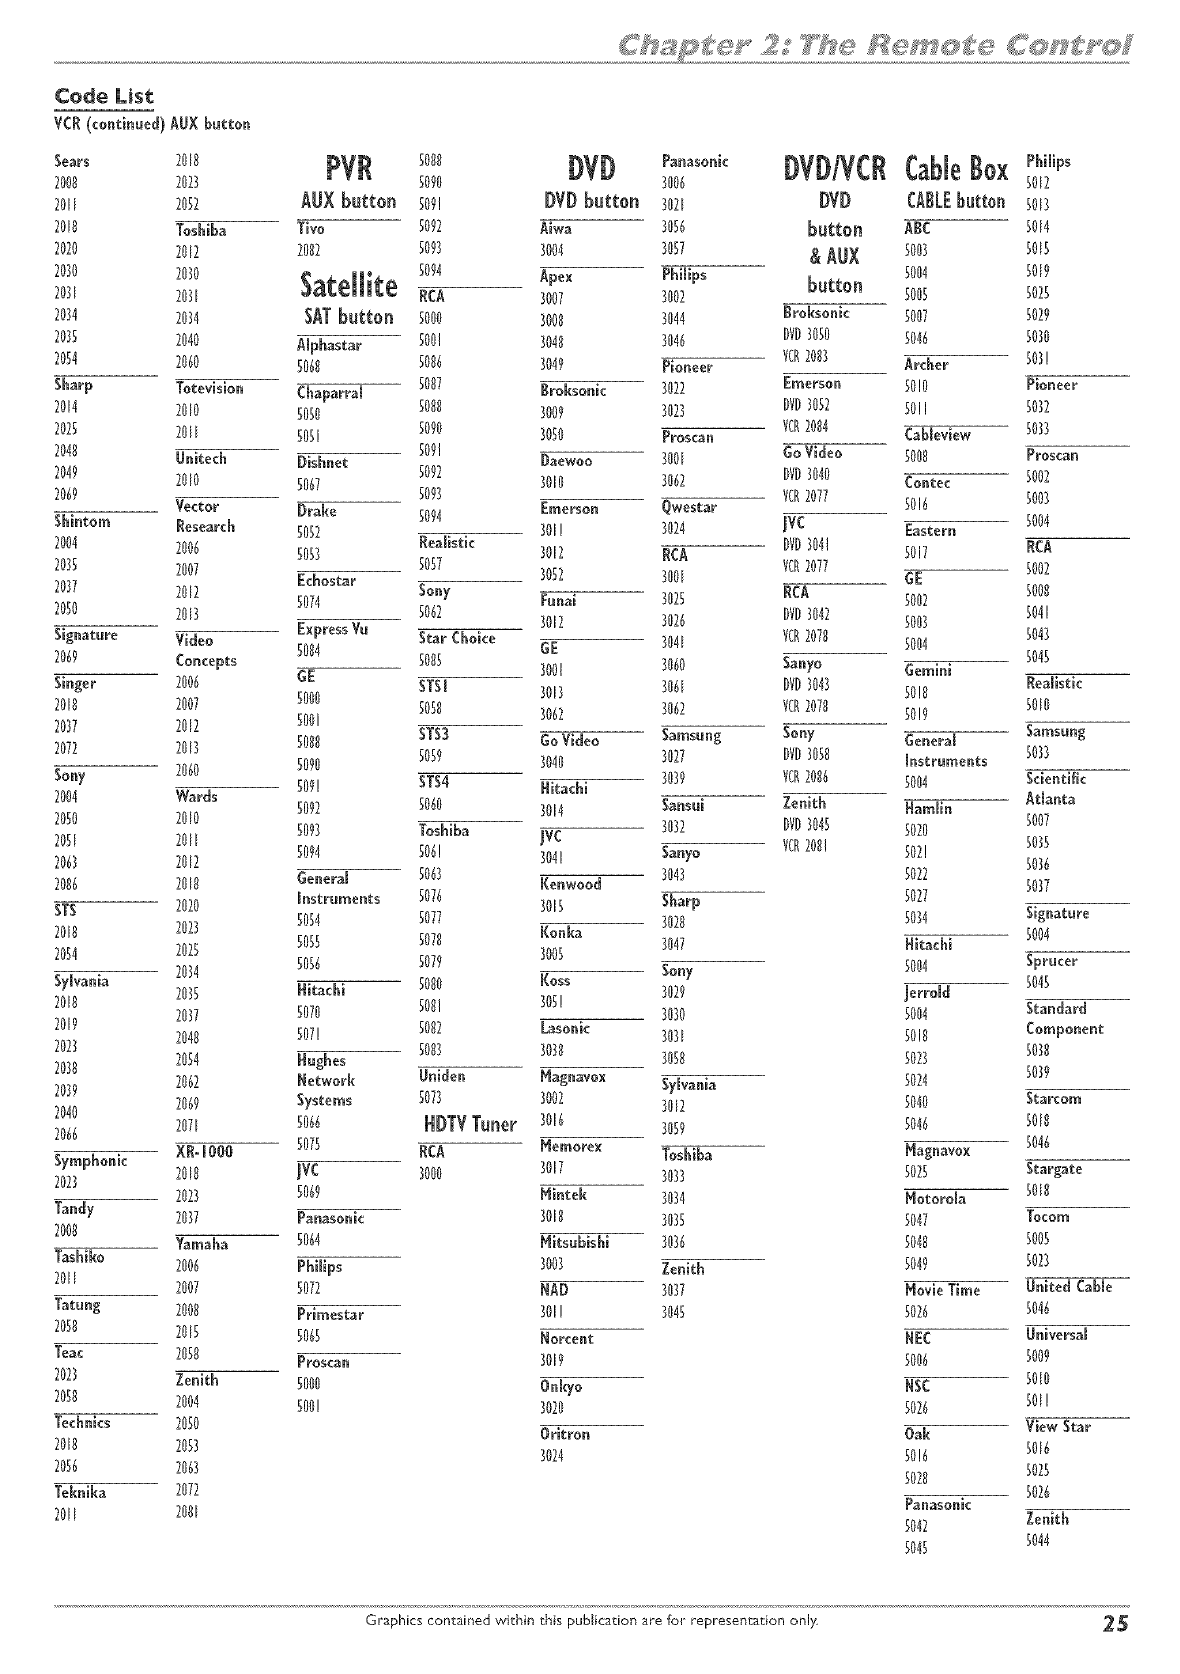
Code List
VCR (continued) AU× button
Sears 20 0 PVR 0080 DVD Paoasoni<
2008 2023 0090 3006
2011 2052 AIJXbutton 009! DYDbutton 3021
2010 Toshiba Tivo 0092 Aiwa 3050
2020 2012 2002 0093 3004 3057
0094 Apex Pbilips
2030 2030 Satellite ,cA 3oo7
2031 203[ 3002
2034 2034 SATbutton 0000 3008 3044
2035 2040 AIphastar 5001 3040 3046
2054 2060 0060 0006 3049 Pioneer
Sharp Totevision Chaparral 0007 Broksonk 3022
2014 2010 5050 5080 3009 3023
2025 Nil 0051 0090 3050 Proscan
2040 IJnitech Dghnet 009! Daewoo 3001
2049 2010 0067 5092 3010 3062
2069 0093
Vector Drake 0094 Emerson Qwestar
Shintom Research 0082 3011 3024
2004 2006 0053 fleMgtic 3012 !tCA
5057 3052 3001
2035 2007 Ecbostar Sony Fnnai 3025
2037 2012 5074 5062 3012 3026
2050 2013 Express Vu Star Choice 3041
Signature Video 5084 GE
2069 Concepts 0085 3001 3060
ginger 2006 GE SISI 3061
2010 2007 0000 3013
5058 3062
2037 2012 0001 3062
2072 2013 0000 STS3 GoVideo Samsnng
Sony 2060 5090 5059 3040 3027
2004 Wards 0091 STS4 Nitacbl 3037
0092 0060 3014 Sansni
2000 2010 0093 Toshiba 3032
2051 Nil jvc
0094 006! Sanyo
2063 2012 3041
2006 2010 General 0063 I(enwood 3043
STS 2020 Instruments 0076 3015 Sharp
2010 2023 5084 5077 3020
2054 2020 0085 0078 I(onka 3047
Sylvania 2034 0056 0079 3005
2010 2035 Hitachi 0080 I(oss Sony
2019 2037 0070 0081 300! 30303029
2023 2040 007! 0082 Lasonk 3031
0003 3030
2030 2054 Hughes 3050
2039 2062 Network Unidea Nagnavox Sylvania
2040 2069 Systems 0073 3002 3012
2066 2071 0066 ttl)TVTuner 3016 3059
Symphonk XR=IOOO 0075 ItCA Memorex Toshiba
2023 2010 JVC 3000 3017 3033
2023 0069 blintek 3034
Tandy 2037 Panasonic 3018 3035
2000 Yamaha 0064 Nitsubishi 3036
Tashiko 2006 Pbilips 3003 Zenith
2011 2007 0072 NAD 3037
Tatung 2000 Primestar 3011 3040
2000 2015 0065 Norcent
Teac 2050 Proscan 3019
2023 Zenith 0000 Onlcyo
2058 2004 000! 3020
Technics 2050 Oritron
2010 2053 3024
2006 2063
leknika 2072
20If 2001
I)Vl)/VCll
l)Vl)
button
&AtlX
button
Broksonic
DV_3050
VCR2003
Emerson
DVD3052
VCR2084
GoVideo
DVD3040
VCR2077
jvc
DVD304t
VC02077
NCA
DVD3042
VCR2070
Sanyo
DVD3043
VCR2070
Sony
DVD3058
VCR2086
Zenith
DVD3048
7¢0208!
CableBox
CABLEbutton
ABC
0003
0004
0005
0007
0046
Archer
00!0
0011
Cableview
0000
Contec
0016
Eastern
0017
GE
0002
0003
0004
Gemini
00!0
00!7
!ieneral
Instruments
0004
Namlin
0020
002!
5022
0077
5034
Nitachi
0004
jerrold
0004
0010
5023
0024
5040
0046
blagnavox
5025
Motorola
5047
0040
0049
blovie Time
5026
NEC
5006
NSC
0026
Oak
00!6
0020
Panasonk
5042
0045
Philips
5012
5013
5014
8015
8019
8028
5029
8030
803!
Pioneer
5032
5033
Proscan
5002
8003
8004
!lCA
5002
5000
504I
8043
5045
!lealistic
8010
Samsung
5033
Sdentiflc
Atlanta
8007
5035
5036
8037
Signature
8004
Sprucer
8048
Standard
Component
8038
5039
Starcom
8018
8046
Stargate
8010
Tocom
5005
8023
United Cable
5046
Universal
8009
8010
801!
View Star
5016
5025
8026
Zenith
8044
Graphics contained within this publication are for representation only 25
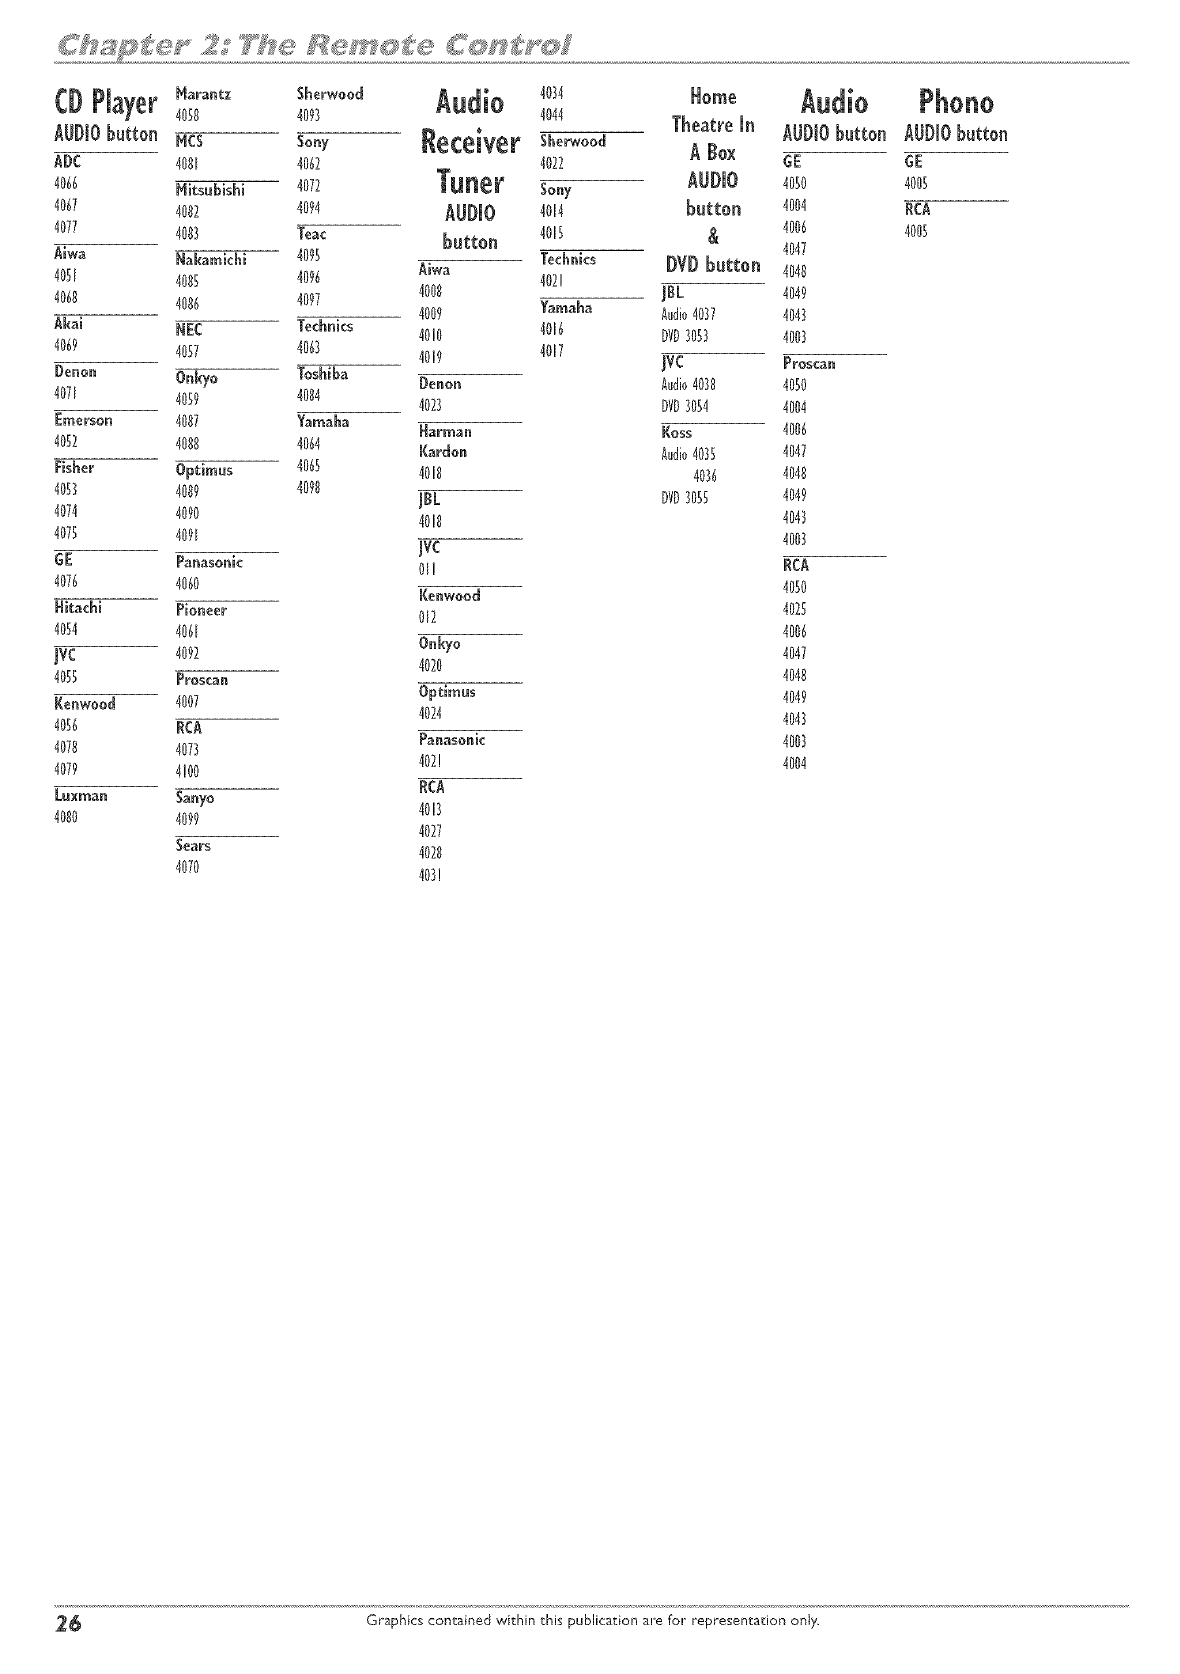
Marantz Sherwood
CDPlayer4050 4098
AUDIObutton Rcs so.y Receiver
ADC 4001 4062
4066 HitsubisN 4072 TUn_F
4067 4002 4094 AUDmO
4077 4008 Teac button
Aiwa Nakamichi 4095
4081 4005 4096 Aiwa
4060 4006 4097 4008
4009
Akai NEC Technics 4010
4069 4057 4063 4019
Deoon Onkyo Toshiba Denoo
4071 4059 4084 4023
Emersoo 4007 Yamaha _a_man
4052 4008 4064 Kardon
Fisher Optimus 4065 4018
4053 4009 4090 JBL
4074 4090 4018
4078 4091 JVC
GE Paoasooic 01!
4076 4060 Kenwood
Hitachi Piooeer 012
4054 406[
JVC 4092 Onkyo
4020
4058 Proscan
Keowood 4007 Optimus
4024
4056 RCA Pan°sonic
4078 4078 402!
4079 4!00
Laxraa° Saayo RCA
4080 4099 4013
4027
gears 4020
4070 403!
4084
4044
Sherwood
4022
Sony
4014
4018
Technics
402!
Yamaha
4016
4017
_ome
TheatreAUDIObutton
A Box GE
AUDIO 4080
button 4oo4
& 4006
4047
DVD button 4040
JBL 4049
Audio4087 4048
DVD3053 4008
JVC Prosca.
Audio4088 4050
DVD3054 4004
Koss 4006
Audio4085 4047
4086 4048
DVD3058 4049
4043
4008
RCA
4050
4025
4006
4047
4048
4049
4048
4008
4004
Phono
AUDIO button
GE
4005
RCA
4005
2_ Graphics contained within this publication are foF representation only.
®
o
o
®
o
o
Watching TV
DVD Recording (DVD+R and DVD +RW)
Disc Library
DVD Playback
VCR Recording
VCR Playback
Graphicscontained within this User_ Guideare for representation oniy_Some
of the menu screens,buttons, and disp/ay messagesmight be different in your
product than they appear in this book. [he on-screenhelp text provides the
most current operational information.
page 27
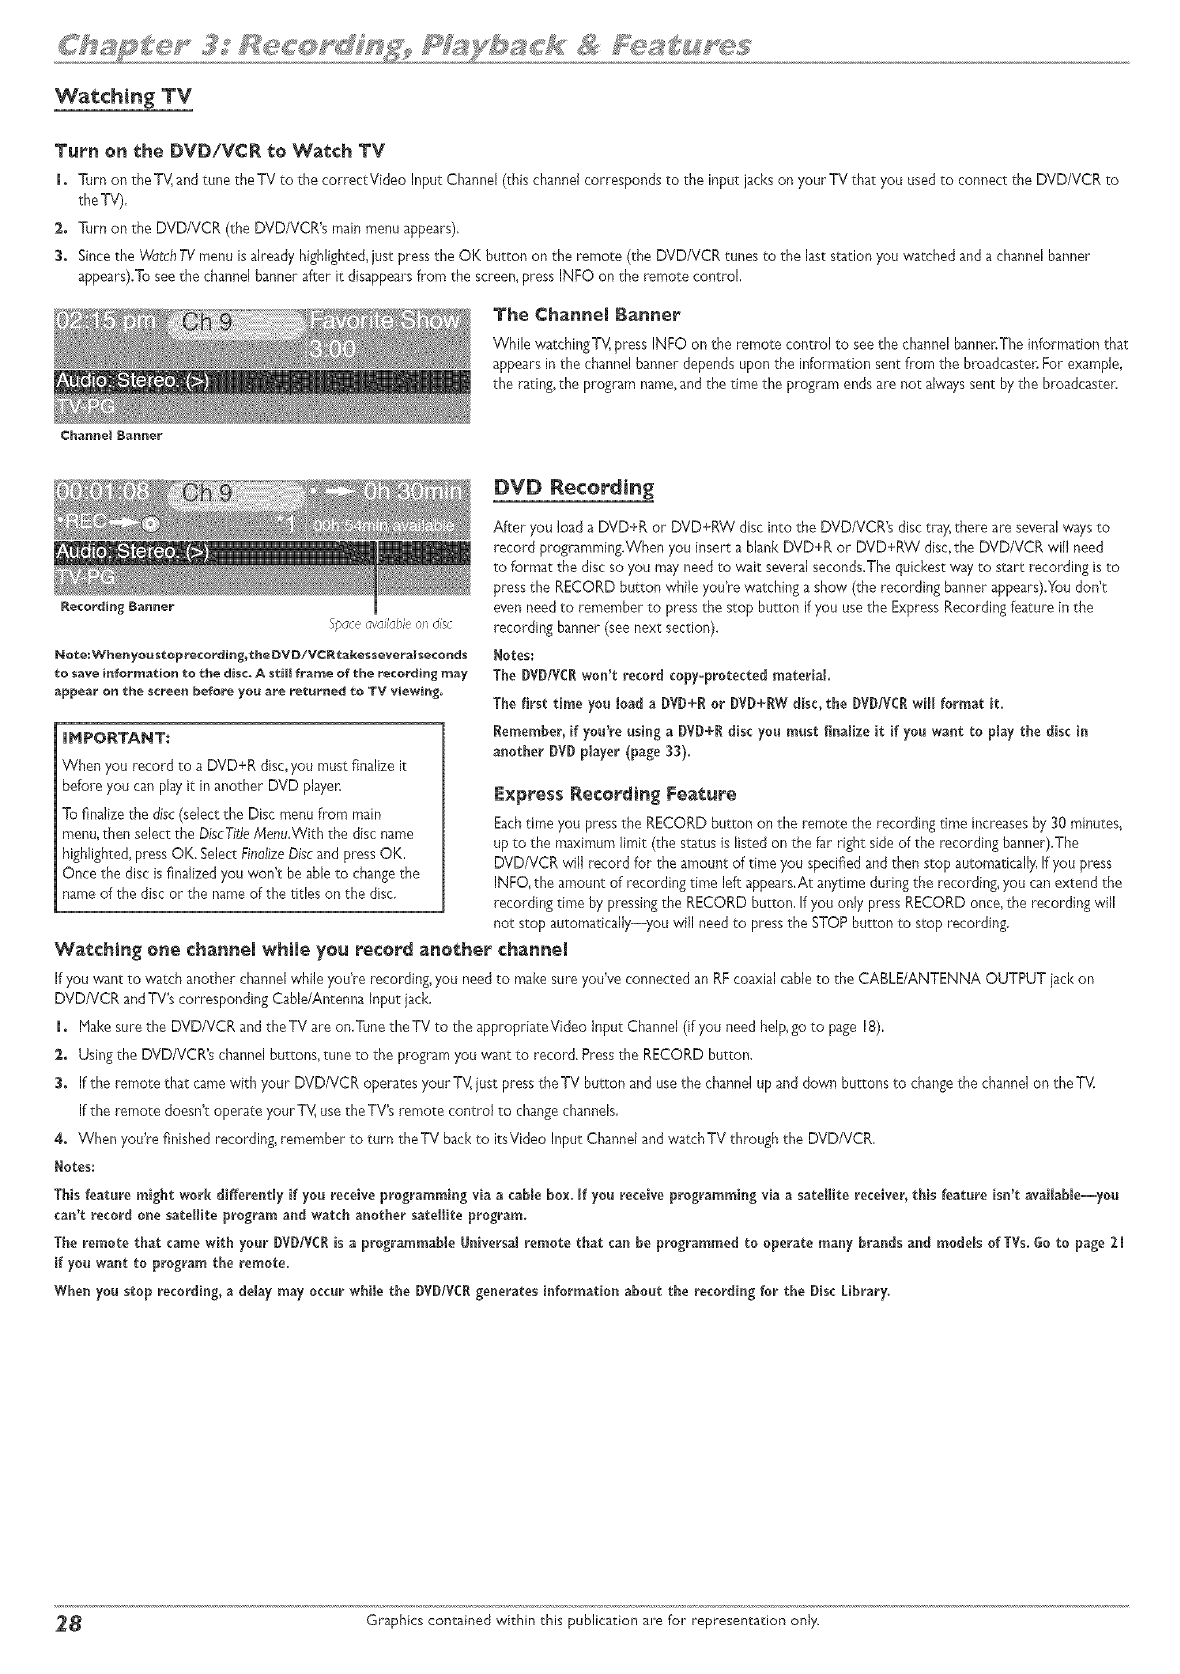
Watchin tTV
Turn on the DVD/VCR to Watch TV
1. Turn on the T_,_arid tune the TV to the correctVideo Input Channel (this channel corresponds to the input jacks on your TV that you usedto connect the DVD/VCR to
the TV),
2. Turn on the DVD/VCR (the DVD/VCR's mainmenu appears),
3. Sincethe WatchTV menu is already highlighted,just pressthe OK button on the remote (the DVD/VCR tunes to the last station you watched and a channelbanner
appears).Toseethe channel banner after it disappearsfrom the screen,press INFO on the remote control,
Channel B_rmer
The Channel Banner
While watchingTV, press INFO on the remote control to seethe channelbannenThe information that
appearsin the channelbanner depends upon the information sent from the broadcaster.For example,
the rating, the program name,and the time the program ends are not alwayssent by the broadcaster.
DVD Recording
Fpacea,_aiiableo_ disc
Note:Whe_yo_s¢opre¢ordi_g_¢he_VD/VCR¢a[_essevera_secends
te save in_r_io_ to _he dis¢_ A $til _r_me o_ _he recordi_ m_y
appear on the screen before you are re_rne_ _o TV viewing+
IHPORTANT:
When you record to a DVD+R disc,you must finalize it
before you can play it in another DVD player.
Tofinalize the disc(select the Disc menu from main
menu,then select the DiscTitleMenu.With the disc name
highlighted,press OK. SelectFinalizeDiscand press OK,
Once the disc is finalized you won't be able to changethe
name of the disc or the nameof the titles on the disc,
After you load a DVD+R or DVD+RW disc into the DVD/VCR's disc tray;there are several waysto
record programming.When you insert a blank DVD+R or DVD+RW disc,the DVD/VCR will need
to format the disc so you mayneed to wait several seconds,Thequickest way to start recording isto
press the RECORD button while you're watching a show' (the recording banner appears),Youdon't
even needto remember to pressthe stop button if you usethe Express Recordingfeature in the
recording banner (see next section),
Heros:
The DVDIVC! won't record copy=protectedmaterial
The first time you load a DVD+[_or DVD+RWdisc, the DVD/VCIwtl format it.
Remember, if you're using a DVD+_ disc you must finalze it if you want to play the disc in
another DVD player (page 33),
Express Recordi_ Fea_:ore
Eachtime you pressthe RECORD button on the remote the recording time increases by }0 minutes,
up to the maximum limit (the status is listed on the far right side of the recording banner).The
DVD/VCR wi/record for the amount of time you specified and then stop automatically,If you press
INFO,the amount of recording time left appears.At anytime during the recording, you can extend the
recording time by pressingthe RECORD button, If you only pressRECORD once,the recording wil
not stop automatica/y--you wil need to pressthe STOP button to stop recording,
Wat¢hi_ o_e cha_el whle yo_ record a_other cha_el
If you want to watch another channelwhile you're recording,you needto make sure you've connected an RFcoaxial cableto the CABLE/ANTENNA OUTPUT jack on
DVDNCR and TV'scorresponding Cable/Antenna input jack.
l, Hake sure the DVD/VCR and theTV are on._une theTV to the appropriateVideo input Channel (if you need help,go to page 18),
2, Using the DVD/VCR's channel buttons, tune to the programyou want to record. Pressthe RECORD button.
3, If the remote that camewith your DVD/VCR operates your TV,iust pressthe TV burton and usethe channel up and down buttons to changethe channel on the TV.
If the remote doesn't operate your TV, use the TV's remote control to changechannels,
4, When you're finished recording, remember to turn theTV back to itsVideo Input Channeland watchTV through the DVD/VCR,
Hotes:
Thisfeature might work differently if you receiveprogrammingvia acamebox. [f you receiveprogrammingvia a satelite receiver,this feature isn't available--you
can't record one satellite program and watch another satellite program.
The remotethatcame withyour DVDIVCRisa programmaMe Universalremotethatcanbe programmed tooperatemany brandsand modelsofTVs.Go to page2[
if you want to program the remote.
When you stoprecording,a delaymay occurwhle theDVD!VCRgeneratesinformationaboutthe recordingforthe DiscLibrary,
_ Graphics contained within ghis publication are for representation only.
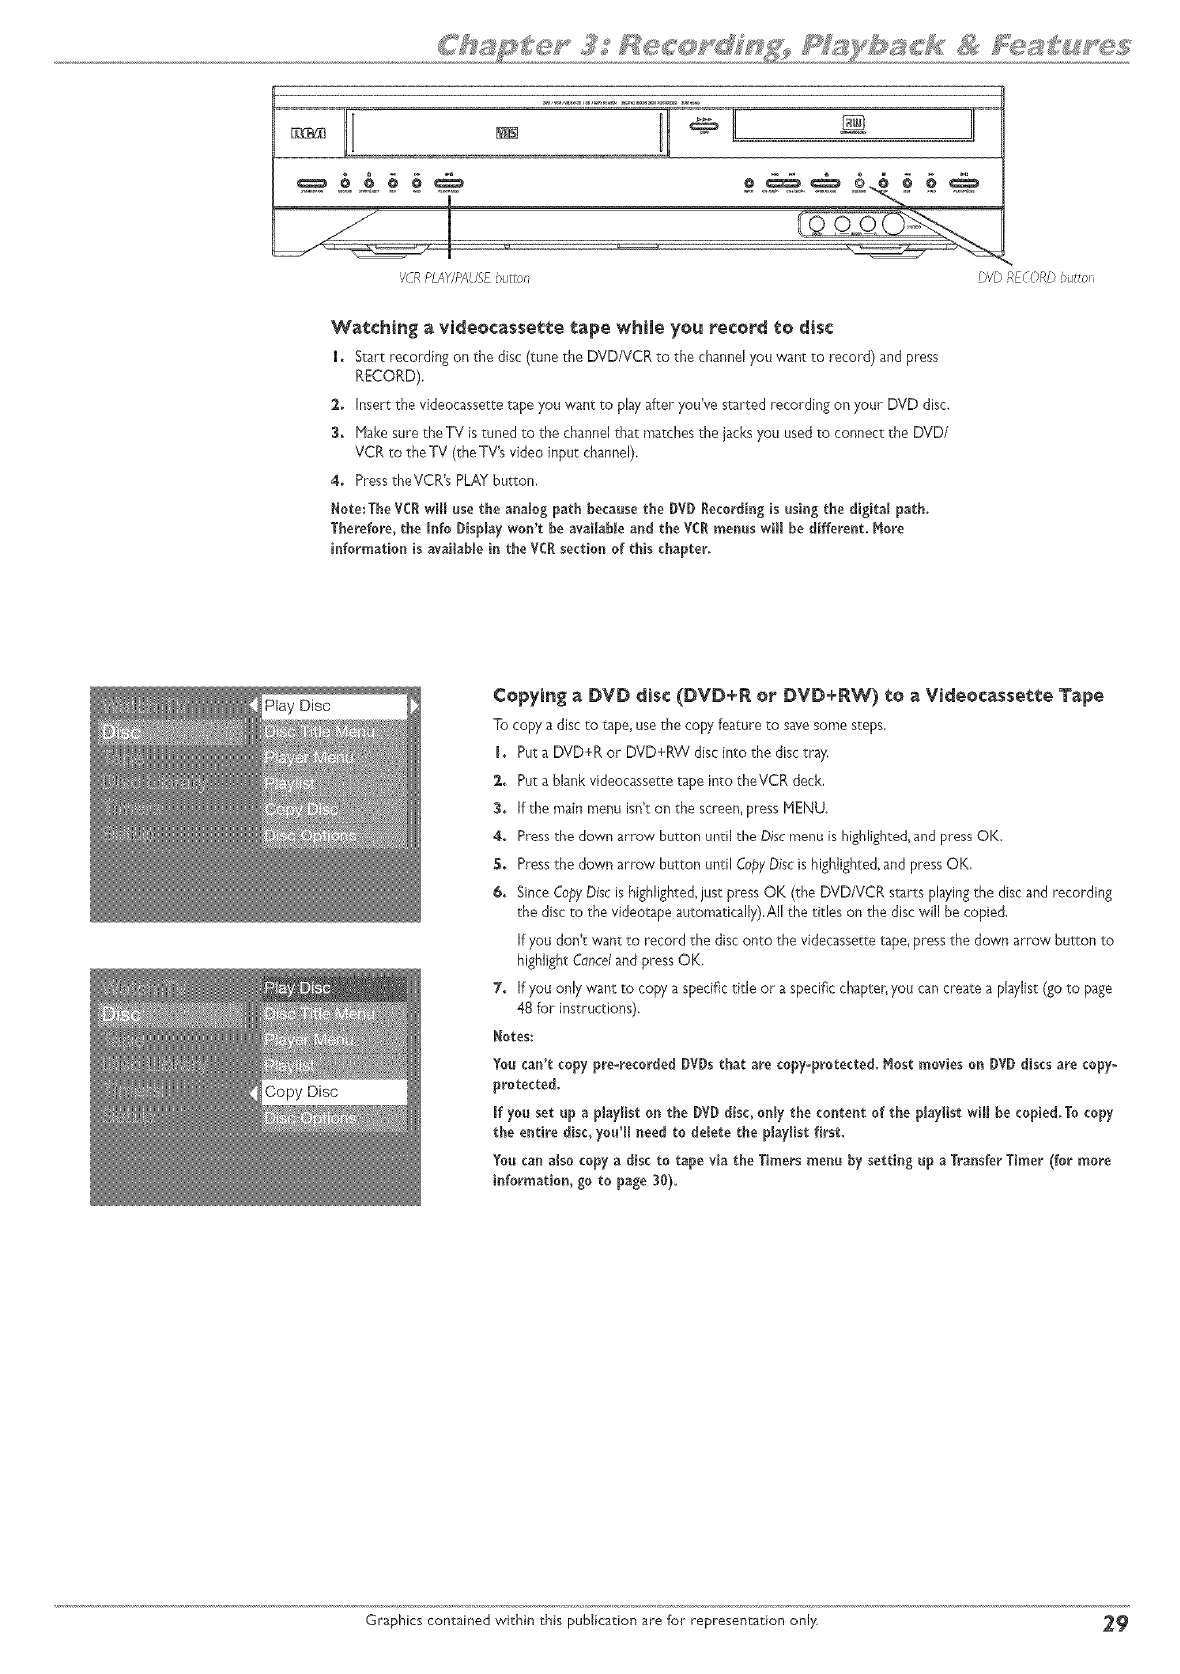
/C8 F_M,h'_AUSEoutto_
Watching avideocassette tape while you record to disc
i, Start recording on the disc (tune the DVD/VCR to the channelyou want to record) and press
RECORD),
2, Insert the videocassette tape you want to play after you've started recording on your DVD disc.
3, Hake sure the TV istuned to the channel that matches the jacks you used to connect the DVD/
VCR to the TV (the TV's video input channel).
4, PresstheVCR's PLAYbu_ton,
Note:The VOltwii[ use the analog path because the DVD Recording [s using the digital path.
Therefore,the [nfo Display won't be available and the ¥CRmenus will be different More
information [s available [n the VCRsection of this chapter,
OlD RFCORDoutto_
Play Disc Copying a DVD disc (DVD+R o_ DVD+@_ e_ a Vide_casse_e Tape
To copy a disc to tape, use the copy feature to savesome steps,
I, Put a DVD+R or DVD+RW disc into the disc tray.
g, Put a blank videocassette tape into theVCR deck,
_, If the main menu isn't on the screen,press MENU,
4, Press the down arrow button until the Discmenu is highlighre&and press OK.
5, Pressthe down arrow button until CopyDiscis highlighted,and pressOK,
_. SinceCopyDiscis highlighted,just pressOK (the DVD/VCR starts playingthe disc and recording
the disc to the videotape au_omatically).AIIthe titles on the disc will be copied,
If you don't want to record the disc onto the videcasserretape, pressthe down arrow button to
highlight Canceland pressOK.
7. If you only want to copy a specifictitle or a specific chapter,you can create a pUist (go to page
48 for instructions).
Notes:
You can'tcopy pro-recordedDVDs thatarecopy-protected,Most movieso_ DVD discsarecopy-
protected,
ifyou setup a p[ay[iston theDVD disc,onlythecontentofthep[ay[istwillhe copied,Tocopy
theentiredisc, you'_need tode_etethep[ay[ist first.
Youcan also copy a disc to tape via the Timers menu by setting up a Transfer Timer (for more
information, go to page 30),
Graphics contained within chis publication are for representation only 2_
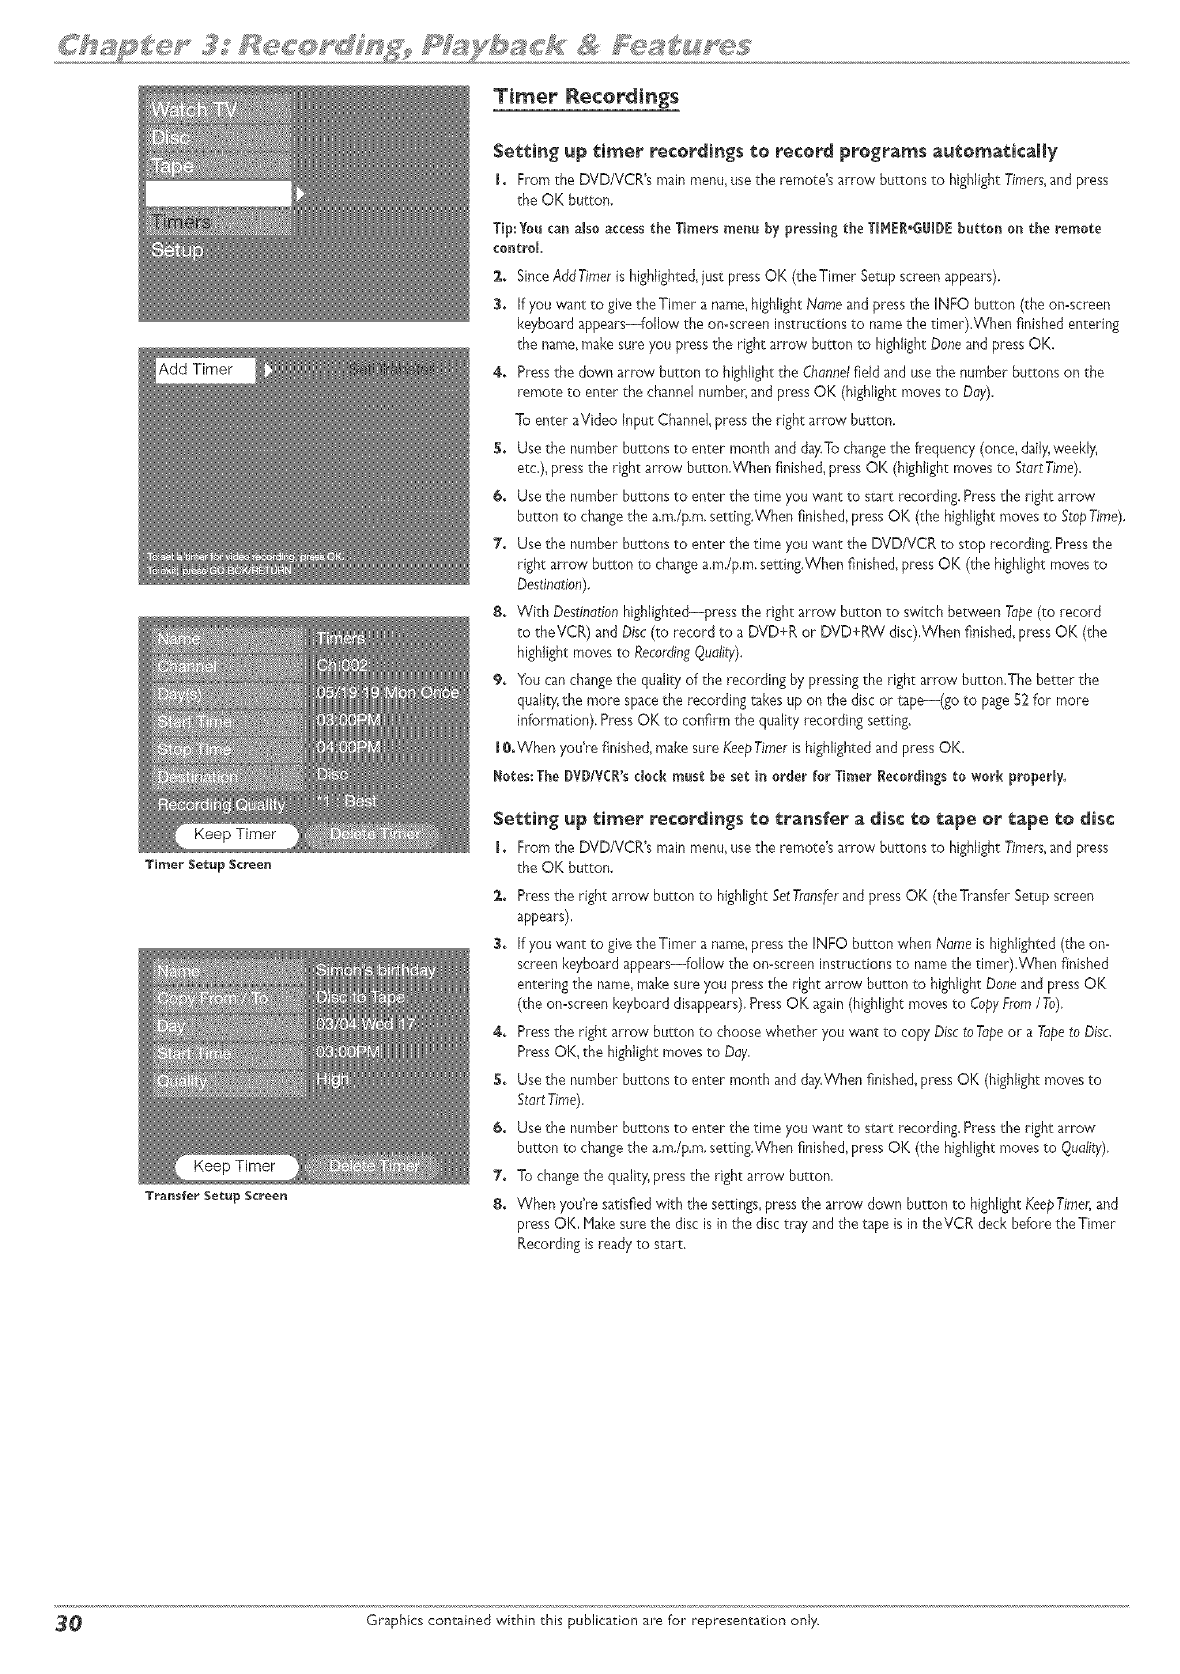
Timer lecortings
Timer Setup Screen
Transfer Setup Screen
Setting up timer recordings to record programs automatically
1, From the DVD/VCR's main menu,usethe remote's arrow buttons to highfght Timers,and press
the OK burton.
Tip:Y0u can also accessthe Timers menu by pressir_gthe TIMEI*GLII)E button on the remote
coatroL
2. SinceAddTimer is highfghte& just pressOK (theTimer Setupscreen appears).
3. If you want to give the Timer a name,highlght Name and pressthe INFO button (the on-screen
keyboard appears--folow the on-screen instructions to namethe timer).When finished entering
the name,make sure you pressthe right arrow button to highlight Doneand press OK.
4. Pressthe down arrow button to highlightthe Channelfield and usethe number buttons on the
remote to enter the channel number,and pressQK (highfght moves to Day).
To enter aVideo input ChanneJ,pressthe right arrow button.
5. Use the number buttons to enter month and day.Tochangethe frequency (once, daily,weeld};
etc.), ptess the right arrow button,When finishe& press OK (highlight movesto StartTime).
& Use the number buttons to enter the time you want to start recording. Pressthe right arrow
button to changethe a,m,/p,m,setting.When finished,pressOK (the highlightmoves to StopTime).
7. Use the number buttons to enter the time you want the DVD/VCR to stop recording. Pressthe
right arrow burton to changea,m./p,m,setting.When finished,pressOK (the highlight movesto
Destination).
8+ With Destinationhighlighted--press the right arrow button to switch between Tape(to record
to theVCR) and Disc(to record to a DVD+R or DVD+RW disc),When finished,pressOK (the
highlight moves to RecordingQuality).
9+ You canchangethe quality of the recording by pressingthe right arrow button.The better the
quali_T,the more spacethe recording takes up on the disc or tape--(go to page52 for more
information). PressOK to confirm the quality recording setting.
IO.When you're finishe& make sure KeepTimer is highlighted and press OK.
Notes: The DVD/VCI'sdock must be set in order for Ti_er [_ecordir_gsto work property.
Set:_ing up ¢i_er recordings _:e transfer a _isc _:_ tape er tape _e _isc
LFrom the DVD/VCR's main menu,usethe remote's arrow buttons to highlight Timers,and press
the OK burton,
2, Pressthe right arrow butron to highlight SetTranslkrand pressOK (theTransfer Setupscreen
appears),
3, If you want to give the Timer a name,press the INFO button when Name is highlighted(the on=
screen keyboard appears--follow the omscreen instructions to namethe timer),When finished
entering the name_makesure you pressthe right arrow button to highlight Done and pressOK
(the on=screenkeyboard disappears),Press OK again(highlight movesto CopyFrom/To),
4, Pressthe right arrow button to choose whether you want to copy Discto Tapeor a Tapeto Disc,
Press OK, the highlight moves to Day,
5, Use the number buttons to enter month and day,When finished,pressOK (highlight movesto
StartTime).
& Use the number buttons to enter the time you want to start recording. Pressthe right arrow
button to changethe a.m./p,m,setting.When finished,pressOK (the highlightmoves to Quality),
7. To changethe quality,pressthe right arrow button,
8. When you're satisfied with the settings,pressthe arrow down button to highlight KeepTimer,and
press OK, Hake sure the disc is in the disc tray and the tape is in theVCR deck before the Timer
Recording isready to start.
30 Graphics contained within this publication are for representation only.
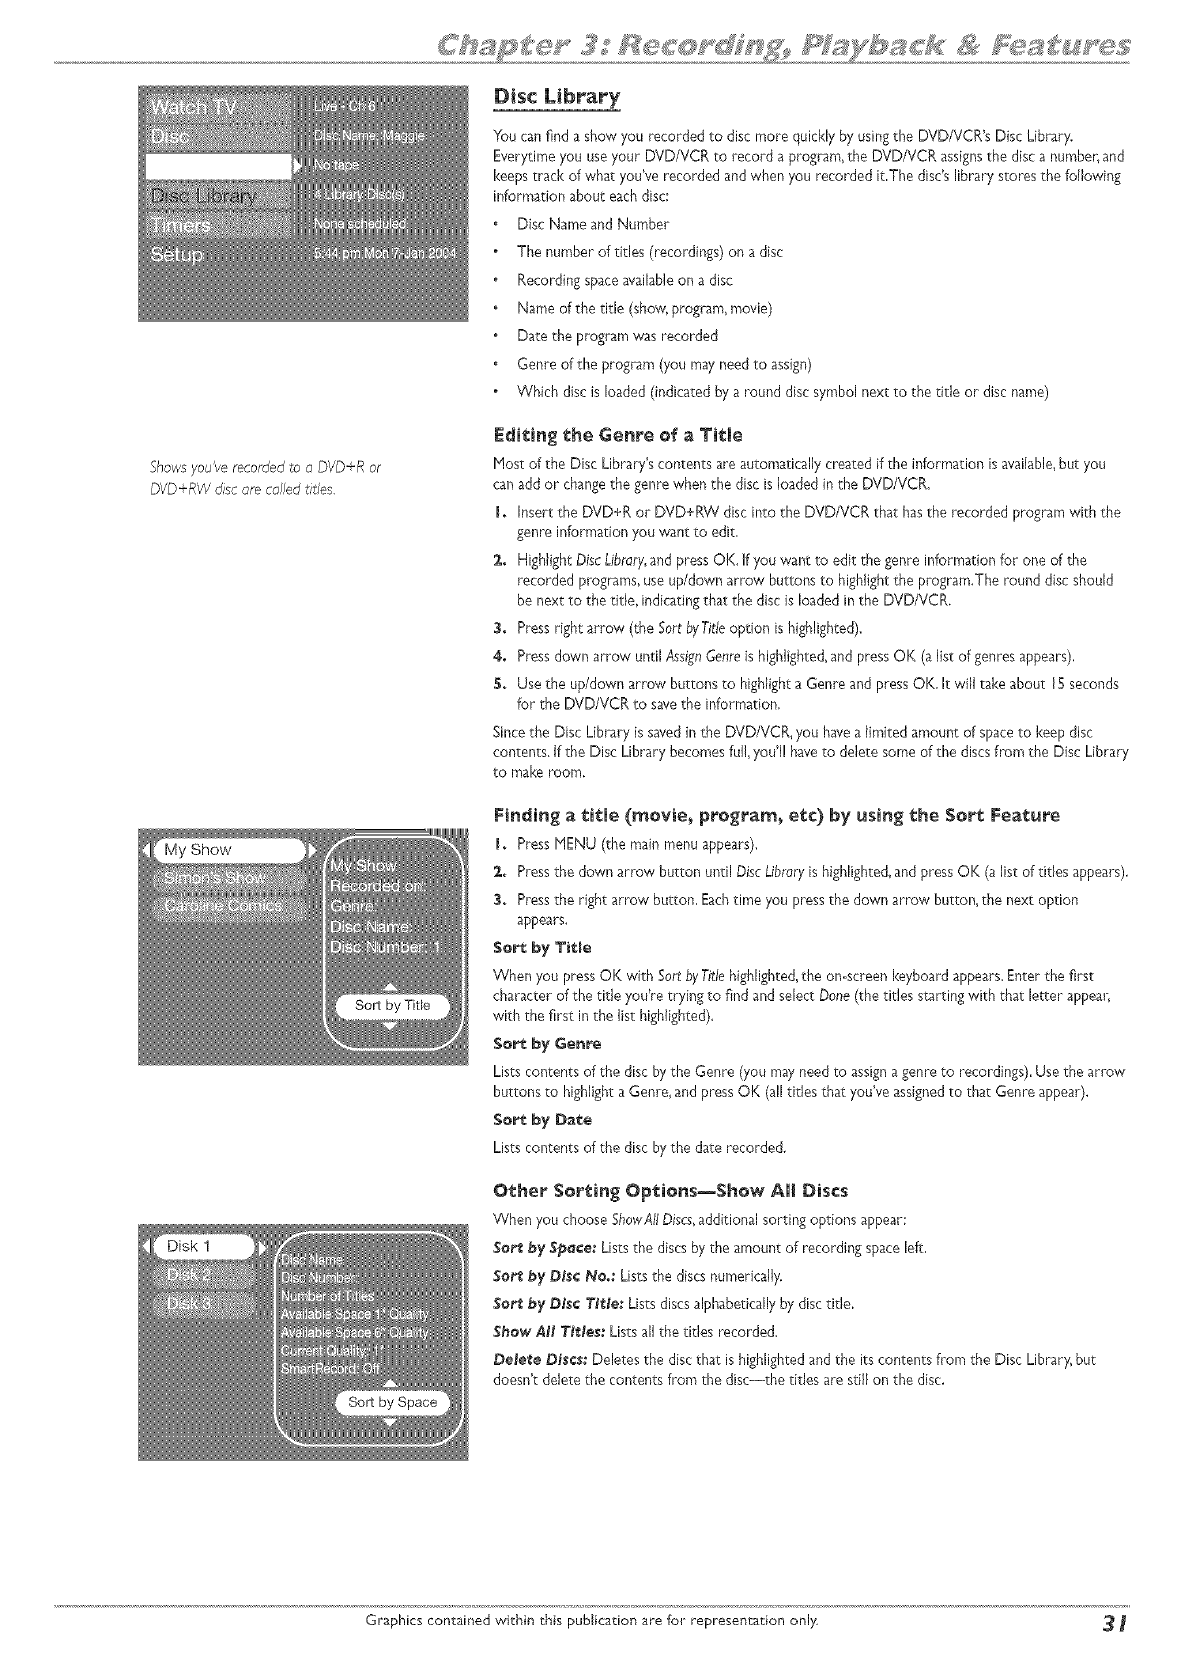
Showsyou'verecordedto a DVD+R or
DVD+RW dsc are called t_tles.
'Show
Disc Library
You canfind a show you recorded to disc more quickly by using the DVD/VCR's Disc Library.
Everytime you useyour DVD/VCR to record a program, the DVD/VCR assignsthe disc a numbe_and
keeps track of whacyou've recorded andwhen you recorded it,The disc'slibrary stores the following
information about eachdisc:
Disc Name and Number
The number of titles (recordings) on a disc
Recording spaceavailableon a disc
Name of the title (show,ptogram, movie)
Date the program was recorded
Genre of the program (you mayneed to assign)
Which disc is loaded (indicated by a round disc symbol next to the title or disc name)
Editing t,he Genre of a Title
Most of the Disc Library's contents are automatically created if the informationisavailable,but you
canadd or changethe genre when the disc is loaded in the DVD/VCR,
I + Insert the DVD+R or DVD+RW disc into the DVD/VCR that hasthe recorded program with the
genre informationyou want to edit,
2. HighNghtOiscLibrary,and pressOK. If you want to edit the genre information for one of the
recorded programs,use up/down arrow buttons to highlightthe program.The round disc should
be next to the title, indicating that the disc is loaded in the DVD/VCR.
3. Press right arrow (the Sort byTitleoption is highlighted),
4. Press down arrow until Assiw_Genreis highNghted,and pressOK (aNstof genresappears),
5+ Use the up/down arrow buttons to highlighta Genre and pressOK, It win take about 15 seconds
for the DVD/VCR to savethe information,
Sincethe Disc Library is savedin the DVD/VCR, you havea limited amount of spaceto keep disc
contents, if the Disc Library becomes ful, youG!haveto delete some of the discsfrom the Disc Library
to make room.
Finding a t,itle (_evie_ pre_:rarn_ e_:¢) by using the Sort Feature
I+ Press MENU (the main menu @pears),
2+ Pressthe down arrow button urltil DiscLibraryis highlighted,and press OK (alist of titles appears).
3+ Pressthe right arrow button, Eachtime you pressthe down arrow button, the next option
appears,
$o_ by Title
When you pressOK with Sort byTitlehighlighted,the on-screen keyboard @pears.Enter the first
character of the title you're trying to find and select Done (the titles s_rting with that letter @pear,
with the first in the list highlighted).
Sort by Genre
Lists contents of the disc bythe Genre (you mayneed to assignagenre to recordings),Use the arrow
buttons to highlight a Genre, and press OK (all titles that you've assignedto that Genre appear),
Sort by Da_e
Lists contents of the disc bythe dare recorded.
Other Sorting Opt:iens_$how All Discs
When you choose ShowAIIDiscs,additional sorting options appear:
$or_ _y ._p_¢," Lists the discsby the amount of recording space left.
Se_ _y Disc N_,: Liststhe discs numerically.
Se_ _y Dt_¢ Tit_e; Lists discsalphabeticallyby disctitle,
$ffew AH Tlt_le_:Lists all the titles recorded.
Delete D_¢_: Deletes the discthat is highlighted and the its contents from the Disc Library_but
doesn't delete the contents from the discithe titles are still on the disc,
Graphics contained within this publication are for representation only 3
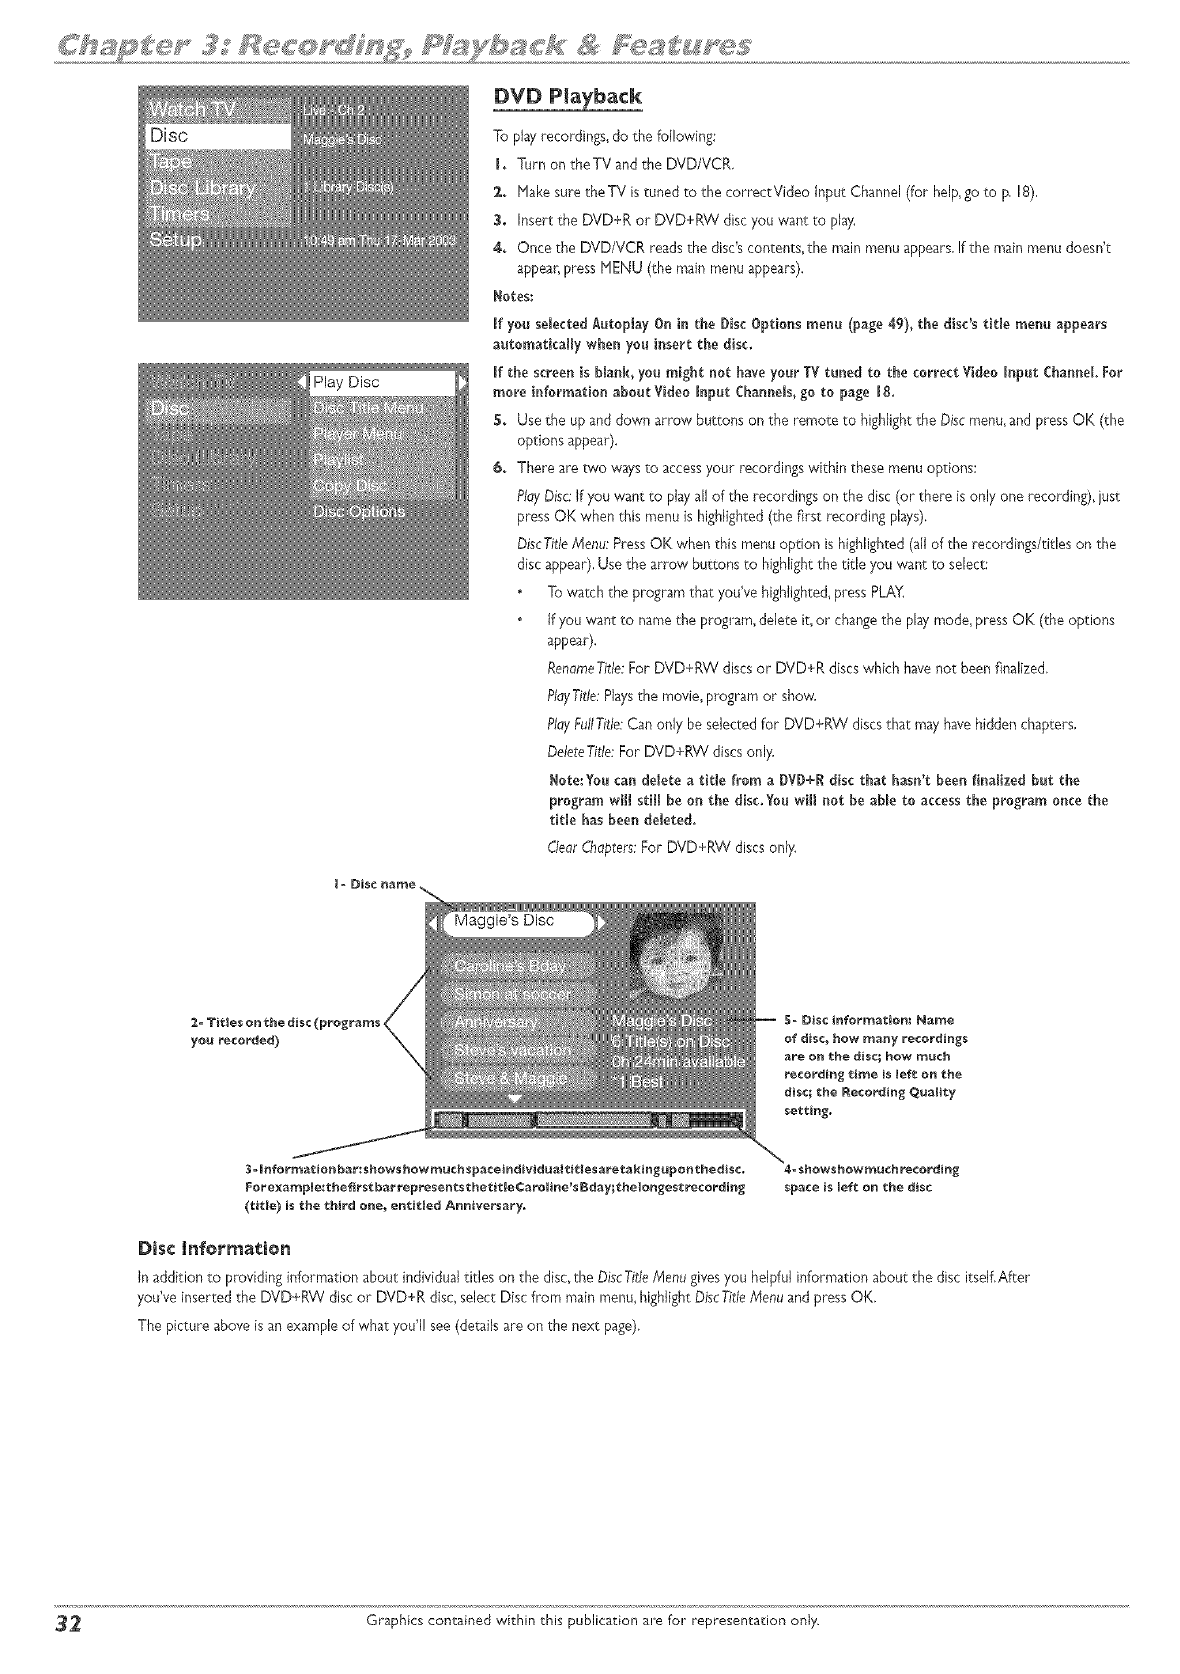
Play Disc
DVD Playback
To play recordings, do the following:
I. Turn on theTV and the DVD/VCR.
2. Hake sure theTV is tuned to the correct Video input Channel(for help,go to p. 18).
3, Insert the DVD+R or DVD+RW disc you want to play.
4. Once the DVD/VCR reads the disc'scontents, the main menu appears.If the main menu doesn't
appear,press HENU (the main menuappears).
Notes:
If you selectedAutopJay On in the Disc Options menu (page 49), the disc's title menu appears
automaticaffy when you insert the disc.
If the screenis blank, you might not haveyour TV tuned to the correctVideo Input Channel For
more information about Vi_]eoInput Channels,go to page 18.
5. Use the up and down arrow buttons on the remote to highlightthe Discmenu,and pressOK (the
options appear).
€. There are two ways to accessyour recordings within these menu options:
PlayDisc If you want to play all of the recordings on the disc (or there is only one recording), just
press OK when this menu is highlighted (the first recording plays).
biscTitle/Vlenu:PressOK when this menu option is highlighted(all of the recordings/titles on the
disc appear).Use the arrow buttons to highlightthe title you want to select:
To watch the program that you've highlighted, press PLAY,
if you want to namethe program, delete it, or changethe playmode, press OK (the options
appear).
ReaameTitJe:For DVD+RW discs or DVD+R discs which havenot been finalized.
PlayTitle:Playsthe movie, program or show.
PlayFallTitle:Can only be selected for DVD+RW discs that mayhavehidden chapters.
DeleteTitle:For DVD+RW discs only.
Hate:You can delete a tit_e from a _VD+_ disc that hasn't been finalized but the
program wiff stitl be on the disc.Youwill net he able to accessthe program once the
tit_e has been deleted.
Dear Chapters:For DVD+RW discs only.
$-_for_a¢io_ba_:shows howm_ch spacei_dividuait_t|es a_e_a_i_po_thedis¢,
For e×ar_p_e_'_he first ba_eprese_ts _he_it_eCa_o_i_e'_ Bday;¢he_o_ges¢ reco_din_
(l:itle} is the _hird e_e_ ¢_¢itled A_iversary.
4- showshowm_¢h re¢ordin_
_pace is left o_ €he disc
Disc lnfo_a_io_
in addition to providing in_rmation about individualtitles on the disc,the D_c T/tieMenu givesyou helpful in_rmation about the disc itself,After
you've inserted the DVD+_W disc or DVD+R disc, select Disc from main menu,highlight DiscTideMenu and press OK,
The picture above isan example of what you'l! see(details are on the next page).
_2 Graphics contained within ehis publication are for representation only.
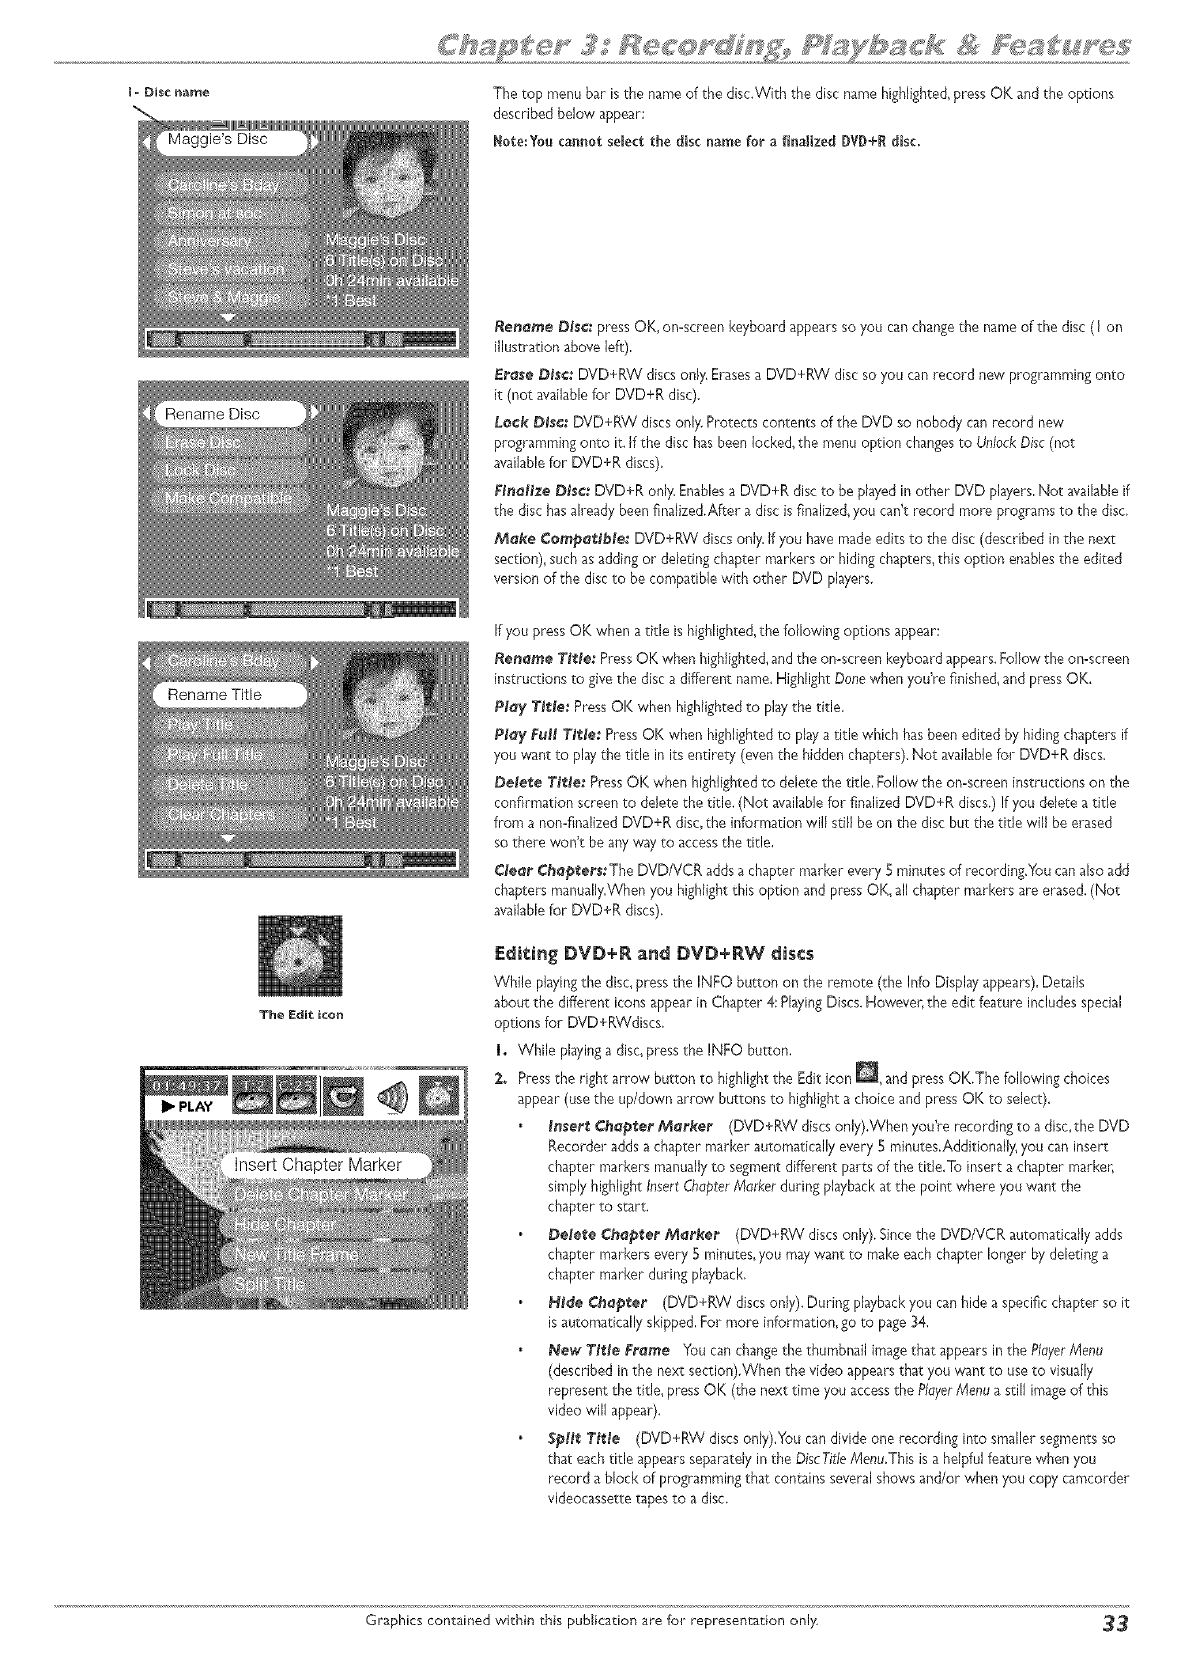
i _ Disc name The top menu bar isthe nameof the disc.With the disc name highlighted,press OK and the options
described below appear:
Note:You cannot select the disc name for a finalized DVD+R disc,
The Edit icon
Rename DIsc: Press OK, on=screenkeyboard appearsso you canchangethe name of the disc ([ on
illustration above left),
Erase Disc: DVD+RW discsonly.Erasesa DVD+RW disc so you can record new programming onto
it (not availablefor DVD+R disc).
lack Disc: DVD+RW discs onl>;Protects contents of the DVD so nobody canrecord new
programming onto it. Ifthe disc hasbeen locked,the menu option changesto UnlockDisc(not
availablefor DVD+R discs).
Finalize Disc: DVD+R only.Enablesa DVD+R disc to be played in other DVD players,Not availableif
the disc hasalready been finalized.After a disc is finalized,you can't record more programs to the disc,
Make Campattb/e: DVD+RW discsonly.If you have madeedits to the disc (described in the next
section),such asadding or deleting chapter markers or hiding chapters,this option enablesthe edited
version of the discto be compatible with other DVD players.
If you press OK when a title is highlighted,the following options appear:
Rename Title: PressOK when highlighted,and the omscreen keyboard appears.Follow the on-screen
instructions to give the disc a different name.Highlight Donewhen you're finished,and press OK.
Play Title: PressOK when highlightedto pby the title.
Play Full Tttle: PressOK when highlighted to play a title which hasbeen edited by hiding chapters if
you want to play the title initsentirety (eventhe hiddenchapters).Not availablefor DVD+R discs.
De/ere T/tie: PressOK when highlighted to delete the title, Follow the on-screen instructions on the
confirmation scteen to delete the title. (Not availablefor finalized DVD+R discs.) If you delete a title
from a non-finalized DVD+R disc,the information will Slimbe on the disc but the title will be erased
so there won't be any 'wayto accessthe title.
Clear Chapters:The DVD/VCR addsa chapter marker every 5 minutes of recording,You canalso add
chapters manually.Whenyou highlight this option and pressOK, all chapter markers are erased.(Not
availablefor DVD+R discs),
F:di_:ing DVD+R and DVD+RW discs
While playingthe disc,press the INFO button on the remote (the Info Display appears),Details
about the different icons appear in Chapter 4: PlayingDiscs.However, the edit feature includes special
options for DVD+RWdiscs,
1. While playinga disc,pressthe INFO button.
2. Pressthe right arrow button to highlight the Edit icon _, and press OK.The following choices
appear (use the up/down arrow buttons to highlighta choice and pressOK to select).
/nsert Chortler Marker (DVD+RW discs only).When you're recording to a disc,the DVD
Recorder addsa chapter marker automatically every 5 minutes,Additionall_ you can insert
chapter markers manuallyto segment different parts of the title.To insert a chapter marker,
simply highlight InsertChopterfVJarkerduring playbackat the point where you want the
chapter to start.
Delete C;hapter Marker (DVD+RW discs only). Since the DVD/VCR automatically adds
chapter markers every 5 minutes, you may want to make each chapter longer by deleting a
chapter marker during playback,
_ide Cha_te_ (DVD+RW discs only). During playbackyou can hide a specific chapter so it
isautomatically skipped,For more information, go to page_4.
New TItle Frame You canchangethe thumbnail imagethat appearsin the PIoyeriVlenu
(described in the next section).When the video appearsthat you want to useto visually
represent the title_ press OK (the next time you access the PlayerfVlenua still image of this
video will appear).
Split Title (DVD+RW discs only).you can divide one recording into smaller segmentsso
that eachtitle appearsseparately in the DiscTit/eMenu.This isa helpful feature when you
record a block of programming that containsseveral shows and/or when you copy camcorder
videocassette tapes to a disc.
Graphics contained within this publication are for representation only _
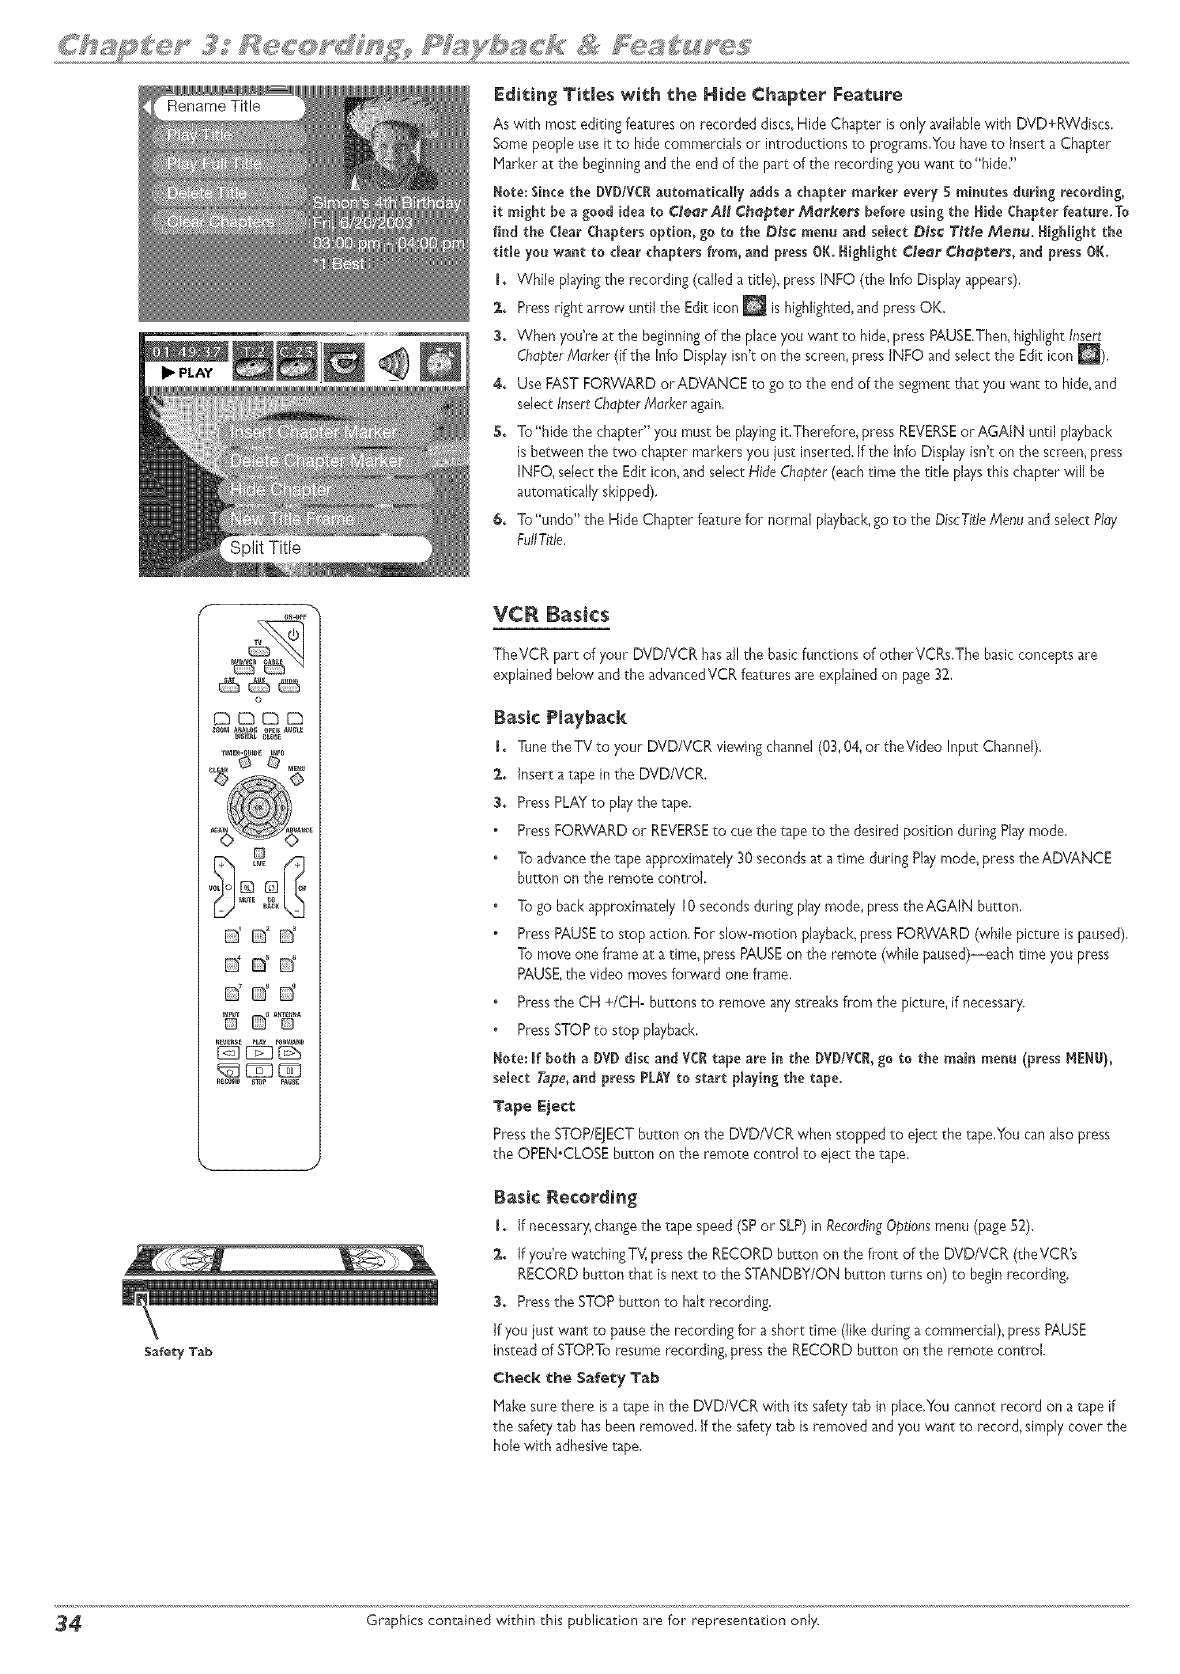
Editing Titles with the Hide Chapter Feature
As with most editing features on recorded discs,Hide Chapter is only availablewith DVD+RVVdiscs.
Some people useit to hide comme_cialsor introductions to programs.You haveto Insert a Chapter
P1arkerat the beginningand the end of the part of the recording you want to"hide."
Note; Since the DVD/VCRautomatically adds a chapter marker ever}, 5 minutes during recording,
it might be a good idea to Great At/Chepter Merkers before using the HideChapter feature. To
find the Clear Chaptersoption, go to the Disc menu and select Disc Title Menu. Highlight the
title you want to dear chapters from, and pressOK. Highlight _teer _hept_e_, and press OK.
L While playing the recording (called a title), press INFO (the Info Display appears),
2. Press right arrow until the Edit icon _ is highlighted,and pressOK.
3. When you're at the beginningof the place you want to hide, pressPAUSE.Then,highlight Insert
ChapterMarker (if the Info Displayisn't on the screen,press INFO and selectthe Edit icon _),
4. Use FASTFORWARD or ADVANCE to go to the end of the segmentthat you want to hide,and
select InsertChapterMarker again,
5. To"hide the chapter" you must be playingit.Therefore, press REVERSEorAGA[N until playback
is between the two chapter markersyou just inserted. If the Info Displayisn't on the screen,press
INFO, selectthe Edit icon, and select Hide Chapter(eachtime the title playsthis chapter win be
automatically skipped).
_. To"undo" the Hide Chapter feature for normal playback,go to the DiscTitleMenu and selectP/ey
Fu/ITitle.
o
CbEbC3E3
ddd
ddd
ddd
-;;
Safety Tab
VC_ Basics
TheVCR part of your DVD/VCR hasall the basicfunctions of otherVCRs.The basicconcepts are
explained below and the advancedVCRfeatures are explained on page32,
Basic Playback
[. Tune the TV to your DVD/VCR viewing channel(03,04, or theVideo Input Channel).
2. Insert a tape in the DVD/VCR.
3. Press PLAYto play the tape.
Press FORVVARDor REVERSEto cuethe tape to the desired position during Playmode,
To advancethe tape approximately 30 seconds at a time during Playmode, press the ADVANCE
button on the remote control.
To go back approximately 10seconds during play mode, press theAGAIN button,
Press PAUSEto stop action, For slow-motion playback,press FORWARD (while picture is paused),
To move one frame at atime, press PAUSEon the remote (while paused)--each time you press
PAUSE,the video moves fol ward one frame,
Pressthe CH +/CH- buttons to remove any streaks from the picture, if necessary.
Press STOP to stop playback.
_ote: [f both a DVD disc a_d VC_ tape are in the DVD/VC_,go to the main menu (press _E[IU),
select Tape,and press PLAYto start playing the tape.
Tape Eject
Press the STOP/E_ECT button on the DVD/VCR when stopped to eiect the tape,You can also press
the OPEN.CLOSE button on the remote control to eject the tape.
Basic _eco_ding
I. If necessary, change the tape speed (SP or SLP) in Recordin_Options menu (page 52).
_. If you're watching TVIpress the RECORD button on the front of the DVD/VCR (the VCR's
RECORD button tha_ is next to the STANDBY/ON button turns on) to begin recording.
3. Press the STOP button to halt recording.
If you just want to pause the recording for a short time (like during a commercial), press PAUSE
instead of STOPTo resume recording, pressthe RECORD button on the remote control.
Check the Safety Tab
Hake sure there is a tape in the DVD/VCR with its safetytab in place,Youcannot record on a tape if
the safety tab hasbeen removed, if the safer' tab is removed and you want to record, simply cover the
hole with adhesivetape.
34 Graphics contained within this publication are for representation only.
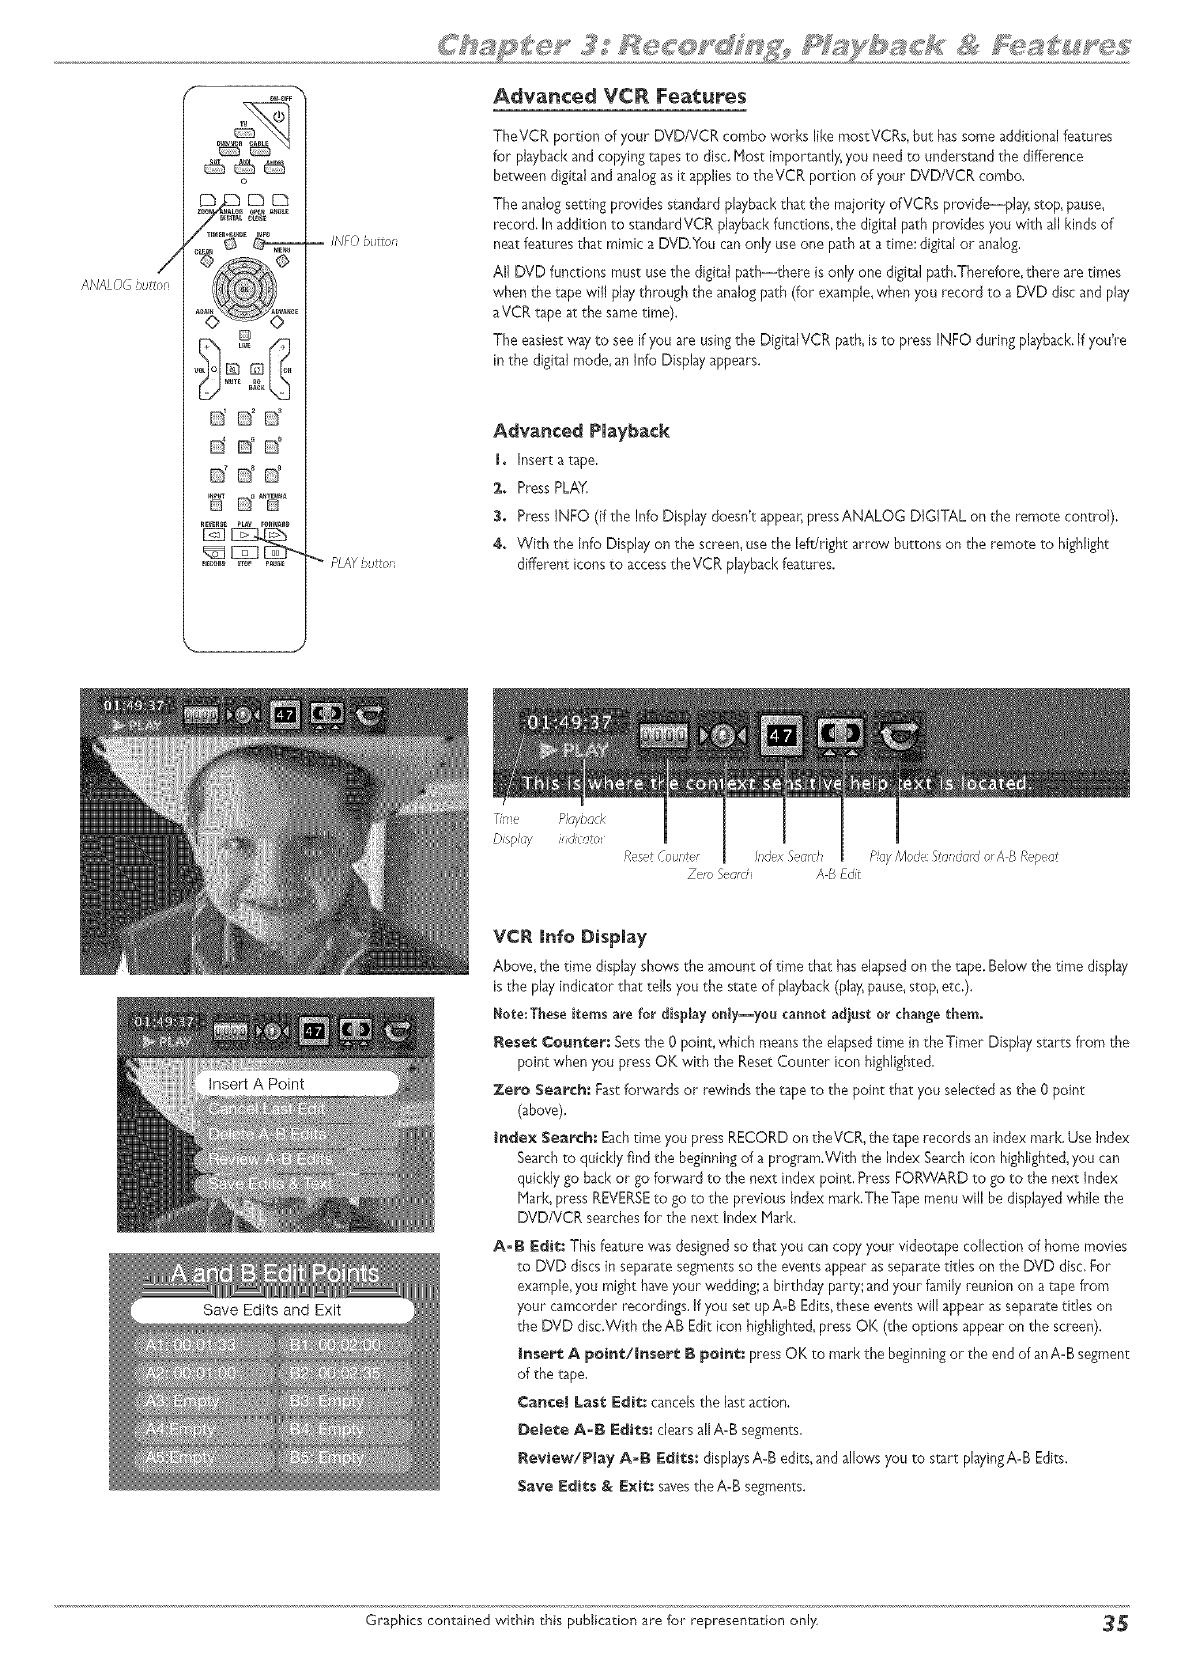
o
.qol@ @lb,,
o' o' n'
'W D°%_'
-- INFO burro
PLAYbuttol
Advanced VCR Features
TheVCR portion of your DVD/VCR combo works like mostVCRs, but hassome additional features
for playbackand copying tapesto disc.Most importantly, you need to understandthe difference
between digital and analog asit appliesto theVCR portion of your DVD/VCR combo.
The analog setting provides standard playbackthat the majority of VCRs provide--play; stop_pause_
record. In addition to standardVCR playbackfunctions,the digital path provides you with all kinds of
neat features that mimic a DVD,You canonly use one path at a time; digital or analog,
All DVD functions must use the digital path--there is only one digital path.Therefore, there are times
when the tape will play through the analogpath (for example,when you record to a DVD disc and play
aVCR tape at the sametime).
The easiestway to see if you are usingthe DigitalVCR path, isto press INFO during playback.If youYe
in the digital mode, an Info Display @pears.
Advanced Playback
I_ Insert atape,
:_+ Press PLAY,
3. Press INFO (if the Info Displaydoesn't appear,pressANALOG DIGITAL on the remote control),
4+ With the Info Display on the screen,use the lefdright arrow buttons on the remote to highlight
different icons to accesstheVCR playbackfeatures.
T,n e Playback
Dispk;y ii4cat@ Reset Counter Index %a<)_
Zero Seard A B Fdit P!ay Mode: Xa_da,a orAB Repeat
VCR lnfo Display
Above, the time display shows the amount of time that haselapsedon the tape. Below the time display
is the play indicator that tells you the state of playback(play,pause,stop,erc,).
_ote;These items are for display onJy--yol caBllot adjust or change the_,
_ese¢ ¢o_¢er: Setsthe 0 point, which meansthe elapsedtime in the Timer Display starts from the
point when you pressOK with the ResetCounter icon highlighted.
Zero Search: FastfoPwardsor rewinds the tape to the point that you selected asthe 0 point
(above).
Ir_e× Search; Eachtime you press RECORDon theVCR, the tape records an index marl<.Use index
Searchto quickly find the beginningof a program.With the index Searchicon highlighted,you can
qukkly go back or go forward to the next index point, PressFORWARD to go to the next index
Mark, press REVERSEto go to the previous Index mark.The Tapemenu will he displayedwhile the
DVD/VCR searchesfor the next Index Mark.
A-B E_i_: This feature was designedso that you can copyyour videotape collection of home movies
to DVD discsin separate segmentsso the events appear asseparatetitles on the DVD disc,For
example,you might haveyour wedding; a birthday party; and your family reunion on a tape from
your camcorder recordings.If you set up A-B Edits,these events will appear asseparatetitles on
the DVD disc,With the AB Editicon highlighted,pressOK (the options appear on the screen),
Inser_ A _oi_/Ir_ser_ B _oi_: pressOK to marl<the beginningor the end of an A-B segment
of the _pe.
Cancel Las'€:_:dit:: cancelsthe last action.
Delete A=B EctCs: clears allA-B segments,
Review/Play A=B E_iCs: dispbysA-B edits,and allows you to start playingA-B Edits.
Save _:_i_s & Exit;:savesthe A-B segments.
Graphics contained within _his publication are for representation only _
VCR Recording
After you put a videocasse_e tape in theVCR deck,there are severalw_s to record programming,The quickest wv to start recording isto pressthe RECORD button
(on the front of the DVD/VCR next to the STANDBY/ON button) while you're watching a show,You don't evenneed to remember to pressthe stop button if you usethe
ExpressRecording feature in the recording barmen
Note:The DVD/VC!supports Macrovbion and won't record copy-protected material.
Express Recording Feature
Eachtime you pressthe RECORD button on the remote the recording time increasesby 30 minutes, up to the maximum limit (the status is listed on the far right side of
the recording banner).The DVD/VCR will record for the amount of time you specified and then stop automatically.At anytime during the recording,you canextend the
recording time by pressingthe RECORD button.
Watching one ¢han_e! while ye_ record a_o_her ¢ha_e[
If you want to watch another channelwhile you're recording, yOUneedto makesure you've connected the DVD/VCR to theTV properly (both audio/video cablesand art RF
coaxial cable need to be connected):
1. Hake sure the DVD/VCR and theTV are on,Tune theTV to the appropriateVideo input Channel (if you need help,go to page 18).
2. Put a tape with its safety tab intact into theVCR deck.
3. Using the DVD/VCR's channel buttons, tune to the program you want to record. Press the RECORD button,
4. _therem_tethatcamewithy_urDVD/VCR_Peratesy_urTV_iustPresstheTVbuttonandusethechannel up and down buttons to go to a differont channel
[fthe remote doesn't operate your TV,use the TV's remote control to change channels.
[fyou don't see a picture on the TV or the picture looks fuzzy ("noisy"), press the ANTENNA button on the remote control,
_. When you're finished recording, remember to turn theTV back to itsVideo Input Channeland watchTV through the DVD/VCR,
Notes:
This feature might work differently if you receive programming via a cable box, If you receive programming via satellite receiver, this feature isn't available--you
can't record one satellite program and watch another satellite program.
The remote that came with your DVDIVC! is a programmable U_iversalremote that ca_ be programmed to operate many brands and models of TVs.Go to page21
if you want to program the remote,
Recording _o _ape whNe you watch e DVD disc
1. Hake sure the DVD/VCR and theTV are on._une theTV to the appropriateVideo input Channe} (if you need help,go to page 18),
2. Put a tape with its safetytab intact into theVCR deck,
3. Using the DVD/VCR's channel buttons, tune to the program you want to record. Press the RECORD button,
4. Put the DVD disc into the disc tra_ and close it.
5. Press PLAYto start playingthe DVD disc.
Notes: Since you're using the digital path to play the DVDdisc, the YC! wli be recordingin true analog mode.Therefore, the advanced V(R features i_ the
InfoDispiay won't be avalable when you play the tape,
Timer Recordings
Go to p_ge _0 for i_str_ctio_s to set _p Timer Recordings (both Add Timer _Set Transfer).
CO_Ybutto;i
if yo_ set _p A-B Edits (p_ge 3_)_ o_ly the A=B
Edits wil be recorded eo disc whe_ yo_ _se _he
COPY b_o_ o_ _he fro_ of eh_ DVD/VC_.
Copying eVi_eo¢_sse_e Tape to _ DVD disc (DVD+@ or DVD+RV_
To copy a disc to tape, use the COPY button on the front of the DVD/VCR to savesteps.
1. Put a DVD+R or DVD+RWdisc into the disc tray (if i(s a blank disc,you'/need to wait for the
DVD/VCR to initiafze the disc).
2. Put the videocassette tape you want to transfer to a disc,into theVCR deck and makesure it's
cued up or rewound to the beginning,
3. Pressthe COPY button on the fi ant of the DVD/VCR.
The current record quality setting isdisplayedalong with the Copy Hode, Press OK to
confirm and beginthe copy (the DVD/VCR starts playingthe tape and recording onto the disc
automatica/y). If you want to changethe record quality setting, press the down arrow button
to highlight Canceland pressOK.The record quality canbe changedin the Setupmenu (select
Recurdin_Options).
4. To watch TV while the tape is copyingto disc,you'll need to changechannelson theTV because
the DVD/VCR is conducting two functions--playback of the tape and recording onto a DVD.
Note:You can't copy pro-recorded videocassette tapes that are e_crypted with Nacrovisio_
software+
_ Graphics contained within this publication are for representation only.
®
o
o
®
o
o
o
Graphicscontained within this User_ Guide are for representation on/y_Some
of the menu screens,buttons_ and display messagesmight be di[ferent in your
product than they appear in this book. The on-screenhelp text provides the
most current operational information.
page 37
Note: $o_e discs may not be compatible due _o
laser pickup and design.
This is an example of a one-
sided disc.
This is an e×a_ple of a two-
sided disc--the tJtJe is
usually in the center of the
disco
When youstopplayingadisc,the player
rememberswhereyoust@pod.Whenyou
start playingthe discagain,the DVD/VCB
picksup where youleft off unlessthe discis
removedor the playerisunplugged,or you
pressthe STOPbuttontwice,
Regional Coding
Both the DVD/VCR and the discs are coded by region,These regional codes must match in order
for a pre-recorded DVD to play.This pJayetscode is region h However, discs you usefor recording
(DVD+R and DVD+RW) aren't assignedregion numbers.
Types of discs you can play
DVD+R and DVD+RW discs -used to record programming.Instructions about playingand
recording these discs are in Chapter 3.
DVDVideo discs- contain picture and sound [DVD-R, DVD-RW (video mode only),DVD+R,
DVD+RW, and DVD ROH are compatible with this player], DVD-R discs must be finalized,
CDs (CD-R, CD-RW) -Audio CDs con_in musical or sound content only,rap3 discsare DDs
tha_ contain rap3 files,This playerisalso capableof playingCDs that contain JPEGfiles,and
Multisession CDs.
Video CD discs- Like DVD video discs,VCDs contain picture arid sound content, The difference
isthe amount of information that canbe stored on the disc,VCDs typically havelower picture and
sound quality than DVD discs,
SuperVideo CDs (S-VCDs) hold up to 70 minutes of digital sound and video,with HPEG-2
standard video and HPEG-I standardaudio (but you must use DVD+R or DVD+RW discsto
record on your DVD/VCR, NOT S-VCDs),Additiona}ly,S-VCD disc compatibility is dependent on
which P1PEGcoding software, disc design software, and/or disc writer software are used;and the
discsthemselves.
Yo_ ca_'_ play,he _olowi_ypes of _Jscs:_Laser_isc$_ CD=I_ ¢D= RO_ (co_p_er o_ty
discs)_discs_ec_ed_sir_go'_herb_oadcas_st._nda_s(i.e.PALo_$ECA_)_DVD=_
discs,
Note: Some discs may net he compatibJe due to laser pickup and disc design.
To Lead a_d P|ay D_scs
Turn on the TV and your DVD/VCR (pressON'OFF on the remote or pressthe STANDBY/ON
button on the DVD/VCR).
J. Hake sure the TV istuned to itsVideo Input channel(if you need more information, go to
page 18),
_+ Pressthe OPEN/CLOSE burton (the disc tray opens),
3, Placea disc gendy into the tray with the disc'slabel facing up (double-sided discs havecontent on
both sides,so you can place either side up).
4. Pressthe OPEN/CLOSE or PLAY button.The disc tray doses,The DVD/VCR readsthe disc'stable
of contents, and then one of three things happensdependingon how the disc was prowammed:
The discstarts playing,
The disc menuappears on the screen.One of the options will start disc play.Highlight that
option and pressOK.
The DVD/VCR's main menu appearson the screen. Highlight the Disc menu and pressPLAY,
Note: If you don't seea picture, pressSTOP(the main menu appears), and check the position of
the PROOSCANswitch on the back of the unit, Make snre the PROQSCANswitch is in the OFF
position.Try playing the disc again.
The on_ytime the PROGSCANswitch should be in the ON position is if yet connected this unit
to a progressivescan TV via Y,PI, Pr COHPOIEIT jacks,
3_ Graphics contained within this publication are for representation only.
Using Different Menus
Eachdisc isprogrammed with different features.There are three separatetypes of menusthat you can
use to access features:
The Disc menu - The Disc menu is part of eachdiscand is separatefrom the DVD/VDWs menu.
The contents of eachDisc menu vary according to how the disc was authored and what features
are included.
To makethe Disc menu appeanpressthe MENU button while the disc is playing.
The DVD/VCR's lnfo Display-The Info Display appearsas iconsacrossthe top of the screen
when a disc isplaying.It can only be accessedwhile you are playinga disc.It's turned on and off
with the INFO button on the remote.The Info Display icons changebasedon the type of disc
you're playing.Go to page40 for more information.
The DVD/VCR menu - If you're playinga disc,press STOP (the DVD/VCR's menu appears
automatically).
Remember: A feature will only wer_ Jf the disc wes programmed with thet _eaeure° For
exclmple, Jf you cheese s_b_e_ on t:he_n_e D_sp_, t:hesub't_t,teswH_en_y _ppe_r _f _he d_s¢
w_ ¢re_ted v_h sub_l_les,_ _ menu or _¢en is _rc_yed eu_" i_ means _h_ i_em {or _ee_ure)
_sn't; _val_Me.
N;k/N
_ t.it t Og
RE',/ERSE
butto _
F.......................................
IR-_)FF
C,
ZIO_ ARALOR OPEl ARRLE
D[E_AL CLOSE
"AD/ANCE
button
FORWARD
butto_
PAlJ_Ebt,itto !
Search Options
Picl:_re Scan
To searcha disc during playback,use the FORWARD or REVERSEbutton. Eachtime you press
FORWARD or REVERSE,your DVD/VCR scansthe disc faster until you reach the fastest scan speed.
To resumenormal playback,press PLAY.
Note: Many DVDtitles are programmed to prohibit skipping of warnings or credits so that yo_
can't fast forward through them.
Free=e Frame and Frame Advance
Whte a disc is playing,press PAUSEto freeze the picture.To advanceone frame at a time, pressPAUSE
again(the on-screen icon changesfrom PAUSEto FRAME).Eachtime you pressthe FORVv'ARDor
REVERSEbutton, the picture goesto the next (or previous) frame.To resume normal playback,press
PLAY.
Slow Hotien (in _reeze Frame Mode) -DVD discs only
While a disc is playing,press PAUSE.PressREVERSEor FORWARD (each time you press REVERSEor
FORWARD the slow morion will get a little faster until you reach the fastest slow motion speed).To
resume normal playback,pressPLAY
Time Search -DVD an_ VCD discs only
Makesure the Time Display (top left side of the hfo Display) is highlighted,and then usethe number
buttons to enter aspecific time on the discthat is playing.Go to page4! for more information about
theTime Displa}:
Q_iek Fas_ Forwar_ and Q_cR Reverse -_VD and Audio CD only
While you're playing a disc, press the AGAIN burton on the remote (the disc automatically repeats the
last 10 seconds of the movie).
Similarly, press the ADVANCE bugon to go forward approximately 30 seconds.
PiaybacR ept:io_s
Manyof your DVD/VCR's playbackfeatures are accessedthrough the Info Display(described on pages
40 through 44).Additionaly, with some discsyou can usethe Zoom Featureto seederails of an image.
_oem
i, While you're playinga dis< pressZOOM (the playerzooms in on the image).Eachtime you press
ZOOM, the picture is magnifiedeven more (until you get to the maximum zoom level).
2, To see other parts of the picture when you've zoomed in on the image,pressthe up,down, lef:c,
and/or right arrow buttons to go in corresponding directions.
Graphics contained within this publication are for representation only, 3_
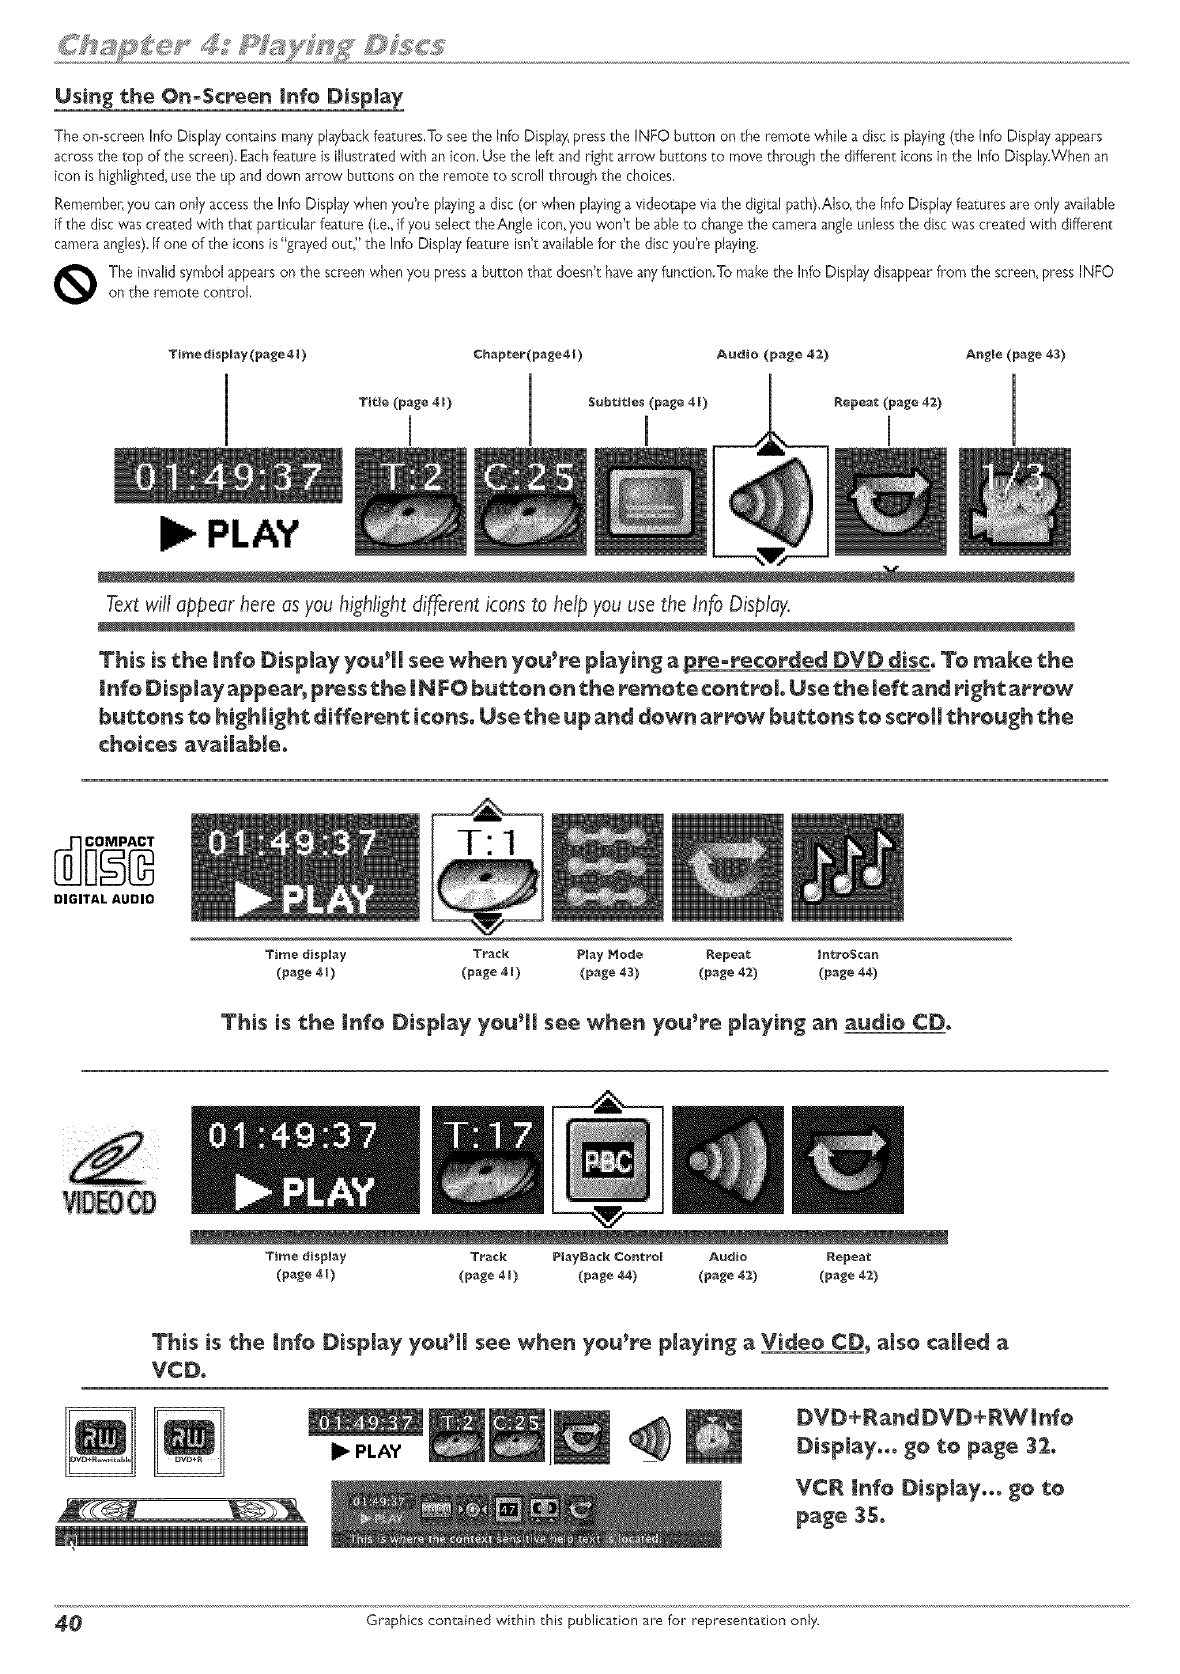
Using the On°Screen |nfo Display
The on=screenInfo Dispby con_ins manyplaybackfeatures,To seethe Info DispJ3_pressthe INFO button on the remote while a disc is playing(the Info Display appears
acrossthe top of the screen).Eachfeature is illustrated with an icon, Usethe left and right arrow buttons to move through the different icons in the Info Display.Whenan
icon is highlighted,usethe up and down arrow buttons on the remote to scrol! through the choices.
Remembe_you canonly accessthe Info Dispby when you're playinga disc (or when playingavideotape via the digital path).AJso,the {nfoDisplayfeatures are only available
if the disc was created with that particular feature (i.e. if you select the Angle icon,you won't be able to changethe camera angleunlessthe disc was created with different
cameraangles).If one of the icons is"grayed out," the Info Displayfeature isfft availablefor the disc you're playing.
The invalid symbol appearson the screenwhen you pressa button that doesfft haveanyfunction.To make the Info Display disappearfrom the screen,press INFOon the remote control,
PLAY
Text will appear here as you highlight di_erent icons to help you use the Info Display.
This is the lnfo DispJay youth see when you're playing apre-_'eco_'ded DVD disc. To make _he
!nfoDisp_y_pp÷_; p_'ess_he _NFO b_on o_ _he re_o_e control Use _he_ef__nd _'igh_?ow
_u%%o_s %0 hi_h_i_h%diff÷_'en_icons.Use %he up and down a_ow bu%%ons %0 sc_oH%h_ou_h %h÷
choices _vai_b_.
DIGITAL AUDIO
Time display Tr_ck Piay Hode _epea_ #n_o$ca_
(p_ge 41) (page 4_) (page 43) (p_ge 4_) (p_ge 44)
Time display T_ack PlayBack Control Audio Repe_
(p_e 4_) (p_ge 4_) (p_ 4_) (p_ge _) (p_ge 4_)
This is _he _nfo Display youth see when you_e pl_ying aVideo CD, _lso ¢_Hed
VCD.
I_ PLAY
DVD+P_nd DVD+RW_nfo
Display... go _o p_ge 32.
VCR _nfo Displ_y..o go _o
p_ge 35.
4_ Graphics contained within this publication are for representation only.
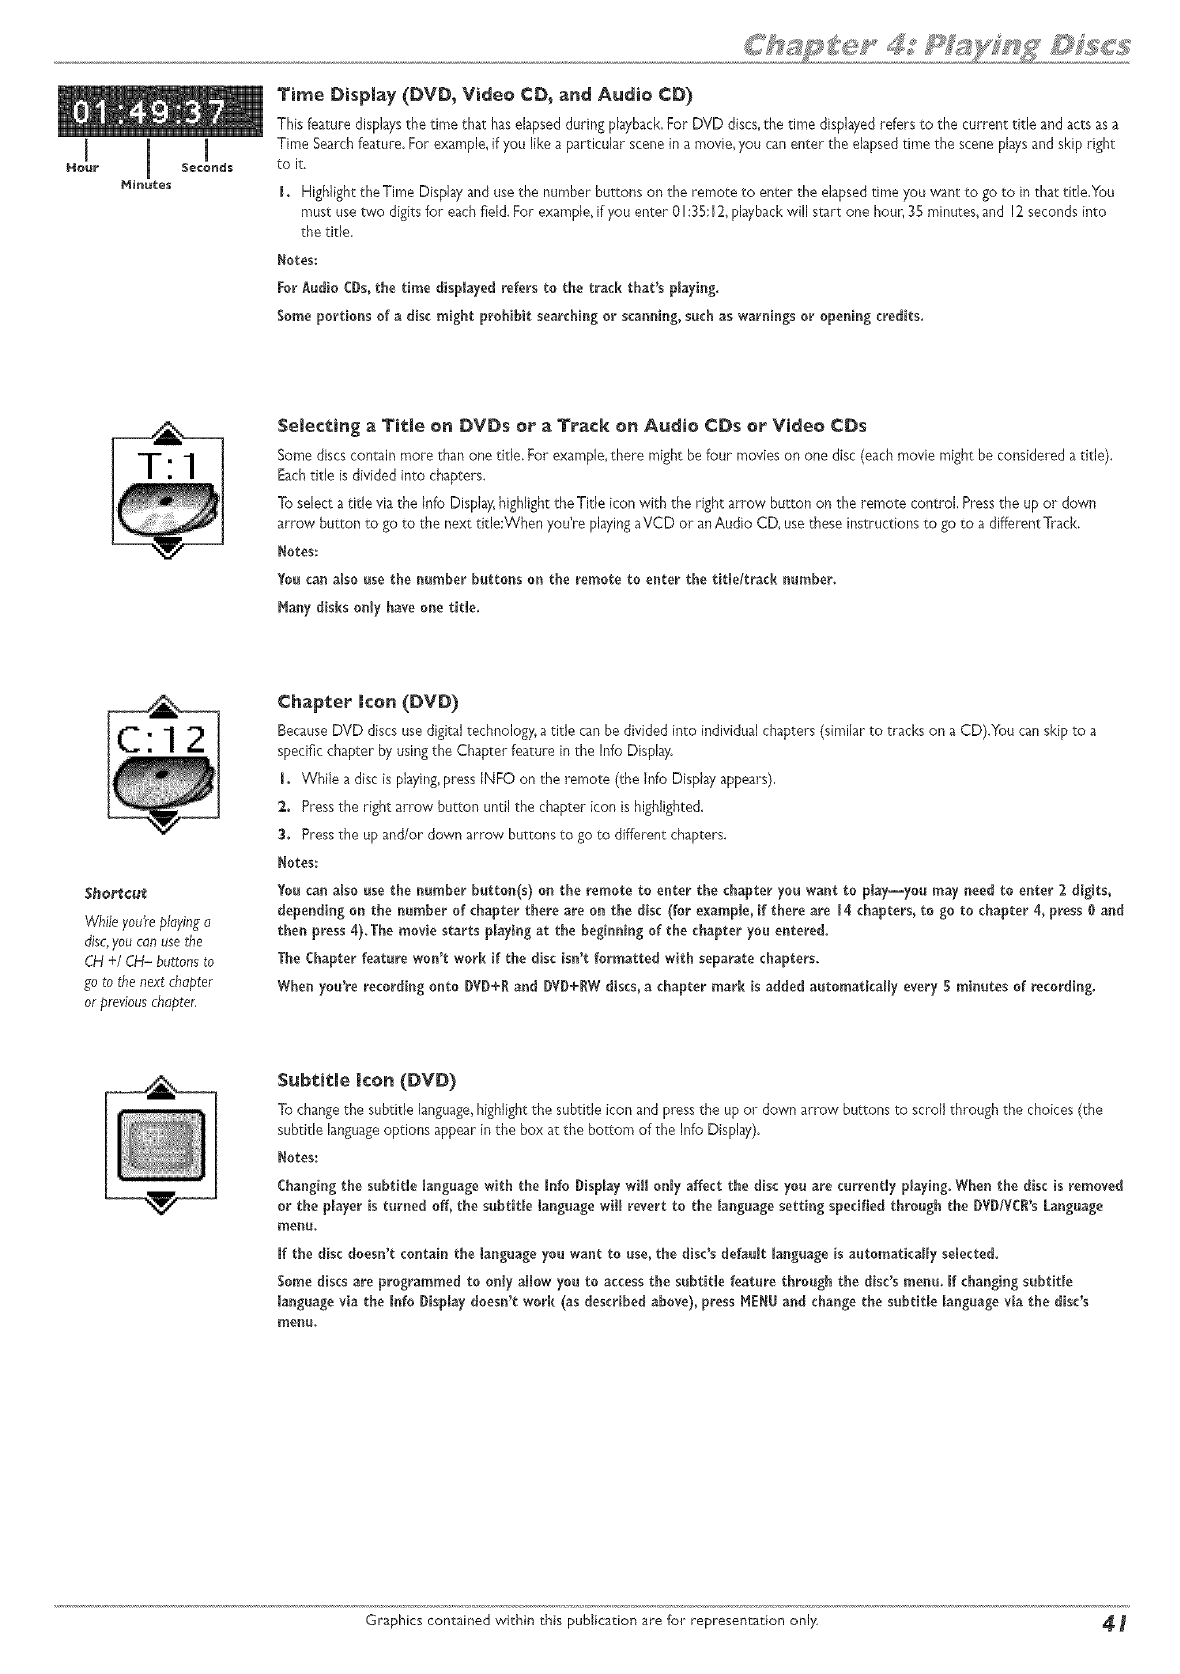
1 m
Hour Seconds
Hinutes
Time Display (DVD_ Video CD_ and Audio CD)
This feature displaysthe drne that haselapsedduring playback,For DVD discs,the time displayedrefers to the current title and acts asa
Time Searchfeature. For example,if you like a particular scene in a movie,you can enter the elapsedtime the scene playsand skip right
to it.
LHighlight the Time Display and use the number buttons on the remote to enter the elapsed time you want to go to in that title.You
must use two digits for each field. For example, ifyou enter O1:35:12,playback will start one hour, 35 minutes, and 12 seconds into
the title.
Notes:
For Audio CDs,the time displayed refers to the track that's playing.
Some portions of a disc might prohibit searching or scanning, such as warnings or opening credits.
Selecting aTitle on DVDs or a Track on Audio ¢Ds or Video CDs
Some discscontain rnore than one title. For example,there might be four movieson one disc (each movie might be considered a title).
Eachtitle is divided inca chapters.
To select a title via the Info Display; highlight the Title icon with the right arrow button on the remote control, Press the up or down
arrow button to go to the next title:When you're playing aVCD or an Audio CD, use these instructions to go to a different Track.
Notes:
You can alsousethe number buttonson theremotetoenterthetit_e/tracknumber.
Hany disks only have one tit_e.
Shortcut
While you'replayinga
disc,youcanusethe
CH +/CH- buttonsto
goto the next chapter
or previouschapter.
Chapter ken (DVD)
BecauseDVD discs usedigital technology,a title can be divided into individual chapters (similar to tracks on a CD).You canskip to a
specific chapter by usingthe Chapter feature in the Info Display.
LWhile a disc is playing,press JNFOon the remote (the Jnfo Display appears),
2,. Press the right arrow button until the chapter icon is highlighted.
3. Press the up and/or down arrow buttons to go to different chapters.
Notes:
You can alsousethe number button(s)on theremoteto enterthechapteryou want to play--youmay need to enter2 digits,
dependingon teenumber ofchapterthereareon thedisc(forexample,ifthereare 14 chapters,to go to chapter4,press0 and
then press4).The moviestartsp_aying at thebeginningofthechapteryou entered.
The Chapterfeaturewon'twork ifthediscisn'tformattedwithseparatechapters.
When you'rerecordingonto DVD+R and DVD+RW discs,a chaptermark isadded automaticallyevery5 minutesofrecording.
Subtitle Icon (DVD)
To changethe subdfle language,highlightthe subtitle icon and pressthe up or down arrow bur_onsto scroll through the choices (the
subtitle languageoptions appear in the box at the bottom of the Info Display).
Notes:
Changb_gthesubtitlelanguagewith theInfoDisplaywillonlyaffectthediscyou arecurrentlyplaying.When thediscisremoved
or theplayeristurnedoff,thesubtitlelanguagewiff revertto the_anguagesettingspecifiedthroughtheDVDIVCRN Language
menu.
If the disc doesn't contain the language you want to use, the disc's default _anguage is automatically selected.
Some discsareprogrammed toonlyallowyou toaccessthesubtitlefeaturethroughthedisc'smenu. Ifchangingsubtitle
languageviatheInfoDisplaydoesn'twork (asdescribedabove),pressHENU and changethesubtitle_anguageviathe disc's
menu.
Graphics contained within this publication are for representation only 4
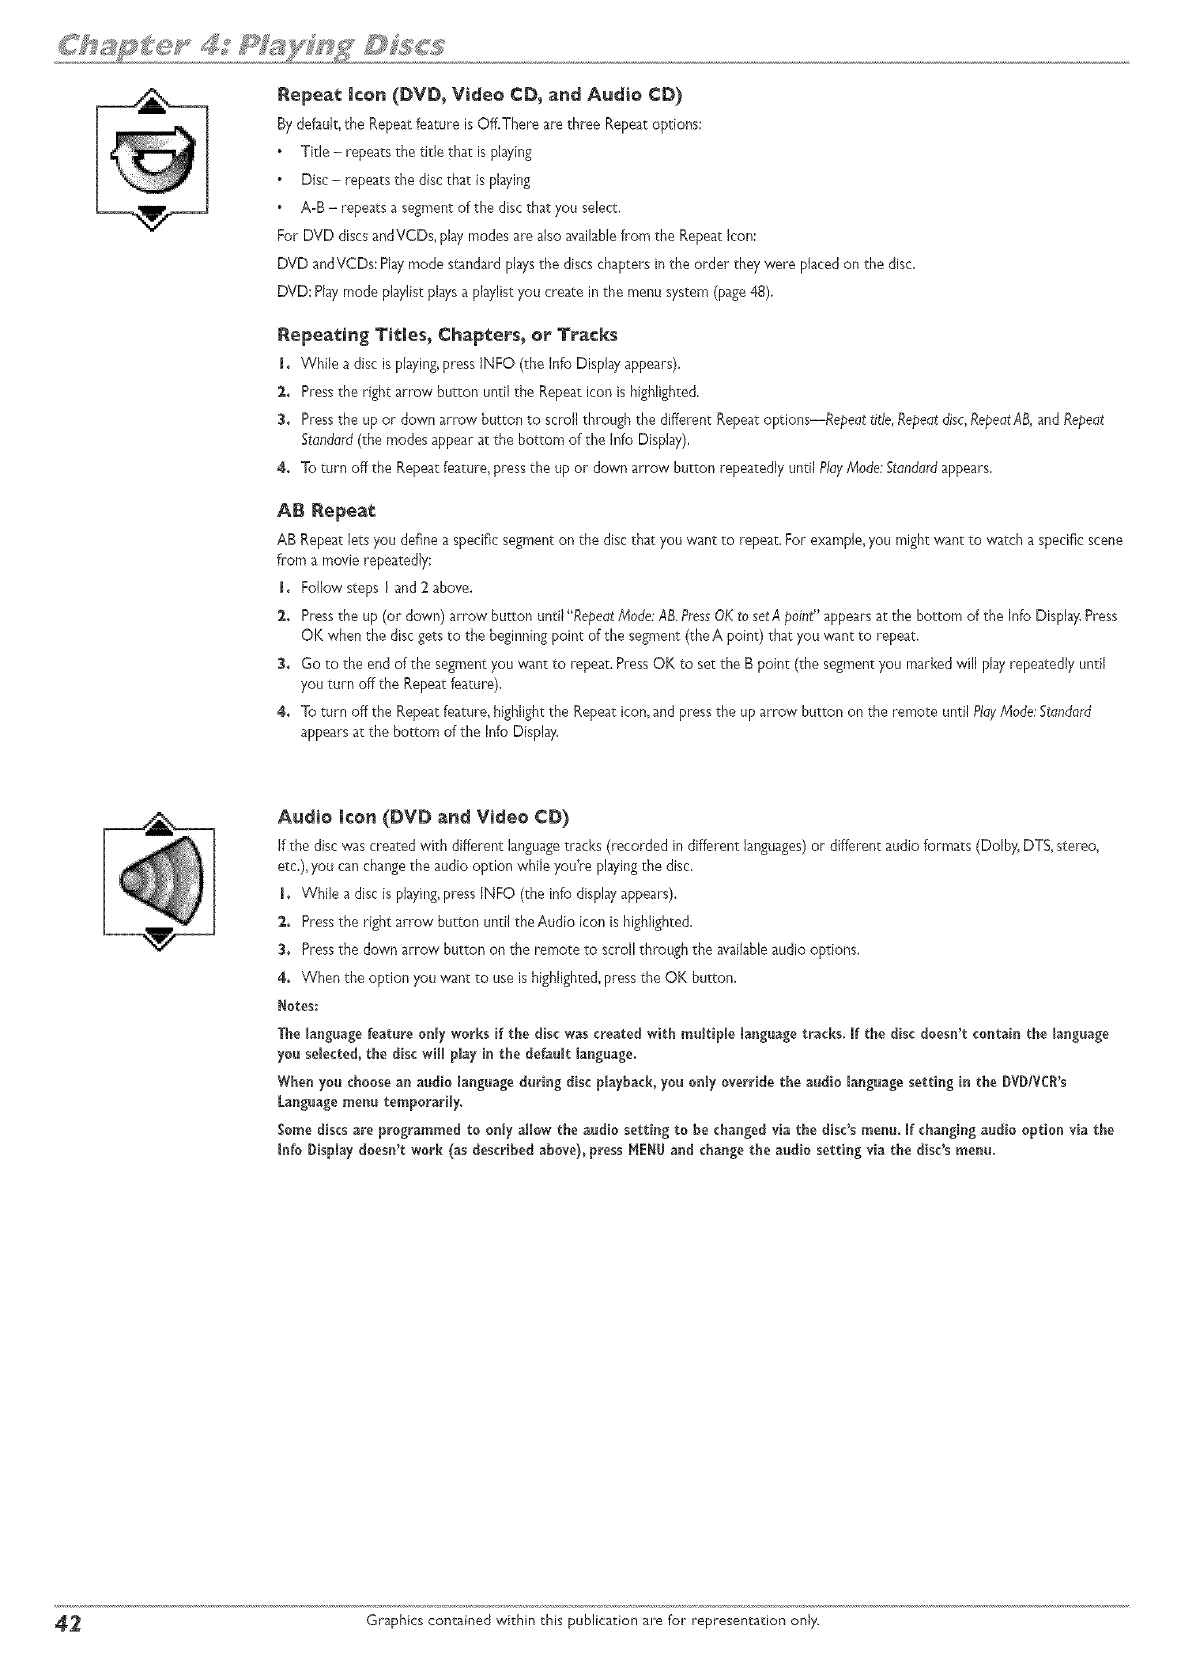
Repeat Icon (DVD_ Video CD, and Audio CD)
By default,the Repeatfeature isOff.There are three Repeat eptions:
Title - repeatsthe title that is playing
Disc - repeatsthe disc that is playing
A-B - repeats a segmentof the discthat you select,
For DVD discs andVCDs, play modes are also availab{efrom the Repeat Icon:
DVD andVCDs: Playmode standardplaysthe discschapters in the order they were placedon the disc.
DVD: Playmode playlistplaysa playlistyou create in the menu system (page48),
Repeating Tittles, Chapters_ er Tracks
I+ While a disc is playing,press INFO (the Info Display appears).
2. Pressthe right arrow button until the Repeat icon is highlighted.
3. Pressthe up _r d_wn arr_w button to scr_ thr_ugh the di_erent Repeatoptions_Re_edt _de_Re_e_tdisc_P`e_eatA_ and Re_edt
Stondord(the modes appear at the bottom of the Info Display),
4+ To turn off the Repeatfeature, press the up er down arrow button repeatedly until P/dyMode:Stonddrdappears.
AB Repeat:
AB Repeatlets you define aspecific segment on the disc that you want te repeat. For example,you might want to watch aspecific scene
from a movie repeatedly:
LFol{ow steps I and 2 above,
2+ Pressthe up (or down) arrow button until "Repedt/Mode:AB.PressOKto setA;_eint"appearsat the bottom of the Info Display,Press
OK when the discgets te the beginningpoint ofthe segment (theA point) that you want te repeat.
3. Go to the end of the segment you want to repeat. PressOK to set the B point (the segment you markedwill play repeatedly until
you turn off the Repeat feature).
4. To turn off the Repeatfeature, highlight the Repeat icon, and pressthe up arrow button en the remote until Play/Mode:Stdndord
appearsat the bottom of the Info Display.
Audio icon (DVD and Video CD)
ifthe disc was created with different languagetracks (recorded in different languages)er different audio fermats (Dolby, DTS, stereo_
etc.), you canchangethe audio option while you're playingthe disc.
LWhile a disc is playing,press {NFO (the info displayappears).
2. Press the right arrow butten untl the Audio icon is hightghted.
3. Press the down arrow button on the remote to scroll through the availableaudio options.
4. When the option you want to use is highlighted, pressthe OK button,
Notes:
The _anglage feature only WOrkSif the disc was created with muttiple language tracks. If the disc doesn't conrail the language
you selected, the disc wil play in the default language,
Wher_you cheese an audio language durilg disc p_ayback,you orty override the audio _anguagesetting in the DVDIVCI's
Languagemenu temporarly,
Some discs are programmed to only alow the audio setting to be cha_gedvia the disc's rae_. If cha_gingaudio option via the
I_fe Display doesn't work (as described above), press _E_U and cha_ge the audio setting via the disc'sme_u.
_ Graphics contained within this publication are for representation only.
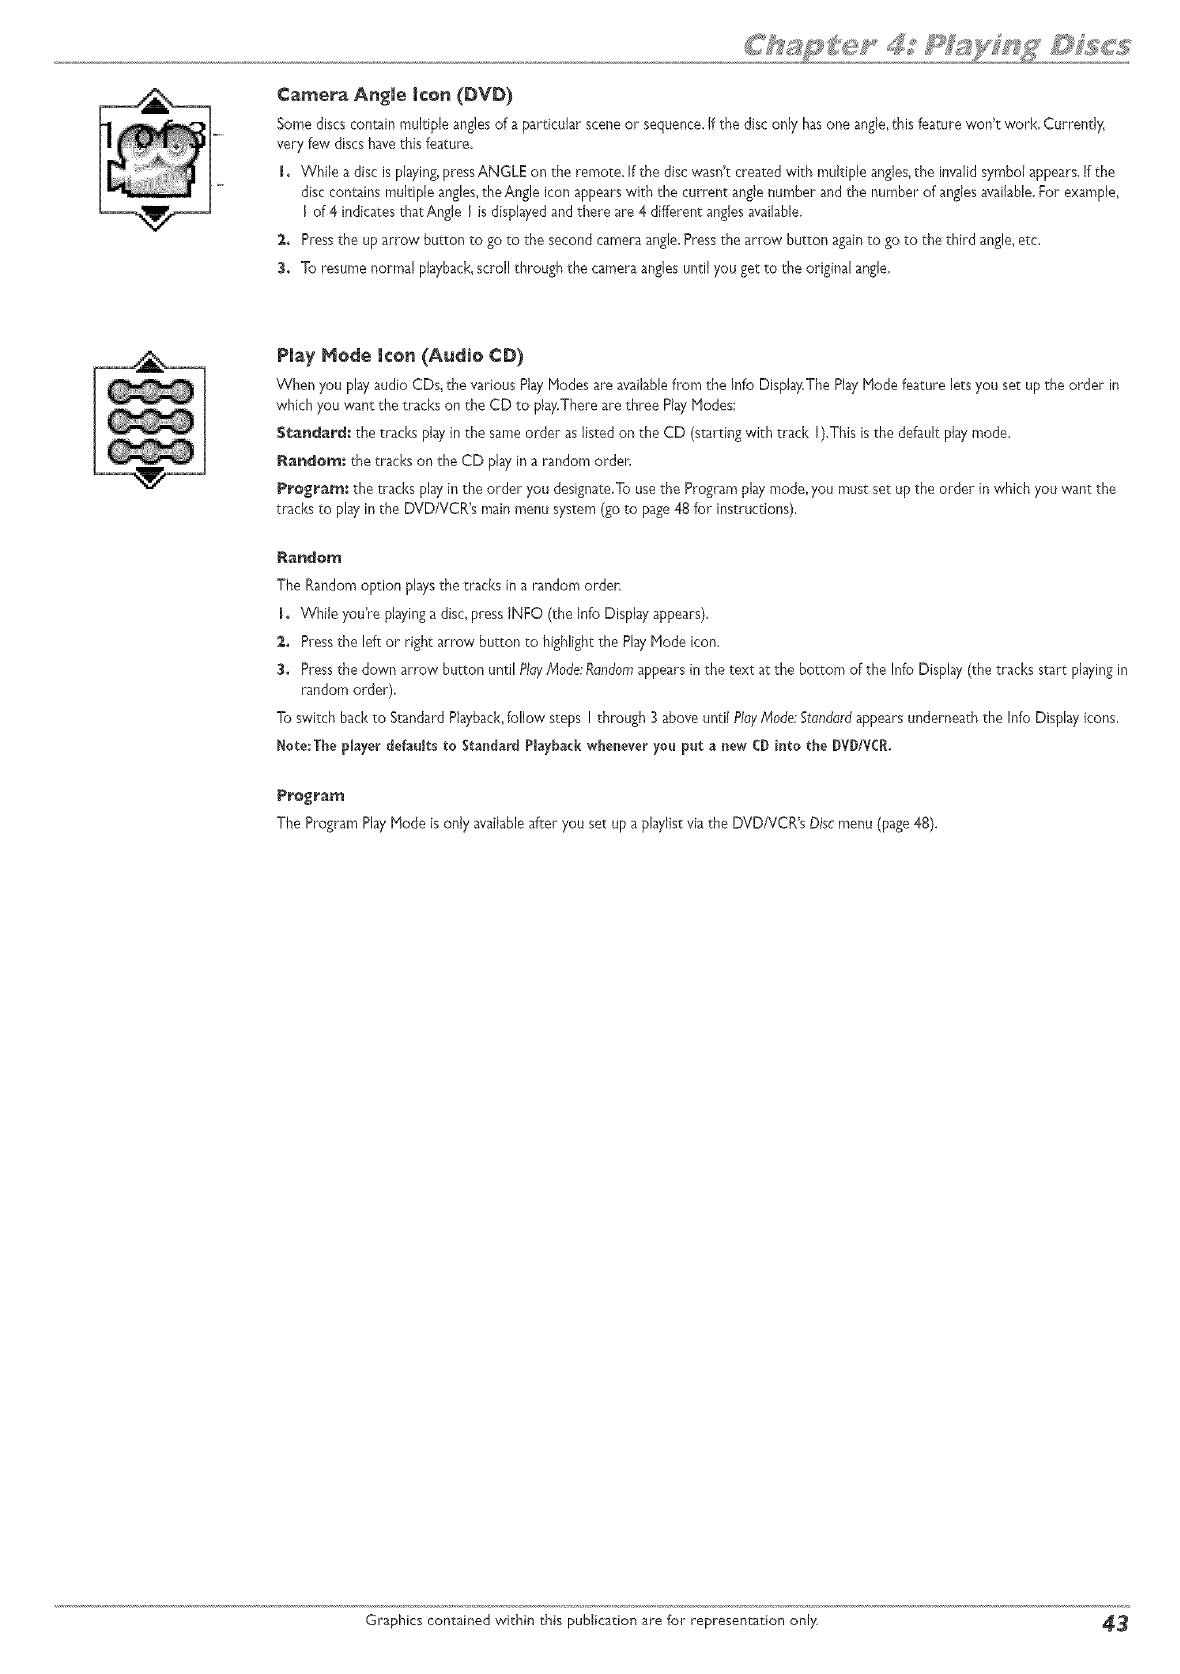
Camera Angle icon (DVD)
Some discs contain multiple anglesof a particular scene or sequence,if the disc only hasone angle,this feature won't work. Currently,
very few discs havethis feature.
I. While a disc isplaying,pressANGLE on the remote, if the disc wasn't created with multiple angJes,the invalid symbol appears.Ifthe
disc contains multiple angles,theAngle icon appearswith the current anglenumber and the number of anglesavailable.For example,
I of 4 indicatesthat Angle I isdisplayedand there are 4 different anglesavailable.
2,. Pressthe up arrow button to go to the second cameraangle,Press the arrow button againto go to the third angle,etc.
3. To resume normal playback,scroll through the camera anglesuntil you get to the original angle.
Play Merle Icon (Audio ¢D)
When you playaudio CDs,the various PlayModes are availablefrom the Info Display,The PlayMode feature lets you set up the order in
which you want the tracks on the CD to play.Thereare three PlayModes:
Standard; the tracks playin the same order aslisted on the CD (starting with track I).This isthe default playmode.
Randem, the tracks on the CD play in a random arden
Program: the tracks play in the order you designate.Tousethe Program play mode, you must set up the order in which you want the
tracks to play in the DVD/VCR's main menu system (goto page48 for instructions),
Random
The Random option playsthe tracks in a random arden
LWhile you're playinga disc,press iNFO (the Info Displayappears).
2,. Pressthe left or right arrow button to highlightthe PlayMode icon.
3. Pressthe d_wn arr_w butt_n unti_P_y M_de:R_nd_ma_ears _nthe text at the b_t_m _f the _nf_D_s_ay(the tracks start _aying in
random order).
To switch back to StandardPlayback,follow steps I through 3 above unti{ PlayMode:Standardappearsunderneath the Info Display icons,
Note:The player defaults to Standard Playbackwheneveryou put a new CDinto the DVD/VCR.
Program
The Program PlayHode isonly availableafter you set up a playlist via the DVD/VCR's Disc menu (page48).
Graphics contained within ehis publication are for representaeion only _3
_ @ _ _y A¸ F
mntroScan icon (Audio CD)
Use the IntroScan feature to preview each track on the CD,
1. While the CD is playing, press INFO (the Info Display appears).
2,. Use the arrow buttons to highlight the IntroScanicon,
3. Press OK (the first 20 seconds of eachtrack starts playing).
Playback Control (PBC) Icon (Video CD)
Use the arrow buttons to highlight the Playback Control icon. Press the up or down arrow button to go back and forth between On and
Off, How Playback Control (PBC) works varies for differentVideo CDs.WRh mostVideo CDs, turning on Playback Control enables you
to access theVideo CD's menu if it has one and requires that you navigate through theVideo CD's contents by using theVideo CD menu
instead of the DVD/VCR's Info Display.When PBC is on, you won't be able to use any repeat modes or skip titles in the DVD/VCR's Info
Display.
Playing Discs You Recorded (DVD6R and DVD÷RW)
Playbackof DVD+R and DVD+RW discsthat you used to record programs is explainedin Chapter 3 (goto page32).
Playing _p3 or JPEG fi|es
Your DVD/VCR can pby rap3 files and JPEG files.You can also create a musical slide show by putting both rap3 (PIPEG-I, layer 3) and ]PEG files on the same disc.
_p3 is an audio file format which compresses recorded music. It was developed by Fraunhofer Gesellsch_ff in collaboration withThomson Inc,The main advantage of the
rap3 format is the ability to store CD=quality music tracks that are user-friendly and compressed on a personal computer, rap3 (MPEG=3,which stands for Notion Picture
Experts Group=Layer 3,meaning the third layer of information) is a format used to compress digital audio. Since the audio is compressed, it takes up less space.
Note:You can only play true rap3 files in the DVD/VCR--some products use software to compress rap3 files and convert them to other formats such as MPX.Your
DVD/YCRwon't recognize or play _IPX files or other types of converted rap3 flies.
JPEG files are imagefiles. Makesure that they have a resolution of lessthan S me_pixels (approximately 2MB).
Note:The time taken for the contents of the disc to he displayed variesaccording to the size and number of JPEGfliesactually on the disc. If nothing is displayed
after a few minutes, it is likely that certain flies are too large. In this case,reduce the files' resolution to less than 5megapixeis (approximately 2H8) and write
another disc.
Creating an rap3 Disc on Your Computer
Your DVD/VCR handles HPEG=I, layer 3 audio.If you encodeyour own rap3 files from an audio CD,avoid using the features of HPEG=2,such asthe 22kHz sampling
frequency,
Be sure to make adata CD ra_herthan an audio CD,If you makean audio CD, you will lose the extra features and compression of the rap3 format.
Notes:
Some transport modes (reverse and fast forward) are not availaMe for rap3 C_s.
When h_r_i_ mu_tisessio_ CDs,mahe s_re yo_ close the _astsession.
i. Placethe disc in the disc tray with the printed sidefacing up.
2. if the gutoPluyoption in the PlayMode menu is enabled (see page49), the disc'scontents are
displayed,otherwise pressthe PLAYbutton to displaythem,
3. Selecta folder usingthe A and _ buttons on the remote control, then pressOK to displaythe
list of files or pressPLAY to start playingall the files contained in the leiden
Example of folder list.
44 Graphics contained within this publication are for representation only.
Example of rap3 files_
IE×ample of _PEG files.
4. Select a file usingthe A and _'_ buttons, press OK (the playbackoptions appear). Usethe Aand
V buttons to scroll through the options and pressOK when desired option appears.
rap3 file: if you press play when a file is highlighted (and you selected PlayAII),the player begins
by playingthe selected file,then al! the files and subfoJderscontained in the samefolde_:The
playerthen playsthe contents of the folders at the same levelas the folder containing the file
selectedat the start. If you chose StundardPlay,playbackwill stop after all of the flies in the
current folder (andits subfolders) haveplayed.
Notes:
WflHe listening you can use the F_ or _ button to go back to the previous track or go to
the next one, and press the NENU button to display the disc's contents.
Some file names are too long to be completely displayed.
JPEGfile: the player starts the slide show with the JPEGfile you haveselected and proceeds
to displayall the JPEGfiles in the samefolder, then all the JPEGfiles in the subfolders located
in the samefoJden
Note: During the slide show you can use the ANGLEbutton to rotate the picture 90%the
ZOON buttonto magnifythepicture,the_ or_,Hbuttonsto go back tothe previous
pictureor go on to thenextone,theFORWARD and REVERSEbuttonstochange the
speedoftheslideshow (thespeedselectionvariesdependingupon thesizeofthe)PEG
fi(es), and the NENU button to interrupt the slide show and display the disc's contents.
N. When the playerhasplayed allthe files,the disc'scontents appean
€. Press STOPto end playback,
Play Disc Nusical SHale Show:
Playing JPEG and rap3 fi|es at the same time
The way the JPEGfiles and rap3 files are displayedwhen you put the CDoRdisc in the DVD/VCR,
varies depending upon how you set up the files and folders when you created the CD,The musical
slide show enablesyou to displayJPEGfiles while listening to rap3 musicfiles that are on the same
disc,
If you want to control the order in which the rap3 musicfiles play,you need ro set up a playiistby
goingto the Discmenu and choosing Playlistand enter the individual rap3files in the order you want to
play them,Then, you choose PlayDisc and choose go_hfrom the submenu.Whenthe JPEGlist appears,
select the picture you want to useas the first slideshow picture.When playbackstarts,the rap3 playlist
will start playingautomatically in the order you designatedas the ]PEGfiles are displayed.
The order the rap3files and JPEGfiles play in the !qusiealSlideShow as described in the instructions
that follow are designatedbythe order the files were placed on the disc.
1. Insert the discthat hasthe rap3and jpegfiles on it into the DVD/VCR disctray.
2. Close the disctray (pressOPEN/CLOSE),
3. After the DVD/VCR readsthe disc, highlight the Disc menu and pressOK.
4. SincePlayOiscis highlighted,just press OK.
S. Pressthe arrow down button on the remote to highlightBoth,and pressOK,
6. Select the rap3folder and the JPEGfolder.
7. To try different options, pressthe right arrow button to highlight StandardPlay.Usethe up/down
arrow buttons to scroll through the choices available.
Graphics contained within this publication are for representation only _
®
o
o
®
o
o
o
Overview of the DVD/VCPJs Menu System
Watch YV Menu
Disc Menu
Tape Henu
Disc Library Henu
Timer Menu
Setup Menu
GraphicscontainedwithinthisUser'sGuideareforrepresentationon/y.Some
ofthemenu screens,buttons,and disp/a}/messagesmightbe differentin}!our
productthanthe}/appearin thisbook.Theon-screenhe/ptextprovidesthe
most current operationa[ information.
page 46
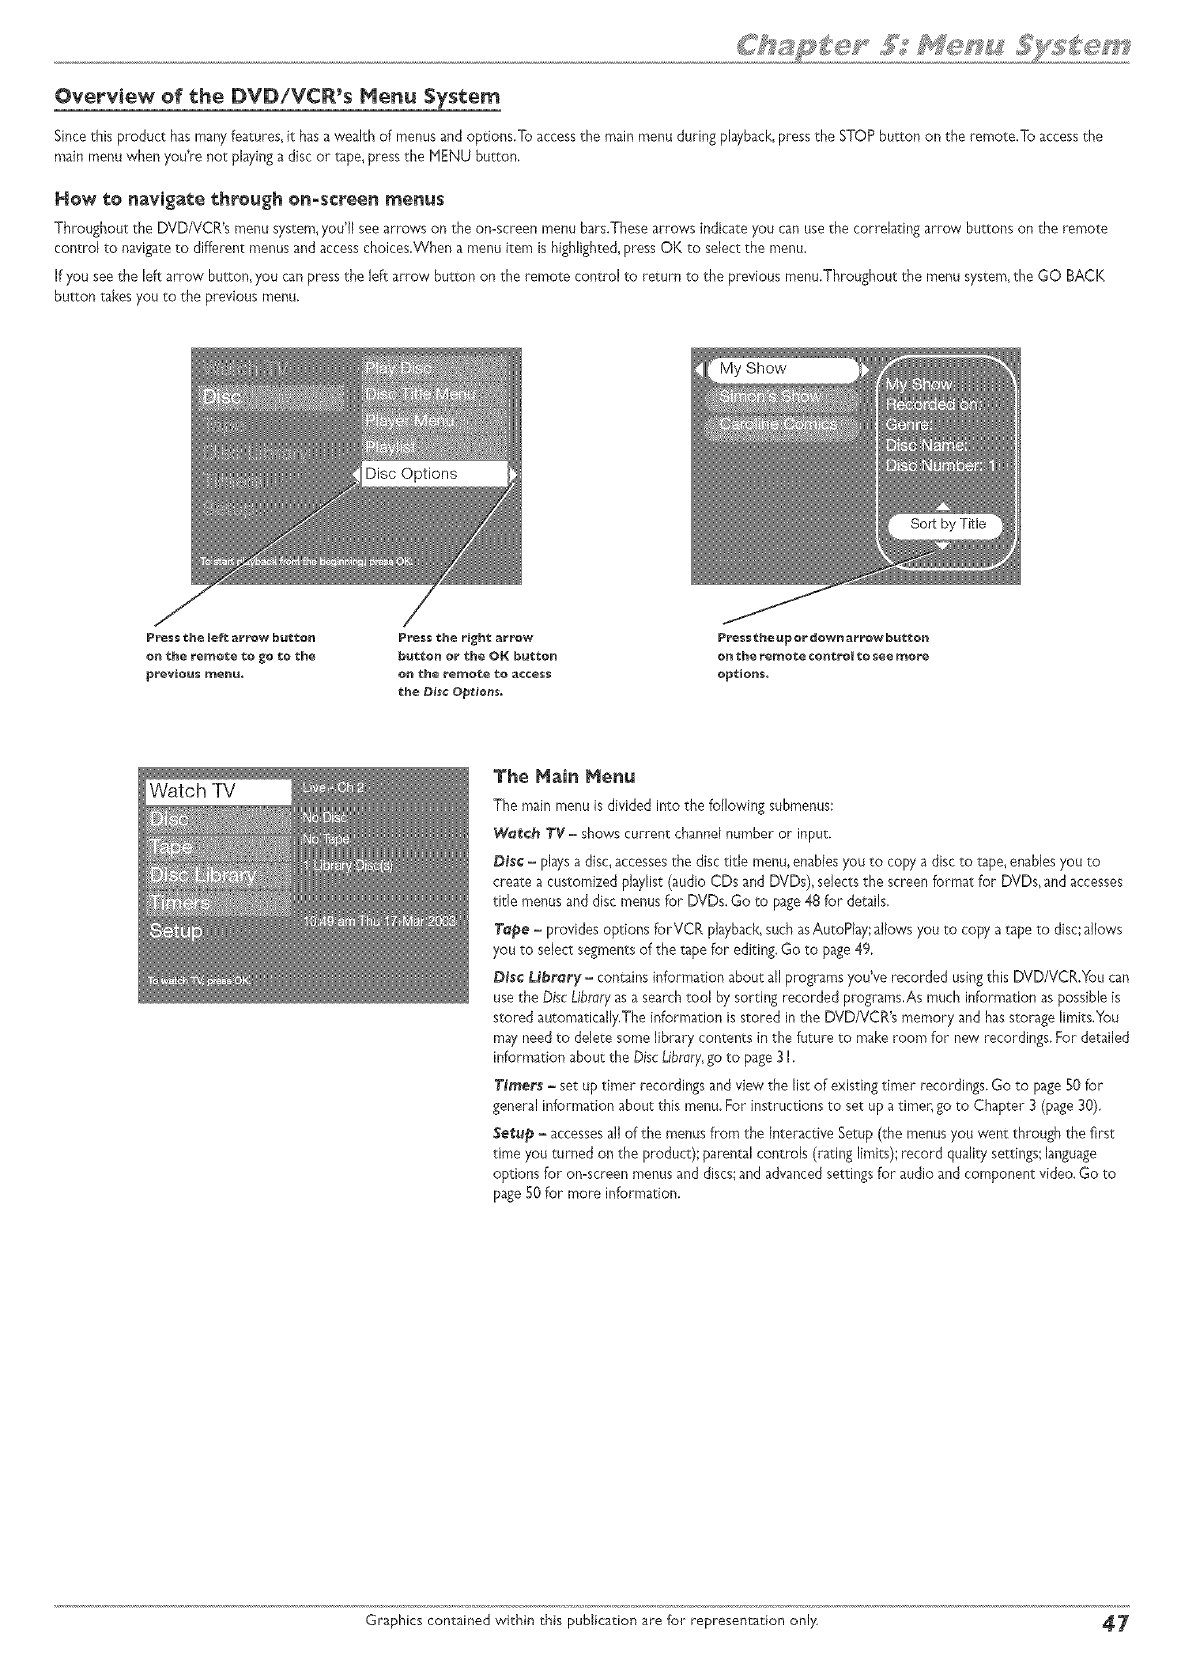
Overview of the DVDiVCR's Menu System
Sincethis product hasmanyfeatures,it hasa wealth of menus and options.To accessthe main menu during playback,pressthe STOPbutton on the remote.To accessthe
main menu when you're not playinga disc or tape, pressthe MENU burton.
NeW te navigate threugh on-screen menus
Throughout the DVD/VCR's menu system,you'll seearrows on the on-screen menu bars.Thesearrows indicate you can usethe correhting arrow buttons on the remote
control ro navigateto different menusand accesschoices.When a menu item is highlighted,press OK to select the menu.
If you seethe left arrow button, you canpressthe left arrow button on the remote control to return to the previous menu.Throughout the menu system,the GO BACK
button takesyou to the previous menu.
Press the left arrow butfcon
on the re_ote to go to the
previ@u$ menu.
Press the right arrow
button or the OK but_o_
Pressthe up or do_s arrow butf¢on
op¢io_s,
The Main Menu
The main menu is divided into thefollowing submenus:
Wet¢_ TV =shows current channelnumber or input.
D_¢ = playsa disc,accessesthe disc title menu,enablesyou to cop>,a disc to tape,enablesyou to
crea_ea customized phylist (audio CDs and DVDs), selects the screen format for DVDs,and accesses
rifle menus and disc menus for DVDs. Go to page48 for details,
Tape - provides options forVCR playback,such asAutoPiay;allows you to copy atape to disc;allows
you to select segmentsof the rape for editing. Go to page49,
D_¢ Library - contains information about all programs you've recorded usingthis DVD/VCR.You cart
usethe DiscLibraryasa searchtool by sorting recorded programs,As much information aspossible is
stored automatically,The information is stored in the DVD/VCR's memory and hasstorage limits.You
may needto delete some library contents in the future to make room for new recordings. For detailed
information about the DiscLibrary,go to page3 I.
Timers = set up timer recordings and view the list of existing timer recordings. Go to page50 for
general information about this menu.For instructionsto set up a time_ go to Chapter 3(page30),
Setup - accessesall of the menusfrom the interactive Setup(the menusyou went through the first
time you turned on the product); parental controls (radng limits); record quality settings;language
options for on-screen menus and discs;and advancedsettingsfor audio and component video. Go to
page50 for more information.
Graphics contained within _his publication are for representation only 47
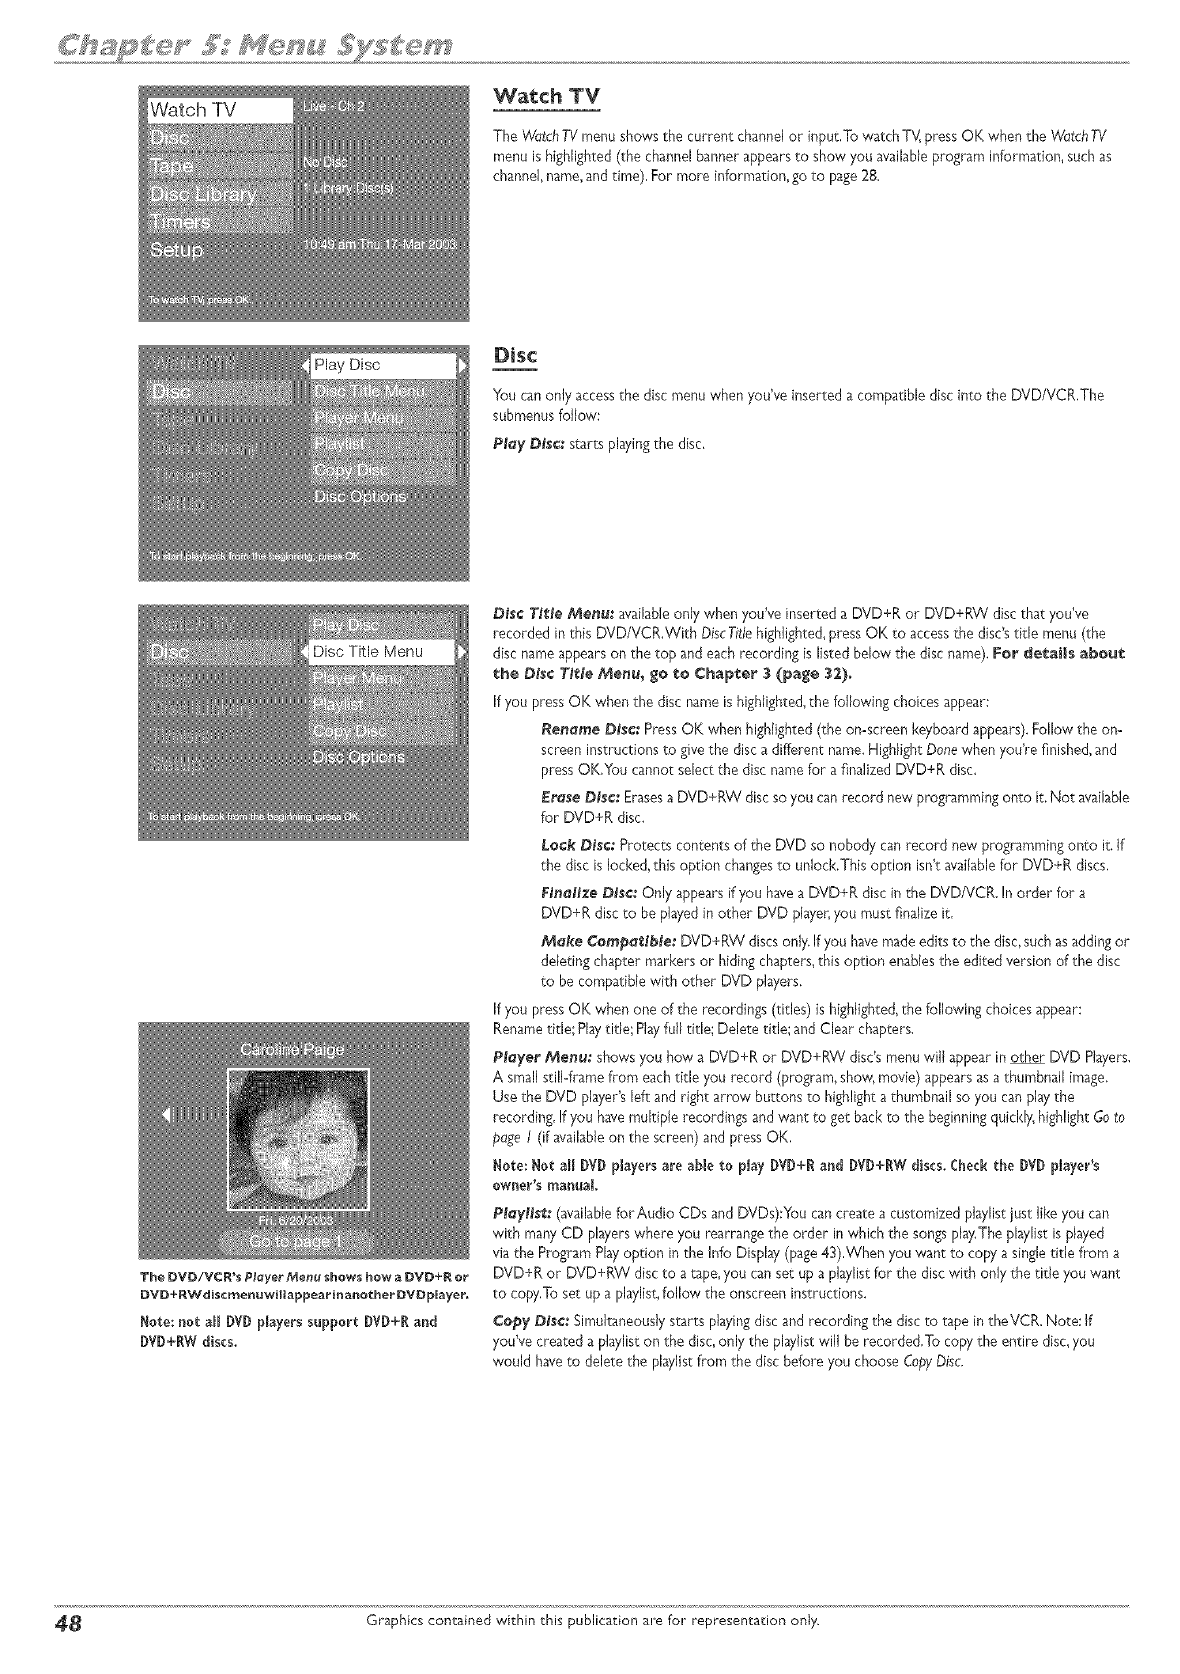
Watch TV
The WutchTV menu shows the current channel or input,To watch TV, press OK when the WatchTV
menu ishighlighted (the channel banner appearsto show you availableprogram information, such as
channel,name,and time). For more information, go to page28.
Play Disc Disc
You canonly accessthe disc menu when you've inserted a compatible disc into the DVD/VCR,The
submenusfollow:
Play Disc: starts playingthe disc.
The DVD/VCWs PlayerMenu shows hew a DVD+R or
DVD+RWdiscreenuwillappearinanother DVDplayer.
Note: not a_l I)VD#ayers support DVD+Rand
DVO+RWdiscs.
Disc T[,tle Menu: _vailabieonly when you've inserted a DVD+R or DVD+RW disc that you've
recorded in this DVD/VCR.With DiscTitle highlighted,pressOK to accessthe disc'stitle menu (the
disc name appearson the top and eachrecording is listed below the disc name). For details about
the Disc TJf;leMenu_ go to Chapter 3 (page 32).
If you pressOK when the disc nameis highlighted,the following choices appear:
Reneme Disc: PressOK when highlighted (the on=screenkeyboard appears).Follow the on-
screen instructions to givethe disc a different name.Highlight Donewhen you're finished,and
press OK,You cannot select the disc namefor a finalized DVD+R disc.
Erase DJs¢:Erasesa DVD+RW disc soyou canrecord new programming onto it, Not available
for DVD¢R disc.
Leek Disc."Protectscontents of the DVD so nobody canrecord new programmingonto it. If
the disc is locked,this option changesto unlock,This option isn't availablefor DVD+R discs,
FJneltxe Disc: Only appears if you havea DVD+R disc in the DVD/VCR. In order for a
DVD+R disc to be playedinother DVD player,you must finalize it.
Make Cempattble: DVD+RW discs only.If you havemade edits to the disc,such asadding or
deleting chapter markers or hiding chapters,this option enablesthe edited version of the disc
to be compatible with other DVD players.
If you pressOK when one of the recordings (titles) is highlighted,the following choices appear:
Renametitle',Pby title; Playfull title; Delete title; and Clear chapters.
PMyer Menu. • shows you how a DVD+R or DVD+RW disc'smenu will appear in other DVD Players.
A small still4rame from eachtitle you record (program, show,movie) appearsasa thumbnail image.
Use the DVD player's left and right arrow buttons to highlighta thumbnail so you can playthe
recording, If you havemultiple recordings and want re get back to the beginningquickly,highlight Goto
page /(if availableon the screen) and press OK,
Here: Not all [_VDplayersare able to play DVD+Rand DVD+RWdiscs. Checkthe DVD player's
owner's manual
PMyHst: (availablefor Audio CDs and DVDs):You cancreate a customized pJaylistjust like you can
with many CD playerswhere you rearrangethe order in which the songsplay.The playlist isplayed
via the Program Playoption in the Info Display (page43),When you want to cop}, a singletitle from a
DVD+R or DVD+RW discto a tape,you canset up a pJaylistfor the disc with only the title you want
to copy,To set up a playlist,follow the onscreen instructions.
Cepy DJsc:Simultaneouslystarts playingdisc and recording the discto tape in theVCR. Noce: If
you've created a playlist on the disc,only the playlistwill be recorded.To copy the entire disc,you
would haveto delete the playlistfrom the disc before you choose CopyDisc.
_ Graphics contained within this publication are for representation only.
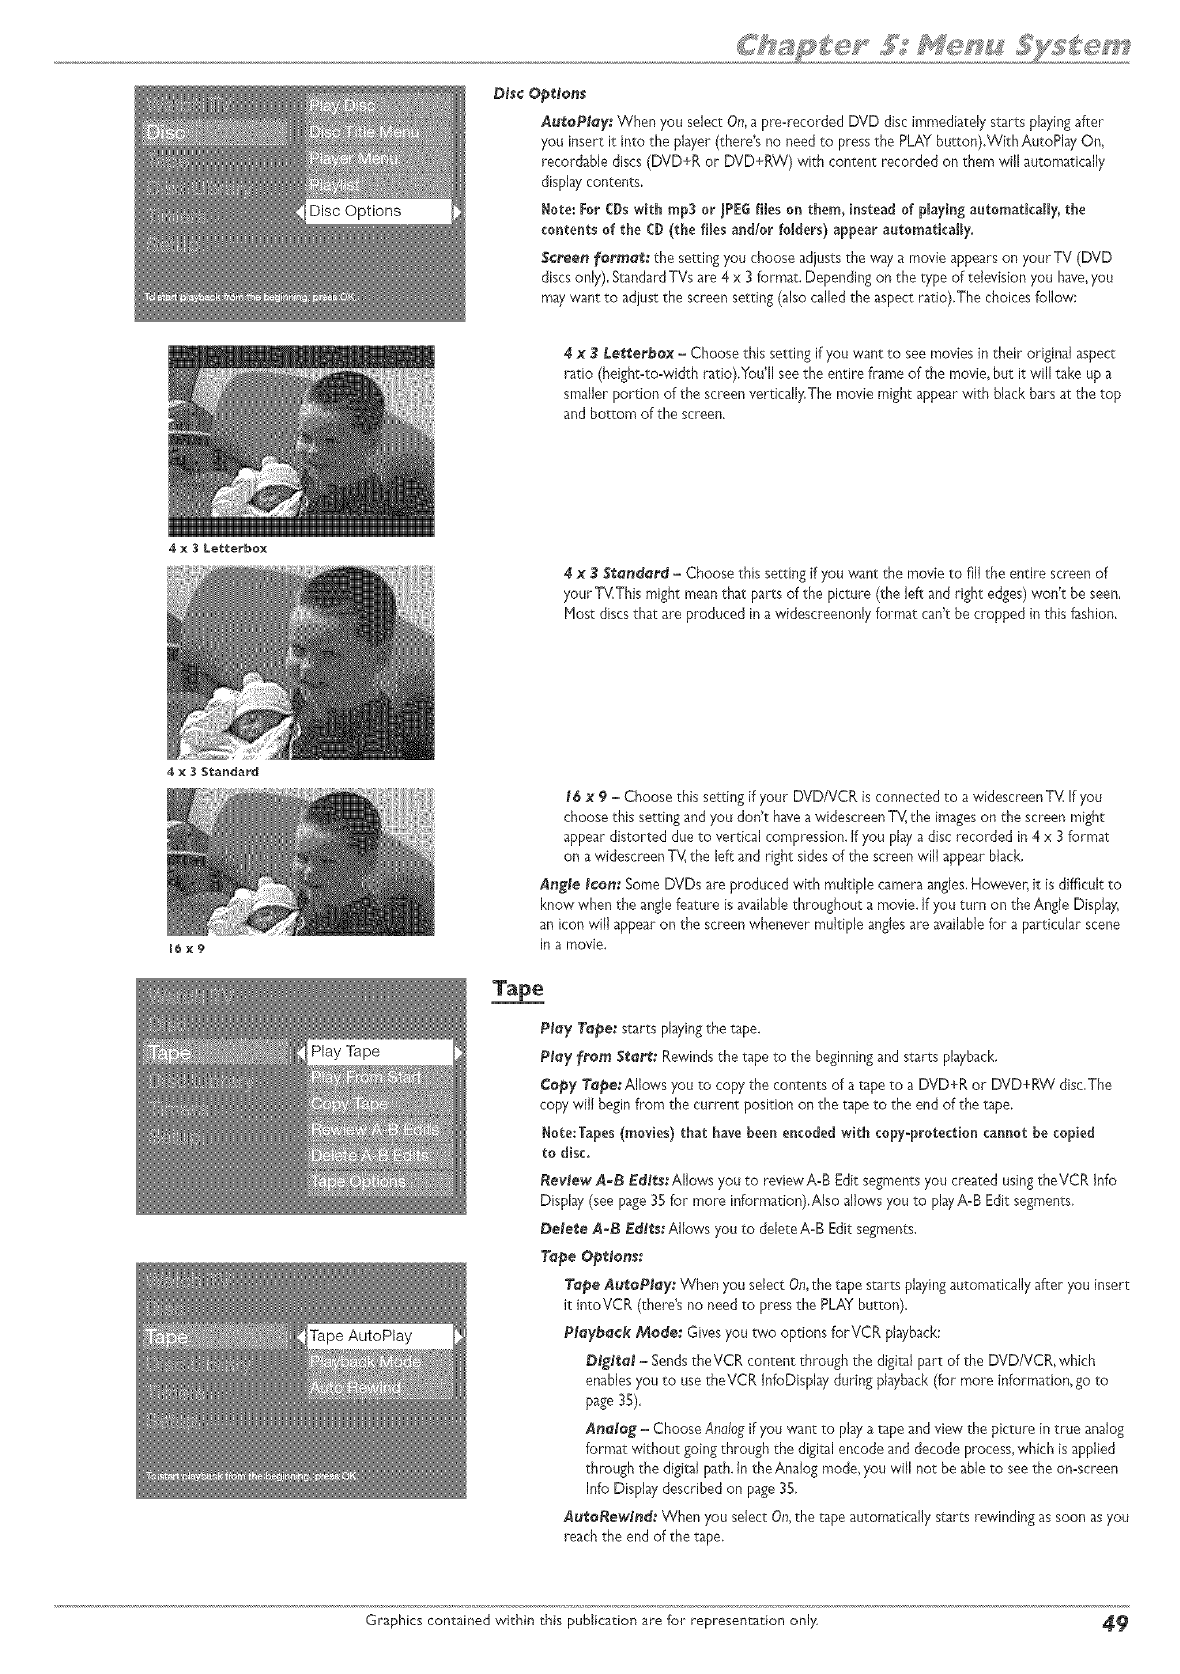
4x 3Letterbo×
4 x 3 Standard
16x9
Disc Op_fons
AutoPlay: When you select On, a pre=recorded DVD disc immediately starts playing after
you insert it into the player (there's no need to press the PLAY button).With AutoPlay On,
recordable discs (DVD+R or DVD+RW) with content recorded on them will automatically
display contents.
Note: For CDs with rap3 or _PEG files on them_ instead of pWaying automatically_ the
contents of the CD (the files and/or folders) appear automaticaffy.
Screen _ormat: the setdng you choose adiusts the way a movie appears on your TV (DVD
discs only). Standard TVs are 4x 3 format. Depending on the type of television you have, you
may want to adjustthe screen setting (also called the aspect ratio).The choices follow:
#x3Le_;t_erba×-Choose this setting if you want to see moviesin their original aspect
ratio (height=to=width ratio).You'll seethe entire frame of the movie, but it will take up a
smaller portion of the screen vertically,The movie might appearwith black bars at the top
and bottom of the screen.
#×3Standard -Choose this setting if you want the movie to fill the entire scteen of
your TV.Thismight meanthat parts of the picture (the left and right edges)won't be seen,
Host discs that are produced in a widescreenonly format can't be cropped in this fashion.
16 x 9 -Choose this setting if your DVD/VCR is connected to a widescreenTV: If you
choose this setting and you don't havea widescreenTV:the imageson the screen might
appear distorted clueto vertical compression. If you play a disc recorded in 4 x3 format
on a widesc_eenTV_the left and right sidesof the screen will appear black,
Angle _¢an: Some DVDs are produced with multiple camera angles,However, it is difficult to
know when the anglefeature isavailablethroughout a movie. If you turn on the Angle Display,
an icon will appear on the screenwhenever multiple anglesare availablefor a particular scene
in a movie.
Ta_e
P_ay Ta_e: starts playingthe tape.
P_ay from Sea_: Rewindsthe tape to the beginningand starts playback.
_y Tape: Allows you to copy the contents of a tape to a DVD+R or DVD+RW disc,The
copy will beginfrom the current position on the tape to the end of the _pe,
Note:Tapes (movies) that have been encoded with copy-protection cannot be copied
to disc.
_ee_ew A_B Ed_s:AlJowsyou to reviewA-B Edit segmentsyou created usingtheVCR Info
Display (see page35 for more information).Also allows you to playA-B Edit segments,
DeCeiVeA-B Ed_s: Allows you to deleteA-B Editsegments,
Tape Operant:
Tape Au_aP_ay: When you select On,the tape starts pbying automatically after you insert
it intoVCR (there's no need to press the PLAY button).
P_ay'ba¢_ Made: Gives you two options forVCR playback:
D_'ft_a_ - Sendsthe VCR content through the digital part of the DVD/VCR, which
enablesyou to usetheVCR InfoDisplay during playback(for more information, go to
page 35).
Ana_a_ -Choose Analogif you want to play a tape and view the picture in true analog
format without going through the digital encode and decode process,which isapplied
through the digital path. In the Analog mode, you will not be ableto seethe on-screen
Info Display desctibed on page35,
_uf;aRew_nd: When you select On,the tape automatically starts rewinding as soon asyou
reach the end of the tape.
Graphics contained wRhin _his publication are for representation only _
Disc Library
The disc library accessesinformation about whatyou've recorded onto discs.Details of this feature and the submenusare described on page3 I,
Timers
Timer You canadd timers and view or edit existing timers flora this menu for automatic recording.Timer recordings are especiallyuseful when you havea favorite program
that you want to record every week and/or every day.If you usea cable box,the cable box must be On and tuned to the channelyou want to record, during the timer
recording; if you're recording from satellite, the satellite serotopbox, also called a receive_must be On and tuned to the channelyou want to record. For details about setting
up a timer, go to page30.
Setup
The Setup menu contains manysubmenustha_ are explained on the following pages.Follow the instructions at the bottom of the screen.
Note:To return to a previousraenu, pressthe left arrow button or GO BACK.
Parental ControJs
You canset up ratings limits andturn on the Parental Control feature in order to control the type of discs people can play in the DVD/VCR.The padlock icon on the Loci<
menu indicates whether the playeris locked or unlocked,
Le¢ked:You need to enter the password in order to play discsthat havea higher rating than what you've allowed.When the player is locked,nobody can accessthe
Lock menu without entering the password.
Unlocked: No password required to play discs,Even if you've set ratings limits, they won't be enforced when the player is unlocked.
I_otes:
The player is shipped unlocked without any rating ffmits set, If yon want to use the Parental Control feature, set Ratings LimKs and then lock the player,
Don't confuse the DVDfVCR's Parental Control feature with apareatal centro_ feature that may be in your T¥, often referred to as V-Chip. The ratings described here
refer to discs that you play in the recorder, not TV prograras.
Parental Control Lock Lock (and Unlock)
I. From the DVD/VCR's main menu,select Setupand pressOK (the Setupmenu items appear),
2. SincePorentdlControlis highlighted,just pressthe OK button (the PdrentdlControlmenu items
appear).
3. SinceLock ishighlighted,just pressthe OK button on the remote.
4. If prompted to enter apassword, usethe number buttons on the remote control and pressOK
(ConfirmPasswnrdappears).Enter the samenumbers you entered before and press OK.
5, To return to the previous menu, pressthe left arrow button.
Once the player is locked,you'll needto enter the password everytime you accessthe PurentdCentrals
menu.
Note:The player isshipped without any rating limitsset.You need to set Ratings Umits (go
to page50 for instructions) in order for the player to prevent people from playingdiscs with
certain ratiags.
Rating Limits
The RatingLimitsmenu lets you determine what types of discs canbe playedin the player,and what
types of discs will require a password to override the rating limit that you've set. In the U.S.,the
ratingsfeature isbasedon the ratingsset up by the PIPAA(Notion PicturesAssociation of America)
such as R,PG,G, etc,
The system ranks the ratings from I to 8 in order to accommodate ratings systems usedin other
countries ( ! isconsidered material that is least offensiveand 8 is considered the most offensive),
Note: In order for the Ratingsto he enforced, the DYD/VCt_faust be locked and the disc you're
playing must contain a movie (or a tit_e) that is rated.
_0 Graphics contained within this publication are for representation only.
Parental Control To set Ratings:
hFrom the DVD/VCR's main menu,select Setupand pressOK (the Setupmenu items appear),
2+ SincePorentdlControlis already highlighted,just press OK (the ParentalControlmenu items appear).
3. Highlight RatingLimitsand pressOK (the 8-level rating list appears).
4. Usethe up and down arrow buttons to movethe bar to the rating level you find acceptable.
Ratingsthat don't require a password (free access)appear under the bar.
Ratingsthat require a password appear abovethe ban
$. PressOK,
Note:Yea must lock the player (page 5@)in order for the ratings to be enforced.
Unrated Titles
Some discs contain titles (or movies) that don't havea rating assignedto them. Sometimes,moviesyou
mightfind the most expfcit are unrated. However, muchof the new programming on discs,such as
interviews with actors and directors, is also unrated.Additionall); the discsyou useto record (DVD+R
and DVD+RW} are considered unrated.
In order to prevent unrated titles from being playe&you need to choose PasswordRequiredfrom the
UnmtedTidesmenu,and lock the playen
if you want this setting to applyto discs you recorded (DVD+R and DVD+RW discs),simply highlight
the check box next to ApplyDVD+R,+RWand pressOK.
System OptNons:
Contains settingsand menusfor audiofeatures,aswel! as black levelsettings and dimmer options for the front display of your DVD/VCR.
DBgttal Out,put, If you connected your DVDNCR to a receiver via the DIGITAL AUDIO OUT lack on the back of the player,choose the type of
receiver (or decoder) you have:Dolby Digital or DTS.
Note: If you select DT$,and you don*t have a DT$receber connected to the DVD/VCRyou won't bear any audio or the audio wN be distorted.
SR$/TruSurround_ TheTruSurround® feature simulatesa six-speaker listening experience through just two speakers.Thedefault setting isOi/fiToturn
on theVirmal Surround® feature highlightSRS/TruSurround,and pressOK. Highfght Onand pressthe OK button.
Block Leve_: Adiusts how bright the picture appears.Choose between Dark and Light.Usethe arrow buttons to highlight a choice and press the OK
button to select the choice that's highlighted.
D_mmer: Adiusts the brightnessof the displayon the front of the DVD/VCR. Use the arrow buttons to highight asetting, and the OK button to select
the option that's highlighted.The choices follow: Automatic (the display automatica/y dims during playback);Bright;Dim.
Audio B_e_d¢_st_, Default setting for type of audio recorded and played.Choices are Stereo,None, SAP(SecondAudio Program).
Aui_o¢_e¢_: Keepsthe DVD/VDR's time current by downloading time from broadcast signal.If the DVD/VCRg clock is out of sync andAutoCIock ison,
try turning offAutoCfeck and set the time manuallyvia the Clock Setup menu (page 53).
S$_(_]
Trm urround _ is a trademark of SRS Labs Inc.
TruSmTound technology is incoxt_orated under licex_se
agreement ii'om SRS Labs Inc.
Graphics contained within this publication are for representation only _
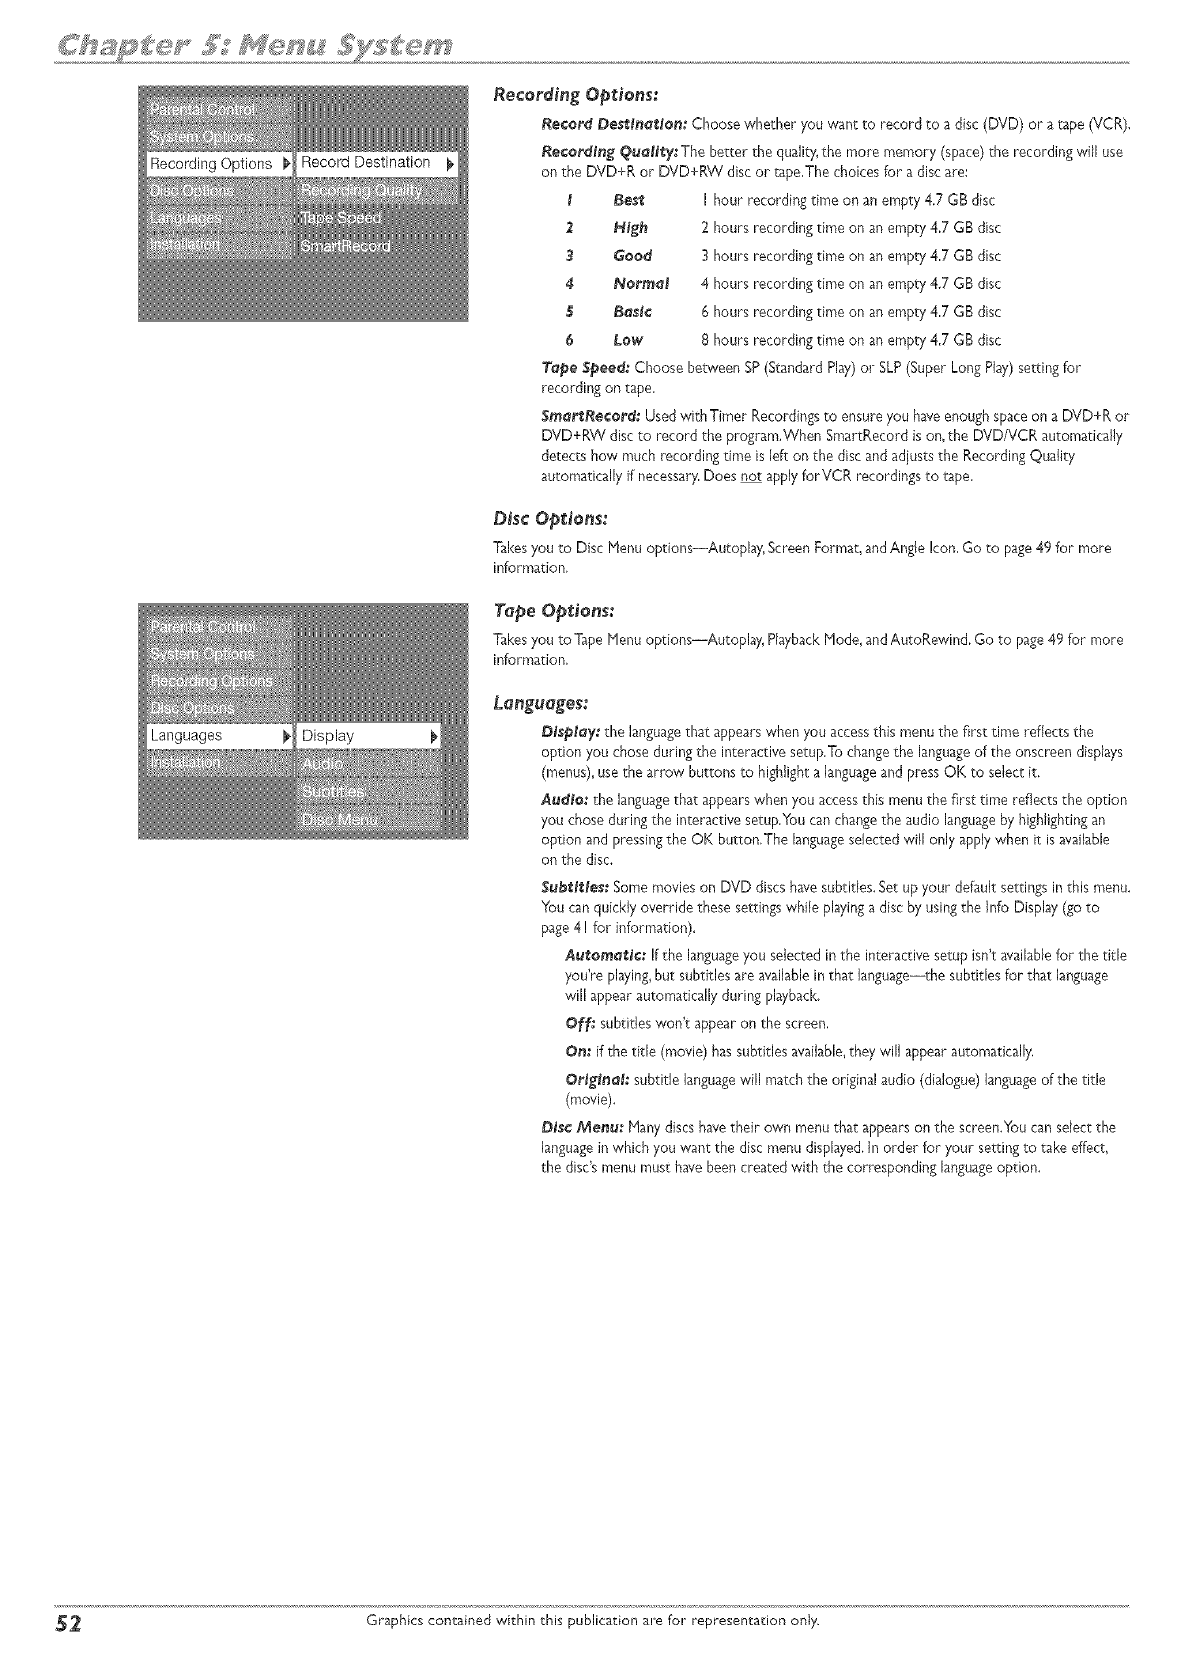
Recording Options
Languages Display
Recording Options:
Record Destination: Choose whether you want to record to a disc (DVD) or a tape (VCR),
Recording Quality: The better the quality,the more memory (space) the recording will use
on the DVD+R or DVD+RW disc or tape,The choices for a disc are:
tBest I hour recording time on an empty 4.7 GB disc
2High 2 hours recording time on an empty 4,7 GB disc
9 Good 3 hours recording time on an empty 4,7 GB disc
4Normal 4 hours recording time on an empty 4,7 GB disc
$Basic 6 hours recording time on an empty 4,7 GB disc
6 Low 8 hours recording time on an empty 4,7 GB disc
Tope Speed: Choose between SP(Standard Play)or SLP(Super Long Play)setting for
recording on tape.
$morl_Record: UsedwithTimer Recordingsto ensureyou haveenoughspaceon a DVD+R or
DVD+RW disc to record the program.When SmartRecord ison, the DVD/VDR automatically
detects how much recording time is left on the disc and adjuststhe Recording Quality
automatically if necessary,Does not applyforVCR recordings to rape.
Disc Options:
Takesyou to Disc Henu options--Autoplay, Screen Format, andAngle Icon,Go to page49 for more
information,
Tape Opinions:
Takesyou toTape Henu options--Autoplay, PlaybackHode, andAutoRewind, Go to page49 for more
information,
Lengueges:
Db'sploy: the languagethat appearswhen you accessthis menu the first time reflects the
option you chose during the interactive setup.To changethe languageof the onscreen displays
(menus),use the arrow buttons to highlight a languageand pressOK to select it.
Audio: the languagethat appearswhen you accessthis menu the first time reflects the option
you chose during the interactive setup.Youcan changethe audio languageby highlightingan
op'don and pressingthe OK but'ton,The languageselected will only apply when i't isavailable
on the disc.
Subt_tt_les:Some movies on DVD discs havesubtitles. Set up your default settingsin this menu.
You canquickly override these settingswhile playing a disc by using the Info Display (go to
page4 ! for information).
Aut_omot_ic: If the languageyou selectedin the interactive setup isn't availablefor the title
you're playing,but subtitles are availablein that language--the subtitles for that language
will appearautomatically during playback.
Off: subtitles won't appear on the screen,
On: if the title (movie) has subtitles _vailable,they will appear automatically,
OrJgJnol:subtitle languagewill match the original audio (dialogue) languageof the title
(movie).
Disc Menu: Manydiscs havetheir own menu that appearson the screen.Youcanselect the
languagein which you want the disc menu displayed,in order for your setting to _ke effect,
the disc'smenu must havebeen created with the corresponding languageoption.
_ Graphics contained within this publication are for representation only.
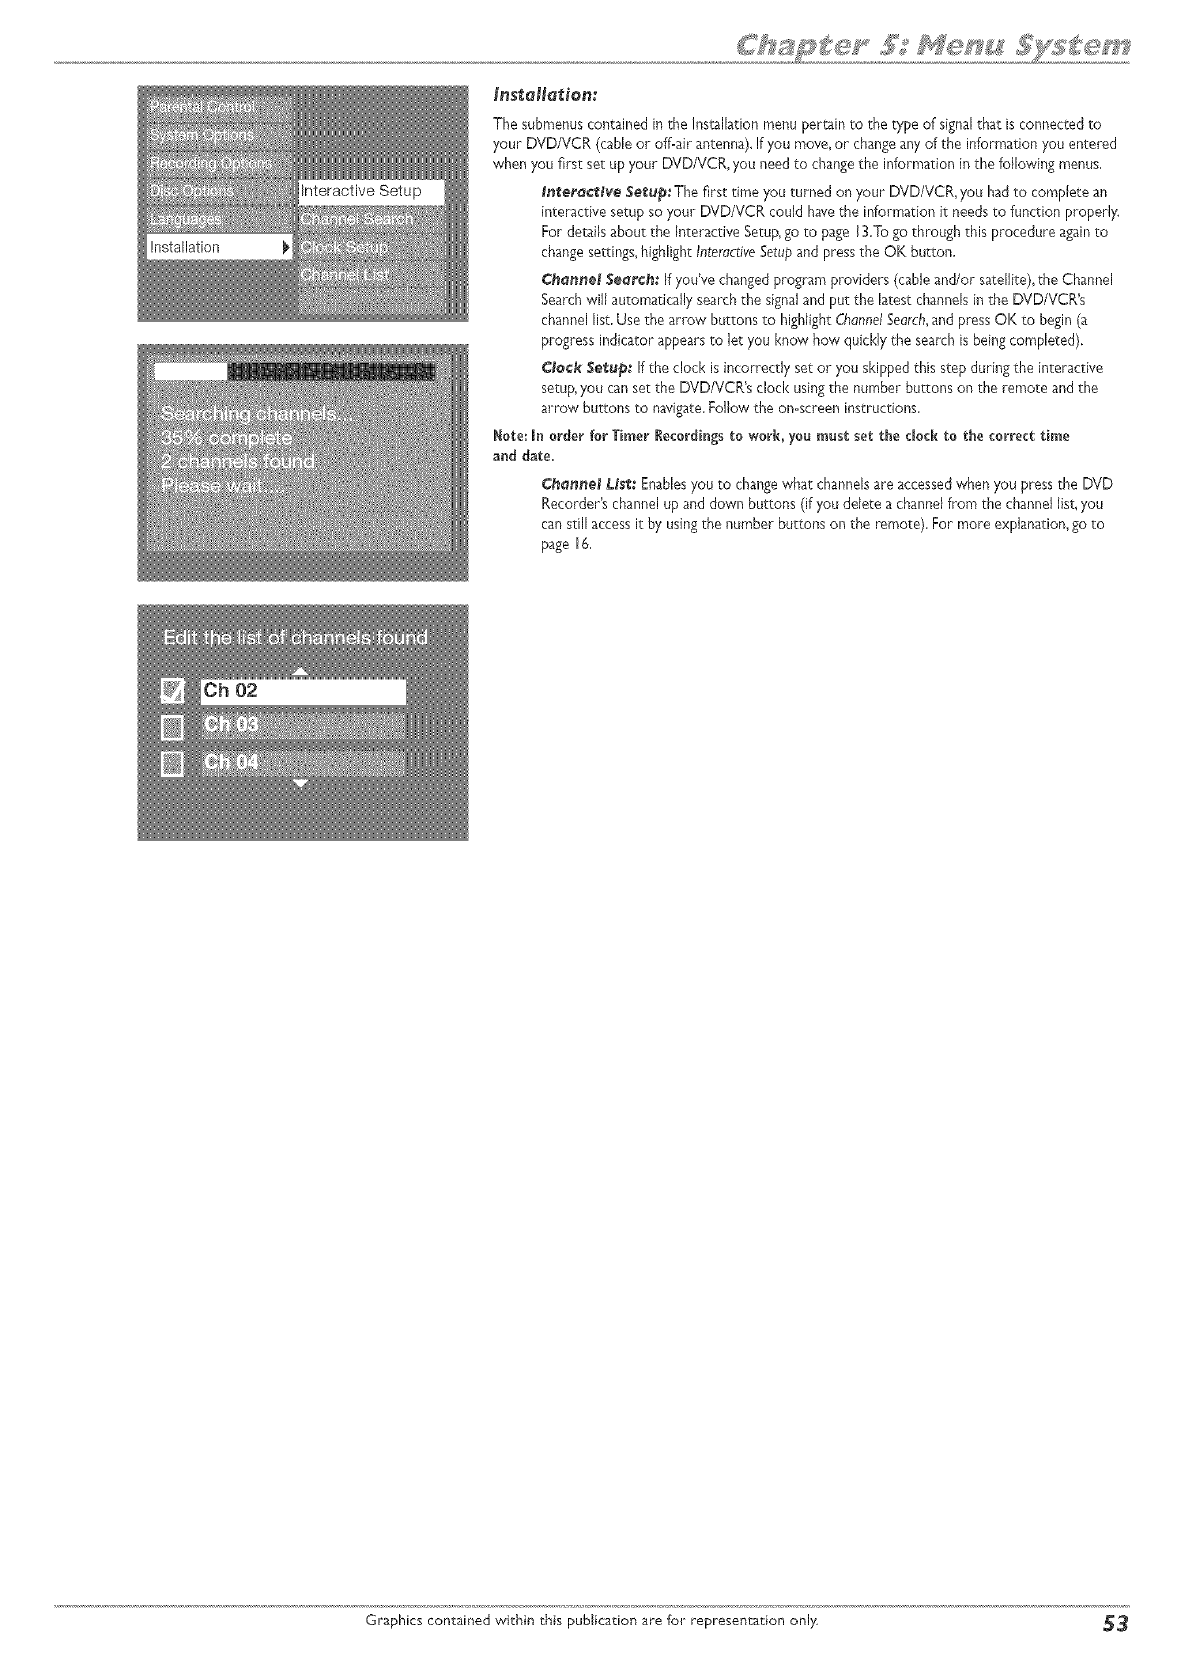
Installation
Inste/e_ien:
The submenuscontained in the Inseallationmenu pertain to the type of signalthat is connected to
your DVD/VCR (cableor off-air antenna). If you move,or changeany of the information you entered
when you first set up your DVD/VCR, you need to changethe information in the following menus.
lnterQctive Setup: The first time you turned on your DVD/VCR, you had to camp{ere an
interactive setup so your DVD/VCR could havethe information it needsto function properly.
For detailsabout the Interactive Setup,go to page 13.To go through this procedure againto
changesettings,highlight InterdctiveSetupand pressthe OK button.
Channel Sear€if: If you've changedprogram providers (cable and/or satellite), the Channel
Searchwill automatically searchthe signaland put the latest channelsin the DVD/VCR's
channel list. Usethe arrow buttons to highlight ChannelSearch,and press OK to begin(a
progress indicator appearsto lec you know how quickly the search is beingcompleted).
Clock Set,up: If the clock is incorrectly set or you skippedthis stepduring the interactive
setup,you can set the DVD/VCR's clock usingthe number buttons on the remote and the
arrow buttons to navigate.Fo/ow the on-screen instructions.
Note: In order for Timer lecordings to work, you must set the clock to the correct time
and date.
Cffannel L.tsi_:Enablesyou to changewhat channelsare accessedwhen you pressthe DVD
Recorder's channelup and down buttons (if you delete a channelfrom the channel list, you
can still accessit by usingthe number buttons on the remote). For more exphnation, go to
page 16.
Graphics contained within ehis publication are for representaeion only _
®
o
o
®
o
Troubleshooting
Handling Cautions
Maintenance of Cabinet
Limited Warranty
Accessory information
GraphicscontainedwithinthisUser'sGuideareforrepresentationon/y.Some
ofthemenu screens,buttons,and disp/a}/messagesmightbe differentin}!our
productthanthe}/appearin thisbook.Theon-screenhe[ptextprovidesthe
most currentoperationa[ information.
page $4

TroubHeshoeting
Genet'al ProMems
Player won'_ work (locks up)
Try unplugging theAC power cord and plugging it back in.
Reset the DVD/VCR: on the front of the unit, press and hold the STANDBY/ON button while you press and hold the STOP button--wait at least 3 seconds
before you release both of the buttonsXou'll need to set up your menu preferences because this Reset Procedure returns the DVD/VCR's menus to the
factory default settings and also erasesthe contents of the Disc Library,
No power
Plug in the DVDIVCR_ Make sure both ends of the AC power cord are securely plugged into the Recorder and into an AC outlet.
Make sure you've plugged it into a working outlet and/or a power strip that is turned on,
Don't plug the unit into an outlet that is operated by a wall switch.
No pic_ure
Turn on theTV.
Tune your TV to theVideo Input Channel that corresponds to the jacks you used to connect theTV to the DVD/VCR (go to page 18for more help)
Check the PROG SCAN switch on the back of the unit to make sure it is in the OFF position.Try playing the disc again.
Hake sure your DVD/VCR is connected properly,
If you connected a satellite receiver or a cable box, make sure it is turned on,
Press the ANTENNA button,
Ascreen saver oppeors on _he TV
Your player is equipped with a screen saverthat appears on the TV after your player hasbeen idle for several minutes.To make it dis@pear, press STOP or
CLEAR on the remote.
The menu is di@loyed in a foreign languoge
The Languagemenu (Display menu) is set to that language,Go to the Setup menu and choose Languages(in Spanish,shown as ldiomas;in French, as Langues)_
choose the Display option. Highlight the languageyou prefer, and press OK.
I forgo_ my password
Press the STOP button on the front of the unit while you press the STOP button on the remote control--keep pressing both buttons for approximately 3
seconds (until the _1 icon disappears fl_omthe front panel display) Releaseboth buttons (the player should be unlocked)If that doesn't work, try resetting the
DVD/VCR (instructions are listed below),
Reset the DVD/VCR: on the front of the unit, press and hold the STANDBY/ON button while you press and hold the STOP button--wait at least 3seconds
before you release both of the buttonsXou'll need to set up your menu preferences because this Reset Procedure returns the DVD/VCR's menus to the
factory default settings and also erasesthe disc library.
The _ime (clock) is wrong
Go to the SystemOptions menu and select AutoOock. Set it to off and then set the time manually via the Clock Setupmenu, which is found in the Installation menu.
DVD P_e_e_s
Disc won'_ eject:
When you put a disc into the player, the player may take up to IS seconds to read the disc You won't be able to eiect the disc during this time Wait I S seconds
and try again.
Maybe the Tray Lock feature has been activated_To unlock the disc tray, press and hold the STOP button on the front of the unit and then press and hold the
OPEN/CLOSE button on the front of the unit at the same time--wait 3 seconds before releasing both buttons.
Disc_rey won't open
P1aybethe Tray Lock feature has been activated.To unlock the disc tray, press and hold the STOP button on the front of the unit and then press and hold the
OPEN/CLOSE button on the front of the unit at the same time--wait 3 seconds before releasing both buttons.
Disc won*_ play
Many problems encountered when playing (or recording) a disc are lelated to the "wide variation in disc quality due to the large number of brands and
manufacturers.We highly recommend using discs from a reputable manufacturer. If you encounter problems with one brand, please try another brand.
Insert a disc with the label side facing up.
Check the type of disc you put into the player.This player only plays DVD video discs,Video CDs, audio CDs, and CDs with true rap3 files and/or JPEGfiles.
rap3 files that havebeen converted to HPX files (or similar types of files) won't be recognized by your DVD/VCR.
Both the DVD/VCR and the disc are coded by region_if the regional codes don't match, the disc cannot be played.This player is Region No. !. Region coding
isn't applicable to discs you use to record (DVDcR and DVD+RW)_
Press STOP (the main menu appears). Check the PROG SCAN switch on the back of the unit to make sure it is in the OFF position.Try playing the disc again.
If you've put both a DVD in the disc tray and a videotape in theVCR deck, select the Disc menu from the main menu and choose Pby Disc (or press the PLAY
button when the menu is highlighted).
If you're playing a PluJtisession CD, you might not have closed the session before ejecting it from your computen Close the session and try the disc again.
If you're trying to play a DVD+R or DVD+RW disc you recorded in this DVD/VCR in another DVD player,the DVD player may not support DVD+R or
DVD+RW discs_Also,if it is a DVD+R disc make sure you finalize it (p_4I).
If you're trying to play a DVD-RW disc, it must havebeen recorded using the video mode (VP1)and it must have been finalized.
If it's a DVD+R or DVD+RW disc,check the setdng in the ParentalControlsmenu. Go to Unmted Titles,and see if the box is checked next to Apply to DVD+R and
DVD+RW dis_s.If there is a check in the box and you set Unroted Titlesto PasswordRequired,simply highlight the checkbox and press OK.Try to play the
disc again,
Graphics contained within _his publication are for representation only _
Play star_s_ bu_ then stops immediately
The disc is dirty. Clean it.
Condensation hasformed in the DVD/VCR,AJiow it to dry out.
The picture is di$_orted ond/or fuzzy; or _j_*mps_ during disc pIwbocR
The disc might be damaged.Try another disc.
It is normal for some distortion to appear during forward or reverse scan
The disc might be dirty, Clean it (go to page 58 for instructions).
Some discs havedefects that cause them to jump from one scene to the next,
Turn the PROG SCAN switch on the back of the DVD/VCR to the"off" position.This switch should only be turned on if you've connected the DVD/VCR to a
television that uses progressive scanningto display the image,Some, but not all High Definition Televisions (HDTVs) and multimedia monitors use progressive
SCan.
If you have a progressive scan TV connected, a slight jumping of the signal is normal when you first play a DVD discA more detailed explanation follows:
If you have a progressive scan TV connected to the DVD/VCR via the COMPONENT }arks (Y,Pb, Pr) and turned on the PROG SCAN switch, the DVD/VCR
automatically switches between progressive scan and regular interlace because progressive scan is only available when you play DVD discs.As the signal is
converted from inter{ace to progressive (and vice versa), the Recorder resynchronizes the signal Depending upon yourTV, this resynchronization process might
cause a slight"jump" in the picture when you start playing a DVD disc and again when you return to watchingTVi
No sound or dis{orted sound
Make sure your player is connected properly, Make sure all cables are securely inserted into tile appropriate jacks.
You may need to readjust the Digital Output setting (from the SystemOptions menu), Go to page SI. If you select DTS, and your DVD/VCR isn't connected to a
DTS-capabie receiver, you won't hear any sound, or the sound wiJJbe distorted
Turn your TV to itsVideo Input Channel (go to page 18).
Sound is muted when you're using search features (fast forward, reverse, fl-ame advance, etc.).
If you connected an audio receiver to your DVD/VCR, make sure you chose the correct input setting on the receiver.
Can'_ advance _hro_gh o mov_e
You can't advance through the opening credits and warning information that appear at the beginning of movies because the disc is programmed to prohibit that
action.
Sub{i{Je ond/or oudio Jong_oge is no* {he one seJec{ed from {he in*{ioJ ge_;{ing
If the subtitle and/or audio language does not exist on the disc, the disc's priority language will be selected instead. Set the subtitle and/or audio language
manually through the Info Display or the DVD/VCR's menu system.
P_aydoesn'_ beg_n
The rating of the title on the disc exceeds the rating limit set in the Ratings Limits menu, Unlock the player and/or change the rating limit in those menus. Go to
page S0 for more information.
No for_ord or rever_e scan
Some discs havesections that prohibit rapid scanning, or title and chapter skip.
If you're trying to skip through the warning information and credits at the beginning of a movie, you won't be able to,This part of the movie is often
programmed to prohibit skipping through it.
Desired ong_econno_ be changed
Host discs don't havethe multi-camera angle system, and some discs only have multiple angles during certain parts of the movie,
Change the Screen Format in the menu system. Go to page 49 for more information.
Picture is _oo shor_ ond verde
Change the Screen Format in the menu system. Go to page 49 for more information.
b_sc_recorded won'_ pgoy in another DVD p_oyer
If it's a DVD+R disc, make sure you finalize the disc (p 33).
Some DVD players won't play DVD+R and/or DVD+RW discs. Check the DVD player's manual
Rec@ 'dingiCopying P 'obJems
No_ enough spoee on {he DVD+R or DVD+RW d_sc
To get more recording time, you can change the Recording Quality setting (page 52). If it is a DVD+RW disc, you can delete some titles to create more space.
V¢O_ record
You can't record content that is copy-protected, If a messageappears notifying you that you can't record the materiaJ, press CLEAR on the remote to remove
the message from the screen.
Make sure you've inserted a DVD+R or DVD+RW disc
Make sure the disc isn't Jacked, which protects contents of disc but prevents recording_ Go to page 48 for more information
Many problems encountered when recording (or playing) disc are related to the wide variation in disc quality due to the large number of brands and
manufacturers.We highly recommend using discs from a reputable manufacturer, If you encounter problems with one brand of disc, please try another brand.
Press the DVD's RECORD button on the front of the DVD/VCR.The remote control's RECORD button activates recording on the part of the DVD/VCR
selected in the Recording Options menu (Tape or Disc) You can change the selection (page 52),
_ Graphics contained within this publication are for representation only.
rap3 files
The followingrecommendations can't be taken as a guarantee that the DVD/VCRwill playrap3 recordings, or as an assurance of sound quality.Certain technologies
and methods for rap3 file recording on CD-R discs prevent optimal playbackof these flies on your product.
Hake sure the file is a true rap3 file.Youcan only playtrue HP3 files inthe DVD/VCR--some products use software to compress rap3 flies and convert them
to other formats such as HPX.Your DVD/VCRwon't recognize or play HPX filesor other types of converted rap3 files.
When naming rap3 flies,don't exceed 12characters, and enter .rap3 as the file extension_When usinga general name format of:Tide.rap3, make sure the title is
8 characters or less, don't use spaces, and don't use special characters (such as, = +,/, %,&,etc.).
Whatever the real recording capacity of the CD-R,don't use more than 630HB of recording space on the disc_
Use a decompression transfer *-ateof at least i28 kb/sec (kilobits/second) when recording rap3 flies_Sound qualitywith rap3 files basicallydepends on the rate
of compression you choose_Getting audio CD qualitysound requires an analog/digitalsampling rate, that isconversion to rap3 format, of at least 128 kb/sec
and up to 160kb/sec. However; choosing higher rates like 192 kb/sec or more, only rarely give even better sound quality.Conversely,files with samplingrates
below 128 kb/sec won't be played.
Cen'_ ge_ _a DVD/VCR_s main mena
Press the STOP button until the main menu appears or press the left arrow button to return to the previous menu.Ifthat doesn't work, remove the rap3 disc
#am the disctray.
Can't make {he Infa Display appear
The Info Displayisonly availablewhen playingDVD discs,VCRtapes usingthe digitalpath,Audio CDs,Video CDs, and watchingTV
VCR ProMems
No picture or _a_/ p_c_re
Turnon theTV
Checkthe PROGSCANswitchon the backof the unitto makesure it is in the OFFposition.
Hake sureyour DVD/VCRis connectedproperJy_
If youconnectedasatellitereceiveror a cablebox,makesure it isturned on_
Somesnow or streaksale normalduringsearch,stopaction,frameadvance,andslow-morionplayback.
Adjustthe tracl<ingby pressingthe CH+ and/orCH- buttonsduringplayback.
Thetapemaybeworn out or poor quality.
PresstheANTENNA button,
Tape wa_'_; p_ey
Hake sureyou turn on theTV,andtune it to the correctVideo Input Channel,
Try eiecting the tape and reinserting it.
Hake surethe tape is not broken,
If the mainmenuappearswhen youpressPLAY,youprobablyhaveboth a DVDdiscloadedinthe disctray anda tape in theVCRdeck.Youneedto selectTape
from the mainmenuto playit.
Hake surethe DVD/VCRis not in pausemode.PressPAUSEor PLAYto return to normalplayback,
T_me ca_er d_sappear$ d_r_g searching
Thisisnormal
Try eiecting the tape and reinserting it.
Tape wa_'_ retard
Hake surethere isa recordabietapein the DVD/VCR.
Hake sure the tape's safety tab is intacL
Press theVCR's RECORD button on the front of the DVD/VCR.Theremote control's RECORD button activates recording on the part of the DVD/VCR
selected in the Recording Options menu (Tape or Disc).You can change the selection (page 52).
Timer
Hake sure the time is correct.Your DVD/VCR is equipped with an automatic clock, but the feature might not worl< properly in some areas. If the time is
inaccurate, set it manually by selecting the Setup menu; then Installation; and then Clock Setup,
Hake sureyou set up the timer recordingcorrectly--specifically,checkthe Destinationfield (you mighthavechosenDisc whenyou meantto chooseTape,or
viceversa);checktheAH/PH setting.
If you'rerecordingfrom a satellitereceiveror cablebox,makesure theyare turned onwhenit is time for the recordingto start,Also,ifyou usedaudio/video
or S-Videocablesto connectyour satellitereceiveror cableboxto the DVD/VCR,tune the DVD/VCRto the correspondingVideoInputChannelby pressing
the INPUTbutton on the remote control.If youuseda coaxialcableto connectyour satellitereceiveror cablebox to the DVD/VCR,tune the DVD/VCRto
the correspondingsatellite/cablebox channel(usuallychannel2, 3,or 4). Remember,the DVD/VCRmustbetunedto the appropriateinput that matcheshow
the satellitereceiveror cablebox isconnectedbeforeyouturn off the DVD/VCR.
Graphics contained within this publication are for representation only _ 7'
Re_ote Control
Remo_e WOn't WOrk
You might be in the wrong mode.To operate your DVD/VCR, press the DVD/VCR button on the remote before you press any other buttons. If you're
operating the T_] press the TV button first, etc. (this remote operates most RCA, GE, and Proscan TVs and satellite receivers, and you can program it to operate
other brands of televisions).
Insert new batteries in the remote.
Operate the remote control at a distance of no more than 20 feet.
Remove any obstacles between the remote and the DVD/VCR or other component. If your DVD/VCR is in an entertainment cabinet, the glass doors might
obstruct the remote control from operating the DVD/VCR. Open the doors.
Cen'_ program the remo_e
The universal remote control that came with your DVD/VCR is already programmed to operate most RCA, GE, and Proscan componentsi_'ou can program it
to operate many other brands and models of TVs, cable boxes, digital satellite receivers, audio components, etc. However, the remote doesn't support all brands
and all models so there is a possibility the remote can't be programmed to operate your component. Instructions for programming the remote control are on
page 2 I
If you're trying to program the AUX button, you must use the Direct Entry method, NOT the Automatic Code Search method,
Los_ the remo_e control
To order a new remote control, go to page 6O.The buttons on the front of the DVD/VCR operate the DVD/VCR's basic functions, but you won't be able to
use the menu system without the remote control.The buttons on the front of the unit are described on page 7.Also, if you have another RCA, GE, or Proscan
brand product with a remote control that has a DVD button, some of the buttons will probably operate this product if you press the DVD button first.
Hand|ing Cautions
Before connecting other components to this DVD/VCR, be sure to turn all components off.
Don't move the playerwhile a disc is beingplayed.The disc m_yget scratched or broken_and the player's internal parts may be damaged.
Don't put anycontainer filled with liquid or any small metal objects on the DVD/VCR,
Don't put your hand into the disc tr@
Don't placeanything other than the disc in the disc tray,
Exterior influencessuch aslightning and static electricity canaffect normal operation, If this occurs,turn the unit off and on againwith the STANDBY.ON button, or
disconnect and then reconnect the AC power cord to the AC power outlet.The unit should operate normally.
Be sure to remove the disc and turn off the player after use,
Maintenance of Cabinet
For safety reasons,when cleaningthe cabinet be sure to disconnect the AC power cord from the AC outlet.
Do not usebenzene,thinner, or other solvents for cleaning.
Wipe the cabinet with a soft cloth,
Format:ion of Condensation
Due to sharp changes in temperature and humidity, condensation may form ifwarm air comes in contact with any cold parts inside the playen
When condensation forms insidethe player,the playermay not operate correctly, If this occurs_leavethe playerat room temperature until the insideof the player
becomes dry and operational.
If condensation forms on a disc,wipe the disc with a soft, dry cloth by moving the cloth from the center hole toward the outer edge,
Handling Discs
Don't touch the disc'ssignalsurfaces,Hold by the edgesor byone edge and the hole in the cente_
Don't affix labelsor adhesivetape to label surfaces.Don't scratch or damagethe label.
Do not usedamaged(cracked or warped) discs.
_ Graphics contained within this publication are for representation only.
Limited Warranty
What your warranty covers:
Defectsinmaterialsor workmanship,
For how long after your purchase:
One year from date of purchasefor parts and labon
The warranty period for rental units begins with the first rental or 45 daysfrom date of shipment to the rental firm, whichever comes first,
what we will do:
PayanyAuthodzed RCA Service Center the laborchargesto repair your DVD/VCR,
PayanyAuthorized RCA Service Center for the new or,at our option_ refurbished replacement parts required to repair your DVD/VCR,
How you get service:
Takeyour DVD/VCR to anyAuthorized RCA Service Center To identifyyour nearestAuthorized RCA ServiceCenter, askyour dealer,look in the Yellow Pages,or call
I-800-336=1900,
Proof of purchasein the form of a bill of sale or receipted invoice which is evidencethat the product is within the warranty period must be presented to ob_in warranty
service.For rental firms, proof of first rental is also required.
Pick up your DVD/VCR when repairs are completed,
What your warranty does not cover:
Acts of nature, such as but not limited to lightning damage,
Adiustment of customer controls,
Damagefiom misuseor neglect,
A unit that hasbeen modified or incorporated into other products or is used for institutional or other commercial purposes,
Batteries.
Units purchased or serviced outside the U.S.A,
Product Registration:
Pleasecomplete the online Product Registration on RCA,com or complete and rnaiJthe Product R%istradon Card packedwith your unit, It will make it easierto contact
you should it ever be necessary.Thereturn of the card is not required for 'warranty coverage,
Limita1:Jon of Warranty;
THEWARRANTY STATEDABOVE ISTHE ONLY WARRANTY APPLICABLETO THIS PRODUCT.ALL OTHERWARRANTIES, EXPRESSOR IHPLIED (INCLUDING
ALL IMPLIEDWARRANTIES OF HERCHANTABILITY OR FITNESSFORA PARTICULARPURPOSE)ARE HEREBYDISCLAIHED. NOVERBAL ORWRITTEN
INFORMATION GIVEN BYTHOHSON INC., ITSAGENTS OR EMPLOYEESSHALL CREATEA GUARANTY OR IN ANYWAY INCREASETHE SCOPEOFTHIS
WARRANTY,
REPAIROR REPLACEMENTAS PROVIDED UNDERTHISWARRANTY iSTHE EXCLUSIVEREHEDYOFTHE CONSUHER.THOHSON INC. SHALL NOT BE
LIABLE FOR INCIDENTAL OR CONSEQUENTIAL DAMAGES RESULTINGFROMTHE USEOFTHIS PRODUCT ORARISING OUT OFANY BREACH OFANY
EXPRESSOR !PIPLIEDWARRANTY ONTHIS PRODUCT,THIS DISCLAIHER OFWARRANTIES AND LIHITED WARRANTYARE GOVERNED BYTHE LAWS OF
THE STATEOF INDIANA. EXCEPTTOTHE EXTENT PROHIBITED BYAPPLICABLE LAW,ANY IHPLIED WARRANTY OF HERCHANTABILITY OR FITNESSFORA
PARTICULARPURPOSEON THIS PRODUCT ISLlblITED TO THE APPLICABLEWARRANTY PERIOD SETFORTHABOVE,
How state law relates to warranty:
Somestates do not allow the exchsion nor limitation of incidental or consequential damages,or limitations on how longan implied warranty lasts,so the above
limitations or exclusions may not apply to you.
This warranty givesyou specific levi rights, and you also mayhaveother rights that vary from state to state.
If you purchased your product outside the |Jnited St:ares:
Thiswarrantydoesnotapply,Seeyourdealerfor warrantyinformation.
Graphics contained within this publication are for representation only _9
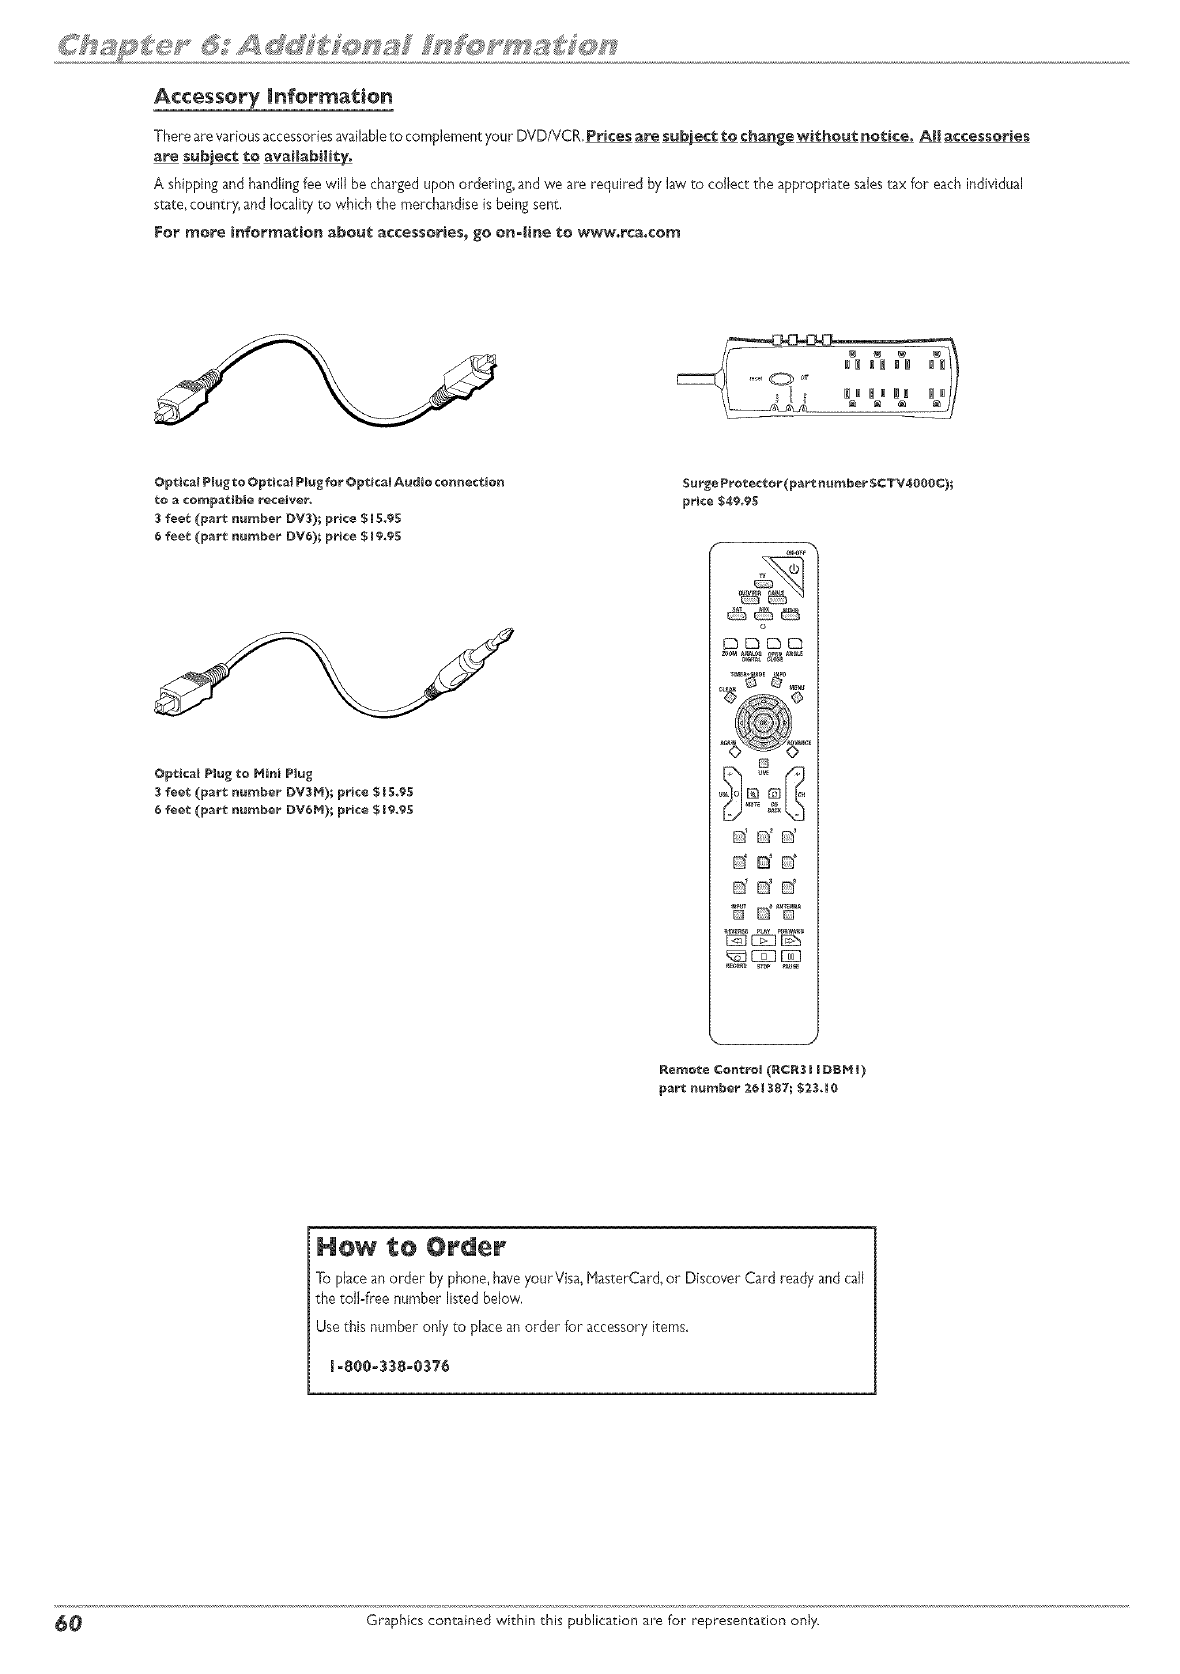
Accessory Infor_atien
There are various accessoriesavailableto complement your DVD/VCR, P_¢es are subject te change witheut notice. AH accessories
are subject to avaimabifft_
A shippingand handlingfee will be chargedupon ordering, and we are required by law to collect the appropriate salestax for eachindividual
state, country, and locality to which the merchandiseis being sent,
For more information about ac¢essories_ go on-line to w_w,rca,cem
Optical Plug to Optical P_ug for Optical Audio cermet€ion
to a compatible receiver,
3 feet (part nurnber DV3)I price $ R5,95
6 feet (part number DV6); price $ R9,95
Optical Plug to Hi_i P_u_
feet. (part n_r_ber DV$H)I price $ B5,95
_ee_ (part n_ber DV_H)I price $ _9,95
Surge Protector (part _ber SCTV4000¢);
price $49,95
o
ddd
dd_ o
ddd
'E d% °°
part _ur_ber _ i 3871 $2.3, _0
Hew Order
To place an order by phone,haveyourVisa, HasterCard, or Discover Card ready and call
the toll-free number listed below,
Use this number only to place an order for accessory items.
_-8e0_338_0376
_0 Graphics contained within this publication are for representation only.
Visit our w÷bsit÷ at w_w°rca°¢o_
Please do not send any products to the indianapolis address listed in this manual or on the carton. This will only
add delays in service for your product.
Thomson |nc°
m0330 North Meridian Street
IndianapoHs_ iN 46:Z90
@I_004 Thomson Hnco
Trademark(s) @ R÷gistered
Ma_'ca(s) R÷gistraaa(s)
Print÷d in China
TOCOM m64m3540 THOMSON _
