RCA DVD Systems Manual L0601224
User Manual: RCA RCA DVD Systems Manual RCA DVD Systems Owner's Manual, RCA DVD Systems installation guides
Open the PDF directly: View PDF ![]() .
.
Page Count: 4
DVD Player
User's Guide
DRC22SN
Ch_lgJng Entertainment.Again.
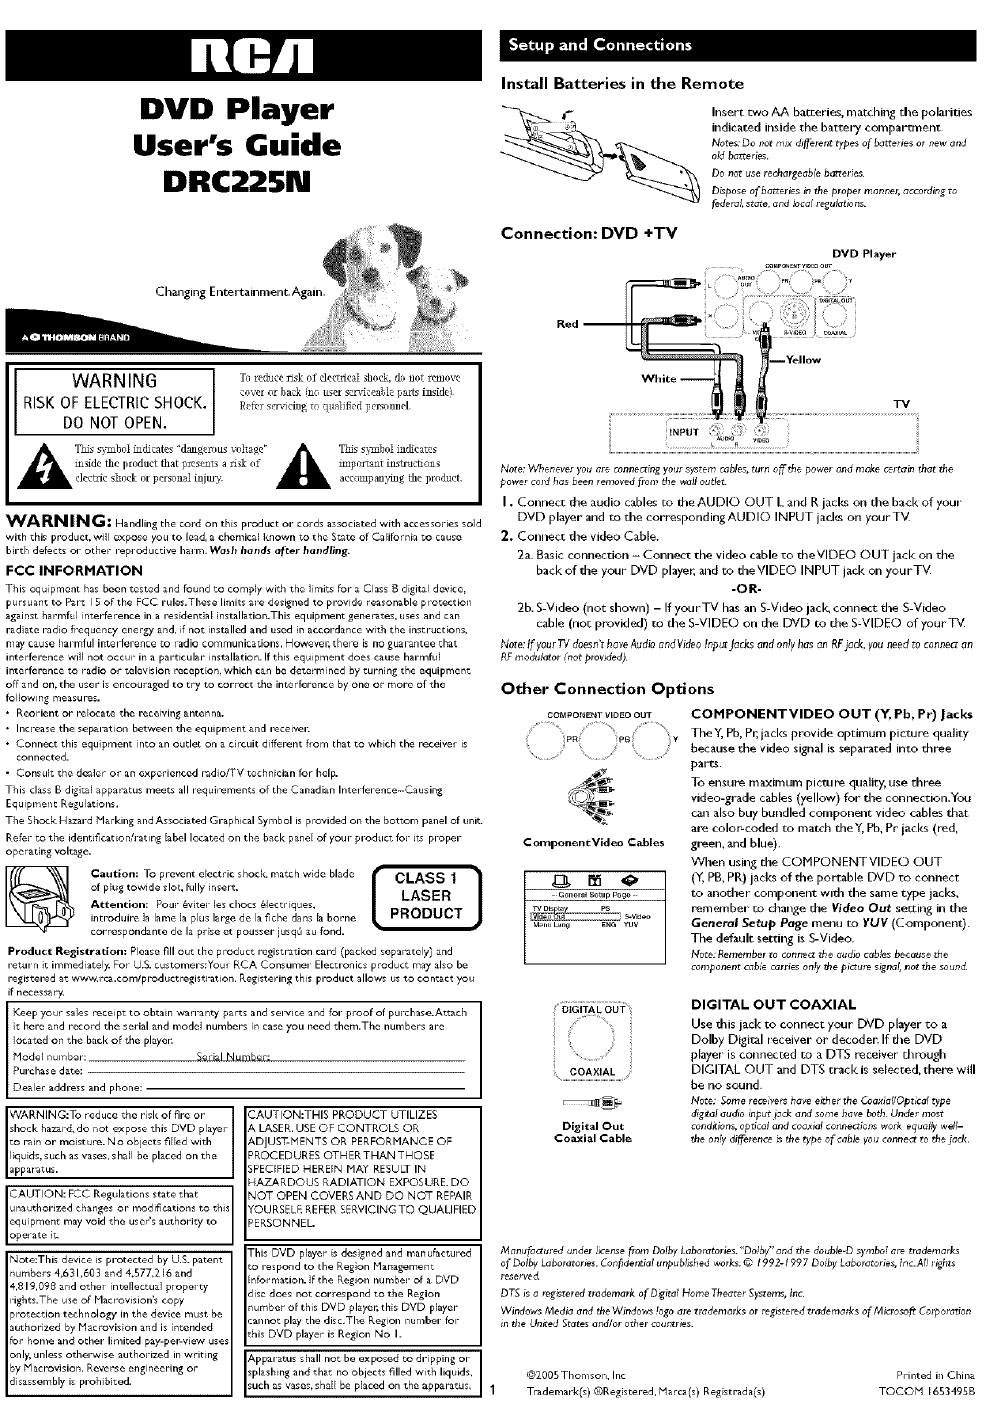
Install Batteries in the Remote
__) nsert ewe AA batgeries, matching tile polarities
indicated_ inside the battery compartment
Notes." Do #or mJx di_hret_ types of batteries or new and
old batteries.
Do not use rechargoable batteries
D_p0se of batteries in the proper manner, according to
fedora!, st_e, and ;ocai _egu_tions.
Connection: DVD +TV
DVD Player
WARNIN6
RISK OF ELECTRICSHOCK•
DO NOT OPEN.
Tc rcduce risk of dectrical shock, thb not remove
covcr or back (no user scndceable parts i_sidc)
£_fer s_ldng to qg_lifled personnel¸
A TNs sb"mh01indicates "dangerous voltage' _ Tins s}_ab01 indicates
in,de the product that presents a risk of _ mip0rLa_t thstructI0nselectric sii0ck or personal injury, acc0mpanymg the product.
WARN ING: Handling the cord on this product ..... d ...... Jated with ........ ies sold
with this product, will expose you to lead, a chemical known to the State of California to cause
birth defects or other reproductive harm. Wash hands after handling.
FCC INFORMATION
This equipment has been tested and found to comply with the limits for a Class B digital device.
pursuan_ to P&r_ I S of the FCC rules.These limits a_e designed to provide reasonable p iotection
against harmfll interference in a r_sidential installation.Thi_ equipment generates, uses and can
radiate radio frequency energy and, if not installed and used [n accordance "with the instructions,
may cause harmful inte rlerence to radio communications. Howeve=_ ther_ is no guarantee that
interference will not occur in a particular installation. If this equipment does cause har_ftd
interference to radio or television reception, wbicb can be determined by turning the equipment
off and on, the user is encouraged to try to correct the interference by one or more of the
following measures.
• Reorient or rdocat_ the receiving antenna.
• Increase the separation between the equipment and receiven
• Connect dlis equipment into an oudet or= a circuit different horn that _o which die receivel is
connected.
•Consult the dealer or an experienced radio/TV technician for bdp.
This cla_s B digital apparatus meets all _equir_men_s of the Canadian Inter le_er, ce-Causin_
EquJpmer/t Regulations,
The Shock H_zard Marking and Associated Graphical Symbol is provided on the bottom panel of unit.
Refer to the identiPc_t ionh-ating label located on the back panel of your product for ire proper
operating voltage.
of plug tow_de slot, fully b/sort. LASER
Attention: Pour &viter les chaos _lectriques,
introduire la lame la plus large de la Pche dane la borne PRODUCT
correspondante de la prise et pousser jusq_ au fond.
Product Registration: Please fill out the product r_gisl;Fation card (packed separately) and
_etu_n it immediately. Fo_ U.S. customers:You_ RCA Consume_ Elecuonics produc_ may also be
registered at www.rcg.com/pl'Oductregistration. Registering this D_duct allows us to contact you
if necessary.
Keep your sales recei pt to obtain warranty pa_s and service and for proof of purchase.Attach
rt here and record the serial and model numbers in case you need them,The numbers are
located on the back of the playen
Hodel numbel: Set ial Number:
Purchase date:
Dealer address and phone:
WARNING:To reduce the risk of fire or
shock hazard, do not expose this DVD player
re rain or moisture. No objects Plied with
liquids, such as vases, shall be placed on the
apparatus.
CAUTION: FCC Regulations state that
unauthorized changes or modiPcations to this
equipment may void the user's authority to
opel ate it_
Note:This device is p_-otected by U.S. patent
numbers 4,631,603 and 4.577,216 and
4,819,098 and othe_ incullec_ual p_ope_ cy
rights.The use of kbcrovision's copy
,rotection technology in the d_vice must be
authorized by Placrovision and is intended
for home and other limited pay-pe_w_ew uses
only, unless otherwise author_ed in writing
by Hacrovision, Reverse engineering or
disassembly is p_ohibiced.
CAUTION:THIS PRODUCT UTILIZES
& LASER. USE OF CONTROLS OR
&DJUST-NENTS OR PERFORHANCE OF
:ROCEDURES OTH ER THAN THOSE
SPECIFIED HEREIN NAY RESULT IN
HAZARDOUS RADIATION EXPOSURE. DO
NOT OPEN COVERS AND DO NOT REPAIR
FOURSELE REFER SERVICING TO QUALIFIED
_EKSONNEL.
This DVD player is designed and manufactured
:o respond to the Region Managemen_
information, if the Region number of a DVD
isc does not correspond to the Region
number of this DVD player, this DVD player
=annot play the disc.The Region number foE-
:his DVD player is Region No I.
Apparatus shall no_ be exposed to dripping or
splashing and that no objects filled with liquids,
such as vases, shall be placed on the apparatus,
Note: VVhenewr you are _onnec_;ngyour system _abl#s,turn o_ the power and make certain that the
Rower co_dhas been removed i_m the wag oude_
I. Connect the audio cables m the AUDIO OUT L and R jacks on d_e bad< of your
DVD player and m the corresponding AUDIO INPUT jacks on yourTM
2. Connecg the video Cable.
2a Basic ronnection - Connect the video cable to theVlDEO OUT jack on the
back of the your DVD player, and to theVIDEO INPUT lack on yourT_
-OR-
2b. S-Video (not shown) - If yourTV has an S-Video lack cc_mect the S-Video
cable (nag provided) _o d_e S VIDEO on the DVD to the S VIDEO of yourTM
Note:If your?_/ doesn't have Audb andVideo lnput Jacks and on!yhas an RF_ack, you need to connect an
RFmodulator (not prowded)
Other Connection Options
COt_pON_NT VIDEO OUT
Pa ¥
%
ComponentVldeo C_les
COMPONENTVIDEO OUT (Y, Pb, Pr) Jacks
TheY, Pb, Pr, jacks provide optimum picture quality
because the video signal is separated into three
parts,
To ensure maximum picture quality, use three
video-grade cables (yellow) for the connecuon.You
ca_ also buy bundled component video cables that
are color_coded re match theY, Pb, Pr jacl<s (red,
green, and blue).
When using the COMPONENTVIDEO OUT
(Y, PB, PR) jacks of the portable DVD re connect
to another compc_ent with the same r.ype jacks.
remember _o change the Video Out se_ing in the
General Setup Page menu to YUV (Component).
The default setting is S-Video.
Note: Remember to connectthe audiocablesbecause the
component _ahe carries only the p_:ure s_gndi,not the sound.
5IaiT:_C85?
i s""' "'%
Digital Out
Coaxial Cable
DIGITAL OUT COAXIAL
Use this jack to connect your DVD player to a
Dolby Digital receiver or decoder. If the DVD
player is connected to aDTS receiver through
DIGITAL OUT and DTS track is selected, there will
be 11o soulld
Note: Some receivels have either the Coaxidi/Opt;cal type
dig_al audio input jack arm some haw both Lfnd_r most
condgion_, optical and coaxial connecti_,s w0_k equaily weP-
the 0nly difference _ the type of cable yo u connect to the jc_ck
Manufac_llred under hcense from Dolby Laboratories. "Do!by"arM _he deuble-D symbo! are tradernaths
of Ddby Laboratories. Confident_di unpub_hed _orks. © 1992-1997 Doiby Laboraton_s_ lnc.A!i r_ts
reserve_
DT_ _ a reg_sered trademark of D_itdi Home Theater S_tems, tnc
Windows Media and the Windows !ago ar_ trademarks or registered trrM_rnaths of Microsoft Corporatbn
in _le Unr_ed States and/or other countries.
@2005Thomson, Inc Printed in China
1Trademark(s) ®Registered, Marco(s) Registreda(s) TOCOH 165349gB
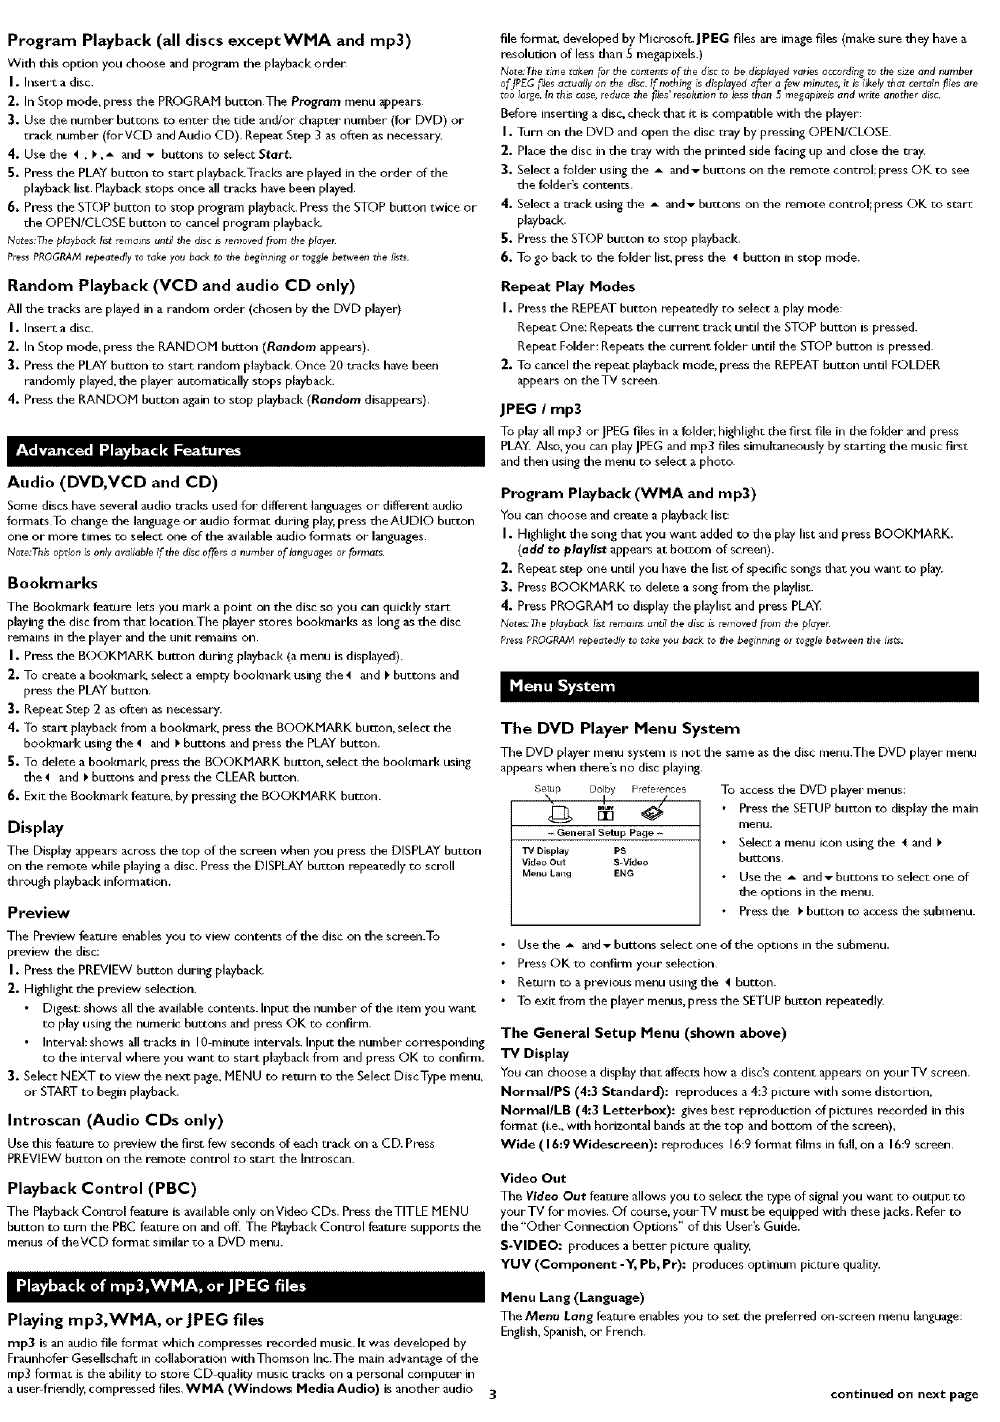
Front of the DVD Player (buttons appear left to right below)
t,- .......... -.o 11
1
I ON/STANDBY
20PENICLOSE
3 STOP
4 SELECT
5 PLAY
2345
lurns the DVD player on and off In stop mode.press and hold
to put DVD player in standby mode
()pens and closes disc tray
During playback, places disc in stop mode In stop mode, press
and hold to put DVD player in standby mode
Provides playback status.
Begins disc play.
[] [] _ Compatible Discs
This DVD Player is capable of playing the following types of
[][][] discs: DVDs, Audio CDs.Video CDs, and CDs wJth rnp3 fi,es,
WMA files (VVindows Media Audio), and ]PEG files on dlem.
_ _k Before you put a disc in the player.make sure it is compatible
You cart Play die following types of discs: Laser'discs, CD-I,
_ _=_,,_" CD-ROM (computer-only discs), DVD-ROFi. or discs recorded
using other broadcast standards (it, PAL or SECAM); CD-G
discs.
No_s: Some d;scsmay not be ¢ornpmible dueto IGserpickup, recording
formats, and so_wa_eused.
Some ted,noio_ies and method_ used fur rap3 fi_ leco_di_,_on CD-Rscan
preve_ optima! playback of these files on your DVD player by degradingthe
souI_dqual_yand/or tile abd_y of the piaye_to read tile file.
I_ [_
4,_ ,_ ,_ Navigates through the menus.
0- 9 Number entry.
A-B Accesses theA-B repeat
playback mode.
ANGLE Accesses the camera angle.
AUDIO Selects the audio language.
BOOKMARK Accesses the bookmark
feature.
CLEAR Clears some functions.
DISC MENU Accesses the disc's menu
(if available).
DISPLAY Provides playback status.
FORWARD Searches forward through
the disc.
MUTE Lowers and restores the
volume.
OK Selects item highlighted in
nlenu.
ON/OFF Turns the player on and off.
OPEN/CLOSE Opens and closes the tray.
PAUSE Freezes frame,frame advance,
and slow motion.
PLAY Starts playing a disc.
PREVIEW Previews contents of disc.
PROGRAM Accesses the Program
playback mode.
RANDOM Starts the Random playback
nlode.
REPEAT Accesses the Repeat playback
nlode.
REVERSE Searches back through the
disc.
SETUP Accesses and exits the General
Setup main) menu.
SKIP Advances to the next/
preceding chapter or track.
STOP Stops playback.
SUBTITLE Turns the subtitle on and off,
TITLE MENU Accesses the title of the disc
and turns Playback Control
PBC) forVCDs only on and off.
ZOOM Accesses the Zoom feature
(if available).
Regional Coding
Both the DVD Playerand the discs are coded by region These regional codes must
match in order for due disc to play, This player's code is Region 1,
Turn on the DVD Player
I. Plug the power cord into due oude_ once due DVD player is cc_nected to your T_L
2. lurn on the TV and tune to i_sVideo Inpu[ Channel. if necessary
"_. Press the STANDBY/STOP on the DVD player or the ON/OFF button on the
remote control to turn i_ on
4. Press the OPEN/CLOSE buu_on on the fl'ont of d_e player o_ remote control _o
open the disc tray
5. Place a disc gently into due tray with due disc's label facing up (double-sided discs
have content on bod_ sides, so you can place the disc wid_ either side up.)
6. Press OPEN/CLOSE again to close the disc tray. Play starts automatically. If a menu
appears, one of _s opuons can be selected to start playing the disc. H_ghlight it a_d
press ()K.
7. Press STOP to stoP playback.The player remembers the point where disc was
stopped. If you press PLAY again, playback resumes fi'om this point.To sc_p playback
completely or I:o start ,_gain lrom the beginning, press STOP twice. If the Player
is lef_ in STOP mode For more than one minute without any user interaction, the
screel saver" is activated.
Search - To search adisc, you can use the FORWARD button or REVERSE button
You can also use the following search features:
Picture Scan -When you're playing adisc. each time you press FORWARD or
REVERSE, your DVD player scm_s the disc faster until you read_ the fastest scan speed.
To resume normal playback, press PLAY or continue to press FORWARD or REVERSE.
Freeze Frame and Frame Advance -While a disc is playing, press PAUSE to
freeze the picture.To advance one flame a_ a time, press PAUSE wpeatedly.To resume
normal playback, press PLA_
Note: After app!_x#tl_te_yone minute in PAUS_w_h r_ouser ir_eract_n, tbe p:aye_goes into screen s_ver
mode.
Slow Motion While adisc is playing, press PAUSE Press REVERSE or FORWARD
(each time you press reverse or forward, the slow motion will get even slower until
you reach the slowest speed).To resume normal playback press pLAY.
Chapter/TrackAdvance -_ile a disc is playing, you ca_ sl_p forward or backward
a chapter or' track ac a time by pressing the SKIP I_" a_d SKIP N4.
Note: Use the numeric b_lrtons_odirertly _c_ess_ s_eci_ tr_ck or chapter number.For s_ngted_gi¢tr_cks
or chapters, enter a 0 before sl:l_:e d_ numbers;for example, enter O,ttlen 3 for cboptei/track 3.
Zoom -While a disc is playing, press ZOOM (the player zooms in on the image).
Each time you press ZOOM. the picture is magnified even more (until you get to the
maximum zoom level). To see other parts of the picture when you've zoomed in c_
d_e image, _ry pressing the 4, _.,_ and _ buttons 1.o go in corresponding directions.
This feature is called pan and scan
Repeat Playback
While the disc is playing, press REPEAT bu_ton i_peatedly _o select a play mode:
DVD play modes:Tide repeat, Chapter repeat`A-B repeat;
CD pl,_y modes:All tr,_cl<s repeat_Track repea_,A-B repeat;
A-B Repeat
To repeat a seglnel_t between two points (A and B). press the A-B button at the
beginning of the segment you want to repeat Allow the disc ro play to the end of the
segment or use FORWARD to advance to the end point (B). Press the A-B button
again at the end of the segment.The segmen_ plays repeatedly until you press A-B _o
resume normal playback.
Program Playback (all discs exceptWMA and mp3)
With this option you choose and program the playbackorder
I. Insert a disc.
2. In Stop mode, press the PROGRAM button The Program menu appears
3. Use the number buttons to enter the tide and/or chapter number (fur DVD) or
track number (forVCD andAudio CD) Repeat Step 3 as often as necessary
4. Use the 4 ,PA and _ buttons to select Start;
5. Press the PLAY button TO start playback.Tracks are played in she order of the
playback list. Playback stops once all tracks have beau played.
6. Press the STOP button to stop program playback. Press she STOP button twice or
the OPEN/CLOSE button to c_lcel program playback
Notes:JJle playback i_t !_mair_s until the disc _ lemoved flonl the player.
PressPROGRAMrepeatedlyto tak_ you back to the beginningor toggl_ between the ;_ts
Random Playback (VCD and audio CD only)
All the tracks are played in a random order (chosen by the DVD player)
I. Insert a disc.
2. In Stop mode, press the RANDOM buttc4u (Random appears).
3. Press the PLAY bun:on to start random playback Once 20 tracks h,3vebeen
randomly played, the player automatically stops playback.
4. Press the RANDOM bugton again to stop playback (Random disappears).
Audio (DVD, VCD and CD)
Some discs have seveFal audio ttacks used for different Imlguages or different audio
formats To change the language or audio format during play. press the AUDIO button
one or more times to select one of the available audio formats or lalgnages.
Note:Th_ option ;son!y available if the disc offers a number of languages or formats
Bookmarks
The Bookmark feature lets you marl< a point on the disc so gnu ¢_n quickly start
playing the disc from that Iocationthe player stores bookmarks as long as the disc
remains in the player _uud the unit remains on.
I. Press the BOOKMARK bu_ron during playbacl< (a menu is displayed.
2. To create a bookanark select a empty bool_nark using tile 4 and _ buttons and
press the PLAY button.
3. Repeat Step 2 as often as necessar_
4. To start playback from a bool_nark press the BOOKMARK button, select the
boo[_nark using the _ and _ buttons and press the PLAY button,
5. To delete a bookmarl<, press the BOOKMARK button, select the bookmark using
the _ and I_buttons and press the CLEAR button.
6. Exit. the Bookmark feature, by pressing the BOOKMARK butt.on.
Display
The Display appears across the top of the screen when you press the DISPLAY butl.on
on the remote while playing a disc Press the DISPLAY button repeatedly to scroll
through playback information.
Preview
Time Preview feature _uables you to view contents of the disc on tile screen.To
preview the disc:
I. Press the PREVIEW button dunng playback.
2. Highlight the preview selection.
• Digest: shows all the available contents. Input the nun_ber of the item you wa_lt
to play using the numeric buttons and press OK ro confirm
• Interval: shows all tracks in I0-minute intervals. Input the number corresponding
to the interval where you want to soul. playback from and press OK to confirm.
3. Select NEXT to view the next page, MENU to return to the Select DJscType menu,
or START to beam playback.
Introscan (Audio CDs only)
Use this featul_ to preview the first few seconds of each track on a CD. Press
PREVIEW button on the remote control to start tileIntroscan.
Playback Control (PBC)
Time Playback Control feature is available only onVideo CDs. Press theTITLE MENU
bu_ton to turn the PBC feature on and off. The Playback ConrJ'ol feature supports the
menus of theVCD format similar to a DVD menu.
file format, developed by Microsoft.lPEG files are image files (make sure they have a
resolution of less than S megapixels.)
Note:Thet_metakenforthec0r_eRtsofthedisctobe displayedvariesaccordingtothes_zeand number
of JPEGf#es actually on the disc If nothing is displayed a_er a few minutes, it is likely that certain f_lesare
t0o _arge.In this case, reducethe _es'reso_ion to _essthan 5megapixNs and write another disc.
Before inserting a disc, check that it is compatible with due player:
I. Turn on the DVD and open tile disc tray by pressing OPEN/CLOSE
2. Place the disc in tile tray with tile printed side facing up _md dose due tray.
3. Select afolder using the _ and _ buttons on the remote control; press OK to see
the folder's contents.
4. Select atrack using tile _and_ buttons on the remote control;press OK to star:
playback.
_. Press the STOP burton to stop playback.
_. To go back to the folder list, press the ! button in stop mode.
Repeat Play Modes
I. Press the REPEAT button repeatedly to select a play mode:
Repeat One; Repeats the current track until the STOP button is pressed.
Repeat Folder: Repeats the current folder until the STOP button is pressed
2. To cancel the repeat playback mode. press the REPEAT button until FOLDER
appears on theTV screen
JPEG Imp3
To play all rap3 or JPEG files it+ a folder; highlight the first file ill the folder and press
PLAY. Also, you can play ]PEG and mp3 files simukaneously by starting the music first
and then using the menu to select a photo.
Program Playback (WMA and rap3)
You can choose and create a playback list:
I. Highlight the song that you waJlt added to the play list and press BOOKMARK.
(add to playlist appears at bottom of screen).
2. Repeat step one until you have the list of specific songs that you w+mt to play.
3. Press BOOKMARK to delete asong from the playlist
4. Press PROGRAM to display the playlist and press PLAY
Notes._leplayback bst _rnait_ unSIthe discis lemaved pore d,e playel.
P_essPROGRAMtepeated;y to take you back to _)e beginning or toggle between the iists.
The DVD Player Menu System
The DVD player mere system is not the sa+ne as the disc menu.The DVD player menu
appears when there's no disc playing.
DOllbY Prefe _nces
+-General Setup Page +-
TV Display PS
VideoOut S-Video
M_I_ Laird EN_
To access the DVD player menus:
•Press the SETUP button to display the main
menu,
• Selecr a menu icon using the t and
buttons.
•Use The A and _ buttons ro select one of
the options in the menu
• Press the I. button _.o access the submenu.
• Use the _ _md _ buttons select one of she opticms ilmdue submenu.
• Press OK ro confiml your selection
•Return to a prevlous menu using the 4button.
• To exit from the player menus, p ress the SETUP button repeatedly
The General Setup Menu (shown above)
"IV Display
You ¢_n choose a display that affects how a disc's content appears on yourTV screen.
NormaUPS (4:3 Standard): r_pt_duces a 4;3 picture with some distortion.
NormaBLB (4:3 Letterbox): gives best reproduction of pictures recorded in This
format (i,e,, with horizontal bands at due top and bottom of the screen),
Wide ( 16:9 Widescreen): reproduces 16:9 lormat films in full, on a 16:9 screen
Video Out
The Video Out feature allows gnu to select the rype of signal you want to output to
yourTV for movies. Of course, yourTV must be equipped with these jacks. Refer to
the "Other Connection Opt4ons" of this User's Guide.
S-VIDEO: produces a better picture quality,
YUV (Component -Y, Pb, Pr): produces optimum picture quality.
Menu Lang (Language)
Playing mp3,WMA, or JPEG files Tile Menu Lang feature enables you to seL die preferred on screen menu language:
English, Spmlish, or French
rap3 is ml audio file format which compresses recorded music. It was developed by
Eraunhofer Gesellschaft in collaboration withThomson Inc.The main advantage of the
rap3 format is the ability to store CD quality music tt_cks on a per_aonal computer ill
a user-friendly, compre%ed files WMA (Windows Media Audio) is another audio 3 continued on next page
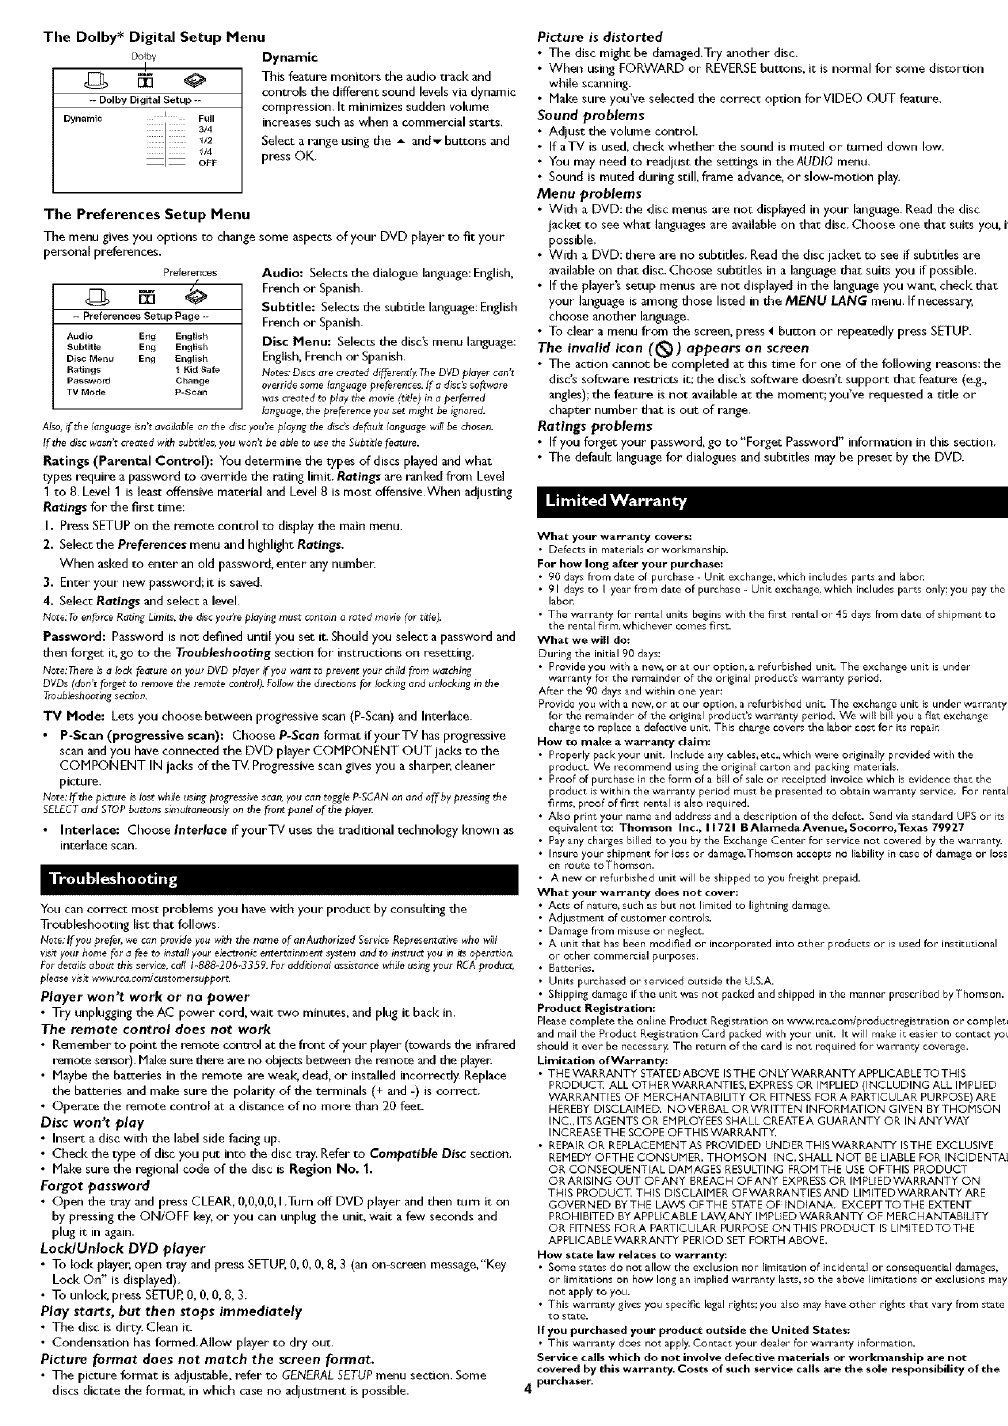
The Dolby* Digital Setup Menu
L)olby Dynamic
I
_ _ This feature monitors the audio u-ack and
controls the differeng sound levels via dynamic
-- Dolby Digital Setup-- compression It minimizes sudden volume
Dynamic iFull increases sudl as when a commercial starts,
1/2 Select a range using the A andT buttons and
4/4 press OK
OFF
The Preferences Setup Menu
The menu gives you options to change some aspects of your DVD player to fit your
personal preferences.
Pre[erer ces
z5
-- Preferences Setup Page -
Audio Eng English
Subtitle Eng English
Disc M_nu Eng Engllsll
_qalin_s 1 ]_id _a{_
password Change
TVM_e P-Scan
Audio: Selects the diaMgue language:English,
French or Spanish
Subtitle: Selec_ the subdde language: English
French or Spanish
Disc Menu: Selecr_ the disc's menu language:
English, French or Spanish
Note&"D_cs are cleated d_tent_y. T_leD_'D playel c_n_t
override some language preferences.If adiscg software
w_s createdto play the movie ft_!@ in aperf_rred
language,B,e ptetelence you set mlgbt be ignored.
Afro,_the ianguag_ _sn'tavaMb!e cn tEe &so youE_ piayng the dis& d_aug ianguag_ wgIbe chosen.
ff the disc wasn't crea_edw_ subtgles,you w0n't beable w use the Subtgie lecture.
Ratings (Parental Control): You determine due types of discs played _uudwhat
types require a password to oveiT-ide the t_ting limit. Ratings are ranked from Level
1 to 8 Level 1 is least offensh, e material and Level 8 is most offensive When adjusting
Ratings for due first time:
I. Press SETUP on the remote control _o display the main menu.
2. Select the Preferences menu _d highlight Ratings,
When asked to enter an old password, enter any number.
3. Enter youl new password; it is saved.
4. Select Ratings and select alevel
Note:Tu enI,_iceRo_ingLhtht_,_e dsscyou}e playsngmust contain e _atedmovie (ur tgie).
Password: Passwol_l is not defined until you set it. Should you select apassword mud
then ksi3et it. go to the Troubleshooting section for instructions on iesetting.
Nore:Tt_ere_a lock feature on youyDVD player if you wantra prevensyour child from watching
DVDs (don'_ forget to remove the _em0te col_ol). Follow the directions for locking _nd unlocking m the
Troubleshootingsection,
"1_ Mode: Lets you choose between progressive scan (P-Scan) and Interlace
•P-Scan (progressive scan): Choose P-Scan folmat if yourTV has progressive
scan and you have connected the DVD player COMPONENT OUT jacks to the
COMPONENT IN lacks of the T_ Progressive scan gives you a sharper, cleaner
picture,
Note: If the p;mtr_ is Io_twhJ_ usin_ progr_ssiw scan, you can toggl_ P-SCAN on and off bypressing the
SELECTand STOPbuttons simultaneously on the fto#_ panel of the player:
• Interlace: Choose Interlace if yourTV uses the uadidonal _echnology I_own as
interlace scan
You can correct most problems you have with your produc_ by consuking the
Troubleshooung list that follows.
Note:If you prefer,we can pro_kleyou with the name of an AuthorJzedServiceRepresentcRvewho w;g
ws_ your home for a fee to installyour e_troni_ entertainm ent syste_ and to instruct you _n_ operation.
Fordetahs about this service, call 1-888-206-335P. For addgionai assistancewhile using your RCAproduct,
please vr_ _=rca com/c_tomersupport
Player won't work or no power
• Try unplugging the AC power cord, wait two minutes, and plug Jt back in.
The remote control does not work
• R_ember to point the remote cc_trol at the front of your player (towards due infrared
_mote sensor). Make su_ the_ a_ no obje_ between the remote and the playe_:
• Maybe the batteries in the remote a_e weak dead, or installed incorrectly Replace
the batteries a_d make sure the polarity of due terminals (+ and -) is correct.
• Operate the remote control at adis_ce of no more than 20 fee_
Disc won't play
•Insert a disc with the label side _cing tip
• Check the type of disc you put into the disc tray. Refer to Con_atible Disc section,
• Make sure the I_gJonal code of the disc is Region No. 1.
Forgot password
• ()pen the tray and press CLEAR, 0,0,0,0, IhJrn off DVD player and then r_rn it on
by pressing the ONiOFF key, or you can unplug the unit, wait a few seconds and
plug it in again,
LoctdOnlock DVD player
• To loci< player, open tray and press SETUP, 0, 0, 0, 8, 3 (an on-screen message,"Key
Lock Off' Js displayed)
•To unlock press SETUP, O,O, O, 8, 3.
Play starts, but then stops Immediately
• The disc is dirty. Clean it.
•Condensation has formed.Allow player to dry out
Picture format does not match the screen format.
• The picture format is adlust_le, refer to GENERAL SETUP menu sedan, Some
discs dictate the formar_ in which case no adjuslsnent is possible.
Picture is distorted
• The disc might be damaged.Try another disc.
• Wh_ using FORVVARD or REVERSE buttons, it is natural for some distortion
while scanning.
• Make sure you've selected the correct option forVIDEO OUT feature
Sound problems
• Adlust the volume control.
•If aTV is used, check whether the sound is muted or r_Jmed down low.
• You may need to readjust the serrJngs in the AUDIO menu
•Sound is muted during still, frame advance, or slow-motion play.
Menu problems
• With a DVD: die disc menus are riot displayed in your language. Read the disc
jacket to see what languages are available on that disc. Choose one that suits you, if
possible.
• With a DVD: there ale no subtitles. Read the disc jacket to see if subtitles are
available on that disc. Choose subtitles in a language that SUiLSyOU if possible
• If the player's setup menus are not displayed in the language you want, check that
your language is al_ong those Iis_ed in the MF-_U LANG menu. If necessary,
choose another language
• To clear a menu from the scl_ee_, pl_ess _ huron or repeatedly press SETUP
The invalid icon (_ ) appears on screen
• The action cannot be completed at this time for one of the following reasons: the
disc's software i_su'icls it; the disc's software doesn't support thac feature (e.g.,
angles); the feature is not available at the moment; you've requested a tide or
chapter number that is out of range.
Ratings problems
•If you forget your password, go to"Fot_et Password" information in this section.
• The default language for dialogues and subtitles may be preset by the DVD.
What your warranty covers:
• Defects in materials orworkmansbip.
For how long atte_ your purchase:
• 90 days born date o[ purchase -Unit exchange, which includes parts arm laban
• 91 days to Iyear fro m date of purchase - Unit exchange, which includes parts only; you pay the
laban
• The w_ runty for rental units begins with the Br st r_ntal or 4S days ban1 date of shipmen_ to
the lental B{ m, whichever comes firsg,
What we will do:
During the initial 90 days:
•Provide you witq a new, or at ou_ option, a lefurb[shed unit.The exchange unit is unde_
walt anty lo_ the remainder of the or iginal p_oduct'_ walt anty period,
Affar the 90 days and within one year:
Provide you wi_h a n_w, or at our option, a refurbished unit. The exchange uni_ is under warranty
for the remainder of the original product's warranty period. VVe will bill you a flat exchange
charge to replace a defective unit, This charge covers the lahor cost for its repai_
How to mMce a warranty claim:
• Properly packyour unit. Include any cables,etc, which were originally provided with tbe
product. W_ le_ommend using the original calton and packing mater ials.
•Proof of purchase in the form of abill of sale or receipted invoice which is evidence that the
product is withJo the warranty period must be presented to obtain warranty service. For r_ntal
Brms, Voof of first rental is also required.
• Also print your nam_ and address and a description of the defect. Send via standard UPS or i_s
equivalent to: Thomson Inc., 11721 BAlamedaAvenue, SocorrprTexas 79927
• Pay any charges billed to you by the Exchange Center for service not covered by the w_rranty.
• Insure your shipment for loss or damage.Thomson accepts no liability in eas_ of damage or loss
en route toThomson,
• A new or refurbished unit will be shipped to you E'eight prepaid.
What your warranty does not cover:
• Acts of nature, _uch as but not limited to lighming damage.
• Adjustment of customer controls.
• Damage flora misuse or neglect.
• A tlnrt that has been modified or incorporated into other products or is used for institutional
or other commercial purposes.
• Batteries,
• Units purchased or serviced outside the U.S.A.
• Shipping damage if the uni_ was not packed and shipped in the manner prescribed by Thomson,
Product Registration:
Please complete the online Product fiegistrat[on on w_vw.rca.com/productr_gistration or complete
and mail the Ploduct Registladon Cold packed with your unit. It will rrla;_e it easier to contact you
should _t ever be _ecessary The return of the card is not required for warranty coverage,
Limitation of Warranty:
• THE WARRANTY STATEDABOVE ISTHE ONLYWARRANTY APPLICABLETOTHIS
PRODUCq_ ALL OTHER WARRANTIES, EXPRESS OR IHPLIED (INCLUDING ALL IMPLIED
WARRANTIES OF HERCHANTABILITY OR FITNESS FOB A PARTICULAR PURPOSE) ARE
HEREBY DISCLAINED. NOVEBBAL ORWRITTEN INFORNATION GIVEN BYTHOHSON
INC., ITS AGENTS OR EMPLOYEES SHALL CREATEA GUARANTY OR IN ANYWAY
INCREASETHE SCOPE OFTHISVCABRANTY.
• REPAIR OR REPLACEHENTAS PROVIDED UNDERTHISWAREANTY ISTHE EXCLUSIVE
REMEDY OFTHE CONSUMER. THOMSON INC. SHALL NOT BE LIABLE FOR INCIDENTAL
OR CONSEQUENTIAL DAHAGES RESULTING FROMTHE USE OFTHIS PRODUCT
ORARISING OUT OFANY BREACH OPANY EXPRESS OR IHPLIED WARRANTY ON
THIS PRODUCZ TNIS D[SCLAINER OFWARRANTIES AND LIH[TEDWARRANTY ARE
GOVERNED BYTHE LAWS ©FTHE STATE OF INDIANA. EXCEPTTOTHE EXTENT
PROHIBITED BY APPLICABLE LAg'V,,ANY IHPL ED VVARRANTY OF HERCHANTABIUTY
OR FITNESS FORA PARTICULAR PURPOSE ©NTHIS PRODUCT IS LIHITEDTOTHE
APPLICABLE WARRANTY PERIOD SET FORTH ABOVE.
How state law relates to warranty:
• Some states do not allow the exclusion nor limitation of inciden_l or consequential damages,
or [imrotions on how long an implied warranty lasts, so the above limitations or exclusions may
not apply to you.
• This warranty gives you spec_c legal rights; you also may have other rights that vary from state
to state,
If you purchased your product outside the United States:
• This warranty does not apply. Contact your de_ler for warranty information.
S_'vke calls which do not involve defective materials or workmanship are not
covered by this warranty. Costs of such service calls are the sole responsibility of the
4 purchaser.
