RCA Direct View/Digital 26 And Under TV Manual L0704489
User Manual: RCA RCA Direct View/Digital 26 and under TV Manual RCA Direct View/Digital 26 and under TV Owner's Manual, RCA Direct View/Digital 26 and under TV installation guides
Open the PDF directly: View PDF ![]() .
.
Page Count: 40
Changing Entertainment. Ag _m.
User's Gu"de
|
IRISK OF ELECTRIC SHOCK /
DO NOT OPEN |
F_ his symbol indicates that this product incorporates double insulation
between hazardous mains voltage and user accessible parts. When servicing
use only identical replacement parts.
Caution: To reduce the risk of electric shock, do not remove cover (or back). No user serviceable parts inside. Refer
servicing to qualified service personnel.
A This symbol indicates "dangerous voltage" inside _, This symbol indicates important instructions |
k_l_ the productthatpresentsa riskof electricshockor _ accompanying the product. |
personal injury.
WARNING
To reduce the risk of fire or electric
shock, do not expose this product to
rain or moisture.
The apparatusshallnot be exposed
to drippingor splashingand no
objects filled with liquids, such as
vases, should be placed on the
apparatus.
"Changing Entertainment. Again." is
a trademark of THOMSON used under
license to TTECORPORATION.
Manufactured under license from
Dolby Laboratories.
Refer to the identification/rating label located on the back panel of your product for
its proper operating voltage.
FCC Regulations state that unauthorized changes or modifications to this equipment
may void the user's authority to operate it.
Caution: To prevent electric shock, match wide blade of plug to wide slot, Fully insert.
Caution: Using video games or any external aeeessory with fixed images for
extended periods of time ean cause them to be permanently imprinted on the
picture tube (or projection TV picture tubes]. ALSO, some network/program Iogos,
phone numbers, black borders (sides, top and bottom], ete. may cause similar
damage. This damage is not covered by your warranty.
Cable TV Installer: This reminder is provided to call your attention to Article 820-40
of the National Electrical Code (Section 54 of the Canadian Electrical Code, Part 1)
which provides guidelines for proper grounding and, in particular, specifies that the
cable ground shall be connected to the grounding system of the building as close to
the point of cable entry as practical.
Important Stand and Base Safety Information
Choose the location for your TV carefully. Place the TV on a stand or base that is of
adequate size and strength to prevent the TV from being accidentally tipped over,
pushed off, or pulled off. This could cause personal injury and/or damage the TV.
Refer to the Important Safety Instructions on page 1.
Product Registration
Please fill out the product registration card (packed separately) and return it immediately. For US customers: Your RCA Consumer
Electronics product can also be registered at www.rca.com/television. Registering this product allows us to contact you if needed.
Product Information
Keep your sales receipt to obtain warranty parts and service and for proof of purchase. Attach it here and record the serial and
model numbers in caseyou need them. These numbers are located on the product.
Model No. Serial No. Purchase Date:
Dealer/Address/Phone:
IMPORTANT SAFETY INSTRUCTIONS
Read before operating equipment
1. Read these instructions.
2. Keep these instructions.
3. Heed all warnings.
4. Follow all instructions.
5. Do not use this apparatus near water.
6. Clean only with a dry cloth.
7. Do not block any of the ventilation openings. Install in accordance with
the manufacturer's instructions.
8. Do not install near any heat sources such as radiators, heat registers,
stoves, or other apparatus (including amplifiers) that produce heat.
9. Do not defeat the safety purpose of the polarized or grounding type
plug. A polarized plug has two blades with one wider than the other.
A grounding type plug has two blades and a third grounding prong.
The wide blade or third prong are provided for your safety. When the
provided plug does not fit into your outlet, consult an electrician for
replacement of the obsolete outlet.
10. Protect the power cord from being walked on or pinched, particularly
at plugs, convenience receptacles, and the point where they exit from
the apparatus.
11. Only use attachments/accessories specified by the manufacturer.
12. Use only with a cart, stand, tripod, bracket, or table specified by the
Omanufacturer or sold with the apparatus. When a cart is used,
use caution when moving the cart/apparatus combination to
avoid injury from tip-over.
13. Unplug this apparatus during lightning storms or when unused for long
periods of time.
14. Refer all servicing to qualified service personnel. Servicing is required
when the apparatus has been damaged in any way, such as if the
power-supply cord or plug is damaged, liquid has been spilled or
objects have fallen into the apparatus, or if the apparatus has been
exposed to rain or moisture, does not operate normally, or has been
dropped.
15. This product may contain lead and mercury. Disposal of these
materials may be regulated due to environmental considerations. For
disposal or recycling information, please contact your local authorities
or the Electronic Industries Alliance (www.eiae.org).
16. Damage Requiring Service - The appliance should be serviced by
qualified service personnel when:
A. The power supply cord or the plug has been damaged;
8. Objects have fallen or liquid has been spilled into the appliance;
C. The appliance has been exposed to rain;
D. The appliance does not appear to operate normally or exhibits a
marked change in performance;
E. The appliance has been dropped or the enclosure damaged.
17. Tilt/Stability - All televisions must comply with recommended
international global safety standards for tilt and stability proper ties of
its cabinet design.
. Do not compromise these design standards by applying excessive
pull force to the front, or top, of the cabinet, which could ultimately
overturn the product.
.Also, do not endanger yourself, or children, by placing electronic
equipment/toys on the top of the cabinet. Such items could
unsuspectingly fall from the top of the set and cause product damage
and/or personal injury.
18. Power Lines - An outdoor antenna should be located away from
power lines.
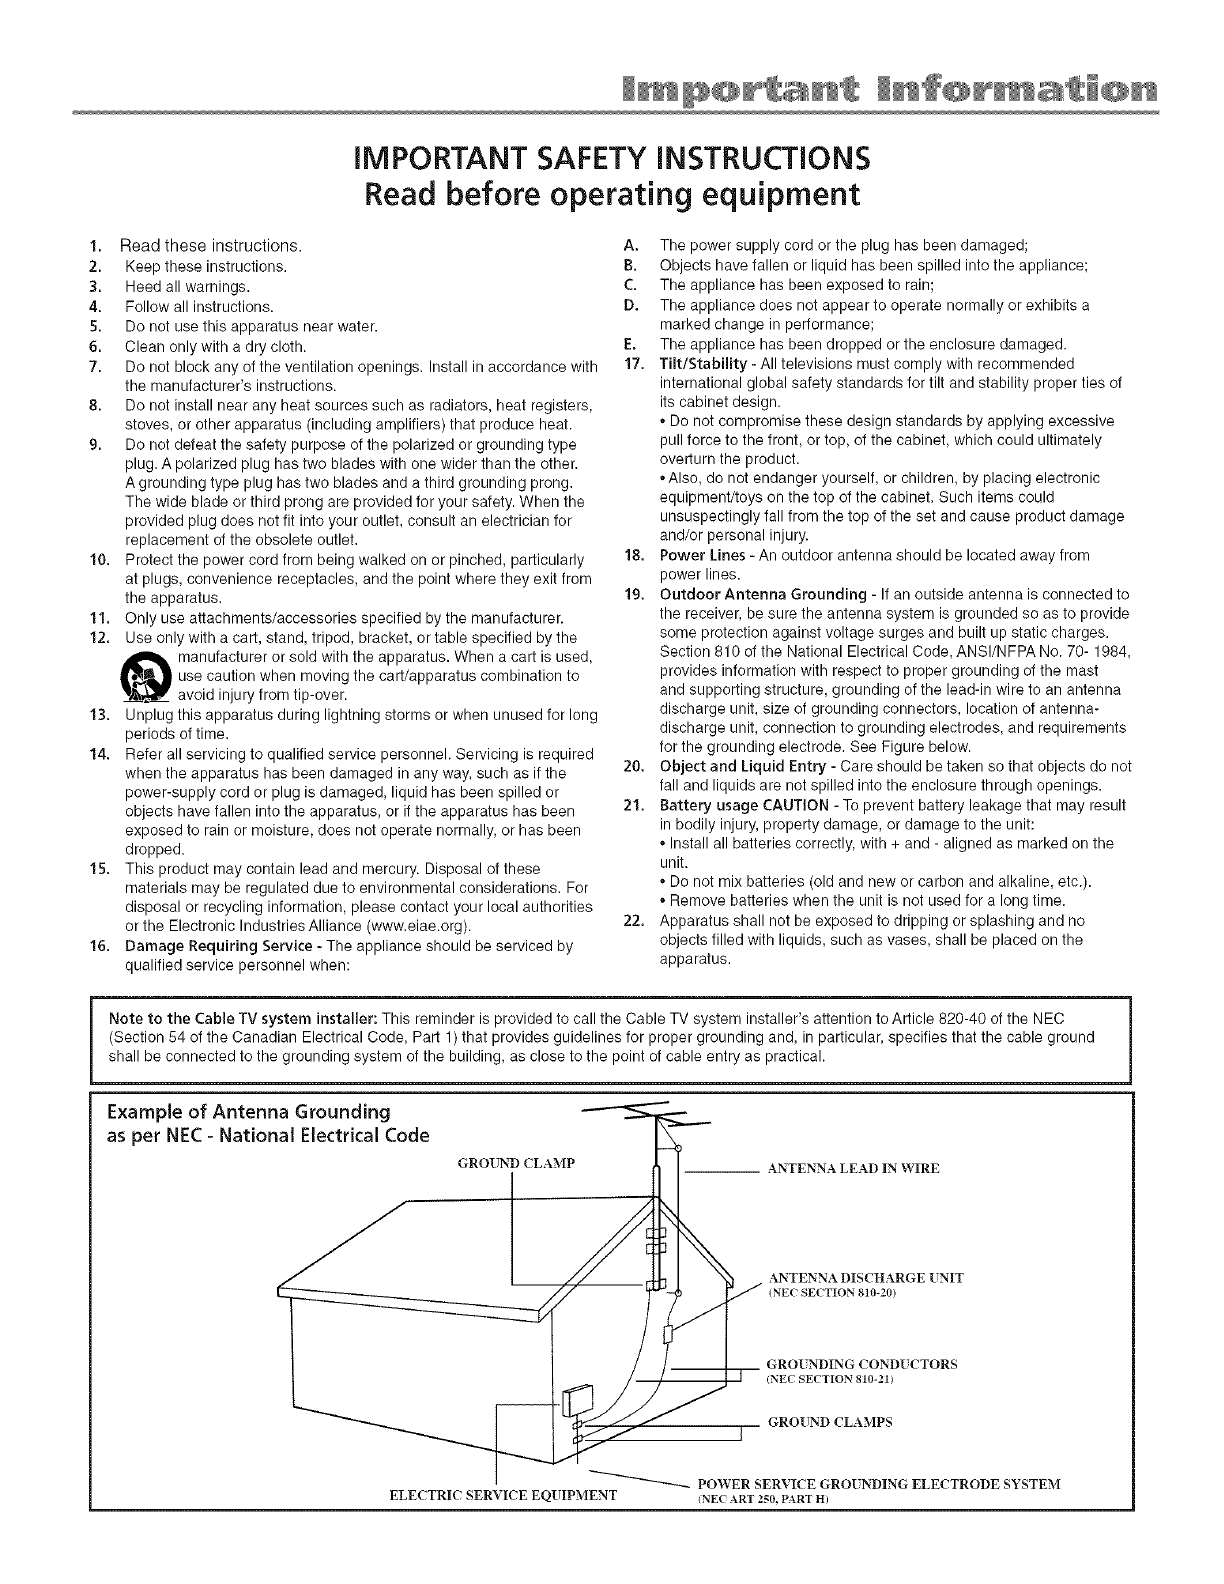
19. Outdoor Antenna Grounding - If an outside antenna is connected to
the receiver, be sure the antenna system is grounded so as to provide
some protection against voltage surges and built up static charges.
Section 810 of the National Electrical Code, ANSI/NFPA No. 70- 1984,
provides information with respect to proper grounding of the mast
and supporting structure, grounding of the lead-in wire to an antenna
discharge unit, size of grounding connectors, location of antenna-
discharge unit, connection to grounding electrodes, and requirements
for the grounding electrode. See Figure below.
20. Object and Liquid Entry - Care should be taken so that objects do not
fall and liquids are not spilled into the enclosure through openings.
21. Battery usage CAUTION - To prevent battery leakage that may result
in bodily injury, property damage, or damage to the unit:
. Install all batteries correctly, with + and - aligned as marked on the
unit.
. Do not mix batteries (old and new or carbon and alkaline, etc.).
. Remove batteries when the unit is not used for a long time.
22. Apparatus shall not be exposed to dripping or splashing and no
objects filled with liquids, such as vases, shall be placed on the
apparatus.
Note to the Cable TV system installer: This reminder is provided to call the Cable TV system installer's attention to Article 820-40 of the NEC
(Section 54 of the Canadian Electrical Code, Part 1) that provides guidelines for proper grounding and, in particular, specifies that the cable ground
shall be connected to the grounding system of the building, as close to the point of cable entry as practical.
Example of Antenna Grounding
as per NEC- National Electrical Code
ELECTRIC SERVICE EQUIPMENT
GROUND CLAMP -- ANTENNA LEAD IN WIRE
ANTENNA DISCHARGE [NIT
(NEE SECTION 810-20)
GRO[ NDING COND[ CTORS
(NEE SECTION 810-21)
GROUND CLAMPS
POWER SERVICE GROUNDING ELECTRODE SYSTEM
iNEC ART 250, PART H)
Chapter 1: Connections & Setup
Things to Consider Before You Connect ......................................................................... 4
Protect Against Power Surges .................................................................................... 4
Protect Devices from Overheating ............................................................................ 4
Position Cables Properly to Avoid Audio Interference ............................................. 4
Use Indirect Light ........................................................................................................ 4
Get the Picture ................................................................................................................. 5
Receiving Cable Channels .......................................................................................... 5
What You Need .......................................................................................................... 5
What You Need to Know ........................................................................................... 5
Receiving Channels with an Antenna ........................................................................ 6
What You Need .......................................................................................................... 6
What You Need to Know ........................................................................................... 6
Choose Your Connection .................................................................................................. 7
Y Pb Pr (Component Video) Connection ......................................................................... 8
Connecting the Device ...................................................................................................... 9
Using the FrontlSide Jacks ............................................................................................. 10
Connecting the Device ............................................................................................. 10
Explanation of Jacks ....................................................................................................... 11
Front Buttons .................................................................................................................. 12
Plug in the TV and Turn It On ......................................................................................... 13
Put Batteries in the Remote ........................................................................................... 13
Use the Remote Control to Complete the Initial Setup ............................................... 13
Complete the Initial Setup ............................................................................................. 14
Auto Channel Search ............................................................................................... 14
Tuning to a Channel ................................................................................................. 14
What to Expect ................................................................................................................ 15
Watching TV ............................................................................................................. 15
Remote Buttons .............................................................................................................. 16
Using the INPUT Button .................................................................................................. 17
Using the SOUND Button .............................................................................................. 17
Using the GUIDE Button ................................................................................................ 17
Chapter 2: Using the TV's Features
Channel Banner ............................................................................................................... 18
Parental Controls and V-Chip ......................................................................................... 18
How V-Chip Works .................................................................................................... 18
Activate Parental Control ............................................................................................... 19
Resetting the Password ............................................................................................ 19
Set V-Chip TV Programming Limits .......................................................................... 19
Downloadable V-chip ............................................................................................... 19
Content Ratings ........................................................................................................ 20
Blocking Specific Content Themes ........................................................................... 20
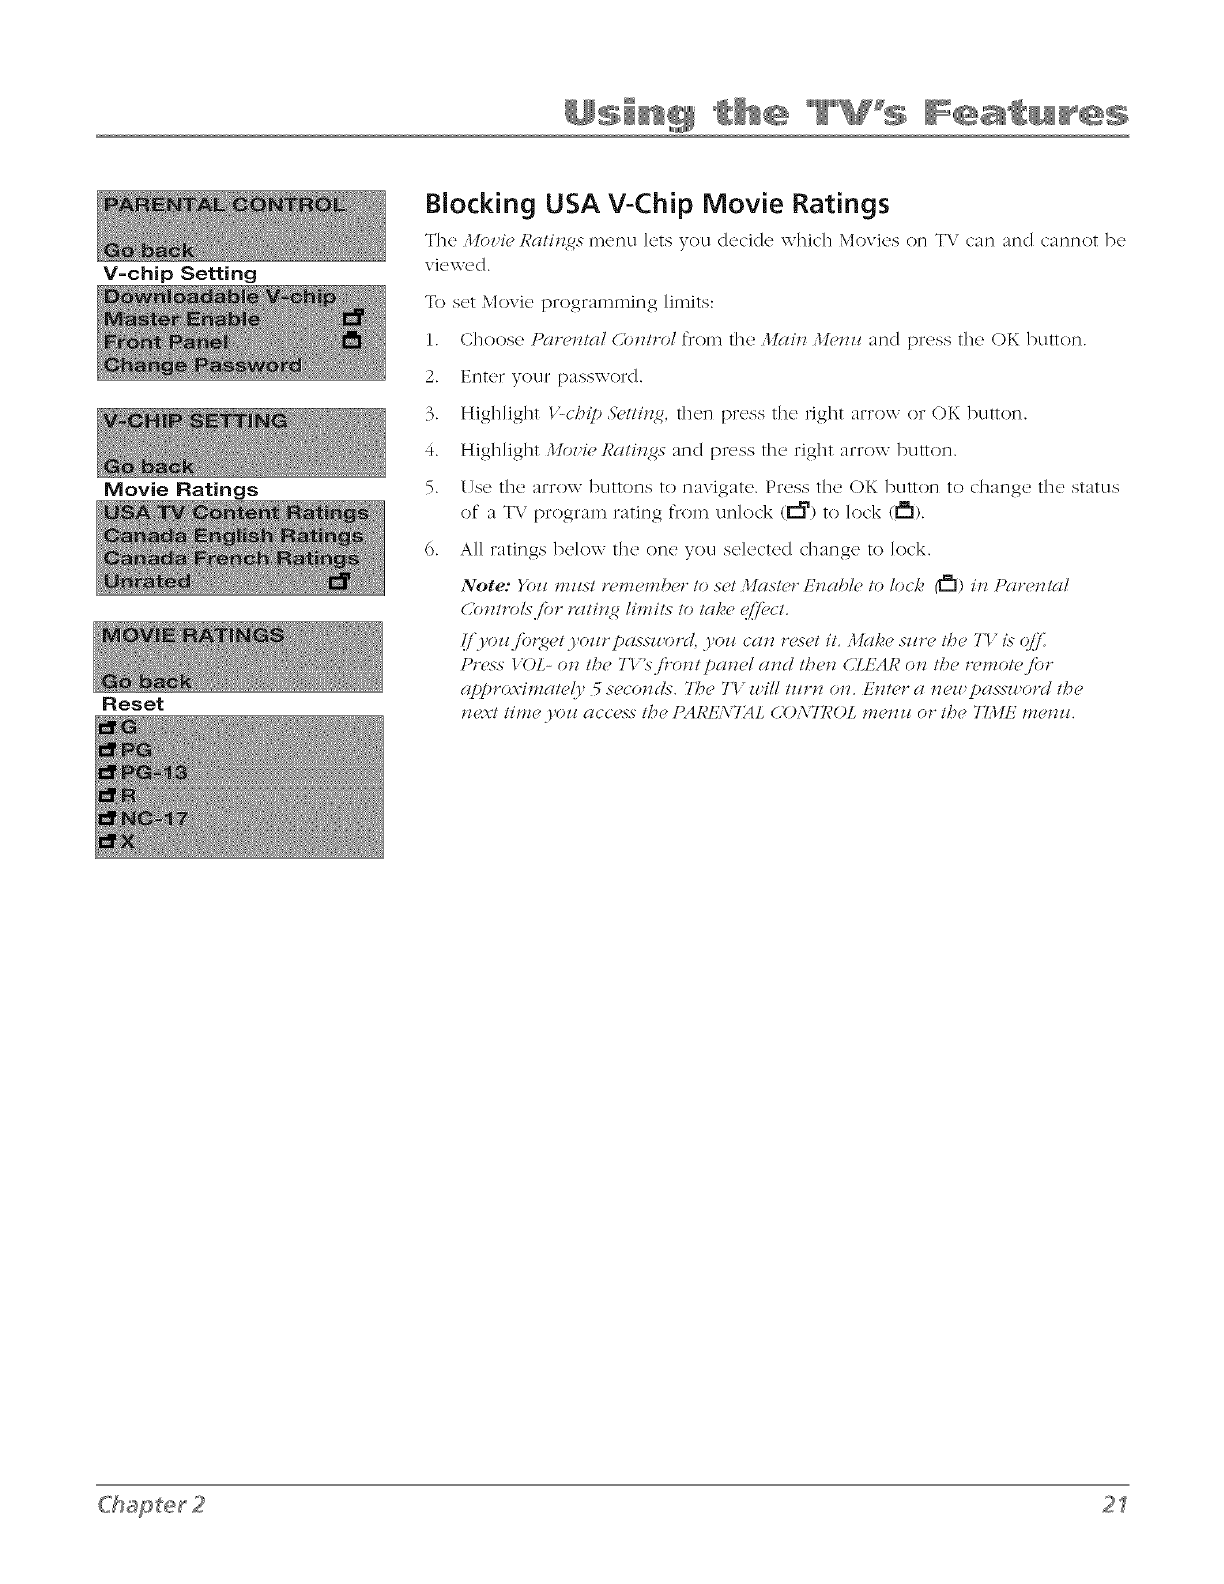
Blocking USA V-Chip Movie Ratings ........................................................................ 21
BlockingCanadianV-ChipMovieRatings...............................................................22
UnratedPrograms....................................................................................................22
FrontPanel................................................................................................................23
ChangeYourPassword.............................................................................................23
Chapter 3: Using the TV°s Menu System
Picture Menu ................................................................................................................... 24
Setup Menu ..................................................................................................................... 24
Parental Control Menu ................................................................................................... 27
Time Menu ....................................................................................................................... 28
Notepad Menu ................................................................................................................ 29
Chapter 4: Other Information
Frequently Asked Questions (FAQs) .............................................................................. 30
Troubleshooting .............................................................................................................. 31
USA V-Chip Rating System ............................................................................................. 33
Canadian English V-Chip Rating System ....................................................................... 33
Canadian French V-Chip Rating System ........................................................................ 34
Limited Warranty ............................................................................................................ 35
Care and Cleaning ........................................................................................................... 37
FCC Information .............................................................................................................. 37
Things to Consider Before You Connect
Protect Against Power Surges
- Connect all devices Ix'fore you plug any of their power cords into the wall outlet.
', Turn off tile TV :rod/or device before you connect or disconnect :my cables.
', Using a surge protector can help prevent damage to your TV from electrical power surges. In
case of lightning, unplug your TM
,, Make sure all antennas and cables are properly grounded. Retbr to tile Important Safety
Instructions on page 1.
Protect Devices from Overheating
,, Don't block ventilation holes on :my of the devices. Arrange the devices so that air c:m
circulate fi_,e]y.
,, Don't stack devices.
,, If you place devices in a stand, make sure you allow adequate ventilation.
• If you connect an audio receiver or amplifier, place it on tile top shelf so tile heated air from
it won't flow around ()tiler devices.
Position Cables Properly to Avoid Audio interference
® Insert each cable firmly into the designated jack.
•If" you place devices abow' the T\"_route all cables down the side of the back of the TV
instead of straight down the middle of the T\".
• If your antenna uses 300-ohm twin lead cables, do not coil the cables. Also, kee I) the twin
lead cables away from audio/video cables.
Use indirect Light
I)orft place the TV where sunlight or loom lighting will be dilected towmd the screen. Use soft
or indirect lighting.
(;r(lphics (:o_l(_i1_'d u'il/?il/ lhis pztblicalio_ ar(Lfnr r_])r(<_,I/l(_lio_ old),.
Get the Picture
The first part of connecting your T\, is to get []let picture, a/so known as a signal The back pane]
of your T\" a]]ows you to receive ana]og and dJgita] channe]s by using the ANTENNA,CABLE
INP{ 7T.
Receiving Cable Channels
What You Need
Coaxial cable
Coaxial cable from a cable outlet. Plug the coaxial cable into the
ANTENNA,CABLE INPUT to receive your Rn_/]og Rn(.] digita] cab]e
What You Need to Know
This television is equipped with a (.)AM (Quadrature Amplitude Modulation) tuner that
enables reception of unscrambled digital cane content. Check with your cane provider
for information about content availability in your area. Your TV also receives analog cable
TV channels.
The Azw) C[*aiz1lml 5'oarch screen in the 5'mlztp menu searches for both ana]og and digital
channels. Choose d,>zbl_>as }:()Ill" SoklrC(2 [VD(2. To comp]ete a channe] seal:all now, go to
page 14.
\'¢'hen you are ready to watch digital channels, make sure you are tuned to a digital
channel. Digita] stations typically haxe a (lash in their channel number because they can
cof]taif] sul)c]lw]f]ds, for c}xal]_p]c}, _ •{ -'),
\\."]]en VOll 3rL! re3dv [o x\:3[c]] 31] 3[]3]og c]]ar]nel, inak<, sllrL! you 3rt2 [llncd [o 3n
analog dlanne]. Analog stations contain no more than three digits. Refer to page 14 fol
information on analog and digita] stations.
When using the input described above, press the ANTENNA
(I)IG,,ANA) button on the remote to toggle between digital and analog
channels. Refer to page 14.
Note: Allol/_mr mqy Io smm{/'.yoll 'rm lllllmU Io <r7c!{_il_71or <rlll<rTlo<f_
CDCTIII/_ff is lopping.', 17_' /.'\;770 Dl!IloI7. 7_.?i._; bpill_s z!/._Ibm C_?CTlllld
]_(71lI1{ P 5"CP{ {II, rift,'( 1155{?d 011 pgl_{? [_%.
ANTENNA
(DIG,ANA)
button
-- #NFO
button
C'hapterl
(]0t1/7tlll{?S 0tl IC<V/ I)C _(7
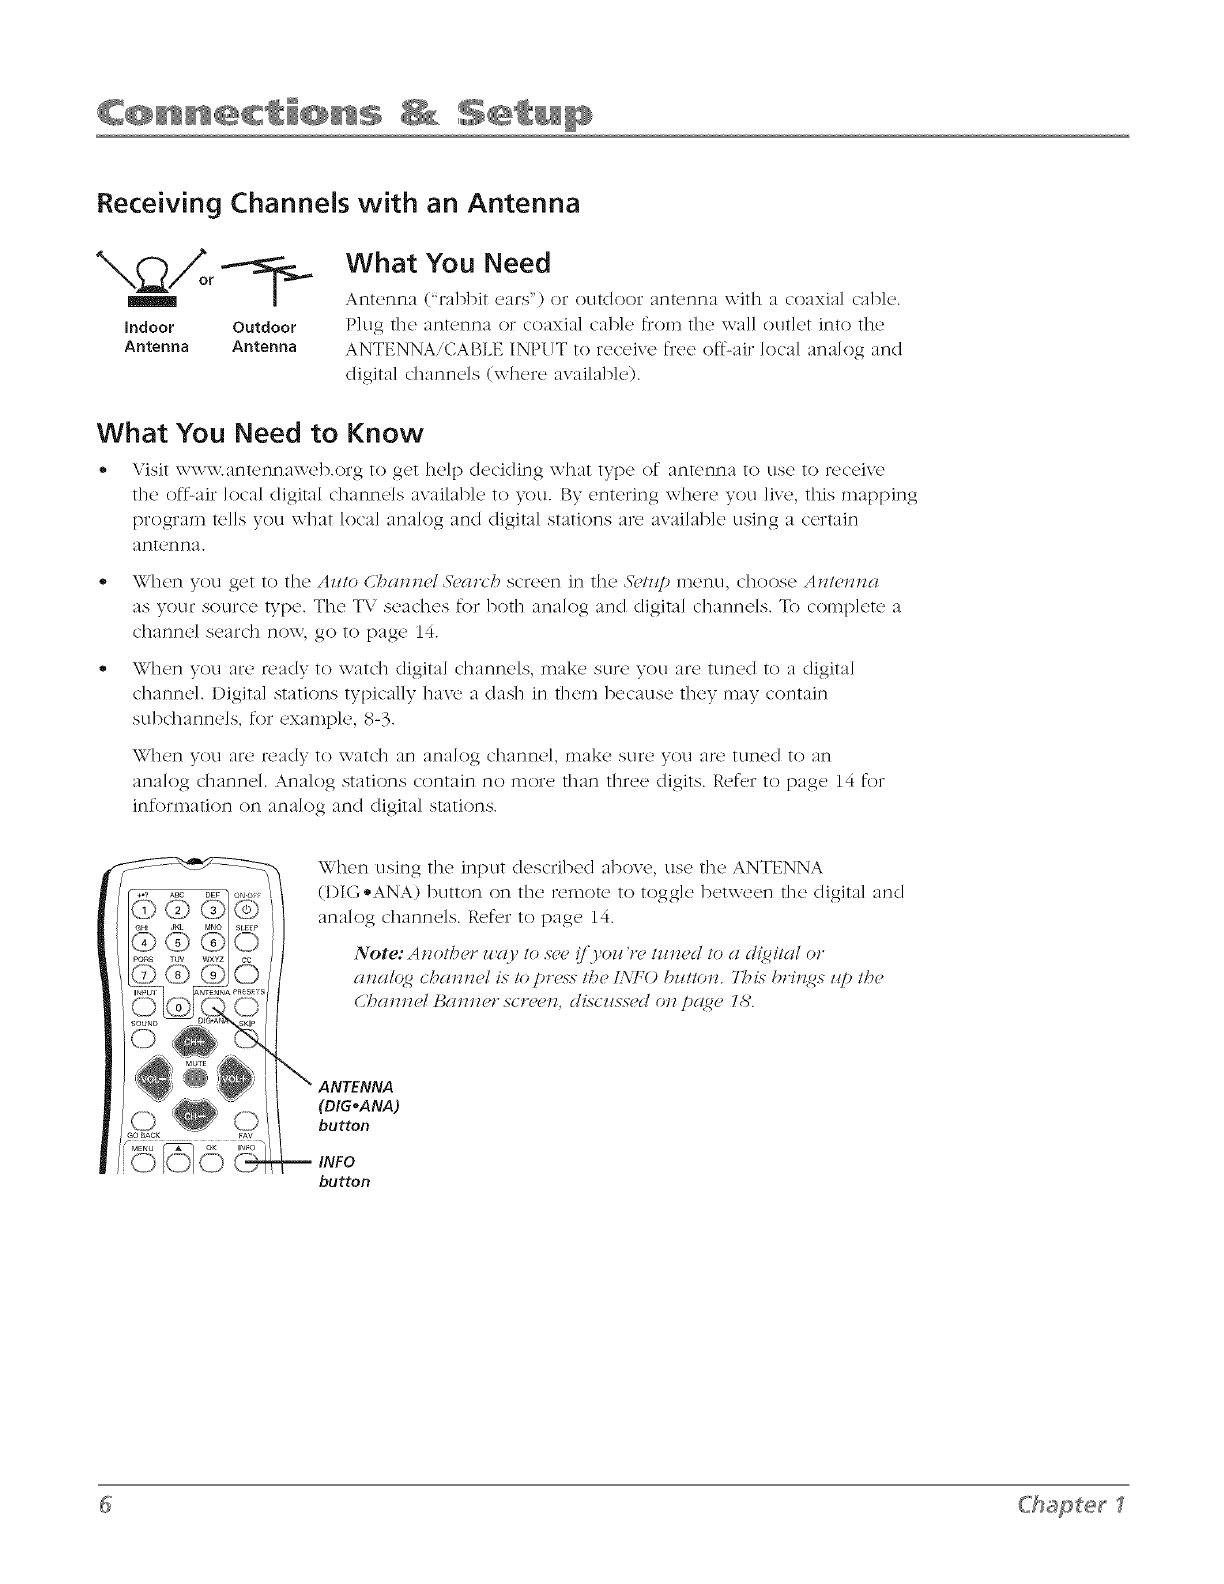
Receiving Channels with an Antenna
indoor Outdoor
Antenna Antenna
What You Need
Antenna ("rabbit ears") or outdoor antenna with a coaxial cable.
Plug tile antenna or coaxial cable from tile wall outlet into the
ANTENNA/CABLE INPITT to receive free off-:dr local analog :rod
digital channels (where :w:dlable).
What You Need to Know
Visit www.antennaweb.org to get help deciding what type of antenna to use to receive
the off-air local digital c]_anne]s a_ ailable to you. By entering where you li_e, this mapping
program te]]s you what Ioca] ana]og and digital stations are avai]ab]e using a certain
ant_21) l)a.
When you get to the Alllo C_a1_# &,arch screen in the %ell#_ menu, choose A1zl_,1_za
as your source type. The T\ seaches for both ana]og and digita] channe]s. To comp]ete a
channe] search now, go to page 14.
\\.'hen you are ready to watch digita] channels, make sure you are tuned to a digita]
channel. Digital stations typically have a dash in them because they may contain
subchanne]s, for example, 8 •
(-'),
\\./]]ell VOll at(2 r(2ady to -watc]] al) ana]og c]]al)ll(_], illake SLlr(2 you are tllll(_d to all
analog channel. Analog stations contain no more than three digits. Refer to page 14 for
information on analog and digital stations.
When using the input described above, use the ANTENNA
(I)IG-ANA) button on the remote to togg]e between the digita] and
ana]og channe]s. Refer to page 14.
Note: Azzolb_,r z_,gl.),Io .s-_,_,ij.yozl 'r_, lzzzzcd Io gzd{_flal or
gl!lgllO<g Chglllll{?l j,S"/O_)l*{*.s'.s" 1_7{? ]'\']7() _)I11101l. "/_')J,S" bl*illi_S l@/h{?
(,7741111ld I._41111l_q* scl*_'_,ll, dLscllss_d oll p412_' 1H.
_" ANTENNA
(DIG,ANA)
button
INFO
button
C'haSerl
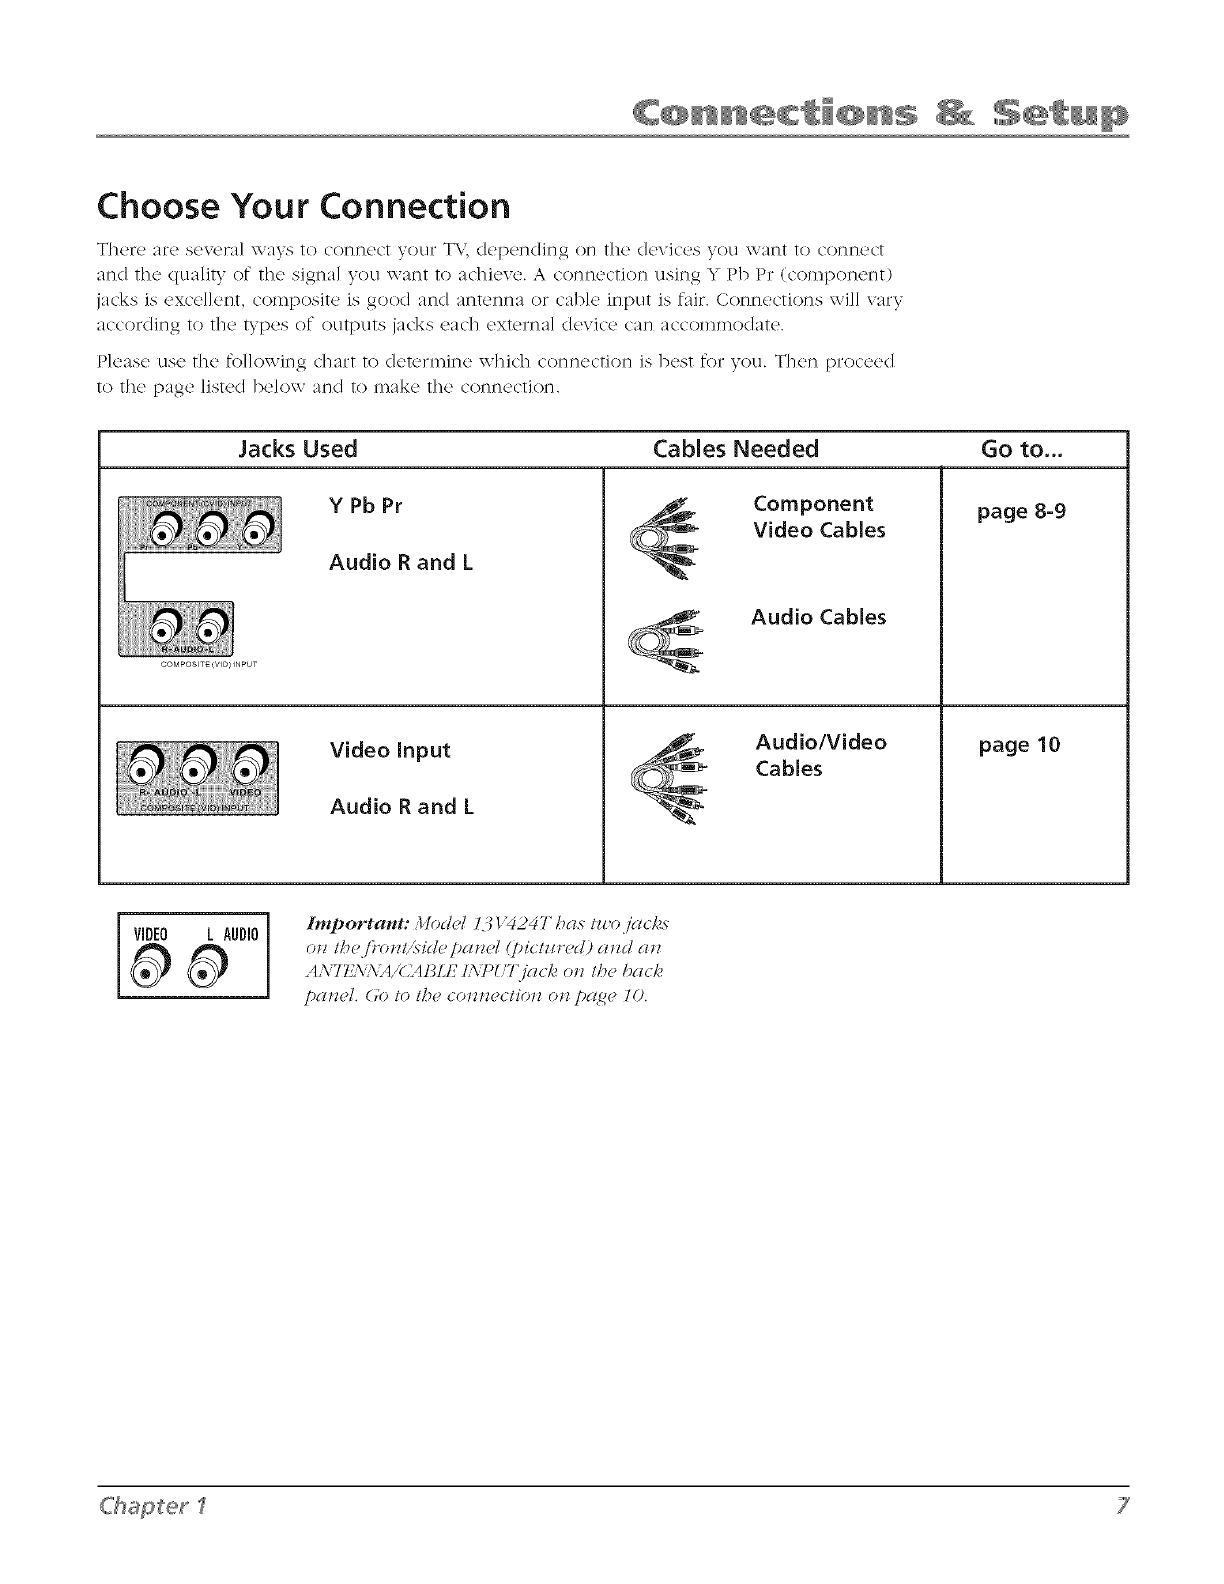
Choose Your Connection
There are sev_,ra] ways to connect your T\.', depending on the devices you want to connect
and the quality of the signal you want to achieve. A connection using Y Pb Pr (component)
jacks is excd]ent, co,_posite is good and antenna or cable input is fair. Connections will vary
according to the types of outputs jacks each ext<,rnal device can accommodate.
Please use the fo]]ox_ing chart to determine which connection is best for you. Then proceed
t(7the page listed be]ow and t(7make the co_]_]<_ctJo_].
Jacks Used Cables Needed Go to...
COMPOSlTE_VID) INPUT
Y Pb Pr
Audio R and L
Video Input
Audio R and L
Component
Video Cables
Audio Cables
Audio/Video
Cables
page 8-9
page 10
VIDEO L AUDIO
iImportant: 110del 131"4247has lzrojglcks
(71l//_e i)'olH/_s-idepgll_d (pi( /zll'ed) a!_d a!_
A_ TI2_I_'A/VrAL_LI7k_7_(:'Tjg_cl. olz /be bach
/)411l_?1. (7(7 I(7 I/7{? COIIlI_?CIIOII 011 pgl(_{? 10.
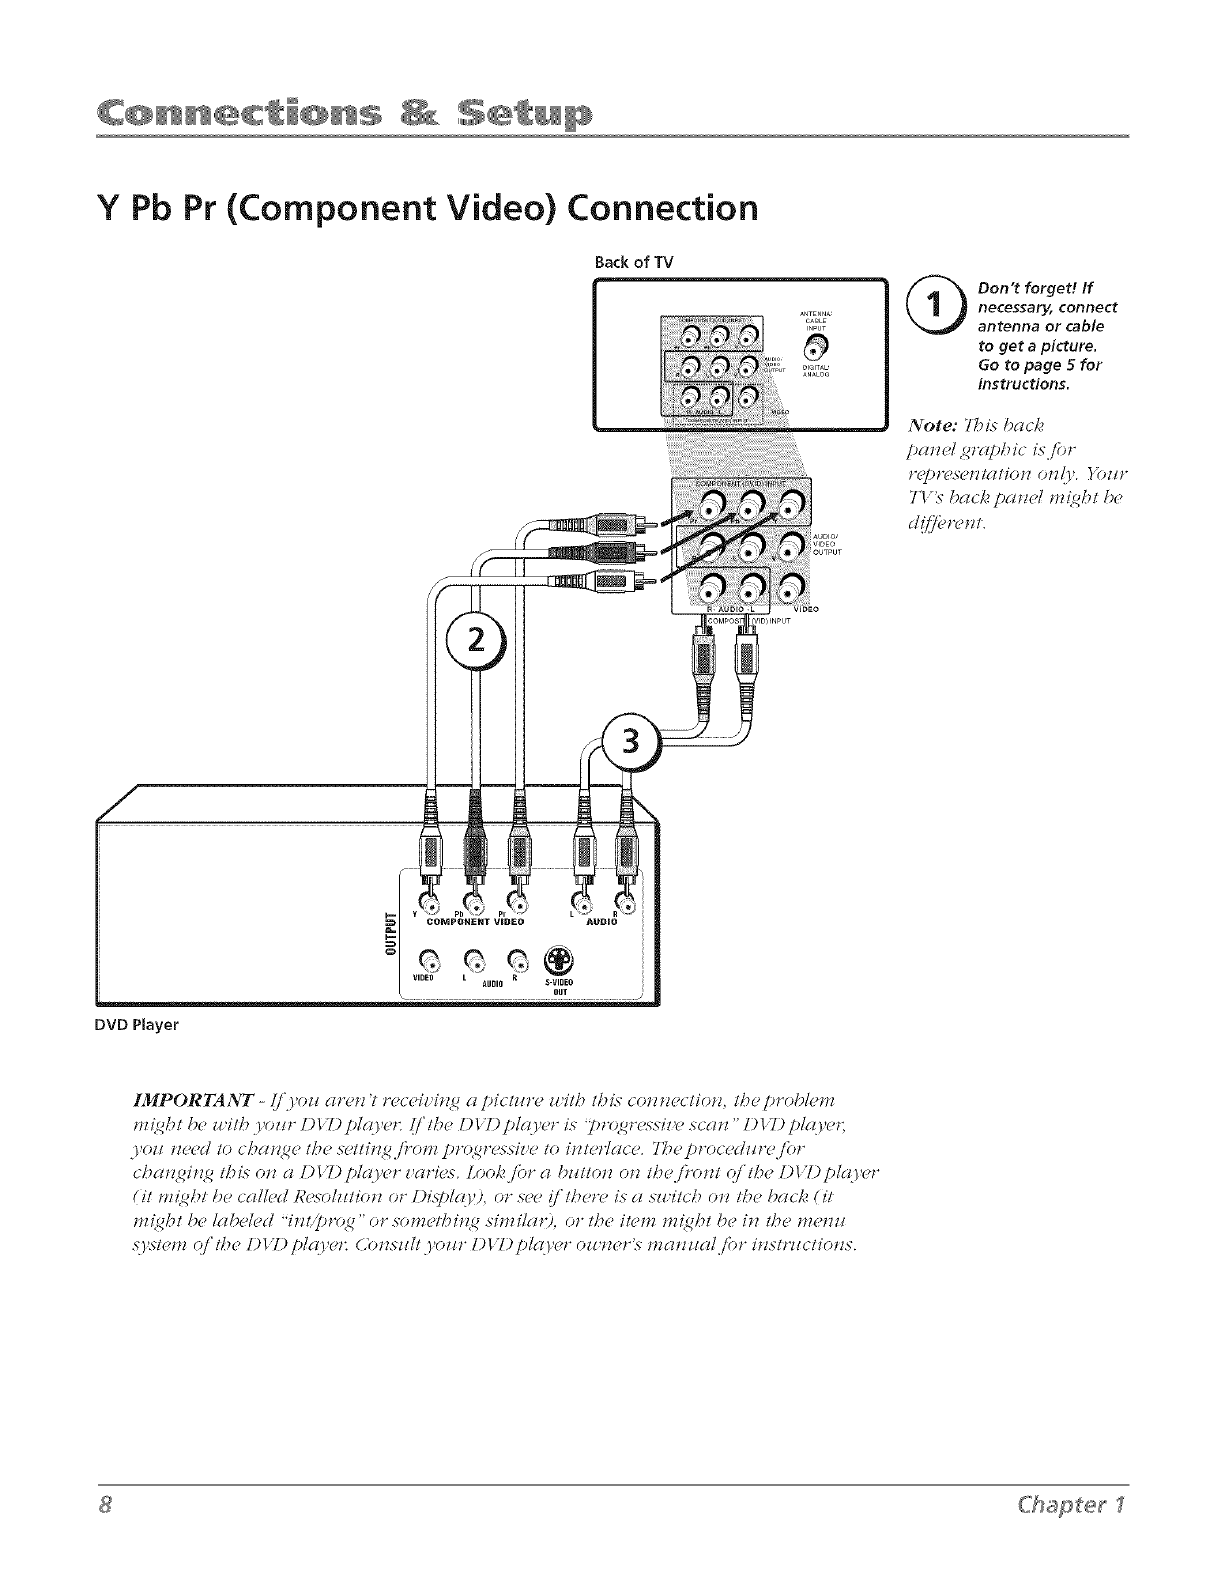
YPb Pr (Component Video) Connection
Backof TV
.....
/
7°.............'u_':..........._!_;
DVD Player
_on't forget! If
necessary, connect
antenna or cable
to get a picture.
Go to page 5 for
instructions.
Note: 7PLs-bac/,
panel gtwphic i<l'of
t'g'/)t'('N('l_l(l/JOll Oil{} t. }_()llt"
TV_" hack p(ltwl m_ht b(,
di/[/'(,twlzt.
IMPORTANT- (i'.)._oztat'_'n 't ,n,c(,i_'h<g a pictz_t'g" l_i/h thi,_ connection, th(,pt'obk,m
m_ht be with yosr DI T)plro,(,,: (/th(, DI T)pl(o'_,," Ls-'J)t'(4_t'_,,s>-i_,_,scan "DIT)pl(ly_,t,
.yozl ng,(,d to cha,<ge the settingj)'om pt'(4gt'g<s>i_'eto hzteteace_ 7_?ept'ocedzltv /bt"
cl_angilz<g /_i.s OlZ a [)17)plgl.Wt" _'at'i_'_< LooI" /'or a b_#tlon on the /}>nt oj'tl_e l)17)plgl.y(,t"
(it m{ght !)e calldd R_,_olz/tion of [)i,sJ}lq}O, or sg'(" i/'t/_etw Lsa sz_itch on t/_e back (it
m{ght be I(_bel(,d "in@t'(4g" or sometl*ing simik_tg, of the iWm m{ght be in the men_#
sy._l(,m q/'l/_(" [)l T) pl((y(,t: dgn.szd/.yo_t" DI T) pl(o,(,t" oz_n(,t% m(m_(_lj'of insl_'_mtions.
ChaSerl
Connecting the Device
This connection allows you to connect a devkc that has Y Pb Pr jacks (Coml)oncnt Video), fol
example, aD\.I) player. If the de\ice you are connecting also has S-\.'kleo or composite video,
we 17(2coll)]l)elld you use []]e COml)onent video input for better qua]ity.
Component Video
cables (Y Pb Pr) are
color coded- Green
(Y), Blue (Pb) and Red
(Pr).
Using the example of a DVD player:
If connect cable and/or antenna as described on 5.
necessary, your page
Connect YPb Pr video cables.
your component
Conn,'or thr_'_' video grade cables to the' Y Pb Pr jacks on tl-w b:_ck of the' TV and to
the Y Pb Pr outputs on the I)VD [)layer. Y Pb Pr cables are colored green, b]ue and
red. Just match the colors on the cables to the Y Pb Pr jacks.
Connect audio cables.
your
Connect the audio (red and white) cables to the AUDIO R and L (COMPOSITE
INPUT) jacks on the back of the T\,' and to the audio output jacks on the I)VI)
player..lust match the colors.
Important - t_:'/_,_z z/sing I/_, Cb1_zpo_z_,nl _,id_,o inpnl (} Pb P<)jacks. z/se on{y
lbc Az/dio £/L /acl;'s i)'o_'Jz Ibm'C011POSITF k_7){ Tibr ibis (OH!?CCIiOIL
Audio cables are color
coded- Red= right audio;
white= left audio
INPUT
button
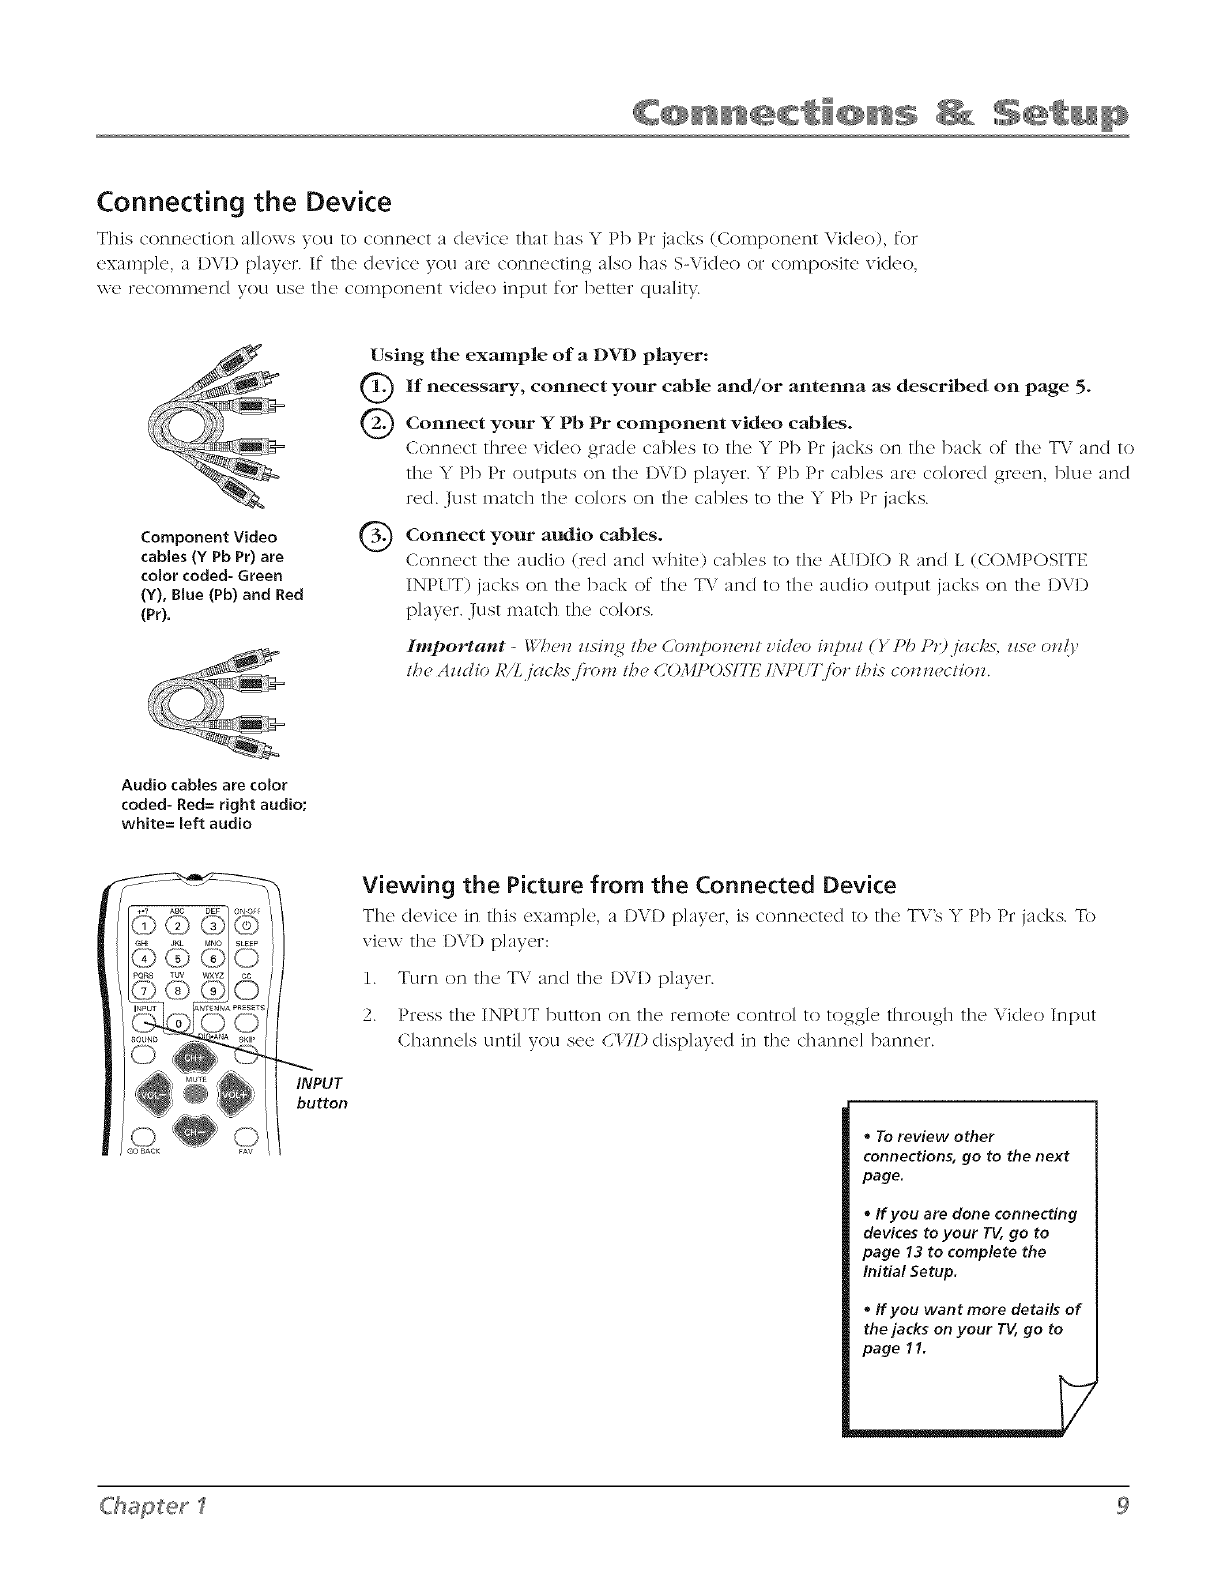
Viewing the Picture from the Connected Device
The device in this cXaml)]C, aplayer, is connected to the TV's Y Pb Pr jacks. To
view the I)VI) p]ayer:
1. Turn on the TV and the I)\/I) p]ayer.
2. Press the INPUT button on the remote control to toggle through the Video Input
Channds until you see CITD displayed in the channel banner.
,To review other
connections, go to the next
page.
eIf you are done connecting
devices to your T_, go to
page 13 to complete the
initial Setup.
oIf you want more details of
the jacks on your T_, go to
page 1L
C'haSet
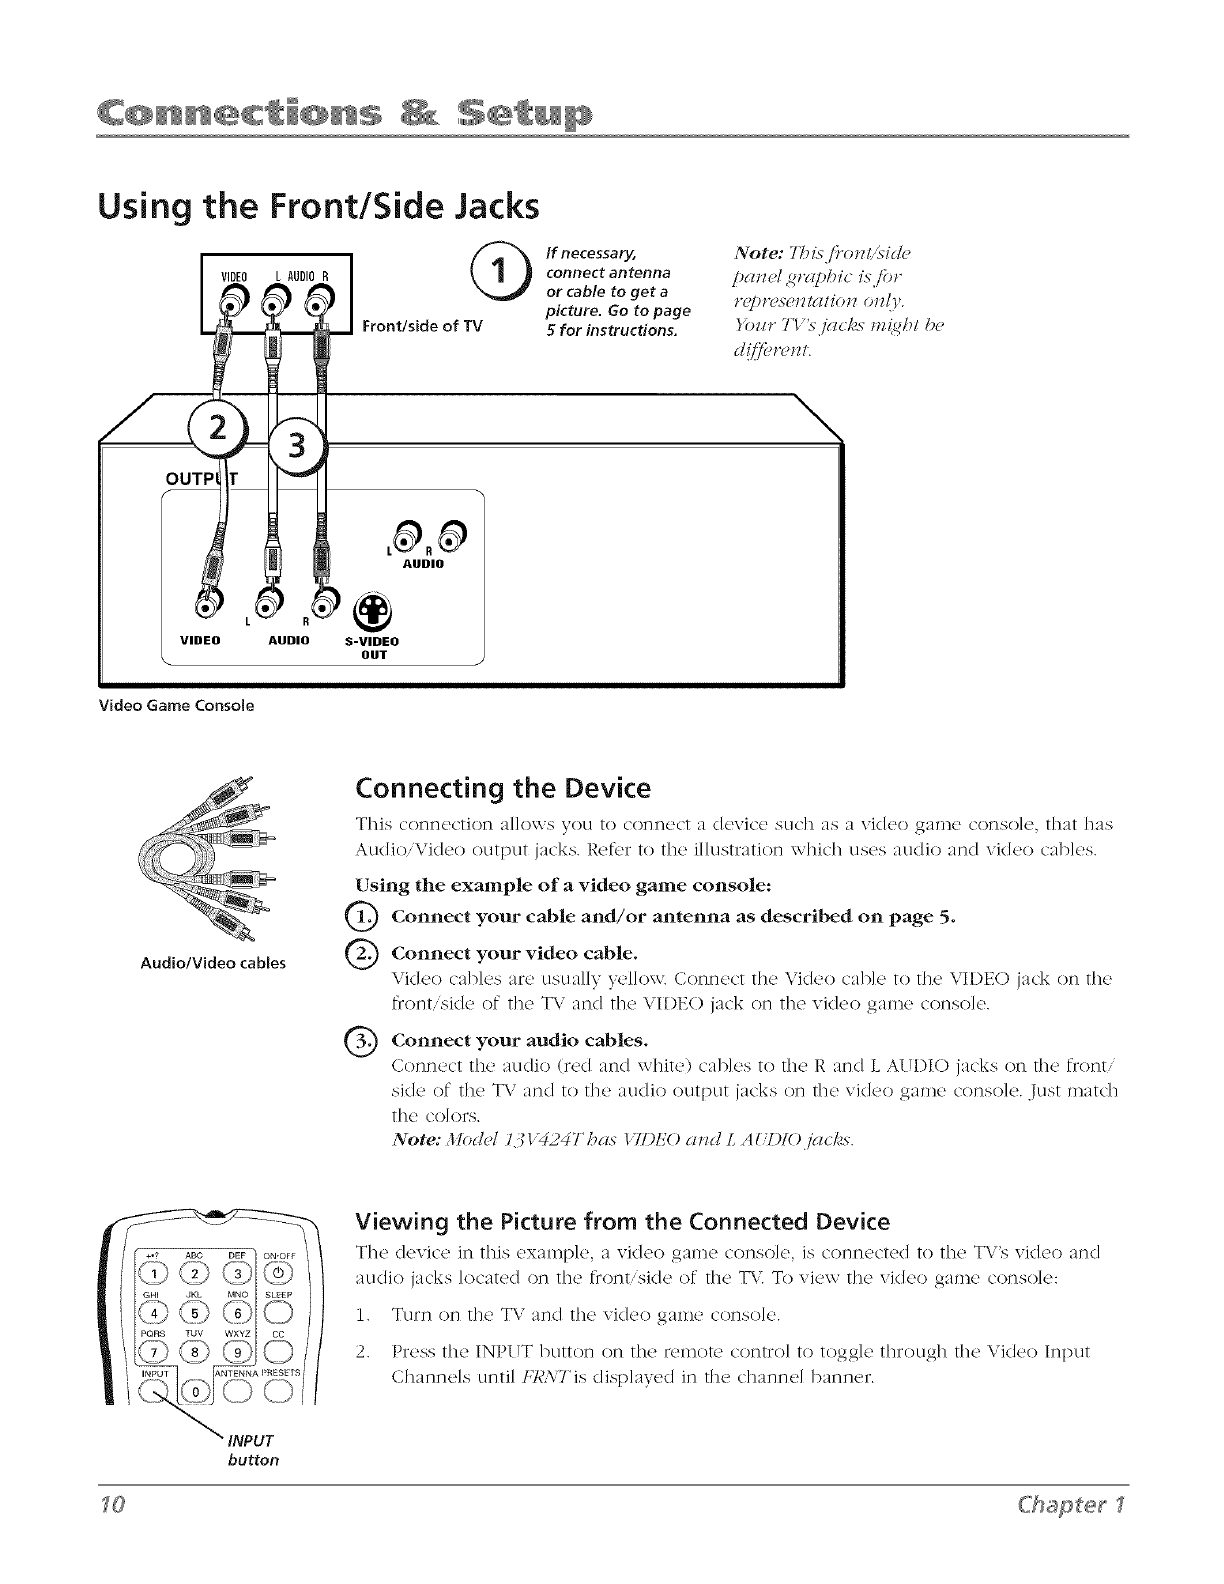
Using the Front/Side Jacks
VIDEO L AUDIO
VIDEO AUDIO
Ifnecessary,
Connect antenna
orcabletogeta
picture.Go topage
Front/side of TV 5 for instructions.
Note: 7_is /;'onl,,_id(,
prowl gra/_hic is /or
t'(])t'('s_'IH(l/iOll OIIlF,
}'bzlrTl'3jci(k.sm_@/h<,
dij]br.nt.
\
AUDIO
®
S-VIDEO
DOT
Video Game Console
Audio/Video cables
Connecting the Device
This connection allows VOLI [() COrlrlL!c[ a d(2vJc(_ SLIC]] as a VJ([(2o gai]l(2 COl]So](,, []]a[ ]]as
Au(lio,\ideo OLIgpLl[ jacks. Ref('r to the illustration wl?ich uses au(lio and vkleo cables.
Using the example of a video game console:
0
®
®
Connect your cable and/or antenna as described on page 5.
Connect your video cable.
Video cal)les are LlSLla]]}: yel]oxv. Connect the \ideo cable to the \IDE() jack on the
fi:ont'si(le of the T\" and the VII)EO jack on the video game console.
Connect your audio cables.
Connect tile audio (red and white) cables to the R and L AUDIO jacks on the front/
side of the T\.' and to the audio output jacks on the video game console. Just match
the colors.
Note: Mod_'/ 131 "424Tha._" I 7I)EO aJld L AUDlOj<¢ckx.
+o? ABC DEF ONOFF
GH, @
PQRS WXYZ
Viewing the Picture from the Connected Device
Th(' cl('vic'(' in this ('xampl(', a vid('o gamo consol(' is corm('ct('(I to th(' TV's vic/('o and
audio jacks located on the fi'ontiside of the T\". To view the video game console:
1. Turn on the TV and the vkleo game console.
2. Press the INPUT button on the remote control to toggle through the Vkleo Input
Channds until FR.\Tis displaye(I in the channd banner.
button
C'haSetl
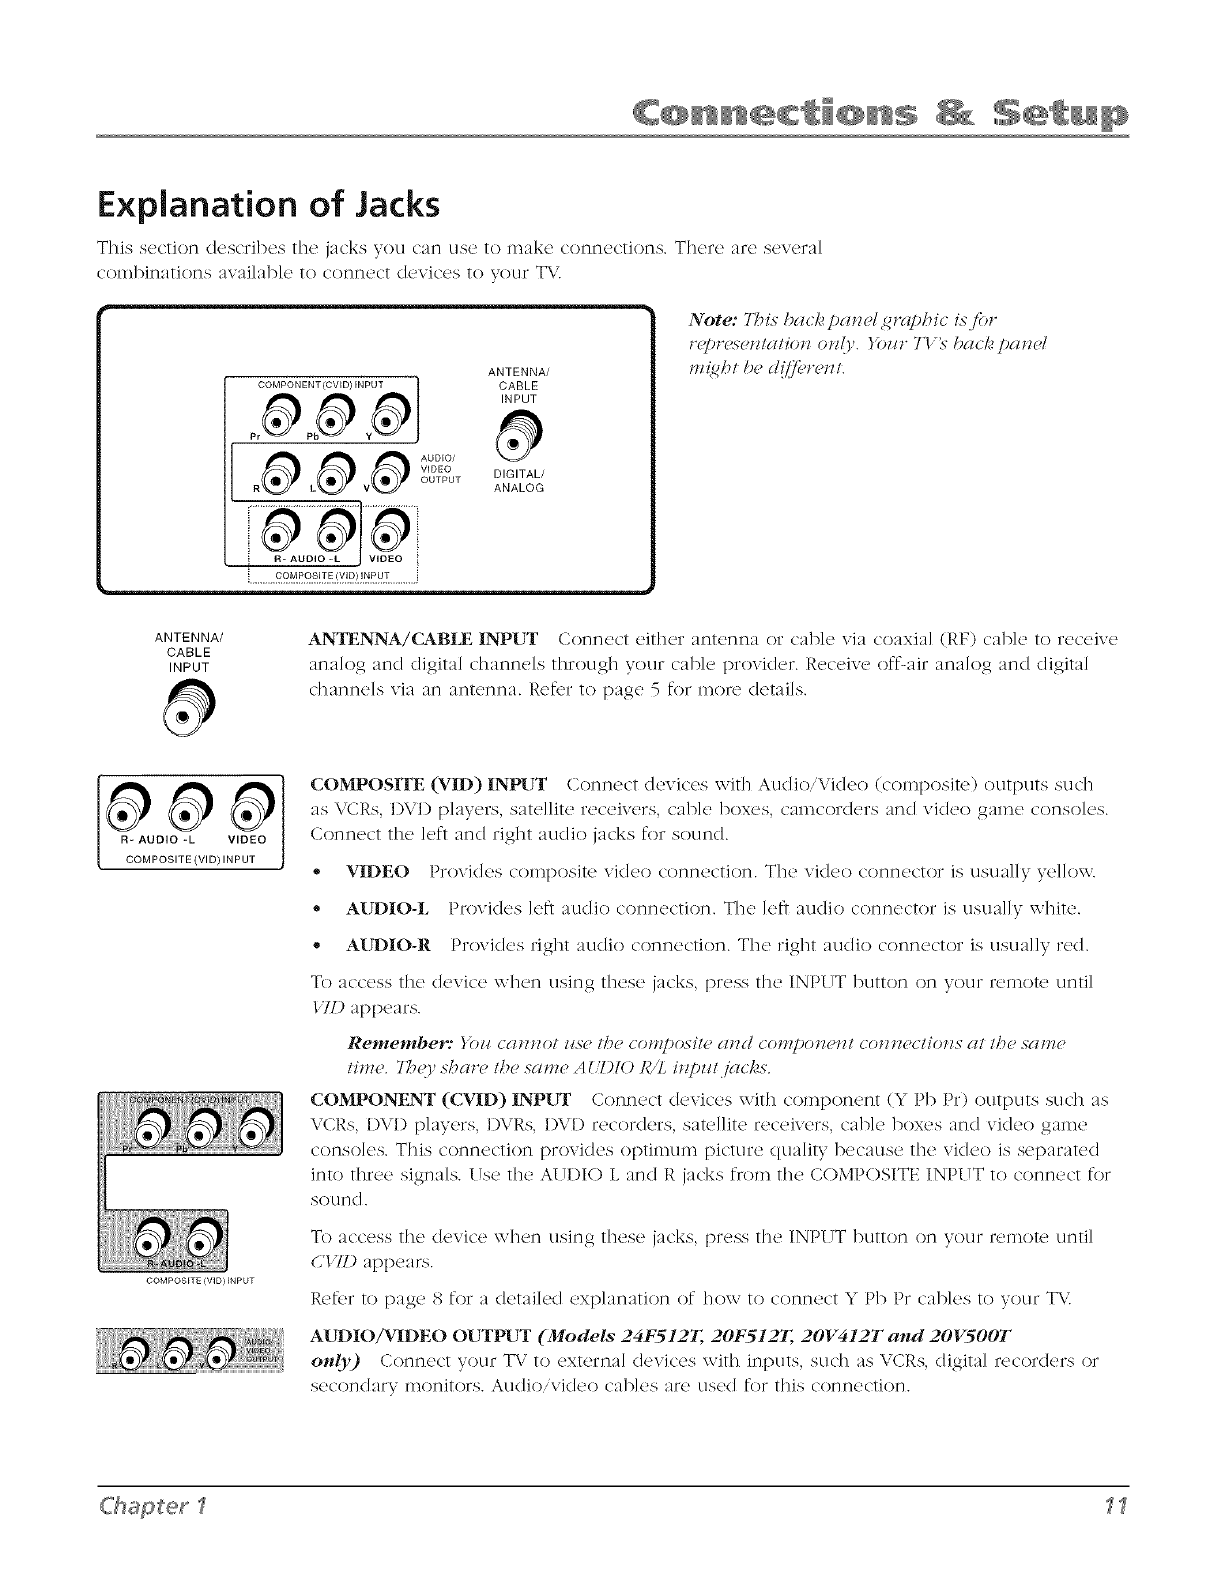
Explanation of Jacks
This section dL}scrJ]){2S [])e jHcks VOLI C_/N LIS£! [o In_/k(' COnF/('C{lONS. There ale sere]a]
combinations :/v:dlable to connect devices to your TV.
COMPONENT (CVID) INPUT
VIDEO
OUTPUT
R L V
i.,........£Ru__k!_.E!E_!!.q_T...........
ANTENNA/
CABLE
INPUT
DIGITAL/
ANALOG
Note: 7_is ba(k gal_d £ wphic is for
r_fn'e.s_mal£m on{p. }'ore" TI_" ba(k palml
t'lZ{gf.H b_' d{_'f_'FOlll.
ANTENNA/
CABLE
INPUT
ANTENNA/CABIIE INPUT Connect either antenna or cable xia coaxia] (RF) cane to receive
analog and digital channels through your cab]c! proxkler. Receive off-air analog and digital
channe]s via an antenna. Retbr to page 5 for inore detai]s.
R- AUDIO -L VIDEO
COMPOSITE (VID) INPUT
COMPOSITE (riD} INPUT
COMPOSITE (V_) INPUT Connect devices with Au(lio,Vi(leo (composite) outputs such
as \CRs, I)\;I) p]ayc!rs, sate]]ite receivers, cable boxes, camcorders and video game conso]es.
Connect the left and right audio jacks for sound.
®VIDEO ProvJ(]cs coi]]positc vi(Ico connection. The vi(leo connector is USU:_]]y y£!]]o%\_,
•AUDIO-L Provi(les left audio connection. The ]eft audio connector is usual]y white.
• AUDIO-R Provi(les right audio connection. The right audio connector is usua]]y red.
To access the device when using these jacks, press the INPUT button on your remote until
Ill) appears.
Remember: )'ozz C(llZlZ()/ z&sP//?P Col_!/)os'i/(, (ztz(l Col_//)ot;(,t;/ COlZtH,c/iolzs d///_P .s(/l_z{,
tim('. 7b(9; sh(w(, the s(mm A££)10 1£,%itpz_tj(l(ks',
COMPONENT (CVID) INPUT Conn{'c't dcvJc'cs with componcnt (Y Pb Pr) outputs such as
VCRs, DVI) players, I)\'Rs, I)\'1) recorders, satellite receivers, cable boxes and vkleo game
consoles. This connection provkles optimum picture quality because the vk/eo is separated
into three signals. Use the AUDIO L and R jacks from the COMPOSITE INPUT to connect for
sound.
To access the device when using these jacks, press the INPUT button on your remote until
(,'l 7D al3pears.
Re_br to page 8 for a detailed exp]:matJon of how to connect Y Pb Pr canes to your T\',
A(_IO/VIDEO OUTPUT (Models 24F512T, 20F512T, 20V412T and 20V500T
only) Corm{'c't yotn TV to ext{Tna] d('vic{,s with inputs such as VCRs, digita] recorders or
S£!COfK[:/ry mof]JtolTS. Atl(lJo,vJd(_To cab]es arct klS£!([ for this connection.
Chapter I 11
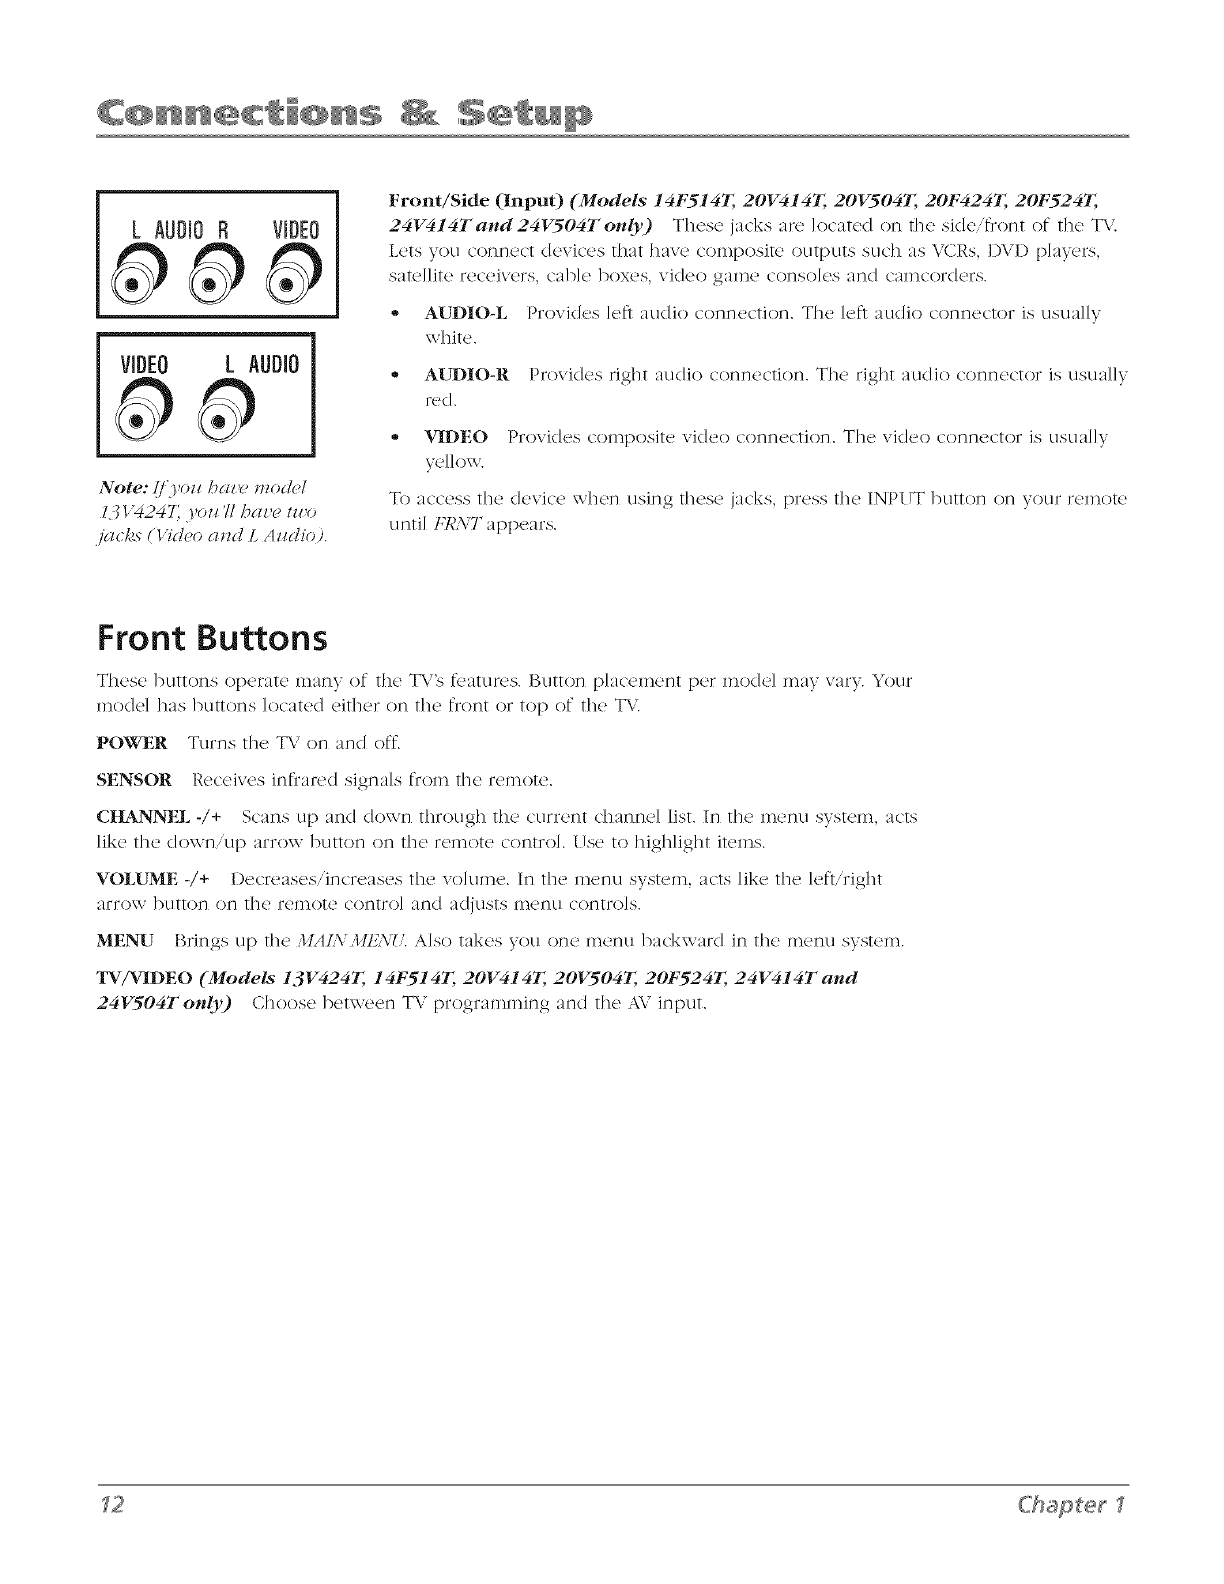
LAUDIO B VIDEO
VIDEO L AUDIO
Note: ,(/you baud, moch,l
131 '424T, yoz_ '/1baz,_/zuo
fil_ t,s <I_id_,oand L AzYdio).
Front/Side (Input) (Models 14F514T, 20V414T, 20V504T, 20F424T, 20F524T,
24V414Tand24V504Tonly) These jacks are located on tile sideit]ont of the T\.'.
Lets you connect devices that have COlnposite outputs such as VCRs, I)VI) players,
satd]ite receivers, cane boxes, video game consoles and camcorders.
,, AUDIO-L Provkles let} audio connection. The let} audio connector is usua]ly
white.
* A/_IO-R Provides fight audio connection. The right audio connector is usual]y
red.
,, VIDEO Provides composite video connection. The video connector is usually
yd]ow.
To access the device when using these jacks, press the INPUT button on your remote
until ]:R.\ 7"appears.
Front Buttons
These buttons operate many of the T\."s features. Button placement per modal may vary. Your
modal has buttons located either on the front or top of the TV.
POWER Turns the TV on and of[.
SENSOR Receives infrar<,d signals from the re,note.
CHANNEL -/+ Scans uI) and down through the current channd list. In the menu system, acts
like the down/up arrow button on the remote control. Use to high]ight items.
VOLUME -/+ Decreases/increases the volume. In the menu system, acts like the left/right
arrow button on the re,note control and a(Ijusts menu controls.
MENU Brings up the ,IlAI.\ :lllihY]] Also takes you one menu backward in the menu system.
TV/VI[DEO (Models 13V424T,, 14F514T, 20V414T,, 20VSO4T, 20F524T, 24V414T and
24VSO4Tou!y) Choose between TV programming and the AV input.
ChaSer
Plug in the TV and Turn it On
Plug the end of the powel corcl into a grounclccl wall outlet. Insert tile plug compk'teIy into
file outlet. P_ess ON-OFF on the remote, ol press POWER on file T\."s front pane].
Put Batteries in the Remote
- Rcmow' the battery compartment cow,r from the back of the remote by pushing down
and sliding off the cover.
,* Insert 2 fresh 'AA" batteries. Make sure the polarities (+ and -) are aligned correctly to the
diagram inside the battery compartment.
- Replace the cover.
Note: (i.yoz# z_on 't ,zt,_,_/to z_sg,.yo_r ,_,mote /or a lotzq period q/time, twmoz'e the bat/ettie_ to
az,oid dgm_r(ge dz_e to pos.siMe /U(l/d(l<ge.
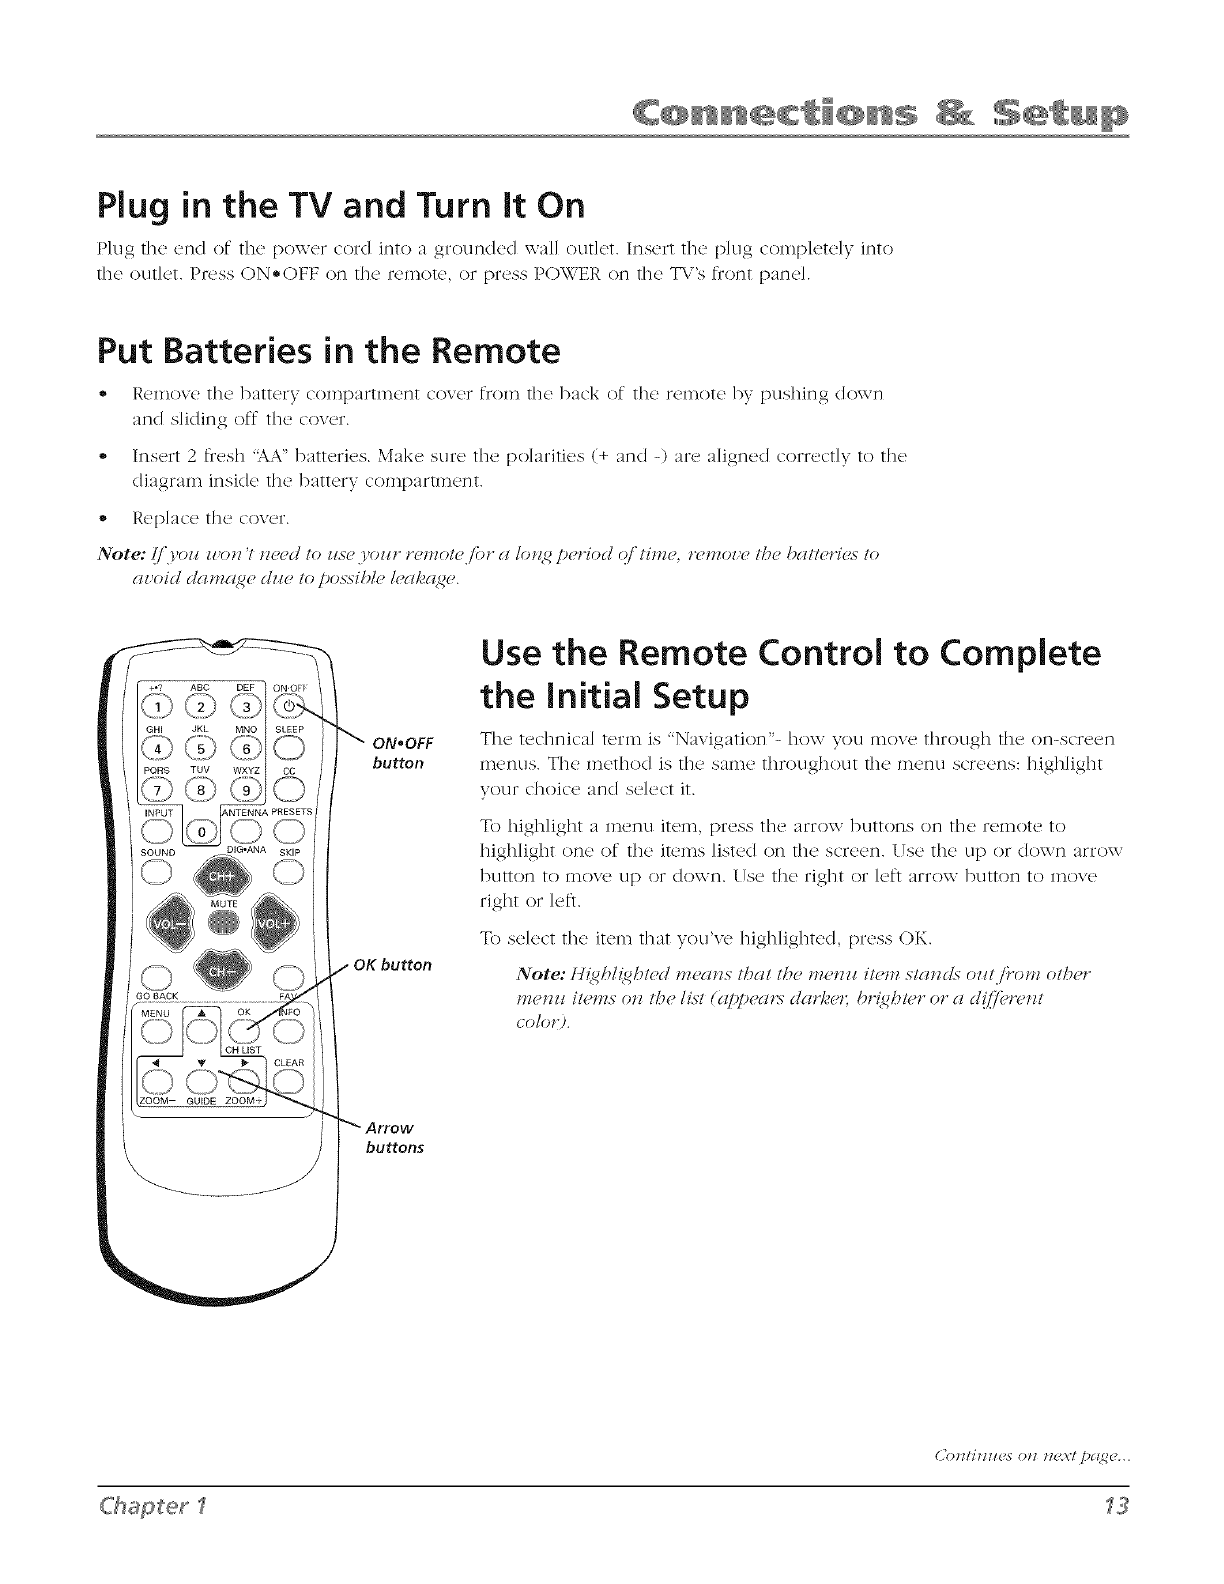
ON*OFF
button
Use the Remote Control to Complete
the initial Setup
Tile technical term is "Navigation'- [low you move through the on-screen
menus. The method is the same throughout the menu screens: big]flight
your choice and select it.
To highlight a menu item, press the arrow buttons on the remote to
highlight one of the items listed on the screen. Use the up or down arrow
button to mox_, up or down. Use tile right or left arrow button to move
right or left.
To select tile item that you've highlighted, press OK.
Note: H{_hl{_ht(,d m('git_s float tl_(" rm,nz_ it(,m star, el.sozd /i'on_ other
m(,nz_ it(,ms on tb(, list ((zpp(,gits (/(ltqe('t; bt'_/)2t" Of (l d(/[/'('t'('IZ/
colotg.
buttons
C'hapterl
C'onti*/zlcs oJz Jz4:x'tpa4;_?-.
Complete the Initial Setup
To set the ]anguagu, use tile arrow buttons to high]ight Lau2zlc_e. The defauJt
language is ]Zn21Lsb To d_oose another language, press t]]e rig]it a_row button
on t]le ten]ore, c]1oosc tile ]arlguag<_.
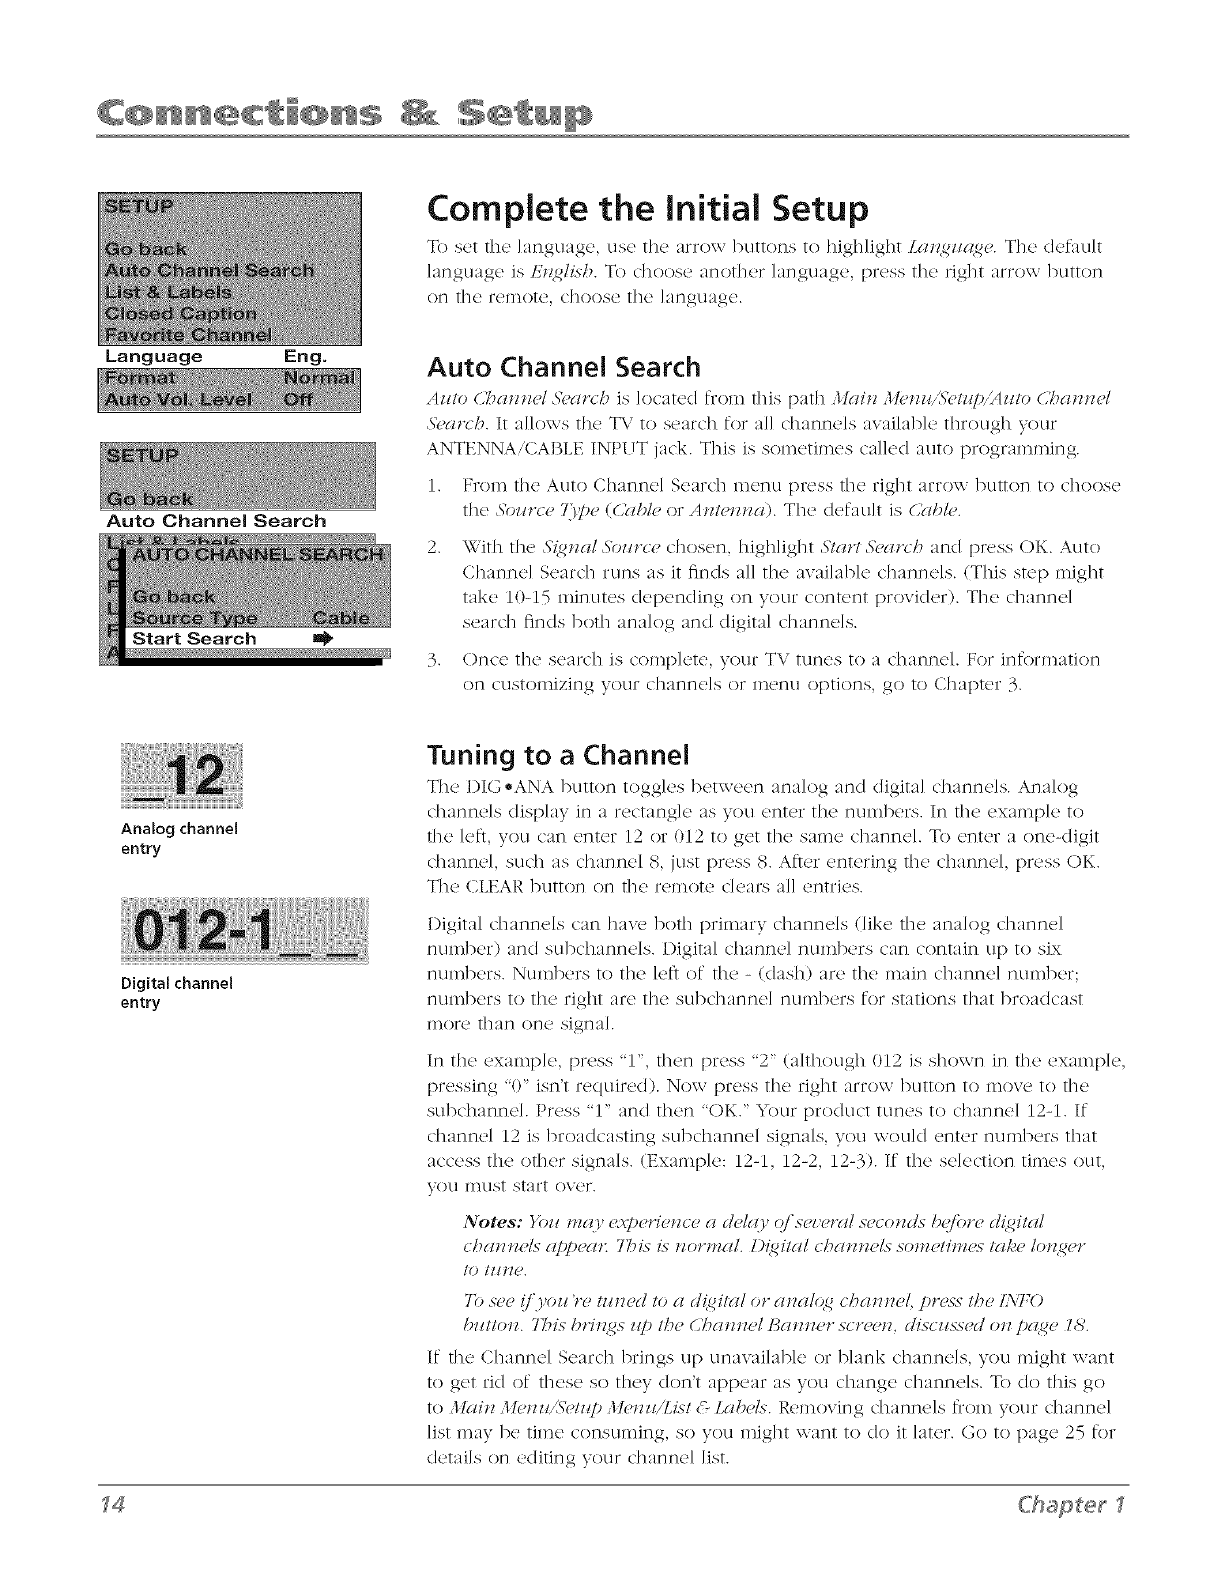
Analog channel
entry
Digital channel
entry
Auto Channel Search
AzHo (£')gnnzd 37,cII_'/:_is ]oc'at(</ from this path .llgli}_Mu,nt,/,S_,/np/AzHo (.7_{lt_t_'l
,%}'(ltvh.It allows the T\.' to search for all channels available through your
ANTENNA/CABLE INPITT jack. This is sometimes caned auto programming.
1. FroIn the Auto Chal]l](,l S(2ard] lllel]u Dr(,ss the rig]it arro\v ]3Litton to c]loosc
t]le ,S})llpCc 7.'}pc> ( (,_l!_l_> or Alllc17!747). The default is (,klblm.
2. With the S{gnal 3})zlrc(, chosen, highlight 57arl 57,(n'c'h and press OK. Auto
Channd Search runs as it finds all the available channels. (This step might
take 10-15 ininutes depending on your content provider). The channd
search finds both analog and digital channds.
3. Oncu the scarc]_ is complete, your TV tunes to a channel. For information
on customizing your c]]anne]s or inenu options, go to C]]aDter 3.
Tuning to a Channel
The DIG-ANA button toggles between analog and (ligita] ch:]nnds. An:]log
channds display in a rectangle as you enter the numbers. In the example to
the left, you can enter 12 or 012 to get the same channel. To enter a one-digit
channd, such as channel 8, just press 8. After entering the channd, press OK.
The CLEAR button on the remote dears all entries.
I)igital channels can havu both primary channels (like the analog channd
number) and subdmnnds. Digital channel numbers can contain up to six
numbers. Numbers to the le_} of the - (dash) are the main channel number;
numbers to the right are the subchannd numbers for stations that broa(Icast
more than one signal.
In the example, press "1", then press "2" (although 012 is shown in the example,
pressing "0" isn't required). Now press the right arrow button to move to the
subdmnnd. Press "1" and then "OK." Your product tunes to channd 12-1. If
channd 12 is broadcasting subd-mnnd signals, you would enter numbers that
access the other signals. (Example: 12-1, 12-2, 12-3). If the selection times ()lit,
you must start over.
Notes: )%zl t'm'ly _::vperience a cA>/clyoj'se_,elvU .suconds bP/bru d{_i/al
(/?dtTtTel.s" (l/)/)('(111 7_')J.S" ig t_ormal. D{_i/al (bat_nPI.s-som{,ti,m,s t<ll&,mlot?2{,r
10 /ZIIIE.
7b sPe (i'.yoz_'ru tz¢*_edto aU{_i/<Uor a*_ulq_ cbrnmeL pn'ss" the I.\TO
b_//on. 77:M<>" brin2s _@ the CT"_annel iJanner scrPm< Ui.s-c_.%ed on p(¢Te 18.
If"thu Channel Search brings up unavailable or blank channds, you might want
to get rid of these so they don't appear as you change channds. To do this go
to .ll<_in ,lh>tn_/A>t_@:llutnw'Li.s/& Lab(>l.s. Removing channds from your d-mnnd
list may be time consuming, so you might want to do it later. Go to {)age 25 for
details on editing your channel list.
14 #'haptetl
What to Expect
Watching TV
- Your pro(luct allows you to c'hangc the form:it of the picttm' you're vk,wing, lq_'ss the
ZOOM- or ZOO\I+ buttons 1o choose dift_'rent screen fori_'mts. I)epending on the type
of signal you're viewing and how it's being formatted, a diftcrent format might not be
available. Tile ]:otTn;ll option in tile Setup menu also changes tile screen format. The
options are .\_t'n_t#. Le//t,t'b_,:v, C)'op, or ,S'ql/t,,_'._,.Go to [)age 27 for examp]es of screen
formats.
Tile DIG®ANA button on tile remote switches between analog or digital channels.
Analog channels are sent in 4:3 (standard) format. Most digital channels are sent in a
16:9 (wi(lescrcen) format. You might see gray or b]ack bars at the top and bottom of
tile screen; it depends on how tile station is formatting tile video. Press tile ZOOM- or
ZOOM+ buttons for a dif[crent format that might eliminate tile bars. 4:3 and 16:9 are also
known as aspect ratios.
Note: l)(_il_l slnlions in nc_li_,_,4.3 /o "run/ru_/_l no/b_ c_bl_, Io bc_,c I/_{i "./b"n_al cban_'d., .
{]'ozl '11s_'_' IJlad_, o "2 "cO'b41 "sr,_zI/'*_'side's <?/'l/_?!)l(lll "_?S_?lll {_s!){l *l_'?1"I/_?S_llgT//}'Ol}l I/1{?
/')I'O{IdC{ISI_?I').
ChaSer
+,? ABC DEF ON'OFF
@@
GHI JKL MNO SLEEP
@@@
PQRS TUV WXYZ CC
@@@
O0
SOUND DIG°ANA SKIP
GO BACK FAV
OK
00
LIST
T _ CLEAR
GO 0
ZOOM- GUIDE
Note: (i]Yozl Jleed to
r_,[)/glce.yoz_r rg,mote, call
1-800- ;._'-03 7(L A
sbii)i)itl 2 (llzd l_alzdlilz 2
./'_'¢ u ill be cbat:_ed
z@o_z orderi*_2, aJzd the
(l[)[)ropH(lm sales tax. []Hve
yoz/r IL_,,'L3l(L_t{'r(,?l*'d or
DLscovf't" (,?ltZ/ t'_'(l;/.l'.
}'bllt" twtllote patY !lz/tllbet"
Ls R/.SO(',';.
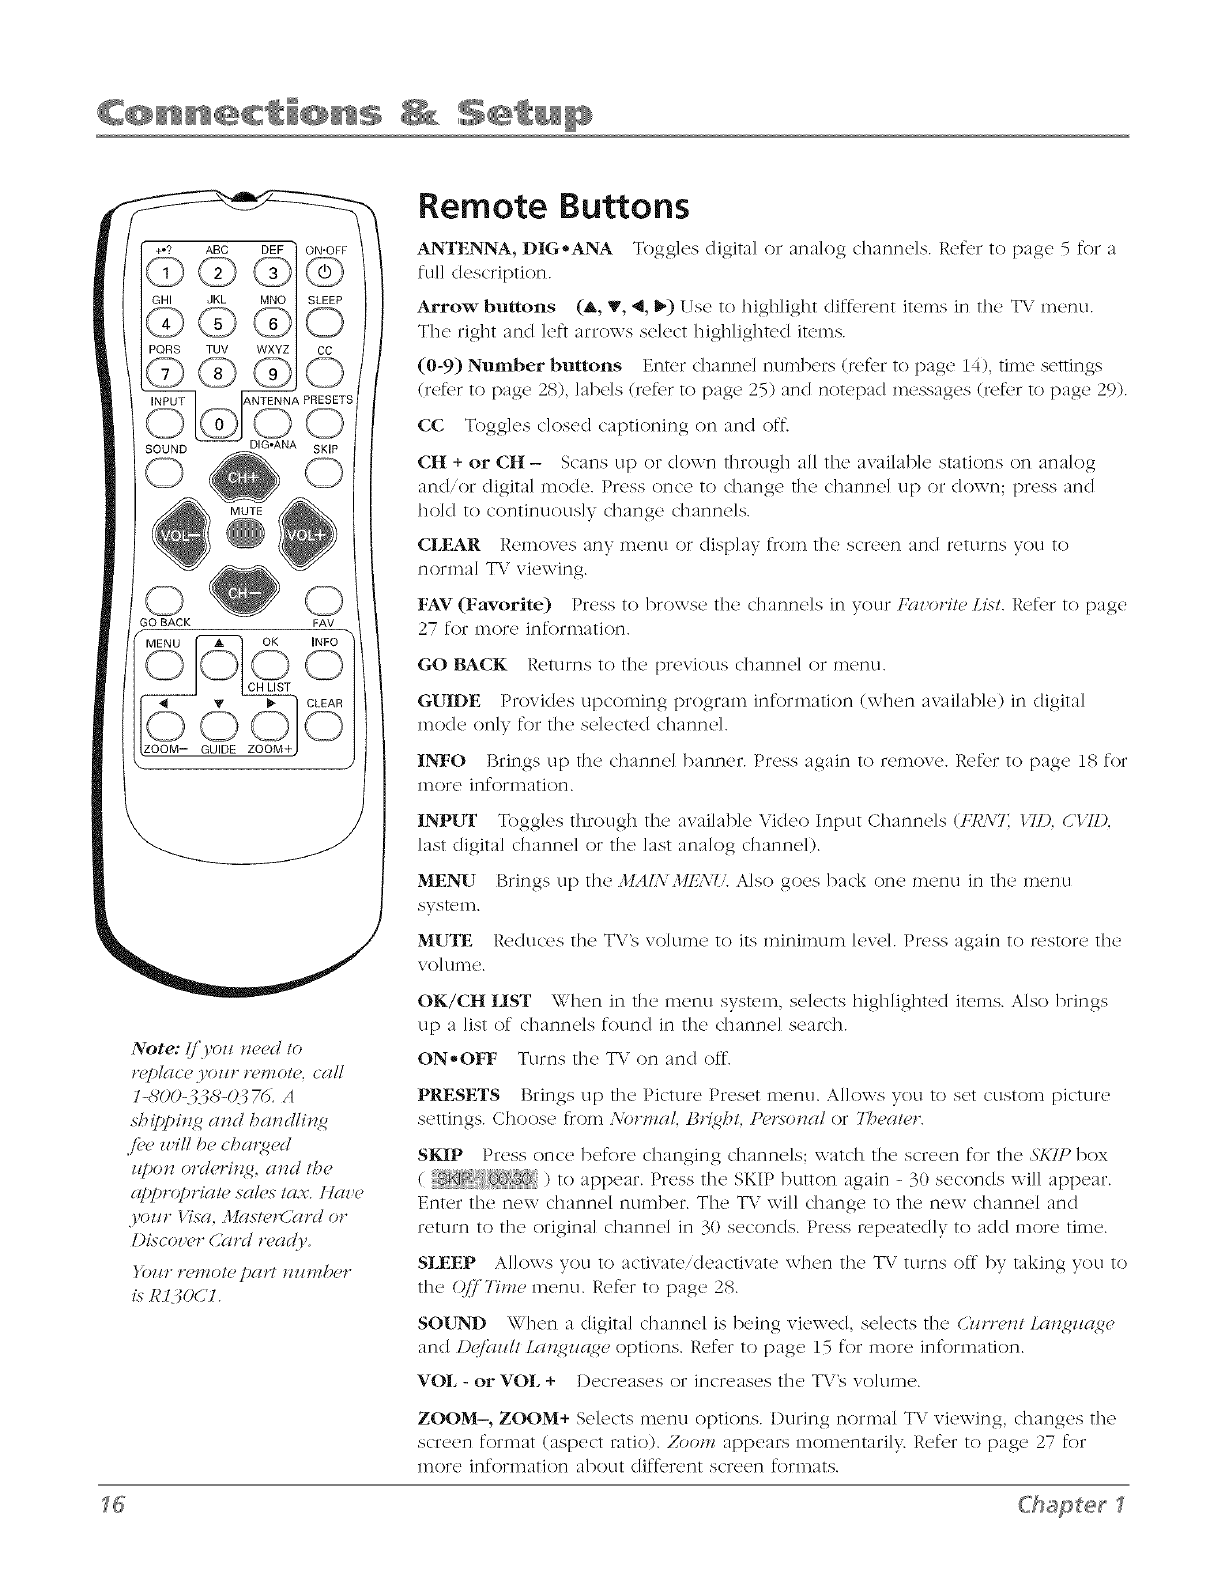
Remote Buttons
ANTENNA, DIG-ANA Toggles digital or analog channds. Refer to page 5 for a
full description.
Arrow- buttons (A, T, _1,_,) Use to highlight diftbrent items in the TV menu.
The right and left arrows select highlighted items.
(0-9) Number buttons Enter channd n umbers (ref<,r to page 14), time settings
(refer to [)age 28), labds (refer to [)age 25) and notepad messages (refer to [)age 29).
CC Toggles dosed captioning on and off.
CH + or CH- Scans up or down through all the available stations on analog
and,or digital mode. Press once to change the channd up or down; press and
hold to continuously change channels.
CLEAR Removos any menu or display from the screen and returns you to
normal TV viewing.
FAV (Favorite) Press to browse the channels in your ]:glz,orite List. Refer to page
27 for more information.
GO BACK RcKtlrns to the previous channel or menu.
GUIDE Provides upcoming program information (when available) in digital
mode on]y for the selected channel.
INFO Brings up the channel banner. Press again to remove. Refbr to page 1_ for
more inforll_ation.
INPUT Togg]es through the available Video Input Channds (FR.\7: lID, C'/7D,
last (ligita] channel or the last analog channel).
MENU Brings up the MAL\ 3II_AU: Also goes back one menu in the menu
syst<'m.
MUTE Reduces the TVg volulne to its minimum levd. Pn,ss again to restore the
vo] LllIIe.
OK/CH HST When in the menu sysg._lll sdects highlighted items. Also brings
up a list of channc_ls foun(I in the channel search.
ON*OFF Turns the T\,' on and off.
PRESETS Brings up the Picture Preset menu. Allows you to set ctlsto]11 picttlre
settings. C]loose l]:om \orrllal, BH2bl, Pcr.s-ollal or 7]'_t241l_:_1".
SKIP Press once before changing channels; watch the screen for the ,S7;l]"box
( {_ {}}00{{_I0}) to appear. Press the SKIP button again - 3 seconc s will appear.
Enter the new channel number. The TV will change to the new channel and
return to the original channd in 30 seconds. Press n,peatedly to add more time.
SLEEP Allows you to activate/deactivate when the TV turns off by taking you to
the (?[/TYme menu. Retbr to [)age 28.
SO/D4D When a digital channel is being xiewed, selects the C}lrreizl Lalzgzta2e
and D{:/2_z/ll Lalz,W/g{t{e options. R(,fer to pag(, 15 for inorct information.
VOL -or VOL + I)ecreases or increases the T\,"s xolume.
ZOOM-, ZOOM+ Selects menu options, l)uring normal TV viewing changes the
scret._n format (aspt._ct ratio). Zoom appt._ars momentarily. Refer to page 27 for
Inore ]nforlnation abotlt (]iff<trc}nt scrct()n forlllats.
C'hapterl
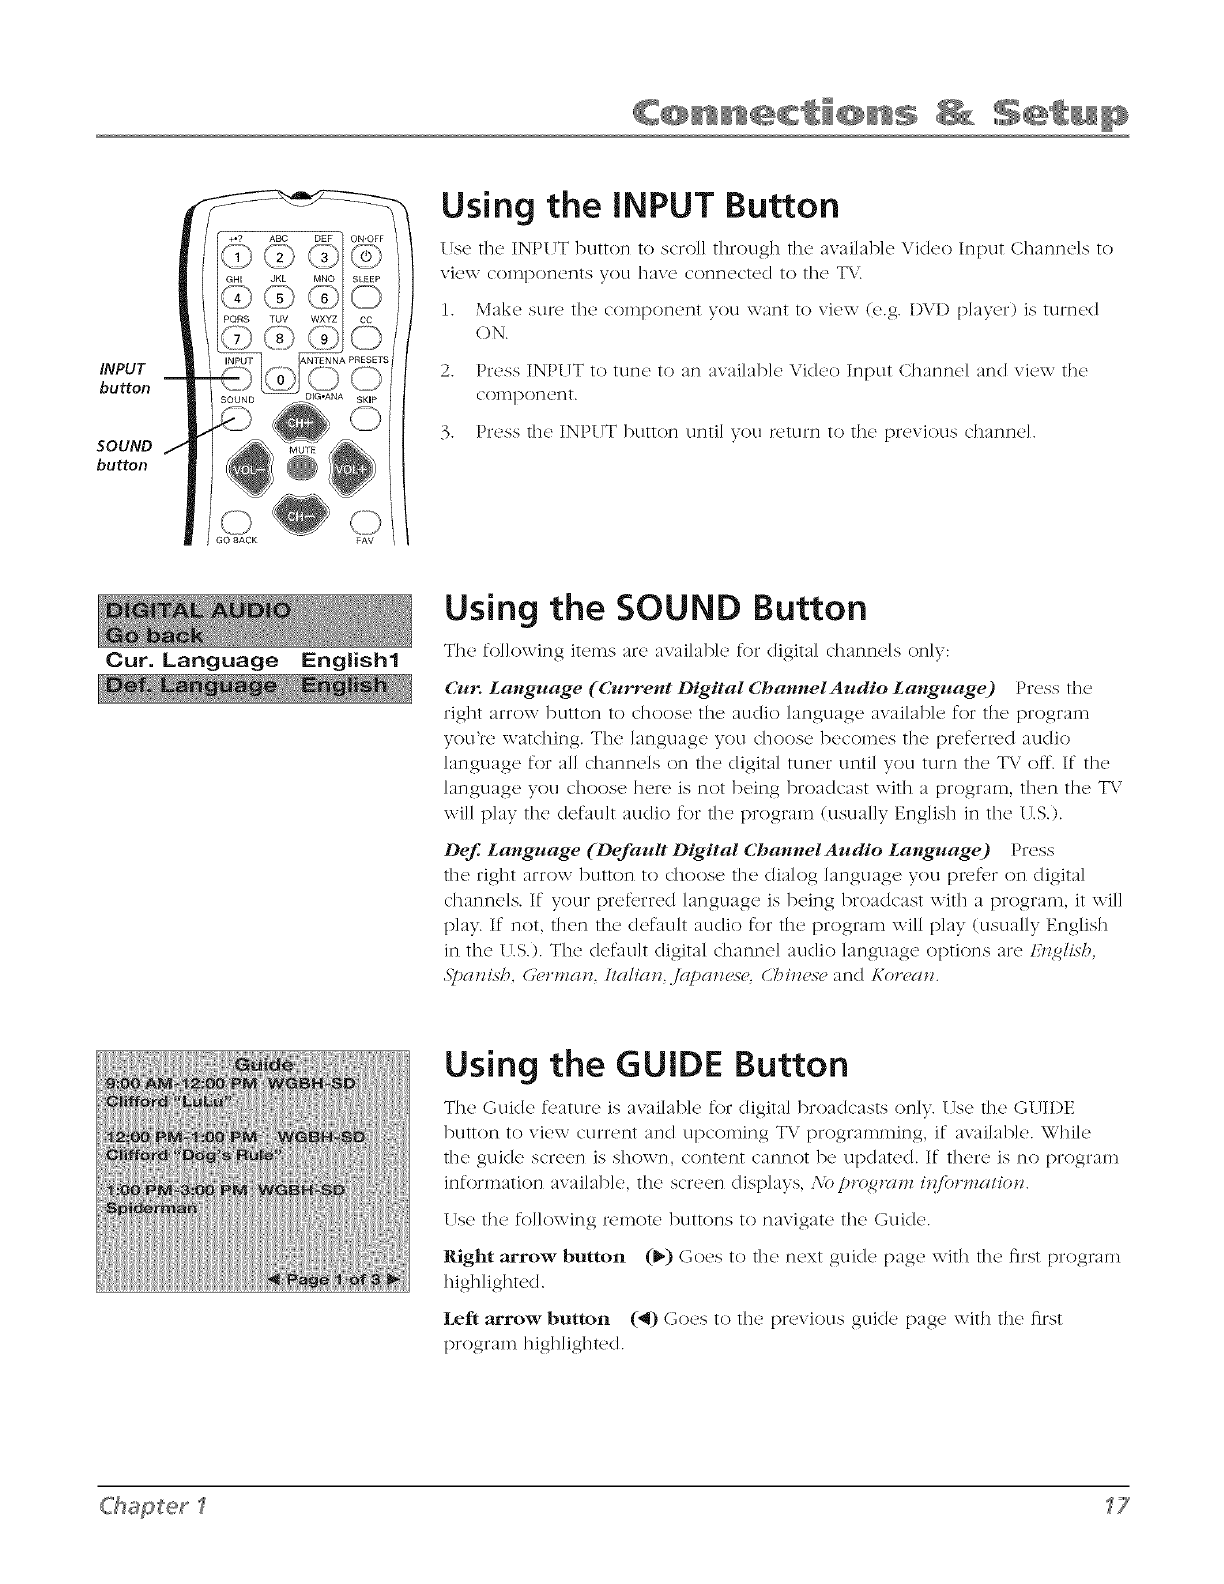
INPUT
button
SOUND
button
GO BACK
O0
Using the INPUT Button
Ilse fl]_,INPI TTburton to sclo]] fllrough file avai]ab]e VideoInput Channe]s to
Vi{2_V co]npo]_]{.!l][S VOL1 ]13ve co]_]n{2c[ed [o []le T\',
1, Make sure the component you want 1o view (e,g, I)VI) player) is turned
ON.
2. Press INPUT to tune to :m :_vai]ab]e Vi(leo Input C]l:mne] :m(I view the
compon ent.
3. Press the INPUT button unti] you return to the previous channe].
Cur. Language EngJishl
Using the SOUND Button
Tile foI]{lwing items ar{' availab]e for digital dlanneIs on]y:
Cur. Lattguage (Current Digital Chatmel Audio Language) Press the
right arrow button to choose the audio language availab]e for the program
you're watching. The language you choose becomes tile pref_,rred audio
language for all channels on tile digital tuner until you turn the T\.' off. If tile
language you choose here is not being broadcast with a program, then tile TV
will p]ay tile default audio for the progmn] (usually English in tile U.S.).
Def. Language (Default Digital Channel Audio Lattguage) Press
the right arrow button t(! choose the dialog language you pref<,r on digital
channels. If your preferred language is being broadcast with a prograli_, it will
play. If not, then the default audio for the prograln will p]ay (usually English
in the U.S.). The default digital channel audio language options are £n_li.sb,
Npat£.s-b. (/{?rt_lath Ilaliclth Jclpa_{,.s-{,.C1"*i_l('s_"and Kot'{,gllz.
Using the GUIDE Button
The Guic/{' f_'atur{' is :_vailab]c for c/igita] broadcasts only. Use th{, GUIDE
button to view current and upcon]ing T\.' programming, if available. While
the guide screen is shown, content cannot be updated. If there is no program
information available, tile screen (lisplays, .M)!_t'(4_t'(lmh{/brma/io_.
Use the fo]]owing remote buttons to navigate the Guide.
Right arrow button (_) Goes to the next gui(le page with the first progran_
higIlIigIlte(I.
Left arrow button (_) Goes to the previous guide page with the first
program ]ligh]ighted.
ChooSer I 17

Channel Banner menu for an
analog channel.
Channel Banner menu for a
digital channel.
Channel Banner
There are sex'era] items that ,night appear on-screen when you press the INFO
button on the re,l_ote. This display is called the Channe] Banner. The following
list describes the iten_s on the Channel Banner screen.
TV-14 I)isp]ays current prograln'S rating. Re_br to [)age 20 for more
inforlnation.
_1 Parental Controls Maswr Enable shows either a _1 lock or 12Tunlock
icon. (Ref_,r to [)age 19).
•Tile lock icon is displayed when tile l'gireJlml Cbmt>l (Master Enable)
setting is active.
-The unlock icon is displayed when the l'gnwmal Cbt_tt>l (Master
Enable) setting is deactivated.
English Displays the language currently being heard.
CC Displayed when Closed Captioning is available on the current
ch annd.
Analog/Digital Indicates whether the current signal is analog or
digital
Skip: 0<_0 Corresponds to the SKIP button. Shows the amount of time
left before the TV switches back to tile previous channd. (Re_br to [)age
16).
D18AM I)isp]ays the current time (entered in tile Time menu).
11 CNN/ll-2 CNN Displays tile current channel and label assigned
to tile channel. Digital channds also have a subchannd (e.g. -2) listing.
Refer to page 25 for inore inforn_ation.
Normal Displays the current screen format chosen from the Setup
menu or when the _I/ZOOM-, _,/ZOOM+ buttons are used.
_{ I)isp]ayed when you MUTE the sound.
Parental Controls and V-Chip
The choices in tile {A'A I'-CTIII" In_'nu involve software inside your TV (retbrred to as V'-(_hip) which allows you to
block TV progran_s and inovies based on violence, sex or other content you may believe children should not view.
Once you set Parental Controls to block progran>, you can unblock programs by entering a password.
By default, the software inside your TV is turned "off." For instructions to turn on V-Chip, ref_,r to Ac/i_'ate l'(ltwJ//gtl
CbJztrol bdow.
How V-Chip Works
V-Chip r_'ads the' progr_ll/_'s ag_'-bas('d rating (T1ZIIA, TI'-14, _'tc.) and cont_'nt them<'s (I)'olm2c# (1"), Adzdt l/nz2zlc(_#
(L), etc.). Broadcasters are not required to provide content themes, so programs r<,ceiv<<lwith no content themes \viii
only be blocked if you block their age-based rating. You can also block out progran_s that have been given a rating of
Not Rated and programs that are considered "unrated."
Tile TV age-based ratings and content themes you can block are identified and explained in detail in Chapter 4.
The following sections give you more details about how to change tile status of TV prograln limits.
(;r(lphi(:s (:o_l(_i1_,d u,ilbil/ lhis pztbli(:alio_ ar(, /br r_])r(<__,I/l(_lio_ o1_(y.

V-chip Setting
Parental ControJ menu for an analog
signal.
V-chip Setting
Parental Control menu for a digital
signal.
Activate Parental Control
T]]is f'{,atLlrL! ]{2ts VOLI activat{, an(I deactivate parental control R,atures. Follow th{,
on-scI'L}(_] _1 JnStFL1CtJOIIS [o cr(2atL} VOLlr passxvor(I using t]l(.} nLlnll)(2r ]3LIt[OIlS oil []]{2
I (21noRL
Resetting the Password
If you forg{'t your password, you can reset it. Her{' is how to do it:
1. \,t]:lk{' SLIt{' Ell{.' TX' Js turn{'d of['.
2. Press V()L- on the T\,"s front panel and then (]LEAR on the Runot(' for
:lpproxin_:_t{,ly 5 seconds. The T\ /will turn back on.
3. Ent{T a new password tile next time you accc'ss tile PAR£ATLOI. (/().\77{}OL or
the 71.1I£ men u.
Set V-Chip TV Programming Limits
1. Choose ]'gzt>tz/a/Cb_z/,'_£/Tom tile ,llgzi_z£1l{,tzz_and press tile OK button.
2. Enter your password.
3. Highlight 12(/_ip N(,ttit?_, then press tile right arrow button.
4. Highlight {.YA7"l'Cbtzte_zt Ra/i_z_s and press tile right arrow button.
5. Use tile arrow buttons to navigate and the OK button to change tile status
of a TV content theme from unlock (1_) to lock ([_1).
Downloadable V-chip
Sine{' broadc:_st{,rs h:]v{, th{, ability te! add new ratings for T\/ progr:m_s, this
option lets you define more parameters for your TV viewing, like parental
controls. This option and its name are dependent on content from the
broadcaster.
a_,ai/abA,.
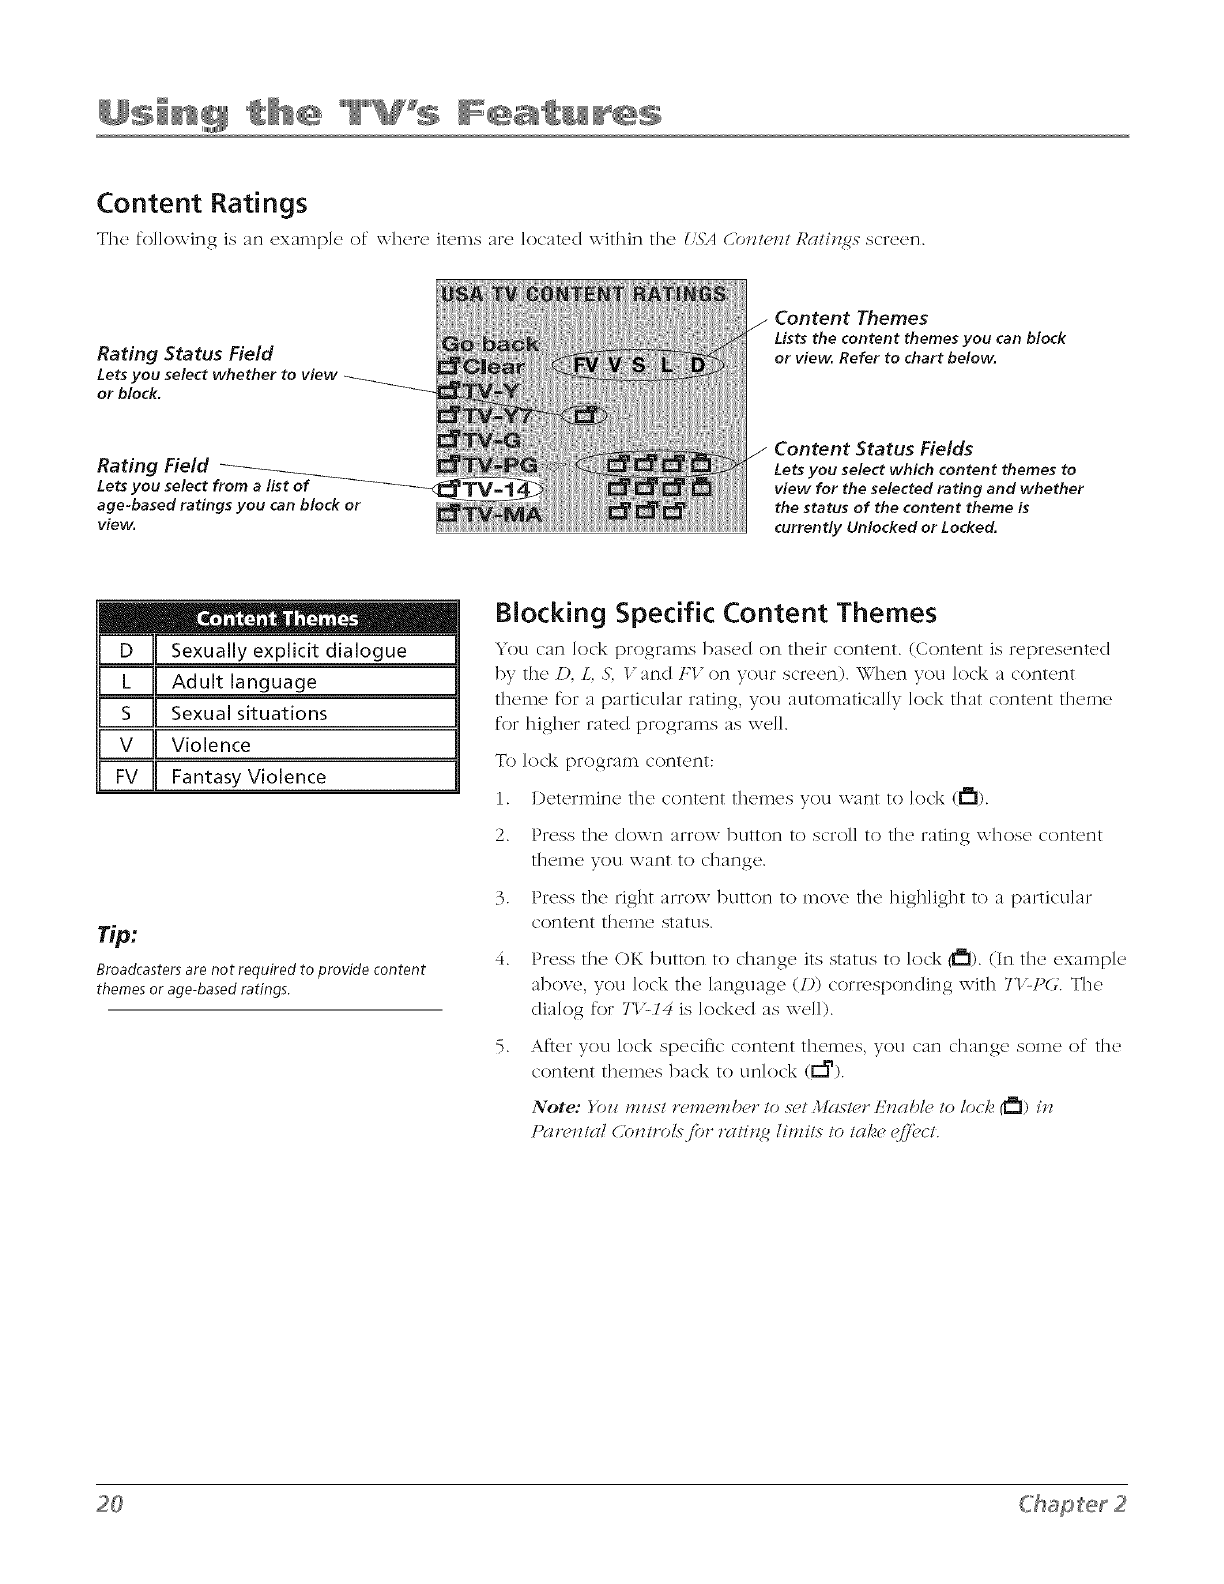
Content Ratings
The fo]]owJng is an examp]e of wher(, items a_e located within the _'5'A C'nnl_,_l Rc_li_5 scTe_ n
Rating Status Field
Lets you select whether
or block.
Content Themes
Lists the content themes you can block
or view. Refer to chart below.
Rating Field
Lets you select from a list of
age-based ratings you can block or
view.
Content Status Fields
Lets you select which content themes to
view for the selected rating and whether
the status of the content theme is
currently Unlocked or Locked.
DU Sexually explicit dialogue
_1 Adult language
S II Sexual situations
v IIViolence
FvIIFantasy Violence
Broadcasters are not required to provide content
themes or age-based ratings.
Blocking Specific Content Themes
You can lock programs based on their content. (Content is represented
by the/). L, _S',gand FV on your screen). When you lock a content
theme for a particular rating, you automatica]ly lock that content theme
for higher rated programs as well.
To lock progra/n co]_]t(_]_]t:
1. Determine the content then_es you want to ]ock (t_l).
2. Press tile' down arrow bLItton to scro]] to t]lQ rating w]losc content
t]lL!]n(2 yOU \_,_ant tO C]]_]]_]g(2.
3. Press the right arr()w button to move the big]flight to a particular
content theme stattls.
4. Press the OK button to change its status to lock (_l). (In the examp]e
aboxe, you lock the ]anguage (/)) corresponding with TI_t)(7. The
dialog for 71 'z14 is locked as we]]).
..,s,_teryou lock specific content the*_es, you can change some of the
content themes back to unlock (E_).
t)(_r_?lll(ll Conlrols,for r(llill 2 lirnils Io lc_k_ _!/,7"ocl.
V=chip Setting
Movie Ratings
Reset
Blocking USA V-Chip Movie Ratings
The Moz'h> ]¢cl/h_2s menu lets you decide which Movies on T\" c;m ;_nd c;mnot be
viewed.
To set Movie progrumming limits:
1. Choose ]'c#r_,_/cU Cbt_/rol from tile _llciit_ :ll_,_z_ :rod press tile OK button.
2. Enter your p_Jssword.
3. Highlight IL(;[_i/),ST>/Ihl2, then Dress tile fight ;irrow or OK button.
4. Highlight Moz,i(,l&llh_2s :ln(I press tile right :lrr()x\- button.
5. Use tile :_rrow buttons to n_vig:_te. Press tile OK button to ch_mge tile st:_tus
of a T\. program rating from un]ock (_) to ]ock (Ill).
6. All r_tings below tile one you _e]ected ch_mge to lock.
Note: )Uz/ n/zzs/ i¢,t/_en/IJer 1o set Mds/er t:mc##_, 1o loci,,, _) in Pm'_,nlcU
db_z/rol.s" for tw/itl 2 lil_il.s 1o lcl[_ >_:/'/'_,(1.
dl)lJrG_:ilJld/(>!}_ _ ,s('COtld.s'. 7<1.'_(>Y_V_t ill /Z/rt7 017. /[ll/(q _(# tl(q_ lJ(l.S'S2t Otd /l'7( >
17ctk*l/ilTle yOZ# (ICC(>SS /be ]JA]T]'_;\ 7_1, dO.\']7701, tllel711 01"/lira T/.Ilt7 menzl.

V-chip Setting
Canada English Ratings
Reset
Reset
V-chip Setting
Blocking Canadian V-Chip Movie Ratings
If you wc_qvc Canadian programs you can kx'k (,?lncldicn_ Eu21ish and
C?lnddicln FFPnU? ratings. When you lock a particular rating, you auton]atJcal]y
lock the higher rated programs ks well.
To lock Canadian English and French program ratings:
1. Choose Pgir(,JmU CbJm'o/from tile 3hHn ;ll(,Jlzi and press tile OK button.
2. Enter your passwor(I.
3. Highlight /'-chip 5"_,111n2,then press tile right arrow button.
4. Highlight C?lnad(l En2/ish R(ltin2s (or C?l_Zadgi ]:*'ench R(lti_<gs) and press tile
right arrow button.
.
6.
7.
Determine tile rating you want to lock.
Use the arrow and OK buttons on your remote to change tile status of a T\ /
program rating from unlock (1_) to lock (_1).
Press the OK button to change the status to lock (t_l) and a]] ratings below
tile one you selected change to lock.
Note: }'hi'/ mz/st r('metnbet" to set 3Iglstc't"/g.nabld to loci. (_l) ill I#ltwntgll
Cbntrols./'o," ?'(ttin 2 lira ils to take (>ff'uct. ]_Pi'u?"to pd2e 19.
Wh(,n (l chdnn(,l is/ock(,d, yoz_ c(m tempozwni{p clP(lcti_'(lt(,p(n'Pn/(U
(:ontz'(U .s(,ltin£.s'. A m(,nz_ s(:z'(,Pn (//;!)mgizx z_/:?('n.Fozl I<F to (:hgint_(, th("
(:h(ltn_('/, pne.<s OK (lnd the p(l.sszl ord s(:r(,(,t_ (#)p(,(l*_. .\ow.i,oz_ (:(lt_ t'(,s(,t
.FOZIZ'/)gI,%_IOZY/.
Unrated Programs
The (mwlPd option lets you decide it' programs that the \"-Chip recognizes
ks unrated can be viewed, lJnrated TV programs may inclu(le news, sports,
political, religious, local and weather programs, emergency bulletins, public
announcements and programs without ratings. The (imwted option app]ies to
both USA and Canadian unrate(I programs, and Canadian programs rated E
(Exempt).
Uttlocked( _ ) All unrated programs are available.
Locked( I_1 ) All unrated progran_s are not available.
Go to the l'(ltwnta/Cbntrol screen and choose I'-chip ,S>t/itz<gand press OK. In
tile UmwlPd screen press the right arrow button to toggle between tile lock
( _1 ) and unlock ( _ ) icon.
Note: b)z/ mz/st ,_,membe," to set 3histe," £nable to/oc/. (_3) in Pgt*'(>ntal
O)ntz'cds.fo?" ?'(ttin<t7 lira ils to tg_k(, (>ff'uct. 1_>/'_>?"to pd<tT(>19.
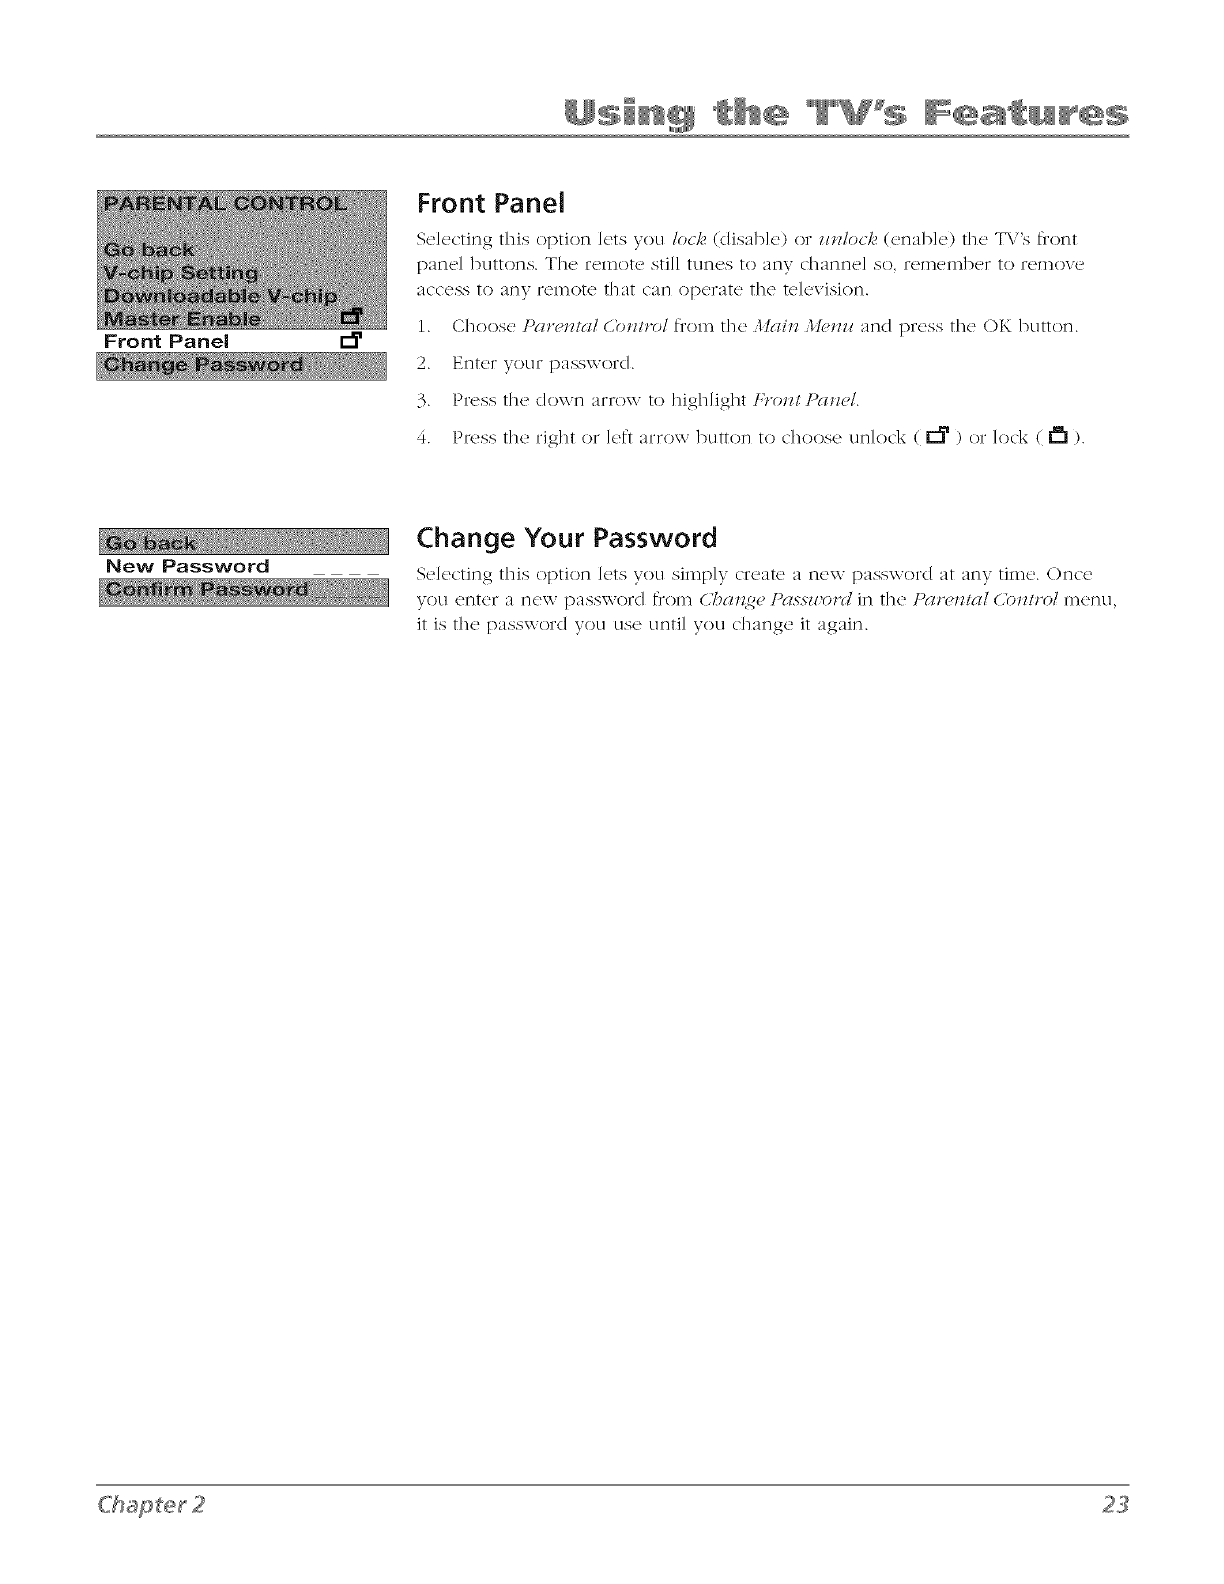
Front Panel I_
Front Panel
Selecting this option lets yocl In& (clisab]e) or H_Uoc]_ (enable) the T\,>s front
pand buttons. Th(, r('mote still runt's to any channel so lem(,mb(,r to lemove
access to arYf relnote that can operate the television.
1. Choose ]'(m,JltgU (,bJl/,'()l from the M(thl ,lI_>Jlziand press the OK button.
2. Enter your passworc/.
3. Press the down arrow to highlight F,'oJl/P(t_m/.
4. Prc,ss the right or left arrow button to choose unlock (_) or lock (t_).
New Password Change Your Password
Se]ecting this option lets yocl simply c'r<_> a new password at any time. ()nc_'
you enter a new password flTom U'_alz<ge t'(_ssmo*'U in the P(TI'_III_II Coll/l'ol menu,
it is thc_ password you else clnti] you c]lange it again.
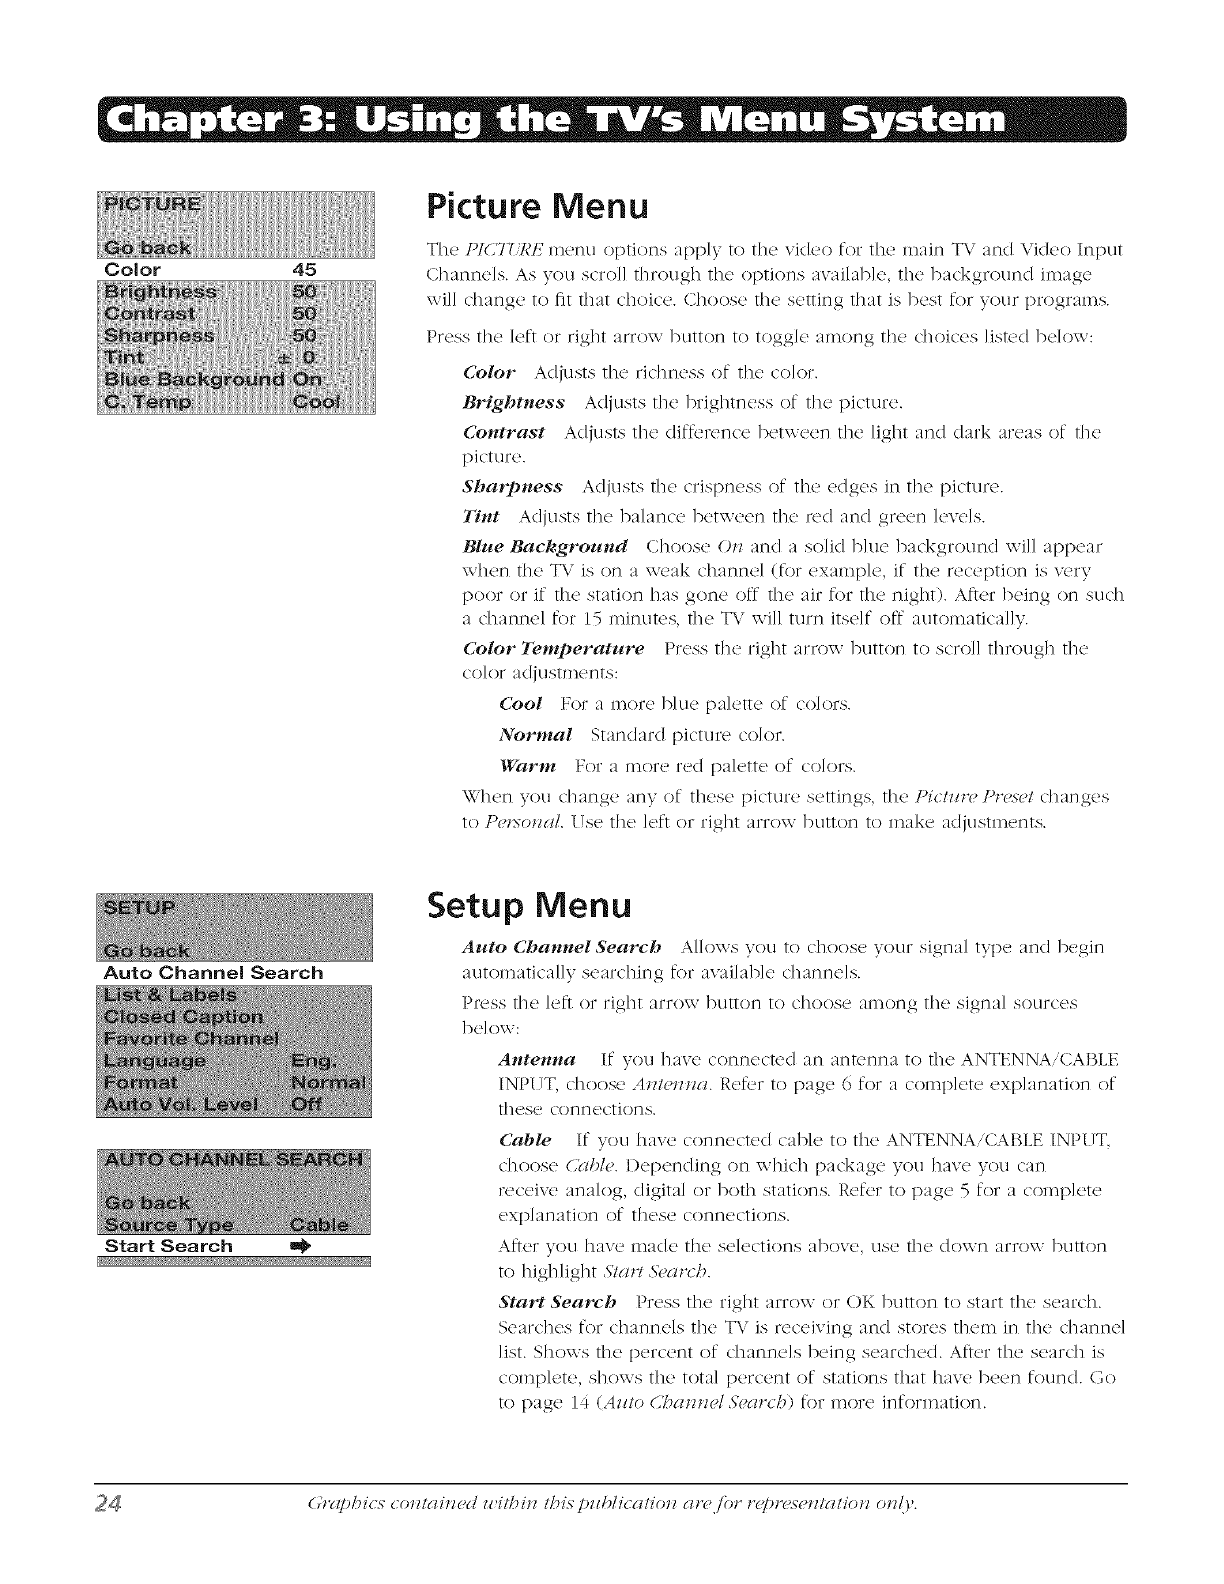
CoJor 45
Auto Channel Search
Picture Menu
The IVCTfI¢If menu options apply to the video for the main T\,' and Video Input
Channels. As you scroll through the options available the background image
x\ill change to fit that choice. Choose the setting that is best for your programs.
Press the left or right arrow button to toggle among the choices listed below:
Color Adjusts the richness of the color.
Brightness Adjusts tile brightness of tile picture.
Contrast Adjusts tile diftbrence between tile light and dark areas of tile
picture.
Sharpness Adjusts tile crispness of the edges in tile picture.
Tint Adjusts tile balance between tile red and green levels.
Blue Background Choose OJl and a solid blue background will appear
when tile T\.' is on a weak channel (for example, if the reception is \:(,rv
poor or if tile station has gone ()ft the air for the night). After being on such
a channel for 15 minutes, the T\/ will turn itself ()ft automatically.
Color Temperature Press the right arrow button to scroll througI1 the
color adjustments:
Cool For a more blue palette of colors.
Normal Standard picture color.
War*** For a more red palette of colom.
When you change any of these picture settings, the Pi(;/Hr(, ])r(,_(,/changes
to l'ut>o_zal. 17se the left or right arrow button to make acljustments.
Start Search
Setup Menu
Auto ChanneISearch Allows you to choose your signal type and begin
automatically searching for available channels.
Press the let} or right arrow button to choose among the signal sources
below:
Antenna If you [lave connected an antenna to the ANTENNA/CABLE
INPUT, c[loose AJz/eJnla. Retbr to [)age 6 for a complete explanation of
these connections.
Cable If you have connected cable to the ANTENNA/CABLE INPUT,
choose 6?lble. Depending on which package you have you can
receive analog, digital or both stations. Ref_,r to [)age 5 for a complete
explanation of these connections.
At}er you have made the selections above, use the down arrow button
to highligIlt ,57arl &,ar( h.
&'tart Search Press the right arrow or OK button to start the search.
Searches for channels the T\" is receiving and stores them in the channel
list. Shows the percent of channels being searched. Atter the search is
complete, shows the total percent of stations that have been found. Go
to [)age 14 (Az_todT_aJlJwl &,at(h) for more information.
G'rglphicx (:o_ztgli,_(,d zz,itbi,_ thix pzzblicatio_z ar(, ibr r(])r(,x(,,_tgHio,_ o,_/,y.
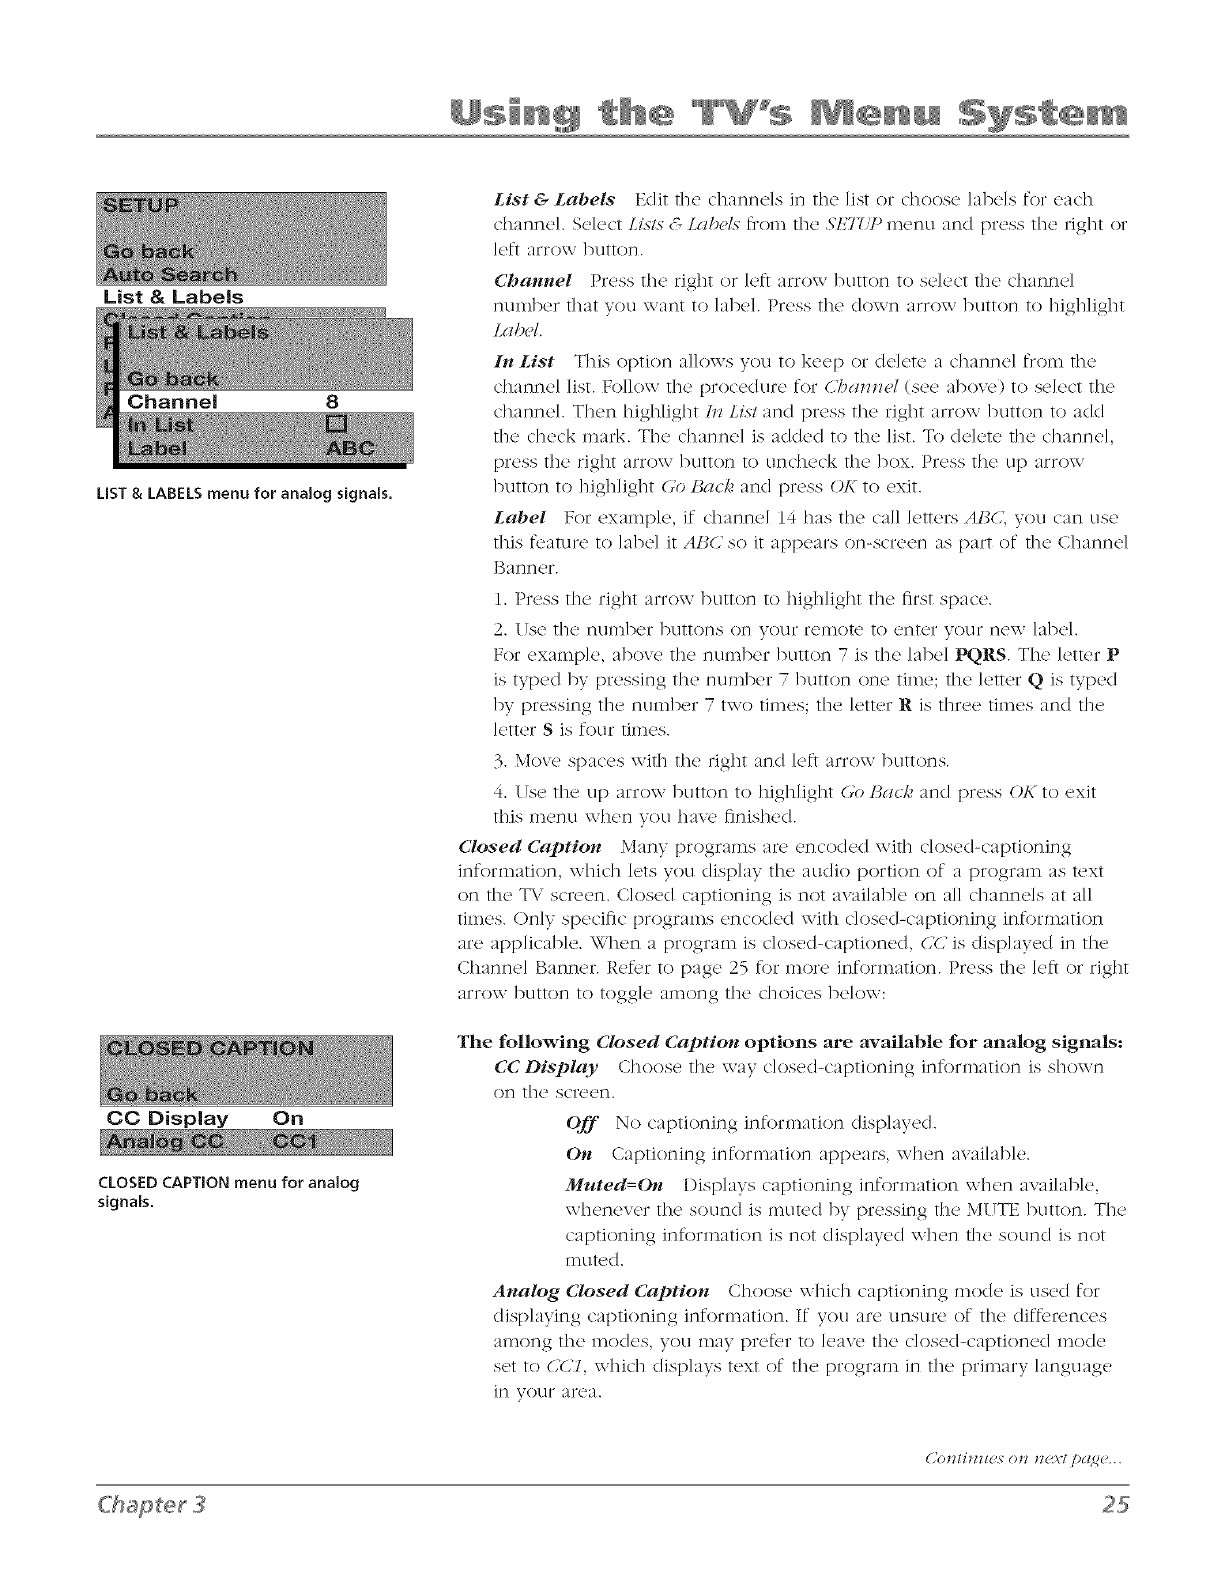
List & Labels
Channel 8
LiST&LABELSmenu for analog signals.
CC Display On
CLOSED CAPTION menu for analog
signals.
List &Labels Edit tile channels in tile list or choose labels for each
channel Select LisLs& Lalx,ls fron_ tile ,S'ET/1"menu and press tile right or
left arrow button.
Channel Press tile right or left arrow button to select tile channel
number that you want to label. Press tile down arrow button to highlight
Label.
In List Tills option allows you to kee I) or delete a channel from tile
channel list. Follow tile procedure for dT_am_el (see above) to select the
channel. Then highlight hz Lix/and press the right arrow button to add
tile check mark. Tile channel is added to tile list. To delete the channel
press tile right arrow button to uncheck tile box. Press tile up arrow
button to highlight Go J_a(71dand press (,*Kto exit.
Label For example, if channel 14 has tile call letters AI_C; you can use
this f_,ature to ]abe] it AI_C so it appears on-screen as part of tile Channel
Banner.
1. Press tile right arrow button to highlight tile first space.
2. Use tile nulnber buttons on your remote to enter your new label.
For example, above tile nulnber button 7 is tile label PQRS. The letter P
is typed hy pressing the nun_ber 7 button one tili_e; tile letter Q is typed
hy pressing tile number 7 two times; tile letter R is three times and tile
letter S is four times.
3. Move spaces with tile right and left arrow buttons.
4. Use tile up arrow button to highlight (,'o l_a_/, and press <,V<to exit
this menu when you hav_, finished.
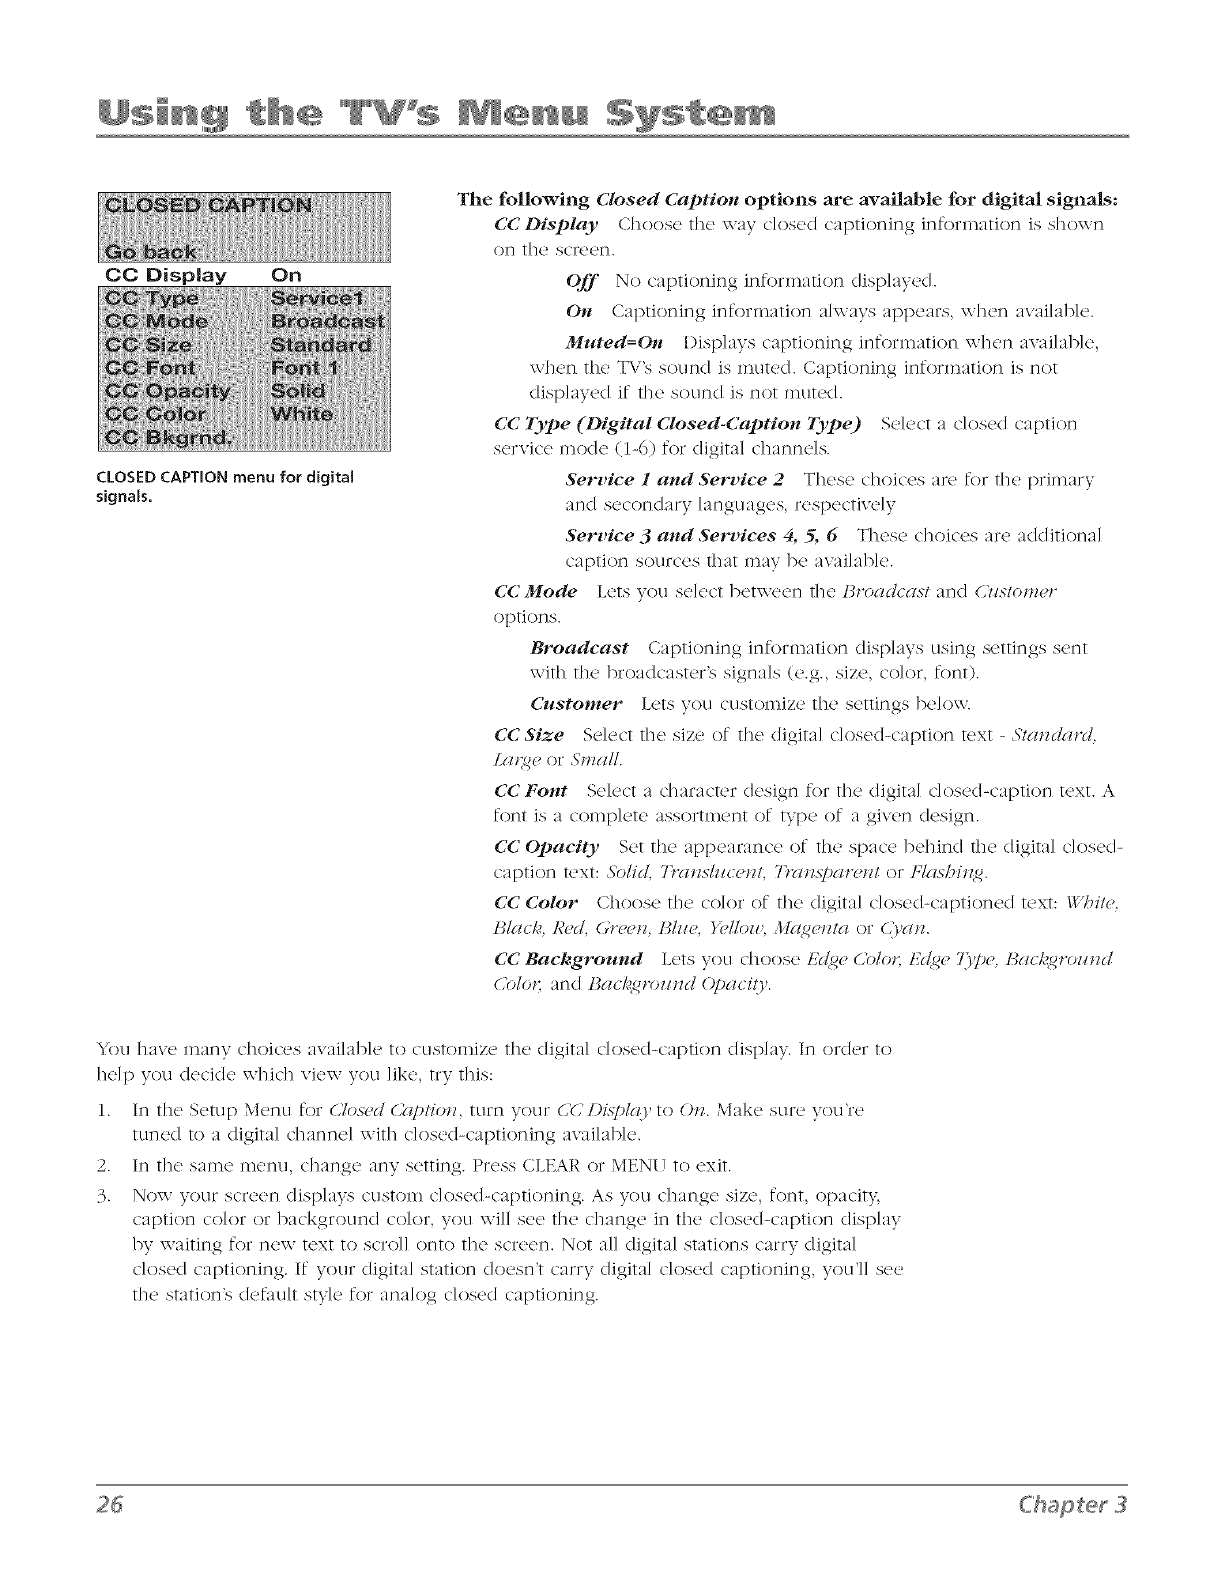
Closed Caption Many programs are encoded with closed-captioning
information, which lets you display tile audio portion of a program as text
on tile T\.' screen. Closed captioning is not available on all channels at all
times. Only specific progralns encoded with closed-captioning inforlnation
are applicable. When a program is closed-captioned, CKiis displayed in the
Channel Banner. Ref<,r to page 25 for inoie inforlnation. Press tile left or right
arrow button to toggle alnong tile choices below:
The following Closed Caption options are avaHabk for analog signals:
CCDisplay Choos(' tilt' way close'd-captioning inforlnation is shown
on tile screen.
OjfJ" No captioning information displayed.
On Captioning information appears, when available.
Muted=On Displays captioning inf()rlnation when available,
whenever tile sound is nluted hy pressing tile MUTE button. Tile
captioning infl)rlnation is not displayed when tile sound is not
inure(I,
Analog Closed Caption Choose which captioning inoc/e is used for
displaying captioning inforlnation. If you are unsure of tile diftbrences
alnong tile inodes, you may pref<,r to lear<, tile closed-captioned ino(le
set to CK,I, which displays text of tile progran_ in tile primary language
in your area.
CC DispNay On
CLOSED CAPTION menu for digital
signals.
The following Closed Caption options are avaHabk for digital signals:
CCDisplay Choos(' th(' way c]osod captioning information is shown
on the screen.
Off No captioning information displayed.
On Captioning information ahvavs appears, when available.
Muted=(_ I)isp]ays captioning information when available,
\\-lien the TV's sound is inute(I. Captioning information is not
displayed if the sound is not inured.
CC Type (Digital Closed-Caption Type) Select a c]ose(I caption
service mode (1-6) for digital channels.
Service 1 and Service 2 These choices are for the primary
and secondary languages, respectively
Service 3 and Services 4, 5, 6 These choices are additional
caption sources that may be available.
CCMode Lets you select between the l_road(:ast and Cl_stom(,r
options.
Broadcast Captioning information displays using settings sent
with the broadcaster's signals (e.g., size, color, font).
Customer Lets you customize the settings below.
CCSize Select the size of the (ligita] closed-caption text - 51/andgit'd.
Large or Small.
{;{;Font Select a charack, r design for the digital closed-caption text. A
font is a complete assortment of type of a given design.
CC Opacity Set the appearance of the space behind the digital dosed-
caption text: Solid. 7)'<mslzl(eJlL 7)'<lJl.s!)at>Jz/or FlgtshiJl<_.
CC Color Choose the color of the digital closed-captioned text: _V_ite,
Bla(/,. Red. (;*'ee_. Bh_e. )'oil(m,. I](IgCIZI(7 or Q')'(IIZ.
CC Background Lets you choose l;(lge (,blot: Ecl,ge 7])7)e,l_ac/_'gt'oz_zd
(,>lot: and l_a(/,'.,gt>zl_ldO/m( i{y.
You have many choices available to customize the digital closed-caption display. In order to
help you deckle which view you like, try this:
1. In the Setup Menu for CTo.s-edCbptio,_, turn your C_,'DLsydgLyto On. Make sure you're
tuned to a digital channel with closed-captioning available.
2. In the same menu, change any setting. Press CLEAR or MENU to exit.
3. Now your screen displays custom closed-captioning. As you change size, font, opacit>
caption color or background color, you will see the change in the closed-caption display
by waiting for new text to scroll onto the screen. Not all digital stations carry digital
closed captioning. If your digital station doesn't carry digital closed captioning, you'll see
the station's (lefi]ult style for analog closed captioning.
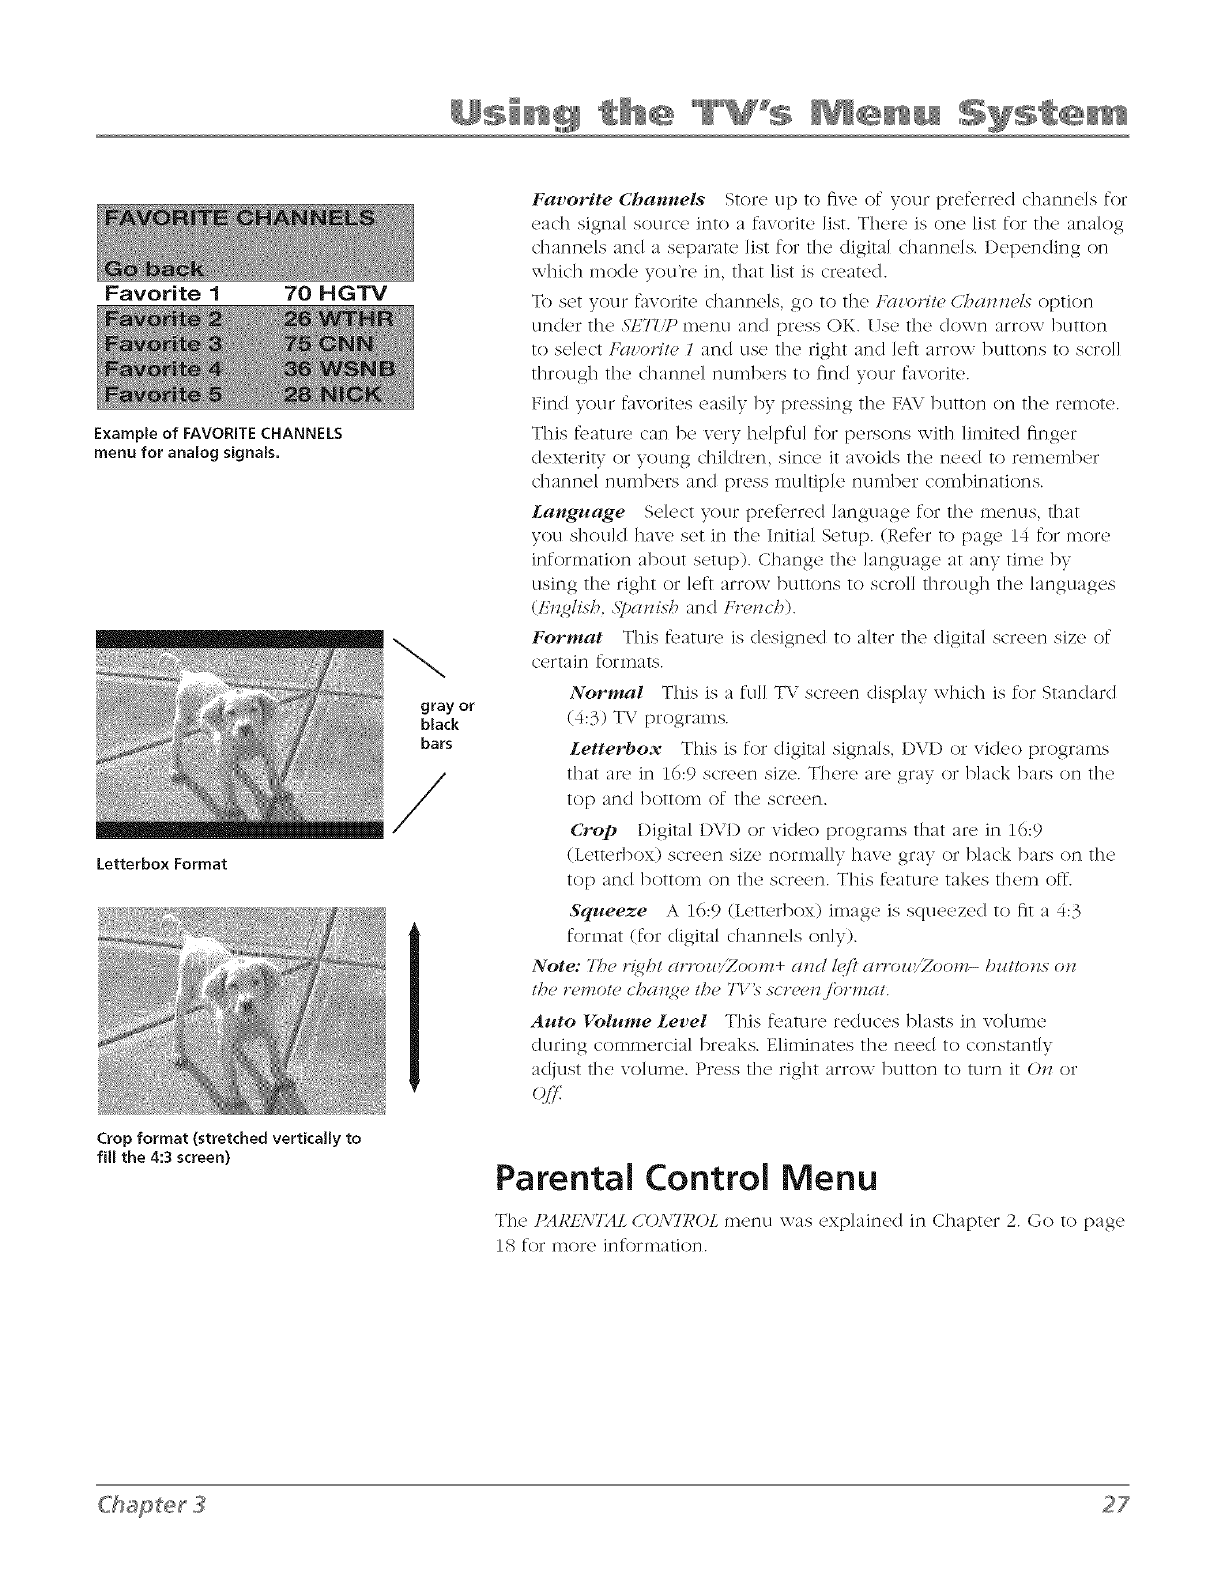
Favorite 1 70 HGTV
Example of FAVORITE CHANNELS
menu for analog signals,
Letterbox Format
Crop format (stretched vertically to
fill the 4:3 screen)
gray or
black
bars
/
Favorite Cba_tnels Store up to five of your pref_,rred channels for
each signal source into a f:_vorite list. There is one list for tile analog
channels and a separate list for tile digital channels. Depending on
which inode you're in, that list is created.
To set your favorite channels, go to the ]:(l_'()r//eCT_a,_,_el.soption
under the A7_7'/1"menu and press OK. Use tile down arrow button
to select Fa_'or/te I and use tile right and left arrow buttons to scroll
through tile channel nulnbers to find your f;_vorite.
Find your f_vorites easily/)y pressing tile FAVbutton on tile re,note.
This _bature can be very helpful for persons with limited finger
dexterity or young children, since it avoids the need to remember
channel nulnbers and press multiple nulnber combinations.
La,lguage Select your prefbrred language for tile menus, that
you should have set in tile Initial Setup. (Ref<,r to page 14 for more
information about setup). Change tile language at any tinge 1)y
using tile right or left arrow buttons to scroll through tile languages
(FH<gli.s-b,_Sj)aJli.s-band t:,>Jlcb).
Format This _bature is designed to alter tile digital screen size of
certain formats.
Normal This is a full TV screen display which is for Standard
(4:3) T\.' programs.
Letterbox Tills is for digital signals, DVI) or video progralns
that are in 16:9 screen size. There are gray or black bars on tile
top and bottom of the screen.
Crop Digital DVI) or video programs that are in 16:9
(Letterbox) screen size normally have gray or black bars on tile
top and bottom on tile screen. This f<,ature takes theln off.
Squeeze A 16:9 (Letterbox) image is squeezed to fit a 4:3
format (for digital channels only).
Note: 7>e r{gb/ arr(n_'/Zoo_+ a*_d /_'/?a*q*ozl'/Z(_o_- bz_/lot_s ot_
the *>mote cbaJzge /be Tl'> scr_'_%ibrmat.
Auto Volume Level This f_,ature reduces blasts in volume
during commercial breaks. Eliminates tile need to constantly
adjust tile volume. Press tile right arrow button to turn it OJl or
Parental Control Menu
Th(' ]'AI_I2\TAI_ (/O.\T]_OL m('nu was ('xplain_'d in Chapt('r 2. Go to pag('
18 for more information.
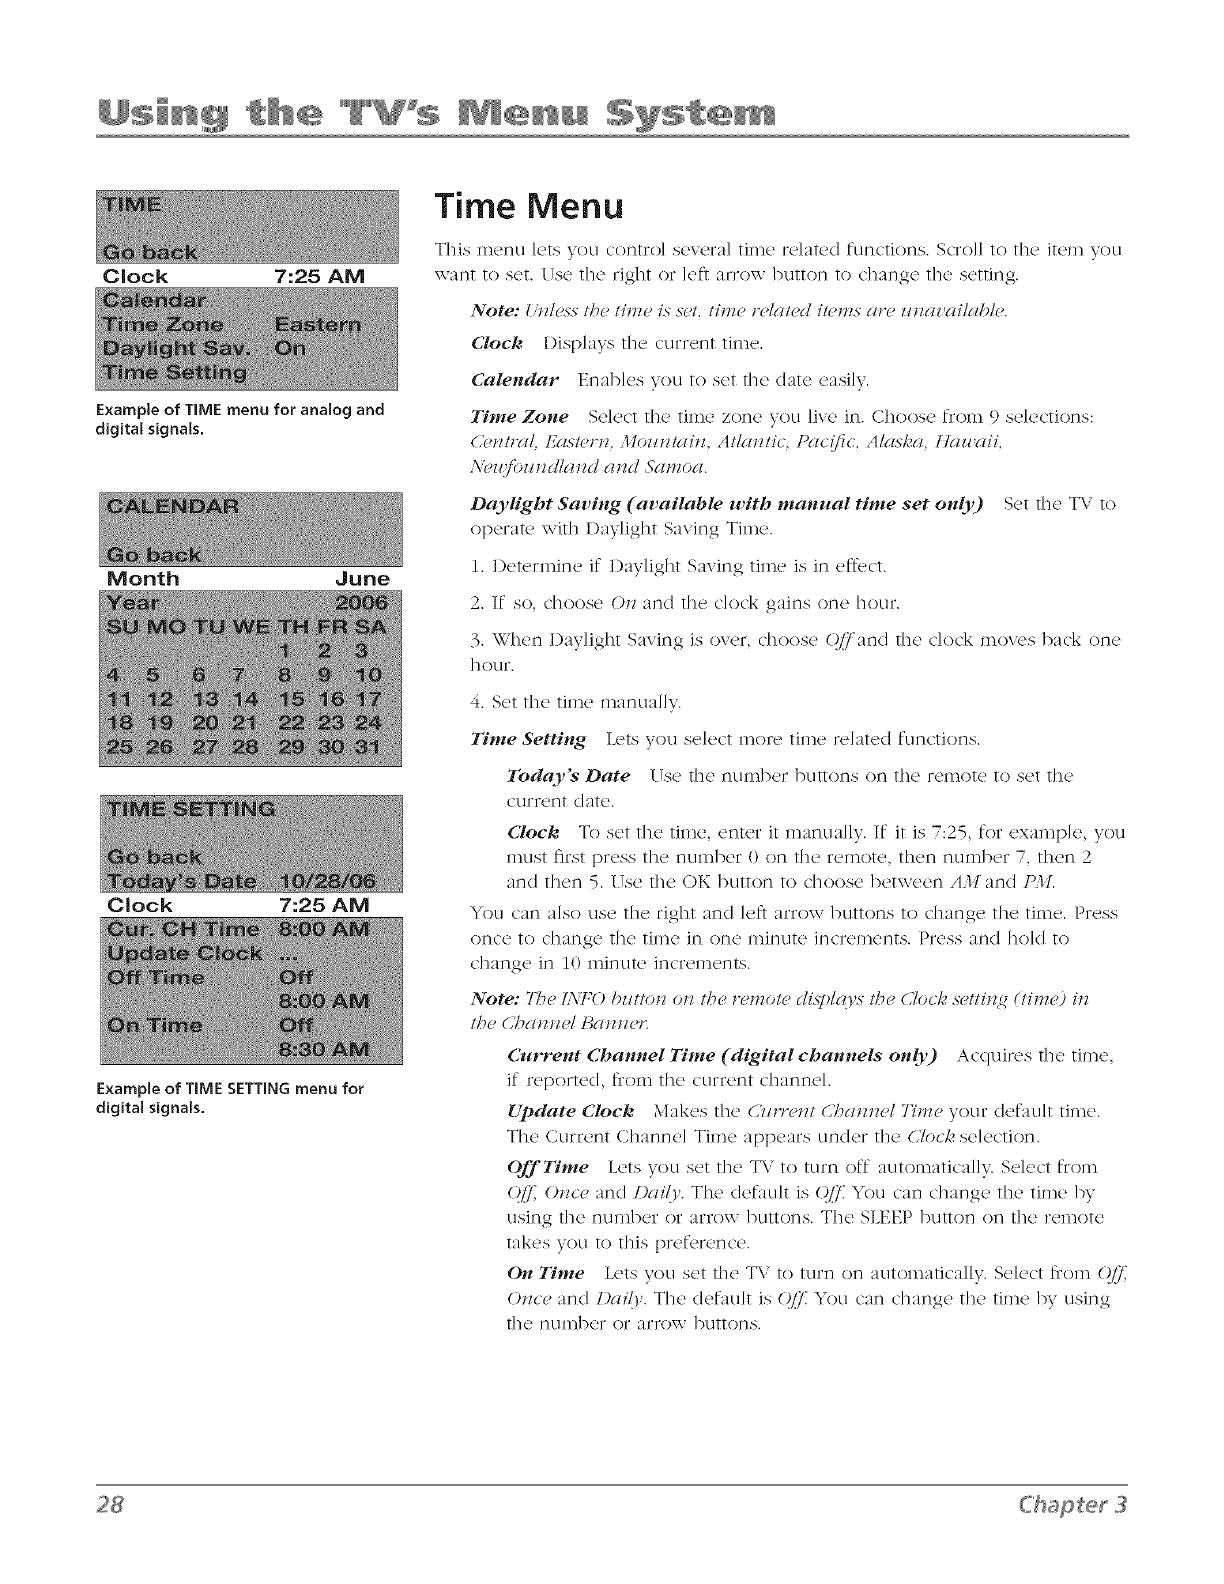
Clock 7:25 AM
Example of TIME menu for analog and
digital signals.
Month June
Clock 7:25 AM
Example of TIME SETTING menu for
digital signals.
Time Menu
This menu lets you control several time relat<</functions. Scroll to the item you
\\-ant to set. Use tile right or left arrow button to change tile setting.
Note: Ut_l_,ss//_e time is s('L time *vlgl/ed ik,ms a*v ztt_az,ailgibl_,.
Clock Displays the current tinge.
Calendar Enables you to set tile date easily.
Time Zone Select the tilne zone you live in. Choose/_om 9 selections:
C>*l/*'glk/:xlsR,,'ll. Mozz,llglill. At/glllti(, ]'glCi/ic, A/glS/aa, / /gl_l'glii.
.\_,_l'/'o/#lld/gllld alld _S'gll_lOa.
Daylight Saving (available with manual time set only) Set the TV to
operat<, with I)aylight Saving Tinge.
1. I)eternaine if I)ay]ight Saving time is in eff<,ct.
2. If so, choose OJl and the clock gains one hour.
3. When 1)aylight Saving is over, choose Q/_"and the clock naovcs back one
IIo l] r.
4. Set the time inanually.
Time Setting Lets you select In(Ire time related functions.
Today's Date Use the nun_ber buttons (in the relnOte to set the
current (late.
Clock To set the time, enter it inanua]ly. If it is 7:25, for exali_p]e, you
n_llst first press the number 0 on the remote, then number 7, then 2
and then 5. Use the OK button to choose between AM and 1".1#
You can also use the right and ]err arrow buttons to change the time. Press
once to change the time in one minute increments. Press and hold to
change in 10 ininute increments.
Note: 7Z_,/.\7:t; bzlt/oJl oil t/_, tvmote di_J;lg(],sIbm,C'/o(I, .s_,ltiJl2 (tim_,) iJl
t/?e (_7?alzl/el J_gllll/eI:
Current Channel Time (digital channels only) Acquires the time,
if reported, from the current channel.
Update Clock Makes the Cm',v,t_t U_am_el 71ime your default time.
The Current Channel Tinge appears under the (.7oc/_, selection.
OJ_Time Lets you set the T\" to turn off autoll_atica]]v. Select fron_
Q//I O,_ce and DcH/y. The default is Q_7_You can change the time by
using the number or arrow buttons. The SLEEP button on the remote
takes you to this preference.
On Time Lets you set the TV to turn on autoll_atically. Select _}()ln (.)£7_
O_zce and [)gH{_,. The default is Qif You can change the time l)y using
the nUlilber or arrow buttons.
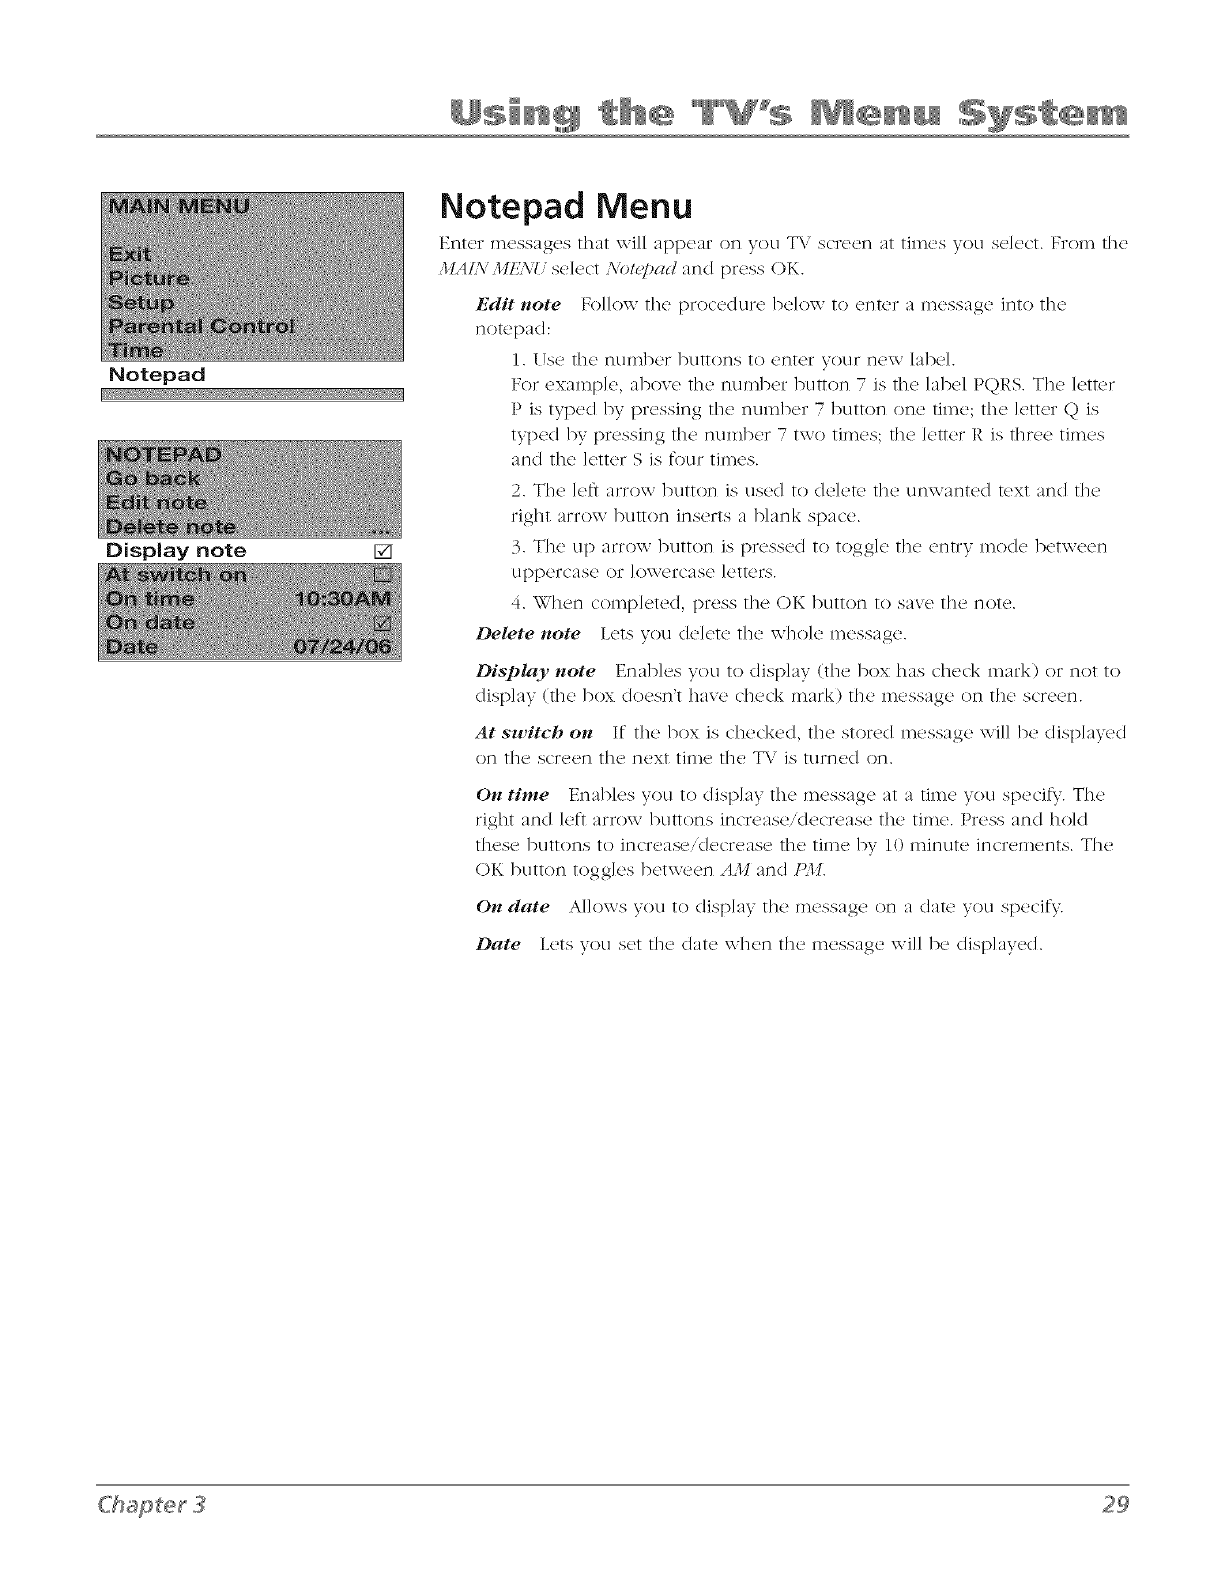
Notepad
Display note []
Notepad Menu
Enter messages thatwillappem" on you T\,' screen at times you select,From the
31AI.\MI::\_ select.MZ<]}adand press OK.
Edit note Follow the procedure below to enter a message into tlw
notepad:
1. Use the number buttons to enter your new label.
For ex:unple, above the number button 7 is the label PQRS. The letter
P is typed by pressing the number 7 button one time; the letter Q is
typed by pressing the number 7 two times; the letter R is three times
and the letter S is four times.
2. The left arrow button is used to delete the unw:mted text and the
right arrow button inserts a blank space.
3. The up arrow button is pressed to toggle the entry mode between
uppercase or lowercase letters.
4. When completed, press the OK button to save the note.
Delete note Lets you delete the whole message.
Display note Enables you to display (the box has check mark) or not to
display (the box doesn't have check mark) the message on the screen.
At switch on If the box is checked, the stored message will be displayed
on the screen the next time the T\ /is turned on.
Ots time Enables you to display the message at a time you specify. The
right and left arrow buttons increase'decrease the time. Press and hold
these buttons to increase/decrease the time by 10 minute increments. The
OK button toggles between AM and P,1L
O_t date Allows you to display the message on a date you specify.
Date Lets you set the (late when the message will be displayed.
Frequently Asked Questions (FAQs)
How do I tell an analog channel from a digital channel?
Thc'r(' ar(' s_'v_'ra] ways to t_']] if your chann_q is digita] or not. Pr_'ss th(' INFO button to
display tile channel banner. Look at the left side for a channel number. Channels with a
primary channel and a subchannel are digital channels. Remember that not all digital channels
have subchannels. Look at the left side of the Channel banner, it will show A,_al_4gfor an
analog channel or a D_gital for a digital channel. Go to page 14 for more infor,nation on the
diftbrence between analog and digital channels and page 18 for the Channel banner.
Why does the channel search take a long time?
Dop_,nding on your connt,ctions, \\-ht,n the T\.' sc,archt, s for digital channtqs it is also s('arching
for each sul>cbannel of that (ligita] channel. This sometimes takes longer, but once you have
your channel list setup, you only have to do it once.
Why does channel search find a lot of channels, but when I try to tune to them there's
nothing there?
Sony channcqs ;u_,('nab]ed by the' cabk' con_pany and don't carry progralnming, such as
video-on</emand. When channels are unavailable, your T\."s screen displays {llZLsgl&/t",S'Ii!{lgal.
You probably want to get rid of these so they no longer appear in your channel list. Remove
these in the LLst&LabeLs menu. Go to page 25 for more information.
Why are there bJack bars on my screen and can I get rid of them?
#i)ur T\.' has a 4:3 screen so most digital channels are disp]ayed with gray or b]ack bars at
the top and bottom of the screen because most are sent in a 16:9 format. It depends on how
the station is formatting the vide(). Aspect ratios are determined by the broadcaster and may
change _iom one program to another. Use the ZOOM-and ZOOM+ buttons on the remote
to see the dift'erent formats available that may eliminate the bars. Go to page 15 for more
information.
No other options are possible aside/_om those you see by cycling through this button.
However, you can change the default settings for both analog and digital programming
through the menu. Go to page 27 for more details.
G'rglphic3 co_ztgli,_(,d _,itbi,_ thLspz_blicatio_z ar(, /br r_,pr(,3-(,,_tgltio,_ o*_/,F.
Troubleshooting
Most problems you encounter \\qtll your TV c_n be corrected l,y consulting tile fol]o\\-ing trou]_]esI1ooting list.
TV Problems
TV won't turn on
•Make sur_' the TV is plugg_'d in.
• Check the \\-all receptacle (or extension cord) to make sure it is "live" by plugging in something else.
- Something might be wrong \\ith your remote control. Press tile PO\VER button on tile front of tile TV. If the TV
turns on, check tile r_,mote control.
- The Front Panel might be locked. Go to page 23 for more information.
Buttons don't work
-The Front Panel might be locked. Go to page 23 for more information.
TV turns off unexpectedly
- Qif 7into might have boen activat_'d. Go to page 28 for instructions.
•Electronic protection circuit may have been activated because of a power surge. If this happens frequently, tile
voltage in your house may be abnormally high or lo\\-.
TV turns on unexpectedly
-0_ 7_nm might hax_. been set. Go to page 28 for instructions.
Blank screen
®You may/)e on an inactive channel. Try :mother channel.
,_ Make sure devices connected to the TV are turned on.
,, If you've connected another device (such as a camcorder or I)\..'D player) make sure you select tile Video Input
Channel that is used for that device. Use the INPUT button to toggle through tile available Vkleo Input Channels.
Digital tuning delayed
"YOU In;Jy exl)erJel_ce ;i delay of several seconds before digit_d pictures ;qp_oear.This can happen when you first
tune to a digital channel and when you change channels. This is normal
No sound, picture okay
-Maybe the sound is mut_'d. Try pressing the volume up button to restore sound.
• If using the YI Pb, Pr jacks, remember to connect tile device's left and right au(lio output jacks to tile TV's AUDIO
input jacks.
Can't select certain channel
'_ Channel may be' b]ocke(I or not approvu(I through Parental Controls.
• Try pressing the DIGiANA button on the remote. This button toggles between digital and analog channel sources.
• If using a VCR, check to make suru the TV/VCR button on the VCR is in the correct mode (press the TV/VCR
button on your VCR).
No picture, no sound but TV is on
• Maybe' the ,Sbz_c'# 7]E/_uis set wrong. Go to page 24 for more instructions.
,, You may have, the \\-tong video input channel selected. Use tile INPUT button to toggle through tile available
vkleo input channels.
,, If tile device you're connected to has "progressive, scan" and you aren't receiving a picture using a component (Y
Pb Pr) connection, you need to change tile setting from progressix_, to interlace. Tile procedure for changing this
varies. Look for a button on tile front of the device (it might be called resolution or display), or see if there is a
switch on tile back (it might be labeled "intil)rog" or something similar), or tile item might be in tile menu system.
Consult tile user's guide for instructions.
Sound okay, picture poor (analog channels only)
,, Check your connections. Make sure all of the cabl('s are firmly connected to th<' jacks.
- Try adjusting the 57)aq)_r,ss menu item to in?prove weak signals. Go to page 24 for more instructions.
Black box appears on the screen
,, Closed c:_ption might be on. Check this setting in the .SV:'T//) menu. Go to page 24 for more instructions.
The Remote Control Doesn't Work
® S()in(.ttJlJng lllight/)('/)(_tx, v(x'n 111(._i(.tln(iu._ an(I 1]1(._ i(.tln(iu._ s('nsor (in 1]1(._ (l(_vic(,. Ma_e SLI/X2 []l(_r(' is a c]Ltal pat]? and
point direct]y at the T\(
,, Maybe batteries in the remote are weak, dead or installed incorrectly. Put new batteries in the remote.
Problems with Parental Controls
Can't select a certain channel
•The channel may be blocked or not approved through parental control settings.
The rating limits don't work
•You must set Mas/_,r/:'t_ab/e to lock (_1). Go to page 19 for instructions.
I don't remember my password and I want to unlock the TV
', If you forget your password, you c:m reset it. \'lake sure the TV is of['. Press \_OL- on the TV's ti'ont panel and then
CLEAR on the remote for approxhnately 5 seconds. The T\.' turns on. Enter a new password next time you access
the I'AREATAL Co.\TROL menu or the 77.1It_menu.
The Parental Controls won't let me watch a program even though it's not rated as violent
'_ May/x' the movie is unrated. Check to see if the ('reviled option is set to lock (_). Refur to page 22 re1
in str u ction s.
Connection Problems with a DVD Player. Set-ton Box etc.
', If the device you're connected to has _'progrcssivc scan" and you aren't receixing a picture using a component (Y
Pb Pr) connection, you need to change the setting from progressive to interlace. The procedure for changing this
varies. Look for a button (in the front of the de\ice (it might be called resolution or display), or see if there is a
sxxitch on the back (it might be labeled "int,prog" or something similar), or the item might be in the menu system.
Consult the L1s()r's guide for instructions.
What Else Can I
If you've been through the Troubleshooting section and nothing has fixed your problem, try rebooting your TV.
Note that after a reboot you may need to run your T\/through the setup process again. To do a reboot, unplug
the power cord from the wail outlet, power strip, etc. Keep your TV unplugged for about 5 minutes. Then plug
the T\/back in, turn on the T\/, and see if the problem is fixed. If the problem remains, then please visit www.
rca.com,television for updated FAQs or contact RCA Customer Support at the support number provided in your
\Vurranty under How To Get Service.
How Do I Replace My Remote?
* If you need to replace your remote, call 1-8 ))-338- )376 Yet r remotc, part number is RI3 )( 1 Ashipping and
handling fee will be charged upon ordering, and the appropriat(_ sa]es tax. Have your Visa, Mast(_rCard or Discover
Card ready.
Chapter 4
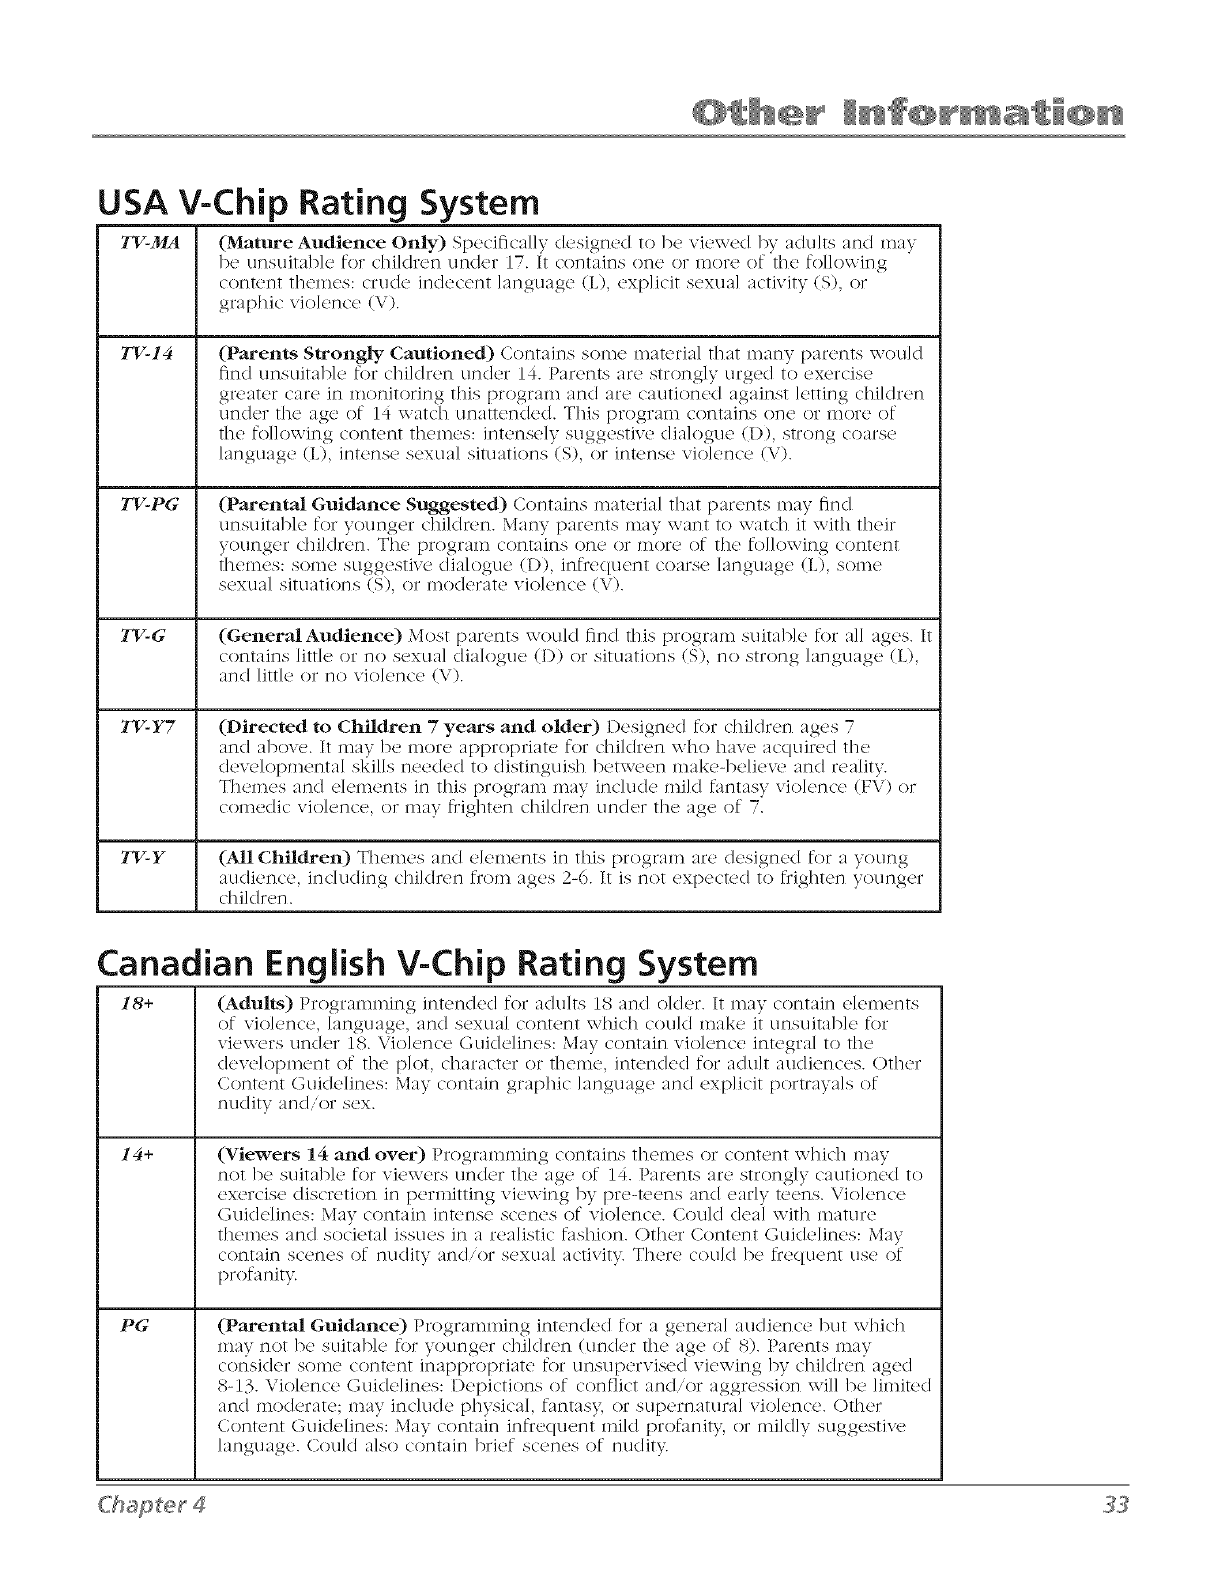
USA V-Chip Rating System
TV-MA (Mature Audience Only) Sp(,cifical]y d('signed to be vi(,w(,d 1U adu]ts and may
bc' unsuitabk' for children under 17. It contains one' or mort' of the' following
content themes: crude indecent language (L), explicit sexual activity (S) or
graphic violence (V).
TV-14 (Parents Strongly Cautioned) Contains some material that many parents wou]d
find unsuitable for children under 14. Parents are strongly urged to exercise
greater care in monitoring this program and are cautioned against letting children
under the age of 14 watch unattended. This progran_ contains one or more of
the following content themes: intensely suggestive dialogue (1)), strong coarse
language (L), intense sexual situations (S), or intense violence (V).
TV-PG (Parental Guidance Suggested) Contains material that parents may find
unsuitable for younger children. Many parents may want to watch it with their
younger children. The program contains one or more of the following content
themes: some suggestive dialogue (1)), inflequent coarse language (L), some
sexual situations (S), or moderate violence (V).
TV-G (GeneralAudience) Most parents would find this program suitable for all ages. It
contains little or no sexual dialogue (1)) or situations (S), no strong language (L),
and little or no violence (V).
TV-Y'7 (Directed to Chiklren "7years and okter) Designed for children ages 7
and above. It may be more appropriate for children who have acquired the
developmental skills needed to distinguish between make-believu and reality.
Themes and elements in this program may include mild fantasy violence (FV) or
comedic violence, or may frighten children under the age of 7.
TV-Y (All Chiklren) Themes and elements in this program are designed for a young
audience, including childrun from ages 2-6. It is not expected to fiighten younger
children.
Canadian English V-Chip Rating System
18+ (Adults) Programming int('nck'd for adults 18 and oldc'r. It may contain el('m('nts
of violence, language, and sexual content which could make i{ unsuitable for
viewers under 18. Violence Guidelines: May contain violence integral to the
development of the plot, character or theme, intended for adult audiences. Other
Content Guidelines: May contain graphic language and explicit portrayals of
nudity and/or sex.
14+ (Viewers 14 and over) Programming contains themes or content which may
not be suitable for viewers under the age of 14. Parents are strongly caution_,d to
exercise discretion in permitting viewing by pre-tuens and early teens. Violence
Guidelines: May contain intense scenes of violence. Could deal with mature
themes and societal issues in a realistic fashion. Other Content Guidelines: May
contain scenes of nudity and/or sexual activit> There could be fiequent use of
profanit>
PG (Parental Guidance) Programming intended for a general audience but which
may not be suitable for younger children (under the age of 8). Parents may
consider some content inappropriate for unsupervised viewing 1U chile/re,{ aged
8-13. Violence Guidelines: I)epictions of conflict and/or aggression wil] be limited
and moderate; may include physical, fantas B or supernatural violence. Other
Content Guidelines: May contain infrequent mild prof;mity, or mild]y suggestix_.
language. Could a]so contain brief scenes of nudit>

Canadian English V-Chip Rating System (co,t .ued)
G
C8+
(GeneralAudience) Programming considered acceptable for all age groups.
While not designed specifically for children, it is understood younger viewers may
be part of the audience. Violence Guidelines: Will contain very little violence,
either physical or verbal or emotional. Will be sensitive to themes which could
fiigbten a younger child, will not depict realistic scenes of violence which
minimize or g]oss over the eftbcts of violent acts. Other Content Guidelines: There
may be some inoftbnsive slang, no profanity and no nu(lity.
(Children 8 and Older) Programming generally considered acceptable for
children 8 years and ov_,r to watch on their own. Violence Guidelines: Violence
will not be portrayed as the prefbrred, acceptable, or only way to resolve conflict
or encourage children to imitate dangerous acts which they may see on television.
Any realistic depictions of violence will be inflequent, discreet, of low intensity
and will show the consequences of the acts. Other Content Guidelines: There wil]
be no profanit> nudity or sexual content.
(Children) Programming intended for children under age 8. Violence Guidelines:
Careful attention is paid to themes which could threaten children's sense of
security and well being. There will be no realistic scenes of violence. Depictions
of aggressive behavior wil] be infrequent and limited to portrayals that are clearly
imaginary, comedic or unrealistic in nature. Other Content Gui(lelines: There will
be no oftbnsiv_, language, nu(lity or sexual content.
Canadian French V-Chip Rating System
18+
13+
8+
G
(Adults) Programming is for adults ()nix:.This program contains sustained
violence or extremely violent scenes. 16+ (Viewers 16 and over) Programming
is not suitable for th()se under age 16. This program contains frequent scenes of
violence or intensely violent scenes.
(Viewers 13 and over) Programming may not be suitable for children under
the age of 13. This program either contains several violent scenes or one or more
scenes that are violent enough to affect them. Viewing in the company of an
a(lult is therefore strongly recommended for children under the age of 13.
(Viewers 8 alld over) Not recommended for young children. This prograln
is suitab]e for most audiences, but it contains mild or occasional violence that
could upset young children. Viewing in the company of an adult is therefbre
recoznmended for young children (under the age of 8) who do not distinguish
between reality and imagination.
(GeneralAudience) This program is suitab]e for audiences of a]l ages. It
contains no violence, or any violence that it does contain is either minima] or is
presented in a ]?!.llnorotls inannLuT, as a caricature, or Jn an unrealistic way.
Ch_pter 4
Limited Warranty
What your warranty covers:
Defects in materials or workmanship.
For how long after your purchase:
•90 claysfrom d:m'of purchaseforlaborcharges.At our optionwe will_qtherpay an
Authorized RCA Service Center the labor to rep:/ir your television or rel)lac(, your to]evision
with :/ new or refurl>ished unit.
One year from date of purchase for [)arts. At our option we will either supply new or
refurbished parts to an Authorized RCA Service Center for them to repair your television or
replace your television with a new or refurbished unit. After 90 clays, labor charges will be at
your expense.
One year from date of purchase for tile picture tube. At our option we will either supply
new or refurbished [)arts to an Authorized RCA Service Center for them to repair your
television or replace your television with a new or refur/)ished unit. Afier 90 (lays, labor
charges will be at your expense.
How you get service:
,, Call 1-800-33(>1900 or visit www.rca.com. Pk,asc haw' your unit's elate' of purdlasc :rod
mo(leliserial number read> Tile mo(lel.serial number information can be found on tile back
of your unit.
•Proof of purchase in the form of a bill of sale or receipted invoice which is evidence that
the product is within tile warranty period must be presented to obtain warranty service. For
rental firms, proof of first rental is also required.
What your warranty does not cover:
•Customer instruction. (Your Owner's blanu:d d_,scribcs how to install, adjust, and operate
your television. Any additional information should be obtaine(I tiom your dealer).
,, Installation and relate(I adjustments.
,, Signal reception problems not caused by your television.
,, I)amage tiom misuse or neglect.
• Batteries.
® Customer replacement fuses.
• I)amage from images burnt onto tile screen.
• Special, incidental or consequential damages.
,, A television that has been modified or incorporate(I into other pro(lucts or is use(I for
institutional or ()tiler commercial purposes.
• A television purchased or serviced outsi(le the U.S.A.
® Acts of nature, such as but not limite(I to lightning (lamage.
Product registration:
- Please complete and mail the P_(xluct Registration Card packed wJfll your T\,', It will make it
(._/sJ(.tl" to COt]tact VOLI S]]OLlJd ]t (.)V('I" 1)(2 II(2C('SS_/I y. The I('tLI/'I] O_' t]](2 C_//'d ]S llOt Io([l_l]l'(2d ['or
\V_/171"_11'1t}: COV(.t]'_lg(.t.
Limitation of Warranty:
- THE \_;.']hRRANTY STATE1) ABOV'E IS THE ONLY \\.']hRRANTY APPLICABLE TO THIS
PRODIJCT. NO VERBAL OR WRI_EN INFORMATION GIVEN BY TTE TECHNOLOGY, INC.,
ITS AGENTS OR EMPLOYEES SHALL CREATE A GI rARANTY OR IN ANY \_.']hYINCREASE OR
MOI)IFY THE SCOPE OF THIS \\.'ARRANT5(
REPAIR OR REPLACEMENT AS PRO\.'II)E1) UNDER THIS \XL4RRANTY IS THE EXCLUSIVE
REMEI)Y OF THE CONSIJMER. TTE TECHNOLOG'L INC. SHALL NOT BE LIABLE FOR
SPECIAL, INCIDENTAL OR CONSEQIJENTIAL I)AMAGES RESIJLTING FROM THE USE
OF THIS PRODIJCT OR ARISING OUT OF ANY BREACH OF ANY EXPRESS OR IMPLIE1)
\X.'24RRANTY ON THIS PRO1)IJCT. THIS I)ISCLAIMER OF \_.'24RRANTIES AND LIMITEI)
\X.'24RRANTY ARE GO\/ERNE1) BY THE LAWS OF THE STATE OF INDIANA. EXCEPT
TO THE EXTENT PROHIIBITEI) BY APPLICABLE LA\V, ANY IMPLIED \X.'24RRANTY OF
MERCHANTABILITY OR FITNESS FOR A PARTICIJLAR PI JRPOSE ON THIS PROI)IJCT IS
LIMITEI) TO THE APPLICABLE \\LhRRANTY AND \\LhRRANTY PERIO1) SET FORTH ABOVE.
How state law relates to this warranty:
o Solll(' stat_s do _]ot allow t]]_ _xclusloI] r]o]' ]llllltat]oI] of ]r]cl(R}r]ta] or cor]s{_xiItK}I]tia]
(]:/II]_/g(.ts, OT ]Jlnltat]or]s oil ]lox, v ]or]g ar] ]inl)]l(.t(I \V_l/TI'_lJ_l[y ]_/StS, SO t]](2 _I/])OV(2 ]llnlt_i/t]()rlS OT
excltlsions may not apply to you.
-This warranty gives you• specific legal riohts_, :rod you• also re:iv• ]]av(_ ot]]c!r rights that vary•
froIn Stag2 to Sta/(L
If you purchased your unit outside the United States or seek warranty
coverage outside the United States:
•This XV:/I'I{tI'lt}: (I{)(2S I']Ot :/t)t)]y. Col']t:/ct VOLI]" (1(.}{t](21" ['()r XV://'I{tB[V ir]formatior].
Service calls which do not involve detective materhds or workmanship are not covered by this
warranty: Costs of such service calls are the sole responsibility of the purchaser.
Chapter 4
Care and Cleaning
CAUTION: Turn OFF your TV l)eforc c]eaning.
You can dean the TV as required, using a soft ]int-flv,e c]oth. Be sure to occasionally dust tile
ventilation slots in the cabinet to help assure adequate ventilation.
The TV's screen may be cleaned with asoft, lint-free cloth as well. Take care not to
scratch or mar the screen. If necessary, you may use a cloth dalnpened with warln
water. Never use strong cleaning agents, such as aininonia-based cleaners, or abrasive
powder. These types of cleaners will dainage the TV.
While c]eaning do not spray liquid directly on tile screen, or a]low liquid to run down the screen
and inside the T\.'. Also, never [)lace drinks or vases with water on top of the TV. This could
increase the risk of fir<, or shock hazard or damage to the TV.
Caution: 17sing video games or any external accessory with fixed images for extended periods
of time can cause them to be perlnanently imprinted on tile picture tube (or projection T\.'
picture tubes). ALSO, some network/program Iogos, phone nulr_bers, etc. may cause similar
damage. This damage is not covered 1)y your warranty.
FCC Information
This equiplnent has been tested and found to COlnp]y with the limits for a Class B digital device,
pursuant to Part 15 of the FCC Rules. These limits are designed to provide reasonab]e protection
against harmful interf_,rence in a residential installation. This eqt_il)ment generates, uses, and can
radiate radio tiequency energy and, if not installed and used in accordance with the instructions,
may cause harli_ful interf_wence to radio COmlr_unications. However, there is no guarantee that
intertbrence will not occur in a particular installation. If this equiplnent does cause harlnful
interf_,rence to radio or television reception, which can lye determined 1)y turning the equiplnent
()ft and on, the user is encouraged to try to correct the interf_,rcnce l)y one or more of the
following measures:
1. Reorient or re]orate the receiving antenna.
2. Increase the separation between the equipment and receiver.
3. Connect the equiplnent into an outlet on a circuit diftbrent tiOln that to which tile receiver
is connecWd.
4. Consult the dealer or an experienced radio,TV technician for help.
This Class B digital apparatus COlnplies with Canadian ICES-003.

Visit the RCA website at www.rca.com/television
Please do not send any products to the Indianapolis address listed in this manual or on the carton. This will
only add delays in service for your product.
TTE Technology, Inc,
101 West 103rd Street
Indianapolis, IN 46290
02007 TTE Technology, Inc.
RCA and associated marks are trademarks of THOMSON S.A. used under license to TTE Corporation.
TOCOM 16732900
