RCA Projection/Digital 42 And Above TV Manual L0902080
User Manual: RCA RCA Projection/Digital 42 and above TV Manual RCA Projection/Digital 42 and above TV Owner's Manual, RCA Projection/Digital 42 and above TV installation guides
Open the PDF directly: View PDF ![]() .
.
Page Count: 48

it/!
Guide
Changing Entertainment. aln
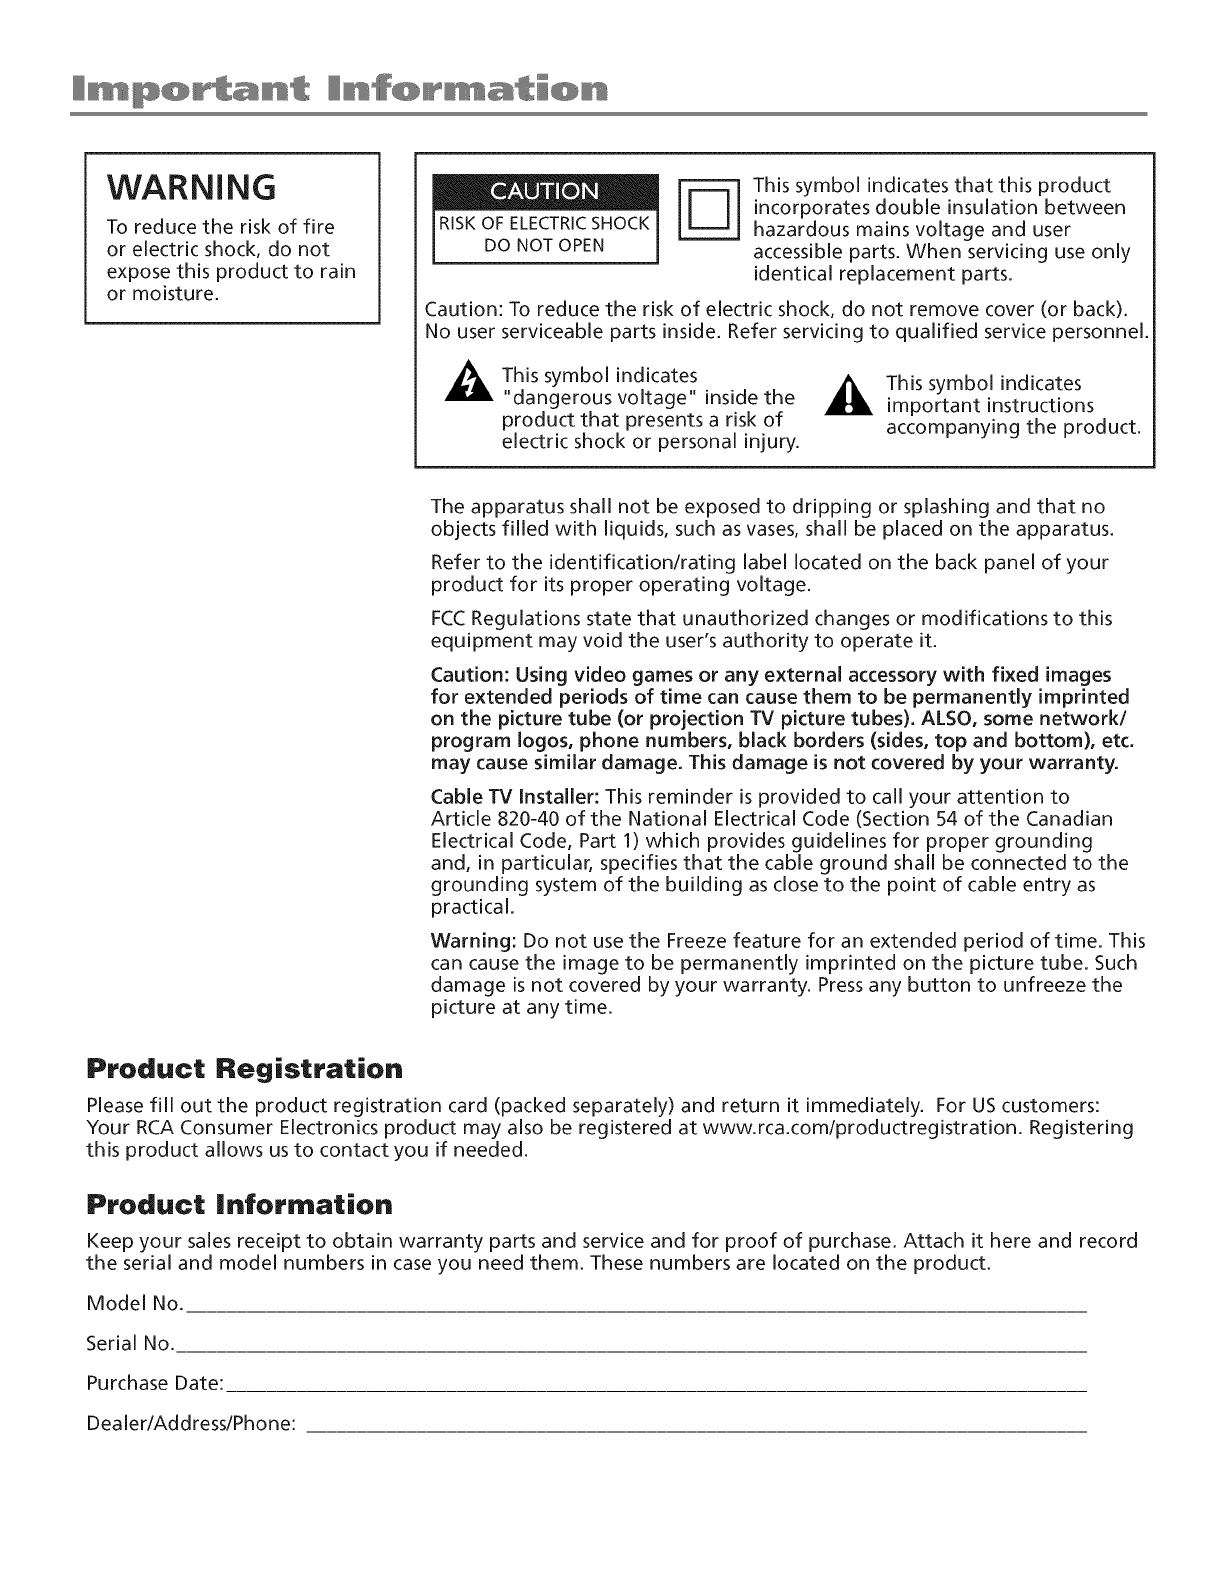
WARNING
To reduce the risk of fire
or electric shock, do not
expose this product to rain
or moisture.
RISK OF ELECTRIC SHOCK
DO NOT OPEN
This symbol indicates that this product
incorporates double insulation between
hazardous mains voltage and user
accessible parts. When servicing use only
identical replacement parts.
Caution: To reduce the risk of electric shock, do not remove cover (or back).
No user serviceable parts inside. Refer servicing to qualified service personnel.
This symbol indicates
"dangerous voltage" inside the
product that presents a risk of
electric shock or personal injury.
This symbol indicates
important instructions
accompanying the product.
The apparatus shall not be exposed to dripping or splashing and that no
objects filled with liquids, such as vases, shall be placed on the apparatus.
Refer to the identification/rating label located on the back panel of your
product for its proper operating voltage.
FCCRegulations state that unauthorized changes or modifications to this
equipment may void the user's authority to operate it.
Caution: Using video games or any external accessory with fixed images
for extended periods of time can cause them to be permanently imprinted
on the picture tube (or projection TV picture tubes). ALSO, some network/
program Iogos, phone numbers, black borders (sides, top and bottom), etc.
may cause similar damage. This damage is not covered by your warranty.
Cable TV Installer: This reminder is provided to call your attention to
Article 820-40 of the National Electrical Code (Section 54 of the Canadian
Electrical Code, Part 1) which provides guidelines for proper grounding
and, in particular, specifies that the cable ground shall be connected to the
grounding system of the building as close to the point of cable entry as
practical.
Warning: Do not use the Freeze feature for an extended period of time. This
can cause the image to be permanently imprinted on the picture tube. Such
damage is not covered by your warranty. Press any button to unfreeze the
picture at any time.
Product Registration
Please fill out the product registration card (packed separately) and return it immediately. For US customers:
Your RCA Consumer Electronics product may also be registered at www.rca.com/productregistration. Registering
this product allows us to contact you if needed.
Product Information
Keep your sales receipt to obtain warranty parts and service and for proof of purchase. Attach it here and record
the serial and model numbers in case you need them. These numbers are located on the product.
Model No.
Serial No.
Purchase Date:
Dealer/Address/Phone:
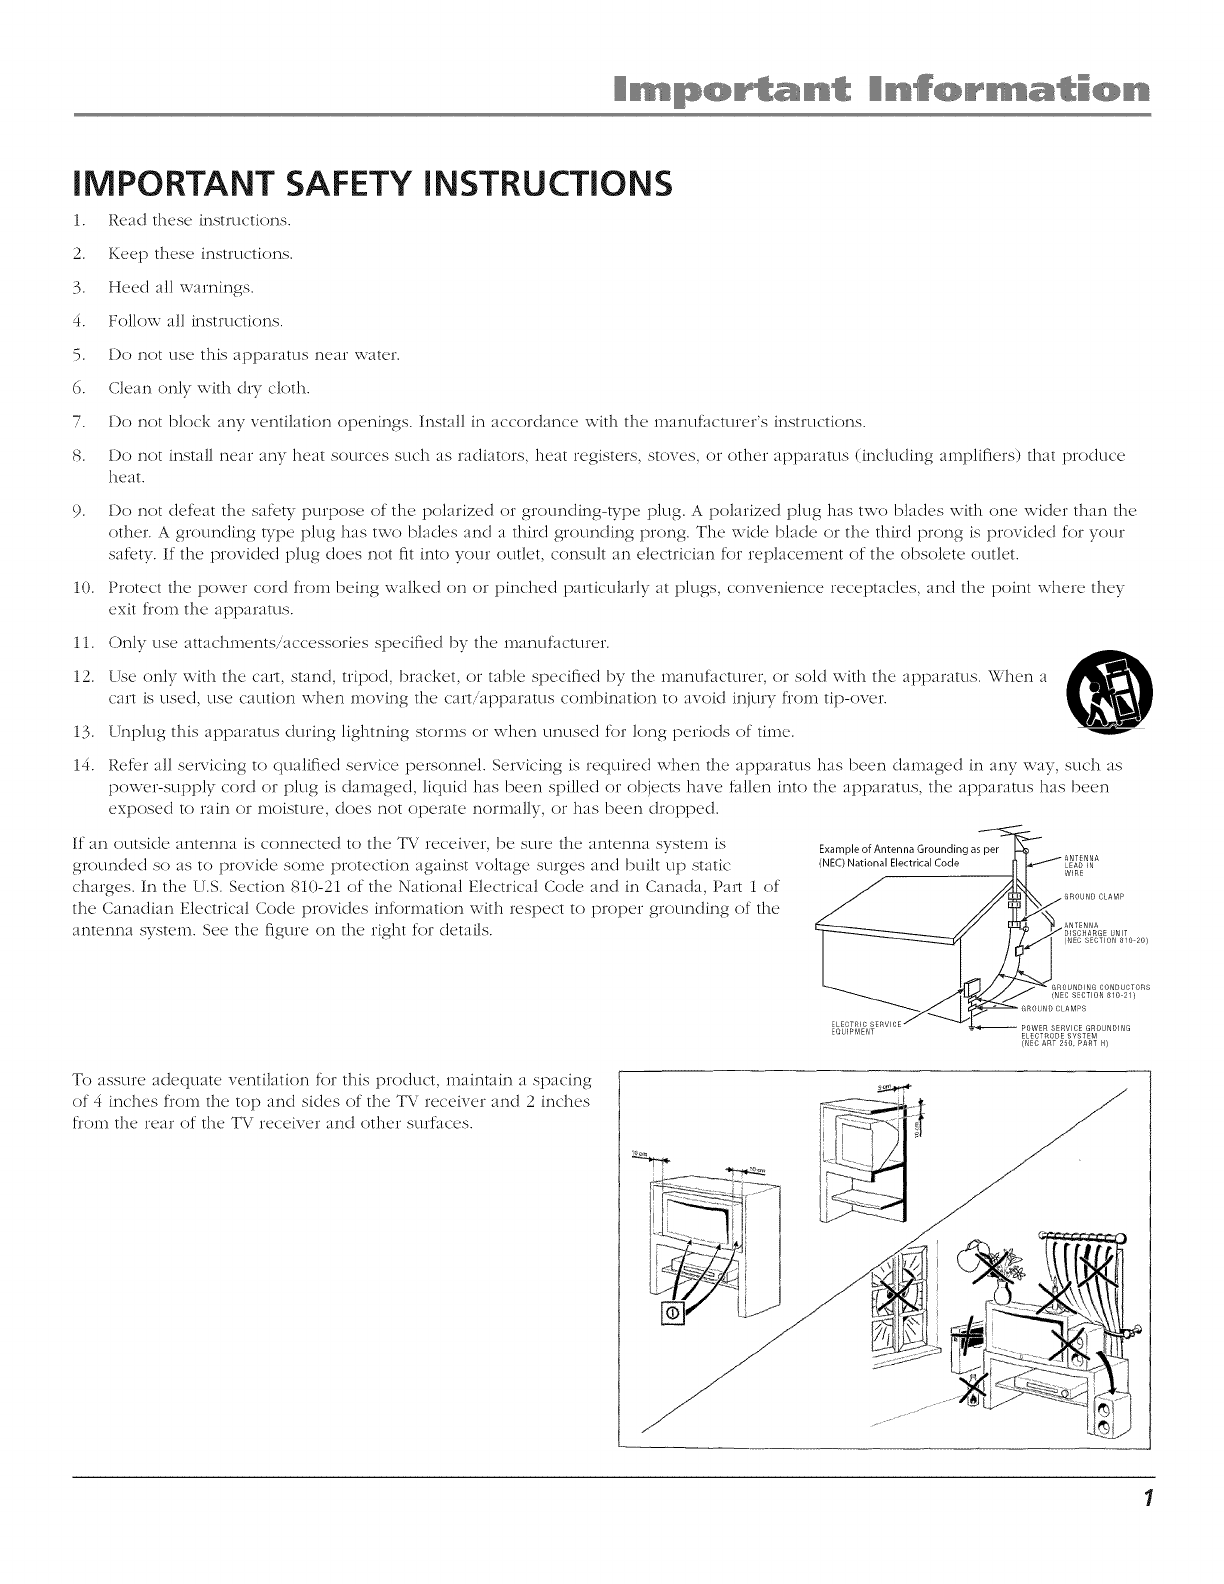
iMPORTANT SAFETY iNSTRUCTiONS
i. Rc_a(tthese instructions.
2. Keep these instructions.
3. Heed all warnings.
4. Follow all instructions.
5. Do not use this apparatus near water.
6. Clean only with dD;_cloth.
7. Do not block any ventilation openings. Install in accordance with the manuLtcturer's instructic_ns.
8. Do not install near any heat sources such as radiators, heat registers, stoves, or other apparatus (including amplifiers) that produce
heat.
9. Do not de*L'at the safl_ty purpose of the polarized or grounding-type plug. A polarized plug has tv,o blades with one wider than the
other. A grounding type plug has tv,o blades and a third grounding prong. The wide blade or the third prong is provided for your
safl_ty. If the provided plug does not fit into your outlet, consult an electrician *i_rreplacement of the obsolete outlet.
i0. Protect the power cord from being walked on or pinched particularly at plugs, convenience receptacles, and the point where they
exit from the apparatus.
ii. Only use attachments/accessories specified by the manuf:tcturer.
i2. Use only with the cart, stand, tripod, bracket, or table specified by the manuf:lcturer, or sold with the apparatus. When a
cart is used, use caution when moving the cart/apparatus combination to avoid injury from tip-over.
i3. Unplug this apparatus during lightning storms or when unused *i_rlong periods of time.
i4. Refinerall servicing to qualified service personnel. Servicing is required when the apparatus has been damaged in any way, such as
pov,er-supply cord or plug is damaged, liquid has been spilled or objects have Ldlen into the apparatus, the apparatus has been
exposed to rain or moisture, does not operate normally, or has been dropped.
Example of Antenna Grounding as per
(NEC) National Electrical Code
If an otltside antenna is connected to the TV receiver, I)e sure the antenna system is
grotmded so as to provide some protection against voltage surges and built up static
charges. In the LI.S. Section 810-21 of the National Electrical Code and in Canada, Parr 1 of
the Canadian Electrical Code provides infi_rmation with respect to proper grounding of the
antenna system. See the figure on the right for details.
To assure adequate ventilation ff_r this product, maintain a spacing
of 4 inches from the top and sides of the TV receiver and 2inches
from the rear of the TV receiver and other surf:tEeS.

Key Features Overview
Your TV is equipped with features that will add to your TV viewing experience. The following
information summarizes a few of these features. Chapter 3 provides more information about the
rest of the TV's features and how to use them.
TruScan Digital Reality
Pi('[ur(2 performance starts with signal processing. TmScan Digital RcaliWintelligent signal
processing recognizes incoming video signals and progressively converts them to achieve
optimum digital picture performance. It enhances the picture quality and makes you feel as if
you're close to the real thing. It also recognizes when original film sources have been modified
and automatically converts the analog frame rate back to its original format to bring out the
detail - a process commonly referred to as reverse 3:2 pulldown.
Precision CRTs
Your HDTV monitor features Precision CRTs. These Precision CRTs (cathode ray tubes) produce
sharp, high-resolution images, with great detail and better transition between images than
regular CRTs.
HDTV Component Input (SYNCHROSCAN TM)
Auto-adjusting inputs allow a wide array of component equipment to be c'onncx'ted to this
HDTV monitor. The SYNCHROSCAN circuits automatically detect and display video in various
formats including High Definition (HDTV, 1080i), Enhanced Definition (EDTV, 480p) and
standard definition (SDTV, 48@). This helps simplif?: the connection process.
V-Chip: Parental Controls (for the U.S. and Canada)
Description: You can block programs and movies by content, age-based ratings,
and/or movie ratings.
Requirements:
• Set up the Pare_ta/Co_tro/menu in the TV's main menu (Chapter 3 has
details).
The broadcasters must use the rating system when they send the program to
your TV in order for your TV to block the program.
Parental controls must be locked for these settings to take effect.
2
Important Safety Instructions .......................................... I
Introduction
Key Features Overview .................................................... 2
Chapter 1: Connections & Setup
Things to Consider Before You Connect ......................... 4
Choose Your Connection .................................................. 5
TV + HDTV Tuner + VCR + DVD Player ............................. 7
TV + Satellite Receiver + VCR ........................................... 9
TV + DVD + VCR .............................................................. 11
Explanation of Jacks (in alphabetical order) ................. 12
The Front of Your TV....................................................... 13
Front Input Jacks....................................................... 13
Front Panel Buttons .................................................. 13
Plug in the TV .................................................................. 14
Put batteries in the remote ............................................ 14
How to Use the Remote Control to Complete
the Initial Setup .......................................................... 14
Turn on the TV ................................................................. 14
Complete the Initial Setup ............................................. 15
Set the Menu Language .......................................... 15
Complete Auto Channel Search ............................... 15
Changing Lists and Labels ........................................ 15
Auto Convergence .................................................... 16
Chapter 2: Using the Remote Control
The Buttons on the Remote Control .............................. 17
Programming the Remote .............................................. 19
Find Out If You Need to Program the Remote ...... 19
How to Use the Remote After You've
Programmed It .................................................... 21
Using the INPUT Button .................................................. 21
Remote Control Codes .................................................... 22
Chapter 3: Using the TV's Features
Channel Banner ............................................................... 23
Autotuning ...................................................................... 23
Why You Should Use the Autotuning Feature ....... 23
How to Set Up the Autotuning Feature .................. 24
Parental Controls and V-Chip ......................................... 25
How V-Chip Works for USA and Canada ................. 25
US V-Chip TV Rating Limit ........................................ 25
Canada V-Chip Ratings ............................................. 29
Blocking Canadian V-Chip Ratings .......................... 31
V-Chip Movie Rating Limit ....................................... 31
Blocking Unrated/Exempt Programs .................... 32
Lock/Unlock Parental Controls ............................... 32
Chapter 4: Using the Menu System
Sound Menu .................................................................... 33
Picture Menu ................................................................... 34
Channel Guide Menu ...................................................... 35
Time Menu ....................................................................... 36
Parental Control Menu ................................................... 36
Setup Menu ..................................................................... 37
Chapter 5: Other Information
Troubleshooting .............................................................. 39
FCC Information .............................................................. 41
Care and Cleaning ........................................................... 41
RCA HDTV Monitor Limited Warranty ........................... 42
Accessory Information .................................................... 44
Index ................................................................................ 45
3
Things to Consider Before You Connect
Protect Against Power Surges
•Connect all components before you plug any of their power cords into the wall outlet.
• Turn off the TV and/or component before you connect or disconnect any c'ablcs.
• Make sure all antennas and cables are properly grounded. Refer to the Important SafclT
Instructions on page 1.
Protect Components from Overheating
• Don't block ventilation holes on any of the components. Arrange the components so that air
can circulate freely.
• Don't stack components.
• If you place components in a stand, make sure you allow adequate ventilation.
• If you connect an audio receiver or amplifier, place it on the top shelf so the heated air from it
won't flow around other components.
Position Cables Properly to Avoid Audio interference
• Insert each cable firmly into the designated jack.
• If you place components above the TV, route all cables down the side of the back of the TV
instead of straight down the middle of the TV.
• If your antenna uses 300-ohm twin lead cables, do not coil the cables. Also, keep the twin
lead cables away from audio/video cables.
important Stand and Base Safety information
Choose the location for your TV carefully. Place the TV on a stand or base that is of adequate size
and strength to prevent the TV from being accidentally tipped over, pushed off, or pulkM off. This
could cause personal injmT and/or damage the TV. Refer to the Important Safety Instructions on
page 1.
Use indirect Light
Don't place the TV where sunlight or room lighting will be directed toward the screen. Use soft or
indirect lighting.
4 Graphics contained within this pzib/ication are for rcq)resentation only. C_ap_eY
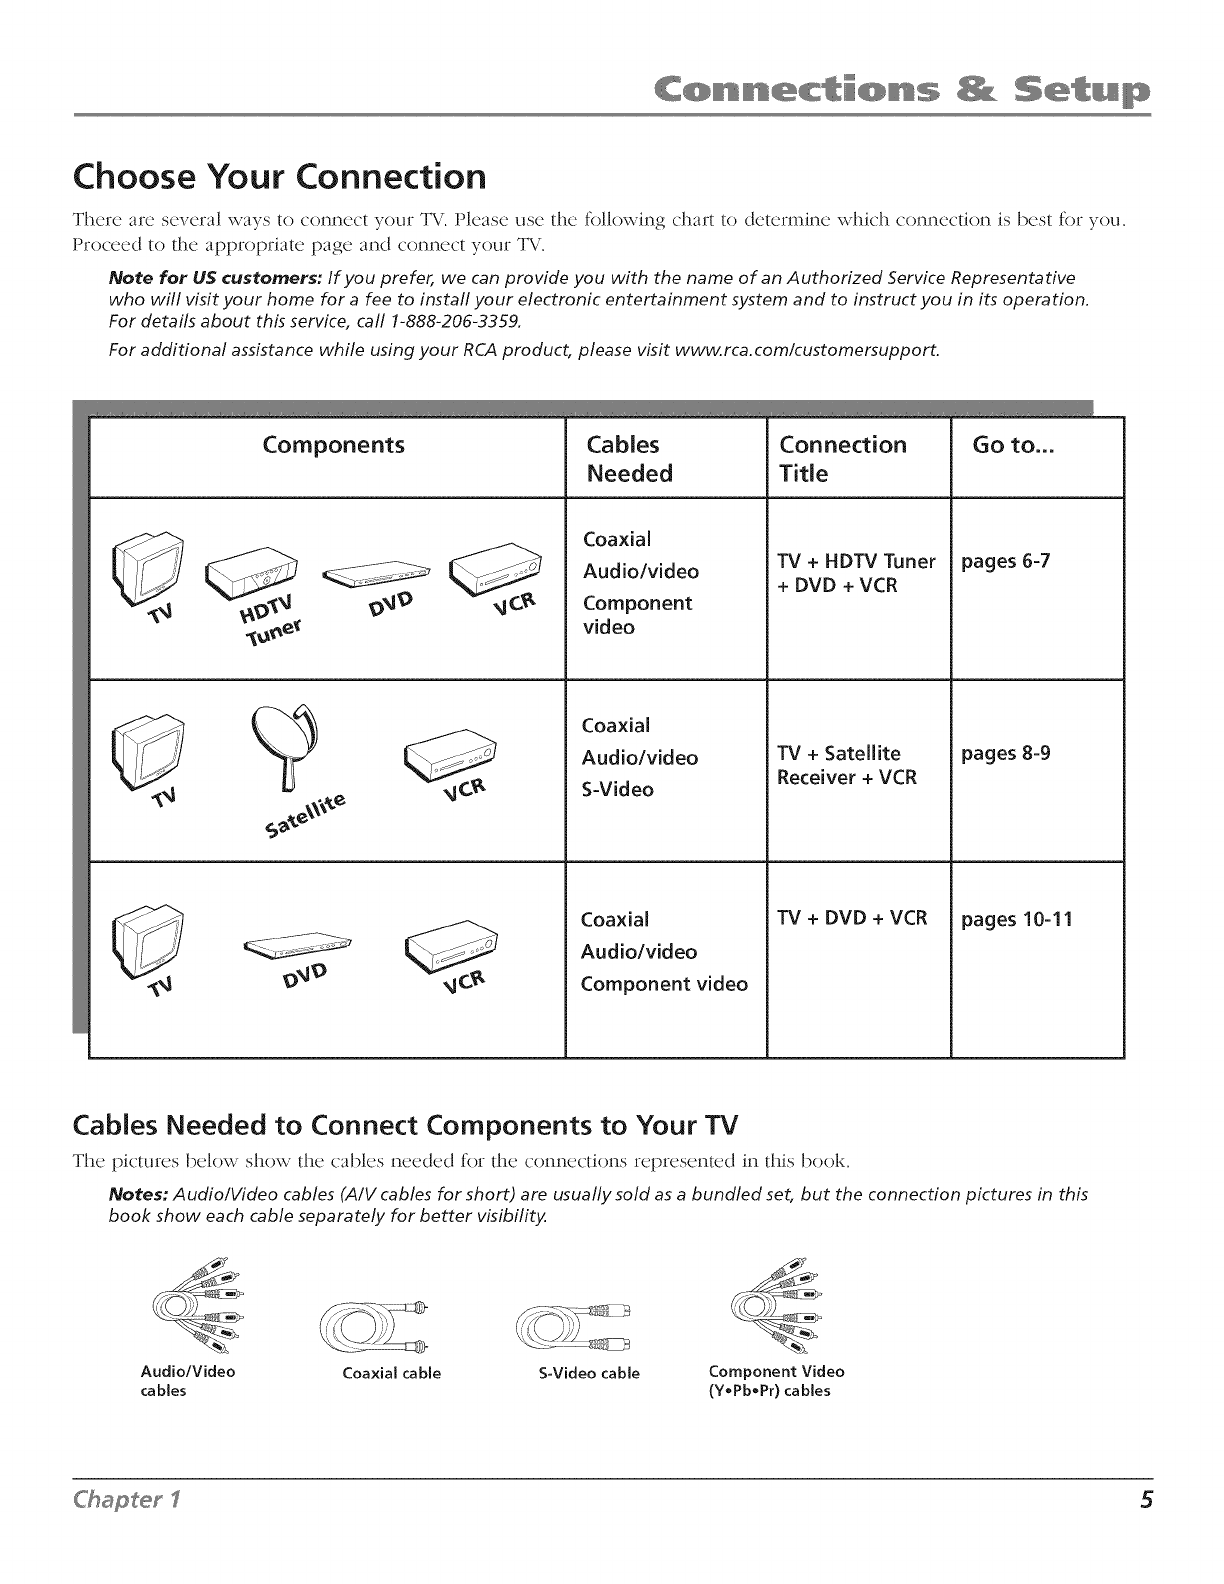
Choose Your Connection
There are several ways to connect your TV. Please use the following chart to determine which connection is best for you.
Proceed to the appropriate page and connect your TV.
Note for US customers: If you prefer, we can provide you with the name of an Authorized Service Representative
who will visit your home for afee to install your electronic entertainment system and to instruct you in its operation.
For details about this service, call 1-888-206-3359.
For additional assistance while using your RCA product, please visit www.rca.com/customersupport.
Components Cables
Needed
Coaxial
Audio/video
Component
video
Coaxial
Audio/video
S-Video
Coaxial
Audio/video
Component video
Connection
Title
TV + HDTV Tuner
+ DVD + VCR
TV + Satellite
Receiver + VCR
TV + DVD + VCR
Go to...
pages 6-7
pages 8-9
pages 10-11
Cables Needed to Connect Components to Your TV
The pk'turcs below show the ('ablcs needed fO£the connections represented in this book.
Notes: Audio/Video cables (A/V cables for short) are usually sold as a bundled set, but the connection pictures in this
book show each cable separately for better visibility.
AudiolVideo Coaxial cable S-Video cable Component Video
cables (Y*Pb*Pr) cables
SATELLITE RECEIVER
HDTVTUNER
LAUDI° R
DVDPLAYER
TV
(-
VCR
6Chapter 1
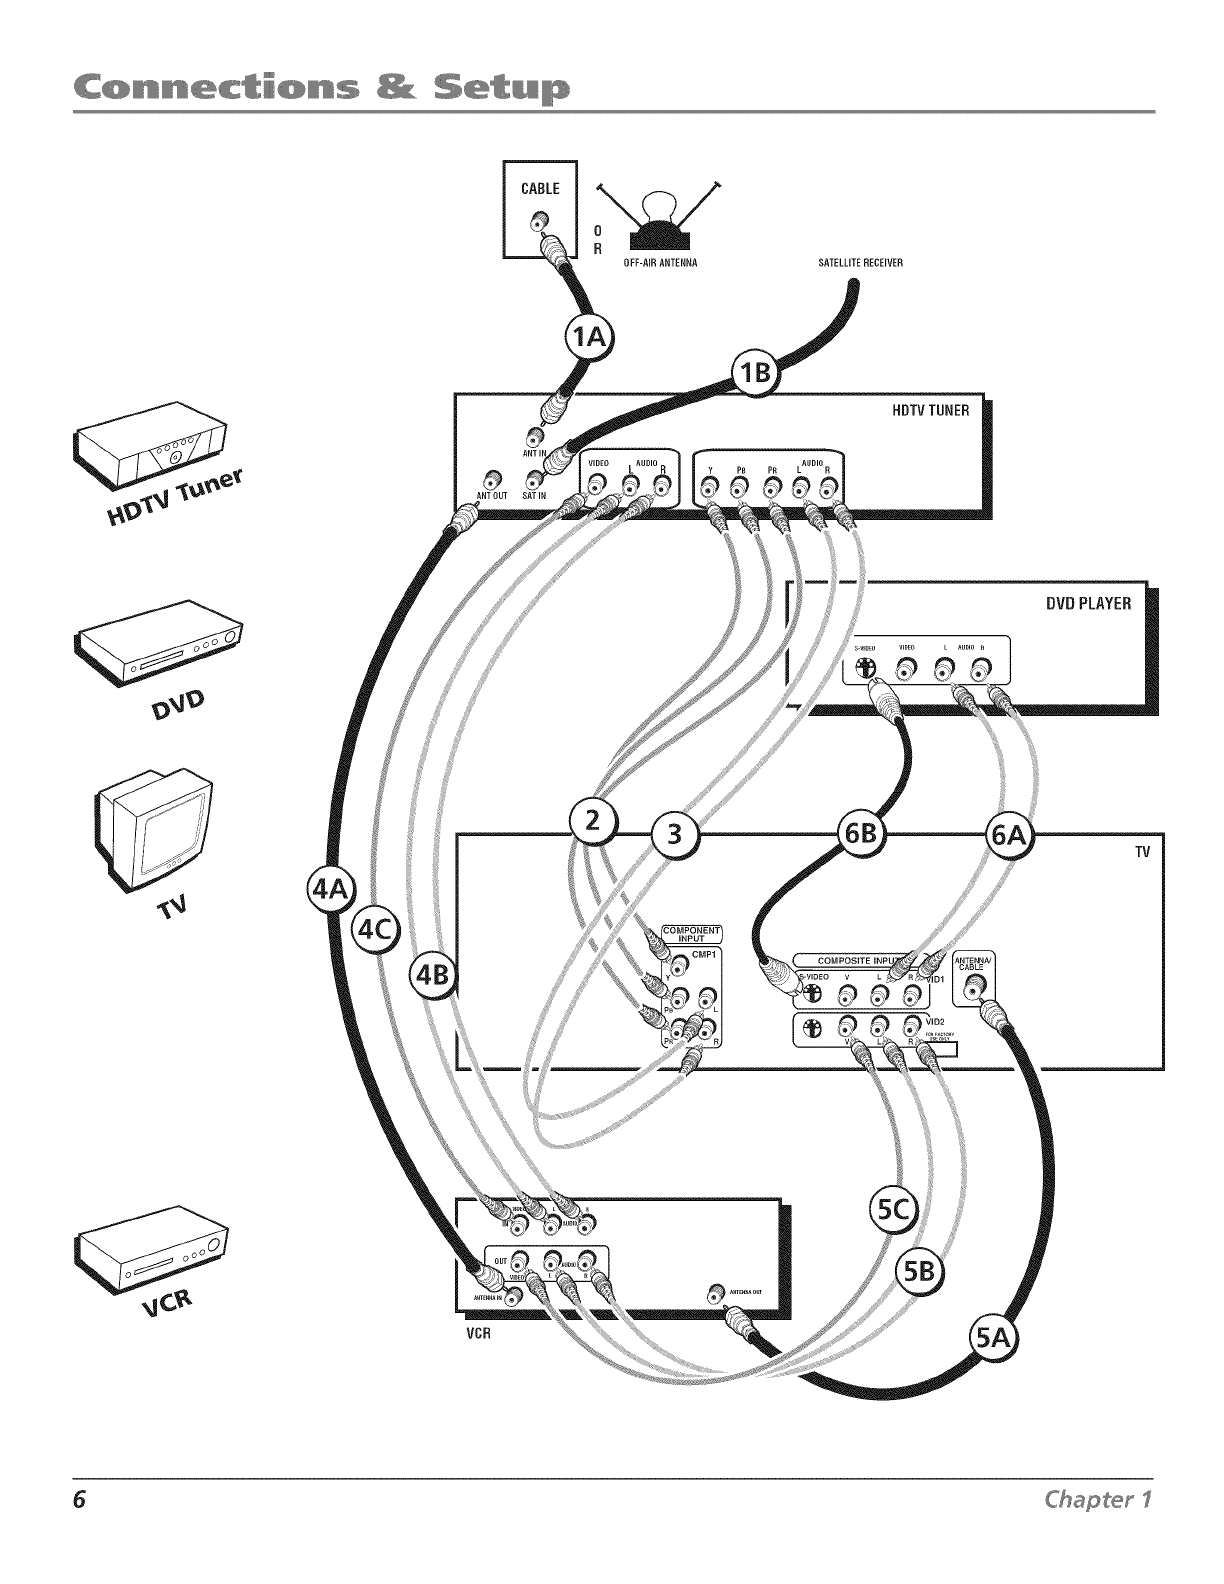
TV +HDTV Tuner +VCR +DVD Player
1. Make sure cable or antenna and/or satellite is connected to your HDTV Tuner.
A. Connect the coaxial cable from your cable outlet or antcmna to the antenna input on the HDTV Tuner.
B. Connect the satellite dish antenna feed to the satellite input on the HDTV Tuner.
2. Make the video conneclion between your HDTV Tuner and the TV.
Connect three video grade cables to the CMP1 Y PB PR jacks on the back of the TV and to the Y PB PR jacks on the
HDTV Tuner.
3. Make the audio connection between your HDTV Tuner and the TV.
Connect the audio (white and red) cables to the CMP1 L and R audio jacks on the back of the TV and to the Audio
Output jacks on the HDTV Tuner.
4. Connect your HDTV Tuner to your VCR.
A. Connect a coaxial cable to the H1)TV Tuner's antenna output an(] to VCR's antenna input.
B. Connect the audio (white and red) cables to the Audio Output jacks on the HDTV Tuner and to the Audio Input
jacks on the VCR.
C. Connect the video cable to the Video Output jack on the HDTV Tuner an(] to the Video Input jack on the VCR.
5. Connect your VCR to your TV.
A. Connect a coaxial cable to the VCR's antenna output and to the ANTENNA/CABLE Input jack on the TV.
B. Connect the audio (white and red) cables to the VI1)2 L/MONO an(] R audio jacks on the back of the TV and to the
Audio Output jacks on the VCR.
C. Connect the video cable to the VID2 V (video) jack on the back of the TV and to the Video Output jack on the VCR.
6. Connect your DVD player to your TV.
A. Connect the audio (white and red) cables to the VID1 L/MONO and R Audio jacks on the back of the TV and to the
Audio Output jacks on the 1)V1) player.
B. If your DV1) player has an S-Video jack, connect an S-Video cable (instead of the video cable in step B) to the
S-VIDEO jack on the TV and to the S-V]DEO jack on the DVD player.
Notes: If your DVD player doesn't have an S-Video jack, connect the player to the YV's VID1 V (video)jack using a
video cable.
Go to page 14
Chapter I 7
SATELLITE
RECEIVER
TV
0OFF-AIBANTENN_
8Chapter 1
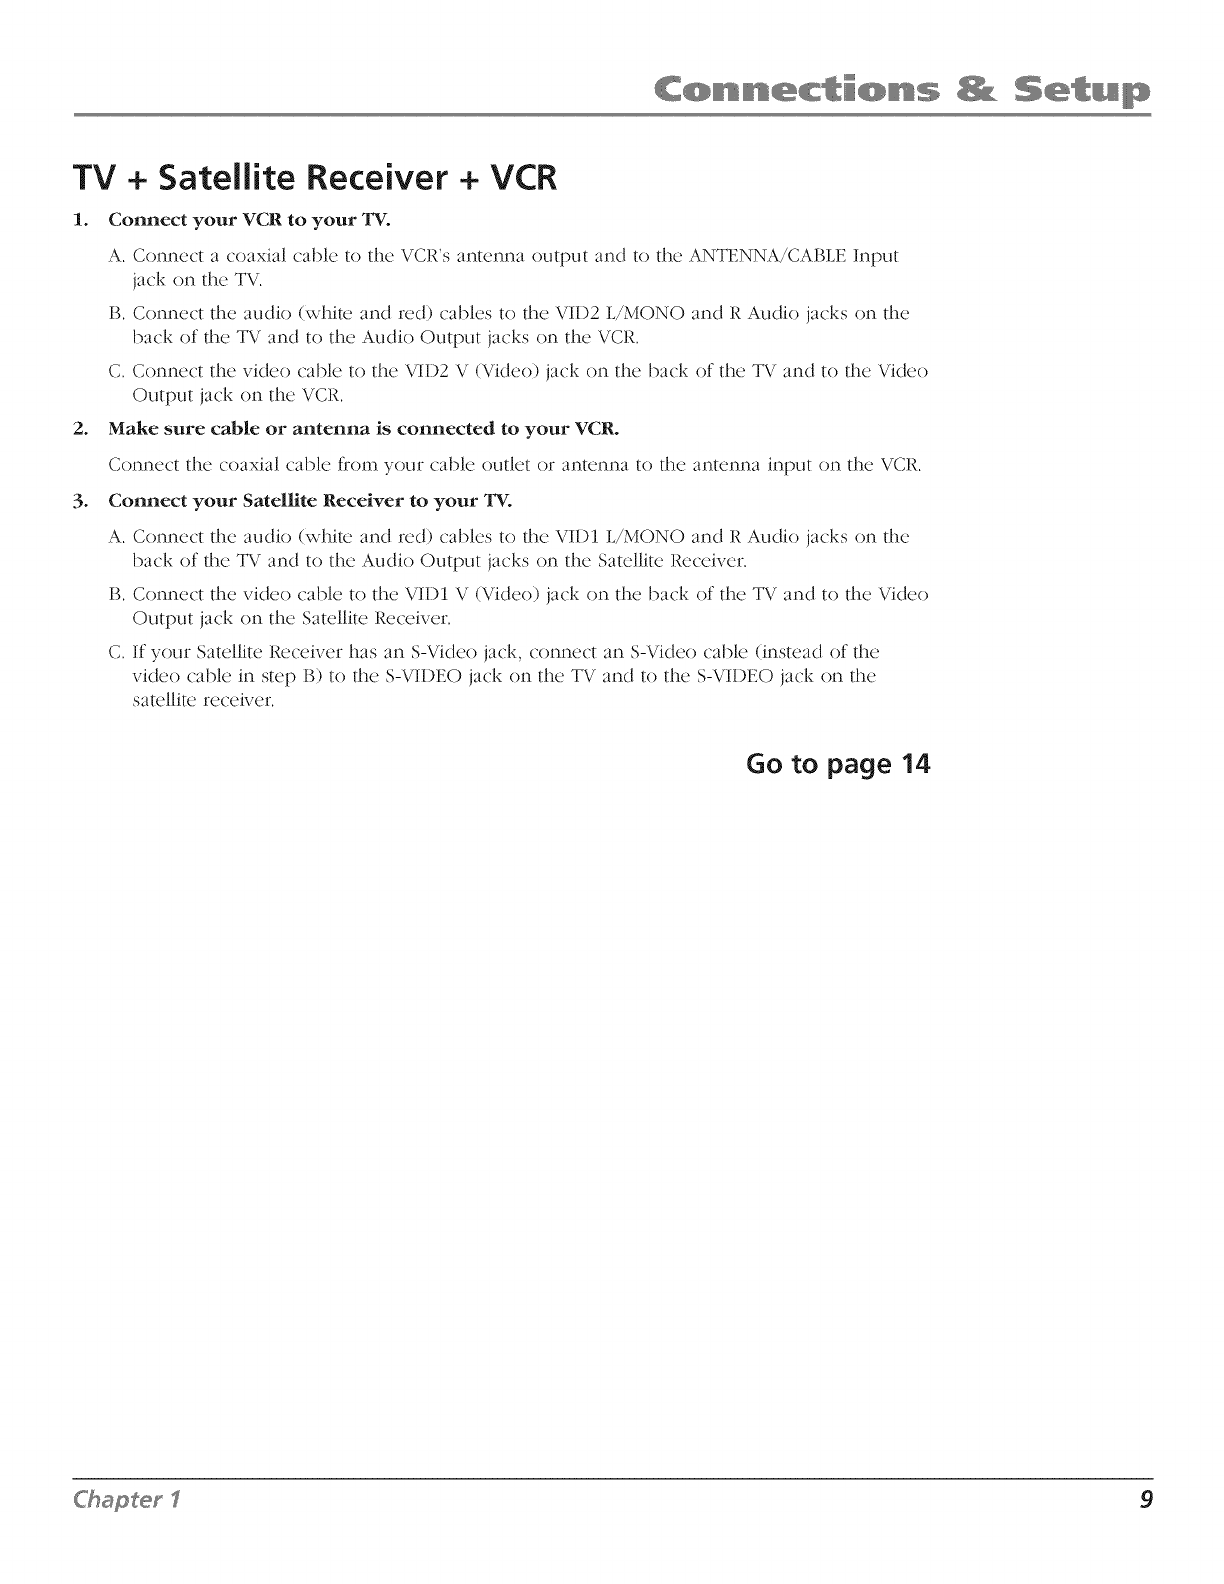
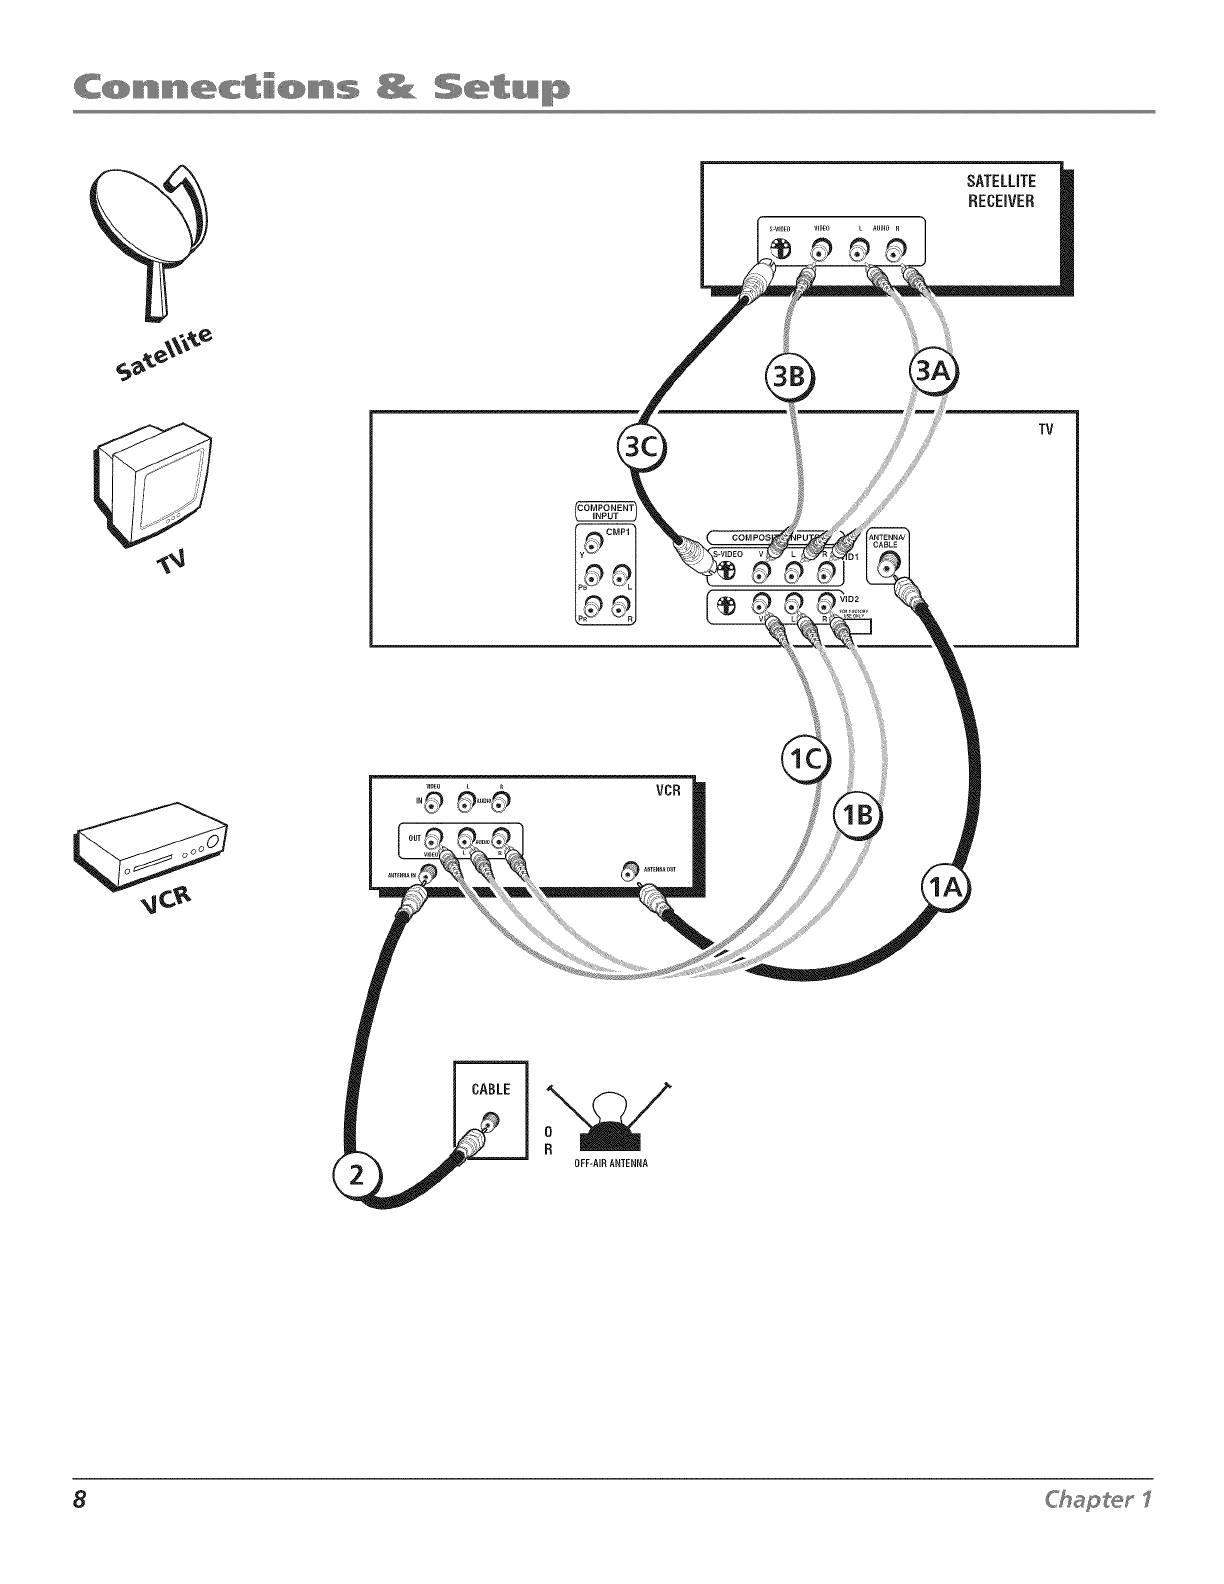
TV + Satellite
1.
2.
.
Receiver + VCR
Connect your VCR to your TV.
A. Connc('t a coaxial cable to the VCR's antenna output and to the ANTENNA/CABLE Input
jack on the TV.
B. Connect the audio (white and red) cables to the VID2 WMONO an(] R Audio jacks on the
back of the TV and to the Audio Output jacks on the VCR.
C. Connect the video cable to the VID2 V (Video) jack on the back of the TV and to the Video
Output jack on the VCR.
Make sure cable or antenna is connected to your VCR.
Connect the coaxial cable from your cable outlet or antenna to the antenna input on the VCR.
Connect your Satellite Receiver to your TV.
A. Connect the audio (white and red) cables to the VID1 L/MONO and R Audio jacks on the
back of the TV and to the Audio Output jacks on the Satellite Receiver.
B. Connect the video cable to the VID1 V (Video) jack on the back of the TV and to the Video
Output jack on the Satellite Receiver.
C. If your Satellite Receiver has an S-Video jack, connect an S-Video cable (instead of the
video cable in step B) to the S-VIDEO jack on the TV and to the S-VIDEO jack on the
satellite receiver.
Go to page 14
Ckapter I 9

y PB PR
TV
10 C_}apter I
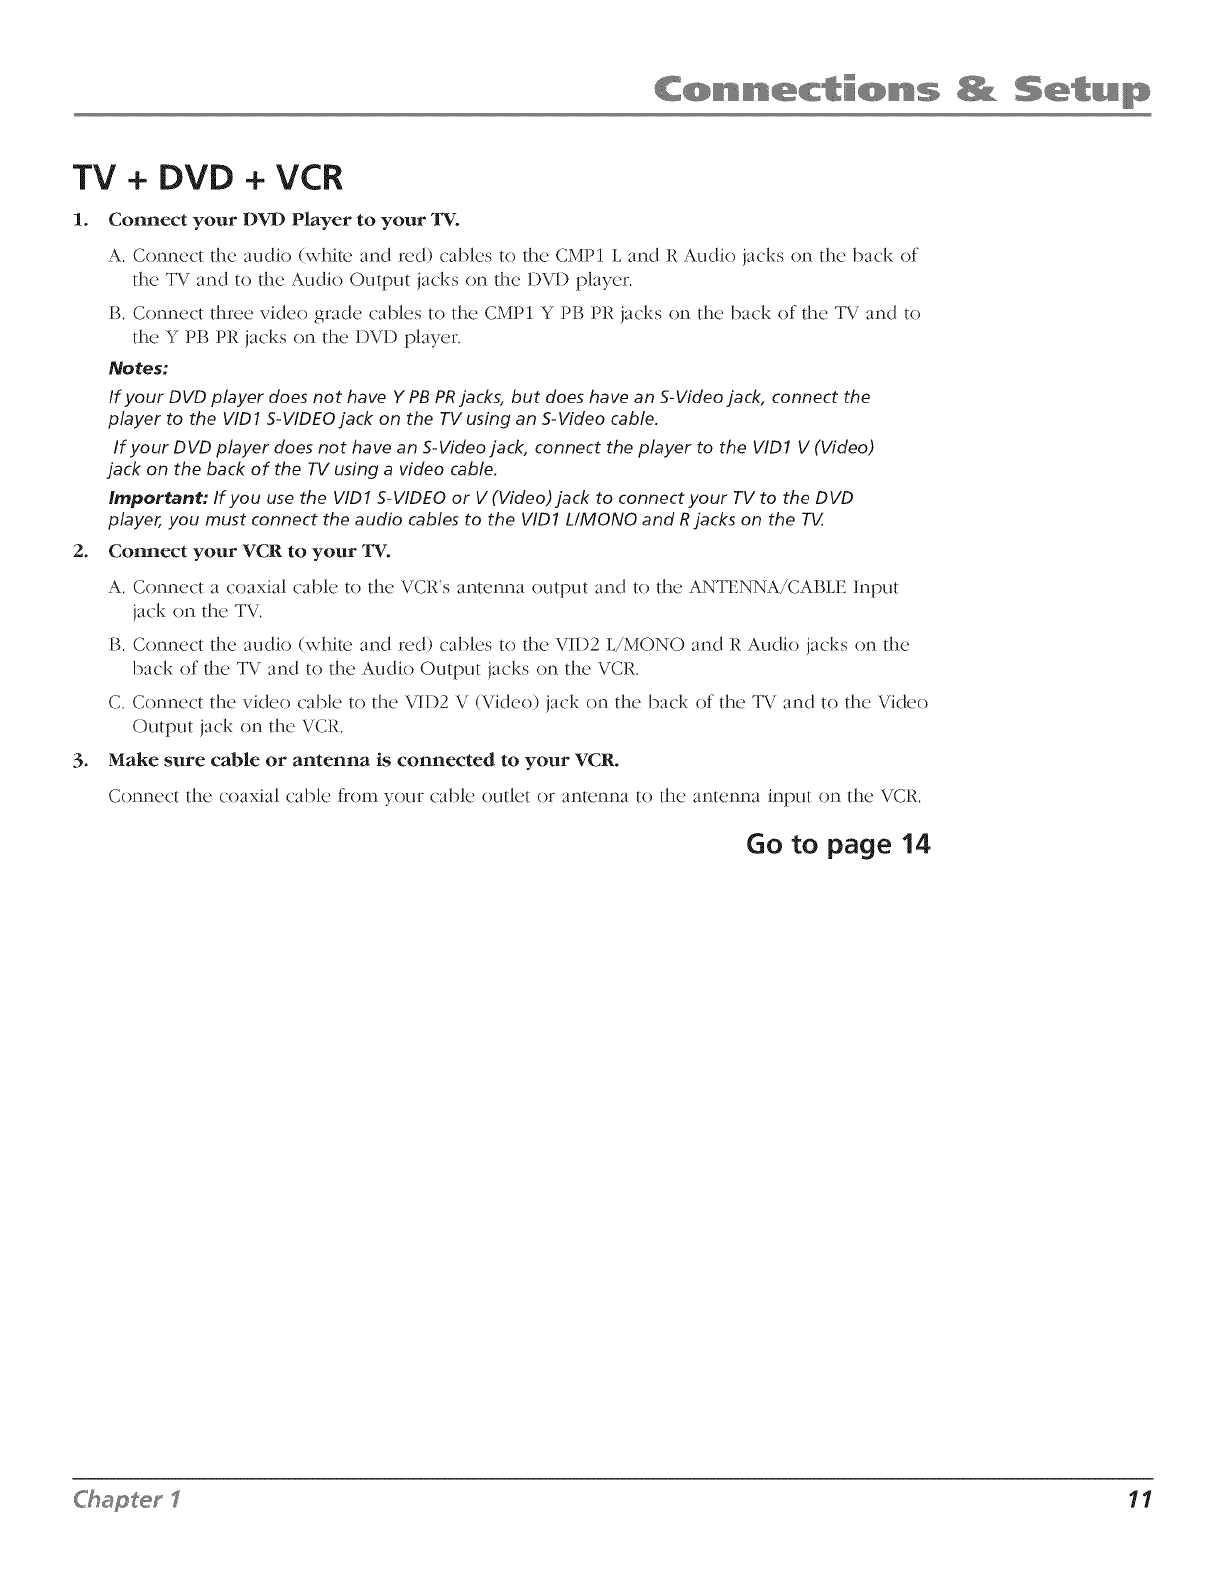
TV + DVD + VCR
1. Connect your DVD Player to your TV.
2.
A. Connect the audio (white and red) cables to d_e CMP1 L and R Audio jacks on the back of
the TV and to the Audio Output jacks on the 1)V1) player.
B. Connect d_ree video grade cables to the CMP1 Y PB PR jacks on d_e back of d_e TV and to
d_e Y PB PR jacks on dae DVD player.
Notes:
If your DVD player does not have Y PB PR jacks, but does have an S-Video jack, connect the
player to the VlD1 S-VIDEO jack on the TV using an S-Video cable.
If your DVD player does not have an S-Video jack, connect the player to the VID1 V (Video)
jack on the back of the TV using avideo cable.
Important: If you use the VID1 S-VIDEO or V (Video)jack to connect your TV to the DVD
player, you must connect the audio cables to the VID1 LIMONO and R jacks on the TV.
Connect your VCR to your TV.
A. Connect a coaxial cable to the VCR's antenna output and to the ANTENNA/CABLE Input
jack on the TV.
B. Connect the audio (white and red) cables to the VID2 L/MONO and R Audio jacks on the
back of the TV and to the Audio Output jacks on the VCR.
C. Connect the video cable to the VID2 V (Video) jack on the back of the TV and to the Video
Output jack on the VCR.
3. Make sure cable or antenna is connected to your VCR.
Connect the coaxial cable from your cable outlet or antenna to the antenna input on the VCR.
Go to page 14
Chapeer I11

Explanation of Jacks (in alphabetical order)
This section describes the jacks you can use to make connections. There are several ways to
connect components to your TV.
ANTENNA/CABLE Lets you c(mnect a coaxial cable to receive the signal from the
antenna, cable, cable box, or if using the examples on pages 6-11, a VCR.
INPUT
CMP1
COMPONENT INPUT Lets you connect a component video source, such as a DVD
player.
CMP1 YPB PR (Component Video) Provides optimum picture quality because
the video is separated into three signals. Use three video-grade cables for the
connection. When using CMP1 Y PB PR, make sure to connect left and right audio
cables to the CMP1 L and R Audio Input jacks.
• CMP1 L(Audio) Provides left audio connection. The left audio connector is
usually white.
• CMP1 R (Audio) Provides right audio connection. The right audio connector is
usually red.
COMPOSITE INPUTS )
COMPOSITE INPUTS Lets you connect another component such as a VCR, DVD
player, or laserdisc player. Its AUDIO jacks are the same as described for CMP1 above.
VID1 S-VIDEO Provides better picture quality than the video jacks (VID1 and 2
Video) because the color part of the picture is separated from the black and white
part of the picture. When using VID1 S-VIDEO, make sure to connect left and right
audio cables to the V]D1 L/MONO and R Audio Input jacks.
• VID1 V (Video) Provides composite video connection. The video connector is
usually yellow.
• VID2 S-VIDEO, V and IJMONO and RAudio Allows you to connect a component
such as a VCR, DVD player, or laserdisc player. Their description is the same as
VID1 above.
Note: For each VlD jack group (VlD1 and VlD2), you may connect either an S-Video
or Video cable. Do not connect both at the same time in either of the VID jack
groups.
12 Ckapter 1
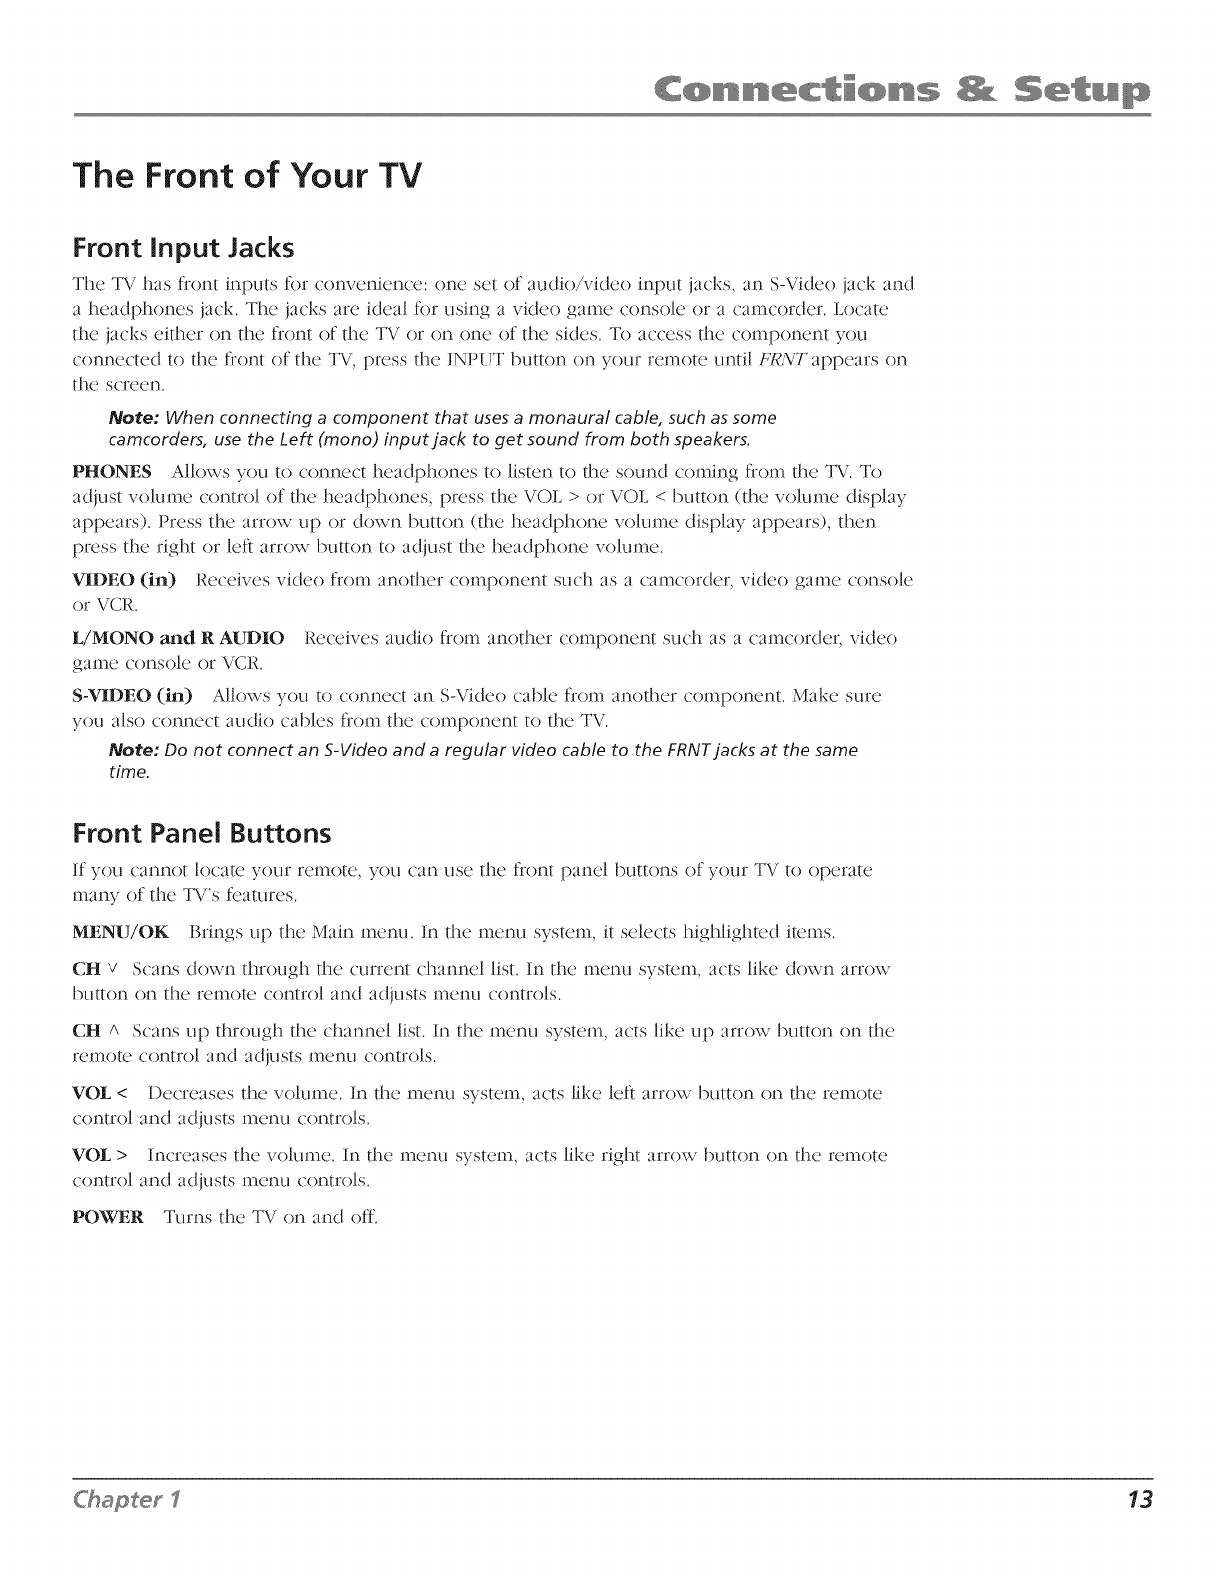
The Front of Your TV
Front input Jacks
The TV has flont inputs for convenience: one set of audioAddco input jacks, an S-Video jack and
a headphones jack. The jacks are ideal for using a vide() game console or a c'al_('order. Locate
the jacks either on the front of the TV or on one of the sides. To access the component you
connected to the front of the TV, press the INPUT button on your remote until FRNT appears on
the screen.
Note: When connecting acomponent that usesamonaural cable, such as some
camcorders, use the Left (mono) input jack to get sound from both speakers.
PHONES Allows you to connect headphones to listen to the sound coming from the TV. To
adjust volume control of the headphones, press the VOL > or VOL < button (the volume display
appears). Press the arrow up or down button (the headphone volume display appears), then
press the right or left arrow button to adjust the headphone volume.
VIDEO (in) Receives video from another component such as a camcorder, video game console
or VCR.
L/MONO and RAUDIO Receives audio from another component such as a camcorder, video
game console or VCR.
S-VIDEO (in) Allows you to connect an S-Video cable from another component. Make sure
you also connect audio cables from the component to the TV.
Note: Do not connect an S-Video and a regular video cable to the FRNYjacksat the same
time.
Front Panel Buttons
If you cannot locate your remote, you can use the front panel buttons of your TV to operate
many of the TV's features.
MENU/OK Brings up the Main menu. In the menu system, it selects highlighted items.
CH v Scans down through the current channel list. In the menu system, acts like down arrow
button on the remote control and adjusts menu controls.
CH /_ Scans up through the channel list. In the menu system, acts like up arrow button on the
remote control and adjusts menu controls.
VOL < 1)ecreases the volume. In the menu system, acts like left arrow button on the remote
control and adjusts menu controls.
VOL >Increases the volume. In the menu system, acts like right arrow button on the remote
control and adjusts menu controls.
POWER Turns the TV on and off.
Chapeer I13
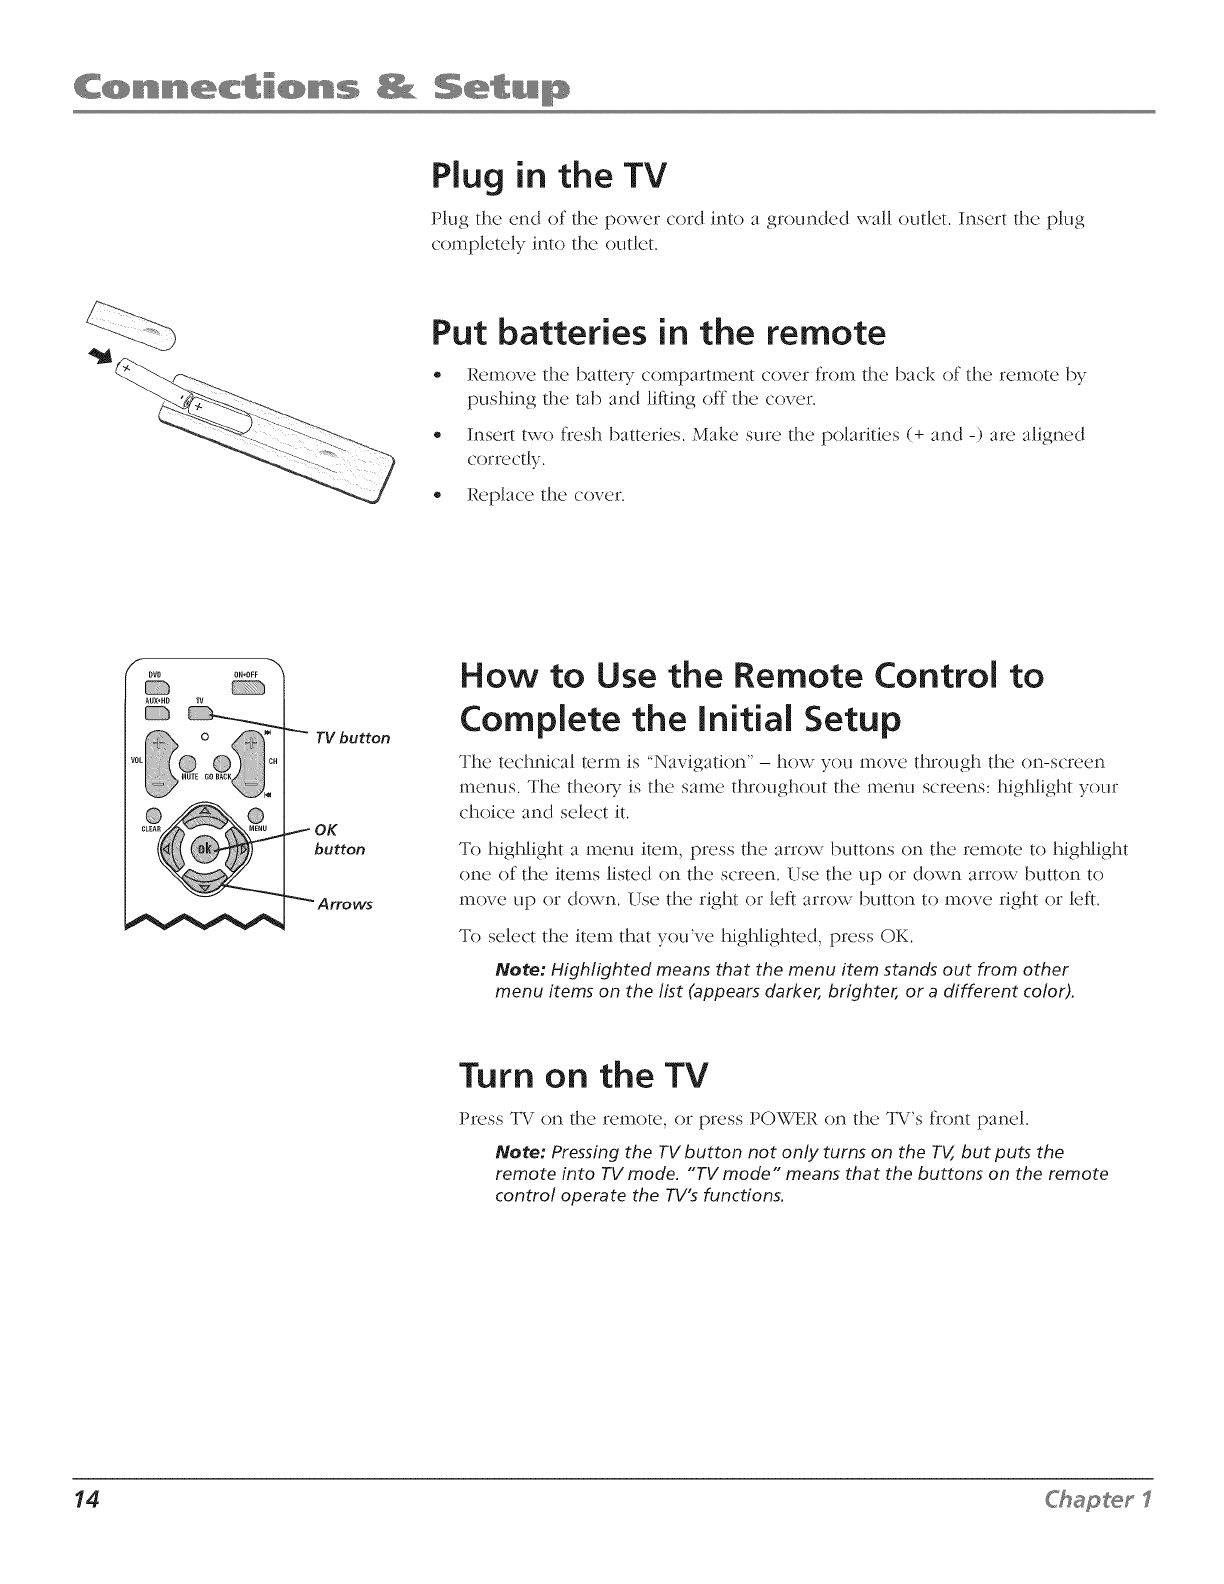
Hug in the TV
Plug the end of the power cord into a grounded wall outlet. Insert the plug
completely into the outlet.
Put batteries in the remote
Remove the battery compartment cover from the back of the remote by
pushing the tab and lifting off the cover.
Insert two flesh batteries. Make sure the polarities (+ and -) are aligned
c()rrectly.
• Replace the cover.
AUX_HD
ON*OFF
"_ TV button
button
How to Use the Remote Control to
Complete the Initial Setup
The technical term is "Navigation" -how you move through the on-screen
menus. The theory is the same throughout the menu screens: highlight your
choice and select it.
To highlight a menu item, press the arrow buttons on the remote to highlight
one of the items listed on the screen. Use the up or down arrow button to
move up or down. Use the right or left arrow button to move right or left.
To select the item that you've highlighted, press OK.
Note: Highlighted means that the menu item stands out from other
menu items on the list (appears darker, brighter, or adifferent color).
Turn on the TV
Press TV on the rc:n]ote, or press PO_'4%_R on the TV's front panel.
Note: Pressing the rV button not only turns on the TV, but puts the
remote into TV mode. "TV mode" means that the buttons on the remote
control operate the TV's functions.
14 Chapter 1
rO
To access the setup menus manually, press
MENU and choose SETUP.
Complete the Initial Setup
The menu system in your TV allows the TV's features to work properly. The first
time you turn on your TV, the setup screens appear. Complete the entire setup
sequence including Autoconvergence to prevent the setup screen from appearing
the next time the set is turned on.
Set the Menu Language
The first part of the setup allows you to select your prefc_rred language for the
1]]enu sys[el]].
If English is your preferred language, press OK. If you want to choose another
language, press the down arrow button until that language is highlighted, and
pre.'ss OK.
Complete Auto Channel Search
The nextscreenasksyou tomake sure you've conne('[(.%{ [I](2TV to a cable,
satellite, or off-air signal. When you're sure that a signal is connected to your TV,
pre.'ss OK on your re.'mote to go to the Channel setup screen.
In the Channel setup screen, you can launch the Auto channel search by
pressing OK. The Auto channel search allows the TV to search for all channels
viewable through your antenna or cable TV system. This is sometimes called aztto
programming. When the channel search is complete, press OK to access the List &
Labels screen.
Changing Lists and Labels
The List & Labels part of the setup lets you edit your chann(.q list and choose or
create a personal six-character label for each channel.
1.
2.
Note: Changing List and Labels can be time consuming. You can change
these at a later time by accessing the Setup menu.
Press the left or right arrow to scroll through the channels and choose the one
you want to edit.
Press the down arrow to highlight the.' In channel list option. Press the left
or right arrow button to add (the box is checked) or re.'move (the box is
und_ecked) the channel flom the list.
.
.
5.
.
Press the down arrow to highlight the Channel label option. Press the left
or right arrow button to scroll through the available list of 25 most common
labels. The last option in the list allows you to create your own six-character
label for the channel (the first letter of the label is highlighted).
Press the 1 or 2 number button to change the first letter of the label.
Press the right arrow to highlight the.' second letter, then pre.'ss the 1 or 2
number button to change the second letter, etc...
When you are finished creating your label, pre.'ss OK. Select Go back to go to
the Az_to Conz:e<_ence me.nu. Continzces on next page...
Chapter _15
Note:
If you're using an HD source (such as an
HDTV tuner or HDTV satellite receiver) on
the CMPNT input, you should run Auto
convergence separately for that input as well
Tune to the input you're using for the HD
source, then go to page 38 for information on
Auto convergence.
Auto Convergence
Your TV's picture tubes might have been disturbed during dclivcI T or after you
moved the TV, causing the color in your TV to be out of alignment. The colors
adjust by starting auto convergence.
1.
2.
.
IMPORTANT."Auto convergence works best once the TV has warmed up for
at least an hour. If you've just unpacked your TV, it's agood idea to repeat
the Auto convergence function when the TV's been running for at least an
hour. Seepage 38 for more information about Auto convergence.
Press OK to begin auto convergence.
When the auto convergence is complete, the Red cet_ter cotweJi_et_ce menu
appears. The cross in the middle of the screen shouk/be yellow. If it is not,
use the arrow buttons to move the red cross to overlap the green cross. Press
OK when adjustments are complete.
The Blzw ce_zter cotweJi_et_ce menu appears with a cyan cross in the middle
of the screen. If it is not, use the arrow buttons to move the blue cross to
overlap the green cross. Press OK (the TV tunes to the last selected/available
channel in the channel list).
16 Ckapter 1
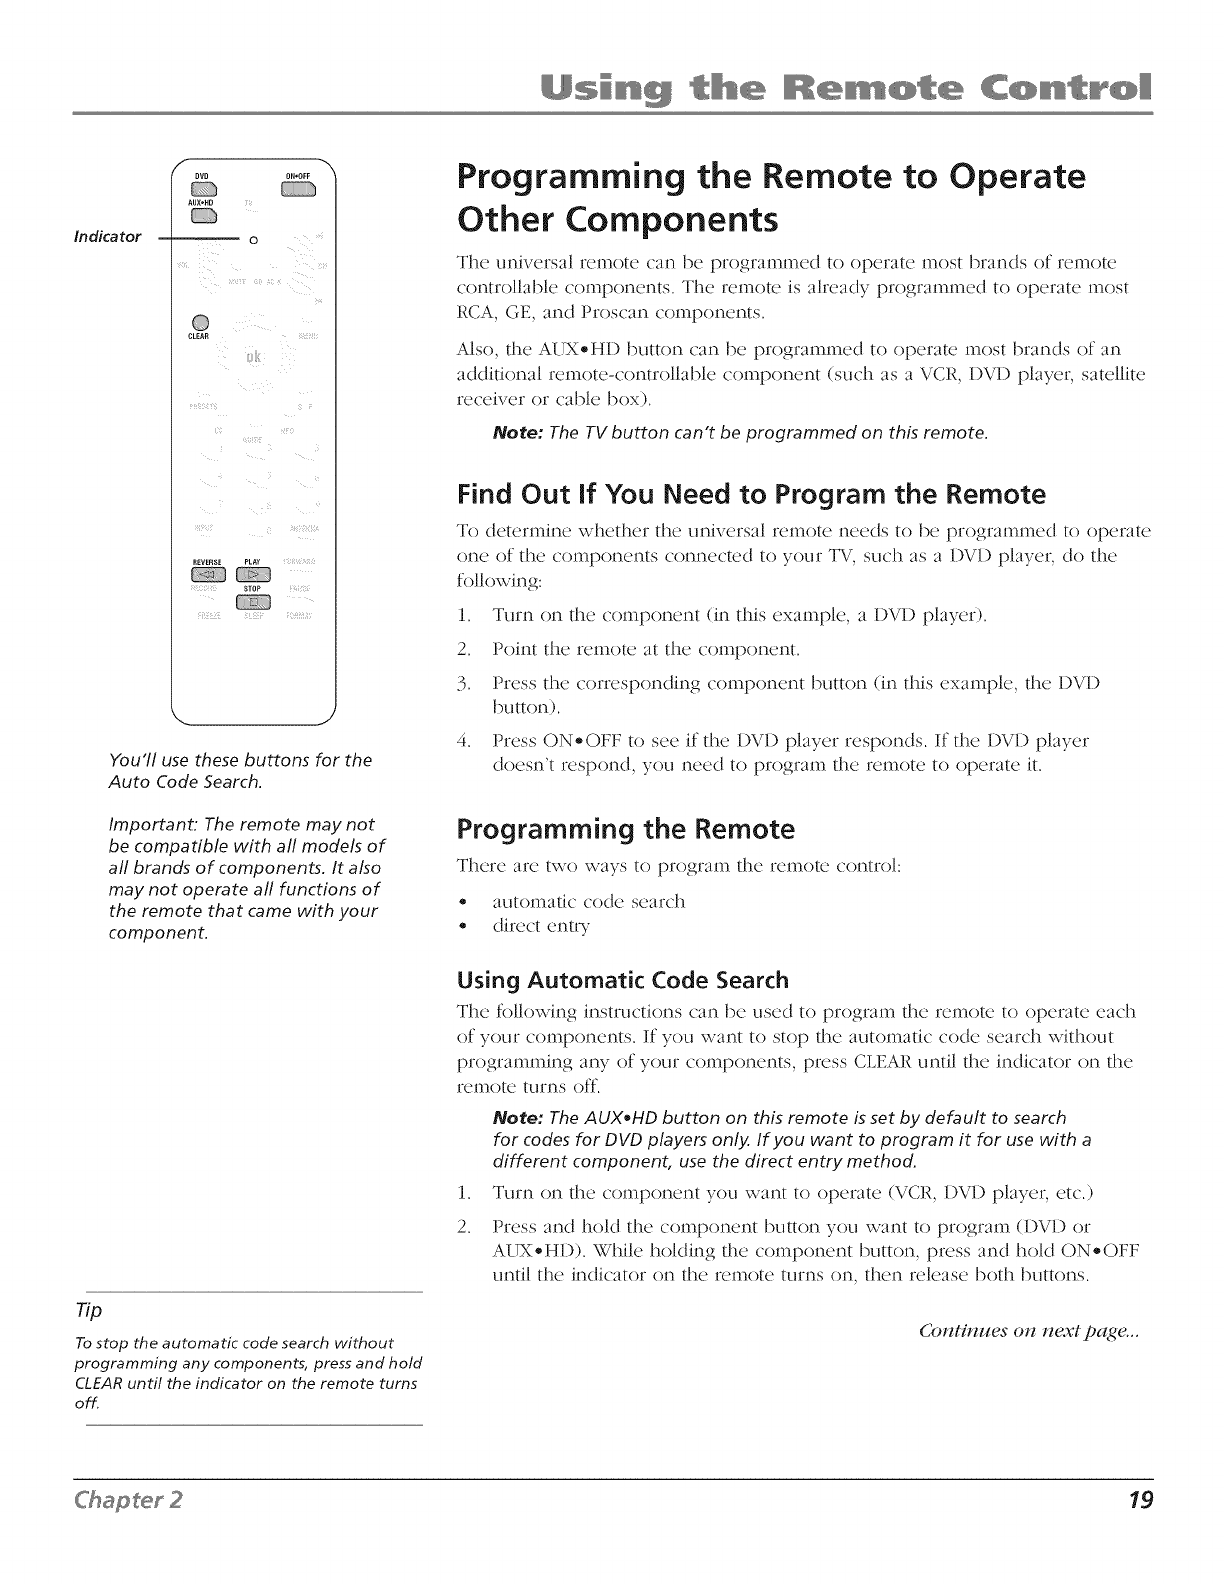
In dica tor
f
DVD
AUX.HD TV
ON*OFF
_/OL
iERU
PRESETS
CC
iNPUT
GUIDE
SKIP
REVERSE
RECORD
FREEZE
PLAY
STOP
SLEEP
ANTENNA
FORWARD
PAUSE
FORMAT
J
The Buttons on the Remote ControJ
(0-9) Number Buttons Enter channel numbers and time settings directly
through the remote control.
To enter a one-digit channel, enter a zero first. To enter a two-digit channel,
press the two (limits. To enter a three-digit channel, press and hold the 1 button
until 1 and two clashes (--) appear, then add the second Pwo (limits. Example:
to tune to channel 123, press and hold 1 until 1- - appears, release the 1 button
and then press 2and 3.
ANTENNA In VCR mode (if programmed), this button works as a TV/VCR
button for some VCRs. In SAT mode (if programmed), this button works as a
TV/SAT button for some satellite receivers.
Arrows Used to highlight different items in the TV menu and to adjust the
menu controls. When watching TV without the menu system in use, the left and
right arrows change the current format of the screen, exactly like the FOI_MAT
button described below.
AUX=HD Puts the remote in AUX/HD mode. As a default, this button controls
some models of RCA HDTV Tuners. It can also be programmed to operate
some brands of an additional remote-controllable components. The Automning
feature for this button works on/y with HDTV tuners (see page 23 for more
information on Autotuning).
CC Displays a reduced Closed Captioning menu, allowing you to turn closed
captioning on and oft"or change the closed captioning mode. Use the up and
down arrow buttons to highlight the setting you want to change. Use the lef_
and right arrow buttons to change the highlighted setting.
CH +or CH - Scans up or down through the current channd list. Press once
to change the channd up or down; press and hold to continue changing
channds. In DVD mode (if programmed), these buttons work as chapter
advance or chapter reverse buttons with some DVD players.
CLEAR Removes ;my menu or display from the screen and returns you to
normal viewing.
DVD Puts the remote in DVD mode and, if Autotuning is enabled, will turn on
the TV and tune to the correct input channel.
FORMAT Changes the current format (aspect ratio and magnification) of the
image on the screen.
FREEZE When watching TV, freezes the picture until you press any button
on the remote to resume normal TV viewing. The FREEZE feature automatically
times out after a short time. Please note that when you "unfreeze" you go back
to live programming (skipping aw programming that occurred during the
freeze).
Note: The FREEZE feature does not work on signals from the CMP1 input in
progressive scan (480p) or HDTV (10800 modes.
Do not use the Freeze feature for an extended period of time. This can cause
the image to be permanently imprinted on the picture tube. Such damage is
not covered by your warranty. Press any button to unfreeze the picture at any
time.
Ckapeer 2
Continues on next page...
Graphics contained within this I)zcblication are for representation only. 17
The indicator flashes when the remote
batteries are low and you press abutton on
the remote.
A warning banner may also appear on the
screen when you press aremote button and
your batteries are low.
To turn off all the RCA, GE, and Proscan
components that are connected to the TV,
press ON*OFF twice within two seconds.
This feature only works with most RCA, GE,
and Proscan products.
Note:
The DVD and AUX*HD buttons also turn on
most RCA, GE, and Proscan products.
GO BACK Returns you to the previous channel.
GIRDE Brings up the Cbat_t_o[ Gztide menu.
Indicator Indicates the programming mode when programming the remote to
control components. The indicator lights up when you press a valid button on
the remote. It flickers when the remote batteries are low and you press a button.
INFO Brings up channel banner; press again to clear the screen.
INPUT Press to toggle through the available input sources (VII)l, VI1)2, FRNT
and CMP1--press the CH+ or CH- button to resume TV viewing).
MENU Brings up the Main menu.
MUTE Reduces the TV's volume to its minimum level. Press again to restore
the volume.
OK When in the menu system, selects highlighted items. When watching
TV, fleezes the picture until you press any button on the remote to resume
normal TV viewing. Please note that when you "unfreeze" you go back to live
programming (skipping any programming that occurred during the freeze).
ON-OFF When in TV mode, turns the TV on and off. If in another component
mode (DV1) or AI _X-H1)) and programmed, will turn the component on and
off. When pressed twice within two seconds, the ON-OFF button turns off most
RCA, GE and Proscan components.
PRESETS 1)isplays the Picture and Sound preset settings. Use the up and down
arrow buttons to highlight either Picture or Sound settings. Use the left and right
arrow buttons to change to a different Picture or Sound preset.
REVERSE, PIAY, FORWARD, RECORD, STOP, PAUSE If programmed,
provides transport control for some remote-controllable VCRs and DVD players.
SLEEP 1)isplays the Sleep Timer. Each press adds an additional 15 minutes.
SKIP Press once before changing channels and the TV will wait 30 seconds
before returning you to the original channel. Press repeatedly to add more time.
TV Turns on the TV and puts the remote in TV mode. Also displays current
status.
VOL- or VOL + 1)ecreases or increases the TV's volume.
18
Indica tor
f
ON*OFF
AUX*HD
@
CLEAR
REVERSE PLAY
STOP
You'll use these buttons for the
Auto Code Search.
Important: The remote may not
be compatible with all models of
all brands of components. It also
may not operate all functions of
the remote that came with your
component.
Tip
To stop the automatic code search without
programming any components, press and hold
CLEAR until the indicator on the remote turns
off.
Programming the Remote
Other Components
to Operate
The universal remote can be programmed to operate most brands of remote
controllaNe components. The remote is already programmed to operate most
RCA, GE, and Proscan components.
Also, the AUX-HD button can be programmed to operate most brands of an
additional remote-controllable component (such as a VCR, DVD player, satellite
receiver or cane box).
Note: The TV button can't be programmed on this remote.
Find Out If You Need to Program the Remote
To determine whefl_er the universal remote needs to be programmed to operate
onc Of [hc con_poncl_[S conncc'[cd to }7()/lr TV, s/ic'h as a DVD player, do the
following:
1. Turn on the component (in this example, a DVD player).
2. Point the remote at the component.
3. Press the corresponding component button (in this example, the DVD
button).
4. Press ON-OFF to see if the DVD player responds. If the DVD player
doesn't respond, you need to program the remote to operate it.
Programming the Remote
There are two ways to program file remote control:
* automatic code search
* direct enti T
Using Automatic Code Search
The following instructions can be used to program the remote to operate each
of your components. If you want to stop the automatic code search without
programming aw of your components, press CLEAR until the indicator on the
remote turns off.
1.
Note: The AUX*HD button on this remote is set by default to search
for codes for DVD players only. If you want to program it for use with a
different component, use the direct entry method.
Turn on the component you want to operate (VCR, DVD player, etc.)
2. Press and hold the component button you want to program (DVD or
AUX*HD). While holding the component button, press and hold ON-OFF
until the indicator on the remote turns on, then release boda buttons.
Continues on next page...
Chapter 2 19
Important
You must continue pressing the component
button while you enter the code.
Let's say you have a Zenith DVD player. To
program the universal remote to operate the
DVD player, you would:
Press and hold the DVD button while you
enter the first code listed for Zenith in the
DVD Codes column.
Release the DVD button. Press ON*OFF to
see if the DVD player responds. If it doesn't,
follow the same steps, but enter the second
code for Zenith DVD players instead of the
first.
3. Point the remote at the component. Keep the remote pointed at the
component until the end of this step.
Press and release PLAY, then wait 5 seconds or until the indicator on the
remote stops flashing.
At this point the remote is searching for the correct code to program. I[
after 5 seconds, the component you want to operate does not turn off,
press PLAY again to tell the remote to search the next set of codes.
Continue pressing PLAY until the component turns off or the indicator ligb
on the remote turns off'. If the indicator light turns off, then all codes for that
particular component have been tested once. If the component does not turn
off, then flx_ remote can't be programmed to operate that component.
If the component you want to control does turn off:
1. Press and release REVERSE, then wait 2 seconds. Repeat this step until the
device turns back ON.
2. To finish, press and holt] STOP until the indicator on the remote turns off.
A code that controls your component has been saved to that remote button.
Using Direct Entry
1. Turn on the component to be programmed.
2. Look up the brand and code number(s) for the component on the code list
in this section.
.
4.
.
Press and holt] the component button you want to program on the remote.
Enter the code from the remote control code list on the following pages. If
the indicator flashes, you have either entered an invalid code or the button
isn't programmable.
Release the component button. Point the remote at the component. Keep
the remote pointed at the component until the end of this step.
Press ON-OFF to see if the component responds to the command. If it
doesn't, tU pressing the component button and then ON-OFF again.
If you get no response, repeat these steps using the next code listed for
your brand, until the component responds to the remote commands.
If you txT all the codes for your component brand anti none work, tlT the
automatic code search method. If automatic code search doesn't find the
code, the remote is not compatible with your component.
2O
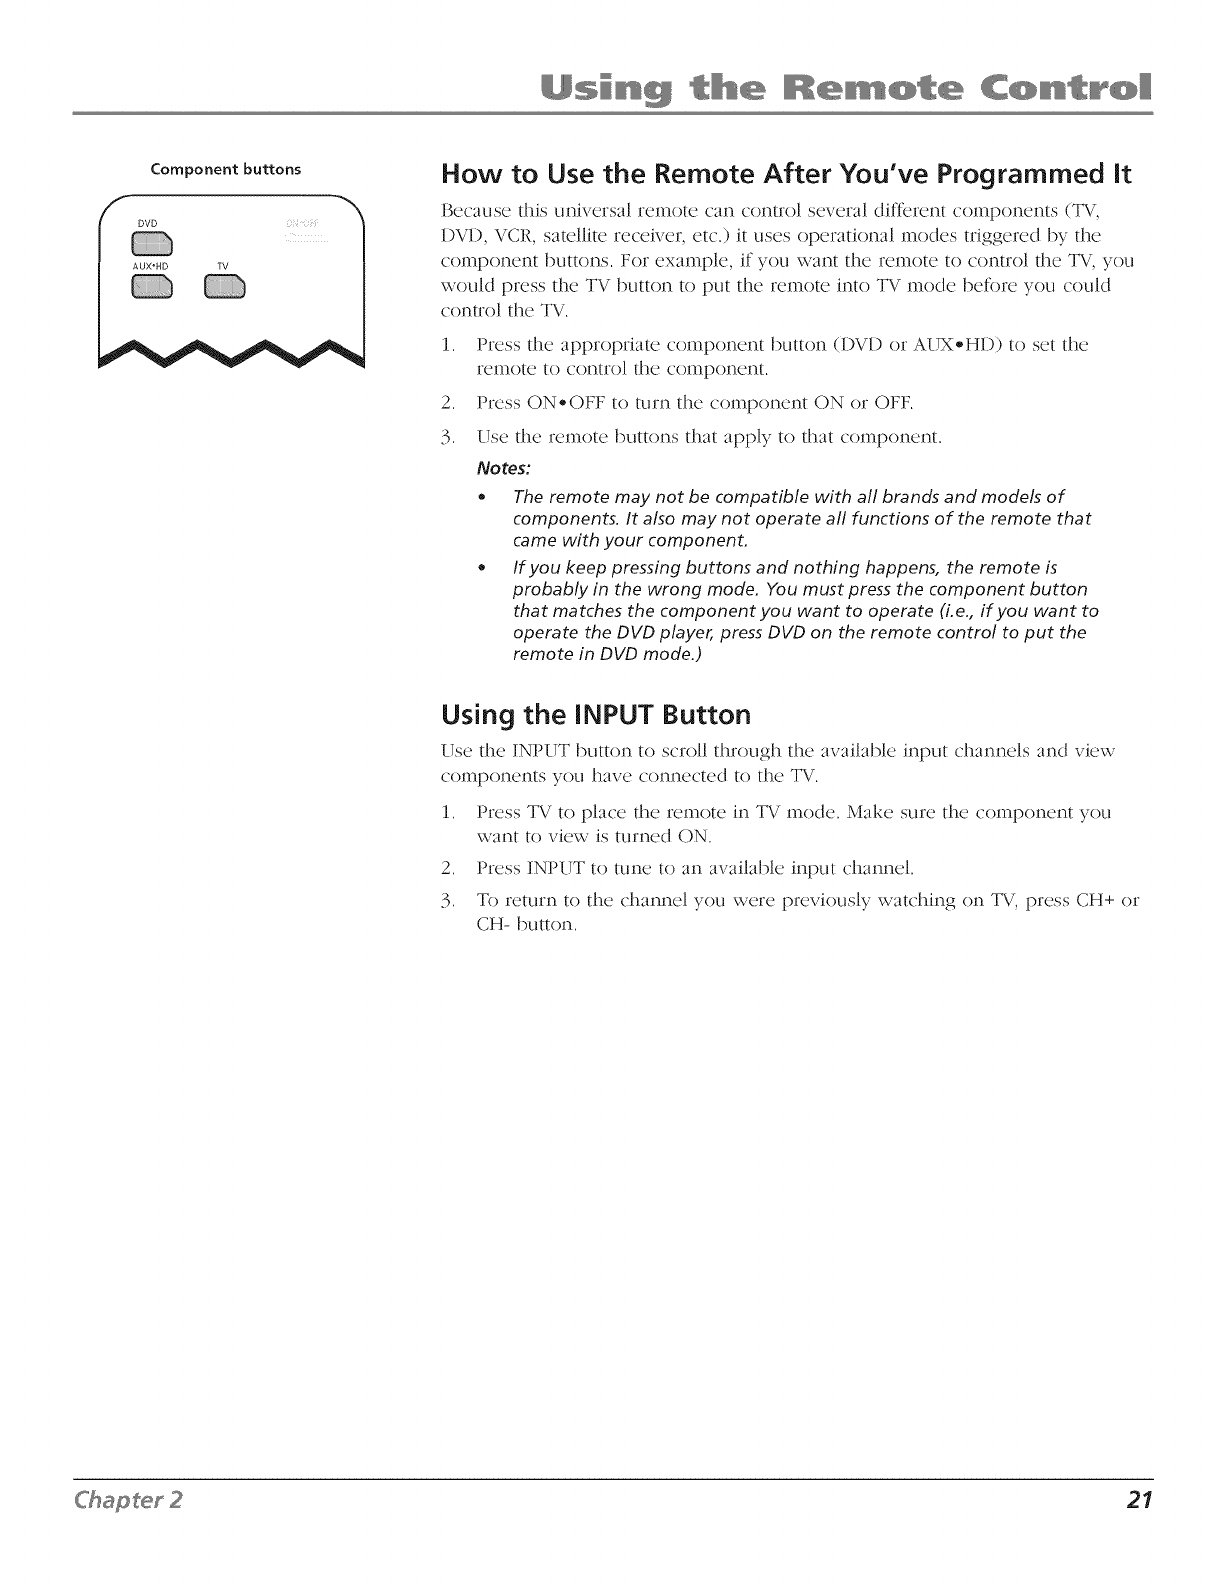
Component buttons
DVD
AUX'HD TV
How to Use the Remote After You've Programmed It
Bcx'ause this universal r(m_otc ('an control several diffcrcmt c'ompon(_nts (TV,
1)V1), VCR, satellite rcx'civcr, etc.) it uses operational modcm triggered by the
component buttons. For example, if you want the remote to control the TV, you
would press the TV button to put the remote into TV mode before you could
control the TV.
1.
2.
3.
Press the appropriate component button (DV1) or AUX-HD) to set the
remote to control the component.
Press ON-OFF to turn the component ON or OFF.
Use the remote buttons that apply to that component.
Notes:
The remote may not be compatible with all brands and models of
components. It also may not operate all functions of the remote that
came with your component.
If you keep pressing buttons and nothing happens, the remote is
probably in the wrong mode. You must press the component button
that matches the component you want to operate (i.e., if you want to
operate the DVD player, press DVD on the remote control to put the
remote in DVD mode.)
Using the INPUT Button
[Is<.,the INPUT button to scroll through the available input c'hannels and view
components you have connected1othe TV.
1. Press TV to place the remote in TV mode. Make sure the component you
want to view is turned ON.
2. Press INPUT to tune to an available input channel.
3. To return to the channel you were previously watching on TV, press CH+ or
CH- button.
Chapter 2 21
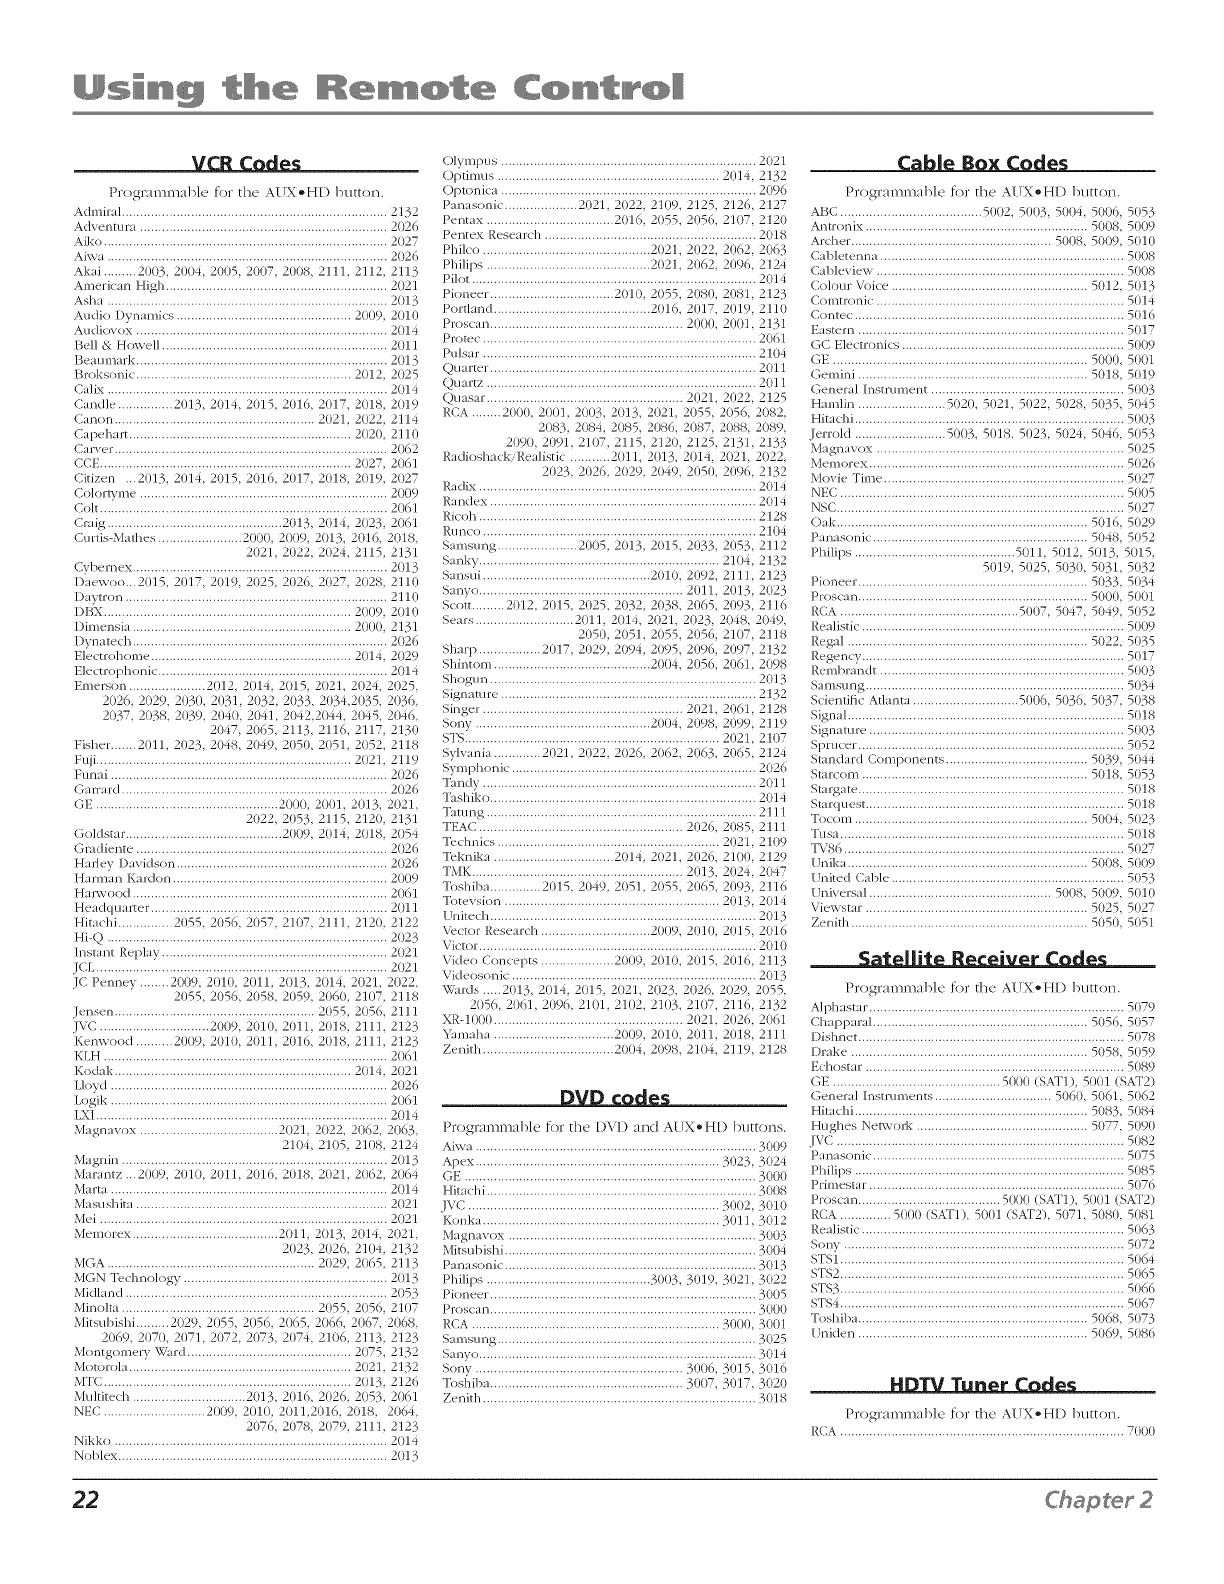
VCR Codes
P_'ogrammal)le for the AUX-HD I)utto,_.
Admiral ......................................................................... 2132
Adventura .................................................................... 2026
Aiko .............................................................................. 2027
Aiwa ............................................................................. 2026
Akai ......... 2()03, 2()04, 2005, 2007, 2()08, 2111, 2112, 2113
American High ............................................................. 2021
Asha ............................................................................. 2013
Audio Dynamics ................................................ 20()9, 201()
Audk)vox ..................................................................... 2014
Bell & Howell .............................................................. 2011
Beau mark ..................................................................... 2{i)13
Broksonic ........................................................... 2{)12, 2025
Calix ............................................................................. 2014
Candle ............... 2013, 2014, 2{)15, 2()]6, 2017, 2018, 2019
Canon ....................................................... 2()21, 2022, 2114
Capehal"t ............................................................. 2{)2{),211()
Carver ........................................................................... 2062
CCE ..................................................................... 2027, 2061
Citizen ... 2()]3, 2014, 2015, 2{)16, 2()]7, 2()]8, 2{)19, 2027
Coloru'me .................................................................... 2009
Colt ............................................................................... 2{i)61
Craig ................................................ 2013, 2014, 2{i)23, 2061
Curtis-Mathes ....................... 2000, 2{i)(i)9,2{i)13, 2(i)16, 2(i)18,
2{)21, 2022, 2()24, 2115, 2131
Cybemex ...................................................................... 2013
Daewoo... 2()]5, 2017, 2019, 2{)25, 2()26, 2()27, 2{)28, 211()
Daytron ........................................................................ 211()
DBX .................................................................... 2{i)09, 2010
Dimensia ............................................................ 20(}0, 2131
Dynatech ...................................................................... 2<i)26
Electrohome ....................................................... 2014, 2029
Electrophonic ............................................................... 2014
Emerson ..................... 2()12, 2(}14, 2015, 2()21, 2(}24, 2025,
2<i)26,2<i)29,2030, 2031, 2<i)32,2<i)33,2034,2(1135, 2036,
2037, 2038, 2(}39, 2040, 2041, 20422044, 2045, 2(}46,
2<i)47,2<i)65,2113, 2116, 2117, 2130
Fisher ....... 2(}11, 2023, 2048, 2049, 2050, 2(}51, 2052, 2118
Fuji ...................................................................... 2021, 2119
Funai ............................................................................ 2026
Ganard ......................................................................... 2026
GE .................................................. 2000, 2001, 2013, 2(}21,
2<)22, 2053, 2115, 212<i),2131
Golclstal" ........................................... 2009, 2(}14, 2018, 2054
Gmdiente ..................................................................... 2026
Hmiey 1)avidson .......................................................... 2<i)26
Hannah Kardon ........................................................... 2<i)(19
Hm'wood ...................................................................... 2<i)61
Headquarter ................................................................. 2011
Hitachi ............... 2055, 2<i)56,2<)57, 21<)7, 2111, 212<), 2122
Hi-Q ............................................................................. 2{i)23
Instant Replay .............................................................. 2021
JCI................................................................................. 2021
JC Penney ........ 2009, 2010, 2(}11, 2013, 2014, 2021, 2(}22,
2055, 2<i)56,2<)58, 2059, 2060, 2107, 2118
Jensen ....................................................... 2055, 2<i)56,2111
JVC .............................. 2009, 2()1(}, 2011, 2018, 2111, 2123
Kenwood .......... 2009, 2010, 2011, 2(}16, 2(}18, 2111, 2123
KLH .............................................................................. 2{i)61
Kodak ................................................................. 2014, 2021
Lloyd ............................................................................ 2<i)26
Logik ............................................................................ 2061
LXI ................................................................................ 2014
Magnavox ...................................... 2<i)21,2022, 2062, 2063,
2104, 2105, 2108, 2124
Magnin ......................................................................... 2013
Mal"antz ... 2009, 2010, 2<i)11,2<)16, 2018, 2021, 2<)62, 2<i)64
Mal"ta ............................................................................ 2014
Masushita ..................................................................... 2021
Mei ............................................................................... 2021
Memorex ........................................ 2011, 2013, 2014, 2(}21,
2(}23, 2026, 2104, 2132
MGA ......................................................... 2029, 2{)65, 2113
MGN T_chnology ........................................................ 2{i)13
Midland ........................................................................ 2<i)53
Mino]ta ..................................................... 2055, 2{i)56, 21(117
Mitsubishi ......... 2<i)29,2(1155,2056, 2<i)65,2066, 2(1167,2068,
2069, 2(}70, 2071, 2072, 2073, 2(}74, 2106, 2113, 2123
Montgome_ 7Ward ............................................. 2<i)75,2132
Motorola ............................................................. 2<i)21,2132
MTC .................................................................... 2{i)13, 2126
Muhitech ............................... 2013, 2016, 2026, 2<)53, 2061
NEC ............................ 2(11<)9,2010, 2011,2016, 2<)18, 2064,
2076, 2078, 2(}79, 2111, 2123
Nikko ........................................................................... 2014
Noblex .......................................................................... 2013
Olympus ...................................................................... 2<i)21
Optimus ............................................................. 2014, 2132
Optonica ...................................................................... 2{i)96
Panasonic .................... 2(}21, 2022, 2109, 2125, 2126, 2127
Pentax ................................... 2<)16, 2<)55, 2(1156,21<)7, 212<i)
Pentex Research .......................................................... 2018
Philco .............................................. 2<i)21,2022, 2062, 2<i)63
Phi]ips ............................................. 2021, 2062, 2096, 2124
Pilot .............................................................................. 2{i)14
Pioneer .................................. 2010, 2055, 2080, 2081, 2123
Portland ........................................... 2<)16, 2017, 2019, 211<i)
Pros(:an ..................................................... 2(11<)(11,2001, 2131
Protec ........................................................................... 2061
Pulsm" ........................................................................... 2104
Qu m'ter ......................................................................... 2011
Quartz .......................................................................... 2<i)11
Quasar ...................................................... 2021, 2022, 2125
RCA ........ 2000, 2001, 2<i)03,2<i)13,2021, 2055, 2<i)56,2<i)82,
2(1183,2<i)84,2085, 208& 2087, 2<i)88,2<i)89,
2090, 2091, 2107, 2115, 2120, 2125, 2131, 2133
Radiosl'mckiRealistic ........... 201L 2(}13, 2(}14, 2021, 2022,
2023, 2(}26, 2029, 2049, 2050, 2096, 2132
Radix ............................................................................ 2014
Randex ......................................................................... 2014
Ricoh ............................................................................ 2128
Run co ........................................................................... 2104
Samsung ...................... 2(}05, 2013, 2015, 2033, 2053, 2112
Sanky .................................................................. 2104, 2132
Sansui .............................................. 2010, 2092, 2111, 2123
Sanyo ........................................................ 2(1111,2013, 2<i)23
Scott ......... 2<i)12,2(1115,2025, 2<)32, 2038, 2065, 2093, 2116
Sears ........................... 2011, 2014, 2(}21, 2(}23, 2048, 2049,
2050, 2<i)51,2<i)55,2(1156,21<i)7,2118
Sharp ................. 2(1117,2029, 2<)94, 2<i)95,2(1196,2097, 2132
Shintom ........................................... 2<)(114,2(1156,2061, 2098
Shogun ......................................................................... 2<i)13
Signature ...................................................................... 2132
Singer ....................................................... 2{)21, 2061, 2128
Sony ................................................ 2004, 2098, 2099, 2119
STS...................................................................... 2021, 2107
Sylvania ............. 2(1121,2022, 2<)26, 2<)62, 2(1163,2065, 2124
Symphonic ................................................................... 2{i)26
Tandy ........................................................................... 2()11
Tashiko ......................................................................... 2014
Tatung .......................................................................... 2111
TEAC ........................................................ 2(1126,2085, 2111
Technics ............................................................. 2021, 2]09
Teknika ................................. 2{)14, 202], 2026, 2100, 2129
TMK .......................................................... 2013, 2024, 2047
Toshiba .............. 2015, 2049, 2{)51, 2{)55, 2065, 2093, 2116
Totevsion ........................................................... 2013, 2014
Unitech ......................................................................... 2013
V_ct()r Research .............................. 2009, 2010, 2015, 2016
Victor ............................................................................ 2010
Video Concepts .................... 2{)([}9,2{)1{),2015, 2016, 2113
Videosonic ................................................................... 2013
Wards ..... 2(}13, 2(}14, 2015, 2021, 2(}23, 2(}26, 2029, 2055,
2056, 2061, 2096, 21{)1, 2102, 2]03, 2107, 2116, 2132
XR-1000 .................................................... 202L 2026, 206]
Yanmha ................................. 2009, 2010, 2011, 2018, 211]
Zenith .................................... 2004, 2{)98, 21{)4, 2119, 2128
DVD codes
Pl"ogl'ammal)]{ _ fol" th{ _ DV°D at_cl AI_JX- HD I)uttons.
Aiwa ............................................................................. 3(i)09
Apex ................................................................... 3023, 3024
GE ................................................................................ 3000
Hitachi .......................................................................... 3(i)08
JVC ..................................................................... 3{i}(i)2,3(i)1(i)
Konka ................................................................. 3011, 3012
Magnaw_x .................................................................... 3(i)03
Mitsubishi ..................................................................... 3004
Panasonic ..................................................................... 3013
Philips ............................................. 30(}3, 3019, 3021, 3022
Pioneel" ......................................................................... 3(i)05
Proscan ......................................................................... 3(i)0(i)
RCA .................................................................... 3000, 3001
Samsung ....................................................................... 3025
Sanyo ............................................................................ 3014
Sony ......................................................... 3{i}(i)6,3{i}15,3(i)16
Toshiba ..................................................... 3007, 3017, 3020
Zenith ........................................................................... 3018
Cable Box Codes
Pl'{_gl'ammal)]{ _ fol" th(' AUX- HD I)utton.
ABC ....................................... 5002, 5003, 50(}4, 5006, 5{i}53
Antronix ............................................................. 5008, 5{i}(i)9
Al"cher ....................................................... 5008, 5009, 5()10
Cal)]etenna ................................................................... 5008
Cal)]eview. ................................................................... 5008
Co]ore" Voice ...................................................... 5012, 5013
Comtl"onic .................................................................... 5014
Conte(: .......................................................................... 5{i}16
Eastern ......................................................................... 5017
GC Electronics ............................................................. 5{i}(i)9
GE ...................................................................... 500(}, 5001
C,emini ............................................................... 5018, 5019
General InstlTument ..................................................... 5(}03
Hamlin ........................ 502(}, 5(}21, 5022, 5028, 5035, 5045
Hitachi .......................................................................... 5{i}(i)3
.{en:old ......................... 5003, 5{i}18.5{i}23,5024, 5046, 5{i}53
Magnavox .................................................................... 5{i}25
Memorex ...................................................................... 5{i}26
Movie Time .................................................................. 5027
NEC .............................................................................. 5{i}(i)5
NSC ............................................................................... 5{i}27
Oak ..................................................................... 501& 5{i}29
Panasonic ........................................................... 5()48, 5052
Phi]ips ............................................ 5011, 5{)12, 5013, 5015,
5{i}19,5{i}25,5030, 5(i)31, 5{i}32
Pioneer ............................................................... 5033, 5034
Pl"osca n ............................................................... 5000, 5{i}(i)1
RCA ................................................. 5007, 5047, 5049, 5052
Realistic ........................................................................ 5{i}(i)9
Regal .................................................................. 5022, 5{i}35
Regency ........................................................................ 5{i}17
Rembrandt ................................................................... 5{i}(i)3
Samsung ....................................................................... 5034
Scientific Atlanta ............................. 5{i}{i}6,5036, 5037, 5{i}38
Signal ............................................................................ 5018
Signature ...................................................................... 5{i}(i)3
Spruce1" ......................................................................... 5{i}52
Standard C()mponents ....................................... 5039, 5044
Stal"com .............................................................. 5018, 5(i}53
Stalgate ......................................................................... 5(i}18
Starquest ....................................................................... 5018
Tocotn ................................................................ 5004, 5023
"[usa .............................................................................. 5(}]8
TV86 ............................................................................. 5{i}27
[!nika .................................................................. 5008, 5009
United Cal)le ................................................................ 5053
Universal .................................................. 5008, 5009, 5010
Viewstar ............................................................. 5025, 5027
Zenith ................................................................. 5050, 5(i}51
Satellite Receiver Code_
Pl'ogl'ammal)]{ _ fol" th{ _ AI_JX- HD I)utto_.
Alphastal" ...................................................................... 5079
Chappaml ........................................................... 5056, 5057
Dishnet ......................................................................... 5078
D_'ake ................................................................. 5<)58, 5059
Echostar ....................................................................... 5089
GE .............................................. 5000 (SAT1), 5{i}(i)1(SAT2)
General Instruments ................................ 5<)6<),5<i)61,5062
Hitachi ................................................................ 5<i)83,5084
Hughes NeB.vork ............................................... 5077, 5090
JVC ............................................................................... 5082
Panasonic ..................................................................... 5075
Phi]ips .......................................................................... 5085
Primestar ...................................................................... 5(}76
P_'oscan ....................................... 5000 (SAT1), 5001 (SAT2)
RCA .............. 50(}0 (SAT1), 500] (SAT2), 507], 5080, 5081
Realistic ........................................................................ 5063
Sony ............................................................................. 5072
STS1 .............................................................................. 5064
STS2 .............................................................................. 5065
STS3 .............................................................................. 5066
STS4 .............................................................................. 5067
Toshiba ............................................................... 5068, 5073
!]niden ............................................................... 5<)69, 5086
HDTV Tuner Codes
Programmable for the AUX-HD I)utton.
RCA .............................................................................. 7(}0(}
22
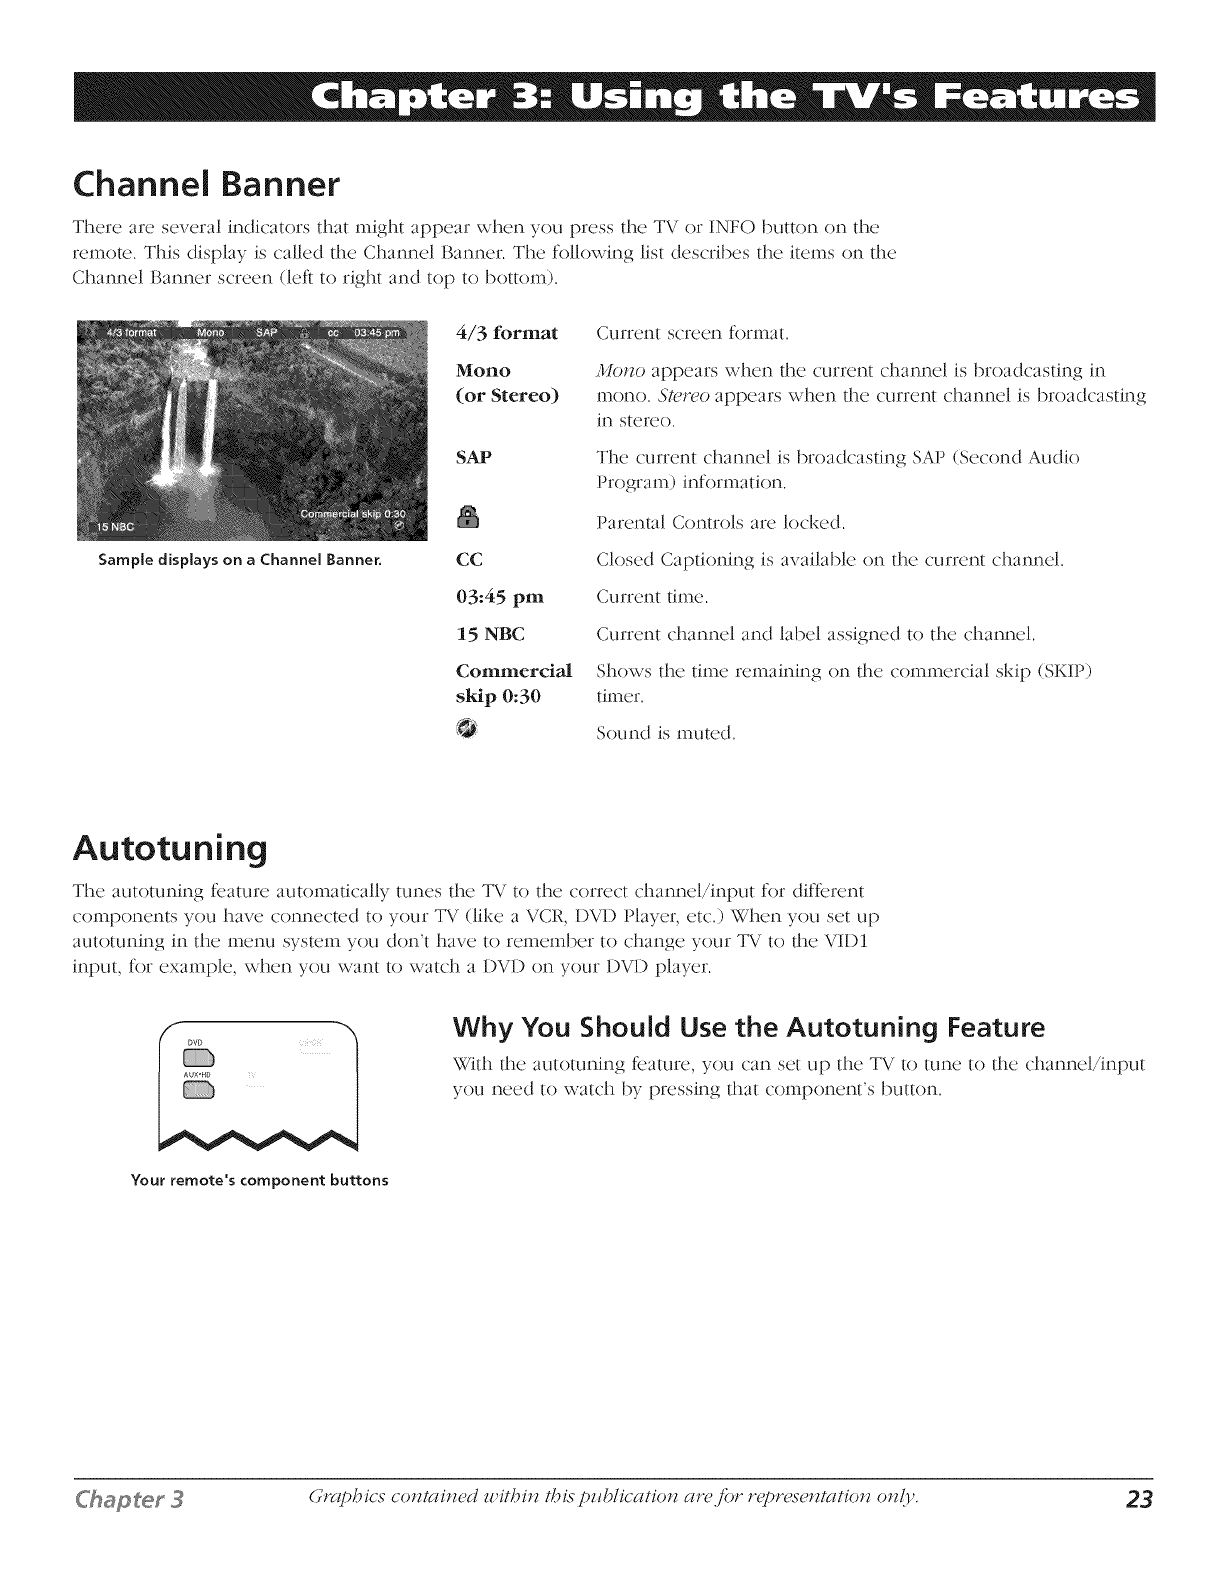
Channel Banner
There are several indicators that might appear when you press the TV or INFO button on the
remote. This display is called the Channel Banner. The following list describes the items on the
Channel Banner screen (left to right and top to bottom).
Sample displays on a Channel Banner.
4/3 format
Mono
(or Stereo)
SAP
CC
03:45 pin
15 NBC
Commercial
skip 0:30
Current screen format.
Mo,zo appears when the current channel is broadcasting in
mono. ,5't_'J_'o appears when the current channel is broadcasting
in stereo.
The current channel is broadcasting SAP (Second Audio
Program) information.
Parental Controls are locked.
Closed Captioning is available on the current channel.
Current time.
Current channel and label assigned to the channel.
Shows the time remaining on the commercial skip (SKIP)
timer.
Sound is muted.
Autotuning
The autotuning feature automatically tunes the TV to the correct channel/input for different
components you have connected to your TV (like a VCR, DVD Player, etc.) When you set up
autotuning in the menu system you don't have to remember to change your TV to the VID1
input, for example, when you want to watch a DVD on your DVD player.
Your remote's component buttons
Why You Should Use the Autotuning Feature
With the autotuning feature, you can set up the TV to tune to the channel/input
you need to watch by pressing that component's button.
_¢?ap_eY _ Graphics co_zmi_zed u,itbi_z t/.)is pzcblicatio_z are for rcprese_zmtio_z o_z/y. 23
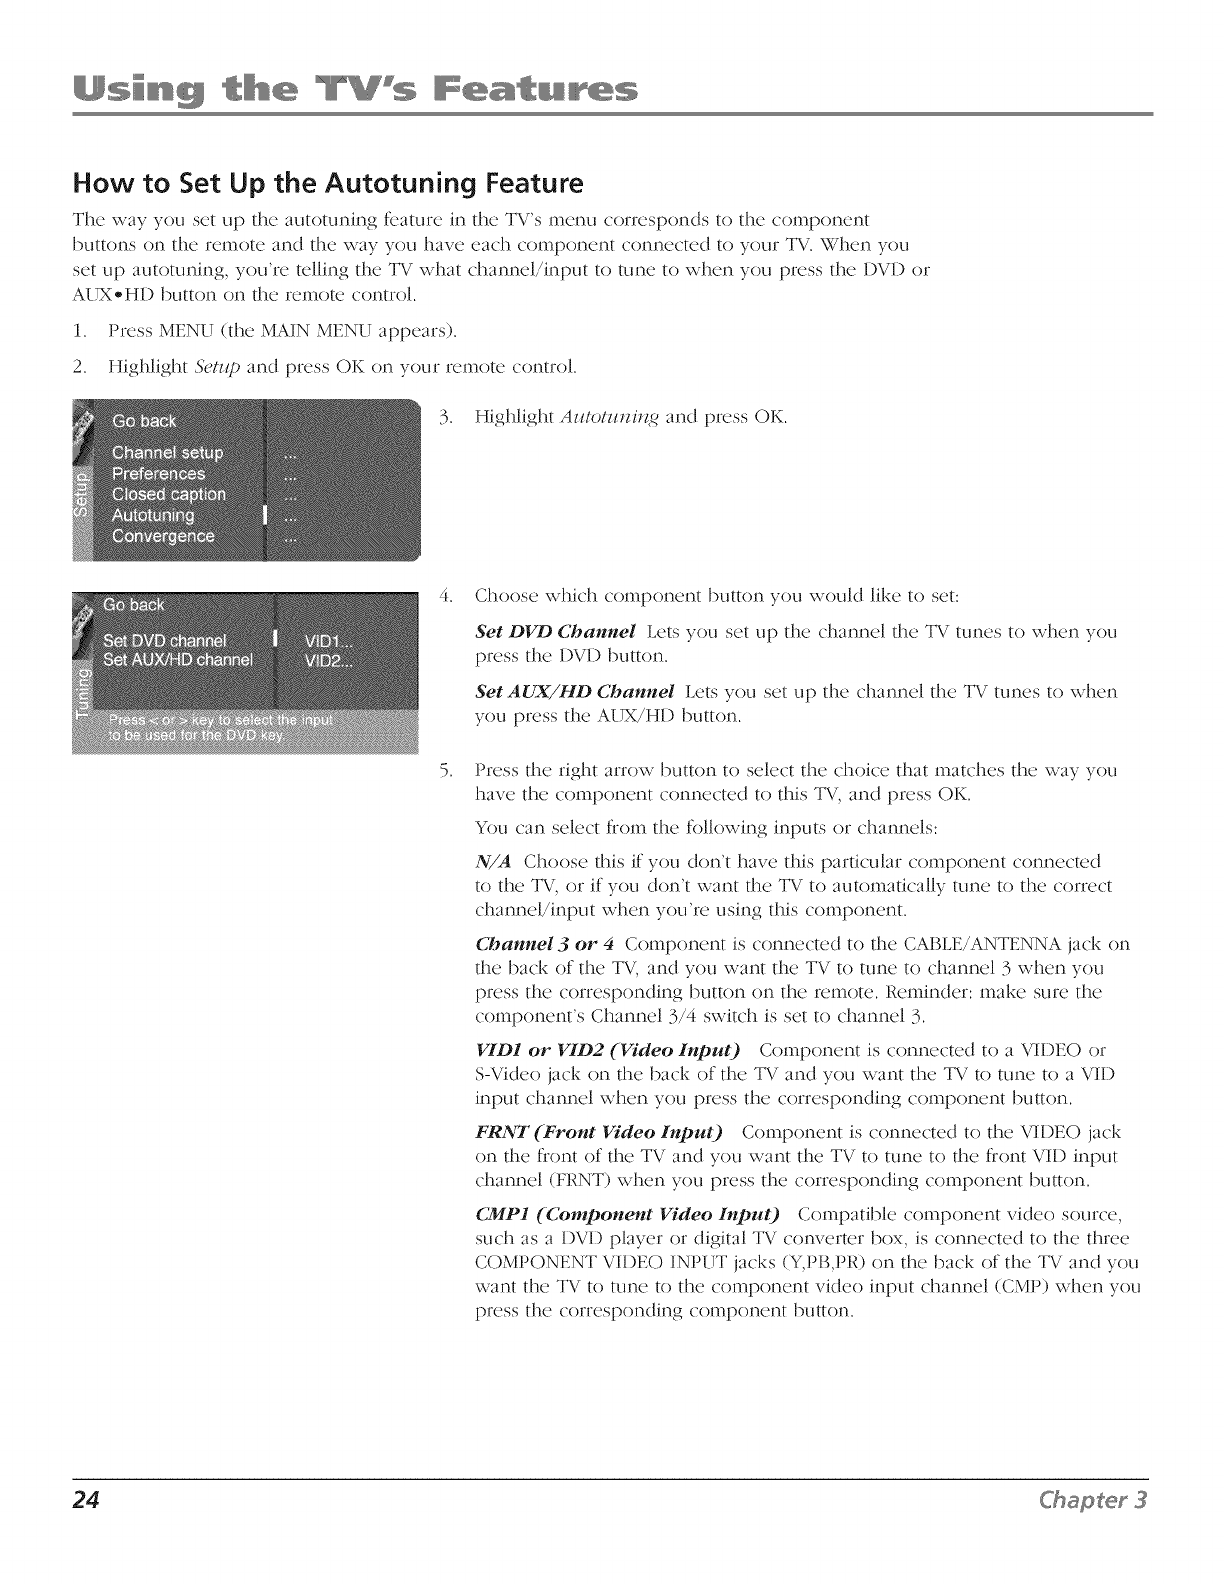
How to Set Up the Autotuning Feature
The way you set up the autotuning ff?ature in the TV's menu ('orresponds to the ('omponent
buttons on the remote and the way you have each component connected to your TV. When you
set up autotuning, you're telling the TV what channel/input to tune to when you press the DVD or
AUX-HD button on the remote control.
1. Press MENU (the MAIN MENU appears).
2. Highlight &'tztp and press OK on your remote control.
3. Highlight Azttotzttzit?g and press OK.
.
.
Choose which component button you would like to set:
Set DVD Channel Lets you set up the channel the TV tunes to when you
press the DVD button.
Set AUX/HD Channel Lets you set up the channel the TV tunes to when
you press the AUX/HD button.
Press the right arrow button to select the choice that matches the way you
have the component connected to this TV, and press OK.
You can select from the following inputs or channels:
N/A Choose this if you don't have this particular component connected
to the TV, or if you don't want the TV to automatically tune to the correct
channel/input when you're using this component.
Channel3 or 4 Component is connected to the CABLE/ANTENNA jack on
the back of the TV, and you want the TV to tune to channel 3 when you
press the corresponding button on the remote. Reminder: make sure the
•/
component's Channel 3/4 switch is set to channel 3.
VID1 or VID2 (Video Input) Component is connected to a VIDEO or
S-Video jack on the back of the TV and you want the TV to tune to a VID
input channel when you press the corresponding component button.
FRNT (Front Video Input) Component is connected to the VIDEO jack
on the front of the TV and you want the TV to tune to the front VID input
channel (FRNT) when you press the corresponding component button.
CMP1 (Component Video Input) Compatible component video source,
such as a DVD player or digital TV converter box, is connected to the three
COMPONENT VIDEO INPUT jacks (Y,PB,PR) on the back of the TV and you
want the TV to tune to the component video input channel (CMP) when you
press the corresponding component button.
24 Ckapter 3
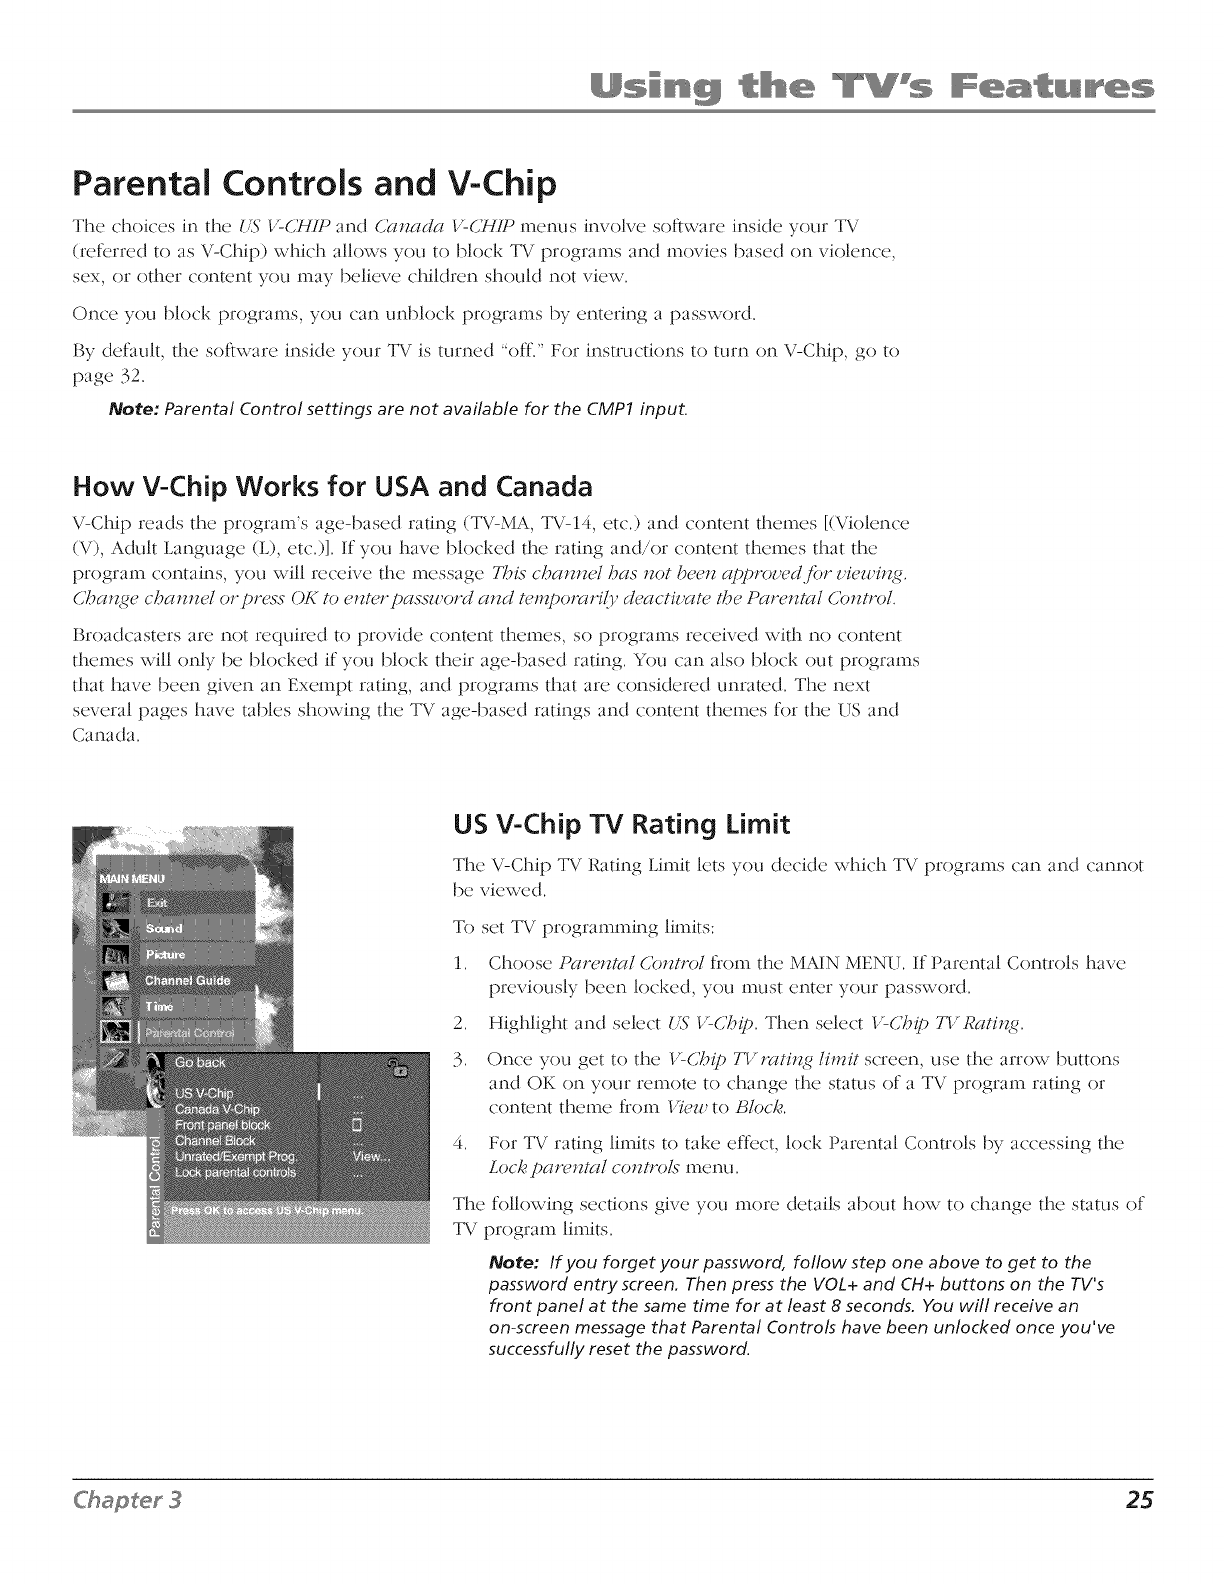
Parental Controls and V-Chip
The choices in die LS' V-CHIP al"_d (;atzac/a I,ZCHIP menus involve software: inside yo/lr TV
(referred to as V-Chip) which allows you to block TV programs and movies based on violence,
sex, or other content you may believe children should not view.
Once you block programs, you can unblock programs by entering a password.
By default, the software inside your TV is turned "off." For instructions to turn on V-Chip, go to
page 32.
Note: Parental Control settings are not available for the CMP1 input.
How V-Chip Works for USA and Canada
V-Chip reads die program's age-based rating (TV-MA, TV-14, eW.) and content themes [(Violence
(V), Adult Language (L), etc.)]. If you have blocked the rating and/or content themes that the
program contains, you will receive the message TMs chatztzel has tzot beetz a/)/)roued,/'or z,,iewitzg.
ChatNe chatztze/ or press OK to etztur password atzd tum/)oJzH"ily deactiz,,atu the Paretzta/ Cotztl_)L
Broadcasters are not required to provide content themes, so programs received with no content
themes will only be blocked if you block their age-based rating. You can also block out programs
that have been given an Exempt rating, and programs that are consictered unrated. The next
several pages have tables showing the TV age-based ratings and content themes for the [IS and
Canada.
US V-Chip TV Rating Limit
The V-Chip TV Rating Limit lets you decide which TV programs can and cannot
be viewed.
To set TV programming limits:
1. Choose Paretztal Cotztro/from the MAIN MENU. If Parental Controls have
previously been locked, you must enter your password.
2. Highlight and select LS' V-Chit). Then select V-Chit) TV Ratit_.
3. Once you get to the V-CMI) TI,:rating limit screen, use the arrow buttons
and OK on your remote to change the status of a TV program rating or
content theme from I,,Tewto Blocb.
.For TV rating limits to take effect, lock Parental Controls by accessing the
Lock;parutzta/ cotztrols menu.
The following sections give you more details about how to change the status of
TV program limits.
Note: If you forget your password, follow step one above to get to the
password entry screen. Then press the VOL+ and CH+ buttons on the TV's
front panel at the same time for at least 8 seconds. You will receive an
on-screen message that Parental Controls have been unlocked once you've
successfully reset the password.
25
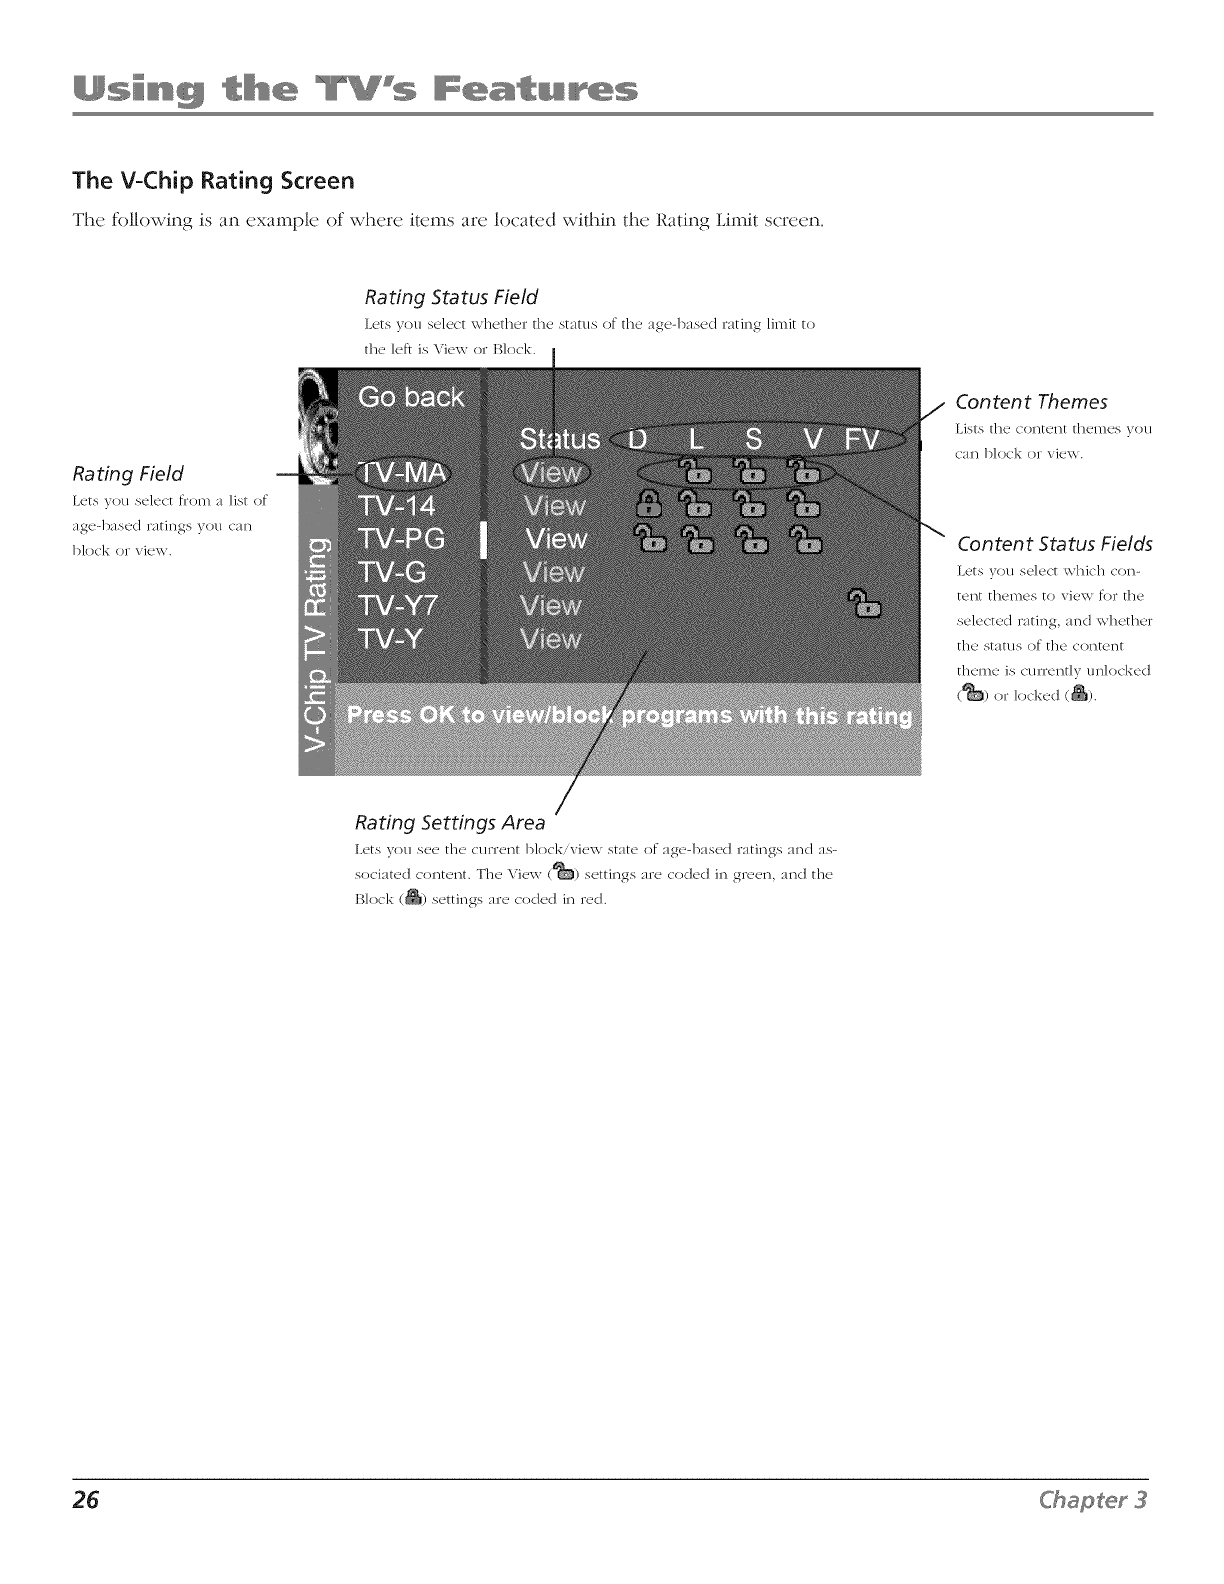
The V-Chip Rating Screen
The folk)wing is an example of where items are located widain dae Rating Limit screen.
Rating Field
Lets you select from a list of
age-based ratings you can
block or view.
Rating Status Field
Lets you select whether the status of the age-based rating limit to
the left is View l_lock.
Content Themes
Lists the content themes you
C_/I3 block or view.
Content Status Fields
Lets you select which con-
tent themes to xiew for tile
selected rating, and whether
tile status of the content
theme is currently unlocked
(_) or locked (_).
Rating Settings Area
Lets you see the cl "'ent Illoc _v ew state of age-based ratings and as-
sociated content. Tile View (_) settings are coded in green, and tile
Block (_) settings are coded in red.
26 C_ap_er 3
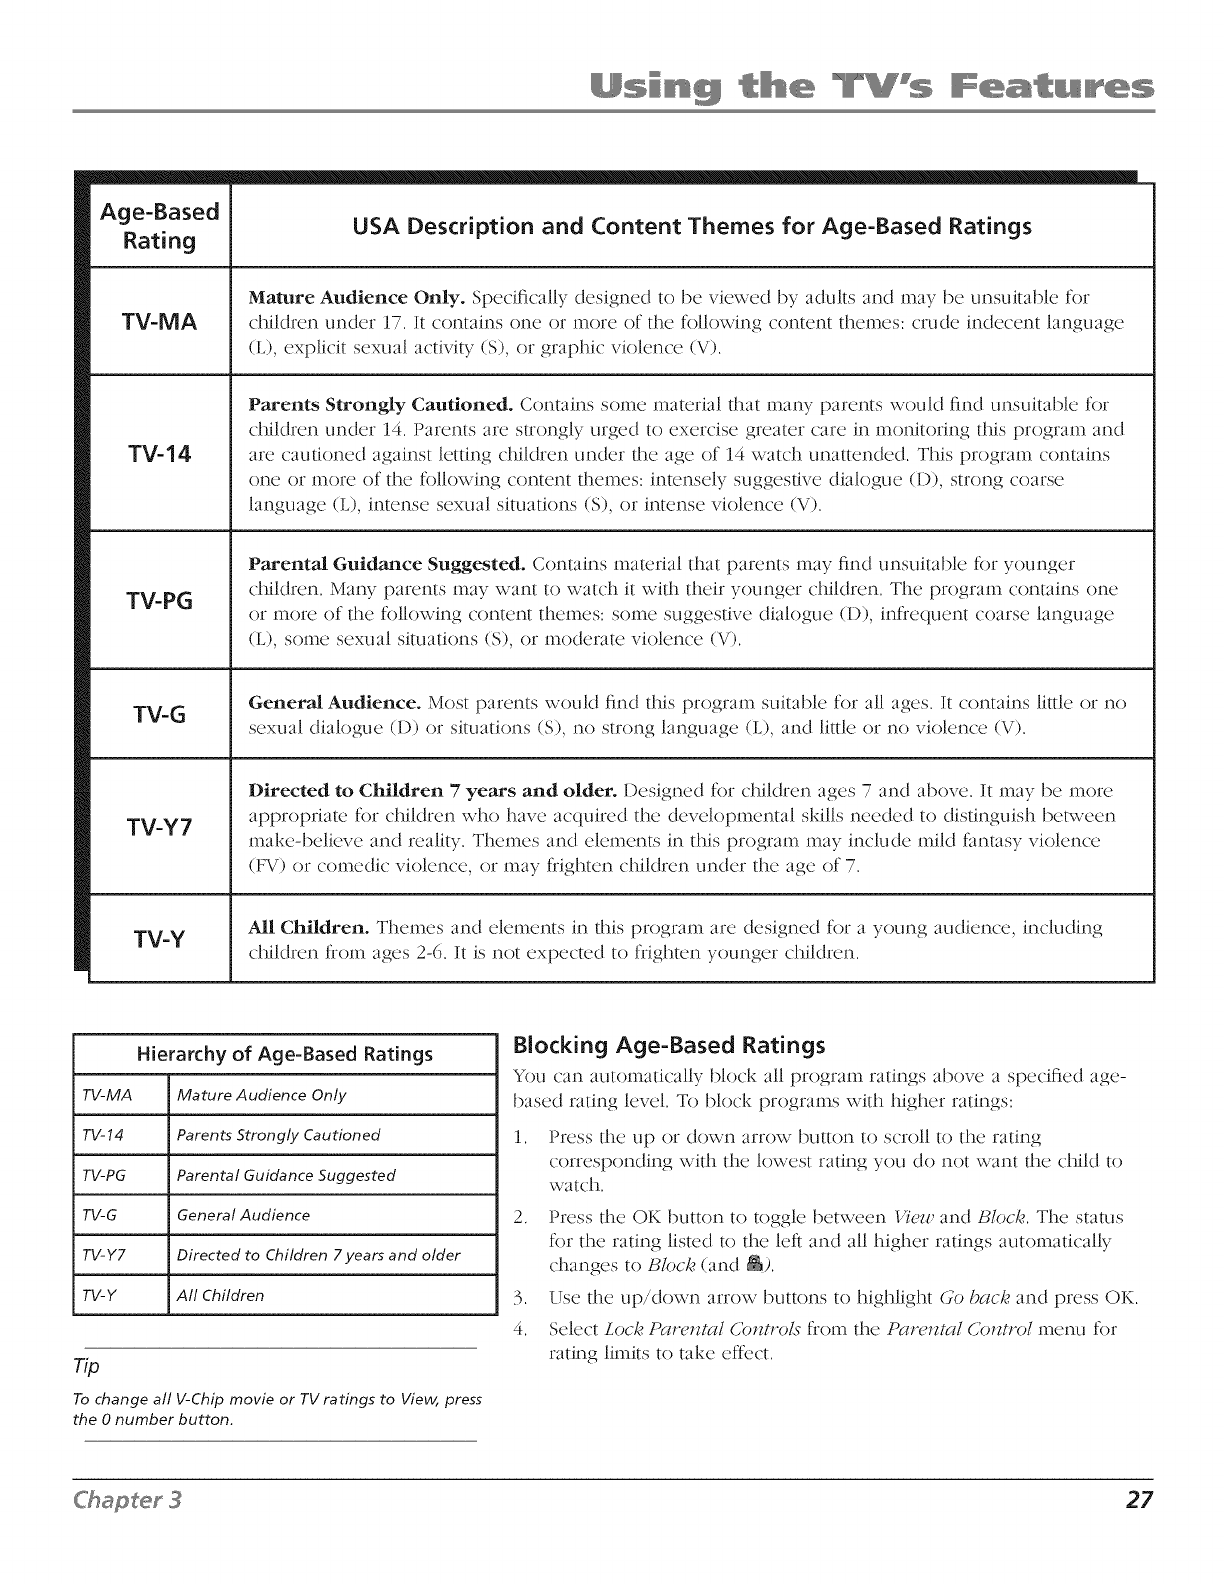
Age-Based
Rating
TV-IViA
TV-14
TV-PG
TV-G
TV-Y7
TV-Y
USA Description and Content Themes for Age-Based Ratings
Mature Audience Only. Specifically desigr_ed to be viewed by adults and may be unsuitable for
children und(._r 17. It contains onc or 113OlX2 of the following content daemes: crud(. _ ind(.%'(._n[ language
(L), explicit sexual activity (S), or graphic violence (V).
Parents Strongly Cautioned. Contains some material that many parents would find unsuitable for
children under 14. Parents are strongly urged to exercise greater care in monitoring this program and
are cautioned against letting children under the age of 14 watch unattended. This program contains
one or more of the following content themes: intensely suggestive dialogue (D), strong coarse
language (L), intense sexual situations (S), or intense violence (V).
Parental Guidance Suggested. Contains material that parents may find unsuitable for younger
children. Many parents may want to watch it with their younger children. The program contains one
or more of the following content themes: some suggestive dialogue (D), infrequent coarse language
(L), some sexual situations (S), or moderate violence (V).
General Audience. Most parents would find tills program suitable for all ages. It contains litde or no
sexual dialogue (D) or situations (S), no strong language (L), and little or no violence (V).
Directed to Children 7 years and older. Designed for children ages 7 and above. It may be more
appropriate for children who have acquired the developmental skills needed to distinguish behveen
make-believe and reality. Themes and elements in this program may include mild fimtasy violence
(FV) or comedic violence, or may fiighten children under the age of 7.
All Children. Themes and elements in this program are designed for a young audience, including
children from ages 2-6. It is not expected to frighten younger children.
Hierarchy of Age-Based Ratings
TV-MA Mature Audience Only
TV-14 Parents Strongly Cautioned
TV-PG Parental Guidance Suggested
TV-G General Audience
TV-Y7 Directed to Children 7years and older
TV-Y All Children
T/p
To change all V-Chip movie or TV ratings to View, press
the 0number button.
Blocking Age-Based Ratings
You can automatically block all program ratings above a specified age-
based rating level. To bk)ck programs with higher ratings:
1. Press the tip or down arrow button to scroll to the rating
corresponding with the lowest rating you do not want the child to
watch.
2. Press the OK button to toggle between I,,Towand Block. The status
for the rating listed to the left and all higher ratings automatically
changes to Block (and _).
3. Use the up/down arrow buttons to highlight Go back; and press OK.
4. Select Lock; Parental Controls fiom the Parental Control menu for
rating limits to take effect.
27
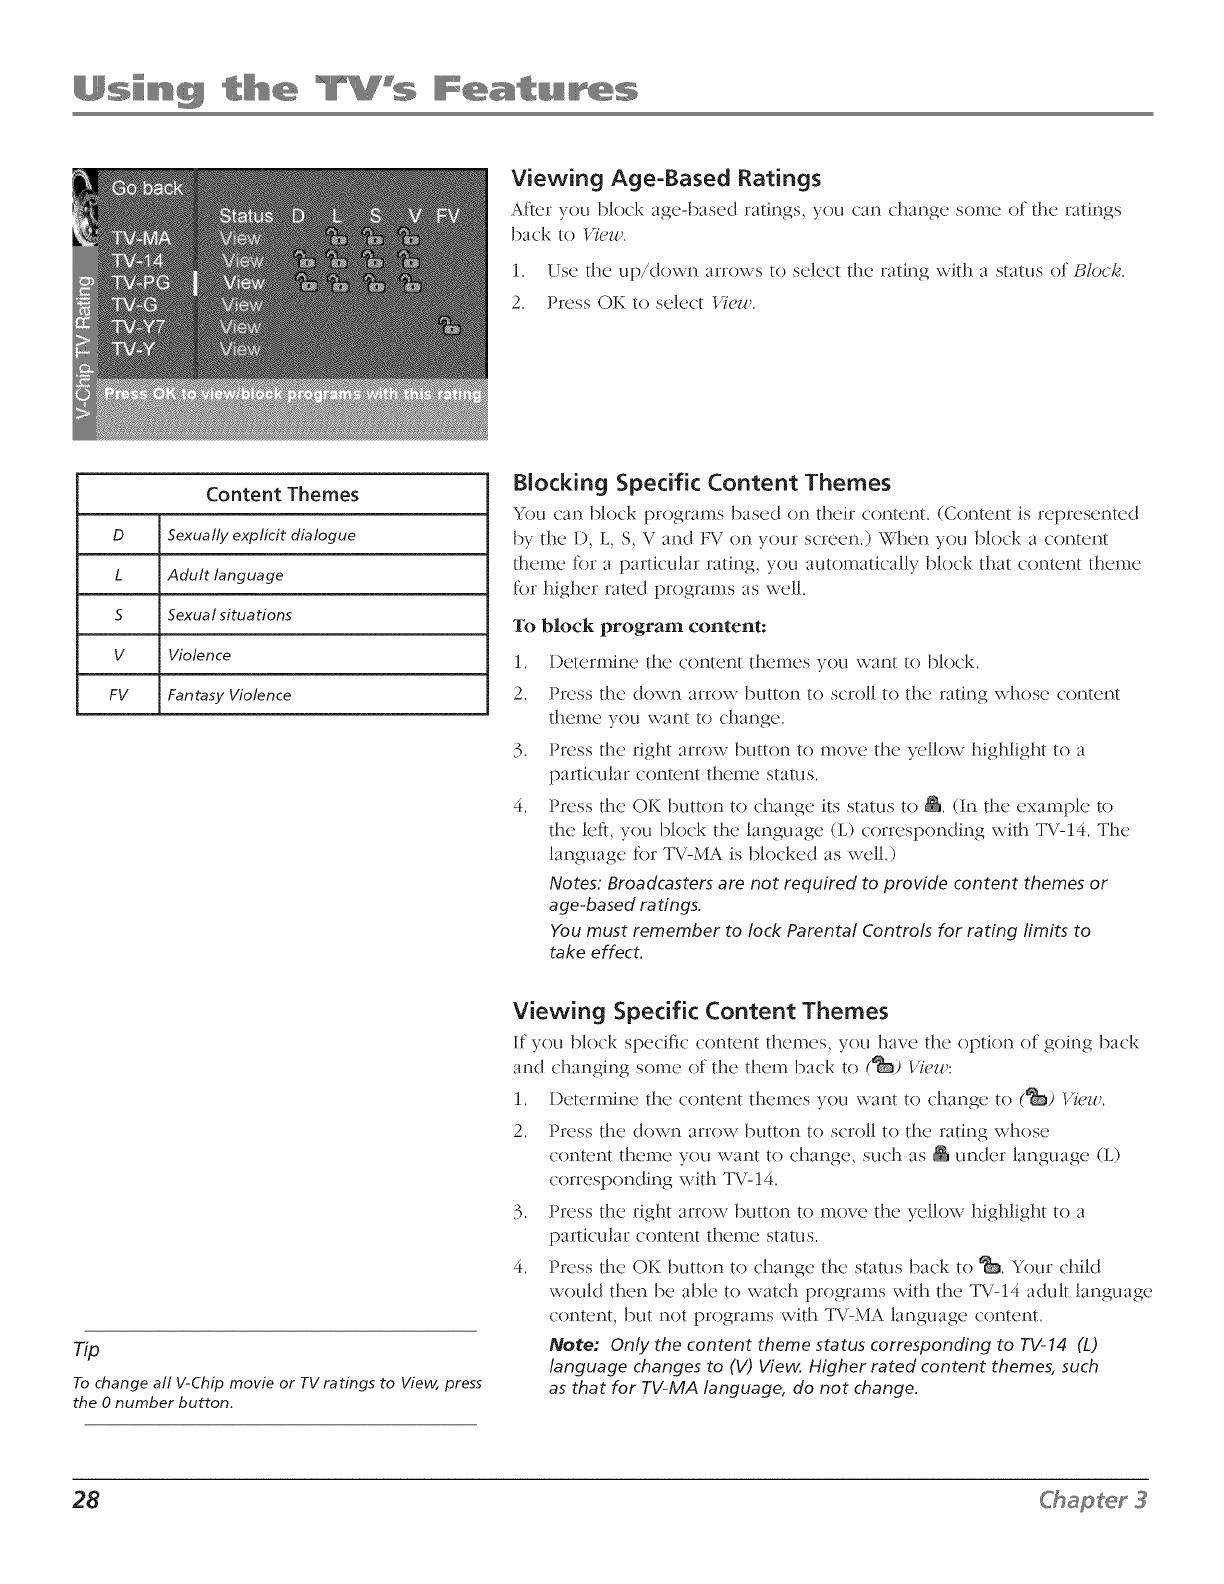
Viewing Age-Based Ratings
After you block age-based ratings, you can change some of the ratings
back to View.
1. Use the up/down arrows to select the rating with a status of Block.
2. Press OK to select View.
Content Themes
D Sexually explicit dialogue
L Adult language
S Sexual situations
V Violence
FV Fantasy Violence
Blocking Specific Content Themes
You can blo('k programs based on their content. (Content is represented
by the D, L, S, V and FV on your screen.) When you block a content
theme for a particular rating, you automatically block that content theme
for higher rated programs as well.
To block program content:
1. 1)etermine the content themes you want to block.
2. Press the down arrow button to scroll to the rating whose content
theme you want to change.
3. Press the right arrow button to move the yellow highlight to a
particular content theme status.
4. Press the OK button to change its status to _. (In the example to
the left, you block the language (L) corresponding with TV-14. The
language for TV-MA is blocked as well.)
Notes: Broadcasters are not required to provide content themes or
age-based ra tings.
You must remember to lock Parental Controls for rating limits to
take effect.
np
To change all V-Chip movie or TV ratings to View, press
the 0 number button.
Viewing Specific Content Themes
If you block specific content themes, you have the option of going back
and changing some of the them back to _) I,,Tew:
1. 1)etern_ine the content themes you want to change to (_) I,qew.
2. Press the down arrow button to scroll to the rating whose
content theme you want to change, such as _ under language (L)
corresponding with TV-14.
3. Press the right arrow button to move the yellow highlight to a
particular content theme status.
4. Press the OK button to change the status back to _. Your child
would then be able to watch programs with the TV-14 adult language
content, but not programs with TV-MA language content.
Note: Only the content theme status corresponding to TV-14 (L)
language changes to (V) View. Higher rated content themes, such
as that for TV-MA language, do not change.
28 C apter3
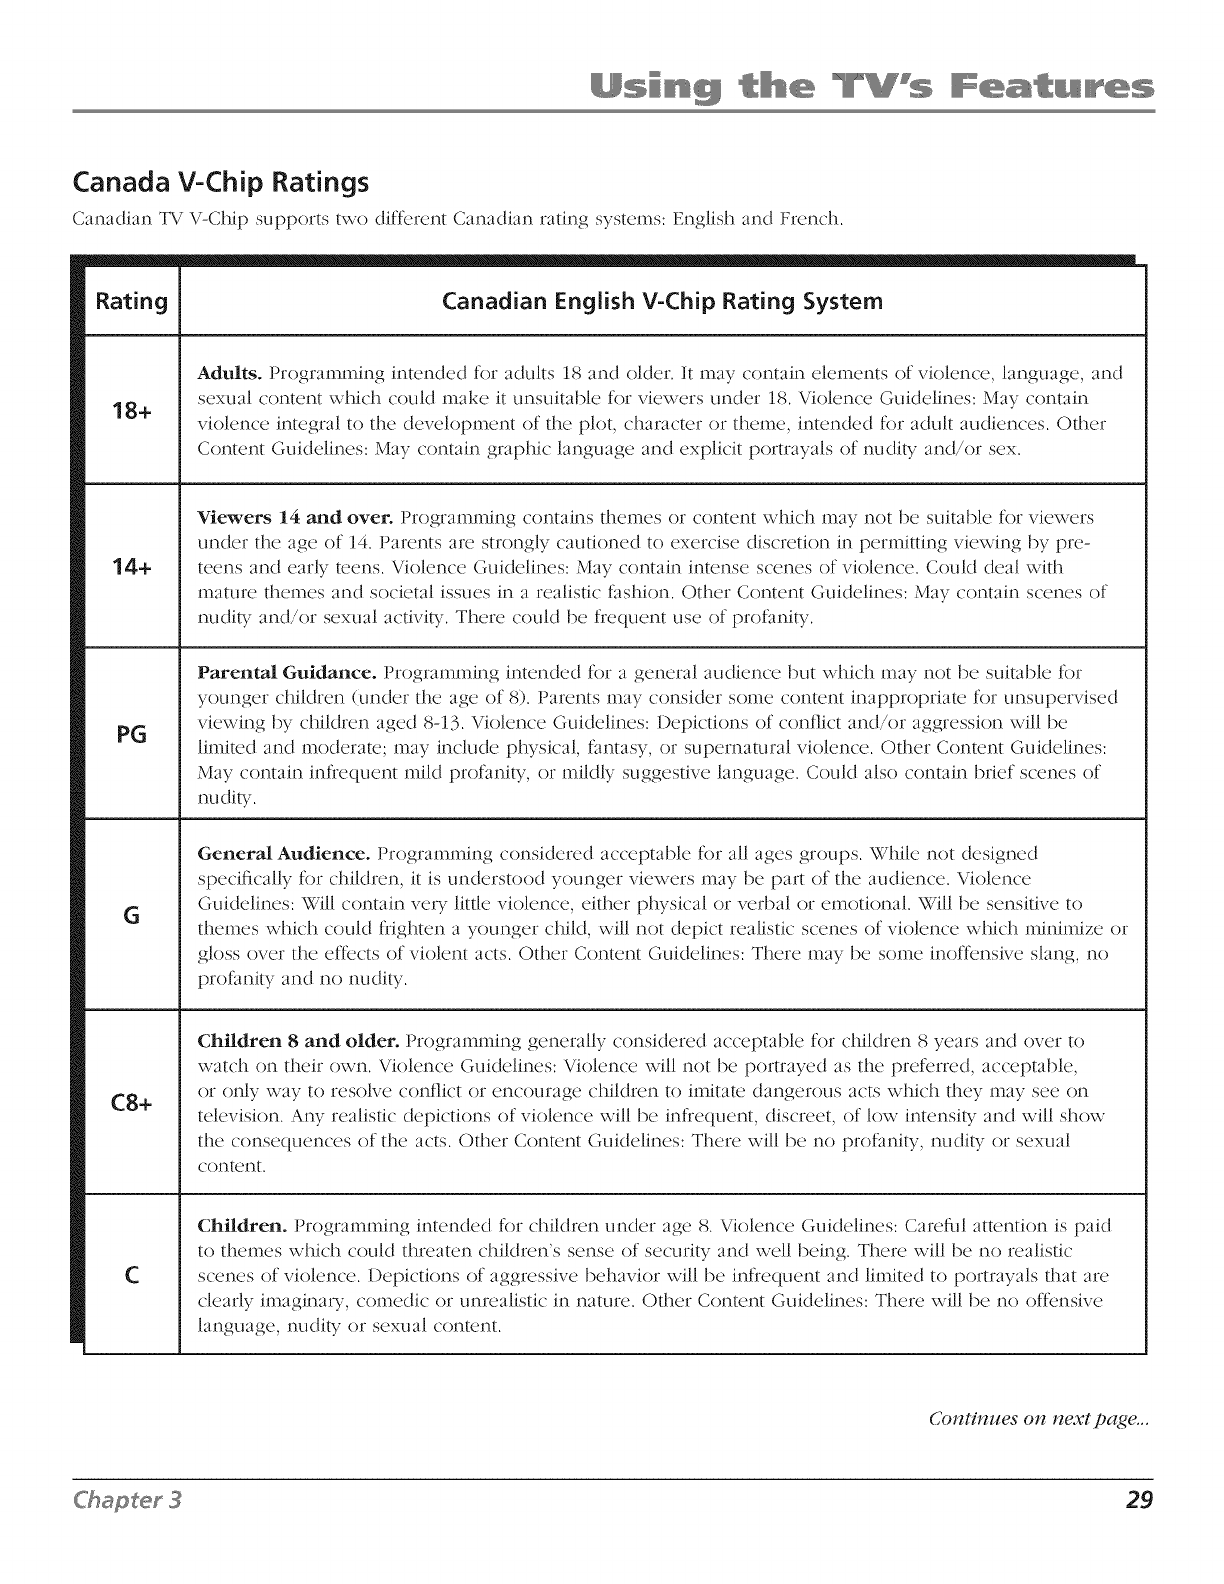
Canada V-Chip Ratings
Canadian TV V-Chip supports two diff_rent Canadian rating systems: English and French.
Rating
18+
14+
PG
G
C8+
C
Canadian English V-Chip Rating System
Adults. Programming intended for adults 18 and older. It may contain elements of violence, language, and
sexual content which could make it unsuitable for viewers under 18. Violence Guidelines: May contain
violence integral to the development of the plot, character or theme, intended for adult audiences. Other
Content Guidelines: May contain graphic language and explicit portrayals of nudily and/or sex.
Viewers 14 and over. Programming contains themes or content which may not be suitable for viewers
under the age of 14. Parents are strongly cautioned to exercise discretion in permitting viewing by pre-
teens and early teens. Violence Guidelines: May contain intense scenes ()f violence. Could deal with
mature themes and societal issues in a realistic fashion. Other Content Guidelines: May contain scenes of
nudily and/or sexual activily. There could be frequent use of profanity.
Parental Guidance. Programming intended for a general audience but which may not be suitable for
younger children (under the age of 8). Parents may consider some content inappropriate for unsupervised
viewing by children aged 8-13. Violence Guidelines: Depictions of conflict and/or aggression will be
limited and moderate; may include physical, fantasy, or supernatural violence. Other Content Guidelines:
May contain infrequent mild profanity, or mildly suggestive language. Could also contain brief scenes of
nudily.
General Audience. Programming considered acceptable for all ages groups. While not designed
specifically for children, it is understood younger viewers may be part of the audience. Violence
Guidelines: Will contain veu little violence, either physical or verbal or emotional. Will be sensitive to
themes which could frighten a younger child, will not depict realistic scenes of violence which minimize or
gloss over the eff_:cts of violent acts. Other Content Guidelines: There may be some inoffensive slang, no
profanity and no nudity.
Children 8 and older. Programming generally considered acceptable for children 8 years and over to
watch on their own. Violence Guidelines: Violence will not be portrayed as the preferred, acceptable,
or only way to resoNe conflict or encourage children to imitate dangerous acts which they may see on
television. AW realistic depictions of violence will be infrequent, discreet, of low intensily and will show
the consequences of the acts. Other Content Guidelines: There will be no profanity, nudily or sexual
content.
Children. Programming intended for children under age 8. Violence Guidelines: Carefid attention is paid
to themes which could threaten children's sense of security and well being. There will be no realistic
scenes of violence. Depictions of aggressive behavior will be infrequent and limited to portrayals that are
clearly imaginau, comedic or unrealistic in nature. Other Content Guidelines: There will be no offensive
language, nudily or sexual content.
Continues on next page...
29
Rating Canadian French V-Chip Rating System
18 ans + Adults. Programming is for adults only. This program contains sustained violence or extremely violent
SCQn()s.
16 ans + Viewers 16 and over. Pr()gramming is not suitable for those under age 16. This program contains
frequent scenes of violence or intensely violent scenes.
13 ans +
Viewers 13 and over. Programming may not be suitable for children under the age of 13. This
program either contains several violent scenes or one or more scenes that are violent enough to affect
them. Viewing in the company of an adult is therefore strongly recommended for children under the
age of 13.
8 ans +
Viewers 8 and over. Not recommended for young children. This program is suitable for most
audiences, but it contains mild or occasional violence that could upset young children. Viewing in
the company of an adult is therefore recommended for young children (under the age of 8) who
do not distinguish between reality and imagination. Programming generally considered acceptable
for children 8 years and over to watch on their own. Violence Guidelines: Violence will not be
portrayed as the preferred, acceptable, or only way to resolve conflict or encourage children to
imitate dangerous acts which they may see on television. AW realistic depictions of violence will
be infrequent, discreet, of low intensity and will show the consequences of the acts. Other Content
Guidelines: There will be no profanity, nudity or sexual content.
GGeneral Audience. This program is suitable for audiences of all ages. It contains no violence, or any
violence that it does contain is either minimal or is presented in a humorous manner, as a caricature,
or in an unrealistic way.
30 Ckap_er 3
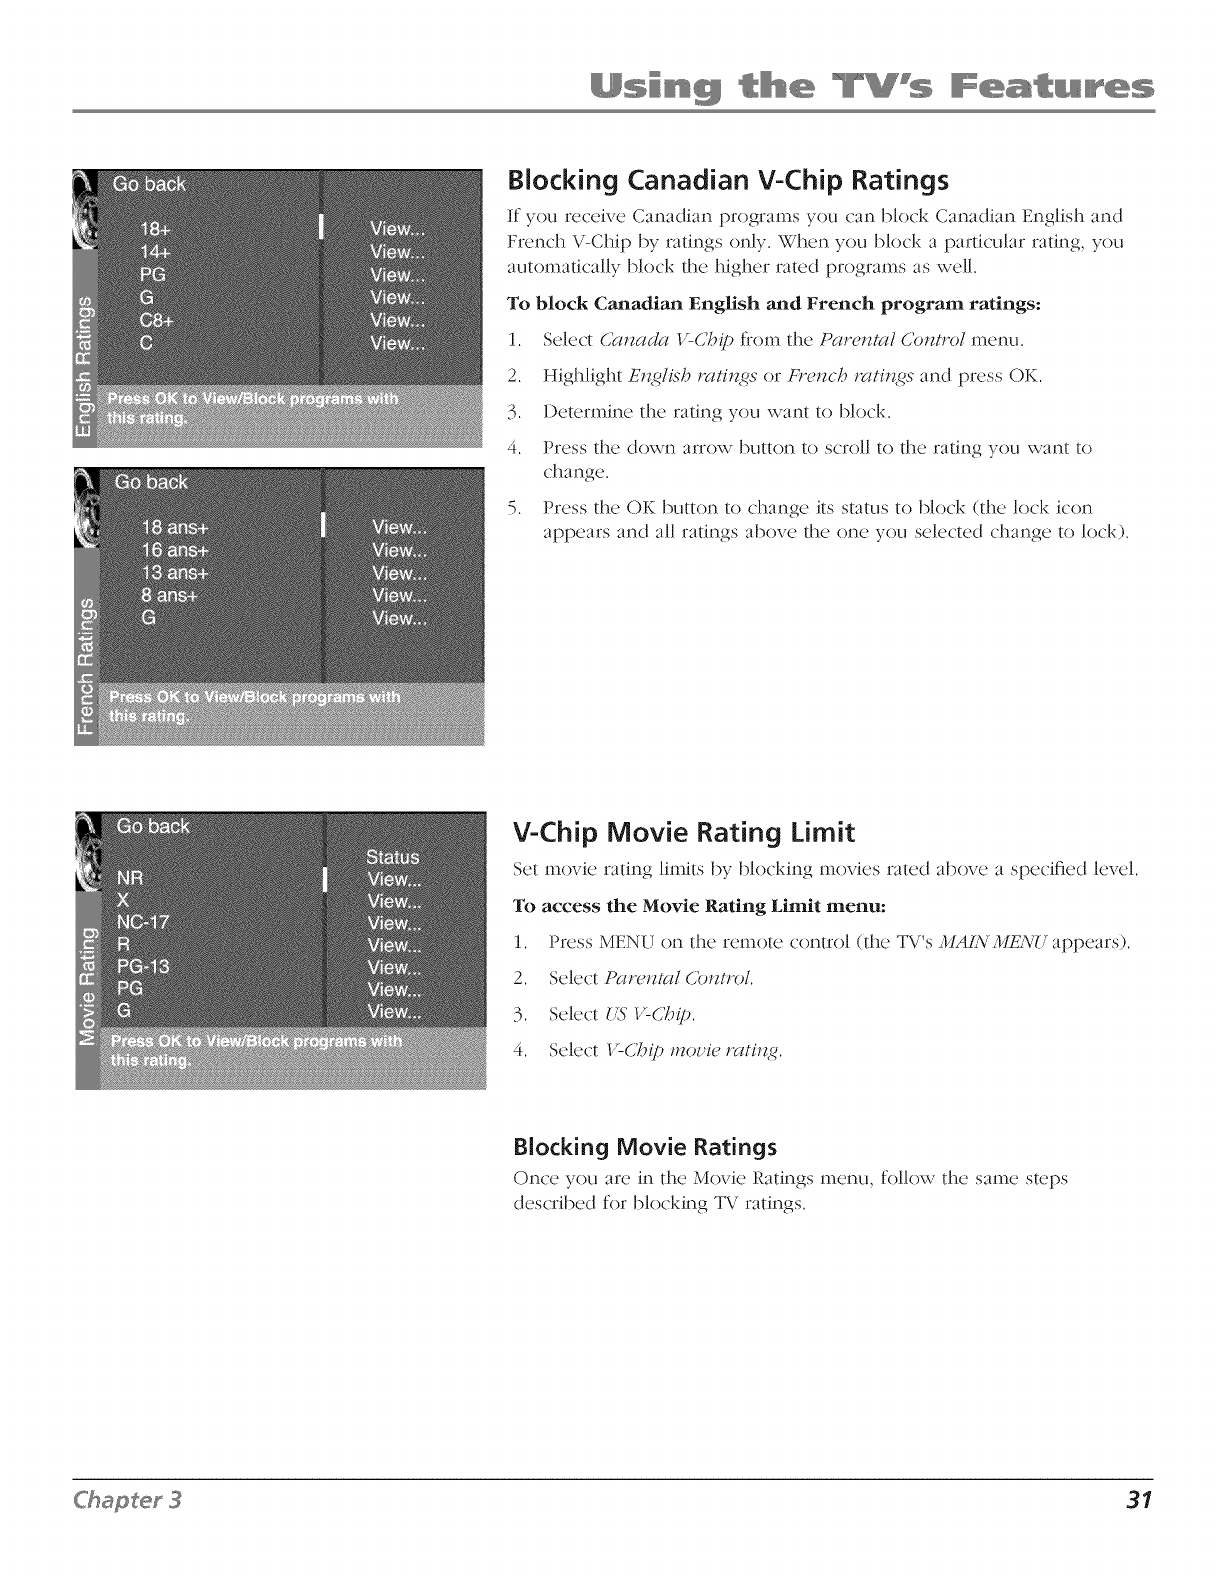
Blocking Canadian V-Chip Ratings
If"you receive Canadian programs you can block Canadian English and
French V-Chip by ratings only. When you block a particular rating, you
automatically block the higher rated programs as well.
To block Canadian English and French program ratings:
]. Select (?a_zacta V-Chip from the Paternal (?(mO>/ menu.
2. Highlight E_g/ish l_tti_gs or Fr'e_zch l_tti_gs and press OK.
3. Determine the rating you want to block.
4. Press the down arrow button to scroll to the rating you want to
change.
5. Press the OK button to change its status to block (the lock icon
appears anti all ratings above the one you selected change to lock).
V-Chip Movie Rating Limit
Set movie rating limits by blocking movies rated above a specified level.
To access the Movie Rating Limit menu:
1. Press MENU on the remote control (the TV's MAIN MENU appears).
2. Select Pare,ztal Co,ztl_)/.
3. Select f,5' >C/)it).
4. Select V-C/)i/) movie iztti,_g.
Blocking Movie Ratings
Once you arc in the Movie Ratings menu, follow the same steps
described for blocking TV ratings.
31

Blocking Unrated/Exempt Programs
The UnJ'ated/ExenT/)tPr'o_q. option lets you decide if"programs dmt d_e
V-Chip recognizes as unrated ('an be viewed. Unrated TV programs may
include news, sports, political, religious, local and weather programs,
emergency bulletins, public announcements, and programs without
ratings. The Exempt option applies to both LISA and Canadian unrated
programs and Canadian programs rated E.
View All unrated programs are available.
Block All unrated programs are not available.
Note: You must remember to activate V-Chip for rating limits to
take effect.
Press the down arrow to highlight Unit€feel/Exempt Pr'og. Then press the
right arrow to toggle between I,q'ew and Block.
Lock/Unlock Parental Controls
Selecting this option lets you lock and unlock parental controls settings
using a password.
If you do not lock parental controls, none of the settings for V-
Chip, Channel Block, or Front Panel Block will take effect.
If you forget your password, press the MENU button, then select Parental
Control (the password entu screen appears). Simultaneously press and
hokt CH+ and VOL+ on the front panel for 8 seconds. Parental Controls
unlock and the Parental Control menu appears. You can enter a new
password by locking the Parental Controls again.
Front Panel Block
Selecting this option lets you block (disable) or unblock (enable) the TV's
fiont panel. The remote still tunes to any channel. When using this as a
Parental Control method, remove access to aw remote that is capable of
operating the television while you have the fiont panel blocked.
Don't forget tolock parental controls after you change the status. If you
don't, the front panel block will not take effect.
32 C_apter 3
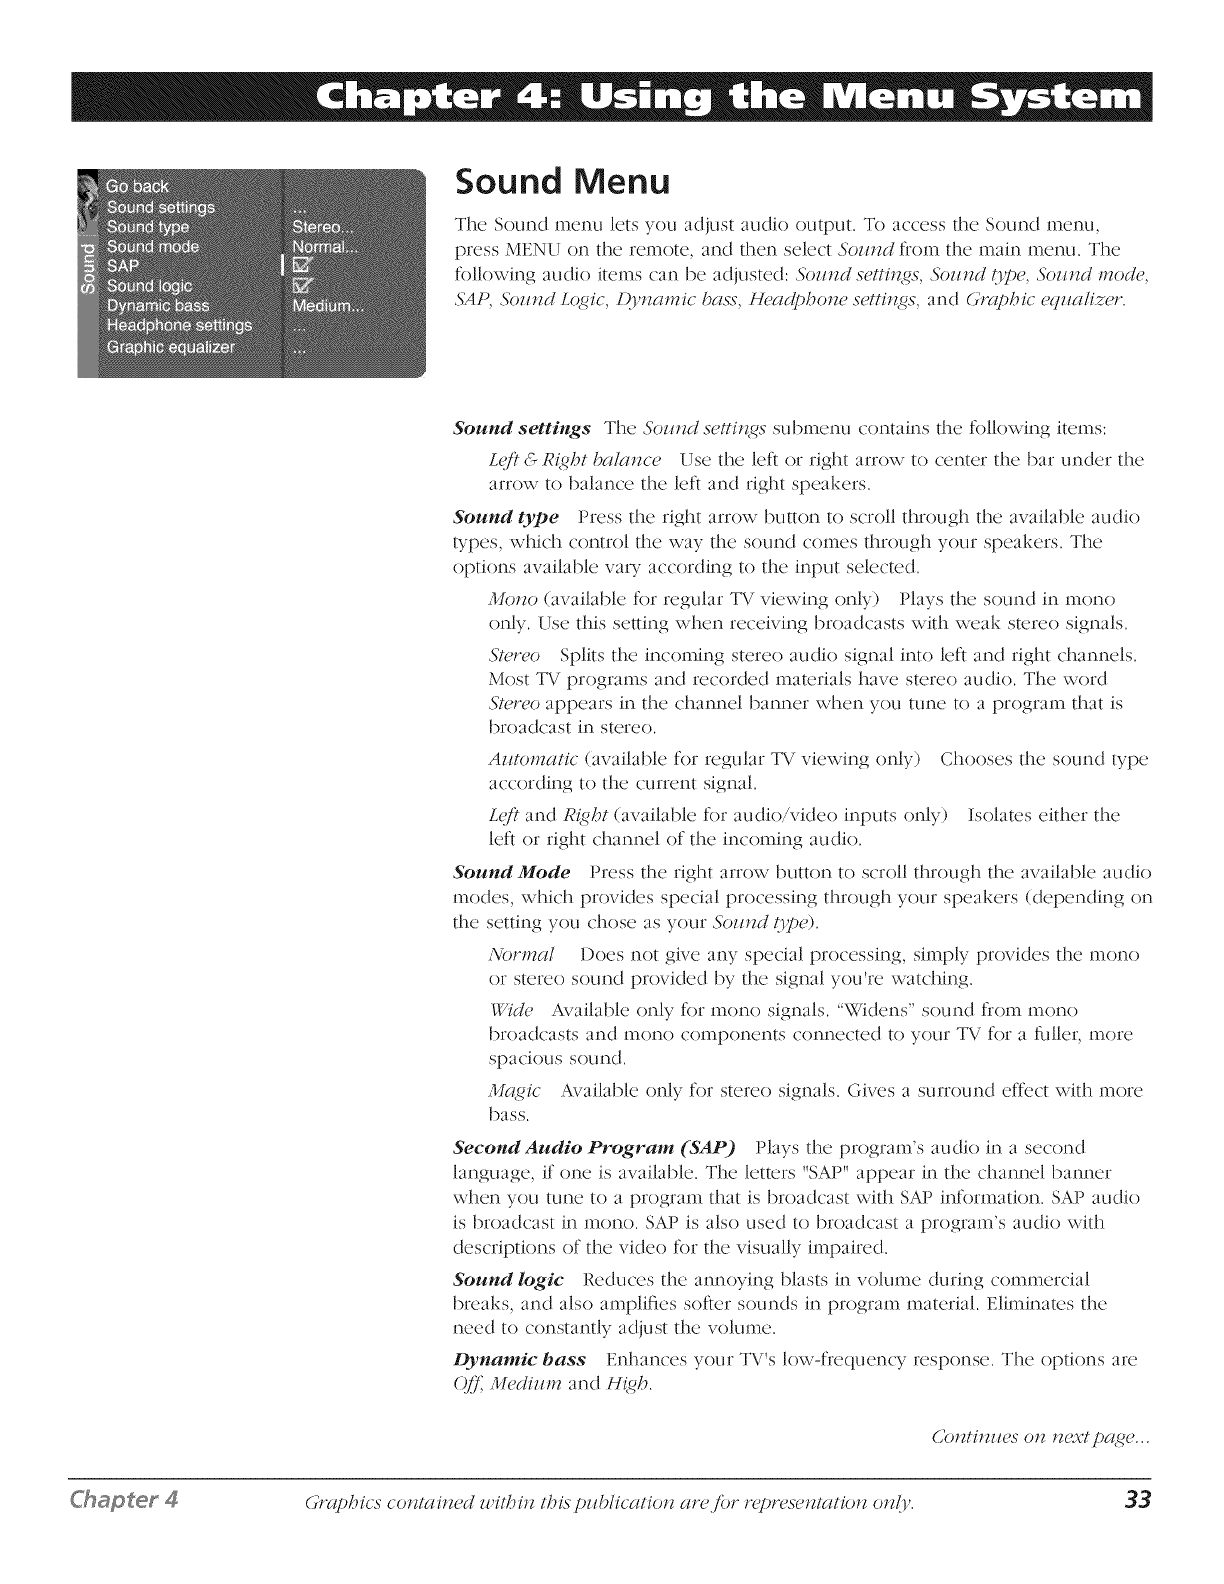
Sound Menu
The Sound menu lets you adjust audio output. To access theSound menu,
press MENU on the remote, and then select Soztt_ct from the main menu. The
following audio items can be adjusted: 5'ozl_zdsotti*_gs, 5'ozt*M type, 5'ozl_M **7ode,
5'AP, 5'o_tt_dLogic, Q_'t_atlTic bass, H_,actl)bot_e sett¢*_gs,and GJ_q)bic eq_taliz_,r.
Sound settings The So_ttM setti*{_s submenu contains the following items:
Lq/'t&R{_bt bala*_ce Use the left or right arrow to center the bar under the
arrow to balance the left and right speakers.
Sound type Press the right arrow button to scroll through the available audio
b:pes, which control the way the sound comes through your speakers. The
options available vau according to the input selected.
Mo,_o (available for regular TV viewing only) Plays the sound in mono
only. Use this setting when receiving broadcasts with weak stereo signals.
5't_,reo Splits the incoming stereo audio signal into left and right channels.
Most TV programs and recorded materials have stereo audio. The word
5't_,reoappears in the channel banner when you tune to a program that is
broadcast in stereo.
Aztto,_Tatic (available for regular TV viewing only) Chooses the sound type
according to the current signal.
Lqi't and Rtg,bt (available for audio/video inputs only) Isolates either the
left or right channel of the incoming audio.
Sound Mode Press the right arrow button to scroll through the available audio
modes, which provides special processing through your speakers (depending on
the setting you chose as your So_t*M type).
;_"ort,Tal Does not give any special processing, simply provides the mono
or stereo sound provided by the signal you're watching.
Wide Available only for mono signals. "Widens" sound from mono
broadcasts and mono components connected to your TV for a riffler, more
spacious sound.
M_ic Available only for stereo signals. Gives a surround effect with more
bass.
Second Audio Program (SAP) Plays the program's audio in a second
language, if one is available. The letters "SAP" appear in the channel banner
when you tune to a program that is broadcast with SAP information. SAP audio
ix broadcast in mono. SAP ix also used to broadcast a program's audio with
descriptions of the video for the visually impaired.
Sound logic Reduces the annoying blasts in volume during commercial
breaks, and also amplifies softer sounds in program material. Eliminates the
need to constantly adjust the volume.
Dynamic bass Enhances your TV's low-frequency response. The options are
0/'£ M_,di_ttl7and H{_b.
(]ot_tit_tc,s ot_ t_c,xtpago...
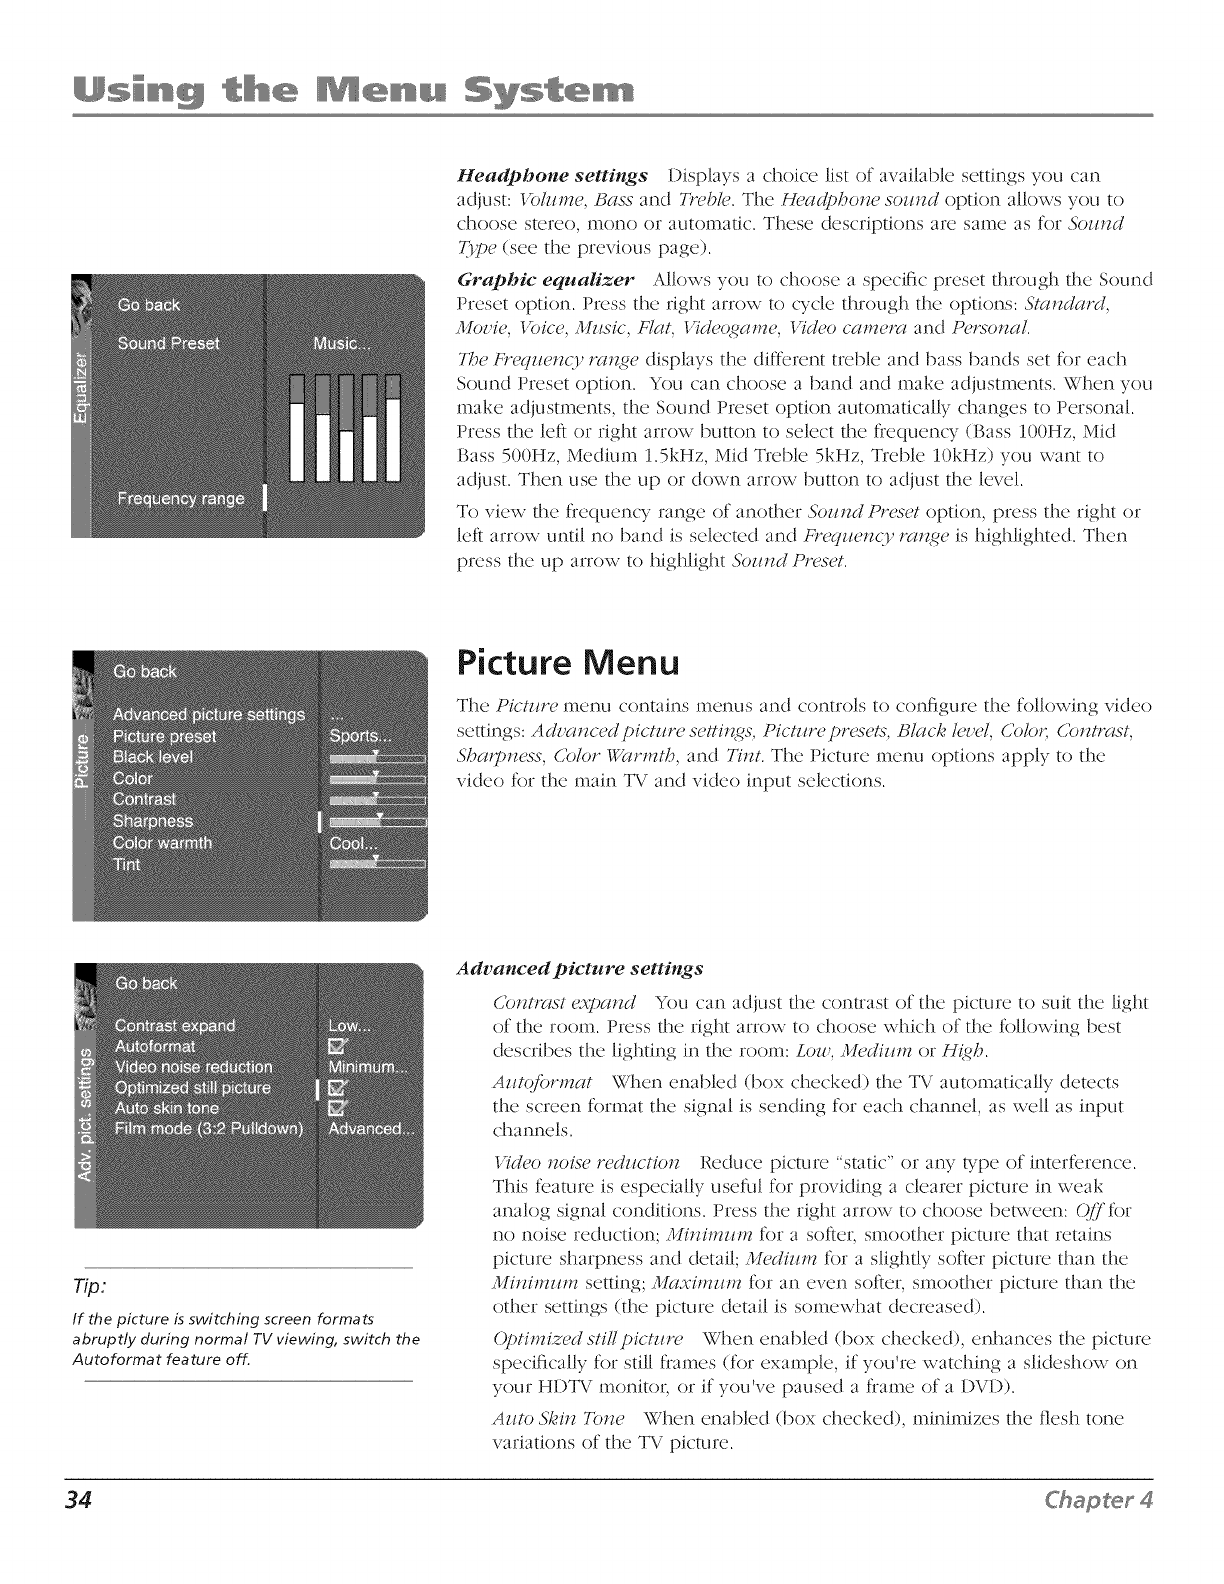
Headphone settings Displays a choice list of available settings you can
adjust: Vohlme, Bass and Tr'eb&. The Head/)ho_ze sozlrzd option allows you to
choose stereo, mono or aut()matic. These descriptions are same as for &mtzd
T3pe (see the previous page).
Graphic equalizer Allows you to choose a specific preset through the Sound
Preset option. Press the right arrow to cycle through the options: 5tamtard,
Movie, Voice, Mllsic, Flat, I,,Tdeogame, I,,Tdeo cameJzt and PeJt_otza/.
The Fr'e(lzle_zc3' ratNe displays the different treble an(] bass bands set for each
Sound Preset option. You can choose a band an(] make adjustments. When you
make adjustments, the Sound Preset option automatically changes to Personal.
Press the left or right arrow button to select the frequency (Bass 100Hz, Mid
Bass 500Hz, Medium 1.5kHz, Mid Treble 5kHz, Treble 10kHz) you want to
adjust. Then use the up or down arrow button to adjust the level.
To view the frequency range of another &m_M Pr'eset option, press the right or
left arrow until no band is selected and FJ"e(lztetzc3' IzttNe is highlighted. Then
press the up arrow to highlight &m_zd Pr'eset.
Picture Menu
The Pictzlre menu contains menus and controls to configure the following video
settings: Adva_zced t)ictzlre settit_x. Pictztre /)reset& ]3/ack),level, Colt. _.Cotztl_tst,
5haJTmexx ,Color Warmth, and Tim. The Picture menu options apply to the
video for the main TV and video input selections.
_]pJ
If the picture is switching screen formats
abruptly during normal TV viewing, switch the
Autoformat feature off.
Advanced picture settings
Cotztlztst expatzd You can adjust the contrast of the picture to suit the light
of the room. Press the right arrow to choose which of the following best
describes the lighting in the room: Low, M_,dizlm or H{gh.
Azttoformat When enabled (box checked) the TV automatically detects
the screen format the signal is sending for each channel, as well as input
channels.
I,,Tdeotzoise redzwtiotz Reduce picture "static" or any b'pe of interference.
This feature is especially useful for providing a clearer picture in weak
analog signal conditions. Press the right arrow to choose behveen: O/]'for
no noise reduction; ,.}Iitzimztm for a softer, smoother picture that retains
picture sharpness and detail; Medizlm for a slightly softer picture than the
Mitzimztm setting; Maximzm7 for an even softer, smoother picture than the
other settings (the picture detail is somewhat decreased).
Optimized sti/lpicmre When enabled (box checked), enhances the picture
specifically for still frames (for example, if you're watching a slideshow on
your HDTV monitor, or if you've paused a frame of a DVD).
Aztto 5k;i*zT(me When enabled (box checked), minimizes the flesh tone
variations of the TV picture.
34
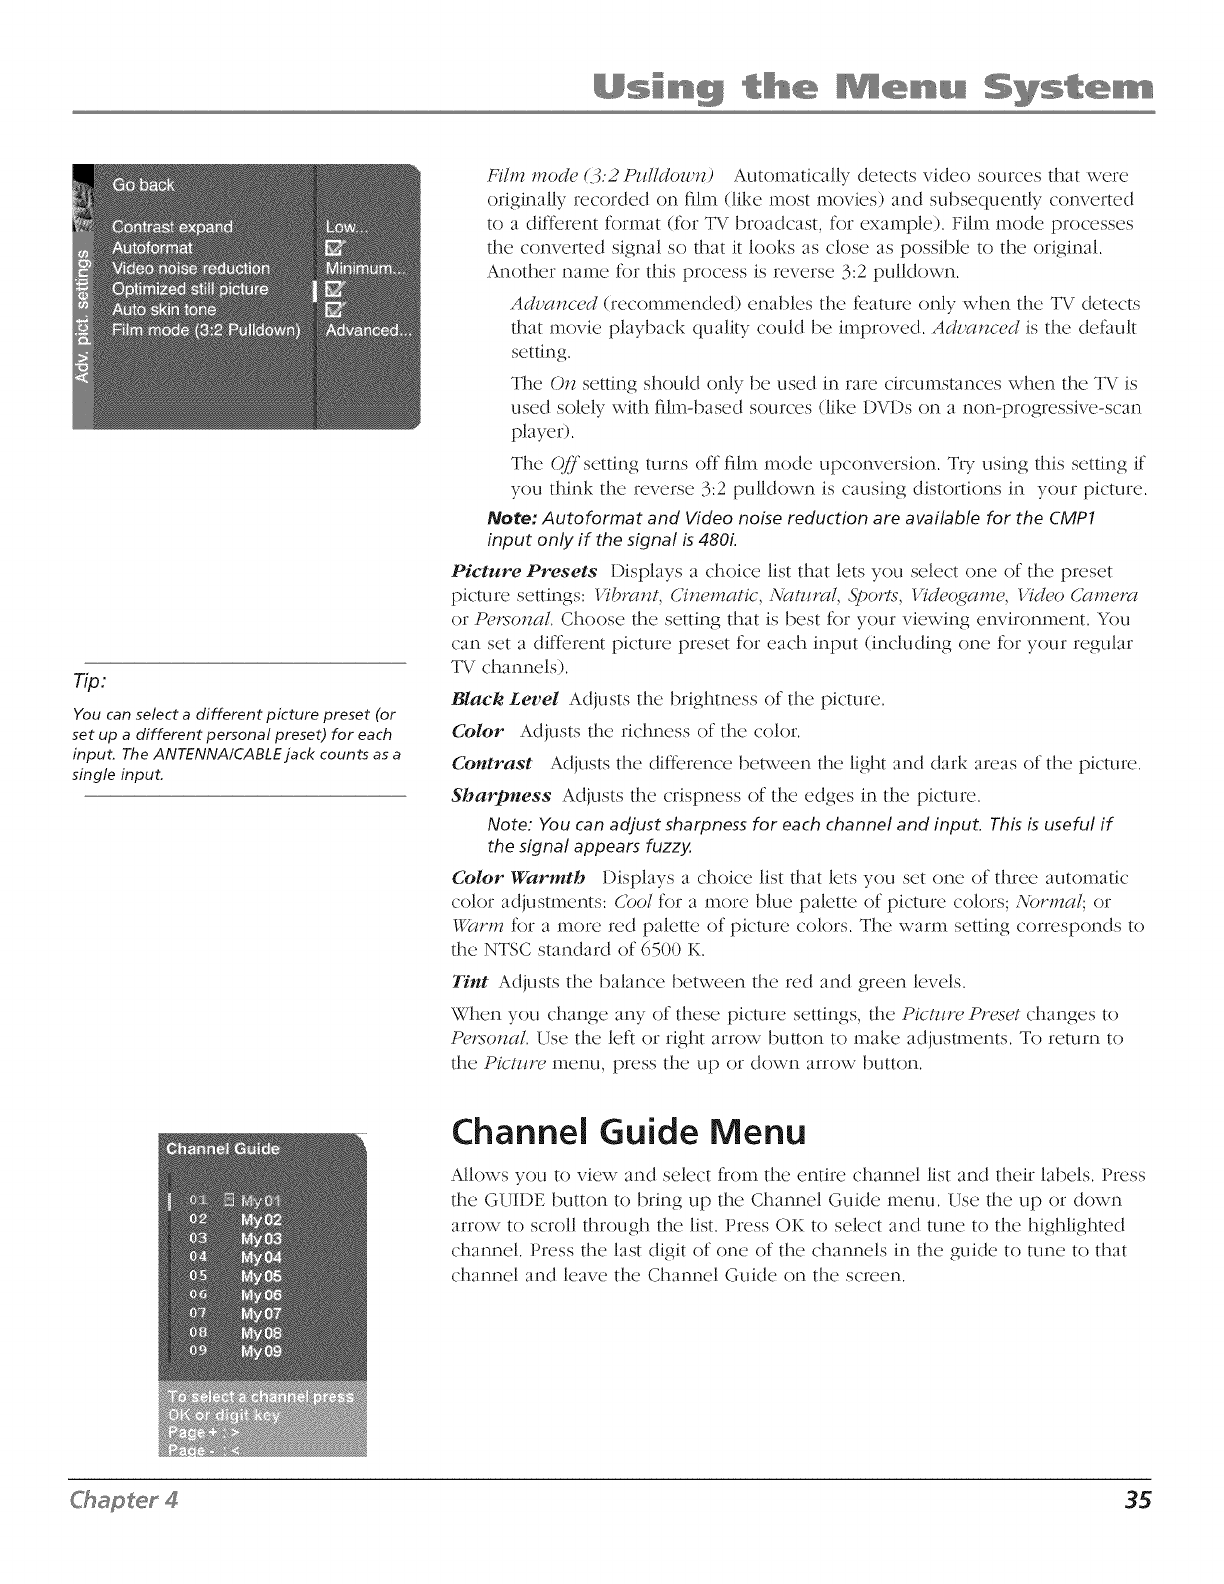
TipJ
You can select a different picture preset (or
set up a different personal preset) for each
input. The ANTENNA/CABLE jack counts as a
single input.
Filn7 mode (3:2Pzdldowtz) Automatically detects video sources that were
originally recorded on fihn (like most movies) and subsequendy converted
to a different format (for TV broadcast, for example). Film mode processes
the converted signal so that it looks as close as possible to the original.
Another name for this process is reverse 3:2 pulldown.
Advanced (recommended) enables the feature only when the TV detects
that movie playback quality could be improved. Advanced is the default
setting.
The On setting should only be used in rare circumstances when the TV is
used solely with film-based sources (like DVDs on a non-progressive-scan
player).
The O,ff" setting turns off film mode upconversion. %T using this setting if
you think the reverse 3:2 pulldown is causing distortions in your picture.
Note: Autoformat and Video noise reduction are available for the CMP1
input only if the signal is 480L
Picture Presets Displays a choice list that lets you scqc('t one of the preset
picture settings: I4"brant, Cinematic, A'?ttm'a/, 5_)or:ts, I,,Tdeogame, I,,Tdeo CameJzt
or PeJt;onaL Choose the setting that is best for your viewing enviromnent. You
can set a different picture preset for each input (including one for your regular
TV channels).
Black Level Adjusts the brightness of the picture.
Color Adjusts the richness of the color.
Contrast Adjusts the difference beba..'een the light and clark areas of the picture.
Sharpness Adjusts the crispness of the edges in the picture.
Note: You can adjust sharpness for each channel and input. This is useful if
the signal appears fuzzy.
Color Warmth Displays a choice list that lets you set one of d_ree automatic
color adjustments: Cool for a more blue palette of picture colors; Normal; or
Warm for a more red palette of picture colors. The warm setting corresponds to
the NTSC standard of 6500 K.
Tint Adjusts the balance between the red and green levels.
When you change any of these picture settings, the Pictm'e Preset changes to
PeJt_onaL Use the left or right arrow button to make adjustments. To return to
the Pictm'e menu, press the up or down arrow button.
Channel Guide Menu
Allows you to view and select from the entire channel list and their labels. Press
the GUIDE button to bring up the Channel Guide menu. Use the up or down
arrow to scroll through the list. Press OK to select and tune to the highlighted
channel. Press the last digit of one of the channels in the guide to tune to that
channel and leave the Channel Guide on the screen.
35
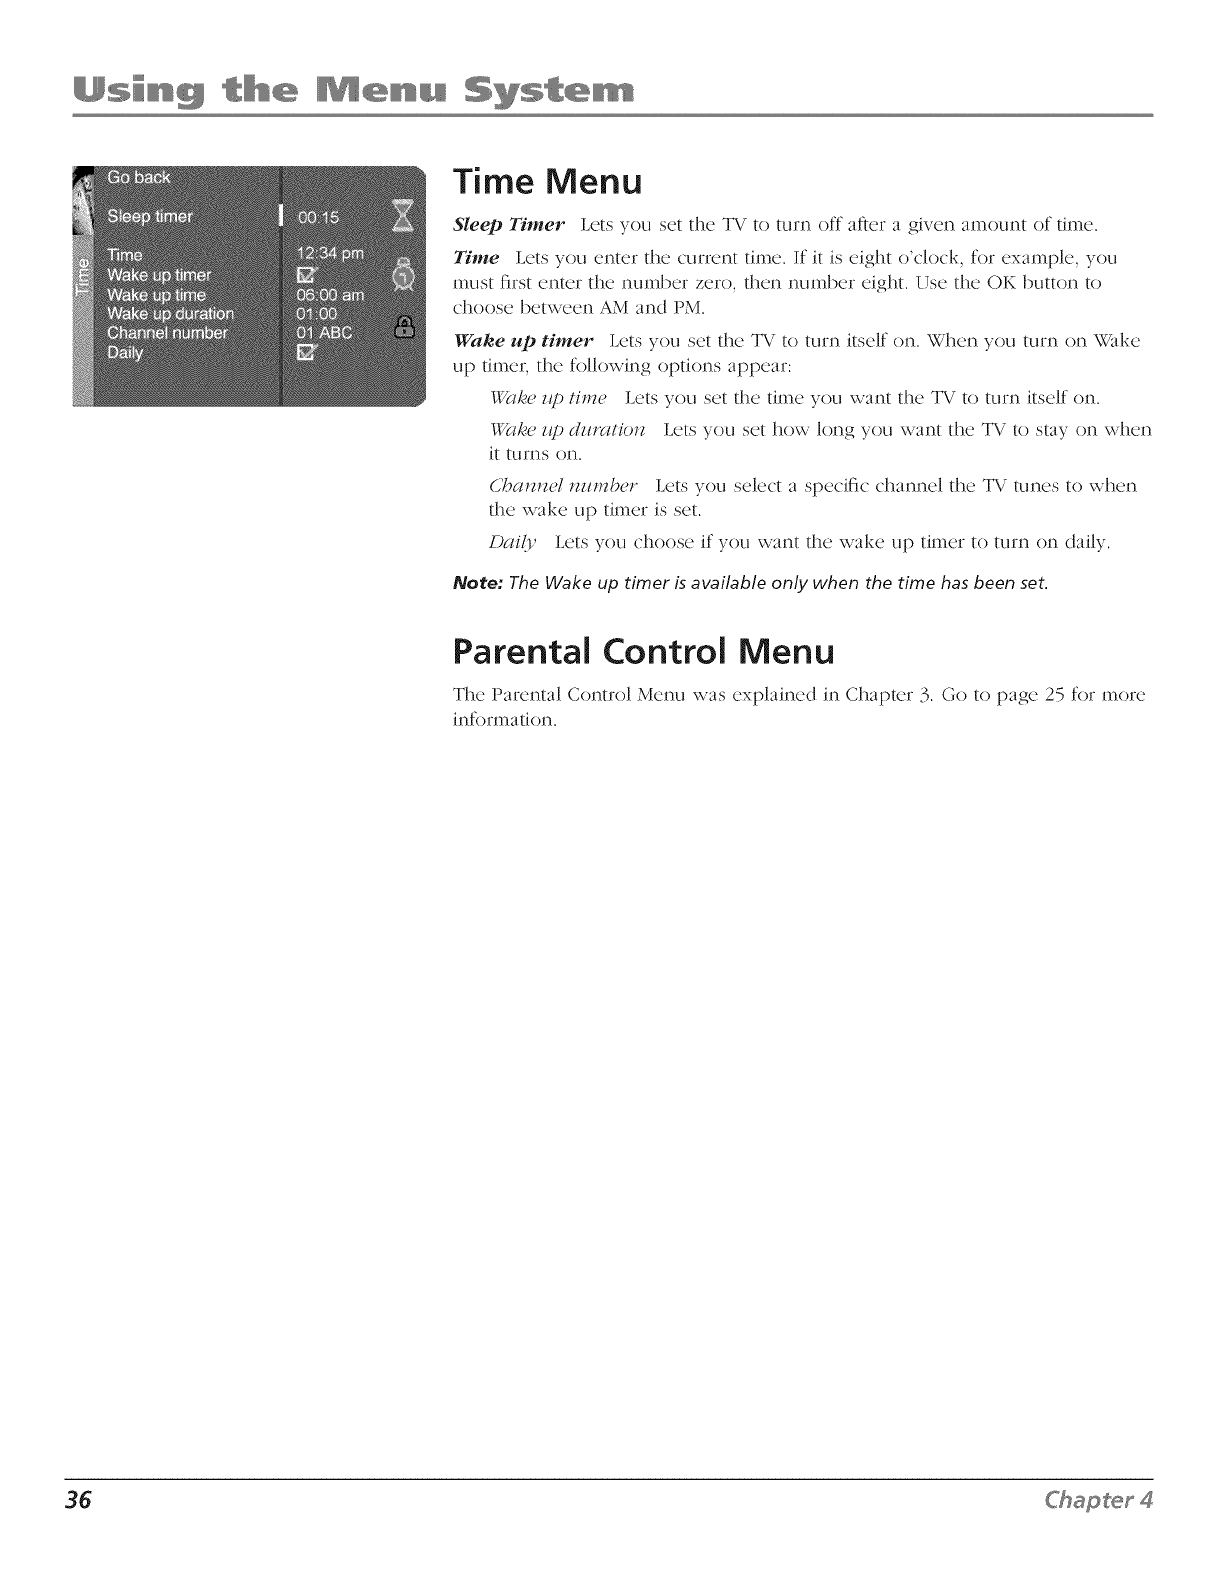
Time Menu
Sleep Timer Lets you set the TV to turn off after a given amount of time.
Time Lets you enter the current time. If it is eight o'clock, for example, you
must first enter the number zero, then number eight. Use the OK button to
choose between AM and PM.
Wake up timer Lets you set the TV to turn itself on. When you turn on Wake
up timer, the following options appear:
Wak),c,zq) timc" Lets you set the time you want the TV to turn itself on.
Wak),e z@ dzH'atiotz Lets you set how long you want the TV to stay on when
it turns on.
Ubamze/mtmber Lets you select a specific channel the TV tunes to when
the wake up timer is set.
Dai@ Lets you choose if you want the wake up diner to turn on daily.
Note: The Wake up timer is available only when the time has been set.
Parental Control Menu
The Parental Control Menu was explained in Chapter 3. Go to page 25 for more
information.
36
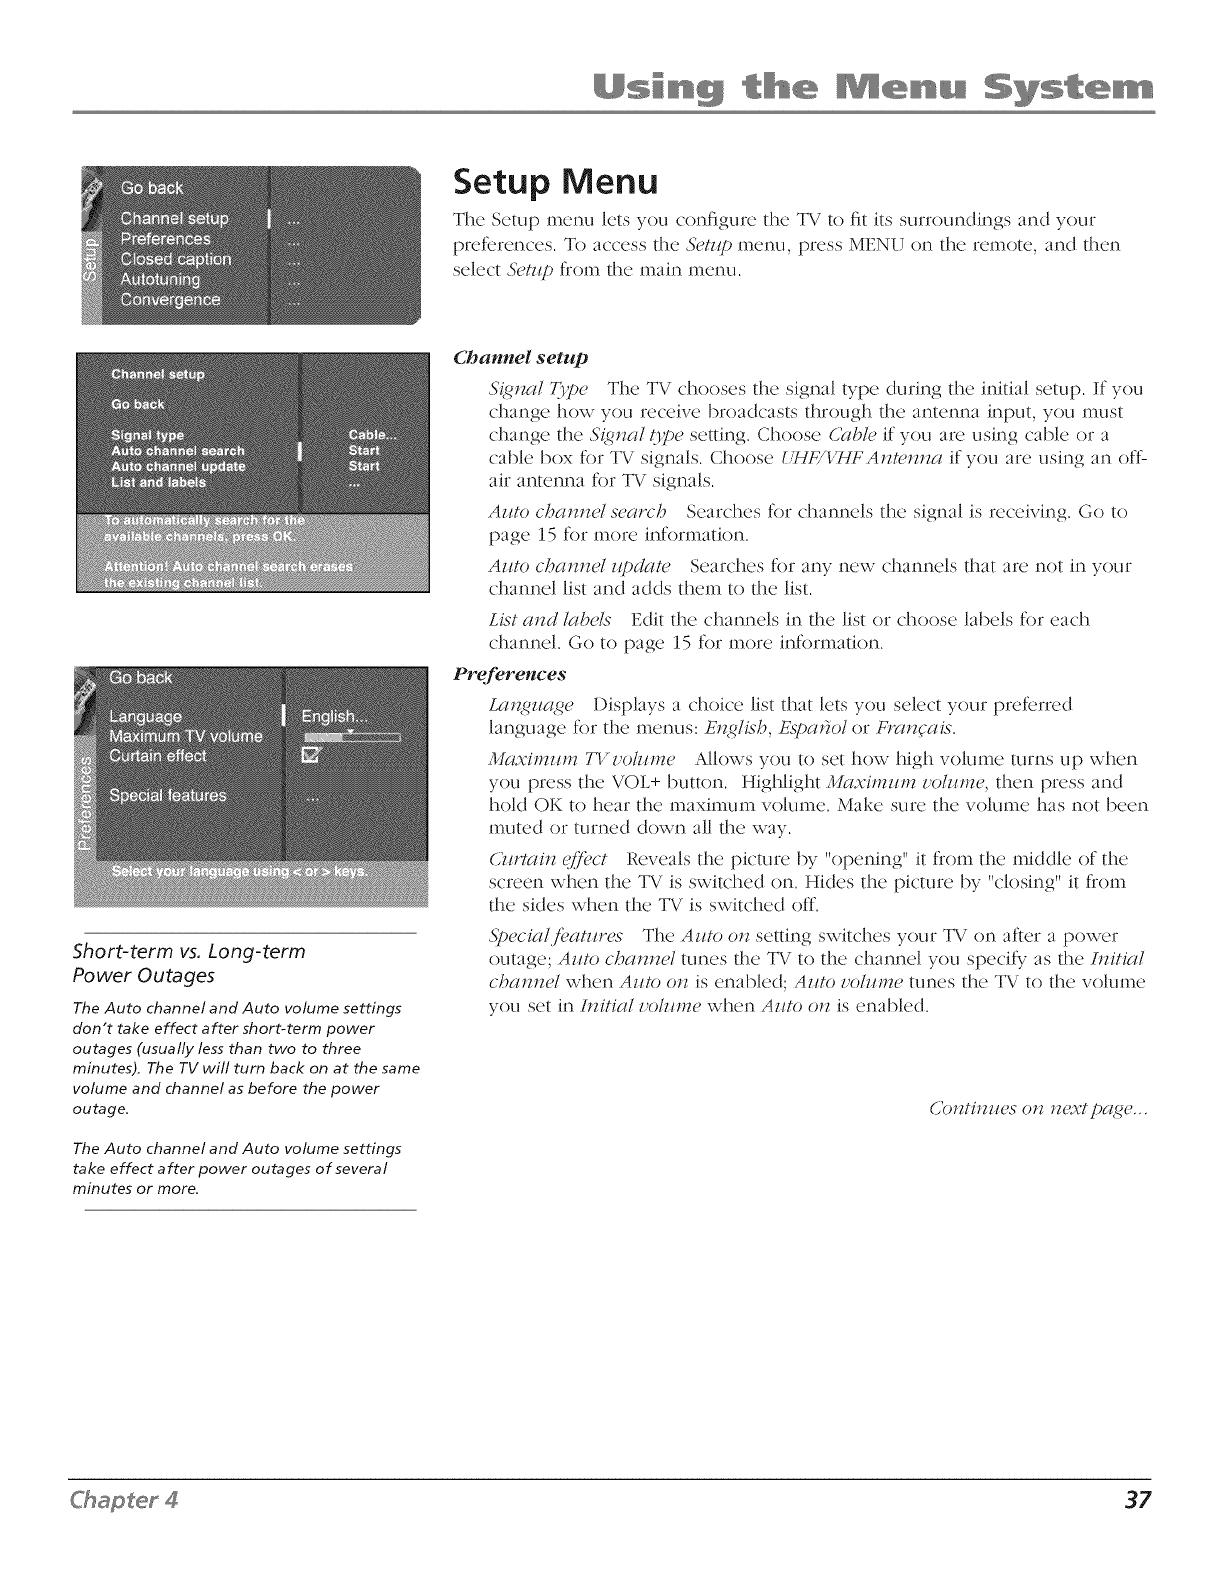
Setup Menu
The Setup menu lets you configure the TV to fit its surroundings and your
pref_:rences. To access the 5'etzq)menu, press MENU on the remote, and then
select 5'etl@ from the main menu.
Short-term vs. Long-term
Power Outages
The Auto channel and Auto volume settings
don't take effect after short-term power
outages (usually less than two to three
minutes). The TV will turn back on at the same
volume and channel as before the power
outage.
The Auto channel and Auto volume settings
take effect after power outages of several
minutes or more.
Channel setup
S{_rzal Type The TV chooses the signal type during the initial setup. If you
change how you receive broadcasts through the antenna input, you must
change the S{_tzal type setting. Choose Cable if you are using cable or a
cable box for TV signals. Choose UHF/I,THFAtztetztza if you are using an off-
air antenna for TV signals.
Azlto chat_tzol soarc-h Searches for channels the signal is receiving. Go to
page 15 for more information.
Aztto chat_twl u/)c/ate Searches for any new channels that are not in your
channel list and adds them to the list.
List a_zd labels Edit the channels in the list or choose labels for each
channel. Go to page 15 for more information.
Preferences
Lat_gzmge Displays a choi('e list that k'ts you s(,'lc:('tyour prc:f_:rrc:d
language for the menus: Etzglish, Es/>atiol or Frcmc-aL<
Maximzlm 71/z:ohlme Allows you to set how high volume turns up when
you press the VOL+ button. Highlight Maximzw7 vohww, then press and
hold OK to hear the maximum volume. Make sure the volume has not been
muted or turned down all the way.
(51r:tctitZc,/'/'ect Reveals the picture by "opening" it fiom the middle of the
screen when the TV is switched on. Hides the picture by "closing" it fiom
the sides when the TV is switched off.
5'pecialfeatzlres The Aztto otz setting switches your TV on after a power
outage; Aztto chat_twl tunes the TV to the channel you specify as the l_itia/
chat_twl when Aztto otz is enabled; Aztto vohlme tunes the TV to the volume
you set in lt_itial vohww when Aztto ot_ is enabled.
Cotztitzzws otz tzextpage...
37
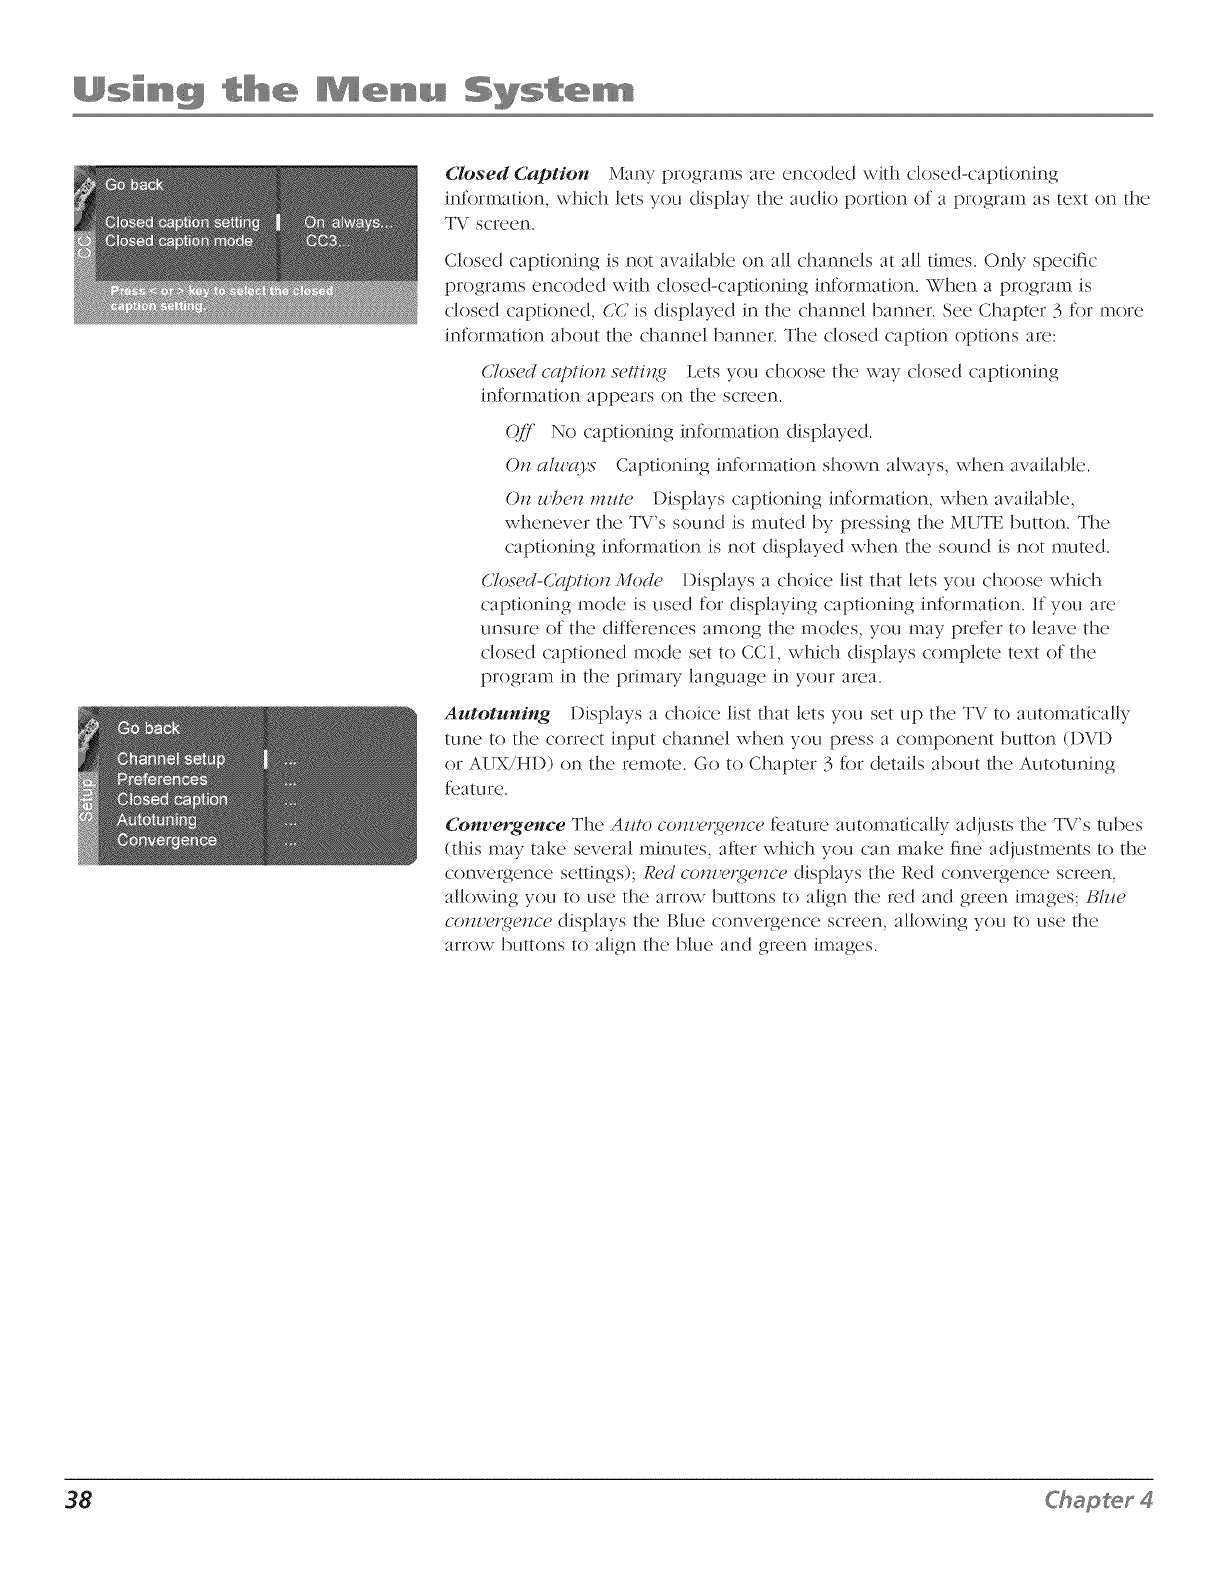
Closed C_ption Many programs are encoded with closed-captioning
information, which lets you display the audio portion of a program as text on the
TV screen.
Closed captioning is not available on all channels at all times. Only specific
programs encoded with closed-captioning information. When a program is
closed captioned, U(; is displayed in the channel banner. See Chapter 3 for more
information about the channel banner. The closed caption options are:
U/osed c@tion settit_ Lets you choose the way closed captioning
information appears on the screen.
()_'" No captioning information displayed.
On ah#co's Captioning information shown always, when available.
On u'ben mzlte 1)isplays captioning information, when available,
whenever the TV's sound is muted by pressing the MUTE button. The
captioning information is not displayed when the sound is not muted.
Ulosed-(2q)tionMode Displays a choice list that lets you choose which
captioning mode is used for displaying captioning informati(m. If you are
unsure of the differences among the modes, you may prefer to leave the
closed captioned mode set to CC1, which displays complete text of the
program in the primau language in your area.
Autotuning Displays a choice list that lets you set up the TV to automatically
tune to the correct input channel when you press a component button (DVD
or AUX/HD) on the remote. Go to Chapter 3 for details about the Autotuning
feature.
Convergence The Azlto conveJi_ence feature automatically adjusts the TV's tubes
(this may take several minutes, after which you can make fine adjustments to the
convergence settings); Red conveJiqence displays the Red convergence screen,
allowing you to use the arrow buttons to align tl_e red and green images; Bhte
conveJiqence displays the Blue convergence screen, allowing you to use the
arrow buttons to align the blue and green images.
38
Troubleshooting
Most probk:ms you cnc'ountcr with your TV can be corrected by consulting the following troubleshooting list.
Note for US customers: If you prefer, we can provide you with the name of an Authorized Service Representative
who will visit your home for afee to install your electronic entertainment system and to instruct you in its operation.
For details about this service, call 1-888-205-3359.
For additional assistance while using your RCA product, please visit www.rca, com/customersupport.
TV Problems
TV won't turn on
*Press the TV button.
- Make sure the TV is plugged in.
- Check the wall receptacle (or extension cord) to make sure it is "live" by plugging in something else.
- Something might be wrong with your remote control. Press the POWER button on the flont of the TV. If the TV turns on, check the
remote control solutions on the next page.
- The front panel controls may be locked (disabled). Llse the remote control to unlock the flont panel controls by selecting the bFw,_t
Pa_zo/Block in the Par_mta! Cm_trol menu and press OK to uncheck the box.
- The TV might be perfl_rming a periodic diagnostic check. Wait fl_r a fl._v,minutes fl_r the TV to turn on.
Buttons don't work
*If you're using the remote control, press the TV button first to make sure the remote is in TV mode.
- The front panel controls may be locked (disabled). Llse the remote control to unlock the flont panel controls by selecting the bF'm_t
Pa_ol Block in the Paru_ta! Cm_tro/menu and press OK to uncheck the box.
- Unplug the TV fl._rten minutes and then plug it back in. Turn the TV on and try again.
TV turns off unexpectedly
" Sleep timer may have been ac't_vatcd. (',o to page 36 _r instructions.
- Electronic protection circuit may have been activated because of a power surge. W:dt 30 seconds and then turn on again. If this
happens flequently, the voltage in your house may be abnommlly high or low.
- Unplug. W:dt ten minutes. Plug in again.
TV turns on unexpectedly
,, Wake up timer might have been activatcd. (',o to page 36 _r instructions.
- Auto on might have been activated. (',o to page 37 fl_r instructions.
- You might have pressed CH+, CH- or INPUT on the remote accidentally.
Blank screen
-Make sure the component connected to the TV is turned on.
- Try another channel.
- If you're trying to watch something that's playing on a component connected to the TV (like a DVD or a VCR tape), press the TV
button on the remote, then press INPUT until you get to the correct video input channel.
No sound, picture okay
-Maybe the sound is muted. TIT pressing the volume up button to restore sound.
- If using S-Video or Y, PB, PR, remember to also connect the component's let} and right audio output jacks to the TV's L and R Audio
Input jacks.
- The sound settings may not be set correctly. Go to page 33 fl_r more infl_mmtion.
Can't select certain channel
* Make sure the remote control is in TV mode. Press the TV button and enter the channel number using the number buttons.
- Channel may be blocked or not approved in the Par_,_tal Cm_trol,s-menu.
- If using a VCR, check to make sure the TViVCR button on the VCR is in the correct mode (press the TViVCR button on your VCR).
Noisy stereo reception
* May bca v,c:tk station. Use 5bz_zd menu to choose mono sound.
Cotzthzztc,s otz ,zc,xt/-)ago...
_}apt@r 5Graph ics co_zta i_zed zuitbi_z tb is pz¢blicatio_z are,/'or roprese_ztatio_z o_z/y. 39
No picture, no sound but TV is on
*Maybt_ th_ cable/air function is s_t to th_ \vrong position. (;o to pagc_ 37 for dc_taiDd instructions.
- Thc_ channd might bc_blank -- change channels.
- If you're watching your VCR and it's connected with coaxial cable to the ANTENNA/CABLE jack, tune the TV to channel 3 or 4
(whichever channel is selected on the 3/4 switch on the back of your VCR). Also check to make sure the TViVCR button on the VCR
is in the correct mode (press the TViVCR button on your VCR).
Sound okay, picture poor
* Ch_ck antenna connections. Mak_ sure all of th_ cables ar_ firmly connc.cted to the jacks.
- TW adjusting sharpness ffmction to ,reprove weak signals. Go to page 35 t_r more instructions.
Volume buttons not adjusting volume louder
* Ch_ck to makc_surc_volumc_isn't limitc_dby thc_maximum volumc_ffmturc_.(',o to pagc_37 tbr morc_instructions.
Picture not moving
- You hav_ activatc_dthe Freeze fl_'attlreby pr_ssing FREEZEor OK on the:r_m_otc:.Pr_:ssany button to 'unfl_z_i' the: pictur_.
Black box appears on the screen
- Close,d-captioning might I)_ on. Ch_ck C/o.s{,dCaptio*_in th_ &,t_¢pm_nu. (',o to pagc_38 tbr mor_ instructions.
Freeze not working
- Thc_flc_c_zc_tbaturc_is not availablc_tk}rcomponent vicDo (CMPI) input.
Low battery warning appears on screen
-Placc_ nc_w battc_ric_sin rc_mote.
TV picture keeps switching between screen formats abruptly
*S\vitch thc_A_¢o.fi_m_atfl:aturc_to O_)':Sc_c_pagc_34 for morc_int_rmation.
The Remote Control Doesn't Work
-Something might be between the remote and the remote sensor on the component. Make sure there is a clear path.
- Maybe the remote isn't aimed directly at the component (TV, VCR, DVD player, etc.) that you're twing to operate.
- Maybe remote is not in TV Mode. Press the TV button so remote will control TV.
- Maybe batteries in remote are weak, dead, or installed incorrectly. Put new batteries in the remote. (Note, if you remove the
batteries, you i_]ay have to reprogram the remote to operate other components.)
- You might need to drain the remote's microprocessor: remove batteries and press the number i button *i)r at least 60 seconds.
Release the i button, replace the batteries, and (if necessary) program the remote again.
Problems with V-Chip/Parental Controls
The rating limits don't work
- You must lock thc_ sc_ttings. (',o to thc_MAI;\ Mk_\_' (prc_ss MENLI on your rc_motc_),sdc_ct Par_,_ta/Cm_tro/, sdc_ct Loc/_Par_,_ta/Co_tro£.
Idon't remember my password and Iwant to unJock the TV
- If you fl._rget your password, press MENU, then select Par_,_ta/Co,_trol (the password entry screen appears). Simultaneously press
and hokt CH+ and VOL+ on the TV's front panel *i_r8 seconds. The Parental control menu appears on the screen, and you can re-
enter a password via Lock Par_,_tal Omtrol.s-.
The V-Chip won't Jet me watch a program even though it's not rated as violent.
-Ma-,ilgc_the movie: was given an NR (Not R:ttc:d) status. Aftc:r you block movie: ratings, you must sc:t XR to _?_,z_sc:paratdy in orcDr to
view movies with an NR rating.
4O
FCC Information
This equipment has been tested anti found to comply with the limits for a Class B digital device, pursuant to Part 15 of
the FCC Rules. These limits are designed to provide reasonable protection against harmfld interference in a residential
installation. This equipment generates, uses, anti can radiate radio frequency energy and, if not installed anti used in
accordance with the instructions, may cause harmflll interference to radio communications. However, there is no guarantee
that interference will not occur in a particular installation. If this equipment does cause harmflll interference to radio or
television reception, which can be determined by turning the equipment off and on, the user is encouraged to try to correct
the interference by one or more of the %llowing measures:
o
o
o
o
Reorient or relocate the receiving antenna.
Increase the separation between the equipment and receiver.
Connect the equipment into an outlet on a circuit different from that to which the receiver is connected.
Consult the dealer or an experienced radio/TV technician for help.
This Class B digital apparatus complies with Canadian ICES-003
Care and Cleaning
CAUTION: Turn OFF your TV bC_fO1X2 cleaning.
You can clean the TV as required, using a soft lint-free cloth. Be sure to occasionally dust the ventilation slots in the cabinet
to help assure adequate ventilation.
The TV's screen may be cleaned with a soft, Hnt-free cloth as well. Take care not to scratch or mar the screen. If
necessary, you may use a cloth dampened with warm water. Never use strong cleaning agents, such as ammonia-
based cleaners, or abrasive powder. These types of cleaners will damage the TV.
While cleaning do not spray liquid directly on the screen, or allow liquid to run down the screen and inside the TV. Also,
never place drinks or vases with water on top of the TV. This could increase the risk of fire or shock hazard or damage to
the TV.
Caution: Using video games or any external accessol T with fixed images for extended periods of time can cause them to
be permanently imprinted on the picture robe (or projection TV picture robes). ALSO, some network/program logos, phone
numbers, etc. may cause similar damage. This damage is not covered by your warranty.
Chapter 541
RCA HDTV Monitor Limited Warranty
What your warranty covers:
,, Defcc'ts in materials or workmanship.
For how long after your purchase:
,, One year from date of purchase for labor.
• One year fro::: date of purchase for parts.
• Two years from (late of purchase for the picture tube.
The warranff period for rental units begins with the first rental or 45 clays from (late of shipment
to the rental firm, whichever comes first.
What we will do:
• Pay an Authorized Servk'e Center the labor charges to repair your m_it.
• Pay an Authorized Service Center for the new, or at our option, refurbished replacement parts
and picture tube required to repair your unit.
How you get service:
= Call 1-877-RCA-HDTV and have yoilr unit's date of purchase and model number ready.
• A representative will troubleshoot your problem over the phone.
• If the representative determines that you should receive service, they will provide you with
the name(s) of the Authorized Service Center in your area.
• Contact the Service Center and arrange for home or pick up, repair, and return service,
provided that your unit is located within the geographic territou covered by an Authorized
Service Center. If not, you must take your unit to the Service Center location at your own
expense, or pay for the cost the Service Center may charge to transport your unit to and from
your home.
• Proof of purchase in the form of a bill of sale or receipted invoice which is evidence that the
product is within the warranty period must be presented to obtain warranty service. For rental
firms, proof of first rental is also required.
What your warranty does not cover:
• Customer instruction. (Yo/lr (-)vv'ner's Manual describes how to install, adjust, and operate
your unit. Any additional information should be obtained from your dealer.)
• Installation and related adjustments.
• Signal reception problems not caused by your unit.
• Damage from misuse or neglect.
• Batteries.
• Images burnt onto the screen.
• A unit that has been modified or incorporated into other products.
• A unit purchased or serviced outside the U.S.A.
• Acts of nature, such as but not limited to lightning damage.
Product Registration:
• Pk'ase compk.'te the online Product Registration on RCA.com or complete and mail the
Product Registration Card packed with your unit. It will make it easier to contact you should
it ever be necessary. The return of the card is not required for warranty coverage.
42
Limitation of Warranty:
* THE WARRANTY STATED ABOVE IS THE ONLY WARRANTY APPLICABLE TO THIS
PRODUCT. ALL OTHER WARRANTIES, EXPRESS OR IMPLIED (INCLUDING ALL IMPLIED
WARRANTIES OF MERCHANTABILITY OR FITNESS FOR A PABTIC_RAR PURPOSE) ARE
HEREBY DISCLAIMED. NO VERBAL OR WRITTEN INFORMATION GIVEN BY THOMSON
INC., ITS AGENTS OR EMPLOYEES SHALL CREATE A GUARANTY OR IN ANY WAY
INCREASE THE SCOPE OF THIS WARRANTY.
*REPAIR OR REPI_kCEMENT AS PROVIDED UNDER THIS WARRANTY IS THE EXCLUSIVE
REMEDY OF THE CONSUMER. THOMSON INC. SHAIJ_ NOT BE LIABLE FOR INCIDENTAI_
OR CONSEQUENTIAL DAMAGES RESISLTING FROM THE USE OF THIS PRODUCT
OR ARISING OUT OF ANY BREACH OF ANY EXPRESS OR IMPLIED WARRANTY ON
THIS PRODUCT. THIS DISCLAIMER OF WARRANTIES AND LIMITED WARRANTY ARE
GOVERNED BY THE I_kWS OF THE STATE OF INDIANA. EXCEPT TO THE EXTENT
PROHIBITED BY APPLICABLE IAW, ANY IMPLIED WARRANTY OF MERCHANTABILITY
OR FITNESS FOR A PABTIC_R_AR PURPOSE ON THIS PRODUCT IS LIMITED TO THE
APPLICABLE WARRANTY PERIOD SET FORTH ABOVE.
How State Law relates to warranty:
• Some states do not allow the exclusion l_()r limitation of incidental or consequential damages,
or limitations on how long an implied warranty lasts, so the above limitations or exclusions
may not apply to you.
• This warranty gives you specific legal rights, and you also may have other rights that vau
from state to state.
If you purchased your unit outside the United States:
- This warranty does not apply. Contact yoLlr ([(.'aler for warranty information.
Service cars which do not involve defective materials or workmanship are not covered by
this warranty. Costs of such service cars are the sole responsibility of the purchaser.
Ckapter 5 43

Accessory information
There are various accessories available to complement your HDTV Monitor. Prices are subject to change without notice. All
accessories are subject to availability.
A shipping and handling fee will be charged upon ordering, and we are required by law to collect the appropriate sales tax
for each indMdual state, county and localilT to which the merchandise is being sent.
HOW TO ORDER
By phone: Have your Visa, MasterCard or Discover Card ready and call the toll-free number listed below. Use this number
only to place an order for accessory items.
1-800-338-0376
Online: Accessories may also be purchased at www.rca.com/accessories (subject to availability).
VH81 (3-fl), price: $3.95
VH82 (6-fl), price: $4.95
Screw-on Cable attaches to the round
antenna connectors (called 75-ohm
F-type) on the back of your VCR or TV.
The encls screw onto the connectors
for a secure connection.
VH89 (6-ft.), price: $5.95
Push-on antenna cable attaches to
the round antenna connectors (called
75-ohm F-type). The ends push on for
a quick connection
SCTV4000C,
price: $49.95
Surge Protector provides eight
outlets, coaxial and telephone line
protection. Audible alarm for surge
failure. $100,000 Surge Equipment
Guarantee.
Component Video Cables Triple
cable used to connect a video source
with Y, PR PB jacks to the TV.
Gold-Tipped cable
DT6DC (6-fl), price: $24.95
DT12DC (12-fl), price: $34.95
VH976 (6-ft.),
price: $7.95
VH913 (12-fl.),
price: $14.95
VH47, price: $3.95
S-Video Cable has multi-
pin connectors on each
end for connecting S-Video
components to your TV.
2-way Signal Splitter helps
you connect to a second TV
or VCR.
Amplified VHF/UHF/FM
Antenna allows you to switch
easily fl-om the antenna signal
to cable or satellite easily
without disconnecting antenna.
ANT200, price: $49.95
Remote Control This is
the remote control that
came packed with your TV.
Replacements or spares can be
ordered as needed.
264852, price: $19.00
Standard Audio/Video cable
with RCA-type phono plugs.
VH83 (6-ft., mono), price: $5.95
VH84 (6-ft., stereo), price: $9.95
44
A
Accessories 44
Age-based ratings 27, 28
Antenna
Button 17
Jack 12
Arrow buttons i7
Audio/Video
Cables 5
Jacks i2
Audio menu 33
Audio processor 33
Autoff)rmat 34, 40
Automatic code search i9
Autotuning 23, 24, 38
Auto channel search i5, 37
Auto channel update 37
Auto on 37
Auto skin tone 34
AUX button i8
AUXiHD channel 24
B
Batteries i4
Block
Age-B:tsed R:ttings 27
Front Panel 32
Movie Ratings 3i
Specific Content Themes 28
V-Chip Unrated Program 32
Buttons
Front Panel i3
Remote i7
C
Cables 5, 44
Canada V-Chip ratings 29, 30
Care and Cleaning 40
Channel
Banner 23
Labels i5
Search 15
Setup 37
CLEAR button i7
Ck)sed caption 37, 38
CMPI input i2, 24
Coaxial cable 5
Codes *_.)rthe remote 22
Color 35
Cok)r v,am_th 35
Commercial skip 18, 23
Component buttons i7, i8, 2i,
23, 24, 38
Component video cables 5, 44
Connections 5, 6, 7, 8, 9, i0, ii
Content themes 28
Contrast 35
Contrast expand 34
Curtain effi._ct 37
D
Direct entry 20, 22
DVD
Button i7, 24
Channel 24
Connection 6, 7, i0, ii
Dynamic bass 33
E
English, Canadian ratings 29
Exempt programs 32
FCC in*_.)rmation 4i
Film mode 35
FREEZE i7, 40
French, Canada ratings 30
Front panel
Block 32
Buttons i3
Inputs i3
G
(',O BACK button i8
(',raphic equalizer 34
(',UIDE button i8, 35
H
HDTV tuner 6, 7
Headphones i3, 34
[
INFO Button 18
Initial setup i4, i5
Inputs i3, 24
J
Jacks i2, 24
K
Key features overview 2
L:d)els 15, 37
L:mgu:tges, selecting i5, 37
Lock, Parental Controls 32
M
Maximum TV volume 37
Menu
Button i8
Channel guide 35
Picture 34
Picture Qu:dity 34
Setup 37, 38
Sound 33
Time 36
Modes, remote control 2i
Mono 33
Mute i8, 33, 38
N
Normal list i5
O
OK Button 18
ON-OFF Button 17
Optimized still picture 34
P
Parental controls
Lockiunk)ck 32
Menu 25
Problems 40
Password 32, 40
Picture
Menu 34
Presets 35
POWER o1_Front Panel i3
Prefi.'rences 37, 38
Programming the remote i9, 20
R
Rating limits 25, 3i, 40
Remote control
Buttons 17
Installing the batteries i4
Programming 19
Programming codes 22
Reverse 3:2 pulldo\vn 2, 35
S
S-Video
Cable 5, 44
Jack 12, 13
Safi.'ty in*_.)rmation i, 4
Satellite receiver 8, 9
Screen *_rmat 17, 23, 34, 40
Second Audio Program (SAP)
23, 33
Setup menu 15, 37, 38
Set autotuning channel 24
Sharpness 35
Signal type 37
SKIP button i8, 23
Sleep timer 23, 36
Sound
Menu 33, 34
Presets 18, 33, 34
Sound logic 33
Stereo 23, 33, 39
T
Time 23, 36
Tint 35
Transport buttons 18
Troubleshooting 39
TV button 18
TV problems 39
U
Univers:d remote 21
Unrated programs 32
US V-Chip ratings 25, 27
V
V-Chip
Age-based ratings 25
Canada ratings 29, 30
Content themes 25
Movie rating limit 3i
Problems 40
US ratings 27
VCR 6, 7, 8, 9, i0, 11, 24
Video noise reduction 34
W
W:tke up timer 36
W:trranty 42
Y
Y PB PR jacks i2
Chapter 545

Visit the RCA website at www.rca.com
Please do not send any products to the Indianapolis address listed in this manual or on the carton, This will only
add delays in service for your product,
Thomson Inc.
10330 North Meridian Street
Indianapolis, IN 46290
02004 Thomson Inc.
Trademark(s)® Registered
Marca(s) Registrada(s)
Printed in USA
TOCOM 16379930 THOr_ISON
