RCA LRK32G30RQD User Manual LCD TV/DVD Manuals And Guides 1409328L
User Manual: RCA LRK32G30RQD LRK32G30RQD RCA LCD TV/DVD - Manuals and Guides View the owners manual for your RCA LCD TV/DVD #LRK32G30RQD. Home:Electronics Parts:Rca Parts:Rca LCD TV/DVD Manual
Open the PDF directly: View PDF ![]() .
.
Page Count: 2
LED
Roku @ Streaming Stick TM
(Roku Ready@ vers on) Included
MODEL
LRK32G30RQD
We've built asmarter TV= includes
Roku"Strearning Stick'°moku R_dvwers_o.)
• No wires, MHL port powers streaming stick
•Enjoy more than 1000+ entertainment channels
• Control with Roku Ready _TV remote
and mobile app
i_ availabb some restrrct o,ls may apply 20_4 Horr,e _x Offie Ir,c Allrghts rest,fred
Su_ptlc_l _ oth_ _rr ents m_ be requl_ to _s oontent _ _ln ch_,n_
Fc_ _am_e, Net_ _equlres a paid ub_o_lptlon, wN® gbes you a_ to tTcMe and W sh_ tltl_ In the Ne_ _t_ea_llng_t alc_
an_or regl t_ tr_emark_ of _k_,lnc lathe _ed State_ and other oount_e_
Avallablllty of 1 _p HDvld_ limit_ bY chann_ pr_lder and _d of broadband _r_n_Uon
VId_ pla_c_ of per_nal m_la via the _ku a_ I_ IItTIt _ to lOS and _t Andtold'_ d_
Please register your product at www,r¢a.¢o_
P!ensei_ep your sale_ _ceipl arid keep the I_COldd1hese_ialnumber
and the d_e ofpUl_lsasehi o_lel ¸ to receivewar_n V pal_S and _el_ice
The !_elialnumber is;located at a!e back ofa!e -S
Serial Number
Date of Pumhase
I. Read these instructions,
Pal Ne,: f_NOS32f_24022
HADE FOR TODAY
O2
O2
04
05
Check Accessories 05
Setup TV Table Stand 05
Select TV Location 05
Connection and Using 05
05
Cable Connections 05
Side Panel Connections 05
L/onr](_CLing iAV L/.)[f}[DOSIL@ VKJ@O LJevIcu L#O
Choosing TV Channel 07
Selecting Input Source 07
Channel Bar 08
Adjusting Volume 08
EPG (Electronic Program Guide) 08
08
Adjust the OSD Screen 08
Quick Menu 08
Channel Menu 08
Picture Menu 08
Audio Menu 08
_me Menu
Connecting YPbPr Component device 06
Connecting HDMI device 06
How to obtain various kinds of Input Sources 06
06
07
Keypad Buttons 07
Front Panel 07
07
Turning On and Off 07
Setup Menu 09
Lock Menu 09
ROKU 10
DVD OPERATIONS 10
13
13
13
/l_-i'/a( e _: erT iiks )/
_ al e_ 1,41o_ 1.4a[7 I't4_D/\ I'<1 R C IdaIu/,.i Of HDf,4/L/c ru In ,L2 (
@
@
¢
¢
¢
¢
@
¢
@
@
¢
¢
¢
¢
@
e
@
@
@
¢
¢
¢
@
e
@
@
@
¢
¢
¢
e
@
@
@
@
e
e
@
¢
¢
¢
¢
@
@
@
@
@
¢
¢
@
@
@
@
@
@
¢
¢
@
@
@
@
@
e
e
@
@
@
@
@
@
@
¢
@
@
@
Congratulations on your purchase! As you enjoy your new product.
please keep these safety tips in mind :
The Issue
The home theater entertainment experience is a
growing trend and larger flat panel displays and
popular purchases.
FloweveD flat panel displays are not always supported
on the proper stands or installed according to the
manufacturer's recornrnendations.
Flat panel displays that are inappropriately situated
on dressers, bookcases, shelves, desks, speakers,
chests or cab may fall over and cause injury.
This _anufatturer Cares!
The consumer electronics industry is comrnitted to
ruskin(7 horne entertainment enjoyable and safe
Tune Into Safety
-One size does NOT fil all, follow lhe manufacturer's
recommendalion for Ihe safe installalion and use of
your fiat panel display.
-Carefully read and understand all enclosed
inslructions for proper use dthis product.
-Don't allow children Io climb on or play wilh
fumilure and Ielevision sets.
- Don'I place flal panel displays on furnilure Ihal can
easily be used as steps, such as a chest of drawers.
-Remember thai children can becorne exciled while
watching a pPogr_im,especially on a "larger than life" flat
panel display Care should be Iaken Io pla(_o or inslall
the display where il eannol be pushed, pulbd over, or
knockod down.
- Care should be taken to route all cords and cables
eennected to the panel display so that they cannot be
pulled or grabbed by curious children,
Wall Hounting : iF YOU DIODE TO WALL MOUNT YOUR FLAT PANEL DISPLAY, ALWAYS :
-Use a rYiOt,lr][ that has been reeomrnended by the display manufacturer and/or listed by an independent
laboralory (such as UL,CSA,ETL).
- Follow all h_slructions supplied by the display and wall mounl manufacturers.
- If you have any doubts aboul your abilily to safely inslall your flal panel display, eonlacl your retailer aboul
professional inslallaIion.
unsure conlact a professional inslaller.
-A minirnurn of two people are required for inslaNation. Flat panel displays can be heavy.
Caution and Warnin 8
Cau on:ro reducehe rskof ele tric shock,do not remove
coverorback Nouser_serviceablepartsinside
Referse vcing to qualffedservicepersonnel
I_ Thelghtn n 9 flash with arrowhead ymbo[ wthi_s arl
e ibe_ltriangle s tended to alet theset tothe
p_eser,ceof unnsulateddangerousv Itagewithinthe
p_oduct enclosurethat may h_, of suffli_,n
mag,li ude ocon'dtut_,adskofele_tri ho_k
I5_ f he exclamation point wi h n arl eqwlater_l tdar_gle is
int_,ndedto alert h user to the pmsenteof
fl_port;mt operatng arid manteraal(e(serv(:ifg)
instructionsinthe Itera_urea_omp,snyingtheTV
@
¢
e
¢
@
e
@
¢
@
¢
e
¢
@
e
@
e
¢
¢
¢
@
¢
¢
@
e
¢
¢
¢
@
¢
¢
¢
¢
¢
@
¢
@
e
@
@
@
@
e
e
@
@
¢
@
@
@
e
@
@
@
@
@
@
@
e
@
@
@
¢
e
@
e
@
@
@
@
iMuchas gracias por su uso del presente producto!
Cuando usted disfru_ de su nuevo producto, por favor" ten_
en cuenta los conseios de s%uridad:
Posbles Problemeas
- La experiencia de enlretenirniento de cine en casa
es una lendencia crecienle y los grandes monitores
de panlalla plans son muy populares.
embargo los monitores de panLaNa plans no se
ban instalado siempre en los soportes adecuados o
instalado de acuerdo con las recomendaciones de
fabricanLe
Los monilores de panLaNa plana que se ban
insialado inadecuadament en tocadores estanterfas,
estantes, escrilorios, oradores, baOle s o earFos se
pueden cant y causar el dano corporal.
iAI Fabritante le Importa
-La indus[ria electrCnica del consurnidor est_
eompromeIida a hacer el en[re[enirnienlo de casa
agradable y seguro
D_ NINOS_
El CCmo y OoCnde tJsted usar Su
Mo iitor de Pa' ',tails Plalla
Mama La Diferr÷ncia
Ajustar Hasta Seguridad
Un tamado fljo NO es adecuado pars redes, siga las
recemendacbnes de fabricsnte psra la inslalaclon segurs y
el uso de su monitor de pantalla plans
Lea con cuidado y entienda tedas las instruccbnes
sdjuntss pars el use prepk) de esle preducle,
No permits a los niflos s subir sl equipo o jugar con
muebles y televiskTnes.
No cloque los menitores de pan alia plans en el mueble
quese puede/laSt ff]cihnente come escslcn, sst come uns
comeda,
Recuerde que bs nidos pueden llegsr a ser exdtados al vet
uns pregramscbn, especialmente en el meniter de psntaNa
plans "l i_:_sgla_ de que vida", El cu}dado se I:ie_e que
empezar pot poner o inslalar el monblr dende ne se pu(xJe
empujar, dalener al caslade del camine ni echar abaje,
El cuidade se tbne que empezar pot encaminar todos
los cordones y cables conectados al monitor de pantalla
plans pars que ne se puedan bar e agarrar conectados
sl menitor de pantaNa plans pars que no se pueden tirar e
agarrar per los nihos cunesos,
_ontaje de Pared: s_ USTEDDECIDEA MONTAR SU MONITOR DEPANTALLA PLANA LA PARED,SIEMPRE
-Use una montura que se ha recomendadop or el fabrieanle de rnonilor y/o Iislado pot un laboratorio
independienle(como UL, CSA, ETL).
-Siga todas las instrucciones ofrecidas por el fabricanle de monitor y montaje de pared.
-Si usled Iiene cualquier duds sobre su habilidad pars inslalar seguramente su monilor de panlalla plans,
eonlacle a su dislribuidor pars la inslalacbn profesional.
-Compruebe que la pared adonde se est,. monlando el rnonilor es adecuada. Algunos rnontajes de la pared
no son diseriados pars ser montados a paredes con lachenes de acero o la vieja conslrucci6n de bloque de
eeniza. Si usted est& inseguro, conlacle aun inslalador srofesional.
-Pot Io menos dos personas se requieren pars la inslalaciOn. Los monilores de panlalla plans puede ser pesados.
Fcc /nformaffon
Thb equipment has beers tested and found to cemply with the
Nmils fer a Class B digital devbe, pursuant Io Part 15 ef the FCC
rules,
These limits are designed 1:o previde reasenable prolection againsl
harm ul interfereHce in a msidential inslallation.
This equipment genera es, uses and can radiate radio
frequency eHergy and, if not installed and used in accerdance
with the instructions, may cause harmful interference 1:o radio
Commulficafions.
However, Ihere is no Guaranlee that inlerforence will net eccur in a
particular inslallation.
If this equipment does cause harmful interference to radio or
television reception, which can be detern_ined by tun-ring the
equipment off and on+ the user is enceuraged 1:otry Io cerrect Ihe
interference by one or more of the following measures:
ReorieHt or rP,Iocate the r(£seiving antenna,
Increase the separation belween the equiprneHI and the receiver,
Connect the equiprneHI into an outlet en a circuil diflorent free
that o which the m,ceiver is connected,
Censull Ihe dealer or an experienced radio/rV techniciar_ for
help,
Device complies with FDA radiation performance standards, 21
CFR subchapter.
Caution: (hwisible) laser Radiation when epen.
De net stare inlo beam.
2. Keep Hsese instructions.
3. H_d all warnings,
4. Follow all inslrucllons.
5, Do not use his apparatus near waler, For example, do not use
neala laundry tub, in a wet basement, or near a swimrHing poel,
and the like,
6. Clean enly wilh dry cloth,
7. Do net block any ventilalion openings, Ins all in accordance with
the rnanuflr_cturer's inslruc ions, Slots and epenings in the cabinet
back or bottom are provided for ventila ion, to eHsure reliable
eperation ef the TV and to pretect il frorn overhea ir% These
epenings must not be blocked er covered. The openings should
never be blocked by placing the fV en a bed, sofa, rug, or elher
similar surface,
8. Do Hot iHstaN Heal any heat seurces such as radialors, hea
registers, stoves, er other apparatus (including ampNfiers) that
preduce heat,
9. De not defoal the safiely purpese of the polarPed er grocfl_dh-_g
type plug, A polaIized plug has two blades with one wider thar_ the
elher: A greunding lype plug has two blades and a third gr_Tunding
prong, The wide blade or the third prong is previded for your
safely, If he previd_J plug does not fi into yeur eutlM, censull an
electrician for replacement of the ebselete eutkg.
10, Protect he power cord from being walked on or pinched
padricularly al plugs, convenience receptacles, and the poinl where
they exil free the apparalus.
11. Only use attachments/accessories specified by the
n lanu[aoturelR
12, Use enly wilh cart, stand, tripod, brackel, er table specified by
the nsanufachxer, er sold with Ihe apparalus.
When a cart is used, use caution when reeving the carl/apparalus
combination Io avoid injury free tip over.
A Pd and cart cerr_bh_alion should be moved with care, Quick
slops, e/xcessive ferce, and urlever/surfaces may cause Ihe IV and
cart combinallon to everlum,
13, Unplug this apparatus during lightning slorms or when unused
fer long periods of time.
For added prolection for Ibis IV receiver during a Iighlning st"ore,
er when i is leR unused fer long periods ef time, unplug it free the
wan outIM and discennect antenna er cable syslem,
This will prevent damage Io the fV due Io lightning and power line
sQrges,
14, Re[er all servicing 1:o qualified service personnel, Servicing is
required when the apparatus has b_n damaged is asy way, such
as power supply cord or plug is damaged, liquid has b_,n spilled
or ohjects have fallen inlo the apparatus, the apparalus has been
exposed Io rain er moisture, dees net eperate nomsally, er has
beers drepped,
15, This IM should be eperated only frem the lype ef power supply
indicated on the raling label.
If cuslomer is not sure he type of power supply in yeur home,
consult your appliance deale_ or local power cempan% For IV
remole control ballery peweq re/er to Ihe operaling inah uctions,
16, The TV set shall nol be exposed to dripping or splashing, No
ebj_;ts filled wilh liquids, such as vases, shaN tx_ pla(>_ on Ihe %/set
17. Never push ebjects of any kind into this IV thr_Tugh openings
as H4_y may touch dangereus voltage or ether ebctrical paris that
could re,suit in fire er ebclric sheck. Never spill Nquid ef any kind into
the IV.
18. Unplug the ?d free the wall oullel bebre cleaning. De not use
liquid er aere cleaners, Use a damp clolh for clearfing,
19, ]his TV should newer be placed nP,_r or over a radialor or heat
resource, This IV should net be placed in a buill dn inslallalion such
as a bookcase or rack unless preper ventilation is previded or the
marlu[achsrer's irlM'ructions have b_n adhered to,
20, Do no1 place this Pd on an unstable cart, sland, l:ripod, bracket,
or table, The IV may 1all, causing serious inju_' to someone, and
serious damage Io the appliance.
21, Do not allempt to service this ]M by yourself b_;ause opening
or removing cevers may expose you to dangereus high voltage or
eflser hazards, Rder all servicing to qualified service persennel,
22, This devbe compNes wiH-_Pa_ 15 of the FCC Rubs. Operation
is subject to the feNowing Iwo cendilions: (1} this device may
not cause harmful interference, and (2} this devbe lnusl accept
any inter[erence received, including interference that may cause
undesired eperation,
23. WARNING: Ib preveHt injury, this apparalus musl be securely
allached to the floer/waN in accerdance wilh the h-_staNatbn
ir_si"rucfions,
24, fo reduce he risk of ekx;tric sheck, the greunding of cenler pin
of plug must be mainlained.
25, If an oulside anlenna or cable system is cennected Io Ihe IV,
be sum the antenna or cable system is geunded o previde seme
protection against vollage surges and built-up static charges,
Section 810 o[ the National Electrical Code, ANSI/NFIVk NO.70,
provides infermation wih respecl 1:o preper g_>unding of the mast
and supporting struclure, grounding of the lead in wire Io an
antenna discharge uni, size of grounding cenductors, location ef
antenna discharge unil, connection to gr_Tunding electrodes, and
requiremenls fer the greunding eleclredes, (See figure A)
" ROWR SERVICE GROUNDING
_LECTROD_ SYSTM
Safety Strap
eaution: Pushing, pulling or climbing on the TV may cause the ]V
falling, Do nol let children climb or hang on he IV. Always place Ihe
Pd on a sturdy, level, slable surface Ihat can hold Ihe weigh of ]M
And if possible, secure Ihe IV according to the h_struction below
(Note: the fastening co/npor_ents such as screws are not suppli_J
with fV).
Step one: Insert the M6 mounting screws into the upper two wall
mounting screw heles and fasten them (Figure B),
Step two: Insed anchors Io wall and connect the bolts and anchors
wilh ropes or chains (Figure C),
............................... Wall
@
@
@
@
@
@
¢
¢
e
e
¢
¢
¢
¢
e
@
¢
¢
e
@
¢
¢
¢
¢
e
@
¢
e
e
@
@
@
@
e
e
@
@
@
@
e
@
¢
¢
e
@
¢
¢
¢
¢
e
@
¢
¢
e
@
e
@
@
®
@
¢
¢
e
e
@
@
@
@
®
@
¢
Before Turning On 71/
Check Accessories
Check the,accessories that are packed wilh your fV,
(refe,r te Quick Start Guide)
Setup TV Table Stand
Please re[orto Quick Star1Guide to carry out stand inRtalling,
Select TV Location
Select a flal, slable lable to place your IV see Please fellow the
saf_ty instructions when placing Ihe fM
Connection and Using
Choose };our Connecffons
IV I RK32G30RQD suppor/s various connections o other
devices (such as DVD, VCR, Setep box, elc.). Please fellow the
table Io cheese the cables whicl-_ adapl to yeur device,
Jacks
COMPOSITE
L_AUDIO,_R
COMPONENT % Pb, Pr
L_AUDIO_R
Fu_her
Cables Inferrnddon
See the below
Video/Audio cable
Audio Cable
Go to page 6
i COMPONENT video cable
After t lacing your ]V properly, you can connect the TV wilh power
supply and cable cernponents, For further irfformation, see page 5 _:_ _([i
1:o page 6. HDMI-DVI sable Ge to page 6
E_ ................. <_,TIJ
HDMI IN 2iDVl, l/ARC HDMI cable
/ih s/_i_
bl H Leabb
Go to page 6
Roku/HDMI3 Roku Stleaming Stick
(4 /rat Mrla/</_ _ f ' /t( ce/d w t7 ,'od (oru ,(: oh&r d,w(: ,f o
TW
the fie1 step in connecting your IV is obtaining the signal, Your
IV I RKS2GSORQD has a back panel, which allows you to receive
analog and/or digi al television channels via ANI/CABLE jack,
Before cennecting your 1'7, dei"emsine using an antenna era cable
seraice to eblain the signal
A_ Antenna
Conn_;t the antenna 1:o ]V via coaxial cable en AN]TeABLE jack
ef the back _anel, You are ready to receive air local digital and
analeg channels.
B_ Cable TV service
Conn_st the cable IV wan jack 1(7 IV via ceaxial cable ors
AN I/C/CLE ack of Ihe back pan& Yeu are ready Io receive offair
local digital and analog channeb.
C_ Set-Top Box
If yeu use a set- op bex, you may need te call yeur cable company
er satellite service previder, which use a special corfl/_;tion, please
refer 1:o Ihe user's guide dsebtop bex,
HaW/[o not p,/__g 2>eAB :as: urd ax ha:e' a:: comaffshe( _a// ttTe
gaaaec//ons 77ru, T'/:Tees act s #a_e/t (_/\iA;/as'a/gab/a :::_anad
Connecffng AV Composite device
(Good Video Ouality)
Composi e connector will be shared wiH_ Compenent Y cenneclor:
fb connect a cernposile/W dovice, such as a DVD player, feNow
these s?'eps:
I ,Connect the COMPOSITE jack on the side of fY to the video
eulput jacks ef dovbe via video cabb (yeNow),
2,Connect Ihe I AUDIO R jacks on he side ef IV to the audio
eulput jacks ef dovbe via audio cable,
Notice rise left channel jack and plugs are white and the dghl
charfl/el jack and plugs are red,
Note: AY s/f;r _# be/of;s /a ca_;,pas/te w,:_c Fir:, /d>:7 oi d:Te:>
src/, Jh_:/egl/a/" reel: c',':,f>l y qil _fi/i:
Composite Video Connection
The picture below is an example of a connection using the
cempesile video jack,
e
¢
@
e
e
@
¢
e
¢
®
e
¢
@
e
e
@
¢
¢
¢
e
¢
¢
¢
e
@
@
¢
¢
¢
e
¢
@
@
e
@
¢
@
¢
e
ConnecUng _{PbPr Component device
(Better Wdeo Quality,)
fo connect a compenent device, such as a DVD player, feNow
ttlese ,s_eps:
1,Connect the COMPONENT iN Y/Pb/Pr jack on the side of IV 1:o
the videe eulpul jacks ef dovbe via videe cable (green, blue and
red).
2.Connect the I AUDIO R jacks ors the sue of TV 1:othe audio
output jacks of device via audio cable.
Notice the left channel ack and plugs are while and the right
channe ack and pugs are red.
/, } ,/ }- { < .... .
',,foe _ F J* F/c .K, :/ c >/?Teenerl ,fide) T,/f v_,fi)e /
t_as t7etter ¸ drsyay _ua/i/A
Component Video Connection
Fhe picture below is an example of a connection using the cen _p(Tnent
video) jack,
_f-- ......
s_ , @
......................................................................................ii @iiiiii!i ; !i
iii ii ]igiiiiiiii{l; ;ili
e
@
¢
e
¢
e
¢
¢
¢
e
@
@
¢
¢
¢
e
@
¢
¢
e
@
e
@
¢
¢
e
¢
e
@
e
@
¢
@
¢
®
e
¢
Connecting HDM/ device
(Best Y7deo Quality)
rb connect a HDMI device, such as a DVD player; please Corfl/ec_
the BDMI l/ARC, 2/DVI lack on the side ef rv 1:o the output
jacks of device via HDMI cable.
k> connect a DVI device, via DVI port ef PC er Device and HDMI
jack ef IV:
1, Connecl Ihe HDMI 2/DVI jack en the side ef IV 1:othe I)VI pod
ef PC via HDMI DVI cable.
2, Connect the L AUDIO R jack en the side ef IV to the audio
eutput jack of computer wih audio cable (dual channel RCA jacks
1:o 3,5me slereo jack er the I AUDIO R jack),
Pa connect an ARC HDMI OUT device, please connect Io the HDMI
inpul port ef the dovice such as amplifier,
Nete: 7 HD'X/ OHK/t Deh /iue AX #£necru /ne_iece ha (:on" )act
a://a'v/a'uo s,7/(;s/<4e/a/tl'arts,'?/ttRg rca; _/x_,<<se(: d'gf!;d (;L_!;_ Jt
::,t/Trr-s UTe a (( and yia';:e ::;;0/7a/yra he amn_: ::a 7#: as# ha:, U?e
ben :D:/#:sy (7!_N}
> HD/,,ii DI, i 7hie/7"ar_r#e ,! >n/.' wd,a sr_ l;i f/or} D/i ,'>>H of
/
)Yid,ase o h,D/,'fi/akofTI i:e/ N_"ro 7rfin/, /Pue nrl(:i
_udiooutp4toL-AUDiOS,(:/,e_TV5 /,p ne/
HDMI Connection
he pbtum below is arl oxampb ef a cenrlecliorl using the HDMI
videe jack,
i\ktte: 7; :i(ik! /St _>/art/pg StT.'N/_ afro#o? eonoectud _,;/tt 7/ /i/i/ 3
_, /! yOU Y/Uat [0 LA I! /:ili // , yOU sh >//I] remove _;ok /Sb?aR)/i?g
Stick ker_ iOAli/ ;7
!
tt
\
How to Obtain Various Kinds of Input Sources
/Vler connection is done, press INPUT button en remote contrel
er IV top panel o choese the inpul source you need, _:'.4)epage 7,
Bash Operalbn dPd,
H_AD PNON_; Connect a S,5mrn headphone lot personal audio,
USB: Connect your USB slorage device to enjoy music/pholo files
e orl your Pd (Also used fer service purpose).
eNDbll IN
® HDMi l/ARC, P/DVI, Roku/HDMI3 : (High Definition Multim_Jia Interface}
eIt prevides an uncompressed digital connec'tien that carries beth video
e and audio data by way of an integrated mini plug cable,
e ARC: (Audio Return Channel) Adopted in IV output Old SitS} audio, can be
connected to the device suppotring ARC, transmit the rV sound to the device,
MHL: (Mobile High-Definition Link) Te slandard HDMI input, tlanslnit
ethe video/audb fl'om poltable electronic device (cellphone, dutal
e camera,digital video camera} to TV set,
® N<te:/'a/<_, HD4'i,':_/Te/t s >oo/t/,,/_H if }a wa_t :< ,se ,M;H[,
@ }o can se it ai/ r:i/sca/'dir_g Rak_ Ste>ant/ng st/(:k
e eO[4_ON_NT W_b/_r: Connect a dovice that has cornponent
®video jacks, such as a I)VD player, Io access d_:_v'iceconnected
to the Y/Pb/Pr jack, press the INPUT buIIon oil your remote; Ihen
epress the up/down arrew Io select Compenerlt, Press Ihe OK bullorl
a lasl to confirm,
e _ Y/_b/Pr (Gom[:_o_ent VTdee): Thoy provide good picture quali y
because Ihe video signal is sepam ed hlto three components, Use
three videe grade or component video cables fer the cennecfior_,
e When using Y/Pb/Pr, make sure yeu connect left and right audio
®cables to Ihe AUDIO IN R/I jacks,
L-AUDIO=R_ OO_aPOSlT[; Connect an /W device tha has
ecomposite video jacks, such as a VCR or a DVD player, Io access
edevice cenrlected to these jacks, press the INPUT button erlyour
e remote; then press Ihe up/down strew to select AM. Press the
¢ ENTER button al lasl 1:ocenfirm,
e _ AUDIO IN L: left audio channel cennection, The left audio
÷ connector is usually while. For morlo audio sources, be sure 1:o
e use the lefl AUDIO INPU I,
e
@
e
@
AU#IO IN R: Right audio channel conneclion. The righl audio
connector is usually red,
ANT/CABLe; Connect to receive Ihe signal free your anlenna or
cable via coaxial cable,
_igital A_die o_t; Connect a coaxial cable for digital audio
output,
@
@
e
¢
e
¢
¢
¢
@
¢
¢
e
¢
¢
¢
@
¢
÷
@
@
@
¢
@
@
¢
¢
@
@
@
¢
@
@
@
Keypad Buttons
If you cannot locate your remote, you can use the keypad buttons
on yeur rv 1:ooperate many Pd features,
INPUT
MENU
CH&
CH_
VOL+
VOL_
Displays the Seurce Select List,
Displays the IV Main Menu,
Scans up through the channel Iisl,
In Ihe IV rner_u system, it acls like the up arrow on the
remole contrel and can be used 1:oselec_ menu options,
Scans down threugh the channel Iisl, In the Pd menu
syslem, il acts like the down arrow en the remee
contrel arid call be used to sebct menu oplions,
Increases he volume, In the TV menu syslem, it acts
like the right arrew on the remete cenlrel and can be
used o select mersu options,
Decreases the volume. In the IV menu syslem, it acts
like the lefl arraw ors he remole centrel and can be used
1:o select menu options,
rums the IV on and off,
Front Panel
About remote centrol
working distaHce and
angle, see Ihe quick
slarl guide
Power/Star_dby I_dTcator; Light up in red when the fV is in
slaHdby mode, Iighl out when Ihe IV is en.
Re_ete Oo_trel Se_ser; Remote conlrel IR senseh which
receives hffrared ray sent by remote conlrel,
Codes for Cox Communications: 0178
Codes for Comcast: 10178
Codes for Dish Network: 627
Codes for Fios Verizon: 0205, 0057, 0493, 0775
Turning On and Off
eonnect the AC cord to power the LED ICD IV At this time the
IV will enler slandby mode and power indicator will turn red, Use
Power button ((_)) on the top panel d IV or en the remote control
to turn on the Pd After switching effthe fV fer 5 seconds, you can
turrl oil Pd again,
Choosing TV Channel
Tuning Te A_alog Oha_els
an analog channel has a channel number begirflfing with "A'L
input Ihe digital number with numeric butlons directly and press
OK huron Io confirm, For e,xarnpb, to walch analog clsannel "A51 ",
press "5", "1 ", "OK" on remete conlrol in sequence.
Note: A/tt (x gh tf><;;_ N. re aeak>g 7!/s;geq/ayl//,7/;: R Ame/7<a,
14,'(/ese/wf/tTI/iwac!iaes ia/" sam (:anat>s/h/l: ds(
Tu_i_g Te Digital Ohannels
A digilal channel has a channel number beginning with 'D'L input
the main digital number wih numeric but ons direclly, Ihen press
"" button en remote control and input the sub number at last,
For example, to walch analog channel "D31 1 ", press "3", "I ", "",
"1", "OK" on remee centr_Ti in sequence.
ehanging Channels Directly _¢au can use CHA button to increase
channel number and CHv e decrease channel number,
When ne OSD (On Screen Dbplay) is used, the up/dewn arrews
can abe work as CHA/CHv buttens,
Selecting Input Source
Press INPUT buton on remele
control o display Source Select Iisl,
Use up/down arrews 1:o highlight he
source you need and press OK to
confirm.
Source Select
TV
AV
Component
DVD
HDMI I
HDMI 2
Roku
USB
$.... @......
ChannelBar
Press the OK button on the remote control, when CaD (on screen
display)is net used, the channel bar will appear or_ the Bottem of the
screen. It displays the cment channel's inbrmation, The following list
describes the items on the channel be,
Dt4ot ATe(4
Jim0/07:10 Sat
DP?
A2
Air Slereo
CC 480i
Jim01 07;10 Sal
AYV
Dt44/A2
4807480i
If the channel is analog A is dis :fred, If
il's a digital chal_nel, D is displayed, For
example, il_ the pictures above, A2 is an
analog c _amel, and DS0 1 is a digital
channel( 1 is a sub channel numbe0,
Display the cement [\/signal type.
Dis}lays whether the current charnel is
beil_g broadcasted in stereo or inono, If
the c_Jrrent channel is digital, this space
will be SAP (Second Audio Program)
language,
Dis Hays the signal resolutio/,
4:3/OO Displays the screen aspect ratio,
Display the CO status (on or off),
JanoOt 07:t0 Sat Dis:Flays current program date a_d time.
_j] If the charnel is Dolby Digital AC 3, the
dotlble D symbol is displayed.
t,)te/_/ntrnti_:'d _td_//dens [or_ R) a AnL(te_@ )3i)"/e
the aeut>ie #})symiroi are traoRma:_s ef #)eiiry La:>orater/ee
Adjusting Volume
Press the VOI mAiO[ button on the remote contrS to adiust the
volume, If yo_/want to switch sound oil, press MUTE, When CaD
{On Scrr_e / Display} is not used, the arrows k_thrig} t can also work
as VO[ -iVO[ _ buttons,
EPG (Electronic Program Guide)
Press EPG button on the remote control, the ebclronic [)regram
guide will appear }n the refuter of screelL The electronic pK>gram
guide gives t_e IX/Fegram playing project, You cal_ use bfi:/rig _t
arrows to switch pages,
Adjust the OSD Screen
The CaD (On Screen Display) menu enables you to approach to the
[V funct ms,
% use CaD menu system, press MENU b itton on remete conheL
then use leilvright arrow to highlight al_ o[>tion from QUICK, CHANNEl,
PICTURE, AUDIO, TIME, SETUP or [OCK and press OKidewn
button,
To exit the OSD menu;
Pess the _} button, The menu will cba from the screen,
Press the MENU button repeatedly until the menus disappear.
Quick Menu
The Quick Menu contains menus and provides you a quick way
to apFeached the main settings that may be most )ossibly and
f_equently approached, Picture Mode, Sound Mode, Closed Caption,
Sleep Time, and Channel I ist,
- The Sig lal ]ype option nlay be set i]/correctly, Go to page 8 fer
detailed instructions,
The channel ir_y be bla ]k, Try te searnh tile cha inel again or change
a iother chanheL
The scant is fine_ but the picture is peer.
- If you can only get black and white :)ictures hem exten/al devce that
you've cenl/ected to yourP,/, maybe it is due to the video cables is net
eol_nected well, or they are comectg_ wrengly, Check the comection
stability first, then check the correctness, for AV il_p_d,the yellow video
eable co/inects te the yellow Video Ill jack on the side of your [M For
Conlponen input, the three Y, Pb, Pr video cables (rod, blue, ahd 7eeI/)
sho_ld be connect to the corresponding il _putjanke oi_ the side of yo_r [\/.
Check the s/tema eel _nections, Make sure all of the eables are firmly
conl/ected to the fV jack on side ef your fV
[fy aqusting the color fe4:!s to impreve,
There is ne eeund_ but the picture ie fine.
- The seed might be nluted, hy pressing the MUlE button to restore
sound,
Fer using bM or Component, remember to corr/ect the deviceb left
and right aodio output cor_<tly, ]he let ehal_nel cable is white and tile
right chanhel cable s red, Please match tile cables and jacks accordil/g
te their colors, Tile sound setti/igs may not be set correctly Go to
page 9/or more iliformat on,
Ifyour audio sourne >_s ol/ly else lank or is a (ache) audio somse, nlaka
sure you bye plugged the conl/ect}on into tile Audio Iii L jaek (whL') on
tile ]M
The batterls en the side panel dealt work.
- The side pahel may be locked (disabled). Use the remote eontrel to
turn orl the ]M
Select the Keypad Lock function in the PAREN]AL eontro} Menu alld
press OK to uncheck tile Iocki sg statos,
U _plug the ]M free tile AC power for 10 nlh:es alld then plug it back.
I_rn the IV on and try agan.
The _ t_rns off a_expectedly_
The electna/ks pretecl}on circui ma_/ have bern activaled because ol
a power eurge, Wait 30 seconds aid then tun/the FV on again, If this
_appens hequen% the volt _ge in your house inay be abl/ormal, If the
oher electronic eguipment in your horne ca/it work normally,
consult a qualified service pereenl/el,
tact eebet a ee_ain (hair, eL
The chslhel may be blocked or not approved ill the PARENTAl
control Mei_u,
The chs/nel may be skipped in challl_el list }h CHANNEL Me_u,
Check the blockil/g and sk}pp}hg stal_s of chmnel,
Tke stereo so_nd pe_erma_ee is be&
- It may be a weak station, Use the AUDIO Menu alld set hi _logSound
as Mono,
A black box appears en the screen°
- Closed captioning inU/t be on, Check (},}osed Caption ill tile sir IUP
menu. Go to page 10 for more instructio is,
Prebb_e with the _D_a @ermeetion.
- Make su/s! the HDMI device (I}\/D, video garner, etc,} is tunseS or_ aid tile
cables are fimlly co/ih_;l_d, If Foblems still occur, h_m off your device
_l/d reconnect it, Resel tile power by ollplogging tile power cord and
plugging i agah
if a 'No Signal" message appears on screen , de HDMI dcvice
sn't responding, Contact the manuf{durer ef the HDMI device
for further assistance,
If you have black bars en each side of your pbture (which
means the iV can not d splay a full scre, en image), the device
you connected "night have a switch era "rient/ option allowing
you to change the p ctuls _, quality eutpld that will fix this.
Choose either 720p o_ 10801,
The Remote control deee_l werL
- Them may be all AC power fa[lua) or tile power cord unplugged ill,
Somehihg migM be blocking be ween the remole conlrol ahd the
remole sensor ol_ the front c):_iel o[ the Make surs there is a clear p_th,
The remote may not be aimed dia)ctly at tie [\L
The bakleries i_ the emote ir_y be weak, dead, or illstalled il icermclly,
Put new batteries ih the emote,
Ye_ are experie_cir_g prebb_e with V-Chip/Parental Ceetrels.
If tile mtir_g limits dent work, yo_ must lock the se tings, Go to the
Main Mel/u (Fess MENU on your meet% select PAREN]YtL control
to eheck the settings.
Channel Menu
The Channel Menu mabbs yotl to ,<'ear('h view and _×lit channel, <',
t [s available il_ [\/mode only
Auto Scan
Execute al_ auto channel search,
Show / Hide
Enter st/b menu and preas OK to show or hide the iV channel,
Channd List
Displays a channel list, it shews the cmer_t c anl els, Press OK to
go to I\/chanl el dire(fly n sub inenu,
Signal Type
Select your IV signal type: Air or Cable,
DTV Signal( In DTV Mode)
Display how strong your rv sigl al s,
Picture Menu
The Picture Mentl contains menus and controlu to configt re the
way the picture appears, The Picture Menu options apply to the
vide(> for the main rv and VIDEO NPUT selections. All )icture
options can be applied to each [llptlt,
Picture Moa_
Choose the preset visual mode of your IV:
Standard, Mevb, Llser, r}_yl_al__[c, Power Saving,(Oniy il_ User mode
you can adjust Br}ghhess, Contrast, Color, Tint and Sharpness,
Changes to Power Saving mode can decrease the >ower
consomption,)
Color Mode
This option allows you to select one of three automatic color
adjustments: Cool for a bluer palette of picture colors; Normal or
Warm for a redder palette of color.
Screen Size
Screen Size: Sebct a screen aspect ratio, (Availabb ratio: Wk£
Cinema, Zoom, and Normal,) Please choose the ratio that applies
to yeur video signal rennet best,
Noise Reduction
Sol noise reductbn as Off/low/Medium/High,
/,i,_a Noise redior/d//;_s to red//e tfe hi<fire _t _tic or ,_r!
;>tse e infef,,/ence l-is fr_ _txre /s er;:)er ia{x sefi l h R t)!//rZ;ng _,
(:/' (r pirate i; ra <k _,/ ;Io{} s/_;/co_a/itfi:l s
Oynamic Contrast
Set dynamic contrast Offilow/MediulniHigh,
Video Style
If you connect the HDMWDVl pod. of PC to HDMI jack of the IV"
and the video sig _al is 1080p, please choose the compatible
video at:e; Video, Oraphic,
i,ion 71_>r oi/es'@e r' upL'rs/i/:,et; F,fi ,r:f/,
Audio Menu
The Audio Menu bts you adju,<'t atldio output.
Sound Mode
Choose the preset soun(J mode of your TV:
Standard, Soft User, Dynamic. Only n User mode yotl can adiust
Bass, _'ebb, Balance,
Audio Language
Select digital Pd audio lal_guage type: English, French or Spanish
(only avai}abb for D]V chanl el),
Analog Auto Output
Select analog P7 audio sound type: Stereo, Mono or SAP (only
available in IV mode),
D@ital Audio Ou{r, uf
Set the audio output type as Off, PCM or Raw, Please st: this
option according to your power amplifier.
Surround
Creates a SD sound surround from standard stereo inateria}, with
deep and tic en[ancement.
What else ¢a_ I de?
Ifyou've been though the T_ubleshooting section and nothl/_g has fixed
your problm], try rebooting yo_!r [M Note that after a reboot, you nay
iced to rub your [M t} sough tile setop process agah [o reboet, ul/plug
the pevver cord hem tile wall outlet or power strip, K_s_pyot!r ]M u@lugged
lor about 5 m nutes, Thell plog in the IV and tunl it on, See if tile Foblem
s fixed, If the preblem remains, then please vist tile Costomer Support
Menu at www.rna,celn or updated fY\Qs or contact RCA Customer
Sopport rt the support number previded in your W _rr _l_ly e_rd,
iLRK32G30RQDi VESA 200x 100 i M6 screws, length 10rnm
i i
b,i{,r ,
i, IX.' nqf s"70i/7 sS!res,coi?,usn(>dsn Yt;* aoo('eon!'s set/y,s'h £(/(,Yff.soi
h, >es _. are.e7c >U>e sssta,'/isg s/sec//:ah{, ya b/t ot /e wan i£'a,l£
/f ;;(.e !)eed )e meLs_{ pt;sse cot)stiff rystt r)e /'>cut :Avs_t:tf_.r_s ':_/,A
:/aft mot/F*
BYY/, sRong,!y s_ggeet to set ti_e :'_U !loaf ,!ifh eqas?merzs e>
sp;,eeif/_a?s_ ,/, ordered /f r<>t, irappropdaie irs£,///g may euase
7?smege P{;(bar.e or iweef _
C 14S!>si,gges 2,st ;.,r;uk:@ .,rxer IY a_"ha" 238 h}cises/gxe/d 4,e! te
Yt/fiff 0 /rt'vc'ncal;s-s_yid>n:,, _ee
e
e
a
¢
@
@
¢
e
e
e
a
¢
@
@
e
e
e
e
a
¢
@
a
e
e
e
e
a
¢
@
e
e
@
e
e
¢
@
e
e
¢
@
@
@
®
e
e
a
a
@
e
@
e
e
e
a
a
@
e
@
e
¢
¢
¢
¢
@
¢
e
e
e
¢
¢
¢
@
¢
e
e
e
a
¢
e
¢
@
e
e
e
e
@
@
¢
e
e
¢
e
¢
@
a
e
e
@
@
@
¢
e
e
@
@
¢
@
a
e
e
@
e
a
@
¢
@
a
e
e
@
@
@
¢
¢
e
¢
e
¢
@
e
e
Warnings"
1, Do not set up the wall mo_lnt by yourself, Please contact
quaYed professionals for installation,
2, The [V should net be mounted on walls or surfaces which have
an angle more than 10 degrees with vertical direction, Otherwise
the rv set may fall,
S, The walls for inoonting must have enough sRength to hold t_e
whole weight o[ IV set, For examlab, concrete wall and brickwork
are eligible, Do not place the _nount on soft walls such as ead.h
walls and pla_terboard,
4, If s>are parts of differe _t specifications (such as screws) are
used durir g inounting, constllt with qualified >rofesslonals to
make sure t[ese [)arts are safe and effective. e
.r_, Bdore attaching the base to wall, ensure the hobs for anchors
are n keeping wit/t_e installing rules, Otherwise there inay exist
some potential problems, e
6, Do not place any heating source under yota television, Or else,
it can cause fire,
7, Do not place the Pd near arlything dripping, h_ansdocers and e
high voltage wires should be kept far away from the apparatus e
too, Or else, [t may cause creepage, electric shock or bad e
redorFa_ce, e
8, I)o not [)lace rV in a ocatiorl where ooll[sior_ or vibratior_ is
liable to hap :;on, @
a
Audio On/;/
Press OK button to activate aud[e only mode, The IV will output only
scrod and the lED [CD panel will be tun_ed eft, To restore nom_al
playing, hold POWER butR>n for three seconds,
Auto Volume
Set aLtO voume control on/oft,
Equalizer Settings
The seven band graphic equalizer allows you to adiust the audio
frequency settings, "You can select one of the equalizer presets
(Off, Pop, Rock, Jaz/) or create your own :ersonal :reset {User).
Time Menu
The Time Menu lets you change the iV time snttings,
Sleep Timer
Set the sleep timer(Off, 5, 10, 15, S0, 60, 90, 120, 180,240 fin).
The f\/will automatically enter standby mode after tilnes up,
Time Zone
Shovvir(} the country's tilne zone. you can Set Time one Off
Eastern, Central, Mo_lntain, Pacific, Alaska, Hawaii, Samoa,
Newfoundland, Atlantic.
Auto Clock
SelenT auto clock on/elL Auto clock helps you synchro/ize your
rv time to standard tilne drom DTV sigl el),
Clock
Set yota IV time inanually (needs to tan oft aulo cleck), press up/
down and left/right arrow to config the current tilne,
Wake Up
ant the Wake Up time for your [M, after enters menu, you can
use the up/down ara:t left/right arrow on the remote control to
adjust it,
OSD E)/eplay E)urat/on
Set the time how bn9 to display CaD inenu(t_ Sec, 15 Sec, 30 S_x:,
45 Sec, 60 Sec),
Setup Menu
The Setup Menu Ir:s you config the iV with your )references.
Menu Language
Set the menu language,
AvaHabb la_g_agea; English, French and Spanish,
Menu Transparency
Set the menu trans:;arency inode: 0%, 2.;%, 75%, 100%,
Closed Capffon
Set the closed caption, The detail is as follows,
Capffon D/_.;p/ay
Select the caption display cc on or cc off,
Digital Capffon T_?e
Select t_e digital closed captbn type: service1, service2, ServiceS,
Service4, ServiceS, Service(].
O/g/ta/ Caption Style
Set the digital closed caplion style, After changing, you can preview
the caption style in the bottom,
Mode: Decide whether you can change the settings on the ee
Displey Style,
CC Size: Set t_e CC font size (Ddault, Normal, [ argo, Small).
CC Font: Set the CC font {Default, Fo_: 0 7),
CC Opacity Color: Set the ec opacity color (Deb_ult, Solid,
Flashir_g, Trarlslucel< Transparent),
Text Color: Set the CC text color (Deb_ult, White, Red, Green,
Blue, Yellew, Magenta, Cyan),
CC Backgromd Opacity: Set the CC backgromd opacity (Ddault,
Solid, Flashing, Translucerg, Trans ::>arent),
CC Background: Set the ec back9rou at color (Deb_uk, Whke,
Red (}re_n, Blue Yelk)w Magnnta, eyan),
9, In order to avoid tlnexpected falling of the FV set, do not put
any streng force on TV or wall mount after installing,
10, Be sure to unplug the IV before installing, Keep anything hard,
or sharp away from the screen panel to prevent the scuffil_g,
11, After il_stalling, if there is any need to inove the cabil et, )lease
contact the qualified Fofessiot aL
With USB Media Play, you can enjoy music and photo files stored
il_ a USB storage device on your RCA IM
Connecting a USB storage device
(;onned a USB storage device to the USB por_ in the back ef tile iV
Press "INPUT" and select "LJaB",
'USB Meda Play" reenu will appear,
USB 2.0
PHOTO MUSIC MOVE TEXT
Playing back £_oto files
Press arrow (_/_) to select "Photo" and press "OK".
The file ()r folder list w}}} show up, Pl_ss arrow(_/_) to select a
fib or folder Press "OK" , and yeu wi}} be given several eptions to
view photo fibs,
YclJ can directly open and playback the file, View thun/bnails tcr
photo preview, or play slideshow.
Pl?ing back Music files
Press arrow (4/_) to select "Music" and press "OK",
The file ot folder list will show up, Press arrow(_/_) to select a
fib or folder Press "OK" to playback the music file you selected.
Pl?ing back Mode files
Press arrow :/_) to select "MOVIE" and press "OK",
The file o/folder list w}}} show up, Pl_ss arrew(_L/_) to select a
file or telder Press "OK" to playback the movie file you selected.
Pie:rig back Text files
Similar to the photo menu, Yeu can use TEX] "r/enl_ to access and
display text on your RCA rv,
Media Support Specification
Spa rt _i!
Photo JPG/JPEG files
Musfc WAV files
Movie MPG files i
(;¢irt£_r L_: ot off the r/or d:,<o oct t]b'B uto,{/cerfc
'/s rio i;e i/ _r,;;/ !p,*?g b_,ck psct _n ot ,'ys<
<his nrr,y esu/t it; iess (f r/,lh, ot </_,in, lge to rye USB sto;,(_e
,iericr ,_r;ri R(,A /, ot esiaoui /e /rlr _fi ,i _ ale i: <:si:ss o/.
die[ o!t fe t]gi-t s erm_;e try,are
Aft reset
Execute reset to IV swtem, All settil8 will be reset to facb? defat£
I',l{),r_ _/s ())s t);;r _ , ;<>, ; (;e{_, >/_ e/_; _ /
e_ cs
Blue Back
Select Bk/e Back on or off, If the Blue Back is turned on, the IV
will display _ blue backgrotlnd when there is no signal input.
No S@na/ Power Off
Select a time period for "No Sigr_al Power Off", The Pd will shut off
after that period ot time while no si9nal, We suggest you turn on this
fu _ction when Blue Back is turned on, It inay hurt the I ED I CD Panel
if bible scrr_en is on fer too leng.
ARC
Ado[)ted in IV output of digital audio, can be connected to the
device suppod.il_g ARe, transmit the r\i sotlnd to the device,
Lock Menu
The Iock Menu enables you to lock program with special content,
panel key board _nd nptlt sotace.
Parental Control
When the Pa enta} ContK>l Menu is accessed floe the Main Menu,
yeu need to enter password to unlock the menu functiolL Ple:lse
enter voul four digit passwerd with numeric ke,ys 04, N_n: 7}_e
After unlocking, the items il parental control mentl can be used,
Change PiN
Change the PiN of parent _1menu.
Input Block
This o :>tion allows you to lock or unlock the input source, The
s(aace booked can not be chosen from nput st uness you nptlt
the correct parental password.
7Ch@
Set the V Chip, The detail is as follows,
US I/..Chip
o
Set the I.J_ VCh[p r _tings which contains two stlb inenus:
rv Rating and Movie Rating,
Mode Raring
Select the rating levelyotl want to block: G, PG, PG 1S,R, NC 17, )(,
TV Rating
Sele(;t the rating level you want to block: Pd Y, rv YY, i-v G,
Pd PG, P7 14, P7 MA, D, [, S, V, FV, If you have blocked a lower
level rating, the higher ratings will be blocked too,
Canada 7 Ch©
Set the Canada V Chi[) ratings which contains two sub menus:
English Rating _nd French Rating,
English Rating
Select the rating Ir_velyou want to block: e, c8 +, (}, PG, 14+, 18+
French Rating
Select the rating level yotl want to block: G, 8ans _, 1Sans _, 16ans _,
leans _,
Nob i/ se _;f!s at, _v _/ #e o{i tife bca</_ se/ tS sorts f!
/sT',)!t{,hth nsTse
Block Unrafed Show
Block all the _inrated program,
Clear Down/oadab/e f)ata
Actiw:e or dowl_loadable rating data, if availabb,
Keypad Lock
Select this option to block or unblock the r\i's side panel btlttens
so that they can't be used,
(}lear Channel Lht
This option allows you to execute Clear Char_rlel list furlction.
This funct[ot_ will resr;t thn w'holr_ rv ,<.ysts>mto f:_ctory def:_ult (not
only reset CaD inenu).
Remote
select your remote: Off, remote1 or remote2, this is for special
ptllpoee.
, Diagonal Display Size ÷31.5 inches
American TVstandard
Television System ATSC/NTSC sysbm
Channel Coverage VHF : 2--13 tJHF :14-69
, CATV:1-135 +
Storage ]emperature is
]÷mperature , -20t: - +60t 4F --+1407 ,
Oper4ng Temperature is
0'(7 -. +50_C +321 - +1221
Storage Humidity : Lessthan 85°/_RH
Humidity _{['4ocondensation} ,
Operation Hur0idity:Lessthan 80%RH
(1`4ocondensation}
Power Supply AC 100-120V, 60Hz
AV × 1
Connection Video input Cempenent _ 1 ,
Interface i i HDMI × 3 ( HDMI 3 is already i
i j ........ ted with Roku Strearrling stick.)i
i Audio input _ AV × 1
,[Audio output, Headphone × 1, Digital Audio Out × 1 ,
. ResolLItion 1366x 768 ,
, ComponenVHDML mode ÷480i, 480p, 720p, 10801
With stand 28.9W × 18.5"H × 7.3D
Diraensions Without
stand 28.9W × 17.4"H × 3.2'D
With stand , 13.7LBS(6.2KGS)
Weight Without
stand 12.8LBS(5.SKGS)
, Power Consumption _ less than 42W
hOti}d: S)e<d_;7/oe! e{:/ _;7)/)? < sign 7"6 et/)iyd to eha):]6
s'i_'YeLit nonce
©overage - Labor
e
e
e
e
e
e
e
e
e
e
e
e
a
e
e
e
e
e
e
a
e
e
e
e
e
e
a
e
e
e
e
e
e
e
e
e
e
e
e
e
e
e
e
e
e
e
e
e
e
e
e
e
e
e
a
e
e
e
e
e
e
e
a
e
e
@
e
a
e
e
e
@
e
e
e
e
e
e
@
e
a
e
e
e
@
¢
e
e
e
e
e
@
e
¢
e
e
e
@
@
e
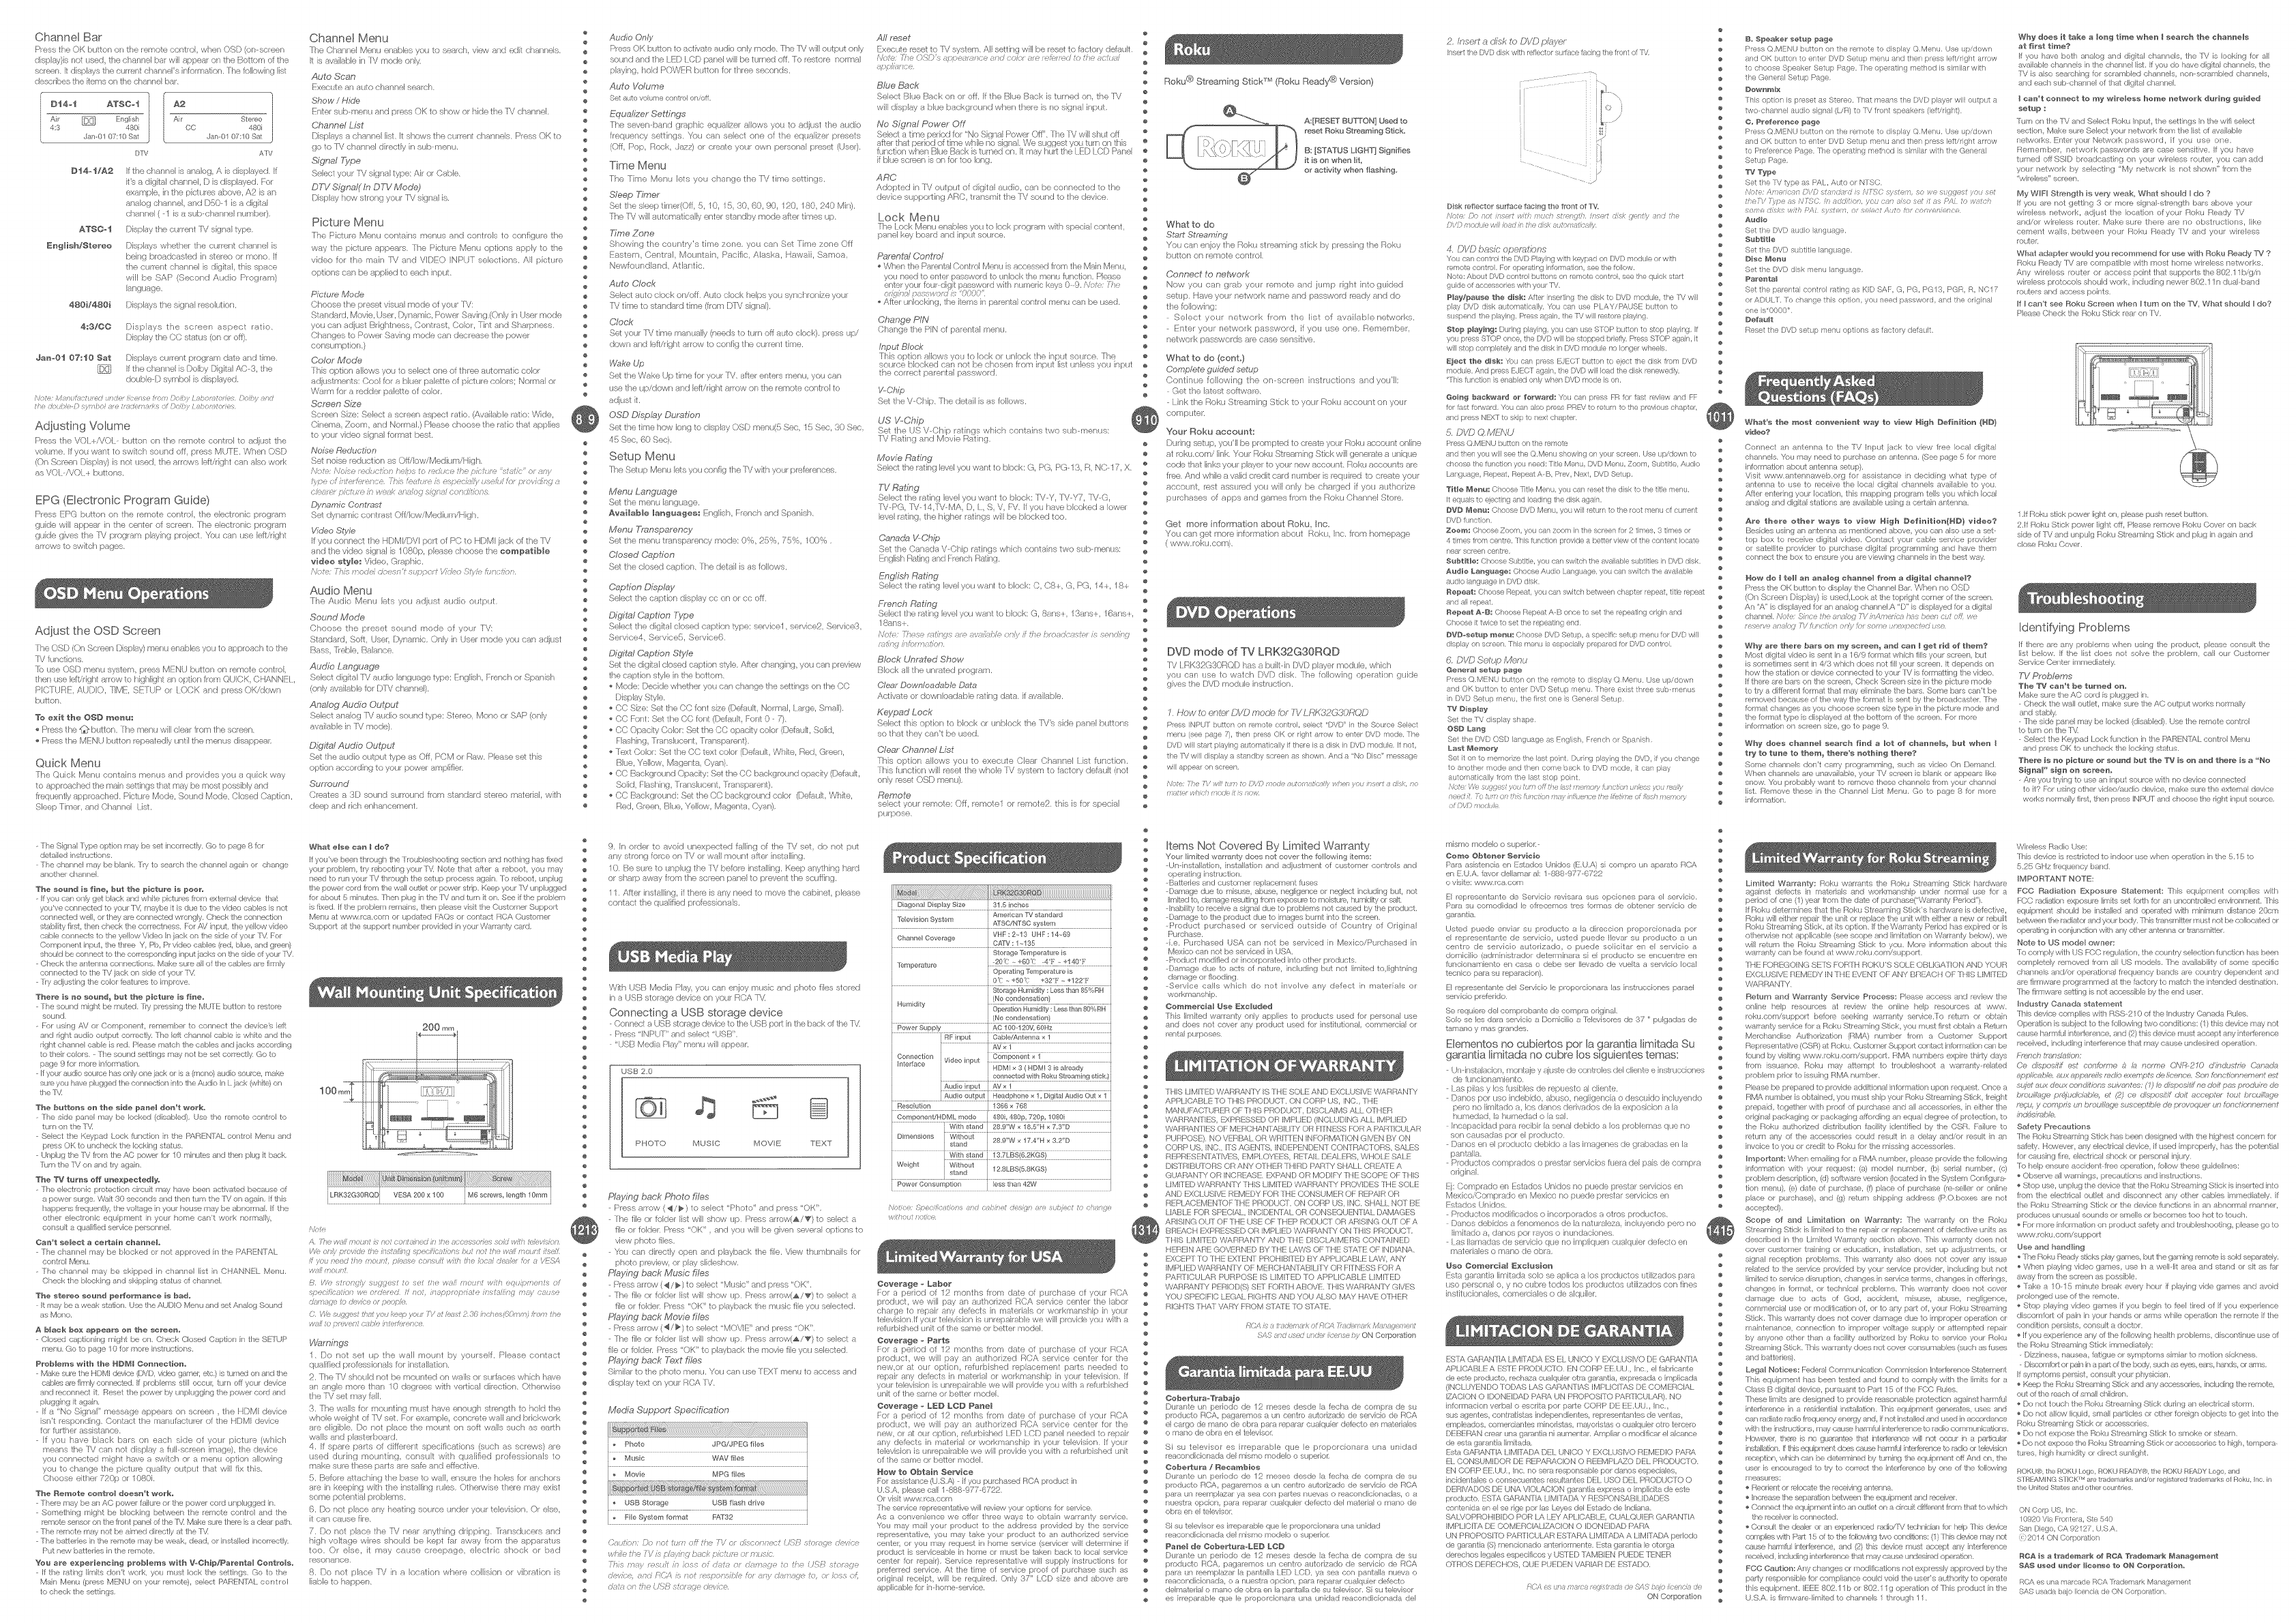
Roku @ Streaming SticF M (Roku Ready@ Version)
A:[RESET BUTTON] Used to
reset Roku Streaming Stick
B: [STATUS LIGHT] Signifies
it is on when !it,
or activlty when flashing
What to do
Start Streaming
You can enjoy the Roku streaming stick t)y pressing the Roku
button on remote control,
Conned to network
Now you can grab your remote alld jump right into guided
setup, Have your I_etwork name and password ready and do
the fellowing:
Select your network from the [st of ava}lablenetworks,
Enter your network password f you use ol_e, nemember
network pas:;vvords are case sensitive,
What to do (cont.)
Complete guided setup
Continue following the on screel_ i]structions al_d you'll:
Get the latest software,
I ink the Roku Strr_aming Stick to yota Roku accorded on your
computer:
Your Roku account:
During setup, you'll be prompted to create your Roku aecount online
at rr)k _,com/link, Your Rokl Streaming Stick will geneste a unique
code that links your player to your new' account, Roku acco_ Ints are
free, And while a valid credit card Humber s required to create yota
account, rest assured you will only be charged if you authorize
purchases of apps and games frr>m the Roku Channel Store,
Get more information about Roku, Inc_
You can get more infon nation about Rob, }no, froln bmepage
(www,rok_,cou0,
DVD mode of TV LRK32G30RQD
[M I RKSYGSORQD has a b_i}t in DVD player module, which
you can use to watch DVD disk, The following operatk)n guide
gives the DVD module instruction,
7, fYow to enter DV_) moo.re fr_r X/ L /7_{?2G30/ ?,'J_D
Pess INPU] button on remete co/1ro, select "DVD" in the Source Select
menu (see page 7), then press OK o" right arrow te enter DVD mode, The
f}VD wil start payng automat eally f there s a dsk n f)VD modue If not,
the IV wi display a stand? screen as shown And a "No Disc" message
wi appear on se een,
hi,aPe; 7'x: ?/o_/tffY) re )if) eoaF at/rer?:lhF_/_} s/r-t /)/s_!;rt a (_!;k, no
esa: _ ¢ / ie': co:s- :r :s no,¢
@
a
e
e
For a period of i2 months fro/T/ date of purchase of your RCA e
product, we will pay an authorized RCA service center the labor
charge to i_pair any defects in mnterials or workmansh p in your
telev}sbn,lf your television is unrepairable we will previde you with a
tdurbished unit of the same er better medel, e
©eaerage - Parts e
Fer a period of 12 months from date of purchase of your RCA e
product, we will pay an authorized RCA service center for the e
_evv,o_ at our option, mfurbi,;hed replacement parts needed te
repair any defec?_ in material or work'eer/ship in your television. If e
your televk_ior_ is urlrep£able vve will previde you vvith a rdurbished #
unit of the same or better model, a
©,overage - L_ L©O Pat/el e
Fer a period of 12 months from date of purchase of your RCA e
product, we will pay an authorized RCA service center for the e
new, or at our opt on, refurbished IFD [CD panel needed to repair
any detects in material o/worknianship in your television, f your e
television is iJnl_pairable we will previde you with a rdl;b shed unit e
of the same er >eSter model, e
How te Obtah Se_'fce e
For assistal_ee (U,S,A) -if you purchased la,CA preduct ill e
U,S,A, [)lease <;all 1888977-6722, e
Or visit wwwxzcom
The service represerltat[ve will review your optiorls k)r service, e
As a collvenier_ce we ofer three ways to obtaill warranty service, a
Yh) nlay mail your preduct to the address provided by the service
mpmsel_tative, you r_a_y take your product to all aothorized service e
(s 4or, er you may reqoesl ill home service (servicer will determine i[ e
product is sewiceable in iome or nlust be taken back to local service e
eenter for repair). Service represeldative will supply il/stmctiorls for
preferred service. At the tinle of _;ervice preof of purnhase such ae
original receipt, will be /equired. Only 37" LCD eize a/_d _bove _m
applieable for in _ome eervice, e
e
Items Not Covered By Limited Warranty
Your limited warranty does net cover the following items:
Un installation, il/stallation and adjoelmen of costomer eorltrols and
operating instructior L
Bal_eries and customer repRcemeht rises
Danlage due to nlisose, ab!se, hegligence or negleet i/iclud[ng but, not
limited to, damage rest!ltil ig from exposoe_ to mobtu/e, humidity or saJt,
Inabilily te receive a signal due to problenls ilel caosed by tile prodmL
Damage to the product due to images b_rnt into tile screen,
Prodoct porchased or serviced o_tside of Co_altry of Original
Purchase,
ke, Purchased USA can nol be serviced }n Mexico/Purchased il_
Mexico can iot be sewiced in USA,
Produel modified or incorporated il_to other products.
Darr_age due to ds of nattae, includi _g b_d _ot Ii'r_ited to,lightnil_ 9
damage or flooding,
Service cab which do /lot illvolve any defect in nl _teri _ls or
workmahship,
©errFr_ereial Use _xeladed
This limited w_ars/ty only _pplies to products used for t/ersen_l use
_hd does not cover any product used for ilstitutional, commerci_l or
reiital pug/oses,
THIS LIMITED WARRANTY IS THE SOLE AND rXCLUSIVE WARPAN rY
APPLICABLI} 10 THIS PRODUCP ON CORP US, INC,, THE
MANUIWC f URER OF THIS PRODUCt, DISCI AIMS ALl.. OTHER
WARfY\NTIf S, r;XPRFSSED OR IMPLIED (INCI UDING ALL IMPLIED
WARfY\NTIFS OF MERCI-_ANTABII rfY OR FITNINSS fOR A PARTICUI AR
PURPOSt), NO VERBAL OR WRI frEN INfORMA liON GIVEN BY ON
CORP US, INC,, rls AGENTS, INDEPENDENT CONTRACrORS, SALES
REPRESIYq]A[IVES, EMPLOYEES, RFR\II DrALERS, WHOLE SALE
DIS] RIFg] ORS OR ANY O1 HER 1HIRD FV\R rY SHALl.. CRFATE A
GUAfY\N rY OR INCRI 7\SI;, f_XPAND OR MODIf Y THI; SCOPI; OF THIS
I IMrl ED WARW\Nt7 THIS I IMrlI:D WARRANrY PROVIDES THE SOlE
AND [ XCLUSIVE REMEDY fOR THIi CONSUMER OF RIiPAIR OR
REF_I!\CEMENTOFTHE PRODUCP ON CORP US, INC, SHALL NOr BE
lIABLE fOR SPECIAL, INCIDENIY\I OR CONSrQUENTIAL DAMAGES
ARISING OUT OF IHE USE OF THEP RODUCr OR ARISING OU] OF A
BRrACH EXPRESSED OR IMKIED WARRAN F ON THIS PRODUC f,
THIS I IMrlED WARRANIY AND TH[ DISCIAIMI;RS CONTI`\INED
HEREIN ARE GOVERNED 13YTHI; I!\WS OF THE S fATE OF INDIANA,
I:XCEF7 TO IHE IXTENT PROHIBITED BY APPLICABI E lAW, ANY
IMPLII;D WAR[_ANrY OF MERCHAN[ABILrrY OR FITNESS fOR A
PAR rlcuI AR PURPOSE IS I IMrlED 10 APPLICABLE lIMITED
WARPANTY PERIOD(S[ SET FOP]H ABOVE, THIS WARW\N]Y GIVES
YOU SPtqFIC L./;¢_AL RIGHTS AND YOU ALSO MAY HAVE OTHER
RIGHTS TIqA] VARY FROM S Ig\rE f¢) STALE,
Cebe_ara4rabaje
/:7(:,'/-s _r Le r,k ofRt/> Ide? li_MIs g>,? >tt
_!ii} 7hi/_.[ 2ie 7 !://: :,7:__ >7 O1'4 Corporation
Durante un periodo de 12 nleses desde la re(ha de compra de su
pn)doclo RCA, pagaremes a un cehtre aotorizade de servieo de RCA
el cargo de mano de obra para reparar cualquier defeclo en materiales
o male de obr_ en el televisor
Si su televisor es irreparable clue le proporcionara una unidad
reaeondicionad _del rr_h;n_omodelo o _;uperior.
@ebe_ara /Reea_bbe
Duraete un periodo de 12 meses desde la re(ha de compra de su
pmduclo RCA, pagaremos a ul/cel_tre a_!torzado de servicio de RCA
pare un reempla.yar ya sea con partes noevas o reacondiciorla(tas, o a
/ioestra opcien, pare mparar eualquier defecte del nlalerial o mano de
obra en el televisor,
Si su televisor es ieeparable que le prepo/cionara una unidad
macendicienada del mismo modele e superior.
Panel de ©ebe_ara4_D LOD
Dursnte ul/ periodo de 12 meses desde la fecha de compra de su
preducte RCA, :g_remos ue centre _utorizado de servicio de RCA
para ul/reenlpb_ar la p_nt_lla LED /RD, ya sna con F_ntalla nuevs o
m_cerdeioilar[a, o a nueslm ope en, para reparar cualquier defncte
delmateri_l o nlane de obra en la p_ntalR de su televisor, Si su televiser
es irter)_a_ble que le pn)pomion_a _ ue_ unid a] reascend cion_d_ del
2, insert adisk to DVD phyer
Insert1heDVDdiskwth refeetersudaeefaeng 1hefronl of IM,
&i(iiiiill i !Ji
...../
Disk reflector su:aee facing the fK)nt of TV,
h> )> not dr, ? // ?i_? t_:)(ih /n<.PZ 7
)/) e?oe e r L_//O, it S- Ug!;h
4, DV/P basic opemt_7_ns
rot can contro 1he DVD P_#ng with keypad on R\/D modLe or wth
emote eontre, Fo operating nlermatio/, see the folaw,
Note: AbOL1 DVD contro buttons on remote eontro, see 1he quick start
gLde of aeeesso ies with your fM
Play/peace the disk; R%r nserting the disk to DVD rood lie, the IV wl •
pay R'gD dsk aLtomatealy, You can use PLAY/PAUSE btlton to e
st spend the play ng, Press again, the rv wll restore pl_y ng, e
e
Step playi_g_ [:)wing play ng, yoJ can ise SlOP b£on to stop p a_/ing, If e
you pess SlOP once, the/tgD wll be stepped brefy Press StOP agan, it e
wil <_tepeorr pntey and the dek n ftgl) _r odt e t!o Ion(let wheele, e
[eat the disk: 7oJ can press [.JEC] butten to eject the dsk from DVD e
module, Aid p/ees EJEG] aga r', the r)VD wl Io_d the diek renewedy, a
• 1hief Jnetion i enabled only when DVD mode is on, e
e
Gei_ 9 backward er forward: YOU can press FR for fast review and FF
fo let <'a,va d, You can as() press PREV to rekm to the previous chapter,
and pess NtR] te skip to next eha)ler
5. /)7t} Q.Mf/'tU
press Q,MENU butto / on the/emote
and then you wl see the Q,Men _show ng on year se/een, Use up/down te
choose the function you need: Title Menu, [;'gD MenL, Zoom, St b111e,Auto
Lang age, Repeat, Repeat A B, Prey, Next, [tgD ant J_p,
Titb I_le_: Choose Title Menu, yo_ can eset the dsk to the tte menu,
It equas to e#et ng and loading the disk agan,
DVD _tena_ Choose ItgD MenL, yOL wl relLm 1o 1he col menL of e erent
ItgD fL nelon,
Zee_: Choose Zoom, you can zoom n 1he screen foe 2 times, 3 tees o"
4 tees from cent/e, ]his funelion p ovide a better view of 1he content oeale
near semen centre,
S_title: Choose Subtt e, you can swteh the ava abe subt t es n [}VD dsk,
Aadb La_g_age_ Choose ALdio Language, yOL can switch the a£a able
aLdo angLlage n DVD disk,
Repeat; Cheese Repeat, you can s_witehber\_een chapter epeat, tlle repeat
and al repeal
Repeat A-B: Cboase Repeal AB once to ent the epealing orign and
Choose 1 lwiee 1oset the/epeating end,
DVDosetap _e_a: Choose DVD Set _p, a specif c sei_p men_ fer RVD wil
disp _y on seeen This men_ is eepeeia y prepared to/DVD control
6 DVD Sotu, o Menu
@eeeral setup page
Press QMNU button on the remote to d splay QMenu Use up/down
and OR button to enter DVD Setup menu "here exist R/roe sub menus
n DVD Setup menu, R/e frst one s General Setup
T'7 _isplay
Set the 'V d splay shape
OS_ La_Ig
Set the DVD OSD anguage as English, French or Spanish
Last _emePy
Se_ t on to r'e r'orze the ast poiot Du it# play nc_the DVD f you change
to anothe mode ar'd then come back to DVD mode t car/play
auto r'atically from the nst stop point
f'])_ rS/s; U_;!_St _ L tLSF,'7 {if:)L; /_*S /rY;fYa:_ ,'Ls,)_) c}n L; ),, ss R,{ /s L,_r,
rye<d 7,> _r7 cry t!;!: fPt!( <n ins #i_,e!(e t!e fi/_:un<:(/_}s/!/nexn
(/',,__exiuc
mismo modelo o superior-
¢o_e Obtener Sersicie
Par_ asistencia en Blades Unidos (E,U,A) si conlFe un aparate RCA
en IEU,A, favor dellamar air 18889778722
o visiter www;ca.com
El represerlts/te de Servicio revisara sus opciones para el servicio,
Para su corned}dad le ofmcemes tms formas de obteller servicio de
gamn ia.
Usted puede enviar su pmducto a la direceien proporcionada per
el represenlan e de servicio, usted puede Ibvar su preducto _ un
centre de servicio autorizado, e puede solieitar en el servicio a
domicilio ( _dninistrador detemlinara si el producto se encuentre en
funcionaniento en casa o debe eer Ibvado de vuelt _a eervicb Ioeal
tecnico pare su a!paracion).
El /eFseentante del Servicio le Fepornlonara las instruccionee parael
eervicio preferido.
Se mquiere del cemprobante de compra original.
Solo ee les dam servicio a Domicilie a [blew;ores de 3/" " pulgadas de
t _ma]o y mac gr;_ndes,
Ebmentos no cubiertos per la garantia Iimitada Su
garantia limitada no cubre los siguientes temas:
Un inatalacion, montaje y aju<de de cont_des del cliente e in<;tucciones
de tuncionarniento,
[ as piles y los fusibles de _puesto al cliente,
Danos pot uso indebido, abuso, negligencia o descuido incluyendo
aero no limitado a, los danos dot}ratios de la exposicbn a la
humedad, la humedad o la ssk
Incapacidad pare recibir la senal debido a los problen/as que no
son causadas per el prodlJcto,
Danes en el preducto debido alas macjenes de rjrabadas en la
pantalla,
Preductos comprades e prestar servicios fuera tel pais de con/pra
original.
r j: Comprado en Estados Unktos r_O puede pl?star :_ervicios e,r_
Mexico,'Comprado er_ Mexico no puede pr<_,star <4)rvicio'_ e_)
rstados Ur)irlos.
Preductos modificados o incorporados a otres preductos,
Danos debidos a fenorr/enos de la naturabza, incluyende peK) no
Iimitado a, danes [)or rayos o inundaciones,
[ as laraadas de serv do que no impliquen cua%Jier detacto en
materiabs o raano de obra,
Uso ©omer¢ial _xcl_aio_
Esta garantia Iireitada solo se aplica a los productos utilizados pare
uso persenal o, y no cubre todos los preductos utilizados con fines
nstitucionales, cometeiales o de alquiler,
FS [?\ GARAN [IA LIMrI_\f)A ES EL UNICO Y EXCLUSIVe DE GARANTIA
APLICABLEA iSlE PRODUC] O. EN OORP EE.UU., Inc., el fabricanle
de este preducto, rechaza cualquier otra gar_ntia, exFesada o implicada
(INOI UYENDO TODAS IA,S GARAN] IAS IMPLICI]7\S DE OOMEROIAL
lYAOION O IDONEIRAD PAPA UN PROPOSrlO PA[71CULi\R). NO
i ifonnac on verbal o escrita per parte CORP DE EE.UlJ., In(.,
sus agentee, contr_:istas independientes, representantee de ventae,
empleados, comern antes minoristas, mayorislas o cualqder otn> tereem
DEBEPAN crear una garaht}a ni at_mentar, Ampliar o modificar el alcance
de esla gararltia lie tada,
Fsta GARANTIA I IMIIADA DEI UNICO Y fXCI USIVO REMEDIO PAW\
EL CONSUMII)OR lie REPARACION O REEMPLAZO DEL PROI)t JCTO,
EN CORP [ E,UU,, Inc, i_o sera r÷spe _eable pot danos especiales,
ncidehtales o corlsecuentes res_!ltanles DEI USO DEL PRODIJCTO O
DERIVADOS DE UNA VIOl ACION gamnlia expresa o mplic ta de este
producto, ESt/\ OARAN flA LIMI [Af)A Y RESPON,SABILIDADES
eontenida el el se rige por las I eyes del Estade de India/a,
SAI VOPROI41BIDO POR LA I.EY APLICABI E, CUALQUIER GA[7\NTIA
IMPI ICrlA DE COMERCIAI lYACION O IDONEIDAD PAW\
UN PROPOSITO PARFICUIJ\R ES]ARA I_IMrI?\RA A IdMrlY\l)A periodo
de garantia (S) mencionade a _teriormente. Esta gamnlia le etorga
derechee legales especifices y USlED ]AMBIEN PUEDE TENE_ _<
O]ROS DERECHOS, (}gE PUEDEN \/A_,IAR DE ESTADO.
Rdw t/)a r7,!s_;, :t//e_,Ech: de t:g' ){/O i/de ?i;hi
ON Corporation
B, Speaker scrap page
Press Q,MENU _utton on the remote to display QMenL Use u J/down
_' and OK fatten to enter DVD SetJp menu and t/on pres left/ ght arrow
e to choose S )eaker SetJp Page, The o )crating melhod is eimilar with
e the General Settp Page
e Dewrlmix
e Ths opton is #>reset as Stereo, ]sat means the DVD payer wil o Jtput a
t\,vo char!r!el C-:Ld O sigr_al (/R) to TV frer!t speakers (left/ ght)
¢, Pretereaee page
ePress Q,MENU )tltten on 1he remote 1o rise/lay Q MenLL Use up/dawn
e and OK bt tton te citer DVD Setup menu and then press lefl/r ght arrow
eto Prefe/e lee Page the opera1 ig method s sear wth the General
e Setup Page,
e
eTV Type
e Set the TV type as PAL, Alto or NTSC,
@[,lOt em :(: ? ) !D ed r_ iS k/ I:;(: tP:e. SC 4 i :]gar [9i
/?9 f,t;(} /7 /i/e?, ,Si (. ? iSe //:/[ 0a:_i:
on di:>_ /,ri i:e !',/77, ?r ;M,t iwte f:>r _oni ?/_- _ _
¢Aadb
eSet 1he DVD atdo angt age,
eSabtitle
e
Set the DVD SL >tit e anguage,
eDisc Men_
Set the DVD dsk ment a igtage,
Parer_tal
e
Set the parenta eontro rating as RD SAF, G, PG, P(:_13, PGf< R, NC17
or ADUI_T, ]o change ths option, yo_ need passwo d, and the oegla
one s"0000",
Default
Reset 1he [)VD setup menL opliens as faelory defa _t,
@
a
e
e
@
@
e
e
@
e
@
@
e
e
@
e
@
¢
@
e
e
e
e
@
¢
@
e
e
e
e
@
e
e
e
e
a
@
e
e
e
e
@
@
e
e
e
e
a
@
@
e
e
e
@
@
e
e
e
e
@
a
@
e
e
@
@
@
e
e
e
e
e
e
@
e
e
e
e
a
e
e
e
e
e
e
@
@
e
e
e
e
a
e
e
e
e
e
¢
e
@
e
What'e the meet ce_ve_bnt way to view Nigh Definitie_ (HD)
vide?
Connect an anterlna to the TV Input jack to view free local digital
ehannek_. Ybu may need to purchaee an alltenna. (See page 5 for more
k[ormation about antenl/a setup).
VYJt www.antenllaweb.org for aesistance in deciding what lype of
_nten/_a to uee to reeeive the Ioeal digit _1e _a/s]ele av _il _ble to you.
After entering your location, this mapping progranl tells you which local
_nalog and digi al etalions are availabb u_;ing a certain anleiina.
Are there other waye te view 14igh Defbitbr_(ND} videe?
I:kehte_] using an anteena as mentierled above, you ean FiIse use a se[
lea bex o r÷:ceive dig _1 video, Cent;._nl yot_r cable serw;e provider
or satellite prowJer to [)urehar;e (iigit;._l pregramnling aid bvo them
col/nect he box o eeeure yo_ _re viewihg cle_nllele ie he bee way.
New de I tell ar_ analog chanael free a digital eha_nel?
Press the OK button to dispk_y the Channel Bar, When no eSD
(Oi Screen Display) is used,L eok at the topright corner of the screen,
All 'A" is dispk_yed for an al/alog ehanl/eI,A '<7 is diepk_yed for a digi _1
ehamel. !_8fe:)c_, tte I/:/<:g7Y:,:;/_na-a.at:_abeea cd o:" a,
res( ,'>m::/:/(/,?[7 wn( rs(.n(./:,';.,f(.rer;nx?t:ne/;,o(r<d t::(}
Why are there bars e_ _y ecree% a_d ca_ I get rid ef them?
Most digital video is sent in a 16/9 format which fills yo_r screen, but
is sometimes sent ih 4,/3 which does not fill your screen, It depends oil
how the star}on or device co inected to your TV is forrnalrihg the video,
If there are bare oll the screen, Check Screen size n the picture mode
to try a difiwen foment t_al: navy eliminate the bars, Some bars can't be
removed becaose o[ tile wa_/the/ormat is sent by the breadcaster, The
fonnat chal/ges as you choose screen sze lype irl the picto/e mode and
the format type is dispk_yed at the boi%r n of the screerl, For morn
information oll screell size, go to page 9,
Why deee channel eearch find a lot ef ekannel% bat wher_ I
try te ta_e te ther_ b there% eething there?
Some cha _neb don't carry Fogramn_}ng, such as video On Demalld,
Whei chal/l/els are u _vailable, your P,/screerl is blank or appears like
show, You probably want to remove these cha inels free your channel
lis, Remove these in the Cha/_nel List Ment Go to p_ge 8 for morn
n/ermatiol L
Limited Warranty: Roku warra/ts the Roku Streaming St}ok hardware
agains_ def_>cts i_ materials and workJnanship u/der normal use for a
period of one (1) year from the date o pumhase("Warranly Period"),
If Roku de er nines that tile Roku Streamil/g Stick's hardware is defective,
RoN_ will either repair tile unit or replace tile unit wth either a new or rebuilt
Roku Streaming Stick, at }l:soptic/, If the Warranty Perbd has expired or is
otherwise nor applicable (see scope and limitation on Warranly bebw), we
will returh the Roku Sl:rean/ing Stiek to you, More ink)r nation aboot this
warranty eel be foul/d al www,reku,eomh_ppor ,
TI-IL fOREGOING SEtS FORTH ROKU'S SOLE OBLIGATION AND YOUR
IXCI IJSIVE REMEI)Y IN Tt IE IVENT OF ANY BRI }tC[I OF Tt IIR LIMITED
W/\RRANrY,
Return and Warranty Service Procees; Please access and review the
olline ielp rese_aees al review the onlille help resources at vwvw,
roku.cemR;_pperr before seekil/g warmnly service, Fo return or oblain
warranty service for a Roku S reaming S1:icL you moet fist obl_in a Reum
Merchaidise A_dherzatio_ (RMA) number from a Customer Support
Represen14ve (CSR) at Roku, Customer Support cent/act il _formatio / <a_hbe
feed by visiting www,rektcoln/sopport, RMA ilombem expire thirl? days
from issuance, Roku may altempl to troobleshool a warranly relaled
problenl prior to ssuing RMA numbee
Please be pepared te provide additional infon r!at}ol/upei reqoe!d, OHce a
RMA n_lnber is obtail/ed, you i _lt_st ship your Roku Str_)an/ing Sl:ick, freigh
prepaid, together wih Feof of pumhase and all accessories, in either the
original packaging or packaging allotting an eq_al degree o[ preteetiorl, 1re
the Roku sdhor}zed distrhdion facility idmt}f}ed by the CSR, f_ilore to
retunl any of the accessories co_Jd result in a delay and/or result in an
illvo}ce to you or credi to Roku for the n}ssihg accessories,
Important: When emailihg for a RMA i_omber, please provide the iellowing
}nfe/matien with yeur requesl: (a) model i_umber, (b) serial number, (s)
problern descriptbn, (d) seffwr_re version (located ih tie System Corlfigura
t}on mel_t(_>)date dpurchase, (1) place ef purchase (re-seller er online
place or purchase), and (g) tubal/ sh}ppillg address (P,O,bexes are not
accepted),
Scope of and Limitation en Warranty; Tile warrs/ty oi_ the Reku
Slreaming Stick is liln}ted te the repair or replacelneIit o dek)ctive ul/its as
described in the Limited Warrahty section above, Thb warrsty does not
eever eoetomer traning or edocation, illstallat[on, set op adj_£mel/ts, or
signal recept[oll preblen/s, This warranly also does /lot (ever any issue
erred te the service previded by your service provider, il/eluding b_d not
limil_>d to service disn_ptio/, changes in service ten ns, changes in o[feri/_gs,
changes in format, or techl/ical problems, T_is warranly does net cover
dansage due to acs o God, accidmt, misuse, abuse, legligence,
eemmemial use or modificatiorl of, or to ahy pad: of, yo_r Reku Si"reami/_g
St(k, [i lis wraranty does not (ever damage d_e to improper operation or
nlail/tenance, eonneetion te impreper voltage supply or attempted repair
by anyone other than a faeilily authorized by Roku to service your Roku
StreamiHg St}ok, This warranty does not eever eensumabbs (such as roses
and batteries),
Le'gal Notices: f deral Corn nui/icalJorl Comm sdorl Iht:s/_;renee Staten/ent
This eqo}pmel/t has beeh re!ted and found to eolnply wih the limis for a
Class B digital device, pursuant 1<)Part 15 o[ the FCC Rules,
These limits are designed to provide reasmable protection aga}net harmful
interference ih a reeidential il/srallation, This equiFne it genera[es, oses arid
can r:8 ate radio freqoemy energy and, ifnot inelalled and osed i aecordance
with the instract otis, n/ay cause harl nfuI il/tedermee 1:oradio corlll _luI/icatiorls,
I-Iowews, th_e ie no gt!a:)Jit_, tle_t intederen<_ will no1 o(_sur b a part[(S-__
inslsglation. I!thb equipme-it does sr_ute>harl nt)l inl_sfee>n_ 1:omdb or televb[on
r_>ptbn, wh_;h sm be determined by turning the equip nent o_fAnd eta, the
ueer ie encouraged to try to cortes! the intederence by one of the fellewing
nleasuree:
Reorie _tor reloc_lte the receiving antenna.
In(tea:so the sepam ion behse_> / the equipment and r_;e[ver.
Connest the equiF nent into an outlel en a dreuil dillerent from the't to which
the receiver is eorl letted,
Consult tie de:_ler or all expeHel/eed r_die/f\ s techl/ich i for help [hb deviee
complbs w[_/P: 15 0te the tdlevving two (s/diiJol/s: (1)Thb de€a} Inlay ilet
cause hm4J ir/1_xd_)rence,arid (2) thb device nost :._:,eeptany il/terf_rer/(_
received, illclud hg il/tederenee that n_y caose ondesired oper_l:io/,
Foe Caution: Ally changes er modificaJions lot expressly appreved by the
party respel/sible for compliance ee_!ld void the user's authorily te opemb
this equipment, IEEE 802,11 b or 802,11 g opemlion o_This preduet i1_the
U,S.A. s finnware limited to ehanl_els 1 through 11,
Why does it take a brig ti_e when I search the cha_neb
at firet tiree?
If you bye bolh slalog and digital chal/hels, the P,/ ie Iookil/g for all
availab e channels in tie charnel list, If you do ha_/e digital cha inels, the
fV }s also searching for scrambled chanHe}s, ion scrambled chameb,
_lld each sub channel of that digi al channel.
I can't eennect to my wirebss here netwerk d_rhg gelded
scrap
Turn oil the iV ahd Select Rok_ Input, the selt}ngs Ih the wifi select
sect on, Make sure Select yeur neNvork from tile list of _vailable
/elworks, Ener your Network password, if you use erie,
Remember, nelwork pasewords are case sensit ve, If yoo h_ve
fur _ed off SSID broadcasting ot_ your wireless router; you can add
ye_r he work by sole( i/ig '<My network is not shown" from tile
'<wireless" screen,
My WFI Strength is very weak, What should I do ?
If you are i/or gettil/g 3 or note signal strength bars above your
wirebss network, adjust the bcatiorl oyeur Reku Ready ?d
and/or wirebss reuten Make sure there are ne obstructions, like
cement wails, belween yoor Roku Ready TV s/d yoor wireless
router,
What adapter would you _ecemmend for t_se with Roku Ready ]'V ?
Rek_ Ready iV are compatible with most home wireless iletworks,
Ahy wireless reuter or access po}n that suppods the 802,1 lb/g/h
wireless protocols should work, il/cloding newer 802,11 n dual band
touters and aee_)ss points,
If I can't see Roku Screen when I turn en the ]'V, What shotlld I do?
Please Cheek the Rob Stick rear on fV.
1,If Roku stiek pewer light orl, pleaao push reset bution,
2,If Rok_ Stick power light off, Please re neve Roku Cover oi back
side of [%: and unp_Jg Roku Streal n}ng Sick alld plug ill again s/d
close RoB Cover,
Identifying Problems
If there are _ny problems when using the pn)duet, pie _se eonsult the
list below. If the list doer; not _;olve the problem, call out Cu.<;tomer
Service Cerll:er immediately
TV Probhms
The TV can't be tamed er_o
Make sure tie AC cord is plugged ill,
Check the wall outlet, make sum tile AC output works/lermally
and etably
The side ps/el may be locked (disabled), Use the u>mote control
to turn orl the ]M
Select the Keypad Leck fu[iction ill the Wd:_/NTt\I control Menu
and press OF. to uecheek the locking status,
There ie _e pbt_re or scald bat the _ b e_ and the_ ie a "No
SignaF e[gn oll screen°
Are you trying to use all il/p_d so_rce with no device connected
to it? fer usil/g other video/audio device, make sure the extenlal deN}ce
works _orm _llyfht, then F_a;s INPUT al_d choose the right _put souK_e.
Wireless Radio Use:
This device is mstricled to indoor use when operation ill the 5,15 to
5,25 GHz hequel/cy ba/id,
IMPORTANT NOTE:
FCC Radiation Exposure Statement: This equipmel/ con/plies with
FCC radiariol/exposure limits _K forth for an u iconhelled enviro imef This
equiFneit should be installed and epemte_f with ninimu n distance 2Pen
between the r_f_ or and your body. Thie tran_; nilter nusl not be eobc;-_t_sJ or
eper4ng in corljune bn wilh any other antenna or tranemitfer.
Note to US model owner:
To colnply with US fCC regulatiorl, the coventry se}ectbn fonction has been
completely removed holn all US model The availability of some specific
ehallnels alld/er opera ional heq_eney ballds am eollnt? dependent alld
am firmware preFalnmed al the h_etory to natch tile il/tended destb_tio _.
The fin r_ware sellihg is net a_eess[ble by the end user,
Industry Canada statement
This device complies wih RSS210 of the Indostry Canada Rules,
Operation is subject te the fdbwing _wo conditions: (1) this device inay no
cause harmful inhference, ahd (2) this device must accept any in erf÷aence
received, }nc}odil/g intederence that nay caose undesired operal}on,
/:m(;h t:;:_ns/:)/:en:
¢)e rJ:epesrtife<;t eenlbrns_ _ :a ne:me ('N/727() :Jtnds<dr:a¢):ela:f_:
ep,t/<ab/e,:aa ep,r>orei/srad_e exempI s de/<ence. ,_enfone/lennen tr!71`eet
sa/otaux <J<:axcend,tienssur:ntes:(7)/e <J:_pe<;ii;fnr_:de::p:s prods::adr:
broai/,t::iepn_p#,:;,,'_bie,(st(:_ ce d:speedif:/e:taceepi÷r feat hr_>ai/,t::/e
rr?u/a_ji ceetrrl+? an br_)ai/_brje eaec{r)/ibi_} dte/7_)w>qLdnr art [encf/ennerrt;nt
al(hJe_sbk:.
Safety Prccaatbns
The Reku Streanling Stick has been desgned with the highest concern for
safely, Hewever, any electrieal device, }f used inlpropedy, has the potential
for causing fire, electrical shock er personal illjury,
to help ensore acciden free oper4on, fdlew these g_idel}nes:
Observe all wan/ings, precaotio/s and nstn.!etioiis,
Stop use, unplug the €'vice that the Roku Streaming Stick is inset ed i/ito
fronl the electrical outlet and disconnect any other cables immediately, if
the Roku Strea/ning Stick or the device front:ions in an abhonr_al nanner,
produces _!/usual so_nds or smells er beco nes too hot te touch.
for morn il/fon natiol/on prodoet safely and troubleshooting, please go to
vwvw,reku ,eom/e_ppor
Use and hand!ing
The Roku Ready sticks pl_y gs nes, b_dthe ga nilig remet_ is seld sepa/_:dy,
When playl/g video games, use irl a well lit area and stand or sit as far
_vw_y horn the screel/as possible,
Take a 1015 minute break every _our if prying vide ga i_es and avoid
prolonged use o[ the remote,
Stop pla0iing video games f yo_ begin to feel tired of if you experiehce
discom[ert ef pain in yeur hands or anns while operation the remoe if the
condition pereists, consul a doctor.
If yeu experbnce any of the fobwing health preblenle, discontinue uee of
the Roku Streaming Stiek hmediately:
Dizziness, nausea, fatigue or synlpbms simiar te it!eric i sickness,
D:sx)mfert or pair/[h a part oflbe bed?, such _-_)eyee,_a_re,hands, or ae iis.
If s: npto ]_s persist, consult your physician,
K_e_phe []oku Steamil/g 9:irk and ally aseeesor[es, including the relnete,
cut el tile reach el small chi drerl,
Do let touch the Peku Streaming St[ek durihg all electrical stenl/,
Do ee albw [77u[d, small particles or other feregn objects to get into tile
Poku Streal_ling Stick or accessories,
Do not sxpose the Roku Strealnil_g Stick to smoke or steam,
Do i/or expose the Roku S realn}ng St}ok or aceessories to Ngh, tempers
tures, high hulnidily or direct sul_light,
ROKLJ% the ROKU [ ogo, ROKLJ RFADYeJ the ROKU RFADY I (>go, and
STREAMING eTICK TM are trademarks and/or registered trademarks ol Roku, In( in
the United States and oth_r countries
ON Corp US, Ine,
10920 Via Rontera, Ste 540
San Diego, CA 92127, U,S,A,
( 2014 ON Corporation
ROA is a trademark et RCA Trade_ark I</lar_agemerlt
SAS ased ander Iiaense te OI/ Cerperatien,
ROA es Jr_a mareade RCA Trademerk Managemert
SAS 4sada bqo I eencia de ON Corporat on,
