RDI Technology LSP-R1100 HOME VIEWER User Manual LSP R1000 EVNT 0905
RDI Technology (Shenzhen) Co., Ltd. HOME VIEWER LSP R1000 EVNT 0905
USERS MANUAL
Introduction
The LSP-R1000/LSP-R1100 is a combined wireless color camera &
video monitor (receiver). A high-resolution color video camera, it includes
a built-in motion detector and an audio microphone. An ideal combina-
tion for watching the baby, monitoring the porch, pets, yard or the pool. It
is also suited to many small business applications.
Features
•2.4 GHz wireless technology
•2.5-inch (LSP-R1000) / 1.8-inch (LSP-R1100) LCD display for good
picture display.
•Plug and play installation
•Supports up to 3 cameras.
•LCD display can work with 3 modes : Power save, Auto and Manual
•Adjustable cycle time between cameras in Auto mode.
•The Brightness, Colour, Contrast, Alarm volum and Audio volume can
be adjusted.
•PIR sensor function.
(LSP-R1000 : Motion sensing, LSP-R1100 : Sound trigger).
Package Contents
Your package contains the following:
Part Name and Functions
LCD Monitor Overview
aLCD monitor screen.
Displays the live image of the selected wireless camera.
bChannel indicator.
lights green or red when the channel is selected.
Blinks when the motion is detected.
cMode select buttons.
-P/S : Select when you want to place the system in scan mode.
-AUTO : Select when you want to place the system in auto mode.
-MANUAL : Select when you want to place the system in manual
mode.
dSpeaker.
You can listen to the sounds of the wireless camera.
ePower button.
Turn the LCD monitor On or Off.
fSpeaker volume adjustment buttons.
Adjust the speaker volume level by using the volume buttons.
gAlarm volume adjustment button.
Adjust the alarm volume of the LCD monitor by tuning the alarm vol-
ume tuner.
hMENU button.
You can select the Brightness, Colour or Contrast setting mode.
iv/V buttonss
Adjusts the level value of the Brightness, Colour or Contrast.
jAudio/Video output jack.
You can connect the other display and/or sound device by using
supplied AV cable.
kDC 9V Power input jack.
lBattary case.
You can use the LCD monitor without the power supply adapter by
using the four AA type batteries or battery pack (optional).
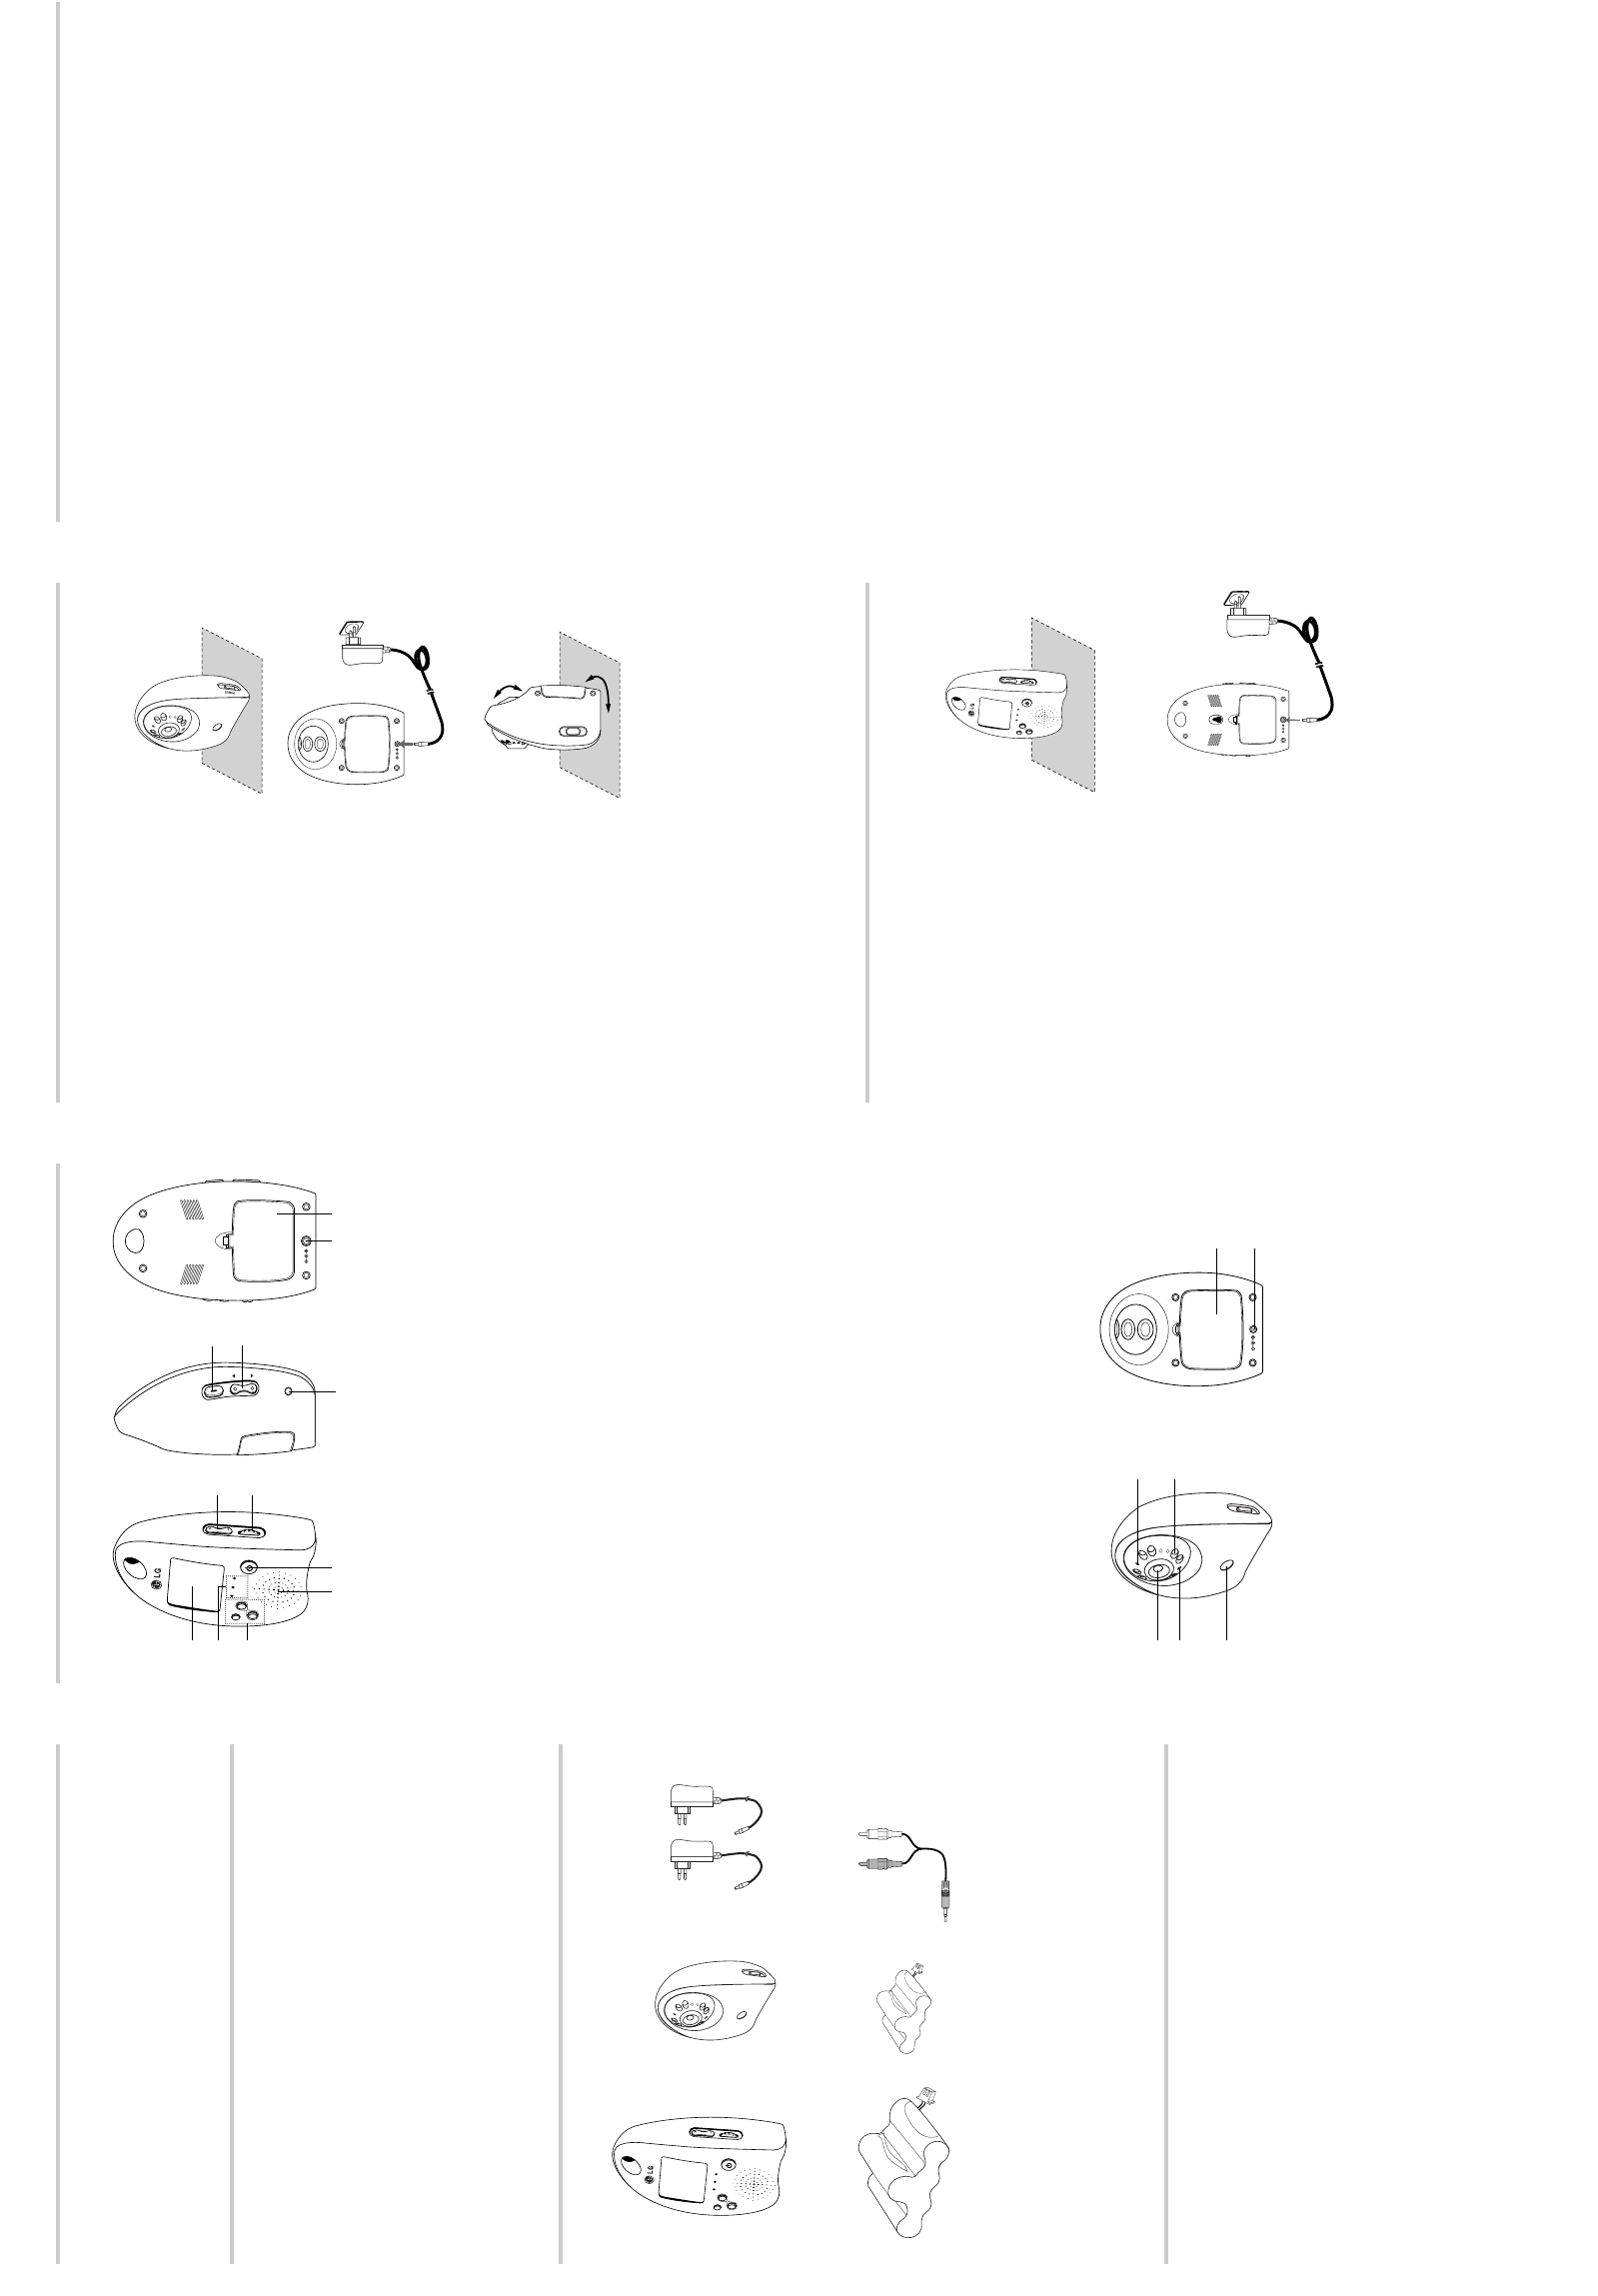
Camera Overview
aCamara lens.
bIR(Infrared Rays) lamp sensor.
cMotion sensor.
dMicrophone.
The microphone is included on the camera.
eAn infrared lamp.
fBattary terminal box.
You can use the camera without the power supply adapter or battery
pack (Supplied for LSP-R1001 only) by using the four AA type bat-
tery.
gDC 9V Power input jack.
Installing the wireless camera
Installing your camera is a simple process. It can be placed on any hori-
zontal surface.
1. Locate the camera on a hori-
zontal surface.
2. Plug the power supply into
the camera and then to a
wall outlet.
3. Make adjustments of the
camera viewing angle by tilt-
ing and panning the camera
head with your hand.
4. Press the POWER button to
turn on the camera.
Note : Make sure the power adapter cord is long enough to reach your
mounting location.
Operating the Wireless Camera System
Mode operation
•P/S mode :
Press the P/S button on the LCD monitor, the system will be
changed to P/S mode. The LCD monitor screen blanks into a
standby mode while the system continuously scans the active
cameras. If a camera detects motion, the LCD monitor displays
the camera picture and the beeper will sounds. Two minutes
after the last detection, the screen returns to standby mode while
the LCD monitor resumes scanning. Press the MANUAL or
AUTO button to cancel this mode.
•AUTO mode :
Press the AUTO button on the LCD monitor, the system will be
changed to auto mode. The system automatically rotates
through all cameras. When a camera detects motion, the LCD
monitor will display the picture from the camera for a few sec-
onds and the beeper will sound. To avoid searching channels
that do not have cameras/transmitters assigned, set the dip
switches for those corresponding channels to the off position.
The dwell time(Time taken to switch between cameras) is preset
to 4 seconds and can be adjusted between 2-30 seconds. To
adjust the dwell time, press both the AUTO and MANUAL but-
tons simutaneously. Each flash of the LED increases the dwell
time by one second.
•MANUAL mode :
Press the MANUAL button on the LCD monitor to select a spe-
cific camera. The LCD monitor will switch to a different camera
each time the MANUAL button is pressed. When a camera
detects motion, the LCD monitor will display the picture of the
camera for a few seconds, and the beeper will sounds. To avoid
searching channels that do not have cameras assigned, set the
dip switches for those corresponding channels to the OFF posi-
tion.
Menu Operation
•Brightness adjustment
1. Press the MENU button repeatedly on the LCD Monitor to
select the brightness mode. If the LED in the ENTER button
is turned green, stop pressing.
2. Adjust brightness level using the v/V buttons.
•Blue colour adjustment
1. Press the MENU button repeatedly on the LCD Monitor to
select the Colour mode. If the LED in the ENTER button is
turned green and fast flicker, stop pressing.
2. Adjust blue colour level using the v/V buttons.
•Blue colour adjustment
1. Press the MENU button repeatedly on the LCD Monitor to
select the Colour mode. If the LED in the ENTER button is
turned green and slow flicker, stop pressing.
2. Adjust red colour level using the v/V buttons.
•Contrast adjustment
1. Press the MENU button repeatedly on the LCD Monitor to
select the contrast mode. If the LED in the ENTER button is
turned off, stop pressing.
2. Adjust contrast level using the v/V buttons.
Note:
If you press the MENU button, the LED is changed as shown below.
Turned green ➔Turned green and fast flicker ➔Turned green and
slow flicker ➔ Turned off ➔Truned green.
Motion-Sensing Cameras
The cameras are equiped with a motion sensor PIR. When a camera
detects motion, a red light flashes on the camera and an alert sounds on
the LCD monitor.
Before Installation
•The camera must not faces to direct sunlight or any bright light; oth-
erwise, this may cause damage to the camera.
•Avoid viewing areas where half of the area is in bright sunlight and
the other half is dark. All types of cameras have difficulty seeing
wide variations of light.
•This device’s communication range is up to 60 feet (18 m) from the
Wireless System Controller in a typical home, depending on the
number of obstacles. These can include metal framing, thick walls,
and other wireless devices operating at 2.4 GHz. It is recommended
that different positions be tried.
•The 2.4 GHz video signals pass easily through your home interior
walls, but the signal may be reflected by power wires or plumbing
inside the wall. The most common source of interference are
microwave ovens. And try to avoid mounting the LCD monitor near a
microwave oven or other source of RF interference such as wireless
phones.
Installing the LCD Monitor
Installing your LCD Monitor is a simple process.
You can either hang the LCD Monitor to the ceiling with a string or just
place on a leveled place.
1. Locate the LCD Monitor on a
horizontal surface.
2. Plug the power supply into
LCD Monitor and then to a
wall outlet.
3. Turn on the LCD Monitor.
The system of LCD Monitor will be activated in auto mode automati-
cally.
Note : Make sure the power adapter cord is long enough to reach your
mounting location.
DC IN 6V
POWER
SCAN
MANUAL
AUTO
CAMERA
ALARM VOL. VOL.
123
DC IN 6V
DC IN 6V
SCAN
MANUAL
AUTO
CAMERA
ALARM VOL. VOL.
123
AV-OUT
MENU
SCAN
MANUAL
AUTO
CAMERA
ALARM VOL. VOL.
123
POWER
a
b
c
de kl
j
fh
i
g
DC IN 6V
POWER
a
be
c
g
f
d
Wireless LCD
Monitor DC 9V
Power Adapter (2)
Battery pack for
wireless LCD
Monitor (Supply for
LSP-R1001 only).
Battery pack for
wireless camera
(Supply for LSP-
R1001 only).
AV Cable
Wireless Motion
Sensor Camera
Specifications
LCD Monitor
Multi-camera Operation
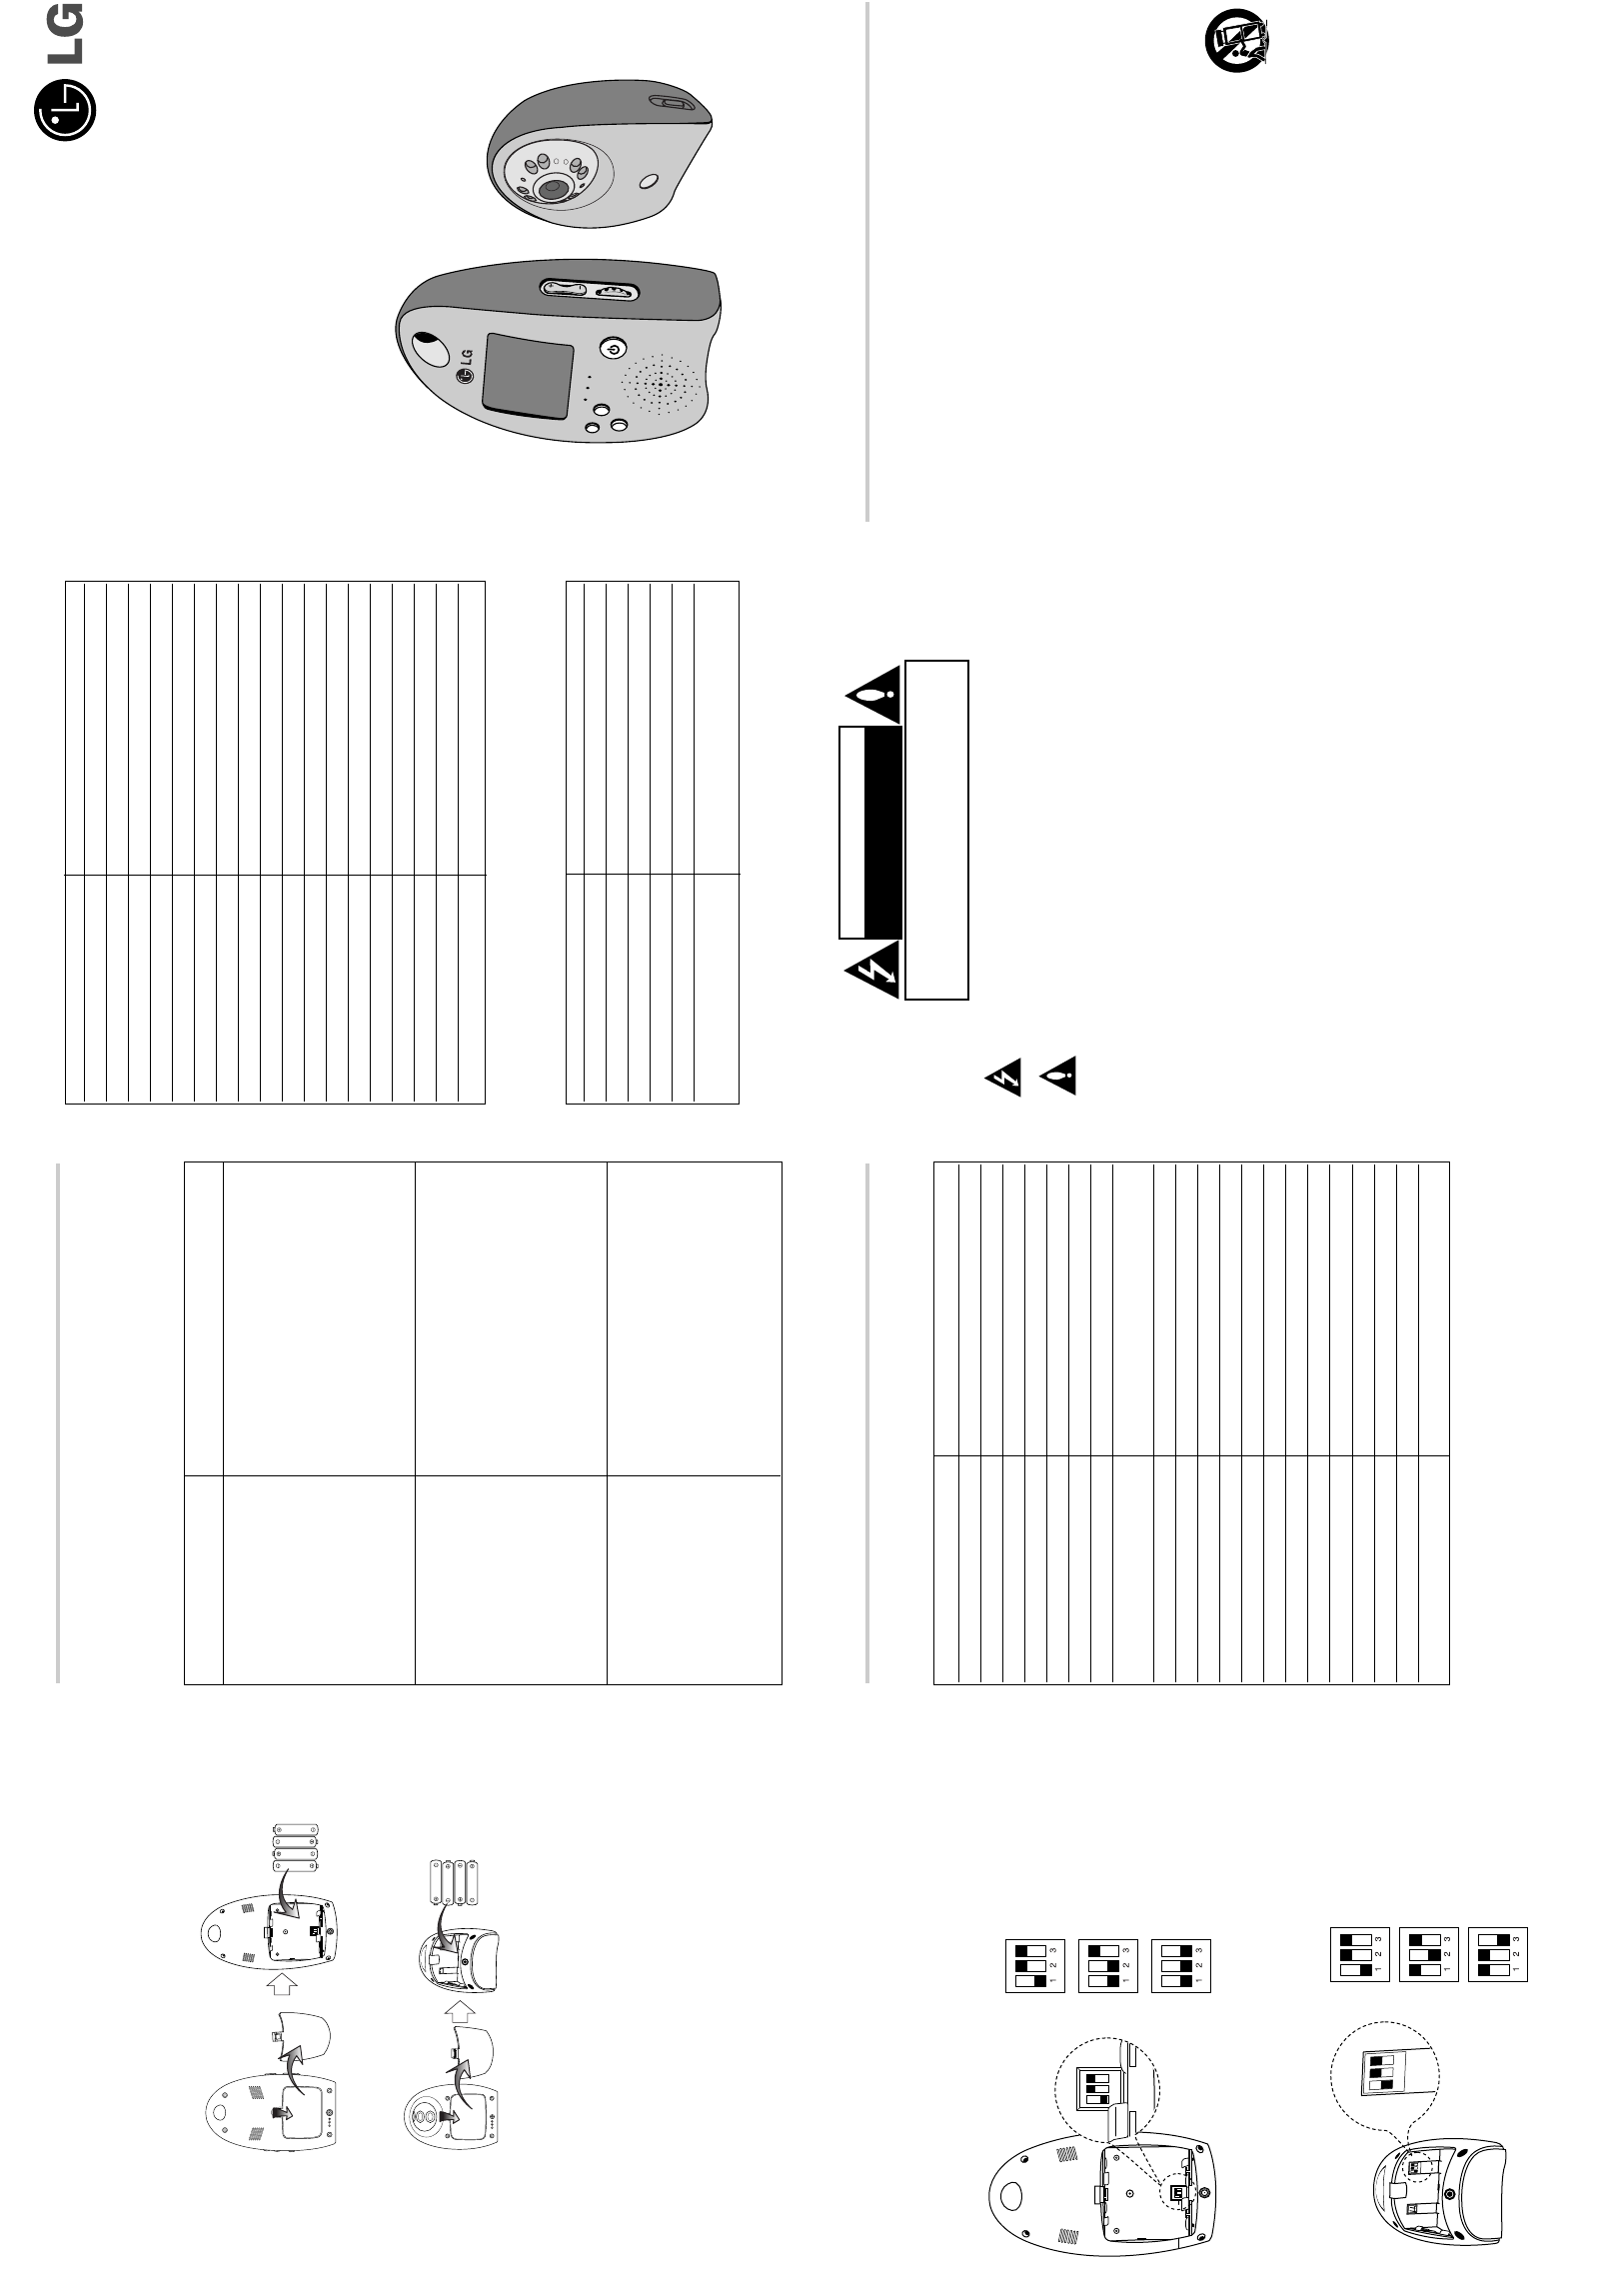
If you use the multi camera, you must set the Dip-switch for each cam-
eras and the LCD monitor. The LCD monitor system is designed to work
with up to three cameras. Additional cameras have to be purchased.
•Dip-switch positon of the LCD monitor
You can find the dip-switch on the battery box as shown below.
•Dip-switch positon of Wireless Camera
You can find the dip-switch on the battery box as shown below.
Battery installation guide.
When you use the Wireless camera system without the supplied adapter,
you can use the Wireless system by using four batteries.
Detach the battery cover on the camera and LCD monitor, and insert
four AA size batteries on the with 3and #aligned correctly as shown
below.
Note : Do not mix old and new batteries and never mix different types
of batteries such as standard, alkaline, etc.
Trouble shooting
Check the following guide for the possible cause of a problem before
contacting service.
Wireless Camera
Antena
This lightning flash with arrowhead symbol within an equilateral triangle is intended to alert the
user to the presence of uninsulated dangerous voltage within the product’s enclosure that may be
of sufficient magnitude to constitute a risk of electric shock to persons.
The exclamation point within an equilateral triangle is intended to alert the user to the presence
of important operating and maintenance (servicing) instructions in the literature accompanying
the product.
FCC WARNING : This equipment may generate or use radio frequency energy. Changes or modifications to
this equipment may cause harmful interference unless the modifications are expressly approved in the
instruction manual. The user could lose the authority to operate this equipment if an unauthorized change or
modification is made.
Regulatory Notices For U.S.A
This equipment has been tested and found to comply with the limits for a Class A digital device, pursuant to
Part 15 of the FCC Rules. These limits are designed to provide reasonable protection against harmful inter-
ference when the equipment is operated in a commercial environment.
This equipment generates, uses, and can radiate radio frequency energy and, if not installed and used in
accordance with the instruction manual, may cause harmful interference to radio communications.
Operation of this equipment in a residential area is likely to cause harmful interference in which case the
user will be required to correct the interference at his own expense.
•Asuitable conduit entries, knock-outs or glands shall be provided in the cable entries of this product in
the end user.
•Caution: Danger of explosion if battery is incorrectly replaced. Replaced only with the same or equiva-
lent type recommended by the manufacturer. Dispose of used batteries according to the manufacturer’s
instructions.
•Holes in metal, through which insulated wires pass, shall have smooth well rounded surfaces or shall
be provided with brushings.
Warning: Do not install this equipment in a confined space such as a bookcase or similar unit.
Warning: Wiring methods shall be in accordance with the National Electric Code, ANSI/NFPA 70.
Warning: This is a class A product. In a domestic environment this product may cause radio interference
in which case the user may be required to take adequate measures.
Warning: To reduce a risk of fire or electric shock, do not expose this product to rain or moisture.
Caution: This installation should be made by a qualified service person and should conform to all local
codes.
Caution: To avoid electrical shock, do not open the cabinet. Refer servicing to qualified personnel only.
Caution: The apparatus should not be exposed to water (dripping or splashing) and no objects filled with
liquids, such as vases, should be placed on the apparatus.
Important Safety Instructions
LG WIRELESS HOME VIEWER
Instruction Manual
Models : LSP-R1000
LSP-R1100
Before installing, operating or adjusting this
product, please read this instruction booklet
carefully and completely.
1 32
1 32
Set the camera 1 in
use.
Set the camera 1 and 2
in use.
Set the all 3 cameras in
use (Default setting).
13
2
13
2
Set the camera as
channel 1 (Default set-
ting).
Set the camera as
channel 2.
Set the camera as
channel 3.
Item Description
Frequency Range 2.400 --- 2.483Ghz
Polarizaion Monopole
SWR < 2 : 1
Gain 0 dB
Impendance 50 Ohm
Outline Size øı2x85mm (Transmitter)/
øı2x145mm (Receiver)
Item Description
Rated Voltage DC 9 V
Rated Current 800 mA
Frequency Range 2.4~2.48 GHz
Frequency 2.41, 2.44, 2.47 Ghz
Intermediate Frequency 480MHz
Type of Radio Waves Analog
Display Mode TMR
Display Size (Diagonal) 2.5 inch (LSP-R1000),
1.8 inch (LSP-R1100)
Number of Dots(HxV) 882x228 Dot
Dot Pitch (H x V) 0.056 x 0.168 mm
Color Number Full Color/16 Million
Viewing Angle U/D: 17/45o L/R: 45/45o
Brightness 250cd/m2
Contrast Rate 200:1
Light Source Type LED
TV System NTSC/PAL (Color) Standard
Color Configuraton R.G.B Strip
Overall Size 75mm (W) x 118mm (H) x 46mm (D)
Weight 180g
Operating Temperature -10° to 40°
Operating Humidity Less than 85%
Item Description
Rated Voltage DC 9 V
Rated Current 400 mA
Transmit Power Less than 10mW
Frequency Range 2.4~2.48 GHz
Frequency 2.41, 2.44, 2.47 Ghz
Modulation Method FM
Oscillation Method PLL
Image Sensor 1/3'' CMOS IC
Integrated Lens 5.6mm, F1.8 Fixed Focus
TV System NTSC/PAL (Color) Standard
Auto Electronic Exposure 1/60~1/15000 sec.
Min Illumination 0.5 Lux
Resolution 360 Horizontal TV lines
Signal/Noise Ratio 48dB
Overall Size 95mm W x 107mm H x 62mm D
Weight 100g (Without Battery)
Operating Temperature -10° to 40°
Operating Humidity Less than 85%
CAUTION: TO REDUCE THE RISK OF ELECTRIC SHOCK
DO NOT REMOVE COVER (OR BACK)
NO USER-SERVICEABLE PARTS INSIDE
REFER SERVICING TO QUALIFIED SERVICE PERSONNEL.
CAUTION
RISK OF ELECTRIC SHOCK
DO NOT OPEN
1. Read these instructions. - All these
safety and operating instructions
should be read before the product is
operated.
2. Keep these instructions. - The
safety, operating and use instructions
should be retained for future refer-
ence.
3. Heed all warnings. - All warnings on
the product and in the operating
instructions should be adhered to.
4. Follow all instructions. - All operat-
ing and use instructions should be
followed.
5. Do not use this apparatus near
water. - For example: near a bath
tub, wash bowl, kitchen sink, laundry
tub, in a wet basement; near a swim-
ming pool; etc.
6. Clean only with dry cloth. - Unplug
this product from the wall outlet
before cleaning. Do not use liquid
cleaners.
7. Do not block any ventilation open-
ings. Install in accordance with the
manufacturer’s instructions. - Slots
and openings in the cabinet are pro-
vided for ventilation, to ensure reli-
able operation of the product, and to
protect it from over- heating. The
openings should never be blocked by
placing the product on a bed, sofa,
rug or other similar surface. This
product should not be placed in a
built-in installation such as a book-
case or rack unless proper ventilation
is provided and the manufacturer’s
instructions have been adhered to.
8. Do not install near any heat
sources such as radiators, heat
registers, stoves, or other appara-
tus (including amplifiers) that pro-
duce heat.
9. Do not defeat the safety purpose
of the polarized or grounding-type
plug. A polarized plug has two
blades with one wider than the
other. A grounding type plug has
two blades and a third grounding
prong. The wide blade or the third
prong are provided for your safety.
If the provided plug does not fit
into your outlet, consult an electri-
cian for replacement of the obso-
lete outlet.
10. Protect the power cord from
being walked on or pinched par-
ticularly at plugs, convenience
receptacles, and the point where
they exit from the apparatus.
11. Only use attachments/acces-
sories specified by the manufac-
turer.
12. Use only the cart,
stand, tripod,
bracket, or table
specified by the
manufacturer, or
sold with appara-
tus. When a cart is used, use
caution when moving the cart/
apparatus combination to avoid
injury from tip-over.
13. Unplug this apparatus during
lightning storms or when unused
for long periods of time.
14. Refer all servicing to qualified
service personnel. Servicing is
required when the apparatus has
been damaged in any way, such
as power- supply cord or plug is
damaged, liquid has been spilled
or objects have fallen into the
apparatus, the apparatus has
been exposed to rain or mois-
ture, does not operate normally,
or has been dropped.
P/NO : MFL3058013?
Symptom
Abnormal or no picutre
Interference on
Camera picture
Audio problems
Correction
•Check the connection.
•Plug the power cord into the wall
outlet securely.
•Make sure the camera(s) and LCD
monitor switched on.
•Maker sure rechargeable battery is
charged.
•Check the batteries polarity with 3
and #aligned correctly.
•Make sure each camera is within
range, and that no large obstuctions
are blocking the signal.
•Try repositioning the camera, moni-
tor or both to impove the reception
quality.
•Reposition other nearby equipment
transmitting on the 2.4GHz frequen-
cy.
•Ensure the volume is turned up suf-
ficiently on the monitor.
•Make sure the sound is within the
microphone range.
•If the units emit a loud wailing
sound(feeds back), try moving the
camera away from the monitor or
angle the monitor differently.
1 32
13
2
DC IN 6V
DC IN 6V
Rear of the camera.
Rear of the LCD monitor.
FCC NOTE:
THE MANUFACTURER IS NOT RESPONSIBLE FOR ANY RADIO OR TV INTERFERENCE CAUSED BY
UNAUTHORIZED MODIFICATIONS TO THIS EQUIPMENT. SUCH MODIFICATIONS COULD VOID THE USER'S
AUTHORITY TO OPERATE THE EQUIPMENT.
This device complies with Part 15 of the FCC Rules. Operation is subject to the following two conditions:
1)•This device may not cause harmful interference.
2)•This device must accept any interference received including interference that may cause undesired operation