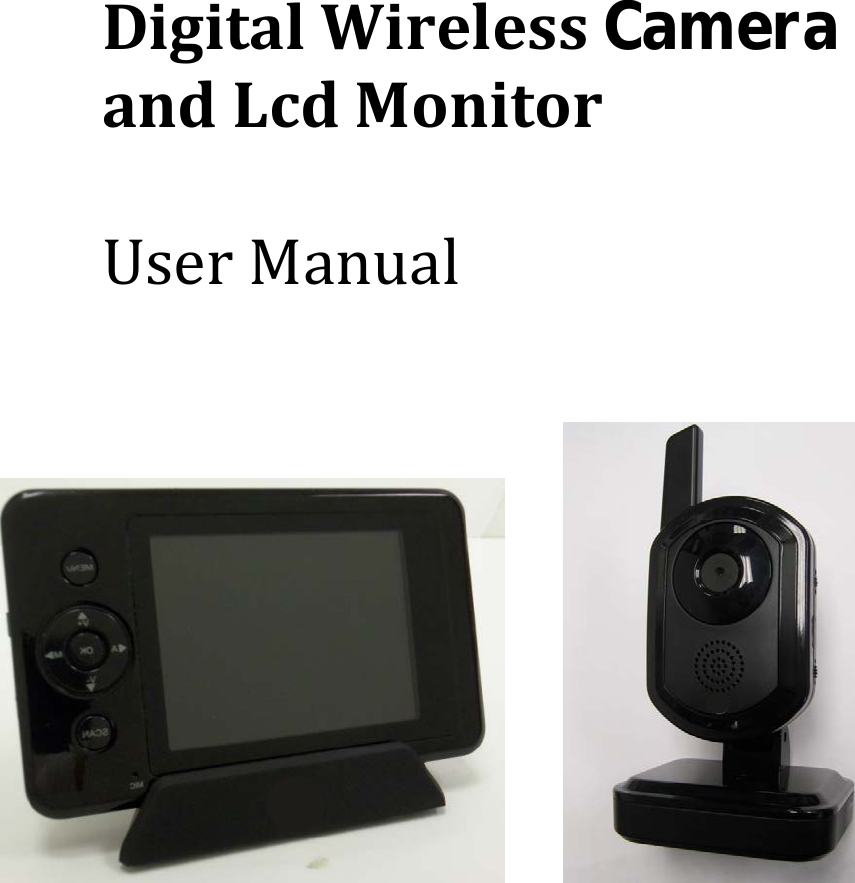
RDI Technology M370QN DIGITAL WIRELESS LCD MONITOR User Manual 45255 user s manual RD5x
RDI Technology (Shenzhen) Co., Ltd. DIGITAL WIRELESS LCD MONITOR 45255 user s manual RD5x
UserManual.wiki
>
RDI Technology
>
M370QN User Manual
Users Manual
Navigation menu
Upload a User Manual
Namespaces
Wiki Guide
HTML
PDF
Info
Views
User Manual
Discussion / Help
Navigation
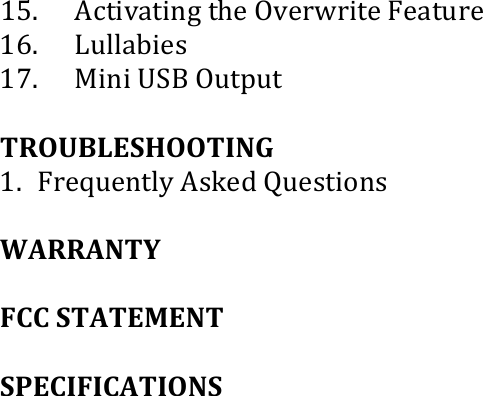
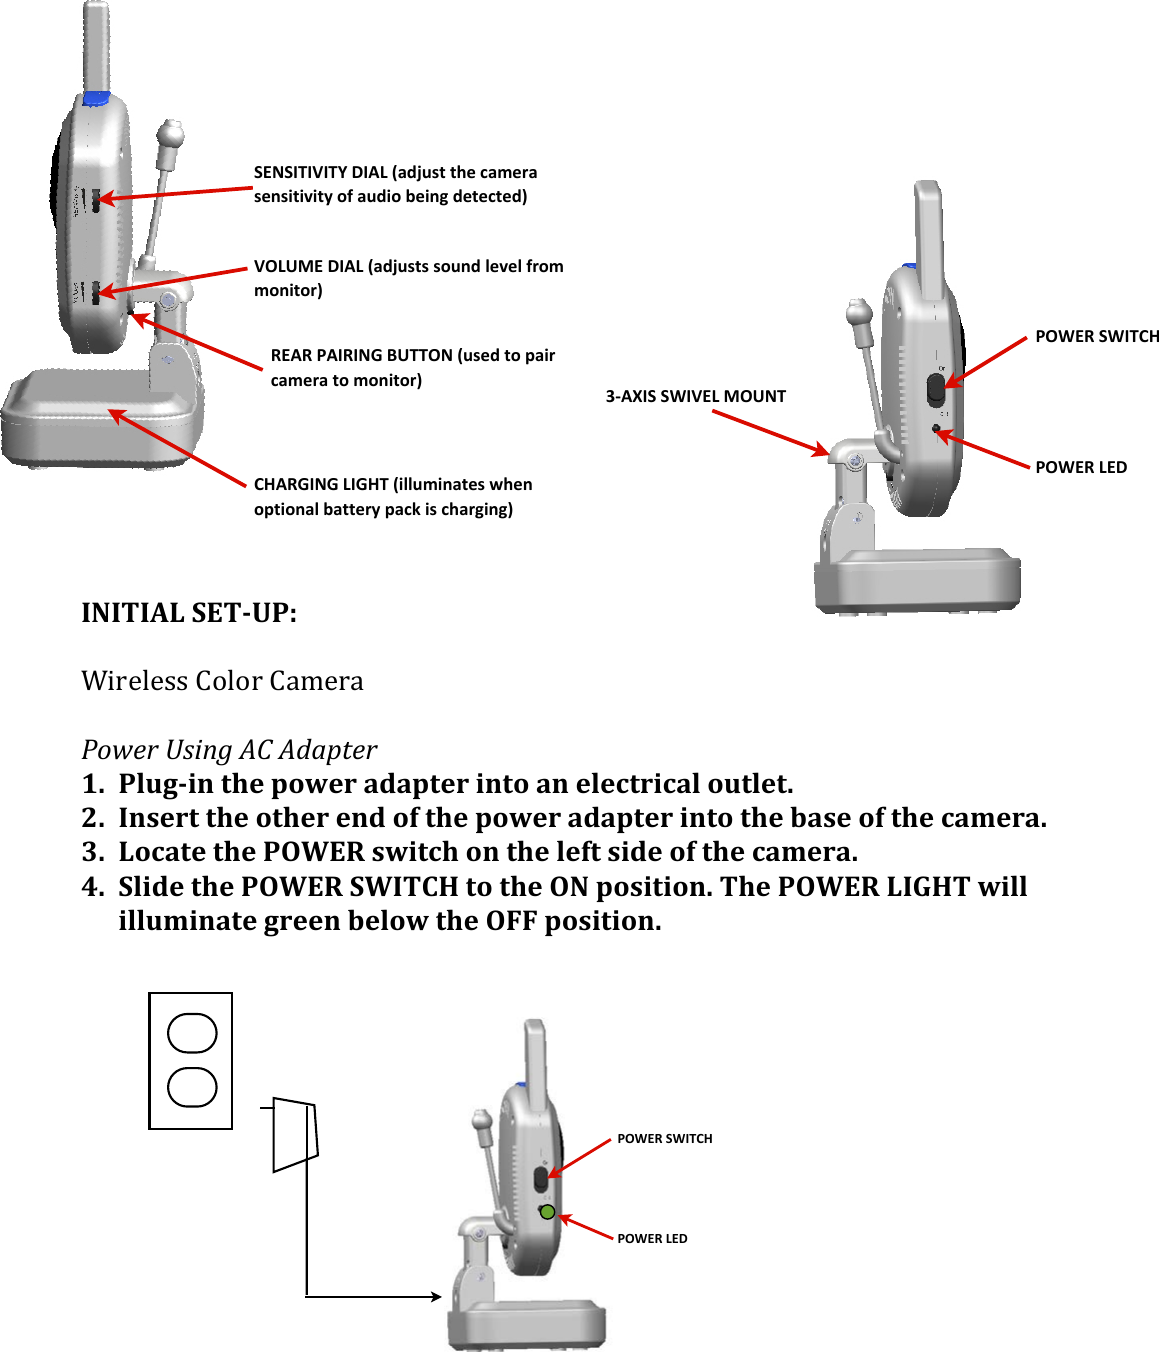
![Congratulations!on!your!purchase!of!the Digital!Wireless!Portable!LCD!Monitor/Receiver!with!DVR!system.!Please!review!these!instructions!carefully!before!attempting!to!operate!the!unit.' !PRODUCT'FEATURES:' !<=>&?"0/4@%$&="%"0&!"-./"0AB$9$.C$0&&• )7'[+\&#.1./4%&6.0$%$33&/$9M-"%"1H];UU^&.-/$0X$0$-9$&X0$$_&:0.C4/$&4-#&3$950$&!"#$%$&&%'(#$)$"*$&(+,-".(+/-(*"-$.(,0(1.(234(51(6,/.7&1#,)1$-8(%"/$(.5(&"9:1;(• B$9"0#.-1&94:4@.%./H&53.-1&0$,"C4@%$&,.90"&G>&940#&`I)[O&,4a&94:49./H&b&;)UM03c&<.1"./=+)1"*+1$->(&.,/-=+)1"*+1$-(+/-(?+/,+%(#$).#-"/9(?.-$&(• •da:4-#4@%$&5:&/"&'&94,$043&e&Y54#_&3$Y5$-/.4%&"0&3.-1%$&C.$6&2GO&"5/:5/&e&3/0$4,&%.C$&C.#$"&/"&H"50&M",$&9",:5/$0&•2GO&"5/:5/&e&0$9"0#&%.C$&C.#$"&"-/"&H"50&9",:5/$0&M40#&#0.C$&&•O5.%/F.-&,.90":M"-$&X"0&@0"4#943/.-1&H"50&C".9$&/"&$49M&94,$04&•O5.%/F.-&3:$4L$0&X"0&%.3/$-.-1&/"&45#."&9",.-1&X0",&$49M&94,$04&•O5.%/F.-&45#.@%$&4%$0/3&X"0&6M$-&,"/."-&"0&3"5-#&.3&#$/$9/$#&&•O5.%/F.-&'M0&<.F:"%H,$0&0$9M401$4@%$&@4//$0H&•B"",&/$,:$04/50$&#.3:%4H&4-#&4%$0/3&•=M401$4@%$&53.-1&904#%$&"0&@H&#.0$9/%H&:%511.-1F.-&/"&,"-./"0&&D.0$%$33&="%"0&=4,$04&&• )7'[+\&#.1./4%&6.0$%$33&/$9M-"%"1H];UU^&.-/$0X$0$-9$&X0$$_&:0.C4/$&4-#&3$950$&!"#$%$&&%'(1#+/&?"1&(+,-".(+/-(*"-$.(,0(1.(234(51(6,/.7&1#,)1$-8(%"/$(.5(&"9:1;(• •="-/.-5"53_&3"5-#&"0&,"/."-F49/.C4/$#&C.#$"&3/0$4,&O5.%/F.-&-.1M/&C.3."-&`5:&/"&)UX/&C.3.@.%./Hc&•O5.%/F.-&,.90":M"-$&X"0&@0"4#943/.-1&45#."&/"&,"-./"0&45/",4/.94%%H&•O5.%/F.-&-.1M/&%.1M/&`,4-54%%H&"0&0$,"/$%H&49/.C4/$#&6./M&,"-./"0c&•`'c&<5%%4@.$3&:%4H4@%$&X0",&94,$04&`0$,"/$%H&49/.C4/$#&6./M&,"-./"0c&•N4@%$/":&"0&64%%&,"5-/&":/."-&&•?"0/4@%$&":$04/."-&53.-1&`'c&KK&@4//$0.$3&"0&0$9M401$4@%$&@4//$0H&&PACKAGE'CONTENTS:'&?%$43$&9M$9L&4-#&.#$-/.XH&4%%&/M$&:40/3&@$X"0$&:0"9$$#.-1&6./M&/M$&.-3/4%%4/."-f&&`;c& !IQUZP&>.1./4%&D.0$%$33&?"0/4@%$&<=>&!"-./"0AB$9$.C$0&&`;c&& =K*(UZP&>.1./4%&D.0$%$33&="%"0&=4,$04&`;c&& =M401.-1&904#%$&`;c&& =4,$04&64%%&:%4/$&4-#&,"5-/.-1&M40#640$&`;c&& =>&`=",:5/$0&!"-./"0.-1&G"X/640$c&`)c&& K=&:"6$0&4#4:/$03&`;c&& !.-.&2GO&94@%$&](https://usermanual.wiki/RDI-Technology/M370QN/User-Guide-1641722-Page-4.png)
![OPERATION:'!J.$6.-1&!"#$3&&1. Manual'(Single)'View%individual%camera%continuously%a. Press'and'release'the'MANUAL'button.'Press'and'release'to'toggle'from'one'camera'to'another'(if'additional'cameras'are'paired'to'monitor)'2. Sequential'(Scan)'View%each%paired%camera%every%76seconds%%a. Press'and'release'the'QUAD/SCAN'button'until'a'single'camera'video'stream'appears.'[1]'Approximately'every'7>seconds,'the'display'will'sequentially'toggle'from'one'camera'to'the'other'(if'additional'cameras'are'paired'to'monitor)'3. Quad'(Multi>Camera'View)'View%all%paired%cameras%continuously%at%once%%a. Press'and'release'the'QUAD/SCAN'button'repeatedly'until'multiple'camera'video'streams'appear'(if'additional'cameras'are'paired'to'monitor)'[2]''(FIGURE'DISPLAYING'QUAD'MODE?)''NOTE:'Recording'the'multi>screen'viewing'(quad'mode)'video'stream'is'not'supported.'However,'recording'single'camera'video'streams'is'possible'with'multi>screen'viewing'(quad'mode).'&K5/"&>$/$9/."-&@,1&(?./"1.#("/1.(F&1+/-7'G(?.-$(,/1"%(*"-$.(?.1"./(.#(+,-".("&(-$1$)1$-(7'()+?$#+H(D+/(7$(,&$-("/(7.1:(?+/,+%(+/-(+,1.?+1")(#$).#-"/9(?.-$&H('Before'activating'auto'detection'mode,'determine'if'using'audio'(noise)'detection'or'video'detection.'You'can'select'either'or'both'to'activate'auto'detection.'To'activate'auto'detection'you'must'adjust'sensitivity'for'audio'and'on'video'detection.''''C-I,&1JK"&+7%$(C,-".(L$/&"1"*"1'(1. Identify'the'SENSITIVITY'DIAL'and'adjust'as'shown:''](https://usermanual.wiki/RDI-Technology/M370QN/User-Guide-1641722-Page-13.png)
![!"#!$%$&$%'()$*+(,-./012(234(5-647-(1481929:92;(<=(-0.9<(>498?(.424524.@'''''''((Turn'the'dial'completely'down'to'disable'audio'detection.'(C-I,&1JK"&+7%$(M"-$.(L$/&"1"*"1'(1. Press'and'release'the'MENU'button'on'the'monitor.'[4]'2. Using'the'directional'keypad,'highlight'the'‘Record’'option.'Press'and'release'the'OK'button.'[5]'3. Using'the'directional'keypad,'highlight'the'‘VMD'Sensitivity’'option.'Press'and'release'the'OK'button.'[6]'4. Use'the'directional'keypad'to'highlight'‘High,'‘Medium’,'‘Low’'or'‘Off’.'Press'and'release'the'OK'button.'[7]'5. Press'and'release'the'MENU'button'to'exit.'[8]''C)1"*+1$(1. Press'and'release'the'AUTO'DET'button'repeatedly'until'the'display'turns'off.'[3]'2. When'video'motion'or'audio'is'detected'by'a'camera,'the'screen'will'automatically'turn'back'on.'It'will'remain'on'for'approximately'10'seconds'after'the'video'motion'or'audio'stops.''3. If'detected'again,'this'task'repeats.''K$=+)1"*+1$(1. Press'and'release'AUTO'DET'button'until'the'screen'turns'itself'back'on.''NOTE:'The'Auto'Detection'feature'will'not'function'in'‘multi>screen’'viewing'mode.'''K5/"&B$9"0#.-1&C)1"*+1$&(#$).#-"/9(A:$/(*"-$.(?.1"./(.#(+,-".("&(-$1$)1$-(7'()+?$#+H(''](https://usermanual.wiki/RDI-Technology/M370QN/User-Guide-1641722-Page-14.png)
![!"#!$%$&$%'()$*+(,-./012(234(5-647-(1481929:92;(<=(-0.9<(>498?(.424524.@NOTES:'• Before'recording,'it’s'recommended'to'change'the'date'and'time'settings'(Additional'Features'p.XX).'This'will'help'locate'recorded'videos'more'easily'during'playback.'• A'Micro'SD'card'is'required'(not'included).''• When'activated,'only'the'AUTO'DET'button'is'functional.''C)1"*+1$(1. Press'and'release'the'A'button'on'the'right'side'of'the'monitor.'A'red'light'will'illuminate'near'the'top'left'of'the'display'indicating'automatic'recording'mode'is'active.'[10]'2. When'video'motion'or'audio'is'detected'by'camera,'recording'will'begin'and'‘REC’'will'appear'flashing'on'top'of'the'display.''3. The'name'of'the'video'recording'is'pre>set'and'cannot'be'customized.'It'appears'in'blue'and'also'displays'near'the'top'of'the'display.'[11]'4. The'monitor'will'stop'recording'approximately'5'seconds'after'the'video'motion'or'audio'detection'stops.'Both'the'name'and'‘REC’'on'the'display'will'disappear.'A'new'flashing'yellow'icon'will'appear'indicating'a'new'file'was'recorded'and'ready'for'playback.'[12]'Maximum'recording'time'is'10'minutes'of'continuous'video'motion'or'audio'detected'by'camera.'5. If'video'motion'or'audio'is'detected'again,'this'task'repeats'itself.'''C-I,&1JK"&+7%$(C,-".(L$/&"1"*"1'(1. Identify'the'SENSITIVITY'DIAL'and'adjust'as'shown:''''''((((((((Turn'the'dial'completely'down'to'disable'audio'detection.'(](https://usermanual.wiki/RDI-Technology/M370QN/User-Guide-1641722-Page-15.png)
![C-I,&1JK"&+7%$(M"-$.(L$/&"1"*"1'(1. Press'and'release'the'MENU'button'on'the'monitor.'[13]'2. Using'the'directional'keypad,'highlight'the'‘Record’'option.'Press'and'release'the'OK'button.'[14]'3. Using'the'directional'keypad,'highlight'the'‘VMD'Sensitivity’'option.'Press'and'release'the'OK'button.'[15]'4. Use'the'directional'keypad'to'highlight'‘High,'‘Medium’,'‘Low’'or'‘Off’.'Press'and'release'the'OK'button.'[16]'Press'and'release'the'MENU'button'to'exit.'[17]''K$=+)1"*+1$(1. Press'and'release'the'A'button.'The'red'light'near'the'top'left'of'the'display'will'no'longer'illuminate.''!4-54%&B$9"0#.-1&&NOTES:''• Before'recording,'it’s'recommended'to'change'the'date'and'time'settings'(Additional'Features).'This'will'help'locate'recorded'videos'more'easily'during'playback.&• A'Micro'SD'card'is'required'(not'included).'&• When'activated,'only'the'AUTO'DET'button'is'functional.&'C)1"*+1$(1. Press'and'release'the'M'button'on'the'right'side'of'the'monitor.''[18]'Recording'will'begin'immediately'and'‘REC’'will'appear'flashing'on'top'of'the'display.''2. The'name'of'the'video'recording'is'pre>set'and'cannot'be'customized.'It'appears'in'blue'and'also'displays'near'the'top'of'the'display.''''K$=+)1"*+1$(1. Press'and'release'the'M'button'again.'[19]'Both'the'name'and'‘REC’'on'the'display'will'disappear.'A'new'flashing'yellow'icon'will'appear'indicating'a'new'file'was'recorded'and'ready'for'playback.'[20]''NOTE:'The'monitor'will'only'record'the'active'camera'shown'on'the'display.'It'will'not'record'in'multi>screen'view.'''?%4H@49L''](https://usermanual.wiki/RDI-Technology/M370QN/User-Guide-1641722-Page-16.png)
![PLAY/PAUSEFAST+FORWARDBACK+(after+viewing+a+recorded+video)REWIND+STOPOK+(press+to+select)1. In'either'single'or'sequential'viewing'mode,'press'the'OK'button.''[21]'2. A'list'of'folders'stored'on'the'memory'card'will'appear'on'the'screen.''[22]'Use'the'directional'keypad'to'select'the'folder'named,'‘VIDEO’'and'press'and'release'the'OK'button.'[24]'3. A'new'list'of'folders,'sorted'by'the'date'the'video(s)'were'recorded,'[23]'will'appear'on'the'display.'Use'the'directional'keypad'to'select'the'folder'desired.'Press'and'release'the'OK'button'to'select.'[25]''NOTE:'If'the'date'and'time'settings'haven’t'been'adjusted'(Additional'Features),'the'folder'names'may'be'inaccurate.''4. A'list'of'individual'video'files'will'appear.'The'newest'videos'will'appear'near'the'bottom'of'the'list.''Use'the'directional'keypad'to'select'the'file'desired.'Press'and'release'the'OK'button'to'select.'[26]'5. The'video'selected'will'start'playing'immediately.'The'following'commands'can'be'used'during'playback:'''''''''''''''Press'and'release'the'MENU'button'to'return'to'the'previous'screen.''NOTE:'To'return'to'a'previous'list'of'folders'viewed'on'the'display,'press'and'release'the'OK'button'after'highlighting'the'icon'whenever'shown:''''''](https://usermanual.wiki/RDI-Technology/M370QN/User-Guide-1641722-Page-17.png)
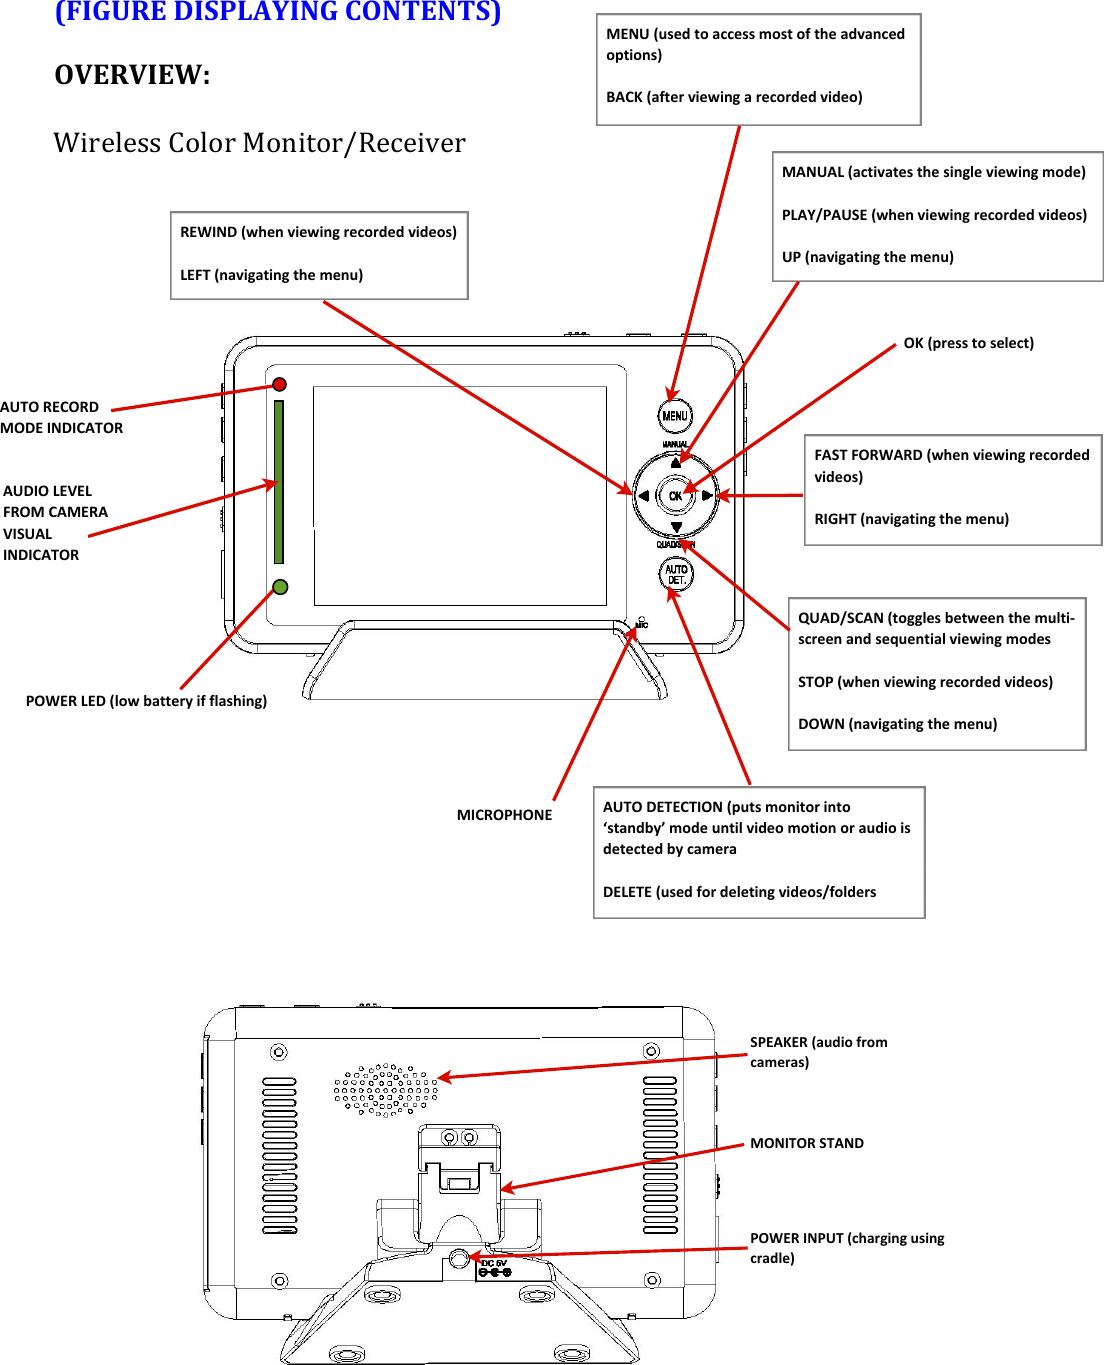
1%'(1.(),##$/1%'(&$%$)1$-()+?$#+():+//$%((1. Locate'the'TALK'BACK'button'on'the'left'side'of'the'monitor.'[31]'2. In'either'single'or'sequential'viewing'mode,'press'and'hold'the'TALK'BACK'button.'[32]'3. Begin'speaking.''4. Release'when'finished.'5. Adjust'the'volume'level'on'the'camera'if'needed'(located'below'the'sensitivity'dial).''''''''''''''NOTE:'The'Talk'Back'feature'will'not'function'in'‘multi>screen’'viewing'mode.'''&&](https://usermanual.wiki/RDI-Technology/M370QN/User-Guide-1641722-Page-18.png)
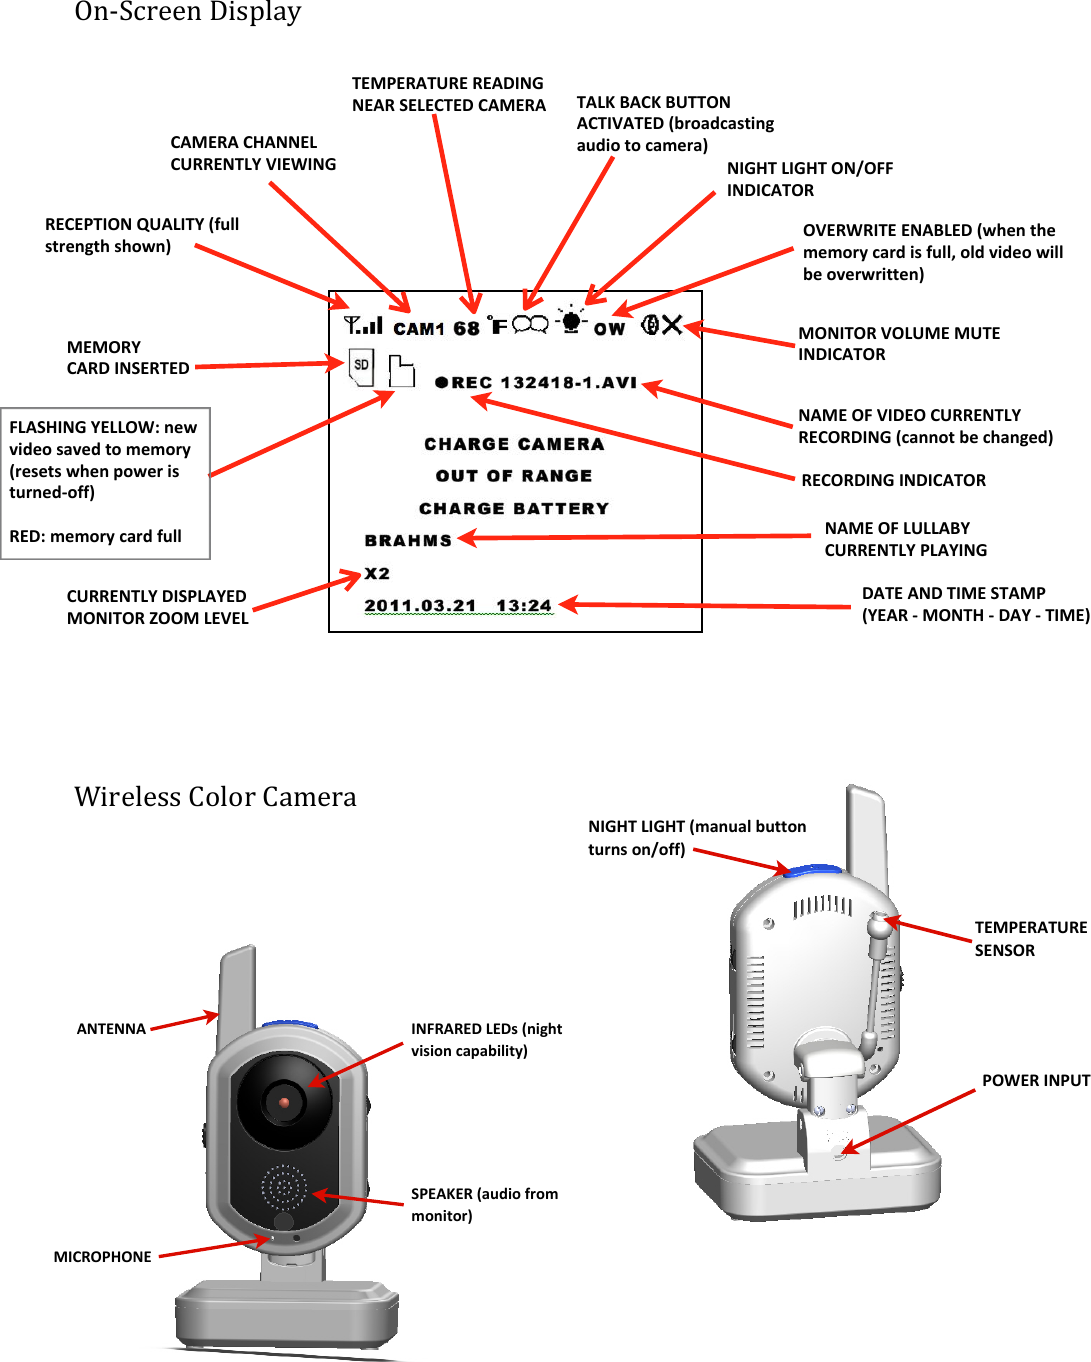
![NIGHT&LIGHT&(manual&button&turns&on/off)NIGHT&LIGHT&(remotely&turns&on/off&on&selected&camera&channel)P.1M/&<.1M/&'1. Press'and'release'the'NIGHT'LIGHT'button'on'top'of'the'camera'to'manually'turn'on/off.'''''''''''''''2. Can'also'be'controlled'remotely'using'the'monitor.'In'either'single'or'sequential'viewing'mode,'press'and'release'the'NIGHT'LIGHT'button'located'on'the'right'side'of'the'monitor.'[33]'The'night>light'will'illuminate'on'the'camera'currently'shown'on'the'display.''''''''''''''?4.0.-1&K##./."-4%&=4,$043&'1. Place'both'the'monitor'and'new'camera'a'few'feet'from'each'other.'2. Follow'the'initial'setup'procedures'as'indicated'in'the'beginning'of'this'manual'(p.'XX).'3. Press'and'release'the'MENU'button'on'the'monitor.'[34]'](https://usermanual.wiki/RDI-Technology/M370QN/User-Guide-1641722-Page-19.png)
![REAR$PAIRING$BUTTON$(used$to$pair$camera$to$monitor)4. Using'the'directional'keypad,'highlight'the'‘Paring’'option.'[25]'Press'and'release'the'OK'button.'[26]'5. Using'the'directional'keypad,'highlight'the'channel'number'desired.'[27]'You'can'also'overwrite'cameras'already'assigned'a'channel'number.''Press'and'release'the'OK'button'to'save.'[28]'6. Press'and'release'the'REAR'PAIRING'button'on'the'rear'of'the'new'camera.'The'monitor'will'allow'30'seconds'before'timing'out.''If'successful,'the'camera'will'be'automatically'added'and'a'live'video'stream'will'appear'on'the'display.'''''''''''''K5#."&4-#&J.#$"&!"/."-&>$/$9/."-&K%40,&L.,/-&(2(7$$0&(A:$/(+,-".(.#(*"-$.(?.1"./("&(-$1$)1$-H(D+/(7$(1#"99$#$-(+9+"/(+51$#(+00#.O"?+1$%'(2=&$)./-&H(C%+#?()+/(7$(1#"99$#$-(#$0$+1$-%'(5.#(+/("/-$5"/"1$(0$#".-(.5(1"?$H(&C)1"*+1$JC-I,&1JK$+)1"*+1$(1. Press'and'release'the'MENU'button'on'the'monitor.'[39]'2. Use'the'directional'keypad'to'highlight'‘Alarm'Volume’.'Press'and'release'the'OK'button.'[40]'3. Adjust'the'volume'using'the'LEFT'and'RIGHT'arrows'on'the'directional'keypad.'[41]'No'bars'displayed'de>activates'the'alarm.''[42]'Press'and'release'the'OK'button'to'save.''[43]'4. Press'and'release'the'MENU'button'to'exit.'[44]''NOTE:'Refer'to'the'‘Auto'Detection’'or'‘Auto'Recording’'section'of'this'manual'to'adjust'the'audio'and'video'sensitivity.'&&&](https://usermanual.wiki/RDI-Technology/M370QN/User-Guide-1641722-Page-20.png)
![K5/"&!5/$&<,1$&(?./"1.#(&0$+N$#(,/1"%(+,-".("&(-$1$)1$-(7'()+?$#+H(L0$+N$#(1#+/&?"1&(+,-".(5#.?()+?$#+(5.#(+00#.O"?+1$%'(P(&$)./-&(+51$#()+?$#+(/.(%./9$#(-$1$)1&(+,-".H(D+/(7$(1#"99$#$-(5.#(+/("/-$5"/"1$(0$#".-(.5(1"?$H(&C)1"*+1$JC-I,&1JK$+)1"*+1$(1. Press'and'release'the'MENU'button'on'the'monitor.'[45]'2. Using'the'directional'keypad,'highlight'the'‘Settings’'option.'[46]'Press'and'release'the'OK'button.'[47]''3. Using'the'directional'keypad,'highlight'the'‘Auto'Mute’'option.'[48]'Press'and'release'the'OK'button.'[49]'4. Use'the'directional'keypad'to'highlight'either'‘Yes’'or'‘No’.'[50]'Press'and'release'the'OK'button.'[51]'5. Press'and'release'the'MENU'button'to'exit.'[52]'&NOTE:'Refer'to'the'‘Auto'Detection’'or'‘Auto'Recording’'section'of'this'manual'to'adjust'the'audio'sensitivity.'&>$%$/.-1&J.#$"3&4-#&R"%#$03&&'1. In'either'single'or'sequential'viewing'mode,'press'and'release'the'OK'button.'[53]'A'list'of'folders'stored'on'the'memory'card'will'appear'on'the'display.'[54]'Use'the'directional'keypad'to'select'the'folder'titled,'‘VIDEO’.'[55]'Press'and'release'the'OK'button.'[56]'2. A'new'list'of'folders'sorted'by'date'the'video(s)'were'recorded'will'appear'on'the'display.'[57]'Use'the'directional'keypad'to'select'the'folder'containing'the'file'desired.'Press'and'release'the'OK'button'to'select.'[58]'3. A'list'of'individual'video'files'will'appear.'The'newest'videos'will'appear'near'the'bottom'of'the'list.''Use'the'directional'keypad'to'select'the'file'desired.'Press'and'release'the'AUTO'DET'button.'[59]'4. A'warning'message'will'appear'on'the'display'requesting'confirmation.'[60]'Use'the'directional'keypad'to'select'‘Yes’.'[61]'Press'and'release'the'OK'button.'[62]''NOTE:'Folders'can'be'deleted'following'the'same'procedure.'Instead'of'highlighting'the'file'desired,'simply'highlight'the'folder.'[63]'](https://usermanual.wiki/RDI-Technology/M370QN/User-Guide-1641722-Page-21.png)
![K#853/.-1&/M$&O0.1M/-$33&'1. Press'and'release'the'MENU'button'on'the'monitor.'[64]'2. Using'the'directional'keypad,'highlight'the'‘Settings’'option.'[65]'Press'and'release'the'OK'button.''[66]'3. Use'the'directional'keypad'to'highlight'‘Brightness’.'[67]'Press'and'release'the'OK'button.'[68]'4. Adjust'the'brightness'using'the'LEFT'and'RIGHT'arrows.'[69]'5. Press'and'release'the'OK'button'to'save.'[70]'6. Press'and'release'the'MENU'button'to'exit.'[71]''NOTE:'Changes'will'not'be'shown'inside'the'menu'screens.'N$,:$04/50$&K%$0/&Q:$()+?$#+().?$&($R,"00$-(A"1:(+/($O1$#/+%(1$?0$#+1,#$(&$/&.#(1.(SPTU()./5"#?(+))$01+7%$(1$?0$#+1,#$(.0$#+1"/9(%"?"1&H(('C)1"*+1$JC-I,&1JK$+)1"*+1$(1. Press'and'release'the'MENU'button'on'the'monitor.'[73]'2. Using'the'directional'keypad,'highlight'the'‘Settings’'option.'[74]'Press'and'release'the'OK'button.'[75]'3. Using'the'directional'keypad,'highlight'the'‘Temp.'Alert'Range’'option.'[76]'Press'and'release'the'OK'button.'[77]'4. Use'the'directional'keypad'to'adjust'the'values'displayed.'[78]'5. Use'the'directional'keypad'to'highlight'‘On’'or'‘Off’.'[79]'Press'and'release'the'OK'button'to'save.'[80]'6. Press'and'release'the'MENU'button'to'exit.'[81]''NOTE:'Use'the'camera'operating'temperature'range'as'a'reference'(located'in'the'‘Specifications’'section'of'this'manual).''K#853/.-1&/M$&N$,:$04/50$&>.3:%4H&2-./('1. Press'and'release'the'MENU'button'on'the'monitor.'[82]'2. Using'the'directional'keypad,'highlight'the'‘Settings’'option.'[83]'Press'and'release'the'OK'button.'[84]'3. Using'the'directional'keypad,'highlight'the'‘Temp.'Display'Unit’'[85]'option.'Press'and'release'the'OK'button.'[86]'4. Use'the'directional'keypad'to'highlight'either'‘C’'(Celsius)'or'‘F’'(Fahrenheit).'[89]'Press'and'release'the'OK'button.'[87]'](https://usermanual.wiki/RDI-Technology/M370QN/User-Guide-1641722-Page-22.png)
![5. Press'and'release'the'MENU'button'to'exit.'[88]''K#853/.-1&/M$&V"",&<$C$%&(1. Press'and'release'the'MENU'button'on'the'monitor.'[90]'2. Using'the'directional'keypad,'highlight'the'‘Settings’'option.'[91]'Press'and'release'the'OK'button.'[92]'3. Using'the'directional'keypad,'highlight'the'‘Zoom’'option.'[93]'Press'and'release'the'OK'button.'[94]'4. Use'the'directional'keypad'to'highlight'either'‘1x’'or'‘2x’.'[95]'Press'and'release'the'OK'button.'[96]'5. Press'and'release'the'MENU'button'to'exit.'[97]''R"0,4//.-1&/M$&W-3$0/$#&!.90"&G>&=40#&'1. Press'and'release'the'MENU'button'on'the'monitor.'[98]'2. Using'the'directional'keypad,'highlight'the'‘Settings’'option.'[99]'Press'and'release'the'OK'button.'[100]'3. Using'the'directional'keypad,'highlight'the'‘Format’'option.'[101]'Press'and'release'the'OK'button.'[102]'4. A'warning'message'will'appear'on'the'display'requesting'confirmation.'[103]'Use'the'directional'keypad'to'select'‘Yes’.'[104]'Press'and'release'the'OK'button.'[105]'Press'and'release'the'MENU'button'to'exit.'[106]''B$3/"0.-1&R49/"0H&>$X45%/3&'1. Press'and'release'the'MENU'button'on'the'monitor.'[107]'2. Using'the'directional'keypad,'highlight'the'‘Settings’'option.'[108]'Press'and'release'the'OK'button.'[109]'3. Using'the'directional'keypad,'highlight'the'‘Default’'option.'[110]'Press'and'release'the'OK'button.'[111]'4. Use'the'directional'keypad'to'highlight'either'‘Yes’'or'‘No’.'[112]'Press'and'release'the'OK'button.'[113]'5. Press'and'release'the'MENU'button'to'exit.'[114]''K#853/.-1&/M$&N0.11$0&B$9"0#&V/(1:$(C,1.(W$).#-(?.-$>(+-I,&1&(1:$(+?.,/1(.5(1"?$(7$5.#$(1:$()+?$#+()+/(1#"99$#(+,-".(.#(*"-$.(?.1"./(+9+"/(6+/-(1:$#$5.#$(#$).#-"/9;H((](https://usermanual.wiki/RDI-Technology/M370QN/User-Guide-1641722-Page-23.png)
![1. Press'and'release'the'MENU'button'on'the'monitor.'[115]'2. Using'the'directional'keypad,'highlight'the'‘Record’'option.'[116]'Press'and'release'the'OK'button.'[117]'3. Using'the'directional'keypad,'highlight'the'‘Trigger'Record’'option.'[118]'Press'and'release'the'OK'button.'[119]'4. Use'the'directional'keypad'to'highlight'‘5'Seconds’,'’15'Seconds’,'or'’30'Seconds’.'[120]'Press'and'release'the'OK'button.'[121]'5. Press'and'release'the'MENU'button'to'exit.'[122]'&K9/.C4/.-1&/M$&EC$060./$&R$4/50$&!:$/(1:$(?$?.#'()+#-("&(5,%%>(.%-(*"-$.(A"%%(7$(.*$#A#"11$/(+,1.?+1")+%%'H('1. Press'and'release'the'MENU'button'on'the'monitor.'[123]'2. Using'the'directional'keypad,'highlight'the'‘Record’'option.'[124]'Press'and'release'the'OK'button.'[125]'3. Using'the'directional'keypad,'highlight'the'‘Overwrite’'option.'[126]'Press'and'release'the'OK'button.'[127]'4. Use'the'directional'keypad'to'highlight'‘Yes’'or'‘No’.'[128]'Press'and'release'the'OK'button.'[129]'5. Press'and'release'the'MENU'button'to'exit.'[130]''<5%%4@.$3&@%+'(?,&")+%(1,/$&(5#.?($+):()+?$#+H(X/)$(+)1"*+1$->(+(0%+'%"&1()./&"&1"/9(.5(2(-"55$#$/1(%,%%+7"$&(A"%%(0%+'(+/-(#$0$+1(,/1"%(0%+'7+)N("&(&1.00$-H('1. Press'and'release'the'PLAY/STOP'button'on'the'monitor.'[131]'2. Press'and'release'the'NEXT'button'to'select'a'lullaby'desired.'[133]'The'lullaby'name'will'appear'on'the'LCD'screen.'[135]'3. Press'and'release'the'PLAY/STOP'button'to'exit.'[134]''NOTE:'Specific'songs'cannot'be'played'repeatedly.'Songs'cannot'be'changed'or'modified.''!.-.&2GO&E5/:5/&L1#$+?(%"*$(*"-$.(1.('.,#(:.?$().?0,1$#(+/-(#$).#-(1.('.,#(:+#-(-#"*$(,&"/9(&,00%"$-(&.51A+#$H(W$5$#(1.(B&$#(<+/,+%(./(&,00%"$-(DKH(<+/,+%()+/(7$(0#"/1$-H(''''](https://usermanual.wiki/RDI-Technology/M370QN/User-Guide-1641722-Page-24.png)