REALTRACE ZR004 Pet Scan RT250 Electronic RFID Reader User Manual
REALTRACE Pet Scan RT250 Electronic RFID Reader
User Manual
1
Pet Scan RT250 Electronic
RFID Reader User Manual
(V1.0)
2
CATALOG
1, Produce Presentation ..........................................................................................................................................3
1.1 Product features............................................................................................................................................1
1.2 Produce description ......................................................................................................................................1
1.3Applications...................................................................................................................................................1
1.4 Photos ...........................................................................................................................................................4
2, Parameters ..........................................................................................................................................................4
3 Quick Start...........................................................................................................................................................5
3.1 Buttons..........................................................................................................................................................5
3.2 OLED ...........................................................................................................................................................5
3.3 Configuring the reader..................................................................................................................................5
3.4 Activating the reader ....................................................................................................................................6
3.5 Bluetooth Function .......................................................................................................................................6
3.6 Recharging the battery..................................................................................................................................7

3
1, Produce Presentation
1.1Productfeatures
Support ISO norms 11784/85 &14223 protocol.;
Working Frequency: ISM 134.2Khz;
Focused on goods tracking and data collecting;
Data Transmission: Bluetooth 2.0+EDR;
1.2Producedescription
ZR004 is a Pet Scan RT 250 Electronic RFID
reader, operation is simple, it Support Bluetooth
to transmit data.
1.3Applications
Animal tracking
Parking lot
Warehouse and logistics
Produce line
Assets management
4
1.4Photos
2, Parameters
Model Value
Working Frequency ISM 134.2KHz
Protocol 11784/85 &14223
RF Power MAX 38.8dBm, software adjustable
Identify Distance
2 x 12mm FDXA glass tag scanning distance: 10cm
2 x 12mm FDXB glass tag scanning distance: 14cm
Ear tag 26/30cm depends of the provider
Reads HDX and EM4102 chips
Indication One buzzer inside
Data Interface Bluetooth 2.0+EDR,USB 2.0
1
6
5
4
3
2
Mini USB

5
Bluetooth
Communication Distance 15 meters
Power Supply 3.7V 5500mAh lithium battery
Processor PIC18F46K22
Memory 64KB (800 numbers)
Standby Time 12 hours
Operating current 1A (Max)
Size 600mm×60mm×35mm
OLED Display four lines of 16 characters
Temperature -5~40℃
3 Quick Start
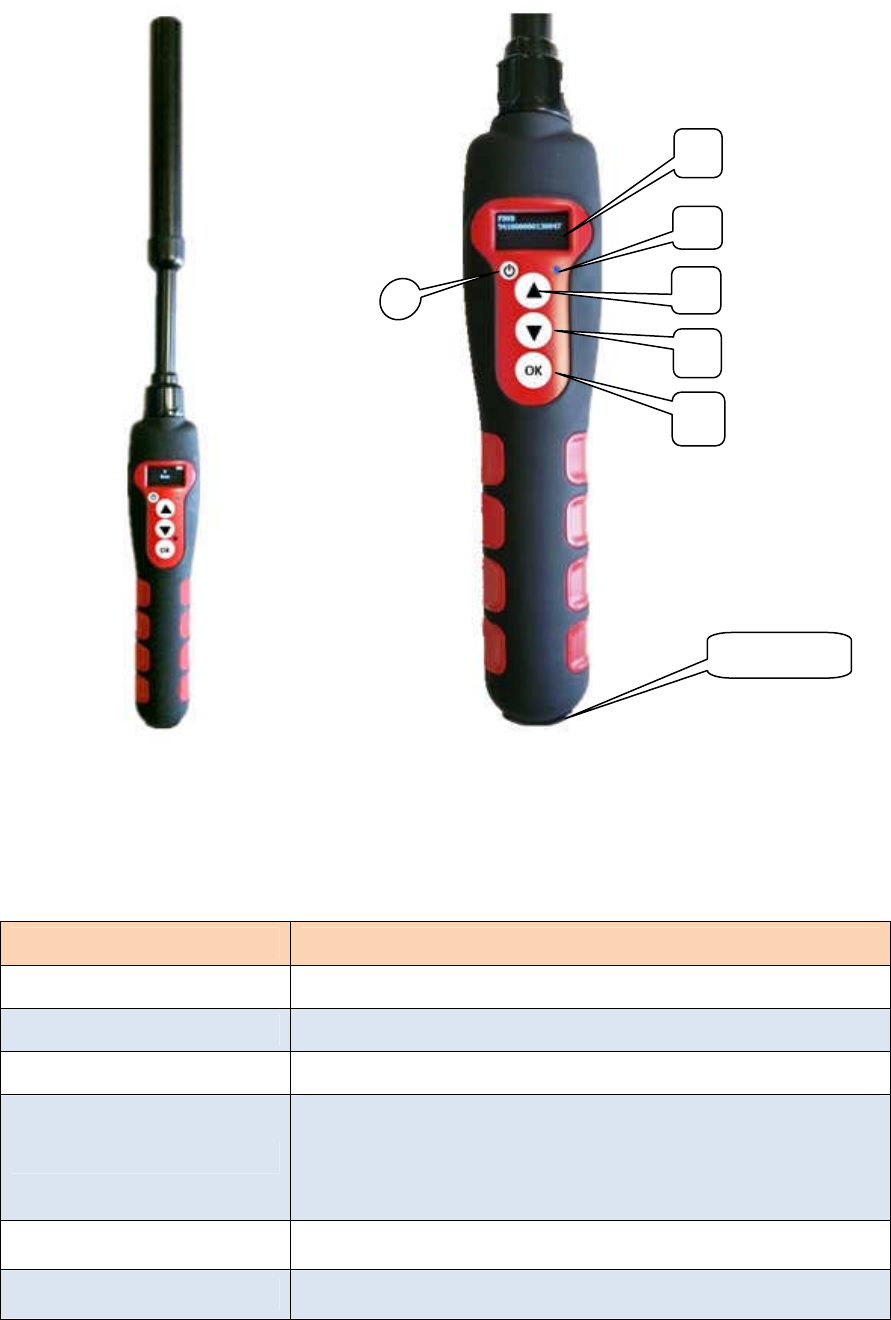
3.1Buttons
The reader has four buttons.
- One round button to switch the device on/off.
- Three central buttons.
The upper button (3) and midle button (4) (scroll up and scroll down) are used to scroll the
various functions of the reader on the display. The lower “OK” button (Validate or Enter) (2) is used
to validate the options selected by the user when navigating through the various menus.
3.2OLED
An OLED display comprising four lines of 16 characters.
3.3Configuringthereader
After switching on the reader by pressing the On/Off button (1), you will see the message
“Scan” with an arrow above it. Press three times upper button (3) to display the “Language” menu.
Then validate by pressing button (2) The reader is initially configured to operate in English.
To change the language, press button (4) and scroll down the languages until the one you wish
to use (for example spanish) is displayed. You must then validate your choice (button 2). The ollowing
message is displayed for 4 seconds: English OK and then the reader displays: Scan
The languages available are: English, French, Spanish, Italian, Portuguese, Deutsch and Polish.
6
Once you have selected the language pressing “OK” (4 ) you can switch off the reader by holding
down the “On/Off” button.
3.4Activatingthereader
When the reader is switched off, you can switch it on by pressing button “OK” (1). The
display shows: Scan
Press the“Validate”button (2) to activate chip search for 20 seconds. Reading
The operator must hold the reader close to the place where the chip is assumed to be,scanning
over the area slowly.
Two cases may arise:
First case:
A transponder is detected. The reader emits a “beep” and displays the identification number
in the following form: FDXB
939 274877906744
In this case the transponder is an ISO FDX B. Type transponder. The identification number
takes the form of a series of 15 digits (FDX B) or 10 digits (FDX A).
The number remains displayed for one minute before the reader switches itself off.
Note: switching off the reader causes the number displayed to be erased from the memory.
Second case:
No transponder is detected. If no transponder has been detected after 20 seconds, the reader
emits three “beeps” and displays: No transponder found !
This message will be erased after approximately 20 seconds. The reader will then display:
Scan
It will switch itself off automatically after two minutes to save to save battery power.
In this case, it is recommended to make two or three or three further attempts to read a
chip, scanning more widely over the area in which it is assumed to be implanted. Each successive
pressing of the button (4) will restart the reading in accordance with the process described above.
3.5BluetoothFunction
Chance the Bluetooth options , the (5)Blue LED will display. In this time you can use mobile
phone or laptop to match reader. Reader name is “HC-06” and password is “1234” , Bluetooth
connect success, blue LED will display always.
7
3.6Rechargingthebattery
The reader is powered by a Lithium/ion battery. This battery is designed to allow several
thousand reading operations. It can be recharged by connecting the reader to a USB port. A fixed
red LED (5) indicates that recharging is in progress and green (5) when it is fully loaded.
This led blink in blue when Bluetooth is activated. The service life of the battery depends not
only on its use but also on the environment in which the reader is stored. An indicator on the right
of the display (6) indicates the battery charge level. When the charge is too low the reader displays
the following message:Low battery
Only around ten more reading operations will be possible before the reader switches itself off
permanently. To replace the battery, it is necessary to open the reader. So it is strongly advised to
consult your distributor. It is essential to use original batteries only.
8
NOTE: This equipment has been tested and found to comply with the limits for a Class
B digital, pursuant to Part 15 or the FCC Rules. These limits are designed to provide
reasonable protection against harmful interference in a residential installation. This
equipment generates, uses and can radiate radio frequency energy and, if not installed
and used in accordance with the instructions, may casue harmful interference to radio
communications, However, there is no guarantee that interference will not occur in a
particular installation. If the equipment does cause harmful interference to radio or
television reception, which can be determined by turning the equipment off and on, the
user is encouraged to try to correct the interference by one or more of the following
measures:
--- Reorient or relocate the receiving antenna.
--- Increase the separation between the equipment and receiver.
--- Connect the equipment into an outlet on a circuit different
from that to which the receiver is connected.
--- Consult the dealer or an experienced radio/ TV technician for help.
FCC STATEMENT
1. This device complies with Part 15 of the FCC Rules.
Operation is subject to the following two conditions:
(1) This device may not cause harmful interference, and
(2) This device must accept any interference received, including interference that
may cause undesired operation.
Changes or modifications not expressly approved by the party responsible for
compliance could void the user’s authority to operate the equipment.
FCC Radiation Exposure Statement:
The device has been evaluated to meet general RF exposure requirement.
The device can be used in portable exposure condition without RF striction.