RFNet Technologies 000001 Wireless LAN Access Point User Manual Welcome
RFNet Technologies Pte Ltd Wireless LAN Access Point Welcome
Users Manual
RFNet Wireless LAN Access Point AP-I002
Chapter 1 Welcome......................................................................................................................... 4
1.1 About this book..................................................................................................................... 4
1.2 About the RFNet wireless LAN Access Point AP-I002 ....................................................... 4
1.3 Information to the user.......................................................................................................... 5
1.3.1 Regulatory Information.................................................................................................. 5
1.3.2 Wireless AP-I002 and Your Health ............................................................................... 5
1.3.3 Wireless AP-I002 and Permission to use....................................................................... 6
1.4 AP-I002 Application Examples ............................................................................................ 6
1.4.1 Enterprise Network ........................................................................................................6
1.4.2 SOHO/HOME................................................................................................................ 7
1.4.3 Wireless Bridge (Optional)............................................................................................ 7
Chapter 2 Installation Guide ........................................................................................................... 9
2.1 AP-I002 Standard Package ................................................................................................... 9
2.2 Product Identification............................................................................................................ 9
2.3 Hardware Installation............................................................................................................ 9
2.3.1 Locating Your Access Point .......................................................................................... 9
2.3.2 Removing Top Cover of AP-I002................................................................................ 10
2.3.3 Installing DC Power Cord and Ethernet Cable ............................................................ 10
2.3.4 Closing the Front Cover............................................................................................... 11
2.3.5 Mount the AP-I002 (in case of wall mounting)........................................................... 11
2.4 Power-up the Device........................................................................................................... 11
2.5 Install the AP Search Software to Microsoft Windows...................................................... 12
Chapter 3 Using Your AP-I002 .................................................................................................... 13
3.1 Installation Requirements ................................................................................................... 13
3.2 Best Place for the AP-I002 ................................................................................................. 13
3.3 Connecting Stations to Your AP-I002 ................................................................................ 13
3.3.1 To Connect to Any SSID ............................................................................................. 13
3.3.2 To Connect to the Specific SSID................................................................................. 14
3.4 Management........................................................................................................................ 15
3.4.1 Web Server Within Access Point................................................................................. 15
3.4.2 Access Point Search..................................................................................................... 24
3.4.3 Telnet ........................................................................................................................... 24
Chapter 4 AP-I002 Specifications ................................................................................................ 27
4.1 Hardware............................................................................................................................. 27
4.1.1 Environment & Electrical ............................................................................................ 27
4.1.2 Wireless........................................................................................................................ 27
4.1.3 Interface & Standards .................................................................................................. 28
4.2 Software .............................................................................................................................. 28
4.2.1 Network Protocol......................................................................................................... 28
4.2.2 Management & Configuration ..................................................................................... 28
4.2.3 Security & Access Control........................................................................................... 29
4.2.4 Optional Accessories, Features and Service ................................................................ 29
4.3 Management........................................................................................................................ 30
Chapter 5 Technical Support ........................................................................................................ 31
Chapter 6 Troubleshooting ........................................................................................................... 32
User Manual 2
RFNet Wireless LAN Access Point AP-I002
6.1 Identify AP.......................................................................................................................... 32
6.2 No Power ............................................................................................................................ 32
6.3 No Ethernet ......................................................................................................................... 32
6.4 Factory Reset ...................................................................................................................... 32
Chapter 7 Warranty....................................................................................................................... 34
7.1 Warranty Period.................................................................................................................. 34
7.2 Limited Warranty................................................................................................................ 34
Chapter8 Feedback........................................................................................................................ 35
Chapter9 Disclaimer ..................................................................................................................... 36
User Manual 3

RFNet Wireless LAN Access Point AP-I002
Chapter 1 Welcome
1.1 About this book
Thank you and congratulations on selecting our Wireless LAN Access Point AP-I002.
This manual will provide you with the main guidance in using AP-I002 Access point. It contains the
following information:
• Installation guide.
• Using and configuring AP-I002.
• AP-I002 specification.
• Information on technical support.
• Basic troubleshooting.
In order to allow us to be able to continue serving you better, the specifications may subject to
changes without prior notice.
All the brand and product names are trademarks or registered trademarks of their respective
holders.
Copyright 2001 RFNet Technologies
All Rights Reserved
1.2 About the RFNet wireless LAN Access Point AP-
I002
This Wireless LAN Access Point AP-I002 will bring you a new wireless networking experience. It
helps to free you from the tangles of wires and enjoy the power of wireless communication. It is the
way to go for more convenient and improve productivity.
AP-I002 could serve as a connection between an existing wired network and wireless devices. It
provides the physical wireless link between the mobile units and wired network together. As such,
the mobile units could access to the intranet and corporate data anywhere within the organization.
AP-I002 also supports seamless roaming within the same subnet for mobile unit to move from one
radio cell to another, and yet stay connected to the network as long as the mobile unit is within the
radio cell coverage.
The AP-I002 is designed in accordance with the IEEE 802.11b standard. It consists of two
antennas (one is rotatable, the other is hidden below the front casing) as to provide optimal radio
reception. There are 3 non-overlapping channels that you could utilize for radio cell planning to
achieve higher data throughput or wider radio coverage. Therefore, the AP-I002 is not only suitable
for small local area networks, but also for large-scale local area network implementations.
User Manual 4
RFNet Wireless LAN Access Point AP-I002
1.3 Information to the user
1.3.1 Regulatory Information
RFNet Technologies shall not be responsible for any radio or television interference caused by
unauthorized modification of the device, or the substitution or attachment of connecting cables and
equipment other than specified by RFNet Technologies. Such unauthorized modifications will void
user’s authority to operate the equipment.
USA
Federal Communications Commission (FCC)
This device complies with Part 15 of the FCC Rules. Operation is subject to the following two
conditions: (1) this device may not cause harmful interference, and (2) this device must accept any
interference received, including interference that may cause undesired operation.
Remedies for the Interference
This equipment has been tested and found to comply with the limits for a Class B digital device,
pursuant to Part 15 of the FCC Rules. These limits are designed to provide reasonable protection
against harmful interference in a residential installation. This equipment generates, uses, and can
radiate radio frequency energy. If not installed and used in accordance with the instructions, it may
cause harmful interference to radio communications. However, there is no guarantee that
interference will not occur in a particular installation.
If this equipment does cause harmful interference to radio or television reception, which can be
determined by turning the equipment off and on, the user is encouraged to try and correct the
interference by one or more of the following measures:
• Reorient or relocate the receiving antenna.
• Increase the separation between the equipment and the receiver.
• Connect the equipment to an outlet on a circuit different from that to which the receiver is
connected.
• Consult the dealer or an experienced radio/TV technician for help.
1.3.2 Wireless AP-I002 and Your Health
Wireless AP-I002, like other radio devices, uses radio frequency technology to perform wireless
communication, thus emits radio frequency electromagnetic energy. The level of energy emitted by
AP-I002 devices however is far much less than the electromagnetic energy emitted by wireless
devices like for example mobile phones.
Because AP-I002 operates within the guidelines found in radio frequency safety standards and
recommendations, RFNet Technologies believes AP-I002 is safe for use by consumers. These
standards and recommendations reflect the consensus of the scientific community and result from
deliberations of panels and committees of scientists who continually review and interpret the
extensive research literature.
Properly installed AP-I002 according to the instructions found in this manual will result in the user
exposure to electromagnetic energy substantially below the FCC recommended limits.
For your health, you must keep the following points in mind:
User Manual 5
RFNet Wireless LAN Access Point AP-I002
• Do not touch or move antenna(s) while the unit is transmitting or receiving.
• Do not hold any component containing a radio such that the antenna is very close or to
touching any exposed parts of the body, especially the face or eyes, while transmitting.
• Do not operate a portable transmitter near unshielded blasting caps or in an explosive
environment unless it is a type especially qualified for such use.
• Do not operate the radio or attempt to transmit data unless the antenna is connected;
otherwise, the radio may be damaged.
• Keep at least 12 inches (30 cm) away from the unit while the unit is in operation.
1.3.3 Wireless AP-I002 and Permission to use
In some situations or environments, using wireless AP-I002 may be prohibited by the proprietor of
the building or responsible representatives of the organization. Such as:
• Using the Wireless AP-I002 equipment on board of airplanes, or
• In any other environment where the risk of interference to other devices or services is
perceived or identified as harmful.
Should you uncertain of the policy that applies on the use of wireless device (AP-I002) in a specific
organization or environment, you are encouraged to ask for authorization to use the Wireless AP-
I002 device prior to turning on the equipment.
1.4 AP-I002 Application Examples
The throughput of the AP-I002 is among the top in the industry with RFNet’s cutting edge
technology, and accordingly you may build a variety of networks as you desire. Banks, hospitals,
airports, historical buildings, warehouses, retail stores, …… in a word, all the difficult-to-wire
environments are our potential users. Here, we only illustrate three basic application examples for
your kind reference.
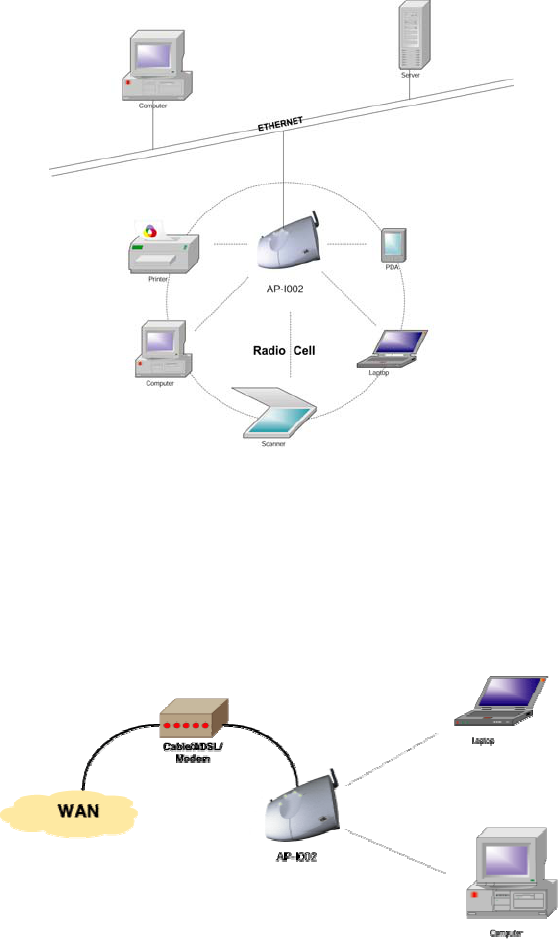
1.4.1 Enterprise Network
You can connect a number of wireless AP-I002 to an existing Ethernet infrastructure, or create a
wireless environment for mobile computers. In addition, the AP-I002 can act as a repeater, passing
along transmissions form one AP-I002 to another, serving as a wireless backbone and reaching
hard-to-wired areas.
User Manual 6
RFNet Wireless LAN Access Point AP-I002
Figure 1-1 Enterprise Network
1.4.2 SOHO/HOME
You can create a home office/small office network with the AP-I002, which brings the Internet to
every room in your home/office without cables. AP-I002 allows multiple users to access Internet
simultaneously in a simple, affordable way.
Figure 1-2 SOHO/HOME
1.4.3 Wireless Bridge (Optional)
To connect multiple LAN segments located in different buildings, the AP-I002 in combination with
an external directional antenna, enables you to set up a wireless bridge as an alternative to leased
wired connections.
User Manual 7
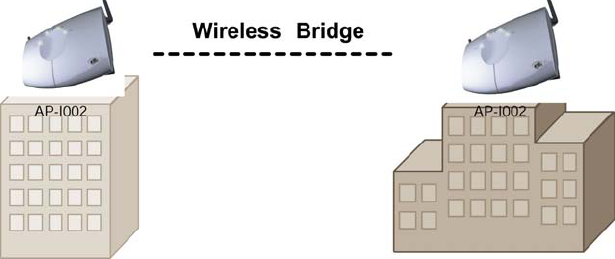
RFNet Wireless LAN Access Point AP-I002
Figure 1- 3 Wireless Bridge (Optional)
User Manual 8

RFNet Wireless LAN Access Point AP-I002
Chapter 2 Installation Guide
2.1 AP-I002 Standard Package
When preparing for installation of the AP-I002, verifying kit contents becomes especially important.
Please verify all the items in the package are present as listed below:
1) One Wireless LAN Access Point (AP-I002);
2) One 96-264 VAC input, 5V 2A output adaptor;
3) One Quick Start Guide;
4) One CD-ROM consists of Network Management Software and User’s Manual;
5) One Wall Mounting Guide.
If you find any missing or wrong item(s), please report to your local authorized reseller, Sales Office
or our headquarter in Singapore as soon as possible. You are assured of immediate response.
2.2 Product Identification
Before you install the RFNet AP-I002, please write down the following AP-I002 information:
• Serial Number
• MAC address
This information is printed on the back housing of the access point as shown below.
Figure 2-1 Example for AP-I002 Identification Label
2.3 Hardware Installation
2.3.1 Locating Your Access Point
You can mount the AP-I002 on a vertical surface like a wall or place the unit on a flat surface such
as a table or cabinet.
Prior to mounting it to a fixed location, consider performing a site survey to determine optimal
performance and safe location to install your AP-I002 unit(s). See also “Installation Requirements”
and “Best Place for the AP-I002” on Page10 and Page 11.
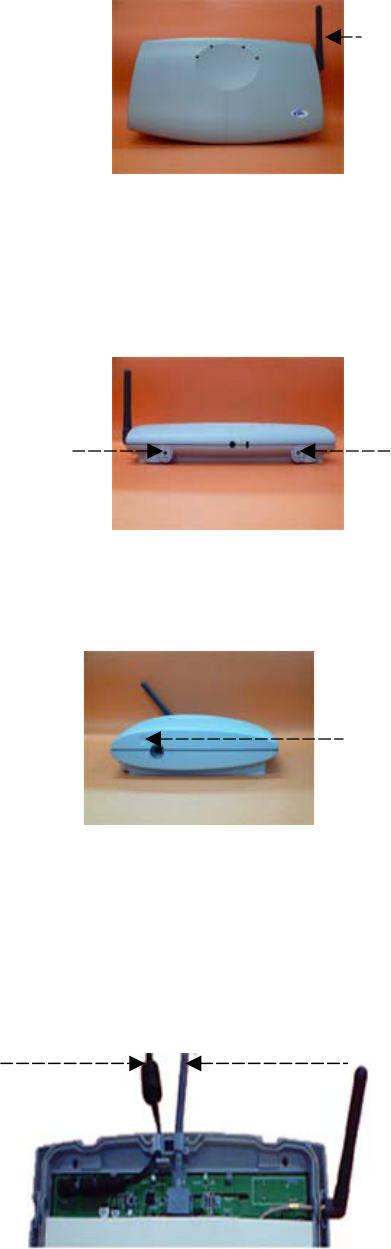
Confirm there is an external antenna attached to the AP-I002 before you proceed to next step.
(See Figure 2-2).
User Manual 9
RFNet Wireless LAN Access Point AP-I002
Figure 2-2 AP-I002 with attached antenna
2.3.2 Removing Top Cover of AP-I002
6) Removing Screw 1 and 2 (See Figure 2-3 below);
Figure2- 3 Back Side View of AP-I002
7) Using two hands to push on the two grids (See Figure 2-4 below) on the left and right top of the
unit;
Figure 2- 4 Left Side View of AP-I002
8) Gently lift up the top cover.
2.3.3 Installing DC Power Cord and Ethernet Cable
After removing the top cover, you can install the DC power cord and Ethernet cable. Please follow
cable styling below.
External
Antenna
Grid (for push use)
Screw 2 Screw 1
Ethernet Cable
DC Power Cord
Figure 2–5 Installations of DC Power Cord and Ethernet Cable
User Manual 10

RFNet Wireless LAN Access Point AP-I002
2.3.4 Closing the Front Cover
1) Gently put back the top cover.
2) Using two hands to align the two latches to the grids (See Figure 2-4 on the previous page) on
the left and right top of the unit.
3) Tightening the Screw 1 and 2 (See Figure 2-3 on the previous page).
2.3.5 Mount the AP-I002 (in case of wall mounting)
Should you need wall mounting, please follow procedures listed below:
1) Place the wall mounting guide provided to the location where the device to be mounted.
2) Drill according to the marks.
3) Place the unit to the wall, align the screw hole of your unit to the wall screw hole created
earlier, mount the screw one by one to ensure perfect alignment.
Note:
We recommend you to do the wall mounting before you install the DC Power cord and Ethernet
cable.
Your hardware installation is now completed.
2.4 Power-up the Device
To power-up the AP-I002, connect the device to an AC wall-outlet with the provided AC/DC power
cord.
Warning:
Please use AC/DC power adapters specified in AP-I002 standard package list only.
Power-up sequence (can be observed by LED indicator):
1) 1 second after power-up: LNK LED (Amber) flashes.
2) 30 seconds after power-up: LAN1 or LAN2 (Green) flashes.
When these are finished, the AP-I002 is functional and start bridging operation characterized by the
LED activity as listed in Table 2-1 as follows.
LED Definition Activity Description
Power (PWR) Red Power Enabled
Ethernet LAN Activity
(LNK)
Flicker Amber Ethernet LAN Activity
User Manual 11

RFNet Wireless LAN Access Point AP-I002
WLAN Activity
(LAN1, LAN2)
Flicker Green Wireless LAN Activity
Table 2-1 AP-I002 LED Activity Table
2.5 Install the AP Search Software to Microsoft
Windows
To install AP search software, what you need to do is just copy the apsearch.exe from the
installation CD to your local disk.
User Manual 12

RFNet Wireless LAN Access Point AP-I002
Chapter 3 Using Your AP-I002
3.1 Installation Requirements
While installing, AP-I002s must satisfy the following requirements:
• Connect the unit to a grounding type AC wall outlet (100-240 VAC) using the standard power
cord as supplied with the unit.
• Must allow easy disconnection the access point unit from the AC wall-outlet.
• Do not cover the unit, or block the airflow to the unit with any other objects.
• Must keep the unit away from excessive heat and humidity and keep the unit free from
vibration and dust.
• Installation must at all times conform to local regulations.
Should you connect AP-I002 to an outdoor antenna system or external accessory, please consult
the documentation that came with the outdoor antenna kit for additional regulatory information,
safety instructions and installation requirements.
3.2 Best Place for the AP-I002
Try to position - AP-I002s in an open environment with as few obstructions as possible for optimal
performance. To ensure the best link quality:
• Place the AP-I002s as high and as centrally as possible (relative to the mobile wireless stations
in the vicinity).
• Do not conceal the integrated antennae of the AP-I002.
• Do not place AP-I002 too near to metal wall.
3.3 Connecting Stations to Your AP-I002
A unique Wireless Network Name or Service Set Identification (SSID) identifies IEEE 802.11b
Wireless Networks. All Access Point that belong the same Wireless Network Infrastructure will
share the same SSID.
To establish communication between your station and the Access Point, you can configure your
PCM-01 PC Card to:
• Connect to any wireless LAN (SSID) or
• Connect to a specific wireless LAN (SSID)
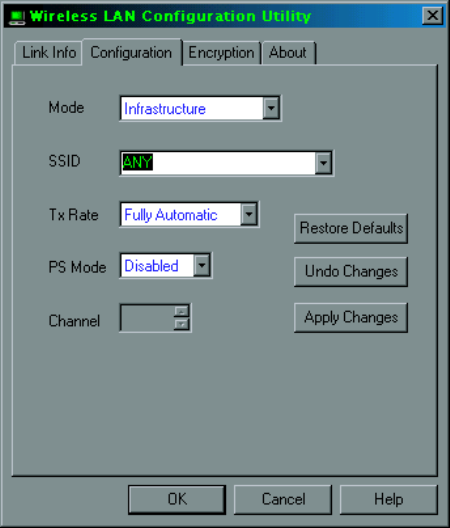
3.3.1 To Connect to Any SSID
This is recommended if you intend to connect your PC to various networking environments. By
using this setting, your PC that equipped with the PCM-01 WLAN PC Card will connect
automatically to any Access Point that provides the best level of communications.
• Open your Wireless LAN Configuration Utility and click on the ‘Configuration’ tab.
User Manual 13
RFNet Wireless LAN Access Point AP-I002
• Type in “ANY” in the SSID Column and click on the “Apply Changes” tab.
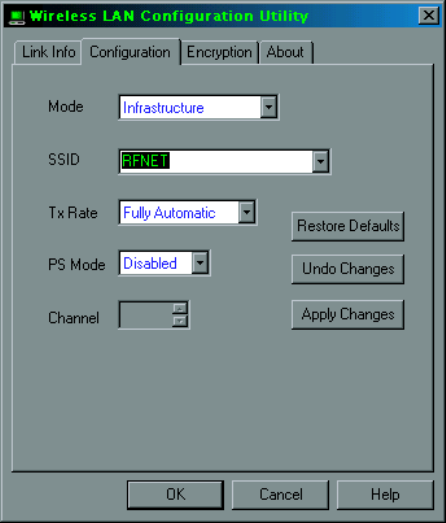
3.3.2 To Connect to the Specific SSID
This is recommended if you intend to connect to a specific wireless network or SSID. By using this
setting, your PC that is equipped with the PCM-01 WLAN PC Card will find and connect to the
Access Point with the matching wireless network ID that give the best level of communications.
• Open the Wireless LAN Configuration Utility and click on the “Configuration” tab.
• Type in the your wireless network ID, for example “RFNET” as shown below, and click on the
“Apply Changes” tab.
User Manual 14
RFNet Wireless LAN Access Point AP-I002
3.4 Management
3.4.1 Web Server Within Access Point
1.Access the web server
To access the web server, you must know the IP address of the AP-I002. You have several options
to get the IP address, which depends on the environment of your network.
• If the AP-I002 works in DHCP mode, you may need to install a small software called apsearch
, which especially useful for you to find the AP-I002. For details on using the apsearch, please
refer to “Access Point Search” on Page 23.
• If the AP-I002 works in static mode, it means that you have already known the IP address. In
case you forget the static IP address, just follow the DHCP mode solution.
• If you have installed the Network Management Software (“NMS”), you can get the IP
address of each AP-I002 within your network no matter which mode the AP-I002 is working in.
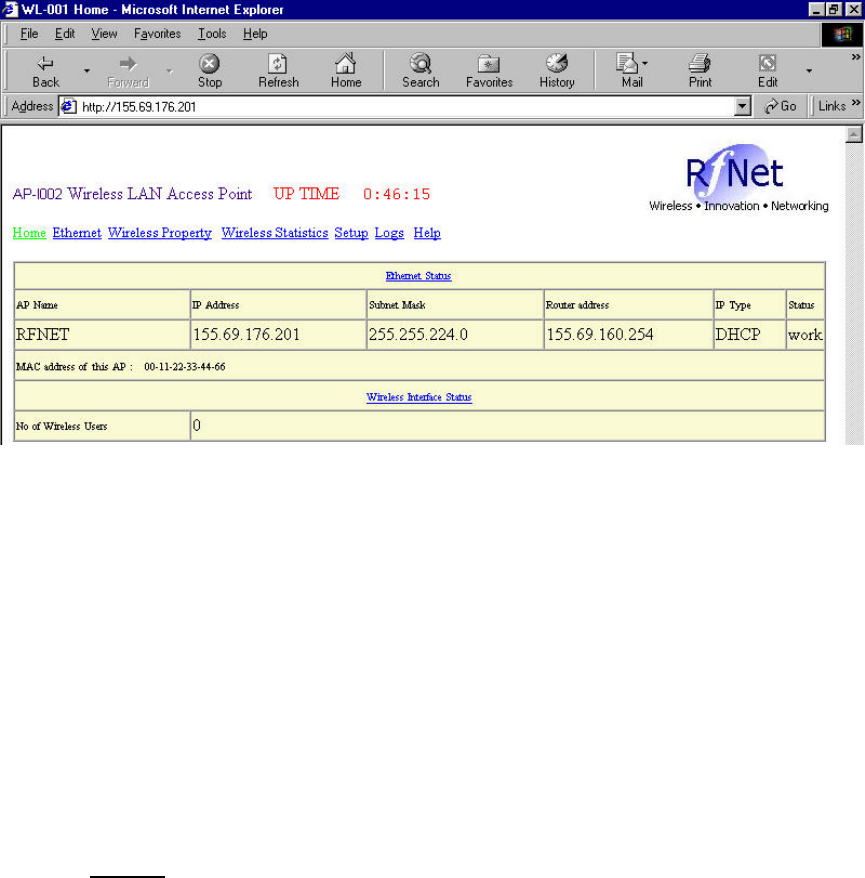
After getting the IP address, you are ready to access the web server through any web browser. We
recommend Internet Explorer. Just type the IP address in the IE’s address text box and press
Enter, you’ll see the AP-I002’s homepage on the screen as follows, which means that you have
already gotten the correct IP address and this AP-I002 is working well.
User Manual 15
RFNet Wireless LAN Access Point AP-I002
2. Browsing and setting through the web server.
There are totally 7 pages in this web server. Each gives you different information. The information
provides excellent support for you to know about nearly all the information you want about this AP-
I002, including the general information such as the AP name, channel number, as well as
complicated and detailed information such as active user amount and their MAC address. We’ll
guide you to fulfill management job through the web server in the following subsections.
3.Home page (Read-Only)
The home page, just as you saw in the above, lets you know the general information about this AP-
I002 unit, like for example, AP name, IP address, subnet mask, router address, IP address type,
and the MAC address etc.
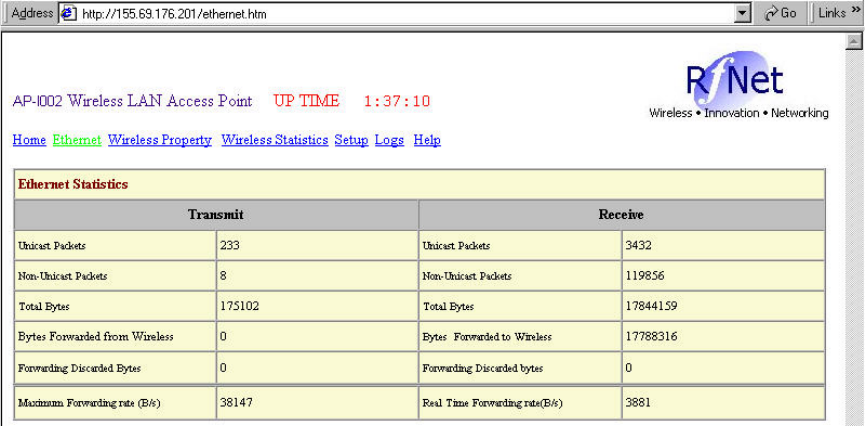
4. Ethernet status page (Read-Only)
Click the Ethernet link, and the Ethernet Status Page appears. Here you can get all the useful
statistics information of Ethernet interface for easy managing and monitoring your network. The
page is similar to the following picture.
User Manual 16
RFNet Wireless LAN Access Point AP-I002
To know more about the transmit and receive, you can go through the detailed information listed in
respective column as you see.
Unicast Packets:
This field gives you the unicast packets this AP-I002 has handled. Unicast packet means the
packet is destined to a specified MAC address instead of the multicast or broadcast.
Non-Unicast Packets:
This field gives you the information of multicast or broadcast packets this AP-I002 has handled.
Total Bytes:
This field gives you the total bytes this AP-I002 has handled including both the unicast packets and
non-unicast packets.
Bytes forwarded from wireless:
This field allows you to view the bytes that this AP-I002 received from wireless users and
transmitted to the Ethernet interface.
Bytes forwarded to wireless:
This field allows you to view the bytes that this AP-I002 received from Ethernet and forwarded to
the wireless users.
Forwarding discarded bytes:
This field tells you about the bytes discarded by the AP-I002 resulting from various reasons. These
reasons may include inside buffer overflow, or invalid MAC address which is not addressed to
wireless users.
Maximum forwarding rate:
User Manual 17
RFNet Wireless LAN Access Point AP-I002
This is the maximum forwarding rate after power-up. The rate information include both transmit and
receive which are measured in Bytes per Second.
Real time forwarding rate:
This is the real time forwarding rate during the last 1 second. The measurement unit is Byte per
Second.
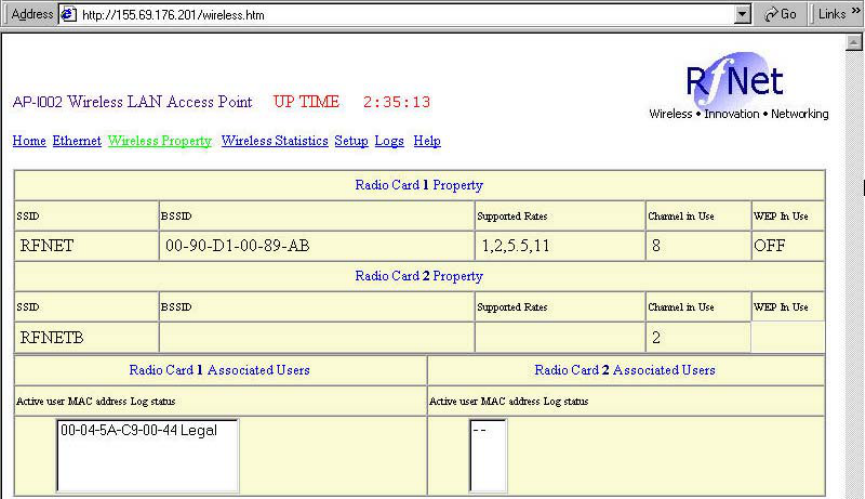
5. Wireless property page (Read-Only)
Click the wireless property hyperlink, you can browse the wireless property which includes the
SSID, BSSID, etc. There are two sets of field which reflect the value for the 2 slots inside the AP-
I002. When the slot is empty, there will be no value for the BSSID field.
SSID:
In this field, you can see the Service Set ID (SSID).
BSSID:
In this field you can see the wireless side MAC address of this AP-I002.
Supported rate:
This field tells you the transmit and receive rate the AP-I002 supports.
Channel in use:
This field tells you the wireless channel the AP-I002 is using. The channel that AP-I002 can use
varies from country to country.
WEP in use:
This field tells you whether the WEP function is activated or not in the AP-I002.
Active User Mac address and Log status:
In this field you can see the MAC address of the active users in the recent 15 minutes. Take the
following captured page for example, the MAC address 00-04-5A-C9-00-44 is a legal user. This
means you have activated the MAC address control function and this MAC address is a legal one.
When the user is not a legal one, it should be in ‘Initial’ state or ‘Illegal’ state. This option makes it
easy for you to block out all the illegal users. When you turn off the MAC address control switch, all
the active users should be in ‘Initial’ state.
User Manual 18
RFNet Wireless LAN Access Point AP-I002
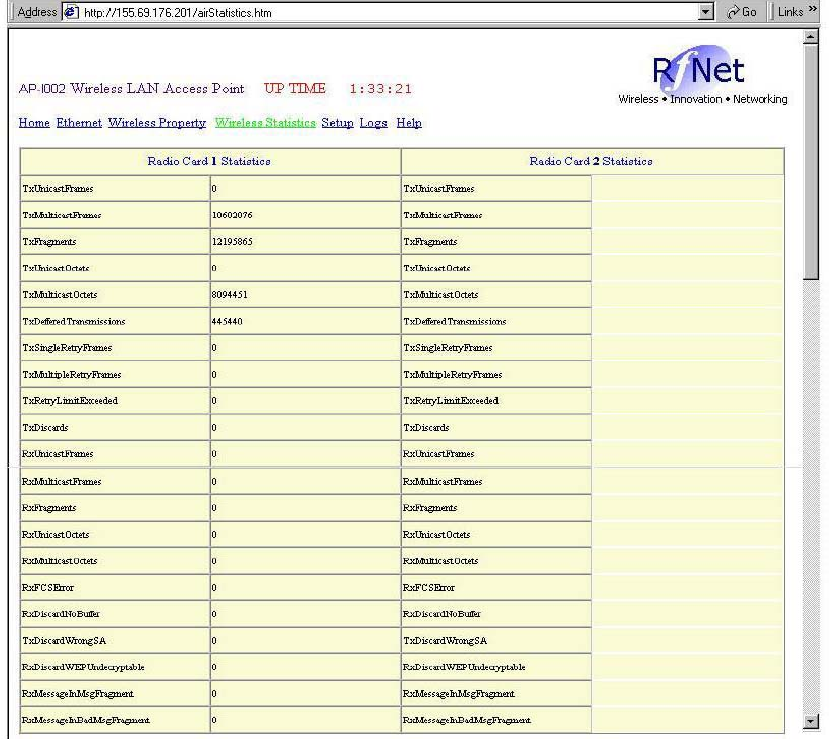
6. Wireless statistics page (Read-Only)
This page enables you to check all the wireless statistics information such as unicast packets,
discarded packets etc.
User Manual 19
RFNet Wireless LAN Access Point AP-I002
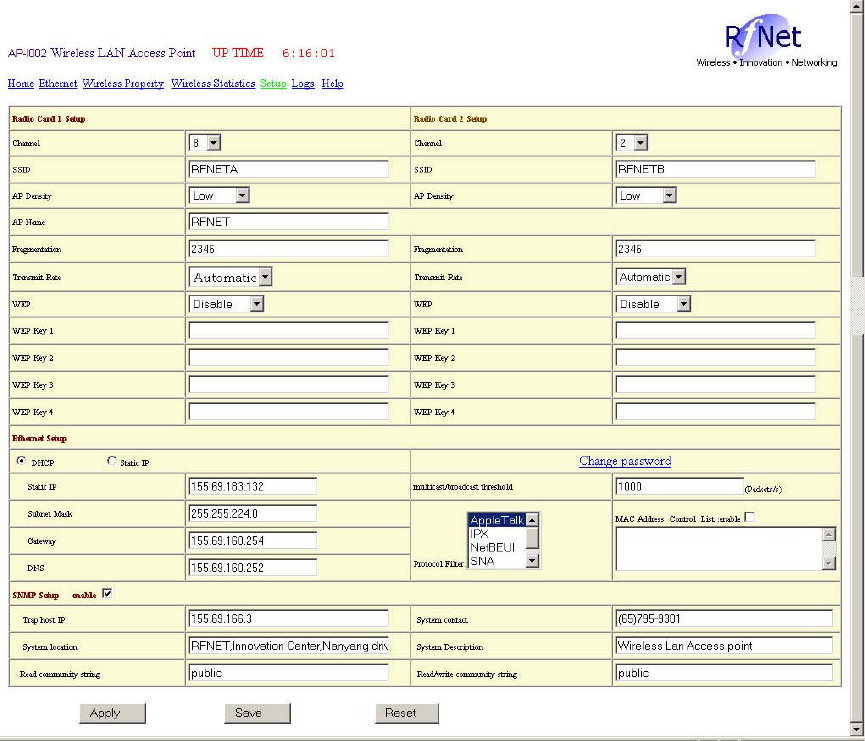
7. Setup page
The setup page provides comprehensive yet easy-to-use controls for setting most of the
parameters you need to. The parameters fall into three categories, one is the wireless parameters
which control the wireless interface within this AP-I002, the second one is the wired parameters
which control the Ethernet interface, the last one is some setting for SNMP parameters.
User Manual 20
RFNet Wireless LAN Access Point AP-I002
To Set Channel
In the wireless parameter category, you can determine which channel you want to use by changing
the channel number.
To Set SSID
You can define the SSID by typing a new one in. Please note that the SSID of the AP-I002 must be
a single string excluding space with the length less than or equal to 32 characters.
To Rename the AP-I002
The one showed at the AP Name field can be changed into any name as you like. The only
limitation is the length. It must be less than 8 alphanumeric characters.
To Control the AP Density
You can choose low, middle, or high to control the AP density, which gives you great flexibility in
managing the network in an effective way.
User Manual 21

RFNet Wireless LAN Access Point AP-I002
To Better Utilize the Bandwidth
Depending on how much bandwidth is available, you are advised to fragment a large packet before
transmitting to achieve best result. That is the fragmentation threshold of the wireless interface.
The valid range is from 0 to 2346. We recommend to remain this value as default for better
performance.
To Set Transmit Rate
Normally we set it to automatic mode, yet you can modify the setting when you feel it is necessary.
To Use WEP Function
You can choose to disable the WEP function or turn it on. To turn on the WEP function, you must
specify one of the WEP keys, which are WEP key 1, 2, 3, 4. Each WEP key must consist of 10
hexadecimal characters for 64-bit encryption and 26 hexadecimal characters for 128-bit encryption.
When you turn on this WEP key, please keep in mind that you must specify the same WEP key in
the client side.
In the Ethernet parameter category, you can set the following parameter:
To Decide IP Mode
You can decide this AP-I002 to work either in the DHCP or static IP mode. If you choose DHCP,
there is no need for you to specify the detailed IP address of AP or router etc. If you choose static
mode, normally the setup page will show the current IP address in the static IP field at your
convenience. So if you want to fix the current IP address, just check the static IP option.
Static IP, Subnet Mask, Gateway, DNS
In static IP mode, you must specify the correct values of these parameters for you to access the
AP-I002.
Nonunicast Threshold
This is to specify the threshold of multicast or broadcast the AP-I002 is handling. When the
nonunicast packets come through faster than this threshold, the AP-I002 will discard some of them.
Protocol Filter
Here you can select the protocols you want to filter out. To select multiple protocols, just hold down
ctrl while click the mouse.
To Enable MAC Address Control List
This is to enable or disable the Mac address control function. Just tick it when you want to enable
the MAC address control. Remember to add the legal MAC address list in the below box. To add a
legal MAC to the list, just type in. For example if you want to add on 009012345678, then just type
in 009012345678.
After the parameter is set, you either click the Apply button to activate it or click Save button to
save it into flash and enable it. Please note that if you want to change the IP setting, you must save
it and power up the AP again.
To Change Password
User Manual 22
RFNet Wireless LAN Access Point AP-I002
Click on this hyperlink, a change password page will pop up. Only after you enter the correct
username & old password, and the new password in the “new password” & “confirm new
password” fields, the change of password will take effect.
To Enable SNMP
Tick the enable check box. You can disable SNMP function by deselecting this check box.
To Set Trap Host IP
Trap host is your SNMP manager. Whenever the AP-I002 powers up or experiences some critical
conditions, it will send out traps to this IP address.
To Change System Contact, System Location, System Description
These are for you to specify your own specific information. You only need to type in the field.
Please note that the maximum of each piece of information is 100 characters.
To Change Community Read Or Read-Write String in SNMP
When SNMP manager wants to access the agent inside AP-I002, it must have the same
community string.
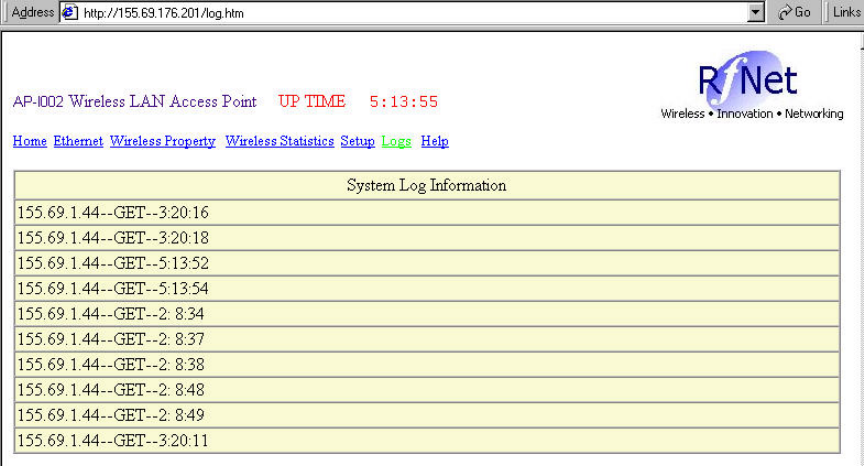
8. Log page (Read-Only)
There is a limited buffer inside the AP-I002. So the AP-I002 only buffers the latest 10 accesses to
it. The format is: IP address method (get or post) time.
The log on time is measured from the moment this AP-I002 powered up. For accurate log on time
and detailed information about the user, we recommend you to install the Network Management
Software (NMS). The page appearing as below only serves as a simple log function. The time
format is hour : minute : second.
9. Help page (Read-Only)
User Manual 23
RFNet Wireless LAN Access Point AP-I002
For this help page, please refer to our web site www.rfnetech.com that gives you the updated help
either in Technical Support or FAQ 24 hours a day, 7days a week.
NOTES: All the values and the information above are only examples. Your display and setting are
subject to your own environment.
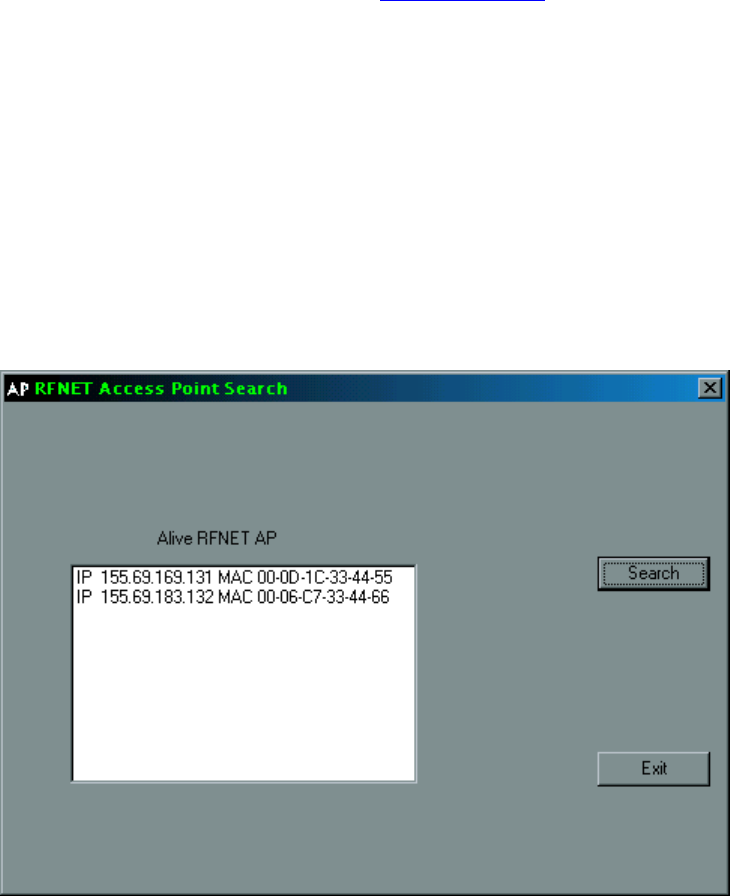
3.4.2 Access Point Search
The objective of using AP Search is to identify the IP and MAC Address of each live Access Point,
and furthermore, to use those information for the AP setting and configuration purposes.
Using the AP Search is as easy as to double click on the APM.exe file. Simply click on the
“Search” tab, which located on the right hand side of the “RFNET Access Point Search” screen and
it will shows all the information (as shown below).
3.4.3 Telnet
1. Connect to the telnet
You must know the IP address of the AP prior to connecting to AP-I002 through Telnet. It’s the
same procedure as connecting through web. After you know the IP address, in your windows
desktop, click the “Start” icon. And then the “Run” item in the popup menu. Here you are supposed
to see a dialog box as the following picture.
User Manual 24

RFNet Wireless LAN Access Point AP-I002
Please follow the above instruction and type a correct IP address and then click “OK” button. After
inputting the correct login name & password, you can use Telnet to set the parameter of the AP-
I002. Both the default login name and password are RFNET (please note all the alphabets are
upper cases).
2. Command through Telnet
Using the commands through Telnet speeds up the time it takes to get response if you are familiar
with them. Once you type a correct command, the related information will appear on you screen in
no time. Currently there are about 10 commands for Telnet. They are as follow:
3) addmac
You can use this command when you want to add one legal MAC address, for example, to add in
00123456789a to the list, just type addmac 00123456789a. If you want to confirm the format of the
command, typing addmac without any successor will give you an example.
4) conf
You can set most of the parameters with this command. The format of this command is: conf
name-of-parameter value. For example, if you wish to change the previous active channel to
channel 6, simply type: conf channela 6, which will change the channel number of slot a to channel
6. To activate this change, you need to type in enable wireless. You can use the show command
to know more about all the parameters you can set, for there is an explanation for each parameter.
5) copy
This command is used for you to save the parameters in RAM into Flash. After setting up all the
parameters, just issue a command copy ram rom and as a result, the AP-I002 saves the
parameters you set.
6) delmac
This command is used to delete a particular legal MAC address. Refer to the example in addmac
part above, you can delete the MAC you added just now by issuing command like delmac
00123456789a.
7) enable
After setting the wireless parameters, you must issue this command to activate them. The
command is: enable wireless.
8) history
User Manual 25
RFNet Wireless LAN Access Point AP-I002
You can view all the commands history you typed in by issuing this command.
9) load
This command is for you to update the firmware. Typing load alone and then you will get detailed
information of this command’s usage. You must setup a TFTP server prior to update the firmware,
and then copy the new firmware to the TFTP server’s directory. For example, let’s assume that
your TFTP server’s IP address is 155.69.178.128, therefore, your command should be load
155.69.178.128.
10) logoff
This command is used as a quick way to log off the session.
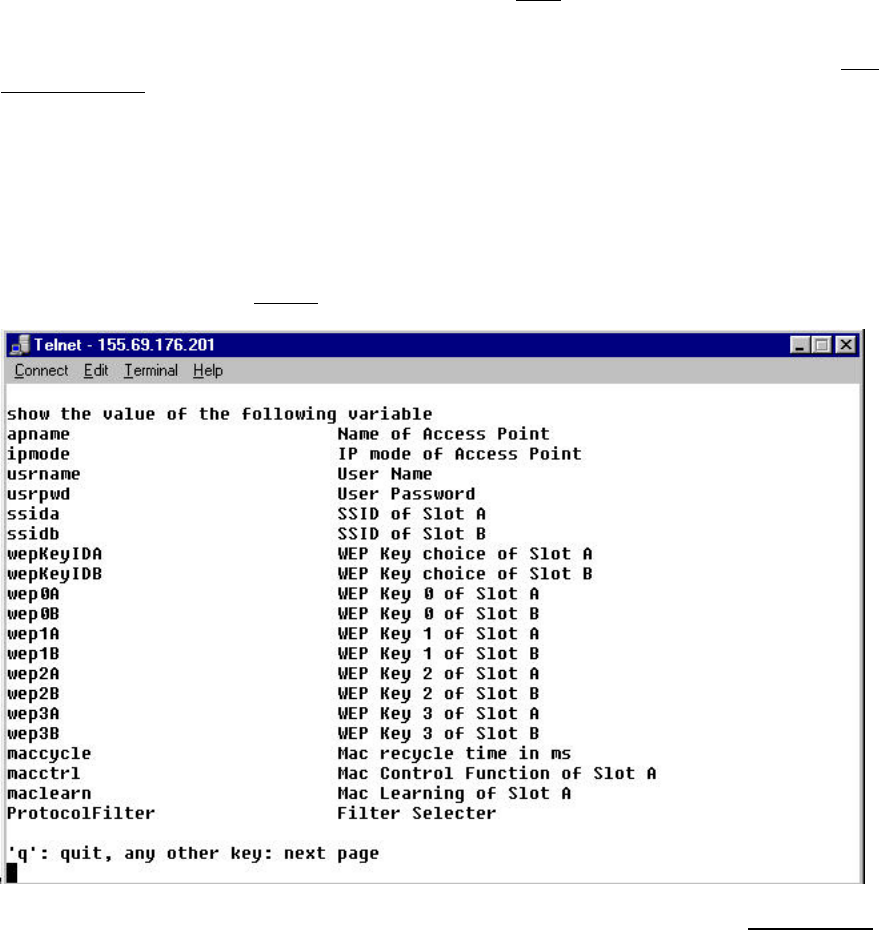
11) show
This command is used to show all the parameters inside this AP-I002. For more information about
the parameters, please type show ? and then the following figure appears on your screen:
To show the value of a particular parameter, like for example, apname, please type show apname,
and the particular name for the AP-I002 in use is quickly displayed on the screen.
12) version
This command is to inform you the version of this AP-I002.
User Manual 26

RFNet Wireless LAN Access Point AP-I002
Chapter 4 AP-I002 Specifications
4.1 Hardware
4.1.1 Environment & Electrical
Adapter Input Voltage 90 ∼ 264 VAC, 50/60 Hz
Input Voltage over UTP 5VDC ∼ 12VDC, 2A at RJ-45
Water Resistance Yes
Operating Temperature 0 ∼ 55°C
Humidity 10 ∼ 90%
LEDs Power (PWR), Ethernet LAN activity (LNK),
WLAN activity (LAN 1, LAN2)
4.1.2 Wireless
Data Rate 11, 5.5, 2 and 1 Mbit/s, IEEE 802.11b & 802.11
Frequency Band 2.4 ∼ 2.4835 GHz
Modulation Direct Sequence Spread Spectrum (DSSS)
Channels 11 (USA), 13 (Europe), 14 (Japan); 3 non-
overlapping channels
Antennae Diversity Two antennae are used per radio channel to
provide optimal reception
Media Access Protocol Carrier sense multiple access with collision
avoidance (CSMA/CA)
User Manual 27

RFNet Wireless LAN Access Point AP-I002
4.1.3 Interface & Standards
Wireless LAN IEEE 802.11b
Telecom FCC part 15
Wired Uplink 10/100 Base-T (RJ-45 connector)
Fiber Uplink (Optional) 100 Base-F (MTRJ connector)
4.2 Software
4.2.1 Network Protocol
TCP/IP
SNMP V1
Telnet
TFTP
DHCP
4.2.2 Management & Configuration
RFNet Network Management Software (NMS) Supports centralized control & configuration.
Allows definitions of various user access policy,
network baselining and auto access point
discovery. (For more information, please refer
to the user manual for NMS in the CD-ROM)
Firmware Upgrade Firmware upgradeable through TFTP & Telnet
SNMP Compliance Supports V1
User Manual 28

RFNet Wireless LAN Access Point AP-I002
Filtering Selectable Protocol filtering
Telnet Command line interface for configuration
Roaming Supports seamless roaming
Web Based Management Configure and monitor each access point
through any web browser
AP Search Quick access point IP address discovery
Fix IP Address Fix IP address
DHCP Auto IP address configuration through DHCP
Statistics Ethernet and wireless
Factory Reset Reset access point to a know default
configuration
4.2.3 Security & Access Control
WEP Supports up to 128-bit
Access Control By MAC Address
4.2.4 Optional Accessories, Features and Service
Wireless Bridge Wireless link between remote access points
Fiber Uplink 100 Base-F (MTRJ connector)
External Directional Antenna Extend range up to 4km for point to point
communication
User Manual 29

RFNet Wireless LAN Access Point AP-I002
NAT (Optional) Network address translator
IEEE 802.1x (Optional) Authentication of wireless users
4.3 Management
Centralized network management software that allows network administrator to manage a
pool of Access Points (AP) through a Java-enabled web browser on any computer within
an intranet or over Internet.
Graphical display of all AP in a network.
Allows network administrator a bird’s eye view of overall status of all AP in a network.
Operate on Win 98/ME/2000/NT4 platform.
Controlled access for network administrators.
A database of configurations of all AP in a network.
Able to view wired and wireless network statistics, user MAC address.
Auto access point discovery within a network.
User Manual 30

RFNet Wireless LAN Access Point AP-I002
Chapter 5 Technical Support
You can find the most recent software and user documentation for the AP-I002 on our web site:
www.rfnetech.com
If you encounter problems when installing or using this product, or would like information about our
other wireless LAN products, please contact your local authorized reseller or regional RFNet
Technologies Sales Office. Addresses of resellers and Sales Offices can be found on the said
website.
In case no local or regional support is available, you can reach us at the address or telephone
number listed below.
Unit 233, Innovation Centre, Blk 2, 18 Nanyang Drive, Singapore 637722
Tel: (65) 795 9301
Fax: (65) 795 9302
Enquiry: support@rfnetech.com
User Manual 31

RFNet Wireless LAN Access Point AP-I002
Chapter 6 Troubleshooting
6.1 Identify AP
Identify AP means that you cannot find the AP-I002 in use within the network. We provide some
solutions in advance to make it easy to settle the problem as soon as possible. You are always
advised to follow our procedures as below:
• First of all, you are advised to use AP search software (See Access Point Search on Page 23)
to try to locate the AP-I002 again.
• Secondly, check the power and Ethernet connection. The Link LED and the Power LED can
inform you about it. If they are blinking, it shows good connection with both the power supply
and the Ethernet. If they are not, therefore, the poor connection with power or Ethernet is
responsible for the error.
• Thirdly, you may turn to the factory reset. You can press the Factory Reset button and insert
power simultaneously. This sets all the parameters to default values.
• Fourthly, you can either seek help by sending it to authorized reseller or go to our Technical
Support on the web site. (See Page 30).
6.2 No Power
No power means that the Power LED in the surface of the AP-I002 doesn’t blink. This situation
mainly results from the incorrect connection or no connection with the power supply. You must
make sure that all connections listed below are good:
• Connection between the power adaptor cable and the power supply;
• Connection between the power supply and the AP-I002;
• Connection between the power cord and the power supply;
• Connection between the power cord and the power outlet on the wall.
In addition, you’d better assure yourself that all the switches concerned are on, not off.
6.3 No Ethernet
No Ethernet means that you cannot receive or transmit any data or packets through Ethernet. This
problem usually can be solved easily by checking the cables, especially the straight cable used to
connect with the Ethernet. Please verify that the said cables are connected correctly.
6.4 Factory Reset
Generally, it is not necessary for you to use the factory reset function if everything goes well. We
provide this function only to save your time and harassment when encountering problems. If this
function helps, you needn’t send it for technical service. You can make good use of this function by
following steps as below:
User Manual 32
RFNet Wireless LAN Access Point AP-I002
• Because the factory reset button is inside the AP-I002, please keep in mind that you should
conform to the instructions (See the “Removing Top Cover of AP-I002” on Page 9) strictly to
open the cover plate to avoid unexpected damage to the AP-I002.
• After opening the top cover correctly, you can press the factory reset once.
• Then, all the useful parameters are back to default values.
User Manual 33

RFNet Wireless LAN Access Point AP-I002
Chapter 7 Warranty
7.1 Warranty Period
RFNet provides one (1) year warranty for manufacturing defect. If users give RFNet notice of
defects in material or workmanship within such warranty period, RFNet will replace the defective
product or documentation. RFNet’s entire responsibility under this warranty shall be restricted to
replacement of the product or documentation not meeting the limited warranty and shall not
encompass or extend to any other responsibility.
7.2 Limited Warranty
RFNet does not represent or warrant and expressly disclaims any representation or warranty, that:
• The operation of the AP-I002 will be uninterrupted; and
• The functions or features of the AP-I002 will meet user’s requirement.
User Manual 34

RFNet Wireless LAN Access Point AP-I002
Chapter8 Feedback
RFNet values your feedback. If you find errors or omissions in this manual, or if you can suggest
ways to improve its usefulness, RFNet would like to hear from you. Please contact us at:
Unit 233, Innovation Centre, Blk 2, 18 Nanyang Drive, Singapore 637722
Tel: (65) 795 9301
Fax: (65) 795 9302
Enquiry: support@rfnetech.com
User Manual 35

RFNet Wireless LAN Access Point AP-I002
Chapter9 Disclaimer
• RFNet Technologies assumes no responsibility for any damage or loss resulting from the use
of this manual.
• RFNet Technologies assumes no responsibility for any loss or claims by third parties that may
arise through the use of this product.
• RFNet Technologies assumes no responsibility for any damage or loss caused by incorrect
use of AP-I002.
• The contents of this manual are subject to change without prior notice.
• No part of this manual may be reproduced in any form without the express written consent of
the manufacturer.
• Sample displays shown in this manual may differ somewhat from the displays actually
produced by the product.
User Manual 36