RIFA R100 Internet Phone User Manual EMI MNU 0830
RIFA Industrial Co., Ltd. Internet Phone EMI MNU 0830
RIFA >
User manual
Index
1. Product Introduction
1-1. Components
1-2. Names and function of parts
1-3. Safety Introduction
2. Installation
2-1. Check Point to installation
2-2. Preparing for installation
2-3. Installation of the Cyfone executing program
2-4. Connecting the Cyfone set
2-5. Driver program installation
2-6. Check of device installation
3. Software Overview
4. Making no cost PC-to-PC calls using IP.
1. Product Introduction
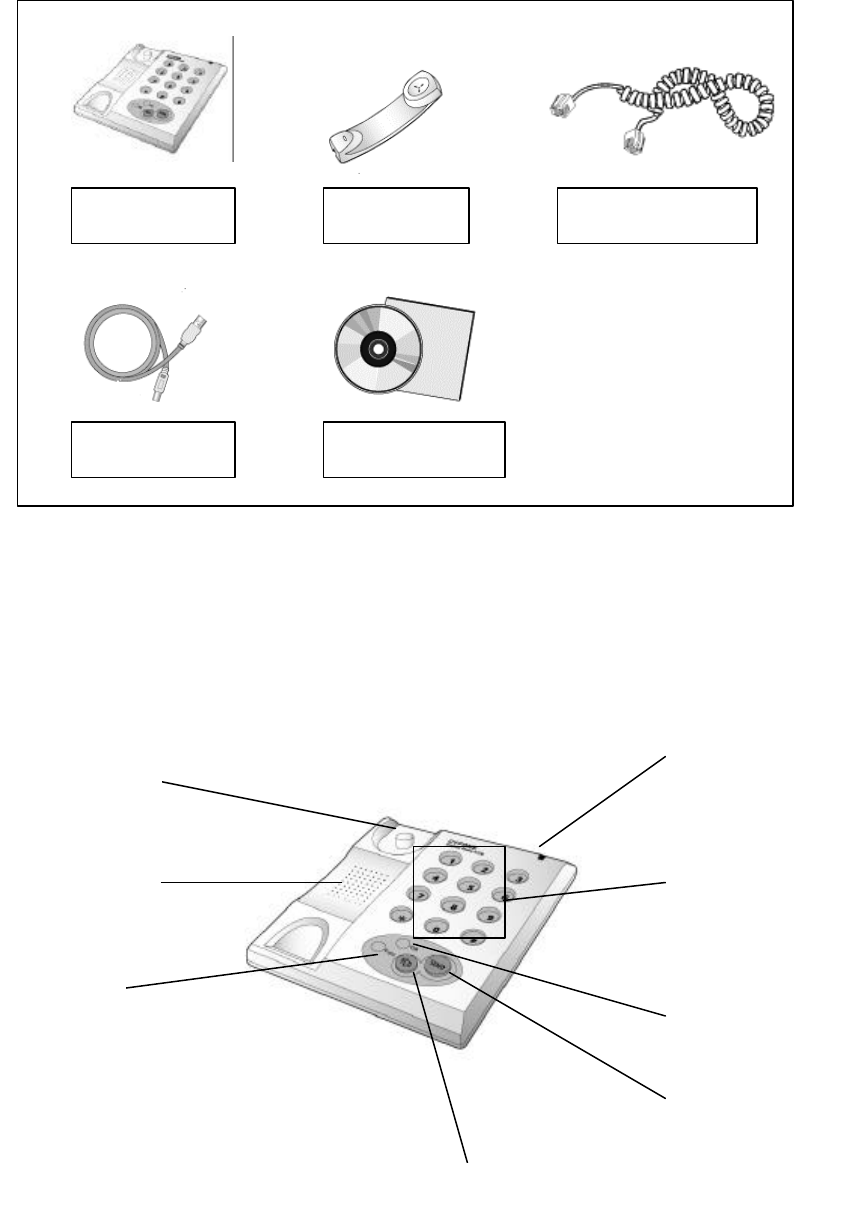
1-1 Components
1-2 Names and Functions of Parts
Fig. 2-1 Front View
a.
Main Body
b. Handset c. Connection Cord
d. USB Cable e. Cyfone CD
Hook Switch
Speaker
DOT Enter
Status
Indicator
Dial Pad
Call Connect
Speaker
Phone
Input Cancelling
Button
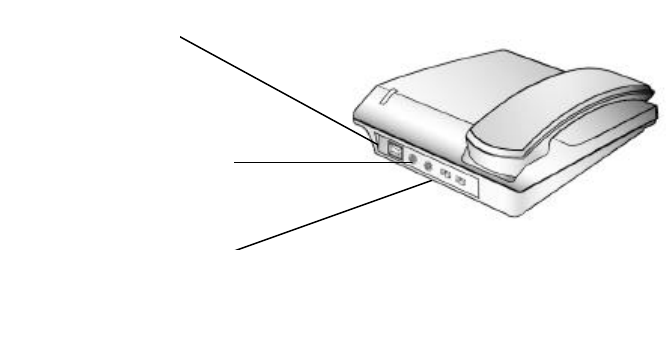
Fig. 2-2 Rear View
♦ The Function of Each Part (Handset Manual)
Ring Indicator: Indicates operation status (normal or not) and incoming calls
Key Pad: Dials the telephone
Send Key: Sends a call once telephone number has been entered
Access Key: Press down when using speakerphone
Clear Key: Cancels the last number entered
DOT Key: Enters DOT characters (for IP dialing)
Speaker Jack: Connects to the external speaker or to the hands-free set
Microphone Jack: For hands-free calls
Ring Volume Control Switch: Controls the ringer volume
Voice Volume Control Switch: Controls volume of incoming voice
USB Port: Connection to computers
Connection Cord Jack: For main body and handset
Microphone &
Speaker Jack
Voice & Volume
Control
USB
Connection
Port
1-3. Safety Introduction
This device complies with part 15 of the FCC Rules. Operation is subject to the following
conditions: 1) This device may not cause harmful interference, and 2) this device must any
interference received, Including interference that may cause undesired
FCC Compliance Statement
Caution : Any changes or modifications in construction of this device which are not expressly
the party responsible for compliance could void the user’s authority to operate the compliance
could Note : This equipment has been tested and found to comply with the limits for a Class
B digital pursuant to part15 of the FCC Rules. These limits are designed to provide
reasonable protection against harmful interference in a residential installation. This equipment
generates, uses and can radiate frequency energy and, if not installed and used in accordance
with the instructions, may cause interference to radio communicationser, there is no guarantee
that interference will not occur particular installation. If this equipment does cause harmful
interference to radio or television which can be determined by turning the equipment off and
on, the user is to try to correct interference by one or more of the following
Reorient or relocate the receiving
Increase the separation between the equipment and
Connect the equipment into an outlet on a circuit different from which the receiver
Consult the dealer or an experienced radio/TV technician for

2. Installation
2-1 Checkpoints Prior to Installation
The Cyfone cannot be used when the system requirements and the network environment are
unsupported. Please refer to the following requirements:
A. System Requirements
Description Basic Requirement
Operating System Windows 98/SE/ME/2000
CPU Pentium & above
Memory 32M & above
HDD Left capacity of 50MB & above
Internet Connection Dedicated line, ADSL, Cable, ISDN, Modem
Others MS NetMeeting 3.0 & above
USB port support
B. Requirements for the Network Environment
Confirmation on Internet Connection
Internet connection is confirmed when a particular home page is connected and displayed
using Internet browsers such as Explorer or Netscape.
Confirmation on Network IP
*Public IP: can be used regardless of whether it is a **Fixed IP or a ***Dynamic IP. As
an exception, when there is a firewall, enquiries must be made to the webmaster.
****Private IP (virtual IP): In the case of a private IP, making calls is possible while
taking calls might not be possible. As an exception, when there is a firewall, enquiries
must be made to the webmaster.
*: Generally, this is applied to companies and cable modems for PC Rooms such as Internet
cafés, ADSL, etc. Some B&A methods are provided with private IP’s.
**: This is applied when the user IP remains constant (generally for PC Rooms).
***: This is applied when the user IP changes at each Internet connection (ADSL, Cable
modem, PPP connection).
****: This is applied when the IP address starts with “1” (1xx.xxx.xxx.xxx) – for shared IP’s
or certain B&A methods.
2-2 Preparing for Installation
Before connecting Cyfone to a PC, ensure that the program environment is prepared in
the following order.
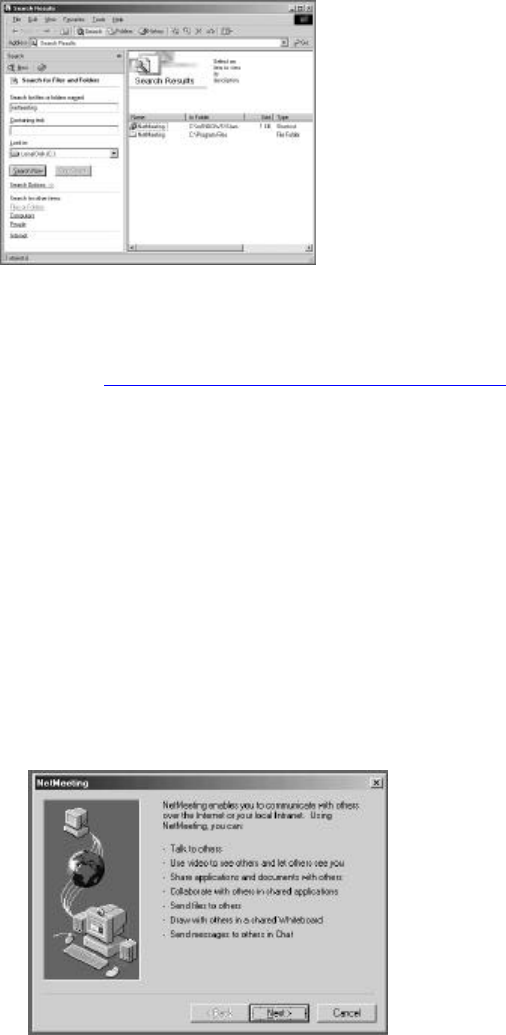
C. Preparation 1: Confirmation on MS NetMeeting Installation
Confirm installation of the MS NetMeeting executing the File or Folder Search Function at
the Start. (Confirmation shall be done for the utilized OS).
NetMeeting installation can be omitted when MS NetMeeting is installed (as seen in Fig. 4).
Fig. 4. Screen for the Search Result<WindowsMe>
If MS NetMeeting is not installed, please install it after downloading it from the Microsoft
homepage (http://www.microsoft.com/downloads/search.asp?).
Installing the NetMeeting
The following screen will appear upon completing the installation of NetMeeting Ver. 3.0 or
above if it has not yet been installed.
The following screen is for setting the sound, according to how the user wants it to be done,
and to confirm personal information and ensure proper telephone installation.
i. Introduction of NetMeeting
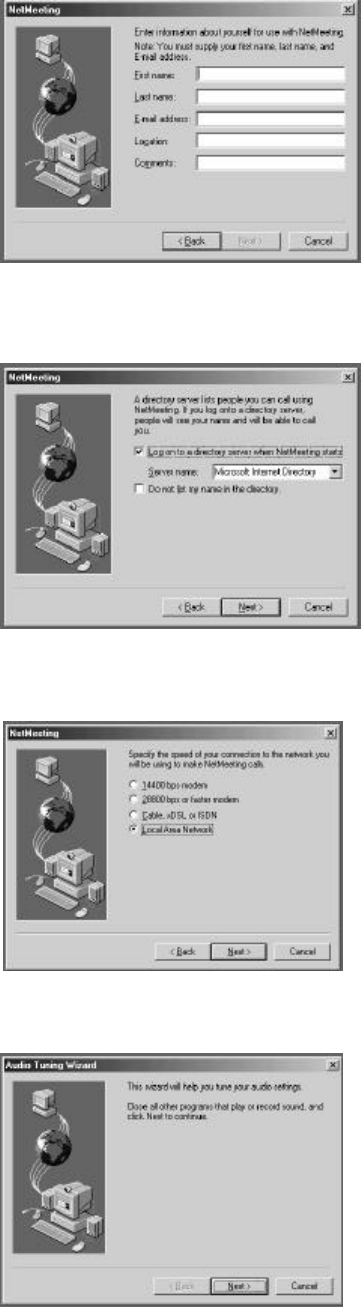
ii. Entering Personal Information
iii. Registering Directory Server
iv. Selecting Transmission Speed for Network Connection Line
v. Audio Control Master – controls the volume of the speaker and microphone
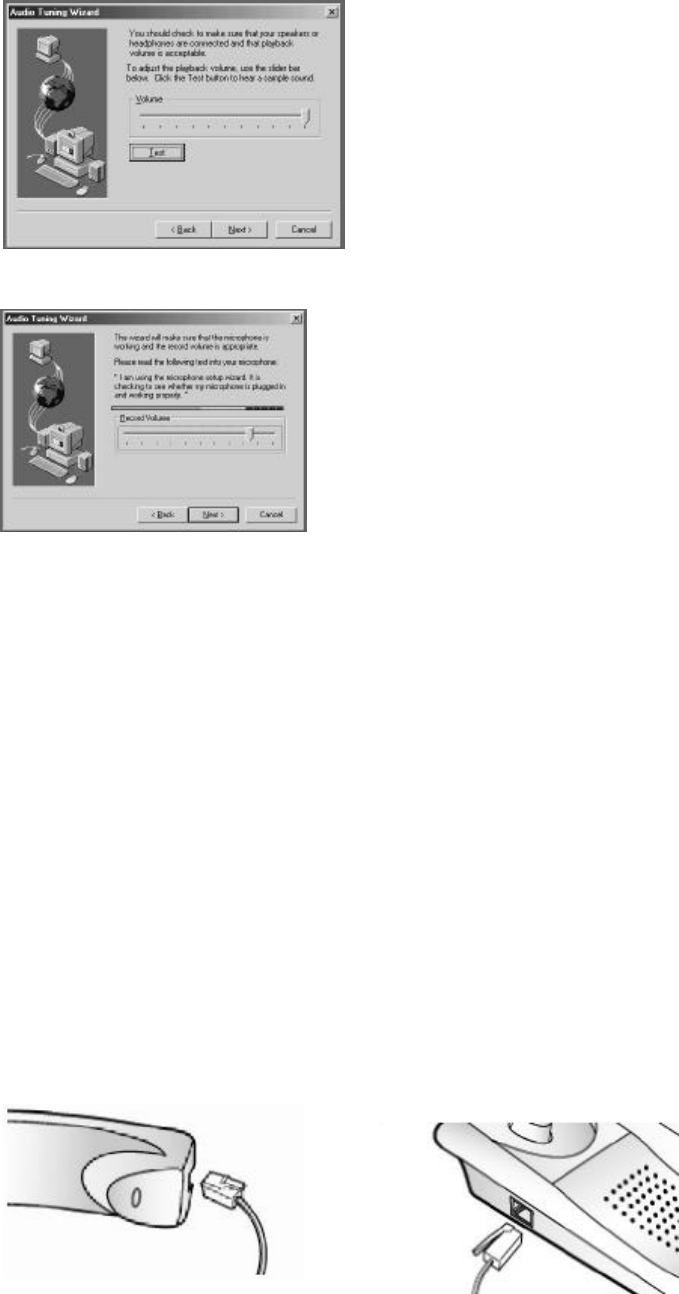
vi. Speaker Test
vii. Microphone Test
viii. Completion
2-3. Installation of the Cyfone Execution Program
1) Insert the Cyfone Execution Program into the CD-ROM drive of the PC.
2) Execute Setup.exe of the CD using the Windows Search.
3) Select the folder to install the Cyfone Execution Program and then press
the Next button. (Default recommended)
4) And the installation is complete.
2-4 Connecting the Cyfone Set
1) Connect one end of the handset connection cord (RJ-11) to the connection cord jack of
the main body of the telephone set (Fig. a), and the other end of the connection cord
(RJ-11) to the connection cord jack of the handset (Fig. b).
Fig. a Fig. b

2) Connect the B-type connector of the USB cable (d in Fig. 1) to the USB socket on the
rear side of the telephone set (b in Fig. 2), and the other end of the USB cable, the A-
type connector (d in Fig. 1), to the USB Port of the PC.
2-5. Driver Program Installation
When the telephone is connected to the PC as outlined above, the Cyfone Driver recognition
process will automatically begin as follows. The order of the Driver installation may vary
according to the types of PC used.
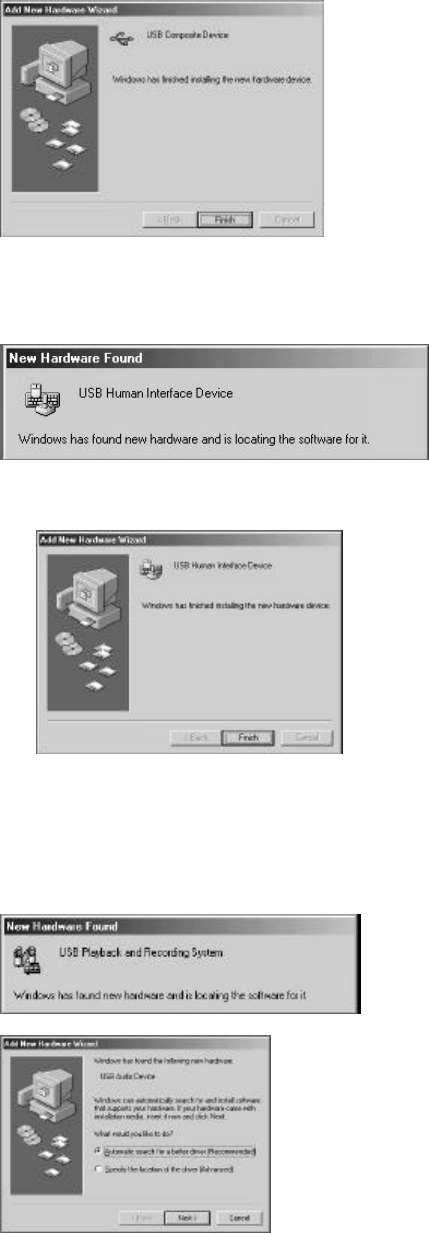
1) Installation for USB composite device
i. The following screen appears on the monitor when one end of the USB
cable is connected to the Cyfone and the other end is connected to the USB
port of the PC.
ii. Clicking the Next button will bring forward the following screen.
iii. If a Windows CD is required, the computer will automatically install the
driver when the Next button is clicked after specifying where the Windows
Installation CD or the Windows Installation Program is located.
iv. When the installation of the USB combined set is complete, the screen for
installation completion will appear as follows:
2) Installation of the USB Human Interface
i. When the installation of the USB composite device is complete, the
following USB Human Interface screen will appear.
ii. Press the Next button and install in the same way as outlined above.
3) USB Audio Installation
i. The USB Audio is automatically installed in the same way as outlined
above.
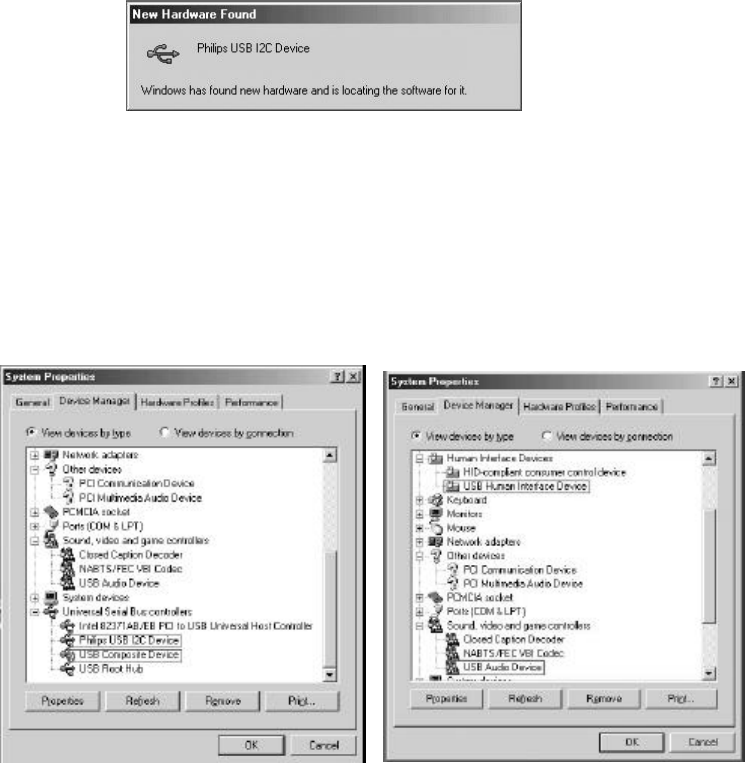
4) I2C Driver Installation
If I2C device is not being installed automatically, select the driver directory where the
win98(or win2000) in Cyfone CD
2-6. Check of device installation
After completing of installation, you can see the following devices have been installed
into device manager in system properties.
3. Software Overview

4. Making no cost PC-to-PC calls using IP
1) Select NetMeeting at the Service Selection
2) Pick up the handset, enter other party’s IP address, and press ‘Send’
3) The call concludes once the handset is placed back onto the phone
* Making Hands-free Calls Using a Headset
1) Connect the headset to the microphone and speaker on the rear side of the telephone
set
2) Select NetMeeting at Service Selection
3) The Cyfone program automatically begins when the ‘Access’ button of the telephone
is pressed
4) Enter the IP of the other party and press the ‘Send’ button
5) The call ends once the ‘Access’ button is pressed again following call completion
Other Additional Functions
Visual call: Visual calls are possible if a camera is connected to the users’ PC for PC-to-
PC telephone service. Press ’Visual Call’ on the Cyfone program.
Status Display
Window
Volume Control
Microphone
Speaker
Environment
Setting
Selection for
Connection
Sound Driver
Switch-over
Telephone
Directory
Opening RIFA
Homepage
Additional
Function
Video
Chatting
General
Chatting
Picture Pad
Sharing
File
Transmission
Chatting while making a telephone call: Press ‘Chatting’ on the Cyfone program during a
telephone call
Explaining to the other party using pictures while making a telephone call: Press ‘Picture
Pad’ on the Cyfone program during a telephone call to display difficult to explain things
in the form of a picture.
File Transmission: It is possible to transmit and receive files to and from other PC’s.