RM Acquisition 01001A 802.11 b,g Module User Manual TND 760 Usersguide 011812 final4 LH indd
RM Acquisition LLC 802.11 b,g Module TND 760 Usersguide 011812 final4 LH indd
Contents
- 1. User Manual - Final product
- 2. User Manual - Module
User Manual - Final product
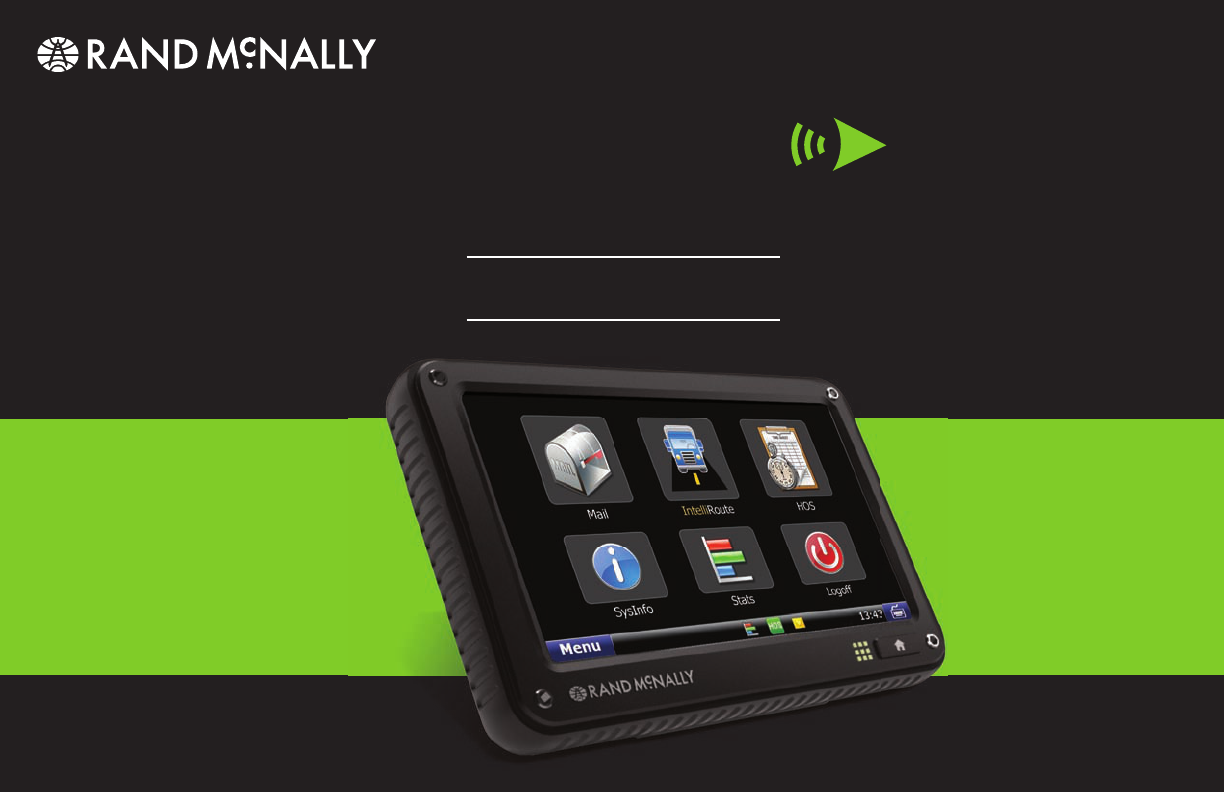
TND 760
Fleet Edition
TM
User’s Guide

Support
This guide is organized to help you effi ciently accomplish all your
work-related tasks. However, if you have questions that are not
addressed here, we invite you to contact us.
Call us: 1-800-641-RAND (7263)
E-mail us: fl eetsupport@randmcnally.com
Write to us:
Rand McNally
Attn: TND 760 Fleet Edition Customer Support
106 Hi-Lane
Richmond, KY 40475
Safe Driving Practices:
Always use your best judgment, exercise caution and common sense
when the vehicle is in motion. Do not become distracted by the device
while driving. Minimize the amount of time spent looking at the device
while driving and use voice prompts when possible.
Do not input destinations, change settings, or access any functions
requiring prolonged use of the device controls while driving. Pull over
in a safe and legal manner before attempting such operations.

FCC Compliance Statement
This device complies with part 15 of the FCC Rules. Operation is subject
to the following two conditions:
1. This device may not cause harmful interference, and
2. This device must accept any interference received, including
interference that may cause undesired operation.
FCC WARNING
This equipment has been tested and found to comply with the limits for a Class
B digital device, pursuant to Part 15 of the FCC Rules. These limits are designed
to provide reasonable protection against harmful interference in a residential
installation. This equipment generates, uses and can radiate radio frequency energy
and, if not installed and used in accordance with the instructions, may cause
harmful interference to radio communications. However, there is no guarantee that
interference will not occur in a particular installation. If this equipment does cause
harmful interference to radio or television reception, which can be determined
by turning the equipment off and on, the user is encouraged to try to correct the
interference by one or more of the following measures:
• Reorient or relocate the receiving antenna.
• Increase the separation between the equipment and the receiver.
• Connect the equipment into an outlet different from that to which
the receiver is connected.
• Consult the dealer or an experienced radio/TV technician for help.
Exposure to Radio Frequency Radiation.
The TND 760 device transmits and receives radio frequency (RF) energy
through its internal antennas. The TND 760 cellular antenna is located
at the top of the left edge of the device. The Wi-Fi antenna is located
near the center of the bottom edge of the device. The TND 760 is
designed to operate with internal antennas and has no provisions
for external antennas.
The TND 760 has been designed, tested and manufactured to comply
with the limits for exposure to RF energy set by the FCC. The radiated
output power of the TND 760 device is below the FCC radio frequency
exposure limits. The FCC has granted an Equipment Authorization for this
model device with all reported SAR levels evaluated as in compliance
with the FCC RF exposure guidelines. SAR information on this model
device is on file with the FCC and can be found under the Display
Grant section of http://www.fcc.gov/oet/fccid after searching on
FCC ID: A4C 01001A
FCC Caution
Any changes or modifications not expressly approved by the party
responsible for compliance could void the user’s authority to operate
this equipment.
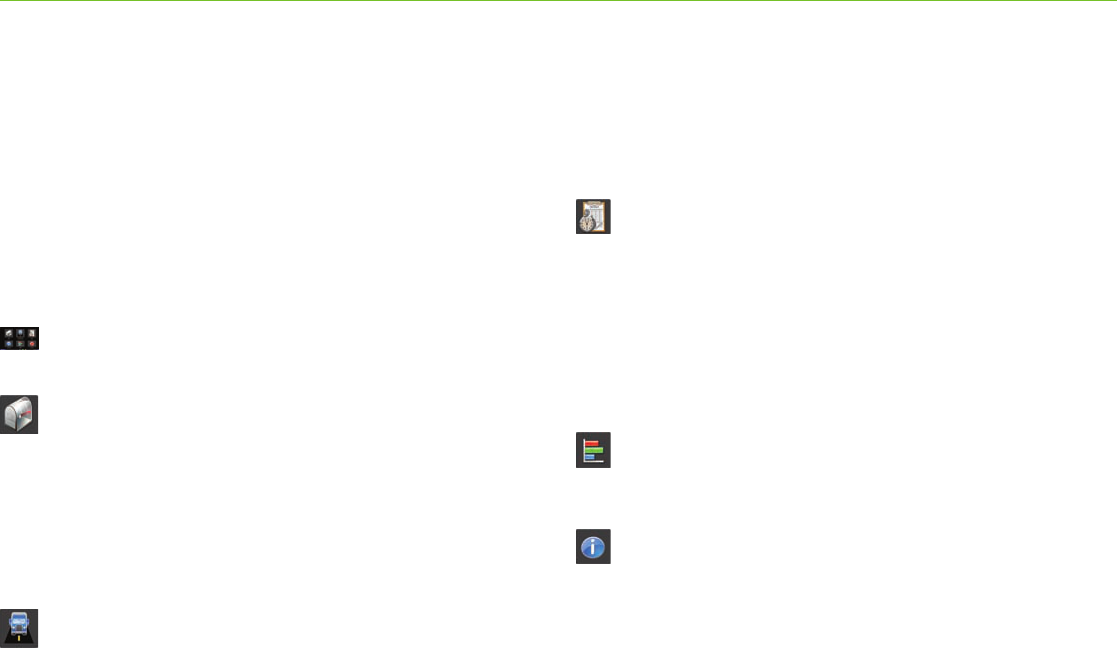
Table of Contents
Welcome to Your Rand McNally TND™ 760 Fleet Edition ........................2
Device Overview......................................................................................3
Getting Started ....................................................................................... 4
System Registration ..............................................................................4
Power On .............................................................................................5
Log On ................................................................................................5
Warning Screen ....................................................................................6
On-Screen Keyboard .............................................................................7
Status Bar ............................................................................................8
Screen Calibration ................................................................................9
TND™ 760 Menu ...........................................................................10
Menu Safe-driving Screen ...................................................................11
TND™ 760 Mail .............................................................................12
Inbox .................................................................................................13
Open Message ...................................................................................14
Outbox ...............................................................................................15
Send ..................................................................................................16
Options ..............................................................................................17
Mail Safe-driving Screen .....................................................................17
TND™ 760 IntelliRoute® ...............................................................18
Main Menu ........................................................................................18
Truck Info ...........................................................................................19
Route and Device Options ............................................................ 19-20
Warnings ...........................................................................................20
Route to Destination .................................................................... 21-22
POIs ...................................................................................................23
Timers and Trails ........................................................................... 23-25
TND™ 760 Hours of Service .........................................................26
Summary ...................................................................................... 27-28
Duty Status ................................................................................... 29-31
Logs ............................................................................................ 32-36
DVIR ............................................................................................ 37-40
Options ........................................................................................ 41-43
Company ............................................................................................44
HOS Safe-driving Screen .....................................................................45
TND™ 760 Stats ............................................................................46
Driver Performance .............................................................................47
Fault Codes ........................................................................................48
TND™ 760 SysInfo ........................................................................ 49
Settings Tab ........................................................................................50
Info Tab ..............................................................................................50
Diagnostics .........................................................................................51
SysInfo Safe-driving Screen .................................................................52

Welcome to Your Rand McNally TNDTM 760 Fleet Edition
Easy. Convenient. Accurate. Flexible. Responsive.
The Rand McNally TND™ 760 Fleet Edition is
designed to improve your work life.
1. Easy. The format, the applications and the processes are easy
to understand and easy to use. Safe-driving screens simplify
tasks you may need to perform while driving.
2. Convenient. From Log on to Log off, every task you need to
perform has touch-screen convenience. From start to fi nish,
instructions are clear and intuitive.
3. Accurate. HOS logs are recorded with
accurate-to-the-second technology.
4. Flexible. Tools are built into the system to allow you to
manage several applications simultaneously.
5. Responsive. Buttons fi t your fi ngers so managing the touch
screen is comfortable. Going back a step is as easy as going
forward so you can quickly arrive at where you want to be
in the system.
2
TND
™
760 Fleet Edition User’s Guide
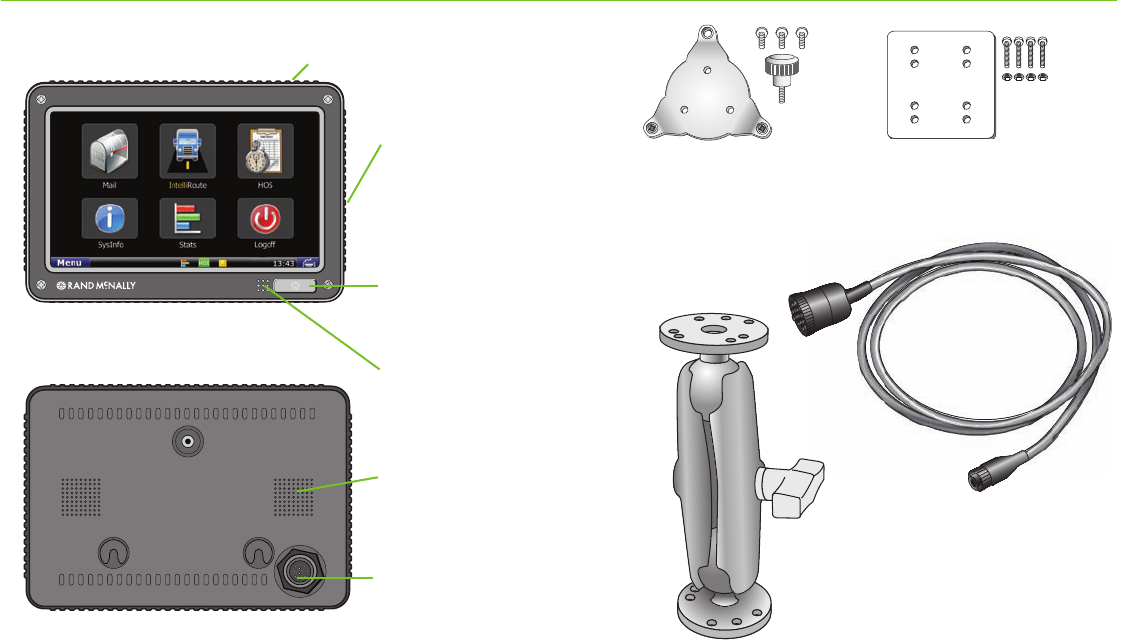
Device Overview
Front of Display
Back of Display
Power Button
USB
Use the USB to connect
a keyboard or mouse to your
TNDTM 760.
Home Button
Press to return to Home Menu screen.
LED Light
Lights up when unit is powered on.
Speaker
Power and OBD Access
3
TND
™
760 Fleet Edition User’s Guide
Mounting Bracket
(with (3) 10-32 x 3/8” screws)
Dash Mount
To adjust the position of the
mount, turn the mount knob to
loosen tension.
Support Plate
(with (4) 10-24 x 1”screws
and (4) 10-24 nuts)
Power and OBD Cable
4
Getting Started
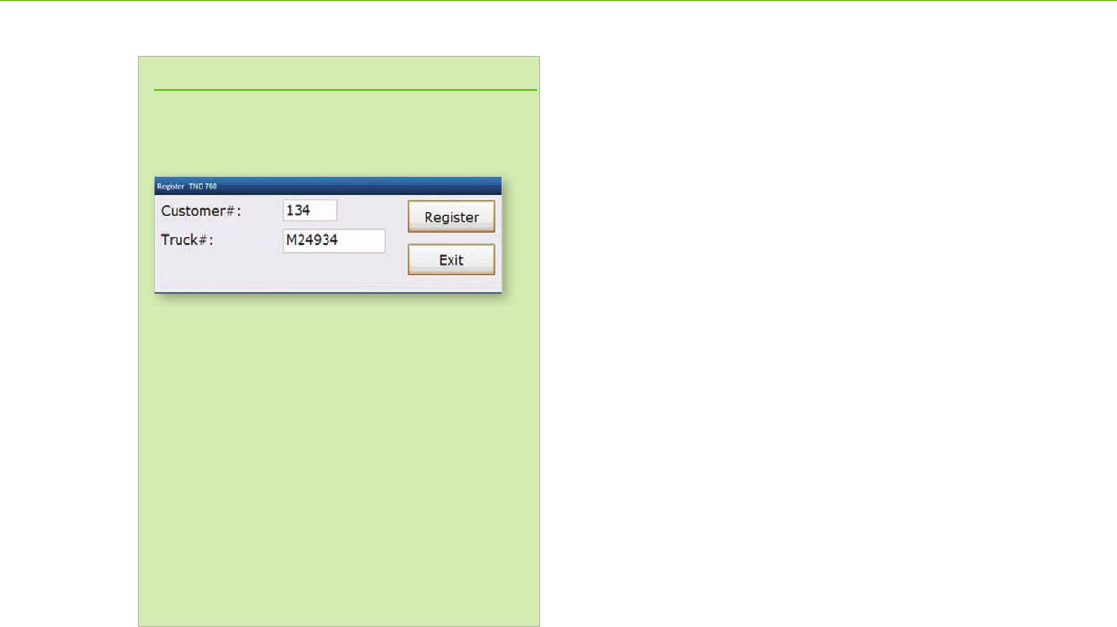
System Registration
The fi rst time you power up your TND™ 760, you will
need to register your unit.
Register TND™ 760 Fleet Edition.
Once system is installed
and powered on, the Registration screen should display. Enter
your truck number in the
Truck # fi eld and tap
Register.
Send test message. Select the Mail icon on the Home
Menu and tap Send. Type message subject and message
text and tap Send in the upper left hand corner. Make sure
message indicator changes from X to a green check mark.
Verify GPS. Select the
SysInfo
icon on the Home Menu.
Select
Diagnostics, then the GPS tab. Verify GPS status is good
and that there are values in the Latitude and Longitude fi elds.
Verify J1708/1939 data.
Drive the truck at least .2 miles.
Select the SysInfo icon on the Home Menu. Select the
Diagnostics, then the J-Bus tab. Verify that there is an odom-
eter value in the Engine Odometer fi eld. Then go back to the
menu and select the Stats icon, then the Driver Performance
tab. Verify there is a value in the Engine Odometer fi eld on the
second line in the fi rst column.
TND™ 760 Fleet Edition System Registration
TND
™
760 Fleet Edition User’s Guide
5
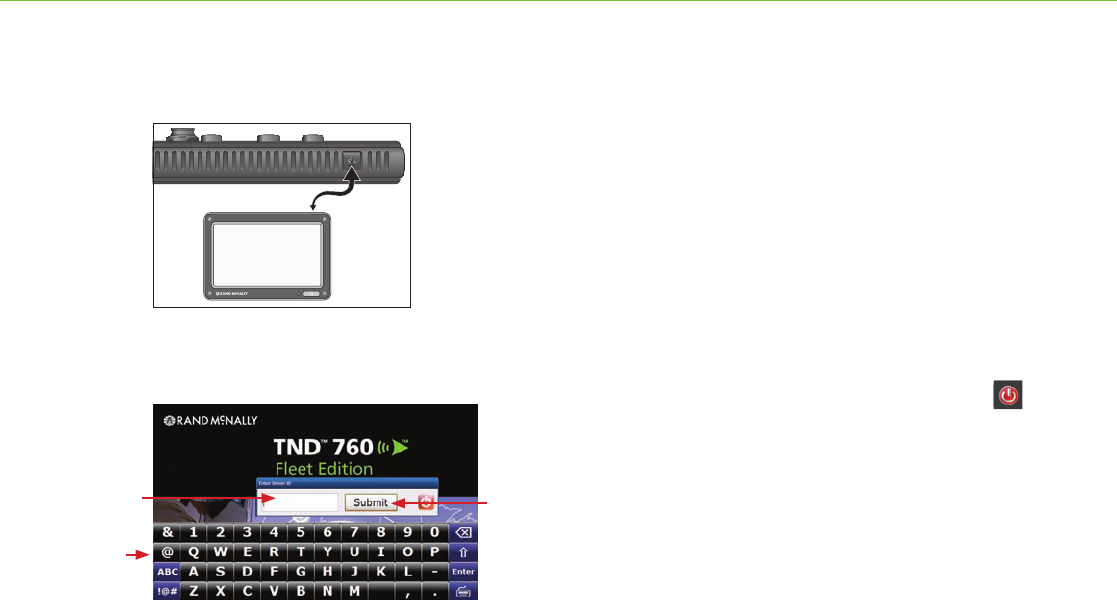
Exhibit 2.
TND™ 760 Log On Screen
Power On
Press the Power button on the top right of the TND™ 760 display.
Log On
The start-up screen for the TNDTM 760 Fleet Edition displays a
log on pop-up [Exhibit 2, (a)] and the on-screen keyboard
[Exhibit 2, (b)].
• Use the on-screen keyboard to enter your Driver ID
(assigned by your company).
• Tap Submit [Exhibit 2, (c)].
NOTE: To log off your TNDTM 760, select the Logoff icon
on the menu.
Getting Started
Exhibit 1.
TND™ 760 Power Button
, select the Logoff icon
(a)
(b)
(c)
TND
™
760 Fleet Edition User’s Guide
Getting Started
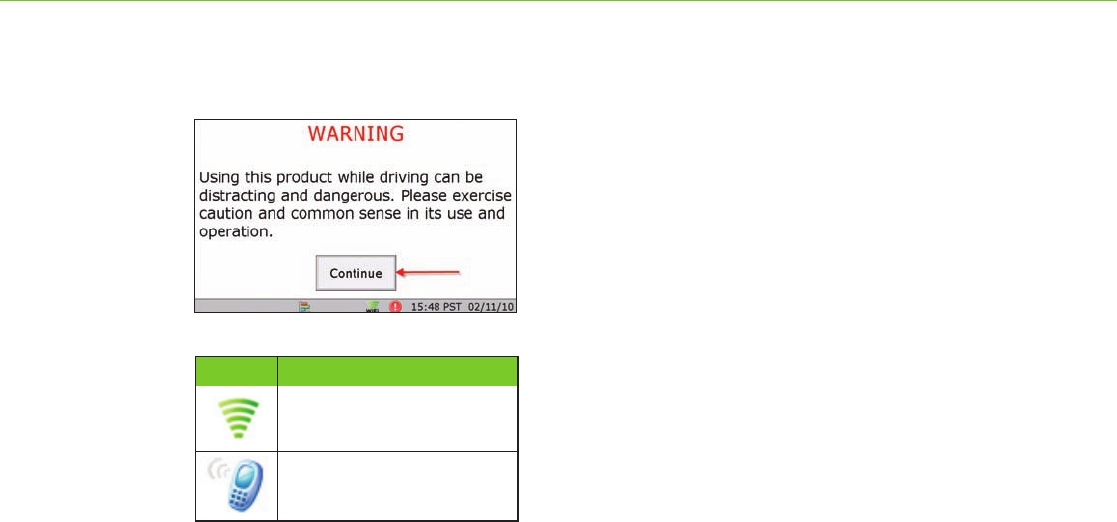
Warning Screen
• The Warning Screen [Exhibit 3] reminds you that using
your TNDTM 760 while driving can be distracting. Be
cautious and wise.
Tap Continue [Exhibit 3] to complete the logon.
Communication Status
You must have a cell or Wi-Fi connection to log on
for the first time.
• Locate the communication icon on the status bar. Icons and
their definitions are shown in the table to the left.
• Tap the keyboard button in the bottom left corner of the
keyboard if you cannot view the status bar.
NOTE: If you have a signal but still see errors (such as Invalid
Logon), contact your company for instructions.
Exhibit 3.
Warning Screen
Icon Definition
Wi-Fi
Cell
6
TND
™
760 Fleet Edition User’s Guide

7
Getting Started
On-screen Keyboard
The TND™ 760 on-screen keyboard is quick to access and easy to use.
• All controls are on the screen.
• Large button faces fi t your fi ngers.
To use the keyboard:
• Tap the keyboard button [Exhibit 4, (e)] on the
TND™ 760 status bar to display the keyboard.
• Tap the ABC or !@# buttons [Exhibit 4, (a)] to view alphanumeric
characters and symbols respectively. The arrow button [Exhibit 4, (c)]
on the right on the ABC screen allows you to change between upper
and lower-case letters.
• Tap the Delete button [
Exhibit 4,
(b)] to erase a character.
• Tap the space bar button to insert a space [Exhibit 4, (f)].
• Tap
Enter [
Exhibit 4,
(d)]
when you have fi nished typing.
• Tap the keyboard button [Exhibit 4, (e)] again to
hide the keyboard.
Exhibit 4.
On-screen Keyboard
TND
™
760 Fleet Edition User’s Guide
(f)

8
Getting Started
Status Bar
The status bar remains visible at the bottom of every screen and gives
you access to current information about the TND™ 760.
Any status or alert icons are found on the status bar [Exhibit 5, (a)].
Icons and their defi nitions are shown in the table to the left.
The status bar also allows you to:
• Check your terminal time [Exhibit 5, (b)].
• Pull up the on-screen keyboard [Exhibit 5, (c)].
• Return to the Menu [Exhibit 5, (d)].
Note: You can also tap the Home button on the
unit to return to the Menu.
Driver Peformance. Balloon messages appear
over the icon to help you manage your performance.
Messages are related to metrics such as over idling
and speeding.
HOS. The icon changes color according to your HOS
status. The icon is green when you are within acceptable
limits for each HOS status. The icon changes to yellow
when you are nearing violation status and to red when
you are in violation.
Mail. The icon appears on the status bar when
you have unopened mail.
Communications. The icon shows your communication
status (Wi-Fi, Cellular, No communication).
System message. System alerts appear in
balloon messages over the icon
Icon Definition
Exhibit 5.
Status Bar
TND
™
760 Fleet Edition User’s Guide

9
Getting Started
Exhibit 6.
Calibrate Screen
Screen Calibration
As soon as the TND™ 760 is running, calibrate your screen.
Re-calibrate from time to time, especially if the screen “slips”
when you touch it.
To calibrate your screen:
• Press and hold the Home button for 10 seconds.
Calibration starts once button is released.
• Tap the center of the crosshairs as they appear on the calibration
screen [Exhibit 6]. There are four total.
-
Tap as close to the center of the crosshairs symbol (+) as possible.
- Use the same pressure you normally use when tapping the screen
- If you receive an error, try again.
NOTE:
Do NOT press and hold fi nger on the center of the crosshairs.
Just tap.
TND
™
760 Fleet Edition User’s Guide
10
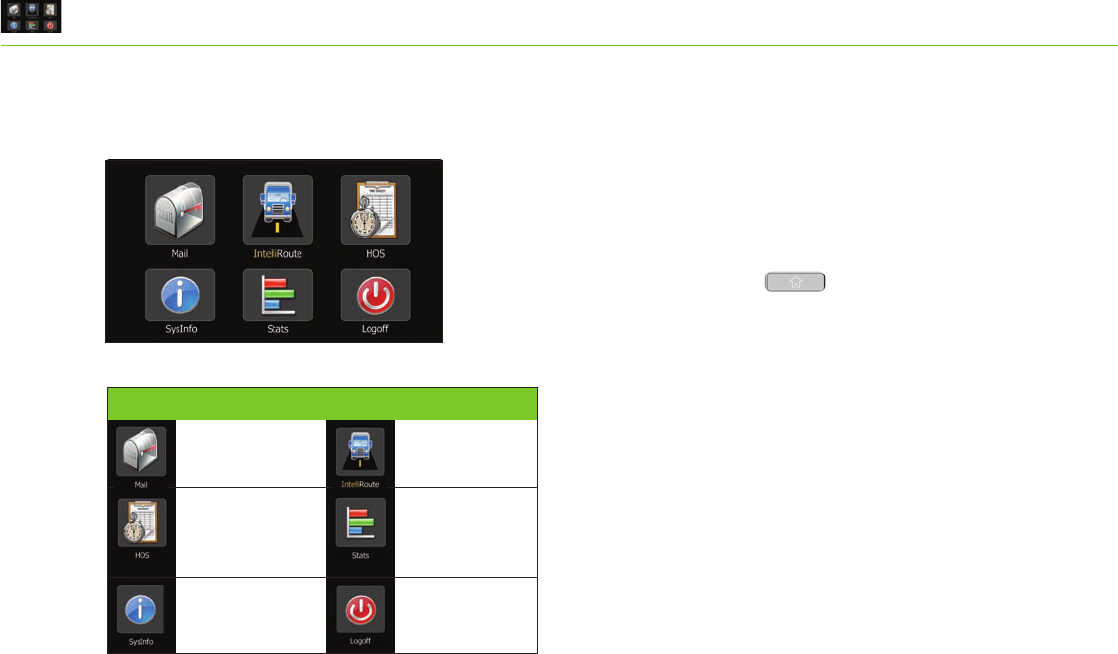
TNDTM 760 Home Menu
Home Menu
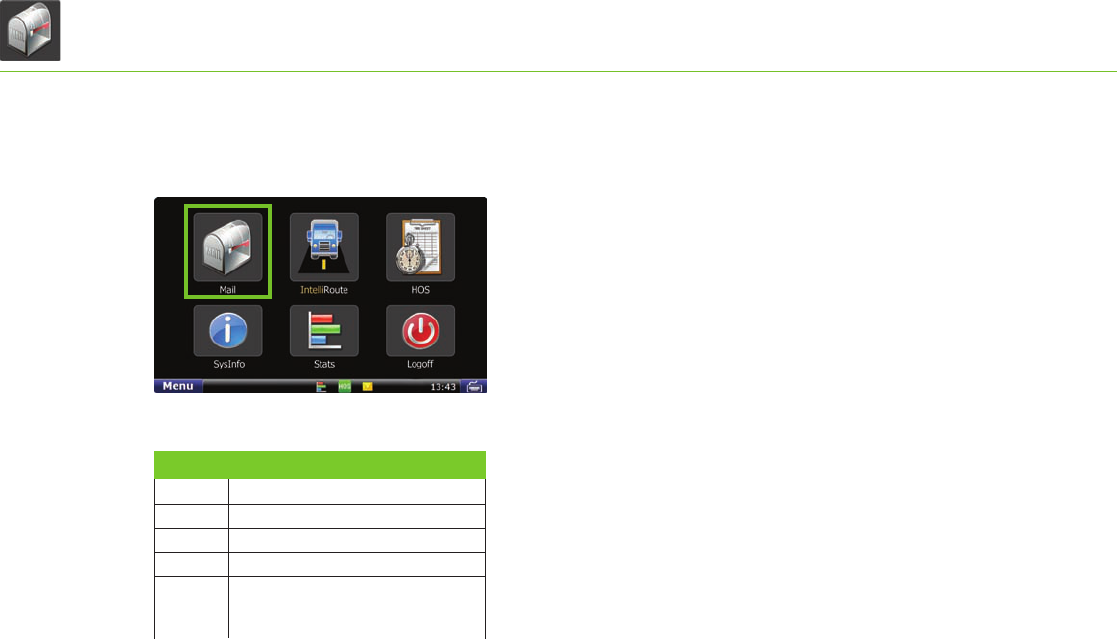
The Menu [Exhibit 7] is the home screen of the TND™ 760.
The applications available to you on the TND™ 760 are
identified by icons.
The icons on the Menu are explained in the table to the left.
• Press the Home button to return
to the Home Menu screen.
Exhibit 7.
Home Menu Screen
Icon Function Icon Function
View, listen
and respond
to messages.
Pinpoint location
and find routes.
Manage
settings, tasks and
coommunication.
Review, create
and send logs.
Access company
information.
View driver
perfomance stats.
Log off the
TND
TM 760.
TND
™
760 Fleet Edition User’s Guide
11
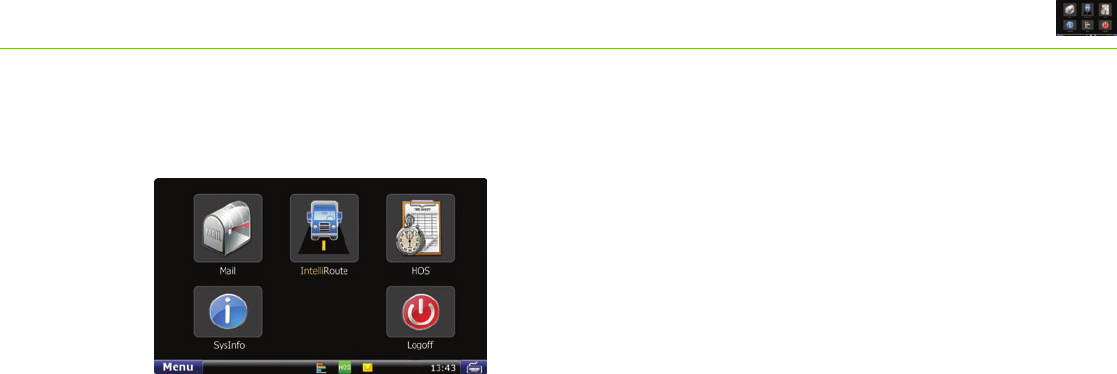
TNDTM 760 Home Menu
Exhibit 8.
Home Menu Safe-driving Screen
Home Menu Safe-driving Screen
Menu options are limited while you are driving. When your
truck is moving, the home menu safe-driving screen displays.
NOTE: Functionality within the Mail, HOS and SysInfo applications is
simplified while you are driving.
TND
™
760 Fleet Edition User’s Guide
12
TNDTM 760 Mail
Exhibit 9.
Mail Icon on Home Menu
Mail
Select the Mail icon on the Home Menu [Exhibit 9]
to access messages and send e-mails.
Mail opens to the Inbox tab. The tabs in Mail are explained
in the table to the left.
Inbox Holds incoming messages.
Outbox Holds outgoing messages.
Send Allows you to send messages.
Work Helps you process assignments.
Options Has buttons for displaying your
email address and for managing
your e-mail contacts.
Tab Function
TND
™
760 Fleet Edition User’s Guide
13
TNDTM 760 Mail
Exhibit 10.
Inbox Tab
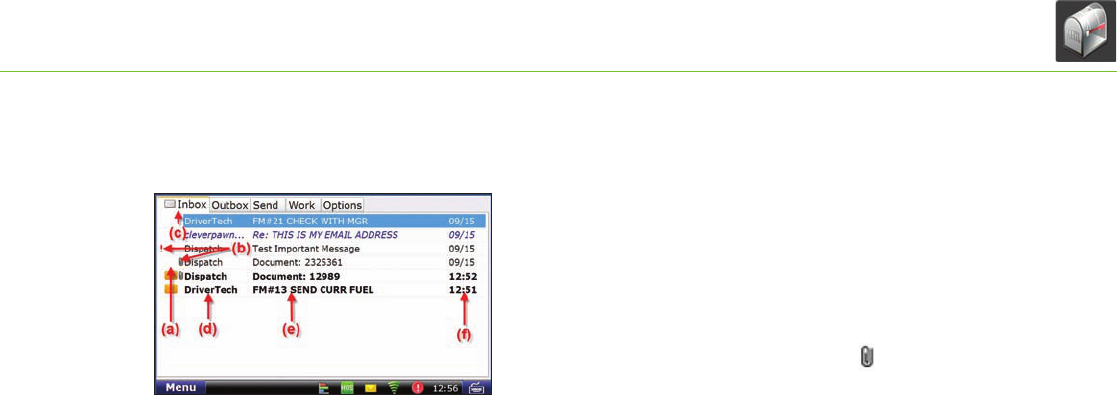
Inbox
All incoming messages appear in your Inbox
[Exhibit 10]
. Special features
of the Inbox tell you details about your messages.
Status information is clustered together [Exhibit 10, (a), (b) and (c)].
• (a). A blank space in this column means the message
has been opened. An envelope means it has not been opened.
• (b). A red exclamation point ( ! ) icon means the
message is important. A paperclip ( ) icon means the message
has an attachment.
• (c).
When you are working in another Mail tab, an
envelope icon appears on the tab indicating that you have
an unopened message.
Other columns in the Inbox tell you more about your messages
[Exhibit 10, (d), (e) and (f)].
• (d). This column tells you who sent the message.
• (e). This column tells you the subject of the message.
• (f). This column tells you when the message arrived.
-The time displays for messages that arrived on that current day
(based on your terminal time).
-The date displays for messages that arrived on previous days.
TND
™
760 Fleet Edition User’s Guide
14
TNDTM 760 Mail
Exhibit 11.
Open Message Screen
Open Message
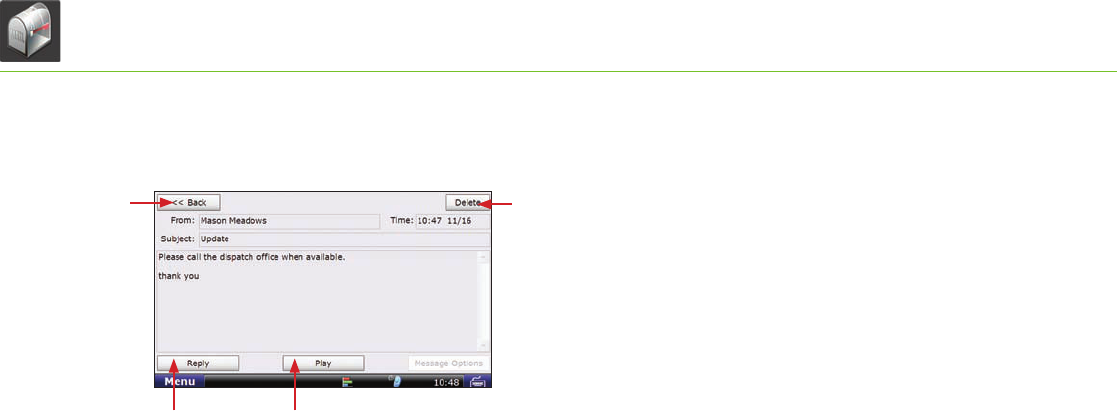
Select a message to open it [Exhibit 11].
Four action buttons are available once a message is open.
• (a). Back returns you to the Inbox.
• (b). Play lets you listen to the message.
• (c). Reply lets you send a response to the message.
• (d). Delete lets you delete the open message.
Your Inbox holds 200 messages. When more messages arrive,
the oldest messages in your Inbox are automatically deleted.
Personal E-mail Access
• If your carrier has enabled personal email access. You can save up to
5 personal e-mail addresses to communicate with while on the road.
• Personal e-mails are color-coded blue in your Inbox so you can identify
them quickly. The color coding remains after the e-mail is read.
• You can view your assigned e-mail address by selecting the Options
tab on the Mail screen and tapping the View E-mail Address button.
(a)
(c) (b)
(d)
TND
™
760 Fleet Edition User’s Guide
15
TNDTM 760 Mail
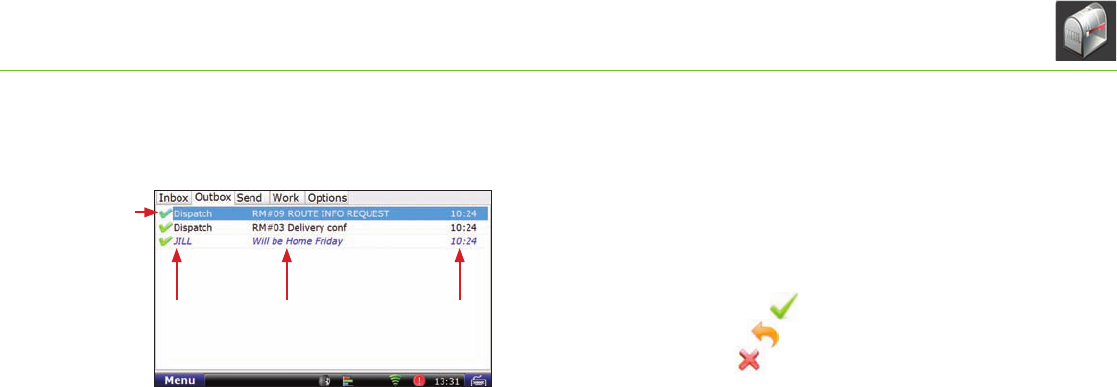
Outbox
All outgoing messages appear in your Outbox [Exhibit 12]. Special
features of the Outbox tell you details about your messages.
Your Outbox holds 50 messages. When you have sent more than
that, the oldest messages in your Outbox are automatically deleted.
• (a). A green check mark ( ) icon means the message has been
sent. A orange arrow ( ) icon means the message is waiting
to be sent. A red X ( ) icon means the message has not yet
been sent.
Other columns in the Outbox tell you more about your messages
[Exhibit 10, (b), (c) and (d)].
• (b). This column tells you who received the message.
• (c). This column tells you the subject of the message.
• (d). This column tells you when the message arrived.
-The time displays for messages that arrived on that current day
(based on your terminal time).
-The date displays for messages that arrived on previous days.
Exhibit 12.
Outbox Tab
(b) (c) (d)
(a)
TND
™
760 Fleet Edition User’s Guide
16
TNDTM 760 Mail
Exhibit 13.
Send Tab
Send Messages
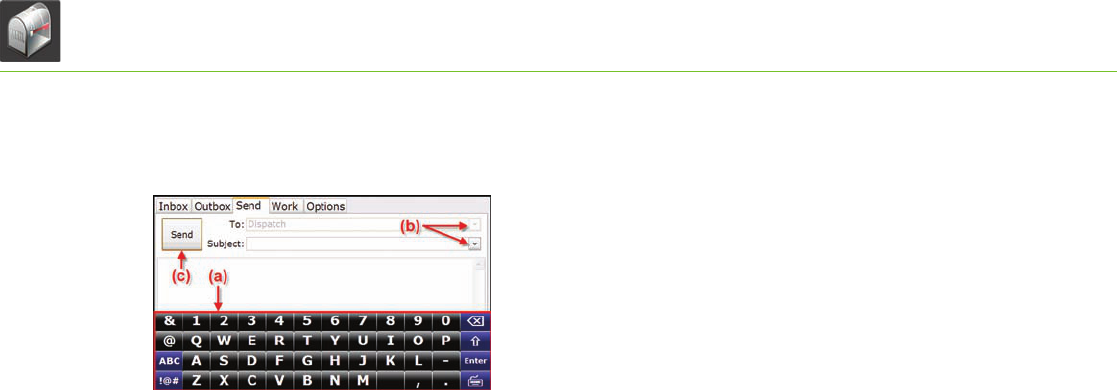
You can send messages from the Send tab [Exhibit 13].
The on-screen keyboard [Exhibit 13, (a)] appears automatically when
you select the Send tab.
Drop-down boxes [Exhibit 13, (b)] make it easy for you to complete
the To and Subject fi elds.
• The To fi eld automatically selects Dispatch. The drop-down is for
other contacts if you have e-mail.
• You can fi ll in the Subject fi eld by using either the drop-down
list (if you want to send a form) or the on-screen keyboard
(if you want to send a message). If you choose a form from the
drop-down list, the screen displays the form in the message
fi eld (the body of the screen).
When you are done, tap Send [Exhibit 13, (c)].
TND
™
760 Fleet Edition User’s Guide
17
TNDTM 760 Mail
Exhibit 14.
Options Tab
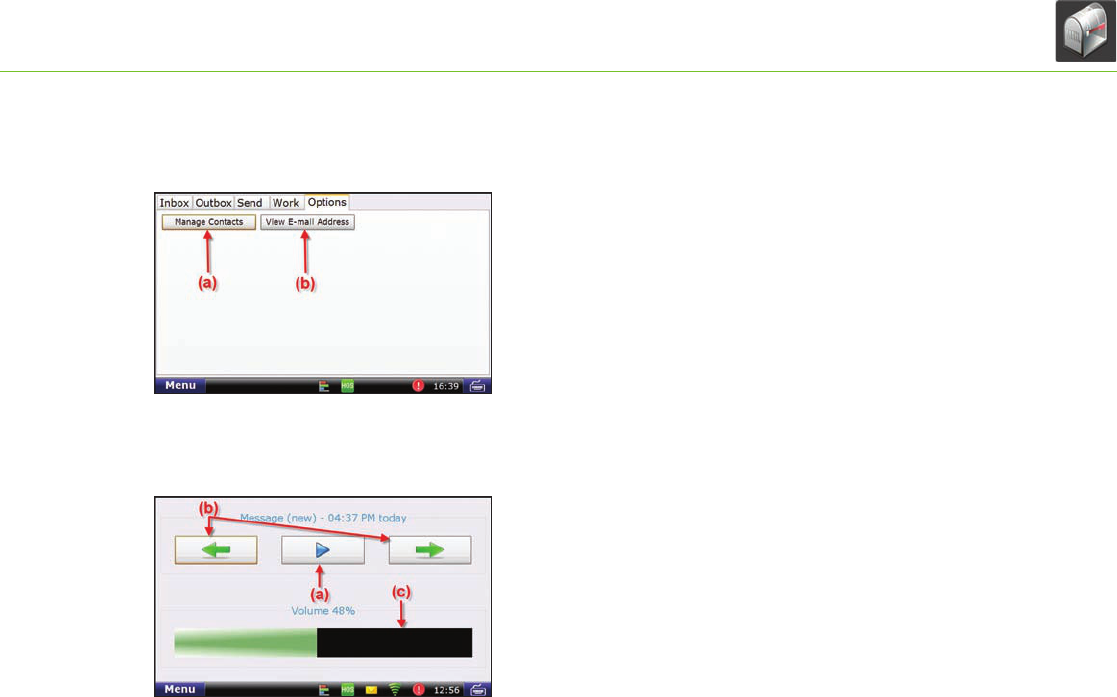
Options
The Options tab has two buttons [Exhibit 14].
• Manage Contacts [Exhibit 14, (a)]. This button lets you add
contacts
(for the list that displays in the To drop-down box on
your Send message screen)
, request your contact list when you
enter a new truck and make changes to your contact list.
• View E-mail Address [Exhibit 14, (b)]. This button
lets you review your TND™ 760 e-mail address.
Mail Safe-driving Screen
When you select the Mail icon while vehicle is in motion, the mail
safe-driving screen will appear. With the mail safe-driving screen
[Exhibit 15], you can hear a message rather than read it.
• Play and stop messages [Exhibit 15, (a)].
• Hear the previous or next message [Exhibit 15, (b)].
• Control volume by dragging a fi nger across the volume box
[Exhibit 15, (c)].
Exhibit 15.
Mail Safe-driving Screen
TND
™
760 Fleet Edition User’s Guide
18
TNDTM 760 IntelliRoute®
Exhibit 16.
IntelliRoute® Icon on Home Menu
IntelliRoute®
Select the IntelliRoute
®
icon on the Home Menu [Exhibit 16] to
access the truck-specifi c routing application. IntelliRoute
®
will route
you around low bridges, truck-restricted roads and help you fi nd
driver-specifi c points of interest.
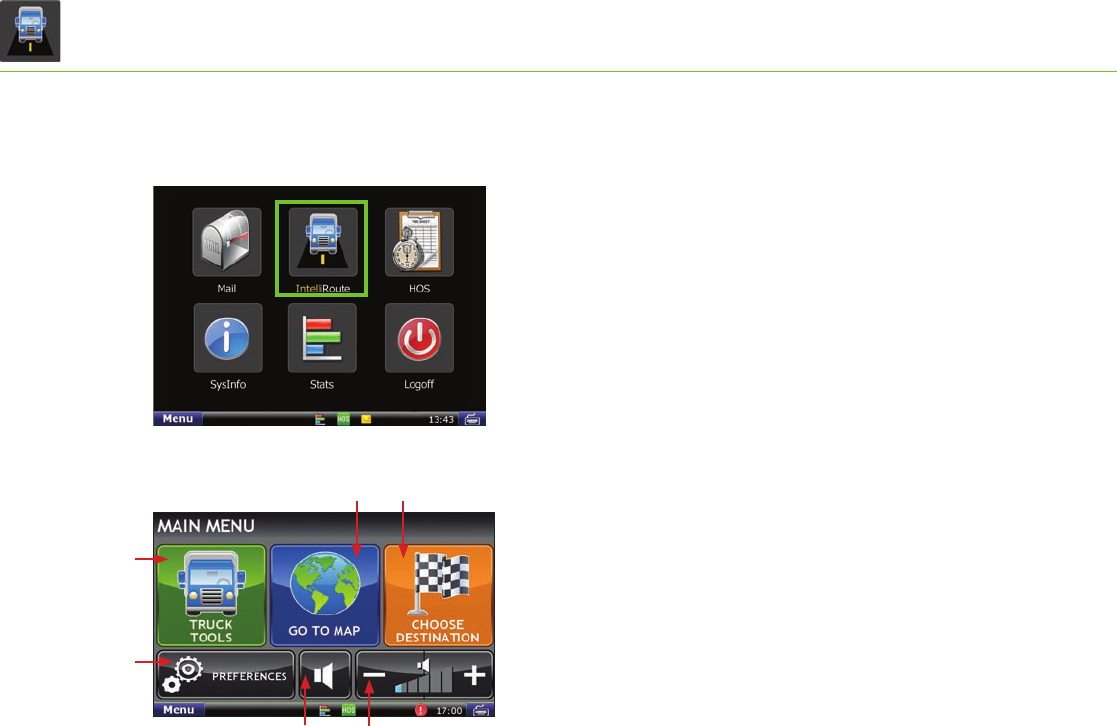
Main Menu
a. Enter truck information and access truck-specifi c use tools.
b. Show location on the map and view navigation instructions.
c. Choose a destination.
d. Select TND™ and route preferences.
e. Mute/unmute the speaker.
f. Adjust speaker volume.
Exhibit 17.
IntelliRoute® Screen
(a)
(d)
(b) (c)
(e) (f)
TND
™
760 Fleet Edition User’s Guide
19
TNDTM 760 IntelliRoute®
Exhibit 18.
Truck Info Screen
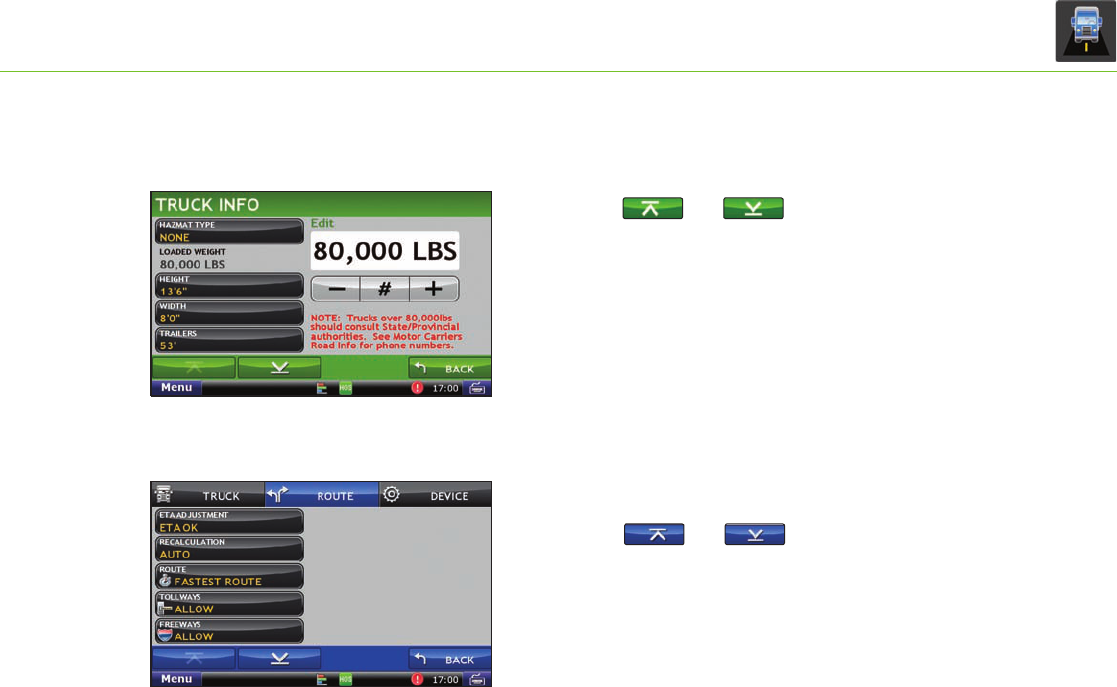
Enter Truck Information
1. Tap Truck Tools > Truck Info [Exhibit 18].
2. Tap and to view all options.
3. Tap to select the options to be changed.
4. Enter new truck information settings.
5. Tap Back to save changes.
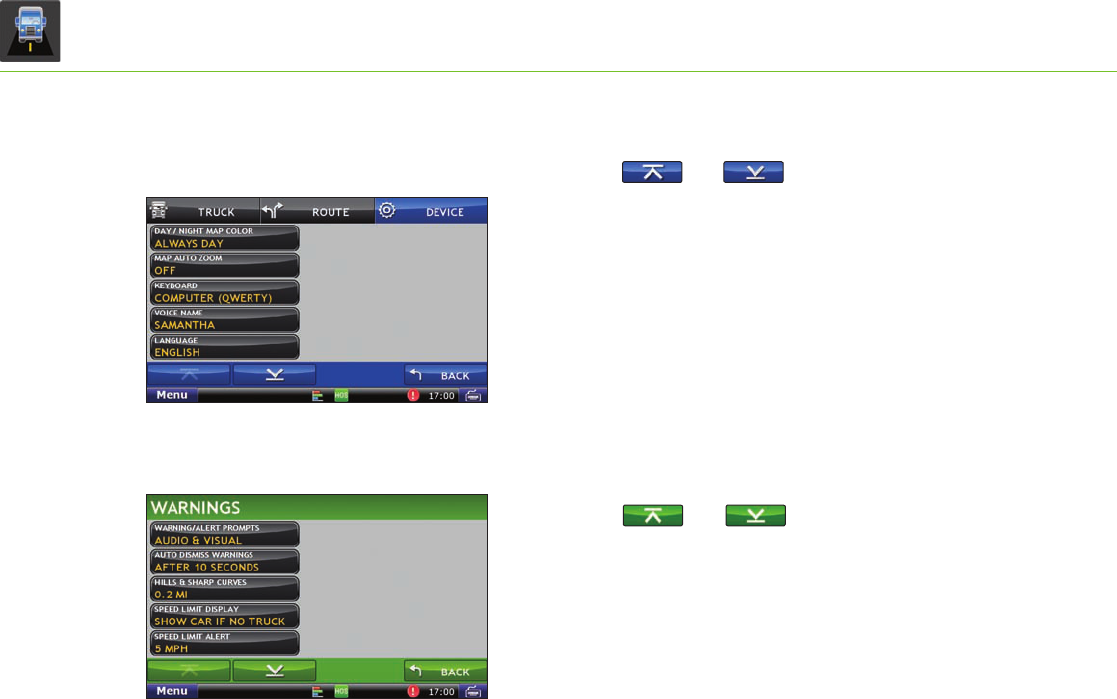
Set Route and Device Options
1. From the Main Menu, Tap Preferences.
2. Tap the Route tab [Exhibit 19].
3. Tap and to view routing options.
4. Tap the option button to be changed.
5. Enter the new settings for the option.
Exhibit 19.
Route Tab
TND
™
760 Fleet Edition User’s Guide
20
TNDTM 760 IntelliRoute®
Exhibit 20.
Device Tab
6. Tap the Device tab [Exhibit 20].
7. Tap and to view device options.
8. Tap the option button to be changed.
9. Enter the new settings for the option.
10. Tap Back to save changes.
Set Warnings
1. Tap Truck Tools > Warnings [Exhibit 21].
2. Tap and to view all warning options.
3. Tap the option button to be changed.
4. Enter the new settings for the option.
5. Tap Back to save changes.
Exhibit 21.
Warnings Screen
TND
™
760 Fleet Edition User’s Guide
21
TNDTM 760 IntelliRoute®
Exhibit 22.
Keyboard Screen
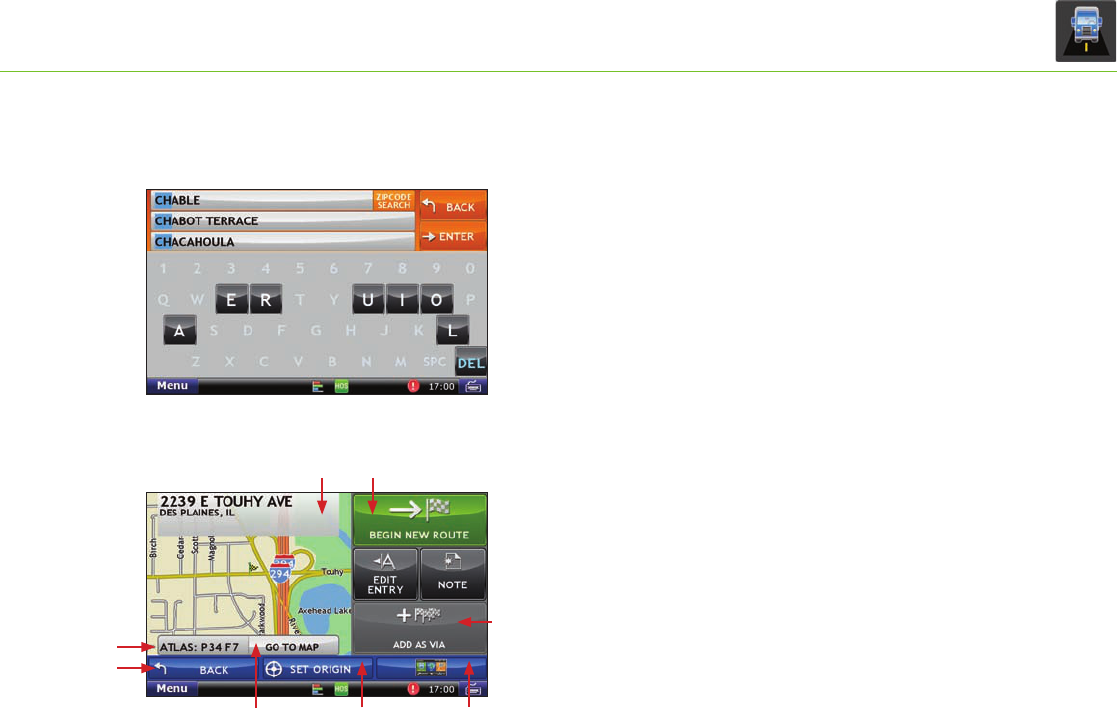
Route to Destination
Find an Address
1. Tap Choose Destination > New Location.
2. Select a search type (Address, City Center or Intersection).
3. Use the keyboard to type location information [Exhibit 22].
4. Tap on the address in the displayed list.
Confi rm Destination
a. Destination address.
b. Begin route to destination.
c. Cross reference to printed Rand McNally
Motor Carriers’ Road Atlas.
d. Return to previous window.
e. View the map.
f. Change the starting address for a route to the location
displayed on the map screen.
g. Return to Main Menu.
h. Add the location to a multi-stop route as a via stop.
Exhibit 23.
Destination Screen
(d)
(a)
(e) (f)
(b)
(c)
(g)
(h)
TND
™
760 Fleet Edition User’s Guide
22
TNDTM 760 IntelliRoute®
Exhibit 24.
Address Book Tab
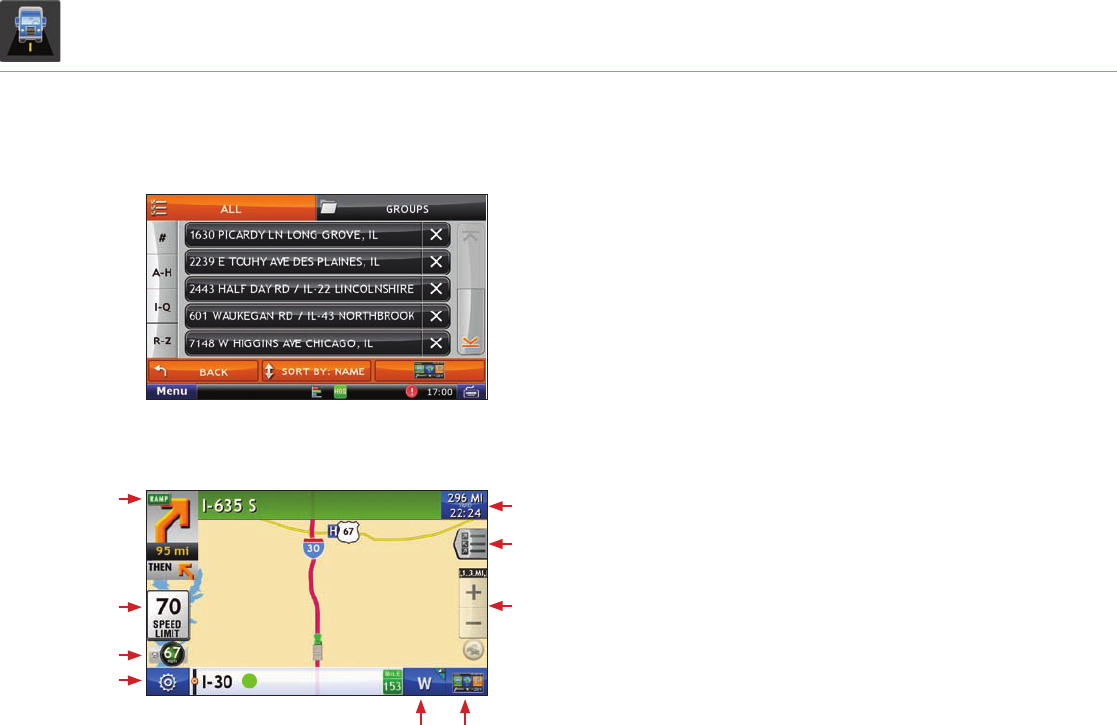
Route to Saved Location
1. Tap Choose Destination > Address Book [Exhibit 24].
2. Tap on the All Addresses tab.
3. Tap on the destination in the displayed list.
4. Tap Begin New Route.
Route Map Screen
a. Repeat spoken next-maneuver instructions.
b. Name of street you will turn onto next.
c. Show arrival time and distance remaining.
d. Directions list slideout.
e. Zoom in/zoom out.
f. Posted speed limit.
g. Current vehicle speed. Tap to view Virtual Dashboard.
h. Additional current location or route options.
i. Tap to view current road name, upcoming cross road
name, or city name and state.
j. Select a map display option: (North Up, Heading Up or 3D View).
k. Return to Main Menu.
Exhibit 25.
Route Map Screen
i
(a)
(f)
(g)
(h)
(c)
(d)
(e)
(k)(j)
TND
™
760 Fleet Edition User’s Guide
23
TNDTM 760 IntelliRoute®
Exhibit 26.
Point of Interest Screen
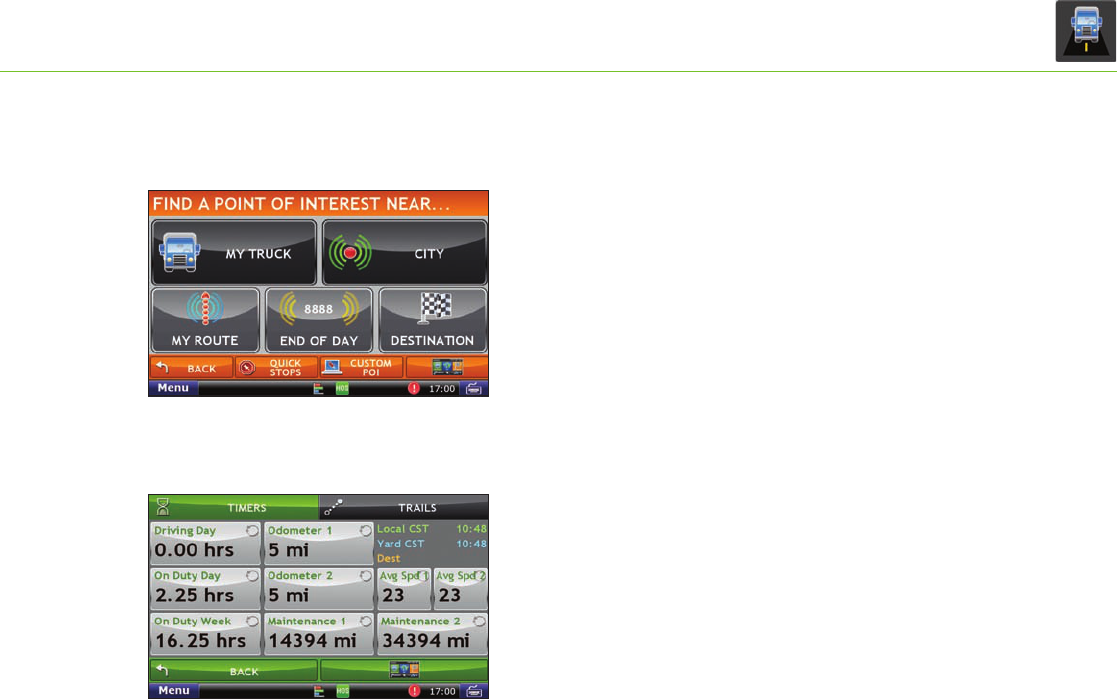
Find a Point of Interest (POI)
1. Tap Choose Destination > Points of Interest [Exhibit 26].
2. Select a search type (My Truck, City, My Route
End of Day, or Destination).
3. Select a category and if necessary, a subcategory.
4. Tap on the Point of Interest in the displayed list.
Enter Timers and Trails
Timers
Countdown timers are linked to your HOS information managed under
the Hours of Service application (Driving, On-duty or Off-duty).
To access the timers, Tap Truck Tools > Timers and Trails [Exhibit 27].
Tap the Timers tab to view timers, odometer readings, local, yard and
destination times.
Note: Odometers are driver tools and must be set manually. They are not
linked to the vehicles odometer.
Exhibit 27.
Timers Tab
TND
™
760 Fleet Edition User’s Guide

24
TNDTM 760 IntelliRoute®
Exhibit 28.
Trails Tab Trails
Record a New Trail
The Trails feature allows you to record and later view or follow
route information on the map. This capability is particularly useful
when driving off-road or through private facilities such as a
terminal or distribution center where road data is not available.
1. Tap Truck Tools > Trails [Exhibit 28].
2. Tap New Trail.
3. Tap OK. The Trail Icon
displays on the map screen [Exhibit 29].
4. When you wish to stop recording, tap on the Trail icon.
5. Tap OK.
Exhibit 29.
Route Map Screen
TND
™
760 Fleet Edition User’s Guide
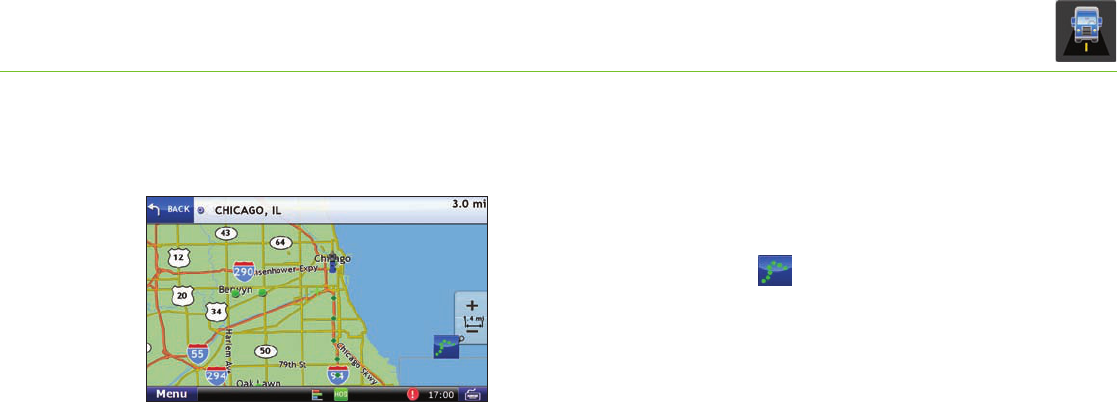
25
TNDTM 760 IntelliRoute®
View Recorded Trails
1. Tap Truck Tools > Trails.
2. Tap on the trail you want to run.
3. Tap on Show on Map.
4. Tap on the Trails icon.
5. Tap:
- Trail only to show only the trail.
- Trail and Vehicle to show the trail and your current location.
- Hide Trail to not display the trail.
6. Visually follow the trail. The trail is denoted by green diamond icons.
Notes:
- Because Trails mode may not contain roads, no voice
direction is available.
- You can also rename and delete recorded trails.
Exhibit 28.
Trail Route Screen
Exhibit 30.
Trail Route Screen
TND
™
760 Fleet Edition User’s Guide
26
TND
TM 760 Hours of Service
Hours of Service
With the TND™ 760, your HOS information is well-organized and
user-friendly.
What You Do
Mark the beginning of your day by submitting an On Duty status and
Trip Info entry. From that point on, the TND™ 760 records Driving and
segments automatically. The only entries you need to submit manually
are Off Duty and Sleeper Berth statuses. When your day ends, you can
review and certify your logs—all in one streamlined process.
What the System Does
The TND™ 760 logs all your HOS activities with accurate-to-the-second
technology so you can make the most of each day.
• When you tap the Trip Info button, the 14-hour day offi cially begins.
• When you begin driving after your pre-trip work is complete, Driving
status is activated as soon as the tractor detects motion.
• When you stop, the system waits to be sure you have completed a
driving segment before marking the time and activating the On Duty
status. You do not need to worry about the system changing statuses
when you stop for traffi c lights or signs.
Exhibit 31.
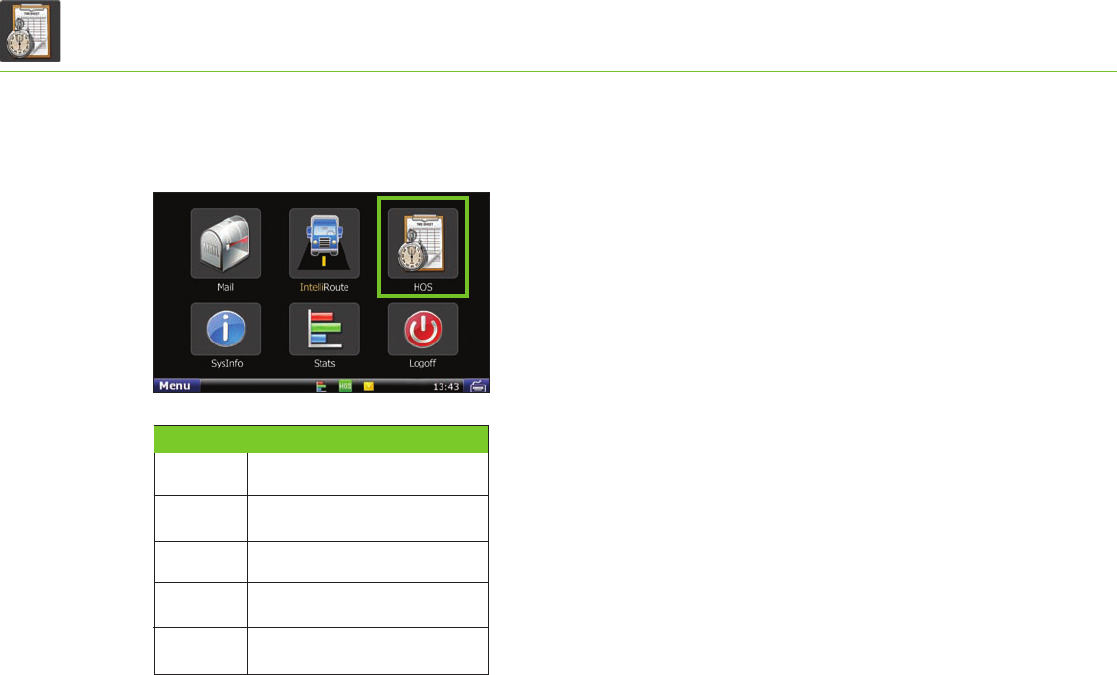
HOS Icon on Home Menu
Displays critical HOS information based
on your current duty status.
Displays list of duty statuses for the
current 8-day period.
Allows you to enter and certify your
DVIRs for the current 8-day period.
Allows you to manage log information and
settings related to violations and enforcement.
Displays information related to your
carrier and terminal.
Summary
Logs
DVIR
Options
Company
Tab Function
TND
™
760 Fleet Edition User’s Guide
27
TND
TM 760 Hours of Service
Summary
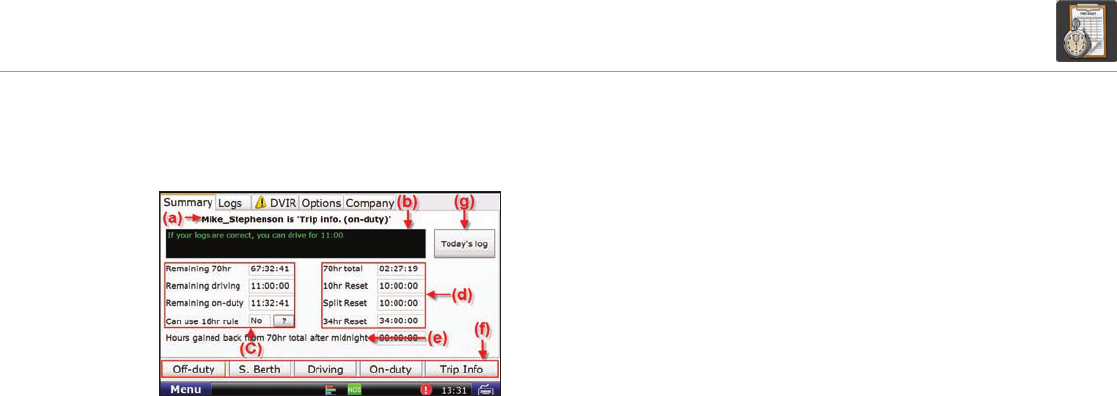
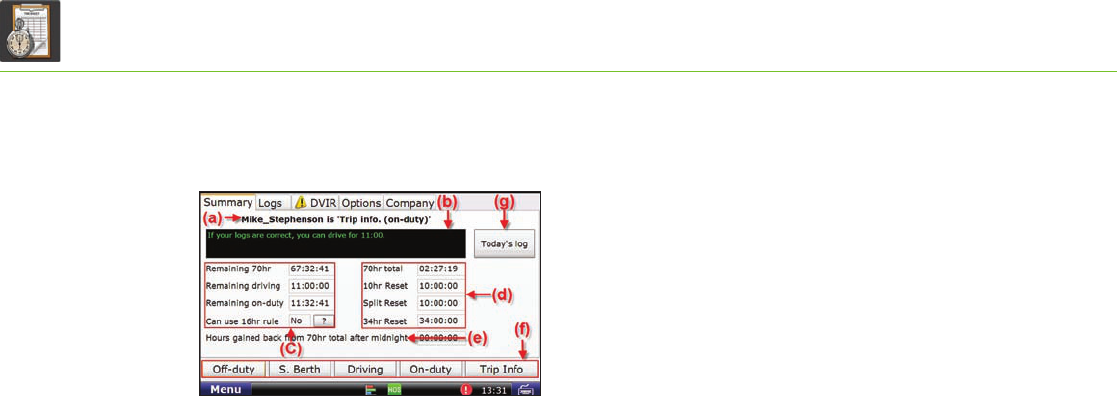
This tab gives you critical HOS information at-a-glance.
• The top of the Summary tab shows the name and HOS status
of the driver logged on to the TND™ 760 [Exhibit 32, (a)]. If the
driver shown is not you, log off then log back on.
• The Status Box provides a summary of your current status
[Exhibit 32, (b)].
• Screen left tells the time remaining before you reach HOS limits
and whether you can use the 16-hour rule [Exhibit 32, (c)]. Tap
the (?) button for details.
• Screen right shows the time remaining before each type of reset
occurs [Exhibit 32, (d)].
- 70hr total. Time until a new 70-hour log starts.
- 10hr Reset. Time until a 10-hour reset.
- Split Reset. Time until reset with sleeper-berth
statuses calculated in.
Note: The TNDTM 760 Fleet Edition is compliant with
FMCSA regulation 395.15
Exhibit 32.
HOS Main Screen-Summary Tab
TND
™
760 Fleet Edition User’s Guide
28
TND
TM 760 Hours of Service
Summary (continued)
• The Summary tab also reports Hours gained back from
70hr total after midnight [Exhibit 32, (e)].
Buttons at the bottom let you change your HOS status or
add specifi c trip information to the log [Exhibit 32, (f)].
The buttons display at the bottom of each HOS tab.
The Today’s log button accesses the graph and tabs you
need to manage your day [Exhibit 32, (g)].
The functions of adding a duty status, adding trip information
and managing the current day’s log are explained on the
following pages.
Exhibit 32.
HOS Main Screen-Summary Tab
TND
™
760 Fleet Edition User’s Guide
29
TND
TM 760 Hours of Service
Exhibit 33.
Pop-up for Adding a Duty Status
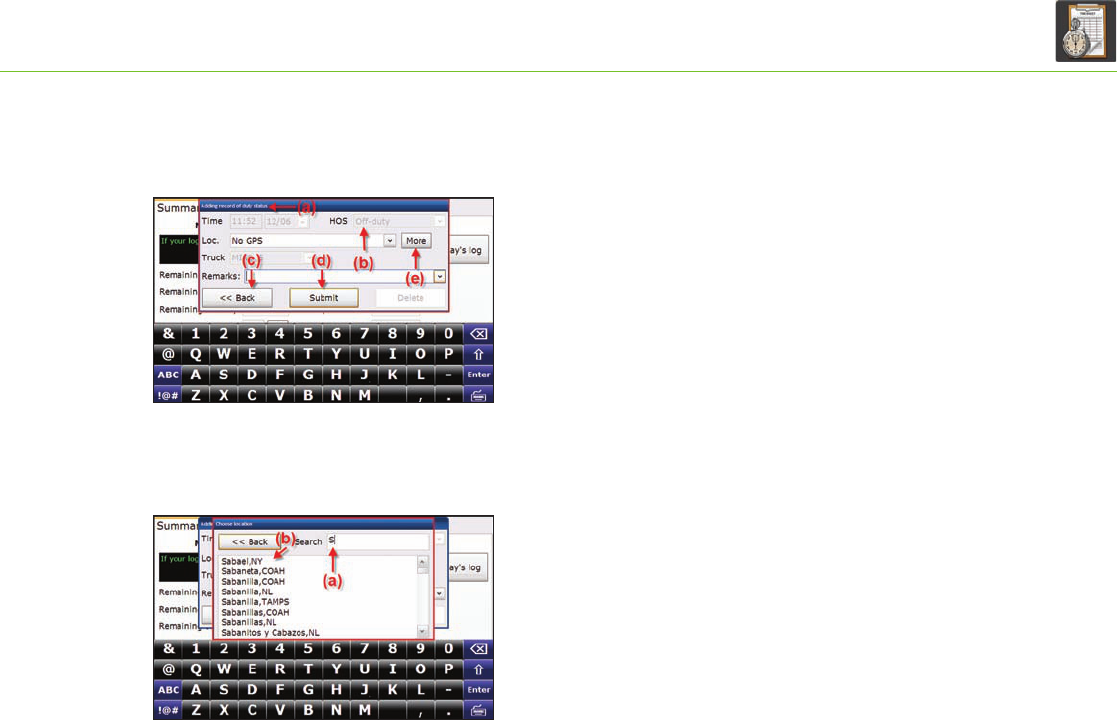
Add a Duty Status
• Tap any duty-status button to view the [Exhibit 32, (f)) Adding
record of duty status pop-up [Exhibit 33, (a)]. Most fi elds are
grayed out, which means you do not need to do anything; the
system records the required information automatically.
• The pop-up shows the status selected [Exhibit 33, (b)].
For a different status, tap Back [Exhibit 33, (c)] and
select the status you want.
• Tap Submit [Exhibit 33, (d)] if the record is correct.
• If GPS is on, the Loc. fi eld will be grayed out. If GPS is off, tap
More [Exhibit 33, (e)] to view the Choose location
pop-up [Exhibit 34].
Choose a Location
• Begin typing your location in the Search box [Exhibit 34, (a)]
to bring up the section of the location list showing places
beginning with those letters [Exhibit 34, (b)].
• Select your location to fi ll in the Loc. fi eld.
Exhibit 34.
Pop-up for Choosing a Location
TND
™
760 Fleet Edition User’s Guide
30
TND
TM 760 Hours of Service
Exhibit 35.
Pop-up for Adding a Duty Status - Remarks Field
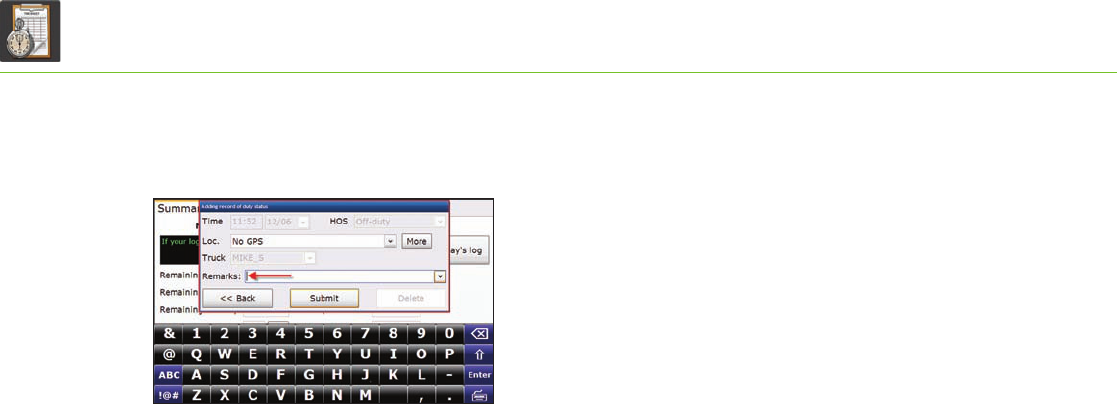
Add a Remark to a Duty Status
You may need to include a comment about the duty status.
The cursor automatically appears in the Remarks fi eld
[Exhibit 35].
• Use the drop-down arrow to view company-provided options.
• If a standard remark applies, select it to fi ll in the fi eld.
• If a standard remark does not apply, type your own remark
using the on-screen keyboard.
• Tap Submit to record the enhanced duty-status entry.
TND
™
760 Fleet Edition User’s Guide
31
TND
TM 760 Hours of Service
Exhibit 36.
Pop-up for Adding Trip Information
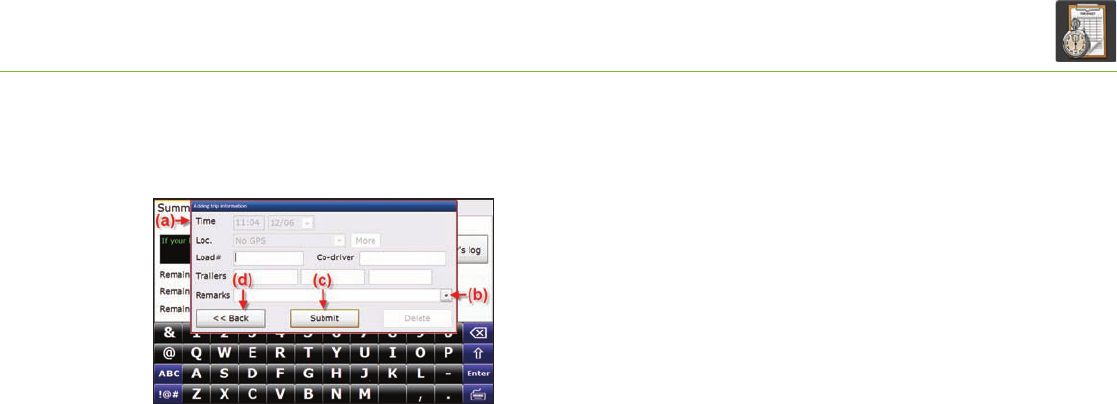
Add Trip Information
• Tap the Trip Info button on the Summary tab to view
the Adding trip information pop-up [Exhibit 36, (a)].
The on-screen keyboard automatically appears so you can
enter Load, Co-driver (if appropriate), Trailer numbers
and Remarks.
• The cursor appears in the active fi eld. To move the cursor
to another fi eld, just touch the fi eld you want.
• Standard remarks are included in the Remarks drop-down
[Exhibit 36, (b)]. Select the remark you want or use the
on-screen keyboard to enter a non-standard remark.
• Tap Submit [Exhibit 36, (c)] to record your information and
return to the Summary tab. Tap Back [Exhibit 36, (d)] to return
to the Summary tab without recording your information.
TND
™
760 Fleet Edition User’s Guide
32
TND
TM 760 Hours of Service
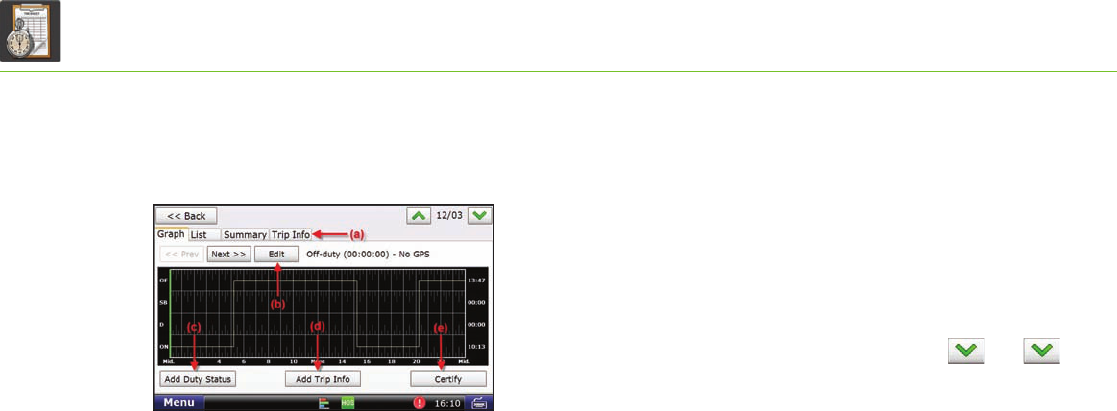
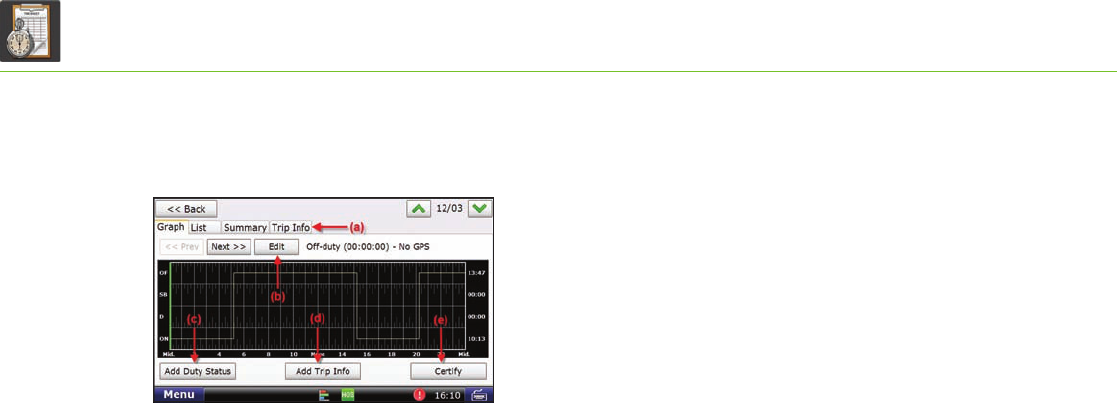
Today’s Log
The Today’s log button can be accessed on the Summary tab
[Exhibit 32, (g)]. Four tabs display across the top of the
Today’s log screen [Exhibit 37, (a)].
Graph is the tab that opens when you select Today’s log. This screen
has three buttons: Edit, Add Duty Status and Add Trip Info.
• Edit. This button [Exhibit 37, (b)] allows you to edit any uncertifi ed
log from the last 8 days (select the arrow buttons and
to view a previous day’s log).
• Add Duty Status. This button
[Exhibit 37, (c)]
on the Today’s
Log Graph screen allows you to add a current duty status to the
current day. Any changes to earlier statuses must be made using
the Edit button.
• Add Trip Info. This button
[Exhibit 37, (d)]
allows you to add
information for a new trip for the current day. Any changes
to the trip information for previous trips must be made using the
Edit button.
Note: Driving status time cannot be edited once recorded.
Exhibit 37.
Today’s Log Main Screen - Graph Tab
TND
™
760 Fleet Edition User’s Guide
33
TND
TM 760 Hours of Service
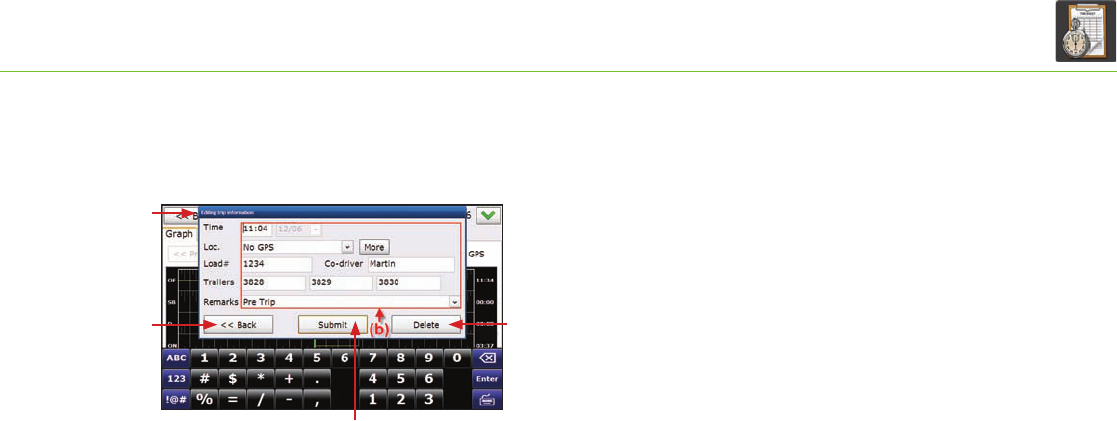
Edit Trip Information
Before selecting the Edit button [Exhibit 37, (b)], you can tap the
graph screen on the point where you would like to make an edit.
The green line on the graph indicates a change in duty status. You
can also tap the Prev and Next buttons to move the green line to
the desired point on the graph.
Once you tap Edit, the Editing trip information pop-up will
appear [Exhibit 38, (a)]. Make any changes to the preexisting
information [Exhibit 38, (b)].
• Tap Delete [Exhibit 38, (d)] If you wish to delete the
entire status entry.
• Tap Back [Exhibit 38, (e)] to go back to the Graph tab.
• Tap Submit [Exhibit 38, (c)] to save your entry.
Exhibit 38.
Pop-up for Editing Trip Information
(a)
(e) (d)
(c)
TND
™
760 Fleet Edition User’s Guide
34
TND
TM 760 Hours of Service
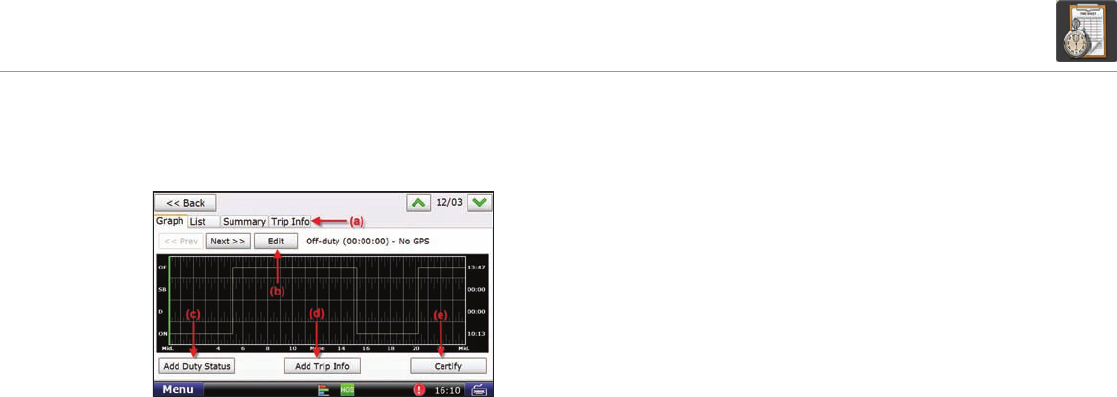
Exhibit 39.
Graph Tab - Day to be Certifi ed
Certify Logs
• If you have outstanding uncertifi ed log entries (those that do
not have a check mark next to them), you should review and
certify them as soon as possible.
• Uncertifi ed log entries must be certifi ed in order of
oldest to newest.
• Review the entry using the tabs (Graph, List, Summary and
Trip Info) to verify that the log is accurate.
• Make any required changes.
- To change an incorrect status, select the correct status from
either the Graph or the List tab. Tap Edit [Exhibit 39, (b)]
to access the required pop-up. Make your changes and
tap Submit.
NOTE: If a status that cannot be edited on the TND™ 760 is
incorrect, contact your manager for help.
TND
™
760 Fleet Edition User’s Guide
35
TND
TM 760 Hours of Service
Exhibit 39.
Graph Tab - Day to be Certifi ed
Certify Logs (continued)
-To add a status, tap Add Duty Status [Exhibit 39, (c)].
Fill in the time, change the duty status fi eld (if required) and
enter the location. Add Remarks if appropriate. Tap Submit.
-To alter the trip information record, tap Add Trip Info
[Exhibit 39, (d)], fi ll in the form and tap Submit.
• Once you are satisfi ed that the log is accurate, tap Certify
[Exhibit 39, (e)]. A pop-up asks you to confi rm the log is correct.
-Tap No to return to the previous screen.
-Tap Yes to return to the Logs tab.
When the log has been certifi ed and recorded, a green check mark
appears at the beginning of the row.
TND
™
760 Fleet Edition User’s Guide
36
TND
TM 760 Hours of Service
Exhibit 40.
Logs Tab
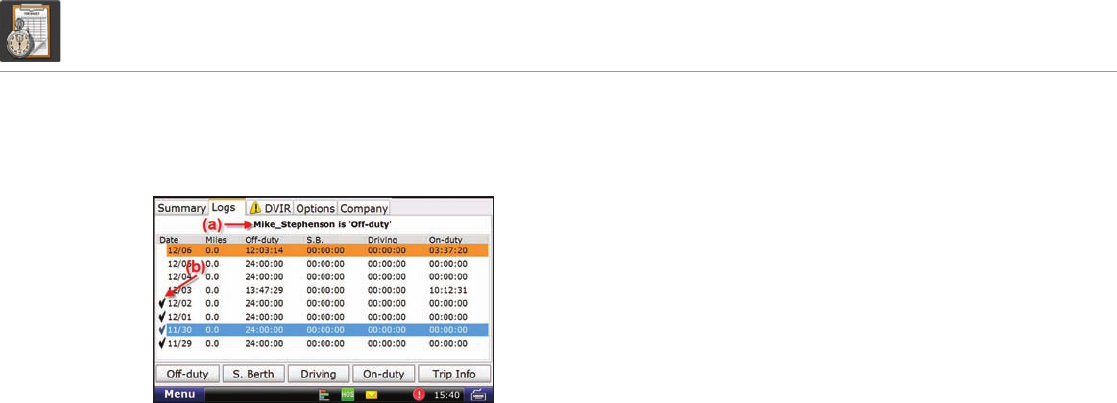
Logs
The Logs tab gives a summary of the totals for the last 8 days
[Exhibit 40]. Past days that you want to review, edit or certify are
selected here.
• The top of the tab lists your name and current HOS status
[Exhibit 40, (a)]. If you are not the driver shown, log off
the TND™ 760, then log back on.
•
The columns on this tab show summary information
about each day’s log.
- Date. Displays the last eight days with the current date at
the top of the list.
- Miles. States the number of miles traveled for the day.
- Off-duty. Gives the number of off-duty hours logged for the day.
- S.B. Indicates the time spent in the sleeper berth for the day.
- Driving. Gives the time spent driving for the day.
- On-duty. Gives the time spent on-duty but not driving for the day.
•
The check marks to the left of the date column show which days
have been certifi ed [Exhibit 40, (b)].
TND
™
760 Fleet Edition User’s Guide
37
TND
TM 760 Hours of Service
Exhibit 41.
DVIR Tab
DVIR
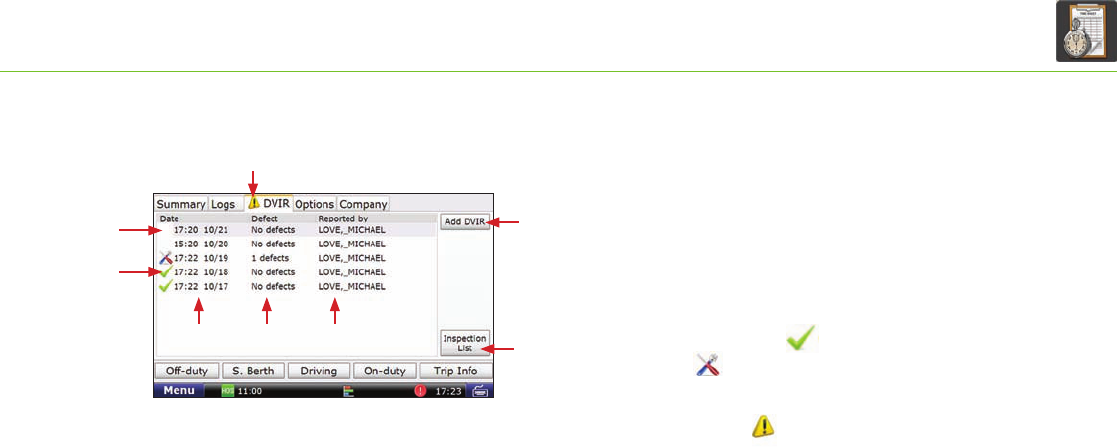
The DVIR (Daily Vehicle Inspection Report) tab contains information
regarding all DVIR entries from the last 8 days.
DVIR information is clustered together [Exhibit 41, (a), (b) and (c)].
• (a). A blank space in this column means the DVIR entry has not yet
been certifi ed.
• (b). A green check mark ( ) means the DVIR has been certifi ed.
A tool icon ( ) means a DVIR entry has been added and that
there is an outstanding defect that should be reviewed and certifi ed.
• (c). A warning icon ( ) on the DVIR tab means there is an
outstanding defect.
• (d). This column tells you when the DVIR entry was made.
• The time and date are listed.
• (e). This column tells you the number of defects listed
in the DVIR entry.
• (f). This column tells you the Driver ID of the person who added
the DVIR entry.
(a)
(b)
(c)
(d) (e) (f)
(g)
(h)
TND
™
760 Fleet Edition User’s Guide
38
TND
TM 760 Hours of Service
Exhibit 42.
Pop-up for Adding DVIR
Add a DVIR
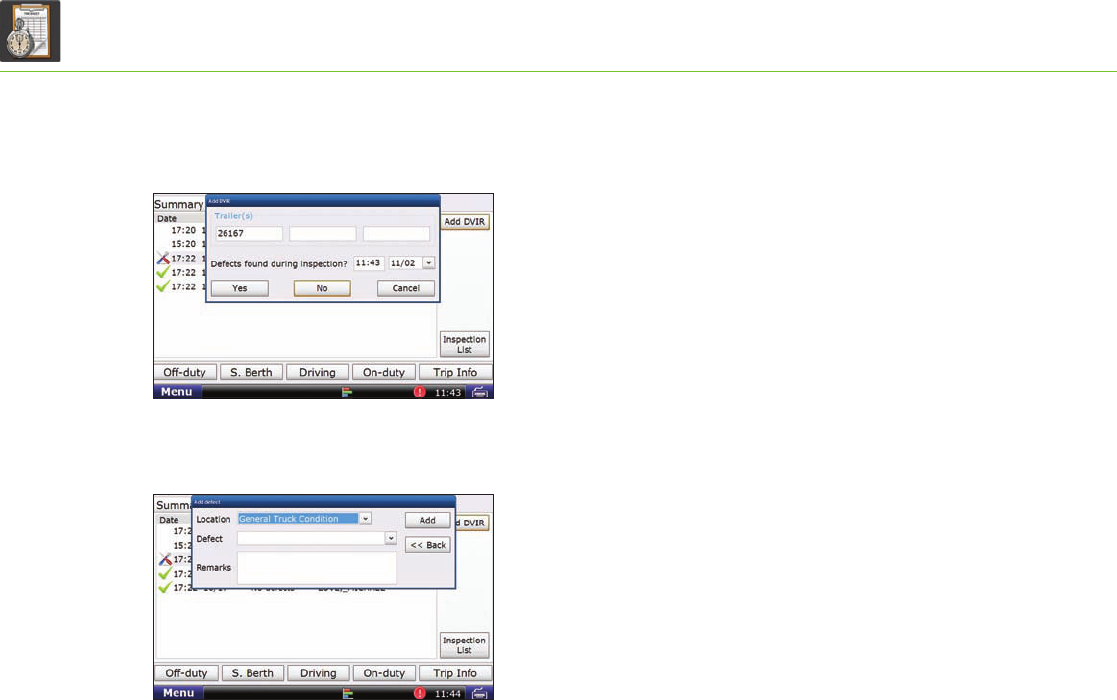
• Add DVIR. Use this button when you want to add a DVIR
for the current day or for any day within the last 8 days
[Exhibit 41, (g)].
- Trailer(s).
- Time and Date.
• You may have to enter defects from your inspection.
If so, select Yes [Exhibit 42].
- Enter the Location and Defect fi elds [Exhibit 43]
- You can also add other notes about the inspection in
the Remarks fi eld.
Note: You can also view this screen by selecting any DVIR entry
from the past 8 days on the DVIR main screen. This will allow you
to add a defect to a previous day’s DVIR.
Exhibit 43.
Pop-up for Adding Defect
TND
™
760 Fleet Edition User’s Guide
39
TND
TM 760 Hours of Service
Exhibit 44.
DVIR Record-Defects Tab
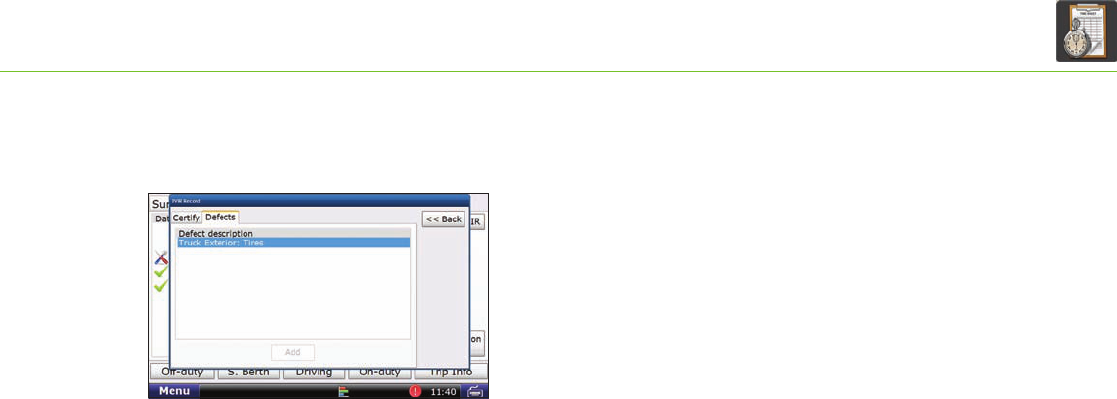
Certify DVIR Entries and Repairs
To review the entered defects of previous DVIR entries, select
any entry from the last 8 days on the DVIR tab [Exhibit 40].
-Defects tab [Exhibit 44].
Select this tab to view the description of each defect listed for
the selected DVIR. Click on any of the defect entries to view
any entered remarks.
TND
™
760 Fleet Edition User’s Guide
40
TND
TM 760 Hours of Service
Exhibit 45.
DVIR Record - Certify Tab
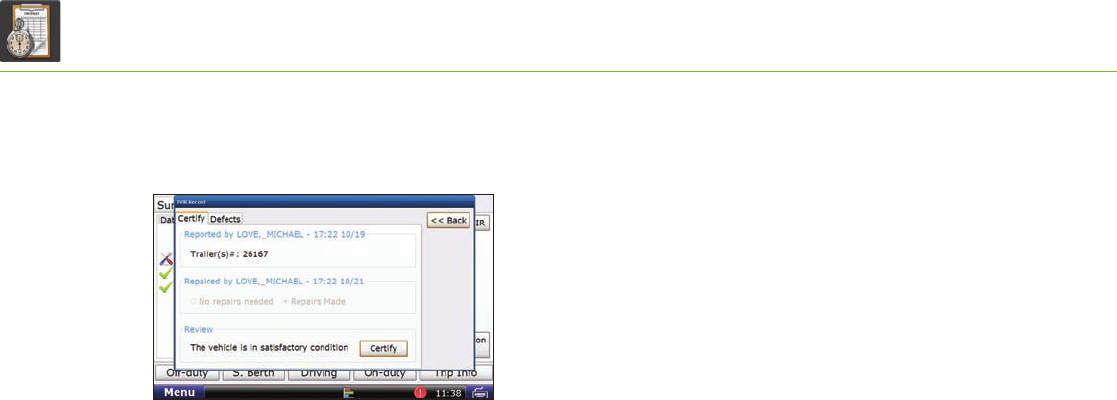
Certify DVIR Entries and Repairs (continued)
- Certify tab [Exhibit 45].
Select this tab to certify the DVIR entry.
• Reported by: lists Driver ID and time and date of DVIR entry.
• Repaired by: lists Driver ID and time and date of repair.
- Tap No repairs needed.
- Tap Repairs Made to indicate that defects have
been repaired.
Note: You must select one of these options in order to
certify your DVIR.
• Review:
- Tap Certify to submit the DVIR.
As with other HOS screens, you can update your current status
with the buttons at the bottom [Exhibit 40].
TND
™
760 Fleet Edition User’s Guide
41
TND
TM 760 Hours of Service
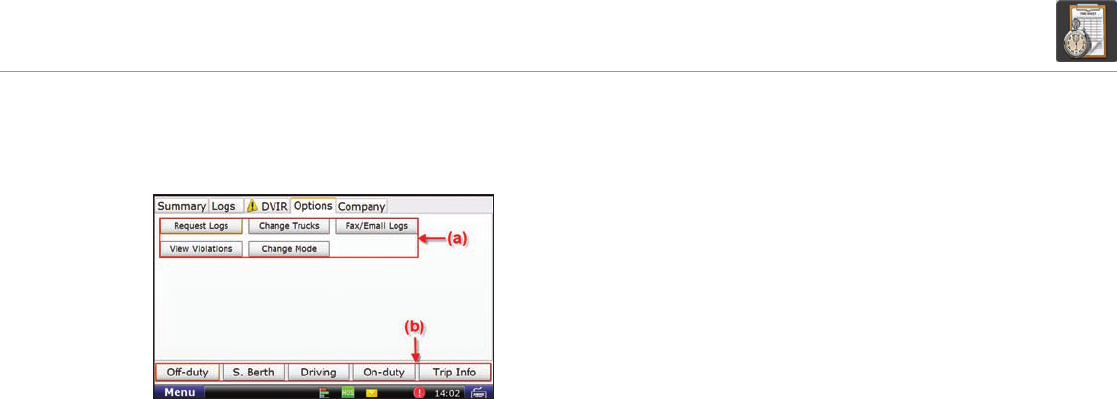
The Options tab allows you to:
• Request Logs. Use this button when you want to move your logs
from a previous tractor or when you have previous logs that you
cannot view. The button brings up a pop-up box that displays the
following notice:
“Those portions of your log that haven’t been received by the back-end
may be deleted when your HOS logs are downloaded.”
- You choose whether to continue (Ye s) or to cancel the request (No).
• Change Trucks. Use this button before you move to another tractor
to confi rm for yourself that your logs are sent to the server and will
be available for you when you log on in the new truck (you may
need to use Request Logs on the new truck, but usually the logs
arrive as you log in).
Exhibit 46.
Options Tab
TND
™
760 Fleet Edition User’s Guide
42
TND
TM 760 Hours of Service
Options (continued)
• Fax/E-mail Logs. Use this button to fax or e-mail your logs.
Note: You cannot send your logs unless you have certifi ed all.
logs from the last 8 days. You must wait 10 minutes before
sending your log again.
• View Violations. Use this button to review any violations
that are currently part of your weekly log.
- The screen shows the type of violation, the time and
date the violation began, and the time and date the
violation ended.
- If you have multiple violations on the same day, each
driving segment is its own violation. However, violations
on the same day count as a single violation for the day.
Exhibit 46.
Options Tab
TND
™
760 Fleet Edition User’s Guide
43
TND
TM 760 Hours of Service
Exhibit 47.
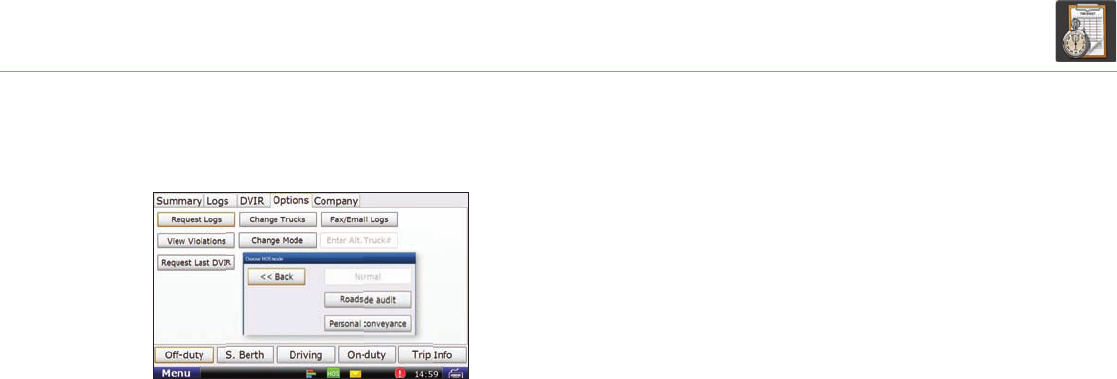
Pop-up for Changing Mode
Options (continued)
• Change Mode. This button lets you govern the information
displayed by the TND™ 760.
- Normal. This option is the default or standard working mode.
- Roadside Audit. This option provides limited access to your logs
when enforcement asks to see them. No additional information
is shown except what is required by law. No log information can
be changed by you or enforcement while you are in Roadside
Audit mode.
• Tap Normal to exit Roadside Audit mode.
- Enter your Driver ID.
- Personal Conveyance. This option, if allowed by your carrier, lets
you use your vehicle for personal use. Use this mode only when
your vehicle is not laden. The use of personal conveyance is strictly
monitored by your carrier as your carrier may have additional re-
quirements not specifi cally listed in §395.8. If you have questions,
ask your carrier before using this feature.
As with other HOS screens, you can update your current status
with the buttons at the bottom [Exhibit 46, (b)].
TND
™
760 Fleet Edition User’s Guide
44
TND
TM 760 Hours of Service
Exhibit 48.
Company Tab
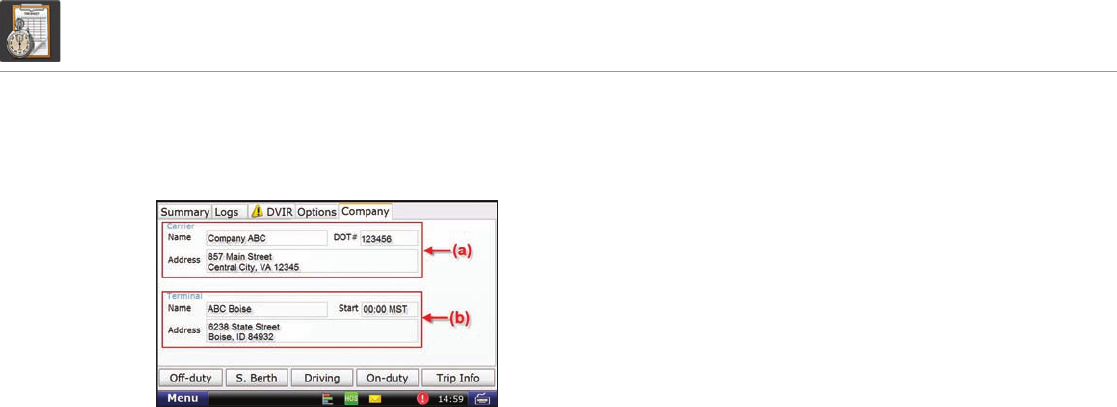
Company
The Company tab [Exhibit 48] contains information required for
your log. Your carrier must make the changes to this screen. If any
of the information is incorrect, contact your manager for help.
Carrier
The upper half of the screen identifi es your carrier
[Exhibit 48, (a)].
- Name.
- Address.
- DOT number.
Terminal
The lower half of the screen identifi es the home terminal to which
the TND™ 760 is assigned [Exhibit 48, (b)].
- Name.
- Address.
- Start. This fi eld shows the time and time zone for the terminal,
which governs the HOS information captured by the unit.
TND
™
760 Fleet Edition User’s Guide
45
TND
TM 760 Hours of Service
Exhibit 49.
HOS Safe-driving Screen
HOS Safe-driving Screen
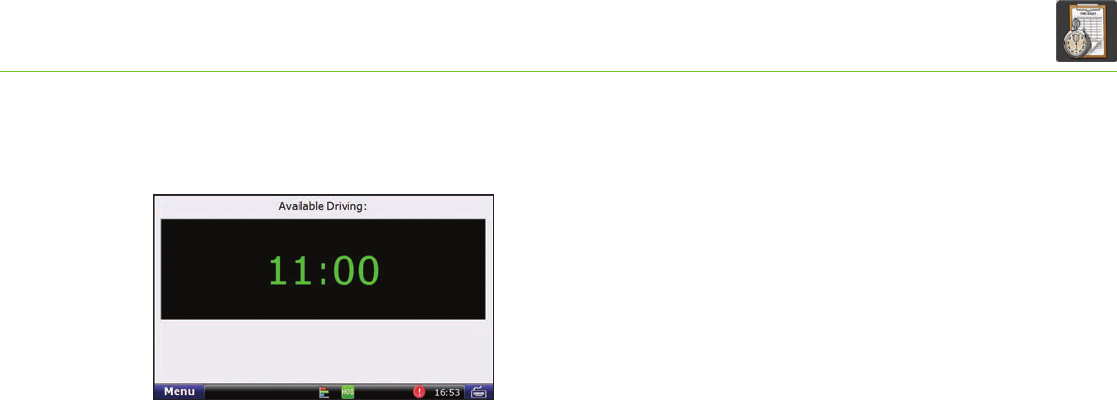
The time shown on the HOS safe-driving screen is the effective
drive time available to you for the day [Exhibit 49]. The time
indicates how long you can drive before going into
any
violation,
so the time displayed may not be your actual available drive time
if you are close to your 14 or 70-hour limit.
• Time. Two numbers appear for your remaining drive time if
the 16-hour rule is active.
• Color. Color coding lets you closely monitor your HOS
statuses and take whatever action is necessary to remain
in compliance.
• When vehicles are in compliance with HOS limits, the
time displays in green.
• When a vehicle is within one hour of the legal limit for
any HOS requirement, the display changes to yellow.
• When a vehicle is out of time for
any
HOS
requirement, the display changes to red.
TND
™
760 Fleet Edition User’s Guide
46
TND
TM 760 Stats
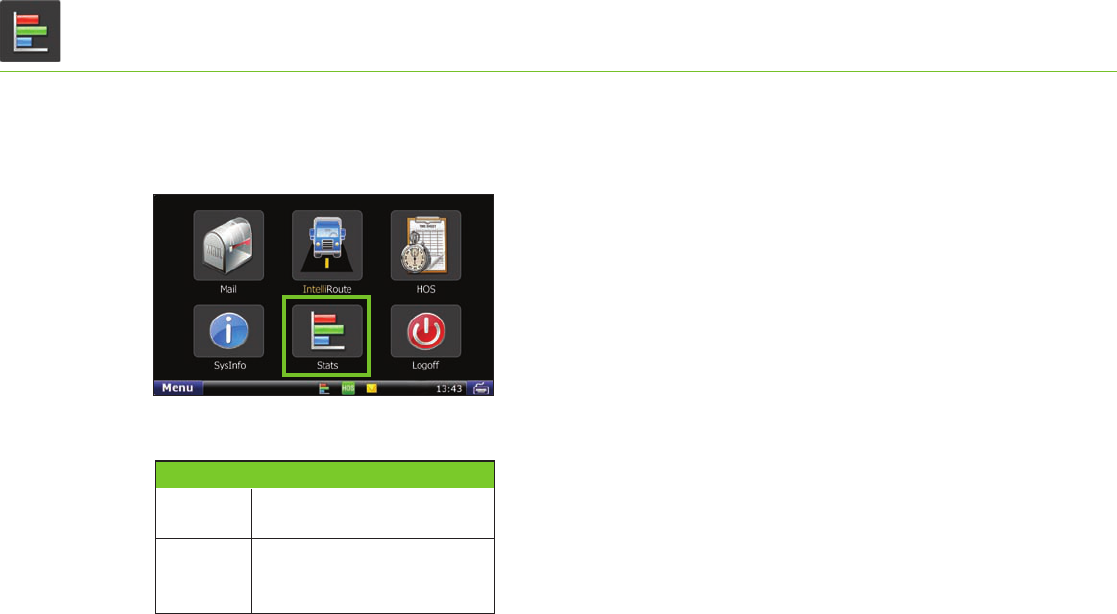
Stats
Select the Stats icon on the Home menu [Exhibit 50] to access
information about driver performance and fault codes.
Stats opens to the Driver Performance tab. The tabs in
stats are explained in the table to the left.
Exhibit 50.
Stats Icon on Home Menu
Tab Function
Displays statistics based on idle time, RPM,
engine and motion time.
Displays list of duty statuses for the current
8-day period. Displays fault codes and the
location and type of fault in relation
to your vehicle.
Driver
Performance
Fault Codes
TND
™
760 Fleet Edition User’s Guide
47
TND
TM 760 Stats
Exhibit 51.
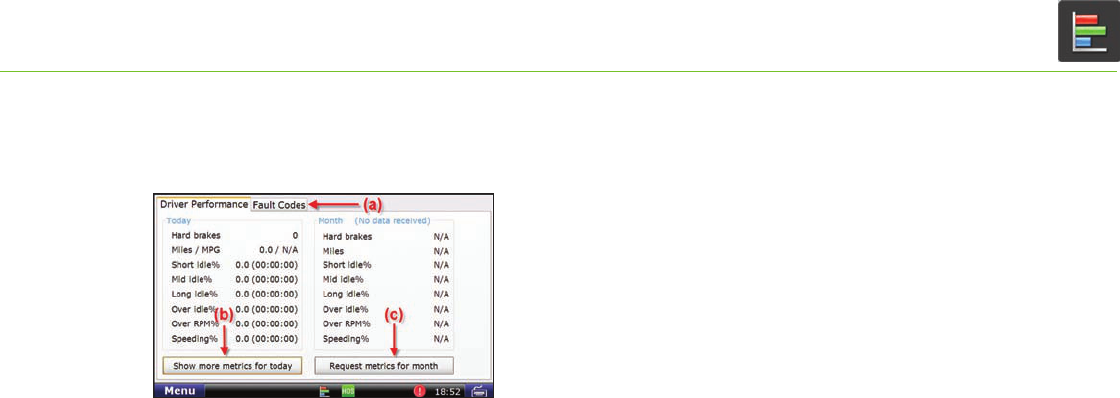
Driver Performance Tab
Driver Performance
The Driver Performance tab displays provides these statistics:
• Hard brakes—where vehicle speed is over 20MPH.
• Miles / MPG.
• Idling percentages for Short, Mid and Long Idles.
• Over Idle %—where idle is over your fl eet’s grace period.
• Over RPM%.
• Speeding%.
You can tap the Show more metrics for today button
[Exhibit 51, (b)] to view a pop-up with information on
Idle fuel, Stop Idle %, Total Idle %, Driving %, Engine time
and Motion time.
You can tap the Request metrics for month button
[Exhibit 51, (c)] to receive an update on driver performance.
The report includes month-to-date information.
TND
™
760 Fleet Edition User’s Guide
48
TND
TM 760 Stats
Exhibit 52.
Fault Codes Tab
Fault Codes
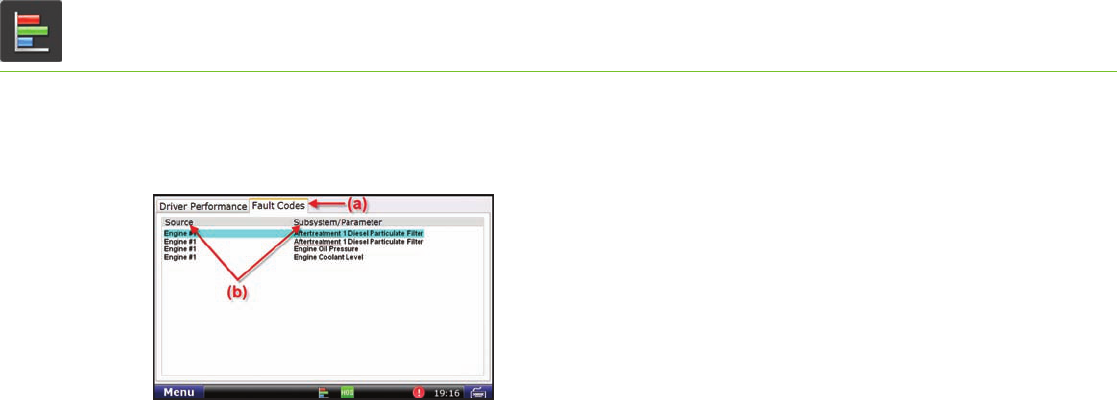
The Fault Codes tab [Exhibit 52, (a)] displays
recorded fault codes for the vehicle.
Two columns provide details about the fault
[Exhibit 52, (b)].
• Source. Indentifi es the location of the fault
(e.g., engine, cab controller, etc.).
• Subsystem/Parameter. Identifi es the type of fault.
TND
™
760 Fleet Edition User’s Guide
49
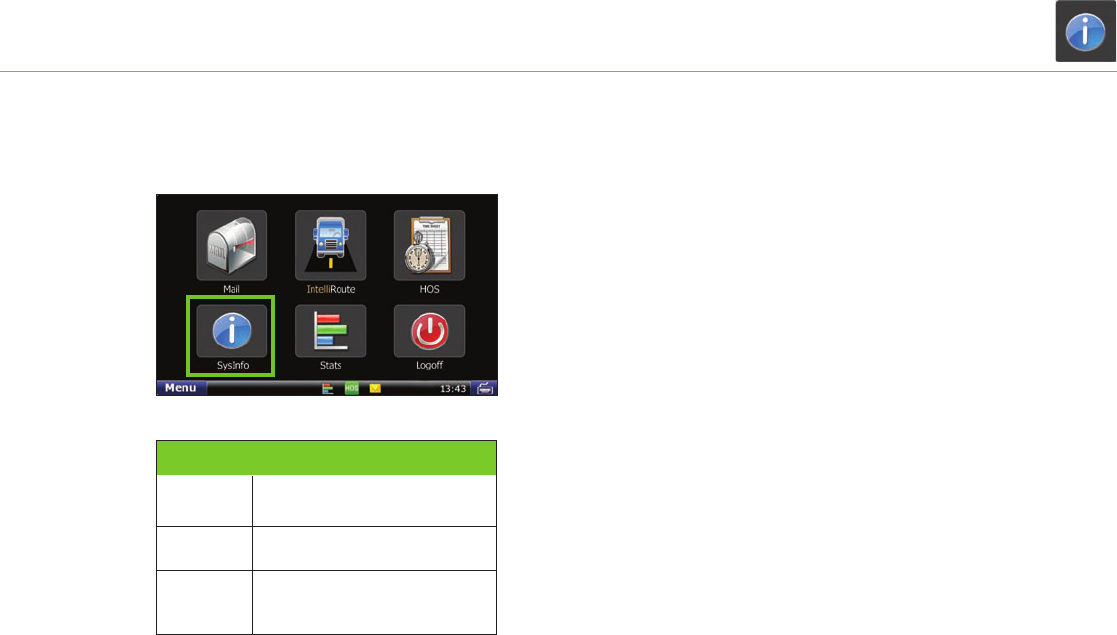
TND
TM 760 SysInfo
SysInfo
Select the SysInfo icon on the Home menu [Exhibit 53] to control
system settings and to view technical information about
your TNDTM 760.
SysInfo opens to the Settings tab. The tabs in SysInfo are
explained in the table to the left.
Exhibit 53.
SysInfo Icon on Home Menu
Tab Function
Allows you to control the volume and
screen brightness.
Displays system information.
Settings
Info
Displays information related to your
TND™ 760's communication status.
Diagnostics
TND
™
760 Fleet Edition User’s Guide
50
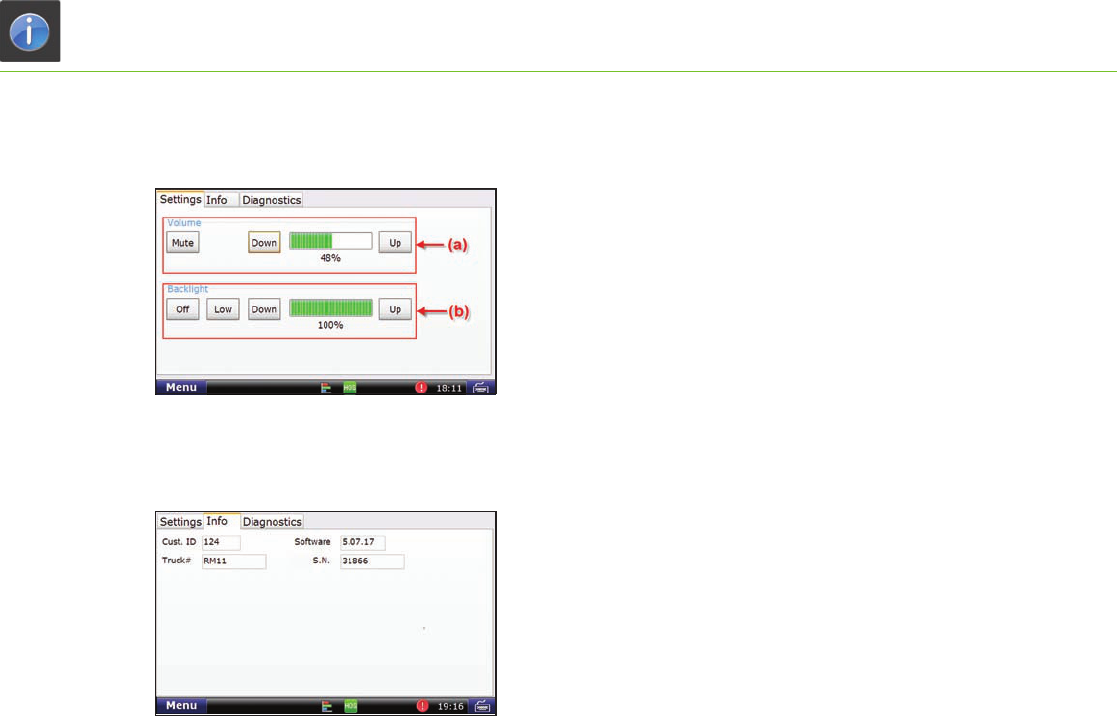
TND
TM 760 SysInfo
Settings
• Volume. Control the volume of your TND™ 760 by selecting
Mute or by tapping the Down and Up buttons [Exhibit 54, (a)].
Each tap changes the volume by 10 percent. You can also
change the volume by pressing down and drawing your fi nger
across the percentage box.
• Backlight. Control the backlight by selecting Off or by adjusting
the screen’s brightness by tapping the Down and Up buttons
[Exhibit 54, (d)]. You can also press down and draw your fi nger
across the percentage box. Low dims the screen to less than
10 percent.
Info
• Tap Info to access registration information for your
TND™ 760. The fi elds on the tab window include Cust. ID.
(Customer Number), Software Version, Truck # and
S.N. (Serial Number)
Exhibit 54.
Settings Tab
Exhibit 55.
Info Tab
TND
™
760 Fleet Edition User’s Guide
51
TND
TM 760 SysInfo
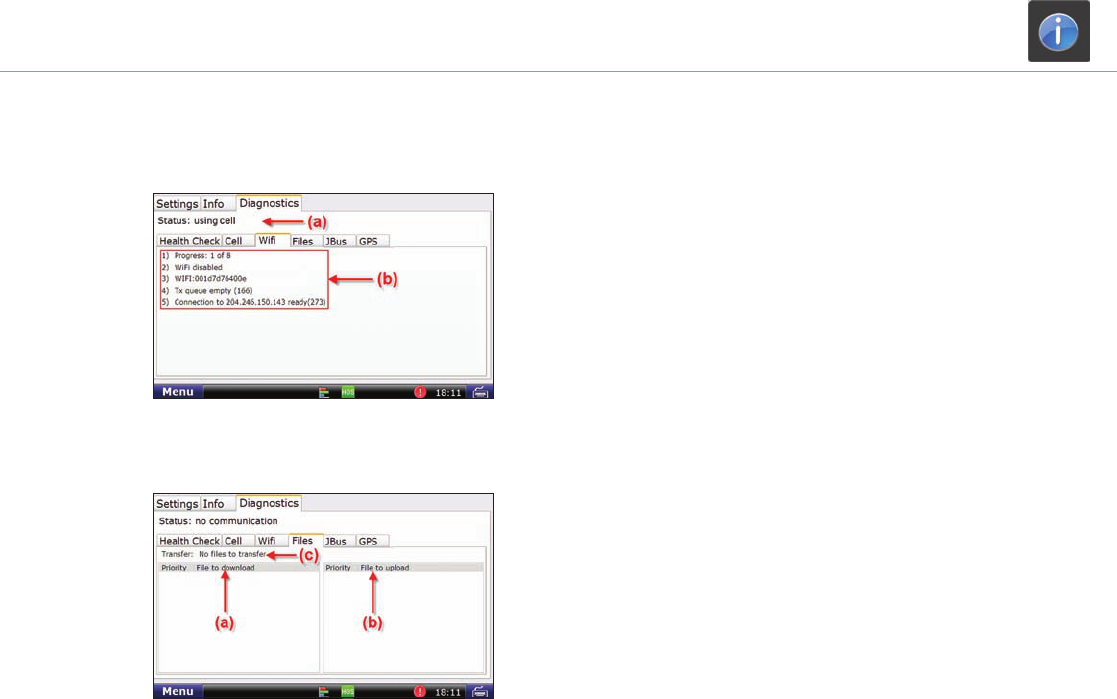
Exhibit 56.
Diagnostics – Wi-Fi Sub-Tab
Diagnostics
• Status. Shows the current method of communication
[Exhibit 56, (b)].
• Health Check. Confi rms function of system hardware.
• Cell. Provides status of cell connection.
• Wi-Fi. Provides status of Wi-Fi connection
[Exhibit 56, (a) and (b)].
• Files. Shows fi les scheduled for download or upload [Exhibit 57].
- Downloads to the truck [Exhibit 57, (a)] can include
software updates and dispatch fi les.
- Transfer [Exhibit 57, (c)] provides the current status of the
fi le being transferred. If you are expecting a software update, you
can look here to see the status of that download. The percentage
shown indicates how much of the fi le has been received.
• JBus. Confi rms connection to on-board computer.
• GPS. Captures latitude, longitude, altitude, speed, direction and
provides debug information for the GPS.
Exhibit 57.
Diagnostics – Files Sub-Tab
TND
™
760 Fleet Edition User’s Guide
52
TND
TM 760 SysInfo
Exhibit 58.
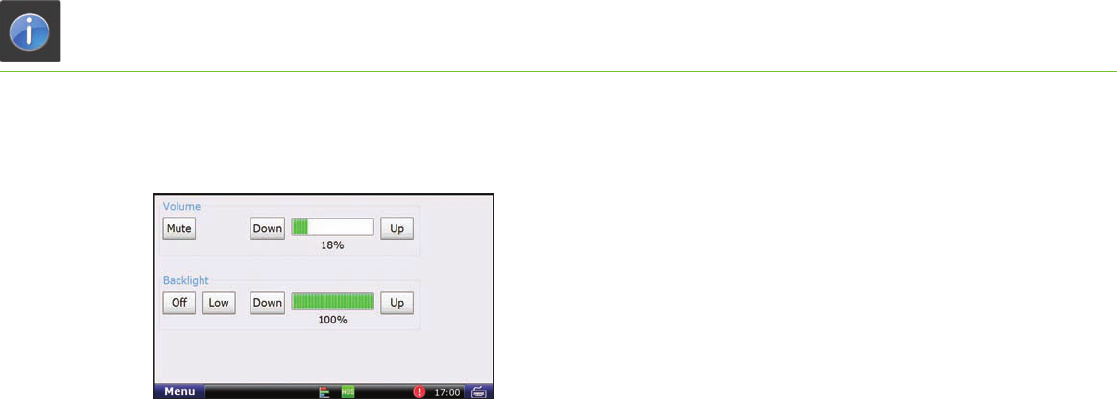
SysInfo Safe-driving Screen
SysInfo Safe-driving Screen
The SysInfo safe-driving screen allows you to adjust the
TND™ 760’s volume and screen brightness [Exhibit 58].
TND
™
760 Fleet Edition User’s Guide

Troubleshooting
Troubleshooting
To assist you with troubleshooting, please refer to the list
of possible solutions below. You are always welcome to call
Customer Support, but the hints in the chart on the left may
be all you need to have your system up and running quickly.
Check power connection
- Ensure that the cable is secured to Deutsch port and display.
- Reestablish the cable connections by unplugging them, then plugging them back in.
Check communications
- Look for any crossed-out icons on the lower right of the display.
- Take the truck for a drive to ensure that the issue is not signal interference.
Verify registration information
- Check the Registration screen to make sure you have entered the correct Truck #.
-
Verify your customer number (Customer # or Cust. ID). If you have questions about
your customer number, please call Customer Support at 1-800-641-RAND (7263).
Check communications
- Look for any crossed-out icons on the lower right of the display.
- Take the truck for a drive to ensure that the issue is not signal interference.
Restart the unit
- Restart the unit by first logging off, then pressing the On/Off button.
This will cause the unit to reset and reconnect.
Check connections
- Take the truck for a drive to ensure that the issue is not signal interference.
Restart the unit
- Restart the unit by first logging off, then pressing the On/Off button.
This will cause the unit to reset and reconnect.
Check connections
- Take the truck for a drive to ensure that the issue is not signal interference.
Check connections
- Ensure that the cable is connection to Deutsch port and display.
Restart the unit
- Restart the unit by first logging off, then pressing the On/Off button.
This will cause the unit to reset and reconnect.
Try a different unit
- Try a different unit to determine whether the issue is with the unit or cable.
Check connection
Make sure truck ignition is on
Restart engine
No power or
intermittent
power loss:
Unable to
register:
Unable to
send and receive
messages:
Unable to
connect cellular
modem, GPS
or Wi-Fi:
Nothing appears
on display:
Unable to use
touch screen:
J-Bus not
responding:
Problem Possible Solutions

Rand McNally follows a continuous improvement process
and reserves the right to provide enhancements that may not
be reflected in the pictures and specifications of this manual.
Rand McNally and IntelliRoute are registered trademarks and TND is a trademark of Rand McNally.
The Trucker’s Friend and National Truck Stop Directory are registered trademarks of TR information Publishers,
Truck Down is a registered trademark of TruckDown Info International, Inc.
NAVTEQ ON BOARD is a trademark of NAVTEQ ©NAVTEQ. All rights reserved.
©2012 Rand McNally. All rights reserved.
While the information contained herein is believed correct when compiled, Rand McNally does not
guarantee its accuracy.
U.S. Patent No. 7,580,791

TND760010612_0001_v1