RM Acquisition 01002A Truck Information Terminal User Manual HD100 User Manualx
RM Acquisition LLC Truck Information Terminal HD100 User Manualx
UserManual.wiki
>
RM Acquisition
>
01002A User Manual
User.Manual Rev.2
Navigation menu
Upload a User Manual
Namespaces
Wiki Guide
HTML
PDF
Info
Views
User Manual
Discussion / Help
Navigation


![16HD 100 UserManualGetting Started Exhibit 1. TND™ 720 Power Button Exhibit 2. HD 100 Log On Screen Power On Turn on your truck to accessory mode (the mode you use to operate your radio and A/C without turning on the ignition fully) to power on your HD 100 device. Press the Power button on your TND™ 720. Log On You will first see the IntelliRoute® software Home Menu. Click the HD 100 button on this screen. Once the HD 100 software loads, log onto the HD 100 software by entering the Driver ID you created when activating your device through the Rand McNally Dock. Tap Submit [Exhibit 2, (c)]. NOTE: You can also refer to the Rand McNally HD 100 Activation email you received after you completed this process. Your log-in information is in this email for your records. To go back to the IntelliRoute Home Menu, select the Back button. NOTE: To log off your HD 100, select the Logoff icon on the HD 100 Home Menu.](https://usermanual.wiki/RM-Acquisition/01002A/User-Guide-2025351-Page-18.png)
![HD 100 User Manual 17 Icon Definition Wi-Fi Cell Getting Started Exhibit 3. Warning Screen Warning Screen The Warning Screen [Exhibit 3] reminds you that using your HD 100 and TNDTM 720 while driving can be distracting. Be cautious and wise. Tap Continue [Exhibit 3] to complete the logon. Communication Status You must have a cell or Wi-Fi connection to log on for the first time. Locate the communication icon on the status bar. Icons and their definitions are shown in the table to the left. Tap the keyboard button in the bottom left corner of the keyboard if you cannot view the status bar. Note: If you have a signal but still see errors (such as Invalid Logon), refer to the Rand McNally HD 100 Activation email you received after you completed the activation process through the Dock. This email contains your Driver ID.](https://usermanual.wiki/RM-Acquisition/01002A/User-Guide-2025351-Page-19.png)
![18HD 100 UserManualOn-Screen Keyboard (a) Exhibit 4. On-screen Keyboard (f) (b) (c) (d) (e) On-screen Keyboard The HD 100 on-screen keyboard is quick to access and easy to use. • All controls are on the screen. • Large button faces fit your fingers. To use the keyboard: • Tap the keyboard button [Exhibit 4, (e)] on the HD 100 status bar to display the keyboard. • Tap the ABC or !@# buttons [Exhibit 4, (a)] to view alphanumeric characters and symbols respectively. The arrow button [Exhibit 4, (c)] on the right on the ABC screen allows you to change between upper and lower-case letters. • Tap the Delete button [Exhibit 4, (b)] to erase a character. • Tap the space bar button to insert a space [Exhibit 4, (f)]. • Tap Enter [Exhibit 4, (d)] to type on the next line. • Tap the keyboard button [Exhibit 4, (e)] again to hide the keyboard.](https://usermanual.wiki/RM-Acquisition/01002A/User-Guide-2025351-Page-20.png)
![HD 100 User Manual 19 Icon Definition Driver Peformance. Balloon messages appear over the icon to help you manage your performance. Messages are related to metrics such as over idling and speeding. HOS. The icon changes color according to your HOS status. The icon is green when you are within acceptable limits for each HOS status. The icon changes to yellow when you are nearing violation status and to red when you are in violation. Mail. The icon appears on the status bar when you have unopened mail. Communications. The icon shows your communication status (Wi-Fi, Cellular, No communication). System message. System alerts appear in balloon messages over the icon. On-Screen Keyboard Exhibit 5. Status Bar Status Bar The status bar remains visible at the bottom of every screen and gives you access to current information about the HD 100. Any status or alert icons are found on the status bar [Exhibit 5, (a)]. Icons and their definitions are shown in the table to the left. The status bar also allows you to: • Check your terminal time [Exhibit 5, (b)]. • Pull up the on-screen keyboard [Exhibit 5, (c)]. • Return to the Home Menu [Exhibit 5, (d)]. ](https://usermanual.wiki/RM-Acquisition/01002A/User-Guide-2025351-Page-21.png)
![20HD 100 UserManualScreen Calibration Exhibit 6. Calibrate Screen Screen Calibration As soon as you are logged in with the HD 100 software, calibrate your screen. Recalibrate from time to time, especially if the screen “slips” when you touch it. To calibrate your screen: • Press and hold the Home button for 10 seconds. Calibration starts once button is released. • Tap the center of the crosshairs as they appear on the calibration screen [Exhibit 6]. There are four total. - Tap as close to the center of the crosshairs symbol (+) as possible. - Use the same pressure you normally use when tapping the screen - If you receive an error, try again. NOTE: Do NOT press and hold finger on the center of the crosshairs. Just tap.](https://usermanual.wiki/RM-Acquisition/01002A/User-Guide-2025351-Page-22.png)
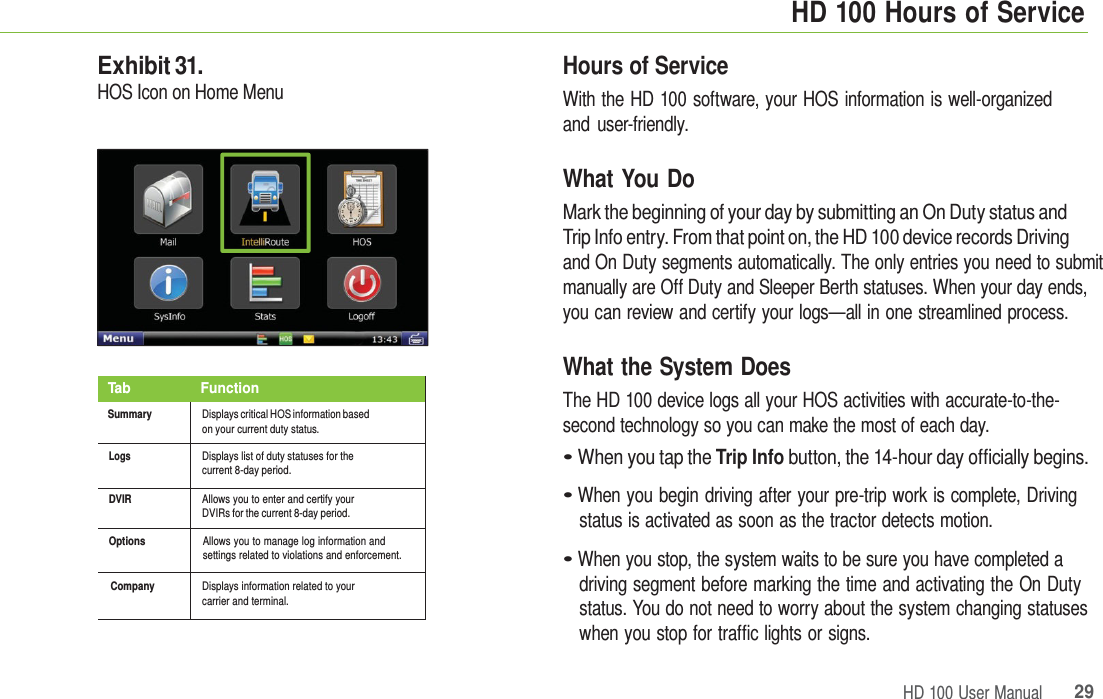
![HD 100 User Manual 21 HD 100 Home Menu Exhibit 7. Home Menu Screen Home Menu The Home Menu [Exhibit 7] is the home screen of the HD 100 software. The applications available to you on the HD 100 are identified by icons. The icons on the Home Menu are explained in the table to the left. • Press the Menu button on the left of the status bar to return to the Home Menu screen. Icon Function Icon Function View, listen and respond to messages. Pinpoint location and find routes. Review, create and send logs. Access company information. View driver perfomance stats. Manage settings, tasks and communication. Log off the TNDTM 760.](https://usermanual.wiki/RM-Acquisition/01002A/User-Guide-2025351-Page-23.png)
![HD 100 User Manual 23 HD 100 Mail Exhibit 9. Mail Icon on Home Menu Mail Select the Mail icon on the Home Menu [Exhibit 9] to access messages and send e-mails. Mail opens to the Inbox tab. The tabs in Mail are explained in the table to the left. Tab Function Inbox Holds incoming messages. OutboxHolds outgoing messages. Send Allows you to send messages. Work Helps you process assignments. OptionsDisplays your e-mail address and allows you to manage your e-mail contacts.](https://usermanual.wiki/RM-Acquisition/01002A/User-Guide-2025351-Page-25.png)
![24HD 100 UserManualHD 100 MailExhibit 10. Inbox Tab Inbox All incoming messages appear in your Inbox [Exhibit 10]. Special features of the Inbox tell you details about your messages. Status information is clustered together [Exhibit 10, (a), (b) and (c)]. (a). A blank space in this column means the message has been opened. An envelope means it has not been opened. (b). A red exclamation point ( ! ) icon means the message is important. A paperclip ( ) icon means the message has an attachment. (c). When you are working in another Mail tab, an envelope icon appears on the tab indicating that you have an unopened message. Other columns in the Inbox tell you more about your messages [Exhibit 10, (d), (e) and (f)]. (d). This column tells you who sent the message. (e). This column tells you the subject of the message. (f). This column tells you when the message arrived. - The time displays for messages that arrived on that current day (based on your terminal time). - The date displays for messages that arrived on previous days.](https://usermanual.wiki/RM-Acquisition/01002A/User-Guide-2025351-Page-26.png)
![HD 100 User Manual 25 HD 100 Mail (a) Exhibit 11. Open Message Screen (c) (b) (d) Open Message Select a message to open it [Exhibit 11]. Four action buttons are available once a message is open. (a). Back returns you to the Inbox. (b). Play lets you listen to the message. (c). Reply lets you send a response to the message. (d). Delete lets you delete the open message. Your Inbox holds 200 messages. When more messages arrive, the oldest messages in your Inbox are automatically deleted. Personal E-mail Access If you would like to use your in-cab device to message people other than those who have a manager log-in to your Connect Web Portal account, you can save up to 5 personal e-mail addresses to communicate with while on the road. Personal e-mails are color-coded blue in your Inbox so you can identify them quickly. The color coding remains after the e-mail is read. You can view your assigned e-mail address by selecting the Options tab on the Mail screen and tapping the View E-mail Address button.](https://usermanual.wiki/RM-Acquisition/01002A/User-Guide-2025351-Page-27.png)
![26HD 100 UserManualHD 100 Mail(a) Exhibit 12. Outbox Tab (b) (c) (d) Outbox All outgoing messages appear in your Outbox [Exhibit 12]. Special features of the Outbox tell you details about your messages. Your Outbox holds 50 messages. When you have sent more than that, the oldest messages in your Outbox are automatically deleted. (a). A green check mark ( ) icon means the message has been sent. An orange arrow ( ) icon means the message is waiting to be sent. A red X ( ) icon means the message has not yet been sent. Other columns in the Outbox tell you more about your messages [Exhibit 10, (b), (c) and (d)]. (b). This column tells you who received the message. (c). This column tells you the subject of the message. (d). This column tells you when the message arrived. - The time displays for messages that arrived on that current day (based on your terminal time). - The date displays for messages that arrived on previous days.](https://usermanual.wiki/RM-Acquisition/01002A/User-Guide-2025351-Page-28.png)
![HD 100 User Manual 27 HD 100 Mail Exhibit 13. Send Tab Send Messages You can send messages from the Send tab [Exhibit 13]. The on-screen keyboard [Exhibit 13, (a)] appears automatically when you select the Send tab. Drop-down boxes [Exhibit 13, (b)] make it easy for you to complete the To and Subject fields. • The To field automatically selects Dispatch. The drop-down box lists other saved contacts. • You can fill in the Subject field by using either the drop-down list (if you want to send a form) or the on-screen keyboard (if you want to send a message). If you choose a form from the drop-down list, the screen displays the form in the message field (the body of the screen). When you are done, tap Send [Exhibit 13, (c)].](https://usermanual.wiki/RM-Acquisition/01002A/User-Guide-2025351-Page-29.png)
![28HD 100 UserManualHD 100 MailExhibit 14. Options Tab Exhibit 15. Mail Safe-driving Screen Options The Options tab has two buttons [Exhibit 14]. Manage Contacts [Exhibit 14, (a)]. This button lets you add contacts (for the list that displays in the To drop-down box on your Send message screen), request your contact list when you enter a new truck and make changes to your contact list. View E-mail Address [Exhibit 14, (b)]. This button displays the email address assigned to your HD 100 device. Mail Safe-driving Screen When you select the Mail icon while vehicle is in motion, the mail safe-driving screen will appear. With the mail safe-driving screen [Exhibit 15], you can hear a message rather than read it. • Play and stop messages [Exhibit 15, (a)]. • Hear the previous or next message [Exhibit 15, (b)]. • Control volume by dragging a finger across the volume box [Exhibit 15, (c)].](https://usermanual.wiki/RM-Acquisition/01002A/User-Guide-2025351-Page-30.png)
![30HD 100 UserManualHD 100 HoursofServiceExhibit 32. HOS Main Screen-Summary Tab Summary This tab gives you critical HOS information at-a-glance. • The top of the Summary tab shows the name and HOS status of the driver logged into the HD 100 software [Exhibit 32, (a)]. If the driver shown is not you, log off then log back on. • The Status Box provides a summary of your current status [Exhibit 32, (b)]. • Screen left tells the time remaining before you reach HOS limits and whether you can use the 16-hour rule [Exhibit 32, (c)]. Tap the (?) button for details. • Screen right shows the time remaining before each type of reset occurs [Exhibit 32, (d)]. - 70hr total. Time until a new 70-hour log starts. - 10hr Reset. Time until a 10-hour reset. - Split Reset. Time until reset with sleeper-berth statuses calculated in. NOTE: The HD 100 device is compliant with FMCSA regulation §395.15.](https://usermanual.wiki/RM-Acquisition/01002A/User-Guide-2025351-Page-32.png)
![HD 100 User Manual 31 HD 100 Hours of Service Exhibit 32. HOS Main Screen - Summary Tab Summary (continued) • The Summary tab also reports Hours gained back from 70hr total after midnight [Exhibit 32, (e)]. Buttons at the bottom let you change your HOS status or add specific trip information to the log [Exhibit 32, (f)]. The buttons display at the bottom of each HOS tab. The Today’s log button accesses the graph and tabs you need to manage your day [Exhibit 32, (g)]. The functions of adding a duty status, adding trip information and managing the current day’s log are explained on the following pages.](https://usermanual.wiki/RM-Acquisition/01002A/User-Guide-2025351-Page-33.png)
![32HD 100 UserManualHD 100 HoursofServiceExhibit 33. Pop-up for Adding a Duty Status Exhibit 34. Pop-up for Choosing a Location Add a Duty Status • Tap any duty-status button to view the [Exhibit 32, (f)) Adding record of duty status pop-up [Exhibit 33, (a)]. Most fields are grayed out, which means you do not need to do anything; the system records the required information automatically. • The pop-up shows the status selected [Exhibit 33, (b)]. For a different status, tap Back [Exhibit 33, (c)] and select the status you want. • Tap Submit [Exhibit 33, (d)] if the record is correct. • If GPS is on, the Loc. field will be grayed out. If GPS is off, tap More [Exhibit 33, (e)] to view the Choose location pop-up [Exhibit 34]. Choose a Location • Begin typing your location in the Search box [Exhibit 34, (a)] to bring up the section of the location list showing places beginning with those letters [Exhibit 34, (b)]. • Select your location to fill in the Loc. field.](https://usermanual.wiki/RM-Acquisition/01002A/User-Guide-2025351-Page-34.png)
![HD 100 User Manual 33 HD 100 Hours of Service Exhibit 35. Pop-up for Adding a Duty Status - Remarks Field Add a Remark to a Duty Status You may need to include a comment about your duty status. The cursor automatically appears in the Remarks field [Exhibit 35]. • Use the drop-down arrow to view company-provided options. • If a standard remark applies, select it to fill in the field. • If a standard remark does not apply, type your own remark using the on-screen keyboard. • Tap Submit to record the enhanced duty-status entry.](https://usermanual.wiki/RM-Acquisition/01002A/User-Guide-2025351-Page-35.png)
![34HD 100 UserManualHD 100 HoursofServiceExhibit 36. Pop-up for Adding Trip Information Add Trip Information • Tap the Trip Info button on the Summary tab to view the Adding trip information pop-up [Exhibit 36, (a)]. The on-screen keyboard automatically appears so you can enter Load, Co-driver (if appropriate), Trailer numbers and Remarks. • The cursor appears in the active field. To move the cursor to another field, just touch the field you want. • Standard remarks are included in the Remarks drop-down [Exhibit 36, (b)]. Select the remark you want or use the on-screen keyboard to enter a non-standard remark. • Tap Submit [Exhibit 36, (c)] to record your information and return to the Summary tab. Tap Back [Exhibit 36, (d)] to return to the Summary tab without recording your information.](https://usermanual.wiki/RM-Acquisition/01002A/User-Guide-2025351-Page-36.png)
![HD 100 User Manual 35 HD 100 Hours of Service Exhibit 37. Today’s Log Main Screen - Graph Tab Today’s Log The Today’s log button can be accessed on the Summary tab [Exhibit 32, (g)]. Four tabs display across the top of the Today’s log screen [Exhibit 37, (a)]. Graph is the tab that opens when you select Today’s log. This screen has three buttons: Edit, Add Duty Status and Add Trip Info. • Edit. This button [Exhibit 37, (b)] allows you to edit any uncertified log from the last 8 days (select the arrow buttons and to view a previous day’s log). • Add Duty Status. This button [Exhibit 37, (c)] on the Today’s Log Graph screen allows you to add a current duty status to the current day. Any changes to earlier statuses must be made using the Edit button. • Add Trip Info. This button [Exhibit 37, (d)] allows you to add infor- mation for a new trip for the current day. Any changes to the trip information for previous trips must be made using the Edit button. NOTE: Driving status time cannot be edited once recorded.](https://usermanual.wiki/RM-Acquisition/01002A/User-Guide-2025351-Page-37.png)
![36HD 100 UserManualHD 100 HoursofService(a) Exhibit 38. Pop-up for Editing Trip Information Edit Trip Information Before selecting the Edit button [Exhibit 37, (b)], you can tap the graph screen on the point where you would like to make an edit. The green line on the graph indicates a change in duty status. You can also tap the Prev and Next buttons to move the green line to the desired point on the graph. (e) (d) (c) Once you tap Edit, the Editing trip information pop-up will appear [Exhibit 38, (a)]. Make any changes to the preexisting information [Exhibit 38, (b)]. • Tap Delete [Exhibit 38, (d)] if you wish to delete the entire status entry. • Tap Back [Exhibit 38, (e)] to go back to the Graph tab. • Tap Submit [Exhibit 38, (c)] to save your entry.](https://usermanual.wiki/RM-Acquisition/01002A/User-Guide-2025351-Page-38.png)
![HD 100 User Manual 37 HD 100 Hours of Service Exhibit 39. Graph Tab - Day to be Certified Certify Logs • If you have outstanding uncertified log entries (those that do not have a check mark next to them), you should review and certify them as soon as possible. • Uncertified log entries must be certified in order of oldest to newest. • Review the entry using the tabs (Graph, List, Summary and Trip Info) to verify that the log is accurate. • Make any required changes. - To change an incorrect status, select the correct status from either the Graph or the List tab. Tap Edit [Exhibit 39, (b)] to access the required pop-up. Make your changes and tap Submit. NOTE: Driving status time cannot be edited once recorded.](https://usermanual.wiki/RM-Acquisition/01002A/User-Guide-2025351-Page-39.png)
![38HD 100 UserManualHD 100 HoursofServiceExhibit 39. Graph Tab - Day to be Certified Certify Logs (continued) -To add a status, tap Add Duty Status [Exhibit 39, (c)]. Fill in the time, change the duty status field (if required) and enter the location. Add Remarks if appropriate. Tap Submit. -To alter the trip information record, tap Add Trip Info [Exhibit 39, (d)], fill in the form and tap Submit. • Once you are satisfied that the log is accurate, tap Certify [Exhibit 39, (e)]. A pop-up asks you to confirm the log is correct. -Tap No to return to the previous screen. -Tap Yes to return to the Logs tab. When the log has been certified and recorded, a green check mark appears at the beginning of the row.](https://usermanual.wiki/RM-Acquisition/01002A/User-Guide-2025351-Page-40.png)
![HD 100 User Manual 39 HD 100 Hours of Service Exhibit 40. Logs Tab Logs The Logs tab gives a summary of the totals for the last 8 days [Exhibit 40]. Past days that you want to review, edit, or certify are displayed. • The top of the tab lists your name and current HOS status [Exhibit 40, (a)]. If you are not the driver shown, log off the HD 100 software, then log back on. • The columns on this tab show summary information about each day’s log. - Date. Displays the last eight days with the current date at the top of the list. - Miles. States the number of miles traveled for the day. - Off-duty. Gives the number of off-duty hours logged for the day. - S.B. Indicates the time spent in the sleeper berth for the day. - Driving. Gives the time spent driving for the day. - On-duty. Gives the time spent on-duty but not driving for the day. • The check marks to the left of the date column show which days have been certified [Exhibit 40, (b)].](https://usermanual.wiki/RM-Acquisition/01002A/User-Guide-2025351-Page-41.png)
![HD 100 HoursofService40HD 100 UserManual(a) (b) Exhibit 41. DVIR Tab (c) (d) (e) (f) (g) (h) DVIR The DVIR (Daily Vehicle Inspection Report) tab contains information regarding all DVIR entries from the last 8 days. DVIR information is clustered together [Exhibit 41, (a), (b) and (c)]. (a). A blank space in this column means the DVIR entry has not yet been certified. (b). A green check mark ( ) means the DVIR has been certified. A tool icon ( ) means a DVIR entry has been added and that there is an outstanding defect that should be reviewed and certified. (c). A warning icon ( ) on the DVIR tab means there is an outstanding defect. (d). This column tells you when the DVIR entry was made. • The time and date are listed. (e). This column tells you the number of defects listed in the DVIR entry. (f). This column tells you the Driver ID of the person who added the DVIR entry.](https://usermanual.wiki/RM-Acquisition/01002A/User-Guide-2025351-Page-42.png)
![HD 100 Hours of Service HD 100 User Manual 41 Exhibit 42. Pop-up for Adding DVIR Exhibit 43. Pop-up for Adding Defect Add a DVIR • Add DVIR. Use this button when you want to add a DVIR for the current day or for any day within the last 8 days [Exhibit 41, (g)]. - Trailer(s). - Time and Date. You may have to enter defects from your inspection. If so, select Yes [Exhibit 42]. - Enter the Location and Defect fields [Exhibit 43] - You can also add other notes about the inspection in the Remarks field. NOTE: You can also view this screen by selecting any DVIR entry from the past 8 days on the DVIR main screen. This will allow you to add a defect to a previous day’s DVIR.](https://usermanual.wiki/RM-Acquisition/01002A/User-Guide-2025351-Page-43.png)
![HD 100 HoursofService42HD 100 UserManualExhibit 44. DVIR Record-Defects Tab Certify DVIR Entries and Repairs To review the entered defects of previous DVIR entries, select any entry from the last 8 days on the DVIR tab [Exhibit 40]. -Defects tab [Exhibit 44]. Select this tab to view the description of each defect listed for the selected DVIR. Click on any of the defect entries to view any entered remarks.](https://usermanual.wiki/RM-Acquisition/01002A/User-Guide-2025351-Page-44.png)
![HD 100 Hours of Service HD 100 User Manual 43 Exhibit 45. DVIR Record - Certify Tab Certify DVIR Entries and Repairs (continued) - Certify tab [Exhibit 45]. Select this tab to certify the DVIR entry. • Reported by: lists Driver ID and time and date of DVIR entry. • Repaired by: lists Driver ID and time and date of repair. - Tap No repairs needed. - Tap Repairs Made to indicate that defects have been repaired. Note: You must select one of these options in order to certify your DVIR. • Review: - Tap Certify to submit the DVIR. As with other HOS screens, you can update your current status with the buttons at the bottom [Exhibit 40].](https://usermanual.wiki/RM-Acquisition/01002A/User-Guide-2025351-Page-45.png)
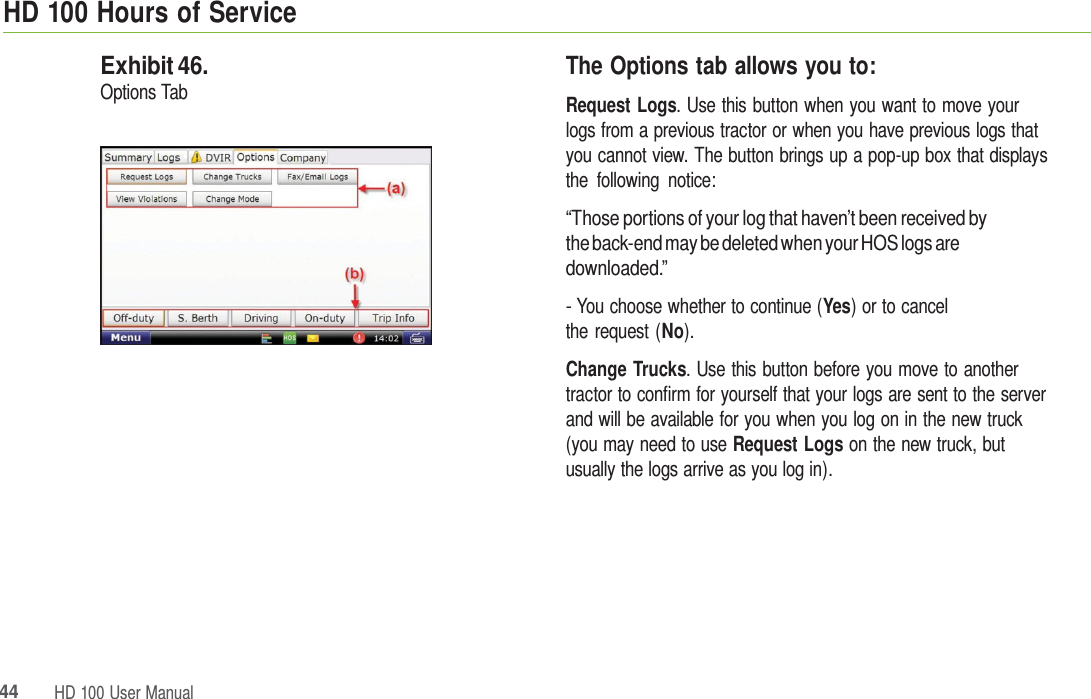

![HD 100 HoursofService46HD 100 UserManualExhibit 47. Pop-up for Changing Mode Options (continued) Change Mode. This button lets you govern the information displayed within the HD 100 software. - Normal. This option is the default or standard working mode. - Roadside Audit. This option provides limited access to your logs when enforcement asks to see them. No additional information is shown except what is required by law. No log information can be changed by you or enforcement while you are in Roadside Audit mode. • Tap Normal to exit Roadside Audit mode. - Enter your Driver ID. - Personal Conveyance. This option lets you use your vehicle for personal use. Use this mode only when your vehicle is not laden. You must also be Off Duty first before you can enter Personal Conveyance Mode. As with other HOS screens, you can update your current status with the buttons at the bottom [Exhibit 46, (b)].](https://usermanual.wiki/RM-Acquisition/01002A/User-Guide-2025351-Page-48.png)
![HD 100 Hours of Service HD 100 User Manual 47 Exhibit 48. Company Tab Company The Company tab [Exhibit 48] contains information required for your log. If any of the information is incorrect, please refer to the Connect Web Portal User Manual (Help > Connect Help > [Management > System Settings > Company Settings]) Carrier The upper half of the screen identifies your carrier [Exhibit 48, (a)]. - Name. - Address. - DOT number. Terminal The lower half of the screen identifies the home terminal to which the HD 100 is assigned [Exhibit 48, (b)]. - Name. - Address. - Start. This field shows the time and time zone for the terminal, which governs the HOS information captured by the unit.](https://usermanual.wiki/RM-Acquisition/01002A/User-Guide-2025351-Page-49.png)
![HD 100 HoursofService48HD 100 UserManualExhibit 49. HOS Safe-driving Screen HOS Safe-driving Screen The time shown on the HOS safe-driving screen is the effective drive time available to you for the day [Exhibit 49]. The time indicates how long you can drive before going into any violation, so the time displayed may not be your actual available drive time if you are close to your 14 or 70-hour limit. Time. Two numbers appear for your remaining drive time if the 16-hour rule is active. Color. Color coding lets you closely monitor your HOS statuses and take whatever action is necessary to remain in compliance. When vehicles are in compliance with HOS limits, the time displays in green. When a vehicle is within one hour of the legal limit for any HOS requirement, the display changes to yellow. When a vehicle is out of time for any HOS requirement, the display changes to red.](https://usermanual.wiki/RM-Acquisition/01002A/User-Guide-2025351-Page-50.png)
![HD 100 User Manual 49 HD 100 SysInfo Exhibit 50. SysInfo Icon on Home Menu SysInfo Select the SysInfo icon on the Home Menu [Exhibit 50] to control system settings and to view technical information about your HD 100 device. SysInfo opens to the Settings tab. The tabs in SysInfo are explained in the table to the left. Tab Function Settings Allows you to control the volume and screen brightness. Info Displays system information. DiagnosticsDisplays information related to your HD 100's communication status.](https://usermanual.wiki/RM-Acquisition/01002A/User-Guide-2025351-Page-51.png)
![50HD 100 UserManualHD 100 SysInfoExhibit 51. Settings Tab Exhibit 52. Info Tab Settings Volume. Control the volume of your in-cab device by selecting Mute or by tapping the Down and Up buttons [Exhibit 51, (a)]. Each tap changes the volume by 10 percent. You can also change the volume by pressing down and drawing your finger across the percentage box. Backlight. Control the backlight by selecting Off or by adjusting the screen’s brightness by tapping the Down and Up buttons [Exhibit 51, (b)]. You can also press down and draw your finger across the percentage box. Low dims the screen to less than 10 percent. Info Tap Info to access registration information for your HD 100. The fields on the tab window include Cust. ID. (Customer Number), Software Version, Truck # and S.N. (Serial Number).](https://usermanual.wiki/RM-Acquisition/01002A/User-Guide-2025351-Page-52.png)
![HD 100 User Manual 51 HD 100 SysInfo Exhibit 53. Diagnostics – Wi-Fi Sub-Tab Exhibit 54. Diagnostics – Files Sub-Tab Diagnostics Status. Shows the current method of communication [Exhibit 53, (a)]. Health Check. Confirms function of system hardware. Cell. Provides status of cell connection. Wi-Fi. Provides status of Wi-Fi connection [Exhibit 53, (a) and (b)]. Files. Shows files scheduled for download or upload [Exhibit 54]. - Downloads to the truck [Exhibit 54, (a)] can include software updates and dispatch files. - Transfer [Exhibit 54, (c)] provides the current status of the file being transferred. If you are expecting a software update, you can look here to see the status of that download. The percentage shown indicates how much of the file has been received. JBus. Confirms connection to on-board computer. GPS. Captures latitude, longitude, altitude, speed, direction and provides debug information for the GPS.](https://usermanual.wiki/RM-Acquisition/01002A/User-Guide-2025351-Page-53.png)
![52HD 100 UserManualHD 100 SysInfoExhibit 55. SysInfo Safe-driving Screen SysInfo Safe-driving Screen The SysInfo safe-driving screen allows you to adjust your TND™ 720’s volume and screen brightness [Exhibit 55].](https://usermanual.wiki/RM-Acquisition/01002A/User-Guide-2025351-Page-54.png)
![HD 100 User Manual 53 HD 100 Stats Exhibit 56. Stats Icon on Home Menu Stats Select the Stats icon on the Home Menu [Exhibit 56] to access information about driver performance and fault codes. Stats opens to the Driver Performance tab. The tabs in stats are explained in the table to the left. Tab Function Driver Performance Displays statistics based on idle time, RPM, engine and motion time. Fau lt C od es Displays fault codes and the location and type of fault in relation to your vehicle.](https://usermanual.wiki/RM-Acquisition/01002A/User-Guide-2025351-Page-55.png)
![54HD 100 UserManualHD 100 Stats Exhibit 57. Driver Performance Tab Driver Performance The Driver Performance tab displays these statistics: Hard brakes— where vehicle speed is over 20MPH. Miles / MPG. Idling percentages for Short, Mid and Long Idles. Over Idle %—where idle is over your fleet’s grace period. Over RPM%. Speeding%. You can tap the Show more metrics for today button [Exhibit 57, (b)] to view a pop-up with information on Idle fuel, Stop Idle %, Total Idle %, Driving %, Engine time and Motion time. You can tap the Request metrics for month button [Exhibit 57, (c)] to receive an update on driver performance. The report includes month-to-date information.](https://usermanual.wiki/RM-Acquisition/01002A/User-Guide-2025351-Page-56.png)
![HD 100 Stats HD 100 User Manual 55 Exhibit 58. Fault Codes Tab Fault Codes The Fault Codes tab [Exhibit 58, (a)] displays recorded fault codes for the vehicle. Two columns provide details about the fault [Exhibit 58, (b)]. Source. Indentifies the location of the fault (e.g., engine, cab controller, etc.). Subsystem/Parameter. Identifies the type of fault.](https://usermanual.wiki/RM-Acquisition/01002A/User-Guide-2025351-Page-57.png)