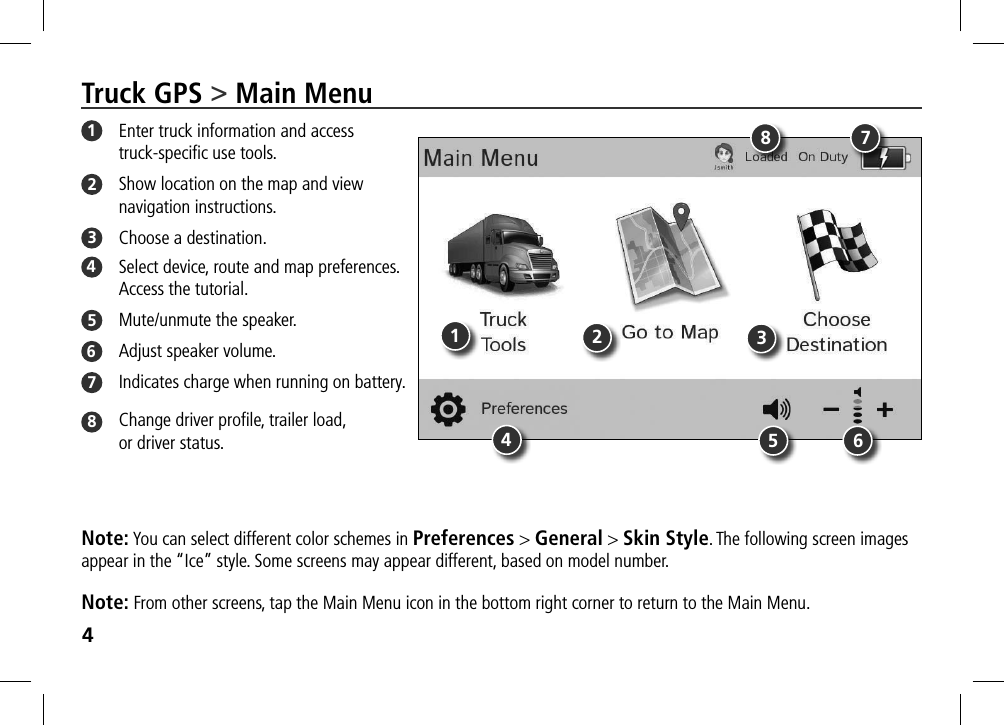
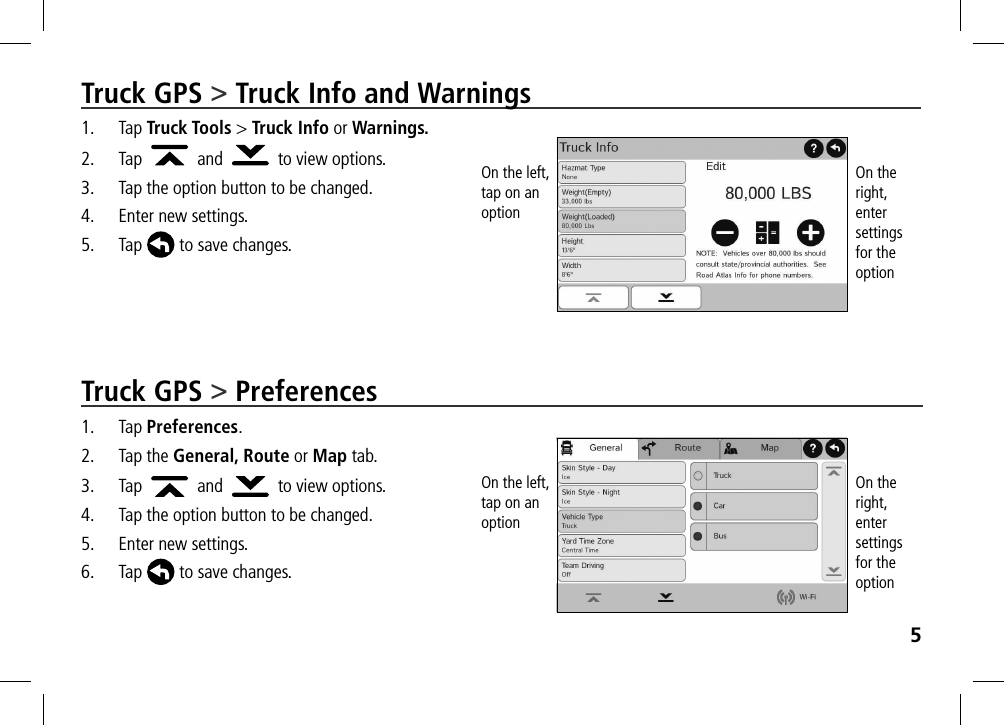
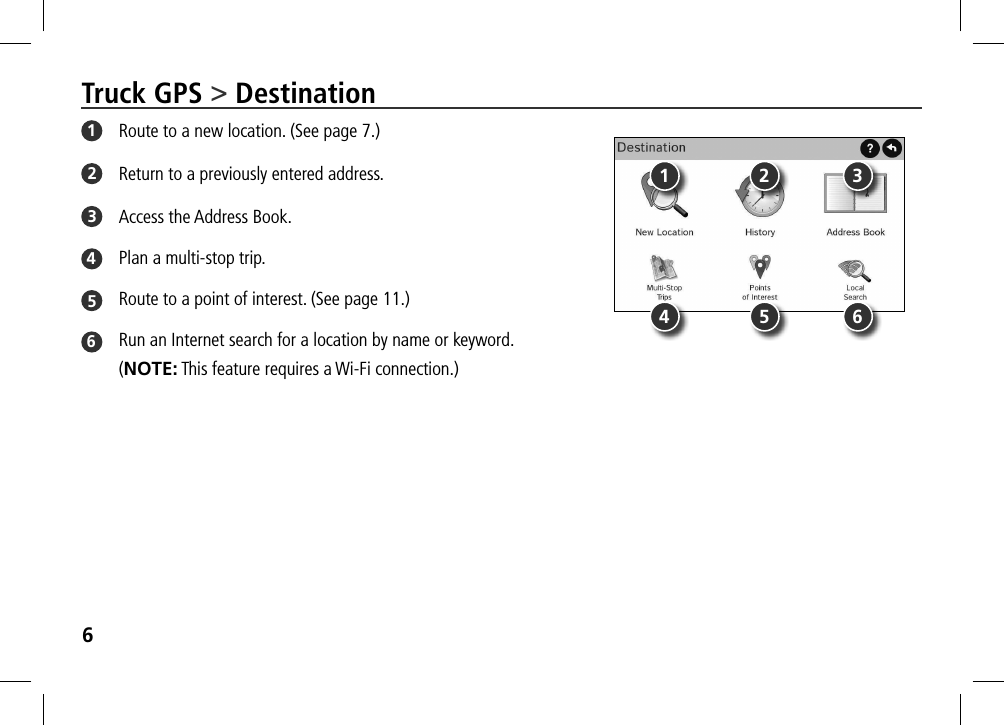
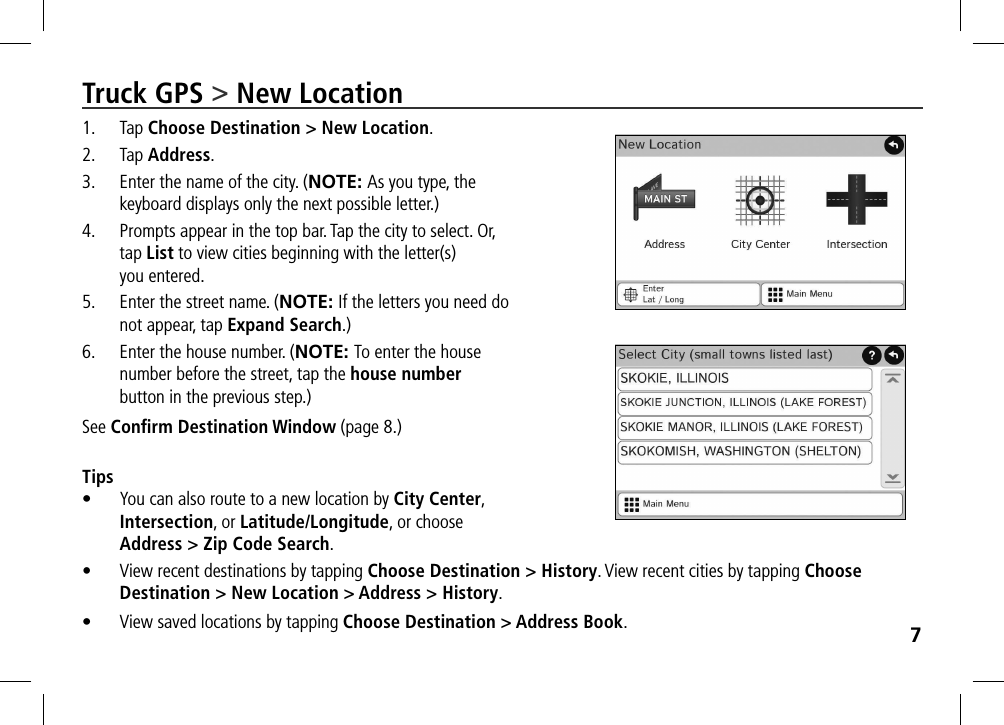
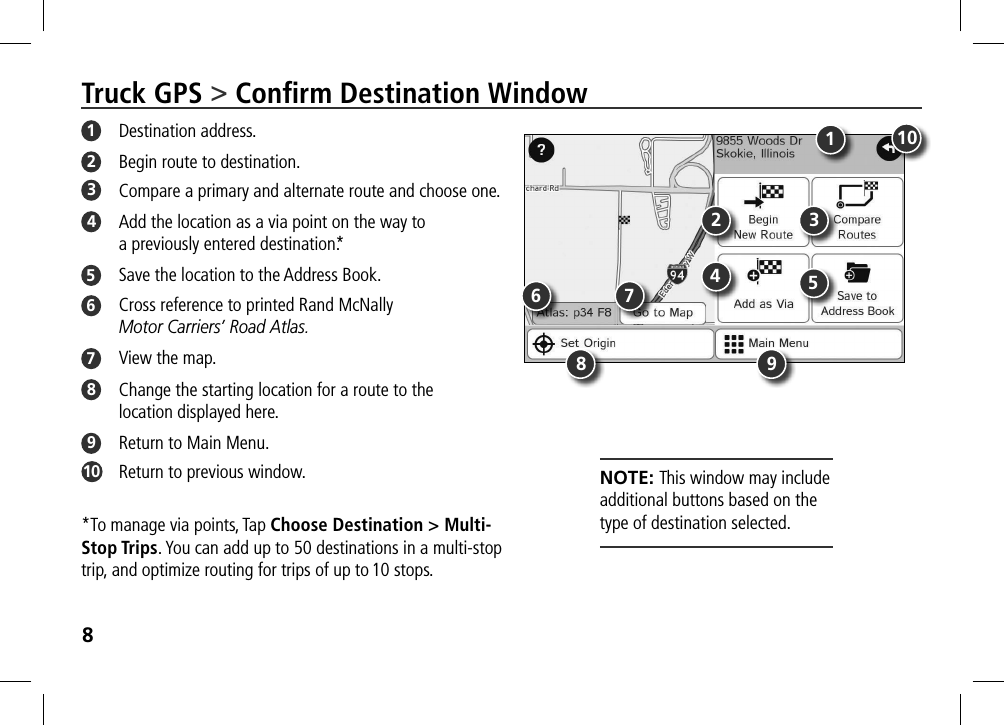
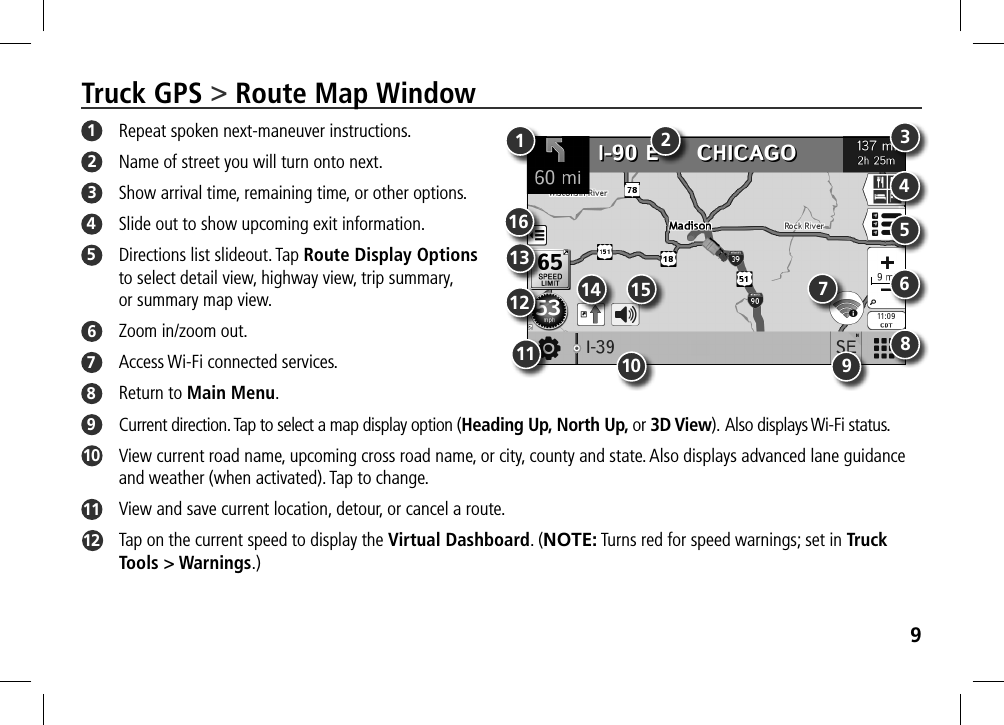
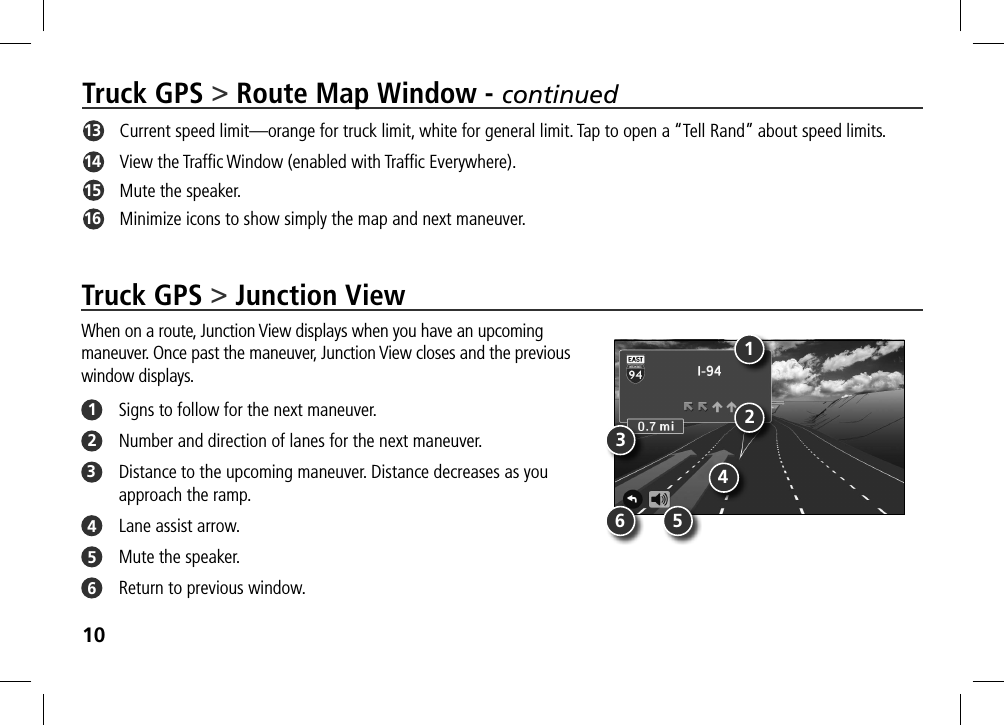
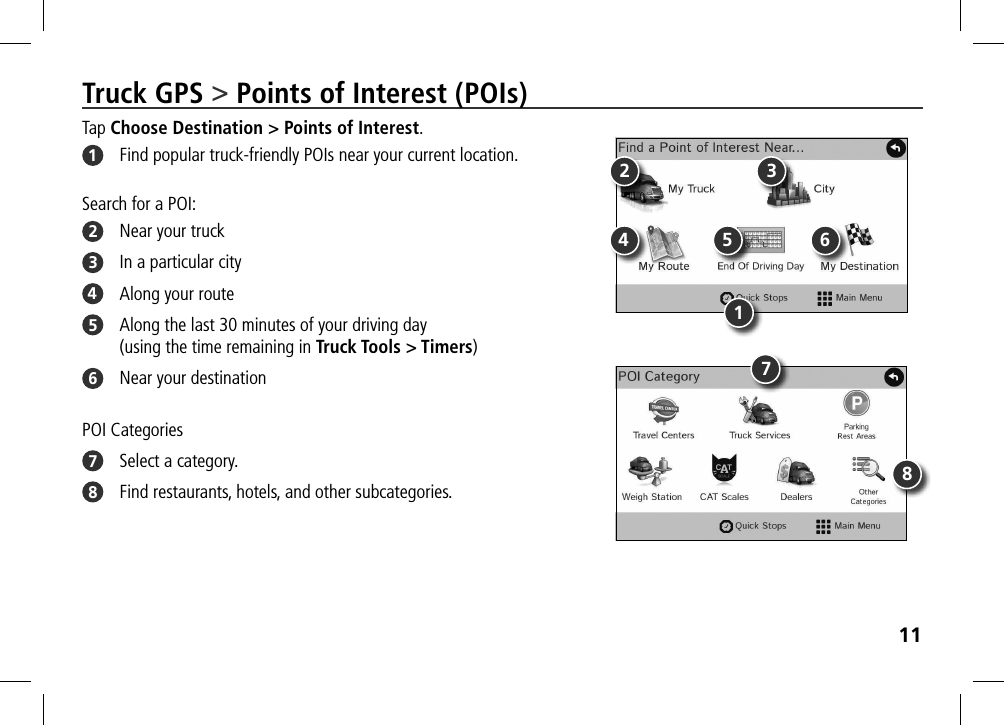
RM Acquisition 10007A TND Tablet User Manual DES 1223 TND Tablet QSG 141121 No Cam AG indd

RM Acquisition LLC TND Tablet DES 1223 TND Tablet QSG 141121 No Cam AG indd

User Manual

QUICK START GUIDE
1Your TND™ TabletMain MenuVolumeDown Up Power Dash camVideo outMicro USBSD CardAudio Out
2Install the MountNOTE: Follow all local regulations governing the placement of the mount. Select an area with a line of sight to the sky and GPS satellites to ensure reliable GPS information.1.  Clean and dry the mounting area.2.  Remove the suction cup protective film.3.  Adjust the angle of the mount using the thumbscrew.4.  Pull the suction cup lever up to release suction.5.  Clip the two pieces of the mount together.  Slide up to secure.6.  Plug the power cord into the mount and the  vehicle’s 12-volt power source.7.  Attach the tablet to the mount.8.  Place and hold the mount suction cup against the  mounting surface.9.  Press the suction cup lever down until it snaps into place.10.  Adjust the tablet so that it can be easily seen and does not block the driver’s line of sight.
3Main Menu1 IntelliRoute® TND™ Main Menu2 TripMaker® Use the online planning tool to plan a trip with multiple via points and transfer it to the navigation app as a multi-stop trip.3 Motor Carriers' Road Atlas4 Dash Cam5 Fuel Manager1 23 4 5Pre-Installed AppsThe following apps are ready to use on your tablet:  •  Profit Gauges and Fuel Manager, powered by Let’s Truck  • TRANSFLO® Mobile+ document scanning  •  TruckItSmart load boardAdditional apps are available in the Rand McNally Market.
4Truck GPS > Main Menu1  Enter truck information and access truck-specific use tools.2  Show location on the map and view navigation instructions.3  Choose a destination.4  Select device, route and map preferences.  Access the tutorial.  5  Mute/unmute the speaker.6  Adjust speaker volume.7  Indicates charge when running on battery.8  Change driver profile, trailer load,  or driver status.Note: You can select different color schemes in Preferences > General > Skin Style. The following screen images appear in the “Ice” style. Some screens may appear different, based on model number. Note: From other screens, tap the Main Menu icon in the bottom right corner to return to the Main Menu.14586723
5Truck GPS > Truck Info and Warnings1. Tap Truck Tools > Truck Info or Warnings.2.  Tap     and     to view options.3.  Tap the option button to be changed.4.  Enter new settings.5. Tap  to save changes.Truck GPS > Preferences1. Tap Preferences.2.  Tap the General, Route or Map tab. 3. Tap     and     to view options.4.  Tap the option button to be changed.5.  Enter new settings.6. Tap  to save changes.On the left, tap on an optionOn the left, tap on an optionOn the right, enter settings  for the optionOn the right, enter settings  for the option
6Truck GPS > Destination1  Route to a new location. (See page 7.)2  Return to a previously entered address.3  Access the Address Book.4  Plan a multi-stop trip.5  Route to a point of interest. (See page 11.)6  Run an Internet search for a location by name or keyword. (NOTE: This feature requires a Wi-Fi connection.)1 2 34 5 6
7Truck GPS > New Location1. Tap Choose Destination > New Location.2. Tap Address.3.  Enter the name of the city. (NOTE: As you type, the keyboard displays only the next possible letter.)4.  Prompts appear in the top bar. Tap the city to select. Or, tap List to view cities beginning with the letter(s)  you entered.5.  Enter the street name. (NOTE: If the letters you need do not appear, tap Expand Search.)6.  Enter the house number. (NOTE: To enter the house number before the street, tap the house number button in the previous step.)See Confirm Destination Window (page 8.) Tips•  You can also route to a new location by City Center, Intersection, or Latitude/Longitude, or choose Address > Zip Code Search.•  View recent destinations by tapping Choose Destination > History. View recent cities by tapping Choose Destination > New Location > Address > History.•  View saved locations by tapping Choose Destination > Address Book.
8Truck GPS > Confirm Destination Window1  Destination address.2  Begin route to destination.3  Compare a primary and alternate route and choose one.4  Add the location as a via point on the way to  a previously entered destination.*5  Save the location to the Address Book.6  Cross reference to printed Rand McNally  Motor Carriers’ Road Atlas.7  View the map.8  Change the starting location for a route to the  location displayed here.9  Return to Main Menu.10   Return to previous window.*To manage via points, Tap Choose Destination > Multi-Stop Trips. You can add up to 50 destinations in a multi-stop trip, and optimize routing for trips of up to 10 stops.NOTE: This window may include  additional buttons based on the  type of destination selected.1356 7981024
9Truck GPS > Route Map Window1  Repeat spoken next-maneuver instructions.2  Name of street you will turn onto next.3  Show arrival time, remaining time, or other options. 4  Slide out to show upcoming exit information.5  Directions list slideout. Tap Route Display Options  to select detail view, highway view, trip summary,  or summary map view. 6  Zoom in/zoom out.7  Access Wi-Fi connected services. 8  Return to Main Menu.9  Current direction. Tap to select a map display option (Heading Up, North Up, or 3D View). Also displays Wi-Fi status.10   View current road name, upcoming cross road name, or city, county and state. Also displays advanced lane guidance and weather (when activated). Tap to change. 11   View and save current location, detour, or cancel a route.12   Tap on the current speed to display the Virtual Dashboard. (NOTE: Turns red for speed warnings; set in Truck Tools > Warnings.)134568792101112 14131615
10Truck GPS > Route Map Window - continued13   Current speed limit—orange for truck limit, white for general limit. Tap to open a “Tell Rand” about speed limits.14   View the Traffic Window (enabled with Traffic Everywhere).  15   Mute the speaker.16   Minimize icons to show simply the map and next maneuver.Truck GPS > Junction ViewWhen on a route, Junction View displays when you have an upcoming  maneuver. Once past the maneuver, Junction View closes and the previous  window displays. 1  Signs to follow for the next maneuver.2  Number and direction of lanes for the next maneuver.3  Distance to the upcoming maneuver. Distance decreases as you approach the ramp.4  Lane assist arrow.5  Mute the speaker.6  Return to previous window.132456
11Truck GPS > Points of Interest (POIs)Tap Choose Destination > Points of Interest.1  Find popular truck-friendly POIs near your current location.Search for a POI:2  Near your truck3  In a particular city4  Along your route5  Along the last 30 minutes of your driving day (using the time remaining in Truck Tools > Timers)6  Near your destination POI Categories7  Select a category.8  Find restaurants, hotels, and other subcategories.871345 62
12Truck GPS > Local SearchTap Choose Destination > Local Search. (Note: This feature requires a Wi-Fi connection.)Search for a location by name or keyword near:1  Your truck2  A particular city3  Your destination4 Search for local restaurants.5  Access recent searches.Truck GPS > POIs - continued10   Tap location to select.11   View and edit ratings and comments.12   Tap to search by available services.13   Apply or remove services filter for search results.14   Search POI by name.10 1112 13 141 2 34 5
13Truck GPS > Virtual Dashboard1  Current direction of travel.2  Displays current time at the yard, current location  and your destination.3  Sunrise and sunset times based on vehicle location  (latitude/longitude) and day.4  Current speed (above) and posted speed limit (below).5  Elevation at current location.6  Percentage of current trip completed, distance to next maneuver, and the number of miles and time spent  on the trip to this point.7  Return to the Route Map Window.8  Gather trip information for up to three trips. Includes odometer settings, hours, and speeds.9  Reset trip information for the selected trip (Tab 1, Tab 2 or Tab 3).10   Select to automatically reset the information in each tab after the vehicle has remained stationary  for the specified number of hours.11   View fuel logs and add fuel purchase information.12   Match with truck's odometer to automatically update new fuel logs.  Tap the pencil to edit.134567910118212
14Truck GPS > Timers and Logs1. Tap Truck Tools > Timers, Logs, Trails, Fuel.2. Tap Timers to view timers, odometer readings, and average speed.3.  Tap on a field to change or reset the number. NOTE: Countdown timers are controlled by the Driver Status (Driving, On Duty, or Off Duty) selected on the Main Menu.To switch driver profiles, tap the driver information field. 4. Tap Logs to view a list of mileage logs by quarter.5.  Tap on a quarter to view individual logs by state.
15Truck GPS > Trails and Fuel1. Tap Truck Tools > Timers, Logs, Trails, Fuel.2. Tap Trails to record a “bread-crumb” path of GPS coordinates where your truck has traveled.3.  Tap any record to view the trail, edit the name  or set the color. 4. Tap Show on Map to display the trail on the  Route Map Window.5. Tap Fuel to view a list of fuel logs by quarter.6.  Tap on a quarter to view individual logs by state.7. Tap Add Fuel to record the date, location and cost  of fuel purchase. 8.  Tap on a field to make changes.9. Check Taxable to include the purchase in the fuel log.10. Tap Save.
16Truck GPS > Weather, Fuel Prices, and Traffic EverywhereNote: These features require a Wi-Fi connection.Tap the Wi-Fi connected services icon (   ) on the map screen.  Tap each tab to view live information.Weather:1 Tap to view details for current weather alerts.2  View weather information at your destination.3  Display weather on the map as you drive.Fuel Prices:4 Check to show fuel prices on the map screen.5 Sort results by distance or price. 6 Set filters for type and brand of fuel. 7 Choose to search near your vehicle or along your route. 1324675
17Pay attention to road conditions and street signs, and obey all traffic and safety laws. Traffic laws and current traffic conditions must always be observed and take precedence over the instructions issued by the TND™ product navigation system. The User should be aware of situations where current traffic conditions and the instructions from the navigation system may be in conflict. Some states prohibit the use of windshield mounts and may otherwise restrict the usage of navigation and other electronic devices in the vehicle. It is the User’s responsibility to ensure compliance with all laws and regulations. The use of the navigation system does not relieve the User of his/her responsibilities. The User is ultimately responsible for the vehicle under his/her control and should be aware of the surroundings at all times.If after reading these statements the User decides not to accept these terms, the User should not use the TND™ product.Rand McNally hereby grants you (“User”) a single-user non-exclusive, non-transferable license to use the Rand McNally IntelliRoute® TND™ trucking navigation product (hereinafter referred to as the “TND™ product” (including software and associated data) ) for User’s own internal business or personal use and not for resale, sublicense or commercial use.This TND™ product and the software incorporated in it and related documentation are furnished under license and may be used only in accordance with this license. Except as permitted by such license, the contents of this TND™ product and software may not be disclosed to third parties, copied or duplicated in any form, in whole or in part, without the prior written permission of Rand McNally. This TND™ product and software contain proprietary and confidential information of Rand McNally and its licensors. Rand McNally grants User a limited license for use of this TND™ product and the software incorporated in the TND™ product for its normal operation. By using the TND™ product, User acknowledges that the content of this document and the TND™ product are the property of Rand McNally and its licensors and are protected by U.S. copyright, trademark and patent laws and international treaties.THE USER MAY NOT:• Use the TND™ product on a network or file server, time-sharing or to process data for other persons. • Use the TND™ product to create any routing tables, files, databases or other compendiums.• Copy, loan or otherwise transfer or sublicense the TND™ product, its software or content.• Modify, or adapt the TND™ product in any way, or decompile, disassemble, reverse engineer or reduce to human readable form the TND™ product and software incorporated therein.• Alter, remove or obscure any copyright notice, trademark notice, or proprietary legend from the TND™ product, its software or content.This license will terminate automatically if User fails to comply with any of the terms of this license and User agrees to stop using the TND™ product. Rand McNally may revise or update the TND™ product and is not obligated to furnish any revisions or updates to User.RM Acquisition, LLC d/b/a Rand McNally warrants that the TND™ product, and the component parts thereof, will be free of defects in workmanship and materials for a period of one (1) year from the date of first use as determined by contact with GPS satellites. This warranty may be enforced by the first consumer purchaser (“Customer”), provided that the product is utilized within the U.S.A. or Canada.Rand McNally will, without charge, repair or replace (with a new or newly reconditioned unit), at its option, defective TND™ products or component parts. For repair or replacement of defective TND™ products, Customer must contact Rand McNally at 1-800-333-0136 for return authorization and instructions. Customer will be required to have the product registered or, if Customer is unable to register the product electronically, Customer will be required to provide proof of date of first Customer purchase, such as a duplicate copy of a sales receipt, for the warranty to be valid. The Customer must pay any initial shipping charges required to ship the product for warranty service, but the return charges will be at Rand McNally’s expense, if the product is repaired or replaced under warranty.Repairs or replacements have a 90-day warranty. If the product sent in is still under its original warranty, then the new warranty is 90 days or to the end of the original one (1) year warranty, depending on which is longer.This warranty gives the Customer specific rights. Other rights may be available to Customer which vary from state to state.Exclusions: This limited warranty does not apply: 1) to any product damaged by accident; 2) in the event of misuse or abuse of the product or as a result of unauthorized alterations or Warnings, End-User License Agreement, and Warranty
repairs; 3) if the serial number has been altered, defaced or removed; or 4) if the owner of the product resides outside of the U.S.A. or Canada.Caution: Rand McNally makes no warranty as to the accuracy of completeness of the information in the TND™ product and disclaims any and all express, implied  or statutory warranties, including any implied warranty of merchantability or fitness for a particular purpose. It is the user’s responsibility to use this product prudently. This product is intended to be used only as a travel aid and must not be used for any purpose requiring precise measurement of direction, distance, location or topography.RAND MCNALLY AND ITS LICENSORS DO NOT MAKE ANY OTHER WARRANTY OR REPRESENTATION, EITHER EXPRESS OR IMPLIED, WITH RESPECT TO THE TND™ PRODUCT, INCLUDING ANY WARRANTY AS TO QUALITY, PERFORMANCE, TITLE OR NON- INFRINGEMENT. IN NO EVENT WILL RAND MCNALLY OR ITS LICENSORS BE LIABLE FOR ANY INDIRECT, SPECIAL, INCIDENTAL, OR CONSEQUENTIAL DAMAGES ARISING OUT OF THE USE OR INABILITY TO USE THE TND™ PRODUCT, EVEN IF ADVISED OF THE POSSIBILITY OF SUCH DAMAGES.Some states do not allow limitations on how long an implied warranty lasts and/or do not allow the exclusion or limitation of incidental or consequential damages, so the above limitations my not apply to some consumers.The User agrees to allow User-provided information to Rand McNally to be used for internal business evaluation purposes, including, but not limited to, evaluating the effectiveness of the services provided, methods to simplify or improve User experiences. Such information will not be used by third parties or in any way that discloses the identity of the User.Rand McNally may make use of third party software in the TND™ product. Notwithstanding the terms and conditions of this license, use of some third party materials included in the TND™ product may be subject to other terms and conditions. The official third party copyright notices are provided at the end of this License.The User agrees to indemnify, defend and hold Rand McNally and its licensors (including their respective licensors, suppliers, assignees, subsidiaries, affiliated companies, and the respective officers, directors, employees, shareholders, agents and representatives of each of them) free and harmless from and against any liability, loss, injury (including injuries resulting in death), demand, action, cost, expense or claim of any kind or character, including but not limited to attorney’s fees, arising out of or in connection with any use or possession by the User of this TND™ product.These terms and conditions constitute the entire agreement between Rand McNally (and its licensors and suppliers) and the User pertaining to the subject matter hereof, and supersedes in their entirety any and all written or oral agreements previously existing between us with respect to such subject matter. The terms and conditions (including the license) may be updated from time  to time.The above terms and conditions shall be governed by the laws of Illinois, without giving effect to (i) its conflict of laws provisions, or (ii) the United Nations Convention for Contracts for the International Sale of Goods, which is explicitly excluded. The User agrees to submit to the jurisdiction of Illinois for any and all disputes, claims and actions arising from or in connection with the Data provided to the User hereunder.User shall not export the TND™ product in violation of any U.S. or foreign laws. Rand McNally’s licensors shall be third party beneficiaries of Rand McNally’s rights under this license, but are not parties hereto and have no obligations hereunder.By using this product you agree to be bound both by the foregoing and to the terms of use found at www.randmcnally.com/truckgps.Restricted Rights Legend. For governmental agencies: Use, reproduction or disclosure is subject to restrictions set forth in subparagraph (c) (1) (iii) of the Right in Technical Data and Computer Software clause at DFARS 52.227-7013, as amended.Rand McNally, the Rand McNally logo, the globe design mark, TripMaker, and IntelliRoute are registered trademarks and TND is a trademark of RM Acquisition, LLC, d/b/a Rand McNally.  The term Wi-Fi® is a registered trademark of the Wi-Fi Alliance®. CityGrid is a registered trademark of CityGrid Media. TRANSFLO is a registered trademark of Pegasus TransTech, LLC.Copyright © 2015 Rand McNally. All rights reserved. Portions © 2015 HERE. All rights reserved. This data includes information taken with permission from Canadian authorities, including  © Her Majesty the Queen in Right of Canada, © Queen’s Printer for Ontario. Traffic information provided by INRIX © 2015. All rights reserved by INRIX, Inc. Portions © 2015 InfoGation.  All rights reserved. Portions © 2015 The Trucker’s Friend. Portions © 2015 TruckDown. All rights reserved. Patent pending. U.S. Patent Nos. 7,580,791 and 8,214,141.
19Notes:
20Notes:
21Notes:
 10FCC RF Exposure Information and Statement The SAR limit of USA (FCC) is 1.6 W/kg averaged over one gram of tissue.  A4C-10007A and IC: 10199A-10007A) has also been tested against this SAR limit. The highest SAR value reported under this standard during product certification for use when properly worn on the body is 0.588 W/kg. This device was tested for typical body-worn operations with the back of the handset kept 1.0cm from the body. To maintain compliance with FCC RF exposure requirements, use accessories that maintain a 1.0cm separation  distance between the user's body and the back of the handset. The use of belt should not contain metallic components in its assembly. The use of accessories that do not satisfy these requirements may not comply with FCC RF exposure requirements, and should be avoided. This device complies with part 15 of the  FCC rules. Operation is subject to the  following two conditions: (1) this device may not cause harmful interference, and (2) this device must accept any interference received, including interference that may cause undesired operation.  NOTE: The manufacturer is  not responsible for any radio or TV interference caused by unauthorized modifications to  this equipment. Such modifications could void the user’s authority  to operate the equipment.  NOTE: This equipment has been tested  and found to comply with the limits for a Class B digital device, pursuant to pa rt 15 of the FCC Rules. These limits are designed to provide reasonable prot ection against harmfu l interference in a residential installation. This equipm ent generates uses and can radiate radio frequency energy and, if not inst alled and used in accordance with the instructions, may cause harmful inte rference to radio communications. However, there is no guarantee that interference will not occur in a particular installation. If this equipment does cause harmful in terference to radi o or television reception, which can be determined by tu rning the equipment off and on, the user is encouraged to try to correct  the interference by one or more of the following measures: - Reorient or relocate the receiving antenna. - Increase the separation between  the equipment and receiver. clips, holsters and similar accessories -Connect the equipment into an outlet on a circuit different from that to which the receiver is connected. -Consult the dealer or an experienced radio/TV technician for help. -Connect the equipment into an outlet on a circuit different from that to which the receiver is connected. -Consult the dealer or an experienced radio/TV technician for help. -Connect the equipment into an outlet on a circuit different from that to which the receiver is connected. -Consult the dealer or an experienced radio/TV technician for help. -Connect the equipment into an outlet on a circuit different from that to which the receiver is connected. -Consult the dealer or an experienced radio/TV technician for help. -Connect the equipment into an outlet on a circuit different from that to which  the receiver is connected. -Consult the dealer or an experienced radio/TV technician for help. Device types: TNDT80  (FCC ID:
CANADA Under Industry Canada regulations, this radio transmitter may only operate using an antenna of a type and maximum (or lesser) gain approved fo r the transmitter by Industry Canada. To reduce potential radio interference to other users, the antenna type and its gain should be so chosen that the equivalent isotropically radiated power (e.i.r.p.) is not more than that necessary for successful communication. This radio transmitter 10199A-10007A has been approved by Industry Canada to operate with the antenna types listed below with the maximum permissible gain and required antenna impedance for each antenna type indicated. Antenna types not in cluded in this list, having a gain greater than the maximum gain indicated for that type, are strictly prohibited for use with this device.  IC Statement  This device complies with Industry Canada licence-exempt RSS standard(s).   Operation is subject to the following two conditions: (1) This device may not cause interference, and (2) This device must accept any interference, including interference that may cause undesired operation of the device.  Le présent appareil est confor me aux CNR d'Industrie Canada applicables aux appareils radio exempts de licence. L'exploitation est autorisée aux deux conditions suivantes:  (1) l'appareil ne doit pas produire de brouillage, et  (2) l'utilisateur de l'appareil doit accepter t out brouillage radioélectri que subi, même si le  brouillage est susceptible d'en compromettre le fonctionnement.   brouillage est susceptible d'en compromettre le fonctionnement.

Navigation menu