RM Acquisition CAM100 Dash Cam User Manual Manual for A95FL DC100
RM Acquisition LLC Dash Cam Manual for A95FL DC100
User manual

- 1 -
This is a digital HD (high definition) video camera recorder with the most
advanced technology; this device is a common HD video camera as well as a
professional driving recorder. It can record the high resolution image with the
pixel as high as 1920X1080P fps FULL HD and take the picture of 4 mega
pixels. Using TF card as the storage device, compact size, low power
consumption, HD camcorder can record more detailed perfect video image.
Video also can be transferred by HDMI transmission wire directly to the high
quality LED TV (HDMI) for high resolution displaying.
Enjoy true high-definition lift by using this product.
Overview

2
Product features:
◎ 170 degree ultra wide angle lens.
◎1920X1080P fps FULL HD high quality resolution.
◎ Equipped with low light sensor, can get good video quality at night.
◎ Advanced H.264 video compression technology.
◎ 4 mega pixels.
◎ 1.5 inch high resolution LCD, can watch while shooting.
◎ Matching IR Light for supplementing light at night.
◎ Support HDMI high quality video transmission.
◎3 resolution forms can be changed for video recording.
◎ 60 frames per second for smooth video flow.
◎ Equipped with special auto suction cup holder. Conveniently fix and use.
◎ Built-in GPS, record traffic speed, driving track. (Optional)
◎G-sensor to keep records of sensor data and real-time display on the player. (Optional)
◎ Powerful document protection, even in the recording process, the occurrence of sudden
power outages, machine damage, etc., video files will be intact.
◎ Seamless continuous recording, will not miss any data.
◎ Adopt auto cigarette lighter power supply, to make the video recording while driving.
◎ When car engine started, automatically start recording.
◎ Automatic circulating video recording, being able to set the record time for each file.
◎ Watch video while make video recording in driving. Support on-spot play back.
◎ Improve time & date display, no need reset when re-start.
◎ Screenshots function, can capture the video screen while video recording and
reviewing(optional).
◎ Human orientated operation interface.
◎ One press taking a photo
◎ Maximum 64GB or even bigger SD high capacity storage device.
◎ Dewrup function
Feature

3
Product Structure
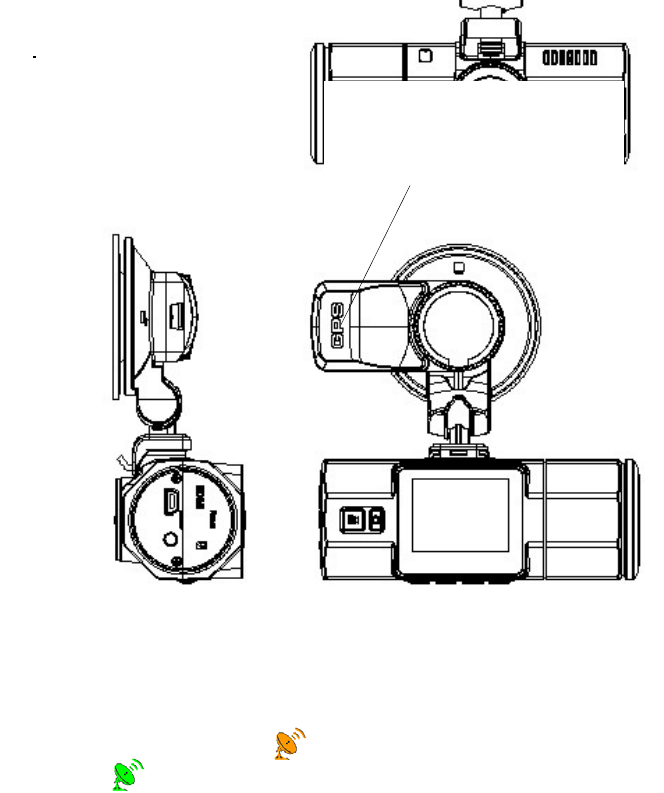
External GPS
Micro TF
HDMI
USB
AV
Reset
Photo/Delete
OK/Rec LCD
LED Speaker
Lens Mic
Power
Right
Left
Mode
4
The connection of external GPS is as belo
Remarks:
When power on, GPS auto search satellite. No GPS positioning, LCD screen display dynami
c lower left corner of the yellow icon ; GPS positioning, LCD screen shows a
green icon on the lower left corner. (Optional)
External GPS
Slide rail + card buckle:
Install: position the DVR and the sliding rail
of the GPS, sliding inside until you hearing a
sound.

5
MODE Key: to shift video recording, playback mode, system settings. To lock or unlock
the file during recording. At playback mode, press “MODE” key to back to thumbnail
status.
Right / Left key:
In Menu mode, used for menu selection; At thumbnail status to review
videos/photo. At video playback mode, short press Right key to low-speed play back. Short
press Left key to fast forward. At recording mode, short press Rigth key to on/off the LCD,
short press Left key to on/off the MIC.
Power key: Short press power on, press for 2 seconds power off. In the recording mode,
short press to on/off the LED. At thumbnail mode, short pressing can lock or unlock the
current file.
REC/OK Key:To start/stop recording. At menu setting to confirm selection. At Thumbnail
mode, to confirm the playing of the video/photo.
Photo/Delete Key: Take a Photo at Phote mode. At video playback mode, to start/pause
playing. At Thumbnail mode, to delete file.
Rest key: to Reset and force power off
Key Functions

6
Load and unload the battery
1. Battery indicators as below:
Full Half Low Empty
Battery Recharge
2. This device can be charged through connecting the USB terminal of computer as well as
connecting charger.
Connect to 12V/24V car charger as driving recorder
When used as driving recorder, it is required to turn on the Circulating Video Recording
and Automatic Video Recording Upon Start On, at the same time, connect it with the car
charger, when the vehicle engine is on, It will start video recording automatically; when the
vehicle engine is off, the data will be saved, and the device will shutdown automatically.
¾ Note:
Only the car charger with the output of 5V 2A can be used for the power supply, if the
currency is less than 2a, the device could be damaged by the charger of other voltages.
Insert in and take out the memory card.
1. Confirm the inserting direction of TF card, wrong inserting direction could damage the
camcorder and TF card;
2. Use the SDHC specification conforming high speed TF card, this TF card has the marking
of C4 or C6.
3. In the event of the storage card format cannot be compatible with the device, the device
could not read the card, and it is required to formalize the TF card.
Turn on / off and auto off of video recorder
1. Press the power key for 1 second to turn on/off the device.
Operation
Operation

7
2. For saving the power capacity of battery, to set the automatic off time in the menu, the
device will turn off automatically when not any operation on the video recorder.
Camcorder Mode
1. Press REC button to start the video recording, and then press REC button to stop the
video recording. During the process, red icon will flash on the screen.
2. Select flashlight:
Choose the mode of flashlight in the status of video recording by pressing right key. The
sequencing will be forced flash , and no flash .
Revise the following content in the Menu mode:
Video recording quality: to choose the resolution of video recording
Circulating video recording: to set or shut the circulating video recording, in the status of
circulating video recording, when the capacity of TF card is full, the previous content shall
be covered automatically.
Motion detect: When moving object is detected, the DVR will automatically start
recording , when no moving object is detected, the DVR will continue recording for 10 s
and then power off
Automatic video recording upon start on: when connecting car charger, the device will
start the video recording automatically 3 seconds after start on.
Power on delay: When connecting with car charger, during the set time period (default:10s,)
can continuously detected the power, the DVR will be turned on
Power off delay: When dis-connecting with car charger, during the set time period
(default:30s,) can continuously detected no power, the DVR will be turned off.
Sound recording: select to open or close the microphone.
Language:set language.
Operation

8
TV out:NTSC/PAL.
Auto off:set idle time to power off the device.
Format:Format the TF card.
Stamp: Video recording/pictures whether add into the time and date, customer logo and
speed info.
Date:Use up or down key to change the digits and press OK to go to next item.
Auto LCD off Time: set the time auto turn off the LCD screen; press any key to wake up
the LCD screen.
Reset system: to set the system parameter as the default value.
Night Mode: if the light is dim, night mode can significantly improve the ability to capture
the light, enhancing effect of night photography. Anti-glare function will clear the visual
quality of the files at the night mode.
Light source frequency: to choose the frequency of electric wire, in the event of selecting
the wrong frequency, the horizontal lines interruption will show on the image.
G-sensor: G-Sensor is used to test if the car has any crash. If so, it will automatically lock
the file, there will be a at the right corner of file. In this case, the video won’t be
erased by loop recording. There is eight settings of these sensitivity of the G-sensor:
off/1/2/3/4/5/6/7. “Off” closes the G-sensor function. “1” is the lowest sensitivity and “7” is
the highest. (To prevent too many locked files in the card which may affect normal loop
recording, the max total size of the locked file is 1G)
GPS auto time synchronization: when GPS signal is catch, will automatically correct the
date and time according to GPS.
Time zone setting: Set the time zone of your erea.
Firmware Version: to check the firmware version number of video recorder.

9
Sensor 4M CMOS sensor,1/3 inch light-sensing surface area
Lens 4 fixed focus Lens, aperture 2.0, focus 3.4mm
Zoom 2.7inch 16:9 TFT LCD
LCD display Terminal: composite TV signal output NTSC/PAL High
definition TV terminal interface: HDMI signal output. Max
1920X1080i50 or 1920X1080i60 AV (CVBS)
Picture PG file format Maximum output pixel: 12.0 mega pixels
Video output H.264 compressed format 2304X1296, 30
frame/sec, 1280 x 720, 60 frame/sec
Audio Microphone and speaker (AAC) Equipped
Memorizer Memory: 128M or 256M(optional)
External media: SDHC (support64G max, TF card)
Shutter Electronic shutter
Flashlight Automatic electronic video supplement lamp (IR)
Battery 280 mAh 3.7V Polymer Li-ion battery
Size 86*48.2*33.3
Net weight 82.8g
Specifications

10
Warning Notice
Cannot take pictures or video clips.
Check the TF card whether it’s locked or has insufficient space.
Stop recording half way.
Please check whether your TF card supports high-speed transmission (marked with
C10).
“File error” pops up in playback mode.
Please format the TF card.
No image on TV screen.
Make sure AV or HDMI cable is correctly connected. Make sure TV is switched to
correct mode.
Video or pictures are blurry.
Please clean up the lens.
Flashlights cannot be used.
The battery might be low.
Horizontal lines interruption in the image
This is caused by the light source is wrongly set, please set as 50Hz or 60Hz according
to the local power supply frequency.
FAQ
11
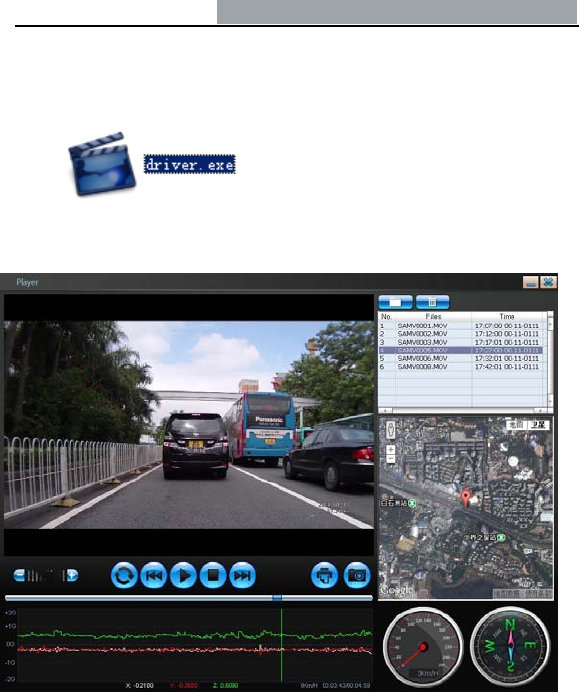
GPS Player Install Instruction:
(1) Firmware Installation
Install the “Driver.exe” at CD disk.
(2) Play the video
Double-click the “Player.exe”,select the file and play it.
FCC Statement:
This device complies with part 15 of the FCC Rules. Operation is subject to the following
two conditions: (1) This device may not cause harmful interference, and (2) this device
must accept any interference received, including interference that may cause undesired
operation.
This equipment has been tested and found to comply with the limits for a Class B digital
device, pursuant to part 15 of the FCC Rules. These limits are designed to provide
reasonable protection against harmful interference in a residential installation. This
equipment generates, uses and can radiate radio frequency energy and, if not installed
and used in accordance with the instructions, may cause harmful interference to radio
communications. However, there is no guarantee that interference will not occur in a
particular installation. If this equipment does cause harmful interference to radio or
television reception, which can be determined by turning the equipment off and on, the
user is encouraged to try to correct the interference by one or more of the following
measures:
—Reorient or relocate the receiving antenna.
—Increase the separation between the equipment and receiver.
—Connect the equipment into an outlet on a circuit different from that to which the
receiver is connected.
—Consult the dealer or an experienced radio/TV technician for help.
Caution: Any changes or modifications not expressly approved by the party responsible
for compliance could void the user's authority to operate the equipment.