RM COSTRUZIONI ELETTRONICHE Srl HLA305V HF power amplifier User Manual
RM COSTRUZIONI ELETTRONICHE Snc di Marchioni Davide e Daniele HF power amplifier
User manual
1
3
Amplificatore Lineare per bande HF a stato solido
Solid-State HF Linear Power Amplifier
HLA 305
Manuale Utente
User Manual
3 Costruzioni Elettroniche S.n.c.
www.rmitaly.com

HLA305
2
3
1. Introduzione
L'amplificatore HLA305 è un amplificatore lineare ad alte prestazioni costruito per essere utilizza-
to con tutti i ricetrasmettitori HF in tutte le modalità di trasmissione.
Questo amplificatore utilizza quattro dispositivi bipolari MRF455 configurati in classe AB.
Opera in tutte le bande da 160 a 10 metri in maniera lineare e senza interruzioni da 1,5 e 30MHz.
Una ventilazione forzata (HLA305V) a velocità variabile provvede al raffreddamento di tutte le
parti dell'amplificatore, un circuito elettronico controllato da un microprocessore ne controlla il fun-
zionamento.
Un display LCD, vi tiene sempre informati sui parametri fondamentali dell'amplificatore. Tempera-
tura dissipatore, banda impostata e molte altre informazioni sono visualizzabili per avere sotto
controllo in ogni momento lo stato di funzionamento dell'amplificatore.
Vi raccomandiamo la lettura del presente manuale in tutte le sue parti prima della messa in fun-
zione dell'amplificatore.
Conoscere il funzionamento di tutte le sezioni dell'amplificatore vi permetterà un uso più perfor-
mante ed eviterà errori che, oltre a causare una perdita di potenza in uscita, potrebbero determi-
nare danni ai componenti anche in maniera irreversibile.
Un uso attento e corretto vi farà apprezzare le "performance" dell’HLA 305 per molti anni senza
nessun intervento tecnico.
Introduction
The HLA 305 Linear Amplifier is a high performance amplifier designed for use with all HF trans-
ceivers and all modes of transmission.
The amplifier uses four MRF455 configured for Class AB operation.
Operation is possible for all bands from 160 to 10 meters and without interruption from 1.5 to 30
MHz.
It features a microprocessor controlled variable speed forced air ventilation (HLA305V) that provi-
des cooling for all areas of the amplifier.
An LCD display shows all of the amplifiers operational parameters; Heat-sink temperature, band
in use and other parameters, enabling the operator to see the state of the amplifier at any time.
This allows the user to obtain the maximum performance and avoid any possible operating errors
resulting in a loss of output power and possible irreversible component damage.
Attention to correct operating procedure and operating the amplifier within it’s capabilities will re-
sult in optimum performance and many years of trouble free use.

HLA305
3
3
2. Indice – Index
1 Introduzione – Introduction .................................................................................................................................................................................. 2
2 Indice – Index ...................................................................................................................................................................................................... 3
3 Specifiche - Specifications .................................................................................................................................................................................. 4
4 Descrizione parte Anteriore - Front panel description ......................................................................................................................................... 6
5 Descrizione parte Posteriore - Rear panel description ........................................................................................................................................ 6
6 Italiano .......................................................................................... 7
6.1 Rimozione dall'imballo ed ispezione ............................. 7
6.2 Procedura d'installazione .............................................. 7
6.3 Connessione all’alimentazione ...................................... 7
6.4 Antenna ......................................................................... 7
6.5 Massa ............................................................................ 7
6.6 PERICOLI ...................................................................... 7
7 Funzionamento ............................................................................ 7
7.1 Uso in CW ..................................................................... 7
7.2 Impostazioni iniziali ....................................................... 7
7.3 Menù ............................................................................. 7
7.3.1 SSB Delay ..................................................... 7
7.3.2 Backlight High/Low ........................................ 7
7.3.3 Contrast ......................................................... 8
7.3.4 Exit ................................................................. 8
7.4 Operate ......................................................................... 8
7.4.1 Default Setting ............................................... 8
7.4.2 Visualizzazione stato amplificatore ................ 8
7.4.2.1 Display LCD ................................... 8
7.4.2.2 Indicazioni Lumisose ...................... 8
7.4.2.2.1 TX ................................... 8
7.4.2.2.2 A WARNING ................. 8
7.4.3 Comandi ........................................................ 8
7.4.3.1 SSB/Off .......................................... 8
7.4.3.2 HI/Off .............................................. 8
7.4.3.3 Power ON/Off ................................. 8
8 Protezioni ...................................................................................... 8
8.1 OVER Input Power ........................................... 8
8.2 OVER Temp ..................................................... 8
8.3 SWR ................................................................. 8
8.4 FILTER FAULT ................................................. 8
8.5 Error Frequency ................................................ 8
9 Garanzia ........................................................................................ 9
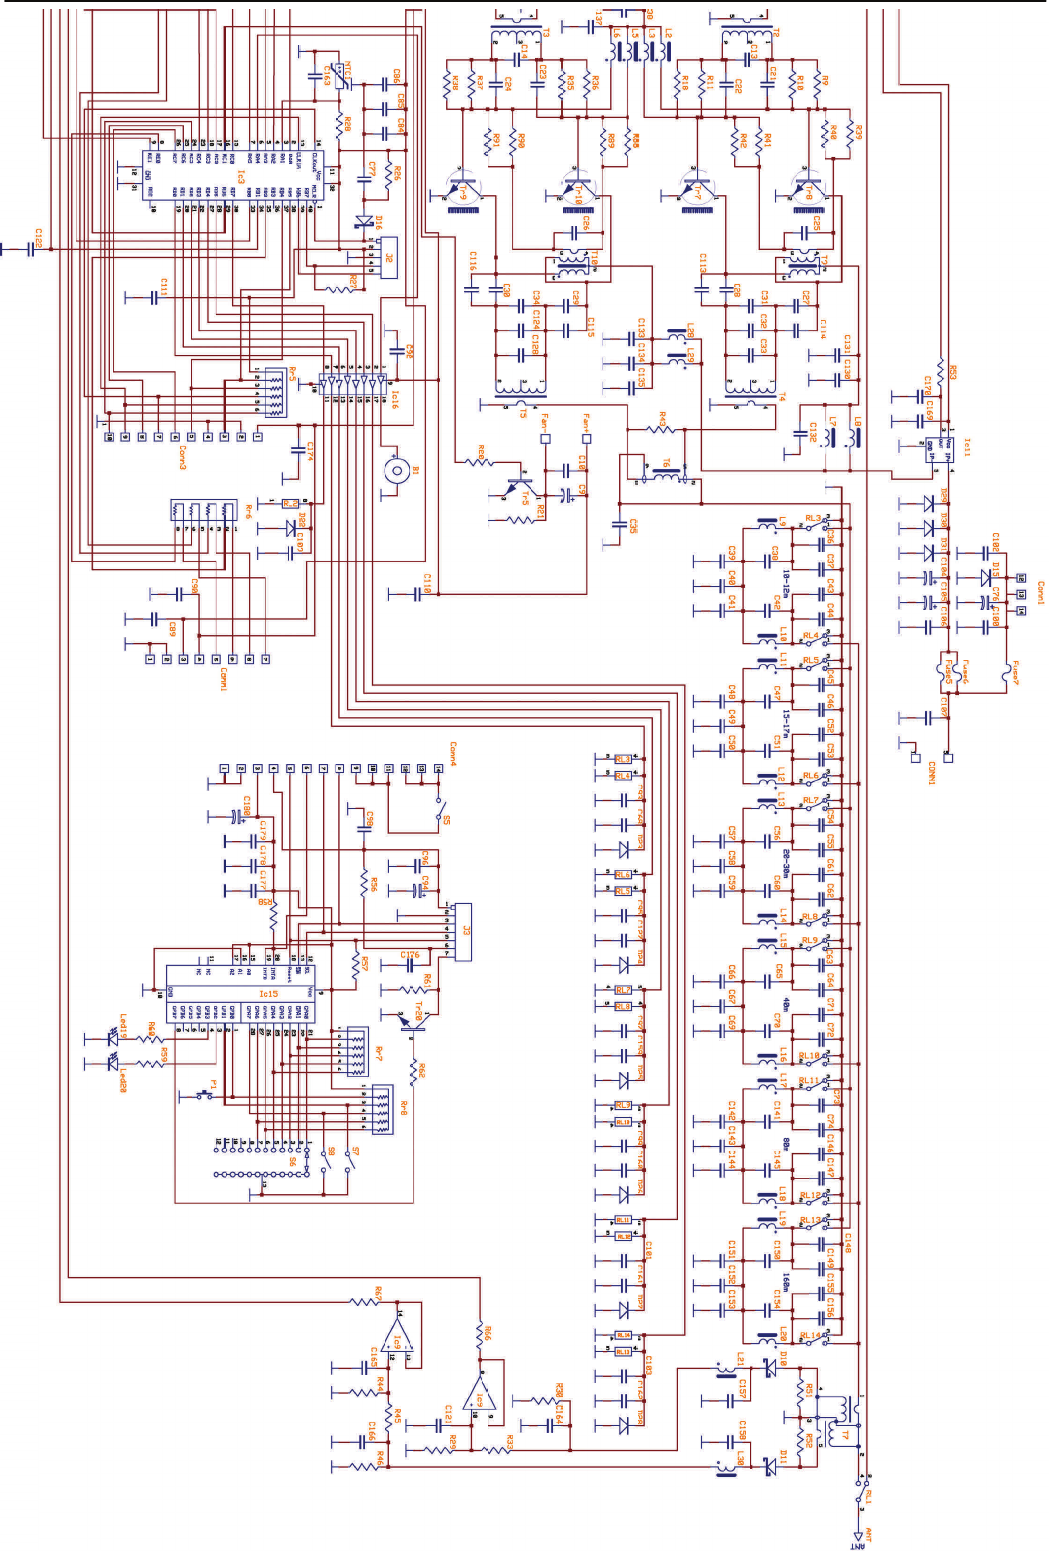
Schema elettrico .............................................................................. 12
Scheda per assistanza tecnica ........................................................ 14
16 English Precaution ..................................................................... 9
16.1 Removal from packaging and inspection .................... 9
16.2 Installation ................................................................... 9
16.3 Connection to Power supply ....................................... 9
16.4 Antenna ....................................................................... 9
16.5 GROUND .................................................................... 9
16.6 WARNING ................................................................... 9
17 OPERATION ............................................................................... 10
17.1 CW Operation ............................................................. 10
17.2 Initial Settings .............................................................. 10
17.3 MENU .......................................................................... 10
17.3.1 SSB Delay ................................................... 10
17.3.2 Backlight High/Low ...................................... 10
17.3.3 Contrast ........................................................ 10
17.3.4 Exit ............................................................. 10
17.4 Operate ....................................................................... 10
17.4.1 Default Setting ............................................. 10
17.4.2 Monitoring the Amplifier operation ............... 10
17.4.2.1 Display LCD ................................. 10
17.4.2.2 Front Panel LED's ........................ 10
17.4.2.2.2 TX ................................ 10
17.4.2.2.3 A WARNING ............... 10
17.4.3 Front Panel controls .................................... 10
17.4.3.1 SSB/Off ........................................ 10
17.4.3.2 HI/Off ........................................... 11
17.4.3.3 Power ON/Off ............................. 11
18 Protection .................................................................................... 11
18.1 Excessive Input Power ................................................ 11
18.2 OVER Temp ................................................................ 11
18.3 Excessive VSWR ........................................................ 11
18.4 FILTER FAULT ........................................................... 11
18.5 Error Frequency .......................................................... 11
19 Warranty ...................................................................................... 11
Schematic diagram .......................................................................... 12
Repair Form ..................................................................................... 14
InconformitàconlenormeFCCquestoamplificatoreèbloccatonellefrequenzeda26a28MHz
InAccordancewithFCCregulaonsthisamplifierisbandblockedfrom26to28MHz
HLA305
4
3
FCC Verification:
This Power Amplifier has been tested and found comply to FCC rules parts §§97.315 and §§97.317 regarding the Spurious and
mean power emissions as request for §§97.307.
According to FCC rules §§97.315 this Power Amplifier can be used only by an Amateur Radio Operator and it can be used in
that operator’s station.
Frequenza - Frequency : 1.5 ~ 30 MHz all amateur bands including WARC bands
Modi - Mode: AM, FM, SSB, CW, RTTY
Potenza di pilotaggio - RF Drive: 10W typ. (15W max.)
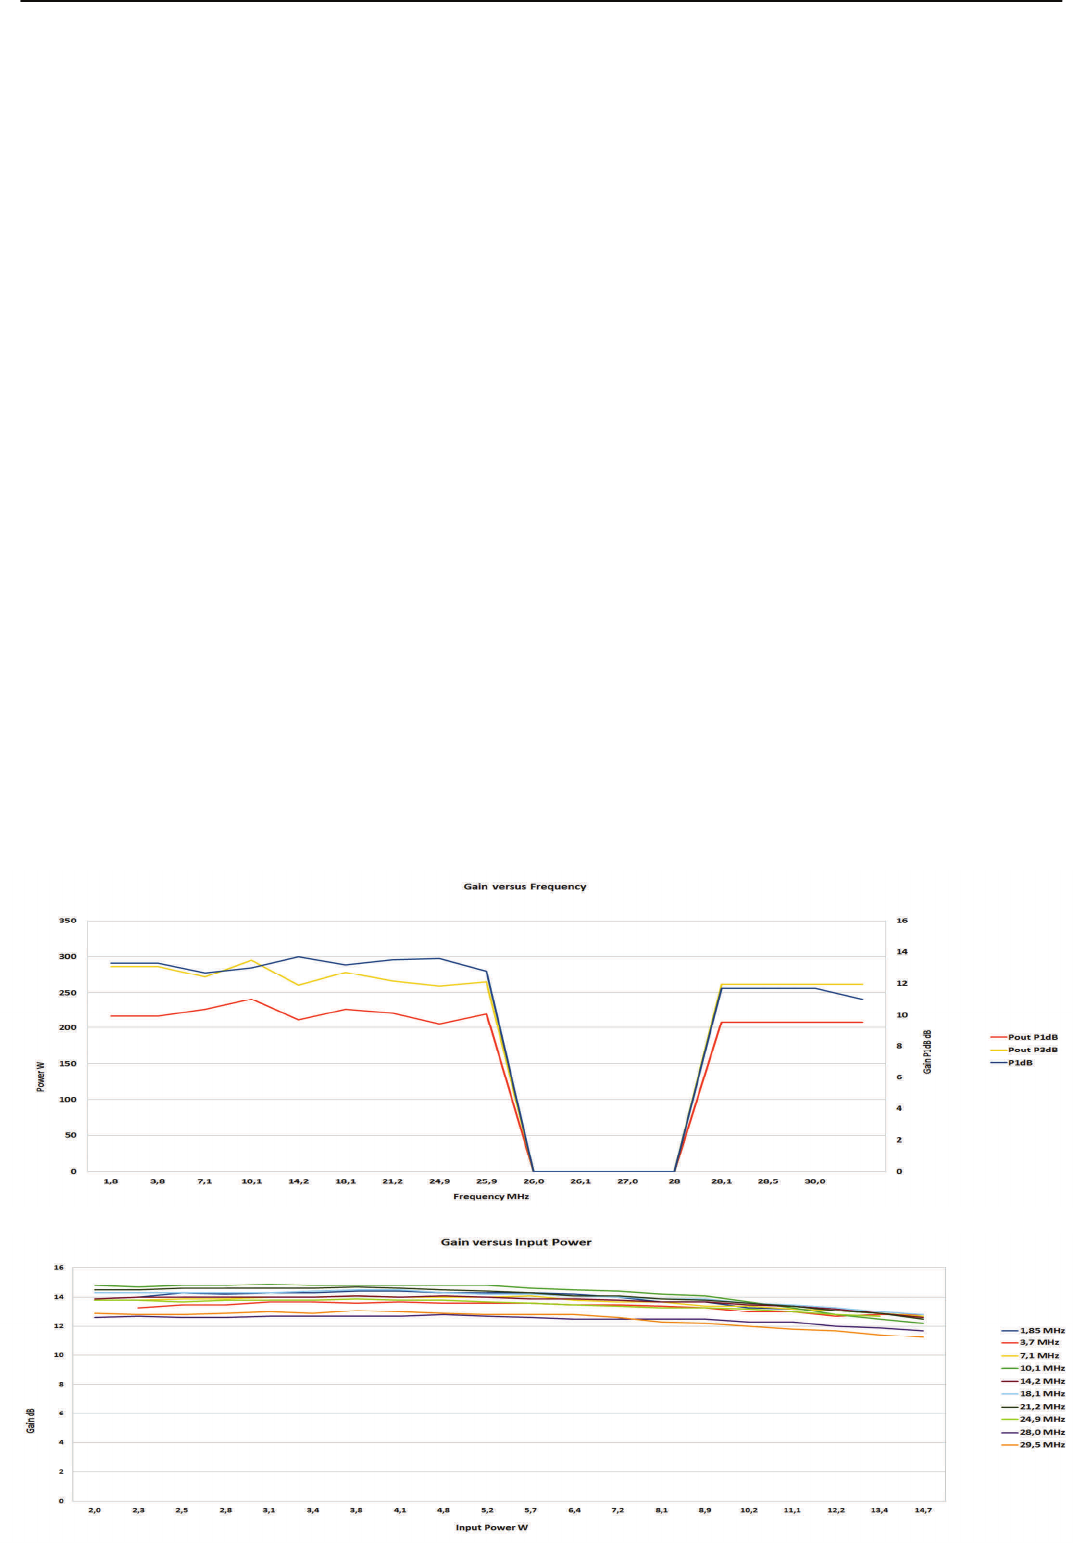
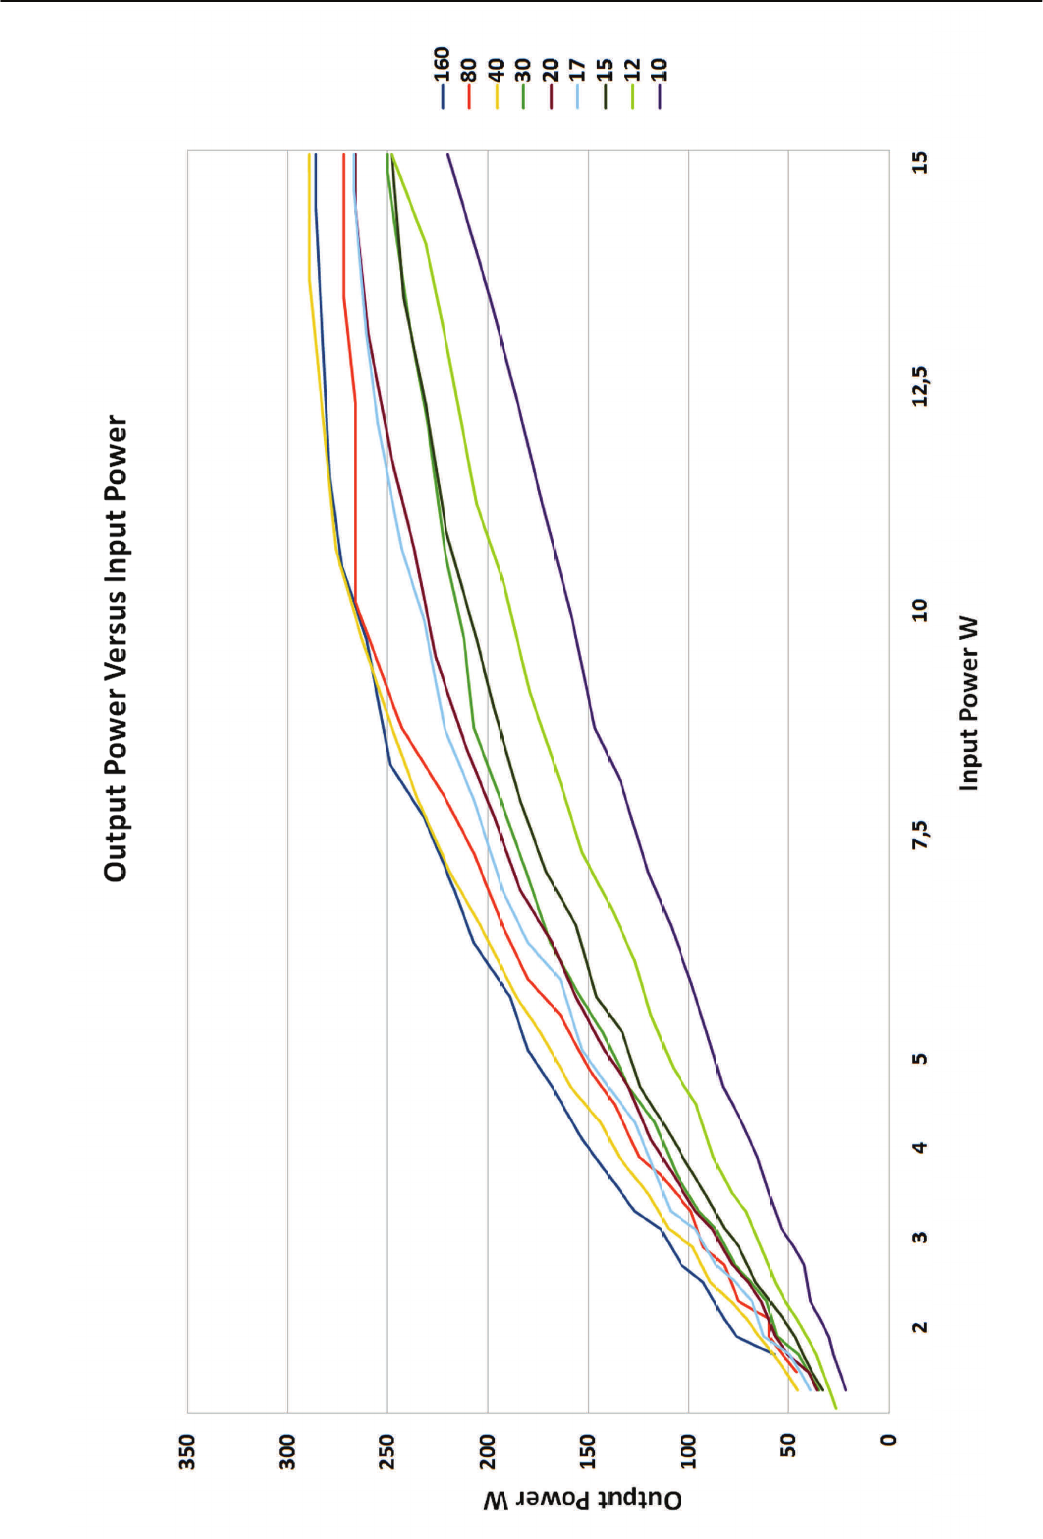
Potenza d'uscita Media – Average Output Power: P1dB 200W CW ±1dB typ.
P3dB 250W CW ±1dB typ.
Guadagno – Gain: 13.5 ± 1dB P1dB
Tensione di Alimentazione - Power Voltage: 13 Vcc ±2V
Corrente assorbita - Input Current: 45 A max.
Impedenza d'ingresso - Input Impedance: 50 (unbalanced)
Impedenza d'uscita - Output Impedance: 50 (unbalanced)
Transistor di potenza - Final Transistor: MRF 455 x 4
Configurazione - Circuit: Class AB push-pull
Metodo di raffreddamento - Cooling Method: Forced Air Cooling (HLA305V)
Microprocessore - MPU: PIC 18F4620
LCD: Temperatura dissipatore – Heat-sink temperature
Stato amplificatore – Amplifier state
Banda usata – Used band
Settaggi—Settings
Protezioni – Protection: Potenza d'ingresso – Input Power
Errore Filtri – Filter Error
R.O.S. - S.W.R.
Temperatura – Temperature
Frequenza - Frequency
Connettori Ingresso/Uscita - Input/Output Connectors :
UHF SO-239 with low loss Teflon insulator
PTT (RCA Connector)
Dimensioni - Dimensions : 240 x 67 (90 HLA305V) x 450 mm (W x H x D)
Peso - Weight : Approx. 4 kg. Or 8,8 lbs.
3. SPECIFICHE – SPECIFICATIONS
HLA305
5
3

HLA305
6
3
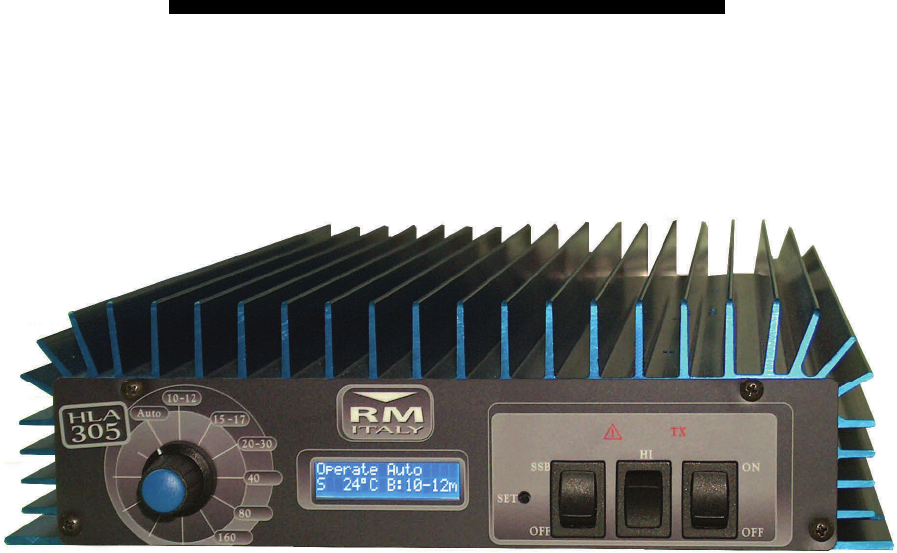
1)Auto/Band selector
Selezione filtro di banda Band Filter Selector
2)Display
Visualizza i parametri di funzionamento Displays the operational parameters
3)SET
Pulsante navigazione Menù di Setup Menu button
4)SSB ON/Off
inserimento ritardo SSB SSB delay button
5)High/Low
ON/Off attenuatore d’ingresso ON/Off Input attenuator
6)Power ON/Off
Interruttore generale di alimentazione Power switch
7)A WARNING
Indica una condizione di allarme, eccessiva potenza Indicates excessive input power, high temperature and
d'ingresso, eccessiva temperatura, allarme generico general alarm fault conditions
8)TX
Indica che l'amplificatore è in trasmissione Illuminates during transmission
9)ANT
Connetore SO239 Ricetrasmettitore Transceiver SO329 connector
10)RTX
Connetore SO239 Antenna Antenna SO329 connector
11)PTT
ConneoreingressoPTTInputPTT connector
12)Power
Connettore alimentazione Power connector
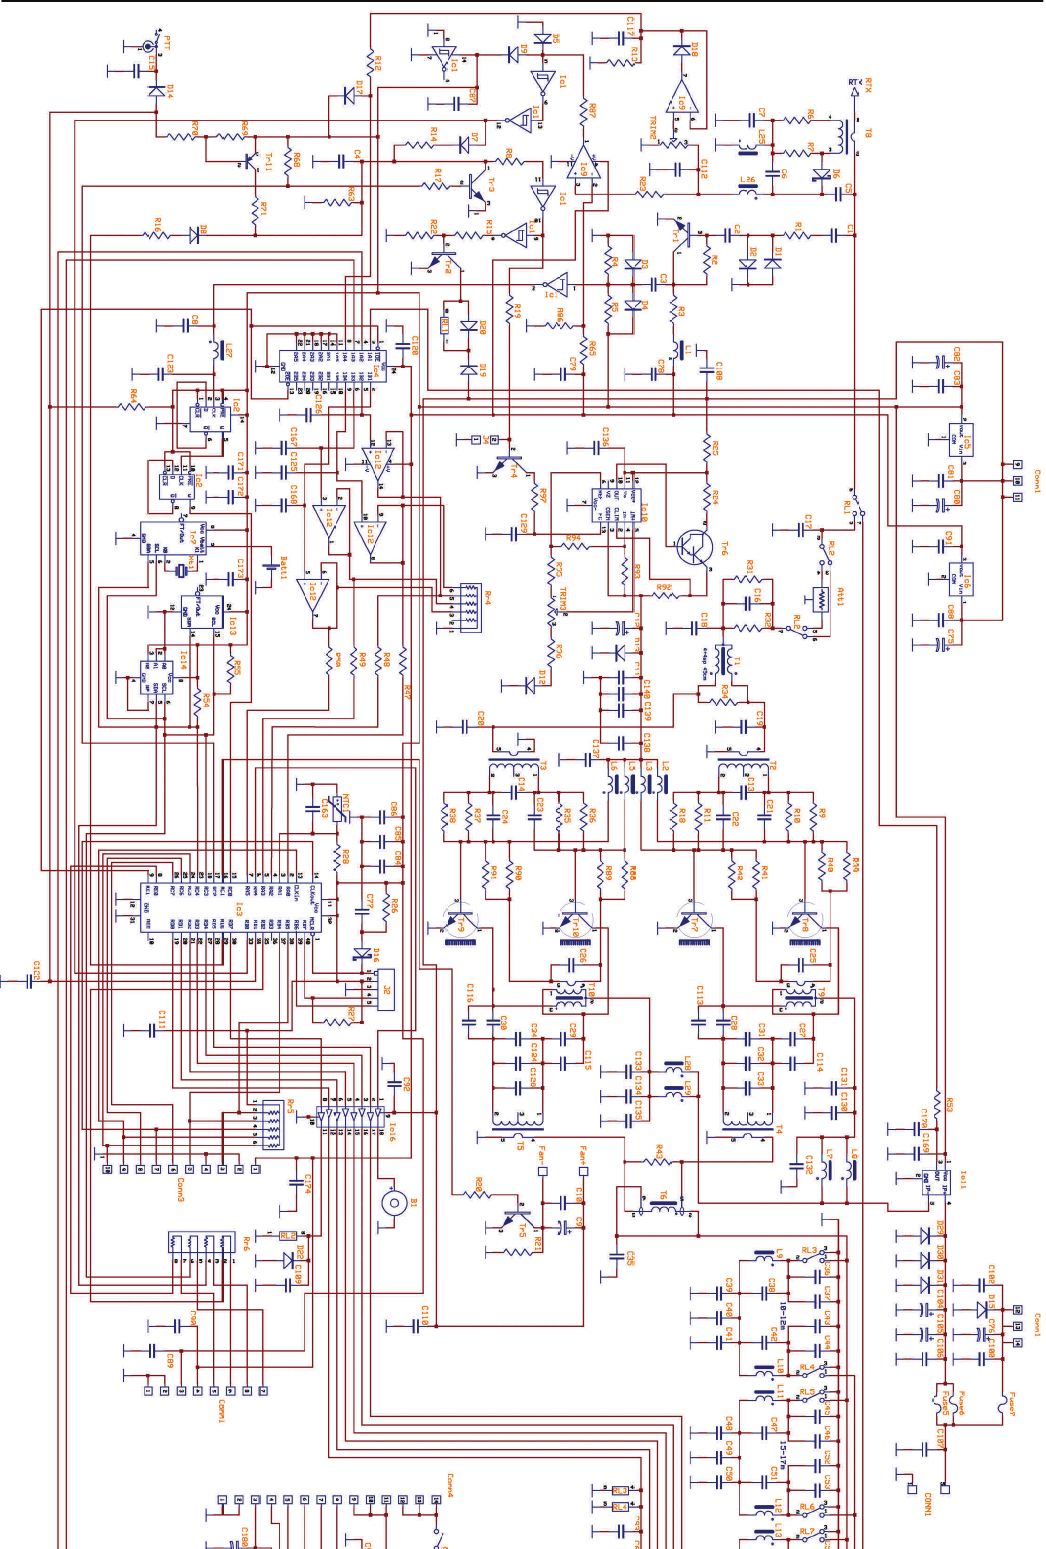
4. Descrizione parte anteriore – Front panel description
Fig2
Fig1
5. Descrizione parte Posteriore - Rear panel description
HLA305
7
3
Italiano
6. Precauzioni
6.1 Rimozione dall'imballo e Ispezione
Rimuovere, con molta attenzione, l’HLA 305 dal proprio imballo, con-
trollare che il lineare non abbia nessun segno visibile di danni.
Agire delicatamente su ogni controllo per verificare che abbiano un
normale funzionamento.
Se è rilevato qualche danno, fate una relazione dettagliata ed inviatela
o consegnatela immediatamente al vostro fornitore.
Conservare l'imballo originale completo da riutilizzarsi in caso di neces-
sità. E' obbligatorio l'uso dell'imballo originale in caso di rientro presso
un centro di riparazione in garanzia.
6.2 Procedura d'installazione
L'amplificatore deve essere posto in modo che vi sia un ampio spazio
attorno, per permettere che il flusso d'aria sia libero di circolare consen-
tendo una corretta ventilazione di tutte le parti, non deve essere espo-
sto direttamente alla luce solare ed il luogo deve essere fresco ed
asciutto.
Non porre libri, carta, o altri oggetti sulla parte superiore dell’HLA 305.
Una limitazione del flusso di ventilazione può danneggiare in maniera
irreversibile il lineare.
Per il dettaglio delle connessioni di un'installazione tipica dell’HLA 305,
fare riferimento al capitolo 5. Connettere l'uscita PTT del ricetrasmettito-
re all'ingresso PTT (e Fig.2) del lineare. In caso di mancato uso di que-
sta connessione un circuito VOX interno all’HLA 305 fornisce il segnale
necessario ma per un miglior controllo della commutazione, si consiglia
in ogni caso l'uso dell'ingresso PTT.
Usare un corto spezzone di cavo coassiale tipo RG-58A/U o RG-8A/U o
equivalenti per l'interconnessione dell'uscita del ricetrasmettitore al
connettore RTX (c Fig.2) dell’HLA 305.
Per la connessione dell'uscita ANT (d Fig.2) dell’HLA 305 all'antenna
evitare di usare cavo tipo RG-58 ma un cavo più indicato che sopporti
ampiamente la potenza d'uscita, cavi adeguati sono RG8A/U, RG-213/
U o equivalenti.
Il ricetrasmettitore usato per pilotare l’HLA 305 deve essere in grado di
fornire una potenza pari a 10-12 W per avere la massima potenza in
uscita al lineare.
6.3 Connessione all’alimentazione
L'alimentatore per il funzionamento dell’HLA 305 deve essere in grado
di operare alla tensione continua di 13V ±2V fornendo una corrente di
almeno 45A. Prima di connettere l’alimentazione all’amplificatore (f
Fig.2) assicurarsi della corretta tensione di lavoro.
In caso di un uso su di un veicolo I’HLA 305 deve essere connesso
direttamente alla batteria con un cavo di almeno 10mm² o #7 AWG
protetto con un fusibile da almeno 40A.
6.4 ANTENNA
L’HLA 305 è costruito per l'uso con antenne che presentano un carico
resistivo di 50 sulla frequenza di lavoro, in caso di uso con un'antenna
che non risponde a questi requisiti si consiglia di interporre un adattato-
re d'impedenza o un accordatore in grado di portare l'impedenza vista
dall'amplificatore alla sua uscita nei limiti richiesti. Si ricorda che acces-
sori a valle dell'amplificatore devono ampiamente sopportare la potenza
d'uscita dello stesso, accessori inadeguati possono provocare danni
irreversibili all'amplificatore.
6.5 MASSA
Questo amplificatore deve essere connesso all'impianto di terra della
stazione radio.
Per una istallazione mobile fissare fermamente il dissipatore ad una
parte metallica della carrozzeria, in caso di istallazione fissa verificare
che l'impianto di terra della stazione sia di ottima qualità, questo elimi-
nerà molti disturbi in ricezione, preverrà accumulo di cariche statiche ed
eviterà che ci siano punti a tensione RF elevata in trasmissione sulle
parti metalliche che è possibile toccare.
Per evitare disturbi RF può essere utile porre una ferrite di soppressio-
ne EMI (Clamp-on ferrite cores) su ogni cavo di connessione all'amplifi-
catore.
6.6 PERICOLI
Non rimuovere il coperchio dell'amplificatore, all'interno sono presenti
tensioni elevate e pericolose.
Prima di compiere qualsiasi operazione di manutenzione sull'amplifica-
tore assicurarsi di avere disconnesso il cavo di alimentazione ed i cavi
di connessione all'antenna ed al ricetrasmettitore.
Se si sentono rumori o odori anomali provenire dall'interno dell'amplifi-
catore, spegnerlo immediatamente, fare un controllo su tutte le connes-
sioni e rivolgersi ad un centro di assistenza autorizzato.
Non sottoporre l'amplificatore ad urti, umidità, luoghi polverosi e/o caldi,
operare una pulizia periodica dagli accumuli di polvere.
Non immettere in ingresso una potenza maggiore di 25W, l'eccessiva
potenza d'ingresso è potenzialmente distruttiva e fa' decadere la garan-
zia.
L'amplificatore è provvisto di molte sofisticate protezioni ma l'uso reite-
rato in condizioni di pericolo può comunque determinare un danno per-
manente all'amplificatore.
L'uso con un filtro di banda errato o senza un'antenna collegata può
essere distruttivo se è operato alla massima potenza.
Le regolazioni all'interno dell'amplificatore sono impostate durante la
fase di taratura in fabbrica con una adeguata strumentazione, la loro
modifica fa' decadere la garanzia.
7. FUNZIONAMENTO
Prima di iniziare qualsiasi operazione verificare che la tensione di
alimentazione presente al connettore, corrisponda alla tensione
nominale (f Fig.2). Verificare che un’antenna adeguata sia con-
nessa al connettore ANT dell'amplificatore (d Fig.2).
7.1 Uso in CW
Dato il tempo di commutazione dei relè di antenna non è possibile l'uti-
lizzo del Full / Semi Break-in quando l'amplificatore è in uso.
Il modo ottimale per trasmettere in CW è mettere il trasmettitore in tra-
smissione manualmente con un PTT esterno. Questo permette la com-
mutazione dei relè del lineare prima della trasmissione dei caratteri ed
anche il primo punto/linea viene amplificato.
7.2 Impostazioni iniziali
Il ricetrasmettitore, usato per pilotare l’HLA 305, se necessario, deve
essere accordato prima che possa operare in accoppiamento al lineare.
Se è necessario l’accordo dell’RTX deve essere eseguito con l’interrut-
tore ` (Fig.1) posto su OFF.
Posizionare i comandi dell’HLA 305 nel seguente modo (fare riferimen-
to al paragrafo 4):
Power ON/OFF su ON
Band selector su Auto
SSB ON/OFF su OFF
Hi/Low su Low
7.3 MENU'
Quando l'amplificatore è in ricezione (b Fig.1 spento) è accessibile il
menù delle impostazioni. Premere il pulsante SET accessibile tramite il
foro ] Fig.1 (non usare un oggetto metallico !!), si entra in un menù
dove è possibile personalizzare alcuni dei parametri di funzionamento
dell'amplificatore.
Dopo essere entrati nel menù, è possibile scorrere tutte le voci premen-
do più volte il tasto SET, per modificare i parametri della voce visualiz-
zata ruotare Band Selector ([ Fig.1 ), per uscire dai menù senza altera-
re le impostazioni premere set fino all’ultimo menù
e ripremerlo senza variare la posizione di Band Selector.Per salvare le
modifiche muovere Band Selector, compare la scritta Save, premendo
nuovamente il pulsante SET i nuovi valori vengono fissati in memoria.
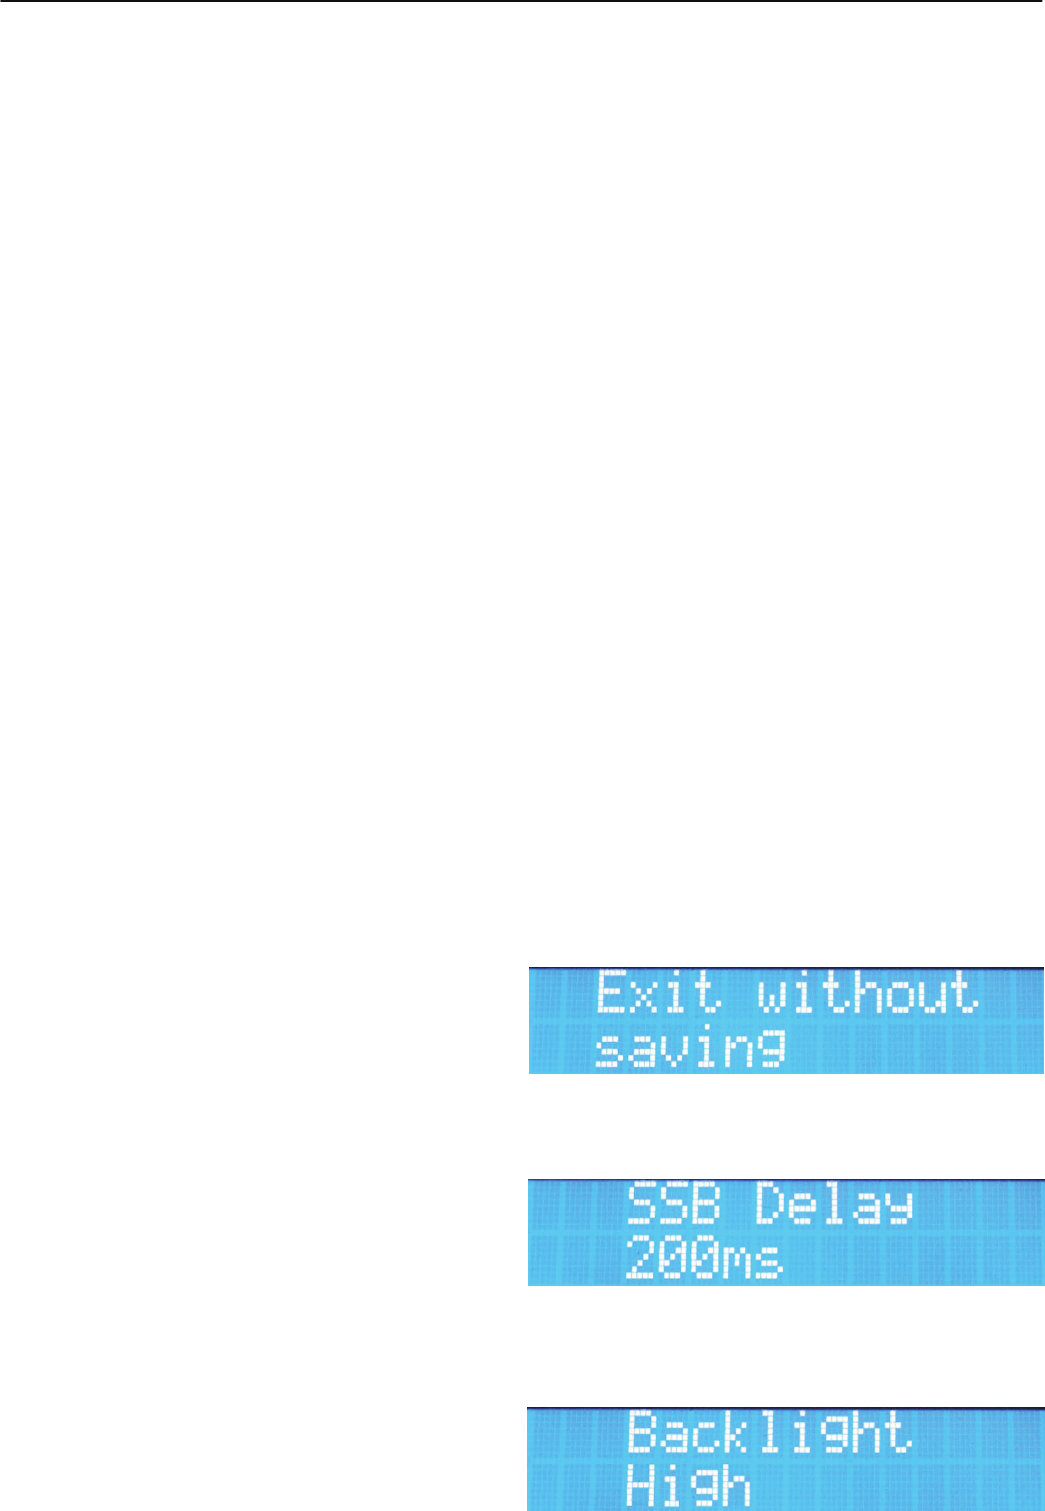
7.3.1 SSB Delay
In questo menù è possibile variare le impostazioni della funzione SSB
Delay attivabile tramite il comando SSB On/Off (^ Fig.1 ),
i valori selezionabili tramite Band Selector vanno da 50ms a 1,5s
(default 200ms)
7.3.2 Backlight High/Low
Questa voce permette di selezionare la luminosità del Display tra due
HLA305
8
3
livelli.
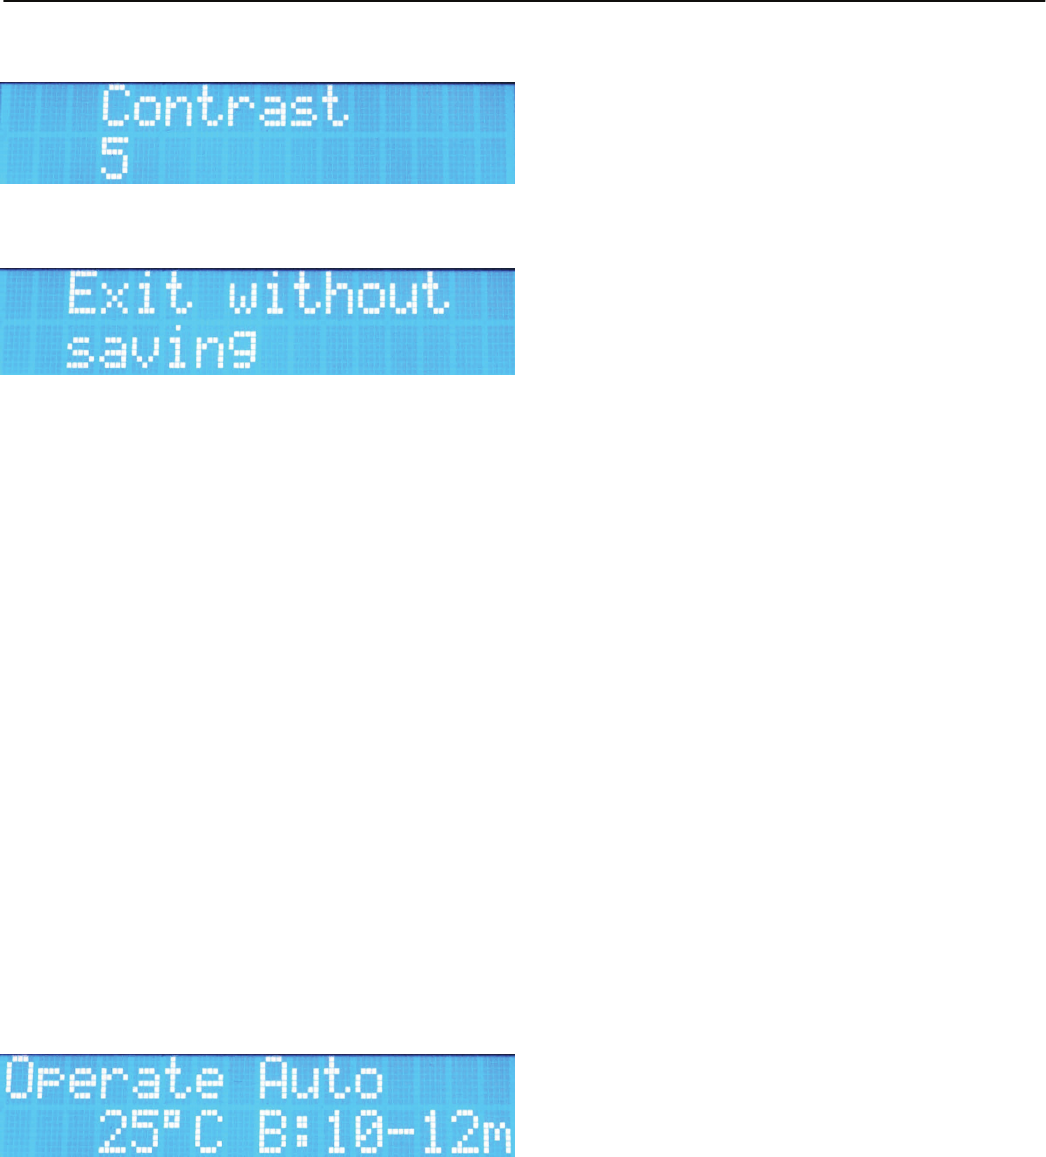
7.3.3 Contrast
imposta il contrasto del display per la visualizzazione più corretta.
7.3.4 Exit
Permette di salvare i nuovi parametri impostati nei menù.
Se non si desidera salvare procedere senza variare Band Selector, per
salvare muovere il commutatore fino a che compare la scritta “Save”,
alla successiva pressione di SET i parametri vengono memorizzati e si
esce dal menù
7.4 OPERATE
Commutando l'interruttore Power/ON (` Fig.1) su ON si accende l’am-
plificatore e dopo un breve test dei parametri di sicurezza l’amplificatore
entra in modalità Operate e si prepara ad esprimere tutta la sua poten-
za.
7.4.1 Default setting
Per avere un uso immediato dell'amplificatore è sufficiente posizionare il
comando Band Selector ([ Fig.1) su AUTO, assicurarsi che l'antenna
sia adeguata sia in frequenza che in potenza alla banda in cui si deside-
ra operare. Infine eseguire quindi le connessioni come indicato al capi-
tolo 6.2, inserire l’SSB delay (^ Fig.1) se necessario e posizionare il
comando High/Low (_ Fig.1) in posizione HI.
A questo punto, tutte le operazioni del lineare sono completamente
automatizzate e non vi è necessità di alcun intervento dell'operatore.
Se non sono state cambiate le impostazioni di default, commutando in
trasmissione il ricetrasmettitore, il lineare si pone in attesa del primo
segnale RF in ingresso per determinare la frequenza ed impostare il
corretto filtro di banda. Se alla successiva trasmissione è necessario
cambiare il filtro di banda, il microprocessore provvederà autonoma-
mente.
7.4.2 Visualizzazione stato Amplificatore
Vengono visualizzati diversi dati relativi al funzionamento dell'amplifica-
tore.
7.4.2.1 Display LCD
Il display visualizzerà:
Nella prima riga è visualizzato lo stato dell'amplificatore e l'im
postazione della gestione filtri.
La seconda riga Visualizza la temperatura del dissipatore ed il
filtro inserito.
7.4.2.2 Indicazioni luminose
7.4.2.2.1 TX (b Fig.1)
Quando l’amplificatore è in trasmissione si accende la
scritta rossa TX. Un piccolo ritardo del LED rispetto alla
commutazione effettiva del relè è normale.
7.4.2.2.2 A WARNING (a Fig.1)
L'accensione di questa indicazione rossa indica uno
stato di pericolo per l'amplificatore.
L'evento che lo ha generato viene scritto sul display
LCD.
7.4.3 Comandi
Sul pannello frontale sono presenti alcuni comandi che
permettono di fare un uso più personalizzato dell'amplificatore.
I comandi agiscono solo quando l'amplificatore non è in
trasmissione.
7.4.3.1 SSB/Off (^ Fig.1)
Permette di inserire un ritardo nel rilascio del relè di
antenna in caso di uso in SSB o CW, se l’amplificatore
è connesso al ricetrasmetitore tramite la connessione
PTT (e Fig.2 ) lasciare questo comando in Off.
Quando inserito il ritardo compare una S nel primo
carattere della seconda riga del display
7.4.3.2 Hi/Off (_ Fig.1)
Questo pulsante permette di inserire manualmente
l’attenuatore d’ingresso. Se non inserito sarà presente
una H come secondo carattere della seconda riga del
Display LCD
7.4.3.3 Power ON/OFF (` Fig.1)
Questo è l'interruttore con cui si può accendere e
spegnere l'amplificatore
8. Protezioni
L'amplificatore HLA305 possiede vari sofisticati circuiti di protezione che
intervengono in caso di necessità per proteggere i componenti dell'am-
plificatore. Tutte le misure sono gestite da un potente microprocessore
che provvede ad identificare ogni possibile situazione di pericolo ed
avvisa l'operatore sia con un segnale acustico che luminoso scrivendo
sul display LCD il motivo dell'allarme.
Se la situazione di pericolo lo richiede, l'amplificatore viene bloccato e
portato in standby, in questo caso è necessario eliminare la causa
dell'intervento della protezione e spegnere e riaccendere l'amplificatore
tramite l'interruttore (` Fig.1).
Nonostante le sofisticate protezioni l'uso reiterato in condizioni di
pericolo può comunque determinare un danno permanente all'am-
plificatore.
L'uso con un filtro di banda errato o senza un'antenna collegata
può essere distruttivo se è operato alla massima potenza.
8.1 OVER Input Power
Se la potenza di ingresso all'amplificatore supera i 15W
sul display viene scritto Power TRX >15W e viene
inserito automaticamente l’attenuatore d’ingresso.
Se la potenza d'ingresso supera i 25W lampeggia A
dell'indicatore WARNING (a Fig.1) e il Display visua-
lizza Power TRX >25W. A 30W il lineare viene blocca-
to, l'operatore sentirà l'allarme audio, verrà accesa fissa
la scritta A e sarà necessario spegnere e riaccendere
l'amplificatore per resettare la protezione.
In questo caso il Display indicherà nella prima riga:
Error Power TRX
8.2 OVER Temp.
La temperatura del punto di contatto tra i dispositivi RF
di potenza ed il dissipatore viene gestita per regolare la
velocità di rotazione delle ventole che raffreddano il
dissipatore (solo HLA305V). Se la temperatura è
inferiore a 37°C le ventole girano alla velocità minima,
tra 38 e 49°C la velocità e media, tra i 50 ed i 54 °C la
velocità delle ventole è alta, oltre i 55°C la velocità è
massima l'indicatore A WARNING (a Fig.1) lampeg-
gia. Per entrambi i modelli, se la temperatura supera i
56°C il sistema viene bloccato, sarà presente il segnale
acustico di allarme, l'indicatore A diventa fisso. Il ripri-
stino delle normali funzionalità avverrà quando la tem-
peratura del dissipatore diventerà inferiore a 51°C.
In questi casi il Display indicherà nella prima riga:
OVER Temp! E nella seconda la temperatura letta.
8.3 SWR
Un sensore posto dopo il gruppo filtri passa-basso mi-
sura i livelli di potenza diretta e riflessa all'antenna.
Il microprocessore esegue il calcolo del Rapporto di
Onde Stazionarie e lo utilizza per proteggere lo stadio di
potenza dall'eccessiva dissipazione. La condizione
ottimale è con un ROS fino a 2:1, l'amplificatore lavo-
ra al massimo guadagno. Se il valore di ROS supera il
valore di 3:1 avviene il blocco dell'amplificatore, l'avviso
sonoro dell'allarme e l'accensione fissa del simbolo di
pericolo (a Fig.1). Per il ripristino è necessario lo
spegnimento dell'amplificatore.
In questi casi il Display indicherà nella prima riga:
Error SWR >3.0
8.4 FILTER FAULT
La scheda filtri di banda invia al microprocessore vari
segnali di stato, servono per identificare il
funzionamento regolare del filtro impostato anche in
rapporto all'efficienza dell'antenna. Se il filtro impostato
è errato, presenta un'anomalia o l'antenna è
disadattata, il processore segnala un errore, viene
emesso un segnale audio, si accende il simbolo di peri
colo
A (a Fig.1) e il display indica Err Power Filt.

HLA305
9
3
8.5 Error Frequency
Se la frequenza rilevata dal microprocessore è fuori dal
campo di funzionamento, l'amplificatore viene bloccato,
viene emesso un segnale audio e sul display compare
la scritta Error Frequency.
9. Garanzia
1 Costruzioni Elettroniche S.n.c. Garantisce all'acquirente iniziale
un prodotto esente da difetti di fabbricazione e da difetti dei materiali
impegnati per un periodo a termine di legge dalla data di acquisto. La
riparazione dei difetti di lavorazione e la sostituzione dei componenti
difettosi verrà effettuata presso i laboratori 3 o i laboratori autorizzati,
sono a carico dell'acquirente solo le spese di trasporto.
L'intervento in garanzia deve essere richiesto al Distributore o Rivendi-
tore presso il quale è stato effettuato l'acquisto e che è responsabile
della garanzia. In caso che tale referente cessi la propria funzione 3
comunicherà al cliente un nuovo referente o accetterà a proprio insinda-
cabile giudizio se effettuare al riparazione presso la propria sede. Le
spese di spedizione da e verso il laboratorio rimarranno a carico del
cliente. Eventuali riparazioni richieste ad altri laboratori non rientreranno
nel presente contratto di garanzia e saranno a carico del cliente e gesti-
te direttamente dal laboratorio.
Se il cliente riscontra un qualsiasi difetto alla ricezione dell'amplificatore
deve notificarlo immediatamente al rivenditore inviandogli copia del
Repair Form correttamente compilato. Una eventuale sostituzione
dell'amplificatore può avvenire solo ad insindacabile giudizio di 3 non
oltre il decimo giorno di ricezione del prodotto.
La garanzia sarà riconosciuta solo se il prodotto è accompagnato dalla
copia del documento di acquisto se il serial number è leggibile se il
prodotto risulta utilizzato nei modi consentiti e se l'amplificatore viene
spedito nell'imballo originale.
La garanzia non copre danneggiamenti delle parti estetiche e i
Transistors di potenza.
Eventuali accordi tra rivenditore ed acquirente come particolari obblighi
imposti da singolo stato sono a carico del rivenditore locale e quindi non
a carico di 3.
Per qualunque controversia è competente il foro di Bologna.
In caso di acquisto, il compratore dichiara di accettare le presenti
condizioni di garanzia.
English
16. Precaution
16.1 Removal from packaging and inspection
Carefully remove the amplifier from it’s packaging, and inspect for any
sign of damage incurred during shipping.
With care check each button / switch to check mechanically they oper-
ate correctly.
If any damage is found, note in as much detail as possible the problem
and immediately contact your supplier.
Retain all of the original packaging as this must be used if it is neces-
sary to return the amplifier to an approved service centre for any rea-
son.
16.2 Installation
The amplifier must be positioned in a cool and dry area that has suffi-
cient space surrounding the amplifier to allow good ventilation to all
surfaces and free flow of the surrounding air. Do not operate the amplifi-
er if it is in direct contact with sunlight. Do not place books, paper or
other objects on the top surface of the amplifier.
For details of a typical installation of the HLA305 amplifier refer to Chap-
ter 5. The PTT output from the transceiver should be connected to the
PTT input of the HLA305 (
eFig 2 ). In case there is no PTT output
from the transceiver it is still possible to use the amplifier by utilising the
internal VOX circuit . For the best control of TX/RX switching it is recom-
mend that the PTT input is utilised. The PTT input connector is an RCA/
Phono type.
Use a short length coaxial cable, type RG-58A/U,RG-8A/U or equivalent
for the connection between the output of the transceiver and the input of
the amplifier, connector RTX (
cFig 2 ) HLA305.
Connection to the output, ANT (
dFig 2) of the HLA305 to the antenna
should not be made with low power RG-58 type cable or equivalent, but
only with a coaxial cable of sufficient power rating, for example RG-8A/
U, RG-213/U or equivalent.
The transceiver used for the input of the HLA305 must be capable of a
power output of 10-12 W to obtain the maximum output from this linear
amplifier.
16.3 Connection to DC Power Supply
The power supply for operation of the HLA305 should be capable of
13V +/- 2V DC and able to provide a current of at least 45A. Before
connecting the amplifier to the power supply (f Fig.2) ensure that the
voltage is correct and also that the correct polarity is observed.
If the amplifier is operated in a vehicle it must be connected directly to
the vehicles battery with a cable that has a conductor size of at least
10mm² or #7 AWG protected with a fuse at the battery of at least 40A.
16.4 ANTENNA
The HLA305 is designed for use with antennas that present a resistive
load of 50 at the frequency of operation. In the case that the antenna
does not correspond to this it will be necessary to use a system of im-
pedance matching such as an antenna tuner to provide the correct
impedance transformation. If using such a device it must be capable of
withstanding the output level of the amplifier otherwise damage to the
matching device and or the amplifier may result. The antenna must also
be tuned at low power with the amplifier switched off to avoid load mis-
match to the transistors during the tuning process.
16.5 GROUND
This amplifier must be connected to the RF ground system of the radio
station.
Verify that the RF ground of the station is of suitable quality, this will
eliminate noise problems on reception, prevent the build up of static
charge and avoid points of high RF voltages during transmission on
metallic objects that may come into contact with the operator. To avoid
RF interference it can be useful to use a Ferrite EMI suppressor on all
cables connected to the amplifier. (Clamp on Ferrite cores). For an
installation in a vehicle the heat sink must be electrically connected to
the chassis of the vehicle
16.6 WARNING!
Dangerous high voltages are present inside the amplifier and as such
we recommend that the cover is only removed by qualified service tech-
NrProtezioneCausaDisplayResetLedNote
1
OverInputPower
Potenzad’ingresso>15WPowerTRX>15WNessunaazione
Ridurrelapotenzadell’amplificatore
2Potenzad’ingresso>25WPowerTRX>25WNessunaazioneA*
3Potenzad’ingresso>30WErrorpowerTRXSpegnere
l’amplificatoreA
4Over Temp Temperatura >56°C OVERTemp!Automaco>51°CAControllarelacorreaareazione
dell’amplificatore
5OverSWRROSinantenna>3,0:1Error SWR >3.0 Spegnere
l’amplificatoreAControllarel’impiantod’antenna
6Filter Fault Potenzaresainantenna
insufficenteErr Power Filt. Spegnere
l’amplificatoreAFiltroerratooantennadisadaata
7Frequenza errataFrequenza<1,5o>30MHzError Frequency Spegnere
l’amplificatoreAControllarelafrequenzaditrasmis‐
sione
*LEDLampeggiante
8Banda vietata Frequenzatra26e28MHzForbidden Freq. Spegnere
l’amplificatoreA Controllarelafrequenzaditrasmis‐

HLA305
10
3
nicians. Before removing the cover from the amplifier, it is essential that
the DC power cable, coaxial cables to the antennas and the transceiver
are disconnected.
If during operation it is noticed an abnormal noise or odour, switch off
the amplifier immediately and check all of the connecting cables and if
necessary return to a authorised service centre for testing. Do not sub-
ject the amplifier to physical shock, high humidity, dusty environments
or excessive heat. Periodically clean any accumulated dust from the
amplifier especially around ventilation grilles with a soft dry antistatic
cloth.
Do not exceed more than 25W on the input to the amplifier. Excessive
drive on the input may cause damage and invalidate the warranty.
This amplifier features several sophisticated protection circuits however
using the amplifier in a manner other than that described in the operat-
ing instructions may be dangerous to the user and may cause perma-
nent damage to the amplifier.
Using the amplifier with the wrong band filter selected or without a
suitable antenna connected at maximum power may be destructive to
the amplifier.
The internal set-up parameters of the amplifier are adjusted on an indi-
vidual basis for each amplifier during a calibration and test procedure at
the factory. Modification of these parameters will invalidate the warran-
ty.
17. OPERATION
Before use verify that the voltage of the power supply corresponds
to that written on the rear of the amplifier. (f Fig.2). Verify also
that there is a suitable antenna, correctly adjusted connected to
the ANT Connector of the amplifier (d Fig.2).
17.1 CW Operation
Due to the switching time of the amplifiers TX RX relays it is not possi-
ble to use Full / Semi Break-in mode when the amplifier is in use.
The optimum method for sending CW with the amplifier is to put the
transceiver into TX mode manually, either with the MOX switch on the
front panel of the transceiver or an external foot switch PTT to the trans-
ceiver. This allows the PTT relay on the amplifier to close before send-
ing any characters so that first dot / dash of the first character is ampli-
fied.
17.2 Initial Settings
If it is necessary to tune the transceiver/antenna before use, this may be
carried out with the amplifier used in OFF mode. Power Switch `
(Fig.1) set to OFF .
Set the front panel controls in the following positions, (with reference to
paragraph 4):
Power/ON on ON
SSB/ON on OFF
Band Selector on AUTO
High/Low on Low
17.3 MENU
When the amplifier is Switched on but in receive mode (` Fig.1 ON) (b
Fig.1 OFF), it is possible to access the settings menu. Press the button
SET trough the hole (]Fig.1) using a non metallic object. In this mode it
is possible to change many of the amplifiers parameters to suit the op-
erators requirements.
After entering the settings menu, it is possible to access all of the sub
menus by repeatedly pressing SET. To change a menu parameter ro-
tate the band selector (
[Fig.1) . To exit a sub menu without changing
any data press the SET key (]), repeatedly to cycle through the set-
tings menu until Exit and press SET without moving the Band Selector
position. To save any modifications change position of Band Selector on
Exit menu, when SAVE is displayed press SET and any modification
will be saved.
17.3.1 SSB Delay
In this menu it is possible to change the delay time from TX to RX when
SSB Delay is enabled, (^ Fig.1 ). Between 50ms a 1,5s (default 200ms)
17.3.2 Backlight High/Low
It is possible to adjust the brightness of the LCD back light between two
levels.
17.3.3 Contrast
It is possible to adjust the contrast of the display.
17.3.4 Exit
Allows you to save any changed parameters by rotating the band se-
lector until SAVE is displayed and then pressing the SET button. This
will also exit the menu system. If you do not want to save anything do
not rotate the band selector and press set to exit
17.4 OPERATE
Switching the Power/ON (` Fig.1) switch to ON enters the mode Oper-
ate, the amplifier completes a brief self test and is then ready to use.
17.4.1 Default setting
To use the amplifier immediately it is sufficient to position the Band
Selector ( )
[to Auto, (Automatic). Ensuring that the antenna is connect-
ed to the ANT (d) connector and that it is suitable for the desired fre-
quency of operation and power rating. Insert SSB delay if is necessary,
set High/Low on Low. The input drive power must also be set to the
correct level 10W.
In this mode all of the functions of the amplifier are completely automat-
ic and no operator intervention is required.
If all menus remain at their default settings when operating the trans-
ceiver in TX the amplifier will automatically measure the input frequency
and select the correct band filter. If the operator changes the transmit
frequency the microprocessor will automatically change to the correct
band filter if necessary.
17.4.2 Monitoring the Amplifiers operation
The display shows the current operating parameters.
17.4.2.1 Display LCD
The first row indicates the state of the amplifier and the if the filter
choice is in manual or automatic mode.
The second row displays the temperature of the heat sink and the cur-
rent selected output filter.
17.4.2.2 Front panel LED's
17.4.2.2.1 TX (b)
Illuminates red when the amplifier is in transmission. A
small delay is normal for the LED, however this does not effect
the switching time of the relay.
17.4.2.2.2 A WARNING (a)
Illuminates red indicating a problem with the amplifier, the de-
scription of the error is displayed on the LCD.
17.4.3 Controls
The front panel features several user controls. These should only be
operated when the amplifier is not in transmission.
17.4.3.1 SSB/Off (^)
When active adds a small delay (Adjustable) for the drop out

HLA305
11
3
time of the TX relay before switching back to receive. When
inserted an 'S' is displayed at the first character of the second
row. This should only be required in SSB or CW modes if the
PTT input connector is not utilised.
17.4.3.2 Hi/Off ( )
_
This switch allows manual insertion of the input attenuator in
order to reduce the output power. When set to OFF an 'H' is
displayed on the display (second character of the second row).
17.4.3.5 Power ON/OFF ( )
`
Main On / Off power switch.
18. Protection
The HLA305 features several sophisticated protection circuits that will
interrupt operation if necessary in order to protect the amplifier from
damage. These are controlled by a powerful microprocessor that can
identify all possible fault conditions and alert the operator with both an
audible error tone and an error message on the LCD display. If neces-
sary the protection circuits will shut down the amplifier and return the
amplifier to Standby. In this case it will be necessary to eliminate the
cause of the problem and reset the amplifier by switching the Power
switch off and on. (`).
Despite sophisticated protection, operating the amplifier repeated-
ly after an error has been reported without any correction may
cause permanent damage. The use of an incorrect band filter or
transmitting without a suitable antenna connected to the amplifier
at maximum power may cause irreversible damage.
18.1 Excessive Input Power
If the input power from the transceiver exceeds 15W
the input attenuator is automatically inserted and the
Display show Power TRX >15W , when the input power
increases above 25W, the red
Awarning LED will
illuminate (a) and the display shows: Power TRX
>25W. If the input power then rises above 30W the
amplifier will be shut down, an audible error tone will be
emitted and the A warning LED will remain illuminated.
In this case the LCD will show: Error Power TRX. It will
then be necessary to restart the amplifier by switching
the amplifier off and then back on to reset the protect-
tion.
18.2 OVER Temp.
The temperature at the point of contact between the
transistors and the heat sink regulates the speed of the
heat sink cooling fan (only HLA305V). If the tempera-
ture is below 37°C the fans rotate at minimum speed,
between 38 and 49°C medium speed , between 50 and
54 °C at maximum speed. Above 55°C the speed is
maximum and the
Awarning LED illuminates (a). For
both models, above 56 °C the amplifier will shut down,
the audible warning will continue and the A warning
LED will remain illuminated. The amplifier will return to
normal operation when the temperature drops below
51°C. In this case the LCD Display will show:
OVER TEMP! on the first row and display the current
temperature on the second row.
18.3 Excessive VSWR
A sensor positioned after the Low Pass Filter section
measures the level of forward and reflected power on
the antenna. The microprocessor calculates the VSWR
and is used to protect the amplifier from excessive dissi
pation in this case. The amplifier operates at it’s best
when the VSWR is below 2.0:1. Above 3.0:1 an audible
error tone will be emitted and the A (a par.4) warning
LED will illuminate, the amplifier will also be shut down.
The audible warning will continue and the warning LED
will remain on. To reset the amplifier it will be necessary
to switch the amplifier off and back on. In this case the
LCD display will show: ERROR SWR >3.0 on the first
row.
18.4 FILTER FAULT
The band pass filter selection is controlled and moni-
tored by the microprocessor in order to verify that the
correct filter is selected. If the current filter is incorrect or
has a problem during use the processor will signal an
error. If the filter selection is incorrect or that there is a
problem between the amplifier and antenna, the opera-
tion of the amplifier is outside of its safety limits and will
sound the audible alarm and illuminate the A (a par.4)
warning LED. The LCD will display: Err Power Filt.
18.5 Error Frequency
If the input frequency is outside of the specified limits,
the amplifier will shut down , an audible tone will be
emitted and the LCD will display 'Error Frequency'
19. Warranty
3 Costruzioni Elettroniche S.n.c. Guarantees that the product is
free from manufacturing defects both parts and workmanship for a peri-
od of time specified by the law. The warranty commences on the date of
purchase. Any work undertaken for the warranty must be carried out by
3 or an authorised 3 service centre. The costs of transportation,
duties and insurance between the purchaser and 3 or an 3 ap-
proved service centre are the responsibility of the purchaser, both to
and from the service centre.
The warranty must be requested to the distributor or reseller where the
amplifier was originally purchased.
In the case where the original distributor or reseller no longer exits or no
longer deals with 3 products 3 will communicate the nearest distrib-
utor or reseller to use, or in the instance where this is not possi-
convenient, 3 will honour the warranty directly. If any repairs are car-
ried out outside of an approved 3 service centre this will void the origi-
nal warranty and 3 will not be responsible for any incurred charges.
The warranty will only be honoured if the amplifier has been used for it's
intended purpose as described in the operation manual and it is re-
turned with the original purchase receipt, that the amplifier is transport-
ed in the original packing container, that the serial number is unchanged
and readable and that the warranty labels remain intact.
The warranty does not cover the Mosfet power transistors or any aes-
thetic damage.
Any change to the warranty either by local law or that made by the dis-
tributor or reseller directly with the purchaser will be the sole responsi-
NrProteconCausaDisplayResetLedNote
1
OverInputPower
InputPower>15WPowerTRX>15WNoacon
Reducetransmierpower
2InputPower>25WPowerTRX>25WNoaconA*
3InputPower>30WErrorpowerTRXSwitchOffamplifierA
4Over Temp Temperature >56°C OVERTemp!Automac>51°CACheckvenlaonofamplifier
5OverSWRAntennaSWR>3,0:1Error SWR >3.0 SwitchOffamplifierACheckantennatuning/fault
6Filter Fault Lowefficiency Err Power Filt. SwitchOffamplifierAIncorrectFilteroAntennaFault
7Frequency out of
rangeFrequency<1,5o>30MHzError Frequency SwitchOffamplifierA
Checktransmissionfrequency
*LEDFlashing
8Forbidden
FrequencyFrequencyfrom26to28MHzForbidden Freq. SwitchOffamplifierAChecktransmissionfrequency
HLA305
12
3
HLA305
13
3

HLA305
14
3
REPAIR FORM
Model HLA 305 Serial number …................................ date …...................
Amplifier settings at the moment of Fault
Transceiver …..................................….......................................................................................................
Antenna …..................................….......................................................................................................
PTT connection? Yes No
Was the power output of the transceiver set to the maximum level? Yes No
If not set to maximum power, what is the maximum value? …..................…...................................................................
What band does the fault occur? …................................…..............................................................................................
What is the transmission mode? ….................................….............................................................................................
How long does the amplifier operate normally before the fault occurs? ….….................................................................
Is there an error message on the LCD Display? …..........................................................................................................
What is the heat sink temperature? ….............................................................................................................................
What was the power suply voltage at the time of fault? ...................................................................................................
Other information: ............................................................................................................................................................
..........................................................................................................................................................................................
..........................................................................................................................................................................................
..........................................................................................................................................................................................
3 Technician
Technician ….......................................................................................... Date of repair …..............................................
Notes …...........................................................................................................................................................................
…......................................................................................................................................................................................
..........................................................................................................................................................................................
..........................................................................................................................................................................................
..........................................................................................................................................................................................
..........................................................................................................................................................................................
Parts replaced: ….............................................................................................................................................................
…......................................................................................................................................................................................
..........................................................................................................................................................................................
..........................................................................................................................................................................................
Date of test Technician signature
…............... …...................................