RTX America RTX3080 RTX3080 User Manual VoIP LAN InstallationGuide
RTX America Inc. RTX3080 VoIP LAN InstallationGuide
Contents
- 1. UserMan1
- 2. UserMan2
UserMan1

1
Table of Contents
WELCOME .........................................................................................................................................2
BOX CONTENTS ...............................................................................................................................4
AT A GLANCE...................................................................................................................................5
Handset ............................................................................................................................................5
Gateway ...........................................................................................................................................7
GETTING STARTED .........................................................................................................................8
Prerequisites.....................................................................................................................................8
How to Install the Gateway..............................................................................................................9
How to Install and Register the Handset .......................................................................................10
How to Configure the DUALphone...............................................................................................11
Recommended Basic Settings........................................................................................................13
QUICK GUIDE .................................................................................................................................15
TROUBLESHOOTING.....................................................................................................................17
WELCOME......................................................................................................................................2
BOX CONTENTS..........................................................................................................................4
AT A GLANCE...............................................................................................................................5
Handset..........................................................................................................................................5
Gateway.........................................................................................................................................7
GETTING STARTED...................................................................................................................8
Prerequisites .................................................................................................................................8
How to Install the Gateway......................................................................................................9
How to Install and Register the Handset.............................................................................10
How to Configure the DUALphone.....................................................................................11
Recommended Basic Settings................................................................................................13
QUICK GUIDE.............................................................................................................................15
TROUBLESHOOTING..............................................................................................................17

2
WELCOME
Thank you for purchasing the LAN Cordless DUALphone. This guide describes how to install the
LAN Cordless DUALphone, enabling you to make Internet calls, landline calls and use onscreen
information services. Included in this guide is also a brief description of the basic functions of the
DUALphone and a troubleshooting section. Note that throughout this guide, we refer to the LAN
Cordless DUALphone as DUALphone.
For detailed information about the features of the DUALphone refer to the User Manual on our
website. On the website you can also find out how to contact product support.
www.dualphone.net/lan
Have your serial number and MAC address ready when contacting support. You find the numbers on the bottom of the
gateway. For matters concerning telephony services, contact your Internet Telephony Service Provider. For matters
concerning your broadband connection, contact your Internet Service Provider (ISP), and for matters concerning Onscreen
Information Services contact your Information Service Provider.
For EU: Conformity of the telephone to EU directives is confirmed by the CE symbol. Hereby, we declare that the LAN
Cordless DUALphone and/or LAN Cordless DUALhandset are in compliance with the essential requirements and other
relevant provisions of Directive 1999/5/EC.
For US: This equipment complies with Part 15 of the FCC rules and Part 68 of the FCC rules, and the requirements adopted
by the Administrative Council for Terminal Attachments (ACTA).
Located on the equipment is a label that contains, among other information, the FCC registration number, and ringer
equivalence number (REN.) If requested, this information must be provided to the telephone company.
The REN is used to determine the quantity of devices which may be connected to the telephone line. Excessive REN's on the
telephone line may result in the devices not ringing in response to an incoming call. In most, but not all areas, the sum of the
REN's should not exceed five (5.0) To be certain of the number of devices that may be connected to the line, as determined by
the total REN's, contact the telephone company to determine the maximum REN for the calling area.
This equipment cannot be used on the telephone company-provided coin service. Connection to Party Line Service is subject
to State Tariffs.
If this equipment causes harm to the telephone network, the telephone company will notify you in advance that temporary
discontinuance of service may be required. If advance notice isn't practical, the telephone company will notify the customer as
soon as possible. Also, you will be advised of your right to file a complaint with the FCC if you believe it is necessary.
The telephone company may make changes in its facilities, equipment, operations, or procedures that could affect the
operation of the equipment. If this happens, the telephone company will provide advance notice in order for you to make the
necessary modifications in order to maintain uninterrupted service.
If the trouble is causing harm to the telephone network, the telephone company may request you to remove the equipment
from the network, until the problem is resolved.
This equipment uses the following USOC jacks: RJ11C.
It is recommended that the customer install an AC surge arrester in the AC outlet to which this device is connected. This is to
avoid damaging the equipment caused by local lightening strikes and other electrical surges.
This product is manufactured for RTX Products A/S. Copyright ©. All rights reserved. All forms of copying or reproduction
of the product or its associated user manual is strictly prohibited.
For further information, see “FCC and other information” on the Safety Information sheet for US.
3
4
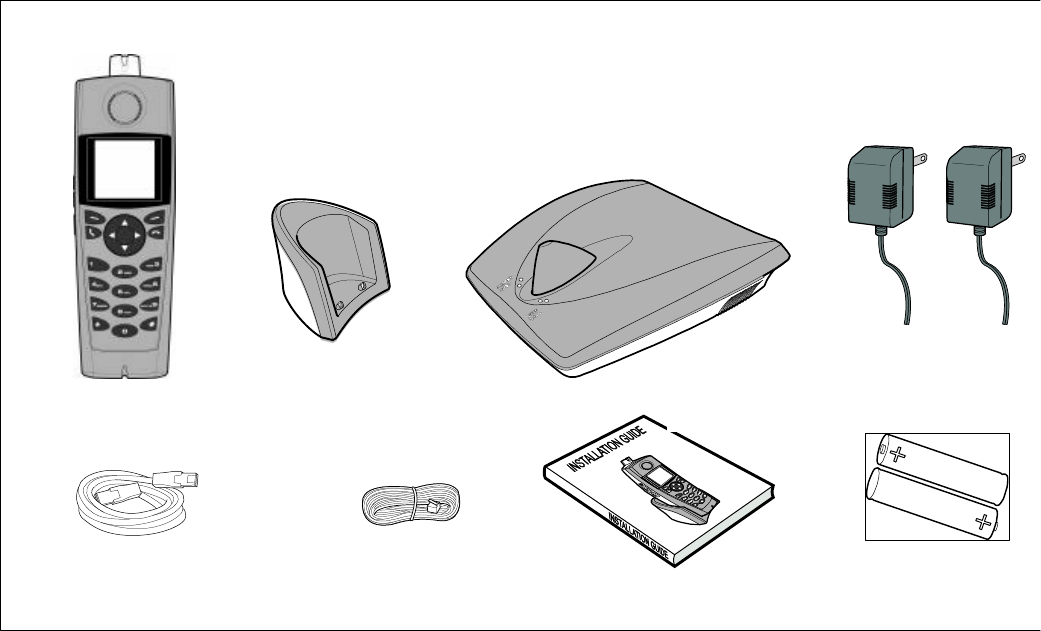
BOX CONTENTS
The following items are included in the box. If the items in the box do not comply with the items on
this list, contact your place of purchase before you start installation.
1 1 DUALphone handset
2 1 DUALphone handset charging cradle
3 1 DUALphone gateway with LAN and telephone line interface
4 2 Mains power adapters for gateway and handset charger
5 1 Ethernet cable
6 1 Telephone cable
7 1 Installation Guide
8 2 standard rechargeable AA Ni-MH batteries
5
1
2
4
6
8
7
3
5
AT A GLANCE
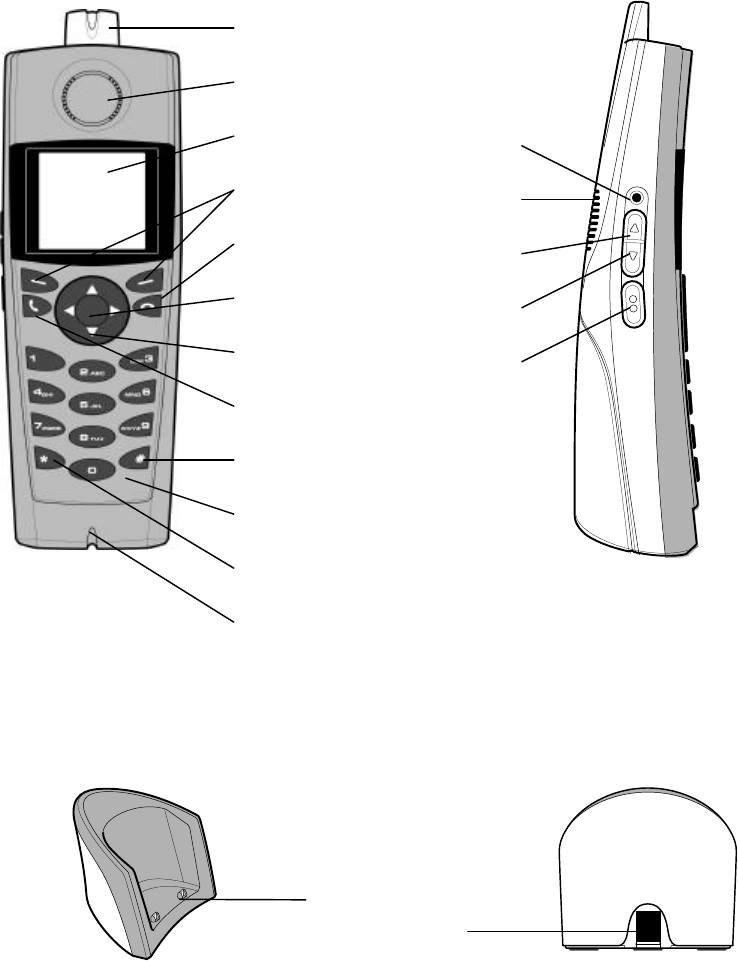
Handset
Front Side
Handset Charger
19
18
13
14
15
16
17
1
2
3
4
5
6
7
8
9
10
11
12
6
1
2
4
5
6
3
7
8
9
10
11
12
13
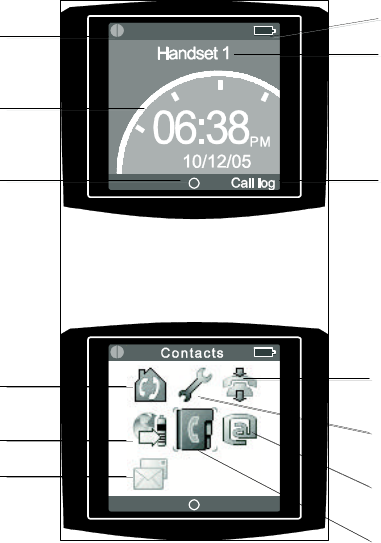
Standby Mode
1 Message indicator – used for voicemail, missed calls, etc.
2 Earpiece
3 Color display
4 Soft keys – used for various functions
5 Red phone key - used to hang up or leave a menu, or to turn the handset on or off
6 OK key - used to enter the main menu or to choose and confirm
7 Navigational keys - used to navigate through menus and services
8 Green phone key - used for making or answering calls
9 R-key - used for sending flash
10 Key pad - used for entering numbers and letters
11 Star key – used in the name editor to capitalize letters and type numbers and as star
12 Microphone
13 Headset jack connector
14 Loudspeaker for speakerphone
15 Volume up key
16 Volume down key
17 Speakerphone activation key
18 Handset charger
19 Power supply connector on handset charger
Main Menu
7
1 2 3 4
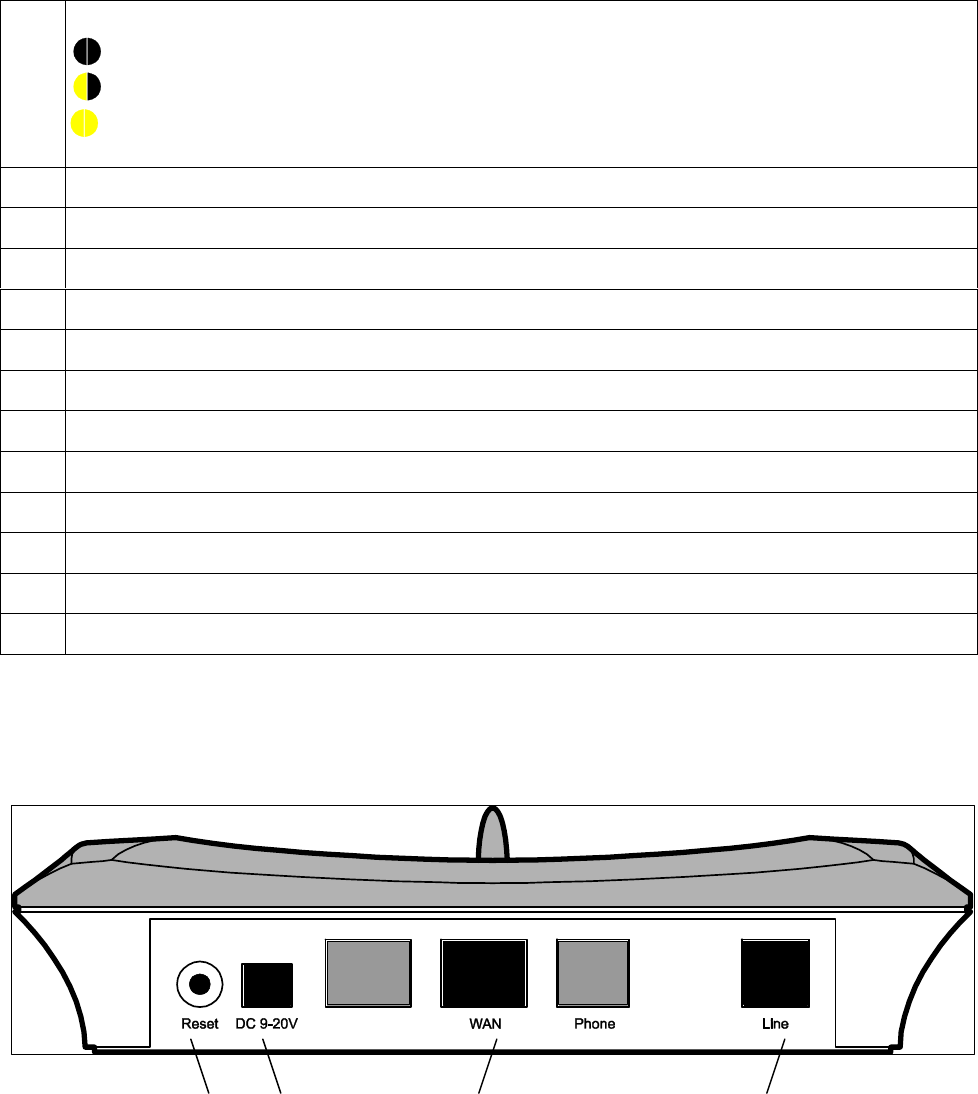
Gateway
Back
1 Connection status indicators:
Black/black - out of range of the gateway.
Yellow/black - within range of the gateway, but not ready for Internet calls.
Yellow/yellow - within range of the gateway, and ready for Internet calls.
2 Time and date
3 OK button indicator
4 Battery status indicator
5 Handset number
6 Call log soft key
7 Intercom
8 Onscreen Information Services
9 Messages
10 Call log
11 Settings
12 Product website
13 Contacts
1 Reset button
2 Power connection
3 WAN connection port – for Ethernet cable
4 Landline (POTS/PSTN) connection port

8
3
2 1
4
Front
GETTING STARTED
Prerequisites
In order to take full advantage of the features of the DUALphone, you need to have the following in
place:
• Internet Telephony Service Provider subscription – to make Internet calls
• Internet Service Provider subscription – to access the Internet
• Broadband connection – cable, DSL or equivalent for high-speed access
• Landline subscription – to make ordinary phone calls
Furthermore, before you start the installation process, make sure that you have the following within
reach of the gateway:
• Router or broadband modem
• Power outlet for the gateway
1 POWER indicator – indicates power on
2 I-NET indicator – indicates active LAN connection
3 VoIP indicator – indicates ready for Internet telephony
4 CALL indicator – indicates call in progress
9
• (Optional) Telephone wall outlet used for landline telephony
Note
The gateway can be placed on either a tabletop or wall mounted. If you need longer
cables, you can use ordinary cable extensions. The handset has an indoor signal range of
up to 50 meters from the gateway, and you must place your handset charger within the
signal range. Concrete and metal might affect the signal range.
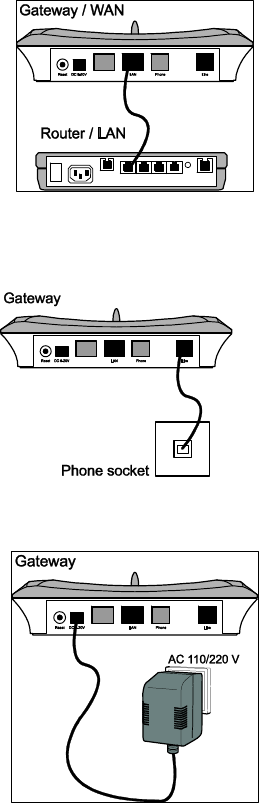
How to Install the Gateway
1. To prepare the gateway for Internet telephony, connect the Ethernet cable to the WAN
port on the gateway, and then to a LAN port on your broadband modem or router.
2. To prepare the gateway for landline telephony, connect the telephone cord to the Line
port on the gateway, and then to a telephone wall outlet.
3. Connect the power adaptor to the gateway and to a power outlet. Make sure that power
is on.
10
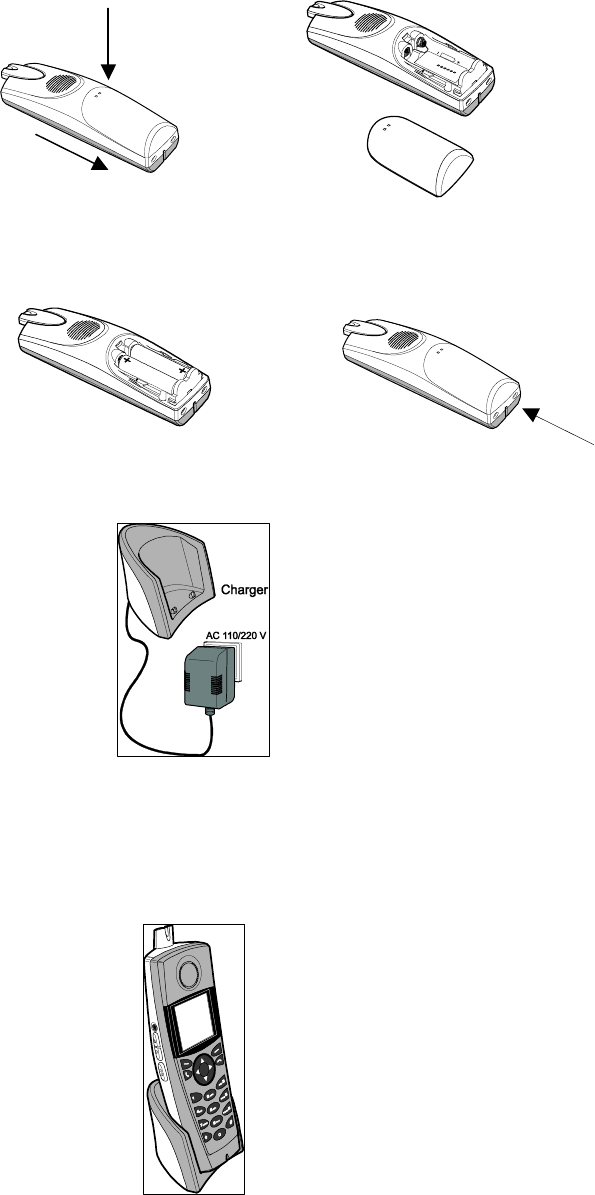
How to Install and Register the Handset
1. Push the two holes in the back of the handset to release the battery cover.
2. Insert the two batteries in the handset, making sure that their plus and minus ends are
facing as shown in the illustration, and then slide the battery cover shut.
3. Connect the power adaptor to the charger and the other end to a power outlet.
4. Place the handset in the charger, and make sure the batteries are fully charged before
first use. This takes approximately 10 hours. When you place the handset in the charger,
it turns on automatically and registers with the gateway.
11
Note
After registration of the first handset, there is a 5-minute period where you can register
additional handsets. If you want to register additional handsets after the 5-minute period
has expired, press the reset button on the gateway to start the registration process.
How to Configure the DUALphone
You will need the account information that you received from your Internet Telephony Service
Provider to complete the configuration of your DUALphone. If you have not registered with your
Internet Telephony Service Provider yet, you need to do so before continuing. For more
information, see your router’s user manual.
You can either configure your DUALphone online, or you can use the handset. Both options are
described in the following.
Note
If you bought your DUALphone as a plug and play solution, it comes with an Internet
Telephony Service Provider subscription, and a complete configuration. The
DUALphone is therefore ready for use once you have plugged in all cables and turned
on the power.
How to Configure the DUALphone Online
1. Open a browser on your PC and go to www.dualphone.net/lan. Click the
Configuration link and follow the login instructions. You will need the MAC address,
which you find on the bottom of the gateway.
2. Fill in the form on the screen using the account information from your Internet
Telephony Service Provider. Typically, you need to fill in the following fields:
• SIP Display name (optional)
• SIP User name
• SIP Authentication Name
• SIP Password
• SIP Registration Server
• SIP Proxy
• Domain/Realm
• Voicemail (optional)
3. Click OK. The gateway is reset automatically.

12
When you have successfully configured your DUALphone, the status indicators in the upper left
corner of the screen will be yellow after a few seconds.
For more detailed information on how to configure your account, refer to your Internet Telephony
Service Provider’s configuration instructions.
Note
If, for some reason, you need to change your configuration, remember to reset the
gateway afterwards. If you do not configure your DUALphone on installation, you can
only make landline calls. However, you can always complete the configuration at
www.dualphone.net/lan or return to the configuration menu on the handset.
How to Configure the DUALphone Using the Handset
If you are unable to complete the online configuration, the handset displays instructions on how to
configure your DUALphone using the handset keys. Follow the instructions to complete the
configuration.
1. Enter the main menu, and choose Settings.
2. Choose VoIP settings, and when prompted for a PIN code, enter the default PIN code
1234, and press OK.
3. Choose VoIP subscriptions, and choose the parameters one by one, and enter the
relevant information, based on the account information you received from your Internet
Telephony Service Provider or broadband provider:
• SIP Display name (optional)
• SIP User name
• SIP Authentication Name
• SIP Password (use the star key to change the case of letters)
• SIP Registration Server
• SIP Proxy
• Domain/Realm
• Voicemail (optional)
When you have completed the configuration, you are ready to use the DUALphone. Make sure to
change the PIN code after first login:

13
• To change the PIN code, choose VoIP settings, and then Set PIN. Change the PIN
code, and press .
How to Configure Onscreen Information Services
To take full advantage of the onscreen information services features, you need to configure the
settings of your onscreen information services online.
1. Go to www.dualphone.net/lan/configurations, and click the Onscreen Information
link.
2. Follow the instructions, and specify whether you want to use the default settings, or if
you want to personalize the information services.
3. Click OK.
Once you have configured the onscreen information services, you can use the onscreen information
services features on the handset. For more detailed information, see the User Manual.
Recommended Basic Settings
Before you start using your phone, we recommend that you specify handset language, country, and
emergency dialing settings.
How to Set the Handset Language
The handset language setting determines in which language the text on the display is presented.
1. In the Settings menu, choose System settings.
2. Choose Handset language, and then select the language in which you want the text to
be displayed.
How to Specify Country Settings
The country setting determines, among other things, whether you can receive incoming calls, and it
determines the dial tone. You therefore have to specify which country you are in.
1. In the Settings menu, choose System settings.
2. Choose Country, and then select the country that you are in.
Note
The handset language and country settings are independent of each other. You can
change the handset language whenever you want, but we recommend that you only
change the country settings if you bring your DUALphone to another country and want
to make landline calls.
14
How to Specify an Emergency Line
The default setting for emergency dialing is landline. However, you can change this to Internet
instead.
1. In the Settings menu, choose Telephony settings.
2. Choose Emergency line and select VoIP.
Note
If you set your emergency line to VoIP (Internet call), you must check with you ITSP
whether they have a service that makes it possible for your call to reach the appropriate
emergency call center, and for the emergency call center to locate from where you are
calling.

15
QUICK GUIDE
How to…
Turn telephone on and off • To turn the handset on, long press .
• To turn the handset off, long press .
Make an Internet call • Enter a number and press .
Answer a call • Press .
Enter the main menu • Press in standby mode.
Make a landline call • Enter a number and press Options. Choose Landline
call and press .
End a call • Press to end a conversation, or return the handset to the
charging cradle.
Use the speakerphone • To turn the speakerphone on, press on the side of the
telephone.
• To turn the speakerphone off, press again.
Redial a call • In standby mode, press Options and then choose Redial
to see the most recently dialed number. Press to dial the
number.
View the call log • In standby mode, press Call log, or choose Call log
from the main menu.
Adjust volume • During a call, press on the side of the telephone to
increase the volume.
• During a call, press to decrease the volume.
Add an entry to contacts • Press to enter the main menu, and choose Contacts.
Choose Options, and then choose Add contact.
Call a contact. • Press to enter the main menu, choose Contacts, and
choose the contact you want to call, and then press .
Mute the microphone • During conversation, press Mute.
• To deactivate the microphone, press Unmute.
Change the ringer melody • Press to enter the main menu, choose Settings and then
Audio settings. Choose Ringer melody, and then choose
the type of call. Browse the list of melodies and press to
choose a melody.
Use voicemail • Sign up for a voicemail account with your Internet
Telephony Service Provider.
• In the main menu, choose Messages, and then Listen to
messages.
Use information services • Press to enter the main menu, choose Info Services, and
then choose Browse to see a list of available services.
• In the Info Services menu, choose Show Push to view the
most recent information.
Make simultaneous calls • During an Internet call, choose Options, and then Hold
call
. Enter the number you want to call, and choose

16
Options and then Landline call.
Capitalize letters • Press to capitalize letters or write numbers when
working in a text editor.
For a detailed description of all features of the DUALphone, see the User Manual on
http://www.dualphone.net/lan.

17
TROUBLESHOOTING
The following is a list of solutions to the most common issues that may occur during installation
and use of the DUALphone. Some problems you can easily solve yourself, and some require that
you call your service provider.
General Problem Possible Causes Possible Solutions
The display screen
is black.
Deep sleep mode
1. Power is not turned on.
2. Batteries are flat.
1. Check that the power cord is
connected properly, and that
power is turned on.
2. Charge the batteries.
3. press a key
The handset does
not charge. 1. Power is not turned on.
2. Batteries are not inserted
correctly.
1. Check that the power cord is
connected properly, and that
power is turned on.
2. Check that the batteries are
inserted with the plus and minus
ends facing the right way.
The handset
registration failed,
and the status
indicator on the
display is black.
1. Handset is out of range of the
gateway. 1. Move the handset closer to the
gateway, and turn the handset off
and then on again. Reset the
gateway, and place the handset in
the charger.
The display says
“Searching for
Gateway”.
1. The handset is out of range of the
gateway.
2. Power is not turned on.
1. Move the handset closer to the
gateway.
2. Turn the power on.
The POWER
indicator on the
gateway is not lit.
1. Power is not turned on. 1. Check that the gateway power
cord is connected properly, and
that power is turned on.
The I-NET
indicator on the
gateway is not lit.
1. The Ethernet cable is not
connected.
2. The router or modem is not
turned on.
1. Check that the Ethernet cable
between the WAN port on the
gateway and the LAN port on
your modem or router is
connected properly.
2. Turn on the power to the modem
or router.
I cannot make
landline calls. 1. The landline cable is not
connected.
2. The landline is out of order.
1. Check that the landline cable
between the Line port on the
gateway and the telephone wall
outlet is connected properly.
2. Contact your landline provider.

18
When I make
Internet calls, the
sound quality is
poor.
1. There is too much simultaneous
data traffic on your broadband
connection.
1. Reduce the amount of traffic on
your broadband connection.
2. Sign up for a Quality of Service
agreement with your broadband
provider.
3. Order a connection with higher
speed from your broadband
provider.
Router Problem Possible causes Things to check
I cannot make
Internet calls, the
VoIP indicator on
the gateway is not
lit, and the right
status indicator in
the upper left corner
of the display is
black.
1. The configuration of the
DUALphone is not complete.
2. The gateway has not been reset
after you saved the configuration.
3. The router or modem has not
assigned an IP address to the
DUALphone.
4. The router blocks Internet
telephony.
5. The router firmware needs
updating.
1. Check that you have configured
your DUALphone properly. Go
to www.dualphone.net/lan and
then click Configuration. For
more information, see, How to
Configure the DUALphone in
this guide or in the User Manual
or contact your Internet
Telephony Service Provider.
2. Reset the gateway and allow the
gateway 2 minutes to login at
your Internet Telephony Service
Provider.
3. Check that your router or modem
is working properly. Check the IP
address by pressing the volume
up key on the handset. The
handset must be in the status
window status mode to do this.
4. a) Change the configuration to
disable STUN. For more
information, see the User Manual
or contact your Internet
Telephony Service Provider.
b) Use port forwarding. The
default SIP port is 5060, and the
default RTP port is 5004. If you
use Port Forwarding, you must
use static IP mode. For more
information, check your router’s
user manual.
5. Check your router’s user manual
to see how to update the
firmware.
I cannot make
Internet calls, but it
1. The gateway is not logged in at
the Int
ernet Telephony Service
1. Check that all cables are
connected properly, and then

19
worked yesterday. Provider.
2. The router is turned off.
3. The router is using Port
Forwarding, but the DUALphone
has dynamic IP mode enabled.
4. The SIP server is down.
5. The Internet connection is down.
check that power is turned on and
reset the gateway.
2. Turn on the router.
3. Change to static IP mode. For
more information, see the User
Manual. Note that the configured
static IP address must agree with
the configured Port Forwarding.
4. Contact your Internet Telephony
Service Provider.
5. Contact your broadband provider.
There is no audio,
when I make
Internet calls.
1. The router blocks audio.
2. The Internet Telephony Service
Provider you signed up with does
not support the same audio
codec’s as are supported by the
DUALphone.
1. Use port forwarding. Check your
router’s user manual to see how
to configure port forwarding.
2. Contact your Internet Telephony
Service Provider for more
information.