RTX CT8830 DECT and BT IP65 Handset User Manual
RTX Hong Kong Ltd. DECT and BT IP65 Handset Users Manual
UserManual.wiki
>
RTX
>
CT8830 User Manual
>
Users Manual
Contents
1.
Users Manual
2.
User Manual
Users Manual
Navigation menu
Upload a User Manual
Namespaces
Wiki Guide
HTML
PDF
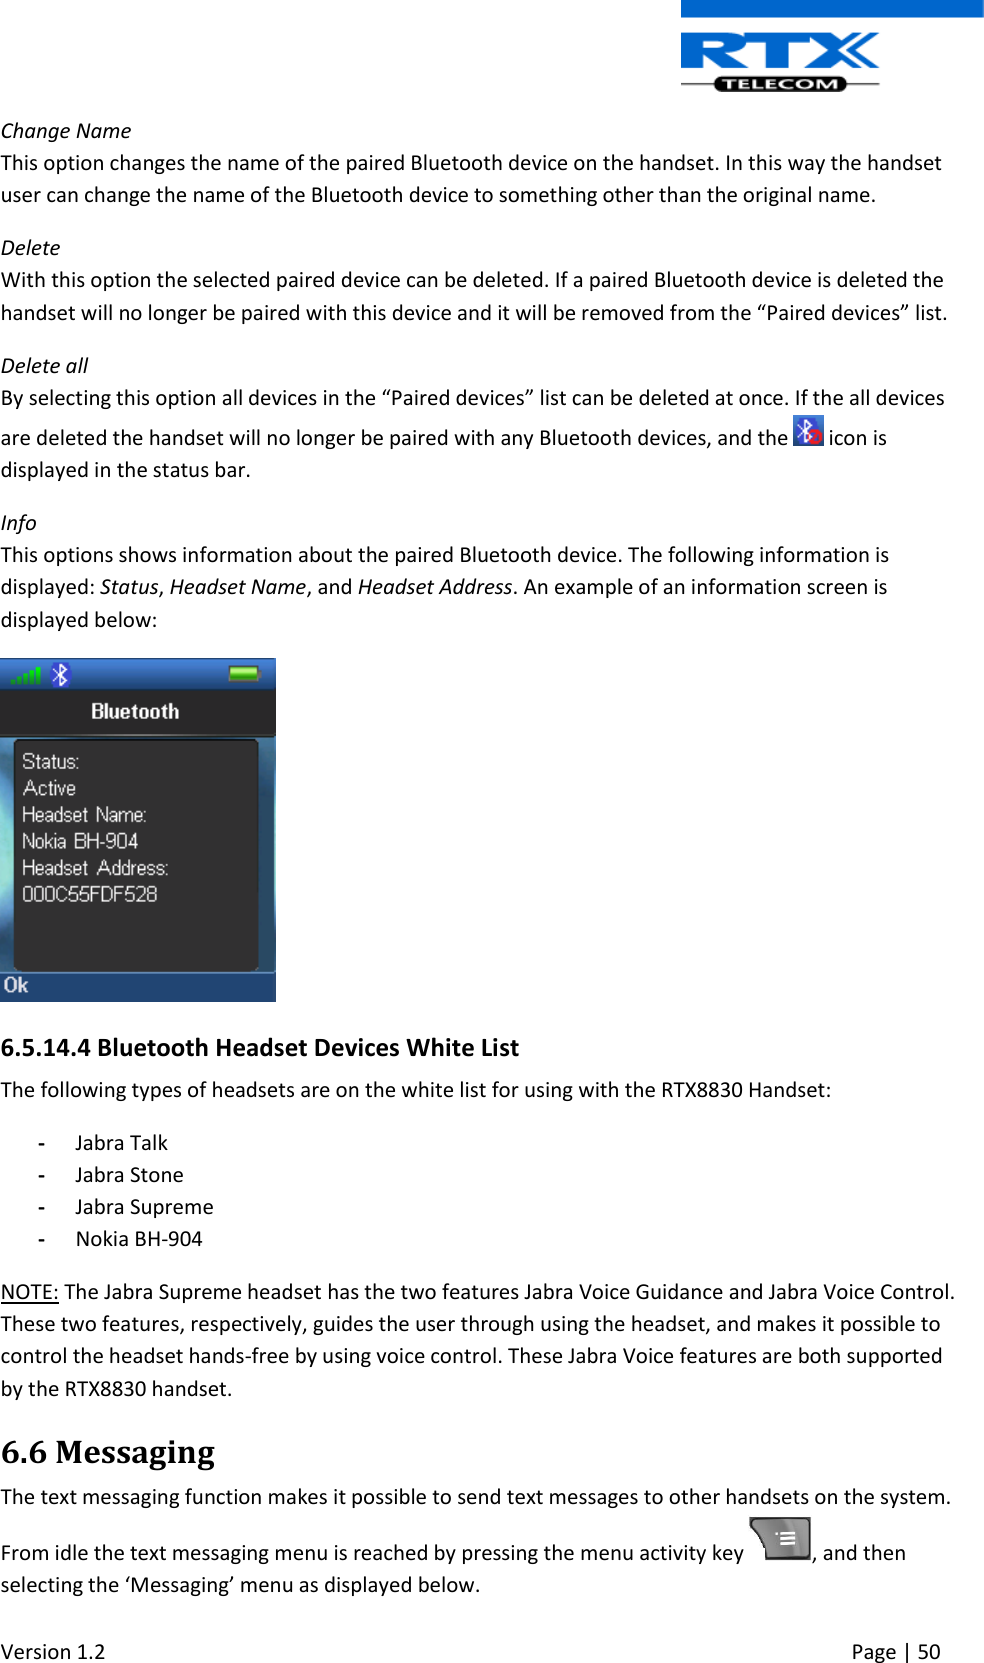
Info
Views
User Manual
Discussion / Help
Navigation

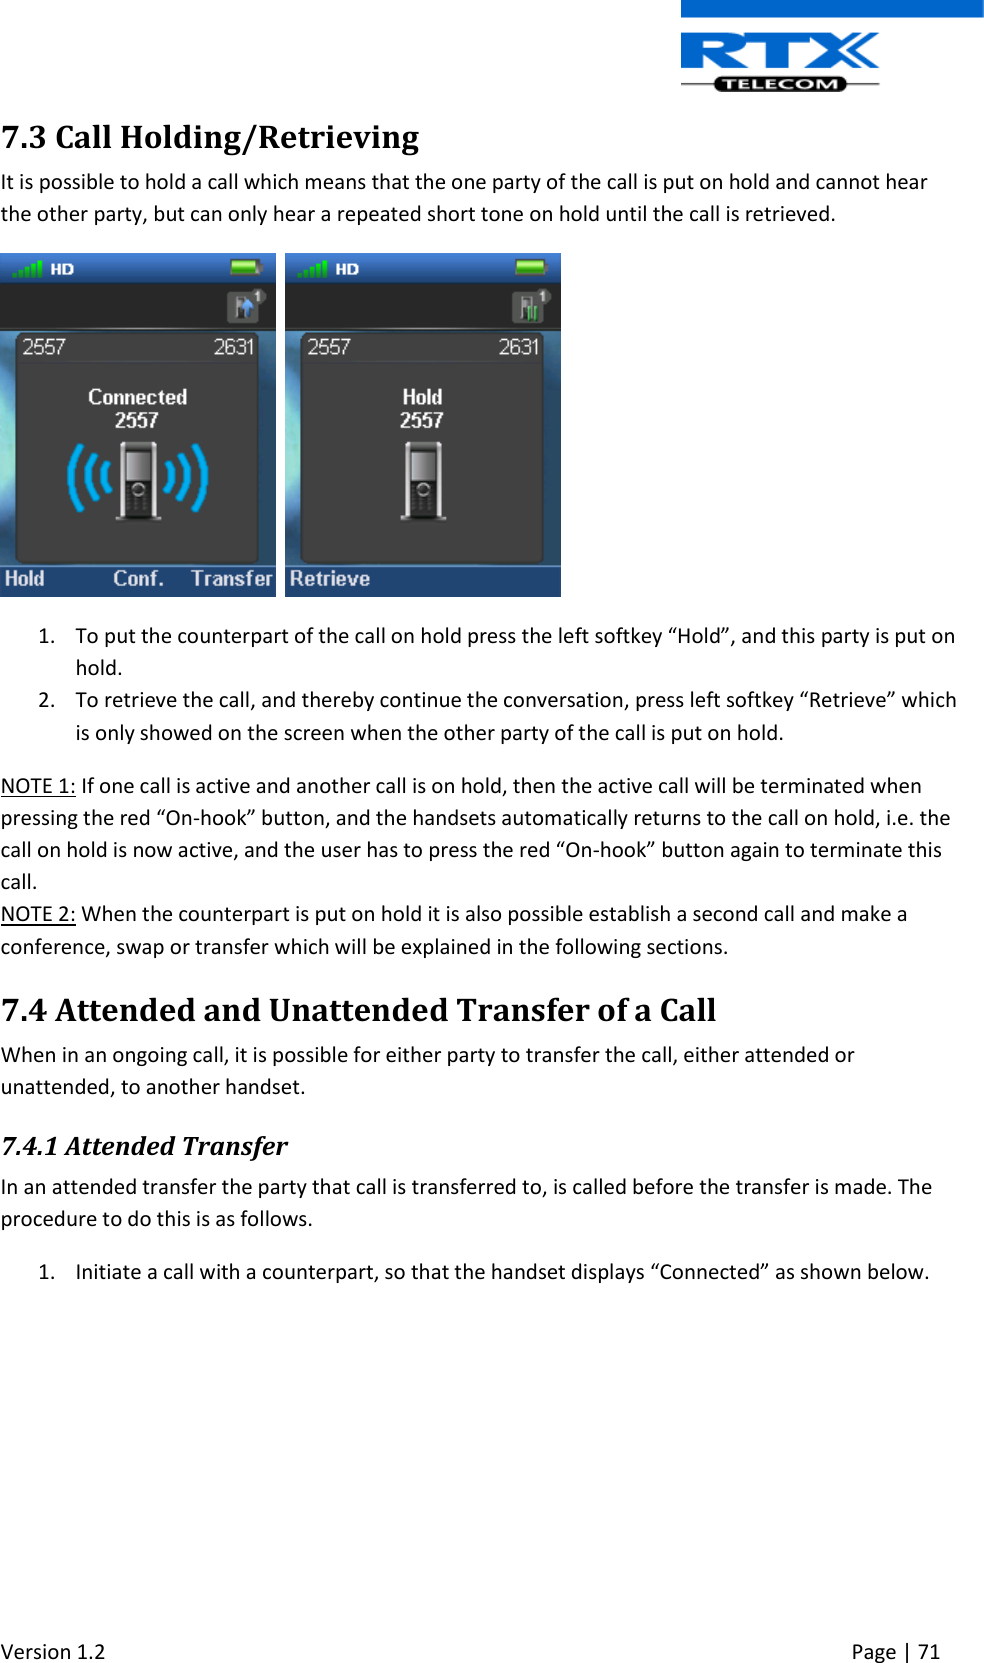
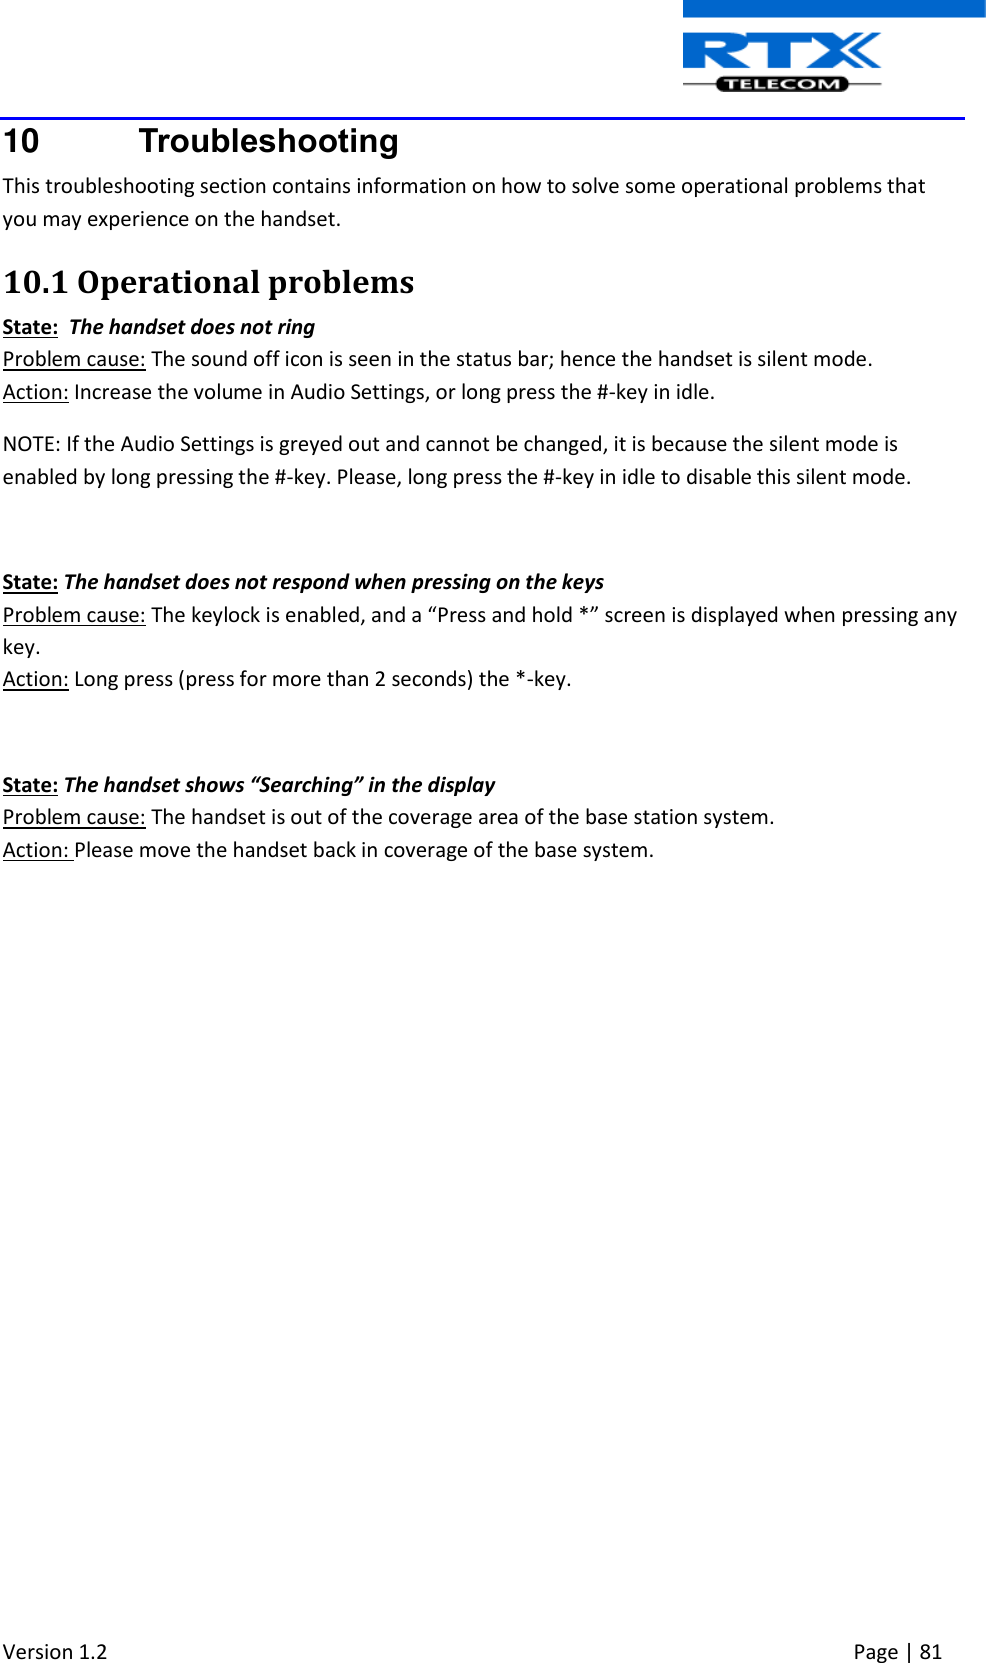
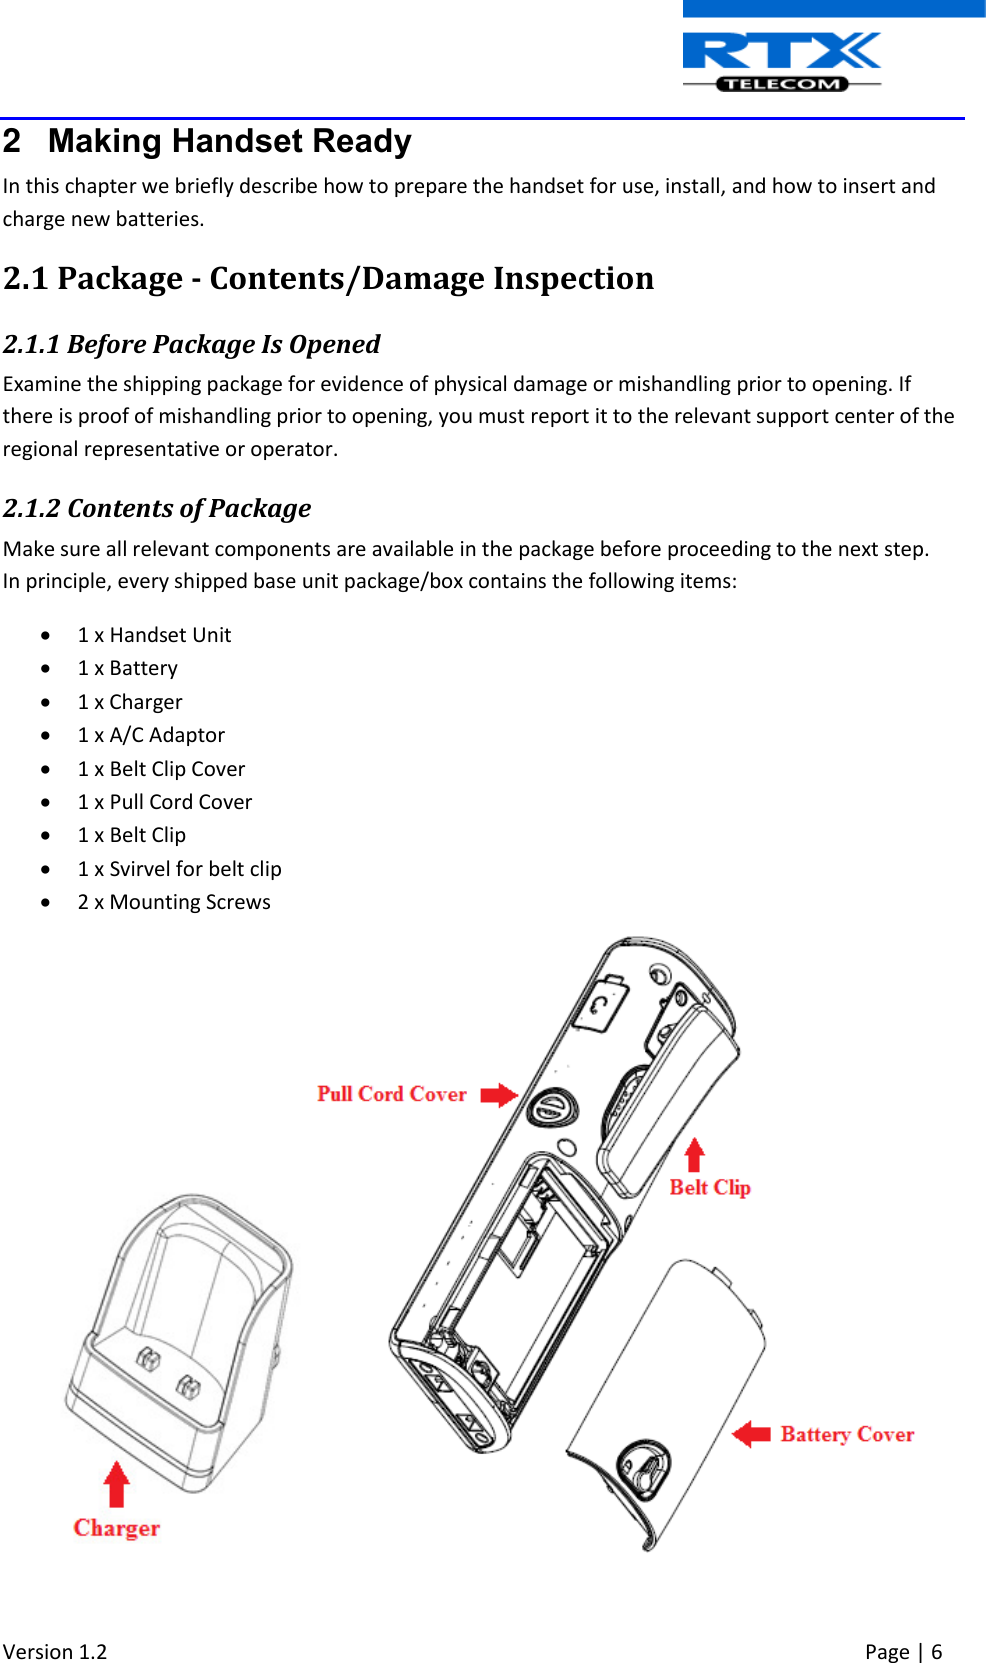
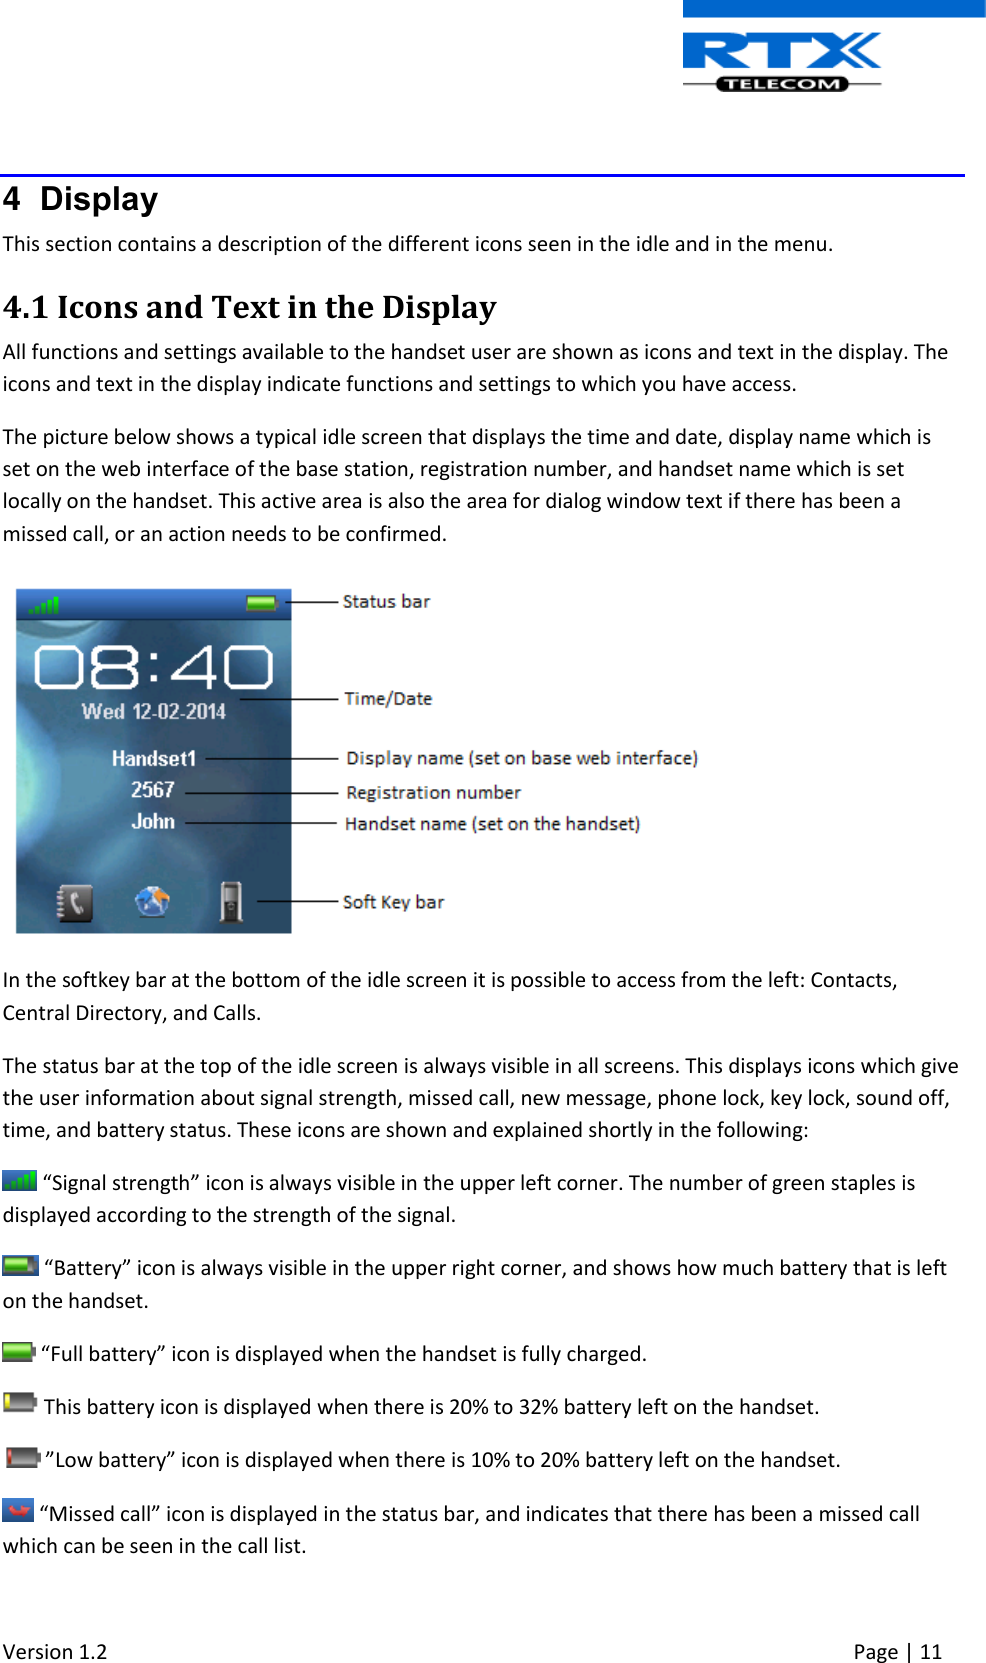
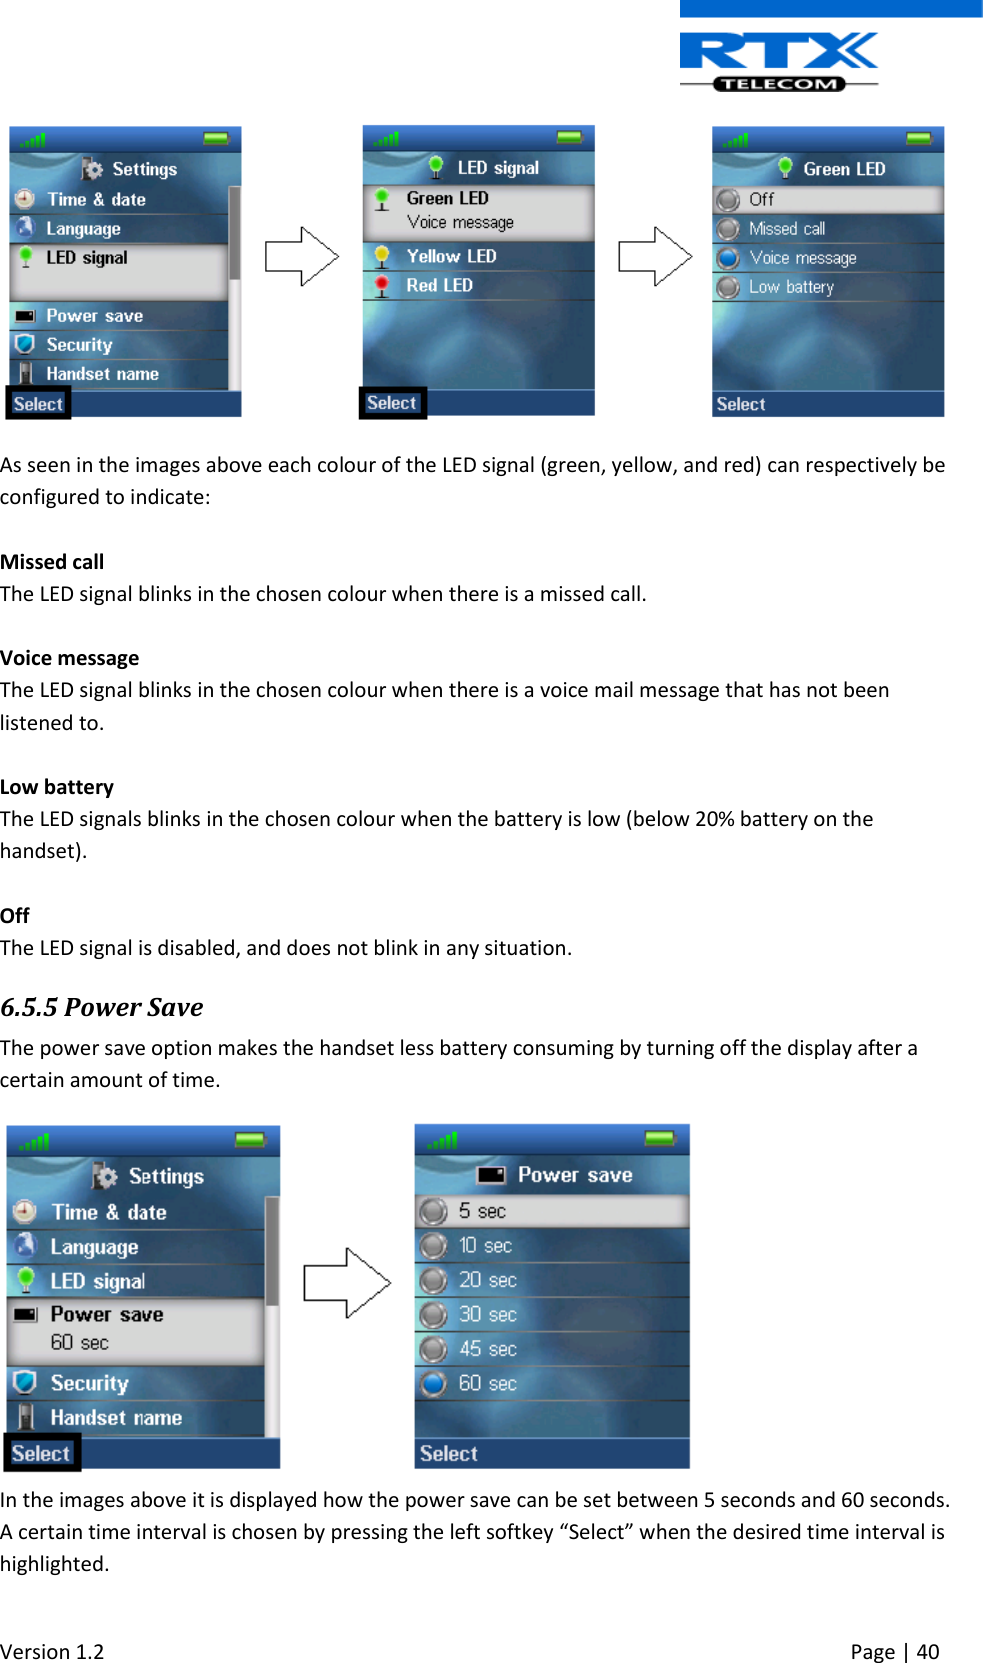
![Version 1.2 Page | 5 1 About This Document This document describes the features and functionalities available in the RTX SME VoIP DECT 8830 Handset. We describe how to operate the handset without going into details of its mechanical features. 1.1 Audience This guide is intended for everyday users as well as system administrators. 1.2 Abbreviations For the purpose of this document, the following abbreviations hold: DECT: Digital Enhanced Cordless Telecommunications IPEI: International Portable Equipment Identity MAC: Media Access Control PBX: Private Branch Exchange 1.3 References/Related Documentations [1]: Adding Multiple Base Stations to Network V0.2 Document [2]: How to Initiate Force Handover Procedure V0.2 [3]: SME VoIP System Guide, Version 2.0 1.4 Document History Revision Author Issue Date Comments 1.0 KMH 24-July-2014 New version 1.2 KMH 22-July-2014 Updated with handset pictures](https://usermanual.wiki/RTX/CT8830.Users-Manual/User-Guide-2382040-Page-5.png)
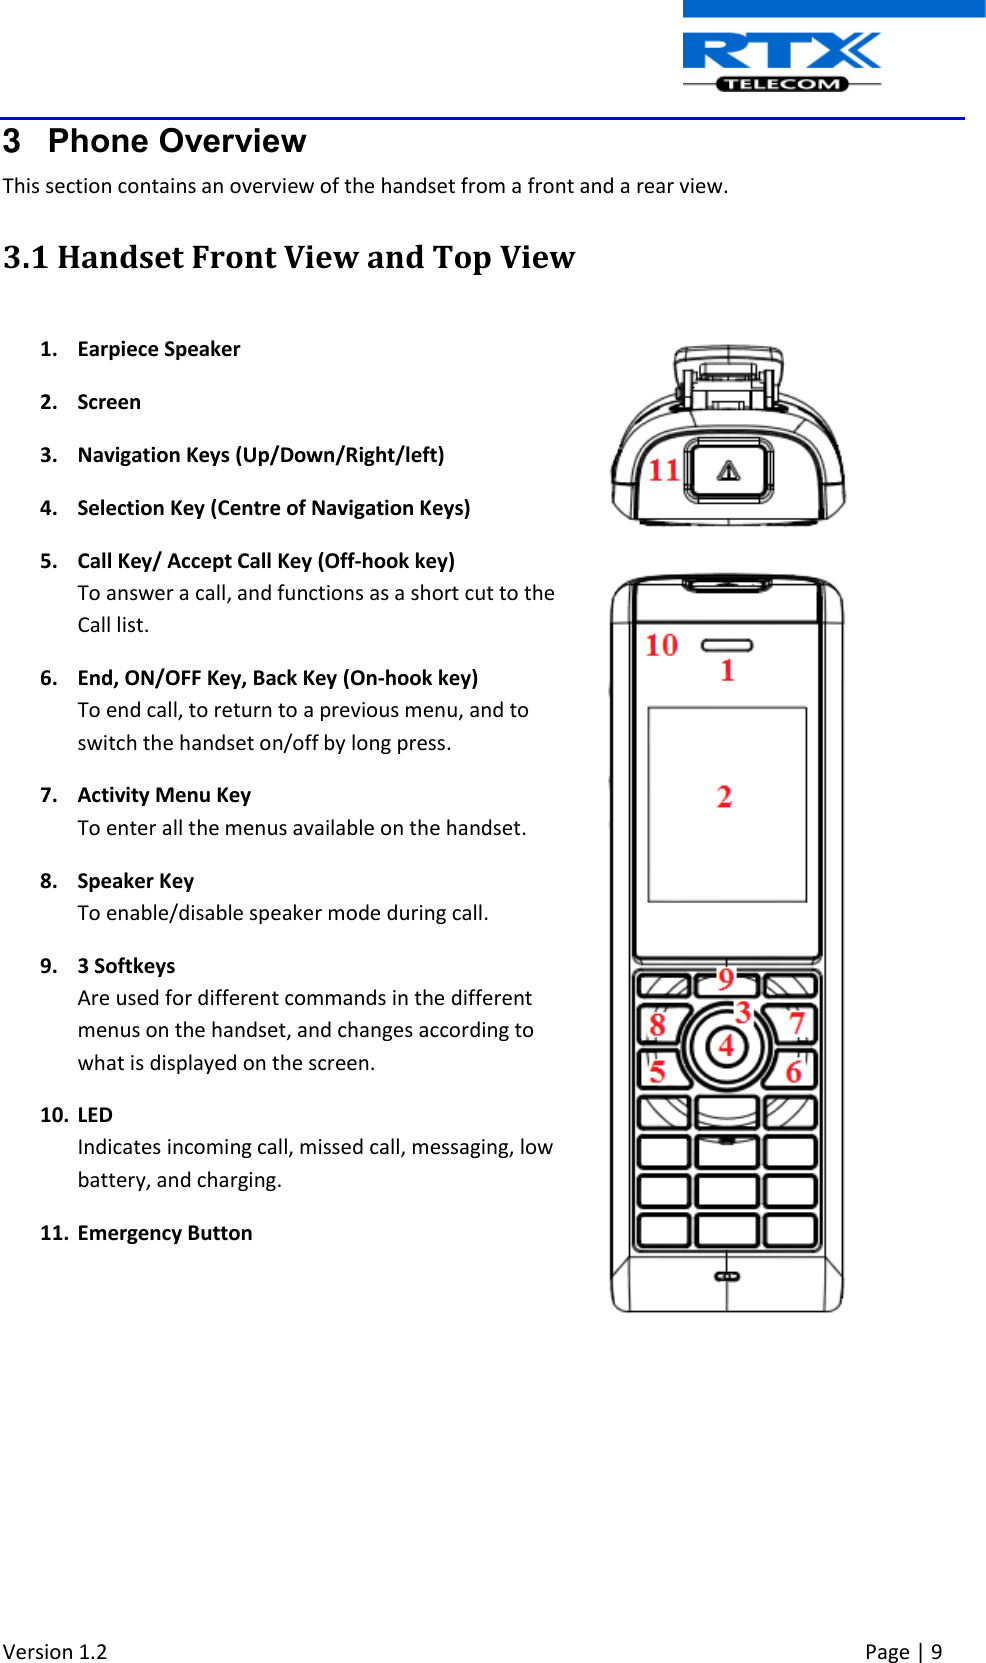
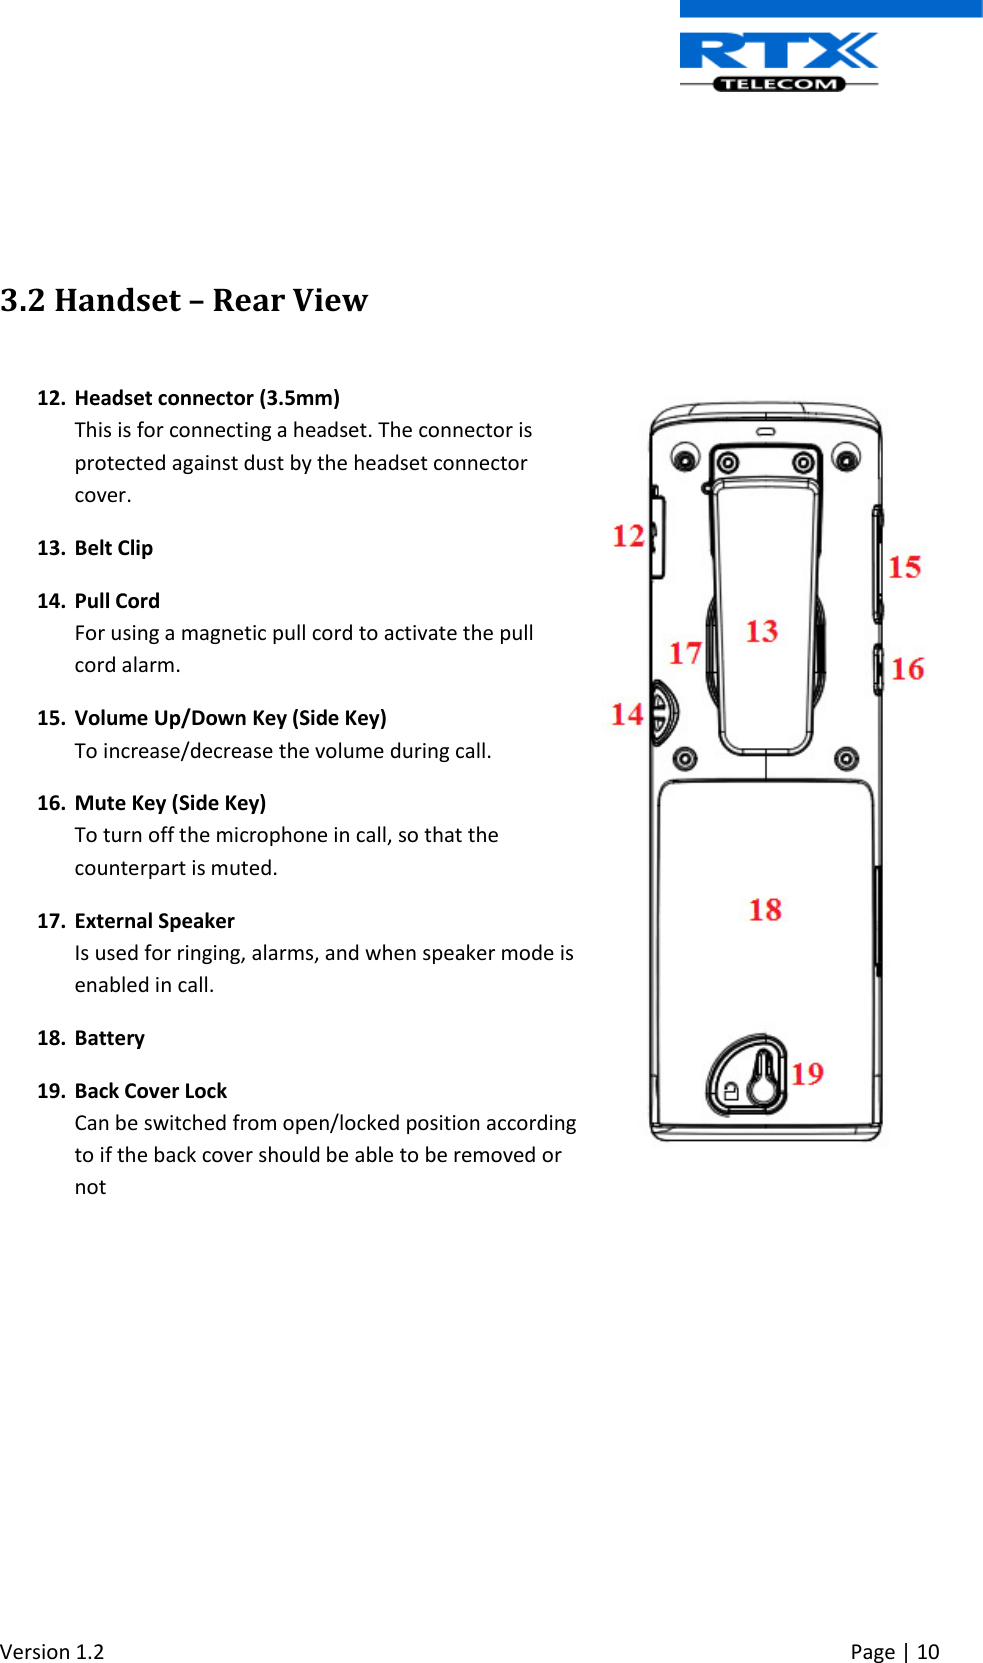
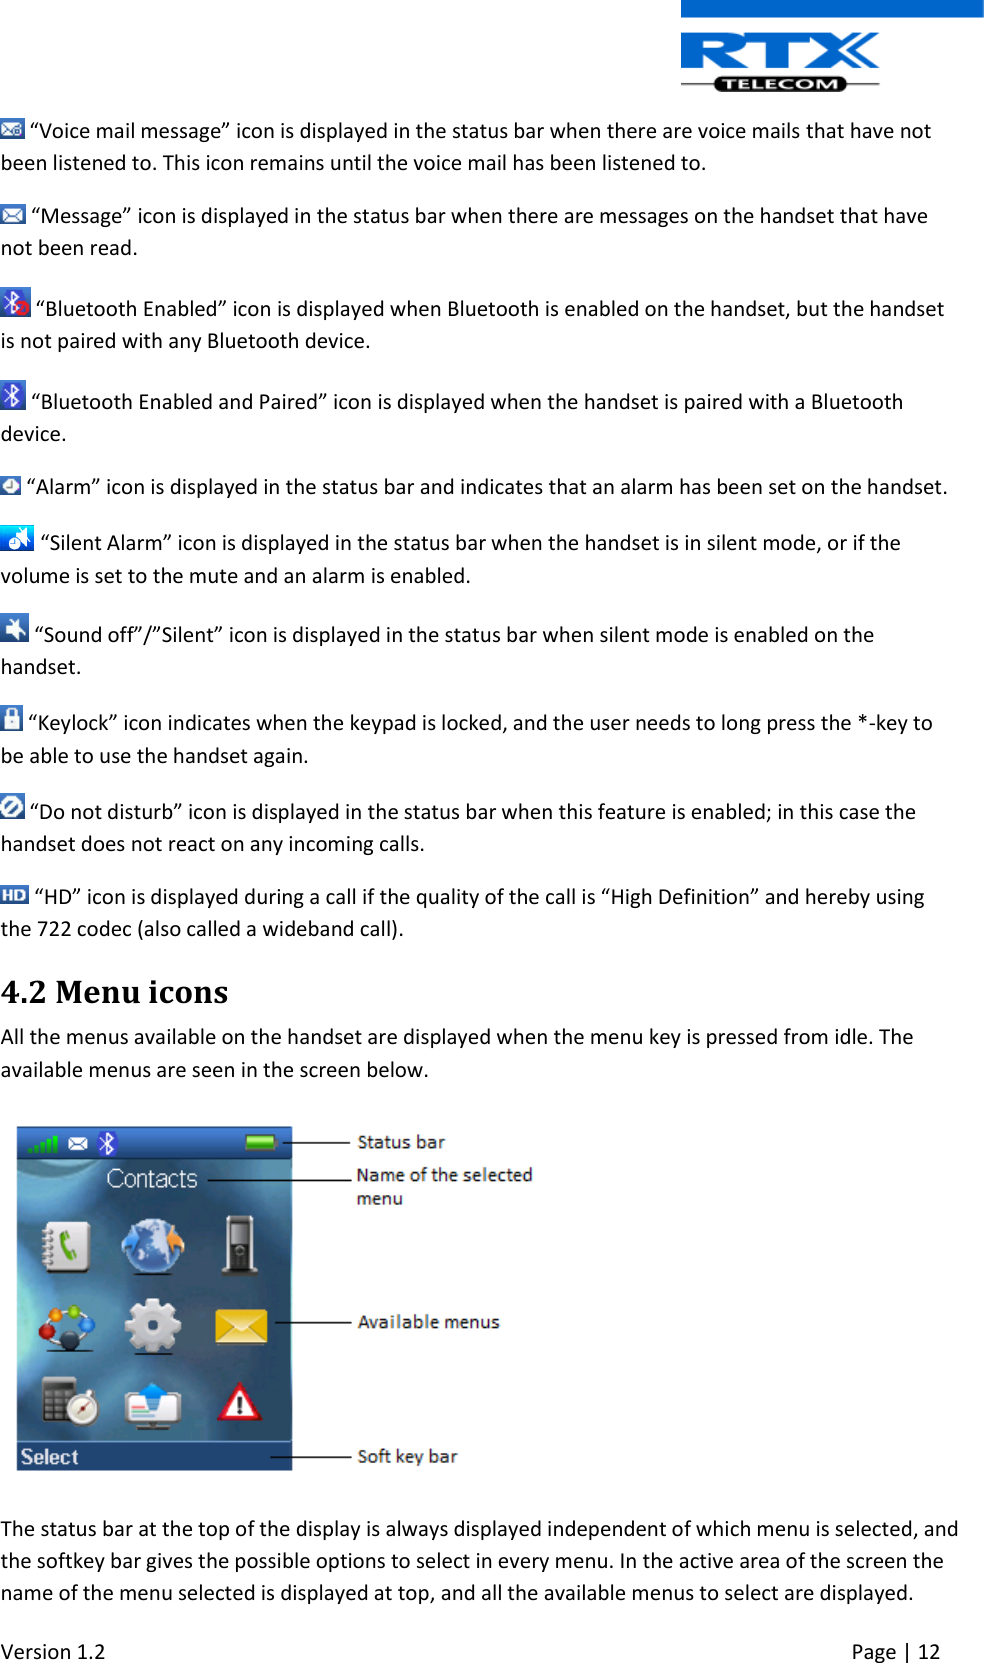
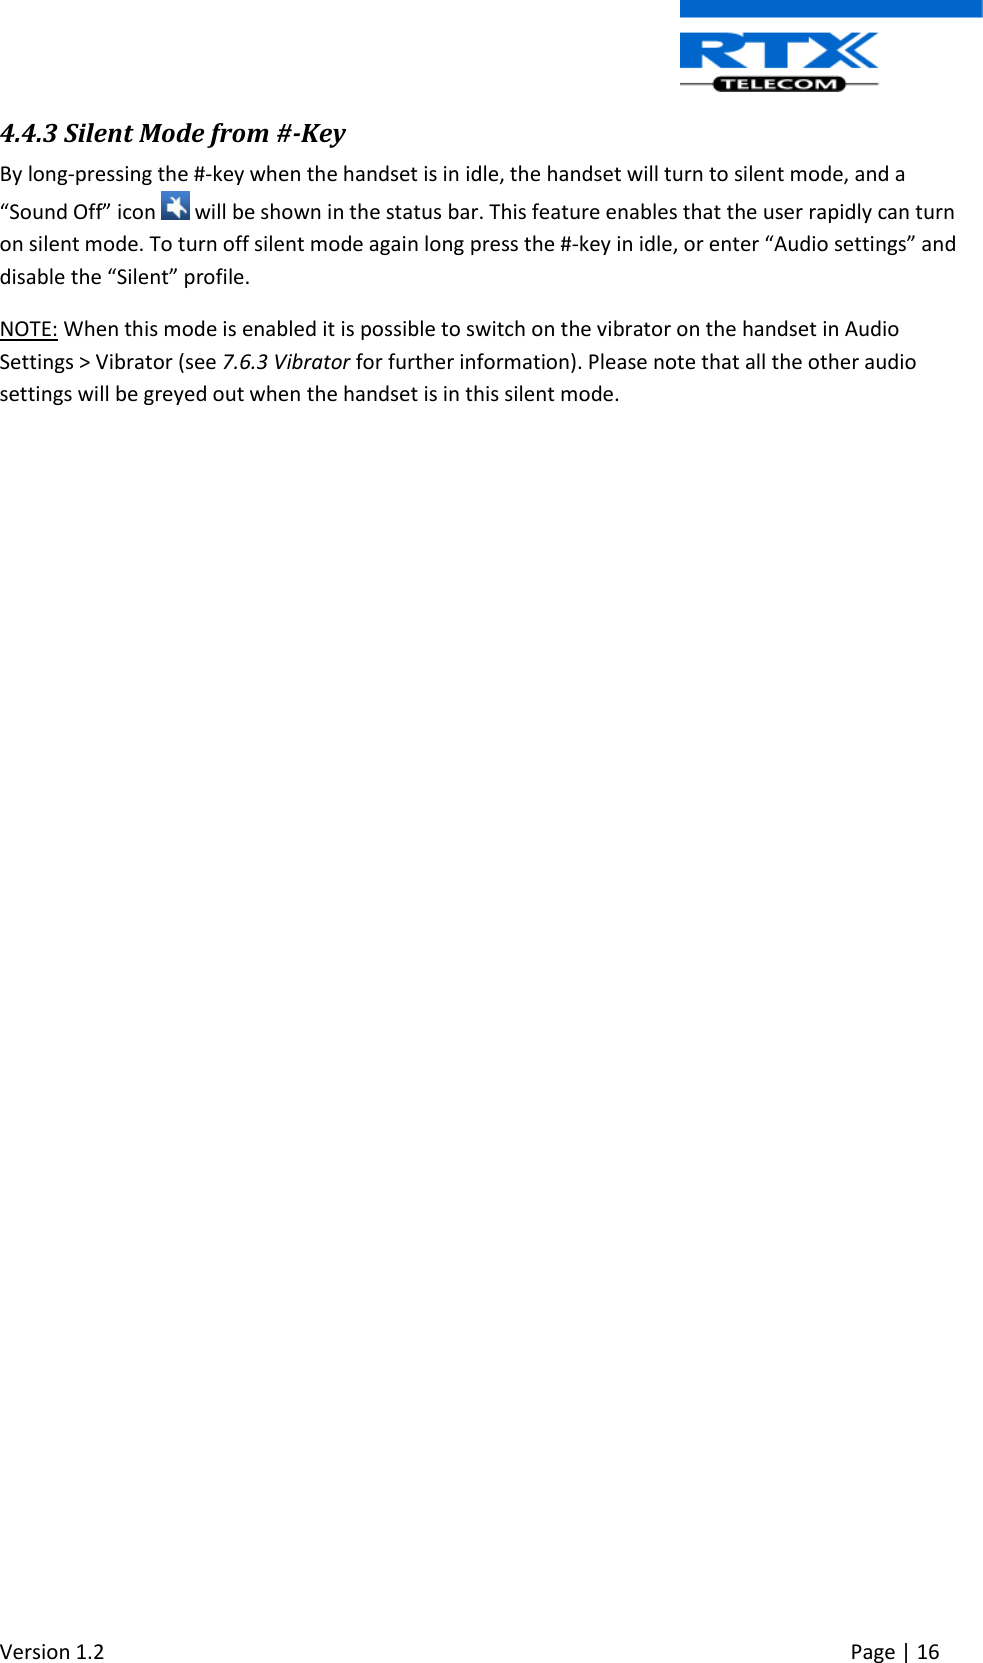
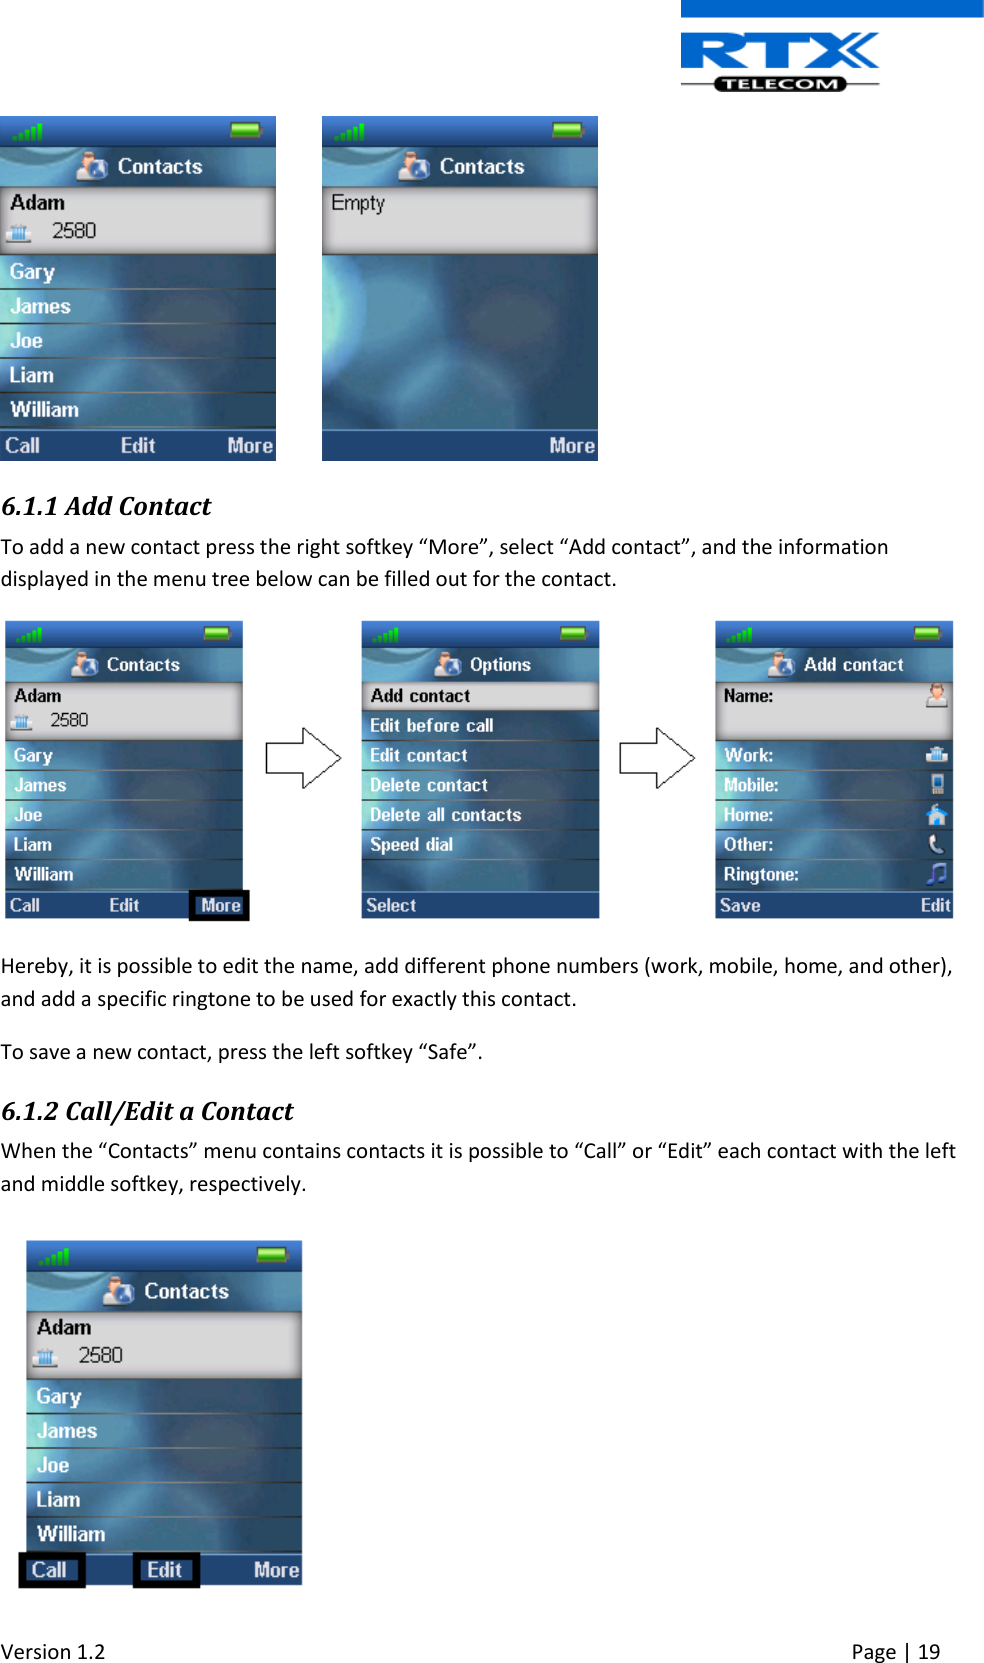
![Version 1.2 Page | 13 During navigation across the different menus the highlighted icon is moving to indicate where the navigation key is. The menu icons are showed and shortly explained in the following: The “Contacts” menu contains all names/numbers in the local phonebook. The “Central directory” menu contains all names/numbers in the central directory of the system. This is set up in the web interface of the base system (see the additional base station manual document for further information on this via [3]) The “Calls” menu contains call lists and call times. The “Connectivity” menu contains options to register/deregister the handset and network options. The “Settings” menu contains personal handset settings such as time/date, language, handset name, etc. The “Messaging” menu contains messages received on and sent from the handset along with the available messaging settings. The “Alarms” menu contains personal handset settings for the alarm. The “F-Keys” menu contains personal handset settings for the F-Keys. The “Alarm List” menu contains alarms received on the handset 4.3 Keys and Buttons 4.3.1 Navigation Keys/Selection Key Use this key when navigating in menus, and to move the cursor when writing some text or a number. The navigation keys are used for stepping left/right and up/down when navigating in the menus. When selecting or entering a menu use the selection key in the middle of the navigation keys. 4.3.2 Softkeys The handset has three softkeys located just beneath the display, and the function of these is indicated by text in the display just above each softkey according to the respective screen.](https://usermanual.wiki/RTX/CT8830.Users-Manual/User-Guide-2382040-Page-13.png)
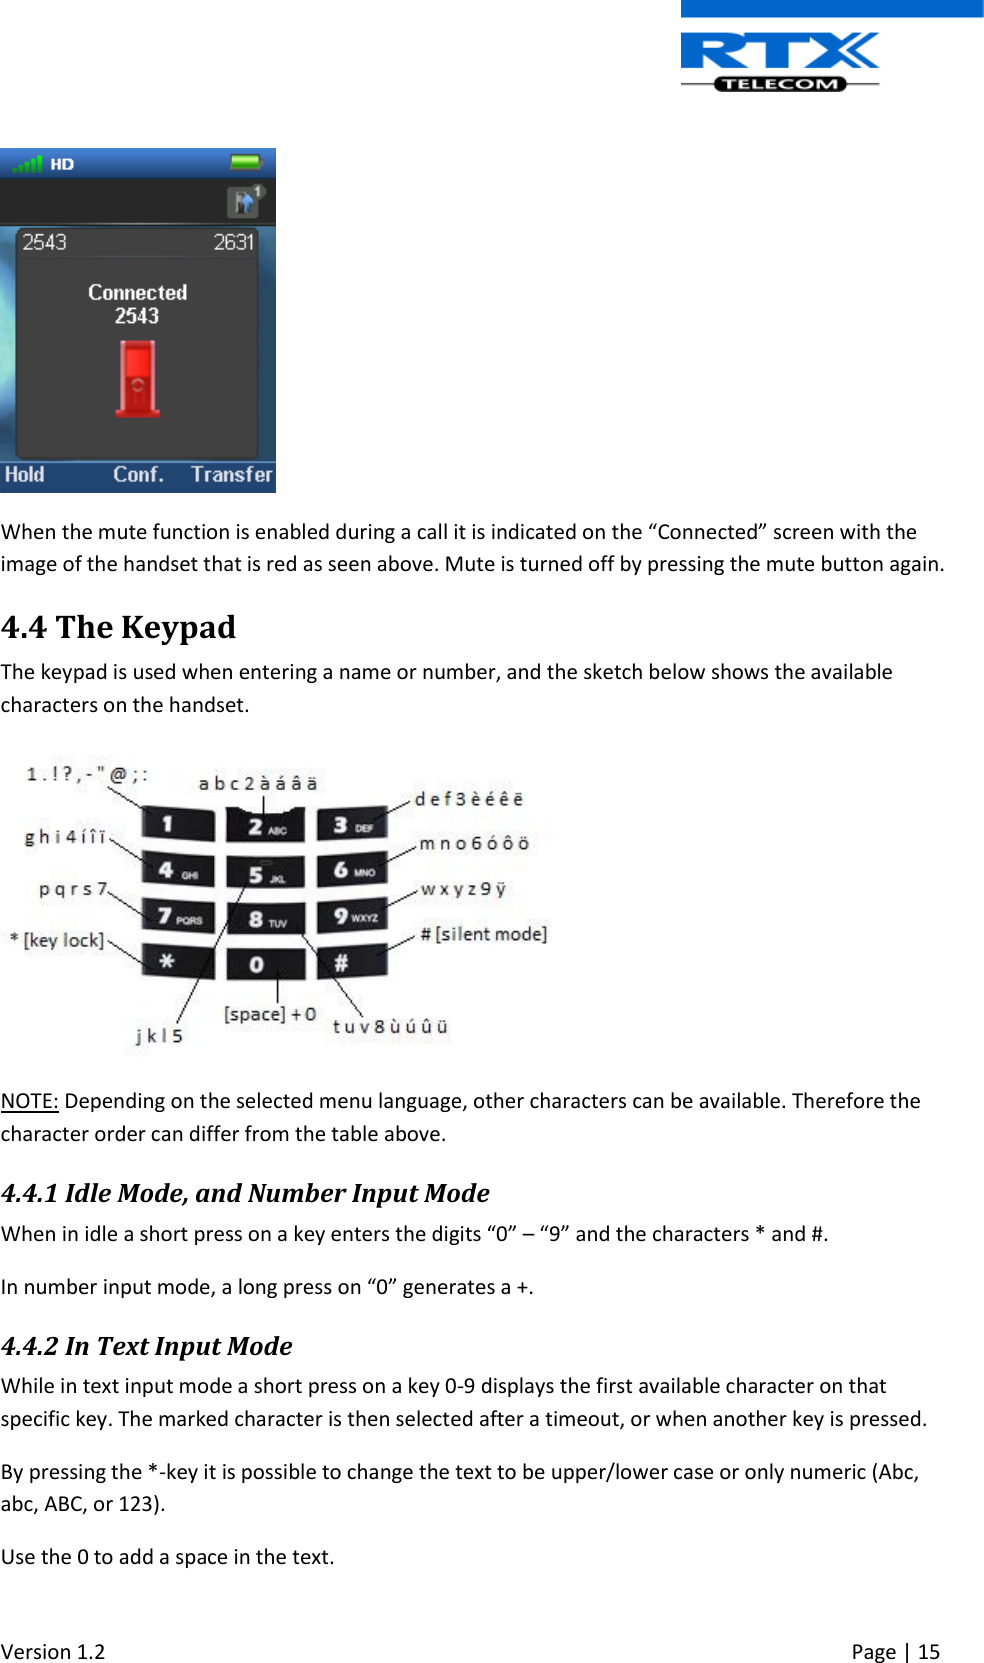
![Version 1.2 Page | 17 5 Basic Operation The following explain three basic operations of the handset: How to switch the handset on/off, how to lock/unlock the keypad, and the available options when entering a number in idle. 5.1 How to Switch the Handset On/Off Switching on the handset To switch the handset on long press the on-hook key to switch the handset on. When the handset is on, it will display “Searching” for a short while until a signal is detected, and then the handset is showing the registration number and is ready for use. Switching off the handset To switch the handset off return to the idle screen and long press the on-hook button , and the handset will turn off. 5.2 Lock/Unlock the Keypad To prevent accidentally pressing keys and making a call the keypad can be locked. Locking the keypad To lock the keypad long press the in idle, and a text message is displayed “Press and hold *”. When the keypad is locked, the “Key Lock” icon is displayed in the status bar. Unlocking the keypad To unlock the keypad long press until the text message “Press and hold *” disappears. NOTE: It is possible to answer/reject an incoming call while the keypad is locked. 5.3 Entering a number in idle When entering a number in idle it is possible to call the number by pressing the off-hook key Otherwise, the following three different options are available when a number is entered in idle. Save With this option the number can be added as a local contact by pressing the left softkey “Save”. Line Using this option, by pressing the middle softkey “Line”, you can choose which line the call should be initiated from if the handset is set up to using different lines (see the base station manual for additional information on this; reference [3]) Clear Using the right softkey “Clear” deletes one character at a time to the left of the cursor.](https://usermanual.wiki/RTX/CT8830.Users-Manual/User-Guide-2382040-Page-17.png)
![Version 1.2 Page | 22 NOTE: The speed dial function can also be set up for the F-Keys (for additional information on this see section 7.8 F-Keys) 6.2 Central Directory In the “Central directory” menu different contacts can be called according to which list the system administrator has setup in the base system. This menu can be entered directly from idle with the middle softkey , or from the menu by pressing the menu activity key and choosing “Central directory”. 6.2.1 LDAP Mode and Local Mode The “Central directory” can be set to LDAP Mode or Local Mode via the web interface of the base station (see [3] for additional information on this). When set to LDAP mode, opening the central directory will show a search screen as displayed in the following. By leaving the search field empty and pressing the middle softkey “Search” all the contacts in the central directory will be displayed.](https://usermanual.wiki/RTX/CT8830.Users-Manual/User-Guide-2382040-Page-22.png)
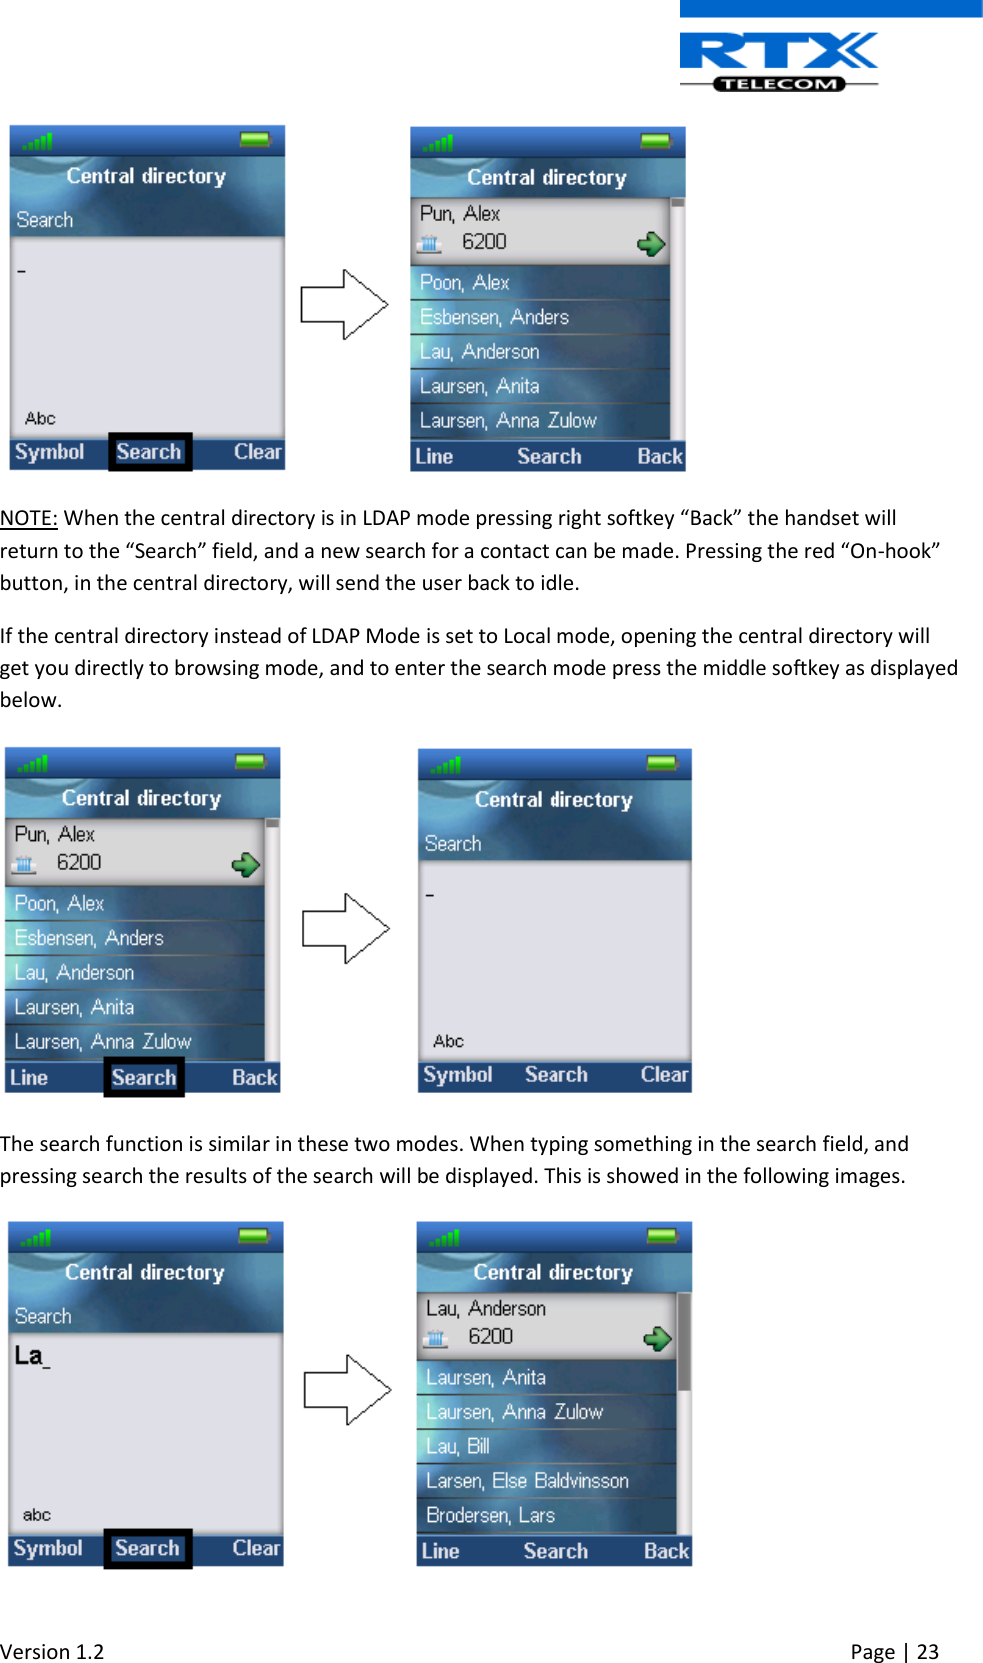
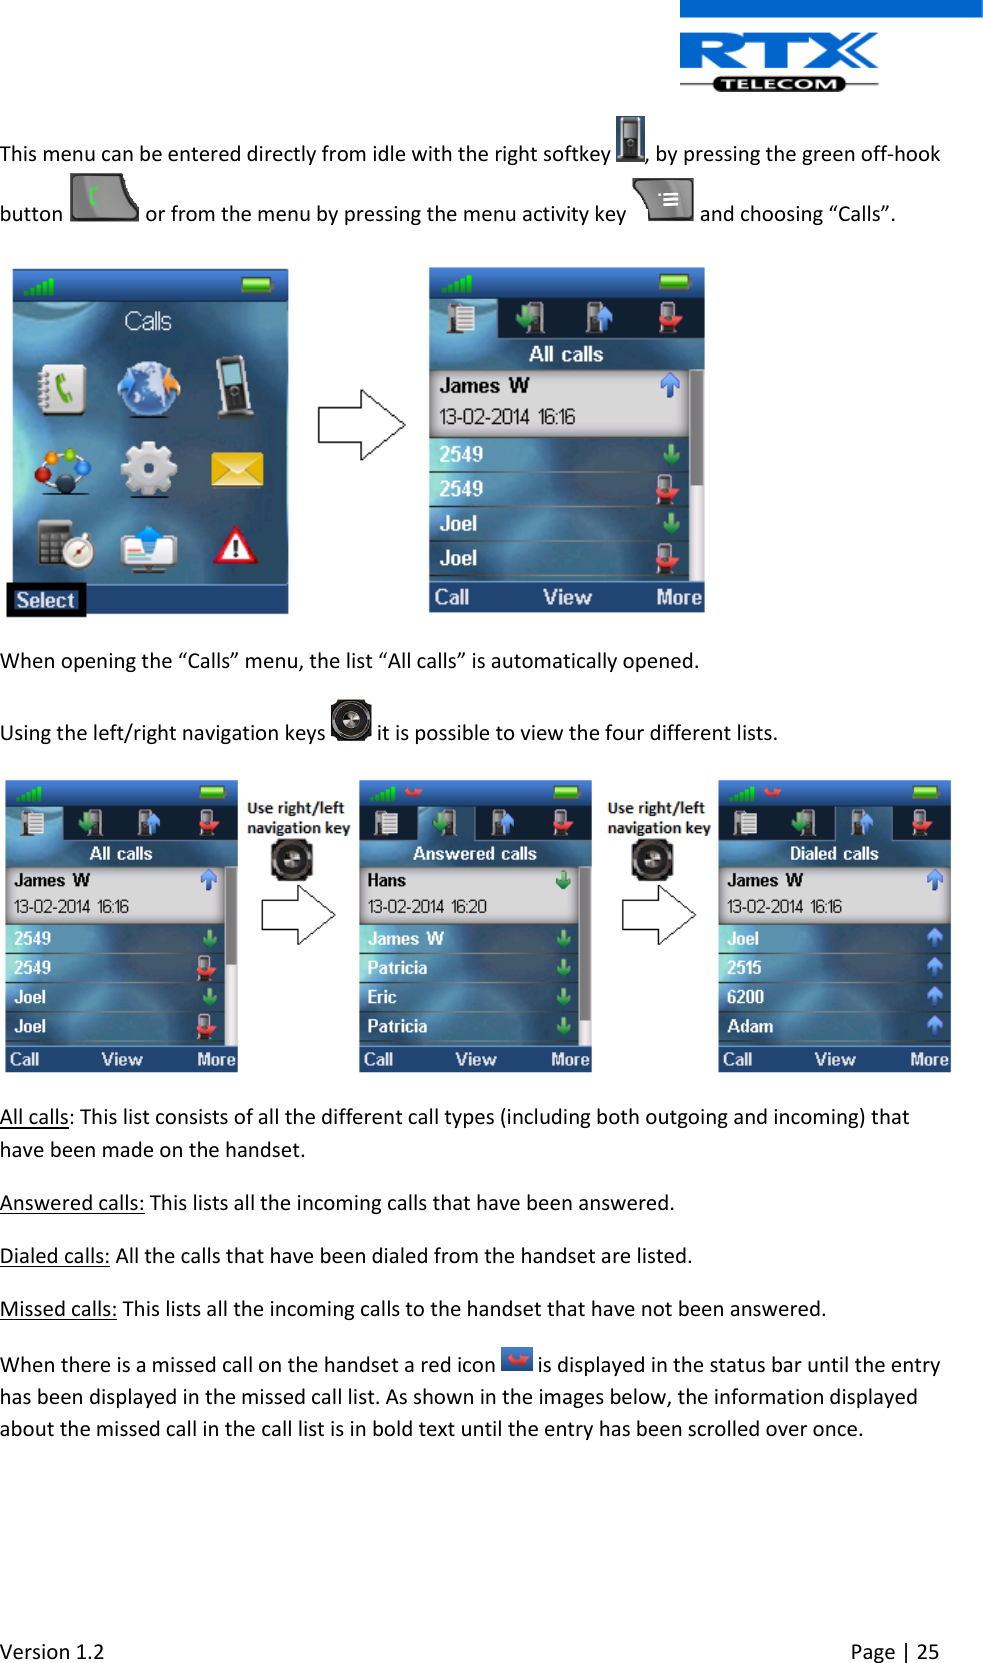
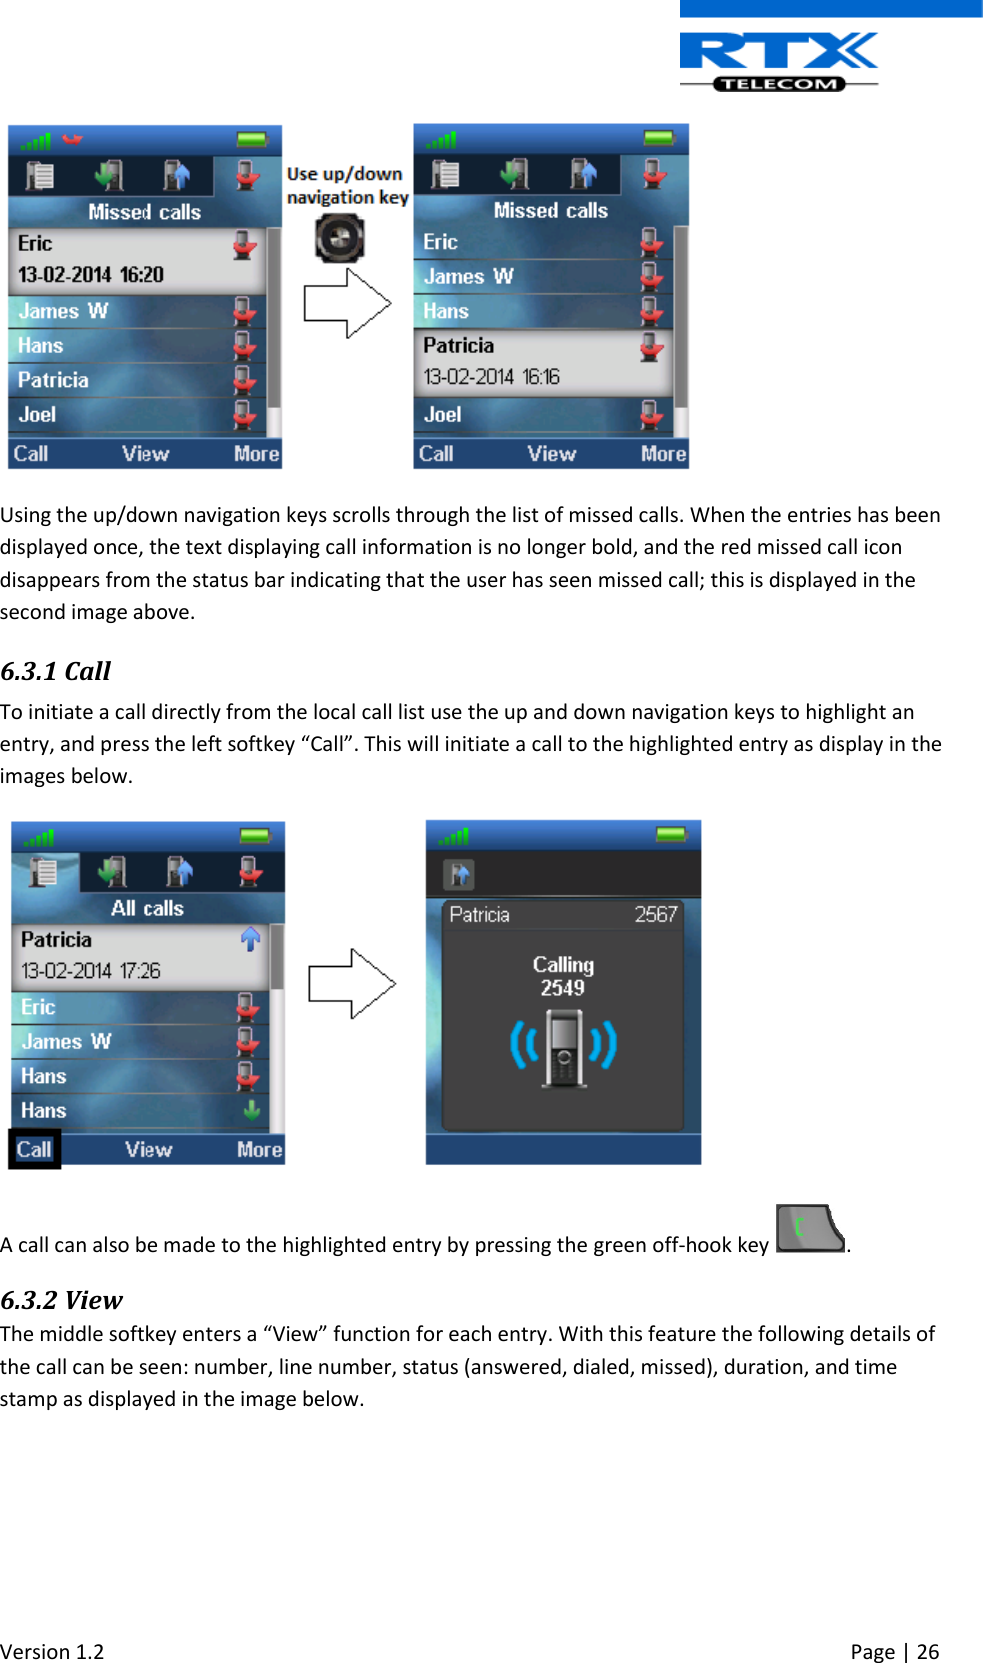
![Version 1.2 Page | 24 To scroll through the search results use the navigation keys up and down and you will scroll through the list. If a green arrow is seen to the right of a contact (as seen above), this contact has more than one number added, and to scroll through these different numbers use the left/right navigation keys. 6.2.2 Calling a Contact in the Central Directory To call a contact from the central directory press the green “Off-hook” button, and the contact number that currently appears on the screen will be called. If a contact has more numbers added a green arrow is shown to the right of the contact, and by pressing the right/left navigation keys it is possible to navigate between the different numbers assigned to that contact. The number that currently appears on the screen is the one that is called 6.2.3 Line By pressing the left softkey “Line” it is possible to choose different lines for the call to be made through as for example if the handset is assigned to different extension numbers, or to different PBX’s; as illustrated in the picture below. By choosing one of these different lines the call is then routed through the selected one. The line that is set in Settings > Line is used as default. To see additional information on this “Line” feature, and more about the “Central Directory” setup on the base station please check the user manual for the base station; reference [3]. 6.3 Calls The menu “Calls” consists of lists of all the calls that have been made to or from the handset.](https://usermanual.wiki/RTX/CT8830.Users-Manual/User-Guide-2382040-Page-24.png)
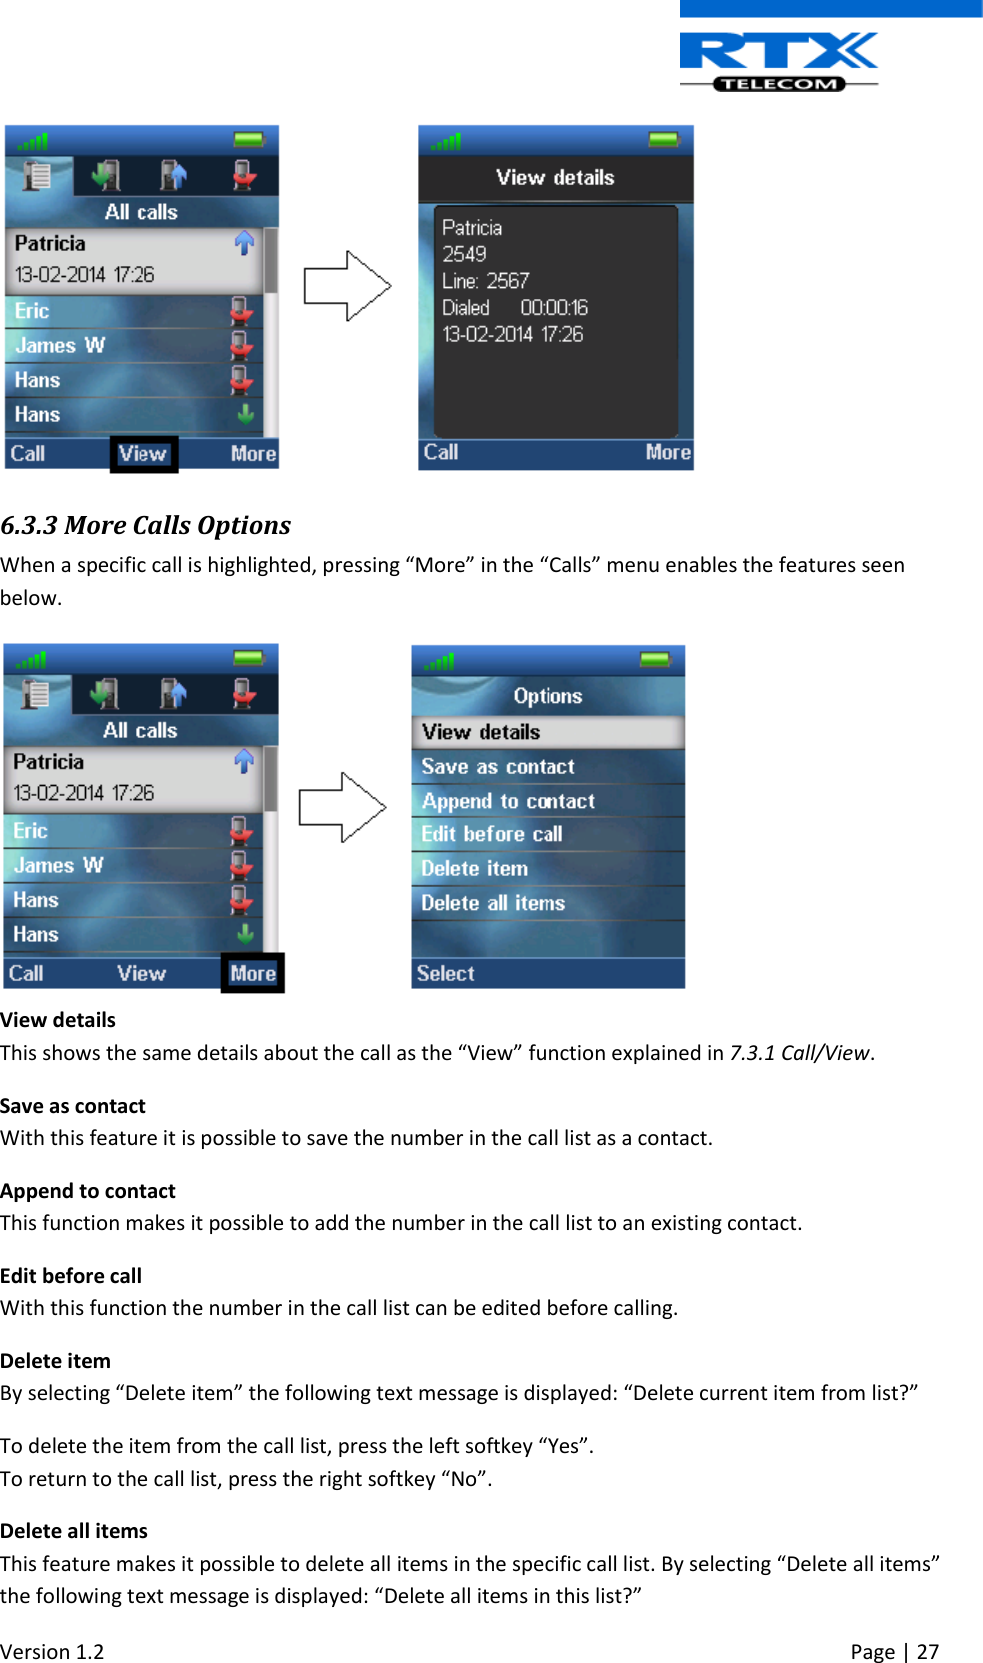
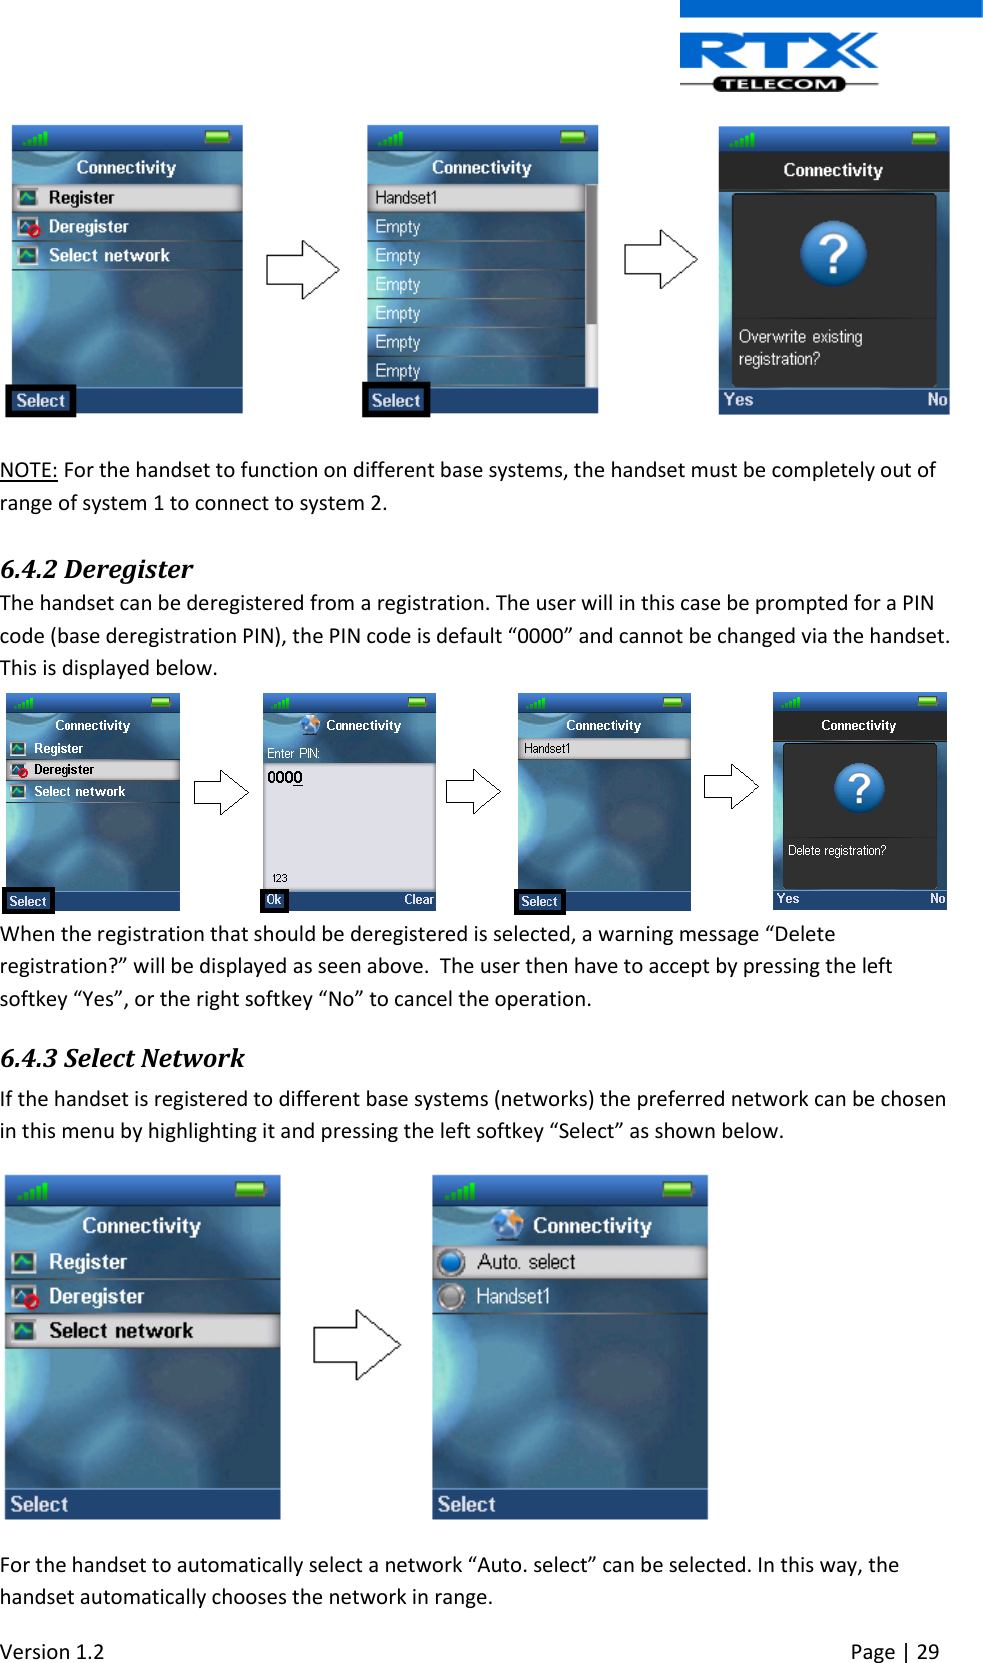
![Version 1.2 Page | 28 To delete all items in the specific list, press the left softkey “Yes”. To return to the call list, press the right softkey “No”. 6.4 Connectivity The “Connectivity” menu is entered in the menu by pressing the menu activity key in idle. In this menu it is possible to register or deregister the handset to a certain base system. Moreover, the “Select network” function makes it possible to register the handset to more than one base system. 6.4.1 Register When a handset is to be registered on a base system, the user will be prompted for an access code (base registration PIN) before the registration procedure is started. Since it is possible for the handset to be registered on different base systems that are out of range of each other, the “Register” menu displays 10 different entries with which the handset can be assigned to different base systems. When selecting an “Empty” entry the user is prompted for the PIN code as shown below. The access PIN code is default “0000” and cannot be changed via the handset. The access PIN code can only be changed via the web interface on the base (please check the additional document via [3] for more information about handset registration on a base system). It is also possible to overwrite an existing registration by selecting that entry that should be overwritten instead of selecting an “Empty” slot. This is displayed below.](https://usermanual.wiki/RTX/CT8830.Users-Manual/User-Guide-2382040-Page-28.png)
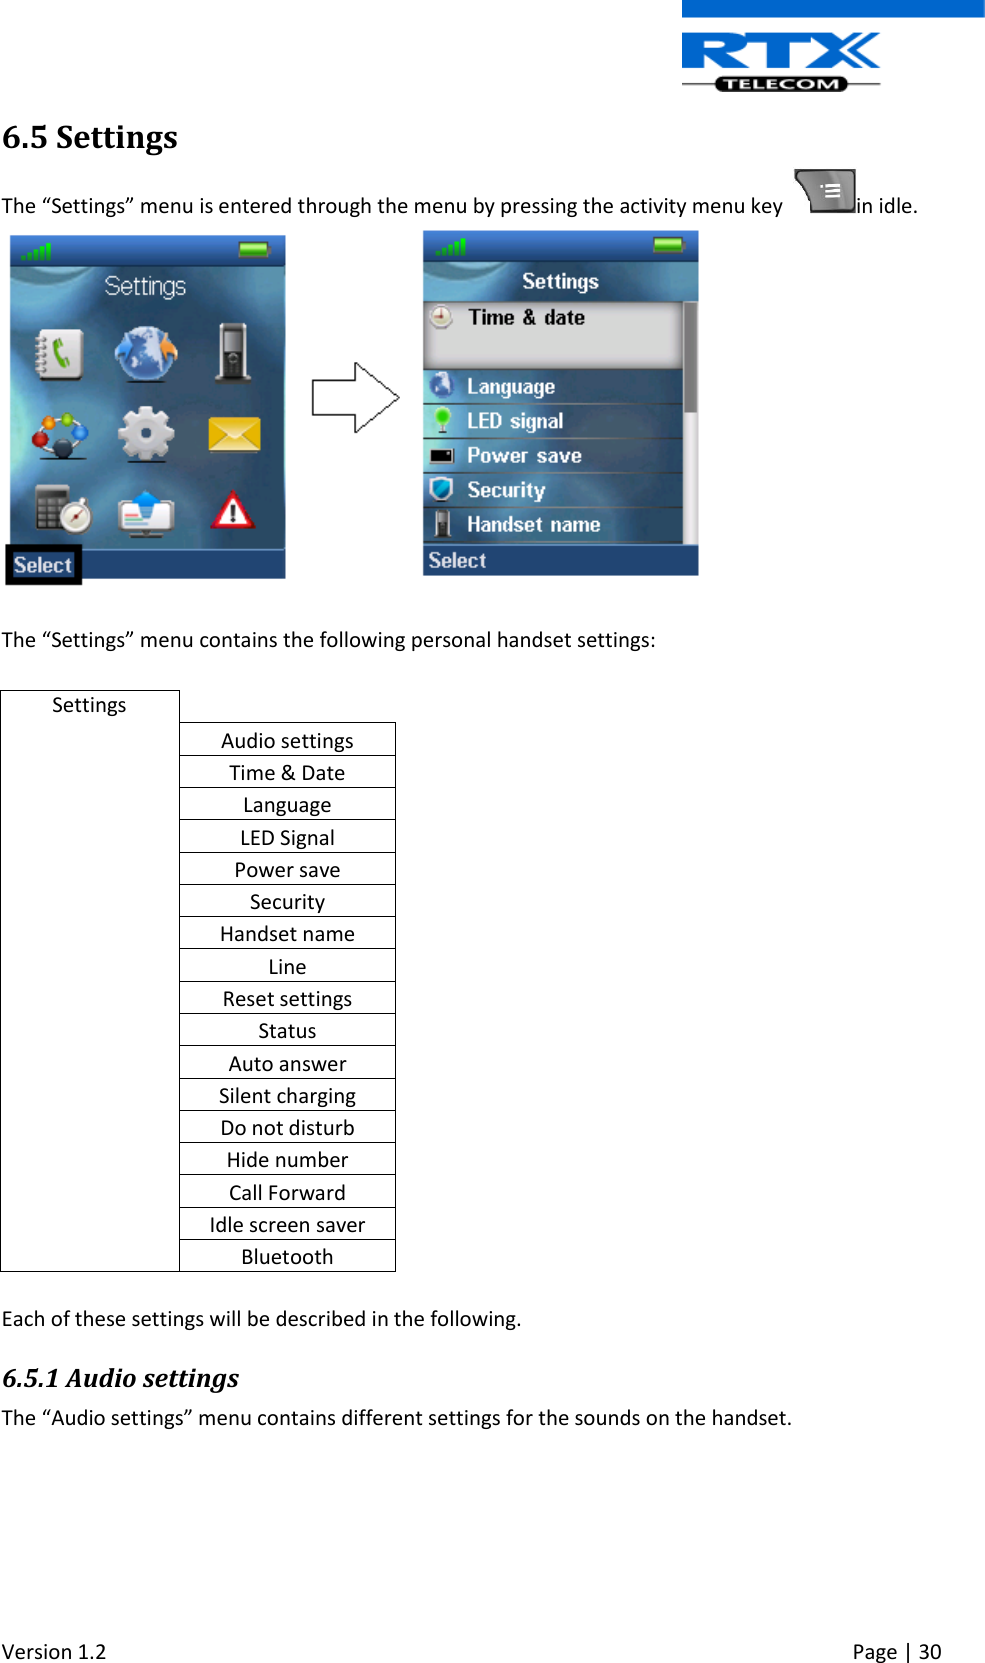

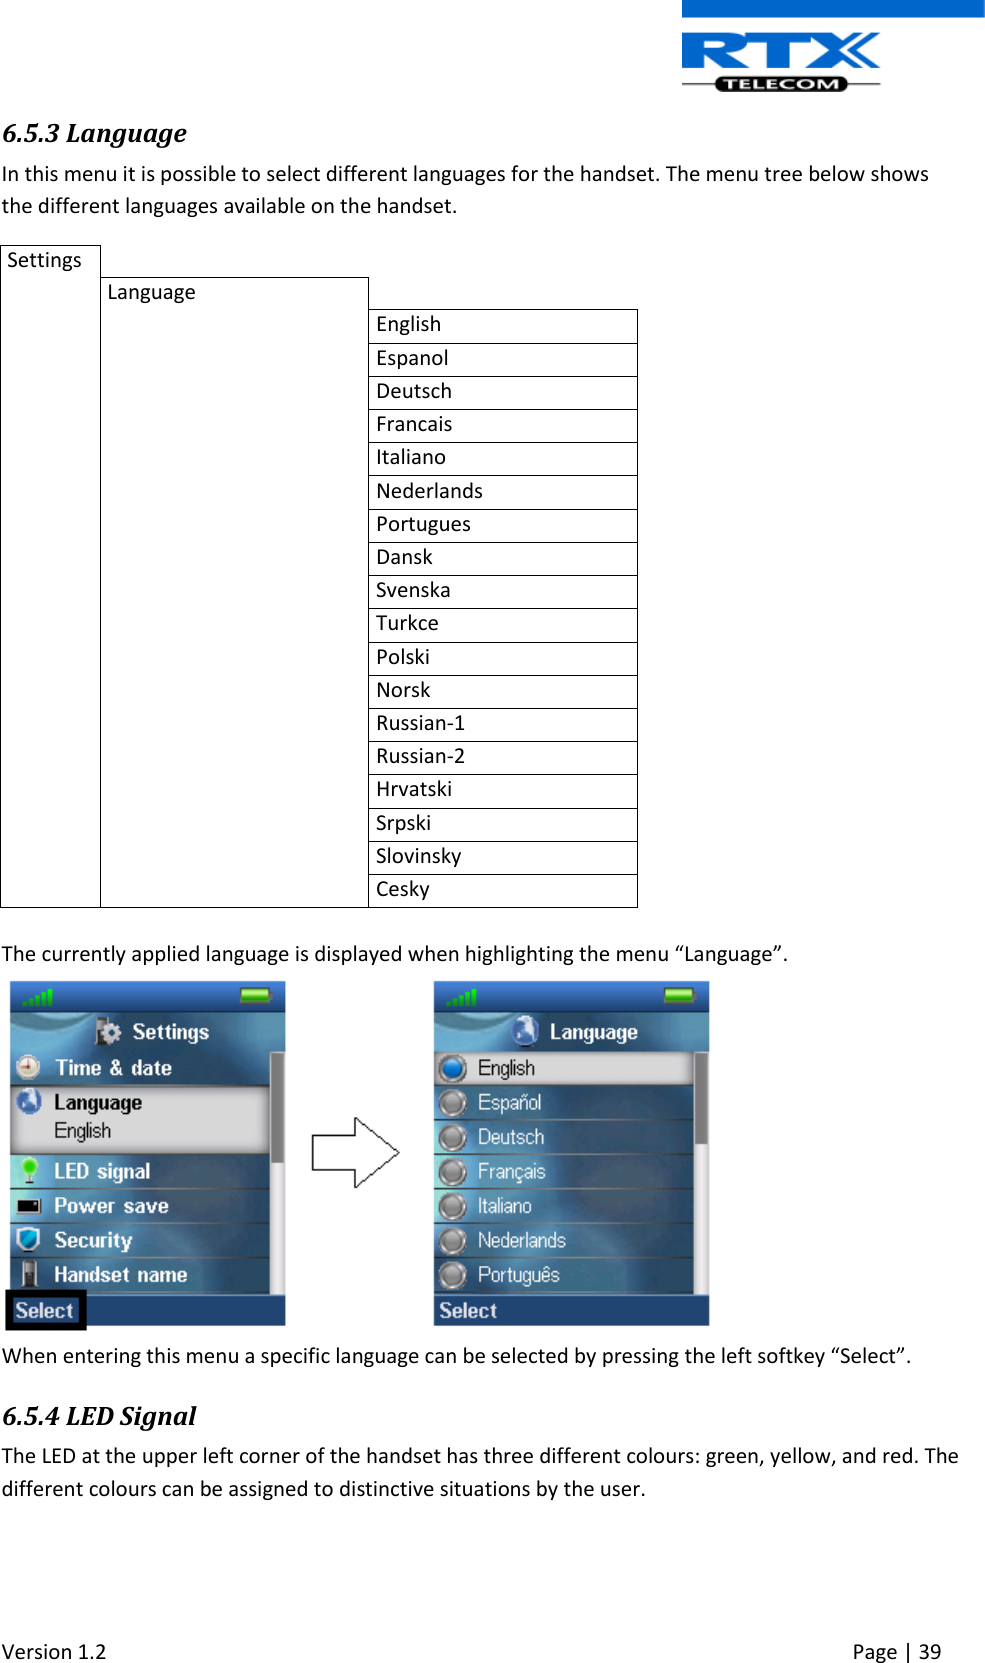
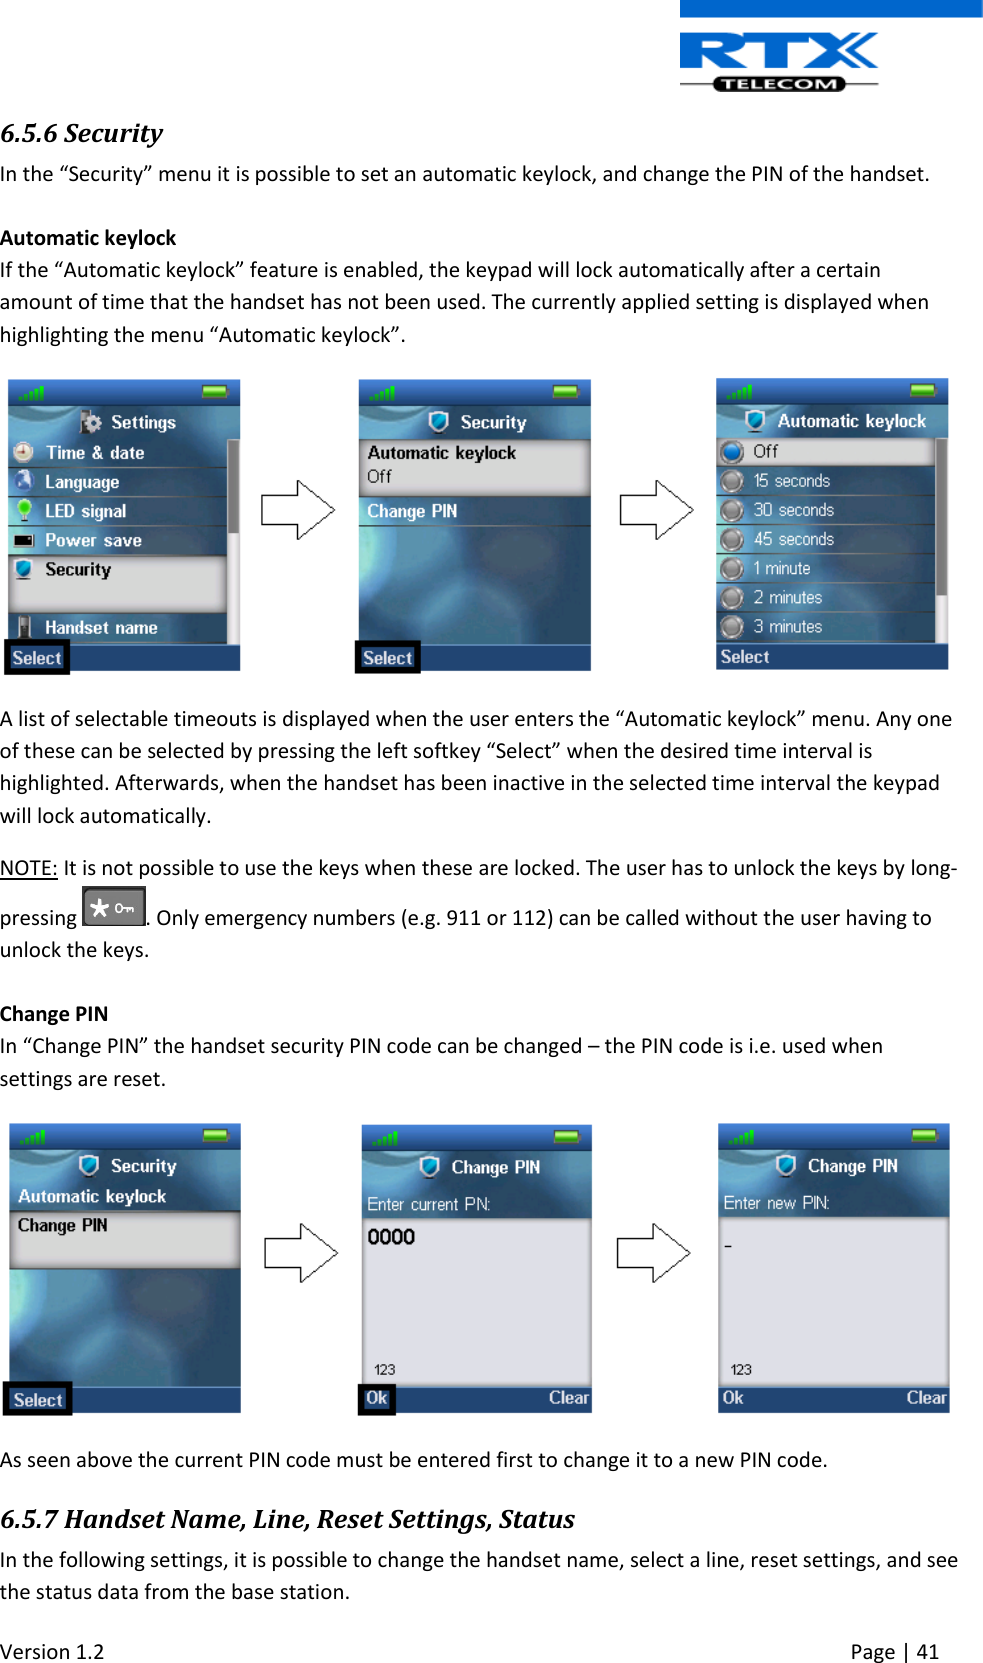
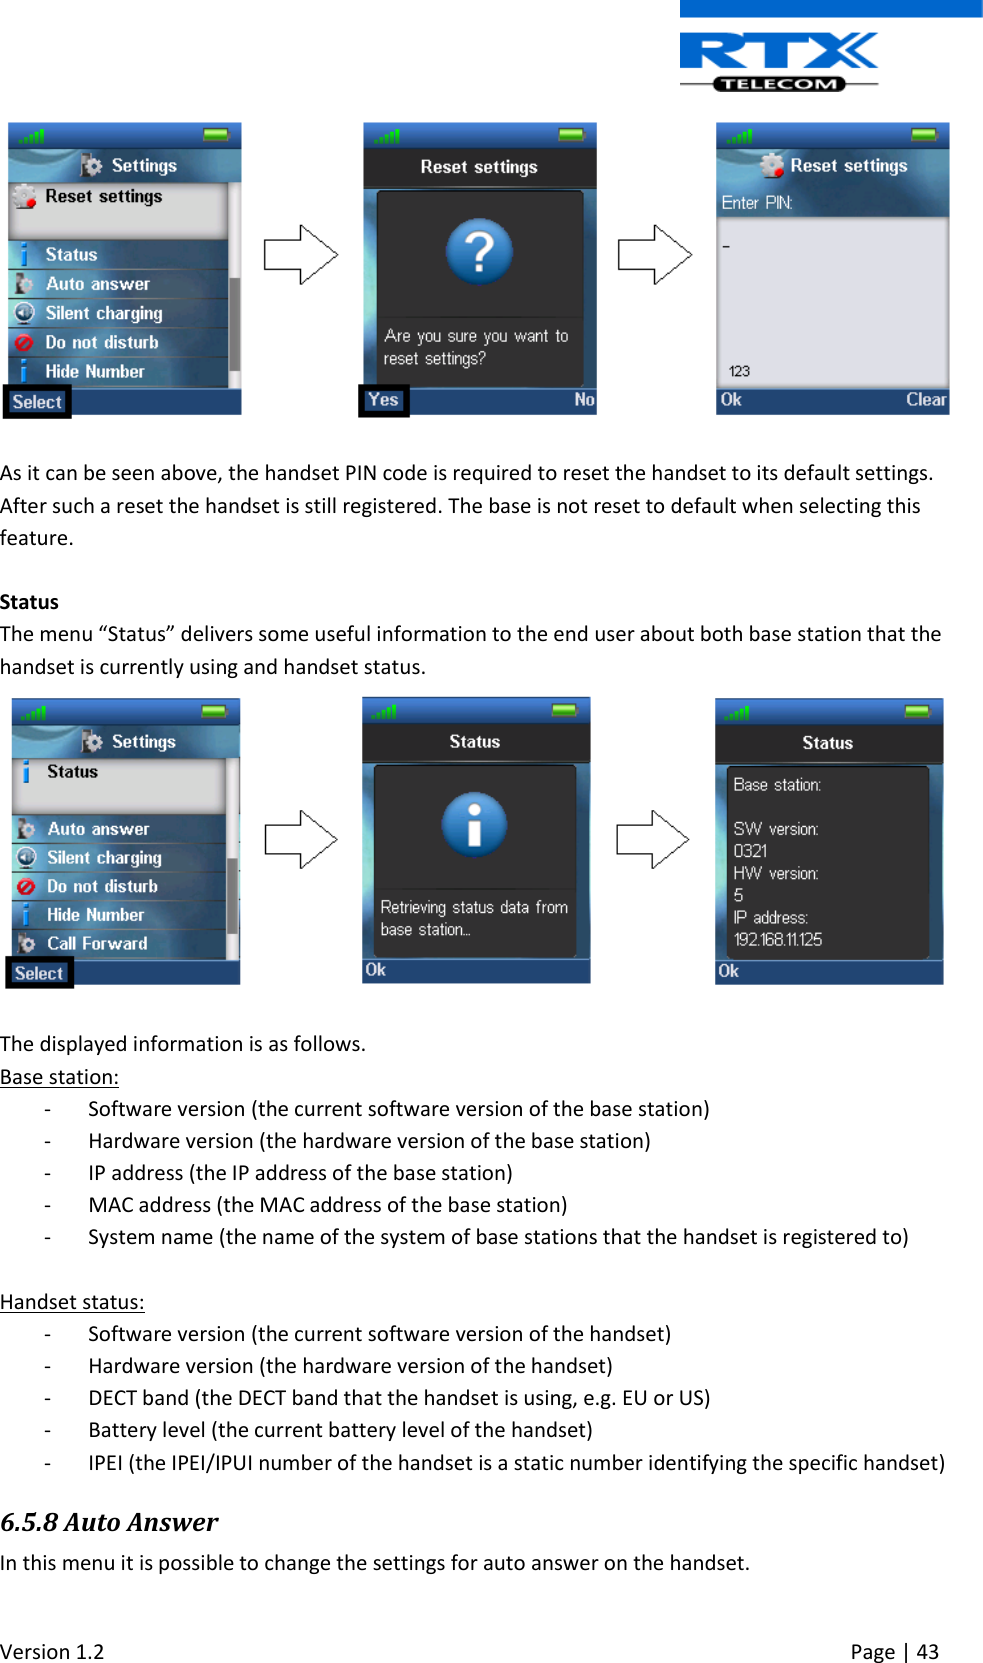
![Version 1.2 Page | 42 Settings Handset name Line Reset settings Status Handset name By selecting “Handset name” the name of the handset can be changed. As seen above, an editor is displayed when entering the menu. The handset name is typed in by using the numeric keys and afterward pressing the left softkey “Save”. The handset name is displayed in the third line of the idle display. Line If the handset is used in a multiline environment, it is possible to select preferred lines for the handset to make outgoing calls from in this “Line” menu as shown below. NOTE: To see additional information on this “Line” feature, please check the base system document via [3]. Reset settings The handset settings can be reset to default settings by selecting menu “Reset settings”.](https://usermanual.wiki/RTX/CT8830.Users-Manual/User-Guide-2382040-Page-42.png)

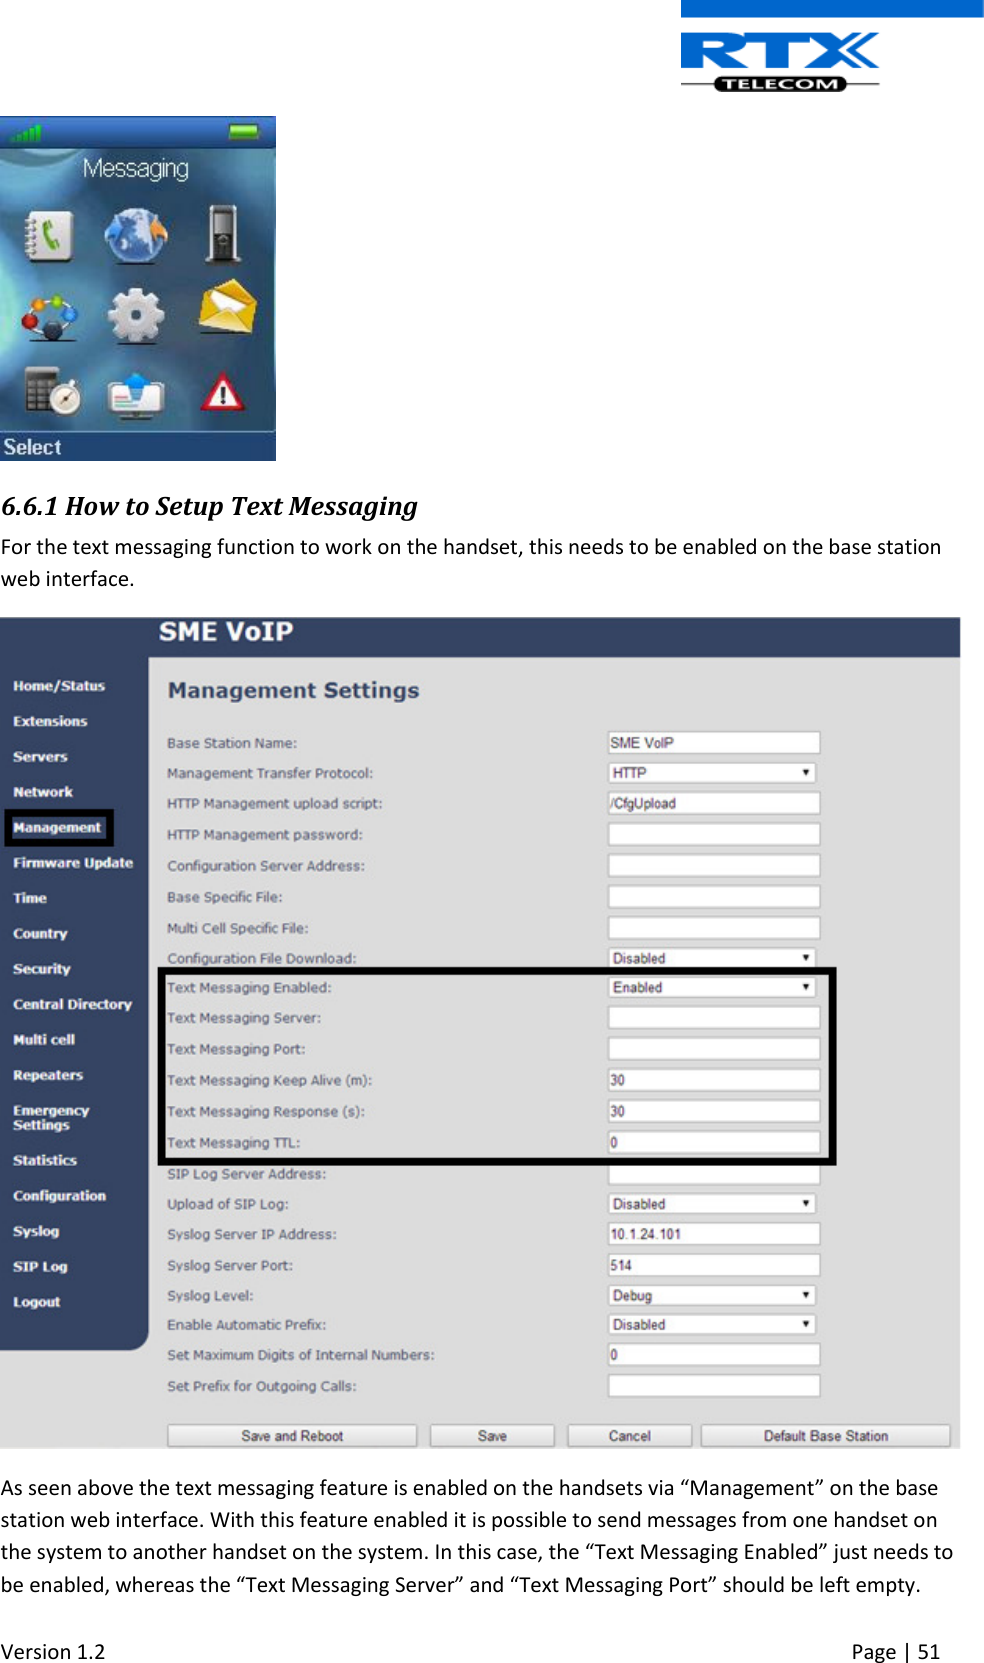
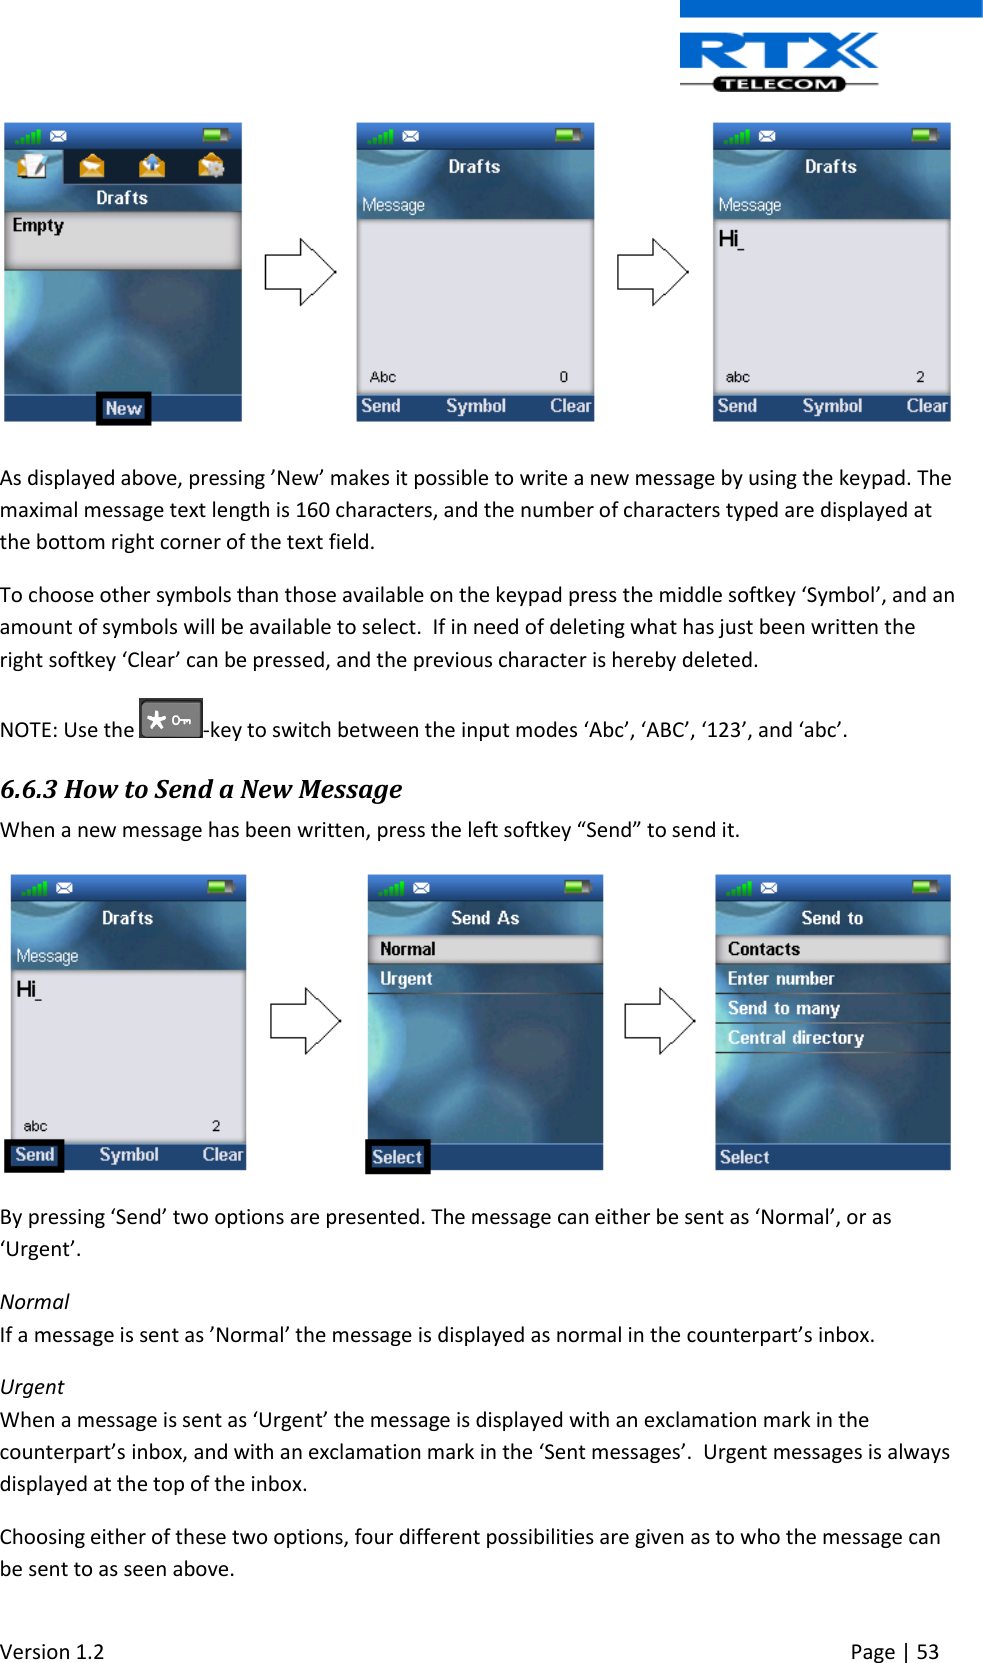
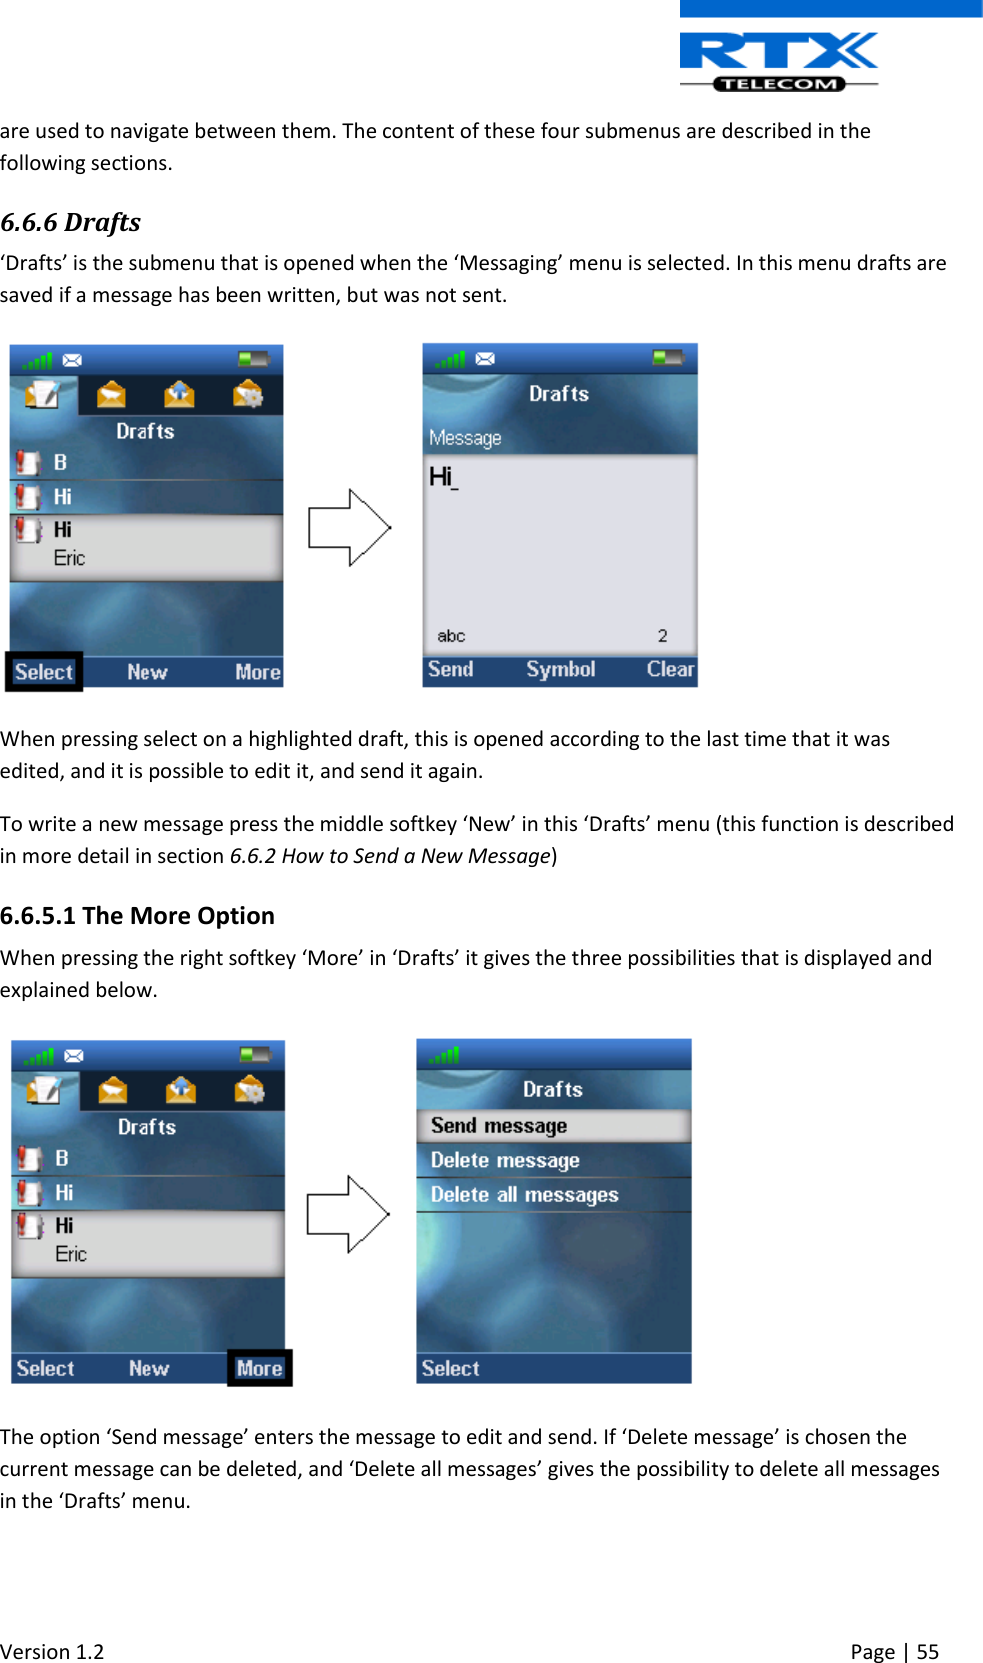
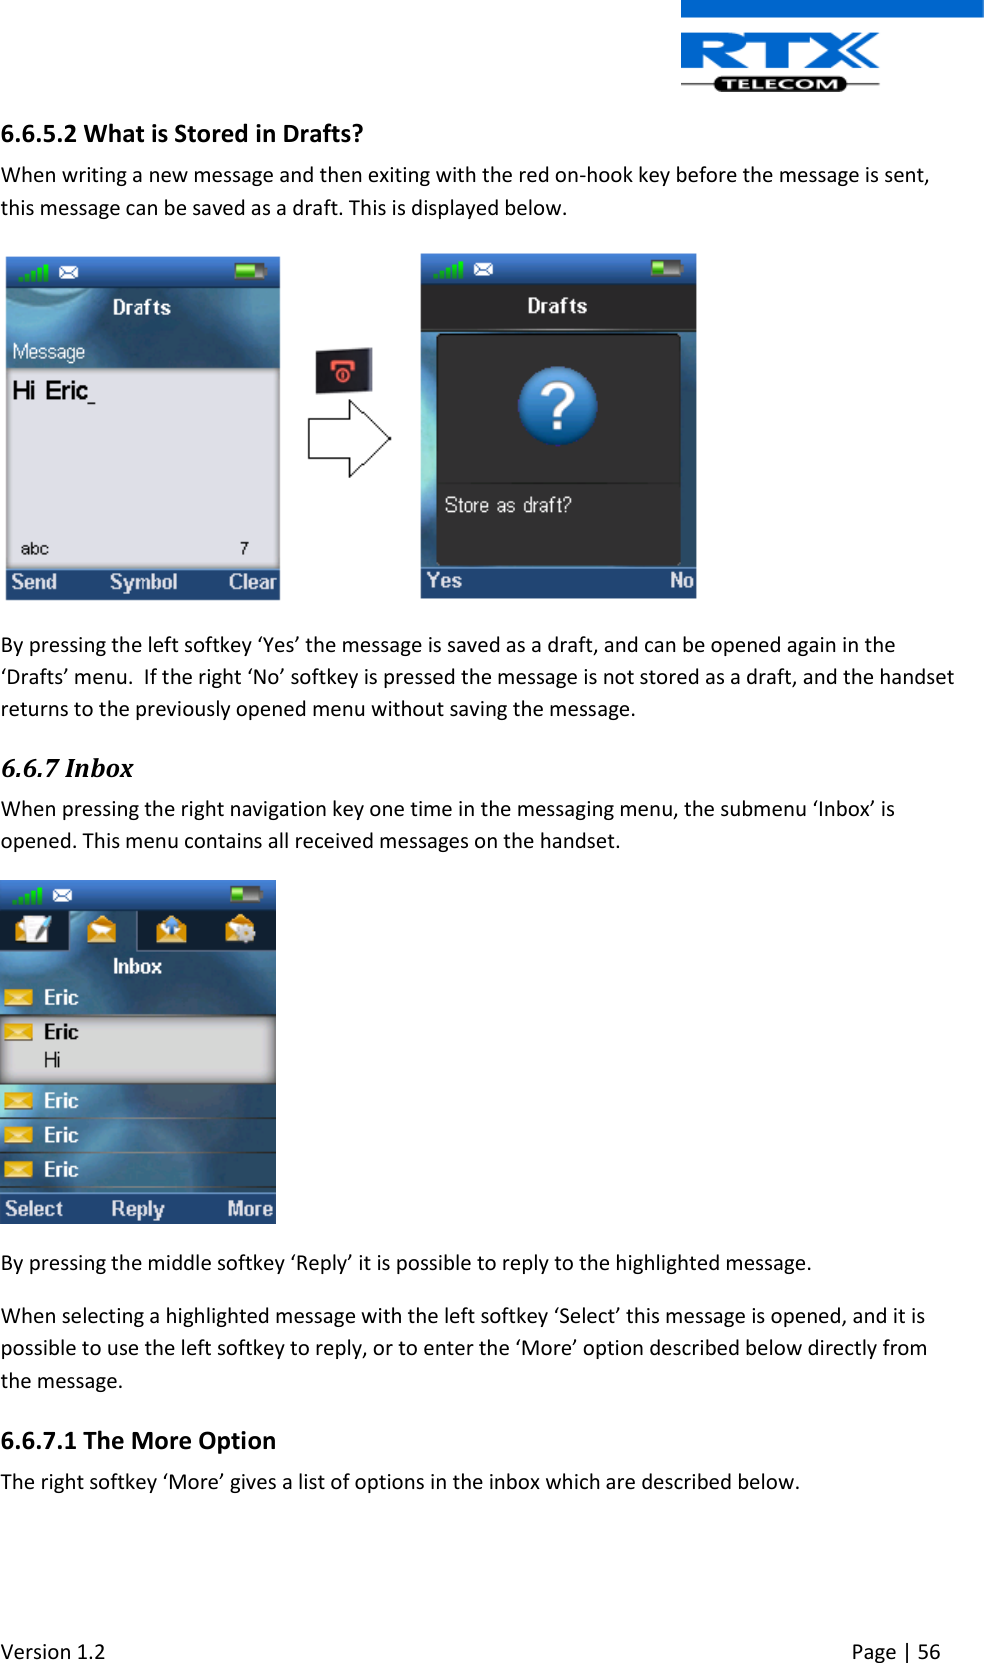
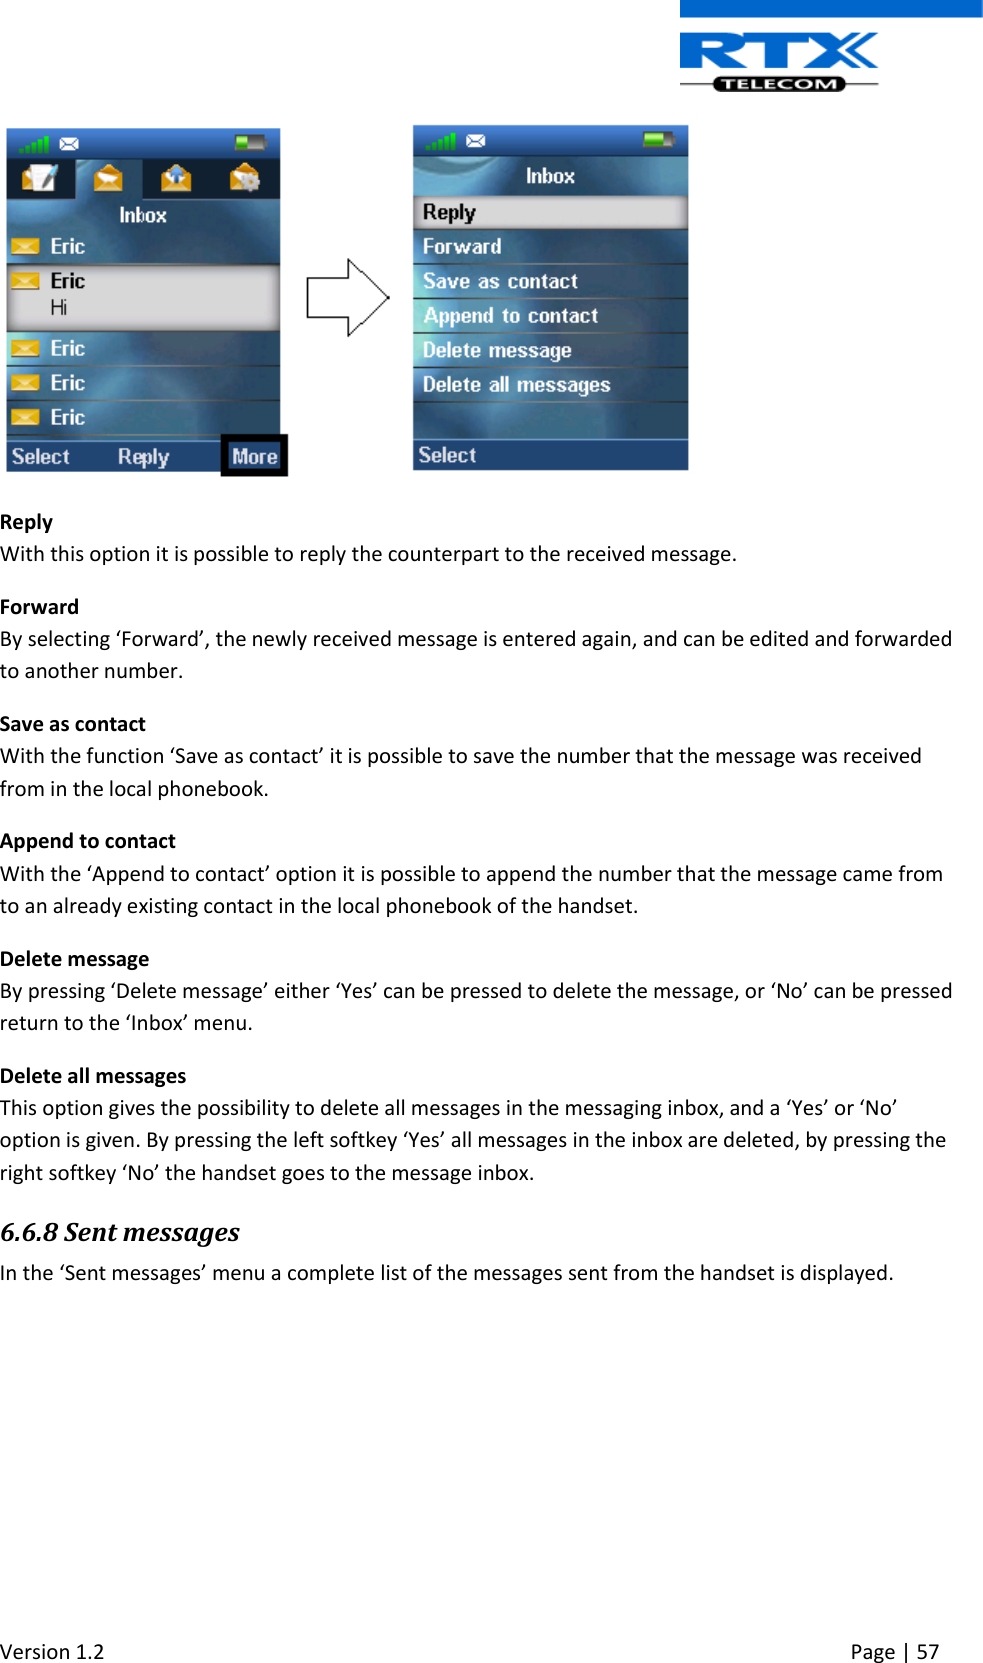
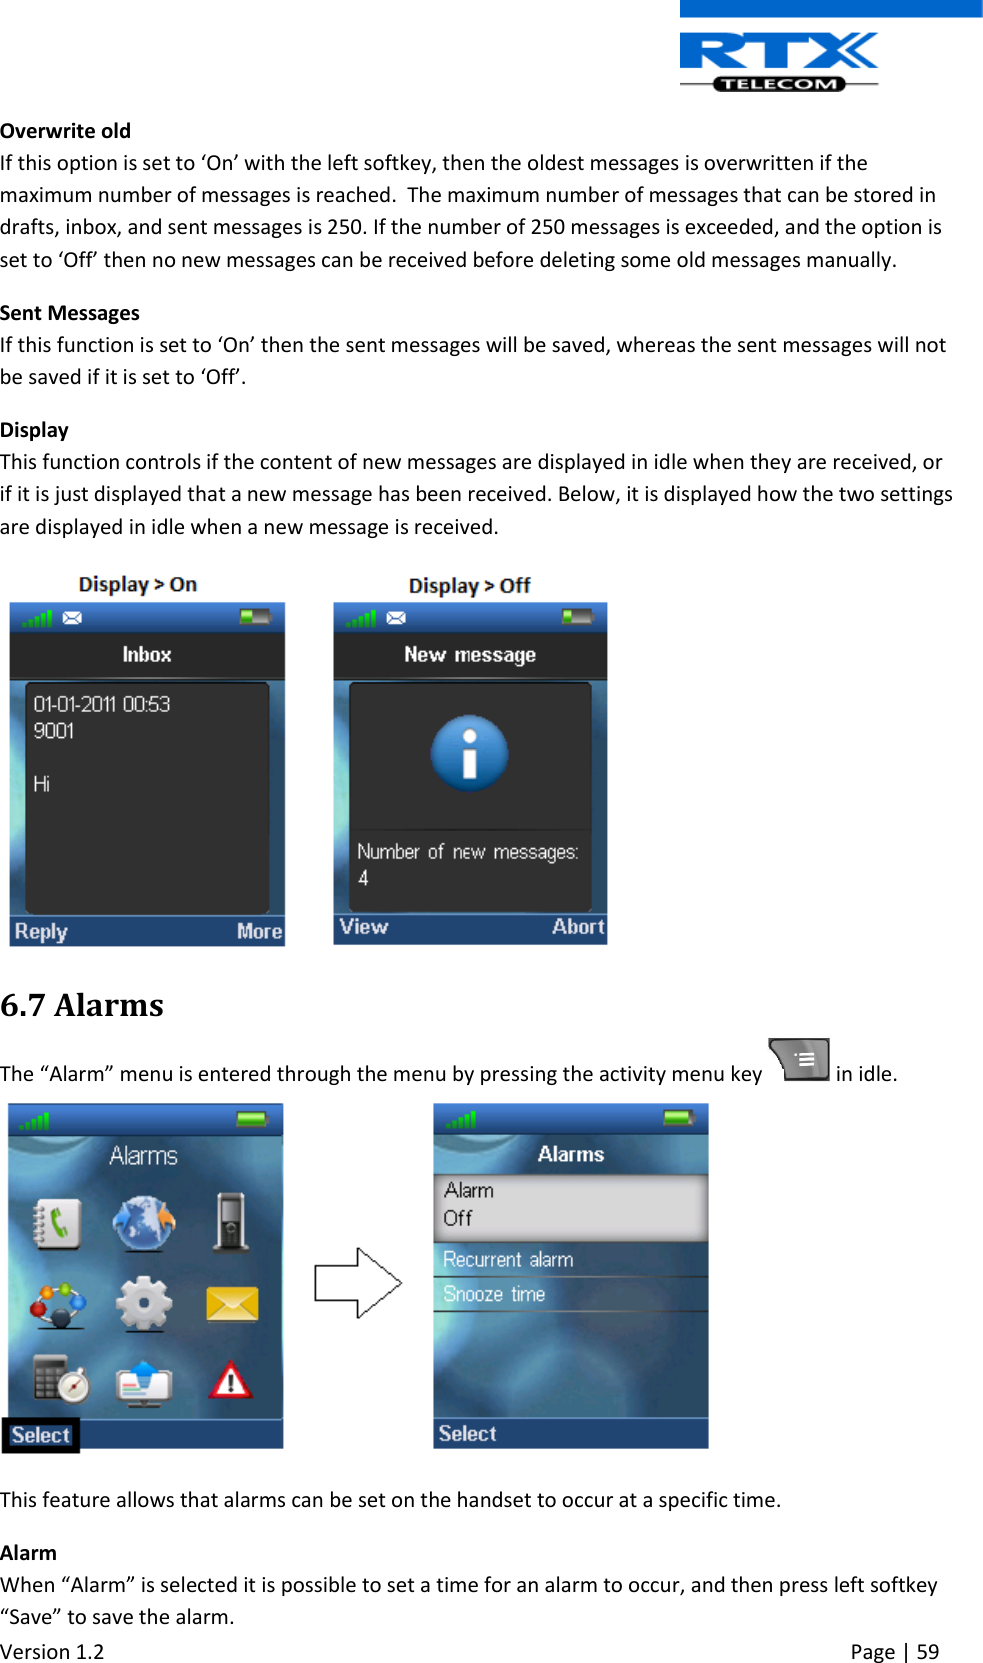
![Version 1.2 Page | 52 Additionally, it is possible to send the text messages via a text messaging server (MobiCall server) which enables handsets on different systems of base stations to send text messages to one another. When using a text messaging server for text messaging the “Text Messaging Server” and “Text Messaging Port” needs to be filled out. An example of this is seen below. For further information on the text messaging feature and setup on the base station see the base station manual via reference [3]. 6.6.2 How to Write a New Message When opening the menu ‘Messaging’ the menu ‘Drafts’ is reached, and it is possible to write a new message by pressing the middle navigation key, or the middle softkey called “New”.](https://usermanual.wiki/RTX/CT8830.Users-Manual/User-Guide-2382040-Page-52.png)
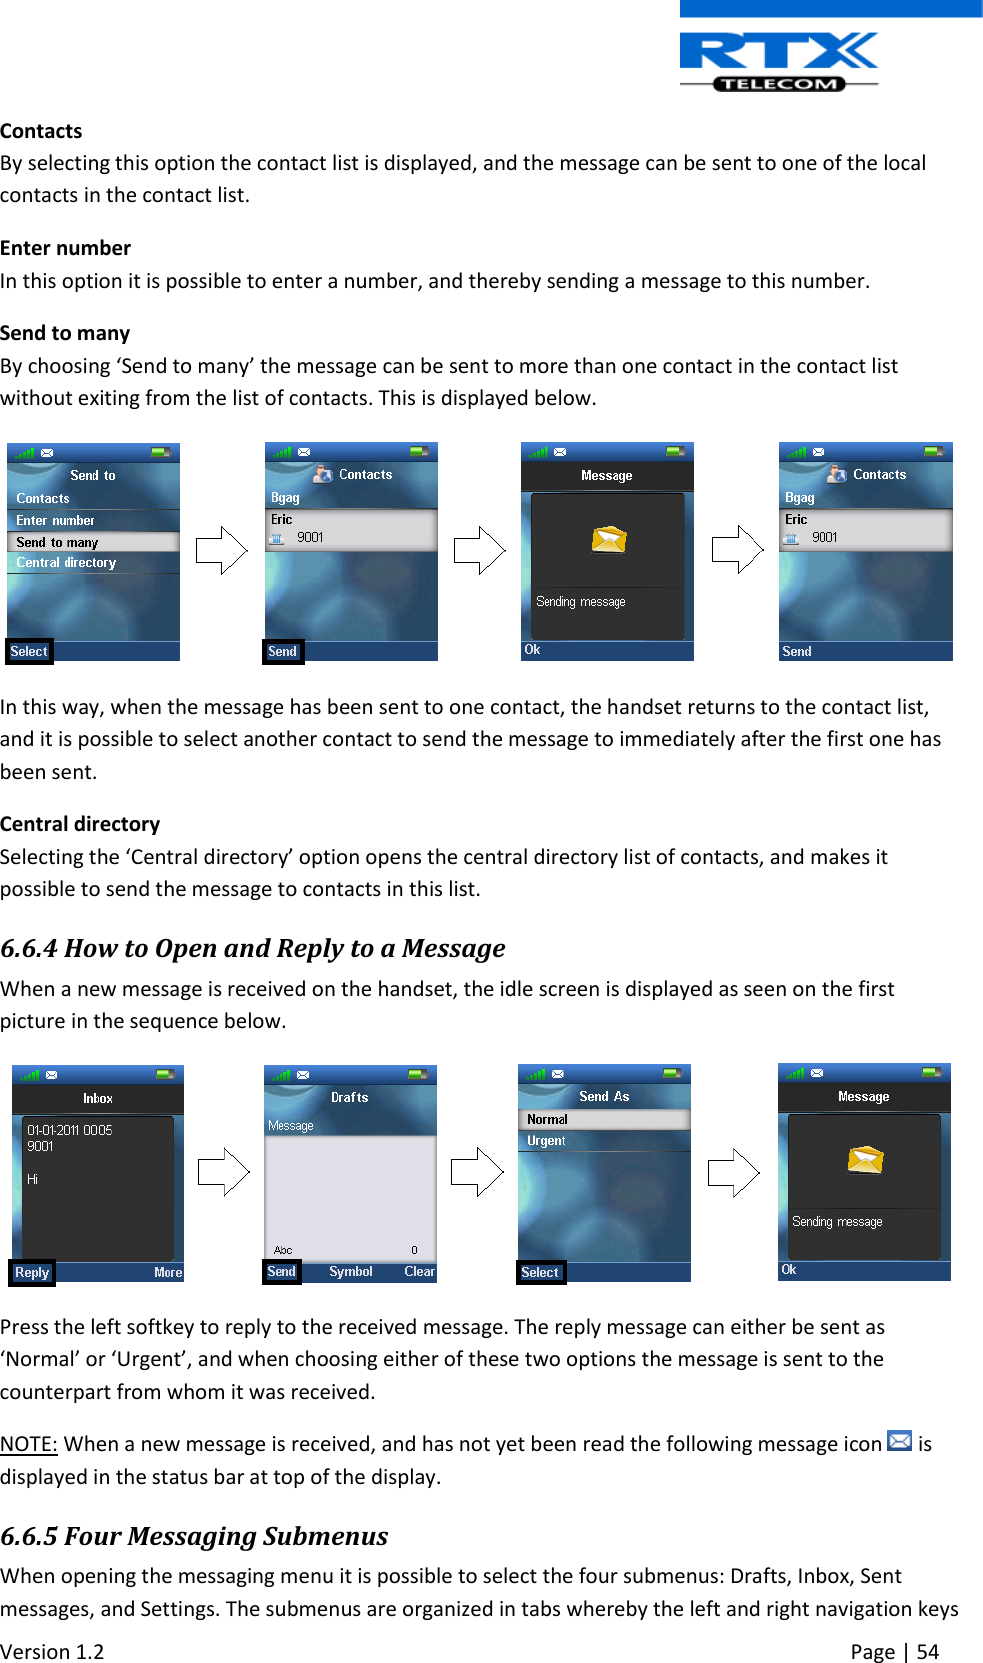

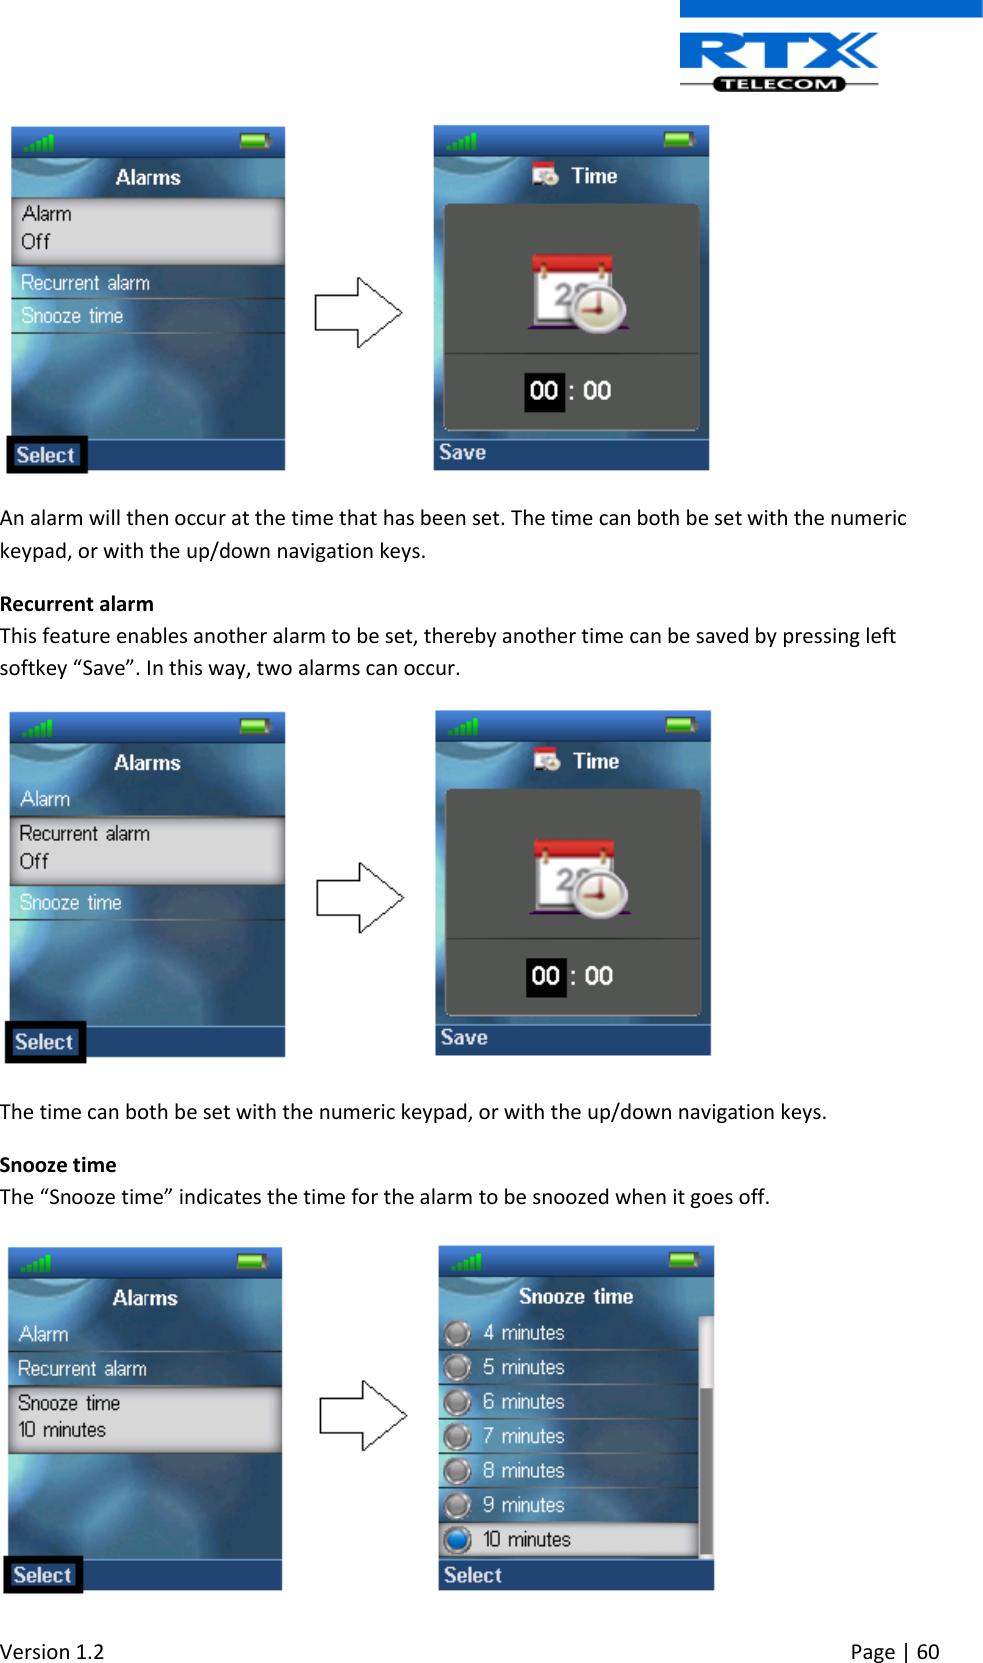
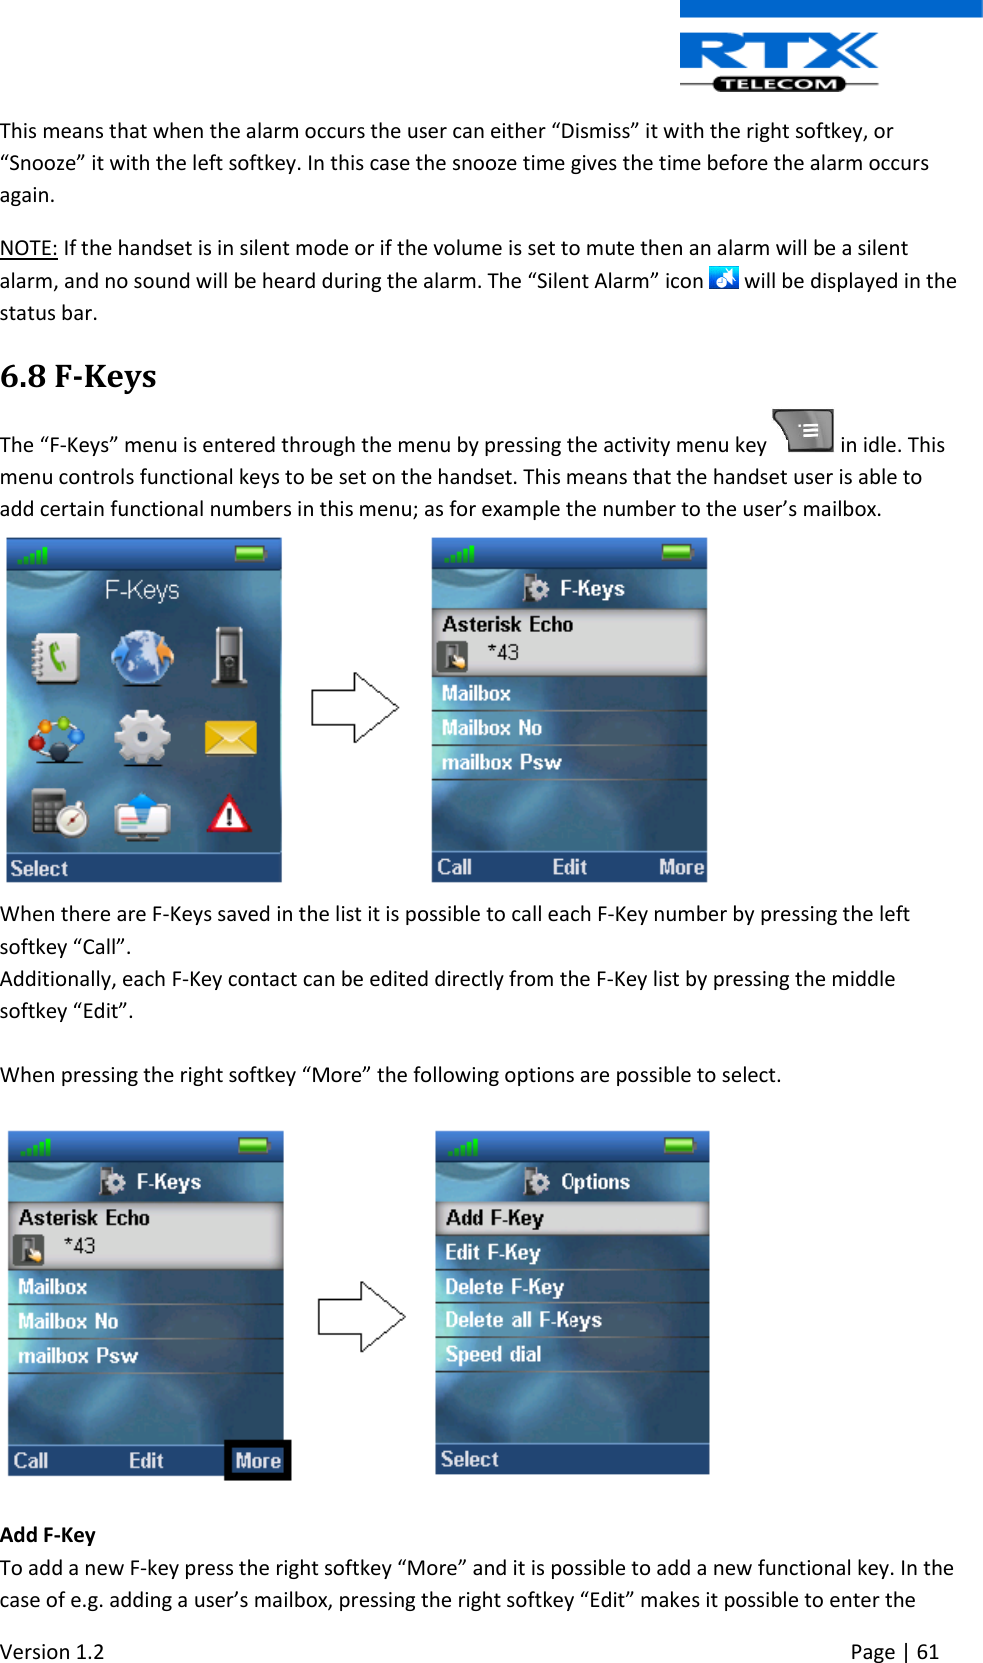
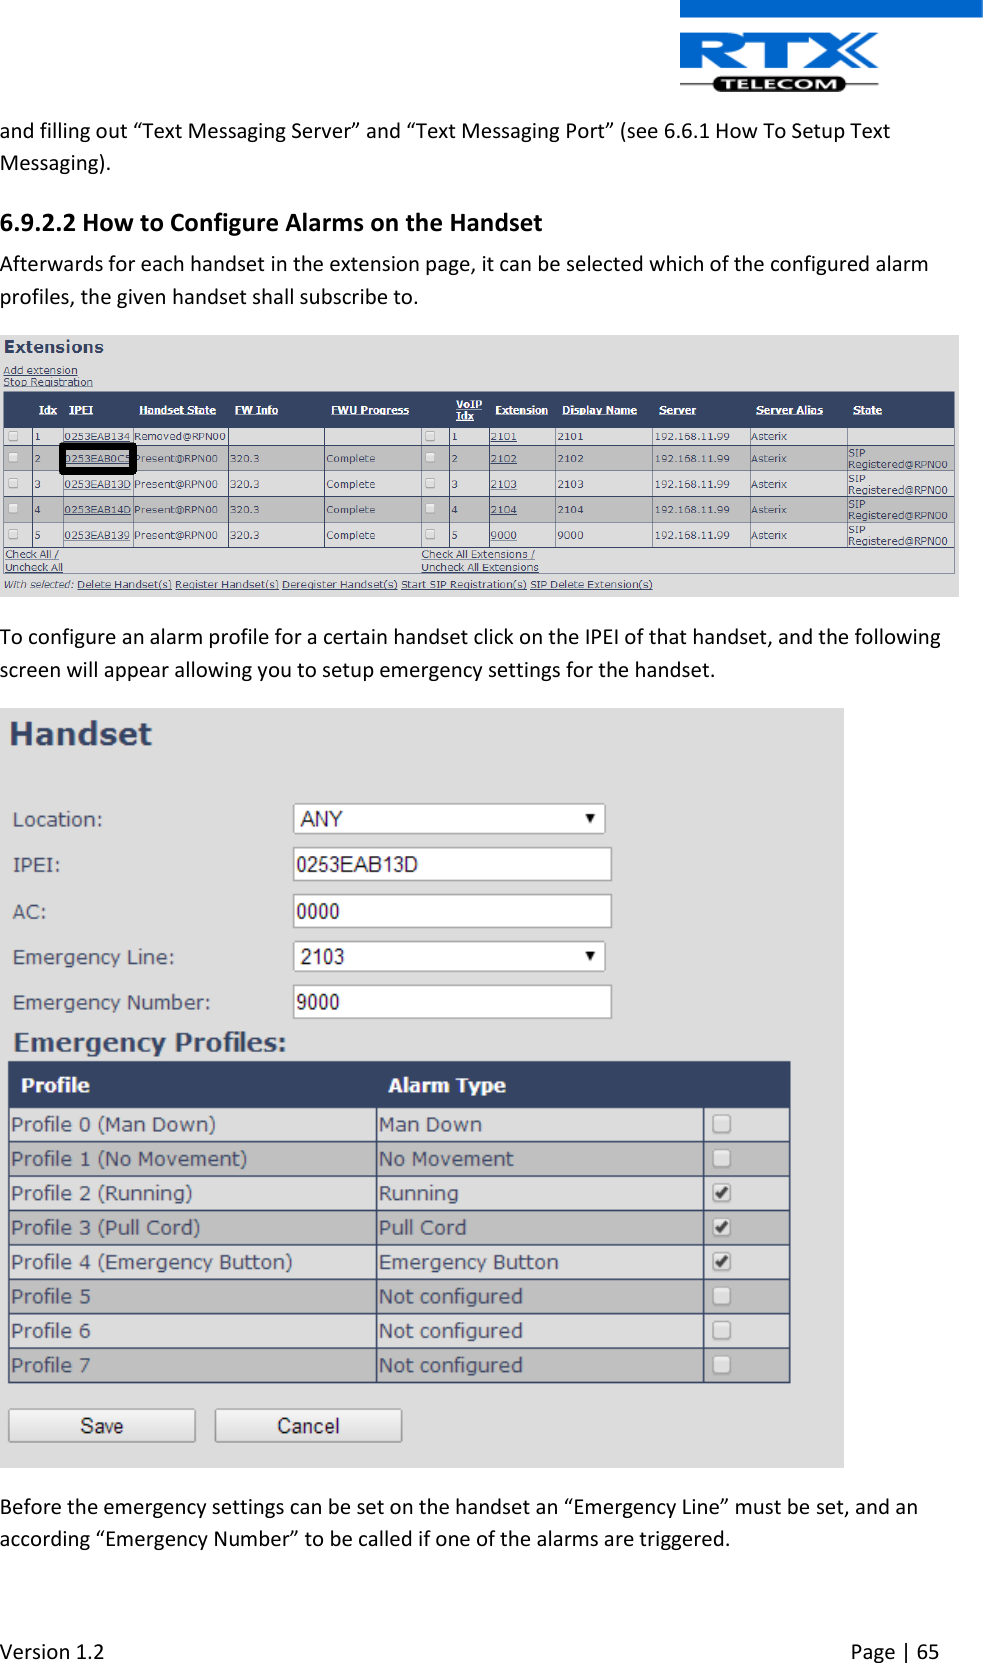
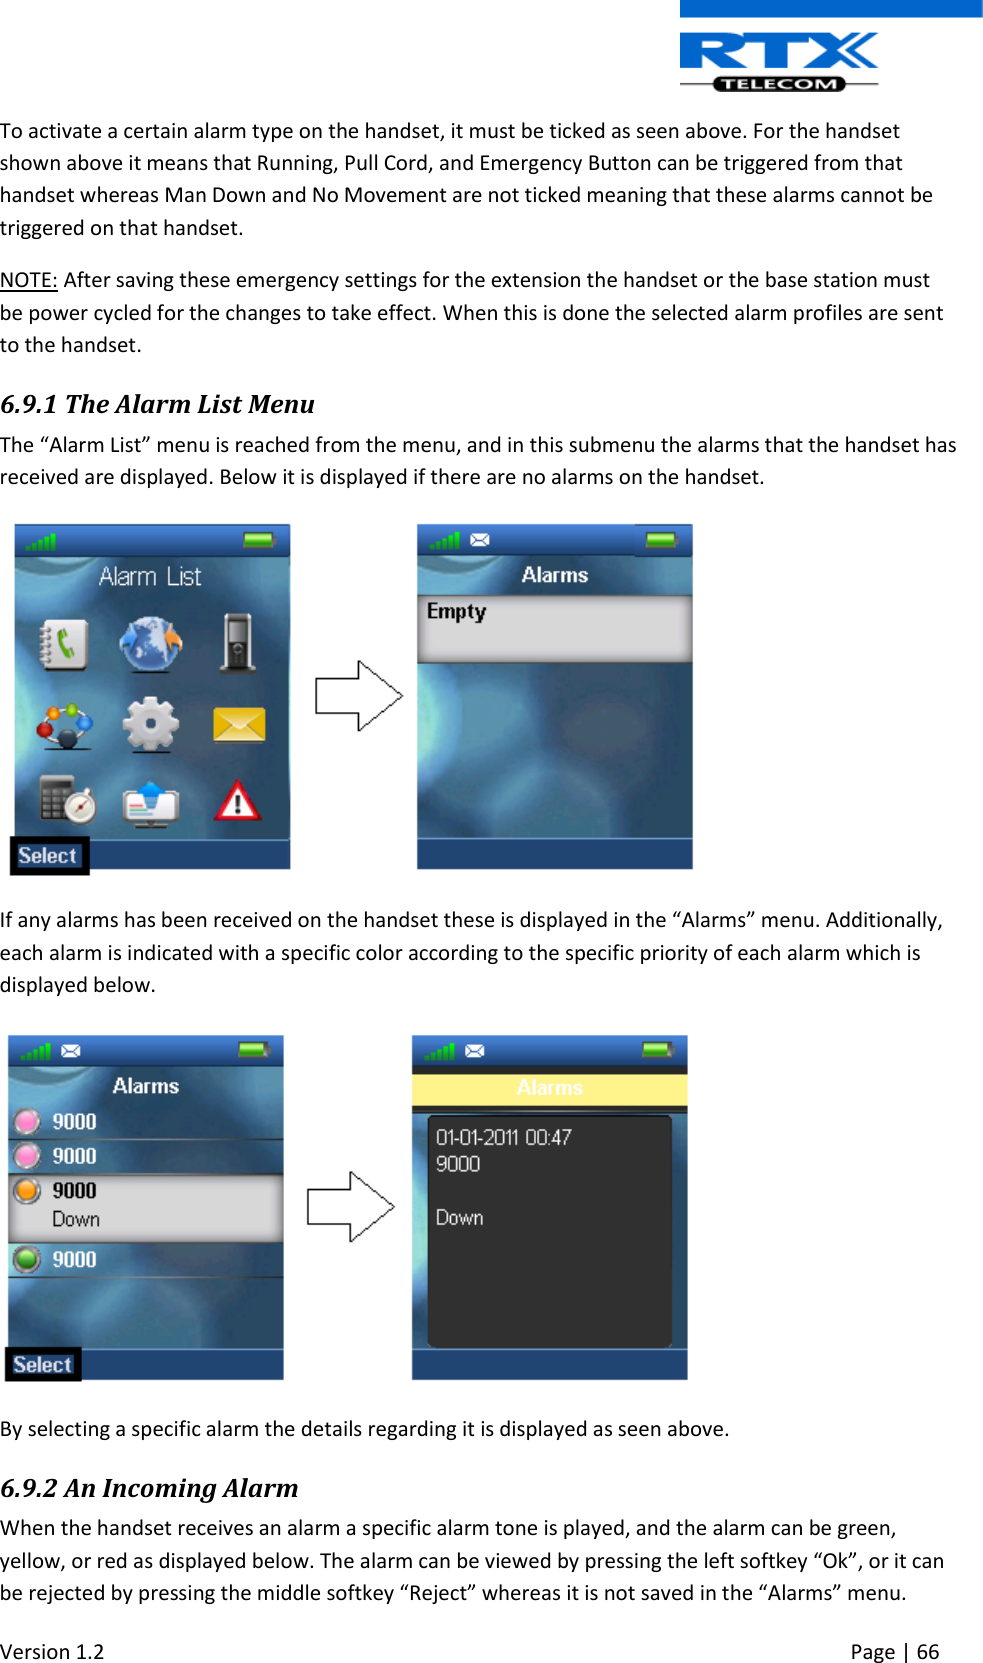
![Version 1.2 Page | 62 name and number, respectively. For the new F-key to be saved press the left softkey “Save”, and this F-key is added to F-keys. Edit F-Key This feature enables that an existing F-key can be edited, if the name or number need changing. Delete F-Key By selecting “Delete F-Key” the message “Delete current contact from F-Key list?” appears on the screen, and it is possible to press the left softkey “Yes” to delete the currently highlighted F-Key, or to press the right softkey “No” to cancel and go back to the F-Keys menu. Delete all F-Keys With this function it is possible to delete all the saved F-Keys on the handset. When selecting “Delete all F-Keys” the message “Delete entire F-Key list?” appears, and by pressing left softkey “Yes” this action is performed, whereas pressing the right softkey “No” cancels the action and returns to the F-Keys menu. Speed dial When selecting “Speed dial” the list with speed dial numbers assigned to long pressing the numbers 2-9 appears. From this menu it is possible to add the chosen F-Key to a speed dial number with the left softkey “Add”. If an already existing speed dial entry is highlighted the left softkey gives the opportunity to instead “Replace” the current speed dial entry with this one. To delete a speed dial entry press the right softkey “Delete” and the entry is deleted straightaway. NOTE: This speed dial list uses both contacts from the contact list, and from the F-Keys list. For additional information on this feature see the section 7.1.4 Speed Dial/On Touch Dial. 6.9 Alarm List The handset can receive and send emergency alarms. These different emergency settings are defined and controlled from the web interface of the base station. But triggering an emergency alarm is done from the handset. For further explanation about the emergency settings see the base station manual via reference [3]. 6.9.1 How to Trigger Alarms on the Handset Five different alarm types can be triggered on the handset which is described in more detail in the following. Emergency Button Alarm This alarm is triggered by long-pressing (3 seconds) the red button on top of the handset. Pull Cord Alarm The Pull Cord alarm can be triggered by pulling a cord containing a magnet from the pull cord hole on the right side of the handset.](https://usermanual.wiki/RTX/CT8830.Users-Manual/User-Guide-2382040-Page-62.png)
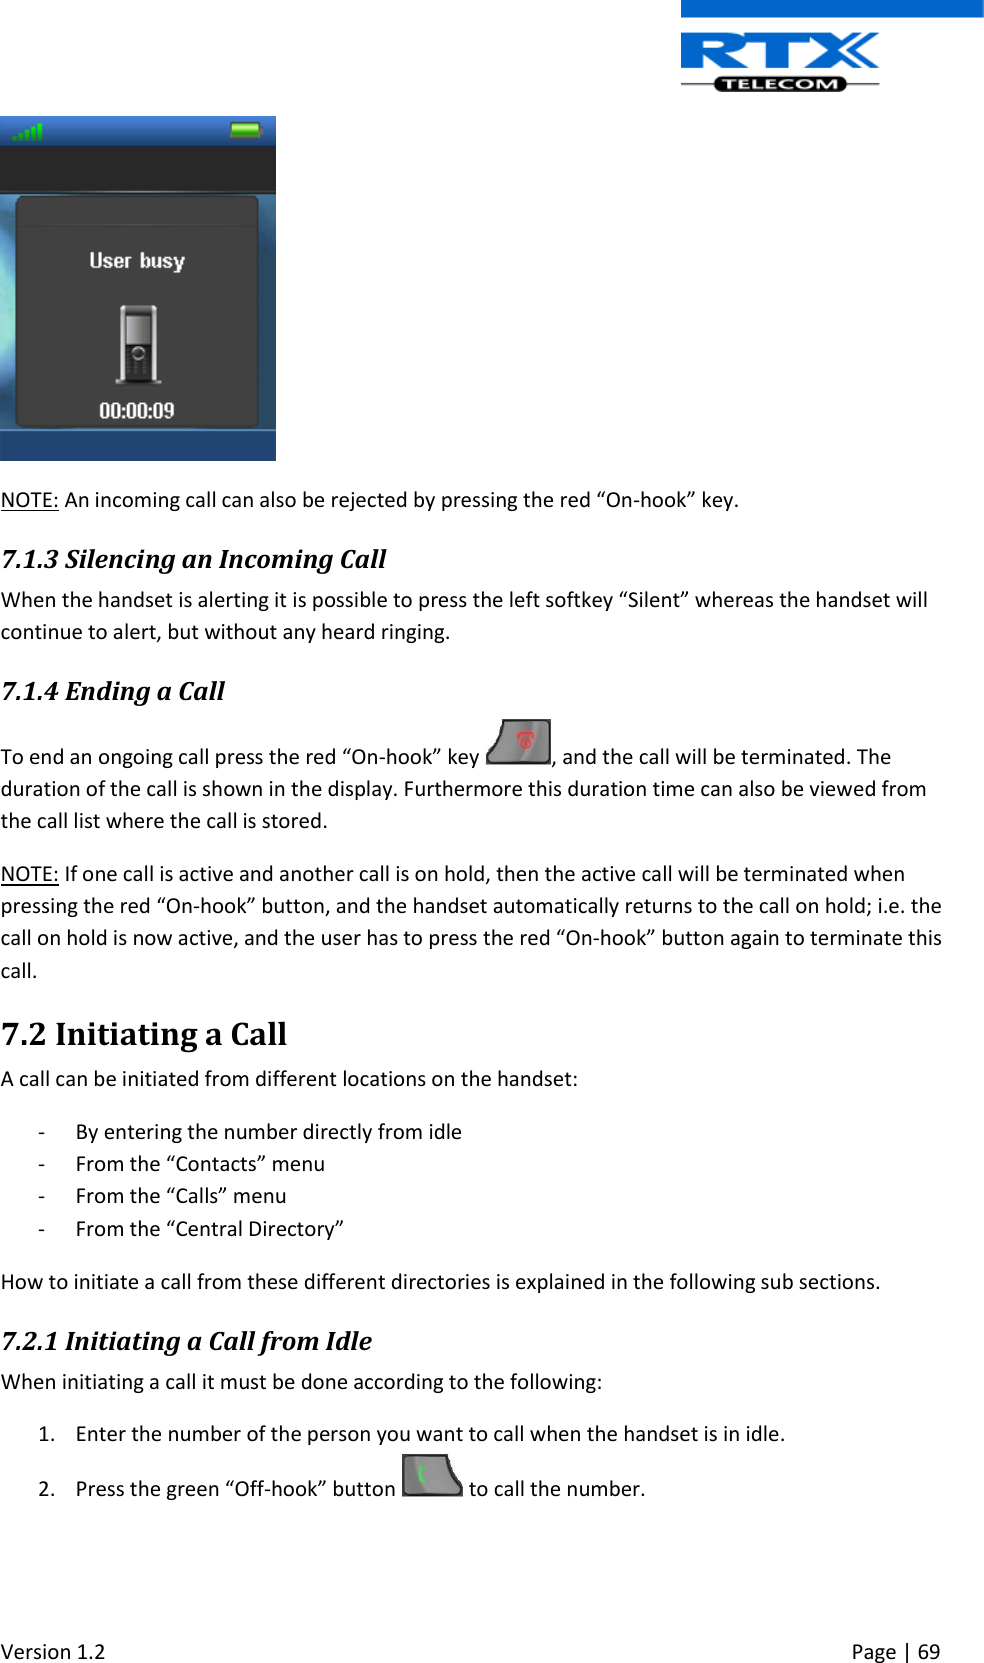
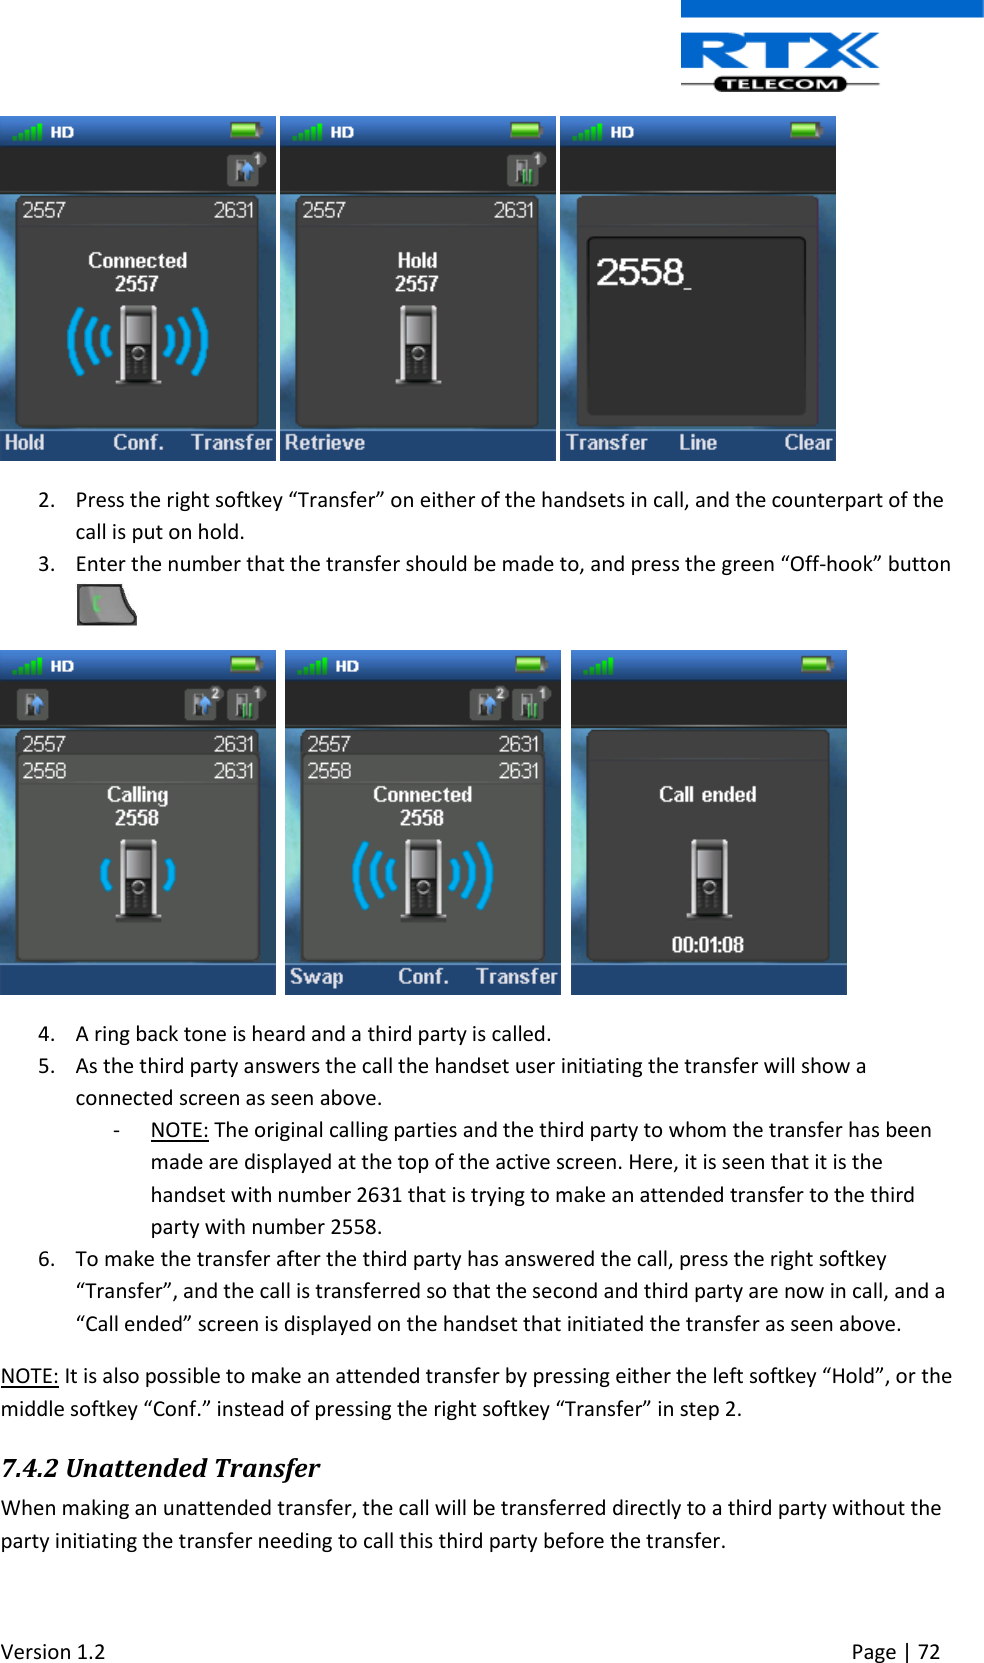
![Version 1.2 Page | 70 3. The handset will show a “Calling” screen as seen above. 4. When the counterpart answers the call the screen will show “Connected”, and the two parts are now in call. 7.2.1.1 Line Call If the handset is used in a multiline environment, it is possible to make a call from different lines by pressing the middle softkey “Line”, and choose the line according to which system the call should be made from. See 7.5.6 Handset Name, Line, Reset Settings, Status. NOTE: To see additional information on the “Line” function, please check the base system document via [3]. 7.2.2 Initiating a Call from Contacts To initiate a call from the contact list, there has to be contacts added to the local phonebook. When this prerequisite is met a local contact can be called by highlighting the contact in the contact list, and then pressing the left softkey “Call”, or pressing the green “Off-hook” button. NOTE: The list of local contacts can be reached from the menu “Contacts” or directly from idle by pressing the left softkey when in idle. 7.2.3 Initiating a Call from Calls The number of an outgoing, incoming or missed call can be called directly from the call list by highlighting the number and pressing the left softkey “Call” or the green “Off-hook” button to call the entry. NOTE: The “Calls” list can be reached from the menu “Calls” or directly from idle by pressing either the green “Off-hook” button or the right softkey when in idle. 7.2.4 Initiating a Call from the Central Directory When opening the “Central directory” a call can be made to a specific contact by searching for this contact, and thereby enter the list from which a contact can be called by pressing the green “Off-hook” key. If different numbers are assigned to one contact a green arrow is showed to the right of the contact, and the right/left navigation keys can be used to choose which number that should be called. NOTE: The “Central Directory” can be reached both from the menu “Central Directory” or directly from the idle by pressing the middle softkey when in idle.](https://usermanual.wiki/RTX/CT8830.Users-Manual/User-Guide-2382040-Page-70.png)