Racing Electronics RE1000 Racing Scanner User Manual
Racing Electronics Racing Scanner Users Manual
UserManual.wiki
>
Racing Electronics
>
RE1000 User Manual
Users Manual
Navigation menu
Upload a User Manual
Namespaces
Wiki Guide
HTML
PDF
Info
Views
User Manual
Discussion / Help
Navigation
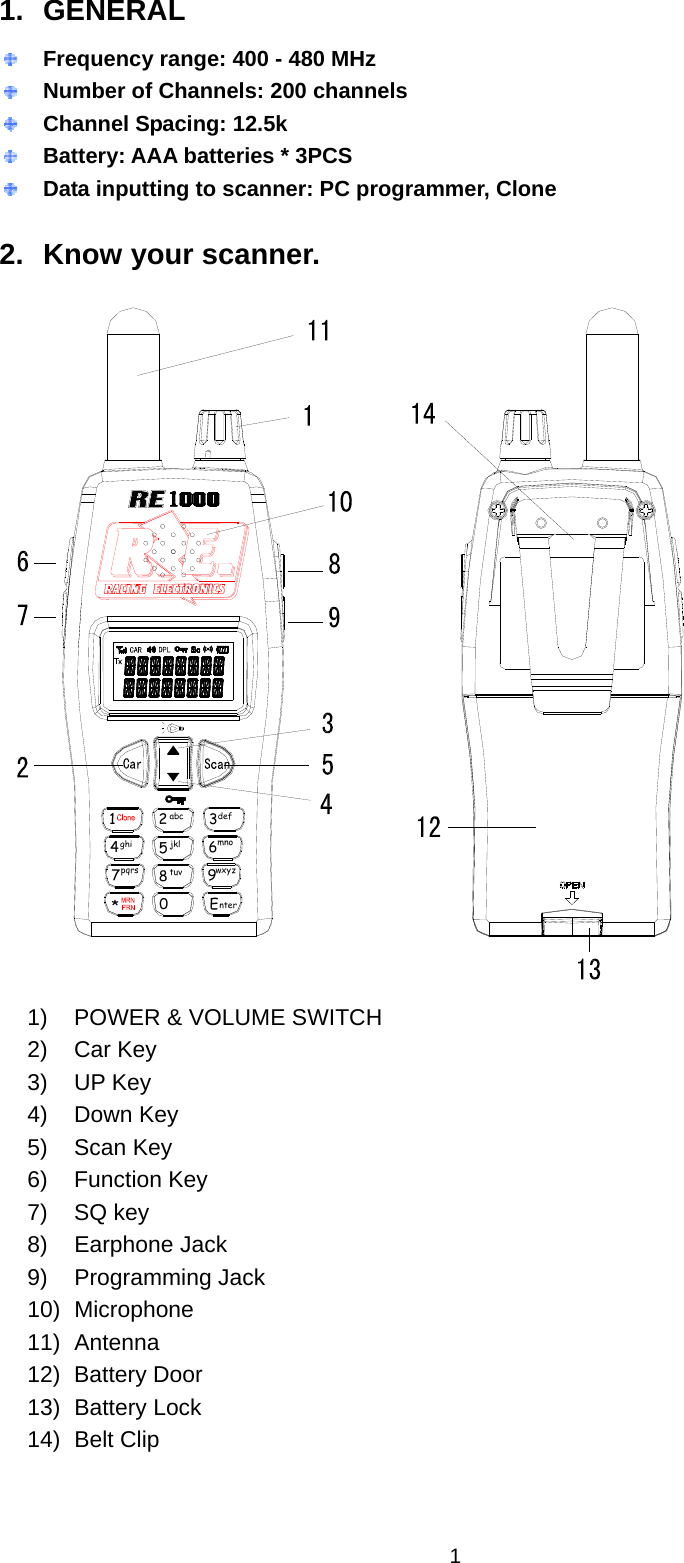
![INDEX 1. GENERAL....................................................................................................................1 2. Know your scanner.......................................................................................................1 3. LCD Full Display ..........................................................................................................2 4. OPERATION ................................................................................................................3 4.1 Power on/Power off................................................................................................3 4.2 Volume Alignment...................................................................................................3 4.3 CAR channel Select ...............................................................................................3 4.4 Key-lock .................................................................................................................3 4.5 CAR channel Scanning function.............................................................................3 4.6 CAR Scan List Setting............................................................................................4 4.7 Set squelch level ....................................................................................................4 4.8 Set battery saving ..................................................................................................4 4.9 Set To [MRN] Station..............................................................................................4 4.10 Set radio’s channel spacing .................................................................................5 4.11 LCD Back light......................................................................................................5 4.12 Reset....................................................................................................................5 5. CAR CHANNEL SETTING ...........................................................................................5 5.1 Frequecy setting.....................................................................................................5 5.2Channel name setting .............................................................................................5 5.3 PL/DPL setting .......................................................................................................6 5.4 LOCK OUT setting .................................................................................................6 6. Programming................................................................................................................6 7. Clone............................................................................................................................6](https://usermanual.wiki/Racing-Electronics/RE1000/User-Guide-1528095-Page-1.png)
![4 At CAR channel mode, press “SCAN” button to scan the “CAR Scan List”, press “ “ or “ “ button to choose the scan channel fequence increasing or decreasing. Press “SCAN“ button again will stop the scan function, and will go back to the channel before scanning. But if signal received during the scanning, pressing “SCAN” button, radio will stop at this channel. (See LCD indicator in Figure (4-1)) The scan frequency shows & icon [Sc] flashes during scanning, it will stop if signal received. When signal disappears, it will hold two seconds then continue the scan function.(See LCD indicator in Figure (4-2) ) (4-1) (4-2) 4.6 CAR Scan List Setting Press “ “ or “ “ button to choose the desired CAR channel , press “F” + “SCAN” buttons to add into or delete from the scan list. The LCD “Sc” icon turns on when this CAR channel is set into Scan List. (See LCD indicator in Figure (5-1) & (5-2) ) (5-1) (5-2) 4.7 Set squelch level Press “F”+”2” buttons to the SQ level setting mode. Press “ “or “ ” button to choose level 1~3(Level 1 has the highest sensitivity), press “Enter” button to store the setting & go back to previous channel. The default setting is level 1 which is programmed by program software(See LCD indicator in Figure( 6) ) Note: During this setting, “SCAN”, digit buttons will be disabled, and error tone will be heard when pressed. (6) 4.8 Set battery saving Set by PC programmer. The cycle of battery saving are as below: Level 1 is 100ms on & off, Level 2 is 100ms on & 200ms off, Level 3 is 100ms on & 300ms off, level 0 is on all of time. 4.9 Set To [MRN] Station Press “F” +” MRN “ buttons to [MRN station], Press “F”+” MRN“ buttons again will go back to previous channel,The MRN frequency could be changed by PC programmer. This channel has to be program by program software only, the LCD indicate [PRN/MRN] in this mode.(See LCD indicator in Figure (7) )](https://usermanual.wiki/Racing-Electronics/RE1000/User-Guide-1528095-Page-5.png)
![5 Note: At the “MRN” mode, press “SCAN” button, it will go to car channel scanning. (7) 4.10 Set radio’s channel spacing Could be set by PC programer. The icon is 12.5KHz channel spacing. The icon is 25KHz channel spacing. 4.11 LCD Back light Press “F”+ “ ” to turn on the back light, Press “F“ + “ “ button again to turn off . 4.12 Reset Press & hold “F”+”SQ” buttons & turn on the power switch. The reset function are including CAR channel, name, tone squelch, 450MHz regular frequency, battery saving.LCD full display during reset on. 5. CAR CHANNEL SETTING Press “F”+”CAR” to enter in the setting menu.There are four settings in the setting menu: CAR channel frequency, CAR channel name, PL/DPL , LOCK OUT. 5.1 Frequecy setting Type the frequency by keyboard, then press enter to store the setting and go to next setting. The [CAR] icon will be flashing & indicate the CAR number/ [operating frequency] during the frequency setting,(see LCD indicator in Figure (8-1)) Note: If typed frequency is out of the frenquency range, it will go back to the previous frenquency. If the typed frequency is wrong in step, it will go to the right frequency automatically. For example, when channel spacing is set to 12.5Khz, key in [450.0125] will be accepted, key in [450.0010] won’t be accepted and will go to [450.0000] automatically. (8-1) 5.2Channel name setting Type the channel name, then press “ Enter” button to store the setting and go to the next setting. When typing the channel name, press “ Sc” button to store the typed letter and go to the next letter, and press” CAR” button to delete the typed letter. It will indicate the CAR number & driver name during this [Driver Name] setting mode (each digit be flashing before edit).( See LCD indicator in Figure (8-2)) Note: The name length could be 12 letters. And name letters are all in capital.](https://usermanual.wiki/Racing-Electronics/RE1000/User-Guide-1528095-Page-6.png)
![6 (8-2) 5.3 PL/DPL setting Press “ “or “ ” button to choose 51 PL tone or 104 DPL codes.Press “Enter” to store the settting and go to the LOCK OUT setting. The LCD will shows the PL tone or DPL code.(See LCD indicator in Figure (8-3)&(8-4) ) (8-3) (8-4) 5.4 LOCK OUT setting press “ “ “ , “ to choos ON /OFF,When CAR CAHNNEL is set to LOCK OUT ON, press “ ” or using scan function , the LOCK OUT channel would be skipped.(LCD indicator in Figure (8- 5)& (8- 6) ) (8-5) (8-6) Note: During all these settings, press” F” +” CAR” button to store the settings and exit the setting memu. After each setting, if no button pressed within 10 seconds, it will quit the setting & go back to the channel before setting. 6. Programming Connect the radio to PC through program cable, then you can go to the programming mode. The LCD show [PROGRAM] indicator when pragramming the data.(See LCD indicator in Figure (9) ) (9) 7. Clone (1) Press “F”+”1” buttons to the clone mode. (2) Connect the clone cable between two radios through 2.5φstero jack. (3) Once using the Clone, pressing” Enter” button, the radio will enter into the Master mode and](https://usermanual.wiki/Racing-Electronics/RE1000/User-Guide-1528095-Page-7.png)
![7 send the data to another radio, and the other one will be like programming. Press”Enter” again, radio will perform the clone function again.Or press “F” button, it will quit the cloning mode. (4) During this mode, the master’s LCD will show [CLONING] indicator, and the programming radio will show [PROGRAM]. After data cloned, the master’s LCD will show[CLONE], and the programming radio will show [PROGRAM SUCCEED] or [PROGRAM FAIED] then go back to normal mode. FCC Caution:Any Changes or modifications not expressly approved by the party responsible for compliancecouldvoid the user’s authority to operate the equipment.This device complies with part 15 of the FCC Rules. Operation is subject to the following twoconditions:(1) This device may not cause harmful interference, and(2) This device must accept anyinterference received, including interference that may cause undesired operation.](https://usermanual.wiki/Racing-Electronics/RE1000/User-Guide-1528095-Page-8.png)