Radarsign TC-500 Vehicle Speed Sensor User Manual Owners Manual ver5 Sept 25
Radarsign LLC Vehicle Speed Sensor Owners Manual ver5 Sept 25
Manual
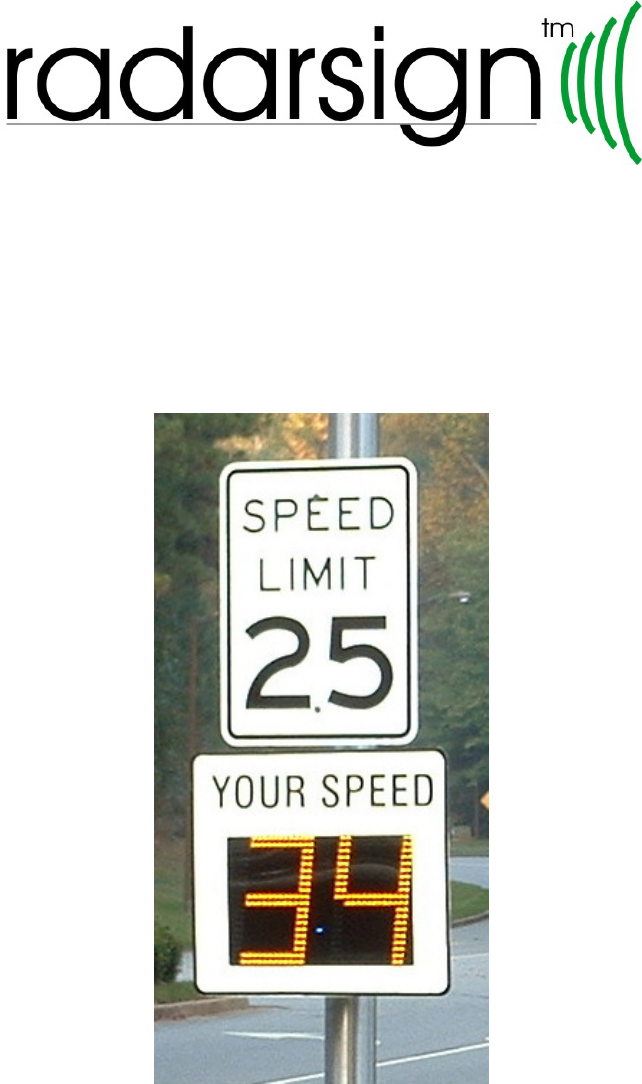
Model TC-500S
Guide to Operations
(revised 9-25-05)
www.radarsign.com
Copyright 2005 RadarSign LLC.
All Rights reserved

radarsign TC-500S 2
I. Introduction
1. About Radarsign LLC
2. “MUST” items to review
3. Powering up the first time
II. Getting Started – Basic Settings
1. PDA Start-up
2. Radarsign Software Start-up
3. Basic Settings
4. Sign and Software Start-up
5. Display Options
6. Speed Settings
7. Timer Operation
8. Turning Off the Radarsign
9. LED Settings and Blinkey
III. Beam Settings
1. Sending settings from PDA to Sign
2. Receiving settings from Sign to PDA
IV. Traffic Data - StreetSmart™ Software (Optional)
1. Retrieving Daily Records
2. Daily Statistics Report
3. Daily Time Records
4. Daily Speed Records
5. Retrieving Weekly Summary
6. Spreadsheet Template for Graphs
V. Diagnostics
1. LED Tests
2. Battery and Solar Details
3. Sign History and Information
VI. Pole Selection & Mounting Guidelines
1. Types of Poles
2. Location of installation
3. Mounting Hardware
Appendix A: Data saved in your TC-500S sign
Appendix B: System Specifications
radarsign TC-500S 3
Thank you for your purchase of this Radarsign™ product.
CAUTION:
The RadarSign TC-500 series devices comply with Part 15 of the United States Federal Communication
Commission (FCC) part 15 rules as shipped from the factory. The RadarSign device must not be opened
or modified with the exception of the connection of the solar panel or AC power connections.
Any changes or modifications not expressly approved by RadarSign LLC may void the users
authority to operate the equipment under FCC rules.
This device complies with part 15 of the FCC Rules.
Operation is subject to the following two conditions:
(1) This device may not cause harmful interference, and (2) this device must accept any
interference received, including interference that may cause undesired operation.
I. Introduction
1. We at Radarsign LLC, want your use and association with our products to be an
enjoyable one. We have worked dillegently to design and build products with the
features and durability that will last for years and exceed your expectations. If we
have missed a feature, or you detect anything that is not to your liking, please let us
know. We will strive to include your suggestions for improvement into our future
designs.
! ! SPECIAL NOTICE ! !
2. These are key considerations that MUST be addressed BEFORE you place the TC-
500S into operation.
• CALL BEFORE YOU DIG!!! It is imperative that you are sure there are no buried
utilities in the area you choose for pole mounting the Radarsign. Fines and cost of
repairs vary by jurisdiction, and can be quite expensive.

radarsign TC-500S 4
• For public roads, secure written permission with the local city or county traffic
officials BEFORE putting your sign into operation. The right of way for most public
roads is owned by the local government, and they have the right to remove ANY item
not approved prior to installation. Radarsign representatives can assist you in this
process.
• Choose a pole for mounting the TC-500S that has a break-away base mounting
system. This type of pole mounting system is available from many manufacturers,
including Radarsign. Generally the poles are 3.5” to 4.5” round, U-Channel (or Hat
Channel), decorative design, or 2” square. U-Channel and 2” square poles should be
used in pairs to support the TC-500S, as the unit weighs between about 48 pounds.
With high wind gusts, a single pole that is not sturdy enough will simply bend over,
leaving the system ineffective. The break-away base is critical for reducing vehicle
damage and passenger injury should the pole be struck by a moving vehicle that has
left the road.
RadarSign, Inc. reserves the right to change the specifications without notice. Contact our sales department for
special applications and configurations. www.radarsign.com © 2005 RadarSign LLC.
radarsign TC-500S 5
Power Connections
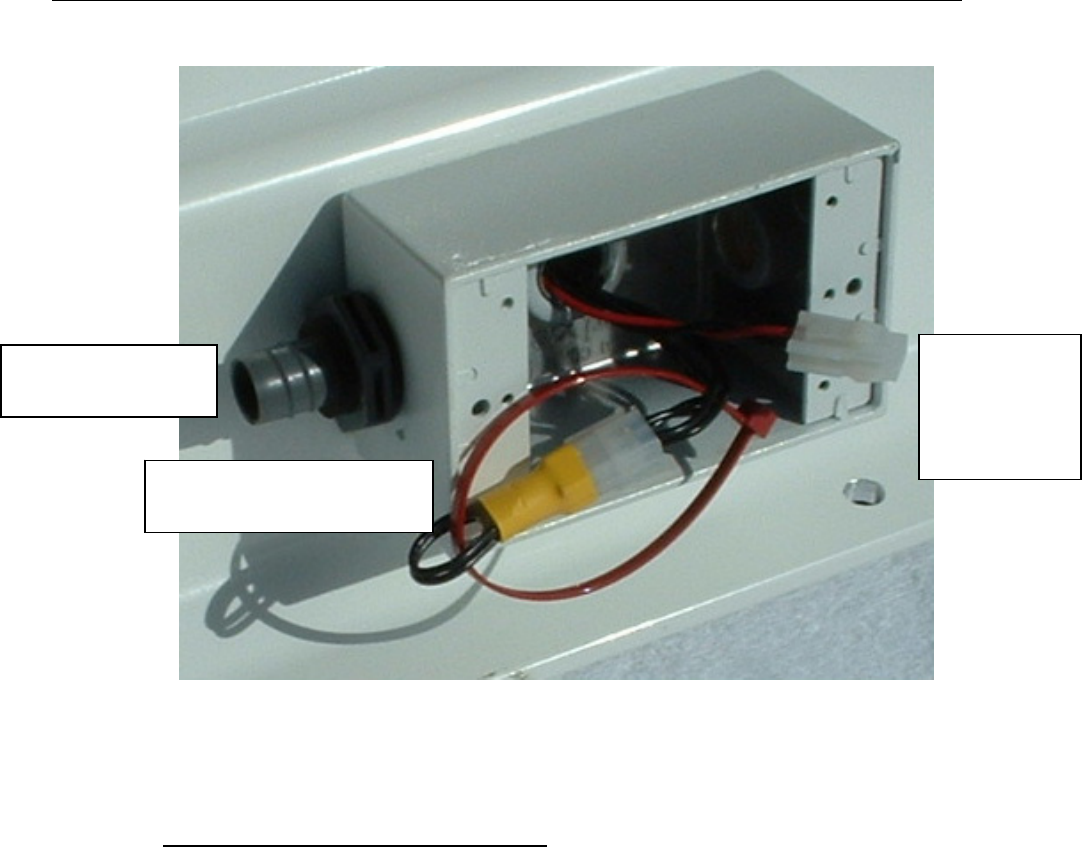
3. POWERING UP THE FIRST TIME
A. Locate the open box at bottom of Radarsign
B. Connect 4 prong male (yellow) and female pins to power up the TC-500S model with
batteries.
C. Watch LEDs run through quick test. (15-20 seconds)
D. Connect 8 foot lead from solar panel, through Power Conduit Connection, to 2 prong
solar connector.
E. Proceed to software setup with PDA.
Å AC or
Solar Power
Connector
(2 prong)
Power Conduit
Connection Æ
4 Prong Internal Power
Connection Æ
radarsign TC-500S 6
II. Getting Started
With every TC-500S, a Model IIIxe PDA is included. This device contains the software with
menu driven screens to set up your Radarsign. It is the only model guaranteed to work with our
Model TC-500S or TC-500A products. Here are the basic steps to activate your sign:
1. PDA START-UP
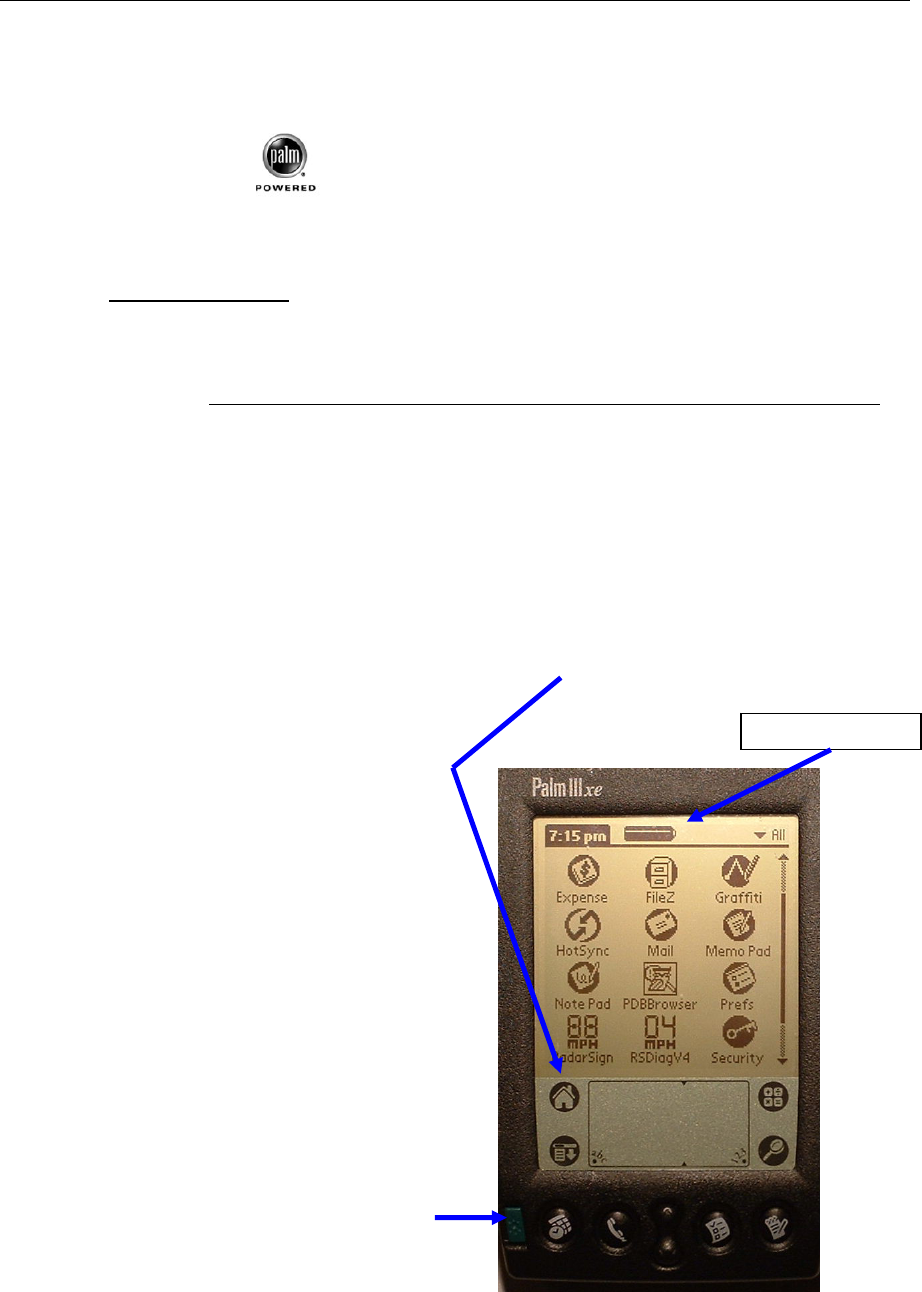
A. PDA has two installed AAA batteries. Battery life is monitored by battery icon at top
of main screen. Radarsign settings will remain intact in PDA while changing
batteries, AS LONG AS YOU COMPLETE THE TASK IN LESS THAN ONE MINUTE!
B. Turn on the PDA with the lower left green button.
C. To use backlight feature at night, hold the green on/off button down for 2 seconds.
To turn off the backlight, repeat the process.
D. Locate stylus pen in the back of the PDA. Use to tap the touch-screen program
buttons.
E. Locate ‘screen contrast’ wheel on back side of PDA. Rotate wheel for optimum
viewing.
F. Set PDA date and time by tapping <PREFS> on PDA main menu. Change date and
time by tapping on item you wish to change. When completed tap the PDA home
icon (lower left corner of screen, looks like a house).
Batter
y
level icon
ON/OFF Button
radarsign TC-500S 7
2. RADARSIGN SOFTWARE START-UP
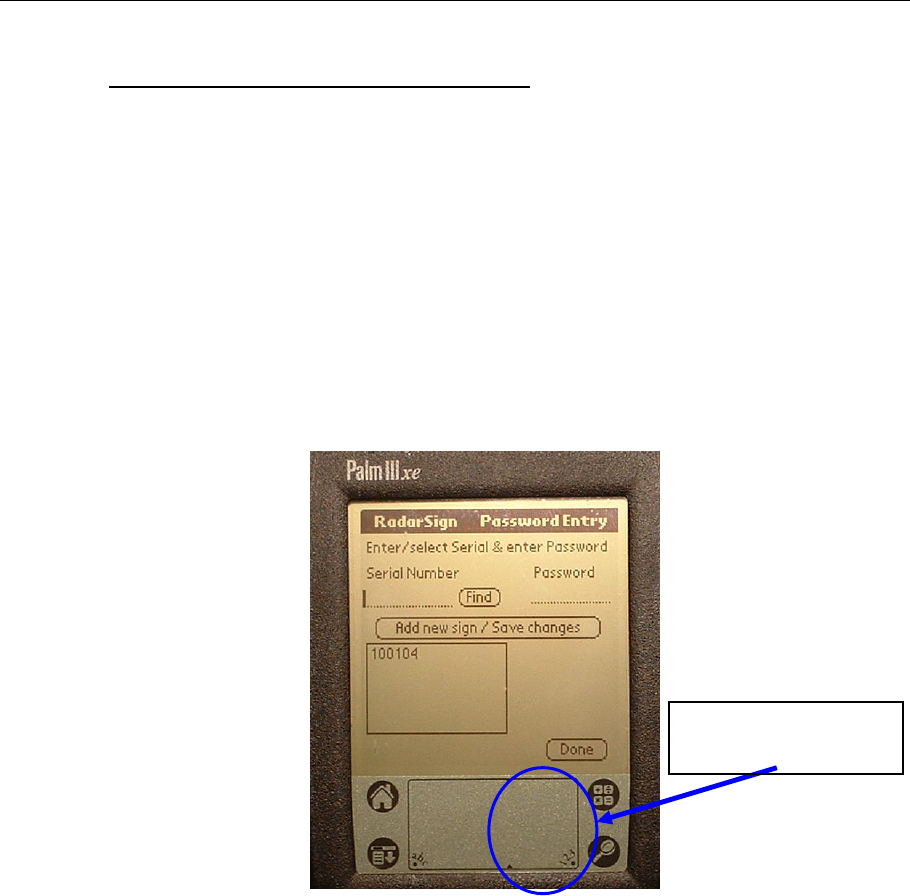
A. Tap the Radarsign icon once to go to setup menu. Wait 10-12 seconds for startup.
Your TC-500S has a unique Serial number assigned to it. To access the main enu,
you must first store this serial number in the Palm. Using the Palm’s number pad,
enter your sign’s serial number. When finished, tape DONE. Now tap the
PASSWORD line so the cursor shows blinking. Enter a password of your own
choosing (3 digit minimum), and tap ADD NEW SIGN/SAVE CHANGES button. The
serial number will show up in the box below.
Now highlight the serial number in the box, tap the PASSWORD line and re-enter the
password. Tap <DONE>, and you will go to the Radarsign main menu.
Palm Number Pad,
tap once
radarsign TC-500S 8
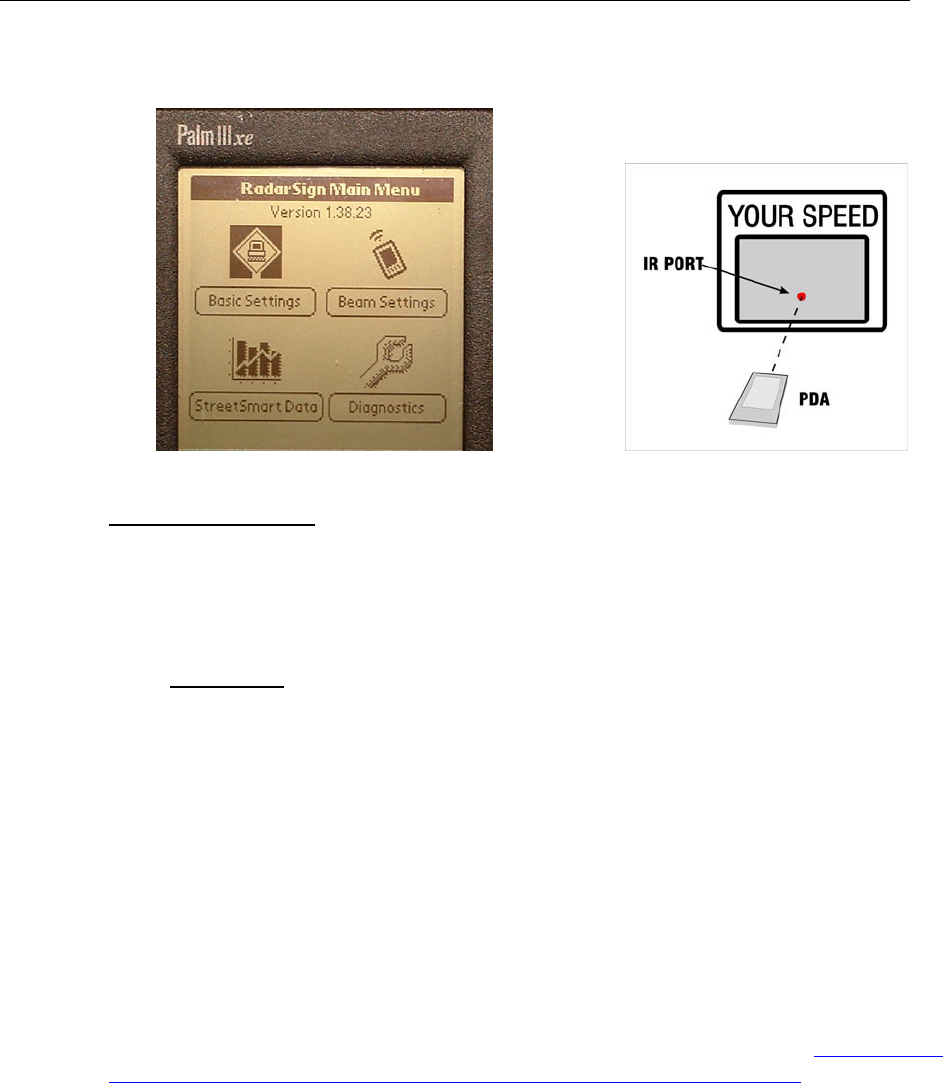
RADARSIGN APPLICATION MAIN MENU
3. BASIC SETTINGS
A. Go to <BASIC SETTINGS> first. Tap the <SET SIGN TIME/DATE> button and
confirm PDA times are correct.
B. If correct, BEAM settings into Radarsign by positioning PDA in front of the sign per
the diagram above, within one foot of the sign. Closer is better. The IR BEAM port
is the largest hole in the center of the sign, just below the blue blinking LED.
C. Tap <BEAM TO SIGN> button. A pop-up message will ask:
BEAM SETTINGS?
Hold PDA steady in front of IR Port hole, and tap the <BEAM> button if ready, or
tap the <CANCEL> button if you do not wish to update the sign.
NOTE: ** Beaming of commands to and from the Radarsign can take from 5 to 20
seconds. Be patient, and hold the Palm still while beaming. A successful beam will
result in a pop-up message saying: DATA SAVED. Tap the <OK> key to return to
BASIC SETTINGS. This process of BEAMING will be the same throughout the various
operations of the software.
If the BEAM is not good, you will get an error message that says: PROBLEM
ENTERING COMMAND MODE. REPOSITION PDA & TRY AGAIN. You will need to
move closer to the IR port on the sign and try again. During the beaming process
there is a blue LED in the center of the sign will glow continuously. The beaming
process is complete when you hear a short beep coming from the PDA.
NOTE: The PDA will shut off after 2 minutes of inactivity. Simply press the Green
ON/OFF button to restart the PDA. It will start on the same screen you were in the
process of using.
radarsign TC-500S 9
4. SIGN and SOFTWARE START-UP
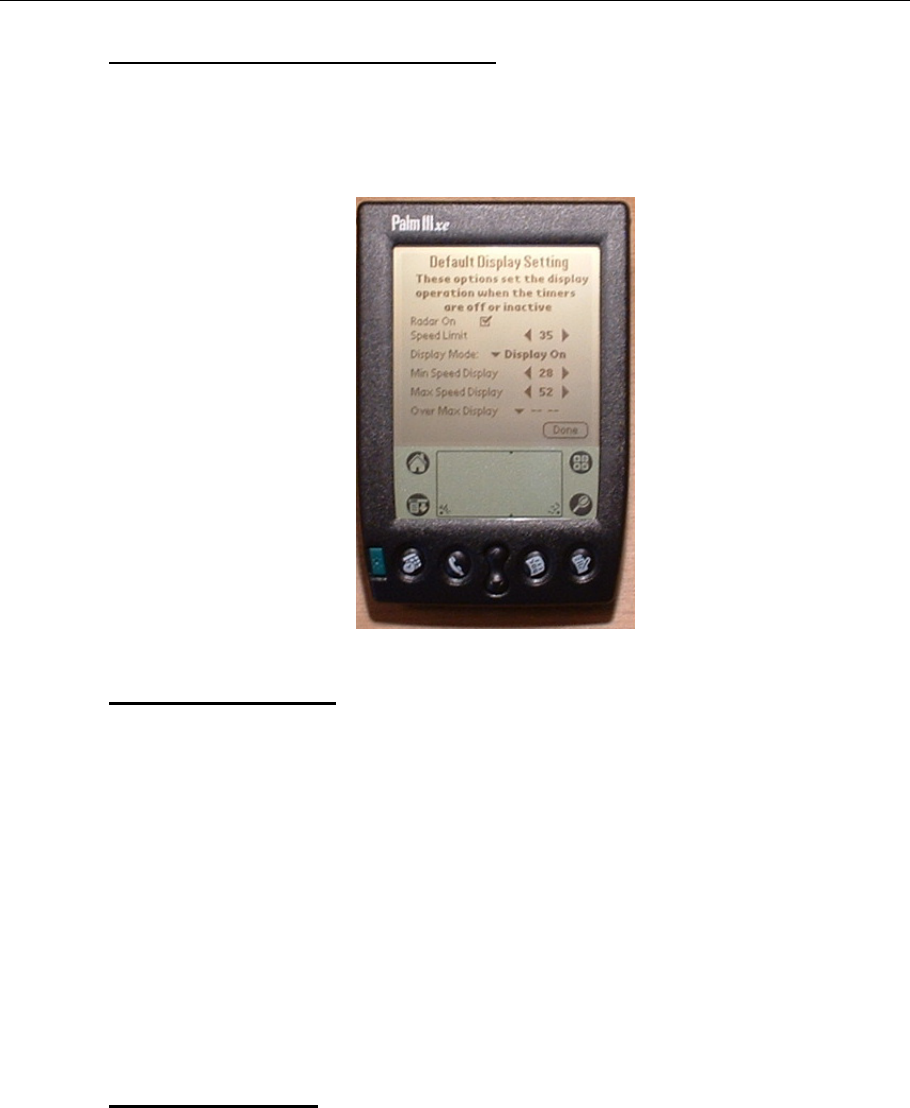
A. Tap the <TURN ON SIGN> button to define display parameters in the Radarsign.
B. These settings will run 7x24 hours. If you need to change settings for different days
or time of day, the Timer 1 setup options are explained in paragraph 7.
5. DISPLAY OPTIONS (in Basic Settings/Turn On Sign)
A. Ensure RADAR ON checkbox has been checked.
B. To set SPEED LIMIT, tap the left or right arrow keys to make your selection.
C. Select <DISPLAY MODE> for operation of LEDs by tapping DOWN ARROW.
Choices are as follows. Choose one by tapping once.
DISPLAY OFF
DISPLAY CONTINUOUS ON
FLASH FAST
FLASH SLOW.
D. To evaluate FLASH FAST and FLASH SLOW options, go back to the Main screen and
select DIAGNOSTICS icon (see section V of this manual).
6. SPEED SETTINGS
A. The MIN. SPEED DISPLAY sets lowest speed that LEDs will activate. Choose a speed
greater than or equal to actual speed limit of street. Select by tapping left or right
arrows.
radarsign TC-500S 10
B. The MAX. SPEED DISPLAY sets the highest speed that LEDS will activate. This
feature helps reduce drivers ‘testing’ the sign by continually speeding up to see how
high the sign will go. Select by tapping left or right arrows.
C. The OVER MAX DISPLAY provides three options for speeds greater than your MAX
SPEED DISPLAY setting. Choose one from the drop down menu; BLANK, -- --, or 00.
NOTE:
Even though the LEDs are de-activated at the higher speeds, the individual
vehicle data is still recorded by the TC-500S.
ONCE YOU HAVE SUCCESSFULLY BEAMED THIS SETUP INFORMATION TO THE
MODEL TC-500S, THE DEFAULT OPERATION PERIOD IS 24 HOURS BY 7 DAYS A
WEEK! You will use the timers in the <SETTING TIMERS> section ONLY if you
need the sign operational for time periods other than 24 hours a day, or you need
different sign settings (speed limit, for example) at different times of the day.
7. TIMER OPERATION
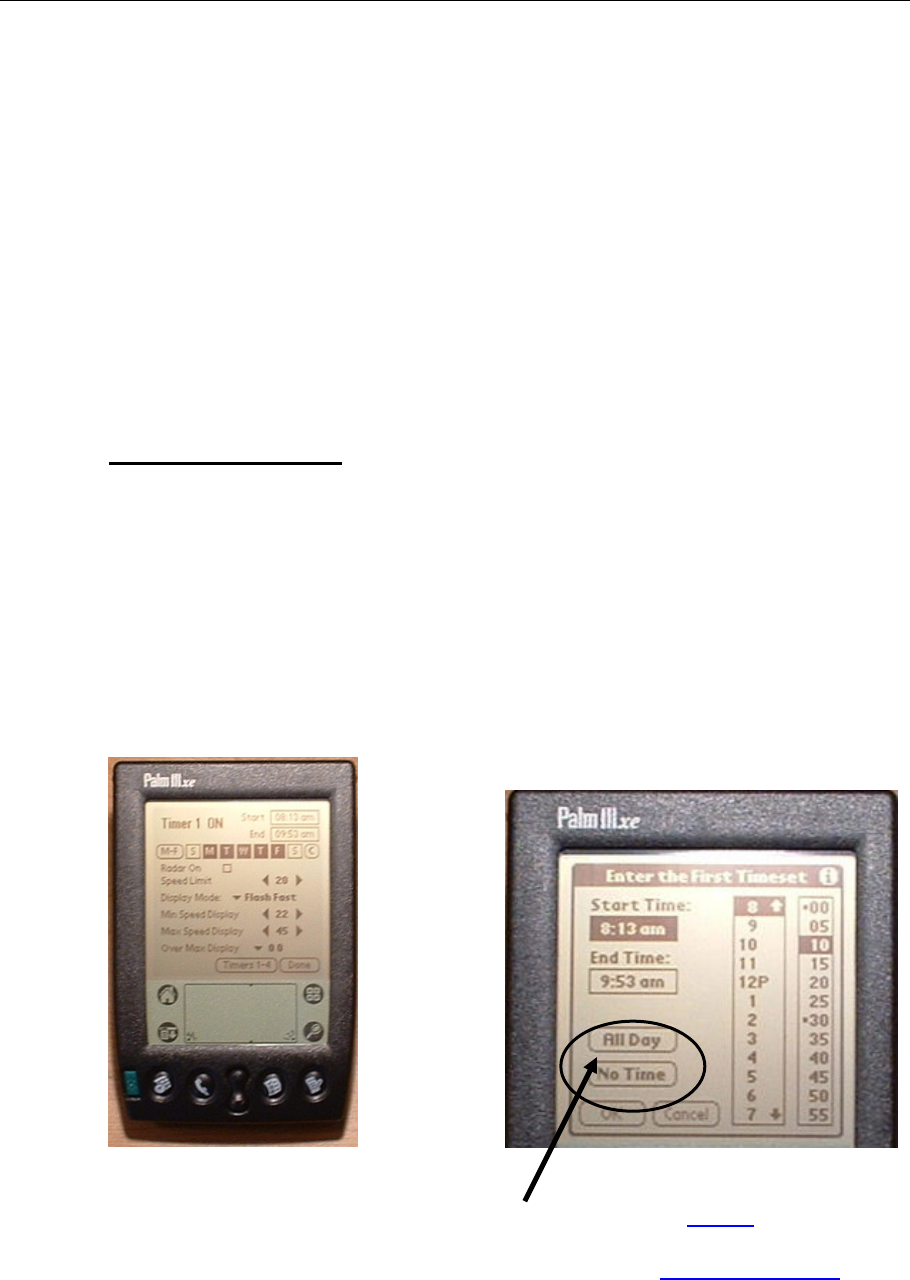
A. In BASIC SETTINGS main menu, tap Check box labled ENABLE TIMERS. The PDA
will now save all Timer settings. There are up to 4 Timers you may use.
B. Tap the <SETTING TIMERS> button.
C. Tap START time numbers in upper right corner of screen.
D. Set START time from hour and minute boxes in Timer Sub-menu. (see below)
E. Set END time by tapping on END TIME box, and repeating step D above.
F. Tap <OK> button when finished.
MAIN TIMER SCREEN TIMER ON/OFF SUB-MENU
NOTE: There are two buttons on this screen that should NEVER be selected. They
are the <ALL DAY> button and the <NO TIME> button. These buttons are
included with the timer program for the PALM, but have no operational use in the TC-
500S Radarsign.

radarsign TC-500S 11
G. After returning to Main TIMER 1 screen (see screen photo previous page), set the
days of operation for TIMER 1. Tap on the days desired. The last button, <C>, will
Clear all days if you made a mistake.
H. Ensure RADAR ON checkbox is checked.
I. Set SPEED LIMIT for use during TIMER 1.
J. Set DISPLAY MODE for use during TIMER 1.
K. Set MIN. SPEED DISPLAY for use during TIMER 1.
L. Set MAX. SPEED DISPLAY for use during TIMER 1
M. Choose Display Option for speeds over Maximum setting.
N. When finished, tap <DONE> button. PDA will ask: SAVE CHANGES? Tap <YES>.
O. PDA will ask: BEAM SETTINGS? Tap <CANCEL>, and PDA will return you to BASIC
SETTINGS main menu.
P. For additional timers, tap <SETTING TIMERS>, wait for beep, and tap <TIMERS
1-4> button in Sub-menu to reach Timers 2, 3, and 4.
NOTE: The original sign settings you chose for the Default Display Setting under the
<TURN SIGN ON> button will be retained and used for ALL time periods that are
NOT defined in the TIMERS section. To turn any of the TIMERS OFF, simply set the
START and END times to the SAME time (example, both at 1:00am). TIMERS in the
OFF position will show NO setting options on the screen. By choosing your START
and END time settings, the other options will re-appear for you.
8. TURNING OFF THE RADARSIGN
A. Tap the <TURN OFF SIGN> button.
B. PDA will ask: BEAM SETTINGS? To turn off the sign, position PDA for Beaming and
tap <YES>. If not, tap <CANCEL>.
NOTE: Turning off the sign will NOT delete the sign settings or vehicle records.
They will remain in the system memory until you turn the sign on again.
9. LED SETTINGS and BLINKEY
A. The <LED SETTINGS> button allows you to override the automated brightness
controls for the LEDs. The Radarsign software adjusts the LED brightness to match
the external lighting conditions, (day vs. night vs. overcast).
B. To override automatic settings, tap MANUAL checkbox, and adjust brightness using
arrow bar below checkbox. (settings are left to right, 0% to 100%)
C. To de-activate Blue LED (Blinkey), tap the checkbox. Blue LED gives visual
confirmation that Radarsign is operational.
D. When finished tap <DONE> button.
E. Position PDA, and BEAM commands into sign.

radarsign TC-500S 12
III. Beam Settings
1. Sending Settings from PDA to SIGN
A. Tap <SEND DATA TO SIGN>, position PDA for BEAMING, and tap <BEAM>.
B. BEAMING will take 10-15 seconds. You will get a confirmation note on the PDA that
your BEAM was successful. If the BEAM was not successful, reposition the PDA
closer to the IR port hole, and repeat the process.
NOTE: If you have BEAMED setup info during the BASIC SETTINGS portion of the
program, you do NOT have to re-beam the entire setup again with this section.
2. Sending Settings from SIGN to PDA.
A. Tap <RECEIVE DATA FROM SIGN>, position PDA for BEAMING, and tap
<BEAM>. This should be used when you are unsure of the sign settings and wish to
see them on the PDA. If you have multiple signs and wish to copy the settings from
one sign to another, this process can be used to load the information from sign 1 in
the PDA, then use the first button <SEND DATA TO SIGN> to copy this
information into sign 2.
IV. Traffic Data -
STREETSMART
™ (Optional Software)
1. Retrieving Daily Records
A. Tap <BEAM TRAFFIC DATA FROM SIGN> button and select date of report to be
displayed on the PDA.
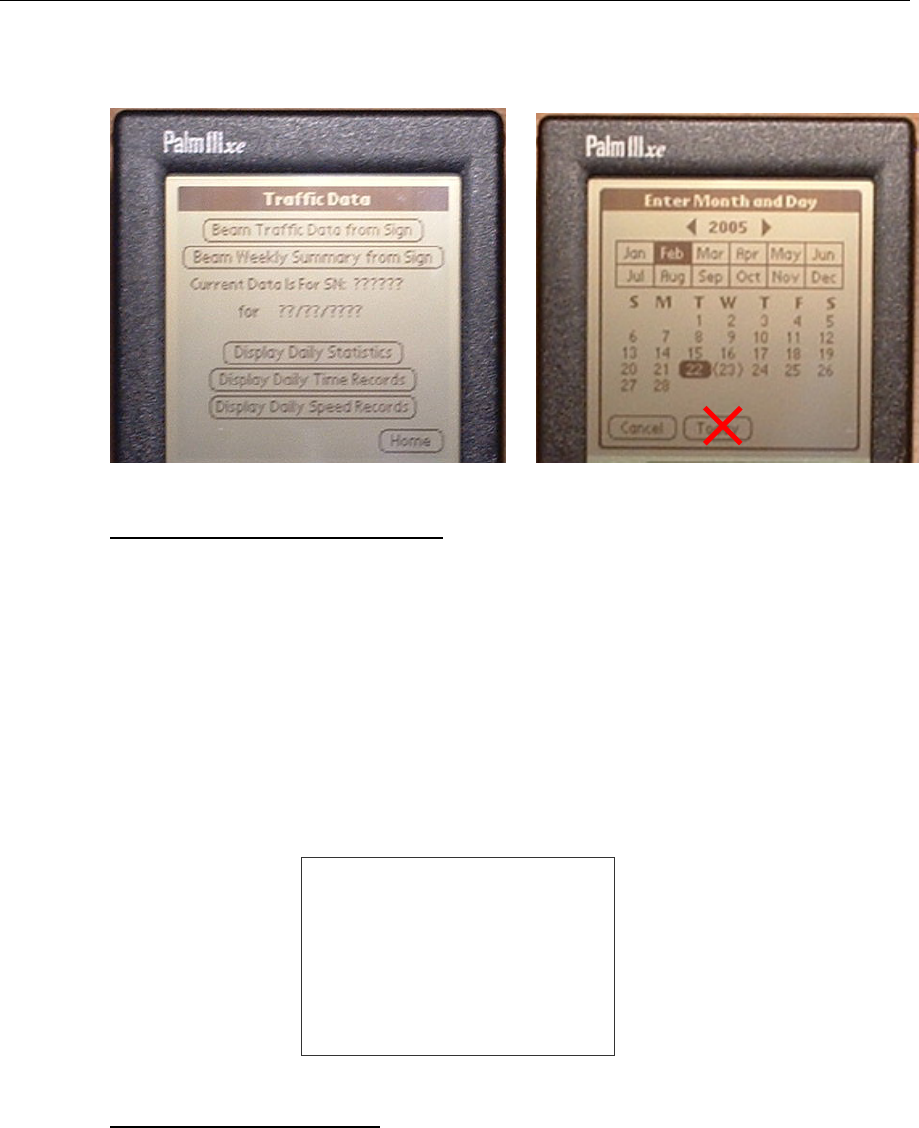
B. ALWAYS CHOOSE A DATE PRIOR TO ‘TODAY’S’ DATE. In the DATE SUB-MENU
(see screen shot on next page), tap on the Month desired first, then tap on the
actual date desired. The PDA will then open the ‘Beam Settings?’ window.
C. Position your PDA and <BEAM>. Please be patient as this process will take 16-20
seconds. You may now select from three standard reports. All are displayed on your
PDA screen from the StreetSmart main menu shown below.
NOTE: DO NOT choose the <TODAY> button on the DATE Sub-Menu. This will
result in invalid data, as a full 24 hour period for today is not complete. (Location of
button shown on next page, Sub-Menu photo)
radarsign TC-500S 13
STREETSMART MAIN MENU STREETSMART DATE SUB-MENU
2. DAILY STATISTICS REPORT
A. Tap <DISPLAY DAILY STATISTICS>. You will see a roll-up of the vehicle
volume, number of speed violators, and speed averages and peak for the day. See
sample below.
B. The 50th percentile number is the speed at which ½ of all vehicles for the day are
traveling slower than. The 85th percentile number is the speed at which 85% of all
vehicles for the day are traveling slower than. The 85th percentile speed is a critical
factor for most local government programs when considering other types of traffic
calming solutions, including speed humps or extra police coverage.
DAILY STATISTICS
Vehicle Count 701
Vehicle Violations 272
Violation Percentage 38.8
Average Speed 22.8
Peak Speed 44
50th Percentile Speed 30.1
85th Percentile Speed 34
3. DAILY TIME RECORDS
A. Tap <DAILY TIME RECORDS>. This report shows traffic volume and speeds in ½
hour segments for the day. Five hours of the day will display at one time, starting at
7pm to midnight.
B. To move to different time segments of the report, tap the <GO TO> button. A
drop-down menu will open, giving you the choice to jump to 2pm, 9am, 4am, or 12
midnight. Choose one and the report will move to the new time segment.

radarsign TC-500S 14
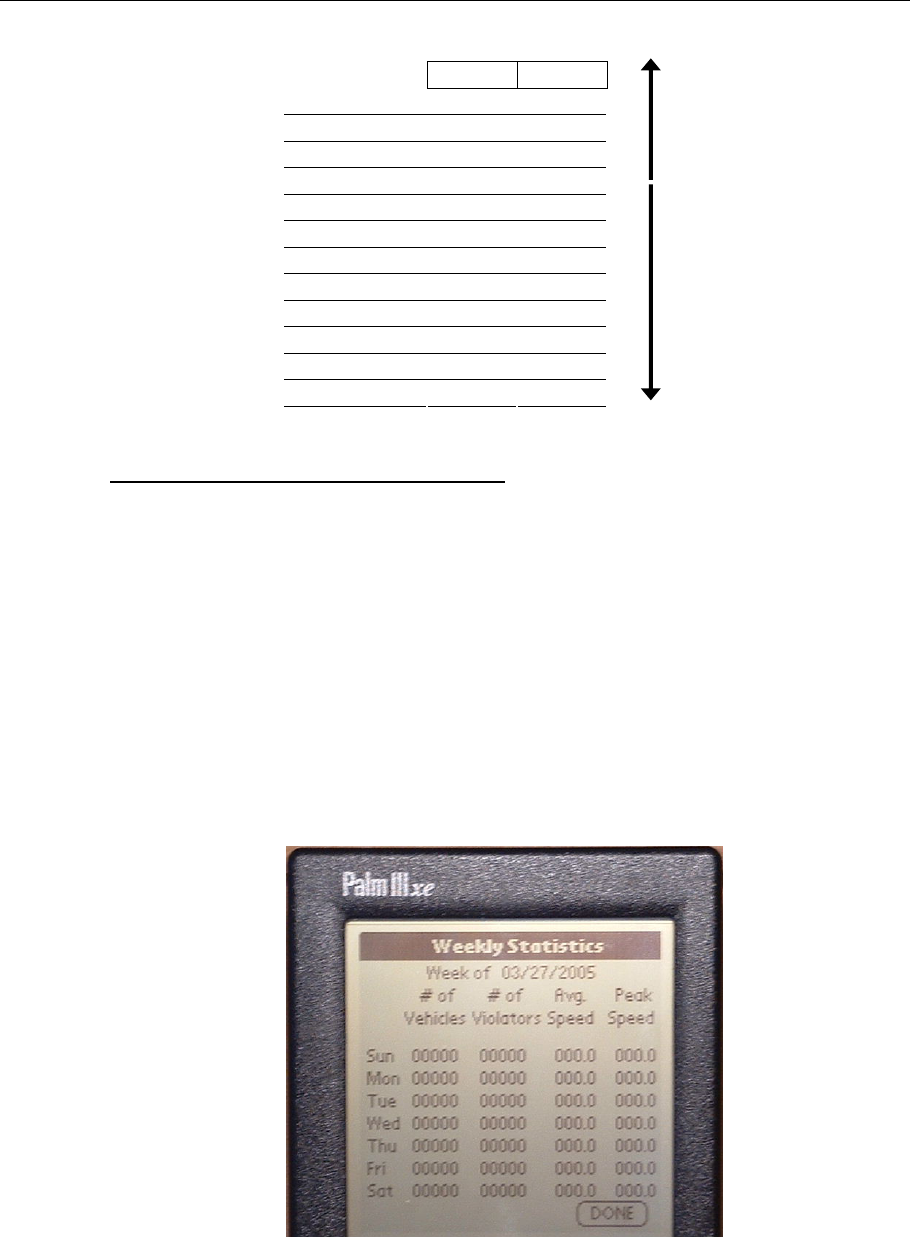
C. Tap the bold arrow tips to the right of the report to scroll up or down by one ½ hour
segment. It will take about 5 seconds to move. Repeat the process as needed. A
sample report is shown below:
NOTE: Use this report to determine the effectiveness of your Radarsign. When you
first install the sign on the pole, in the initial BASIC SETTINGS section, set the LED
option to OFF. The sign will operate and record traffic statistics without notifying the
drivers by using the LED numbers for feedback.
After recording the daily information for one week, go back to the BASIC SETTINGS
section, and set the LED option to CONTINUOUS ON, or FLASHING. This will activate
the LED numbers. After recording the DAILY TIME RECORDS data for another week,
compare week 1 vs. week 2. You will have accurate ‘before and after’ data that will
quantify how much overall traffic is slowing down.
4. DAILY SPEED RECORDS
A. Tap <DAILY SPEED RECORDS>. This report provides the volume of vehicles
each day, broken out by speeds in 2 mph increments from 25 to 45 MPH.
B. Tap the bold arrow tips to the right of the report to scroll up and down the report.
(See sample report on next page.)
DAILY TIME STATISTICS
TIME # OVER AVG PEAK
8:00 32 17 25.6 40
8:30 16 6 24.7 43
9:00 15 8 26.7 39
9:30 12 4 25.6 35
10:00 11 5 24.7 38
10:30 14 2 25.9 37
11:00 21 8 22.2 41
11:30 20 8 25.9 40
12:00 18 6 23.9 36
12:30 19 6 21.3 37
radarsign TC-500S 15
DAILY SPEED RECORDS
PEAK AVG
5 to 24 mph 365 93
25 to 26 mph 120 92
27 to 28 mph 103 106
29 to 30 mph 62 115
31 to 32 mph 31 101
33 to 34 mph 17 90
35 to 36 mph 3 54
37 to 38 mph 0 29
39 to 40 mph 0 16
41 to 42 mph 0 2
43 to 44 mph 0 3
45 + mph 0 0
5. RETRIEVING WEEKLY SUMMARY
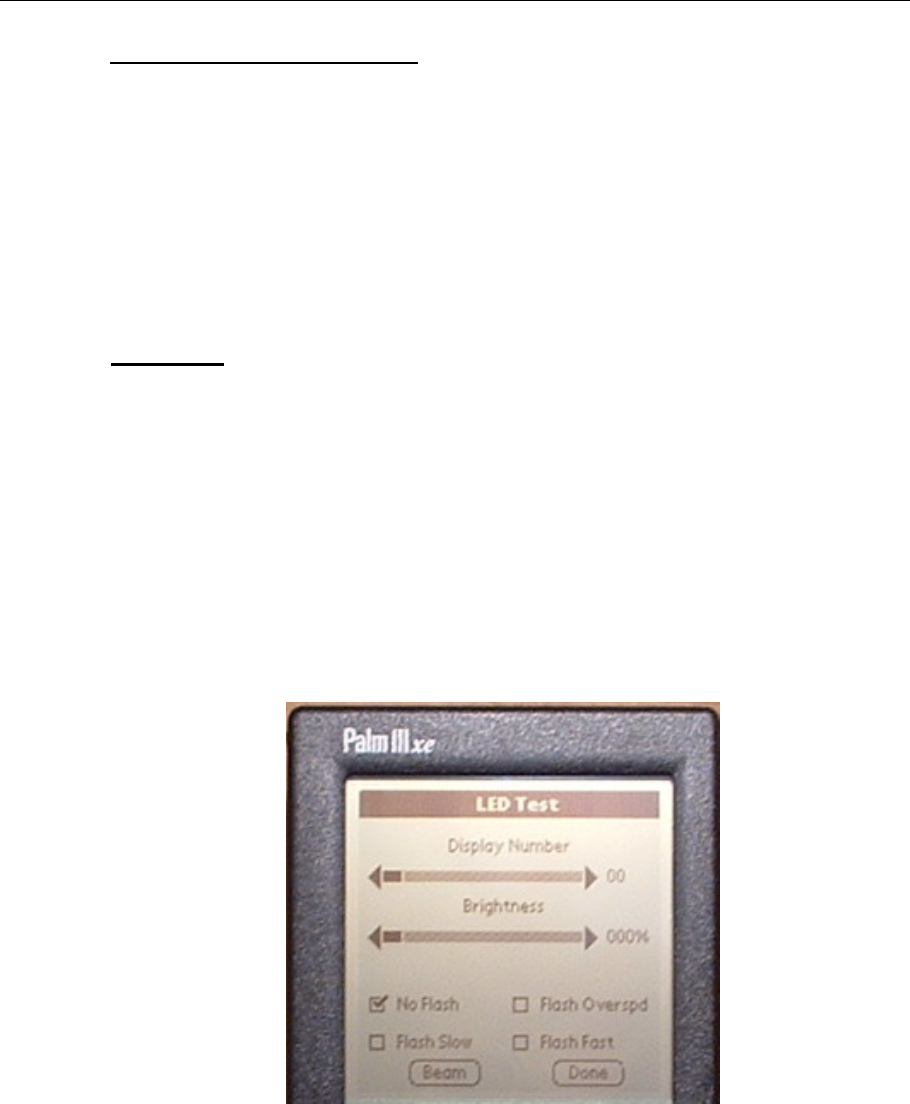
A. Tap <BEAM WEEKLY SUMMARY>. Daily summaries of vehicle volume, speed
violators, and speeds are shown for the week, starting each Sunday. To select the
most current complete week, tap <LAST COMPLETE WEEK>, position PDA and tap
<BEAM>.
B. To select an older week, tap <2 WEEKS AGO>, <3 WEEKS AGO>, or <SELECT
WEEK>.
C. For the <SELECT WEEK> option, you MUST choose a date that falls on a SUNDAY.
Select the date, position the PDA, and tap the <BEAM> button. This process will
take about 20 seconds. A sample report is shown below.
WEEKLY STATISTICS SUMMARY REPORT
radarsign TC-500S 16
6. SPREADSHEET TEMPLATE
A. Included with StreetSmart™ Software is a CD-ROM with a spreadsheet that can be
used to turn the numeric data from the Radarsign into graphs. Simply populate the
Master Data form with report data, and over 15 graphs will be generated for you to
analyze and review.
V. Diagnostics
1. LED TEST
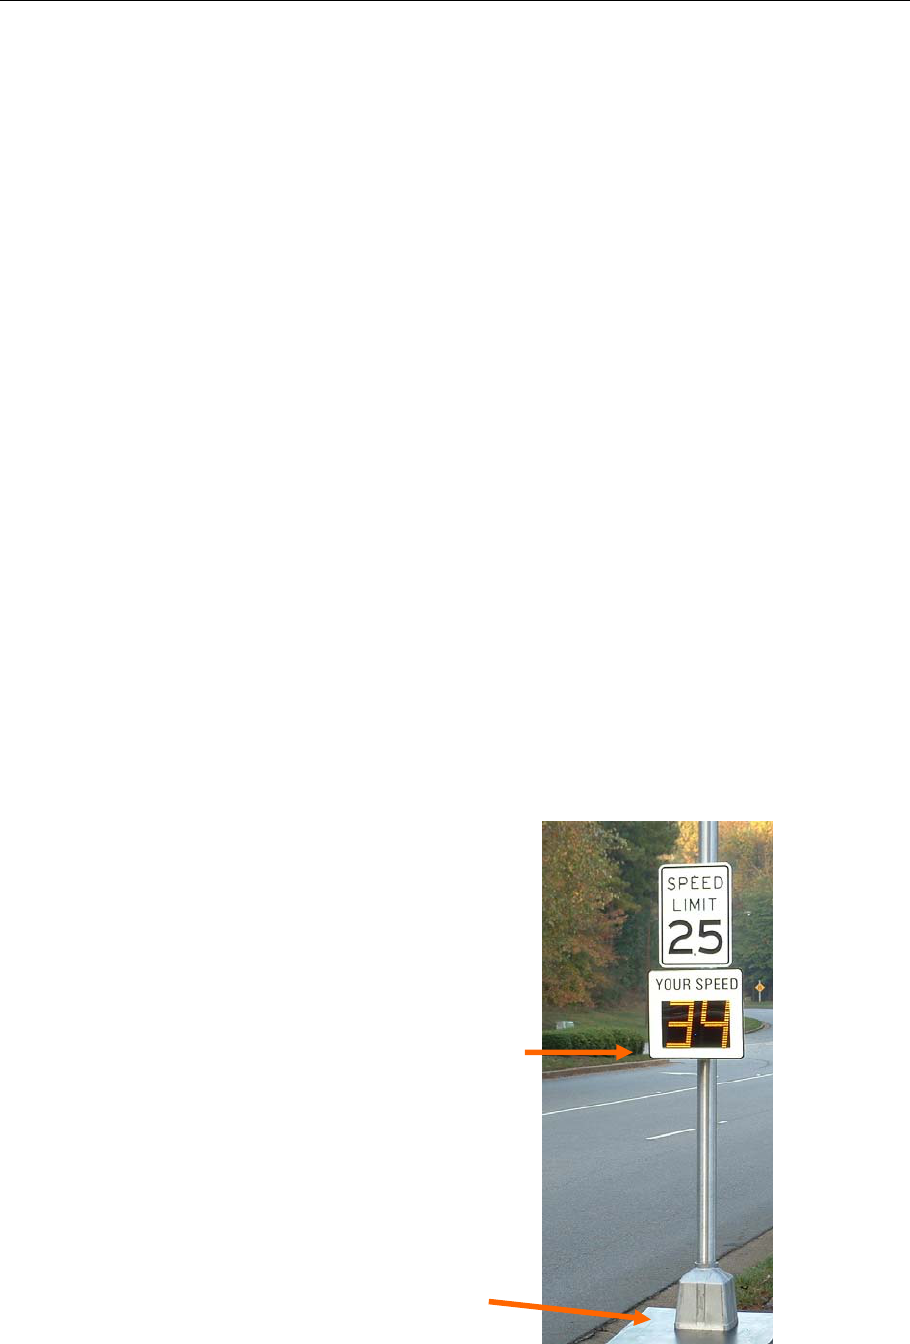
A. Tap the <LED DISPLAY TEST>. Use your stylus pen to slide the arrow guide to
the number you wish to test. Choose between 00 and 99. See screen below.
B. Choose on the second arrow an intensity level between 1% and 100%.
C. The NO FLASH checkbox is the default, and will show a continuous LED light during
the test.
D. To choose a flashing option, check the FLASH SLOW, FLASH FAST, or FLASH
OVERSPEED box.
E. Make selections, tap <BEAM> button, position PDA, and tap <BEAM> button. Test
will last 5-7 seconds.

radarsign TC-500S 17
2. BATTERY & SOLAR DETAILS
A. Tap <BATTERY AND SOLAR DETAILS> button, which takes you to the SYSTEM
HEALTH screen. Tap the <BEAM> button, position PDA, and tap <BEAM> button.
You will receive current power condition of the batteries inside the TC-500S. Battery
voltage of 11.5-11.9 indicates a low power reserve. Voltage of 13.2-13.6 indicates a
high power reserve.
The insolation AMP reading tells how much power is being generated from the solar
panel into the batteries.
B. There are historical records for battery voltage and Solar amperages. To reset these
numbers, tap the <RESET> button, position PDA, and tap <BEAM> button.
C. There are historical records for low and high temperature readings in the TC-500S.
The system also keeps a record of the number of low battery power shutdowns. To
reset these numbers, tap the <RESET> button, position PDA, and tap <BEAM>
button.
Note: For solar models, batteries recharge more completely if they are never
allowed to discharge down to a zero power state. When the batteries reach a power
level of about 10% of their full charge, the TC-500S’ SmartCharge™ software
performs an orderly shutdown of the sign. As soon as the solar panel provides
enough energy to re-charge the batteries to about 30% of a full charge, the
SmartCharge software will turn the sign back on. The sign will retain all settings and
vehicle records stored prior to the shutdown.
3. SIGN INFORMATION
A. Tap the <SIGN INFORMATION> button, <BEAM> button, position PDA, then tap
<BEAM> to get information. The information provided is as follows:
Owner Name
Address
Serial number of sign
Date of Manufacture
Date of last download
Total Vehicles detected by sign – since installation (approx. 60,000 max)
radarsign TC-500S 18
VI. Pole Mounting Guidelines
1. The model TC-500S can be mounted on any of the following size and style poles (pole
length should be 10 to 12 feet). Review the enclosed POLE INSTALLATION
GUIDELINE.
• Round pole, 2.375”, 3”, 3.5”, 4”, or 4.5” Outside Diameter
• U channel (hat channel) poles, 2 per sign
• 2” Square poles, 2 per sign
• 4” Square pole
These minimums are recommended to ensure sufficient pole strength to keep the
sign steady whenever there is a high wind. The solar models will need the larger
(stronger) poles, as there is nearly 4 square feet of surface on the sign itself, and
you would add another 4 square feet of surface for the solar panel.
The pole you select should also be anchored by a breakaway base. There are
several manufacturers of this type of system, and most city, county, and state DOT
agencies require this type of pole for ANY sign to be mounted on a street right-of-
way.
Once you have selected your pole, place the Model TC-500S with the sign bottom at
a height of between 5.5 and 7.5 feet from the ground (see picture below). This will
produce the best readings from the radar in detecting on-coming vehicles. Adjust
the left/right direction of the sign on the pole, testing against oncoming vehicles in
order to determine the optimum setting prior to tightening the sign to the pole. This
will be especially true on roads that are not relatively flat or straight.
BOTTOM OF SIGN
5.5 Feet MINIMUM,
7.5 Feet MAXIMUM
GROUND
radarsign TC-500S 19
2. Placement of the pole should be approved by the local city or county traffic engineer
for all public roads. The sign and pole should always be placed on the same side of
the road as on-coming traffic. As highlighted at the beginning of this document,
CALL the local utility companies BEFORE you dig the pole hole.
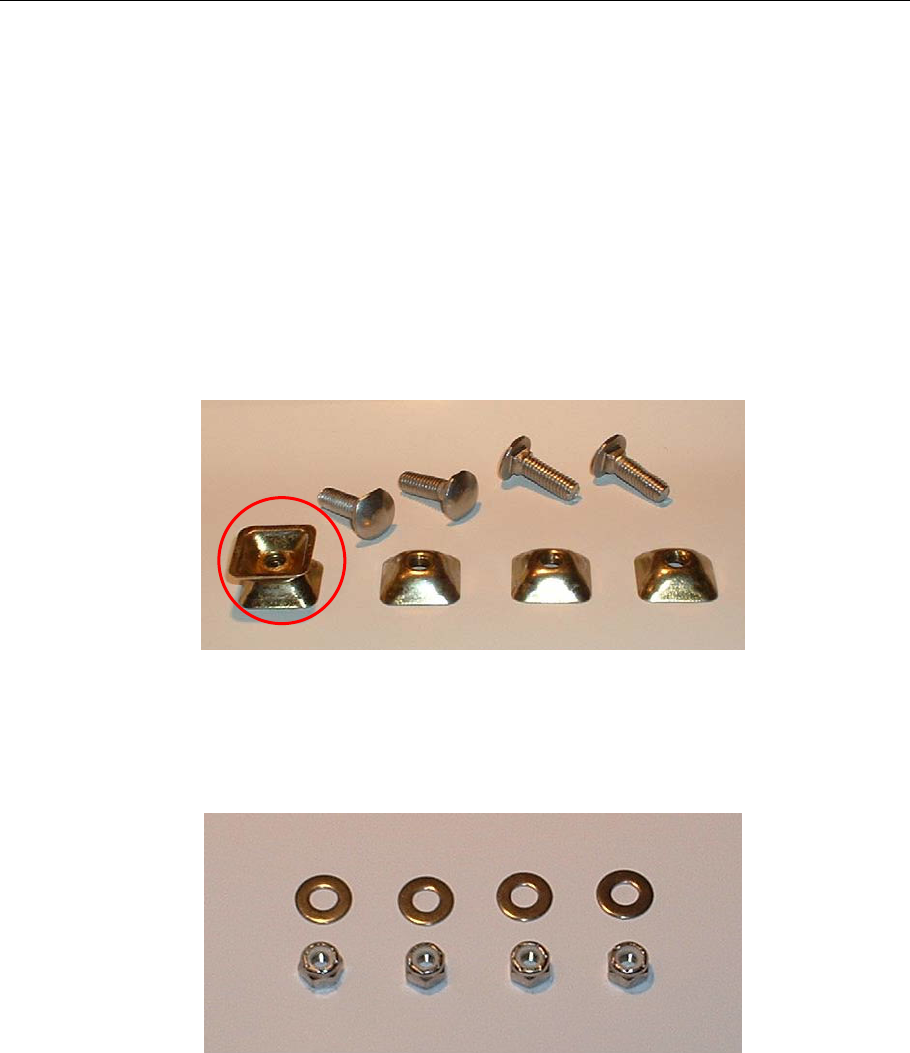
3. Key hardware components are shown below. DO NOT attach the “YOUR SPEED”
faceplate to the TC-500S until the unit is mounted on the pole. It will be much
easier to mount the radar unit without the faceplate attached.
Vandal resistant nuts for mounting the TC-500S on pole clamp.
Use extra nut as shown above to tighten others with monkey wrench.
Nuts and washers to be used with “YOUR SPEED” faceplate, after sign is mounted on pole.

radarsign TC-500S 20
Appendix A: Data that is saved in your sign
The Radarsign TC-500S saves data in three groups of memory:
Permanent Settings
This data is encrypted and can only be retrieved or reset at the Radarsign factory.
o Date of manufacture
o Ship Date
o Sign Serial Number
o Customer Name, Address
o Sign Password
o Total Vehicle Readings
o Total Display On Time
o Total PDA readings
o Sign Off Battery Threshold
User Settings
These settings are accessible and changeable using the RadarSign PDA program. You must know
the serial number of your sign and the password to change the settings.
o Time H:M:S
o Date MM/DD/YY Day of week
o Installation Date MM/DD/YY
o On/Off Time 1 Hour and Minutes, Day of Week
o On/Off Time 2 Hour and Minutes, Day of Week
o On/Off Time 3 Hour and Minutes, Day of Week
o On/Off Time 4 Hour and Minutes, Day of Week
o Radar Activity LED On / Off
o Min Speed Displayed 10-99 MPH
o Max Speed Indicator 10-99 MPH
o Speed Display Cutoff 10-99 MPH
o Display Off, On Continuous, On Fast Flash, On Slow Flash
o Test Test mode : Flashes Digit Count, LED intensity levels, flash
Speeds, overspeed example
StreetSmart™ Traffic Statistics Software
Vehicle data is stored in the sign for up to 60,000 vehicles. When the vehicle count exceeds
60,000 the sign continues to store new data and begins to discard the oldest data in favor of
newer data. The data can be retrieved by your PDA with the purchase of the optional
StreetSmart software. The vehicle records may then be transferred to a personal computer and

radarsign TC-500S 21
analyzed using any popular spreadsheet program. Vehicle data may only be retrieved by sign
owners that know their serial number and password and have purchased the optional software
package, StreetSmart™.
o Vehicle Number The RadarSign™ assigns a number to each vehicle that it detects.
o Date The Date that the vehicle was detected
o Time The Time that the vehicle was detected
o Peak Speed The peak speed for the detected vehicle
o Average Speed The average speed of the vehicle.
o Detect Counts The number of times a vehicle is detected while approaching
the Radarsign
o Lighting conditions Day vs. Night vs. overcast for auto-adjustment of LED intensity
o Temperature Records highest and lowest temperatures in the sign housing
o Battery Voltage Records current and historical Voltages of Batteries
o Solar Current Records current and historical Amperages

radarsign TC-500S 22
Appendix B: System Specifications
Description:
The Radarsign Model TC-500S is a self contained driver feedback system with built in K-Band radar
and digital speed indicator. This solar version of the sign is powered by internal batteries which
are charged by the included solar panel. The TC-500S series is designed with residential, school
zone, or other low speed, single lane areas. The speed display may be turned off for data
gathering purposes if you have selected the StreetSmart™ software as an option.
User Selectable Parameters:
System On/Off
Display On/Off
Display Brightness
Maximum Speed Cutoff of Display (helps prevent unwanted high speed clocking) 10-99 MPH
Date / Time Setting
Download (Beam) to PDA (password protected)
Data Collection System:
Data is collected by the internal microprocessor and is downloaded to PDA type devices as a text
file using a built in infrared port.
Recorded data: TIME, DATE, AVERAGE SPEED, PEAK SPEED, VEHICLE#, LIGHTING CONDITION,
SYSTEM STATUS (includes Battery Condition, Insolation Value, Temperature, Humidity)
Data Recording Format:
Palm Data Base (PDB) suitable for import into spread sheet programs for statistical analysis by
appropriate authorities.
Size and Weight:
The housing of the Radarsign™ is 15.8” high, 22.2” wide, and 5.25” deep. The AC model weighs
approximately 28 lbs. The TC-500S model, which includes two 18 amp deep cell batteries, weighs
approximately 48 lbs.
Sign:
T6061 Aluminum with retro reflective white surface / Black Letters (MUTCD standard colors)
Modular construction of Radar / Indicator assembly
LED Display behind GE LEXAN® vandal resistant cover
.375” thick aluminum Bashplate™ to reduce vandal damage and improve LED viewing by 10%
Automatic Night Dimming adjusts LED intensity to appropriate levels for darkness
Electronics Enclosure : Weather resistant aluminum
Solar Panel: The Model TC-500S has as standard a 40 watt solar panel to recharge the enclosed
batteries. The 40 watt solar panel is approximately 21” x 26” x 2”. An optional 60 watt panel is
available for geographies north of 45˚ Latitude that do not receive as much solar energy. The 60
watt panel is approximately 26” x 30” x 2”. Radarsign offers a side mount bracket for round poles.
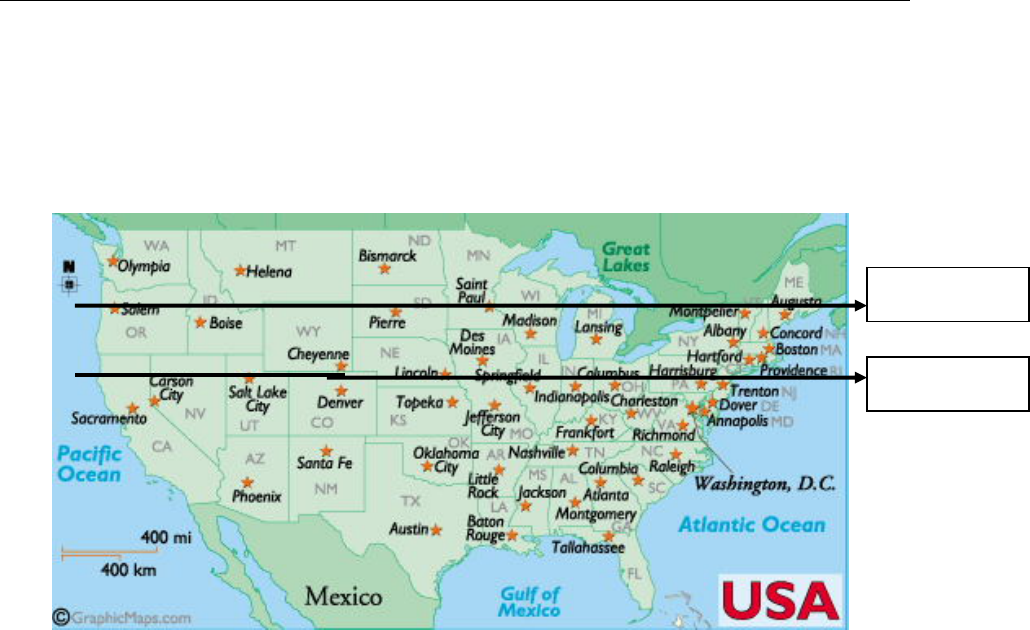
Support Bracket mounts are fixed at a 45° angle to provide the best results in locations that are
within the 38-52° latitude. See map below.
Operating Environment: -20F to +130F 5-95% Relative Humidity
radarsign TC-500S 23
US MAP
For Solar Model, the 60 watt solar panel upgrade is recommended for any installation North of
45° latitude. The 60 watt upgrade is optional for locations between 40° and 45° latitude.
TROUBLESHOOTING
40° Latitude
45° Latitude