Radio Shack 1501892T RF Remote Control Transmitter User Manual 15 1892 final indd
RadioShack Corporation RF Remote Control Transmitter 15 1892 final indd
User Manual
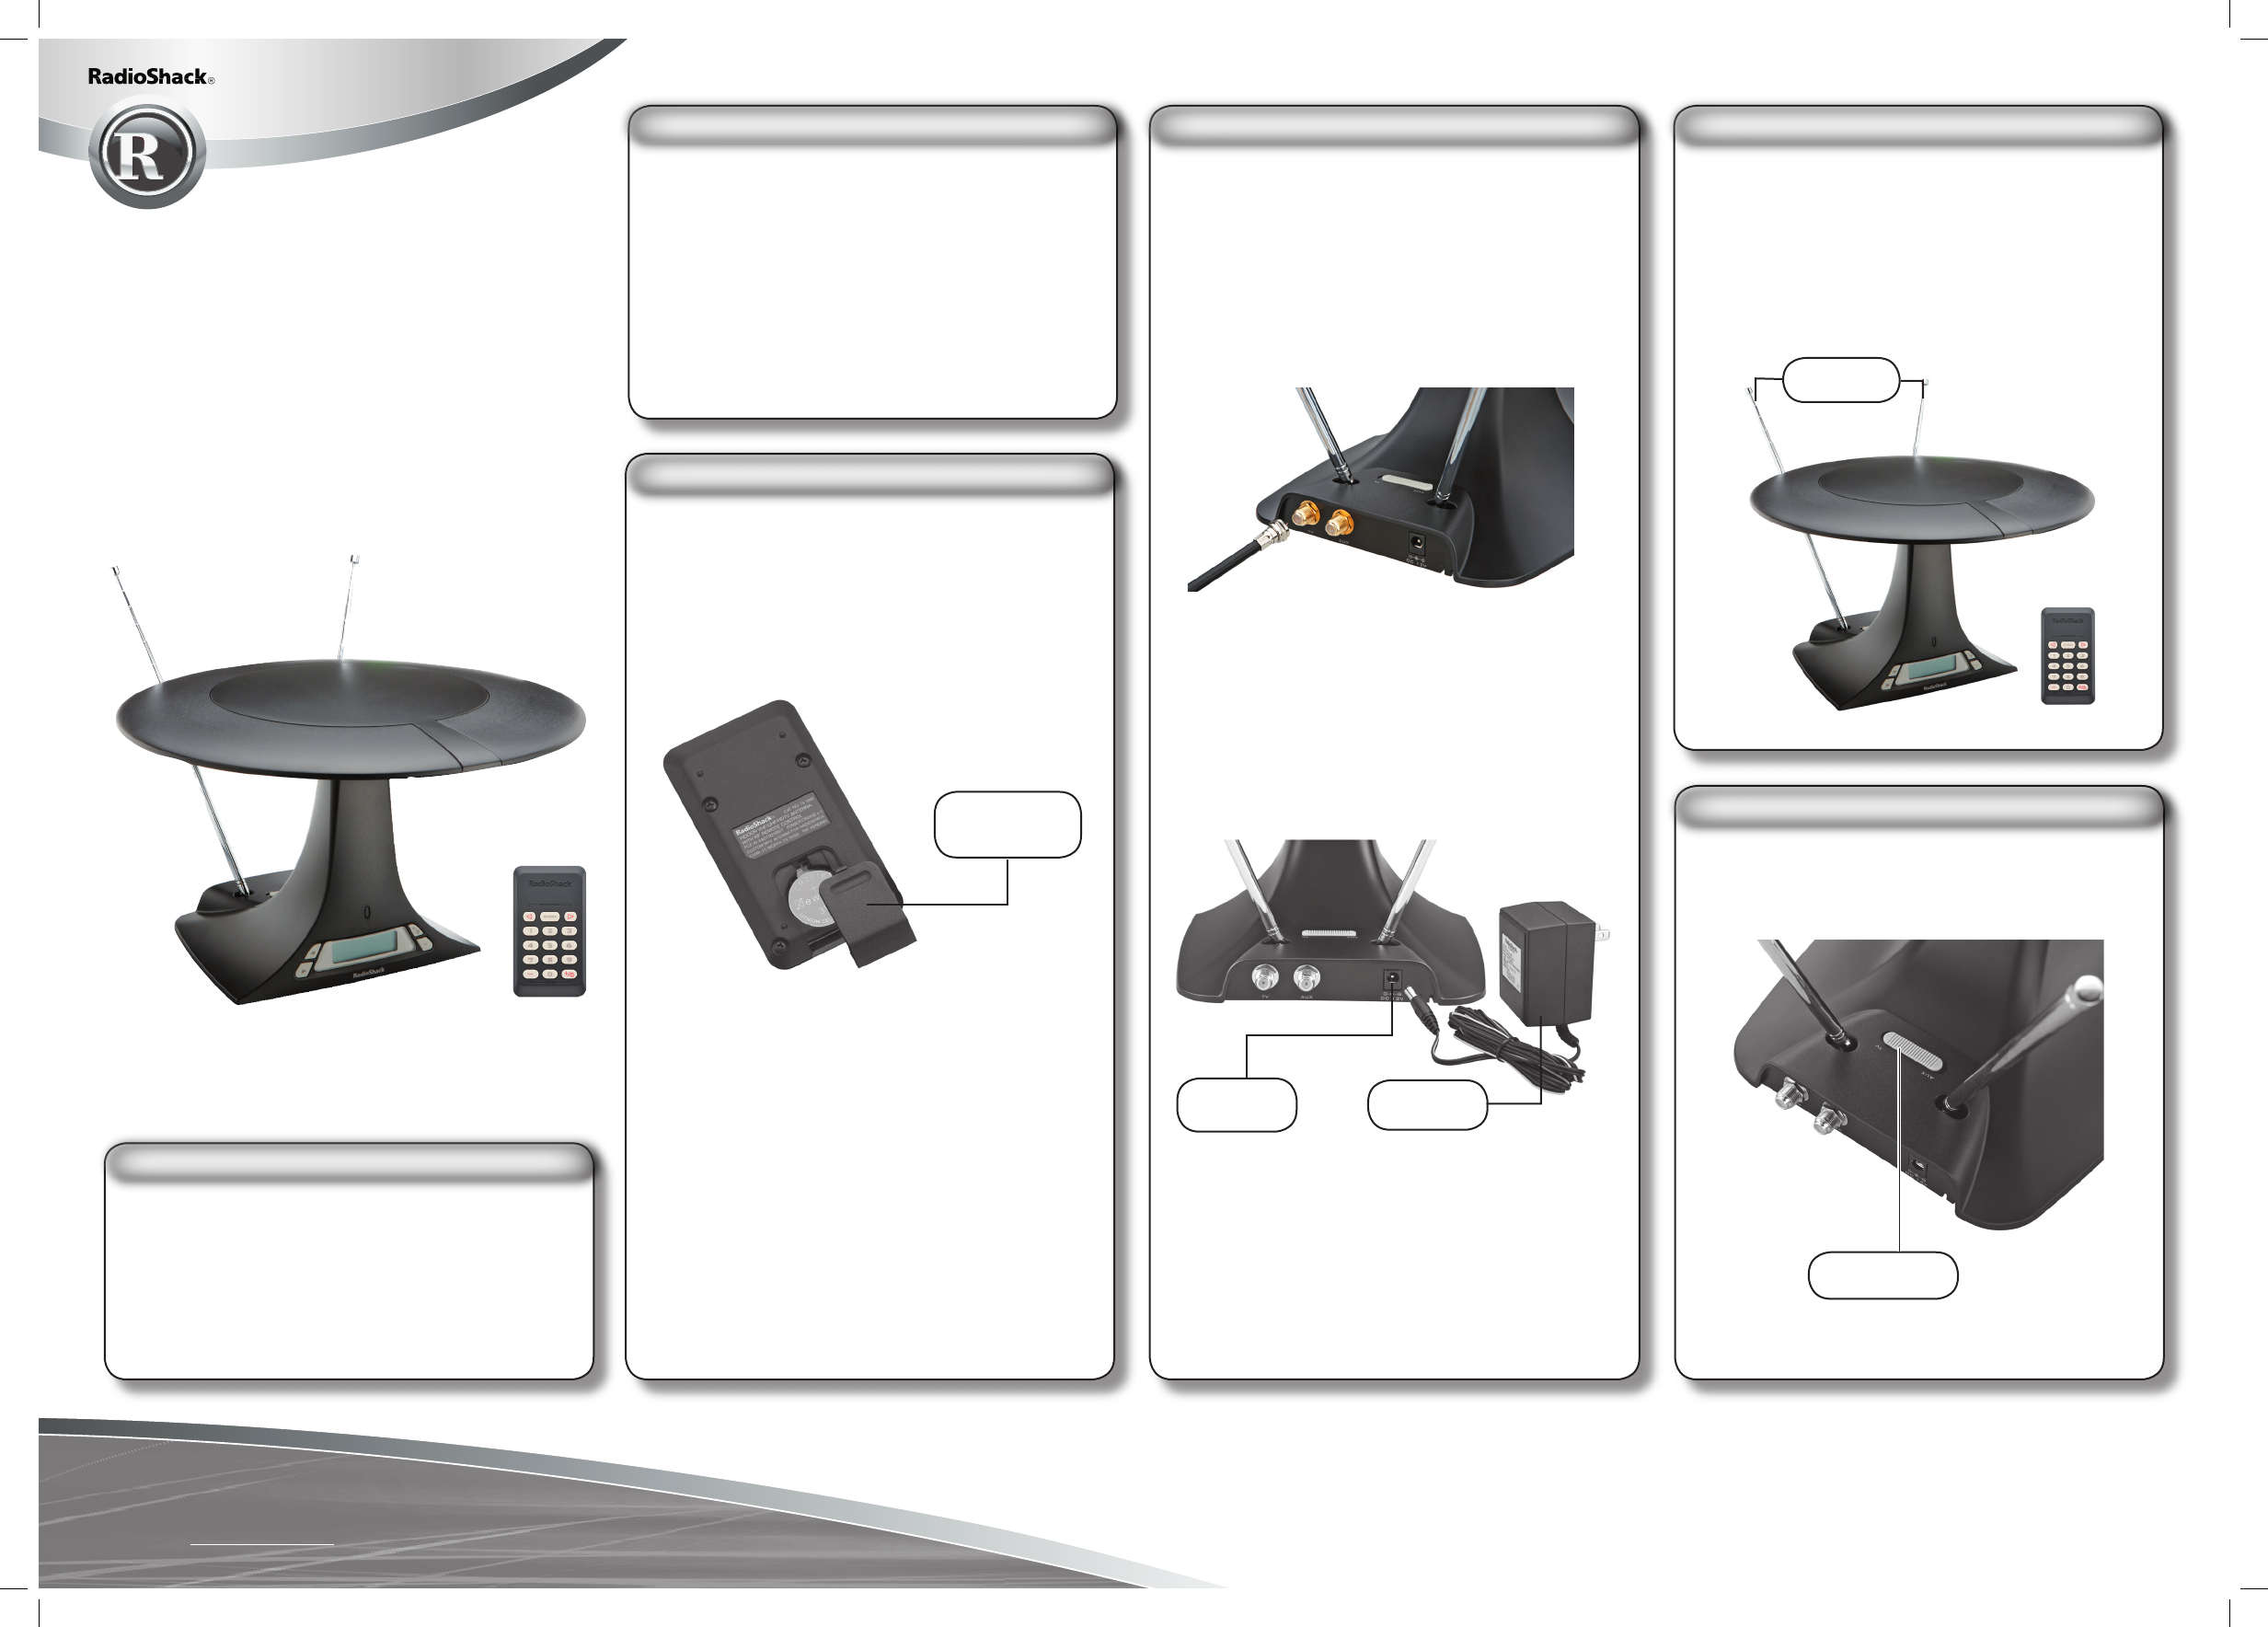
Your remote control is powered with a button-cell
battery (included), to install the battery:
1. Press and push open the battery compartment
cover.
2. Insert the CR2032 battery with positive polarity
(+) facing up into the remote control then
replace the cover.
battery notes
• Keep button-cell away from small children. If
swallowed, promptly see a doctor. Have the
doctor call 202-625-3333 collect.
• Do not open the battery; or dispose of it in a
fire; or recharge; or insert backwards. It may
explode or leak, causing personal injury.
• Use only fresh batteries of the required size and
recommended type.
• If you do not plan to use your remote control for
a week or more, remove the batteries. Batteries
can leak chemicals that can damage electronic
parts.
Please read this user’s guide before
installing, setting up and using your new product
www.radioshack.com
installing batteries
indoor VHF/UHF/HDTV antenna
remote control
75 Ohm coaxial cable with gold plated connectors
power adapter
1 button-cell battery
user’s guide
what’s included
Microprocessor-Controlled Antenna Rotating
Control – Allows you to rotate the antenna in 12
distinct positions only in a few seconds, either
clockwise or counterclockwise for best UHF
reception.
100 Channel Memories - Allows you to select
up to 100 channels (0-99) and the corresponding
antenna position stored for that channel.
Built-in Amplifier Gain Control – Allows you to
amplify weak signal.
other features
Thank you for purchasing the Indoor VHF/UHF/
HDTV Antenna with RF remote control from
RadioShack. Your antenna is perfect for improving
TV reception. You can retrieve stored channel
position with the RF remote control by simply
recalling one of the channel memories. Your
antenna will automatically move to the direction
you programmed for best reception.
For VHF TV Channels 2-6 and FM radio:
• Fully extend the telescopic antenna.
For VHF TV Channels 7-13:
• Retract the antenna to the appropriate length
and move to an angle that produces the best
reception
adjusting your antenna
15-1892
indoor VHF/UHF/HDTV antenna
with RF remote control
To select a second video source, such as cable TV,
a video game, or satellite dish signal, slide “AUX/
TV” switch to “AUX”.
selecting another source
battery
compartment cover
AUX/TV switch
Perfect for improving TV reception, this indoor
antenna boosts the best received signals to your
TV, so you can enjoy the best picture. You can also
use this antenna to improve FM radio reception
installing your antenna
1. Place the antenna on or near your TV set.
2. Connect the antenna’s TV output cable to your
TV’s or VCR’s input terminal.
3. Connect a second video source, if available,
to the AUX terminal using the 75 ohm coaxial
cable/connector.
4. Connect the supplied AC adapter’s barrel plug
into the DC jack on the back of the indoor
antenna, and connect the AC adapter’s other
end to a standard AC outlet.
CAUTION
You must use an adapter that supplies 12V DC
and delivers at least 350 mA. Its center tip must
be set to positive and its plug must fit this indoor
antenna’s jack. The supplied adapter meets these
specifications. Using an adapter that does not
meet these specifications could damage the
indoor antenna or the plug.
installing the antenna
DC 12V jack AC-DC adaptor
Antennas
©2005. RadioShack Corporation.
All rights reserved. RadioShack and
RadioShack.com are trademarks
used by RadioShack Corporation.
15-1892
08A05
Printed in China
P/N:AO0239AAA1
Frequency Range ................................VHF(54-214MHz)
......................................................... UHF (470-806MHz)
Gain Control ......................... 22dB Min for Level 3 gain
.............................................. 18dB Min for Level 2 gain
.............................................. 13dB Min for Level 1 gain
Power Supply ..........................................12V @ 350mA
AUX to TV Insertion Loss .............VHF/UHF 3.0dB Max
AUX/TV Isolation .............................VHF/UHF 30dB Min
Front to Back Ratio ............................................8dB Min
Weight ..................................................................1.04kg
Base unit Dimensions (W x D x H) .. 320x 320x 206 mm
Remote Control Dimensions (WxDxH)
...........................................................48 x 86 x 10.7 mm
Specifications are typical and individual units may vary.
Specifcations are subject to change and improvement without
notice. Actual product may very from the images found in this
document.
specifications
Warning: Changes or modifications to this unit not
expressly approved by the party responsible for
compliance could void the user’s authority to operate
the equipment.
This equipment has been tested and found to comply
with the limits for a Class B digital device, pursuant
to Part 15 of the FCC Rules. These limits are designed
to provide reasonable protection against harmful
interference in a residential installation. This equipment
generates, uses, and can radiate radio frequency
energy and, if not installed and used in accordance
with the instructions, may cause harmful interference
to radio communications. However, there is no
guarantee that interference will not occur in a particular
installation. If this equipment does cause harmful
interference to radio or television reception, which can
be determined by turning the equipment off and on, the
user is encouraged to try to correct the interference by
one or more of the following measures:
• Reorient or relocate the receiving antenna.
• Increase the separation between the equipment and
receiver.
• Connect the equipment into an outlet on a
circuit different from that to which the receiver is
connected.
Consult your local RadioShack store or an experienced
radio/TV technician for help.
If you cannot eliminate the interference, the FCC
requires that you stop using your microphone system.
Changes or modifications not expressly approved by
RadioShack may cause interference and void the user’s
authority to operate the equipment.
This device complies with Part 15 of the FCC Rules.
Operation is subject to the following two conditions: (1)
This device may not cause harmful interference, and
(2) This device must accept any interference received,
including interference that may cause undesired
operation.
the FCC wants you to know
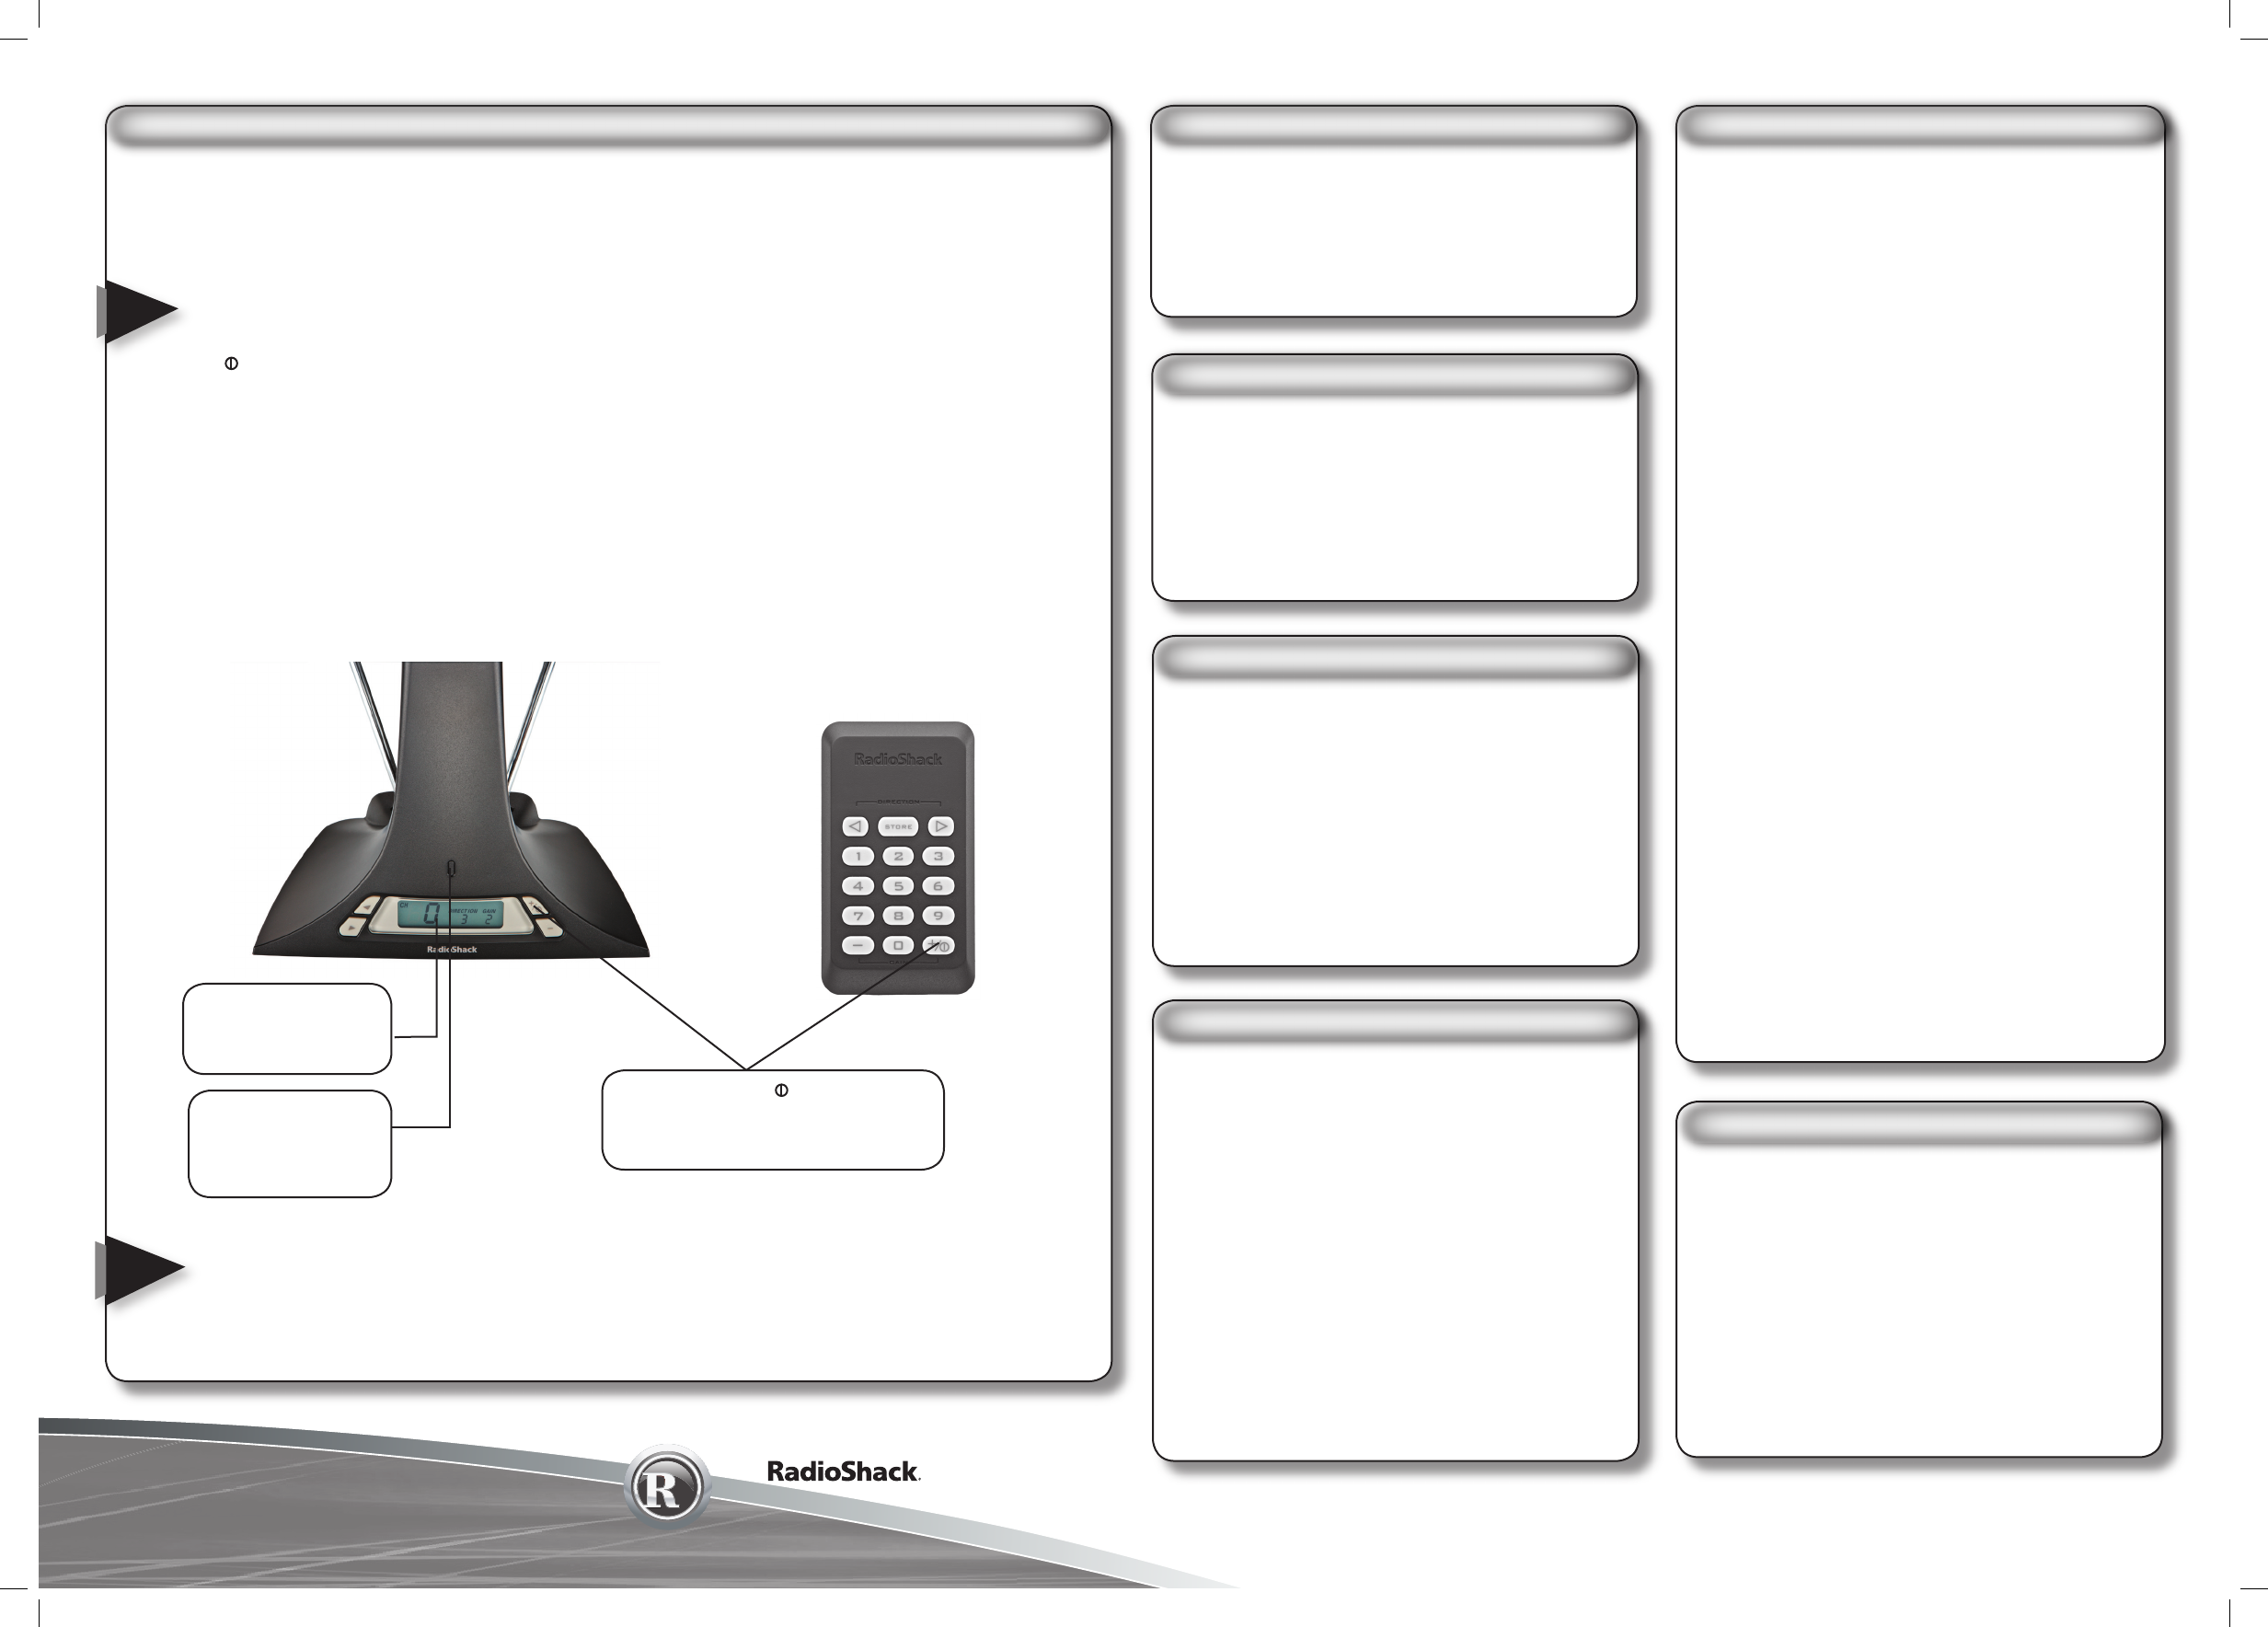
This will clear all the memory and restore to
factory default setting:
1. Make sure the DC power adapter is unplugged.
2. Press and hold - on the antenna base.
3. Plug in the DC power adapter
4. Default CH 0, Direction 5 and Gain 3 should be
shown.
restoring factory default setting
Keep the antenna dry; if it gets wet, wipe it dry
immediately. Use and store the antenna only
in normal temperature environments. Handle
the antenna carefully; do not drop it. Keep the
antenna away from dust and dirt, and wipe it with
a damp cloth occasionally to keep it looking new.
Modifying or tampering with the antenna’s
internal components can cause a malfunction and
might invalidate its warranty. If your antenna is
not performing as it should, take it to your local
RadioShack store for assistance.
care and maintenance
The antenna can store up to 100 antenna channels, keyed to channels 0 through 99.
Follow these steps to preset a new antenna direction to a channel memory:
1. There are 12 antenna directions available (1 to 12). Position the antenna by pressing ± or ² to obtain the
best reception. When connected to a HDTV, adjust the antenna to where the signal strength display on
the HDTV tuner indicates the best signal level.
It takes several seconds for the HDTV tuner to stabilize and produce the best pictures.
2. Press +/ or - to select one of the three gain levels.
There are three available gain levels you may select manually or with the remote:
Set “GAIN” to “3” for weak or distant stations.
Set “GAIN” to “2” for most stations.
Set “GAIN” to “1” for strong or nearby stations, or when you are not using the antenna.
3. Press and hold STORE until CH indicators flashing.
4. Select a channel (same as your TV’s channel) to store the antenna direction and gain level by pressing
a number between 0 and 99 on the remote, e.g. Press 00 to select channel 0; 01 to select channel 1,
etc.
5. Press STORE to save the antenna direction, the gain level and the channel number. Once the channel is
saved, the indicators will stop flashing to indicate the end of preset mode.
• If no key is pressed within 30 seconds after the indicators start flashing, the preset mode
will end automatically.
• Under normal operation, the motor gear-box will generate noise when the internal antenna
element is moving to a new direction.
adjusting your antenna
+/
Press and hold to turn off the LCD and
backlight. To turn it on, press it again.
NOTES
LED indication
The LED flashes when
RF remote data is
received successfully.
LCD display
indicates the antenna
direction and status.
NOTE
You can recall the antenna direction and the gain
level previously saved:
Press a channel number between 0 and 99. The
antenna will rotate to the selected direction. If
there is no previously- stored channel, the default
setting is “Direction 5” and “Gain 3”.
recalling the stored antenna angle
This product is warranted by RadioShack against manufacturing defects in
material and workmanship under normal use for ninety (90) days from the
date of purchase from RadioShack company-owned stores and authorized
RadioShack franchisees and dealers. For complete warranty details and
exclusions, check with your local RadioShack store.
RadioShack Customer Relations
300 RadioShack Circle, Fort Worth, TX 76102
04/04
limited 90-day warranty