Radio Shack 1900903 GMRS handheld transceiver User Manual www RadioShack with In Line CircleR eps
RadioShack Corporation GMRS handheld transceiver www RadioShack with In Line CircleR eps
Contents
- 1. users manual
- 2. Revised user manual
Revised user manual
© 2001 RadioShack Corporation. All Rights Reserved.
RadioShack and RadioShack.com are trademarks
used by RadioShack Corporation.
OWNER’S MANUAL — Please read before using this equipment.
5W 15 Channel 2-Way GMRS Radio
Your RadioShack 5W Compact GMRS
Handheld Transceiver is a portable,
two-way, General Mobile Radio
Service (GMRS) transceiver that you
can carry almost anywhere. It meets
commercial-grade standards for clear
and reliable communication. The
transceiver has fifteen operation
channels — seven GMRS channels,
one emergency channel, seven
interstitial channels, and ten weather
channels with alert.
38 Quiet-Tone CTCSS (Continuous
Tone Control Squelch System) —
helps reduce interference from other
systems in the area operating on the
same frequency.
Built-in Modulation Limiter Circuit
— automatically adjusts for a wide
range of voice levels to ensure an
effective transmission.
High/Low Power — saves power by
choosing a suitable transmitting power
for different ranges.
Flexible Antenna with BNC
Connector — provides excellent
reception and is easy to attach and
remove, so you can use an external
antenna to extend the range and
performance.
Splash Proof (JIS Level 4) — offers
water resistance.
FCC INFORMATION
FCC License Required
Warning: There is a penalty for any
unlicensed operation of a GMRS radio.
The Federal Communications Commission
(FCC) requires you to have a GMRS
license before you operate this transceiver.
To obtain a license, you must be at least 18
years of age, and cannot be a
representative of a foreign government.
You must complete FCC Forms 605 and
159 (Fee Remittance Advice) and return
them with the applicable fees and Payment/
Fee Type Code (PAZR) to the FCC. To
obtain the necessary forms, contact the
FCC at:
Federal Communications Commission
Wireless Bureau Applications
P.O. Box 358130
Pittsburgh, PA 15251-5130
1-888-CALLFCC (1-888-225-5322)
To obtain instructions on filing form 605
electronically, go to
http://www.fcc.gov.wtb/
uls
.
This radio is intended for communications
from base-to-mobile or mobile-to-mobile
stations. Base-to-base communication is
not permitted.
19-903.fm Page 1 Wednesday, September 5, 2001 4:30 PM
2
When you receive your license from the
FCC, you are assigned a call sign. You
must give your call sign at the end of every
communication exchange or once every 15
minutes during a continuous
communication.
We recommend you record the radio’s
serial number and your call sign in the
space provided, and keep this manual and
a copy of your GMRS license with your
important records. The serial number is on
the transceiver’s back panel.
Serial Number
Call Sign
The Personal Radio Steering Group
(PRSG) is the national user-advocacy
organization for the GMRS. The PRSG
provides assistance with licensing and
other information about the GMRS,
including how to contact and communicate
with other GMRS licensees.
Personal Radio Steering Group
P.O. Box 2851
Ann Arbor, MI. 48106
www.provide.net/
~
prsg/
Your RadioShack radio
generates RF
electromagnetic energy
during transmit mode.
This radio is designed for
and classified as “
Occupational Use
Only
”, meaning it must be used only
during the course of employment by
individuals aware of the hazards, and
the ways to minimize such hazards. This
radio is
NOT
intended for use by the
“General Population” in an uncontrolled
environment.
This radio has been tested and complies
with the FCC RF exposure limits for
“Occupational Use Only.” In addition, your
RadioShack radio complies with the
following Standards and Guidelines with
regard to RF energy and electromagnetic
energy levels and evaluation of such levels
for exposure to humans:
• FCC OET Bulletin 65 Edition 01-01
Supplement C, Evaluating Compliance
with FCC Guidelines for Human
Exposure to Radio Frequency
Electromagnetic Fields.
• American National Standards Institute
(ANSI) (C95.1—1992), IEEE Standard
for Safety Levels with Respect to
Human Exposure to Radio Frequency
Electromagnetic Fields, 3 kHz to 300
GHz.
• American National Standards Institute
(C95.3—1999), IEEE Recommended
Practice for the Measurements of
Potentially Hazardous
Electromagnetic Fields — RF and
Microwave.
To ensure that your
exposure to RF
electromagnetic energy is
within the FCC allowable
limits for occupational
use, always adhere to the following
guidelines:
DO NOT operate the radio without a proper
antenna attached, as this may damage the
radio and may also cause you to exceed
FCC RF exposure limits. A proper antenna
is the antenna supplied with the radio by the
manufacturer or an antenna specifically
SAFETY TRAINING
INFORMATION
WARNING
CAUTION
!
19-903.fm Page 2 Wednesday, September 5, 2001 4:30 PM
3
authorized by the manufacturer for use with
this radio.
DO NOT transmit for more than 50% of total
radio use time (“50% duty cycle”).
Transmitting more than 50% of the time can
cause FCC RF exposure compliance
requirements to be exceeded. The radio is
transmitting when 7;
7;7;
7; appears on the LCD.
ALWAYS keep the antenna at least 1cm
(1/2 inch) away from the body when
transmitting and only use the belt-clip
supplied with your radio when attaching the
radio to your belt, etc., to ensure FCC RF
exposure compliance requirements are not
exceeded. To provide the recipients of your
transmission the best sound quality, hold
the antenna at least 2.5 cm (1 inch) from
your mouth.
USE ONLY RadioShack authorized
accessories (speaker/microphones,
handstraps, etc.) with your radio. Use of
unauthorized accessories can cause the
FCC RF exposure compliance
requirements to be exceeded.
The information listed above provides
the user with the information needed to
make him or her aware of RF exposure,
and what to do to assure that this radio
operates within the FCC RF exposure
limits of the radio.
ELECTROMAGNETIC
INTERFERENCE/COMPATIBILITY
During transmissions, your RadioShack
radio generates RF energy that can
possibly cause interference with other
devices or systems. To avoid such
interference, turn off the radio in areas
where signs are posted to do so. DO NOT
operate the transmitter in areas
sensitive to electromagnetic radiation,
such as hospitals, aircraft, and blasting
sites.
IMPORTANT CAUTIONS:
• NEVER hold the transceiver so that
the antenna is very close to, or
touching exposed parts of the body
while transmitting. The transceiver will
perform best if the microphone is 2.5–
5 cm (1 to 2 inches) away from the
mouth and the transceiver is vertical.
• If you wear the radio on your body,
ensure that the antenna is at least 1
centimeter (1/2 inch) from your body
when transmitting.
• DO NOT push the PTT when not
actually desiring to transmit.
19-903.fm Page 3 Wednesday, September 5, 2001 4:30 PM
4
ˆ
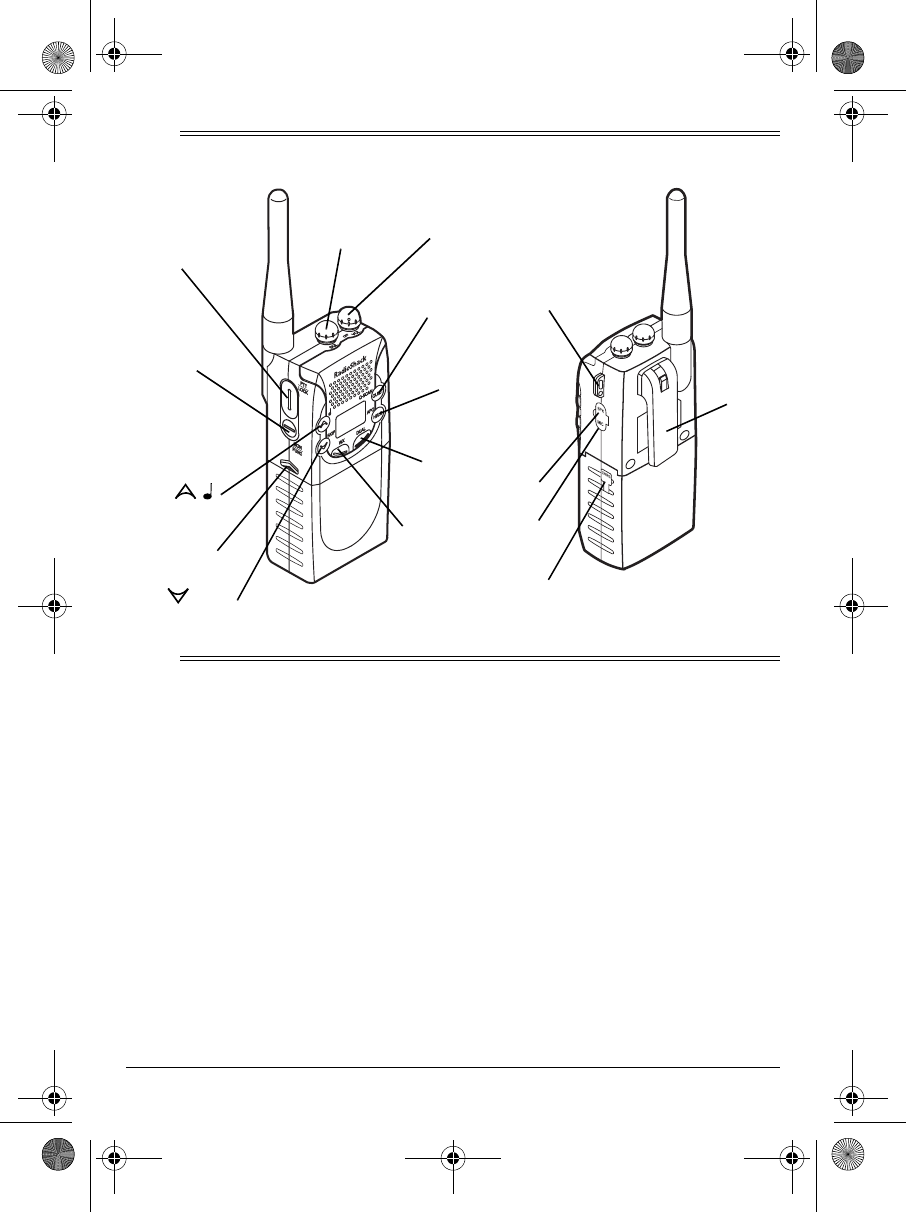
A Quick Look at Your Radio
ˆ
Preparation
CHARGING THE
BATTERY PACK
Your transceiver comes with a 8.4V,
1300mAH NiMH battery pack for
power. Before you use the battery
pack for the first time, you must use
the supplied battery charger to charge
it for about 14–16 hours. Once it is fully
charged, the battery pack provides
power to your transceiver for about 11
hours when you set the transmission
power to low, and about 5 hours when
you set the power to high.
You cannot use the transceiver while
you charge the battery pack.
Caution: The supplied battery charger
was designed specifically for your
transceiver. Use only the supplied
battery charger.
1. If necessary, turn OFF/VOL to OFF.
2. Pull out the rubber CHRG cover on
the side of the transceiver and
insert the charger’s barrel plug
into the jack. Then plug the other
PTT/
LOCK
MON/
FUNC
Battery
Release
WX
DUAL
APO/
HI/LO
Q-SCAN/
QUIET
SQL
VOL/
OFF
MIC
CHRG
Handstrap
Hole
Belt
Clip
SPK
/
/SKIP
19-903.fm Page 4 Wednesday, September 5, 2001 4:30 PM
5
end of the charger into a standard
AC outlet.
When appears, recharge the
battery pack.
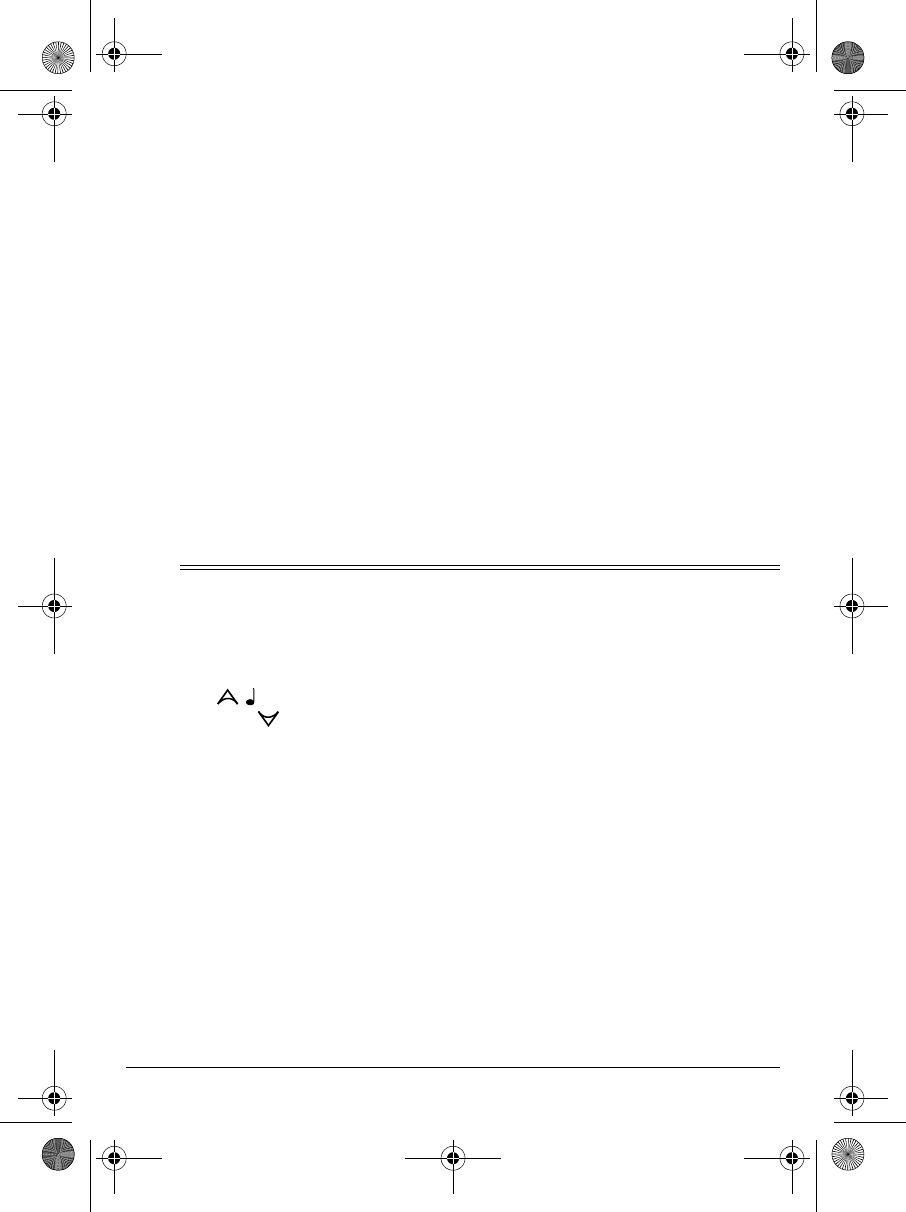
To detach the battery pack, push up
the arrow key on the side of the
transceiver, then slide the battery pack
away from the arrow key.
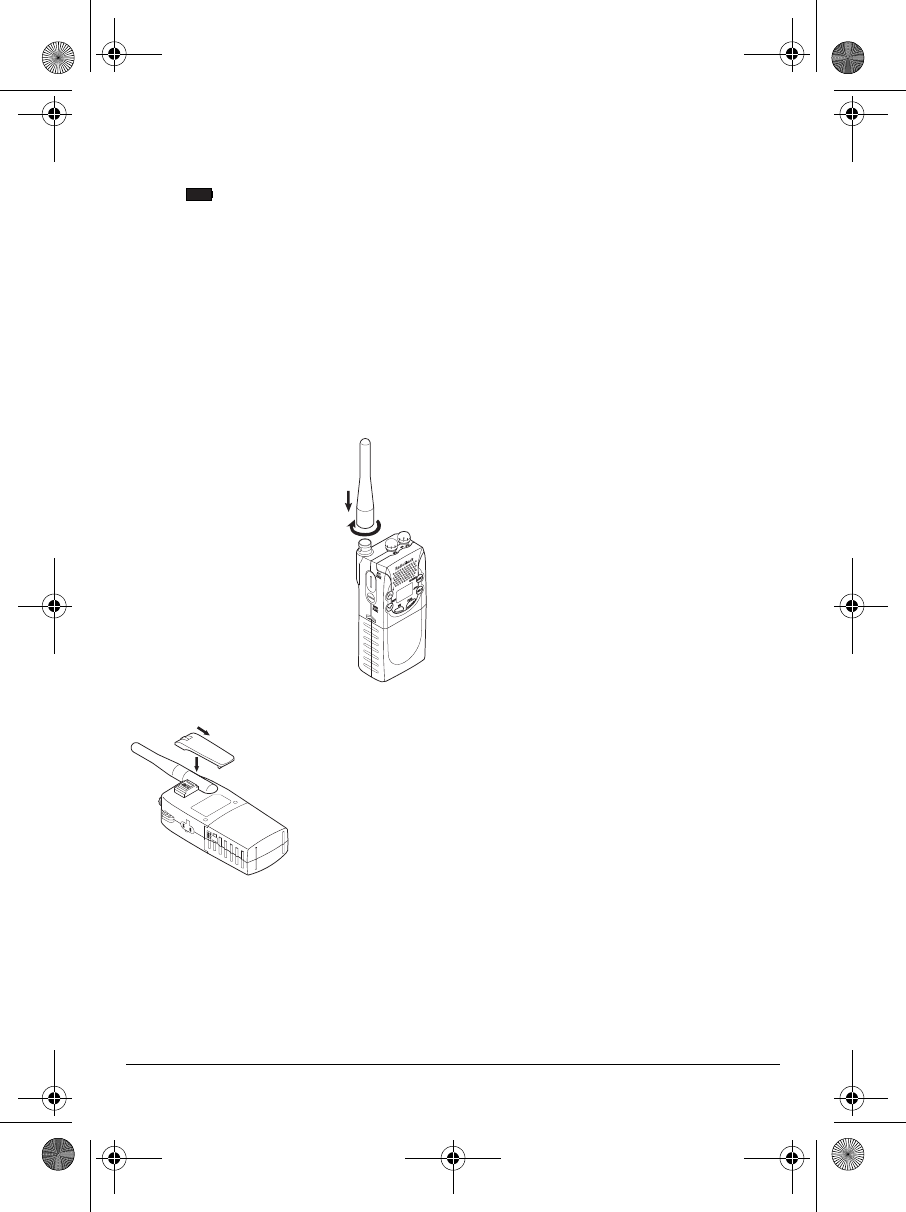
CONNECTING THE
ANTENNA
Align the slots around
the antenna’s connector
with the tabs on the
antenna jack. Press the
antenna down over the
jack and turn the
antenna’s base
clockwise until it locks
into place.
USING THE
BELT CLIP
The supplied
belt clip lets you
easily attach the
transceiver to
your belt.
To attach the
belt clip, slide
the belt clip down onto the plastic tab.
To detach the belt clip, lift up the tab
and slide off the clip.
Using an External Speaker/
Microphone
An external speaker/microphone lets
you use the transceiver while it is
clipped to your belt, without lifting it to
your mouth to transmit. Lift up the
rubber cover on the MIC and SPK
jacks. Connect an optional speaker/
microphone with a 3/32 inch mini-plug
and a 1/8 inch plug to the MIC and SPK
jacks on the side of the transceiver.
This automatically disconnects the
transceiver’s built-in speaker and
microphone.
CONNECTING AN
EARPHONE/EXTERNAL
SPEAKER
To listen privately (or to hear more
clearly in a noisy area such as a
warehouse) you can connect an
earphone or an external speaker. Lift
the rubber cover off the MIC and SPK
jacks on the side of the transceiver,
then plug an optional earphone or
external speaker with a 1/8 inch plug
into the SPK jack. This automatically
disconnects the built-in speaker.
Listening Safely
To protect your hearing, follow these
guidelines when you use an earphone.
• Set the volume to the lowest
setting before you begin listening.
After you begin listening, adjust
the volume to a comfortable level.
19-903.fm Page 5 Wednesday, September 5, 2001 4:30 PM
6
• Do not listen at extremely high
volume levels. Extended high
volume listening can lead to
permanent hearing loss.
• Once you set the volume, do not
increase it. Over time, your ears
adapt to the volume level, so a
volume level that does not cause
discomfort might still damage your
hearing.
Traffic Safety
Do not use an earphone with your
transceiver when operating a motor
vehicle or riding a bicycle in or near
traffic. Doing so can create a traffic
hazard and could be illegal in some
areas.
Even though some earphones let you
hear some outside sounds when
listening at normal volume levels, they
can still present a traffic hazard.
USING AN OPTIONAL
HANDSTRAP
You can attach an optional handstrap
(not supplied) to the transceiver. Snap
the clip onto the hole at the side of the
transceiver. Or, slide the hand strap’s
small loop under the hole at the side of
the transceiver. Then pull the strap’s
large loop through the small loop.
ˆ
Operation
Rotate OFF/VOL to turn the transceiver
on and off and adjust the volume.
Hold down / to scan up through
the channels, or /SKIP to scan down
through the channels.
Set QUIET/Q-SCAN to the desired code
to provide greater communication
flexibility. See “Using Quiet Codes” on
Page 7.
If you did not set the transceiver to use
a quiet code, wait until there is no
signal on the channel. Then turn SQL
clockwise until the background noise
between signals stops.
To transmit, hold down LOCK/PTT.
Then hold the transceiver about 3
inches from your mouth and speak
slowly in a normal voice. 7;
7;7;
7; appears.
Release LOCK/PTT when you finish
your transmission.
To receive, release LOCK/PTT. %86<
%86<%86<
%86<
appears when a call is received.
Hold down MON/FUNC to hear
everything on a channel, even weak
transmissions. )81&
)81&)81&
)81& appears. Release
MON/FUNC to turn squelch back on.
The display’s backlight lights for 5
seconds when you press any key
except LOCK/PTT. If you want to turn
on the backlight without changing the
19-903.fm Page 6 Wednesday, September 5, 2001 4:30 PM
7
transceiver’s setting (except in Dual
Watch mode), press MON/FUNC.
SELECTING AN
OPERATION CHANNEL
Your transceiver has fifteen operation
channels.
To manually select a channel
, press
/ or /
SKIP. The selected
channel number appears.
To scan through the channels
, hold
down / or /SKIP until 6&$1
6&$16&$1
6&$1
appears. The transceiver automatically
scans through the channels and
pauses on each active channel. Press
/ or /
SKIP to change direction.
Press any key other than / or /
SKIP to stop scanning.
To skip a channel to be scanned
,
press / or /SKIP to select the
desired channel. Hold down MON/
FUNC then press /SKIP. appears.
To resume scanning the skipped
channel
, select the skipped channel,
hold down MON/FUNC then press
/SKIP. disappears.
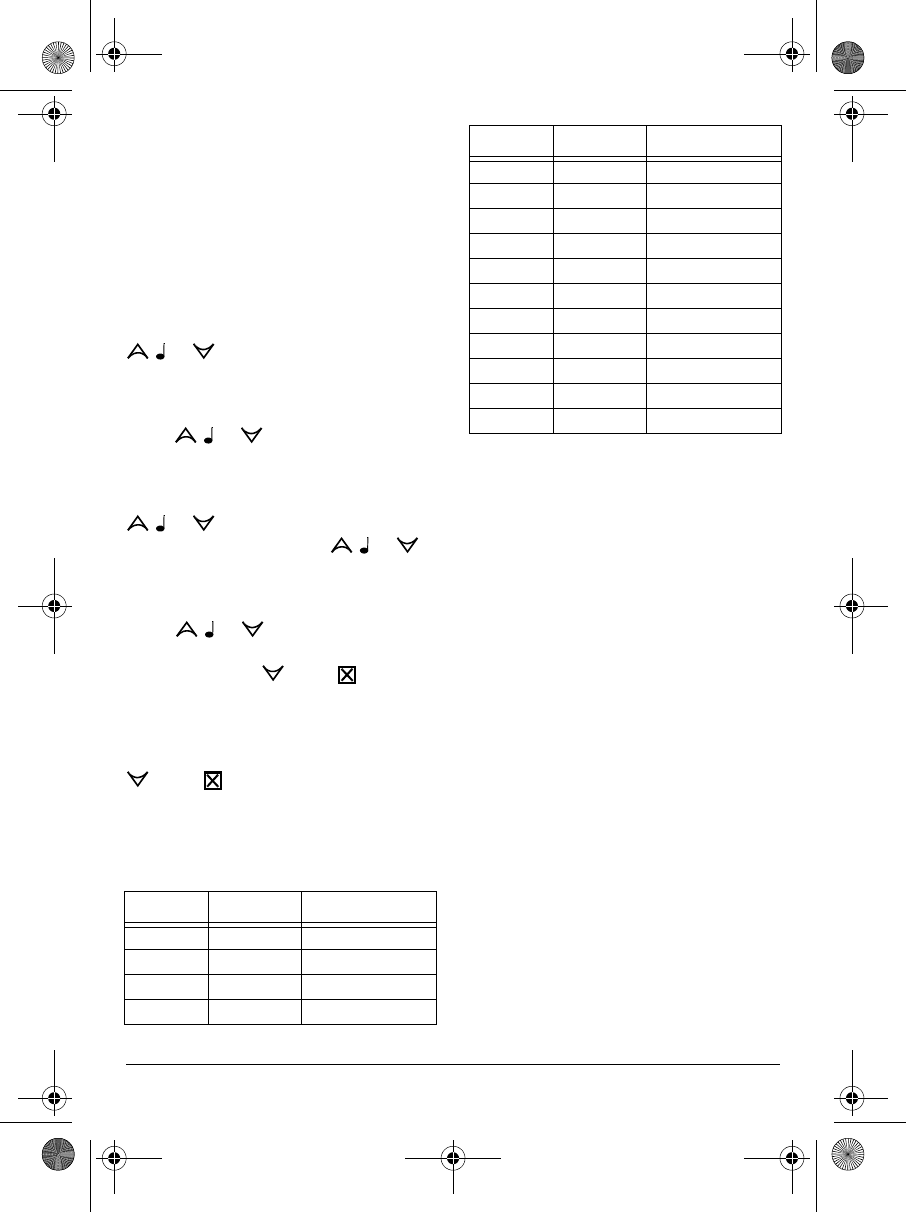
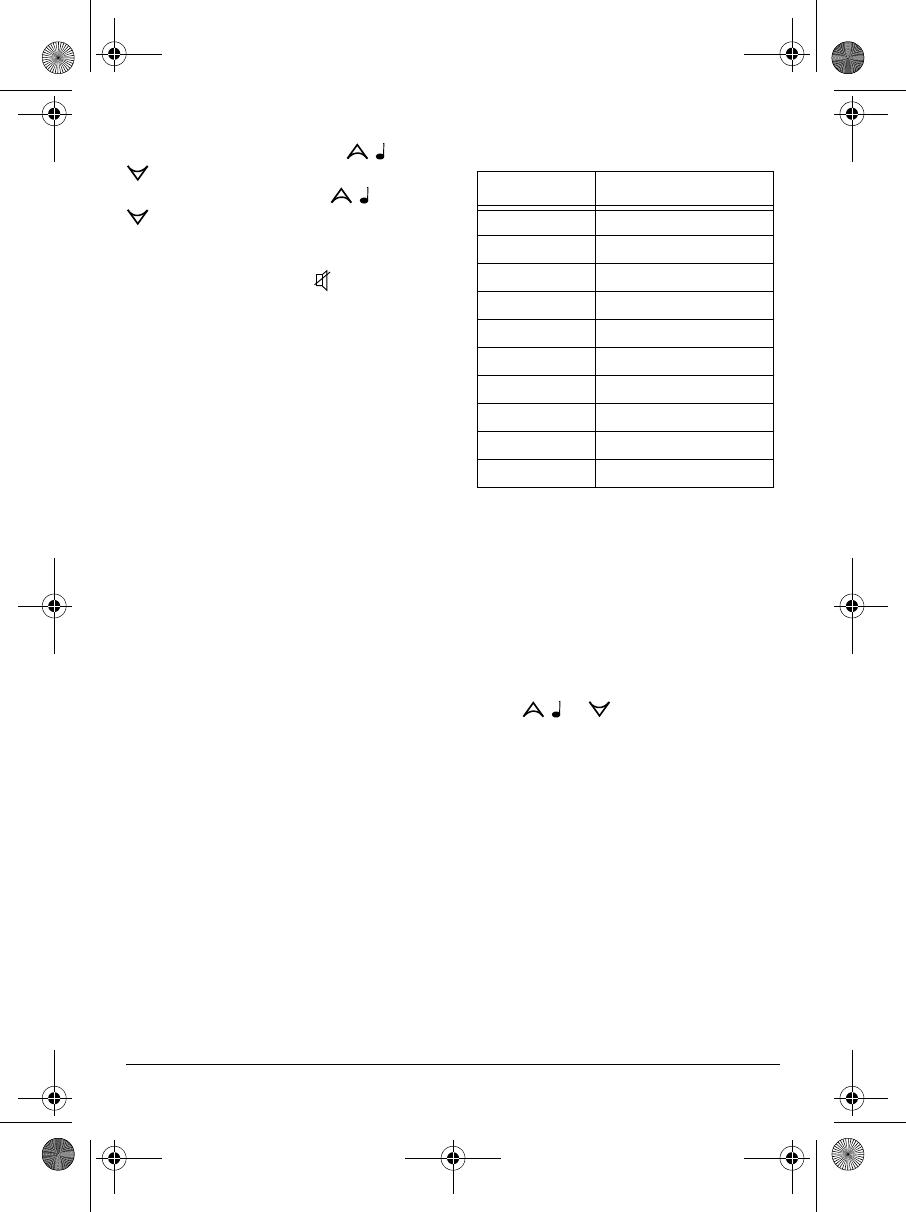
Operation Channel
Frequency
USING QUIET CODES
Quiet codes help eliminate
interference between different users
on the same frequency, letting you talk
and listen to people who are using
other transceivers set to the same
frequency and quiet code. This is like
having a channel within a channel,
giving you greater communication
flexibility. When you set a quiet code
(there are 38 to choose from), the
transceiver transmits a tone with your
transmission, letting you communicate
with anyone who has a transceiver set
to the same frequency and code. The
tone is too low for you to hear, but
other transceivers can detect it.
If Quiet Code is turned on and set to
the same tone on the receiving
transceiver, it only receives those
transmissions that include the tone. If
two different groups operate
transceivers in the same area on the
same frequency, they do not hear each
Channel # Channel Frequency (MHz)
0 Emergency 462.6750
1 Interstitial 1 462.5625
2 Interstitial 2 462.5875
3 Interstitial 3 462.6125
4 Interstitial 4 462.6375
5 Interstitial 5 462.6625
6 Interstitial 6 462.6875
7 Interstitial 7 462.7125
8 GMRS 1 462.5500
9 GMRS 2 462.5750
10 GMRS 3 462.6000
11 GMRS 4 462.6250
12 GMRS 5 462.6500
13 GMRS 6 462.7000
14 GMRS 7 462.7250
Channel # Channel Frequency (MHz)
19-903.fm Page 7 Wednesday, September 5, 2001 4:30 PM
8
other’s broadcasts if they both use a
different quiet code.
Press QUIET/Q-SCAN to turn Quiet
Code on or off. 48,(7
48,(748,(7
48,(7 appears when the
feature is on.
Setting a Quiet Code
Hold down QUIET/Q-SCAN until 48,(7
48,(748,(7
48,(7
and the quiet code flashes.
Repeatedly press / or /SKIP to
select the desired code. (See the
“Quiet Codes” chart.)
Press QUIET/Q-SCAN to store the code.
Note: We recommend that you select
a quiet code in the 7–30 range. If you
select a code below or above that
range, hold down LOCK/PTT, then wait
briefly before you start talking.
Using Quiet Code Scan
Press QUIET/Q-SCAN to turn on Quiet
Code. 48,(7
48,(748,(7
48,(7 and the quiet code
appear. Hold down MON/FUNC then
press QUIET/Q-SCAN. 6&$1
6&$16&$1
6&$1 appears.
When matching with an appropriate
quiet code, the transceiver stops
scanning and 48,(7
48,(748,(7
48,(7 flashes. The
transceiver goes on scanning after the
signal disappears. Press any key other
than QUIET/Q-SCAN to stop scanning.
The transceiver stays on the quiet
code just scanned.
Note: If you press QUIET/Q-SCAN to
stop scanning, the transceiver stays on
the preset quiet code.
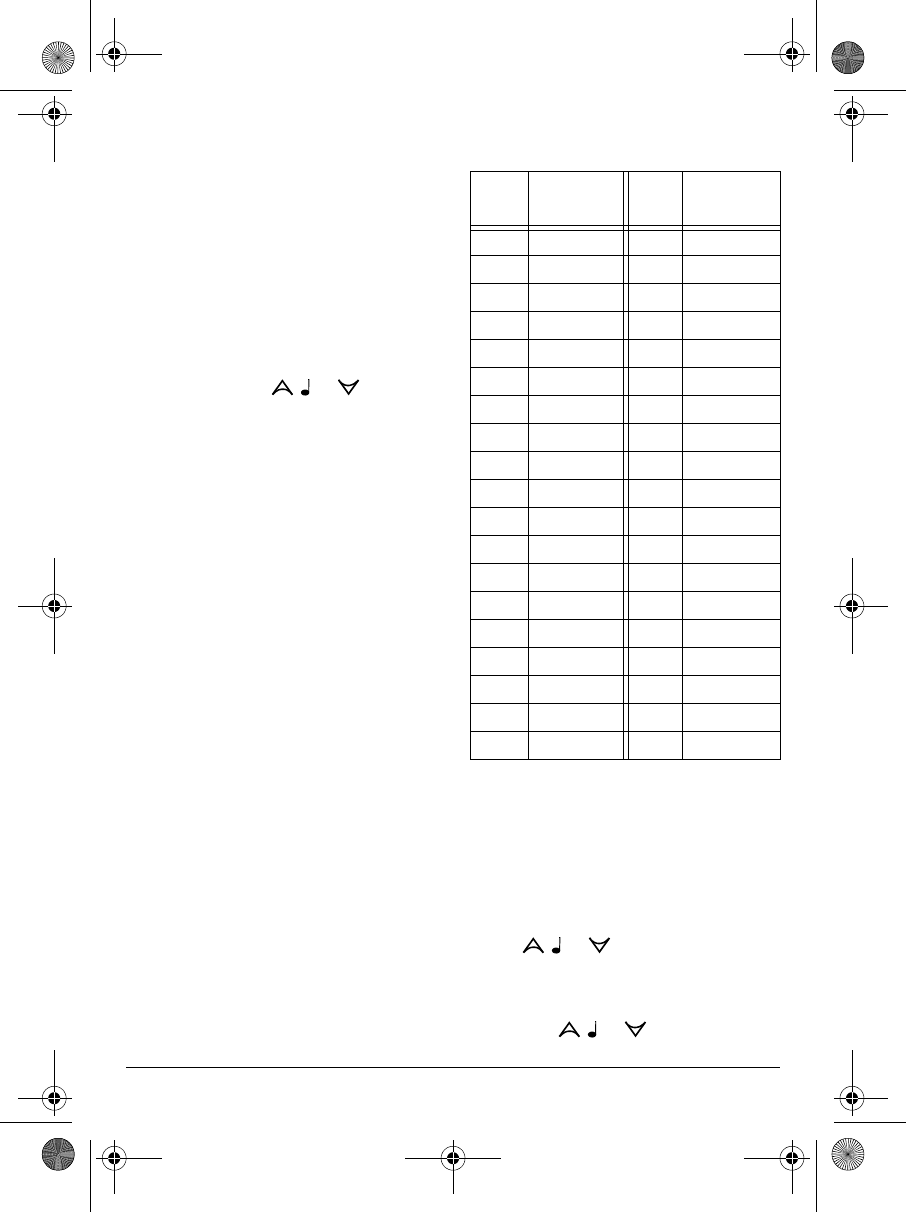
Quiet Codes
USING THE WEATHER
RADIO
Press WX to turn the weather radio on
or off. :;
:;:;
:; appears when the weather
radio is on.
Press / or /SKIP to manually
select the weather channel.
To scan through the weather channels,
hold down / or /SKIP
until
6&$1
6&$16&$1
6&$1
Code Frequency
(Hz) Code Frequency
(Hz)
1 67.0 20 131.8
2 71.9 21 136.5
3 74.4 22 141.3
4 77.0 23 146.2
5 79.7 24 151.4
6 82.5 25 156.7
7 85.4 26 162.2
8 88.5 27 167.9
9 91.5 28 173.8
10 94.8 29 179.9
11 97.4 30 186.2
12 100.0 31 192.8
13 103.5 32 203.5
14 107.2 33 210.7
15 110.9 34 218.1
16 114.8 35 225.7
17 118.8 36 233.6
18 123.0 37 241.8
19 127.3 38 250.3
19-903.fm Page 8 Wednesday, September 5, 2001 4:30 PM
9
appears. The transceiver pauses on
each active channel. Press / or
/SKIP to change the scan direction.
Press any key other than / or
/SKIP to stop scanning.
Press QUIET/Q-SCAN to set the
weather radio to mute. appears.
The transceiver alerts you when it
detects a weather emergency
broadcast, so you do not have to
continuously listen to the weather
broadcasts. When the weather alert
signal is received, $/7
$/7$/7
$/7 appears and the
alert tone sounds. Press QUIET/Q-
SCAN again to return the weather radio
to standby.
Notes:
• When the weather radio is muted
and a second weather alert is
detected, the radio does not beep,
but $/7
$/7$/7
$/7 appears and the weather
broadcast resumes.
• When the weather radio is on,
squelch is automatically turned on
and SQL does not adjust the
squelch.
Weather Channel Frequency
USING DUAL WATCH
You can set the transceiver to monitor
the DW (Dual Watch) channel and one
operation channel, or one operation
channel and one weather channel.
To set the DW channel
:
Press / or /SKIP to select the
desired channel, then hold down DUAL
until '8$/
'8$/'8$/
'8$/ appears.
Notes:
• The default DW channel is
channel 0 (emergency channel).
• You cannot set a weather channel
as the DW channel.
Channel Frequency (MHz)
1 162.400
2 162.425
3 162.450
4 162.475
5 162.500
6 162.525
7 162.550
8 161.650
9 161.775
10 163.275
19-903.fm Page 9 Wednesday, September 5, 2001 4:30 PM
10
To monitor the DW channel and one
operation channel:
1. Press / or /SKIP to select a
second channel.
2. Press DUAL. '8$/
'8$/'8$/
'8$/ appears. The
transceiver checks the two
channels alternately, and their
numbers alternately appear.
When a signal is received on
either channel, the transceiver
stops on the active channel until
the signal disappears. After a few
seconds of inactivity, dual watch
mode resumes.
3. Press any key to stop dual watch.
To monitor one operation channel and
one weather channel:
1. Press / or /SKIP to select
an operation channel.
2. Press WX to turn on the weather
radio. :;
:;:;
:; appears.
3. Press / or /SKIP to select a
weather channel.
4. Press DUAL. '8$/
'8$/'8$/
'8$/ appears. The
transceiver checks the two
channels alternately, and their
numbers alternately appear.
When a weather alert signal is
received, the transceiver exits
dual watch mode to receive the
broadcast.
Note: To return to dual watch,
press DUAL.
When a signal is received on the
operation channel, the transceiver
stops on the active channel until
the signal disappears. After a few
seconds of inactivity, dual watch
mode resumes.
5. Press any key to stop dual watch.
SETTING THE KEY TONE
Hold down MON/FUNC then press /
to set the key tone beep to on or off.
appears when the key tone is on.
Note: The key tone does not beep
when you press LOCK/PTT or MON/
FUNC, even if the key tone is on.
USING APO/HI/LO
Press APO/HI/LO to set the transmitting
power to high for long distance
transmissions, or low for short distance
transmissions. +,
+,+,
+, or /2
/2/2
/2 appears.
Note: You cannot set the transmitting
power when the weather radio is on.
When Auto Power Off is on, the
transceiver automatically turns off
when it is idle for 2 hours. Press any
key to turn the transceiver back on. To
turn the Auto Power Off function on or
off, hold down MON/FUNC then press
APO/HI/LO. $3 21
$3 21$3 21
$3 21 or $3 2)
$3 2)$3 2)
$3 2) appears
briefly.
USING KEY LOCK
You can lock the / , /SKIP, WX,
DUAL, APO/HI/LO, and QUIET/Q-SCAN
19-903.fm Page 10 Wednesday, September 5, 2001 4:30 PM
11
keys on the transceiver. Hold down
MON/FUNC then press LOCK/PTT to
lock or unlock these keys. When these
keys are locked, /2&.
/2&./2&.
/2&. appears. If the
key tone is on, an error tone sounds
when you press any of the keys.
SETTING THE
COURTESY TONE
While turning on the transceiver, hold
down LOCK/PTT to turn the courtesy
tone on or off. When you turn on the
courtesy tone, a tone sounds and &0
&0&0
&0
721(
721(721(
721( appears. When you end the
transmission, the party you are
communicating with hears the courtesy
tone.
RESETTING THE
TRANSCEIVER
If the transceiver stops operating
properly, reset the transceiver by
holding down QUIET/Q-SCAN while
turning on the transceiver. All the set
channels will be cleared. The current
channel and the DW channel will be
channel 0, Quiet Code will be off, and
the key tone and courtesy tone will be
on.
CARE
Keep the transceiver dry; if it gets wet,
wipe it dry immediately. Use and store
the transceiver only in normal
temperature environments. Handle the
transceiver carefully; do not drop it.
Keep the transceiver away from dust
and dirt, and wipe it with a damp cloth
occasionally to keep it looking new.
Modifying or tampering with the
transceiver’s internal components can
cause malfunction and invalidate its
warranty. If your transceiver is not
performing as it should, take it to your
local RadioShack store for assistance.
ˆ
Specifications
Operation Channels ................................................................................................. GMRS: 7
Interstitial: 7
Emergency: 1
Weather Channels ............................................................................................................... 10
Power Source ................................................................ 8.4V, 1300mAH Ni-MH Battery Pack
12V, 200mA AC/DC Charger
Sensitivity at 12dB SINAD ............................................................................................. 0.5uV
Adjacent Channel Rejection ........................................................................................... 45dB
Audio Distortion ................................................................................................................. 7%
Output Power ........................................................................................... 1W/5W @ 8.4V DC
19-903.fm Page 11 Wednesday, September 5, 2001 4:30 PM
RadioShack Corporation
Fort Worth, Texas 76102
19-903
63-1903011-A00
09A01
Printed in Hong Kong
Harmonic Emissions ............................................................................................ 55dB (High)
48dB (Low)
Dimensions
(HWD) ................................................................................................ 55/16 × 25/16 × 13/8 inch
(135 × 58 × 35 mm)
Weight ............................................................................................................ 13.1 oz (372 g)
Specifications are typical; individual unit might vary. Specifications are subject to change and
improvement without notice.
Limited One-Year Warranty
This product is warranted by RadioShack against manufacturing defects in material and workman-
ship under normal use for one (1) year from the date of purchase from RadioShack company-owned
stores and authorized RadioShack franchisees and dealers. EXCEPT AS PROVIDED HEREIN, Ra-
dioShack MAKES NO EXPRESS WARRANTIES AND ANY IMPLIED WARRANTIES, INCLUDING
THOSE OF MERCHANTABILITY AND FITNESS FOR A PARTICULAR PURPOSE, ARE LIMITED
IN DURATION TO THE DURATION OF THE WRITTEN LIMITED WARRANTIES CONTAINED
HEREIN. EXCEPT AS PROVIDED HEREIN, RadioShack SHALL HAVE NO LIABILITY OR RE-
SPONSIBILITY TO CUSTOMER OR ANY OTHER PERSON OR ENTITY WITH RESPECT TO ANY
LIABILITY, LOSS OR DAMAGE CAUSED DIRECTLY OR INDIRECTLY BY USE OR PERFOR-
MANCE OF THE PRODUCT OR ARISING OUT OF ANY BREACH OF THIS WARRANTY, IN-
CLUDING, BUT NOT LIMITED TO, ANY DAMAGES RESULTING FROM INCONVENIENCE, LOSS
OF TIME, DATA, PROPERTY, REVENUE, OR PROFIT OR ANY INDIRECT, SPECIAL, INCIDEN-
TAL, OR CONSEQUENTIAL DAMAGES, EVEN IF RadioShack HAS BEEN ADVISED OF THE
POSSIBILITY OF SUCH DAMAGES.
Some states do not allow limitations on how long an implied warranty lasts or the exclusion or limita-
tion of incidental or consequential damages, so the above limitations or exclusions may not apply to
you.
In the event of a product defect during the warranty period, take the product and the RadioShack
sales receipt as proof of purchase date to any RadioShack store. RadioShack will, at its option, un-
less otherwise provided by law: (a) correct the defect by product repair without charge for parts and
labor; (b) replace the product with one of the same or similar design; or (c) refund the purchase
price. All replaced parts and products, and products on which a refund is made, become the prop-
erty of RadioShack. New or reconditioned parts and products may be used in the performance of
warranty service. Repaired or replaced parts and products are warranted for the remainder of the
original warranty period. You will be charged for repair or replacement of the product made after the
expiration of the warranty period.
This warranty does not cover: (a) damage or failure caused by or attributable to acts of God, abuse,
accident, misuse, improper or abnormal usage, failure to follow instructions, improper installation or
maintenance, alteration, lightning or other incidence of excess voltage or current; (b) any repairs
other than those provided by a RadioShack Authorized Service Facility; (c) consumables such as
fuses or batteries; (d) cosmetic damage; (e) transportation, shipping or insurance costs; or (f) costs
of product removal, installation, set-up service adjustment or reinstallation.
This warranty gives you specific legal rights, and you may also have other rights which vary from
state to state.
RadioShack Customer Relations, 200 Taylor Street, 6th Floor, Fort Worth, TX 76102
12/99
19-903.fm Page 12 Wednesday, September 5, 2001 4:30 PM