Radio Shack 3301186 900 MHz Headphone Receiver User Manual www RadioShack with In Line CircleR eps
RadioShack Corporation 900 MHz Headphone Receiver www RadioShack with In Line CircleR eps
User Manual
OWNER’S MANUAL — Please read before using this equipment.
© 2000 RadioShack Corporation. All Rights Reserved.
RadioShack and RadioShack.com are trademarks
used by RadioShack Corporation.
900 MHz Wireless Stereo Headphones
Your RadioShack Rechargeable 900 MHz
Wireless Stereo Headphones use the 900
MHz band to deliver high-quality stereo
sound to almost anywhere in or around your
home. Your headphones’ three selectable
channels, PLL (Phase-Locked Loop) circuitry
and built-in antenna give you precise tuning,
so you can enjoy your favorite sounds with-
out disturbing others while you exercise or
work around your yard or house — up to 150
feet away from your stereo.
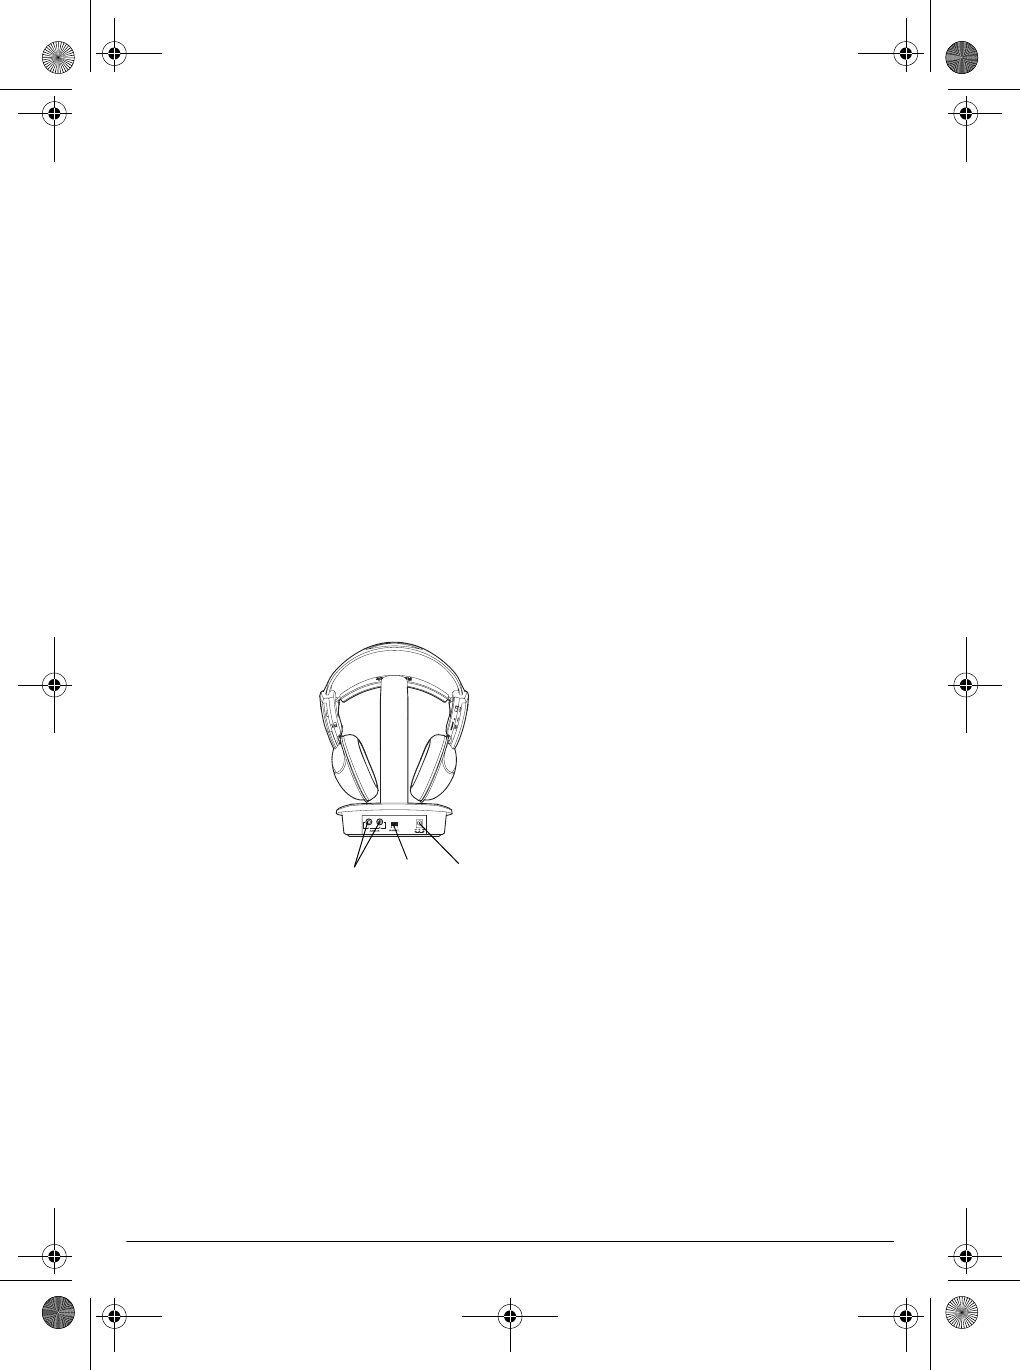
Power/Transmitter Indicator — lights
green when the AC adapter is correctly
plugged in and turns amber when the trans-
mitter is on.
Charging Indicator — lights red when the
battery is charging.
THE FCC WANTS YOU TO
KNOW
Your headphones might cause TV or radio
interference even when they are operating
properly. To determine whether your head-
phones are causing the interference, turn off
the headphones. If the interference goes
away, your headphones are causing the in-
terference.
Try to eliminate the interference by:
• moving your headphones’ transmitter
away from the receiver
• connecting your headphones’ transmit-
ter to an outlet that is on a different elec-
trical circuit from the receiver
• contacting your local RadioShack store
for help
If you cannot eliminate the interference, the
FCC requires that you stop using your head-
phones.
Warning: Changes or modifications to this
unit not expressly approved by the party re-
sponsible for compliance could void the us-
er’s authority to operate the unit.
Notes:
• This equipment has been tested and
found to comply with the limits for a
Class B digital device, pursuant to Part
15 of the
FCC Rules.
These limits are
designed to provide reasonable protec-
tion against harmful interference in a
residential installation. This equipment
generates, uses and can radiate radio
frequency energy and, if not installed
and used in accordance with the instruc-
tions, may cause harmful interference to
radio communications.
• Your headphones are subject to interfer-
ence from other devices, such as cord-
less phones, wireless speakers, and
other wireless headphones that operate
on the same frequencies. If you experi-
ence interference, try moving the head-
phones away from the other device.
PREPARATION
Choosing a Location
Many factors affect the range of your system.
To achieve the best performance:
• Position the transmitter as far as possi-
ble from other electronic devices such
as TVs, receivers, or VCRs. Radio inter-
33-1186.fm Page 1 Tuesday, October 31, 2000 4:48 PM
2
ference from these devices could affect
your system’s performance.
• Position the transmitter away from large
metal objects, as these could block your
transmitter’s signals.
• Try several locations for the transmitter.
Select the location that provides the best
performance.
Your system’s overall performance depends
on your home’s construction method, the oth-
er devices near the system, and other radio
frequency sources in your home (such as
cordless telephones).
Using AC Power
Use the supplied 12V, 250mA AC adapter to
connect the transmitter to AC power.
Cautions:
• You must use a Class 2 power source
that supplies 12 volts DC and delivers at
least 250mA. Its center tip must be set to
positive and its plug must fit the transmit-
ter's DC 12V jack. The supplied adapter
meets these specifications. Using an
adapter that does not meet these specifi-
cations could damage the transmitter or
the adapter.
• Always connect the AC adapter to the
transmitter before you connect it to AC
power. When you finish, disconnect the
adapter from AC power before you dis-
connect it from the transmitter.
Plug the supplied AC adapter’s barrel plug
into the transmitter’s DC 12V jack, then plug
the adapter into a standard AC outlet.
Charging the Rechargeable Battery
Packs
To power the headphones, use the supplied
nickel-metal-hydride rechargeable battery
packs. There are two batteries supplied, so
you can alternately charge one and use the
other.
Your transmitter has a built-in charger to
charge the rechargeable battery pack. When
the headphones are not in use, the battery
pack can be continuously charged over sever-
al days.
Before using your headphones for the first
time, you must charge the battery pack for at
least 24 hours. If the headphones’ range de-
creases, you do not hear sound from the au-
dio source, or the headphones’ POWER
indicator is blinking, recharge the batteries. It
takes 12 to 14 hours to completely recharge
the batteries.
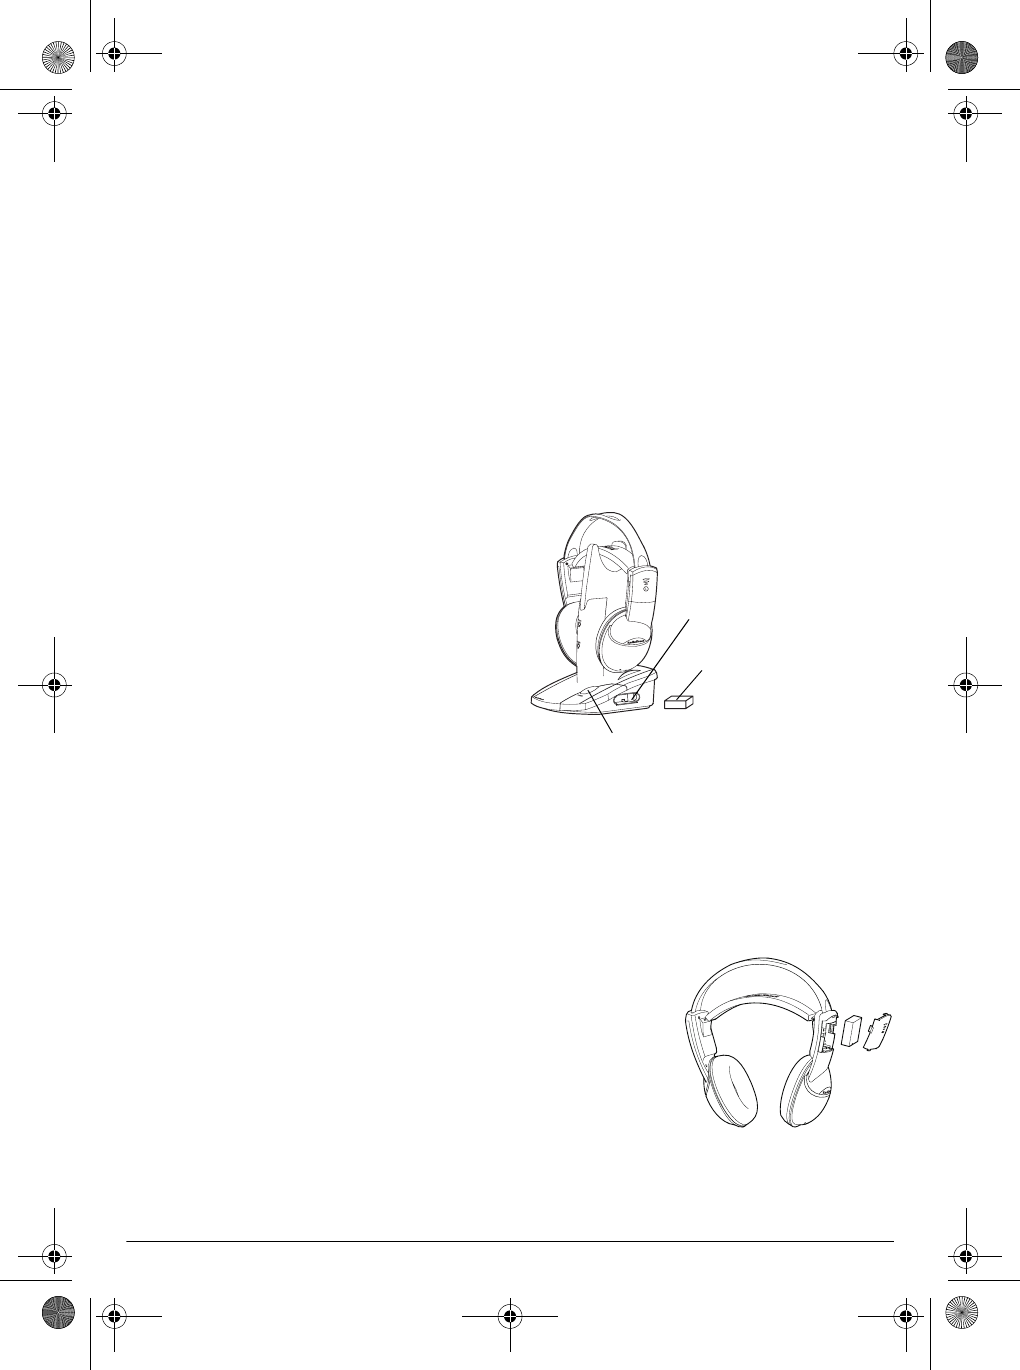
To charge the
battery pack,
plug it into the
transmitter’s
charging portal.
The battery pack
automatically be-
gins charging
and the
CHARGE indica-
tor lights.
When charging is complete, unplug the bat-
tery pack. The indicator turns off.
Note: You can charge the battery pack with
the transmitter set to on or off.
Installing a Battery Pack
1. Remove the
battery com-
partment
cover on the
left earpiece
by pressing
the sides of
the cover
and lifting it
off.
Battery
Pack
Charging
Portal
POWER
33-1186.fm Page 2 Tuesday, October 31, 2000 4:48 PM
3
2. Place the battery pack in the compart-
ment so its metal plates contact the metal
tabs inside the compartment.
3. Replace the cover.
Warning: Dispose of old batteries promptly
and properly. Do not burn or bury them.
Caution: When you replace the battery, use a
RadioShack replacement battery pack.
Note: When the headphones stop operating
properly, replace or recharge the battery pack.
Connecting to an Audio Source
To connect the transmitter to your audio
source, connect one end of the supplied ste-
reo audio cable to the transmitter’s R/AUDIO IN
(red plug) and L/AUDIO IN (white plug) jacks.
Then plug the other ends into the audio
source's audio output or headphone jacks.
1. To operate the
transmitter, press
POWER. The
power indicator
turns amber.
2. Press POWER to
switch the trans-
mitter to standby.
The power indi-
cator turns
green.
Note: When the transmitter is not in use,
set it to standby to avoid interference with
other wireless devices.
OPERATION
Listening Safely
To protect your hearing, follow these guide-
lines when you use headphones.
• Set the volume to the lowest setting
before you begin listening. After you
begin listening, adjust the volume to a
comfortable level.
• Do not listen at extremely high volume
levels. Extended high-volume listening
can lead to permanent hearing loss.
• Once you set the volume, do not increase
it. Over time, your ears adapt to the vol-
ume level, so a volume level that does
not cause discomfort might still damage
your hearing.
Using Your Headphones
You can use multiple sets of headphones with
each transmitter. We do not recommend using
multiple transmitters in the same area.
1. Set the headphones’ channel (1 – 3) to
the same channel as the transmitter.
2. Turn on the transmitter and the audio
source.
3. To turn on the headphones, slide ON/OFF
to ON. The POWER indicator lights.
Note: If the POWER indicator is blinking,
the battery level is low and you must
recharge it before use.
4. Put on the headphones and adjust VOL-
UME to the desired listening level.
Note: If you connected the transmitter to
an audio source’s headphone jack, set
the audio source’s volume control to its
mid-position, then adjust the head-
phones’
VOLUME to the desired level.
5. To turn off the headphones, slide POWER
ON/OFF to OFF.
Notes:
• To preserve battery life, be sure to turn off
the headphones when you are not using
them.
• If reception is poor even when the batter-
ies are fully charged and you are near the
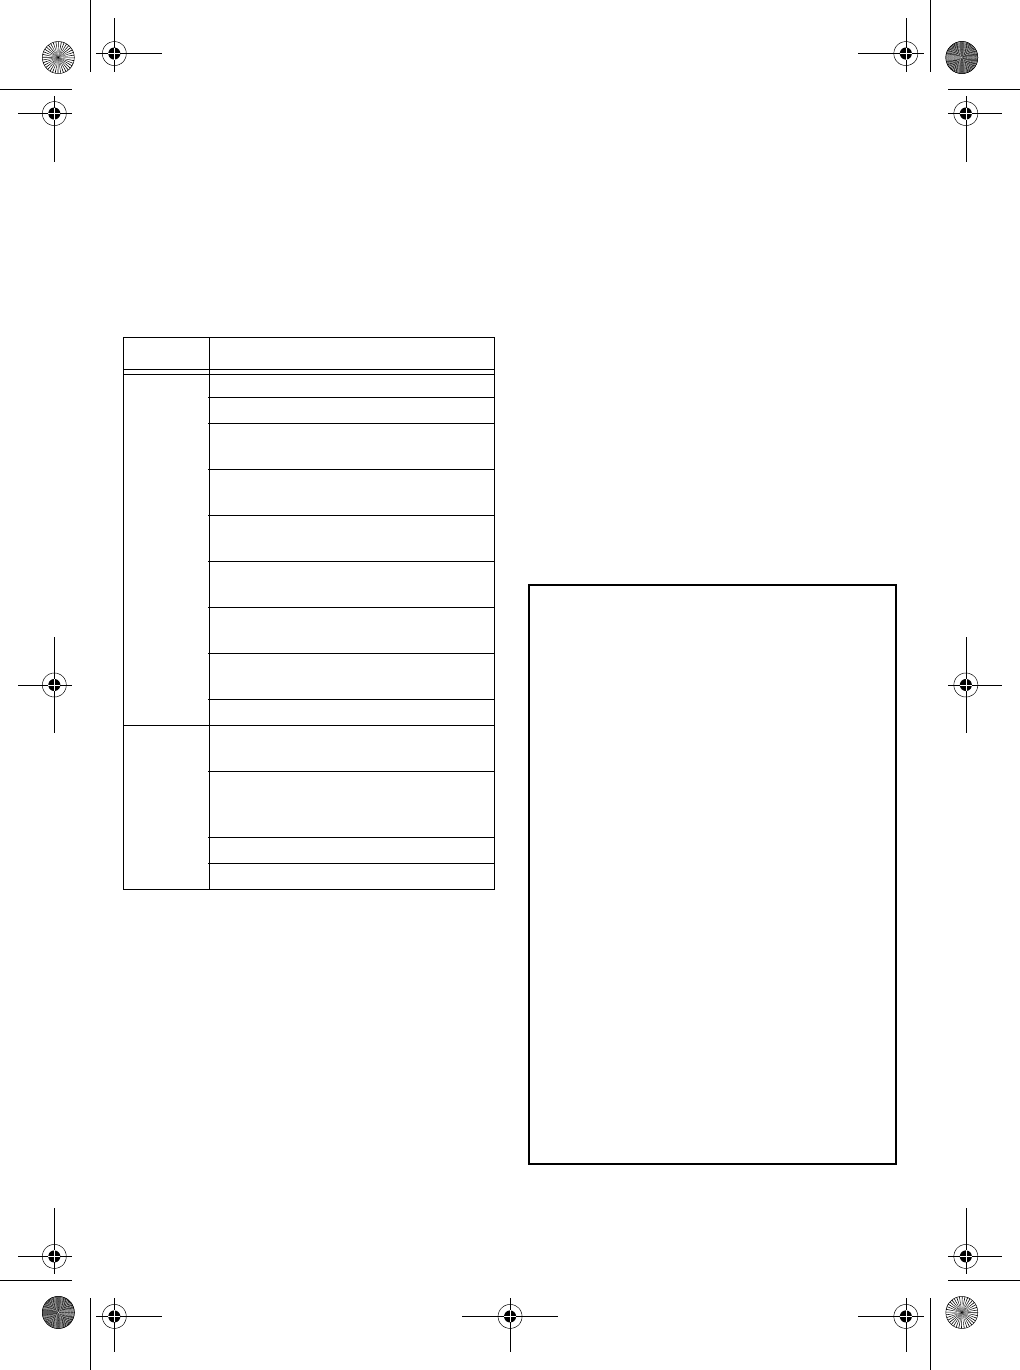
L/R
AUDIO IN
AC
Jack
CH
Switch
33-1186.fm Page 3 Tuesday, October 31, 2000 4:48 PM
33-1186
AO0031AAA1
10A00
Printed in China
RadioShack Corporation
Fort Worth, Texas 76102
transmitter, try moving the transmitter to a
higher location or moving it away from the
audio source.
TROUBLESHOOTING
We do not expect you to have problems with
your headphones, but if you do, these sug-
gestions might help.
CARE
Keep the headphones dry. Use and store the
headphones only in normal temperature envi-
ronments. Handle the headphones carefully.
Keep the headphones away from dust and
dirt, and wipe them with a damp cloth occa-
sionally to keep them looking new.
Modifying or tampering with the headphones’
internal components can cause a malfunction
and might invalidate their warranty and void
your FCC authorization to operate them. If
your headphones are not performing as they
should, take them to your local RadioShack
store for assistance.
SPECIFICATIONS
Transmitter
Carrier Frequency ....................................... 911.4 – 918.4 MHz
Power Source ................................................. 12V DC, 250 mA
Modulation Method ............................................ FM Modulation
Frequency Response ............................. 50 Hz – 20 kHz (6 dB)
Receiver
Sensitivity .............................................. <2µV (with 20 dB S/N)
S/N Ratio (@ –50dBm) ................................. >60 dB (A weight)
Audio Distortion .................................................................. <2%
Max. Audio output ......................................................... > 8 mW
Power requirement ............................................. 3.6V 200 mAH
Ni-MH rechargeable battery pack
Specifications are typical; individual units might vary. Specifica-
tions are subject to change and improvement without notice.
Problem Solution
No sound Be sure the headphones are turned on.
Charge the headphones’ batteries.
Be sure the AC adapter is plugged in
and has power.
Be sure all cables are securely con-
nected.
Be sure the audio source is turned on
and tuned to an active channel.
Be sure the source’s volume control is
turned up.
Be sure the headphones and transmit-
ter are set to the same channel.
Adjust the headphones’ volume con-
trol.
Change the position of the transmitter.
Distorted
audio
Be sure the headphones and transmit-
ter are set to the same channel.
If you connected the transmitter to an
audio source’s headphone jack, reduce
the audio source’s volume.
Charge the headphones’ batteries.
Change the position of the transmitter.
Limited Ninety-Day Warranty
This product is warranted by RadioShack against manufacturing defects in ma-
terial and workmanship under normal use for ninety (90) days from the date of
purchase from RadioShack company-owned stores and authorized
RadioShack franchisees and dealers. EXCEPT AS PROVIDED HEREIN,
RadioShack MAKES NO EXPRESS WARRANTIES AND ANY IMPLIED WAR-
RANTIES, INCLUDING THOSE OF MERCHANTABILITY AND FITNESS FOR
A PARTICULAR PURPOSE, ARE LIMITED IN DURATION TO THE DURA-
TION OF THE WRITTEN LIMITED WARRANTIES CONTAINED HEREIN. EX-
CEPT AS PROVIDED HEREIN, RadioShack SHALL HAVE NO LIABILITY OR
RESPONSIBILITY TO CUSTOMER OR ANY OTHER PERSON OR ENTITY
WITH RESPECT TO ANY LIABILITY, LOSS OR DAMAGE CAUSED DI-
RECTLY OR INDIRECTLY BY USE OR PERFORMANCE OF THE PRODUCT
OR ARISING OUT OF ANY BREACH OF THIS WARRANTY, INCLUDING,
BUT NOT LIMITED TO, ANY DAMAGES RESULTING FROM INCONVE-
NIENCE, LOSS OF TIME, DATA, PROPERTY, REVENUE, OR PROFIT OR
ANY INDIRECT, SPECIAL, INCIDENTAL, OR CONSEQUENTIAL DAMAGES,
EVEN IF RadioShack HAS BEEN ADVISED OF THE POSSIBILITY OF SUCH
DAMAGES.
Some states do not allow limitations on how long an implied warranty lasts or
the exclusion or limitation of incidental or consequential damages, so the above
limitations or exclusions may not apply to you.
In the event of a product defect during the warranty period, take the product
and the RadioShack sales receipt as proof of purchase date to any RadioShack
store. RadioShack will, at its option, unless otherwise provided by law:
(a) correct the defect by product repair without charge for parts and labor; (b)
replace the product with one of the same or similar design; or (c) refund the pur-
chase price. All replaced parts and products, and products on which a refund is
made, become the property of RadioShack. New or reconditioned parts and
products may be used in the performance of warranty service. Repaired or re-
placed parts and products are warranted for the remainder of the original war-
ranty period. You will be charged for repair or replacement of the product made
after the expiration of the warranty period.
This warranty does not cover: (a) damage or failure caused by or attributable to
acts of God, abuse, accident, misuse, improper or abnormal usage, failure to
follow instructions, improper installation or maintenance, alteration, lightning or
other incidence of excess voltage or current; (b) any repairs other than those
provided by a RadioShack Authorized Service Facility; (c) consumables such
as fuses or batteries; (d) cosmetic damage; (e) transportation, shipping or in-
surance costs; or (f) costs of product removal, installation, set-up service ad-
justment or reinstallation.
This warranty gives you specific legal rights, and you may also have other
rights which vary from state to state.
RadioShack Customer Relations, 200 Taylor Street, 6th Floor, Fort Worth, TX
76102
We Service What We Sell
12/99
33-1186.fm Page 4 Tuesday, October 31, 2000 4:48 PM