Radio Shack 400268T 3-Channel Wireless Stereo Amplified Speakers (Transmitter) User Manual
RadioShack Corporation 3-Channel Wireless Stereo Amplified Speakers (Transmitter)
User Manual
XX-XXX
User’s Guide
Please read
this User’s
THE PERFORMANCE YOU NEED
TM
Wireless Amplified Stereo Speakers
User’s Guide 40-268
Please read this user’s guide before using your new speakers

2
Contents
Package Contents .................................................................................................. 4
Features ................................................................................................................. 5
Setup ...................................................................................................................... 5
1. Select a location ........................................................................................... 5
2. Attach rubber feet to speakers .................................................................... 6
3. Power the system ........................................................................................ 6
4. Connect to an audio source ........................................................................ 8
5. Stereo/Mono Setup ................................................................................... 10
6. Select Channel ............................................................................................11
7. Mount the Speakers ................................................................................... 12
Basic Operation ................................................................................................... 13
Turn On ........................................................................................................... 13
Additional Information ....................................................................................... 14
Listening Safety ............................................................................................. 14
Care ................................................................................................................. 14
Troubleshooting ............................................................................................. 15
Specifications ................................................................................................. 16
FCC Information ............................................................................................. 17
Limited Warranty............................................................................................ 18

3
Contents
Package Contents .................................................................................................. 4
Features ................................................................................................................. 5
Setup ...................................................................................................................... 5
1. Select a location ........................................................................................... 5
2. Attach rubber feet to speakers .................................................................... 6
3. Power the system ........................................................................................ 6
4. Connect to an audio source ........................................................................ 8
5. Stereo/Mono Setup ................................................................................... 10
6. Select Channel ............................................................................................11
7. Mount the Speakers ................................................................................... 12
Basic Operation ................................................................................................... 13
Turn On ........................................................................................................... 13
Additional Information ....................................................................................... 14
Listening Safety ............................................................................................. 14
Care ................................................................................................................. 14
Troubleshooting ............................................................................................. 15
Specifications ................................................................................................. 16
FCC Information ............................................................................................. 17
Limited Warranty............................................................................................ 18
4
Features
Ideal for use as rear-channel speakers in your surround-sound home theater.
Enables you to listen to your stereo in any room of your home.
True stereo sound, with individual bass and treble controls.
Setup
1 Select a location
In order to achieve the best performance:
Position the transmitter as far as possible from other electronic devices such
as TVs, receivers, or DVD players. Radio interference from these devices could
affect your system’s performance.
Position the transmitter away from large metal objects, as these could block
the transmitter’s signals.
Try several locations for the transmitter and select the location that provides
the best performance.
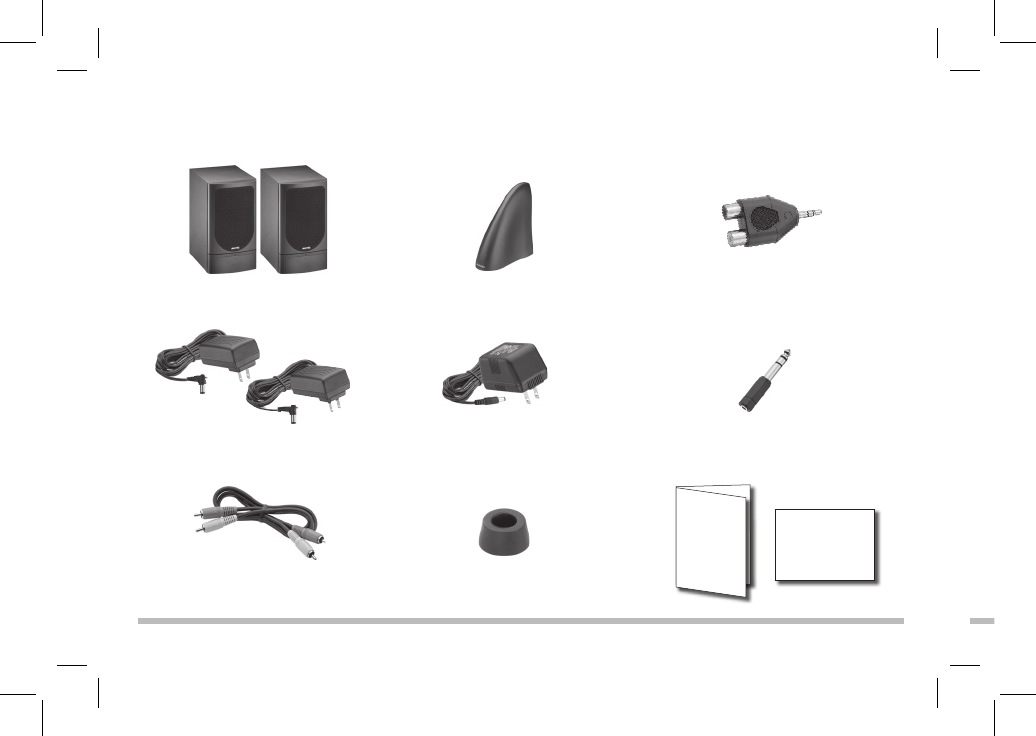
Package contents
Speaker Transmitter
AC Adapter for Speakers (2)
Stereo audio cable
RCA jack to 3.5mm Plug
(Y-Adapter)
Quick Start
User’s
Guide
AC Adapter for Transmitter
3.5mm to 6.3mm adapter
Rubber feet (8)

5
Setup
Features
Ideal for use as rear-channel speakers in your surround-sound home theater.
Enables you to listen to your stereo in any room of your home.
True stereo sound, with individual bass and treble controls.
Setup
1 Select a location
In order to achieve the best performance:
Position the transmitter as far as possible from other electronic devices such
as TVs, receivers, or DVD players. Radio interference from these devices could
affect your system’s performance.
Position the transmitter away from large metal objects, as these could block
the transmitter’s signals.
Try several locations for the transmitter and select the location that provides
the best performance.
Package contents
RCA jack to 3.5mm Plug
(Y-Adapter)
Quick Start
3.5mm to 6.3mm adapter
6
Setup
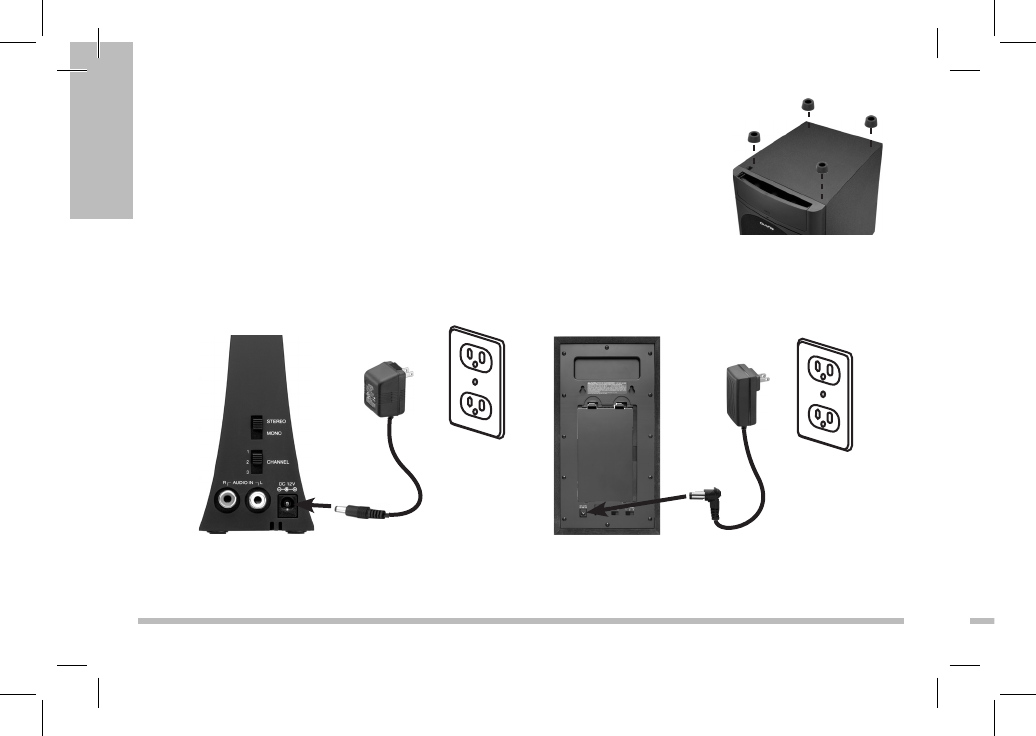
2 Attach rubber feet to speakers
Remove the backing on the bottom of the rubber feet and
attach them to the four corners on the bottom of each speaker.
3 Power the systemPower the system
Connect the supplied AC power adapters into the DC 12V jacks on the transmitter
and speakers, then plug the adapters into standard AC outlets.
You also can use 16 (8 for each speaker) D size
batteries (not supplied) to power the speakers.
To install the batteries:
1. Remove the battery cover.
2. Insert 8 batteries for each speaker with
correct polarities.
3. Replace the cover when finished.
w Caution:
You must use a Class 2 power source that supplies 12 volts DC and delivers at
least 250mA or 1250mA. Its center tip must be set to positive and its plug must
fit the transmitter’s DC 12V jack. The supplied adapter meets these specifications.
Using an adapter that does not meet these specifications will damage the
transmitter or the adapter.
Always connect the AC adapter to the transmitter before you connect it to AC
power. When you finish, disconnect the adapter from AC power before you
disconnect it from the transmitter.
Speakers 12V, 1250mA
AC Adapter
Transmitter 12V, 250mA
AC Adapter
n Note: Use the adapter labeled “12V 250 mA” for the transmitter, and the one
marked “12V, 1250 mA” for the speakers.

7
Setup
2 Attach rubber feet to speakers
Remove the backing on the bottom of the rubber feet and
attach them to the four corners on the bottom of each speaker.
3 Power the systemPower the system
Connect the supplied AC power adapters into the DC 12V jacks on the transmitter
and speakers, then plug the adapters into standard AC outlets.
You also can use 16 (8 for each speaker) D size
batteries (not supplied) to power the speakers.
To install the batteries:
1. Remove the battery cover.
2. Insert 8 batteries for each speaker with
correct polarities.
3. Replace the cover when finished.
w Caution:
You must use a Class 2 power source that supplies 12 volts DC and delivers at
least 250mA or 1250mA. Its center tip must be set to positive and its plug must
fit the transmitter’s DC 12V jack. The supplied adapter meets these specifications.
Using an adapter that does not meet these specifications will damage the
transmitter or the adapter.
Always connect the AC adapter to the transmitter before you connect it to AC
power. When you finish, disconnect the adapter from AC power before you
disconnect it from the transmitter.
LR20LR20
LR20LR20
LR20 LR20
LR20 LR20
n Note: Use the adapter labeled “12V 250 mA” for the transmitter, and the one
marked “12V, 1250 mA” for the speakers.

8
Setup
b Battery Notes
Using the AC adapter overrides any installed batteries.
When the speakers POWER LED blinks, replace the batteries.
Do not burn or bury batteries. Do not puncture or crush. Do not disassemble.
Use only fresh batteries of the required size and recommended type.
Do not use batteries of different types, capacities, or chemistry.
Remove the batteries if you do not plan to use the product for an extended
time.
If the electrolyte in the cells gets on your skin, thoroughly wash with soap
and water. If in the eyes, rinse thoroughly with cool water. Immediately seek
medical attention.
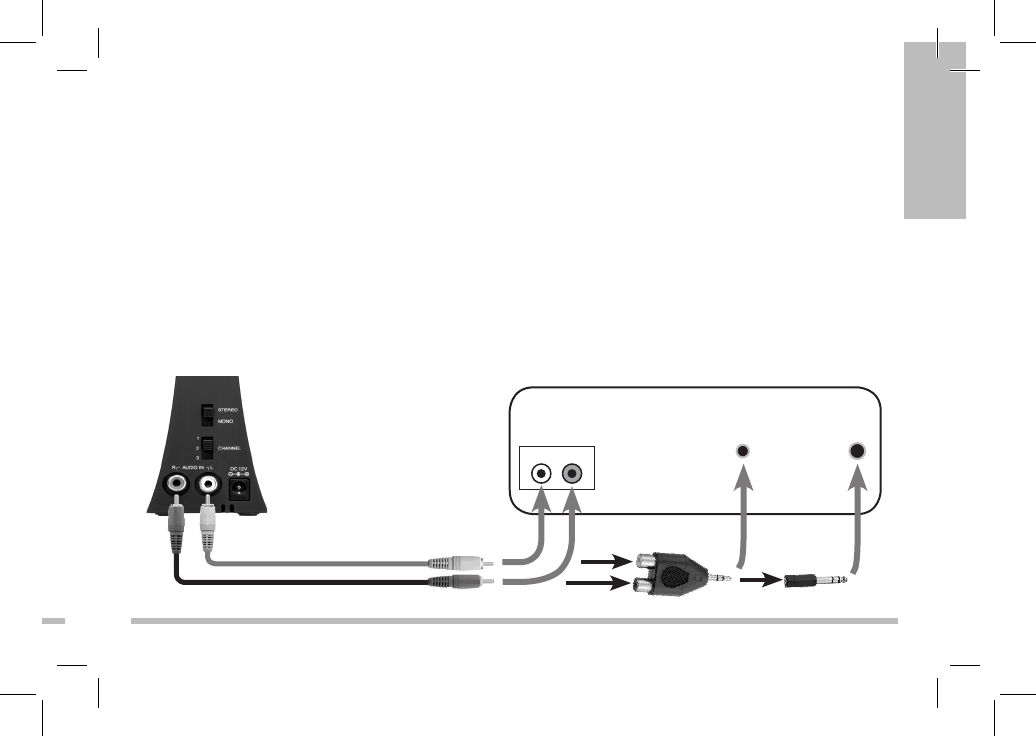
4 Connect transmitter to an audio sourceConnect transmitter to an audio source
Connect the transmitter to your audio source’s left and right audio output jacks or
to its headphone jack.
1. Connect one end of the supplied audio cable to the transmitter’s audio jacks
(white plug to L AUDIO IN and red plug to R AUDIO IN).
2. Connect to your audio source’s output jacks:
Connect the white and red plugs at the other end of the cable into the
corresponding left (white) and right (red) audio jacks on your audio source.
Connect to your audio source’s stereo headphone jack:
Connect the audio cable’s white and red plugs to the white and red jacks on
the stereo side of the Æ-inch (3.5mm) supplied adapter.
If your audio source has a Æ-inch (3.5mm) headphone jack:
Insert the adapter’s Æ-inch (3.5mm) stereo plug into the headphone jack.
9
Setup
b Battery Notes
Using the AC adapter overrides any installed batteries.
When the speakers POWER LED blinks, replace the batteries.
Do not burn or bury batteries. Do not puncture or crush. Do not disassemble.
Use only fresh batteries of the required size and recommended type.
Do not use batteries of different types, capacities, or chemistry.
Remove the batteries if you do not plan to use the product for an extended
time.
If the electrolyte in the cells gets on your skin, thoroughly wash with soap
and water. If in the eyes, rinse thoroughly with cool water. Immediately seek
medical attention.
4 Connect transmitter to an audio sourceConnect transmitter to an audio source
Connect the transmitter to your audio source’s left and right audio output jacks or
to its headphone jack.
1. Connect one end of the supplied audio cable to the transmitter’s audio jacks
(white plug to L AUDIO IN and red plug to R AUDIO IN).
2. Connect to your audio source’s output jacks:
Connect the white and red plugs at the other end of the cable into the
corresponding left (white) and right (red) audio jacks on your audio source.
Connect to your audio source’s stereo headphone jack:
Connect the audio cable’s white and red plugs to the white and red jacks on
the stereo side of the Æ-inch (3.5mm) supplied adapter.
If your audio source has a Æ-inch (3.5mm) headphone jack:
Insert the adapter’s Æ-inch (3.5mm) stereo plug into the headphone jack.
Audio Out
Stereo
Headphone
Jack
Æ-inch (3.5 mm)
Headphone Jack
RL
10
Setup
w Caution:
Do not connect the transmitter to your audio source’s speaker output. It could
damage the transmitter and the audio source.
If you connected the transmitter to an audio source’s headphone jack, set the
audio source’s volume control to its middle position.
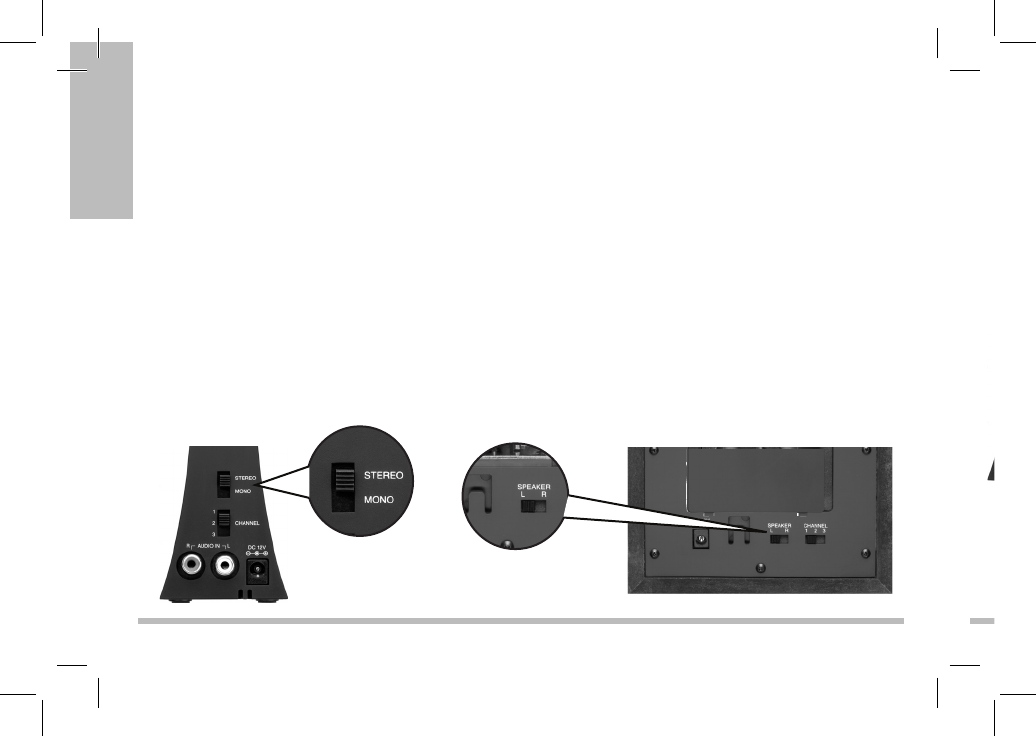
5 Stereo/mono setup
For normal stereo use, set STEREO/
MONO on the back of the transmitter
to STEREO. If you are using a monaural
system, set STEREO/MONO to
MONO.
If you select STEREO:
Set SPEAKER on the back of each speaker
to either L (for the Left stereo speaker) or
R (for the Right stereo speaker).
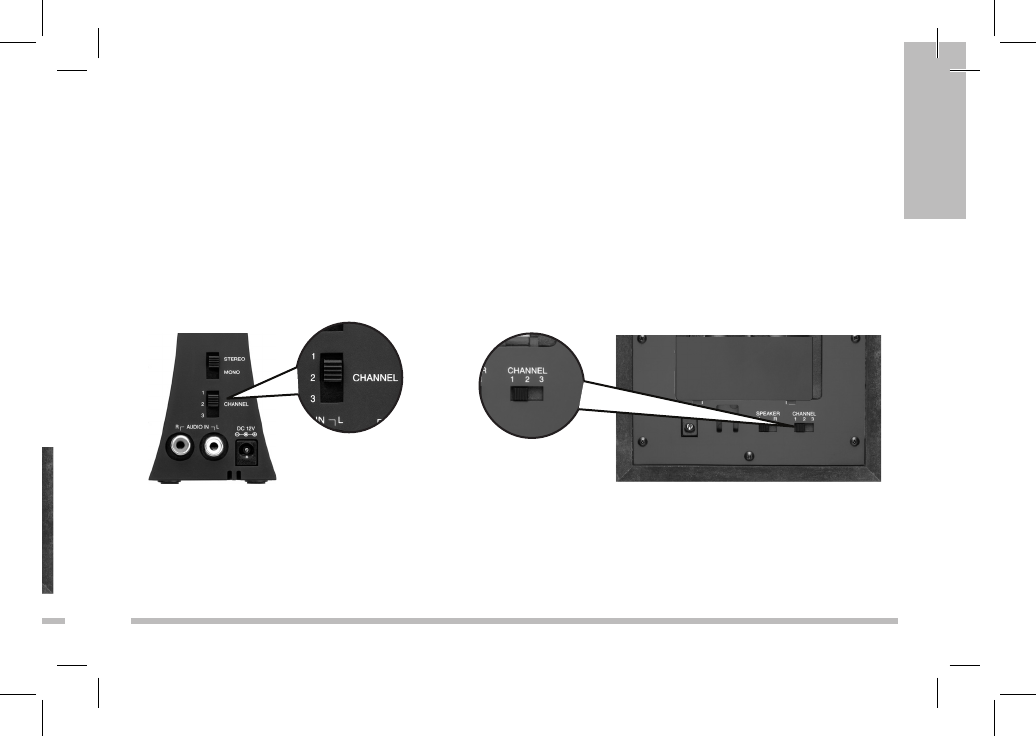
6 Select channel
1. Set the transmitter to a frequency channel (CHANNEL 1, 2, or 3) that has no
interference.
2. Set the speaker to the same channels as the transmitter.
n Note: If you receive interference, try changing the channel number on the
transmitter and the speakers.
11
Setup
w Caution:
Do not connect the transmitter to your audio source’s speaker output. It could
damage the transmitter and the audio source.
If you connected the transmitter to an audio source’s headphone jack, set the
audio source’s volume control to its middle position.
5 Stereo/mono setup
For normal stereo use, set STEREO/
MONO on the back of the transmitter
to STEREO. If you are using a monaural
system, set STEREO/MONO to
MONO.
If you select STEREO:
Set SPEAKER on the back of each speaker
to either L (for the Left stereo speaker) or
R (for the Right stereo speaker).
6 Select channel
1. Set the transmitter to a frequency channel (CHANNEL 1, 2, or 3) that has no
interference.
2. Set the speaker to the same channels as the transmitter.
n Note: If you receive interference, try changing the channel number on the
transmitter and the speakers.
12
Setup
Basic Operation
Turn on
1. Turn on your audio source.
The transmitter has a built-in automatic ON/OFF controller. When the AC
adapter is plugged in and the transmitter receives audio signals from the audio
source, the transmitter’s power LED lights blue. The transmission stops if the
transmitter does not receive audio signals from the audio source for about one
minute. The transmitter’s power LED turns off.
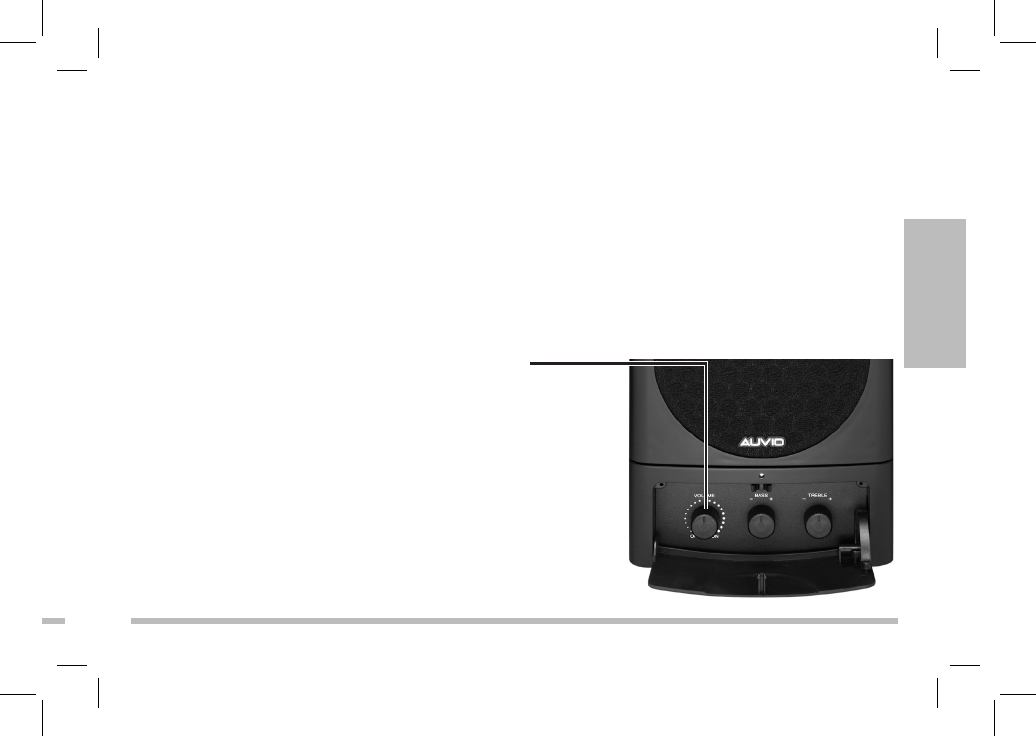
2. Rotate VOLUME to ON to turn on your
speakers. The power indicator lights blue.. The power indicator lights blue.The power indicator lights blue.
3. Adjust TREBLE and BASS on each speaker
between – (minimum) to + (maximum) to a
desired level.
4. To turn off each speaker, rotate VOLUME to
OFF. The power indicator turns off.
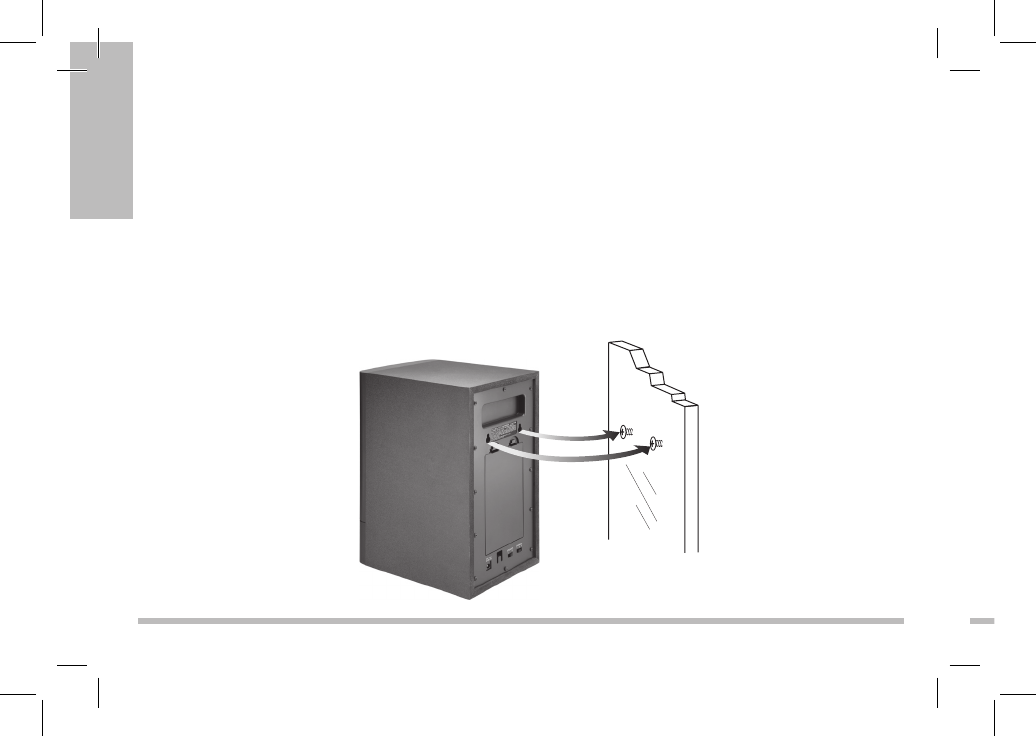
7 Mount the speakers
To mount a speaker on the wall, you need two screws (not supplied) with a head
that fits into the keyhole slot on the back of the speaker.
1. Select a location and drill a hole to fit your screws.
2. Thread each screw into the hole until the screw’s head extends about 3/5 inch
(15mm) from the wall.
3. Align the keyhole on the speaker with the screw head in the wall, then slide
the speaker down gently to secure it.
13
Basic Operation
Basic Operation
Turn on
1. Turn on your audio source.
The transmitter has a built-in automatic ON/OFF controller. When the AC
adapter is plugged in and the transmitter receives audio signals from the audio
source, the transmitter’s power LED lights blue. The transmission stops if the
transmitter does not receive audio signals from the audio source for about one
minute. The transmitter’s power LED turns off.
2. Rotate VOLUME to ON to turn on your
speakers. The power indicator lights blue.. The power indicator lights blue.The power indicator lights blue.
3. Adjust TREBLE and BASS on each speaker
between – (minimum) to + (maximum) to a
desired level.
4. To turn off each speaker, rotate VOLUME to
OFF. The power indicator turns off.
7 Mount the speakers
To mount a speaker on the wall, you need two screws (not supplied) with a head
that fits into the keyhole slot on the back of the speaker.
1. Select a location and drill a hole to fit your screws.
2. Thread each screw into the hole until the screw’s head extends about 3/5 inch
(15mm) from the wall.
3. Align the keyhole on the speaker with the screw head in the wall, then slide
the speaker down gently to secure it.

14
Additional Info
Additional Information
Listening Safety
To protect your hearing, follow these guidelines when you use the speaker system.
Set the volume to the lowest setting before you begin listening. After you
begin listening, adjust the volume to a comfortable level.
Do not listen at extremely high volume levels. Extended high-volume listening
can lead to permanent hearing loss.
Once you set the volume, do not increase it. Over time, your ears adapt to
the volume level, so a volume level that does not cause discomfort might still
damage your hearing.
Care
Keep the system dry; if it gets wet, wipe it dry immediately.
Use and store the system only in normal temperature environments.
Handle the system carefully; do not drop it.
Keep the system away from dust and dirt, and wipe it with a damp cloth
occasionally to keep it looking new.
w Caution: You might permanently damage your speakers by cleaning them
with a vacuum cleaner. Use a feather duster or a soft cloth instead.
Troubleshooting
We do not expect you to have problems with your speaker system; however, if you
do have problems, try these troubleshooting tips.
Problem Solution
No sound Make sure the speakers are turned on.
Replace the speakers’ batteries and/or make sure the AC adapters
are plugged in and have power.
Make sure all audio cables are securely connected.
Make sure the audio source is turned on and turned to an active
channel.
Speakers and transmitter should be set to the same frequency
channel (1–3).
Adjust the speakers’ volume control.

15
Additional Info
Additional Information
Listening Safety
To protect your hearing, follow these guidelines when you use the speaker system.
Set the volume to the lowest setting before you begin listening. After you
begin listening, adjust the volume to a comfortable level.
Do not listen at extremely high volume levels. Extended high-volume listening
can lead to permanent hearing loss.
Once you set the volume, do not increase it. Over time, your ears adapt to
the volume level, so a volume level that does not cause discomfort might still
damage your hearing.
Care
Keep the system dry; if it gets wet, wipe it dry immediately.
Use and store the system only in normal temperature environments.
Handle the system carefully; do not drop it.
Keep the system away from dust and dirt, and wipe it with a damp cloth
occasionally to keep it looking new.
w Caution: You might permanently damage your speakers by cleaning them
with a vacuum cleaner. Use a feather duster or a soft cloth instead.
Troubleshooting
We do not expect you to have problems with your speaker system; however, if you
do have problems, try these troubleshooting tips.
Problem Solution
No sound Make sure the speakers are turned on.
Replace the speakers’ batteries and/or make sure the AC adapters
are plugged in and have power.
Make sure all audio cables are securely connected.
Make sure the audio source is turned on and turned to an active
channel.
Speakers and transmitter should be set to the same frequency
channel (1–3).
Adjust the speakers’ volume control.

16
Additional Info
Audio is
distorted
Be sure the speakers and transmitter are set to the same channel.
If the transmitter is connected to an audio source’s headphone
jack, reduce the audio source’s volume.
Change the position of the transmitter.
The speakers are placed beyond the transmitter’s effective
range (approximately 300 feet). Move the speakers closer to the
transmitter.
Other 900 MHz transmissions are being picked up by the speaker’s
receiver (possibly from a 900 MHz cordless telephone). Change the
transmitter’s and the speaker’s frequency channel.
The speaker’s batteries are low. Replace the batteries.
Specifications
Transmitter
Carrier Frequency .................................................................................................... 910.7–919.2 MHz
Power Source ........................................... unregulated 12V DC, center tip set to positive (+), 250 mA
Modulation Method ..................................................................................................... FM modulation
Frequency Response ............................................................................................50 Hz–20 kHz (6 dB)
Approximate Measurement (HWD) ............................... 4½ × 4 × 4 inches (116 × 106.2 × 107.2 mm)
Speaker
Sensitivity ........................................................................................................ <2µV (with 20 dB S/N)
S/N Radio (@-50 dBm) .......................................................................................... >=70 dB (A weight)
Audio Distortion ........................................................................................................................... <2%
Max. Audio output ................................................................................................................... >=10W
Approximate Measurement (HWD) ................................................................................ 11 × 6 × 7½ in
........................................................................................................................... (280 × 150 × 195 mm)
Power Source ..............................................2 regulated AC adapters (AC 120/60Hz; DC 12V 1250mA)
........................................................................... or DC 8 x D Size 1.5V alkaline batteries (not supplied)
Specifications are subject to change and improvement without notice. Actual product may vary from the
images found in this document.
FCC Information
This equipment has been tested and found to comply with the limits for a Class B digital device, pursuant
to Part 15 of the FCC Rules. These limits are designed to provide reasonable protection against harmful
interference in a residential installation. This equipment generates, uses and can radiate radio frequency
energy and, if not installed and used in accordance with the instructions, may cause harmful interference
to radio communications. However, there is no guarantee that interference will not occur in a particular
installation. If this equipment does cause harmful interference to radio or television reception, which can
be determined by turning the equipment off and on, the user is encouraged to try to correct the interfer-
ence by one or more of the following measures:
Reorient or relocate the receiving antenna.
Increase the separation between the equipment and receiver.

17
Additional Info
Audio is
distorted
Be sure the speakers and transmitter are set to the same channel.
If the transmitter is connected to an audio source’s headphone
jack, reduce the audio source’s volume.
Change the position of the transmitter.
The speakers are placed beyond the transmitter’s effective
range (approximately 300 feet). Move the speakers closer to the
transmitter.
Other 900 MHz transmissions are being picked up by the speaker’s
receiver (possibly from a 900 MHz cordless telephone). Change the
transmitter’s and the speaker’s frequency channel.
The speaker’s batteries are low. Replace the batteries.
Specifications
Transmitter
Carrier Frequency .................................................................................................... 910.7–919.2 MHz
Power Source ........................................... unregulated 12V DC, center tip set to positive (+), 250 mA
Modulation Method ..................................................................................................... FM modulation
Frequency Response ............................................................................................50 Hz–20 kHz (6 dB)
Approximate Measurement (HWD) ............................... 4½ × 4 × 4 inches (116 × 106.2 × 107.2 mm)
Speaker
Sensitivity ........................................................................................................ <2µV (with 20 dB S/N)
S/N Radio (@-50 dBm) .......................................................................................... >=70 dB (A weight)
Audio Distortion ........................................................................................................................... <2%
Max. Audio output ................................................................................................................... >=10W
Approximate Measurement (HWD) ................................................................................ 11 × 6 × 7½ in
........................................................................................................................... (280 × 150 × 195 mm)
Power Source ..............................................2 regulated AC adapters (AC 120/60Hz; DC 12V 1250mA)
........................................................................... or DC 8 x D Size 1.5V alkaline batteries (not supplied)
Specifications are subject to change and improvement without notice. Actual product may vary from the
images found in this document.
FCC Information
This equipment has been tested and found to comply with the limits for a Class B digital device, pursuant
to Part 15 of the FCC Rules. These limits are designed to provide reasonable protection against harmful
interference in a residential installation. This equipment generates, uses and can radiate radio frequency
energy and, if not installed and used in accordance with the instructions, may cause harmful interference
to radio communications. However, there is no guarantee that interference will not occur in a particular
installation. If this equipment does cause harmful interference to radio or television reception, which can
be determined by turning the equipment off and on, the user is encouraged to try to correct the interfer-
ence by one or more of the following measures:
Reorient or relocate the receiving antenna.
Increase the separation between the equipment and receiver.

18
Additional Info
Connect the equipment into an outlet on a circuit different from that to which the receiver is connected.
Consult the dealer or an experienced radio/TV technician for help.
Changes or modifications not expressly approved by Ignition L.P. may cause interference and void the
user’s authority to operate the equipment.
This device complies with part 15 of the FCC Rules. Operation is subject to the following two conditions:
(1) This device may not cause harmful interference, and (2) this device must accept any interference
received, including interference that may cause undesired operation
Limited Warranty
Ignition L.P. warrants this product against defects in materials and workmanship under normal use by
the original purchaser for one (1) year after the date of purchase. IGNITION L.P. MAKES NO OTHER
EXPRESS WARRANTIES.
This warranty does not cover: (a) damage or failure caused by or attributable to abuse, misuse, failure to
follow instructions, improper installation or maintenance, alteration, accident, Acts of God (such as floods
or lightning), or excess voltage or current; (b) improper or incorrectly performed repairs by persons who
are not a Ignition L.P. Authorized Service Facility; (c) consumables such as fuses or batteries; (d) ordinary
wear and tear or cosmetic damage; (e) transportation, shipping or insurance costs; (f) costs of product
removal, installation, set-up service, adjustment or reinstallation; and (g) claims by persons other than the
original purchaser.
Should a problem occur that is covered by this warranty, take the product and the sales receipt as proof
of purchase date to the place of purchase in the U.S. Ignition L.P. will, at its option, unless otherwise
provided by law: (a) repair the product without charge for parts and labor; (b) replace the product with
the same or a comparable product; or (c) refund the purchase price. All replaced parts and products, and
products on which a refund is made, become the property of Ignition L.P. New or reconditioned parts and
products may be used in the performance of warranty service. Repaired or replaced parts and products
are warranted for the remainder of the original warranty period. You will be charged for repair or replace-
ment of the product made after the expiration of the warranty period.
IGNITION L.P. EXPRESSLY DISCLAIMS ALL WARRANTIES AND CONDITIONS NOT STATED IN THIS
LIMITED WARRANTY. ANY IMPLIED WARRANTIES THAT MAY BE IMPOSED BY LAW, INCLUDING
THE IMPLIED WARRANTY OF MERCHANTABILITY AND, IF APPLICABLE, THE IMPLIED WARRANTY
OF FITNESS FOR A PARTICULAR PURPOSE, SHALL EXPIRE ON THE EXPIRATION OF THE STATED
WARRANTY PERIOD.
EXCEPT AS DESCRIBED ABOVE, IGNITION L.P. SHALL HAVE NO LIABILITY OR RESPONSIBILITY TO
THE PURCHASER OF THE PRODUCT OR ANY OTHER PERSON OR ENTITY WITH RESPECT TO ANY
LIABILITY, LOSS OR DAMAGE CAUSED DIRECTLY OR INDIRECTLY BY USE OR PERFORMANCE OF
THE PRODUCT OR ARISING OUT OF ANY BREACH OF THIS WARRANTY,
INCLUDING, BUT NOT LIMITED TO, ANY DAMAGES RESULTING FROM INCONVENIENCE AND ANY
LOSS OF TIME, DATA, PROPERTY, REVENUE, OR PROFIT AND ANY INDIRECT, SPECIAL, INCIDENTAL,
OR CONSEQUENTIAL DAMAGES, EVEN IF IGNITION L.P. HAS BEEN ADVISED OF THE POSSIBILITY OF
SUCH DAMAGES.
Some States do not allow limitations on how long an implied warranty lasts or the exclusion or limitation
of incidental or consequential damages, so the above limitations or exclusions may not apply to you.
This warranty gives you specific legal rights, and you may also have other rights which vary from State to
State. You may contact Ignition L.P. at:
Ignition L.P., 3102 Maple Ave Suite 450, Dallas, TX 75201 02/09
For product support, call 1-866-315-0426

19
Additional Info
Connect the equipment into an outlet on a circuit different from that to which the receiver is connected.
Consult the dealer or an experienced radio/TV technician for help.
Changes or modifications not expressly approved by Ignition L.P. may cause interference and void the
user’s authority to operate the equipment.
This device complies with part 15 of the FCC Rules. Operation is subject to the following two conditions:
(1) This device may not cause harmful interference, and (2) this device must accept any interference
received, including interference that may cause undesired operation
Limited Warranty
Ignition L.P. warrants this product against defects in materials and workmanship under normal use by
the original purchaser for one (1) year after the date of purchase. IGNITION L.P. MAKES NO OTHER
EXPRESS WARRANTIES.
This warranty does not cover: (a) damage or failure caused by or attributable to abuse, misuse, failure to
follow instructions, improper installation or maintenance, alteration, accident, Acts of God (such as floods
or lightning), or excess voltage or current; (b) improper or incorrectly performed repairs by persons who
are not a Ignition L.P. Authorized Service Facility; (c) consumables such as fuses or batteries; (d) ordinary
wear and tear or cosmetic damage; (e) transportation, shipping or insurance costs; (f) costs of product
removal, installation, set-up service, adjustment or reinstallation; and (g) claims by persons other than the
original purchaser.
Should a problem occur that is covered by this warranty, take the product and the sales receipt as proof
of purchase date to the place of purchase in the U.S. Ignition L.P. will, at its option, unless otherwise
provided by law: (a) repair the product without charge for parts and labor; (b) replace the product with
the same or a comparable product; or (c) refund the purchase price. All replaced parts and products, and
products on which a refund is made, become the property of Ignition L.P. New or reconditioned parts and
products may be used in the performance of warranty service. Repaired or replaced parts and products
are warranted for the remainder of the original warranty period. You will be charged for repair or replace-
ment of the product made after the expiration of the warranty period.
IGNITION L.P. EXPRESSLY DISCLAIMS ALL WARRANTIES AND CONDITIONS NOT STATED IN THIS
LIMITED WARRANTY. ANY IMPLIED WARRANTIES THAT MAY BE IMPOSED BY LAW, INCLUDING
THE IMPLIED WARRANTY OF MERCHANTABILITY AND, IF APPLICABLE, THE IMPLIED WARRANTY
OF FITNESS FOR A PARTICULAR PURPOSE, SHALL EXPIRE ON THE EXPIRATION OF THE STATED
WARRANTY PERIOD.
EXCEPT AS DESCRIBED ABOVE, IGNITION L.P. SHALL HAVE NO LIABILITY OR RESPONSIBILITY TO
THE PURCHASER OF THE PRODUCT OR ANY OTHER PERSON OR ENTITY WITH RESPECT TO ANY
LIABILITY, LOSS OR DAMAGE CAUSED DIRECTLY OR INDIRECTLY BY USE OR PERFORMANCE OF
THE PRODUCT OR ARISING OUT OF ANY BREACH OF THIS WARRANTY,
INCLUDING, BUT NOT LIMITED TO, ANY DAMAGES RESULTING FROM INCONVENIENCE AND ANY
LOSS OF TIME, DATA, PROPERTY, REVENUE, OR PROFIT AND ANY INDIRECT, SPECIAL, INCIDENTAL,
OR CONSEQUENTIAL DAMAGES, EVEN IF IGNITION L.P. HAS BEEN ADVISED OF THE POSSIBILITY OF
SUCH DAMAGES.
Some States do not allow limitations on how long an implied warranty lasts or the exclusion or limitation
of incidental or consequential damages, so the above limitations or exclusions may not apply to you.
This warranty gives you specific legal rights, and you may also have other rights which vary from State to
State. You may contact Ignition L.P. at:
Ignition L.P., 3102 Maple Ave Suite 450, Dallas, TX 75201 02/09
For product support, call 1-866-315-0426

User’s Guide 40-268
Please read this user’s guide before using your new speakers
Printed
in China
©2009. SCK,
Inc. All rights
,
© 2009. Ignition L.P. All rights reserved. Auvio is a trademark used by Ignition L.P.
Package and user’s guide are recyclable. User’s guide contains recycled material.
Protect the environment by recycling used electronics. Go to
E-CyclingCentral.com to find an electronic recycling center near you.
Get more from your audio and video equipment. See what you’ve
been missing. With Auvio, you control the experience.
Auvio was established by a group of technophiles to provide
high quality audio and video products without the high sticker
price. The Auvio philosophy is for you to experience audio and
video as it was intended to be: pure and distortion free.
We know electronics can be intimidating. Auvio simplifies your
experience by providing the right products, with the right specs,
to work with your equipment.
Be confident about your purchase: your new Auvio product
incorporates the latest technology, is built to the highest quality
standards, and reduces environmental impact by complying
with RoHS environmental restrictions.
06A09
40-268
AO0367AAA1
Printed in China