Radio Shack Pro 82 Users Manual Www RadioShack With CircleR
PRO-82 to the manual d12318c7-417a-48ff-87d6-011028206071
2015-01-21
: Radio-Shack Radio-Shack-Pro-82-Users-Manual-352552 radio-shack-pro-82-users-manual-352552 radio-shack pdf
Open the PDF directly: View PDF ![]() .
.
Page Count: 56

© 2002 RadioShack Corporation.
All Rights Reserved.
Hypersearch, Hyperscan, Adaptaplug,
RadioShack, and RadioShack.com are trademarks
used by RadioShack Corporation.
20-315
OWNER’S MANUAL — Please read before using this equipment.
One-Touch Search Banks
— let you search preset
frequencies in separate
marine, fire/police, aircraft,
ham, and weather banks, to
make it easy to locate
specific types of calls.
Supplied Flexible Antenna with
BNC Connector — provides good
reception of strong local signals. You can
connect an external antenna with a BNC
connector to the scanner for improved
reception of distant/weaker signals.
Liquid-Crystal Display —
makes it easy to view and
change programming
information. The display
backlight also makes the
scanner easy to read in low-
light situations.
Tune — lets you tune
for new and unlisted
frequencies starting
from a specified
frequency.
Priority Channel — lets
you program a channel as
the priority channel. As
the scanner scans, it
checks the priority
channel every 2 seconds
so you do not miss
transmissions on that
channel.
241/:4"
422/%JCPPGN"8*(1#KT17*(
*CPFJGNF"5ECPPGT
20-315.fm Page 1 Wednesday, July 24, 2002 2:27 PM

Introduction
2
+0641&7%6+10
Your new RadioShack PRO-82
200 Channel VHF/Air/UHF
Handheld Scanner lets you scan
conventional transmissions, and is
preprogrammed with search
banks for convenience. By
pressing a one touch search key,
you can quickly search those
frequencies most commonly used
by public service and other
agencies without tedious and
complicated programming.
This scanner gives you direct
access to over 25,000 exciting
frequencies, including those used
by police and fire departments,
ambulance services, aircraft, and
amateur radio services, and you can
change your selection at any time.
Your scanner also has these
special features:
Ten Channel-Storage Banks —
you can store 20 channels in each
bank (200 total channels), letting
you group channels so you can
more easily identify calls.
Weather Alert — the scanner
automatically sounds an alert
when it receives a weather
emergency signal, providing more
complete information about
weather conditions in your
immediate area.
HyperSearch™and
HyperScan™ — let you set the
scanner to search at up to 50
steps per second (in frequency
bands with 5 kHz steps) and scan
at up to 25 channels per second,
to help you quickly find interesting
broadcasts.
%106'065
Introduction ............ 2
The FCC Wants You
to Know ................. 4
Scanning
Legally .............. 5
Preparation ............ 7
Installing
Batteries ........... 7
Charging
Rechargeable
Batteries ........... 8
Using
AC Power ......... 9
Using Vehicle
Battery
Power ............. 10
Connecting the
Supplied
Antenna .......... 10
Connecting an
Earphone/
Headphones ... 11
Connecting an
Extension
Speaker .......... 12
Using the
Belt Clip .......... 12
About Your
Scanner ............... 13
A Look at the
Keypad ................ 14
A Look at the
Display ................. 15
#"+/2146#06"#
If an icon appears at
the end of a
paragraph, go to the
box on that page with
the corresponding
icon for pertinent
information.
Rý— Warning
# — Important
.
..
. — Caution
°
°°
° — Hint
± — Note
20-315.fm Page 2 Wednesday, July 24, 2002 2:27 PM

Introduction
3
Lockout Function — lets you set
your scanner to skip over specified
channels or frequencies when
scanning or searching.
Memory Backup — keeps the
channel frequencies stored in
memory for about an hour in the
event of a power loss.
Wired Programming — you can
connect your scanner to a
personal computer and program
frequencies into it using an
optional cable and software. ±
Scan Delay — delays scanning
for about 2 seconds before moving
to another channel, so you can
hear more replies that are
transmitted on the same channel.
Duplicate Channel Alert —
warns you when the frequency
you are storing already exists in
memory.
Manual Access — you can
directly access any stored channel
by entering that channel's number.
Key Lock — lets you lock the
scanner's keys to prevent
accidentally changing the
scanner's programming.
Key Confirmation Tones — the
scanner sounds a confirmation
tone when you perform an
operation correctly, and an error
tone if you make an error.
Three Power Options — you can
power the scanner from internal
(rechargeable or non-
rechargeable batteries) or external
AC or DC power (using an optional
AC or DC adapter).
±"016'"±"
You can get the
cable, software, and
additional information
about using your
personal computer to
program your scanner
from your local
RadioShack store.
%106'065
(Continued)
Understanding
Banks .................. 20
Channel Storage
Banks .............. 20
One Touch
Banks .............. 20
Operation ............. 24
Turning On the
Scanner/Setting
Volume and
Squelch ........... 24
Storing Known
Frequencies Into
Channels ........ 24
Searching the
One Touch
Banks .................. 25
Using Tune ..... 27
Scanning the
Stored
Channels ........ 28
Turning Channel-
Storage Banks Off
and On ............ 29
Monitoring a
Stored
Channel .......... 29
Clearing a Stored
Channel .......... 30
Listening to the
Marine Bank ... 30
Listening to the
Weather
Band ............... 31
(Continued)
20-315.fm Page 3 Wednesday, July 24, 2002 2:27 PM

The FCC Wants You to Know
4
Your PRO-82 scanner can receive
these bands: ±
6*'"(%%"9#065"
;17"61"-019
This equipment has been tested
and found to comply with the limits
for a scanning receiver, pursuant
to Part 15 of the
FCC Rules
.
These limits are designed to
provide reasonable protection
against harmful interference in a
residential installation. This
equipment generates, uses and
can radiate radio frequency
energy and, if not installed and
used in accordance with the
instructions, may cause harmful
interference to radio
communications.
However, there is no guarantee
that interference will not occur in a
(TGSWGPE["
4CPIG"*/*\+
6[RGU"QH"
6TCPUOKUUKQPU
29 – 54 10-Meter
Ham Band,
VHF Lo,
6-Meter
Ham Band
108 – 136.9875 Aircraft
137 – 174 Military Land
Mobile,
2-Meter
Ham Band,
VHF Hi
380 – 512 UHF Aircraft,
Federal
Government,
70-cm
Ham Band,
UHF
Standard Band,
UHF “T” Band
%106'065
(Continued)
Special
Features .............. 33
Delay .............. 33
Locking Out
Channels or
Frequencies .... 34
Using
Priority ............ 36
Using the Display
Backlight ......... 36
Turning the
Key Tone
On and Off ...... 37
Using the
Key Lock ......... 37
Avoiding Image
Frequencies .... 38
Resetting/
Initializing the
Scanner .......... 38
Wired
Programming .. 39
A General Guide to
Scanning ............. 41
Guide to
Frequencies .... 41
Guide to the
Action Bands .. 43
Band
Allocation ........ 44
Frequency
Conversion ..... 50
Troubleshooting ... 51
Care ..................... 52
Service and
Repair .................. 52
Specifications ...... 53
±"016'"±"
See “Specifications”
on Page 53 for more
information about the
scanner's frequency
steps.
20-315.fm Page 4 Wednesday, July 24, 2002 2:27 PM

The FCC Wants You to Know
5
particular installation. If this
equipment does cause harmful
interference to radio or television
reception, which can be
determined by turning the
equipment off and on, the user is
encouraged to try to correct the
interference by one or more of the
following measures:
• Reorient or relocate the
receiving antenna.
• Increase the separation
between the equipment and
receiver.
• Connect the equipment into
an outlet on a circuit different
from that to which the receiver
is connected.
This device complies with Part 15
of the
FCC Rules
. Operation is
subject to the following two
conditions:
1. This device may not cause
harmful interference.
2. This device must accept any
interference received,
including interference that
may cause undesired
operation.
5ECPPKPI".GICNN["
Your scanner covers frequencies
used by many different groups
including police and fire
departments, ambulance services,
government agencies, private
companies, amateur radio
services, military operations,
pager services, and wireline
(telephone and telegraph) service
providers. It is legal to listen to
almost every transmission your
20-315.fm Page 5 Wednesday, July 24, 2002 2:27 PM

The FCC Wants You to Know
6
scanner can receive. However,
there are some transmissions you
should never intentionally listen to.
These include:
• Telephone conversations
(cellular, cordless, or other
private means of telephone
signal transmission)
• Pager transmissions
• Any scrambled or encrypted
transmissions
According to the Electronic
Communications Privacy Act
(ECPA), you are subject to fines
and possible imprisonment for
intentionally listening to, using, or
divulging the contents of such a
transmission unless you have the
consent of a party to the
communication (unless such
activity is otherwise illegal).
This scanner has been designed
to prevent reception of illegal
transmissions. This is done to
comply with the legal requirement
that scanners be manufactured so
as to not be easily modifiable to
pick up those transmissions. Do
not open your scanner's case to
make any modifications that could
allow it to pick up transmissions
that it is not legal to listen to. Doing
so could subject you to legal
penalties.
We encourage responsible, legal
scanner use.
Mobile use of this scanner is
unlawful or requires a permit in
some areas. Check the laws in
your area.
20-315.fm Page 6 Wednesday, July 24, 2002 2:27 PM

Preparation
7
24'2#4#6+10
You can power your scanner from
any of three sources: ±
• internal non-rechargeable
batteries or rechargeable
batteries (not supplied – see
“Installing Batteries”).
• standard AC power (with an
optional AC adapter - see
“Using AC Power” on
Page 9).
• vehicle power (with an
optional DC adapter – see
“Using Vehicle Battery Power”
on Page 10).
+PUVCNNKPI"$CVVGTKGU
Your scanner uses four AA
batteries (not supplied) for power.
You can use either the supplied
non-rechargeable battery holder
(black), or the supplied
rechargeable battery holder
(yellow) to install the batteries. Rý
If you install the rechargeable
battery holder, you can operate
the scanner and recharge the re-
chargeable batteries at the same
time. See “Charging
Rechargeable Batteries” on
Page 8.
For the best performance and
longest life, we recommend
RadioShack batteries. .
..
.
Follow these steps to install
batteries.
1. Press in on the battery
compartment cover on the
back of the scanner and slide
the cover down to remove it.
."%#76+10"."
• The battery holder
fits only one way.
Do not force it.
• Use only fresh
batteries of the
required size and
recommended
type.
• Do not mix old
and new batteries,
different types of
batteries
(standard,
alkaline, or
rechargeable), or
rechargeable
batteries of
different
capacities.
±"016'"±"
Connecting an AC or
DC adapter to the
scanner disconnects
internal batteries
when you use the
supplied non-
rechargeable battery
holder, but it does not
disconnect internal
batteries when you
use the supplied
rechargeable battery
holder.
R"9#40+0)"R"
Never install non-
rechargeable
batteries in the
rechargeable yellow
battery holder. Non-
rechargeable
batteries can get hot
or explode if you try
to recharge them.
20-315.fm Page 7 Wednesday, July 24, 2002 2:27 PM

Preparation
8
2. Pull the battery holder out of
the battery compartment.
3. If you are using non-
rechargeable batteries, place
them into the black holder, as
indicated by the polarity
symbols (+ and –) marked on
the holder. Or, if you are using
rechargeable batteries, place
them into the yellow holder,
as indicated by the polarity
symbols (+ and –) marked on
the holder.
4. Place the battery holder into
the battery compartment.
5. Replace the cover.
When 8
88
8 appears and the scanner
beeps or the scanner stops
operating properly, replace or
recharge the batteries. Rý.#
.#.#
.#
If the scanner stops working prop-
erly after connecting it to power,
try resetting it. See “Resetting the
Scanner” on Page 39. ±
%JCTIKPI"
4GEJCTIGCDNG"$CVVGTKGU"
Your scanner has a built-in
charging circuit that lets you
charge nickel-metal hydride (Ni-
MH) or nickel cadmium (Ni-CD)
rechargeable batteries (not
supplied) while they are in the
scanner. To charge rechargeable
batteries, you need to use a 9V
AC adapter (RadioShack Cat. No.
273-1767) or 10V DC adapter
(Cat. No. 273-1830) and a size C
Adaptaplug™ adapter (neither
supplied). Both are available at
your local RadioShack store.
.#
.#.#
.#±
R"9#40+0)"R"
Dispose of old
batteries promptly
and properly. Do not
burn or bury them.
."%#76+10"."
If you do not plan to
use the scanner with
batteries for a month
or more, remove the
batteries. Batteries
can leak chemicals
that can destroy
electronic parts.
±"016'"±"
Installing
Batteries
You must charge
rechargeable
batteries before you
use them the first
time. See “Charging
Rechargeable
Batteries”.
Charging
Rechargeable
Batteries
It takes about 15
hours to recharge fully
discharged 1500mAh
Ni-MH rechargeable
batteries. You can
operate the scanner
while recharging the
rechargeable
batteries, but charging
takes longer.
20-315.fm Page 8 Wednesday, July 24, 2002 2:27 PM

Preparation
9
Connect a size C Adaptaplug to
the adapter's cable with the tip set
to positive then insert the
Adaptaplug into the scanner’s
PWR DC 9V jack. For best results,
we recommend RadioShack
rechargeable nickel-metal hydride
(Ni-MH) 1500mAh batteries. ±
The scanner can also charge Ni-
Cd batteries. 600mAh batteries
require 6 hours and 850mAh
batteries require 8 hours to
charge.
Rechargeable batteries last longer
and deliver more power if you let
them fully discharge once a
month. To do this, use the scanner
until 8
88
8 appears. Then fully charge
the rechargeable batteries.
7UKPI"#%"2QYGT
You can power the scanner using
a 9V, 300 mA AC adapter (Cat.
No. 273-1767) and a size C
Adaptaplug™ adapter (neither
supplied). Both are available at
your local RadioShack store. .
..
.
To power the scanner using an AC
adapter, attach the Adaptaplug to
the AC adapter so the tip reads
positive (+), then insert the
Adaptaplug into the scanner's
PWR DC 9V jack. Then connect the
other end of the adapter to a
standard AC outlet.
."%#76+10"."
You must
use a
Class 2
power source that
supplies 9V DC
and delivers at
least 300 mA. Its
center tip must be
set to positive and
its plug must fit the
scanner's PWR
DC 9V jack. Using
an adapter that
does not meet
these specifica-
tions could dam-
age the scanner
or the adapter.
• Always connect
the AC adapter to
the scanner
before you
connect it to AC
power. When you
finish, disconnect
the adapter from
AC power before
you disconnect it
from the scanner.
!
±"016'"±"
When you charge Ni-
Cd batteries, pay
attention not to over
charge. Overcharging
shortens battery life.
20-315.fm Page 9 Wednesday, July 24, 2002 2:27 PM

Preparation
10
7UKPI"8GJKENG"$CVVGT["
2QYGT
You can power the scanner from a
vehicle’s 12V power source (such
as a cigarette-lighter socket) using
a 9V, 300 mA DC adapter and a
size C Adaptaplug™ adapter
(neither supplied). Both are
available at your local RadioShack
store. .
..
.
To power the scanner using a DC
adapter, attach the Adaptaplug to
the DC adapter so the tip reads
positive (+) and set the adapter's
voltage switch to 9V. Next, insert
the Adaptaplug into the scanner's
PWR DC 9V jack. Plug the other
end of the DC adapter into your
vehicle's cigarette-lighter socket.
±
%QPPGEVKPI"VJG"
5WRRNKGF"#PVGPPC
To attach the supplied flexible
antenna to the antenna jack on top
of your scanner, align the slots
around the antenna's connector
with the tabs on the antenna jack.
Press the antenna down over the
jack and turn the antenna's base
clockwise until it locks into place.
%100'%6+0)"#0"
176&114"#06'00#
The antenna connector on your
scanner makes it easy to use the
scanner with a variety of
antennas, such as an external
mobile antenna or outdoor base
station antenna. Your local
RadioShack store sells a variety of
antennas.
."%#76+10"."
Always connect the
DC adapter to the
scanner before you
connect it to the
power source. When
you finish, disconnect
the adapter from the
power source before
you disconnect it
from the scanner.
±"016'"±"
If you use a cigarette-
lighter power cable
and your vehicle's
engine is running, you
might hear electrical
noise from the engine
while scanning. This
is normal.
20-315.fm Page 10 Wednesday, July 24, 2002 2:27 PM

Preparation
11
Always use 50 Ohm coaxial cable,
such as RG-58 or RG-8, to
connect an outdoor antenna. For
lengths over 50 feet, use RG-8
low-loss dielectric coaxial cable. If
the antenna cable's connector
does not have a BNC connector,
you will also need a BNC adapter
(not supplied, available at your
local RadioShack store).
Follow the installation instructions
supplied with the antenna, route
the antenna cable to the scanner,
then connect it to the antenna
jack. Rý
%QPPGEVKPI"CP"'CTRJQPG1
*GCFRJQPGU
For private listening, you can plug
a 1/8-inch (3.5-mm) mini-plug
earphone or headphones (not
supplied), available at your local
RadioShack store, into on the
top of the scanner. This auto-
matically disconnects the internal
speaker.
.+56'0+0)"5#('.;
To protect your hearing, follow
these guidelines when you use an
earphone or headphones.
• Set the volume to the lowest
setting before you begin
listening. After you begin
listening, adjust the volume to
a comfortable level.
• Do not listen at extremely
high volume levels. Extended
high-volume listening can
lead to permanent hearing
loss.
R"9#40+0)"R"
Use extreme caution
when installing or
removing an outdoor
antenna. If the
antenna starts to fall,
let it go! It could
contact overhead
power lines. If the
antenna touches a
power line, contact
with the antenna,
mast, cable, or guy
wires can cause
electrocution and
death. Call the power
company to remove
the antenna. DO
NOT attempt to do
so yourself.
20-315.fm Page 11 Wednesday, July 24, 2002 2:27 PM

Preparation
12
• Once you set the volume, do
not increase it. Over time,
your ears adapt to the volume
level, so a volume level that
does not cause discomfort
might still damage your
hearing.
64#((+%"5#('6;
Do not use an earphone or
headphones with your scanner
when operating a motor vehicle or
riding a bicycle in or near traffic.
Doing so can create a traffic
hazard and could be illegal in
some areas.
If you use an earphone or
headphones with your scanner
while riding a bicycle, be very
careful. Do not listen to a
continuous broadcast. Even
though some earphones/
headphones let you hear some
outside sounds when listening at
normal volume levels, they still
can present a traffic hazard.
%QPPGEVKPI"CP"'ZVGPUKQP"
5RGCMGT
In a noisy area, an amplified
extension speaker (not supplied)
available at your local RadioShack
store, might provide more
comfortable listening. Plug the
speaker cable's 1/8 inch (3.5 mm)
mini-plug into . ±ý
7UKPI"VJG"$GNV"%NKR
You can use the belt clip attached
to the back of the scanner for
hands-free carrying when you are
on the go. Slide the belt clip over
your belt or waistband.
±"016'"±"
You must use an
amplified speaker with
this scanner. Non-
amplified speakers do
not provide sufficient
volume for
comfortable listening.
20-315.fm Page 12 Wednesday, July 24, 2002 2:27 PM

About Your Scanner
13
#$176";174"
5%#00'4
Once you understand a few simple
terms used in this manual and
familiarize yourself with your
scanner's features, you can put
the scanner to work for you. You
simply determine the type of
communications you want to
receive, then set the scanner to
scan them.
A
frequency
is the receiving signal
location (expressed in kHz or
MHz). To find active frequencies,
you can use the search function.
You can also search the One
Touch Search Banks, which are
preset groups of frequencies
categorized by type of service.
When you find a frequency, you
can store it into a programmable
memory location called a channel,
which is grouped with other
channels in a channel-storage
bank. You can then scan the
channel-storage banks to see if
there is activity on the frequencies
stored there. Each time the
scanner finds an active frequency,
it stays on that channel until the
transmission ends.
20-315.fm Page 13 Wednesday, July 24, 2002 2:27 PM
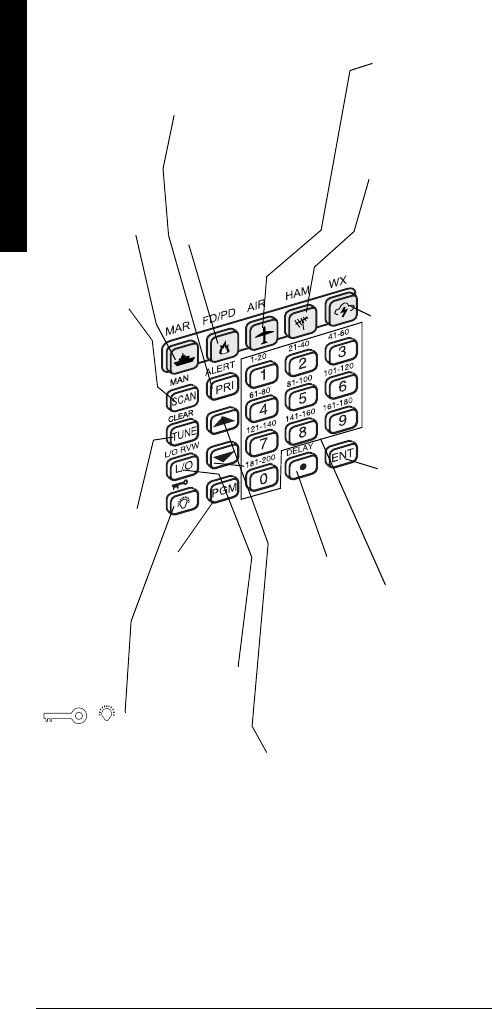
A Look at the Keypad
14
#".11-"#6"6*'"-';2#&
FD/PD Lets you
search the
scanner's
preprogrammed
fire/police band.
AIR Lets you
search the
scanner's
preprogrammed
aircraft band.
HAM Lets you
search the
scanner's
preprogrammed
amateur radio
band.
WX
Lets you search
the scanner's
preprogrammed
weather
channels.
SCAN/MAN
Scans any
preprogrammed
channels; stops
scanning and
lets you directly
enter a channel
number.
PRI/ALERT Turns the priority feature
and WX alert mode on and off.
Number Keys
Each key has a
single digit (0 to
9) and a range
of numbers.
Use the range
of numbers
above the key
(21-40 for
example) to
select the
channel in a
channel-
storage bank.
See
“Understanding
Banks” on
Page 20.
TUNE/CLEAR
Lets you tune
a frequency
along with H
or G; clears
an incorrect
entry.
ENT (enter)
Enters
frequencies
into channels.
DELAY/´
Programs a 2-
second delay
for the
selected
channel;
enters a
decimal point.
PGM
Programs
frequencies
into
channels.
H or G
Searches up or
down for active
frequencies or
selects the
direction when
scanning
channels.
L/O RVW/L/O
Reviews
locked-out
frequencies;
lets you lock
out selected
channels or
frequencies.
/
Locks (and
unlocks)
the keypad
to prevent
accidental
entries;
turns the
backlight
on and off.
MAR Lets you
search the
scanner's
preprogrammed
marine band.
20-315.fm Page 14 Wednesday, July 24, 2002 2:27 PM

15
A Look at the Display
#".11-"#6"6*'"&+52.#;
The display has indicators that show the scanner's
current operating status. This quick look at the display will
help you understand how your scanner operates.
87DA
87DA87DA
87DA
Appears with
numbers (1-10)
to indicate the
scan bank.
Bank numbers
with a bar under
them show
which banks are
turned on for
scanning (see
“Understanding
Banks” on
Page 20).
Appears when you lock the keypad.
C7H
C7HC7H
C7H
Indicates that the scanner is searching
the marine bank (see “Listening to the
Marine Bank” on Page 30).
MN
MNMN
MN
Indicates that the scanner is
searching the weather channels.
<:%F:
<:%F:<:%F:
<:%F:
Indicates that the
scanner is searching
the fire/police bank.
7?H
7?H7?H
7?H
Indicates that
the scanner is
searching the
aircraft bank.
>7C
>7C>7C
>7C
Indicates that the
scanner is
searching the
amateur radio
bank.
H or G
Indicates the search
or scan direction.
IH9>
IH9>IH9>
IH9>
Appears during service
bank searches.
9>
9>9>
9>
Appears with
digits (1-200)
or F
FF
F to show
which
channel the
scanner is
tuned to.
C7D
C7DC7D
C7D
Appears when you
manually select a
channel.
20-315.fm Page 15 Wednesday, July 24, 2002 2:27 PM

A Look at the Display
16
8
88
8
Appears when the batteries are
low.
B%E
B%EB%E
B%E (lockout)
Appears when you manually
select a channel that was
previously locked out during
scanning or when you review a
locked-out frequency.
I97D
I97DI97D
I97D
Appears when the scanner scans
channels.
F=C
F=CF=C
F=C
Appears when you program
frequencies into the scanner's
channels.
FH?
FH?FH?
FH?
Appears when the priority feature
is turned on.
:BO
:BO:BO
:BO
Appears when you program a 2-
second delay.
7BBý9>ýBe$#ekj
7BBý9>ýBe$#ekj7BBý9>ýBe$#ekj
7BBý9>ýBe$#ekj
Appears when you lock out the all
marine channel.
XýNý#<KBB
XýNý#<KBBXýNý#<KBB
XýNý#<KBB
Appears when you try to enter a
frequency during a search when
all displayed banks channels are
full.
#ZKFB#
#ZKFB##ZKFB#
#ZKFB#
Appears when you try to store a
frequency that is already stored in
another channel.
:;<7KBj
:;<7KBj:;<7KBj
:;<7KBj
Appears when you remove all the
lock-outs from the FD/PD, AIR, or
HAM bank frequencies.
20-315.fm Page 16 Wednesday, July 24, 2002 2:27 PM

A Look at the Display
17
:#;hheh
:#;hheh:#;hheh
:#;hheh
Appears when the scanner
receives a data error during wired
programming.
;dZ
;dZ;dZ
;dZ
Appears when the scanner has
finished wired programming.
;hheh
;hheh;hheh
;hheh
Appears when you make an entry
error.
<Beý7BB#9B
<Beý7BB#9B<Beý7BB#9B
<Beý7BB#9B
Appears when you remove all the
locked-out frequencies during a
FD/PD, AIR, or HAM bank or tune
search.
<Be#<KBB
<Be#<KBB<Be#<KBB
<Be#<KBB
Appears when you try to lock out a
frequency during a tune when 50
frequencies are already locked
out.
<ýB#ekj
<ýB#ekj<ýB#ekj
<ýB#ekj
Appears when you start a tune
from a locked-out frequency.
B#h
B#hB#h
B#h
Appears when you review locked-
out frequencies.
e<<ýjed;
e<<ýjed;e<<ýjed;
e<<ýjed;
Appears when you turn the key
tone off.
edýjed;
edýjed;edýjed;
edýjed;
Appears when you turn the key
tone on.
F
FF
F
Appears when the scanner is
tuned to the priority channel.
Ij7hj
Ij7hjIj7hj
Ij7hj
Appears when the scanner starts
wired programming.
20-315.fm Page 17 Wednesday, July 24, 2002 2:27 PM

A Look at the Display
18
#j#
#j##j#
#j#
Appears when the scanner is
tuning frequencies.
M_h;Z
M_h;ZM_h;Z
M_h;Z
Appears when you set the scanner
to its wired programming mode to
program frequencies into it.
C7h
C7hC7h
C7h
Appears about 2 seconds after
you press MAR.
<?h;
<?h;<?h;
<?h; / FeB?9;
FeB?9;FeB?9;
FeB?9;
Appears about 2 seconds after
you press FD/PD.
7?h
7?h7?h
7?h
Appears about 2 seconds after
you press AIR.
>7C
>7C>7C
>7C
Appears about 2 seconds after
you press HAM.
M;7j^;h
M;7j^;hM;7j^;h
M;7j^;h
Appears about 2 seconds after
you press WX.
BeýL><
BeýL><BeýL><
BeýL><
Appears when you turn on the low
VHF sub-bank while searching in
the fire/police bank.
>_ýL><
>_ýL><>_ýL><
>_ýL><
Appears when you turn on the
high VHF sub-bank while
searching in the fire/police bank.
K><
K><K><
K><
Appears when you turn on the
UHF sub-bank while searching in
the fire/police bank.
'&ýC
'&ýC'&ýC
'&ýC
Appears when you turn on the
10m sub-bank while searching in
the ham bank.
20-315.fm Page 18 Wednesday, July 24, 2002 2:27 PM

A Look at the Display
19
,ýC
,ýC,ýC
,ýC
Appears when you turn on the 6m
sub-bank while searching in the
HAM bank.
(ýC
(ýC(ýC
(ýC
Appears when you turn on the 2m
sub-bank while searching in the
HAM bank.
-&9ýC
-&9ýC-&9ýC
-&9ýC
Appears when you turn on the
70cm sub-bank while searching in
the HAM bank.
20-315.fm Page 19 Wednesday, July 24, 2002 2:27 PM

Understanding Banks
20
70&'456#0&+0)"
$#0-5
%JCPPGN"5VQTCIG"$CPMU
A bank is a storage area for a
group of channels. Channels are
storage areas for frequencies.
Whereas a channel can only
contain one frequency, a bank can
hold numerous channels.
To make it easier to identify and
select the channels you want to
listen to, your scanner divides the
channels into 10 banks (1 to 10) of
20 channels each, a total of 200
channels. You can use each
channel-storage bank to group
frequencies. ±
1PG"6QWEJ"$CPMU
The scanner is preprogrammed
with the frequencies allocated by
marine, fire/police, aircraft, ham
radio, and weather services. This
is handy for quickly finding active
frequencies instead of searching
through an entire band (see
“Searching the One Touch Banks”
on Page 25). ±
Marine
%JCPPGN (TGSWGPE["
*/*\+
01 156.0500
05 156.2500
06 156.3000
07 156.3500
08 156.4000
09 156.4500
10 156.5000
11 156.5500
±"016'"±"
Channel Storage
Banks
The scanner is preset
so each bank is
turned on (see
“Turning Channel-
Storage Banks Off
and On” on Page 29).
One-Touch Banks
The frequencies in the
scanner's one touch
banks are preset. You
cannot change them.
±"016'"±"
Both frequencies
(transmission and
reception) are shown
for marine channels
used for duplex
transmission.
20-315.fm Page 20 Wednesday, July 24, 2002 2:27 PM

Understanding Banks
21
12 156.6000
13 156.6500
14 156.7000
15 156.7500
16 156.8000
17 156.8500
18 156.9000
19 156.9500
20 157.0000/161.6000
21 157.0500
22 157.1000
23 157.1500
24 157.2000/161.8000
25 157.2500/161.8500
26 157.3000/161.9000
27 157.3500/161.9500
28 157.4000/162.0000
63 156.1750
64 156.2250/160.8250
65 156.2750
66 156.3250
67 156.3750
68 156.4250
69 156.4750
70 156.5250
71 156.5750
72 156.6250
73 156.6750
74 156.7250
77 156.8750
78 156.9250
79 156.9750
80 157.0250
81 157.0750
82 157.1250
83 157.1750
%JCPPGN (TGSWGPE["
*/*\+
20-315.fm Page 21 Wednesday, July 24, 2002 2:27 PM

Understanding Banks
22
Fire/Police
84 157.2250/161.8250
85 157.2750/161.8750
86 157.3250/161.9250
87 157.3750/161.9750
88 157.4250
)TQWR "(TGSWGPE["4CPIG"
*/*\+
5VGR"
*M*\+
1
33.420 – 33.980 20
37.020 – 37.420 20
39.020 – 39.980 20
42.020 – 42.940 20
44.620 – 45.860 40
45.880 –
45.900 –
45.940 – 46.060 40
46.080 – 46.500 20
2
153.770 – 154.130 60
154.145 – 154.445 15
154.650 – 154.950 15
155.010 – 155.370 60
155.415 – 155.700 15
155.730 – 156.210 60
158.730 – 159.210 60
166.250 –
170.150 –
3
453.0375 – 453.9625 12.5
458.0375 – 458.9625 12.5
460.0125 – 460.6375 12.5
465.0125 – 465.6375 12.5
%JCPPGN (TGSWGPE["
*/*\+
20-315.fm Page 22 Wednesday, July 24, 2002 2:27 PM

Understanding Banks
23
Air
Ham Radio
Weather
"(TGSWGPE["4CPIG"
*/*\+
5VGR"
*M*\+
108.000-136.9875 12.5
)TQWR "(TGSWGPE["4CPIG"
*/*\+
5VGR"
*M*\+
1 29.000 – 29.700 5
2 50.000 – 54.000 5
3 144.000 – 148.000 5
4 420.000 – 450.000 12.5
%JCPPGN "(TGSWGPE["
*/*\+
1 162.400
2162.425
3 162.450
4162.475
5 162.500
6162.525
7 162.550
20-315.fm Page 23 Wednesday, July 24, 2002 2:27 PM

Operation
24
12'4#6+10
6WTPKPI"1P"VJG"5ECPPGT1
5GVVKPI"8QNWOG"CPF"
5SWGNEJ
1. Turn SQUELCH until the
indicator points to MIN before
you turn on the scanner.
2. To turn on the scanner, turn
VOLUME clockwise until you
hear a hissing sound.
3. Turn SQUELCH clockwise, just
until the hissing sound stops.
±
4. To turn off the scanner when
you finish, turn VOLUME
counterclockwise to OFF.
5VQTKPI"-PQYP"
(TGSWGPEKGU"+PVQ"%JCPPGNU
Good references for active frequen-
cies are the
RadioShack Police
Call Guide including Fire and Emer-
gency Services
,
Official Aeronauti-
cal Frequency Directory
, and
Mari-
time Frequency Directory
. We up-
date these directories every year,
so be sure to get a current copy.
1. Press PGM. F=C
F=CF=C
F=C appears.
Then enter the channel
number (1-200) where you
want to store a frequency,
then press PGM again.
2. Use the number keys and
DELAY/´ to enter the frequen-
cy (including the decimal
point) you want to store.
3. Press ENT to store the
frequency into the channel. ±
±"016'"±"
Turning On the
Scanner/Setting
Volume and
Squelch
• To listen to a weak
or distant station,
turn SQUELCH
counterclockwise.
If reception is poor,
turn SQUELCH
clockwise to cut
out weak
transmissions.
• If SQUELCH is
adjusted so you
always hear a
hissing sound, the
scanner will not
scan or search
properly.
Storing Known
Frequencies Into
Channels
• If you made a
mistake in Step 2,
;hheh
;hheh;hheh
;hheh appears and
the scanner beeps
three times when
you press ENT.
Simply start again
from Step 2.
20-315.fm Page 24 Wednesday, July 24, 2002 2:27 PM

Searching the One Touch Banks
25
Your scanner automatically
rounds the entered frequency
down to the closest valid fre-
quency. For example, if you
enter a frequency of 151.473,
your scanner accepts it as
151.470.
Press DELAY/´ if you want the
scanner to pause 2 seconds
on this channel before it
proceeds to the next channel
after a transmission ends (see
“Delay” on Page 33). The
scanner also stores this
setting in the channel.
To program the next channel in
sequence, press PGM and repeat
Steps 2 and 3.
5'#4%*+0)"6*'"
10'"617%*"$#0-5
Your scanner contains groups of
preset frequencies called One
Touch Banks. Each one touch
bank is associated with a specific
activity (see “One Touch Banks”
on Page 20). You can search for
marine, fire/police, air, ham, and
weather transmissions even if you
do not know the specific frequen-
cies that are used in your area. ±
The fire/police and ham one touch
banks have separate groups of
frequencies called
sub-banks
.
This lets you search for and select
only those frequencies that fall
within a specific range within the
fire/police and ham one-touch
banks. ±
To listen to the marine bank, see
“Listening to the Marine Bank” on
±"016'"±"
Storing Known
Frequencies Into
Channels
• If you entered a
frequency that is
already stored in
another channel,
the scanner beeps
three times while
displaying the
lowest channel
number where the
frequency is already
stored, then #ZKFB
#ZKFB#ZKFB
#ZKFB-
then the frequency
you entered flash
on the display. To
store the frequen-
cy anyway, press
ENT again. Press
TUNE/CLEAR to
clear the
frequency.
Searching the
One Touch Banks
• You can use the
scanner's delay
feature while
searching the
banks (see “Delay”
on Page 33).
• The fire/police
one-touch bank
contains low VHF,
high VHF, and
UHF sub-banks.
The ham one-
touch bank
contains 10m, 6m,
2m, and 70cm
sub-banks.
20-315.fm Page 25 Wednesday, July 24, 2002 2:27 PM

Searching the One Touch Banks
26
Page 30. To listen to the weather
bank, see “Listening to the
Weather Band” on Page 31.
1. Press FD/PD, AIR, or HAM. <?h;ý
<?h;ý<?h;ý
<?h;ý
FeB?9;
FeB?9;FeB?9;
FeB?9;, 7?h
7?h7?h
7?h, or >7C
>7C>7C
>7C appears.
After about 2 seconds, the
scanner starts searching.
When the scanner finds an
active frequency, it stops
searching and displays the
frequency's number. ±
2. To search for another active
frequency in the selected
band, hold down H or G for
about 1 second. To search for
an active frequency within a
sub-band of the fire/police or
ham band, press a number
key to select the sub-band
you want. To select a different
band and search for another
active fre-quency, repeat Step
1.
Once you find interesting frequen-
cies during the search, you can
store them into the scanner’s
channel-storage banks. Frequen-
cies found in the one touch banks
are automatically assigned to
specific channel-storage banks as
shown below. You can quickly scan
the channel-storage banks corres-
ponding to the one touch banks by
pressing a one touch bank key
and SCAN/MAN successively.
5GCTEJ"$CPMU %JCPPGN"5VQTCIG"
$CPMU
Fire/Police 4, 5
Aircraft 6
Ham 7, 8
±"016'"±"
• To reverse the
search direction at
any time, hold
down H or G for
about 1 second.
• To search up or
down the band in
small increments,
repeatedly press H
or G. (See “One
Touch Banks” on
Page 20 for
frequency steps).
• To pause the
search while
receiving a signal,
press H or G. To
resume searching,
hold down H or G.
• To quickly move
up or down
through the
frequencies, hold
down H or G. The
scanner tunes
through the fre-
quencies until you
release H or G.
• If necessary, you
can select search
groups using the
number keys.
20-315.fm Page 26 Wednesday, July 24, 2002 2:27 PM

Searching the One Touch Banks
27
1. To store the displayed
frequency in the lowest
available channel in the
assigned channel-storage
banks, press ENT when you
find a frequency. The channel
number flashes.
2. Press ENT again to store the
frequency. The channel and
frequency flash twice. If you
want to cancel the operation,
press TUNE/CLEAR instead of
ENT.
To scan the channel-storage
banks, press the one touch bank
key, then SCAN/MAN while <?h;%
<?h;%<?h;%
<?h;%
FEb_9;
FEb_9;FEb_9;
FEb_9;, 7?h
7?h7?h
7?h, or >7C
>7C>7C
>7C appears. ±
If there is no empty channel at an
available bank, XýNý#<KBB
XýNý#<KBBXýNý#<KBB
XýNý#<KBB (where N
NN
N
is the bank number) appears after
you press ENT. To store more
frequencies, you must clear some
channels. See “Clearing a Stored
Channel” on Page 30. To continue
searching after XýNý#<KBB
XýNý#<KBBXýNý#<KBB
XýNý#<KBB appears,
press TUNE/CLEAR.
7UKPI"6WPG
You can set the scanner to search
through all receivable frequencies
from a specified frequency. You
can use the scanner's delay
feature while using tune. ±
1. Repeatedly press SCAN/MAN
until C7D
C7DC7D
C7D appears.
2. Enter the desired channel
number you want to use as a
starting point for the tune.
Then press SCAN/MAN again.
±"016'"±"
Searching the
One Touch Banks
If you entered a
frequency that is
already stored in
another channel,
#ZKFB#
#ZKFB##ZKFB#
#ZKFB# (duplicate)
and the lowest-
numbered channel
containing the
duplicate frequency
flash for about 3
seconds. If you want
to store the frequency
anyway, press ENT
again. You can then
delete the frequency
later. See “Clearing a
Stored Channel” on
Page 30.
Using Tune
• To reverse the
tuning direction at
any time, hold
down H or G for
about 1 second.
• To tune up or down
the selected band
in small increments
(5 or 12.5 kHz
steps), repeatedly
press H or G.
• To pause tuning,
press H or G. To
resume tuning,
hold down H or G.
• To quickly move
up or down
through the
frequencies, hold
down H or G. The
scanner tunes
through the
frequencies until
you release
H or G.
20-315.fm Page 27 Wednesday, July 24, 2002 2:27 PM

Searching the One Touch Banks
28
3. Press TUNE/CLEAR to start
tune. #j#
#j##j#
#j# appears.
4. Hold down H or G for about 1
second to tune up or down. H
or G appear and the scanner
searches the frequencies.
When the scanner finds an
active frequency, it stops
searching and displays the
frequency's number. ±
5. To search for another active
frequency, hold down H or G
for about 1 second.
Once you find interesting
frequencies during the search, you
can store them in the scanner’s
channel-storage banks. Frequen-
cies found during tune search are
automatically assigned to channel-
storage banks 9 and 10.
1. To store the displayed fre-
quency in the lowest available
channel in the assigned
banks, press ENT. The
channel number flashes.
2. Press ENT again to store the
frequency. The channel and
frequency flash twice. If you
want to cancel the operation,
press TUNE/CLEAR instead of
ENT. After storing the frequen-
cy, the scanner continues to
search for frequencies. ±
5ECPPKPI"VJG"5VQTGF"
%JCPPGNU
To set the scanner to continuously
scan through all channels with
stored frequencies, repeatedly
press SCAN until I97D
I97DI97D
I97D and H
appear. The scanner rapidly scans
until it finds an active frequency.
±"016'"±"
• If there is no empty
channel, Xý/ý'&ý
Xý/ý'&ýXý/ý'&ý
Xý/ý'&ý
#<KBB
#<KBB#<KBB
#<KBB appears
after you press
ENT. To store
more frequencies,
you must clear
some channels.
See “Clearing a
Stored Channel”
on Page 30. To
continue tuning
after Xý/ý'&ý#<KBB
Xý/ý'&ý#<KBBXý/ý'&ý#<KBB
Xý/ý'&ý#<KBB
appears, press
TUNE/CLEAR.
• If you entered a
frequency that is
already stored in
another channel,
#ZKFB#
#ZKFB##ZKFB#
#ZKFB# (duplicate)
and the lowest-
numbered channel
containing the
duplicate
frequency flash for
about 3 seconds. If
you want to store
the frequency
anyway, press
ENT again. You
can then delete the
frequency later.
See “Clearing a
Stored Channel”
on Page 30.
20-315.fm Page 28 Wednesday, July 24, 2002 2:27 PM

Searching the One Touch Banks
29
If the scanner finds an active
frequency, it stops and displays
that channel and frequency
number, then it automatically
begins scanning again when the
transmission on that frequency
ends. ±
6WTPKPI"%JCPPGN/5VQTCIG"
$CPMU"1HH"CPF"1P
Channel-storage banks (1-10) are
on when they have a bar
underneath them and off when no
bar appears underneath them. To
turn off a channel-storage bank,
press the bank's number key
during scanning. The bar under
the bank's number disappears.
To turn on a channel-storage bank
(1-10) during scanning, press the
bank's number key. A bar appears
under the bank's number. ±
You cannot turn off all banks.
There must be at least one active
bank.
You can manually select any
channel in a bank, even if the bank
is turned off.
When you turn on a bank during
scanning, the scanner moves to
the selected bank and scan it.
If no transmission is found, the
scanner continues scanning to
scan through all selected banks.
/QPKVQTKPI"C"
5VQTGF"%JCPPGN
You can continuously monitor a
specific channel without scanning.
This is useful if you hear an
emergency transmission on a
±"016'"±"
Scanning the
Stored Channels
• To reverse the
scanning direction,
press H or G.
• To set the scanner
to remain on the
current channel for
2 seconds after the
transmission ends,
see “Delay” on
Page 33.
• To set the scanner
to remain on the
current channel,
even after the
transmission
stops, press
SCAN/MAN at any
time during the
transmission. C7D
C7DC7D
C7D
appears and I97Dý
I97DýI97Dý
I97Dý
disappears (see
“Monitoring a
Stored Channel”
on Page 29).
• To lock out
channels so the
scanner does not
stop for a
transmission on
those channels,
see “Locking Out
Channels or
Frequencies” on
Page 34.
Turning Channel-
Storage Banks Off
and On
The scanner does not
scan any of the
channels within the
banks you have
turned off.
20-315.fm Page 29 Wednesday, July 24, 2002 2:27 PM

Searching the One Touch Banks
30
channel and do not want to miss
any details – even though there
might be periods of silence – or if
you simply want to monitor that
channel.
Follow these steps to manually
select a channel.
1. Repeatedly press SCAN/MAN
until C7D
C7DC7D
C7D appears.
2. Enter the channel number
(1-200).
3. Press SCAN/MAN again.
%NGCTKPI"C"5VQTGF"%JCPPGN
If you no longer want a frequency
stored in a channel (and you do
not want to replace that frequency
with a different one), follow these
steps to clear the stored
frequency.
1. Press SCAN/MAN to stop
scanning.
2. Use the number keys to enter
the channel number (1-200)
you want to clear.
3. Press PGM. F=C
F=CF=C
F=C appears.
4. Press 0 then ENT. The
frequency number changes to
&&&$&&&&
&&&$&&&&&&&$&&&&
&&&$&&&& to indicate the
channel is cleared.
.KUVGPKPI"VQ"VJG"
/CTKPG"$CPM
To listen to the marine bank, press
MAR. C7h
C7hC7h
C7h appears for about 2
seconds, then the scanner starts
searching from marine channel 16.
20-315.fm Page 30 Wednesday, July 24, 2002 2:27 PM

Searching the One Touch Banks
31
To stop searching the channels,
hold down H or G for about 2
seconds. IH9>
IH9>IH9>
IH9> disappears and
C7D
C7DC7D
C7D appears.
To change the channel manually,
press H or G.
To search through the marine
bank again, hold down H or G for
about 2 seconds. C7D
C7DC7D
C7D disappears
and IH9>
IH9>IH9>
IH9> appears. To change the
searching direction, press H or G.
You can select a marine channel
directly. When the scanner stops
searching the marine bank, use
the number keys to enter the two-
digit channel number.
.KUVGPKPI"VQ"VJG"
9GCVJGT"$CPF
To hear your local forecast and
regional weather information,
press WX. Your scanner begins to
scan through the weather band.
Your scanner should stop within a
few seconds on your local weather
broadcast. If the broadcast is
weak, you can press WX again to
resume scanning.
%JCPPGN "(TGSWGPE["
*/*\+
1 162.400
2162.425
3 162.450
4162.475
5 162.500
6162.525
7 162.550
20-315.fm Page 31 Wednesday, July 24, 2002 2:27 PM

Searching the One Touch Banks
32
9:"#.'46
Your scanner's WX alert warns
you of serious weather conditions
by sounding an alarm if a National
Weather Service broadcaster in
your area broadcasts a weather
alert tone.
To set the scanner so it sounds an
alarm when a weather alert tone is
broadcast, press PRI/ALERT while
you are listening to the WX
channel. 7B;hjý
7B;hjý7B;hjý
7B;hjýappears.
If the scanner detects the weather
alert, it sounds an alarm. The
scanner sounds the alert for five
minutes when it receives the
weather alert signal. After five
minutes the alert stops and the
scanner beeps every ten seconds.
Press any key except /
to
turn off the alarm. To cancel the
weather alert operation, press PRI/
ALERT again. ±
±"016'"±"
• WX alert is only for
receiving a
weather alert.
• When the scanner
detects a 1050 Hz
alert tone, WX alert
activates and you
hear a weather
alert.
20-315.fm Page 32 Wednesday, July 24, 2002 2:27 PM

Special Features
33
52'%+#."('#674'5
&GNC[
Many agencies use a two-way
radio system that has a period of
several seconds between a query
and a reply. To avoid missing a
reply, you can program a 2-
second delay into any channel or
frequency. When your scanner
stops on a channel or frequency
with a programmed delay, :BOý
:BOý:BOý
:BOý
appears and the scanner
continues to monitor that channel
or frequency for 2 seconds after
the transmission stops before
resuming scanning, searching, or
tuning.
You can program a 2-second
delay in any of these ways:
• If the scanner is scanning and
stops on an active channel,
quickly press DELAY/´ before
it resumes scanning.
• If the desired channel is not
selected, manually select the
channel, then press DELAY/´.
• If the scanner is searching or
tuning, press DELAY/´. :BO
:BO:BO
:BO
appears and the scanner
automatically adds a 2-
second delay to every
transmission it stops on in
that band.
To turn off the 2-second delay in a
channel or for all frequencies,
press DELAY/´ while the scanner is
monitoring that channel or
frequency. :BO
:BO:BO
:BO disappears.
20-315.fm Page 33 Wednesday, July 24, 2002 2:27 PM

Special Features
34
.QEMKPI"1WV"%JCPPGNU"QT"
(TGSWGPEKGU
You can increase the effective
scanning or search speed by
locking out individual channels or
frequencies that have a
continuous transmission, such as
a weather channel (see “National
Weather Frequencies” on
Page 41) or a birdie frequency
(see “Birdie Frequencies” on
Page 41).
To lock out a channel while
scanning or a frequency during
one-touch search or while tuning,
press L/O/L/O RVW when the
scanner stops on the channel or
frequency. If you locked out a
frequency, the scanner locks it out
then continues searching.
To manually lock out a channel,
select the channel then hold down
L/O/L/O RVW until B%E
B%EB%E
B%E appears.
To remove the lockout from a
channel, manually select that
channel again, then press
L/O/L/O RVW until B%E
B%EB%E
B%E disappears.
See “Removing Lockouts From All
Frequencies in a One Touch
Search Bank” on Page 35 and
“Removing Lockouts From All
Frequencies” on Page 35 for more
information about removing
lockout from frequencies. ±
4'8+'9+0)".1%-'&/176"
(4'37'0%+'5
To review the frequencies you
locked out, hold down L/O/L/O
RVW for about 2 seconds during a
search, then repeatedly press H
or G. The scanner beeps if there
are no locked-out frequencies, or
±"016'"±"
• Your scanner
automatically locks
out empty
channels.
• You can still
manually select
locked-out
channels.
• You can lock out
as many as 50
frequencies during
a search. If you try
to lock out more,
<Beý#<KBB
<Beý#<KBB<Beý#<KBB
<Beý#<KBB appears
(see “Reviewing
Locked-Out
Frequencies” and
“Removing
Lockouts From All
Frequencies” on
Page 35).
20-315.fm Page 34 Wednesday, July 24, 2002 2:27 PM

Special Features
35
B#h
B#hB#h
B#h appears and the scanner
displays all locked out frequencies
as you press H or G. When you
reach the highest locked-out
frequency, the scanner beeps
twice and returns to the lowest
locked-out frequency.
4'/18+0)".1%-1765"
(41/"#.."(4'37'0%+'5"+0"
#"10'"617%*"5'#4%*"
$#0-"
1. Hold down L/O/L/O RVW for
about 2 seconds during a
search or while tuning. B#h
B#hB#h
B#h
appears. ±
2. While holding down TUNE/
CLEAR, press the one-touch
search key where you locked
out frequencies. Z;<7KBj
Z;<7KBjZ;<7KBj
Z;<7KBj
appears.
3. Press ENT. The scanner
clears any lockouts from all
frequencies in a one touch
bank. Or, if you do not want to
clear the lockouts, press
TUNE/CLEAR.
4'/18+0)".1%-1765"
(41/"#.."(4'37'0%+'5
1. Hold down L/O L/O RVW for
about 2 seconds during a
search or tune. B#h
B#hB#h
B#h appears.
2. While holding down TUNE/
CLEAR, press L/O L/O RVW.
<Beý7BB#9B
<Beý7BB#9B<Beý7BB#9B
<Beý7BB#9B appears.
3. Press ENT. The scanner
clears any lockouts from all
frequencies (except in the
marine bank). Or, if you do not
want to clear the lockouts,
press TUNE/CLEAR.
±"016'"±"
• These steps do not
clear any lockouts
in the marine and
weather bank.
• If you locked out
frequencies which
are within the
range of any of the
one touch search
banks during tune,
the scanner also
removes those
locked-out
frequencies when
you use these
steps. For
example, if you
locked out 29.000
MHz while tuning,
the scanner
removes it since
29.000 MHz is one
of the frequencies
in the ham radio
service bank.
20-315.fm Page 35 Wednesday, July 24, 2002 2:27 PM

Special Features
36
7UKPI"2TKQTKV[
The priority feature lets you scan
through channels and still not miss
important or interesting calls on a
frequency you select. You can
program one frequency into the
priority channel. As the scanner
scans, if the priority feature is
turned on, the scanner checks the
priority channel for activity every 2
seconds. ±
1. Press PGM, then press PRI/
ALERT. F9>
F9>F9>
F9> and &&&$&&&&
&&&$&&&&&&&$&&&&
&&&$&&&& or
the previously-stored
frequency appear.
2. Enter the frequency you want
to enter into the priority
channel, then press ENT. The
display flashes twice.
To turn on the priority feature,
press PRI/ALERT during scanning
or searching. FH?
FH?FH?
FH? appears. The
scanner checks the priority
channel every 2 seconds and
stays on the channel if there is
activity. F9>
F9>F9>
F9> and the frequency
appear whenever the scanner is
set to the priority channel.
To turn off the priority feature,
press PRI/ALERT. FH?
FH?FH?
FH? disappears.
7UKPI"VJG"&KURNC["
$CEMNKIJV
You can turn on the display's
backlight for easy viewing in the
dark. Press / to turn on
the light for 5 seconds. To turn off
the light sooner, press /
again.
Press both PGM and / to
turn on the display's backlight for
±"016'"±"
If you program a
weather frequency
into the priority
channel and the
scanner detects a WX
alert tone on that
frequency (see “WX
Alert” on Page 32),
the scanner sounds
the alert tone and
7B;hj
7B;hj7B;hj
7B;hj flashes. Press
any key to turn off the
alarm.
20-315.fm Page 36 Wednesday, July 24, 2002 2:27 PM
Special Features
37
an extended period of time. To
turn it off, press both PGM and
/ , or press / .
6WTPKPI"VJG"-G["6QPG"1P"
CPF"1HH
The scanner is preset to sound a
tone each time you press one of
its keys (except / ). You
can turn the key tone off or back
on.
1. If the scanner is on, turn it off
by turning VOLUME counter-
clockwise until it clicks.
2. While you hold down 2 and
ENT, turn on the scanner.
3. When e<<ýjed;
e<<ýjed;e<<ýjed;
e<<ýjed; or edýjed;
edýjed;edýjed;
edýjed;
appear, release 2 and ENT.
7UKPI"VJG"-G[".QEM
Once you program your scanner,
you can protect it from accidental
program changes by turning on
the keylock feature. When the
keypad is locked, the only controls
that operate are LIGHT, VOLUME,
and SQUELCH. ±
To turn on the keylock, hold down
for about 3 seconds until the
scanner beeps three times and
appears. To turn it off, hold
down for about 3 seconds
until the scanner beeps three
times and disappears.
±"016'"±"
The keylock does not
prevent the scanner
from scanning
channels or
monitoring a single
channel, whichever
feature you last
selected.
20-315.fm Page 37 Wednesday, July 24, 2002 2:27 PM

Special Features
38
#XQKFKPI"+OCIG"
(TGSWGPEKGU
You might hear one of your regular
stations on another frequency that
is not listed. For example, you
might find a service that regularly
uses a frequency of 453.275 also
on 474.675 MHz. Do the following
to determine if you are listening to
an image frequency:
Note the new frequency 474.675
Double the intermediate frequency
of 10.7 MHz (21.400)
and subtract it from the new
frequency –21.400
If the answer is the regular
frequency 453.275
then you have tuned to an image.
Occasionally, you might get
interference on a weak or distant
channel from a strong
transmission 21.4 MHz above or
below the tuned frequency. This is
rare, and the image signal is
usually cleared whenever there is
a transmission on the actual
frequency.
4GUGVVKPI1+PKVKCNK\KPI"VJG"
5ECPPGT
If the scanner's display locks up or
does not work properly after you
connect a power source, you
might need to reset or initialize the
scanner. #
4'5'66+0)"6*'"5%#00'4
1. Turn off the scanner, then turn
it on again.
#"+/2146#06"#
If you have
problems, first try to
reset the scanner
(see “Resetting the
Scanner” on
Page 38). If that
does not work, you
can initialize the
scanner (see
“Initializing the
Scanner !” on
Page 39); however,
this clears all
information stored in
your scanner's
memory.
20-315.fm Page 38 Wednesday, July 24, 2002 2:27 PM

Special Features
39
2. Insert a pointed object, such
as a straightened paper clip,
into the reset opening on the
side of the scanner. Then
gently press the reset button
inside the opening. ±
+0+6+#.+<+0)"6*'"5%#00'4"
#1. Turn off the scanner, then turn
it on again.
2. Hold down TUNE/CLEAR.
3. While holding down TUNE/
CLEAR, insert a pointed object
(such as a straightened paper
clip) into the reset opening on
the side of the scanner, then
gently press the reset button
inside the opening. The
display should turn off.
4. When the display turns on
again, release TUNE/CLEAR.
±
9KTGF"2TQITCOOKPI
You can transfer programming
data to your scanner using your
home computer and an optional
scanner PC programming kit (Cat.
No. 20-048, available at your local
RadioShack store). The
programming kit includes a CD-
ROM with the software you need
and a connecting cable. ±
1. Make sure your scanner is
turned off.
2. Follow the steps provided with
the programming kit to
connect the cable to your
computer and load the
software into your computer,
±"016'"±"
Resetting the
Scanner
If the scanner still does
not work properly, you
might need to initialize
the scanner (see
“Initializing the
Scanner”).
Initializing the
Scanner
You must release the
reset button before
releasing TUNE/
CLEAR; otherwise
the memory might not
clear.
Wired
Programming
• If the scanner
receives no data
from the PC for
more than 20
seconds or if you
press any key,
wired program-
ming stops.
• Wired program-
ming stops if the
scanner receives
an empty channel
number.
#"+/2146#06"#
This procedure
clears all information
you stored in the
scanner's memory.
Initialize the scanner
only when you are
sure the scanner is
not working properly.
20-315.fm Page 39 Wednesday, July 24, 2002 2:27 PM

Special Features
40
then connect the other end of
the cable to on top of the
scanner.
3. Using the software supplied
with the programming kit,
configure the software to work
with your scanner by clicking
on Tools, selecting
Configuration, then selecting
PRO-89.
4. While pressing ENT and 9,
turn on the scanner. F=C
F=CF=C
F=C and
M_h;Zý
M_h;ZýM_h;Zý
M_h;Zýappear. Then send the
data from the PC. Ij7hj
Ij7hjIj7hj
Ij7hj and
the data being received by the
scanner appears in the order
it is received. ±
5. When the scanner
successfully receives all data,
;dZ
;dZ;dZ
;dZ and <_d_I^ý
<_d_I^ý<_d_I^ý
<_d_I^ýappear. If the
scanner received an error
while receiving data, ;dZ
;dZ;dZ
;dZ and
Z#;hh
Z#;hhZ#;hh
Z#;hh appear. If the scanner
received a checksum error
while receiving data, 9#;hh
9#;hh9#;hh
9#;hh and
a number shown next to 9#;hh
9#;hh9#;hh
9#;hh
indicates the packet number
where the error occurred. ±
±"016'"±"
If the scanner did not
receive a start or end
bit respect-ively from
the PC, Ij7hj
Ij7hjIj7hj
Ij7hj and ;dZ
;dZ;dZ
;dZ
do not appear.
20-315.fm Page 40 Wednesday, July 24, 2002 2:27 PM

A General Guide to Scanning
41
#")'0'4#.")7+&'"
61"5%#00+0)
Reception of the frequencies
covered by your scanner is mainly
“line-of-sight.” That means you
usually cannot hear stations that
are beyond the horizon.
)WKFG"VQ"(TGSWGPEKGU
0#6+10#."9'#6*'4"
(4'37'0%+'5
$+4&+'"(4'37'0%+'5
Every scanner has birdie
frequencies. Birdies are signals
created inside the scanner's
receiver. These operating
frequencies might interfere with
transmissions on the same
frequencies. If you program one of
these frequencies, you hear only
noise on that frequency. If the
interference is not severe, you
might be able to turn SQUELCH
clockwise to cut out the birdie.
This scanner's birdie frequencies
(in MHz) are:
162.400 162.425 162.450
162.475 162.500 162.525
162.550
30.735 32.020 38.400
40.025 40.980 48.025
51.200 112.0625 120.025
128.025 136.025 139.995
140.800 144.030 152.090
160.100 165.430 168.035
173.485 392.250 400.0875
424.250 432.0125 440.250
445.6375 448.0875 453.650
456.0875 461.650 464.100
20-315.fm Page 41 Wednesday, July 24, 2002 2:27 PM

A General Guide to Scanning
42
To find the birdies in your
individual scanner, begin by
disconnecting the antenna and
moving it away from the scanner.
Make sure that no other nearby
radio or TV sets are turned on
near the scanner. Use the search
function and search every
frequency range from its lowest
frequency to the highest.
Occasionally, the searching will
stop as if it had found a signal,
often without any sound. That is a
birdie. Make a list of all the birdies
in your scanner for future
reference.
472.0125 480.100 485.400
488.0125 493.3875 496.0125
501.400 504.100
20-315.fm Page 42 Wednesday, July 24, 2002 2:27 PM

A General Guide to Scanning
43
)WKFG"VQ"VJG"#EVKQP"
$CPFU
6;2+%#."$#0&"75#)'"
*/*<+
24+/#4;"75#)'
As a general rule, most of the
radio activity is concentrated on
the following frequencies:
8*("$CPF
Low Range 29.00 – 50.00
6-Meter Amateur 50.00 – 54.00
Aircraft 108.00 – 136.00
U.S. Government 137.00 – 144.00
2-Meter Amateur 144.00 – 148.00
High Range 148.00 – 174.00
7*("$CPF
Military Aircraft 380.00 – 384.00
U.S. Government 406.00 – 420.00
70-Centimeter
Amateur 420.00 – 450.00
Low Range 450.00 – 470.00
FM-TV Audio
Broadcast,
Wide Band
470.00 – 512.00
8*("$CPF
#EVKXKVKGU (TGSWGPEKGU"
*/*\+
2-Meter Amateur
Band
144.000 –
148.000
Government, Police,
and Fire
153.785 –
155.980
Emergency Services 158.730 –
159.460
Railroad 160.000 –
161.900
20-315.fm Page 43 Wednesday, July 24, 2002 2:27 PM

A General Guide to Scanning
44
$CPF"#NNQECVKQP
To help decide which frequency
ranges to scan, use the following
listing of the typical services that
use the frequencies your scanner
receives. These frequencies are
subject to change, and might vary
from area to area. For a more
complete listing, refer to the
Police
Call Radio Guide including Fire
and Emergency Services
,
available at your local RadioShack
store.
7*("$CPF
#EVKXKVKGU (TGSWGPEKGU"
*/*\+
70-Centimeter
Amateur Band
420.000 –
450.000
FM Repeaters
Land-Mobile
“Paired” Frequencies
450.000 –
470.000
Base Stations 451.025 –
454.950
Mobile Units 456.025 –
459.950
Repeater Units 460.025 –
464.975
Control Stations ±465.025–
469.975
#DDTGXKCVKQP 5GTXKEG
AIR Aircraft
BIFC
Boise (ID)
Interagency
Fire Cache
BUS Business
CAP Civil Air Patrol
CCA Common Carrier
CSB Conventional
Systems
±"016'"±"
Remote control
stations and mobile
units operate at 5
MHz higher than their
associated base
stations and relay
repeater units.
20-315.fm Page 44 Wednesday, July 24, 2002 2:27 PM

A General Guide to Scanning
45
CTSB Conventional/
Trunked Systems
FIRE Fire Department
HAM Amateur (Ham)
Radio
GOVT Federal Government
GMR General Mobile
Radio
GTR General Trunked
IND Industrial Services
(Manufacturing,
Construction,
Farming, Forest
Products)
MAR Military Amateur
Radio
MARI Maritime Limited
Coast
(Coast Guard,
Marine Telephone,
Shipboard Radio,
Private Stations)
MARS Military Affiliate
Radio System
MED Emergency/Medical
Services
MIL U.S. Military
MOV Motion Picture/Video
Industry
NEW New Mobile Narrow
NEWS
Relay Press
(Newspaper
Reporters)
OIL Oil/Petroleum
Industry
POL Police Department
PUB Public Services
(Public Safety, Local
Government,
Forestry
Conservation)
PSB Public Safety
#DDTGXKCVKQP 5GTXKEG
20-315.fm Page 45 Wednesday, July 24, 2002 2:27 PM

A General Guide to Scanning
46
HIGH FREQUENCY (HF) —
(3 MHz-30 MHz)
10-Meter Amateur Band
(28.0-29.7 MHz)
29.000-29.700 ............................ HAM
VERY HIGH FREQUENCY
(VHF) — (30 MHz-300 MHz)
VHF Low Band
(29.7-50 MHz-in 5 kHz steps)
29.700-29.790................................IND
29.900-30.550....................GOVT, MIL
30.580-31.980...................... IND, PUB
32.000-32.990....................GOVT, MIL
33.020-33.980.............BUS, IND, PUB
34.010-34.990....................GOVT, MIL
35.020-35.980........... BUS, PUB, IND,
PTR Private Trunked
ROAD Road & Highway
Maintenance
RTV Radio/TV Remote
Broadcast Pickup
TAXI Taxi Services
TELM Telephone
Maintenance
TOW Tow Trucks
TRAN Transportation
Services
(Trucks, Tow Trucks,
Buses, Railroad,
Other)
TSB Trunked Systems
TVn FM-TV Audio
Broadcast
USXX Government
Classified
UTIL Power & Water
Utilities
WTHR Weather
#DDTGXKCVKQP 5GTXKEG
20-315.fm Page 46 Wednesday, July 24, 2002 2:27 PM

A General Guide to Scanning
47
TELM
36.000-36.230.................... GOVT, MIL
36.230-36.990.......... Oil Spill Cleanup,
GOVT, MIL
37.020-37.980...................... PUB, IND
38.000-39.000.................... GOVT, MIL
39.020-39.980...............................PUB
40.000-42.000......... GOVT, MIL, MARI
42.020-42.940...............................POL
42.960-43.180................................IND
43.220-43.680...........TELM, IND, PUB
43.700-44.600............................ TRAN
44.620-46.580..................... POL, PUB
46.600-46.990............................GOVT
47.020-47.400...............................PUB
47.420.................American Red Cross
47.440-49.580...................... IND, PUB
49.610-49.990................................MIL
6-Meter Amateur Band
(50-54 MHz)
50.00-54.00..................................HAM
Aircraft Band (108-136 MHz)
108.000-121.490............................AIR
121.500.......................AIR Emergency
121.510-136.000............................AIR
U.S. Government Band (137-144
MHz)
137.000-144.000................ GOVT, MIL
2-Meter Amateur Band (144-148
MHz)
144.000-148.000..........................HAM
VHF High Band (148-174 MHz)
148.050-150.345......... CAP, MAR, MIL
150.775-150.790..........................MED
150.815-150.980.........................TOW,
Oil Spill Cleanup
150.995-151.475.............. ROAD, POL
151.490-151.955.................. IND, BUS
151.985...................................... TELM
152.0075......................................MED
152.270-152.480.........IND, TAXI, BUS
20-315.fm Page 47 Wednesday, July 24, 2002 2:27 PM

A General Guide to Scanning
48
152.870-153.020................. IND, MOV
153.035-153.725.......... IND, OIL, UTIL
153.740-154.445................ PUB, FIRE
154.490-154.570.................. IND, BUS
154.585..................... Oil Spill Cleanup
154.600-154.625.......................... BUS
154.655-156.240............ MED, ROAD,
POL, PUB
156.255-157.425................. OIL, MARI
157.450....................................... MED
157.470-157.515......................... TOW
157.530-157.725..................IND, TAXI
157.740........................................ BUS
158.130-158.460......... BUS, IND, OIL,
TELM, UTIL
158.730-159.465.....POL, PUB, ROAD
159.480.......................................... OIL
159.495-161.565........................ TRAN
161.580-162.000........OIL, MARI, RTV
162.0125-162.35.... GOVT, MIL, USXX
162.400-162.550....................... WTHR
162.5625-162.6375...........GOVT, MIL,
USXX
162.6625......................................MED
162.6875-163.225............. GOVT, MIL,
USXX
163.250........................................MED
163.275-166.225............... GOVT, MIL,
USXX
166.250...................GOVT, RTV, FIRE
166.275-169.400..............GOVT, BIFC
169.445-169.505........ Wireless Mikes,
GOVT
169.55-169.9875... GOVT, MIL, USXX
170.000-170.150... BIFC, GOVT, RTV,
FIRE
170.175-170.225....................... GOVT
170.245-170.305......... Wireless Mikes
170.350-170.400............... GOVT, MIL
170.425-170.450......................... BIFC
170.475....................................... PUB
170.4875-173.175........... GOVT, PUB,
Wireless Mikes
173.225-173.5375.......... MOV, NEWS,
UTIL, MIL
173.5625-173.5875........................MIL
Medical/Crash Crews
173.60-173.9875........................GOVT
20-315.fm Page 48 Wednesday, July 24, 2002 2:27 PM

A General Guide to Scanning
49
ULTRA HIGH FREQUENCY
(UHF) — (300 MHz-3 GHz)
U. S. Government Band
(406-420 MHz)
406.125-419.975........... GOVT, USXX
70-Centimeter Amateur Band
(420-450 MHz)
420.000-450.000......................... HAM
Low Band (450-470 MHz)
450.050-450.925.......................... RTV
451.025-452.025...... IND, OIL, TELM,
UTIL
452.0375-453.00................ IND, TAXI,
TRAN TOW, NEWS
453.0125-454.000................ PUB, OIL
455.050-455.925.......................... RTV
457.525-457.600.......................... BUS
458.025-458.175......................... MED
460.0125-460.6375.. FIRE, POL, PUB
460.650-462.175.......................... BUS
462.1875-462.450............... BUS, IND
462.4625-462.525.... IND, OIL, TELM,
UTIL
462.550-462.925............... GMR, BUS
462.9375-463.1875..................... MED
463.200-467.925.......................... BUS
FM-TV Audio Broadcast, UHF
Wide Band (470-512 MHz) ±
(Channels 14 through 20 in 6 MHz
steps)
475.750............................. Channel 14
481.750............................. Channel 15
487.750............................. Channel 16
493.750............................. Channel 17
499.750............................. Channel 18
505.750............................. Channel 19
511.750 ............................. Channel 20
±"016'"±"
Some cities use the
470-512 MHz band
for land/mobile
service.
20-315.fm Page 49 Wednesday, July 24, 2002 2:27 PM

A General Guide to Scanning
50
(TGSWGPE["%QPXGTUKQP
The tuning location of a station
can be expressed in frequency
(kHz or MHz) or in wavelength
(meters). The following
information can help you make the
necessary conversions.
1 MHz (million) =
1,000 kHz (thousand)
To convert MHz to kHz, multiply
the number of megahertz by
1,000:
30.62 (MHz) x 1000 =
30,620 kHz
To convert from kHz to MHz,
divide the number of kilohertz by
1,000:
127,800 (kHz) / 1000 =
127.8 MHz
To convert MHz to meters, divide
300 by the number of megahertz:
300 / 50 MHz =
6 meters
20-315.fm Page 50 Wednesday, July 24, 2002 2:27 PM

Troubleshooting
51
6417$.'5*116+0)
2TQDNGO 2QUUKDNG"%CWUG 4GOGF[
Scanner is totally
inoperative.
The AC or DC
adapter is not
connected.
Be sure the
adapter's barrel plug
is fully inserted into
the PWR jack.
The batteries are
dead.
Replace non-
rechargeable
batteries with fresh
ones, or recharge
the rechargeable
batteries.
Poor or no
reception.
An antenna is not
connected or is
connected
incorrectly.
Be sure an antenna
is properly
connected to the
scanner.
Programmed
frequencies are the
same as “birdie”
frequencies.
Avoid programming
frequencies listed
under “Birdie
Frequencies” on
Page 41 or only
listen to them
manually.
The keypad does
not work.
Keylock is turned
on.
Turn off keylock.
The scanner might
need to be reset or
initialized.
Turn the scanner off
then on again, or
reset/initialize the
scanner (see
“Resetting/Initializing
the Scanner” on
Page 38).
The scanner is on
but will not scan.
SQUELCH is not
correctly adjusted.
Turn SQUELCH
clockwise.
Only one channel or
no channels are
stored.
Store frequencies
into more than one
channel.
During scanning,
the scanner locks
on frequencies
that have an
unclear
transmission.
Programmed
frequencies are the
same as “birdie”
frequencies.
Avoid programming
frequencies listed
under “Birdie
Frequencies” on
Page 41, or only
listen to them
manually.
20-315.fm Page 51 Wednesday, July 24, 2002 2:27 PM

Care
52
%#4'
Keep the scanner dry; if it gets
wet, wipe it dry immediately. Use
and store the scanner only in
normal temperature environments.
Handle the scanner carefully; do
not drop it. Keep the scanner away
from dust and dirt, and wipe it with
a damp cloth occasionally to keep
it looking new.
5'48+%'"#0&"
4'2#+4
If your scanner is not performing
as it should, take it to your local
RadioShack store for assistance.
Modifying or tampering with the
scanner’s internal components
can cause a malfunction and
might invalidate its warranty and
void your FCC authorization to
operate it.
20-315.fm Page 52 Wednesday, July 24, 2002 2:27 PM

Specifications
53
52'%+(+%#6+105
Frequency Coverage (MHz):
10 Meter Amateur Radio............ 29-30
(in 5 kHz steps)
VHF Lo....................................... 30-50
(in 5 kHz steps)
6 Meter Amateur Radio ............. 50-54
(in 5 kHz steps)
Aircraft ..........................108–136.9875
(in 12.5 kHz steps)
Government...........................137–144
(in 5 kHz steps)
2 Meter Amateur Radio...........144-148
(in 5 kHz steps)
VHF Hi ....................................148-174
(in 5 kHz steps)
Amateur Radio/Government.. 380-450
(in 12.5 kHz steps)
UHF Standard........................ 450-470
(in 12.5 kHz steps)
UHF “T”.................................. 470-512
(in 12.5 kHz steps)
Channels of Operation... 200 channels
Sensitivity (20 dB S/N):
29-54 MHz ............................... 0.5 µV
108-136.9875 MHz .................. 1.0 µV
137-174 MHz ........................... 0.5 µV
380-512 MHz ........................... 0.7 µV
Spurious Rejection (FM @154 MHz)
................................................... 50 dB
Selectivity:
±10 kHz...................................... –6 dB
±18 kHz.................................... –50 dB
Search Speed .......Up to 50 Steps/Sec
Scan Speed ....Up to 25 Channels/Sec
Delay Time..........................2 Seconds
20-315.fm Page 53 Wednesday, July 24, 2002 2:27 PM

Specifications
54
IF Frequencies:
1st IF.................................... 10.7 MHz
2nd IF......................................455 kHz
IF Interference Ratio (10.7 MHz)
............................... 70 dB at 154 MHz
Squelch Sensitivity:
Threshold................. Less than 0.5 µV
Tight (FM) ................. (S + N)/N 25 dB
Tight (AM) ................. (S + N)/N 20 dB
Antenna Impedance............. 50 Ohms
Audio Output Power (10% THD)
................................. 180 mW Nominal
Built-In Speaker ..13/8 Inches (36 mm),
8 Ohms
Operating Temperature . 14° to 140°F
(-10° to 60°C)
Power Requirements ........ 6 Volts DC,
4 AA Batteries
AC Adapter (Optional)
DC Adapter (Optional)
Current Drain (Squelched) ...... 45 mA
Dimensions (HWD)
...................511/16 × 23/8 × 19/16 Inches
(145 × 63 × 40 mm)
Weight (without antenna):
Approx. 7.8 oz (220 g)
Supplied Accessories............ Antenna,
Battery Holder,
Rechargeable Battery Holder
Optional Accessories PC Cable,
Ni-MH Batteries
Specifications are typical; individual
units might vary. Specifications are
subject to change and improvement
without notice.
20-315.fm Page 54 Wednesday, July 24, 2002 2:27 PM

55
Parts and Accessories
2#465"#0&"
#%%'5514+'5
Parts and accessories are
available at your local RadioShack
store. Accessories are also
available online at
www.radioshack.com
. Parts and
accessories are available but not
limited to the following. Visit your
local RadioShack store or obtain a
RadioShack catalog for a more
complete listing of available
accessories.
RG-8/RG-58
50-Ohm
Coaxial Cable
Use to connect
your scanner to an
external antenna.
External Antenna
Connect to your scanner’s
external antenna jack for clear,
crisp reception.
AC/DC Adapter
Use with a size C Adaptaplug™
adapter to power the scanner
and recharge its rechargeable
batteries.
Scanner PC Programming Kit
Use with your home computer to
program your scanner.
20-315.fm Page 55 Wednesday, July 24, 2002 2:27 PM

RadioShack Corporation
Fort Worth, Texas 76102
20-315
GE-02D-7520
07A02
Printed in China
Limited One-Year Warranty
This product is warranted by RadioShack against manufacturing de-
fects in material and workmanship under normal use for one (1) year
from the date of purchase from RadioShack company-owned stores
and authorized RadioShack franchisees and dealers. EXCEPT AS
PROVIDED HEREIN, RadioShack MAKES NO EXPRESS WARRAN-
TIES AND ANY IMPLIED WARRANTIES, INCLUDING THOSE OF
MERCHANTABILITY AND FITNESS FOR A PARTICULAR PUR-
POSE, ARE LIMITED IN DURATION TO THE DURATION OF THE
WRITTEN LIMITED WARRANTIES CONTAINED HEREIN. EXCEPT
AS PROVIDED HEREIN, RadioShack SHALL HAVE NO LIABILITY
OR RESPONSIBILITY TO CUSTOMER OR ANY OTHER PERSON
OR ENTITY WITH RESPECT TO ANY LIABILITY, LOSS OR DAM-
AGE CAUSED DIRECTLY OR INDIRECTLY BY USE OR PERFOR-
MANCE OF THE PRODUCT OR ARISING OUT OF ANY BREACH
OF THIS WARRANTY, INCLUDING, BUT NOT LIMITED TO, ANY
DAMAGES RESULTING FROM INCONVENIENCE, LOSS OF TIME,
DATA, PROPERTY, REVENUE, OR PROFIT OR ANY INDIRECT,
SPECIAL, INCIDENTAL, OR CONSEQUENTIAL DAMAGES, EVEN
IF RadioShack HAS BEEN ADVISED OF THE POSSIBILITY OF
SUCH DAMAGES.
Some states do not allow limitations on how long an implied warranty
lasts or the exclusion or limitation of incidental or consequential dam-
ages, so the above limitations or exclusions may not apply to you.
In the event of a product defect during the warranty period, take the
product and the RadioShack sales receipt as proof of purchase date
to any RadioShack store. RadioShack will, at its option, unless other-
wise provided by law: (a) correct the defect by product repair without
charge for parts and labor; (b) replace the product with one of the
same or similar design; or (c) refund the purchase price. All replaced
parts and products, and products on which a refund is made, become
the property of RadioShack. New or reconditioned parts and products
may be used in the performance of warranty service. Repaired or re-
placed parts and products are warranted for the remainder of the orig-
inal warranty period. You will be charged for repair or replacement of
the product made after the expiration of the warranty period.
This warranty does not cover: (a) damage or failure caused by or at-
tributable to acts of God, abuse, accident, misuse, improper or abnor-
mal usage, failure to follow instructions, improper installation or
maintenance, alteration, lightning or other incidence of excess voltage
or current; (b) any repairs other than those provided by a RadioShack
Authorized Service Facility; (c) consumables such as fuses or batter-
ies; (d) cosmetic damage; (e) transportation, shipping or insurance
costs; or (f) costs of product removal, installation, set-up service ad-
justment or reinstallation.
This warranty gives you specific legal rights, and you may also have
other rights which vary from state to state.
RadioShack Customer Relations, 200 Taylor Street, 6th Floor,
Fort Worth, TX 76102
12/99
20-315.fm Page 56 Wednesday, July 24, 2002 2:27 PM
