Radio Systems 3001089 DOG TRAINER, HAND HELD UNIT User Manual USERS MANUAL
Radio Systems Corp DOG TRAINER, HAND HELD UNIT USERS MANUAL
USERS MANUAL

GPS TRACKING
OPERATING GUIDE
PLEASE READ THIS ENTIRE GUIDE BEFORE BEGINNING
400-1360 TEK 1.0L Manual.indd 1 3/31/11 1:49 PM
21-800-732-0144
IMPORTANT SAFETY INFORMATION
Explanation of Attention Words and Symbols used in this guide
This is the safety alert symbol. It is used to alert you to potential personal injury hazards.
Obey all safety messages that follow this symbol to avoid possible injury or death.
WARNING indicates a hazardous situation which, if not avoided, could result
in death or serious injury.
CAUTION, used without the safety alert symbol, indicates a hazardous situation
which, if not avoided, could result in harm to your dog.
NOTICE is used to address safe use practices not related to personal injury.
•Not for use with aggressive dogs. Do not use this product if your dog is aggressive, or if your dog
is prone to aggressive behavior. Aggressive dogs can cause severe injury and even death to their
owner and others. If you are unsure whether this product is appropriate for your dog, please
consult your veterinarian or a certified trainer.
•This device contains Lithium-Ion (Li-Ion) batteries; never incinerate, puncture, deform, short-
circuit, or charge with an inappropriate charger. Fire, explosion, property damage, or bodily harm
may occur if this warning is not followed.
•Risk of explosion if battery is replaced by an incorrect type. Dispose of used batteries according
to the regulations in your area.
•Batteries should never be removed from the battery compartment for charging.
•Taking your product apart can cause damage and void your warranty.
•Do not charge the batteries in areas with high temperature (100°F +).
•Keep batteries away from children.
•Using your TEK™ Series Location System while operating a motor vehicle can be distracting.
Always pay full attention to operating your vehicle.
•Always be alert to your surroundings when navigating to a way point. Do not cross dangerous
terrain or obstacles as you move.
400-1360 TEK 1.0L Manual.indd 2 3/31/11 1:49 PM

3sportdog.com/tEK
Please read and follow the instructions in this manual. Proper fit of the collar is important.
•Avoid leaving the collar on the dog for more than 12 hours per day.
•When possible, reposition the collar on the dog’s neck every 1 to 2 hours.
•When using a separate collar for a lead, don’t put pressure on the GPS Collar.
•Wash the dog’s collar weekly with a damp cloth.
•Taking product apart can cause damage and void your warranty. Contact the Customer Care
Center for battery replacement service.
•Avoid using a high-powered radio (greater than 5 watts) in close proximity to the TEK™ Series
Location System. It may cause irreversible damage to the TEK Series Location System.
•Avoid chemical cleaners and solvents that can damage plastic components.
•Do not store the TEK Series Location System where prolonged exposure to temperature
extremes may occur, because permanent damage may result.
•When storing the device for an extended time, store within the following temperature range: from
32°F to 77°F (from 0° to 25°C).
•Do not leave the device exposed to a heat source or in a high-temperature location, such as in the
sun in an unattended vehicle. To prevent damage, remove the device from the vehicle or store it
out of direct sunlight, such as in the glove box.
400-1360 TEK 1.0L Manual.indd 3 3/31/11 1:49 PM

41-800-732-0144
Thank you for choosing SportDOG Brand®. Used properly, this product will help you track your dog
efficiently and safely. To ensure your satisfaction, please review this owner’s manual thoroughly. If
you have questions regarding this product’s operation, please see this manual’s Frequently Asked
Questions or Troubleshooting section, contact our Customer Care Center at 1-800-732-0144, or
visit our website at www.sportdog.com.
To get the most protection out of your warranty, please register your product within 90 days at
www.sportdog.com. By registering, and keeping your receipt you will enjoy the product’s full
warranty and should you ever need to call the Customer Care Center, we will be able to help you
faster. Most importantly, SportDOG™ will never give or sell your valuable information to anyone.
Complete warranty information is available online at www.sportdog.com.
400-1360 TEK 1.0L Manual.indd 4 3/31/11 1:49 PM

5sportdog.com/tEK
TAblE OF CONTENTS
COMPONENTS .............................................................................................................................................................................6
HOW THE SYSTEM WORKS.......................................................................................................................................................7
KEY DEFINITIONS ........................................................................................................................................................................8
ICON DEFINITIONS .................................................................................................................................................................. 10
MAIN MENU .............................................................................................................................................................................. 12
OPERATING THE TEK™ SERIES .............................................................................................................................................. 13
PREPARE THE TEK SERIES HANDHELD DEVICE ............................................................................................................... 13
TO CALIBRATE THE COMPASS ..............................................................................................................................................15
PREPARE THE GPS COLLAR ....................................................................................................................................................17
PAIR COLLARS TO THE HANDHELD DEVICE ...................................................................................................................... 20
FIT THE GPS COLLAR ............................................................................................................................................................... 21
ADD YOUR DOG ......................................................................................................................................................................... 22
ACQUIRE GPS SATELLITE SIGNALS .................................................................................................................................... 23
TRACK YOUR DOG .................................................................................................................................................................... 24
VIEW DOG STATUS ................................................................................................................................................................. 26
NAVIGATE WITH THE COMPASS AND GPS TOOLS ......................................................................................................... 27
MARK YOUR LOCATION WITH WAY POINTS .................................................................................................................... 27
SETTINGS MENU ...................................................................................................................................................................... 30
CHANGE GENERAL SETTINGS .............................................................................................................................................. 30
CHANGE COMMUNICATION SETTINGS ............................................................................................................................. 32
CHANGE MY COLLARS SETTINGS ....................................................................................................................................... 33
CHANGE MY DOGS SETTINGS .............................................................................................................................................. 34
CHANGE UNIT SETTINGS ....................................................................................................................................................... 36
SET SYSTEM TIME ................................................................................................................................................................... 36
CHANGE DISPLAY SETTINGS................................................................................................................................................ 37
USE VEHICLE MODE ................................................................................................................................................................. 38
RESET HANDHELD DEVICE .................................................................................................................................................... 39
FREQUENTLY ASKED QUESTIONS ....................................................................................................................................... 40
TROUBLESHOOTING ................................................................................................................................................................ 42
TERMS OF USE AND LIMITATION OF LIABILITY .............................................................................................................. 43
FCC COMPLIANCE .................................................................................................................................................................... 44
BATTERY DISPOSAL ................................................................................................................................................................ 45
INDEX .......................................................................................................................................................................................... 46
ADD-A-DOG® ............................................................................................................................................................................. 48
400-1360 TEK 1.0L Manual.indd 5 3/31/11 1:49 PM
61-800-732-014461-800-732-0144
GETTING STARTED
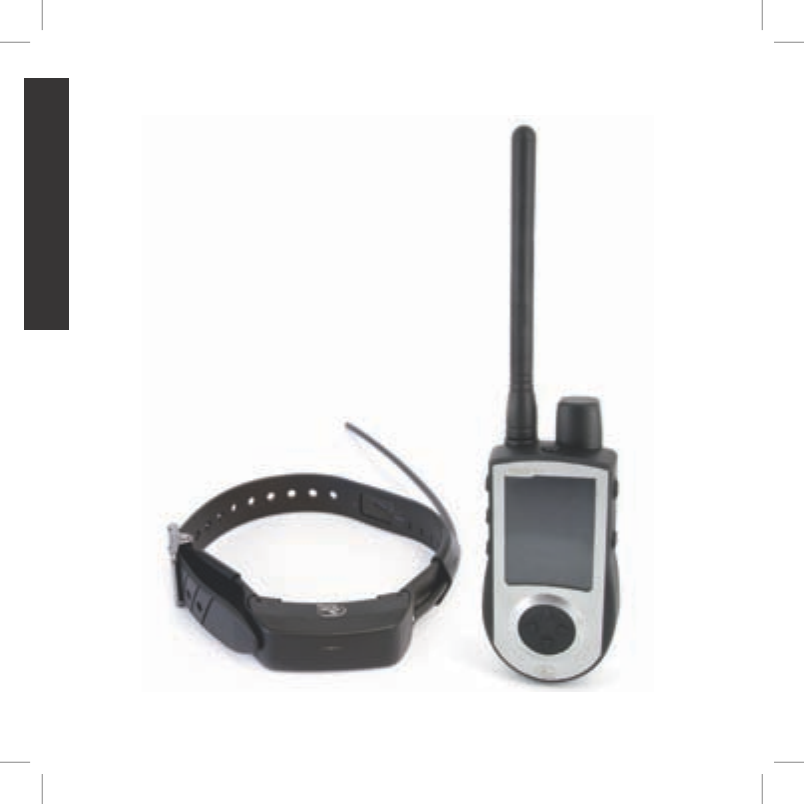
COMPONENTS
400-1360 TEK 1.0L Manual.indd 6 3/31/11 1:49 PM
7sportdog.com/tEK 7sportdog.com/tEK
GETTING STARTED
HOW THE SYSTEM WORKS
The SportDOG Brand® TEK™ Series Location System has been proven safe, comfortable and
effective for all dogs over 8 pounds. Consistent, correct use of this product allows you to track your
dog from up to 7 miles. The Handheld Device receives your location from its built-in GPS antenna
and receives location updates from the antenna mounted on the GPS Collar to track the location of
your dog.
IMPORTANT : THE TEK SERIES LOCATION SYSTEM HAS A RANGE OF UP
TO 7 MILES. DEPENDING ON THE WAY YOU HOLD THE HANDHELD DEVICE,
THE MAXIMUM RANGE MAY VARY. FOR CONSISTENT RESULTS AT
LONGER RANGES, HOLD THE HANDHELD DEVICE IN A VERTICAL POSITION
AWAY FROM YOUR BODY AND ABOVE YOUR HEAD. TERRAIN, WEATHER,
VEGETATION, TRANSMISSIONS FROM OTHER RADIO DEVICES, AND OTHER
FACTORS WILL AFFECT THE MAXIMUM RANGE.
400-1360 TEK 1.0L Manual.indd 7 3/31/11 1:49 PM
81-800-732-014481-800-732-0144
GETTING STARTED
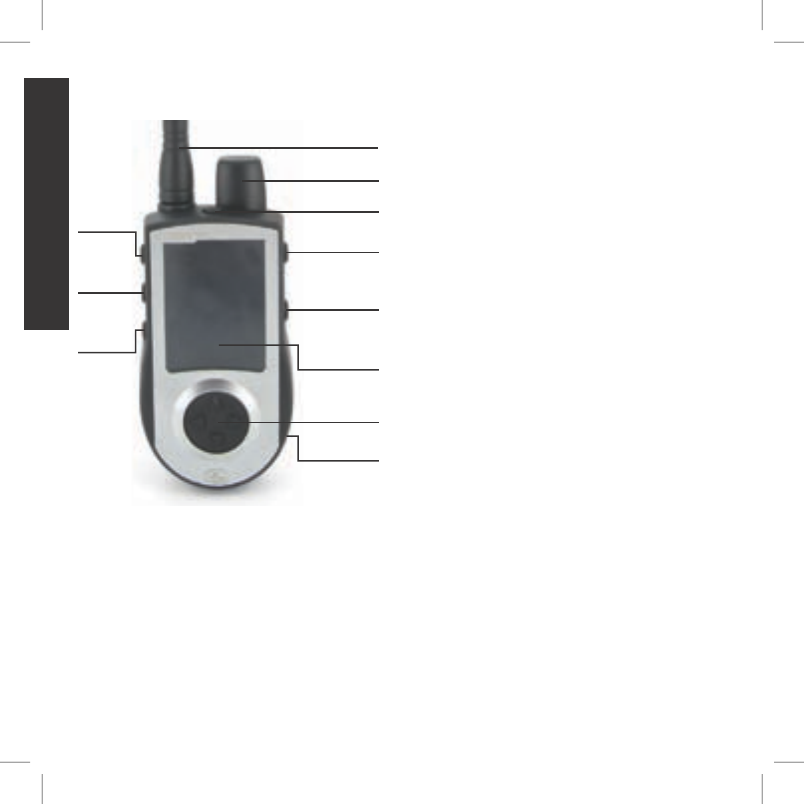
KEY DEFINITIONS
BACK
BUTTON
GPS ANTENNA
ON/OFF BUTTON
HANDHELD DEVICE
ANTENNA
TRACKING
BUTTON
MENU
SELECTION PAD
DISPLAY
CHARGING
JACK
STIM
BUTTON 1
STIM
BUTTON 2
STIM
BUTTON 3
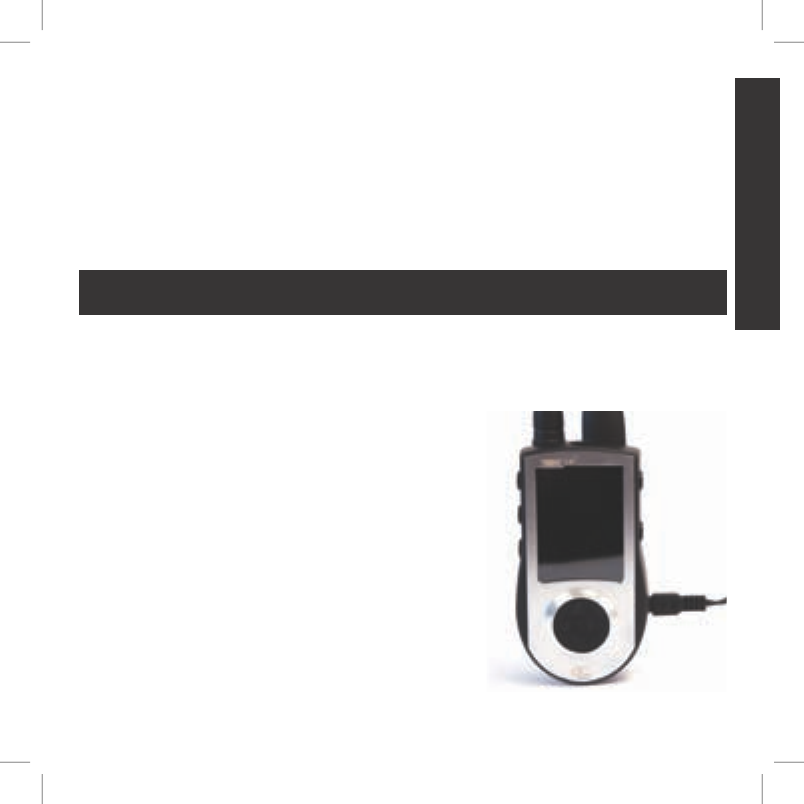
HANDHELD DEVICE: Receives and displays
location updates from the GPS Collar. It is
waterproof and can be submerged in water to a
depth of 5 feet.
ON/OFF BUTTON: Pressing and releasing this
button turns the Handheld Device on and off, and
also controls the display’s brightness level.
BACK BUTTON: While navigating menus, this
button moves back to the previous menu screen.
TRACKING BUTTON: This button takes you to the
tracking screen at any time and acts as an enter
key when entering information in text entry fields.
MENU SELECTION PAD: This pad contains four
arrow keys (up, down, left, and right) for use
when navigating and selecting to menus.
USER-DEFINED STIM BUTTONS: These buttons
(button 1 on top, button 2 in the middle, and
button 3 on the bottom) are used to send signals
for the user-defined stimulation type when
training your dog with the optional E-Collar
module.
CHARGING JACK: For connecting the Handheld
Device to the wall charger.
400-1360 TEK 1.0L Manual.indd 8 3/31/11 1:49 PM
9sportdog.com/tEK 9sportdog.com/tEK
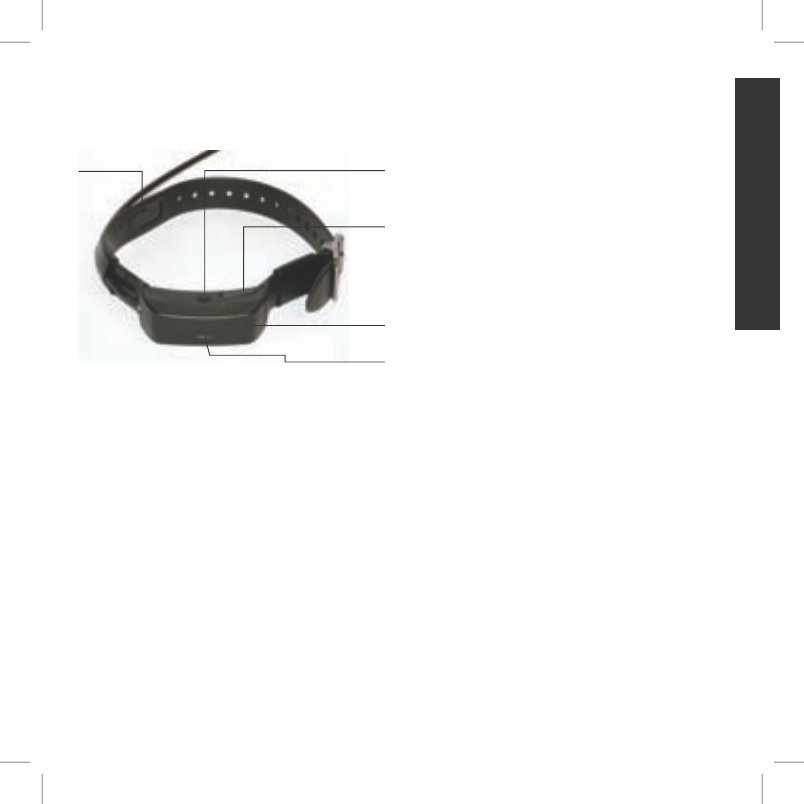
GETTING STARTED
GPS
INDICATOR LIGHT
CHARGING
JACK
ON/OFF
BUTTON
GPS COLLAR
GPS
ANTENNA
GPS COLLAR: Receives location from GPS and
transmits location updates to the Handheld
Device. It is waterproof and can be submerged in
water to a depth of 25 feet.*
GPS ANTENNA: Receives GPS satellite signals.
GPS ON/OFF BUTTON: Pressing and releasing
this button turns the collar on and off.
GPS INDICATOR LIGHT: Indicates when the GPS
Collar has been turned on or off, whether a GPS
lock has been attained, is in pairing mode, and
also serves as a low-battery indicator.
GPS CHARGING JACK: For connecting the GPS
Collar to the charger.
*Per NEMA 6P and IP67 standards.
400-1360 TEK 1.0L Manual.indd 9 3/31/11 1:49 PM
10 1-800-732-014410 1-800-732-0144
GETTING STARTED
ICON DEFINITIONS
The following icons are used throughout the TEK™ SERIES Location software interface.
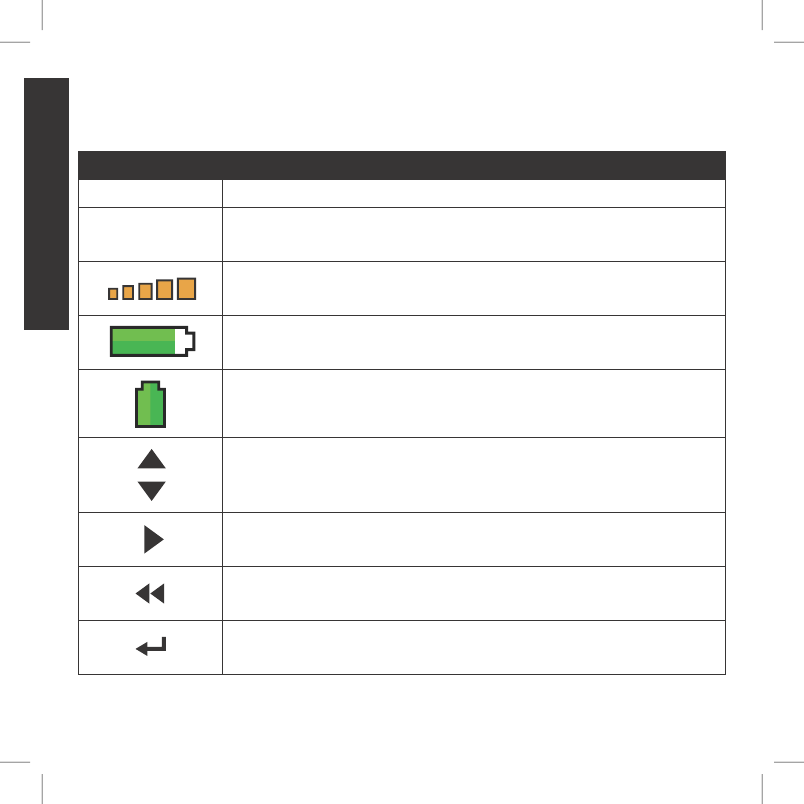
ICON FUNCTION
GENERAL ICONS
9:40 AM
GENERAL
Time
Brightness
Battery Gauge
Up / Down Indicators
More / Select
Back
Text Enter
100 YDS
TRACKING
GPS Lock/Fix Indicator
Compass
Dog Direction Indicator
Dog Direction Indicator Communication Lost
Dog On Point / Treed
Scale Indicator
Battery Gauge on Collar
C
V
T
TRAINING
Continuous Stimulation
Vibration
Tone
My Dog
R
M
P1
P2
Rising Stim
Momentary Stim
Programmable 1
Programmable 2
TIME INDICATOR: Displays the current local time.
9:40 AM
GENERAL
Time
Brightness
Battery Gauge
Up / Down Indicators
More / Select
Back
Text Enter
100 YDS
TRACKING
GPS Lock/Fix Indicator
Compass
Dog Direction Indicator
Dog Direction Indicator Communication Lost
Dog On Point / Treed
Scale Indicator
Battery Gauge on Collar
C
V
T
TRAINING
Continuous Stimulation
Vibration
Tone
My Dog
R
M
P1
P2
Rising Stim
Momentary Stim
Programmable 1
Programmable 2
BRIGHTNESS INDICATOR: Displays the current brightness level.
9:40 AM
GENERAL
Time
Brightness
Battery Gauge
Up / Down Indicators
More / Select
Back
Text Enter
100 YDS
TRACKING
GPS Lock/Fix Indicator
Compass
Dog Direction Indicator
Dog Direction Indicator Communication Lost
Dog On Point / Treed
Scale Indicator
Battery Gauge on Collar
C
V
T
TRAINING
Continuous Stimulation
Vibration
Tone
My Dog
R
M
P1
P2
Rising Stim
Momentary Stim
Programmable 1
Programmable 2
BATTERY GAUGE: Displays the battery charge status of the Handheld
Device.
9:40 AM
GENERAL
Time
Brightness
Battery Gauge
Up / Down Indicators
More / Select
Back
Text Enter
100 YDS
TRACKING
GPS Lock/Fix Indicator
Compass
Dog Direction Indicator
Dog Direction Indicator Communication Lost
Dog On Point / Treed
Scale Indicator
Battery Gauge on Collar
C
V
T
TRAINING
Continuous Stimulation
Vibration
Tone
My Dog
R
M
P1
P2
Rising Stim
Momentary Stim
Programmable 1
Programmable 2
BATTERY GAUGE: Displays the battery charge status of the GPS Collar.
9:40 AM
GENERAL
Time
Brightness
Battery Gauge
Up / Down Indicators
More / Select
Back
Text Enter
100 YDS
TRACKING
GPS Lock/Fix Indicator
Compass
Dog Direction Indicator
Dog Direction Indicator Communication Lost
Dog On Point / Treed
Scale Indicator
Battery Gauge on Collar
C
V
T
TRAINING
Continuous Stimulation
Vibration
Tone
My Dog
R
M
P1
P2
Rising Stim
Momentary Stim
Programmable 1
Programmable 2
UP / DOWN INDICATORS: Indicates menu choices available. Use the
arrow keys to view additional menu items.
9:40 AM
GENERAL
Time
Brightness
Battery Gauge
Up / Down Indicators
More / Select
Back
Text Enter
100 YDS
TRACKING
GPS Lock/Fix Indicator
Compass
Dog Direction Indicator
Dog Direction Indicator Communication Lost
Dog On Point / Treed
Scale Indicator
Battery Gauge on Collar
C
V
T
TRAINING
Continuous Stimulation
Vibration
Tone
My Dog
R
M
P1
P2
Rising Stim
Momentary Stim
Programmable 1
Programmable 2
MORE / SELECT INDICATOR: Indicates more information is available. Use
the arrow keys to view additional information.
9:40 AM
GENERAL
Time
Brightness
Battery Gauge
Up / Down Indicators
More / Select
Back
Text Enter
100 YDS
TRACKING
GPS Lock/Fix Indicator
Compass
Dog Direction Indicator
Dog Direction Indicator Communication Lost
Dog On Point / Treed
Scale Indicator
Battery Gauge on Collar
C
V
T
TRAINING
Continuous Stimulation
Vibration
Tone
My Dog
R
M
P1
P2
Rising Stim
Momentary Stim
Programmable 1
Programmable 2
BACK INDICATOR: Indicates lower menu level. Press the BACK button to
return to the previous screen.
9:40 AM
GENERAL
Time
Brightness
Battery Gauge
Up / Down Indicators
More / Select
Back
Text Enter
100 YDS
TRACKING
GPS Lock/Fix Indicator
Compass
Dog Direction Indicator
Dog Direction Indicator Communication Lost
Dog On Point / Treed
Scale Indicator
Battery Gauge on Collar
C
V
T
TRAINING
Continuous Stimulation
Vibration
Tone
My Dog
R
M
P1
P2
Rising Stim
Momentary Stim
Programmable 1
Programmable 2
TEXT ENTER/ACCEPT: Select to lock in a new text entry.
400-1360 TEK 1.0L Manual.indd 10 3/31/11 1:49 PM
11sportdog.com/tEK 11sportdog.com/tEK
GETTING STARTED
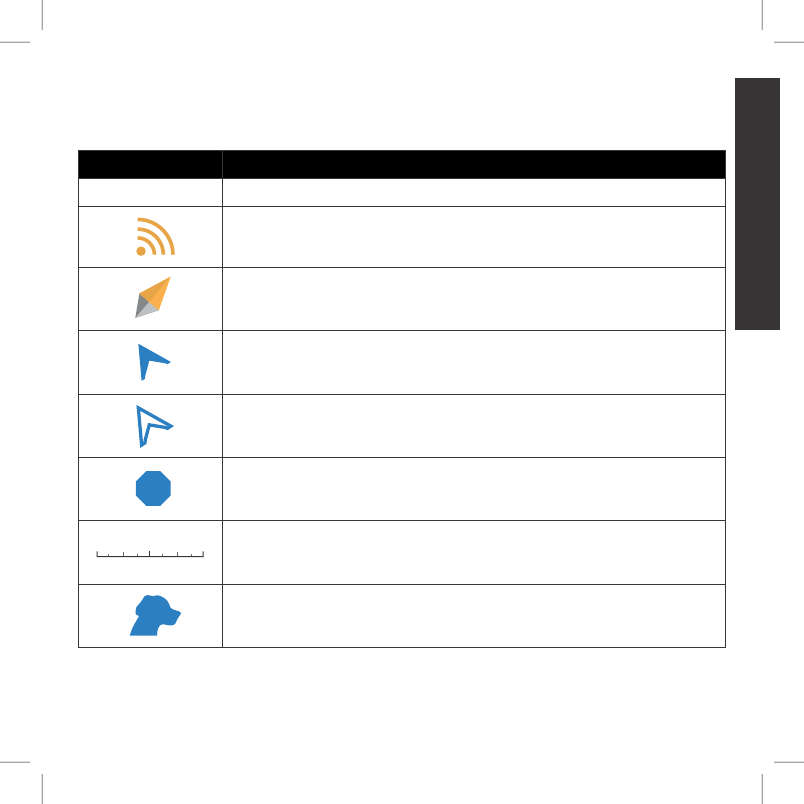
ICON FUNCTION
TRACKING ICONS
9:40 AM
GENERAL
Time
Brightness
Battery Gauge
Up / Down Indicators
More / Select
Back
Text Enter
100 YDS
TRACKING
GPS Lock/Fix Indicator
Compass
Dog Direction Indicator
Dog Direction Indicator Communication Lost
Dog On Point / Treed
Scale Indicator
Battery Gauge on Collar
C
V
T
TRAINING
Continuous Stimulation
Vibration
Tone
My Dog
R
M
P1
P2
Rising Stim
Momentary Stim
Programmable 1
Programmable 2
GPS LOCK INDICATOR: Indicates the Handheld Device has a good satellite fix.
9:40 AM
GENERAL
Time
Brightness
Battery Gauge
Up / Down Indicators
More / Select
Back
Text Enter
100 YDS
TRACKING
GPS Lock/Fix Indicator
Compass
Dog Direction Indicator
Dog Direction Indicator Communication Lost
Dog On Point / Treed
Scale Indicator
Battery Gauge on Collar
C
V
T
TRAINING
Continuous Stimulation
Vibration
Tone
My Dog
R
M
P1
P2
Rising Stim
Momentary Stim
Programmable 1
Programmable 2
COMPASS NEEDLE: Displays compass heading to magnetic north.
9:40 AM
GENERAL
Time
Brightness
Battery Gauge
Up / Down Indicators
More / Select
Back
Text Enter
100 YDS
TRACKING
GPS Lock/Fix Indicator
Compass
Dog Direction Indicator
Dog Direction Indicator Communication Lost
Dog On Point / Treed
Scale Indicator
Battery Gauge on Collar
C
V
T
TRAINING
Continuous Stimulation
Vibration
Tone
My Dog
R
M
P1
P2
Rising Stim
Momentary Stim
Programmable 1
Programmable 2
DOG DIRECTION INDICATOR: Displays the direction your dog is traveling.
9:40 AM
GENERAL
Time
Brightness
Battery Gauge
Up / Down Indicators
More / Select
Back
Text Enter
100 YDS
TRACKING
GPS Lock/Fix Indicator
Compass
Dog Direction Indicator
Dog Direction Indicator Communication Lost
Dog On Point / Treed
Scale Indicator
Battery Gauge on Collar
C
V
T
TRAINING
Continuous Stimulation
Vibration
Tone
My Dog
R
M
P1
P2
Rising Stim
Momentary Stim
Programmable 1
Programmable 2
DOG DIRECTION INDICATOR COMMUNICATION LOST: Displays if
communication to the collar is lost.
9:40 AM
GENERAL
Time
Brightness
Battery Gauge
Up / Down Indicators
More / Select
Back
Text Enter
100 YDS
TRACKING
GPS Lock/Fix Indicator
Compass
Dog Direction Indicator
Dog Direction Indicator Communication Lost
Dog On Point / Treed
Scale Indicator
Battery Gauge on Collar
C
V
T
TRAINING
Continuous Stimulation
Vibration
Tone
My Dog
R
M
P1
P2
Rising Stim
Momentary Stim
Programmable 1
Programmable 2
DOG STATUS INDICATOR: Indicates the location of your dog when the dog
is either on point or treed.
9:40 AM
GENERAL
Time
Brightness
Battery Gauge
Up / Down Indicators
More / Select
Back
Text Enter
100 YDS
TRACKING
GPS Lock/Fix Indicator
Compass
Dog Direction Indicator
Dog Direction Indicator Communication Lost
Dog On Point / Treed
Scale Indicator
Battery Gauge on Collar
C
V
T
TRAINING
Continuous Stimulation
Vibration
Tone
My Dog
R
M
P1
P2
Rising Stim
Momentary Stim
Programmable 1
Programmable 2
SCALE INDICATOR: Shows the current scale. Scale is adjustable from 100
yards to 75 miles.
9:40 AM
GENERAL
Time
Brightness
Battery Gauge
Up / Down Indicators
More / Select
Back
Text Enter
100 YDS
TRACKING
GPS Lock/Fix Indicator
Compass
Dog Direction Indicator
Dog Direction Indicator Communication Lost
Dog On Point / Treed
Scale Indicator
Battery Gauge on Collar
C
V
T
TRAINING
Continuous Stimulation
Vibration
Tone
My Dog
R
M
P1
P2
Rising Stim
Momentary Stim
Programmable 1
Programmable 2
MY DOG: Indicates the current dog. Color is based on the assigned collar
to this dog.
400-1360 TEK 1.0L Manual.indd 11 3/31/11 1:49 PM
12 1-800-732-014412 1-800-732-0144
GETTING STARTED
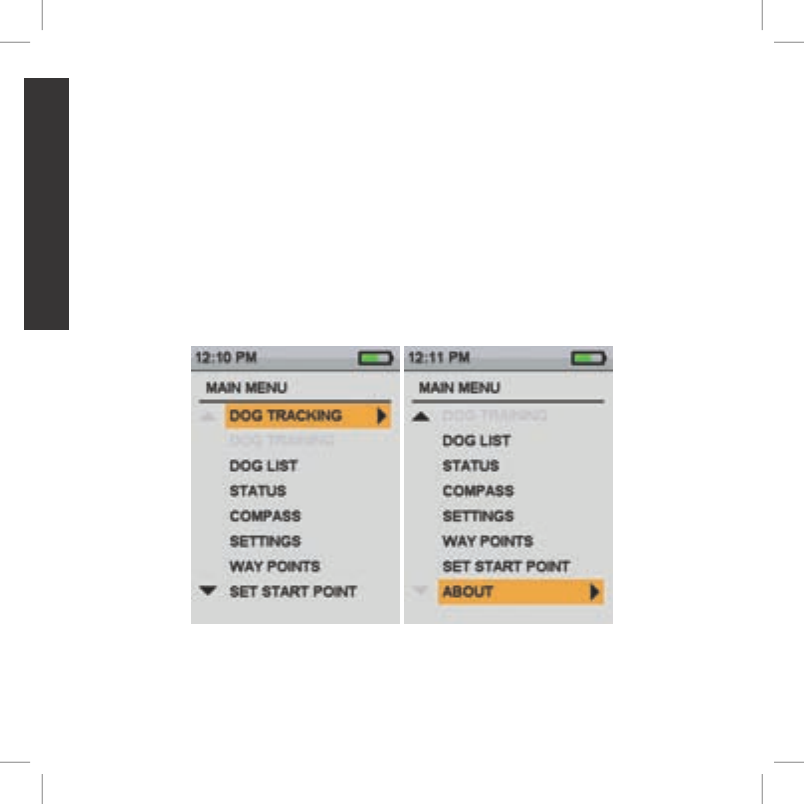
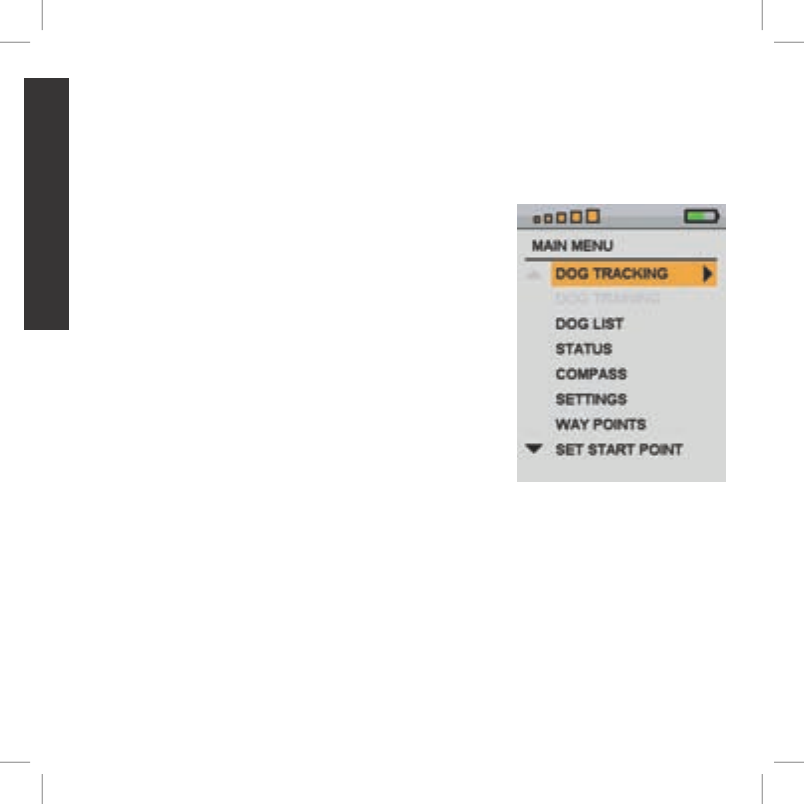
MAIN MENU
When you power on the Handheld Device or press the BACK button, the main menu displays. The
main menu provides the following options:
DOG TRACKING: Views the location of your dogs and way points in relation to you (Page 24).
DOG LIST: Suspend or resume tracking of a particular dog, and set the order of the dogs (Page 25).
STATUS: View a list of all dogs and their current status (Page 26).
COMPASS: View the electronic compass for navigation (Page 27).
SETTINGS: Change configuration for dogs, collars, units, time, display, and other settings (Page 30).
WAY POINTS: Add, change, or remove way points from the system (Page 27).
SET A START POINT: Set a way point to your starting location (Page 27).
ABOUT: View name, ID number and software/hardware version of your Handheld Device (Page 39).
400-1360 TEK 1.0L Manual.indd 12 3/31/11 1:49 PM
13sportdog.com/tEK 13sportdog.com/tEK
GETTING STARTED
OPERATING THE TEK™ SERIES
The following terms are used throughout this manual:
SELECT: Move the highlighted area on the screen up, down, left, or right with the respective arrow keys
on the Menu Selection Pad to select individual menu items. A selected item is highlighted in orange.
BACK: Press the BACK button on the top right side of the Handheld Device to go to the previous menu.
FIELD: The location on a page where data can be entered.
ENTER: Press the Tracking Toggle button in a text entry field to select a highlighted character.
STEP :: 01
PREPARE THE TEK SERIES HANDHElD DEvICE
You must complete these steps prior to using this device for the first time.
TO CHARGE THE HANDHElD DEvICE:
NOTE: Approximate battery life between charges is 20 hours,
depending on the frequency of use.
1. Lift the rubber cover protecting the charging jack.
2. Connect one of the charger connectors to the charging jack.
3. Plug the charger into a standard 120/240-volt AC wall outlet.
4. Charge the Handheld Device for 2 hours.
5. When charging is complete, indicated by a full green
battery on the screen, replace the rubber cover.
Using Li-Ion technology, the Handheld Device only requires
a 2 hour charge. It is not harmful to let the unit charge more
than 2 hours.
400-1360 TEK 1.0L Manual.indd 13 3/31/11 1:49 PM
14 1-800-732-014414 1-800-732-0144
GETTING STARTED
TO TURN THE HANDHElD DEvICE ON:
On the top of the unit, firmly press and release the On/Off button. The start-up screen will display.
TO TURN THE HANDHElD DEvICE OFF:
Firmly press and hold the On/Off button until the display goes black.
TO ADJUST THE DISPlAY bRIGHTNESS:
The Handheld Device comes with brightness controls to allow
you to adjust the backlight level for the optimum readability in the
current environment.
NOTE: Higher brightness levels will decrease battery life between
charges.
With the Handheld Device powered on, press and release the
On/Off button to increase/decrease brightness levels. There are
5 levels of brightness available. The Brightness Indicator will
display the current level at the top of the display.
400-1360 TEK 1.0L Manual.indd 14 3/31/11 1:49 PM
15sportdog.com/tEK 15sportdog.com/tEK
GETTING STARTED
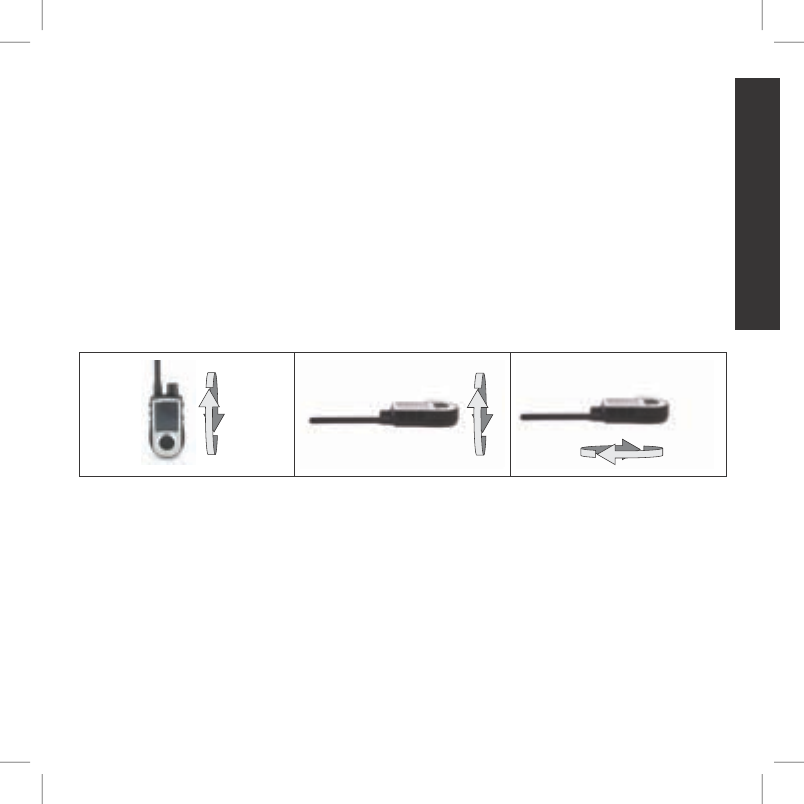
TO CAlIbRATE THE COMPASS
In order for the TEK™ Series Handheld Device to accurately display your location, you must first
calibrate the electronic compass. You should always calibrate the compass after you arrive at a
new starting location, after periods of storage or after you install new batteries.
NOTE: Always calibrate the compass outdoors. Hold the compass level and away from objects that
may generate magnetic fields, such as cars, buildings, or overhead power lines.
1. From the main menu, select COMPASS > CALIBRATE. The compass screen appears.
2. Rotate the handheld device 2-3 times in all three dimensions as shown below. Rotate until
the black indicators are as close as possible to the center of the green zone. If successful,
your handheld device will beep and vibrate, as well as, display a message that says your
“CALIBRATION DATA HAS BEEN UPDATED SUCCESSFULLY.”
NOTE: If you are unable to get the compass to automatically update your calibration data, follow the
remaining steps.
3. Rotate until the black indicators are as close as possible to the green zone and press the Menu
Selection Pad to continue.
4. At the prompt “DO YOU WANT TO SAVE THE NEW CALIBRATION DATA?” press the arrow keys
to select YES.
5. Press BACK to return to the main menu.
400-1360 TEK 1.0L Manual.indd 15 3/31/11 1:49 PM
16 1-800-732-014416 1-800-732-0144
GETTING STARTED
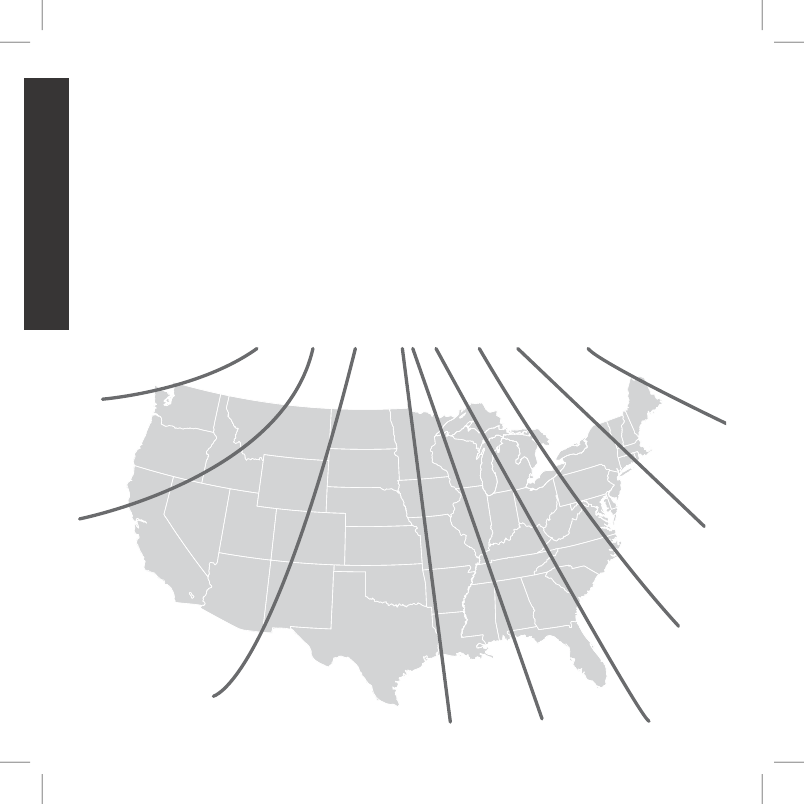
TO SET THE MAGNETIC DEClINATION ANGlE:
Magnetic declination is the angle between magnetic north (the direction the north end of a
compass needle points) and true north. The declination is positive when the magnetic north is
east of true north and negative when the magnetic north is west of true north. To find your exact
declination angle go to: www.ngdc.noaa.gov/geomagmodels/Declination.jsp.
NOTE: Incorrect magnetic declination will result in inaccurate compass readings.
1. From the main menu, select SETTINGS > GENERAL > MAG DEC ANGLE.
2. Press the up or down arrows on the Menu Selection Pad to select the amount of declination.
Magnetic declination ranges from -70 to 70. The default is 0.
3. Press the right arrow when finished.
4. Press BACK to return to the main menu.
20°
15°
10°
5° -5°
-10°
-15°
-20°
0°
400-1360 TEK 1.0L Manual.indd 16 3/31/11 1:49 PM
17sportdog.com/tEK 17sportdog.com/tEK
GETTING STARTED
STEP :: 02
PREPARE THE GPS COllAR
TO CHARGE THE GPS COllAR :
1. Lift the rubber cover protecting the GPS
Charging Jack located on the bottom of the
GPS Collar next to the On/Off button.
2. Connect one of the charger connectors to the
GPS Charging Jack.
3. Plug the charger into a standard 120/240-volt
AC wall outlet.
4. Charge the GPS Collar for 2 hours.
5. When charging is complete, indicated by the
GPS Indicator Light blinking green, replace the
rubber cover.
Using Li-Ion technology, the GPS Collar only
requires a 2 hour charge. It is not harmful to let the unit charge more than 2 hours.
NOTE: Approximate battery life between charges is 20 hours, depending on the frequency of use.
TO TURN THE GPS COllAR ON:
Press and release the GPS On/Off button when the GPS Indicator Light comes on green. The GPS
Collar will beep 1 to 5 times indicating which channel the collar is on, and the GPS Indicator Light
will double blink every 3 seconds until GPS lock has been achieved. Once the GPS Collar has a
lock, the GPS Indicator Light will single blink every 3 seconds.
TO TURN THE GPS COllAR OFF:
Press and hold the GPS On/Off button when the GPS Indicator Light comes on solid red and the
GPS Collar beeps for 2 seconds. To extend the battery life between charging cycles, turn off the
GPS Collar when it is not in use.
400-1360 TEK 1.0L Manual.indd 17 3/31/11 1:49 PM

18 1-800-732-014418 1-800-732-0144
GETTING STARTED
GPS INDICATOR lIGHT
OPERATIONAL
MODE
LIGHT
COLOR
LIGHT FUNCTION BATTERY
STATUS
SPEAKER FUNCTION
Unit is turned on via
On/Off button
Green Light is solid in color
during beep sequence
N/A Beeps 1 to 5 times indicating
which channel the collar is on
Unit is turned off via
On/Off button
Red Light is solid in color
during beep sequence
N/A Beeps continuously for 2
seconds
Unit is on with GPS Fix Green Single blink every 3
seconds
Good N/A
Amber Single blink every 3
seconds
Medium N/A
Red Single blink every 3
seconds
Low N/A
Unit is on without
GPS Fix
Green Double blink every 3
seconds
Good N/A
Amber Double blink every 3
seconds
Medium N/A
Red Double blink every 3
seconds
Low N/A
Unit is in pairing mode Amber Light is solid in color N/A N/A
Unit is charging Green Light is solid in color N/A N/A
Unit is fully charged Green Single blink every 1
second
Good N/A
400-1360 TEK 1.0L Manual.indd 18 3/31/11 1:49 PM

19sportdog.com/tEK 19sportdog.com/tEK
GETTING STARTED
AbOUT RECHARGEAblE bATTERIES
•The Handheld Device and GPS Collar contain Lithium-Ion (Li-Ion) batteries; never incinerate,
puncture, deform, short-circuit, or charge with an inappropriate charger. Fire, explosion,
property damage, or bodily harm may occur if this warning is not followed.
•Risk of explosion if battery is replaced by an incorrect type. Dispose of used batteries accordingly.
•Risk of explosion if batteries are charged in areas with high temperature (100°F+).
•Batteries should never be removed from the battery compartment for charging.
•The rechargeable Lithium Ion (Li-Ion) batteries are not memory sensitive, do not require
depletion before charging and cannot be over charged.
•The batteries come partially charged from the factory, but will require a full charge before the
first use.
•When storing the unit for long periods, remember to regularly give batteries a full charge. This
should be done once every 3 to 4 months. Failure to do so will result in decreased battery life.
•You should expect hundreds of recharge cycles from your batteries. However, all rechargeable
batteries lose capacity over time relative to the number of recharge cycles they experience.
This is normal. If your operating time drops to half of the original life, contact the Customer Care
Center.
•The batteries should last for a period of 3-5 years. When a battery needs replacement, call our
Customer Care Center at 1-800-732-0144. Please do not open the Handheld Device or GPS Collar.
•When storing the device for an extended time, store within the following temperature range: from
32°F to 77°F (from 0° to 25°C).
•Separate collection of spent batteries is required in many regions; check the regulations in your
area before discarding spent batteries.
400-1360 TEK 1.0L Manual.indd 19 3/31/11 1:49 PM

20 1-800-732-014420 1-800-732-0144
GETTING STARTED
STEP :: 03
PAIR COllARS TO THE HANDHElD DEvICE
Your system will already be paired when you get it, but in the event you need to pair the Handheld
Device to the GPS Collar, follow the steps below. The Handheld Device can support up to 12 collars
at a time. You must repeat this procedure for each GPS Collar that you want to monitor with this
Handheld Device.
TO PAIR THE COllARS TO THE HANDHElD DEvICE:
1. On the main menu, select SETTINGS > MY COLLARS > COLOR where COLOR is the icon color
that you want to associate with this collar.
2. Press the right arrow to open the configuration window.
3. To enable the GPS collar, select and press the right arrow key to set ACTIVE to Y.
4. On the GPS collar, press and hold the On/Off button until its indicator light is a solid amber. The
collar is now in “pairing mode.”
5. On the handheld device, select PAIR COLLAR and press the right arrow key to complete the
pairing process. The indicator light on the collar will blink 5 times to confirm that it is paired to
the handheld device.
6. When finished, press BACK to return to the main menu.
400-1360 TEK 1.0L Manual.indd 20 3/31/11 1:49 PM
21sportdog.com/tEK 21sportdog.com/tEK
GETTING STARTED
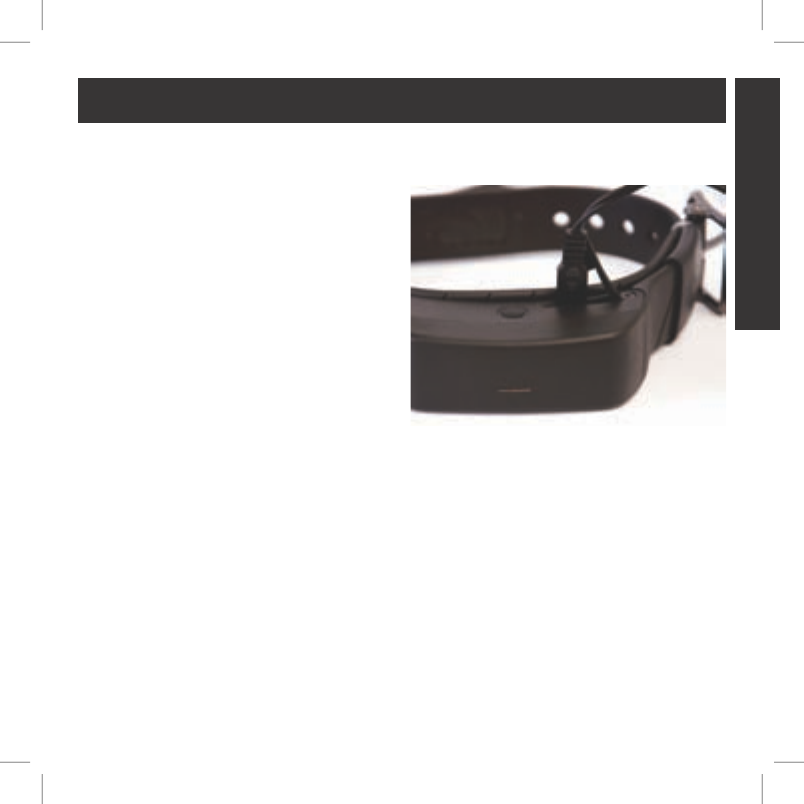
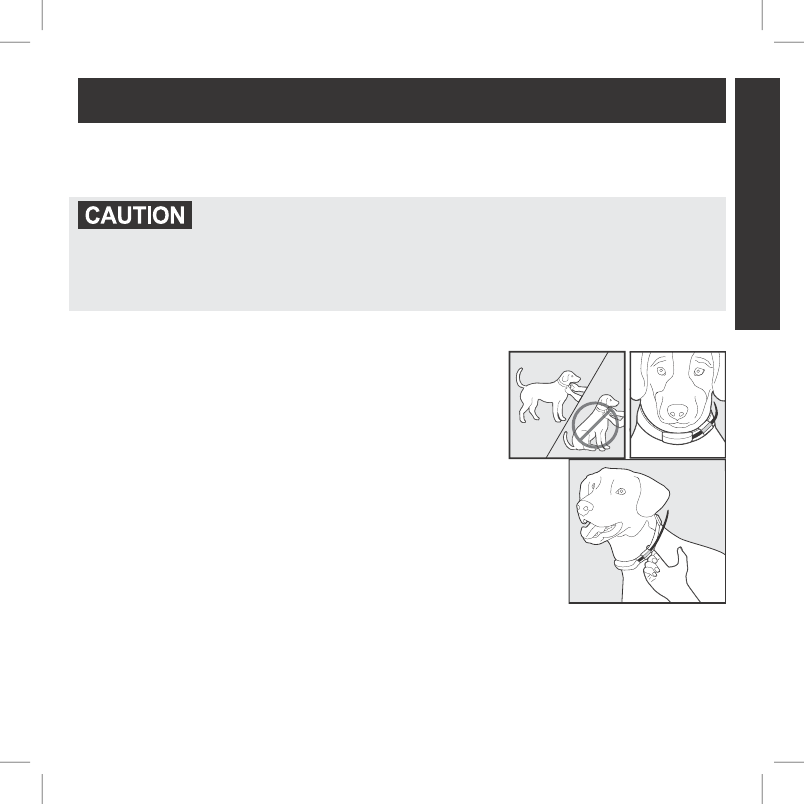
STEP :: 04
FIT THE GPS COllAR
IMPORTANT: The proper fit and placement of the GPS Collar is important for effective use.
Please read and follow the instructions in this manual.
•Avoid leaving the collar on the dog for more than 12 hours per day.
•When possible, reposition the collar on the dog’s neck every 1 to 2 hours.
•When using a separate collar for a lead, don’t put pressure on the GPS Collar.
•Wash the dog’s collar weekly with a damp cloth.
4B
4A
TO ENSURE A PROPER FIT, FOllOW THESE STEPS:
1. With your dog standing (4A), center the collar underneath
your dog’s neck (4B).
4C
2. The collar should fit snugly, yet loose enough to allow one
finger to fit between the strap and your dog’s neck (4C).
3. Allow your dog to wear the collar for several minutes, and
then recheck the fit. Check the fit again as your dog becomes
more comfortable wearing the collar.
Note: To ensure the best reception possible, make sure the GPS antenna is
positioned on the back of your dog’s neck.
400-1360 TEK 1.0L Manual.indd 21 3/31/11 1:49 PM
22 1-800-732-014422 1-800-732-0144
GETTING STARTED
STEP :: 05
ADD YOUR DOG
The TEK™ SERIES Location System allows you to track up to 12 dogs with the purchase of
additional GPS Collars. After the GPS Collar has been paired to the Handheld Device, you must add
the dogs to the system. You must repeat this procedure for each dog that you want to work with the
system.
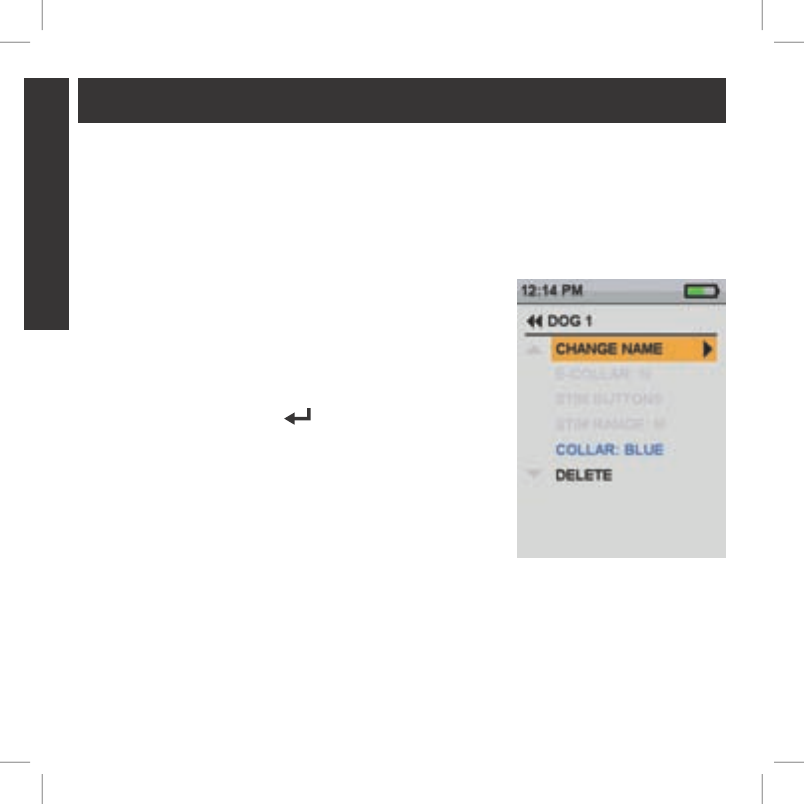
TO ADD A DOG:
1. From the main menu, select SETTINGS > MY DOGS > ADD
A DOG. A screen labeled DOG n appears where n is the next
available number of the dog.
2. To enter the dog’s name, select CHANGE NAME. A text entry
screen displays. Select Clr and press ENTER (bottom-right
button) to clear the name. Use the arrow keys to select letters
to enter a new name. Select
9:40 AM
GENERAL
Time
Brightness
Battery Gauge
Up / Down Indicators
More / Select
Back
Text Enter
100 YDS
TRACKING
GPS Lock/Fix Indicator
Compass
Dog Direction Indicator
Dog Direction Indicator Communication Lost
Dog On Point / Treed
Scale Indicator
Battery Gauge on Collar
C
V
T
TRAINING
Continuous Stimulation
Vibration
Tone
My Dog
R
M
P1
P2
Rising Stim
Momentary Stim
Programmable 1
Programmable 2
to complete the new name.
3. Assign a collar to this dog by selecting COLLAR. Use the arrow
keys to select the color matching the desired collar from the
previously paired collars.
4. Once a collar is assigned to the new dog, you are ready to track
this dog. Press BACK to return to the main menu.
If desired, you can add an E-Collar Module to your system with
the purchase of a TEK-T Add-A-Dog®.
400-1360 TEK 1.0L Manual.indd 22 3/31/11 1:49 PM
23sportdog.com/tEK 23sportdog.com/tEK
GETTING STARTED
ACQUIRE GPS SATEllITE SIGNAlS
Before the TEK™ SERIES Handheld Device can show your current location and the location of your
dog(s), both units must acquire a GPS signal fix.
TO ACQUIRE GPS SIGNAl FIX:
NOTE: Acquiring a GPS signal fix can take several minutes.
1. Go outdoors to an open area with a clear view of the sky.
2. Once you are outdoors, turn the Handheld Device and GPS Collar on. The “Waiting for Lock”
message will display until a good GPS fix is acquired. On the Handheld Device, the GPS Fix
Indicator
9:40 AM
GENERAL
Time
Brightness
Battery Gauge
Up / Down Indicators
More / Select
Back
Text Enter
100 YDS
TRACKING
GPS Lock/Fix Indicator
Compass
Dog Direction Indicator
Dog Direction Indicator Communication Lost
Dog On Point / Treed
Scale Indicator
Battery Gauge on Collar
C
V
T
TRAINING
Continuous Stimulation
Vibration
Tone
My Dog
R
M
P1
P2
Rising Stim
Momentary Stim
Programmable 1
Programmable 2
displays when GPS fix is achieved. The GPS Indicator Light on the collar will
single blink every 3 seconds when it has a GPS lock.
400-1360 TEK 1.0L Manual.indd 23 3/31/11 1:49 PM
24 1-800-732-014424 1-800-732-0144
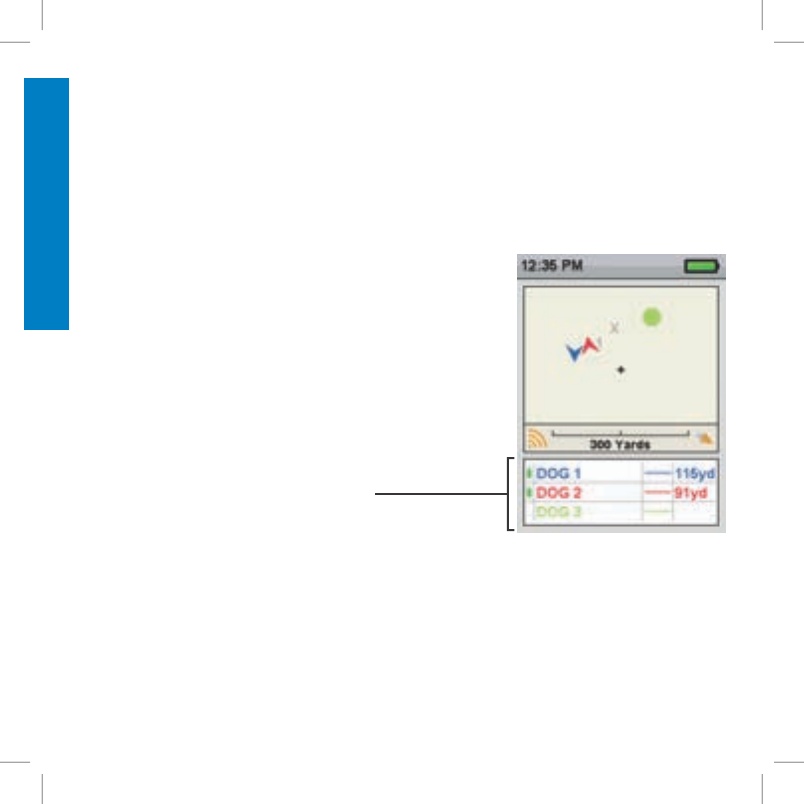
DOG TRACKING
TRACK YOUR DOG
The DOG TRACKING screen allows you to view your location and track the location of your dog(s).
TO USE TRACKING MODE:
NOTE: You must have a clear view of the sky in order for the GPS to acquire a signal. The “Waiting
for Lock” message will display until a good GPS fix is acquired. The Handheld Device will beep once
and move to the tracking window when GPS lock is acquired.
From the main menu, select DOG TRACKING. The tracking
screen displays.
Your location is marked by a black crosshair (+) in the center of
the display. Dogs are marked by a direction arrow showing their
direction of travel or an octagon if the dog is stationary. If you
have set a start point, it appears as an X on the tracking display.
Any active way points are marked by their respective number.
The upper portion of the screen also displays your GPS status,
current map scale, and compass direction.
A table on the lower portion of the screen shows the status of
the first three dogs being tracked as follows:
•The name of each dog is displayed in the color of its assigned
collar.
•The distance of each dog from your location is displayed.
TO ADJUST THE SCAlE:
On the DOG TRACKING screen, press the left or right arrow on the Menu Selection Pad to manually
adjust the scale from 100 yards to 75 miles or set the scale to AUTO which will automatically adjust
to keep your dog(s) on the display. The current scale is displayed just below the tracking area.
400-1360 TEK 1.0L Manual.indd 24 3/31/11 1:49 PM

25sportdog.com/tEK 25sportdog.com/tEK
DOG lIST
TO SUSPEND OR RESUME TRACKING A SPECIFIC DOG:
You can choose to suspend tracking of a specific dog without having to delete the dog from the system.
1. From the main menu, select DOG LIST. A list of current dogs displays.
2. Use the arrow keys to highlight the dog you want to suspend tracking.
3. Press the right arrow key. A message displays “DOG X SUSPEND ” where DOG X is the name of
the dog selected. The dog will no longer display on the tracking screen.
4. To resume tracking the dog, select DOG LIST.
5. Use the arrow keys to highlight the dog you want to resume tracking.
6. Press the right arrow key. A message displays “DOG X RESUME ” where DOG X is the name of
the dog selected. The dog will appear on the tracking screen.
TO SET THE ORDER IN DOG lIST:
You can choose to re-order how dogs are displayed in the system.
1. From the main menu, select DOG LIST > SET ORDER. A list of
dogs displays.
2. Use the arrow keys to highlight the dog you want to move in the
list and press the right arrow key.
3. Use the up or down arrow keys to move the selected dog in
the list.
4. When the dog is in the desired order, press the right arrow key.
5. Repeat for each dog until they are in the desired order. Dogs
will now appear in this order on tracking screen.
400-1360 TEK 1.0L Manual.indd 25 3/31/11 1:49 PM
26 1-800-732-014426 1-800-732-0144
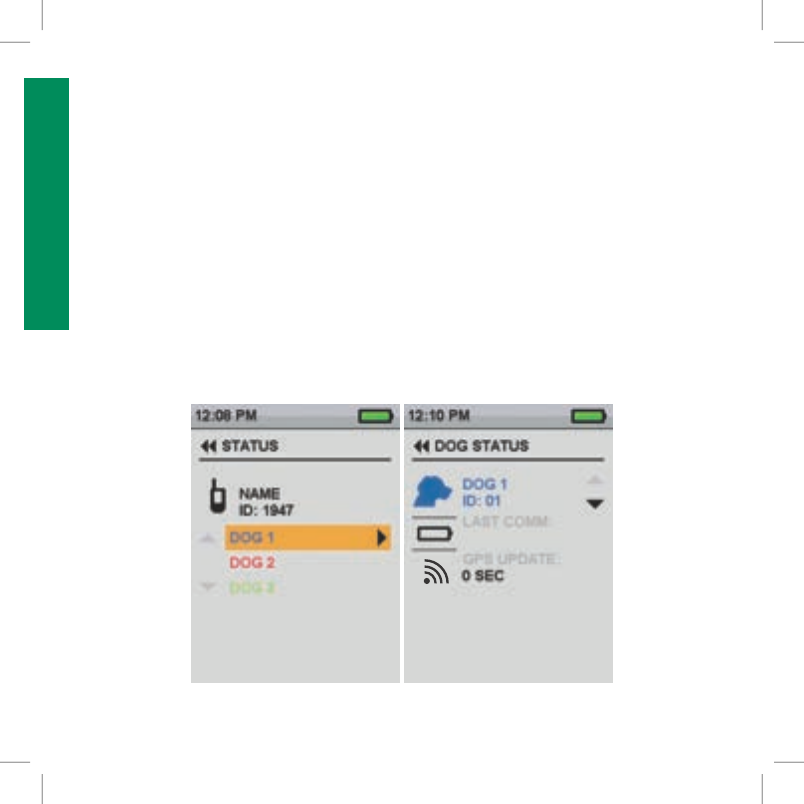
DOG STATUS
vIEW DOG STATUS
The STATUS screen allows you to view the status of the GPS Collar for each dog, the ID for your
Handheld Device and a list of dogs being tracked. For each dog, you can view its ID, GPS battery
status, GPS lock status, update rate, and the time since its last update.
The update rate on your Handheld Device will update automatically according to the following GPS
Collar battery status:
•Good Battery - Every 2.5 seconds
•Medium Battery - Every 10 seconds
•Low Battery - Every 25 seconds
TO vIEW THE DOG STATUS:
1. From the main menu, select STATUS. The STATUS screen displays .
2. Select the dog whose status you want to view e.g. DOG 1.
3. Press the right arrow to view the DOG STATUS screen.
9:40 AM
GENERAL
Time
Brightness
Battery Gauge
Up / Down Indicators
More / Select
Back
Text Enter
100 YDS
TRACKING
GPS Lock/Fix Indicator
Compass
Dog Direction Indicator
Dog Direction Indicator Communication Lost
Dog On Point / Treed
Scale Indicator
Battery Gauge on Collar
C
V
T
TRAINING
Continuous Stimulation
Vibration
Tone
My Dog
R
M
P1
P2
Rising Stim
Momentary Stim
Programmable 1
Programmable 2
400-1360 TEK 1.0L Manual.indd 26 3/31/11 1:49 PM

27sportdog.com/tEK 27sportdog.com/tEK
COMPASS | WAY POINTS
NAvIGATE WITH THE COMPASS AND GPS TOOlS
The TEK™ SERIES Location System comes with a built-in electronic compass and GPS tools to
track your location and guide you to previously saved locations.
SET YOUR STARTING lOCATION
The SET START POINT screen allows you to define a way point specific to your starting location
prior to working the dogs in a particular area.
TO SET A START POINT:
NOTE: You must have a good GPS lock before you can mark a new way point.
1. From the main menu, select SET START POINT. A prompt appears, “You are about to change the
starting location. Are you sure you want to continue?”
2. Select YES to set a new starting location.
MARK YOUR lOCATION WITH WAY POINTS
The WAY POINTS screen allows you to save your current GPS location as a way point, navigate
to, rename or delete existing way points. You can store up to 20 way points. If you have set a start
point, it appears as an X on the tracking display. Other way points are shown by their respective
number.
TO MARK A NEW WAY POINT:
NOTE: You must have a good GPS fix before you can mark a new way point.
1. From the main menu, select WAY POINTS > MARK NEW POINT. A text entry field appears.
2. Use the arrow keys to enter a name for the new way point.
3. Select
9:40 AM
GENERAL
Time
Brightness
Battery Gauge
Up / Down Indicators
More / Select
Back
Text Enter
100 YDS
TRACKING
GPS Lock/Fix Indicator
Compass
Dog Direction Indicator
Dog Direction Indicator Communication Lost
Dog On Point / Treed
Scale Indicator
Battery Gauge on Collar
C
V
T
TRAINING
Continuous Stimulation
Vibration
Tone
My Dog
R
M
P1
P2
Rising Stim
Momentary Stim
Programmable 1
Programmable 2
when finished.
400-1360 TEK 1.0L Manual.indd 27 3/31/11 1:49 PM
28 1-800-732-014428 1-800-732-0144
COMPASS | WAY POINTS
TO RENAME A WAY POINT:
1. From the main menu, select WAY POINT > way point name where way point name is a previously
marked way point.
2. Select RENAME. A text entry screen displays.
3. Use the arrow keys to type in the new name.
4. Select
9:40 AM
GENERAL
Time
Brightness
Battery Gauge
Up / Down Indicators
More / Select
Back
Text Enter
100 YDS
TRACKING
GPS Lock/Fix Indicator
Compass
Dog Direction Indicator
Dog Direction Indicator Communication Lost
Dog On Point / Treed
Scale Indicator
Battery Gauge on Collar
C
V
T
TRAINING
Continuous Stimulation
Vibration
Tone
My Dog
R
M
P1
P2
Rising Stim
Momentary Stim
Programmable 1
Programmable 2
when finished.
TO DElETE A WAY POINT:
NOTE: Deleting a way point cannot be undone.
1. From the main menu, select WAY POINT > way point name where way point name is a previously
marked way point.
2. Select DELETE.
3. At the prompt, “ARE YOU SURE YOU WANT TO CONTINUE?” select YES. The way point is
deleted.
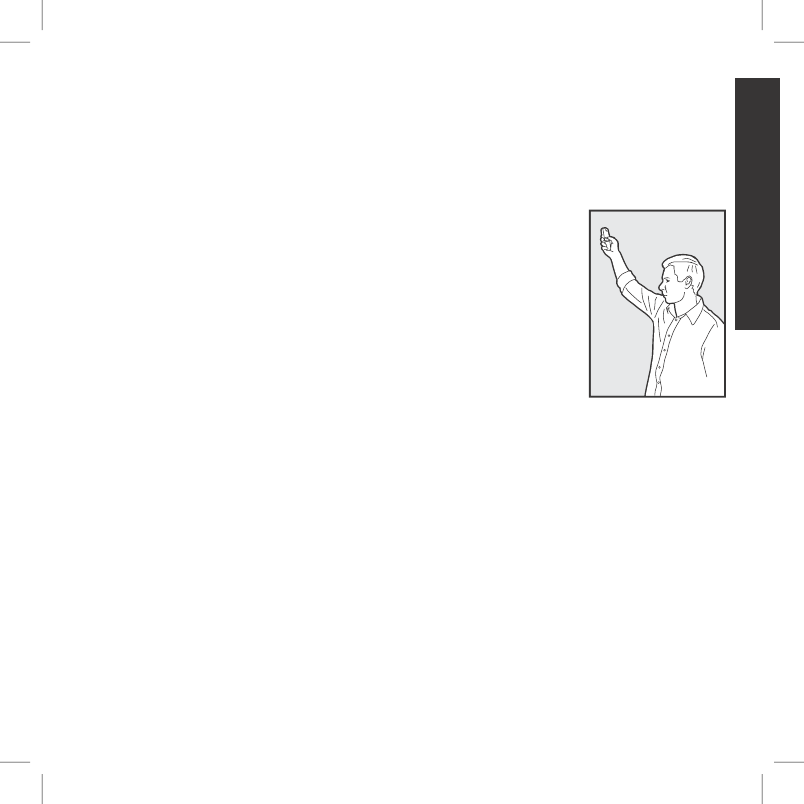
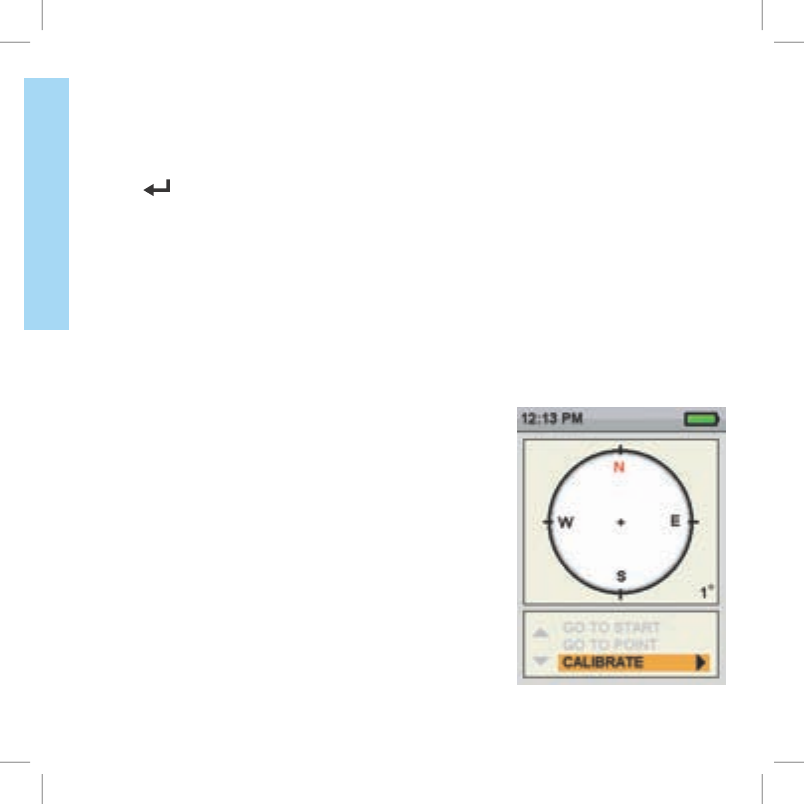
TO USE THE COMPASS:
From the main menu, select COMPASS . The COMPASS screen
displays.
NOTE: When using the compass, hold the Handheld Device up to a
45° angle and point the antenna forward along your line of travel.
The COMPASS screen allows you to see your current heading
and track the bearing to pre-defined way points. The compass
shows north as a red N and will rotate as you move to keep its
orientation. Your current heading is shown at the lower right
corner of the display.
400-1360 TEK 1.0L Manual.indd 28 3/31/11 1:49 PM
29sportdog.com/tEK 29sportdog.com/tEK
COMPASS | WAY POINTS
TO GO TO YOUR START POINT:
NOTE: You must have first set a start point before you can use the compass to navigate to it (see
page 27). And, you must have a good GPS fix of your current location.
1. From the main menu, select COMPASS. The compass screen displays.
2. Select GO TO START. The compass screen now displays the bearing and distance to your
starting location.
3. Face the direction toward the starting location then follow the best route to that location.
Always be alert to your surroundings when navigating to a way point.
Do not cross dangerous terrain or obstacles as you move.
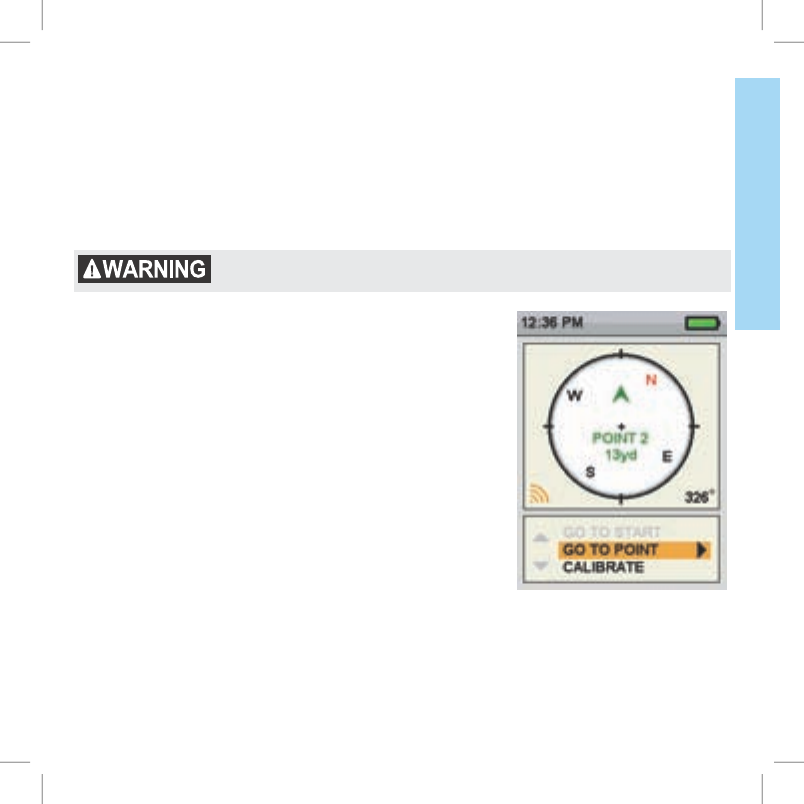
TO GO TO A WAY POINT:
NOTE: You must have first created a way point before you can use
the compass to navigate to it (see page 27). And, you must have a
good GPS fix of your current location.
1. From the main menu, select COMPASS. The compass screen
displays.
2. Select GO TO POINT. A list of pre-defined way points displays.
3. Select the desired way point. The compass screen now
displays the bearing and distance to the way point .
TO GO TO A WAY POINT
(vIA WAY POINT MENU):
1. From the main menu, select WAY POINT > way point name
where way point name is a previously marked way point.
2. Select GO TO. The compass screen displays with the bearing and distance to the selected way point.
400-1360 TEK 1.0L Manual.indd 29 3/31/11 1:49 PM

30 1-800-732-014430 1-800-732-0144
SETTINGS
SETTINGS MENU
The SETTINGS screen allows you to customize the operation of the Handheld Device.
TO OPEN THE SETTINGS MENU:
From the main menu, select SETTINGS. The settings screen displays the following options.
•GENERAL: Includes tracking modes, stimulation settings (for optional E-Collar module), action,
name, and magnetic declination.
•COMMUNICATION: Includes user ID, GPS channel, and optional E-Collar channel.
•MY COLLARS: Includes collar status, collar pairing, and collar sharing.
•MY DOGS: Includes adding a dog, changing dog name, changing color, enabling optional E-Collar,
or deleting a dog from the system.
•UNITS: Includes distance and time modes.
•SET TIME: Sets the time used by the Handheld Device.
•DISPL AY: Includes the brightness dim timer, power off timer, and way point display options.
•VEHICLE MODE: Enables or disables vehicle mode.
•RESET ALL: Resets all settings to the factory default configuration.
CHANGE GENERAl SETTINGS
The GENERAL SETTINGS screen allows you to set the tracking mode, stimulation configuration
(for optional E-Collar module), identity, and magnetic declination.
TO TOGGlE TRACKING MODE:
The Handheld Device can be configured to operate in two modes: TRACKING ONLY and TRACK
& TRAIN. In TRACKING ONLY mode, the Handheld Device will only track the location of dogs and
all stimulation functions will be disabled. In TRACK & TRAIN mode, all stimulation options are
available for use with the optional E-Collar module.
1. From the main menu, select SETTINGS > GENERAL.
2. Press the right arrow to select TRACKING ONLY.
400-1360 TEK 1.0L Manual.indd 30 3/31/11 1:49 PM
31sportdog.com/tEK 31sportdog.com/tEK
SETTINGS
TO ENAblE ACTION AlERTS:
The Handheld Device can alert you when your dog exhibits specific hunting actions:
•On-point – used for hunting with pointing dogs to indicate the dog is stationary or on-point.
•Treed – used for hunting with trailing dogs to indicate the dog is “on the tree” and holding an
animal at bay.
While on the tracking screen, the Handheld Device will alert you when the action is detected.
1. From the main menu, select SETTINGS > GENERAL >ACTION:
2. Press the right arrow key to toggle among the action types: NONE, ON-POINT, TREED.
3. Press BACK to return to the main menu
TO SET THE ACTION AlERT TYPE:
The Handheld Device can alert you to an action with several alert types.
1. From the main menu, select SETTINGS > GENERAL >ALERT:
2. Press the right arrow key to toggle among the action types: NONE, TONE, VIBE, BOTH.
3. Press BACK to return to the main menu
TO SET A NAME:
At initial set-up, you can name your Handheld Device.
1. From the main menu, select SETTINGS > GENERAL >SET NAME. A text entry screen displays.
2. Use the arrow keys on the Menu Navigation Pad to enter a name.
3. Select the
9:40 AM
GENERAL
Time
Brightness
Battery Gauge
Up / Down Indicators
More / Select
Back
Text Enter
100 YDS
TRACKING
GPS Lock/Fix Indicator
Compass
Dog Direction Indicator
Dog Direction Indicator Communication Lost
Dog On Point / Treed
Scale Indicator
Battery Gauge on Collar
C
V
T
TRAINING
Continuous Stimulation
Vibration
Tone
My Dog
R
M
P1
P2
Rising Stim
Momentary Stim
Programmable 1
Programmable 2
when finished.
TO ClEAR OR CHANGE A NAME:
1. From the main menu, select SETTINGS > GENERAL >handheld name where handheld name is
previously entered name. A text entry screen displays.
2. Select Clr to clear the name.
3. Press the arrow keys on the Menu Navigation Pad to enter a new name, if desired.
4. When finished, select
9:40 AM
GENERAL
Time
Brightness
Battery Gauge
Up / Down Indicators
More / Select
Back
Text Enter
100 YDS
TRACKING
GPS Lock/Fix Indicator
Compass
Dog Direction Indicator
Dog Direction Indicator Communication Lost
Dog On Point / Treed
Scale Indicator
Battery Gauge on Collar
C
V
T
TRAINING
Continuous Stimulation
Vibration
Tone
My Dog
R
M
P1
P2
Rising Stim
Momentary Stim
Programmable 1
Programmable 2
.
400-1360 TEK 1.0L Manual.indd 31 3/31/11 1:49 PM

32 1-800-732-014432 1-800-732-0144
SETTINGS
CHANGE COMMUNICATION SETTINGS
The COMMUNICATION screen allows you to set the User ID, GPS channel, and E-Collar channel
(optional). The User ID is a unique identifier used by the Handheld Device and shared with the GPS
Collar. The GPS-channel is the radio channel used for communication between the GPS Collar
and the Handheld Device, while the E-Collar channel is the radio channel used for communication
between the optional E-Collar module and the Handheld Device. The collar learns the User ID and
GPS channel during the pairing process.
The Handheld Device uses an ID value to distinguish it from other Handheld Devices. This ID is
factory set and for most users will never need attention. The ID value can be viewed on either the
STATUS or ABOUT screens.
If the factory-set User ID on your Handheld Device conflicts with another Handheld Device or
similar device, you should change the User ID to eliminate the conflict. Alternately, if two users
want to have the ability to monitor the same dog(s) with each user operating his own Handheld
Device, they can choose to set their User IDs to match.
The only reason to change the GPS channel is if there is outside interference (other radios in the
area) causing communications problems.
TO CHANGE THE USER ID:
NOTE: Changing User ID requires that the collar be paired again to the handheld (See STEP 3).
1. From the main menu, select SETTINGS > COMMUNICATION > USER ID.
2. Press the up or down arrows to select a user ID number from 0 – 100.
NOTE: The User ID value is a number from 0 to 100 that is used to alter the actual ID value that the
Handheld Device uses for communication. A value of 0 is used to revert back to the factory set ID.
3. Press the right arrow to confirm your selection.
4. At the prompt, “ARE YOU SURE YOU WANT TO CONTINUE?” select YES.
5. Press BACK to return to the main menu.
400-1360 TEK 1.0L Manual.indd 32 3/31/11 1:49 PM

33sportdog.com/tEK 33sportdog.com/tEK
SETTINGS
TO CHANGE THE GPS CHANNEl:
NOTE: Changing GPS channel requires that the collar be paired again to the Handheld Device (See
STEP 3).
1. From the main menu, select SETTINGS > COMMUNICATION >GPS CHANNEL.
2. Press the right arrow key to toggle between available GPS channels, 1 to 5.
3. At the prompt “ARE YOU SURE YOU WANT TO CONTINUE?” select YES.
4. Press BACK to return to the main menu.
CHANGE MY COllARS SETTINGS
The MY COLLARS screen allows you to configure a new collar, pair the collar to work with your
Handheld Device, or share tracking of a collar from another Handheld Device. You can add up to 12
collars to the system.
TO ADD A COllAR:
1. From the main menu, select SETTINGS > MY COLLARS.
2. Press the up or down arrow keys to select the color you want to use with the new collar.
3. Press the right arrow to open the configuration window.
4. To enable the GPS Collar, select and press the right arrow key to set ACTIVE to Y. If sharing a
collar skip Steps 5 and 6 and move to the SHARE COLLARS section on the next page.
5. Put the new collar in “pairing mode” by pressing and holding the On / Off button on the collar
until its indicator light is solid amber. See STEP 3 for details on pairing mode.
6. On the Handheld Device, select PAIR COLLAR to allow the GPS Collar to connect to the
Handheld Device. This collar is now ready to be put on a dog.
400-1360 TEK 1.0L Manual.indd 33 3/31/11 1:49 PM

34 1-800-732-014434 1-800-732-0144
SETTINGS
TO SHARE COllARS:
You can track dogs associated with another Handheld Device. This is helpful if you and another
person are working with multiple dogs.
1. On the main menu, select SETTINGS > MY COLLARS > color > SHARE COLLAR where the color
selected is what you want to use for the collar to be tracked.
2. Press the right arrow to select Y to enable collar sharing.
3. To enter a User ID, select ID and press the right arrow.
4. Use the up or down arrow keys on the Menu Selection Pad to enter the four-digit ID code from
the Handheld Device whose dog you want to track. See Status Screen from Main Menu to find
the ID Code.
5. To select a dog number, select DOG and press the right arrow.
6. Use the up or down arrow keys to enter the two-digit identifier of the specific dog to be tracked.
This is the code used by the other user to identify that dog.
7. When finished, press BACK to return to the main menu.
CHANGE MY DOGS SETTINGS
The MY DOGS screen allows you to add or remove dogs assigned to the Handheld Device. It helps
track which dog is wearing which collar and defines collar settings specific to that dog.
TO ADD A DOG:
1. From the main menu, select SETTINGS > MY DOGS > ADD A DOG. A screen labeled DOG n
appears where n is the next available number of the dog.
2. Change the dog’s name by selecting CHANGE NAME. A text entry screen displays. Press the
arrow keys to select Clr and press the tracking mode button to clear the name. Pressing the
arrow keys select letters to enter a new name. Select
9:40 AM
GENERAL
Time
Brightness
Battery Gauge
Up / Down Indicators
More / Select
Back
Text Enter
100 YDS
TRACKING
GPS Lock/Fix Indicator
Compass
Dog Direction Indicator
Dog Direction Indicator Communication Lost
Dog On Point / Treed
Scale Indicator
Battery Gauge on Collar
C
V
T
TRAINING
Continuous Stimulation
Vibration
Tone
My Dog
R
M
P1
P2
Rising Stim
Momentary Stim
Programmable 1
Programmable 2
to complete the new name.
3. Assign a collar to this dog by selecting COLLAR. Use the arrow keys to select the color matching
the desired collar.
4. Once a collar is assigned to the new dog, you are ready to track this dog. Press BACK to return
to the main menu.
400-1360 TEK 1.0L Manual.indd 34 3/31/11 1:49 PM

35sportdog.com/tEK 35sportdog.com/tEK
SETTINGS
TO CHANGE A DOG’S NAME:
1. From the main menu, select SETTINGS > MY DOGS > dog > CHANGE NAME where dog is the
name previously entered for this dog. A text entry screen displays.
2. Press the arrow keys to select Clr and press the tracking mode button to clear the name.
3. Press the arrow keys on the Menu Navigation Pad to enter a new name, if desired.
4. When finished, select
9:40 AM
GENERAL
Time
Brightness
Battery Gauge
Up / Down Indicators
More / Select
Back
Text Enter
100 YDS
TRACKING
GPS Lock/Fix Indicator
Compass
Dog Direction Indicator
Dog Direction Indicator Communication Lost
Dog On Point / Treed
Scale Indicator
Battery Gauge on Collar
C
V
T
TRAINING
Continuous Stimulation
Vibration
Tone
My Dog
R
M
P1
P2
Rising Stim
Momentary Stim
Programmable 1
Programmable 2
.
TO CHANGE THE COllAR ASSIGNED TO A DOG:
The COLLAR setting allows you to assign a collar to a specific dog according to the color set in the
MY COLLARS screen. The color will also be used to identify the dog on the TRACKING screen.
1. From the main menu, select SETTINGS > MY DOGS > dog where dog is the name of the dog.
2. Select COLLAR.
3. Press the arrow keys to select the color for the desired collar then press the right arrow key. You
must select YES to confirm the new collar assignment. NOTE: If the selected collar has already
been assigned to a different dog, a warning message displays.
4. When finished, press BACK to return to the main menu.
TO DElETE A DOG:
NOTE: Deleting a dog cannot be undone. All configuration settings related to this dog will be
deleted.
1. From the main menu, select SETTINGS > MY DOGS > dog where dog is the name of the dog to be
deleted from the system.
2. Press the arrow keys to select DELETE and press the right arrow key.
3. A warning message displays. Select YES, if desired, to confirm.
400-1360 TEK 1.0L Manual.indd 35 3/31/11 1:49 PM

36 1-800-732-014436 1-800-732-0144
SETTINGS
CHANGE UNIT SETTINGS
The UNITS screen allows you to change distance units and time modes.
TO CHANGE DISTANCE UNITS:
1. From the main menu, select SETTINGS > UNITS > DISTANCE.
2. Press the right arrow on the Menu Navigation Pad to select YARDS or METERS. Distances will
be displayed in the selected format. The default is YARDS.
3. Press BACK to return to the main menu.
TO CHANGE TIME MODE:
1. From the main menu, select SETTINGS > UNITS > TIME.
2. Press the right arrow on the Menu Navigation Pad to select 12H or 24H mode. All times will
display in the selected format. The default is 12H.
3. Press BACK to return to the main menu.
SET SYSTEM TIME
NOTE: Be sure to accurately set the time to your current local time.
TO SET THE lOCAl TIME:
1. From the main menu, select SETTINGS > SET TIME. The SET TIME window displays.
2. Press the up or down arrows on the Menu Navigation Pad to set the current hours. Then, press
the right arrow to move to the minute field.
3. Press the up or down arrows to set the current minute. Then, press the right arrow to move to
the AM/PM field.
4. If in 12-hour mode, press the up or down arrows to toggle between AM/PM. Then, press the
right arrow to set the time.
5. Press BACK to return to the main menu.
400-1360 TEK 1.0L Manual.indd 36 3/31/11 1:49 PM

37sportdog.com/tEK 37sportdog.com/tEK
SETTINGS
CHANGE DISPlAY SETTINGS
The DISPLAY screen allows you to configure the brightness display timer, power off timer, and way
point display options.
TO CHANGE THE lIGHT DIM TIMER:
1. From the main menu, select SETTINGS > DISPLAY > LIGHT DIM.
2. Press the right arrow on the Menu Navigation Pad to toggle among timer settings: NO, 30 SEC,
60 SEC, OR 90 SEC. If not used, the display screen will dim after the number of seconds selected.
The default is 30 seconds.
3. Press BACK to return to the main menu.
TO CHANGE POWER OFF TIMER:
1. From the main menu, select SETTINGS > DISPLAY > POWER OFF.
2. Press the right arrow on the Menu Navigation Pad to toggle among timer settings: NO, 1 HR,
2 HR, 3 HR. If not used, the Handheld Device will then automatically power off after the time
period selected. The default is 3 hours.
3. Press BACK to return to the main menu.
TO CHANGE WAY POINT DISPlAY OPTIONS:
1. From the main menu, select SETTINGS > DISPLAY > VIEW PNTS.
2. Press the right arrow on the Menu Selection Pad to toggle among display options: NONE,
START, ALL. NONE will hide all way points on the tracking screen. START will only display start
points. ALL will display all way points within range. The default is START.
3. Press BACK to return to the main menu.
400-1360 TEK 1.0L Manual.indd 37 3/31/11 1:49 PM

38 1-800-732-014438 1-800-732-0144
SETTINGS
USE vEHIClE MODE
Using your TEK™ Series Location System while operating a motor vehicle can
be distracting. Always pay full attention to operating your vehicle.
Using vehicle mode disables the internal compass and allows your Handheld Device to rely on GPS
for heading and bearing information. This allows your Handheld Device to provide stable readings
and not be affected by the metal structure and magnetic fields within your vehicle.
TO ENAblE / DISAblE vEHIClE MODE:
1. From the main menu, select SETTINGS > VEHICLE MODE.
2. Use the right arrow on the Menu Selection Pad to select Y to enable or N to disable
Vehicle Mode.
3. Press BACK to return to the main menu.
400-1360 TEK 1.0L Manual.indd 38 3/31/11 1:49 PM
39sportdog.com/tEK 39sportdog.com/tEK
AbOUT
RESET HANDHElD DEvICE
Reset restores the Handheld Device to its factory-default settings.
TO RESET HANDHElD DEvICE SETTINGS:
NOTE: Resetting the system cannot be undone. All information including way points will be lost.
1. From the main menu, select SETTINGS > RESET ALL. A confirmation window displays.
2. At the prompt, “ARE YOU SURE YOU WANT TO CONTINUE?” select YES. The handheld will reset
to its default configuration and power off.
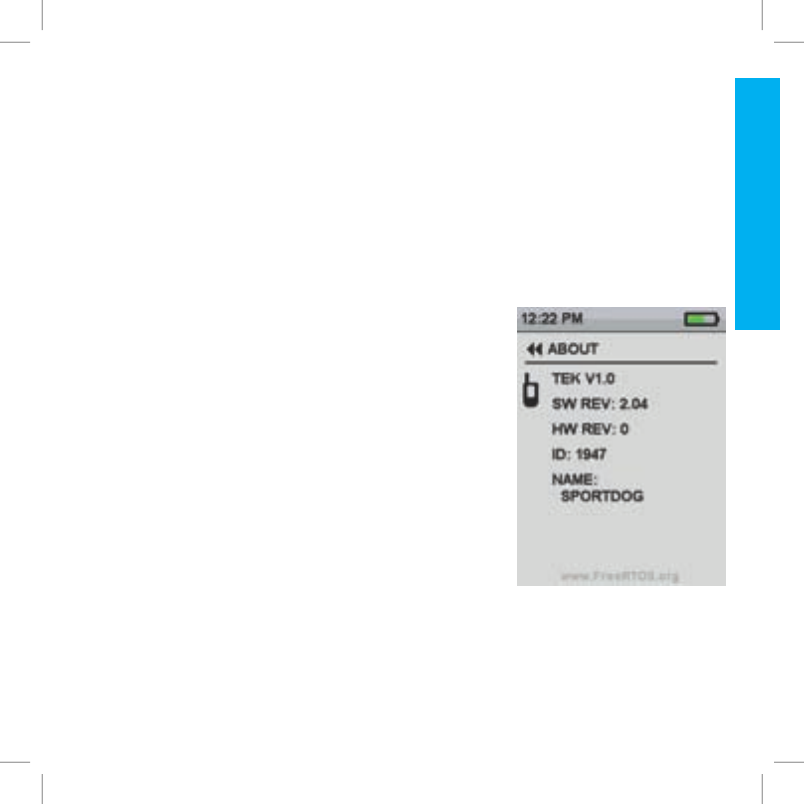
AbOUT
From the ABOUT screen you can view your Handheld Device’s
name, ID number and software/hardware revision.
400-1360 TEK 1.0L Manual.indd 39 3/31/11 1:49 PM

40 1-800-732-014440 1-800-732-0144
FAQ’S | TROUblESHOOTING
FREQUENTlY ASKED QUESTIONS
How old does a dog have to be before using
the TEK™ SERIES Location System?
The collar may be too large for dogs under 8
pounds.
Is the GPS Collar waterproof? Yes. It is waterproof and can be submerged in
water to a depth of 25 feet.
Can my GPS Collar be used around salt water? If the collar is used in or around salt water,
the collar should be rinsed with fresh water
following each use.
Is the TEK SERIES Location System capable of
multi-dog tracking?
Yes. The TEK SERIES Location System
is expandable to a maximum of 12 dogs.
Additional collars must be purchased
separately (see back cover).
Can I use the TEK SERIES Location System on
aggressive dogs?
We do not recommend any of our products
be used on aggressive dogs. We recommend
that you contact your local veterinarian or
professional trainer to determine if your dog
might be aggressive.
Will I get exactly 7 miles of range with the TEK
SERIES Location System?
The range you get with your TEK SERIES
Location System will vary according to terrain,
weather, vegetation, as well as, transmission
from other radio devices. For maximum amount
of range, please refer to the “How the System
Works” section of this guide.
Can I attach a leash to the GPS Collar? DO NOT attach a leash to the GPS Collar. You
may put a separate non-metallic collar on your
dog’s neck and attach a leash.
400-1360 TEK 1.0L Manual.indd 40 3/31/11 1:49 PM

41sportdog.com/tEK 41sportdog.com/tEK
FAQ’S | TROUblESHOOTING
Can I add maps to the TEK™ Series Location
System?
No. Maps cannot be added to your TEK Series
Location System.
Can I program my TEK Series Location System
to work with my other SportDog Brand®
systems?
Other SportDog Brand systems can be used
in conjunction with your TEK Series Location
System, but are not compatible. If desired, you
can add an E-Collar module to your system
with the purchase of a TEK-T Add-A-Dog® (see
back cover).
Can I organize the way the dogs are displayed
on the tracking screen?
Yes. See “To Set The Order In Dog Lists” on
Page 25.
How many dogs can I share? You can share up to 12 dogs. Sharing a dog is
the same as adding a dog to an available slot
on your Handheld Device.
Do I need to recalibrate my compass when I
change locations?
For best results it is recommended that the
compass be calibrated after you arrive at a
new starting location.
How many WAY POINTS can I store? You can store up to 20 way points, which
includes if you set a way point specific to your
starting location.
Will the TEK Series Location System interfere
with my CB radio?
No. Your TEK Series Location System will not
cause interference with your CB radio.
400-1360 TEK 1.0L Manual.indd 41 3/31/11 1:49 PM

42 1-800-732-014442 1-800-732-0144
FAQ’S | TROUblESHOOTING
TROUblESHOOTING
The answers to these questions should help you solve any problem you have with this system. If
they do not, please contact the Customer Care Center at 1-800-732-0144 or visit our website at
www.sportdog.com.
PROBLEM SOLUTION
My Handheld Device does not turn on. Check to make sure the unit was properly
charged. Refer to “TO CHARGE THE
HANDHELD DEVICE” on Page 13.
My GPS Collar does not turn on. Refer to “TO CHARGE THE GPS COLLAR” on
Page 17.
The GPS Collar is not responding to the
Handheld Device.
•Make sure the GPS Collar has been charged.
The GPS Collar will charge in 2 hours.
•Verify the GPS Collar has been turned on.
Refer to “PREPARE THE GPS COLLAR” on
Page 17.
•Refer to “PAIR COLLARS TO THE HANDHELD
DEVICE” on Page 20.
I cannot get my compass to calibrate. Always calibrate the compass outdoors. Refer
to the “TO CALIBRATE THE COMPASS” on
Page 15.
My dog is not showing up on the tracking
screen.
Use the Menu Selection Pad on the Tracking
Screen to set the scale to AUTO.
I can’t figure out how to set the declination
angle.
Refer to the “TO SET THE MAGNETIC
DECLINATION ANGLE” section for more
information on Page 16.
My Handheld Device conflicts with another
handheld or similar device.
Refer to “TO CHANGE THE USER ID” on
Page 32.
400-1360 TEK 1.0L Manual.indd 42 3/31/11 1:49 PM
43sportdog.com/tEK 43sportdog.com/tEK
PROBLEM SOLUTION
My GPS Collar is experiencing outside
interference.
Refer to “TO CHANGE THE GPS CHANNEL” on
Page 33.
TERMS OF USE AND lIMITATION OF lIAbIlITY
1. TERMS OF USE
This Product is offered to you conditioned upon your acceptance without modification of the
terms, conditions and notices contained herein. Usage of this Product implies acceptance of all
such terms, conditions, and notices.
2. PROPER USE
This Product is designed for use with dogs where tracking is desired. The specific temperament
of your dog may not work with this Product. We recommend that you not use this Product if
your dog is less than 8 pounds or if your dog is aggressive. If you are unsure whether this is
appropriate for your dog, please consult your veterinarian, certified trainer or contact our
Customer Care Center at 1-800-732-0144.
Proper use includes reviewing the entire Operating Guide provided with your Product and any
specific Caution statements.
3. NO UNLAWFUL OR PROHIBITED USE
This Product is designed for use with dogs only. This dog tracking device is not intended to
harm, injure, or provoke. Using this Product in a way that is not intended could result in violation
of Federal, State or local laws.
4. LIMITATION OF LIABILITY
In no event shall Radio Systems® Corporation be liable for any direct, indirect, punitive,
incidental, special or consequential damages, or any damages whatsoever arising out of or
connected with the use or misuse of this Product. Buyer assumes all risks and liability from the
use of this Product.
5. MODIFICATION OF TERMS AND CONDITIONS
Radio Systems Corporation reserves the right to change the terms, conditions and notices
under which this Product is offered.
400-1360 TEK 1.0L Manual.indd 43 3/31/11 1:49 PM

44 1-800-732-0144
FCC COMPlIANCE
This equipment utilizes the MURS band to provide data communication between the Handheld
Device and GPS Collar. The unlicensed use of the MURS band is authorized under part 95 Subpart
J of the FCC rules. To insure continued compliance with FCC limits, SportDOG Brand® recommends
that you only use antennas provided by SportDOG™ for use with your TEK™ Series Location
System. Refer all servicing to the SportDOG Brand Customer Care Center.
This device complies with part 15 of the FCC Rules. Operation is subject to the following two
conditions: (1) This device may not cause harmful interference, and (2) this device must accept any
interference received, including interference that may cause undesired operation.
This equipment has been tested and found to comply with the limits for a Class B digital device,
pursuant to part 15 of the FCC Rules. These limits are designed to provide reasonable protection
against harmful interference in a residential installation. This equipment generates, uses and can
radiate radio frequency energy and, if not installed and used in accordance with the instructions,
may cause harmful interference to radio communications. However, there is no guarantee
that interference will not occur in a specific installation. If interference does occur to radio or
television reception, which can be determined by turning the equipment off and on, the user is
encouraged to try to correct the interference by one or more of the following measures:
•Reorient or relocate the receiving antenna.
•Increase the separation between the equipment and the receiver.
•Connect the equipment to an outlet on a circuit different from that to which the receiver is
connected.
•Contact customer service or an experienced radio/TV technician for assistance.
CAUTION: Unauthorized changes or modifications to the equipment may violate FCC regulations
and could void the user’s authority to operate the equipment.
400-1360 TEK 1.0L Manual.indd 44 3/31/11 1:49 PM

45sportdog.com/tEK
bATTERY DISPOSAl
See important safety information on Page 2 related to the battery.
This system operates on two Li-Ion battery packs (1250mAh capacity for the GPS Collar and
1900mAh capacity for the Handheld Device). Call the Customer Care Center at 1-800-732-0144 if
your battery needs to be replaced. Do not remove or attempt to remove the non-user-replaceable
battery.
Separate collection of spent batteries is required in many regions; check the regulations in your
area before discarding spent batteries.
This product is protected by the following patents:
U.S. Patent Numbers: 7,647,545; D615,438 and other patents pending.
400-1360 TEK 1.0L Manual.indd 45 3/31/11 1:49 PM

46 1-800-732-0144
INDEX
About Batteries, 19
Action Alerts, 31
Add A Collar, 33
Add A Dog, 22, 34
Charging
GPS Collar, 17
Handheld Device, 13
Collars
add a collar, 33
change assigned, 35
Fit Your Dog, 21
Pairing to Handheld, 20
Sharing A Collar, 34
Communications
GPS Channel, 33
User ID, 32
Compass
calibration, 15
go to start point, 29
go to way point, 29
magnetic declination angle, 16
operation, 28
vehicle mode, 38
Definitions
icons, 10, 11
main components, 8, 9
main menu, 12
terms, 13
Delete A Dog, 35
Display
brightness, 14
dim timer, 37
way point options, 37
Display Brightness, 14
Dog
add a dog, 22, 34
change assigned collar, 35
delete a dog, 35
track a dog, 24
view status, 26
Dog List, 25
Frequently Asked Questions
(FAQ), 40, 41
GPS
acquire signal fix, 23
change GPS channel, 33
GPS Collar
charging, 17
indicator light, 9
turn on, 17
Handheld Device
charging, 13
pairing collars, 20
reset to default, 39
set name, 31
turn on, 14
How To
acquire GPS signal fix, 23
add a collar, 33
add a dog, 22, 34
adjust display brightness, 14
adjust map scale, 24
calibrate the compass, 15
change a dog’s name, 35
charge the GPS Collar, 17
charge the Handheld
Device, 13
delete a way point, 28
enable action alerts, 31
fit GPS Collar, 21
go to a way point, 29
go to your starting location, 29
mark a way point, 27
pair collars to Handheld
Device, 20
rename a way point, 28
set action alert type, 31
set the magnetic declination
angle, 16
set your start point, 27
share a collar, 34
track your dog, 24
turn on GPS Collar, 17
turn on Handheld Device, 14
use the compass, 28
view dog status, 26
Icons, 10, 11
Lights, 18
Magnetic Declination Angle, 16
Map
adjusting map scale, 24
Mark Location
set start point, 27
set way point, 27
400-1360 TEK 1.0L Manual.indd 46 3/31/11 1:49 PM

47sportdog.com/tEK
Menu
main, 12
settings, 30
Modes
pairing, 20
toggle tracking mode, 30
tracking, 24
Pairing Mode, 20
Rechargeable Batteries, 19
Reset, 39
Settings
action alerts, 31
action alert type, 31
add a collar, 33
add a dog, 34
change a dog’s name, 35
change assigned collar, 35
change Handheld Device
name, 31
delete a dog, 35
dim timer, 37
display brightness, 14
display options, 37
distance units, 36
magnetic declination angle, 16
map scale, 24
pair collar, 20
power off timer, 37
reset, 39
share a collar, 34
time, 36
time mode, 36
tracking mode, 30
unit settings, 36
user ID, 32
vehicle mode, 38
way point display, 37
Share Collars, 34
Status, 26
Time, 36
Tracking
dogs, 24
own location, 28
Troubleshooting, 42, 43
Turn On
GPS Collar, 17
Handheld Device, 14
User ID
change, 32
view, 26
Vehicle Mode, 38
Way Points
delete way point, 28
display options, 37
go to start point, 29
go to way point, 29
mark start point, 27
mark way point, 27
rename way point, 28
400-1360 TEK 1.0L Manual.indd 47 3/31/11 1:49 PM
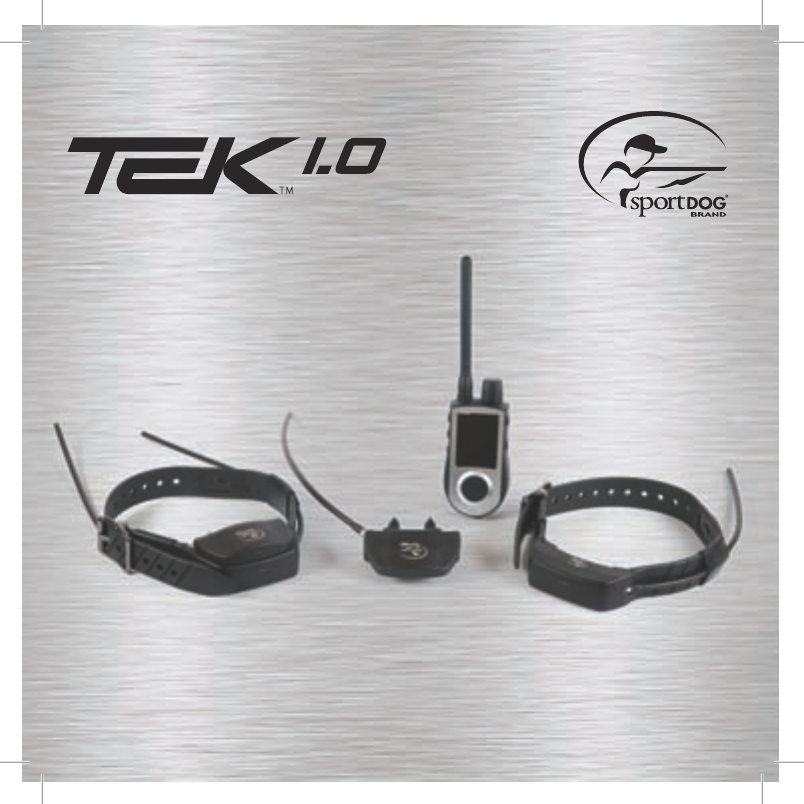
ADD-A-DOG®
ADD-A-DOG®
SPORTDOG.COM
TEK-A D
ORIGINAL COLLAR FOR TEK 1.0LT
TEK-T
E-COLLAR FOR TEK 1.0LT TEK-L
ORIGINAL COLLAR FOR TEK 1.0L
TEK-H
ORIGINAL HANDHELD FOR
TEK 1.0L & TEK 1.0LT
©2011 RADIO SYSTEMS® CORPORATION •10427ElectricAvenue•Knoxville,TN37932•1-800-732-0144
400-1360
400-1360 TEK 1.0L Manual.indd 48 3/31/11 1:49 PM