Radio Systems 3002613 AUTO TRAINER User Manual KE3 3002613 FCC Manual
Radio Systems Corp AUTO TRAINER KE3 3002613 FCC Manual
User Manual
Operating and Training Guide
Model Number
AUTO
PLEASE READ THIS ENTIRE GUIDE BEFORE BEGINNING
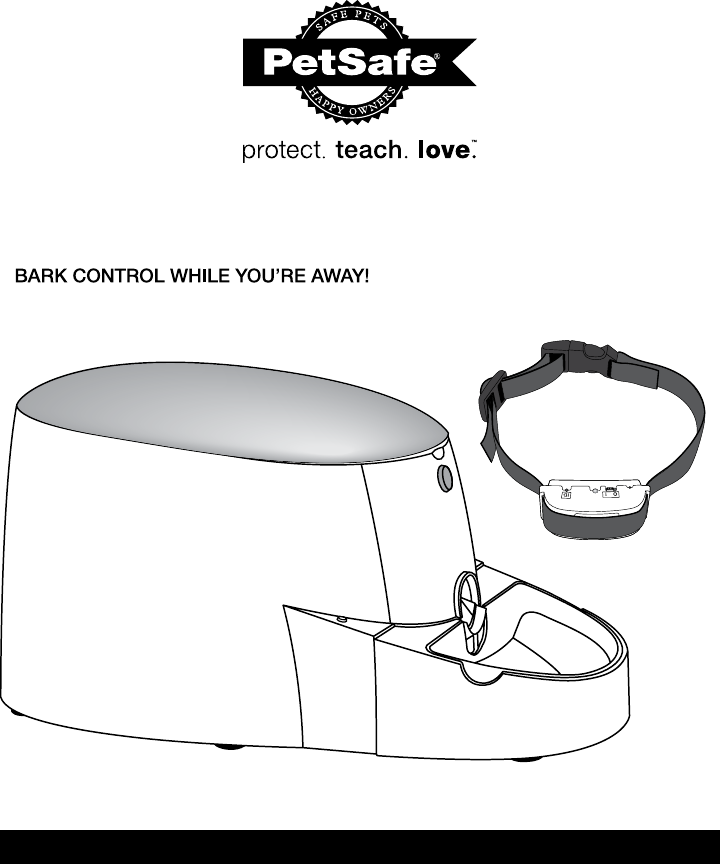
Auto Trainer
TX RFA-518
RX RFA-517

2 Customer Care Center 1-800-732-2677 www.petsafe.net 3
Important Safety Information
Explanation of Attention Words and Symbols used in this guide
This is the safety alert symbol. It is used to alert you to potential personal injury hazards. Obey all
safety messages that follow this symbol to avoid possible injury or death.
WARNING indicates a hazardous situation which, if not avoided, could result in
death or serious injury.
CAUTION, used with the safety alert symbol, indicates a hazardous situation which,
if not avoided, could result in minor or moderate injury.
CAUTION, used without the safety alert symbol, indicates a hazardous situation which,
if not avoided, could result in harm to your pet.
Risk of explosion. Do not short circuit, mix old and new batteries, dispose of in fire,
or expose to water. When batteries are stored or disposed, they must be protected
from shorting. Dispose of used batteries properly.
Not for use with aggressive dogs. Do not use this Product if your dog is aggressive,
or if your dog is prone to aggressive behavior. Aggressive dogs can cause severe
injury and even death to their owner and others. If you are unsure whether this product is appropriate for
your dog, please consult your veterinarian or certified trainer.
Save these instructions for future reference. Read all instructions before
operating product.
UÊFor indoor use only.
UÊFor dry treats/kibble use only.
UÊDo NOT use the AutoTrainer with puppies or dogs with any physical disability.
UÊIntended for use with pets only.
UÊDo NOT allow small children to play with, in or around the AutoTrainer.
UÊBefore leaving for an extended time, always replace used batteries with new batteries to insure
continual operation.
UÊDo NOT place any foreign object in the AutoTrainer.
UÊAutoTrainer should always be leveled.
UÊDo NOT disassemble the AutoTrainer except as instructed in the manual.
UÊDispose of all packaging material properly. Some items may be packed in poly bags; these bags
could cause suffocation; keep away from children and pets.
UÊInitially check operation frequently to be sure the AutoTrainer is dispensing properly.
UÊThe AutoTrainer and AutoTrainer collar should NOT be submerged in water at any time, this may
damage electronic components.
The power cord should be used at the owner’s discretion. Do not use the power cord if
your dog has a history of destroying power cords by chewing them.
Thank you for choosing the PetSafe® brand. You and your pet deserve a companionship that includes
memorable moments and a shared understanding together. Our products and training tools promote a
lifestyle of protection, teaching, and love—essentials that influence memories for a lifetime. If you have
any questions about our products or training your pet, please visit our website at www.petsafe.net or
contact our Customer Care Center at 1-800-732-2677.
To get the most protection out of your warranty, please register your product within 30 days at
www.petsafe.net. By registering and keeping your receipt, you will enjoy the product’s full warranty
and should you ever need to call the Customer Care Center, we will be able to help you faster.
Most importantly, we will never give or sell your valuable information to anyone. Complete warranty
information is available online at www.petsafe.net.
Table of Contents
History of the AutoTrainer.................................................................................................................4
How the AutoTrainer Works..............................................................................................................4
Components, Parts and Features ....................................................................................................5
Set up ........................................................................................................................................... 6-8
Training Tips .....................................................................................................................................9
About the Modes .............................................................................................................................9
Reviewing the History.....................................................................................................................10
Frequently Asked Questions ..........................................................................................................11
Care and Cleaning..........................................................................................................................12
Terms of Use and Limitation of Liability .........................................................................................12
Battery Disposal .............................................................................................................................13
FCC ................................................................................................................................................13
Warranty .........................................................................................................................................14
4 Customer Care Center 1-800-732-2677 www.petsafe.net 5
History of the AutoTrainer
Years ago, during a chance meeting on a flight from Chicago to San Francisco, Dr. Ian Dunbar and Dr. John
Watson struck up a conversation about whether marking a dog’s bark by immediately interrupting a progressive
tone sequence that predicts food delivery would reduce the frequency of barking and number of barks per day.
Back in the Bay Area, Dr. Watson promptly engineered a computerized prototype, which the Doctors tested
on barking dogs, primarily at the Berkeley Humane Society. Amazingly, not only did the tone sequence itself
drastically reduce the frequency and number of barks, but also hyperactivity; many dogs would pace less and
instead, settle down next to their electronic buddy.
How the AutoTrainer Works
It’s not easy leaving your dog at home when they’re prone to anxiety. Separation-induced behaviors such as
barking, whining and pacing can adversely affect your dog’s health.
The AutoTrainer™ is a fully automatic, reward-based training device that requires no prior training for yourself
or your dog. The AutoTrainer works by rewarding your dog for quiet behavior, therefore creating a pleasant
environment. By rewarding for increasingly longer periods of quiet, your dog will soon learn to calmly wait for the
signal that means a small treat is being delivered. The AutoTrainer trains your dog to offer calm, quiet behavior
while you are away.
For many dogs, all you have to do is fill the hopper with kibble, turn on the power and the AutoTrainer will do the
rest. Your dog will soon learn to settle down calmly and quietly, waiting patiently for the next food reward.
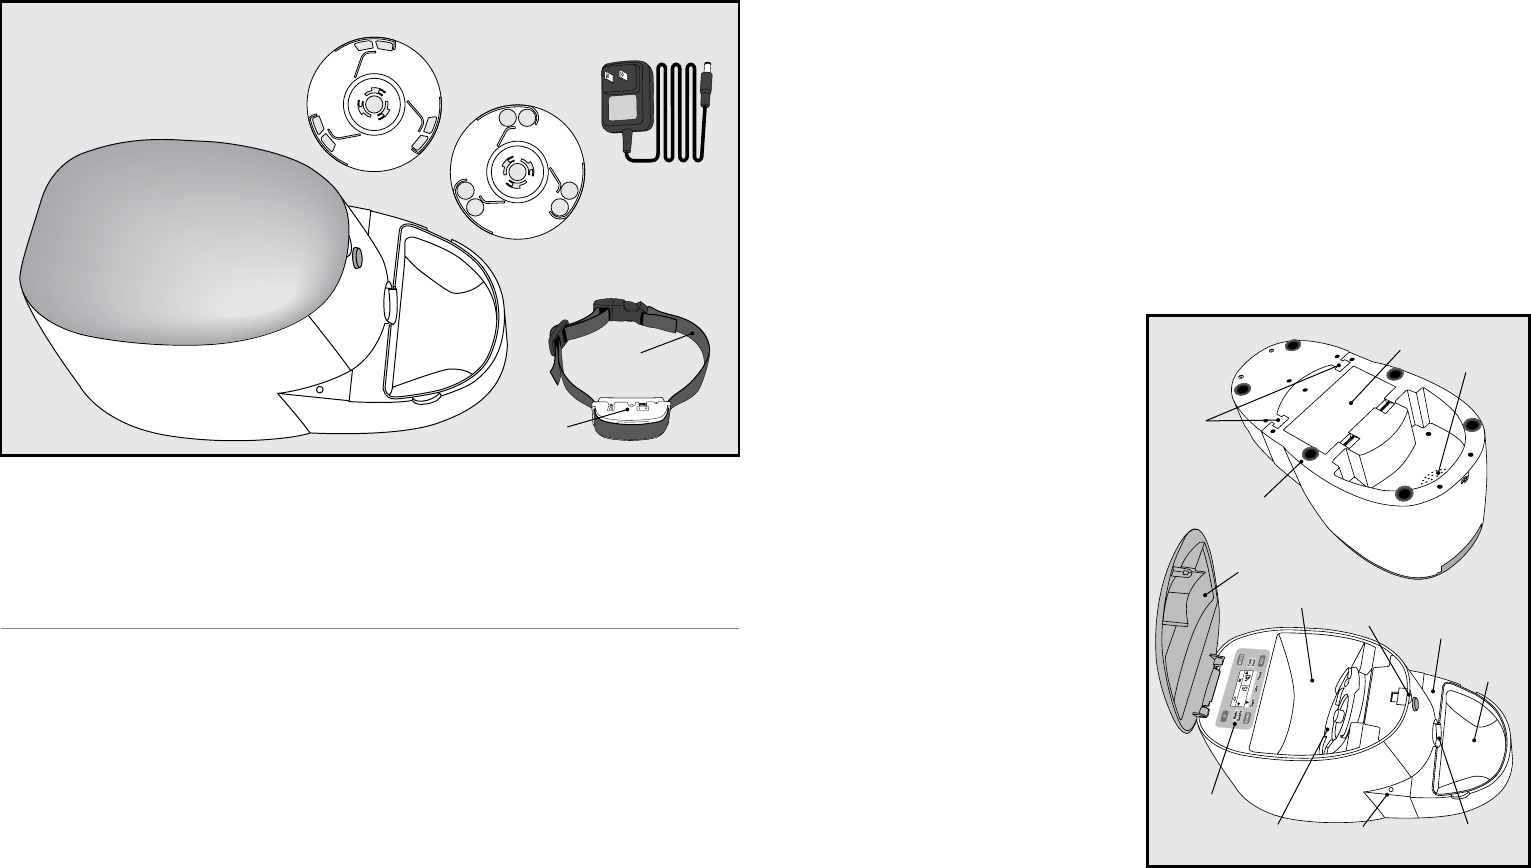
Components, Parts and Features
Image A
AutoTrainer Base Unit: The main portion of the AutoTrainer unit. The part of the product that houses the
Display Screen, Food Hopper, Muzzle Detector and D Batteries.
AutoTrainer Collar: Includes the Nylon Collar and AutoTrainer Collar Unit. Transmits information to the
AutoTrainer Base Unit.
Food Disk – 2 sizes: used to assist food through the Food Dispenser.
Power Adapter: Option for use without batteries.
AutoTrainer Collar Unit: The unit on the AutoTrainer Collar that transmits barking to the AutoTrainer Base Unit.
Image B
Food Hopper: Holds dry treats/kibble in the AutoTrainer Base Unit, approximately 3.5 cups of medium
sized kibble.
Food Dish Attachment: Removable piece that holds the Food Dish.
Food Dish: Catches food that has been passed through the Food Dispenser and Food Disk.
Muzzle Detector: Located under the Food
Dispenser. Senses when the dog takes the food
from the Food Dish.
Lid Release Button: Located on the Front of the
AutoTrainer, opens the AutoTrainer Hopper Lid.
Battery Cover: Located on AutoTrainer Base Unit:
Remove to add/replace the batteries (4-D).
Food Dispenser: Channel that the food travels to
reach the Food Dish.
Hopper Lid: Encloses dry treats/kibble and
Display screen in the AutoTrainer.
Display Screen: Displays information about
training progress and history.
Speaker: Emits tones from the AutoTrainer.
Suction Feet: Six rubber feet located at the bottom
of the AutoTrainer Base Unit that suction to the floor
and prevent the AutoTrainer Base Unit from moving.
Session: The period of time between the start of
a mode and the end.
Sequence: A single series of tones, followed by
kibble dispensing.
“Uh-Oh” tone: This tone plays when the dog
barks, jiggles or paws the machine. In Teach Me
mode, this tone occurs during those behaviors.
In Calm Me mode, this tone also occurs during
those behaviors, but also signals the machine to
delay the delivery of food.
Tone(s): The sounds emitted by the AutoTrainer
Base Unit
AutoTrainer Base Unit
Note: Batteries not included.
(4) D cell, (2) CR 2032
AutoTrainer Collar
Large Food Disk
Power Adapter
Small Food Disk
AutoTrainer
Collar Unit
Nylon Collar
Hopper
Lid
Alert
Light
Removable
Food Dish
Removable
Food Dish
Attachment
Lid
Release
Button
Food
Hopper
Food
Disk
Display
Screen
Muzzle Detector
& Food Dispenser
Removable
Food
Dish Grooves
Battery Cover
Speaker
Suction Feet
Image A
Image B
www.petsafe.net 7
Risk of explosion if batteries are replaced by an incorrect type. Do not short circuit, mix
old and new batteries, dispose of in fire, or expose to water. When batteries are stored
or disposed, they must be protected from shorting. Dispose of used batteries properly.
Step 3
Prepare the hopper. Open the lid by pressing the Lid Release Button on the front of the AutoTrainer:
A. Select the appropriate sized Food Disk and insert it into the Food Hopper. Twist to the left to lock.
To unlock a Food Disk, twist it to the right.
B. Insert your dog's daily amount of kibble into the food hopper. The Food Hopper can hold
approximately 3.5 cups of medium-sized kibble. Be sure to feed your pet their entire recommended
daily serving of kibble each day. Servings over 3.5 cups may need to
be given separately, once the AutoTrainer has been turned off.
Step 4
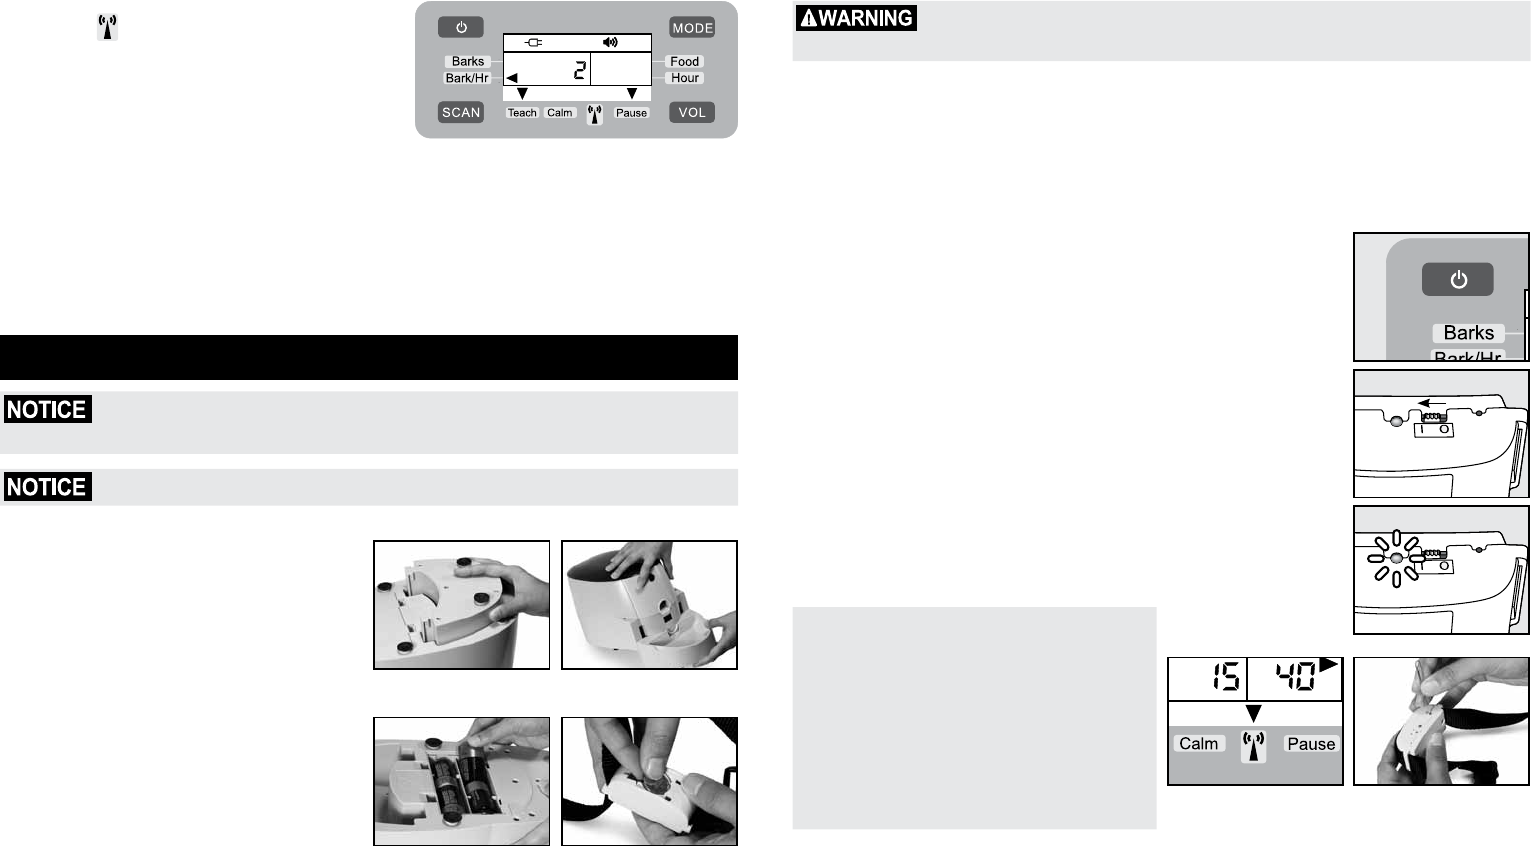
Turn the AutoTrainer Base Unit on by pressing down the Power button (4A)
for 3 seconds.
Turn the power for the AutoTrainer Collar on to synchronize with the
AutoTrainer Base Unit. Move from 0 - I to power on 4B).
A red LED light will turn on for a few moments, then off again (4C).
Note: When the AutoTrainer detects the
AutoTrainer Collar’s signal, an arrow will appear
over the AutoTrainer Collar signal icon (4D). If
the AutoTrainer Collar loses connection with
the AutoTrainer Base Unit as indicated on the
LCD screen, restart the AutoTrainer Collar and
AutoTrainer Base Unit at approximately the
same time while pressing the ID button on the
AutoTrainer Collar (4E) with the tip of a paper
clip (or similar item) for 2 seconds. The ID will
update immediately and the LCD will show an
arrow over the AutoTrainer Collar icon (4D).
6 Customer Care Center 1-800-732-2677
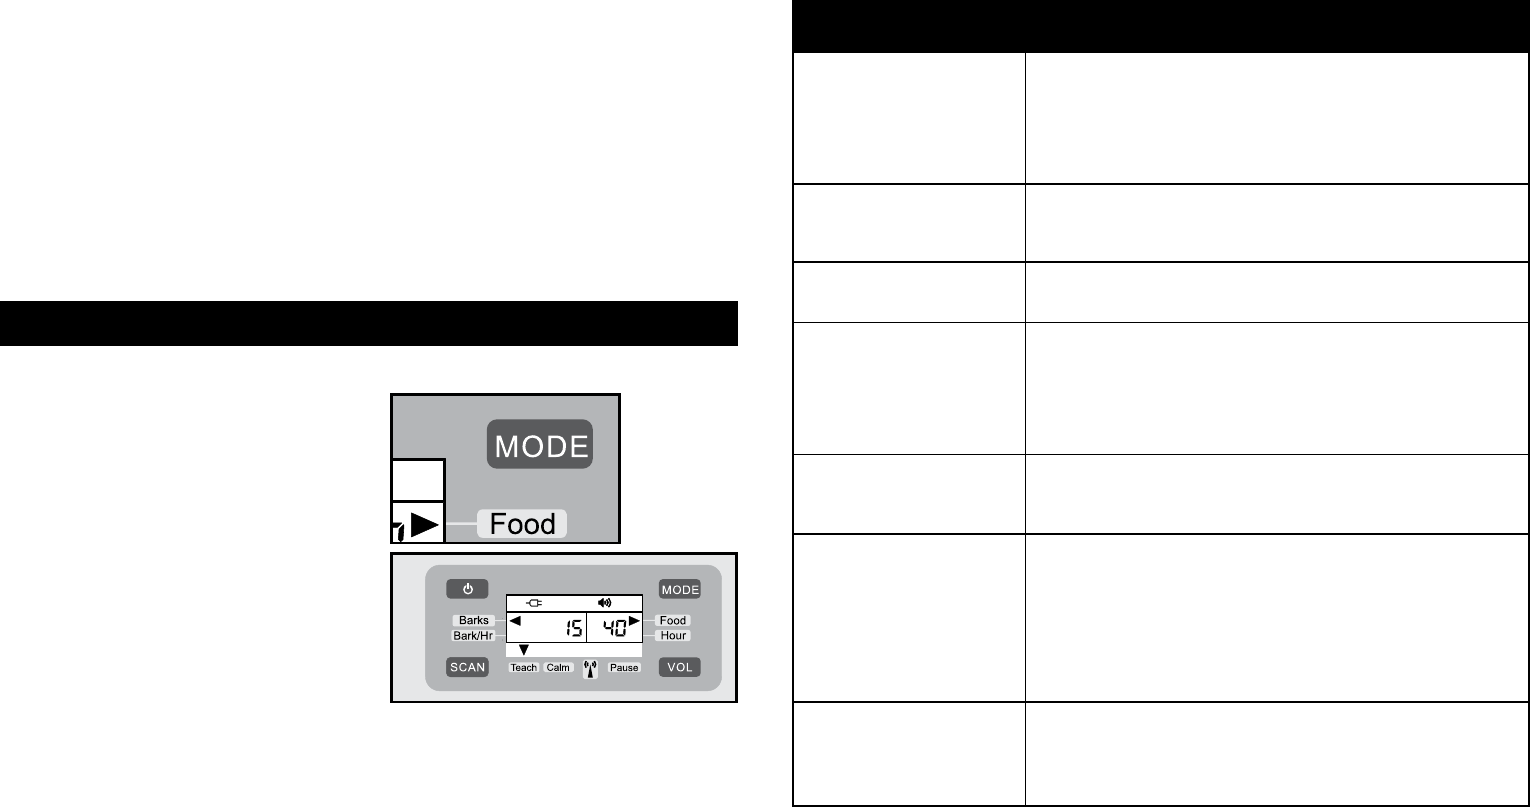
Display:
Collar Signal : An icon displayed to alert the
connection of the AutoTrainer Collar Unit to the AutoTrainer
Base unit, as indicated by the icon on the display screen.
Barks: The number of Barks recorded
Barks Per Hour: The number of barks recorded per hour
Scan: Assists with selection of modes and viewing of history
Vol: Volume control button
Food: Amount of food dispensed during a session
Mode: Press to select Teach Me or Calm Me modes. Press to Pause and Un-Pause
Teach Me Mode: A series of sequences, the introductory mode that prepares the dog for Calm Me mode.
This mode teaches your dog to associate the tones with food delivery and associate other behaviors
(barking, pawing the machine) with an “Uh-Oh” tone.
Calm Me Mode: This mode continues to play the series of sequences from Teach Me mode, however,
when the dog barks or moves the machine, the “Uh-Oh” tone restarts the sequence and delays the delivery
of food. This mode teaches the dog that they will be rewarded for quiet behavior.
Setup
If your dog has special dietary needs, consult your veterinarian before using this
product. Please use with dry food only. Kibble size should not exceed ¼ inch for Small
Food Disk and ½ inch for Large Food Disk.
The AutoTrainer Collar is not guaranteed to fit properly on dogs under 10 lbs.
Step 1
Remove the Food Dish Attachment from the bottom
of the AutoTrainer Base Unit (1A) and attach it to
the front of the AutoTrainer (1B). Be sure to lock
it in securely so the Muzzle Detector and Food
Dispenser are not blocked. Place the Food Dish
securely inside of the Food Dish Attachment.
Step 2
Install 4 D batteries into the battery compartment,
located on the bottom of the AutoTrainer Base
Unit (2A). An AC Power Adapter is provided
as an alternative way to power the AutoTrainer
Base Unit. On the AutoTrainer Collar, insert two
CR2032 batteries, positive side up, into the battery
compartment (2B). Replacement batteries (3-volt,
CR2032) can be found at most retailers. Battery
compartment is located under the strap on the
curved side of the collar.
1A 1B
2A 2B
4A
4D
4C
4E
4B
8 Customer Care Center 1-800-732-2677 www.petsafe.net 9
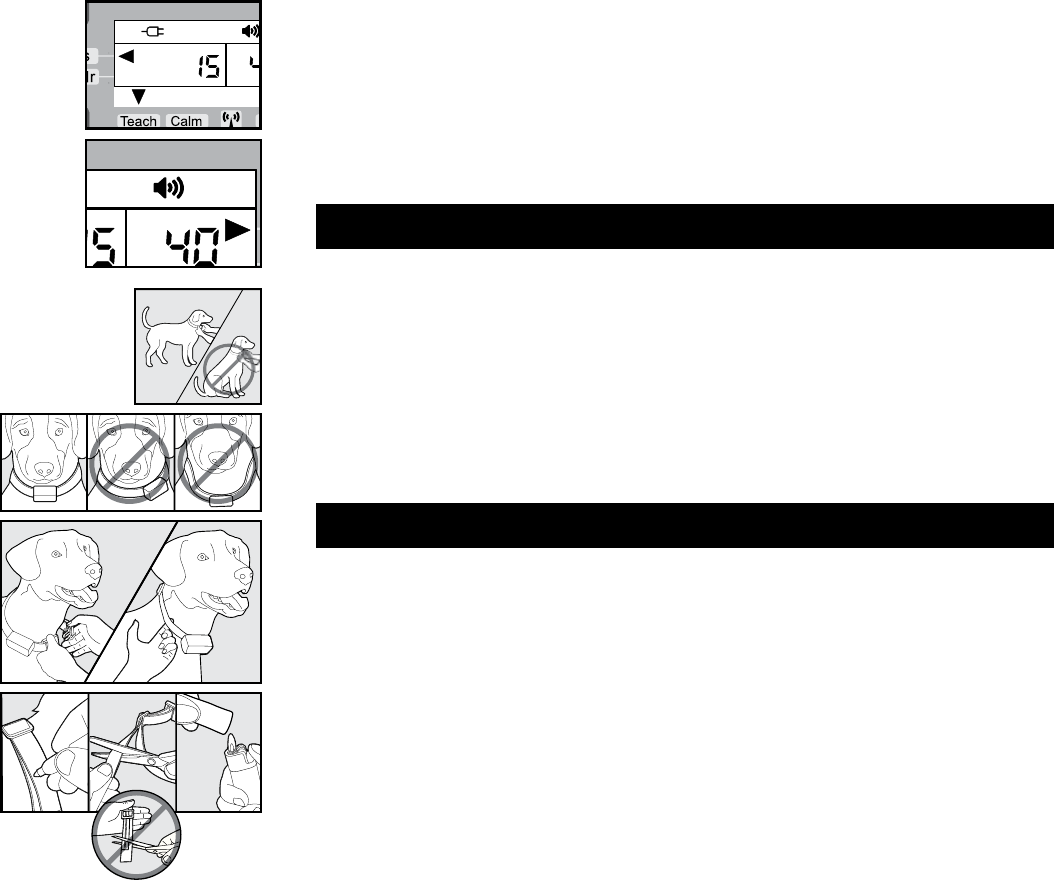
Step 5
To change modes, press the Mode key within 7 seconds of powering on the
AutoTrainer Base Unit. The AutoTrainer Base Unit will begin Calm Me mode if
no buttons have been pressed for 7 seconds. Hold the Power button for one
second to start immediately.
An arrow underneath the collar signal icon will indicate which mode is active
(5A). No mode will begin until the AutoTrainer Collar unit is connected to the
AutoTrainer Base Unit.
Adjust the volume by pressing the Volume key (VOL). The volume icon on the
top right of the screen (5B) will indicate what level is selected. There are three
volume levels.
A dog should experience Teach Me Mode at least 5 times before beginning
Calm Me Mode. Only continue from Teach Me to Calm Me if your dog is
comfortable eating food from the machine.
Step 6
Important: The proper fit and placement of your AutoTrainer Collar is
important for effective training.
To assure a proper fit, please follow these steps:
1. Have your pet standing comfortably (6A).
2. The AutoTrainer Collar should fit snugly to your dog’s neck,
with the transmitter placed directly over your dog’s throat
(6B)
.
3. The AutoTrainer Collar should fit snugly, yet loose enough to allow
one finger to fit between the strap and your pet’s neck (6C).
4. Allow your pet to wear the collar for several minutes then
recheck the fit. Check the fit again as your pet becomes more
comfortable with the
AutoTrainer
Collar.
5. Trim the collar as follows (6D):
A.
Mark the desired length of the collar with a pen. Allow for
growth if your pet is young or grows a thick winter coat.
B. Remove the
AutoTrainer
Collar from your pet and cut off the
excess.
C. Before placing the
AutoTrainer
Collar back onto your pet,
seal the edge of the cut collar by applying a flame along the
frayed edge.
Note: The AutoTrainer Collar will work in a range up to 100 feet.
If your dog leaves this range, or if the AutoTrainer Collar battery
dies, the AutoTrainer Base Unit will turn off after 30 minutes. The
history from the most current session will be saved. If the dog
reenters the range of the AutoTrainer Base Unit, or the battery is
replaced in the AutoTrainer Collar Unit, the AutoTrainer Base Unit
will restart in the 1st sequence and resume tracking history.
UÊJamming - If the red lights on each side of the AutoTrainer Base Unit are blinking, the Food Disk is
jammed. Unjam the Food Disk by removing the Disk and clearing any food that has gotten stuck.
Press Mode to restart if the AutoTrainer Base Unit has been jammed for less than 10 minutes. If the
AutoTrainer Base Unit has been jammed for over 10 minutes, only one light will be blinking. Manually
turn the AutoTrainer Base Unit off, then back on. Don’t forget to read and record all data before
powering off.
UÊEmpty - If the red lights on each side of the AutoTrainer Base Unit are steadily on, the AutoTrainer
Base Unit is empty and needs to be refilled. Refill the AutoTrainer Base Unit and press Mode to start
over if the AutoTrainer Base Unit has been empty for less than 10 minutes. If the AutoTrainer Base
Unit has been empty for more than 10 minutes, manually turn the AutoTrainer Base Unit off, then
back on. Don’t forget to read and record all data before powering off.
Training Tips
UÊBefore beginning training, be sure your dog has not eaten for at least a 4 hour period.
UÊIntroduce your dog to the AutoTrainer by letting him eat near the AutoTrainer Base Unit. Place some
of his daily amount of food in the bowl of the AutoTrainer Base Unit, do not turn it on yet, and let him
eat from the bowl. Once you have done this 1-2 times proceed to the Teach Me mode.
UÊUse only dry treats/kibble.
UÊFor multi dog households, train one dog at a time. Separate the dog in training from any other dogs.
UÊMost dogs are not used to eating from a bowl that beeps and makes some sounds and might be
apprehensive about the unit at first. Please start with the volume low and plan some time to be with
the dog these first few times during the Teach Me phase.
UÊAfter each session, be sure your dog has received any unfinished food or the remainder of their daily
food allowance.
UÊFor more step by step instructions on acclimating your dog to the Autotrainer, and other helpful tips,
see http://store.petsafe.net/training-behavior/bark-control/AutoTrainer
About the Modes
Each mode is made up of sequences of tones. At the end of each sequence, kibble will dispense. Your
dog will learn that the tones of each mode predict a reward.
What To Expect During A Training Session:
Once you have completely assembled the AutoTrainer, followed the step-by-step instructions, and
prepared your dog, what should you expect from a training session?
During a training session, the AutoTrainer will emit sequences of tones. Each sequence was designed
to build up to the next sequence. The sequences consist of many different, unique tones. At the end of
each sequence, the AutoTrainer should dispense 1-4 pieces of kibble, teaching your dog that the end
of a sequence means a reward.
The sequences will not continue until the dog AutoTrainer detects the dog's muzzle at the food dish.
The AutoTrainer sequences will stop if the food is not taken. If the dog barks, the AutoTrainer Collar
transmits that to the AutoTrainer Base Unit which then emits an “Uh-Oh” sound. A light on the collar
will flash when it registers a bark.
6A
6B
6C
6D
5B
5A
10 Customer Care Center 1-800-732-2677 www.petsafe.net 11
What What is the difference between Teach Me Mode and Calm Me Mode?
Teach Me Mode
Teach Me Mode consists of sequences of tones that results in a food reward, just like the Calm Me
Mode. However, in the initial sequences of this mode, if the dog barks, they hear the “Uh-Oh” tone, and
the sequences continue. A dog should begin training in this mode and continue for at least 5 training
sessions so they are able to learn what the tones mean. If the dog is catching on quickly and seems
comfortable eating from the AutoTrainer, they may continue to Calm Me Mode. If the dog is not yet
comfortable eating from the AutoTrainer Food Dish, do not move on to Calm Me Mode. Instead, repeat
sessions in Teach Me Mode.
Calm Me Mode
Calm Me Mode, like Teach Me Mode, also consists of sequences of tones resulting in a food reward. During
Calm Me Mode, when the dog barks, the “Uh-Oh” tone restarts the sequence, delaying the food reward.
This teaches the dog that barking delays their food and they will only receive a reward for quiet behavior.
Every time you turn the AutoTrainer Base Unit off, be sure to feed your dog the remainder of their food
to ensure they meet their daily calorie intake requirements.
Reviewing the History
Note: When the AutoTrainer Base Unit is turned off, the data stored will be deleted and cannot be
recovered. If you wish to keep your data, write it down after every session before the AutoTrainer Base
Unit is turned off.
1. To Pause the AutoTrainer Base Unit, press the
Mode button for one second (7A). The AutoTrainer
Base Unit will remain in Pause for 10 minutes.
2. To read the History:
A. The screen will show a total number of Barks for
the entire session (on left), and total pieces of
dispensed food for the entire session (on right)
(7B).
B. Press the Scan button to view the Average
Barks/Hour.
C. Press the Scan button again to view the number
of barks during the first hour of the session.
Continue to press the Scan to view the number
of barks for each hour of the session. After each
hour of the session has displayed, the History
will return to the Barks/Food screen.
D.The AutoTrainer Base Unit holds 36 hours of data at a time.
3. To Unpause the AutoTrainer Base Unit, press the Mode button again within 10 minutes. After 10
minutes, the AutoTrainer Base Unit will go to sleep. In Sleep, the LCD screen light will blink and
you will not be able to restart the Calm Me or Teach Me mode. In order to resume training after 10
minutes in pause, the AutoTrainer Base Unit will need to be powered off and on manually.
4. If the AutoTrainer Base Unit is powering off from Pause mode, review history and write it down. All
data is deleted when the AutoTrainer Base Unit is turned off and cannot be recovered.
Frequently Asked Questions
I came home to find the
AutoTrainer Base Unit not
dispensing food, kibble in
the dish, and the AutoTrainer
Base Unit playing 1 tone
every 60 seconds. What does
this mean?
UÊIf the dog doesn’t approach the AutoTrainer Base Unit to eat the
kibble when it is dispensed, the device will “go to sleep” and
emit a tone every 60 seconds to remind the dog that it’s listening/
watching. If the dog eats kibble, the AutoTrainer Base Unit will
“wake up” and restart where it left off in the session
How do I properly size the
AutoTrainer Collar to my dog’s
neck?
UÊThe AutoTrainer Collar should fit snugly to your dog’s neck, with
the transmitter placed directly over your dog’s throat. This is
to ensure that the AutoTrainer Collar detects the vibration and
sound from your dog’s barking.
What do I do if I live in a
multiple dog household?
UÊYou will need to separate the dog that is using the AutoTrainer from
the rest of the pets. Only one dog should be able to access and hear
the AutoTrainer at one time.
The AutoTrainer Collar won’t
connect to the AutoTrainer
Base Unit. What do I do?
UÊIf the AutoTrainer Collar loses connection with the base AutoTrainer
Base Unit as indicated in the LCD screen, restart the AutoTrainer
Collar and AutoTrainer Base Unit at the same time while holding
the ID button on the AutoTrainer Collar with the tip of a paperclip
(or similar item) for 2 seconds. The ID will update immediately and
the LCD should show an arrow over the AutoTrainer Collar icon.
See page 7, image 2E.
I feed my dog wet food or
a raw diet. Can I use the
AutoTrainer with wet or raw
food?
UÊNo, the AutoTrainer will only function properly when dry kibble or dry/
semi-dry treats are used.
What happens if food
bounces out of the Food
Dish when dispensed?
UÊWhile rare, this could potentially happen. If the food bounces out of
the dish, your dog should eat it from the ground and could potentially
go back to the dish to look for more food, signaling the Muzzle
Detector to continue. If your dog does not check the dish, the Muzzle
Detector will not indicate that the dog ate the treat, therefore will emit
the reminder tone until the dog puts their muzzle in the dish. If you
return home and the AutoTrainer Base Unit is beeping without a treat
in the dish, simply record existing history from the AutoTrainer Base
Unit and manually restart.
My dog is barking at the
AutoTrainer Base Unit. Is this
normal?
UÊAt first, it is possible that your dog may bark at the AutoTrainer Base
Unit until they figure out the game, most commonly in Teach Me
mode. Once in Calm Me mode, your dog should soon learn that
this behavior delays the arrival of food. Once they’ve figured out the
game, barking will decrease more and more.
7A
7B
12 Customer Care Center 1-800-732-2677 www.petsafe.net 13
Action Red LED Light Green LED Light
Power On
ON
OFF
Update ID/Connect Collar
OFF
ON
Low Battery
Flashing
OFF
Care and Cleaning
AutoTrainer Base Unit: Do not submerge the AutoTrainer Base Unit in water. Wipe down with damp cloth to
clean.
Food Dish: Remove the dish from the AutoTrainer Base Unit and wash in warm, soapy water. Dry thoroughly
before reattaching to the AutoTrainer Base Unit.
Food Hopper: Do not submerge the AutoTrainer Base Unit in water. Wipe down the inside of the Food Hopper
with a damp cloth and dry thoroughly.
Food Disks: Remove food disks and wash in warm, soapy water. Dry thoroughly before reattaching to the
AutoTrainer Base Unit.
Food Dish Attachment: Wipe down with damp cloth.
Customer Care
USA & Canada - Tel: 800-732-2677
Monday - Friday 8 AM - 8 PM / Saturday 9 AM – 5 PM
Terms of Use and Limitation of Liability
1. Terms of Use
This Product is offered to you conditioned upon your acceptance without modification of the terms, conditions
and notices contained herein. Usage of this product implies acceptance of all such terms, conditions, and
notices.
2. Proper Use
This Product is designed for use with pets where training is desired. The specific temperament of your pet may not
work with this product. We recommend that you not use this product if your pet is aggressive. If you are unsure
whether this is appropriate for your pet, please consult your veterinarian or certified trainer.
Proper use includes reviewing the entire Operating and Training Guide provided with your product and any
specific Caution statements.
3. No Unlawful or Prohibited Use
This Product is designed for use with pets only. This pet training device is not intended to harm, injure, or provoke.
Using this product in a way that is not intended could result in violation of Federal, State or local laws.
4. Limitation of Liability
In no event shall Radio Systems® Corporation be liable for any direct, indirect, punitive, incidental, special or
consequential damages, or any damages whatsoever arising out of or connected with the use or misuse of this
Product. Buyer assumes all risks and liability from the use of this Product.
5. Modification of Terms and Conditions
Radio Systems® Corporation reserves the right to change the terms, conditions and notices under which this
Product is offered.
Battery Disposal
Separate collection of spent batteries is required in many regions; check the regulations in your area before
discarding spent batteries. At the end of the product life, please contact our Customer Care Center to receive
instructions on proper disposal of the unit. Please do not dispose of the unit in household or municipal waste.
For a listing of Customer Care Center telephone numbers in your area, visit our website at www.petsafe.net.
Perchlorate Battery
Perchlorate Material – special handling may apply. See www.dtsc.ca.gov/hazardouswaste/perchlorate.
FCC
This device complies with part 15 of the FCC Rules. Operation is subject to the following two conditions:
(1) This device may not cause harmful interference, and (2) this device must accept any interference received,
including interference that may cause undesired operation.
CAUTION: Modification or changes to this equipment not expressly approved by Radio Systems® Corporation
may void the user’s authority to operate the equipment.
NOTE: This equipment has been tested and found to comply with the limits for a Class B digital device, pursuant to
part 15 of the FCC Rules. These limits are designed to provide reasonable protection against harmful interference in a
residential installation. This equipment generates, uses, and can radiate radio frequency energy and, if not installed and
used in accordance with the instructions, may cause harmful interference to radio communications. However, there is
no guarantee that interference will not occur in a specific installation. If interference does occur to radio or television
reception, which can be determined by turning the equipment off and on, the user is encouraged to try to correct the
interference by one or more of the following measures:
UÊ Reorient or relocate the receiving antenna.
UÊ Increase the separation between the equipment and the receiver.
UÊ Connect the equipment to an outlet on a circuit different from that to which the receiver is connected.
UÊ Consult customer care, the dealer, or an experienced radio/TV technician for help.
One Year Non-Transferable Limited Warranty
WHAT IS COVERED: Radio Systems Corporation, owner of the PetSafe Brand, (hereinafter referred to as
“PetSafe”) warrants to the original retail consumer purchaser, and not any other purchaser or subsequent owner,
that its PetSafe product, when subject to normal and proper residential use, will be free from defects in material
or workmanship for a period of one (1) year from the purchase date. An “original retail consumer purchaser” is a
person or entity who originally purchases the product, or a gift recipient of a new product that is unopened and
in its original packaging. When serviced by PetSafe Customer Service, PetSafe covers labor and parts for the
first year of ownership; after the first year, a service or upgrade charge will apply relative to replacement of the
product, with new or refurbished items at PetSafe’s sole discretion. The limited warranty is non-transferrable and
shall automatically terminate if the original retail consumer purchaser resells the PetSafe product or transfers the
property on which the PetSafe product is installed. In the event of defect, these are your exclusive remedies.
PROPER PRODUCT USE: This product is designed only for use with domesticated animals; do not use this
product for any other purpose. However, the specific temperament of your animal may not work with this product.
Collar LED Light Guide
14 Customer Care Center 1-800-732-2677 www.petsafe.net 15
We recommend that you do not use this product if your animal is aggressive. If you are unsure whether this
product is appropriate for your animal, please consult with your veterinarian or certified trainer before you use this
product. Please see the instruction manual for additional important information.
WHAT IS NOT COVERED: This non-transferrable limited warranty does not provide protection against, and
PetSafe will have no liability under this non-transferrable limited warranty for any damage to or defects in the
products caused by any animal, loss of product(s), failure, defect or damage caused by events and situations
beyond normal residential exposure conditions, including, but not limited to: commercial use, misuse, abuse,
neglect, improper installation or installation not in accordance with PetSafe’s instructions, use of non-PetSafe
accessories, impacts of foreign objects, acts of God, abnormal or improper use, improper storage, attempted
repair or service by anyone other than PetSafe Customer Service, accident, alteration, defects in or failure of the
surface the PetSafe product is installed in or upon, discoloration or other damage caused by pollution, sunlight,
other environmental conditions, mold, dirt, mildew, or exposure to harmful chemicals and any other cause not
involving manufacturing defects in the PetSafe product.
REGISTERING THE PRODUCT: Within thirty (30) days of purchase, please go to www.petsafe.net/register-
product to register your purchase. A sales receipt shall be required to obtain warranty coverage. Please keep this
information in a safe place.
MAKING A WARRANTY CLAIM: To obtain warranty service, call the PetSafe Customer Care center. In the United
States or Canada, 1-800-732-2677 begin_of_the_skype_highlighting 1-800-732-2677 FREE end_of_the_skype_
highlighting; in Australia, 1800 786 608; in New Zealand, 0800 543 054.
Pursuant to this non-transferrable limited warranty, PetSafe will replace the part with a new or refurbished part.
This non-transferrable limited warranty will then apply to either the new or refurbished part for the remainder of the
original non-transferrable limited warranty period.
DISCLAIMERS: Replacement as provided under this non-transferrable limited warranty is the exclusive remedy of
the consumer. Neither labor to remove the part nor labor to install the refurbished or replaced part is covered.
This non-transferrable limited warranty is in lieu of all other express warranties. PetSafe expressly disclaims and
excludes all other warranties, express or implied, including without limitation, the warranties of merchantability
and fitness for a particular purpose. PetSafe also disclaims and excludes all liability for incidental, consequential,
punitive, direct, indirect, special or any other damages arising out of or connected with the purchase, use or
misuse of this product or for the breach of any express or implied warranties or breach of contract or otherwise.
Purchaser assumes all risks and liabilities from the use or misuse of this product. PetSafe does not authorize any
other person or agent to make any other express or implied warranties.
Furthermore, PetSafe will not be liable for any loss, damage or injury resulting from delay in delivery of replacement
parts or for any failure by PetSafe to perform covered repair work due to circumstances beyond PetSafe’s control.
GOVERNING LAW: This non-transferrable limited warranty shall be governed by the law of the State of Tennessee,
U.S.A., and by the laws of the United States of America, excluding their conflicts of laws principles. Furthermore,
the United Nations Convention on Contracts for the International Sale of Goods is hereby excluded in its entirety
from application to this non-transferrable limited warranty. Jurisdiction and venue shall be exclusive to the courts
of Knox County, Tennessee.
These warranties give you specific legal rights, and you may also have other rights that vary from state to state or
country to country. Some states or countries do not allow the exclusion or limitation of incidental or consequential
damages, so the above limitation or exclusion may not apply to you.
Radio Systems® Corporation
10427 PetSafe Way
Knoxville, TN 37932
1-800-732-2677
www.petsafe.net
400-1723
©2013 Radio Systems Corporation