Rapoo Technology M5004G 2.4GHz Wireless Optical Mouse User Manual manual
Shenzhen Rapoo Technology Co., Ltd 2.4GHz Wireless Optical Mouse manual
manual

Installation
1. plug the Micro receiver into a USB port of your computer
2. Open the battery door and install
battery, this mouse can operate
with single battery, install two battery
can double the use time. turn on the
mouse, a RED battery icon on the left
side of mouse will light On and flash 10s.
3. Install Software to take all advantage
of your mouse. Insert the CD into your computer’s CD-ROM drive and follow on-screen instructions.
ON/OFF the mouse
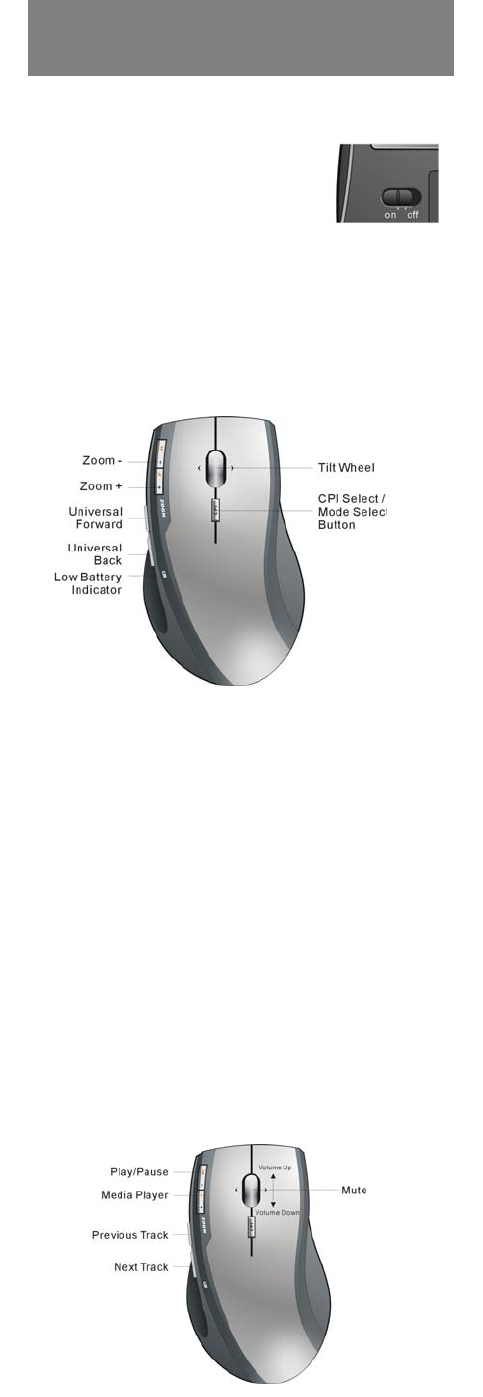
1. You can switch On or shut off the mouse by use the On/OFF switch on the bottom of the mouse
2. The Low battery indicator will flash 10s when the mouse is turned on. If the battery icon keep flash during your using. The
battery need to be replaced.
Mouse Functions
Cursor Speed control
Press the CPI button and you can toggle the CPI between 800 CPI and 1600 CPI (Laser Version, Optical is between 500 CPI
and 1000 CPI)
Scrolling Side-to-side
You can scroll side-to-side by tilting the wheel left or right. This feature is especially useful in spread sheets or viewing
large-size images.
Zoom In and Zoom Out
You can use the two extra button on left size of the mouse to zoom in and zoom out your document.
To use this function, you need to install the CD Driver.
Universal Back / Forward
Use the back button to access previous page and use the forward button to access next page.
Media Remote Control Mode
Press the CPI button for over 3 seconds to enter Media Remote control Mode. the battery icon will fast flash 3 seconds when
you successful change mouse mode.
In Media Remote control mode. the mouse button and scroll will change to following function to let you remote control your
PC’s media player
Press the CPI button for over 3 seconds again and you will back to Normal Mode.
Quick Start Guide of
2.4GHz Wireless Media Remote Mouse

Mouse buttons functions under Media Remote mode
Trouble Shooting
1. Check Micro receiver connection; try to inserting Micro Receiver to another USB port on your computer.
2. Connection between the mouse and the Micro Receiver. Re-insert the Micro Receiver. Take out the battery and
reinstall it.
P/N: 266-80901-0000
Note:
FCC statement
This equipment has been tested and found to comply with the limits for a Class B digital device, pursuant to Part 15 of the FCC
Rules. These limits are designed to provide reasonable protection against harmful interference in a residential installation.
This equipment generates, uses and can radiate radio frequency energy and if not installed and used in accordance with the
instructions, may cause harmful interference to radio communications. However, there is no guarantee that interference will
not occur in a particular installation. If this equipment does cause harmful interference to radio or television reception, which
can be determined by turning the equipment off and on. The user is encouraged to try to correct the interference by one of the
following measures:
Reorient or relocate the receiving antenna.
Increase the separation between the equipment and receiver.
Connect the equipment into an outlet on a circuit different from that to which the receiver is connected.
Consult the dealer or an experienced radio/TV technician for help.
To assure continued compliance, any changes or modifications not expressly approved by the party responsible for
compliance could void the user’s authority to operate this equipment. (Example- use only shielded interface cables when
connecting to computer or peripheral devices).
This device complies with Part 15 of the FCC rules. Operation is subject to the following two conditions:
(1) This device may not cause harmful interference, and
(2) This device must accept any interference received, including interference that may cause undesired operation.
Caution!
The manufacturer is not responsible for any radio or TV interference caused by unauthorized modifications to this equipment.
Such modifications could void the user authority to operate the equipment.
1