Razer RC30014802 Wireless Gaming Headset User Manual
Razer Inc. Wireless Gaming Headset Users Manual
Razer >
Users Manual
DTD: 15/2/2017
User manual for Model: RC30-014801 and RC30-014802

F O R GA M E R S . B Y G AM E R S .
™
1
PACKAGE CONTENTS / SYSTEM REQUIREMENTS
PACKAGE CONTENTS
Wireless Gaming headset ( Model: RC30-014802)
Headset stand
Audio hub( Model: RC30-014801)
Optical cable
2x USB to Micro-USB cable
Important Product Information Guide
SYSTEM REQUIREMENTS
PRODUCT REQUIREMENTS
PC or Xbox One
F O R G A M E R S . B Y G AM E R S .
™
2
2. REGISTRATION / TECHNICAL SUPPORT
REGISTRATION
Sign up now for a Razer Synapse account to get real-time information on your product’s warranty
status. To learn more about Razer Synapse and all its features, visit razerzone.com/synapse.
If you are already a Razer Synapse user, register your product by clicking on your email address at
the Razer Synapse application and selecting Warranty Status from the dropdown list.
To register your product online, visit razerzone.com/registration. Please note that you will not be
able to view your warranty status if you register via the website.
TECHNICAL SUPPORT
What you’ll get:
1 year limited manufacturer’s warranty
Free online technical support at razersupport.com
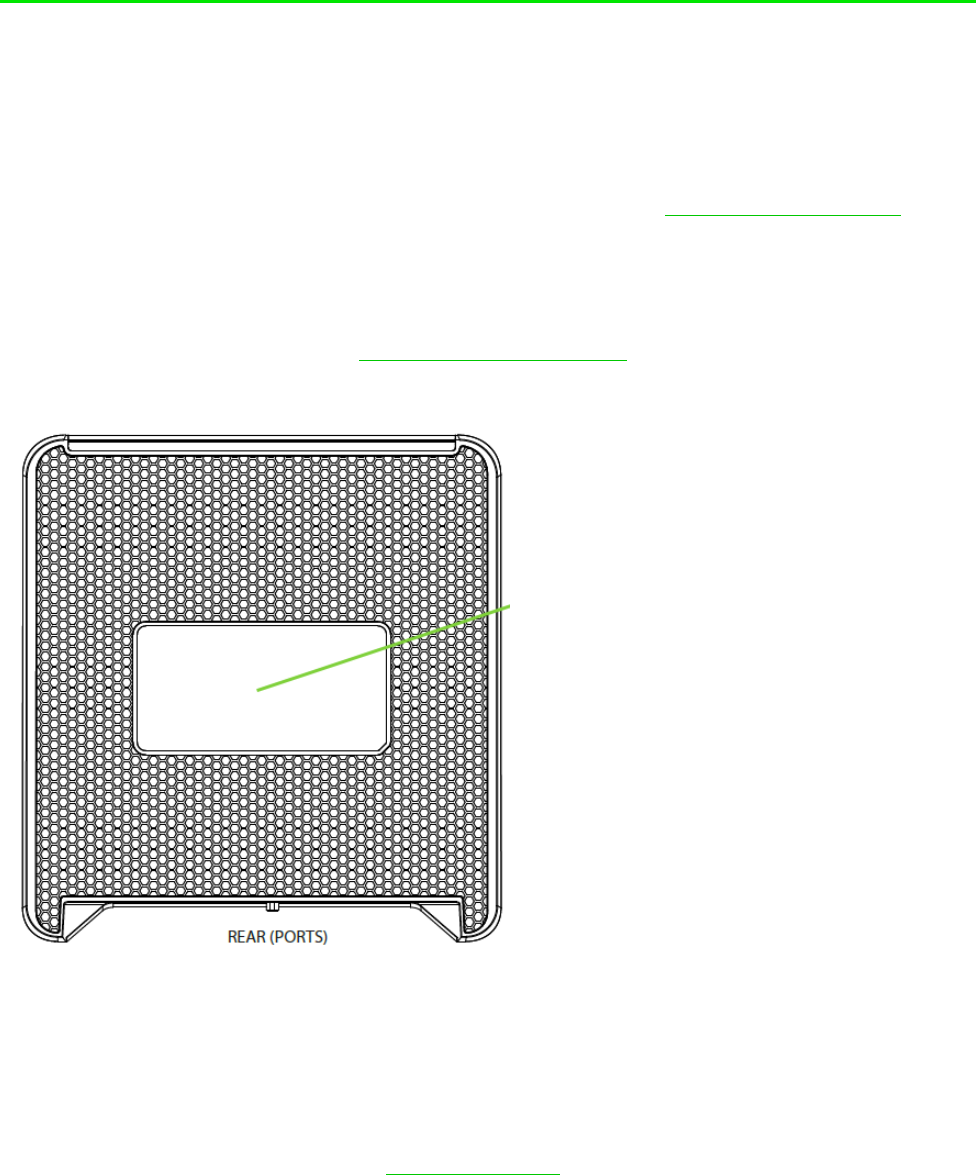
Your product’s serial
number
can be found here.
F O R G A M E R S . B Y G AM E R S .
™
3
DEVICE LAYOUT
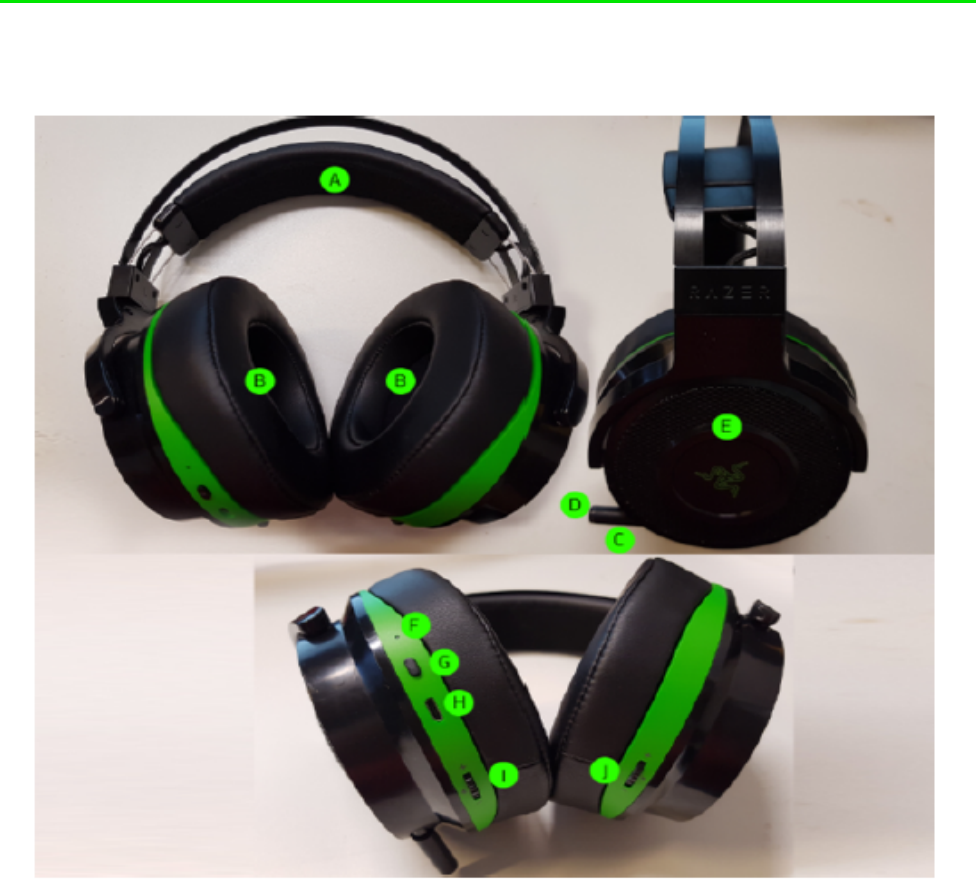
A. Adjustable padded headband
B. Circumaural, leatherette ear cushions
C. Retractable microphone
D. Microphone LED
E. Razer logo backlighting
F. LED indicator
G. Headset power button
H. Micro-USB charging port
I. Game/chat balance control /
microphone mute button
J. Audio volume control / audio mute
button
F O R G A M E R S . B Y G AM E R S .
™
1
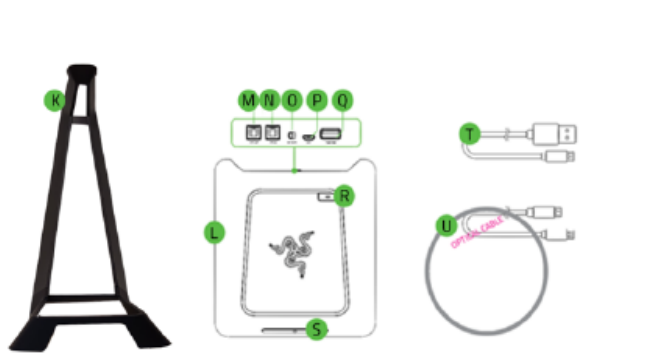
K. Headset stand
L. Audio hub
M. Optical output port
N. Optical input port
O. Xbox / PC toggle
P. Micro-USB power port
Q. USB headset charging port
R. Dolby Headphone button
S. Audio hub power button
T. USB to Micro-USB cables
U. Optical cable
F O R G A M E R S . B Y G AM E R S .
™
2
SETTING UP YOUR RAZER THRESHER ULTIMATE FOR XBOX ONE
PREPARING YOUR RAZER THRESHER ULTIMATE FOR XBOX ONE
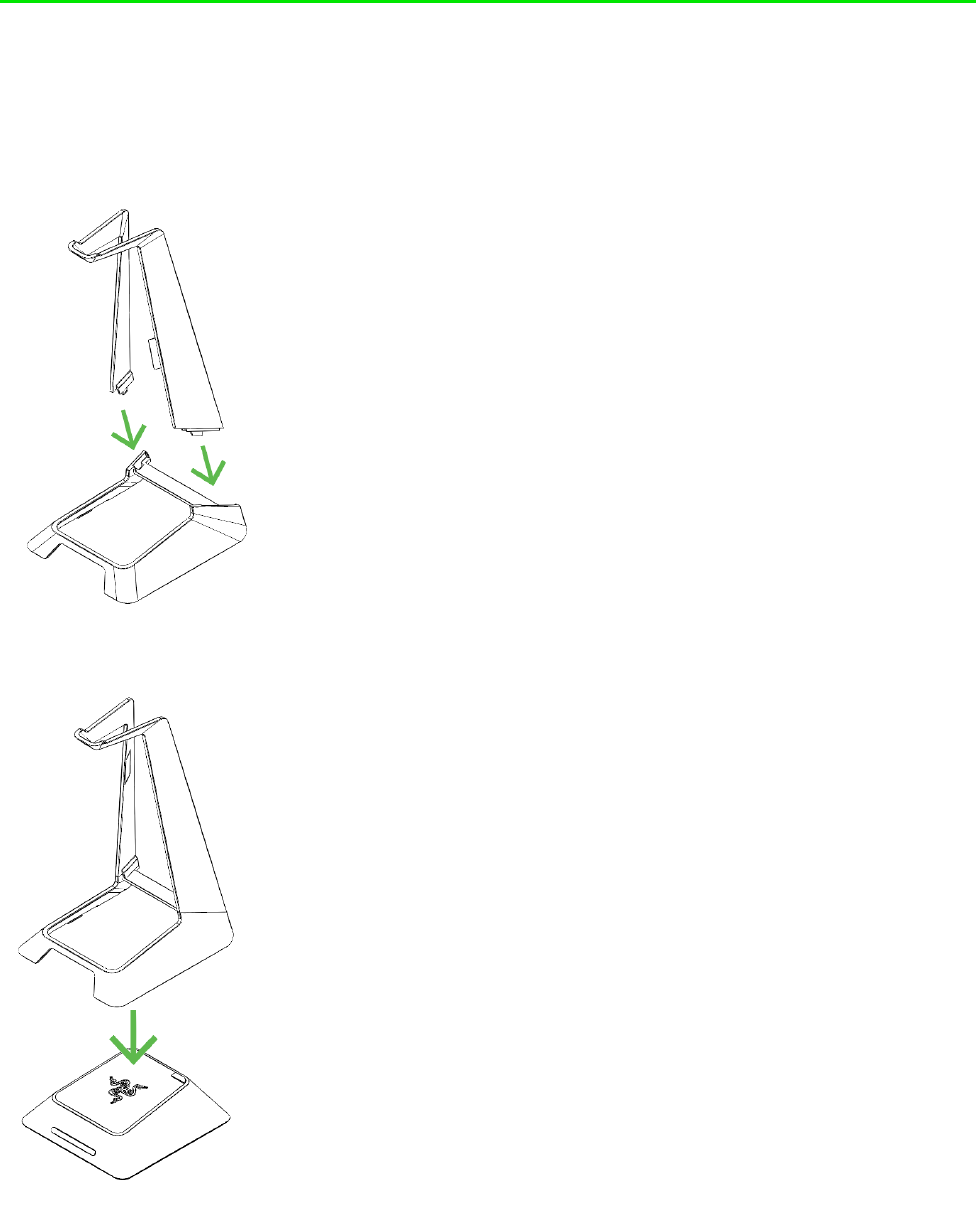
1. Attach the headset holder to the base.
2. Attach the audio hub to the base.

F O R G A M E R S . B Y G A M E R S .
™
3
3. Place the headset onto the headset stand.
4. Plug a USB to Micro-USB cable from the audio hub to the headset.
F O R G A M E R S . B Y G AM E R S .
™
4
CONNECTING YOUR RAZER THRESHER ULTIMATE FOR XBOX ONE TO YOUR XBOX
ONE
Note: Make sure to power on your Xbox One and log into your Xbox Live account before connecting your
Razer Thresher Ultimate For Xbox One.
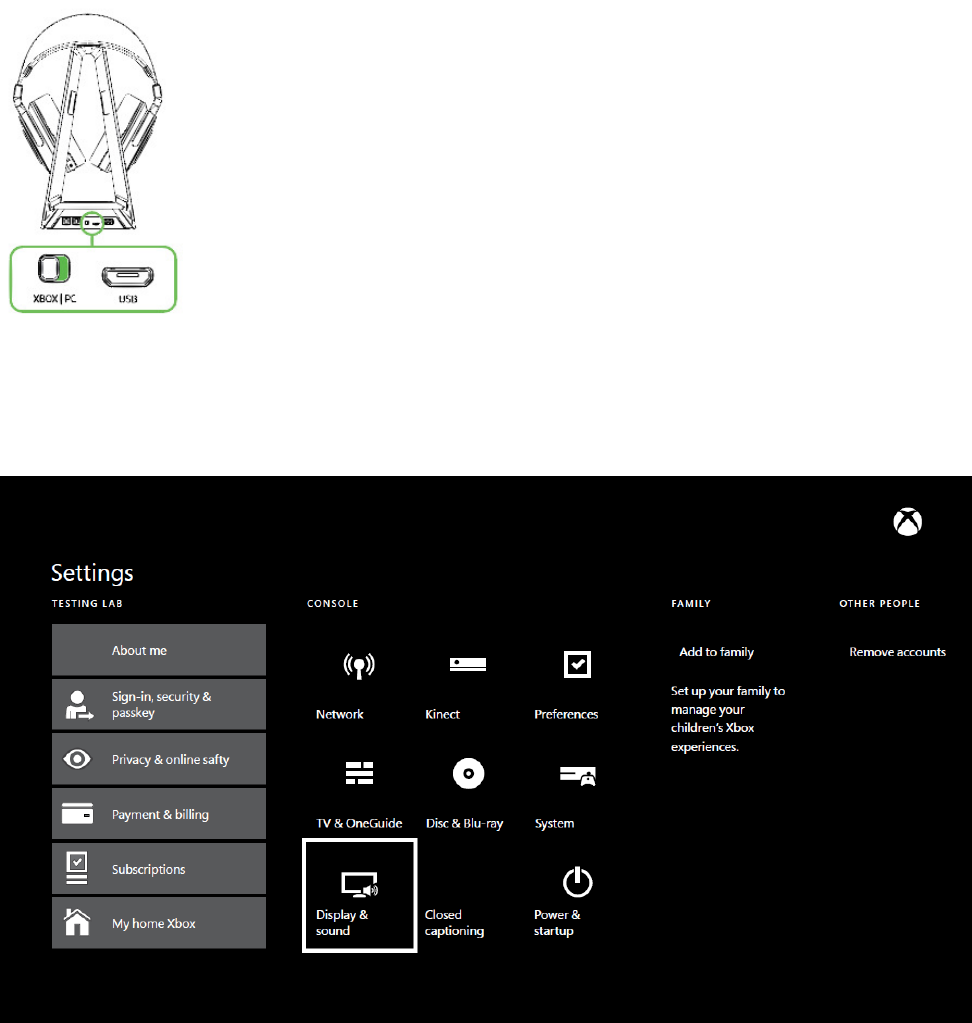
1. Set the Xbox / PC toggle to XBOX.
2. Plug a USB to Micro-USB cable from the audio hub to your Xbox One.
3. Plug the optical cable from the audio hub to your Xbox One.
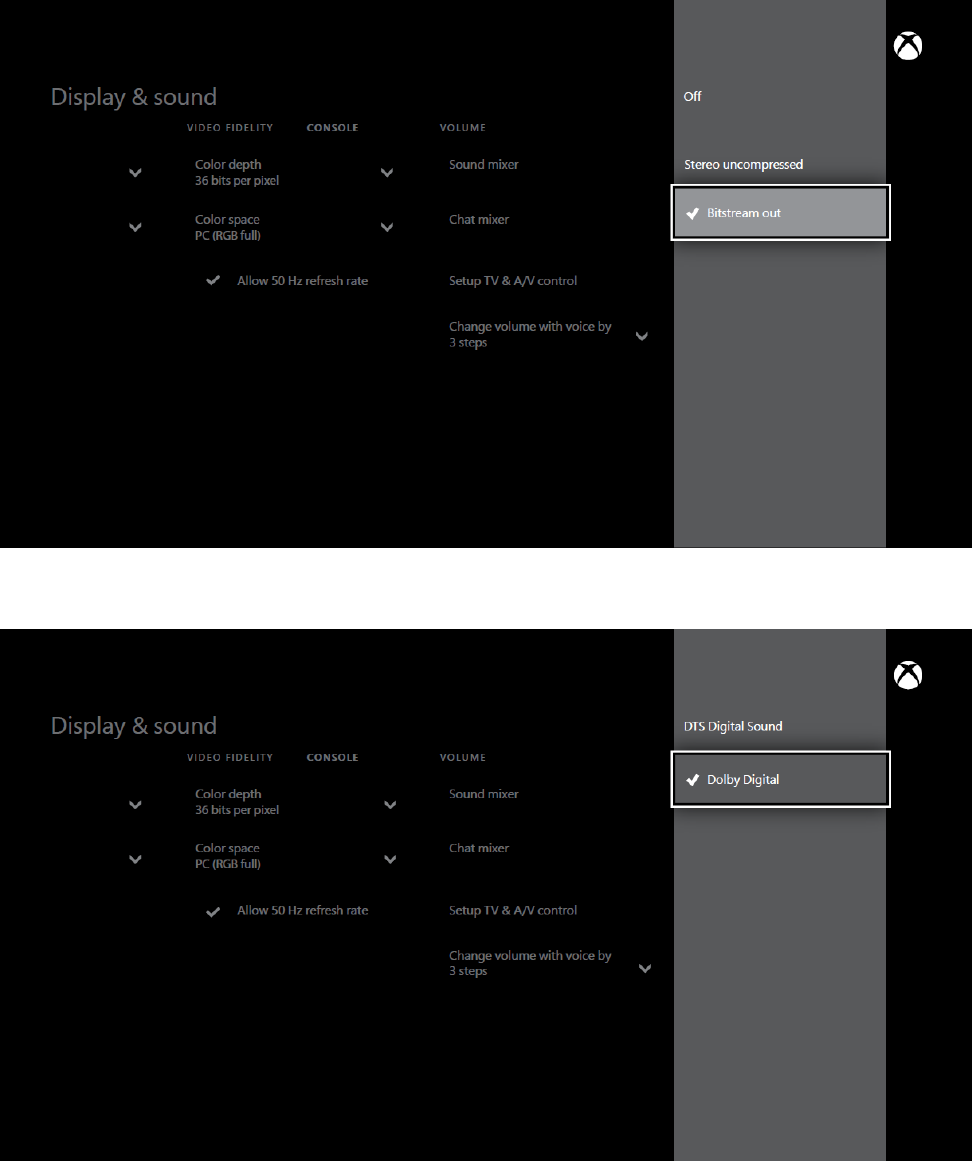
4. From the Xbox One Home Screen, go to the
Settings
window.
F O R G A M E R S . B Y G AM E R S .
™
5
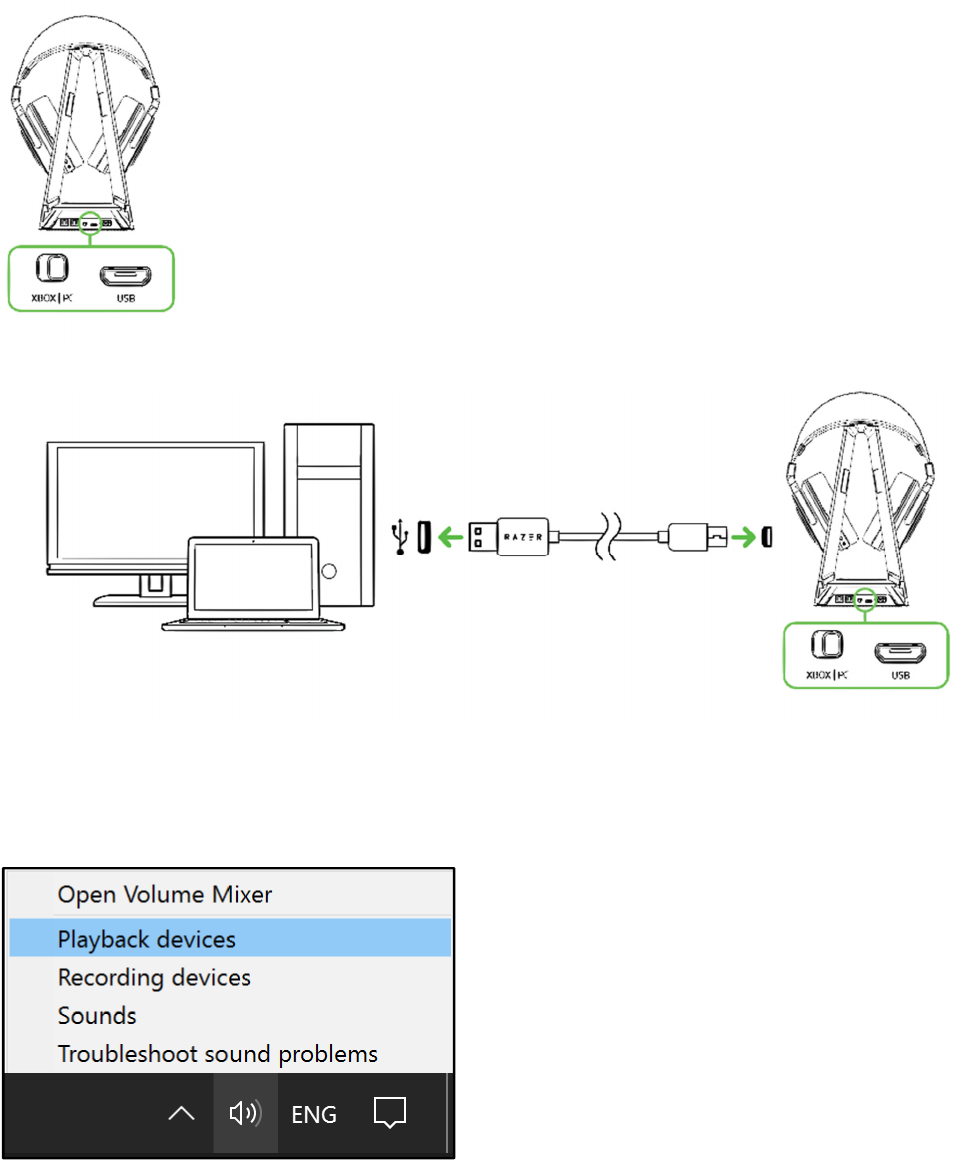
5. Go to
Display & Sound > Optical Audio,
and then select
Bitstream Out
.
6. From the
Display & Sound
screen, go to
Bitstream Format
and select
Dolby Digital
.
F O R G A M E R S . B Y G A M E R S .
™
6
CONNECTING YOUR RAZER THRESHER ULTIMATE FOR XBOX ONE TO YOUR PC
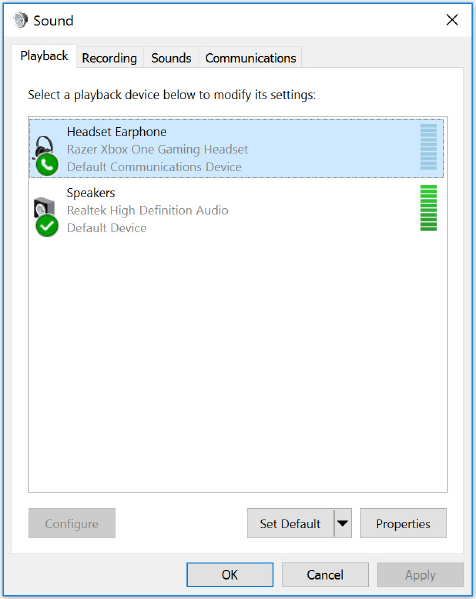
1. Set the Xbox / PC toggle to PC.
2. Plug a USB to Micro-USB cable from the audio hub to your PC.
3. Open your Sound settings from Control Panel > Hardware and Sound > Manage audio
devices. You can also right-click on the sound icon on the system tray, and then select
Playback devices.
F O R G A M E R S . B Y G AM E R S .
™
7
4. In the Playback tab, select your Razer headset from the list, and then click the Set Default
button.
F O R G A M E R S . B Y G AM E R S .
™
8
CHARGING YOUR HEADSET
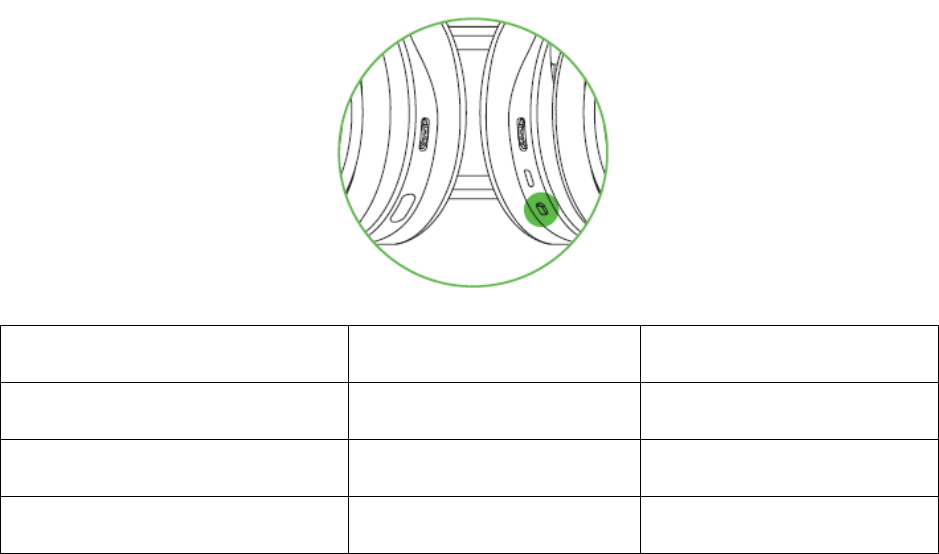
When you first connect to either PC or console, the headset will automatically begin to charge. For
best results, please fully charge the headset before using it for the first time. A depleted unit will
fully charge in about 8 hours.
UNDERSTANDING THE CHARGING NOTIFICATIONS
The LED indicator on the headset will send out notifications depending on its current charging
status, as shown here:
LED NOTIFICATION SOUND NOTIFICATION STATUS
S
tatic
r
ed
None
Charging
Static green None Full Battery
Blinking
r
ed
Warning tone
Low battery
F O R G A M E R S . B Y G AM E R S .
™
9
USING YOUR RAZER THRESHER ULTIMATE FOR XBOX ONE
POWER ON
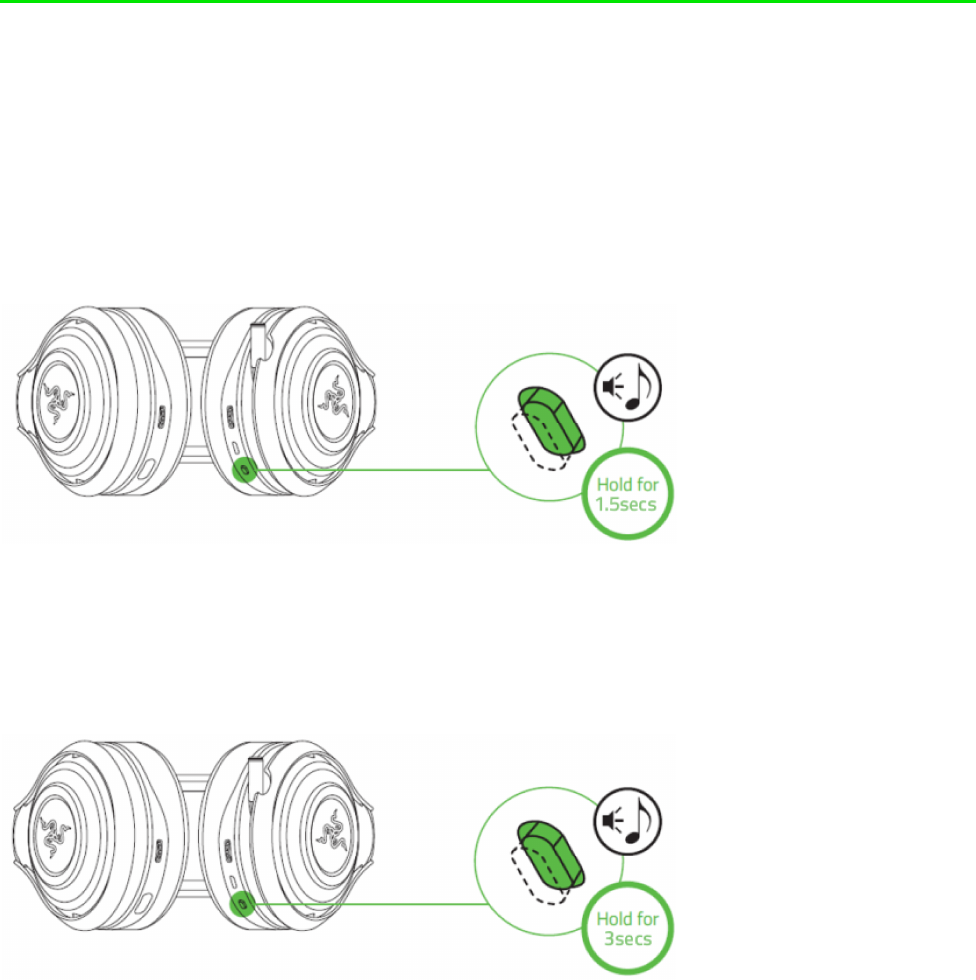
Press and hold the audio hub power button until the LED indicator starts blinking.
Press and hold the headset power button until you hear the ON tone or until the Razer logo starts
blinking.
POWER OFF
Press and hold the headset power button until you hear the OFF tone or until the Razer logo turns
off.
Press and hold the audio hub power button until the LED indicator turns off.
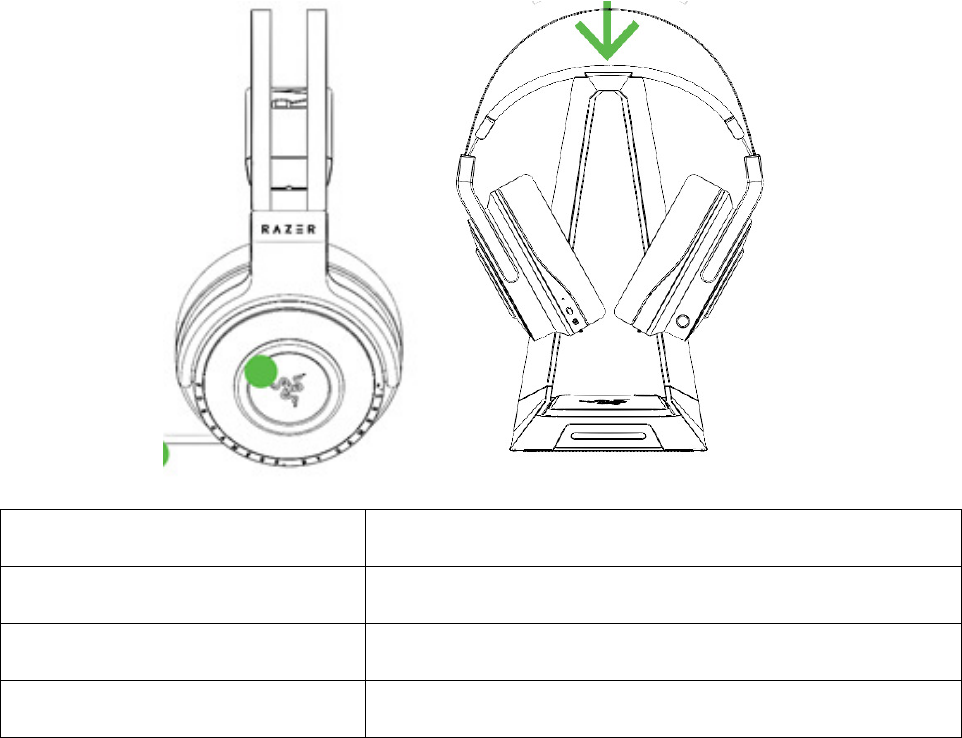
PAIRING NOTIFICATIONS
The headset’s Razer logo and the audio hub’s LED indicator will display notifications depending on
each device’s pairing status, as shown here:
F O R G A M E R S . B Y G AM E R S .
™
10
NOTIFICATION HEADSET/AUDIO HUB STATUS
Slow blinking g
reen
Searching for
a device
Fast blinking green Pairing mode
Static
g
reen
Connected /
Paired
USING THE DOLBY HEADPHONE TECHNOLOGY
Press and hold the Dolby Headphone button for at least 2 seconds to activate/deactivate the
virtual surround sound environment.
F O R G A M E R S . B Y G AM E R S .
™
11
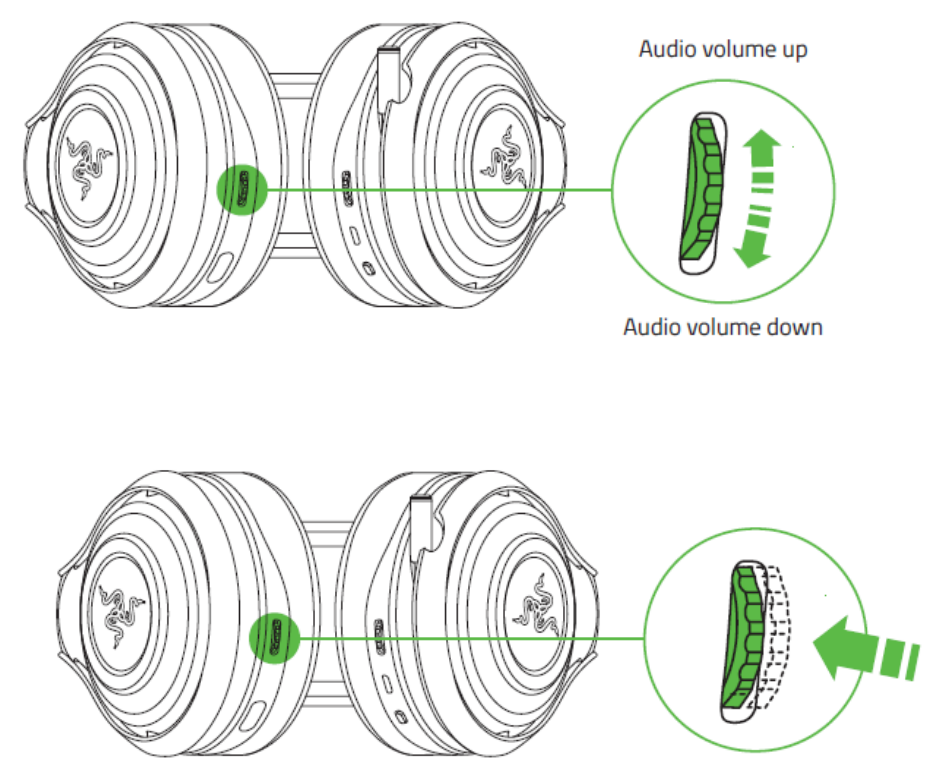
USING THE AUDIO VOLUME CONTROL
Rotate the audio volume control to increase or decrease the volume. You will hear a short beep
when you reach the minimum or maximum volume.
Press the audio mute button to mute or unmute the in-game audio.
F O R G A M E R S . B Y G AM E R S .
™
12
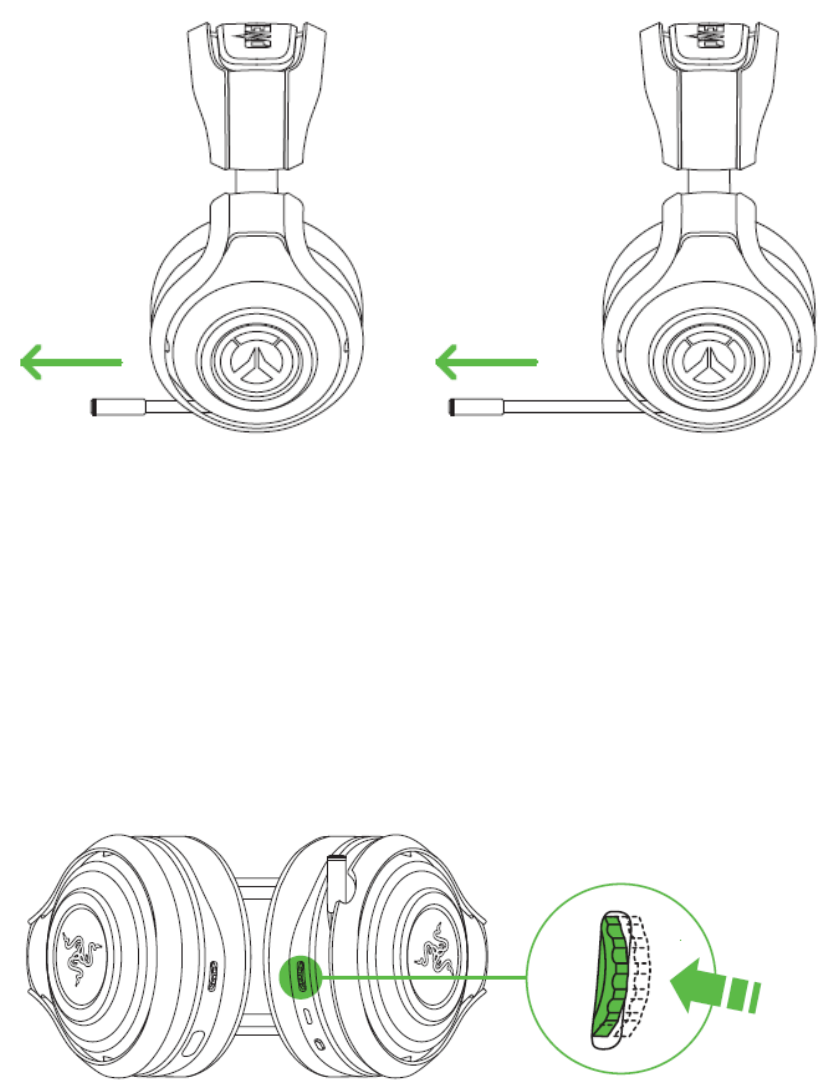
USING THE RETRACTABLE MICROPHONE
Pull the tip of the microphone until it is fully extended.
Bend the microphone until it is in front of your mouth, then adjust the length as preferred.
USING THE GAME/CHAT BALANCE
Rotate the game/chat balance to increase the in-game volume and decrease the voice chat volume
or vice versa. You will hear a short beep when you reach the maximum for either the in-game or
voice chat volume.
Press the microphone mute button to mute or unmute the microphone. The microphone LED will
light up when muted.
F O R G A M E R S . B Y G AM E R S .
™
13
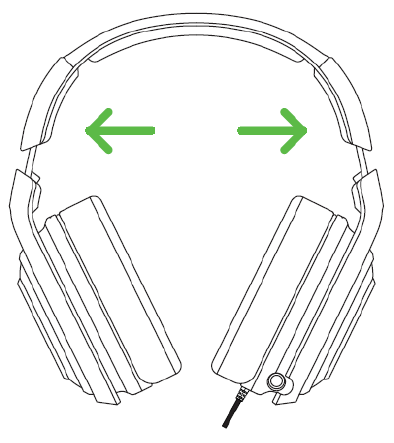
EXTENDING YOUR HEADSET’S LIFESPAN
We recommend stretching the headset gently apart before placing them over your head to
minimize headband stress. However, please avoid overstretching the headset beyond its technical
limits.
TROUBLESHOOTING YOUR RAZER THRESHER ULTIMATE FOR XBOX ONE
In the unlikely event that it is necessary to pair a new headset or a new audio hub, simply follow
these steps to reinitiate pairing:
1. Make sure your headset is sufficiently charged and your audio hub is connected to a power
source.
2. From a power off status, press and hold the audio hub power button for at least 3 seconds.
3. From a power off status, press and hold the headset power button for at least 3 seconds.
Note: The audio hub’s LED indicator and the headset’s Razer logo will blink rapidly to show that
both devices are in pairing mode.
4. Wait until pairing is complete. The audio hub’s LED indicator and the headset’s Razer logo
will be in static green.
F O R G A M E R S . B Y G AM E R S .
™
14
FCC Statement
This equipment has been tested and found to comply with the limits for a Class B
digital device, pursuant to part 15 of the FCC Rules. These limits are designed to provide
reasonable protection against harmful interference in a residential installation. This
equipment generates uses and can radiate radio frequency energy and, if not installed and
used in accordance with the instructions, may cause harmful interference to radio
communications. However, there is no guarantee that interference will not occur in a
particular installation. If this equipment does cause harmful interference to radio or
television reception, which can be determined by turning the equipment off and on, the
user is encouraged to try to correct the interference by one or more of the following
measures:
Reorient or relocate the receiving antenna.
Increase the separation between the equipment and receiver.
Connect the equipment into an outlet on a circuit different from that to which the
receiver is connected.
Consult the dealer or an experienced radio/TV technician for help.
FCC Statement
This device complies with FCC radiation exposure limits set forth for an uncontrolled
environment.
This device complies with Part 15 of the FCC Rules. Operation is subject to the following
two conditions: (1) this device may not cause harmful interference, and (2) this device
must accept any interference received, including interference that may cause undesired
operation.
Caution!
Any changes or modifications not expressly approved by the party responsible for
compliance could void the user's authority to operate the equipment.
Canada Statement
This device complies with Industry Canada’s licence-exempt RSSs. Operation is subject to the following two
conditions:
(1) This device may not cause interference; and
(2) This device must accept any interference, including interference that may cause undesired operation of
the device.
F O R G A M E R S . B Y G AM E R S .
™
15
Le présent appareil est conforme aux CNR d’Industrie Canada applicables aux appareils radio exempts de
licence. L’exploitation est autorisée aux deux conditions suivantes :
(1) l’appareil ne doit pas produire de brouillage;
(2) l’utilisateur de l’appareil doit accepter tout brouillage radioélectrique subi, même si le brouillage est
susceptible d’en compromettre le fonctionnement.
The device meets the exemption from the routine evaluation limits in section 2.5 of RSS 102 and compliance
with RSS-102 RF exposure, users can obtain Canadian information on RF exposure and compliance.
Le dispositif rencontre l'exemption des limites courantes d'évaluation dans la section 2.5 de RSS 102 et
la conformité à l'exposition de RSS-102 rf, utilisateurs peut obtenir l'information canadienne sur l'exposition
et la conformité de rf.
This equipment must be installed and operated in accordance with provided instructions and the antenna(s)
used for this transmitter must be installed to provide a separation distance of at least 20 cm from all persons
and must not be co-located or operating in conjunction with any other antenna or transmitter. End-users and
installers must be provided with antenna installation instructions and consider removing the no-collocation
statement.
This transmitter must not be co-located or operating in conjunction with any other antenna or transmitter.
This equipment should be installed and operated with a minimum distance of 20 centimeters between the
radiator and your body.
Cet émetteur ne doit pas être Co-placé ou ne fonctionnant en même temps qu'aucune autre antenne ou
émetteur. Cet équipement devrait être installé et actionné avec une distance minimum de 20 centimètres
entre le radiateur et votre corps.