User Manual

0 | For gamers. by gamers™
TABLE OF CONTENTS
1. PACKAGE CONTENTS / SYSTEM REQUIREMENTS ...................................... 1
2. REGISTRATION / TECHNICAL SUPPORT ..................................................... 2
3. USING YOUR RAZER NABU ....................................................................... 3
4. CONFIGURING THE UTILITY APP FOR NABU.............................................. 9
5. SAFETY AND MAINTENANCE .................................................................. 15
6. LEGALESE ............................................................................................... 17

1 | razer™
1. PACKAGE CONTENTS / SYSTEM REQUIREMENTS
PACKAGE CONTENTS
• Razer Nabu(RZ15-0124)
• Important product information guide
• Micro-USB charging cable
• 2 Interchangeable clasps
SYSTEM REQUIREMENTS
• iPhone 5 / 5S /5C with iOS 7 (or higher)
• Android 4.3 (or higher) device with Bluetooth Low Energy (BT 4.0 or higher)
capability
2 | For gamers. by gamers™
2. REGISTRATION / TECHNICAL SUPPORT
REGISTRATION
Sign up now for a Razer ID account to get real-time information on your product’s
warranty status. To learn more about Razer ID and all its features, visit
www.razerzone.com/razer-id. If you are already a Synapse user, register your product
by clicking on your email address at the Synapse application and select Warranty Status
from the dropdown list.
To register your product online, visit www.razerzone.com/registration. Please note that
you will not be able to view your warranty status if you register via the website.
Your product’s serial number can be found here
TECHNICAL SUPPORT
What you’ll get:
• 1 year limited manufacturer’s warranty.
• Free online technical support at www.razersupport.com.
3 | razer™
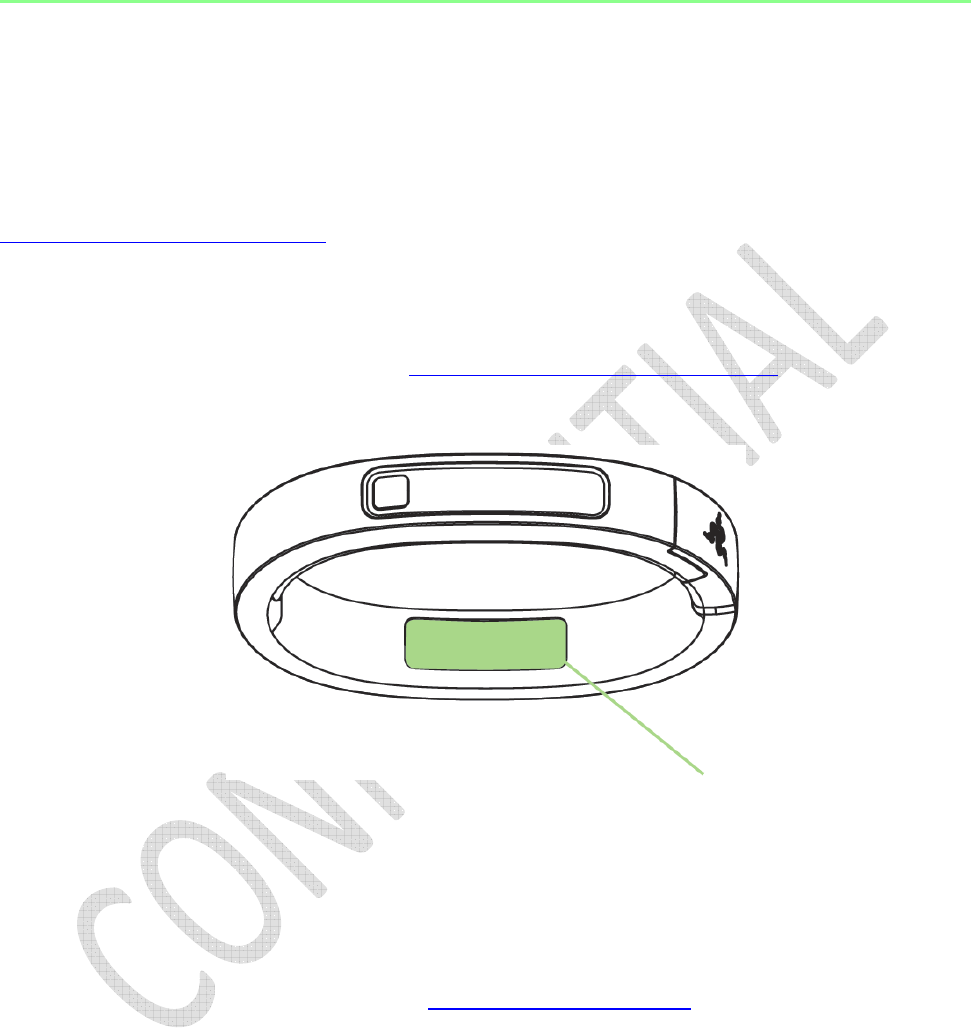
3. USING YOUR RAZER NABU
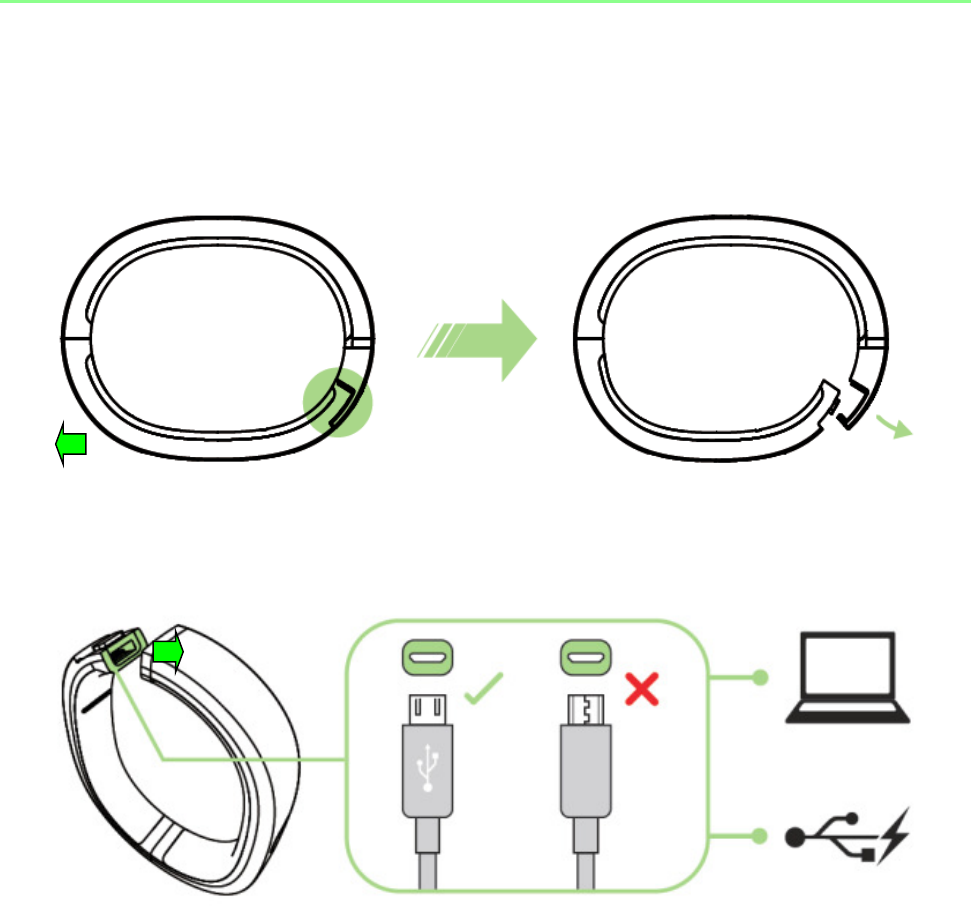
CHARGING THE NABU
1. Unlock the clasp by separating the two ends of the wristband.
2. Insert the micro USB connector to the Razer Nabu and insert the USB connector
to a PC or a USB charger.
Reminder: Please remove the Razer Nabu from your wrist before charging it. The approximate time to
fully charge the Razer Nabu is 90 minutes. Do not leave the Razer Nabu charging overnight.
4 | For gamers. by gamers™
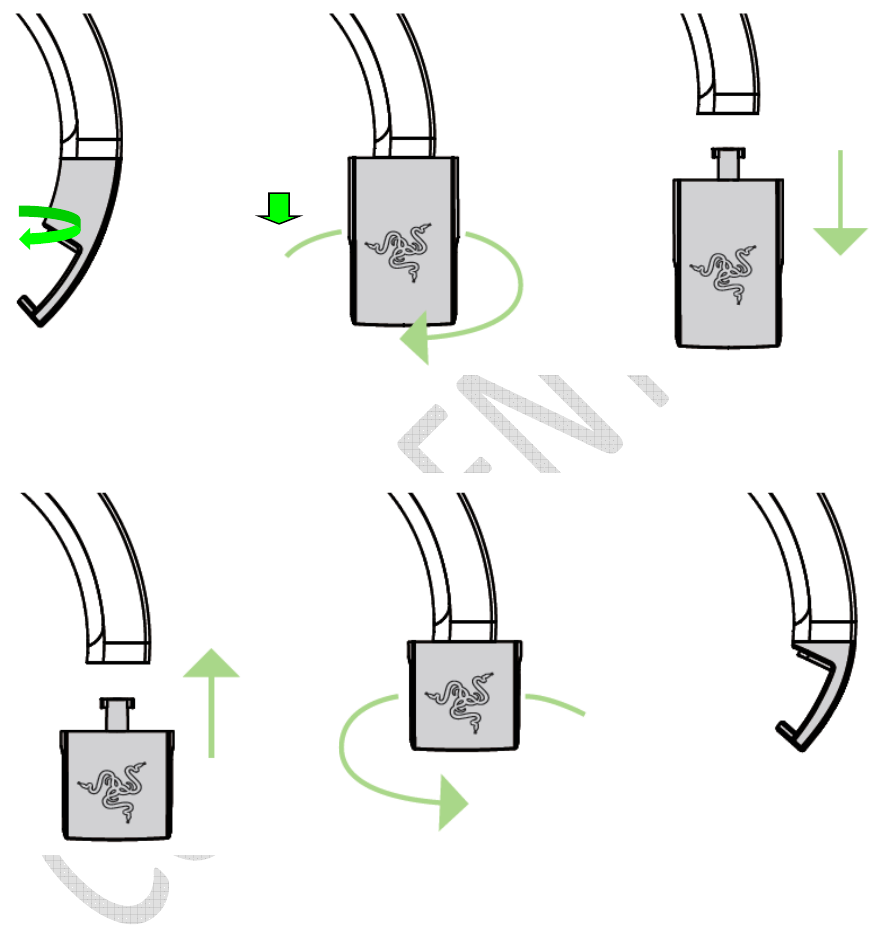
CHANGING THE CLASP
1. Twist the clasp 90 degrees and then gently pull it away from the wristband.
2. Insert the small clasp into the wristband then twist it 90 degrees.
5 | razer™
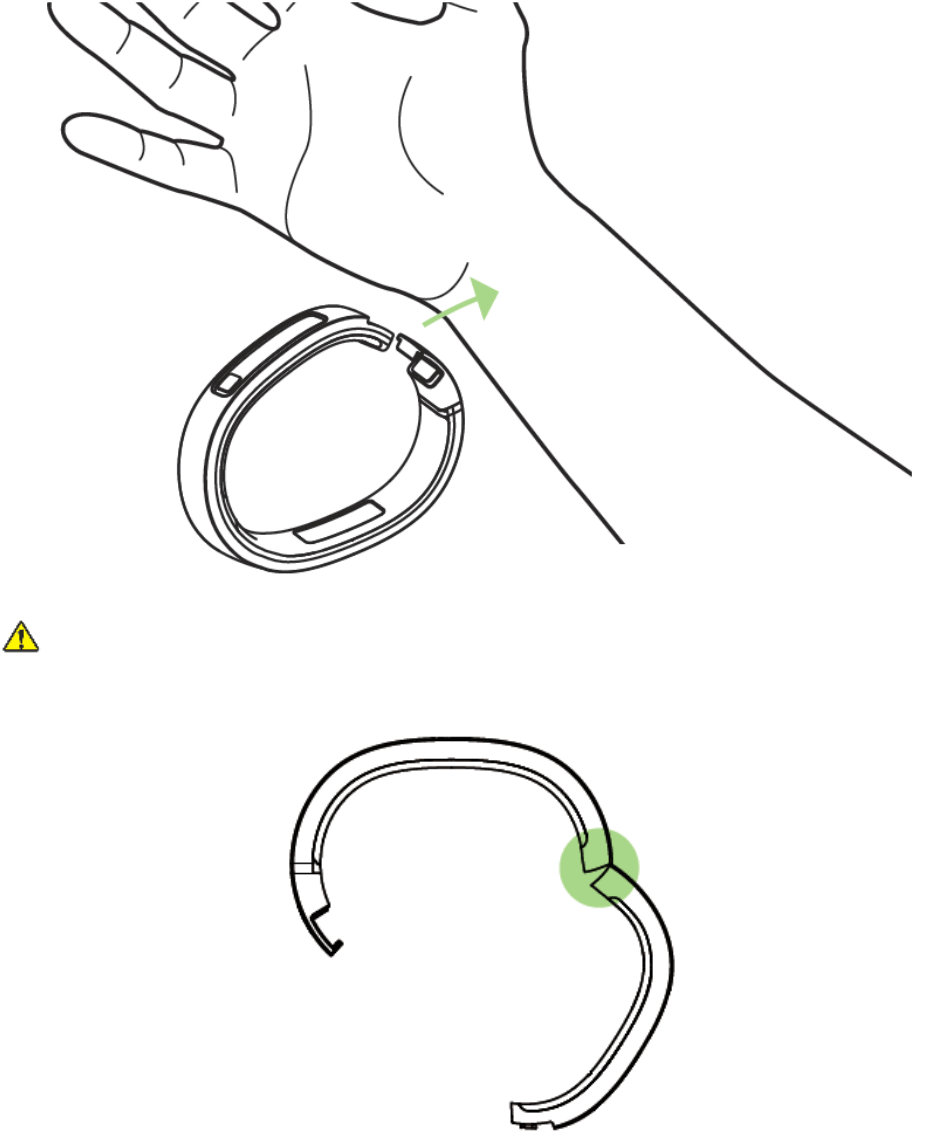
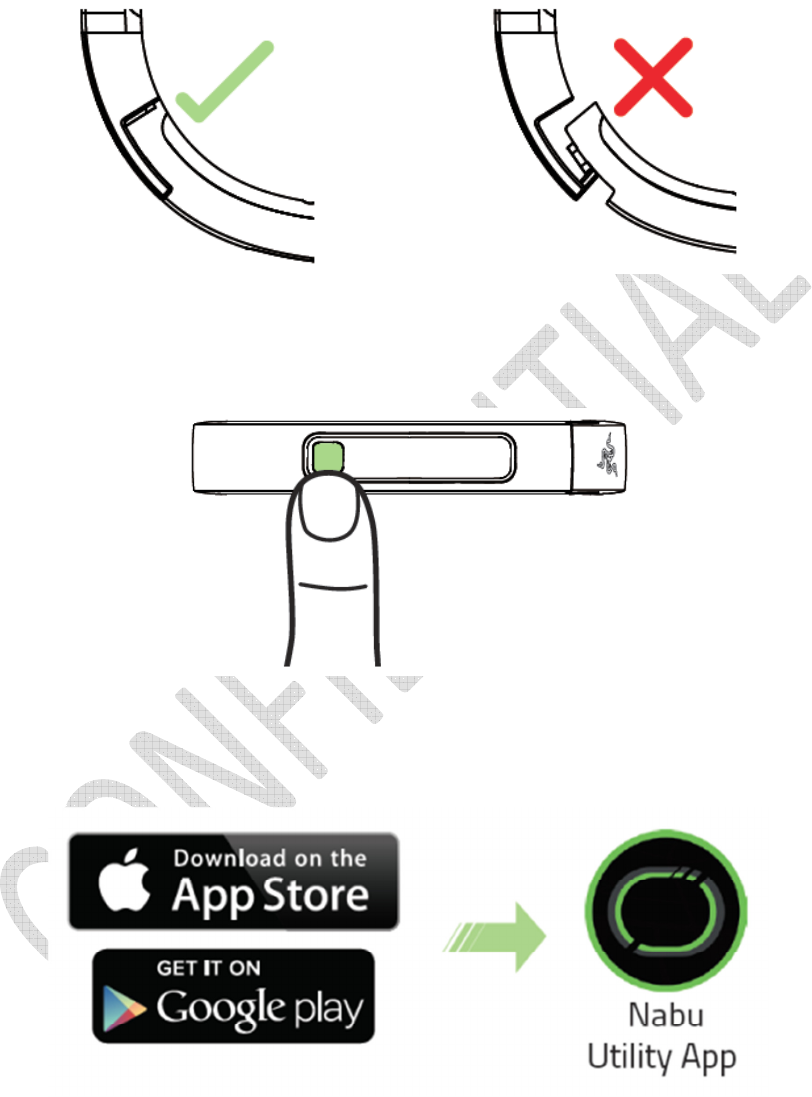
WEARING THE RAZER NABU
1. Unlock the clasp and slide your wristband from the side as shown here.
WARNING: Do not overstretch the wristband beyond its physical limits. Doing so may void your
warranty.
6 | For gamers. by gamers™
2. Lock the clasp and make sure both ends of the wristband are aligned.
3. Press the power button for at least 1 second and release it once you feel a
vibration.
4. Download the Nabu Utility app on iOS or Android and follow the onscreen
instructions.
7 | razer™
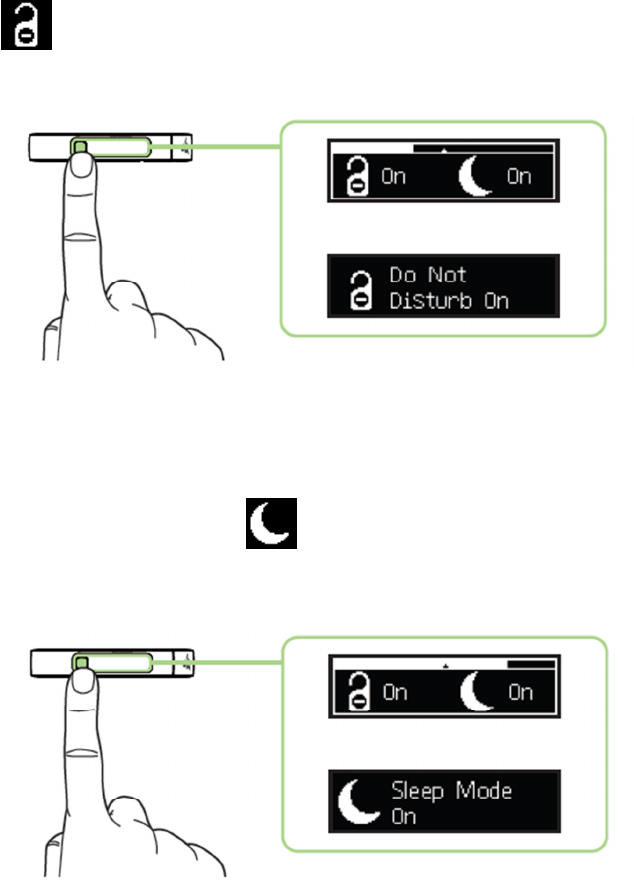
SMARTBAND MODES
While the Razer Nabu is turned ON, it can be set to different modes depending on how
long the power button is pressed.
Do Not Disturb Mode
This mode will disable incoming notifications and band vibration. To activate this mode,
press and hold the power button for at least 3 seconds and release it once you see the
bar is on the icon. Deactivating Do Not Disturb Mode will resume incoming
notifications and band vibration.
Sleep Mode
This mode will disable notifications, disable band vibration, and start sleep tracking. To
activate this mode, press and hold the power button for at least 5 seconds and release
it once you see the bar is on the icon. Deactivating Sleep Mode will resume
incoming notifications, band vibration, and end sleep tracking.
8 | For gamers. by gamers™
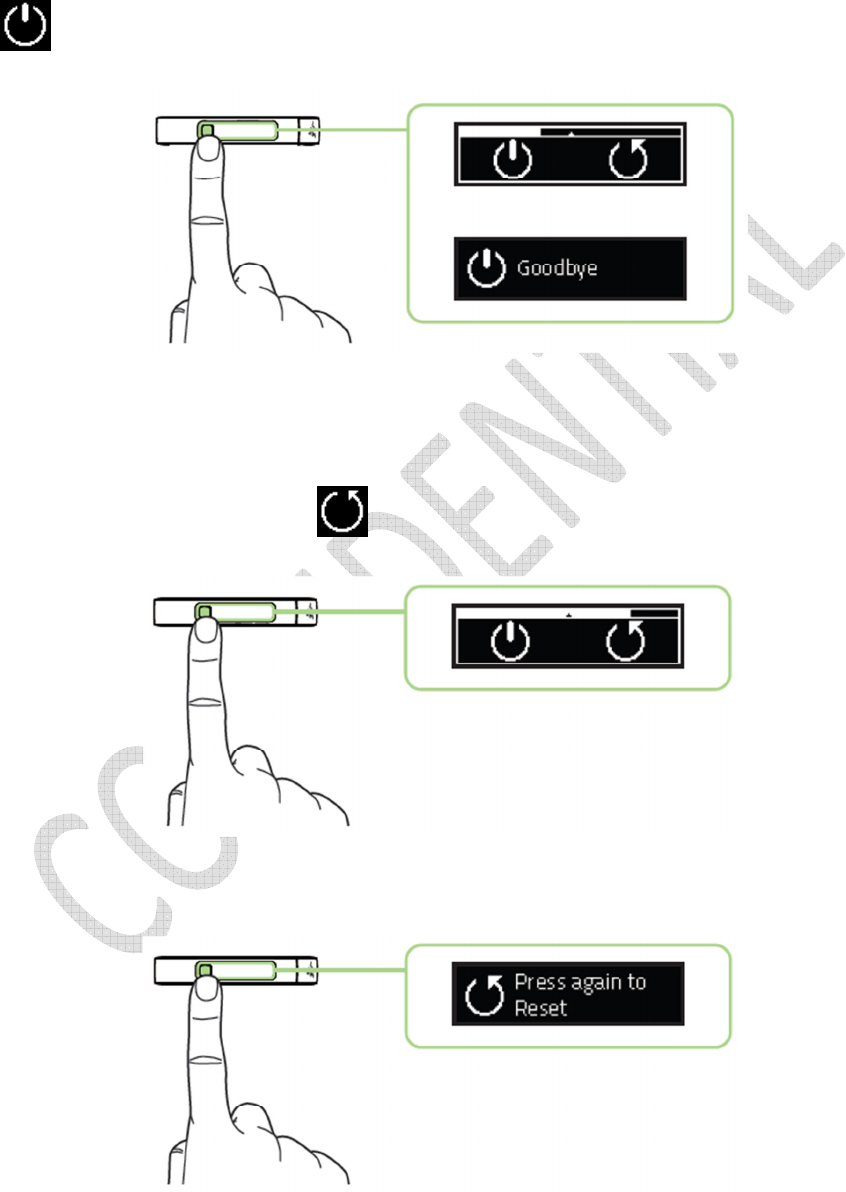
Power Off
Setting the smartband to this mode will turn it off. To activate this mode, press and
hold the power button for at least 7 seconds and release it once you see the bar is on
the icon.
Reset
Setting the smartband to this mode will revert it back to its default factory settings. To
activate this mode, press and hold the power button for at least 9 seconds and release
it once you see the bar is on the icon.
A second button press is required to confirm the reset.
9 | razer™
4. CONFIGURING YOUR NABU VIA THE UTILITY APP
Disclaimer: The features listed here require you to log in to Razer Synapse 2.0. These features are also subject
to change based on the current software version and your Operating System.
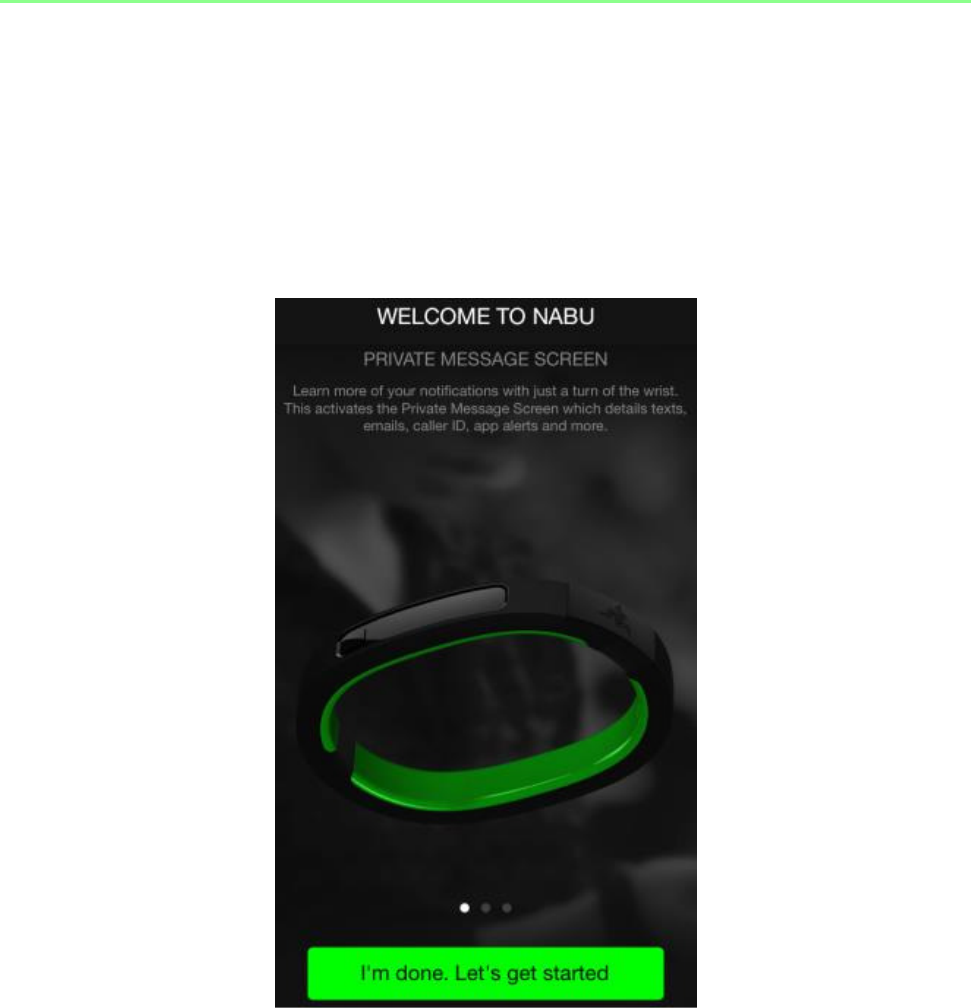
WELCOME SCREEN
The welcome screen highlights some of the features you will find on the Razer Nabu.
Once you are ready to setup your account, tap “I’M DONE. LET’S GET STARTED”.

10 | For gamers. by gamers™
LOGIN SCREEN
To sign up for a Razer ID account, you will need to provide an email or a mobile
number, a password, and you will also need to verify the password. Once you have
filled out the necessary fields, tap “SIGN UP” to continue.
If you already have a Razer ID account, tap “LOGIN” and input your email and
password. You may also log in using your WeChat account.
11 | razer™
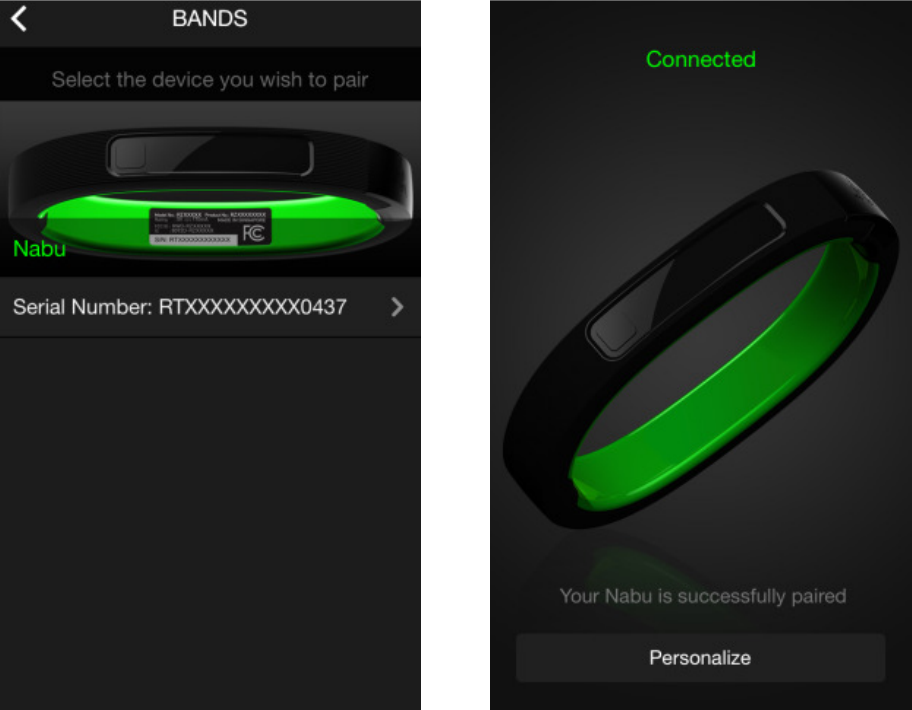
PAIRING SCREEN
The pairing screen will guide you in pairing the Razer Nabu with your smartphone.
Simply follow the onscreen instructions until you have successfully paired the Razer
Nabu and your smartphone then tap “PERSONALIZE”.
12 | For gamers. by gamers™
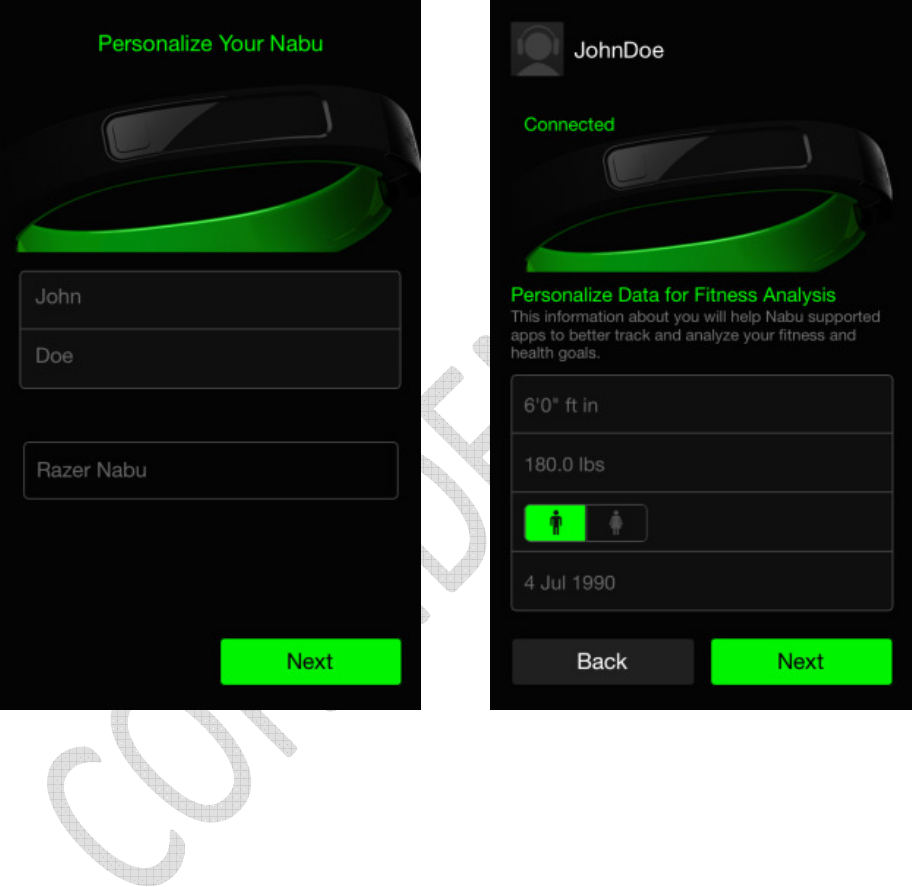
PERSONALIZE SCREEN
The personalize screen allows the Razer Nabu to become associated with you. The
personalize screen also allows you to setup your user profile to be used by fitness apps
that support the Razer Nabu.
13 | razer™
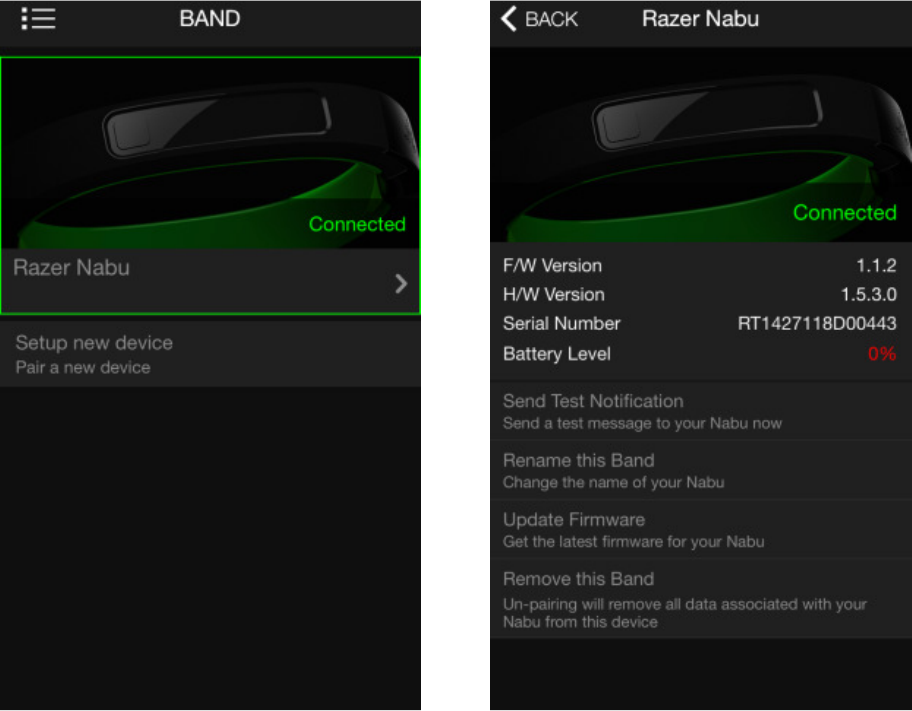
DEVICE AND DETAILS SCREEN
The device screen allows you to view all Razer Nabu smartbands associated with your
account. You may also associate a new Razer Nabu on this screen. If you tap to a
specific smartband, you will be able to see the details screen where you can find
information such as connection status and firmware version.
There are also some available options on the details screen that you may find useful
such as “Sync Now” which allows you to instantly send your user data to the cloud,
“Update Firmware” to get the latest upgrades for your smartband, and “Unpair this
device” to remove the smartband’s association with your account.
14 | For gamers. by gamers™
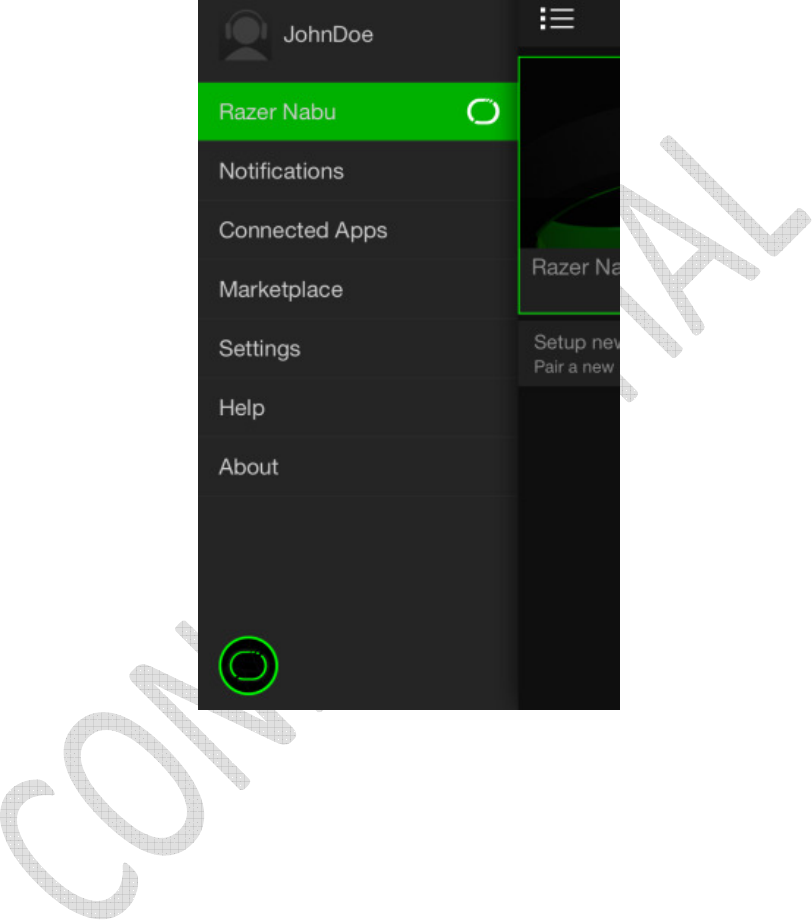
DRAWER MENU
The drawer menu offers a wide variety of features and customizability for you, your
Razer Nabu, and the Utility App.
Listed below are the menu options and their corresponding functions:
Profile - Change or view your account details such as your name, email
address, mobile number, and fitness data.
Notifications - Choose which instances you would like to be notified.
Connected Apps - Allow third party apps to use the information being gathered by the
Razer Nabu.
Marketplace - Find, download, and install apps for the Razer Nabu.
Settings - Customize the Razer Nabu’s settings such as LED brightness,
vibration, clock and much more.
Help - Access the FAQ database to help you troubleshoot your Razer Nabu.
About - View the Utility App’s version as well as legal documentations.

15 | razer™
5. SAFETY AND MAINTENANCE
SAFETY GUIDELINES
In order to achieve maximum safety while using your Razer Nabu, we suggest that you
adopt the following guidelines:
1. Should you have trouble operating the device properly, unplug and/or remove
the device and contact the Razer hotline; or go to www.razersupport.com for
assistance. Do not attempt to fix the device yourself.
2. Do not take apart the device (doing so will void your warranty) and do not
attempt to operate it under abnormal current loads.
3. Charge the Razer Nabu in accordance with the recommended charging time and
do not leave the battery charging overnight. Do not wear the Razer Nabu while it
is charging.
4. Do not expose the Razer Nabu to liquids while charging. Exposing the Razer Nabu
to these conditions may result in an electric shock.
5. The Razer Nabu is splash and dust resistant in compliance with the IP54
standard. Do not submerge the Razer Nabu in liquids and it should not be worn
while swimming, bathing, or inside a sauna.
6. Do not tamper or abuse the Razer Nabu; including but not limited to dropping,
crushing, excessive bending, puncturing, shredding, microwaving, incinerating, or
inserting foreign objects into the Razer Nabu.
7. Do not use abrasive cleaners and/or harsh cleaning agents to clean the Razer
Nabu.
8. Do not expose the Razer Nabu to extremely high or low temperatures such as
leaving the Razer Nabu in direct sunlight or in snowy weather for extended
periods of time.

16 | For gamers. by gamers™
9. Do not expose the Razer Nabu to open flames such as stoves, candles, or
fireplaces.
10. Do not expose the inner band to organic solvents such as alcohol, acetone, and
detergent.
11. Dispose the product in accordance with your local environmental laws and
guidelines.
BATTERY
The Razer Nabu contains an internal, lithium-ion polymer rechargeable battery. In
general, the life expectancy of this battery depends upon use. If the battery does not
charge after several attempts, it may be non-operational and you may need to contact
customer support. Do not attempt to replace the Razer Nabu’s battery yourself.
TRACKING
The accuracy of our sensors and associated calculations (i.e. distance traveled and
calories burned) will vary with use.

17 | razer™
6. LEGALESE
COPYRIGHT AND INTELLECTUAL PROPERTY INFORMATION
© 2014 Razer Inc. All rights reserved. Razer, For Gamers By Gamers, and the triple-
headed snake logo are trademarks or registered trademarks of Razer Inc. and/or
affiliated companies in the United States or other countries. All other trademarks are
the property of their respective owners. Actual product may differ from pictures.
Information is correct at time of printing. iOS is a trademark or registered trademark of
Cisco in the U.S. and other countries and is used under license. Android is a trademark
of Google Inc.
Razer Inc. (“Razer”) may have copyright, trademarks, trade secrets, patents, patent
applications, or other intellectual property rights (whether registered or unregistered)
concerning the product in this guide. Furnishing of this guide does not give you a
license to any such copyright, trademark, patent or other intellectual property right.
The Razer Nabu (the “Product”) may differ from pictures whether on packaging or
otherwise. Razer assumes no responsibility for such differences or for any errors that
may appear. Information contained herein is subject to change without notice.
LIMITED PRODUCT WARRANTY
For the latest and current terms of the Limited Product Warranty, please visit
www.razerzone.com/warranty.
LIMITATION OF LIABILITY
Razer shall in no event be liable for any lost profits, loss of information or data, special,
incidental, indirect, punitive or consequential or incidental damages, arising in any way
out of distribution of, sale of, resale of, use of, or inability to use the Product. In no
event shall Razer’s liability exceed the retail purchase price of the Product.

18 | For gamers. by gamers™
COSTS OF PROCUREMENT
For the avoidance of doubt, in no event will Razer be liable for any costs of
procurement unless it has been advised of the possibility of such damages, and in no
case shall Razer be liable for any costs of procurement liability exceeding the retail
purchase price of the Product.
GENERAL
These terms shall be governed by and construed under the laws of the jurisdiction in
which the Product was purchased. If any term herein is held to be invalid or
unenforceable, then such term (in so far as it is invalid or unenforceable) shall be given
no effect and deemed to be excluded without invalidating any of the remaining terms.
Razer reserves the right to amend any term at any time without notice.
19 | razer™
FCC Statement
This equipment has been tested and found to comply with the limits for a Class B digital
device, pursuant to part 15 of the FCC Rules. These limits are designed to provide
reasonable protection against harmful interference in a residential installation. This
equipment generates uses and can radiate radio frequency energy and, if not installed
and used in accordance with the instructions, may cause harmful interference to radio
communications. However, there is no guarantee that interference will not occur in a
particular installation. If this equipment does cause harmful interference to radio or
television reception, which can be determined by turning the equipment off and on,
the user is encouraged to try to correct the interference by one or more of the
following measures:
—Reorient or relocate the receiving antenna.
—Increase the separation between the equipment and receiver.
—Connect the equipment into an outlet on a circuit different from that to which the
receiver is connected.
—Consult the dealer or an experienced radio/TV technician for help.
FCC Statement
This device complies with FCC radiation exposure limits set forth for an uncontrolled
environment.
This device complies with Part 15 of the FCC Rules. Operation is subject to the following
two conditions: (1) this device may not cause harmful interference, and (2) this device
must accept any interference received, including interference that may cause
undesired operation.
Caution!
Any changes or modifications not expressly approved by the party responsible for
compliance could void the user's authority to operate the equipment.

20 | For gamers. by gamers™
Canada Statement
This device complies with Industry Canada licence-exempt RSS standard(s). Operation is
subject to the following two conditions: (1) this device may not cause interference, and
(2) this device must accept any interference, including interference that may cause
undesired operation of the device.
Le présent appareil est conforme aux CNR d'Industrie Canada applicables aux appareils
radio exempts de licence. L'exploitation est autorisée aux deux conditions suivantes : (1)
l'appareil ne doit pas produire de brouillage, et (2) l'utilisateur de l'appareil doit
accepter tout brouillage radioélectrique subi, même si le brouillage est susceptible d'en
compromettre le fonctionnement.
The device meets the exemption from the routine evaluation limits in section 2.5 of RSS
102 and compliance with RSS-102 RF exposure, users can obtain Canadian information
on RF exposure and compliance.
Le dispositif rencontre l'exemption des limites courantes d'évaluation dans la section
2.5 de RSS 102 et la conformité à l'exposition de RSS-102 rf, utilisateurs peut obtenir
l'information canadienne sur l'exposition et la conformité de rf.
Razer Inc.
2035 Corte Del Nogal,Suite 101,
Carlsbad,California 92011
United States