Reiie intelligent technology RT726 Dual Mode Multimedia Keyboard Touchpad Combo User Manual RT726
Shenzhen Reiie intelligent technology Co., ltd Dual Mode Multimedia Keyboard Touchpad Combo RT726
user manual
说明书成品尺寸: 120X95mm 80g铜版纸 RT726 i4中性说明书
06726207000
120*95mm 16折
VER:1.0
Ben
2018/09/04
RT726
+
The device uses built-in lithium-ion battery. Please use only approved USB
cables and chargers.
Note: Fully charge the unit before initial operation. This device can be used
when charging. But charging time will be extended. When the battery is low,
the low-voltage light will blink to warn the user. The unit will be automatically
turned off if the battery has been depleted.
Thank you for purchasing this Wireless Mini QWERTY Keyboard & Touchpad
Combo. You can use it for emails, chat, remote control, message input and games.
It is compatible with PC, Laptop, Raspberry Pi 2, Mac OS, Linux, HTPC, IPTV,
Google Android Smart TV Box, XBMC, Windows 2000 XP Vista 7 8 10. Use it with
your Android box or smart tv on your sofa or browse the internet in the most
comfortable fashion.
• HID compatible device
• Terminal with USB port
• Windows 2000 • Windows XP
• Windows Vista, Windows CE, Windows 7, Windows 8
• Bluetooth : Windows 8 or more
• Linux(Debian-3, Redhat-9.0, Ubuntu-8.10, Fedora-7.0 tested)
VER: 1.0
M/C: 06726207001
Dual Mode Multimedia
Keyboard Touchpad Combo i4
Installation & User Manual
Receiver (dongle): Nano style
Connection port: With USB2.0 or above
Transmission mode: Bluetooth +(RF) 2.4GHz wireless technology
Bluetooth version:Bluetooth 4.0
Transmission Power: ±5db
Power supply: BL-5B 700mAh
Charging voltage: 4.7V - 5.25V
Charging current: 300mA
Sleeping current class1: 135uA
Operation voltage:3.7v
Operating current:<75mA
Product weight: 112.5g
Product size: 155*89*16.5mm
Take out of the receiver from back chamber of the keyboard.
Plug the USB Receiver into your device’s USB port.
The keyboard supports auto sleep and wake-up. Without operation around
3 minutes, the keyboard will enter sleep mode. In sleep status, all LED
indicators are off. Pressing any key can wake it up.
After use, push the switch to the “OFF” position. The USB receiver does not
need to be pulled out from the terminal. You can use it next time directly.
This touchpad supports multi-finger functions.
1. Single-finger click functions as mouse left click.
2. Two-finger click functions as mouse right click.
3. Two-finger dragging functions as mouse Scrolling.
4. Singe-finger functions as sliding pointer.
Fn+Space=Adjust touchpad speed
Single finger click=Left mouse
Two-finger click=Right mouse
Two-finger drag=Scroll
The Backlit LED will be automatically turned on three seconds after the
keyboard is being turned on . When the backlight is lighted, it will stay on
1 minute. If there is no operation after 1minute, the backlight LED will
be off automatically.
There are 2 brightness backlight levels for you, you can change the
brightness by + .
•
The attached USB cable just can be used for charging, it can not be used
for data transfer.
•
When charging finishes, pull out the charging cable.
•
Never try to open or repair this product yourself.
•
Keep this device away from fluids, such as water.
•
Do not attempt to disassemble the device or replace the rechargeable
battery yourself.
•
The battery will discharge when it is stored for a long time without operation.
•
Use the specified charger. Disconnect the device when the battery is fully
charged.
•
Overcharging will shorten the battery life.
Always dispose the used appliance at a recycling center. Do not
dispose the used appliance together with the household waste.
Note:
Due to 2.4G wave technology adoption, the connection can be subject to
interference from obstacles, like walis, metals, or other electronis devices.
Please keep the space between the keyboard and USB receiver free of obstacle.
In line with the policy of continued development, the manufacturer reserves
the right to amend The specifications without prior notification. The illustrations
in the user manual are for reference only. Please operate according to the
real design.
Touch pad
Multi-media
buttons
Scroll
wheel
Keyboard area
Direction
keys
Power
switch
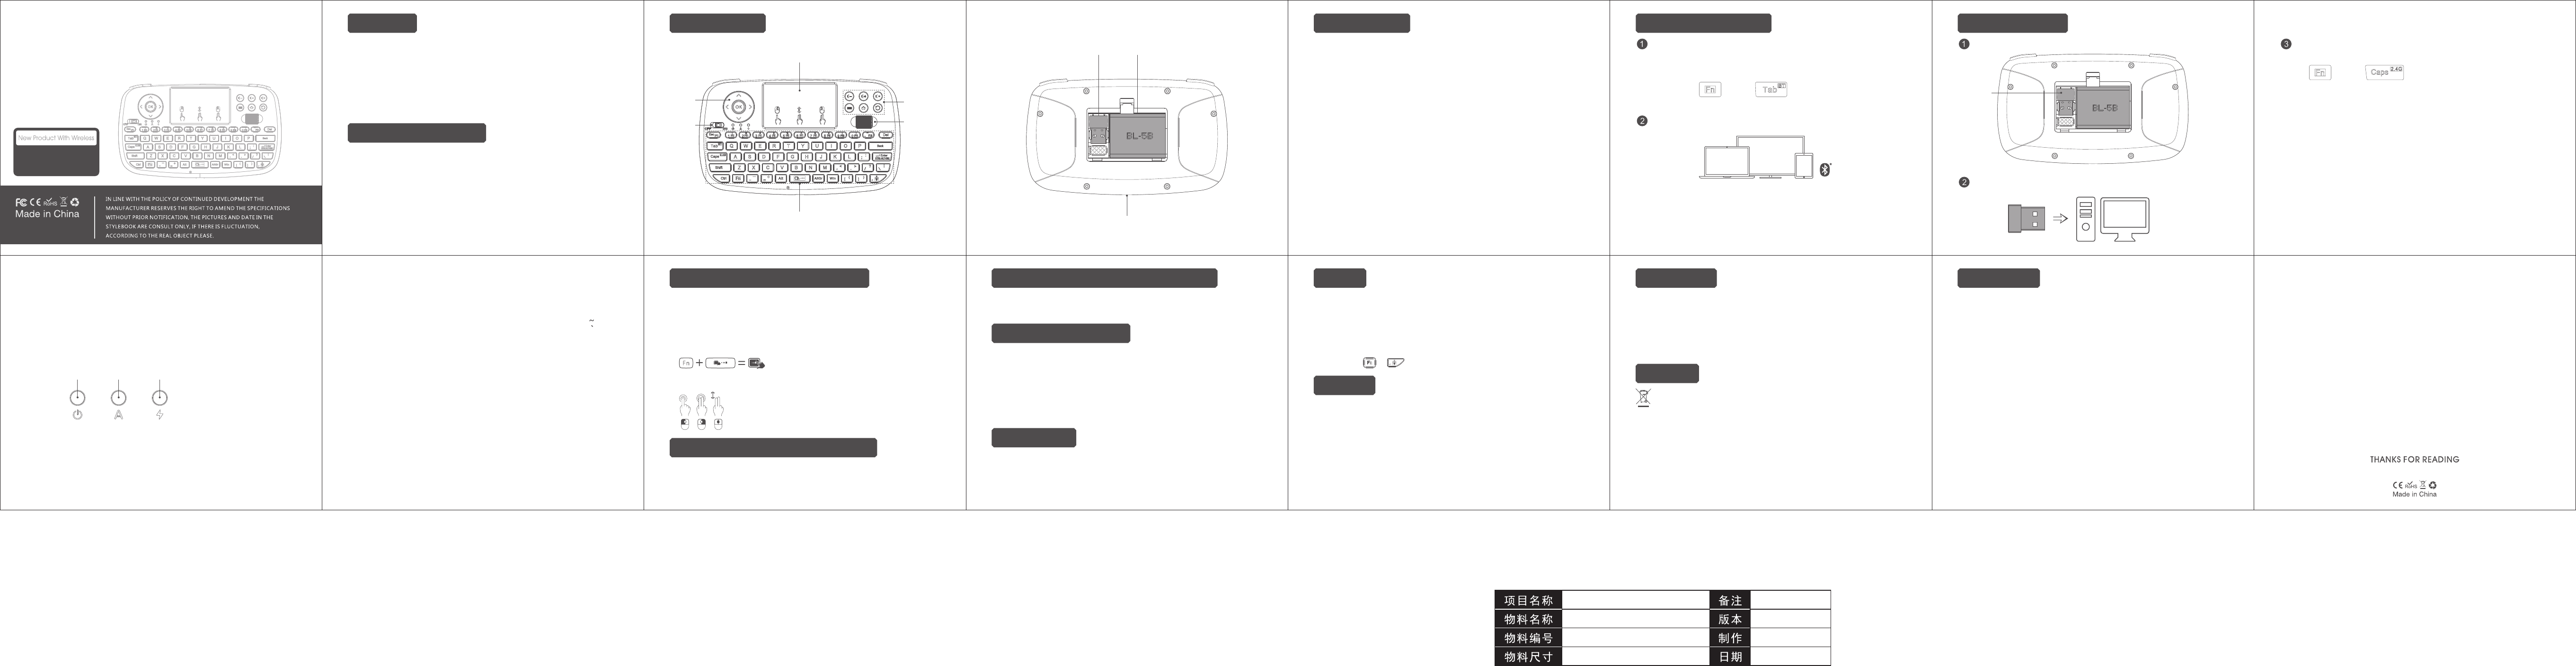
Press the FN+Caps key and switch to 2.4g mode.
The green indicator light is on to indicate successful connection.
Note:
1.
If the Green LED does not stay on and it keeps flashing, it means the keyboard
was not be paired with your device. As for how to pair,please try following
steps:
Step 1: Press FN+Ctrl button ,and the Green LED will flash fast.
Step 2:
Plug in the USB dongle. the flashing Green LED will become solid on
once paired with success within 60 seconds. if it fails for the first time,
you can repeat Step1-2 again. Please make sure the keyboard is
fully charged before pairing.
6.
Special keys used in special layout such as @ in UK layout This keyboard
has different layout. Please know exactly which layout you want. For
example, if you want and buy UK layout. And you want to use @.
You need to first change your device’s system language to British English.
Then it can work by shift+@.
7. Auto Sleep Mode
This keyboard has auto sleep / wake up function. when there is no any
operation in 3 minutes, it will into sleep automatically. Press any button to
wake it up. Make sure it is on enough power.
5.Shortcut Keys:
FN + ESC = F1
FN + 3 = F4
FN + 6 = F7
FN + 9 = F10
FN + ENTER = CTRL + ALT + DEL FN + Space = Overdrive the mouse
FN + Tab = BT FN + Caps = 2.4G
FN + 1 = F2
FN + 4 = F5
FN + 7 = F8
FN + 0 = F11
FN + 2 = F3
FN + 5 = F6
FN + 8 = F9
FN + = F12
This new design can help you scroll through long documents or web pages
faster and easier, same as using your mouse.
4.
About signal interference: when working with android TV box or smart
TV, big monitor device may have some signal interference. Signal
interference may result in short distance and buttons do not work as well.
In this case you can try to move the receiver from back of your device to
the front USB port then re-pair and use this keyboard.
3. LED indicator
Blue/Green- LED
Blue light is bluetooth mode while green light is 2.4g mode.
When the keyboard is not connected to the device, the indicator light flashes
slowly.
When the battery power is low, the Blue/Freen LED will flash.
White LED - Caps LED indicator .
Red LED -
charging status. It is on when charging. After fully charged, it’ll be off.
RedWhiteBlue/Green
Overview
System Requirements
Descriptions
Multi-finger Functions Touchpad
Auto Sleep and Wake-up feature Scroll wheel
Charging the battery
Switching off the keyboard after use
Warning
Backlit
Specifications 2.4G-Installation
Maintenance
Disposal
FCC Notice
Charging port
Receiver Battery
Receiver
Press the FN+Tab and switch to Bluetooth mode.
A blue LED will stay on, that means the keyboard has paired with your
device.
Open bluetooth on the device, search "i4" keyboard and click connect.
Tip:
To pair a bluetooth device, press FN+Ctrl and the blue light flashes, and do
step 2 again
Bluetooth-Installation
MULTI TOUCH
&
SCROLL WHEEL
+
This device complies with Part 15 of the FCC Rules. Operation is subject to the
following two conditions:
(1) This device may not cause harmful interference, and (2) this device must
accept any interference received, including interference that may cause
undesired operation.
NOTE 1: This equipment has been tested and found to comply with the limits
for a Class B digital device, pursuant to part 15 of the FCC Rules. These limits
are designed to provide reasonable protection against harmful interference
in a residential installation. This equipment generates, uses and can radiate
radio frequency energy and, if not installed and used in accordance with the
instructions, may cause harmful interference to radio communications. However,
there is no guarantee that interference will not occur in a particular installation.
If this equipment does cause harmful interference to radio or television reception,
which can be determined by turning the equipment off and on, the user is
encouraged to try to correct the interference by one or more of the following
measures:
- Reorient or relocate the receiving antenna.
- Increase the separation between the equipment and receiver.
-
Connect the equipment into an outlet on a circuit different from that to which
the receiver is connected.
- Consult the dealer or an experienced radio/TV technician for help.
NOTE 2: Any changes or modifications to this unit not expressly approved by
the party responsible for compliance could void the user's authority to operate
the equipment.
FCC ID: 2AJU3RT726