Remote Diagnostic Technologies 0002 Tempus 2000 Patient Monitor User Manual CUD 34 Revision 00 Tempus 2000
Remote Diagnostic Technologies Ltd. Tempus 2000 Patient Monitor CUD 34 Revision 00 Tempus 2000
Contents
- 1. Users Manual Part 1
- 2. Users Manual Part 2
Users Manual Part 1
Tempus 2000™
User/Operator Manual
Part number CUD-34
Copyright 2003, Remote Diagnostic Technologies Ltd.
Basingstoke, Hampshire, UK

Tempus 2000 User/Operator Manual
Page I CUD-34 Revision 00
Contents
1 INTRODUCTION ..............................................................................................................................1
1.1 Manufacturer's Address...........................................................................................................1
1.2 CE Statement............................................................................................................................1
1.3 FDA Prescription Statement....................................................................................................1
1.4 FCC/ACTA Compliance Statement........................................................................................1
1.5 Proprietary Notice.....................................................................................................................1
1.6 Patent Claims ............................................................................................................................2
1.7 Limited Warranty.......................................................................................................................2
1.7.1 Service Support and Preventative Maintenance Check................................................................. 3
2 WARNINGS AND CAUTIONS.......................................................................................................4
2.1 EMC Statement.........................................................................................................................4
2.2 Indications for Use....................................................................................................................4
2.3 Contraindications ......................................................................................................................4
2.4 Warnings, Cautions and Notes...............................................................................................5
2.4.1 Warnings ................................................................................................................................... 5
2.4.2 Cautions .................................................................................................................................... 6
2.4.3 Notes ........................................................................................................................................ 7
2.5 What to do in the Event of Device Failure ............................................................................9
3 FEATURES AND INTENDED USE.............................................................................................11
3.1 Likely Conditions of Use ........................................................................................................11
3.2 Product Description and List of Features............................................................................11
3.3 Theory of operation................................................................................................................11
4 SETTING UP AND INSTALLATION...........................................................................................13
4.1 Setting up .................................................................................................................................13
4.1.1 Connecting the Battery..............................................................................................................13
4.1.2 Charging the Battery..................................................................................................................13
4.1.3 Ensure that the Device is Packed Properly with Sufficient Consumable Items ...............................13
5 USING THE TEMPUS 2000..........................................................................................................14
5.1 Controlling the Tempus 2000................................................................................................14
5.2 Using the Tempus 2000.........................................................................................................15
5.2.1 Help in Using the Tempus 2000 .................................................................................................16
5.2.2 Advanced Help Screen ..............................................................................................................18
5.3 Explanation of the Tempus 2000 Screen............................................................................19
5.3.1 Connection Status Indicators and GMT.......................................................................................19
5.3.2 Instrument Readings .................................................................................................................20
5.3.3 Instrument Status Indicators.......................................................................................................20
5.4 Use on Several Patients ........................................................................................................20
5.5 Switching On............................................................................................................................21
5.5.1 Understanding the Battery Life Indicator .....................................................................................21

User/Operator Manual Tempus 2000
CUD-34 Revision 00 Page II
5.6 Opening the Lid.......................................................................................................................22
5.6.1 Removing the Display for Remote Use.......................................................................................22
5.7 Immediately after Switching On ...........................................................................................22
5.8 Establishing Communication with the Response Centre.....................................................22
5.8.1 Process for Connecting the Tempus...........................................................................................22
5.8.2 Making the Phone Connection ...................................................................................................23
5.8.3 Fitting the Wrist Keypad and Voicelink........................................................................................23
5.9 Blood Pressure and Pulse Oximeter ...................................................................................24
5.9.1 Understanding the Pulse Oximeter Results.................................................................................26
5.9.2 Understanding the Blood Pressure Results.................................................................................26
5.9.3 Blood Pressure Monitor Error helpscreens..................................................................................27
5.10 Electrocardiograph (ECG).....................................................................................................28
5.11 Capnometer.............................................................................................................................30
5.11.1 Understanding the Capnometer Results .................................................................................31
5.12 Temperature............................................................................................................................31
5.12.1 Understanding the Temperature Probe Results.......................................................................32
5.13 Video Camera.........................................................................................................................32
5.14 Actions After Use – Turning the Tempus 2000 Off...........................................................32
6 AFTER USING THE TEMPUS 2000...........................................................................................34
6.1 Cleaning and Re-packing Help Screen...............................................................................34
6.2 Cleaning the Tempus 2000...................................................................................................35
6.3 Re-packing for Re-use...........................................................................................................35
6.3.1 Blood Pressure Cuff..................................................................................................................36
6.3.2 ECG Apron...............................................................................................................................36
6.3.3 Capnometer Cannula................................................................................................................36
6.3.4 Temperature Probe...................................................................................................................36
6.3.5 Phone Cables ...........................................................................................................................36
6.3.6 Wrist Keypad ............................................................................................................................36
6.3.7 Pulse Oximeter .........................................................................................................................37
6.4 Single-use Devices.................................................................................................................37
7 MAINTENANCE, SERVICING AND TROUBLESHOOTING .................................................38
7.1 General.....................................................................................................................................38
7.2 Battery Removal and Replacement.....................................................................................38
7.2.1 Removing the Battery................................................................................................................38
7.2.2 Charging Batteries ....................................................................................................................38
7.2.3 Disposal of Batteries .................................................................................................................39
7.3 Replacing the Fuse ................................................................................................................39
7.3.1 Removing the Fuse...................................................................................................................40
7.3.2 Fuse Replacement Type............................................................................................................40
7.3.3 Replacing the Fuse...................................................................................................................41
7.4 Periodic Preventive Maintenance ........................................................................................41
7.4.1 Cleaning by Manufacturer..........................................................................................................41
8 SPARES LIST.................................................................................................................................42
8.1 Spares List...............................................................................................................................42
9 SYSTEM CONFIGURATION........................................................................................................43
9.1 General.....................................................................................................................................43
9.2 ECG Configuration .................................................................................................................44
9.3 Connection Configuration......................................................................................................44

Tempus 2000 User/Operator Manual
Page III CUD-34 Revision 00
10 SPECIFICATIONS AND STANDARDS......................................................................................45
10.1 Specifications ..........................................................................................................................45
10.1.1 Thermometer ........................................................................................................................45
10.1.2 Electrocardiograph ................................................................................................................45
10.1.3 Non-invasive Blood Pressure .................................................................................................46
10.1.4 ETC02 sensor........................................................................................................................46
10.1.5 Sp02 sensor ..........................................................................................................................46
10.1.6 Environmental Specifications .................................................................................................47
10.1.7 Miscellaneous Features and Specifications .............................................................................47
10.1.8 Communications ...................................................................................................................48
10.1.9 Classification ........................................................................................................................49
10.2 Standards Compliance...........................................................................................................49
10.2.1 Other Standards Being Used for Reference Purposes .............................................................50
11 SYMBOLS USED ON THE TEMPUS 2000...............................................................................51
12 TERMS AND CONDITIONS OF SALE.......................................................................................54
13 SOFTWARE LICENSE AGREEMENTS....................................................................................55
14 FCC SUPPLIER’S DECLARATION OF CONFORMITY.........................................................56
THIS PAGE LEFT INTENTIONALLY BLANK...................ERROR! BOOKMARK NOT DEFINED.

Tempus 2000 User/Operator Manual
Page 1 CUD-34 Revision 00
1 Introduction
1.1 Manufacturer's Address
The Tempus 2000 is designed and manufactured by:
Remote Diagnostic Technologies Limited
The Old Coach House
The Avenue
Farleigh Wallop
Basingstoke
Hampshire
RG25 2HT
UK
Tel +44 (0) 1256 362 400
Fax +44 (0) 1256 362 415
Email sales@rdtltd.com
www.rdtltd.com
1.2 CE Statement
Marking by the symbol indicates compliance of this device to the Medical
Devices Directive 93/42/EEC and the Radio and Telecom Terminal Equipment
Directive 1995/5/EC.
A Declaration of Conformity in accordance with the above regulations has been
made and is on file at Remote Diagnostic Technologies Ltd at the address in
section 1.1.
1.3 FDA Prescription Statement
Federal law (USA) restricts the use or sale of this device by, or on the order of, a
physician.
1.4 FCC/ACTA Compliance Statement
The Tempus 2000 complies with the requirements of US 47 CFR Part 68. A
Supplier’s Declaration of Conformity is provided later in this document.
1.5 Proprietary Notice
Information contained in this document is copyright © 2003 by Remote Diagnostic
Technologies Limited ('RDT') and may not be reproduced in full or in part by any
means or in any form by any person without prior written permission from RDT.

User/Operator Manual Tempus 2000
CUD-34 Revision 00 Page 2
The purpose of this document is to provide the user with adequately detailed
information to efficiently install, operate, maintain and order spare parts for the
Tempus 2000. Every effort has been made to keep the information contained in
this document current and accurate as of the date of publication or revision.
However, no guarantee is given or implied that the document is error free or that it
is accurate with regard to any specification. Tempus 2000TM is a registered
trademark of RDT Ltd.
1.6 Patent Claims
RDT has applied for patents covering the Tempus 2000 and its communications
technology in the following jurisdictions:
Australia (Application No. 63050/98);
Canada (Application No. 2,281,909);
Europe (Application No. 98907073.5, Publication No. 0 969 792 and
Application No. 00303932.8);
Hong Kong (Application No. 00103571.1);
Israel (Application No. 131432);
Japan (Application No. 539332/98);
Singapore (Application No. 9904269.9);
UK (Application No. 9704843.3 and Application No. 9910938.1);
USA (Application No. 09/380,724);
UK (Application No. 01271279).
1.7 Limited Warranty
Remote Diagnostic Technologies Limited ('RDT') warrants each new Tempus 2000
to be free from defects in workmanship and materials under normal conditions of
use and service for a period of one (1) year from the date of shipment.
Consumable items are expressly excluded from this Warranty. RDT's sole
obligation under this warranty will be to repair or (at RDT's option) replace products
that prove to be defective during the warranty period. The foregoing shall be the
sole warranty remedy. Except as set forth herein, RDT makes no warranties,
either expressed or implied, including the implied warranties of merchantability and
fitness for a particular purpose. The warranty shall be void if the Tempus 2000 is
in any way modified or if it is used with non-approved consumables, unless
specifically authorised in writing by RDT, and RDT shall not be liable in any event
for incidental or consequential damage. This warranty is not assignable.
Full terms and conditions of sale are contained later in this document.

Tempus 2000 User/Operator Manual
Page 3 CUD-34 Revision 00
1.7.1 Service Support and Preventative Maintenance Check
Repairs to the Tempus 2000 under warranty must be made by the manufacturer.
If the Tempus 2000 requires repair, contact your local distributor or Remote
Diagnostic Technologies at the address in section 1.1. When calling, please be
ready to quote the serial number of the Tempus 2000.
A preventative maintenance check is required every 10-14 months. This is
described later in this document. The device must be returned to the manufacturer
at this time. Failure to return the device for the preventive maintenance check will
void all guarantees on the device. In this instance the device must not be used.
Please note that all returns must be performed within the restrictions of RDT’s
Terms and Conditions of Sale as described later in this document.

User/Operator Manual Tempus 2000
CUD-34 Revision 00 Page 4
2 Warnings and Cautions
2.1 EMC Statement
The Tempus 2000 remote patient monitor has been tested and approved to
EN60601-1-2:2001. This means that the device meets or exceeds the
requirements for electrical medical equipment in terms of its levels of emitted
electromagnetic radiation and its susceptibility to electromagnetic radiation from
other devices.
In addition, the device has been tested according to the requirements of RTCA
DO160-D section 21 category M.
It should be noted that the Tempus 2000 may be affected by high levels of stray
EM radiation from other electronic devices that are being used in close proximity to
it. Details are given in this manual on those devices that are known to cause such
levels of interference. Where such details are given, attention to them should be
paid during the use of the Tempus 2000.
2.2 Indications for Use
The Tempus 2000 is a patient monitor intended to be used in remote locations
where medical staff may not be present.
The device is intended to be applied to the patient by a trained operator who is not
a medical expert. The device is not intended to allow the operator to make any
clinical decision for treatment or diagnosis. The device permits the operator to
take measurements from a patient, store this information for later transmission or
transmit medical information to a Response Centre at the time of recording, where
trained staff can make clinical assessments based on the information transmitted
and advise the operator on the nature of the medical incident. A trained physician
may use the Tempus 2000 as a standalone diagnostic device.
The Tempus 2000 is suitable for use on adults or children (over 10 years old and
over 20kg in weight).
2.3 Contraindications
The Tempus 2000 is not intended to be used on extremely small or extremely
large patients; this limit is set by the physical limits of the ECG harness.
The device is not intended to, and does not, sound alarms for physiological
parameters. The device does not replace physician’s care. The device is not
intended for neonatal use. The device is not an apnoea monitor. The device is not
intended to be a long term monitor, it is only intended to be used in short, discrete
incidents where the immediate health of the patient is in question.
The device is not intended to be used in strong magnetic or electro-magnetic fields
which are generated for medical purposes e.g. MRI.
The ECG is not suitable to be used on patients with prosthetic limbs.

Tempus 2000 User/Operator Manual
Page 5 CUD-34 Revision 00
2.4 Warnings, Cautions and Notes
2.4.1 Warnings
The following warnings relate to things that could cause serious hurt to the patient
or the operator.
WARNING: Federal law (USA) restricts the use or sale of this device by, or on
the order of, a physician.
WARNING: Do not use this device in the presence of flammable anaesthetics or
fuels.
WARNING: Do not autoclave, ethylene oxide sterilise, or immerse in liquid.
WARNING: ELECTRICAL SHOCK HAZARD when covers are removed. Do not
remove covers. Refer servicing to qualified personnel.
WARNING: Use only SpO2 sensors supplied with the Tempus 2000, or
specifically intended for use with the Tempus 2000.
WARNING: Do not use this device in the presence of magnetic resonance
imaging (MR or MRI) or HF transmitting equipment.
WARNING: Do not use the Tempus 2000 in the presence of computed
tomography (CT) equipment.
WARNING: This device must be used in conjunction with clinical signs and
symptoms. This device is only intended to be an adjunct in patient
assessment.
WARNING: Prolonged use or the patient's condition may harm skin integrity and
circulatory status. Change the sensor site every four hours.
WARNING: Any Tempus 2000 unit or accessory that has been dropped or
damaged should be inspected by qualified service personnel prior to
use to ensure proper operation.
WARNING: The Tempus 2000 is not for use on neonates.
WARNING: The Tempus 2000 should not be used on patients undergoing
defibrillation. The Tempus 2000 is protected against defibrillator
discharge but rate meters and displays may be temporarily affected
during defibrillator discharge but will rapidly recover.
WARNING: The Tempus 2000 is not intended for long term patient monitoring.
There are no audible or visible alarms.
WARNING: Reposition the oximeter probe at least once every 4 hours to allow
the patient's skin to respire.
WARNING: The thermometer provides fast, accurate temperature
measurements on any patient into which the temperature probe can
be inserted into the ear canal to view the tympanic membrane. It
can be considered for use on any patient above three (3) years of
age. Do not use the temperature probe if the probe cannot be
inserted into the ear canal.
WARNING: There is no defibrillator synchronisation output on the Tempus 2000.
Make no connections between the Tempus 2000 and a defibrillator.

User/Operator Manual Tempus 2000
CUD-34 Revision 00 Page 6
WARNING: The Tempus 2000 will not operate effectively on patients who are
experiencing convulsions or tremors.
WARNING: The Tempus 2000 is not for apnoea detection. The Tempus 2000
has not been tested or validated for use in apnoea detection.
WARNING: Misuse or improper handling of the Tempus 2000 or its sensors or
cables can cause damage which may lead to equipment failure or
inaccurate readings.
WARNING: The Tempus 2000 and its batteries are not to be used in the
presence of fuel or other flammable gasses or vapours.
WARNING: Do not attempt to charge a non-rechargeable battery. Never
charge, crush, heat or incinerate, short-circuit, deform, puncture,
dismantle or immerse the batteries in any liquid. Remove batteries
when discharged.
WARNING: Only use recharge batteries using battery chargers specified by
RDT.
WARNING
It is essential to switch off the Tempus 2000 in between
different patients to avoid confusion between different
patient records.
2.4.2 Cautions
The following cautions relate to things that could damage the Tempus 2000 or
cause inaccurate readings or that could potentially cause harm to patients or
operators.
CAUTION: The Tempus 2000 is intended for use by persons trained in its
operation. The operator must be thoroughly familiar with the
information in this manual before using the Tempus 2000.
CAUTION: In the event that the Tempus 2000 displays an error that is not
described within this manual e.g. Windows applications errors, turn
the Tempus 2000 off and then on again. This should clear the error
and allow normal operation to resume. Do not continue to use the
device if such an error is displayed. If symptoms persist, please
contact RDT.
CAUTION: The Tempus 2000 must be switched off between taking readings
from different patients.
CAUTION: Should the Tempus 2000 become wet, wipe off all moisture and
allow sufficient time for drying before operating. Take care to
ensure that water or liquids are not spilt over the Tempus 2000 or
into its ventilation holes in the side corners.
CAUTION: If the accuracy of any measurement is in question, verify the
patient's vital sign(s) by an alternative method and then check the
monitor for proper functioning.

Tempus 2000 User/Operator Manual
Page 7 CUD-34 Revision 00
CAUTION: Follow local government regulations and recycling instructions
regarding disposal and recycling of device components.
CAUTION: The Tempus 2000 contains a 4 hour lithium-ion battery. If the
battery fails to hold a charge or otherwise becomes inoperable, the
battery should be replaced and the old battery should be disposed
of properly. Remote Diagnostic Technologies Ltd cannot dispose of
used batteries. Dispose of batteries in accordance with applicable
regulations which vary from country to country.
(In most countries, the trashing of used batteries is forbidden and
the end-users are invited to dispose them properly, eventually
through not-for-profit profit organisations, mandated by local
governments or organised on a voluntary basis by professionals).
CAUTION: Pressing front panel or wrist keypad keys with sharp or pointed
instruments may permanently damage the keypad. Only fingers
should be used to press these keys.
CAUTION: Do not disassemble the Tempus 2000. There are no user-
serviceable parts inside. Refer servicing to the manufacturer.
CAUTION: Use of monitoring during continuous nebulised medication delivery
will result in damage to the Tempus 2000 which is not covered by
the warranty. Disconnect the capnometer sample line from the
Tempus 2000, or switch off the Tempus 2000, during medication
delivery.
CAUTION: Observe proper battery polarity (direction) when replacing batteries.
The batteries slide easily into place when correctly oriented and
should not be forced.
CAUTION: Use of the Tempus 2000 in Cell Phone Mode will be prohibited in a
number of areas. These include: on aircraft in-flight (including
during take-off and landing), near defibrillators (that are in use),
near other electronic medical devices and in hospitals. In addition,
the use of the Tempus in Cell Phone Mode will be prohibited in
explosive atmospheres e.g. in fuelling areas, near fuel or chemical
transfer or storage areas and in areas containing chemicals or
particles such as grain, dust or metal powders.
In addition, the use of the Tempus 2000 in Cell Phone Mode may
cause interference with some implanted pacemakers and other
medically implanted equipment. Avoid placing the Tempus over a
pacemaker. If you suspect interference is being caused, disconnect
the connection to the Tempus Monitoring Station by pressing
twice.
A minimum distance of 20cm (8”) must be maintained between the
Tempus and the body of the User or Patient.
Do not transport or store the Tempus with flammable gas, liquids or
explosives.
2.4.3 Notes
The following notes provide important information on the use of the Tempus 2000.

User/Operator Manual Tempus 2000
CUD-34 Revision 00 Page 8
Note: Dyes introduced into the bloodstream, including methylene blue,
indocyanine green, indigo carmine and fluorescein may cause an
inability to determine accurate SpO2 readings.
Note: Any condition that restricts blood flow, such as use of a blood
pressure cuff (other than the Tempus 2000 cuff used in accordance
with the instructions herein) may cause an inability to determine
accurate pulse and SpO2 readings.
Note: Operation of the Tempus 2000 may be adversely affected in the
presence of conducted electrical transients or strong
electromagnetic or radio frequency sources such as electrosurgery
and electrocautery equipment, HF radio transmission antenna, x-ray
machines and high intensity infrared radiation.
Note: Significant levels of dysfunctional haemoglobins, such as
carboxyhaemoglobin or methemoglobin will affect the accuracy of
the SpO2 measurement.
Note: SpO2 measurements may be adversely affected in the presence of
high ambient light levels. If necessary, shield the sensor area (e.g.
with a towel).
Note: Remove fingernail polish or false fingernails using the wipe provided
before applying SpO2 sensors. Fingernail polish or false fingernails
may cause inaccurate SpO2 readings.
Note: All user and patient accessible materials are non-toxic.
Note: Hazards arising from software errors have been minimised. Hazard
analysis was performed to meet the requirements of EN14971 and
IEC60601-1-4.
Note: Each external connection and part of the Tempus 2000 is
electrically isolated.
Note: Performance and safety test data are available on request from the
address in section 1.1.
Note: Allow the temperature probe and the patient to acclimate to the
same ambient temperature before taking temperature readings.
Note: Dirt, greasy films or moisture on the temperature probe lens may
affect the accuracy of the instrument.
• Note: Do not open the temperature probe case. The
temperature probe will require factory recalibration if the case is
opened.
Note: This equipment complies with Part 68 of the US FCC Rules and the
requirements adopted by ACTA . On the base of this equipment is a
label that contains, among other information, a product identifier in
the format US:AAAEQ###TXXXX. If requested, this number must
be provided to the telephone company.

Tempus 2000 User/Operator Manual
Page 9 CUD-34 Revision 00
Note: A plug and jack used to connect this equipment to the premises
wiring and telephone network must comply with the applicable FCC
Part 68 rules and requirements adopted by ACTA. A compliant
telephone cord and modular plug is provided with this product. It is
designed to be connected to a compatible modular jack that is also
compliant.
Note: The REN is used to determine the number of devices that may be
connected to a telephone line. Excessive RENs on a telephone line
may result in the devices not ringing in response to an incoming
call. In most but not all areas, the sum of RENs should not exceed
five (5.0). To be certain of the number of devices that may be
connected to a line, as determined by the total RENs, contact the
local telephone company. For products approved after July 23,
2001, the REN for this product is part of the product identifier that
has the format US:AAAEQ##TXXXX. The digits represented by ##
are the REN without a decimal point (e.g., 03 is a REN of 0.3). For
earlier products, the REN is separately shown on the label.
Note: If the Tempus 2000 causes harm to the telephone network, the
telephone company will notify you in advance that temporary
discontinuance of service may be required. But if advance notice
isn't practical, the telephone company will notify the customer as
soon as possible. Also, you will be advised of your right to file a
complaint with the FCC if you believe it is necessary.
Note: The telephone company may make changes in its facilities,
equipment, operations or procedures that could affect the operation
of the equipment. If his happens the telephone company will
provide advance notice in order for you to make necessary
modifications to maintain uninterrupted service.
Note: If the equipment is causing harm to the telephone network, the
telephone company may request that you disconnect the equipment
until the problem is resolved.
Note: Connection to party line service is subject to state tariffs. Contact
the state public utility commission, public service commission or
corporation commission for information.
Note: If your home or area of installation has specially wired alarm
equipment connected to the telephone line, ensure the installation
of the Tempus 2000 does not disable your alarm equipment. If you
have questions about what will disable alarm equipment, consult the
supplier.
Note: This equipment is not hearing aid compatible.
2.5 What to do in the Event of Device Failure
You should respond to error messages shown on screen as the message instructs
you.

User/Operator Manual Tempus 2000
CUD-34 Revision 00 Page 10
In the event that the Tempus 2000 fails to operate correctly or in a way that is not
described in this manual, stop using the device immediately and switch the
Tempus 2000 off immediately. Contact the manufacturer or distributor at once. Do
not attempt any kind of corrective action and do not connect the device to a
patient.

Tempus 2000 User/Operator Manual
Page 11 CUD-34 Revision 00
3 Features and Intended Use
3.1 Likely Conditions of Use
The Tempus 2000 is intended to aid with the diagnosis of a person presenting as
unwell or sick when they are in a location remote from immediate medical
assistance. Typical examples are remote land, sea or air locations.
The Tempus 2000 is intended to be used by medically unqualified people who
have received basic training in the use of the device. Medical expertise is provided
through communication with the Response Centre, which is staffed by physicians
24 hours a day, 7 days a week.
3.2 Product Description and List of Features
The Tempus 2000 is fully automated and includes a 12 lead ECG, which can
easily be operated by a non-expert. The device also has automated blood
pressure, pulse oximetry, temperature, respiration rate and breath gas analysis.
There is a removable colour display screen, a hands-free integrated voice link with
automatic dialling, and the facility to send and receive still video images. A wrist-
mounted keypad provides easy access to the Tempus 2000 functions. The wrist
keypad includes a full colour still-video camera
Colour help screens are provided to assist the user in every stage of use.
Everything that is displayed on the Tempus 2000 screen is simultaneously seen at
the Tempus Monitoring Station in the Response Centre, enabling the medical
expert to fully interact with the operator. The medical expert can, in fact, fully
control the Tempus 2000 if required, giving added comfort to the operator and
patient at the remote location.
3.3 Theory of operation
The Tempus 2000 is a self-contained medical data capture system which connects
to a dedicated Response Centre. Connection is achieved using different
communications technologies, refer to the specific User Supplement attached with
this manual for details of connecting the Tempus.
A physician may use the Tempus 2000 as a stand-alone diagnostic device (without
it being connected to the Response Centre).
The Tempus 2000 provides the following information about the patient from its
sensors:
• Temperature
• Pulse rate
• Oxygen saturation (SpO2)
• Blood pressure
• 12 lead Electrocardiograph (ECG)
• End tidal CO2 (ETCO2)

User/Operator Manual Tempus 2000
CUD-34 Revision 00 Page 12
• Respiration rate
These readings are transmitted via a telecommunications link to the Tempus
Monitoring Station.
Additionally, the Tempus 2000 includes a colour video camera which is capable of
sending colour still images to the Tempus Monitoring Station.

Tempus 2000 User/Operator Manual
Page 13 CUD-34 Revision 00
4 Setting Up and Installation
4.1 Setting up
4.1.1 Connecting the Battery
It is necessary to install the supplied battery into the Tempus 2000 before it will
operate.
4.1.2 Charging the Battery
It is necessary to ensure that the battery is fully charged before the Tempus 2000
is put into service.
Refer to the Tempus 2000 Battery Charger manual (part number 41-0003) for a
detailed description of how to charge the battery.
WARNING
BATTERY CHARGING MUST ONLY BE CARRIED OUT USING THE BATTERY
CHARGER SUPPLIED FOR THAT PURPOSE BY RDT.
4.1.3 Ensure that the Device is Packed Properly with Sufficient
Consumable Items
The Tempus 2000 is provided with, and should be stored with, the following
consumable items:
• 4 cleaning wipes
• 4 nail varnish removal wipes
• Three blood pressure cuffs: child, adult and large adult
• Two cannula and filter packs, one on the top of the foam block and the other
stored beneath the wrist keypad
• Three earpiece covers, stored beneath the wrist keypad plus one cover
attached to the earpiece
• One full spray of ECG contact spray
• One full box of thermometer covers

User/Operator Manual Tempus 2000
CUD-34 Revision 00 Page 14
5 Using the Tempus 2000
5.1 Controlling the Tempus 2000
The Tempus 2000 has three sets of controls that enable it to be operated. These
are:
• The front panel controls
• The screen controls
• The wrist keypad controls
All of the controls are “membrane” buttons, which are made of plastic and are
operated by pressing the centre of the button to activate the function. Undue force
is not required to activate the buttons, they only require to be pressed in until it can
be felt that the internal contact has been made.
The front panel controls consist of the on/off button and the battery power gauge.
Use of these controls is described later in this manual. These are the only buttons
where they must be pressed down and held down to activate their function. To
make the power switch tamper-proof it is designed so that it must be held down for
3 seconds to activate it.
The screen controls and the wrist keypad controls have the same function. They
consist of 8 buttons (each) and these buttons enable all the functions of the
Tempus 2000 to be operated. Two sets of controls are provided so that the
Tempus 2000 can be controlled and operated in small and restrictive areas. The
buttons on both the display and the wrist keypad do not need to be held down to
make them operate, they only need to be pressed briefly to make them perform
their function.
The buttons on the display and the wrist keypad have symbols on them that relate
to their function. It should be noted that these symbols relate to the primary
functions of the buttons e.g. activating the medical functions and connecting and
disconnecting the telephone links. However, the buttons can have other functions
allocated to them at certain points e.g. when changing system configurations the
control buttons allow the telephone number of the Response Centre to be
changed. The function of the buttons is always indicated on the screen at any
given point, even if it has been altered for a particular process. It should also be
noted that when that process is finished, the functions of the buttons revert to their
normal mode.
Tempus 2000 User/Operator Manual
Page 15 CUD-34 Revision 00
5.2 Using the Tempus 2000
The Tempus 2000 is controlled by using 8 buttons on the control pad (either on the
screen or the Wrist Keypad) and the button on the thermometer. The buttons are
labelled to indicate their general function. These are:
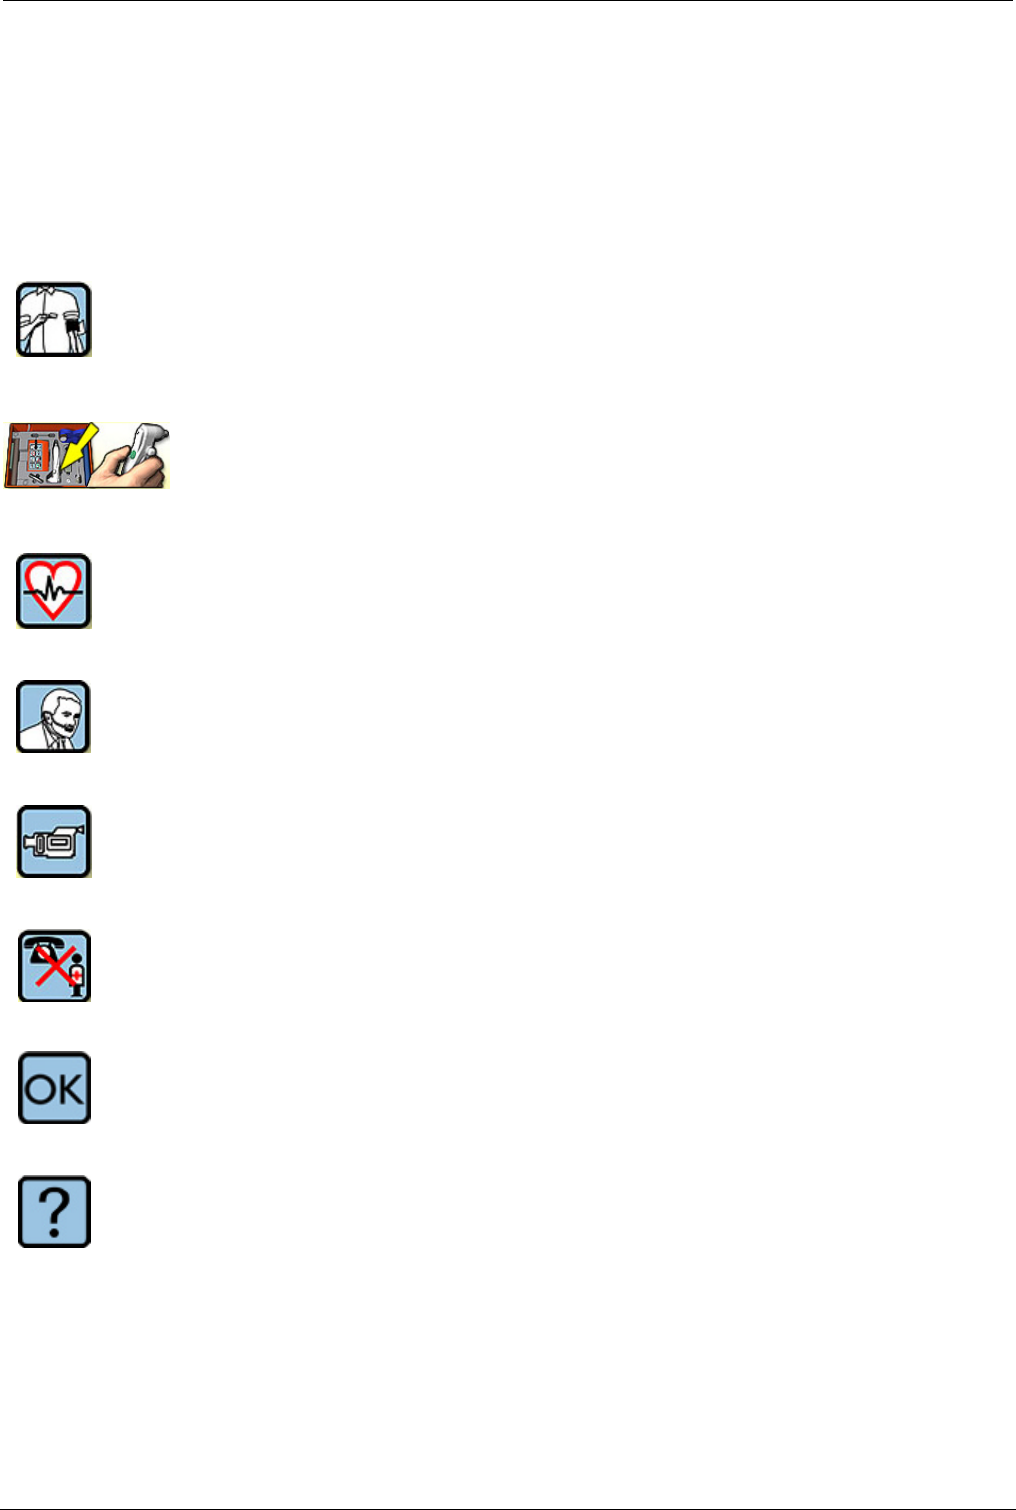
To bring up the helpscreen for this activity.
Press the green button on the temperature probe to bring up the helpscreen
for taking temperature readings.
To activate the ECG and to bring up the helpscreens for this activity.
To activate the capnometer and bring up the helpscreen for this activity.
To activate the video camera.
Press this button to disconnect the telecoms links to the Response centre.
Press this button to exit the screen that you are viewing and return to the main
(results) screen or to the next screen in the process
Press this button to get help at any time.
User/Operator Manual Tempus 2000
CUD-34 Revision 00 Page 16
5.2.1 Help in Using the Tempus 2000
The Tempus 2000 includes a comprehensive set of help screens which explain the
various procedures in words and pictures. You can get help on any individual
instrument by pressing the button with that instrument's icon. Alternatively, you
can get high level help at any time by pressing the key.
Some parts of the help system use more than one screen. These screens tell you
which key to press to get to the next screen.
You can press at any time to close the help screen and return to the main
screen.
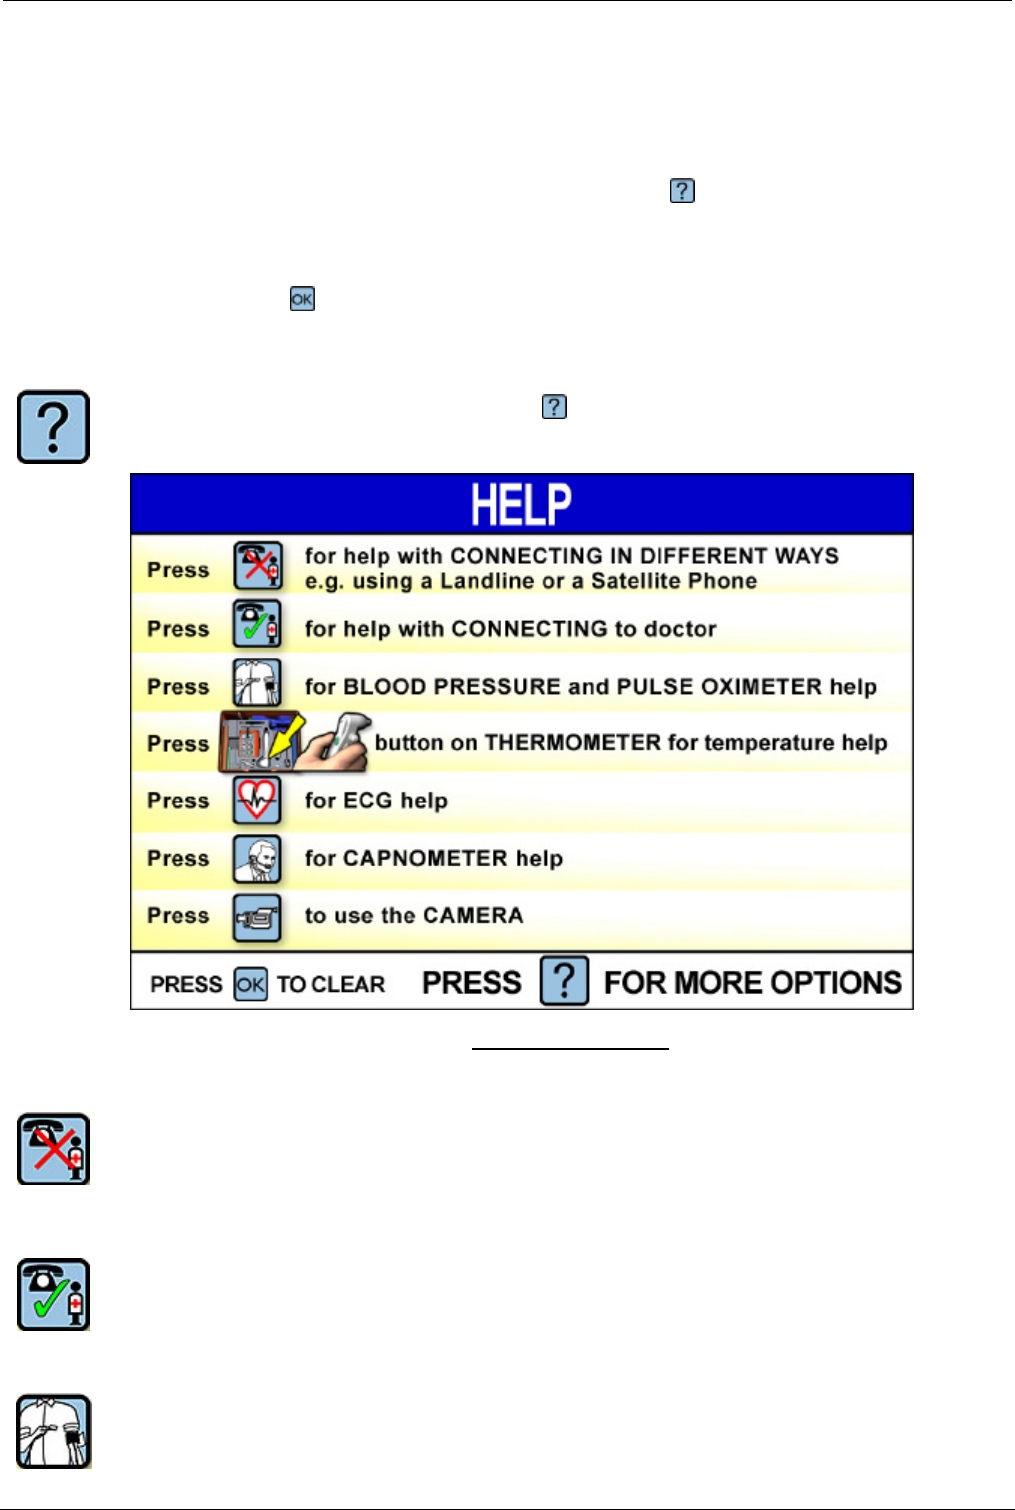
To activate the Help system, press the key. The Help index screen will appear.
Help Index Screen
Press one of the following buttons:
To get help on connecting the Tempus 2000 using different ways e.g. help on
connecting using a Landline as opposed to a Satellite connection.
To get help on connecting the Tempus 2000 to the phone lines so that you can
communicate with the doctor at the Response Centre.
To get help on using the blood pressure and oximeter sensors.
Tempus 2000 User/Operator Manual
Page 17 CUD-34 Revision 00
Press the green button on the temperature probe to get help on using the
temperature probe.
To get help on using the ECG electrode apron.
To get help on using the capnometer.
To get help on using the video camera and sending pictures to the Response
Centre.
Press this button to exit the Help system and return to the main screen.
Press this button to get to the Advanced Help screen.
User/Operator Manual Tempus 2000
CUD-34 Revision 00 Page 18
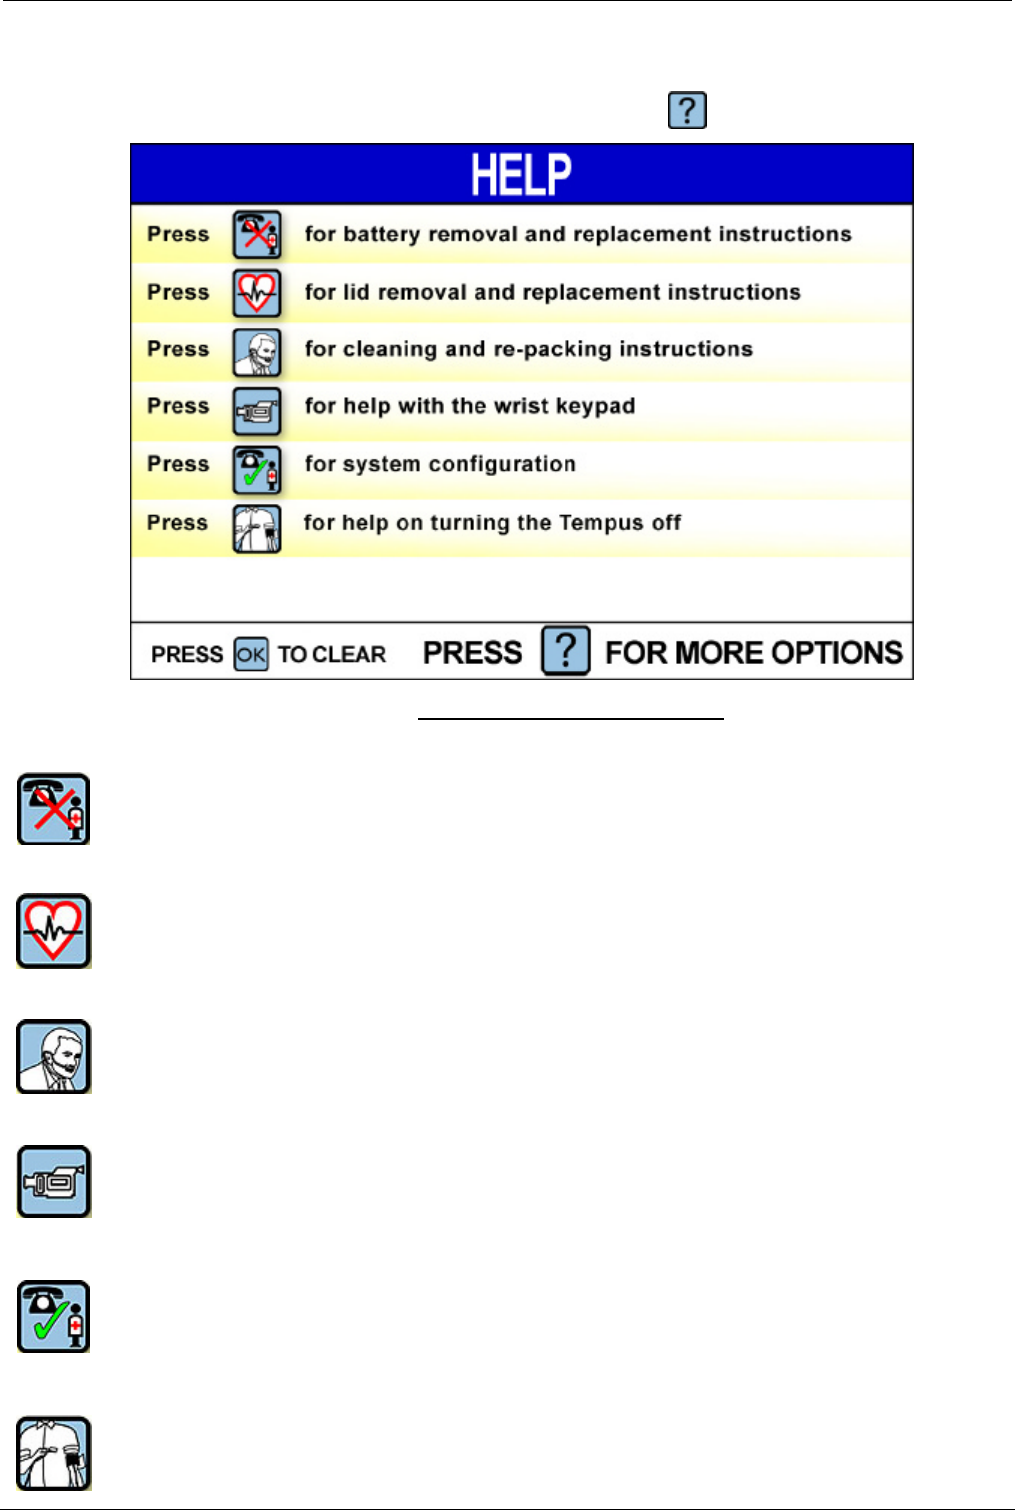
5.2.2 Advanced Help Screen
The Advanced Help Menu is available by pressing in the first Help Menu.
Advanced help Index Screen
Press one of the following buttons to get additional help:
To get help on removing and replacing the battery.
To get help on removing and replacing the Tempus 2000 lid.
To get help on cleaning and re-packing the Tempus 2000 after use.
To get help on using the wrist keypad.
To get help on setting the system configuration parameters (you are unlikely ever
to need to do this during an incident).
For help on turning the Tempus off.
Tempus 2000 User/Operator Manual
Page 19 CUD-34 Revision 00
Press this button to exit the Help system and return to the main screen.
Press this button to get more help options. Pressing this button again will bring up
the previous (first) help menu.
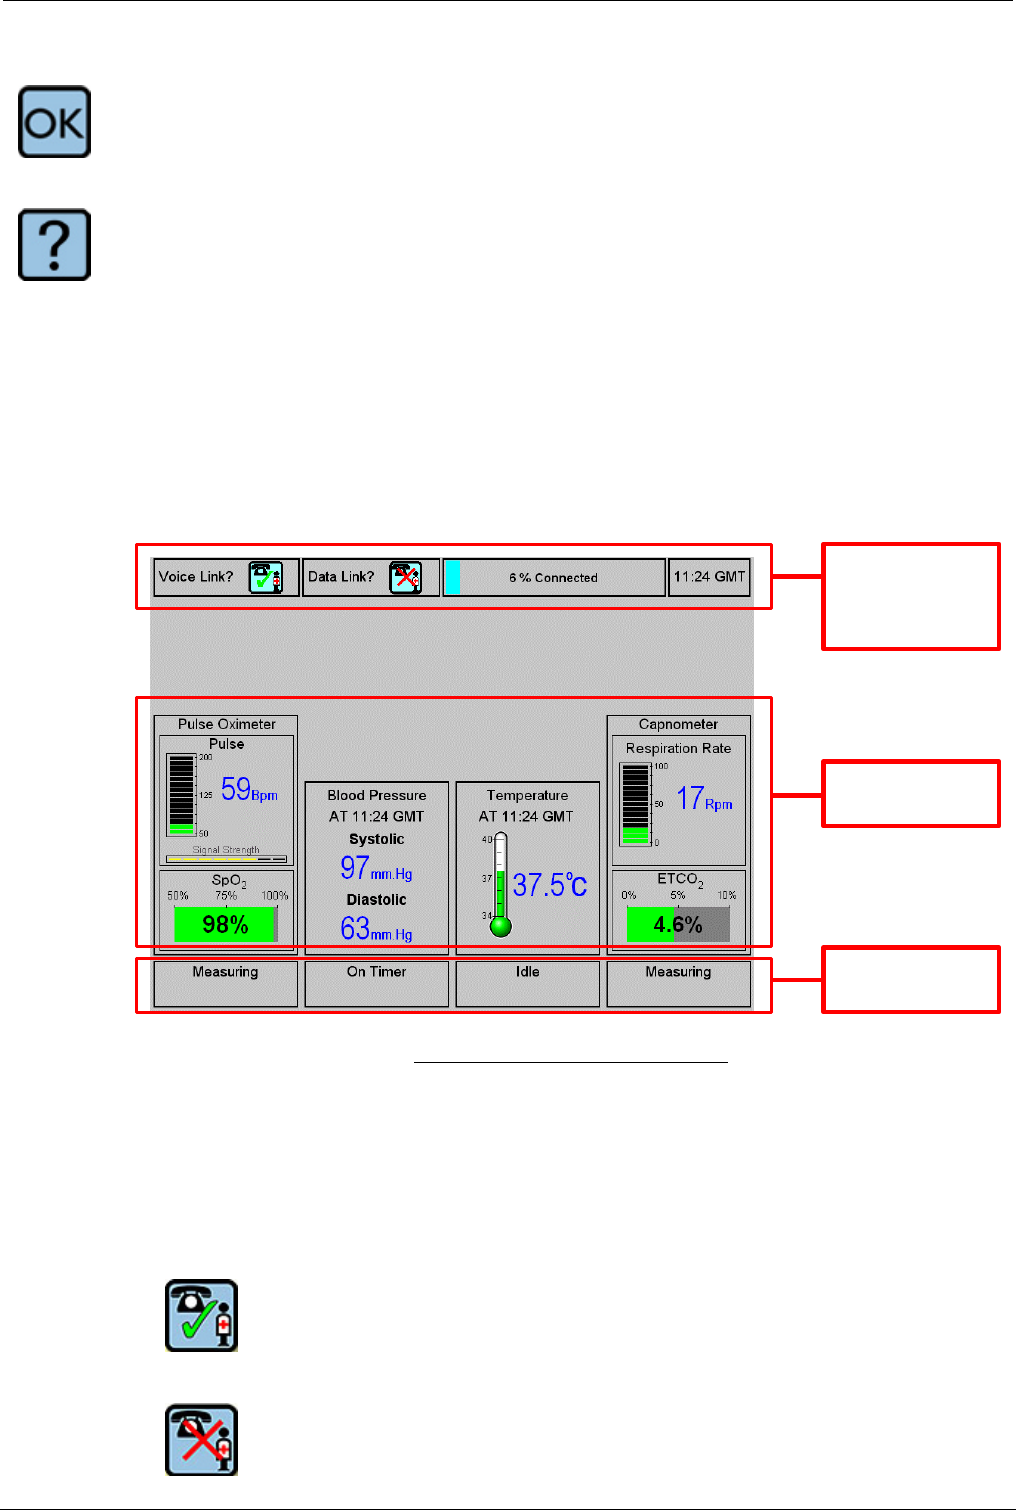
5.3 Explanation of the Tempus 2000 Screen
The Tempus 2000 screen normally divides into three sections:
• Connection status and time of day at the top
• Instrument readings in the middle
• Instrument status indicators at the bottom of the screen.
1. Connection
status and
GMT time
2. Instrument
readings
3. Instrument
status
Tempus 2000 Screen Display
5.3.1 Connection Status Indicators and GMT
The connection status indicators show whether the Tempus 2000 is connected to
the Response Centre. There are separate indicators for the voice link and the data
link.
The following symbols indicate the state of the links:
Call in progress ('connected')
No call in progress ('disconnected').

User/Operator Manual Tempus 2000
CUD-34 Revision 00 Page 20
Note that the words 'connected' and 'disconnected' refer to whether there is a call
in progress, NOT whether the Tempus 2000 phone wires are plugged in.
5.3.2 Instrument Readings
This section of the screen shows the results (if any) from the four different medical
devices (ECGs are displayed separately). Each of the four areas shows more than
one piece of information i.e. data taken, time taken and type of units are displayed.
Descriptions of the instrument readings are contained in the sections of this
manual which describe each instrument.
When help screens are displayed, they take up the space normally occupied by
the instrument readings and the status indicators.
5.3.3 Instrument Status Indicators
The Instrument Status indicators show what each instrument is doing. The status
can be one of the following:
Measuring The instrument is currently taking a reading
Idle The instrument is currently idle
On timer The instrument is making timed measurements (e.g. blood
pressure) and will make another measurement in due course.
Disabled The instrument is disabled, possibly due to a fault
Not present The instrument is not present (e.g. the connection to the
instrument has been physically damaged and the Tempus 2000
cannot detect it).
Additionally, further informative Status messages may appear during readings (e.g.
"press to stop reading" during a capnometer measurement).
When help screens are displayed, they take up the space normally occupied by
the instrument readings and the status indicators.
5.4 Use on Several Patients
The Tempus 2000 is intended for use on one patient per incident. It must not be
used on more than one patient because the Tempus 2000 has no way of
associating a measurement with a particular patient.
WARNING
It is essential to switch off the Tempus 2000 in between different patients to
avoid confusion between different patient records.
Tempus 2000 User/Operator Manual
Page 21 CUD-34 Revision 00
5.5 Switching On
Note
The Tempus 2000 takes up to one minute to become ready for operation after
switching on. It is recommended that you switch on the Tempus 2000 at the same
time as you remove it from its storage location rather than when you arrive at the
patient.
To switch on the Tempus 2000, press and hold the button on the front panel for
3 seconds. Release the button when the lamp at the top left corner of the button
starts flashing green. The Tempus 2000 is ready for use when the LED shines
green constantly. This takes about one minute. If no buttons are pressed within 8
minutes, the unit will switch off automatically to save battery power.
Note that if the lamp on the button flashes red and green then there is not
sufficient power in the battery to start the device properly. In this case the
battery must be replaced or recharged before the Tempus 2000 can be used.
Note: do not press any of the Tempus 2000 control buttons until the first
helpscreen artwork is displayed on the screen.
5.5.1 Understanding the Battery Life Indicator
The Tempus 2000 battery is provided with a battery life indicator which gives an
indication of the amount of charge left in the battery in three grades relative to full
charge. The battery life indicator is also accessible from the front panel of the
Tempus 2000. This battery life indicator is located to the left of the power switch.
Battery Life Indicator (left)
The following description applies both to the battery life indicator on the battery and
the front panel indicator.
To activate the battery life indicator, press the button. One of the different
coloured lights will illuminate:
• Green light is on (with or without any other light) = 100%-75% of full charge (the
battery is fresh)
• Yellow light is on (but green is not) = 75%-25% of full charge
• Red = 25%-10% of full charge (the battery is nearly exhausted)
• Red flashing = less than 10% of battery charge remaining
• No lights = battery completely exhausted.
The battery life indicator should only be regarded as a guide to the battery
condition.
User/Operator Manual Tempus 2000
CUD-34 Revision 00 Page 22
5.6 Opening the Lid
Insert your fingers at the bottom of the Tempus 2000 lid catch and pull towards
you. The catch will partly disengage. Pull the bottom of the catch towards you and
upwards to completely disengage the catch from the lid.
Hold both sides of the Tempus 2000 lid at the front and open it to a comfortable
angle for viewing the screen and so that you can get at the contents of the device.
5.6.1 Removing the Display for Remote Use
For more comfortable or convenient viewing, the display can be removed from the
Tempus 2000 box and placed in a convenient position. The display is connected
to the Tempus 2000 box by a flexible cable approximately 2m (6½ ft) long.
To remove the display for more comfortable viewing, bring up the helpscreen for
this activity by pressing the button in the Advanced Help Menu and then follow
the instructions given there.
5.7 Immediately after Switching On
After switching on, the Tempus 2000 goes through a pre-defined set of help
screens. These are:
• Making the phone connection
• Using the Wrist Keypad
• Blood Pressure and Pulse Oximeter
You can press to jump straight to the results screen, or any other button to get
help for that instrument e.g. pressing will bring up the first Help Menu or
pressing will bring up the help menu for the capnometer.
5.8 Establishing Communication with the Response
Centre
5.8.1 Process for Connecting the Tempus
The first step for using the Tempus 2000 is to establish communication with the
Response Centre. To do this you will need to:
• Ensure the Tempus is set to use an appropriate communications Mode e.g.
using the built in Cell Phone as opposed to using a Landline.
• Connect the Tempus 2000 to the Response Centre.
• Fit the Wrist Keypad to your arm (note that this is optional – the Tempus can be
used without the Keypad if necessary).
• Fit the Voicelink comfortably in your ear.

Tempus 2000 User/Operator Manual
Page 23 CUD-34 Revision 00
It is possible for a physician to use the Tempus 2000 as a standalone diagnostic
tool without connecting to the Response Centre. Under these circumstances, just
press the appropriate measurement function button to access that function. It is
still possible to be connected to the Response Centre at any time by pressing the
Connect button.
The Tempus can also be left running with the data link connected but the voice link
disconnected i.e. if the Response Centre physician wishes to continue monitoring
the patient for a long duration but without keeping the Voicelink open with the
Tempus User. In this case the Voicelink can be reconnected at any time by
pressing the Connect button.
5.8.2 Making the Phone Connection
As soon as the Tempus 2000 is operational, the Making the Phone Connection
screen appears.
This is different for each Communications Mode. Remember to follow the
instructions given in the helpscreen to complete the actitivity.
5.8.3 Fitting the Wrist Keypad and Voicelink
Having initiated dialling, the Tempus will display the Wrist Keypad helpscreen.
Follow the instructions given in the helpscreen to complete this activity.

User/Operator Manual Tempus 2000
CUD-34 Revision 00 Page 24
5.9 Blood Pressure and Pulse Oximeter
Having left the Wrist Keypad Helpscreen, the Tempus will display the Blood
Pressure and Pulse Oximeter helpscreen. Follow the instructions given in the
helpscreen to complete this activity.
WARNINGS
The Tempus 2000 is not for use on neonates (young babies).
The Tempus 2000 is not intended for long term patient monitoring. There are
no audible or visible alarms.
Reposition the oximeter probe at least once every 4 hours to allow the
patient's skin to respire.
The Tempus 2000 will not operate effectively on patients who are
experiencing convulsions or tremors.
Prolonged or repetitive use of the blood pressure cuff may harm skin
integrity and circulatory status. Observe the limb concerned to check that
circulation is not impaired

Tempus 2000 User/Operator Manual
Page 25 CUD-34 Revision 00
Notes
Dyes introduced into the bloodstream, including methylene blue, indocyanine
green, indigo carmine and fluorescein may cause an inability to determine
accurate SpO2 readings.
Any condition that restricts blood flow, such as use of a blood pressure cuff (other
than the Tempus 2000 cuff used in accordance with the instructions herein) may
cause an inability to determine accurate pulse and SpO2 readings.
Compression or restriction of the blood pressure hose or cuff, or induced
movement or vibration may prevent the monitor from taking a reading.
SpO2 measurements may be adversely affected in the presence of high ambient
light levels. If necessary, shield the sensor area (e.g. with a towel).
Remove fingernail polish or false fingernails using the wipe provided before
applying SpO2 sensors. Fingernail polish or false fingernails may cause inaccurate
SpO2 readings.
Performance and safety test data are available on request from the address in
section 1.1.
Significant levels of dysfunctional haemoglobins, such as carboxyhaemoglobin or
methemoglobin will affect the accuracy of the SpO2 measurement.
The graphical displays of pulse rate, SpO2 and pulse strength are not proportional
to the pulse volume.
The arm of the patient must be kept still and either be horizontal to the shoulder (if
the patient is laying down) or below the shoulder (if the patient is sitting upright).
IMPORTANT
You must use the right size of blood pressure cuff to suit the patient,
and you must tell the Tempus 2000 if you are using the Large cuff or Child
cuff.
The cuffs are marked to show the size that they are suited to i.e. Normal
Adult, Large Adult, Child or small adult.
IMPORTANT
The Pulse Oximeter must be on the opposite arm to the blood pressure cuff.

User/Operator Manual Tempus 2000
CUD-34 Revision 00 Page 26
CAUTION
OneTime® nail polish remover is flammable. Keep away from heat and
flame. Use adequate ventilation. Exposed pad should be placed on glass or
tile surface only. FOR EXTERNAL USE ONLY. KEEP OUT OF THE REACH
OF CHILDREN.
5.9.1 Understanding the Pulse Oximeter Results
The Pulse Oximeter display has four data elements plus a status indicator.
Measurements are made continuously and updated in real time. Measurements
are sent in real time to the Response Centre provided that the data link is active.
The Pulse section contains a bargraph and digital display of the patient's pulse
rate, in beats per minute (Bpm).
• Note that extreme pulse rates above 200 Bpm or below 50 Bpm are outside the
range of the bargraph display but will be shown accurately on the digital
display.
The signal strength bargraph shows the how well the pulse sensor is detecting the
pulse. The amplitude of the indication indicates the quality of detection. If the
indication on the Signal Strength meter is low, or becomes low, then the finger
sensor should be repositioned.
The SpO2 reading indicates the oxygen saturation of the blood, and displays the
result in bargraph and digital form.
The status bar shows the status of the Pulse Oximeter, which should normally be
'Measuring'.
5.9.2 Understanding the Blood Pressure Results
The Blood Pressure display has three elements plus a status indicator.
Measurements are normally made every five minutes via an automatic timer, but
can be triggered at any time by pressing the button on the wrist keypad or
display keypad to re-start the process. Note that when the unit is in timer mode,
pressing will cause a reading to be taken. If the unit is taking a measurement,
pressing will cause the reading to be stopped. If the cycle is stopped, the
status indicator below will read “Idle” to indicate that the unit is no longer operating.
Measurements are sent to the Response Centre every time they are made,
provided that the data link is active.
Blood pressure measurements are time stamped, and the time that the last
measurement was made is shown at the top of the Blood Pressure section. The
Systolic and Diastolic measurements are shown beneath the time.
The status bar shows the status of the Blood Pressure Monitor, which should
normally be 'On Timer' when the system is waiting between measurements, or
'Measuring' when a measurement is actually being made.

Tempus 2000 User/Operator Manual
Page 27 CUD-34 Revision 00
5.9.3 Blood Pressure Monitor Error helpscreens
The Blood Pressure Monitor will automatically display helpscreens in the event that
it encounters problems in taking a measurement. The problems that it can
encounter may often have a fairly simple solution, consequently, the helpscreens
attempt to guide the Operator through some basic checks that can be made. Most
of the time, the problems that the monitor experiences are related to being able to
build the correct pressure in the cuff and then maintain and release the pressure at
the correct rates.
Follow the instructions given in each error helpscreen to clear the fault and to
restart the blood pressure reading.

User/Operator Manual Tempus 2000
CUD-34 Revision 00 Page 28
5.10 Electrocardiograph (ECG)
To activate the ECG function, press on the front of the display or on the wrist
keypad.
The first ECG help screen will appear.
Follow the instructions given in the helpscreen and then in the ECG recording
screen to complete this activity.
WARNINGS
The Tempus 2000 should not be used on patients undergoing defibrillation.
The Tempus 2000 is protected against defibrillator discharge but rate meters
and displays may be temporarily affected during defibrillator discharge but
will rapidly recover.
The Tempus 2000 will not operate effectively on patients who are
experiencing convulsions or tremors.
CAUTIONS
The electrodes of the ECG apron must be applied carefully.
Care must be taken to ensure that the electrodes do not contact live
(electrical) parts or earthed metal parts of local systems or structures.
The ECG spray is not to be used on broken or irritated skin
Note
The leads and cables of the ECG should be checked for fraying, tears, knots or
other signs of damage before and after use.
The ECG spray is not a disinfectant. If the ECG contact spray goes into a person’s
eyes, it may be washed out using clean water.
The ECG spray bottle is marked with a label reading “USE BY:” and then giving a
date. All bottles of fluid must be discarded once this date has been reached.

Tempus 2000 User/Operator Manual
Page 29 CUD-34 Revision 00
CAUTION
It is essential that the Tempus 2000 is switched off before it is connected to
another patient, otherwise information from one patient (e.g. an ECG
recording) may be confused with that taken from another patient.

User/Operator Manual Tempus 2000
CUD-34 Revision 00 Page 30
5.11 Capnometer
WARNINGS
The Tempus 2000 is not intended for long term patient monitoring. There are
no audible or visible alarms.
The Tempus 2000 is not for apnoea detection. The Tempus 2000 has not
been tested or validated for use in apnoea detection.
CAUTION
Use of monitoring during continuous nebulised medication delivery will
result in damage to the Tempus 2000 which is not covered by the warranty.
Disconnect the capnometer sample line from the Tempus 2000 or switch off
the Tempus 2000 during medication delivery.
Notes
The capnometer requires regular calibration. A source of calibration gas is fitted
within the Tempus 2000 to enable the device to remain accurate and ready for use
during its period of intended use. The calibration gas can only be replaced by the
manufacturer. If the Tempus 2000 is not returned to RDT Ltd. for its regular
preventative maintenance check, the capnometer will eventually cease to operate.
The capnometer will perform self-calibrations as required when the Tempus 2000
is switched on and the capnometer is operating. These operations may cause
short delays (approximately 5-10 seconds) in the display of measured results.
The capnometer is not for use in conjunction with breathing or anaesthetic systems.
To activate the Capnometer function, press on the front of the display or on
the wrist keypad. The Capnometer help screen will appear.
Follow the instructions given in the helpscreen to complete this activity.

Tempus 2000 User/Operator Manual
Page 31 CUD-34 Revision 00
5.11.1 Understanding the Capnometer Results
The Capnometer display has four data elements plus a status indicator.
Measurements are made continuously and updated in real time. Measurements
are sent in real time to the Response Centre provided that the data link is active.
Owing to the nature of the instrument, readings take a little time to first appear (up
to 30 seconds), and a little longer to stabilise. This is perfectly normal.
The Capnometer section of the results screen is shown below.
The Respiration Rate section contains a bargraph and digital display of the
patient's respiration rate, in respirations per minute (Rpm).
• Note extreme respiration rates above 100 Rpm are outside the range of the
bargraph display but will be shown accurately on the digital display.
The ETCO2 reading indicates the end tidal CO2 reading of the breath, and displays
the result in bargraph and digital form.
The capnometer will take readings for 5 minutes and then stop.
5.12 Temperature
Press the green button on the temperature probe to bring up the help screen.
Follow the instructions given in the helpscreen to complete this activity.
WARNING
The thermometer provides fast, accurate temperature measurements on any
patient into which the temperature probe can be inserted into the ear canal to
view the tympanic membrane. It can be considered for use on any patient
above three (3) years of age. Do not use the temperature probe if the probe
cannot be inserted into the ear canal.
Notes
Allow the temperature probe and the patient to acclimatise to the same ambient
temperature before taking temperature readings.
Dirt, greasy films or moisture on the temperature probe lens may affect the
accuracy of the instrument.
Do not open the temperature probe case. The temperature probe will require
factory recalibration if the case is opened.

User/Operator Manual Tempus 2000
CUD-34 Revision 00 Page 32
The Temperature Probe is normally supplied set to read in Centigrade (ºC). If
required, it can be changed over to read in Fahrenheit (ºF). To make the change,
locate the small hole in the label at the bottom of the handle near where the wire is
connected. A small pushbutton is located behind the hole. Use a suitably sized,
non-pointed object to press the button. While holding this recessed button down,
press the green button on the Thermometer. Subsequent readings will be made in
Fahrenheit. The Temperature Probe can be reset to Centigrade in the same way.
Note that the thermometer operates on a timer. This means that if the green
button is pressed once, the help screen will be brought up on the display, if it is
pressed a second time, a measurement will be made. If the button is pressed a
again, within 30 seconds of the previous measurement being made, then another
measurement will be made. However, if more than 30 seconds have passed, then
the Tempus 2000 will assume that help may be required and so the help screen
will be brought up on screen again.
5.12.1 Understanding the Temperature Probe Results
The Temperature Probe display has three data elements plus a status indicator.
When measurements are made, they are time stamped and sent to the Response
Centre provided that the data link is active.
At the top of the Temperature display is a time stamp which shows when the last
measurement was made. The temperature reading is shown as a thermometer
bargraph, accompanied by a digital display.
• Note that extreme temperatures above 40ºC or below 34ºC are outside the
range of the bargraph but will be shown accurately on the digital display.
5.13 Video Camera
When requested by the Response Centre, it is possible to capture and send still
video images using the camera built into the Wrist Keypad. Video images are
shown live on the Tempus 2000 screen so that you can see what the camera is
seeing. When you are happy with the displayed image, you capture the picture
and can then send it to the Response Centre (if you are not connected the image
will be stored for transmission later). Moving pictures cannot be sent to the
Response Centre.
To activate the video function, press on the front of the display or on the wrist
keypad. A video image from the camera will appear on the Tempus 2000 display
in the position shown in the following picture.
5.14 Actions After Use – Turning the Tempus 2000 Off
For help on how to turn the Tempus off, bring up the Advanced Help Menu and
press the button. Follow the instructions given in the helpscreen to complete
this activity.

Tempus 2000 User/Operator Manual
Page 33 CUD-34 Revision 00
When the countdown is in progress, the power-on lamp will flash red. The lamp
will glow solid red for 10 seconds after the screen goes blank. It is important that
the battery is not removed until the lamp goes blank also. It is possible to cause
damage to the Tempus 2000 if the battery is removed before the LED turns off.
User/Operator Manual Tempus 2000
CUD-34 Revision 00 Page 34
6 After using the Tempus 2000
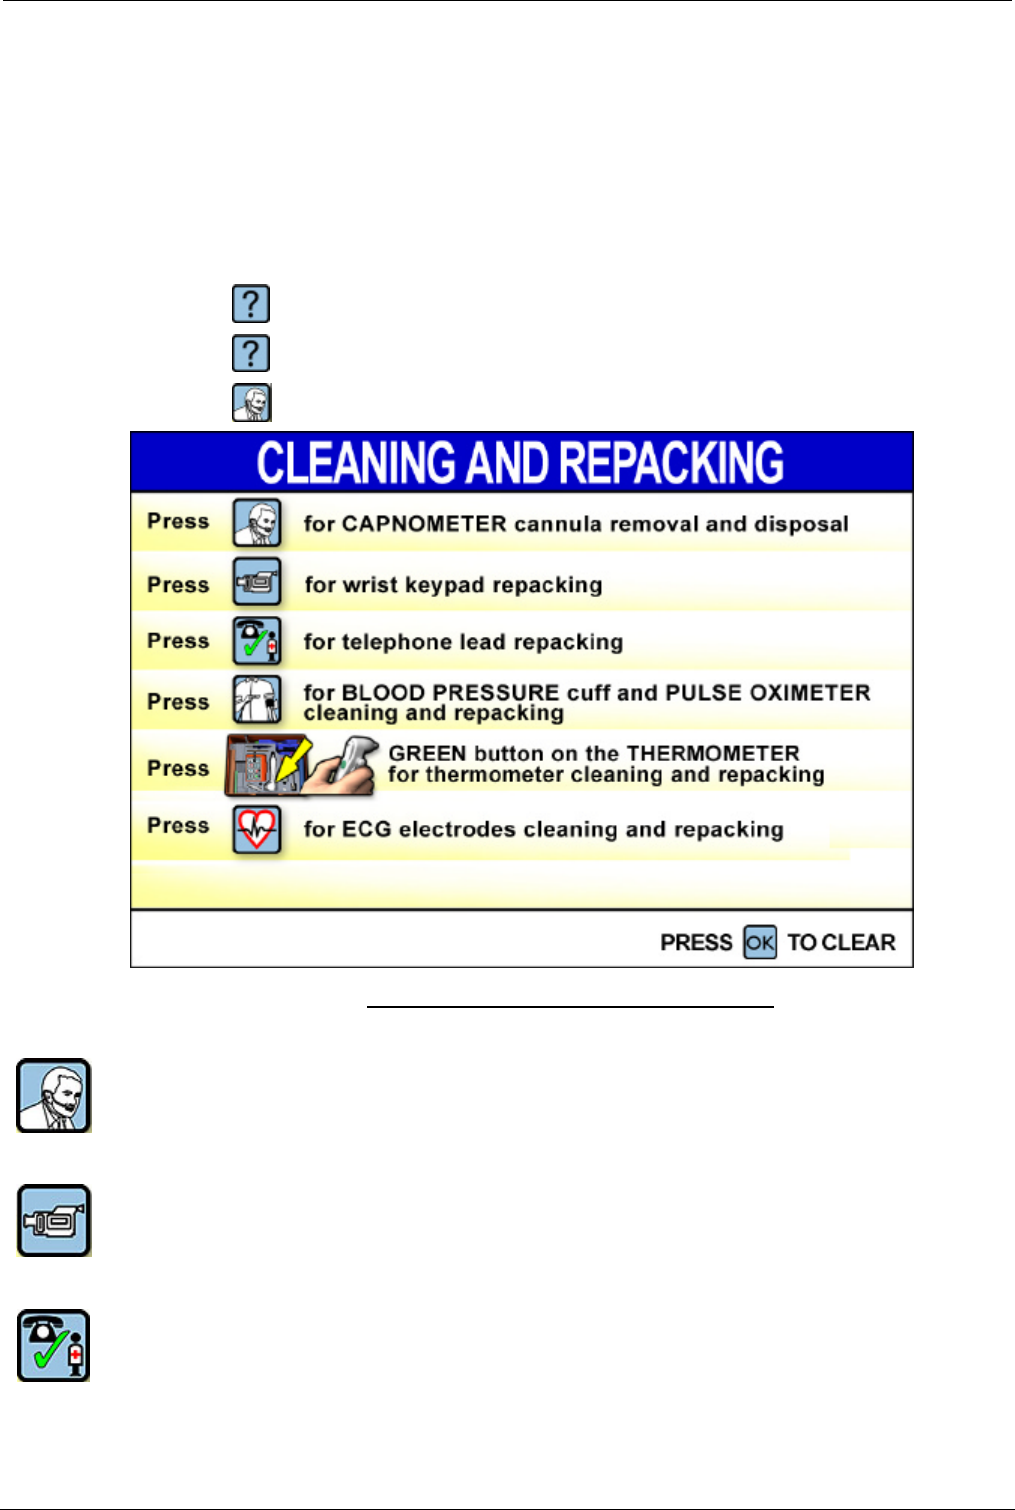
6.1 Cleaning and Re-packing Help Screen
The cleaning and re-packing help screen is shown below. To get to this help
screen, and the screens shown in the rest of this section,
• press to get the main help index screen, then
• press again to get the advanced help screen, then
• press to get the cleaning and re-packing help screen shown below.
Cleaning and Re-packing Help Screen
Press one of the following buttons to get additional help:
To get help on removing and disposing of the capnometer cannula.
To get help on cleaning and re-packing the wrist keypad.
To get help on re-packing the telephone leads.

Tempus 2000 User/Operator Manual
Page 35 CUD-34 Revision 00
To get help on cleaning and re-packing the blood pressure cuff and pulse oximeter.
To get help on cleaning and re-packing the ECG electrodes.
Press the green button on the temperature probe to get help on cleaning and
re-packing the temperature probe.
Press this button to return to the main help screen.
6.2 Cleaning the Tempus 2000
It is necessary to clean the Tempus 2000 after use.
The outer case of the Tempus 2000 should be cleaned to remove any cosmetic
contamination. It should be wiped down with a soft cloth, which may optionally be
dampened with water and a mild detergent solution.
The screen may be cleaned using a proprietary screen cleaning wipe of the type
used for other LCD screens. Under no circumstances should any abrasive
substance be applied to the screen.
If the Tempus 2000 is heavily soiled, or if the inside is soiled or contaminated,
arrangements must be made to return the unit to the manufacturer.
The Tempus 2000 instruments must be cleaned during the re-packing process
described in the following section.
6.3 Re-packing for Re-use
This section describes the steps necessary to clean and re-pack the Tempus 2000
after use.
Suitable cleaning wipes labelled "Alcowipe" or “DisCide” are provided within the
Tempus 2000. The help screen shows the location of the wipes in the highlighted
area on the first picture. These wipes should be used when cleaning the Tempus
2000 earpiece, ECG electrode apron, the Pulse Oximeter probe and the Blood
Pressure cuffs. Since there are only a limited number of wipes within the Tempus
2000, care should be taken to ensure that each wipe is used as much as it can be
on each part before it is disposed of.
It should be noted that the cleaning wipes are provided with written instructions on
their packaging. Read this information before using the wipe. In addition, please
note:
Wiped surfaces must be left wet for at least 1 minute.
Wipes are not to be used as baby wipes.

User/Operator Manual Tempus 2000
CUD-34 Revision 00 Page 36
The wipes are not to be used to disinfect surfaces that have been soiled with
internal bodily fluids (other than sweat). If such soiling has occurred, the item
should not be used and should be returned to RDT.
WARNINGS
The fluid contained within the wipes will cause temporary damage to the eye.
In the event of contact to the eye, wash thoroughly with water for 15 minutes.
Wash hands with soap and water after use.
Warning: flammable, keep away from open flame.
6.3.1 Blood Pressure Cuff
This procedure describes how to clean and re-pack the blood pressure cuff.
Follow the instructions given in the helpscreen to complete this activity.
6.3.2 ECG Apron
This procedure describes how to clean and re-pack the ECG apron. It is important
to follow this procedure carefully in order for the apron to fit properly into its
designated space.
Follow the instructions given in the helpscreen to complete this activity.
6.3.3 Capnometer Cannula
Follow the instructions given in the helpscreen to complete this activity.
The capnometer cannula must be disposed of after use.
6.3.4 Temperature Probe
This procedure describes how to re-pack the temperature probe.
Follow the instructions given in the helpscreen to complete this activity.
6.3.5 Phone Cables
This procedure describes how to re-pack the phone cables.
Follow the instructions given in the helpscreen to complete this activity.
6.3.6 Wrist Keypad
This procedure describes how to re-pack the wrist keypad.
Follow the instructions given in the helpscreen to complete this activity.

Tempus 2000 User/Operator Manual
Page 37 CUD-34 Revision 00
6.3.7 Pulse Oximeter
This procedure describes how to re-pack the pulse oximeter.
Follow the instructions given in the helpscreen to complete this activity.
6.4 Single-use Devices
The following devices and accessories are single-use devices and must be
discarded after use. No particular precautions are required when disposing of
these items provided that they are not contaminated with bodily fluids. In case of
such contamination, the items should be disposed of in accordance with local
regulations.
Part number Description
01-0004 Alcohol Wipes (Box of 100)
01-0006 Nail Varnish Remover Swabs (Box of 100)
01-0007 ECG Spray
01-0009 Thermometer Cover Dispenser (Dispenser of 25)
01-0016 Capnometer Cannula/Filter
01-0022 Tempus 2000 Repack Kit
01-0028 Earpiece Covers (Pack of 60)