Remotek BK1010 BLUETOOTH HEADSET User Manual BT Headset
Remotek Corporation BLUETOOTH HEADSET BT Headset
Remotek >
USERS MANUAL
User Manual
Bluetooth
Headset
Rev.1.0 Sept 2003
Rev.1.0 Sept 2003
Rev.1.0 Sept 2003

It’s more than seeing. It’s believing.
i
Preface
Legal Statement. . . . . . . . . . . . . . . . . . . . . . . . . . . . iii
Copyright . . . . . . . . . . . . . . . . . . . . . . . . . . . . . . . . iv
Trademarks . . . . . . . . . . . . . . . . . . . . . . . . . . . . . . . iv
Safety Information . . . . . . . . . . . . . . . . . . . . . . . . . . iv
Conventions . . . . . . . . . . . . . . . . . . . . . . . . . . . . . . v
About this Manual . . . . . . . . . . . . . . . . . . . . . . . . . . v
Chapter 1 Overview
Package Contents. . . . . . . . . . . . . . . . . . . . . . . . . . . 1
Features . . . . . . . . . . . . . . . . . . . . . . . . . . . . . . . . . 2
System Requirements. . . . . . . . . . . . . . . . . . . . . . . . 3
Product Views . . . . . . . . . . . . . . . . . . . . . . . . . . . . . 3
Chapter 2 Preparing the
Bluetooth
Headset
Initial Battery Charge . . . . . . . . . . . . . . . . . . . . . . . . 5
Charging and Battery Time . . . . . . . . . . . . . . . . . . . . 6
Placing the Headset on Your Ear . . . . . . . . . . . . . . . . 7
Choose the Left Ear Wearing Style . . . . . . . . . . . . 8
Unique Glasses Ridge Design . . . . . . . . . . . . . . . . 8
Hanging the Headset on Your Neck. . . . . . . . . . . . 8
Chapter 3 Using the
Bluetooth
Headset
Getting Started . . . . . . . . . . . . . . . . . . . . . . . . . . . . 9
Turn On . . . . . . . . . . . . . . . . . . . . . . . . . . . . . . . . . 9
Pairing the Headset to a
Bluetooth
Phone. . . . . . . . . 10
General Pairing Instructions . . . . . . . . . . . . . . . . 10
Pairing with a Nokia
Bluetooth
Phone . . . . . . . . 10
Pairing with a Sony Ericsson/Ericsson
Bluetooth
Phone . . . . . . . . . . . . . . . . . . . . . . . . . . . . . . 11
Pairing Link to Additional Phone . . . . . . . . . . . . 12
Making, Receiving, Transferring and Ending Calls . . . 13
Making a Call from a
Bluetooth
Phone . . . . . . . . . 13
Making a Call Using Voice Dialing . . . . . . . . . . . . 13
Receiving a Call with the Headset . . . . . . . . . . . . 13

It’s more than seeing. It’s believing.
ii
Transferring a Call. . . . . . . . . . . . . . . . . . . . . . . 14
Ending a Call from the Headset . . . . . . . . . . . . . 14
Adjusting Volume. . . . . . . . . . . . . . . . . . . . . . . . . . 14
Adjusting the Speaker Volume . . . . . . . . . . . . . . 14
Adjusting the Indicator Sound Volume. . . . . . . . . 15
Muting/Turn off the Microphone . . . . . . . . . . . . . . . 15
Turning Off . . . . . . . . . . . . . . . . . . . . . . . . . . . . . . 15
Audio and Visual Indications . . . . . . . . . . . . . . . . . . 16
Appendix
Product Specifications . . . . . . . . . . . . . . . . . . . . . . 17
Maintaining Your
Bluetooth
Headset. . . . . . . . . . . . . 17
General Care. . . . . . . . . . . . . . . . . . . . . . . . . . . 17
Storage . . . . . . . . . . . . . . . . . . . . . . . . . . . . . 18
Cleaning . . . . . . . . . . . . . . . . . . . . . . . . . . . . 18
About the Battery . . . . . . . . . . . . . . . . . . . . . . . 18
Charging the Battery . . . . . . . . . . . . . . . . . . . . 18
Battery Information. . . . . . . . . . . . . . . . . . . . . 18
Troubleshooting. . . . . . . . . . . . . . . . . . . . . . . . . . . 19
Service Information . . . . . . . . . . . . . . . . . . . . . . . . 22
Glossary
Useful Terms . . . . . . . . . . . . . . . . . . . . . . . . . . . . . 23

It’s more than seeing. It’s believing.
iii
Preface
Legal Statement
FEDERAL COMMUNICATIONS COMMISSION
This device complies with Part 15 of the FCC Rules. Operation is
subject to the following two conditions: (1) This device may not cause
harmful interference, and (2) this device must accept any interference
received, including interference that may cause undesired operation.
Any changes or modifications made to this equipment may void the
user's authority to operate this equipment.
This equipment has been tested and found to comply with the limits
for a Class B digital device, pursuant to Part 15 of the FCC Rules.
These limits are designed to provide reasonable protection against
harmful interference in a residential installation. This equipment
generates, uses and can radiate radio frequency energy and, if not
installed and used in accordance with the instructions, may cause
harmful interference to radio communications. However, there is no
guarantee that interference will not occur in a particular installation If
this equipment does cause harmful interference to radio or television
reception, which can be determined by turning the equipment off and
on, the user is encouraged to try to correct the interference by one or
more of the following measures:
•
Reorient or relocate the receiving antenna.
•
Increase the separation between the equipment and receiver.
•
Connect the equipment into an outlet on a circuit different from that to
which the receiver is connected.
•
Consult the dealer or an experienced radio/TV technician for help.
Changes or modifications not expressly approved by the party
responsible for compliance could void the user’s authority to operate
the equipment.This device and its antenna(s) must not be co-located
or operating in conjunction with any other antenna or transmitter.
NOTE:
To assure continued FCC compliance, any changes or
modifications not expressly granted by the manufacturer of this
device could void the user's authority to operate the equipment.

It’s more than seeing. It’s believing.
iv
CE Notice (European Union)
The Notice indicates that this equipment has been tested and found
to comply with the EMC Directive and the Low Voltage Directive of the
European Union, including EN300328-2, EN301489-1/17, and
EN60950.
Industry Canada
Industry Canada complies with Canada RSS-210.
Operation of the device is subject to following two conditions:
(1) this device may not cause interference, and
(2) this device must accept any interference, including interference
that may cause undesired operation of the device.
Copyright
Information in this document has been carefully checked for
accuracy; however, no guarantee is given to the correctness of the
contents. The information in this document is subject to change
without notice. This document contains proprietary information
protected by copyright. All rights are reserved. No part of this manual
may be reproduced by any mechanical, electronic or other means, in
any form, without prior written permission of the Corporation.
Copyright© 2003, All Rights Reserved.
Trademarks
All the logos and trademarks, including the Bluetooth from SIG, are
the properties of their respective owners. Bluetooth is a trademark of
the Bluetooth SIG, Inc. (Special Interest Group). The Bluetooth
trademarks are owned by Bluetooth SIG, Inc. USA.
Safety Information
Please read the following safety instructions, and keep the user
manual for later reference.
•
The storage temperature for the headset is between -2
0°
C
and
+55°
C
.
•
Do not expose it to direct sunshine or place the product near any
source of heat or in an extremely cold environment.

It’s more than seeing. It’s believing.
v
•
Do not expose the product to moisture. Never spill any liquid on the
product.
•
Do not move the product between cold and hot environments.
•
Be sure to follow the legal restrictions and instructions when using the
Bluetooth Headset on board an aircraft.
Conventions
The following conventions are followed throughout this manual.
NOTE
Text set off in this manner indicates key information that
you should pay attention to.
WARNING
Text set off in this manner indicates that failure to
follow these directions could result in bodily harm or loss of life.
About this Manual
This manual is designed to assist you in setting up and using your
Bluetooth
Headset, and provides information on the essential
hardware required to use your headset. Read carefully before you
begin to use the product kit. All materials and information in the
manual are cautiously checked for accuracy at the time for print.
However the corporation is not liable for any possible mistakes. Any
specifications and accessories are subject to change without prior
knowledge.

It’s more than seeing. It’s believing.
vi
inspiration. invention. freedom. flexibility. simplicity.
1
Chapter 1
Overview
Congratulations on your purchase of the
Bluetooth
Headset Kit. The
Bluetooth
Headset is a mobile voice interaction device that enables
you to use your
Bluetooth
activated mobile phone without the
constraint of wires or cords. This allows for greater convenience, as
well as safety while operating a motor vehicle. The
Bluetooth
Headset
is a compact device that is easy to store in a briefcase, handbag, or a
shirt pocket. Using the
Bluetooth
Headset can help you make full use
of the advanced features found in today's mobile phones, while
allowing you to move about more freely.
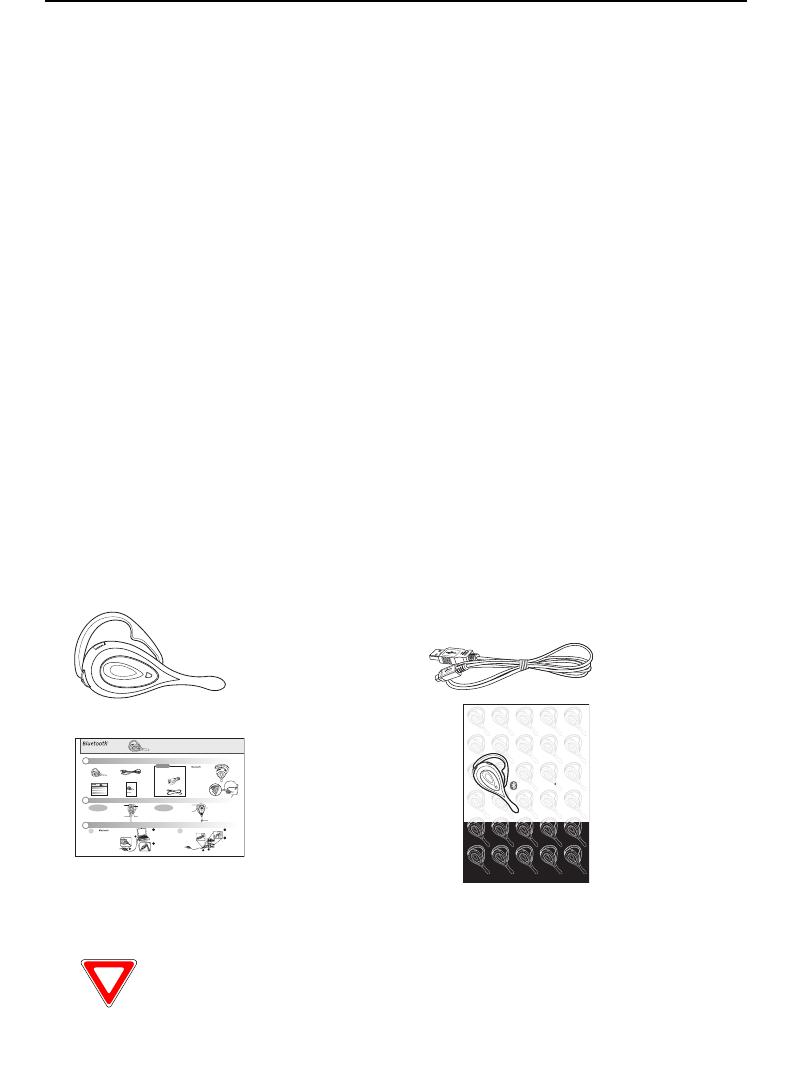
Package Contents
Your
Bluetooth
Headset is shipped in a standard package containing
the following items as shown in the figure below:
•
Bluetooth Headset
•
USB Cable for charging
•
Quick Start Guide to set up your Bluetooth Headset
•
User Manual
1 - 1 Package Contents
NOTE:
While unpacking the package, please open it carefully
and save the original packing materials in case you need to
repack them.
Bluetooth
Headset USB Cable
Quick Start Guide
User Manual
Bluetooth
Headset
Rev.1.0 Sept 2003
Rev.1.0 Sept 2003
Rev.1.0 Sept 2003
Large end of USB Cable
connecting to PC USB
port
1
2
3
Front View
Package Contents
Product Views
Rear View
Headset
User Manual
Connecting Power
Headset
Quick Start Guide
1
2
3
Package Contents
Product Views
Connecting Power
This Quick Start Guide gives you a brief description to help you use the
hands-free, wireless voice interactive device, allowing you more mobility.
Refer to the user manual.
Bluetooth Headset USB Cable
Quick Start Guide User Manual
NOTE
Optional accessories:
USB Car Adapter
Neck Strap
Control Wheel for
volume and on/off
control
Indicator Light
Mini USB Port
for charging
Ergonomic Earhook
with glasses ridge design
USB Car
Adapter for
use in car
AB
MB001-1 P.1
Ergonomic Earhook
with glasses ridge design
Neck Strap Hole
Earpiece
Microphone
1
1
2
2
1
1
2
2
11
2
2
The Headset needs to build an
initial charge for about five hours. Future
charging takes about 90
minutes.
Talk time: 3 hours
Standby time: 120 hours
If you
purchase
the
optional
USB Car
Adapter:
Small end of USB Cable
connecting to headset's
Mini USB Port for
charging
The Headset
has a ridge design to
accommodate glasses.
If you are wearing glasses,
you can fit the earpiece
of the frame into
the Ergonomic
Earhook with glasses
ridge design,
so that the
glasses can be
seated more securely.
Insert to
cigarette
lighter in
car.
R
Headset
Quick Start Guide
R
User Manual

inspiration. invention. freedom. flexibility. simplicity.
2
You may optionally purchase a Neck Strap and a USB Car Adapter for
use in a car. The accessories illustrated here and in this manual are
for reference only. Accessories included with your headset may be
different from the ones shown here.
1 - 2 Optional Accessories
Features
The
Bluetooth
Headset provides the following features:
Compact, comfortable design
The headset is lightweight, and can easily be adjusted for comfortable
use on either the left or right ear. The earpiece is padded and the
ergonomic earhook is shaped to accommodate eyeglasses.
Compatible
The headset is compatible with many
Bluetooth
1.1-compliant mobile
phones on the GSM and CDMA systems.
Long-life rechargeable battery
The headset contains a permanently mounted rechargeable battery.
When fully charged, the battery can support up to 3 hours of use, and
up to 120 hours in stand-by mode.
Pairing
The headset can be paired with up to two devices at one time. This
allows the user to conveniently switch between phones without
switching headsets.
Multi-functional
•
The headset allows control over the volume and can be muted for
privacy.
•
Incoming calls can be answered and terminated from the headset.
•
Outbound calls can be placed when used with phones that support
voice dialing.
Neck Strap
USB Car Adapter
inspiration. invention. freedom. flexibility. simplicity.
3
System Requirements
Your new
Bluetooth
Headset will work only with a
Bluetooth
1.1-
compliant mobile phones placed within 10 meters (33 feet) of the
headset.
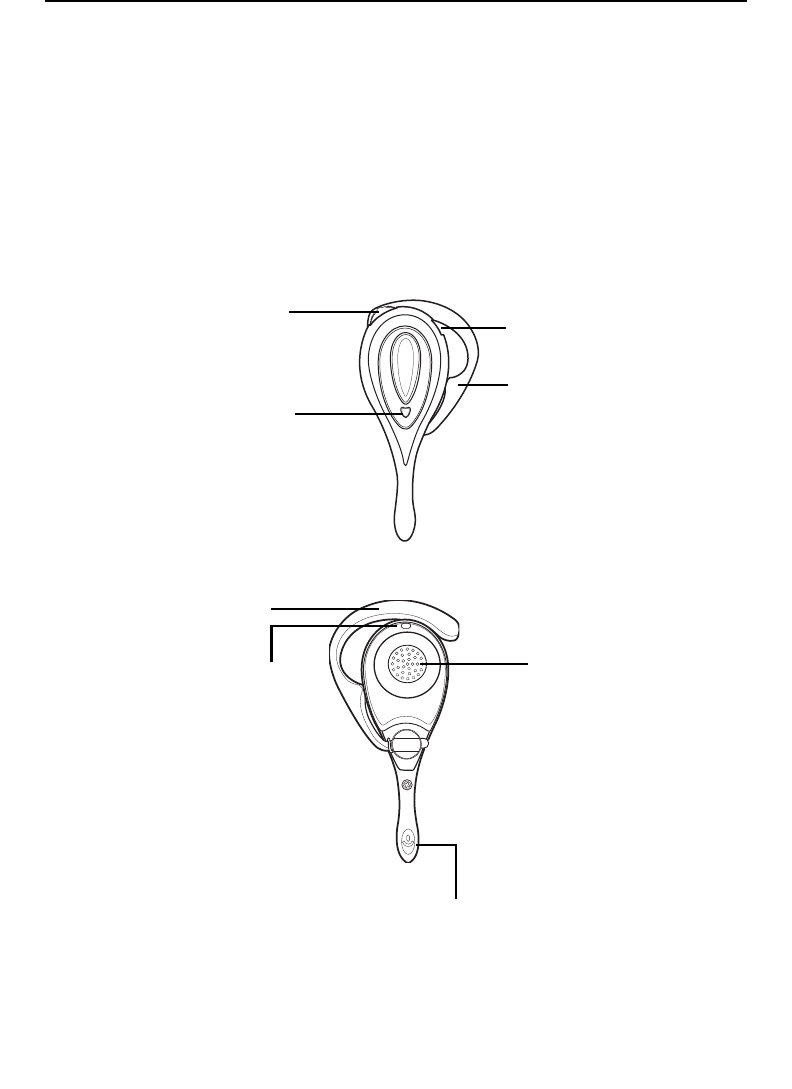
Product Views
Before you begin to use the headset with mobile phone, the section
gives you a brief description to familiarize you with the product
elements.
1 - 3 Headset Overview
Ergonomic Earhook with
glasses ridge design
Indicator Light
Control Wheel Mini USB Port for charging
Front View
Neck Strap Hole
Ergonomic Earhook with
glasses ridge design
Earpiece
Microphone
Rear View
inspiration. invention. freedom. flexibility. simplicity.
4
Mini USB Port for charging: The USB port is reserved for plugging
the supplied USB cable. Using the USB cable to connect to any
devices with a USB port to recharge the headset whenever needed.
Ergonomic Earhook with glasses ridge design: The headset’s
earhook, designed with advanced ergonomics, rests over the top of
the ear much better than eyeglasses do. A ridge in the top allows
eyeglasses to be comfortably worn while using the headset.
Control Wheel: All of the functions of the
Bluetooth
Headset are
performed from this wheel. These include adjusting the volume,
muting, answering calls and terminating calls. See “Chapter 3 Using
the Bluetooth Headset” for more information.
Indicator Light: Two lights indicate the status of the headset and its
battery. The blue light indicates what operating mode the headset is
in, and the red light reports a low battery condition. Both may operate
in combination to notify you of multiple events. Refer to “Audio and
Visual Indications” section for more information.
Earpiece: The earpiece is padded for comfort and produces clear
sound.
Microphone: The microphone, at the end and side
of the pole, is directional and sensitive enough to
clearly register your voice when placed by your
cheek.
NOTE:
Sound volume can also be adjusted by changing the
volume setting on your mobile phone.
Neck Strap Hole: Insert neck strap to hang for easy use.
inspiration. invention. freedom. flexibility. simplicity.
5
Chapter 2
Preparing the
Bluetooth
Headset
Before you familiarize yourself with the newly purchased Bluetooth
Headset, you must prepare the following procedures to use the
headset. This chapter describes how to do the initial battery charge
and how to wear the headset on your ear. Read the following sections
carefully before attempting to utilize your new headset.
Initial Battery Charge
The supplied USB cable is used for charging. You will need to allow
extra time for the built-in battery to build an initial charge before it can
be used. The first charge takes approximately five hours. Future
charges take approximately 90 minutes.
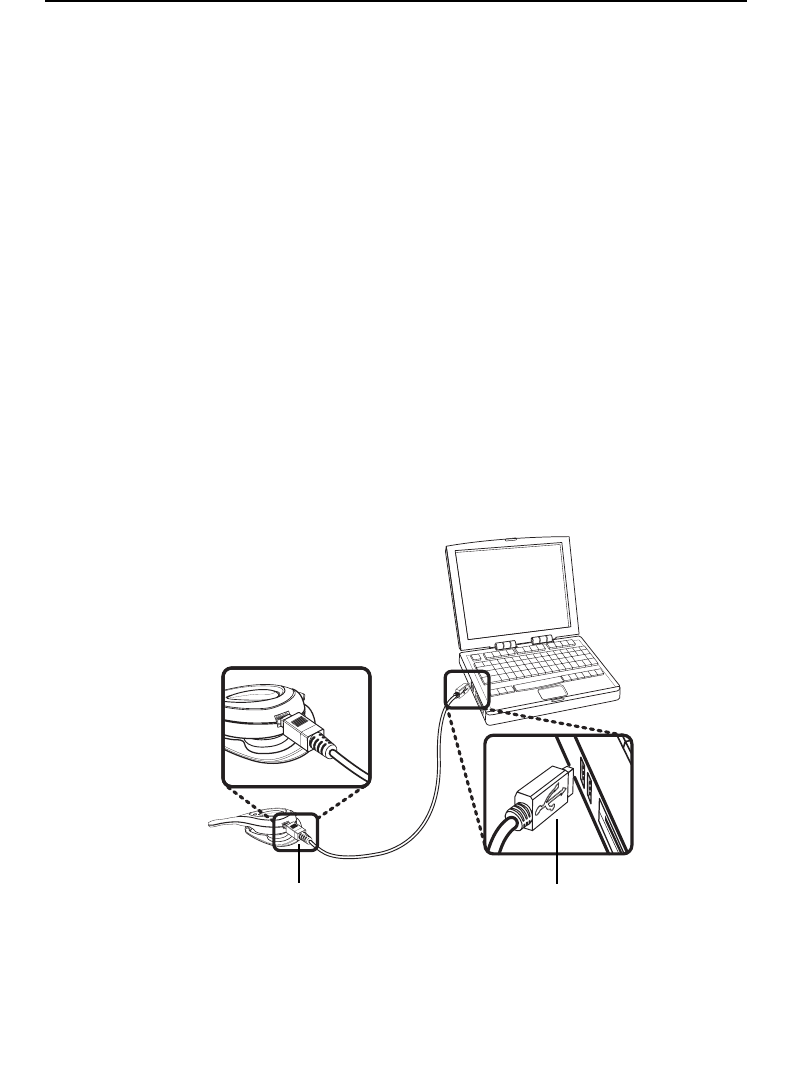
Follow these steps to do an initial battery charge:
1
Insert the small end of the USB cable into the headset’s USB
connector.
2 - 1 Connecting Power
2
Large end of the USB cable
connected to computer’s USB
port
Small end of the USB cable connected to
the headset’s mini USB port for charging
inspiration. invention. freedom. flexibility. simplicity.
6
2Insert the large end of the USB cable to the USB port of any
device you want to connect (such as a personal computer,
printer, or PDA).
3Press the control wheel. The red indicator stays on during
the recharging process.
4When the indicator turns to blue and flashes slowly, the
battery is fully charged. The headset is ready for normal
operation.
Charging and Battery Time
When the
Bluetooth
Headset is in low battery level, the headset gives
a battery low warning. The indicator lights pink and as the battery
goes lower it turns red to remind you of recharging. Follow the
described steps to charge the battery. During charging, you can still
use the headset to receive incoming calls and place phone calls.
Charging may result in an interruption of telephone session.
When the headset is fully recharged, the indicator flashes blue
showing the headset can operate normally again. With full battery
charge, the headset’s talk time can be up to three hours; while the
standby time lasts up to 120 hours.
NOTE:
If you have purchased an optional USB Car Adapter,
you can also charge the headset in car or when you are driving.
See detailed description as follows.
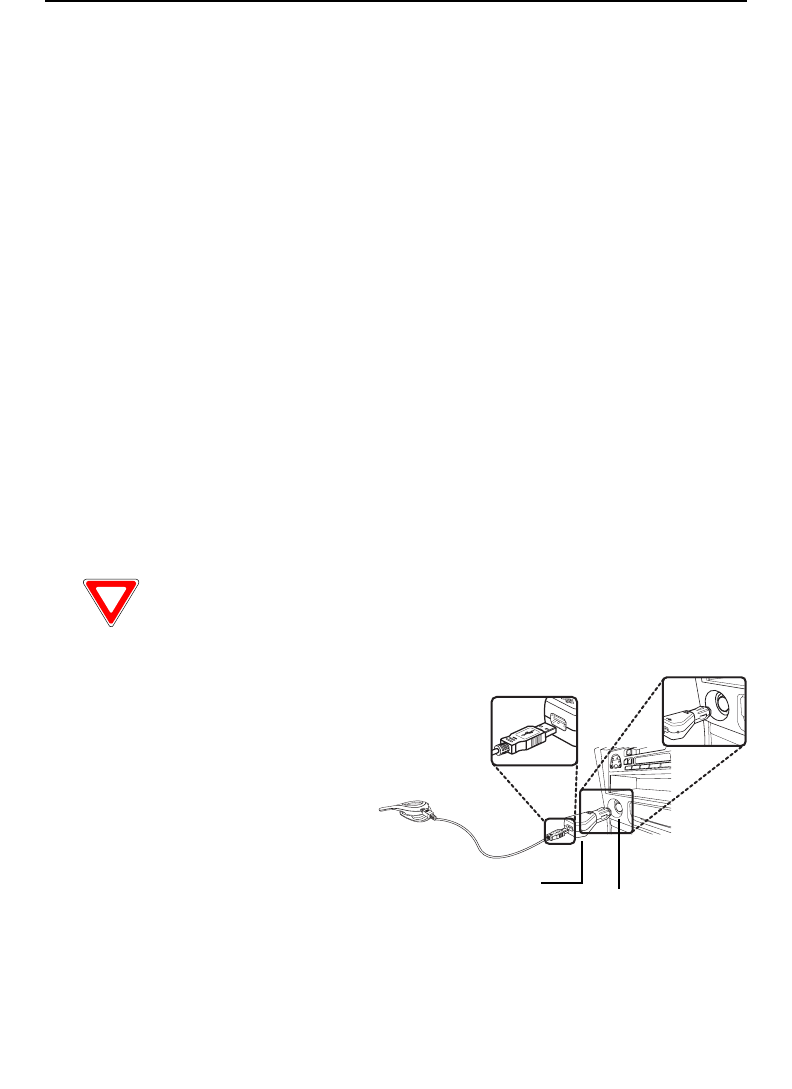
If you purchase the
optional USB car adapter
for use in car, you can also
recharge your headset
when you are driving.
Even when charging, you
still can use the
Bluetooth
Headset to receive
incoming calls as usual.
Connect the small end of
the USB cable to the
headset and the large end
of the cable to the USB car adapter (refer to the following figure). Then
insert the USB car adapter to the cigarette lighter on your car.
USB Car Adapter Cigarette Lighter
in Car
inspiration. invention. freedom. flexibility. simplicity.
7
After the both ends are well connected, press the control wheel
shortly, the red indicator light is on. Wait until it turns to flashing blue,
the charging process is completed.
WARNING:
Use only the USB cable included in the package
and the purchased USB car adapter. Damage may occur if you
use any other cable with your headset or use the cable to
power other electrical devices. If there is smoke, burning smell,
or extreme heat coming from the adapter, please turn off power
and seek service.
NOTE:
No matter if you use the headset or not, you must
charge the headset at least once a month.
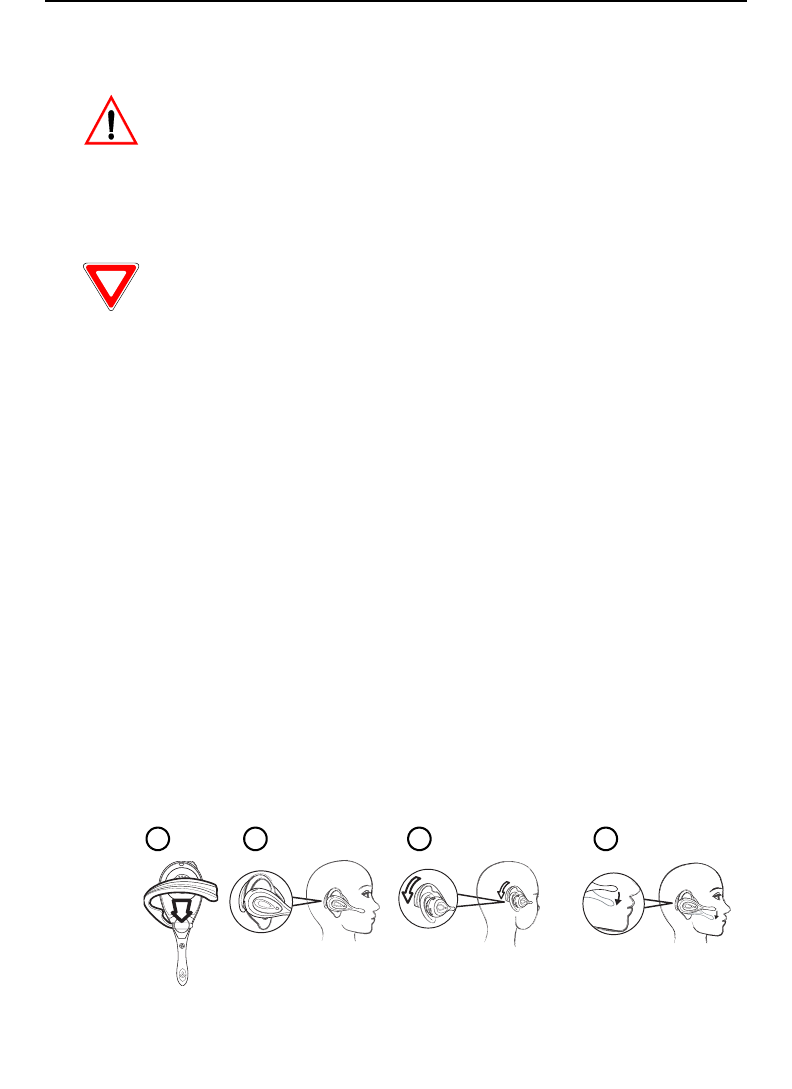
Placing the Headset on Your Ear
The design of the
Bluetooth
Headset is very flexible and convenient.
The factory default and the instruction in this manual is for wearing on
the right ear. Follow these steps to put your headset on the right ear.
1
Open the ergonomic earhook with glasses ridge design
perpendicular to the headset.
2Loop the
ergonomic earhook with glasses ridge design
behind
your ear.
3Press the headset to your ear.
4Point the boom toward your mouth.
1 2 3 4
inspiration. invention. freedom. flexibility. simplicity.
8
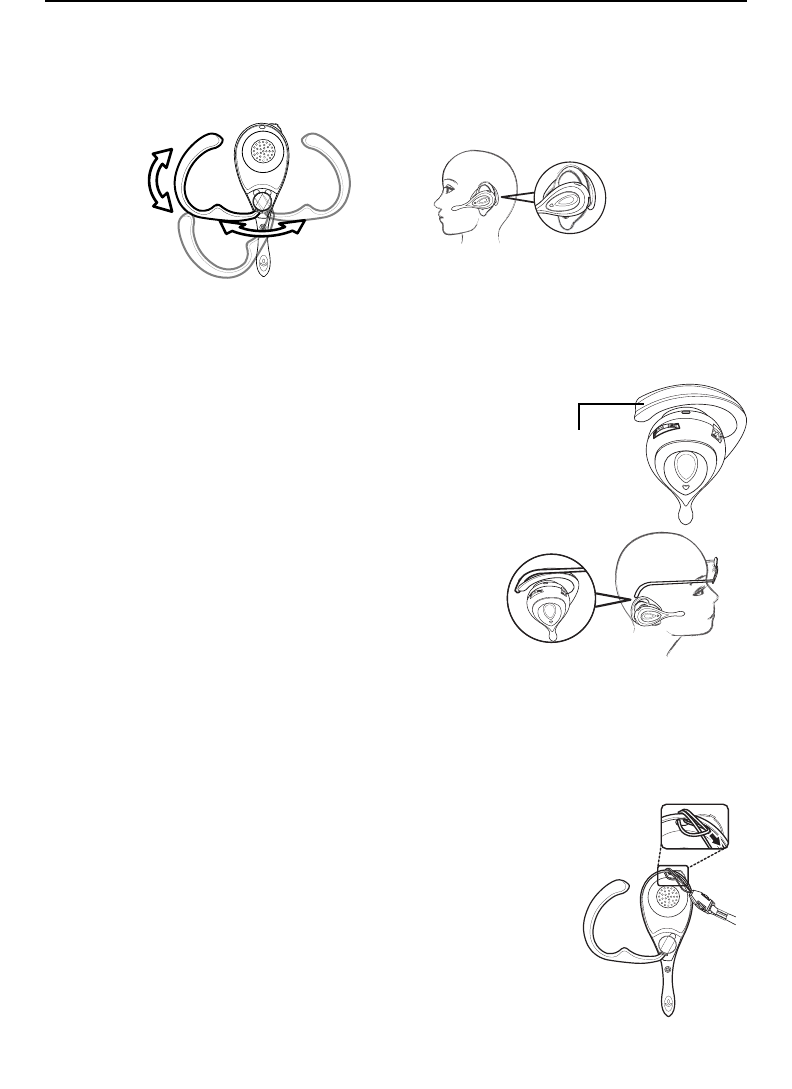
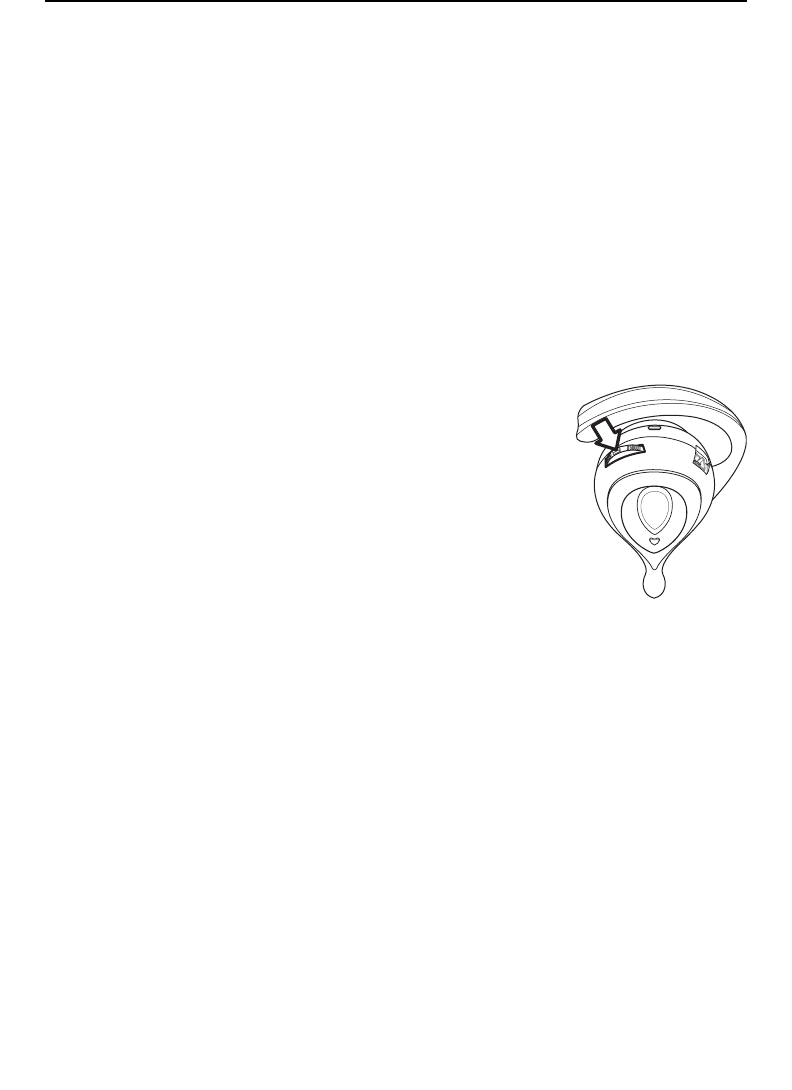
Choose the Left Ear Wearing Style
If you are used to wearing on the left ear, you can easily adjust the
earhook to the other side of the headset for wearing on the left ear.
Refer to the figure below for adjustment.
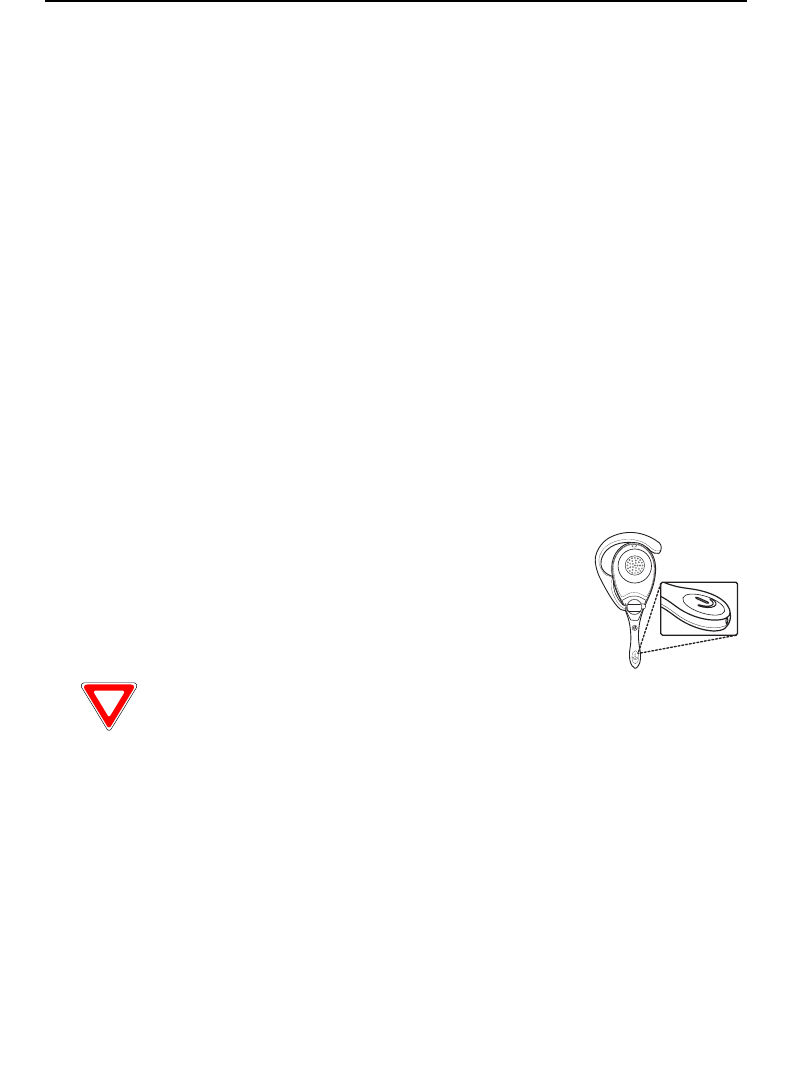
Unique Glasses Ridge Design
The headset’s ergonomic earhook has a
ridge design to accommodate glasses. If
you are wearing glasses, you can fit the
earpiece of the frame into the ergonomic
earhook’s ridge, so that the glasses can
be seated more securely.
Hanging the Headset on Your Neck
If you purchase an optional neck strap, you can hang the headset on
your neck for handy use. Follow these steps to attach the neck strap:
1
Thread the shorter end of your optional
neck strap through the neck strap hole.
2Insert the longer end through the shorter
loop and pull it tight.
Ridge Design
inspiration. invention. freedom. flexibility. simplicity.
9
Chapter 3
Using the
Bluetooth
Headset
Getting Started
The
Bluetooth
Headset allows for quick and easy configuration with a
variety of
Bluetooth
1.1-compatible mobile phones and other devices.
Once configured, the headset should operate with no additional
intervention, apart from periodic charging. This chapter describes
how to set up and use your
Bluetooth
Headset. Read the following
sections carefully before attempting to use your new headset.
Turn On
Press and hold the control wheel for five seconds
to turn on the headset. The indicator lights pink for
two seconds and then turns to blue. Keep on
pressing the control wheel until the blue light
stays on indicating the headset is ready to pair
with wireless devices.
If you wear the headset and turn it on, you will
hear two different tones from the headset to know
that it turned on and entered a pairing-ready
state. For turning on, the headset sounds in a 1-3-5 (Do-Mi-So) scale;
for pairing-ready, it sounds in a 1-3-1 (Do-Mi-Do) scale; and for
turning off it sounds in a 5-3-1 (So-Mi-Do) scale. Now you may follow
the
Bluetooth
configuration instructions for your phone. The following
examples can be used as a guide for models other than those
represented here. Once you have successfully set up the headset on
your mobile phone, the blue light will flash steadily and slowly and the
headset will be ready for use.

inspiration. invention. freedom. flexibility. simplicity.
10
Pairing the Headset to a
Bluetooth
Phone
Before the headset can be used with your mobile phone, it must first
be paired. This process registers the headset and your mobile phone
with each other. Pairing is important and essential, because it
establishes connection between the headset and the mobile phone.
Your headset will only need to be paired once with each mobile phone
that you use; however its unique design enables you to pair it with up
to two mobile phones. After pairing, you can use the headset without
further configuration.
General Pairing Instructions
Pairing with a Nokia
Bluetooth
Phone
Follow the steps below to configure your mobile phone so that it can
recognize the
Bluetooth
Headset and receive incoming phone calls
with the headset.
1Turn on your
Bluetooth
Headset and mobile phone. Set the
headset to pairing-ready status; the blue indicator stays on.
2Select “
Bluetooth
” on your mobile phone.
3Select “Search for audio accessories”.
4Select “
Bluetooth
Headset” from the option list and then
select “Enter Passcode”.
5Enter “0000” (default passcode for
Bluetooth
Headset), and
then press “OK”. A message “Paired with
Blueto...
” appears
on the mobile phone screen. The blue LED on the
Bluetooth
Headset flashes five times within four seconds to show that
the pairing process is finished.
NOTE:
These instructions are for a Nokia 8910 mobile phone.
The procedures for operating your phone may be different.
Consult your mobile phone user manual for more information.
If you are using a Nokia 3650, you must first set the headset to
“Hands-free Mode” by pressing shortly the control wheel under
pairing-ready status, then begin the mobile phone’s searching
function to perform the pairing.

inspiration. invention. freedom. flexibility. simplicity.
11
Pairing with a Sony Ericsson/Ericsson
Bluetooth
Phone
Follow the steps below to configure your mobile phone, so that it can
recognize the
Bluetooth
Headset and receive coming phone calls with
the headset.
1
Turn on your
Bluetooth
Headset and mobile phone. Set the
headset to pairing-ready status; the blue indicator stays on.
2Select “Connect” and “Yes”.
3Select “
Bluetooth
” and “Yes”.
4Select “Discover” and “Yes”, “Searching...” appears on the
screen. When the mobile phone finds the headset, it shows
the headset name. Select the headset and select “Add to
paired”. Select “Yes”.
NOTE:
If a message “No devices found” appears, the headset
may be too far apart from the mobile phone. Move the headset
closer to the mobile phone and try the above steps again.
5You are asked to enter Passkey. Enter Passkey “0000” and
“Yes” to start pairing.
6Give your desired Name tag or use the default “
Bluetooth
Headset”.
7Select “
Bluetooth
Headset” from “Add device” under
“Paired device” and then press “Yes”.
8You can edit, delete, or rename your headset as you like and
then press “Yes”.
9The blue LED on the
Bluetooth
Headset flashes steadily and
slowly to show that the pairing process is finished.
10 Before you receive incoming calls with the headset, activate
the “Discover” function on your mobile phone.
NOTE:
•These instructions are for a Ericsson T68 mobile phone.
The procedures to operate your phone may be different.
Consult your mobile phone user manual for more
information. The Bluetooth Headset has passed the
compatibility test and can be used with mobile phones
from Nokia, Sony Ericsson, Siemens, Motorola and
Philips.

inspiration. invention. freedom. flexibility. simplicity.
12
•
DISCONNECTING THE PAIRED LINK
If you do not want
to use the headset to receive incoming calls, to
disconnect the link by selecting “Off” under “Operation
Mode”. The flashing blue indicator and
Bluetooth
icon on
the mobile phone disappear, indicating the link is
cancelled. You can use the mobile phone to receive
incoming calls as usual.
•If the
Bluetooth
Headset is out of the distance of
receiving range, it beeps two times to indicate weak
signal. If the headset loses the signal it beeps four times
and disconnects.
Pairing Link to Additional Phone
One of the
Bluetooth
Headset’s unique features is that the headset
can pair with two mobile phones at the same time without
disconnecting from either mobile phone.
If you want the headset to pair with two mobile phones, choose the
first mobile phone, under the pairing-ready status turn the control
wheel to the left for two seconds; the indicator flashes blue two times
within five seconds. Now you can perform pairing following the
described steps in General Pairing Instructions section. After
successfully pairing with the first mobile phone, turn off the headset
and then turn it on again to pair with the second mobile phone. Under
the pairing-ready status turn the control wheel to the right for two
seconds until the indicator flashes two times within five seconds. After
the pairing is completed, whenever one of the paired mobile phone is
ringing, the incoming call will be automatically transferred to the
headset.
NOTE:
The Bluetooth Headset can also be linked with other
devices, for example Bluetooth wireless technology-enabled
printer, PC, PDA, cordless PSTN phone, VoIP phone system,
laptop PC, and walkie-talkie. Follow the instructions in user
manuals that came with various devices to finish pairing
process.

inspiration. invention. freedom. flexibility. simplicity.
13
Making, Receiving, Transferring and Ending Calls
Making a Call from a
Bluetooth
Phone
You can place a phone call with your headset linked to your mobile
phone. Use your mobile phone to dial the desired number, and then
talk freely with the
Bluetooth
Headset.
Making a Call Using Voice Dialing
If your mobile phone supports the voice command function, you can
also make a voice call through the headset. Say a name or voice
command to place a phone call. This function is especially convenient
and safe when you are driving or busy doing something manually.
However, it depends on your mobile phone’s supporting function.
Refer to the mobile phone’s user manual to see if this function is
available for you.
NOTE:
If you are using Nokia mobile phones,
you must turn
off the headset and turn it on again to switch to “Hands-free
Mode” (refer to the note on page 10) before you can use the
voice dialing function.
Receiving a Call with the Headset
When you have finished pairing the
Bluetooth
Headset with your
mobile phone and have set up the link properly, you can use the
headset to receive incoming phone calls. Generally you must press
the control wheel on the headset to receive the incoming call (such as
for Ericsson/Sony Ericsson mobile phone). But some mobile phones
(such as Nokia) can transfer the incoming calls to the headset directly.
You do not need to press the control wheel to receive calls. Refer to
the user manual that came with your mobile phone for further
information on operation.
During a telephone session, if the
Bluetooth
Headset exceeds the
range of the operational distance, the signal is interrupted. Now the
mobile phone inquires if you want to resume the conversation using
the headset. If yes, you need to turn on the headset again, and then
press and release the control wheel shortly.

inspiration. invention. freedom. flexibility. simplicity.
14
Your mobile phone shows a message to inquire if you want to
reconnect, select “Yes” option to resume the phone call. When the
headset is on and the pairing is completed, you can automatically
receive incoming calls with the headset. If the pairing is completed but
the headset is off, you can either receive phone calls with your mobile
phone or turn on the headset first to receive phone calls with your
Bluetooth
Headset.
Transferring a Call
The
Bluetooth
Headset is embedded with double directions of sound
transferring. After the successful pairing process, the mobile phone
can recognize the
Bluetooth
Headset. When the phone rings, it
automatically transfers the call to the headset. See “Receiving a Call
with the Headset” on page 13. The headset can transfer the sound
back to the mobile phone if you disconnect the paired link (see the
Note on page 11) between the headset and the mobile phone.
Ending a Call from the Headset
Generally when your telephone session is ended, if the caller hangs
up, the headset ends the call automatically. You do not need to press
any button.
Adjusting Volume
Adjusting the Speaker Volume
(During a call)
The control wheel is also used to adjust the volume. When you wear
the headset on your right ear, you can turn the wheel clockwise or
counterclockwise respectively to decrease or increase the volume
according to need and the ambient environment. Up to 16 volume
levels are available.

inspiration. invention. freedom. flexibility. simplicity.
15
Adjusting the Indicator Sound Volume
(When waiting to pairing)
Follow the same process to adjust the indicator
sound volume. When you wear the headset on
your right ear, after you press and hold the control
wheel to turn on the headset, you can hear the
indicator sound. At this time you can turn
clockwise or counterclockwise respectively to
decrease or increase the volume as needed.
Muting/Turn off the Microphone
Press the control wheel for two seconds to turn off the microphone,
avoiding the other party to hear you talking to other people. This
function is practical for keeping privacy. If you press and hold the
control wheel for two seconds, the muting function is turned off.
Turning Off
When the headset is fully charged, paired and linked, but you do not
want to use the headset, you can turn off the headset. Press and hold
the control wheel to turn it off. If the headset is forced to be turned off
because of low power, use the mobile phone to receive incoming calls
and charge the headset immediately. See “Charging and Battery
Time” on page 6.

inspiration. invention. freedom. flexibility. simplicity.
16
Audio and Visual Indications
The
Bluetooth
Headset provides audio and visual signs to help you
understand the device status. For audio signs, refer to “Turn On” on
page 9 for detailed description. The following tables give you an
overview of various indicator lights and the represented meanings.
Table 1: Indication During Charging
Headset Indicator Color Meaning
On Red Battery low, the charg-
ing is in progress
On Flashing blue Fully charged
Table 2: Indication Under Normal Operation
Headset
Indicator
Color Audio Signal Meaning
Off --- 5-3-1
(So-Mi-Do)
The headset is
turned off.
On Pink 1-3-5
(Do-Mi-So)
The headset is
turned on.
On Steady blue 1-3-1
(Do-Mi-Do)
Ready for pairing;
pairing is in
progress.
On Flashing blue
steadily and
slowly
--- The headset is
activated for
receiving.
On Long flashing
blue with the
same interval
--- Connected to an
incoming call

inspiration. invention. freedom. flexibility. simplicity.
17
Appendix
Product Specifications
Maintaining Your
Bluetooth
Headset
General Care
The
Bluetooth
Headset is of user-friendly and lightweight design. The
material and workmanship is guaranteed for steady and clear
wireless communication. However, you should pay attention to the
proper storage and cleaning process. This will extend the headset’s
use time and enhance stable and superior performance. The
following sections describe general notices for your headset
maintenance.
Table 1: Headset Specification
Bluetooth
Compliance
Bluetooth
1.1
Core ASIC Motorola MC72000
Profile Support Headset/Hands-free
Frequency Band 2.45 GHz ISM band
79 channels frequency hop-
ping
TX Output Power Class 3 (0dBm)
Receiver Sensitivity <–82dBm typical
Operating Range Up to 10 meters
Security Encrypted link
Typical Talk Time Up to 3 hours
Typical Standby Time Up to 120 hours
Typical Charging Time 1.5 hours
Charging Interface USB, 5Vdc
Dimension (LxWxH, mm) 100 x 49 x 16
Weight (gram) 22.8
Regulation FCC, CE, IC RSS-210

inspiration. invention. freedom. flexibility. simplicity.
18
Storage
You must not use the headset in extreme temperature and humidity
environment. The storage temperature is between -20°C~55°C. If you
want to transport it, ensure not to fold it improperly, drop it on the
ground, or scratch with a hard and sharp object.
The supplied USB cable should be stored in a secure and handy
place for frequent use. Use the cable to connect to suitable USB
connector. Do not force in to other types of connectors. When
connecting the headset to any other devices with a USB port, make
sure the connecting end is correct.
Cleaning
The
Bluetooth
Headset needs little maintenance. If the headset is
occasionally stained or greasy, you can use a soft dry cloth to wipe it
clean. If necessary, use a soft cloth with a small amount of neutral
cleaning agent to get rid of the dirt. Do not use any acid or alkaline
cleaning agent. Do not soak in water or flush it with running water.
Avoiding dusty places and keeping the product clean can eliminate
unnecessary cleaning.
About the Battery
The headset is constructed with a built-in battery. Direct contact with
water may result in short circuit, product damage, or malfunction.
Ensure to fully charge the battery before you use the headset for the
first time. See “Initial Battery Charge” on page 5.
Charging the Battery
With normal use the headset’s talk time is up to three hours and
standby time up to 120 hours. When the indicator lights pink,
recharging is necessary. Pay attention to indicator color change to
ensure the headset’s stable performance.
Battery Information
Do not expose the battery to extreme temperature exceeding +55°C
(+131°F). Charge the battery only in an environment between +10°C
(+50°F) and +45°C (+113°F). It is strongly recommended to charge the
battery once a month even when the headset is not used.

inspiration. invention. freedom. flexibility. simplicity.
19
Troubleshooting
If you incur any problem with your
Bluetooth
Headset, you may want
to solve the problem yourself, before consulting your service
representative. The following section describes some frequent
problems encountered while operating the headset. If you don't find
the answer to your problem in these pages, make sure you have
followed the instructions carefully and observed the safety
precautions. If all else fails, contact your service representative. You
should also make a record of what happened and what remedies you
tried.
Refer to the Tips and Hints section before trying to resolve your
problem.
Table 2: Troubleshooting
Problem Possible Cause Tips and Hints
No indicator Power off Press and hold the
control wheel to turn on
the headset. See “Turn
On” on page 9.
No sound •
Power off
•
Not yet pairing
•
Turn the power on.
•
Not yet pairing:
– Press and hold the
control wheel to turn
on the headset. See
“Turn On” on page 9.
– Perform the pairing
operation before
using the headset.
See “Pairing the
Headset to a
Bluetooth Phone” on
page 10.

inspiration. invention. freedom. flexibility. simplicity.
20
Cannot pair
with mobile
phone
•
Your mobile
phone does not
support (built-
in) Bluetooth
function.
•
Power too low
•
Use a mobile phone
with Bluetooth
supporting function. If
your mobile phone
does not have built-in
Bluetooth support,
use the attached
Bluetooth support
device. See “Pairing
the Headset to a
Bluetooth Phone” on
page 10.
•
Charge the headset
immediately.
Unclear
sound
•
Battery low
•
Frequency
interruption
•
Recharge your
headset. See “Initial
Battery Charge” on
page 5.
•
Consult your
telecommunication
carrier or headset
distributor for further
information and help.
The head-
set is auto-
matically
turned off.
•
The battery is
too low.
•
The headset is
placed under
extreme
temperature.
•
Charge the battery
immediately for at
least one hour to build
up the necessary
power. See “About the
Battery” on page 18.
•
Place the headset in a
cool place to return it
to the normal
operational state. See
“Storage” on page 18.
Voice com-
mand does
not work
properly.
The mobile
phone cannot
recognize your
voice command
through the
headset.
Refer to the user man-
ual of your mobile
phone to set up the
voice command again
through the
Bluetooth
Headset.
Table 2: Troubleshooting (Continued)
Problem Possible Cause Tips and Hints

inspiration. invention. freedom. flexibility. simplicity.
21
Telephone
call is inter-
rupted.
•
Charging during
a phone call.
•
The headset is
out of the
receiving range.
•
You should not charge
during talking. The
telephone session is
disconnected. Refer
to “Charging and
Battery Time” on
page 6 for a full
charge first, then you
can resume your
phone call.
•
Move within the range
of the effective
operational distance
(up to 10 meters). See
“Receiving a Call with
the Headset” on
page 13.
No charg-
ing indica-
tor is on.
•
The battery is
too low.
•
You did not use
the headset for
a long time.
For both of the possi-
ble causes, charge the
headset immediately
and wait for 30 minutes
until the headset build
up enough power to
light the indicator. See
“Charging and Battery
Time” on page 6.
Red indica-
tor stays on
Battery low Recharge the headset
immediately. See “Ini-
tial Battery Charge” on
page 5.
Table 2: Troubleshooting (Continued)
Problem Possible Cause Tips and Hints

inspiration. invention. freedom. flexibility. simplicity.
22
Service Information

inspiration. invention. freedom. flexibility. simplicity.
23
Glossary
Useful Terms
Bluetooth
A mobile personal area network (PAN) technology from the Bluetooth
Special Interest Group founded in 1998 by 3M, Ericsson, IBM, Intel,
Motorola, Nokia, and Toshiba. Bluetooth is an open standard for
short-range transmission of digital voice and data between mobile
devices and desktop devices. It provides up to 720 Kbps data transfer
within a range of 10 meters and up to 100 meters with a power boost.
Bluetooth uses omnidirectional radio waves that can transmit through
walls and other non-metal barriers; transmits in the unlicensed
2.4GHz ISM band and uses a frequency hopping spread spectrum
technique that changes its signal 1600 times per second. The name
Bluetooth comes from King Harald Blatand (Bluetooth) of Denmark.
BQB
(Bluetooth Qualification Body) An individual person recognized by the
Bluetooth Qualification Review Board (BQRB) to be responsible for
checking declarations and documents against requirements, verifying
the authenticity of product test reports, and listing products on the
official Bluetooth Qualified Products List.
Headset
A device that is equivalent to a telephone handset in functionality, but
is designed to fit around the person's head for more comfort by
leaving both hands free. Like a handset, the headset contains a
microphone and one or two speakers (for one or both ears).
Pairing
An identification and matching process between your target devices
and the Bluetooth devices. Before you first use a Bluetooth Headset,
you must set up your mobile phone’s supporting function, so that your
mobile phone can identify and search for the Bluetooth Headset and
transfer incoming calls to the headset.
Wireless
Radio transmission via the airwaves. Various communications
techniques are used to provide wireless transmission including
infrared line of sight, cellular, microwave, satellite, packet radio and
spread spectrum.

inspiration. invention. freedom. flexibility. simplicity.
24