Remotesolution RC96A REMOTE CONTROL UNIT User Manual
Remote Solution Co., Ltd. REMOTE CONTROL UNIT
User Manual

RemoteSolution Co. Ltd, Remote Controller Unit
2/6 page
1. Application Processor
1.1. GP565
2. Application Device
2.1. TV(U/R), STB
3. Application KEY
3.1. TV key
TV Power, Vol+/-, Mute, Input Î 5 keys
3.2. STB Key
STB Power, Google, Page up/down, Live, Vol+/-, Mute, Recent, Ch+/-, Backward, Menu, Guide, Up,
Down, Left, Right, OK, Shows, Movies, Search, REC, REW, Play/Pause, FF, 0~9(Digit), Set Î 37keys
4. LED
4.1. Green LED : RF Check output signal and enter setting mode ON/OFF
4.2. Red LED : Confirm for IR output signal & Confirm the detection of Low battery signal.
4.3. Back-Light : Turns on when there is movement on the remote control ÎFade out off after 3 seconds
5. Main Function
5.1. 5Digit Code Entry.
5.2. Auto-Search.
5.3. RF Pairing
5.4. RF Un-Pairing
5.5. Battery Monitor
5.6. Low battery detection
5.7. Couch Function
5.8. IR Un-Pairing
5.9. Version Out
5.10. Device Volume Setting
5.11. RF Information
5.12. Key function table
5.13. Factory Reset
The instructions
model name: RC96A,RC96XBB (X stands for A~Z, BB stands for 00~99)

RemoteSolution Co. Ltd, Remote Controller Unit
3/6 page
1. Code Entry Method
The function is set by inputting 5-digit CODE to Device for each manufacturer.
How to enter set-up Mode?
*Press and hold the setting key for 3 seconds until Red is changed to Green LED Æ Enter Setting Mode.
1.1. UR Setting (TV).
1.1.1. Enter Setting Mode.
1.1.2. When the 5-digit entered in the brand list is present in the DB, the green LED turns off after blinking
twice.
1.1.3. If invalid Digit input is entered, Red LED and Green LED are blinked one time in sequence and then
turned off.
1.2. When the UR setting is completed, TV Power, Vol+/-, Mute, Source key are sent in UR Code.
2. Auto-Search Method
This function searches DB of Device by [CH+] or [CH-] key in turn, finds the setting numbers of the device, and
sets remote.
2.1. Enter the setting mode.
2.2. Press [9][9][1] sequentially to turn off the Green LED after blinking twice.
2.3. Enter the [CH+] or [CH-] key.
2.3.1. 3-Frame Power Code is output by [CH +] or [CH -] key input.
2.4. If the desired code is searched, enter the [OK] key.
2.4.1. Save the searched code and exit the setting mode after Green LED blinking twice.
2.5. If there is no key input for 10 seconds before [OK] key is input, Red LED and Green LED are turned off
after blinking one time in sequence, leaving setting mode
3. RF Pairing
This function is to transmit the key data of the cable device through RF
3.1. Process
3.1.1. Enter the setting mode
3.1.2. If you press [MENU] key, Green LED blinks and enters Discovery mode.
3.1.3. Check the 3-digit validation code on the STB screen and enter it with the remote control.
3.1.4. If the pairing is completed normally with entered input, the Green LED turns off after blinking twice.
3.2. Sending Data
3.2.1. When the pairing is completed, all the key data related to STB transmit through RF.
3.2.2. TV key data transmit through IR.
4. RF Un-Pairing
This function is to cancel the pairing between the STB and the remote control.
4.1 Enter the setting mode.
4.2 If you press [9][8][7], Green LED will blink twice with un-pairing.

RemoteSolution Co. Ltd, Remote Controller Unit
4/6 page
5. Battery Monitor
This function is to check battery status.
5.1 Enter the setting mode.
5.2 Press [9][9][9], and check the LED status.
5.2.1. If the Green LED blinks 4 times, battery status is excellent.
5.2.2. If the Green LED blinks 3 times, battery status is good.
5.2.3. If the Red LED blinks 2 times, battery status is low.
5.2.4. If the Red LED blinks 1 times, battery status is very low.(should be replace)
6. Low Battery Detection
This function blinks the Red LED 5 times, each time the key is pressed and released when the battery voltage is
below 2.4V.
7. Couch Function
This function is to stop the IR output to reduce the battery consumption when any key is pressed for 30 seconds
continuously.
8. IR Un-Pairing
This function is to switch the set TV key to the default state.
8.1. Enter the setting mode.
8.2. Press [9][8][6], and the Green LED blinks 2 times with IR Un-Pairing.
9. Version Out
This function outputs 4-digit version of the remote control through LED.
9.1. Enter setting mode.
9.2. Press [9][8][3], the Green LED blinks 2 times.
9.3. Press [1] and check Red LED blink count
9.4. Press [2] and check Red LED blink count
9.5. Press [3] and check Red LED blink count
9.6. Press [4] and check Red LED blink count.
9.7. Red LED and Green LED sequentially blink 1 time and turn off. Finally setting mode is exited.
9.8. Example,
9.8.1. Press [1], Red LED blink 1 time.
9.8.2. Press [2], Red LED blink 8 times
9.8.3. Press [3], Red LED blink 1 times
9.8.4. Press [4], Red LED blink 0 times
9.8.5. Then, Remote version is 1.8.1.0.
10. Device Volume Setting
This function switches the Vol +/-, Mute Key to TV volume control or STB volume control mode.
10.1. TV Volume Control Mode
10.1.1. Enter setting mode
10.1.2. Press [Vol+] key and Green LED blinks 2 times and it switch to TV Volume control mode.
10.2. STB Volume Control Mode(Default)
10.2.1.
Enter Setting Mode
10.2.2. Press [Vol-] key and Green LED blinks 2 times and it switch to STB Volume control mode.
RemoteSolution Co. Ltd, Remote Controller Unit
5/6 page
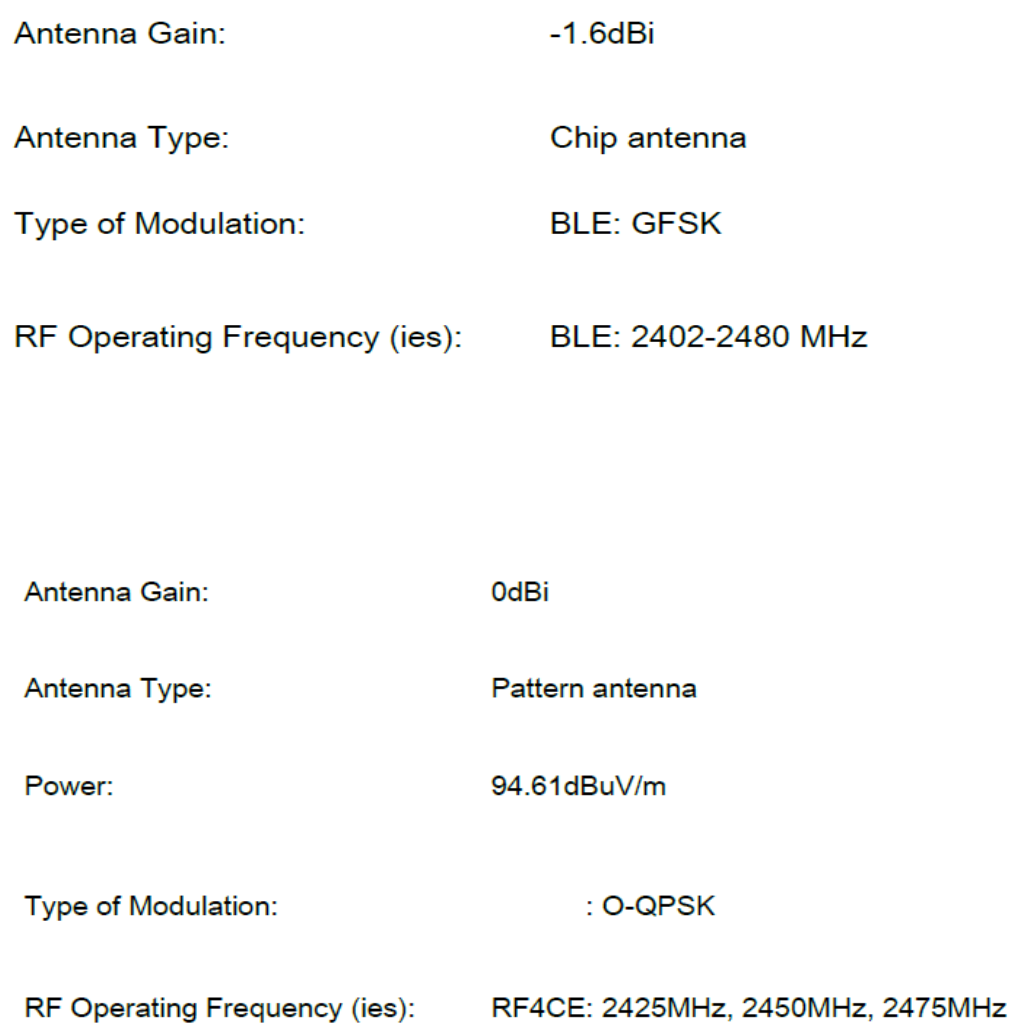
11. RF Information
Vendor ID 0x10D0
Vendor String KAON
User String RC96B
Device Type 0x01
Profile ID 0x01
12. Key Function Table
MODEL RC96B(KUR1)
FORMAT Nec (Lead + Custom(16) + Data(8) + Data_Bar(8) + End)
DUTY 1 / 2
CARRIER 37.9 KHz
LEAD 9.0 / 4.5 ms
BIT "0" 0.56 / 0.56 ms
BIT "1" 0.56 / 1.69 ms
1st WORD 108ms
2nd WORD 108ms (Simple Repeat)
Repeat 9.0 / 2.25 / 0.56 ms
Custom C96A (h)
NO Function Data (IR) Data (RF) TV
1 TV Power TV code - Y
2 Input TV code - Y
3 STB Power 6B (h) 6B (h) N
4 Google 77 (h) 77 (h) N
5 Page Up 37 (h) 37 (h) N
6 Page Down 38 (h) 38 (h) N
7 Live 78 (h) 78 (h) N
8 Vol+ 41 (h) 41 (h) Y
9 Vol- 42 (h) 42 (h) Y
10 Mute 43 (h) 43 (h) Y
11 Last 32 (h) 32 (h) N
12 Ch+ 30 (h) 30 (h) N
13 Ch- 31 (h) 31 (h) N
14 Backward 4C (h) 4C (h) N
15 Menu 09 (h) 09 (h) N
16 Guide 53 (h) 53 (h) N
17 Up 01 (h) 01 (h) N
18 Down 02 (h) 02 (h) N
19 Left 03 (h) 03 (h) N
20 Right 04 (h) 04 (h) N
21 OK 00 (h) 00 (h) N
22 Shows 79 (h) 79 (h) N
23 Movies 52 (h) 52 (h) N
24 Search 3C (h) 3C (h) N
25 REC 47 (h) 47 (h) N
26 REW 48 (h) 48 (h) N
27 Play/pause 61 (h) 61 (h) N
28 FF 49 (h) 49 (h) N
29 1 21 (h) 21 (h) N
30 2 22 (h) 22 (h) N
31 3 23 (h) 23 (h) N
32 4 24 (h) 24 (h) N
33 5 25 (h) 25 (h) N
34 6 26 (h) 26 (h) N
35 7 27 (h) 27 (h) N
36 8 28 (h) 28 (h) N
37 9 29 (h) 29 (h) N
38 Set - - N
39 0 20 (h) 20 (h) N

RemoteSolution Co. Ltd, Remote Controller Unit
6/6 page
13. Factory Default
This function clears all data that is currently set, and then returns to the factory default state.
13.1. Enter setting mode
13.2. Press [9][8][1] and Green LED blinks 2 times. All data set in the RAM and Flash area is switched to
factory default.
* The Above soft specification may change later
. -END-
FCC warning
§ 15.21 Information to user.
Any Changes or modifications not expressly approved by the party responsible for compliance could void the user's authority to operate the
equipment.
§ 15.105 Information to the user.
Note: This equipment has been tested and found to comply with the limits for a Class B digital device, pursuant to part 15 of the FCC Rules.
These limits are designed to provide reasonable protection against harmful interference in a residential installation. This equipment
generates uses and can radiate radio frequency energy and, if not installed and used in accordance with the instructions, may cause harmful
interference to radio communications. However, there is no guarantee that interference will not occur in a particular installation. If this
equipment does cause harmful interference to radio or television reception, which can be determined by turning the equipment off and on,
the user is encouraged to try to correct the interference by one or more of the following measures:
-Reorient or relocate the receiving antenna.
-Increase the separation between the equipment and receiver.
-Connect the equipment into an outlet on a circuit different from that to which the receiver is connected.
-Consult the dealer or an experienced radio/TV technician for help.
15. RF exposure statement
* RF warning for Portable device:
The device has been evaluated to meet general RF exposure requirement. The device can be used in portable exposure condition without
restriction.
16. label statement
§ 15.19 Labelling requirements. This device complies with part 15 of the FCC Rules. Operation is subject to the following two conditions: (1)
This device may not cause harmful interference, and (2) this device must accept any interference received, including interference that may
cause undesired operation.