Remotesolution RH60B Color LCD Touch screen universal remote control User Manual 2LM RH60AB manual 070403
Remote Solution Co., Ltd. Color LCD Touch screen universal remote control 2LM RH60AB manual 070403
User Manual

Comfortable use with touch screen
User's Manual
RH60

G enera l Informa tion
IMPORTANT INFORMATION ON SAFE AND EFFICIENT OPERATION
READ THIS INFORMATION BEFORE USING RH60
I Section 15.19 Labelling requirements.
This device complies with part 15 of the FCC rules.
Operation is subject to the following two conditions:
(1) This device may not cause harmful interference and
(2) This device must accept any interference received, including interference
that may cause undesired operation.
I Section 15.21 Information to user.
The changes or modif cations not expressly approved by the party responsible for
compliance could void the user’s authority to operate the equipment.
I IMPORTANT NOTE :
To comply with the FCC RF exposure compliance requirements, no change to
the antenna or the device is permitted. Any change to the antenna or the device
could result in the device exceeding the RF exposure requirements and void user’s
authority to operate the device.
NOTICE
Note:
The equipment has been tested and found to comply with the limits for a Class B
Digital Device, pursuant to part 15 of the FCC Rules. These limits are designed to
provide reasonable protection against harmful interference in a residential installation.
This equipment generates, uses and can radiate radio frequency energy and,
if not installed and used in accordance with the instruction, may cause harmful
interference to radio communication.
However, there is no grantee that interference will not occur in a particular installation.
If this equipment dose cause harmful interference to radio or television reception,
which can be determined by turning the equipment off and on ,
the user is encouraged to try to correct the interference by one or more of the following
measures:
- Reorient or relocate the receiving antenna.
- Increase the separation between the equipment and receiver.
- Connect the equipment into an outlet on a circuit different from that to which the
receiver is connected.
- Consult the dealer or an experienced radio/TV technician for help.
The user should not modify or change this equipment without written approval from
Remote Solution Co., Ltd.
Modification could void authority to use this equipment.

www.remotesolution.co.kr
Product Features 1
Safety Precautions 2
Components 4
Parts Diagram 5
Battery Removal and Insertion 9
Recharging and Turning Power On/Off 10
Product Specifications 11
$IBQUFS]1SFQBSJOHUP6TFUIF1SPEVDU
Menu Structure 14
Display Structure 15
<DEVICES> Mode 18
<MY PICK> Mode 21
<OTHERS> Mode 22
$IBQUFS]-FBSOJOHUP6TFUIF.FOVT
<SETTING> Mode 28
$IBQUFS]$POGJHVSJOHUIF4FUUJOHT
Contents
$IBQUFS]1SFQBSJOHUP6TFUIF1SPEVDU
1 I
Product Features
I Product Features
Product Features 1
Product Features 1
Safety Precautions 2
About the Power Supply 2
About the Product 3
Components 4
Standard 4
Optional 4
Parts Diagram 5
Remote 5
Cradle 6
SubRemote (Optional) 7
RF Receiver & IR Converter (Optional) 8
Battery Removal and Insertion 9
Battery Removal 9
Battery Insertion 9
Recharging and Turning Power On/Off 10
Recharging with an Adapter 10
Turning the Remote Control Power On/Off 10
Product Specifications 11
3URGXFW6SHFL¿FDWLRQV
$IBQUFS]1SFQBSJOHUP6TFUIF1SPEVDU
Touch screen that facilitates usage convenience
1
2
3
4
5
6
Wheel mechanism that allows for easy page navigation
Simple user interface that promotes intuitive use
/RZSRZHUFRQVXPSWLRQWKDWH[WHQGVEDWWHU\OLIH
Distinctive design including a 3.9-inch color LCD
RF function that enables multi-room control
$IBQUFS]1SFQBSJOHUP6TFUIF1SPEVDU
I 2
$IBQUFS]1SFQBSJOHUP6TFUIF1SPEVDU
3I
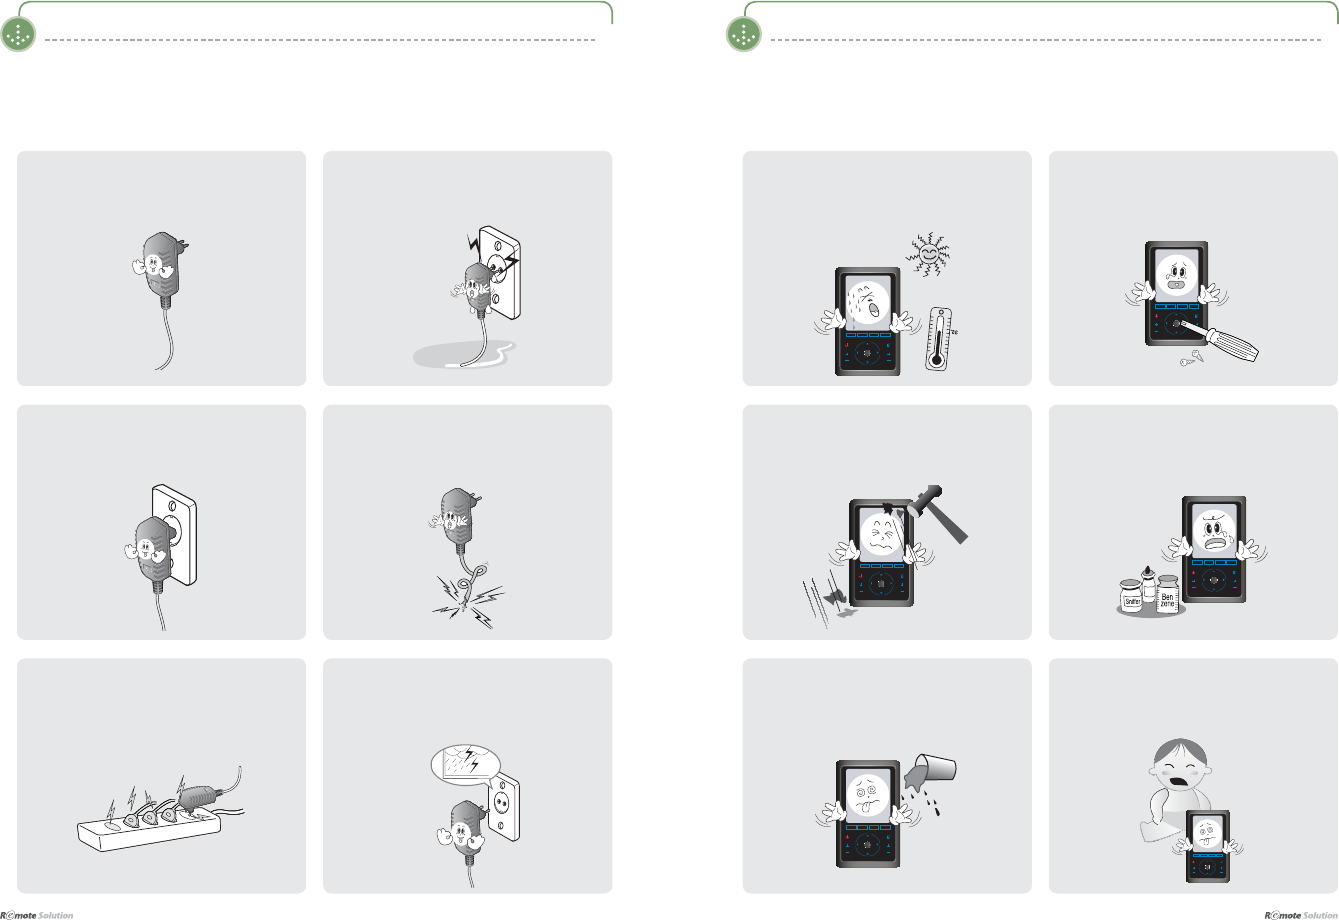
Safety Precautions
The following information is included to promote user safety and prevent any possible injury or
property damage. Please read the directions carefully and use the product correctly..
I About the Power Supply
Safety Precautions
I About the Product
0DNHVXUHWKHSOXJ¿WVWLJKWO\LQWRWKHRXWOHW
Loose plugs can cause electric shock.
Do not fold the power cable or place
anything heavy on it.
This can result in electric shock.
Do Not use too many plugs in a single
power outlet.
This can result in electric shock.
Unplug the power plug during electrical
storms.
Lightning can cause an electric shock.
Do NOT touch the power plug with wet
hands.
This can result in electric shock.
Do not allow foreign objects or liquid to get
inside the product.
This can result in damage to the product.
Do not allow children to play with the remote.
If the product is dropped, this can cause
damage or injury.
Do not place heavy objects on the product.
This can cause breakdown or damage to the
product.
Clean the product with a soft, dry cloth. Do NOT
XVHDQ\ÀDPPDEOHFOHDQHUVRUFKHPLFDOV
This can cause damage to the surface of the
product.
Do not use the product in high temperatures
or high humidity.
This can cause damage to the product.
Do not disassemble the product.
This can result in damage to the product.
}vs
jo
lu{ly
}vs
jo
lu{ly
}vs
jo
lu{ly
}vs
jo
lu{ly
}vs
jo
lu{ly
}vs
jo
lu{ly
Only charge using the power supply
provided.
An incorrect power supply can cause damage
to the product.
$IBQUFS]1SFQBSJOHUP6TFUIF1SPEVDU
I 4
$IBQUFS]1SFQBSJOHUP6TFUIF1SPEVDU
5I
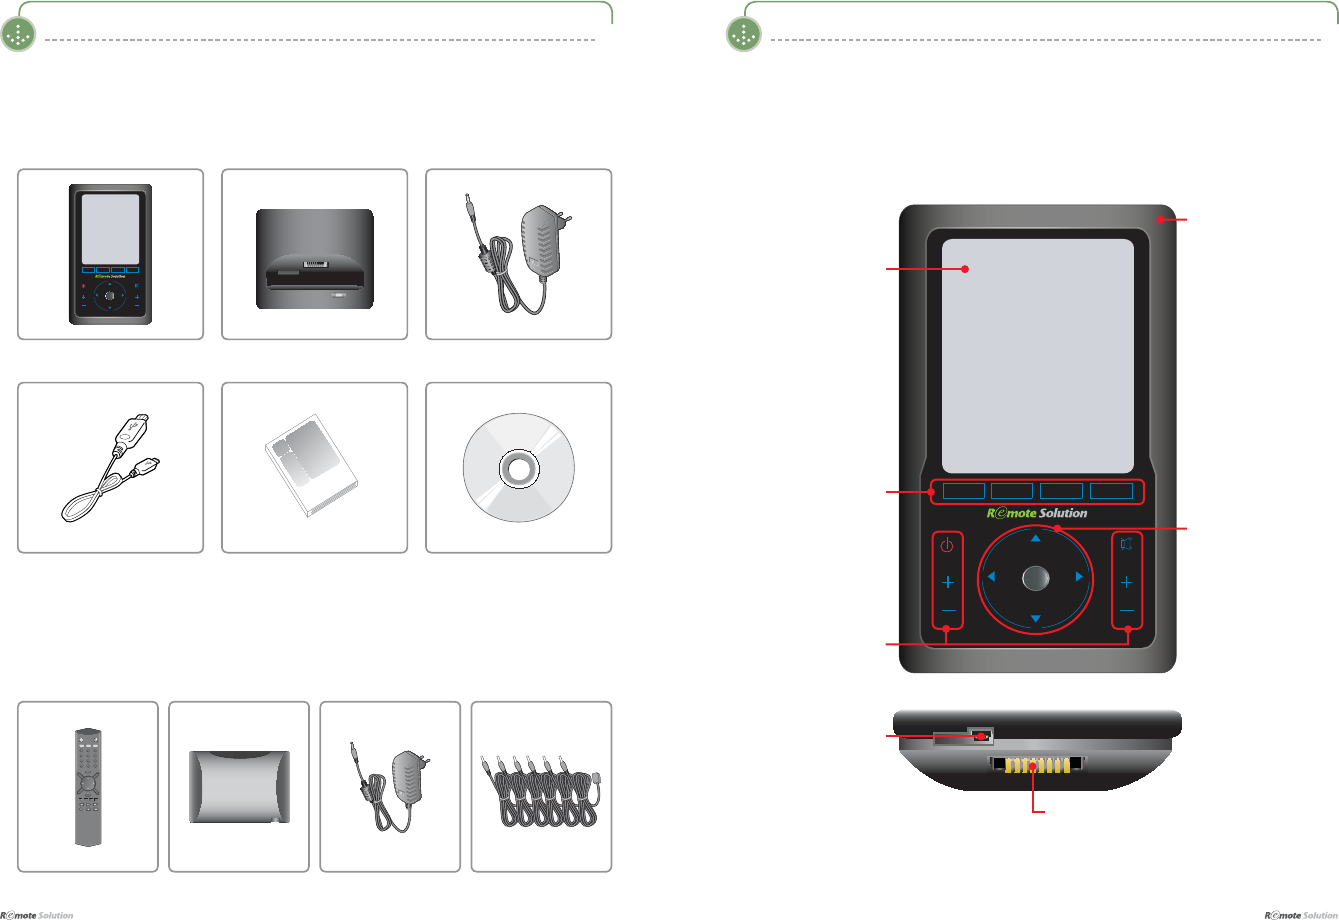
Components
Components may be replaced without any prior notice in the interest of improving product quality or
performance. The components shown here in the manual may differ from the components included
with purchase.
I Standard
I Optional
CradleMain Unit
}vs
jo
lu{ly
Adapter
USB Cable
Parts Diagram
The diagram may differ with the purchased product.
I Remote
4-Menu Link Bottom Button
or Device Link Button
LCD Screen
Safety Frame
Wheel Control or Cursor
Navigation Button
Function Button
USB Port
Product Manual
Sub-Remote Control RF Receiver Adapter 6-CH IR Flashers
123
456
789
100
0
INFO
MUTE
SEL
VID1
VID2
GUIDE
PREV
MENU
EXIT
VID3 VID4
POWER
CH CH
VOL VOL
Cradle Charge Docking Connector
SETUP CD
$IBQUFS]1SFQBSJOHUP6TFUIF1SPEVDU
I 6
$IBQUFS]1SFQBSJOHUP6TFUIF1SPEVDU
7 I
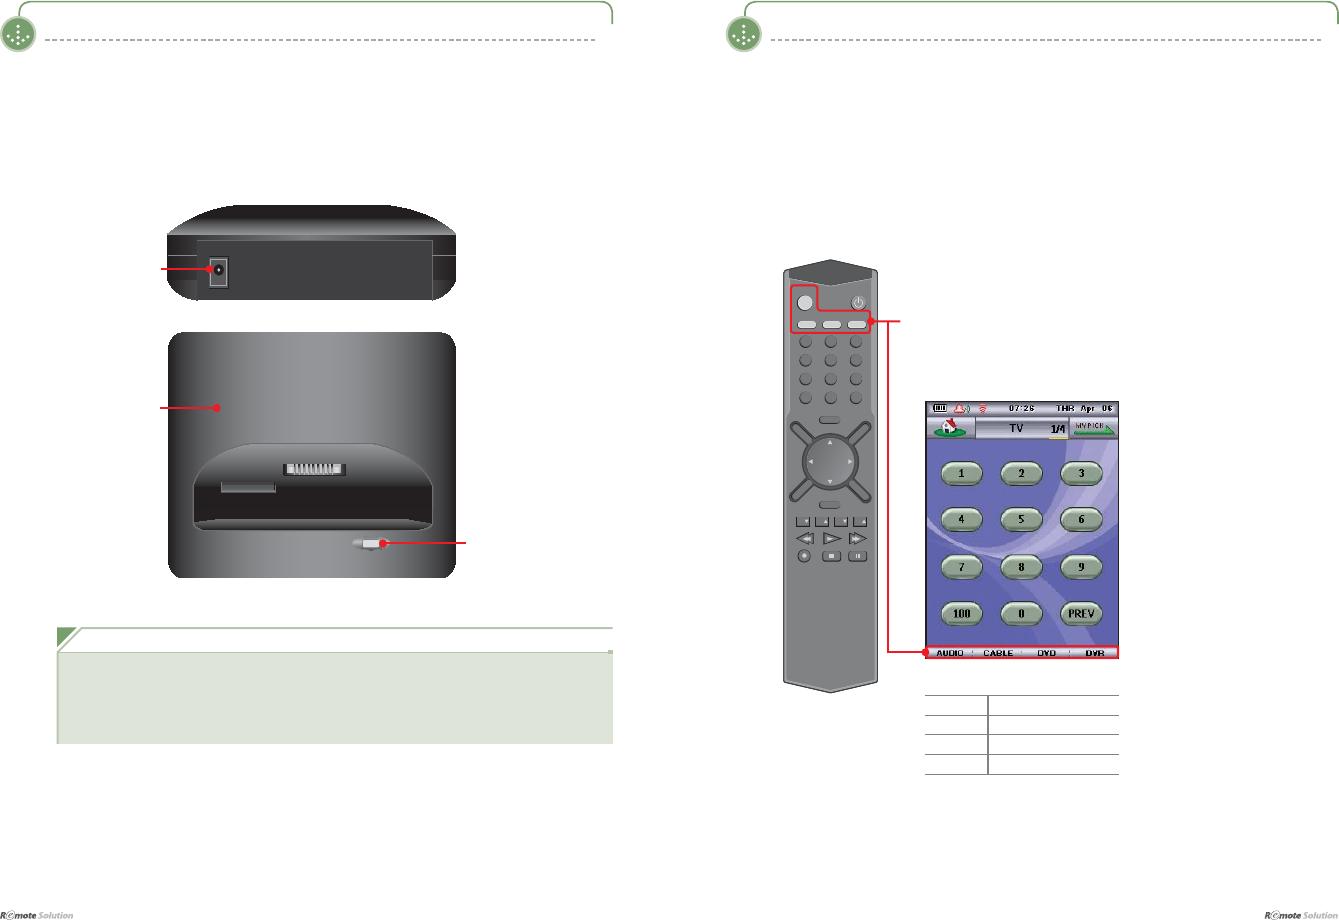
Parts Diagram
The diagram may differ with the purchased product.
I Cradle
Cradle
DC 5.0V
/PUF
Ŷ The LED glows red when charging is needed.
After fully charged, the lamp turns green.
Ŷ Recharging time can vary.
Ŷ
:KHQWKHGHYLFHLV¿UVWFRQQHFWHGWRDSRZHUVRXUFHWKH/('ÀDVKHVRUDQJH
Recharging Status
LED
Parts Diagram
The diagram may differ with the purchased product.
I SubRemote (Optional)
The SubRemote is used when the Main Remote is being recharged
SubRemote is available when the Main Remote is plugged into the Cradle, and the
Main Remote must be selected to RF mode
123
456
789
100
0
INFO
MUTE
SEL
VID1
VID2
GUIDE
PREV
MENU
EXIT
VID3 VID4
POWER
CH CH
VOL VOL
Buttons that are used to choose devices
The procedure of using vid1,vid2,vid3,vid4 with the Sub Remote
Control is the same as using Device link with the RH60.
([0DLQ5HPRWH5+'HYLFHOLQNSDUW
SubRemote Device Link
VID1 AUDIO
VID2 CABLE
VID3 DVD
VID4 DVR
$IBQUFS]1SFQBSJOHUP6TFUIF1SPEVDU
I 8
$IBQUFS]1SFQBSJOHUP6TFUIF1SPEVDU
9 I
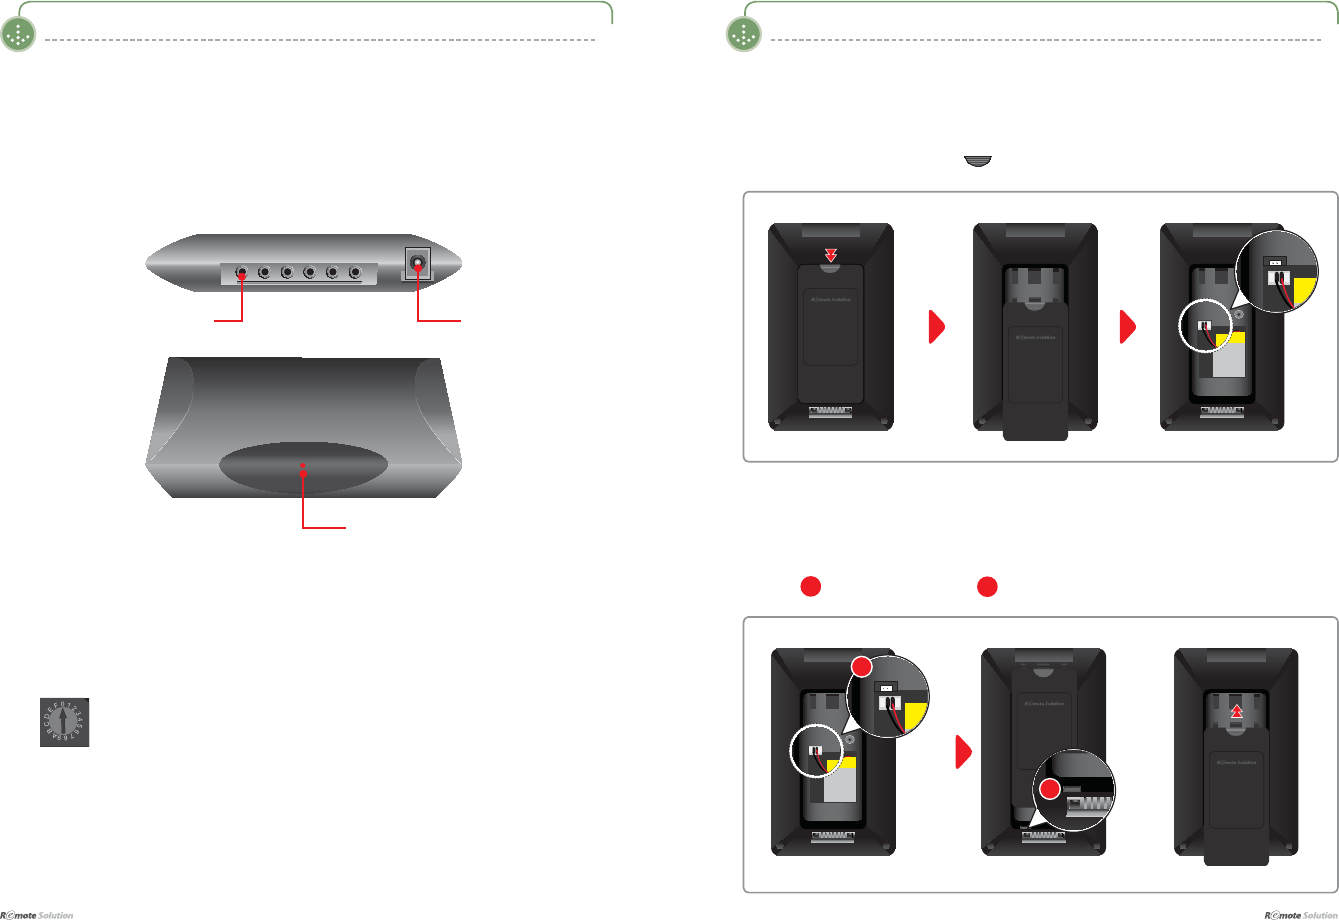
Battery Removal and Insertion
I Battery Removal
I Battery Insertion
Open the battery cover by pushing in the direction of the arrow.
Connect 1 and secure the cover to 2 and then close it.
1
2
Parts Diagram
The diagram may differ with the purchased product.
I RF Receiver & IR Converter (Optional)
Adaptor Spec : DC 12V, 300mA
Receives and changes a RF signal from the Main Remote or SubRemote to an IR signal
IR Signal Indicator. LED
:KHQLWLV¿UVWWXUQHGRQ,56LJQDO,QGLFDWRU/('ZLOOEOLQNWLPHV
If it does not blink 4 times, contact your distributor.
When the RF ID correctly corresponds with the RF Code, the IR Signal Indicator LED
will turn on and the IR code will be transmitted.
* The back (side) Rotary Switch
RF ID Change
DC12VIR Flasher connector
$IBQUFS]1SFQBSJOHUP6TFUIF1SPEVDU
I 10
$IBQUFS]1SFQBSJOHUP6TFUIF1SPEVDU
11 I
Product Specifications
3URGXFW VSHFL¿FDWLRQV FDQ EH FKDQJHG ZLWKRXW DQ\ SULRU QRWLFH WR LPSURYH SURGXFW SHUIRUPDQFH
and quality.
,3URGXFW6SHFL¿FDWLRQV
Item
SoC Processor Type 259 QFP
3URFHVVRU +\QL[+06&
Processor 80MHz
CPU Core ARM 720T
Memory Controller 16&32 bit modes,
LCD Controller Mono/Color STN, TFT LCD
USB Controller USB (Slave) 1.1
Memory )ODVK0HPRU\ 0E[ELWRU0E[ELW
6'5$0 0E[ELW
65$0 0E[ELW>-7$*'HEXJ@
External keys Touch Panel Touch panel controller ADS7843
Touch Key Touch sensor controller QT1080
Touch Wheel Touch slider controller MP1025
Backlight LCD CCFL Controller MP1025
Key EL. Controller ZSP4403
Signal Transmitted
IR Infrared
=LJEHH5) *+]>,(((6WDQGDUG@
PC Interface USB Device USB 1.1 H/S
Battery Rechargeable 3.7V/ 1600mA
Li-Polymer
LCD &RORU/&' ´671&RORU/&'[
Operating Current RUN MAX 500 mA @3.7V
IDLE TYP. 300 mA @3.7V
SLEEP MAX. 8mA @3.7V
Operating Voltage 3.0V ~ 6.0V
Operating Distance
IR MIN. 10m
ZIGBEE (RF) MIN. 20m
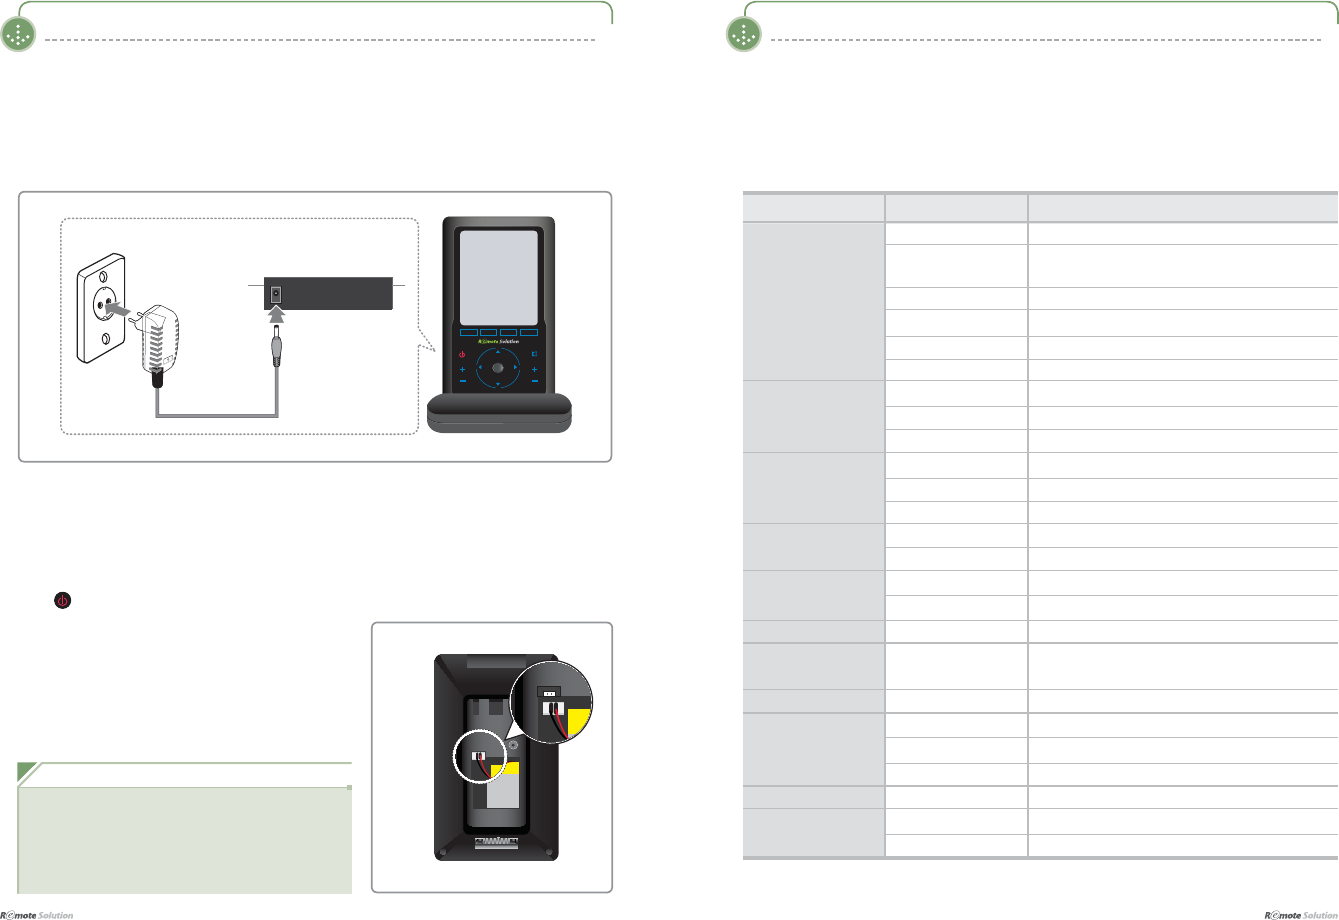
Recharging and Turning Power On/Off
I Turning the Remote Control Power On/Off
The icon is NOT related to the remote control power function.
Open the cover at the rear of the remote control and
unplug the wire to turn off the remote control power.
As the wire can be severed, be careful when unplugging.
I Recharging with an Adapter
Insert the adapter cable into the cradle and then plug the other end into a power outlet.
/PUF
In case that overvoltage, over 6V, impacts the remote
control unit, the product does not work by the operation
of the protective circuit. In order to resume the remote
control unit’s operation, remove the battery and then
reinsert it to the unit.

www.remotesolution.co.kr
Menu Structure 14
Menu Structure 14
Display Structure 15
<HOME> - Screen 15
<DEVICES> - Screen 16
<DEVICES> - TV Screen 17
<DEVICES> Mode 18
<DEVCIES> - Using the TV Remote Control 18
Different Methods to Move to Another Page 19
<DEVICES> - Changing a Link 20
<MY PICK> Mode 21
<MY PICK> - Navigation 21
<OTHERS> Mode 22
<BIO RHYTHM> - Screen 22
<GAMES> - Screen 23
<MEMO> - Screen 24
<ALARM> - Screen 25
$IBQUFS]-FBSOJOHUP6TFUIF.FOVT
$IBQUFS]-FBSOJOHUP6TFUIF.FOVT
I 14
$IBQUFS]-FBSOJOHUP6TFUIF.FOVT
15 I
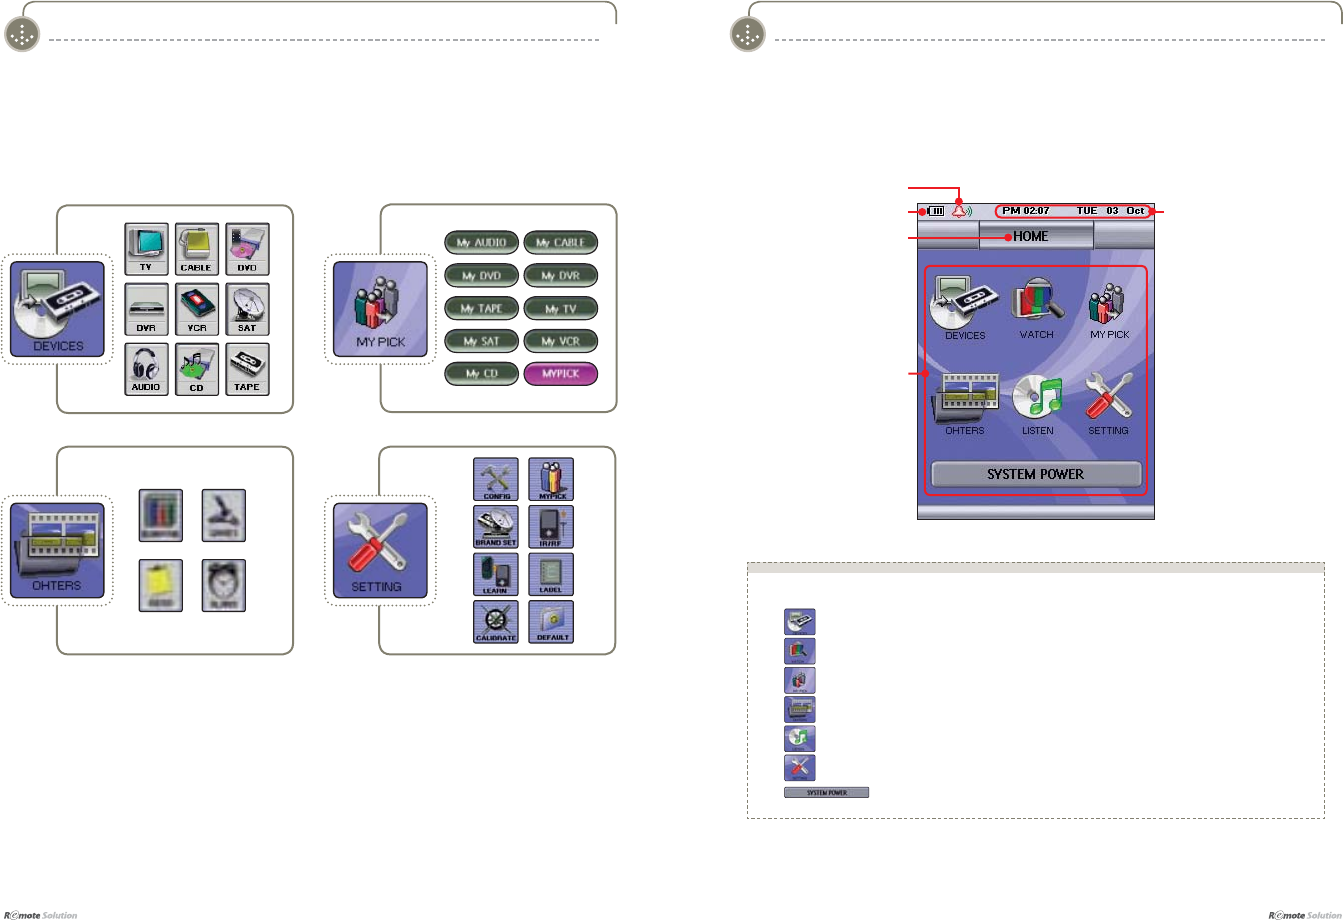
Menu Structure Display Structure
I HOME - ScreenI Menu Structure
The following shows menu buttons that are displayed on the LCD screen. Please refer to each
function in the details shown below.
Battery Charge Indicator
Current Page Display
Time and Date Display
Menus
Ŷ 7KHIROORZLQJ+20(!LFRQVDUHH[SODLQHGEHORZ
: move to the device group that the user wishes to control.
: Watch is jump to Watching group.
: move to the My Pick group.
: move to the other functions menu.
: LISTEN is jump to listening group.
: move to the system settings menu.
: System Power is power control on all devices.
Alarm Set
$IBQUFS]-FBSOJOHUP6TFUIF.FOVT
I 16
$IBQUFS]-FBSOJOHUP6TFUIF.FOVT
17 I
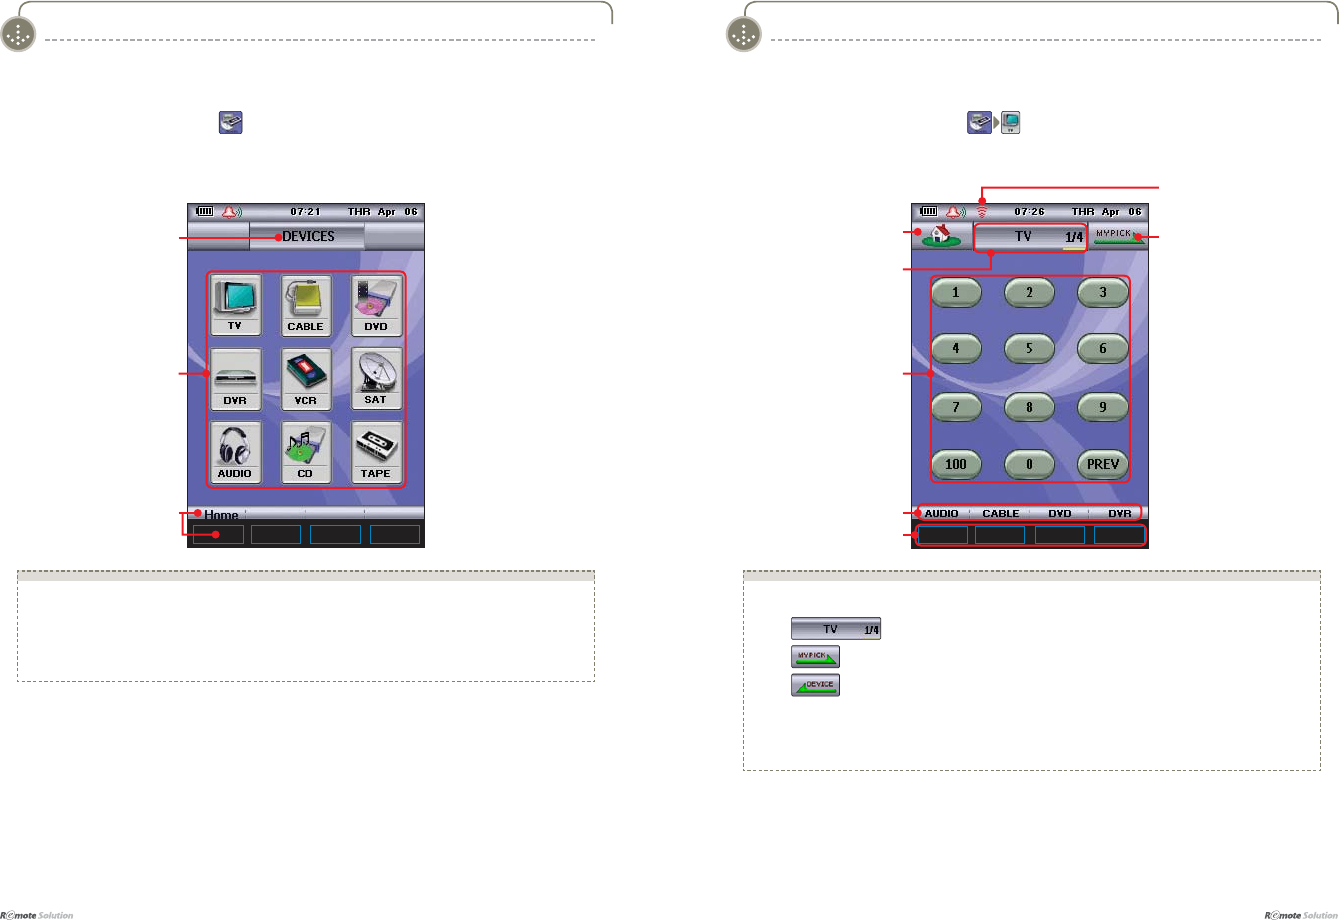
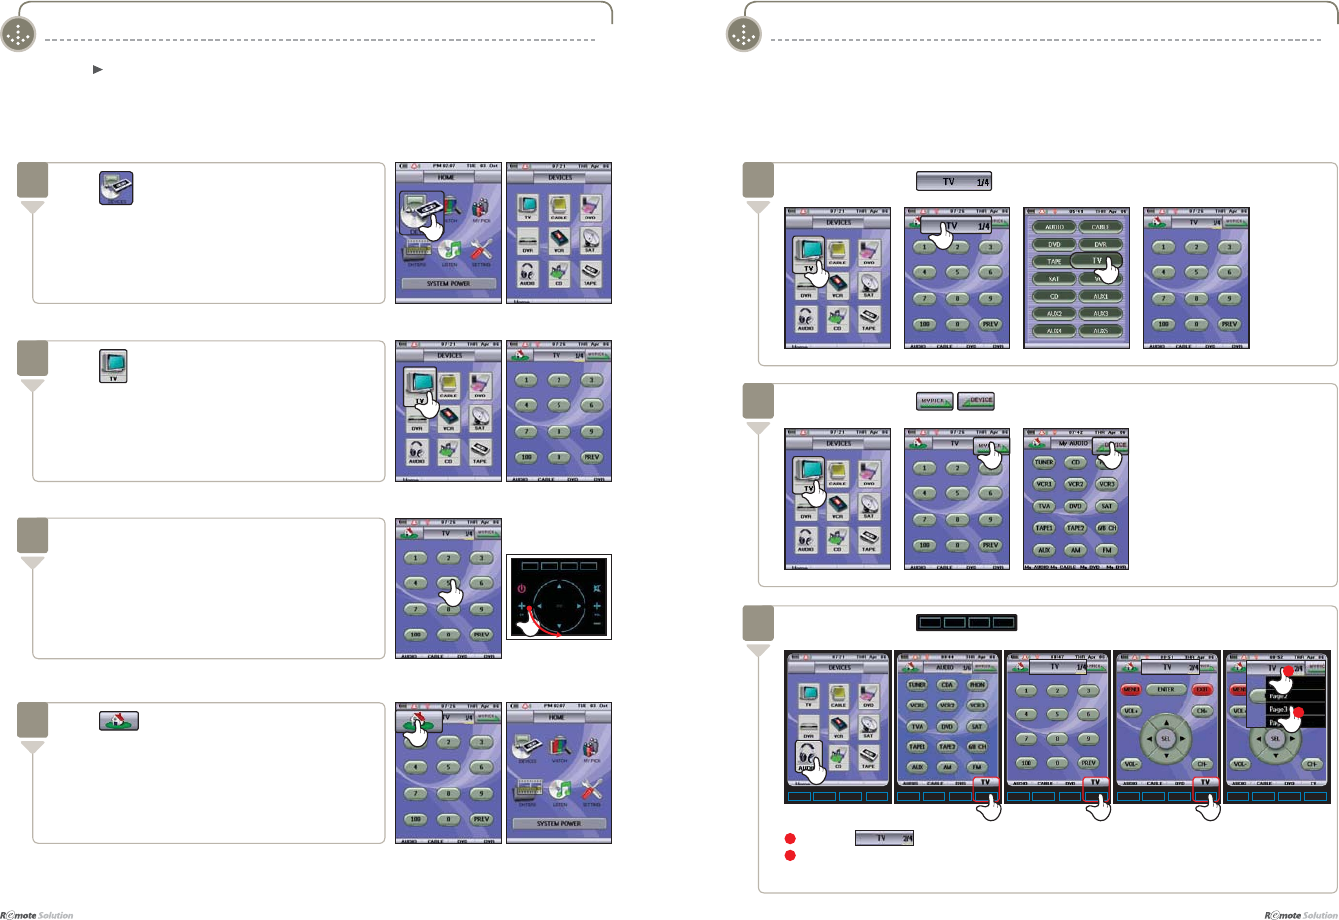
I DEVICES - TV Screen ( )
Ŷ 7KH'(9,&(6!PHQXLVH[SODLQHGEHORZ
Ɣ0HQXVXVHUVHOHFWVDQGPRYHVWRWKHSDJHRIWKHGHVLUHGGHYLFH
Ɣ+RPHUHWXUQWRWKHKRPHVFUHHQE\SUHVVLQJWKH+RPHEXWWRQRUFOLFNLQJRQWKHER[EHORZ
the Home button.
Display Structure
I DEVICES - Screen ( )
Current Page Display
Menus
Return to Home
Display Structure
Move to HOME Screen
Function Icons
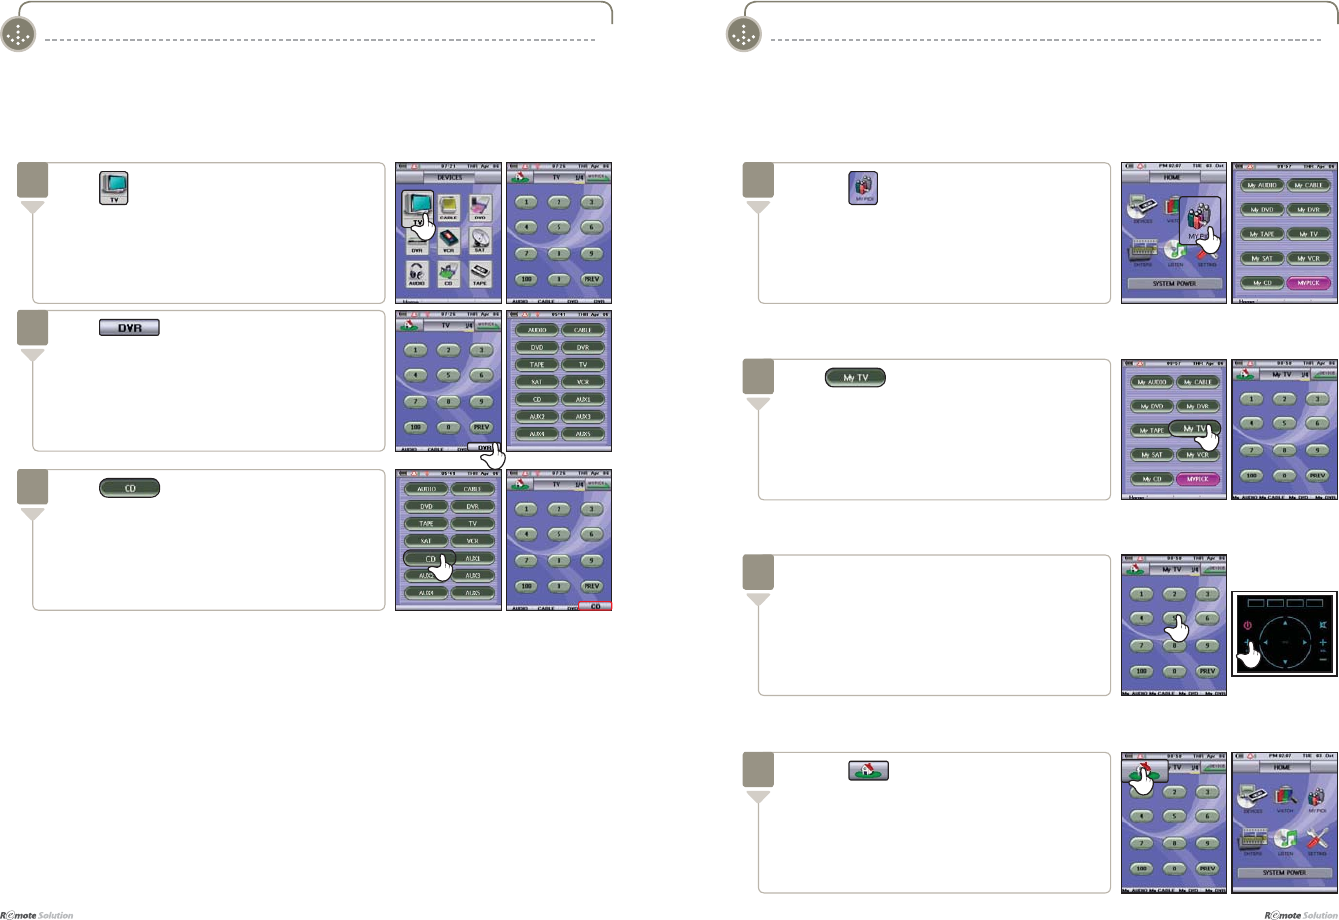
Ŷ 7KHIROORZLQJ'HYLFH!79LFRQVDUHH[SODLQHGDVIROORZV
Ɣ : moves to the device screen and displays the current mode.
Ɣ : moves to MY PICK .
Ɣ : moves to DEVICES .
ƔThe function icons : are used to operate the device functions.
Ɣ'HYLFHOLQNVHWWLQJEXWWRQVEXWWRQVWRVHWGHYLFHOLQNVUHIHUWRSDJH
ƔDevice link buttons : moves to pages preset in device link set.
Device Link Setting Buttons
Move to DEVICE Screen
Page Number Display
Mode change
DEVICE Link Button
Display of IR/RF Signal
$IBQUFS]-FBSOJOHUP6TFUIF.FOVT
I 18
$IBQUFS]-FBSOJOHUP6TFUIF.FOVT
19 I
1Press the to show page information.
2Select the page name to move to the desired page.
(The wheel can also be used to move between pages)
I DEVCIES - Using the TV Remote Control
<DEVICES> Mode
TV , CABLE , DVD , DVR , VCR , SAT , AUDIO , CD , TAPE
HOME Use the same method to move to the DEVICES menu.
Press on HOME screen.
Displays the DEVICES screen.
1
Press on DEVICES screen.
Displays the DEVICES TV screen.
2
Press WRH[LWWKLVPRGH
Displays HOME screen.
(Refer to 33~35 page to set the brand.)
4
I Different Methods to Move to Another Page
<DEVICES> Mode
Press the function icons on the TV screen to turn
the channels.
Use the wheel to move to another page.
3
Wheel
Move by pressing the icons.
2
Move by pressing the icon.
1
Move by pressing the device link buttons.
3
1
2
$IBQUFS]-FBSOJOHUP6TFUIF.FOVT
I 20
$IBQUFS]-FBSOJOHUP6TFUIF.FOVT
21 I
I DEVICES - Changing a Link
<DEVICES> Mode
Press .
Displays the Device screen.
2
Press .
Shows the menu for the changed link.
3
<MY PICK> Mode
I MY PICK - Navigation
Press the icon on the Home screen.
Displays the My Pick screen.
1
The My Pick Macro begins operation when
the operation button on the My TV screen is
pressed.
Refer to page 30~31 for My Pick settings.
3
Wheel
Press .
Displays the My TV screen.
2
Press the button to end.
Displays the Home screen.
4
Press on the DEVICES screen.
Displays the TV screen.
1
$IBQUFS]-FBSOJOHUP6TFUIF.FOVT
I 22
$IBQUFS]-FBSOJOHUP6TFUIF.FOVT
23 I
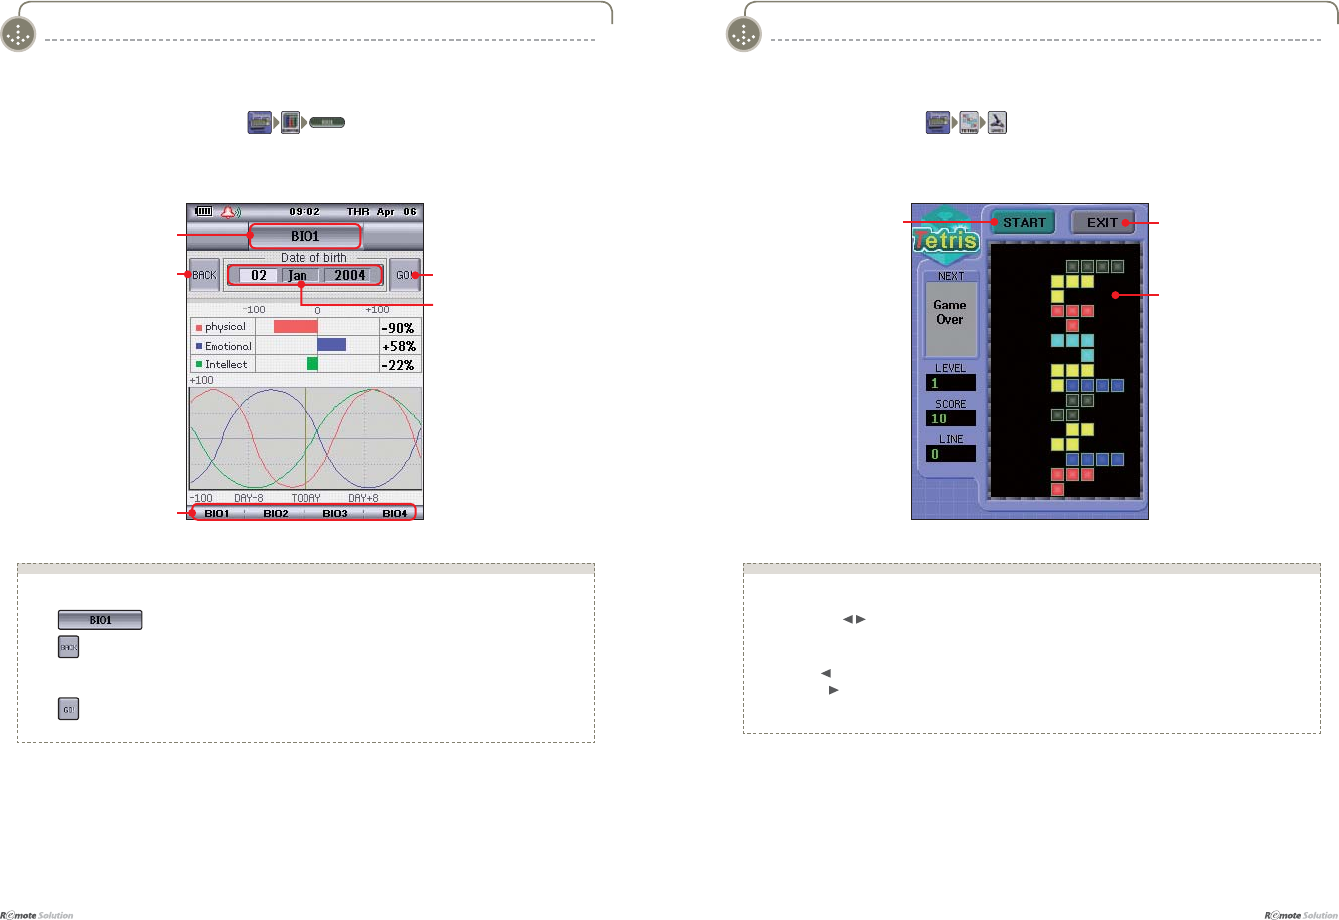
I GAMES - Screen ( )I BIO RHYTHM - Screen ( )
<OTHERS> Mode <OTHERS> Mode
Move to the
Entertainment Screen
Ŷ 7KH%,25+<7+0!LFRQVDUHH[SODLQHGDVIROORZV
Ɣ : moves to the Bio Rhythm Screen.
Ɣ : Moves to the Entertainment Screen.
Ɣ'DWHRIELUWK7RXFKWKH'2%VFUHHQWRFKDQJHWKHEDFNJURXQGFRORU
7KHGDWHRIELUWKFDQWKHQEHPRGL¿HGXVLQJWKHZKHHO
Ɣ 3UHVVWRVDYHPRGL¿FDWLRQVDQGGLVSOD\QHZELRUK\WKPLQIRUPDWLRQ
Bio Rhythm Link
Move to the Bio
Rhythm Screen
Go button after DOB
Year/Month/Date Display
Game Start ([LW
Ŷ 7KH*$0(6!LFRQVDUHH[SODLQHGDVIROORZV
Ɣ8VH>Ÿź on the wheel.
Ɣ83ŸURWDWHWXUQ
Ɣ'RZQźVHQGWRERWWRP
Ɣ/HIW ) : move left
Ɣ5LJKW ) : move right
* The start function is inoperable once the game has started.
Game Screen
$IBQUFS]-FBSOJOHUP6TFUIF.FOVT
I 24
$IBQUFS]-FBSOJOHUP6TFUIF.FOVT
25 I
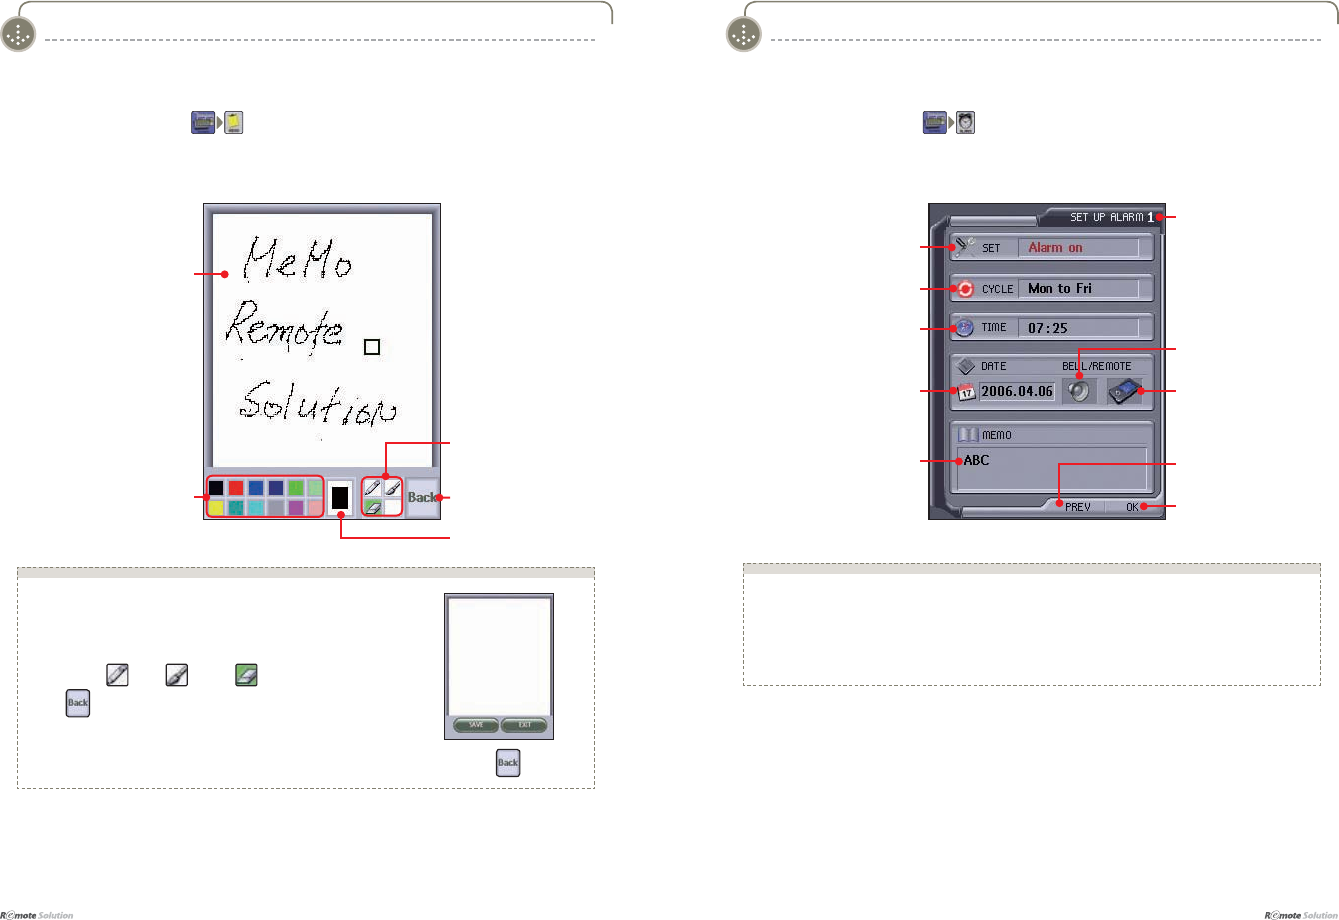
I MEMO - Screen ( ) I ALARM - Screen ( )
Memo Screen
Pen Color
<OTHERS> Mode<OTHERS> Mode
6DYH([LW
Tools
Current Color
Ŷ 7KH0(02!LFRQVDUHH[SODLQHGDVIROORZV
Ɣ0HPR6FUHHQ8VHUVFDQZULWHPHPRV
Ɣ3HQ&RORU8VHUFDQFKRRVHSHQFRORUV
Ɣ&XUUHQW&RORUVKRZVWKHFXUUHQWSHQFRORUVHOHFWHGE\WKHXVHU
Ɣ7RROV (Pen) (Brush) (Eraser)
Ɣ SUHVVLQJWKLVLFRQEULQJVXSWKH6DYH([LWZLQGRZ
screen when pressed
Alarm On/Off
Alarm Cycle
Current Mode Display
Ŷ 7KH$/$50!LFRQVDUHH[SODLQHGDVIROORZV
Remote Control Function Setting :
The My Pick setting function controls both this alarm function as well as those of other devices.
The setting method is identical to that of the My Pick function (refer to page 30~31).
Alarm Time
Special Dates for Alarm
Setting
Memo
Remote Control Function
Setting
Alarm Sound On/Off
OK
Previous Screen

www.remotesolution.co.kr
<SETTING> Mode 28
<SETTING> - Menu Descriptions 28
<CONFIG> - Screen 29
<MYPICK> 30
<BRAND SET> - Screen 32
<BRAND SET> - TV Remote Control Setting 33
<IR/RF> - Output Mode Setting 36
<LEARN> - Learning Function Setting(Buttons) 37
<LEARN> - Learning Function Setting(Devices) 39
<LABEL> - EDIT Screen 40
<LABEL> - Group Label Edit 41
<LABEL> - MyPick Edit / Bio Rhythm Edit 43
<LABEL> - Device Button / Mypick Button 43
<CALIBRATE> - Touch Screen Setting 44
<CALIBRATE> - Wheel Setting 45
<DEFAULT> Menu Descriptions 46
<FACTORY DEFAULT> - Moving 46
<DEFAULT> - BRAND SET 47
<DEFAULT> - MYPICK 48
<DEFAULT> - LEARN 48
<DEFAULT> - ALL CLEAR 49
<DEFAULT> - CLONE 50
$IBQUFS]$POGJHVSJOHUIF4FUUJOHT
$IBQUFS]$POGJHVSJOHUIF4FUUJOHT
I 28
$IBQUFS]$POGJHVSJOHUIF4FUUJOHT
29 I
<SETTING> Mode <SETTING> Mode
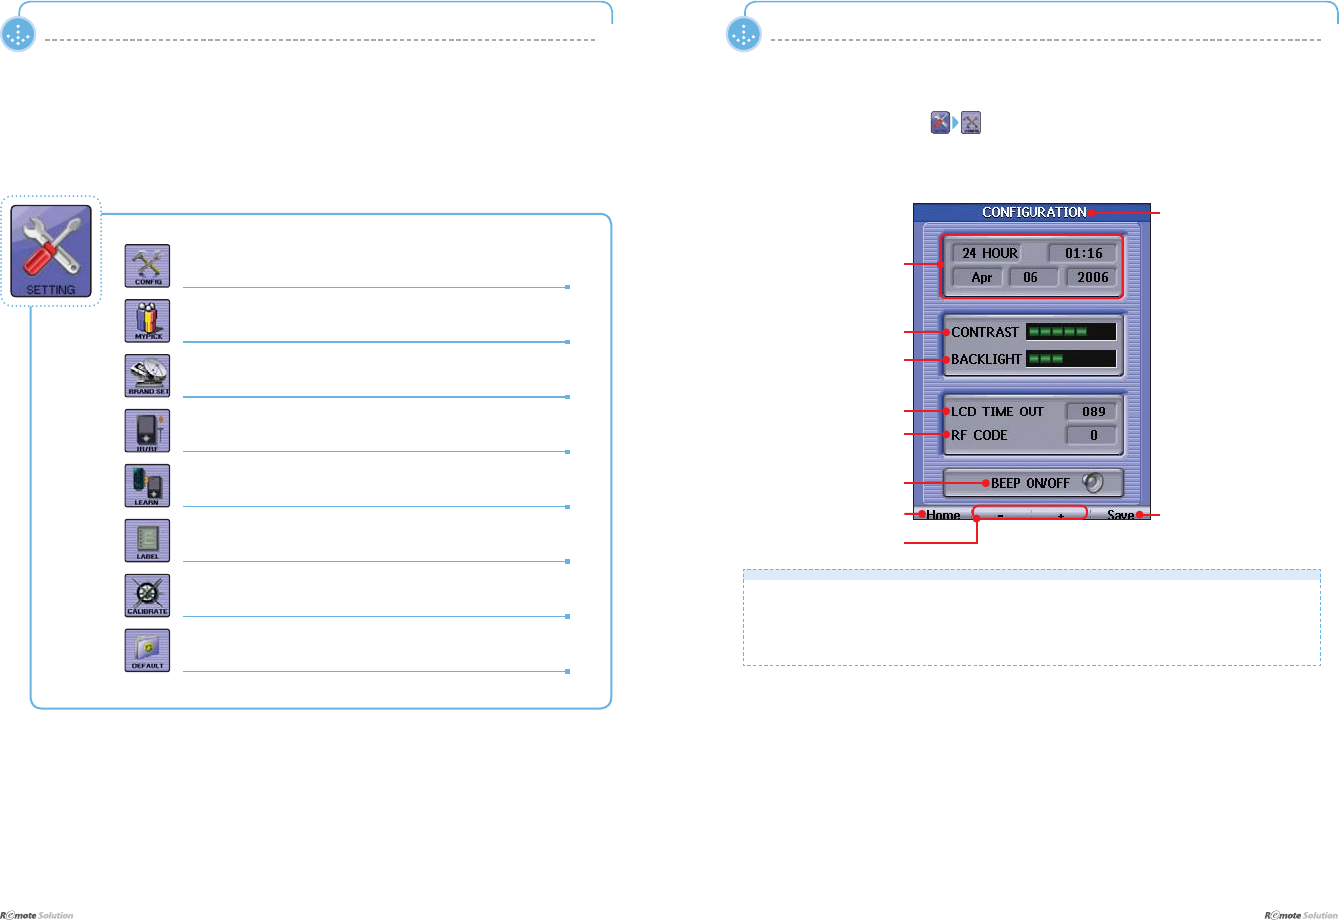
I CONFIG - Screen ( )
I SETTING - Menu Descriptions
Current Time
Current Mode Display
LCD Contrast Control
Ŷ 7KH&21),*85$7,21!LFRQVDUHH[SODLQHGDVIROORZV
To change any value, select the menu to change and adjust the value using the /-
EXWWRQVRUURWDWLQJWKHZKHHO
Return to Home Save
LCD Brightness Control
/&'2II7LPH
RF CODE
Change value using (-, )
RUWKHZKHHO
Sound ON/OFF
&RQ¿J!&RQ¿JXUHWKHUHPRWHFRQWUROGLVSOD\
Mypick
&XVWRPL]HWKHUHPRWHFRQWUROWRWKHXVHU¶VSUHIHUHQFHV
%UDQGVHW!(QWHUWKHUHPRWHFRQWUROSURJUDPPLQJ
,55)!6HWWKHRXWSXWPRGH
/HDUQ!/HDUQWKHIXQFWLRQVRIDUHPRWHFRQWURO
/DEHO!0RGLI\WKHEXWWRQODEHOV
Calibrate
$GMXVWWKHVHQVLWLYLW\RIWKH/&'VFUHHQDQGWKHZKHHO
'HIDXOW!5HVHWWRIDFWRU\GHIDXOWV
$OOSUHYLRXVO\VDYHGIXQFWLRQVDUHGHOHWHG
$IBQUFS]$POGJHVSJOHUIF4FUUJOHT
I 30
$IBQUFS]$POGJHVSJOHUIF4FUUJOHT
31 I
<SETTING> Mode
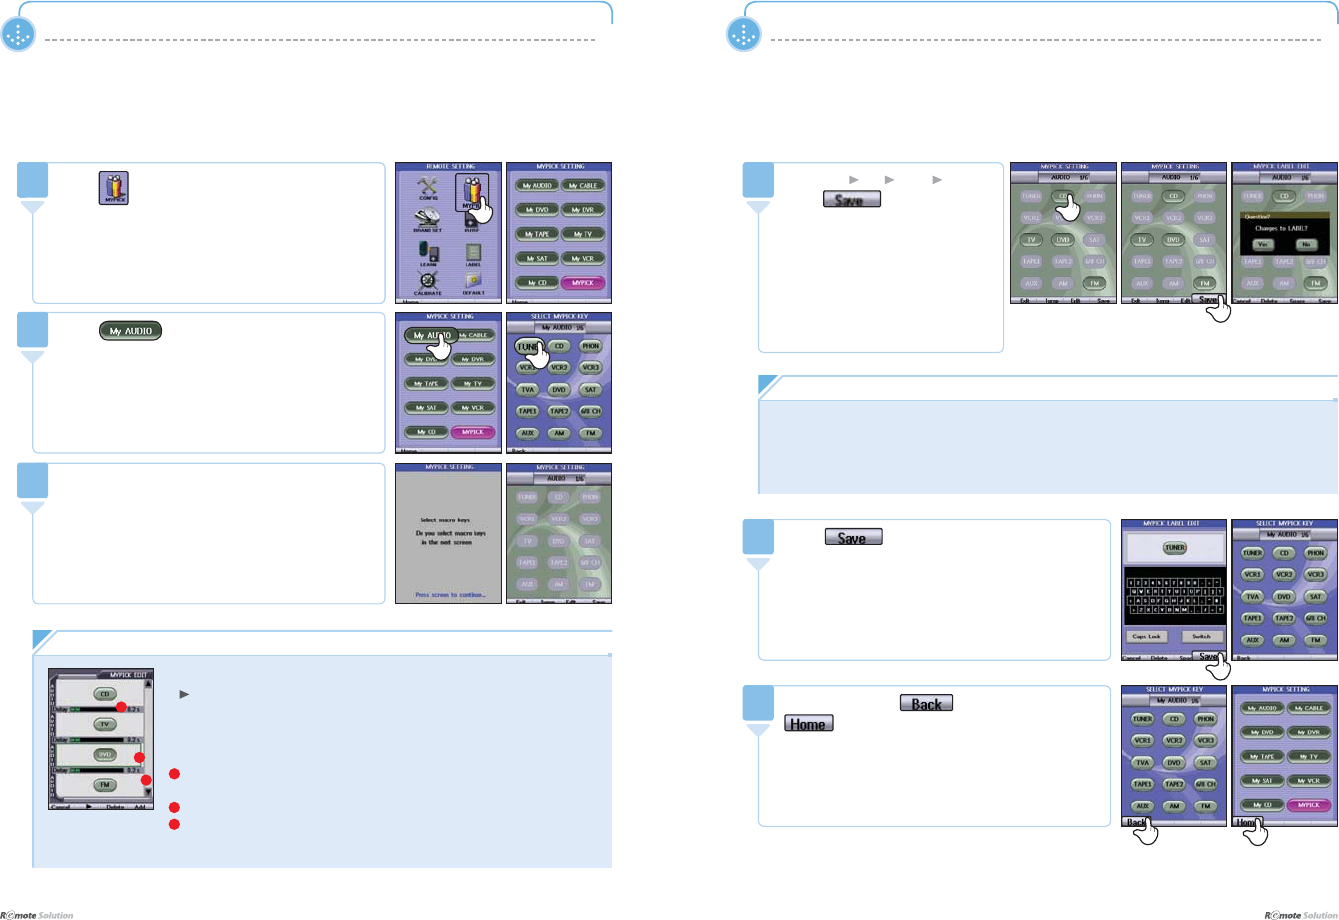
I MYPICK
&XVWRPL]HWKHUHPRWHFRQWUROWRWKHXVHU¶VSUHIHUHQFHV
<SETTING> Mode
1Press RQWKH5(027(6(77,1*!6FUHHQ
'LVSOD\VWKH>0\3LFN6HWWLQJ@6FUHHQ
1
3UHVVDEXWWRQWRLQVWDOOWKHPDFUR$VDYHG
EXWWRQPDFURFDQEHHGLWHG
3UHVVWKHGHVLUHGEXWWRQ
,IWKHUHDUHVDYHGEXWWRQVWKH(GLWOLVWVFUHHQDSSHDUV
3
Press CD TV DVD FM and
press ZKHQ¿QLVKHG
3UHVVWKHGHVLUHGEXWWRQ
Pressing the Save button saves
WKHLQIRUPDWLRQDQGLVIROORZHG
E\WKHDSSHDUDQFHRIDPHVVDJH
asking, Changes to LABEL
<HVPRYHVWRWKHODEHOHGLWVFUHHQ
No: moves to Select My pick key
VFUHHQ
4
Press
3OHDVHUHIHUWRWKHODEHOHGLWLQJVFUHHQSDJHa
5
$IWHUSUHVVLQJWKH icon, press the
LFRQWRHQGWKHPRGH
6
/PUF
Ŷ([LW JREDFNWRWKHSUHYLRXVVFUHHQ
Ŷ-XPS PRYHWRWKH-XPS6FUHHQ6HWWLQJ
Ŷ(GLW PRYHWRWKH(GLW/LVWUHIHUWRSDJH
Ŷ6DYH $IWHUVDYLQJPRYHWRODEHOHGLWLQJUHIHUWRSDJHa
/PUF
Ŷ&DQFHO JREDFNWRSUHYLRXVVFUHHQZLWKRXWVDYLQJ
Ŷ FKHFNWKHEXWWRQVVDYHGRQWKHGHYLFH
Ŷ'HOHWH GHOHWHWKHEXWWRQVVDYHG
6HOHFWDEXWWRQWRGHOHWHDQGSUHVVGHOHWH
Ŷ$GG JRWRSUHYLRXVVFUHHQDIWHUVDYLQJ
1'HOD\ZLQGRZVHWWKHGHOD\WLPHDIWHUDIXQFWLRQLVLQSXWWHG
6HOHFWDIXQFWLRQEXWWRQDQGVHWWKHGHOD\WLPHXVLQJWKHZKHHOaVHFV
27KLVZLOOEHVKRZQZKHQWKHEXWWRQLVVHOHFWHG
38SGRZQ0RUHWKDQEXWWRQVFDQEHYLHZHG
8SWREXWWRQVFDQEHVDYHG
1
3
Edit List Screen
Press
6HOHFWDEXWWRQIRUPDFURLQVWDOODWLRQ
([781(5
2
2
$IBQUFS]$POGJHVSJOHUIF4FUUJOHT
I 32
$IBQUFS]$POGJHVSJOHUIF4FUUJOHT
33 I
<SETTING> Mode <SETTING> Mode
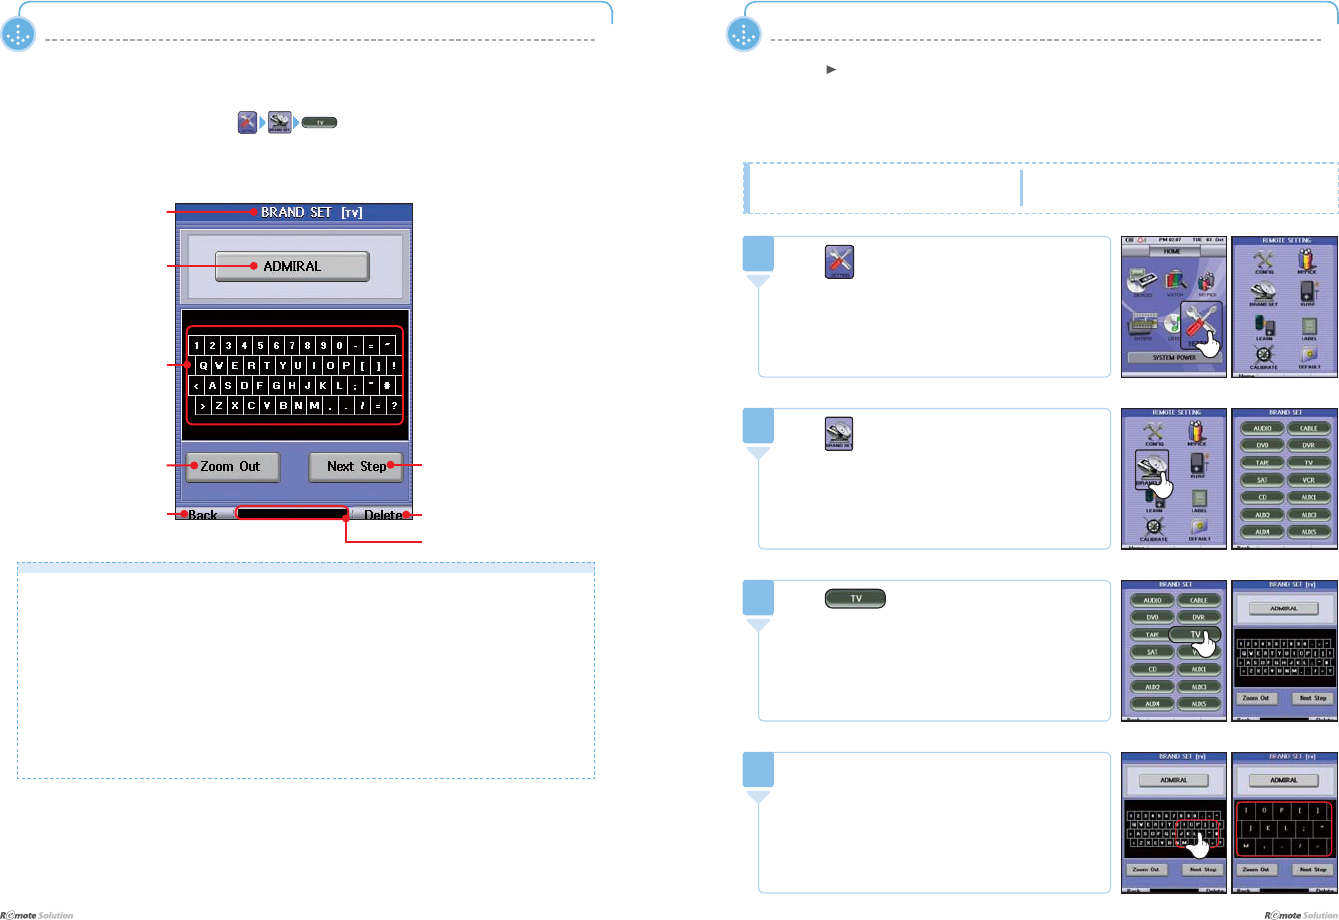
>$8',2!&$%/(!'9'!'95!7$3(!79!6$7!9&5!&'!$8;a!@
HOME 8VHWKHVDPHPHWKRGWRPRYHWRWKH%5$1'6(7!PHQX
I BRAND SET - Screen ( )
%UDQG'LVSOD\
Ŷ 7KH%5$1'6(7!LFRQVDUHH[SODLQHGDVIROORZV
'LVSOD\&XUUHQW0RGHDQG'HYLFH6HWWLQJV
'LVSOD\FXUUHQWEUDQGDQGFOLFNEXWWRQWRJRWRWKHQH[WVFUHHQ
.H\SDGWRHQWHUWKHEUDQG
=RRPRXW
*RWRWKHQH[WVFUHHQLIWKHEUDQGLVFRUUHFW
0RYHWRWKH3UHSURJUDP!VFUHHQ
'HOHWHVWKHOHWWHUVHQWHUHG
'LVSOD\VWKHOHWWHUVHQWHUHG
%DFN 'HOHWH/HWWHUV(QWHUHG
,QSXW.H\SDG
=RRP2XW 1H[W
'LVSOD\/HWWHUV(QWHUHG
&XUUHQW0RGH'LVSOD\
I BRAND SET - TV Remote Control Setting
Press LQWKH+20(!VFUHHQ
'LVSOD\VWKH5(027(6(77,1*!VFUHHQ
1
Press
'LVSOD\VWKH>'HYLFHV@79VFUHHQ
2
Ŷ7XUQRQWKHGHVLUHG79
Ŷ([79EUDQGQDPH/**ROGVWDU
Ŷ3RLQWWKHUHPRWHFRQWURODWWKH79
Press
'LVSOD\VWKH%5$1'6(7>79@!WRXFKSDG
3
3UHVVWKH¿UVWOHWWHURIWKHEUDQGQDPH
IRULQVWDQFH³/´IRU³/*´RQWKH%UDQGVHW>79@!
VFUHHQ
'LVSOD\VWKHWRXFKSDGWRHQWHUWKHEUDQGQDPH
4
$IBQUFS]$POGJHVSJOHUIF4FUUJOHT
I 34
$IBQUFS]$POGJHVSJOHUIF4FUUJOHT
35 I
<SETTING> Mode <SETTING> Mode
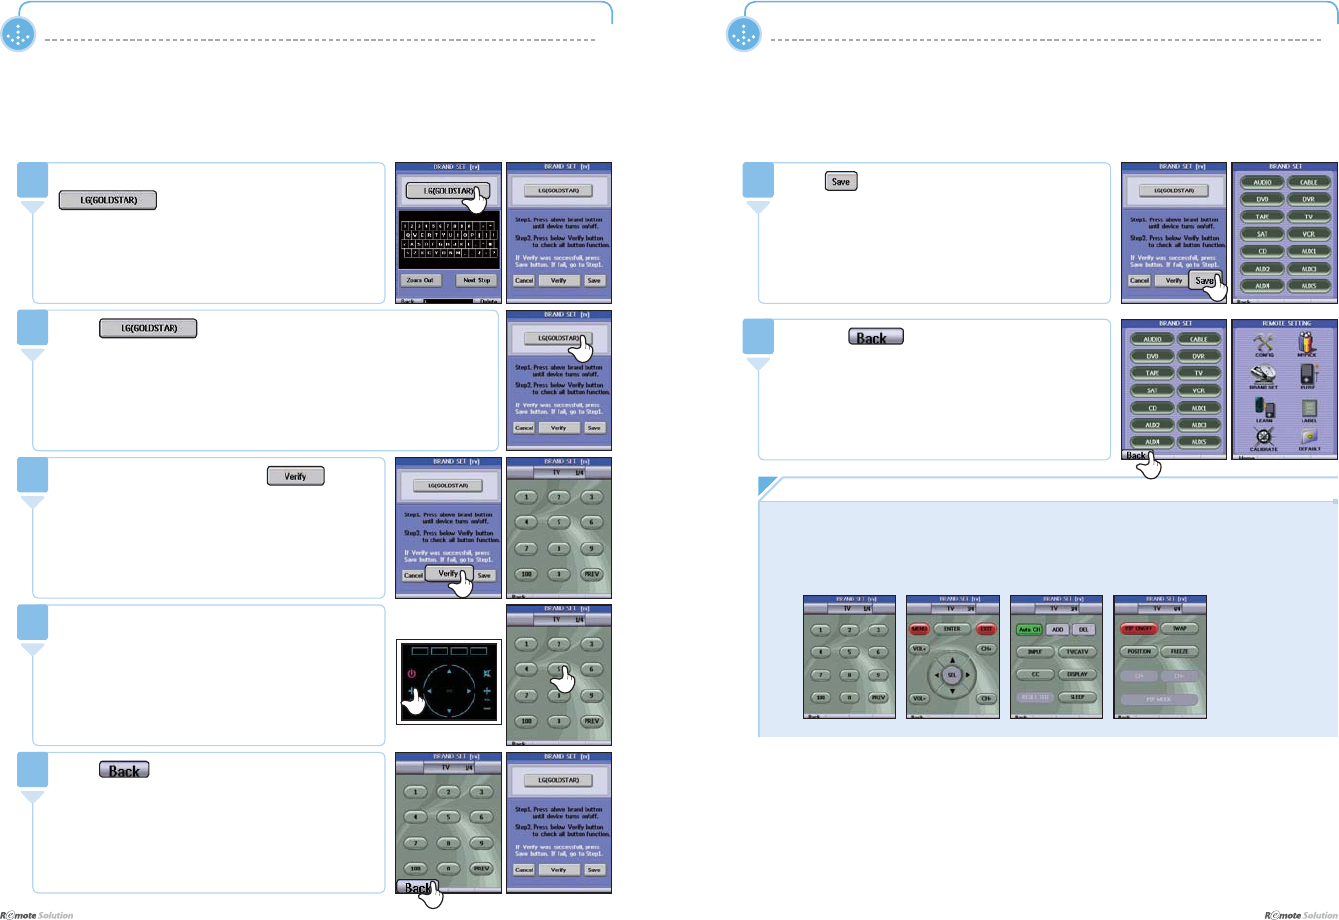
Press DQGFKHFNLI\RXUVHOHFWLRQLVFRUUHFWE\
WHVWLQJWKHSRZHU
Continue pressing LG(GOLDSTAR) to select the correct model
IURPWKHOLVW
'R127KROGWKHEXWWRQGRZQ
6
,IWKHEUDQGQDPHGLVSOD\HGLVDPDWFKSUHVVWKH
LFRQ
5RWDWHWKHZKHHOOHIWRUULJKWWRVFUROOXSDQGGRZQ
WKURXJKWKHEUDQGQDPHV
5
,IWKH79SRZHUZRUNVSUHVVWKH
7
&KHFNRQFHDJDLQLILWLVWKHFRUUHFWVHOHFWLRQE\
using the number icons in the BRAND SET TV
VFUHHQDQGRUZKHHO
8
Wheel
Press WRVDYH
7KH79UHPRWHFRQWUROVHWWLQJLVFRPSOHWH
7KH%5$1'6(7!VFUHHQDSSHDUV
10
/PUF
Ŷ&KHFNWKHSRZHUVXSSO\VWDWXVRIWKH79E\XVLQJWKH/**2/'67$5LFRQ
Ŷ,ISRZHUEXWWRQZRUNVYHULI\DOOWKHIXQFWLRQVZLWKWKH9HULI\!EXWWRQ
PRYHEHWZHHQVFUHHQVXVLQJWKHZKHHO
Ŷ0RYHWRWKHQH[WSDJHXVLQJWKHZKHHO
Press the EXWWRQWRHQG
5HSHDWVWHSVaWRFRQ¿JXUHDQRWKHU79
11
Press LIDOO79IXQFWLRQVZRUN
9
$IBQUFS]$POGJHVSJOHUIF4FUUJOHT
I 36
$IBQUFS]$POGJHVSJOHUIF4FUUJOHT
37 I
<SETTING> Mode <SETTING> Mode
I LEARN - Learning Function Setting(Buttons)
3RLQWWKHRULJLQDOUHPRWHFRQWUROWRZDUGVWKH;UHPRWHFRQWUROGLUHFWO\DWHDFKRWKHUDQGNHHSERWK
UHPRWHVZLWKLQ$ERXWLQFKLQRUGHUWRHQDEOHWKHOHDUQLQJIXQFWLRQ
1Learning Buttons
Press LQWKH5(027(6(77,1*!VFUHHQ
'LVSOD\VWKH/HDUQLQJ!VFUHHQ
1
Press
%XWWRQVOHDUQWUDQVIHUVEXWWRQIXQFWLRQV
'HYLFHVOHDUQWUDQVIHUVGHYLFHIXQFWLRQV
2
3UHVVWKHLFRQWREHOHDUQHG
6LJQDOVIURPWKHRULJLQDOUHPRWHFRQWUROKDYHDODJWLPH
RIDSSUR[LPDWHO\VHFRQGV,IQRVLJQDOLVUHJLVWHUHG
IRUVHFRQGVDEHHSLVVRXQGHGDQGWKHEXWWRQ
SUHVVHGLVUHVHW
4
I IR/RF - Output Mode Setting
1Press LQWKH5HPRWH6HWWLQJ!VFUHHQ
'LVSOD\VWKH>,55)6HWWLQJ@VFUHHQ
1
Press
: RF output
: IR output
2
$IWHUSUHVVLQJWKH icon, press the
LFRQWRHQGWKHPRGH
3Press
6HOHFWDGHYLFHWREHOHDUQHG
7KH6(/(&7/($51%87721PHVVDJHZLOOFRQWLQXH
WRÀDVKLIDNH\LVQRWSUHVVHG
3
/PUF
Ŷ<RXFDQOHDUQWKH3RZHU.H\LQWZRPRGHV3RZHU2QPRGHDQG3RZHU2IIPRGH
$IBQUFS]$POGJHVSJOHUIF4FUUJOHT
I 38
$IBQUFS]$POGJHVSJOHUIF4FUUJOHT
39 I
Press the LFRQWRHQG
5HSHDWVWHSVaIRUPRUHEXWWRQVWREHOHDUQHG
7
<SETTING> Mode
Learning Devices
Press LQWKH/($51,1*!VFUHHQ
>6HOHFWWKHVFUHHQEXWWRQ@DSSHDUVEULHÀ\
1
Press the LFRQWRHQG
>6HOHFWWKHVFUHHQEXWWRQ@PHVVDJHDSSHDUVEULHÀ\
UHSHDWVWHSVaLIWKHUHDUHPRUHGHYLFHVWREH
OHDUQHG
4
I LEARN - Learning Function Setting(Devices)
3RLQWWKHRULJLQDOUHPRWHFRQWURODQGWKHUHPRWHFRQWUROWRXQGHUJROHDUQLQJGLUHFWO\DWHDFKRWKHUZLWKLQLQFK
<SETTING> Mode
Press the original remote control’s button you
ZDQWWREHOHDUQHGZLWKLQVHFRQGV
6DYLQJLVDXWRPDWLFDIWHUWKHVLJQDOLVUHFHLYHG
$IWHUVDYLQJWKHPHVVDJH³&KDQJHVWR/$%(/"´
DSSHDUV
<HVPRYHVWRWKH/DEHO(GLWVFUHHQ
12PRYHVWRWKH6HOHFW/HDUQ%XWWRQVFUHHQ
5
Press
3OHDVHUHIHUWRSDJHaIRUODEHOHGLWLQJPHWKRGV
VKRZVIXQFWLRQVXQGHUJRLQJOHDUQLQJ
6
Press the original remote control’s button you
ZDQWWREHOHDUQHGZLWKLQVHFRQGV
7KHVLJQDOLVVDYHGDXWRPDWLFDOO\DIWHULWLVUHFHLYHG
3
3UHVVDGHYLFHEXWWRQWREHOHDUQHG
6LJQDOVIURPWKHRULJLQDOUHPRWHFRQWUROKDYHDODJWLPH
RIDSSUR[LPDWHO\VHFRQGV,IQRVLJQDOLVUHJLVWHUHG
IRUVHFRQGVDEHHSLVVRXQGHGDQGWKHEXWWRQ
SUHVVHGLVUHVHW
2
/PUF
+RZWROHDUQLQJ
}vs
jo
lu{ly
RH60
123
456
789
100
0
I
I1
I2
I
I
I3 I4
Original Remote
1 inch
$IBQUFS]$POGJHVSJOHUIF4FUUJOHT
I 40
$IBQUFS]$POGJHVSJOHUIF4FUUJOHT
41 I
<SETTING> Mode <SETTING> Mode
I LABEL - Group Label Edit
I LABEL - EDIT Screen ( )
1Device Edit
Press in the REMOTE SETTING screen
'LVSOD\VWKH>/DEHO(GLW@VFUHHQ
1
Ŷ 7KH/$%(/(',7!PHQXVDUHH[SODLQHGDVIROORZV
'LVSOD\VFXUUHQWPRGH
'LVSOD\WKHVHOHFWHGLFRQDQGODEHO
.H\SDGWRHQWHUWKHODEHO
&DSVORFN
0RYHWRDGLIIHUHQWSDGSDJHWRWDORIIRXU
&DQFHO
'HOHWHOHWWHUVHQWHUHG
6DYH
(QWHUDVSDFH
6HOHFWHG,FRQDQG
Label Display
&DQFHO 6DYH
/DEHO,QSXW3DG
&DSV/RFN 3DG6ZLWFK
'LVSOD\/HWWHUV
&XUUHQW0RGH'LVSOD\
'HOHWHWKH/HWWHUV
Entered
1Press
Group Label Edit
Ɣ Device Edit
Ɣ MyPick Edit
Ɣ Bio Rhythm Edit
2
1Press
3
1Press
4
$IBQUFS]$POGJHVSJOHUIF4FUUJOHT
I 42
$IBQUFS]$POGJHVSJOHUIF4FUUJOHT
43 I
<SETTING> Mode
13UHVV³´LQWKH/DEHO(GLW!VFUHHQ
'LVSOD\VWKHFKDQJHGLFRQ
6
1
Press WRHQG
7KH/DEHO(GLW!VFUHHQDSSHDUV
5HSHDWVWHSVaLIPRUHODEHOHGLWLQJLVGHVLUHG
7
/PUF
Ŷ3UHVV WRJRWRDGLIIHUHQWSDGSDJH7RWDOSDJHV
<SETTING> Mode
I LABEL - MyPick Edit / Bio Rhythm Edit
7KHVHWWLQJPHWKRGIRUWKH0\3LFN(GLWDQGWKH%LR5K\WKP(GLWLVWKHVDPHUHIHUWRSDJHa
13UHVV³´LQWKH/DEHO(GLW!VFUHHQ
'LVSOD\VDPDJQL¿HGSDG
5
1MyPick Edit / Bio Rhythm Edit
Press
'LVSOD\VWKH>/$%(/(',7@VFUHHQ
1
I LABEL - Device Button / Mypick Button
7KHVHWWLQJPHWKRGIRUWKH'HYLFH%XWWRQDQGWKH0\SLFN%XWWRQLVWKHVDPHUHIHUWRSDJHa
1Device Button / Mypick Button
Press
'LVSOD\VWKH>/$%(/(',7@VFUHHQ
1
$IBQUFS]$POGJHVSJOHUIF4FUUJOHT
I 44
$IBQUFS]$POGJHVSJOHUIF4FUUJOHT
45 I
<SETTING> Mode <SETTING> Mode
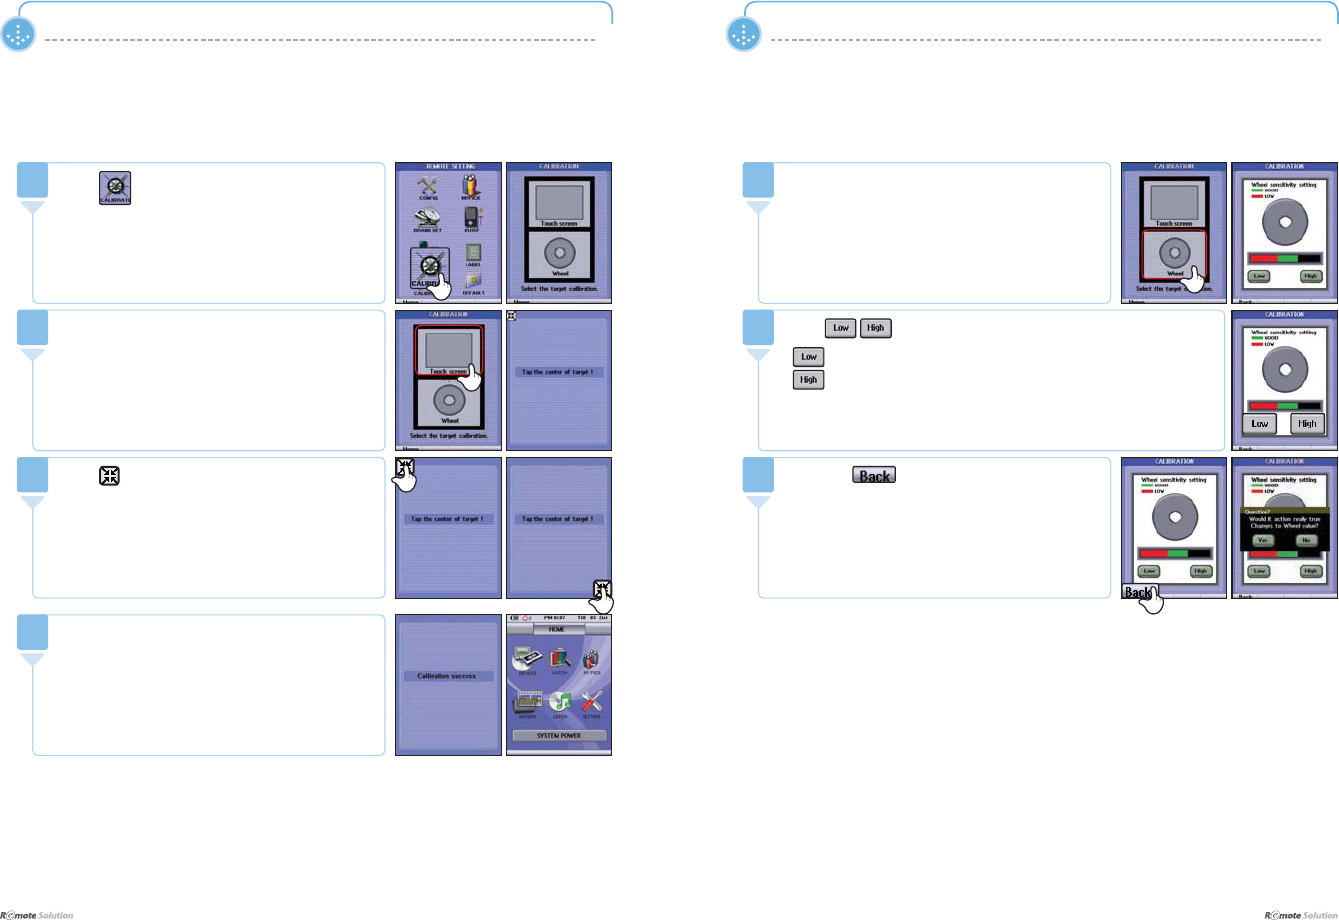
I CALIBRATE - Touch Screen Setting
The Calibration Success message appears
ZKHQ¿QLVKHGIROORZHGE\VDYLQJDQGDUHWXUQWR
WKH+RPH!VFUHHQ
'LVSOD\VWKH+RPH!VFUHHQ
4
Press LQVHTXHQFH
&DXWLRQ0DUNWKHFHQWHUSRLQWSUHFLVHO\
3
3UHVV7RXFK6FUHHQ!
'LVSOD\VWKH7RXFK6FUHHQ!VHWWLQJVFUHHQ
2
Press LQWKH5HPRWH6HWWLQJ!VFUHHQ
'LVSOD\VWKH&$/,%5$7,21!VFUHHQ
1
I CALIBRATE - Wheel Setting
Press the LFRQWRHQG
The message Would it action really true Changes to
Wheel value DSSHDUV
<HVPRYHVWRWKH5HPRWH6HWWLQJVFUHHQ
1RUHWXUQVDJDLQWRWKHVHQVLWLYLW\DGMXVWPHQWVFUHHQ
3
Press WRDGMXVW
GHFUHDVHVHQVLWLYLW\
LQFUHDVHVHQVLWLYLW\
&DXWLRQ&KHFNWKDWWKHZKHHOZRUNVSURSHUO\DIWHUDGMXVWPHQWLVFRPSOHWH
2
3UHVVWKH:KHHOLQWKH&DOLEUDWLRQ!VFUHHQ
'LVSOD\VWKH:KHHOVHWWLQJVFUHHQ
1
$IBQUFS]$POGJHVSJOHUIF4FUUJOHT
I 46
$IBQUFS]$POGJHVSJOHUIF4FUUJOHT
47 I
<SETTING> Mode
I DEFAULT Menu Descriptions
Press ĺ
icon
VLQWXUQLQWKH+RPHVFUHHQ
'LVSOD\VWKH)$&725<'()$8/7!VFUHHQ
1
%UDQG6HW!'HOHWHVUHPRWHFRQWUROVHWWLQJV
0\SLFN!'HOHWHVWKHFXVWRPL]HGVHWWLQJV
Learn 'HOHWHVWKHLQIRUPDWLRQVDYHGLQOHDUQLQJPRGH
$OO&OHDU!3HUIRUPVWKHGHOHWLRQVIRUDOORIWKHDERYH
&ORQH!&RSLHVLQIRUPDWLRQEHWZHHQUHPRWHFRQWUROV
&DQRQO\EHXVHGZKHQKDYLQJWZRRUPRUHUHPRWHFRQWUROV
I FACTORY DEFAULT - Moving
<SETTING> Mode
I DEFAULT - BRAND SET
Press to delete the AUDIO device
VHOHFWHG
$IWHUGHOHWLRQWKH)$&725<'()$8/7!VFUHHQ
DSSHDUV
3
Press
6HOHFWDGHYLFHWRGHOHWH([$8',2
ĺ : When selected, the check
PDUNGLVDSSHDUV
2
'HOHWHGDWDVHWWLQJV
Press the icon in the FACTORY
'()$8/7!VFUHHQ
'LVSOD\VWKH%5$1'6(7'()$8/7!VFUHHQ
1
$IBQUFS]$POGJHVSJOHUIF4FUUJOHT
I 48
$IBQUFS]$POGJHVSJOHUIF4FUUJOHT
49 I
<SETTING> Mode
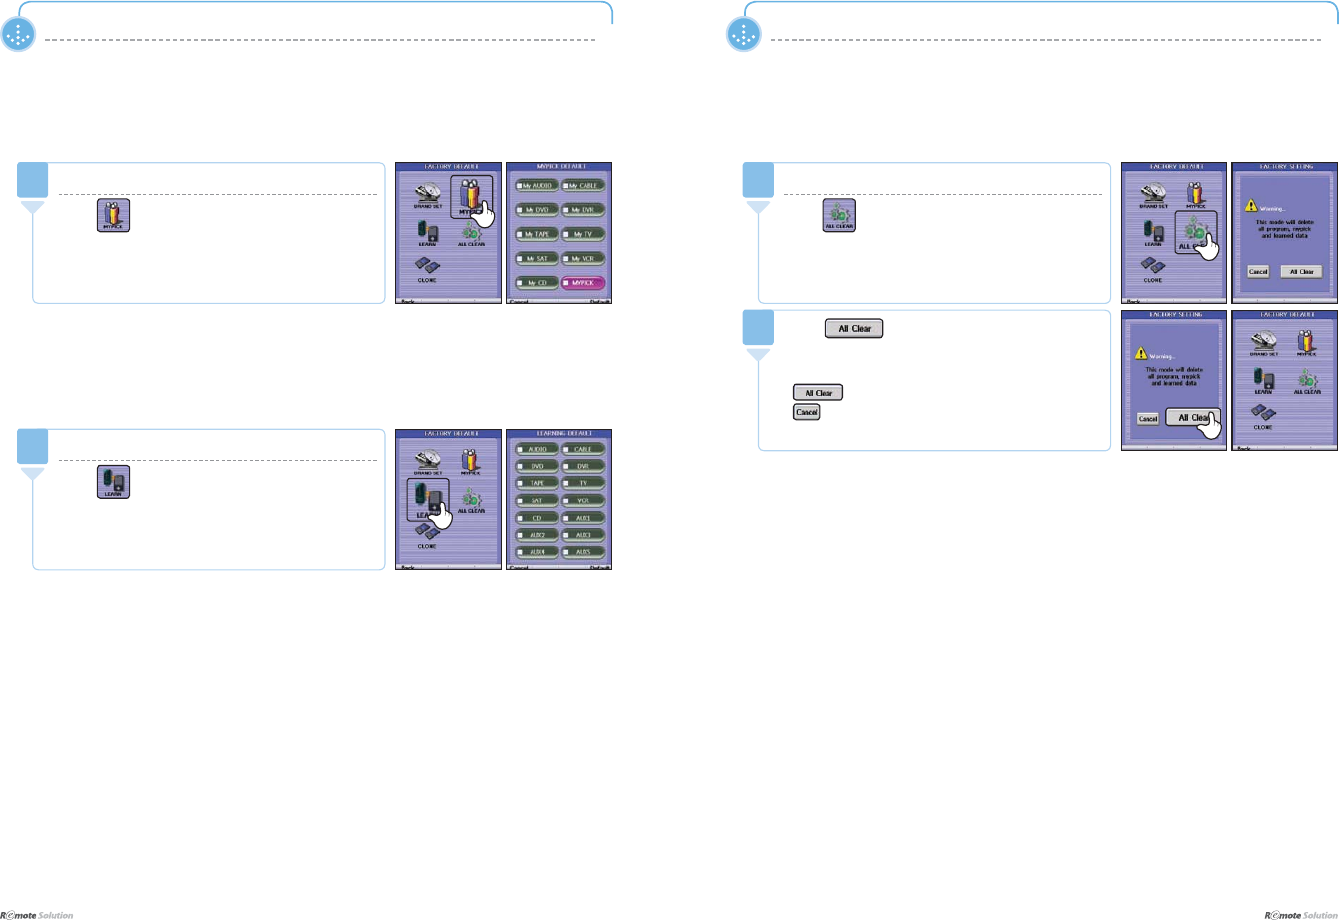
I DEFAULT - MYPICK
7KHGHOHWLRQSURFHGXUHVDUHLGHQWLFDOZLWKWKRVHRIWKH%UDQG6HW!UHIHUWRSDJH
Delete data settings
Press LQWKH)$&725<'()$8/7!VFUHHQ
'LVSOD\VWKH0<3,&.'()$8/7!VFUHHQ
1
<SETTING> Mode
I DEFAULT - LEARN
7KHGHOHWLRQSURFHGXUHVDUHLGHQWLFDOZLWKWKRVHRIWKH%UDQG6HW!UHIHUWRSDJH
Delete data settings
Press LQWKH)$&725<'()$8/7!VFUHHQ
'LVSOD\VWKH/($51,1*'()$8/7!VFUHHQ
1
I DEFAULT - ALL CLEAR
'HOHWHVDOOLQIRUPDWLRQVDYHGLQ%UDQG6HW!0\3LFN!DQG/HDUQ!
Press
$IWHUIXOOGHOHWLRQWKH)$&725<'()$8/7!VFUHHQ
DSSHDUV
GHOHWHDOO
JREDFNWRWKHSUHYLRXVVFUHHQZLWKRXWVDYLQJ
2
Delete all data settings
Press LQWKH)$&725<'()$8/7!VFUHHQ
'LVSOD\VWKH)$&725<6(77,1*!VFUHHQ
1

$IBQUFS]$POGJHVSJOHUIF4FUUJOHT
I 50
MEMO<SETTING> Mode
I DEFAULT - CLONE
8VLQJWZRUHPRWHFRQWUROVDXVHUFDQVDYHDOOWKHLQIRUPDWLRQIURPRQHWRWKHRWKHU
1
st
Remote Control
Press in the FACTORY DEFAULT VFUHHQ
([DFRPSOHWHO\FRQ¿JXUHGUHPRWHFRQWURO
Press
1
2
nd
Remote Control
Press in the FACTORY DEFAULT VFUHHQ
([DQRQFRQ¿JXUHGUHPRWHFRQWURO
Press
2
When the progress bar has completed, it
DXWRPDWLFDOO\VDYHVDQGHQGV
3
SOURCE Remote TARGET Remote

MEMO