Remotesolution RH61A Touch Screen Remote Controller User Manual 1
Remote Solution Co., Ltd. Touch Screen Remote Controller 1
Contents
- 1. User Manual 1
- 2. User Manual 2
User Manual 1

General Information
IMPORTANT INFORMATION ON SAFE AND EFFICIENT OPERATION
READ THIS INFORMATION BEFORE USING TSR750.
NOTICE
I
FCC warning
This equipment generates uses and can radiate radio frequency energy and,
if not installed and used in accordance with the instructions, may cause harmful
interference to radio communications. However, there is no guarantee that
interference will not
occur in a particular installation.
If this equipment does cause harmful interference to radio or television reception
which can be determined by turning the equipment off and on, the user is
encouraged to try to correct the interference by one or more of the following
measures.
• Reorient or relocate the receiving antenna.
• Increase the separation between the equipment and receiver.
• Connect the equipment into an outlet on a circuit different from that to which the
receiver is connected.
• Consult the dealer or an experienced radio, TV technical for help.
• Only shielded interface cable should be used.
Finally, any changes or modifications to the equipment by the user not expressly
approved by the grantee or manufacturer could void the
users’ authority to operate such equipment.
I
CE warning!
Changes or modifications not expressly approved by the party responsible for
compliance could void the user's authority to operate the equipment.
I
EN Test Regulation Version.
ETSI EN 300 328 V1.7.1(2006-10)
ETSI EN 301 489-1 V1.6.1:2005
ETSI EN 301 489-17 V1.4.1:2004


Chapter 1 | Preparing to Use the Product
Contents
Product Features 5
Safety Precautions 6
Components 8
Parts Diagram 9
Recharging and Turning Power On/Off 12
Software Installation 13
Connecting the Product 18
Product Specications 19
Display Structure 22
<DEVICES> Mode 25
OPERATING SET-UP 26
PHOTO 38
UTILITY 43
SETTING 49
Chapter 2 | Learning to Use the Menus

Product Features
Product Features ........................................... 5
Safety Precautions
About the Power Supply...................................... 6
About the Product........................................... 7
Components
Standard.................................................. 8
Parts Diagram
Remote (Front)............................................. 9
Remote (Rear) ............................................ 10
Cradle................................................... 11
Recharging and Turning Power On/Off
Recharging with an Adapter.................................. 12
Turning the Remote Control Power On/Off . . . . . . . . . . . . . . . . . . . . . . 12
Software Installation
TSR750 PC Mananger Installation. . . . . . . . . . . . . . . . . . . . . . . . . . . . . 13
Microsoft ActiveSync 4.2 Installation . . . . . . . . . . . . . . . . . . . . . . . . . . . 15
USB Driver Installation...................................... 17
Connecting the Product
USB Connection........................................... 18
Product Specications
Product Specications ...................................... 19
Chapter 1 Preparing to Use the Product
Please note that product can be updated without prior notice. So it can be
different from user guide.
Please check user guide at the web site(http://www.remotesolution.co.kr).
5 I
Chapter 1 | Preparing to Use the Product
Product Features
I Product Features
Touch screen that facilitates usage convenience
1
2
3
4
5
Simple user interface that promotes intuitive use
Low power consumption that extends battery life
Distinctive design including a 3.5-inch color LCD
RF function that enables multi-room control
I 6
Chapter 1 | Preparing to Use the Product
Safety Precautions
The following information is included to promote user safety and prevent any possible injury or
property damage. Please read the directions carefully and use the product correctly.
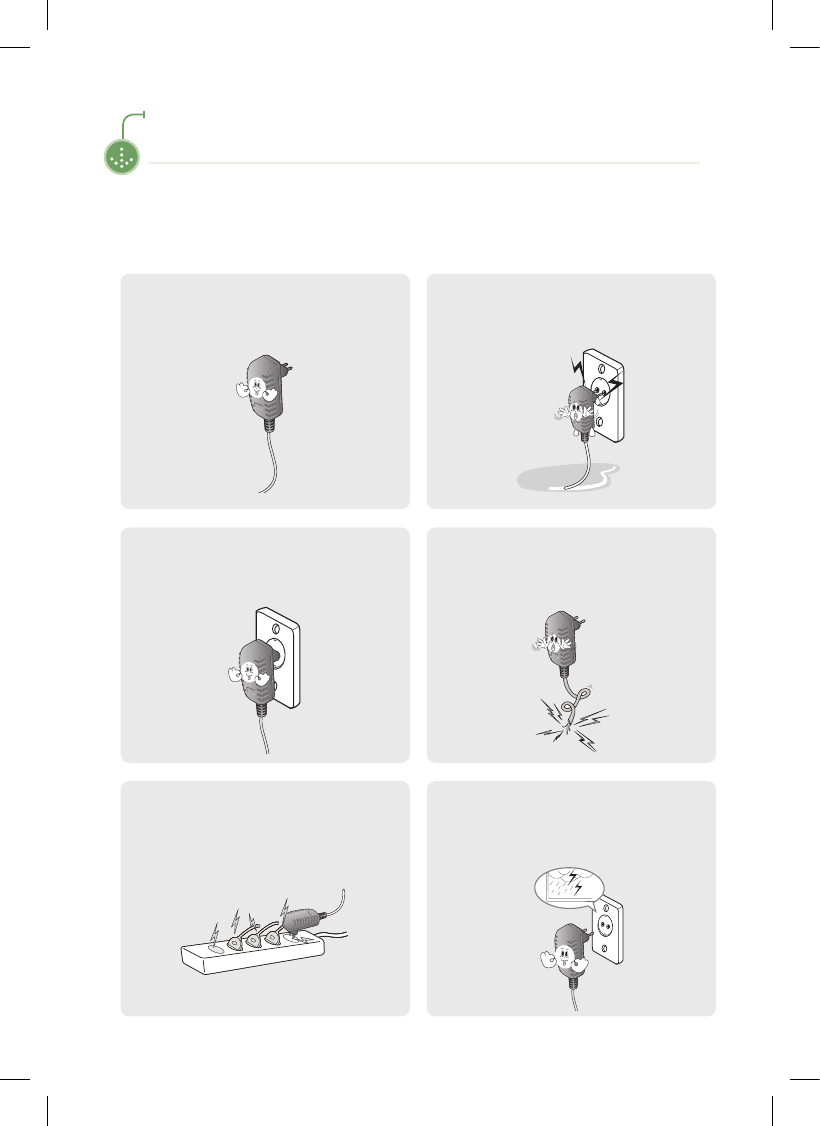
I About the Power Supply
Do Not use too many plugs in a single
power outlet.
This can result in electric shock.
Unplug the power plug during electrical
storms.
Lightning can cause an electric shock.
Make sure the plug ts tightly into the outlet.
Loose plugs can cause electric shock.
Do not fold the power cable or place
anything heavy on it.
This can result in electric shock.
Only charge using the power supply
provided.
An incorrect power supply can cause damage
to the product.
Do NOT touch the power plug with wet
hands.
This can result in electric shock.
7 I
Chapter 1 | Preparing to Use the Product
Safety Precautions
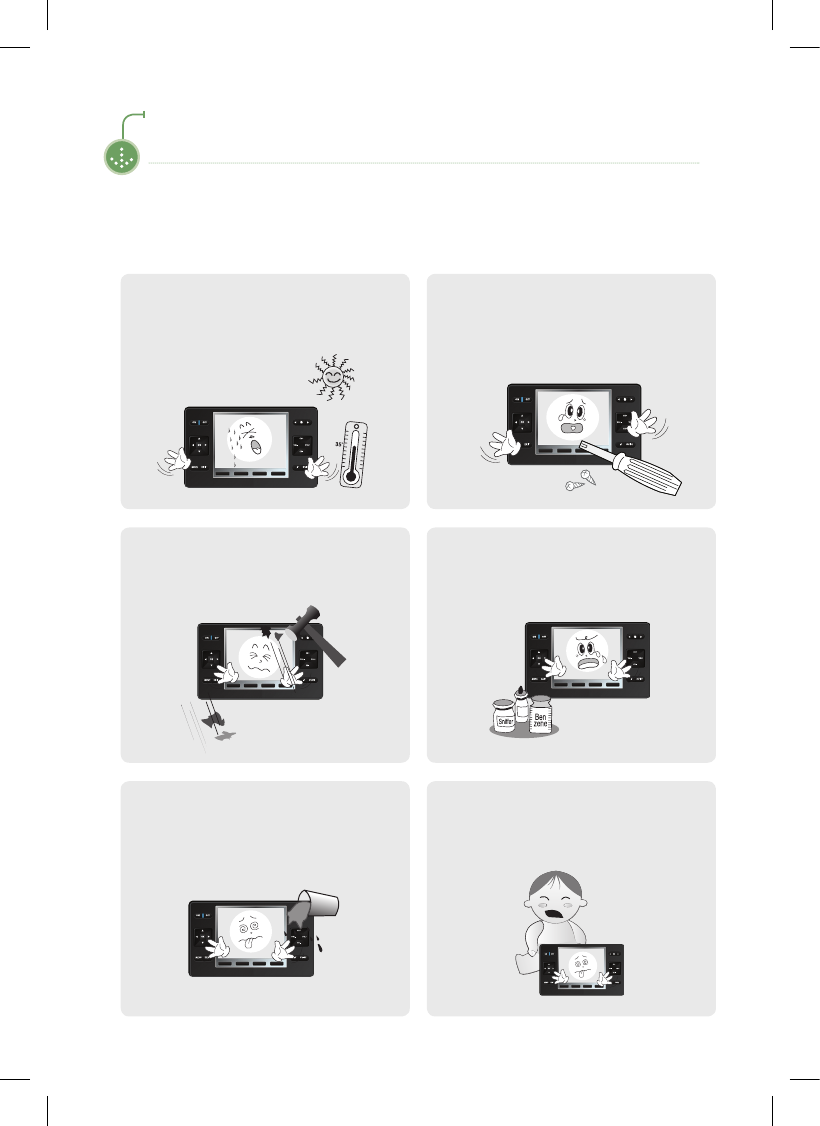
I About the Product
Do not allow foreign objects or liquid to get
inside the product.
This can result in damage to the product.
Do not allow children to play with the
remote.
If the product is dropped, this can cause
damage or injury.
Do not place heavy objects on the product.
This can cause breakdown or damage to the
product.
Clean the product with a soft, dry cloth.
Do NOT use any ammable cleaners or
chemicals.
This can cause damage to the surface of the
product.
Do not use the product in high temperatures
or high humidity.
This can cause damage to the product.
Do not disassemble the product.
This can result in damage to the product.
I 8
Chapter 1 | Preparing to Use the Product
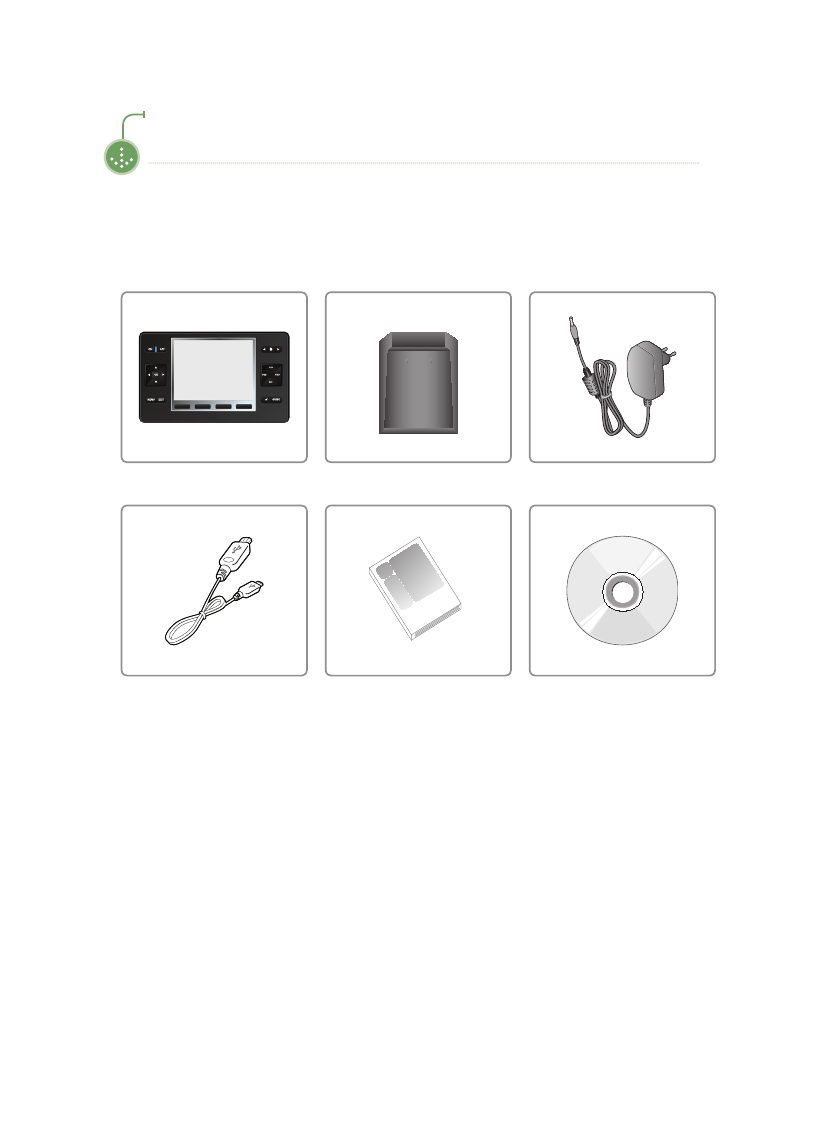
Components
Components may be replaced without any prior notice in the interest of improving product quality or
performance. The components shown here in the manual may differ from the components included
with purchase.
I Standard
CradleMain Unit Adapter
(100~240Vac/50~60Hz, 5Vdc/2A)
USB Cable Product Manual SETUP CD
9 I
Chapter 1 | Preparing to Use the Product
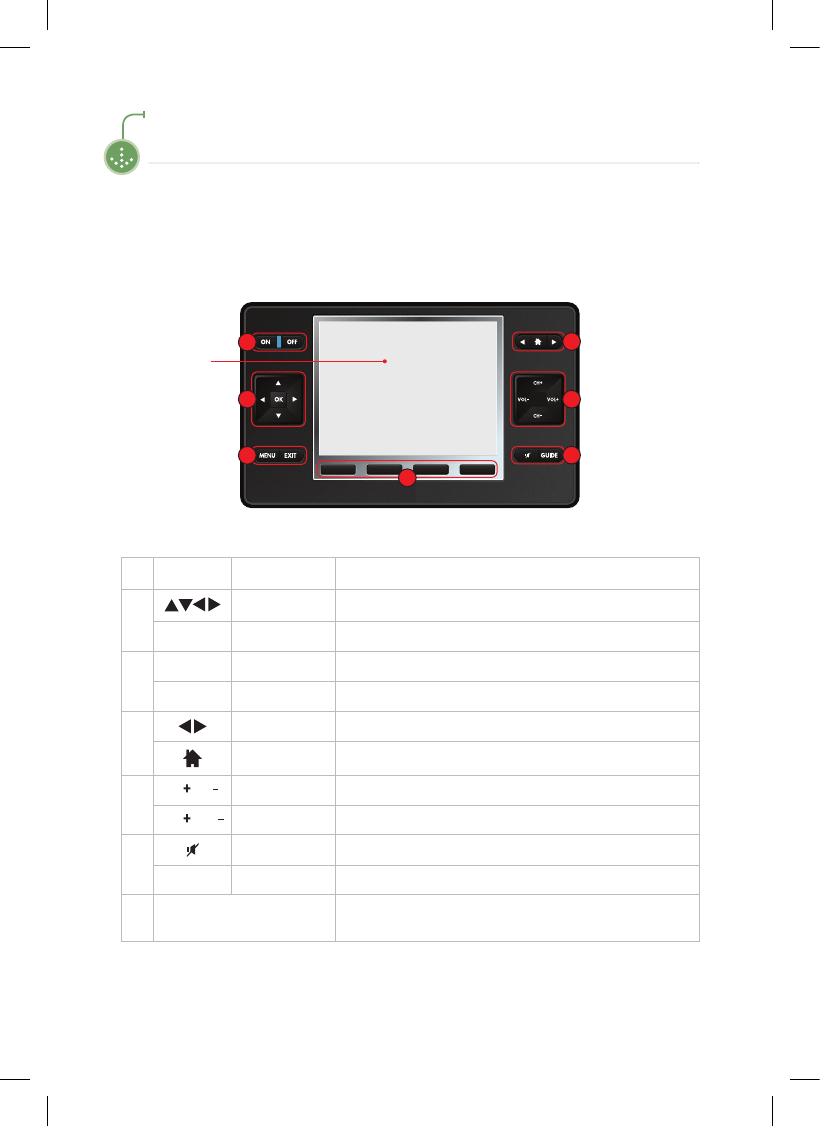
Parts Diagram
The diagram may differ with the purchased product.
I Remote (Front)
1ON, OFF POWER Enters POWER [ON/OFF] CODE for the set device
2
ARROW Enters [UP/DOWN/LEFT/RIGHT] CODE for the set device
OK OK Enters OK and/or ENTER CODE for the set device
3
MENU MENU Enters MENU CODE for the set device
EXIT EXIT Enters EXIT CODE for the set device
4
PAGE MOVE Flips to [NEXT/PREVIOUS] page shown on the device screen
HOME Moves to the HOME / UP Screen
5
CH , CH
CHANNEL Enters CHANNEL [UP/DOWN] CODE for the set device
VOL , VOL
VOLUME Enters VOLUME [UP/DOWN] CODE for the set device
6MUTE Enters MUTE CODE for the set device
GUIDE
INFO
Enters Guide CODE for the set device
7 FUNCTION 1, 2, 3, 4 Moves directly to Page [1, 2, 3, 4] on the set device
* The FUNCTION key can be set in the manager.
1
2
3
4
5
6
LCD Screen
7

I 10
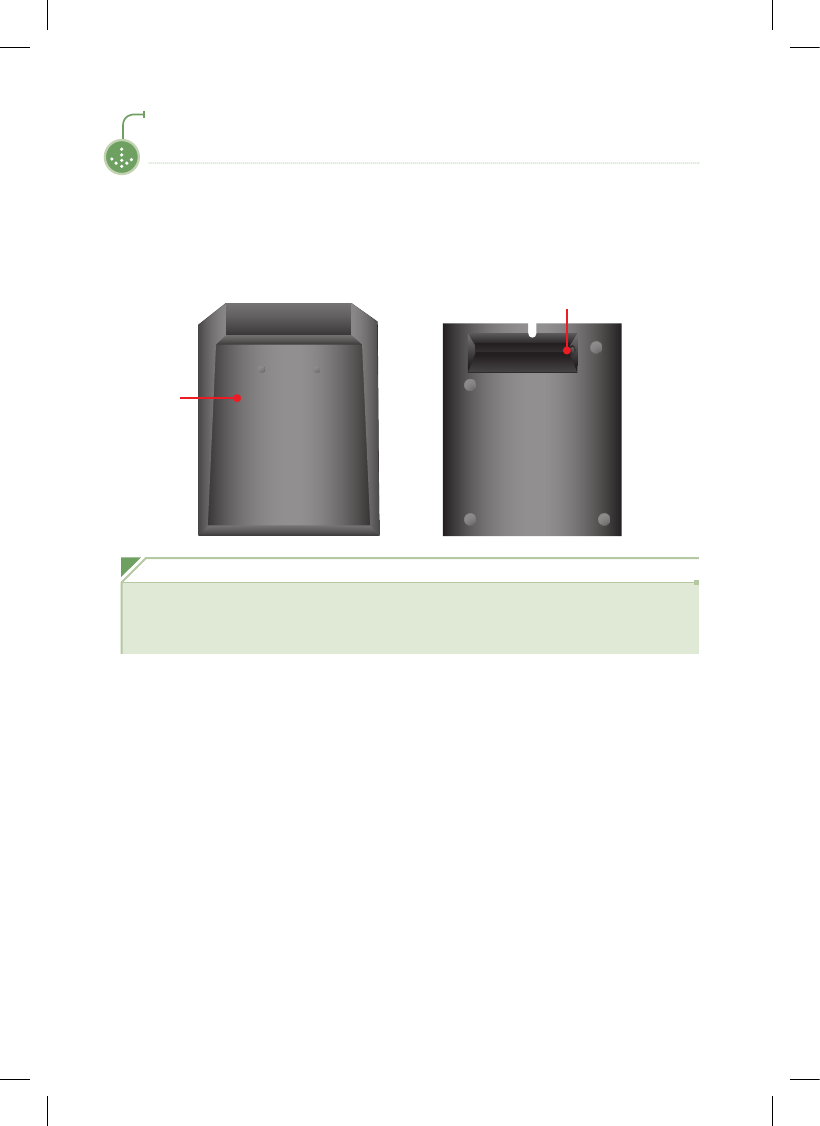
Chapter 1 | Preparing to Use the Product
Parts Diagram
The diagram may differ with the purchased product.
I Remote (Rear)
1IR Window Used when using a wireless remote control.
2Cradle connector Connects to the cradle.
3Power Sets power on/off
4USB Port Connects to a USB cable
3
1
2
4
11 I
Chapter 1 | Preparing to Use the Product
I Cradle
Cradle
DC 5.0V
Note
■ The LED turns red during charging, and blue when charging is complete.
Recharging time can vary(approx. 3~4 hours)
Parts Diagram
The diagram may differ with the purchased product.
I 12
Chapter 1 | Preparing to Use the Product
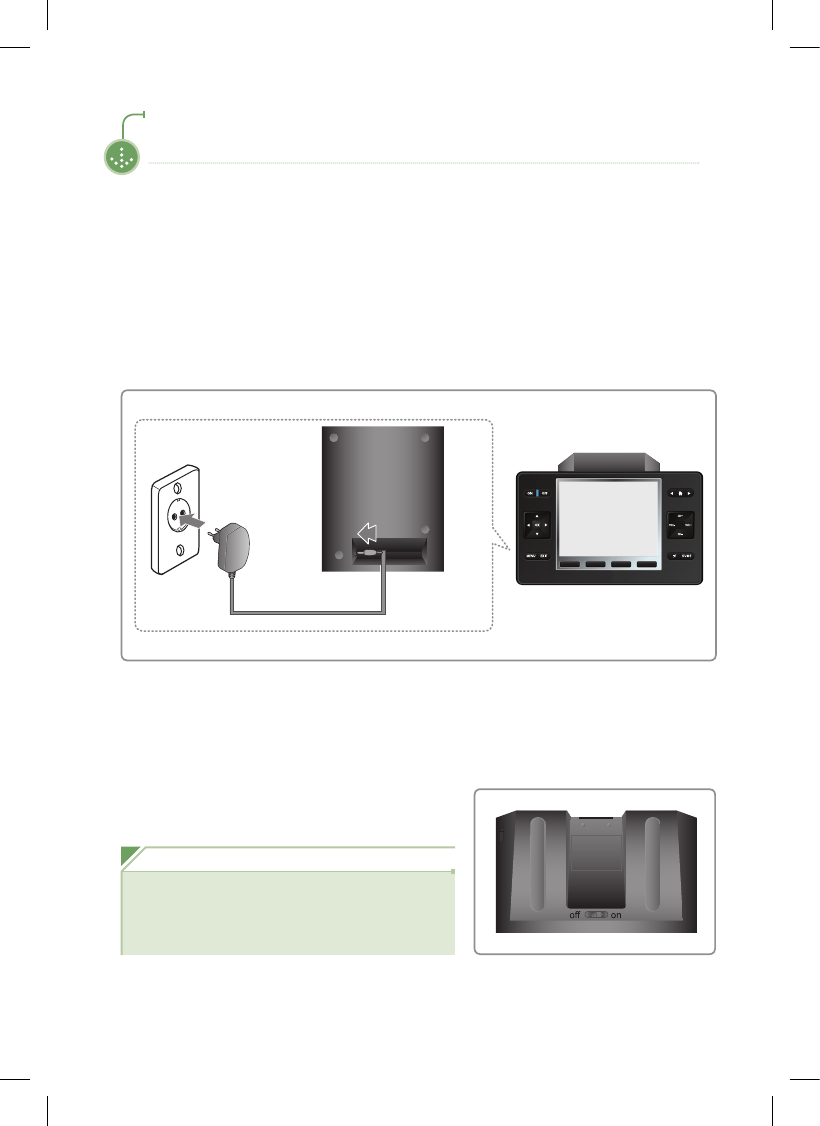
Recharging and Turning Power On/Off
I Recharging with an Adapter
I Turning the Remote Control Power On/Off
Control using the power switch at the bottom rear of
the remote control.
Insert the adapter cable into the cradle and then plug the other end into a power outlet.
When recharging, do so with the power switch at the bottom of the rear side of the remote
control set to [ON]. (Note, if the power switch is set to [OFF], recharging is not performed.)
1) In case of malfunction, power off and then power on product.
2) In case of malfunction, after fully charging battery, retry operation.
Note
If this remote control is subjected to excess voltage above 6.0V,
the protective circuit within the device becomes activated, thus
discontinuing normal remote control operation.
To use normally, turn the remote control OFF and ON.
13 I
Chapter 1 | Preparing to Use the Product
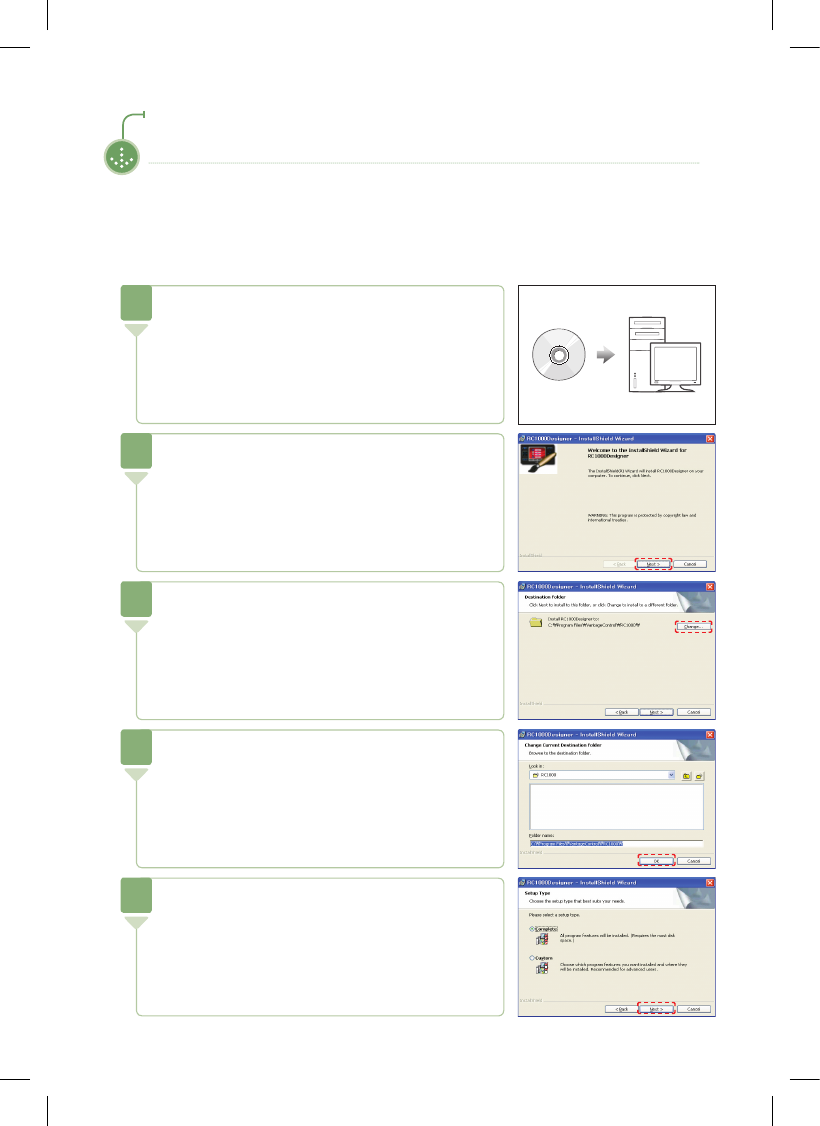
I TSR750 PC Mananger Installation
Software Installation
Insert the Setup CD in the CD-ROM drive.
The installation program will run automatically.
1
Click the [Next] icon.
2
To change the PC folder for installation, click the
[Change] icon.
Clicking the [Next] icon will move directly to the
installation screen in 5).
3
After designating the desired folder for installation, click
the [OK] icon.
4
Click the [Next] icon.
5
I 14
Chapter 1 | Preparing to Use the Product
Software Installation
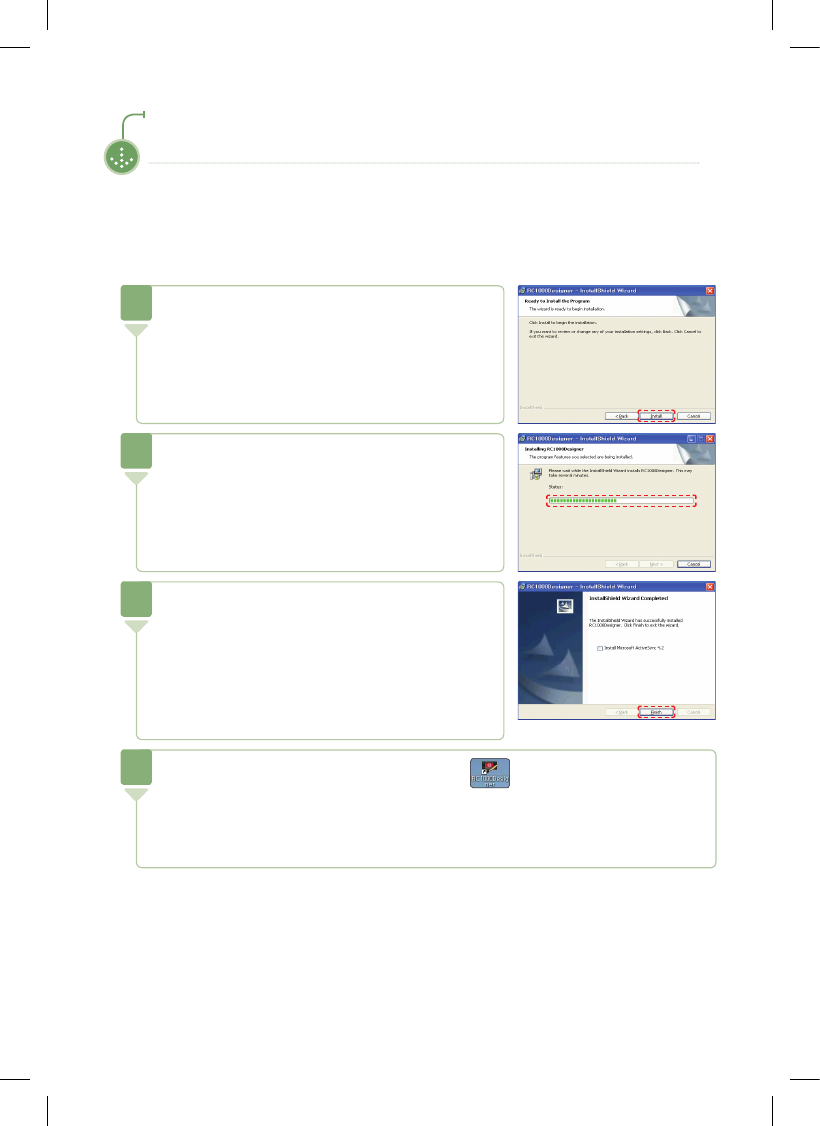
Click the [Install] icon.
6
Wait until the installation process has been completed.
7
If the PC on which the installation was performed has
the Microsoft ActiveSync program installed, click the
[Finish] icon and end the installation.
If the Microsoft ActiveSync program is not already installed,
check the box marked [Install Microsoft ActiveSync 4.2]
and click the [Finish] icon to perform Microsoft ActiveSync
4.2 installation. (Please refer to pages 16~17 for detailed
installation instructions.)
8
When the program installation is fully complete, the icon is created on the desktop.
Double-click the icon to run TSR750 PC Mananger.
9
15 I
Chapter 1 | Preparing to Use the Product
I Microsoft ActiveSync 4.2 Installation
Software Installation
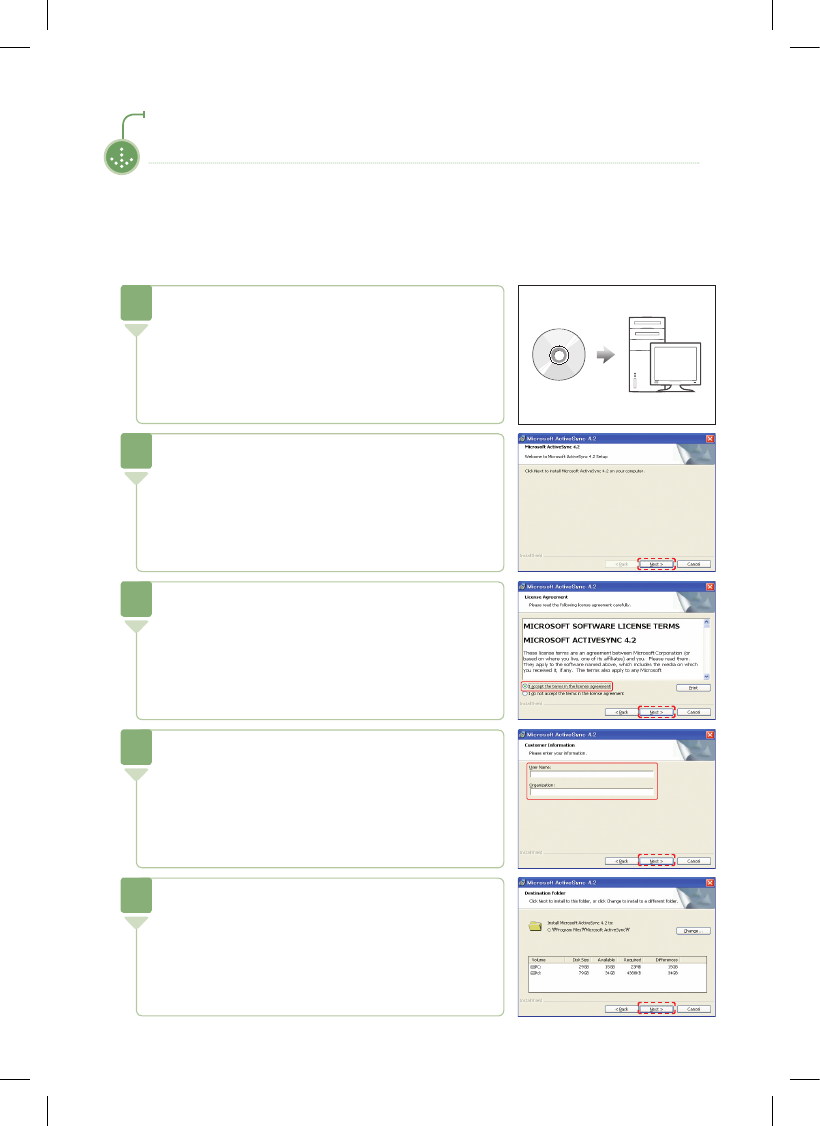
Insert the Setup CD in the CD-ROM drive.
There are two ways to install Microsoft ActiveSync 4.2.
1. Install together with TSR750 PC Mananger.
2. Run the Setup.exe le located in the Setup CD in
[Program Files\RemoteSolution\TSR750\ActiveSync].
1
Run the Setup.exe le located in the Setup CD in
[Program les\RemoteSolution\TSR750\ActiveSync].
Click the [Next] icon in the screen that appears.
2
After selecting [I accept the …], click the [Next] icon.
3
Fill in the User Name and Organization elds and click
the [Next] icon.
4
After conrming the hard disk and folder of the PC for
installation, click the [Next] icon.
Press the [Change] icon to change the folder.
5
I 16
Chapter 1 | Preparing to Use the Product
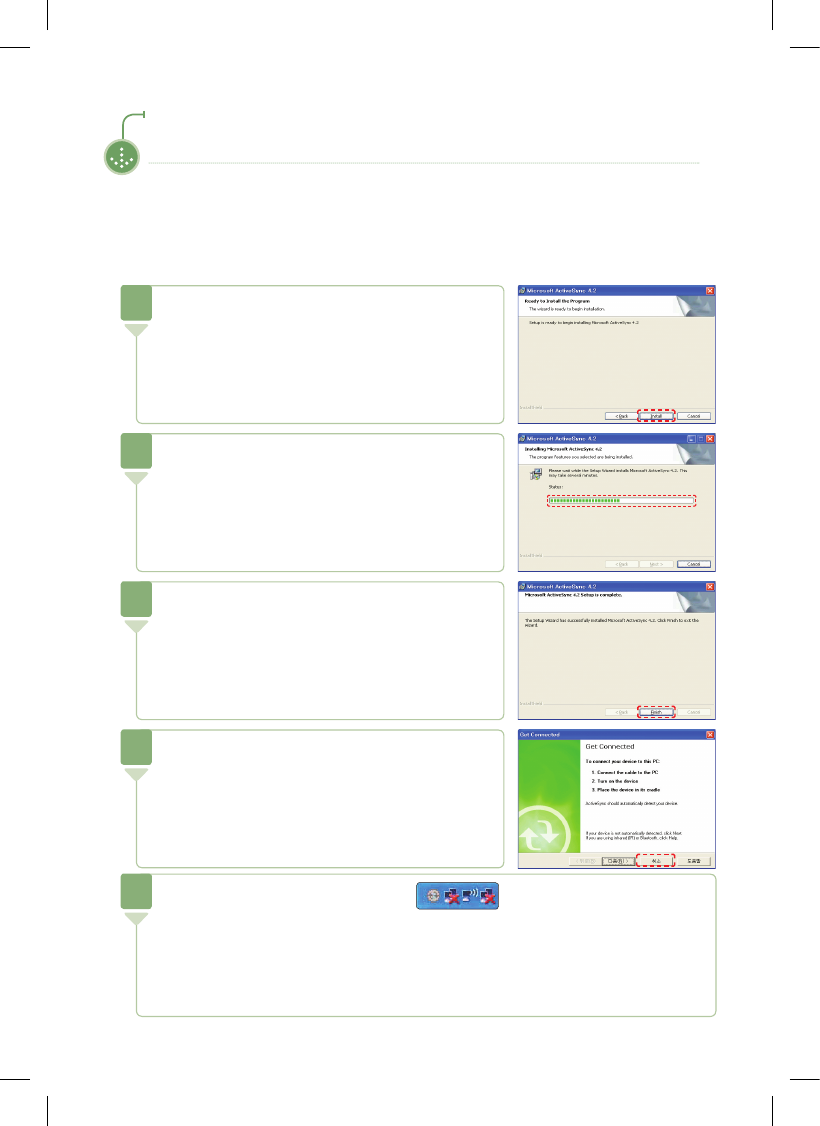
Software Installation
Click the [Install] icon.
6
Wait until the installation process has been completed.
7
Click the [Finish] icon.
8
When the screen as shown appears, click the
[Cancel] icon.
9
When the installation is fully complete, the icon appears at the lower right of
the window. Turn the remote control power ON, and connect it to the PC via the USB cable.
When connecting the remote control to the PC for the rst time, the USB driver must be installed.
(Please refer to pages 17~18 for detailed installation instructions.)
10
17 I
Chapter 1 | Preparing to Use the Product
I USB Driver Installation
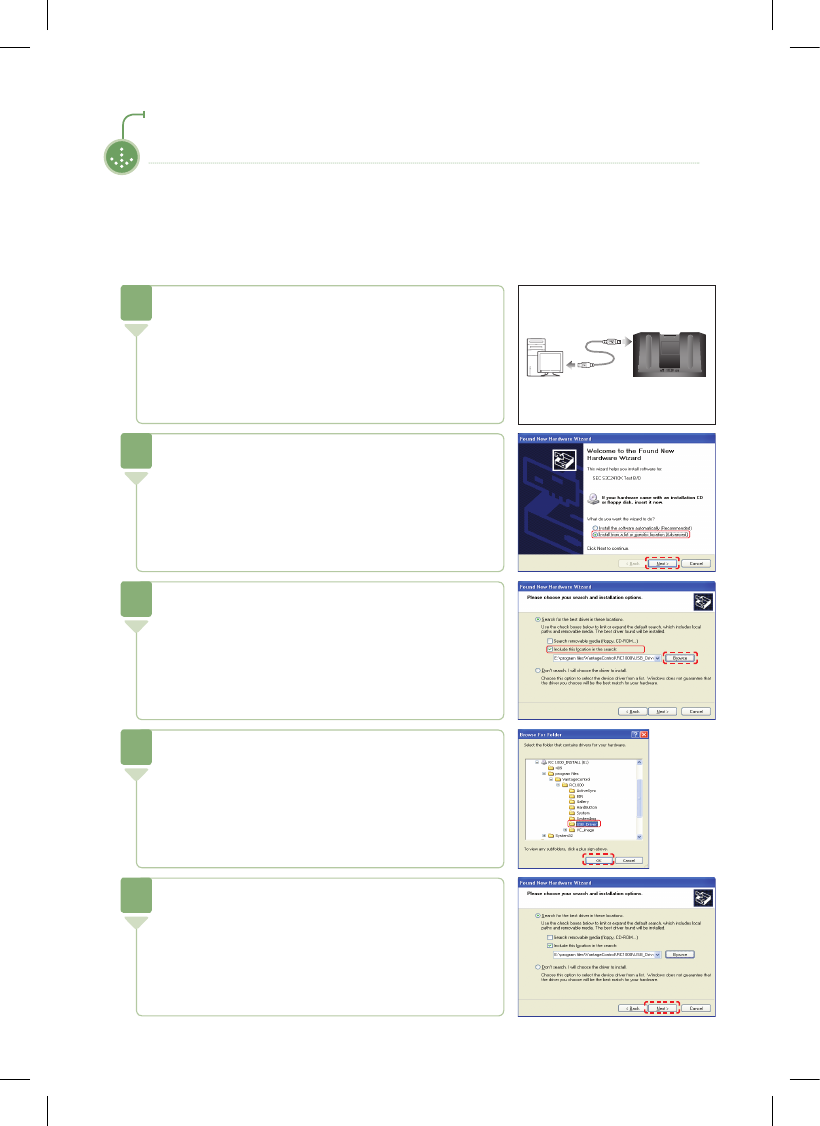
Software Installation
Certain differences may occur depending on the user’s OS environment.
After selecting [Install from a list ...], click the
[Next] icon.
2
After selecting [Include this loction ...], click the
[Browse] icon.
Select the [program les\
RemoteSolution
\
TSR750
\USB_Driver] folder in the SETUP CD.
Click the [OK] icon in the screen that appears.
4
Click the [Next] icon.
5
3
Turn the remote control power ON, and if connecting to
a PC for the rst time, the USB driver must be installed.
Upon rst connection, popup window appears.
1
I 18
Chapter 1 | Preparing to Use the Product
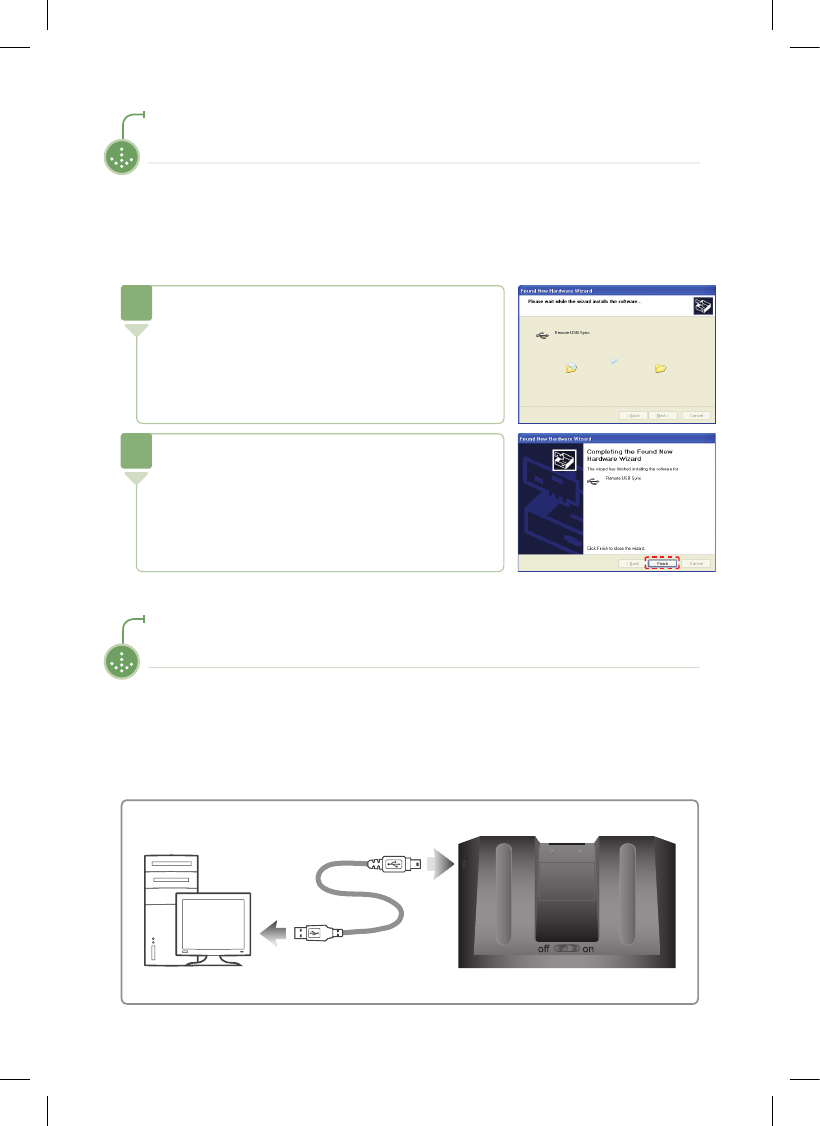
Software Installation
Click the [Finish] icon to end the installation.
7
Wait until the installation process has been completed.
6
Connecting the Product
I USB Connection
Connect the USB cable provided into the USB port of the product.
Chapter 1 | Preparing to Use the Product
19 I
Chapter 1 | Preparing to Use the Product
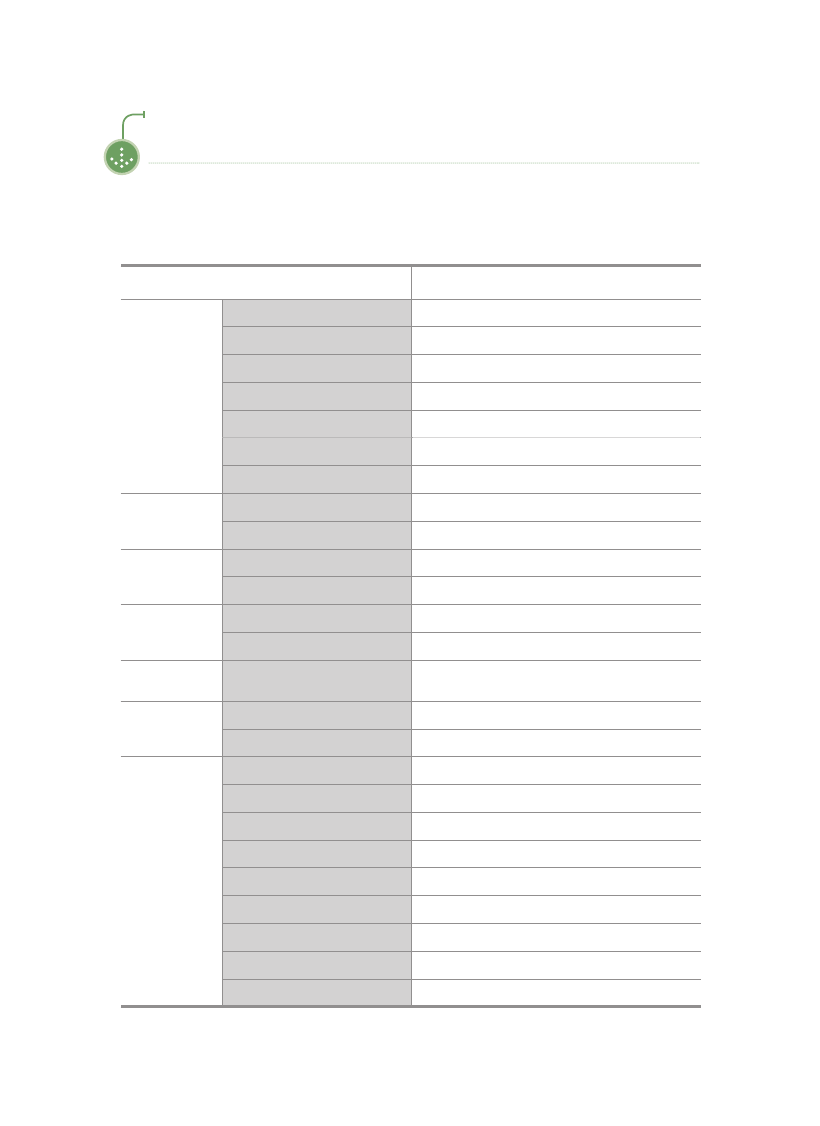
I Product Specifications
Product Specifications
Due to ongoing product performance and/or quality improvements, the following information is
subject to change without prior notice.
Item Specification
General
Product Size 160 X 95 X 20mm
Product Type Portable UR Remote Control
Operating System WINCE 5.0
Usable Memory 128 MByte (including OS)
USB Download USB 1.1
Battery 3.7V / 1800mA
Button 22 External Buttons
Image Color LCD Samsung 3.5" TFT LCD (320X240)
Supported Image File Types
BMP, JPG, PNG
Audio Channel MONO (Built-In Speaker)
Supported Audio File Types
MP3, WAV
Operation
Distance
IR Operation Distance MIN 10m
RF Operation Distance MIN 20m
Operation
Voltage3.2V~5.4V
Details
Processor Type 332-FBGA
0℃ ~ +35℃
-20℃ ~ +70℃
Processor Samsung S3C2442 Processor 300MHz
CPU Core ARM 920T
Touch Panel Touch Panel Controller ADS7846
Motion Sensor LIS302D
IR Infrared
ZigBee 2.4Ghz [IEEE 802.15.4 Standard]
RUN MAX 250mA @ 3.7V
Sleep MAX 4mA @ 3.7V
Temperature Operation
Storage


Display Structure
Main Screen................................................. 22
REMOTE - Screen............................................ 23
<DEVICES> - TV Screen....................................... 24
<DEVICES> Mode
<DEVICES> - Using the TV Remote Control. . . . . . . . . . . . . . . . . . . . . . . . 25
OPERATING SET-UP
BRAND(CODE) SET-UP (TV Remote Control Setting). . . . . . . . . . . . . . . . 26
CODE LEARNING............................................ 29
SELECT SIGNAL BETWEEN IR/RF(Network Mode) . . . . . . . . . . . . . . . . . 31
SELECT SIGNAL BETWEEN IR/RF (Stand_Alone Mode) . . . . . . . . . . . . . 33
PAIRING THE REMOTE CONTROL WITH THE RECEIVER (Network Mode).. 35
CONFIGURATION (TOUCH, EXTERNAL BUTTON SOUND Settings)
......... 37
PHOTO
PHOTO Function Buttons ...................................... 38
PHOTO SET-UP (SLIDE MODE) ................................ 39
PHOTO DISPLAY ............................................ 40
Music File and Image File Saving . . . . . . . . . . . . . . . . . . . . . . . . . . . . . . . . 42
UTILITY
UTILITY Main Screen.......................................... 43
Calendar.................................................... 44
Calculator................................................... 45
Program Version ............................................. 45
Game ...................................................... 46
Game Settings . . . . . . . . . . . . . . . . . . . . . . . . . . . . . . . . . . . . . . . . . . . . . . . 47
Game Instructions ............................................ 48
SETTING
SETTING Main Screen ........................................ 49
SYSTEM.................................................... 50
START PROGRAM ........................................... 51
DISPLAY MODE SET-UP WHILE CHARGING. . . . . . . . . . . . . . . . . . . . . . 52
DIMING MODE............................................... 53
Chapter 2 Learning to Use the Menus
The following content is subject to change according to user needs.
The description of any change can be found in the Customer Support section at
http://www.remotesolution.co.kr.
I 22
Chapter 2 | Learning to Use the Menus
Display Structure
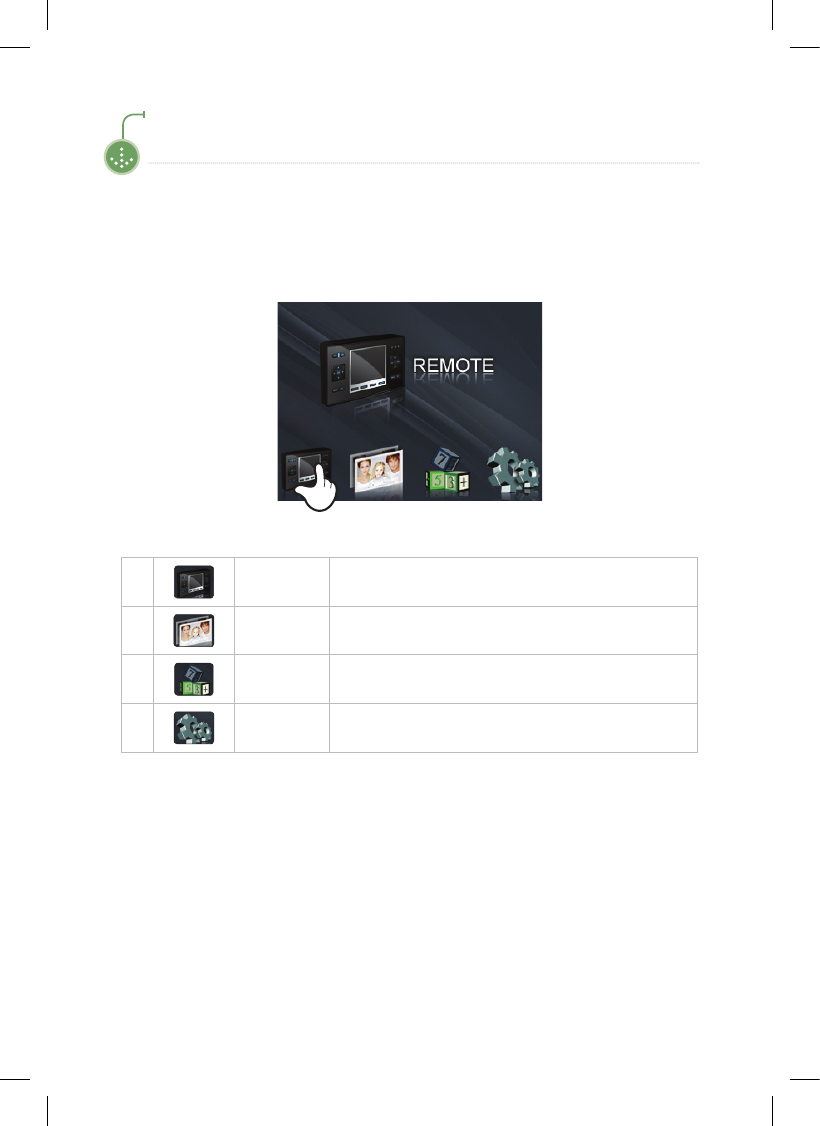
I Main Screen
Press the [Menu] icon in the LCD screen of the remote control to open the menu.
1 REMOTE Moves to the device group to be controlled.
2 PHOTO Moves to the playback menu for image files.
3 UTILITY Goes to the user preferences menu.
4 SETTING Moves to the system settings menu.
23 I
Chapter 2 | Learning to Use the Menus
Display Structure
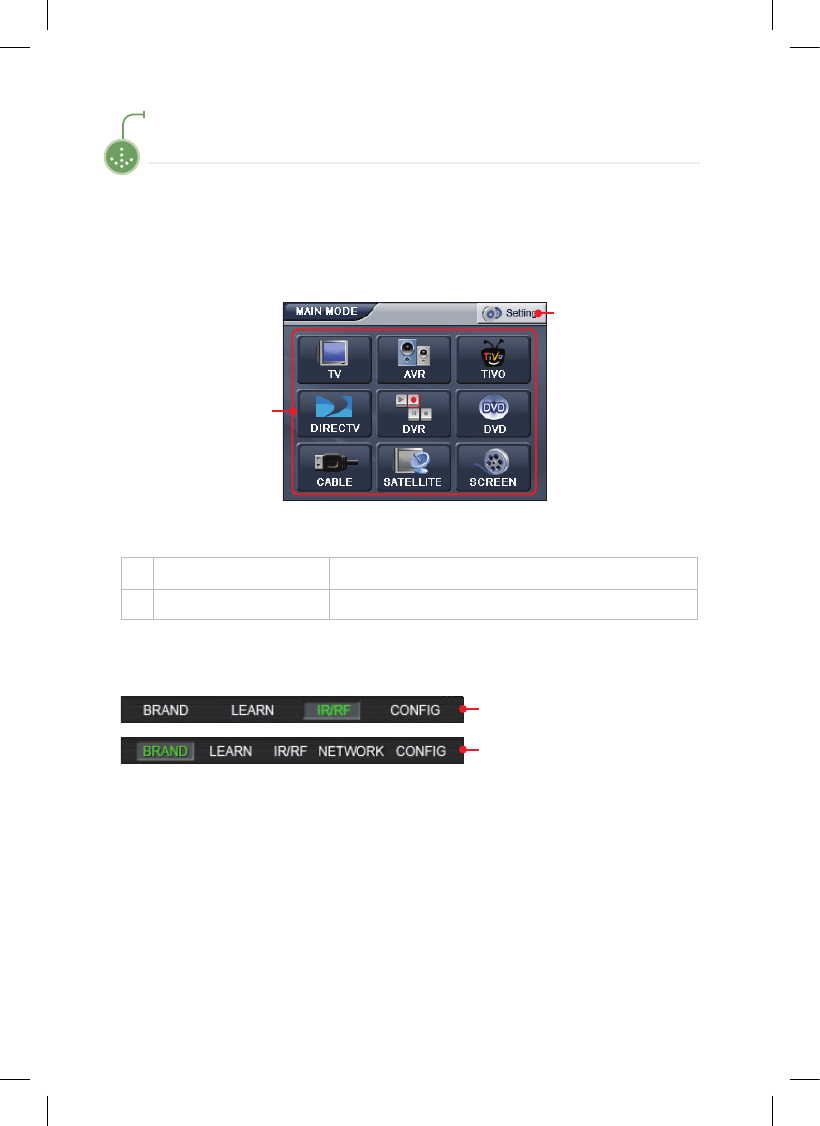
I REMOTE - Screen
Device Settings
Menu
1 Menu
Moves the <DEVICES> selected by the user.
2 Device Settings Moves to the device settings menu.
STAND_ALONE MODE
NETWORK MODE
After enter the setting mode by pressing Device Settings button,
screen can be different depending on the remote mode.
I 24
Chapter 2 | Learning to Use the Menus
Display Structure
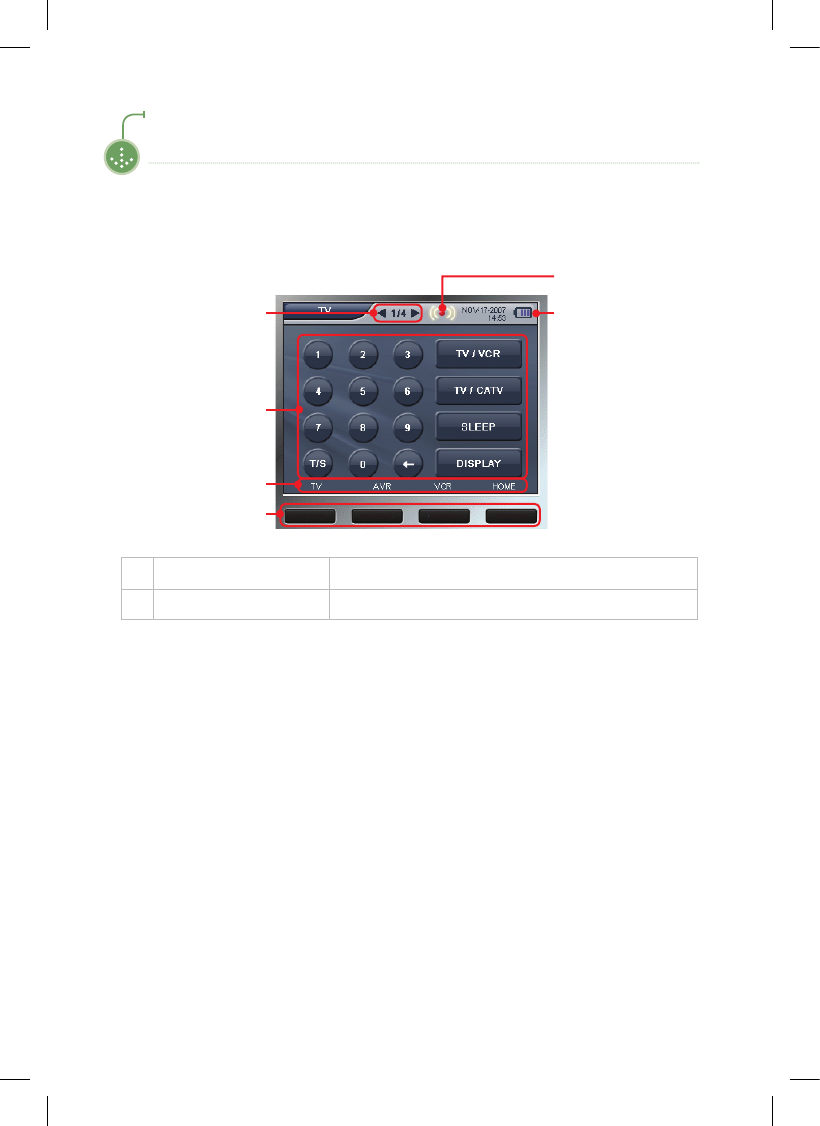
I <DEVICES> - TV Screen
Battery Status Display
Operation Icons
IR/RF Signal of Current
Device Display
Current Position & Page
Display
Function Keys Display
FUNCTION Button
1 OPERATION ICONS
Used to operate device functions.
2 FUNCTION BUTTONS
Moves to the page of the set device.
25 I
Chapter 2 | Learning to Use the Menus
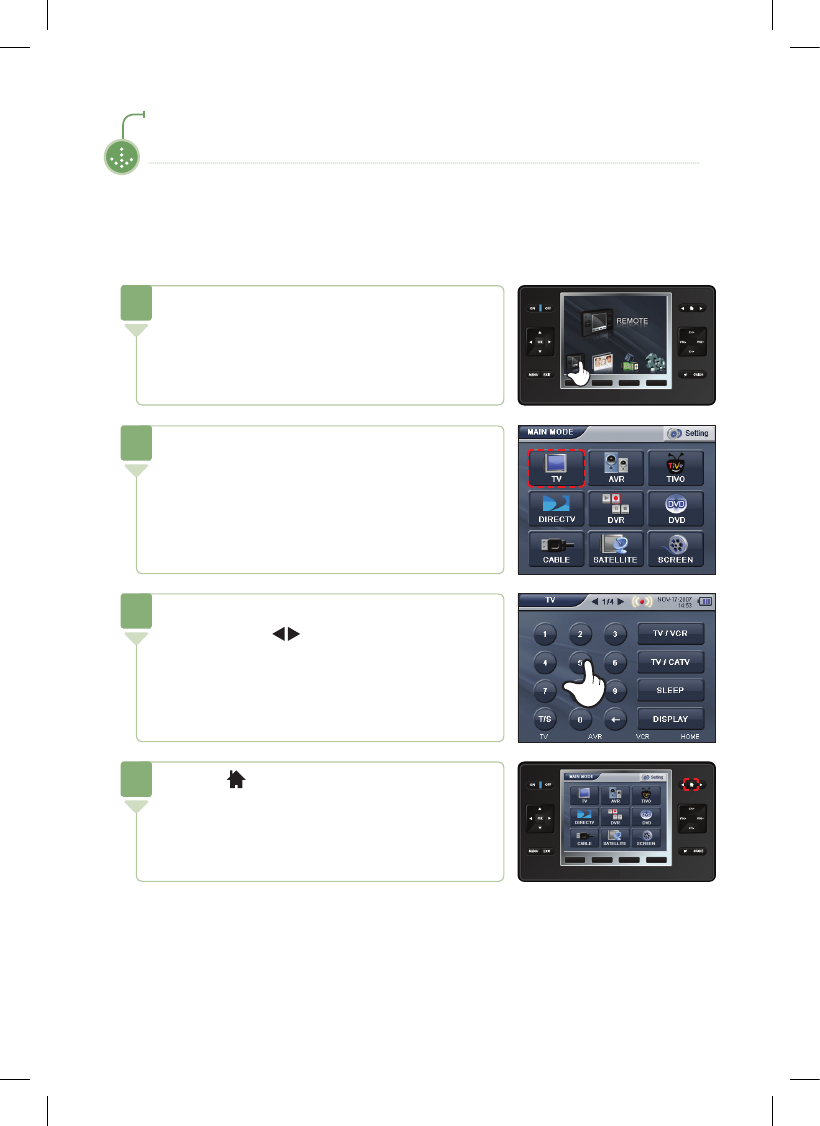
I <DEVICES> - Using the TV Remote Control
<DEVICES> Mode
[ <TV>, <AVR>, <TIVO>, <DIRECTV>, <DVR>, <DVD>, <CABLE>, <SATELLITE>, etc.
Follow the same instructions to move to the [DEVICES] menu.
Press the [REMOTE] icon on the screen to open
the menu.
The [REMOTE] screen appears.
1
Press the [TV] icon on the screen.
The [DEVICES] screen appears.
2
Press and use the operation icons on the <TV> screen.
Use the product's [ ] buttons to move between pages.
(refer to page 9)
3
Press the [ ] button the end the mode.
4
I 26
Chapter 2 | Learning to Use the Menus
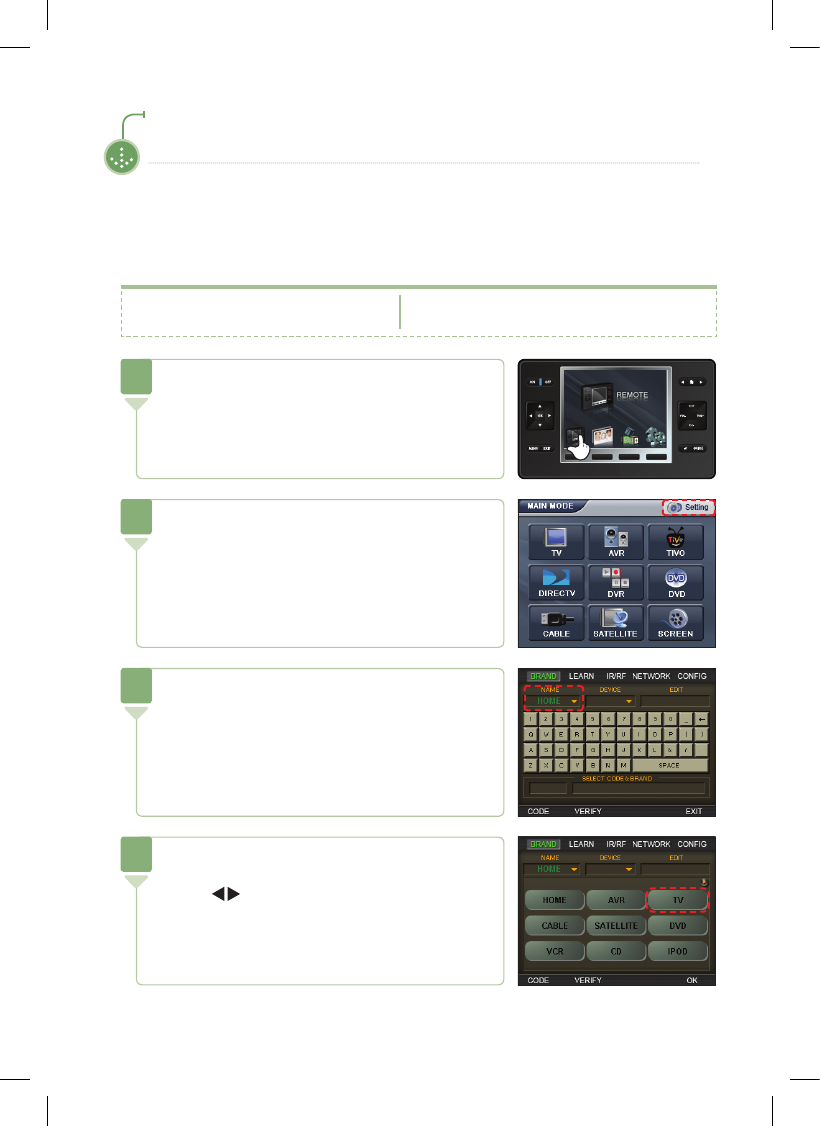
I BRAND(CODE) SET-UP (TV Remote Control Setting)
OPERATING SET-UP
Press the [REMOTE] icon on the screen to open
the menu.
The [REMOTE] screen appears.
1
Press the [Settings] icon on the screen.
The [Settings] screen appears.
2
Press the [NAME-TV] icon on the screen.
The [DEVICES] screen appears.
3
■ Turn on the desired TV.
■ Ex : TV brand name LG (Goldstar).
■ Point the remote control at the TV.
Press the button of the device to be set.
If the selected device is not displayed on the screen,
press [ ] button to move between pages.
Ex.) TV
4
27 I
Chapter 2 | Learning to Use the Menus
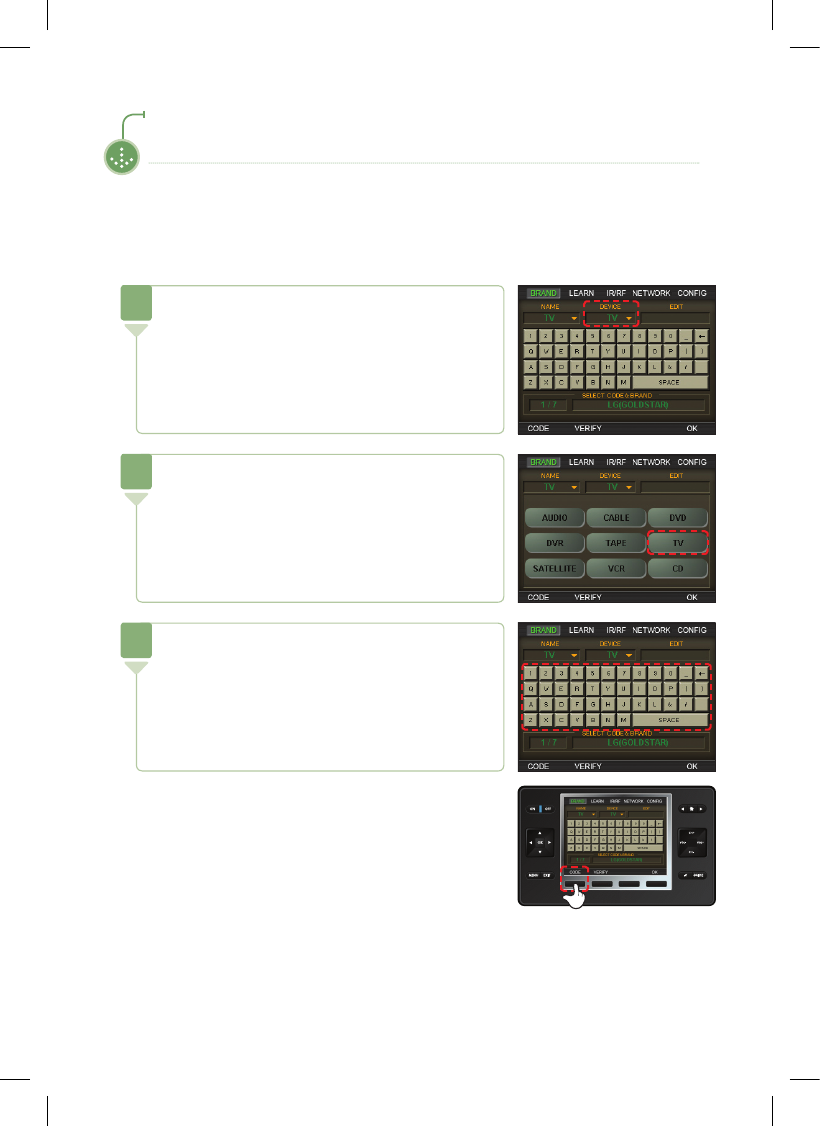
OPERATING SET-UP
In the screen, press the rst letter "L" of the TV brand.
If the TV brand is the same, press the [CODE] button.
The models held by a brand increase by one and are
outputted per each instance of pressing the
[LG(GOLDSTAR)] icon.
(Note: Continuous pressing results in the continuous output
of the same model.)
7
Press the [DEVICE-TV] icon on the screen.
5
Press the button of the device to be set.
The device here is that of the database.
Ex.) TV
6