Renaissance Learning NEO2 Portable Computing Device User Manual SmartApplet
Renaissance Learning, Inc Portable Computing Device SmartApplet
Users Manual

SmartApplet
User Manual

ii
Contact Information
The AlphaSmart Web site is a good source of information about products, sales, support, community forums, and the
latest news. Visit the AlphaSmart Web site at
www.alphasmart.com (United States)
www.alphasmart.co.uk (United Kingdom)
www.alphasmart.com/international (all other countries)
If you can’t find the information you’re looking for on the Web site, use this contact information:
United States
Renaissance Learning
PO Box 8036
Wisconsin Rapids, WI 54495-8036
Technical questions or problems:
Phone: (888) 274-2720
Email: support@alphasmart.com
Web: www.alphasmart.com/support
Purchase AlphaSmart products, general information, or sales questions:
Online store: www.alphasmart.com
Phone: (888) 274-0680
Email: info@alphasmart.com
United Kingdom
Technical questions or problems:
Phone: 0870 120 0718
Email: UK-help@alphasmart.com
Latest support information:
Web: www.alphasmart.co.uk/support
Purchase AlphaSmart products:
Web: www.alphasmart.co.uk/ordering
(This URL also provides a list of resellers and AlphaSmart contacts.)
Europe, Middle East, and Africa
Technical questions or problems:
Phone: +44 870 120 0718
Email: UK-help@alphasmart.com
Latest support information:
Web: www.alphasmart.eu/support
Select your country or region.
Purchase AlphaSmart products:
Web: www.alphasmart.com/international
(This URL also provides a list of resellers and AlphaSmart contacts.)

iii
Asia/Pacific, Canada, and Latin America
Technical questions or problems:
Contact your local reseller. If you do not have a local reseller, email Technical Support at support@alphasmart.com.
Latest support information:
Web: www.alphasmart.com/support
Select your country or region.
Purchase AlphaSmart products:
Web: www.alphasmart.com/international
(This URL also provides a list of resellers and AlphaSmart contacts.)
Copyright Notice
Copyright © 2007 by Renaissance Learning, Inc. All Rights Reserved.
This publication is protected by US and international copyright laws. It is unlawful to duplicate or reproduce any
copyrighted material without authorization from the copyright holder. This document may be reproduced only by staff
members in schools that own NEOs. For more information, contact Renaissance Learning, Inc., at the address above.
AlphaSmart, AlphaHub, AlphaQuiz, NEO, SmartApplet, and Renaissance Learning are trademarks of Renaissance
Learning, Inc., and its subsidiaries, registered, common law, or pending registration in the United States and other
countries.
Macintosh is a registered trademark of Apple Computer, Inc., registered in the US and other countries.
Microsoft and Windows are registered trademarks of Microsoft Corporation in the United States and/or other
countries.
Adobe and Acrobat are registered trademarks of Adobe Systems Incorporated in the United States and/or other
countries.
As technology advances, it becomes necessary for software companies to drop support for older operating systems and
third-party software. It is the responsibility of customers to keep their computers, networks, operating systems, and
third-party software up-to-date and functional. Although Renaissance Learning will not discontinue support for older
products immediately, we will continue to evaluate system requirements and do our best to provide advance notice
when it becomes necessary to raise our requirements.
08/07 NEO2
Any changes or modifications not expressly approved by the party responsible for compliance could
void the user's authority to operate the equipment.

iv
C
ONTENTS
About SmartApplets . . . . . . . . . . . . . . . . . . . . . . . . .1-1
About this Manual . . . . . . . . . . . . . . . . . . . . . . . . . . . . . . . . . . . . . . . . . . . . . . . . . . . . 1-1
What are SmartApplets?. . . . . . . . . . . . . . . . . . . . . . . . . . . . . . . . . . . . . . . . . . . . . . . 1-1
Which SmartApplets Are Installed? . . . . . . . . . . . . . . . . . . . . . . . . . . . . . . . . . . . . . 1-1
Installing SmartApplets . . . . . . . . . . . . . . . . . . . . . . . . . . . . . . . . . . . . . . . . . . . . . . 1-2
Disabling SmartApplets On NEOs. . . . . . . . . . . . . . . . . . . . . . . . . . . . . . . . . . . . . . 1-3
Disabling SmartApplets on the NEO Itself . . . . . . . . . . . . . . . . . . . . . . . . . . . . . . . . . . . 1-4
Disabling SmartApplets within AlphaSmart Manager . . . . . . . . . . . . . . . . . . . . . . . . . 1-4
Deleting SmartApplets from NEOs . . . . . . . . . . . . . . . . . . . . . . . . . . . . . . . . . . . . . .1-5
Learning to Use Your SmartApplets . . . . . . . . . . . . . . . . . . . . . . . . . . . . . . . . . . . . .1-7
AlphaWord Plus . . . . . . . . . . . . . . . . . . . . . . . . . . . . 2-1
Calculator . . . . . . . . . . . . . . . . . . . . . . . . . . . . . . . . 3-1
How to Use Calculator . . . . . . . . . . . . . . . . . . . . . . . . . . . . . . . . . . . . . . . . . . . . . . . 3-1
Pasting Calculations into Other Programs (Paper Tape) . . . . . . . . . . . . . . . . . . . 3-2
Turning off Calculator. . . . . . . . . . . . . . . . . . . . . . . . . . . . . . . . . . . . . . . . . . . . . . . . 3-3
To turn off Calculator While Using AlphaWord Plus. . . . . . . . . . . . . . . . . . . . . . . . . . . 3-3
To Turn Off Calculator from the SmartApplets menu . . . . . . . . . . . . . . . . . . . . . . . . . . 3-3
Control Panel . . . . . . . . . . . . . . . . . . . . . . . . . . . . . 4-1
How to Change Settings Using Control Panel . . . . . . . . . . . . . . . . . . . . . . . . . . . . 4-1
About the Settings in the Control Panel . . . . . . . . . . . . . . . . . . . . . . . . . . . . . . . . . 4-2
Spell Check Settings . . . . . . . . . . . . . . . . . . . . . . . . . . . . . . . . . . . . . . . . . . . . . . . . . 4-3
AlphaWord Settings . . . . . . . . . . . . . . . . . . . . . . . . . . . . . . . . . . . . . . . . . . . . . . . . . 4-4
Turn Show Marks in Files On or Off . . . . . . . . . . . . . . . . . . . . . . . . . . . . . . . . . . . . . . . . 4-4
Turn File Passwords On or Off . . . . . . . . . . . . . . . . . . . . . . . . . . . . . . . . . . . . . . . . . . . . . 4-4
Change a Specific File Password. . . . . . . . . . . . . . . . . . . . . . . . . . . . . . . . . . . . . . . . . . . . 4-5
Reset All File Passwords . . . . . . . . . . . . . . . . . . . . . . . . . . . . . . . . . . . . . . . . . . . . . . . . . . 4-5
Change Default SmartApplet Font . . . . . . . . . . . . . . . . . . . . . . . . . . . . . . . . . . . . . 4-6

v
. . . . .
About Font Sizes. . . . . . . . . . . . . . . . . . . . . . . . . . . . . . . . . . . . . . . . . . . . . . . . . . . . . . . . .4-6
Changing the Font Size . . . . . . . . . . . . . . . . . . . . . . . . . . . . . . . . . . . . . . . . . . . . . . . . . . . 4-7
The System Font. . . . . . . . . . . . . . . . . . . . . . . . . . . . . . . . . . . . . . . . . . . . . . . . . . . . . . . . . 4-7
Turn Calculator Off or On. . . . . . . . . . . . . . . . . . . . . . . . . . . . . . . . . . . . . . . . . . . . . 4-8
Two-button On Setting . . . . . . . . . . . . . . . . . . . . . . . . . . . . . . . . . . . . . . . . . . . . . . . 4-8
Set Screen Contrast Setting . . . . . . . . . . . . . . . . . . . . . . . . . . . . . . . . . . . . . . . . . . . 4-9
Keyboard Command Reference List . . . . . . . . . . . . . . . . . . . . . . . . . . . . . . . . . . . . 4-9
View Keyboard Layout Settings (Including Special Characters) . . . . . . . . . . . . .4-11
Display Battery Status Setting . . . . . . . . . . . . . . . . . . . . . . . . . . . . . . . . . . . . . . . . 4-12
Change Keyboard Settings . . . . . . . . . . . . . . . . . . . . . . . . . . . . . . . . . . . . . . . . . . . 4-12
Change Keyboard Layout . . . . . . . . . . . . . . . . . . . . . . . . . . . . . . . . . . . . . . . . . . . . . . . . 4-12
Change Slow Keys Setting . . . . . . . . . . . . . . . . . . . . . . . . . . . . . . . . . . . . . . . . . . . . . . . . 4-15
Turn Sticky Keys On or Off . . . . . . . . . . . . . . . . . . . . . . . . . . . . . . . . . . . . . . . . . . . . . . . 4-15
Auto Repeat and the Slow Keys Setting. . . . . . . . . . . . . . . . . . . . . . . . . . . . . . . . . . . . . 4-16
KeyWords . . . . . . . . . . . . . . . . . . . . . . . . . . . . . . . . 5-1
Welcome to KeyWords . . . . . . . . . . . . . . . . . . . . . . . . . . . . . . . . . . . . . . . . . . . . . . . .5-1
How the KeyWords SmartApplet Works . . . . . . . . . . . . . . . . . . . . . . . . . . . . . . . . 5-2
Starting the KeyWords SmartApplet. . . . . . . . . . . . . . . . . . . . . . . . . . . . . . . . . . . . 5-2
Adding a Student . . . . . . . . . . . . . . . . . . . . . . . . . . . . . . . . . . . . . . . . . . . . . . . . . . . . 5-3
Choosing Your Name and Starting Lessons . . . . . . . . . . . . . . . . . . . . . . . . . . . . . . 5-4
Learning New Keys . . . . . . . . . . . . . . . . . . . . . . . . . . . . . . . . . . . . . . . . . . . . . . . . . . 5-5
Building Accuracy and Speed. . . . . . . . . . . . . . . . . . . . . . . . . . . . . . . . . . . . . . . . . . 5-6
Accuracy . . . . . . . . . . . . . . . . . . . . . . . . . . . . . . . . . . . . . . . . . . . . . . . . . . . . . . . . . . . . . . . 5-6
Speed Builder . . . . . . . . . . . . . . . . . . . . . . . . . . . . . . . . . . . . . . . . . . . . . . . . . . . . . . . . . . . 5-7
Taking an Accuracy and Speed Test . . . . . . . . . . . . . . . . . . . . . . . . . . . . . . . . . . . . 5-8
How Students Check Progress Using Reports . . . . . . . . . . . . . . . . . . . . . . . . . . . . 5-9
Teacher Options. . . . . . . . . . . . . . . . . . . . . . . . . . . . . . . . . . . . . . . . . . . . . . . . . . . . 5-10
Deleting Students . . . . . . . . . . . . . . . . . . . . . . . . . . . . . . . . . . . . . . . . . . . . . . . . . . .5-11
Creating a Group Progress Report. . . . . . . . . . . . . . . . . . . . . . . . . . . . . . . . . . . . . 5-12
Setting Speed and Accuracy Goals for KeyWords Students . . . . . . . . . . . . . . . . 5-13
Setting Goals Manually Changes How KeyWords Works . . . . . . . . . . . . . . . . . . . . . . 5-13
How to Set Goals Manually in the Teacher Options. . . . . . . . . . . . . . . . . . . . . . . . . . . 5-14
Resetting Goals to the Default . . . . . . . . . . . . . . . . . . . . . . . . . . . . . . . . . . . . . . . . . . . . 5-15

vi
. . . . .
Choosing Whether to Enforce Use of the Correct Shift Key . . . . . . . . . . . . . . . . 5-16
Enforcing Use of the Home Row . . . . . . . . . . . . . . . . . . . . . . . . . . . . . . . . . . . . . . .5-17
Requiring One or Two Spaces Between Sentences . . . . . . . . . . . . . . . . . . . . . . . .5-17
Using AlphaSmart Manager 2 with KeyWords . . . . . . . . . . . . . . . . . . . . . . . . . . 5-18
Setting KeyWords Options in AlphaSmart Manager . . . . . . . . . . . . . . . . . . . . . . . . . . 5-18
Retrieving KeyWords Data and Generating Reports in AlphaSmart
Manager. . . . . . . . . . . . . . . . . . . . . . . . . . . . . . . . . . . . . . . . . . . . . . . . . . . . . . . . . . . 5-21
Synching KeyWords Data with KeyWords RP . . . . . . . . . . . . . . . . . . . . . . . . . . . . . . . 5-23
About KeyWords Reports . . . . . . . . . . . . . . . . . . . . . . . . . . . . . . . . . . . . . . . . . . . . 5-26
Creating a Master Class Report . . . . . . . . . . . . . . . . . . . . . . . . . . . . . . . . . . . . . . . . . . . 5-26
About the Options for Generating Reports on the NEO . . . . . . . . . . . . . . . . . . . . . . . 5-27
Using KeyWords RP to View and Print Reports . . . . . . . . . . . . . . . . . . . . . . . . . 5-29
How KeyWords RP Works . . . . . . . . . . . . . . . . . . . . . . . . . . . . . . . . . . . . . . . . . . . . . . . 5-29
Programs You’ll Use. . . . . . . . . . . . . . . . . . . . . . . . . . . . . . . . . . . . . . . . . . . . . . . . . . . . . 5-30
Learning KeyWords RP . . . . . . . . . . . . . . . . . . . . . . . . . . . . . . . . . . . . . . . . . . . . . . . . . . 5-31
Checking System Requirements . . . . . . . . . . . . . . . . . . . . . . . . . . . . . . . . . . . . . . . . . . . 5-33
Logging in to Renaissance Place and Changing Your Password. . . . . . . . . . . . . . . . . 5-33
Switching Roles in Renaissance Place . . . . . . . . . . . . . . . . . . . . . . . . . . . . . . . . . . . . . . 5-34
Navigating the KeyWords RP Software . . . . . . . . . . . . . . . . . . . . . . . . . . . . . . . . . . . . . 5-34
Logging Out and Closing the Renaissance Place Software . . . . . . . . . . . . . . . . . . . . . 5-34
Setting Up the KeyWords RP Software . . . . . . . . . . . . . . . . . . . . . . . . . . . . . . . . . . . . . 5-35
Activating Schools . . . . . . . . . . . . . . . . . . . . . . . . . . . . . . . . . . . . . . . . . . . . . . . . . . . . . . 5-36
Bringing KeyWords Data into KeyWords RP . . . . . . . . . . . . . . . . . . . . . . . . . . . . . . . . 5-37
Viewing KeyWords RP Reports . . . . . . . . . . . . . . . . . . . . . . . . . . . . . . . . . . . . . . . . . . . 5-37
KeyWords Resources for Teachers . . . . . . . . . . . . . . . . . . . . . . . . . . . . . . . . . . . . 5-45
Materials for handouts and transparencies . . . . . . . . . . . . . . . . . . . . . . . . . . . . . . . . . 5-45
Keyboarding ergonomics. . . . . . . . . . . . . . . . . . . . . . . . . . . . . . . . . . . . . . . . . . . . . . . . . 5-47
Sample lesson plan for getting started. . . . . . . . . . . . . . . . . . . . . . . . . . . . . . . . . . . . . . 5-48
Lessons in KeyWords . . . . . . . . . . . . . . . . . . . . . . . . . . . . . . . . . . . . . . . . . . . . . . . 5-49
Frequently Asked Questions . . . . . . . . . . . . . . . . . . . . . . . . . . . . . . . . . . . . . . . . . 5-57
Why can’t I use the backspace key when using KeyWords? . . . . . . . . . . . . . . . . . . . . 5-57
Why is there so much repetition of words in the practice passages? . . . . . . . . . . . . . 5-57
Why are the passages so easy? . . . . . . . . . . . . . . . . . . . . . . . . . . . . . . . . . . . . . . . . . . . . 5-57
Why is the sequence of key introduction so different from what I am used to
in other typing programs? . . . . . . . . . . . . . . . . . . . . . . . . . . . . . . . . . . . . . . . . . . . . 5-57
Why do the students learn the ASKL keys first?. . . . . . . . . . . . . . . . . . . . . . . . . . . . . . 5-57
What is the rationale for how the practice passages are sequenced? . . . . . . . . . . . . . 5-58
Why aren't my test scores updated when I retake an accuracy and speed
builder test in KeyWords? . . . . . . . . . . . . . . . . . . . . . . . . . . . . . . . . . . . . . . . . . . . . 5-58

vii
. . . . .
Beamer . . . . . . . . . . . . . . . . . . . . . . . . . . . . . . . . . .6-1
Starting Beamer. . . . . . . . . . . . . . . . . . . . . . . . . . . . . . . . . . . . . . . . . . . . . . . . . . . . . 6-1
Finding the Infrared Ports . . . . . . . . . . . . . . . . . . . . . . . . . . . . . . . . . . . . . . . . . . . . 6-2
Beamer and the NEO Clipboard . . . . . . . . . . . . . . . . . . . . . . . . . . . . . . . . . . . . . . . 6-2
Beaming from One NEO to Another . . . . . . . . . . . . . . . . . . . . . . . . . . . . . . . . . . . . 6-3
Beaming AlphaWord Plus files between devices . . . . . . . . . . . . . . . . . . . . . . . . . . 6-6
Beaming from a NEO to a Palm OS Device . . . . . . . . . . . . . . . . . . . . . . . . . . . . . . 6-6
Beaming from a Palm OS device to a NEO . . . . . . . . . . . . . . . . . . . . . . . . . . . . . . . 6-8
Cancelling a Beam . . . . . . . . . . . . . . . . . . . . . . . . . . . . . . . . . . . . . . . . . . . . . . . . . . .6-11
Changing Beamer Settings . . . . . . . . . . . . . . . . . . . . . . . . . . . . . . . . . . . . . . . . . . . 6-12
Troubleshooting. . . . . . . . . . . . . . . . . . . . . . . . . . . . . . . . . . . . . . . . . . . . . . . . . . . . 6-13
I want to change a setting, but I don’t know the master password. . . . . . . . . . . . . . . 6-13
I don’t see the Send option on my Beamer screen.. . . . . . . . . . . . . . . . . . . . . . . . . . . . 6-13
My NEO says it can’t find a receiving device. . . . . . . . . . . . . . . . . . . . . . . . . . . . . . . . . 6-13
I received an error when I tried to beam or receive a file. . . . . . . . . . . . . . . . . . . . . . . 6-14
I have data on the clipboard that I don’t want to lose. What should I do? . . . . . . . . 6-14
I keep getting an invalid password message. . . . . . . . . . . . . . . . . . . . . . . . . . . . . . . . . 6-14
I beamed a file with a password, but now that file doesn’t have a password
on the receiving device. . . . . . . . . . . . . . . . . . . . . . . . . . . . . . . . . . . . . . . . . . . . . . . 6-14
What does the message “could not find a sending device” mean? . . . . . . . . . . . . . . . 6-14
What do I do if the file I’m receiving is too big? . . . . . . . . . . . . . . . . . . . . . . . . . . . . . . 6-15
My buddy beamed an AlphaWord Plus file to me, but Beamer didn’t let
me choose a file to put it in. It automatically put it in a new file.
What happened?. . . . . . . . . . . . . . . . . . . . . . . . . . . . . . . . . . . . . . . . . . . . . . . . . . . . 6-15
AlphaQuiz . . . . . . . . . . . . . . . . . . . . . . . . . . . . . . . .7-1
How AlphaQuiz Works . . . . . . . . . . . . . . . . . . . . . . . . . . . . . . . . . . . . . . . . . . . . . . . .7-1
Programs You’ll Use with AlphaQuiz . . . . . . . . . . . . . . . . . . . . . . . . . . . . . . . . . . . 7-2
Downloading and Installing QuizDesigner and QuizManager. . . . . . . . . . . . . . . 7-2
System Requirements for QuizManager and QuizDesigner . . . . . . . . . . . . . . . . . . . . . 7-2
Windows Instructions for Downloading and Installing QuizDesigner
and QuizManager . . . . . . . . . . . . . . . . . . . . . . . . . . . . . . . . . . . . . . . . . . . . . . . . . . . . 7-3
Macintosh Instructions for Downloading and Installing QuizDesigner
and QuizManager . . . . . . . . . . . . . . . . . . . . . . . . . . . . . . . . . . . . . . . . . . . . . . . . . . . . 7-4
Starting QuizDesigner. . . . . . . . . . . . . . . . . . . . . . . . . . . . . . . . . . . . . . . . . . . . . . . . 7-5
About the Options in QuizDesigner. . . . . . . . . . . . . . . . . . . . . . . . . . . . . . . . . . . . . 7-5

viii
. . . . .
Creating Quizzes in QuizDesigner . . . . . . . . . . . . . . . . . . . . . . . . . . . . . . . . . . . . . . 7-6
Opening and Changing Quizzes in QuizDesigner . . . . . . . . . . . . . . . . . . . . . . . . 7-10
Opening an Existing Quiz . . . . . . . . . . . . . . . . . . . . . . . . . . . . . . . . . . . . . . . . . . . . . . . . 7-10
Changing an Existing Quiz’s Questions . . . . . . . . . . . . . . . . . . . . . . . . . . . . . . . . . . . . . 7-11
Changing Quiz Options for an Existing Quiz . . . . . . . . . . . . . . . . . . . . . . . . . . . . . . . . 7-12
Rearranging Quiz Questions in QuizDesigner . . . . . . . . . . . . . . . . . . . . . . . . . . . . . . . 7-13
Deleting Quiz Questions . . . . . . . . . . . . . . . . . . . . . . . . . . . . . . . . . . . . . . . . . . . . . . . . . 7-13
Copying Questions in QuizDesigner . . . . . . . . . . . . . . . . . . . . . . . . . . . . . . . . . . . 7-14
Copying Questions within a Quiz . . . . . . . . . . . . . . . . . . . . . . . . . . . . . . . . . . . . . . . . . . 7-14
Copying Questions from One Quiz to Another . . . . . . . . . . . . . . . . . . . . . . . . . . . . . . . 7-14
Password Requirements for Quizzes . . . . . . . . . . . . . . . . . . . . . . . . . . . . . . . . . . . 7-16
KeyBoard ShortCuts in QuizDesigner . . . . . . . . . . . . . . . . . . . . . . . . . . . . . . . . . . 7-16
Previewing Questions in QuizDesigner (Seeing Questions as They
Appear on NEO) . . . . . . . . . . . . . . . . . . . . . . . . . . . . . . . . . . . . . . . . . . . . . . . . . . . 7-19
Printing a Quiz from QuizDesigner . . . . . . . . . . . . . . . . . . . . . . . . . . . . . . . . . . . . 7-20
Exporting a Quiz from QuizDesigner to a Word Processing Program . . . . . . . 7-21
Spell-checking a Quiz . . . . . . . . . . . . . . . . . . . . . . . . . . . . . . . . . . . . . . . . . . . . . . . 7-22
Deleting Quizzes . . . . . . . . . . . . . . . . . . . . . . . . . . . . . . . . . . . . . . . . . . . . . . . . . . . 7-22
Creating a Question Library in QuizDesigner . . . . . . . . . . . . . . . . . . . . . . . . . . . 7-23
Windows Instructions for Creating Question Libraries. . . . . . . . . . . . . . . . . . . . . . . . 7-23
Macintosh Instructions for Creating Question Libraries. . . . . . . . . . . . . . . . . . . . . . . 7-23
Using Quiz Library Questions in a Quiz . . . . . . . . . . . . . . . . . . . . . . . . . . . . . . . . . . . . 7-23
Starting QuizManager. . . . . . . . . . . . . . . . . . . . . . . . . . . . . . . . . . . . . . . . . . . . . . . 7-24
About the QuizManager Control Bar. . . . . . . . . . . . . . . . . . . . . . . . . . . . . . . . . . . 7-24
Sending Quizzes to NEOs Using QuizManager . . . . . . . . . . . . . . . . . . . . . . . . . . 7-25
Deleting Quizzes from NEOs . . . . . . . . . . . . . . . . . . . . . . . . . . . . . . . . . . . . . . . . . 7-27
How Students Take a Quiz Using the AlphaQuiz SmartApplet . . . . . . . . . . . . . 7-29
How Students Print Quizzes. . . . . . . . . . . . . . . . . . . . . . . . . . . . . . . . . . . . . . . . . . 7-31
How Students Save Quizzes to an AlphaWord File . . . . . . . . . . . . . . . . . . . . . . . 7-32
Teacher Options in for Quizzes in AlphaQuiz . . . . . . . . . . . . . . . . . . . . . . . . . . . 7-32
Retrieving Students’ Responses from NEOs Using QuizManager. . . . . . . . . . . 7-35
Deleting Students’ Responses to Quizzes Using QuizManager . . . . . . . . . . . . . 7-37
Turning NEOs On or Off Using QuizManager . . . . . . . . . . . . . . . . . . . . . . . . . . . 7-39
Assigning Points (Weights) to Quiz Questions in QuizManager . . . . . . . . . . . . 7-39
Grading Quizzes in QuizManager . . . . . . . . . . . . . . . . . . . . . . . . . . . . . . . . . . . . . 7-41

ix
. . . . .
Printing Reports in QuizManager . . . . . . . . . . . . . . . . . . . . . . . . . . . . . . . . . . . . . 7-43
About the Reports in QuizManager . . . . . . . . . . . . . . . . . . . . . . . . . . . . . . . . . . . . . . . . 7-43
How to Print Reports. . . . . . . . . . . . . . . . . . . . . . . . . . . . . . . . . . . . . . . . . . . . . . . . . . . . 7-44
Exporting Student Quiz Scores . . . . . . . . . . . . . . . . . . . . . . . . . . . . . . . . . . . . . . . 7-46
KeyBoard ShortCuts in QuizManager . . . . . . . . . . . . . . . . . . . . . . . . . . . . . . . . . . 7-48
Frequently Asked Questions . . . . . . . . . . . . . . . . . . . . . . . . . . . . . . . . . . . . . . . . . 7-50
How many students can take a quiz on one NEO? . . . . . . . . . . . . . . . . . . . . . . . . . . . . 7-50
How many different quizzes can be loaded onto a NEO? . . . . . . . . . . . . . . . . . . . . . . 7-51
Does the student response to a short answer question have to be spelled
correctly? Is it case-sensitive?. . . . . . . . . . . . . . . . . . . . . . . . . . . . . . . . . . . . . . . . . 7-51
What happens if a student skips a question? . . . . . . . . . . . . . . . . . . . . . . . . . . . . . . . . 7-51
If I’m using an AlphaHub (SmartOption Cart), and I also have an open
USB port on my computer, can I use both methods of
communication between QuizManager and NEOs at the same time? . . . . . . . . 7-51
Can a student spell check an essay question? . . . . . . . . . . . . . . . . . . . . . . . . . . . . . . . . 7-51
What do students do when they complete a quiz? . . . . . . . . . . . . . . . . . . . . . . . . . . . . 7-52
Can a student take a quiz twice?. . . . . . . . . . . . . . . . . . . . . . . . . . . . . . . . . . . . . . . . . . . 7-52
Is it possible to print a quiz from the teacher’s computer? . . . . . . . . . . . . . . . . . . . . . 7-52
Once an essay question is graded, what capabilities are there to make
notes on the student response in QuizManager? . . . . . . . . . . . . . . . . . . . . . . . . . 7-52
How and when do I assign the point values for each question? . . . . . . . . . . . . . . . . . 7-53
Can the grades from quizzes be saved as a spreadsheet file or be copied
and pasted directly into a tab-delimited grading program? . . . . . . . . . . . . . . . . 7-53
In essay responses, will AlphaQuiz or QuizManager highlight
or underline key words that were defined when creating
the question?. . . . . . . . . . . . . . . . . . . . . . . . . . . . . . . . . . . . . . . . . . . . . . . . . . . . . . . 7-53
What happens if the NEO is turned off before a quiz is completed?
What appears on the screen when the NEO is turned back on?
How does a student continue the quiz? . . . . . . . . . . . . . . . . . . . . . . . . . . . . . . . . . 7-53
Troubleshooting. . . . . . . . . . . . . . . . . . . . . . . . . . . . . . . . . . . . . . . . . . . . . . . . . . . . 7-54
The QuizManager control bar shows a yellow indicator.. . . . . . . . . . . . . . . . . . . . . . . 7-54
The QuizManager control bar shows a black indicator, but a NEO is
connected to that location on the Cart or to the USB port on
the computer. . . . . . . . . . . . . . . . . . . . . . . . . . . . . . . . . . . . . . . . . . . . . . . . . . . . . . . 7-54
I have a quiz installed on some NEOs, and I have student responses
that I have not yet retrieved, but I’ve accidentally erased the quiz
document from my computer. Now I can’t retrieve, or even remove,
the responses. . . . . . . . . . . . . . . . . . . . . . . . . . . . . . . . . . . . . . . . . . . . . . . . . . . . . . . 7-54

x
. . . . .
I have a quiz installed on some NEOs, but I have accidentally erased the
quiz document from my computer and I don’t remember the Admin
Password. Now I am unable to remove the quiz from the NEOs.. . . . . . . . . . . . 7-55
Index . . . . . . . . . . . . . . . . . . . . . . . . . . . . . . . . . . . 8-1
1-1
A
BOUT
S
MART
A
PPLETS
About this Manual
This manual explains what SmartApplets are and how you can install them on
NEOs or remove them from your NEOs. It also explains how to use the
SmartApplets that are installed when you receive your NEO(s).
What are SmartApplets?
SmartApplets are programs that are installed on your NEO. These programs
allow you to write on the NEO, practice keyboarding skills, do calculations,
change settings, administer quizzes to your students, or “beam” files from one
NEO to another.
Which SmartApplets Are Installed?
All NEOs come with these SmartApplets installed. SmartApplets are listed in
the order in which they appear on the NEO.
SmartApplet What It Does
Where to Find More
Information
AlphaWord Plus This is the program that opens when you first turn on the NEO. The
writing that you do on NEO in files 1-8 is done in AlphaWord Plus.
See Chapter 2.
Calculator Allows you to do calculations right on your NEO. (It can be disabled
using the Control Panel settings.)
See Chapter 3.
Control Panel Allows you to change settings for the NEO and for some
SmartApplets.
See Chapter 4.
KeyWords Allows students to learn and practice keyboarding skills. See Chapter 5.
Beamer Allows files to be sent from one NEO to another without using cables
(using infrared technology). You can disable this functionality if you
wish on the AlphaSmart Manager Settings tab or in the Beamer
settings on the NEO.
See Chapter 6.
AlphaQuiz When used with QuizManager and QuizDesigner, AlphaQuiz allows
you to administer quizzes to students on the NEO.
See Chapter 7.
ABOUT SMARTAPPLETS
Installing SmartApplets
1-2
. . . . .
Installing SmartApplets
To install SmartApplets that are not on your NEO, you’ll need AlphaSmart
Manager installed on your computer. For instructions, see the AlphaSmart 2
User Manual. Once you have AlphaSmart Manager installed, follow these
steps.
1. If you have received a new SmartApplet, close AlphaSmart Manager if it
is already running.
2. If you have a single NEO, use the USB cable that came with your NEO to
connect it to your computer.
If you have a SmartOption Cart with several NEOs, connect the NEOs to
the appropriate cables in your cart. (Your computer must be connected to
the cart’s AlphaHub.)
3. If you have received a new SmartApplet, on your computer, use Windows
Explorer or Macintosh Finder to browse to the location where you
unzipped or unstuffed the SmartApplet files. Double-click the file that ends
with .OS3KApp (such as KeyWords.OS3KApp). AlphaSmart Manager
will start and display the SmartApplets tab.
If you want to install a SmartApplet that you already have, start
AlphaSmart Manager and click the SmartApplets tab.
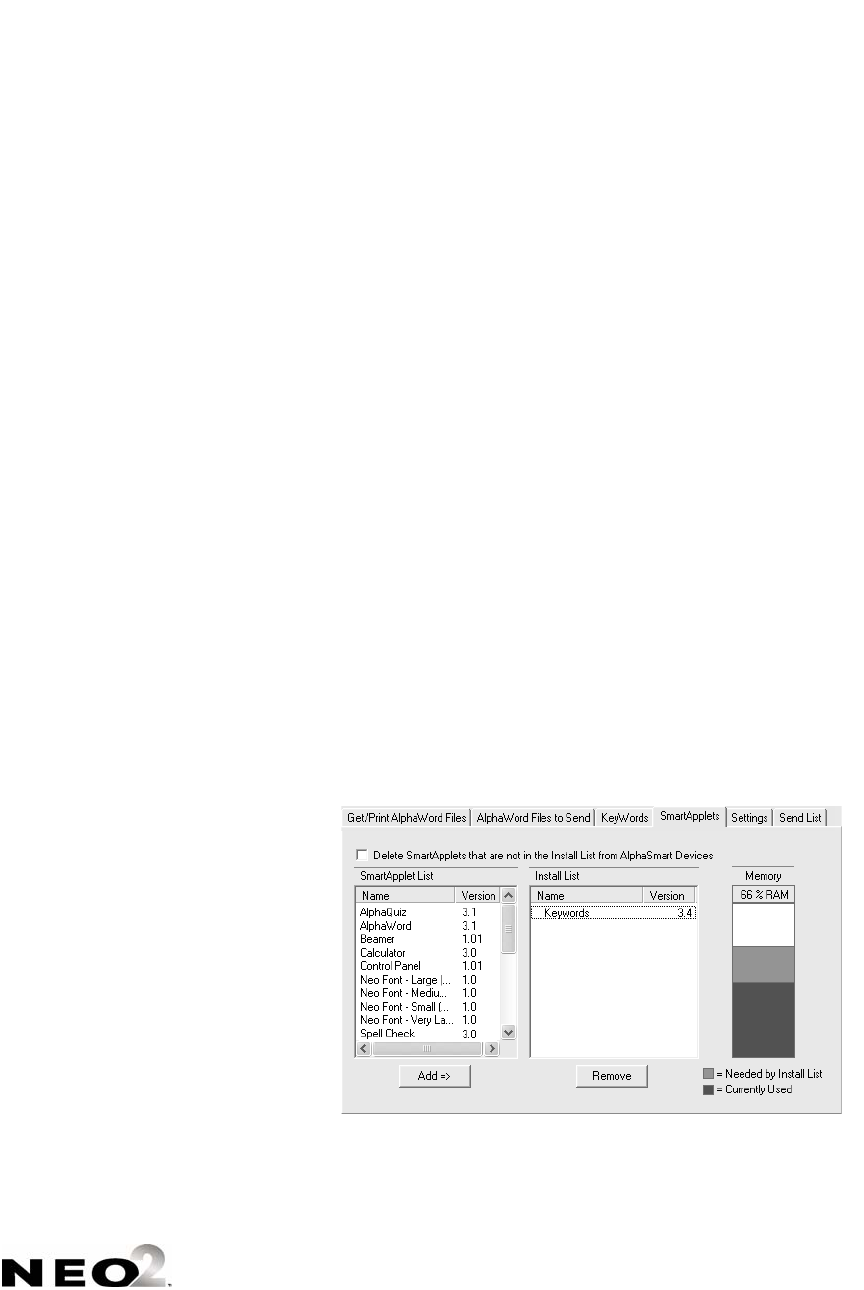
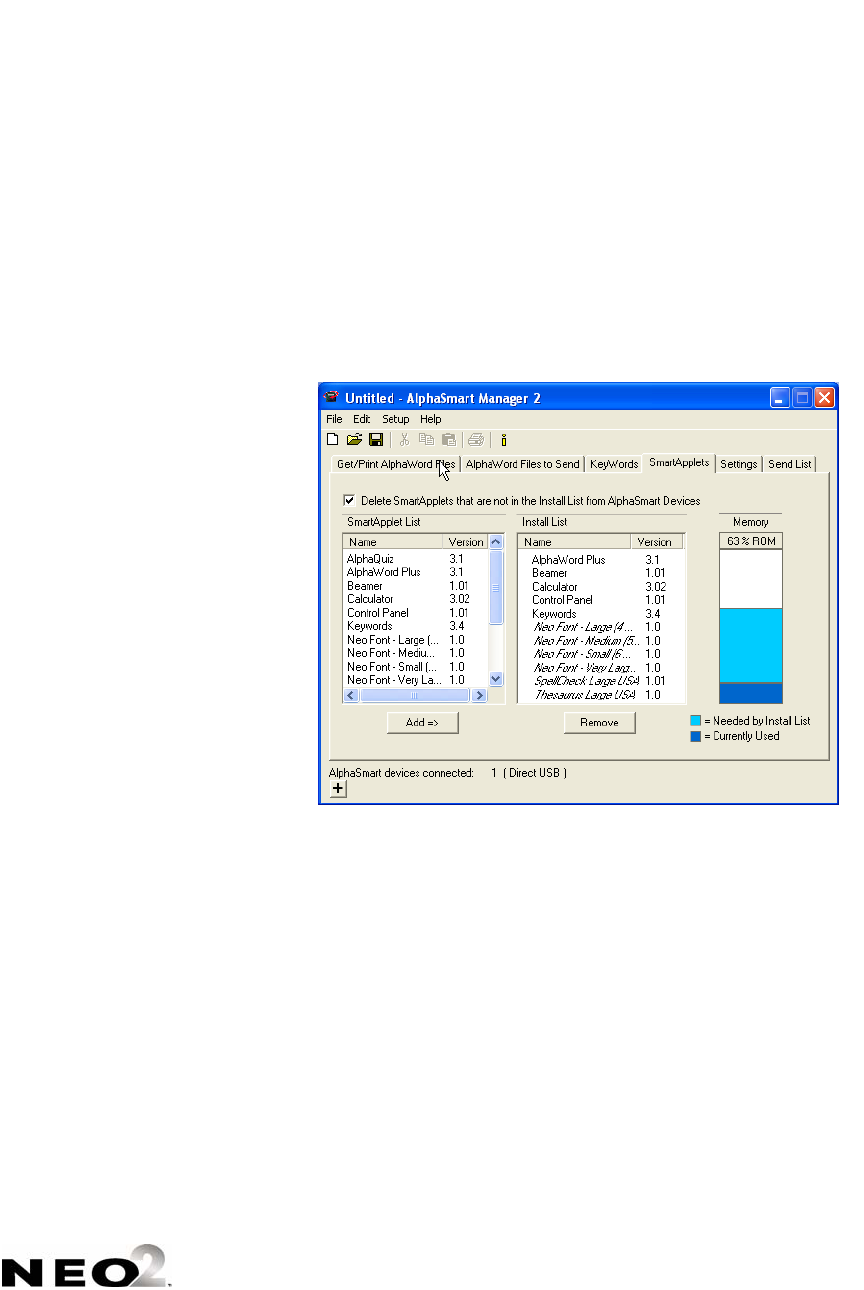
4. If the SmartApplet that you want to install is not already in the Install List
A, click it in the SmartApplet list and click Add => to add it to the list.
(You can also drag the SmartApplets between lists.)
Make sure the Memory column B shows that there is enough space on
the NEO(s) to install this SmartApplet.
A
B

ABOUT SMARTAPPLETS
Disabling SmartApplets On NEOs
1-3
. . . . .
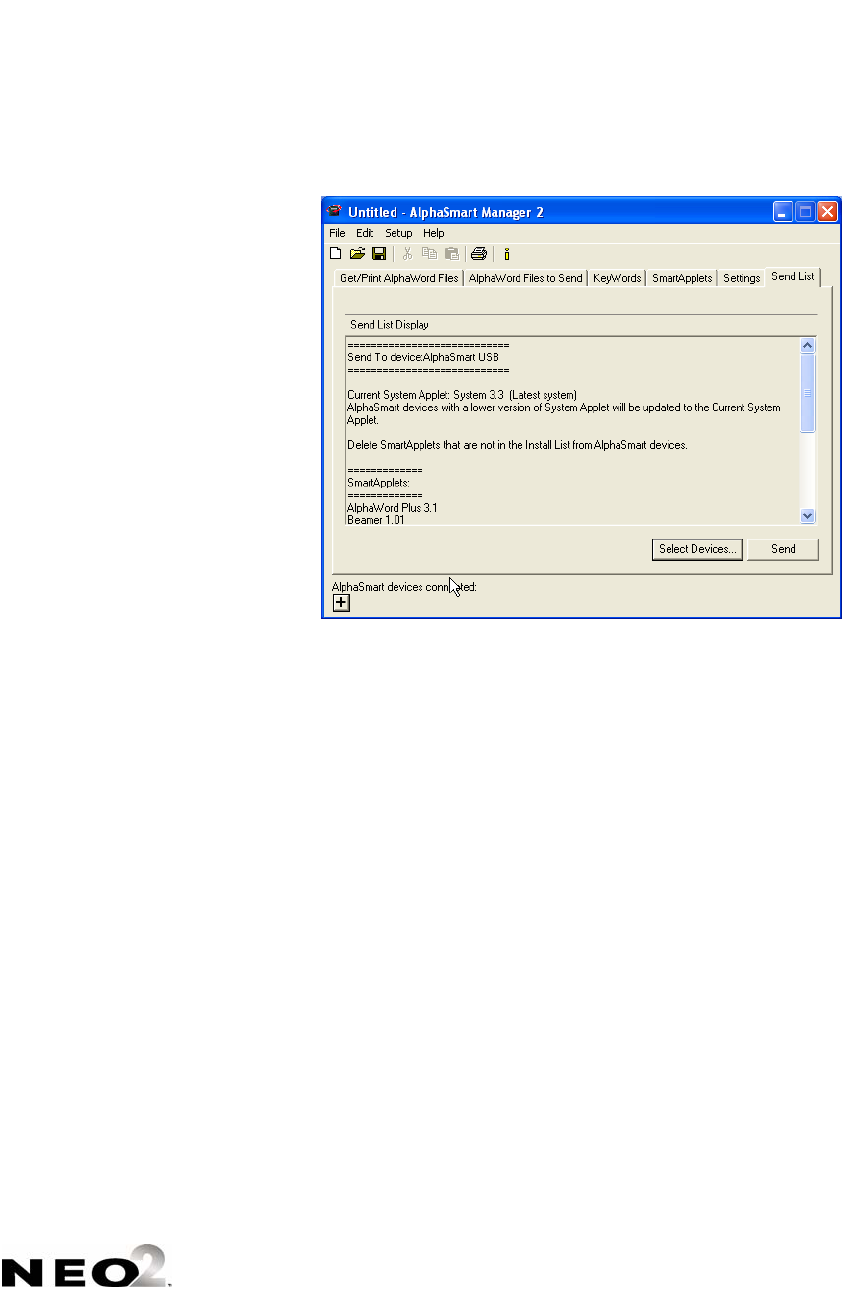
5. Click the Send List tab and make sure the SmartApplet that you’re
installing is listed in the SmartApplets section of the list.
6. If you have a SmartOption Cart, and you don’t want to send the
SmartApplet to all NEOs, click Select Devices C, check the NEOs that
you want to have the SmartApplet, and then click OK.
7. Click Send to send the SmartApplet to your NEO(s).
Disabling SmartApplets On NEOs
You can disable SmartApplets so that they cannot be used on your NEO(s).
The SmartApplets are not deleted, but they are not available. (To delete
SmartApplets, see page 1-5.)
There are two ways to disable SmartApplets: you can change the settings in
AlphaSmart Manager, or you can disable SmartApplets on the NEO itself.
You’ll find both procedures below.
C
ABOUT SMARTAPPLETS
Disabling SmartApplets On NEOs
1-4
. . . . .
Disabling SmartApplets on the NEO Itself
1. With the NEO on, press applets.
2. Use the arrow keys to move the cursor next to the SmartApplet that you
want to disable.
3. Press ctrl-z-L.
4. Enter the NEO’s master password. (This password is set in AlphaSmart
Manager in the System settings; for more information, see the
AlphaSmart Manager 2 User Manual.)
Disabling SmartApplets within AlphaSmart Manager
You need AlphaSmart Manager installed on your computer to follow these
steps.
1. If you have a single NEO, use the USB cable that came with your NEO to
connect it to your computer.
If you have a SmartOption Cart with several NEOs, connect the NEOs to
the appropriate cables in your cart. (Your computer must be connected to
the cart’s AlphaHub.)
2. Start AlphaSmart Manager on your computer.
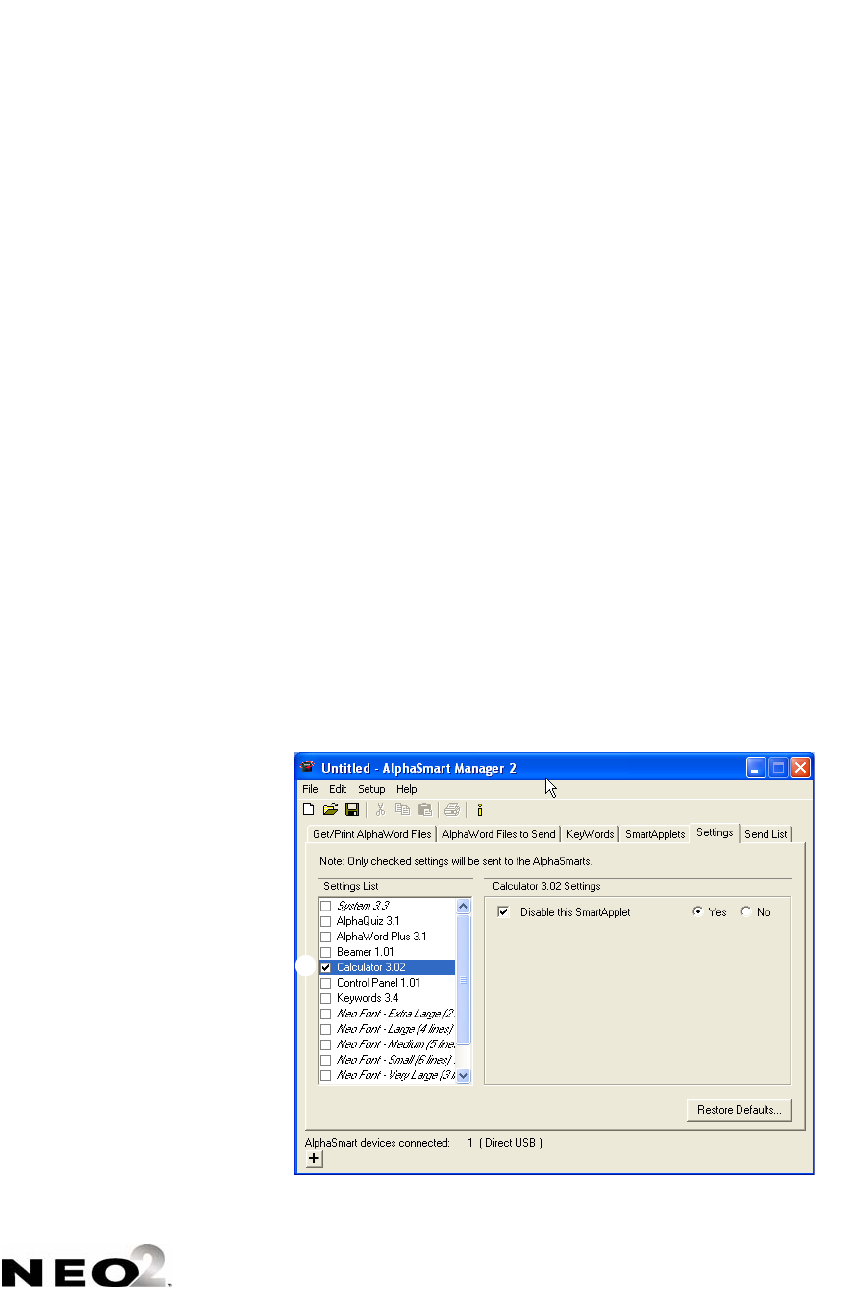
3. Click the Settings tab.
4. In the list on the left , click the SmartApplet that you want to disable.
5. Check the box labeled Disable this SmartApplet .
ABOUT SMARTAPPLETS
Deleting SmartApplets from NEOs
1-5
. . . . .
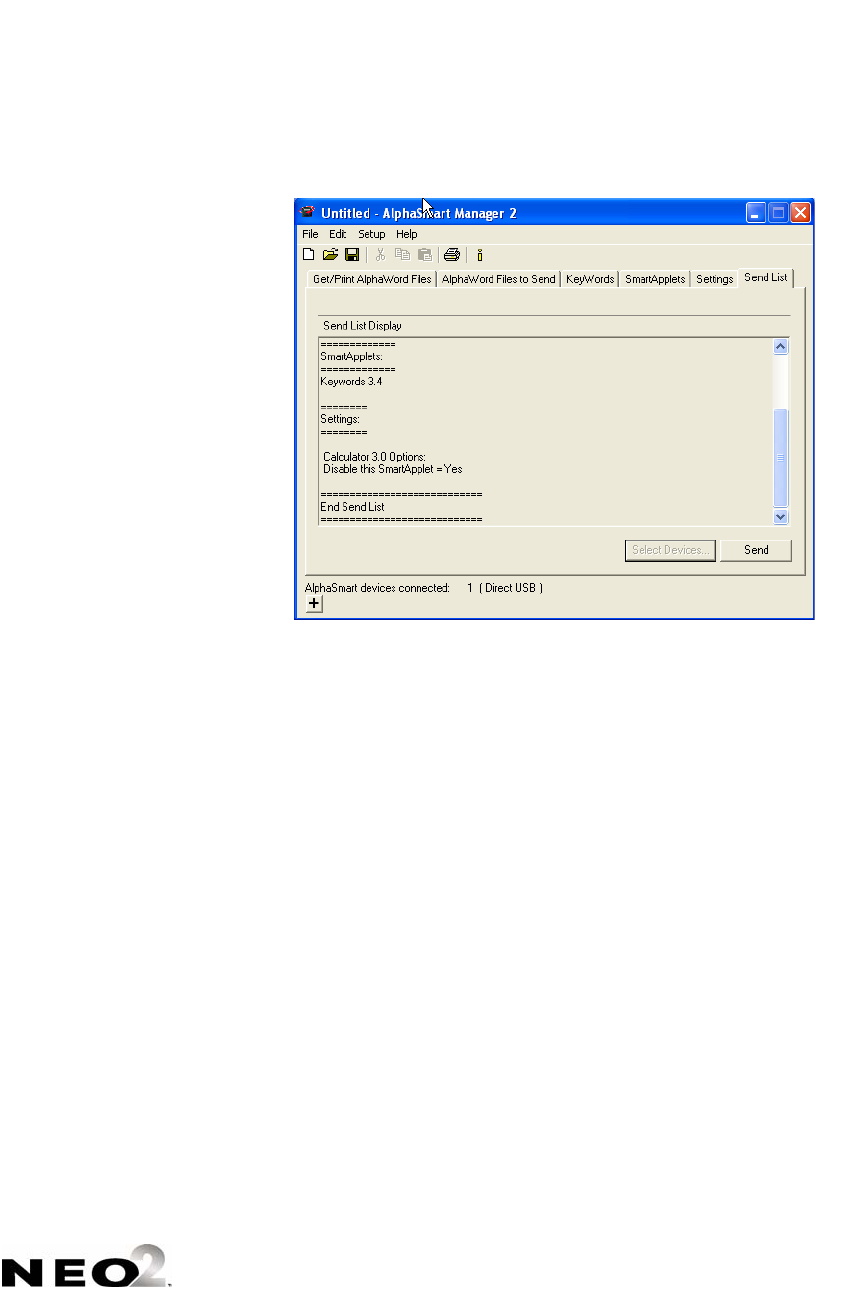
6. Click the Send List tab and make sure your setting change is in the list
.
7. If you have a SmartOption Cart, and you don’t want to disable the
SmartApplet on all NEOs, click Select Devices, check the NEOs on
which you want to disable the SmartApplet, and then click OK.
8. Click Send to send the setting change to your NEO(s).
Deleting SmartApplets from NEOs
By following these steps, you can delete SmartApplets from NEOs. This is
helpful if you want to free space on the NEO or if you don’t plan to ever use a
specific SmartApplet. However, if you’re expecting to use the SmartApplet
again in the future, it may be better to disable the SmartApplet instead as
described on page 1-3.
You need AlphaSmart Manager installed on your computer to follow these
steps.
1. If you have a single NEO, use the USB cable that came with your NEO to
connect it to your computer.
If you have a SmartOption Cart with several NEOs, connect the NEOs to
the appropriate cables in your cart. (Your computer must be connected to
the cart’s AlphaHub.)
ABOUT SMARTAPPLETS
Deleting SmartApplets from NEOs
1-6
. . . . .
2. Start AlphaSmart Manager on your computer.
3. Click the SmartApplets tab.
4. In the SmartApplet List , select all the SmartApplets that you do want
installed on your NEO(s) and click Add => to add them to the Install List
. You can add the SmartApplets one at a time, or you can select
multiple SmartApplets by holding down the Ctrl key (Windows), the z key
(Macintosh), or the Shift key as you click SmartApplets.
5. Check the Delete box . This ensures that any SmartApplet that is not in
the Install List will be removed from the NEO(s).
ABOUT SMARTAPPLETS
Learning to Use Your SmartApplets
1-7
. . . . .
6. Click the Send List tab to make sure that your SmartApplet selections will
be send.
7. If you have a SmartOption Cart, and you don’t want to delete the
SmartApplet on all NEOs, click Select Devices D, check the NEOs on
which you want to delete the SmartApplet, and then click OK.
8. Click Send to send the change to your NEO(s) and to delete the
SmartApplets that were not selected.
Learning to Use Your SmartApplets
The rest of this manual explains how to use each of the SmartApplets that
came installed on your NEO(s). You can use this manual to learn to use the
SmartApplets, or you can use it as a reference as you use the SmartApplets on
your NEO.
D

ABOUT SMARTAPPLETS
Learning to Use Your SmartApplets
1-8
. . . . .

2-1
A
LPHA
W
ORD
P
LUS
When you start your NEO, AlphaWord Plus opens automatically (unless
you’ve changed settings to have another SmartApplet open).
AlphaWord Plus is the program that lets you write in NEO. Simply press one
of the file keys (file 1, file 2, etc.) to choose the file to write in and start typing.
Characters are saved in that file as you type them; there’s no need to worry
about losing text if you accidentally shut off the NEO. The arrow keys,
backspace, and delete all work as they do on a typical computer keyboard.
If you want to delete the text from one of the files, press clear file. Then,
press Y for “yes” when the NEO ask if you’re sure you want to clear the file.
If you want to name and save a file so you can use the file space for other text,
press ctrl and S together. Then, type a name for the file and press enter. You
can then clear the file space without losing the file you saved.
You’ll find detailed instructions for using AlphaWord Plus in the NEO User
Manual that you received with your NEO.

ALPHAWORD PLUS
2-2
. . . . .
3-1
C
ALCULATOR
NEO includes a basic calculator that can perform addition, subtraction,
multiplication, division, exponentiation, and scientific notation.
How to Use Calculator
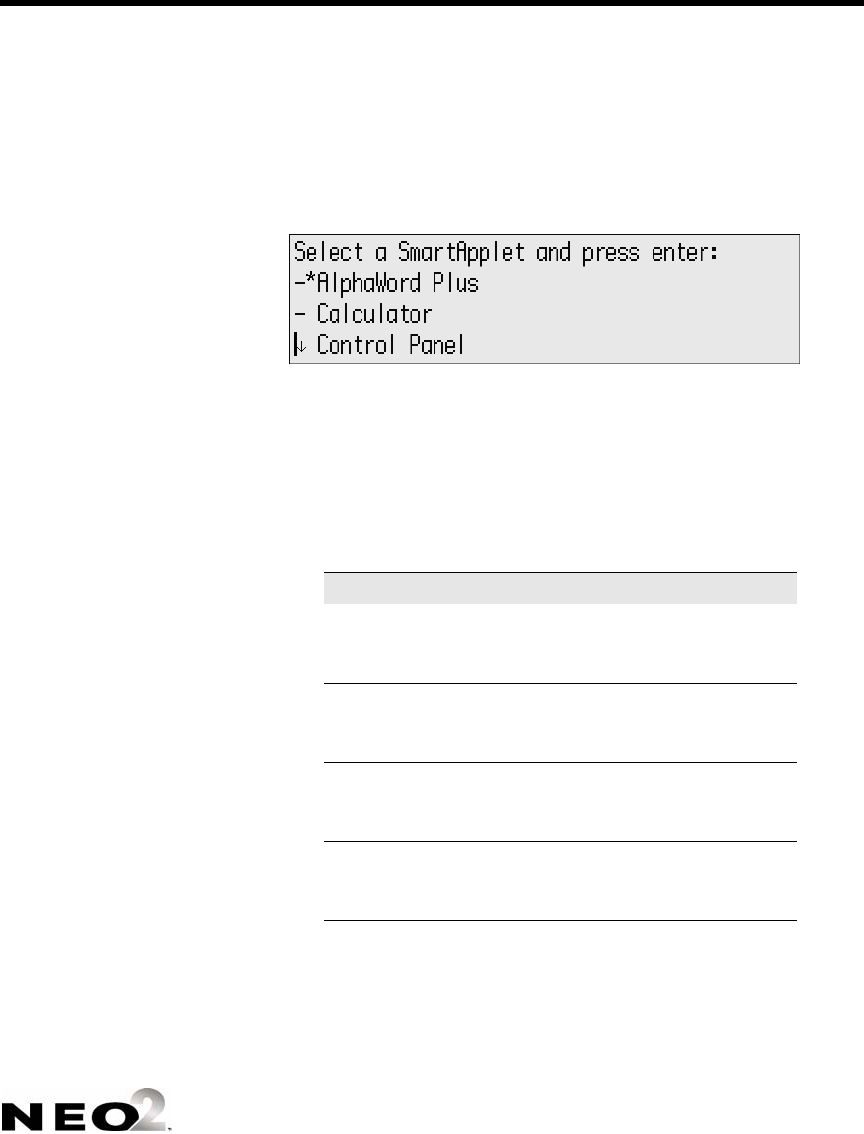
1. Turn on your Neo and press applets.
2. Press ↓ once so the cursor is next to “Calculator.” Then, press enter.
Note: The first time you use Calculator, a help screen may appear. Press
esc to exit from it. You can press a-H to view it again when you want to
see it.
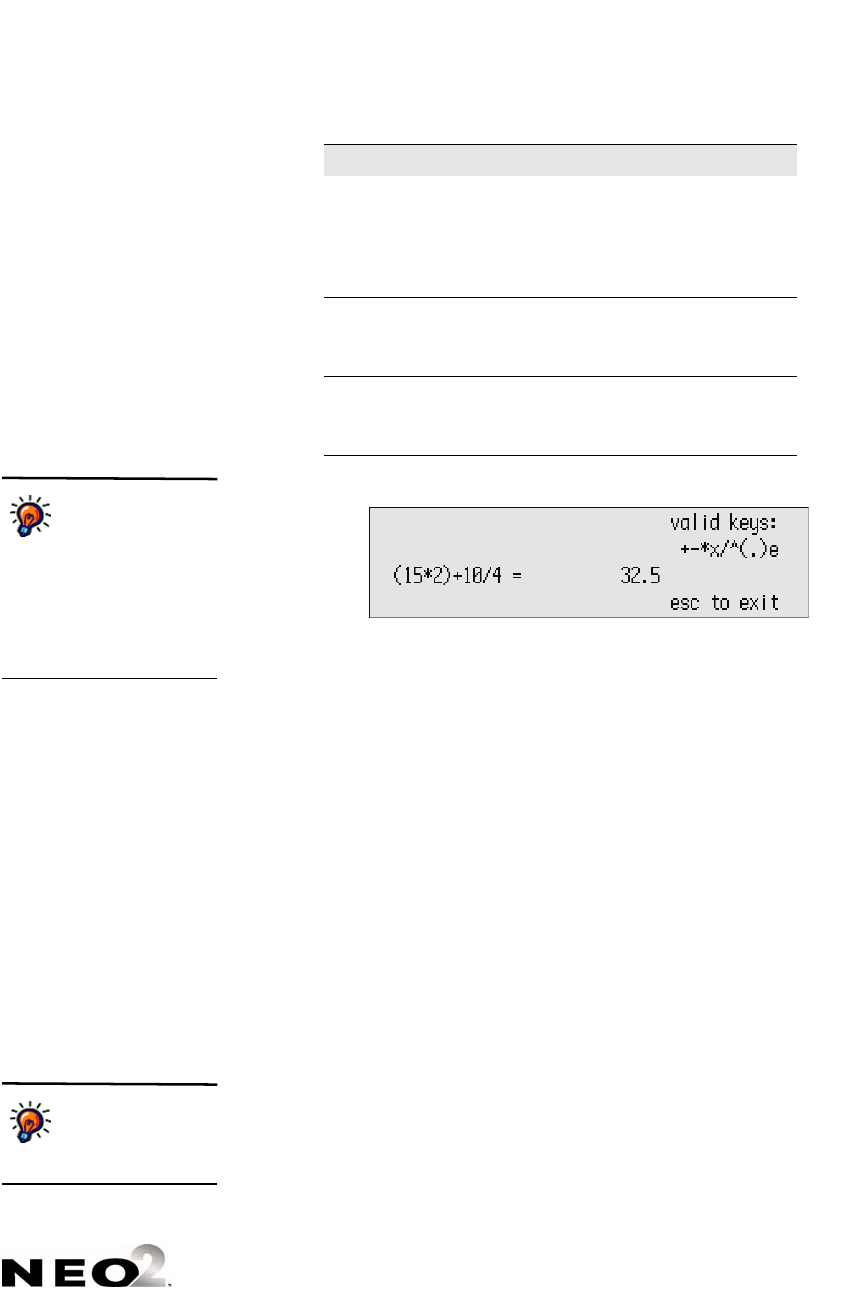
3. Enter the formula you want to calculate. The table below shows you which
characters to use for each type of calculation; it also provides examples of
formulas.
Use these operands To perform these tasks
+ Add
Example: 89 + 91
Example: 15 + 16 + 17
–Subtract
Example: 9 – 2
Example: 100 – 50 – 25
* or x Multiply
Example: 2 * 5
Example: 45 x 2 x 8
/Divide
Example: 18 / 2
Example: 100 / 2 / 10
CALCULATOR
Pasting Calculations into Other Programs (Paper Tape)
3-2
. . . . .
4. Press = or enter to calculate the result.
5. Press esc when you’ve finished.
The next time you use Calculator, your previous calculations appear. Press
clear file to remove them.
Pasting Calculations into Other Programs (Paper Tape)
Calculator can record up to fourteen lines of calculations. Each new
calculation is added to the bottom of the list, and when you reach the
maximum number, older calculations are removed from the top of the list.
This is called the paper tape feature.
If you would like to copy a series of calculations into another SmartApplet,
such as AlphaWord Plus, follow these steps:
1. Press applets, move the cursor down to the Calculator in the list, and
press enter.
2. Enter a series of calculations.
3. Press shift-a-C to copy all calculations in the list. You should see the
calculations selected momentarily as they are copied. (If this does not
happen, your caps lock may be selected. Press the caps lock and try
again.)
^ Exponentiate (raise the first
number to the power of the
second)
Example: 3 ^ 2
Example: 2 ^ 2 ^ 2
e Calculate scientific notation
Example: 10e6
Example: 1.2e15
( ) Construct more complex formulas
Example: (15 *2) + 10 / 4
Example: (25*3) – (45/5)
Use these operands To perform these tasks
If you begin the next
formula with an
operand (such as +
or *), Calculator uses the
result from your previous
calculation as the first number
in the next formula. (This
doesn’t apply to the e
operand.)
If you prefer to copy
just the result of one
calculation, press
ctrl-C or z-C instead.

CALCULATOR
Turning off Calculator
3-3
. . . . .
4. Press applets and select the SmartApplet that you want to paste the
calculations into.
5. Place the cursor in the SmartApplet where you want to paste the
calculations.
6. Press ctrl-V or -V.
You can also type a formula in AlphaWord Plus, copy it, then paste it into
Calculator to obtain the result.
Turning off Calculator
There may be times when you don’t want Calculator to be available, such as
when students who have NEOs are doing math work. If you want to turn off
Calculator on a single NEO, follow the instructions below. If you want to turn
off Calculator for a group of NEOs using AlphaSmart Manager, see “Disabling
SmartApplets within AlphaSmart Manager” on page 1-4. You can also turn off
the Calculator on a NEO in the Control Panel (see page 4-8).
To turn off Calculator While Using AlphaWord Plus
1. Press ctrl-a-C.
2. Type the master password and press enter. (For more about the master
password and how to set it, see the AlphaSmart Manager User Manual.)
To Turn Off Calculator from the SmartApplets menu
1. Press applets.
2. Move the cursor down next to Calculator.
3. Press ctrl-a-L. If the Calculator is on, this turns it off; if it is off, this turns it
on again.

CALCULATOR
Turning off Calculator
3-4
. . . . .
4-1
C
ONTROL
P
ANEL
Control Panel is a SmartApplet that lets you define settings for your NEO.
You can also define many of these settings using keyboard shortcuts or
through AlphaSmart Manager. (For more information about AlphaSmart
Manager, see the AlphaSmart Manager 2 User Manual).
How to Change Settings Using Control Panel
1. Press applets.
2. Press ↓ twice to move the cursor next to Control Panel. Then, press
enter.
3. Use the arrow keys to move the cursor next to the setting you want to
view or change; then, press enter.
4. If you are changing spell check settings or disabling/enabling the
calculator, you will be asked to enter the master password. Type the
password and press enter. (This password is set in AlphaSmart Manager
in the System settings; for more information, see the AlphaSmart
Manager 2 User Manual.)
5. If you want to make changes, follow the instructions on the screen.
6. Press esc to return to the previous screen. You might need to press esc
several times to return to Control Panel or the SmartApplets menu.
Control panel and
the keyboard
shortcuts are only
available when the NEO is
not connected to a computer.

CONTROL PANEL
About the Settings in the Control Panel
4-2
. . . . .
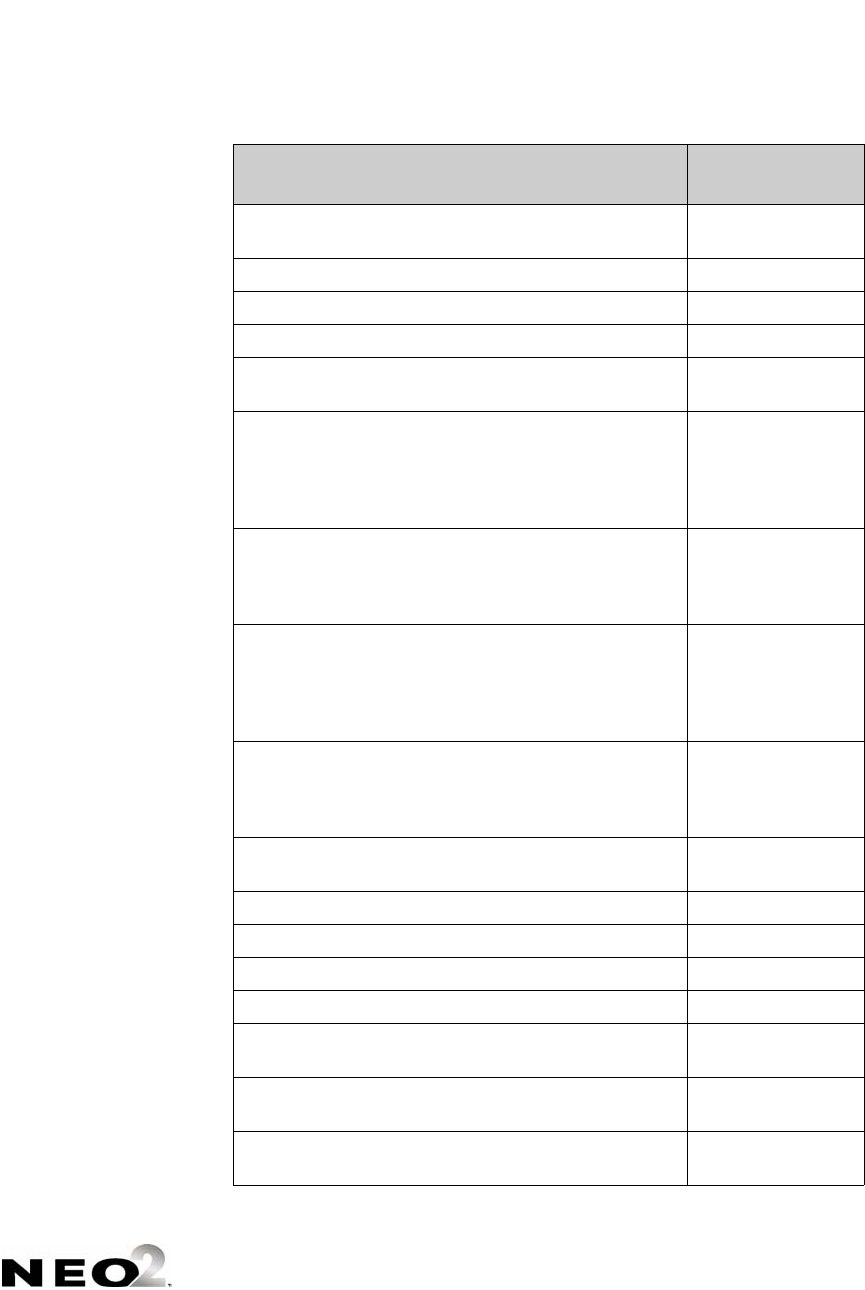
About the Settings in the Control Panel
You can change the following settings in Control Panel:
Control Panel setting What You Can Do
Where to Find More
Information
Spell Check settings • Turn Spell Check on and off
• Turn the ability to add words to the
user dictionary on and off
• Delete the user dictionary
• Add a new word to the user
dictionary
page 4-3
AlphaWord settings • Turn Show Marks on and off
• Turn file passwords on and off
• Change a specific file password
• Reset all file passwords
page 4-4
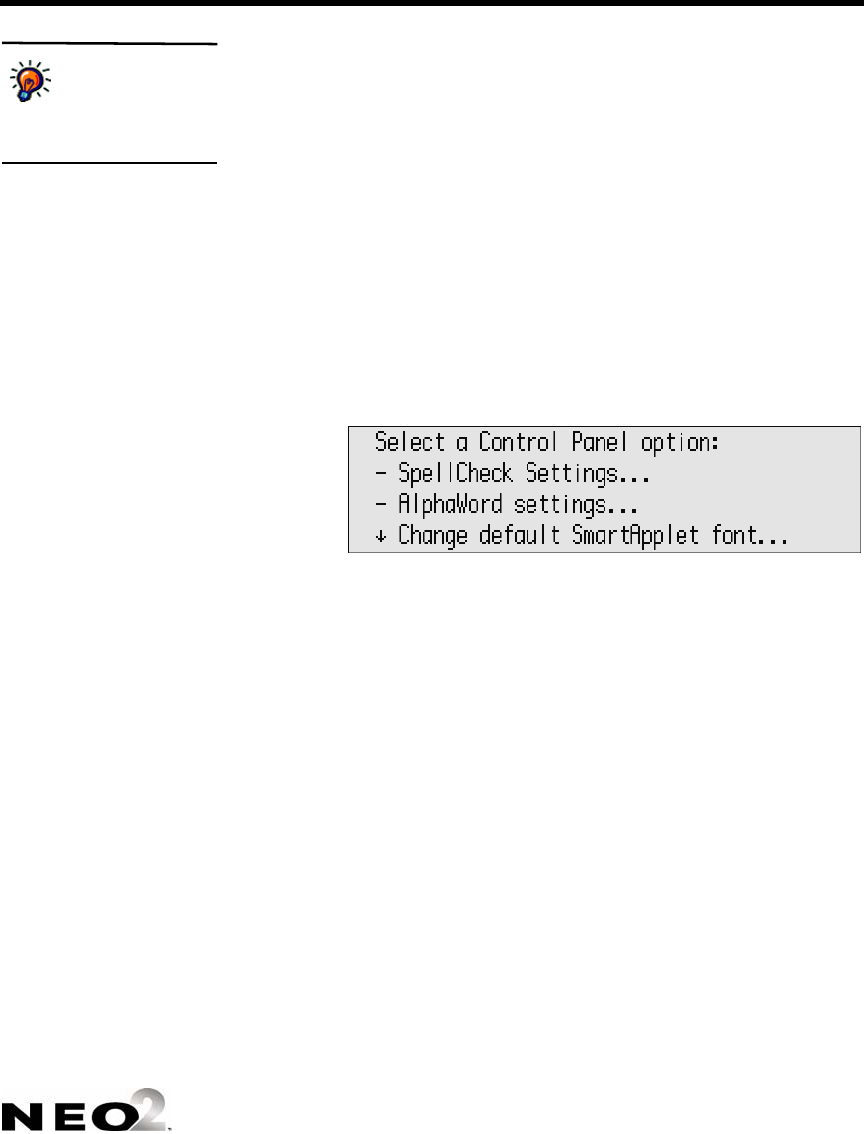
Change default SmartApplet font • Sets the font size for SmartApplets
on the NEO
page 4-6
Turn Calculator on/off • Turns Calculator on and off page 4-8
Two-button On • Sets whether two buttons are
required to turn on the NEO
page 4-8
Set Screen Contrast • Sets your screen lighter or darker page 4-9
Keyboard command reference list • Lists keyboard commands for a
variety of actions on the NEO
page 4-9
View keyboard layout • Displays a representation of the
current keyboard layout
page 4-11
Display battery status • Shows how much battery power is
left on the NEO
page 4-12
Change keyboard settings • Changes keyboard layout
(QWERTY, Dvorak, Right, or Left)
• Changes Slow Keys setting
• Turns Sticky Keys on and off
page 4-12

CONTROL PANEL
Spell Check Settings
4-3
. . . . .
Spell Check Settings
To change Spell Check settings in Control Panel, you need to enter the master
password, which you can set using AlphaSmart Manager.
You can change these spell check settings:
•Turn Spell Check off and on. To change this setting, move the cursor
next to it and press enter. If spell check was on, it will turn off; if it was off,
this will turn it on again. When spell check is off and you attempt to use it
in AlphaWord Plus, the NEO will notify you that spell check is off.
•Turn add words to user dictionary off and on. The user dictionary is
made up of words that the NEO user has added to a dictionary during a
spell check. For example, if the spell check flagged the user’s name as being
misspelled, the user may have added his or her name to the dictionary so it
won’t be marked misspelled again. This setting controls whether users are
allowed to add words to a user dictionary during the spell check. To change
this from on to off or from off to on, move the cursor next to the setting and
press enter.
•Delete user dictionary. This setting deletes the user dictionary. Use
caution when selecting this setting; you can’t recover a user dictionary
that’s been deleted. (You can, however, send a new user dictionary to
devices by using AlphaSmart Manager. See the AlphaSmart Manager 2
User Manual for details.)
•Add new word to user dictionary. This setting lets you add words to
the user dictionary, one word at a time. To use it, move the cursor next to
the setting and press enter. Then, enter one word you want to add and
press enter; the NEO will notify you that the word has been added. Press
any key to leave the setting. Repeat these actions for each word you want to
add.
Note: If you have a big list of words you want to add, it’s more efficient to
create a text file of words and send it to your NEO using AlphaSmart
Manager.
CONTROL PANEL
AlphaWord Settings
4-4
. . . . .
AlphaWord Settings
You can change the following AlphaWord settings:
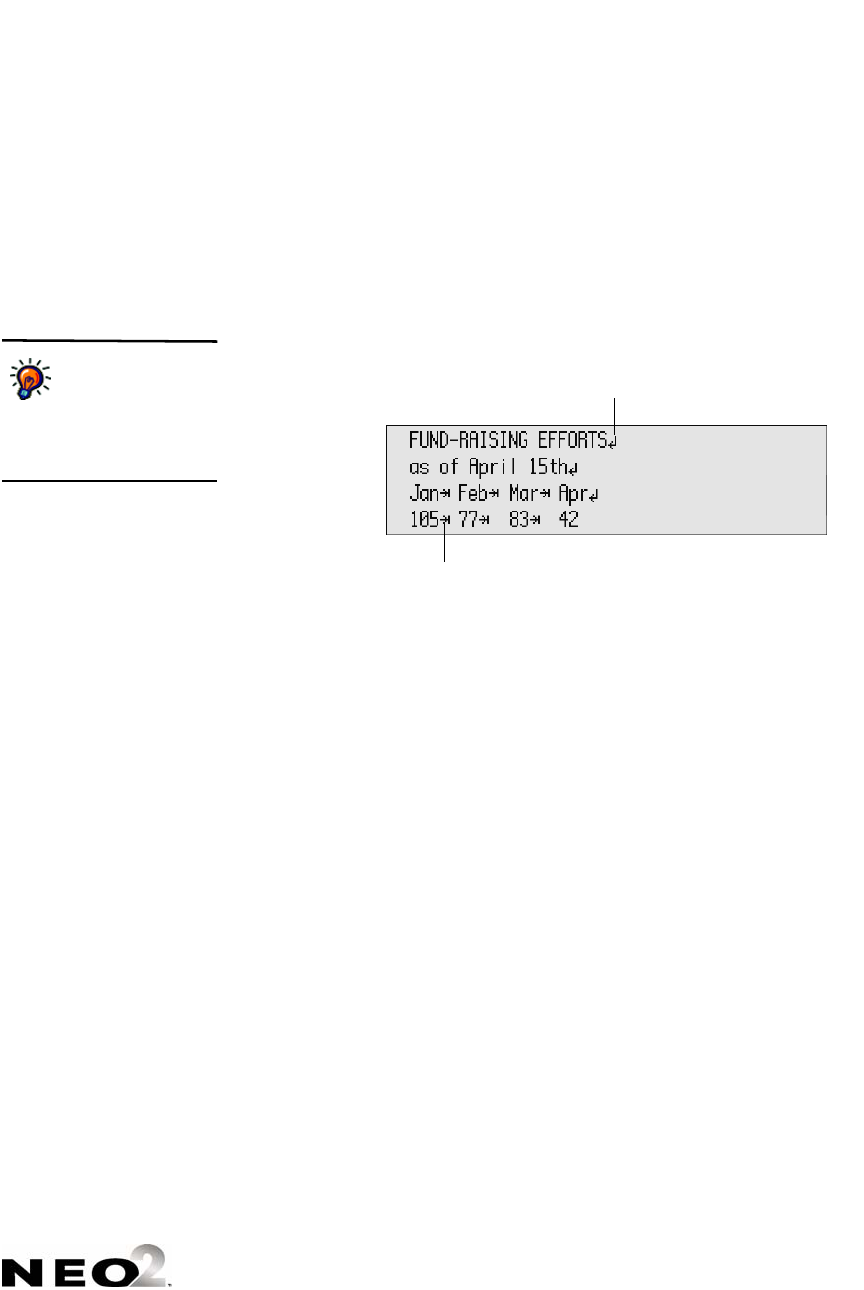
Turn Show Marks in Files On or Off
When “Show Marks” is on, as you write in AlphaWord Plus, you will see right
arrows where you insert tabs, and you’ll see return arrows when you press
enter.
To change the setting, move the cursor next to the setting and press enter to
switch from “On” to “Off” or from “Off” to “On.”
You can also set Show Marks from within AlphaWord Plus by pressing
option- -K, pressing 3 when the instruction screen appears, and then
pressing esc to exit the screen.
Turn File Passwords On or Off
When you first receive your NEO, you cannot set a password for each file until
you turn file passwords on. You can do use this Control Panel setting or use
AlphaSmart Manager (see the AlphaSmart Manager 2 User Manual.)
To turn file passwords on using the Control Panel AlphaWord settings, you
need the master password. (You can set the master password for NEOs using
AlphaSmart Manager. If you want to use the default master password, contact
Technical Support to get the password.)
If you turn file passwords on, whenever you press one of the file keys or open
a file, you will be asked to enter the file password. (If you don’t know the
individual file’s password, you can enter the master password instead.)
To turn file passwords on, follow these steps:
1. From Control Panel, select AlphaWord settings, then select Turn File
Passwords On/Off, OR
When you send text
to your computer
and you have Show
Marks on, the arrows won’t
transfer to your computer, but
the tabs and returns will.
Carriage return
Tab
CONTROL PANEL
AlphaWord Settings
4-5
. . . . .
From AlphaWord Plus, press ctrl-option-a-p.
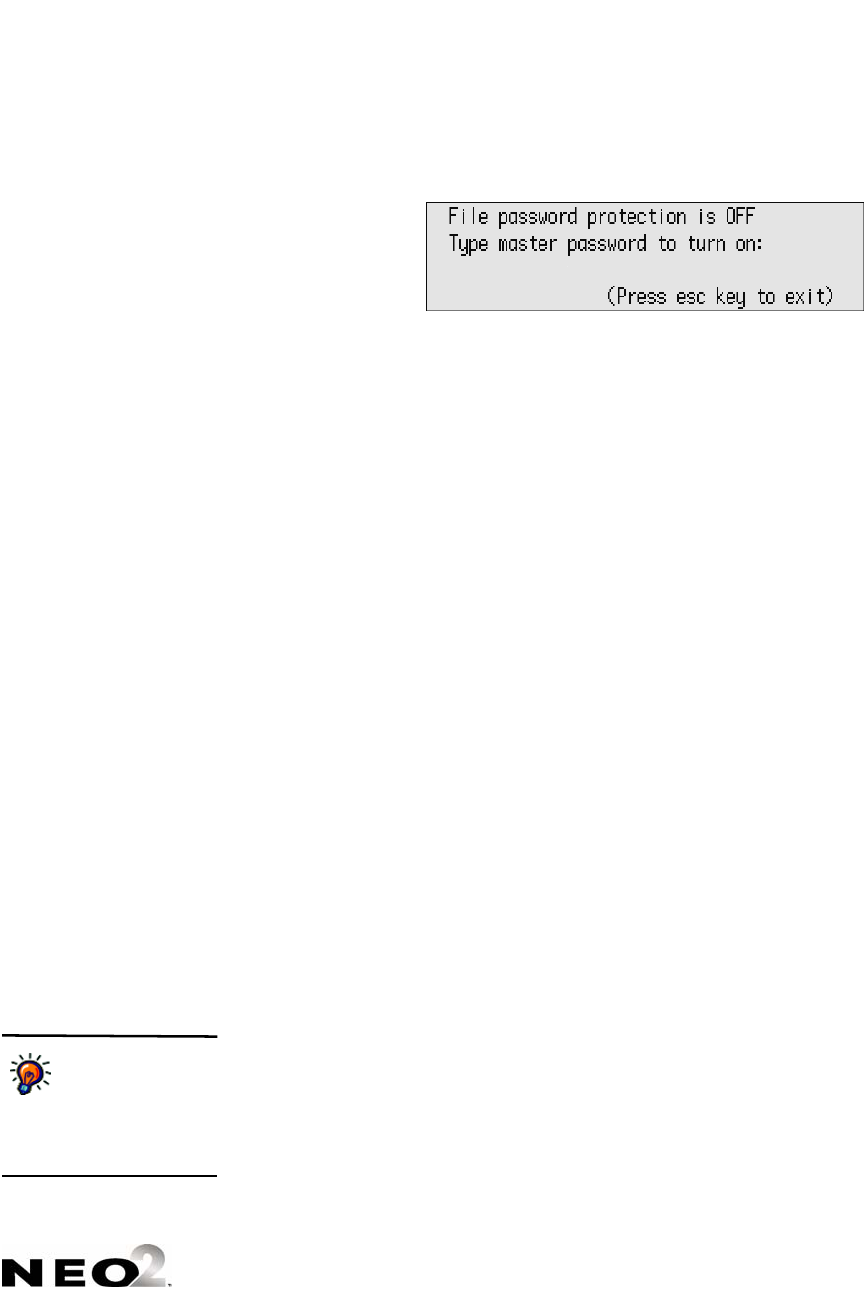
The following message appears.
2. Type the master password and press enter.
When you first turn file passwords on, the password for all files is write.
To change individual file passwords on the NEO, open a file and press
option- -p. Then, type the current password for the file and enter the new
password twice. Press enter. The NEO will tell you that the password has
been changed. Press any key. You can also change file passwords in the
Control panel as described below.
If you prefer all files to have the same password, you can use AlphaSmart
Manager to set a password for all files on the NEO. Simply click the Settings
tab in AlphaSmart Manager, click AlphaWord Plus in the list on the left,
and enter the password you want to use in the File passwords field.
Passwords can be up to six characters long. They aren’t case-sensitive and can
contain letters, numbers, and symbols, but not spaces.
Change a Specific File Password
When you have turned file passwords on as described above, you can use this
setting to change the password for an individual file. To start, move the cursor
next to this setting and press enter. Then, follow these steps:
1. Use the arrow keys next to the file that needs its password changed; then,
press enter. Files 1 through 8 are listed as F1, F2, and so on.
2. Type the current password for the file; then, type the new password twice.
3. Press enter. The NEO will notify you that the password has changed.
Press any key.
Reset All File Passwords
When you have turned file passwords on as described on page 4-4, you can
use this setting to reset the password to write for all AlphaWord Plus files. To
start, move the cursor next to the setting and press enter. Then, enter the
master password. When the NEO notifies you that the passwords have been
reset, press any key.
You can set the
master password for
NEOs in AlphaSmart
Manager by changing the
system settings on the
Settings tab.
CONTROL PANEL
Change Default SmartApplet Font
4-6
. . . . .
Change Default SmartApplet Font
About Font Sizes
You can change the onscreen font size in AlphaWord Plus on your Neo.
Changing the font size changes how text appears onscreen, letting you work at
a screen size that suits your needs. It doesn’t change font attributes associated
with the text, so when you send text to your computer or printer, the text itself
is plain text.
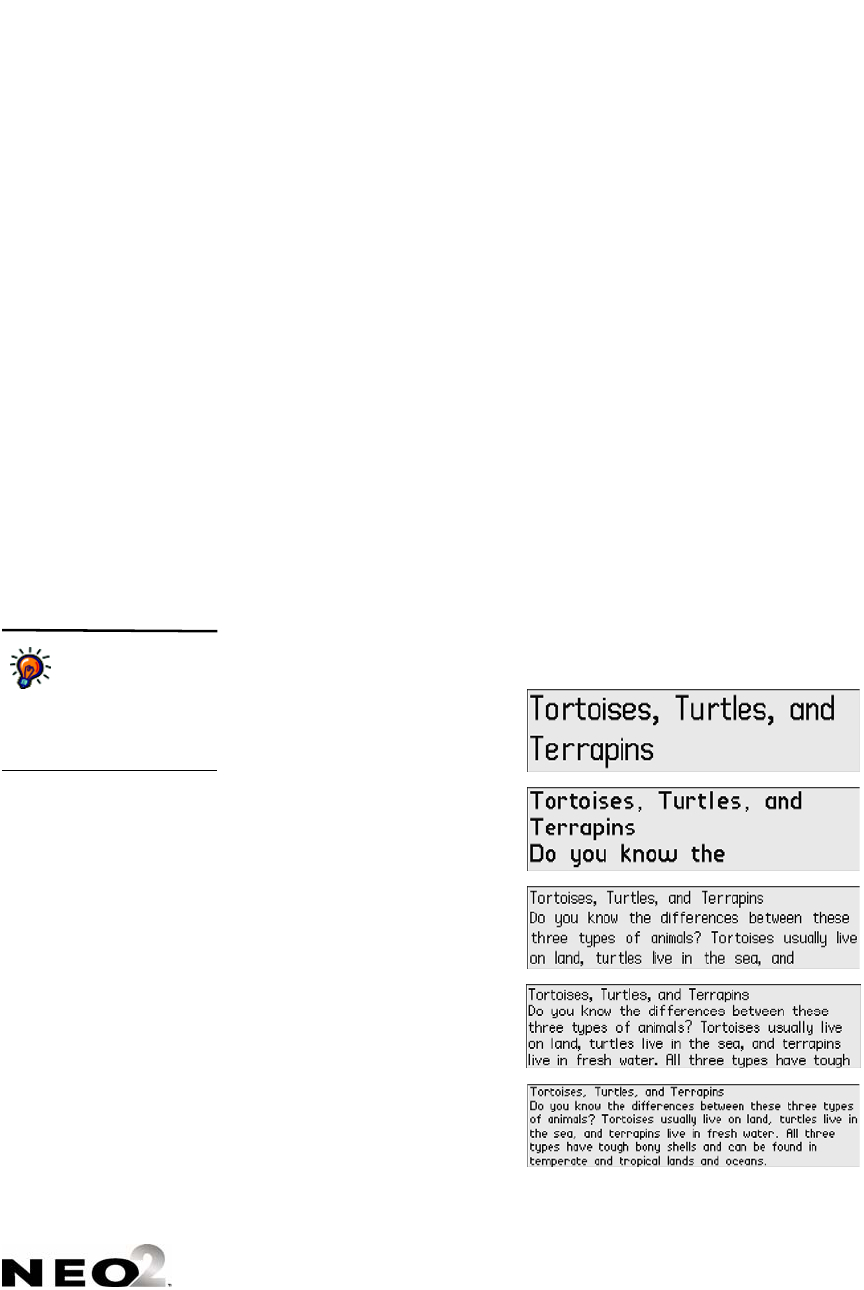
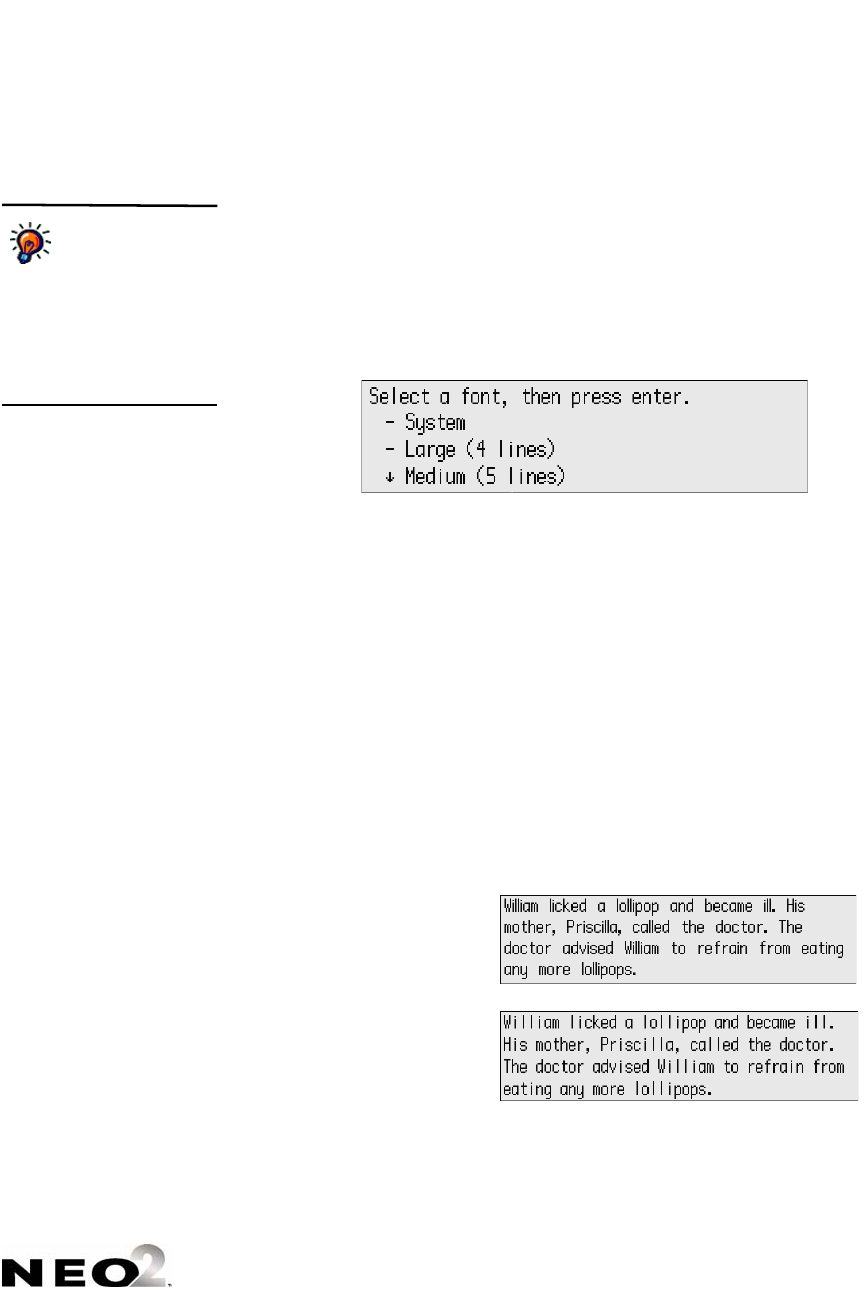
There are six font settings from which to choose:
• System (four lines per screen using a fixed width font)
• Small (six lines per screen)
• Medium (five lines per screen)
• Large (four lines per screen)
• Very large (three lines per screen)
• Extra large (two lines per screen)
When you change the font size, that change applies to all files and workspaces
in AlphaWord Plus. Here are examples of the font sizes.
If some font sizes
are removed from
your NEO using
AlphaSmart Manager, the
NEO defaults to the four-line
system font.
Extra large (two lines)
Very large (three lines)
Large (four lines)
Medium (five lines)
Small (six lines)
CONTROL PANEL
Change Default SmartApplet Font
4-7
. . . . .
Changing the Font Size
Follow these steps to change the font size:
1. Do one of the following:
•Press ctrl-option-a-F.
•In the Control Panel, move the cursor next to Change default
SmartApplet font and press enter.
2. Use the arrow keys to move the cursor next to the font size you want to
use; then, press enter.
If you changed the font size with the keyboard command, you’re returned to
the workspace where you were working previously. If you used Control Panel,
you’re returned to the list of settings; press applets, then select AlphaWord
Plus to view the change in font size.
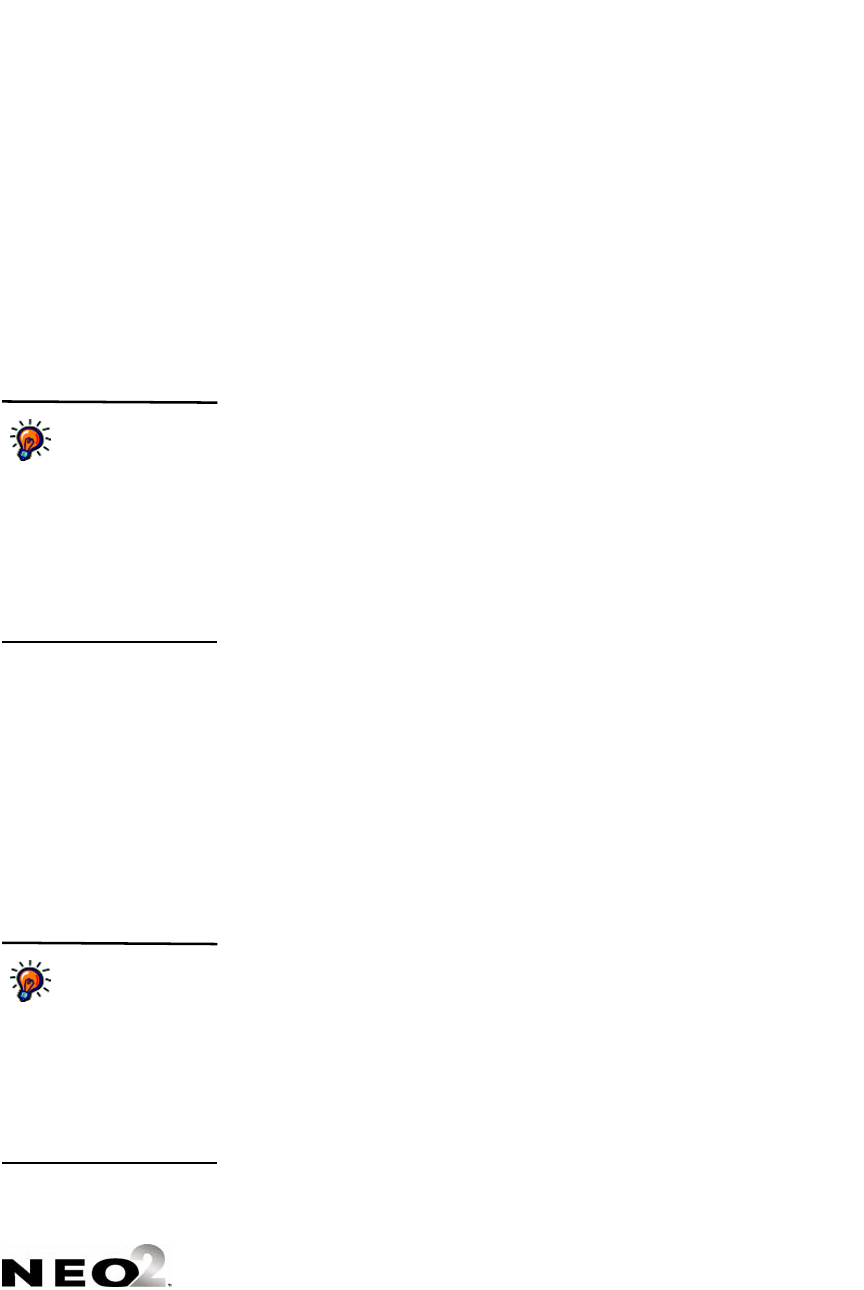
The System Font
The four-line System font is slightly different from the Large font, which also
takes four lines per screen. The four-line System font is a “fixed-width” or
“monospace” font, and the four-line large font is a proportional font. With
fixed-width fonts, every character and space occupies the exact same width.
With proportionally spaced fonts, each character occupies only the space it
needs to display that particular character. So, for example, an m character
takes up more space than an i character.
This illustration shows the difference between Neo’s four-line fonts:
In AlphaSmart
Manager, you can
reset connected
NEOs to the system font
(four lines per screen). Click
the Settings tab, click
System on the left, and click
On behind Reset system
font to default.
Large four-line font
(proportional)
System four-line font
(fixed width)
Note the different widths of the words “William,” “ill,” and
“lollipop” in each illustration
CONTROL PANEL
Turn Calculator Off or On
4-8
. . . . .
Turn Calculator Off or On
This setting allows you to disable or enable the calculator on NEOs. There
may be times when you don’t want Calculator to be available, such as when
students who have NEOs are doing math work. If you want to turn off
Calculator on just one NEO, follow the instructions below. If you want to turn
off Calculator for a group of NEOs using AlphaSmart Manager, see “Disabling
SmartApplets within AlphaSmart Manager” on page 1-4.
To Turn Calculator Off or On in this Control Panel setting
1. In the list of Control Panel settings, move the cursor next to Turn
Calculator Off (or On) and press enter.
2. Enter the master password and press enter.
3. Press any key.
To Turn Calculator Off or On in the SmartApplets Menu
1. Press applets.
2. Move the cursor down next to Calculator.
3. Press ctrl-a-L. If the Calculator is on, this turns it off; if the Calculator is
off, this turns it on again.
To Turn Calculator Off or On While Using AlphaWord Plus
1. Press ctrl-a-C
2. Type the master password and press enter.
Two-button On Setting
The Two-button On setting lets you control whether you turn your NEO on
with one key press or two. NEO’s default behavior is to turn on when you
press on/off. However, if you often carry your Neo in a backpack or
briefcase, you might want to change this behavior so that you don’t
accidentally turn the device on as you carry it and drain power from the NEO.
When the Two-Button On setting is On, you must press and hold down
enter, then press on/off to turn your Neo on.
You need to enter
the master
password to turn the
calculator off or on. To set
the master password for
NEOs, in AlphaSmart
Manager, click the Settings
tab and click System on the
left. Enter a new master
password in the field provided
and send it to the NEOs.
You can also enable
the Two-button on
option in
AlphaSmart Manager. To do
this, click the Settings tab,
click System on the left, scroll
down through the list on the
right to find “Two button on
mode,” and click the On
option.

CONTROL PANEL
Set Screen Contrast Setting
4-9
. . . . .
Follow these steps to turn this option on or off:
1. In the list of Control Panel settings, use the arrow keys to move the cursor
next to Two-button On option; then, press enter.
2. The next screen will tell you if the option is enabled (on) or disabled. If you
want to change the setting, press enter. If not, press esc.
Set Screen Contrast Setting
The Set Screen Contrast setting lets you control how light and dark both the
screen background and the onscreen characters appear. This lets you
optimize the screen for your current lighting conditions.
To change the screen contrast, follow these steps:
1. In the list of Control Panel settings, use the arrow keys to move the cursor
next to Set screen contrast; then, press enter.
2. Use the arrow keys to change the contrast. Pressing the ↑ key increases
the number and darkens the background; pressing the ↓ key decreases
the number and lightens both the background and the text. The setting
ranges from 1 to 16.
3. Press esc when you’re ready to exit the setting.
Keyboard Command Reference List
This Control Panel option is actually a table of the keyboard commands or
shortcuts that you can use to perform actions on the NEO. Most commands
can also be accessed elsewhere on the NEO, but the keyboard commands help
you do the actions quickly. The table below lists the commands that you’ll
find in this menu.
Action
Keyboard
Command
Open help. z-H or ctrl-H
Print. print or z-P
Open Printer Selection menu. option-print
View clipboard status (number of pages in clipboard and
number available).
option-z-c
CONTROL PANEL
Keyboard Command Reference List
4-10
. . . . .
View clipboard status (number or characters in clipboard
and number available).
shift-ctrl-option-
z-C
View clipboard contents. ctrl-option-z-C
Copy selected text to clipboard. z-C or ctrl-C
Paste text from clipboard. z-V or ctrl-V
Set the amount of time the NEO must be idle before it
automatically shuts down.
option-z-T
Choose a keyboard layout (QWERTY, Dvorak, right one-
handed, or left one-handed). See page 4-11.
option-z-L (Then
press 1 for
QWERTY, 2 for
Dvorak, 3 for Right,
or 4 for Left.)
Set the cable transfer speed. option-z-S (then
choose the number
next to the speed
you want)
Set the infrared (IrDA) transfer speed. ctrl-option-z-S
(then choose 1 for
the fastest speed or 2
for compatibility
speed)
View the NEO system information and language, the
current file number, the speed setting, the keyboard
layout, and settings for auto repeat, sticky keys, and
passwords.
option-z-V
Disable or enable spell check. See page 4-3. option-z-spell
check
View and set the auto repeat and sticky keys settings. option-z-K
Disable or enable the calculator. See page 4-8. ctrl-z-C
Disable or enable the slow keys setting. ctrl-option-z-K
View battery charge/status. ctrl-z-B
Lock or unlock the selected SmartApplet in the
SmartApplets menu.
ctrl-z-L
In the SmartApplet menu, make the selected SmartApplet
the one that starts when you turn the NEO on.
ctrl-applets
In the SmartApplet menu, view information about the
selected SmartApplet.
option-applets
Action
Keyboard
Command
CONTROL PANEL
View Keyboard Layout Settings (Including Special Characters)
4-11
. . . . .
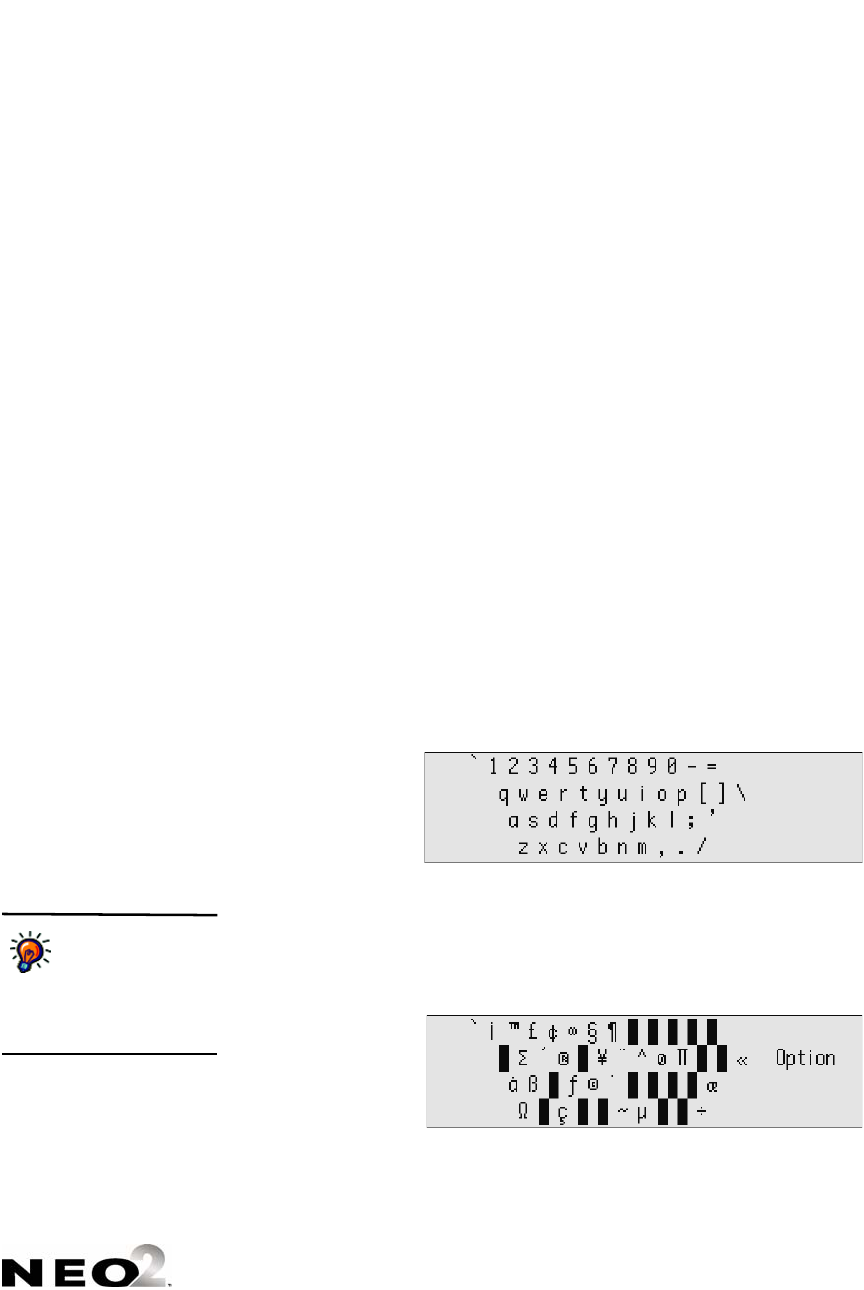
View Keyboard Layout Settings (Including Special
Characters)
This option lets you view the keyboard layout that is currently selected. This
can be useful if you’ve switched to a different layout from what you’re used to
and you’re not quite sure of the new locations of keys.
You can also use this option to view a second screen on how to enter these
commonly used special characters in AlphaWord Plus:
Note: ISO (European) keyboard layouts vary slightly from the following
illustrations, which depict ANSI (US) keyboards.
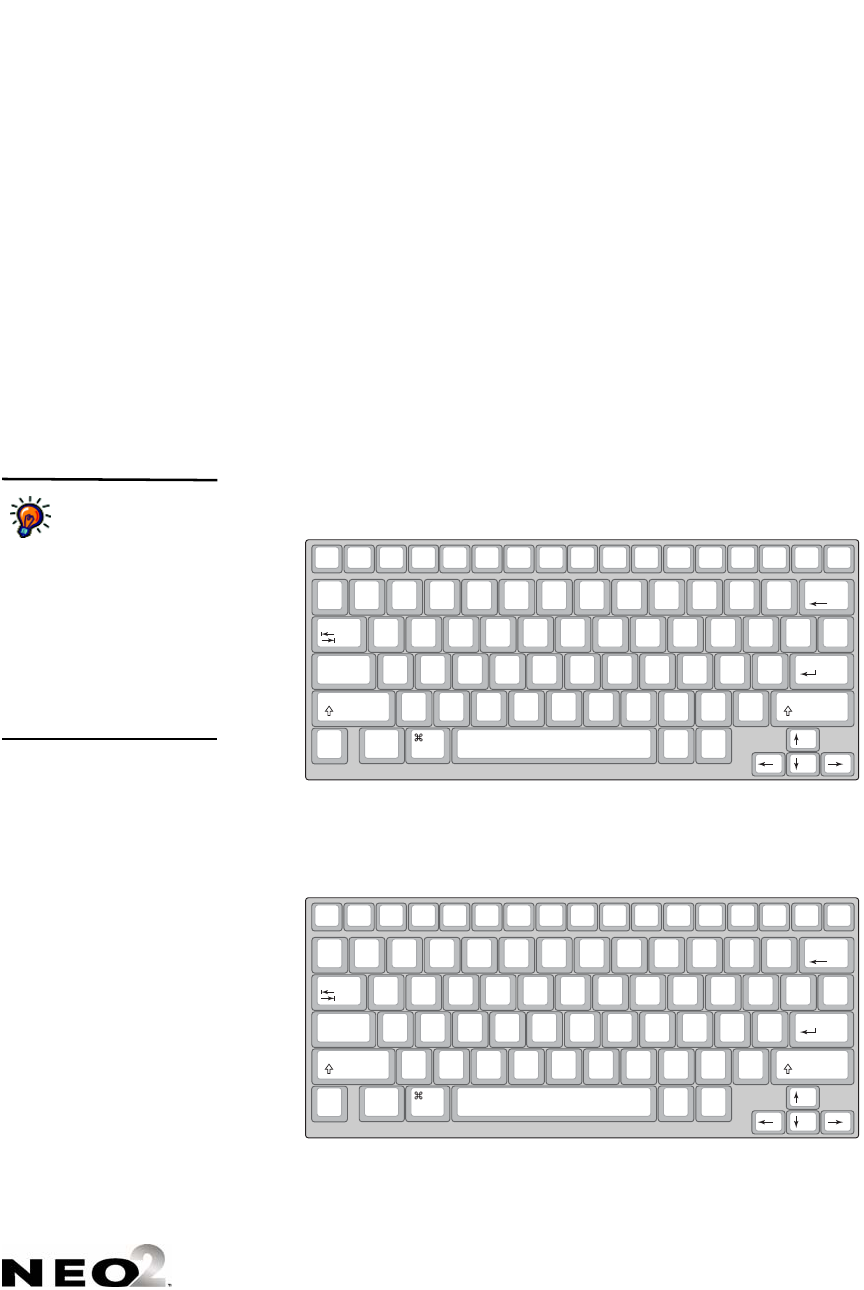
1. In the Control Panel, use the arrow keys to move the cursor next to View
keyboard layout; then, press enter. The layout appears onscreen. (The
example shown is the standard QWERTY layout.)
2. To see the layout when the shift key is pressed, press and hold shift.
3. To view some of the special characters available, press and hold option.
These are the keys you can type by holding the option key. Note their
location on the keyboard. (For example, to type the ™ character in
AlphaWord Plus, hold down option and press 2.)
£ ¥ ® «
¶ µ ¢ ¡
™ ˜ ˆ ƒ
ß
÷
. ¨`§ ´
© ø æ
å ç
Ω
πΣ
∞
You can view a list of
international
characters and find
out how to type them by
pressing ctrl-H in AlphaWord
Plus.
CONTROL PANEL
Display Battery Status Setting
4-12
. . . . .
4. To view the remaining special characters, hold down both option and
shift. (For example, to enter ¿ in AlphaWord Plus, hold down the option
and shift keys and press ?.)
Display Battery Status Setting
To check the battery charge as a percentage, move the cursor next to Display
Battery Status in the Control Panel list; then, press enter.
You can also press ctrl-z-B at any time to display the current battery charge.
Change Keyboard Settings
To choose the keyboard settings in the Control Panel, move the cursor next to
Change keyboard settings and press enter. Then, move the cursor next
to the option you want to change and press enter. You can change the
following:
Change Keyboard Layout
When you choose this setting, NEO gives you a choice of four different
keyboard layouts to provide for special needs or preferences:
• QWERTY, the standard default layout of most keyboards and typewriters
• Dvorak, a scientifically-designed keyboard layout that requires much less
finger reaching and stretching for the most commonly used keys, and
results in faster and easier typing
• Right hand only, a layout that lets people with special needs type faster
• Left hand only, a layout that lets people with special needs type faster
Option Does this
Keyboard layouts Sets alternate keyboard layouts (see below)
Slow Keys Sets a time delay for holding down a key before the
character appears onscreen
Sticky Keys Sets whether you must hold keys down for keyboard
commands or whether you can press them sequentially
You can also change
these settings in
AlphaSmart
Manager. When you click the
Settings tab and click
System on the left, the
available settings that you can
change on the right will
include Sticky Keys, Keyboard
Layout and Slow Keys. It also
includes Auto Repeat.
CONTROL PANEL
Change Keyboard Settings
4-13
. . . . .
When you switch keyboard layouts, all dialog boxes and keyboard commands
conform to the new layout. The command keys (ctrl, option, a, for
example) remain in the same location, but letter keys are derived from the
new layout. For instance, to access the Speed menu, you still press option-
a-S, but the S key is in a different location.
Important: When you send text to your computer from your NEO using a
USB cable and send, the computer must use a QWERTY layout.
To change the keyboard layout, follow these steps:
1. Do one of the following:
•From the Control Panel, select Change Keyboard Settings, then
select Change Keyboard layout.
•From within a SmartApplet, press option-a-L.
2. Select a keyboard layout from the following choices:
•Press 1 to select the QWERTY layout.
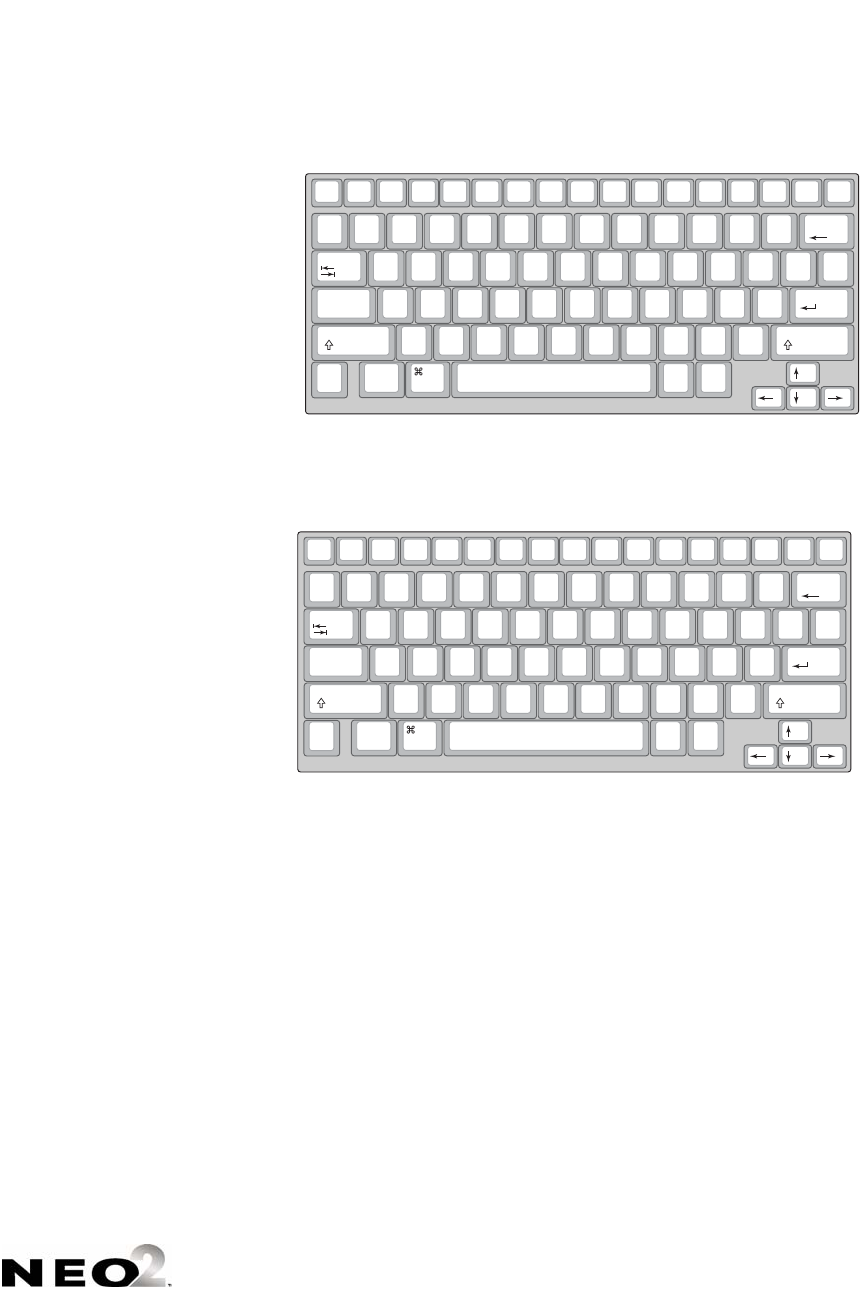
•Press 2 to select the Dvorak layout.
The illustrations
shown in these
steps show ANSI
(US) keyboards. ISO
(European) keyboard layouts
vary slightly. If you have an
ISO keyboard and you want to
check key locations for
different specialized layouts,
use the Control Panel’s View
Keyboard Layout option (see
page 4-11).
on/off file 1 file 2 file 3 file 4 file 5 file 6 file 7 file 8 print spell
check find clear
file home end applets send
tab
Q W E RT Y U I O P
{
[
}
]
|
\
entercaps lock
A S D F G H J K L
:
;
"
'
shift
Z X C V B N M
<
,
>
.
?
/
shift
control alt
option
deleteesc
!
1
@
2
#
3
$
4
%
5
^
6
&
7
*
8
(
9
)
0
_
-
+
=
back
space
~
`
cmd
The standard QWERTY keyboard layout
on/off file 1 file 2 file 3 file 4 file 5 file 6 file 7 file 8 print spell
check find clear
file home end applets send
tab
"
'
<
,
>
.
PY F G C R L
?
/
+
=
|
\
entercaps lock
A O E U I D H T N S
_
-
shift
:
;
Q J K X B MW V Z
shift
control alt
option
deleteesc
!
1
@
2
#
3
$
4
%
5
^
6
&
7
*
8
(
9
)
0
{
[
}
]
back
space
~
`
cmd
The Dvorak keyboard layout
CONTROL PANEL
Change Keyboard Settings
4-14
. . . . .
•Press 3 to select the right hand only layout.
•Press 4 to select the left hand only layout.
3. When the NEO notifies you that the keyboard layout has been changed,
press any key to continue. If you chose a layout other than QWERTY, the
next time you start the NEO, the startup screen will include the keyboard
layout you’ve chosen.
on/off file 1 file 2 file 3 file 4 file 5 file 6 file 7 file 8 print spell
check find clear
file home end applets send
tab
$
4
%
5
^
6
>
.
O R S U Y B
:
;
+
=
|
\
entercaps lock
&
7
*
8
(
9
A E H T D C K
_
-
shift
)
0
Z X
<
,
I N WV G
"
'
shift
control alt
option
deleteesc
!
1
@
2
#
3
Q J L M F P
?
/
{
[
}
]
back
space
~
`
cmd
The right one-handed keyboard layout
on/off file 1 file 2 file 3 file 4 file 5 file 6 file 7 file 8 print spell
check find clear
file home end applets send
tab
:
;
Q B YU R S O
>
.
^
6
%
5
+
=
|
\
entercaps lock
_
-
K C D T H E A Z
*
8
&
7
shift
"
'
X G V W N I
<
,
)
0
(
9
shift
control alt
option
deleteesc
{
[
}
]
?
/
P F M L J
$
4
#
3
@
2
!
1
back
space
~
`
cmd
The left one-handed keyboard layout

CONTROL PANEL
Change Keyboard Settings
4-15
. . . . .
Change Slow Keys Setting
The Slow Keys setting lets you decide how long you must hold down a key
before the character appears onscreen. This setting is useful for someone who
has unsteady hands or difficulty in targeting specific keys.
For example, if you set the Slow Keys option to one second, you would have to
press and hold down a character key for one entire second before that
character would appear. One second is probably too long a delay for many
users, but some fraction of a second might help alleviate inadvertent typing
for certain users.
To set the Slow Keys delay, follow these steps:
1. Do one of the following:
•From the Control Panel, select Change keyboard settings, then
select Change slow keys setting.
•From within a SmartApplet, press ctrl-option-a-K.
2. To increase the delay, press ↑ to increase the amount of time you need to
hold down keys in increments of a tenth of a second. Press ↓ to decrease
the delay.
3. Press enter to accept the change or press esc to exit the screen.
If the Slow Keys delay is greater than one second, the delay before keystrokes
is repeated (normally about one second) increases to match it. For example, if
the Slow Keys delay is set to 1.5 seconds, the delay before keys are repeated
increases to 1.5 seconds as well. This means that after pressing and holding a
key down, 1.5 seconds pass before the character appears, and after an
additional 1.5 seconds, the character begins to repeat.
Turn Sticky Keys On or Off
For some keyboard commands on NEO, you need to hold down several keys
at the same time. This may be difficult for some users. For those users, NEO
has a Sticky Keys setting that lets you type key combinations one key at a time
without holding down all the keys at once. So you could, for instance, press
option, then a, then S individually to get to the Send Speed menu, rather
than pressing all three keys as a group.
Sticky Keys affects these four keys: shift, option, a, and ctrl. When Sticky
Keys is on, pressing one of these keys effectively keeps that key pressed down
for the next normal key press.
To turn the Sticky Keys option on or off in the Control Panel, select Change
keyboard settings, then select Turn sticky keys ON or Turn sticky
keys OFF and press enter.
CONTROL PANEL
Change Keyboard Settings
4-16
. . . . .
You can also set Sticky Keys from within AlphaWord Plus by following these
steps:
1. Press option-a-K.
2. Press 2 to turn Sticky Keys on or off.
3. Press esc to exit the screen and return to your work.
Auto Repeat and the Slow Keys Setting
Auto Repeat lets you set whether keys repeat when held down. Usually if you
press and hold a character key for an extended period of time, the letter
continually repeats itself across the screen. You can change this behavior so
that keys won’t repeat. This is helpful for beginning typists or for users who
have difficulty typing. For example, if you’re administering an activity to a
group of users whose typing skills are at a beginning level, you can turn off
Auto Repeat so they aren’t penalized for holding down a key longer than
normal.
When Auto Repeat is on (the default setting), a character repeats when a key
is held down; when it’s off, only one character appears per keystroke.
Though the Auto Repeat setting is related to the Slow Keys setting, this
setting is not in the Control Panel. To turn Auto Repeat on or off while using
AlphaWord Plus, follow these steps:
1. Press option-a-K.
2. Press 1 to turn auto repeat on or off.
3. Press esc to exit the screen and return to your work.
You can also change
the Auto Repeat
setting in
AlphaSmart Manager. When
you click the Settings tab and
click System on the left, the
available settings that you can
change on the right will
include Auto Repeat. Click On
or Off.

5-1
K
EY
W
ORDS
Welcome to KeyWords
The KeyWords SmartApplet develops basic keyboarding skills using fun and
interesting lessons. Keyboarding is an essential skill for success, and good
keyboarding skills allow you to write much more quickly than if you had to
spend time hunting for each key.
KeyWords keeps learners interested as it teaches typing, employing a
language-based system that entertains as it trains. It provides cumulative
lessons that teach accuracy and speed a few keys at a time, and it offers
encouragement with positive feedback and helpful hints. KeyWords also
checks progress at each level with typing tests. You can then view progress
reports on the NEO or by using the KeyWords program in Renaissance Place.
The KeyWords design is based on research about how people learn to type:
• Speed and typing fluency increase more readily if simple words are used
and repeated. The KeyWords method follows this model of repetition,
presenting diverse vocabulary, rhymes, and humor to keep lessons
interesting.
• Typists learn patterns of keystrokes more quickly when they aren’t
interrupted by immediate corrections. The KeyWords error-checking
method emphasizes the importance of words and phrases.
• Speed skills and accuracy are best developed independently. KeyWords
provides separate lessons for these skills. You can set proficiency goals and
view reports as learners test themselves.
• Speed increases with practice typing words and phrases instead of random
letters. By practicing with words and phrases, new typists learn common
letter patterns that are the building blocks for simple and complex words.
This promotes the ability to quickly recognize and type letter combinations
that occur frequently.
KEYWORDS
How the KeyWords SmartApplet Works
5-2
. . . . .
How the KeyWords SmartApplet Works
1. Teachers add students, or learners add themselves as students.
2. The student selects a group of keys to learn.
3. The student works through the activity for learning the new keys.
4. The student uses the accuracy and speed builder activities.
5. The student takes an accuracy and speed test.
6. The student or teacher checks student progress using reports on the
NEO, or the teacher synchronizes the KeyWords data with Renaissance
Place and views reports in the KeyWords RP program.
Starting the KeyWords SmartApplet
KeyWords comes installed on each NEO. To start KeyWords, follow these
steps:
1. After starting the NEO, press applets.
2. Press the ↓ key to move the cursor down until it is next to KeyWords;
then, press enter.You’ll see this KeyWords startup screen:
Select a SmartApplet and press enter:
K Calculator 3.02
- Control Panel 1.01
L Keywords 3.4
Select your name or choose to add name:
- Teacher options
- Add a student
If you plan to use the
KeyWords RP
reports (within
Renaissance Place), you’ll
need to perform some
additional setup. See
page 5-35.
If KeyWords is not
installed on your
NEO, see page 1-2 to
install it.
KEYWORDS
Adding a Student
5-3
. . . . .
Adding a Student
If you are a teacher using KeyWords in the classroom, you can follow the
steps below to add a student. If you are the student or the person learning the
keyboarding skills, you can follow these steps to add yourself as a student.
1. After starting KeyWords, press the ↓ key to move the cursor next to Add
a student; then, press enter
2. Enter the student’s first name, press enter, and enter the student’s last
name. Then, press enter.
3. Enter a password for the student (two to six characters), press enter, and
enter the password again. Then, press enter.
4. NEO will show you that the student is being added; then, it will return to
the KeyWords start screen, which will now include the new student’s
name.
5. If you want to add more students, repeat the steps above. All students
that you add will be listed alphabetically by last name.
Select your name or choose to add name:
- Teacher options
- Add a student
Enter your first and last name:
First Name:
Last Name:
Press enter after typing the names.
Select your name or choose to add name:
- Teacher options
- Add a student
L Luis Camacho
These steps
describe how to add
a student to the
KeyWords SmartApplet. If
you want to use KeyWords RP
for reports, you’ll need to add
students in Renaissance
Place as well; see page 5-35.
If you make a
mistake, press
backspace to erase
and correct the error. If the
error is on a different line, use
the arrow keys to go to the
error so you can correct it.
KEYWORDS
Choosing Your Name and Starting Lessons
5-4
. . . . .
Choosing Your Name and Starting Lessons
After you’ve been added as a student, you can begin working through the
lessons. The first lesson is an introductory overview to teach you how to sit
properly and where to place your hands on the keyboard. The other lessons
help you learn new keys, build speed and accuracy, and test your proficiency.
Students can follow these steps to start work in the KeyWords SmartApplet.
1. After starting KeyWords, use the arrow keys to move the cursor down
next to your name in the list. Then, press enter.
2. Type your password and press enter. (The password was assigned when
you were added as a student.)
3. To start the first lesson, move the cursor next to Start Here! and press
enter.
4. Follow the instructions on the NEO screen to learn about the space bar
and enter keys, how to sit properly, and where to put your hands on the
keyboard.
Note: This lesson will refer you to the keyboard picture. You or your
teacher can find this picture in the KeyWords Extras folder on the
AlphaSmart Manager 2 CD. For more about the resources available to
KeyWords teachers, see page 5-45.
Select your name or choose to add name:
- Teacher options
- Add a student
L Luis Camacho
Select Lesson or Option:
- Student reports
- Start Here!
L A S K L Keys
The arrows on the
screen show you that
there are more options
above or below the ones
you’re viewing.

KEYWORDS
Learning New Keys
5-5
. . . . .
5. After you complete this lesson, you will return to the lesson list. Notice
that there is an asterisk (*) next to the lesson you’ve completed. The * will
appear next to each lesson as you complete it. A + will appear next to
each lesson that you have started, but not finished.
6. Now, move the cursor next to another lesson you want to complete (such
as A S K L Keys) and press enter. In each of the other lessons, you can
choose one of three options:
• Learn new keys helps you learn to type the keys. For more
information about this, see the next section.
• Use accuracy and speed builders helps you improve your accuracy
and increase your speed while typing these keys. For more
information, see page 5-6.
• Take accuracy and speed test lets you test your proficiency using
these keys. For more information, see page 5-8.
As you complete each task, you can choose another option within this
lesson, or you can select another lesson. To go back to a previous screen
(such as the lesson list or the list of names), press esc until you get to that
screen.
Learning New Keys
When you choose the Learn new keys option within a lesson, KeyWords
asks you to type the keys you’re learning and to type combinations of the keys
in different sequences.
If you type the wrong key, KeyWords will make corrections, but if you
continue to type the wrong keys, KeyWords will give you a hint and show you
the keyboard layout with the key highlighted to help you find it. You must
press the correct key to go on.
You can find visual materials that help you learn keyboarding on the
AlphaSmart Manager 2 CD. See page 5-45.
Select Lesson or Option:
K*Start Here!
- A S K L Keys
L D J F Keys
KEYWORDS
Building Accuracy and Speed
5-6
. . . . .
Building Accuracy and Speed
When you choose Use accuracy and speed builders in a lesson,
KeyWords helps train you to press keys correctly, which improves your
accuracy and helps you build up speed. For each lesson, there are six practice
passages in the accuracy and speed builders. The following example shows
the practice passages for the ASKL keys. (On the NEO, you would typically
only see three of these passages listed at one time.)
To choose the passage you want to work on, move the cursor next to it and
press enter.
Accuracy
During the accuracy portion of this activity, KeyWords will ask you to type
each of the words and then give you the words in different sequences. The
accuracy builder helps you practice your newly learned keystrokes with whole
words and phrases. It emphasizes precision, not momentum. KeyWords
presents passages of small words or letter patters to type.
When you complete all the lines in the passage, KeyWords displays the
number of errors you made. Errors are the number of words you typed
incorrectly; even if you make more than one mistake typing a word, it counts
as only one error. Typing extra spaces between words also counts as one
error.
Select a passage:
- ALL ASK
- AS ALL ASK
- A LASS ASKS
- AS A LASS ASKS
- ASKS A LASS
- ALAS ALL ASK
Type carefully:
tree frog free frog
tree fr_
You can’t skip
forward or backward
during a lesson. You
must perform the activities as
they are presented. However,
you can stop a lesson by
pressing esc.
KEYWORDS
Building Accuracy and Speed
5-7
. . . . .
KeyWords compares your accuracy (number of errors) to the passing criteria
(see page 5-13). If you don’t meet the passing criteria, a message will tell you
to type more carefully so you make fewer mistakes, and you will not go to the
speed builder. Instead, you will go back to the screen where you can select
passages.
If you meet the passing criteria, you will see a message like the one below, and
when you press the space bar, you will go on to the speed builder.
Speed Builder
After you pass the accuracy activity, KeyWords gives you a speed builder
activity. You cannot go straight to the speed builder activity; it always starts
automatically after you pass the accuracy activity. Even if you’ve completed
the accuracy activity before, you must go through it again before you can work
on the speed builder.
KeyWords shows you your goal before the activity, and afterwards, it shows
you whether you met the goal. (To set goals, see page 5-13.) Goals are based
on the number of words you type per minute. Type the text on the screen and
press the space bar when asked to do so.
When you finish the activity, a message will show you whether you met your
goal. If you met your goal, you will see a message like this:
You had 20 errors. You will need 12 or fewer
to continue. Please type more carefully so you
make fewer mistakes.
(Press [SPACE BAR] to continue.)
Nice job! You only made 1 error.
You are now ready for Speed Builder.
(Press [SPACE BAR] to continue.)
Way to go! Your typing rate was 20
words per minute. Your goal rate was
8 words per minute. You passed!
(Press [SPACE BAR] to continue.)
KEYWORDS
Taking an Accuracy and Speed Test
5-8
. . . . .
If not, you will see a message like the one below. Then, you will see a message
asking if you want to try the speed builder again. Press y for yes or n for no.
Taking an Accuracy and Speed Test
The third option in each lesson, Take accuracy and speed test, lets you
test your progress. Each lesson has four different tests that you can take. You
can retake a test anytime. Your record shows only your best results.
When you choose this option, the NEO shows the goals you need to meet for
accuracy and speed in order to pass the test.
As in the accuracy builder, the number of errors is counted as the number of
incorrectly typed words. Even if you make more than one mistake while
typing a word, it counts as only one error. Typing extra spaces between words
also counts as an error.
The top two lines on the screen show you the text to type and when to press
enter. After you’ve typed the text, the screen shows your accuracy and speed
scores, your goal, and whether you passed for accuracy and for speed. Note
that you may pass either accuracy or speed without passing the other
element. When you press the space bar after viewing the score, you’ll return
to the lesson screen.
Your typing rate was 5 words per
minute. You need to type 8 words per
minute or more.
(Press [SPACE BAR] to continue.)
Your goal for the Speed and Accuracy
Test is 12 Words Per Minute with
12 errors or fewer.
(Press [SPACE BAR] to continue.)
Your score Your goal Passed
40 WPM 8 WPM Yes
7 Errors 10 Errors Yes
(Press [SPACE BAR] to continue.)
KEYWORDS
How Students Check Progress Using Reports
5-9
. . . . .
How Students Check Progress Using Reports
You can check your progress any time to see how well you’re doing on your
KeyWords lessons.
The Student Progress Report includes all lessons you’ve worked on. It shows
the keys you did each lesson for, your goals for words per minute (WPM) and
accuracy, and your actual scores. It also shows whether you have passed the
test, and it lists the accuracy and speed builders that you have done.
The Last Lesson Report shows the keys the lesson was for, your goal for words
per minute (WPM), your actual words per minute, your goal for errors, your
actual number of errors, and whether you passed.
When you choose a report, KeyWords can print it, send it directly to the
computer, or send it to an AlphaWord Plus file. If you choose to send it to an
AlphaWord Plus file, the report may wrap across several lines, making it
difficult to read, but you can then transfer the file to a computer or printer
and see the report with its proper formatting. Sending reports to AlphaWord
Plus is also useful because if you are using several NEOs with AlphaSmart
Manager, you can use that program to retrieve the files from multiple NEOs
at the same time, and you can then view, save, or print the reports.
Follow these steps to create a report:
1. In KeyWords, select your name from the student list and press enter.
2. Type your password and press enter.
3. On the Select Lesson or Option screen, press ↑ to move the cursor up
next to Student reports, which is at the top of the list. Then, press enter.
4. You can choose a student progress report or a report on the last lesson.
Move the cursor next to the report you want; then, press enter.
Select Lesson or Option:
- Student reports
-*Start Here
L*A S K L Keys
Student reports
- Create Student Progress report
- Create Last Lesson report
Teachers can also
create a Group
Progress Report.
See page 5-12. Reports are
also available in KeyWords
RP in Renaissance Place; see
page 5-37.
KEYWORDS
Teacher Options
5-10
. . . . .
5. Select one of the options and press enter:
•Print: Choose this option if you want to print the report directly. Then,
press print. (NEO must be connected to a printer with a USB cable or
be able to send the file to a printer wirelessly.)
• Send directly to computer: Choose this option if you want to send
the report to a file on your computer. Make sure AlphaSmart Manager
is not running on the computer. Then, connect your NEO to the
computer via USB cable (or AlphaHub) as directed by the NEO, open
the file on the computer, and press send on the NEO. Disconnect the
cable when the file has been sent. (If characters get jumbled in the
computer file, you may need to change the transfer speed by pressing
option- -s.)
• Transfer to AlphaWord file: Choose this option if you want to send
the report to an AlphaWord Plus file in one of the eight file spaces on
the NEO. Then, type the number of the file you want to send the report
to. If the NEO warns you that the text that’s already in the file will be
deleted, press y for “yes” if you want to continue. In the SmartApplet
list that appears next, you can select AlphaWord Plus, and the file that
you sent the report to will open.
Teacher Options
The Teacher Options in KeyWords allow you to do the following:
• Delete one or more KeyWords students
• Control whether home row confirmation is required
• Control whether KeyWord reinforces use of the correct shift key
• Set whether one space or two spaces are required between sentences
• View student progress using various reports
The master password is required when you set teacher options.
You can use AlphaSmart Manager to set the master password for your NEOs.
For instructions, see the AlphaSmart Manager 2 User Manual. You can find
the CD on the AlphaSmart Manager CD or in the Start menu (Windows) or
the program folder (Macintosh).
Create Student Progress report
- Print
- Send directly to computer
- Transfer to AlphaWord file
If file passwords are
enabled for
AlphaWord Plus (see
page 3-4), you must enter the
password for the file you’ve
chosen before the KeyWords
report can be saved there.
You can substitute the master
password for the file
password.
You can also change
these settings in
AlphaSmart
Manager. Click the Settings
tab, then click KeyWords on
the left to see the settings you
can change.
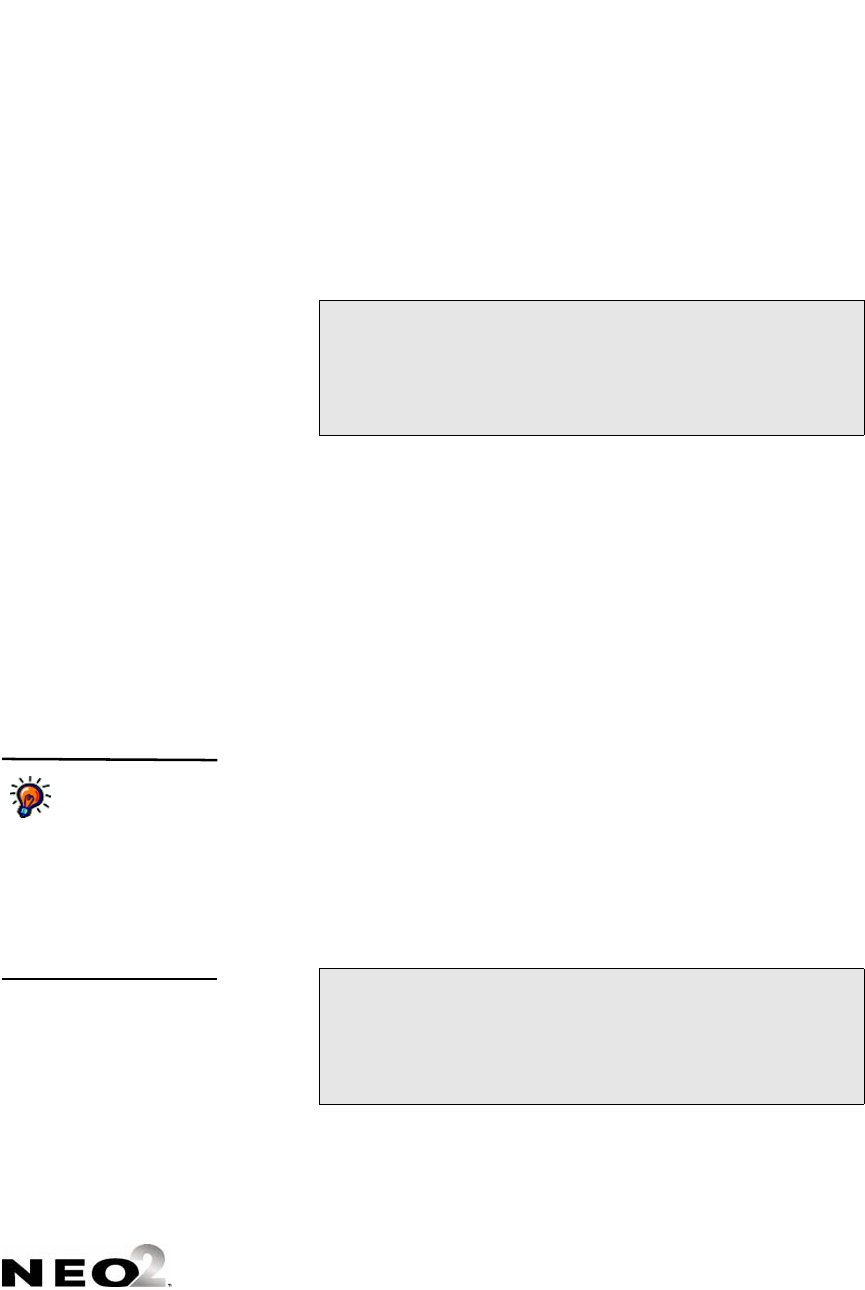
KEYWORDS
Deleting Students
5-11
. . . . .
Follow these steps to change teacher options:
1. In KeyWords, use the arrow keys to move the cursor next to Teacher
options and press enter.
2. Type the master password and press enter. The teacher options will be
listed.
Deleting Students
Within the teacher options, you can choose to delete one or more KeyWords
students. (This does not delete students from KeyWords RP.)
Important: After you delete a KeyWords student, there is no way
to recover that student’s work. Make sure you want to
permanently delete the students work before following the steps
below.
Follow these steps:
1. In KeyWords, move the cursor next to Teacher options and press enter.
2. Type the master password and press enter.
3. In the list of teacher options, do one of the following:
•If you want to delete just one student, move the cursor next to Delete
a student and press enter. Then, move the cursor next to the
student’s name, and press enter.
•If you want to delete all KeyWords students, move the cursor next to
Delete all students and press enter.
4. A message will warn you that the data for the student(s) is about to be
erased. If you’re sure you want to continue, press y for “yes.” If not,
press n.
Select a Teacher Option:
- Delete a student
- Delete all students
Create group progress report
Select a Teacher Option:
- Delete a student
- Delete all students
Create group progress report
You can also delete
all KeyWords
students using
AlphaSmart Manager. To do
this, click Settings, click
KeyWords on the left, and
choose Yes for the Delete all
students option. You cannot
remove individual students in
AlphaSmart Manager.
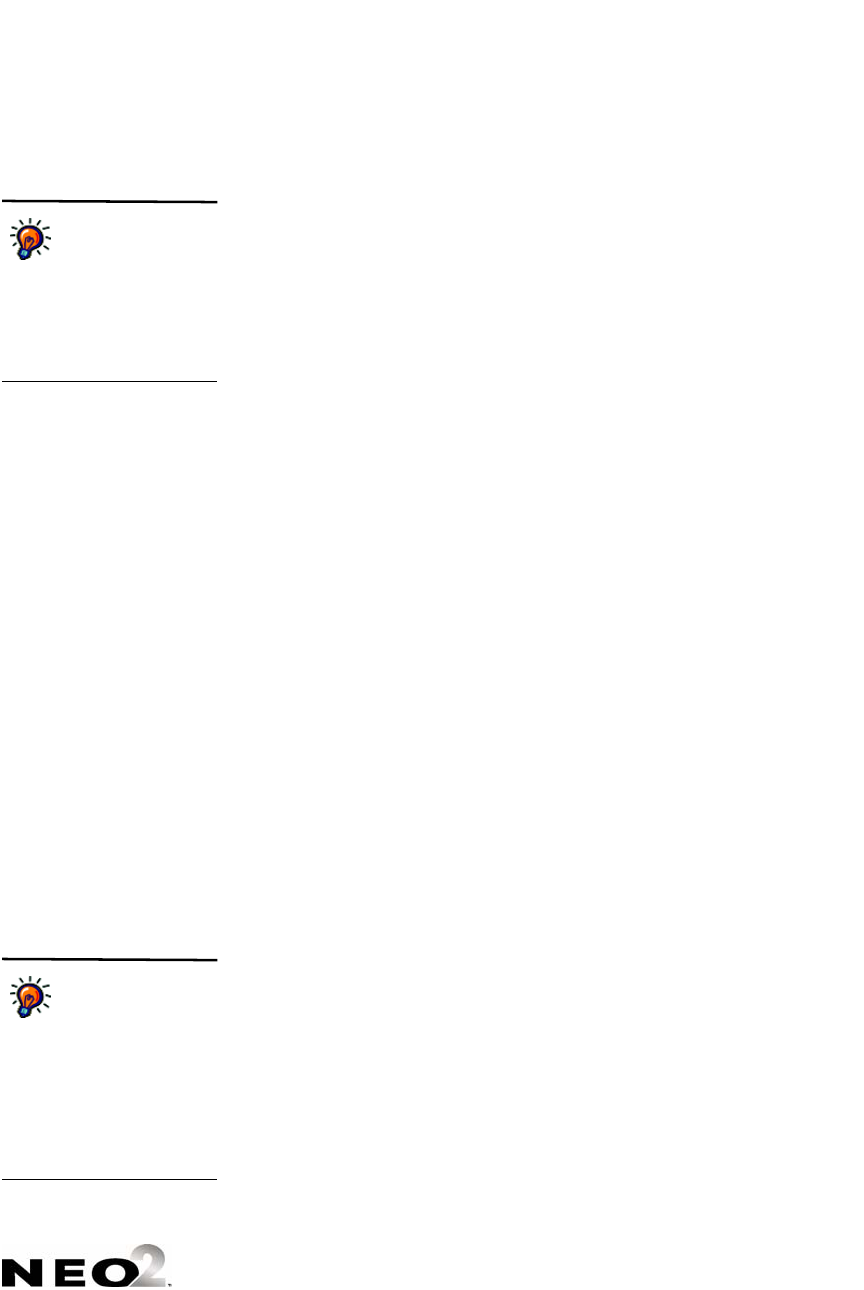
KEYWORDS
Creating a Group Progress Report
5-12
. . . . .
Creating a Group Progress Report
One of the teacher options is the ability to create a group progress report. This
report provides information on each student’s last lesson, including the
student’s goals and actual performance for speed and accuracy and whether
the student passed. The report includes only those students who have used
KeyWords on this NEO.
Follow these steps to create the report:
1. In KeyWords, move the cursor next to Teacher options and press enter.
2. Type the master password and press enter.
3. Move the cursor down next to Create group progress report and press
enter.
4. Select one of the options and press enter:
Print
Choose this option if you want to print the report directly. Then, press print.
(NEO must be connected to a printer or be able to send the file to a printer
wirelessly.)
Send directly to computer
Choose this option if you want to send the report to a file on your computer.
a. Make sure AlphaSmart Manager is not running on the computer.
b. Connect your NEO to the computer via USB cable (or AlphaHub) as
directed by the NEO.
c. Open the file on the computer. (For best formatting results, use a
monospace font like Courier for the report text.)
d. Press send on the NEO.
e. Disconnect the cable when the file has been sent.
Transfer to AlphaWord file
Choose this option if you want to send the report to an AlphaWord Plus file in
one of the eight file spaces on the NEO. On the NEO, the report may wrap
across several lines, making it difficult to read, but you can then transfer the
file to a computer or printer and see the report with its proper formatting.
Sending reports to AlphaWord Plus is also useful because if you are using
several NEOs with AlphaSmart Manager, you can use that program to
retrieve the files from multiple NEOs at the same time, and you can then
view, save, or print the reports.
Students can also
view Progress
Reports and Last
Lesson Reports. See
page 5-9. Reports are also
available in KeyWords in
Renaissance Place; see
page 5-37.
If file passwords are
enabled for
AlphaWord Plus (see
page 3-4), you must enter the
password for the file you’ve
chosen before the KeyWords
report can be saved there.
You can substitute the master
password for the file
password.

KEYWORDS
Setting Speed and Accuracy Goals for KeyWords Students
5-13
. . . . .
Follow these steps to send the report to AlphaWord Plus:
a. Type the number of the file you want to send the report to.
b. When the NEO warns you that the text that’s already in the file will be
deleted, press y for “yes” if you want to continue. The file will open in
AlphaWord Plus.
You will see a report like the one below, showing information for each
student’s latest KeyWords lesson:
Setting Speed and Accuracy Goals for KeyWords
Students
In the Teacher Options, you can also set new speed (Words Per Minute or
WPM) and accuracy (error) goals for students who use KeyWords on this
NEO. As your students’ typing improves, you may want to set a higher goal
for words per minute and a lower goal for errors. Only teachers can set goals;
students can’t set their own goals.
When you set goals, you are setting them for all lessons and all students who
use this NEO. You can’t set different goals for different students who are
using the NEO. The goals apply to all accuracy and speed builders and to
tests.
Setting Goals Manually Changes How KeyWords Works
If you set goals using the teacher options, those goals will stay the same for all
lessons and students until you change them.
If you do not set goals using the teacher options, KeyWords starts with easy
goals for all students and gradually makes the goals more difficult as students
progress through lessons. The following table shows how the goals progress
as the student works through lessons.
KeyWords Group Progress Report
Student Name Latest Goal Actual Goal Actual Passed
Lesson WPM WPM Errors Errors
__________________________________________________________
Luis Camacho ASKL 8 77 12 2 Yes
Benjamin Donne ASKL 8 48 12 19 No
Keisha Fuller ASKL 8 5 12 24 No

KEYWORDS
Setting Speed and Accuracy Goals for KeyWords Students
5-14
. . . . .
If you have set goals in the teacher options and you want to go back to the
default automatic goals that are shown in the table, see the instructions on
page 5-15.
How to Set Goals Manually in the Teacher Options
Follow these steps to set new goals that are the same for all students and
lesson activities:
1. In KeyWords, move the cursor next to Teacher options and press enter.
2. Type the master password and press enter.
3. Move the cursor down next to Set custom WPM and error goals and
press enter.
Lesson
Accuracy/Error Goal
(Maximum)
Words Per Minute (WPM)
Goal (Minimum)
ASKL Keys 12 8
DJF Keys 12 10
TH Keys 12 12
GO Keys 10 14
EI Keys 10 16
PR Keys 10 16
QU Keys 8 16
WY Keys 8 18
Z? Keys 8 16
X. Keys 8 18
C, Keys 8 20
MV Keys 8 22
NB Keys 8 22
“ ‘ ! Keys 8 14
Number Keys 6 14
You can also set
KeyWords goals in
AlphaSmart
Manager. With NEO
connected, click the Settings
tab in AlphaSmart Manager
and click Keywords on the
left. Then, check and change
the WPM and error goals.

KEYWORDS
Setting Speed and Accuracy Goals for KeyWords Students
5-15
. . . . .
4. To make the words per minute (WPM) goal higher, press the ↑ key. To
decrease it, press the ↓ key.
5. Press the space bar.
6. To increase the number of allowable errors, press the ↑ key. To decrease
it, press the ↓ key.
Resetting Goals to the Default
Follow these steps to change back to the default goals, which change as
students progress through the lessons. (See the table that starts on
page 5-14.)
1. In KeyWords, move the cursor next to Teacher options and press enter.
2. Type the master password and press enter.
3. Move the cursor down next to Reset WPM and error goals to default
and press enter.
4. A message will tell you that the goals have been reset. Press the space
bar.
Use the arrow keys to change the
words per minute:8
(Press [SPACE BAR] to continue.)
Use the arrow keys to change the
Allowable errors:12
(Press [SPACE BAR] to continue.)
You can also reset
KeyWords goals in
AlphaSmart
Manager. With NEO
connected, click the Settings
tab in AlphaSmart Manager
and click Keywords on the
left. Then, choose Yes after
Reset WPM/error goals to
default.
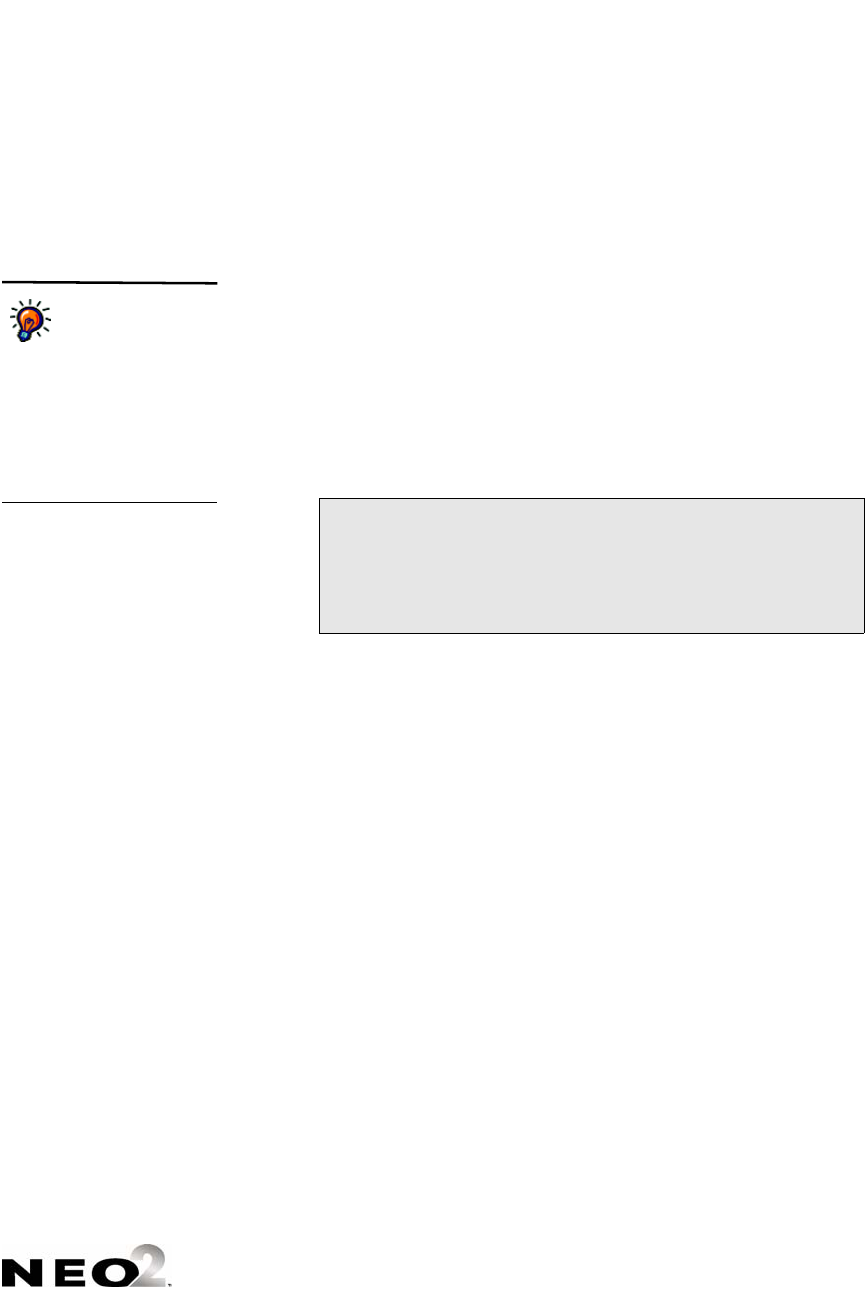
KEYWORDS
Choosing Whether to Enforce Use of the Correct Shift Key
5-16
. . . . .
Choosing Whether to Enforce Use of the Correct Shift
Key
For faster and more accurate touch typing, students should learn to type a
capital letter by holding down the shift key with the opposite hand from the
one that is typing the letter. For example, to type “A,” you should hold down
the shift key using the little finger of the right hand while typing a with the
little finder of the left hand.
If you choose to enforce this practice, in the teacher options, Correct Shift Key
Enforcement should be “On” (as it is when you first receive the NEO). If it is
on, when students are learning new keys in lessons that require them to type
capital letters, NEO will notify them if they use the incorrect shift key. (See
the sample message below.)
Follow these steps to turn this option on or off:
1. In KeyWords, move the cursor next to Teacher options and press enter.
2. Type the master password and press enter.
3. Move the cursor down next to Turn require correct shift key ON (or
OFF) and press enter.
4. The next screen will show you whether correct shift key enforcement is on
or off; then, it will ask if you want to turn it on (if it’s off) or off (if it’s on). If
you want to change the setting, press y for “yes.”
To type a capital A, press the right
shift key.
(Hold down the right [shift] key and
press A now.)
You can also change
this setting in
AlphaSmart
Manager. With NEO
connected, click the Settings
tab in AlphaSmart Manager,
click KeyWords on the left,
and choose Yes or No after
Turn Require correct shift
key OFF or ON.
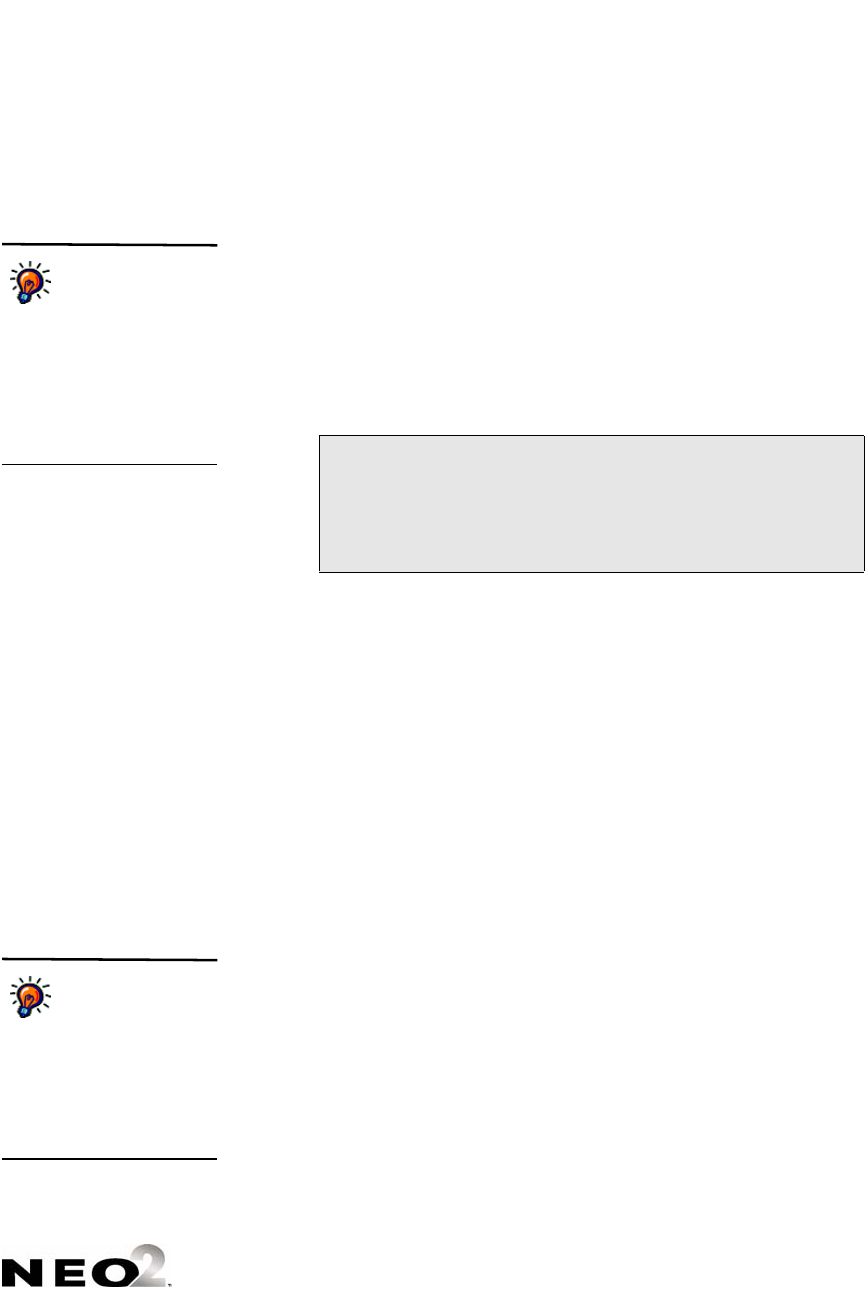
KEYWORDS
Enforcing Use of the Home Row
5-17
. . . . .
Enforcing Use of the Home Row
Because returning your fingers to the home row is such an important concept
in touch typing, you can choose to have KeyWords request that students press
the home row keys (a s d f j k l ;) in sequence during lessons.
When this option is turned on, students see the message below at the
beginning of each accuracy and speed builder activity and each test. They
must then type the home row keys in order from left to right before they can
exit the screen and go on to the lesson. If they type the keys incorrectly,
KeyWords backspaces to where they made the error, and it won’t let them
continue until they press the correct letters in the correct order
This option is off by default. To turn it on or off again, follow these steps:
1. In KeyWords, move the cursor next to Teacher options and press enter.
2. Type the master password and press enter.
3. Move the cursor down next to Turn Home Row Confirmation ON (or
OFF) and press enter.
4. The next screen will show you whether home row confirmation is on or off;
then, it will ask if you want to turn it on (if it’s off) or off (if it’s on). If you
want to change the setting, press y for “yes.”
Requiring One or Two Spaces Between Sentences
Traditional keyboarding classes taught with typewriters specified that typists
should put two spaces after a period before starting a new sentence.
Typesetting, word processing, and web pages all use just one space between
sentences.
In the teacher options, you can specify the number of spaces that you want
your students to include between sentences. Follow these steps:
1. In KeyWords, move the cursor next to Teacher options and press enter.
2. Type the master password and press enter.
Place your fingers on the Home Row now.
Type each Home Row key one at a time
from left to right.
You can also change
this setting in
AlphaSmart
Manager. With NEO
connected, click the Settings
tab in AlphaSmart Manager,
click KeyWords on the left,
and choose Yes or No after
Turn Home Row
Confirmation ON or OFF.
You can also change
this setting in
AlphaSmart
Manager. With NEO
connected, click the Settings
tab in AlphaSmart Manager,
click KeyWords on the left,
and choose 1 or 2 after Set
Spaces between sentences.

KEYWORDS
Using AlphaSmart Manager 2 with KeyWords
5-18
. . . . .
3. Move the cursor down next to Set one/two spaces between sentences
and press enter.
4. Use the ↑ and ↓ keys to increase or decrease the number of spaces
between sentences. You can specify either 1 or 2.
5. Press the space bar when you have finished making the change.
Using AlphaSmart Manager 2 with KeyWords
AlphaSmart Manager 2 comes with each NEO. When you’re using KeyWords,
this program can be useful in many ways:
• It lets you set all KeyWords options from one screen at your computer.
• If you have a SmartOption Cart with an AlphaHub, AlphaSmart Manager 2
lets you manage KeyWords options for up to thirty NEOs at the same time.
• In AlphaSmart Manger version 2.6 and higher, the program can retrieve
KeyWords data from NEOs and create reports that you can print and save.
• AlphaSmart Manager version 2.6 and higher can also synchronize that data
with the KeyWords program in Renaissance Place, allowing you to use that
program to generate reports. (See page 5-23.)
The following procedures explain how to use some KeyWords features of
AlphaSmart Manager 2. For complete instructions for AlphaSmart Manager,
refer to the AlphaSmart Manager User Manual that is available on the
program CD.
Setting KeyWords Options in AlphaSmart Manager
The KeyWords settings that you can change in AlphaSmart Manager are the
same ones that you can change on the NEO itself in the Teacher Options.
However, changing the settings is sometimes faster in AlphaSmart Manager
because you can make all setting changes in one window, and you can change
settings for all NEOs that are connected to your computer.
The table on the next page describes the KeyWords settings you can change
and where to find the same settings on the NEO itself.
KEYWORDS
Using AlphaSmart Manager 2 with KeyWords
5-19
. . . . .
Setting What It Does Where to Find on the NEO
Disable this
SmartApplet
Turns off access to KeyWords so it can’t be used on the
NEO(s). KeyWords is still installed, but if anyone tries
to select it in the list of SmartApplets, they are notified
that it is disabled. Users of NEO need the master
password to enable it again. Click Yes or No.
Press applets, move the cursor
down next to KeyWords, and
press ctrl-z-L. Then, enter the
master password and press
enter. An open square with
four corners will appear next to
KeyWords in the list.
Delete all students Deletes all students who have been added to
KeyWords and their KeyWords data. Note: In
AlphaSmart Manager, you can delete all students, but
not individual students. To do that, use the KeyWords
teacher options on the NEO. Click Yes or No.
You can delete students in the
teacher options in KeyWords.
(See page 5-11.)
Set custom WPM
goals
Sets a specific words per minute (WPM) speed goal for
all students and all lessons. This overrides the
automatic progression of goals that KeyWords
normally uses (see page 5-13). Type the minimum
words per minute you want students to achieve. (The
default is 8.)
You can set goals in the teacher
options in KeyWords. (See
page 5-14.)
Set custom error
goals
Sets a specific goal for maximum errors allowed per
activity for all students and all lessons. This overrides
the automatic progression of goals that KeyWords
normally uses (see page 5-13). Type the maximum
errors you want students to be allowed. (The default
is 12.)
You can set goals in the teacher
options in KeyWords. (See
page 5-14.)
Reset WPM/error
goals to default
Resets goals to the ones used by default in KeyWords
(see page 5-13). Click Yes or No.
You can reset goals in the
teacher options in KeyWords.
(See page 5-15.)
Turn require correct
shift key OFF
Determines whether KeyWords checks to make sure
that students use the shift key opposite the letter they
are typing to make that letter uppercase. If students
use the wrong shift key, they will see a message asking
them to use the other shift key. Click Yes or No.
You can turn this requirement
on or off in the teacher options
in KeyWords. (See page 5-16.)
Turn Home Row
confirmation ON
Determines whether KeyWords requires students to
type the home row keys at the beginning of each
accuracy and speed builder activity and the beginning
of each test. This helps get students used to placing
their hands on the home row. Click Yes or No.
You can turn this requirement
on or off in the teacher options
in KeyWords. (See page 5-17.)
Set spaces between
sentences
Determines whether students are required to type one
space or two between sentences. Click 1 or 2.
You can change the spaces
required between sentences in
the teacher options in
KeyWords. (See page 5-17.)
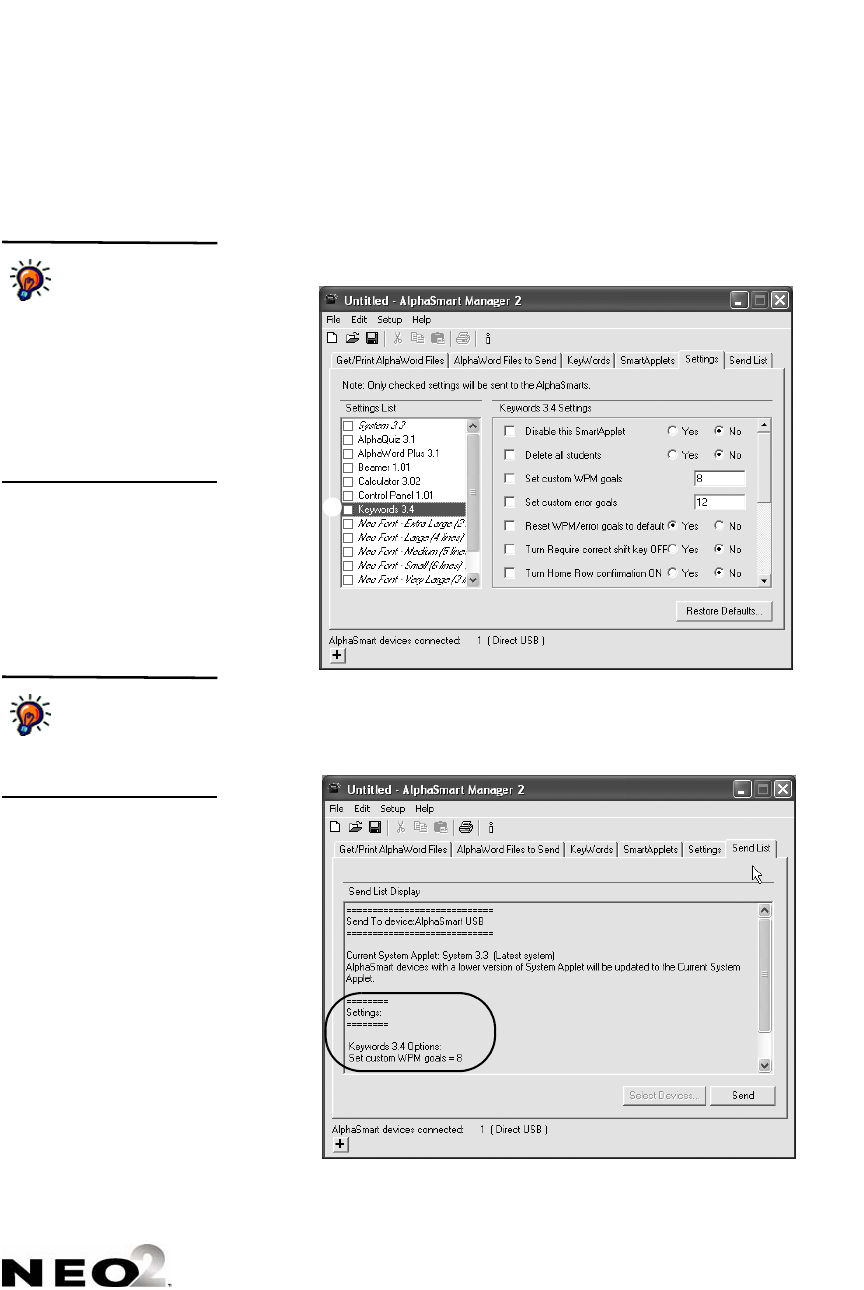
KEYWORDS
Using AlphaSmart Manager 2 with KeyWords
5-20
. . . . .
Follow these steps to change KeyWords options in AlphaSmart Manager.
These steps assume that you have started the program and connected your
NEO(s) as described in the AlphaSmart Manager 2 User Manual.
1. Click the Settings tab in AlphaSmart Manager.
2. Click KeyWords A in the list of SmartApplets on the left as shown.
3. Make changes as needed to the settings listed on the right. (Make sure
the box is checked for each setting you’re changing.)
4. Click the Send List tab and make sure that your changes are listed.
If KeyWords isn’t in
the Settings list, one
or more of the NEOs
doesn’t have KeyWords
installed. To install it on all
connected NEOs, click the
SmartApplets tab, click
KeyWords in the list, and click
Add. Then, send the
SmartApplet to the NEOs. For
instructions, see page 1-2.
A
To restore all
KeyWords settings
to the defaults, click
Restore Defaults at the
bottom of the window.
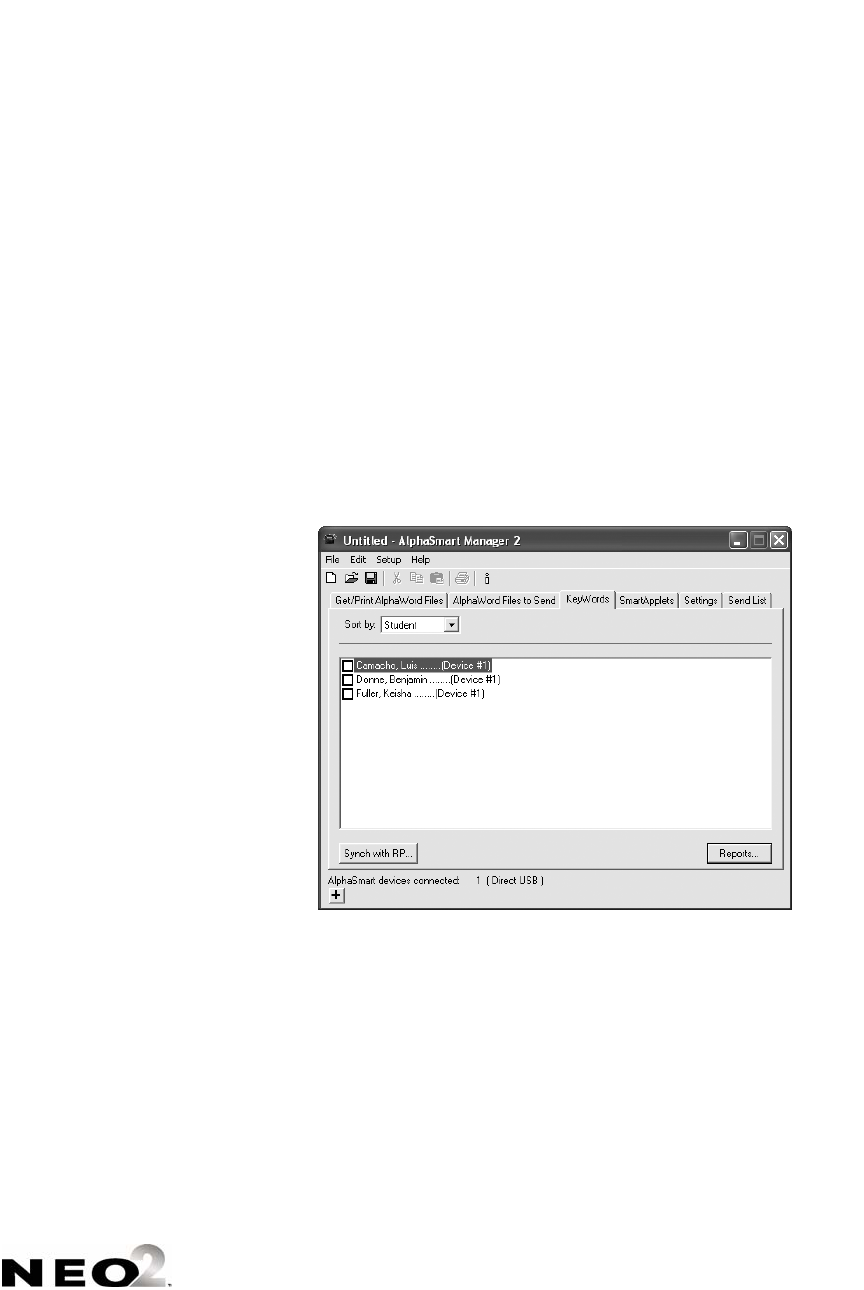
KEYWORDS
Using AlphaSmart Manager 2 with KeyWords
5-21
. . . . .
5. If you have multiple NEOs and you want to limit the changes to certain
NEOs, click Select Devices, check the NEOs that should get the
changes, and click OK.
6. Click Send.
Retrieving KeyWords Data and Generating Reports in AlphaSmart Manager
Follow the steps below to retrieve your students’ KeyWords data from NEOs
and view, save, or print reports. These steps assume that you have started the
program and connected your NEO(s) as described in the AlphaSmart
Manager 2 User Manual.
1. Click the KeyWords tab in AlphaSmart Manager. AlphaSmart Manager
will retrieve students’ KeyWords data from connected NEOs. You can use
the drop-down list A to choose whether to list by student or to list
students under the device (NEO) they’ve used.
2. Check the boxes next to the students or devices (NEOs) you want to
include in reports and click Reports B. (If you don’t check any students,
the program will assume you want to include all students listed.)
3. First, click the report you want to generate: Student Detail or Student
Progress C. The Student Detail Report lists each student’s information
separately by lesson, including the goals, actual words per minute and
errors, whether the lesson was passed, and the accuracy and speed
builders completed. The Student Progress Report includes information on
each student’s latest lesson, including the goals, actual words per minute,
actual errors, and whether the lesson has been passed.
A
B
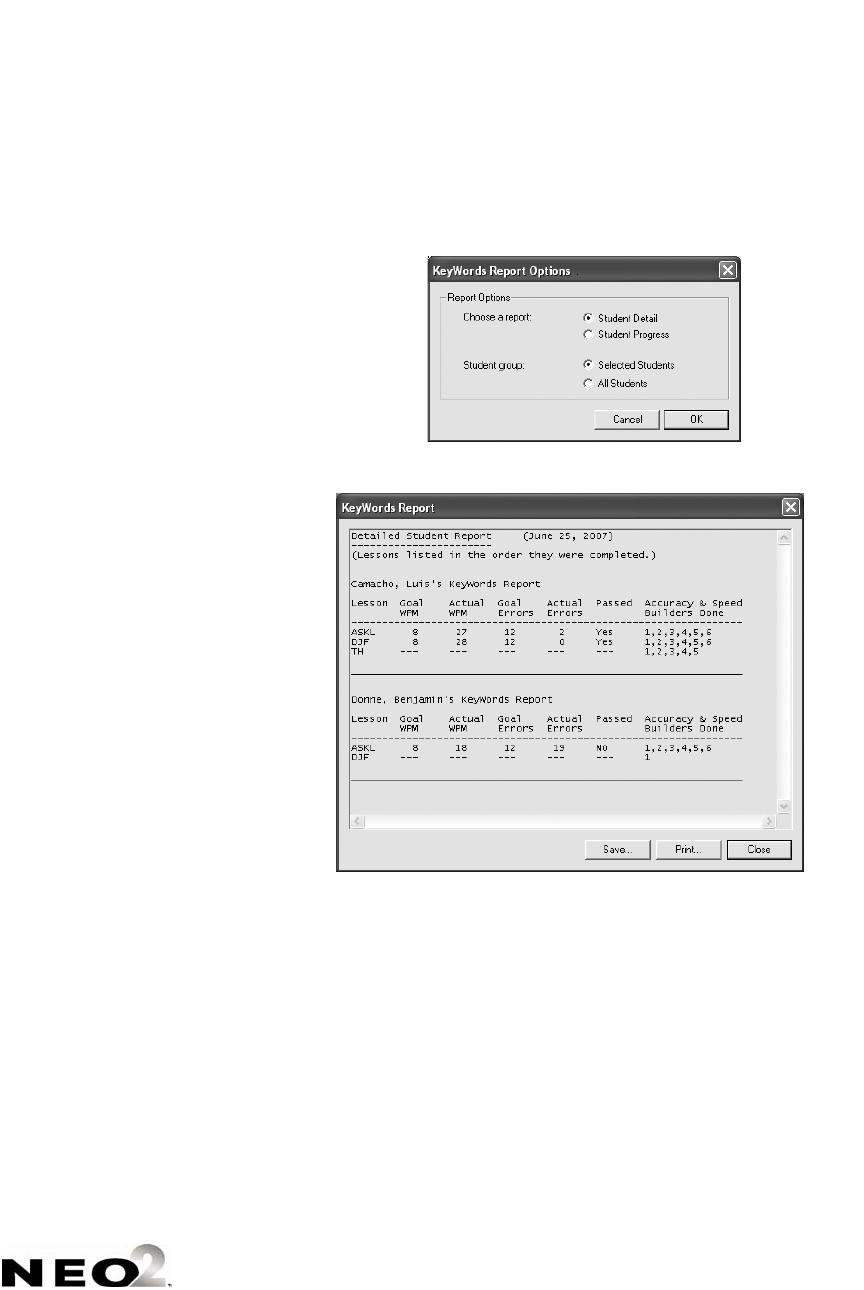
KEYWORDS
Using AlphaSmart Manager 2 with KeyWords
5-22
. . . . .
Next, click the group you want to include: the selected (checked) students
or all students D.
Click OK to continue.
4. The report will open in a new window.
To save the report, click Save, type a name for the report and choose a
location for the file, and click Save.
To print the report, click Print, choose your printer, and click OK
(Windows) or Print (Macintosh).
To close the report window, click Close.
C
D
KEYWORDS
Using AlphaSmart Manager 2 with KeyWords
5-23
. . . . .
Synching KeyWords Data with KeyWords RP
By following these steps, you can synchronize your KeyWords data with the
KeyWords program in Renaissance Place.
Renaissance Place is a web-based information system that brings together a
wealth of student data, giving teacher, principals, and administrators the
information they need in one place. You can use KeyWords in Renaissance
Place if you own and have registered any other Renaissance Place product,
such as Accelerated Reader, Accelerated Math, STAR Reading, or STAR
Math.
Before you synchronize KeyWords data with KeyWords in Renaissance Place,
you must do the following:
• Make sure KeyWords RP is installed on your server. (If you’re using your
own server, see the Renaissance Place Installation Guide.)
• Register at least one other Renaissance Place product.
• Activate your school(s) in Renaissance Place (see page 5-36).
• Decide which Renaissance Place account (user name and password) will be
used to synchronize data since only one may do so.
• Add your KeyWords students to Renaissance Place (see the Renaissance
Place Software Manual). Make sure that the first and last names are
identical to the student names in KeyWords on the NEOs. This is important
because students’ KeyWords data is matched to their records in
Renaissance Place. Data can only be synchronized for students who’ve been
added to Renaissance Place.
• Make sure your KeyWords courses, classes, and teachers have been added
to Renaissance Place. Teachers must be assigned to the classes with
KeyWords RP checked for the teachers, and students must be enrolled in
the classes. For instructions, see the Renaissance Place Software Manual.
Follow these steps to synchronize KeyWords data with RP. These steps
assume you have already started AlphaSmart Manager and connected your
NEO(s) as described in the AlphaSmart Manager User Manual.
1. Click the KeyWords tab in AlphaSmart Manager.
AlphaSmart Manager will retrieve students’ KeyWords data from
connected NEOs. You can use the drop-down list A to choose whether to
list by student or to list students under the device (NEO) they’ve used.
To find manuals in
Renaissance Place,
click the Download
Manuals link in the top right
corner of any page. Then,
click Download next to the
manual you want to open.
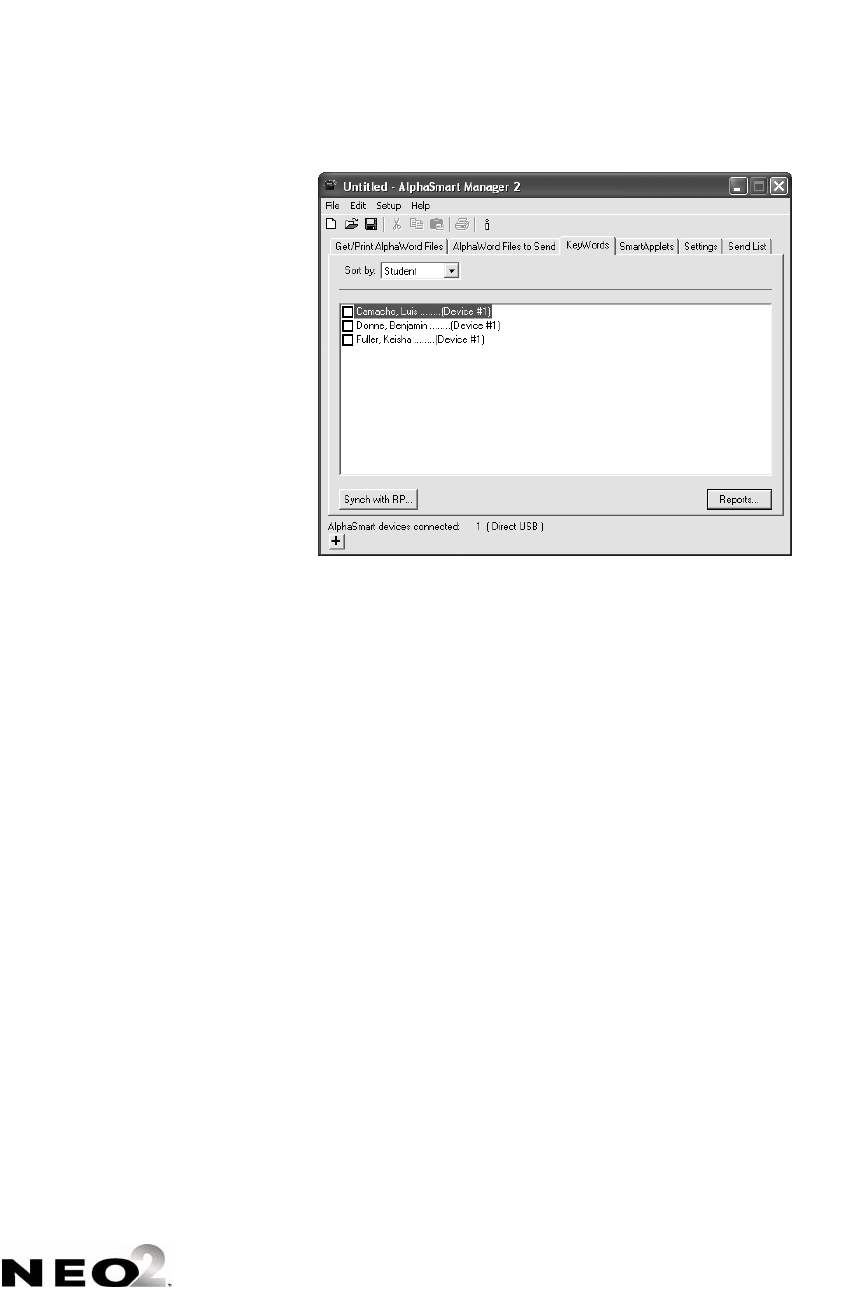
KEYWORDS
Using AlphaSmart Manager 2 with KeyWords
5-24
. . . . .
2. Click Synch with RP B.
3. Enter the web address that you use to access Renaissance Place C.
4. Enter the user name and password that you use to log in to Renaissance
Place D.
5. If you have synchronized with RP before, you can choose to automatically
synch students that have already been matched, or you can use the full
wizard to change previous matches of KeyWords with RP E. Click an
option.
6. Click Next >.
A
B
C
D
E
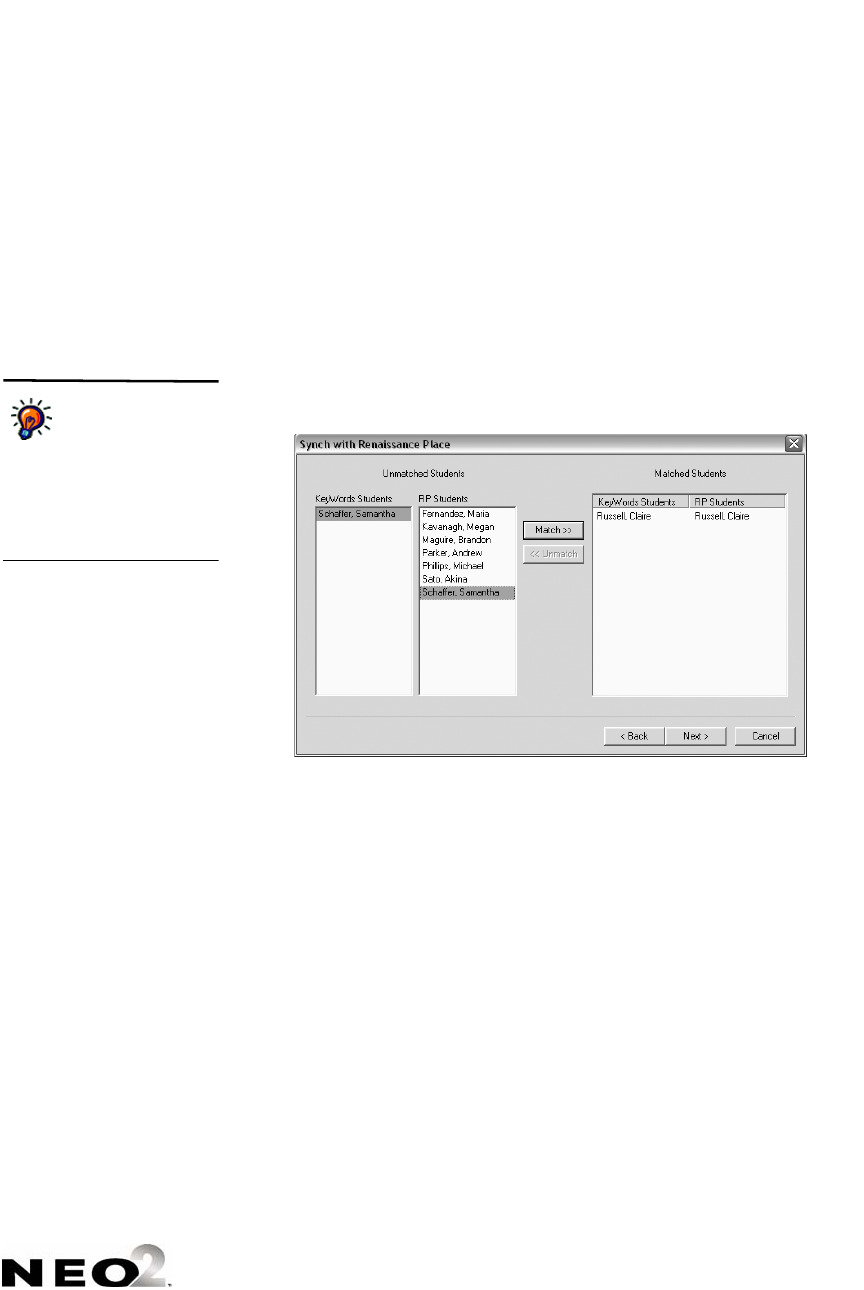
KEYWORDS
Using AlphaSmart Manager 2 with KeyWords
5-25
. . . . .
7. If this is your first time synchronizing, or if you chose to use the full wizard
to change previous matches, select the school you want to use if
necessary. Click Next >.
If you have synchronized before and chose to automatically synch
students with Renaissance Place in the previous step, a message will
appear telling you how many students were successfully imported into
Renaissance Place. Click Finish and go to step 11.
8. Check the class(es) containing the students that you want to synchronize
with Renaissance Place. Click Next >.
9. Match the KeyWords students with the Renaissance Place students as
described below.
10. After the progress dialog box disappears, the program will show you how
many students had data successfully imported into Renaissance Place.
Click Finish.
The first time you
synchronize,
AlphaSmart Manager
performs a basic name match
(auto-matching) between the
list of Renaissance Place
students and the KeyWords
students on the NEOs.
I
GH
F
J
FClick a KeyWords student name
that you want to match to a
Renaissance Place student.
The list is based on the students
entered into the NEO(s)
connected to your computer.
GClick the Renaissance Place
student name you want to
match to the KeyWords student
you selected. The list is based
on Renaissance Place students
already enrolled in the school
and class you selected in the
previous dialog boxes.
HClick Match >> to match the
students and move them to the
Matched Students area on the
right.
IIf you do not want to accept that
match, click the student names
in the Matched Students column
and click << Unmatch to
separate the names and move
them back to their respective
columns on the left side.
JClick Next > when you have
finished.

KEYWORDS
About KeyWords Reports
5-26
. . . . .
11. Open your Web browser and go to the server address (URL) where
Renaissance Place is installed.
12. Log in to Renaissance Place (see page 5-33).
13. View and/or print KeyWords RP reports in Renaissance Place (see
page 5-37).
About KeyWords Reports
There are several different ways to get reports on student work in KeyWords:
• Students can view a Student Progress Report that shows their work on all
lessons, or they can choose a Last Lesson Report. See page 5-9.
• Teachers can create a Group Progress Report that includes information on
each student’s last lesson. See page 5-12.
• You can view a Student Detail Report or Group Student Progress Report
within AlphaSmart Manager. See page 5-21.
• Teachers can use the templates that come with KeyWords to create a
master class report. This report includes each student’s Last Lesson Report.
See the next section.
• Teachers can also view and print reports in KeyWords in Renaissance
Place. See page 5-37.
Creating a Master Class Report
By following the steps below, you can create a master class report that
includes the Last Lesson Reports from each of your students.
When you send a Last Lesson Report to a program on your computer instead
of printing it or sending it to AlphaWord Plus, the column headers aren’t
included so that you can easily create a master classroom report. To create the
master class report, you open a Microsoft Excel file that you want to put the
data in; then, you have your students create a Last Lesson Report and send it
to your computer into the file one at a time. Follow the steps on the next page.
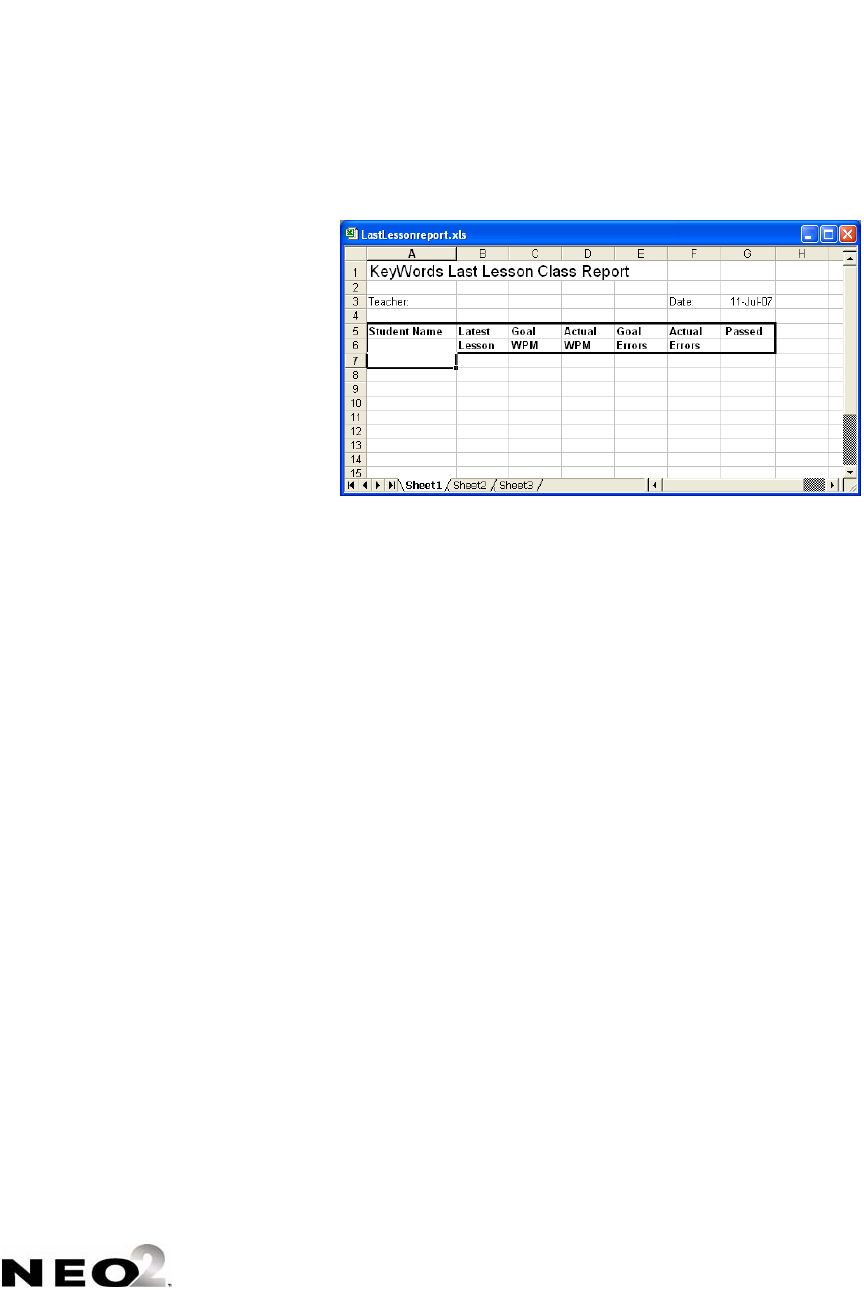
KEYWORDS
About KeyWords Reports
5-27
. . . . .
1. Copy the LastLessonreport.xls file that is on the AlphaSmart Manager 2
CD in the KeyWords Extras folder. Paste the file onto your computer and
open it. Click on the first cell under the heading as shown A.
2. Have your students create a Last Lesson Report on their devices. (See
page 5-9.) Tell them to wait before choosing to print the report, send it to a
computer, or send it to an AlphaWord Plus file.
3. Have a student connect his or her NEO to your computer using the USB
cable. Then, ask the student to move the cursor next to Send directly to
computer and press enter. After a moment, the student will be asked to
press send. This will send the student’s data into the first row below the
column headings. When the data has been sent, have the student
disconnect the NEO. Click in the first cell in the next row.
Repeat this step for each student.
4. Add any other information you want in the report, such as your name or
the classroom, and then save or print the file for your records.
About the Options for Generating Reports on the NEO
When you create KeyWords reports on the NEO, you can choose one of three
options:
•Print the report from the NEO directly to a printer, either by connecting
the NEO to the printer with a USB cable or by using IR beaming to send the
report wirelessly.
•Send the report to an open file on your computer via a USB cable
connection.
•Transfer the report to one of the AlphaWord Plus file spaces (file 1—
file 8).
A
KEYWORDS
About KeyWords Reports
5-28
. . . . .
Printing Reports
If you chose to print the report, follow these steps:
1. Connect the NEO to your printer using a USB cable, or put the NEO in
range of an IR printer.
2. Press print. KeyWords will inform you that the NEO is connected to your
printer; then, it will send the report and go back to the report options
screen.
3. Press esc until you return to the KeyWords main screen.
Sending Reports
If you chose to send the report to your computer, follow these steps:
1. On your computer, open the program and file that you want to send the
report to. Make sure your cursor is in the file so that it is active. For best
formatting results, choose a fixed-width or monospace font like Courier;
these fonts make the columns and header information line up correctly.
2. Using a USB cable, connect the NEO to your computer.
3. Press send. The text will appear in the file you had open.
4. Press esc until you return to the KeyWords main screen.
Transferring Reports to AlphaWord Plus
When you transfer a KeyWords report to AlphaWord Plus, you save it to one
of the existing file spaces (file 1–file 8). Any text that is already in the file you
choose will be overwritten.
This is a quick way to see reports right on the NEO. However, because the
NEO screen is not as wide as a computer screen or printer page, the report
will wrap across several lines, making it hard to read onscreen. If you transfer
the file to a computer or printer, the report will return to its proper
formatting.
If you have a SmartOption Cart with several NEOs connected, saving reports
to an AlphaWord Plus file is also useful because you can use AlphaSmart
Manager to retrieve the files from all connected NEOs at the same time. Then,
you can view, save, or print the reports from your computer.
If you choose to transfer a report to an AlphaWord Plus file, follow these
steps:
1. Type the file number that you want to send the report to.
If you notice missing
characters or
jumbled text, you
might need to slow down the
transfer speed for NEO. To
change the speed for one
NEO, press option-z-S. To
change it for several NEOs,
use AlphaSmart Manager 2.
KEYWORDS
Using KeyWords RP to View and Print Reports
5-29
. . . . .
2. If the file is not empty, KeyWords will warn you that there is text in the file
that will be deleted. To continue, press y for yes. (If you don’t want to
continue, press n for no. KeyWords will ask you to choose a different file.)
3. KeyWords will save the report in that file and open it in AlphaWord Plus.
Using KeyWords RP to View and Print Reports
KeyWords RP is a Renaissance Place program that allows you to generate
reports about your students’ work in KeyWords on NEOs. You do not have to
purchase KeyWords RP separately. You can use it if you have another
Renaissance Place program registered and if you are using KeyWords on
NEOs.
KeyWords RP provides powerful and easy-to-use reports so teachers can see
information for individual students, classes, and entire schools.
How KeyWords RP Works
1. A Renaissance Place administrator activates the schools that will be
using KeyWords. This registers KeyWords RP for those schools. (See
page 5-36.)
2. The Renaissance Place administrator also adds the KeyWords students
and their teachers, courses, and classes. Teachers must be assigned to
the classes with KeyWords RP checked for each teacher, and students
must be enrolled in those classes. To find out how to perform these tasks,
refer to the Renaissance Place Software Manual. The student names
must exactly match the student names you’ve added in KeyWords
on the NEOs.
3. Students complete KeyWords lessons on their NEOs.
4. Teachers use AlphaSmart Manager to synchronize the KeyWords Data
on the NEOs with the data in KeyWords RP. (See page 5-23.)
5. Teachers, principals, or administrators use a web browser to go to their
Renaissance Place address. Then, they log in to Renaissance Place.
6. Users click Reports to choose the report they would like to generate. See
page 5-37.
To find the
Renaissance Place
Software Manual,
click Download Manuals in
the top right corner of any
Renaissance Place page.
Then, click Download next to
the manual.

KEYWORDS
Using KeyWords RP to View and Print Reports
5-30
. . . . .
Programs You’ll Use
KeyWords RP
The KeyWords RP reporting software—accessible from the Renaissance Place
Home page—reports on students’ performance on KeyWords lessons on
NEOs. You’ll need this program installed on your Renaissance Place server.
Renaissance Place
Renaissance Place is the management program that comes with all RP
products. It lets you view and manage district, school, student, teacher,
parent, course, and class information, which is shared by all Renaissance
Place software used in your district or school. The tasks that you can perform
in this program depend on your user level. For example, district-level users
have more management tasks available than school users or teachers. Sample
tasks may include:
• Adding, editing, or deleting courses and classes, and assigning teachers and
students to them
• Choosing a different school year to work in
• Viewing student information
KeyWords SmartApplet on the NEO
The KeyWords SmartApplet on the NEO is the program students use to work
through their lessons. KeyWords RP is compatible with KeyWords 3.3 or
higher.
What You’ll Use KeyWords RP to Do See Page
Activate schools 5-36
Synchronize data with NEOs via AlphaSmart Manager 5-23
Print reports 5-37
Get software tips and manuals to help you use KeyWords
RP in the classroom
5-31
KEYWORDS
Using KeyWords RP to View and Print Reports
5-31
. . . . .
AlphaSmart Manager
AlphaSmart Manager 2 is the link between the KeyWords SmartApplet on the
NEO and KeyWords RP. AlphaSmart Manager helps you retrieve KeyWords
data from NEOs and synchronize it with the data in KeyWords RP. You can
also use AlphaSmart Manager to change KeyWords settings for all connected
NEOs. KeyWords RP is compatible with AlphaSmart Manager versions 2.6
and higher.
Learning KeyWords RP
You’ll find many tools in the software to help you learn to use KeyWords RP.
Online Manuals and Tips
On every page in Renaissance Place and KeyWords RP, you’ll see a
Download Manuals link. Click this link to see a list of the documents that
are available; then, click Download next to the document you want to open.
For KeyWords RP, you’ll find these documents helpful:
Document What It Gives You
KeyWords User Manual
(this document)
• General information about the program
• Step-by-step instructions for performing every
function
Tips for Getting Started
with KeyWords
• Helpful hints to get you started to using the
program
Renaissance Place
Software Manual
• Procedures for managing all school and district
information, including students, teachers,
courses, and classes
Do you have
questions? Send
general questions
about KeyWords RP to
answers@renlearn.com.
Send technical questions to
support@renlearn.com.
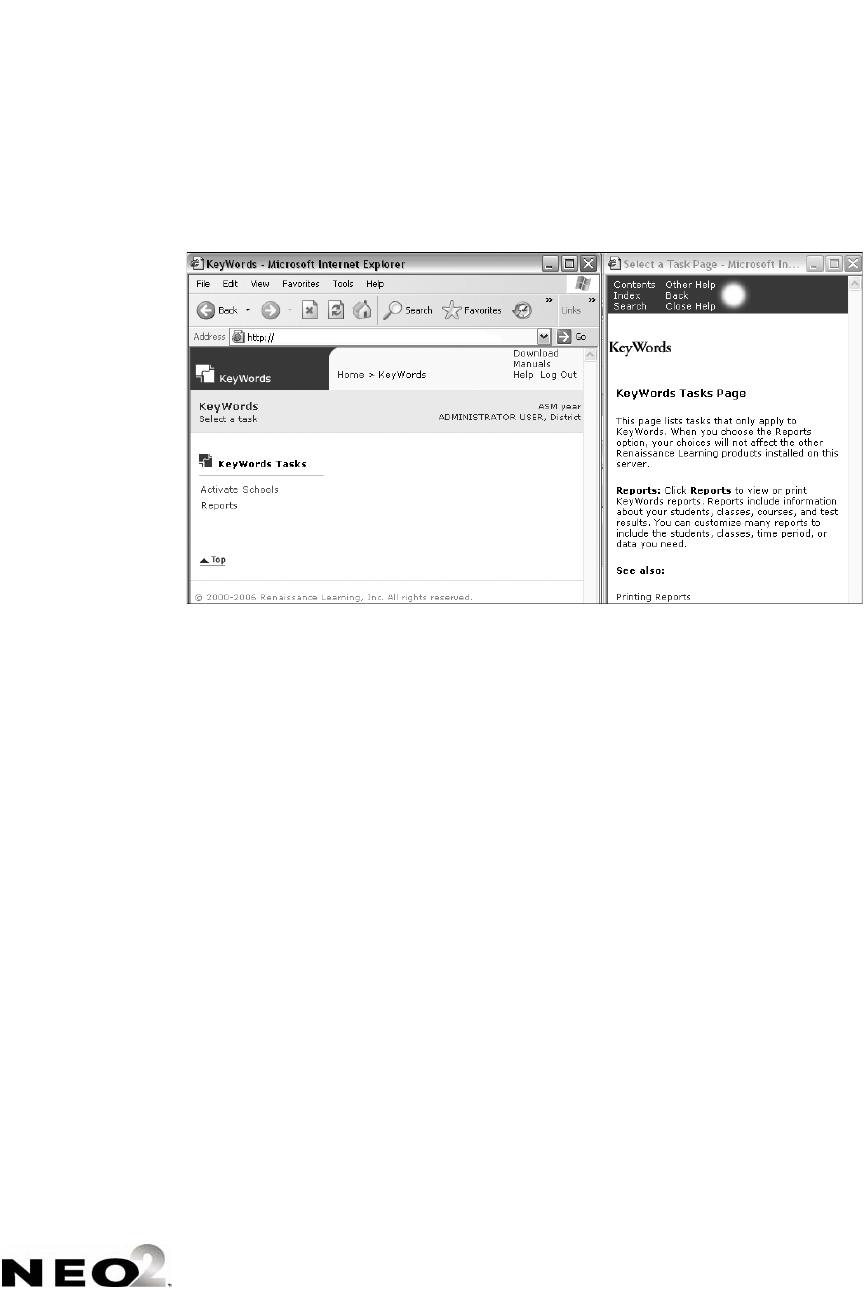
KEYWORDS
Using KeyWords RP to View and Print Reports
5-32
. . . . .
Online Help
To access the online help, click Help in the upper-right corner of any page.
The help usually appears in a separate window to the right of the page, as
shown below.
The Help link is on every page
in the program. Click it to get
more information about the
page currently displayed in the
software.
Use the links at the top of the
Help page to navigate the help.
• Click Contents to display the
table of contents for the help.
• Click Index to display an
alphabetical list of topics.
• Click Search to find a word or
ask a question.
•Click Other Help to see a list
of the Renaissance Place
software installed on your
server and click one of those
products to view its help.
•Click Back to view previously
selected help pages.
•Click Close Help to close the
help window.
This logo lets you know you’re
in the KeyWords RP Reports
help. If you click Other Help at
the top of the Help page and
select another program’s help,
the logo for that program will
appear.

KEYWORDS
Using KeyWords RP to View and Print Reports
5-33
. . . . .
Checking System Requirements
To use KeyWords RP, you must have Adobe Reader installed on your
computer so you can view reports. If you want to see if a specific computer
has the necessary software to run KeyWords RP, click Check Software
Requirements on the Renaissance Place Welcome page before you log in.
Fro the most up-to-date hardware requirements for KeyWords RP, visit
www.renlearn.com/requirements.
Logging in to Renaissance Place and Changing Your Password
Use these instructions to log in to Renaissance Place so you can access the
KeyWords RP program. You can also change your password (either by choice
or when the system requires it).
Only personnel who have been added to the program by the administrator
can log in.
1. In your browser window, go to the Web address (URL) for Renaissance
Place. Supported browsers include Internet Explorer, Netscape, Firefox,
and Safari.
2. On the Welcome page, click Teacher/Administrator.
3. Enter your user name and
password. To change your
password, check the Change
Password box.
4. Check Log In. If you’re not
changing your password, your
Home page opens.
5. If you are changing your password,
enter it now, type it again to verify it,
and click Save to open your Home
page.
If the Change
Password page
appears and you
didn’t select it when logging
in, one of two things has
happened. Either your system
administrator wants you to
change it for security reasons
or you haven’t changed it in a
year and the system requires
it.
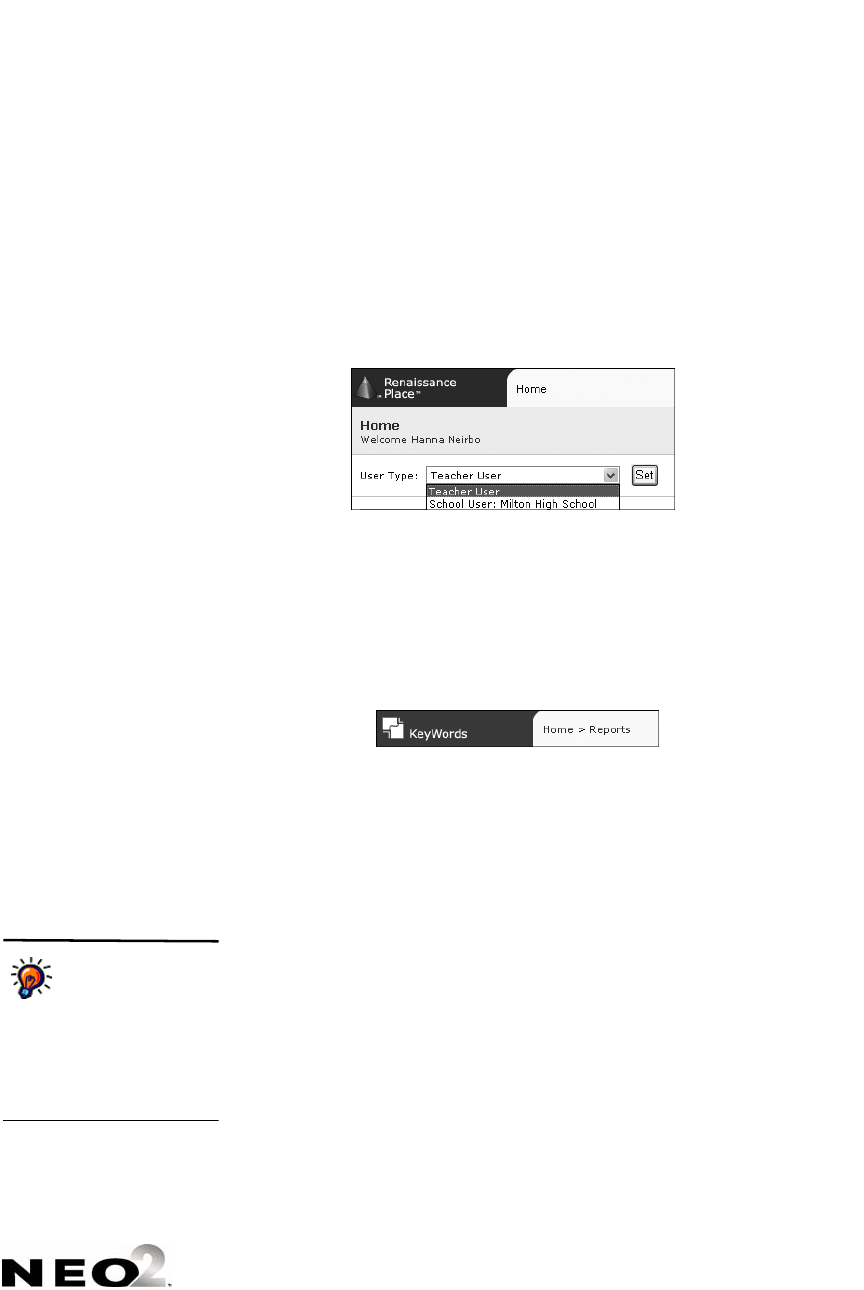
KEYWORDS
Using KeyWords RP to View and Print Reports
5-34
. . . . .
Switching Roles in Renaissance Place
Some people in your district or school may be assigned more than one role, or
they may be assigned to more than one school. For example, the librarian in
the high school might also teach a reading class in one of the middle schools.
Renaissance Place keeps track of these multiple roles and school
assignments. If you have more than one role or school assignment, choose the
correct role or school from the drop-down list on the Home page when you
log in to the software.
You can switch between roles or schools at any time from your Home page
without having to log out of the software.
Navigating the KeyWords RP Software
The yellow navigation bar at the top of each page shows you where you are in
the software.
If you need to go back to a previous page, use the links in the navigation bar
rather than the browser’s Back button, which can sometimes give you
unexpected results. For example, if you’re on the Reports page and want to
display the Home page, click Home in the navigation bar.
Logging Out and Closing the Renaissance Place Software
When you’ve finished working in KeyWords RP Reports, log out to keep your
data secure.
1. Click Log Out in the upper-right corner of any page.
2. Close the software by closing your browser.
Automatic logout
after 20 minutes. If
you don’t use
KeyWords RP for about 20
minutes, it automatically logs
you out, and you’ll have to log
in again when you return to
the software.
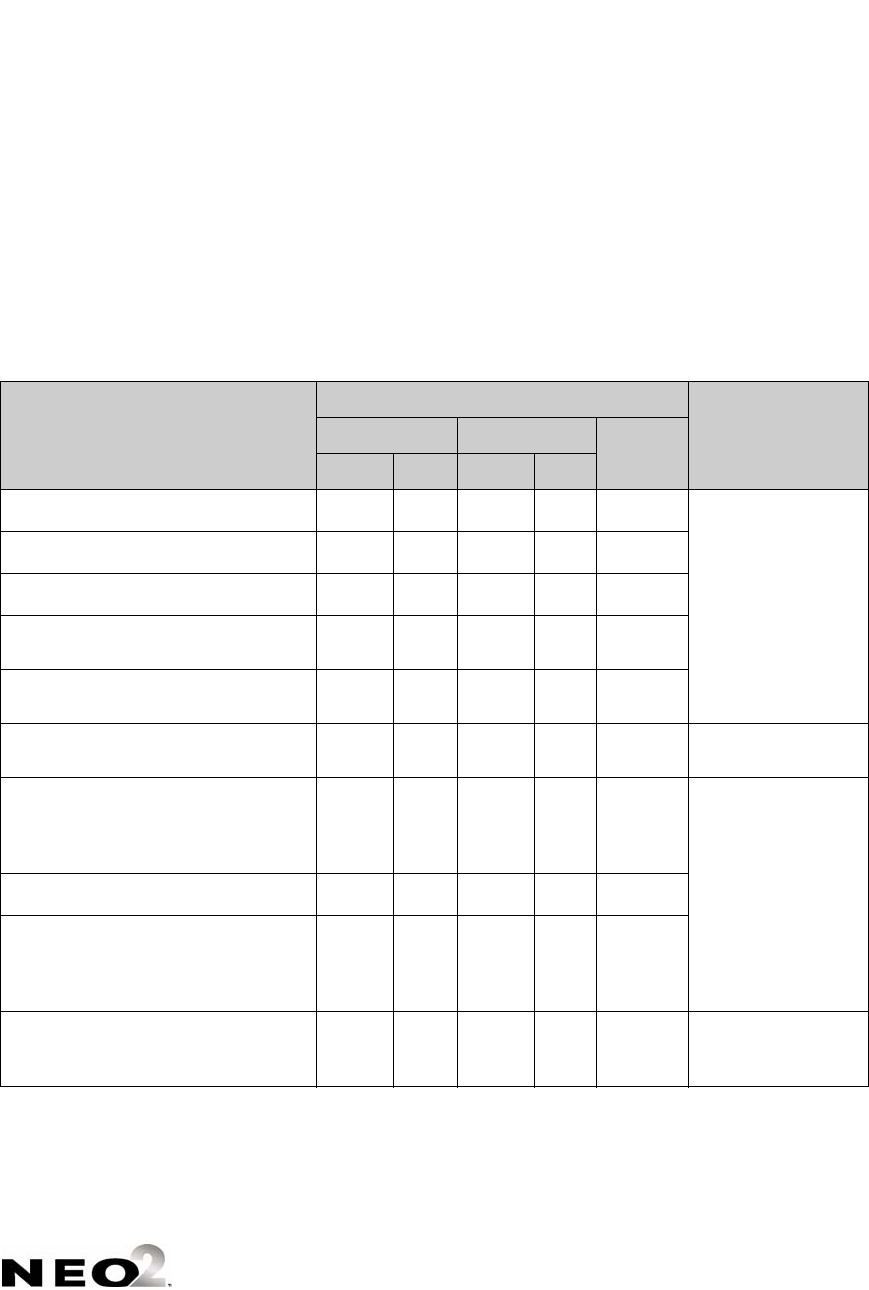
KEYWORDS
Using KeyWords RP to View and Print Reports
5-35
. . . . .
Setting Up the KeyWords RP Software
Much of the preliminary setup for your Renaissance Place programs occurs
before you log in for the first time. For example, KeyWords RP should be
installed by your program administrator, or it may be installed on a server
hosted by Renaissance Learning.
The tasks listed below must be performed after KeyWords RP is installed and
before you synchronize KeyWords data so you can view reports. You may or
may not be the one required to perform these tasks.
Task
Usually Performed By
Where to Find
Instructions
District School
TeacherAdmin. Staff Admin. Staff
Enter district information 3Renaissance Place
Software Manual
Add school years 33
Add school information 33
Add school administrators and district
staff
33
Register at least one other Renaissance
Place product
3
Activate schools for KeyWords RP
Reports
3Page 5-36
Add teachers, school staff, and students
(make sure student names match
exactly what is entered in KeyWords on
your NEOs)
333 Renaissance Place
Software Manual
Add school marking periods 33
Add courses and classes, assign
teachers— designate a lead teacher for
each KeyWords RP class—and enroll
students in classes
3333
Make sure teacher and student
computers have the necessary software
installed
33 3
Page 5-33
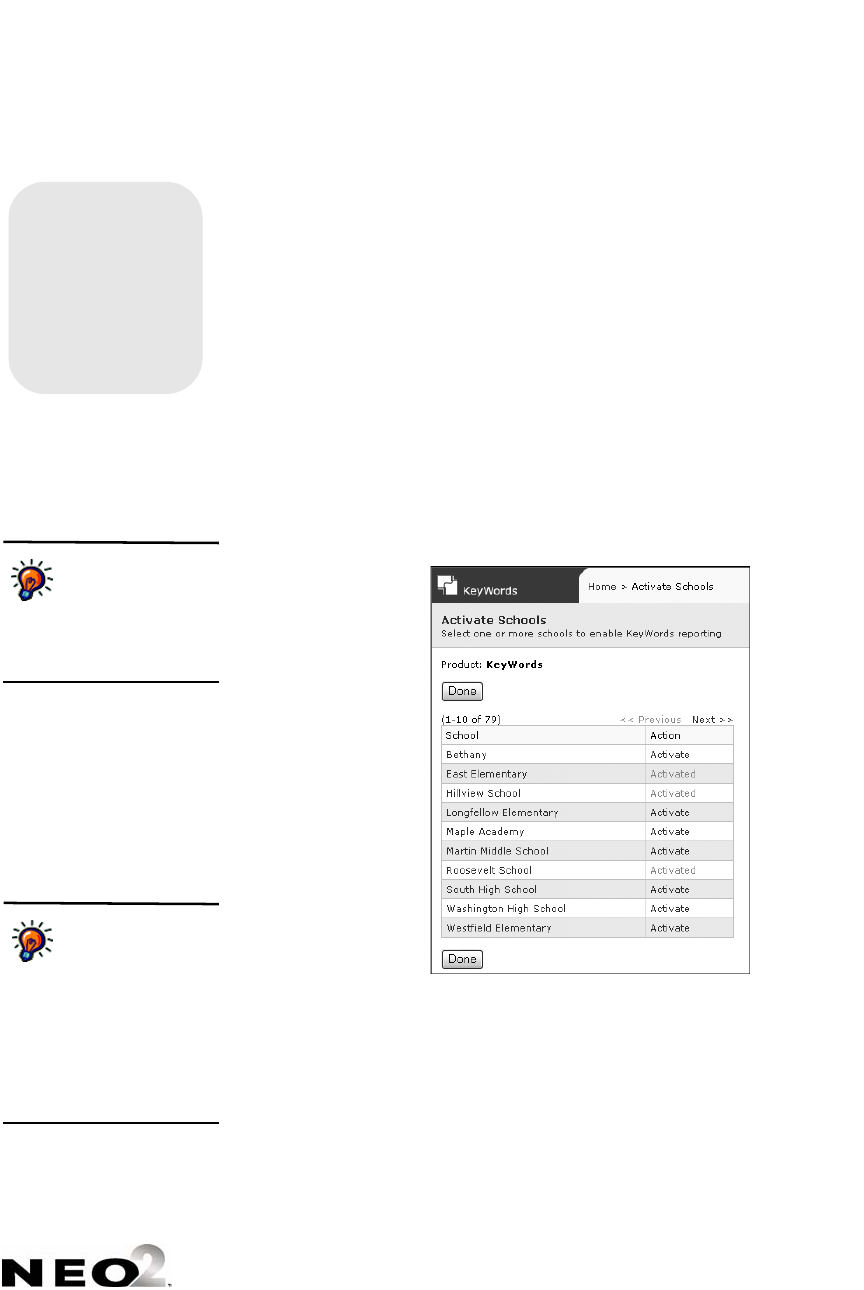
KEYWORDS
Using KeyWords RP to View and Print Reports
5-36
. . . . .
Activating Schools
After KeyWords RP has been installed on your server, schools have been
entered, and at least one other Renaissance Place product has been
registered, a district or program administrator must activate the school that
will be using KeyWords RP. KeyWords RP is automatically registered when
you activate a school; it does not need to be registered separately.
Note: One other Renaissance Place product (such as Accelerated Reader or
STAR Math) must be registered before you activate KeyWords schools. See
the Renaissance Place Software Manual to register those products.
Follow these steps to activate schools for KeyWords RP:
1. Click Activate Schools in the list of KeyWords RP tasks on the Home
page. If you don’t see a list under KeyWords, click Show Details.
2. Click Activate by the school you want to activate A on the Activate
Schools page. You can only activate one school at a time. Repeat this
step for each school you want activated.
3. Click Done when you have finished. The Reports link will now be
available in the list of KeyWords RP tasks on the Home page.
Who Can Do This?
5 District Administrator
District Staff
School Administrator
School Staff
Teachers
To change, see page 5-45.
To deactivate a
school, see
“Removing
Registration” in the
Renaissance Place Software
Manual.
B
A
C
BAfter you click Activate, the
software will enter the
necessary codes for you and
the link will change to Activated.
CClick Previous or Next to move
back and forward through the
list of schools if the list goes to
more than one page.
After the schools
have been activated,
be sure to assign a
Lead KeyWords RP teacher to
the KeyWords RP classes you
create. Check the KeyWords
box and select Lead from the
role drop-down list when
assigning personnel to a
class.
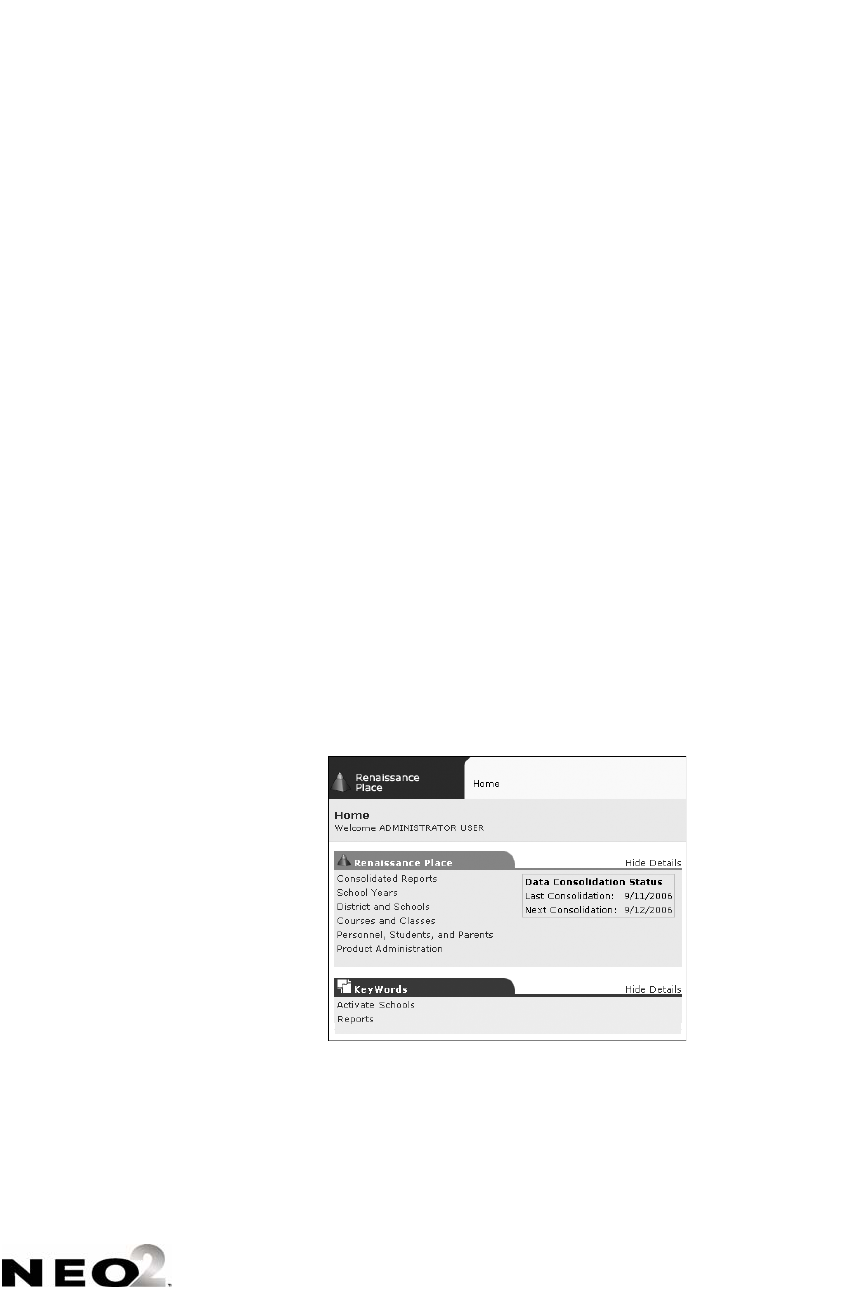
KEYWORDS
Using KeyWords RP to View and Print Reports
5-37
. . . . .
Bringing KeyWords Data into KeyWords RP
To bring your KeyWords data from NEOs into KeyWords RP in Renaissance
Place, you need to use AlphaSmart Manager to synchronize the KeyWords
data from the NEOs with KeyWords RP. For instructions, see page 5-23.
Viewing KeyWords RP Reports
KeyWords RP reports give you more information about your students’
progress and performance on KeyWords lessons and tests on the NEO.
KeyWords RP reports also provide details about class performance, student
and teacher information (including logins and passwords), and schoolwide
performance in KeyWords.
Renaissance Place Reports vs. KeyWords RP Reports
On your Renaissance Place Home page, you will see a Consolidated Reports
link under Renaissance Place in addition to the Reports link under
KeyWords.
When you click Consolidated Reports A under the Renaissance Place tab,
administrators and teachers can generate reports with data from more than
one Renaissance Place product. However, KeyWords data does not appear on
any Renaissance Place consolidated report.
When you click Reports B under the KeyWords tab, you can generate
reports about your student’s KeyWords lessons.
A
B
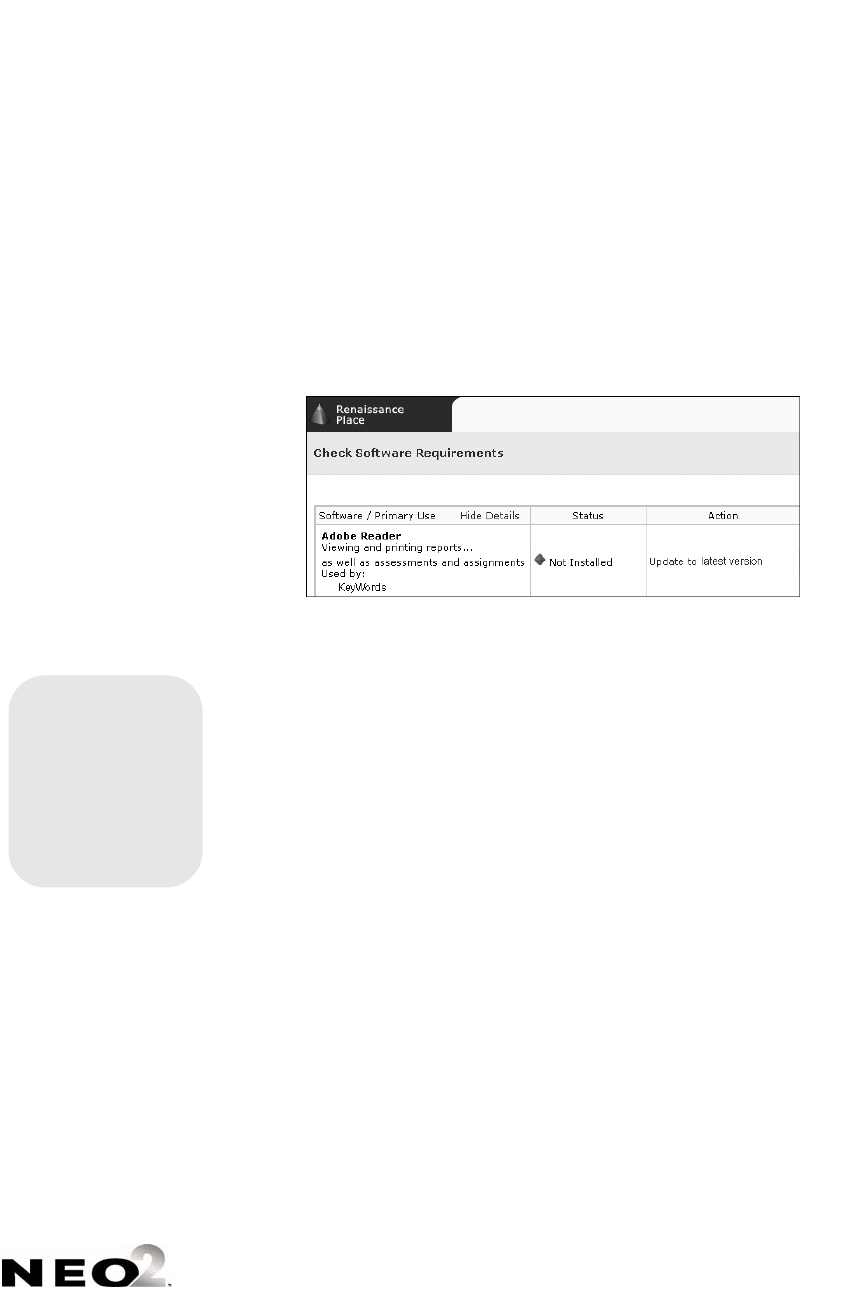
KEYWORDS
Using KeyWords RP to View and Print Reports
5-38
. . . . .
Check for Adobe Reader Before You Generate Reports
KeyWords RP reports are in PDF format. You will need Adobe Reader
installed on your computer to view and print these reports. (On some
Macintosh computers, you can use the Preview program that is already
installed.) When you click Reports in the list of KeyWords tasks on the
Renaissance Place Home page, KeyWords checks for this software. If your
computer does not have the software, the Check Software Requirements page
will open. To get the software you need, click Update in the Action column
for Adobe Reader. You will go to a Web site where you can download Adobe
Reader.
Creating and Printing KeyWords RP Reports
1. Click Reports in the KeyWords RP task list on the Home page. KeyWords
RP will make sure that Adobe Reader is installed on this computer. (See
the information above.)
2. Select your school from the School drop-down list if necessary.
Who Can Do This?
5 District Administrator
District Staff
School Administrator
School Staff
Teachers
To change, see page 5-45.
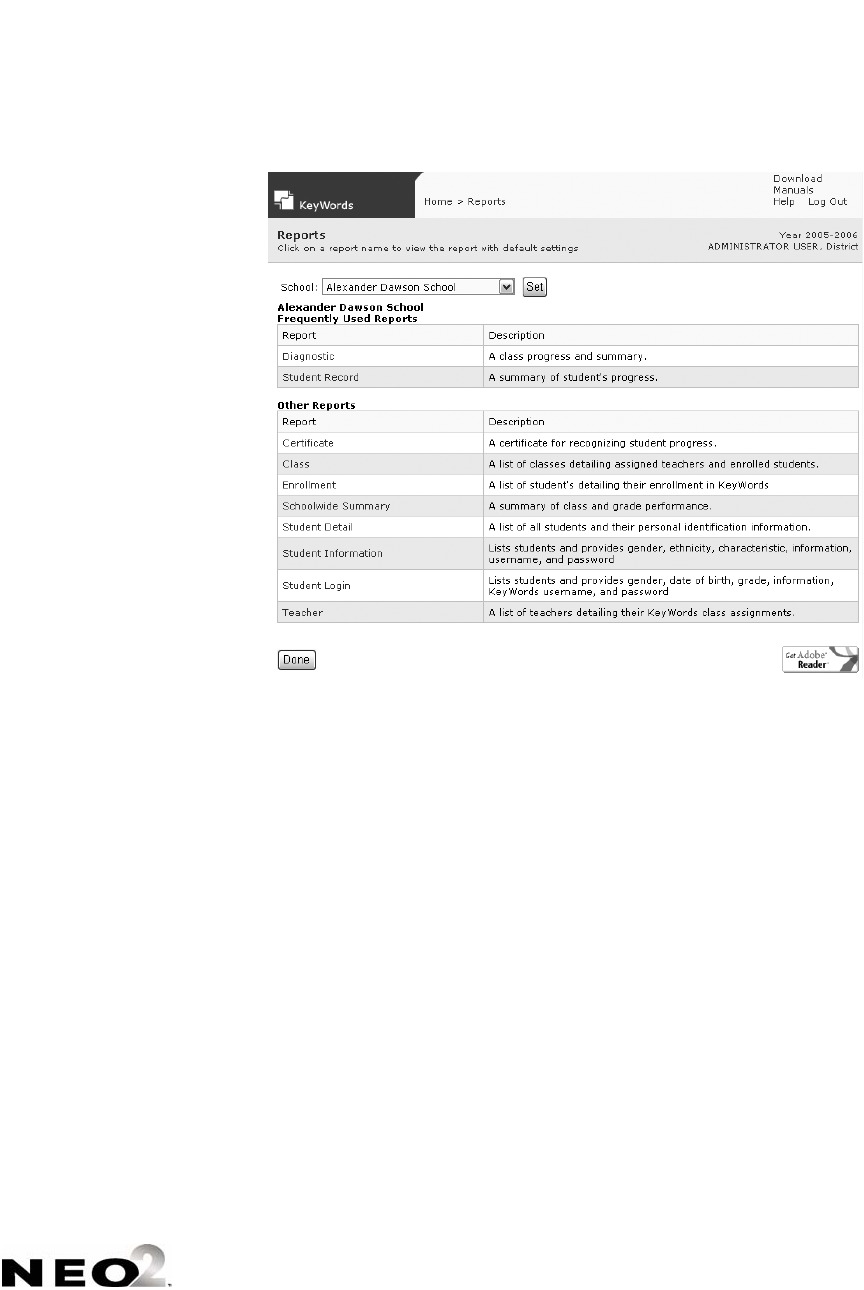
KEYWORDS
Using KeyWords RP to View and Print Reports
5-39
. . . . .
3. Click the report name on the Reports page.
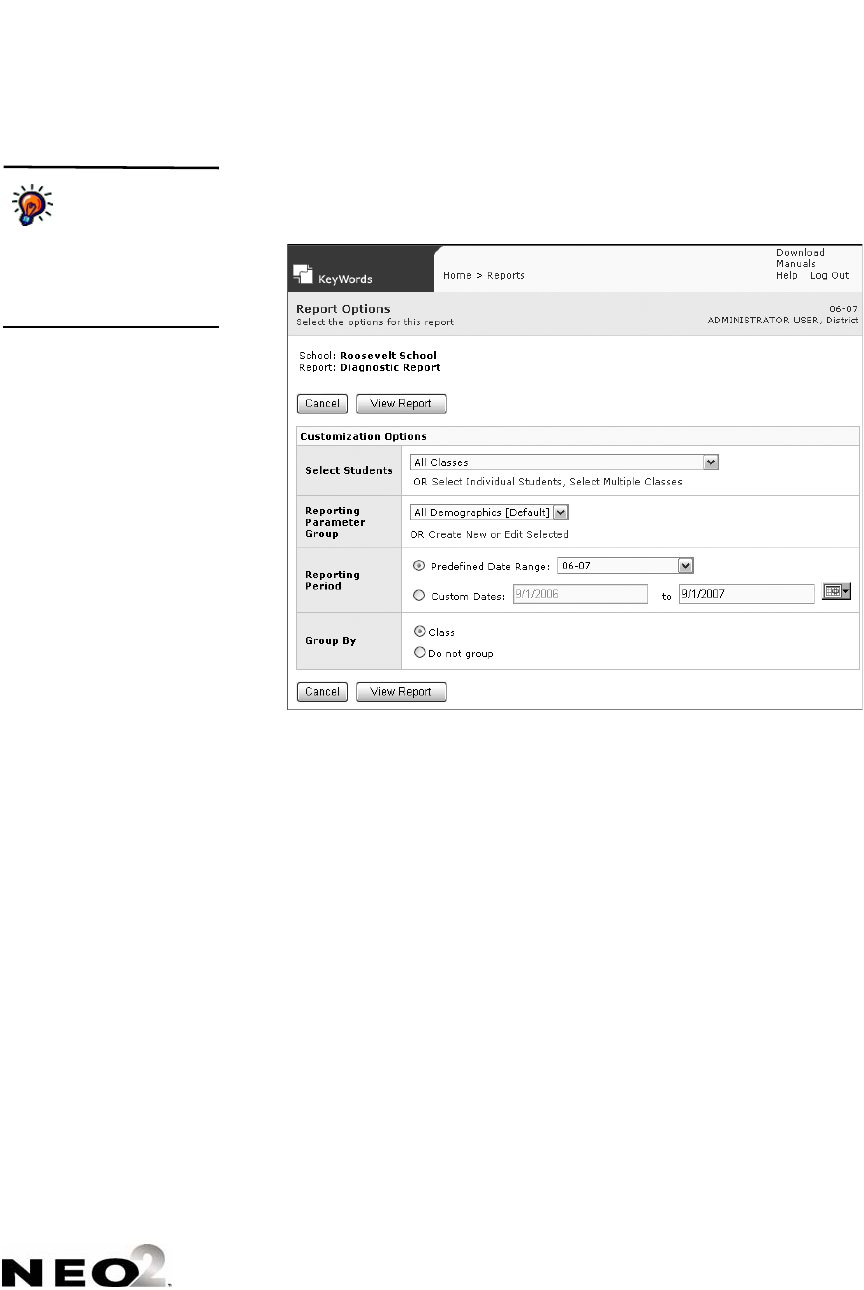
KEYWORDS
Using KeyWords RP to View and Print Reports
5-40
. . . . .
4. Select the options you want to customize for this report on the Report
Options page. (If the report can’t be customized, the report will be
generated as described in step 5.) Click View Report when you’ve
finished C.
Custom report
options. Each report
has its own set of
options. For more information
about the custom options
available for each type of
report, see page 5-43.
A
B
C
AFor many reports, you can
choose students by name or
class. To choose them by name,
click Select Individual
Students. To choose them by
class, choose a class from the
drop-down list or click Select
Multiple Classes.
BReporting parameter groups let
you choose students with
common traits. For more
information, see page 5-41.

KEYWORDS
Using KeyWords RP to View and Print Reports
5-41
. . . . .
5. KeyWords RP Reports will generate the report. When it’s ready, the report
will appear in the browser window or a separate window. To save or print
it, use the Adobe Reader buttons, not the browser buttons.
About Reporting Parameter Groups
Reporting parameter groups let you limit reports to students with common
traits. When you choose custom options for some KeyWords RP reports, you
can choose a reporting parameter group from a drop-down list. You can also
create or change a group by clicking Create New or Edit Selected.
Don’t use the
browser’s print
function. If the report
opens in a browser window,
don’t try to print it using the
browser’s buttons or menus
because only the top of the
page will print. Use the Adobe
Reader buttons instead.
On Macintosh
computers, the
report may open in
Preview. If so, click the File
menu and choose Print to
print it.
Use the save button to save the
report.
Use the printer button to print
the report.
These options let you customize
a report or go back to choose a
different one.
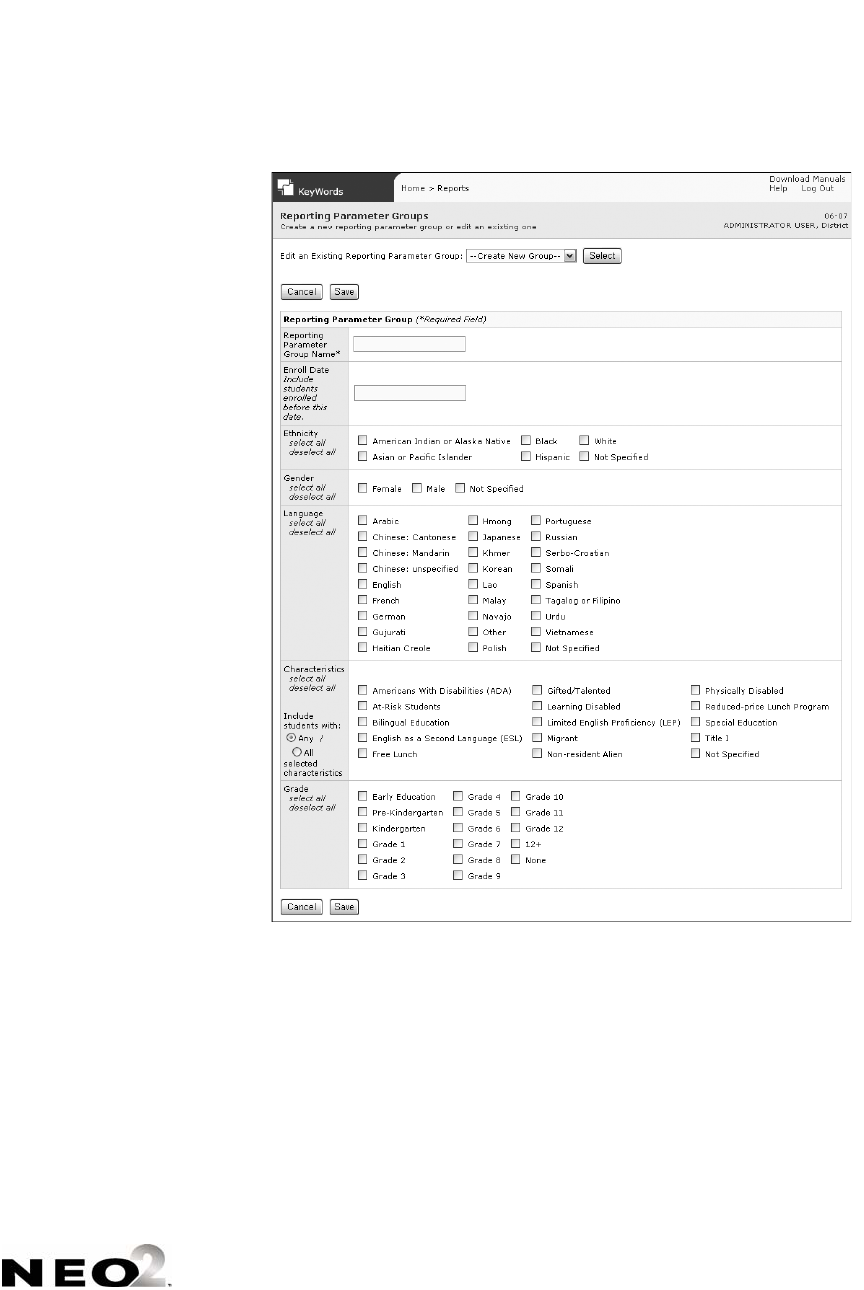
KEYWORDS
Using KeyWords RP to View and Print Reports
5-42
. . . . .
By entering an Enroll date, you
select students enrolled in the
school before the date you specify.
You can specify each student’s
ethnicity, gender, language, and
grade when you add the student
or edit his or her information. See
the Renaissance Place Software
Manual. Then, you can check the
groups that you want to include in
the report on this page.
You can assign characteristics to
students separately. You can also
add your own custom
characteristics and assign them to
students. See the Renaissance
Place Software Manual. When you
check characteristics here, be
sure to click an option on the left to
choose whether to include
students with “any” of the
characteristics or only those with
all checked characteristics.

KEYWORDS
Using KeyWords RP to View and Print Reports
5-43
. . . . .
Report Descriptions
This table lists the KeyWords RP reports with a description of why you would
use it.
Report Why You Would Use It Things You Can Change
Certificate Recognizes students who have successfully completed
their goals for number of WPM (words per minute) and
errors. Each certificate includes a title, the student
name, the accomplishment, and two signature lines.
You may select:
• classes or students to include
•date range
• text included
• signature lines
Class Lists your KeyWords classes, their teachers, and their
students.
Things to Note
• Only KeyWords RP classes are included. To make a
class a KeyWords RP class, check the KeyWords box
when you assign a teacher.
No custom options.
Diagnostic Helps you monitor student work on keyboarding
lessons in NEO KeyWords. It notes progress toward
goals and alerts you to problems students are having.
The report includes the number/percentage of
completed lessons/total, the number/percentage of
passed lessons/taken, diagnostic codes, and detailed
information about the lessons completed (including the
lesson names, goal WPM/error, actual WPM/error, and
the date the data was imported into RP from
AlphaSmart Manager).
Things to Note
• Diagnostic codes are defined on the report. They help
you see potential problems.
• Supports a direct discussion with an individual
student’s parents or guardians.
• There is a page break after each group.
You may select:
• classes or students to include
•date range
• grouping used
Enrollment Lists students in your classes and each student’s ID,
grade, class, and teacher.
No custom options.
Schoolwide
Summary
Provides details from your students’ most recent
KeyWords tests. Shows averages of the all the lessons
completed and the latest lesson completed by grade and
class.
Things to Note
• Use this report to get a good overall picture of your
students’ keyboarding performance while using
KeyWords on the NEO.
You may select:
•date range
• grouping used

KEYWORDS
Using KeyWords RP to View and Print Reports
5-44
. . . . .
Student Detail Lists your students. Includes each student’s ID, gender,
date of birth, grade level, ethnicity, and characteristics.
Things to Note
• To find out how to set this information for each
student, see the Renaissance Place Software
Manual.
• If the administrator hasn’t given you the capability to
see ethnicity and characteristics, they won’t appear
on the report.
No custom options.
Student
Information
Lists each student’s name, ID, gender, date of birth,
Renaissance Place user name, and Renaissance Place
password.
You may select:
• classes or students to include
• sorting used
• grouping used
• page break after each group (if
grouping is used)
Student Login Lists each student’s name, ID, gender, date of birth,
KeyWords user name, and KeyWords password.
Things to Note
• Print this report before a KeyWords practice or test
session and give your students their KeyWords user
names and passwords. Students (and teachers) need
this information to log in to KeyWords on NEOs so
they can take lessons and tests.
You may select:
• classes or students to include
• sorting used
• grouping used
• page break after each group (if
grouping is used)
Student Record Provides information about student performance on
their keyboarding lessons. Includes the lesson name,
whether or not it was passed, the student’s goal and
actual WPM/Error, and the Accuracy and Speed
Builders completed.
You may select:
• classes or students to include
•date range
• page break after each
student’s information
Teacher Lists KeyWords RP teachers, their user names, classes,
and class position.
Things to Note
• This report can help the administrator see which
teachers are using KeyWords RP.
• When teachers print the report, it includes only their
information. It doesn’t include other teachers.
• Only teachers of KeyWords RP classes are included.
To make a class a KeyWords RP class, check the
KeyWords box when you assign a teacher.
No custom options.
Report Why You Would Use It Things You Can Change

KEYWORDS
KeyWords Resources for Teachers
5-45
. . . . .
Capabilities in Renaissance Place Programs
Capabilities in Renaissance Place programs give users the right to perform
specific tasks in the software. They are preassigned based on
• The user group you belong to and the position you hold in your district or
school
• The tasks that group usually performs
KeyWords RP has no capabilities that are unique to that program, but you can
find a table of Renaissance Place tasks and the standard set of capabilities in
the Renaissance Place Software Manual. Within Renaissance Place, district
or school administrators can change the capabilities assigned to:
• New users added to a specific group
• Groups of current users already in the database
• A specific person
To find out how to change capabilities, see the Renaissance Place Software
Manual. That manual also includes a list of the user groups and the positions
in each group.
KeyWords Resources for Teachers
This section gives teachers information about how to use KeyWords to teach
your students touch-typing. It explains
• Reference materials provided with KeyWords that you can use to make
handouts and transparencies
• A review of ergonomic typing posture and body placement
• A sample lesson plan for using KeyWords in a classroom with NEOs
Materials for handouts and transparencies
In the KeyWords Extras folder on the AlphaSmart Manager CD (and in the
AlphaSmart Manager download files), you’ll find a file named KeyWords
SmartApplet Master.pdf. This file contains helpful handouts and
transparencies.
You need Adobe
Reader to view and
print this file.

KEYWORDS
KeyWords Resources for Teachers
5-46
. . . . .
The handouts and transparency masters contained in the PDF file are
described in the following table.
Name of handout Description of master
Prepare these masters before using KeyWords on NEOs:
Posture and Wrist Placement This master shows a drawing of a
student seated properly with good wrist
and hand position. Use it to create an
overhead transparency or a reference
handout for students.
Key Strike This master shows close-up sketches of
correct finger strike positions. Use it to
create an overhead transparency or a
student handout.
Finger Zones This master illustrates the keyboard
divided into zones. A graphic shows the
fingers that correspond to the zones on
the keyboard on each hand.
Home Row Keys This master shows Home Row positions
for the left and right hands. Use this
master as a handout or a poster.
Use these masters while working with KeyWords on NEOs:
Finger Placement for Lesson 1: Start
Here!
This master illustrates the right and left
hands with fingers labeled, and shows
those fingers in their home row
positions. It also illustrates the finger
reach to the enter key and the use of the
thumb to strike the space bar. Use it to
create handouts or posters.
Finger Placement for Lessons 2 through
16
These masters illustrate finger
placement and reaches useful for
student reference as they learn each
level. Use the masters to create a
handout for each lesson.
Progress Report Use this master to create hardcopy
reports for students to fill in so they can
track their progress or hand in progress
reports. This is the same information
kept by the NEO in the students’
records.

KEYWORDS
KeyWords Resources for Teachers
5-47
. . . . .
Keyboarding ergonomics
Teaching students about proper posture and physical setup can help them
prevent health problems caused by typing.
Keep the following tips for wrists and hands in mind:
• Keep wrists aligned, straight, and level. (See the illustrations below.)
• Position chairs so students do not stretch to reach keys.
• Wrists should not rest on anything.
• Take periodic rest breaks.
Follow these guidelines to properly adjust equipment and posture:
• The keyboard should be just below elbow height so the elbows are bent at a
90° angle.
• The chair should adjust so it can fit the various sizes and shapes of your
students.
Use these masters as supplemental materials to KeyWords lessons on NEOs:
Sustained Practice for All Keys These masters contain additional
practice exercises for each lesson.
Students can do the exercises by typing
in AlphaWord Plus. Use these lesson-
appropriate practice sheets as students
pass each lesson.
Congratulations Certificate Use this master to create certificates to
reward students as they pass each
KeyWords lesson.
Name of handout Description of master
Correct hand and wrist position Incorrect hand and wrist position

KEYWORDS
KeyWords Resources for Teachers
5-48
. . . . .
• Forearms and thighs should be parallel to the floor when the student is
seated at the computer.
• Feet should be flat or placed on a tilted footrest.
• Position devices so that light does not reflect off the screen. Light reflecting
off the screen can cause eyestrain and frustration.
Sample lesson plan for getting started
This sample lesson plan teaches basic keyboarding information. You should
present this lesson to students at the beginning of keyboarding instruction.
Students learn
• Correct typing posture
•Correct wrist placement
•Home row keys
• How to strike keys
•How to strike space bar
•How to strike enter
Preparation
Prepare the following overhead transparencies from the masters in the
KeyWords SmartApplet Master.pdf file:
• Posture and Wrist Placement
•Key Strike
•Finger Zones
•Home Row Keys
Teaching the lesson
Explain to students that there are several basic practices that promote
successful keyboarding. These practices include sitting with the proper
posture, holding the wrists properly, striking the keys correctly, and returning
the fingers to the home row keys. The following steps guide you through the
lesson.

KEYWORDS
Lessons in KeyWords
5-49
. . . . .
1. Use the Posture and Wrist Placement overhead transparency to show the
correct typing posture and wrist placement. Have students sit at their
desks with their NEOs and demonstrate the correct posture and wrist
placement. Monitor students, helping them make needed adjustments.
2. Use the Key Strike overhead transparency to explain how to strike the
keys. Have students demonstrate and practice striking the keys.
(Students can use AlphaWord Plus on their NEOs to practice striking
keys.) Monitor students, helping them make needed adjustments.
3. Use the Home Row Keys overhead transparency to show the home row
keys. Have students place their fingers on the home row keys and
practice typing a s d f and then j k l ;. Repeat several times until students
can strike the home row keys correctly.
4. Use the Finger Zones overhead transparency to show students the
keyboard zones for each finger. Have students practice striking another
key with one finger and then returning that finger to the home row key.
Practice with several fingers. Monitor students, helping them make
needed adjustments.
5. Show students how to strike enter and space bar. The right little finger
strikes enter and then returns to the home row key. Either thumb is used
to strike space bar. Have students practice striking enter and space
bar and returning to the correct home row key. Monitor students, helping
them make needed adjustments.
6. Explain to students that enter moves the cursor to the beginning of the
next line and that space bar inserts a space between words.
7. Review the basics of sitting properly, using correct wrist placement,
striking the keys, and always returning to the home row keys.
Lessons in KeyWords
The following tables list the lessons provided in KeyWords. Each table shows
the keys introduced in the lesson, the words and word patterns learned, and
the passing criteria for testing (based on the default goals—see page 5-13).
Lesson 1: Start Here!
Keys introduced none
Words learned none
Patterns none
Passing criteria 0 WPM 0 errors

KEYWORDS
Lessons in KeyWords
5-50
. . . . .
Lesson 2: ASKL
Keys introduced A S K L
Words learned all
alas
as ask lass
Patterns sl
ll
alk as ask
Passing criteria 8 WPM 12 errors
Lesson 3: DJF
Keys introduced D J F
Words learned add
lad
jad
dad
salad
jasks
fall
flask
sad
jalls
Patterns fl ad s (plural)
Passing criteria 10 WPM 12 errors
Lesson 4: TH
Keys introduced T H
Words learned sat
that
ash
hash
hall
salt
flat
has
flash
sash
tall
half
hat
fast
slash
talk
shall
slat
last
dash
stalk
stall
Patterns th
st
alt
at
ast
ash
sh
Passing criteria 12 WPM 12 errors

KEYWORDS
Lessons in KeyWords
5-51
. . . . .
Lesson 5: GO
Keys introduced G O
Words learned dog
jog
shook
lag
lot
sold
of
soot
oat
load
stood
hog
look
hag
got
old
fold
off
tooth
goat
ghost
flood
fog
took
sag
shot
told
soft
stool
toast
float
good
log
hook
shag
hot
gold
aloft
fool
toad
soak
hood
Patterns ood
og
ost
gh
old
ot
oad
ook
ool
ag
oa
oat
oast
Passing criteria 14 WPM 10 errors
Lesson 6: EI
Keys introduced E I
Words learned eat
tea
geese
the
solid
gate
kite
slide
high
seaside
shoes
seal
eel
goose
these
tie
skate
ashes
silk
tight
steak
headlight
flea
feel
loose
did
lake
jade
flashes
jog
light
fish
eagle
feed
lose
lid
fake
like
glide
sigh
flight
elfish

KEYWORDS
Lessons in KeyWords
5-52
. . . . .
Patterns ee
ed
ie
ide
oe
ea
ake
ish
ilk
es
ade
ike
igh
se
id
ite
ight
Passing criteria 16 WPM 10 errors
Lesson 7: PR
Keys introduced P R
Words learned hop
slop
fear
deer
red
tried
are
dark
ill
thrill
girl
reddish
pillar
prettiest
refrigerator
stop
ear
pear
free
fled
tar
large
lark
shrill
dope
radishes
apples
fairies
sorriest
shop
hear
eager
tree
tire
jar
ark
spark
starfish
rope
soap
roses
parrot
alligator
flop
dear
read
see
fire
hard
park
star
earth
hope
horse
spider
strolled
Patterns op
re
ark
oll
str
ear
ee
ope
ir
er
ar
iest
thr
es
ard
or
shr
Passing criteria 16 WPM 10 errors
Lesson 6: EI

KEYWORDS
Lessons in KeyWords
5-53
. . . . .
Lesson 8: QU
Keys introduced Q U
Words learned rug
hour
out
soup
flush
pure
quiet
quail
quip
said
hug
four
shout
gush
trust
suds
quake
quarter
squirt
heartful
jug
pour
loud
hush
judge
three
quilt
quart
spirit
stutter
our
flour
house
just
fudge
quit
quote
equip
dollar
sputter
Patterns ug
ush
ou
ust
out
udge
ouse
qu
Passing criteria 16 WPM 8 errors
Lesson 9: WY
Keys introduced W Y
Words learned day
play
why
flowers
washed
write
hurry
try
playful
whole
pillow
yaks
laws
story
way
stay
where
yellow
owls
you
followed
away
joyful
flow
plow
hoot
furry
slowly
Patterns ay
ory
wr
ow
urry
wh
aw
ly
wh
Passing criteria 18 WPM 8 errors

KEYWORDS
Lessons in KeyWords
5-54
. . . . .
Lesson 10: Z?
Keys introduced Z ?
Words learned zip
zigzag
gazes
jazz
zipper
sizzle
drizzle
zesty
pizazz
puzzles
zero
zeal
Zeus
lazy
Patterns azz
zz
uz
zi
ze izz
Passing criteria 16 WPM 8 errors
Lesson 11: X.
Keys introduced X .
Words learned expert
express
apex
tax
paradox
explode
relax
explore
ox
exasperate
extra
reflex
prefix
fox
exit
exhale
wax
duplex
Patterns ex
pre
ox ax re
Passing criteria 18 WPM 8 errors

KEYWORDS
Lessons in KeyWords
5-55
. . . . .
Lesson 12: C,
Keys introduced C ,
Words learned ace
circles
chick
cupcake
quack
could
deck
chocolate
face
sticky
peck
cheetahs
call
carrot
crawls
race
quick
chew
duck
cows
exactly
cards
circus
pick
juice
Chuck
careless
clothes
choose
Patterns ace
uck
circ
uice
eck
ch
ick
cr
Passing criteria 20 WPM 8 errors
Lesson 13: MV
Keys introduced M V
Words learned love
grove
give
very
caramel
scratch
pilgrim
might
dove
am
arrive
avoid
muddy
pimples
shrimp
church
glove
my
thrive
swerve
comics
rimful
limp
move
five
alive
wave
slime
whim
mild
Patterns ove
im
ive
ime
av ve
Passing criteria 22 WPM 8 errors

KEYWORDS
Lessons in KeyWords
5-56
. . . . .
Lesson 14: NB
Keys introduced N B
Words learned big
job
wobbles
beach
balloons
subway
extinction
bit
cob
singing
brown
blossom
caution
nibble
hobby
dancing
building
bouquet
explosion
rabbit
blue
bang
brave
barley
motion
Patterns ob
ld
in
ub
bb
ion
br
bbl
sion
bl
by
Passing criteria 22 WPM 8 errors
Lesson 15: " ' !
Keys introduced " ' !
Passing criteria 14 WPM 8 errors
Lesson 16: Numbers
Keys introduced 1 2 3 4 5 6 7 8 9 0
Passing criteria 14 WPM 6 errors

KEYWORDS
Frequently Asked Questions
5-57
. . . . .
Frequently Asked Questions
Why can’t I use the backspace key when using KeyWords?
Backspace is disabled because keyboarding research shows that students
need to learn the patterns of keystrokes uninterrupted by immediate
corrections. Disabling backspace benefits students because they can
concentrate on speed, not on correcting errors.
Why is there so much repetition of words in the practice passages?
Research has shown that speed and confidence increase more readily if
simple words are used and are repeated often. KeyWords offsets the
repetition by providing text with humor, poetry, and rhythmic chants.
Why are the passages so easy?
Easy practice material develops speed and typing fluency more effectively,
giving the student a feeling of confidence and a sense of success. Though the
passages are easy, they provide practice in all the needed key patterns.
Why is the sequence of key introduction so different from what I am used to
in other typing programs?
Many other typing programs are based on 1950s typing instruction.
KeyWords designers sensed the need for a more language-based program,
one that reinforces the development of a reading and writing vocabulary as it
teaches typing.
The content of the passages is based on word list analysis. High frequency
words that help develop reading and writing vocabulary and spelling skills
were chosen for the practice material. KeyWords maximizes kinesthetic and
linguistic patterns, which is why it is the most efficient and enjoyable way to
learn to touch-type.
Why do the students learn the ASKL keys first?
Two design principles distinguish KeyWords from all other keyboarding
programs: the application of kinesthetic (tactile, sensory) patterning and the
application of linguistic (language) patterns in all skill-building activities.
When students are learning the home row keys in the first lesson, they type
as. Students are typing enough on the left side of the home row keys to ensure
that their fingers are where they belong. Students are also using two fingers

KEYWORDS
Frequently Asked Questions
5-58
. . . . .
that are next to each other to press two keys that are next to each other in a
left-to-right motion; this is a kinesthetic pattern. The action results in a word,
as, which is also part of many other words, like fast; so as is also a linguistic
pattern. Learning the kinesthetic pattern generates a linguistic pattern.
On the right side of the home row keys, there are no little words to teach.
However, if a student types as on the left side and then adds a k, the student
has typed ask: All flowing left to right—a kinesthetic pattern—and all forming
a word—a linguistic pattern. Similarly, by typing all, the student is introduced
to the second right side home row letter in a fully patterned manner.
Students learn the ASKL keys first because these letters are part of the home
row and they can be combined to form words. When new letters are added,
they are incorporated within kinesthetic and linguistic patterns. Such
patterning makes learning to touch-type very efficient and enjoyable.
What is the rationale for how the practice passages are sequenced?
Practice passages adhere to two important principles:
• Patterned words are repeated enough times to build up a rhythm and
fluency that then transfers to typing the word within a phrase or sentence
where it is not repeated.
• Passages progress from simpler to more complex phrase and sentence
patterns.
When the phrase and sentence patterning combines with the linguistic
patterning, student typing develops in an almost effortless manner.
Why aren't my test scores updated when I retake an accuracy and speed
builder test in KeyWords?
After you take an accuracy and speed builder test for the first time, the results
of the test are logged automatically. The only way to replace a logged score is
to get a higher word-per-minute score. Fewer errors do not constitute an
improvement that causes the score to update; an improved word-per-minute
score is required.

6-1
B
EAMER
Beamer is a SmartApplet that lets NEO send text wirelessly to and from
another NEO, a Dana, or a Palm OS device. Beamer uses IrDA technology to
transfer information in seconds, without the use of cables, cords, or networks.
The Beamer SmartApplet is installed on your NEO when you receive it.
Starting Beamer
Follow these steps to start the Beamer SmartApplet:
1. Press on/off to start your NEO, then press applets. The SmartApplets
menu appears.
2. Press ↓ to scroll down until your cursor is next to Beamer. Then, press
enter.
Beaming between NEOs
Beaming from a NEO to a Palm OS device
Beaming from a Dana to a NEO
If Beamer is not
installed on your
NEO, see page 1-2 to
install it.
BEAMER
Finding the Infrared Ports
6-2
. . . . .
Finding the Infrared Ports
Beamer can be used with devices that have infrared capabilities. Before you
begin, locate the infrared port on each device you’ll be using. On NEO, the
port is in the middle of the back of the device as shown below.
You’ll need to know where the port is on each device you’re using so that you
can point the ports at each other when you beam.
On Palm OS devices such as the Dana, the port may be located along the side
or top. Consult the documentation that accompanied your product for more
information.
Beamer and the NEO Clipboard
Beamer uses the clipboard to receive data before placing it into a SmartApplet
such as AlphaWord Plus. If you already have data in the clipboard, Beamer
will warn you before receiving a beam. This gives you a chance to save the
data on the clipboard in another file before you agree to receive the beam.
For example, text that you have copied from AlphaWord Plus may be in the
clipboard, and you may not have copied it into another file yet. The warning
gives you the chance to do this before overwriting the clipboard with the
beamed information.
If you’re beaming frequently, you might not want to be warned about
clipboard data each time. In this case, you would turn this setting off in the
Beamer settings (see page 6-12).
BEAMER
Beaming from One NEO to Another
6-3
. . . . .
Beaming from One NEO to Another
You can beam AlphaWord or AlphaWord Plus files between two AlphaSmart
devices as long as both devices have infrared ports and are within three feet of
each other. You can send the files from NEO to NEO, NEO to AS3000, or
AS3000 to NEO.
Follow the steps below to beam an AlphaWord or AlphaWord Plus file
between NEOs. Note: If you are working in AlphaWord Plus, you can beam a
file without leaving it; see page 6-6.
On the sending device:
1. Make sure you know which AlphaWord or AlphaWord Plus file contains
the data you want to send.
2. Turn on the NEO by pressing on/off.
3. Press applets to view the SmartApplets menu.
4. Press ↓ to scroll down and move the cursor next to Beamer in the list;
then, press enter. The Beamer screen appears.
5. On the device from which you want to beam, move the cursor next to
Send and press enter. (If Send is not available, the Beamer settings have
been changed so that beaming is not allowed; see page 6-12.)
After you choose Send, files that contain data appear in a list.
6. Select the file you want to send by doing one of the following:
•Using the arrow keys, scroll through the list of files to move the cursor
next to the one you want; then, press enter.
•Press the appropriate file # key along the top of the keyboard on the
device.
Select a Beaming function:
- Send
- Receive
- Settings
Select the file you want to send:
- File 1 (274 bytes)
- File 2 (992 bytes)
L File 6 (1433 bytes)
Make sure you have
used AlphaWord
Plus at least once on
the device that will be
receiving the beam. This
initializes the program.
If you choose a file
that is protected by
an individual
password, you will be asked
to enter that password before
you can send the file. You can
enter the file password or the
master password. For more
on password protection, see
page 4-4.
BEAMER
Beaming from One NEO to Another
6-4
. . . . .
7. Make sure the receiving device is turned on, that it is within three feet of
the beaming device, that it is ready to receive, and that both devices have
their infrared ports pointing at each other.
8. Beam the file by pressing send on the beaming device. Beamer starts
beaming the file to the receiving device.
On the receiving device:
1. Turn on the NEO by pressing on/off.
2. Press applets to view the SmartApplets menu.
3. Press ↓ to scroll down and move the cursor next to Beamer in the list;
then, press enter. The Beamer screen appears.
4. On the receiving device, move the cursor next to Receive and press
enter.
5. If the receiving device contains data on the clipboard, the following screen
appears:
If there’s no data on the clipboard, or if device hasn’t been set to warn
about overwriting the clipboard (see “Beamer and the NEO Clipboard” on
page 6-2), the following screen appears:
Select a Beaming function:
- Send
- Receive
- Settings
There is data currently on the
clipboard. Press the enter key to
overwrite the data.
(Press esc key to cancel)
Ready to receive a file.
(Press esc key to cancel)
BEAMER
Beaming from One NEO to Another
6-5
. . . . .
6. Do one of the following to receive the file:
•Press enter if your AlphaSmart device displayed the clipboard
warning and you want to overwrite the data.
•Press esc to cancel receiving the beam.
•If your AlphaSmart device didn’t display a clipboard warning, go on to
step 7.
7. Select a file where you want to store the beamed file, either by scrolling
the list and pressing enter, or by pressing one of the file # keys along the
top of the keyboard.
If you’re in AlphaWord Plus, you can save to named files that aren’t in
workspaces, or save to a new file. If you choose either of these options,
when you start AlphaWord Plus on the receiving device, you’ll have to
open the file yourself. (AlphaWord Plus automatically opens a beamed file
if it’s stored in a workspace.)
8. If the file you selected was empty, Beamer places the beamed file in the
empty file.
If the file wasn’t empty, choose to overwrite the existing file or to append
the new file to it.
The beamed data should now be in the file you specified on the receiving
device. To view it, press applets and select AlphaWord Plus. AlphaWord
Plus automatically opens the file it received.
Select a file to store the data to:
- File 1 (27 bytes)
- File 2 (667 bytes)
L File 3 (empty)
File x is not empty. Choose one:
- Overwrite the file?
- Append to the file?
(Press esc key to exit)
If you choose a file
that is protected by
an individual
password, you will be asked
to enter that password before
you can receive text into the
file. You can enter the
password for the file or the
master password. For more
on password protection, see
page 4-4.

BEAMER
Beaming AlphaWord Plus files between devices
6-6
. . . . .
Beaming AlphaWord Plus files between devices
If you are working in AlphaWord Plus, you can beam a file without leaving the
program. Both devices must have AlphaWord Plus installed. Follow these
steps to beam a file within AlphaWord Plus:
1. On the sending device, start AlphaWord Plus and go to the file you want
to send.
2. On the receiving device, start AlphaWord Plus and go to the file # that will
receive the data.
3. Place the devices within three feet of each other and align their infrared
ports.
4. On the sending device, press ctrl-send.
5. On the receiving device, press ctrl-B.
6. If the file was empty, the file will be received into it. If the file contained
text, choose whether to overwrite the text or append the new data to the
end of it.
Beaming from a NEO to a Palm OS Device
You can beam AlphaWord Plus files to Palm OS devices, such as Dana or
Dana Wireless by AlphaSmart or typical hand-held Palm OS devices.
You can beam to AlphaWord on Dana or Dana Wireless, or you can beam
AlphaWord files to the Memo Pad program. Before following the step
below, use the Beamer settings to set whether the file will be sent
as an AlphaWord file or a Memo Pad file. See page 6-12.
To beam between a NEO and a Palm OS device, both devices must have
infrared ports and be within three feet of each other.
Follow the steps below to beam an AlphaWord file to a Palm OS device.
On the NEO (the sending device):
1. Make sure you know which AlphaWord file contains the data you want to
send.
2. Turn on both the NEO and the Palm OS device.
3. On the NEO, press applets to view the SmartApplets menu.
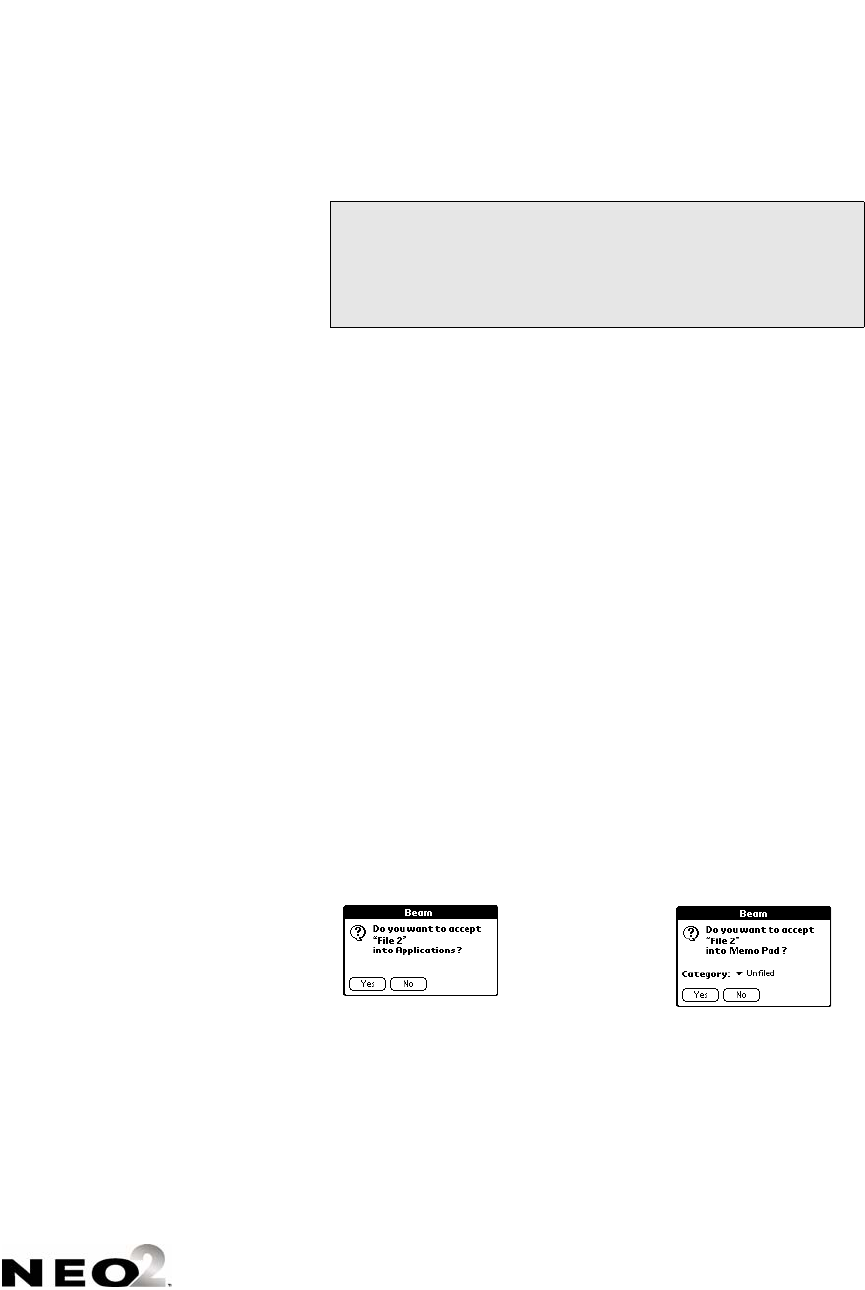
BEAMER
Beaming from a NEO to a Palm OS Device
6-7
. . . . .
4. Press ↓ to scroll down and move the cursor next to Beamer in the list;
then, press enter. The Beamer screen appears.
5. Move the cursor next to Send and press enter. Files that contain data
appear in a list.
6. Select the file you want to send by doing one of the following:
•Using the arrow keys, scroll the list of files to select the one you want,
then press enter.
•Press the appropriate file # key along the top of the keyboard on the
device.
7. Make sure the Palm OS device is turned on, that it is within three feet of
the NEO, and that both devices have their infrared ports pointing at each
other.
8. On the NEO, press send to start beaming. Beamer begins beaming the
file to the Palm OS device.
On the Palm OS Device (Dana, Dana Wireless, or a
Handheld Device):
To receive the beamed file on your Palm OS device:
1. Make sure your Palm OS device is turned on and is within three feet of
the NEO, with its infrared port pointing at the NEO’s port.
2. On your Palm OS device, tap Yes in the Beam Status dialog box that
appears.
Select a Beaming function:
- Send
- Receive
- Settings
This message appears when
you beam an AlphaWord file to
a Palm OS device
This message appears when
you beam a Memo Pad file to
a Palm OS device
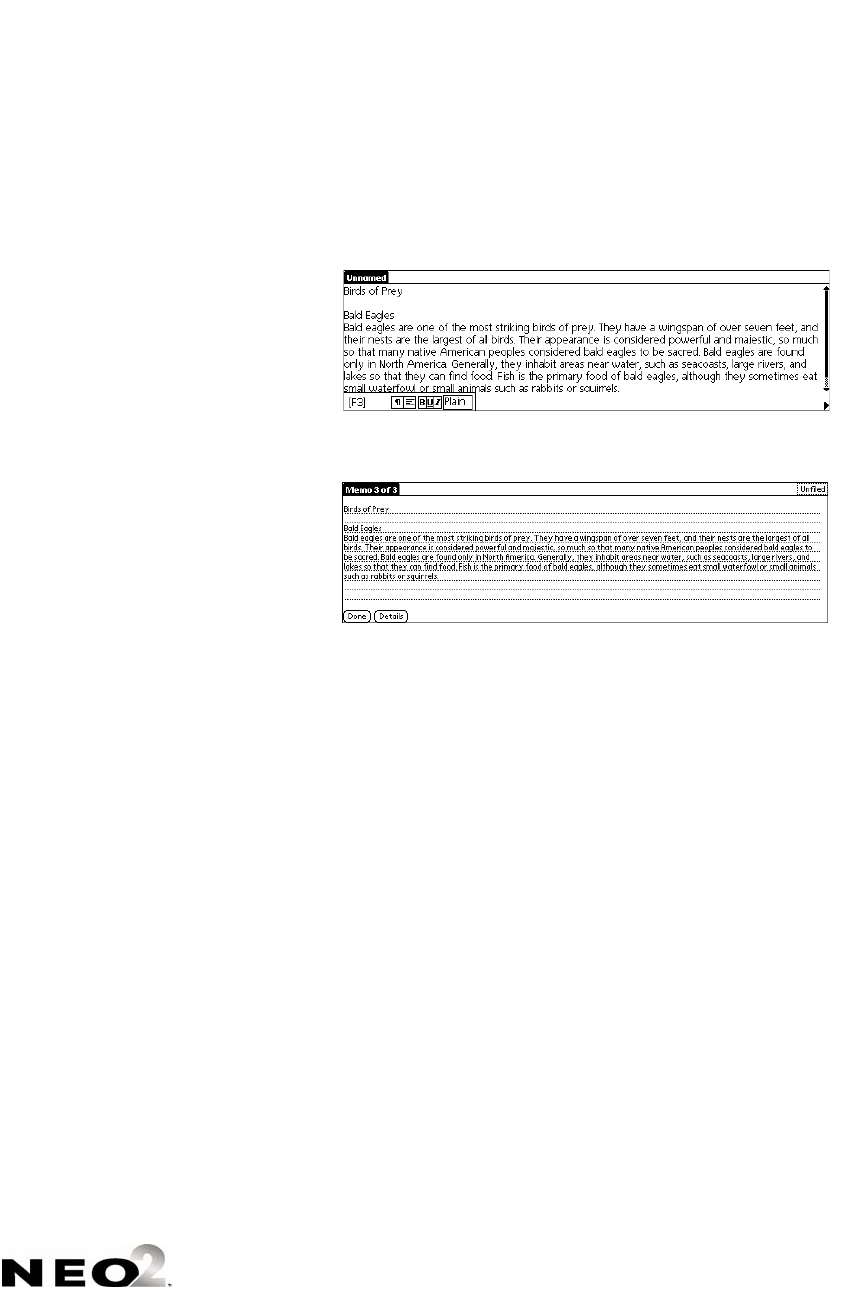
BEAMER
Beaming from a Palm OS device to a NEO
6-8
. . . . .
3. To view the transferred file, do one of the following, depending on the file
format:
•For AlphaWord, tap the Applications Launcher icon, then tap
AlphaWord. Tap the menu icon, then tap to select File > Open. A list
of files appears. Tap the beamed file to open it in AlphaWord.
•For Memo Pad, beaming automatically launches Memo Pad and
displays the transferred file on the screen.
Beaming from a Palm OS device to a NEO
You can beam particular text-based items from Palm OS devices to
AlphaWord Plus on a NEO. The types of items you can beam are based on
industry file formats. If the Palm OS application you want to beam from uses
one of the following file formats, you’ll be able to beam an item from it over to
AlphaWord Plus:
• Note or memo-like items (vNote format), including AlphaWord for Palm
OS devices
• Contact or address items (vCard 3.0)
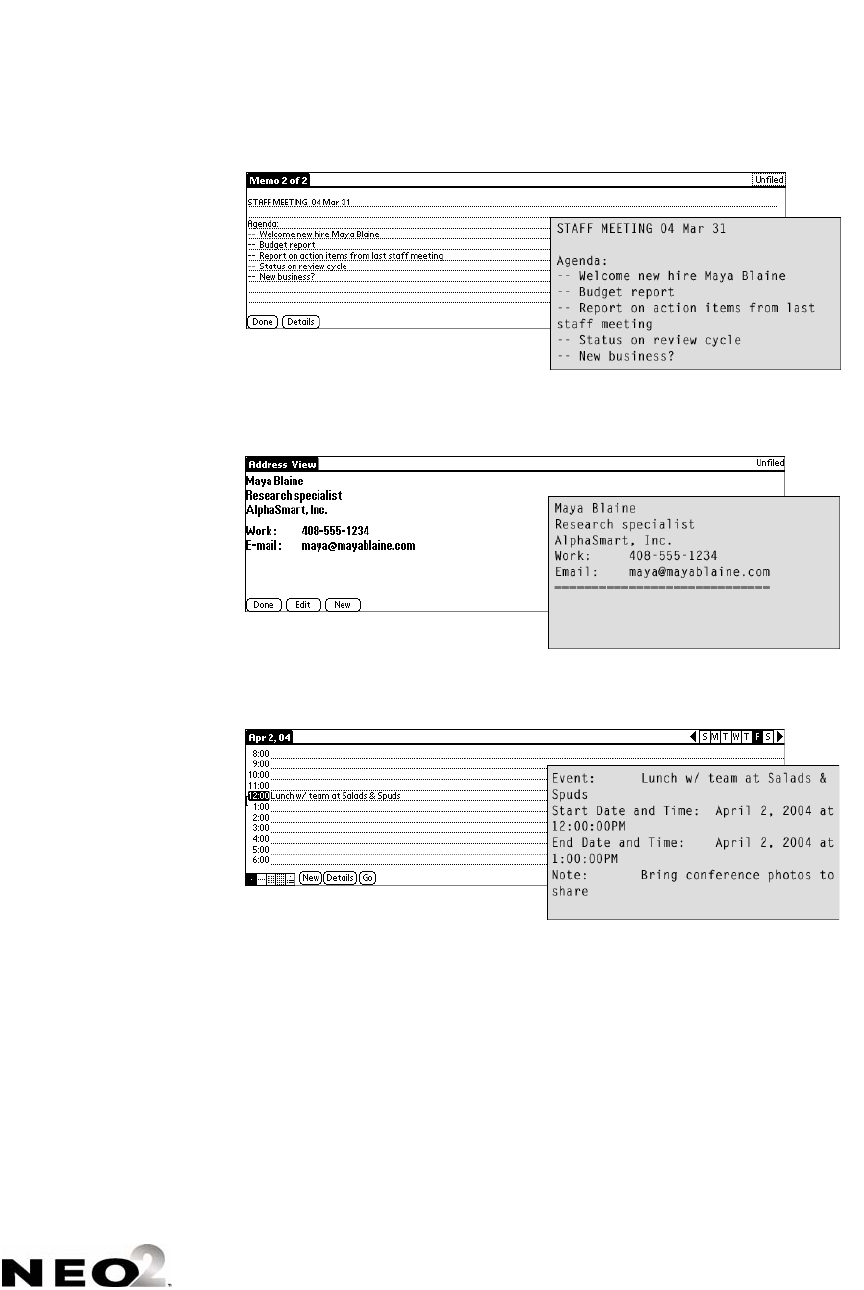
BEAMER
Beaming from a Palm OS device to a NEO
6-9
. . . . .
• Event or date information (vCal 1.0 or iCalendar format)
Important: You should be familiar with how to beam items from your Palm
OS device and its applications. Consult the documentation that came with
your Palm OS device for complete information.
A memo item from a Palm OS device
(Dana) beamed to a NEO
An address item from a Palm OS
device beamed to a NEO
An event item from a Palm OS device
beamed to a NEO
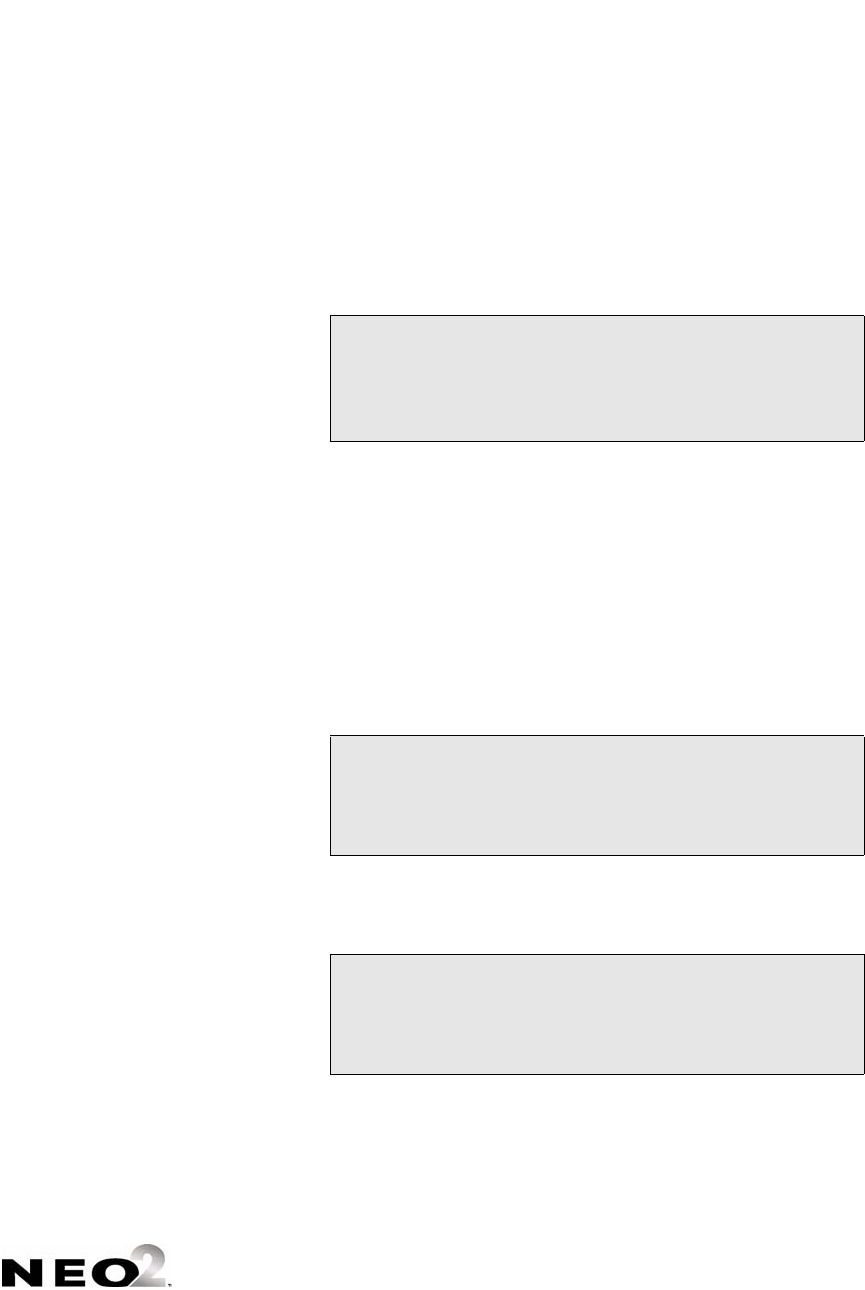
BEAMER
Beaming from a Palm OS device to a NEO
6-10
. . . . .
Follow these steps to beam from a Palm OS device to a NEO:
1. Turn on the Palm OS device and from the Applications Launcher, start the
application that contains the item you want to send.
2. Turn on the NEO, press applets, then press ↓ to scroll down and move
the cursor next to Beamer in the list. Press enter. The Beamer screen
appears.
3. On the NEO, move the cursor next to Receive and press enter.
4. Make sure both devices are within three feet of each other and that the
infrared ports are facing each other.
5. On the Palm OS device, locate the item you want to send, tap the
appropriate area on the screen to activate the menus, and choose the
beaming option you want. The Palm OS device starts beaming the item
you specified.
6. On the NEO, do one of the following, depending on its Beamer settings:
•If the NEO has data on the clipboard, press enter to overwrite the
clipboard, or press esc to cancel receiving the beam.
•If the NEO doesn’t have data on the clipboard, or if the NEO hasn’t
been set to warn about overwriting the clipboard (and you see the
screen pictured here), go on to the next step.
Select a Beaming function:
- Send
- Receive
- Settings
There is data currently on the
clipboard. Press the enter key to
overwrite the data.
(Press esc key to cancel)
Ready to receive a file.
(Press esc key to cancel)
BEAMER
Cancelling a Beam
6-11
. . . . .
7. Using the arrow keys, move the cursor next to the file you want to receive
the data and press enter, or press one of the file # keys along the top of
the NEO.
8. If the file you selected is empty, Beamer places the beamed file in the
empty file.
If the file isn’t empty, choose whether to overwrite the existing file or to
append the new file to it.
The beamed data should now be in the file you specified on the NEO. To
view it, press applets and select AlphaWord Plus, then press the
appropriate file # key. AlphaWord Plus automatically opens the file you
selected to receive the item.
Cancelling a Beam
At any time, from any device, you can press esc to cancel either beaming or
receiving a file.
Select where you want to store the file:
- File 1 (empty)
- File 2 (1437 characters)
L File 3 (empty)
File x is not empty. Choose one:
- Overwrite the file?
- Append to the file?
(Press esc key to exit)
BEAMER
Changing Beamer Settings
6-12
. . . . .
Changing Beamer Settings
The Beamer settings allow you to customize how the program works. You can
change these settings:
• Choose whether to permit the NEO to send
• Choose whether NEO warns you if receiving data will overwrite what’s on
the clipboard
• Choose whether to send to Palm OS devices in AlphaWord or Memo Pad
file format
• Choose whether to require a master password to change Beamer settings
on this NEO
If you’re an individual user using Beamer, you probably won’t need to change
your settings very often. If you’re using several NEOs and Palm OS devices in
a group setting such as a classroom, you might want more control over who
can beam data and how.
Follow these steps to change Beamer settings:
1. On your NEO, press applets.
2. Press ↓ to scroll down and move the cursor next to Beamer in the list;
then, press enter. The Beamer screen appears.
3. Move the cursor next to Settings and press enter.
4. Move the cursor next to the setting you want to change and press enter.
Since each setting has only two options, pressing enter automatically
chooses the option that isn’t currently selected.
For example, if you move the cursor next to “Permit Send: YES” and
press enter, the setting will change to “Permit Send: NO.”
There are four Beamer settings:
•Permit Send determines whether this NEO is allowed to beam to
other devices. You can choose “Yes” or “No.” If you choose “No,” the
Send option is not available on the Beamer screen. This setting is
useful if you don’t want students to beam files to each other.
Select a Beaming function:
- Send
- Receive
- Settings
You can also change
Beamer settings
using AlphaSmart
Manager. Click the Settings
tab and click Beamer in the
list on the left; then, make your
setting changes. Be sure to
send them from the Send List
tab. This is the most efficient
way to change Beamer
settings for several NEOs
connected to your computer in
a SmartOption Cart.

BEAMER
Troubleshooting
6-13
. . . . .
• Warn if overwriting clipboard affects what happens when you are
receiving a file beamed from another device and you already have
something in your NEO clipboard. If this is set to “Yes,” NEO will ask if
you want to overwrite the clipboard before receiving the file.
• Send to Palm device as ALPHAWORD file or MEMO file
determines the format in which AlphaWord Plus files are sent to Palm
devices (such as Dana). You can send files in AlphaWord format or
Memo Pad format. Most Palm OS devices have the Memo Pad
program; AlphaWord is included on Dana and Dana Wireless devices.
• Require master password determines whether the NEO user must
enter a master password after choosing “Settings” in Beamer. If this is
set to No, a password is not required to change the settings. If it is set
to Yes, you must enter the master password after you choose
“Settings.” It is a good idea to require the master password if you have
set Permit Send to “No” so that students can’t beam files to each
other.
Troubleshooting
This chapter contains information about common Beamer issues.
I want to change a setting, but I don’t know the master password.
See the AlphaSmart Manager User Manual for information about changing
the master password.
I don’t see the Send option on my Beamer screen.
If the device has been set to prohibit beaming (see page 6-12), the Send
option won’t appear on the beaming screen.
My NEO says it can’t find a receiving device.
Bring the receiving device closer, make sure the infrared ports are pointing
toward each other, and make sure the receiving device is in the proper mode
to accept a beam. For Palm OS devices, you usually don’t have to do anything.
For NEOs, you have to set up the device so that it’s ready to receive the beam;
see page 6-4.
The master
password can be set
using AlphaSmart
Manager. With your NEO(s)
connected, simply click the
Settings tab, click System on
the left, and scroll down to find
the master password setting.
Then, enter a new password.

BEAMER
Troubleshooting
6-14
. . . . .
I received an error when I tried to beam or receive a file.
You might receive an error if the transfer process was interrupted. There are a
few reasons why this might happen. For example, the person receiving the
beam might have cancelled the transfer before the beam was complete. Or,
users might have moved the devices being used, causing the infrared ports to
move out of alignment before the beam was complete. Try beaming the file
again.
I have data on the clipboard that I don’t want to lose. What should I do?
If you’re about to receive a beam, press esc to cancel receiving it. Then paste
the data in the clipboard into an AlphaWord Plus file. When you’re ready to
receive the beam, press enter to overwrite the data on the clipboard. Be sure
that you don’t select the AlphaWord Plus file where you pasted the data as the
file to receive the beam. Alternatively, you can choose to append the data
rather than overwrite it. (Appending adds the data to the end of the file.)
I keep getting an invalid password message.
If the file you are sending is password-protected, you need to know the exact
individual file password associated with that file in order to beam it. If you are
receiving a file, and your NEO’s files are password-protected, you must know
the exact file password for the receiving file to receive it.
If you don’t know the file password(s), you can enter the master password
instead. You can find out more about file passwords (including disabling
them for a NEO) and master passwords on page 4-4 or in the AlphaSmart
Manager User Manual.
I beamed a file with a password, but now that file doesn’t have a password
on the receiving device.
If the sending device uses file passwords, but the receiving device doesn’t, the
password associated with the file being beamed isn’t sent.
What does the message “could not find a sending device” mean?
It means that Beamer on the NEO is ready to receive a beam from another
device, but it is not sensing any device that is sending anything.

BEAMER
Troubleshooting
6-15
. . . . .
What do I do if the file I’m receiving is too big?
The device receiving the beam will accept as much data as it can and truncate
the file at the point where it can’t receive any more. To work around this, the
person beaming the file should break up the file into separate files and beam
them separately.
My buddy beamed an AlphaWord Plus file to me, but Beamer didn’t let me
choose a file to put it in. It automatically put it in a new file. What
happened?
What likely happened is that AlphaWord Plus on your AlphaSmart device
hadn’t been “initialized,” meaning it hadn’t set itself up yet to receive beamed
files. This can happen if you have a brand new NEO, or if you have a new
installation of AlphaWord Plus on a NEO, and you started Beamer before ever
starting up AlphaWord Plus.
All you need to do to initialize AlphaWord Plus is to start it. Do this before
you use Beamer again, and Beamer should give you the opportunity to choose
a file the next time it’s receiving a file.

BEAMER
Troubleshooting
6-16
. . . . .

7-1
A
LPHA
Q
UIZ
The AlphaQuiz SmartApplet allows students to take quizzes on their NEOs.
You can use the QuizDesigner program on your computer to create the quiz;
then, you can use the QuizManager program to send quizzes to NEOs and
receive and score their answers for automatic grading and reporting.
Quizzes can include true/false, multiple-choice, short answer, and essay
questions.
How AlphaQuiz Works
1. The teacher uses QuizDesigner to create a quiz on his or her computer.
2. The teacher connects the computer to NEOs using one of these methods:
•Connect the computer to a SmartOption Cart so you can send the
quiz to several NEOs at the same time.
•Connect the computer to individual NEOs one by one using a USB
cable.
3. The teacher sends the quiz to the student NEOs using QuizManager.
4. Students take the quiz on their NEOs in the AlphaQuiz SmartApplet.
5. Students connect their NEOs to the SmartOption cart, or they connect
them to the computer one by one using a USB cable.
6. The teacher retrieves quiz responses into his or her computer using
QuizManager, which automatically grades true/false, multiple-choice, and
short answer questions. (Short Answer questions may not be graded
automatically if you didn’t enter answers when you created the quiz.)
7. The teacher grades any questions that were not graded automatically and
enters scores for those questions in QuizManager.
8. The teacher prints a Corrected Quiz Report for each student. The teacher
can also print a Quiz Summary and Statistics Report for his or her own
records.
ALPHAQUIZ
Programs You’ll Use with AlphaQuiz
7-2
. . . . .
Programs You’ll Use with AlphaQuiz
When you use AlphaQuiz, you actually use three programs:
Downloading and Installing QuizDesigner and
QuizManager
The AlphaQuiz SmartApplet comes installed on your NEO, but to create and
send quizzes and retrieve answers, you must download and install the
QuizDesigner and QuizManager on your computer. Follow the steps for your
operating system.
System Requirements for QuizManager and QuizDesigner
Before you download and install these programs, make sure your computer
meets these system requirements:
•Windows computers: Windows 98 (Second Edition) or higher with a
web browser for viewing help.
•Macintosh computers: OS 9.0 or higher with a web browser for viewing
help.
Program Purpose
AlphaQuiz SmartApplet Students use this SmartApplet on the NEO to take the
quizzes that you have created and sent to NEOs.
QuizDesigner Teachers use this program on a computer to create
quizzes that their students can take in AlphaQuiz. You
must download and install this program; see the next
section.
QuizManager Teachers use this program on a computer to send
quizzes to NEOs and to receive student responses for
grading. You must download and install this program;
see the next section.
If AlphaQuiz is not
installed on your
NEO, it may have
been removed by another
user. To install it again, see
page 1-2.
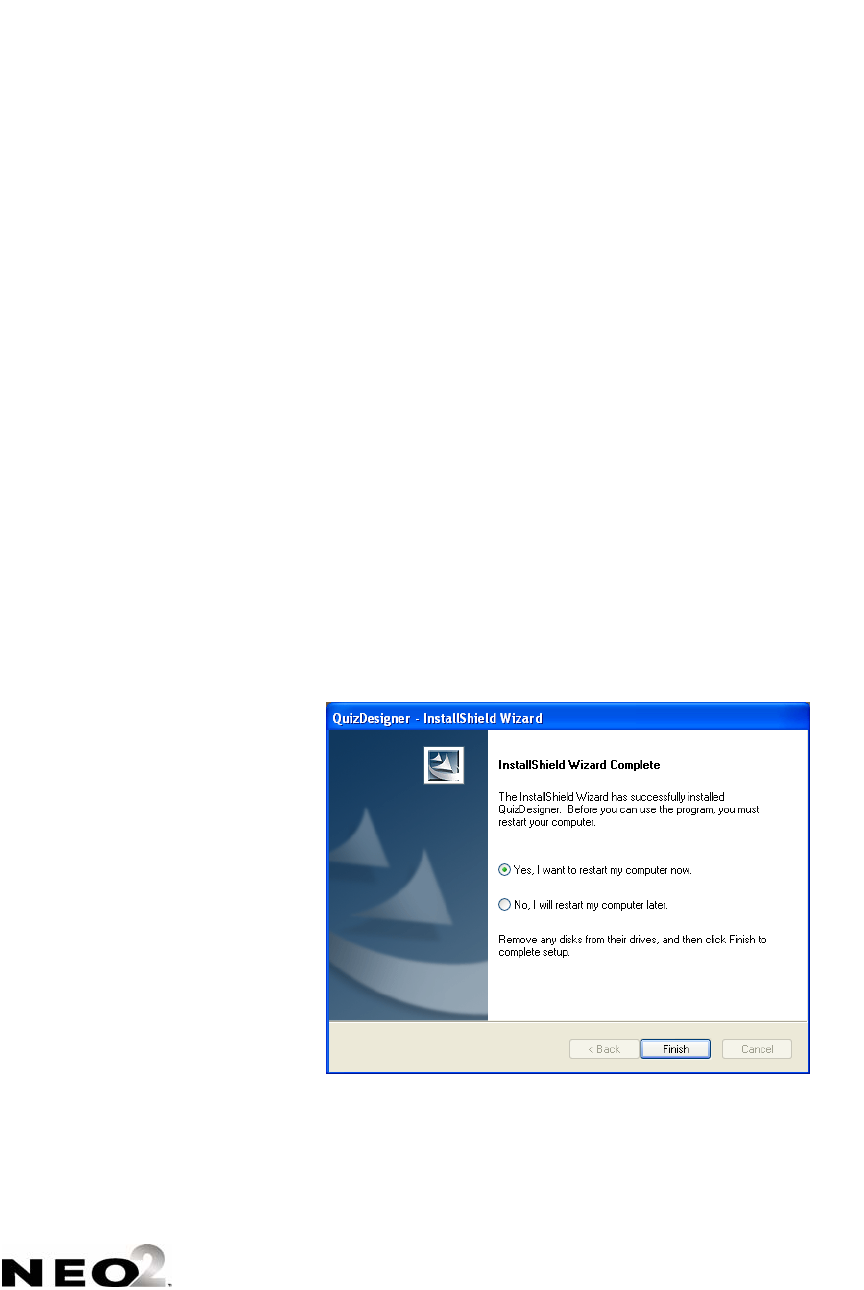
ALPHAQUIZ
Downloading and Installing QuizDesigner and QuizManager
7-3
. . . . .
Windows Instructions for Downloading and Installing QuizDesigner and
QuizManager
1. Go to http://www.alphasmart.com/support/downloads.html.
2. Under the NEO downloads, next to “AlphaQuiz SmartApplet System,”
click PC. If your browser allows you to choose what to do with the file,
choose to save it and choose a common location.
3. Open the .zip file and extract all files. By default, they will be extracted to
a folder called AlphaQuiz3.x.
4. Open the AlphaQuiz folder.
5. Double-click QuizDesigner Setup.exe. After the setup has been
prepared, the QuizDesigner installation Wizard will appear.
6. Click Next in the Welcome panel of the Wizard.
7. Read the license agreement. (If you prefer to read a printed copy, click
Print to print it.) Then, click I accept the terms of the license
agreement and click Next >.
8. After reviewing the installation location, click Next >.
9. Click Install. The program will be installed.
10. The computer needs to be restarted after installation. Decide whether to
restart your computer now or later and click the corresponding option;
then, click Finish.
ALPHAQUIZ
Downloading and Installing QuizDesigner and QuizManager
7-4
. . . . .
11. Now that QuizDesigner is installed, you need to install QuizManager.
Back in the AlphaQuiz3.x folder, double-click QuizManager Setup.exe.
12. When the installation Wizard appears, click Next in the Welcome panel.
13. Read the license. (If you prefer a printed copy, click Print.) Then, click I
accept the terms of the license agreement and click Next.
14. Click Install. The program will be installed.
15. Click one of the restart options. Then, click Finish.
Macintosh Instructions for Downloading and Installing QuizDesigner and
QuizManager
1. Go to http://www.alphasmart.com/support/downloads.html.
2. Under the NEO downloads, next to “AlphaQuiz SmartApplet System,”
click Mac. In most cases, the file will be downloaded to your desktop.
3. The .sit file that you downloaded should be automatically unstuffed into an
AlphaQuiz3.x folder. If it is not unstuffed automatically, double-click the .sit
file to do this.
4. Open the AlphaQuiz3.x folder.
5. Double-click QuizManager Installer first.
6. Click Continue in the QuizManager Installer screen.
7. Read the QuizManager license agreement. (If you prefer to print or save a
copy, click Print or Save As.) Then, click Accept. The program will be
installed.
8. Click Quit when the installation is finished.
9. Double-click QuizDesigner Installer.
10. Click Continue in the QuizDesigner Installer screen.
11. Read the license agreement. (If you prefer to print or save a copy, click
Print or Save As.) Then, click Accept. The program will be installed.
12. Click Quit when the installation is finished.
If you install
QuizDesigner first,
the installer will notify
you that QuizManager is not
installed. You can still install
QuizDesigner, but to avoid
this message, you can install
QuizManager first.

ALPHAQUIZ
Starting QuizDesigner
7-5
. . . . .
Starting QuizDesigner
Once you’ve installed QuizDesigner, you can start the program so that you
can begin creating quizzes.
On Windows Computers:
Click Start or Programs (or All Programs) AlphaSmart
QuizDesigner QuizDesigner.
On Macintosh Computers:
Open the Applications folder, then the QuizDesigner folder. Double-click
QuizDesigner.
About the Options in QuizDesigner
QuizDesigner is the program you use to create the quizzes that students will
take in AlphaQuiz on the NEO. Once you’ve installed QuizDesigner, you can
use it to create or change quizzes and print them as needed.
You can create quizzes on almost any subject, and your quizzes can be short
or long, simple or complex, for students at any level. You can reuse the
quizzes you create for multiple classes, revise them, and share them with
other teachers.
In QuizDesigner, you can create quizzes with these question types:
•True/false
• Multiple-choice
• Short answer (up to 18 characters)
• Essay (with the maximum number of words you set)
You can also place these restrictions on how students use their NEOs during a
quiz:
• Prevent students from using the Calculator SmartApplet.
• Prevent students from using the NEO’s spell check feature.
• Require the use of an access password and student passwords to maintain
test security and to make sure that only assigned students take the quiz.
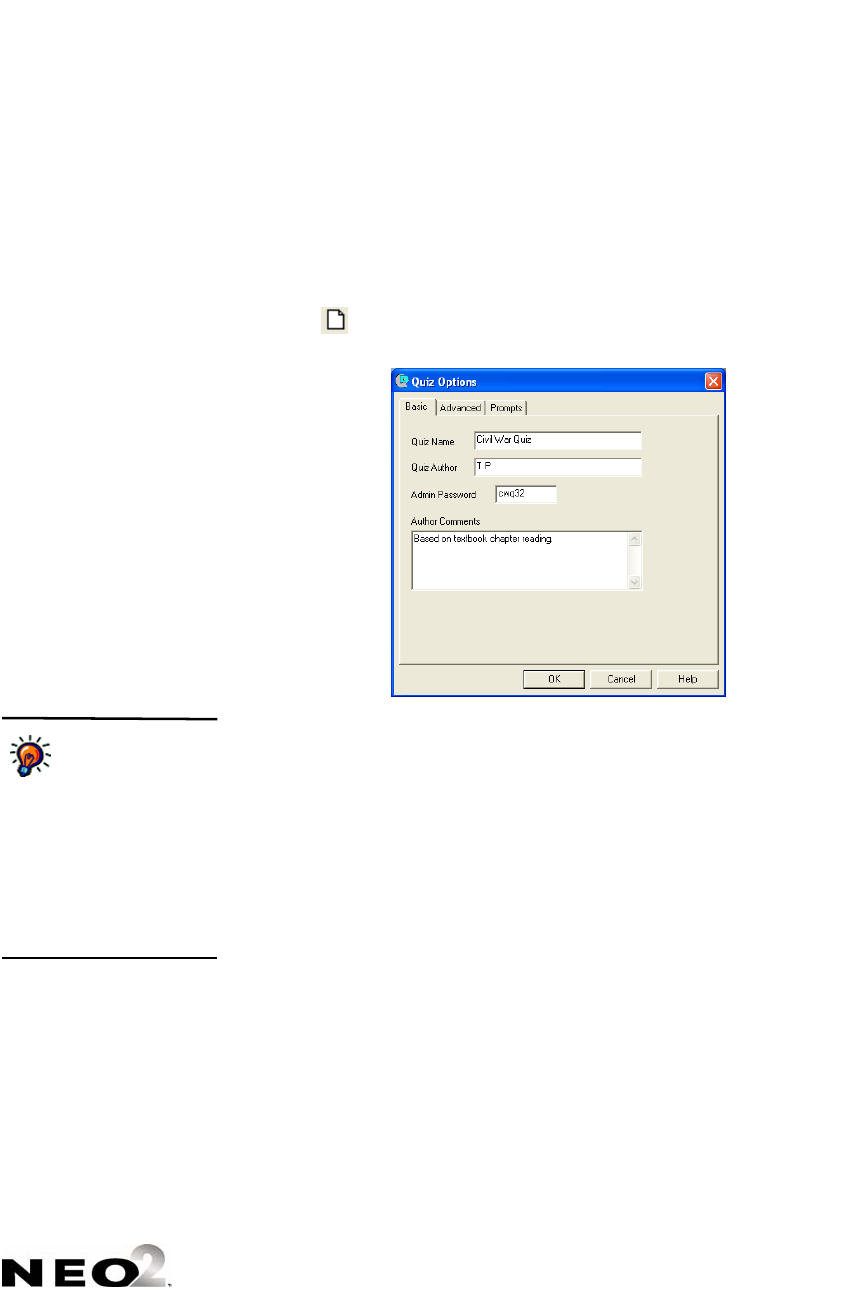
ALPHAQUIZ
Creating Quizzes in QuizDesigner
7-6
. . . . .
Creating Quizzes in QuizDesigner
Follow these steps to create a quiz in QuizDesigner:
1. Start QuizDesigner (see page 7-5). The Quiz Options window will appear
with the Basic tab selected.
Note: If you are already in QuizDesigner and you want to start a new quiz,
click (Windows), or click the File menu and choose New (Windows)
or New Quiz (Macintosh).
2. On the Basic tab A, enter a name for the quiz, the author’s name, a
password for making changes to the quiz (1-6 characters), and any
comments that may be helpful to you. Be sure to choose a quiz name that
will make the quiz easy for students to identify.
A
The Admin
Password for the
quiz helps make the
quiz more secure by
ensuring that only you can
change the quiz or see the
answers. It also prevents
unauthorized removal of a
quiz from a NEO. You can also
substitute this password
during student login.
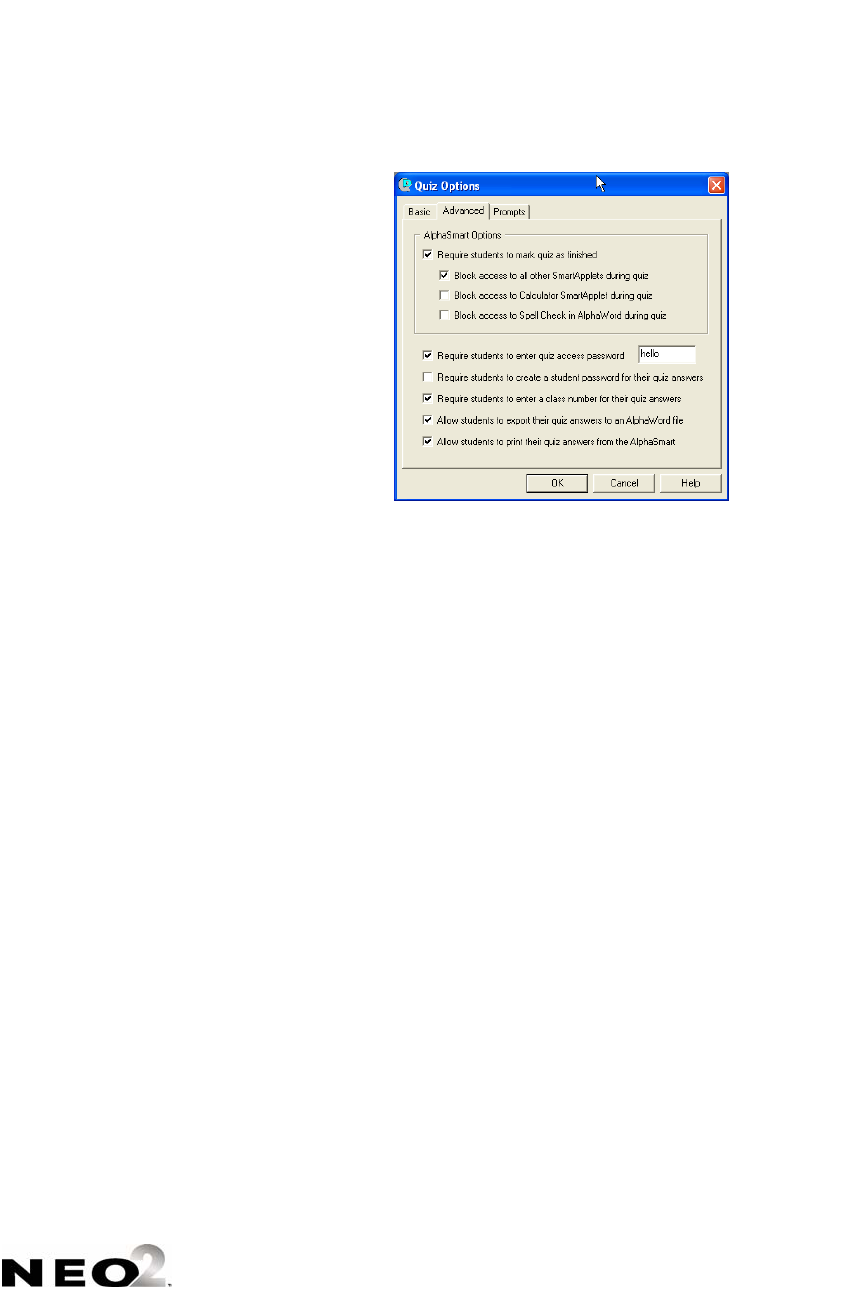
ALPHAQUIZ
Creating Quizzes in QuizDesigner
7-7
. . . . .
3. Click the Advanced tab and make any changes as needed:
B
C
D
E
F
G
H
I
J
BThis prevents students from
using the NEO for other things
until the quiz is finished. It also
prevents students from
changing their answers after
they finish a quiz. The three
boxes below this one are
available only if you check this
box.
CThis prevents students from
using anything other than
AlphaQuiz on the NEO during a
quiz.
DThis prevents students from
using the Calculator on NEO
during a quiz.
EThis prevents students from
using NEO’s spell check feature
during a quiz.
FThis requires students to enter
the password that you specify at
the beginning of a quiz. This
ensures that only authorized
students can take the quiz and
see the questions. The default
password is “hello,” but you
should use a unique password
for each quiz.
GThis requires students to create
their own passwords so that
other students can’t see their
quiz answers.
HThis requires students to enter a
class number so that
QuizManager can group student
responses by class.
IThis lets students send the quiz
to a read-only AlphaWord Plus
file.
JThis lets students print the quiz
questions and answers.
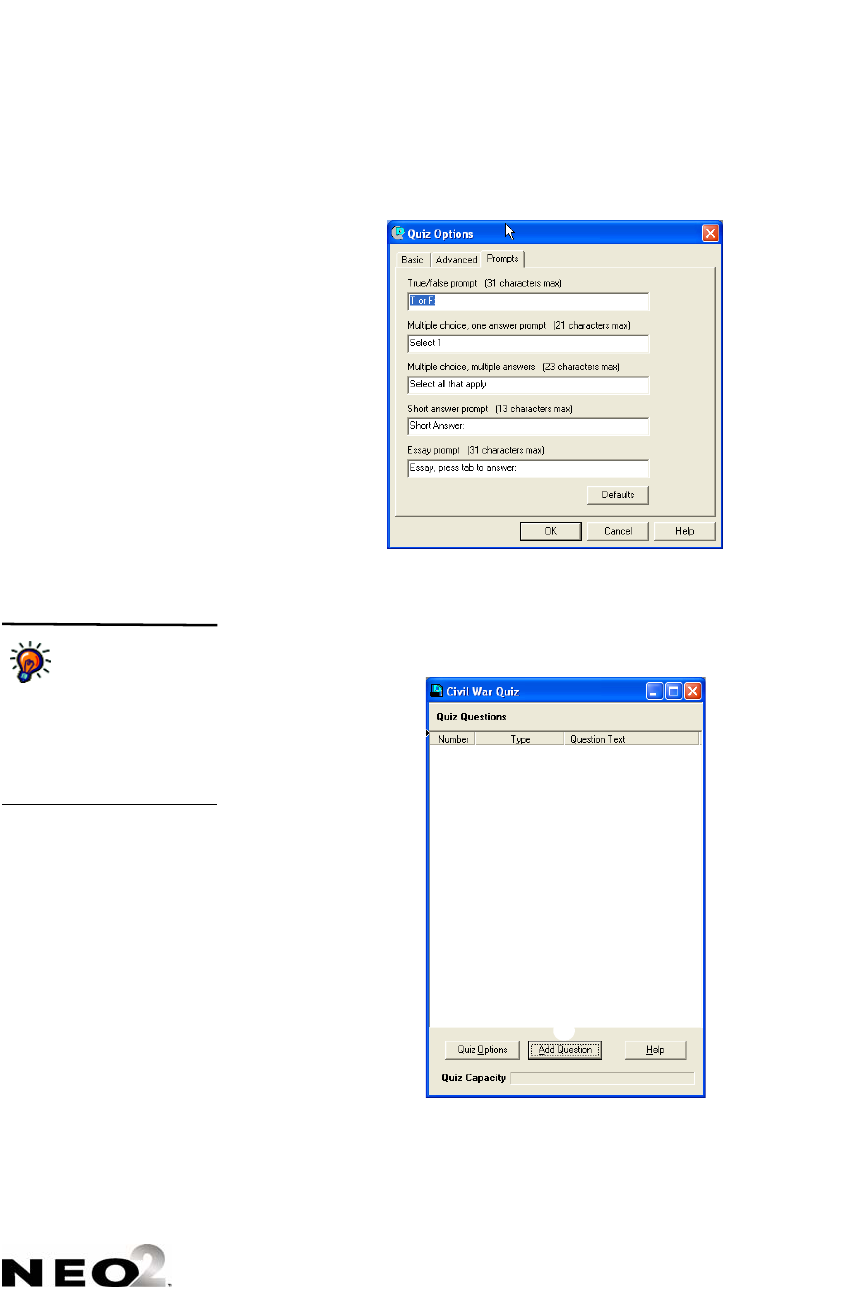
ALPHAQUIZ
Creating Quizzes in QuizDesigner
7-8
. . . . .
4. Click the Prompts tab and make changes to the instructions that appear
on the quiz. You can change the prompt for each type of question, or click
Defaults to go back to the default prompts shown here.
5. Click OK to save the quiz options. (If you decide to change them later, just
click Quiz Options to see the options again.)
6. Next, you’ll see an empty window that has the name of your quiz in the
title bar. Click Add Question C.
On Windows
computers, you can
click the button for
the question type (TF, M, SA,
or E) on the toolbar instead of
clicking Add Question and
then choosing the question
type.
C
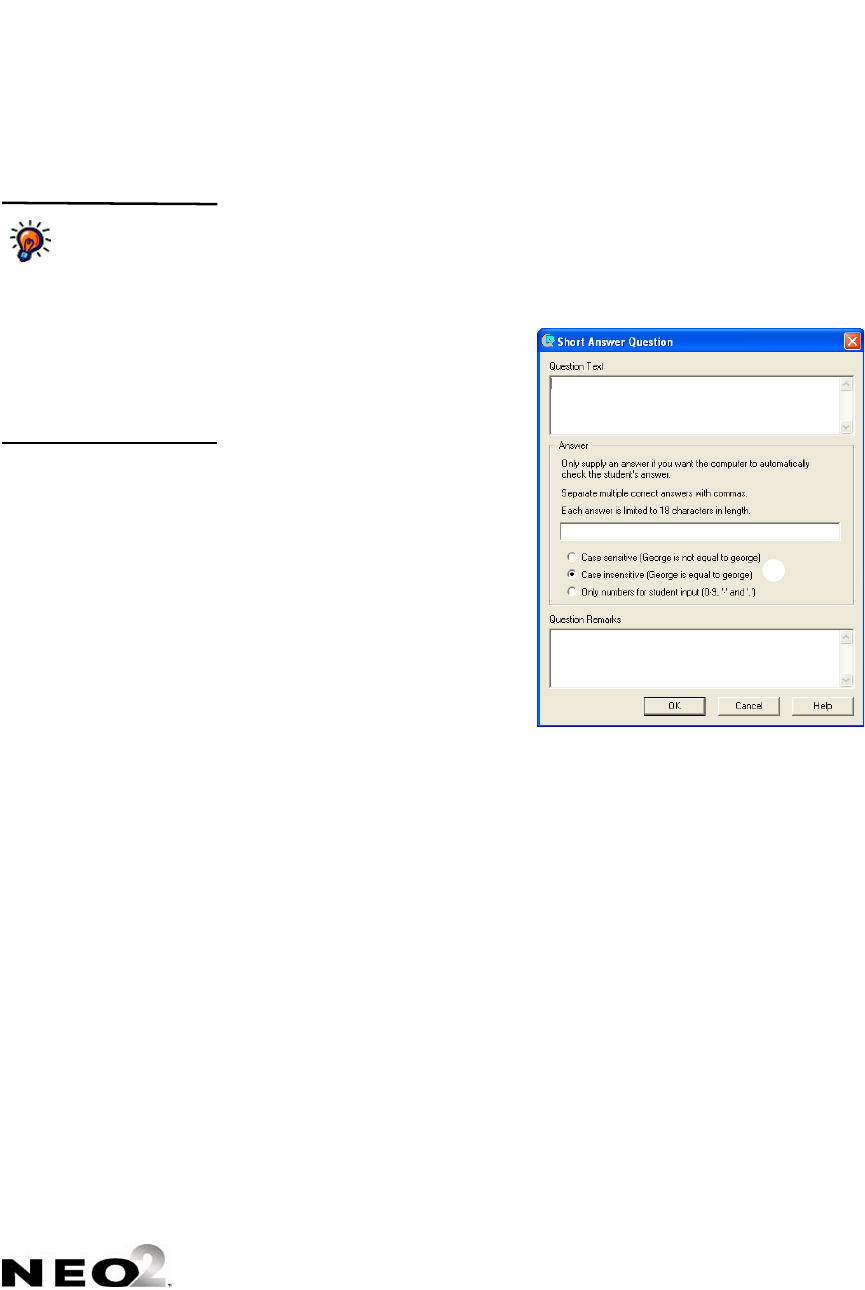
ALPHAQUIZ
Creating Quizzes in QuizDesigner
7-9
. . . . .
7. Click the type of question you want to add and click OK.
8. Enter the required information for the question:
• True/False: Enter the statement, click True or False, and enter any
remarks.
• Multiple Choice: Enter the question and each possible answer, and
check the box next to the correct answer(s). You can also enter
remarks.
•Short Answer: Enter the
question text. If you wish,
you can also enter the
correct answer or answers
so that the computer can
check the student’s answer
against yours D. If there is
more than one correct
answer, separate them with
commas. Each answer can
be up to 18 characters long.
If you enter the correct
answer, be sure to click one
of the options to choose
whether the answers are
case sensitive or whether
you would like to accept
only numbers and a hyphen
in student answers E. (If
you choose “Case sensitive,” student answers must match the case
you used in order to be considered correct.) You can also enter
remarks as needed.
• Essay: Enter the question text, the maximum number of words
allowed, and any remarks.
Remarks aren’t
visible to students
during the quiz. You
can use them for reminders,
comments, or references that
pertain to the question, and
you can include them on
students’ Corrected Quiz
Reports if the information may
be useful to students (see
page 7-43).
D
E
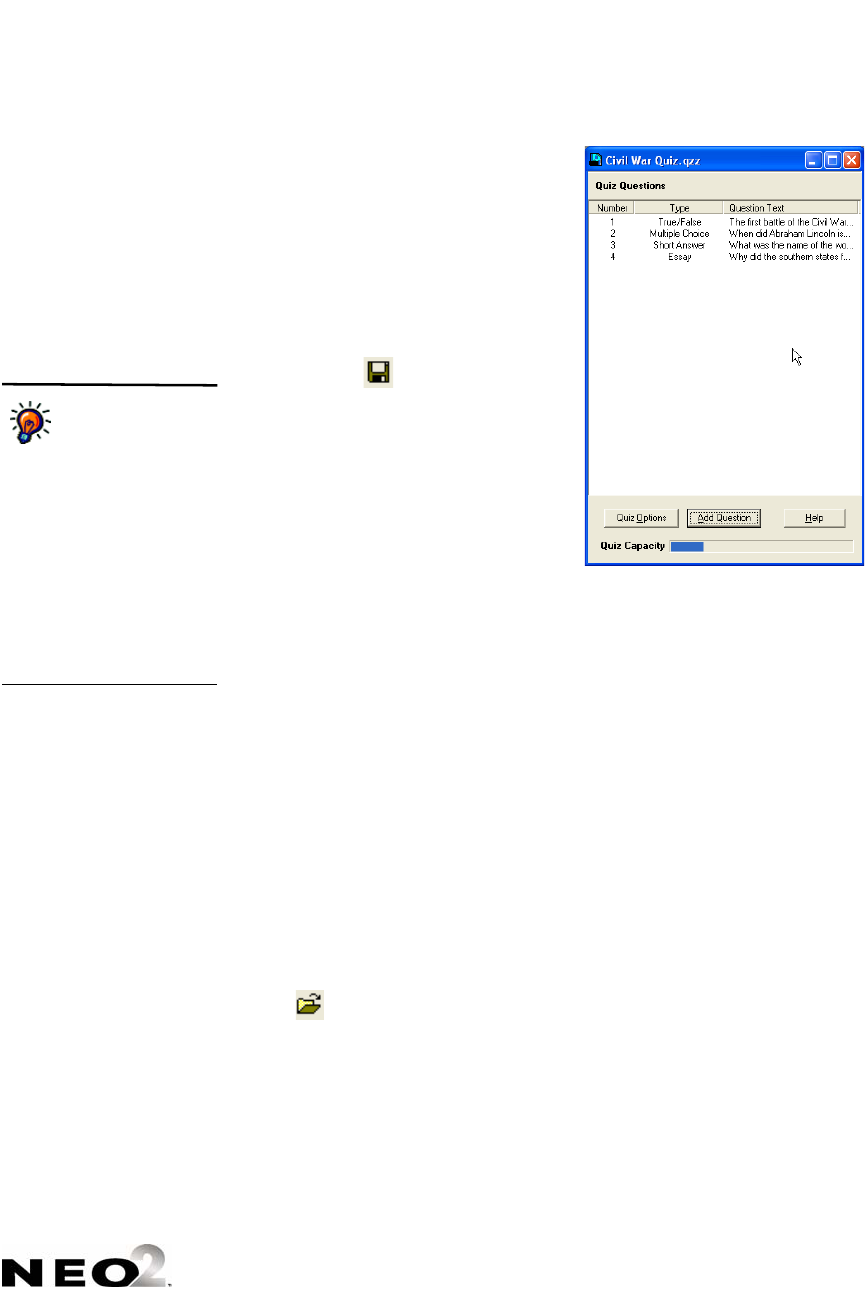
ALPHAQUIZ
Opening and Changing Quizzes in QuizDesigner
7-10
. . . . .
9. Click OK to finish adding the
question. As you add questions,
watch the Quiz Capacity bar at the
bottom of the window F. Since the
file size of each quiz is limited, this
shows how much is still available
based on the questions you’ve
entered so far.
10. When you’ve finished creating the
quiz, click in the toolbar
(Windows) or click the File menu
and choose Save (Windows or
Macintosh). Then, do one of the
following:
•If you haven’t saved the quiz
before, in the dialog box that
appears, choose where to save
the quiz and click Save.
•If you have saved the quiz before, click Save to save the new version.
•If you want to save the quiz under a new name (as a new version),
click Save As, choose where to save the quiz, and click Save.
Opening and Changing Quizzes in QuizDesigner
Once you’ve created and saved a quiz, you can change it at any time. This is
useful when you want to adapt quizzes for different classes.
Opening an Existing Quiz
Follow these steps to open a quiz that you have saved and closed.
Opening Quizzes on Windows Computers
Click in the toolbar or click the File menu and choose Open. Then, go to
the folder where you saved the quiz, click the quiz name, and click Open.
Opening Quizzes on Macintosh Computers
Click the File menu and choose Open Quiz. Then, go to the folder where you
saved the quiz, click the quiz name, and click Open.
F
When you save a
quiz you’ve saved
before, the program
may remind you that if the quiz
has already been loaded on
student NEOs, you should use
Save As and use a new file
name if you still want to
retrieve students’ answers to
the original quiz. If you want to
continue saving anyway, click
Save. Then, click OK to verify
that you want to overwrite the
old quiz.
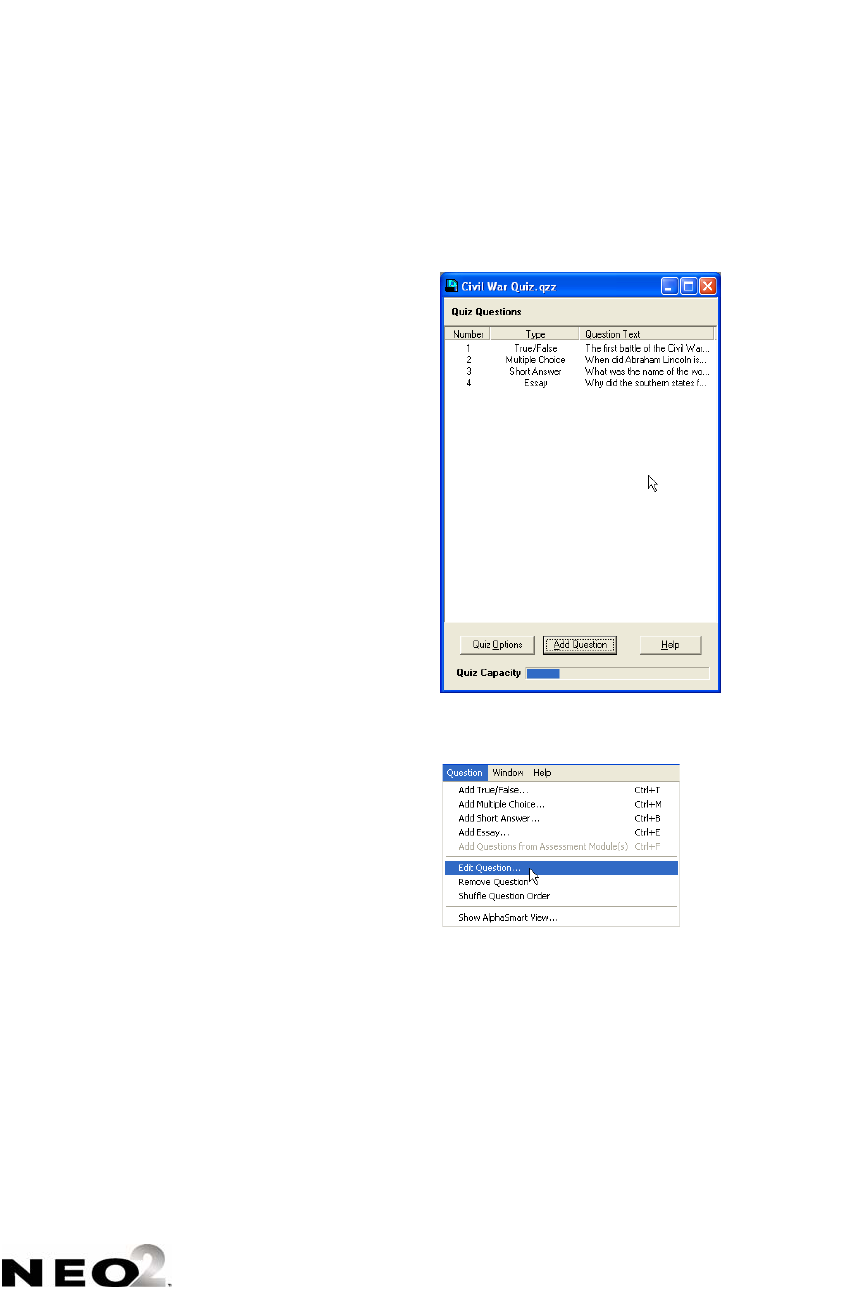
ALPHAQUIZ
Opening and Changing Quizzes in QuizDesigner
7-11
. . . . .
Changing an Existing Quiz’s Questions
1. Open the quiz (see page 7-10).
2. Do one of the following:
•Double-click the quiz question in the list A.
•Click the question once in the list A. Then, click the Question menu
and choose Edit Question.
3. Make changes to the question as needed. When you’ve finished, click
OK.
4. Save the quiz.
A
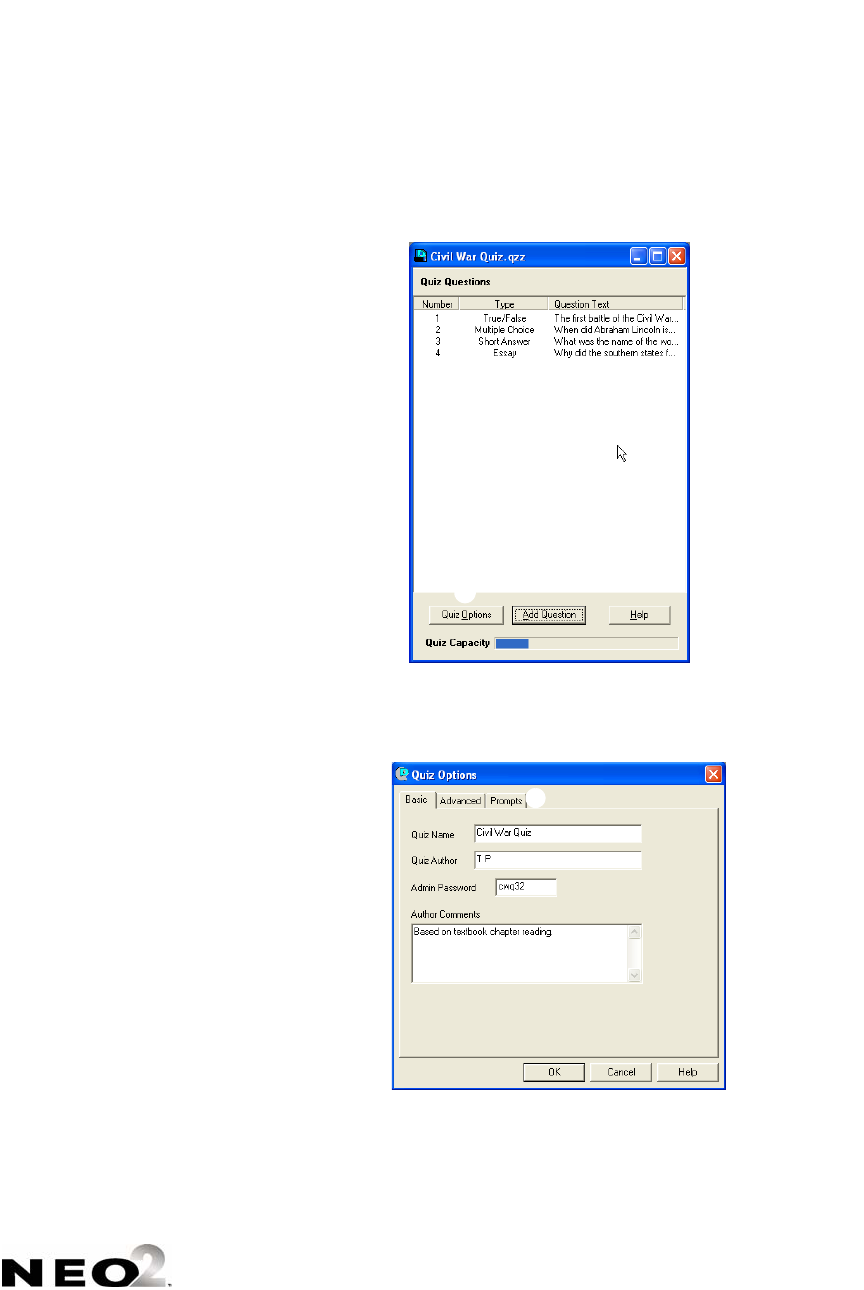
ALPHAQUIZ
Opening and Changing Quizzes in QuizDesigner
7-12
. . . . .
Changing Quiz Options for an Existing Quiz
1. Open the quiz (see page 7-10).
2. Click Quiz Options A toward the bottom of the quiz window.
3. Click the tab where you want to make changes B (Basic, Advanced, or
Prompts) and make changes as needed. Click OK when you’ve finished
your changes.
4. Save the quiz.
A
B
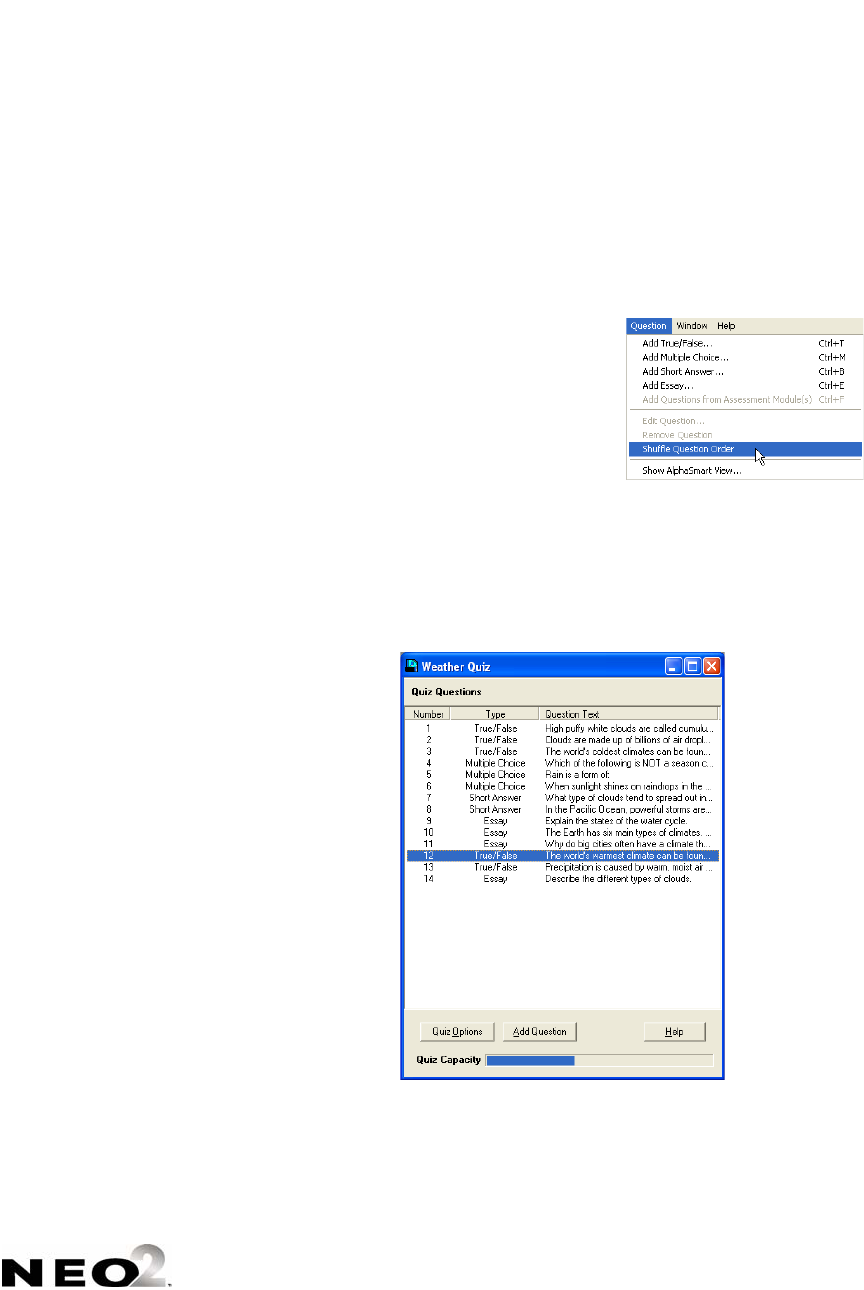
ALPHAQUIZ
Opening and Changing Quizzes in QuizDesigner
7-13
. . . . .
Rearranging Quiz Questions in QuizDesigner
1. Open the quiz (see page 7-10).
2. Do one of the following:
•If you want to rearrange questions into a specific sequence, drag the
questions one by one to the new position in the list. All questions will
automatically be renumbered.
•If you want QuizDesigner to randomly
rearrange the questions, click the
Question menu and choose Shuffle
Question Order. If you change your
mind after shuffling the questions, you
can click the Edit menu and Undo,
but this only undoes the change if you
do it right after shuffling the order.
3. Save the quiz.
Deleting Quiz Questions
1. Open the quiz (see page 7-10).
2. Click the question that you want to delete so that it is highlighted A.
A
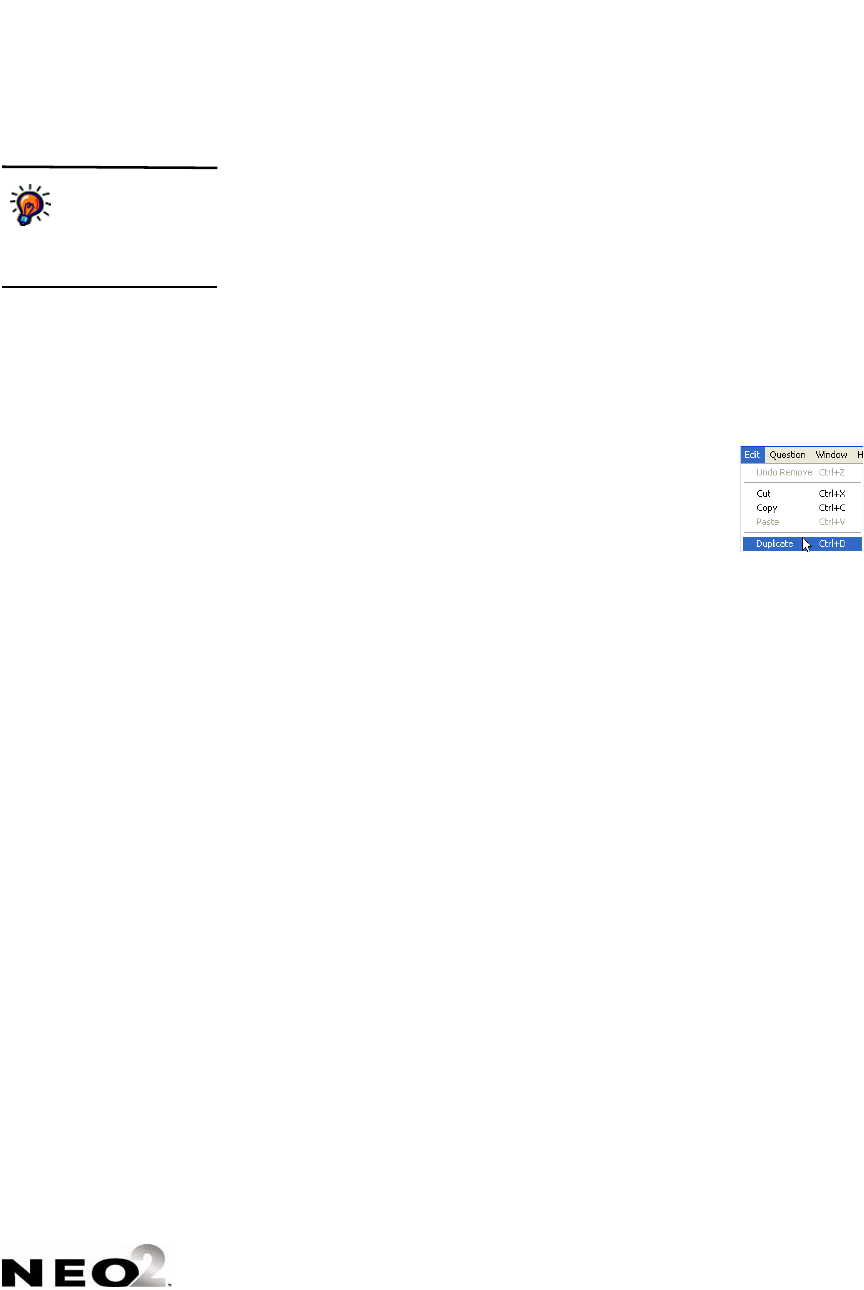
ALPHAQUIZ
Copying Questions in QuizDesigner
7-14
. . . . .
3. Do one of the following:
•Press the Delete key on your computer keyboard, or
•Click the Question menu and choose Remove Question.
4. Save the quiz.
Copying Questions in QuizDesigner
Copying Questions within a Quiz
To copy a question within a quiz, click the question in the
quiz window. Then, click the Edit menu and choose
Duplicate. This creates an exact copy of the question just
below the original question. This command can help you
save time if you have questions with similar wording—you
can just edit the text of the copy to quickly create a new question.
Copying Questions from One Quiz to Another
By following these steps, you can copy a question from one quiz into another.
This can save you time if you use similar questions in different quizzes.
1. Open the two quizzes so that they are side by side in Quiz Designer. (On
Windows computers only, you can click the Window menu and choose
Tile Quiz Windows to line them up quickly.)
If you accidentally
delete a question,
press ctrl-z
(Windows) or z-z (Macintosh)
immediately to restore it.
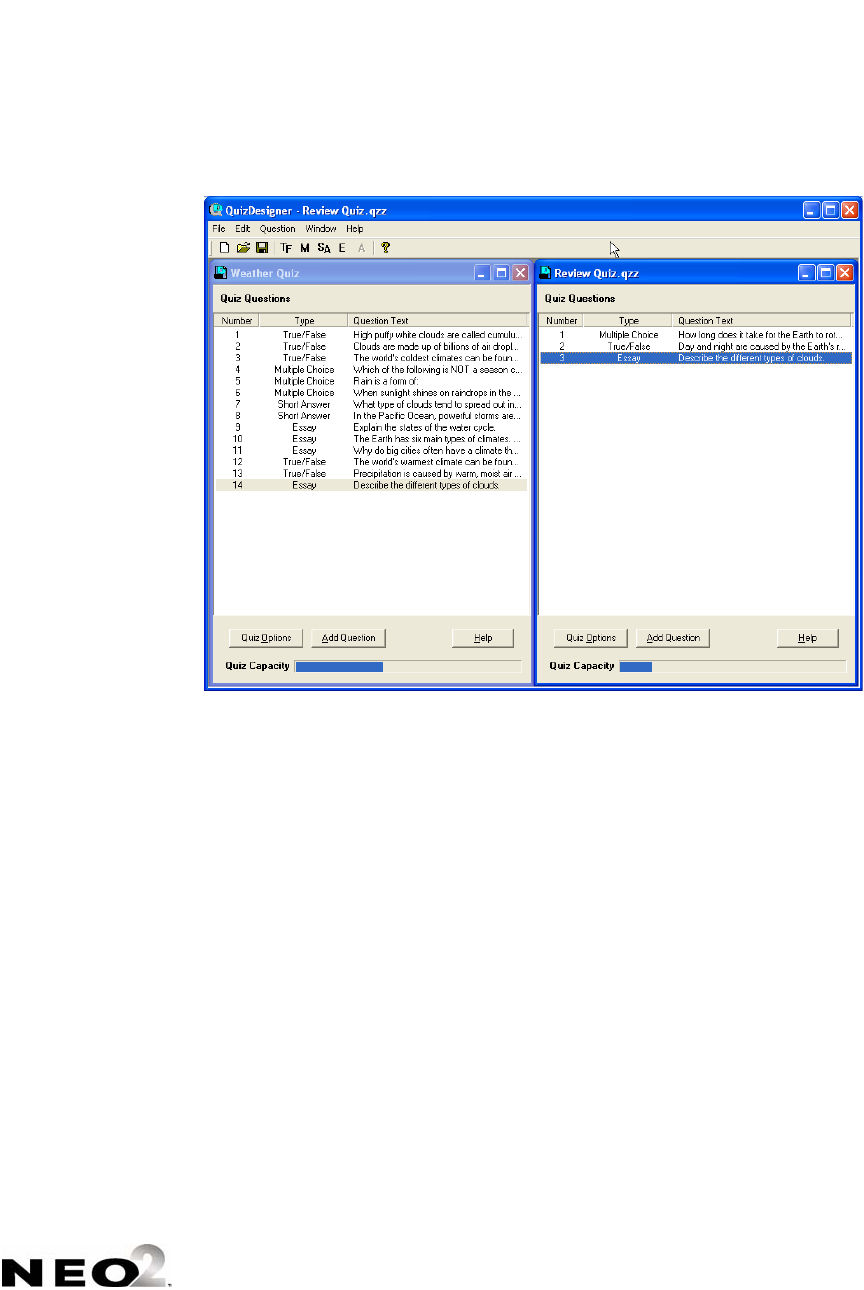
ALPHAQUIZ
Copying Questions in QuizDesigner
7-15
. . . . .
2. Drag the question from one quiz window to the other. The question will be
copied into the new quiz, and it will remain in the original quiz.
3. Be sure to save the quiz that now has a new question when you have
finished working on that quiz.
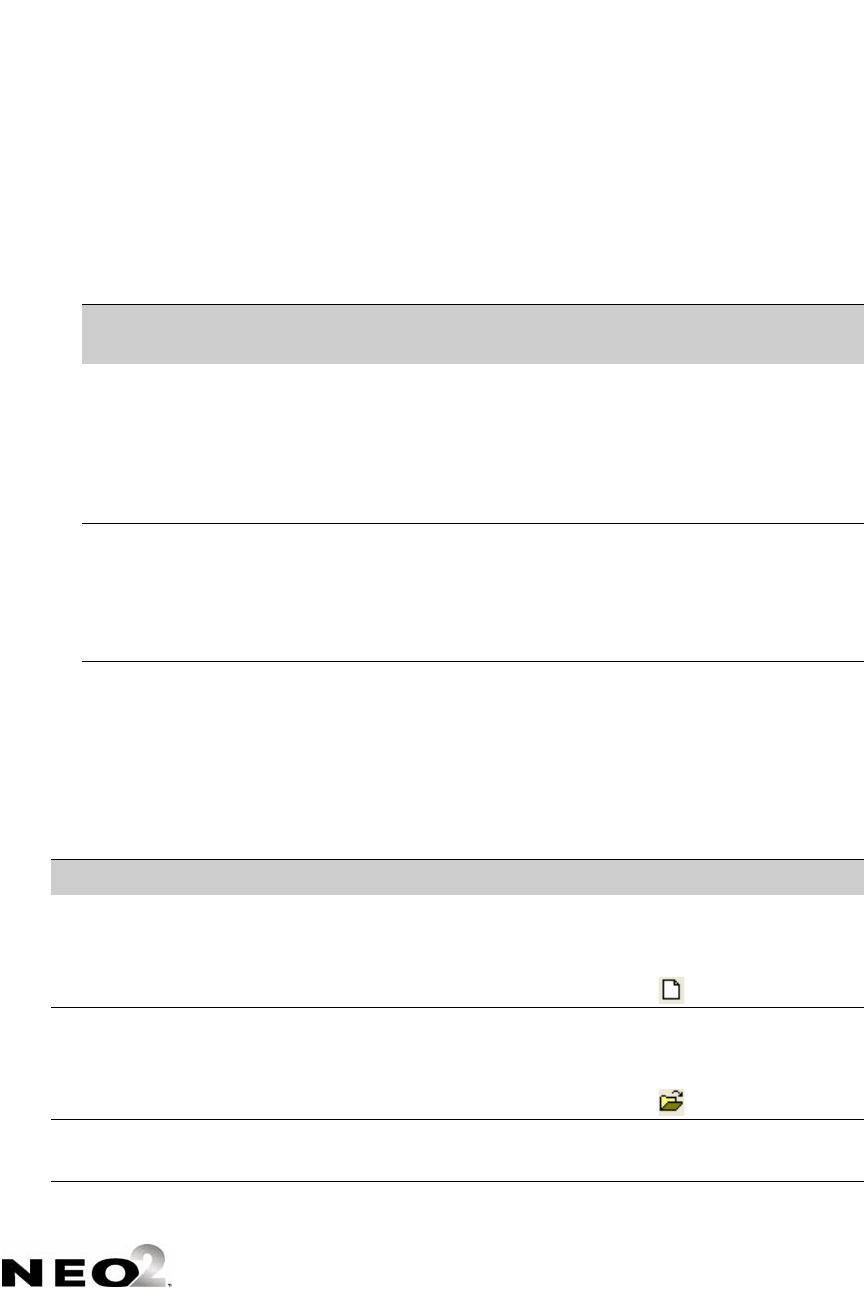
ALPHAQUIZ
Password Requirements for Quizzes
7-16
. . . . .
Password Requirements for Quizzes
In the Quiz Options for any quiz, on the Advanced tab, you can choose to
require students to enter a quiz access password. You can also require them to
create their own student password for quiz answers. The table below explains
how each of these passwords is used.
KeyBoard ShortCuts in QuizDesigner
The following keyboard shortcuts give you a quick way to perform many of
the tasks in QuizDesigner. The table below also includes the equivalent menu
commands.
Password Type
When the Student Enters
or Creates the Password
Protection It
Offers
How to Require This
Password
Quiz Access
Password
When a student first opens
the quiz, the student must
enter this password.
Only those
students who
have the quiz
access password
can open that
quiz.
In the Advanced Quiz
Options, check the box
labeled Require students
to enter quiz access
password and type the
password you want students
to use.
Student password After the student types in
his or her first and last
name, the student must
create a password.
It prevents other
students from
seeing a student’s
quiz responses.
In the Advanced Quiz
Options, check the box
labeled Require students
to create a student
password for their quiz
answers.
Action Keyboard Shortcut Equivalent Menu Item
Start a new quiz. Ctrl-N (Windows)
z-N (Macintosh)
File New (Windows)*
File New Quiz (Macintosh)
*On Windows computers, you can
also click in the toolbar.
Open a saved quiz. Ctrl-O (Windows)
z-O (Macintosh)
File Open (Windows)*
File Open Quiz (Macintosh)
*On Windows computers, you can
also click in the toolbar.
Close a quiz. None (Windows)
z-W (Macintosh)
File Close (both Windows and
Macintosh)
ALPHAQUIZ
KeyBoard ShortCuts in QuizDesigner
7-17
. . . . .
Save a file. Ctrl-S (Windows)
z-S (Macintosh)
File Save (both Windows and
Macintosh)
On Windows computers, you can
also click in the toolbar.
Save As. None File Save As (both Windows
and Macintosh)
Macintosh also has a Save As
Quiz Library item in this menu.
On Windows computers, you can
choose the quiz library file type
after you choose Save As.
Open/edit Quiz Options. Ctrl-I (Windows)
z-I (Macintosh)
File Quiz Options (both
Windows and Macintosh)
Export a quiz in text
format.
None File Export (both Windows
and Macintosh)
Set print or page setup. None File Print Setup (Windows)
File Page Setup (Macintosh)
Print a quiz. Ctrl-P (Windows)
z-P (Macintosh)
File Print (both Windows and
Macintosh)
Close QuizDesigner. None (Windows)
z-Q (Macintosh)
File Exit (Windows)
File Quit (Macintosh OS 9)
QuizDesigner Quit
QuizDesigner (Macintosh OS 10)
Undo last action. Ctrl-Z (Windows)
z-Z (Macintosh)
Edit Undo (both Windows and
Macintosh). The menu item
includes a description of what you
can undo.
Cut selected text. Ctrl-X (Windows)
z-X (Macintosh)
Edit Cut (both Windows and
Macintosh)
Copy selected text. Ctrl-C (Windows)
z-C (Macintosh)
Edit Copy (both Windows and
Macintosh)
Paste text that you have
cut or copied.
Ctrl-V (Windows)
z-V (Macintosh)
Edit Paste (both Windows and
Macintosh)
Clear all text in the field
your cursor is in
(Macintosh computers
only).
None Edit Clear (Macintosh
computers only)
Action Keyboard Shortcut Equivalent Menu Item
ALPHAQUIZ
KeyBoard ShortCuts in QuizDesigner
7-18
. . . . .
Select all text in the field
your cursor is in
(Macintosh computers
only)
None (Windows)
z-A (Macintosh)
Edit Select All (Macintosh
computers only)
Duplicate a selected
question.
Ctrl-D (Windows)
z-D (Macintosh)
Edit Duplicate (both Windows
and Macintosh)
Add a true/false question
to a quiz.
Ctrl-T (Windows)
z-T (Macintosh)
Question Add True/False
(both Windows and Macintosh)
On Windows computers, you can
also click in the toolbar.
Add a multiple choice
question.
Ctrl-M (Windows)
z-M (Macintosh)
Question Add Multiple
Choice (both Windows and
Macintosh)
On Windows computers, you can
also click in the toolbar.
Add a short answer
question.
Ctrl-B (Windows)
z-B (Macintosh)
Question Add Short Answer
(both Windows and Macintosh)
On Windows computers, you can
also click in the toolbar.
Add an essay question. Ctrl-E (Windows)
z-E (Macintosh)
Question Add Essay (both
Windows and Macintosh)
On Windows computers, you can
also click in the toolbar.
Edit a question. None Question Edit Question
(both Windows and Macintosh)
Remove a question. delete key (with the question
highlighted)
Question Remove Question
(both Windows and Macintosh)
Shuffle the question order
in a quiz.
None Question Shuffle Question
Order (both Windows and
Macintosh)
Show a preview of a
question as it will appear
on a NEO.
None Question AlphaSmart View
(both Windows and Macintosh)
Action Keyboard Shortcut Equivalent Menu Item
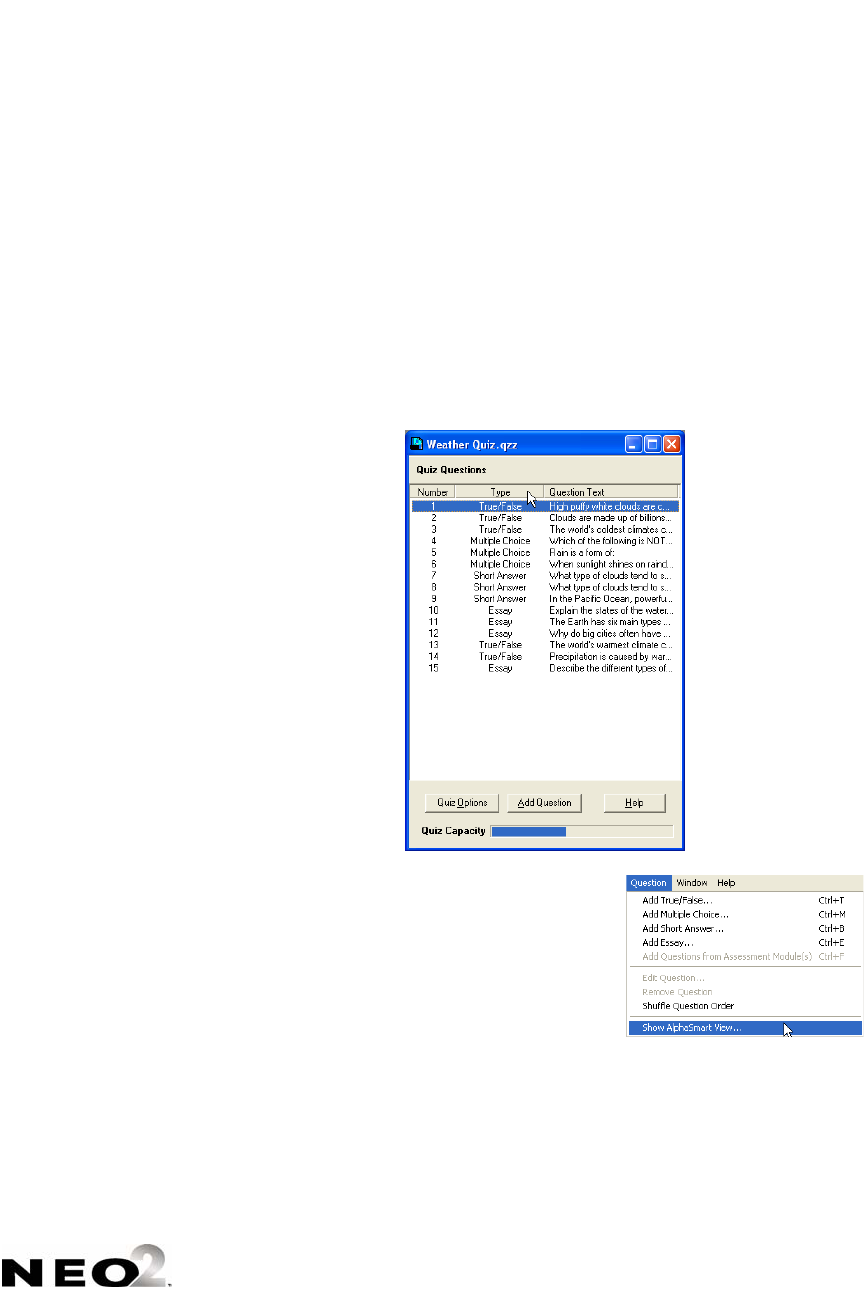
ALPHAQUIZ
Previewing Questions in QuizDesigner (Seeing Questions as They Appear on NEO)
7-19
. . . . .
Previewing Questions in QuizDesigner (Seeing
Questions as They Appear on NEO)
As you work on a quiz, it can be helpful to see how a question will look to
students on the NEO. By following the steps below, you can preview the
questions as they will look on a NEO. This shows you whether your questions
flow well and scroll easily.
1. Open the quiz you want to preview (see page 7-10).
2. In the quiz window, click the first question or another question that you
want to preview .
3. Click the Question menu and choose
Show AlphaSmart View. A window will
appear that shows a simulation of the
NEO screen with the question displayed
just as your students will see it.
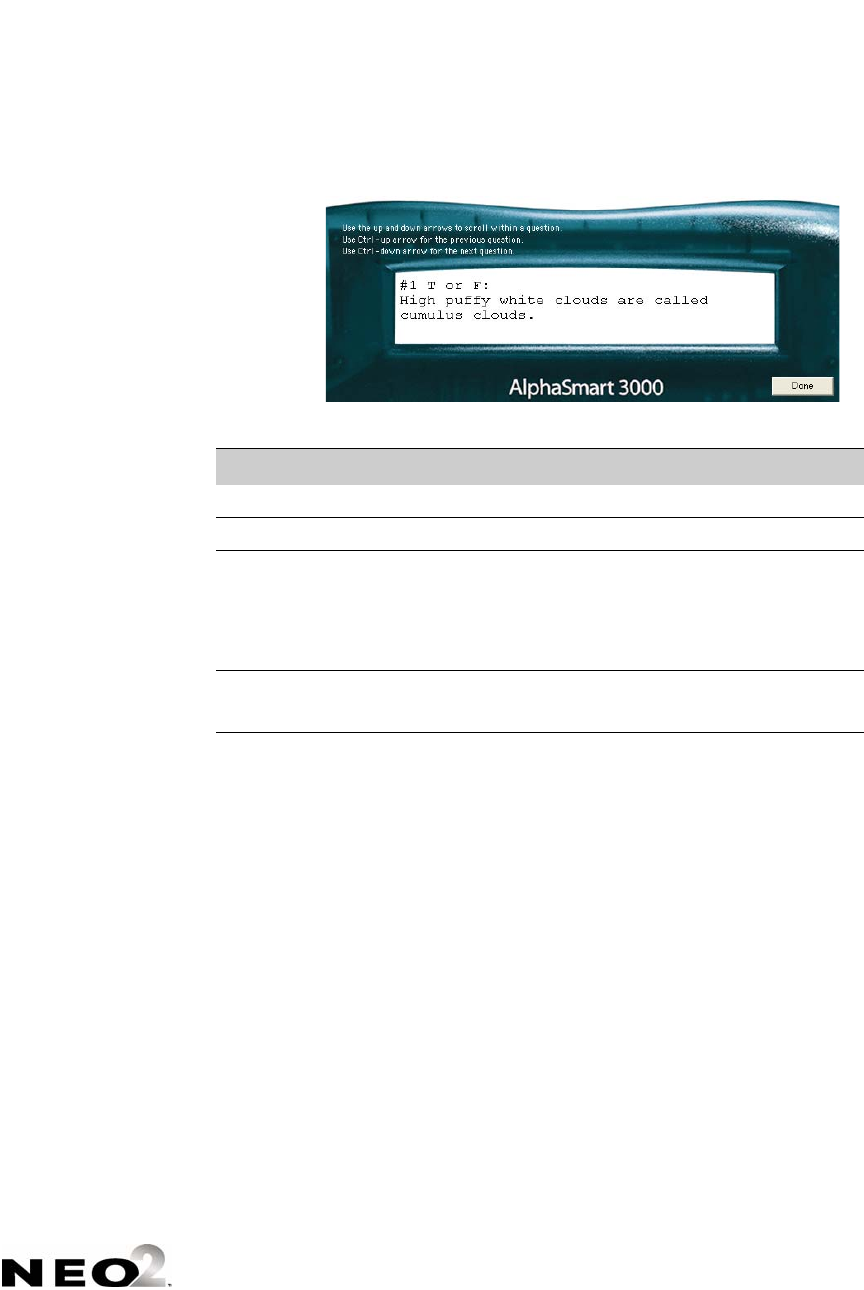
ALPHAQUIZ
Printing a Quiz from QuizDesigner
7-20
. . . . .
4. In this window, you can use the key commands listed in the table below to
move through your question.
5. Click Done to finish previewing the quiz.
Printing a Quiz from QuizDesigner
Follow these steps to print a quiz you’ve created in QuizDesigner. Printing a
quiz can be helpful if you want to review it before sending it to NEOs or if you
want to administer a paper quiz.
1. Open the quiz that you want to print (see page 7-10).
2. With the quiz open, click the File menu and choose Print, or press Ctrl-P
(Windows) or z-P (Macintosh). The Quiz Printing Options window will
open.
Press These Keys... ...To Do This:
↑ (up arrow) Scroll up in the question text.
↓ (down arrow) Scroll down in the question text.
enter
OR
Ctrl-↓ (Windows)
z-↓ (Macintosh)
Go to the next question
Ctrl-↑ (Windows)
z-↑ (Macintosh)
Go to the previous question.
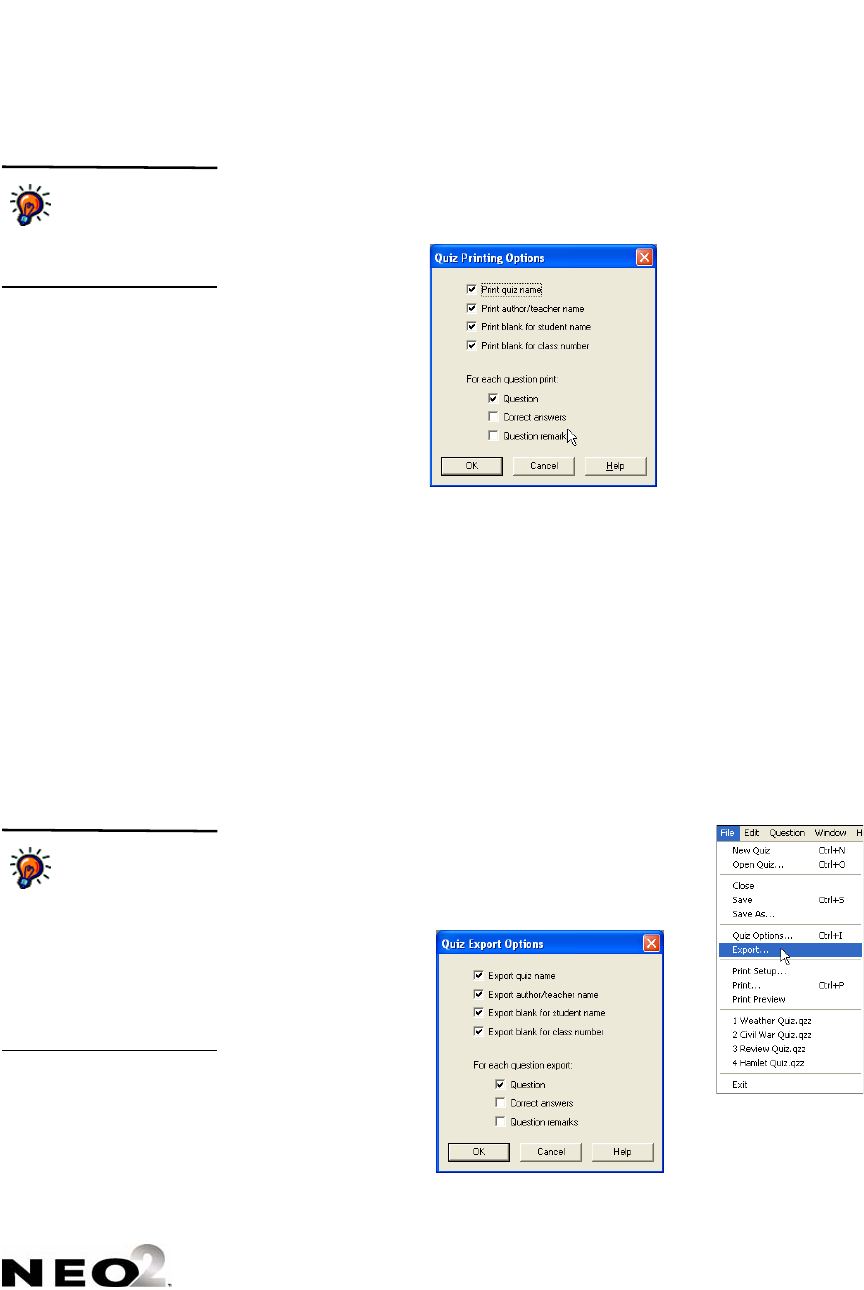
ALPHAQUIZ
Exporting a Quiz from QuizDesigner to a Word Processing Program
7-21
. . . . .
3. Check each item that you want to be included on the printed quiz. If you
are printing the quiz for students to take on paper, make sure that you
don’t check the correct answers box. Click OK after choosing the items to
print.
4. In your computer’s print dialog box, click OK (Windows) or Print
(Macintosh). The quiz will be printed.
Exporting a Quiz from QuizDesigner to a Word
Processing Program
By following the steps below, you can export a quiz in a format that you can
use outside of AlphaQuiz, QuizDesigner, or QuizManager. The exported file
will be a text (.txt) file that you can bring into word processing programs.
1. Open the quiz that you want to export (see page 7-10).
2. With the quiz open, click the File menu and choose
Export. The Quiz Export Options window will open.
3. Check the items that you want to include in the
exported file. Then, click OK.
The blanks for
student name and
class number are
useful if you are administering
a paper quiz.
The export options
are similar to the
ones you have when
you print a quiz. The blanks
for the student name and
class number are useful if you
plan to use this file to develop
a paper quiz. For paper quiz
files, be sure to leave out the
correct answers.
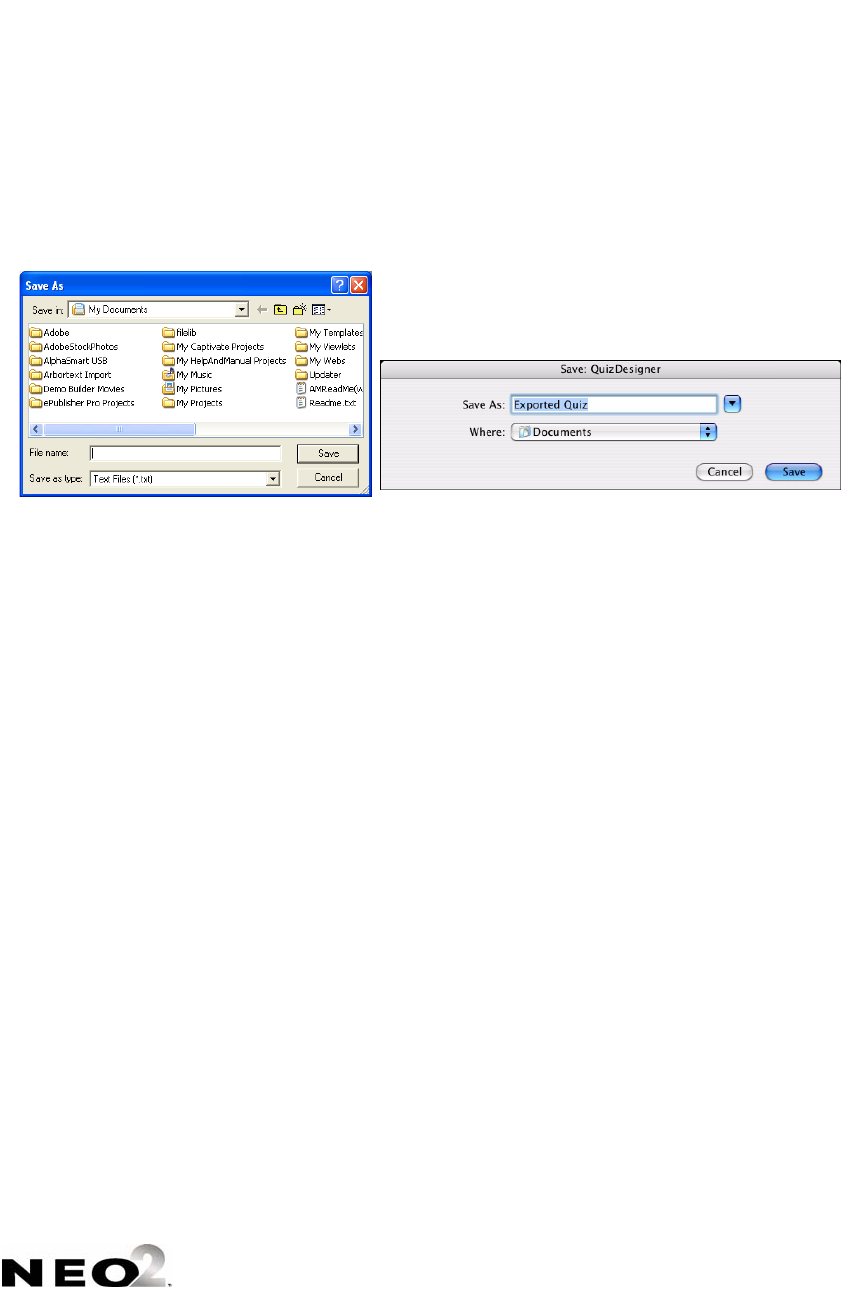
ALPHAQUIZ
Spell-checking a Quiz
7-22
. . . . .
4. In the dialog box that opens, enter a name for the exported file and
choose a location. (On Macintosh computers, you may need to click the
down arrow to see the full dialog box that lets you choose any location.)
Then, click Save.
Spell-checking a Quiz
QuizDesigner does not have a built-in spell check feature. However, you can
export a file and use a word processing program to check a quiz. Follow these
steps.
1. Export the quiz as described on page 7-21.
2. Start your word processing program and open the file that you just
exported. When you choose the file in Windows, you may need to use a
drop-down list to choose to view “All Files” instead of just files of a certain
type.
3. Use the spell check feature in your word processing program to find each
spelling error. You may also be able to check grammar. Note any
changes that need to be made.
4. Return to QuizDesigner and type in the corrections where they are
needed.
Deleting Quizzes
To delete a quiz that you have created, simply delete the file from the location
where you’ve saved it. Before deleting a quiz, you should be sure that you will
not use the quiz again.
Windows
Macintosh
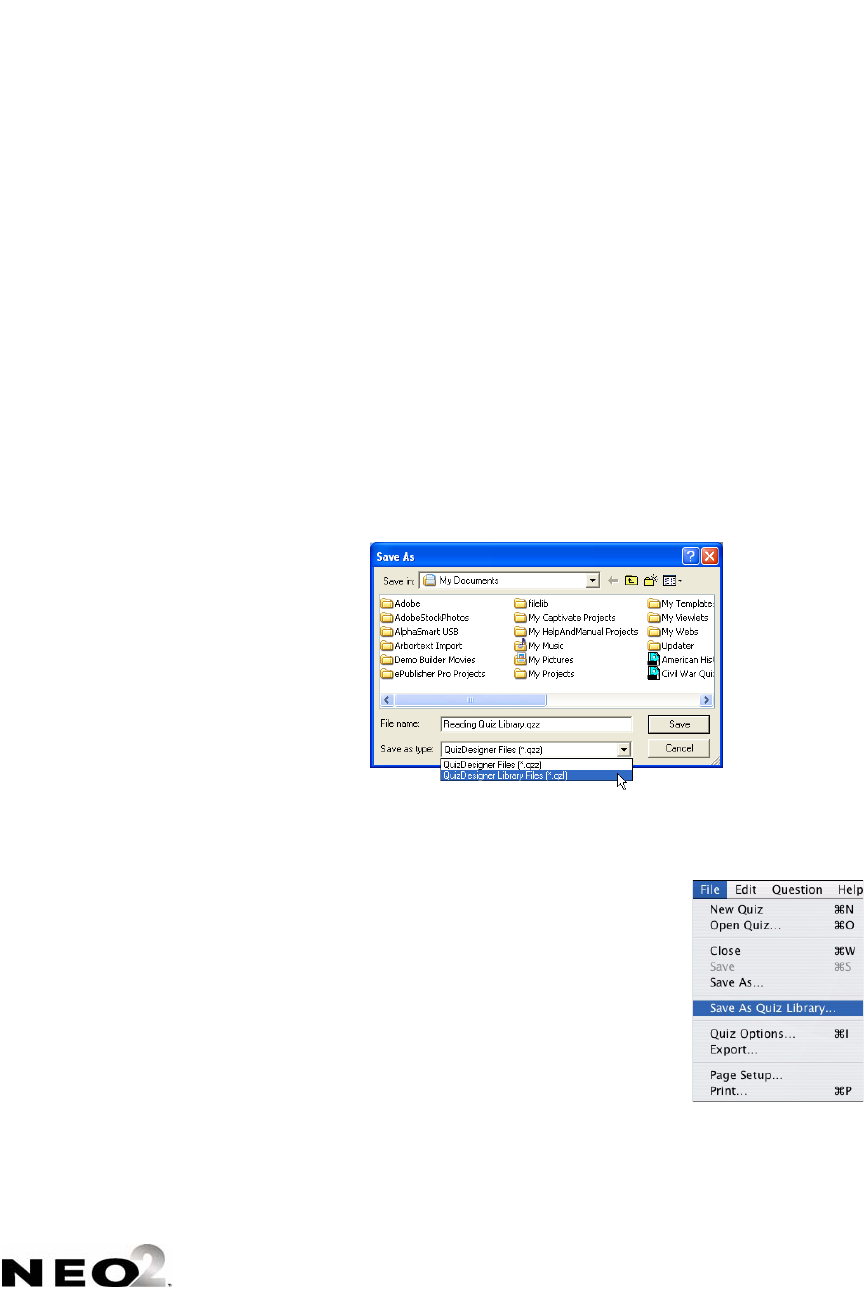
ALPHAQUIZ
Creating a Question Library in QuizDesigner
7-23
. . . . .
Creating a Question Library in QuizDesigner
In QuizDesigner, you can create a question library for storing large numbers
of questions. Unlike quizzes, a quiz library can include any number of
questions. It has no capacity limit because a library is not intended to be sent
to NEOs—the library is simply a place to store questions that you expect to
use in quizzes.
Windows Instructions for Creating Question Libraries
To create a question library, follow the same steps that you perform when you
create a quiz. However, before you add the questions, click the File menu and
choose Save, and choose QuizDesigner Library Files (*.qzl) in the Save
As drop-down list in the dialog box. Once you do this, the Quiz Capacity bar
will disappear since there is no capacity limit for libraries, and you can add as
many questions as you’d like.
Macintosh Instructions for Creating Question Libraries
To create a question library, follow the same steps
that you perform when you create a quiz. However,
before you add the questions, click the File menu and
choose Save As Quiz Library instead of choosing
Save or Save As. Once you do this, the Quiz Capacity
bar will disappear since there is no capacity limit for
libraries, and you can add as many questions as you’d
like.
Using Quiz Library Questions in a Quiz
To bring questions from a quiz library into a quiz, follow the instructions for
copying a question from one quiz to another on page 7-14.

ALPHAQUIZ
Starting QuizManager
7-24
. . . . .
Starting QuizManager
QuizManager is the program you use to send quizzes to student NEOs,
retrieve their responses, assign points to questions, grade quizzes, generate
and print reports, compile statistics, and export scores.
To start QuizManager, follow the instructions for your type of computer.
On Windows Computers:
Click Start or Programs (or All Programs) AlphaSmart
QuizManager Launch QuizManager.
On Macintosh Computers:
Open the Applications folder, then the QuizManager folder. Double-click
QuizManager.
About the QuizManager Control Bar
When you have started QuizManager, a status message across the top of the
control bar lets you know how many NEOs are connected to your NEO (if
any), either through a SmartOption cart or by a direct USB cable connection.
The numbered circles show you NEOs connected through a SmartOption
Cart. The Direct USB circle shows you NEOs connected directly to the
computer with a USB cable. The color of each circle shows you the status of
each NEO:
•Green means a NEO is connected at this location, and the NEO has
AlphaQuiz installed.
•Black means no NEO is connected in this location (or it is an older device
with older software). If you have a NEO connected at this location and the
circle is still black, disconnect the NEO and turn it on; then, reconnect it.
If you’ve closed the
Control Bar on a
Windows computer
and you want to open it
again, you can click the
Window menu and choose
View Control Bar. You
cannot close the Control Bar
separately on Macintosh
computers.

ALPHAQUIZ
Sending Quizzes to NEOs Using QuizManager
7-25
. . . . .
•Yellow means a NEO is connected, but it does not have the AlphaQuiz
SmartApplet installed. To install the SmartApplet on that NEO, see
page 1-2.
•Red means a NEO is connected but is not communicating properly.
The buttons in the control bar perform these functions:
Sending Quizzes to NEOs Using QuizManager
By following the steps below, you can use QuizManager to send a quiz to
NEOs. (The quiz itself must be created in QuizDesigner before you can send
it; see page 7-6 to create quizzes.)
1. Connect your NEOs to the computer, either through a SmartOption Cart
with an AlphaHub or directly with a USB cable. In QuizManager, make
sure your NEOs are connected as shown by the indicators (see
page 7-24).
2. Click Send Quiz on the control bar, or click the Communication menu
and choose Send Quiz. On Windows computers, you can also click
in the toolbar in the QuizManager window.
Control Bar Button What It Does
Send Quiz Sends a quiz to the connected NEOs.
Delete Quiz Removes a quiz from connected NEOs, including all
questions and student responses.
Retrieve Responses Retrieves student responses to a quiz from NEOs
without removing either the quiz or the responses from
the NEOs.
Delete Responses Removes all student responses for a quiz from NEOs.
Power On
AlphaSmarts
Turns on all connected NEOs if they were shut down
using QuizManager.
Power Off
AlphaSmarts
Turns off all connected NEOs.
NEOs have space for
up to four quizzes.
You may need to
delete a quiz before sending a
new one. See page 7-27 to
find out how to delete quizzes.
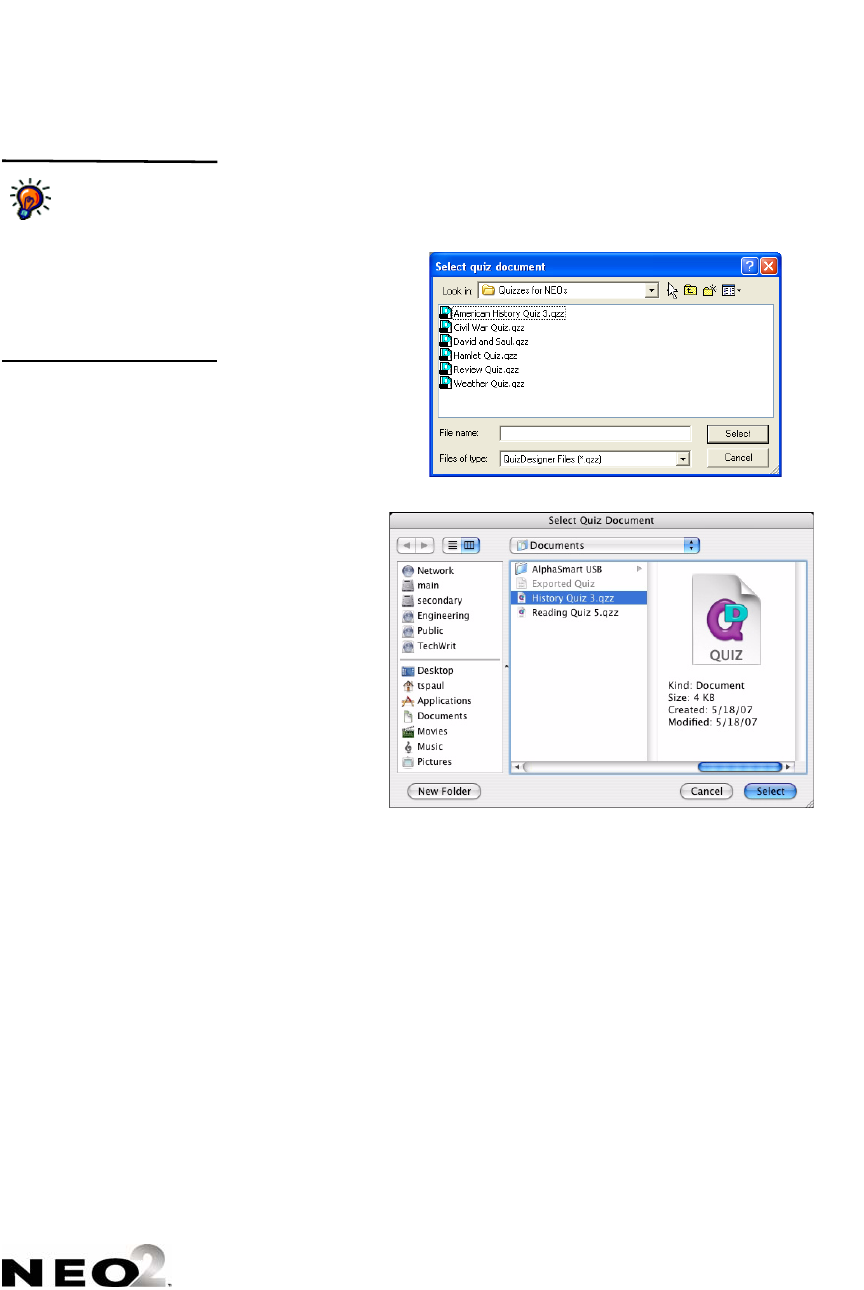
ALPHAQUIZ
Sending Quizzes to NEOs Using QuizManager
7-26
. . . . .
3. Find the quiz that you want to send and click the quiz file to highlight it.
Then, click Select. QuizManager will make sure there is enough space on
the connected NEO(s) for this quiz.
4. If any connected NEOs do not have space for another quiz, the program
will notify you. Click Close (Windows) or OK (Macintosh). You may need
to delete quizzes from NEOs; see page 7-27.
5. In the Send Quiz dialog box, you can decide whether to use a quiz access
password and which password to use:
• If you chose to require a quiz access password when you created
the quiz, the access password is filled in. You can leave it as is or
change it, or you can remove the password and leave the field blank if
you don’t want students to have to enter it. Changing the password
here will not change it in the original quiz file.
If you created the
quiz on a Macintosh
computer and you
are sending it from a
Windows computer, make
sure the quiz name ends with
“.qzz” so that the
QuizManager program shows
it in the list.
Windows
Macintosh
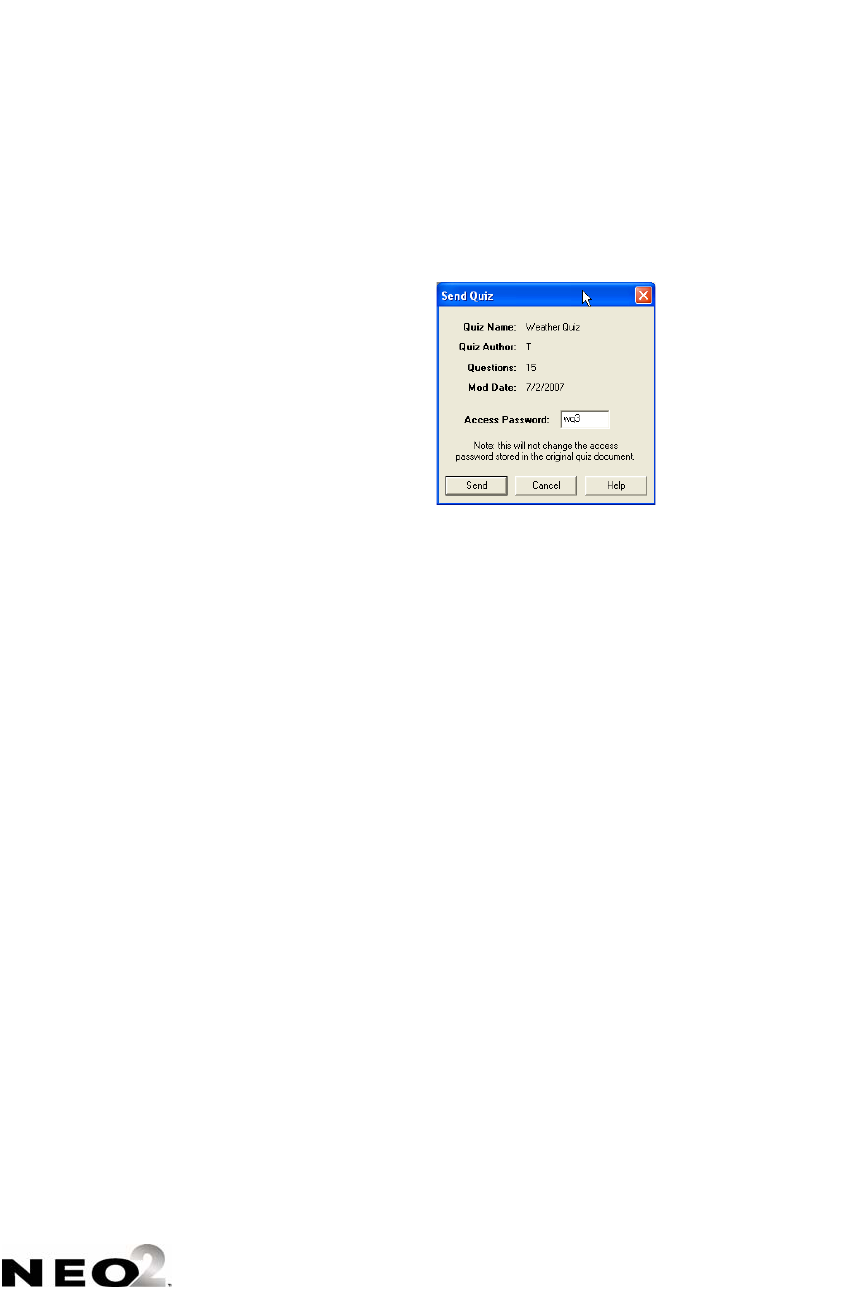
ALPHAQUIZ
Deleting Quizzes from NEOs
7-27
. . . . .
• If you did NOT choose to require a quiz access password when
you created a quiz, you can enter one now that students must enter
before taking the quiz, or you can leave the field blank so that
students don’t need to enter a quiz access password. Setting a
password here will not change the options selected in the original quiz
file.
6. Click Send to send the quiz to the connected NEOs. The program will
show you messages as the quiz downloads.
7. Click Close (Windows) or OK (Macintosh) when the program notifies you
that the quiz has been sent.
8. Disconnect your NEOs (or have your students disconnect them). Your
students can now take the quiz.
Deleting Quizzes from NEOs
By following these steps, you can delete quizzes from connected NEOs. It’s a
good idea to delete older quizzes from NEOs before you send new ones since a
NEO can only store up to four quizzes.
Be sure to retrieve student responses for a quiz before you delete it
unless you do not want a record of the responses. To retrieve responses, see
page 7-35.
You may also want to delete quizzes if you have a different quiz you want
students to take instead. In that situation, you may not need to retrieve
responses before deleting an old quiz.
1. Connect your NEOs to the computer, either through a SmartOption Cart
with an AlphaHub or directly with a USB cable. In QuizManager, make
sure your NEOs are connected as shown by the indicators (see page 7-
24).
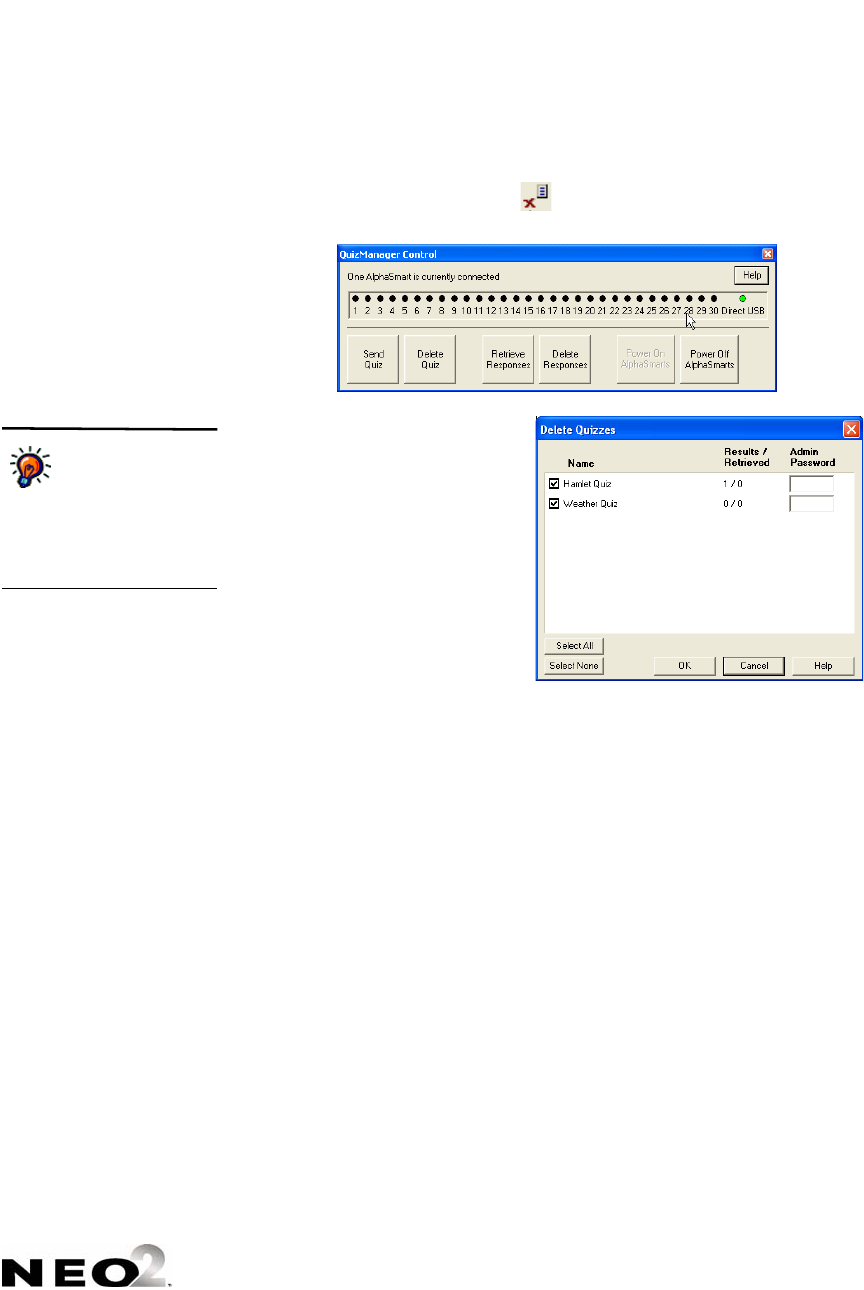
ALPHAQUIZ
Deleting Quizzes from NEOs
7-28
. . . . .
2. Click Delete Quiz in the QuizManager control bar, or click the
Communication menu and choose Delete Quiz. On Windows
computers, you can also click in the toolbar in the QuizManager
window.
3. In the Delete Quizzes dialog
box, check each quiz that you
want to delete from the
NEO(s) .
The list shows you how many
results were retrieved . For
example, if the Results /
Retrieved column shows 2/1,
then two students have
completed the quiz, but
results have only been
retrieved for one student so
far. You may want to retrieve the other student’s results before deleting
the quiz from the NEOs.
If the quiz has an administrative password , you must enter it before
you can delete the quiz. (This is the password you enter on the Basic tab
in the Quiz Options in QuizDesigner. It is different from the access
password.)
4. Click OK to delete the checked quizzes from the NEOs.
5. If the quizzes have any unretrieved student responses, the program will
notify you. If you want to continue anyway, click Yes (Windows) or OK
(Macintosh).
6. Click Close (Windows) or OK (Macintosh) when the program notifies you
that the quizzes have been deleted.
If the connected
NEOs have different
quizzes on them,
you may see more than four
quizzes listed even though
individual NEOs can only
store four quizzes.
ALPHAQUIZ
How Students Take a Quiz Using the AlphaQuiz SmartApplet
7-29
. . . . .
How Students Take a Quiz Using the AlphaQuiz
SmartApplet
Students follow the steps below to take a quiz that you have sent to their
NEOs. (To send a quiz using QuizManager, see page 7-25. To create a quiz
using QuizDesigner, see page 7-6.) Students use the AlphaQuiz SmartApplet
on their NEOs to take the quiz.
1. If students are not already seeing the AlphaQuiz menu on their NEOs,
they must do the following:
a. Start the NEO.
b. Press applets.
c. Press the ↓ key to scroll down until the cursor is next to AlphaQuiz,
which is at the bottom of the list of SmartApplets.
d. Press enter to select AlphaQuiz.
2. In the Select a Quiz menu, students use the arrow keys to move the
cursor next to the quiz they want to take; then, they press enter.
3. Next, students may be asked to enter a quiz access password. If so, they
type the password and press enter.
4. Next, each student must enter his or her first and last name. The student
must type the first name, presses tab or enter, type the last name, and
press enter.
5. Next, students may be asked to create a password to remember. This
password is used to prevent other students from seeing this student’s
answers; the next time the student selects this quiz, the student must
enter his or her password.
The student types a unique password, presses enter, types it again, and
presses enter again.
Select a quiz:
- Multiplication Quiz
- American History Quiz 3 S C L
L Weather Quiz
Enter your first and last name:
First Name:
Last Name:
Press Enter after typing the names.
If you see letters
next to the quiz,
some SmartApplets or
functions are blocked
because a student did not
finish the quiz. S means spell
check is blocked. C means
Calculator is blocked. L
means all SmartApplets are
blocked. The blocks are
based on what you chose in
the Advanced Quiz Options
when you created the quiz in
QuizDesigner.
The Advanced Quiz
Options determine
whether the quiz
access password, a student
password, and the class
number are required. You
set these options when you
create a quiz. See page 7-7
for details. You can also set a
quiz access password
when you send a quiz; see
page 7-26.

ALPHAQUIZ
How Students Take a Quiz Using the AlphaQuiz SmartApplet
7-30
. . . . .
6. Next students may be asked to enter their class number (two characters
or less—letters and/or numbers). Each student types the number and
presses enter.
7. Next, students press any key to start the quiz.
8. Students enter an answer for each question in the quiz and press enter.
After they answer each question, the next one appears until the quiz is
done. Students can also use these keys to move through the quiz or to
find unanswered questions:
Students may also be allowed to print their answers (see page 7-31) or
save their quiz to an AlphaWord file (see page 7-32).
Press these keys... ...to do this:
esc Exit the quiz (if marking the quiz “finished” is not
required).
↑Scroll up within this question.
↓Scroll down within this question.
z-↓Go to the next question.
z-↑Go to the previous question.
enter Go to the next question, except in the answers to essay
questions. In those answers, enter inserts a line break
so students can begin a new paragraph.
z-enter Go to the next question from the essay question
answer.
tab In essay questions, switch between the question and
the answer. If you go to the answer, the cursor returns
to the student’s last location in the answer.
z-J Go to any question in the quiz. After you press this key
combination, the NEO will ask you to enter the
question number. Type the number and press enter.
z-B Check for unanswered questions. After you press these
keys, the NEO will show you which questions you have
not answered. Type the question number that you want
to go to and press enter.
ALPHAQUIZ
How Students Print Quizzes
7-31
. . . . .
9. After students answer the last question, students see a screen like the
one below. They can then use the keys listed go back to the quiz or a
specific question, find unanswered questions, or mark the quiz finished.
If students are within the quiz and have answered all questions, they can
then press esc to finish the quiz. If you did not choose to require students
to mark the quiz finished, they will exit the quiz. If you did require this,
students will see the screen shown below. The student has these choices:
•Pressing R takes the student back to the last question he or she saw.
•Pressing E allows the student to go back to the list of available
quizzes. The student can select the quiz again later and see or
change his or her answers until the quiz is marked finished. The
letters “S C L” may appear to the right of the quiz name in the list of
available quizzes.
•Pressing F marks the quiz as finished, meaning the student cannot
change his or her quiz answers.
10. If the student chooses to finish a quiz, the program will remind the student
that he or she cannot change responses once the quiz has been marked
finished. If any questions were not answered, the program notifies the
student of that as well. Students press y for “yes” to continue.
How Students Print Quizzes
When you create a quiz, in the Advanced Quiz Options, you can choose
whether to allow students to print their quiz answers. If you allow this,
students can press print on their NEOs before exiting the quiz to print their
answers.
On NEOs, you can print using a cable connection to a printer or using
infrared beaming. For more information, see the NEO User Manual.
End of the quiz. Esc to return to the quiz.
Cmd-J to jump to any question.
Cmd-B to find any unanswered questions.
Cmd-F if you are finished.
The quiz has not been marked finished.
Press F if you are finished.
Press E to exit the quiz.
Press R to return to the quiz.
When a quiz is
marked finished,
students can select
the quiz and see their
answers, but they are not
allowed to change their
answers. You can choose
whether students are required
to mark a quiz finished in the
Advanced Quiz Options when
you create a quiz (see
page 7-6).

ALPHAQUIZ
How Students Save Quizzes to an AlphaWord File
7-32
. . . . .
How Students Save Quizzes to an AlphaWord File
When you create a quiz, in the Advanced Quiz Options, you can choose
whether to allow students to save their quiz to an AlphaWord file. If you allow
this, students can follow these steps to save the quiz:
1. Before exiting the quiz, the student must press send.
2. The NEO asks the student to choose a file. The student presses the file
number he or she wants to save the quiz in; then, the student presses
enter.
3. If the file isn’t empty, the NEO warns the student that the quiz will delete
any text that is in the file now. If the student wants to continue, he or she
presses y for “yes.” If not, the student presses n for “no” and then presses
a different file number. The NEO will automatically exit AlphaQuiz and
open the AlphaWord file (unless the quiz needs to be marked finished).
Teacher Options in for Quizzes in AlphaQuiz
For most teacher tasks, you’ll use QuizDesigner and QuizManager on your
computer to create quizzes, send them, and retrieve responses. However, the
AlphaQuiz SmartApplet also includes a few teacher options that you can use
right on the NEO. These options let you do the following:
• Check a student’s password so you can give it to a student who has
forgotten the password and needs it to finish a quiz.
• Delete a student’s answers.
• Change the finished status of a quiz. For example, if a student leaves a class
without marking a quiz finished, and you want to use the NEO for other
functions, you may want to mark it finished yourself.
• Viewing a student’s responses before they are sent to QuizManager.
Follow these steps to use the teacher options:
1. Start the NEO and press applets.
2. Press the ↓ key to scroll down until the cursor is next to AlphaQuiz, which
is at the bottom of the list of SmartApplets. Then, press enter to select
AlphaQuiz.
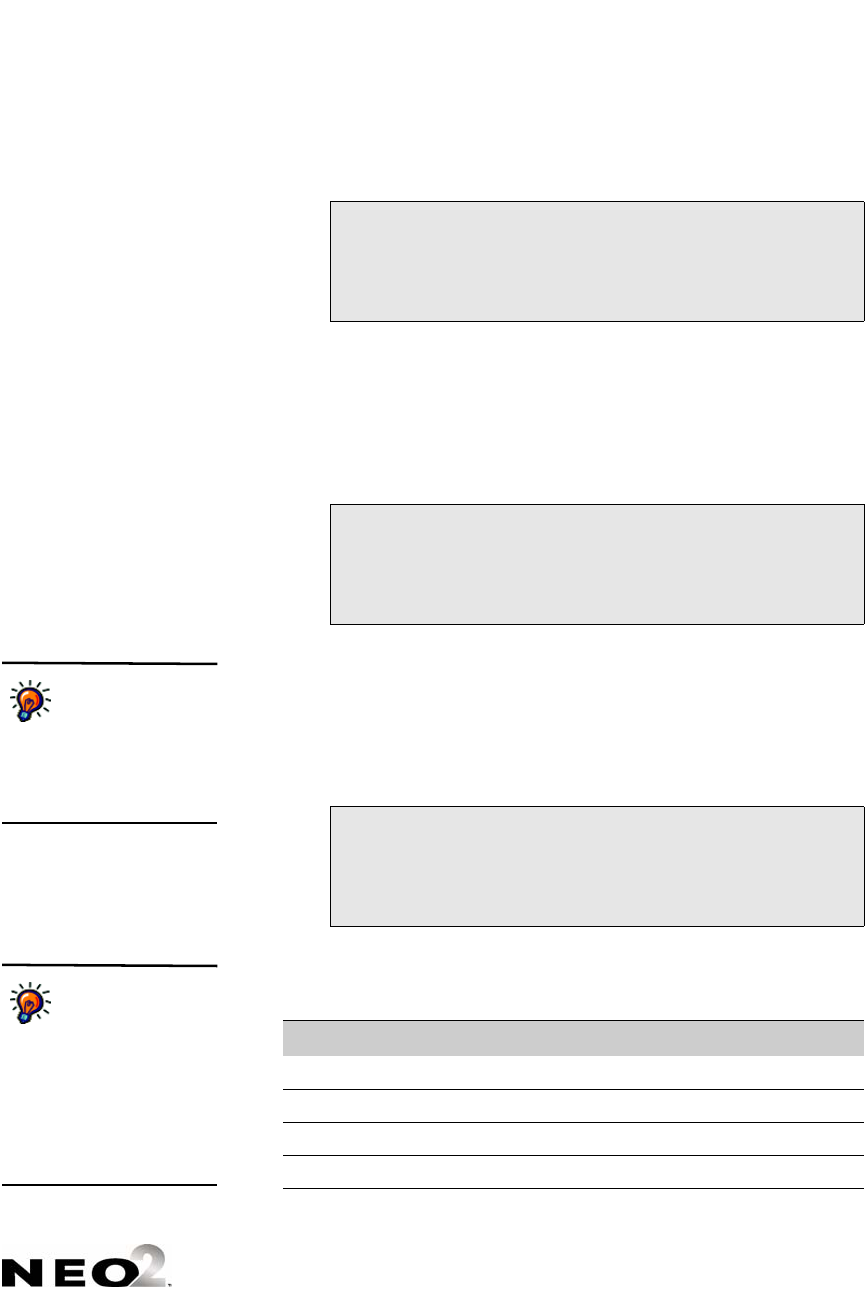
ALPHAQUIZ
Teacher Options in for Quizzes in AlphaQuiz
7-33
. . . . .
3. In the Select a Quiz menu, use the arrow keys to move the cursor next to
a specific quiz that you want to work with; then, press enter.
4. If an access password is required for this quiz, NEO will ask for that
password. Enter the password and press enter.
5. When the NEO asks you to enter your name, enter teacher for the first
name and options for the last name. Then, press enter. This tells
AlphaQuiz that you are a teacher who wants to access the teacher
options.
6. Next, you must enter the admin password that you set when you created
the quiz. If you did not enter an administrative password when you
created the quiz, you can enter the NEO’s master password. (For more
about the master password and how to set it, refer to the AlphaSmart
Manager 2 User Manual.)
7. Next, the teachers who have started the quiz on this NEO will be listed.
The letters to the right of each students name tell you whether the student
has answered all questions and whether the student has marked the quiz
as finished. This is what each letter means:
Select a quiz:
- Multiplication Quiz
- American History Quiz 3
L Weather Quiz
Enter your first and last name:
First Name: teacher
Last Name: options
Press Enter after typing the names.
Student Response List:
- Johanna Espinosa A F
- Jessica Knutson A F
- Anna Martin U N
Letter What It Means
A Student has answered all questions
U Student has not answered all questions
F Student has marked test finished
N Student has not marked test finished
If you don’t
remember the quiz
admin password,
open the quiz in
QuizDesigner, click Quiz
Options, and view the
password on the Basic tab.
If you see U and F
together, the student
may have run out of
time. The student may have
had to mark the quiz finished
even though he or she did not
answer all the questions. If
you see neither F nor N,
students aren’t required to
mark the quiz finished.

ALPHAQUIZ
Teacher Options in for Quizzes in AlphaQuiz
7-34
. . . . .
From this screen, you can do the following:
8. To leave the teacher options, press esc in the Student Response List.
You’ll return to the quiz list.
What You Can Do How to Do It
View a student’s
responses
Use the arrow keys to move the cursor next to a
student’s name. Then, press enter. You can now
move through the questions as the student does
(see the table that starts on page 7-30), viewing the
student’s answer to each question. When you have
finished, press esc to exit the quiz.
View a student’s
password
Use the arrow keys to move the cursor next to the
student’s name. Then, press z-P to see the
student’s password. (If nothing happens, no
student password was required for this quiz.) To
leave the screen, press any key.
Mark a student’s test
finished
This is only necessary if you require students to
mark a quiz finished and a student has not marked
a quiz finished (perhaps because the student
became ill or had to leave the room). To mark the
student’s quiz finished, use the arrow keys to move
the cursor next to the student’s name. Then, press
z-F. You will see the second letter behind the
student’s name change from N (not finished) to F
(finished). (If nothing happens, students weren’t
required to mark this quiz finished.) You can press
z-F again to change the status back.
Delete a student’s
responses to all
questions.
When you delete a student’s responses, they
cannot be recovered. To do this, use the arrow
keys to move the cursor next to the student’s name.
Then, press z-D. When NEO warns you that all
quiz responses for this student will be deleted,
press y for “yes” if you want to continue. The
student’s responses will be deleted, and the
student’s name will no longer be in the student
response list.
View the quiz access
password (if one was
set for the quiz)
While viewing the student response list, press z-A.
The screen will show the access password. To leave
the screen, press any key.
If a student’s quiz is
not marked finished,
access to some
SmartApplets may be blocked
on the NEO until the quiz is
finished. The blocks are
based on the Advanced Quiz
Options you chose when you
created the quiz in
QuizDesigner. They will
remain in place until the
student finishes the quiz or
until you delete the student’s
responses.

ALPHAQUIZ
Retrieving Students’ Responses from NEOs Using QuizManager
7-35
. . . . .
Retrieving Students’ Responses from NEOs Using
QuizManager
QuizManager makes it easy for you to retrieve students’ responses to quizzes
from the NEOs they used to take the quizzes. You can then grade the quiz
responses in QuizManager.
You can retrieve quiz responses more than once for the same quiz if
necessary. This is helpful if some students did not complete a quiz before the
end of class and they need to continue it another time.
1. Connect your NEOs to the computer, either through a SmartOption Cart
with an AlphaHub or directly with a USB cable. In QuizManager, make
sure your NEOs are connected as shown by the indicators (see
page 7-24).
2. Click Retrieve Responses in the QuizManager control bar, or click the
Communication menu and choose Retrieve Responses. On Windows
computers, you can also click in the toolbar in the QuizManager
window.
3. Find the quiz that you want to retrieve responses for and click the quiz file
to highlight it. Then, click Select. You need to select the quiz file because
QuizManager uses some information in this file to organize the data from
the NEOs. The Retrieve Responses window will appear.
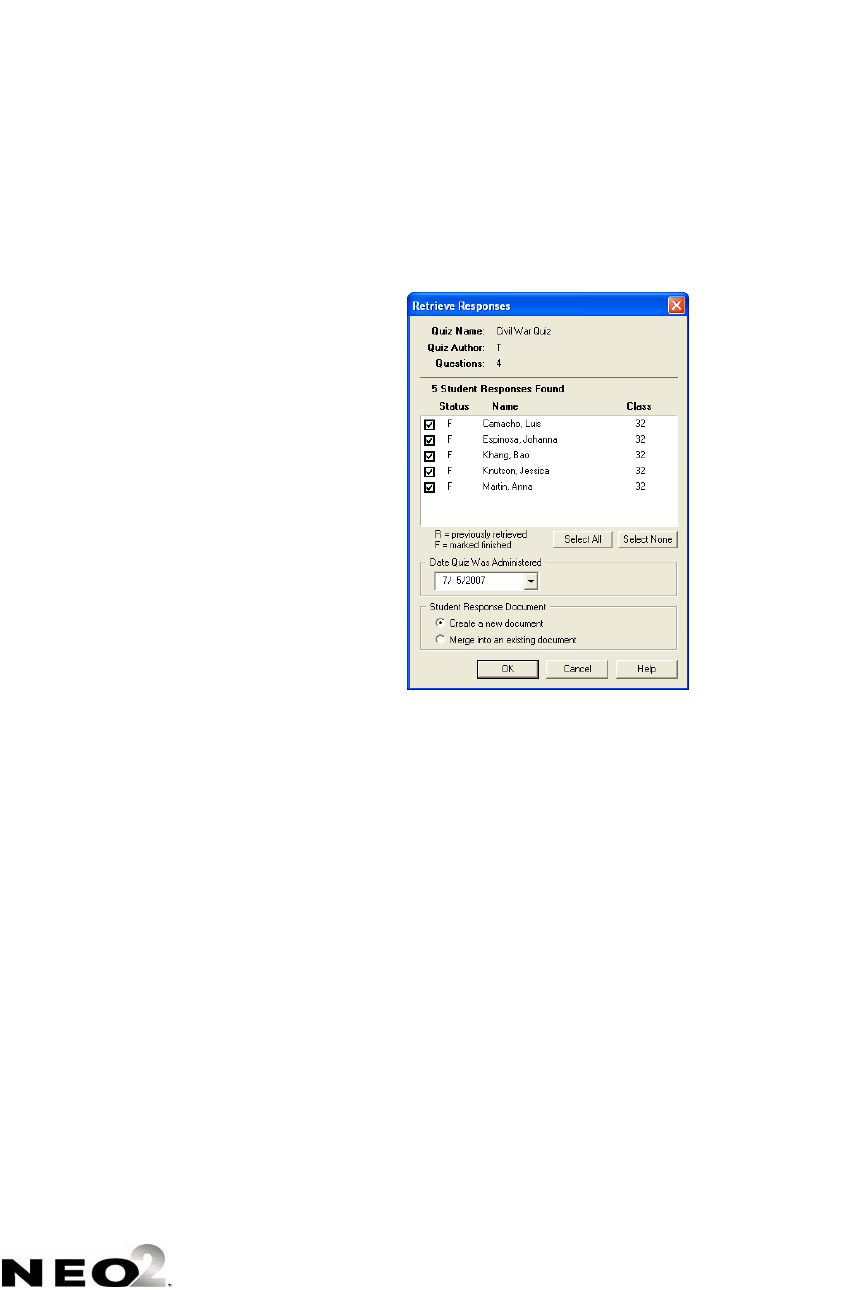
ALPHAQUIZ
Retrieving Students’ Responses from NEOs Using QuizManager
7-36
. . . . .
4. Check the box next to each student whose responses you want to retrieve
. You can click them one by one, click Select All, or click Select None
and then check the boxes for the students whose responses you want. As
you select students, note the status for each one ; R means you’ve
already retrieved the responses. F means the student’s quiz has been
marked finished (if you required them to mark it finished).
5. Choose the date the quiz was administered:
• Windows computers: Choose the date from the drop-down list .
• Macintosh computers: Click each portion of the date and click the
arrows to increase or decrease the number.
6. Click one of the Student Response Options :
• Create a new document: Choose this if you have never retrieved
responses for this quiz before of if you are starting over.
• Merge into an existing document: Choose this if you have retrieved
and saved some students’ responses from this quiz, but you have
more student responses to merge in to that document. Be sure that
you save the document before merging responses into it.
7. Click OK. Student responses will be retrieved. If you chose to merge
responses into an existing document, you’ll be asked to select that
document and click Open.
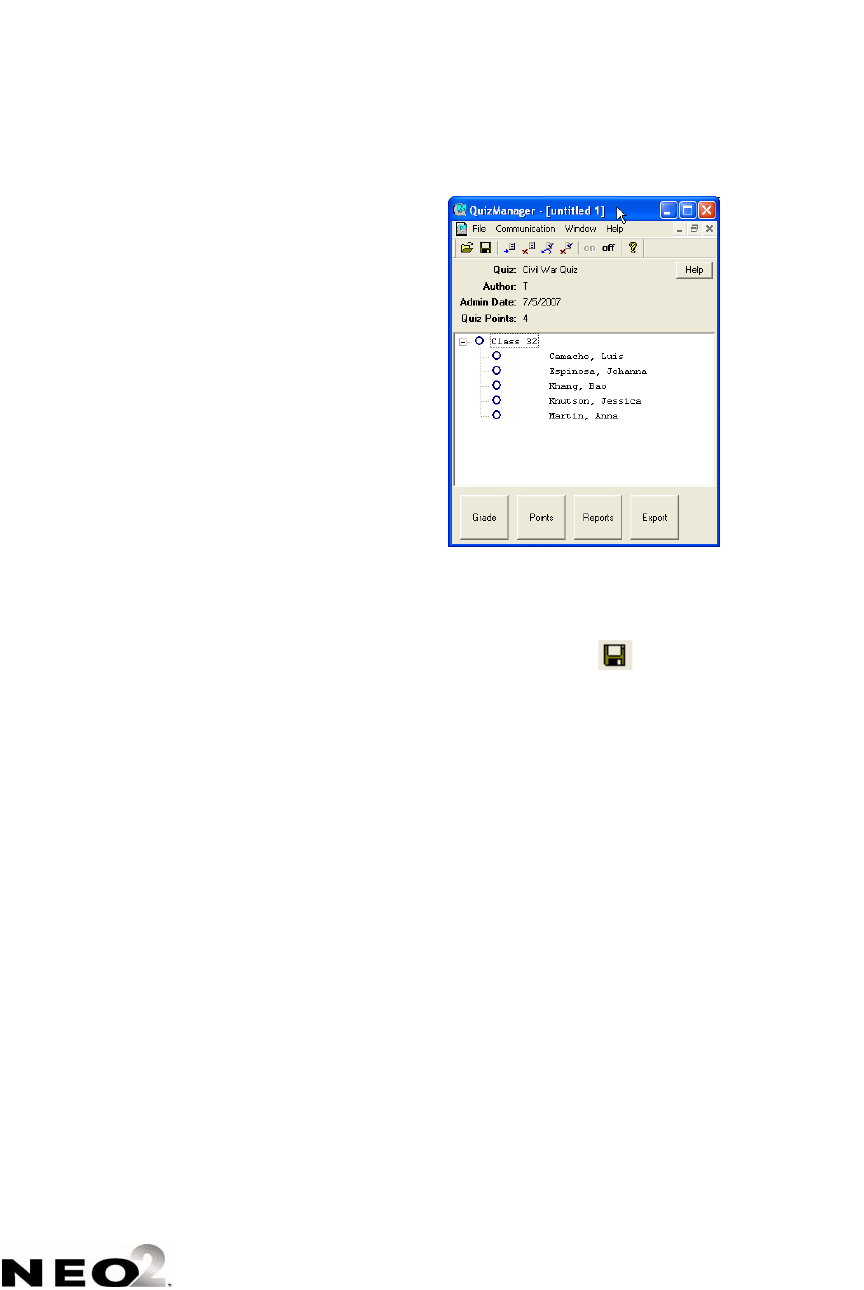
ALPHAQUIZ
Deleting Students’ Responses to Quizzes Using QuizManager
7-37
. . . . .
When the process is done, the students will be listed under the class in
the QuizManager window.
To grade the responses, see page 7-41.
To save the responses, click the File menu, choose Save, and choose a
name and location for the saved responses. Then, click Save. (On
Windows computers, you also can click in the QuizManager toolbar.)
To delete the responses from NEOs after you have saved them in
QuizManager, see the next section of this manual.
Deleting Students’ Responses to Quizzes Using
QuizManager
Once you have retrieved and saved students’ responses to a quiz, you can use
QuizManager to remove them from NEOs by following the steps below. The
quiz itself will remain on the NEO until you delete it so that other students
can take the quiz, but the responses of students who have already taken the
quiz will be deleted.
1. Connect your NEOs to the computer, either through a SmartOption Cart
with an AlphaHub or directly with a USB cable. In QuizManager, make
sure your NEOs are connected as shown by the indicators (see
page 7-24).
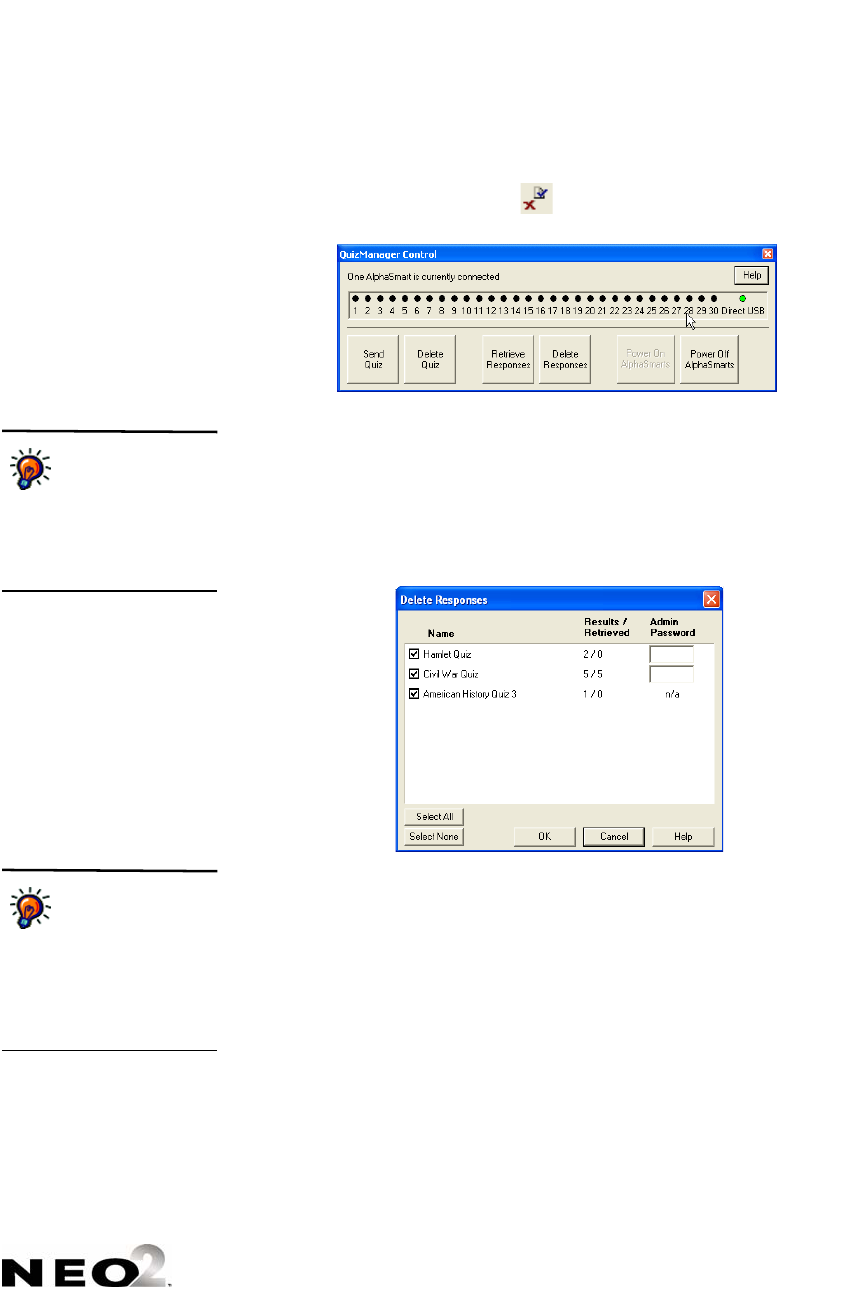
ALPHAQUIZ
Deleting Students’ Responses to Quizzes Using QuizManager
7-38
. . . . .
2. Click Delete Responses in the QuizManager control bar, or click the
Communication menu and choose Delete Responses. On Windows
computers, you can also click in the toolbar in the QuizManager
window.
3. Check the quizzes for which you want to delete responses on the NEO(s)
. As you select quizzes, note the information in the Results/Retrieved
column . The first number (Results) shows how many students have
taken the quiz. The second (Retrieved) shows how many students you’ve
retrieved responses for. Make sure you’ve retrieved student responses for
the quiz before you delete those responses unless you want students to
start over or you want to discard student work on this quiz.
4. If an administrative password was set for the quiz, you must enter it in the
blank field after the quiz.
5. Click OK. The student responses for the quiz will be deleted from the
connected NEO(s).
6. Click Close (Windows) or OK (Macintosh) when the program notifies you
that the responses have been deleted.
You can use Select
All to quickly check
all boxes. Click
Select None if you want to
remove all check marks
before checking the quizzes
you want.
The administrative
password can be set
when you create a
quiz. To find it for an existing
quiz, open the quiz in
QuizDesigner, click Quiz
Options, and look in the
Admin Password field.
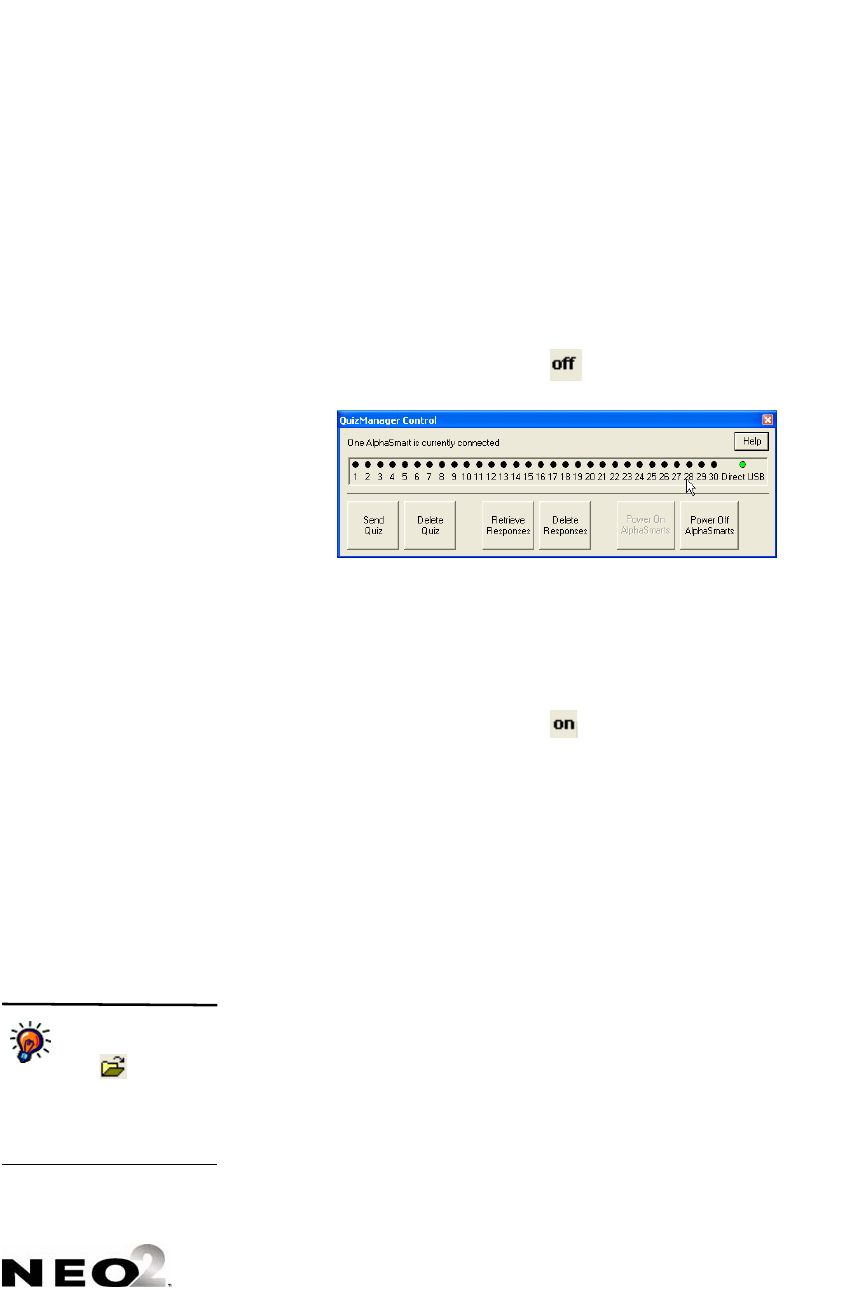
ALPHAQUIZ
Turning NEOs On or Off Using QuizManager
7-39
. . . . .
Turning NEOs On or Off Using QuizManager
When you exit QuizManager with NEOs connected, the NEOs are
automatically turned off. If you want to turn off all NEOs while QuizManager
is still open, do one of the following:
•Click Power Off AlphaSmarts on the Control Bar .
•Click the Communication menu and choose Power Off AlphaSmarts.
• On Windows computers only, click in the toolbar in the QuizManager
window.
To turn the AlphaSmarts on again through QuizManager, do one of the
following:
•Click Power On AlphaSmarts on the Control Bar.
•Click the Communication menu and choose Power On AlphaSmarts.
• On Windows computers only, click in the toolbar in the QuizManager
window.
Assigning Points (Weights) to Quiz Questions in
QuizManager
By default, each question in a quiz is worth one point. In QuizManager, you
can assign different points (weights) to each question by following the steps
below. You can either change points after grading based on how difficult the
questions seemed for students, or you can change them before grading the
quiz. However, you must retrieve student responses before you can assign
points to questions.
1. Make sure you have retrieved student responses from the quiz (see
page 7-35) and that you are viewing the student response document. If
you closed the document, click the File menu, click Open, and select and
open the document.
On Windows
computers, you can
click on the
QuizManager toolbar to
open a student response
document instead of choosing
Open from the File menu.

ALPHAQUIZ
Assigning Points (Weights) to Quiz Questions in QuizManager
7-40
. . . . .
2. Click Points at the bottom of the window.
3. In the Question Points window, you can change the points for each
question by clicking in the field and changing the number. The percentage
next to each question will adjust automatically.
If you want to enter fractional points, use a decimal point. You can enter
one digit after the decimal point.
If you decide to throw out a question so it does not count for any student,
enter “0” for that question.
You can press the tab key to move from the points for one question to the
next question.
4. Click OK to save your changes to points.
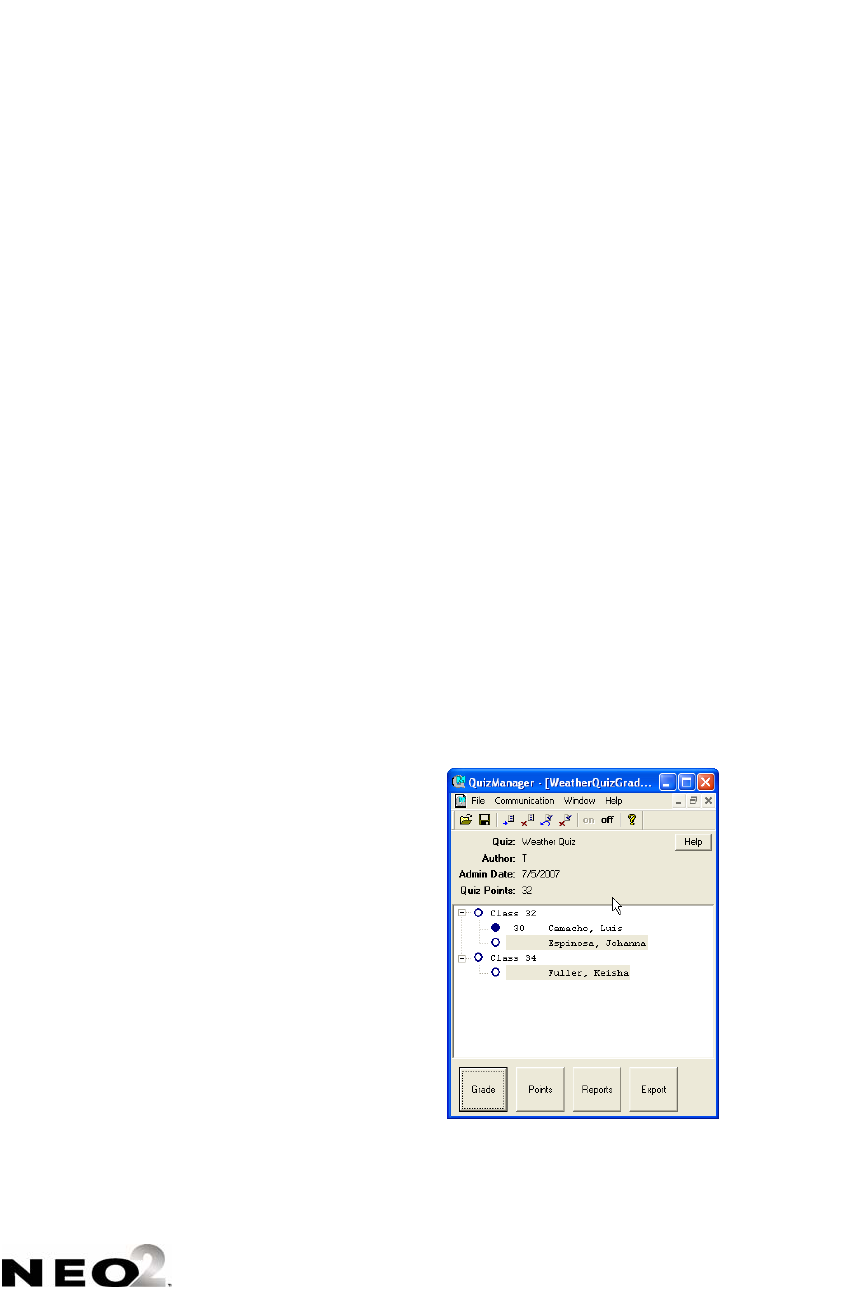
ALPHAQUIZ
Grading Quizzes in QuizManager
7-41
. . . . .
Grading Quizzes in QuizManager
After you’ve retrieved student responses for a quiz (see page 7-35), you can
grade the quiz by following the steps below. You may also want to assign
different points to questions (see page 7-39) before grading the quiz.
Some questions can be graded automatically by QuizManager, such as
multiple choice questions, true/false questions, and short answer questions
for which you’ve entered an answer that QuizManager can match to student
answers.
1. Select the students whose quizzes you want to grade:
•To select all students in a class (if classes are listed), click the class
name.
•To select one student, click the student’s name to highlight it.
•To select more than one, hold down the Ctrl key (Windows) or the z
key (Macintosh) as you click student names. To select a group of
students, click the first name in the group, hold down the Shift key,
and click the last name in the group. You can select students from
more than one class.
•Click – to collapse a class so you don’t see its students, or click + to
see the students in a class again.
•If the circle next to a name is filled in, that student’s quiz has already
been graded. (See the circle next to Luis Camacho in the example
below.) The student’s score is shown after the circle.
2. Click Grade at the bottom of the window.
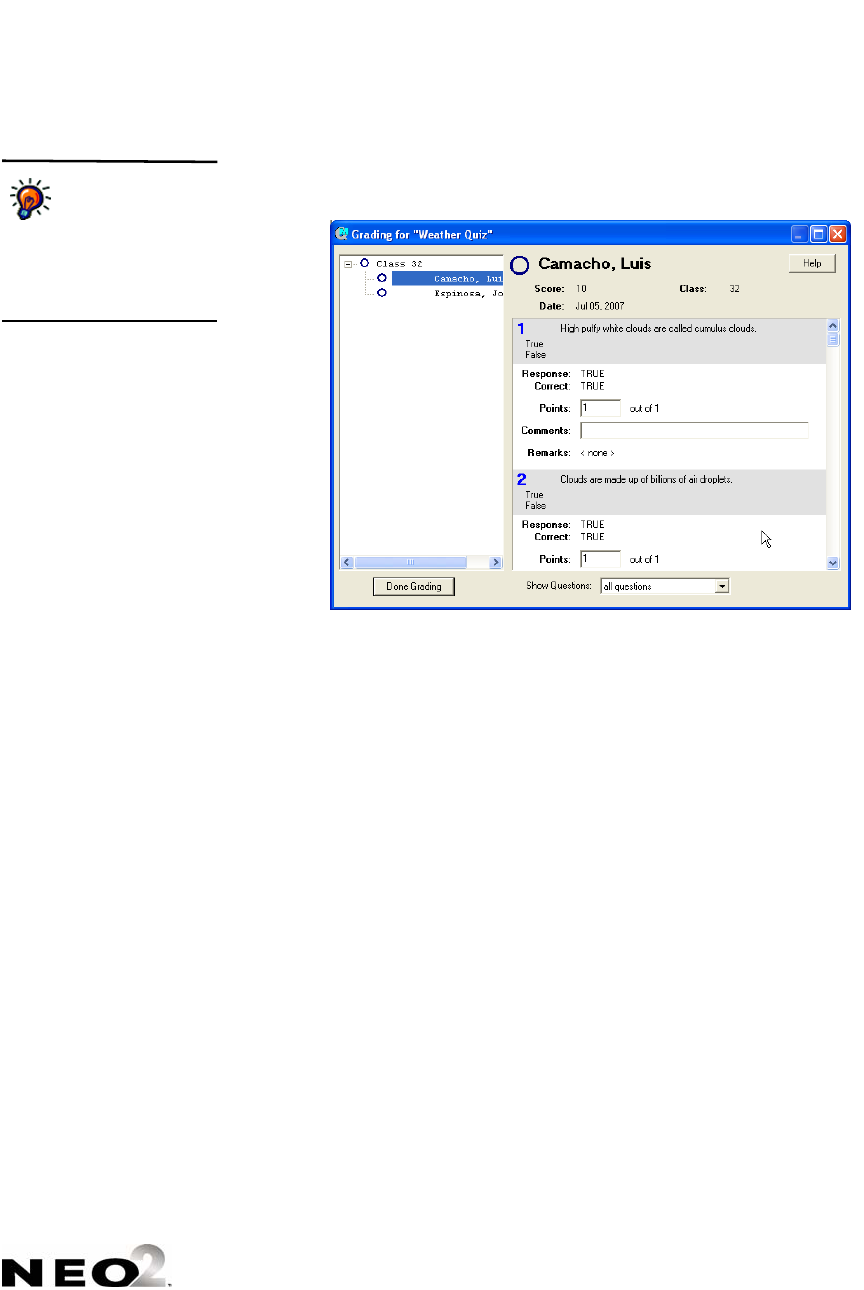
ALPHAQUIZ
Grading Quizzes in QuizManager
7-42
. . . . .
3. In the grading window, adjust the student’s points for each question as
needed. For essay questions and short answer questions, QuizManager
does not award points automatically, so you must award them yourself.
You can’t change the
correct answer or
the remarks in
QuizManager. Those were
set when you created or
edited the quiz in
QuizDesigner.
The name of the student
whose quiz you’re grading.
The gray bar includes the
question number, the question,
and the question type.
The Response is the student’s
answer. The correct answer is
shown below it.
Change the points earned as
needed. For true/false,
multiple-choice, and some
short answer questions,
QuizManager awards points
automatically. For essay
questions and some short
answer questions, you must
award points yourself. You
can’t enter more points than
the question is worth. To set
points, see page 7-39.
Comments may help explain to
the student why he or she did
not receive full credit. They
may also provide extra
information or encouragement.
You can include comments in
the Corrected Quiz Report.
Remarks were entered when
you created the quiz. They
may include references to the
textbook or other information
that will help students. You can
include remarks in the
Corrected Quiz Report.
You can view all questions,
just those that weren’t
automatically graded, or just
those that need grading
because no points have been
awarded.
If you selected multiple
students, after you finish
grading one student’s quiz,
you can click the next
student’s name to grade his or
her quiz.

ALPHAQUIZ
Printing Reports in QuizManager
7-43
. . . . .
4. When you’ve finished grading this quiz for this student, you can click the
next student’s name J if you chose more than one student.
5. Click Done Grading when you’ve finished grading the quiz for all the
students you selected. If necessary, select other students and click Grade
to grade their quizzes.
Printing Reports in QuizManager
About the Reports in QuizManager
In QuizManager, you can print reports that provide more information about
your students’ work on a quiz. You can print four reports, which are described
in the table below. The table also shows which information you can choose to
include when you print the report. In addition to these options, you can
choose whether to use tabs in the report so it’s easy to export to a spreadsheet.
Report When to Use It Information You Can Choose to Include
Grading Sheet A printed grading sheet for a quiz.
This can be helpful if your quiz
contains questions that can’t be
automatically scored, such as essay
questions. The printout lets you
grade the quiz away from the
computer and enter the points into
QuizManager later.
•Quiz name
• Class number
• Date the quiz was taken
• The questions and answer choices
• Student responses (answers)
• Blanks for scores for each question
• Blanks for comments for each question
• All questions or only those that weren’t
automatically graded
Corrected Quiz
Report
A graded quiz report that you can
hand back to students to show
them how they did on the quiz.
Each student’s report prints on a
separate page.
•Quiz name
• Student name
• Class number
•Date quiz was taken
•Score
• The questions and answer choices
• Student responses (answers)
• The correct answers
• Teacher comments from grading
• The question remarks you added when creating
the quiz
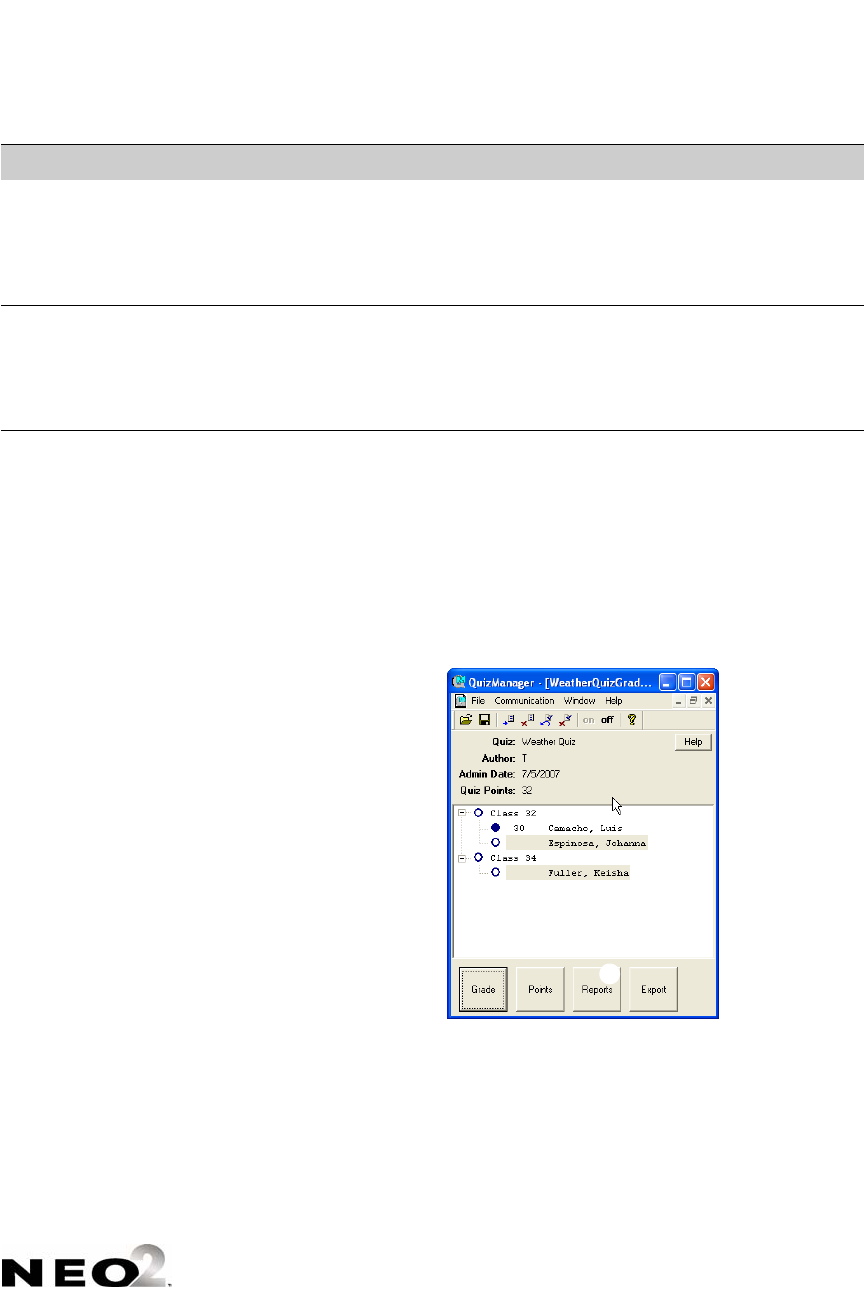
ALPHAQUIZ
Printing Reports in QuizManager
7-44
. . . . .
How to Print Reports
To print reports in QuizManager, follow these steps:
1. Make sure you have retrieved student responses from the quiz (see
page 7-35) and that you are viewing the student response document. If
you closed the document, click the File menu, click Open, and select and
open the document.
2. Click Reports A at the bottom of the window.
Quiz Summary
Report
A tab-delimited list of student
names and grades for a quiz. This
report is intended for teachers
only.
•Quiz name
• Class number
• Date the quiz was taken
• Student names
• Student scores
Statistical Report A report that provides statistics
such as class averages, medians,
and score distributions as well
with the frequency of missed
questions.
• Average score
• Median score
•High and low scores
• Score distribution
• Missed question summary
Report When to Use It Information You Can Choose to Include
A
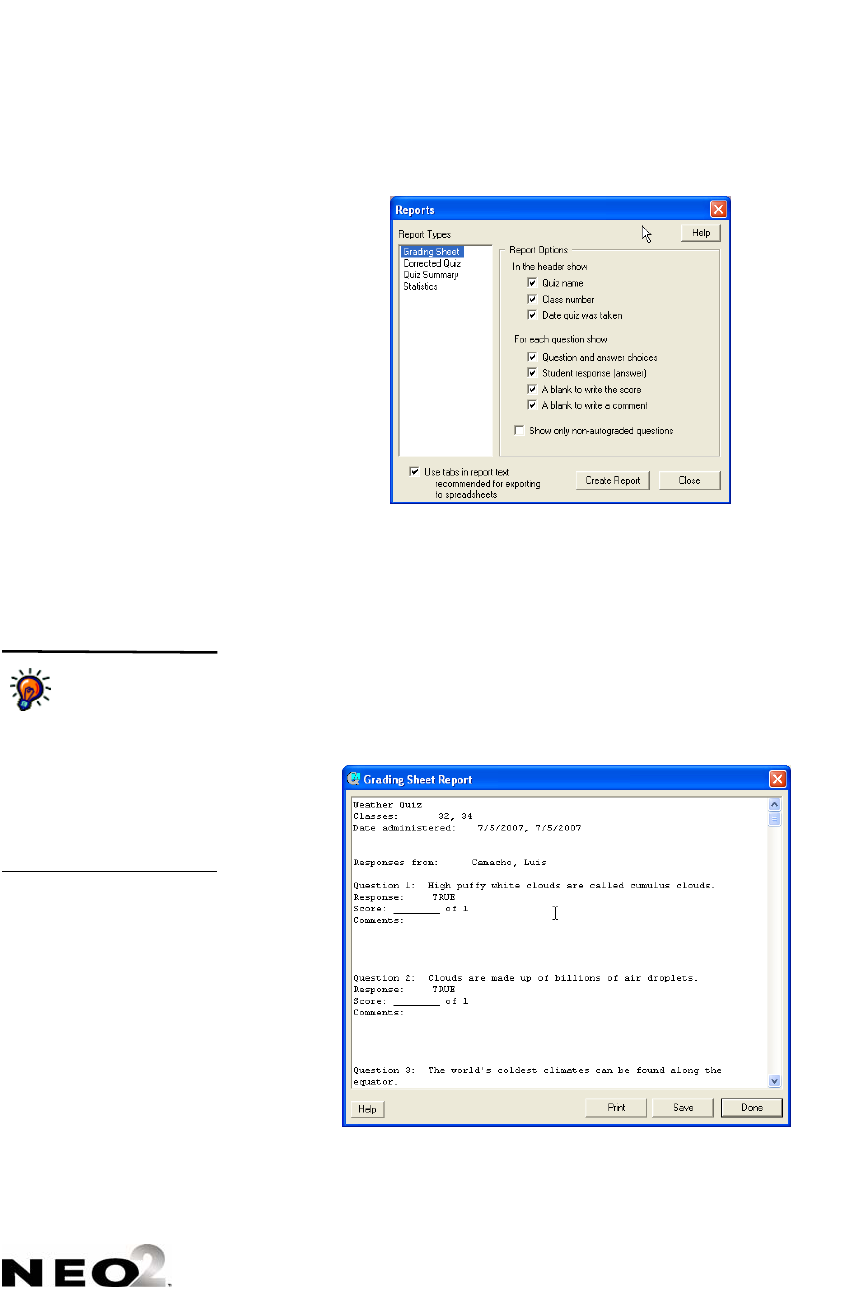
ALPHAQUIZ
Printing Reports in QuizManager
7-45
. . . . .
3. On the left side of the window, click the name of the report you want to
print B.
4. On the right side of the window, check the boxes for the information you
want to include C. If you want tabs in the report text, check that box D.
5. Click Create Report. The report will appear in a window like the one
shown below.
6. Use the buttons in the window to print or save the report:
•To print the report, click Print. In the print dialog box, click OK
(Windows) or Print (Macintosh).
•To save the report as a text file, click Save. Then, choose a location
for the report file and enter a name; then, click Save.
B
C
D
On Macintosh
computers only, you
can also choose
whether to view the report
for all selected students or
just one student. Click the
drop-down list at the bottom of
the window to choose a
student name or All
Students.
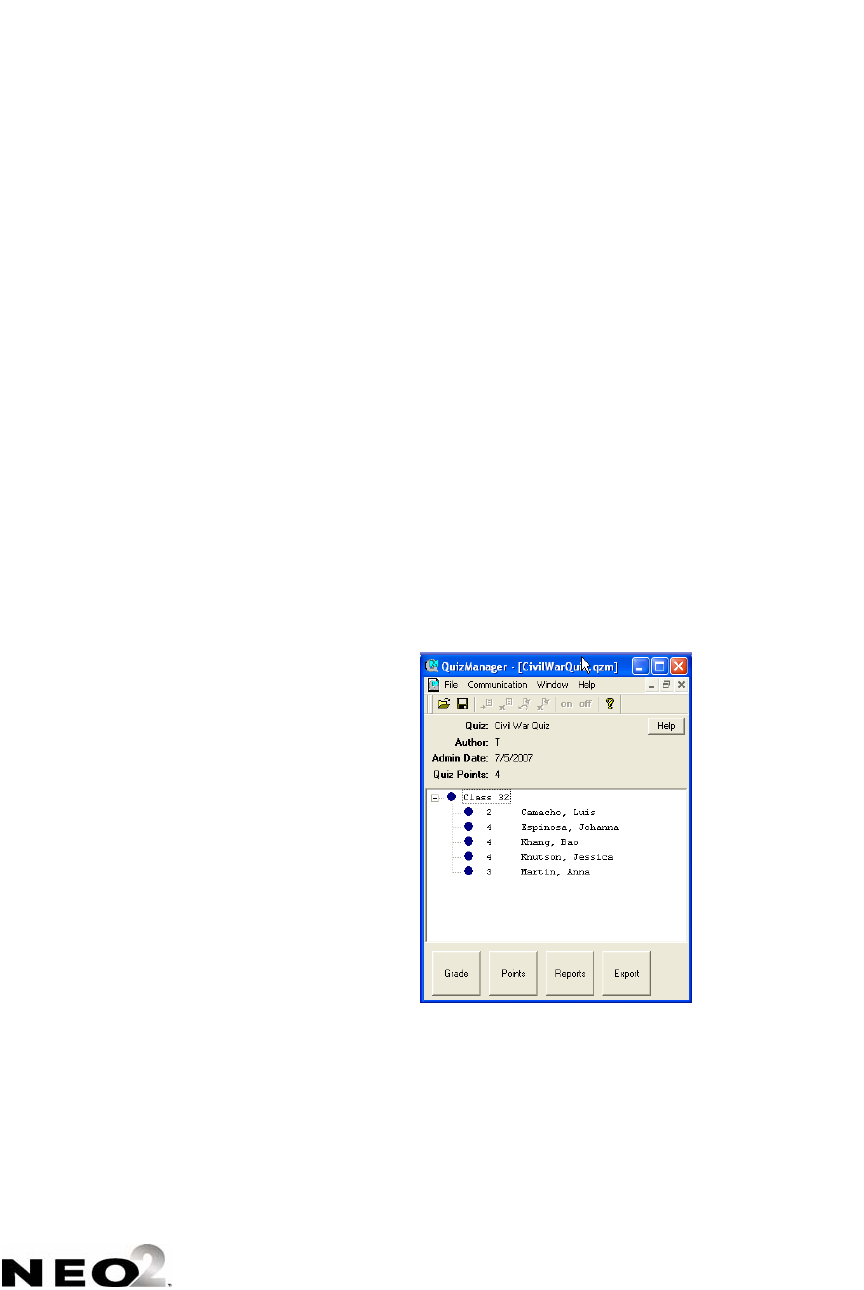
ALPHAQUIZ
Exporting Student Quiz Scores
7-46
. . . . .
7. Click Done to close the report window.
8. Click Close to close the Reports window.
Exporting Student Quiz Scores
By following the steps below, you can export student quiz scores so that you
can bring them into a computerized gradebook program. If you want
QuizManager to match the students’ quiz scores to their names in the grade
book program, the gradebook program must be able to 1) export a text file
roster of student names, and 2) import a text file of names and scores.
1. In your gradebook program, export a student roster and save it as a text
file if you’d like QuizManager to match the student scores to these names.
Make sure you enter the last name, a comma and space, and then the
first name (as in Smith, John).
2. Make sure you are viewing the student response document. If you closed
the document, click the File menu, click Open, and select and open the
document.
3. Click Export A at the bottom of the window.
A
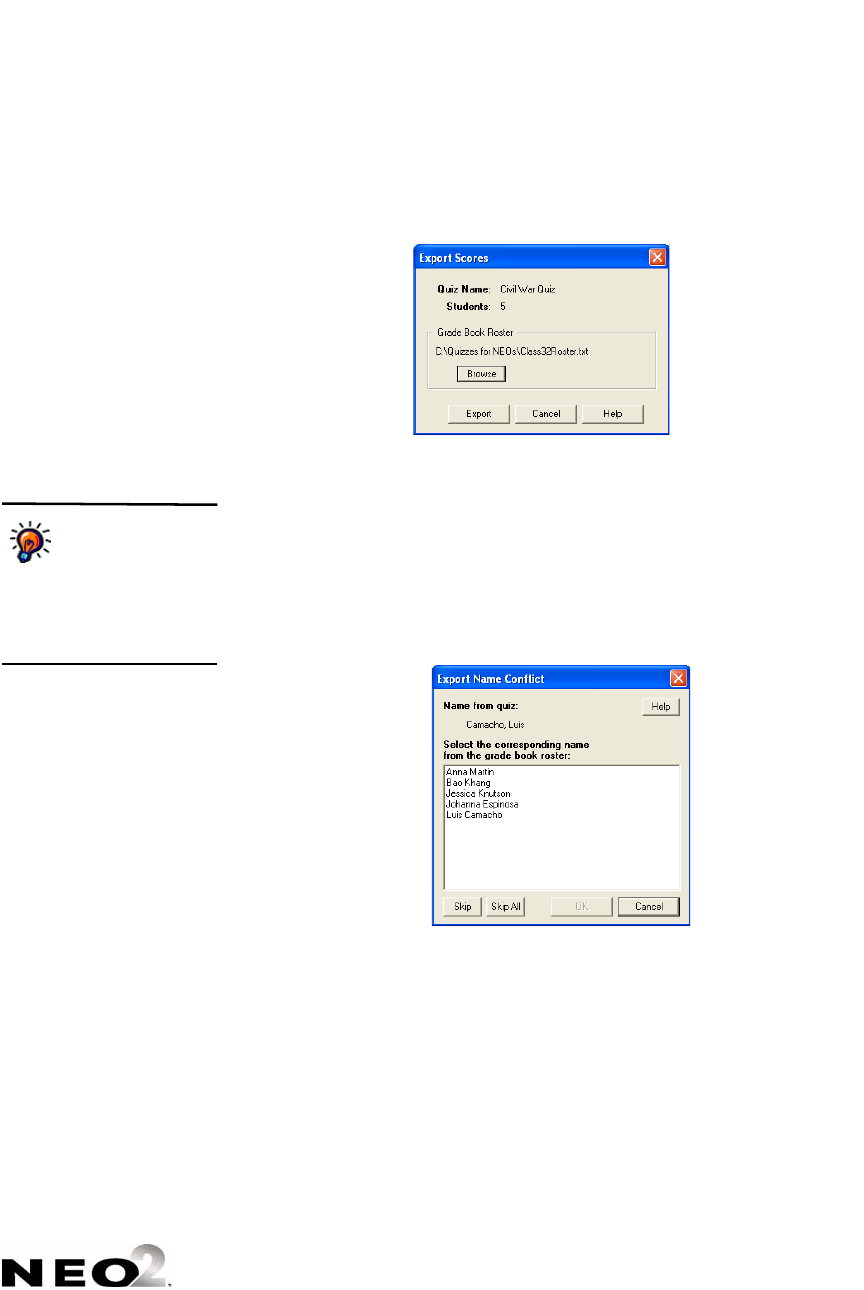
ALPHAQUIZ
Exporting Student Quiz Scores
7-47
. . . . .
4. If you exported a text file of student names from your gradebook program,
click Browse B to select the file. In the dialog box that opens find the file,
click it once, and click Select (Windows) or Choose (Macintosh). The
path to the file will be shown.
5. Click Export.
6. If you are using a roster file, QuizManager compares the students who
responded to the quiz to those in the text file you exported from your
gradebook program.
If QuizManager can’t match a name, you’ll see the Export Name Conflict
window. If the correct name is in the list, click it and click OK. If not, click
Skip (or Skip All to skip all non-matching names). Skipped students
won’t be in the exported file.
7. In the Save As dialog box, choose a location for the exported file and
enter a name. Then, click Save.
8. In your gradebook program, import the file that you exported.
B
C
QuizManager can’t
match names if
they’re not in the last
name, first name format.
Different formats will cause
the Export Name Conflict
window to appear.
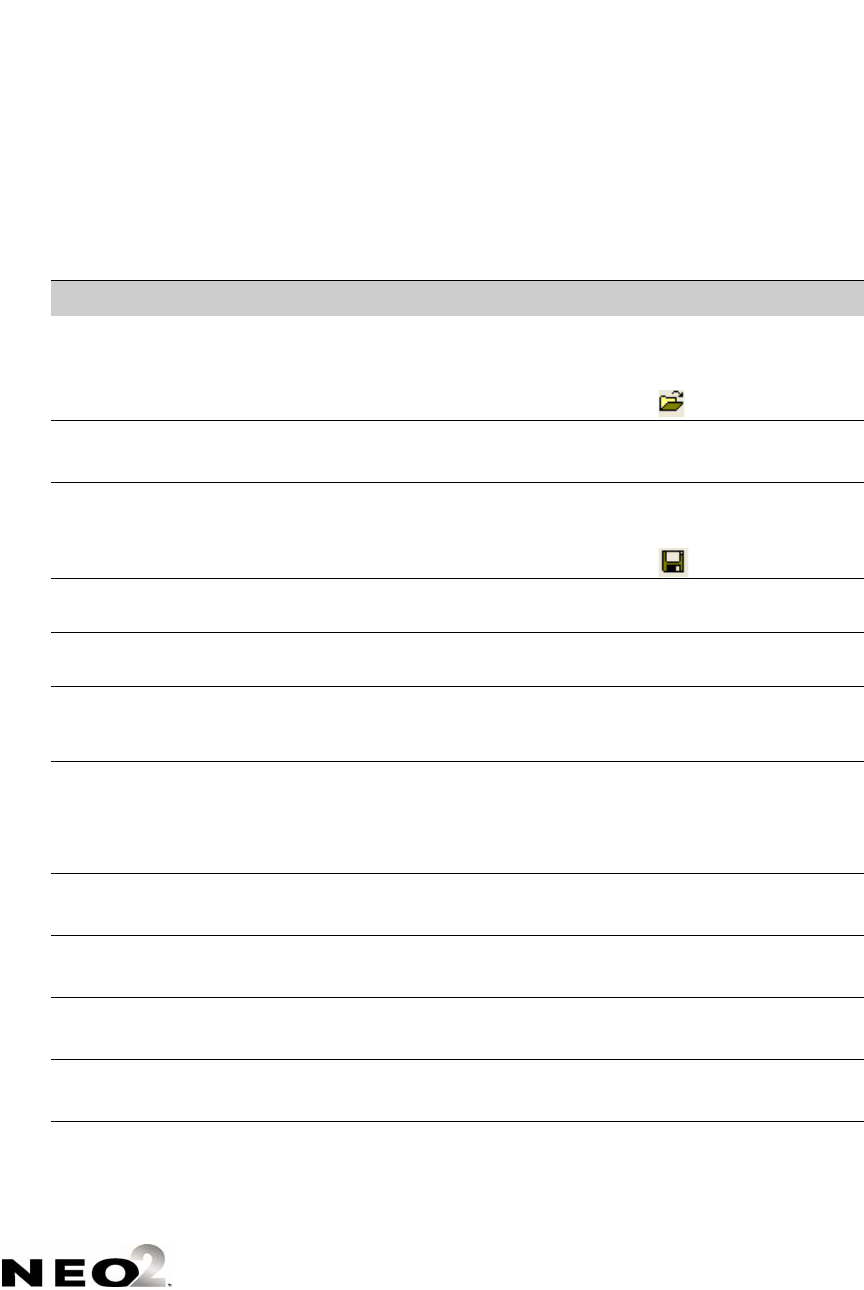
ALPHAQUIZ
KeyBoard ShortCuts in QuizManager
7-48
. . . . .
KeyBoard ShortCuts in QuizManager
The following keyboard shortcuts give you a quick way to perform many of
the tasks in QuizManager. The table below also includes the equivalent menu
commands.
Action Keyboard Shortcut Equivalent Menu Item
Open a file of retrieved
(and possibly graded)
quiz responses.
Ctrl-O (Windows)
-O (Macintosh)
File Open (both Windows and
Macintosh)*
*On Windows computers, you can
also click in the toolbar.
Close a student response
file for a quiz.
None (Windows)
-W (Macintosh)
File Close (both Windows and
Macintosh)
Save a file. Ctrl-S (Windows)
-S (Macintosh)
File Save (both Windows and
Macintosh)
On Windows computers, you can
also click in the toolbar.
Save As. None File Save As (both Windows
and Macintosh)
Set print or page setup
(Macintosh only).
None File Page Setup (Macintosh
only)
Print the student
response set you’re
viewing (Macintosh only).
None File Print (Macintosh only)
Close QuizManager. None (Windows)
-Q (Macintosh)
File Exit (Windows)
File Quit (Macintosh OS 9)
QuizManager Quit
QuizManager (Macintosh OS 10)
Undo last action. Ctrl-Z (Windows)
-Z (Macintosh)
Edit Undo (Macintosh only)
Cut selected text. Ctrl-X (Windows)
-X (Macintosh)
Edit Cut (Macintosh only)
Copy selected text. Ctrl-C (Windows)
-C (Macintosh)
Edit Copy (Macintosh only)
Paste text that you have
cut or copied.
Ctrl-V (Windows)
-V (Macintosh)
Edit Paste (Macintosh only)
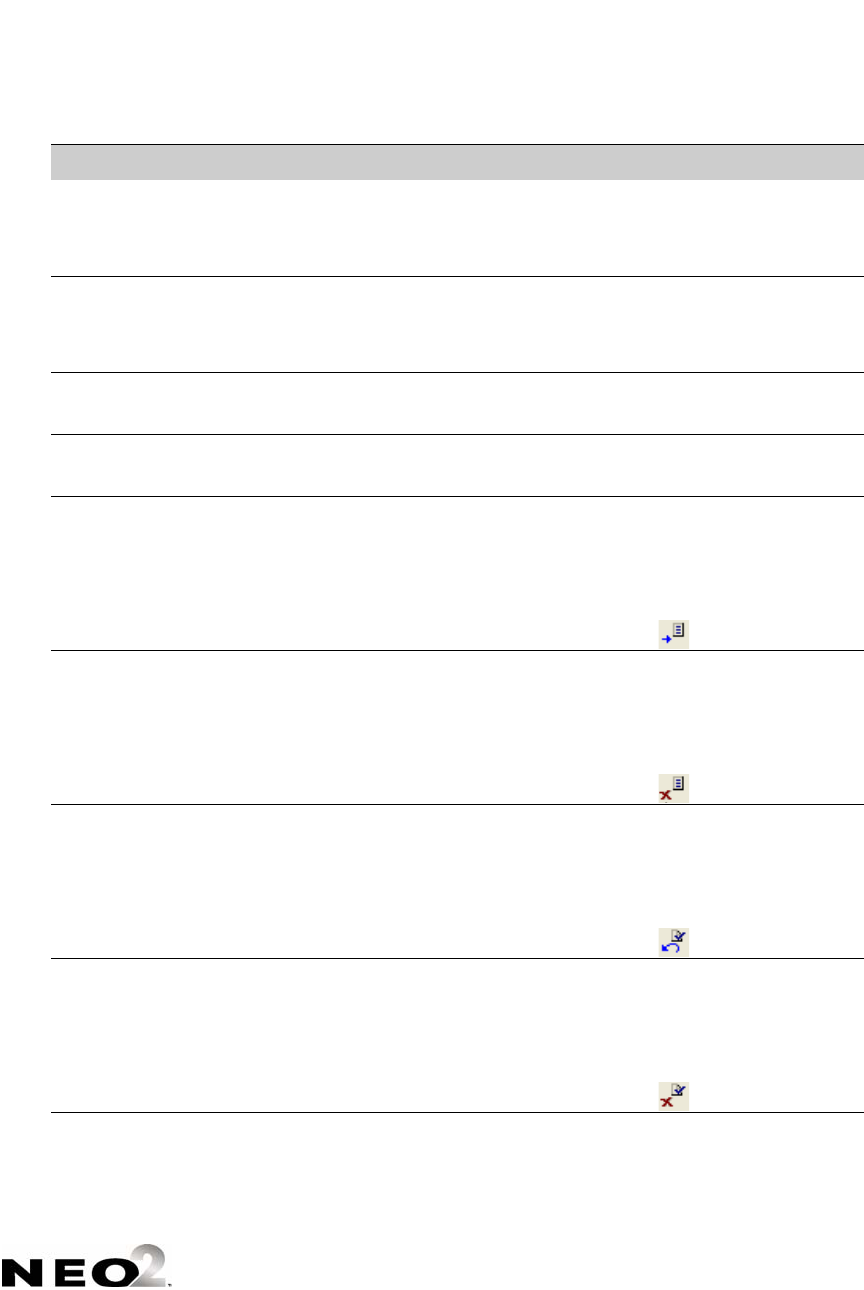
ALPHAQUIZ
KeyBoard ShortCuts in QuizManager
7-49
. . . . .
Clear all text in the field
your cursor is in
(Macintosh computers
only).
None Edit Clear (Macintosh only)
Select all text in the field
your cursor is in
(Macintosh computers
only)
Ctrl-A (Windows)
-A (Macintosh)
Edit Select All (Macintosh
only)
Go to the next student’s
responses.
Ctrl-] (Windows)
-] (Macintosh)
Edit Next Student (Macintosh
only)
Go to the previous
student’s responses.
Ctrl-[ (Windows)
-[ (Macintosh)
Edit Previous Student
(Macintosh only)
Send a quiz to NEOs. None Communication Send Quiz
(Windows)
Communications Send Quiz
(Macintosh)
On Windows computers, you can
also click in the toolbar.
Delete a quiz from NEOs. None Communication Delete Quiz
(Windows)
Communications Delete
Quiz (Macintosh)
On Windows computers, you can
also click in the toolbar.
Retrieve student
responses to quizzes from
NEOs.
None Communication Retrieve
Responses (Windows)
Communications Retrieve
Responses (Macintosh)
On Windows computers, you can
also click in the toolbar.
Delete student quiz
responses from NEOs.
None Communication Delete
Responses (Windows)
Communications Delete
Responses (Macintosh)
On Windows computers, you can
also click in the toolbar.
Action Keyboard Shortcut Equivalent Menu Item
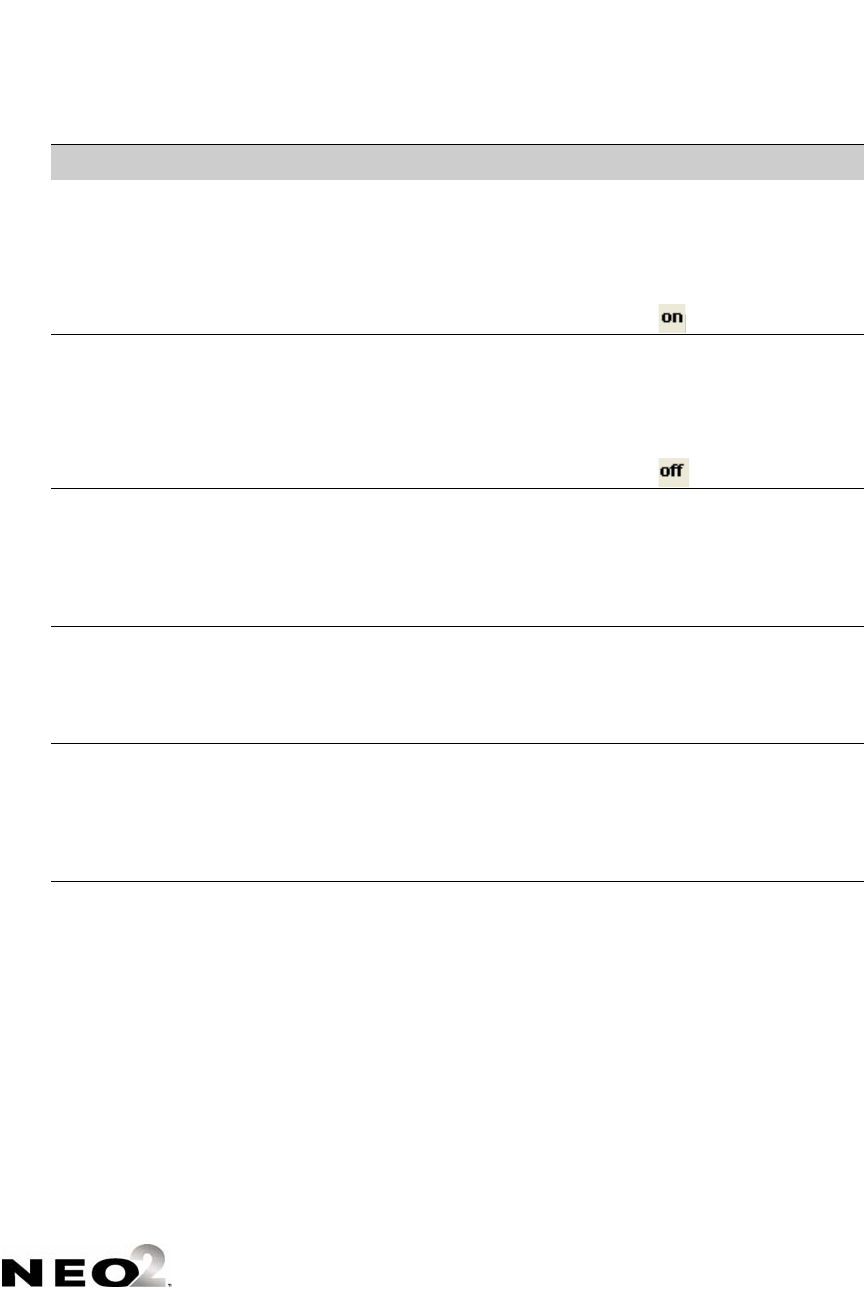
ALPHAQUIZ
Frequently Asked Questions
7-50
. . . . .
Frequently Asked Questions
How many students can take a quiz on one NEO?
The AlphaQuiz SmartApplet can hold responses for up to eight students for
all quizzes combined. For example, if two quizzes have been sent to
AlphaQuiz on the NEO, and two students have taken one of the quizzes, six
can take the other quiz.
Turn connected NEOs on
(after having turned them
off through
QuizManager).
None Communication Power On
AlphaSmarts (Windows)
Communications Power On
AlphaSmarts (Macintosh)
On Windows computers, you can
also click in the toolbar.
Turn connected NEOs off. None Communication Power Off
AlphaSmarts (Windows)
Communications Power Off
AlphaSmarts (Macintosh)
On Windows computers, you can
also click in the toolbar.
View or turn off toolbar in
QuizManager student
response window
(Windows only). The
toolbar is visible when the
menu item is checked.
None Window View Toolbar
(Windows only)
View or close the Control
Bar (Windows only). The
Control Bar is visible
when the menu item is
checked.
None Window View Control Bar
(Windows only)
Tile windows for open
student response files.
This allows you to arrange
the windows so you can
view both at the same
time.
None Window Tile Windows
(Windows only)
Action Keyboard Shortcut Equivalent Menu Item

ALPHAQUIZ
Frequently Asked Questions
7-51
. . . . .
How many different quizzes can be loaded onto a NEO?
Up to four different quizzes can be on the NEO at the same time.
Does the student response to a short answer question have to be spelled
correctly? Is it case-sensitive?
If you have entered answers for short answer questions when you created the
quiz in QuizDesigner, QuizManager can only match student responses that
use the exact same spelling. To help QuizManager match student answers,
you can enter more than one correct answer in QuizDesigner with variations
in spelling, or you can enter multiple forms of the word (such as “rain” and
“raindrops”). When you create the quiz in QuizDesigner, you can turn on case
sensitivity. You can also restrict answers to numbers only.
What happens if a student skips a question?
AlphaQuiz allows students to answer questions in any order they like. They
can skip any question and return to it later. At the end of the quiz, students
can choose to view a list of questions with blank answers by pressing -B;
then, they can jump directly to one of those questions by pressing -J and
entering the question number. When you create the quiz in QuizDesigner,
you can choose whether students can exit the quiz and enter it later to update
responses, or whether students must mark the quiz finished so they can no
longer change their responses.
If I’m using an AlphaHub (SmartOption Cart), and I also have an open USB
port on my computer, can I use both methods of communication between
QuizManager and NEOs at the same time?
Yes. QuizManager supports AlphaHub communication and a direct USB
connection simultaneously. This allows you to work with up to 31 NEOs at
once with QuizManager.
Can a student spell check an essay question?
Spell check can’t be used directly within AlphaQuiz, although it can be used in
other SmartApplets, such as AlphaWord Plus. In QuizDesigner, the author of
a quiz can choose whether to allow use of spell check during the quiz. When
use of spell check is allowed, the student can copy text from an essay answer,
switch to AlphaWord on the NEO, and spell check the text there. When spell
check is disabled, the student cannot spell check the text in any SmartApplet.

ALPHAQUIZ
Frequently Asked Questions
7-52
. . . . .
By default, spell check is enabled unless you do the following on the Advanced
tab in the Quiz Options in QuizDesigner:
•Check Require students to mark quiz as finished.
•Do not check Enable AlphaSmart Spell Checker when taking the
quiz.
•Do not check Enable other AlphaSmart SmartApplets when taking
the quiz so that students can’t use spell check in other SmartApplets.
What do students do when they complete a quiz?
Press -F (for “finished”) to return to the quiz menu. At this point, the NEOs
can be connected to your computer so you can retrieve quiz responses.
Can a student take a quiz twice?
Yes. This can be done in one of two ways:
• Delete the responses for the quiz from the NEO (see page 7-37) and have
the student take the quiz again.
• When the student enters his or her name at the beginning of the quiz, have
the student use a different form of his or her name (such as Olivia Smith-2).
If the student tries to use the same name used for the first quiz, AlphaQuiz
will simply open the students’ first set of responses again.
Is it possible to print a quiz from the teacher’s computer?
The QuizManager reports let you choose to print elements of a quiz. The
Grading Sheet and Corrected Quiz Reports allow you to include the questions
on the quiz and the students answers, and the Corrected Quiz Report also
allows you to include the correct answers and teacher comments. All
QuizManager reports can be printed directly or saved to text files. To print
reports, see page 7-43.
You can also print the original quiz (without any student responses) in
QuizDesigner (see page 7-20).
Once an essay question is graded, what capabilities are there to make
notes on the student response in QuizManager?
When you grade the quiz in QuizManager, you can enter comments for each
of the student’s responses, and you can include these comments when you
print the student’s Corrected Quiz Report.

ALPHAQUIZ
Frequently Asked Questions
7-53
. . . . .
How and when do I assign the point values for each question?
You can assign point values to each question any time after you retrieve the
student responses for a quiz. For instructions, see page 7-39.
When you first write a quiz in QuizDesigner, all questions have the same
weight/point value—one point. You can click Points in QuizManager to
change the point values for each question. QuizManager will calculate the
weight (in %) for each question based on the point values you enter.
Can the grades from quizzes be saved as a spreadsheet file or be copied
and pasted directly into a tab-delimited grading program?
Yes, When you export the student quiz scores from QuizManager (see
page 7-46), you are creating a tab-delimited file that you can open with a
spreadsheet program or import into a gradebook program. QuizManager can
also match student scores to a student roster exported from a gradebook
program, and it allows you to manually match names that QuizManager could
not match.
In essay responses, will AlphaQuiz or QuizManager highlight or underline
key words that were defined when creating the question?
No, this feature is not available.
What happens if the NEO is turned off before a quiz is completed? What
appears on the screen when the NEO is turned back on? How does a student
continue the quiz?
All the student’s responses are saved when the NEO is turned off. When it is
turned back on, the NEO starts its default SmartApplet, which is usually
AlphaWord Plus. The student can press applets, select AlphaQuiz, and
then select the quiz again. All responses are preserved and displayed as if the
student had never exited the quiz.
If you chose to require students to mark the quiz as finished, and if you chose
to block access to other SmartApplets during the quiz, when the NEO starts,
you will see this message: “The other applets, including AlphaWord, cannot
be used because a quiz has not been marked as finished. Press any key to
continue.” After the student presses a key, the student can log in to the quiz
again.

ALPHAQUIZ
Troubleshooting
7-54
. . . . .
Troubleshooting
The QuizManager control bar shows a yellow indicator.
A yellow indicator means that this connected NEO does not have the
AlphaQuiz SmartApplet installed. Send any files that you want to save from
the NEO to your computer, and use AlphaSmart Manager to install
AlphaQuiz on that NEO (see page 1-2).
The QuizManager control bar shows a black indicator, but a NEO is
connected to that location on the Cart or to the USB port on the computer.
There are a few reasons why this might happen:
• That NEO may be off, or it may have a version of AlphaWord earlier than
v1.4 installed. Make sure the AlphaSmart device is on, and check the
version number that appears when the device starts up.
• Some older AlphaSmart 3000s need to be powered on before they are
connected to either the hub or the computer. If the device is connected but
the indicator is black, disconnect the device, turn it on, and then reconnect
it.
• Make sure that QuizManager was properly installed. When installed
correctly, the installer loads drivers (required software) for AlphaHub and
USB communications. On the Macintosh, you can use the System Profiler
to check whether the system software detects the AlphaHub.
I have a quiz installed on some NEOs, and I have student responses that I
have not yet retrieved, but I’ve accidentally erased the quiz document from
my computer. Now I can’t retrieve, or even remove, the responses.
To recover the responses, press send on the NEOs from within the quiz to
create a copy of the quiz and responses in an AlphaWord file, or directly print
the responses. Once you have recovered all responses, use QuizManager’s
Delete Quiz function to clear the quiz from the NEOs (see page 7-27). You can
then create a new version of the quiz for future use.

ALPHAQUIZ
Troubleshooting
7-55
. . . . .
I have a quiz installed on some NEOs, but I have accidentally erased the
quiz document from my computer and I don’t remember the Admin
Password. Now I am unable to remove the quiz from the NEOs.
If there are any responses for other quizzes stored on the NEOs, use
QuizManager to retrieve them. Then, print any response sets for the “lost”
quiz on each NEO (see page 7-31), or save each one as an AlphaWord file and
transfer it to your computer for archival (see page 7-32). You can now delete
and reinstall AlphaQuiz using AlphaSmart Manager; this will remove all
quizzes, including the “lost” one.
Follow these steps:
1. On the SmartApplets tab in AlphaSmart Manager, select all the
SmartApplets you want to keep on the NEOs except for AlphaQuiz and
click Add. Check the Delete SmartApplets that are not in the Install
List box. Click the Send List tab and click Send.
2. When AlphaSmart Manager finishes sending the SmartApplets to the
NEOs, open a new send list by choosing File New Send List. On the
SmartApplets tab, select AlphaQuiz and click Add, and uncheck the
Delete SmartApplets box. Click the Send List tab and click Send.

ALPHAQUIZ
Troubleshooting
7-56
. . . . .

8-1
I
NDEX
A
A code in AlphaQuiz 7-33
About this manual 1-1
Accuracy activities in KeyWords 5-6
Accuracy and speed builders in KeyWords 5-5, 5-6
Accuracy and speed test in KeyWords 5-5, 5-8
Accuracy goals in KeyWords 5-13, 5-14, 5-15
Activating schools in KeyWords RP 5-36
Adding a new word to the user dictionary 4-2, 4-3
Adding a student in KeyWords 5-3
Adding words to the user dictionary 4-2, 4-3
Allowing beaming from NEOs 6-12
AlphaQuiz 1-1, 7-1
A code 7-33
assigning points (weights) to questions 7-39
changing quiz options in QuizDesigner 7-12
changing quiz questions in QuizDesigner 7-11
copying quiz questions in QuizDesigner 7-14
Corrected Quiz Report 7-43
creating a question library 7-23
creating quizzes in QuizDesigner 7-6
deleting a student’s responses to all questions 7-
34
deleting quiz questions in QuizDesigner 7-13
deleting quizzes from NEOs 7-27
deleting students’ responses to quizzes 7-37
downloading QuizDesigner and QuizManager
7-2
exporting quizzes to a text file 7-21
exporting student quiz scores 7-46
F code 7-33
grading quizzes in QuizManager 7-41
Grading Sheet 7-43
how it works 7-1
installing 1-2
installing QuizDesigner and QuizManager 7-2
marking a student’s test finished 7-34
N code 7-33
number of quizzes per NEO 7-51
number of students per NEO 7-50
opening a quiz in QuizDesigner 7-10
passwords 7-16
points for quiz questions 7-39
previewing questions 7-19
printing a quiz from QuizDesigner 7-20
printing quizzes from 7-31
printing reports 7-44
programs with 7-2
prompts for quizzes 7-8
quiz access password 7-16
quiz limit 7-51
Quiz Summary Report 7-44
QuizDesigner 7-2
rearranging quiz questions in QuizDesigner 7-
13
remarks for questions 7-9
reports 7-43
retrieving students’ quiz responses from NEOs
7-35
saving quizzes to AlphaWord files 7-32
sending quizzes to NEOs 7-25
spell checking a quiz 7-22
starting QuizDesigner 7-5
starting QuizManager 7-24
Statistical Report 7-44
student limit 7-50
system requirements 7-2
taking quizzes 7-29
teacher options 7-32
troubleshooting in QuizManager 7-54
turning NEOs off and on using QuizManager 7-
39
U code 7-33
viewing a student’s password 7-34
viewing a student’s responses 7-34
viewing the quiz access password 7-34
weights for quiz questions 7-39
AlphaSmart Manager
Beamer settings 6-12
changing settings in 4-1
deleting all KeyWords students 5-11
deleting SmartApplets from NEOs 1-5
disabling SmartApplets 1-4

INDEX
8-2
. . . . .
generating KeyWords reports 5-21
installing 1-2
installing SmartApplets with 1-2
KeyWords 5-18
KeyWords settings 5-18
retrieving KeyWords data 5-21
settings 4-1
synchronizing KeyWords data with KeyWords
RP 5-23
AlphaWord format for beams to Palm OS devices 6-
13
AlphaWord Plus 1-1, 2-1
adding a word to the user dictionary 4-2, 4-3
beaming files 6-6
deleting the user dictionary 4-2, 4-3
installing 1-2
KeyWords reports in 5-28
settings 4-2
showing tabs and carriage returns 4-4
user dictionary settings 4-2, 4-3
using 2-1
AlphaWord Plus settings 4-2, 4-4
Changing a specific file password 4-2, 4-5
Resetting all file passwords 4-2, 4-5
Turn file passwords on or off 4-2, 4-4
Turn show marks in files on or off 4-2, 4-4
Assigning points (weights) to quiz questions in Quiz-
Manager 7-39
Auto repeat of keys 4-16
B
Backspace key, disabled in KeyWords lessons 5-57
Battery status 4-2, 4-12
Beamer 1-1, 6-1
allowing beaming 6-12
beaming between NEOs 6-3, 6-6
beaming from NEO to Palm OS device 6-6
beaming from Palm OS device to NEO 6-8
beaming in AlphaWord Plus 6-6
can’t find a receiving device 6-13
cancelling a beam 6-11
changing settings 6-12
clipboard 6-2
clipboard, overwriting 6-13
could not find a sending device 6-14
disabling beaming 6-12
finding infrared ports 6-2
format for beams to Palm OS 6-13
installing 1-2
large files 6-15
master password requirement for settings 6-13
overwriting the clipboard 6-2
Permit Send setting 6-12
settings in AlphaSmart Manager 6-12
starting 6-1
troubleshooting 6-13
truncated files 6-15
warn if overwriting clipboard 6-13
Beaming files from a Palm OS device to NEO 6-8
Beaming files from NEO to a Palm OS device 6-6
Beaming files from one NEO to another 6-3, 6-6
Beaming, blocking 6-12
Beaming, cancelling 6-11
Blocking beaming from NEOs 6-12
C
Calculator 1-1, 3-1
calculations 3-1
disabling 3-3
disabling from the SmartApplets menu 3-3
disabling within AlphaWord Plus 3-3
exponents 3-2
installing 1-2
operands 3-1
paper tape 3-2
pasting calculations into other SmartApplets 3-
2
scientific notation 3-2
starting 3-1
turning off 3-3
turning on or off 4-2, 4-8
using 3-1

INDEX
8-3
. . . . .
Callout format 5-32
Can’t find a receiving device in Beamer 6-13
Cancelling a beam 6-11
Capabilities in Renaissance Place 5-45
Carriage returns, showing 4-4
Certificate Report in KeyWords RP 5-43
Changing Beamer settings 6-12
Changing keyboard layout 4-12
Changing quiz options in QuizDesigner 7-12
Changing quiz questions in QuizDesigner 7-11
Changing specific file passwords 4-2, 4-5
Changing the default SmartApplet font 4-2, 4-6, 4-7
Checking KeyWords RP system requirements 5-33
Choosing keyboard layout 4-12
Class Report in KeyWords RP 5-43
Clipboard and Beamer 6-2
Clipboard, overwriting in Beamer 6-13
Congratulations certificate for KeyWords 5-47
Contrast 4-2, 4-9
Control bar in QuizManager 7-24
Control Panel 1-1, 4-1
AlphaWord Plus settings 4-2, 4-4
auto repeat keyboard setting 4-16
Calculator settings 4-2, 4-8
changing keyboard settings 4-2, 4-12
changing settings 4-1
displaying battery status 4-2, 4-12
installing 1-2
keyboard command reference list 4-2
screen contrast setting 4-2
set screen contrast 4-9
settings 4-1, 4-2
spell check settings 4-2, 4-3
starting 4-1
turning Calculator on/off 4-2
two-button on setting 4-2, 4-8
view keyboard layout 4-2
Copying questions from one quiz to another in
QuizDesigner 7-14
Copying quiz questions in QuizDesigner 7-14
Corrected Quiz Report in QuizManager 7-43
Could not find a sending device in Beamer 6-14
Creating a question library in QuizDesigner 7-23
Creating quizzes in QuizDesigner 7-6
D
Darken NEO screen 4-2
Date of birth 5-44
Deactivating KeyWords RP schools 5-36
Default file password 4-5
Default goals in KeyWords 5-13, 5-15
Default SmartApplet font 4-2, 4-6, 4-7
Delay for keys 4-12, 4-15
Deleting quiz questions in QuizDesigner 7-13
Deleting quizzes 7-22
Deleting quizzes from NEOs using QuizManager 7-
27
Deleting SmartApplets from NEOs 1-5
Deleting students in KeyWords 5-11
Deleting students’ responses to quizzes using Quiz-
Manager 7-37
Deleting the user dictionary 4-2, 4-3
Diagnostic Report in KeyWords RP 5-43
Disabled backspace key in KeyWords lessons 5-57
Disabling SmartApplets in AlphaSmart Manager 1-4
Disabling SmartApplets on NEOs 1-3
Disabling SmartApplets on the NEO itself 1-4
Disabling spell check 4-3
Disabling the Calculator 3-3, 4-8
Disabling the Calculator within AlphaWord Plus 3-3
Displaying battery status 4-2, 4-12
Downloading QuizDesigner and QuizManager 7-2
Dvorak keyboard layout 4-2, 4-12
E
Enabling spell check 4-3
Enabling the Calculator 4-8
Enrollment Report in KeyWords RP 5-43
Entering special characters 4-11
Ergonomics, keyboarding 5-47
Error while beaming a file 6-14
Exponents in the Calculator 3-2

INDEX
8-4
. . . . .
Exporting a quiz from QuizDesigner to a text or word
processing file 7-21
Exporting student quiz scores from QuizManager 7-
46
Extra large font 4-6
F
F code in AlphaQuiz 7-33
File passwords 4-2, 4-4
changing 4-2, 4-5
resetting 4-2, 4-5
File passwords and saving KeyWords reports 5-10,
5-12
Finger placement handout for lesson 1 in KeyWords
5-46
Finger placement handout for lessons 2-16 in Key-
Words 5-46
Finger zones handout for KeyWords 5-46
Fixed-width font 4-7
Font sizes 4-6
extra large 4-6
large 4-6
medium 4-6
small 4-6
system 4-6, 4-7
very large 4-6
Fonts, changing on NEOs 4-2, 4-6, 4-7
Formulas with Calculator 3-1
Frequently asked questions about QuizManager 7-
50
Frequently asked questions, KeyWords 5-57
G
Gender 5-44
Goals in KeyWords 5-13, 5-14, 5-15
Grading quizzes in QuizManager 7-41
Grading Sheet in QuizManager 7-43
Group Progress Report in KeyWords 5-12
H
Handouts for KeyWords teachers 5-45
Help for KeyWords RP 5-32
Home row confirmation in KeyWords 5-17
Home row keys handout for KeyWords 5-46
How AlphaQuiz works 7-1
How KeyWords works 5-2
I
iCalendar format 6-9
Infrared ports 6-2
Installing AlphaQuiz 1-2
Installing AlphaWord Plus 1-2
Installing Beamer 1-2
Installing Calculator 1-2
Installing Control Panel 1-2
Installing KeyWords 1-2
Installing QuizDesigner and QuizManager 7-2
Installing SmartApplets 1-2
Invalid password message in Beamer 6-14
ISO keyboard layouts 4-13
K
Key strike handout for KeyWords 5-46
Keyboard command reference list 4-9
Keyboard layout 4-11, 4-12
changing 4-12
Dvorak 4-12
Left hand only layout 4-12
QWERTY 4-2, 4-12
Right hand only 4-12
Keyboard layout, viewing 4-2
Keyboard settings 4-2, 4-12, 4-15
auto repeat 4-16
keyboard layout 4-2, 4-12
Slow Keys 4-2, 4-12, 4-15
Sticky Keys 4-2, 4-12, 4-15
Keyboard shortcuts in QuizDesigner 7-16
Keyboard shortcuts in QuizManager 7-48

INDEX
8-5
. . . . .
Keyboarding ergonomics 5-47
KeyWords 1-1, 5-1, 5-34, 5-46
about 5-1
accuracy activities 5-6
accuracy and speed builders 5-5, 5-6
accuracy and speed test 5-5, 5-8
accuracy goals 5-13, 5-14, 5-15
activating schools in KeyWords RP 5-36
adding a student 5-3
Adobe Reader and KeyWords RP 5-38
AlphaSmart Manager and 5-18
automatic goals 5-13
certificate 5-47
Certificate Report in KeyWords RP 5-43
Class Report in KeyWords RP 5-43
congratulations certificate 5-47
deactivating KeyWords RP schools 5-36
default goals 5-13, 5-15
deleting students 5-11
Diagnostic Report in KeyWords RP 5-43
Enrollment Report in KeyWords RP 5-43
ergonomics 5-47
Finger placement handout/transparency for
lesson 1 5-46
Finger placement handout/transparency for
lessons 2 through 16 5-46
finger zone handout/transparency 5-46
frequently asked questions 5-57
getting data into KeyWords RP 5-23
goals 5-13, 5-14, 5-15
Group Progress Report 5-12
handouts 5-45
help for KeyWords RP 5-32
home row confirmation 5-17
home row handout/transparency 5-46
how it works 5-2
how KeyWords RP works 5-29
installing 1-2
key strike handout/transparency 5-46
KeyWords RP 5-29
learn new keys 5-5
lesson details 5-49, 5-51, 5-52, 5-53, 5-54, 5-
55, 5-56
lesson plan 5-48
logging in to Renaissance Place 5-33
logging out of Renaissance Place 5-34
master class report 5-26
posture and wrist placement
handout/transparency 5-46
printing reports 5-28
printing reports in KeyWords RP 5-29, 5-38
Progress Report master 5-46
Renaissance Place and 5-30
reporting parameter groups in KeyWords RP 5-
41
reports 5-26, 5-27
reports in KeyWords RP 5-43
reports, printing in KeyWords RP 5-37, 5-38
require correct shift key 5-16
resources for teachers 5-45
retrieving data and generating reports in
AlphaSmart Manager 5-21
sample lesson plan 5-48
Schoolwide Summary Report in KeyWords RP
5-43
sending reports to computer 5-28
setting up KeyWords RP 5-35
spaces between sentences (one or two) 5-17
speed builder activities 5-7
speed goals 5-13, 5-14, 5-15
starting 5-2
starting lessons 5-4
Student Detail Report in KeyWords RP 5-44
Student Information Report in KeyWords RP 5-
44
Student Login Report in KeyWords RP 5-44
Student Record Report in KeyWords RP 5-44
student reports 5-9
sustained practice for all keys
handout/transparency 5-47
switching roles in Renaissance Place 5-34
synchronizing data with KeyWords RP 5-23
teacher options 5-10
Teacher Report in KeyWords RP 5-44
tests 5-5, 5-8
Tips for Getting Started 5-31

INDEX
8-6
. . . . .
transferring reports to AlphaWord Plus 5-28
transparencies 5-45
Kinesthetic patterns in KeyWords 5-57
L
Large files in Beamer 6-15
Large font 4-6
Last Lesson Report 5-9
Lead teacher for KeyWords RP class 5-36
Learn new keys lesson in KeyWords 5-5
Left hand only keyboard layout 4-2, 4-12
Left hand only layout 4-14
Lesson plan for KeyWords 5-48
Lessons in KeyWords 5-49, 5-51, 5-52, 5-53, 5-54,
5-55, 5-56
starting 5-4
Lighten NEO screen 4-2
Linguistic patterns in KeyWords 5-57
Locating infrared ports 6-2
Logging in to Renaissance Place 5-33
Logging out of Renaissance Place 5-34
M
Master class report in KeyWords 5-26
Master password requirement for Beamer settings 6-
13
Matching student quiz scores to names from a grade-
book program 7-46
Materials for teachers in KeyWords 5-45
Medium font 4-6
Memo Pad format for Palm OS devices 6-13
Monospaced font 4-7
N
N code in AlphaQuiz 7-33
navigating in KeyWords RP 5-34
NEO
battery status 4-2, 4-12
beaming from one NEO to another 6-3, 6-6
beaming to a Palm OS device 6-6
beaming to from a Palm OS device 6-8
Blocking beaming 6-12
changing default font 4-2, 4-6, 4-7
contrast 4-2, 4-9
darken screen 4-2
deleting quizzes from 7-27
deleting SmartApplets from 1-5
disabling SmartApplets in AlphaSmart Manager
1-4
disabling SmartApplets in Applets menu 1-4
disabling SmartApplets on 1-3
installing SmartApplets 1-2
keyboard command reference list, viewing 4-2
keyboard layout, viewing 4-2
keyboard settings 4-2
lighten screen 4-2
number of students for AlphaQuiz 7-50
previewing AlphaQuiz questions for 7-19
quiz limit 7-51
screen contrast 4-2, 4-9
sending quizzes to 7-25
settings 4-1
taking quizzes using AlphaQuiz 7-29
two-button on setting 4-2, 4-8
viewing keyboard layout 4-2
O
Opening a quiz in QuizDesigner 7-10
Operands in Calculator 3-1
P
Paper tape in Calculator 3-2
Passwords
default file password 4-5
file passwords 4-2, 4-4, 4-5
Pasting calculations copied from the Calculator 3-2

INDEX
8-7
. . . . .
Patterns, linguistic and kinesthetic in KeyWords 5-
57
Points for AlphaQuiz questions 7-39
Posture and Wrist Placement for KeyWords 5-46
Previewing AlphaQuiz questions 7-19
Printing a quiz from QuizDesigner 7-20
Printing KeyWords reports 5-28
Printing quizzes from AlphaQuiz 7-31
Printing reports in QuizManager 7-43, 7-44
Progress report master for KeyWords 5-46
Prompts for quiz questions in QuizDesigner and Al-
phaQuiz 7-8
Proportional fonts 4-7
Q
Question library in QuizDesigner 7-23
Quiz access password in AlphaQuiz 7-16
Quiz passwords in AlphaQuiz 7-16
Quiz Summary Report in QuizManager 7-44
QuizDesigner 7-2
changing quiz options 7-12
changing quiz questions 7-11
copying questions from one quiz to another 7-14
copying quiz questions 7-14
creating a question library 7-23
creating quizzes 7-6
deleting quiz questions 7-13
deleting quizzes 7-22
exporting quizzes to a text file 7-21
installing 7-2
keyboard shortcuts 7-16
opening a quiz 7-10
previewing quiz questions 7-19
printing a quiz 7-20
prompts for quiz questions 7-8
quiz options 7-5
rearranging quiz questions 7-13
remarks for quiz questions 7-9
show AlphaSmart view 7-19
spell checking a quiz 7-22
starting 7-5
system requirements 7-2
QuizManager 7-2
assigning points (weights) to quiz questions 7-
39
control bar 7-24
Corrected Quiz Report 7-43
deleting quizzes from NEOs 7-27
deleting students’ responses to quizzes 7-37
exporting student quiz scores 7-46
frequently asked questions 7-50
grading quizzes in 7-41
Grading Sheet 7-43
installing 7-2
keyboard shortcuts 7-48
power off AlphaSmarts 7-39
power on AlphaSmarts 7-39
printing reports 7-44
Quiz Summary Report 7-44
reports 7-43
retrieving students’ quiz responses from NEOs
7-35
sending quizzes to NEOs 7-25
starting 7-24
Statistical Report 7-44
system requirements 7-2
troubleshooting 7-54
turning NEOs off 7-39
turning NEOs on again 7-39
QWERTY keyboard layout (default) 4-2, 4-12
R
Rearranging quiz questions in QuizDesigner 7-13
Registering KeyWords RP schools 5-36
Remarks for AlphaQuiz quiz questions 7-9
Renaissance Place
capabilities 5-45
logging in 5-33
logging out 5-34
setup 5-35
switching roles 5-34
Renaissance Place manuals, finding 5-23

INDEX
8-8
. . . . .
Renaissance Place Software Manual 5-31
Reporting parameter groups in KeyWords RP 5-41
Reports
Certificate Report in KeyWords RP 5-43
Class Report in KeyWords RP 5-43
Corrected Quiz Report in AlphaQuiz 7-43
descriptions of KeyWords RP reports 5-43
Diagnostic Report in KeyWords RP 5-43
Enrollment Report in KeyWords RP 5-43
Grading Sheet in AlphaQuiz 7-43
KeyWords reports in KeyWords RP 5-29
printing from KeyWords 5-28
Progress Report master for KeyWords 5-46
Quiz Summary Report in AlphaQuiz 7-44
Schoolwide Summary Report in KeyWords RP
5-43
sending KeyWords reports to computer 5-28
Statistical Report in AlphaQuiz 7-44
Student Detail Report in KeyWords RP 5-44
Student Information Report in KeyWords RP 5-
44
Student Login Report in KeyWords RP 5-44
Student Record Report in KeyWords RP 5-44
Teacher Report in KeyWords RP 5-44
transferring KeyWords reports to AlphaWord
Plus 5-28
Reports for students in KeyWords 5-9
Reports in KeyWords 5-26, 5-27
Reports in KeyWords RP 5-37
Reports in QuizManager 7-43
Resetting all file passwords 4-2, 4-5
Resources for KeyWords teachers 5-45
Retrieving students’ quiz responses from NEOs (Al-
phaQuiz) 7-35
Returns, showing 4-4
Right hand only keyboard layout 4-2, 4-12
S
Sample lesson plan for KeyWords 5-48
Saving AlphaQuiz quizzes to AlphaWord files 7-32
Schoolwide Summary Report in KeyWords RP 5-43
Scientific notation in the Calculator 3-2
Screen contrast 4-2, 4-9
Sending KeyWords reports to computer 5-28
Sending quizzes to NEOs using QuizManager 7-25
Setting goals in KeyWords 5-13, 5-14, 5-15
Setting keyboard layout 4-12
Setting up KeyWords RP 5-35
Settings for Beamer 6-12
Settings in Control Panel 4-1, 4-2
Shift key requirements in KeyWords 5-16
Show Marks 4-2, 4-4
Showing carriage returns and tabs 4-4
Slow Keys setting in Control Panel 4-2, 4-12, 4-15
Small font 4-6
SmartApplets 1-1
AlphaQuiz 7-1
AlphaWord Plus 2-1
Beamer 6-1
Calculator 3-1
Control Panel 4-1
defined 1-1
deleting from NEOs 1-5
disabling 1-3
disabling in AlphaSmart Manager 1-4
disabling right on the NEO 1-4
font, changing 4-2, 4-6, 4-7
installed 1-1
installing 1-2
KeyWords 5-1
Spaces between sentences in KeyWords 5-17
Special characters 4-11
Speed builder activities in KeyWords 5-7
Spell check
turning off and on 4-3
Spell check settings 4-2, 4-3
Spell-checking a quiz 7-22
Starting Beamer 6-1
Starting KeyWords SmartApplets 5-2
Starting QuizDesigner 7-5
Starting QuizManager 7-24
Statistical Report in QuizManager 7-44
Status of batteries 4-2, 4-12
Sticky keys for keyboard commands 4-12, 4-15

INDEX
8-9
. . . . .
Sticky Keys setting in Control Panel 4-2, 4-12, 4-15
Student Detail Report in KeyWords RP 5-44
Student ID number 5-44
Student Information Report in KeyWords RP 5-44
Student Login Report in KeyWords RP 5-44
Student Progress Report 5-9
Student Record Report in KeyWords RP 5-44
Students
adding in KeyWords 5-3
deleting in KeyWords 5-11
password for quiz, viewing in AlphaQuiz 7-34
starting KeyWords lessons 5-4
Sustained practice for all keys handout for KeyWords
5-47
Switching roles in Renaissance Place 5-34
System font 4-6, 4-7
System requirements for QuizDesigner and Quiz-
Manager 7-2
System requirements, checking for KeyWords RP 5-
33
T
Tabs, showing 4-4
Taking quizzes in AlphaQuiz 7-29
Teacher for KeyWords RP class 5-36
Teacher options in AlphaQuiz 7-32
deleting a student’s responses to all questions 7-
34
marking a student’s test finished 7-34
viewing a student’s password 7-34
viewing a student’s responses 7-34
viewing the quiz access password 7-34
Teacher options in KeyWords 5-10
deleting students 5-11
home row confirmation 5-17
printing the Group Progress Report 5-12
require correct shift key 5-16
setting goals 5-13
spaces between sentences (one or two) 5-17
Teacher Report in KeyWords RP 5-44
Tests in KeyWords 5-5, 5-8
Tips for Getting Started with KeyWords 5-31
Transferring KeyWords reports to AlphaWord Plus
5-28
Troubleshooting for AlphaQuiz 7-54
Troubleshooting for Beamer 6-13
Truncated files in Beamer 6-15
Turn add words to user dictionary on and off 4-2, 4-
3
Turn Spell Check on and off 4-2
Turning file passwords on and off 4-2, 4-4
Turning off the Calculator 3-3
Turning Show Marks on and off 4-2, 4-4
Turning the Calculator on or off 4-8
Two-button on setting 4-2, 4-8
U
U code in AlphaQuiz 7-33
User dictionary
ability to add words 4-2, 4-3
adding a new word 4-2, 4-3
deleting 4-2, 4-3
User name 5-44
V
vCal 1.0 format 6-9
vCard 3.0 format 6-8
Very large font 4-6
Viewing keyboard layouts 4-11
vNote format 6-8
W
Weights for AlphaQuiz questions 7-39
Words per minute goals in KeyWords 5-13, 5-14, 5-
15

INDEX
8-10
. . . . .