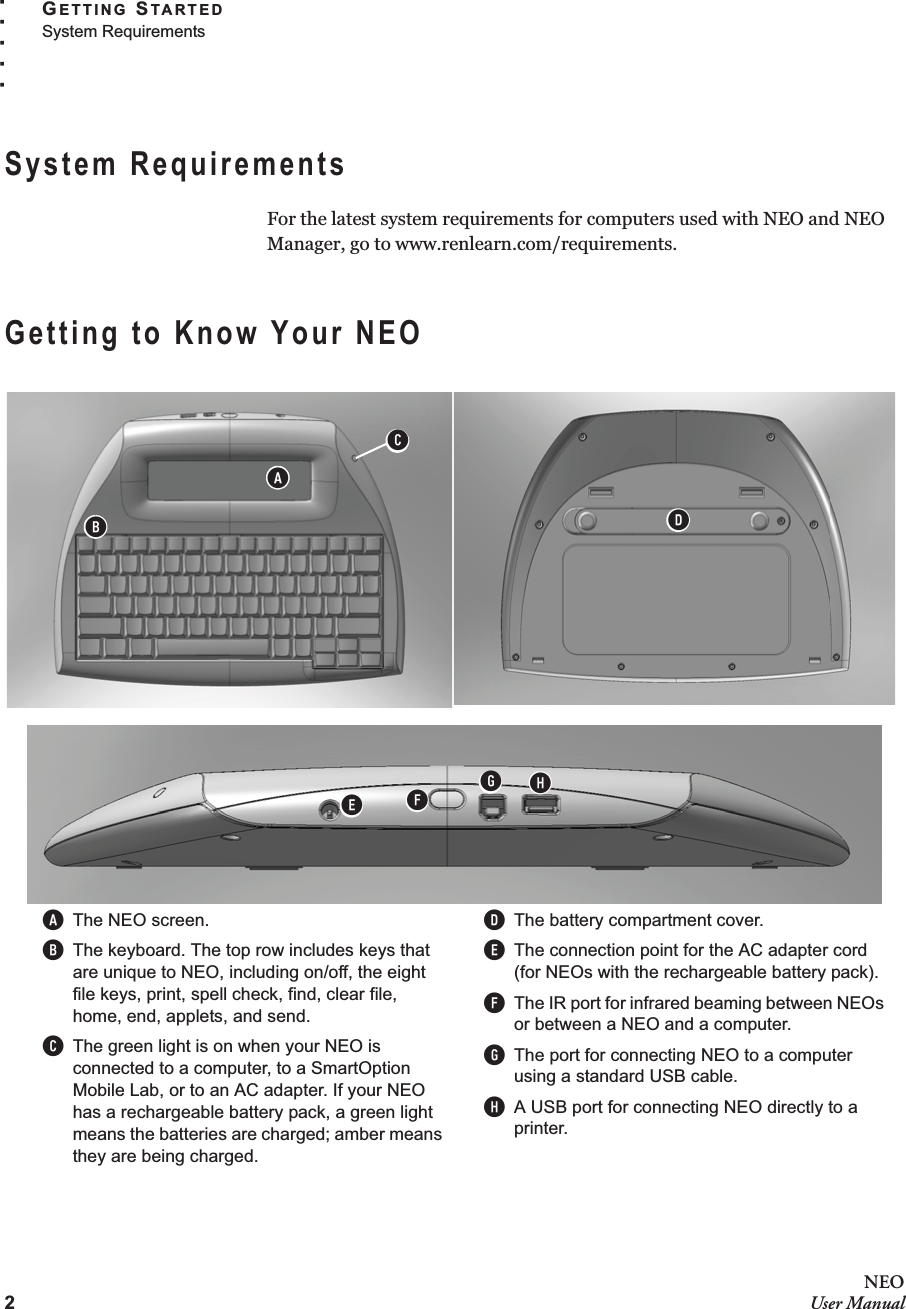
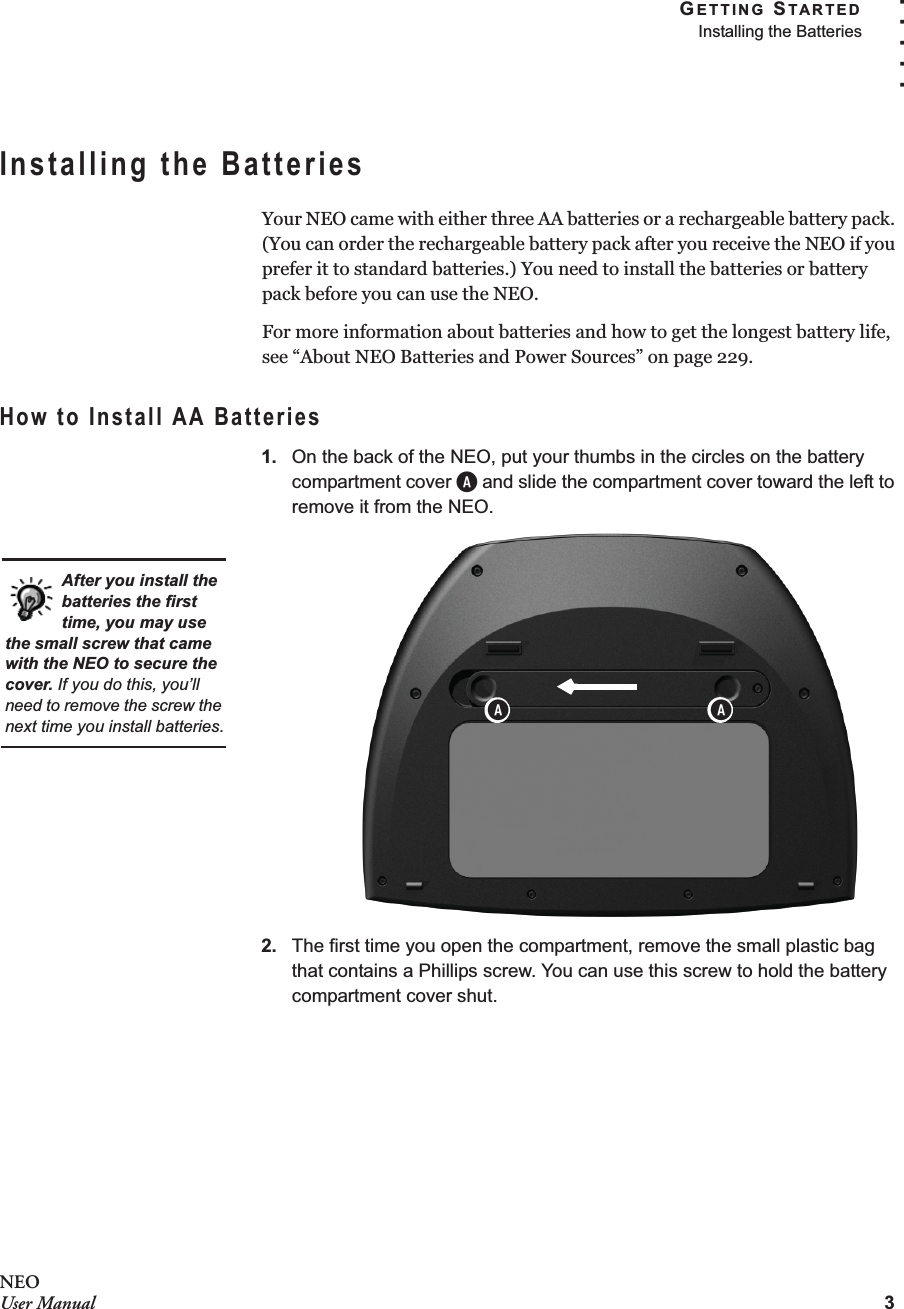
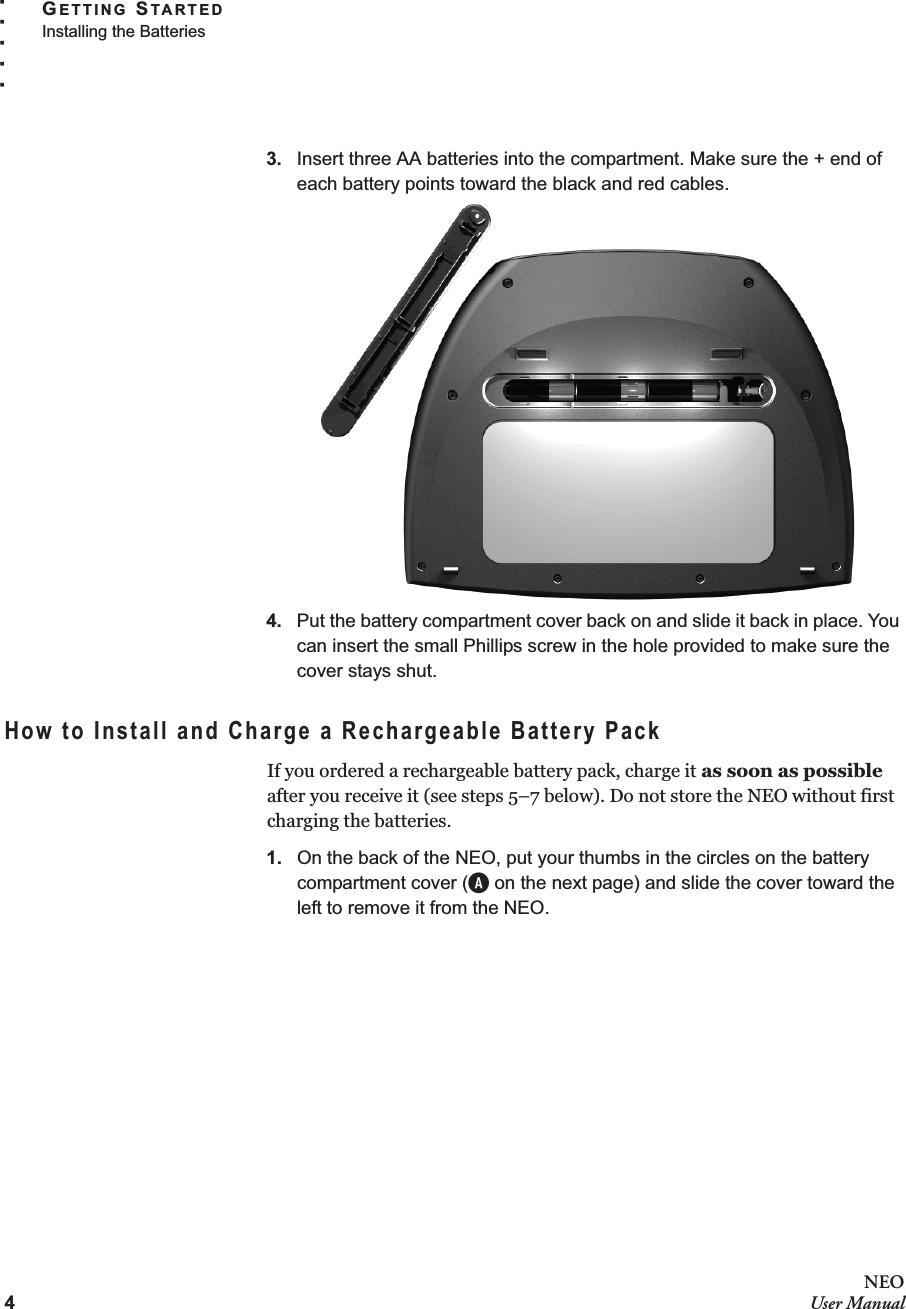
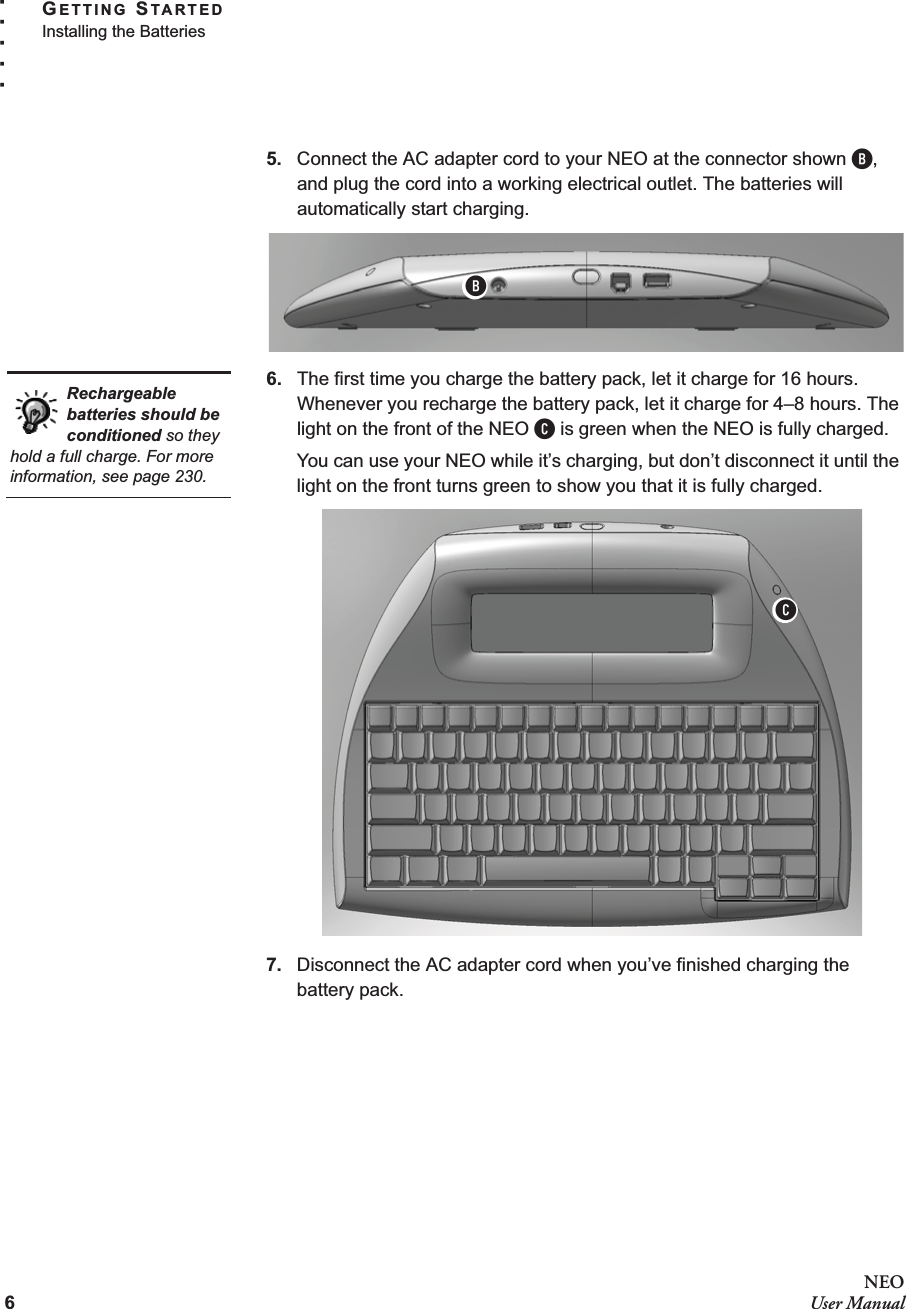
Renaissance Learning NEO2A Wireless Educational Keyboard User Manual
Renaissance Learning, Inc Wireless Educational Keyboard
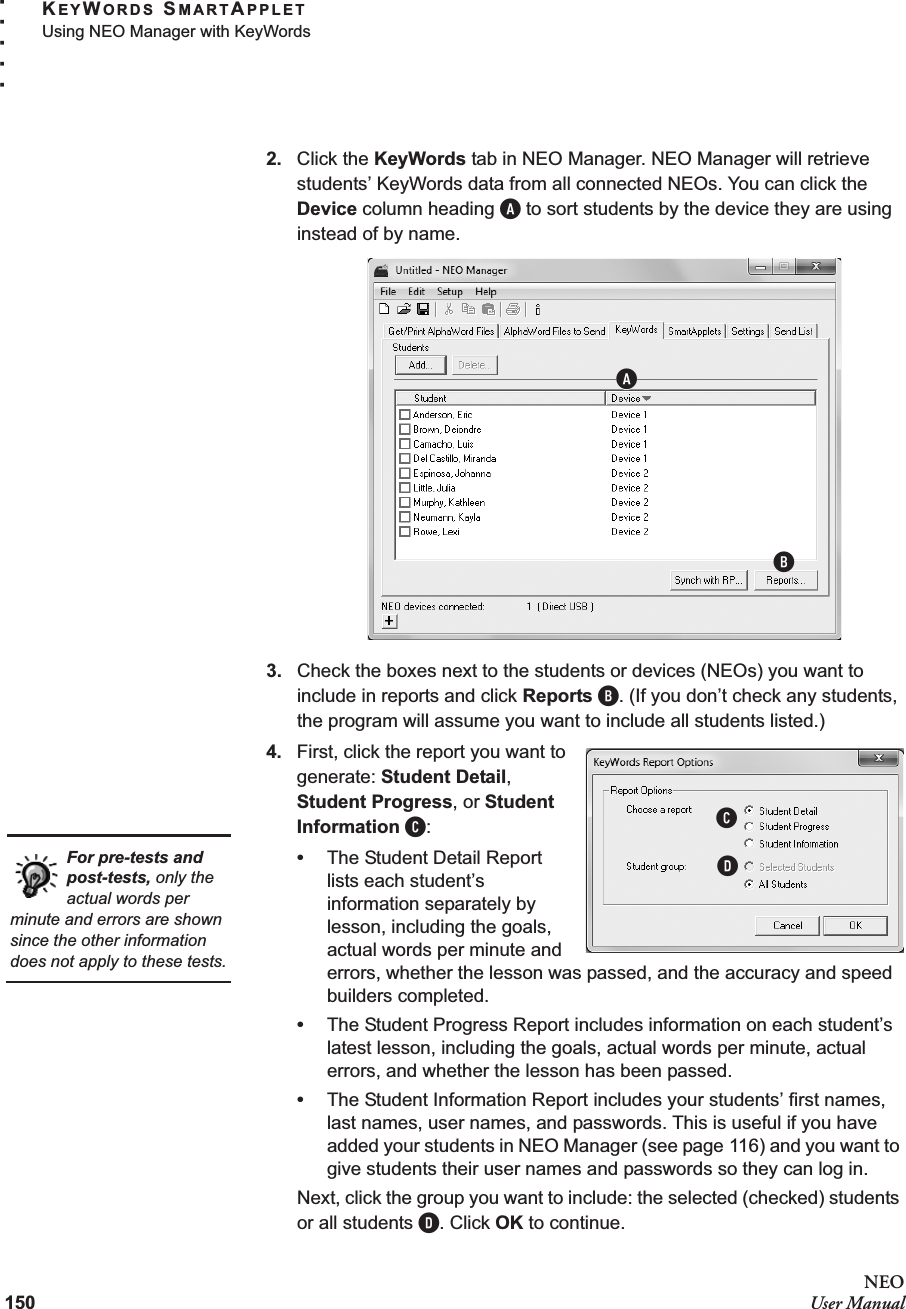
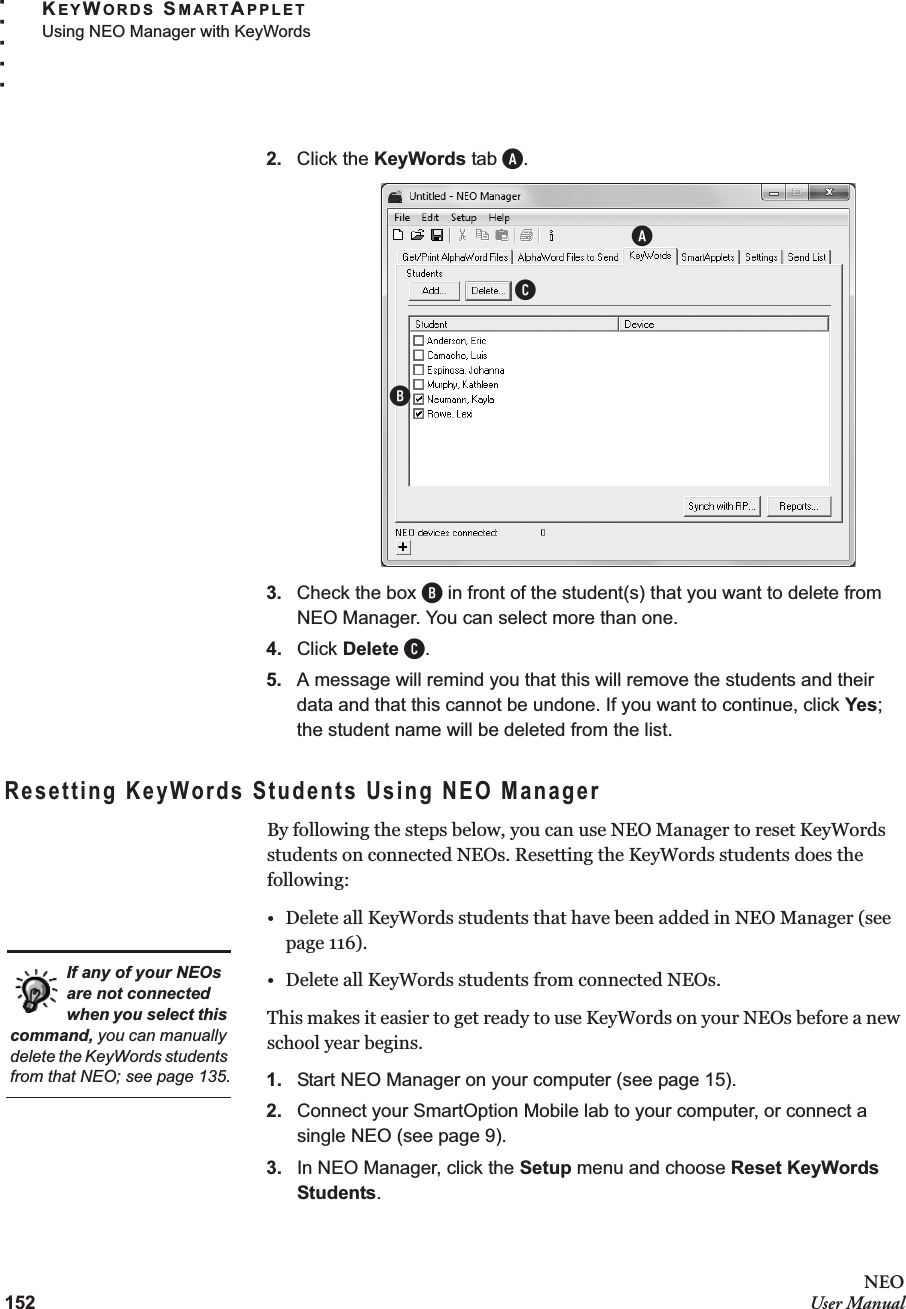
UserManual.wiki
>
Renaissance Learning
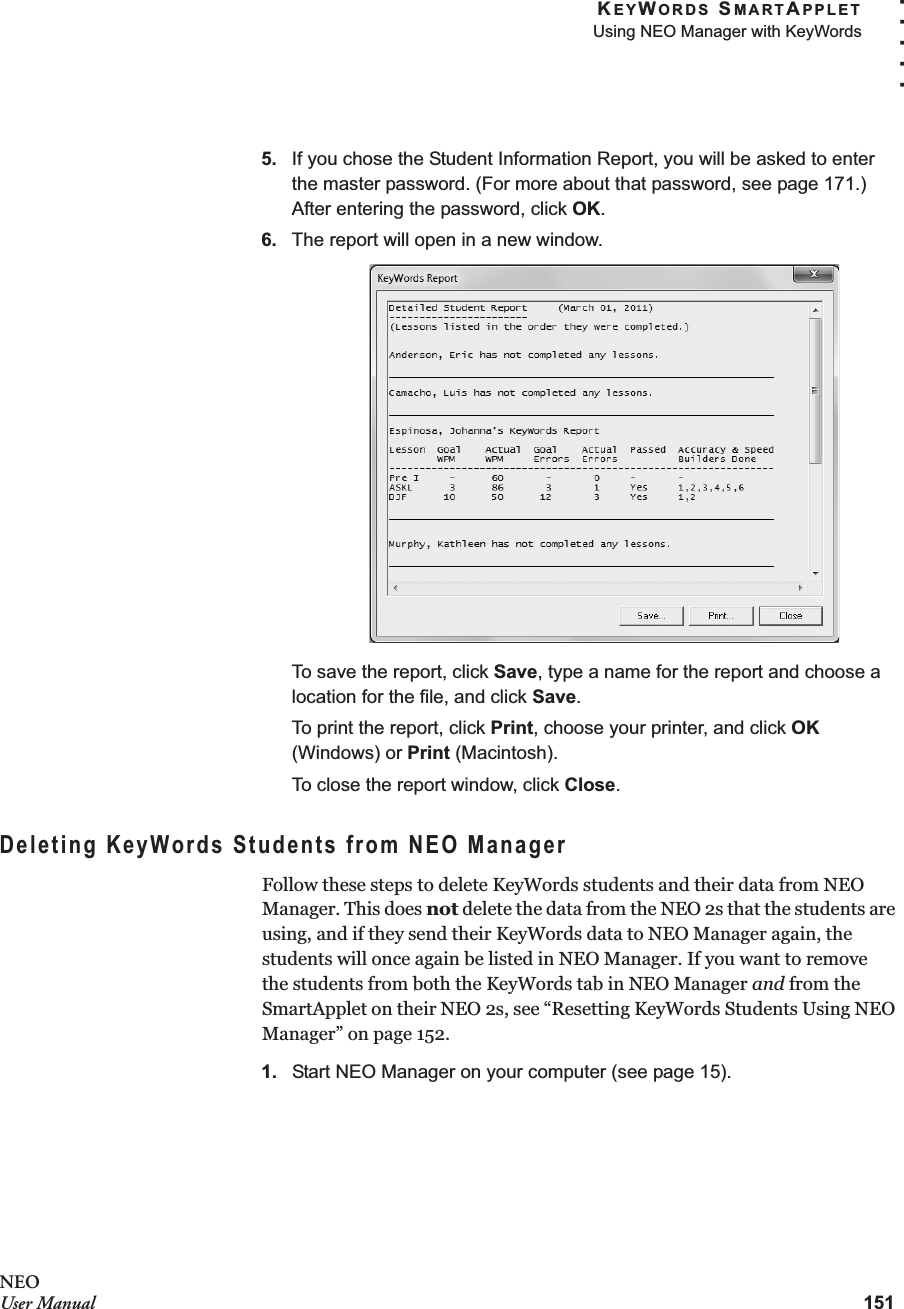
>
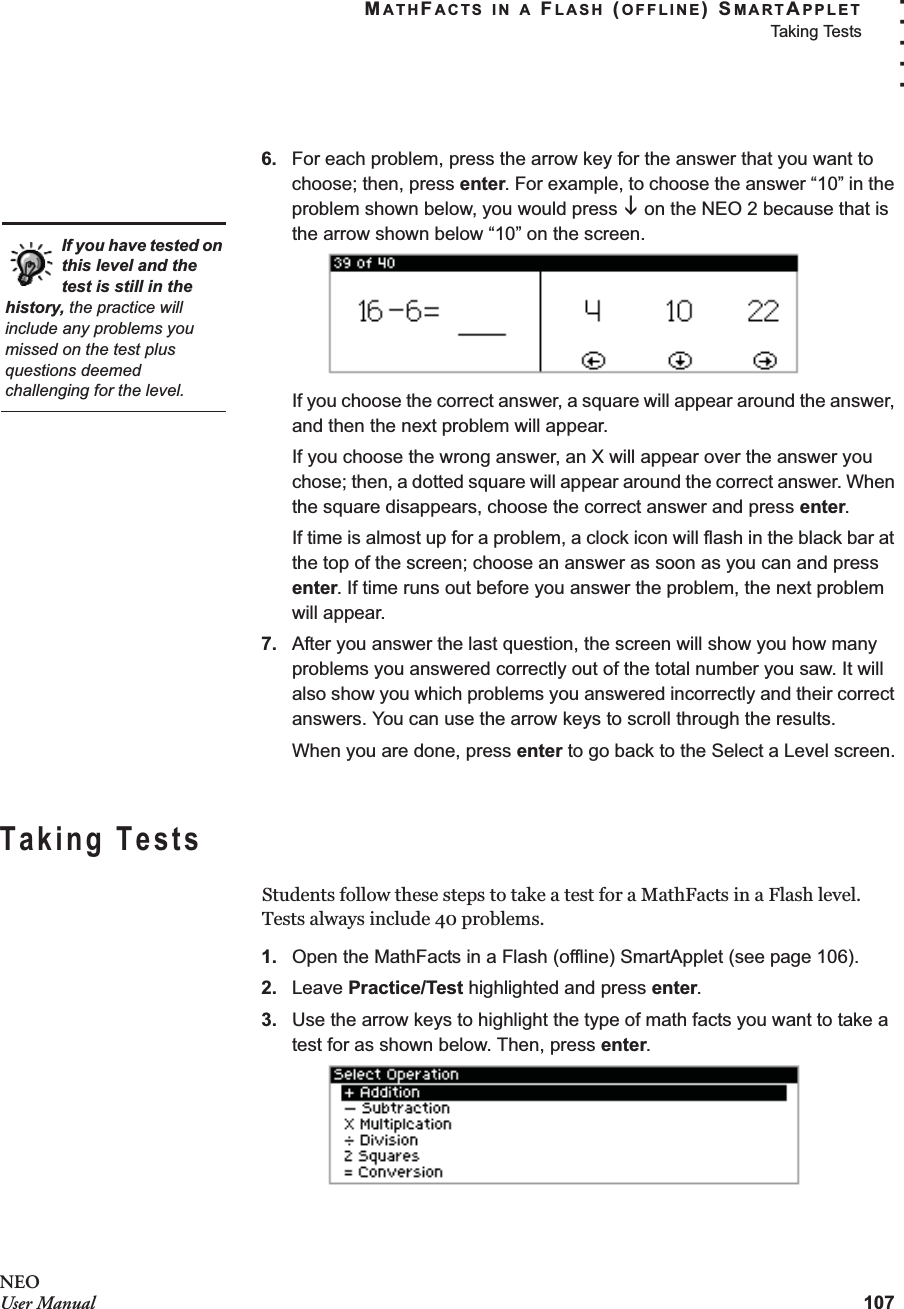
NEO2A User Manual
Users Manual
Navigation menu
Upload a User Manual
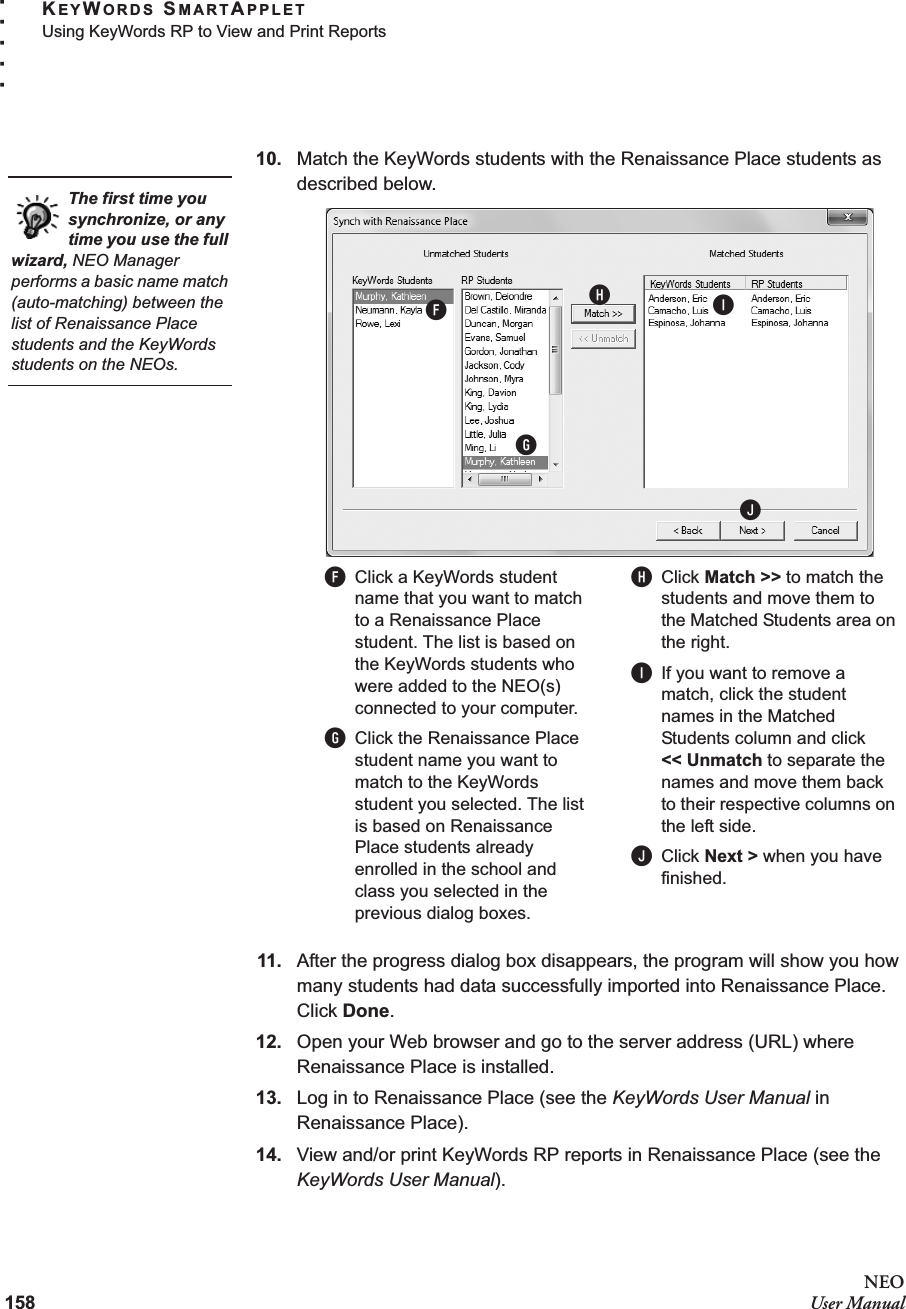
Namespaces
Wiki Guide
HTML
PDF
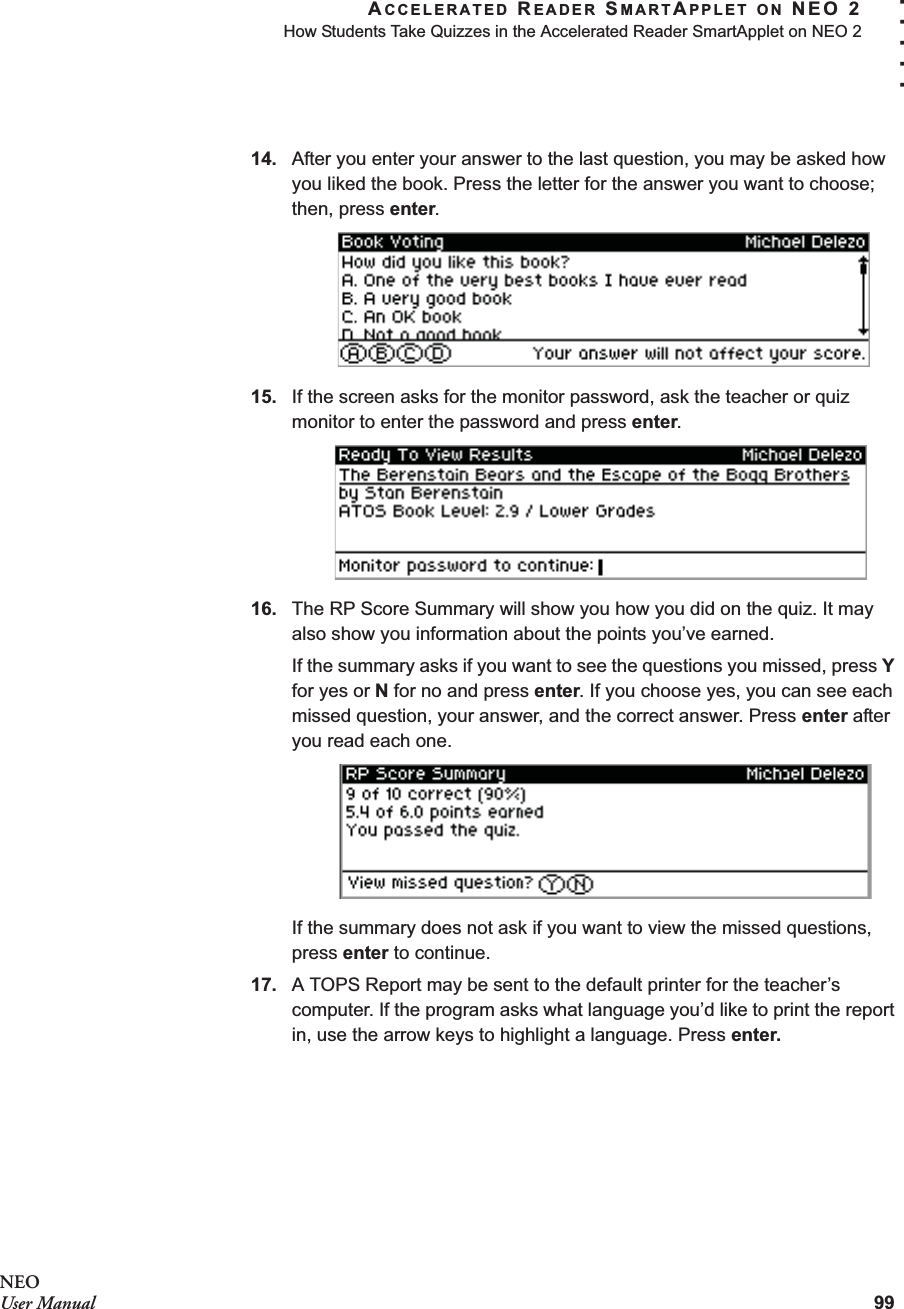
Info
Views
User Manual
Discussion / Help
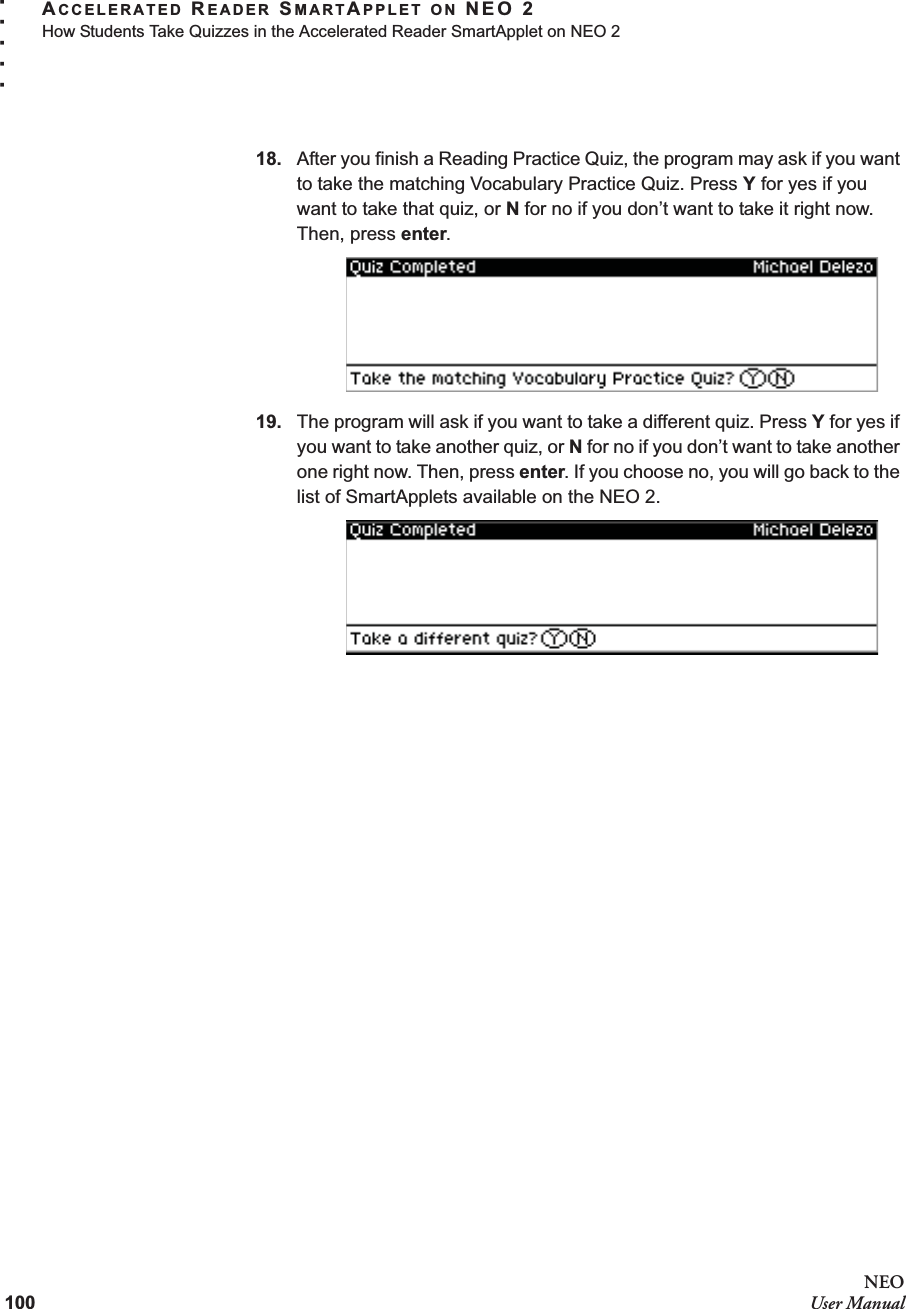
Navigation
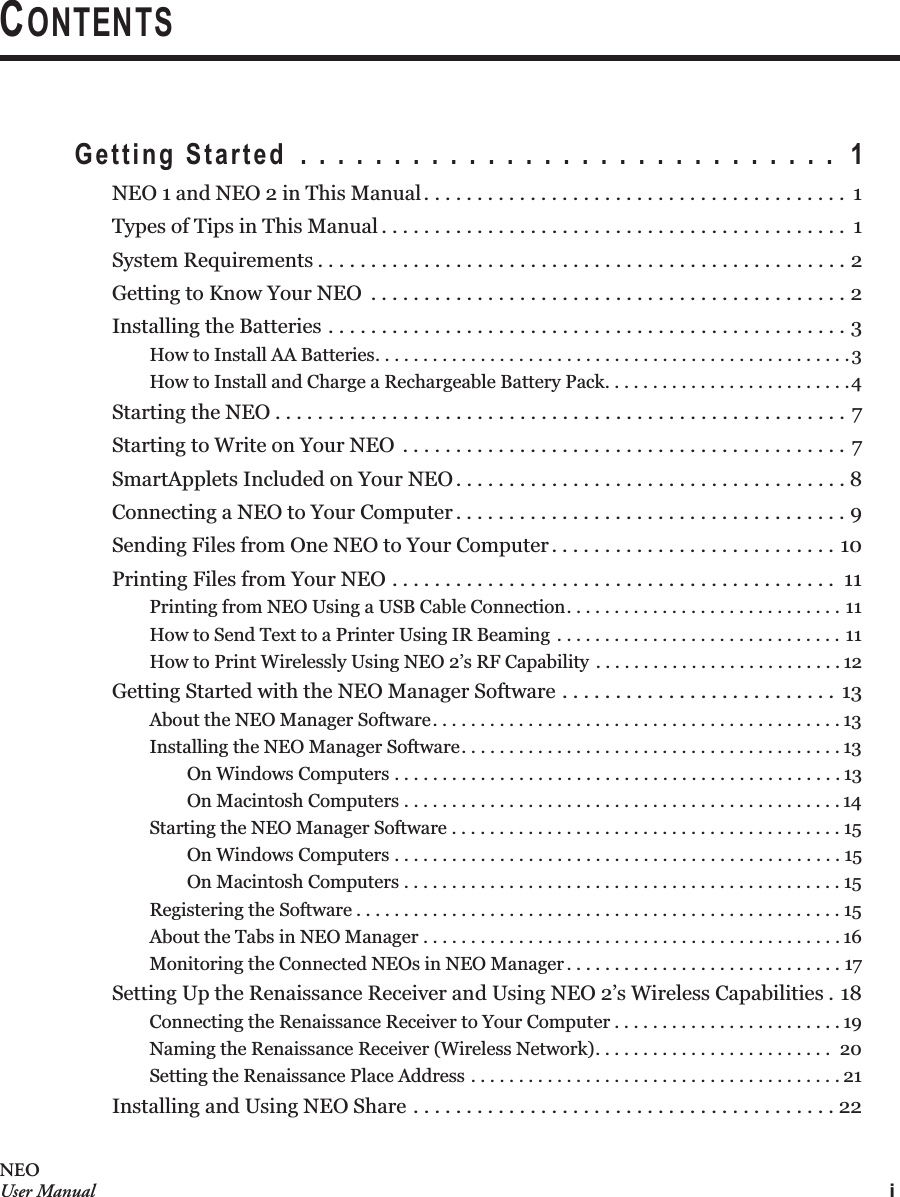
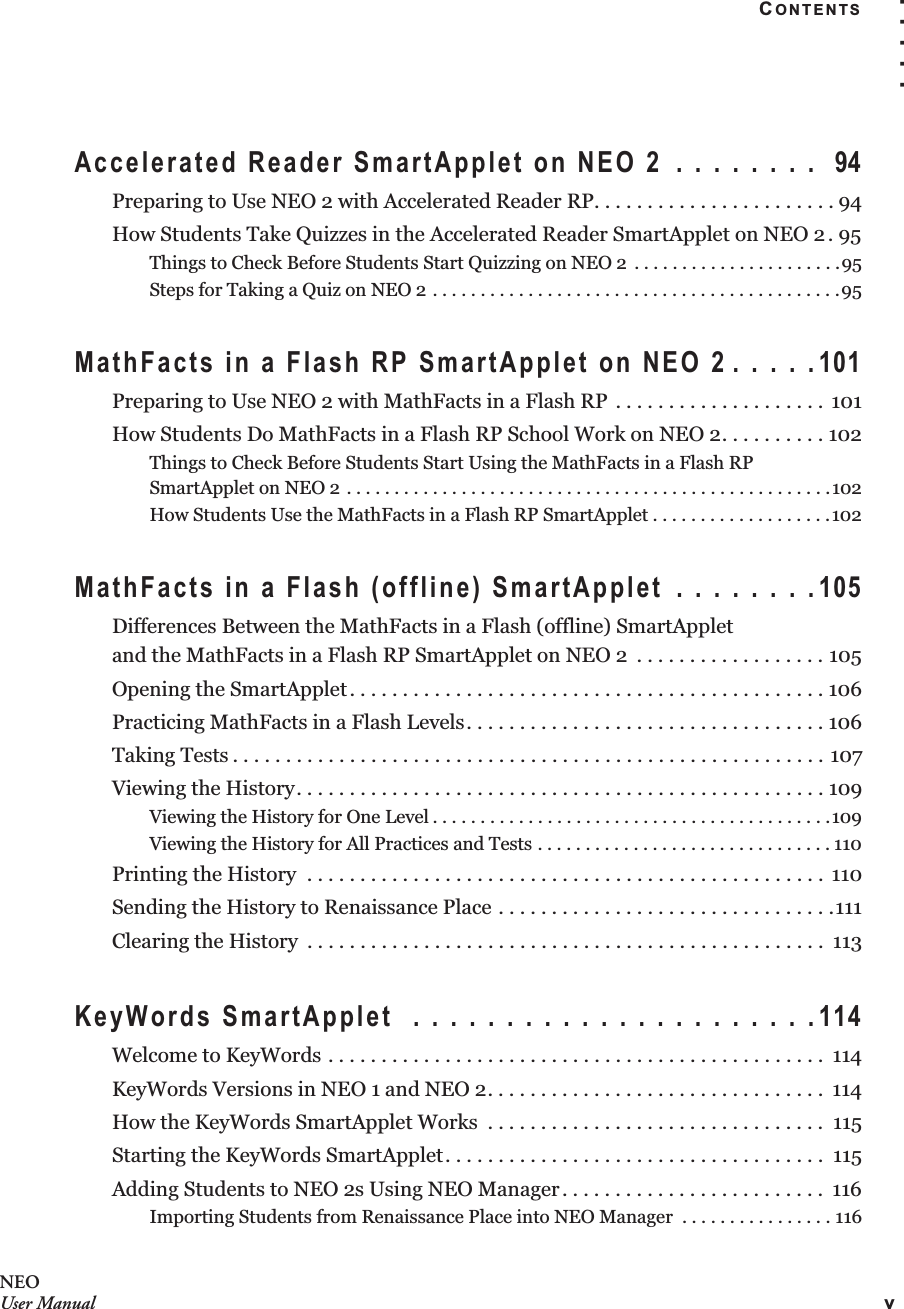


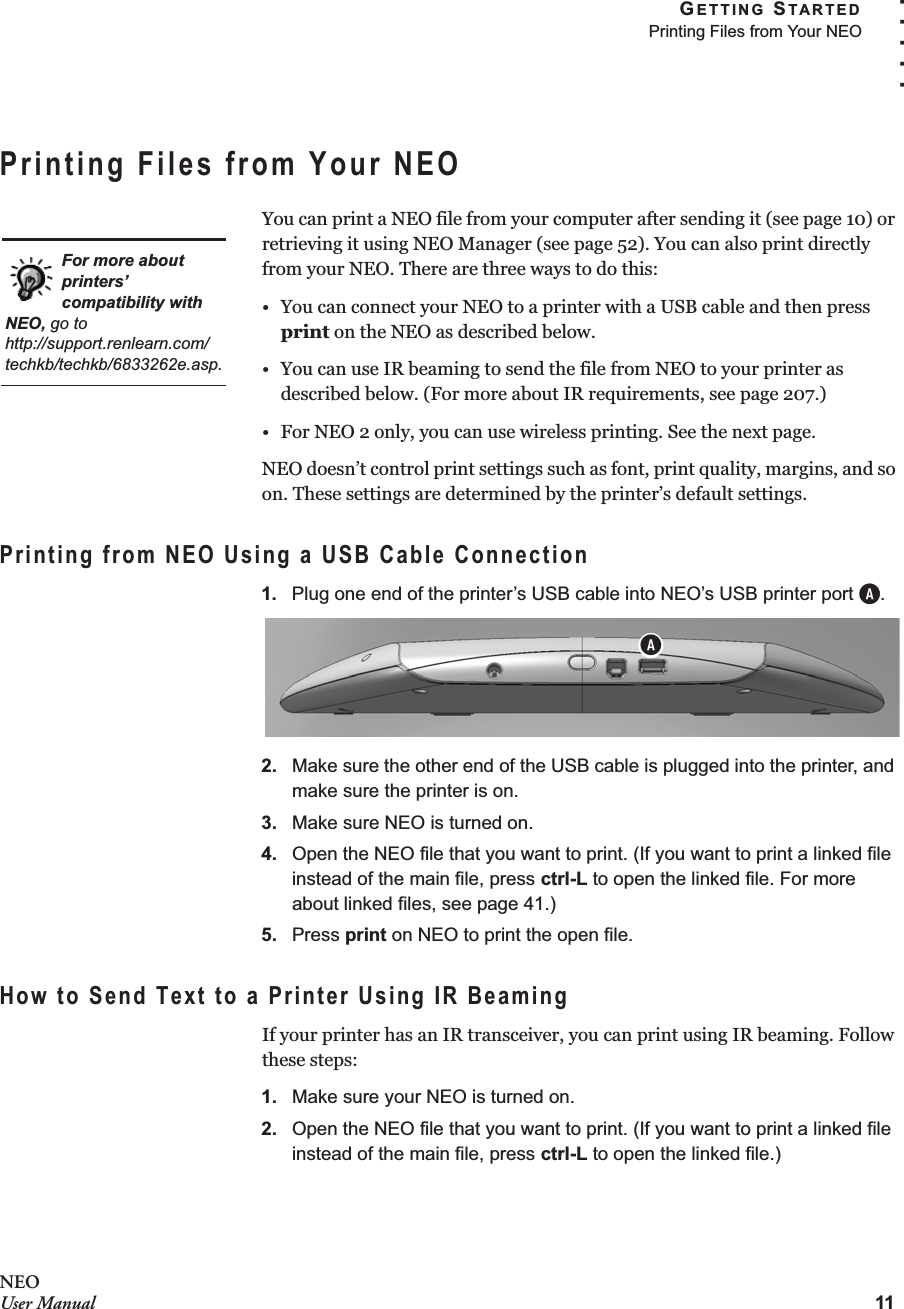

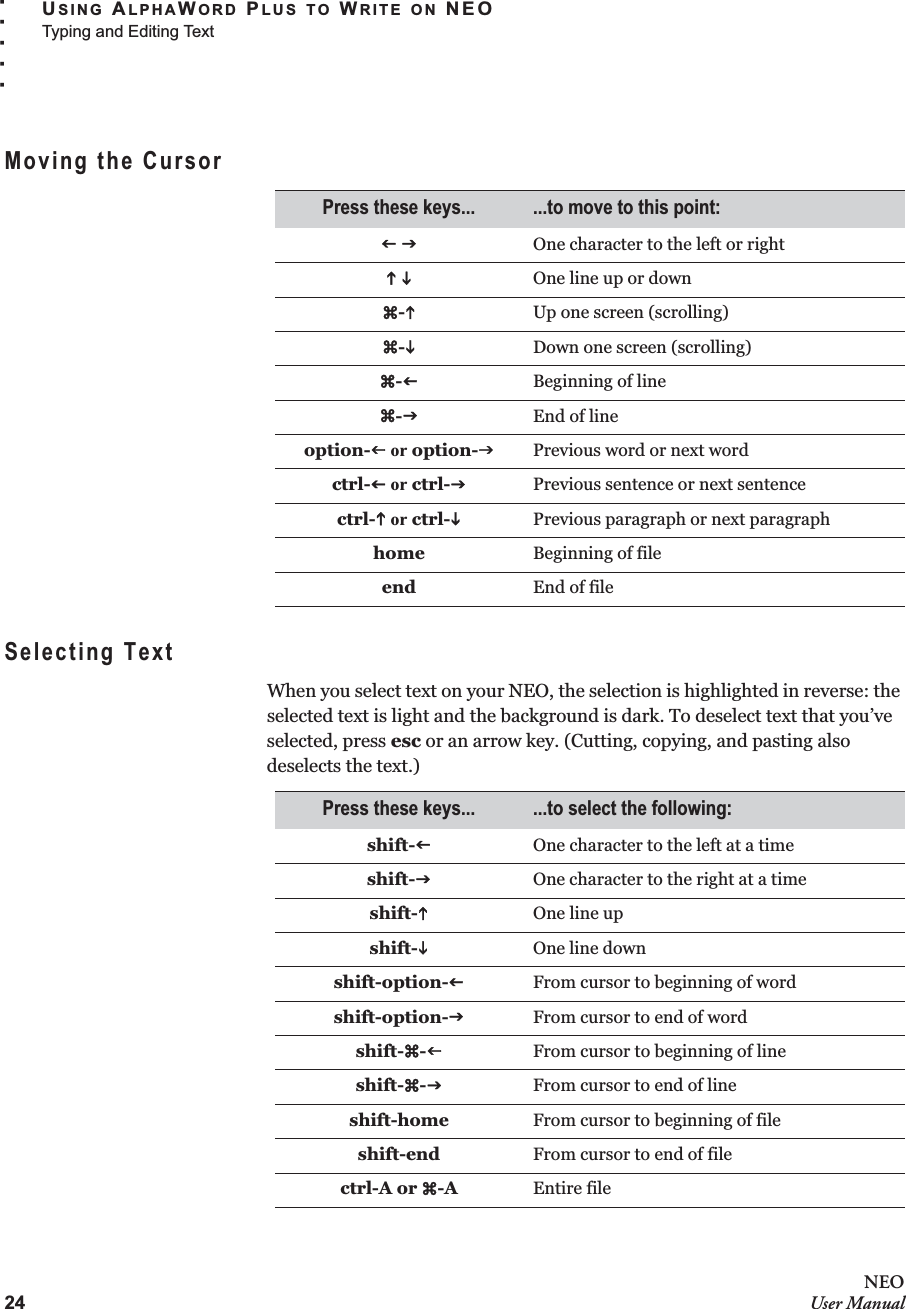
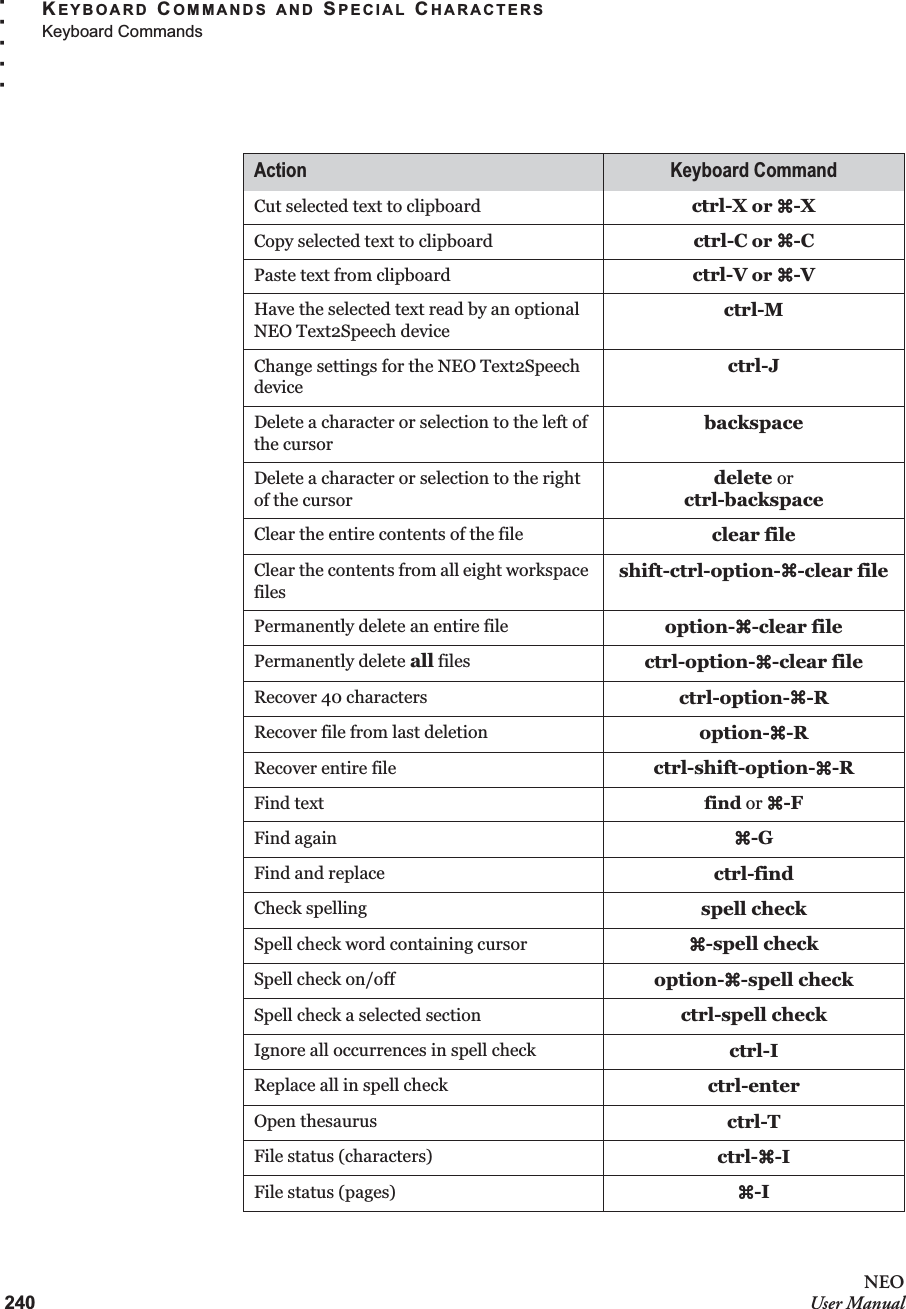
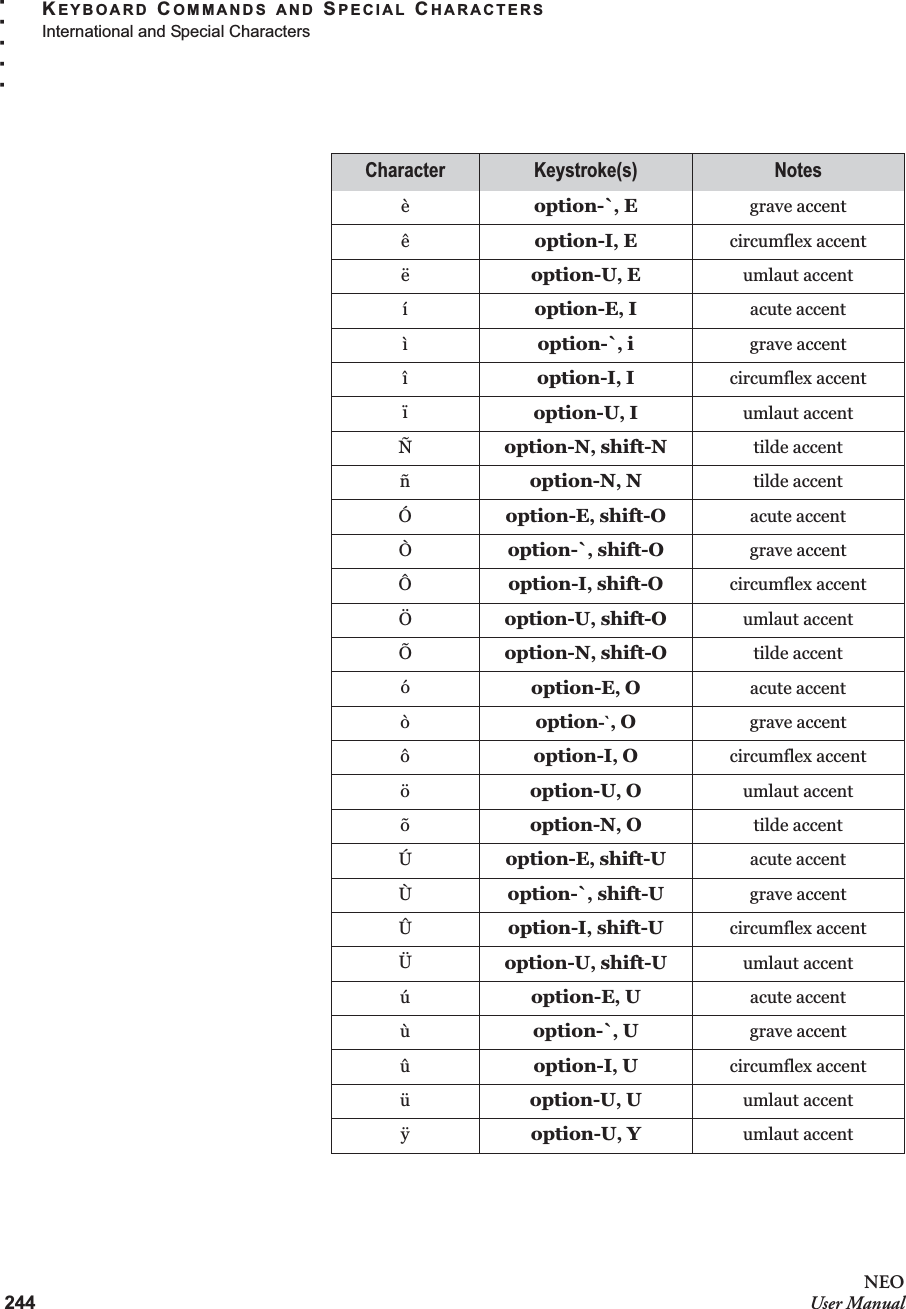
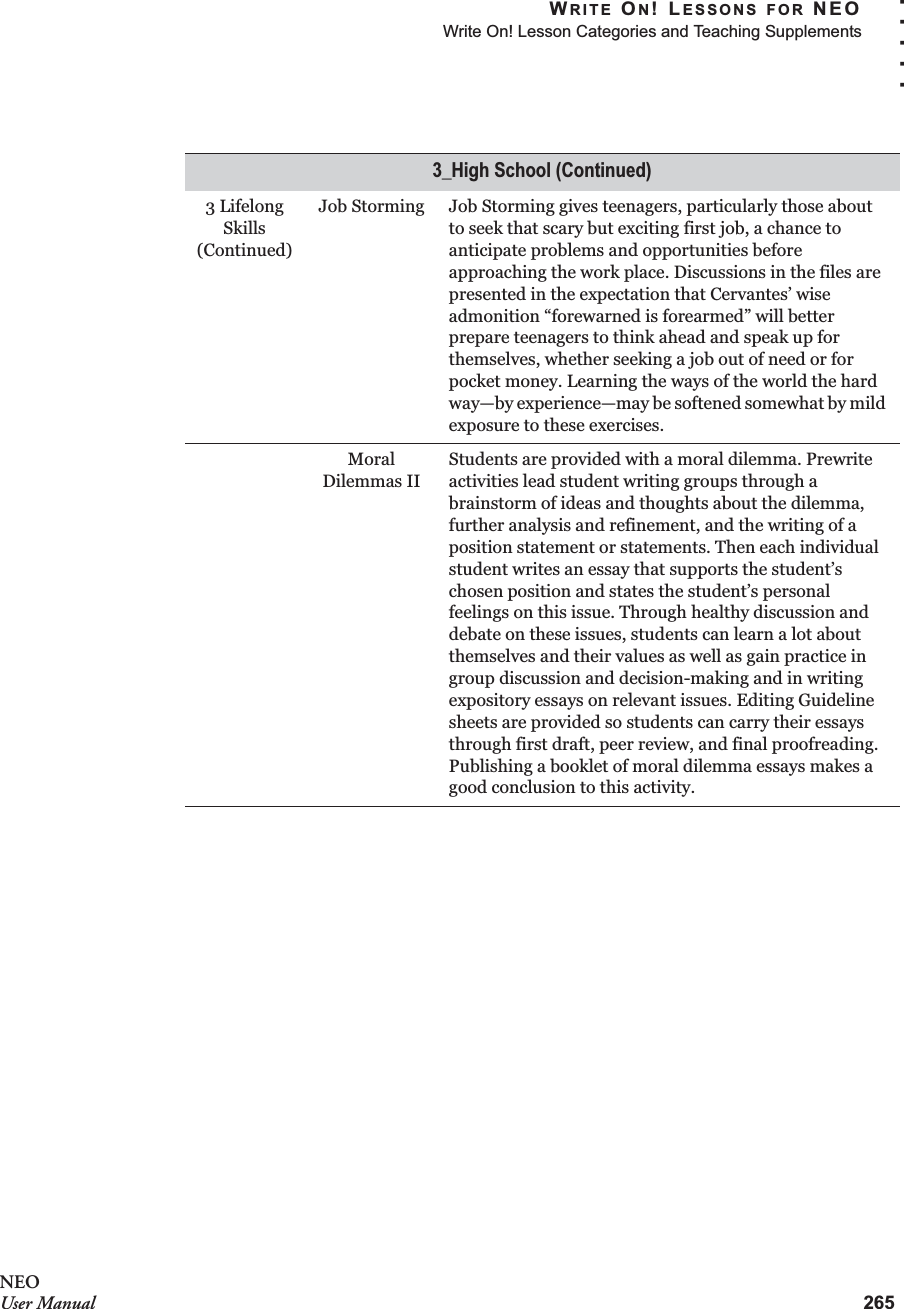
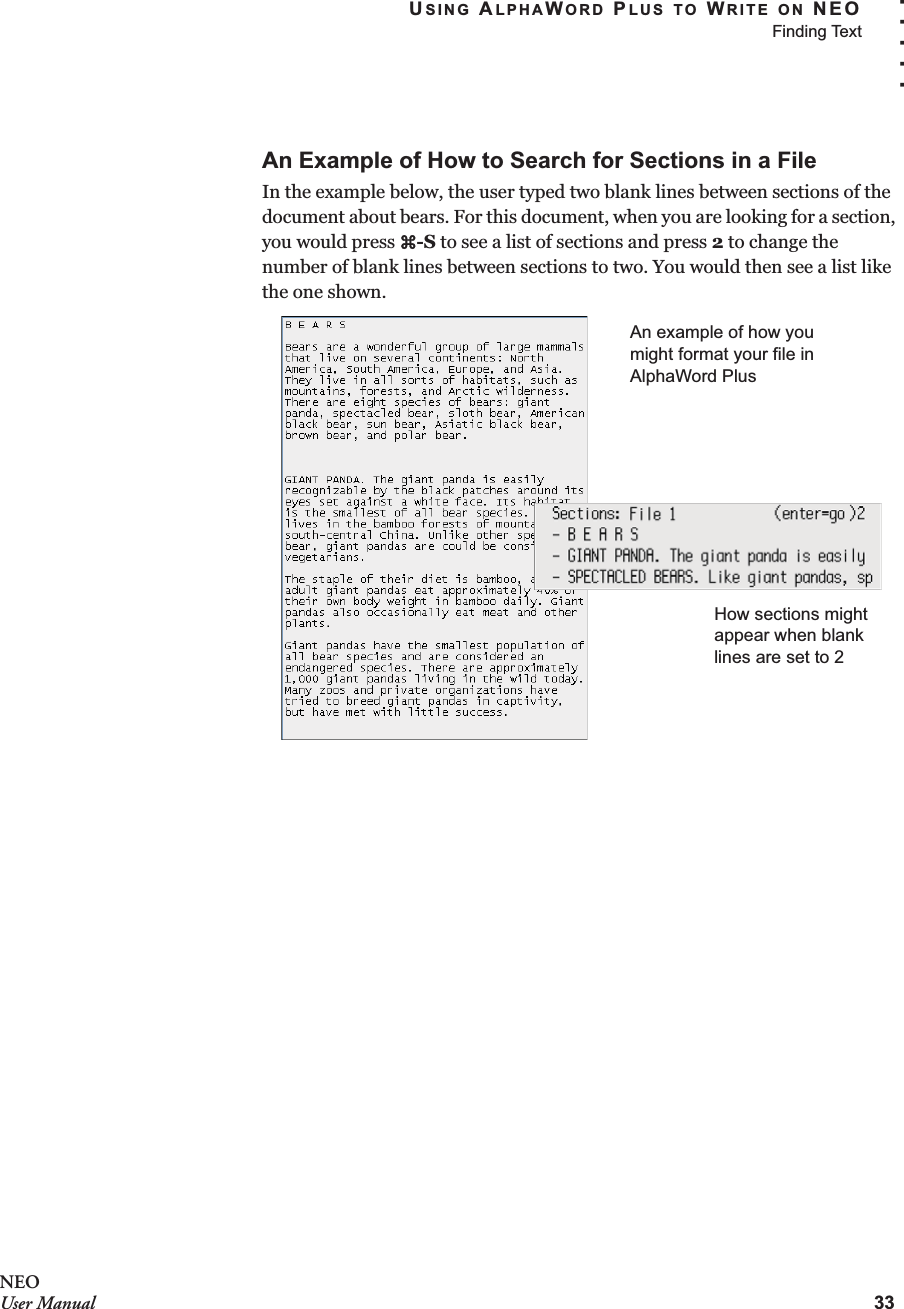
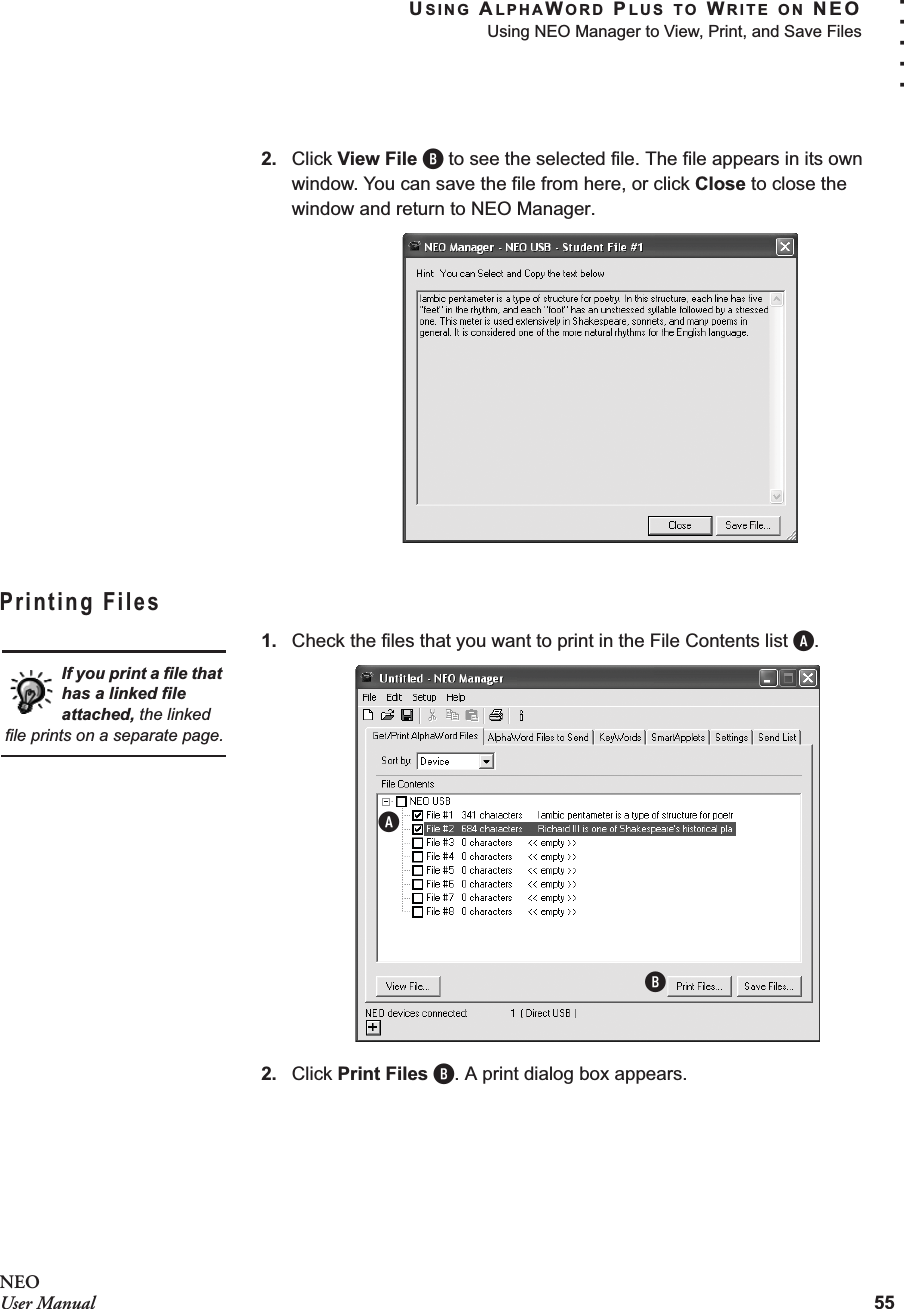
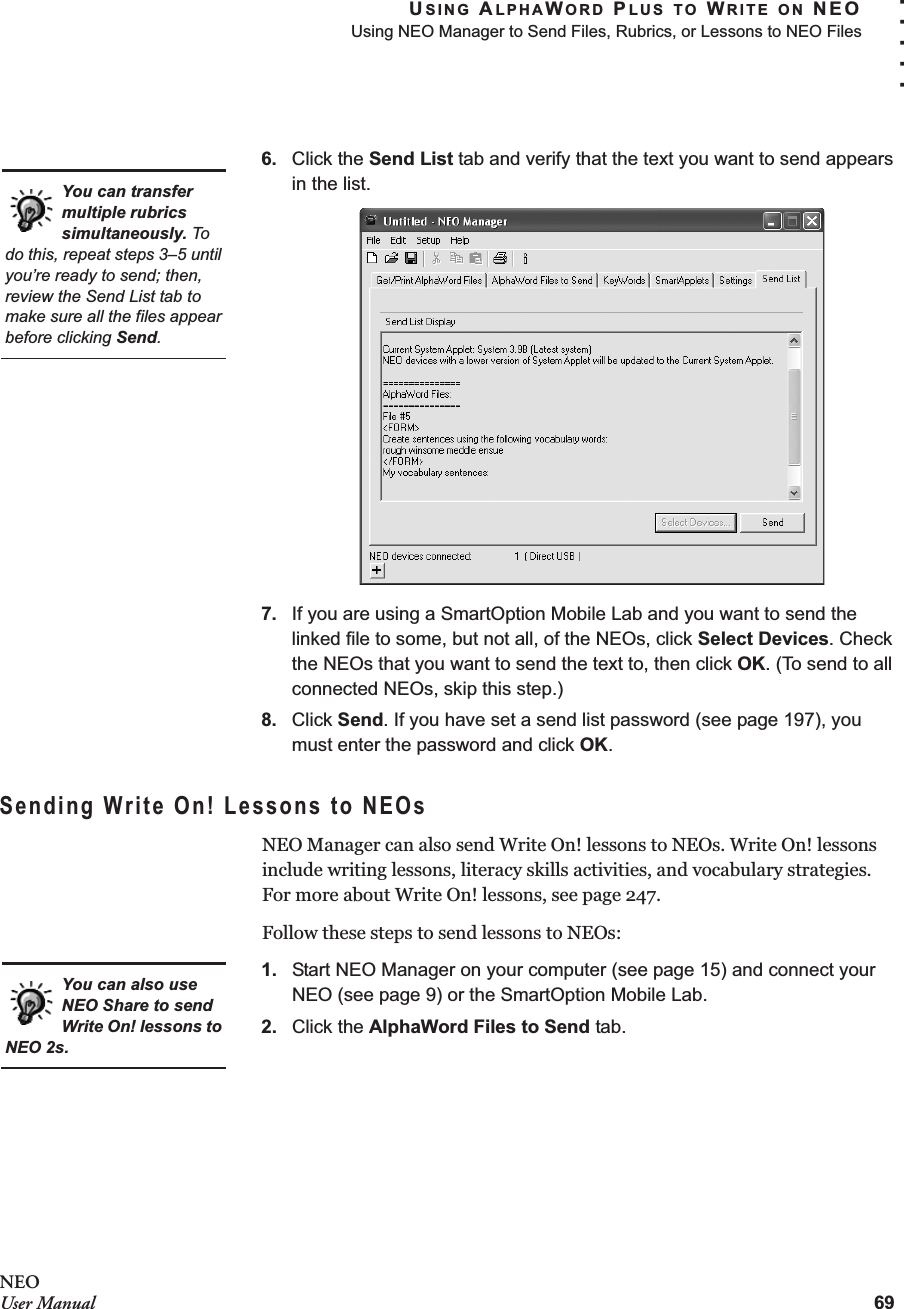
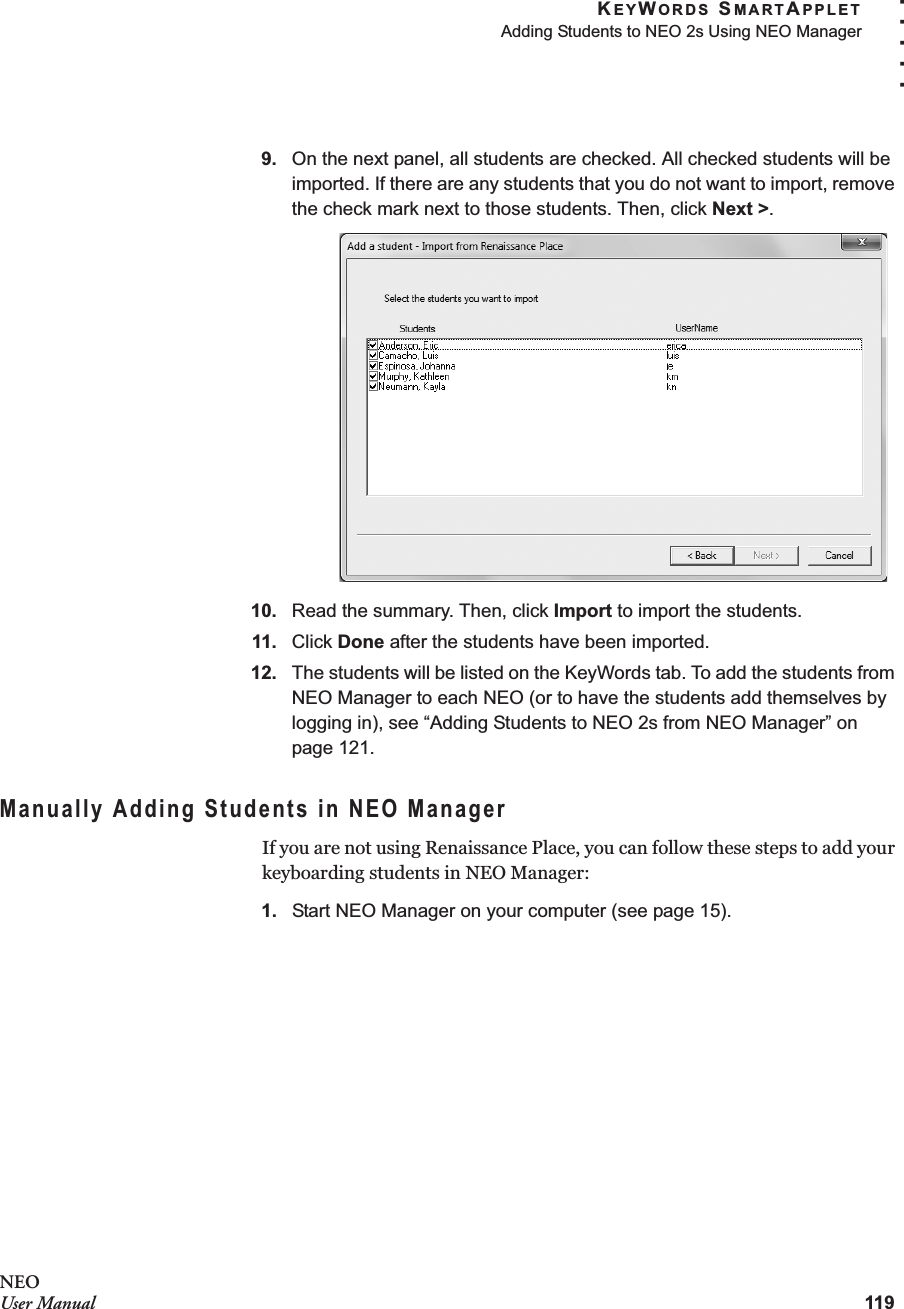
![USING ALPHAWORD PLUS TO WRITE ON NEOFinding and Opening Files27. . . . .NEOUser ManualFinding and Opening FilesTo open a file that you know is in one of the eight active files, press the appropriate file key.If you don’t know where the file is, you can find the file by its first line or name. Follow these steps:1. Press one of the eight file keys to choose which file space you want to use.2. Do one of the following to find a file:•To see a list of files by first line, press ctrl-F. The list will include both the numbered files and named files that aren’t open in files 1–8.•To see a list of files by name, press ctrl-O.3. Use the arrow keys to move the cursor next to the file you want to open; then, press enter.If the file doesn’t open right away, you may see one of these messages:Message Why It Appears What to DoWould you like to keep the current file?Press Y for YesPress N for NoYou already have text in the file number that you chose.Press Y if you want to keep the file. You must enter a name so that you can open the file again later. After you do that, the new file you chose will open.Press N if you don’t want to keep the file that you already have open. The new file that you chose will open instead.Press the enter key to open:[file name] in [F#]The file that you chose to open is already open in the file number that you are using.If you want to open a new copy of the file in the file number shown, press enter.If you want to keep using the file in the current file number, press esc.It’s a good idea to choose an empty file space or one that contains a named file before you open another file. If you have text in the file and you haven’t named it, you will be given the chance to name it.By naming the file, you’re making sure you can open it again later. Named files that aren’t open are listed when you press ctrl-F or ctrl-O.](https://usermanual.wiki/Renaissance-Learning/NEO2A/User-Guide-1590523-Page-41.png)
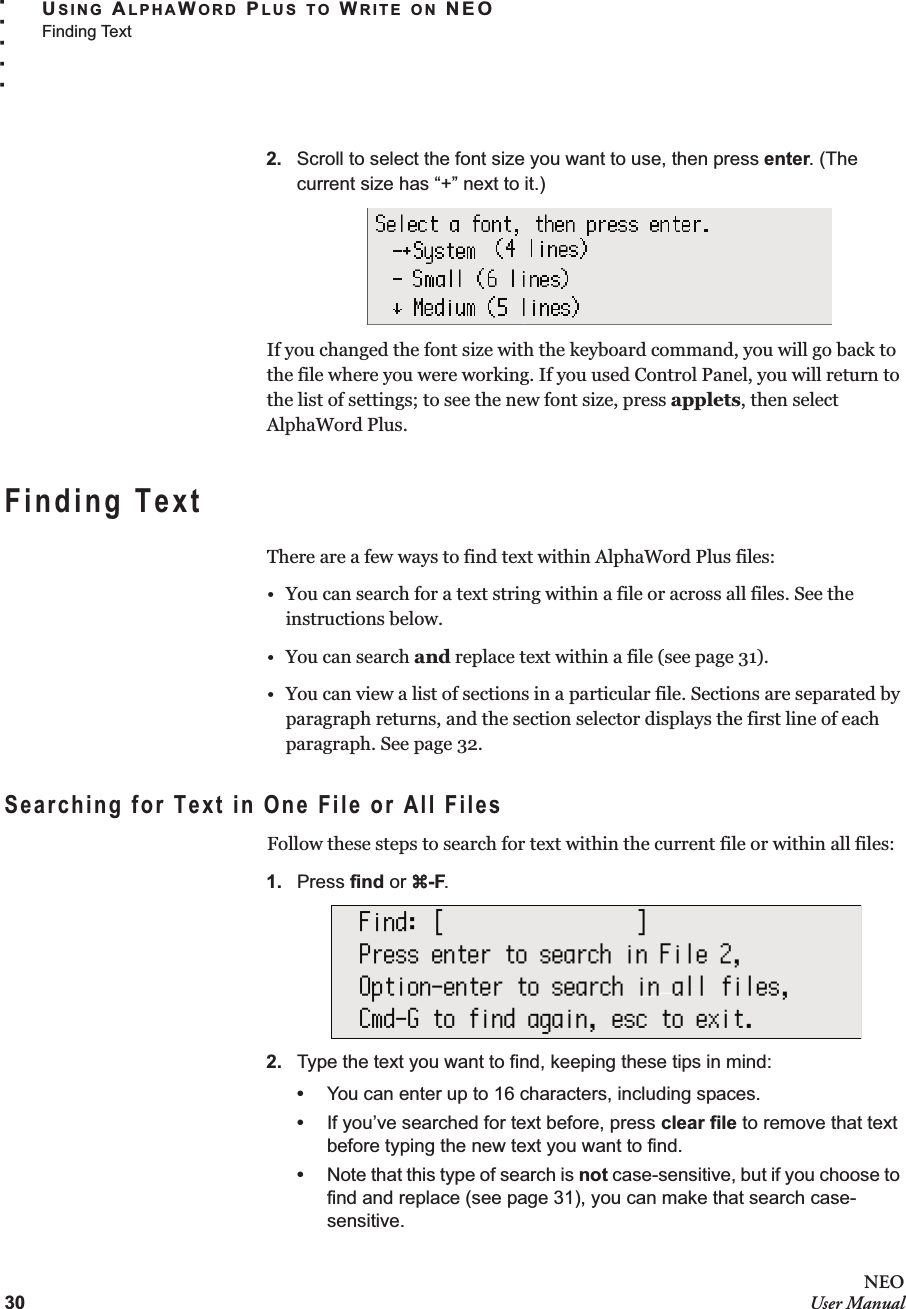
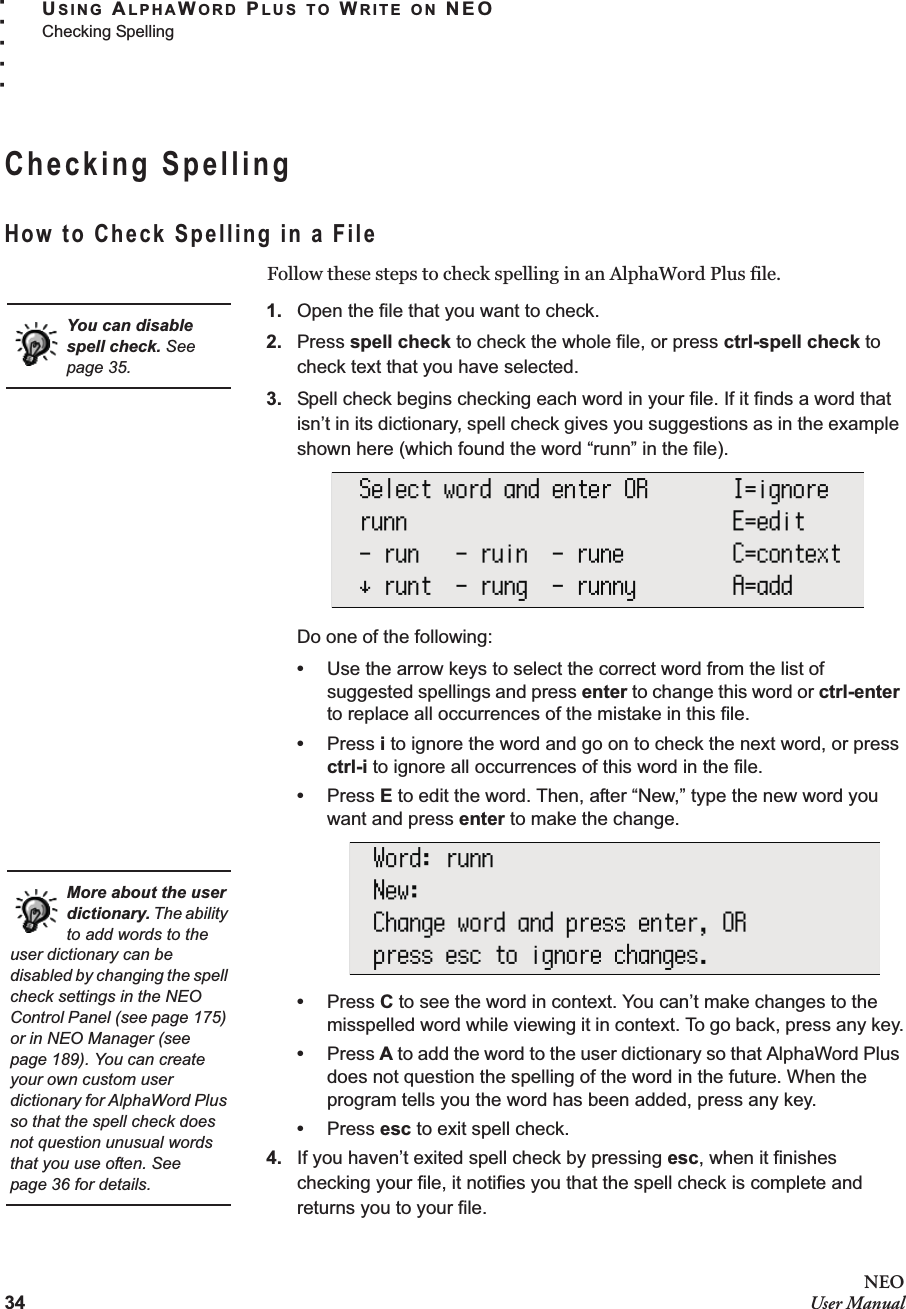
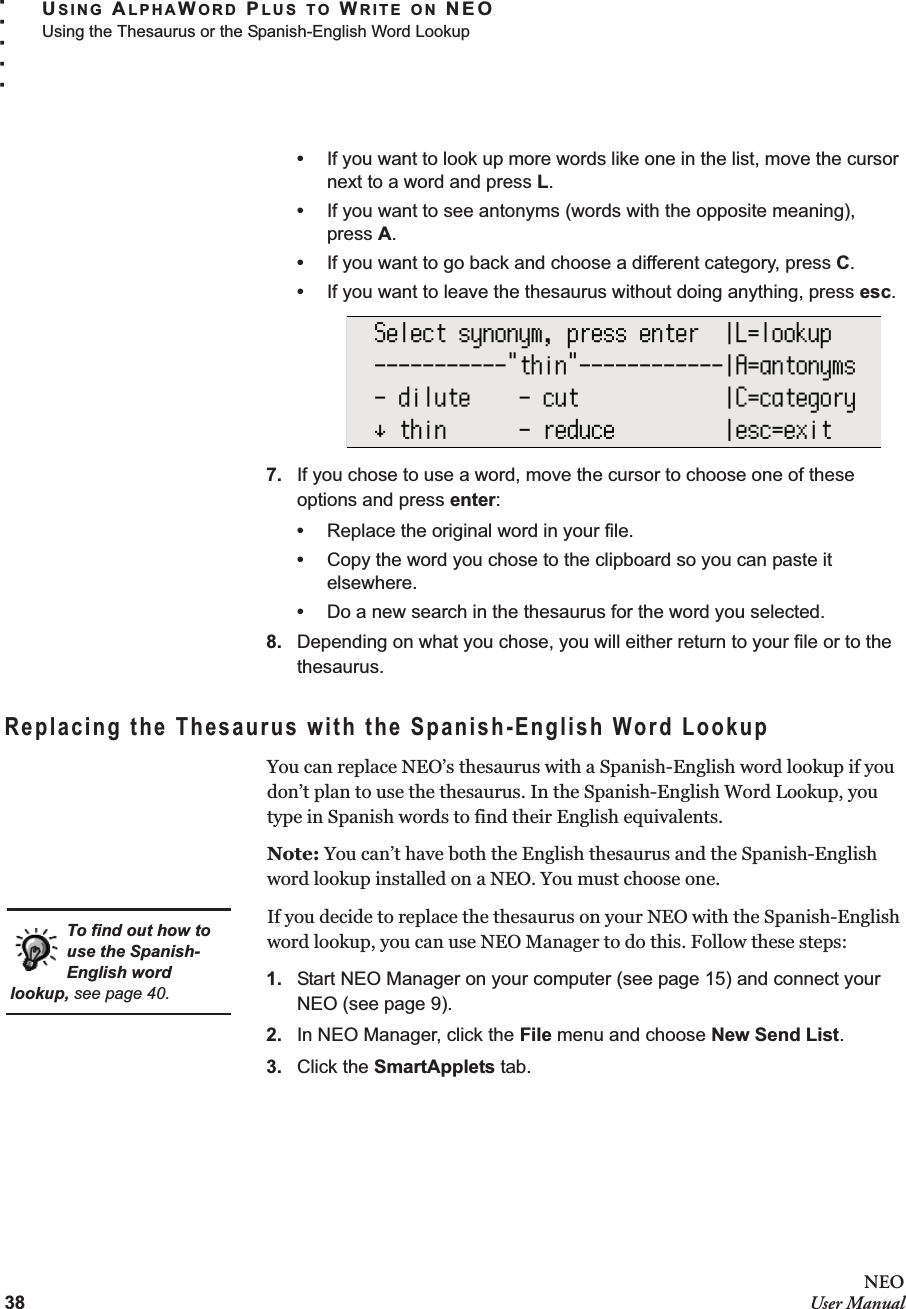
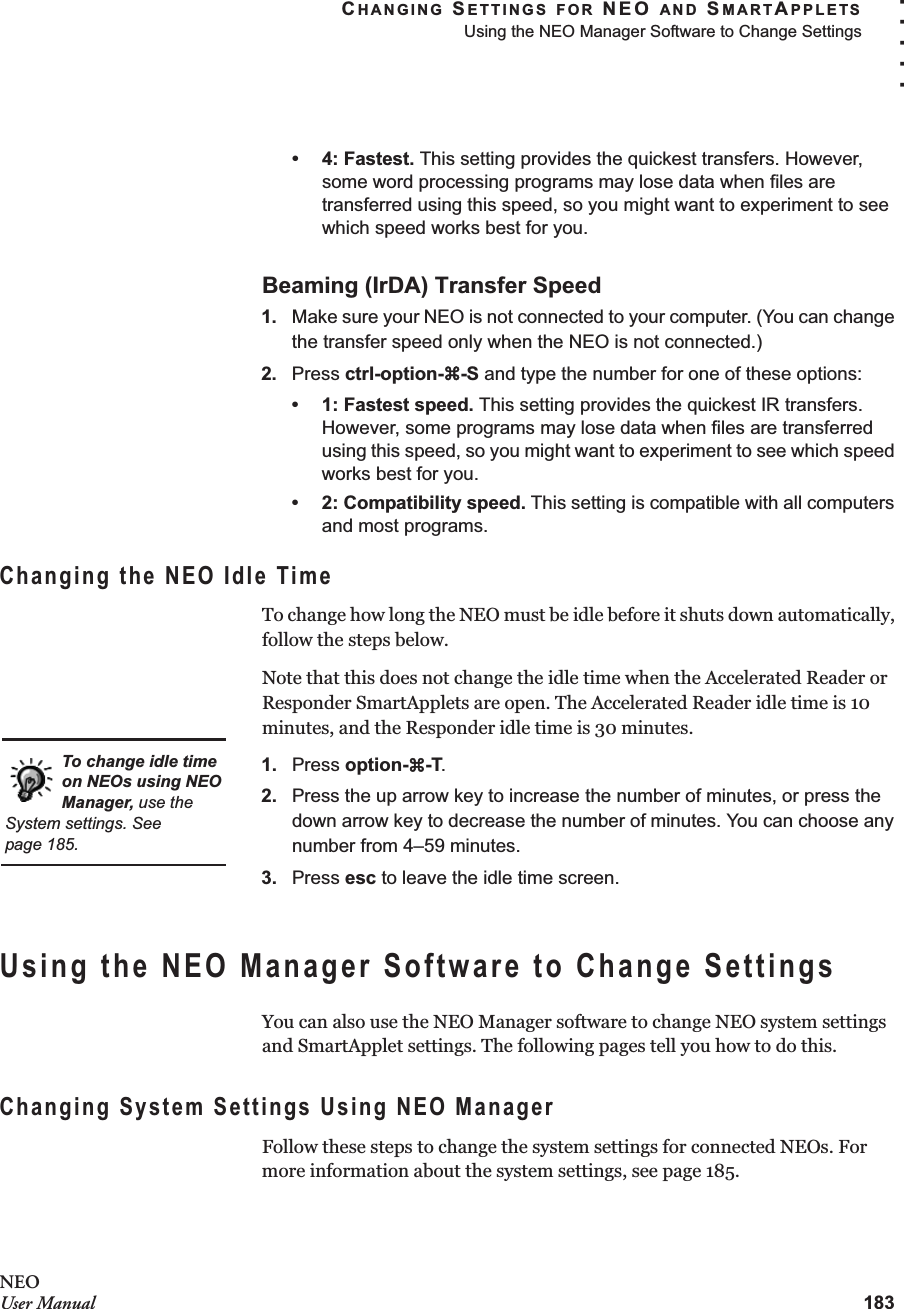
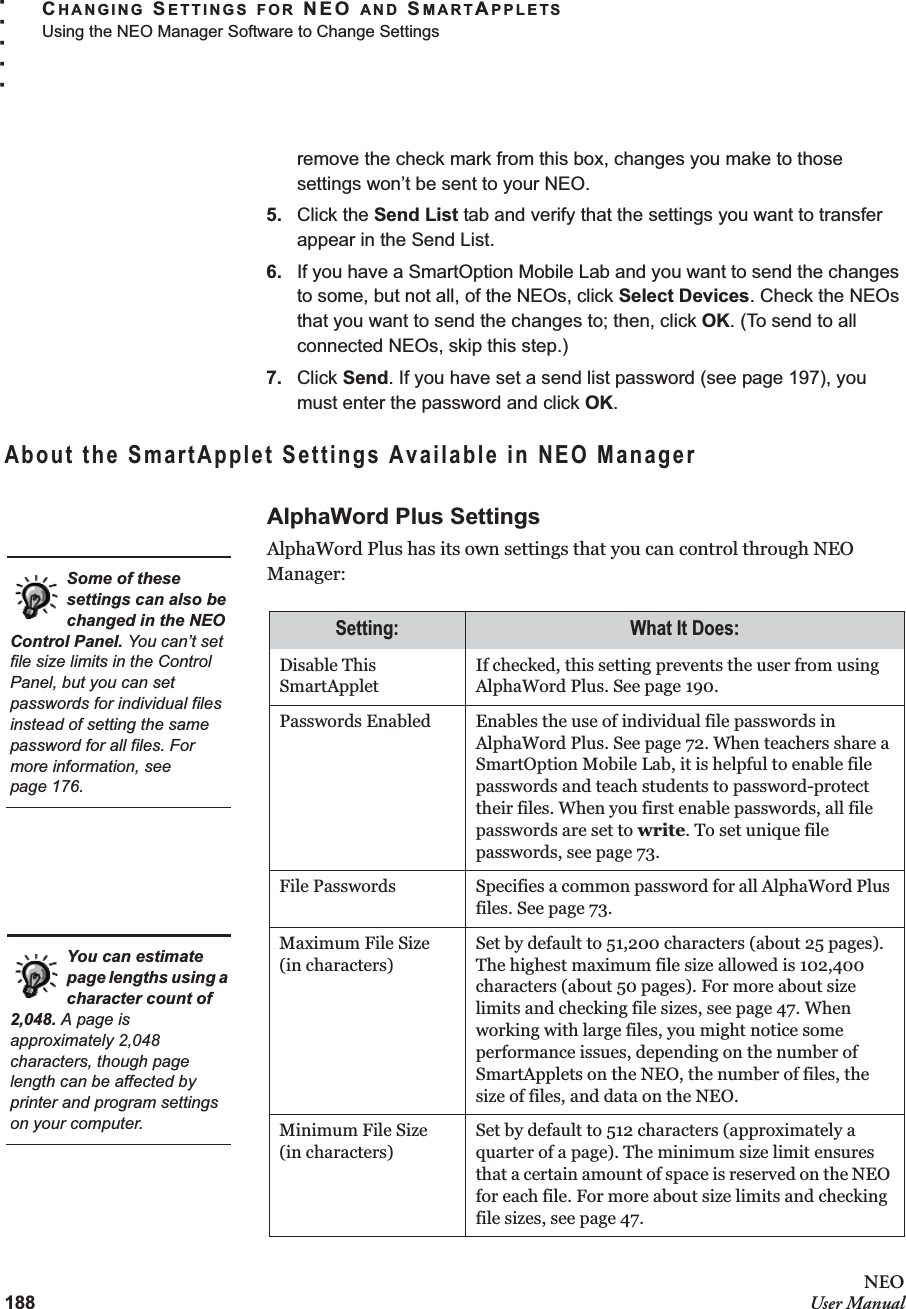
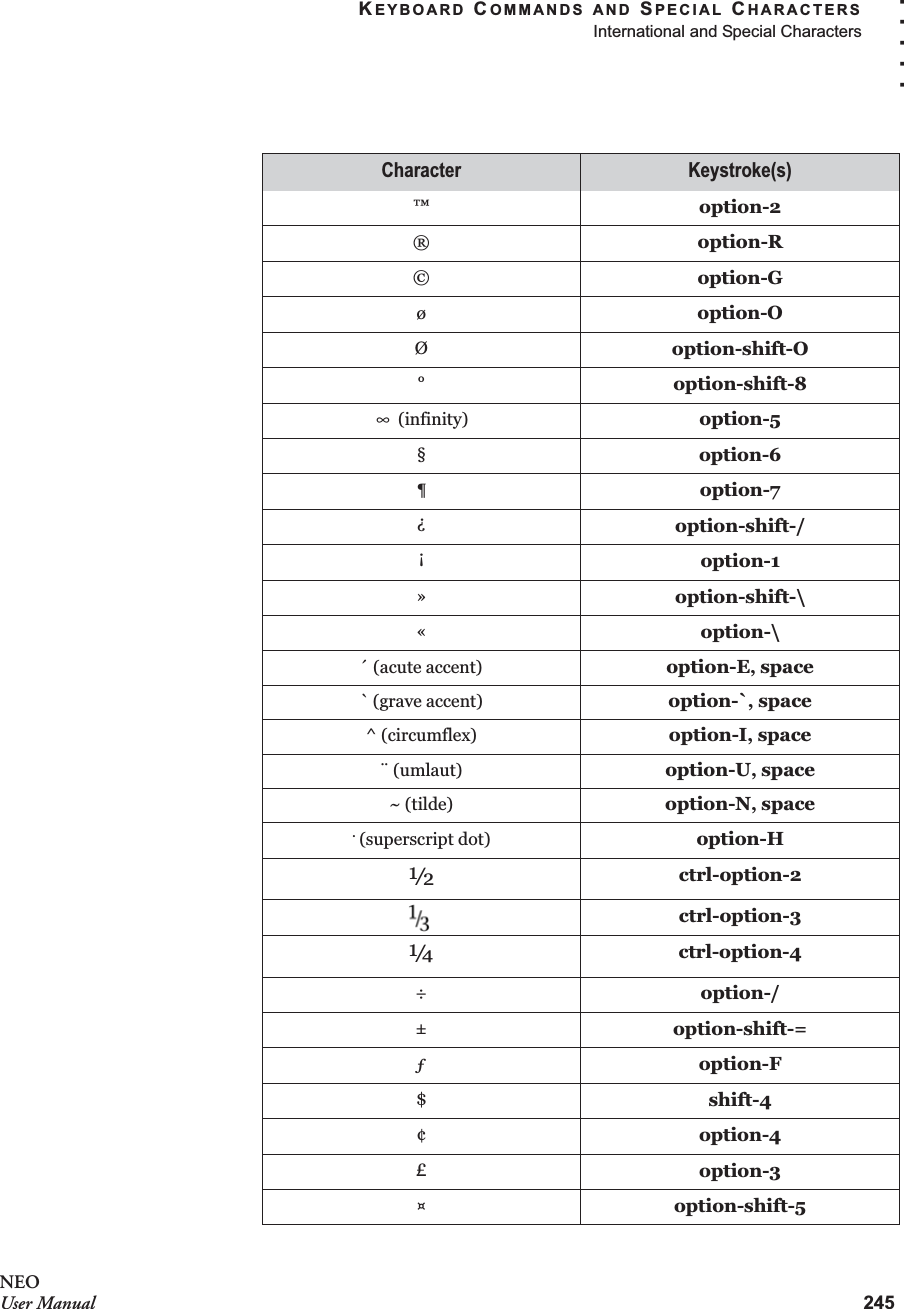
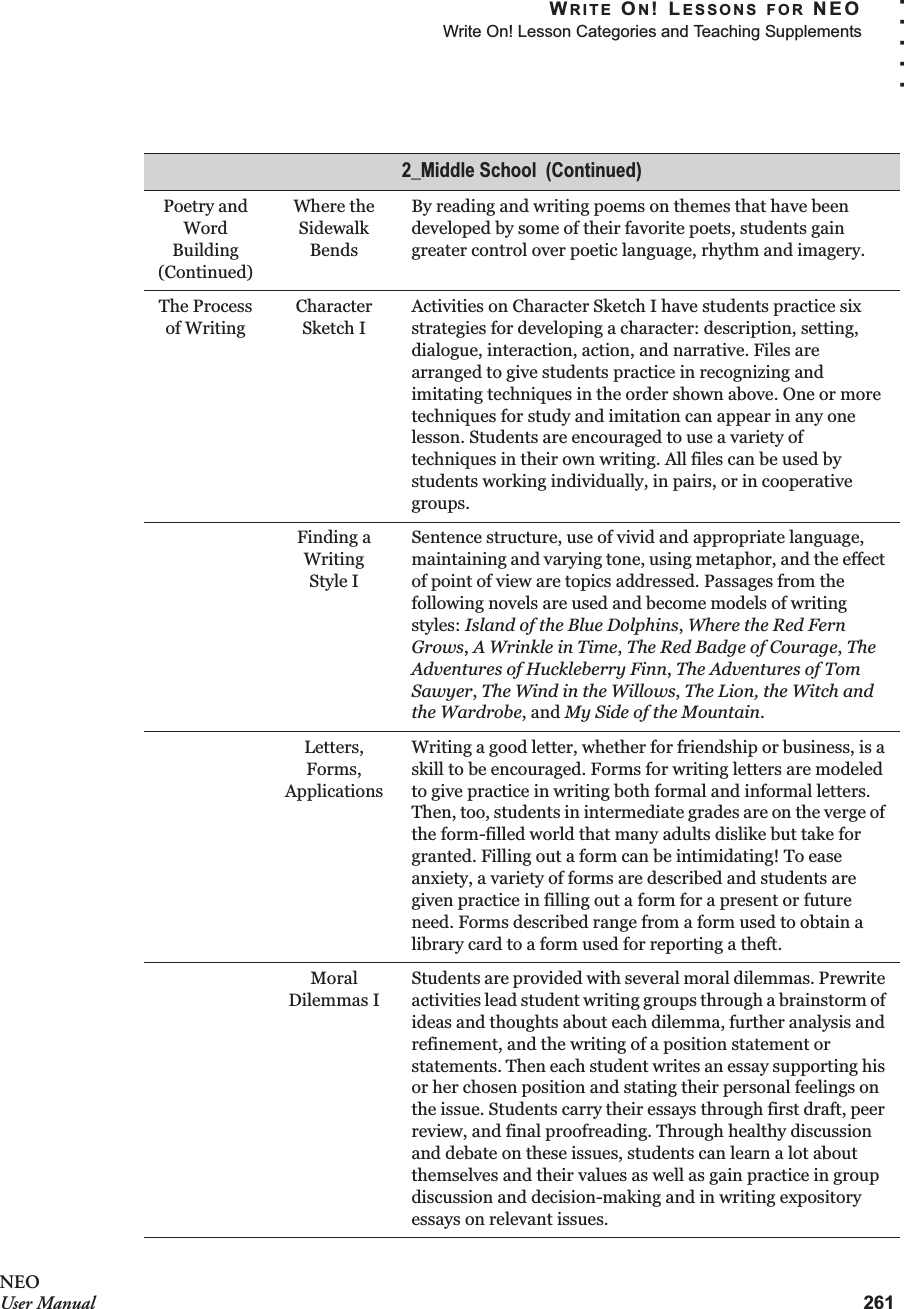
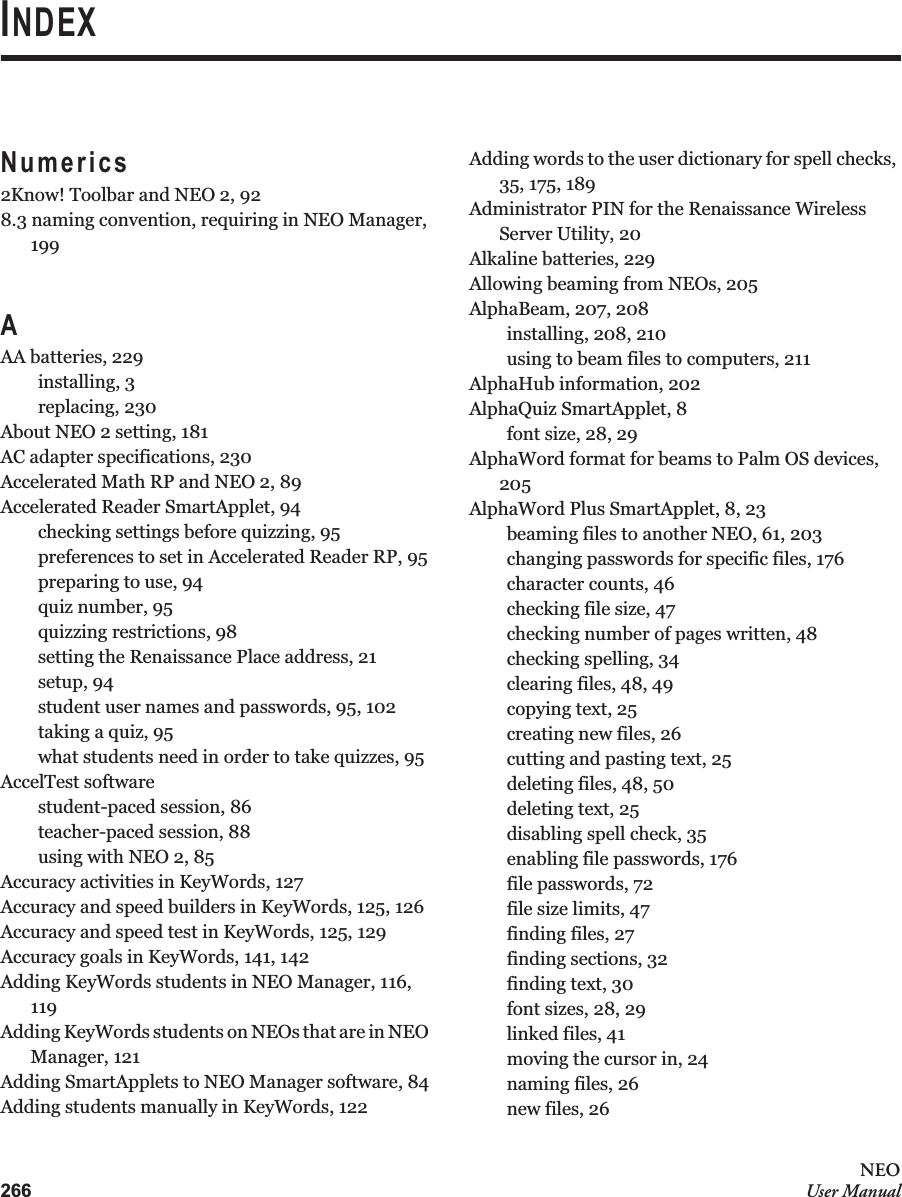
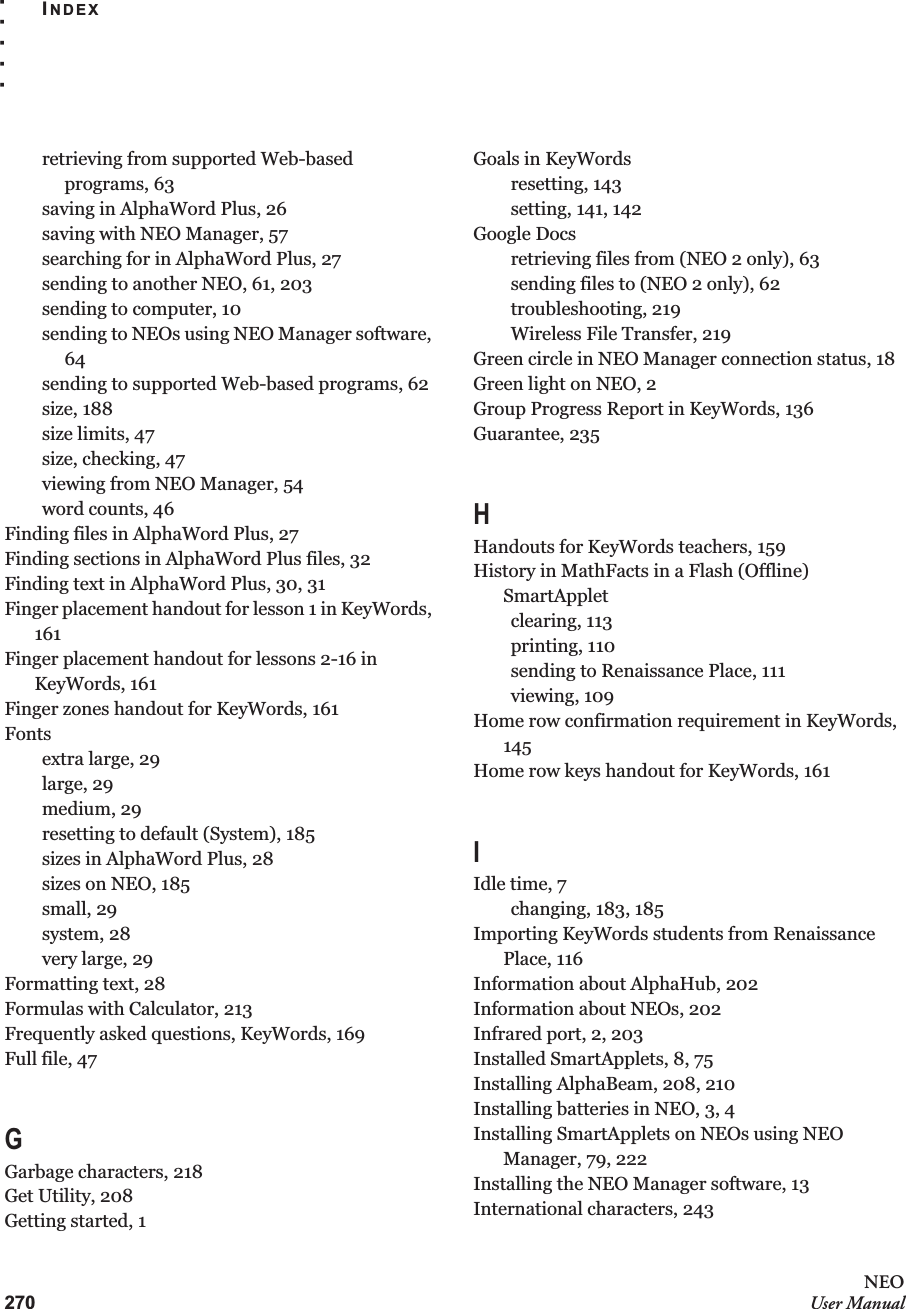
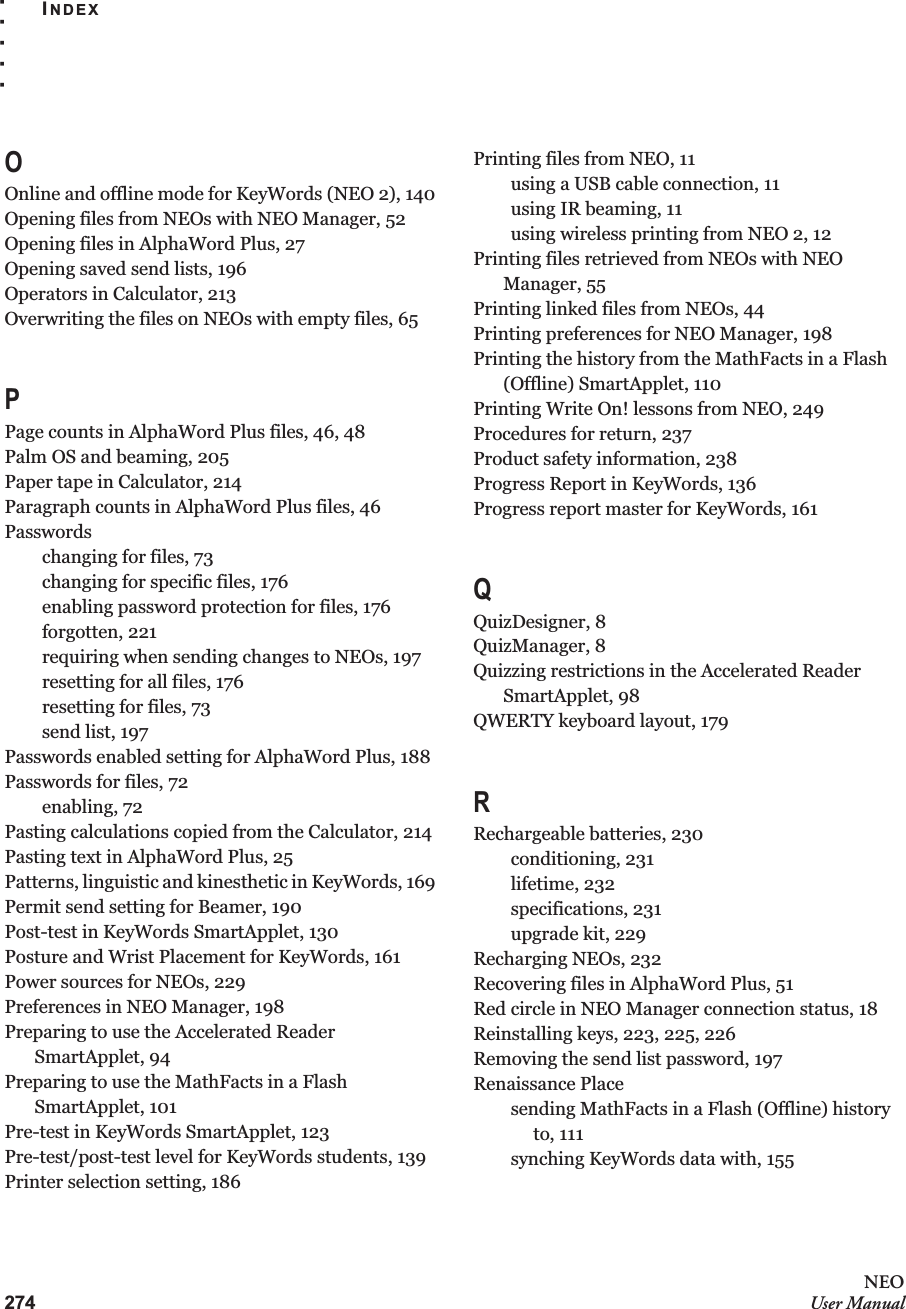
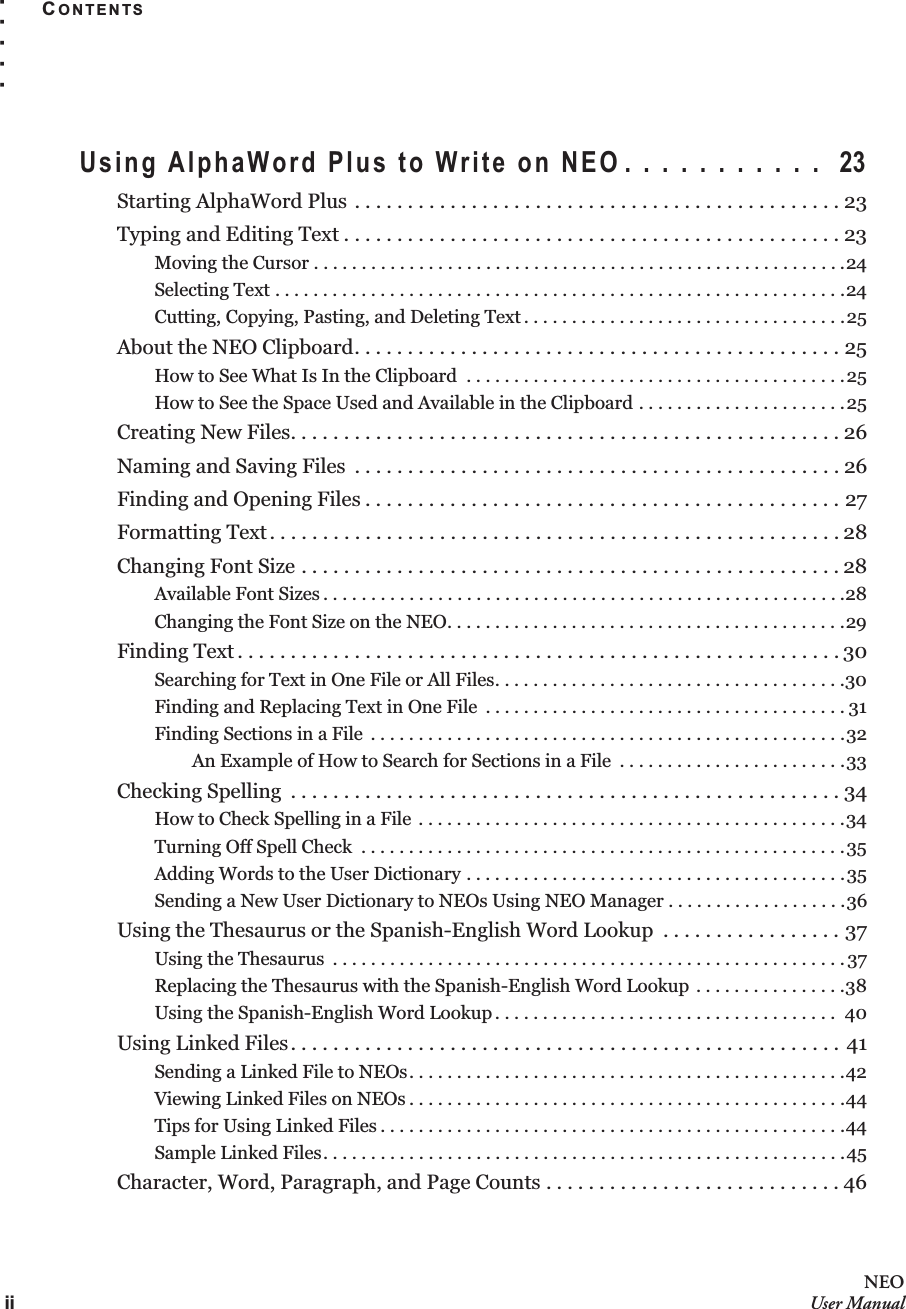
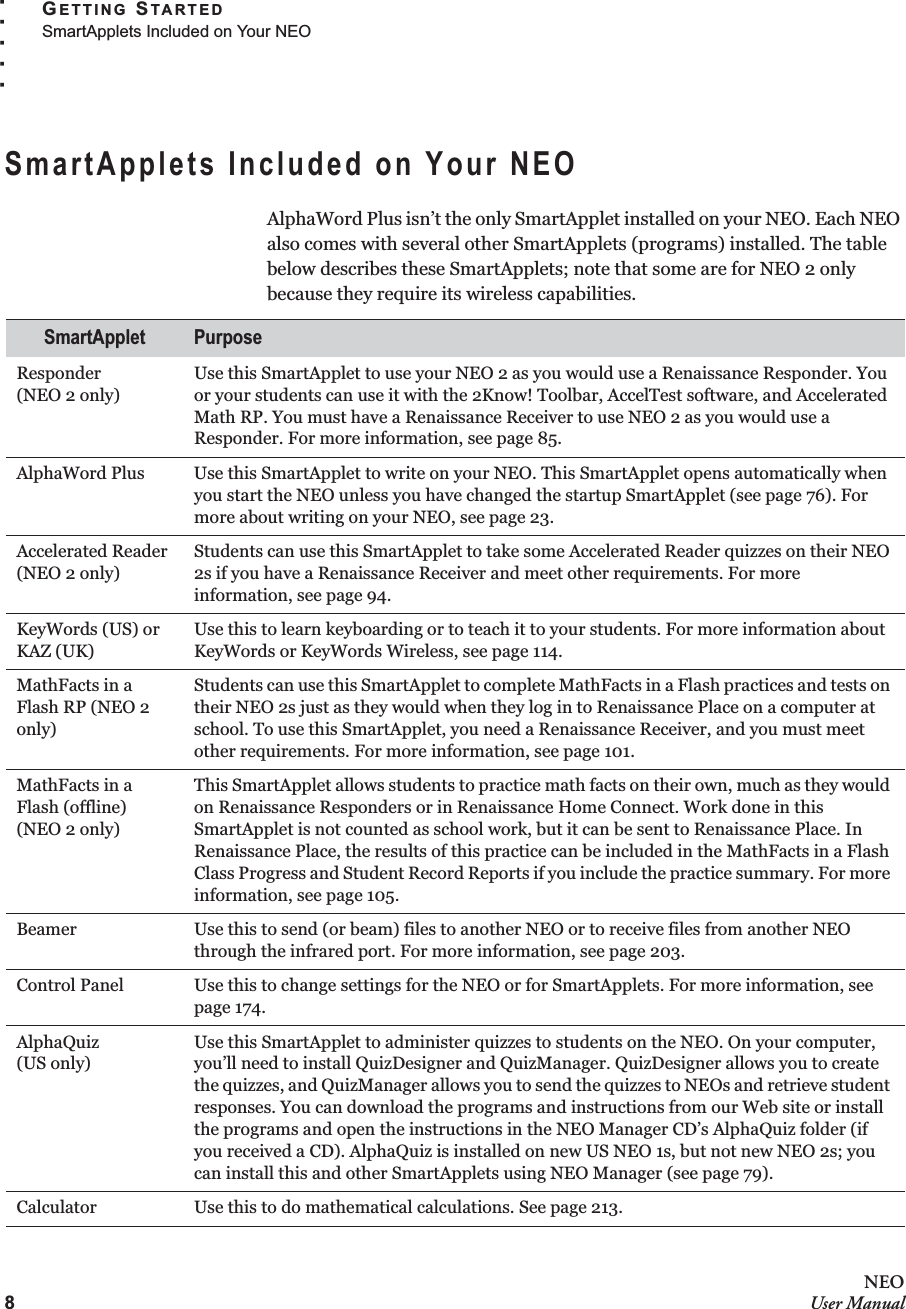
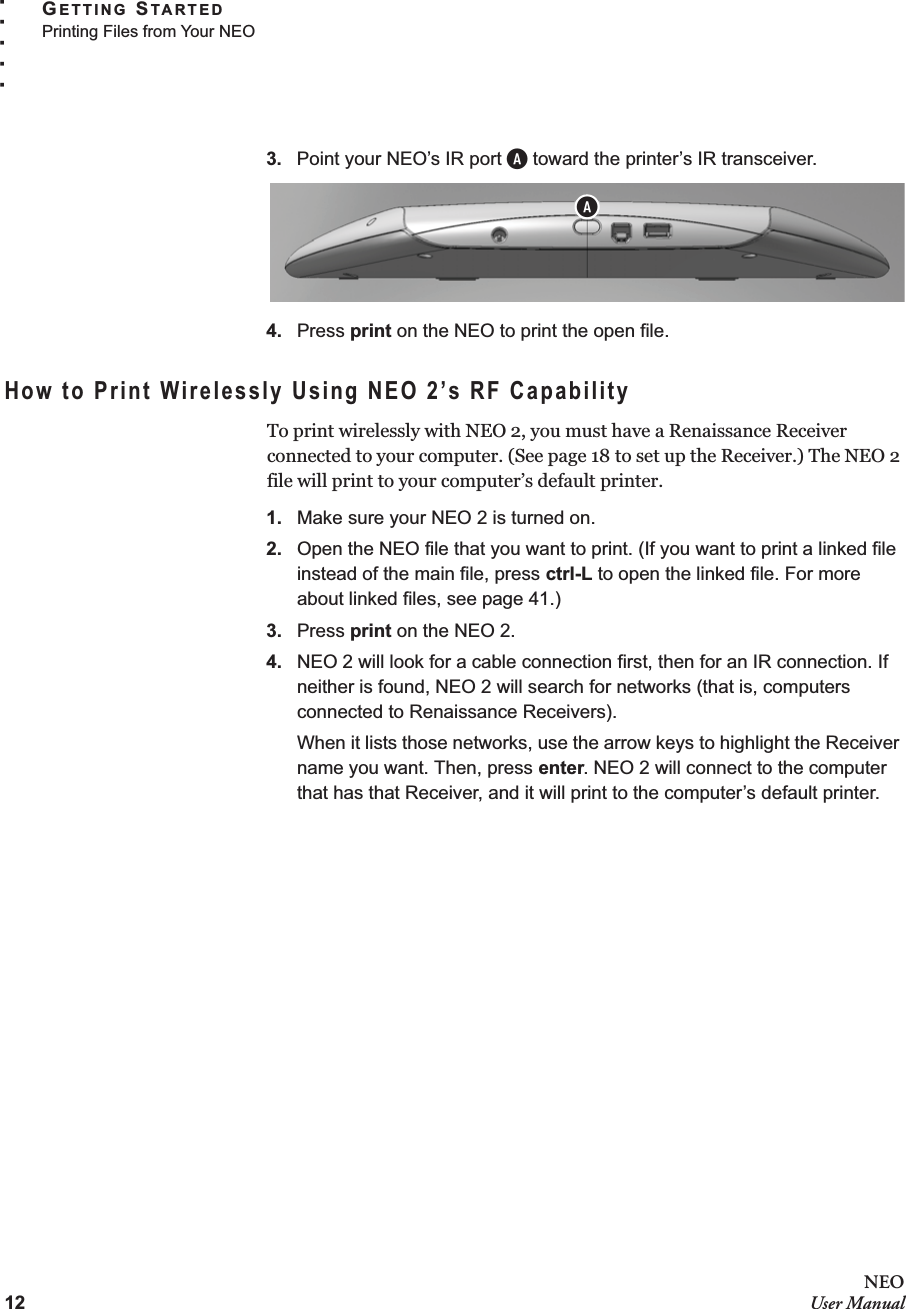
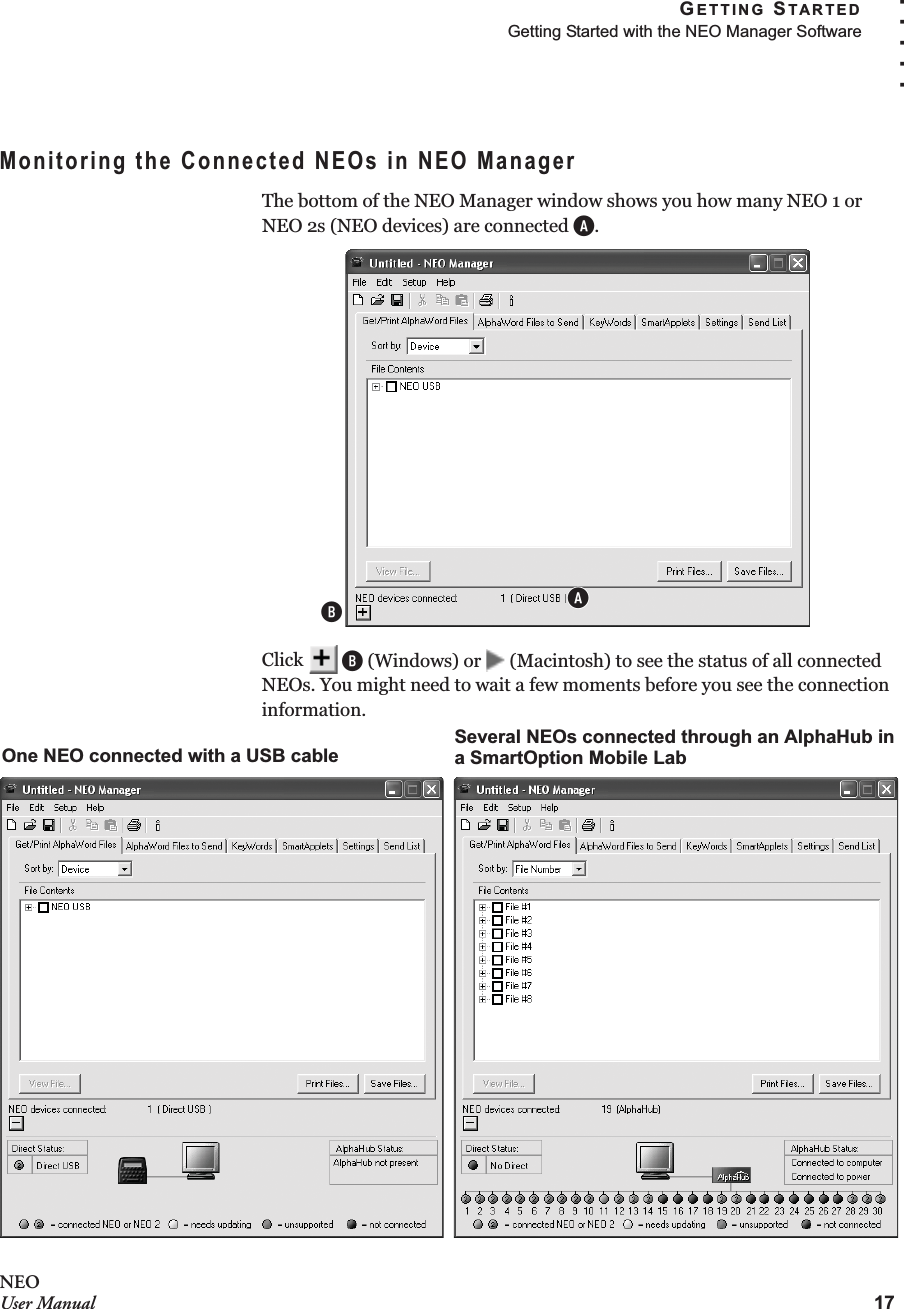
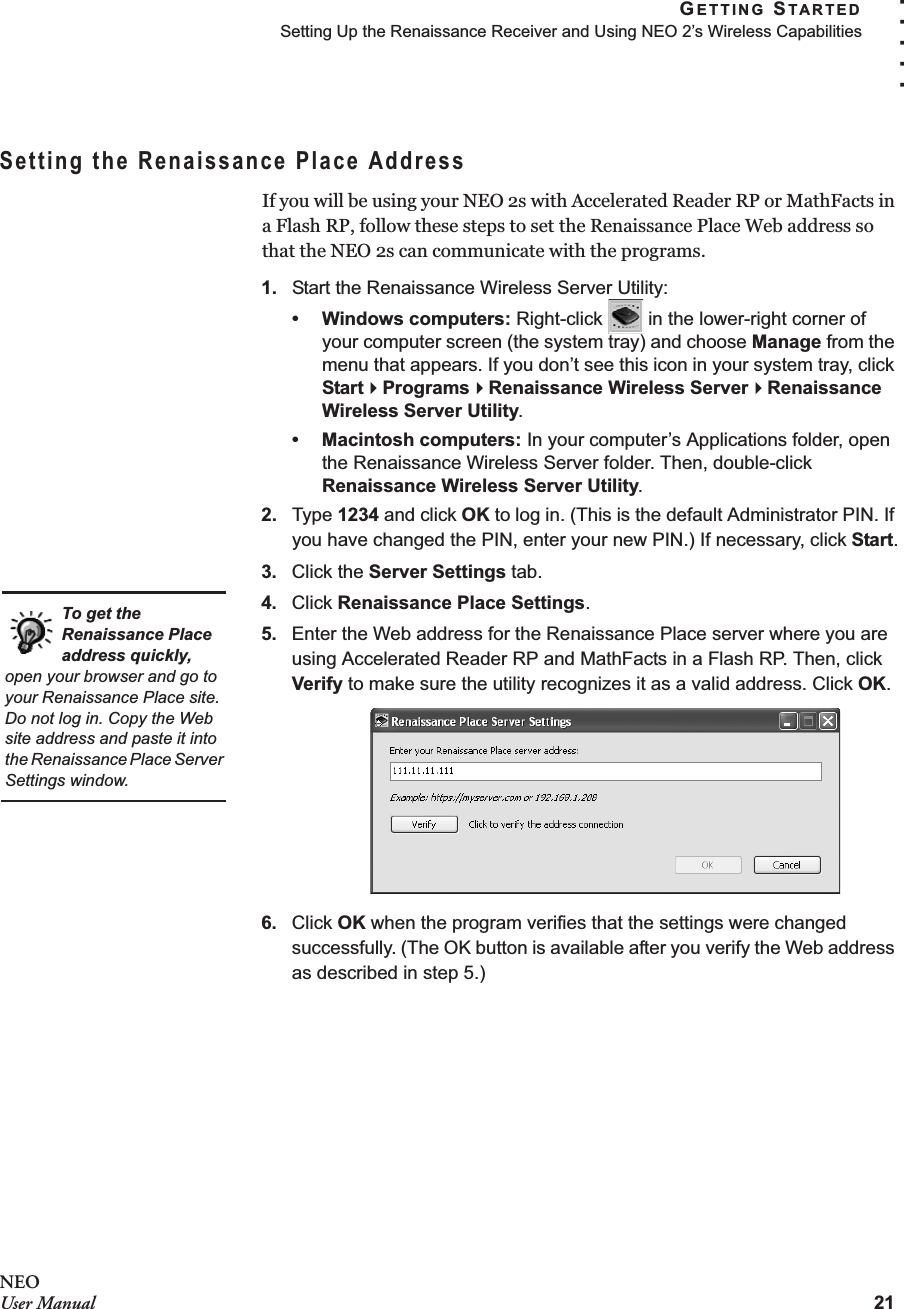
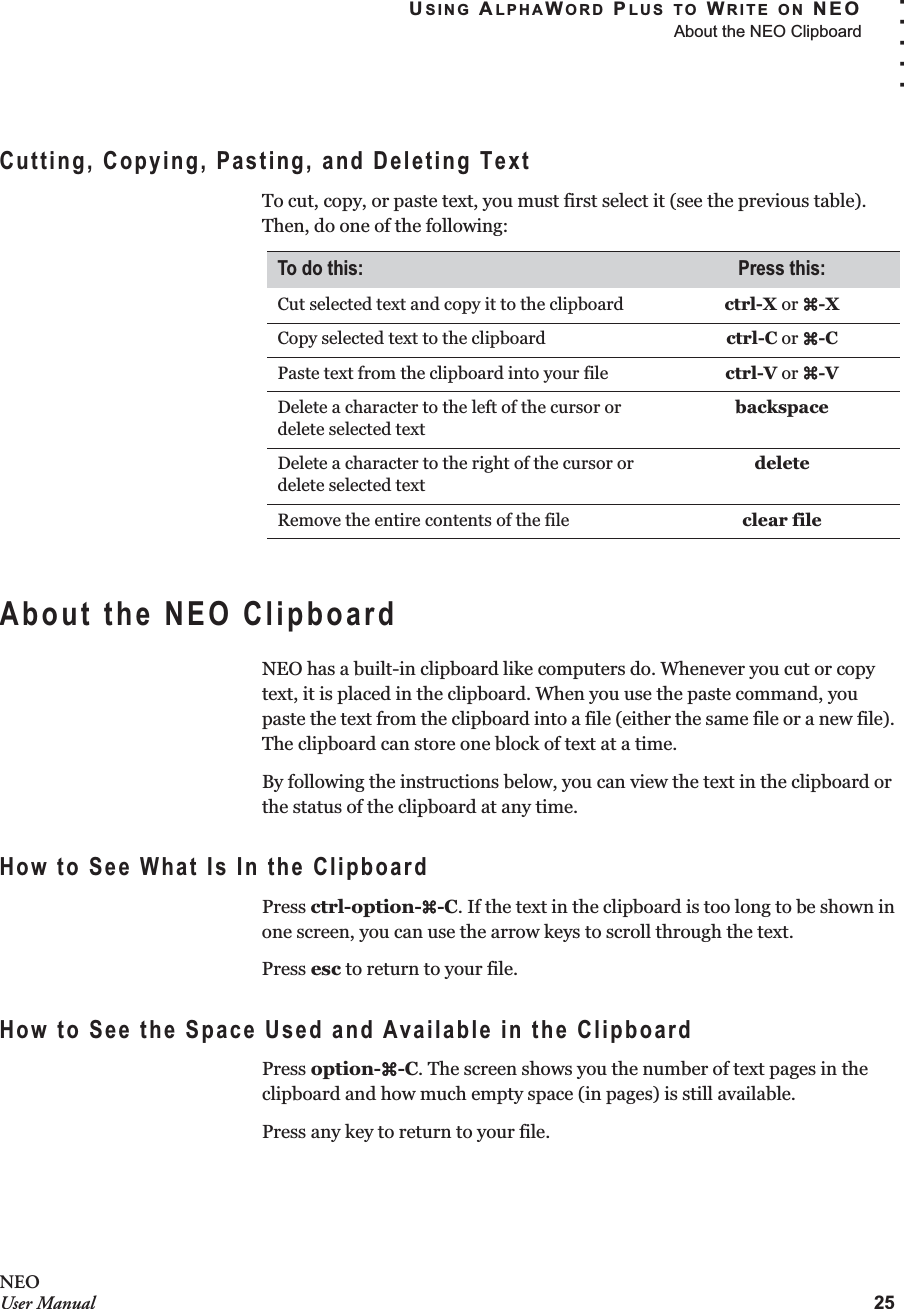
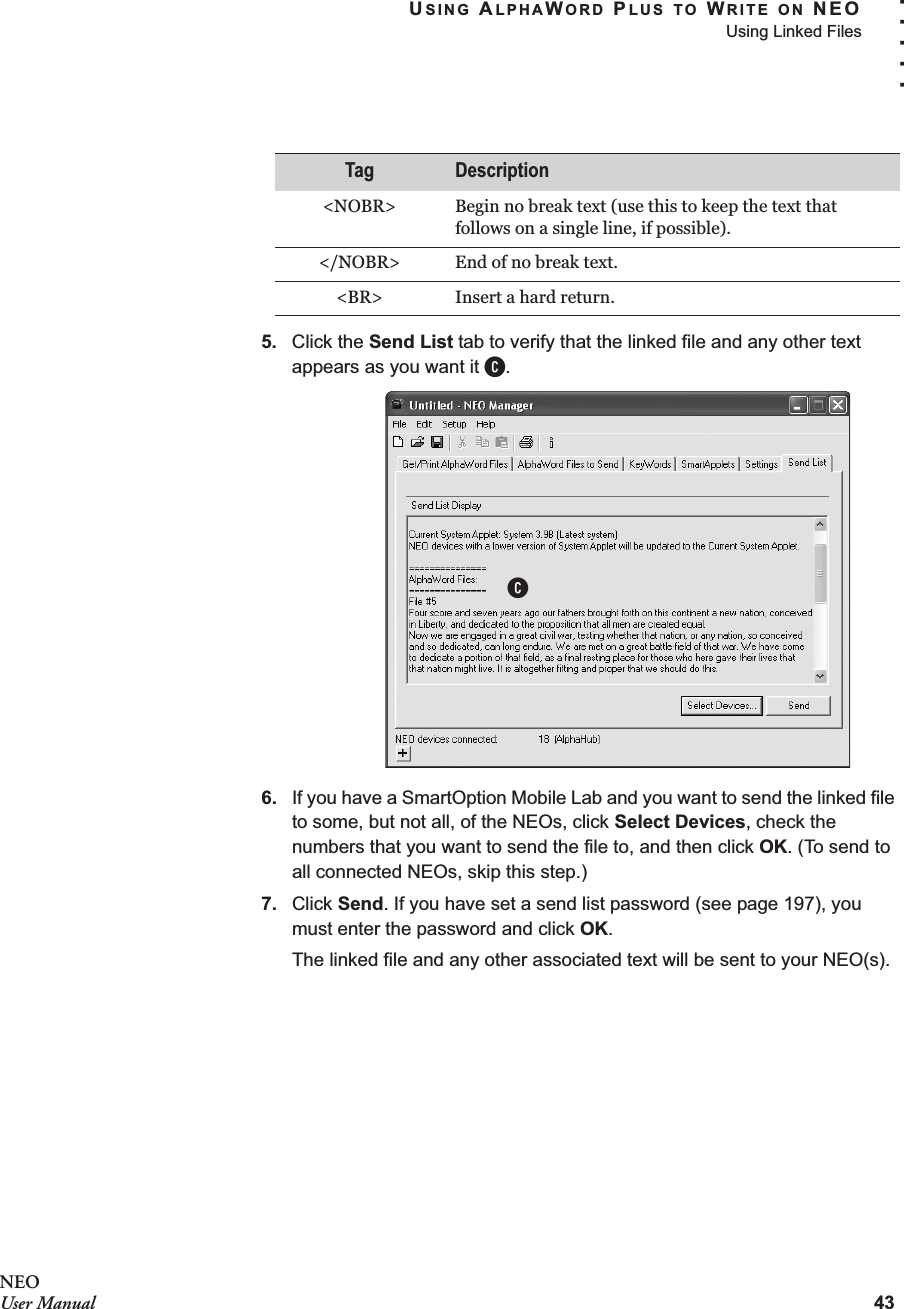
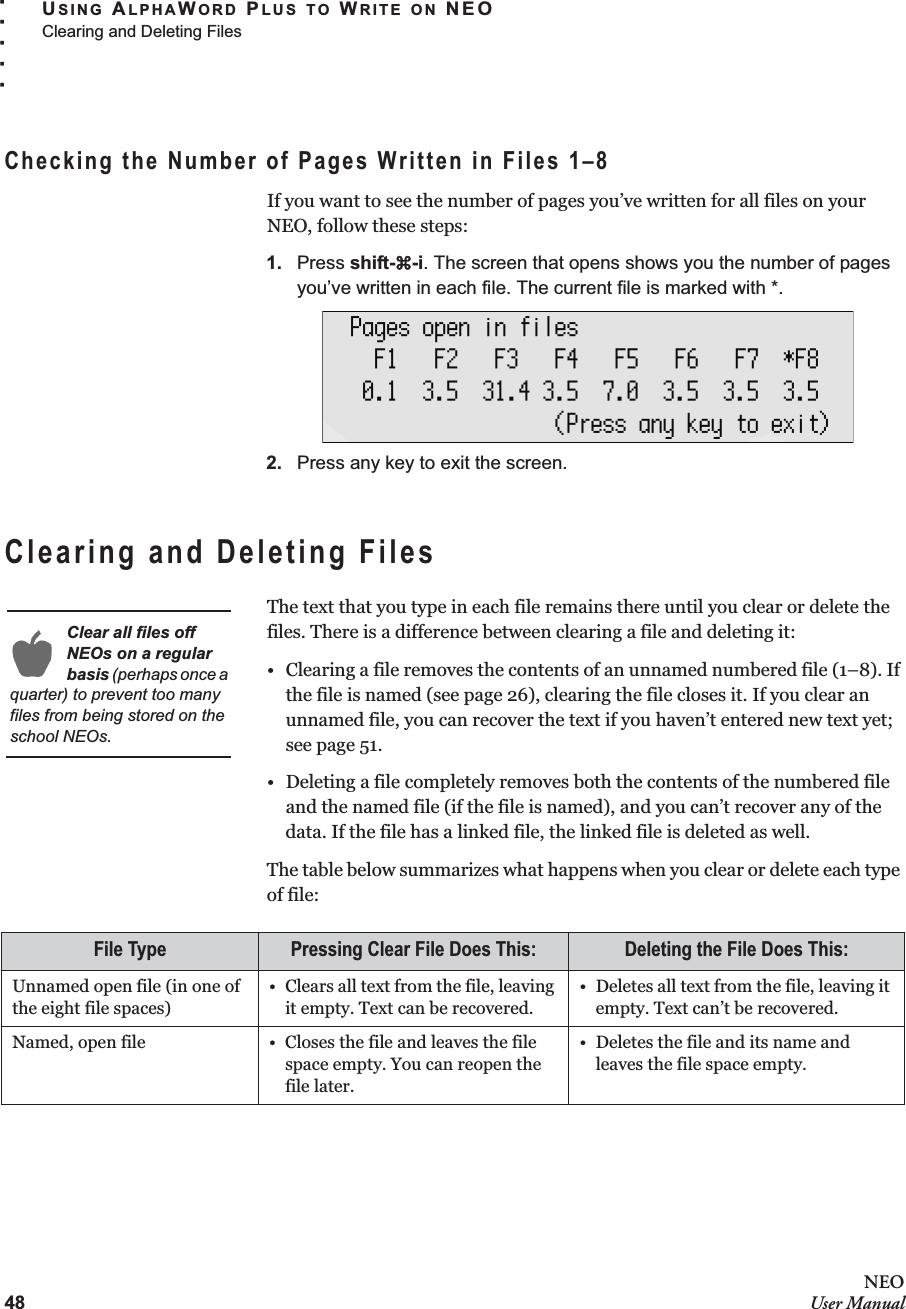
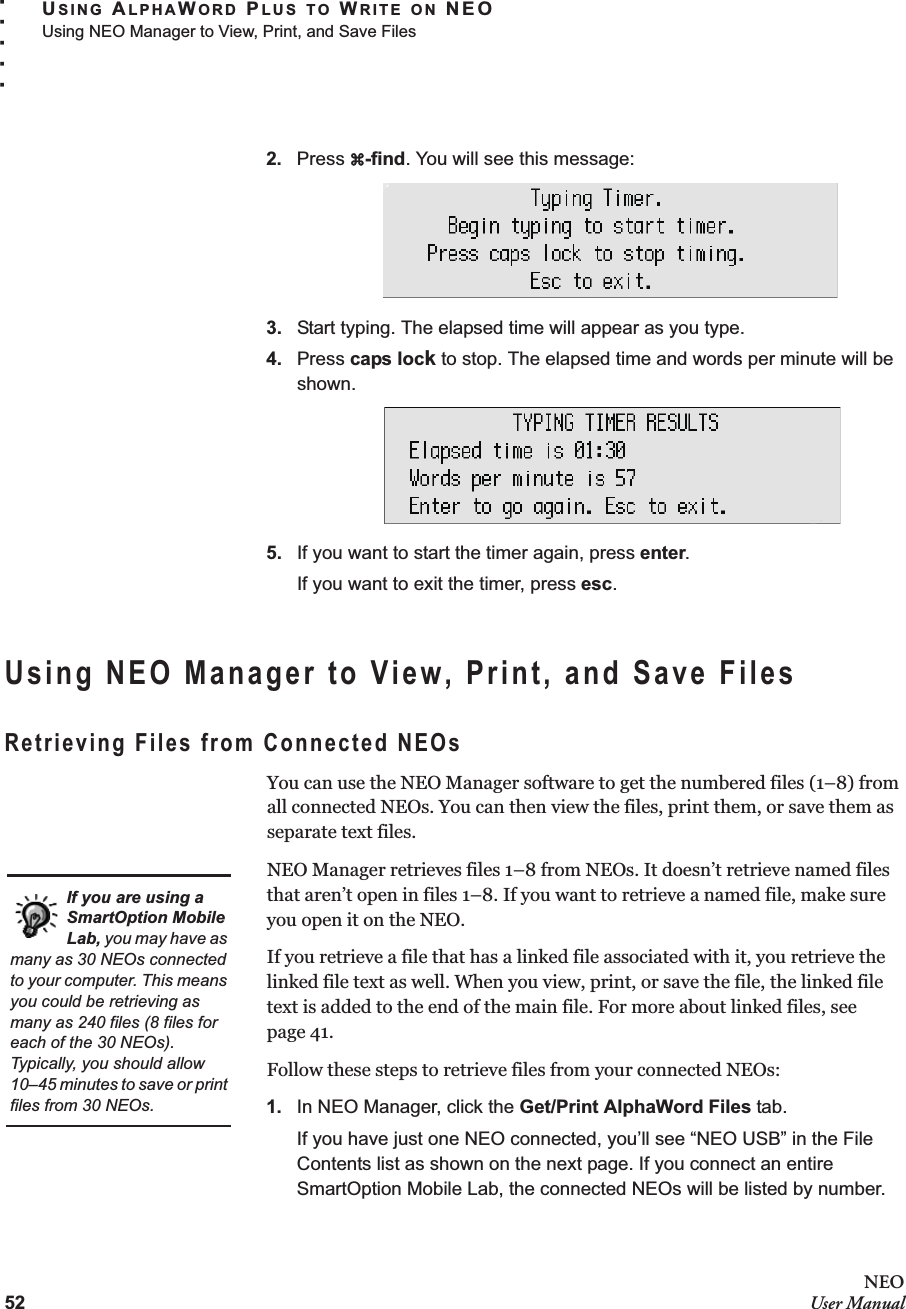
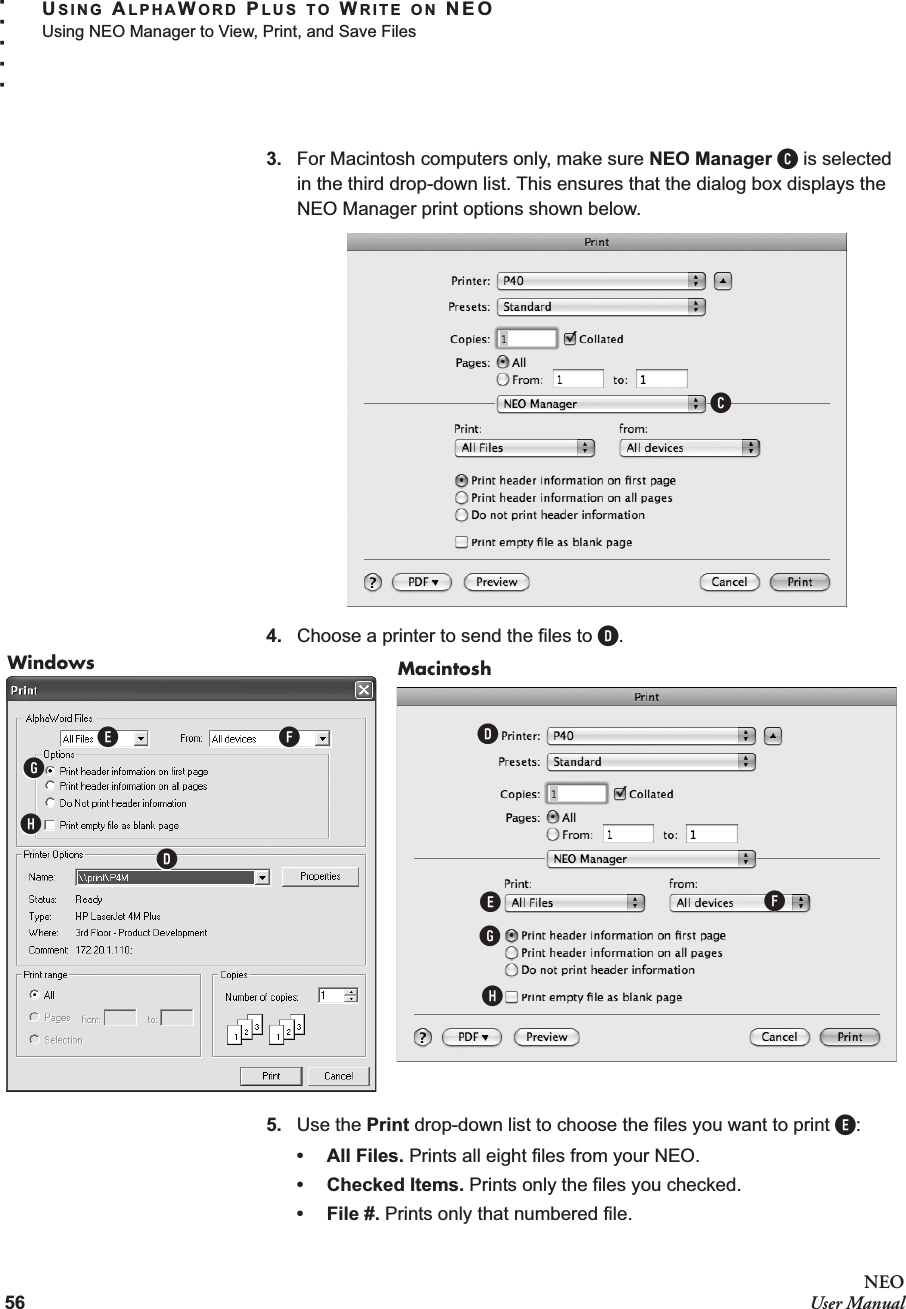
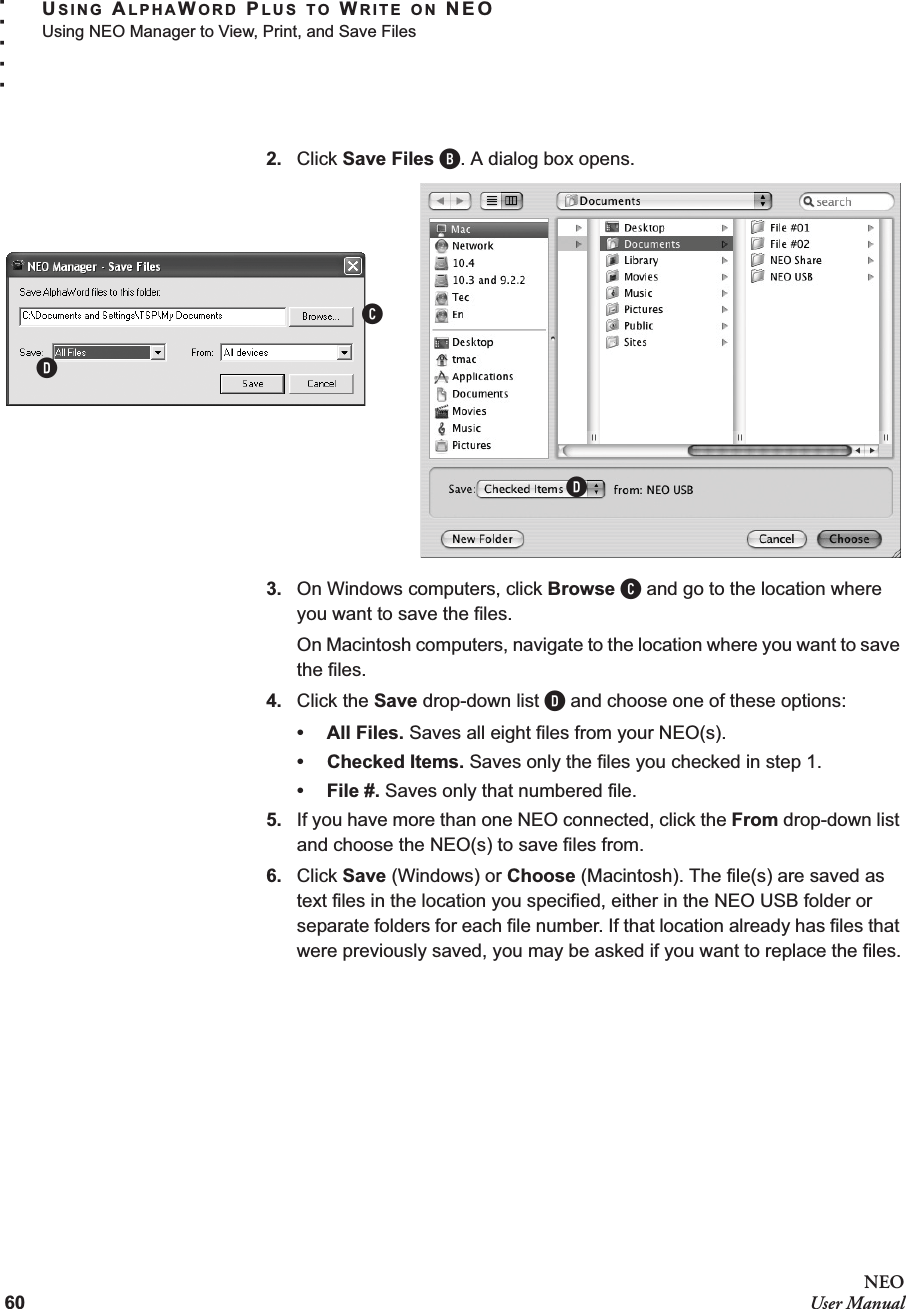
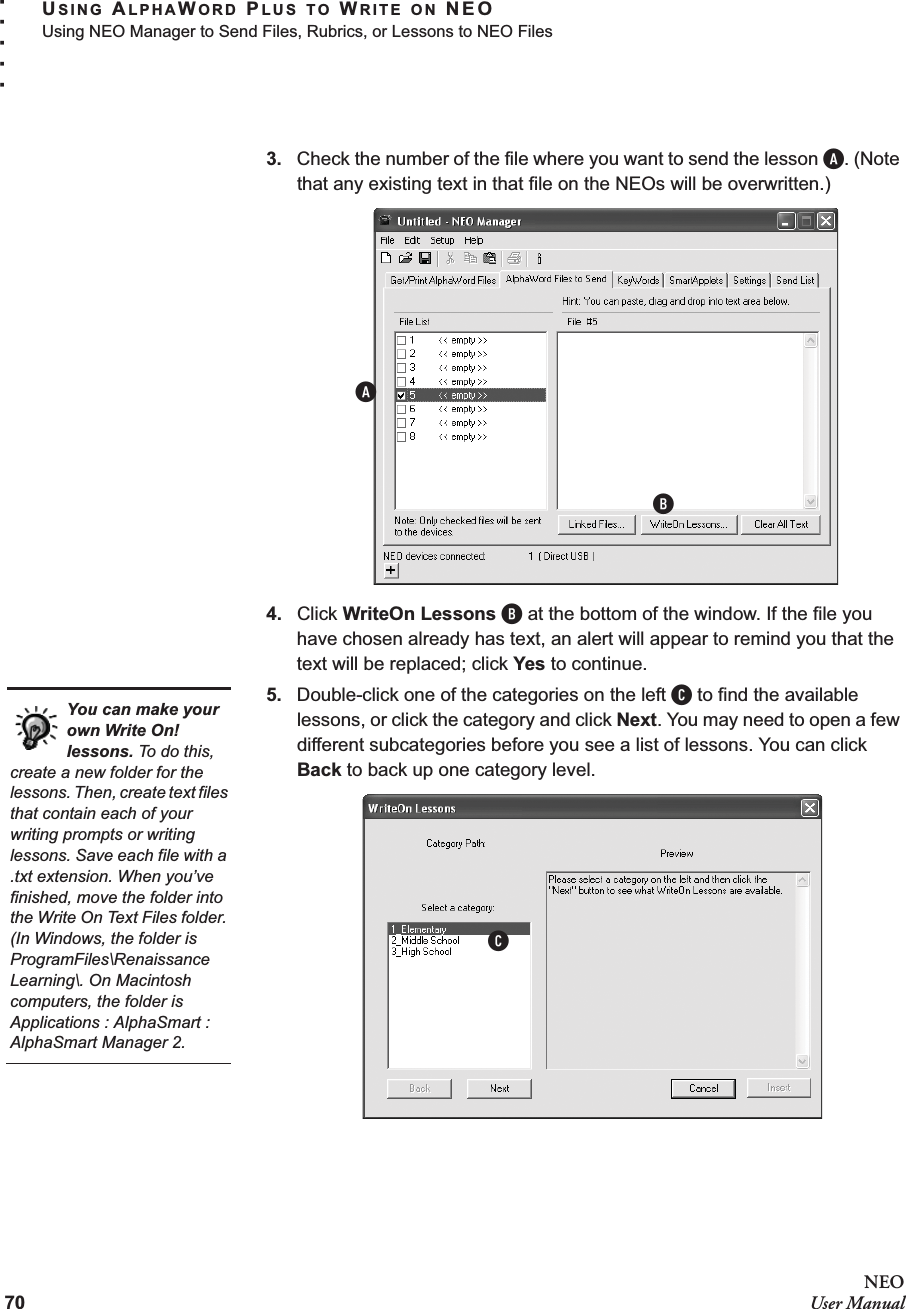
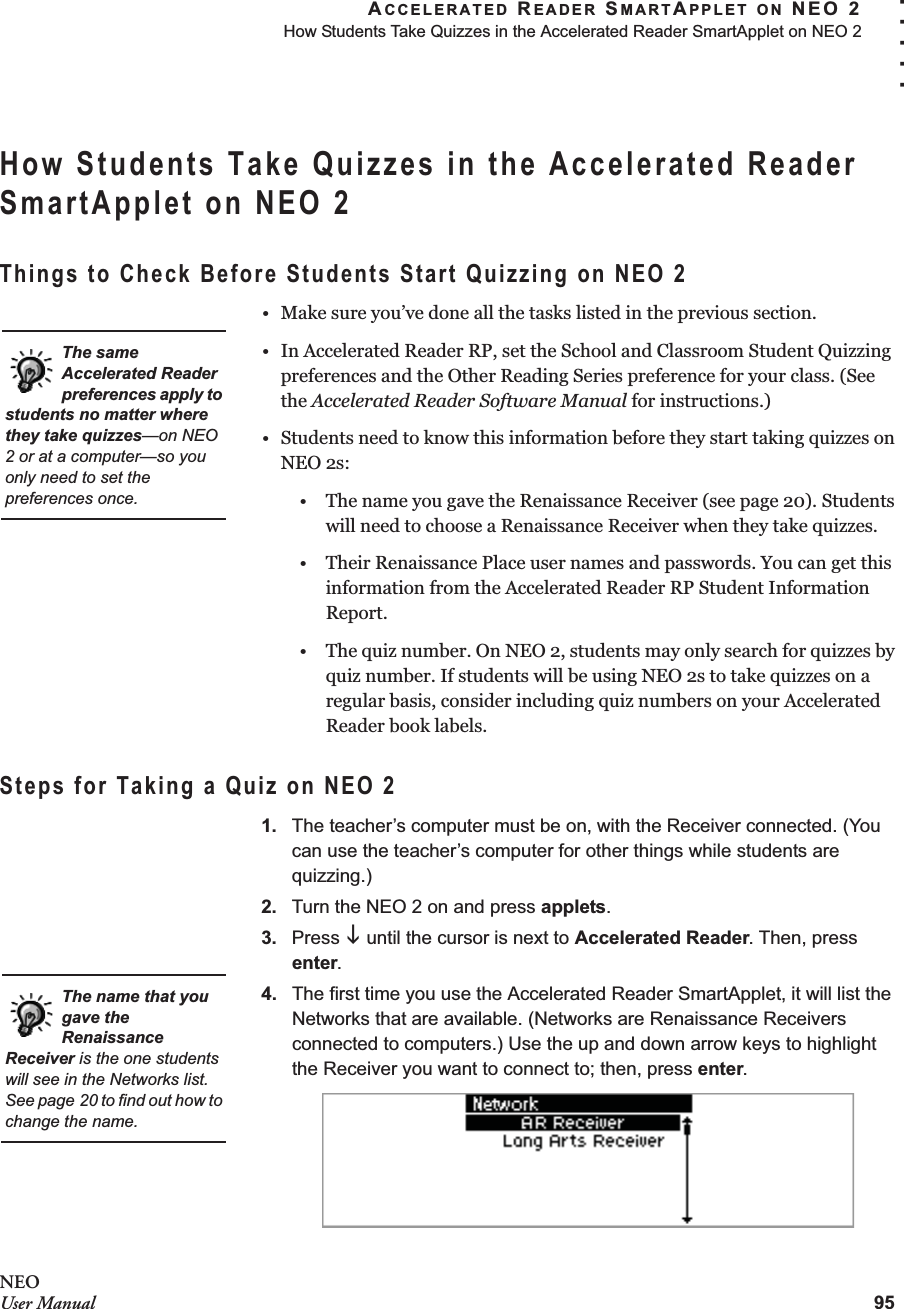
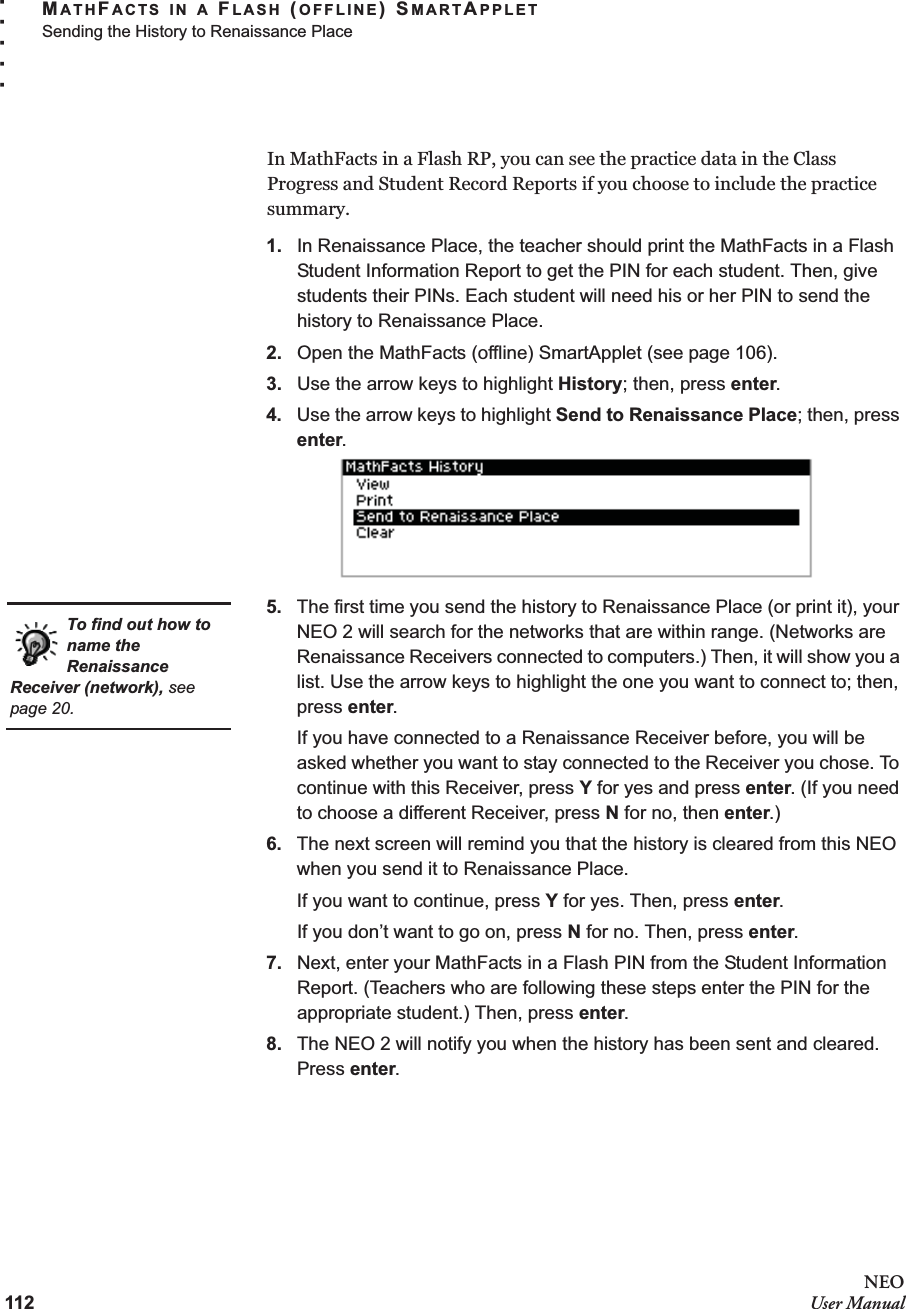
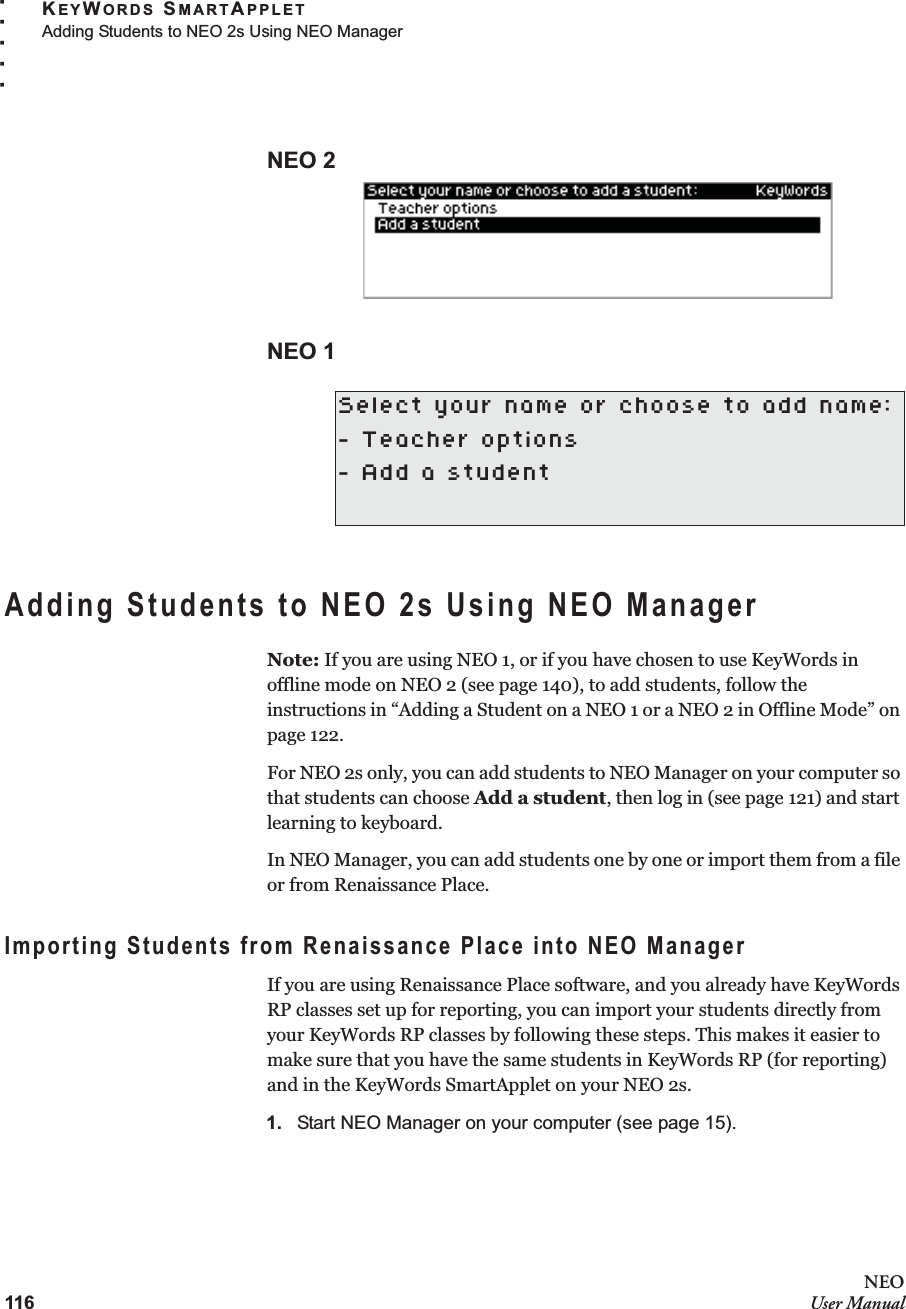
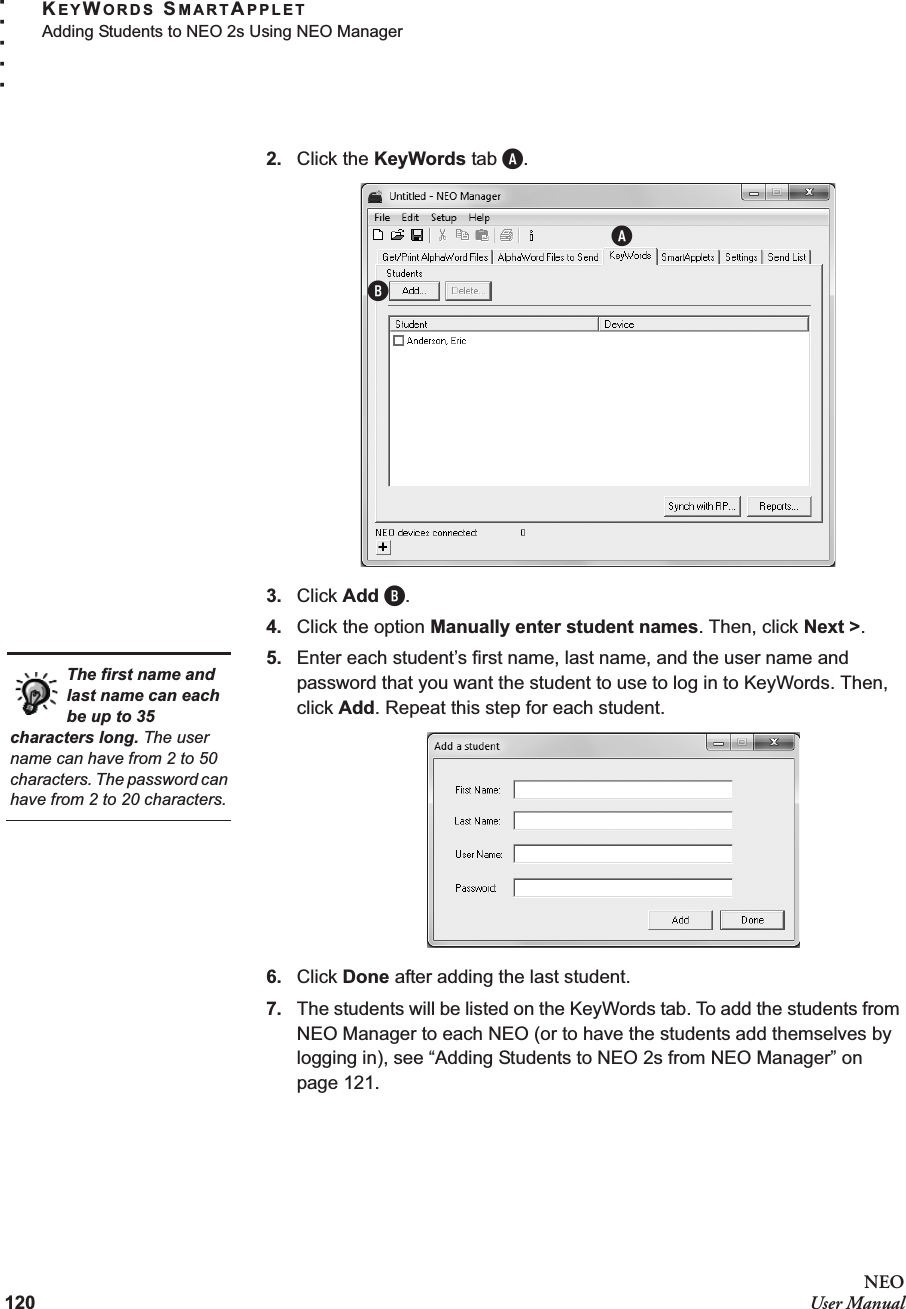
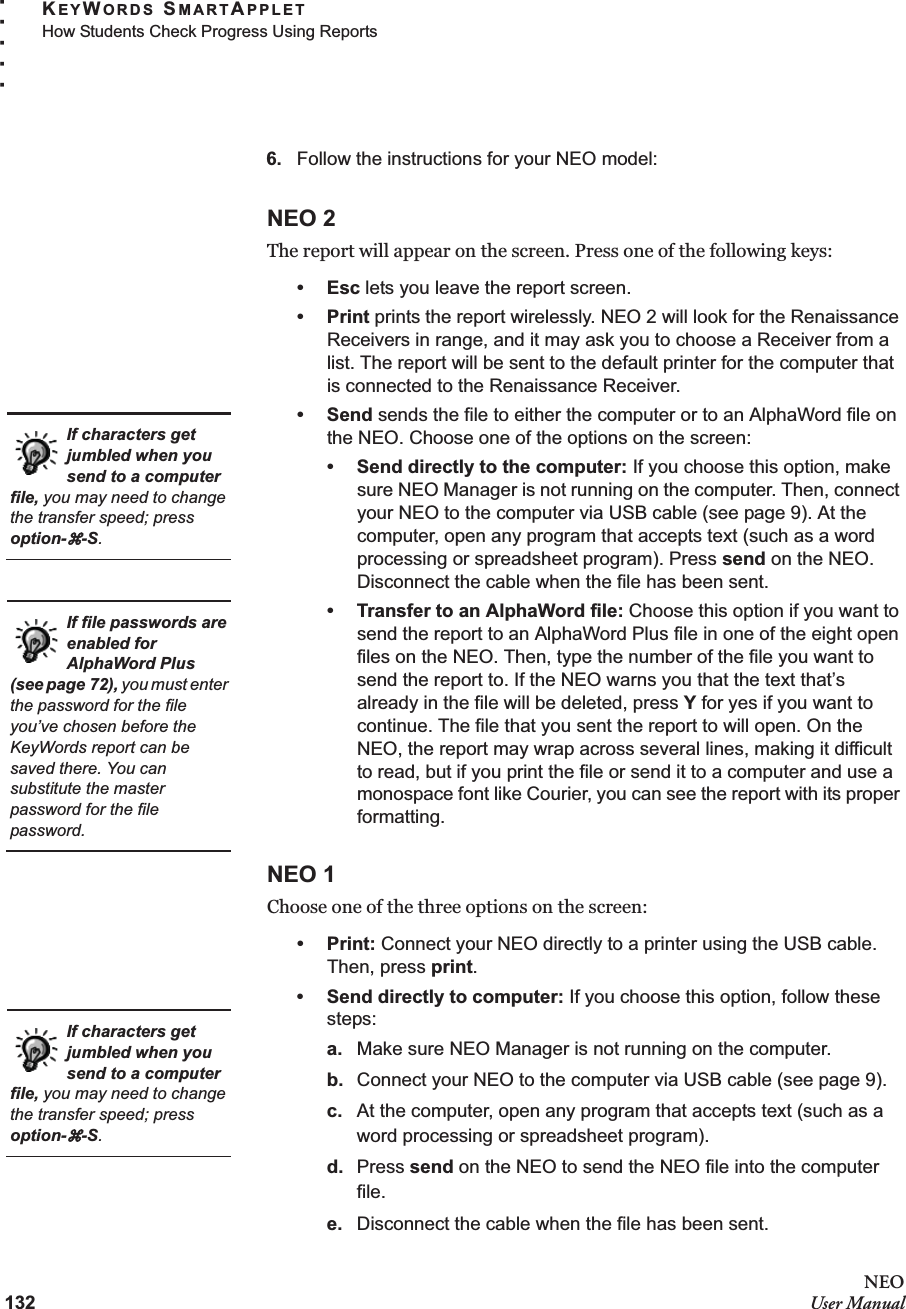
![42NEOUser ManualUSING ALPHAWORD PLUS TO WRITE ON NEOUsing Linked Files. . . . .Sending a Linked File to NEOs1. Start NEO Manager on your computer (see page 15) and connect your NEO (see page 9).2. Click the AlphaWord Files to Send tab.3. In the file list on the left, click the file number that you want to send to on the NEO(s) A.4. In the File # window B, type the text for the linked file. All text that you want in the linked file should be inside <form> and </form> tags as shown above. If you want to send any text into the main AlphaWord Plus file (not the linked file), insert it before or after the <form> tags.In your linked file, you can use the tags below to insert check boxes, specify a preformatted section, and control line breaks. The tags in the table are similar to HTML tags. Most have a beginning tag enclosed in angle brackets (<PRE>) and an end tag enclosed in angle brackets with a forward slash (</PRE>).Tag Description<FORM> Begin a linked file.</FORM> End a linked file.[] or [] Insert a check box.<PRE> Begin a preformatted section (use this when you want to precisely control line breaks).</PRE> End a preformatted section.You can also click the Linked Files button, type the text for the linked file in the <form> tags that have been entered for you in the new window, and then click OK to come back to the main window. See page 66.AB](https://usermanual.wiki/Renaissance-Learning/NEO2A/User-Guide-1590523-Page-56.png)
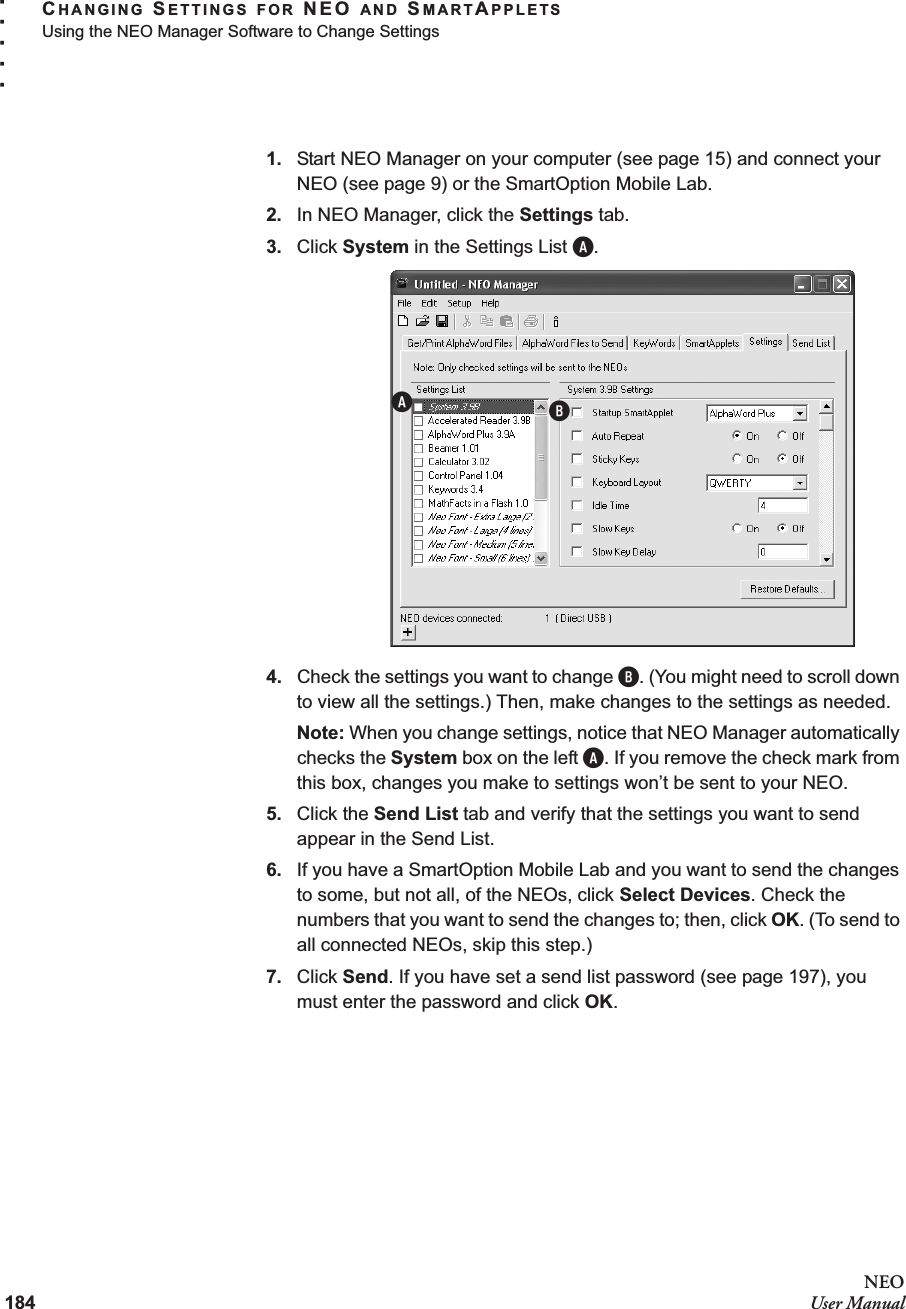
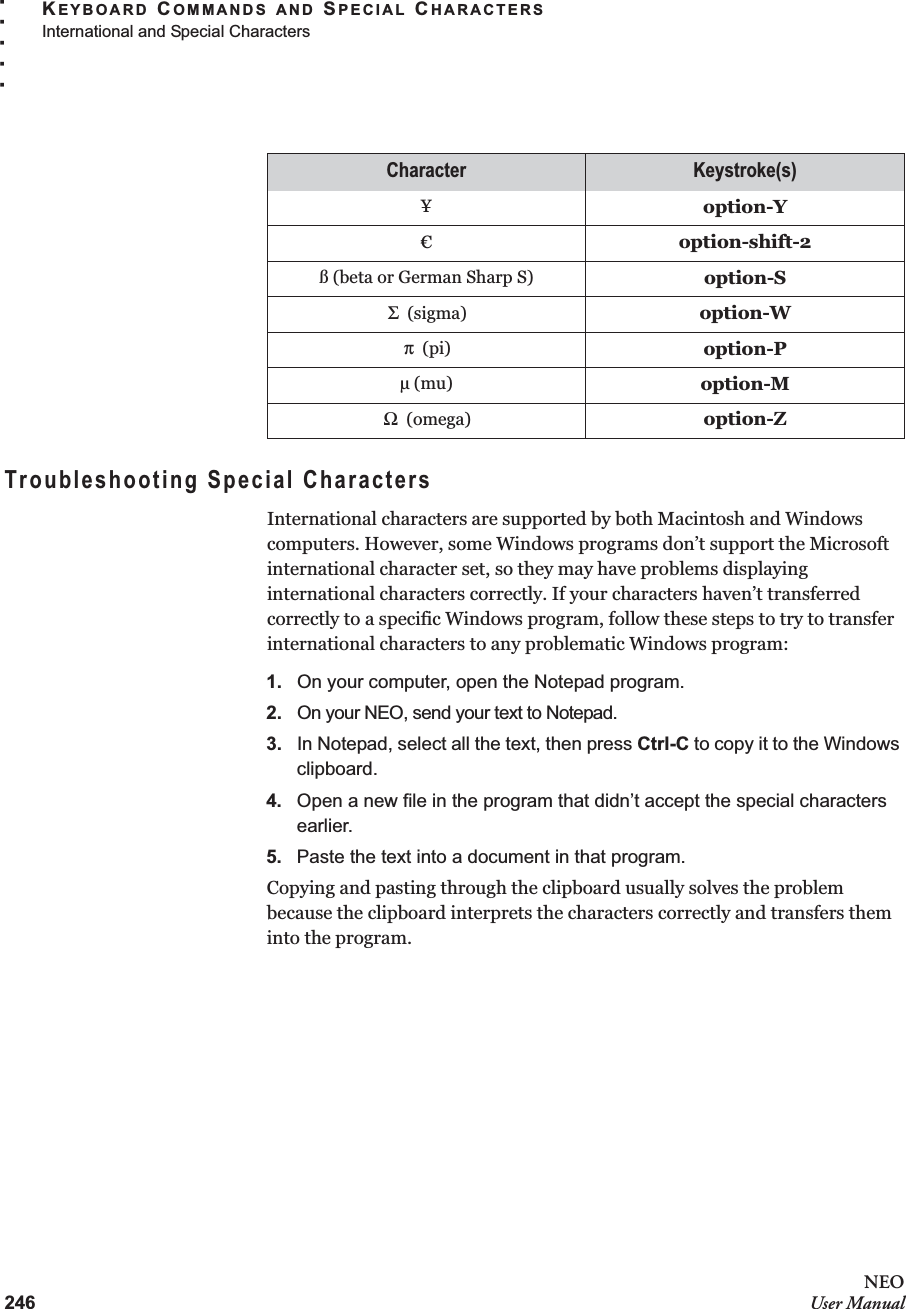
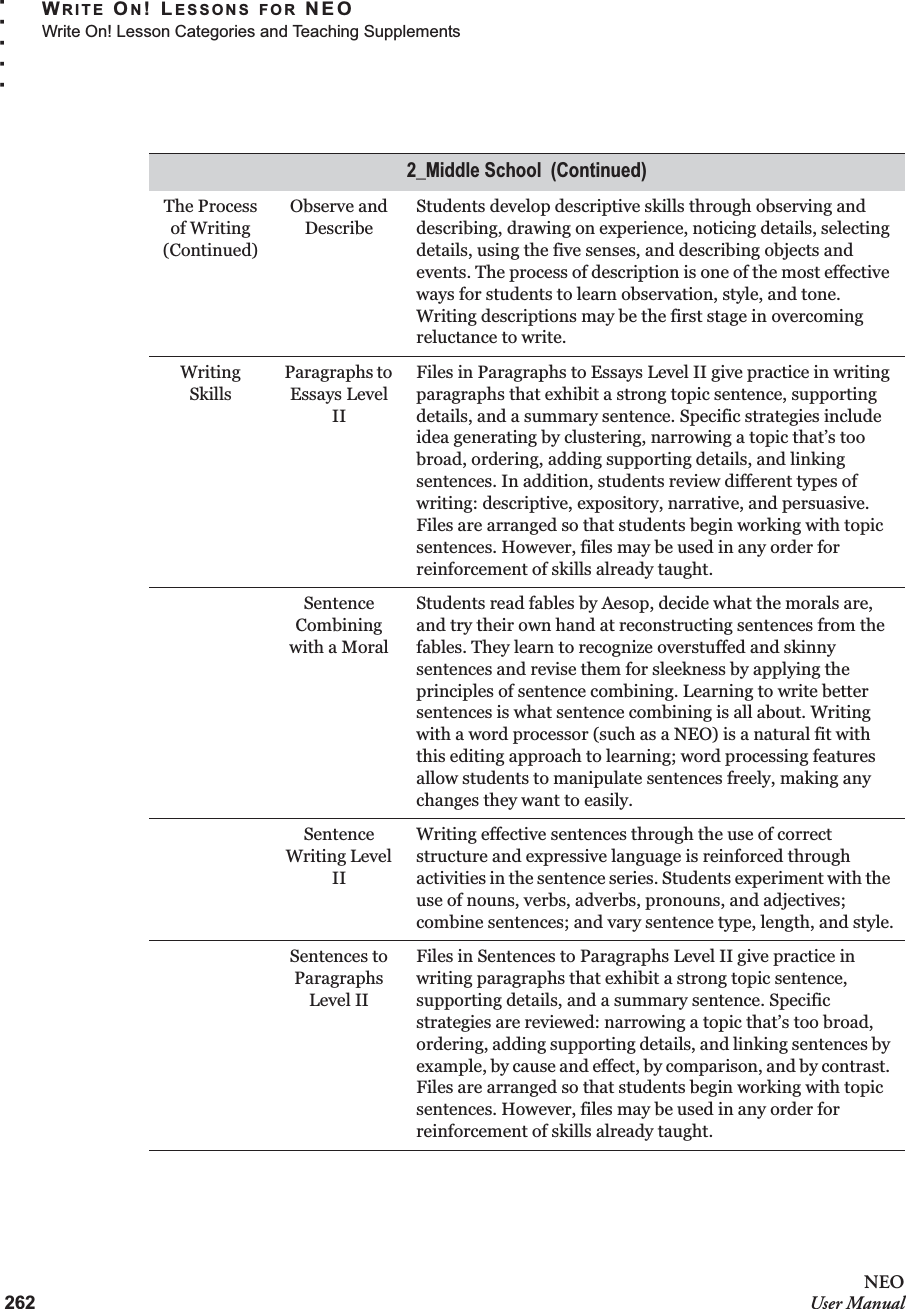
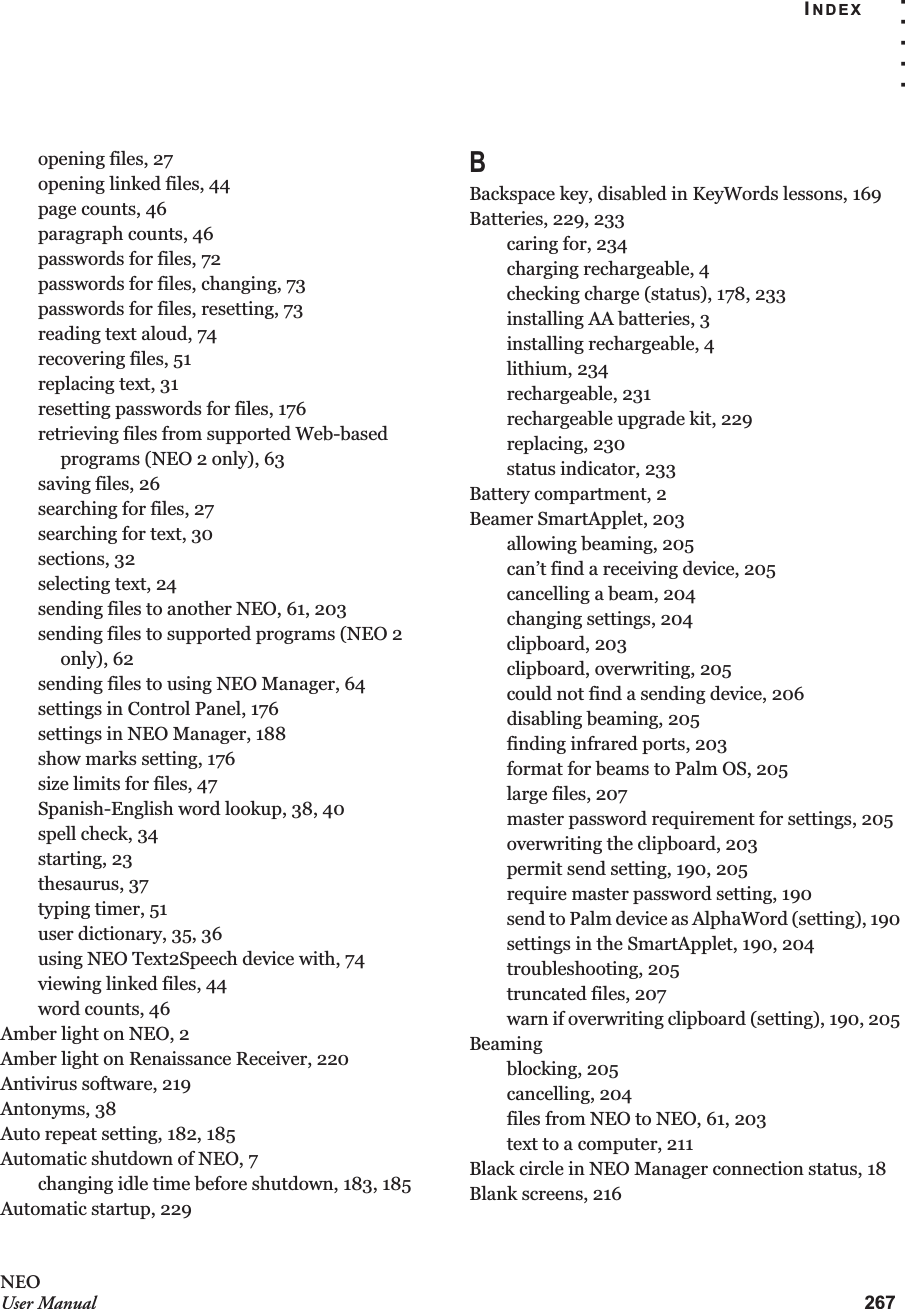
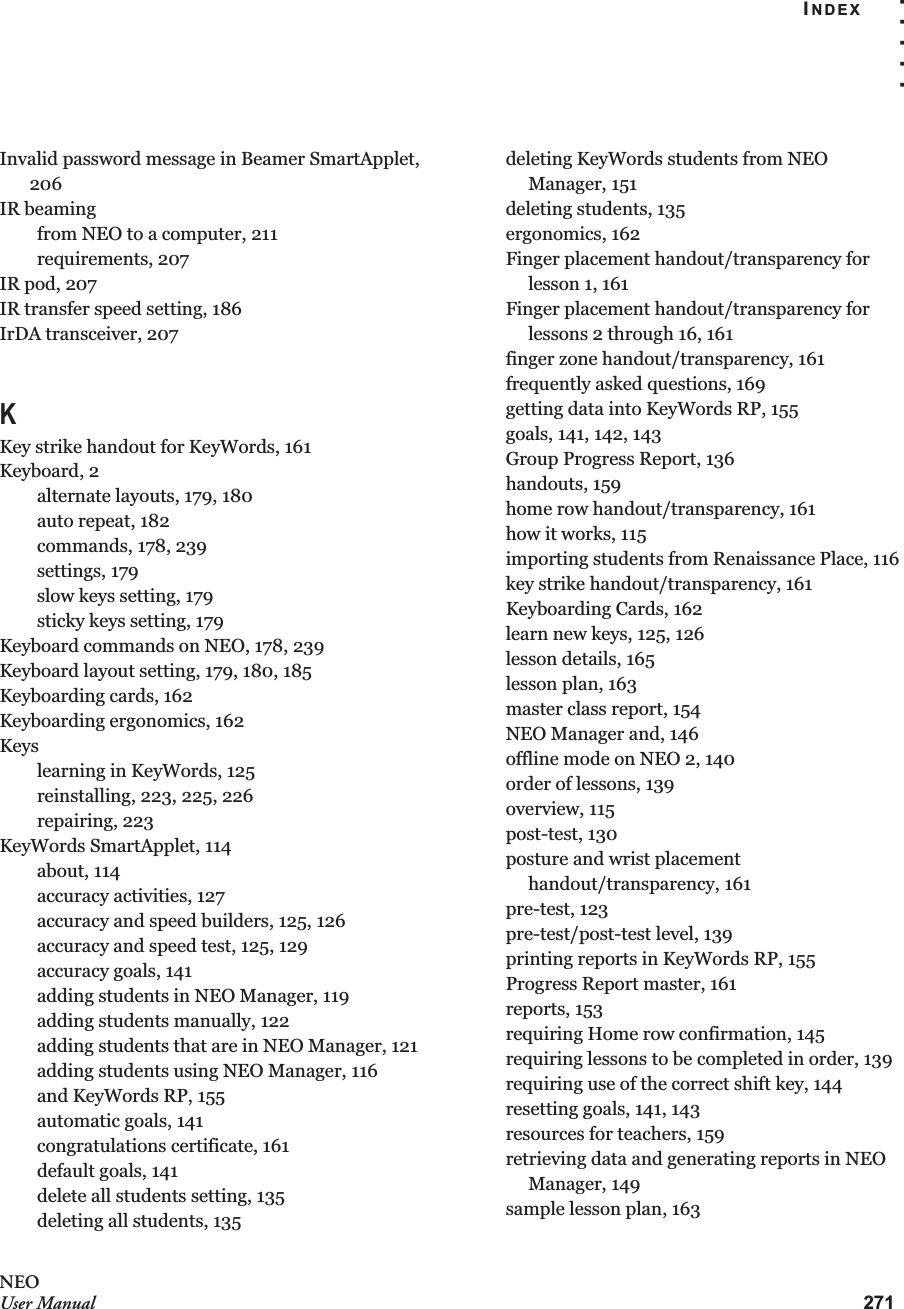
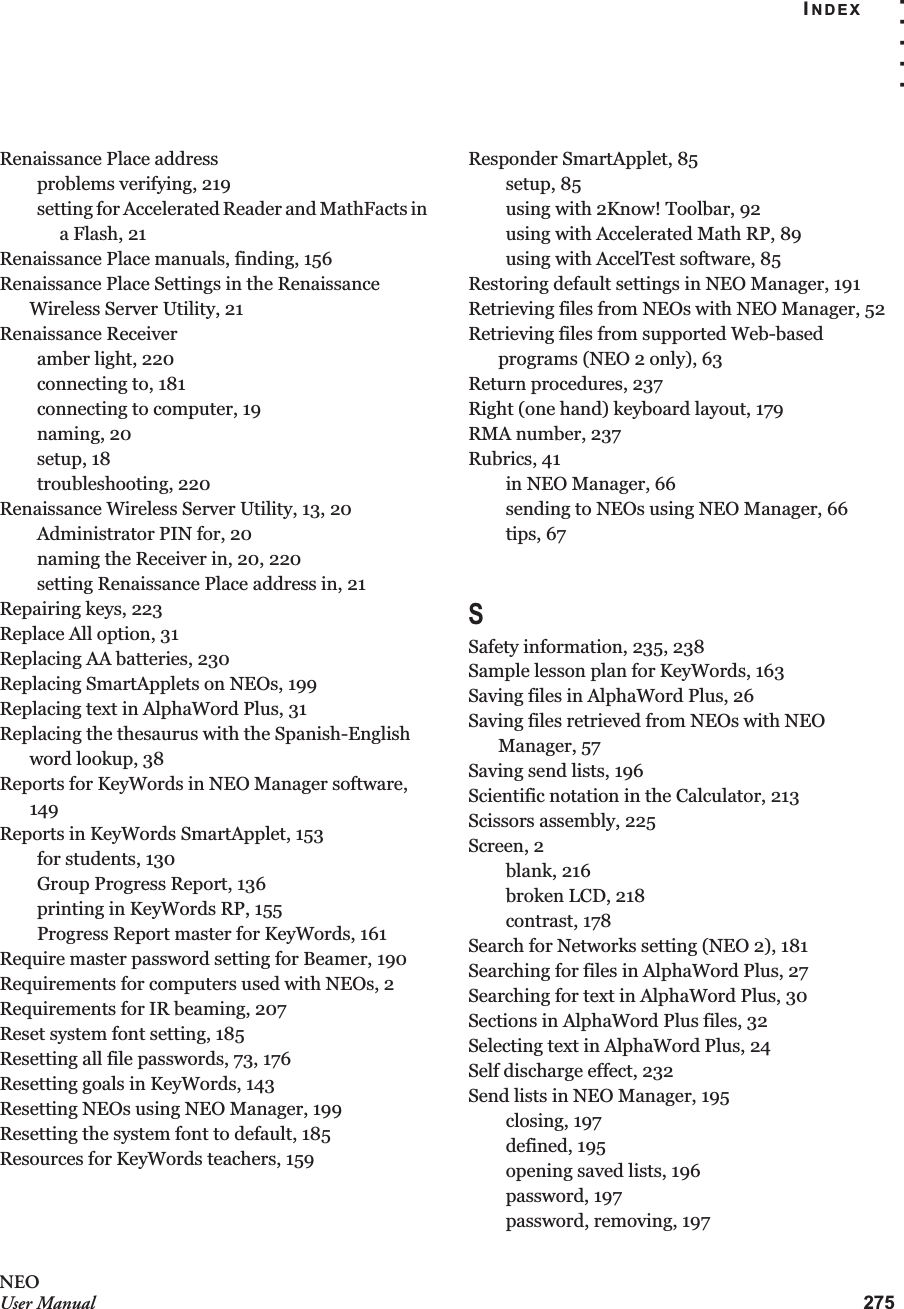
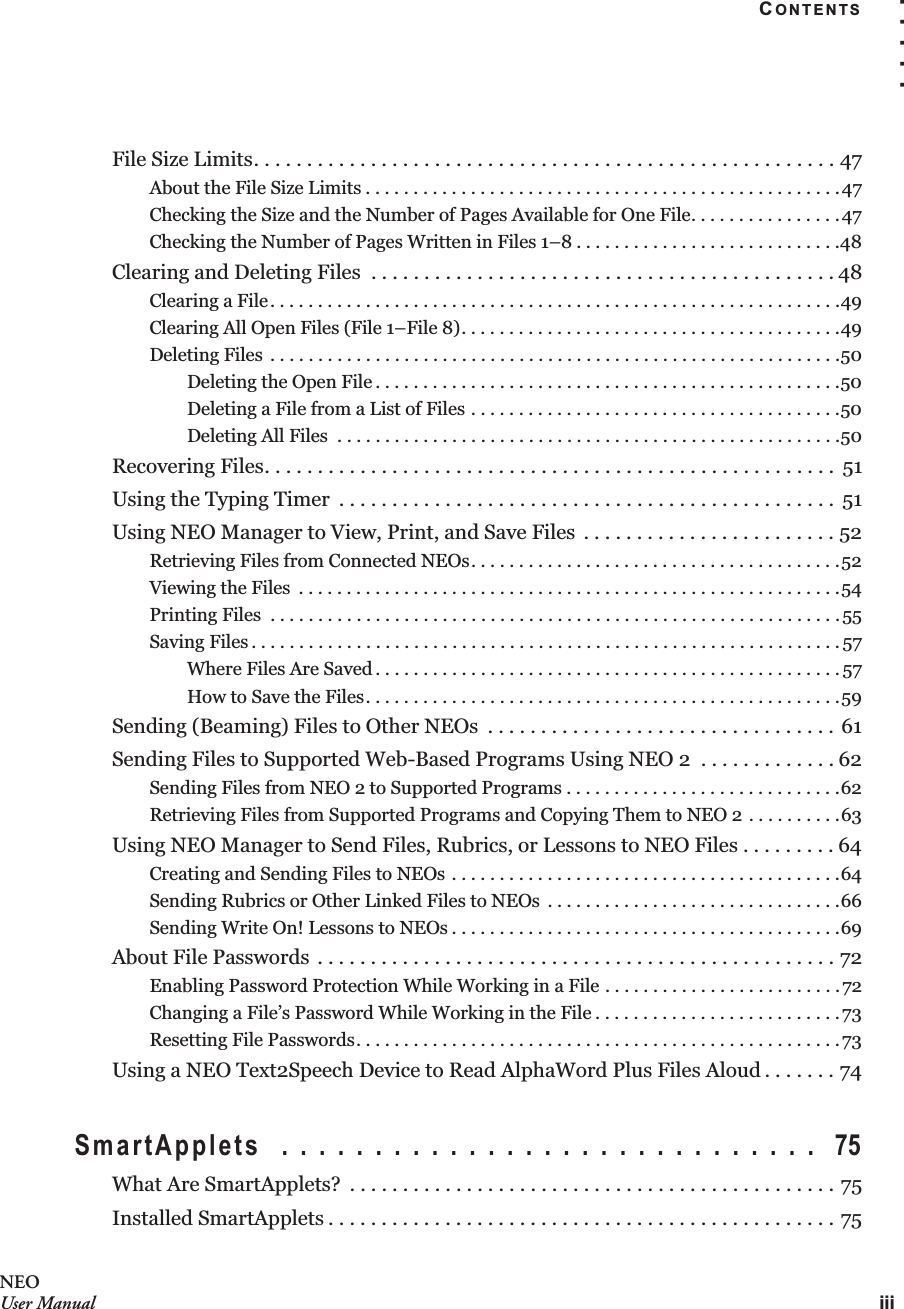
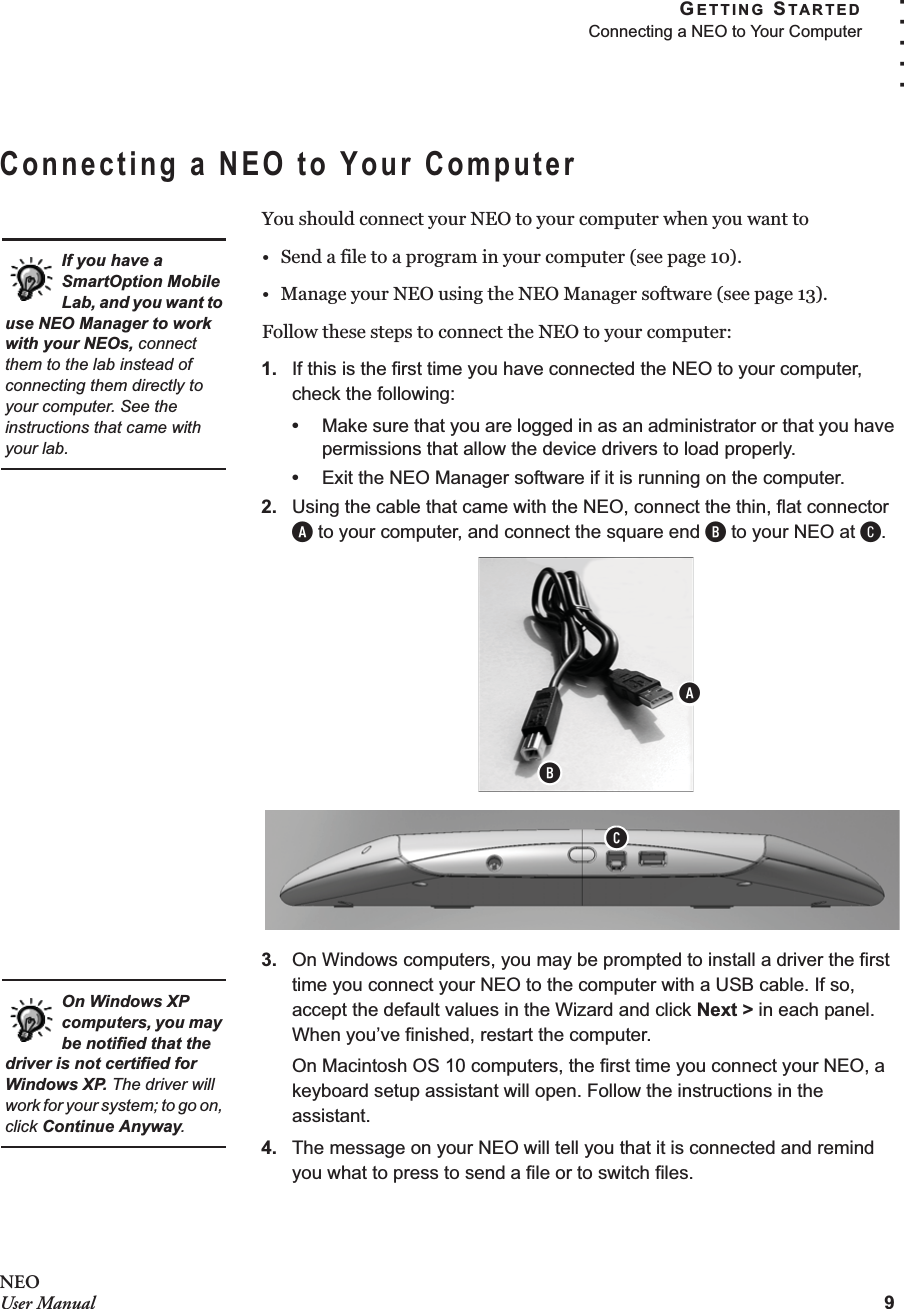
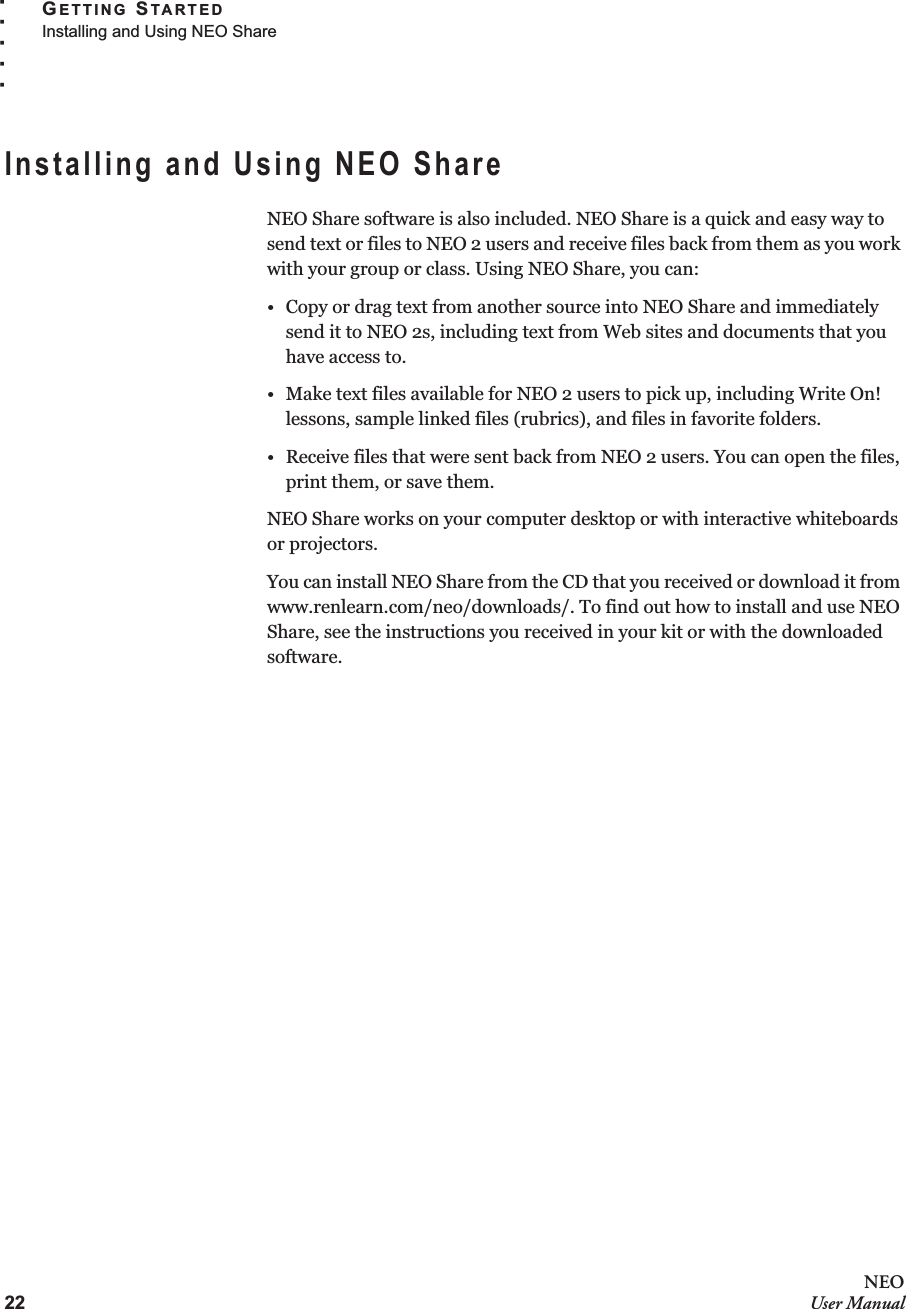
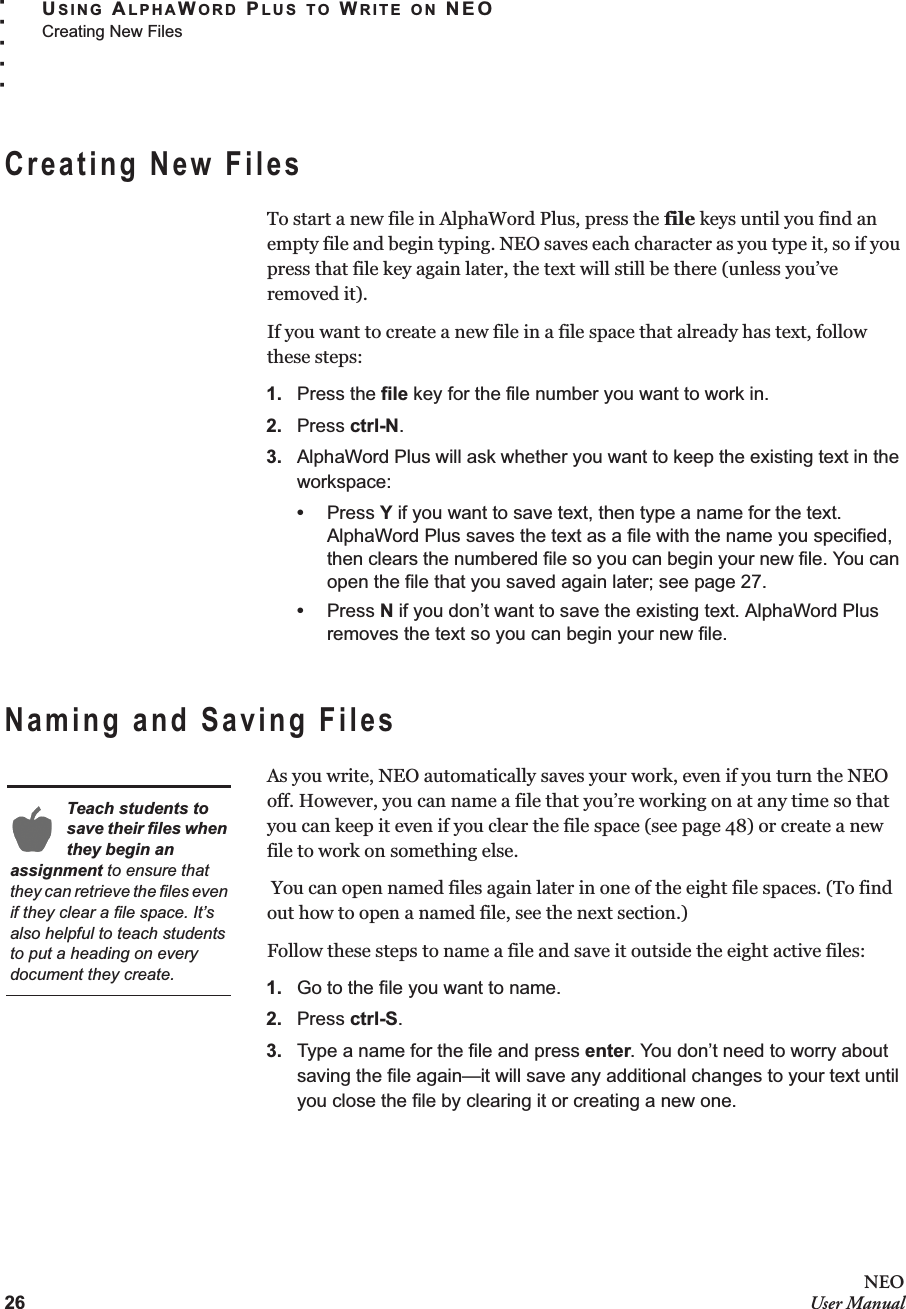
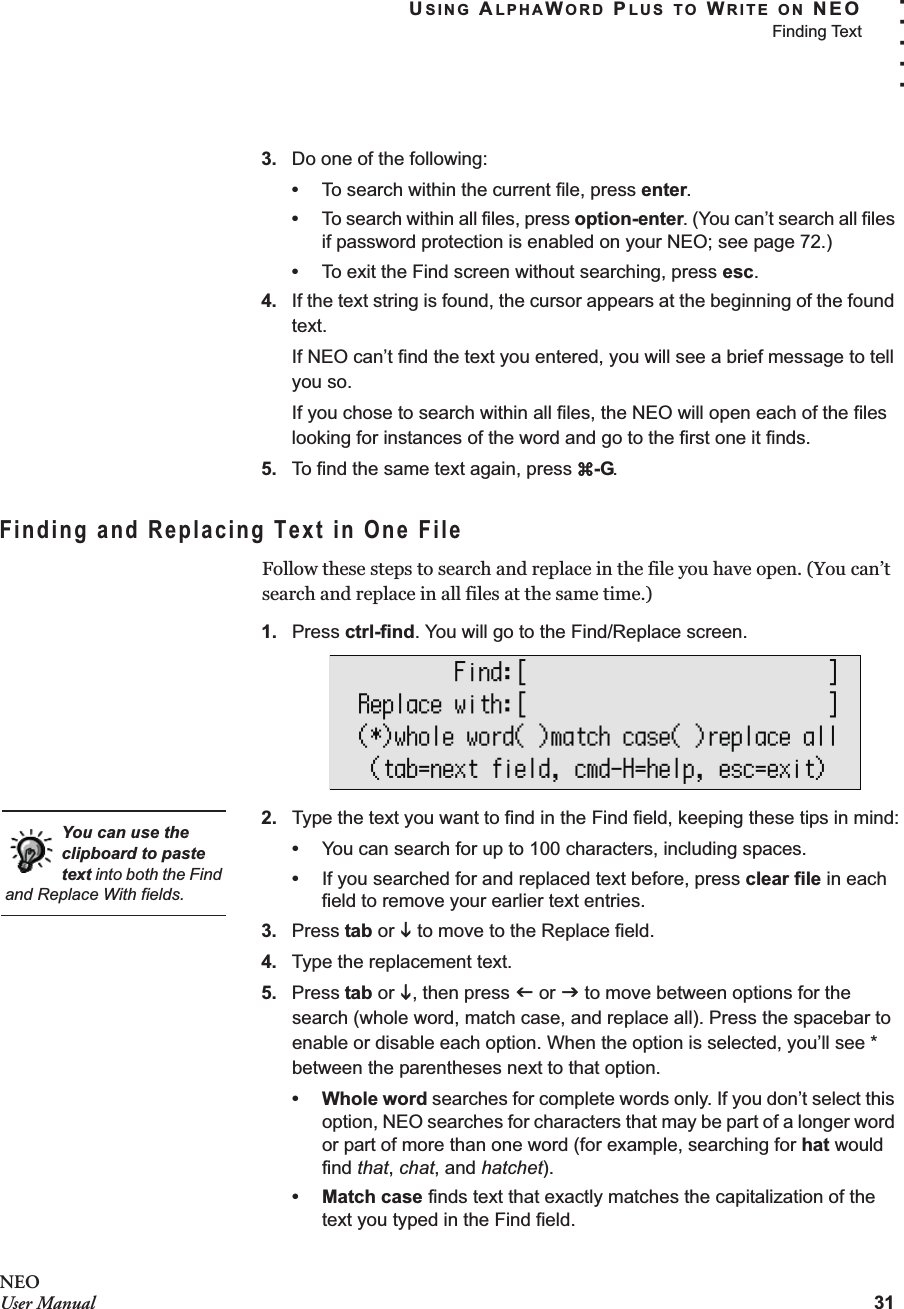
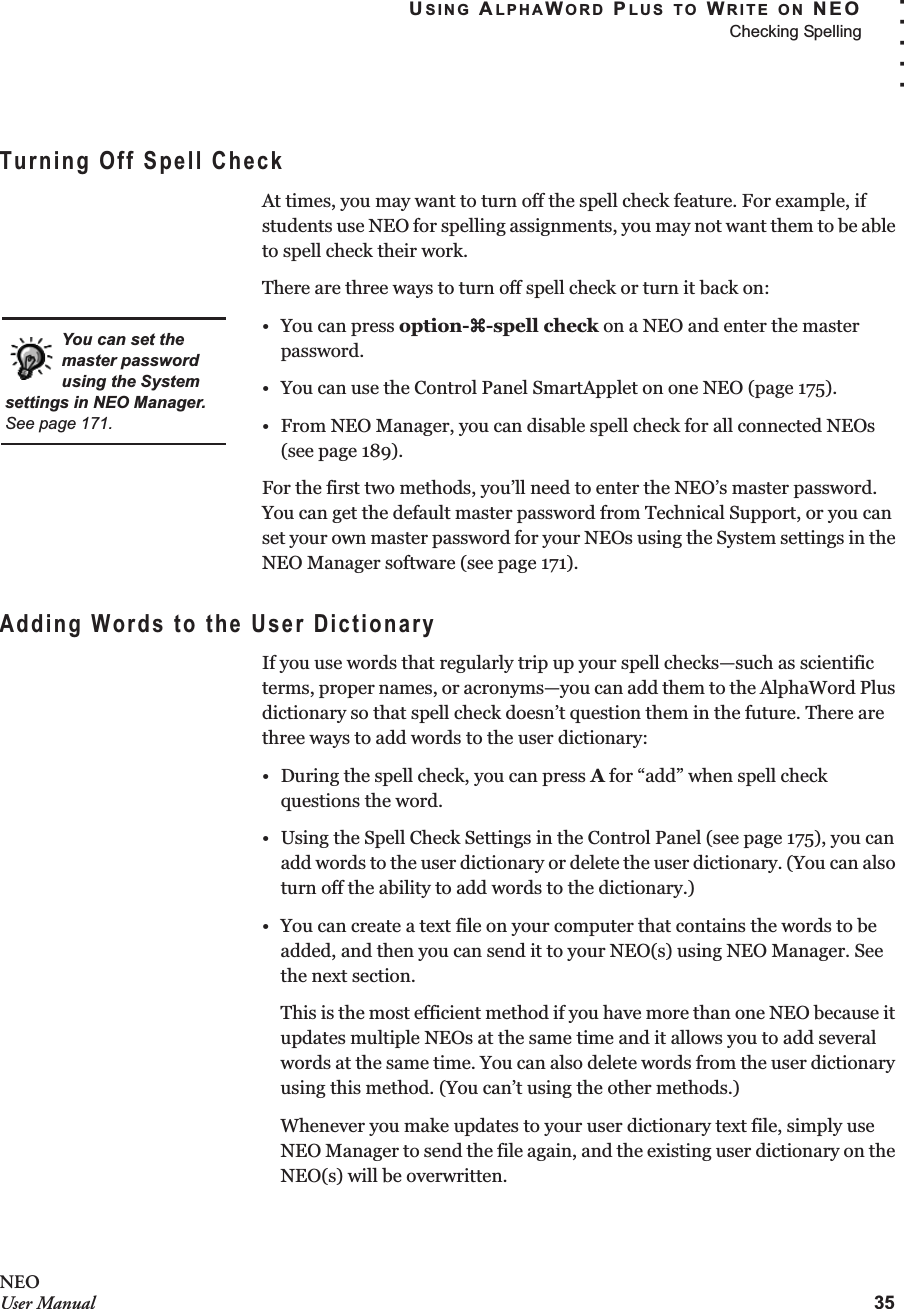
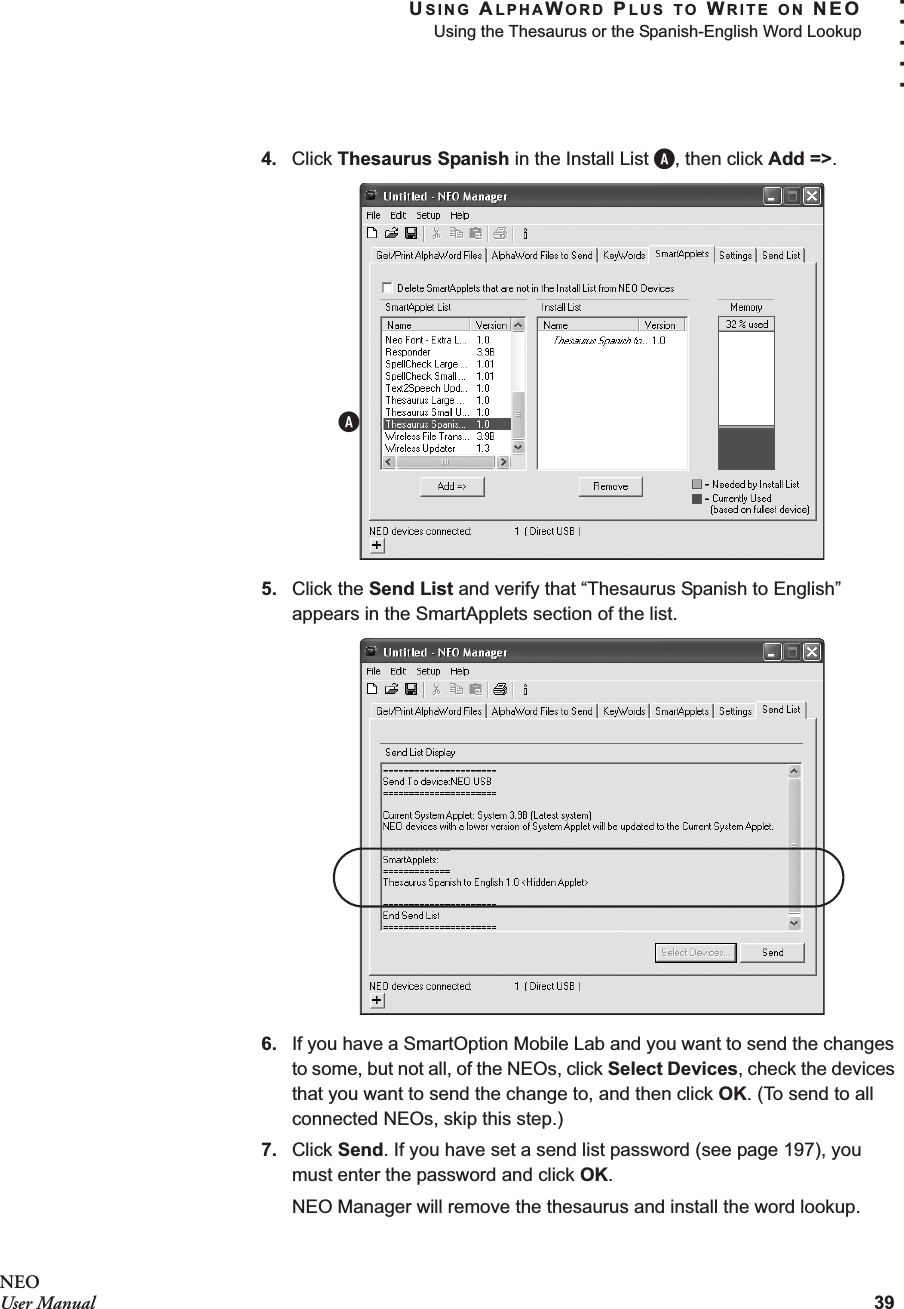
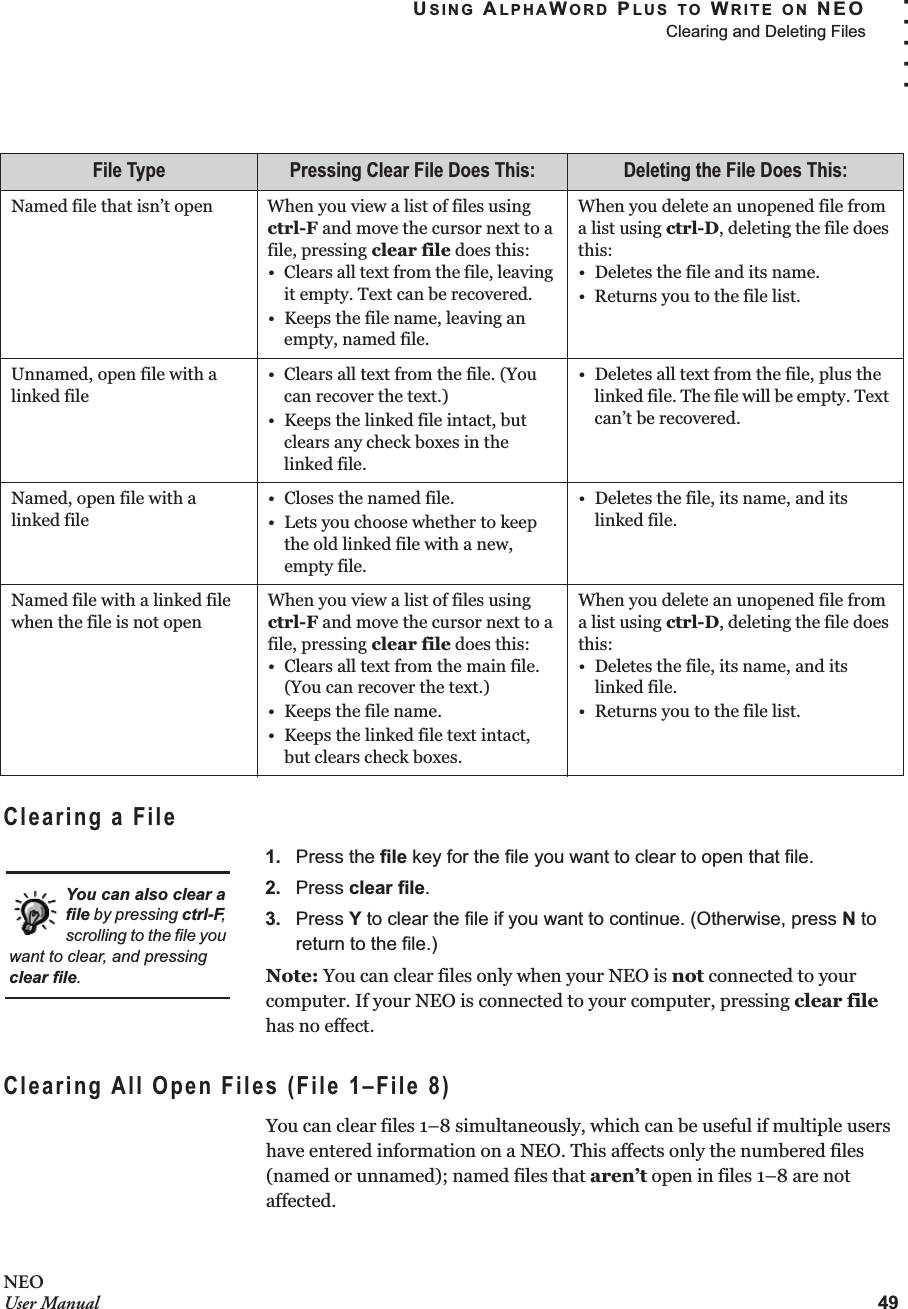
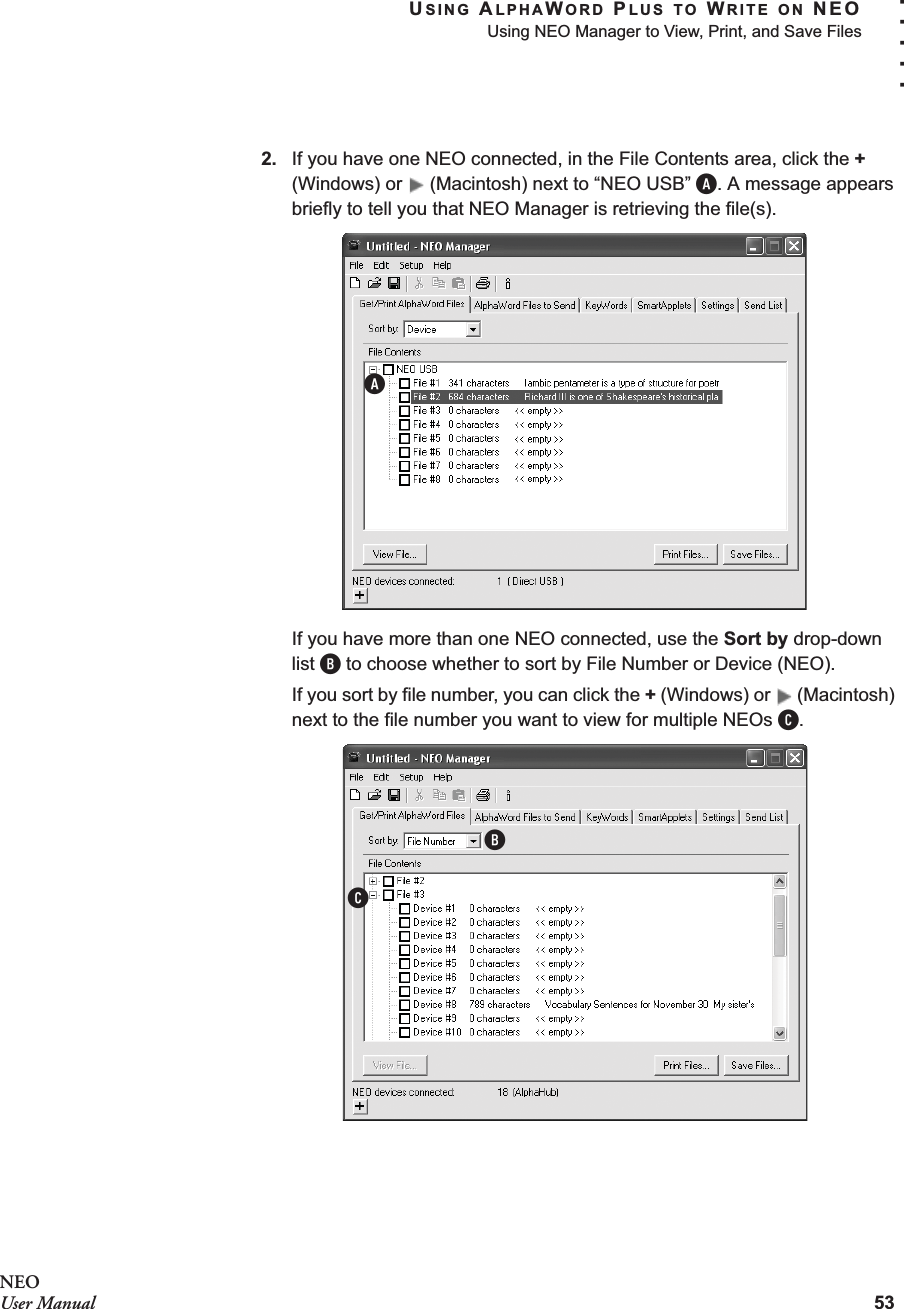
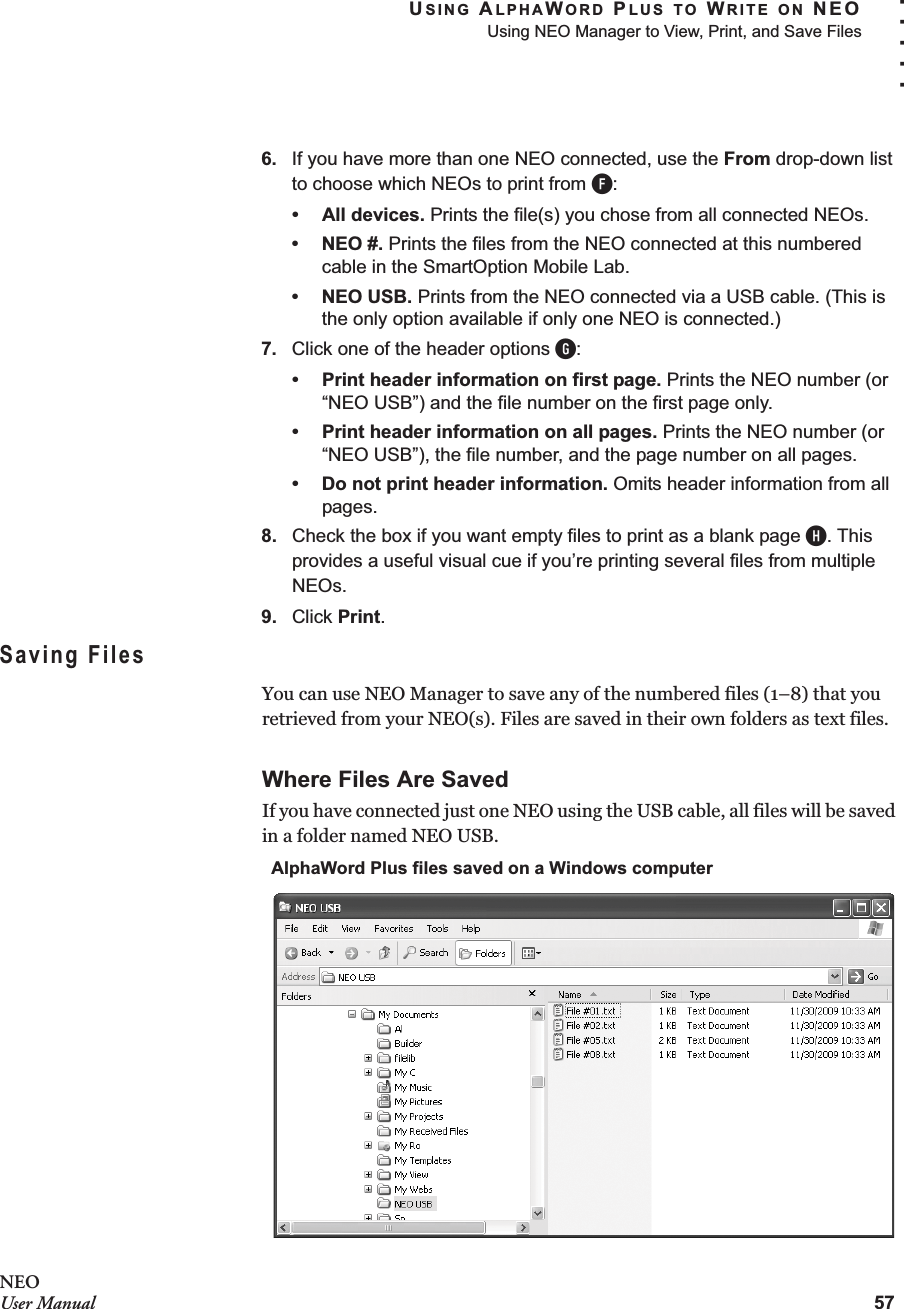
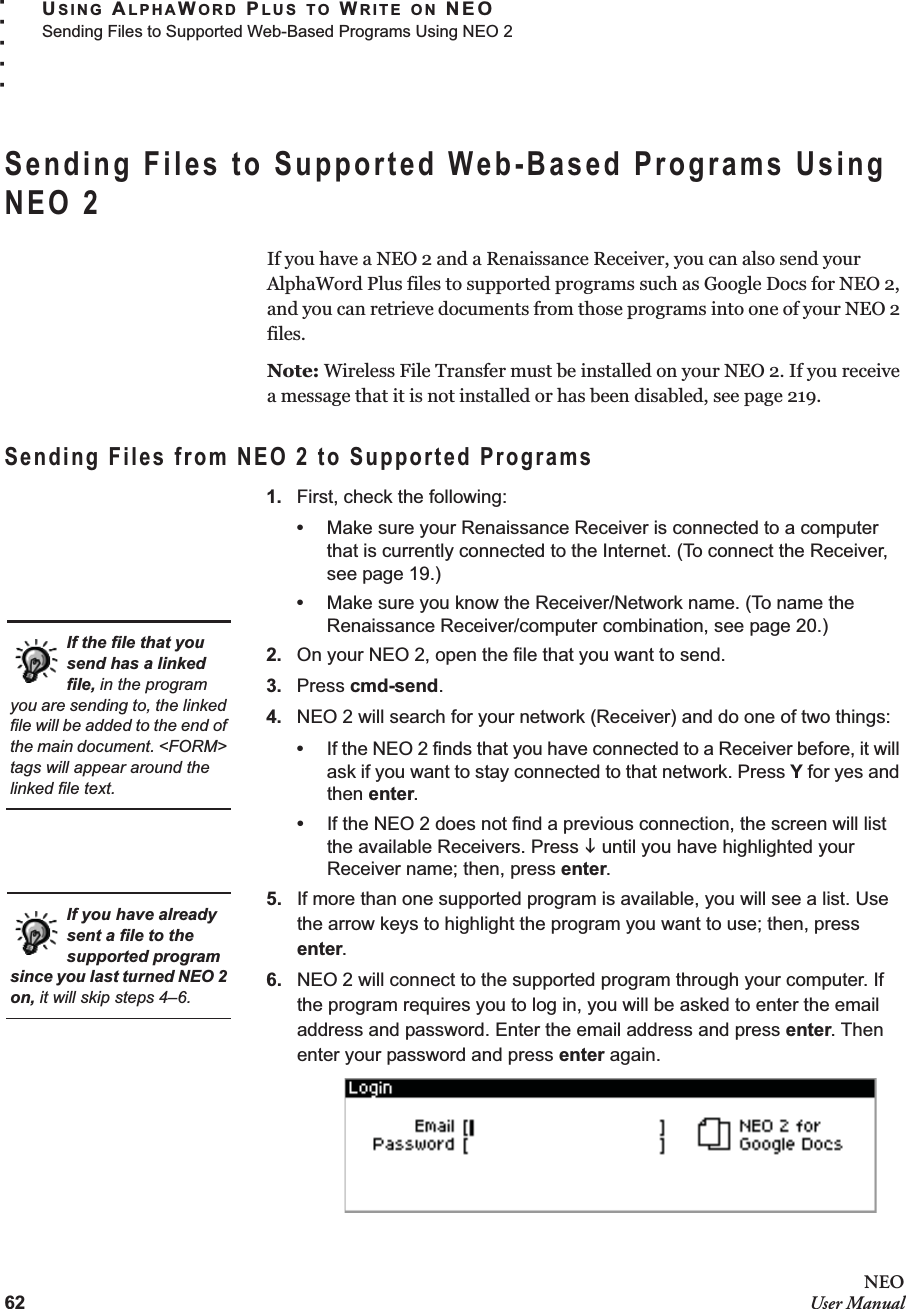
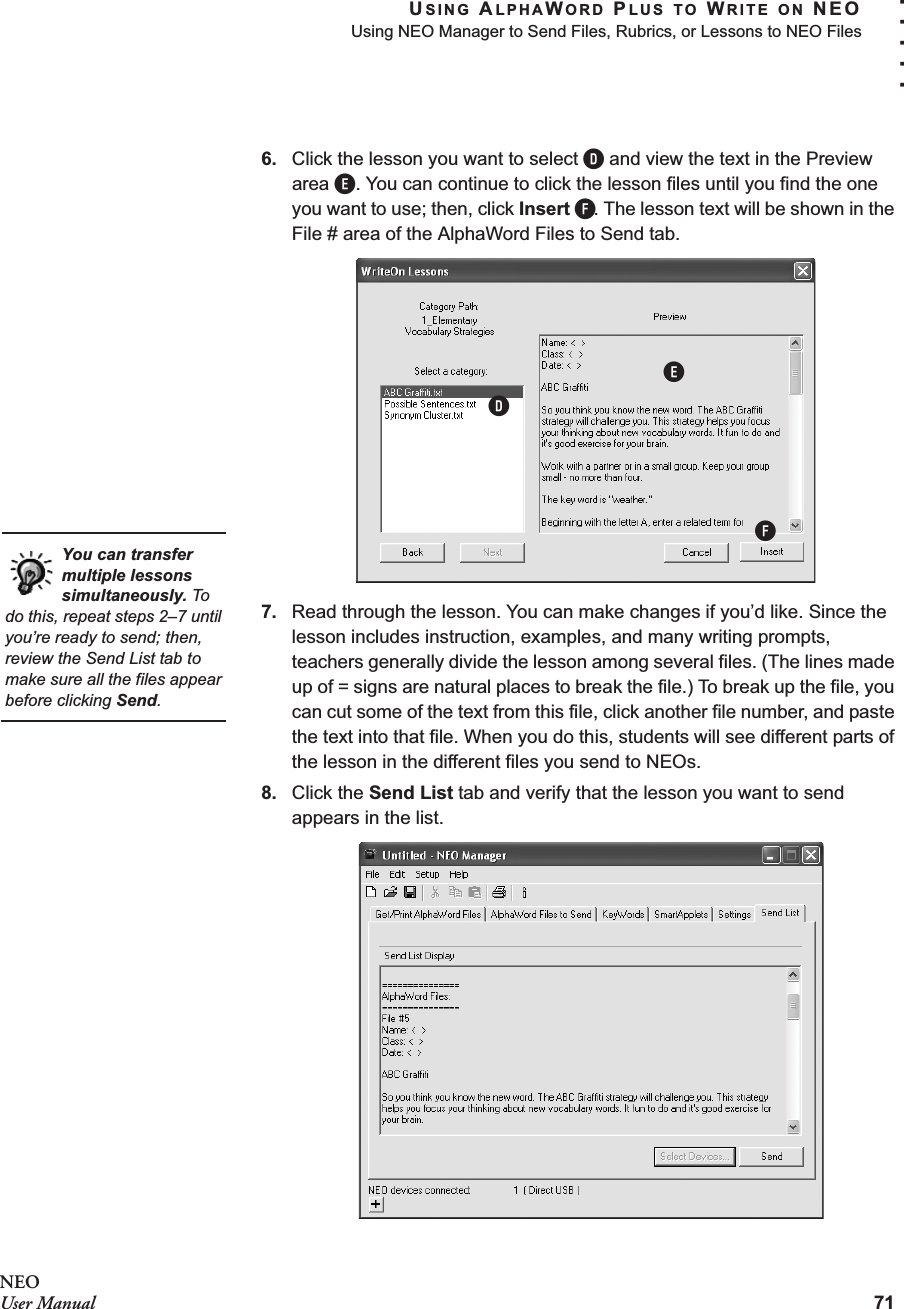
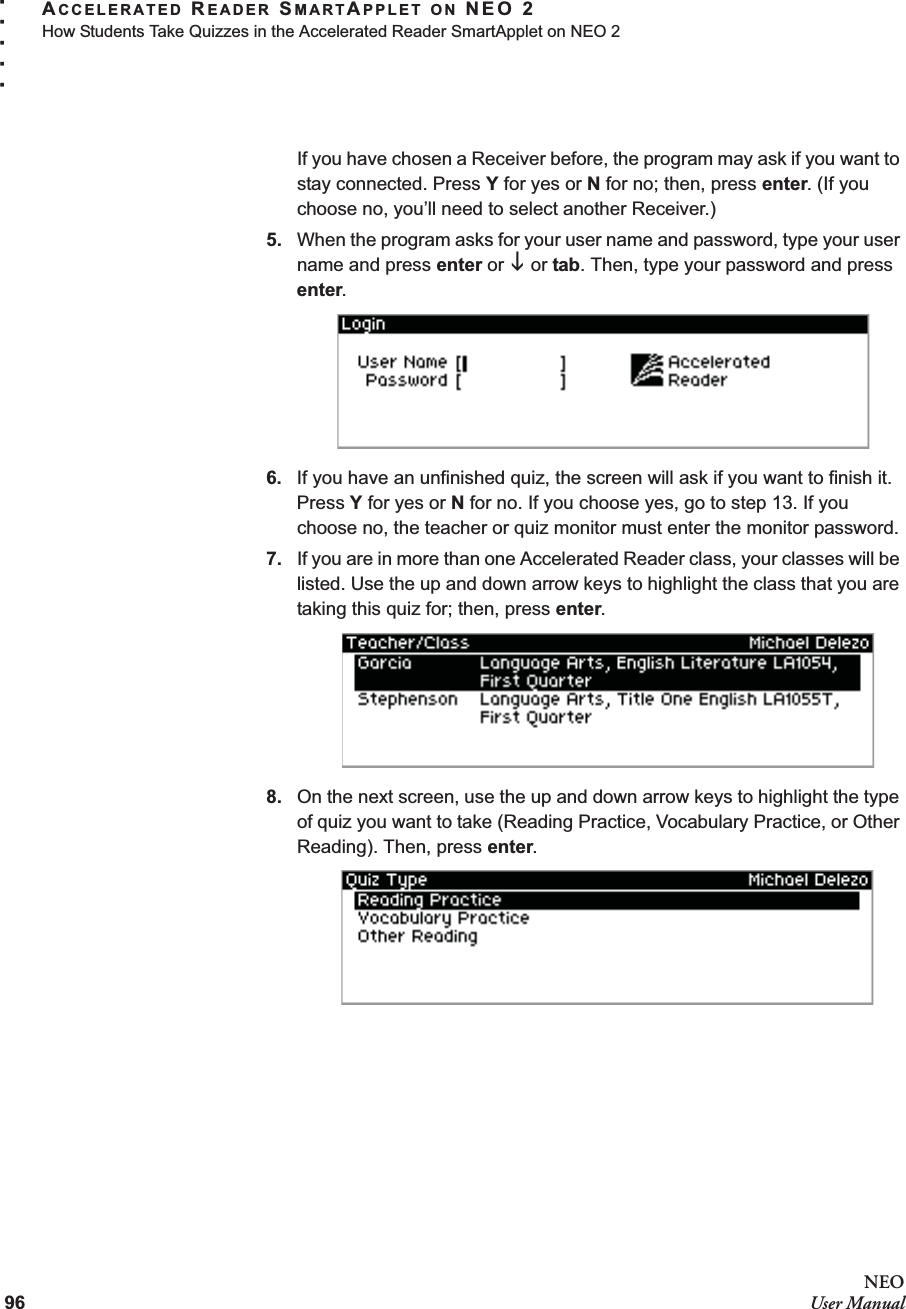
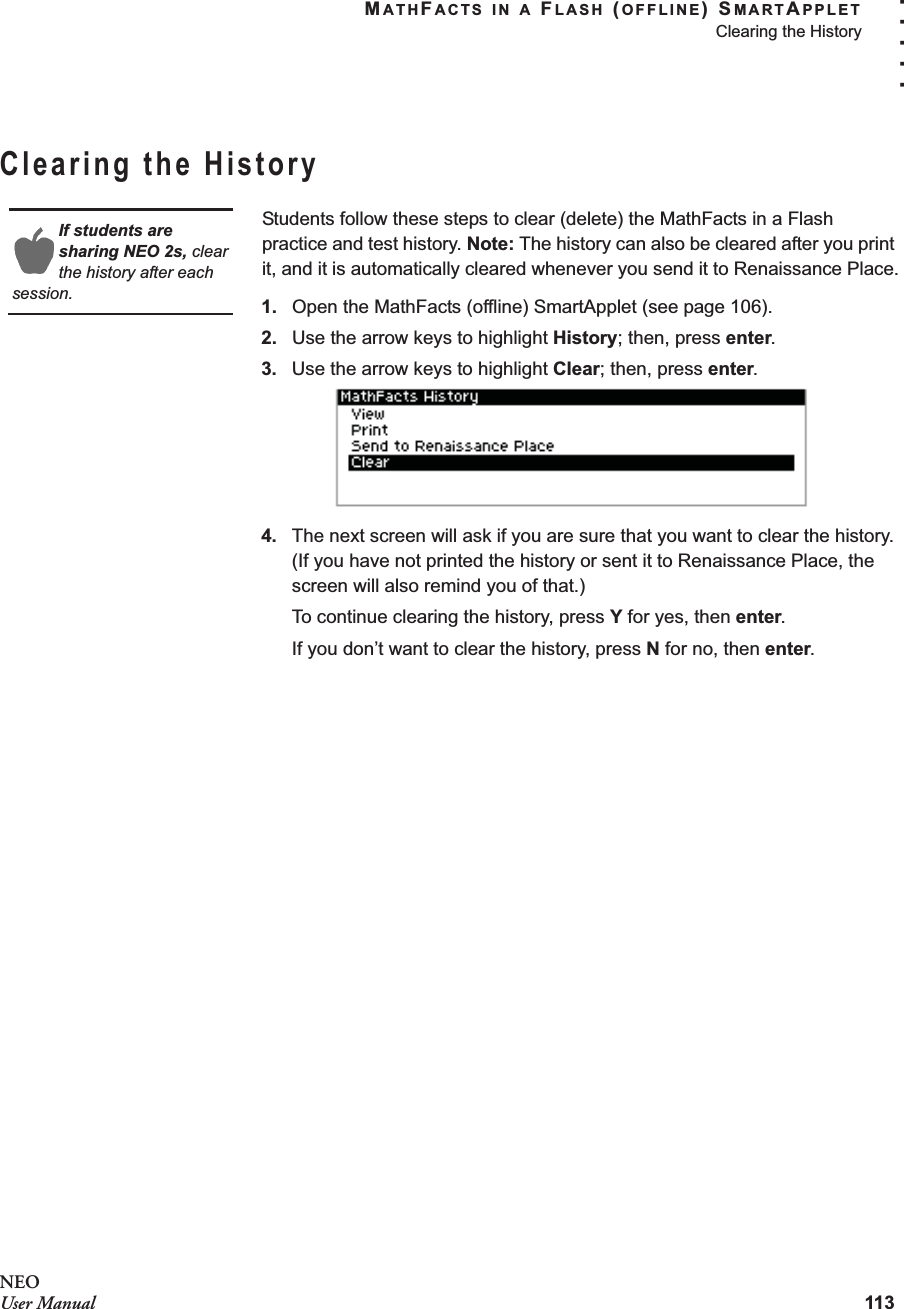
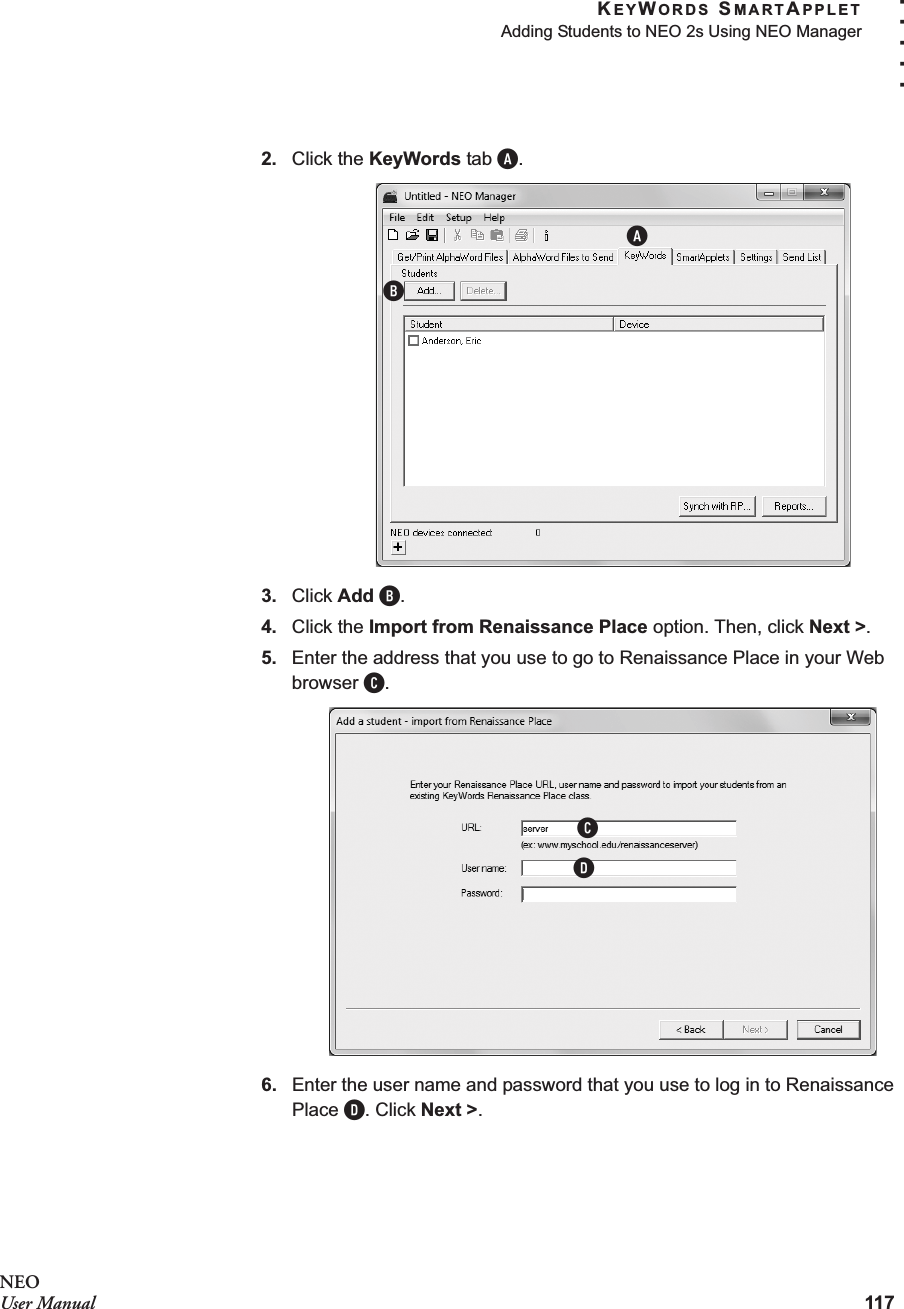
![USING ALPHAWORD PLUS TO WRITE ON NEOUsing Linked Files45. . . . .NEOUser ManualSample Linked FilesBelow is a sample of a complex linked file, shown as you’d create it on your computer and how it appears on a NEO.Story StarterThe assignment is to write a story. Every story has four parts: a setting, characters, a plot, and a solution. Press ctrl-L to view the steps to complete. Write your story in the first person and begin with one of the phrases below.I never noticed...I remember...I felt...I saw...<FORM>Complete each step:<br>[ ] Choose a setting[ ] Choose characters[ ] Choose a plot[ ] Choose a solution</FORM>An example of a linked file you might create on your computerLine breakEditable text that appears in themain fileText and check boxes that appear in the linked fileComplete each step:[ ] Choose a setting[ ] Choose characters[ ] Choose a plot[ ] Choose a solutionStory StarterThe assignment is to write a story. Every story has four parts: a setting, characters, a plot, and a solution. Press ctrl-L to view the steps to complete. Write your story in the first person and begin with one of the phrases below.I never noticed...I remember...I felt...The linked file on a NEOThe connected AlphaWord Plus file](https://usermanual.wiki/Renaissance-Learning/NEO2A/User-Guide-1590523-Page-59.png)

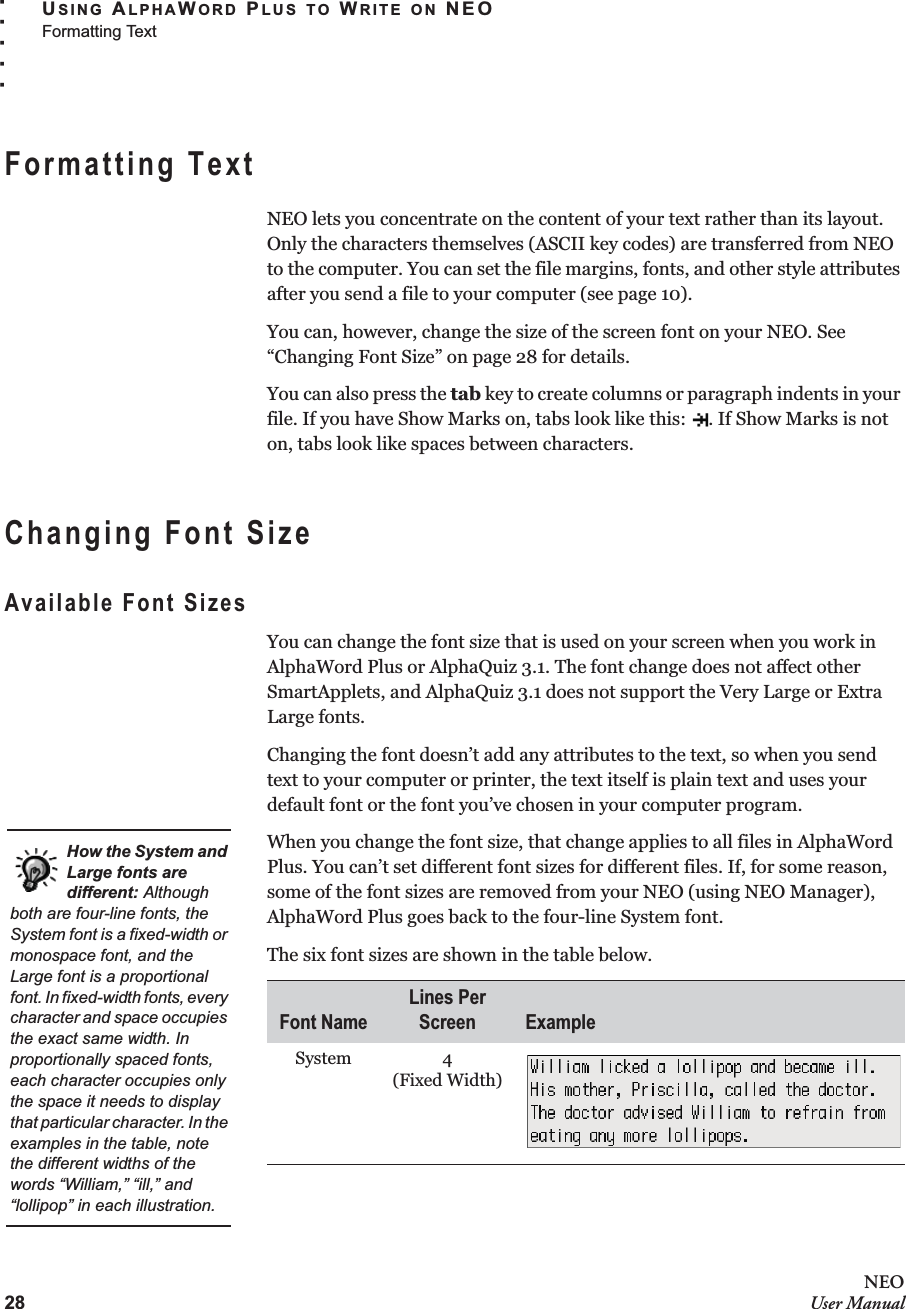
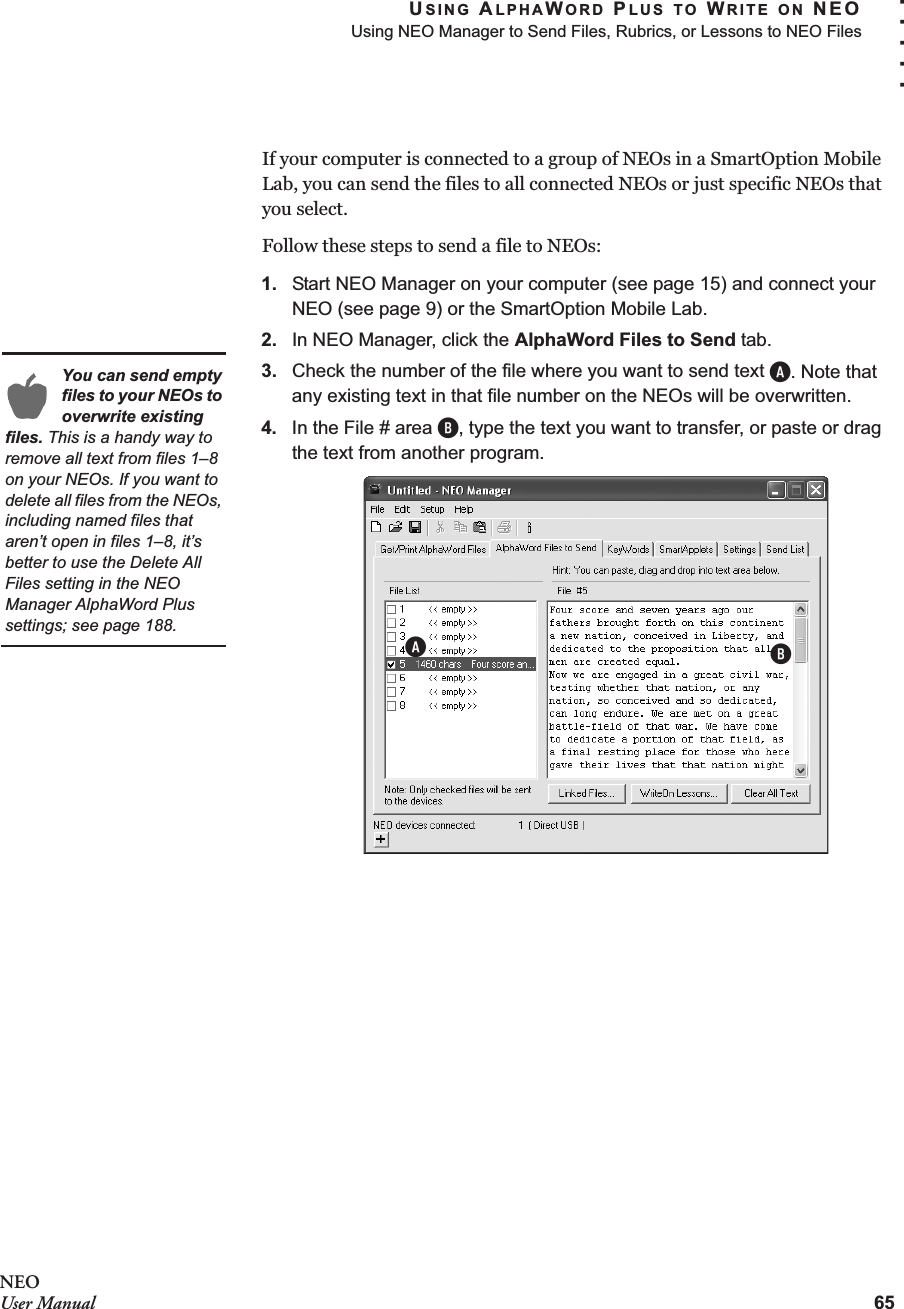
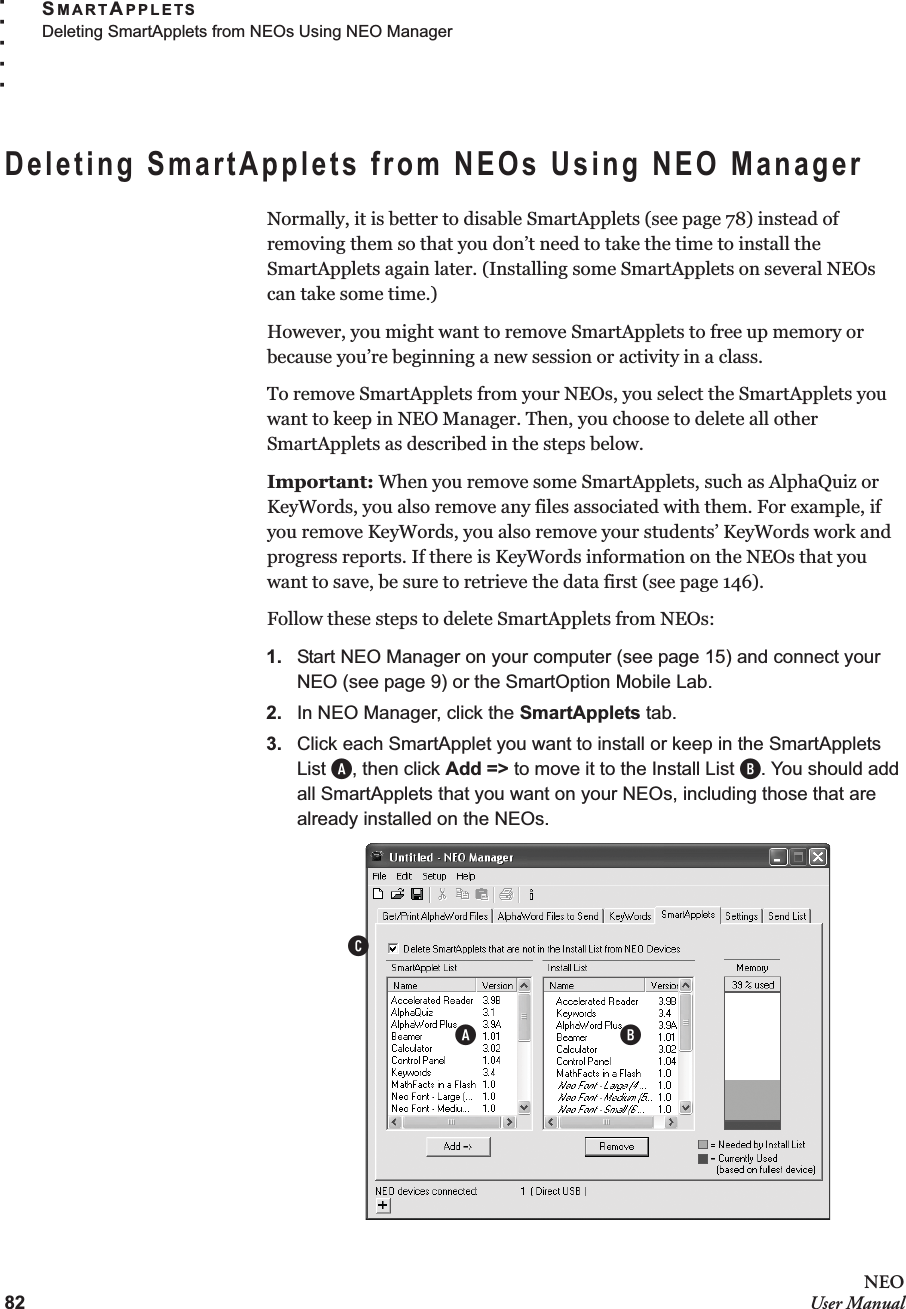
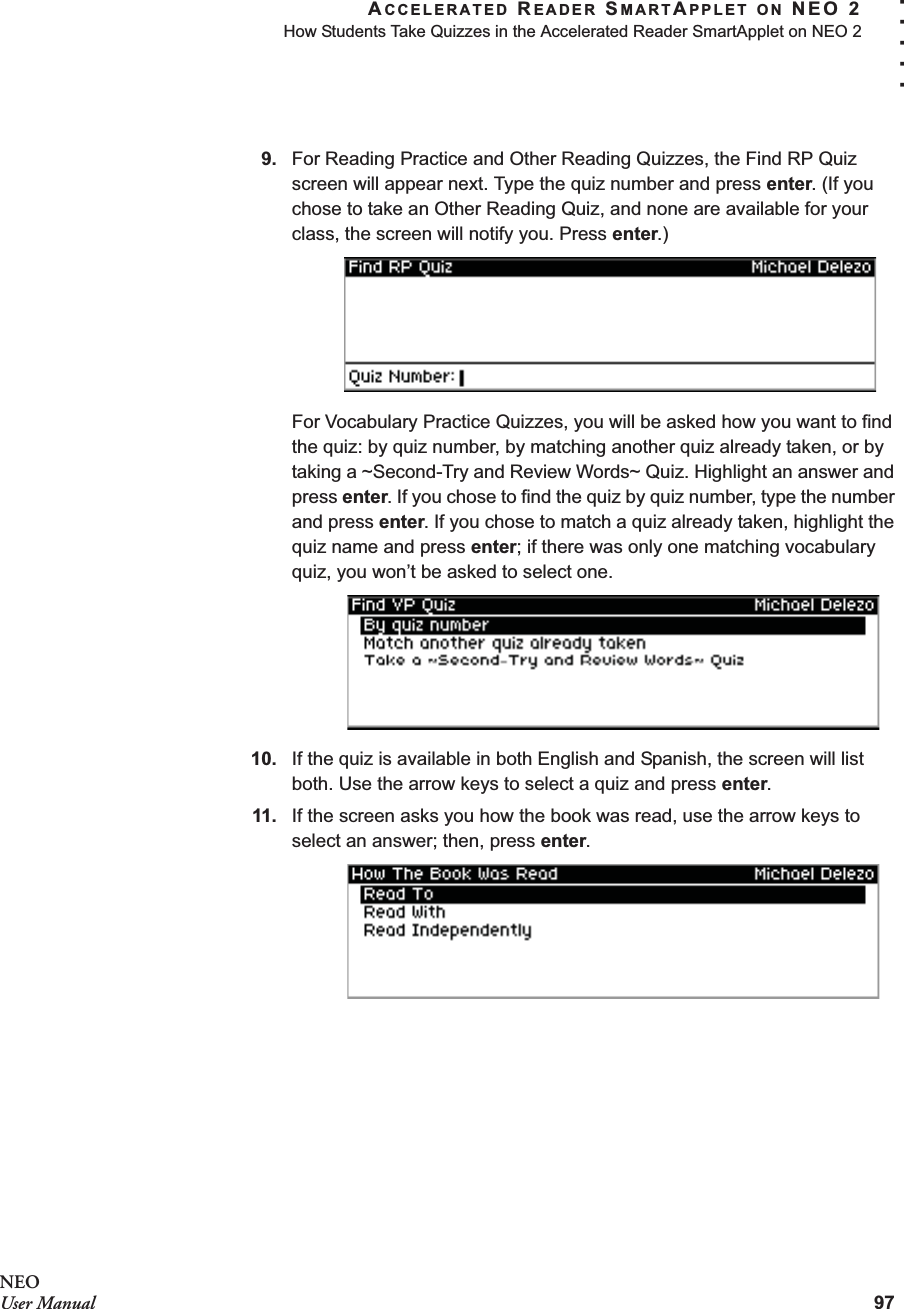
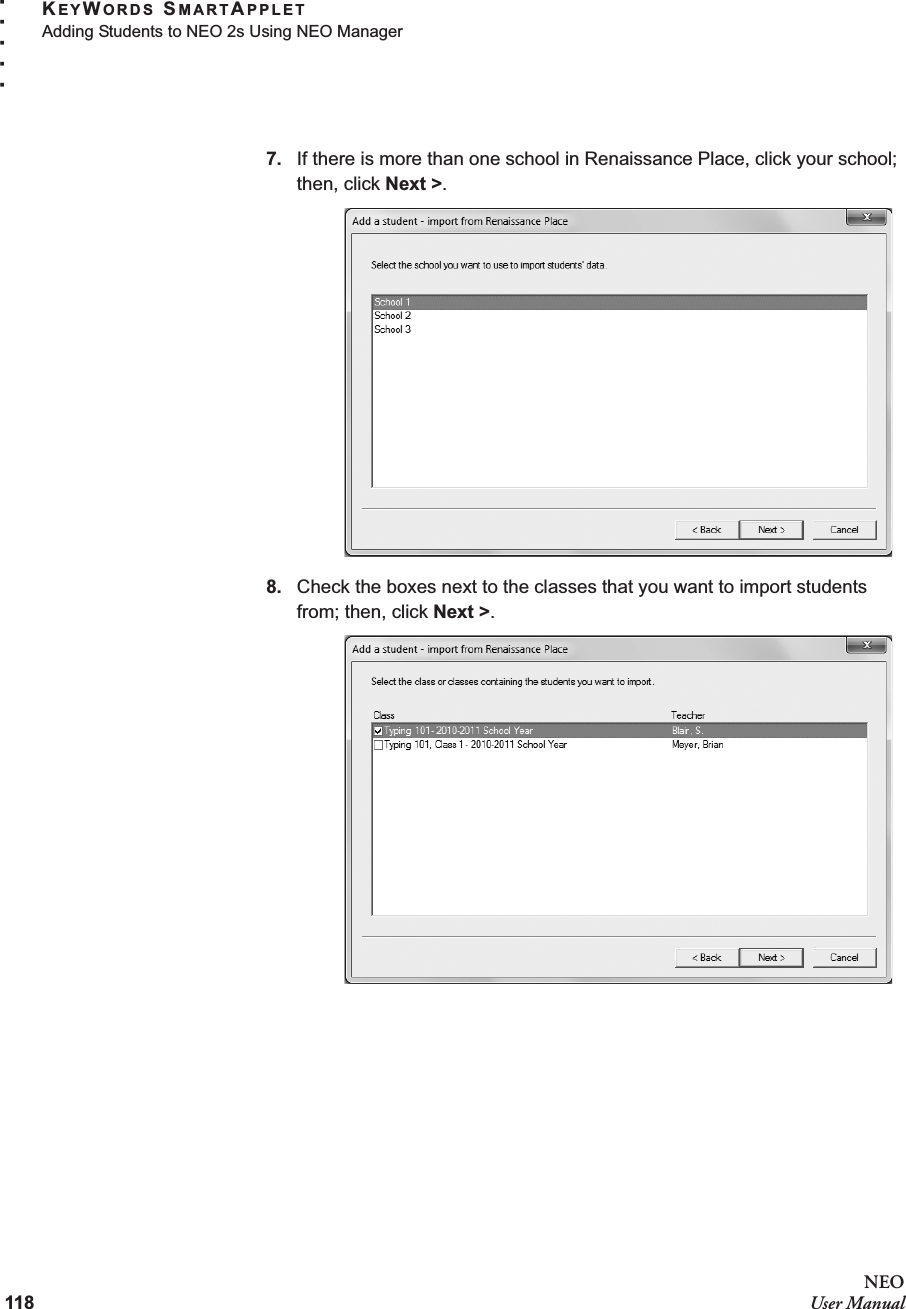
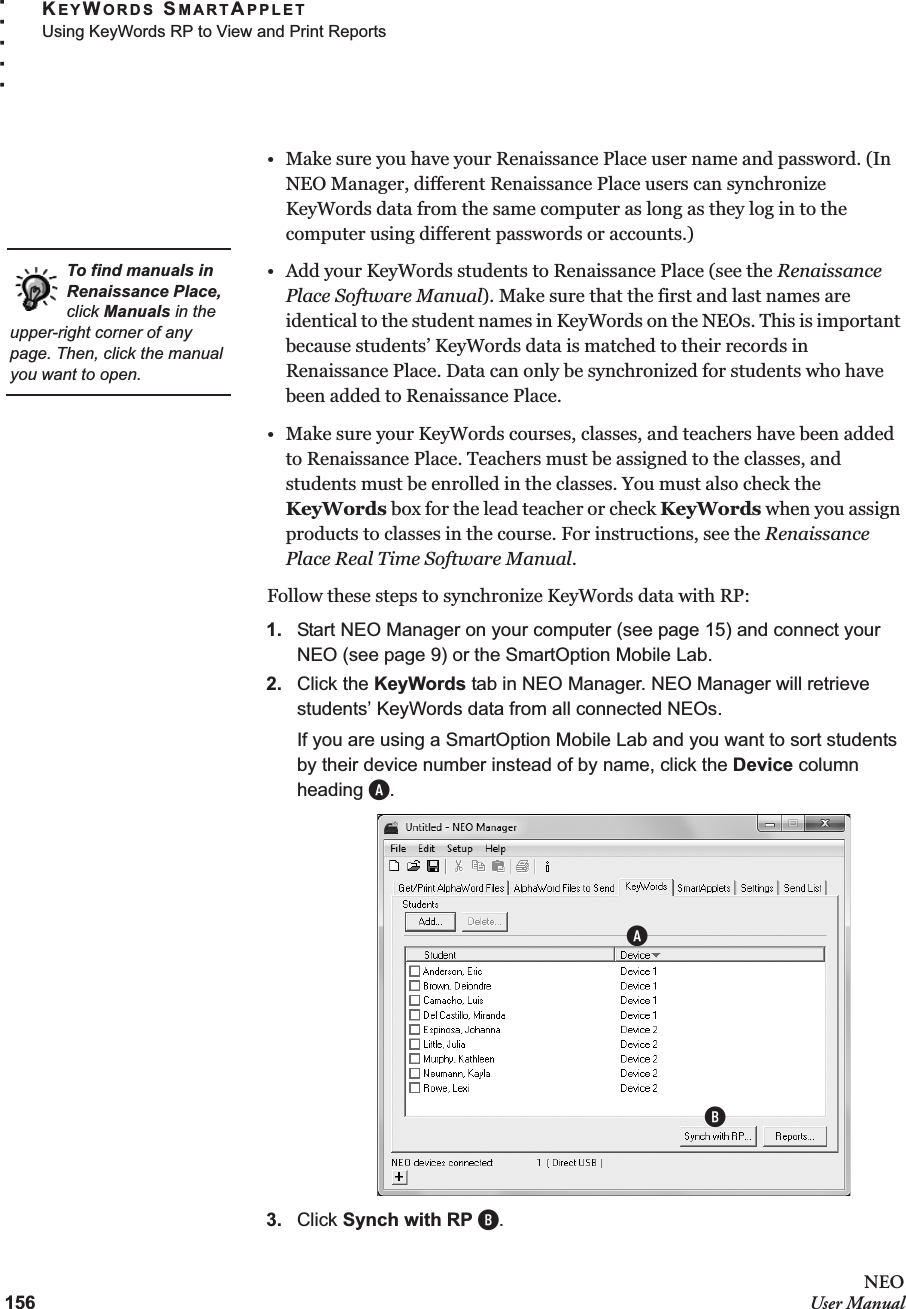
![64NEOUser ManualUSING ALPHAWORD PLUS TO WRITE ON NEOUsing NEO Manager to Send Files, Rubrics, or Lessons to NEO Files. . . . .7. NEO 2 will connect to the program through your computer. If the program requires you to log in, you will be asked to enter the email address and password. Enter the email address and press enter. Then enter your password and press enter again.8. The next screen will list the files found in the supported program. Use the arrow keys to highlight the file that you want to copy to your NEO 2. Then, press enter.9. The file will be copied from the program to the file space you opened on NEO 2. When NEO 2 has finished copying the file, it will open it.Using NEO Manager to Send Files, Rubrics, or Lessons to NEO FilesIn NEO Manager, you can send text files to NEOs. You can also create or select linked files or assignment rubrics to send, or you can select Write On! lessons to send to your NEOs.Warning! When you send a file to NEOs, let NEO Manager finish sending it before disconnecting the NEOs from your computer. If you don’t, you could corrupt system files on your NEOs.Creating and Sending Files to NEOsNEO Manager can send files you’ve created on your computer to your NEOs. You can compose text in another program and paste or drag it into NEO Manager, or you can type text directly into NEO Manager. Comments that were inserted in the document within Google Docs will appear in square brackets [ ] in the document on NEO 2.](https://usermanual.wiki/Renaissance-Learning/NEO2A/User-Guide-1590523-Page-78.png)


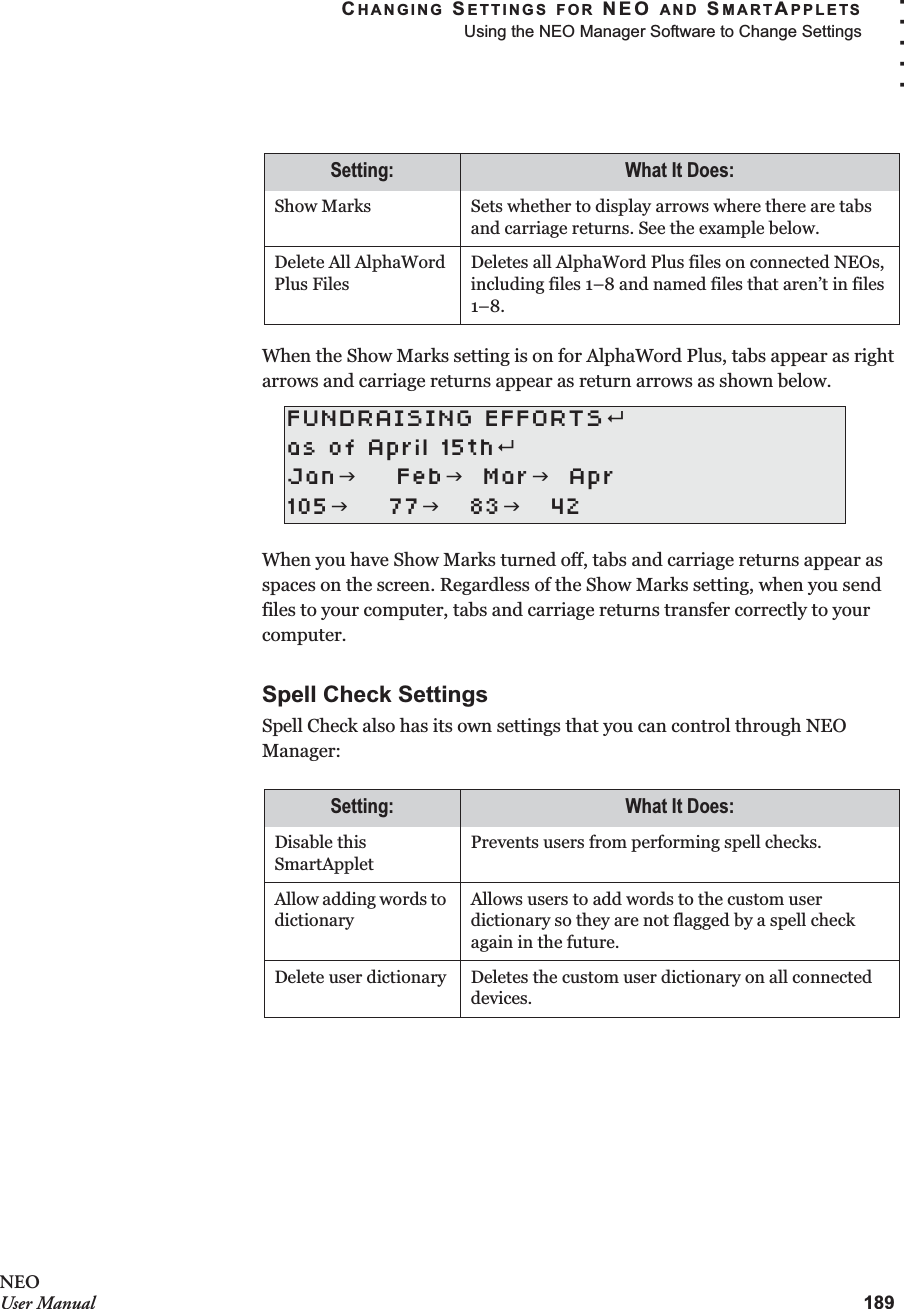
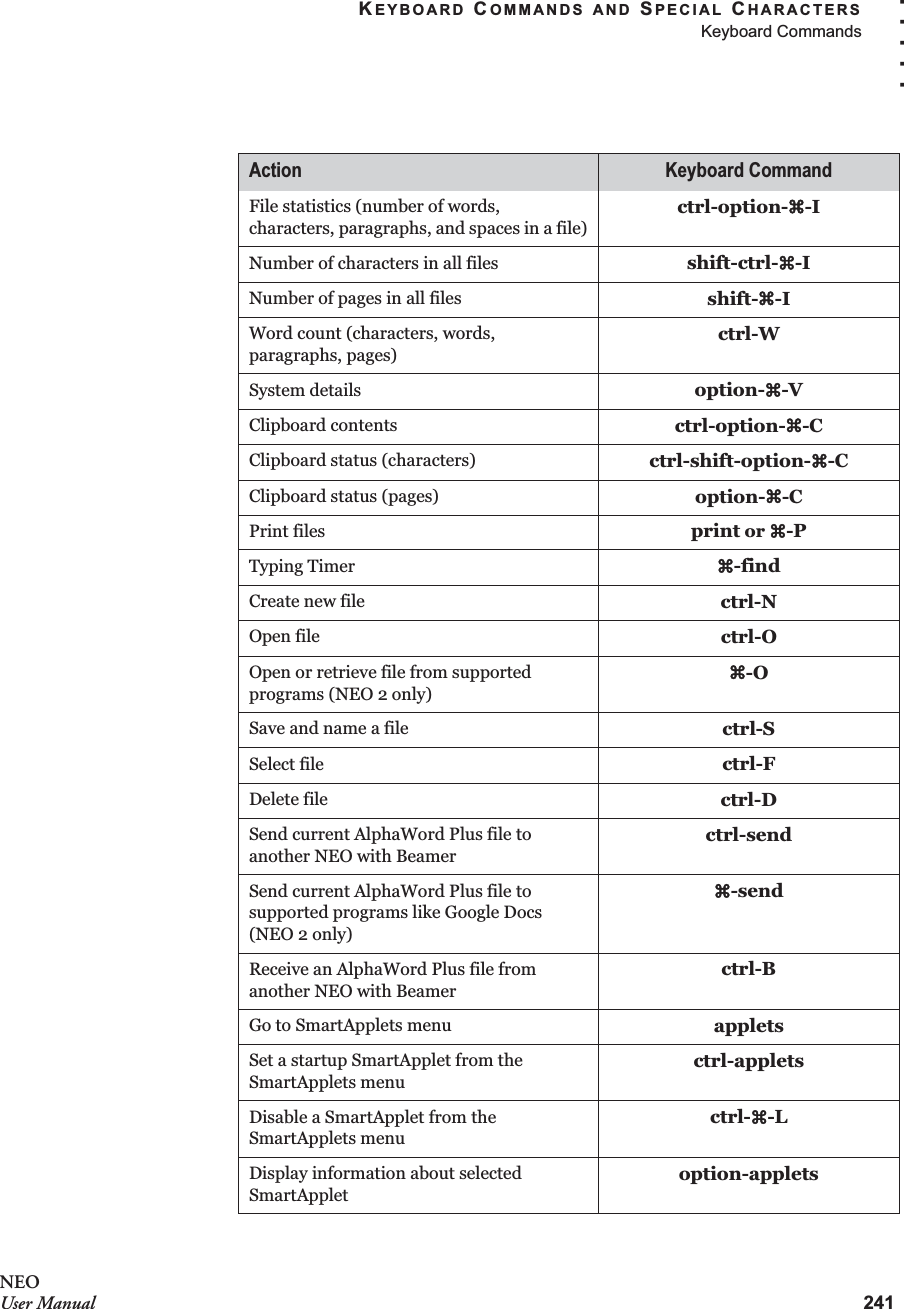
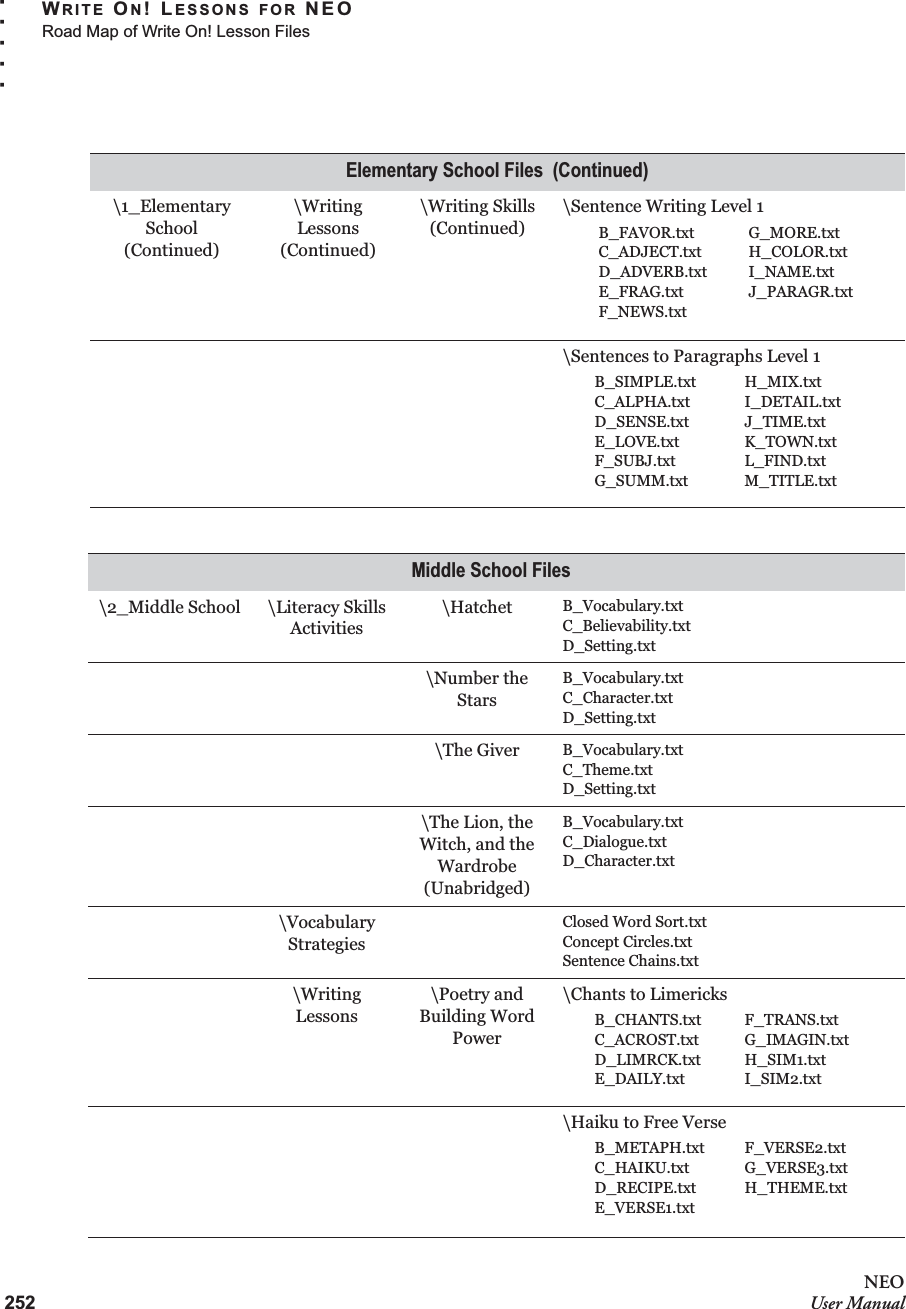
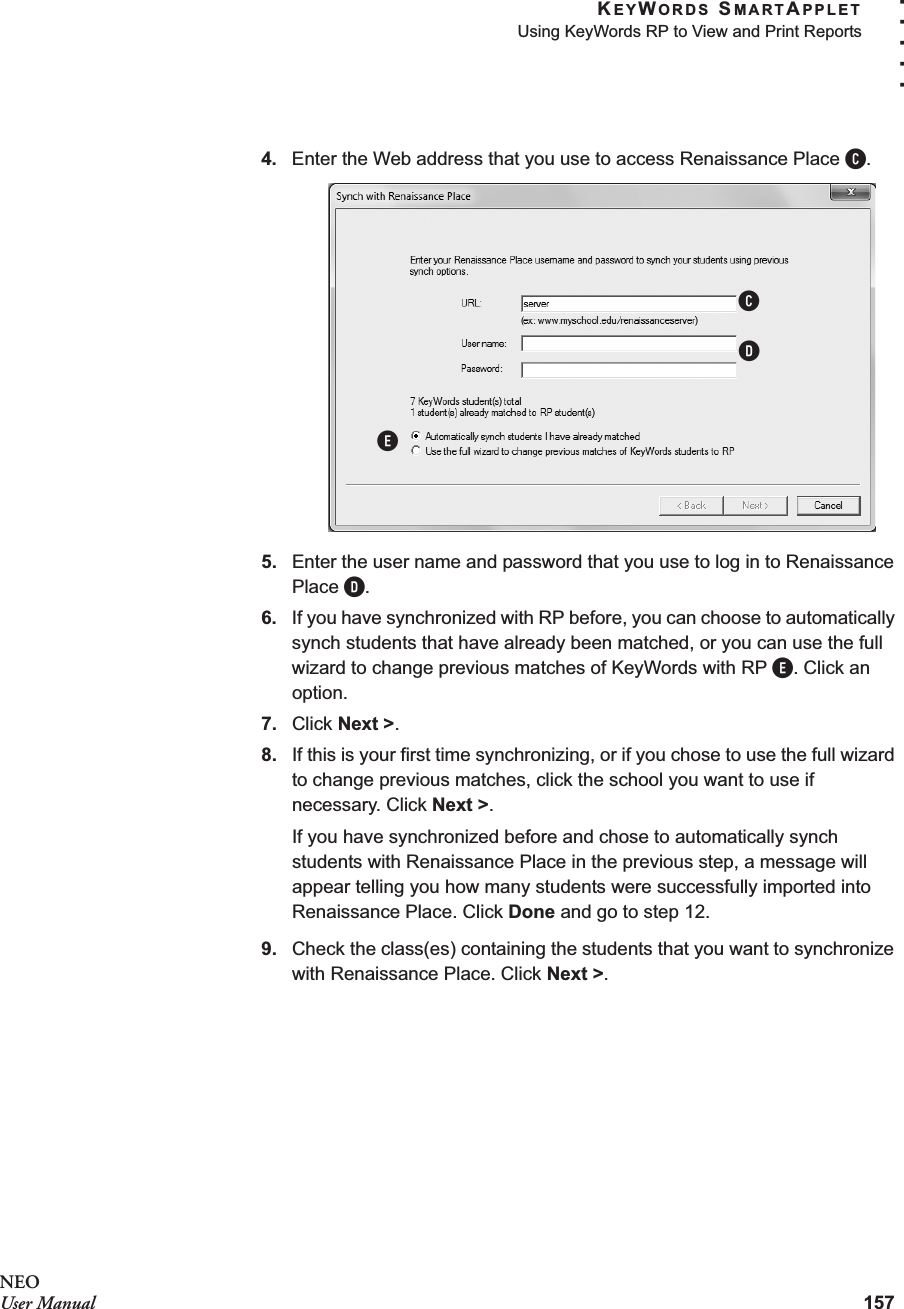
![142NEOUser ManualKEYWORDS SMARTAPPLETSetting Speed and Accuracy Goals for KeyWords Students. . . . .If you have set goals in the teacher options and you want to go back to the default automatic goals that are shown in the table, see the instructions on page 143 to reset goals to the default.How to Set Goals Manually in the Teacher OptionsFollow these steps to set new goals that are the same for all students and lesson activities:1. In KeyWords, use the arrow keys to select Teacher options and press enter.2. Type the master password and press enter.3. Select Set custom WPM and error goals and press enter.4. To change the words per minute goal, follow the instructions for your model:•For NEO 1: To increase the words per minute goal, press the K key. To decrease it, press the L key. After changing the goal, press the space bar.•For NEO 2: The screen shows the current words per minute goal. Type the new goal that you want to set. You can enter any number from 1 to 99. Press enter.MV Keys 8 22NB Keys 8 22" ' ! Keys 8 14Number Keys 6 14Post-Test NA NAUse the arrow keys to change thewords per minute:8(Press [SPACE BAR] to continue.)LessonAccuracy/Error Goal (Maximum)Words per Minute (WPM) Goal (Minimum)You can also set KeyWords goals in NEO Manager. With the NEO(s) connected, click the Settings tab in NEO Manager and click Keywords or KeyWords Wireless on the left. Then, enter values for the custom WPM and error goals and send the changes to your NEOs.](https://usermanual.wiki/Renaissance-Learning/NEO2A/User-Guide-1590523-Page-156.png)
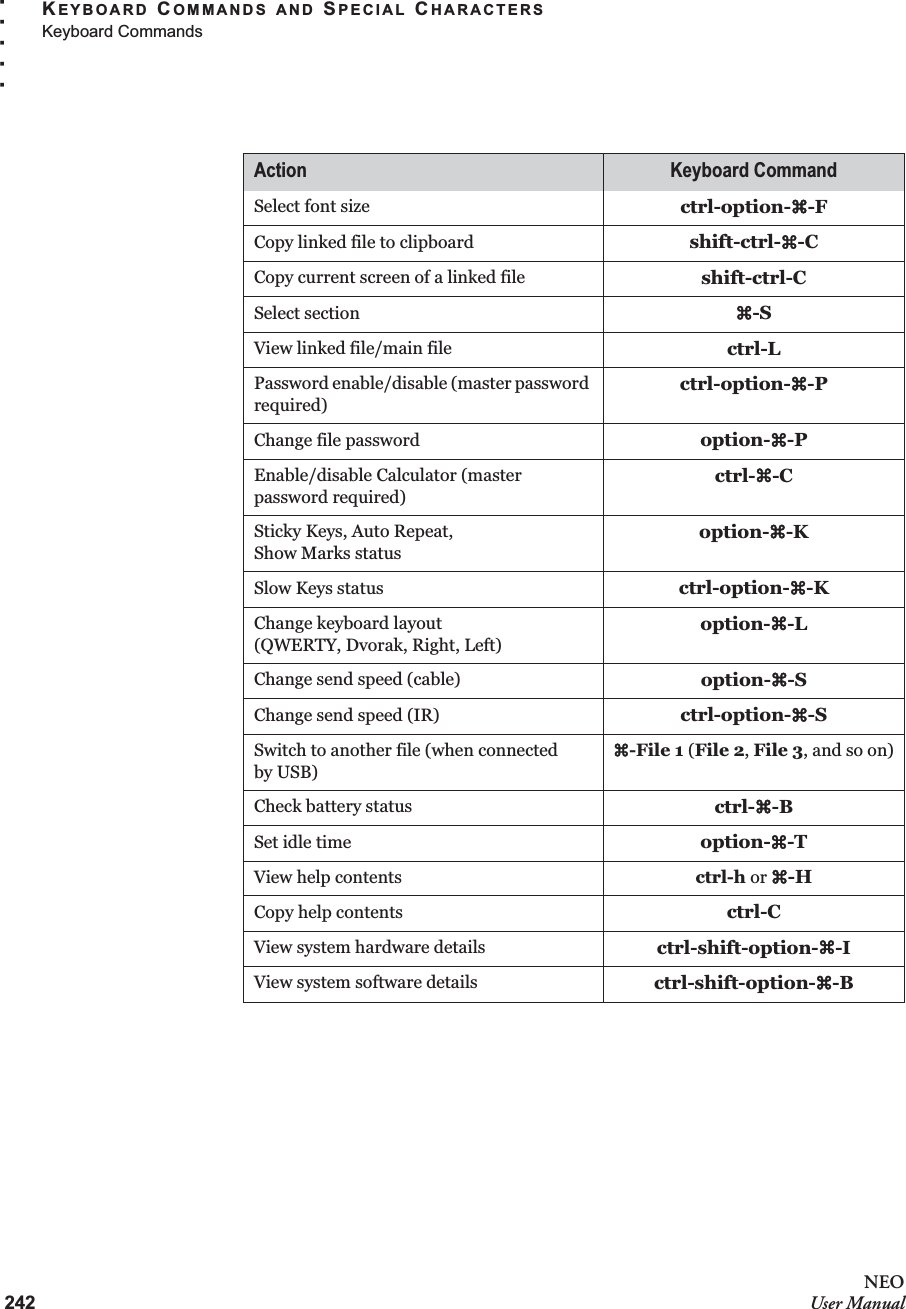
![KEYWORDS SMARTAPPLETSetting Speed and Accuracy Goals for KeyWords Students143. . . . .NEOUser Manual5. To change the maximum number of errors allowed, follow the instructions for your model:•For NEO 1: To increase the number of allowable errors, press the K key. To decrease it, press the L key. Then, press the space bar.•For NEO 2: The screen shows the current maximum number of errors allowed goal. Type the new goal that you want to set. You can enter any number from 0 to 99. Press enter.You will return to the teacher options list.Resetting Goals to the DefaultFollow these steps to change back to the default goals, which change as students progress through the lessons. (See the table that starts on page 141.)1. In KeyWords, use the arrow keys to select Teacher options and press enter.2. Type the master password and press enter.3. Select Reset WPM and error goals to default and press enter.4. On NEO 1s, a message will tell you that the goals have been reset. Press the space bar to go back to the teacher options.On NEO 2s, you will be asked whether you want to reset the goals. Press Y for yes or N for no; then, press enter. A message will tell you that the goals have been reset. Press the space bar to go back to the teacher options.Use the arrow keys to change theAllowable errors:8(Press [SPACE BAR] to continue.)You can also reset KeyWords goals in NEO Manager. With the NEO(s) connected, click the Settings tab in NEO Manager and click Keywords or KeyWords Wireless on the left. Choose Yes after Reset WPM/error goals to default. Then, send the change to your NEOs.](https://usermanual.wiki/Renaissance-Learning/NEO2A/User-Guide-1590523-Page-157.png)

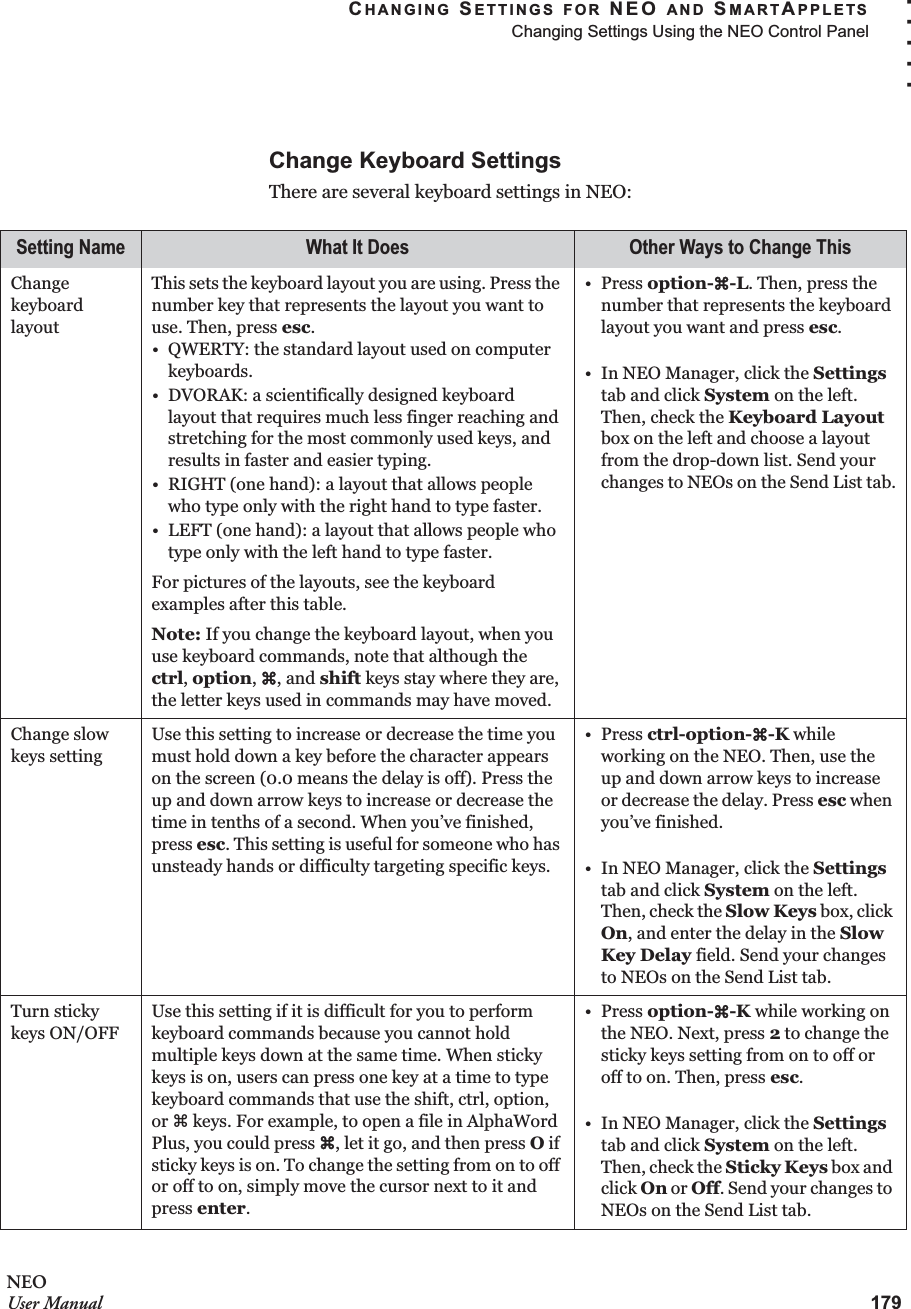
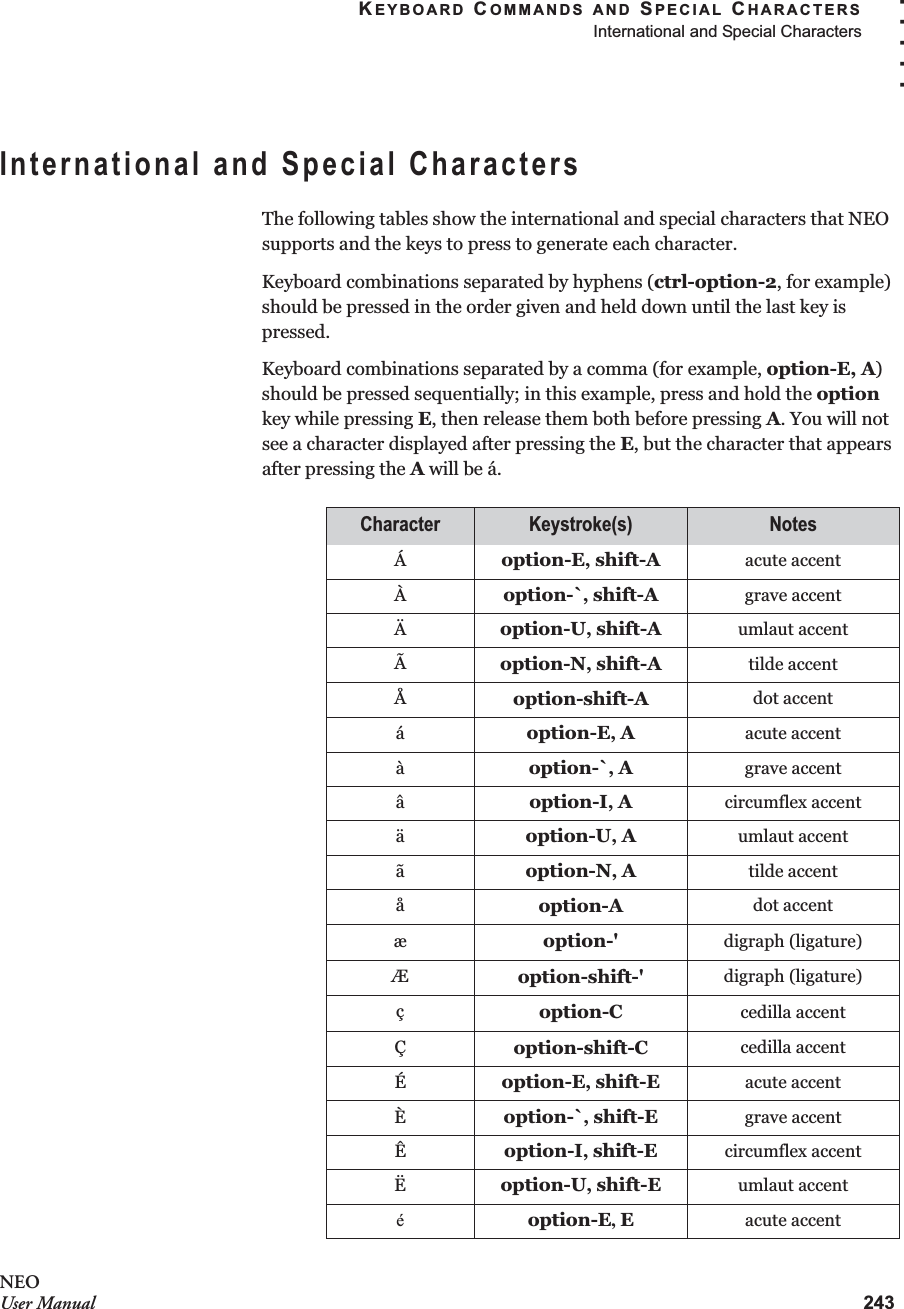
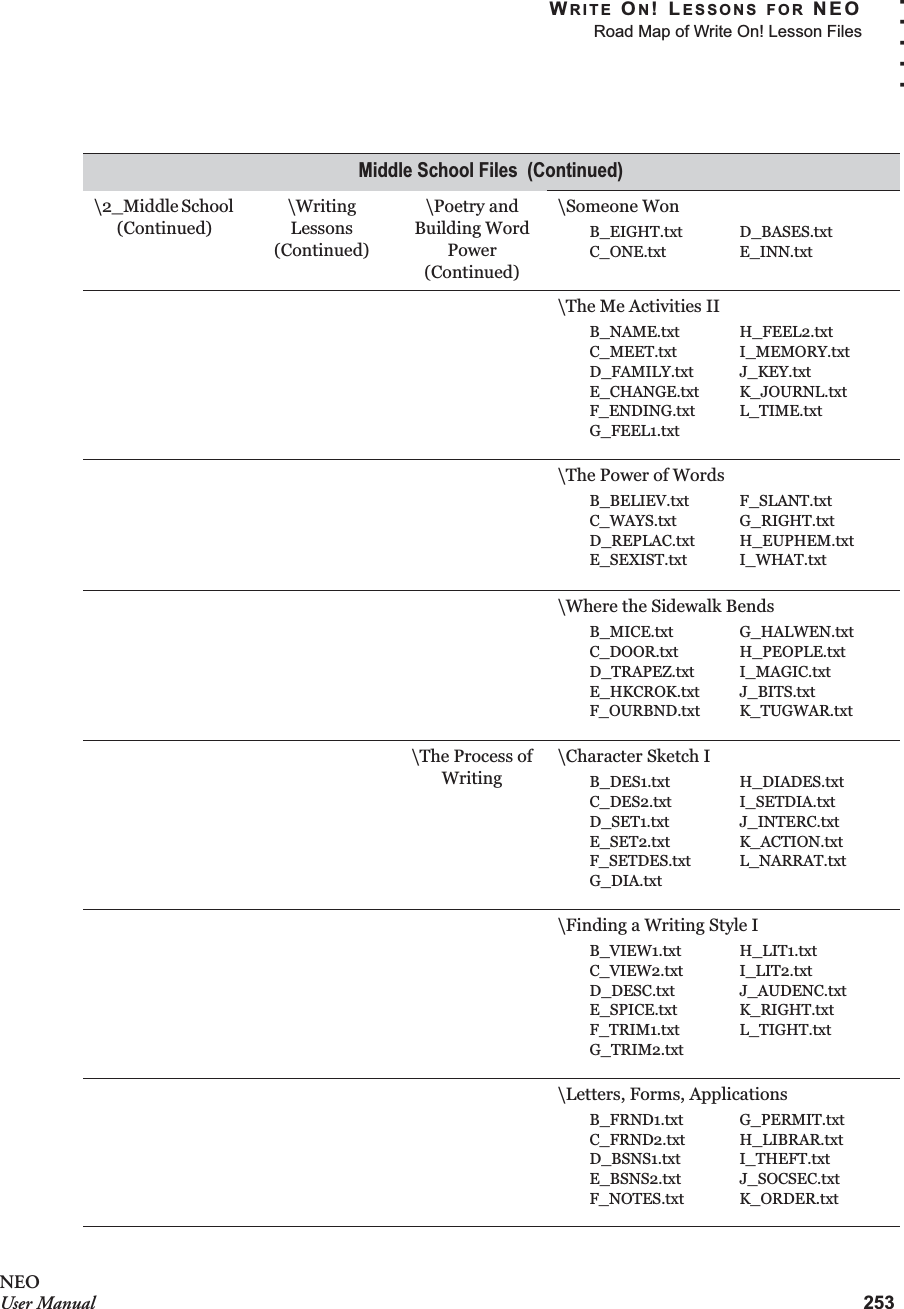
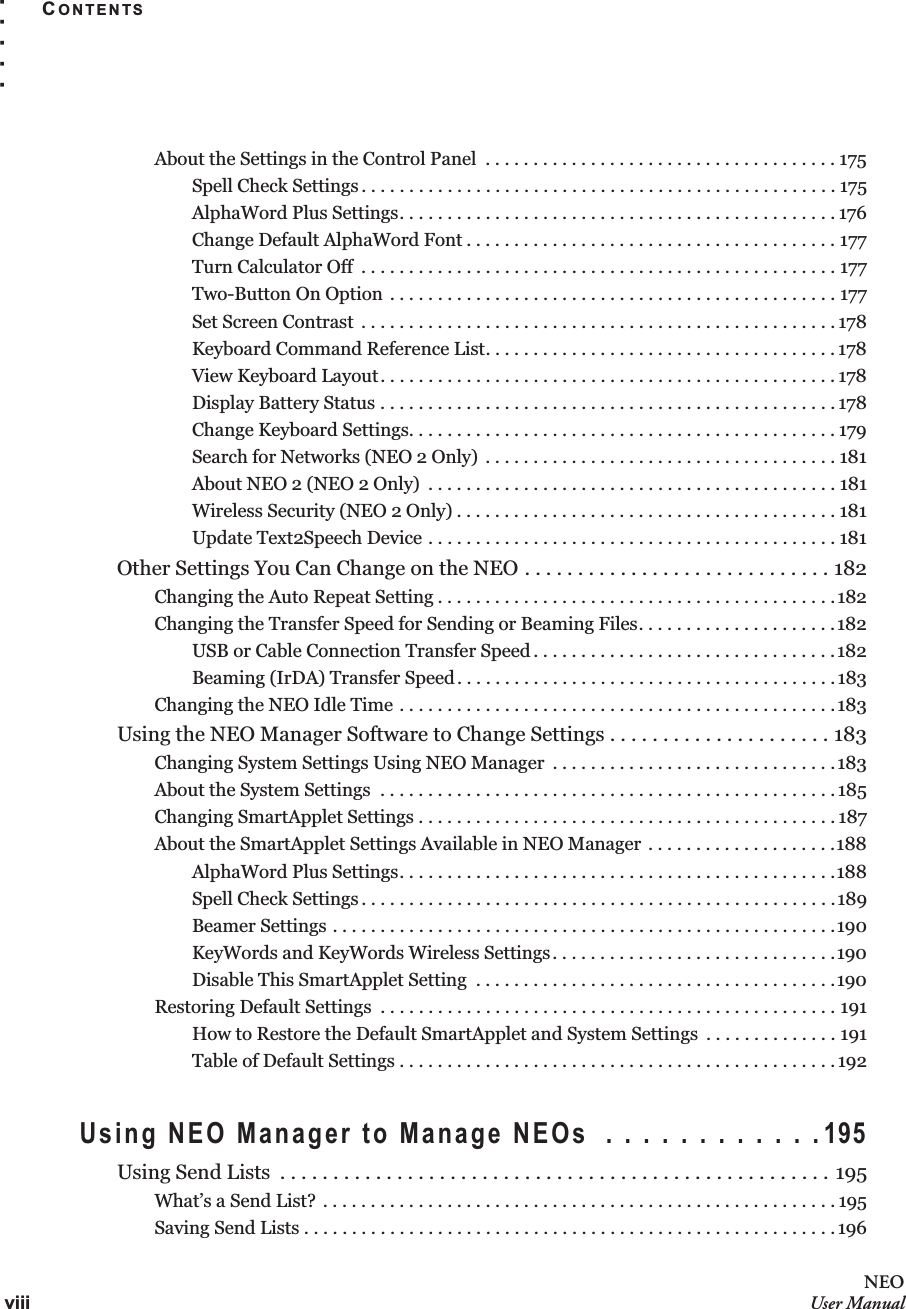
![180NEOUser ManualCHANGING SETTINGS FOR NEO AND SMARTAPPLETSChanging Settings Using the NEO Control Panel. . . . .on/off file 1 file 2 file 3 file 4 file 5 file 6 file 7 file 8 print spellcheck find clearfile home end applets sendtab Q W E R T Y U I O P {[}]|\entercaps lock A S D F G H J K L :;"'shift Z X C V B N M<,>.?/shiftcontrol altoptiondeleteesc!1@2#3$4%5^6&7*8(9)0_-+=backspace~`cmdThe standard QWERTY keyboard layouton/off file 1 file 2 file 3 file 4 file 5 file 6 file 7 file 8 print spellcheck find clearfile home end applets sendtab "'<,>.P Y F G C R L ?/+=|\entercaps lock A O E U I D H T N S _-shift :;Q J K X B MW V Z shiftcontrol altoptiondeleteesc!1@2#3$4%5^6&7*8(9)0{[}]backspace~`cmdThe Dvorak keyboard layoutSome language versions of NEO do not support alternate keyboard layouts. The examples shown are US layouts.](https://usermanual.wiki/Renaissance-Learning/NEO2A/User-Guide-1590523-Page-194.png)
![CHANGING SETTINGS FOR NEO AND SMARTAPPLETSChanging Settings Using the NEO Control Panel181. . . . .NEOUser ManualSearch for Networks (NEO 2 Only)On NEO 2 models, when you use NEO 2 with a Renaissance Receiver, the first network (Receiver) that you choose with NEO 2 is the one that is used by default the next time you use the Responder SmartApplet.If you want to search for a different computer/Receiver combination (network), move the cursor next to this setting in the Control Panel and press enter. NEO 2 will find the Renaissance Receivers that are within range and show you their names. Use the up and down arrow keys to highlight the new Receiver you want to use. Then, press enter to connect to it.About NEO 2 (NEO 2 Only)On NEO 2 models, you can select this Control Panel setting to view information about your NEO, including the system version and the version of other items that are unique to NEO 2.Wireless Security (NEO 2 Only)Use this setting to enter the encryption key if it is required for NEO 2 to communicate with Renaissance Receivers. For more information, contact Renaissance Learning.Update Text2Speech DeviceUse this setting to send updates to an optional NEO Text2Speech device. For more information, see the NEO Text2Speech User Manual.on/off file 1 file 2 file 3 file 4 file 5 file 6 file 7 file 8 print spellcheck find clearfile home end applets sendtab :;Q B YU R S O >.^6%5+=|\entercaps lock _-K C D T H E A Z *8&7shift "'X G V W N I <,)0(9shiftcontrol altoptiondeleteesc{[}]?/P F M L J $4#3@2!1backspace~`cmdThe left one-handed keyboard layout](https://usermanual.wiki/Renaissance-Learning/NEO2A/User-Guide-1590523-Page-195.png)