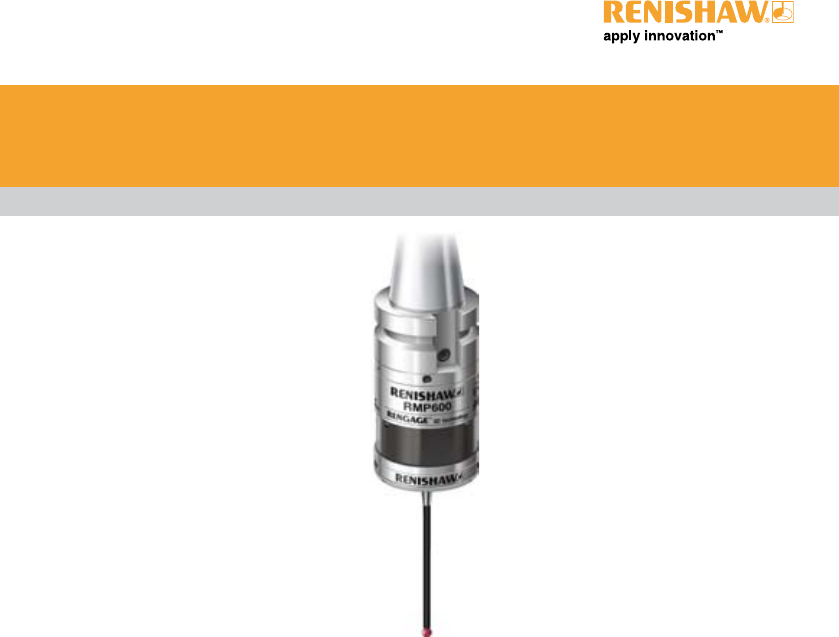
Renishaw plc RMP600 PROBE FOR MACHINE TOOLS User Manual USER GUIDE
Renishaw plc PROBE FOR MACHINE TOOLS USER GUIDE
USER GUIDE
Quick-start guide
H-5312-8502-01-B
RMP600

© 2007 Renishaw plc. All rights reserved.
This document may not be copied or reproduced in whole or in part, or transferred to any other media or language, by
any means, without the prior written permission of Renishaw.
The publication of material within this document does not imply freedom from the patent rights of Renishaw plc.
Disclaimer
Considerable effort has been made to ensure that the contents of this document are free from inaccuracies and
omissions. However, Renishaw makes no warranties with respect to the contents of this document and specifically
disclaims any implied warranties. Renishaw reserves the right to make changes to this document and to the product
described herein without obligation to notify any person of such changes.
Trademarks
RENISHAW® and the probe emblem used in the RENISHAW logo are registered trademarks of Renishaw plc in the UK
and other countries.
apply innovation, Trigger Logic and RENGAGE are trademarks of Renishaw plc.
Adobe® and Acrobat® are either registered trademarks or trademarks of Adobe Systems Incorporated in the United
States and/or other countries.
All other brand names and product names used in this document are trade names, service marks, trademarks, or
registered trademarks of their respective owners.
CAUTION: The RMP600 has a glass window. Handle with care if broken to avoid injury.
!
Part number: H-5312-8502-01-B
Issued: 07.2007

3
Features of the RMP600, and other similar Renishaw probes, are subject to the following patents and/or
patent applications:
CN 1732488A
CN 1771425A
EP 0337669
EP 0390342
EP 0652413
EP 0695926
EP 1185838
EP 1373995
EP 1425550
EP 1457786
EP 1477767
EP 1477768
EP 1576560
EP 1613921
EP 1701234
EP 1734426
EP 872787 B
JP 2,945,709
JP 2,994,401
JP 2003-526,170
JP 2004-279,417
JP 2004-522,961
JP 2005-502,035
JP 2006/522931
JP 2006-313567
JP 2006-511860
JP 3,126,797
US 2004-0178771
US 2006/0215614A1
US 5,040,931
US 5,150,529
US 5,279,042
US 5,669,151
US 6,301,796 B1
US 6,776,344 B2
US 6,941,671 B2
US 7145468B2
WO 2006/134360
WO 2007/028964
WO 2006/100508
WO 2006/120403
Patents

4
EC DECLARATION OF CONFORMITY
Renishaw plc declares that the product:
Name Description
RMP600 Radio machine probe
has been manufactured in conformity with the following standards:
61010-1:2001
EN 301 489-17
EN 300 328
EN 50371
and that it complies with the requirements of the following
directives (as amended):
1999/5/EC - R&TTE Radio and telecommunications
terminal equipment
The above information is summarised from the full EC Declaration
of Conformity. A copy is available from Renishaw on request.
FCC
Information to user (FCC Section 15.19)
This device complies with Part 15 of the FCC rules. Operation is
subject to the following conditions:
1. This device may not cause harmful interference, and
2. This device must accept any interference received, including
interference that may cause undesired operation.
Information to user (FCC Section 15.21)
The user is cautioned that any changes or modifications not
expressly approved by Renishaw plc or authorised representative
could void the user’s authority to operate the equipment.
Preliminary information
C
5
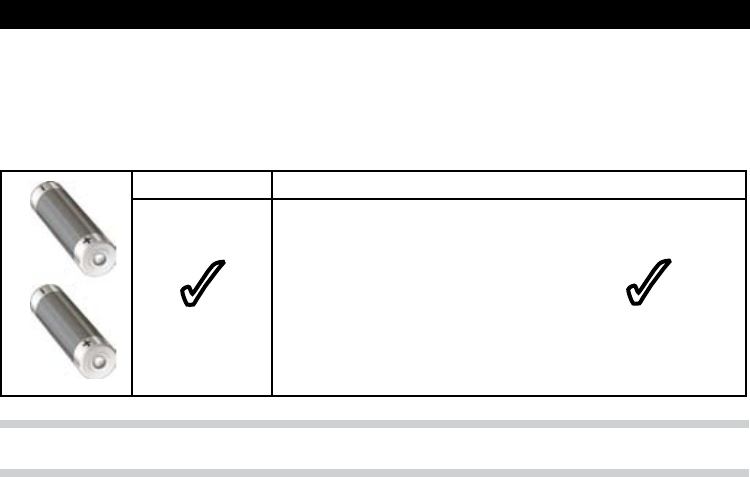
AA alkaline x 2 Lithium thionyl chloride x 2
RS: 596-602, 201-9438
Radio shack: 23-037
Saft: LS 14500
Sonnenschein: SL-760/S
Tadrian: TL-5903/S, TL-2100/S
Xeno: XL-060F
The RMP600 will operate with either 2 x AA alkaline batteries or 2 x lithium thionyl chloride batteries
(of the types approved and listed below).
3
Note: Maximum battery life is achieved when lithium thionyl chloride batteries are used.
Battery specification
3
6
M-5000-3707
2
1
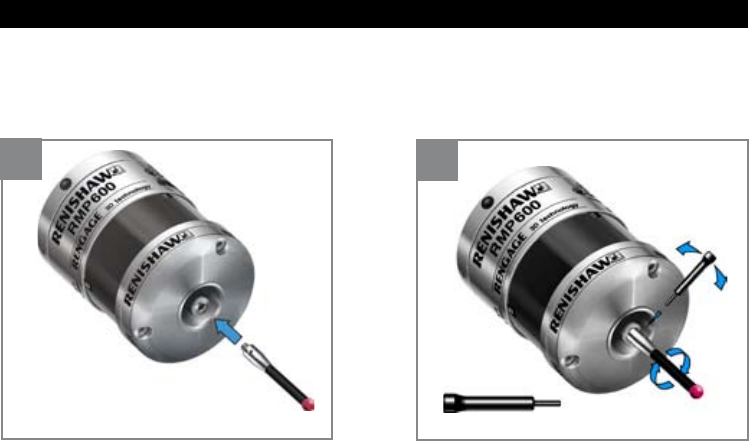
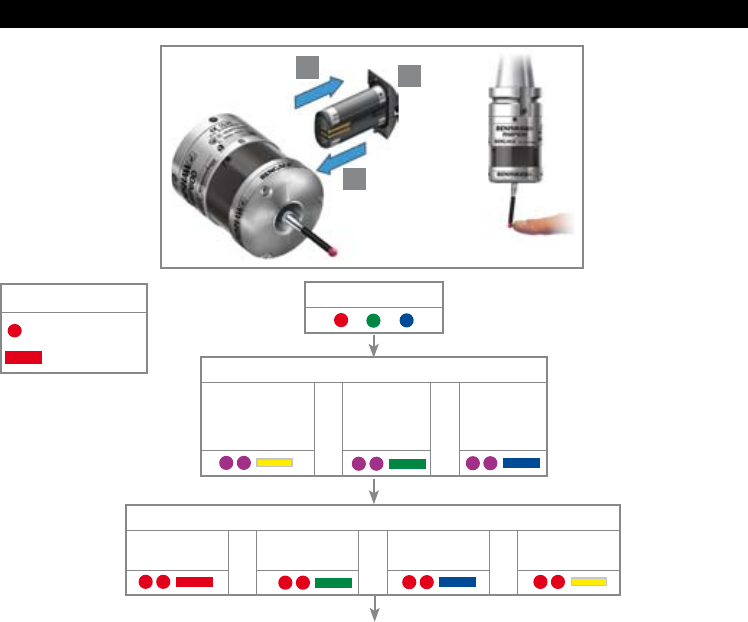
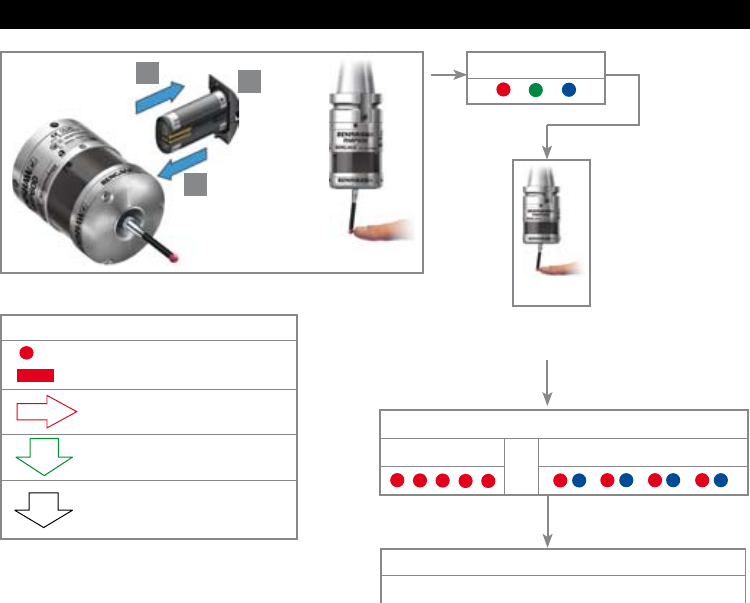
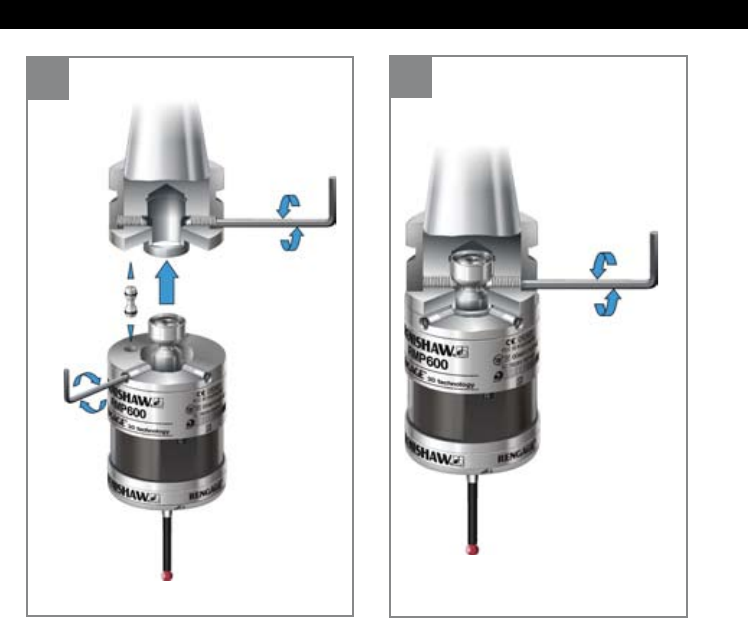
Fitting the stylus
7
V Take care not to short the battery
contacts as this may be a fire hazard.
Ensure the contact strips are located
securely.
1
24
3
V
Installing the batteries
8
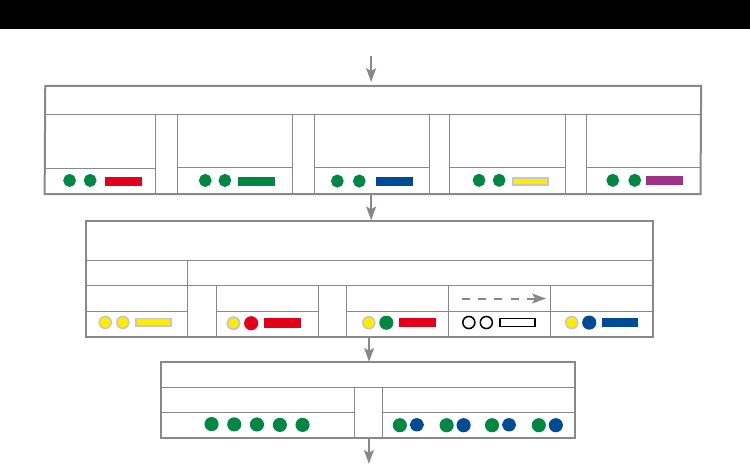
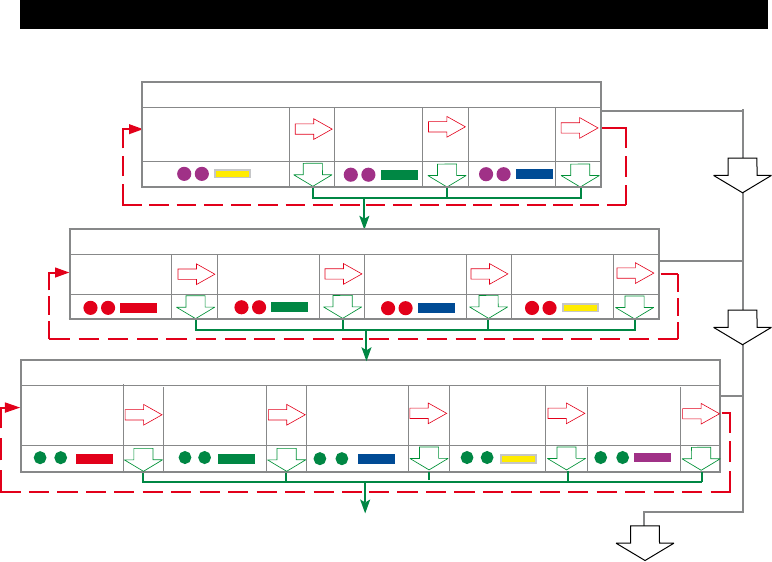
Reviewing the probe’s settings
X
> 5 s
Key to symbols
LED short flash
LED long flash
12
3
LED check
Switch on method
Radio on
(omitted if multiple
probe mode was
selected) or
Shank on
or
Spin on
Switch off method (omitted for shank on)
Radio off or
Spin off or
Short time out
12 s or
Medium time out
33 s or
Long time out
134 s
continued on next page
9
Reviewing the probe’s settings
Multiple probe mode (omitted for radio-on)
(see ‘Multiple probe mode settings’ to view all 16 choices)
Mode off Mode on
or
Machine 1
or
Machine 2 Machine 16
Battery status
Battery good
or
Battery low
Probe in standby mode (after 5 s)
Auto-reset off
Filter off
Auto-reset off
Filter on
16 ms
Enhanced trigger filter setting and auto reset facility
Auto-reset off
Filter on
8 ms
Auto-reset on
Filter on
8 ms
Auto-reset on
Filter on
16 ms
or or or or
10
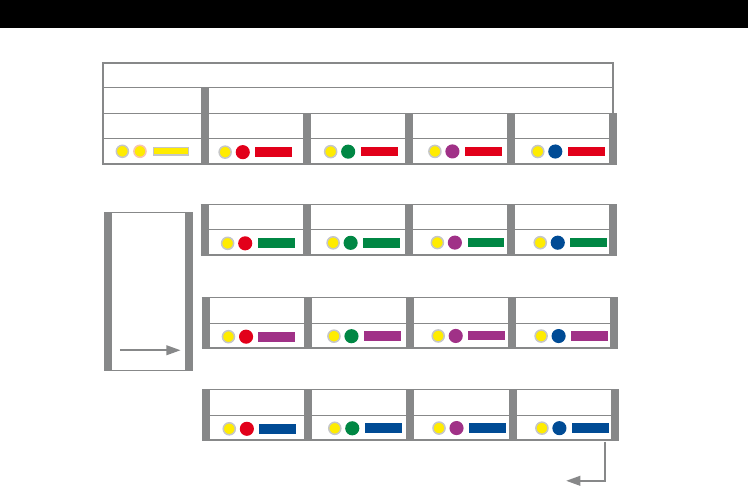
Multiple probe mode settings
Multiple probe mode
Mode off Mode on
Machine 1 Machine 2 Machine 3 Machine 4
Machine 5 Machine 6 Machine 7 Machine 8
Machine 9 Machine 10 Machine 11 Machine 12
Machine 13 Machine 14 Machine 15 Machine 16
Deflect
stylus
< 4 sec
to cycle
to next
setting
Return to mode off
11
Battery status
Battery good
or
Battery low
Key to the symbols
LED short flash.
LED long flash.
Deflect the stylus < 4 seconds to
move to the next menu option.
Deflect the stylus > 4 seconds to
move to the next menu.
To exit , leave the stylus
untouched for >20 seconds.
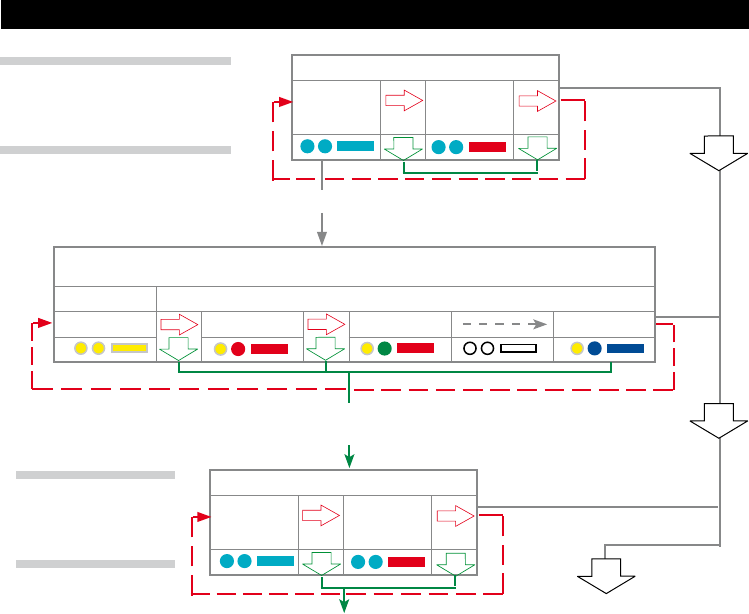
Placing the probe into configuration mode
LED check
To change the switch off method
go to the next page
Deflect the stylus and hold deflected until after the
battery status has been displayed at the end of the
review sequence.
3
X
> 5 s
12
3
12
Changing the probe settings
Auto-reset off
Filter on
16 ms
Auto-reset off
Filter on
8 ms
Auto-reset on
Filter on
8 ms
Auto-reset on
Filter on
16 ms
Auto-reset off
Filter off
To change enhanced trigger filter setting and auto-reset facility
NEW SETTINGS
COMPLETE
To change switch on method
Radio on
(omitted if multiple probe
mode was selected)
Shank on Spin on
To change switch off method (omitted for shank on)
Radio off or
Spin off
Short time out
12 s
Medium time out
33 s
Long time out
134 s
continued on next page
13
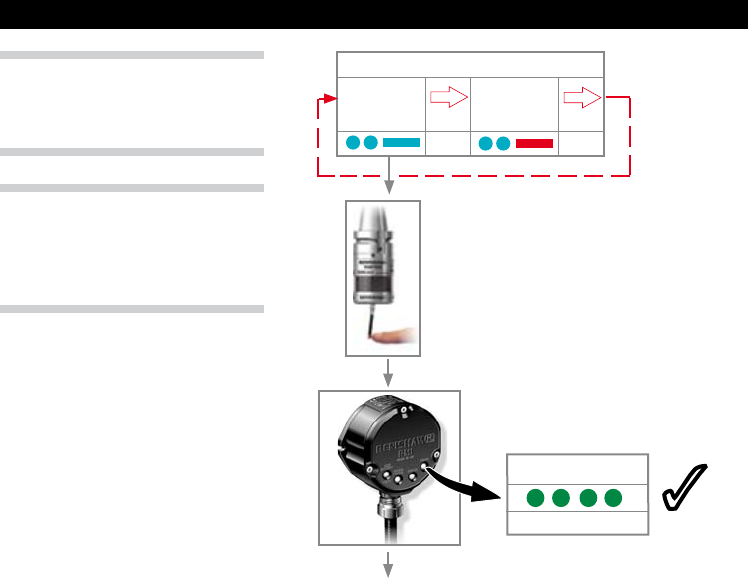
Acquisition mode
Acquisition
mode
off
Acquisition
mode
on
Multiple probe mode (omitted for radio-on)
(see ‘Multiple probe mode settings’ to view all 16 choices)
Mode off Mode on
Machine 1 Machine 2 Machine 16
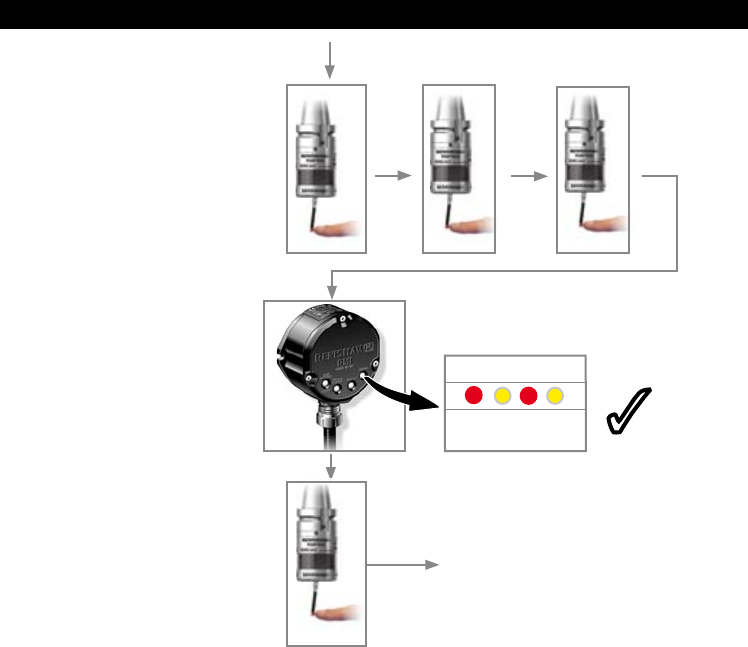
Changing the probe settings
Acquisition mode
Acquisition
mode
off
Acquisition
mode
on
Return to ‘To change switch-on method’
Note: Once acquisition has been
successful, the RMP600 will revert to
‘Aquisition mode off’.
Cease triggering here, unless the multiple probe mode is required
in which case deflect stylus > 4 seconds
Note: If no changes are made in multiple probe mode, then deflecting the stylus for more than 4
seconds will return the probe settings to
‘To change switch-on method’
NEW SETTINGS
COMPLETE
Note: To partner a
RMP600 with a RMI
please see page 12.
14
RMP600 - RMI partnership
Acquisition mode
Acquisition
mode
off
Acquisition
mode
on
Continuously deflect stylus whilst
switching on the RMI.
continued on next page
SIGNAL LED
RMI in acquisition mode
3
Note: In configuration mode, configure
settings as required and then enter
the ‘Acquisition mode’ menu. Select
‘Acquisition mode off’.
3
Note: Unless the RMP600 is in ‘Multiple
probe’ mode, it will be necessary to
partner it with the RMI before use.
15
RMP600 - RMI partnership
New partner RMP
acquired
SIGNAL LED
Release and deflect the stylus
to select ‘Acquisition mode on’.
X
3
X
> 20 s
Probe in standby and system
ready for use.
X
3
16
2
1
×4
×2 4 mm AF
2 - 3 Nm ×2
Mounting the probe to a shank
17
1
+10 µm -10 µm
2.5 mm AF
1 Nm ×4
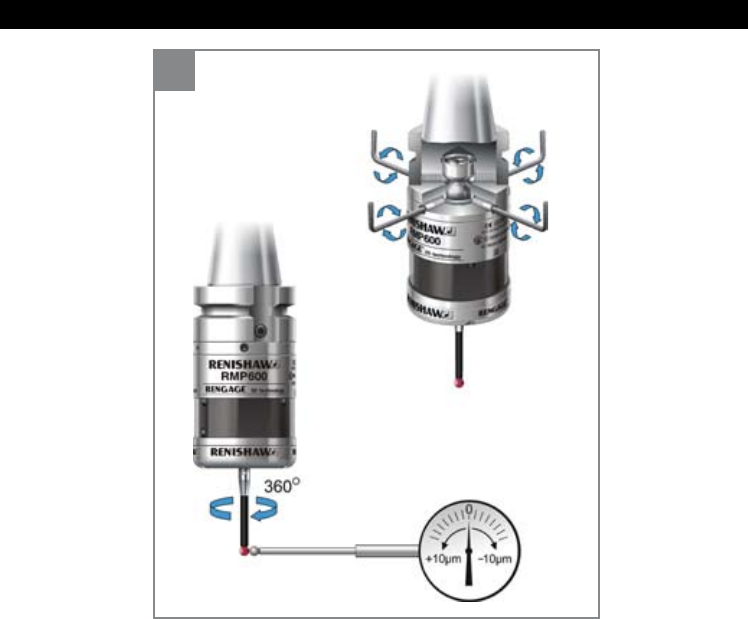
Stylus on-centre adjustment
18
2
+10 µm -10 µm
4 mm AF
6 - 8 Nm ×2
Stylus on-centre adjustment
19
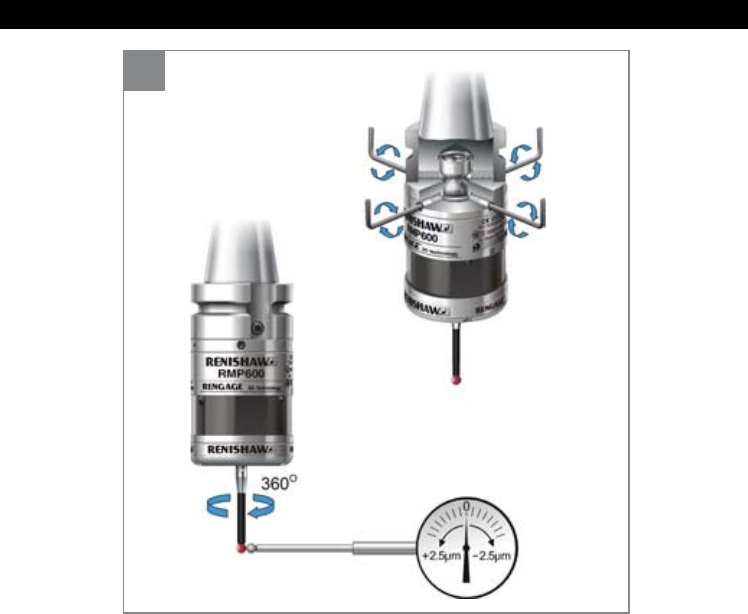
3
+2.5 µm -2.5 µm
2.5 mm AF
1.5 - 3.5 Nm ×4
Stylus on-centre adjustment
20
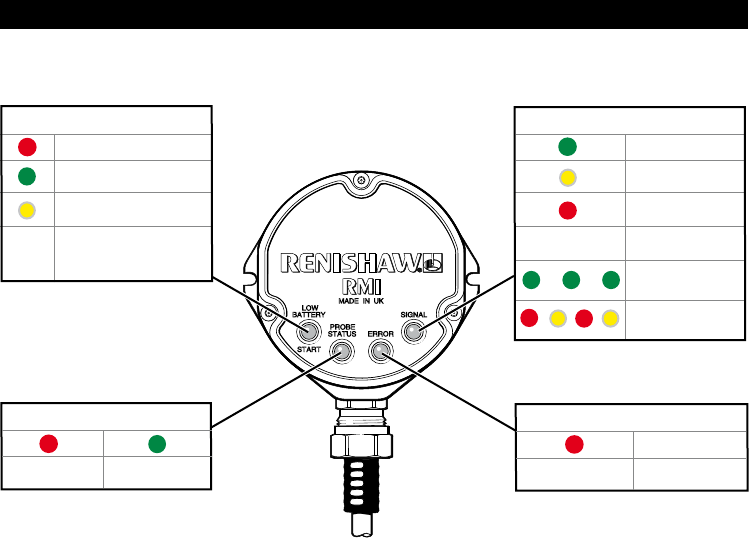
RMI visual diagnostics
LOW BATTERY/START LED
Battery low
M code start/stop in
progress
Battery low and M code
start/stop in progress
Battery is ok and no
M code start/stop in
progress
PROBE STATUS LED
Probe triggered Probe seated
ERROR LED
Error No error
SIGNAL LED
Signal excellent
Signal good
Signal poor
No signal
OFF
In acquisition mode
New partner RMP
acquired
OFF
OFF
21
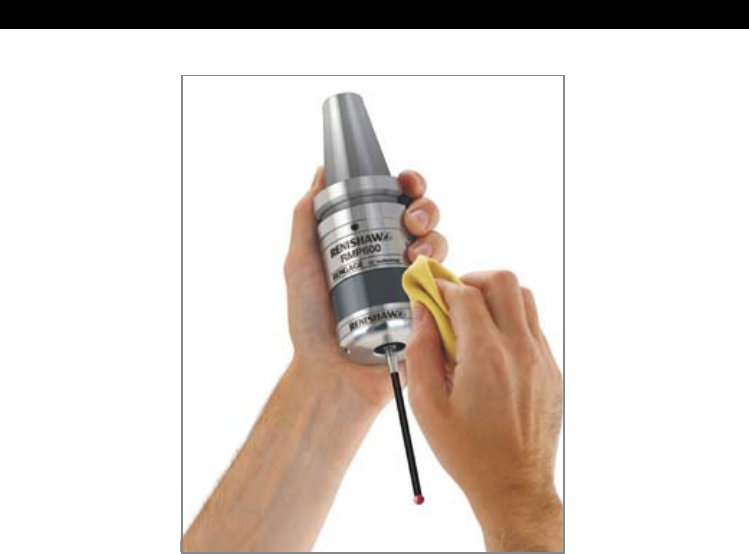
Renishaw receiver visual diagnostics Cleaning
Use clean cloth

Renishaw plc
New Mills, Wotton-under-Edge,
Gloucestershire, GL12 8JR
United Kingdom
T +44 (0)1453 524524
F +44 (0)1453 524901
E uk@renishaw.com
www.renishaw.com
For worldwide contact details,
please visit our main website at
www.renishaw.com/contact
*H-5312-8502-01*