Reo link Digital Technology ARGUS2 WiFi IP Camera User Manual Argus 2 QSG S
Shenzhen Reo-link Digital Technology Co., Ltd WiFi IP Camera Argus 2 QSG S
Manual

Reolink Argus 2
Quick Start Guide
For more troubleshooting, please go to FAQs on our website:
https://reolink.com/faqs/
For other technical support, please contact us at
support@reolink.com
Technical Support
QG2_A
Welcome to Reolink
Easy Setup Within Minutes!
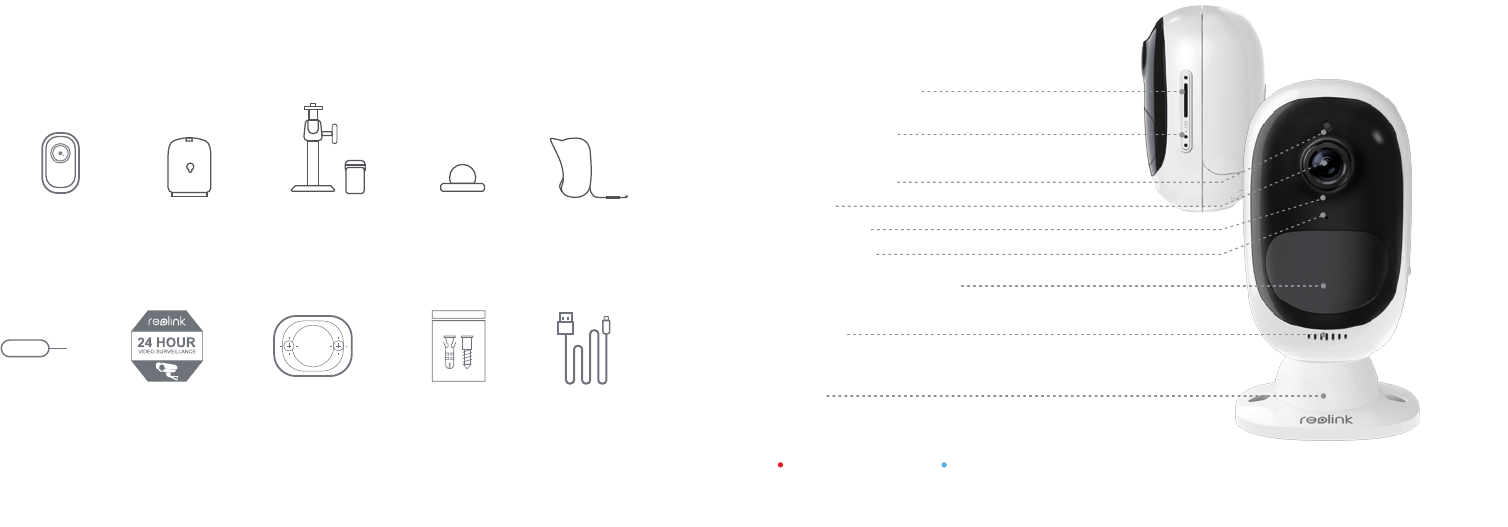
What’s in the Box
Reolink
Argus 2 Camera
x1
Base
x1
Outdoor Security Mount
(with a hook & loop strap)
x1
Surveillance Sign
x1
Mounting
Hole Template
x2
Screws (in pack)
x2
Micro USB Cable
x1
Reset Needle
x1
The camera and the rechargeable battery are packed separately in the same package.
Rechargeable
Battery
x1
General Introduction
Micro SD Card Slot
Reset Hole
Daylight Sensor
Lens
Status LED
Built-in Mic
Built-in PIR Motion Sensor
Speaker
Base
The LED in Blue
(WiFi connection succeeded)
Blinking: Standby status
On: Working status
The LED in Red
(WiFi connection failed)
Blinking: Standby status
On: Working status
Skin
(with a small rope)
x1
* *
*
Please dress the camera with the skin for better weatherproof performance when
you install the camera outdoors.
*
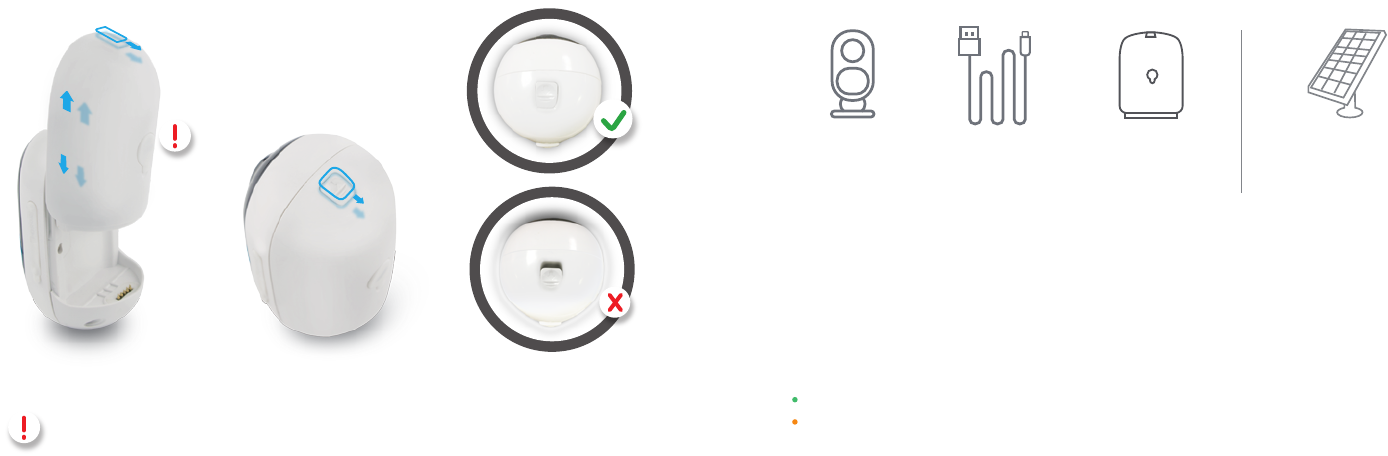
Install the Rechargeable Battery to the Camera Charge the Battery
There is a status LED under the micro USB port of the battery, indicating the battery charging status.
1. You can charge the battery when it's installed to the camera.
Argus 2
2. You can charge the battery separately.
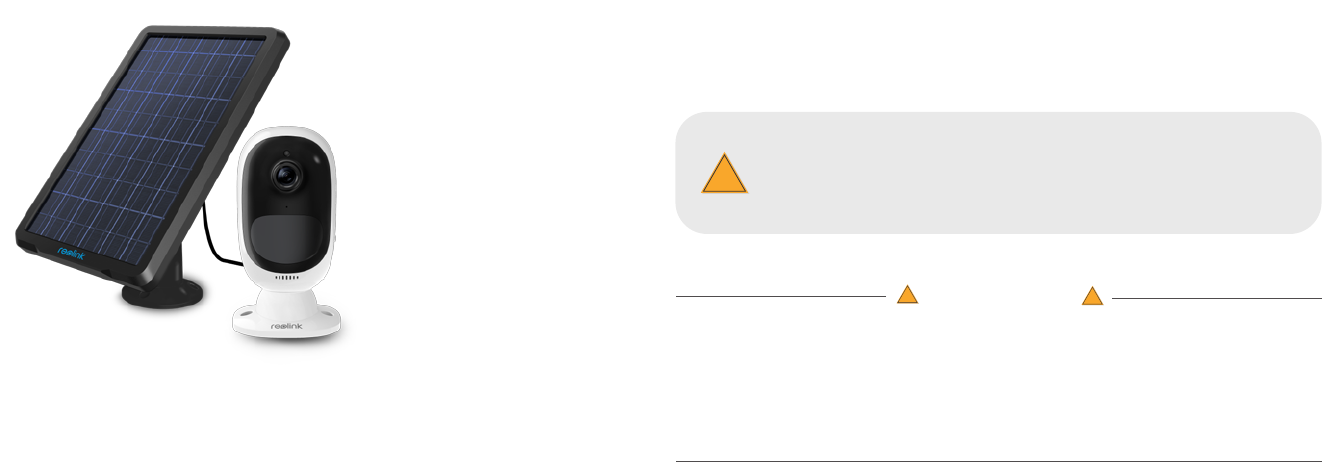
3. You can charge the battery with Reolink solar panel. Please note that the solar
panel is NOT included in the package. You can buy the solar panel on Reolink official
online store.
Micro USB Cable Rechargeable
Battery
Reolink
Solar Panel
Green LED: Fully charged
(Not included in the package)
Orange LED: Charging
Pleasepressthebutton(onthetopofthebackcasing),andslide thebackcasingdownwardtocloseit.
Thebuttonalsoneeds to be closedfirmlyfor goodweatherproofperformance.
For the weatherproof performance, always cover the USB charging port with the rubber plug.
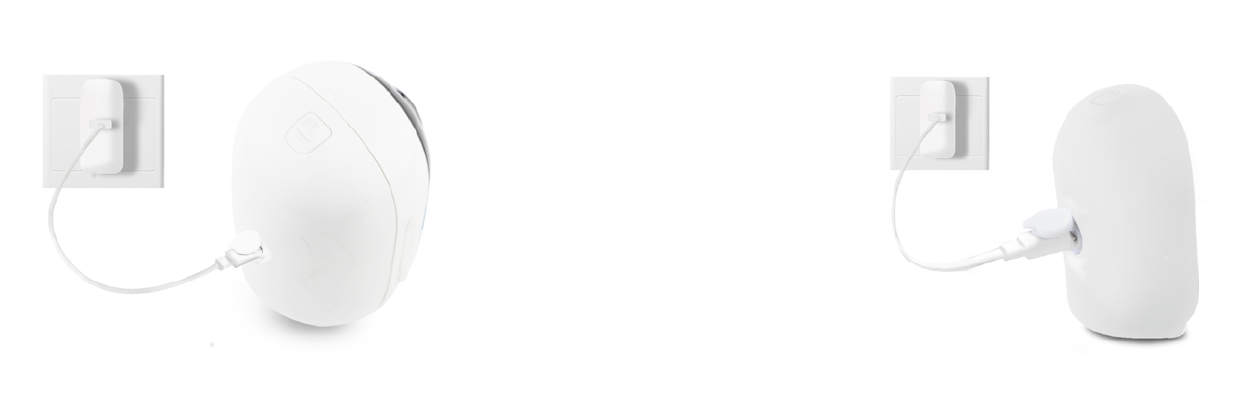
1. Charge the battery when it's installed to the camera. 2.Charge the battery separately.
Important Safeguards on Rechargeable Battery Use
Important Note
!
!
!
3. Charge the battery with the Reolink solar panel. Please note
that the solar panel is NOT included in the package. You can buy
the solar panel on Reolink official online store.
1. Please charge your rechargeable battery with a standard and high-quality DC 5V or 9V battery charger.
Reolink Argus 2 is not designed for 24/7 full capacity running or around-the-clock live streaming. It’s designed to record
motion events and remotely view live streaming only when you need it.
2. If you want to power the camera via the solar panel, please note that the camera is ONLY compatible with Reolink
solar panel. You cannot charge this camera with other solar panel brands.
3.Please charge the battery in temperatures between 0°C and 45°C.
Please learn some useful ways to maximize the battery life in this post:
https://reolink.com/faq/extend-battery-life/
Please read the battery warnings and safety document provided in the package to
use your Reolink Argus 2 rechargeable battery safely.
Install Reolink App
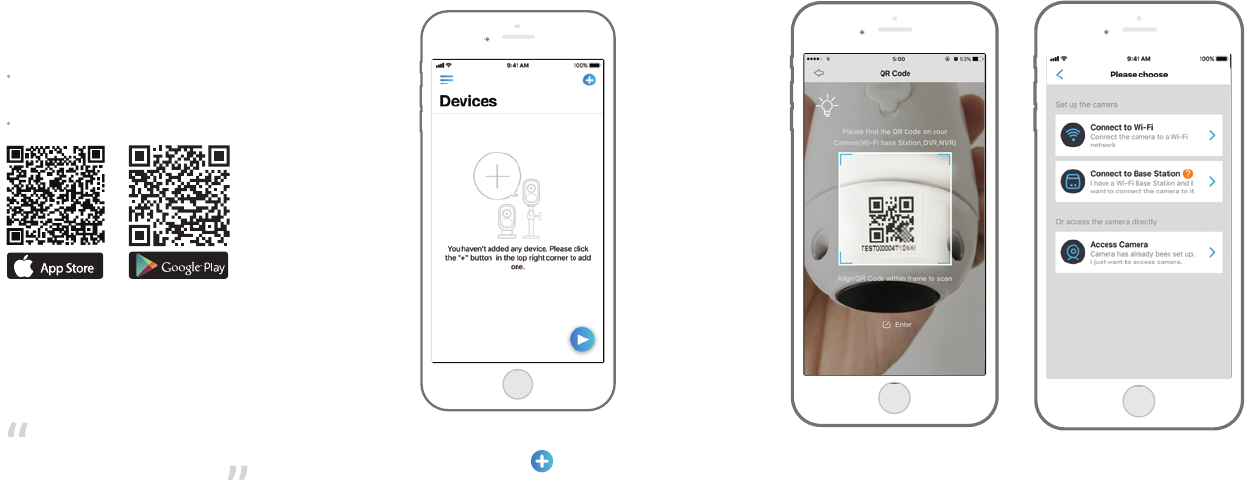
Scan the QR code below to download and install the app.
There are two ways to get the Reolink App:
Available on the Get it on
Search “Reolink” in App Store (for iOS), or Google
Play (for Android), download and install the app.
Set up the Camera
Please follow the prompt tone
to configure the camera
Camera has been started up.
Please run Reolink App, add
the camera and set it up. Please click the “ ” button in the
top right corner to add the camera.
1.
Note 1:
Your family can click
"Access Camera" for live
view after the initial setup.
Note 2:
If you have a Reolink Base,
please follow the Quick Start
Guide of the Base to add the
camera.The Reolink Base is
not included in the package.
2. Scan the QR code on the
back of the camera.
3. Click “Connect to Wi-Fi” to
continue.
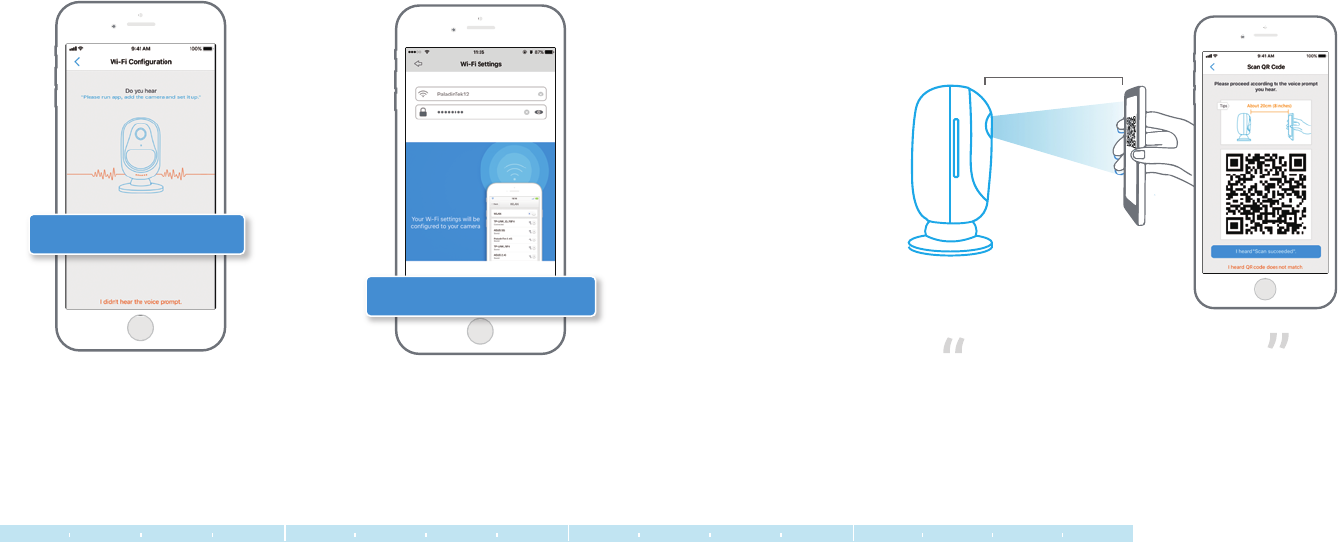
If you did not hear the voice prompt, please
press “I did not hear the voice prompt” for
help.
Click the button “I have heard the voice
prompt” to enter the next page.
4. Enter the Wi-Fi password of the selected
Wi-Fi network and press “I have entered
the correct information” to enter the next
page.
5.
I have heard the voice prompt
I have entered the correct information
About 20cm (8 inches)
Scansucceeded.Camerais
connectingtoyourrouter.Pleasewait.
A QR code will be generated on the phone. Please place the QR code on your phone
towards Reolink Argus 2 camera’s lens at a distance of about 20cm (8 inches) to let the
camera scan the QR code. Please make sure that you’ve ripped the protection film of the
camera’s lens.
6.
Distance (20cm)
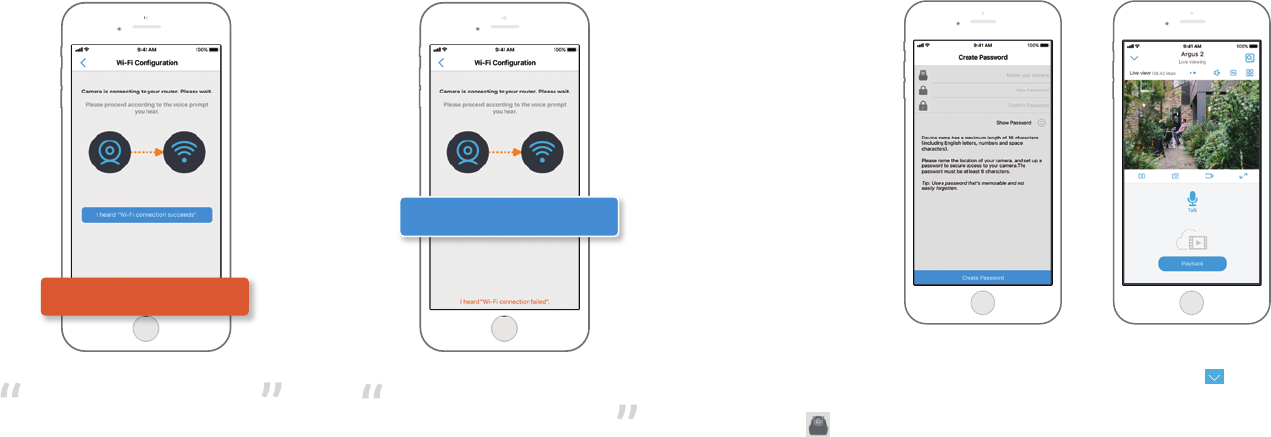
Connection to the router succeeded.
WelcometoReolink!
Connection to the router failed!
If you hear the above voice prompt, please press
“I heard ‘Connection to the router failed! ’ ” for
help.
If you hear the above voice prompt, please
press “I heard ‘Connection to the router
succeeded. ’ ” to finish the quick setup.
Name your camera and create a password (at least 6 characters), tap “Create Password”, slide the
page to read the tips and tap “finish” to start the Live View. Tap to go to the “Devices” menu.
8. 7.
Note:
“Name your camera” field refers to the display name of the camera rather than the login username.
“Playback” only displays when you’ve inserted a micro SD card into the camera. Make sure that the SD
card is recognized by the camera.
9.
I heard “Connection to the router succeeded.”
I heard “Connection to the router failed! ”
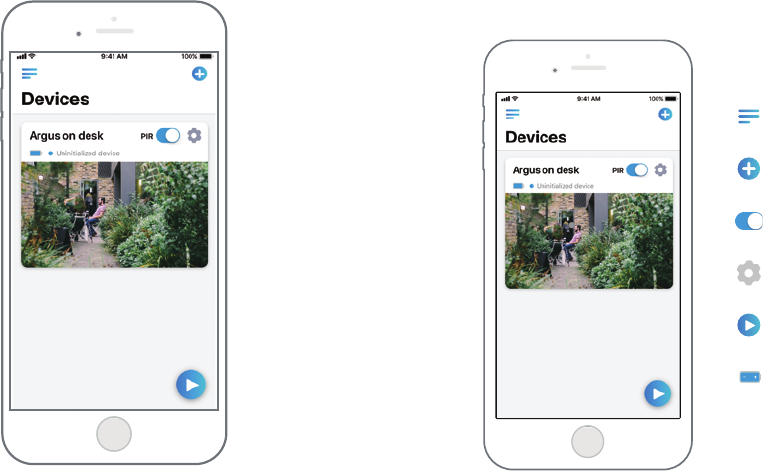
Devices Menu
Battery Status
Please tap the camera and follow the steps to
sync the time, and then start live view or go to
“Device Settings” for more configurations.
10.
Add New Device
Menu
Enable/Disable PIR Motion Sensor
(In default, the PIR sensor is enabled.)
Device Settings
Access the Live View
Adjust the Detecting Distance of the PIR Sensor
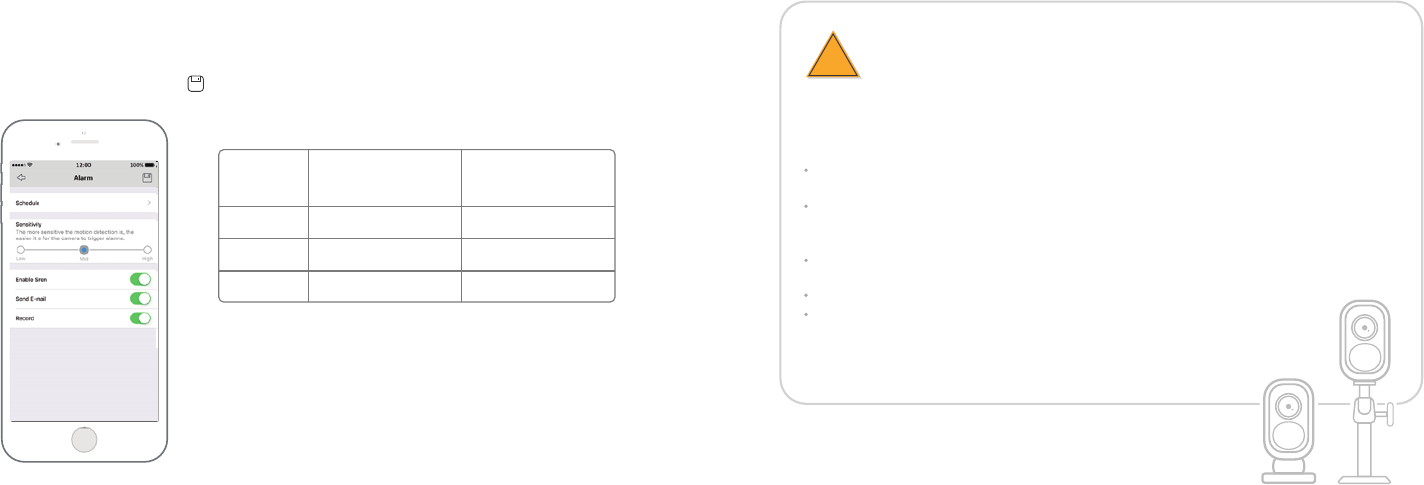
The default sensitivity of the PIR sensor is at “Mid” and the detecting distance is 6 meters (20ft). If you
want to adjust the sensitivity, please launch your Reolink App, and then click “Device Settings” -> “PIR
Settings” and click the “save” button to save the settings.
Sensitivity
Detecting Distance
(For moving
and living things)
Detecting Distance
(For moving vehicles)
High
Mid
Low
Up to 9 meters (30ft)
Up to 6 meters (20ft)
Up to 4 meters (13ft) Up to 10 meters (33ft)
Up to 12 meters (40ft)
Up to 15 meters (50ft)
Do not install the camera facing any objects with bright lights, including sunshine,
bright lamp lights, etc.
Do not place the camera too close to a place where there are frequently moving
vehicles. Based on our numerious tests, the recommended distance between the
camera and the vehicle is 15 meters (55ft).
Stay away from the outlets, including the air conditioner vents, humidifier outlets,
the heat transfer vents of projectors, etc.
Do not install the camera facing the mirror.
Keep the camera at least 1 meter away from any wireless devices, including Wi-Fi
routers and phones in order to avoid wireless interference.
To reduce false alarms, please note that:
Important Notes for Reducing False Alarms
!
Note:
Higher sensitivity offers longer detecting distance, but it would
lead to more false alarms.
You are advised to set up the sensitivity level to “Low” or “Mid”
when you install the camera outdoors.
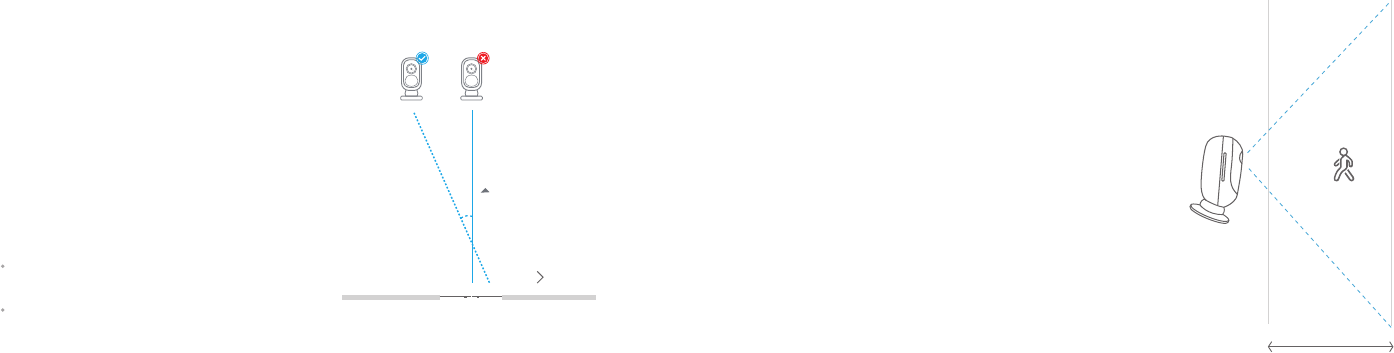
The ideal viewing distance is 2-10 meters (7-33ft),
which enables you to recognize a human.
The Ideal Viewing Distance
Cover the Monitoring Area
When installing the camera, it’s not suggested to
make the PIR sensor vertically face the moving
object. Please note that if the moving object
approaches the PIR sensor vertically, the PIR sensor
may not detect the motion events. You are advised to
install the camera angularly (the angle between the
PIR sensor and the detected object is larger than
10°) for effective motion detection.
FYI:
Entrance
10°
θ
θ
It’s not suggested to make
the PIR sensor vertically
face the moving object.
The path of the
moving object
The PIR sensor’s detecting distance: 20ft
(in default)
The PIR sensor’s detecting angle: 120° (H)
Ideal Viewing Distance:
2-10 meters (7-33ft)
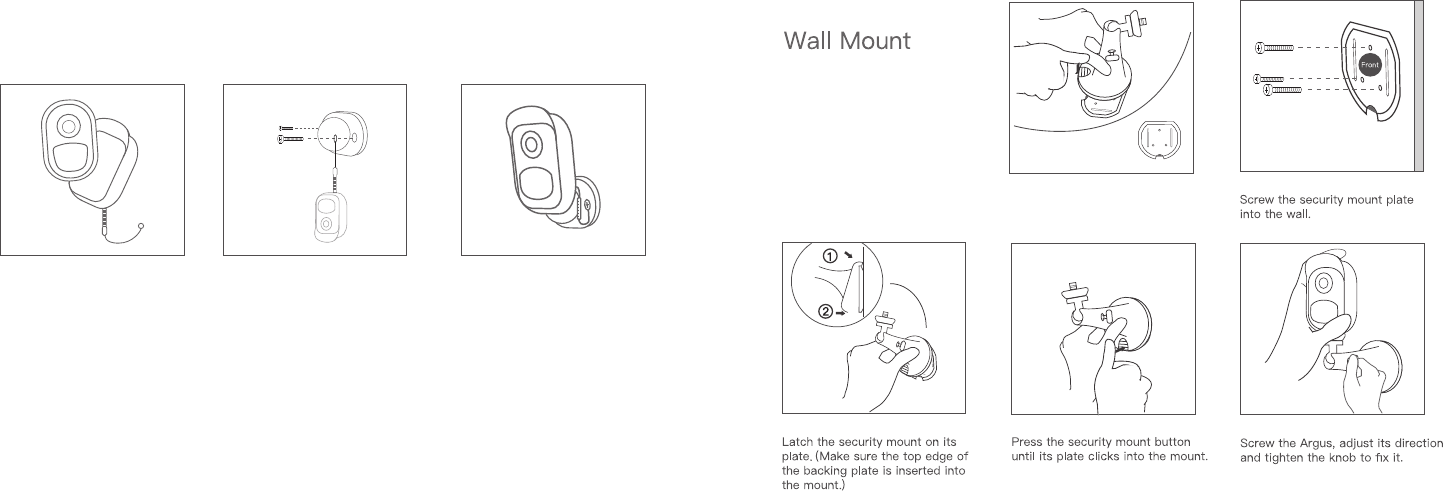
How to Install
Press the button to release the
plate from the security mount.
Step 1 Step 2
Step 3 Step 4 Step 5
Please dress the camera with the skin for better weatherproof performance when
you install the camera outdoors.
How to Install the Skin to the Camera
Please dress the Reolink Argus 2
camera with the skin provided in
the package.
Step 1
The skin has an anti-falling safety
rope. Please fasten the other end
of the rope to the base when
mounting the base to the wall.
Step 2
Stick the camera on the base and
twist the camera in any directions
you want.
Step 3
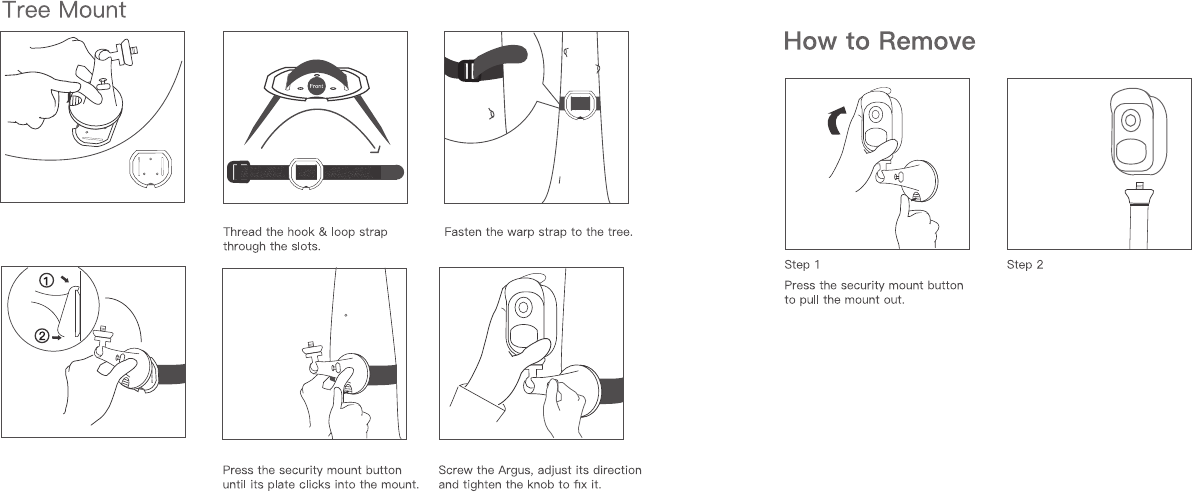
Press the button to release the
plate from the security mount.
Step 1 Step 2 Step 3
Step 4 Step 5 Step 6
Latch the security mount on its plate
(Make sure the top edge of the backing
plate is inserted into the mount.)
Unscrew the Argus from the wall
mount.
FCC Statement
This equipment has been tested and found to comply with the limits for a Class B digital device,
pursuant to Part 15 of the FCC Rules. These limits are designed to provide reasonable
protection against harmful interference in a residential installation. This equipment generates
uses and can radiate radio frequency energy and, if not installed and used in accordance with
the instructions, may cause harmful interference to radio communications. However, there is
no guarantee that interference will not occur in a particular installation. If this equipment does
cause harmful interference to radio or television reception, which can be determined by turning
the equipment off and on, the user is encouraged to try to correct the interference by one or
more of the following measures:
-- Reorient or relocate the receiving antenna.
-- Increase the separation between the equipment and receiver.
-- Connect the equipment into an outlet on a circuit different from that to which the receiver is
connected.
-- Consult the dealer or an experienced radio/TV technician for help.
This device complies with part 15 of the FCC Rules. Operation is subject to the following two
conditions:(1) This device may not cause harmful interference, and (2) this device must accept
any interference received, including interference that may cause undesired operation.
Changes or modifications not expressly approved by the party responsible for compliance
could void the user's authority to operate the equipment.
The distance between user and device should be no less than 20cm.