ResMed A10STACD Wireless Continuous Positive Airway Pressure Device User Manual user guide
ResMed Ltd Wireless Continuous Positive Airway Pressure Device user guide
UserManual.wiki
>
ResMed
>
A10STACD User Manual
user guide
Navigation menu
Upload a User Manual
Namespaces
Wiki Guide
HTML
PDF
Info
Views
User Manual
Discussion / Help
Navigation


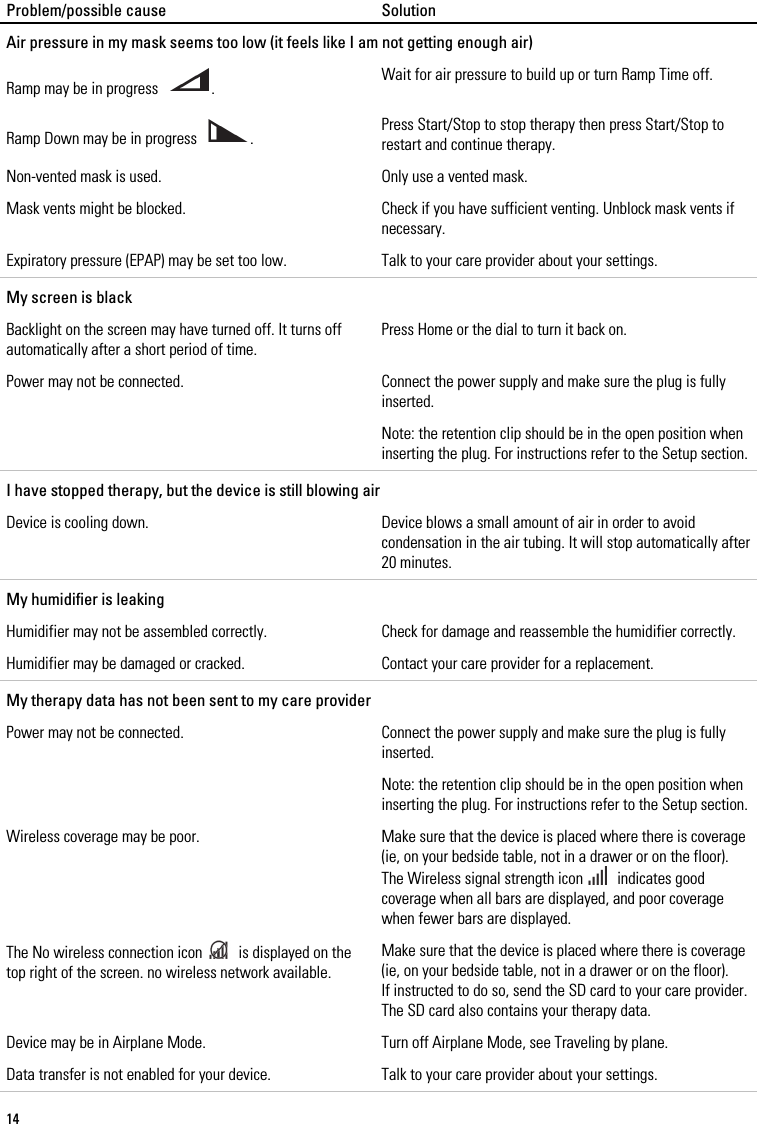

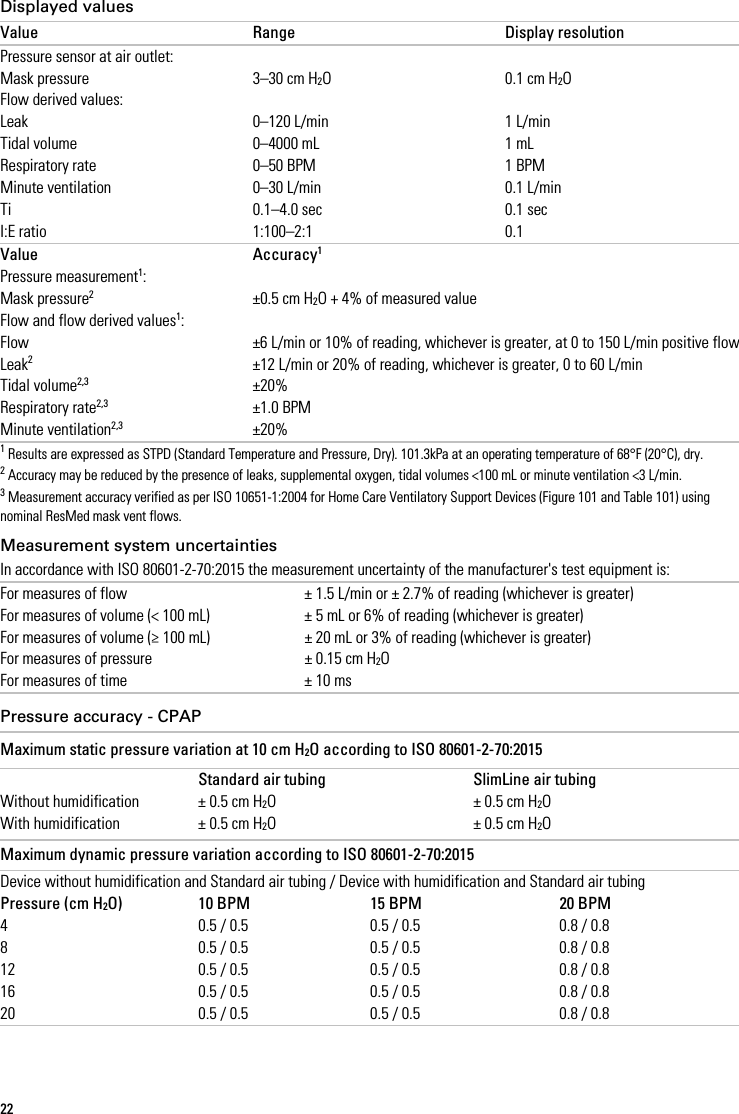
![English 23 Device without humidification and SlimLine air tubing / Device with humidification and SlimLine air tubing Pressure (cm H2O] 10 BPM 15 BPM 20 BPM 4 0.5 / 0.5 0.5 / 0.5 0.8 / 0.8 8 0.5 / 0.5 0.5 / 0.5 0.8 / 0.8 12 0.5 / 0.5 0.5 / 0.5 0.8 / 0.8 16 0.5 / 0.5 0.5 / 0.5 0.8 / 0.8 20 0.5 / 0.5 0.5 / 0.5 0.8 / 0.8 Pressure accuracy - bilevel Maximum dynamic pressure variation according to ISO 80601-2-70:2015. Device without humidification and Standard air tubing / Device with humidification and Standard air tubing Breath rate Inspiratory pressure (cm H2O) (Means, Standard Deviations) 6 10 16 21 25 30 10 BPM -0.09, 0.01 / -0.22, 0.01 -0.01, 0.07 / -0.22, 0.01 0.07, 0.05 / -0.24, 0.01 -0.03, 0.09 / -0.29, 0.03 0.12, 0.01 / -0.26, 0.02 0.12, 0.01 / -0.14, 0.02 15 BPM 0.02, 0.08 / -0.22, 0.01 0.12, 0.01 / -0.22, 0.01 0.15, 0.01 / -0.26, 0.01 0.15, 0.01 / -0.31, 0.02 0.16, 0.12 / -0.30, 0.02 0.20, 0.05 / -0.22, 0.02 20 BPM 0.17, 0.01 / -0.23, 0.01 0.21, 0.01 / -0.28, 0.01 0.25, 0.01 / -0.34, 0.01 0.21, 0.17 / -0.38, 0.02 0.32, 0.02 / -0.40, 0.03 0.34, 0.02 / -0.34, 0.03 Breath rate Expiratory pressure (cm H2O) (Means, Standard Deviations) 2 6 12 17 21 25 10 BPM -0.14, 0.01 / -0.27, 0.01 -0.16, 0.01 / -0.29, 0.02 -0.11, 0.10 / -0.34, 0.02 -0.16, 0.05 / -0.33, 0.01 -0.17, 0.05 / -0.33, 0.02 0.04, 0.17 / -0.21, 0.01 15 BPM -0.16, 0.01 / -0.25, 0.01 -0.20, 0.01 / -0.33, 0.02 -0.20, 0.05 / -0.35, 0.01 -0.21, 0.05 / -0.38, 0.02 -0.23, 0.08 / -0.38, 0.02 0.04, 0.21 / -0.25, 0.01 20 BPM -0.27, 0.01 / -0.37, 0.01 -0.26, 0.02 / -0.34, 0.01 -0.25, 0.01 / -0.38, 0.01 -0.29, 0.01 / -0.43, 0.02 -0.31, 0.01 / -0.45, 0.03 -0.13, 0.23 / -0.31, 0.01 Device without humidification and SlimLine air tubing / Device with humidification and SlimLine air tubing Breath rate Inspiratory pressure (cm H2O) (Means, Standard Deviations) 6 10 16 21 25 30 10 BPM -0.26, 0.01 / -0.52, 0.01 -0.25, 0.02 / -0.53, 0.02 -0.24, 0.02 / -0.53, 0.01 -0.25, 0.02 / -0.54, 0.02 -0.20, 0.02 / -0.51, 0.02 -0.07, 0.09 / -0.18, 0.02 15 BPM -0.26, 0.01 / -0.51, 0.01 -0.25, 0.01 / -0.54, 0.01 -0.26, 0.01 / -0.56, 0.01 -0.31, 0.03 / -0.58, 0.02 -0.30, 0.05 / -0.60, 0.03 0.18, 0.08 / -0.25, 0.02 20 BPM -0.25, 0.02 / -0.52, 0.01 -0.25, 0.02 / -0.58, 0.01 -0.34, 0.02 / -0.62, 0.01 -0.36, 0.02 / -0.67, 0.02 -0.36, 0.03 / -0.69, 0.02 0.36, 0.02 / -0.40, 0.02 Breath rate Expiratory pressure (cm H2O) (Means, Standard Deviations) 2 6 12 17 21 25 10 BPM -0.28, 0.01 / -0.43, 0.01 -0.30, 0.03 / -0.50, 0.01 -0.30, 0.01 / -0.54, 0.01 -0.33, 0.01 / -0.58, 0.01 -0.34, 0.01 / -0.60, 0.02 -0.27, 0.01 / -0.30, 0.01 15 BPM -0.24, 0.02 / -0.37, 0.01 -0.29, 0.02 / -0.47, 0.01 -0.35, 0.01 / -0.55, 0.01 -0.38, 0.01 / -0.62, 0.02 -0.42, 0.02 / -0.66, 0.01 -0.33, 0.01 / -0.36, 0.01 20 BPM 0.05, 0.21 / -0.38, 0.01 -0.31, 0.02 / -0.50, 0.02 -0.37, 0.02 / -0.57, 0.02 -0.43, 0.02 / -0.65, 0.02 -0.48, 0.02 / -0.68, 0.02 -0.43, 0.02 / -0.45, 0.01 Note: The table above is based on data that covers between 60.1 and 88.8% of the inspiratory phase and 66.1 and 93.4% of the expiratory phase durations. These data time slots start immediately after the initial transient overshoot/undershoot periods and end at the point that flow diminishes to an equivalent absolute value of its starting point, towards the end of the breath phases (this corresponds to the % ranges of values given immediately above).](https://usermanual.wiki/ResMed/A10STACD/User-Guide-2809525-Page-25.png)