Resolution RE214 Wireless Smoke Detector User Manual
Resolution Products, Inc. Wireless Smoke Detector
User Manual
I
N
S
T
A
L
L
G
U
I
D
E
I
Smoke Alarm is a fire-protection device
that alarms when it detects smoke or
temperatures above 135°F (57°C).
Features
• UL217 and ULC531 listings
• Smoke and heat detection
• 5 year warranty
Quick Start Guide
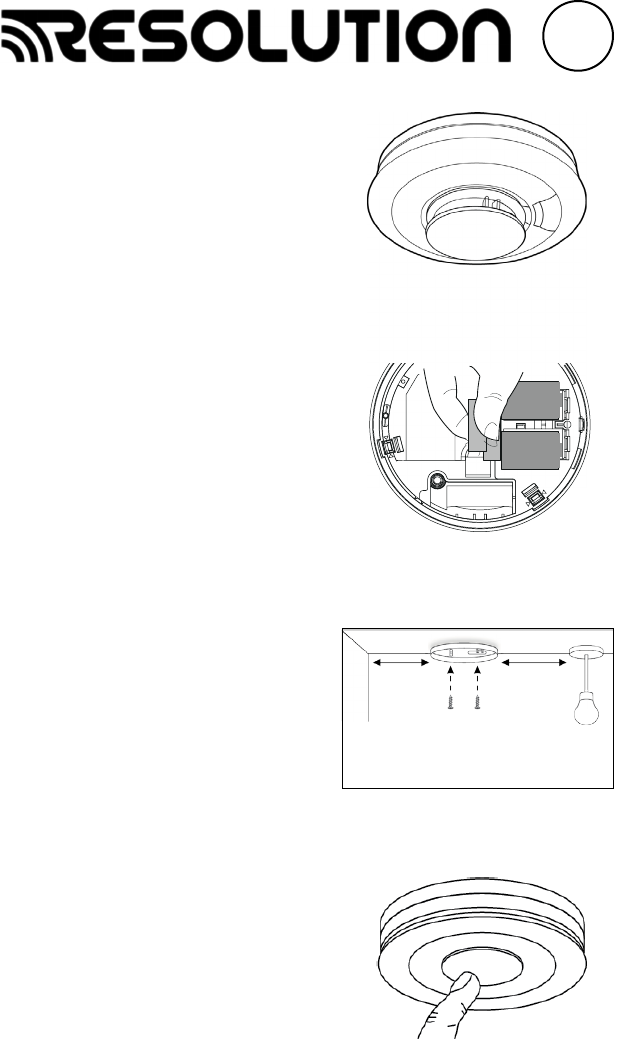
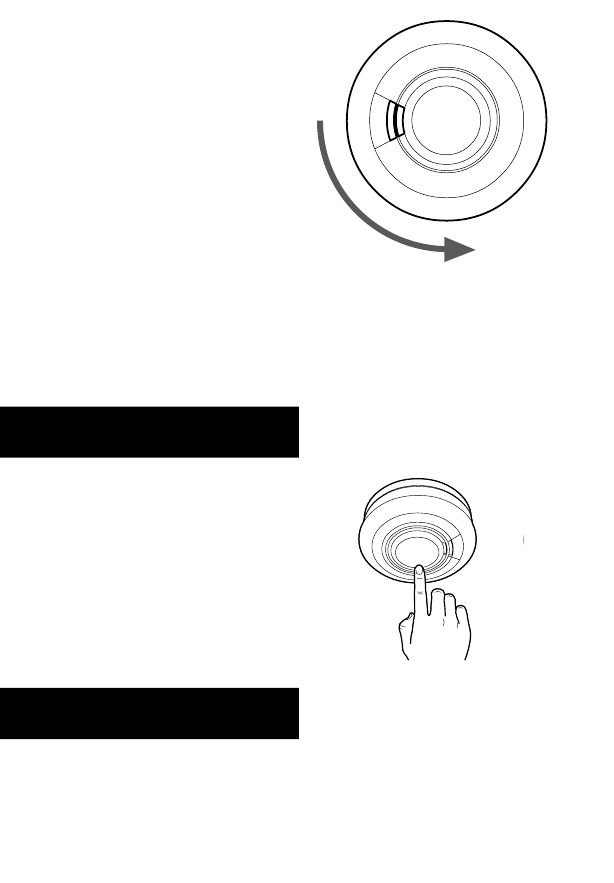
1. Remove the mounting plate.
2. Pull the battery tab.
3. Restore the mounting plate and
twist it fully onto the smoke alarm.
Note: Enrollment is possible only
if the mounting plate is twisted
onto the smoke alarm.
4. Enroll Loop 1 of the smoke alarm
by placing the panel into wireless
enrollment mode and then hold
down the smoke’s test button until
the smoke alarm beeps. Release the
test button until the sounder stops
beeping, and then press and hold
the test button again to enroll.
5. Remove the mounting plate and
refer to Sections 2 and 6 for
positioning and installation.
6. After mounting plate is installed
restore the smoke alarm onto the
mounting plate and fully test the
smoke alarm per Section 7.
To replace the battery, detach the
smoke alarm from its mounting plate
and replace the batteries.
Attention
This manual should be read prior to use and retained for further information.
Verify proper enrollment and operation using your security panel’s installation manual.
Test Smoke Alarm
Pull Battery Tab
Position Smoke Alarm
12 inches
minimum
12 inches
minimum
RE214 Honeywell® Compatible Smoke and Heat Alarm

The Alarm will emit a short beep and flash the
Yellow LED when it becomes partially depleted.
Check the date when the Alarm should be
replaced which is given on the sidewall of the
Alarm. When electronic self testing indicates
that the battery is becoming low the Alarm will
beep and the yellow LED will flash at the same
time (about every 48 seconds) to warn the
user. This indicates that the battery or batteries
must be replaced.
1.2.2. Contaminated chamber
If the Alarm sounds without any apparent
smoke being present, press the test button to
silence the Alarm for 10 minutes (as described
in 1.1.5 above). If the Alarm sounds again
it may be contaminated. Pressing the test
button again, within 4 minutes of the Alarm
re-sounding, will get the Alarm to compensate
for chamber contamination. This will normally
resolve the problem.
If the Alarm re-sounds for a third time, the
Alarm is excessively contaminated and must
be replaced. If it is not convenient to replace
it immediately, pressing the test button within
4 minutes of it going into alarm (for the third
time) will silence the Alarm for 8 hours –
however it will give two short beeps (second
apart) every 10 minutes to remind the user it
has been disabled. If the contamination clears
the Alarm will return to normal operation.
(Note: this does not reduce the users fire
protection, as a Smoke Alarm in continuous
alarm due to a fault, is useless and must be
silenced – by taking the Alarm down or as
described here. This procedure has the added
Indicator Summary
Normal Operation Action Red LED Yellow LED Sounder
Power Up Insert Battery 1 Flash 1 Flash Off
Standby Off Off Off
Sensing Fire Rapid Flashing Off Full Sound
Fault Mode Action Red LED Yellow LED Sounder
Low Battery Off 1 Flash every 48 sec 1 Beep
Faulty Smoke Sensor Off 2 Flashes every 48 sec 2 Beeps
Faulty Heat Sensor Off 2 Flashes every 48 sec 2 Beeps
End of Life Off 3 Flashes every 48 sec 3 Beeps
Silence Sounding
Alarm
Press & Release Button 1 Flash every 8 sec Off Off for 10 mins
Silence “End of Life”
indication (up to
30 days)
Press & Release Button Off Off for 72 hours Off for 72 hours
Test Mode Action Red LED Yellow LED Sounder
Test Smoke Alarm Press Button Rapid Flashing Off Full Sound
Alarm Memory Action Red Led Yellow LED Sounder
24 Hour Memory 2 Flashes every 48
sec for 24 hours
Off Off
Long Term Memory Press & Hold Button Rapid Flashing Off Rapid Chirping
1.1. Normal Operation
1.1.1. Power Up
Twist off the Alarm from the mounting plate
(see Quick Start Guide). Remove the battery
tab to power the Alarm, the red LED will flash
once followed by one flash of the yellow LED
to indicate that the Alarm has been powered
successfully and is now in standby mode.
1.1.2. Standby
In standby mode there are no active visible or
audible indications which can be intrusive to
the householder. To confirm that the Alarm is
operational perform a weekly button test.
1.1.3. Weekly button test
Press and hold the test button and verify that
the red LED flashes rapidly and the Alarm
ramps up to full sound.
1.1.4. Sensing Fire
As soon as the Alarm senses smoke it will
go into Alarm. The red LED on the Alarm
sensing smoke flashes rapidly to indicate this
is the Alarm sensing smoke / fire. Follow the
instruction in section 3 and evacuate the
building.
1.1.5. Silence False / Nuisance alarm
Occasionally Smoke Alarms can be activated
by phenomena other than fire, e.g. dust,
insects, cooking fumes. Once you are sure it is
a nuisance alarm press the large test button to
silence the Alarm for 10 minutes – the red LED
will then flash every 8 seconds for 10 minutes.
1.2. Fault Conditions
1.2.1. Low battery
2

benefits that the user is reminded every 10
minutes by two short beeps that the Alarm
needs to be replaced and that if the problem
clears the Alarm will return to detecting fire).
1.2.3. Faulty smoke chamber
In the unlikely event of the smoke sensing
chamber becoming defective, the Alarm will
give 2 short beeps with 2 yellow LED flashes
every 48 seconds. The Alarm must then be
replaced.
If it is not convenient to replace it immediately,
pressing the test button will silence the beeps
and stop the yellow LED flashing for 12 hours.
This can be repeated as required.
2. Location and Positioning
Introduction
Congratulations on purchasing a Smoke
Alarm. You can easily install these Alarms
throughout the property on escape routes, on
each storey, in corridors and in closed rooms to
give warning of fire.
Heat Alarms can be installed in kitchens
and other areas where Smoke Alarms are
unsuitable.
NATIONAL FIRE PROTECTION ASSOCIATION
REQUIRED PROTECTION
Smoke Detection. Where required by
applicable laws, codes, or standards for the
specified occupancy, approved single- and
multiple-station Smoke Alarms shall be
installed as follows:
(1) In all sleeping rooms and guest rooms
(2) Outside of each separate dwelling unit
sleeping area within 6.4 m (21 ft) of any door
to a sleeping room, the distance measured
along a path of travel
(3) On every level of a dwelling unit, including
basements
(4) On every level of a residential board
and care occupancy (small facility), including
basements and excluding crawl spaces and
unfinished attics
(5) In the living area(s) of a guest suite
(6) In the living area(s) of a residential board
and care occupancy (small facility)
Are More Smoke Alarms Desirable? The
required number of smoke detectors might
not provide reliable early warning protection
for those areas separated by a door from
the areas protected by the required smoke
detectors. For this reason, it is recommended
that the householder consider the use of
additional smoke detectors for those areas
for increased protection. The additional areas
include the basement, bedrooms, dining room,
furnace room, utility room, and hallways not
protected by the required smoke detectors.
The installation of smoke detectors in kitchens,
attics (finished or unfinished), or garages is
not normally recommended, as these locations
occasionally experience conditions that can
result in improper operation.
The equipment should be wired and installed
in accordance with National Fire Protection
Association’s Standard 72, Chapter 11 and
National Electric Code, NFPA 70, Chapter
3. (National Fire Protection Association,
Batterymarch Park, Quincy, MA 02269).
For Canadian installations wiring methods
shall be in accordance with CSA C22.1,
Canadian Electrical Code, Part I, Safety
Standard for Electrical Installations. Testing
and maintenance procedures shall be in
accordance with CAN/ULC-S552, Standard for
the Maintenance and Testing of Smoke-Alarms.
IMPORTANT!
Specific requirements for Smoke Alarm
installation vary from state to state and from
region to region. Check with your local Fire
Department for current requirements in your
area.
SMOKE ALARMS
Sufficient smoke must enter your Smoke Alarm
before it will respond. Your Smoke Alarm
needs to be within 6.4 metres (21ft) of the fire
to respond quickly. Smoke Alarms also need
to be in positions where they can be heard
throughout the property, so they can wake
you and your family in time for everyone to
escape. A single Smoke Alarm will give some
protection if it is properly installed, but most
homes will require two or more (preferably
interconnected) to ensure that a reliable early
warning is given. For recommended protection
you should put individual Smoke Alarms in all
rooms where fire is most likely to break out
(apart from the kitchen and bathroom).
Your first Smoke Alarm should be located
between the sleeping area and the most likely
sources of fire (living room for example), but it
should not be more than 6.4 metres (21ft)from
the door to any room where a fire may start
and block your escape from the house.
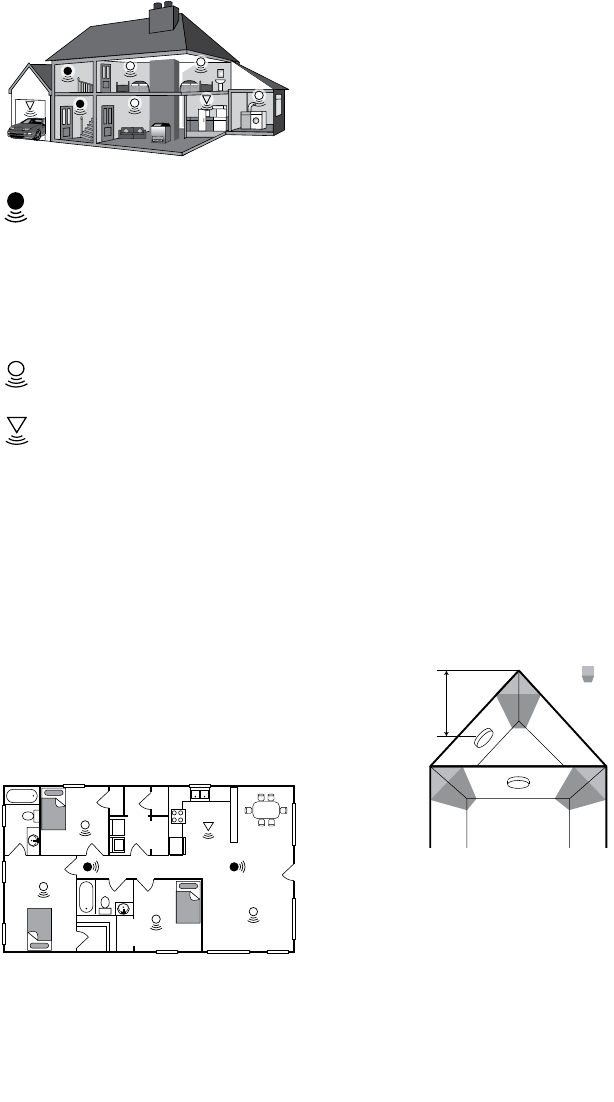
Multi-Storey Dwellings
If your home has more than one floor, at least
one Alarm should be fitted on each level (see
Figure 1). Preferably the Alarms should be
interconnected (if feature is present on unit)
so as to give sufficient warning throughout
the property.
Figure 1 illustrates where Smoke and Heat
Alarms should be located in a typical two
storey house. Note the spacings in “Protection
Levels” which ensure the early detection of fire
and that the warning will be heard.
3
room is the most likely place for a fire to start
at night, followed by the kitchen (where a
Heat Alarm is recommended) and then the
dining room. Consideration should be given to
installing Smoke Alarms in any bedrooms where
fires might occur, for instance, where there is
an electrical appliance such as an electric
blanket or heater, or where the occupant is
a smoker. In addition, consideration should
be also given to installing Smoke Alarms in
any rooms where the occupant is unable to
respond very well to a fire starting in that
room, such as an elderly or sick person or a
very young child.
Checking Alarms Can Be Heard
With the Alarms sounding in their intended
locations check that the alarm can be heard
in each bedroom with the door closed, above
the sound of any TV/audio systems. The TV/
audio systems should be set to a reasonably
loud conversation level. If you cannot hear
the alarm over the sound of the TV/audio
system, the chances are it would not wake you.
Interconnecting the Alarms will help to ensure
that the alarm will be heard throughout the
property.
Positioning
Ceiling Mounting
Hot smoke rises and spreads out, so a central
ceiling position is the recommended location.
The air is “dead” and does not move in corners,
therefore Smoke Alarms must be mounted
away from corners. Keep at least 305mm
(12”) from walls and corners (see Figure 3).
Additionally, mount the unit at least 305mm
(12”) from any light fitting or decorative
object which might prevent smoke entering
the Smoke Alarm.
Figure 3
PLACE IN CENTRAL
LOCATION AND
NOT WITHIN
305mm (12”)
OF ANY CORNER
SMOKE ALARMS
<610mm (24”) FROM APEX
DEAD AIR
SPACE
Wall Mounting
If ceiling mounting is impractical, Smoke Alarms
may be mounted on a wall, provided that:
a) the top of the detection element is between
150mm (6”) and 305mm (12”) below the ceiling
(see; Figure 3a).
b) the bottom of the detection element is
above the level of any door openings;
Wall mounting should only be considered where
close spaced beams or similar obstructions may
Locate Heat Alarms in rooms adjoining escape
routes - kitchens, garages, boiler houses etc.
where Smoke Alarms are unsuitable.
Figure 1
For minimum protection
- Smoke Alarm on each storey
- in each sleeping area
- every 6.4 metres (21ft) of hallways and
rooms
- within 3 metres (10ft) of all bedroom doors
- all units interconnected (where feature is
present)
For recommended protection
(in addition to the above):
- Smoke Alarms in every room (except
kitchens and bathrooms)
- Heat Alarms located in kitchens, garages
etc. within 5.3m (17ft) of potential fire
sources
Single Storey Dwelling
If the premises is one storey you should put
your first Smoke Alarm in a corridor or hallway
between the sleeping and living areas. Place it
as near to the living area as possible, but make
sure that it can be heard loudly enough in the
bedroom to wake someone. See Figure 2 for
placement example.
In houses with more than one sleeping area,
Smoke Alarms should be placed between each
sleeping area and the living area and it is
recommended that Heat Alarms should be
placed in the kitchen and garage.
Figure 2
Bedroom
Bedroom
Bedroom
Bathroom
Bath
Dining Room
Laundry
Room
Living Room
Kitchen
Recommended Protection
Fire authorities recommend you put individual
Smoke Alarms in or near all rooms where fire
is most likely to break out (apart from the
locations to avoid e.g bathrooms). The living
4
• Near a decorative object, door, light fitting,
window moulding etc., that may prevent
smoke from entering the Alarm.
• Surfaces that are normally warmer or colder
than the rest of the room (e.g. attic hatches).
Temperature differences might stop smoke
from reaching the Alarm.
• Next to or directly above heaters or air
conditioning vents, windows, wall vents etc.
that can change the direction of airflow.
• In very high or awkward areas (e.g. over
stairwells) where it may be difficult to reach
the Alarm (for testing, hushing or battery
replacement).
• Locate the Alarm at least 1m (39”) from
dimmer controlled lights and wiring as some
dimmers can cause interference.
• Locate Alarm at least 1.5m (59”) and route
wiring at least 1m away from fluorescent
light fittings as electrical “noise” and/or
flickering may affect the unit.
3. Fire Safety Advice
When using household protective devices, basic
safety precautions should always be followed,
including those listed below
• Please read all instructions.
• Rehearse emergency escape plans so
everyone at home knows what to do in case
the alarm sounds.
• Use the Alarm Test Button to familiarise your
family with the Alarm sound and to practice fire
drills regularly with all family members. Draw
up a floor plan that will show each member
at least 2 escape routes from each room in the
house. Children tend to hide when they don’t
know what to do. Teach children how to escape,
open windows, and use roll up fire ladders and
stools without adult help. Make sure they know
what to do if the alarm goes off.
• Constant exposures to high or low
temperatures or high humidity may reduce
battery life.
• Nuisance alarms can be quickly silenced by
fanning vigorously with a newspaper or similar
to remove the smoke or press the test / hush
button.
• Do not attempt to recharge or burn the
battery, as it may explode.
• If it is necessary to remove the battery
for separate disposal, handle carefully to
avoid possible eye damage or skin irritation if
battery has leaked or corroded.
• To maintain sensitivity to smoke, do not
paint or cover the Alarm in any manner; do
not permit any accumulation of cobwebs, dust
or grease.
• If Alarm has been damaged in any way or
does not function properly, do not attempt
preclude ceiling mounting. It is considered to
be the responsibility of the installer/client to
determine if the presence of asbestos in the
ceiling material would make ceiling mounting
‘impractical’.
Figure 3a
On a Sloping Ceiling
With a sloping or peaked ceiling install a
Smoke Alarm within 610mm (24”) of the peak
(measured vertically). If this height is less than
610mm (24”) the ceiling is regarded as being
flat (see Figure 4).
Figure 4
SMOKE ALARMS
<610mm (24”)
APEX
xx
Locations to avoid
DON’T place Smoke Alarms in any of the
following areas:
• Bathrooms, kitchens, shower rooms, garages
or other rooms where the Smoke Alarm may
be triggered by steam, condensation, normal
smoke or fumes. Keep at least 6 metres (20ft)
away from sources of normal smoke/fumes.
• Locate away from very dusty or dirty areas
as dust build-up in the chamber can impair
performance. It can also block the insect screen
mesh and prevent smoke from entering the
smoke detector chamber.
• Do not locate in insect infested areas.
Small insects getting into the smoke detector
chamber can cause intermittent alarms.
• Places where the normal temperature can
exceed 100°F (38.7°C) or be below 40°F
(4.4°C) (e.g. attics, furnace rooms, directly
above ovens or kettles etc.) as the steam
could cause nuisance alarms.
5
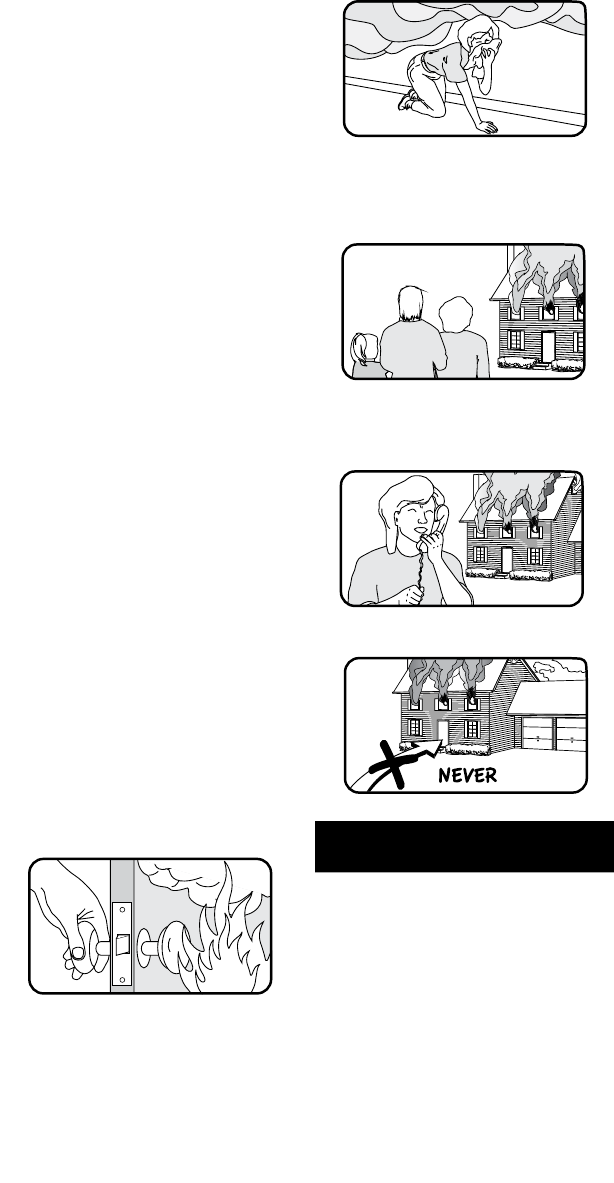
3. Get out as fast as you can. Do not stop
for packing. Have a prearranged meeting
place outside for all family members. Check
everybody is there.
4. Call the Fire Brigade from a neighbour’s
house or mobile phone. Remember to give your
name and address.
5. NEVER re-enter a burning house.
4. Alarm Limitations
Limitations of Smoke Alarms
While Smoke Alarms are extremely effective,
independent authorities have stated that they
may be ineffective in some circumstances.
There are a number of reasons for this:
• Smoke Alarms will not work if the batteries
are depleted or if they are not connected.
Replace the batteries if necessary. Also check
the replace by date on the side of the Alarm.
• Smoke Alarms will not detect fire if sufficient
smoke does not reach the Alarm. Smoke may
be prevented from reaching the Alarm if the
fire is too far away, for example, if the fire is
on another floor, behind a closed door, in a
a repair - see section 5 ‘Getting Your Alarm
Serviced’.
• This appliance is intended ONLY for premises
having a residential type environment.
• This is not a portable product. It must be
mounted following the instructions in this
instruction leaflet.
• Smoke Alarms are not a substitute for insurance.
The supplier or manufacturer is not your insurer.
Fire Safety Hints
Store petrol and other flammable materials in
proper containers.
Discard oily or flammable rags.
Always use a metal fireplace screen and have
chimneys cleaned regularly.
Replace worn or damaged sockets, switches,
home wiring and cracked or frayed electrical
cords and plugs.
Do not overload electrical circuits.
Keep matches away from children.
Never smoke in bed. In rooms where you
do smoke, always check under cushions for
smouldering cigarettes and ashes.
Be sure all electrical appliances and tools have
a recognised approval label.
Smoke alarms are not to be used with detector
guards unless the combination has been
evaluated and found suitable for that purpose.
This device cannot protect all persons at all
times. It may not protect against the three
most common causes of fatal fires:
1. Smoking in bed.
2. Leaving children at home alone.
3. Cleaning with flammable liquids, such as
petrol.
Further information can be obtained from the
Fire Department.
Planning Your Escape Route For When The
Alarms Sound
1. Check room doors for heat or smoke. Do not
open a hot door. Use an alternate escape route.
Close doors behind you as you leave.
2. If smoke is heavy, crawl out, staying close to
floor. Take short breaths, if possible, through a
wet cloth or hold your breath. More people die
from smoke inhalation than from flames.
6
chimney, in a wall cavity, or if the prevailing
air draughts carry the smoke or heat away.
Installing Smoke Alarms on both sides of closed
doors and installing more than one Alarm as
recommended in this leaflet very significantly
improve the probability of early detection.
• The Smoke Alarms may not be heard.
• A Smoke Alarm may not wake a person who
has taken drugs or alcohol.
• The Alarms may not detect every type of
fire to give sufficient early warning. They
are particularly ineffective with: fires caused
by smoking in bed, escaping gas, violent
explosions, poor storage of flammable rags
and/or liquids, (for example petrol, paint,
spirits etc), overloaded electrical circuits, arson,
children playing with matches.
• Current studies have shown smoke alarms
may not awaken all sleeping individuals, and
that it is the responsibility of individuals in the
household that are capable of assisting others
to provide assistance to those who may not
be awakened by the alarm sound, or to those
who may be incapable of safely evacuating the
area unassisted
Limitations of Heat Alarms
There are various situations where a Heat
Alarm may not be effective:
• Fires where the victim is intimate with a
flaming initiated fire; for example, when a
person’s clothes catch fire while cooking.
• Fires where the heat is prevented from
reaching the Heat Alarm due to a closed door
or other obstruction.
• Incendiary fires where the fire grows so
rapidly that an occupant’s egress is blocked
even with properly located Heat Alarms
5. Getting Your Alarm Serviced
If your Alarm fails to work after you have
read the sections on “Installation”, “Testing,
Maintenance and Power Supply Monitoring”,
then contact Customer Assistance at the nearest
address given at the end of this leaflet. If it needs
to be returned for repair or replacement put it
in a padded box with the battery disconnected.
Send it to “Customer Assistance” at the nearest
address given on the Alarm or in this leaflet. State
the nature of the fault, where the Alarm was
purchased and the date of purchase.
6. Installation
Installation Procedure
1. Select a location complying with the advice
in Section 2.
2. Lift off the mounting plate from the Smoke
Alarm.
3. Place the mounting plate on the ceiling
exactly where you want to mount the Alarm.
With a pencil, mark the location of the two
screw holes.
4. Taking care to avoid any electrical wiring in the
ceiling, drill holes using a 5.0mm drill bit through
the centre of the marked locations. Push the
plastic screw anchors provided into the drilled
holes. Screw the mounting plate to the ceiling.
5. Insert the battery or batteries as per the
Quick Start Guide, ensuring the orientation
is correct. If the battery is already installed in
your Alarm just pull the battery tab to power
the Alarm.
Figure 5
ROTATE UNIT ANTI-CLOCKWISE
UNIT WILL NOT TWIST OFF - IT MAY BE
TAMPERPROOFED - SEE FIGURE 8
6. Carefully line up the Alarm on to the
mounting plate, gentle press home and twist
clockwise.
Install all the other Alarms similarly.
7. Press the Test button on each Alarm to ensure
that the Alarm works (see Figure 6).
Figure 6
Smoke Alarm
Tamperproofing the Alarm
The Alarm can be made tamperproof to prevent
unauthorised removal of the Alarm.
Break off the small pillar on the base as shown
in Figure 7a. To remove the Alarm from
the ceiling it is now necessary to use a small
screwdriver, to release the catch (push catch
towards the ceiling) and then twist off the
7
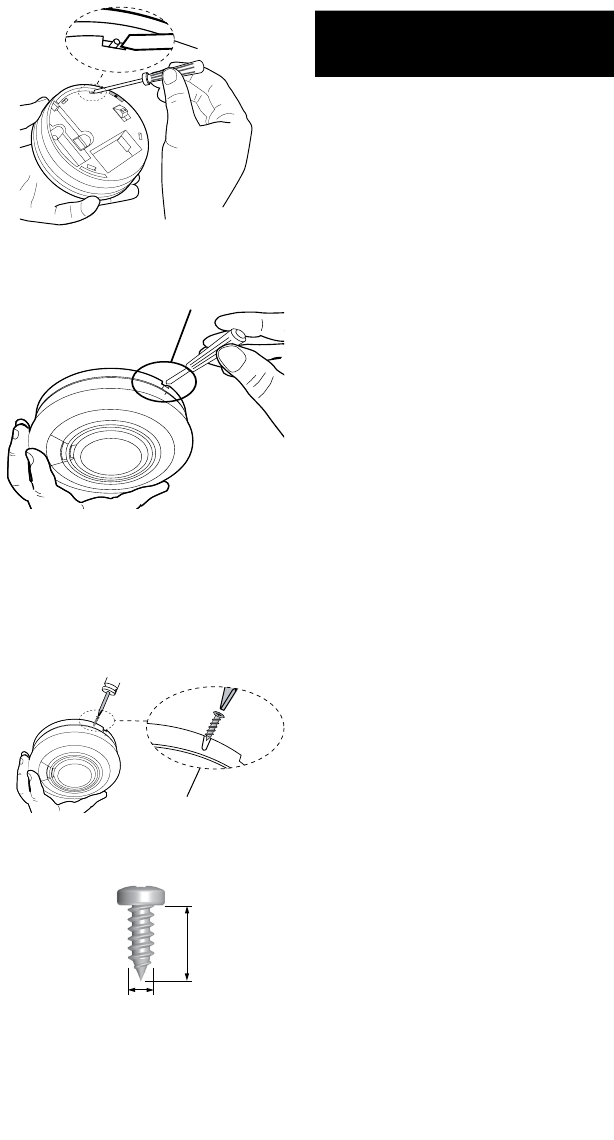
Alarm (see Figure 7b).
Figure 7a - How to Tamperproof
BREAK OFF
SMALL PILLAR
Figure 7b - How to Remove
PUSH UP CATCH & TWIST
ALARM ANTI-CLOCKWISE TO REMOVE
If necessary it is possible to further secure
the Alarm by using a No.2 or No.4 (2 to 3mm)
(1/8”) diameter - not supplied) self tapping
screw 6 to 8mm (1/4”) long (see Figure 7d), to
firmly lock the Alarm and its mounting plate
together (see Figure 7c).
Figure 7c
TAMPERPROOF SCREW
Figure 7d
6 to 8 mm
2 to 3 mm
SELF TAPPING
SCREW
Attach the Alarm to the mounting plate.
Line up the screw (not supplied) on the “U”
shaped recessed area shown in Figure 7c and
screw firmly home.
To remove the Alarm from the ceiling,
remove the screw first, and then twist off
anti-clockwise.
7. Testing, Maintenance and
Power Supply Monitoring
Your Alarm is a life saving device and should be
checked periodically.
7.1 Manually Testing your Alarms
It is recommended that you test your Alarms
after installation and then at least weekly to
ensure the units are working. It will also help
you and your family to become familiar with
the sound of the Alarms.
- Press and hold the Test Button until the
Alarm sounds and the red light flashes (see
Figure 7). The Alarm will stop sounding shortly
after the button is released.
- Repeat this procedure for all other Alarms in
the system.
WARNING: Do not test with flame.
This can set fire to the Alarm and damage the
house. We do not recommend testing with
smoke as the results can be misleading unless
special apparatus is used.
When you press the Test button it simulates
the effect of smoke in a Smoke Alarm which it
could experience in a real fire.
7.2 Test/Silence Button to Control Nuisance
Alarms
The Smoke Alarms have a combined Test/
Silence button to help you control nuisance/
false alarms.
If, when the Alarm sounds, there is no sign of
smoke or noise to indicate that there is a fire,
it should be assumed that it is due to an actual
fire and the dwelling should be evacuated
immediately.
Check the house carefully in case there is a
small fire smouldering somewhere.
Check whether there is some source of smoke
or fumes, for example cooking fumes being
drawn past the Alarm by an extractor.
If there are frequent nuisance/false alarms
it may be necessary to re-locate the Smoke
Alarm away from the source of the fumes.
If you installed Alarms with RF modules and
did not House Code / enroll them in your
system, you may be receiving alarm signals
from a neighbouring system. This can be easy
rectified by “House Coding” your Alarms - see
relevant RF Module Instruction booklet.
1. To cancel a false alarm from a Smoke Alarm
(which has its red light flashing rapidly), press
the Test/Silence button (the Smoke Alarm will
automatically switch to a reduced sensitivity
8

Replace battery with Panasonic CR123A, use
of another battery may present a risk of fire
or explosion.
7.4 Cleaning your Alarm
Clean your Alarm regularly. Use a soft bristle
brush or the brush attachment of your vacuum
cleaner to remove dust and cobwebs from the
side slots where the smoke enters. To clean
the cover, wipe with a damp cloth and dry
thoroughly.
WARNING: Do not paint your Alarm.
Other than the maintenance and cleaning
described in this leaflet, no other customer
servicing of this product is required. Repairs,
when needed, must be performed by the
manufacturer.
7.5 Chamber Cleaning
Cleaning or replacing of the chamber cover
should only be carried out by suitably trained
personal.
1. Remove the Alarm from the mounting plate.
2. Remove the battery or batteries.
3. With a flat screwdriver unclip the three
cover clip points (see figure 8a).
4. Remove the cover (see figure 8b).
5. Unplug the thermistor by holding the
thermistor PCB and pulling the pins out of
the sockets (see figure 8c).
6. To remove the chamber top turn the
chamber anti-clockwise approx. 15 degrees
(see figure 8d).
7. Blow out or use a soft bristled brush to
remove dust and dirt form the chamber
base.
8. Fit a new chamber top and clip in place by
turning clock-wise 15 degrees.
9. Insert the thermistor PCB into the sockets
and ensure the thermistor is perpendicular
to the chamber (see figure 8e).
10. Place the cover back on the Alarm taking
care to ensure the thermistor is protruding
out the cover (see figure 8f).
11. Replace the battery / batteries and reattach
to the mounting plate.
12. Press the test button to ensure the Alarm is
working correctly.
Figure 8a
condition).
The Smoke Alarms will be silenced for a period
of approximately 10 minutes. The red light on
the cover of the Smoke Alarm will flash every
8 seconds to indicate that the unit has been
silenced.
2. The Smoke Alarm will reset to normal
sensitivity at the end of the silenced period
(10 minutes). If additional silenced time is
required, simply push the Test/Silence button
again.
3. If kitchen usage/layout is such that there
are an unacceptable level of nuisance alarms,
re-locate the Smoke Alarm further away where
it will be less affected by cooking fumes etc.
We recommend the use of a Heat Alarm in the
Kitchen area to avoid such nuisance alarms.
7.3 Power Supply Monitoring
7.3.1 What to do when an Alarm is beeping:
A Smoke Alarm is beeping about every 48
seconds with the yellow light flashing at the
same time:
- Replace the Battery or Batteries.
7.3.2 Battery Replacement
When the battery power is low and replacement
is necessary, the Smoke Alarm will “beep” and
the yellow light will flash at the same time
about once every 48 seconds for at least
7 days. The battery must then be replaced.
Also, replace the battery if the Alarm does
not sound when the Test Button is pressed.
When you replace the battery you must press
the Test button to check that the Alarm is
functioning correctly. Only replace the battery
with: Panasonic CR123A Batteries.
Dispose of used battery promptly. Keep away
from children. Do not disassemble and do not
dispose of in fire
Replacement batteries can be purchased at
your local hardware store.
Warning!
CONSTANT EXPOSURES TO HIGH OR LOW
TEMPERATURES OR HIGH HUMIDITY MAY
REDUCE BATTERY LIFE.
Use only batteries specified in marking. Use
of a different battery may have a detrimental
effect on Alarm operation.
These cells are intended for use at ordinary
temperatures where anticipated high
temperature excursions are not expected to
exceed 100°C (212°F).
Prolonged periods of alarm will also reduce
battery life.
Caution: The battery used in this device
may present a fire or chemical burn hazard
if mistreated. Do not recharge, disassemble,
heat above 100°C (212°F) or dispose of in fire.
9
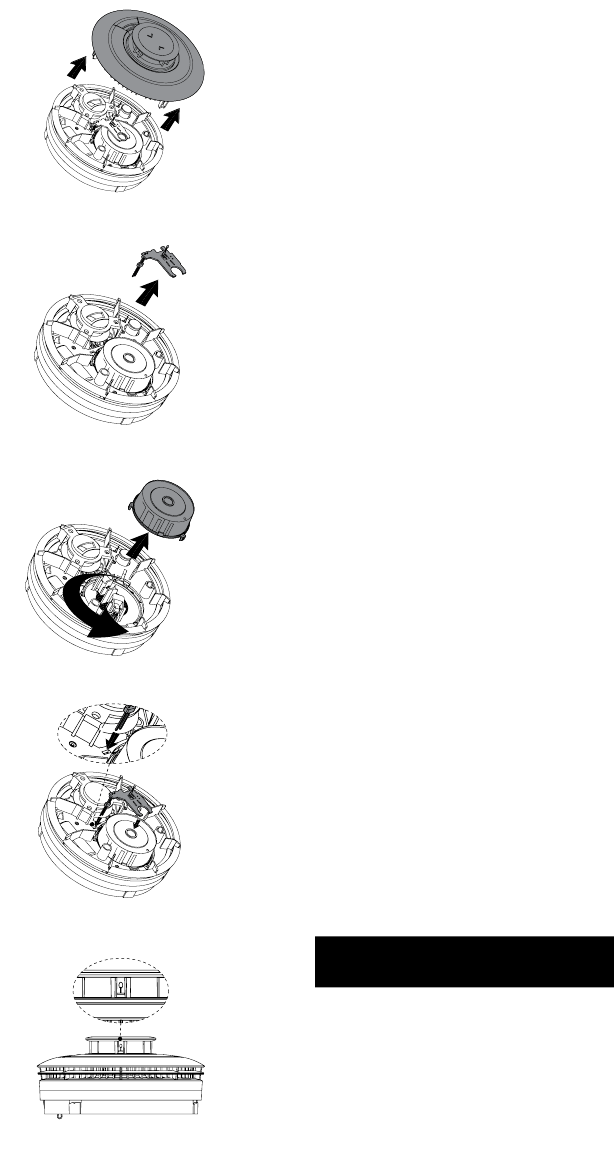
Figure 8b
Figure 8c
Figure 8d
Figure 8e
Figure 8f
8.6 Smoke Alarm Automatic Self-Test
The smoke chamber in the Smoke Alarms
automatically tests itself every 16 seconds.
If the chamber is degraded it will beep twice
every 48 seconds with 2 yellow LED flashes at
the same time. If this happens clean the unit.
If the beeping persists and the beep does not
coincide with a yellow light flash, return the
unit for service (see Section 5 - Getting Your
Alarm Serviced).
8.7 Dust and Insect Contamination
All Smoke Alarms and particularly the optical
(photoelectric) type are prone to dust and
insect ingress which can cause false alarms.
The latest design, materials and manufacturing
techniques have been used in the construction
of Resolution Products’ Alarms to minimise
the effects of contamination. However it
is impossible to completely eliminate the
effect of dust and insect contamination, and
therefore, to prolong the life of the Alarm you
must ensure that it is kept clean so that excess
dust does not build up. Any insects or cobwebs
in the vicinity of the Smoke Alarm should be
promptly removed.
In certain circumstances even with regular
cleaning, contamination can build up in the
smoke sensing chamber causing the Alarm
to sound. If this happens the Smoke Alarm
must be returned for servicing or replacement.
Contamination is beyond our control, it is
totally unpredictable and is considered normal
wear and tear. For this reason, contamination
is not covered by the guarantee and a charge
is made for all such servicing work.
8.8 End of life
The entire Alarm must be replaced if:-
• The unit is installed for over 10 years (check the
“replace by” date marked on the side of the unit).
Before the Alarm is safely discarded, remove
from the mounting plate & disconnect the
batteries.
Do not put the Alarm into a fire.
The Alarm should be disposed in a safe and
environmentally sound manner at your local
recycle centre. Contact your local authority for
further advise.
8. Troubleshooting
Alarms sound for no apparent reason
• Check for fumes, steam, etc. from the kitchen
or bathroom. Paint and other fumes can cause
nuisance alarms.
• Check for any sign of contamination such as
cobwebs or dust. Clean the Alarm as described
in Section 8 if necessary.
10

11
• Press the Test/Silence button on the Smoke
Alarm causing the Alarm (this can be identified
as the Alarm with the red light flashing
rapidly) – this will silence the Smoke Alarm
for 10 minutes (and also silence all other
interconnected Alarms in the system).
The Alarm fails to sound when the Test
button is pressed
• Check the age of the unit - see the “replace
by” label on side of unit.
• If necessary replace the battery or batteries
with Panasonic CR123A.
9. System Compatibility and
Wireless Verification
Smoke alarm model RE214 has only been
evaluated at ETL with Honeywell Lynx Plus
Model#: L3000
Test the system after finishing installation,
enrollment, and configuration. Refer the
panel’s manual for instructions on testing the
system.

Pro Tip
Pressing the test button on the smoke alarm will beep both the panel
and smoke alarm.
Specications
Physical
Housing Dimensions
Weight with Batteries
Mounting Fastener
4.7 x 1.8 inches (12.0 x 4.6 centimeters)
7.36 ounces (210 grams)
#6 screws and anchors (provided)
Environmental
Operating Temperature
Maximum Humidity
40°F to 100°F (4.4°C to 37.8°C), Long Term
15% to 95% non-condensing relative humidity
Sensor Specications
Frequency
Replacement Batteries
Transmitted Indications
Loudness
Smoke Sensitivity
Heat Sensor
345 MHz
Two Panasonic CR123A
Low Battery, Supervision
85 dBA at 10 feet (3m) minimum
1.95% to 4% OBS/Foot
135 ± 5°F (57 ± 2°C)
Certication
RE214 FCC, IC, UL217, ULC531
Specications subject to change without notice.
47-0023-02 • RevA • 2017-05-23
Tech Support Line (877) 260-5578
www.ResolutionProducts.com
WARRANTY
Resolution Products, Inc. will replace non-portable
products that are defective in their rst ve (5) years
and all defective portable products in their rst two
(2) years.
IC NOTICE
This device complies with Industry Canada license-
exempt RSS standard(s). Operation is subject to the
following two conditions:
(1) This device may not cause interference, and
(2) This device must accept any interference, including
interference that may cause undesired operation of
the device.
Le présent appareil est conforme aux cnr d’Industrie
Canada applicables aux appareils radio exempts de
licence. L’exploitation est autorisée aux deux conditions
suivantes:
(1) L’appareil ne doit pas produire de brouillage, et
(2) L’utilisateur de l’appareil doit accepter tout
brouillage radioélectrique subi, même si le
brouillage est susceptible d’en compromettre le
fonctionnement.
IC: 8310A-RE214
FCC NOTICE
This device complies with Part 15 of the FCC rules.
Operation is subject to the following two conditions:
(1) This device may not cause harmful interference.
(2) This device must accept any interference that may
be received, including interference that may cause
undesired operation.
Changes or modications not expressly approved by
the Resolution Products, Inc. could void the user’s
authority to operate this equipment.
FCC ID: U5X-RE214
TRADEMARKS
“Honeywell” is a trademark owned by Honeywell
International, Inc.
Resolution Products, Inc. products will function with
Honeywell systems. However, no Resolution product
is produced by, endorsed by, or is ofcially associated
with Honeywell.
Resolution recommends verifying proper enrollment
and operation, per control panel installation
instructions, at installation.