Resolution RE215 Carbon Monoxide Detector User Manual
Resolution Products, Inc. Carbon Monoxide Detector
UserManual.wiki
>
Resolution
>
RE215 User Manual
User Manual
Navigation menu
Upload a User Manual
Namespaces
Wiki Guide
HTML
PDF
Info
Views
User Manual
Discussion / Help
Navigation
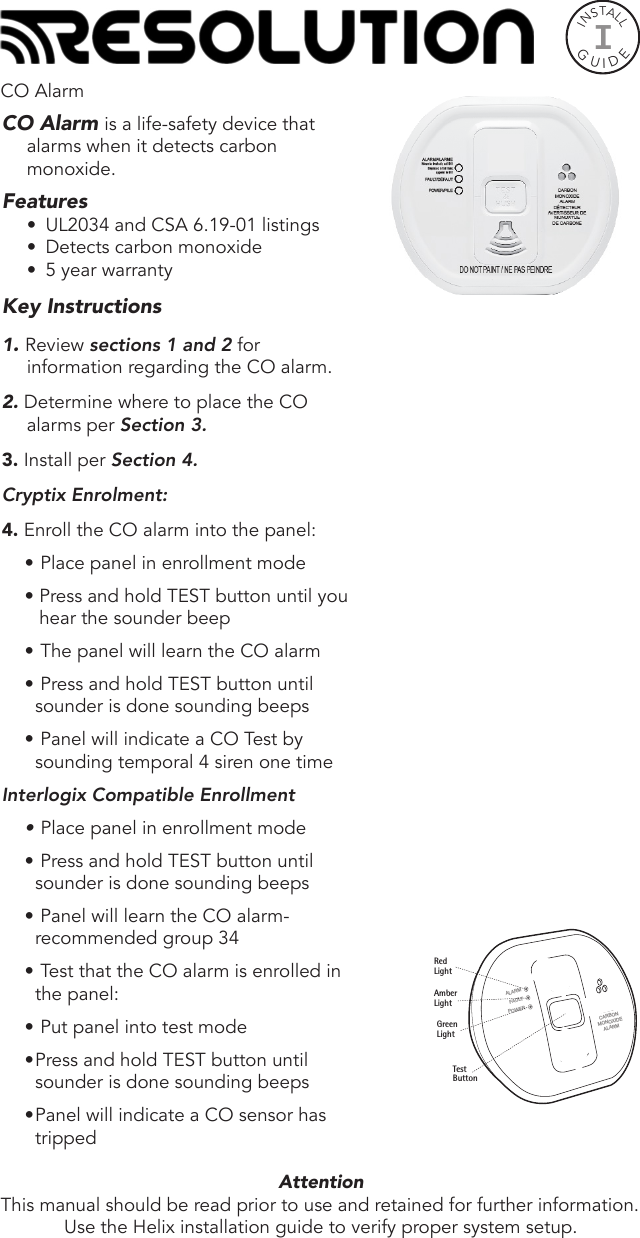
![• Panel will learn the CO alarm• Recommended group is 81• Test that the CO alarm is enrolled in the panel• Put panel into test mode• Press and hold TEST button until sounder is done sounding beeps• Panel will indicate a CO sensor has tripped5. Test that the CO alarm is enrolled in the panel.6. Review Section 5 for CO alarm testing and maintenance.• Test the functionality of the CO alarm weekly.7. Review Sections 6 and 7 for information regarding what to do when the alarm sounds and information regarding how to protect your family.8. Review how to have your alarm serviced per Section 8.9. For troubleshooting information, refer to Section 9. 1. Read This FirstCongratulations on becoming the owner of a carbon monoxide alarm. This will help protect you and your household from the dangerous effects of carbon monoxide - the silent killer. • Wait 15 seconds after connecting the power before button testing. We recommend you:• Install a CO alarm in every room that contains a fuel burning appliance, particularly rooms where people spend a lot of time, such as bedrooms, kitchens, etc.• In rooms with an appliance, install (preferably) on the ceiling (300mm from walls) and between 1.5m to 3m horizontally away from the appliance. In rooms remote from the appliance, install at ‘head height’, where the light indicators can be seen.Honeywell Compatible Enrollment• Place panel in enrollment mode• Zone type= Carbon Monoxide• Input type= Supervised RF Transmitter• When asked for a serial number: trip tamper twice• To tamper, turn base counter-clockwise. Wait for two seconds and restore the base. Wait for three seconds and repeat steps.• Select Loop 1 for CO• Put panel into test mode• Press and hold TEST button until sounder is done sounding beeps• Panel will indicate a CO sensor has tripped2GIG Compatible Enrollment• Place panel in enrollment mode• Q1: Select RF sensor number (01-48) zone number of your choice• Select RF sensor type [14] 24 hour carbon monoxide (see control panel installation manual)• Select RF sensor equip type [1]• Select RF sensor equip code [0860] CO1-345 CO detector• Select RF sensor serial number and press shift, press learn trip sensor• Select RF sensor age [1] New• Select RF sensor Loop number [1]• Put panel into test mode• Press and hold TEST button until sounder is done sounding beeps• Panel will indicate a CO sensor has tripped DSC Compatible Enrollment• Place panel in enrollment mode• Press and hold TEST button until sounder is done sounding beeps2](https://usermanual.wiki/Resolution/RE215/User-Guide-3746370-Page-2.png)