Respironics 1079794 Broadband/Oximetry Accesory User Manual users manual 2
Respironics Inc. Broadband/Oximetry Accesory users manual 2
Contents
- 1. users manual 1
- 2. users manual 2
users manual 2
Intended Use
The Broadband / Oximetry Accessory is an accessory to select Respironics ow generators which
allows recorded data to either be transmitted over a broadband internet connection or stored on an
internal SD card for later download.
Overview
The Broadband / Oximetry Accessory supports two functions:
1. Broadband - When wirelessly connected to the Broadband Wireless Router or connected to
an Ethernet cable with the available Ethernet adapter, this Broadband / Oximetry Accessory can
transmit data to EncoreAnywhere using the patient’s existing home broadband connection. See the
Setup for Broadband Use section for more information.
2. Oximetry - When connected to the appropriate oximeter and sensor, this Broadband / Oximetry
Accessory can record patient oxygen saturation and heart rate data, which can be uploaded and
viewed in EncoreAnywhere, EncorePro, or EncoreBasic. See the Setup for Oximetry Use section for
more information.
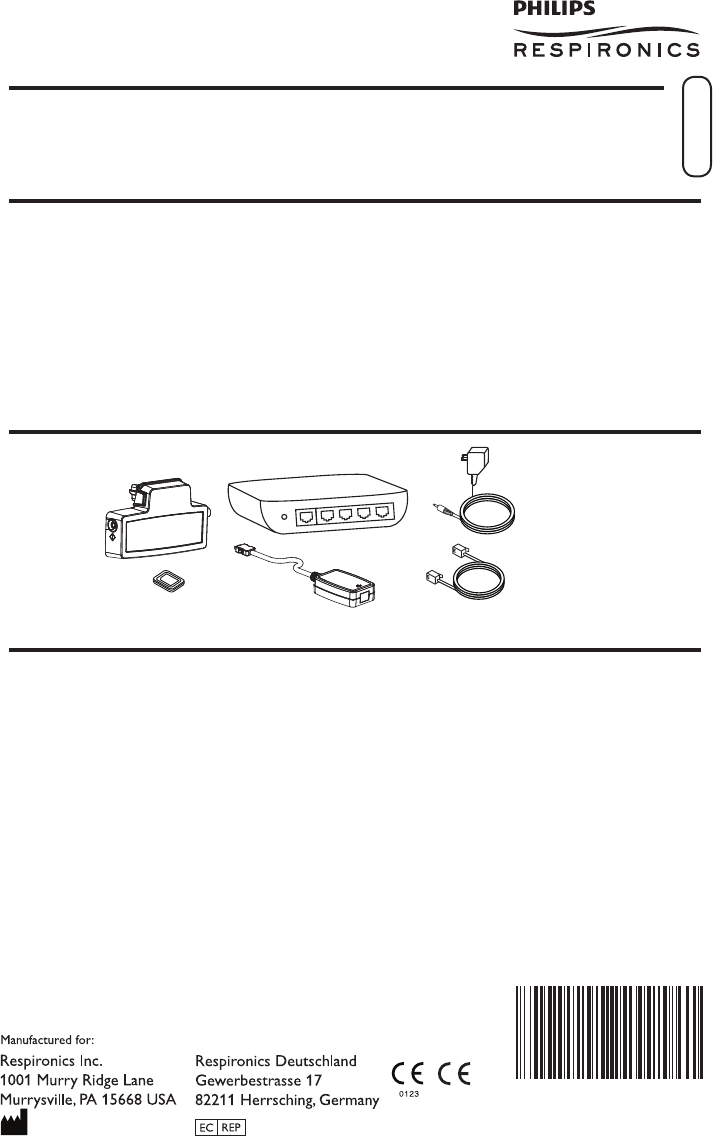
Package Contents
Broadband / Oximetry
Accessory
SD Card
Broadband Wireless Router
(optional)
Ethernet Adapter
(optional)
Broadband Wireless Router
Power Supply
(optional)
Ethernet Cable
(optional)
Warnings and Cautions
Warnings
• If you notice any unexplained changes in the performance of this device, if the device is dropped
or mishandled, if water is spilled into the enclosure, or if the enclosure is broken, discontinue
use and contact Respironics for assistance.
• Repairs and adjustments must be performed by Respironics-authorized service personnel only.
Unauthorized service could cause injury, invalidate the warranty, or result in costly damage.
• To reduce the risk of bodily injury and damage to the equipment, retain and follow all product
safety and operating instructions.
• If you use any other personal medical device, consult the manufacturer of your device to
determine if they are adequately shielded from external RF energy. Your physician may be able
to assist you in obtaining this information.
• When attaching the oximeter sensor, be careful to route the wires in a manner that will reduce
the possibility of strangulation, discomfort, or the sensors becoming detached.
• Use only the Masimo High Performance / Low Power Module and Masimo LNCS Series pulse
oximeter sensors. The sensors are manufactured to meet the accuracy specications for the
Masimo High Performance / Low Power oximeter. Using other manufacturers’ sensors can
result in inaccurate pulse oximeter performance.
Broadband / Oximetry Accessory
INSTALLATION AND OPERATION GUIDE
English
1080873 R02
JDH 07/21/2011
0682 1080873R 0 2
• Do not use a damaged sensor.
• Before use, carefully read these instructions and the directions for use provided with the
Masimo sensor.
Cautions
• Remove power from the therapy device by unplugging the power supply cord’s connector from
the power inlet on the back of the device before proceeding with the installation instructions.
• If the device has been exposed to either very hot or very cold temperatures, allow it to adjust
to room temperature before beginning the installation procedure.
• Pins of connectors should not be touched. Connections should not be made to these
connectors unless ESD precautionary procedures are used. Precautionary procedures include
methods to prevent build-up of electrostatic charge (e.g., air conditioning, humidication,
conductive oor coverings, non-synthetic clothing), discharging one’s body to the frame of the
equipment or system or to earth or a large metal object, and bonding oneself by means of a
wrist strap to the equipment or system or to earth.
• Ensure that the SD card cover on the therapy device is replaced whenever an accessory is not
installed.
Important! From time to time, electronic devices can be affected by irregularities in the electrical
power supplies and other electrical equipment. To prevent electrical interference that
could affect the performance of your medical equipment, always keep accessories (power
supplies, battery packs, etc.) and other electrical devices (telephones, radios, etc.) away
from your therapy device when used with this accessory.
Symbol Key
The following symbols may appear on the Broadband / Oximetry Accessory.
Symbol Definition Symbol Definition
Manual Call button Oximeter connection
Ethernet connection Consult accompanying instructions
Setup for Broadband Use
Installing the Accessory into the Therapy Device
Caution! If the device has been exposed to either very hot or very cold temperatures, allow it to
adjust to room temperature before beginning the installation procedure.
In order for the Broadband / Oximetry Accessory to work properly, it must be installed in a therapy
device. Refer to the installation steps below.
If the therapy device already contains a Broadband / Oximetry Accessory, begin with step 5.
1. Remove power from the therapy device by unplugging the power supply cord’s connector from the
power inlet on the back of the device before proceeding with the installation instructions below.
-2-
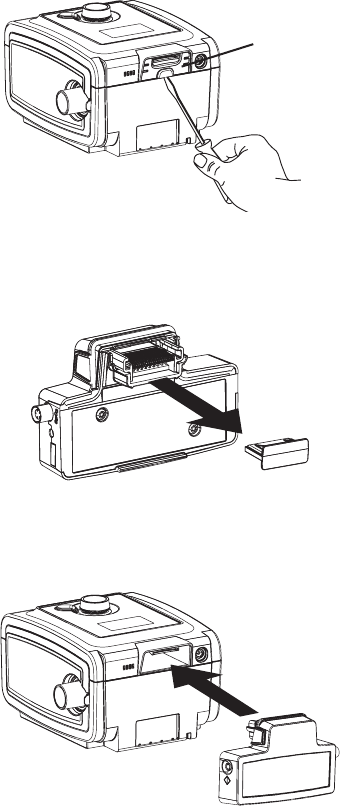
-3-
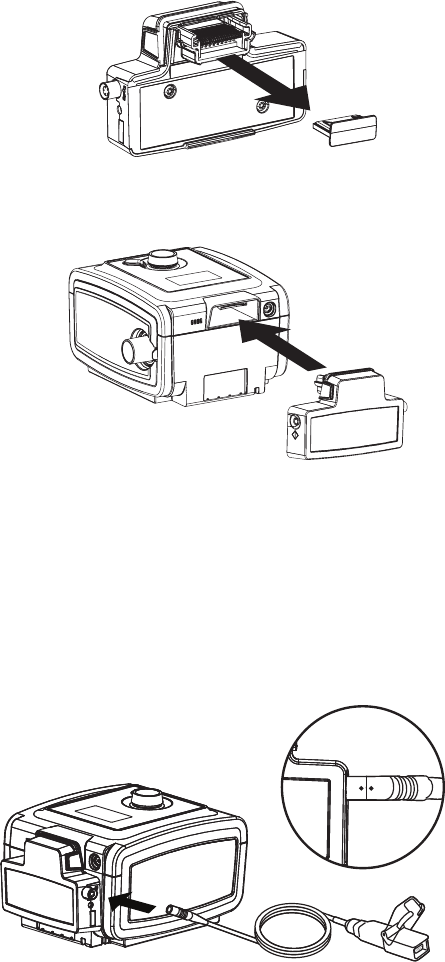
3. Remove the plastic cap from the Broadband / Oximetry Accessory, being careful not to touch the
metal connectors.
Plastic Cap Removal
Accessory Installation
4. Insert the Broadband / Oximetry Accessory into the therapy device, as shown below, until it clicks
into position. It is not necessary to remove the therapy device’s SD card in order to install this
accessory.
5. Connect the therapy device to an AC power outlet using the supplied power adapter, and the device
will automatically turn on. The Broadband / Oximetry Accessory gets its power from the therapy
device.
Note: After powering on, up to 30 seconds may elapse before the accessory is ready for use.
SD card cover
Plastic Cover Removal
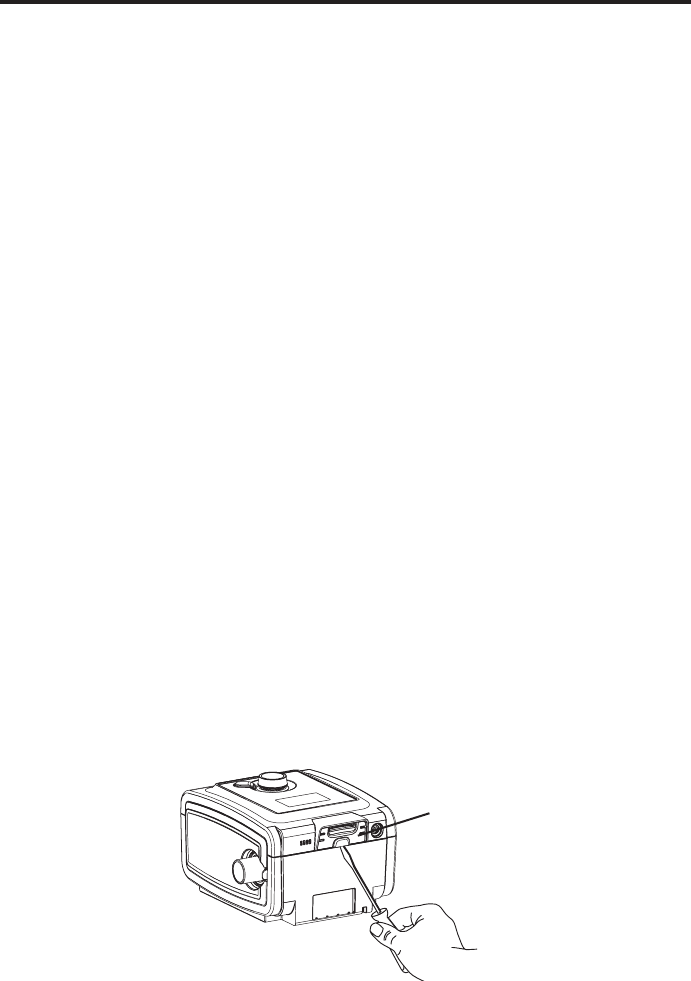
2. Remove the plastic cover on the back of the device. Using a at-head screwdriver, carefully lift the
plastic SD card cover away from the device. Save this plastic cover for future use.
-4-
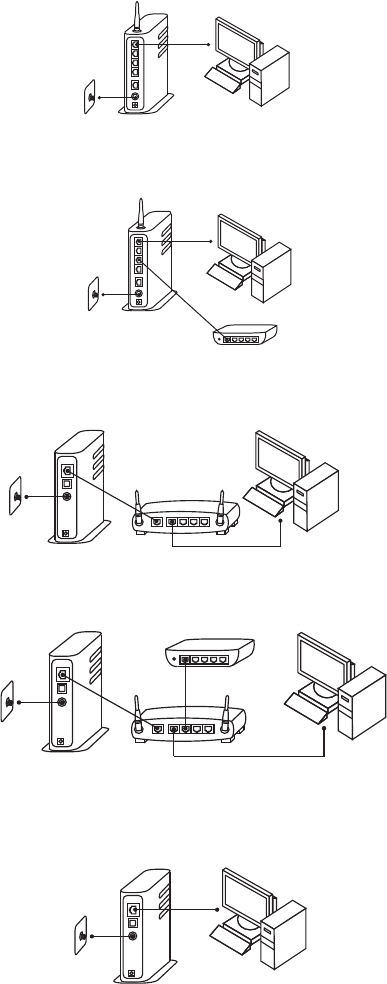
Installing a Wireless Network Connection with the Broadband Wireless Router
First, identify the type of network you currently have installed. Determine which of the following setups,
A, B, or C, most closely resembles your current network.
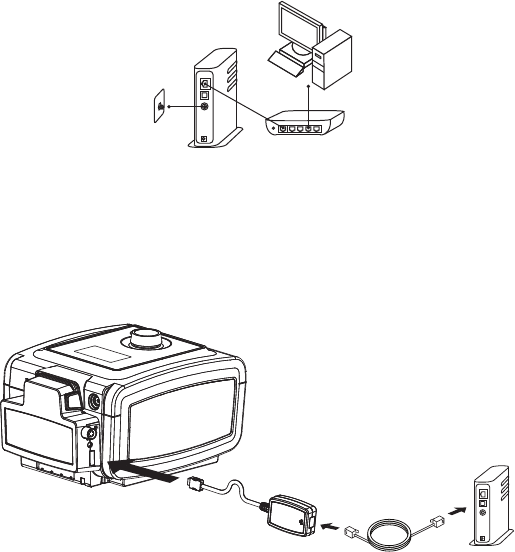
A. If you have a cable or DSL modem with a built-in router:
Your Cable/DSL Modem
with Router
Cable/DSL
Connection
Your Computer
• Connect the Ethernet cable to the yellow port on the Broadband Wireless Router and to
an available port on your network.
Your Cable/DSL Modem
with Router
Cable/DSL
Connection
Your Computer
Broadband Wireless Router
• Supply power to the Broadband Wireless Router.
B. If you have a cable or DSL modem connected to a router:
Your Router
Your Cable/DSL
Modem
Cable/DSL
Connection
Your Computer
• Connect the Ethernet cable to the yellow port on the Broadband Wireless Router and to
an available port on your router.
Broadband Wireless Router
Your Router
Your Cable/DSL
Modem
Cable/DSL
Connection
Your Computer
• Supply power to the Broadband Wireless Router.
C. If you have a cable or DSL modem with one port that your computer is currently
connected to:
Your Cable/DSL
Modem
Cable/DSL
Connection
Your Computer
Connecting to EncoreAnywhere
Normally, the accessory will automatically make a daily call and upload therapy data at predetermined
times without human intervention.
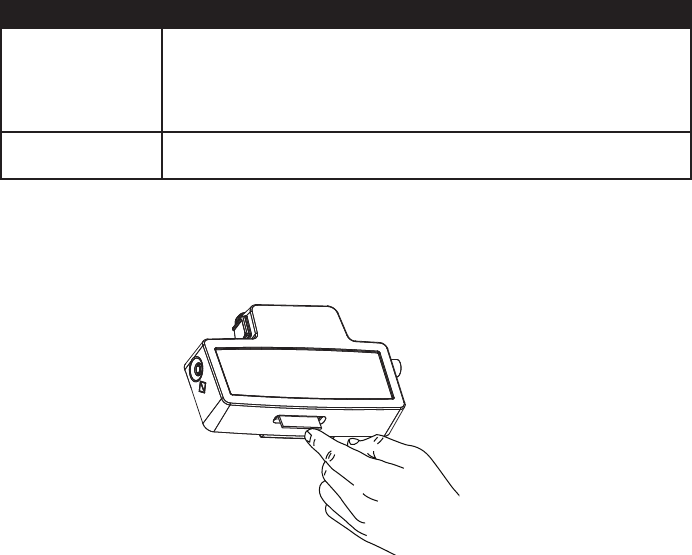
You can manually cause the Broadband / Oximetry Accessory to make a call by pressing and holding in the
call button for at least two seconds, as shown on the next page. The accessory responds by displaying the
appropriate symbol in the device window.
Note: When located near a clock radio, speaker, or other electronic device, an occasional buzzing
noise may be heard. Relocate the therapy device and Broadband / Oximetry Accessory away
from the electronic device to reduce or eliminate this noise.
-5-
• Remove power from your cable/DSL modem. (If your cable/DSL modem contains a
battery for back up power, the battery must be temporarily disconnected to remove
power from the modem.)
• Disconnect your computer from your cable/DSL modem.
• Connect the Ethernet cable to the yellow port on the Broadband Wireless Router and to
your cable/DSL modem.
• Connect your computer to an available gray port on the Broadband Wireless Router.
Your Cable/DSL
Modem
Cable/DSL
Connection
Your Computer
Broadband Wireless Router
• Plug the power supply for your cable/DSL modem into a wall outlet or power strip.
• Supply power to the Broadband Wireless Router.
Installing a Wired Network Connection with an Ethernet Cable
Connect the Ethernet Adapter to the Broadband / Oximetry Accessory. Then, connect the Ethernet
Adapter to an ethernet jack on your modem or router, using an ethernet cable, as shown below.
Wired Setup

Symbols Displayed During Normal Operation
The therapy device will display the Broadband / Oximetry Accessory’s network or EncoreAnywhere
connection status. This will occur automatically when a connection to EncoreAnywhere is in progress. At
all other times, the status can be checked by navigating to the device’s status menu or by briey pressing
the manual call button on the side of the Broadband / Oximetry Accessory once (holding the button in for
less than one second).
Symbol Meaning
Attempting to make a connection
Connection established
Connection successfully completed
Wireless network signal strength 5 (maximum)
Wireless network signal strength 4
Wireless network signal strength 3
Wireless network signal strength 2
Wireless network signal strength 1 (minimum)
No wireless network signal, a connection is not possible
Connected via Ethernet cable
-6-
Call Button
Error Symbols
If a connection attempt fails, one of the following symbols is displayed in the device’s window. The
accessory will retry the call automatically, if you do not do so manually.
Symbol Meaning Action
No network connection.
Verify that the Broadband / Oximetry Accessory has
been installed and setup correctly. If the error still
occurs, the Broadband / Oximetry Accessory may be
located too far from the Broadband Wireless Router.
Try relocating the Broadband Wireless Router closer
to the Broadband / Oximetry Accessory.
A network error occurred.
Verify that the Broadband / Oximetry Accessory has
been installed and setup correctly. If the error still
occurs, try removing power from your cable/DSL
modem for a few minutes. Then, power the modem
up again. Or, try initiating a manual call by pressing and
holding the call button ( ) on the Broadband /
Oximetry Accessory for at least two seconds.
The accessory successfully
reached EncoreAnywhere but
the server terminated the
connection.
Try initiating a manual call by pressing and holding
the call button ( ) on the Broadband / Oximetry
Accessory for at least two seconds.
The accessory successfully
reached EncoreAnywhere but
the connection stalled.
Try initiating a manual call by pressing and holding
the call button ( ) on the Broadband / Oximetry
Accessory for at least two seconds.
The accessory is not
authorized to connect to
EncoreAnywhere.
Contact your equipment provider. Check the user’s
prescription in EncoreAnywhere.
EncoreAnywhere cannot
correlate the device to a user.
Contact your equipment provider. Check the user’s
prescription in EncoreAnywhere.
An internal fault occurred. Contact your equipment provider. Check the user’s
prescription in EncoreAnywhere.
-7-
Setup for Oximetry Use
Overview
This accessory, when used with the Masimo High Performance / Low Power Module and Masimo LNCS
Series pulse oximeter sensors, can be used with System One devices to measure functional oxygen
saturation of arterial hemoglobin (%SpO2) and pulse rate for adult patients. Home care providers (HCPs)
and medical professionals can then use this data as one of several elements to evaluate patient compliance,
and if necessary, change the therapy device’s settings.
Compatibility
The accessory is compatible with the Masimo High Performance / Low Power Module and the following
Philips Respironics System One Devices:
• REMstar • REMstar Auto A-Flex
• REMstar Plus C-Flex • BiPAP Pro Bi-Flex
• REMstar Pro C-Flex+ • BiPAP Auto Bi-Flex
The Masimo High Performance / Low Power Module is compatible with the Masimo LNCS Series pulse
oximeter sensors.
Warnings
• Use only the Masimo High Performance / Low Power Module and Masimo LNCS Series pulse
oximeter sensors. The sensors are manufactured to meet the accuracy specications for the
Masimo High Performance / Low Power oximeter. Using other manufacturers’ sensors can
result in inaccurate pulse oximeter performance.
• Do not use a damaged sensor.
• Before use, carefully read these instructions and the directions for use provided with the
Masimo sensor.
Installing the Accessory into the Therapy Device
Caution! If the device has been exposed to either very hot or very cold temperatures, allow it to
adjust to room temperature before beginning the installation procedure.
In order for the Broadband / Oximetry Accessory to work properly, it must be installed in a
therapy device.
If the therapy device already contains a Broadband / Oximetry Accessory, begin with step 5.
1. Remove power from the therapy device by unplugging the power supply cord’s connector from the
power inlet on the back of the device before proceeding with the installation instructions below.
2. Remove the plastic cover on the back of the device. Using a at-head screwdriver, carefully lift the
plastic SD card cover away from the device. Save this plastic cover for future use.
SD card cover
Plastic Cover Removal
-8-
Connecting an Oximeter
After you have installed the accessory into the therapy device, connect the Masimo High Performance
/ Low Power Module to the round connector as shown below. Be sure to line up the red dots on the
connectors when connecting the module.
Align the red dots on the accessory
and module connectors.
Masimo High Performance / Low Power Module Connection
Then, connect a compatible Masimo LNCS Series pulse oximeter sensor to the Masimo High Performance
/ Low Power Module, and close the clip to secure the connection. The green LED will ash until the
oximeter sensor is connected to a user. Once connected, the LED will remain solid. This indicates that a
proper connection has been established, and the device is recording oximetry data. After one minute, the
LED will dim.
5. Connect the therapy device to an AC power outlet using the supplied power adapter, and the device
will automatically turn on. The Broadband / Oximetry Accessory, gets its power from the therapy
device.
Note: After powering on, up to 30 seconds may elapse before the accessory is ready for use.
Accessory Installation
4. Insert the Broadband / Oximetry Accessory into the therapy device, as shown below, until it clicks
into position. It is not necessary to remove the therapy device’s SD card in order to install this
accessory.
-9-
3. Remove the plastic cap from the Broadband / Oximetry Accessory, being careful not to touch the
metal connectors.
Plastic Cap Removal
Oximetry Troubleshooting
Problem Action
The green LED
continues to ash
after a connection.
Verify that the Broadband / Oximetry Accessory has been installed and setup
correctly. Check that a valid SD card is correctly installed in the Broadband
/ Oximetry Accessory, and check that the Masimo High Performance / Low
Power Module and Masimo LNCS Series pulse oximeter sensor are properly
connected.
The green LED does
not light up.
Check that the Masimo High Performance / Low Power Module and Masimo
LNCS Series pulse oximeter sensor are properly connected.
Retrieving Data
Compliance data (oximetry and therapy data) may be retrieved from the accessory either by conguring
the accessory to function as a broadband modem for remote data transfer or by retrieving the data from
the accessory SD card, located on the bottom of the accessory. The SD card should be present in the
Broadband / Oximetry Accessory at all times when using the accessory to collect data.
To retrieve data from the SD card, remove the card by gently pressing the card in, which will release
it from the accessory. Then, upload the data from the SD card to EncoreAnywhere, EncorePro, or
EncoreBasic.
SpO2 Specications
SpO2 and Pulse Rate Accuracy: Refer to the sensor instructions for accuracies.
Data Update Period and Averaging: The Oximetry values are sampled and displayed every 1 second.
Operating Environment:
Temperature and Humidity ranges for operation: 5°C to 35°C (41° to 95° F); 15 to 95%
Temperature and Humidity ranges for storage/transport: -20°C to 60°C (-4° to 140° F); 15% to 95%
Note: For additional information concerning the Masimo sensor (further specications, cleaning
instructions, directions for use, warnings, cautions, and notes) refer to the packaging and
documentation supplied with the sensor.
Cleaning
Clean the Masimo High Performance / Low Power Module separately from the sensors.
Caution! Do not immerse the module in liquid. Do not use caustic or abrasive cleaning agents on
the module.
Clean the module with a soft cloth dampened with isopropyl alcohol. Do not pour or spray any liquids
onto the module, and do not allow any liquid to enter any openings in the device. Allow the module to dry
thoroughly before reusing.
For instructions on cleaning Masimo LNCS Series pulse oximeter sensors, refer to the respective pulse
oximeter sensor package insert.
SD Card Removal
-10-

-11-
Broadband / Oximetry Accessory Temperature and Storage
Operation Transport & Storage
Temperature: 5° to 35° C (41° to 95° F) -20° to 60° C (-4° to 140° F)
Humidity: 15% to 95% non-condensing 15% to 95% non-condensing
Disposal
Separate collection for electrical and electronic equipment per EC Directive 2002/96/EC. Dispose of this
device in accordance with local regulations.
Additional Warnings, Cautions, and Notices
Warning! If you notice any unexplained changes in the performance of this device, if the device is
dropped or mishandled, if water is spilled into the enclosure, or if the enclosure is broken,
discontinue use and contact Respironics for assistance.
Warning! Repairs and adjustments must be performed by Respironics-authorized service personnel
only. Unauthorized service could cause injury, invalidate the warranty, or result in costly
damage.
Notice: There are no user-serviceable parts within the Broadband / Oximetry Accessory, Masimo
High Performance / Low Power Module, or Masimo LNCS Series pulse oximeter sensors.
Notice: EncoreAnywhere, EncorePro, and EncoreBasic are software applications developed by
Respironics intended for use by physicians and home care providers.
Notice: The antenna(s) used for this transmitter must be installed to provide a separation distance of
at least 20 cm from all persons and must not be co-located or operating in conjunction with
any other antenna or transmitter.
For U.S. Only:
Notice: Use of non-original manufacturer-approved accessories may violate your local RF exposure
guidelines and should be avoided.
Notice: This device complies with part 15 of the FCC Rules. Operation is subject to the following
two conditions: (1) This device may not cause harmful interference, and (2) this device must
accept any interference received, including interference that may cause undesired operation.
This equipment has been tested and found to comply with the limits for a Class B digital
device, pursuant to Part 15 of the FCC Rules. These limits are designed to provide reasonable
protection against harmful interference in a residential installation. This equipment generates,
uses, and can radiate radio frequency energy and, if not installed and used in accordance with
the instructions, may cause harmful interference to radio communications. However, there
is no guarantee that interference will not occur in a particular installation. If this equipment
does cause harmful interference to radio, TV reception, or other devices which can be
determined by turning the equipment on and off, the user is encouraged to try to correct the
interference by one or more of the following measures:
• Reorient or relocate the receiving antenna (on the radio, TV, or other device).
• Increase the separation between the equipment and receiver.
• Connect the equipment into an outlet on a circuit different from that to which
the receiver is connected.
• Consult the dealer of the device for help.
• The FCC requires the user to be notied that any changes or modications
made to the device that are not expressly approved by Respironics may
void the user’s authority to operate the equipment.
For Canada Only:
Notice: This ISM device complies with Canadian ICES-001.
Notice: This product meets the applicable Industry Canada technical specications.
Notice: Operation is subject to the following two conditions; (1) This device may not cause
interference and (2) This device must accept any interference, including interference that may
cause undesired operation for the device.
The Term “IC:” before the certication/registration number only signies that registration
was performed based on a Declaration of Conformity indicating that Industry Canada
technical specications were met. The term “IC:” before the certication/registration number
does not imply that Industry Canada approved the equipment.
Should you experience trouble with this equipment, please contact your home care provider or
Respironics (724-387-4000), for repair or warranty information.
-12-