Rexon Technology RL328U Professional Portable Radio (UHF) User Manual User s Guide
Rexon Technology Corp Professional Portable Radio (UHF) User s Guide
Contents
- 1. Users Manual Part 1
- 2. Users Manual Part 2
Users Manual Part 2
User’s Guide
Model No.RL328
LMR Handheld
Part Names & Functions:
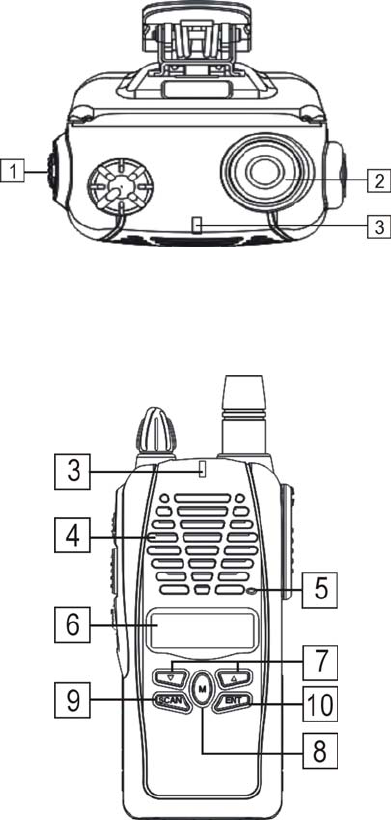
TOP
1Power/Volume Knob: Rotate it to turn on
the transceiver and to adjust the volume.
2. Antenna Connector: Fit the antenna to
this MX type connector.
FRONT
3. LED:
4. SPEAKER
5. MIC
6. LCD Display
7.UP & DOWN
8.MODE
9.SCAN
10.ENTER
SIDE
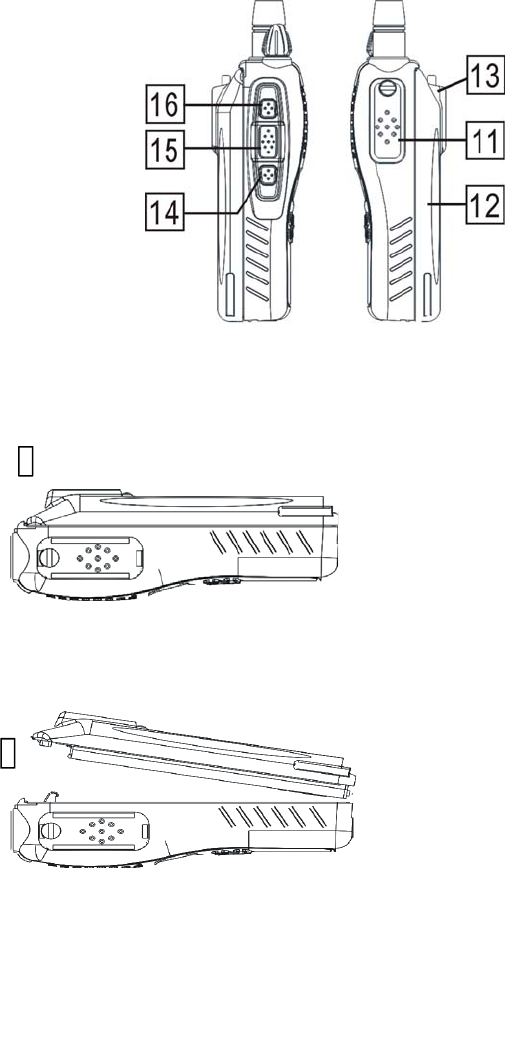
11. External Speaker/Mic Connector
12.Battery Pack:
13. Release Buckle
14. Priority Button
15. PTT (Push To Talk) Button
16. MON (Monitor) Button
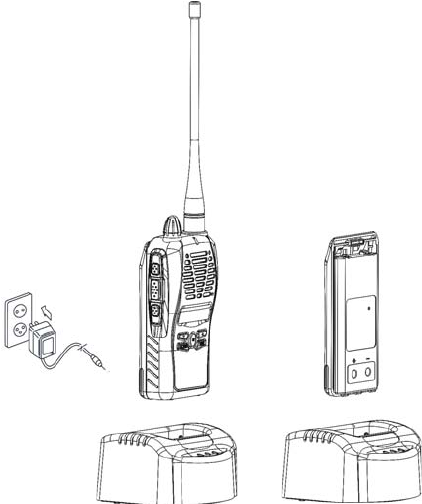
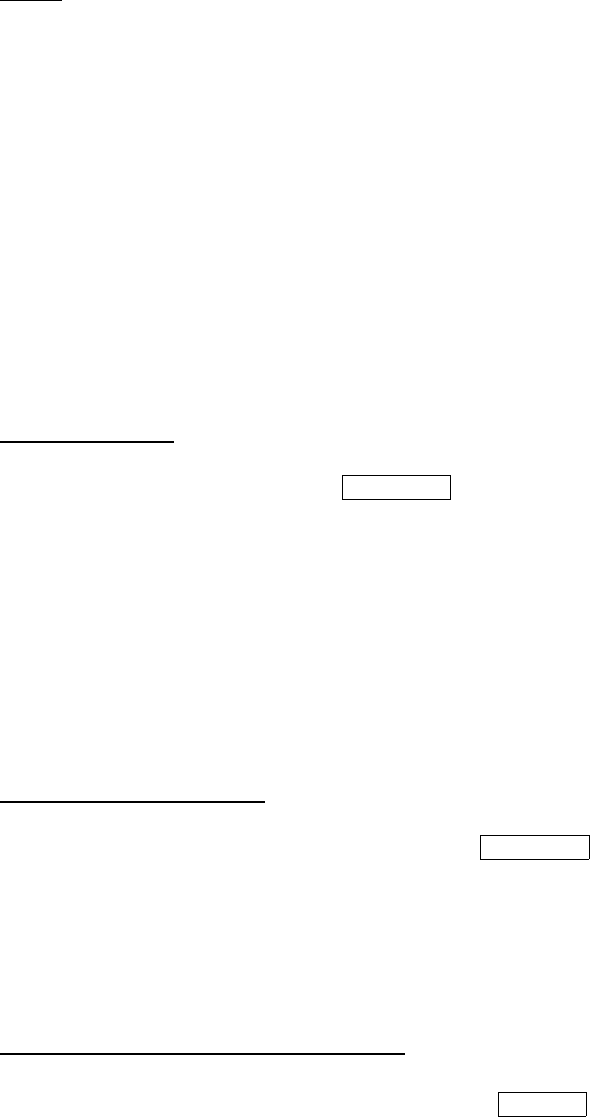
Fitting & Removing the Battery Pack:
To install the battery pack:
1. Fit the bottom edge of the
battery pack into the holes
of the transceiver bottom.
2. Push the battery pack down to the transceiver’s
aluminum chassis till a chip sound is heard.
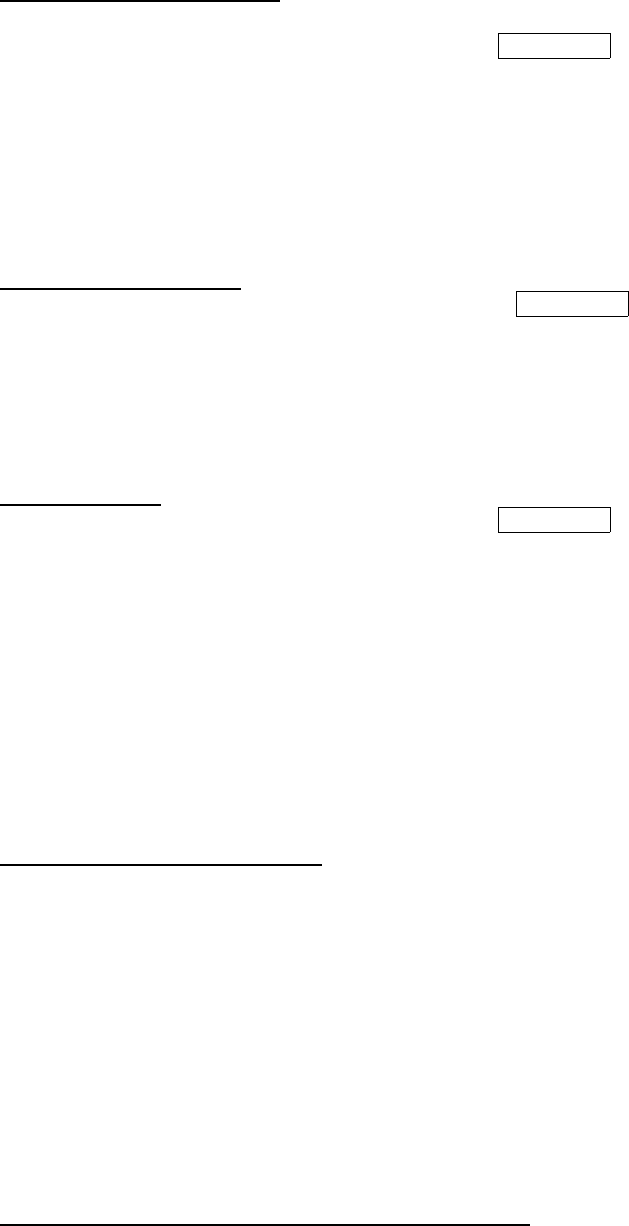
To remove the battery pack:
1. Keep pressing the release
buckle of the battery
pack and lift the battery
pack up from the
transceiver’s body.
Charging the Battery Pack:
1
LIFT UP
2
PUSH DOWN
1.) Connect the jack of AC adaptor into the socket of the charging cradle.
2.) Plug the AC adaptor into the power outlet.
3.) Insert the radio into the cradle
4.) Charge the radio with standard charger for 10-12 hours; with rapid charger for 2 hours.
**Make sure the radio is turned off while charging it.
**Do not forget to remove the radio from the charger when the battery is full-charged.
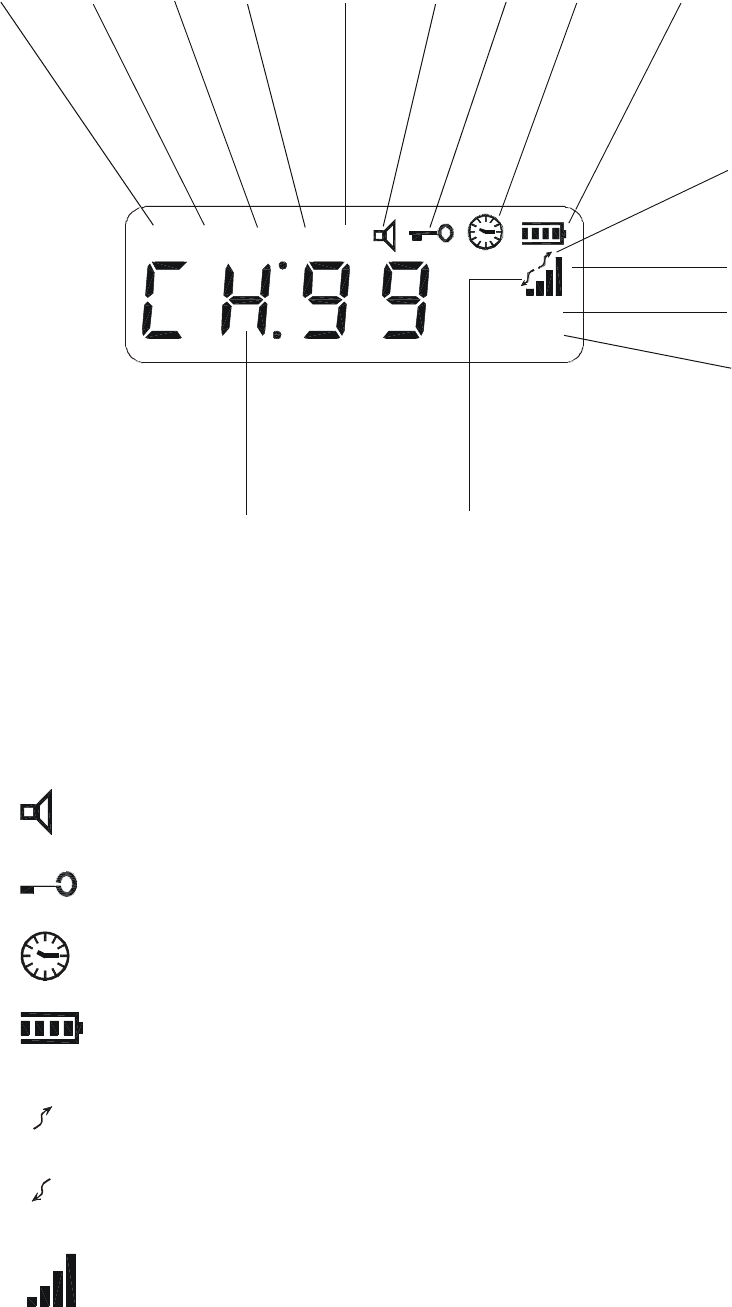
DISPLAY SYMBOLS:
BCLOPRI DCSBTLOCTS
H L
VOX
12345678 9
12
13
15
10
11
14
1.) PRI: indicates the priority channel. (Dealer Programmable)
2.) BCLO: indicates busy channel lockout function (Dealer Programmable)
3.) BTLO: indicates busy tone lockout function (Dealer Programmable)
4.) CTS: indicates continuous tone coded squelched system
5.) DCS: indicates digital coded squelch
6.) : indicates button press tone is active.
7.) : indicated when the keypads have been locked.
8.) : indicates time-out timer function is active. (Dealer Programmable)
9.) : shows battery condition. Replace or recharge the battery pack when this
icon displays 2 or fewer segments of the battery.
10.) : indicates the radio is transmitting.
11.) : indicates busy channel.
12.) : indicate the strength of TX or RX signal.
13.)VOX : indicates “VOX” is activated.

14.)H or L : indicates TX output power: H means high; L means low.
15.)Channel Number: Displays channel number 01-99.
Basic Operation:
Turn the radio On & OFF
1.) Rotate the PWR/VOL knob clockwise till the radio is turned on. The radio gets started to auto test
for two second. During auto testing, all icons on LCD will appear.
2.) After auto testing is done, LCD will show channel number and the functions has been activated by
your dealer.
3.) Rotate the PWR/VOL knob clockwise to increase its volume or counterclockwise to reduce its
volume.
4.) To turn the radio off, rotate the PWR/VOL know counterclockwise to the end.click.
Channel Selection
RL-328 is allowed to be programmed with 99 Channels. To select a channel, press the UP/DOWN key
to select a channel.
Receiving
RL-328 can be programmed to work channel by channel in “Open traffic” or “Group
Mode” (cTCSs or DCS). Group mode prevents other users on the same channel from
being heard on your radio.
*Open Traffic: In this mode, you will hear all communication transmitted on the channel. When a
message is received your squelch will un-mute, you will hear the message.
*Group Mode: TCS/DCS (continuous Tone Code Squelch system / Digital Coded Squelch) are
particular TX signaling as an access key to work a repeater (encoder) or to unlock the party’s signaling
sensitive squelch. In group mode, you will receive only messages coming from parties sending a proper
TX signaling. By this way, more radios share the same frequency.
Monitor
Press and release the “MON” button on the side of the radio to pen the squelch. This
allows you to over ride the squelch and the “CTCSS” or “DCS” tones. It is useful to
monitor the channel before you transmit to ensure there is no one using the channel
when you have CTCSS or DCS tones programmed.
Transmitting
Before transmitting, monitor the channel you are using to ensure it is not busy. Keep
pressing PTT button and start talking at approximately 2 inches from the MIC hole.
During transmitting, the LED on the top of the radio will glow red. Release PTT
button when you have finished talking.
Scan
The advanced scan function of RL-328 allows optionally looking for carrier or carrier with CTCSS or
DCS. Your dealer can program the channels to be scanned on the scan list.
*Normal Scan allows you to scan all the channels you have listed through PC programming. Press
SCAN button, you will see the channel numbers cycling continuously. When the radio stops on a
“Busy” channel, the SCAN mode will stop and resume after about 5 seconds. If your radio has scanned
a channel on which there is a party you want to talk to, you can directly communicate with the party by
pressing the PTT button. To stop scanning, press SCAN button again.
*Delete a Nuisance channel allows you remove temporarily the channels which you don’t want to hear
from the scan list. During scanning, when the radio is locked onto a busy channel, press “ENTER” to
remove this channel from the scan list. It won’t be scanned until the radio is turned on again.
Mode Setting:
Squelch Level
Press MODE for one time, LCD shows And
then, press UP/DOWN key to increase or decrease squelch level from 0 to 8. 0 means squelch
canceling, 8 means tight squelch. Setting the radio to the tight squelch level, you can avoid unwanted
signals or noise, but you may not receive a weak signal. So, it will be better for you to select the normal
squelch level (default value: 3). Press ENTER to save the setting and get back to operation mode or
press MODE to continue setting.
VOX Sensitivity Level
Press MODE repeatedly (normally twice) till LCD
shows Press UP/DOWN key to adjust VOX sensitivity from 0 to 5: 0 means VOX canceling; 1 means
the most sensitive (for quiet environment); 5 means the least (for noisy environment). Press ENTER to
save the setting and get back to operation mode or press MODE to continue setting.
BEEP while pressing the buttons
Press MODE repeatedly (normally 3 times) till LCD shows
Press UP/DOWN key to
choose turning ON or OFF the button press beep. Press ENTER to save the setting and get back to
operation mode or press MODE to continue setting.
SQL:3
VXL:3
bP:ON
CALL Ringer Selection
Press MODE repeatedly (normally 4 times) till LCD
shows. Press UP/DOWN key to choose call ringer type from 1 to 9. Press ENTER to save the setting
and get back to operation mode or press MODE to continue setting.
TX Power Selection
Press MODE repeatedly (normally 5 times) till LCD shows
Press UP/DOWN key to choose TX output power: H means high power; L means low power. Press
ENTER to save the setting and get back to operation mode or press MODE to continue setting.
Keypad Lock
Press MODE repeatedly (normally 6 times) till LCD shows Press UP/DOWN key to choose keypad
lock: “OFF” means unlock; “On” means lock. When keypad is locking, there is a key icon shown on
LCD and only PTT, MON, & PRI buttons work. Press ENTER to save the setting and get back to
operation mode or press MODE to continue setting.
Advanced Operations:
Handsfree transmit (VOX)
VOX (Voice Operated Transmit) allows you to automatically switch the transmission in hands free
mode just by speaking to the built-in microphone, no need to press PTT button.
1.)To activate VOX: Turn off the radio. Keep Pressing PTT button and turn the radio on. “VOX”
icon will be displayed. During VOX mode, PTT button is disabled.
2.)To select VOX sensitivity according to the environment: We suggest that you should set VOX for
minimum sensitivity. Sensitivity set too high could cause accidental transmissions, especially in
high noise environments.
3.) To deactivate VOX: Turn the radio off and turn it on again.
Setting “Group Mode” (CTCSS/DCS) codes
CTCSS/DCS prevents you from hearing any conversation that is not using the same (TCS or DCS)
code. This does not make your conversation private.
1.) Select the channel which has been programmed with TCS or DCS code, and then, turn the radio off.
CALL:0
PwR:H
KL:OFF

2.) Keep pressing MON & ENTER buttons and turn on the radio, there will be “TCS” or “DCS” icon
flashing.
3.) Press Mode button to choose TX or RX respectively. And then, press up/down key to choose the
code number you want. (see the table below) Press ENTER to confirm your selection.
4.) Turn off the radio to quit code setting.
Disable “Group Mode” (CTCSS/DCS) codes
1.) Select the channel you want to disable its tone code (TCS or DCS). And then, turn off the radio.
2.) Keep pressing MON button and turn on the radio. On the top of LCD will show TCS or DCS
flashing.
3.) Press UP/DOWN key to choose “OFF” to disable the tone code. And then, press ENT button to
confirm your choice.
4.) When you turn on the radio again, you will see TCS or DCS keep flashing on the top of LCD. It
means its tone code has been disabled.
If you want to enable the tone code, keep pressing MON button and turn on the radio.
And then, press UP/DOWN key to choose “On” to enable the tone code. Press ENT
button to confirm your choice.
CTCSS code
code Freq. code Freq. code Freq. code Freq. code Freq.
01 67.0 11 97.4 21 135.5 31 192.8 41 165.5
02 71.9 12 100.0 22 141.3 32 203.5 42 171.3
03 74.4 13 103.5 23 146.2 33 210.7 43 177.3
04 77.0 14 107.2 24 151.4 34 218.1 44 183.5
05 79.7 15 110.9 25 156.7 35 225.7 45 189.9
06 82.5 16 114.8 26 162.2 36 233.6 46 196.6
07 85.4 17 118.8 27 167.9 37 241.8 47 199.5
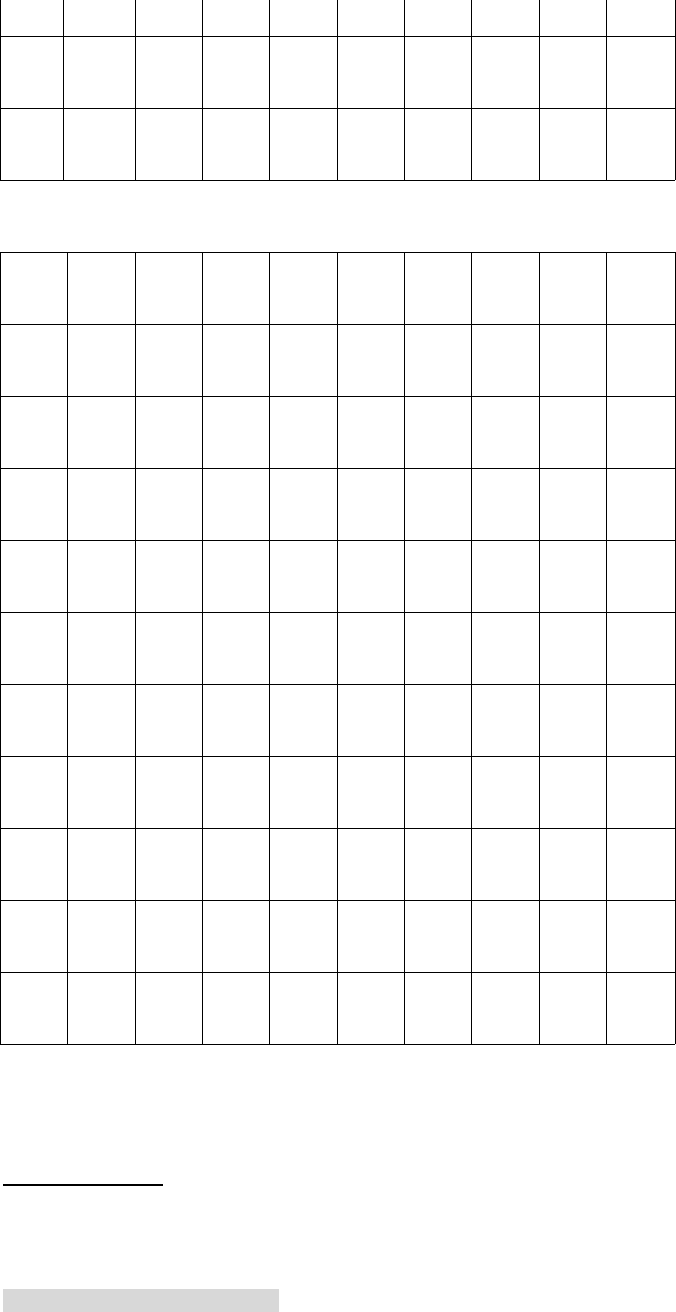
08 88.5 18 123.0 28 173.8 38 250.3 48 206.5
09
91.5 19 127.3 29 179.9 39 69.3 49 229.1
10
94.8 20 131.8 30 186.2 40 159.8 50 254.1
DCS TableÆ
023 025 026 031 032 036 043 047 051 053
054 065 071 072 073 074 114 115 116 122
125 131 132 134 143 145 152 155 156 162
165 172 174 205 212 223 225 226 243 244
245 246 251 252 255 261 263 265 266 271
274 306 311 315 325 331 332 343 346 351
356 364 365 371 411 412 413 423 431 432
445 446 452 454 455 462 464 465 466 503
506 516 523 526 532 546 565 606 612 624
627 631 632 654 662 664 703 712 723 731
732 734 743 754
Priority Scan
Priority scan allows you to select a channel that will be monitored more often than the others while
scanning. Your dealer can program a priority channel through PC. Or you can choose a channel and set
it as the priority channel.
SET THE PRIORITY CHANNEL:
1.) Keep pressing PRI button and turn on the radio.
2.) Choose the priority channel you want to set. And then, press ENT button to confirm.
3.) Turn the radio on again.
PRIORITY SCAN:
Set the radio to the priority channel and press SCAN button. You will see the radio scanning like the
following mentioned.
Normal Scan CH1>CH2>CH3…>CH99>CH1
Priority Scan CH1>CH2>CH1>CH3>CH1>CH4>CH1>CH5….
Dual Watch
Dual watch is a function that allows you to scan the priority channel and one active channel.
1.) Choose the active channel.
2.) Keep pressing PRI button for 2 seconds, the radio will begin scanning between the active channel
and the priority channel.
3.) Press PRI button again to stop dual watch scanning.
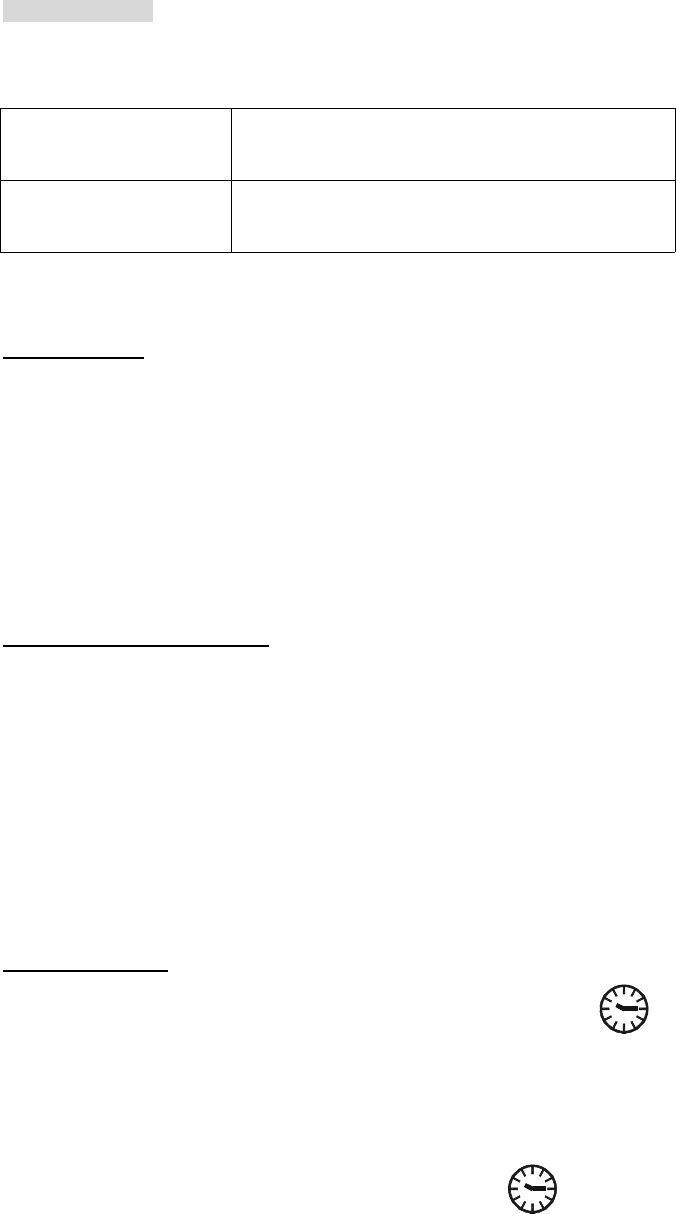
TOT (Time-Out Timer)
TOT is the function that prevents from locking up a repeater or frequency by
prolonged keying of PTT. The time-out timer limits the amount of time you have to
transmit your message. When you reach the time limit which has been programmed
by your dealer, your transmission will be cut off. In order to transmit again, you must
push PTT button to reset the timer.
Disable TOT
1.)Keep pressing UP key and turn on the radio. There will be
flashing on the top of LCD.
2.)Press UP/DOWN key to choose “OFF” to disable TOT function. And then,
press ENT button to confirm your choice.
3.)When you turn on the radio again, you will see a keep
flashing on the top of LCD. It means Time-Out Timer has been disabled.

BCLO (Busy Channel LockOut); BTLO (Busy Tone Lockout)
BCLO is a Dealer programmable feature that disables the radio’s transmitter, when the
RX signal is being received. Furthermore, BTLO won’t disable the radio’s transmitter
until RX signal with the same tone (CTCSS or DCS) is received.
Disable BCLO or BTLO
1.)Switch to the channel which has been programmed with BCLO or BTLO function,
and then, turn off the radio.
2.)Keep pressing MODE button and turn on the radio. There will be a BCL or BTL
icon flashing on the top of LCD.
3.)Press UP/DOWN key to choose “OFF” to disable BCLO or BTLO function. And
then, press ENT button to confirm your choice.
4.)When you turn on the radio again, you will see BCL or BTL icon keep flashing on
the top of LCD. It means BCLO or BTLO function has been disabled.
CLONE
Clone is a function that allows you to copy the original setting of one radio to the
others.
1.)Keep pressing UP & DOWN keys and turn on the radio to be copied (TX).
LCD will appears
2.)Repeat procedure 1 for the other radio to copy (RX).
CLOnE

3.)Press ENT key of TX radio. If clone is OK, the LCDs of both radios will
show
4.)If clone is not successful, the LCD of both radios will show
Please repeat procedure 3 again.
End
EO1