Ricoh PRSP201N1 Printer User Manual
Ricoh Company Ltd Printer
UserManual.wiki
>
Ricoh
>
PRSP201N1 User Manual
User Manual
Navigation menu
Upload a User Manual
Namespaces
Wiki Guide
HTML
PDF
Info
Views
User Manual
Discussion / Help
Navigation


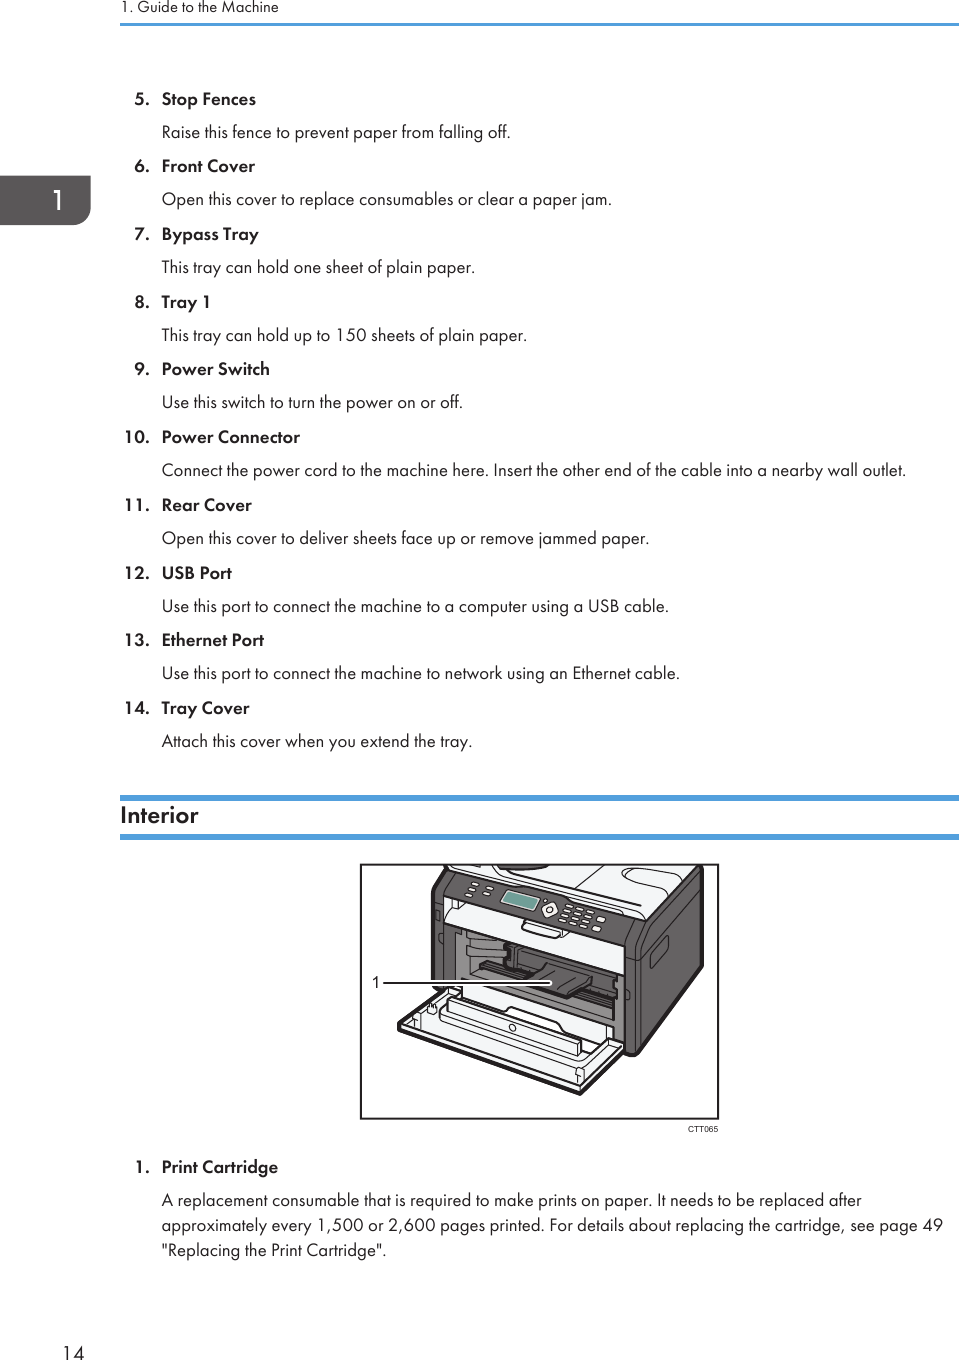
![1. Guide to the MachineGuide to ComponentsThis section introduces the names of the various parts on the front and rear side of the machine andoutlines their functions.ExteriorCTT10821934567810111312141. [Job Reset] keyPress this key to cancel an ongoing print job.2. [Start] keyPress this key to print a test page. (By holding down the key for two seconds, the network setting list can beprinted.) You can also use this key to print on the back of paper in duplex printing and to execute forcedprinting.3. Power IndicatorThis indicator lights up blue when the machine is turned on. It flashes when a print job is received and whileprinting is in progress.4. Alert IndicatorThis indicator lights up red when the machine runs out of paper or consumables, when the paper settings donot match the settings specified by the driver, or when other errors occur.13](https://usermanual.wiki/Ricoh/PRSP201N1/User-Guide-1902552-Page-15.png)
![What is Smart Organizing Monitor?Install this utility on your computer from the included CD-ROM before using it.Smart Organizing Monitor provides the following functions:• Displays the status of the machineDisplays paper jam messages and other error messages.• Paper size and type settingsDisplays the settings for paper sizes or types available on this machine.• Print test and configuration pagesPrints List/Report to check the list of settings for this machine and other information.• Modify the IPv4 AddressUse to specify the IPv4 address.• Modify the system settingsUse to change custom paper size settings and other settings on this machine.• Modify the printer settingsUse to change this machine's print settings such as [Error Skip:] and [I/O Time Out:].For details about basic instructions on how to use Smart Organizing Monitor, see page 33"Configuring the Machine Using Utilities".What is Smart Organizing Monitor?15](https://usermanual.wiki/Ricoh/PRSP201N1/User-Guide-1902552-Page-17.png)
![Configuring Network SettingsThis section explains how to configure network settings.• You can configure the IP address easily by installing the driver using Quick Install for networks inthe CD-ROM menu. For details about installing the driver, see the Software Installation Guide.Configuring the IP Address Settings Using the Web Image MonitorSetting the machine to receive an IPv6 address automatically• A DHCP server is required on the network for the machine to receive an IPv6 addressautomatically.Check that [IPv6] and [DHCPv6] are set to [Enable] in [IPv6] in Web Image Monitor. If [DHCPv6] is setto [Enable], the machine can automatically obtain the IP address.Assigning the machine's IPv6 address manually• The IPv6 address assigned to the machine must not be used by any other device on the samenetwork.1. Launch the Web browser.2. In the address bar, enter "http://(machine's IP address)/".3. Click [Log in].4. Enter the administrator password, and then click [Log in].If you are logging in for the first time, enter "admin133" as the password.5. Click [IPv6].6. Set [IPv6] to [Enable].7. Set [DHCPv6] to [Disable].8. Specify the IP address in [Manual Configuration Address].9. Specify other settings if necessary.10. Click [OK].1. Guide to the Machine16](https://usermanual.wiki/Ricoh/PRSP201N1/User-Guide-1902552-Page-18.png)


![Print AreaThe diagram below shows the area of the paper that the machine can print on.From the printer driverCHZ9042331441. Print area2. Feed direction3. Approx. 4.2 mm (0.2 inches)4. Approx. 4.2 mm (0.2 inches)• The print area may vary depending on the paper size and printer driver settings.• To adjust the print position, specify [Tray1: Registration] or [Bypass Tray: Registration] on the[System] tab in Smart Organizing Monitor.2. Loading Paper22](https://usermanual.wiki/Ricoh/PRSP201N1/User-Guide-1902552-Page-24.png)

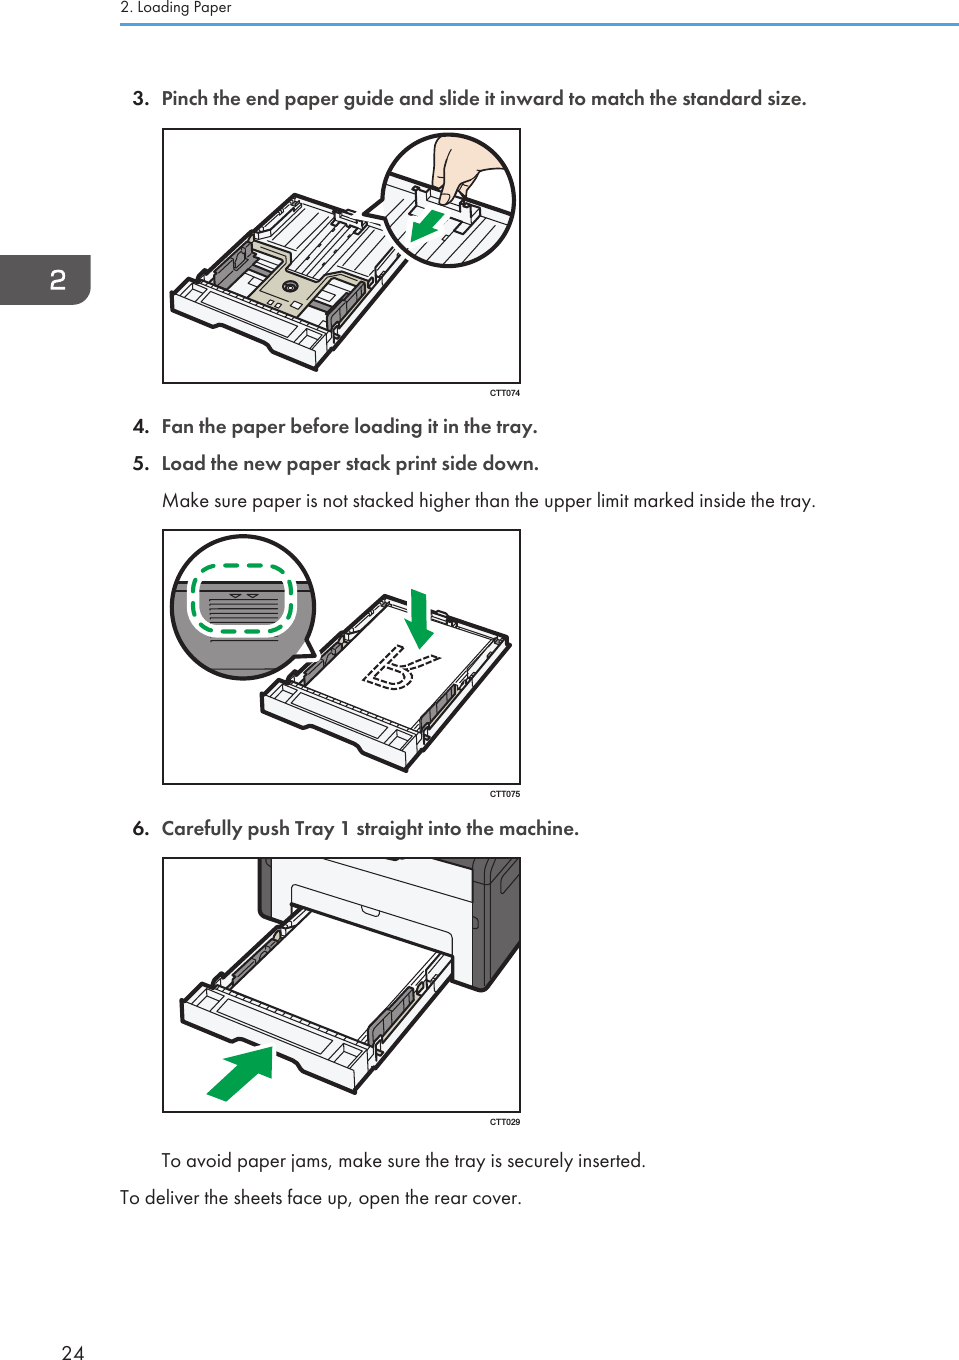
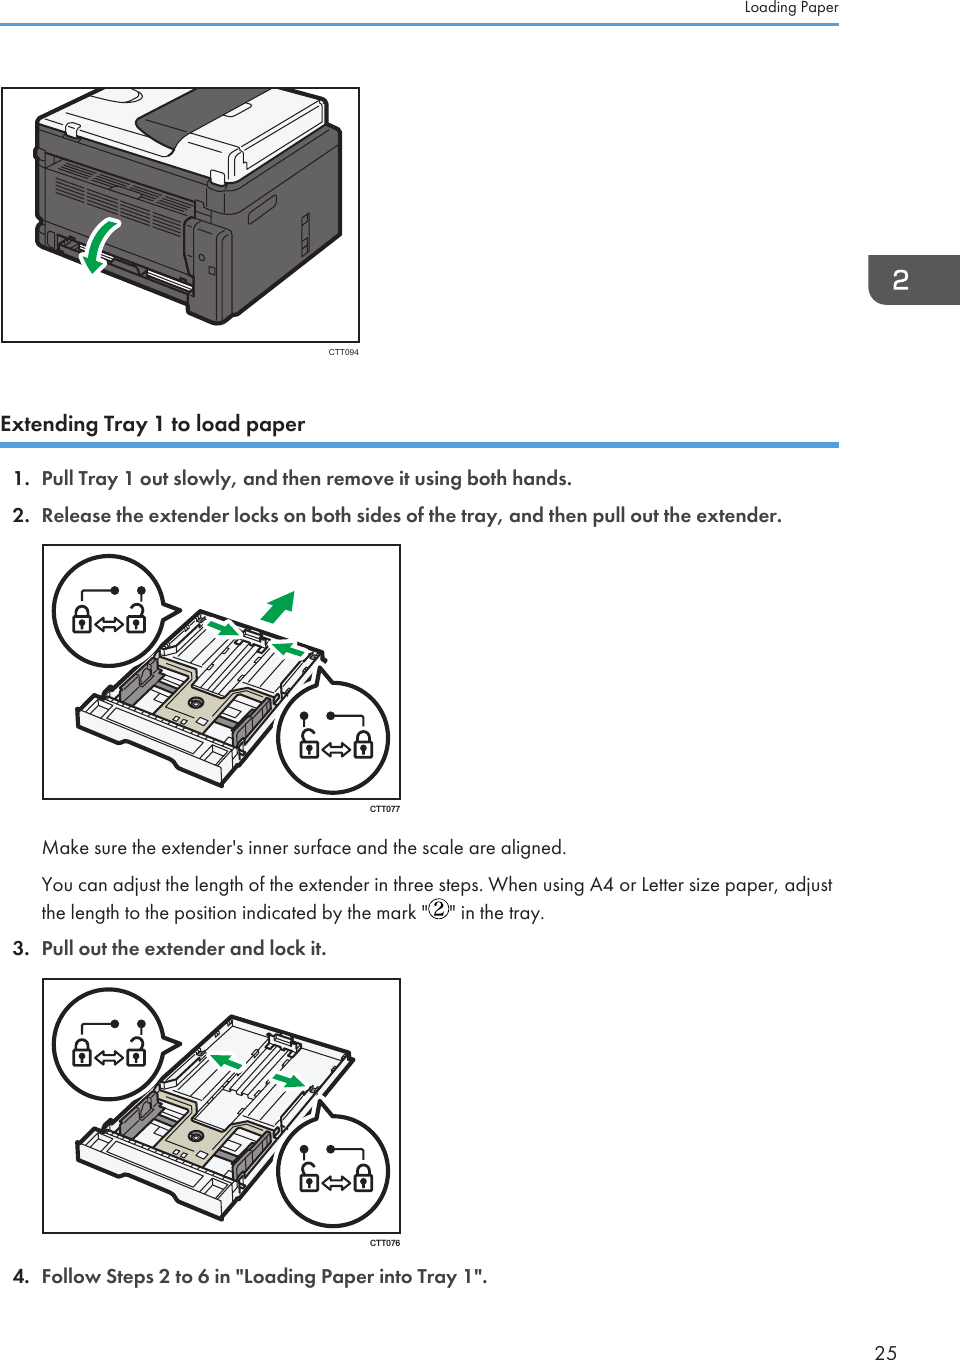
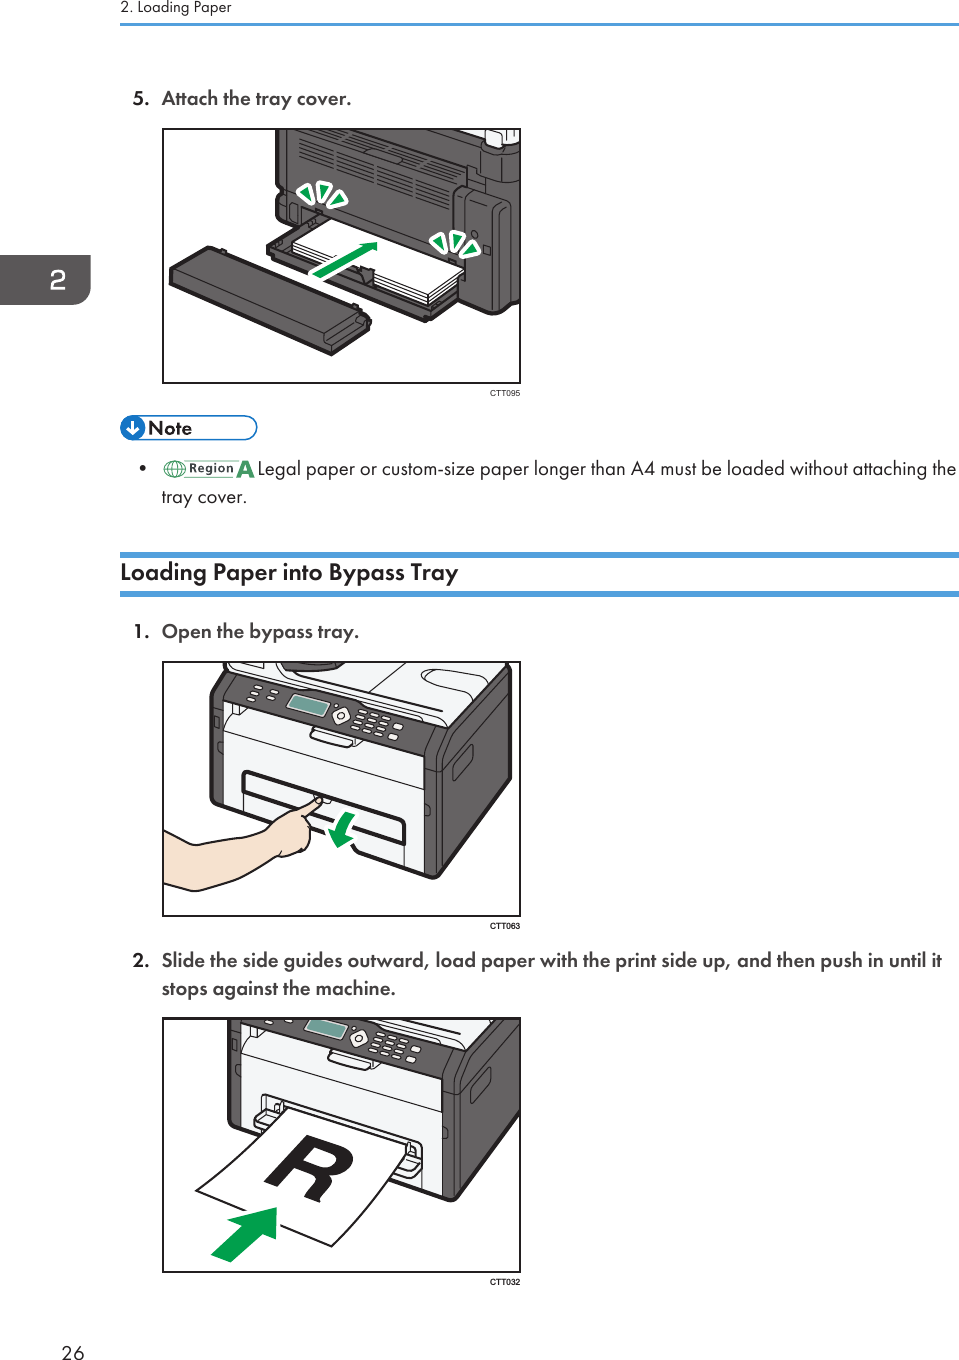
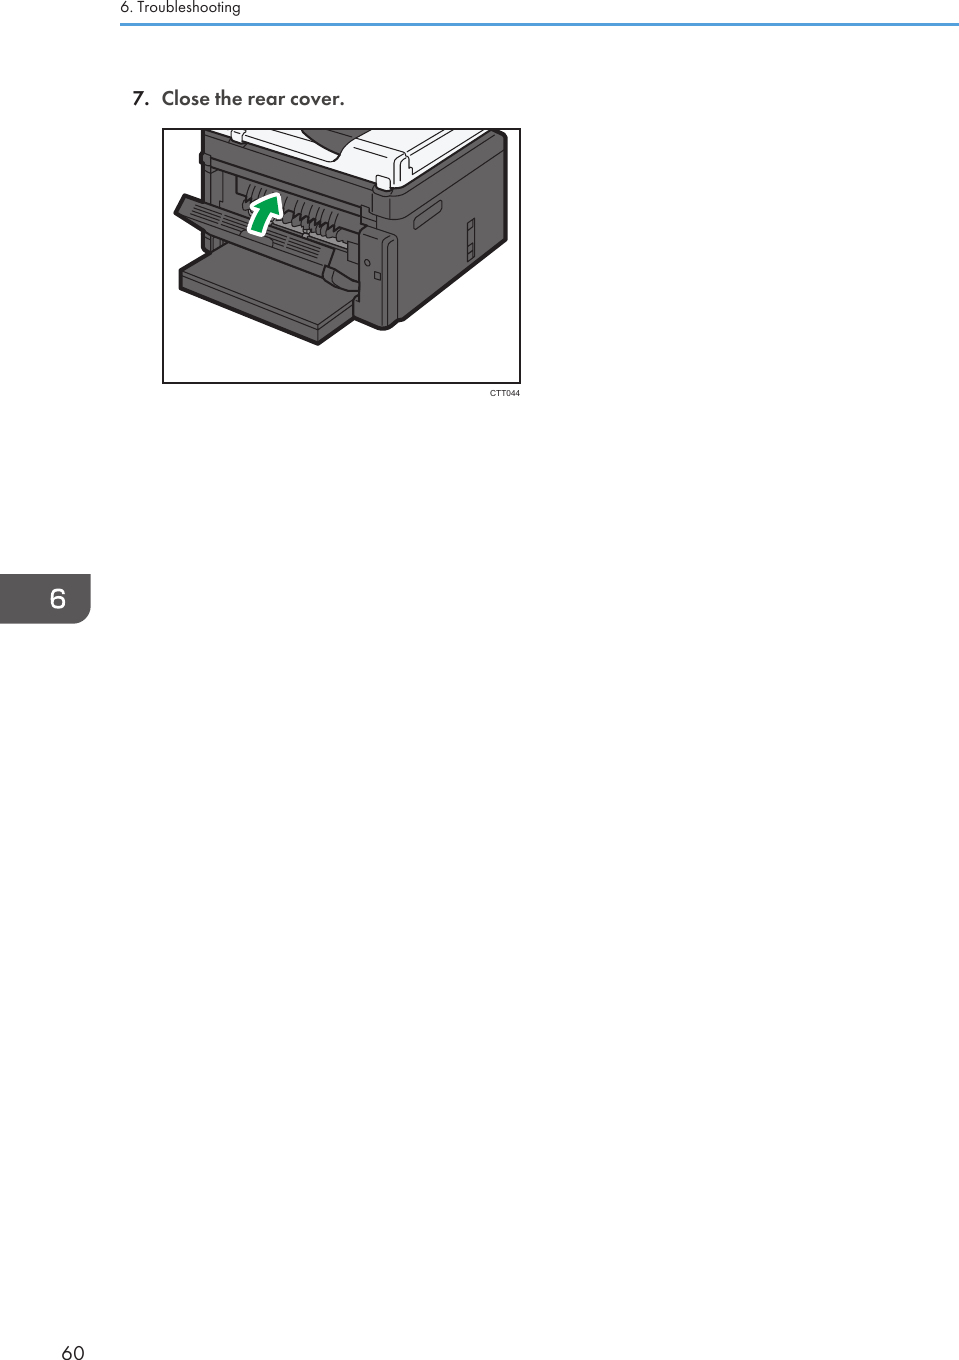
![3. Adjust the side guides to the paper width.CTT033To deliver the sheets face up, open the rear cover.CTT094Specifying Paper Type and Paper Size Using Smart Organizing MonitorThe procedure in this section is an example based on Windows 7. The actual procedure may varydepending on the operating system you are using.Specifying the paper type and paper size1. On the [Start] menu, click [All Programs].2. Click [Smart Organizing Monitor for SP xxx Series].3. Click [Smart Organizing Monitor for SP xxx Series Status].4. If the machine you are using is not selected, click [Select Device...], and then select themachine's model.5. Click [OK].6. On the [Status] tab, click [Change...].7. Select the paper type and paper size, and then click [OK].Loading Paper27](https://usermanual.wiki/Ricoh/PRSP201N1/User-Guide-1902552-Page-29.png)
![8. Click [Close].Changing the custom paper size1. On the [Start] menu, click [All Programs].2. Click [Smart Organizing Monitor for SP xxx Series].3. Click [Smart Organizing Monitor for SP xxx Series Status].4. If the machine you are using is not selected, click [Select Device...], and then select themachine's model.5. Click [OK].6. On the [User Tool] tab, click [Printer Configuration].7. On the [System] tab, select [mm] or [inch] in the [Measurement Unit:] list.8. In the [Horizontal: (100 to 216 mm)] box, enter the width.9. In the [Vertical: (148 to 356 mm)] box, enter the length.10. Click [OK].11. Click [Close].• You cannot specify the settings of the paper in the bypass tray via Smart Organizing Monitor.2. Loading Paper28](https://usermanual.wiki/Ricoh/PRSP201N1/User-Guide-1902552-Page-30.png)
![3. Printing DocumentsBasic OperationUse the printer driver to print a document from your computer.1. After creating a document, open the [Printing Preferences] dialog box in the document'snative application.2. Change any print settings if necessary.The following print settings can be specified using the printer driver:• Printing multiple pages on a sheet• Splitting a single page across multiple sheets• Printing on both sides of sheets• Not having blank pages printed• Having prints sorted• Saving printer driver settings as a file• Recalling and deleting saved printer properties settings• Printing on a custom size paper• Printing a large paper size document on smaller size paper• Reducing and enlarging a document size• Changing the print resolution• Saving on toner when printing• Changing the dithering pattern• Having text stamped on printsFor details about each setting items, click [Help].29](https://usermanual.wiki/Ricoh/PRSP201N1/User-Guide-1902552-Page-31.png)
![3. When setting changes are completed, click [OK].4. Print the document using the print function in the document's native application.• If a paper jam occurs, printing stops halfway. Open the front cover, remove the print cartridge, andthen remove the jammed paper. If the paper cannot be removed in this way, remove it by openingthe fusing cover. Printing will resume automatically once the cover is closed.Printing on Both Sides of Sheets• This function cannot be available with the bypass tray.1. After creating a document, open the [Printing Preferences] dialog box in the document'snative application.2. On the [Setup] tab, in the [Duplex:] list box, select how you want to open the boundoutput.3. After making any additional settings, click [OK].4. Start printing.The machine prints only the one sides of pages first, and then displays on Smart OrganizingMonitor screen a message to reload the outputs turned over.5. Take out all of the prints from the output tray and place them in Tray 1.To print on the reverse side of the prints, turn them over so that the blank side faces down andplace them in Tray 1.PortraitCTT0093. Printing Documents30](https://usermanual.wiki/Ricoh/PRSP201N1/User-Guide-1902552-Page-32.png)
![LandscapeCTT0106. Press the [Start] key.• If the rear cover is open, the paper is delivered face up from the rear. Rearrange the printed sheetsin the correct order.Canceling a Print JobYou can cancel print jobs using either the machine's control panel or your computer, depending on thestatus of the job.Canceling a print job before printing has started1. Double-click the printer icon on the task tray of your computer.2. Select the print job you want to cancel, click the [Document] menu, and then click[Cancel].• If you cancel a print job that has already been processed, printing may continue for a few pagesbefore being canceled.• It may take a while to cancel a large print job.Canceling a print job while printing1. Press the [Job Reset] key.Basic Operation31](https://usermanual.wiki/Ricoh/PRSP201N1/User-Guide-1902552-Page-33.png)
![If a Paper Mismatch OccursIf the paper size or type does not match the print job's settings, the machine reports an error. There aretwo ways to resolve this error:Continue printing using mismatched paperUse the form-feed function to ignore the error and print using mismatched paper.Reset the print jobCancel printing.Continuing Printing Using Mismatched PaperIf the paper is too small for the print job, the printed image will be cropped.1. If the error message is displayed on Smart Organizing Monitor, press the [Start] key.Resetting the Print Job1. If the error message is displayed on Smart Organizing Monitor, press the [Job Reset] key.3. Printing Documents32](https://usermanual.wiki/Ricoh/PRSP201N1/User-Guide-1902552-Page-34.png)
![132CTT1841. Menu areaIf you select a menu item, its content will be shown.2. Header areaThe dialog box for switching to the user mode and administrator mode appears, and each mode's menuwill be displayed.Click [Refresh] button at the upper right in the work area to update the machine information. Click theWeb browser's [Refresh] button to refresh the entire browser screen.3. Basic Information areaDisplays the basic information about of the machine.• If you use an older version of a supported Web browser or the Web browser has JavaScript andcookies disabled, display and operation problems may occur.• If you are using a proxy server, configure the Web browser settings as necessary.• The previous page may not appear even if the back button of the Web browser is clicked. If thishappens, click the refresh button of the Web browser.Changing the Interface LanguageSelect the display language you want use, and then click [Switch].MenuThis section explains the items in the Web browser menu.Guest ModeIn the guest mode, machine status, and settings can be viewed, but the machine settings cannot bechanged.4. Configuring the Machine Using Utilities34](https://usermanual.wiki/Ricoh/PRSP201N1/User-Guide-1902552-Page-36.png)
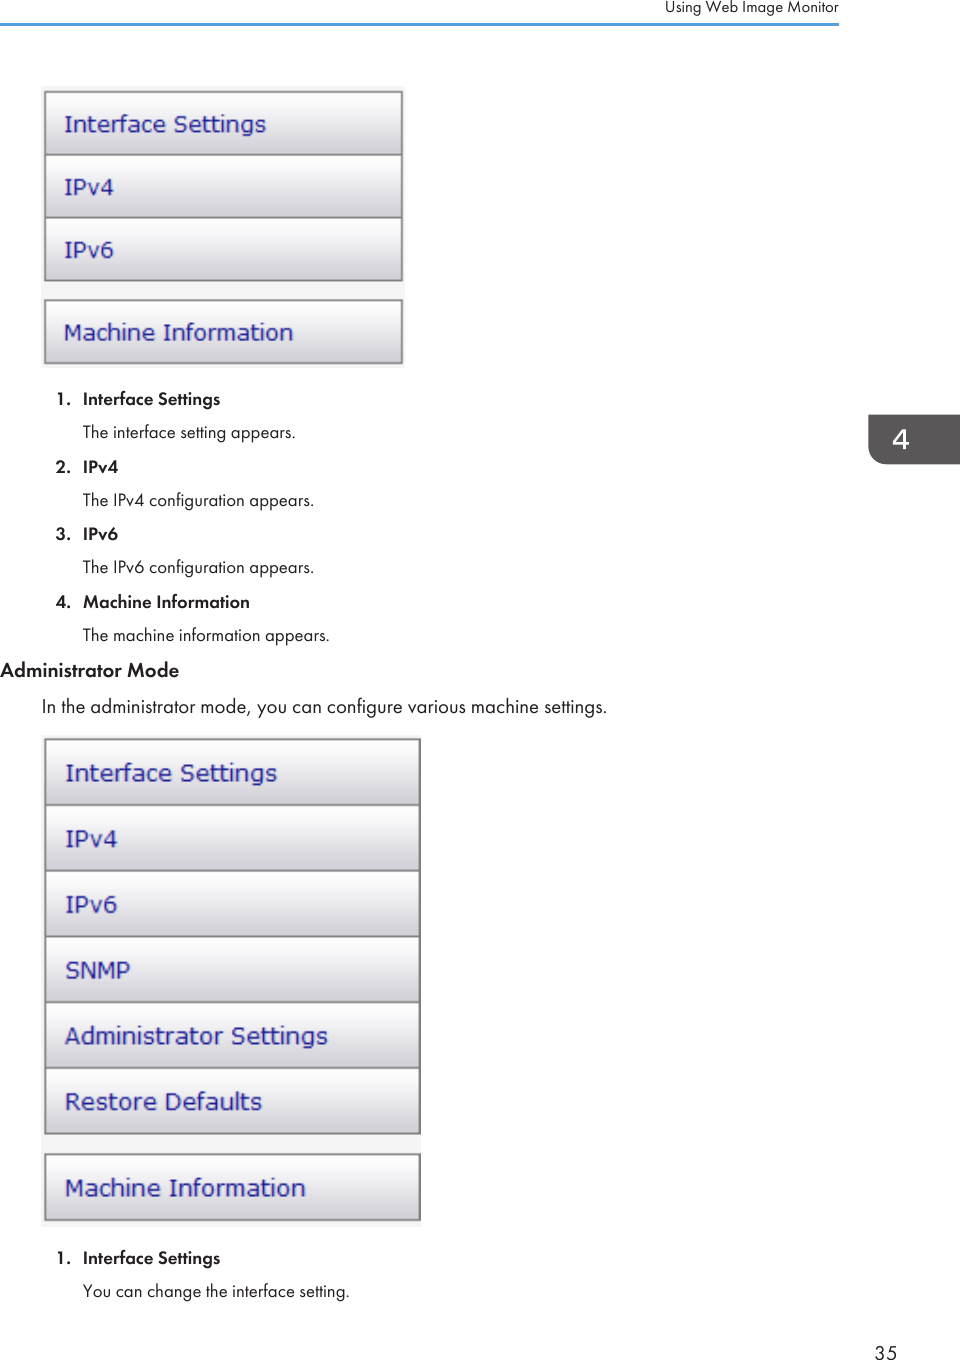
![2. IPv4You can change the IPv4.3. IPv6You can change the IPv6.4. SNMPYou can change the SNMP.5. Administrator SettingsYou can change the administrator password.6. Restore DefaultsYou can reset the administrator password and other network settings.7. Machine InformationThe machine information appears.Changing the Machine SettingsTo change the machine settings, log in to the machine as the administrator.1. Launch the Web browser.2. In the address bar, enter "http://(machine's IP address)/".3. Click [Log in].4. Enter the administrator password, and then click [Log in].If you are logging in for the first time, enter "admin133" as the password.5. In the menu area, select the setting you wish to specify.6. Specify the machine settings.7. Click [OK].The specified settings are transmitted to the machine.Settings ListThis section explains the Web Image Monitor settings.Checking the System InformationOn the top page, you can check the current system information such as the device information, papertray status, toner status, and total counter.4. Configuring the Machine Using Utilities36](https://usermanual.wiki/Ricoh/PRSP201N1/User-Guide-1902552-Page-38.png)
![Item DescriptionStatus Displays the icon indicating the device status.Toner Displays the remaining toner level.Total Counter Displays the total counter.Paper Displays the size and type of paper loaded in Tray 1 and the bypass tray.Configuring the Interface SettingsClick [Interface Settings] to display the page for configuring the interface settings.Item DescriptionNetwork Displays Ethernet operation status.MAC Address Displays the MAC address (Media Access Control Address) of the networkinterface board.I/O timeout(Network)Select whether or not to apply a timeout limit if the machine takes longer than aspecified time to process a job.Using Web Image Monitor37](https://usermanual.wiki/Ricoh/PRSP201N1/User-Guide-1902552-Page-39.png)
![Item DescriptionEthernet Speed Ethernet communication speed. For normal use, select Auto Select. This allowsthe device to select the optimum speed.If communication with the device fails, select 10Mbps Full Duplex, 10MbpsHalf Duplex, 100Mbps Full Duplex, or 100Mbps Half Duplex.Configuring the IPv4 settingsClick [IPv4] to display the page for configuring the IPv4 settings.IPv4Item DescriptionIPv4 Indicates that IPv4 is enabled.EthernetItem DescriptionHost Name Enter the host name you want to set for the network interface board, using up to63 characters. The default is RNP, followed by the MAC address of the activeinterface board. If you change the name to other than the default, the new namecannot begin with "RNP" or "rnp".DHCP Select [Enable] to automatically configure the network settings using the DHCPserver. Select [Disable] to manually configure the network settings.4. Configuring the Machine Using Utilities38](https://usermanual.wiki/Ricoh/PRSP201N1/User-Guide-1902552-Page-40.png)
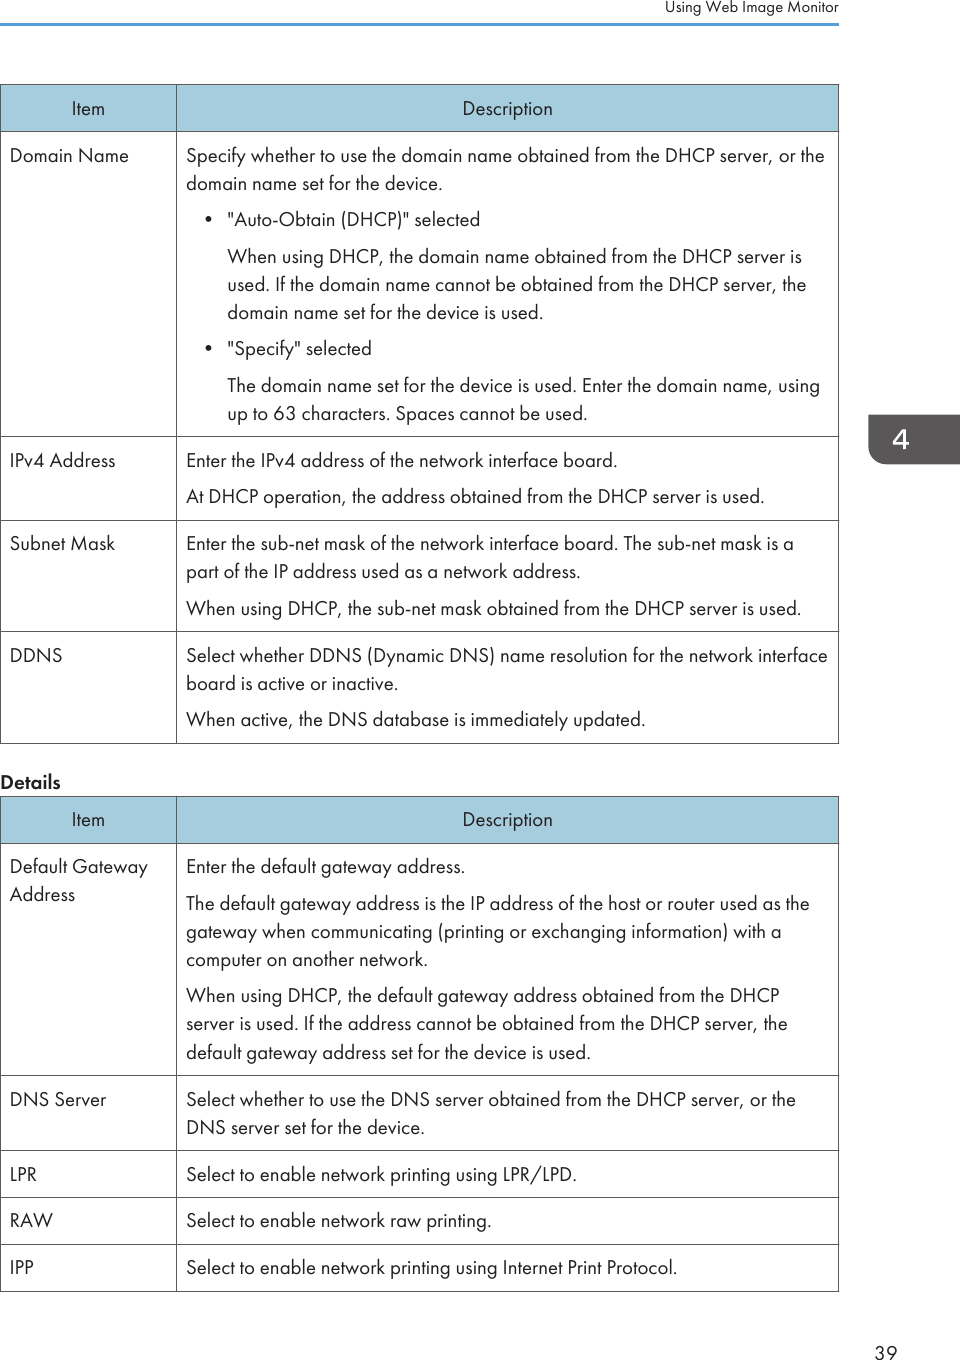
![Configuring the IPv6 settingsClick [IPv6] to display the page for configuring the IPv6 settings.IPv6Item DescriptionIPv6 Select whether IPv6 is active or inactive.EthernetItem DescriptionHost Name Enter the host name you want to set for the network interface board, using up to63 characters. The default is RNP, followed by the MAC address of the activeinterface board. If you change the name to other than the default, the new namecannot begin with "RNP" or "rnp".Domain Name Enter the name of the domain to which the device belongs, using up to 63alphanumeric characters.Link-local Address Displays the link-local address of the network interface board.The link-local address applies only within the local network (local segment) andbegins with "fe80::", followed by an identifier generated from the MAC addressof the active interface board.Stateless Address Displays the stateless address for router.ManualConfigurationAddressIn the left box, enter the IPv6 address assigned for the network interface board.In the right box, enter the prefix length of the IPv6 address, using a valuebetween 0 and 128. The default is 64.• The following addresses cannot be set:Link-local addresses, multicast addresses, loopback addresses, IPv4-compatible addresses, and IPv4-mapped addresses4. Configuring the Machine Using Utilities40](https://usermanual.wiki/Ricoh/PRSP201N1/User-Guide-1902552-Page-42.png)
![Item DescriptionDHCPv6 Select [Enable] to use the DHCPv6 server to automatically configure thenetwork settings. Select [Disable] to manually configure the network settings.DDNS Select whether DDNS (Dynamic DNS) name resolution for the network interfaceboard is active or inactive.When active, the DNS database is immediately updated.DetailsItem DescriptionDefault GatewayAddressEnter the default gateway address.The default gateway address is the IP address of the host or router used as thegateway when communicating (printing or exchanging information) with acomputer on another network.When using DHCP, the default gateway address obtained from the DHCPserver is used. If the address cannot be obtained from the DHCP server, thedefault gateway address set for the device is used.DNS Server Select whether to use the DNS server obtained from the DHCP server, or theDNS server set for the device.DHCPv6 Mode Select an operation mode for DHCPv6.• DHCPv6Operates in DHCPv6 mode.Obtains the IPv6 address and other parameters.• DHCPv6-liteOperates in DHCPv6-lite mode.Obtains parameters except the IPv6 address.IAID IAID is ID to identity IPv6 address and it is needed for acquiring reserved IPv6address.LPR Select to enable network printing using LPR/LPD.RAW Select to enable network raw printing.IPP Select to enable network printing using Internet Print Protocol.Using Web Image Monitor41](https://usermanual.wiki/Ricoh/PRSP201N1/User-Guide-1902552-Page-43.png)
![Configuring the SNMP SettingsClick [SNMP] to display the page for configuring the SNMP settings.SNMPItem DescriptionSNMP Select whether SNMP is active or inactive for the interface board(s).SNMPv1,v2 SettingItem DescriptionSNMPv1 TrapCommunicationSelect whether to send SNMPv1 trap.SNMPv2 TrapCommunicationSelect whether to send SNMPv2 trap.CommunityItem DescriptionCommunity Name Enter the name of the community to which the network interface board belongs,using up to 15 characters. If the community name is different from that of thehosts, requests from the hosts will not be accepted.4. Configuring the Machine Using Utilities42](https://usermanual.wiki/Ricoh/PRSP201N1/User-Guide-1902552-Page-44.png)
![Item DescriptionAccess Type In the list, select the access rights to the community.• Not AccessibleNo access permitted.• read-onlyYou can read the information, but not edit it.• read-writeYou can read and edit the information.• trapNotifies the manager with information about errors. Enter the recipient ofthe error notification in the Manager Address box.Protocol, Active/InactiveConfigure settings for each protocol used by the community.Manager Address Enter the host computer's address according to the protocol in use.Configuring the Administrator PasswordClick [Administrator Settings] to specify the administrator password.Administrator SettingsItem DescriptionCurrent Password Enter the current administrator password. The default is "admin133".New Password Enter the new administrator password. You can enter it using three to eightcharacters.Confirm Password Enter the same password again, to confirm.Using Web Image Monitor43](https://usermanual.wiki/Ricoh/PRSP201N1/User-Guide-1902552-Page-45.png)
![Resetting the Machine’s SettingsClick [Restore Defaults] to reset the network settings and administrator password.Checking the Machine InformationClick [Machine Information] to display machine information.Machine InformationItem DescriptionFirmware Version Displays the version of firmware installed on the machine.Engine FW Version Displays the version of the firmware for the machine engine.Machine ID Displays the serial number of the machine.Total Memory Displays the total memory installed in the machine.4. Configuring the Machine Using Utilities44](https://usermanual.wiki/Ricoh/PRSP201N1/User-Guide-1902552-Page-46.png)
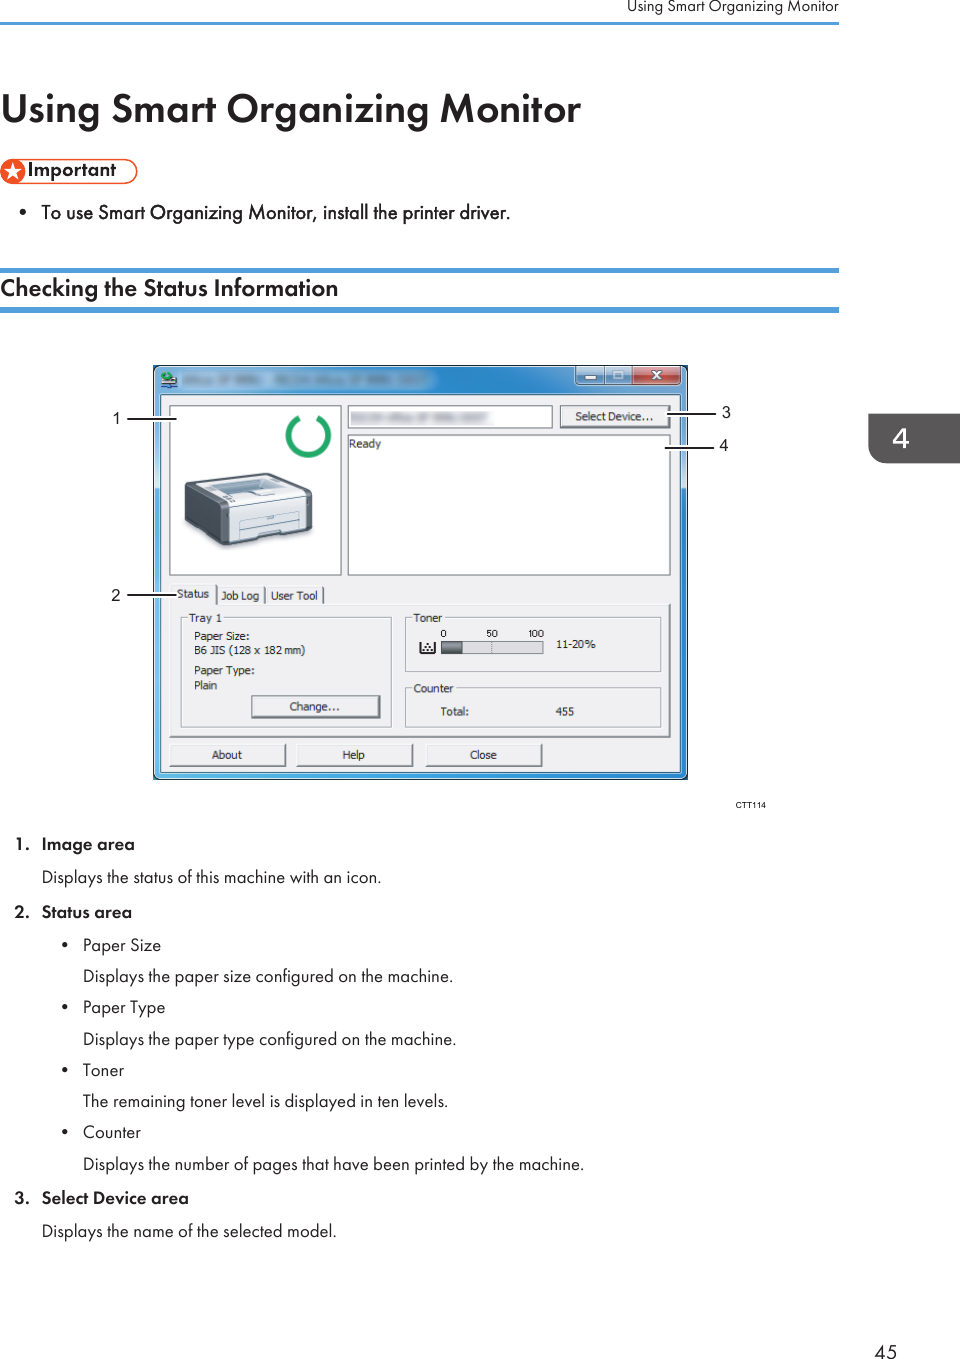
![4. Message areaDisplays the status of this machine with a message.For details about error messages, see page 64 "Error and Status Messages Appear on the SmartOrganizing Monitor".Configuring the Machine SettingsSmart Organizing Monitor is used to modify the machine’s settings.1. On the [Start] menu, click [All Programs].2. Click [Smart Organizing Monitor for SP xxx Series].3. Click [Smart Organizing Monitor for SP xxx Series Status].4. If the machine you are using is not selected, click [Select Device...], and then select themachine's model.5. Click [OK].6. On the [User Tool] tab, click [Printer Configuration].7. Change the settings if necessary.8. Click [OK].9. Click [Close].Tab SettingsThis section provides a tab-by-tab overview of the machine settings that can be modified using SmartOrganizing Monitor. For more information on each setting item, see the Smart Organizing MonitorHelp.System tab• Register custom paper sizes.• Adjust the printing position or density to improve the printing quality when printed results arenot satisfactory.• Enable or disable Energy Saver Mode, and specify the amount of time that will elapse beforeswitching to it.• Update the machine firmware.Printer tab• Configure how the machine behaves when its paper size and/or type settings do not matchthose of the printer driver.• Specify the period of time the machine waits if it fails to receive a print job.4. Configuring the Machine Using Utilities46](https://usermanual.wiki/Ricoh/PRSP201N1/User-Guide-1902552-Page-48.png)
![Printing the Configuration Page• When printing the test page, set the paper size to A4 or Letter. When printing other reports, set thepaper size to A4, Letter, or Legal.1. On the [Start] menu, click [All Programs].2. Click [Smart Organizing Monitor for SP xxx Series].3. Click [Smart Organizing Monitor for SP xxx Series Status].4. If the machine you are using is not selected, click [Select Device...], and then select themachine's model.5. Click [OK].6. On the [User Tool] tab, select [Test Page] or [Configuration Page] in the [List / Test:] list.7. Click [Print].Updating the Firmware• In no event shall the company be held liable to customers for damages of any kind resulting fromuse or loss of use of this software.• The company shall also not be held liable for any disputes between the customer and third partiesresulting from any use or loss of use of this software.• To make sure that a firmware update has successfully completed, print the configuration pagebefore and after the update.• Make sure to never disconnect the USB cable or Ethernet cable during a firmware update.• Disconnect any unnecessary cables from the machine when running a firmware update.• If necessary, modify power management settings on your computer in advance so that thecomputer will not enter standby or sleep mode during a firmware update.• Download the firmware from the manufacturer's Web site.To update the firmware, use the Smart Organizing Monitor from Windows.1. On the [Start] menu, click [All Programs].2. Click [Smart Organizing Monitor for SP xxx Series].3. Click [Smart Organizing Monitor for SP xxx Series Status].4. If the machine you are using is not selected, click [Select Device...], and then select themachine's model.5. Click [OK].Using Smart Organizing Monitor47](https://usermanual.wiki/Ricoh/PRSP201N1/User-Guide-1902552-Page-49.png)
![6. On the [User Tool] tab, click [Printer Configuration].7. On the [System] tab, click [Printer Firmware Update...].8. Click [OK].9. Specify the location of the DWN file, and then click [Open].10. After a message is displayed on the Smart Organizing Monitor to indicate that thefirmware update has completed, turn the machine's power Off and then On again.4. Configuring the Machine Using Utilities48](https://usermanual.wiki/Ricoh/PRSP201N1/User-Guide-1902552-Page-50.png)


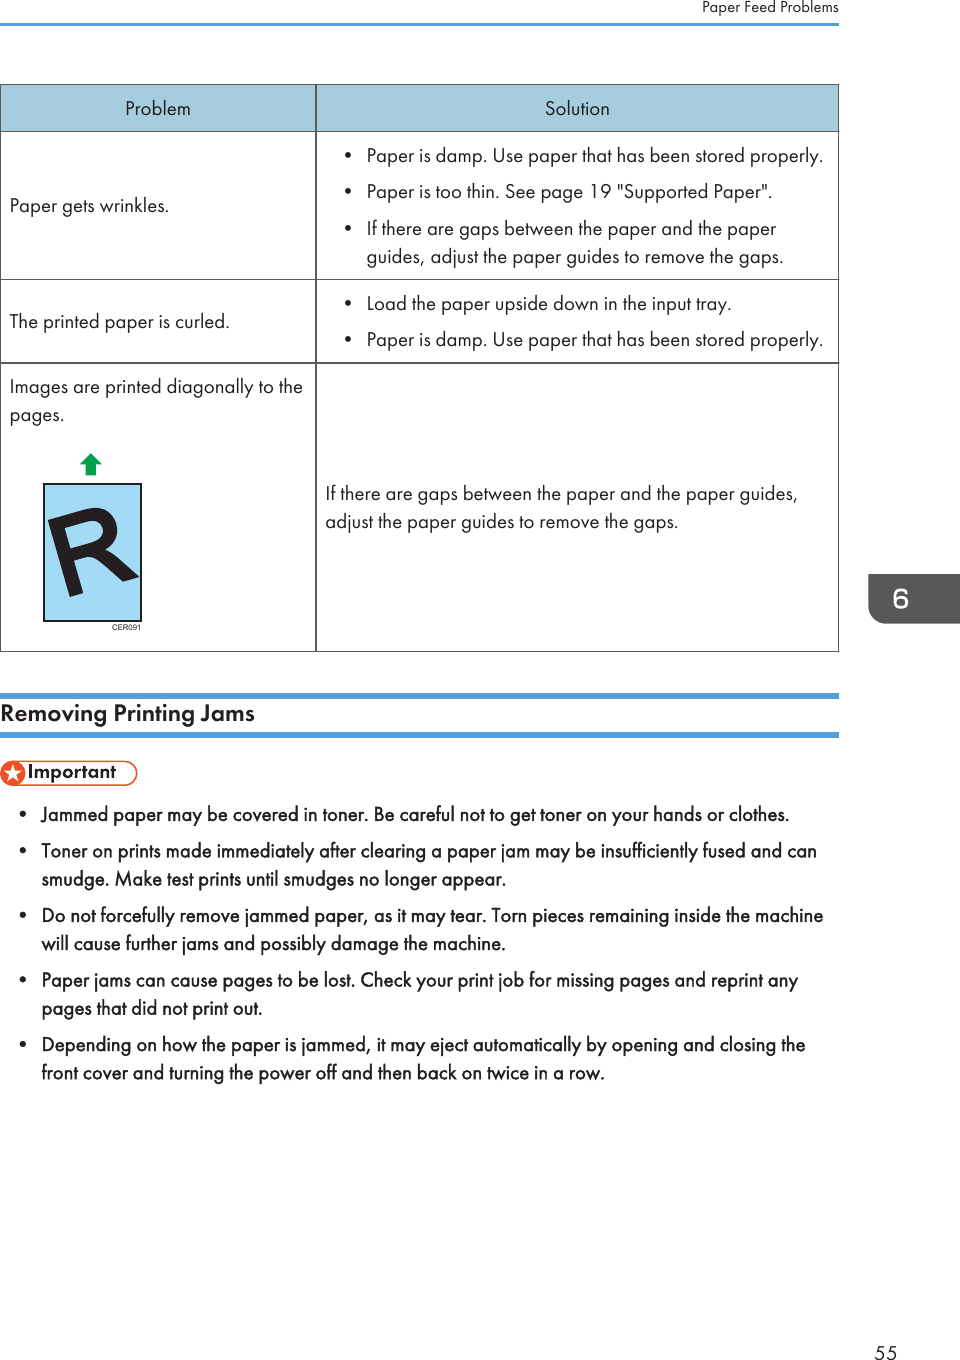
![Printer ProblemsProblem SolutionAn error occurs.If an error occurs when printing, change the computer orprinter driver settings.• Check the printer icon name does not exceed 32alphanumeric characters. If it does, shorten it.• Check whether other applications are operating.Close any other applications, as they may be interferingwith printing. If the problem is not resolved, closeunneeded processes too.• Check that the latest printer driver is being used.A print job is canceled. • Set I/O Timeout to a larger value than the currentsettings.There is considerable delay betweenthe print start command and actualprinting.• Processing time depends on data volume. High volumedata, such as graphics-heavy documents, take longer toprocess. Wait for a while.• To speed up printing, reduce the printing resolution usingthe printer driver.The whole printout is blurred.• Paper is damp. Use paper that has been stored properly.See page 19 "Supported Paper".• If you enable [Toner Save:], printing is generally lessdense.• Condensation may have collected. If rapid change intemperature or humidity occurs, use this machine onlyafter it has acclimatized.Cannot print properly when using acertain application, or cannot printimage data properly.Some characters are printed faintlyor not printed.• Change the print quality settings.The print position is misaligned.Adjust the print position by specifying [Tray1: Registration] or[Bypass Tray: Registration] on the [System] tab in SmartOrganizing Monitor.6. Troubleshooting62](https://usermanual.wiki/Ricoh/PRSP201N1/User-Guide-1902552-Page-64.png)
![Error and Status Messages Appear on theSmart Organizing MonitorMessage Causes SolutionsPrinter Power Off(CommunicationError)• The power cable of themachine is not plugged in.• The power of the machineis not turned ON.• The USB cable or Ethernetcable is not connected.• Check the printer power cord.• Check the printer power switch is on.• Check the USB cable or Ethernetcable is properly connected.Out of Paper: Tray 1 Tray 1 has run out of paper. Load paper into Tray 1. See page 23"Loading Paper".Out of Paper: BypassTrayThe bypass tray has run out ofpaper.Load paper into the bypass tray. Seepage 23 "Loading Paper".Misfeed: Inner/OuterA paper jam has occurred in themachine.Remove the jammed paper. See page 54"Paper Feed Problems".Paper Size MismatchThe paper size specified on themachine and the size specifiedin the printer driver do notmatch.For details about specifying the paper sizesetting on the machine, see page 23"Loading Paper". For details aboutchanging the paper size setting in theprinter driver, see the printer driver Help.Paper TypeMismatchThe paper type specified on themachine and the type specifiedin the printer driver do notmatch.For details about changing the paper typesetting of the machine, see page 23"Loading Paper". For details aboutchanging the paper type setting in theprinter driver, see the printer driver Help.Toner Almost Empty The print cartridge is almostempty. Prepare a new print cartridge.Out of Toner The machine has run out of thetoner.Replace the print cartridge. See page 49"Replacing the Print Cartridge".Memory Overflow The data is too large orcomplex to print.Select [600 x 600 dpi] in [Resolution:] toreduce the size of data. For details, see theprinter driver Help.6. Troubleshooting64](https://usermanual.wiki/Ricoh/PRSP201N1/User-Guide-1902552-Page-66.png)