Ricoh PRSP311DNW1 Printer User Manual
Ricoh Company Ltd Printer
UserManual.wiki
>
Ricoh
>
PRSP311DNW1 User Manual
user manual
Navigation menu
Upload a User Manual
Namespaces
Wiki Guide
HTML
PDF
Info
Views
User Manual
Discussion / Help
Navigation


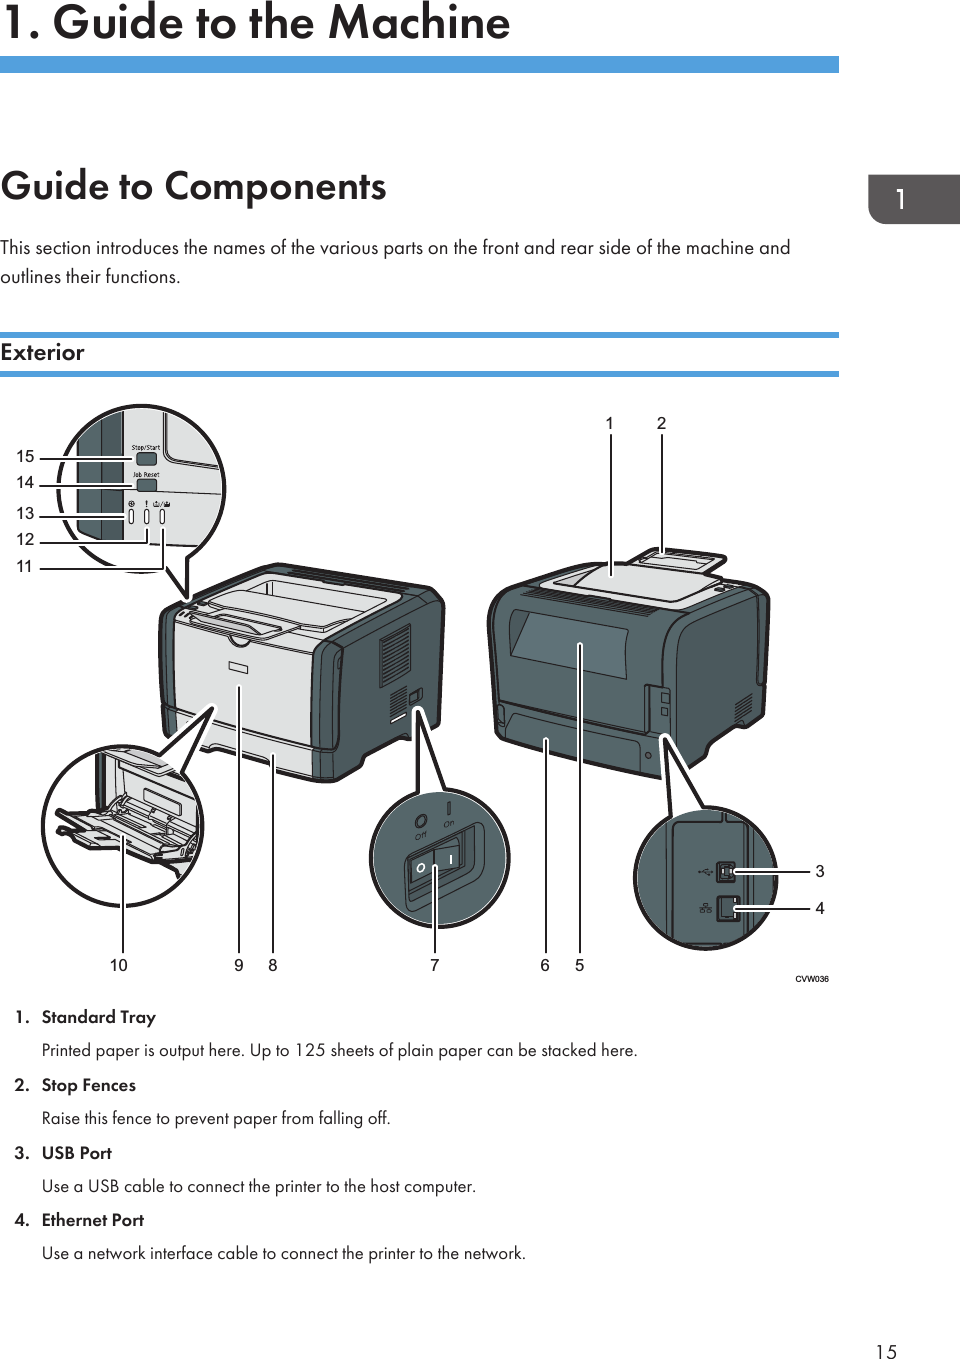
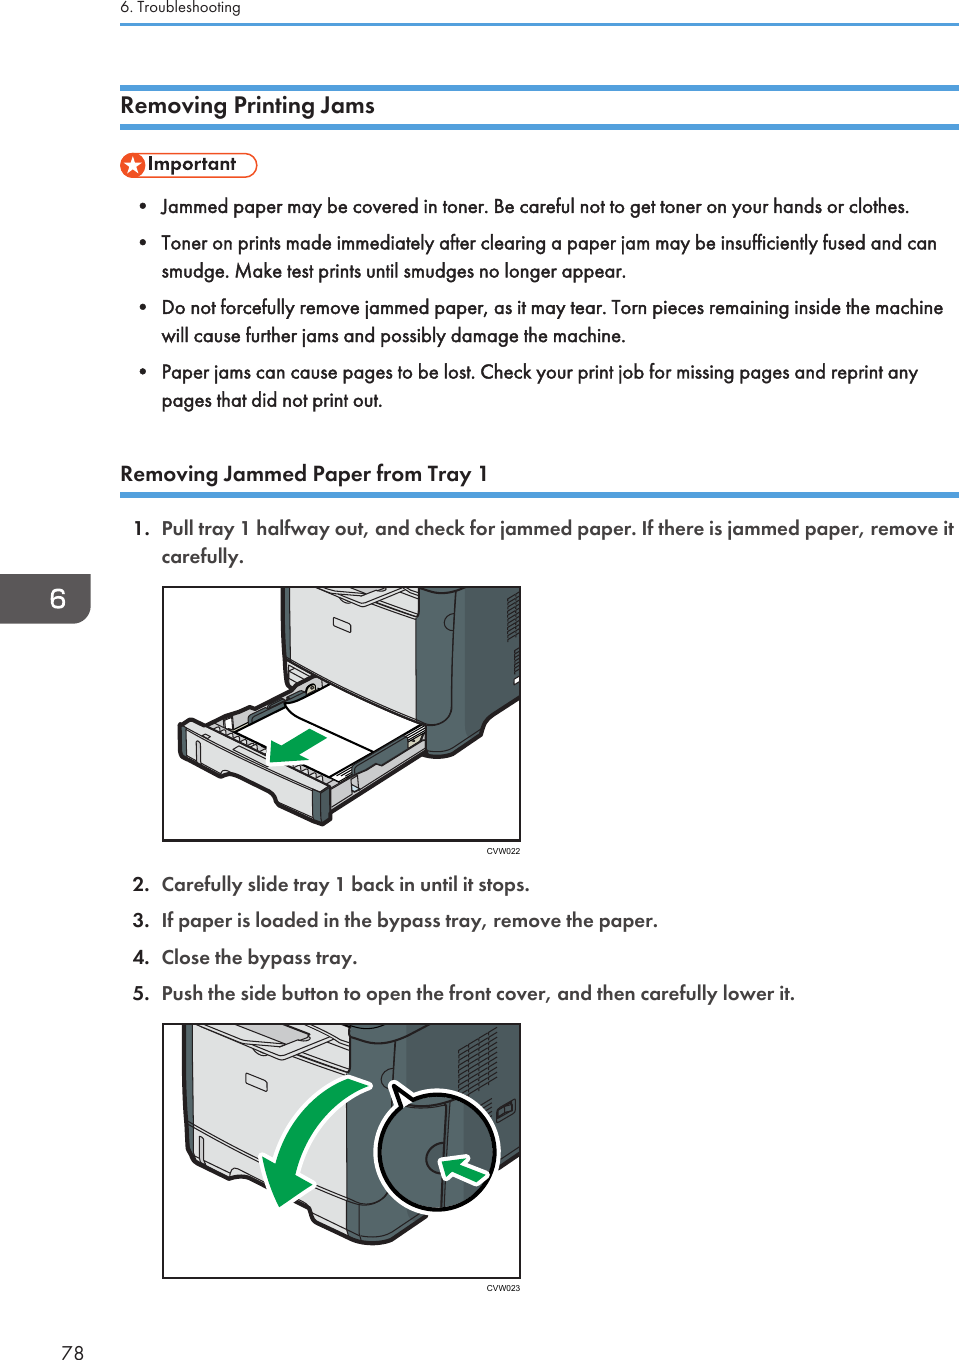
![5. Rear CoverOpen this cover to deliver sheets face up or remove jammed paper.6. Tray 1 Rear CoverRemove this cover when loading paper longer than A4 in Tray 1.7. Power SwitchUse this switch to turn the power on or off.8. Tray 1This tray can hold up to 250 sheets of plain paper.9. Front CoverLift up this cover to replace consumables or clear a paper jam.10. Bypass TrayThis tray can hold 50 sheets of plain paper.11. Toner/Paper End IndicatorThis indicator flashes red when the toner is nearly empty, and it lights up when the machine runs out of paperor toner and when the toner is not set correctly.12. Alert IndicatorThis indicator flashes red when paper jams occur, and it lights up when the paper settings do not match thesettings specified by the driver, and when other errors occur.13. Power IndicatorThis indicator lights up blue when the machine is turned on. It flashes when a print job is received.14. [Job Reset] keyPress this key to cancel a job that is currently printing.15. [Stop/Start] keyIf you press this key, the printer stops receiving data, and printing is not possible.1. Guide to the Machine16](https://usermanual.wiki/Ricoh/PRSP311DNW1/User-Guide-1911780-Page-18.png)
![Installing the Driver and SoftwareYou can install the necessary driver for this machine using the included CD-ROM.The supplied drivers are supported by the following operating systems:•PCL 6 printer driver: Windows XP/Vista/7/8 and Windows Server 2003/ 2003R2/2008/2008 R2/2012• Smart Organizing Monitor: Windows XP/Vista/7/8 and Windows 2003/ 2003R2/2008/2008 R2/2012The procedure in this section is an example based on Windows 7. The actual procedure may varydepending on the operating system you are using.• Be sure to disconnect the USB cable or Ethernet cable from the machine and turn the machine offbefore beginning the installation.Quick Install for USBUse Quick Install to install the printer driver, and Smart Organizing Monitor from the CD-ROM.1. Close all applications except this manual.2. Insert the CD-ROM into the CD-ROM drive.3. Select a language for the interface, and then click [OK].4. From the CD-ROM menu, click [USB Quick Install].5. Follow the instructions in the installation wizard.Quick Install for NetworkUse Quick Install to install the printer driver, and Smart Organizing Monitor from the CD-ROM.1. Close all applications except this manual.2. Insert the CD-ROM into the CD-ROM drive.3. Select a language for the interface, and then click [OK].4. From the CD-ROM menu, click [Network Quick Install].5. Follow the instructions in the installation wizard.1. Guide to the Machine22](https://usermanual.wiki/Ricoh/PRSP311DNW1/User-Guide-1911780-Page-24.png)
![Upgrading or Deleting the Printer DriverUpgrading the printer driver1. On the [Start] menu, click [Devices and Printers].2. Right-click the icon of the printer model you want to modify, and then click [Printerproperties].3. Click the [Advanced] tab.4. Click [New Driver...], and then click [Next].5. Click [Have Disk...].6. Click [Browse...], and then select the printer driver location.7. Click [OK], and then specify the printer model.8. Click [Next].9. Click [Finish].10. Click [OK] to close the printer properties window.11. Restart the computer.Deleting the printer driver1. On the [Start] menu, click [Devices and Printers].2. Right-click the icon of the printer you want to delete, and then click [Remove device].3. Click [Yes].4. Click any printer icon, and then click [Print server properties].5. Click the [Drivers] tab.6. Click [Change Driver Settings] if it is displayed.7. Click [Remove...].8. Select [Remove driver and driver package.], and then click [OK].9. Click [Yes].10. Click [Delete].11. Click [OK].12. Click [Close] to close the print server properties window.Installing the Driver and Software23](https://usermanual.wiki/Ricoh/PRSP311DNW1/User-Guide-1911780-Page-25.png)
![Installing Smart Organizing MonitorSmart Organizing Monitor is a utility that allows you to modify the machine’s settings or view themachine’s status from your computer. For details, see page 25 "About Operation Tools".1. Close all applications except this manual.2. Insert the CD-ROM into the CD-ROM drive.3. Select a language for the interface, and then click [OK].4. From the CD-ROM menu, click [Smart Organizing Monitor].5. Follow the instructions in the installation wizard.1. Guide to the Machine24](https://usermanual.wiki/Ricoh/PRSP311DNW1/User-Guide-1911780-Page-26.png)


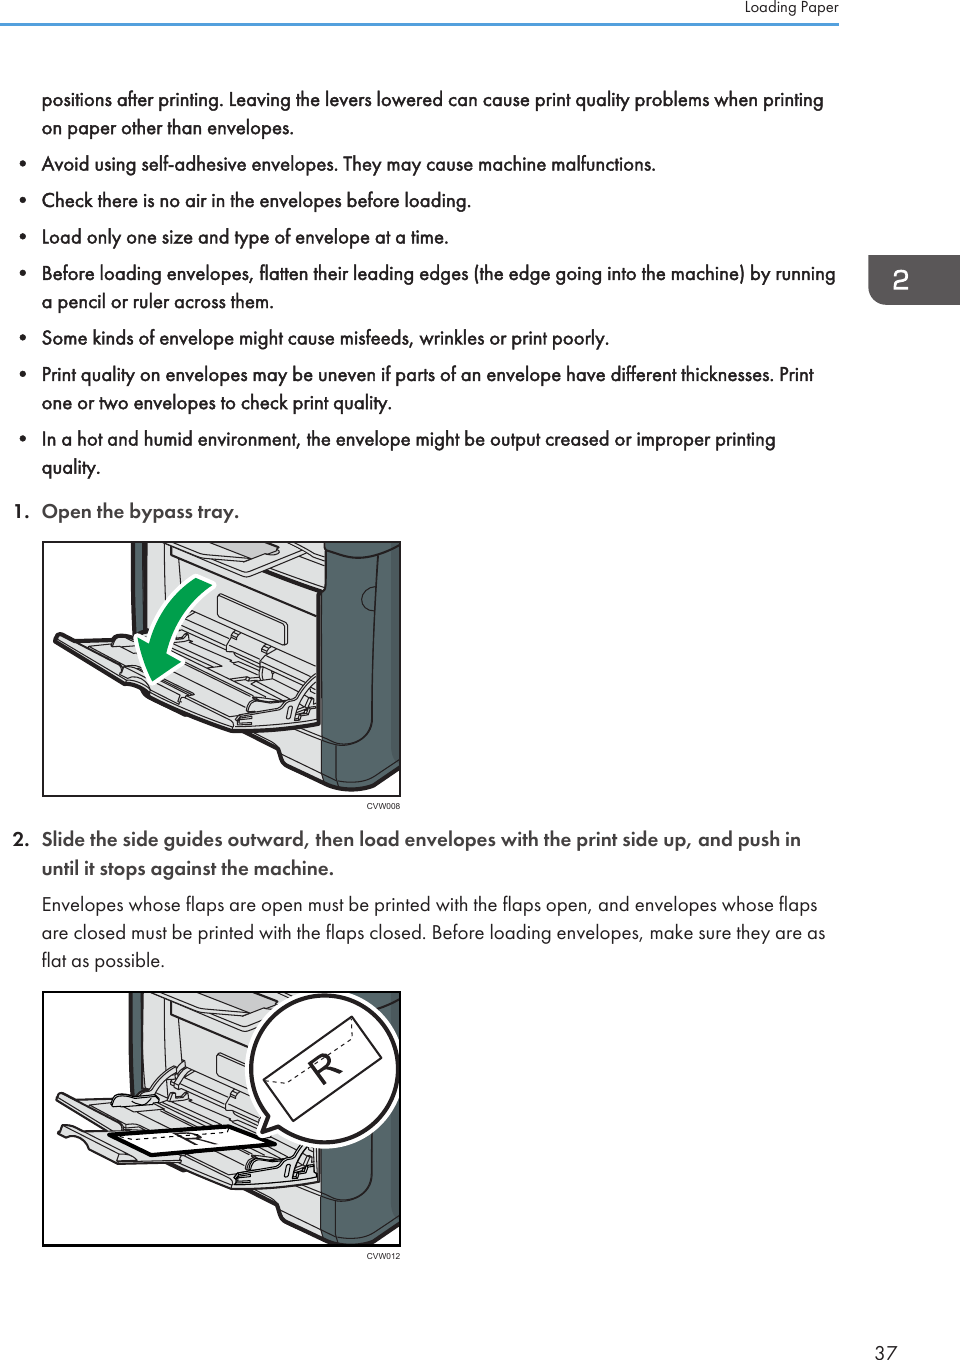
![• If printed envelopes come out badly creased, load the envelopes in the opposite direction, andthen rotate the print object by 180 degrees using the printer driver before printing. For details, seethe printer driver Help.Specifying Paper Type and Paper Size Using Smart Organizing MonitorThe procedure in this section is an example based on Windows 7. The actual procedure may varydepending on the operating system you are using.Specifying the paper type and paper size1. On the [Start] menu, click [All Programs].2. Click [Smart Organizing Monitor].3. Click [Smart Organizing Monitor Status].4. If the machine you are using is not selected, click [Connect Printer], and then select themachine's model.5. Click [OK].6. On the [User Tools] tab, click [Printer Configuration].If you are requested to enter an access code, enter the access code and then click [OK].7. Select the paper type and paper size, and then click [OK].8. Click [Close].Specifying a custom paper size1. On the [Start] menu, click [All Programs].2. Click [Smart Organizing Monitor].3. Click [Smart Organizing Monitor Status].4. If the machine you are using is not selected, click [Connect Printer], and then select themachine's model.5. Click [OK].6. On the [User Tools] tab, click [Printer Configuration].If you are requested to enter an access code, enter the access code and then click [OK].7. On the [Paper Input] tab, select [Custom Paper Size] in the [Paper Size] list.8. In the [Unit] list, select [mm] or [inch].9. In the [Horizontal] box and [Vertical] box, specify the width and length.10. Click [OK].Loading Paper39](https://usermanual.wiki/Ricoh/PRSP311DNW1/User-Guide-1911780-Page-41.png)
![11. Click [Close].2. Loading Paper40](https://usermanual.wiki/Ricoh/PRSP311DNW1/User-Guide-1911780-Page-42.png)
![3. Printing DocumentsBasic OperationThe following procedure explains how to perform basic printing.1. Open the printer properties dialog box in your document's application.For details about each setting, click [Help]. You can also click the information icons to showconfiguration information.2. Set printing options as necessary, and then click [OK].The printer properties dialog box closes.3. Click [OK].• If a paper jam occurs, printing stops after the current page has been printed out. After the jammedpaper is removed, printing restarts from the jammed page automatically. For details about how toremove the jammed paper, see page 78 "Removing Printing Jams".•After printing on envelopes, make sure to pull up the levers for printing on envelopes back to theiroriginal positions. Leaving the levers lowered can cause print quality problems when printing onpaper other than envelopes. For details about the levers for printing on envelopes, see page 27"Loading Paper".Canceling a Print JobYou can cancel print jobs using either the machine's control panel or your computer, depending on thestatus of the job.41](https://usermanual.wiki/Ricoh/PRSP311DNW1/User-Guide-1911780-Page-43.png)
![Canceling a print job before printing has started• Windows1. Double-click the printer icon on the task tray of your computer.2. Select the print job you want to cancel, click the [Document] menu, and then click[Cancel].• If you cancel a print job that has already been processed, printing may continue for a few pagesbefore being canceled.•It may take a while to cancel a large print job.Canceling a print job while printing1. Press the [Job Reset] key.CVW2543. Printing Documents42](https://usermanual.wiki/Ricoh/PRSP311DNW1/User-Guide-1911780-Page-44.png)
![If a Paper Mismatch OccursThe machine reports an error if:•The paper type does not match the print job's settings when [Input Tray;] is set to [Auto Tray Select].• The paper size does not match the print job's settings when [Size Mismatch Detection] in [TrayPaper Settings] under system settings is enabled.There are two ways to resolve these errors:Continue printing using mismatched paperUse the form-feed function to ignore the error and print using mismatched paper.Reset the print jobCancel printing.Continuing Printing Using Mismatched PaperIf the paper is too small for the print job, the printed image will be cropped.1. If the Alert indicator lights up, press the [Stop/Start] key.CVW253If a Paper Mismatch Occurs43](https://usermanual.wiki/Ricoh/PRSP311DNW1/User-Guide-1911780-Page-45.png)
![Resetting the Print Job1. If the Alert indicator lights up, press the [Job Reset] key.CVW2543. Printing Documents44](https://usermanual.wiki/Ricoh/PRSP311DNW1/User-Guide-1911780-Page-46.png)
![Print Output FunctionsYou can specify the form of print outputs according to your purposes. This section briefly describes someof the settings that you can specify.Printing multiple sets of a documentYou can print multiple sets of the same document.Collating the output in document batchesYou can print complete sets of a multiple-page document one set at a time (P1, P2, P1, P2 ...). If thisfunction is not used when printing multiple sets, prints will be output in page batches (P1, P1, P2,P2 ...). This function is useful when, for example, making presentation materials.Changing orientation or rotating the imageYou can change the orientation of an image to portrait or landscape. You can also rotate theimage by 180 degrees. Use rotation to prevent an image from being printed upside down whenusing paper that a predefined top and bottom (such as letterhead paper).Printing multiple pages per sheetYou can print multiple pages onto one sheet of paper.When using this function, a suitable reduction ratio is selected automatically based on the papersize and the number of pages you want to fit on each sheet.Printing on both sides of paper (duplex printing)You can print on both sides of paper.Reducing or enlarging the documentYou can reduce or enlarge documents by a specific ratio, from 25% to 400% in 1% increments.You can also reduce or enlarge documents automatically to fit a specific paper size. This function isuseful, for example, when printing Web pages.If the [Enable Large Papers] option is selected, A3/11” × 17”/B4/8K documents can be scaledto a size that the machine supports, so it can then be printed out.Suppressing printing of blank pagesIf a print job contains blank pages, they can be prevented from being printed.Printing with a cover pageYou can add a cover page to the print job.You can select to leave the cover page blank, or print the first page of the document on the coverpage. If a cover page is inserted into a duplex job, you can print on its back side also.Paper for the cover page can either be the same as or different from the remaining pages.Printing on custom size paperYou can print using non-standard size paper by specifying the size of the paper as custom size.3. Printing Documents46](https://usermanual.wiki/Ricoh/PRSP311DNW1/User-Guide-1911780-Page-48.png)
![To specify a non-standard paper size, select [Custom Paper Size] from the [Document Size:] list,and then click the [Custom Paper Size...] button in the lower part of the dialog box to configure thepaper size.Superimposing text on prints (watermark)You can superimpose watermark text on prints. Various predefined watermarks are provided. Youcan also create your own watermarks.• Some of the functions described above might not be available depending on the printer driver oroperating system. For details, see the printer driver Help.Using Various Print Functions47](https://usermanual.wiki/Ricoh/PRSP311DNW1/User-Guide-1911780-Page-49.png)

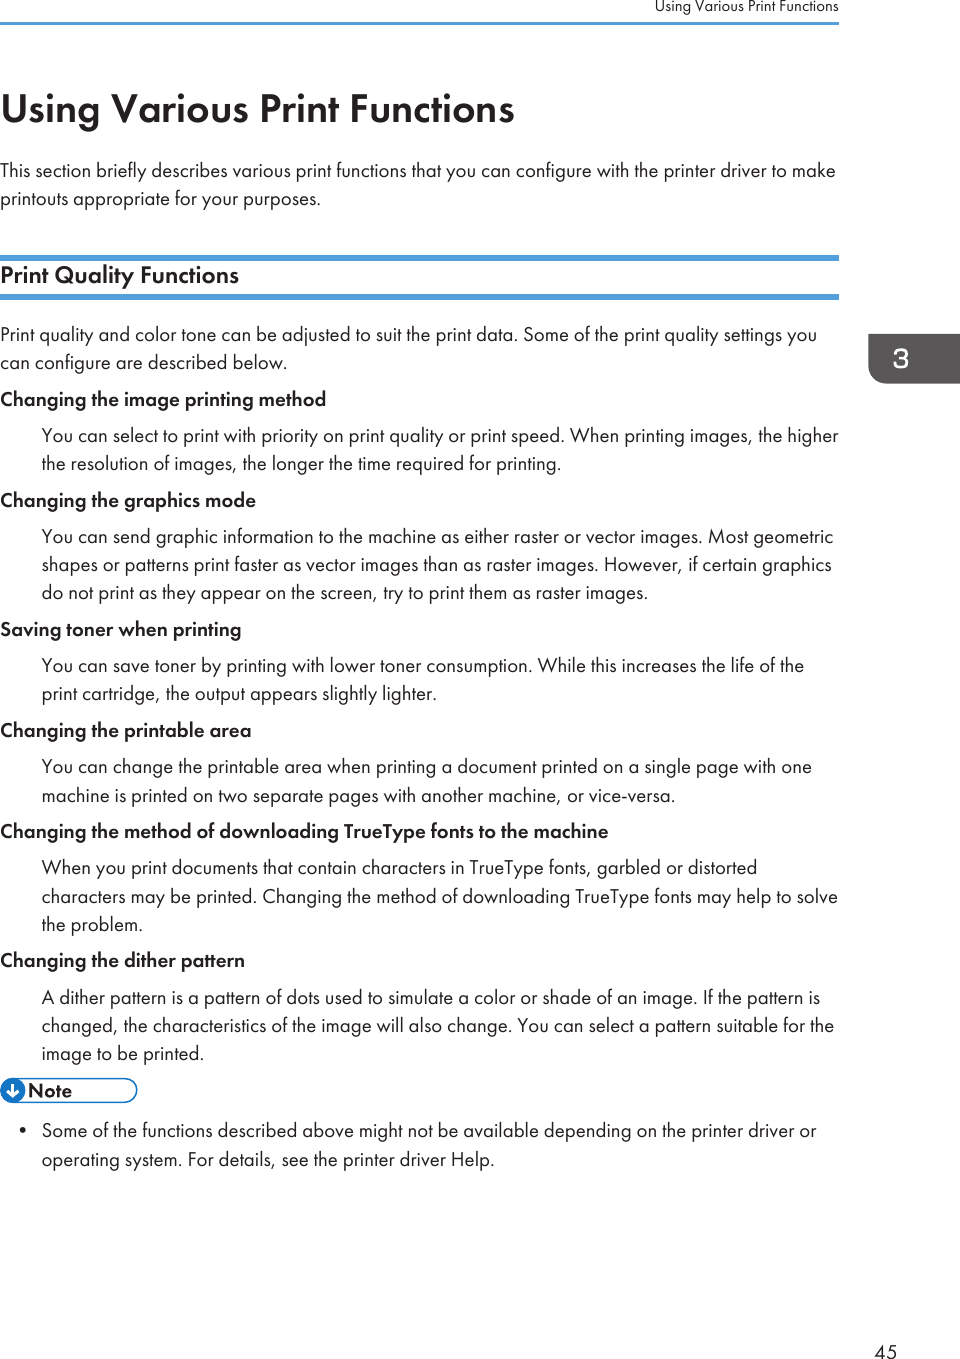
![Top pageEvery Web Image Monitor page is divided into the following areas:14233CVW2511. Menu areaIf you select menu, its content will be shown on the work area, or the sub area.2. Tab areaContains menus for the Status and Counter modes and tabs for switching between them.3. HelpIf you click this icon, help index page opens.4. Main areaDisplays the contents of the item selected in the menu area.Printer information in the main area is not automatically updated. Click [Refresh] at the upper right in the mainarea to update the printer information. Click the Web browser's [Refresh] button to refresh the entire browserscreen.• If you use an older version of a supported Web browser or the Web browser has JavaScript andcookies disabled, display and operation problems may occur.•If you are using a proxy server, configure the Web browser settings as necessary. For details aboutthe settings, contact your administrator.• The previous page may not appear even if the back button of the Web browser is clicked. If thishappens, click the refresh button of the Web browser.Changing the Interface LanguageSelect the desired interface language from the [Language] list.4. Configuring the Machine Using Utilities50](https://usermanual.wiki/Ricoh/PRSP311DNW1/User-Guide-1911780-Page-52.png)
![Install the Help Source FileFollow the procedure below to install the help.1. Copy the [WIMHELP] folder on the CD-ROM to your computer's hard drive.The example procedures explain how to copy the [WIMHELP] folder to theC:\tmp\WIMHELP directory.2. Access Web Image Monitor, and then click [Help Source File Setting] on the[Administrator Tools] page.3. In the text box, enter “C:\tmp\WIMHELP\”.4. Enter the administrator password if required.5. Click [OK].Displaying HelpTo use Help for the first time, you need to install its source file from the CD-ROM provided with thisprinter.• By clicking , the Help icon in the header area, the contents of Help appear.•By clicking , the Help icon in the main area, Help for the setting items in the main area appears.MenuThis section explains the items in the Web browser menu.HomeCheck the current system information.System SettingsConfigure machine settings.Using Web Image Monitor51](https://usermanual.wiki/Ricoh/PRSP311DNW1/User-Guide-1911780-Page-53.png)
![Network SettingsConfigure network settings.IPsec SettingsConfigure IPsec settings.Print List/ReportPrint a list/report related to the printer.Administrator ToolsConfigure administrator settings.Home[Status] tabClick the [Status] tab on the main page to display system information, paper tray status and tonerlevels.[Counter] tabClick the [Counter] tab on the main page to check the counter information.•[Print Counter]Displays the total number of pages printed.• [Duplex]Displays the total number of duplex pages printed (pages printed on both front and backsides).[Machine Information] tabDisplays information about the machine such as the version of the firmware and the total amount ofmemory.System Settings[Tray Paper Settings] tabYou can configure tray paper settings.•[Tray 1]Select the paper size and paper type for Tray 1.• [Bypass Tray]Select the paper size and paper type for the bypass tray.• [Priority Tray]Select a tray to check first when automatic tray selection is specified for the print job.4. Configuring the Machine Using Utilities52](https://usermanual.wiki/Ricoh/PRSP311DNW1/User-Guide-1911780-Page-54.png)
![• [Bypass Tray Setting Priority]Select how print jobs using the bypass tray are handled.•[Size Mismatch Detection]Select whether to set the machine to report an error if the paper size does not match the printjob's settings.[Toner Management] tab• [Supply End Option]If [Continue Printing] is selected, refill toner will be available. However no remaining tonerlevel or messages will be displayed.[I/O Timeout] tab• [Fixed USB Port]Specifies whether the same printer driver can be used for multiple machines or not under USBconnection.Network Settings[Network Status] tab•[General Status]You can check [Ethernet Speed], [IPP Printer Name], [Network Version], [Ethernet MACAddress], and [Active Interface].• [TCP/IP Status]You can specify [DHCP], [IP Address], [Subnet Mask], and [Gateway] for IPv4.[IPv6 Configuration] tab• [IPv6]Select whether to enable or disable IPv6.• [IPv6 Address]You can specify [DHCP], [Stateless Address], [Link-local Address], [Manual ConfigurationAddress] for IPv6.[Network Application] tab• [Network Print Setting]Specify whether or not to print using [IPP], [FTP], [RAW], or [LPR].• [mDNS Setting]Specify whether to enable Multicast DNS.[DNS] tab• [DNS]Using Web Image Monitor53](https://usermanual.wiki/Ricoh/PRSP311DNW1/User-Guide-1911780-Page-55.png)
![You can specify [DNS Method], [Primary DNS Server], [Secondary DNS Server], [DomainName], [IPv6 DNS Method], [Primary IPv6 DNS Server], [Secondary IPv6 DNS Server],[IPv6 Domain Name], [DNS Resolve Priority], [DNS Timeout (seconds)], and [Host Name].[Auto E-mail Notification] tabThe settings on this tab are for sending a notification e-mail when the machine’s status changes.You can specify up to two recipients.•[Display Name]Enter a sender name for notification e-mail.• [E-mail Address]Enter the address of the recipient of the alert email.• [Paper Misfeed]/[Out of Paper]/[Replace Print Cartridge Soon]/[Call Service]/[ReplacePrint Cartridge]/[Cover Open]Select which items to send notifications about.[SNMP] tab• [SNMP]Select whether to enable the machine to use SNMP services.• [Trap]You can specify [Target Trap], [SNMP Management Host 1], and [SNMP Management Host2].• [Community]You can specify [Get Community] and [Trap Community].• [System]Enter [Location] and [Contact] that are displayed on the top page.[SMTP] tabYou can specify [Primary SMTP Server], [Port No.], [Authentication Method], [User Name],[Password], [Device E-mail Address], and [Server Timeout (seconds)].[POP3] tabYou can specify [POP3 Server], [User Account], [User Password], and [Authentication].[Wireless] tab (Type 2 model only)• [Wireless LAN Status]The status of the following items is displayed:[Wireless LAN Status], [Mac Address], [Communication Mode], [SSID], [Wireless SignalStatus], and [Wireless].• [Channel]Select an Ad Hoc channel only if Ad Hoc mode is selected for [Communication Mode].4. Configuring the Machine Using Utilities54](https://usermanual.wiki/Ricoh/PRSP311DNW1/User-Guide-1911780-Page-56.png)
![• [Wireless Signal Status]If Infrastructure mode is selected for [Communication Mode], displays the status of the signalwith the access point.•[Wireless LAN Settings]• [SSID]Enter the SSID name. Can contain 32 characters.When you click [Scan List], a list of access points that is currently available is displayed.You can select the SSID name from the list.• [Communication Mode]Select Infrastructure mode or Ad Hoc mode• [Ad-Hoc Channel]Select a channel for Ad-Hoc mode.• [Authentication]Select an authentication method.If [Ad-Hoc] is selected for [Communication Mode], you can select only [Open System]and [Shared Key].• [Encryption]Select an encryption method.If [Ad-Hoc] is selected for [Communication Mode], you can select only [None] and[WEP].• [None]When it is ON, communication will not be secured by encryption.• [WEP]When it is ON, communication will be encrypted in WEP (Wired EquivalentPrivacy).Specify [WEP Key Length], [WEP Transmit Key ID], and [WEP Key Format] andenter [WEP Key]. The following table shows the number and types of charactersyou can enter, depending on the key settings.WEP key length is 64 bits WEP key length is 128 bitsWEP format isHexWEP format isASCIIWEP format isHexWEP format isASCIIWEP key maxlength 10 characters 5 characters 26 characters 13 charactersUsing Web Image Monitor55](https://usermanual.wiki/Ricoh/PRSP311DNW1/User-Guide-1911780-Page-57.png)
![WEP key length is 64 bits WEP key length is 128 bitsWEP format isHexWEP format isASCIIWEP format isHexWEP format isASCIIWEP key validcharacters 0–9, A–F, a–f 0x20–0x7e 0–9, A–F, a–f 0x20–0x7e• [WPA2-PSK]When this is selected, communication will be encrypted with WPA2 (WiFi Protected Access 2).Enter a value in [WPA Passphrase] that contains from 8 to 64 characters.•[Mixed Mode WPA/WPA2]When this is selected, communication will be encrypted with WPA (WiFi Protected Access) orWPA2 (WiFi Protected Access 2). Enter a value in [WPA Passphrase] that contains from 8 to 64characters.IPsec Settings[IPsec Global Settings] tab•[IPsec Function]Select whether to enable or disable IPsec.• [Default Policy]Select whether to allow for the default IPsec policy.• [Broadcast and Multicast Bypass]Select the services that you do not want to apply IPsec from the following:[DHCPv4], [DHCPv6], [SNMP], [mDNS], [NetBIOS], [UDP Port 53550]• [All ICMP Bypass]Select whether to apply IPsec to ICMP packets (IPv4 and IPv6).[IPsec Policy List] tabClick the [IPsec Policy List] tab on the IP security settings page to display the list of registered IPsecpolicies.4. Configuring the Machine Using Utilities56](https://usermanual.wiki/Ricoh/PRSP311DNW1/User-Guide-1911780-Page-58.png)
![To configure IPsec policies, select the desired IPsec policy, and then click [Change] to open the"IPsec Policy Settings" page. The following settings can be made on the "IPsec Policy Settings"page.IP Policy Settings•[No.]Specify a number between 1 and 10 for the IPsec policy. The number you specify willdetermine the position of the policy in the IPsec Policy List.• [Activity]Select whether to enable or disable the policy.• [Name]Enter the name of the policy. Can contain up to 16 characters.• [Address Type]Select IPv4 or IPv6 as the type of IP address to be used in IPsec communication.• [Local Address]Displays the IP address of this printer.• [Remote Address]Enter the IPv4 or IPv6 address of the device with which to communicate.Can contain up to 39 characters.• [Prefix Length]Enter the prefix length of the Remote Address, using a value between 1 and 128. If this settingis left blank, "32" (IPv4) or "128" (IPv6) will be automatically selected.• [Action]Specify how the IP packets are processed from the following:• [Allow]IP packets are both sent and received without IPsec applied to them.• [Drop]IP packets are discarded.• [Require Security]IPsec is applied to IP packets that are both sent and received.If you have selected [Require Security], you must configure [IPsec Settings] and [IKE Settings].IPsec Settings• [Encapsulation Type]Specify the encapsulation type from the following:• [Transport]Using Web Image Monitor57](https://usermanual.wiki/Ricoh/PRSP311DNW1/User-Guide-1911780-Page-59.png)
![Select this mode to secure only the payload section of each IP packet whencommunicating with IPsec compliant devices.•[Tunnel]Select this mode to secure every section of each IP packet. We recommend this type forcommunication between security gateways (such as VPN devices).• [Security Protocol]Select the security protocol from the following:• [AH]Establishes secure communication that supports authentication only.• [ESP]Establishes secure communication that supports both authentication and data encryption.• [ESP&AH]Establishes secure communication that supports both data encryption and authenticationof packets, including packet headers.Note that you cannot specify this protocol when [Tunnel] is selected for [EncapsulationType].• [Authentication Algorithm for AH]Specify the authentication algorithm to be applied when [AH] or [ESP&AH] is selected for[Security Protocol] from the following:[MD5], [SHA1]• [Encryption Algorithm for ESP]Specify the encryption algorithm to be applied when [ESP] or [ESP&AH] is selected for[Security Protocol] from the following:[None], [DES], [3DES], [AES-128], [AES-192], [AES-256]• [Authentication Algorithm for ESP]Specify the authentication algorithm to be applied when [[ESP]] is selected for [[SecurityProtocol]] from the following:[[MD5]], [[SHA1]]• [Life Time]Specify the life time of the IPsec SA (Security Association) as a time period or data volume.The SA will expire when the time period you specify elapses or the volume of data you specifyreaches the volume carried.• [Key Perfect Forward Secrecy]Select whether to enable or disable PFS (Perfect Forward Secrecy).4. Configuring the Machine Using Utilities58](https://usermanual.wiki/Ricoh/PRSP311DNW1/User-Guide-1911780-Page-60.png)
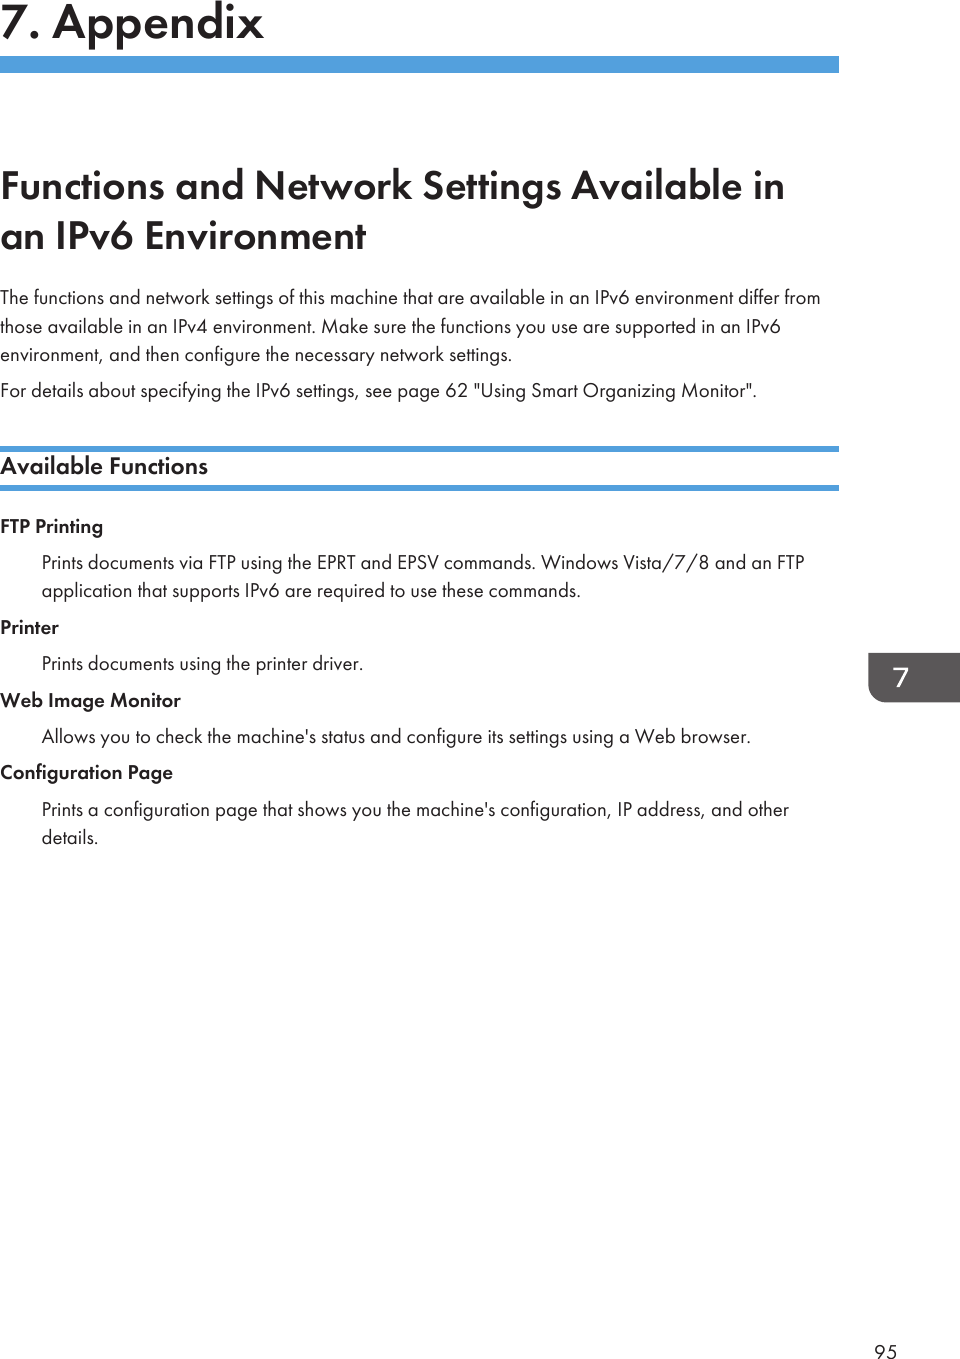
![IKE Settings•[IKE Version]Displays the IKE version.• [Encryption Algorithm]Specify the encryption algorithm from the following:[DES], [3DES], [AES-128], [AES-192], [AES-256]• [Authentication Algorithm]Specify the authentication algorithm from the following:[MD5], [SHA1]• [IKE Life Time]Specify the life time of the ISAKMP SA as a time period. Enter a number of seconds.• [IKE Diffie-Hellman Group]Select the IKE Diffie-Hellman Group to be used in the generation of the IKE encryption keyfrom the following:[DH1], [DH2]• [Pre-Shared Key]Specify the PSK (Pre-Shared Key) to be used for authentication of a communicating device.Can contain up to 32 characters.• [Key Perfect Forward Secrecy]Select whether to enable or disable PFS (Perfect Forward Secrecy).Print List/ReportPrint List/Report•[Configuration Page]Prints general information about the printer and its current configuration.• [Test Page]Prints a test page for checking the printing condition.• [Maintenance Page]Prints the maintenance page.Using Web Image Monitor59](https://usermanual.wiki/Ricoh/PRSP311DNW1/User-Guide-1911780-Page-61.png)
![Administrator ToolsAdministrator Settings•[New Password]Enter the new administrator password. Can contain up to 16 characters.• [Confirm New Password]Enter the same password again, to confirm.Reset Settings• [Reset IPsec Settings] appears only when a password is specified in [Administrator].•[Reset Network Settings]Select to restore network settings to their defaults.• [Reset Menu Settings]Select to restore settings that are not related to the network.• [Reset IPsec Settings]Select to clear the IP security settings.Backup SettingsCreate backup files containing the printer's configuration settings. If necessary, these backup filescan be used to restore previous configurations.• [Back up IPsec Settings] appears only when a password is specified in [Administrator].•[Back up Network Settings]Backs up the network settings.• [Back up Menu Settings]Backs up settings that are not related to the network.• [Back up IPsec Settings]Backs up the IP security settings to a file.Follow the procedure below to create configuration backup files.1. Select the radio button for the type of data you wish to back up.2. Enter the administrator password if required.3. Click [OK].4. Select [Save] or [Save as] from the dropdown list at the bottom of the Window.4. Configuring the Machine Using Utilities60](https://usermanual.wiki/Ricoh/PRSP311DNW1/User-Guide-1911780-Page-62.png)
![5. The backup file is stored in the default folder if choosing [Save]. Navigate to thelocation to save the backup file if choosing [Save as] and proceed to the next step.6. Specify a name for the file, and click [Save].Restore SettingRestore the printer's settings from a previously created backup file.•[File to Restore]Enter the path and name of the file to restore, or click [Browse...] to select the file.Follow the procedure below to restore configuration backup files.1. Click [Browse...].2. Navigate to the directory containing the backup file to restore.3. Select the backup file, and click [Open].4. Enter the administrator password if required.5. Click [OK].6. Reboot the printer if you are requested to do so.Help Source File Setting• [Help Source File]Enter the help source file path.Using Web Image Monitor61](https://usermanual.wiki/Ricoh/PRSP311DNW1/User-Guide-1911780-Page-63.png)
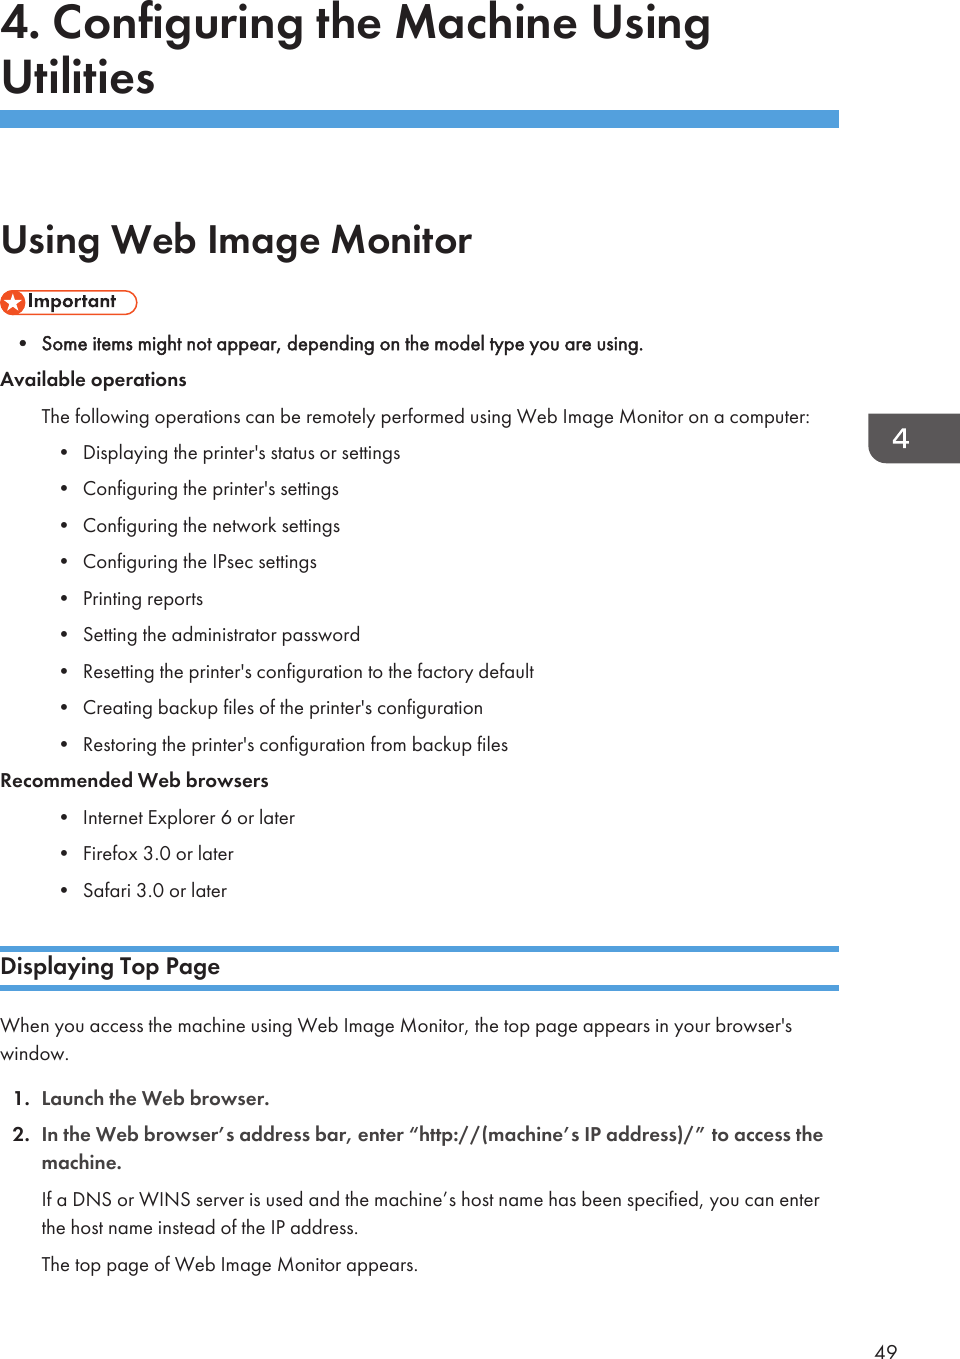
![Using Smart Organizing MonitorThe state and status information of the machine can be checked using Smart Organizing Monitor.Checking the Status InformationCVW252123541. Image areaDisplays the status of this machine with an icon.2. Status area• Printer Name• Print CartridgeDisplays the following messages to indicate remaining toner levels: Remaining Level 1 to 5, “AlmostEmpty” and “Empty”• Input TrayYou can check the following information about the input trays.[Input Tray], [Status], [Paper Size], [Paper Type]Displays the type of the paper loaded into each input tray.• MaintenanceDisplays the consumables statuses.• System4. Configuring the Machine Using Utilities62](https://usermanual.wiki/Ricoh/PRSP311DNW1/User-Guide-1911780-Page-64.png)
![Displays the system information about the printer, such as the model name, system version, and memorysize.•CounterDisplays information about the counters.• NetworkDisplays network details such as the printer's IP address and network-related comments.3. Message areaDisplays the status of this machine with a message.For details about error messages, see .page 92 "Error and Status Messages Appear on Smart OrganizingMonitor"4. [Connect Printer] buttonClick to select a printer driver.5. [Refresh:]Specify the automatic update of the display.Configuring the Machine SettingsSmart Organizing Monitor is used to modify the machine’s settings.1. On the [Start] menu, click [All Programs].2. Click [Smart Organizing Monitor].3. Click [Smart Organizing Monitor Status].4. If the machine you are using is not selected, click [Connect Printer], and then select theprinter driver.5. Click [OK].6. On the [User Tools] tab, click [Printer Configuration].7. Enter the access code.The default access code is “Admin”.8. Change the settings if necessary.9. Click [OK].10. Click [Close].Access CodeThe configurable functions depend on the authority of the access code you enter.•AdministratorAll tabs in the [Printer Configuration] dialog box are available.• General usersUsing Smart Organizing Monitor63](https://usermanual.wiki/Ricoh/PRSP311DNW1/User-Guide-1911780-Page-65.png)
![Only the [Paper Input] tab is available.Tab SettingsThis section provides a tab-by-tab overview of the machine settings that can be modified using SmartOrganizing Monitor. For more information on each setting item, see the Smart Organizing MonitorHelp.Paper Input tab•You can change paper size and other paper settings.Maintenance tab• You can adjust print starting positions.System tab• You can set basic functions required to use the printer. The printer can be used on factory-setdefaults, but the configuration can be changed depending on the condition of the user.• The changed condition holds even if the printer is turned off.• The access code can be changed on this tab.IPv6, Network 1, Network 2 and Network 3 tabs• You can set configurations about network connection and communication.• The following operations are possible on these tabs:• Checking the printer name, active protocol, and other printer information• Making interface settings, including the timeout setting and protocol settings• Checking or making TCP/IP settings• Checking or making SMTP and SNMP settings• Checking or making Alert settingsWireless LAN Settings tab (Type 2 model only)• You can set configurations about wireless LAN network connection and communication.• The following operations are possible on the tab:• Checking the wireless LAN status• Connecting wireless LAN manually• Connecting with one touch using WPSConfiguring the IPv6 SettingsThis section explains how to configure the IPv6 settings using Smart Organizing Monitor.4. Configuring the Machine Using Utilities64](https://usermanual.wiki/Ricoh/PRSP311DNW1/User-Guide-1911780-Page-66.png)
![IPv6 automatic settings• A router with DHCP functionality or a DHCP server that is supported by IPv6 is required.1. On the [Start] menu, click [All Programs].2. Click [Smart Organizing Monitor].3. Click [Smart Organizing Monitor Status].4. Click the [User Tools] tab.5. Click Printer [Configuration].6. Enter the access code, and then click [OK].7. Click the [IPv6] tab.8. Select [Active] in [IPv6 DHCP:], and the click [OK].9. Turn off the machine, and then disconnect the USB cable from the machine.10. Connect the machine to the router or the hub using the Ethernet cable.11. Follow Steps 1 to 3, and then start Smart Organizing Monitor.12. Click [Connect Printer].13. Click [Search Network Printer].A list of printers currently connecting to the network appears.14. Select your printer, and then click [OK].15. If the printer information appears after a while, the connection is established successfully.If nothing appears on the screen in about two minutes, repeat this procedure.16. The network settings are complete.The next step is to install the printer driver from the provided CD-ROM. For details, see page 22"Installing the Driver and Software".IPv6 manual settings1. On the [Start] menu, click [All Programs].2. Click [Smart Organizing Monitor].3. Click [Smart Organizing Monitor Status].4. Click the [User Tools] tab.5. Click Printer [Configuration].6. Enter the access code, and then click [OK].The default access code is "Admin". Enter "Admin" if it has not been changed. Case is significant.Using Smart Organizing Monitor65](https://usermanual.wiki/Ricoh/PRSP311DNW1/User-Guide-1911780-Page-67.png)
![7. Click the [IPv6] tab.8. Select [Inactive] in [IPv6 DHCP:], and the click [OK].9. Enter values in [Manual address:], [Prefix length:], and [Gateway:], and then click [OK].10. Turn off the machine, and then disconnect the USB cable from the machine.11. Connect the machine to the router or the hub using the Ethernet cable.12. Follow Steps 1 to 3, and then start Smart Organizing Monitor.13. Click [Connect Printer].14. Click [Search Network Printer].A list of printers currently connecting to the network appears.15. Select your printer, and then click [OK].16. If the printer information appears after a while, the connection is established successfully.If nothing appears on the screen in about two minutes, repeat this procedure.17. The network settings are complete.The next step is to install the printer driver from the provided CD-ROM. For details, see page 22"Installing the Driver and Software".Printing the Configuration Page1. On the [Start] menu, click [All Programs].2. Click [Smart Organizing Monitor].3. Click [Smart Organizing Monitor Status].4. If the machine you are using is not selected, click [Connect Printer], and then select themachine's model.5. Click [OK].6. On the [User Tools] tab, select [Configuration Page] in the [List/Test Print] list.7. Click [Print].4. Configuring the Machine Using Utilities66](https://usermanual.wiki/Ricoh/PRSP311DNW1/User-Guide-1911780-Page-68.png)


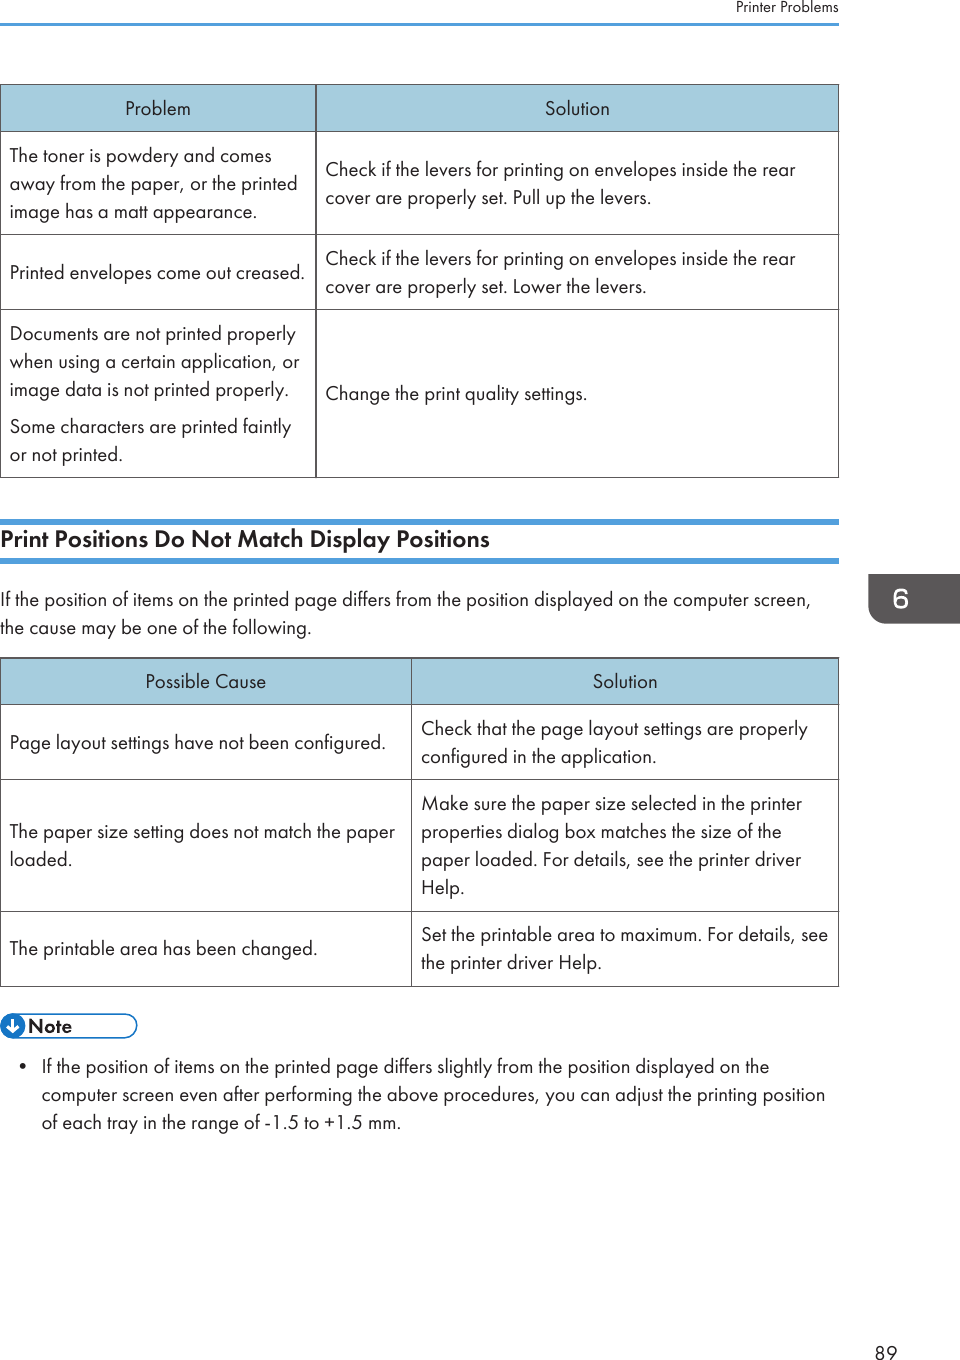
![Print Quality ProblemsChecking the Condition of the MachineIf there is a problem with the quality of printing, first check the condition of the machine.Possible Cause SolutionThere is a problem with themachine's location.Make sure that the machine is on a level surface. Place themachine where it will not be subject to vibration or shock.Unsupported types of paper is used. Make sure that the paper being used is supported by themachine. See page 27 "Supported Paper".The paper type setting is incorrect.Make sure that the paper type setting of the printer drivermatches the type of paper loaded. See page 27 "SupportedPaper".A non-genuine print cartridge isbeing used.Refilled or non-genuine print cartridge reduces print qualityand can cause malfunctions. Use genuine print cartridge only.See page 104 "Consumables".An old print cartridge is being used. Print cartridge should be opened before their expiration dateand used within six months of being opened.The machine is dirty. See page 67 "Maintaining the Machine", and clean themachine as required.Humidity level surrounding themachine may be too low.Using the machine in a room where humidity level is too lowmay cause black lines of a few millimeters thick to appear onprintouts with 75-millimeter spaces in between. In this case, set[Low Humidity Mode] to [On].For details about how to configure the settings, see page 62"Using Smart Organizing Monitor" and the Smart OrganizingMonitor Help.Print Quality Problems87](https://usermanual.wiki/Ricoh/PRSP311DNW1/User-Guide-1911780-Page-89.png)
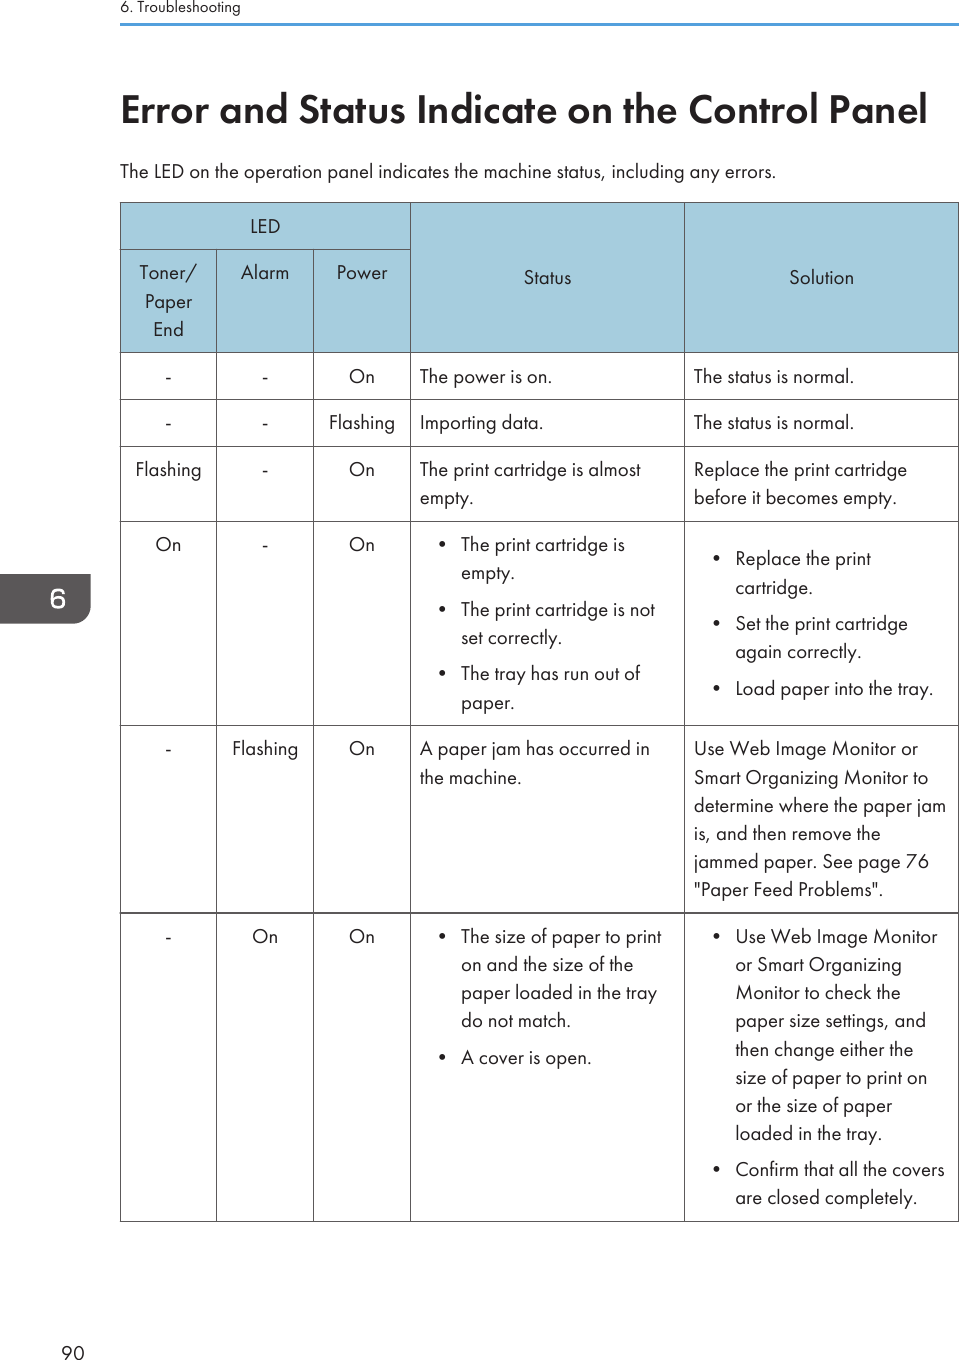
![Printer ProblemsThis section describes printing problems and possible solutions.Problem SolutionAn error occurs.If an error occurs when printing, change the computer orprinter driver settings.•Check the printer icon name does not exceed 32alphanumeric characters. If it does, shorten it.• Check whether other applications are operating.Close any other applications, as they may be interferingwith printing. If the problem is not resolved, closeunneeded processes too.• Check that the latest printer driver is being used.A print job is canceled. Set [I/O Timeout] to a larger value than the current setting.There is considerable delay betweenthe print start command and actualprinting.• Processing time depends on data volume. High volumedata, such as graphics-heavy documents, take longer toprocess.•To speed up printing, reduce the printing resolution usingthe printer driver. For details, see the printer driver Help.Prints fall in front of the machinewhen they are output.Raise the stop fence. See "Loading Paper", Quick InstallationGuide.Prints do not stack properly.• Paper is damp. Use paper that has been stored properly.See page 27 "Supported Paper".•Raise the stop fence. See "Unpacking", Quick InstallationGuide.The whole printout is blurred.• Paper is damp. Use paper that has been stored properly.See page 27 "Supported Paper".• If you enable [Toner Saving], printing is generally lessdense.• Toner is almost depleted. Replace the print cartridge.• Condensation may have collected. If rapid change intemperature or humidity occurs, use this machine onlyafter it has acclimatized.6. Troubleshooting88](https://usermanual.wiki/Ricoh/PRSP311DNW1/User-Guide-1911780-Page-90.png)
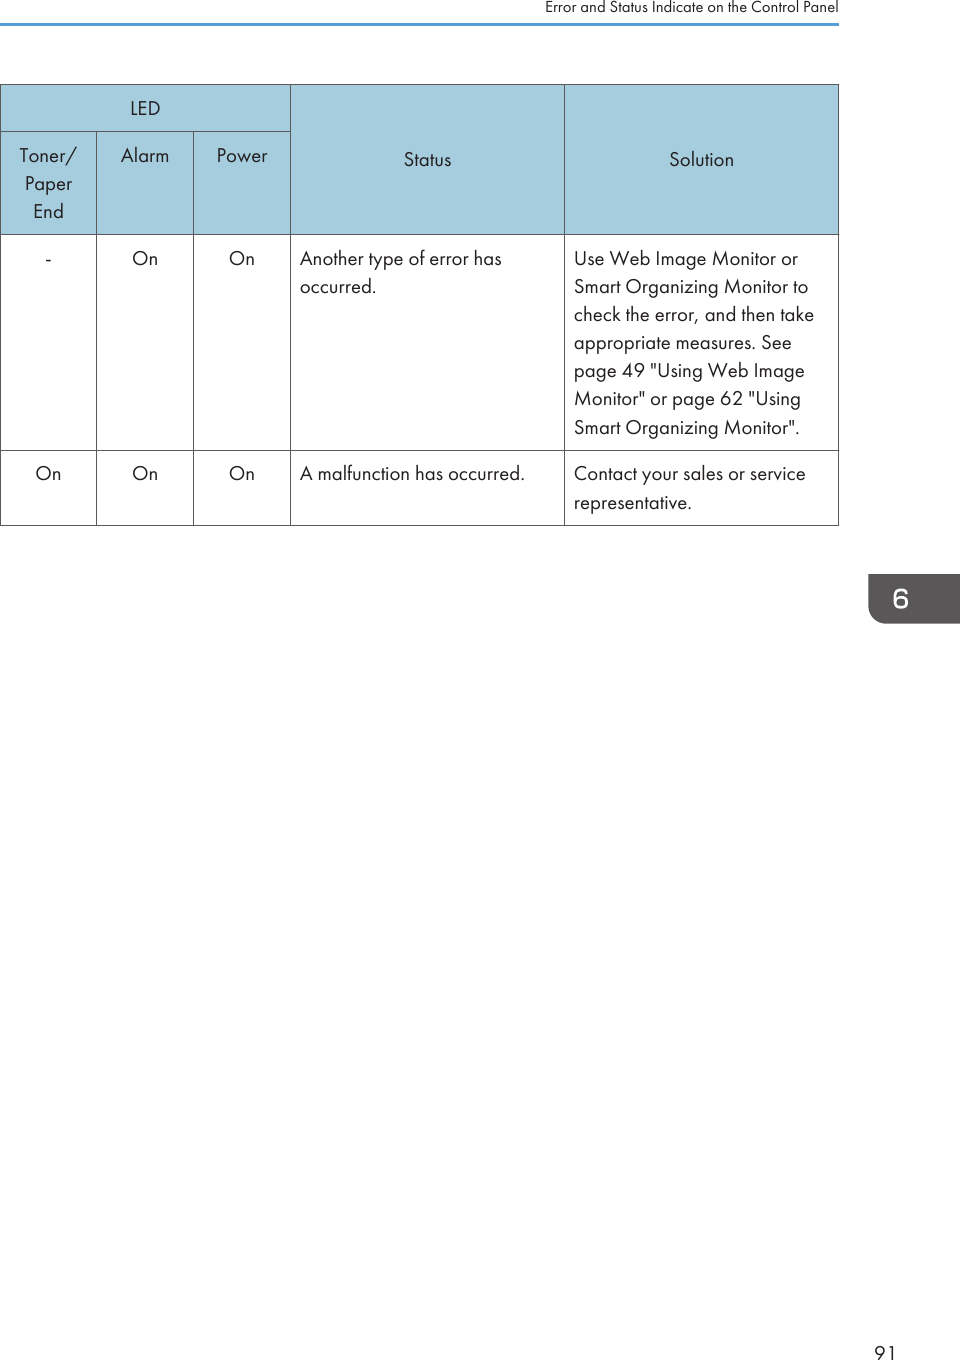
![Message Causes SolutionsPaper TypeMismatchPaper of the selectedpaper type is notloaded in theindicated papersource tray.Check the indicatedtray.The paper type specified on themachine and the type specifiedin the printer driver do notmatch.For details about changing the paper typesetting of the machine, see page 32"Loading Paper". For details aboutchanging the paper type setting in theprinter driver, see the printer driver Help.Print Cartridge isnear empty.The print cartridge is almostempty. Prepare a new print cartridge.Shortly printingbecomes notavailable. Pleasekeep Print Cartridgehandy.The machine has run out of thetoner.Replace the print cartridge. See page 67"Replacing the Print Cartridge".Printing has beeninterrupted becauseof the memoryoverflow.The data is too large orcomplex to print.Select [600 x 600 dpi] in [Resolution:] toreduce the size of data. For details, see theprinter driver Help.Waste Toner fullNo printing isavailable.Open the indicatedcover, and thenreplace PrintCartridge.The waste toner bottle is full. Replace the print cartridge.No Toner or WasteToner fullNo printing isavailable.Open the indicatedcover, and thenreplace PrintCartridge.The print cartridge has not beeninstalled.Reinstall the print cartridge. See page 67"Replacing the Print Cartridge".Error and Status Messages Appear on Smart Organizing Monitor93](https://usermanual.wiki/Ricoh/PRSP311DNW1/User-Guide-1911780-Page-95.png)
![Transmission Using IPsecFor securer communications, this machine supports the IPsec protocol. When applied, IPsec encryptsdata packets at the network layer using shared key encryption. The machine uses encryption keyexchange to create a shared key for both sender and receiver. To achieve even higher security, you canalso renew the shared key on a validity period basis.• IPsec is not applied to data obtained through DHCP, DNS, or WINS.•IPsec compatible operating systems are Windows XP SP2, Windows Vista/7, Windows Server2003/2003 R2/2008/2008 R2, Red Hat Enterprise Linux WS 4.0, and Solaris 10. However,some setting items are not supported depending on the operating system. Make sure the IPsecsettings you specify are consistent with the operating system's IPsec settings.• If you cannot access Web Image Monitor due to IPsec configuration problems, disable IPsec onthe [Network 2] tab under [Printer Configuration] using Smart Organizing Monitor, and thenaccess Web Image Monitor.• For details about specifying the IPsec settings using Web Image Monitor, see page 49 "Using WebImage Monitor".• For details about enabling and disabling IPsec using Smart Organizing Monitor, see the SmartOrganizing Monitor Help.Encryption and Authentication by IPsecIPsec consists of two main functions: the encryption function, which ensures the confidentiality of data,and the authentication function, which verifies the sender of the data and the data's integrity. Thismachine's IPsec function supports two security protocols: the ESP protocol, which enables both of theIPsec functions at the same time, and the AH protocol, which enables only the authentication function.ESP ProtocolThe ESP protocol provides secure transmission through both encryption and authentication. Thisprotocol does not provide header authentication.•For successful encryption, both the sender and receiver must specify the same encryptionalgorithm and encryption key. The encryption algorithm and encryption key are specifiedautomatically.• For successful authentication, the sender and receiver must specify the same authenticationalgorithm and authentication key. The authentication algorithm and authentication key arespecified automatically.AH ProtocolThe AH protocol provides secure transmission through authentication of packets only, includingheaders.7. Appendix96](https://usermanual.wiki/Ricoh/PRSP311DNW1/User-Guide-1911780-Page-98.png)
![• For successful authentication, the sender and receiver must specify the same authenticationalgorithm and authentication key. The authentication algorithm and authentication key arespecified automatically.AH Protocol + ESP ProtocolWhen combined, the ESP and AH protocols provide secure transmission through both encryptionand authentication. These protocols provide header authentication.•For successful encryption, both the sender and receiver must specify the same encryptionalgorithm and encryption key. The encryption algorithm and encryption key are specifiedautomatically.• For successful authentication, the sender and receiver must specify the same authenticationalgorithm and authentication key. The authentication algorithm and authentication key arespecified automatically.• Some operating systems use the term "Compliance" in place of "Authentication".Security AssociationThis machine uses encryption key exchange as the key setting method. With this method, agreementssuch as the IPsec algorithm and key must be specified for both sender and receiver. Such agreementsform what is known as an SA (Security Association). IPsec communication is possible only if thereceiver's and sender's SA settings are identical.The SA settings are auto configured on both parties' machines. However, before the IPsec SA can beestablished, the ISAKMP SA (Phase 1) settings must be auto configured. When this is done, the IPsec SA(Phase 2) settings, which allow actual IPsec transmission, will be auto configured.Also, for further security, the SA can be periodically auto updated by applying a validity period (timelimit) for its settings. This machine only supports IKEv1 for encryption key exchange.Multiple settings can be configured in the SA.Settings 1-10You can configure ten separate sets of SA details (such as different shared keys and IPsecalgorithms).IPsec policies are searched through one by one, starting at [No.1].Encryption Key Exchange Settings Configuration FlowThis section explains the procedure for specifying encryption key exchange settings.Transmission Using IPsec97](https://usermanual.wiki/Ricoh/PRSP311DNW1/User-Guide-1911780-Page-99.png)
![Machine PC1. Set the IPsec settings on Web Image Monitor. 1. Set the same IPsec settings as the machine onPC.2. Enable IPsec settings. 2. Enable IPsec settings.3. Confirm IPsec transmission.• After configuring IPsec, you can use "ping" command to check if the connection is establishedcorrectly. Because the response is slow during initial key exchange, it may take some time toconfirm that transmission has been established.•If you cannot access Web Image Monitor due to IPsec configuration problems, disable IPsec onthe [Network 2] tab under [Printer Configuration] using Smart Organizing Monitor, and thenaccess Web Image Monitor.• For details about enabling and disabling IPsec using Smart Organizing Monitor, see the SmartOrganizing Monitor Help.Specifying Encryption Key Exchange Settings1. Start the Web browser, and access the machine by entering its IP address.2. Click [IPsec Settings].3. Click the [IPsec Policy List] tab.4. Select the number of the setting you want to modify in the list, and then click [Change].5. Modify the IPsec related settings as necessary.6. Enter the administrator password, and then click [Apply].7. Click the [IPsec Global Settings] tab, and then select [Active] in [IPsec Function].8. If necessary, specify [Default Policy], [Broadcast and Multicast Bypass], and [All ICMPBypass] also.9. Enter the administrator password, and then click [Apply].Specifying IPsec Settings on the ComputerSpecify exactly the same settings for IPsec SA settings on your computer as are specified for the IPsecSettings on the machine. Setting methods differ according to the computer's operating system. Thefollowing procedure is based on Windows 7 in an IPv4 environment as an example.7. Appendix98](https://usermanual.wiki/Ricoh/PRSP311DNW1/User-Guide-1911780-Page-100.png)
![1. On the [Start] menu, click [Control Panel], [System and Security], and then click[Administrative Tools].2. Double-click [Local Security Policy], and then click [IP Security Policies on LocalComputer].3. In the "Action" menu, click [Create IP Security Policy...].The IP Security Policy Wizard appears.4. Click [Next].5. Enter a security policy name in "Name", and then click [Next].6. Clear the "Activate the default response rule (earlier versions of Windows only)." checkbox, and then click [Next].7. Select "Edit properties", and then click [Finish].8. In the "General" tab, click [Settings...].9. In "Authenticate and generate a new key after every", enter the same validity period (inminutes) that is specified on the machine in [IKE Life Time], and then click [Methods...].10. Confirm that the Encryption Algorithm ("Encryption"), Hash Algorithm ("Integrity"), andIKE Diffie-Hellman Group ("Diffie-Hellman Group") settings in "Security methodpreference order" all match those specified on the machine in [IKE Settings].If the settings are not displayed, click [Add...].11. Click [OK] twice.12. Click [Add...] in the "Rules" tab.The Security Rule Wizard appears.13. Click [Next].14. Select "This rule does not specify a tunnel", and then click [Next].15. Select the type of network for IPsec, and then click [Next].16. Click [Add...] in the IP Filter List.17. In [Name], enter an IP Filter name, and then click [Add...].The IP Filter Wizard appears.18. Click [Next].19. In [Description:], enter a name or a detailed explanation of the IP filter, and then click[Next].You may click [Next] and proceed to the next step without entering any information in this field.20. Select "My IP Address" in "Source address", and then click [Next].21. Select "A specific IP Address or Subnet" in "Destination address", enter the machine's IPaddress, and then click [Next].22. For the IPsec protocol type, select "Any", and then click [Next].Transmission Using IPsec99](https://usermanual.wiki/Ricoh/PRSP311DNW1/User-Guide-1911780-Page-101.png)
![23. Click [Finish], and then click [OK].24. Select the IP filter that you have just created, and then click [Next].25. Click [Add...] in the Filter Action.The Filter Action Wizard appears.26. Click [Next].27. In [Name], enter a Filter Action name, and then click [Next].28. Select "Negotiate security", and then click [Next].29. Select one of options for computers allowed to communicate with, and then click [Next].30. Select "Custom" and click [Settings...].31. When [ESP] is selected for the machine in [Security Protocol] under [IPsec Settings], select[Data integrity and encryption (ESP)], and configure the following settings:Set the value of [Integrity algorithm] to the same value as the [Authentication Algorithm for ESP]specified on the machine.Set the value of [Encryption algorithm] to the same value as the [Encryption Algorithm for ESP]specified on the machine.32. When [AH] is selected for the machine in [Security Protocol] under [IPsec Settings], select[Data and address integrity without encryption (AH)], and configure the followingsettings:Set the value of [Integrity algorithm] to the same value as the [Authentication Algorithm for AH]specified on the machine.Clear the [Data integrity and encryption (ESP)] check box.33. When [ESP&AH] is selected for the machine in [Security Protocol] under [IPsec Settings],select [Data and address integrity without encryption (AH)], and configure the followingsettings:Set the value of [Integrity algorithm] under [Data and address integrity without encryption (AH)] tothe same value as [Authentication Algorithm for AH] specified on the machine.Set the value of [Encryption algorithm] under [Data integrity and encryption (ESP)] to the samevalue as [Encryption Algorithm for ESP] specified on the machine.34. In the Session key settings, select "Generate a new key every", and enter the samevalidity period (in seconds or Kbytes) as that specified for [Life Time] on the machine.35. Click [OK], and then click [Next].36. Click [Finish].If you are using IPv6 under Windows Vista or a newer version of Windows, you must repeat thisprocedure from Step 12 and specify ICMPv6 as an exception. When you reach Step 22, select[58] as the protocol number for the "Other" target protocol type, and then set [Negotiate security]to [Permit].7. Appendix100](https://usermanual.wiki/Ricoh/PRSP311DNW1/User-Guide-1911780-Page-102.png)
![37. Select the filter action that you have just created, and then click [Next].38. Select one of options for an authentication method, and then click [Next].39. Click [Finish], and then click [OK] twice.The new IP security policy (IPsec settings) is specified.40. Select the security policy that you have just created, right click on it, and then click[Assign].IPsec settings on the computer are enabled.• To disable the computer's IPsec settings, select the security policy, right click, and then click [Un-assign].Transmission Using IPsec101](https://usermanual.wiki/Ricoh/PRSP311DNW1/User-Guide-1911780-Page-103.png)
![Notes About the Toner•Proper operation cannot be guaranteed if any third-party toner is used.• Depending on printing conditions, there are cases where the printer cannot print the number ofsheets indicated in the specifications.• Replace the print cartridge if the printed image suddenly becomes pale or blurred.• When operating the machine for the first time, use the print cartridge supplied with this machine. Ifthis cartridge is not initially used, the following problems may occur:• Toner/Paper End indicator will flash before the toner runs out.• Toner/Paper End indicator will light up when the toner runs out, but instead the printed imagesuddenly becomes pale or blurred.• To continue printing after Toner/Paper End indicator light up, set [Toner End Option Settings] to[Continue Printing] using Smart Organizing Monitor. However, since any trouble caused by usingthis setup is outside of the scope of the manufacturer's warranty, this setup should be used withcare. For details about [Toner End Option Settings], see the Smart Organizing Monitor Help.• If [Toner End Option Settings] is first set to [Continue Printing] and then to [Stop Printing], be sure touse a new print cartridge. If a used print cartridge is installed, there will be a discrepancy betweenthe remaining toner level displayed and the actual remaining toner, and accordingly, Toner/PaperEnd indicator will not flash at the appropriate timing.• The lifetime of the photo conductor, which is built into the print cartridge, is taken into account whenToner/Paper End indicator flashes. If the photo conductor stops working before the toner runs out,Toner/Paper End indicator may flash.7. Appendix102](https://usermanual.wiki/Ricoh/PRSP311DNW1/User-Guide-1911780-Page-104.png)

![If this package is used in a product, Eric Young should be given attribution as the author of theparts of the library used.This can be in the form of a textual message at program startup or in documentation (online ortextual) provided with the package.Redistribution and use in source and binary forms, with or without modification, are permittedprovided that the following conditions are met:1. Redistributions of source code must retain the copyright notice, this list of conditions and thefollowing disclaimer.2. Redistributions in binary form must reproduce the above copyright notice, this list of conditionsand the following disclaimer in the documentation and/or other materials provided with thedistribution.3. All advertising materials mentioning features or use of this software must display the followingacknowledgement:"This product includes cryptographic software written by Eric Young (eay@cryptsoft.com)"The word 'cryptographic' can be left out if the rouines from the library being used are notcryptographic related :-).4. If you include any Windows specific code (or a derivative thereof) from the apps directory(application code) you must include an acknowledgement:"This product includes software written by Tim Hudson (tjh@cryptsoft.com)"THIS SOFTWARE IS PROVIDED BY ERIC YOUNG “AS IS” AND ANY EXPRESS OR IMPLIEDWARRANTIES, INCLUDING, BUT NOT LIMITED TO, THE IMPLIED WARRANTIES OFMERCHANTABILITY AND FITNESS FOR A PARTICULAR PURPOSE ARE DISCLAIMED. IN NOEVENT SHALL THE AUTHOR OR CONTRIBUTORS BE LIABLE FOR ANY DIRECT, INDIRECT,INCIDENTAL, SPECIAL, EXEMPLARY, OR CONSEQUENTIAL DAMAGES (INCLUDING, BUTNOT LIMITED TO, PROCUREMENT OF SUBSTITUTE GOODS OR SERVICES; LOSS OF USE,DATA, OR PROFITS; OR BUSINESS INTERRUPTION) HOWEVER CAUSED AND ON ANYTHEORY OF LIABILITY, WHETHER IN CONTRACT, STRICT LIABILITY, OR TORT (INCLUDINGNEGLIGENCE OR OTHERWISE) ARISING IN ANY WAY OUT OF THE USE OF THISSOFTWARE, EVEN IF ADVISED OF THE POSSIBILITY OF SUCH DAMAGE.The licence and distribution terms for any publically available version or derivative of this codecannot be changed. i.e. this code cannot simply be copied and put under another distributionlicence [including the GNU Public Licence.]Copyright Information about Installed Applications111](https://usermanual.wiki/Ricoh/PRSP311DNW1/User-Guide-1911780-Page-113.png)