Ricoh PRSPC252DN1 Part15 Subpart B-Printer User Manual BBP PRSPC252DN1 1
Ricoh Company Ltd Part15 Subpart B-Printer BBP PRSPC252DN1 1
Ricoh >
Contents
- 1. BBP-PRSPC252DN1_User Manual 1
- 2. BBP-PRSPC252DN1_User Manual 2
BBP-PRSPC252DN1_User Manual 1

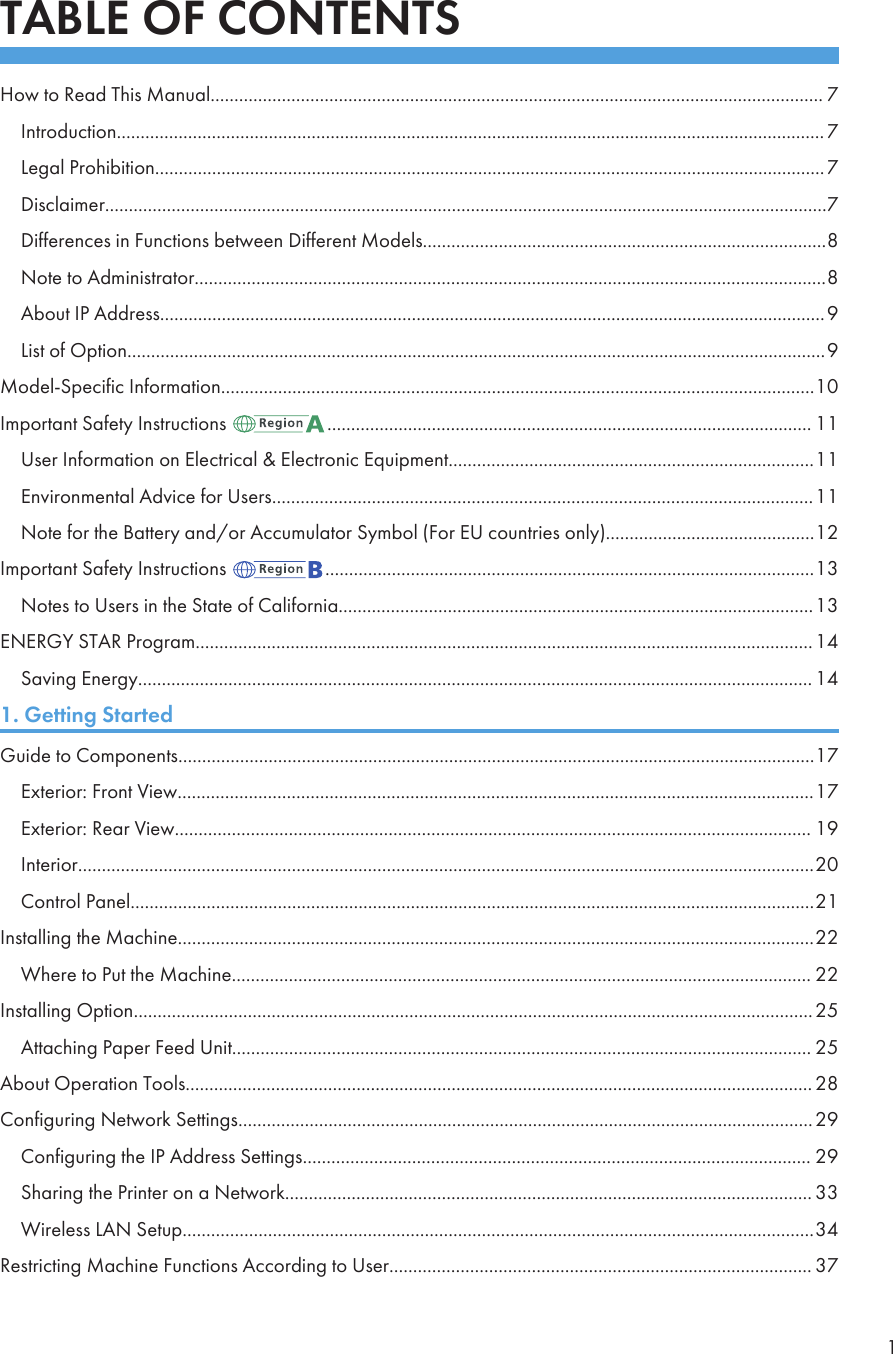

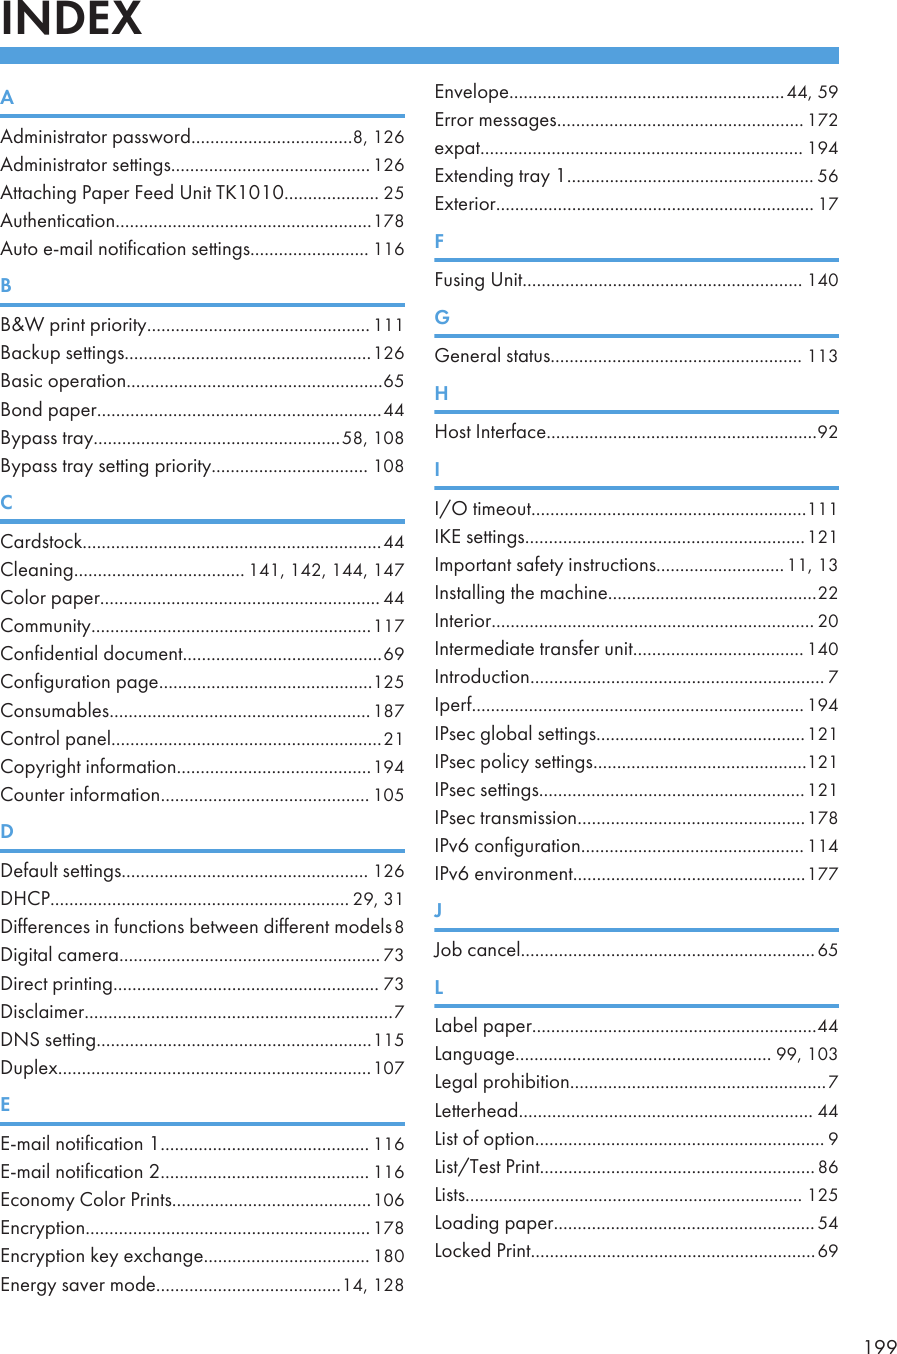
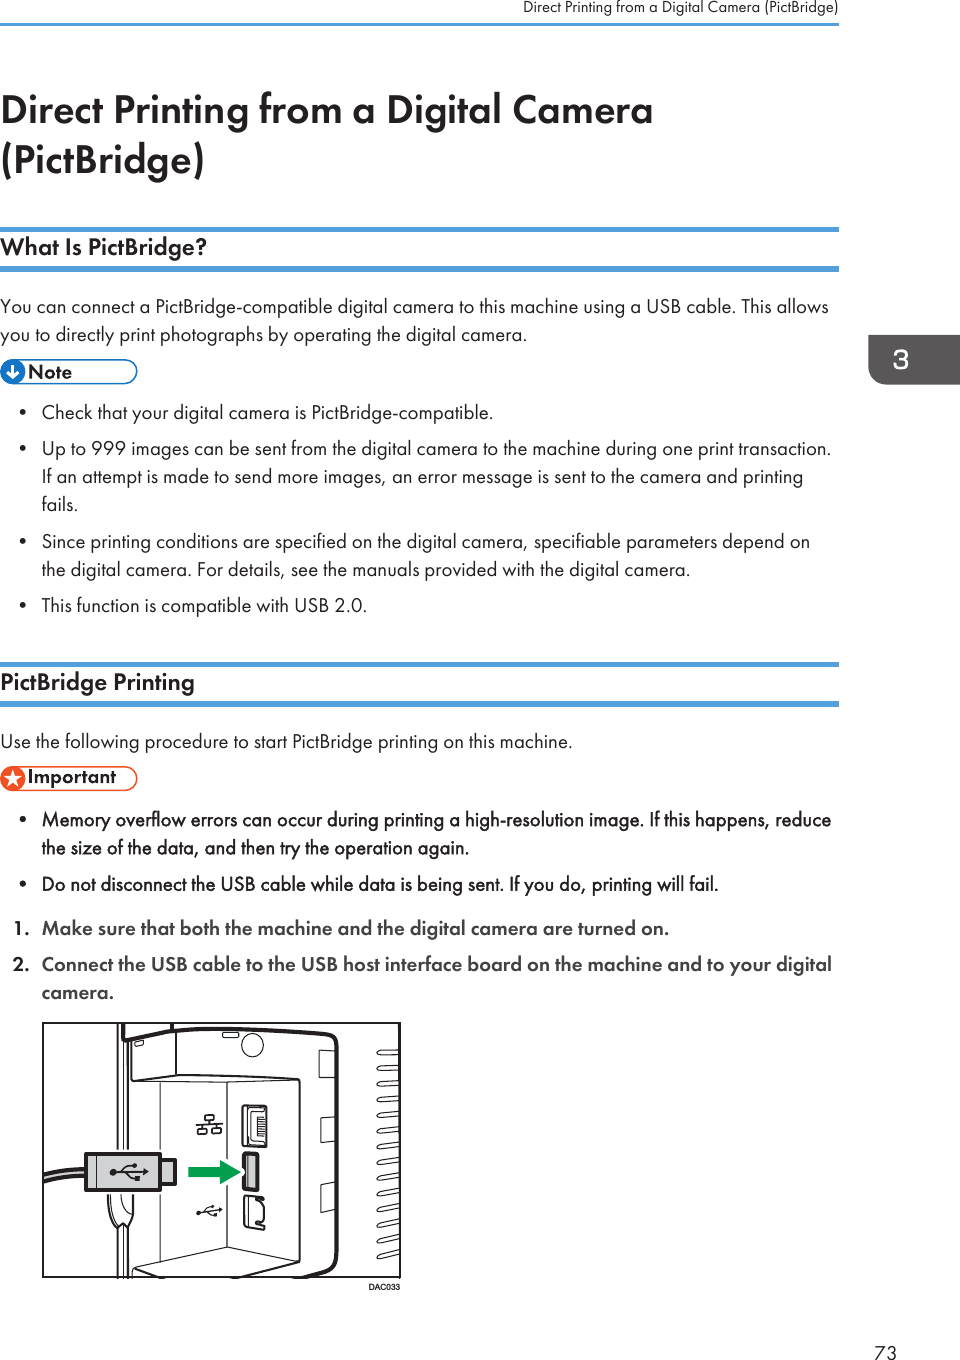
![Differences in Functions between Different ModelsThe differences in main functions between different models are as follows:SP C250DN SP C252DNType Type 1 Type 2Restrictions on available functions Not available AvailableUser Restriction Not available AvailableLocked Print Not available AvailableNotification to replace a component(Fusing unit, Transfer roller, Intermediate transfer belt)Not available AvailableNote to AdministratorPasswordCertain configurations of this machine can be password-protected to prevent unauthorized modificationsby others. We strongly recommend you to create your own password immediately.The following are the operations that can be password-protected:• Configuring the [System Settings], [Restrict Available Functions], [Network Settings], [IPsecSettings], or [Administrator Tools] menu using Web Image MonitorBy default, the access to the machine via Web Image Monitor is not password-protected.The setting for configuring the password can be found in [Administrator Settings].• For details about setting a password, see page 126 "Configuring the Administrator Settings".User RestrictionYou can restrict the use of certain functions of this machine to users with proper authentication.Using Web Image Monitor, you can select the functions you want to restrict, and register the users whocan use that function upon authentication.• For details about creating passwords and configuring the user restriction settings, see page 37"Restricting Machine Functions According to User".8](https://usermanual.wiki/Ricoh/PRSPC252DN1.BBP-PRSPC252DN1-User-Manual-1/User-Guide-2134301-Page-10.png)


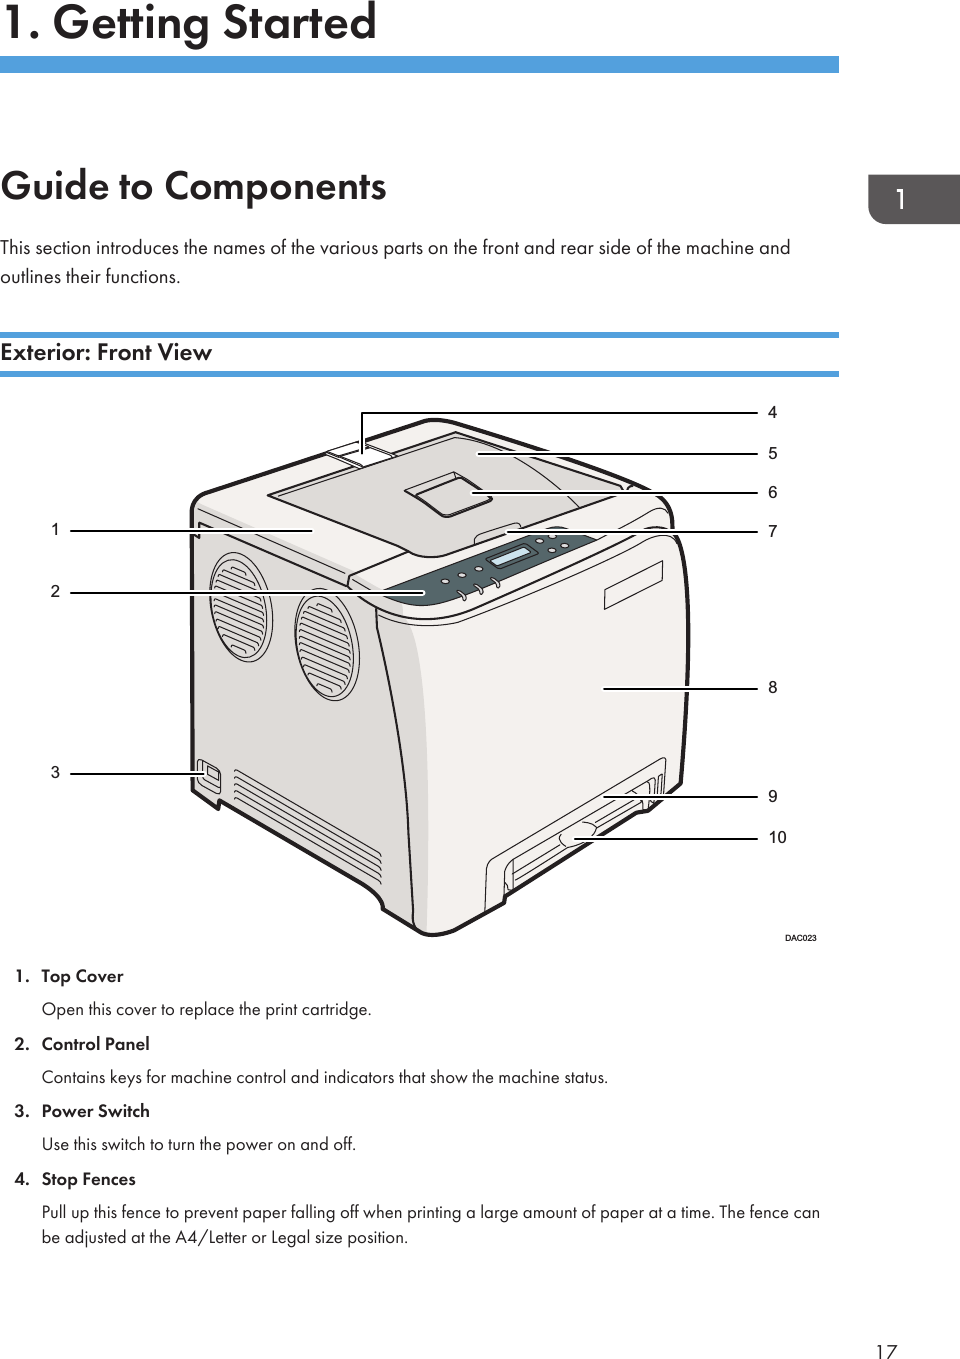
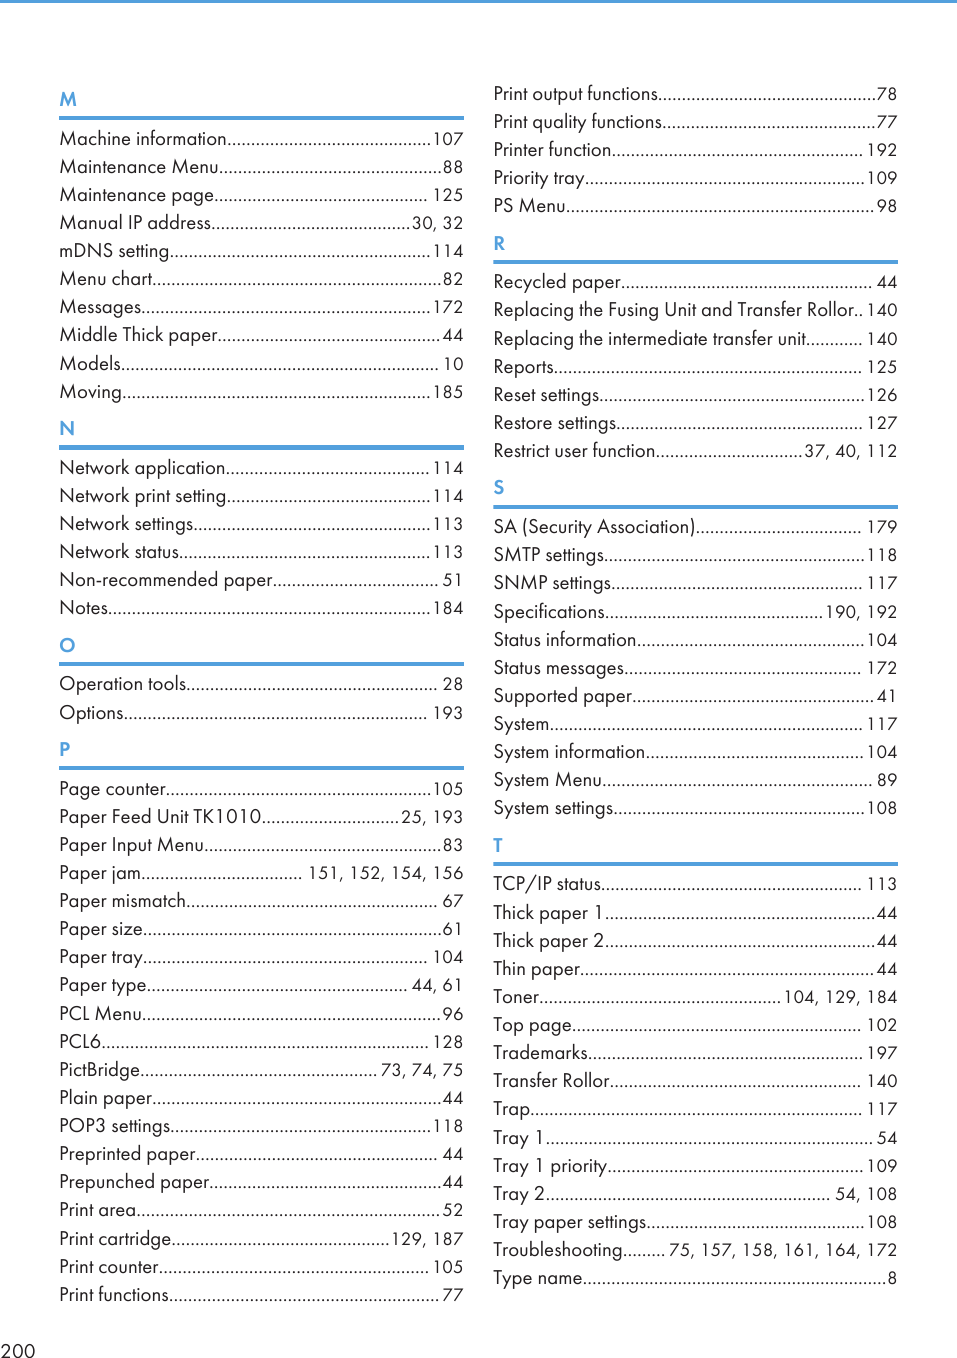
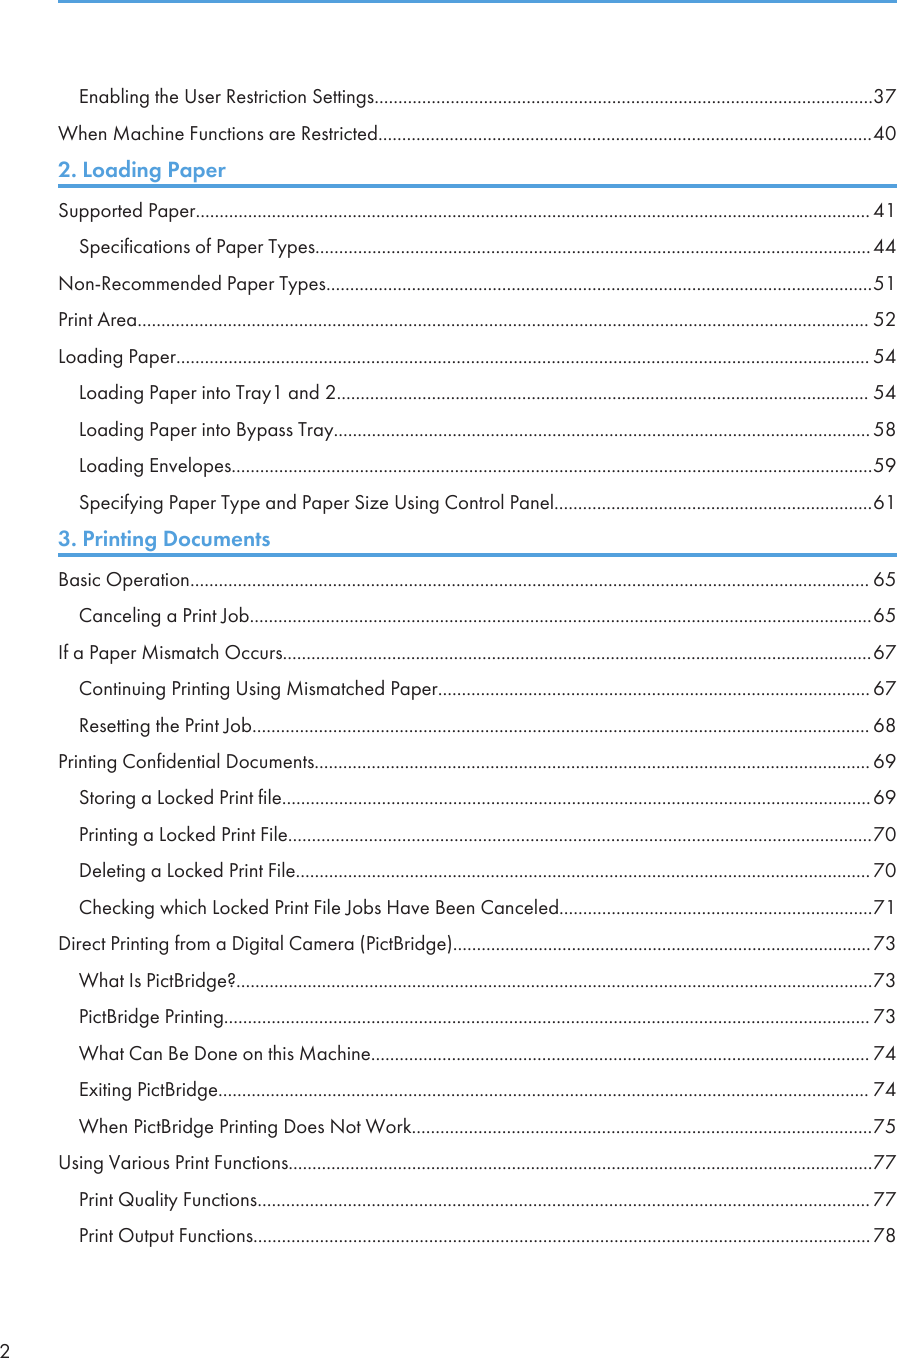
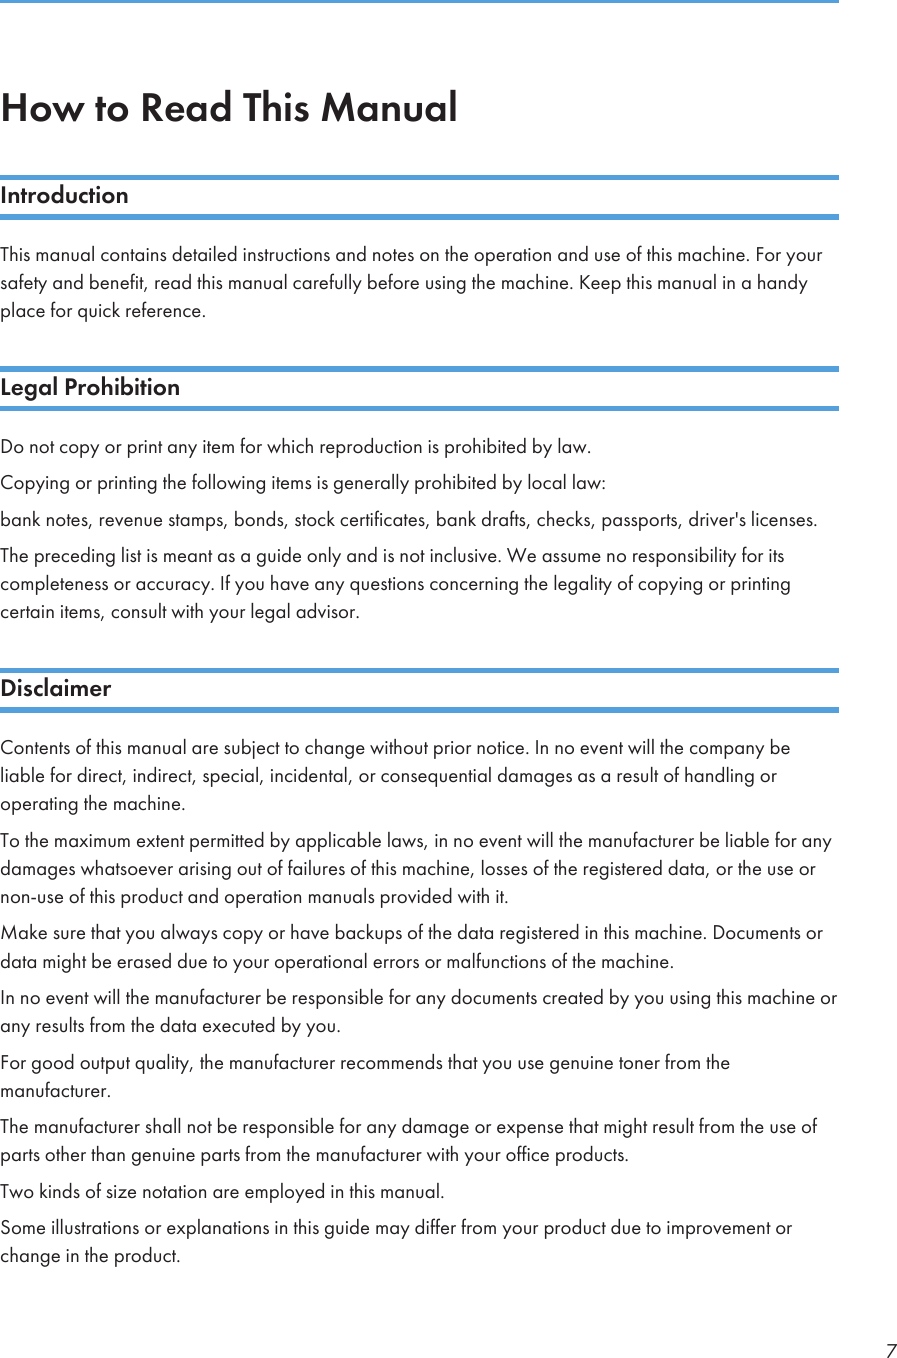
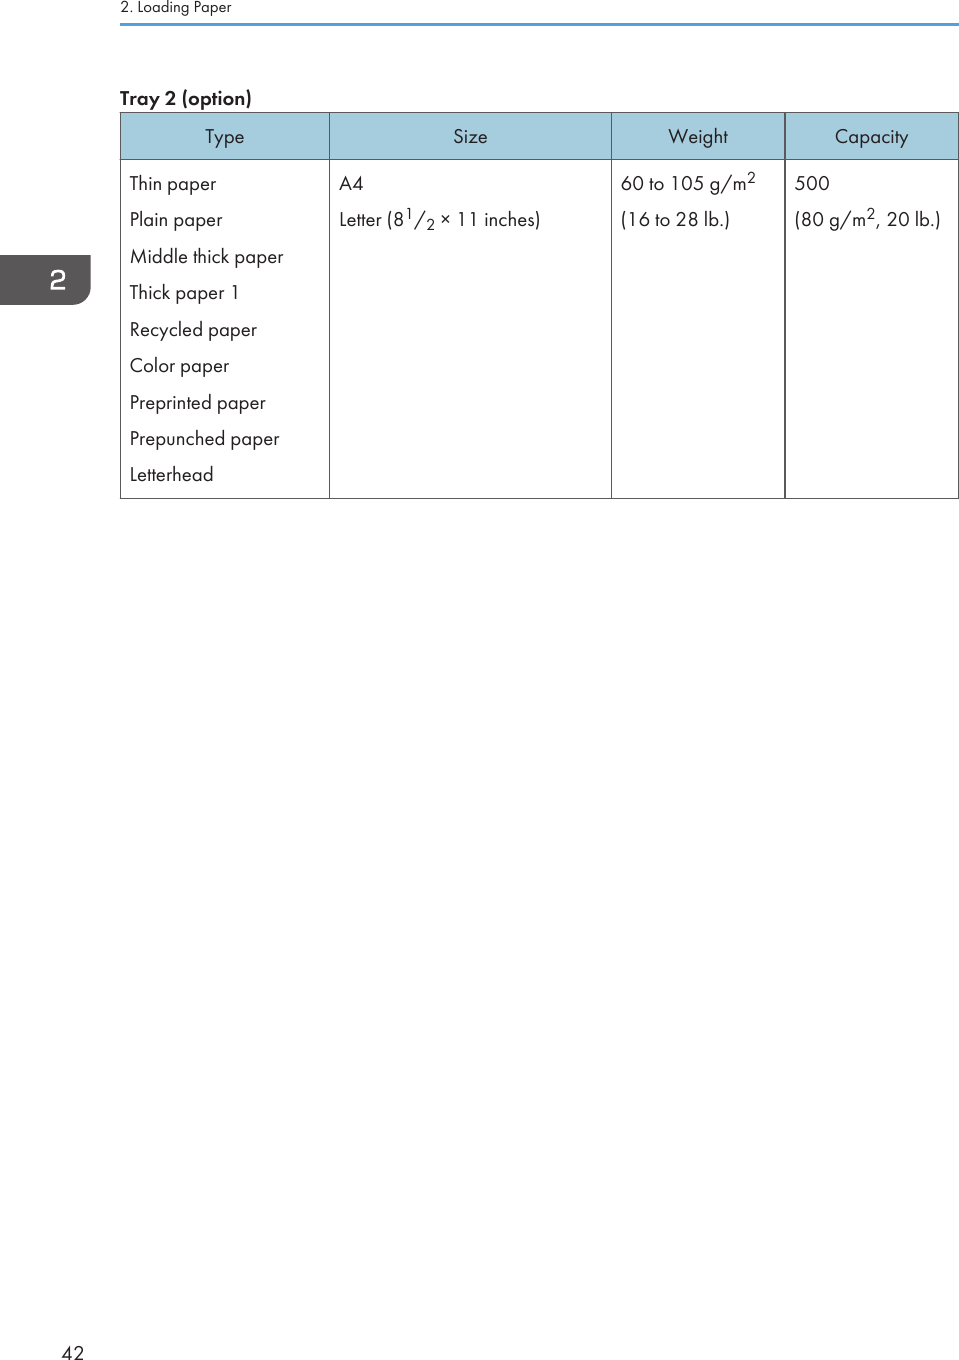
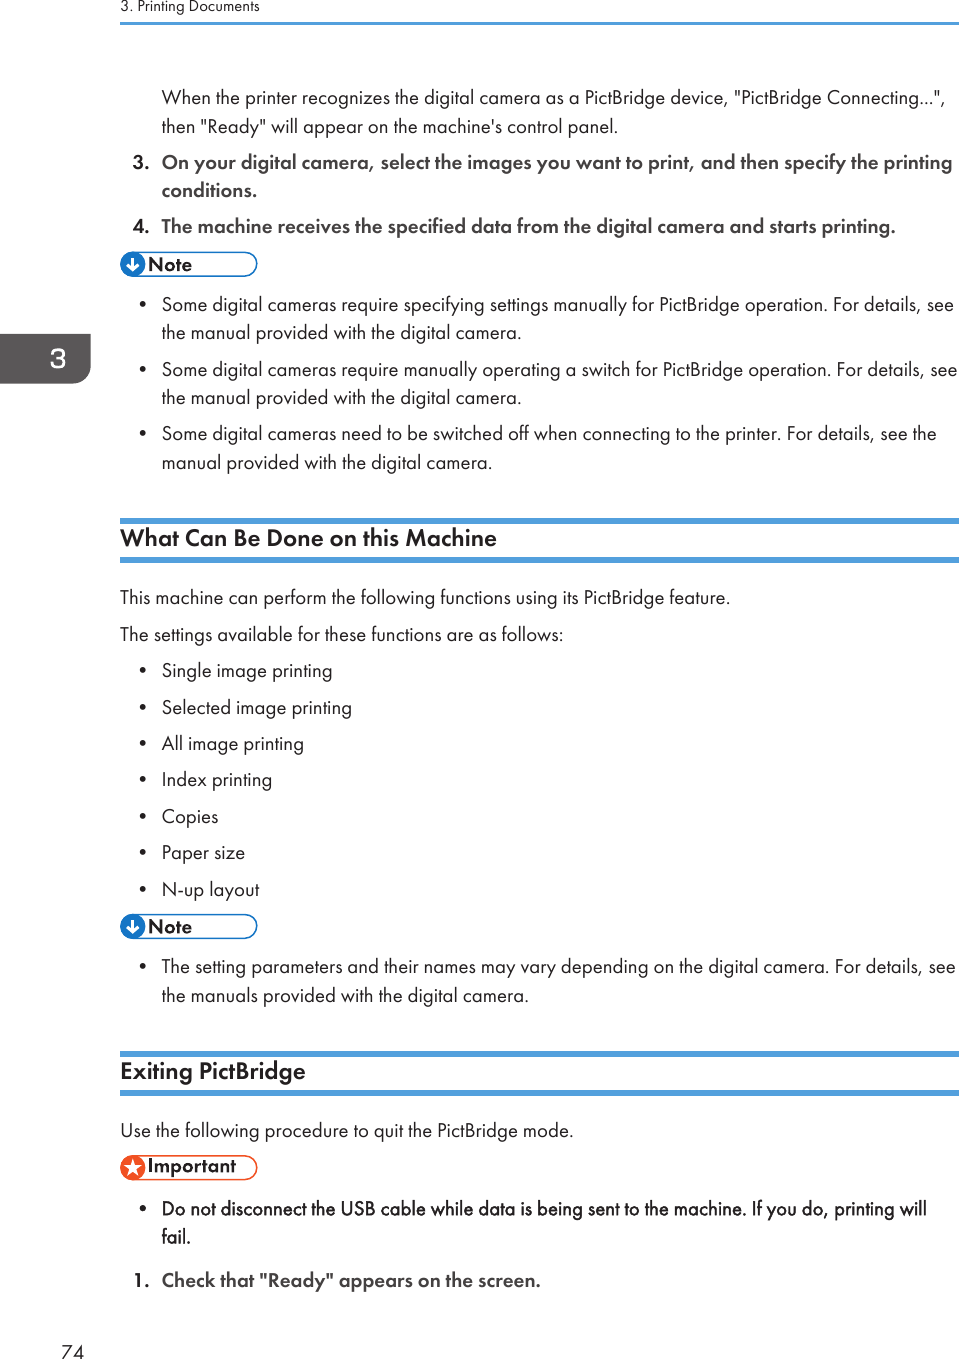
![Control PanelDAC5278 691051 2 4371. [Stop/Start] keyPress this key to stop receiving incoming data from the computer.2. [Job Reset] keyPress this key to cancel a job that is currently being printed or received.3. [Menu] keyPress this key to configure or check the machine settings.Press the [Menu] key again to return to the initial screen.4. DisplayDisplays the current status and messages.5. [Escape] keyPress this key to cancel an operation or to return to the previous screen.6. [OK] keyPress this key to confirm settings and setting values, or move to the next menu level.7. Scroll KeysPress to scroll the screen or to adjust values.8. Data In IndicatorFlashes when the machine is receiving data from a computer. The data indicator is lit if there is data to beprinted.9. Alert IndicatorLights up in red whenever an error occurs. Check the displayed error message. Flashes in yellow when thetoner has nearly run out.10. Power IndicatorRemains lit while the power is on. It is unlit when the power is off.• The color of the control panel varies depending on the model.Guide to Components21](https://usermanual.wiki/Ricoh/PRSPC252DN1.BBP-PRSPC252DN1-User-Manual-1/User-Guide-2134301-Page-23.png)
![Configuring Network SettingsThis section describes configuring the settings required to use the machine on a network.Configuring the IP Address SettingsThe procedure for configuring network settings differs depending on whether the IP address is assignedautomatically by the network (DHCP), or is specified manually.• You can press the [Escape] key to exit to the previous level of the menu tree.• If your network environment requires a specific transmission speed that is not automaticallydetected, specify the transmission speed in [Ethernet Speed] under [Network Setting].• Configure the IP address setting first, then install the driver. For details about installing the driver,see the Driver Installation Guide.• For details about printing the configuration page, see page 86 "List/Test Print Menu".Specifying settings to receive an IPv4 address automatically• A DHCP server is required on the network for the machine to receive an IPv4 addressautomatically.1. Turn on the machine.2. Press the [Menu] key.CER4083. Press the [ ] or [ ] key to select [Host Interface], and then press the [OK] key.4. Press the [ ] or [ ] key to select [Network Setting], and then press the [OK] key.5. Press the [ ] or [ ] key to select [IPv4 Config.], and then press the [OK] key.6. Press the [ ] or [ ] key to select [DHCP], and then press the [OK] key.Configuring Network Settings29](https://usermanual.wiki/Ricoh/PRSPC252DN1.BBP-PRSPC252DN1-User-Manual-1/User-Guide-2134301-Page-31.png)
![7. Press the [ ] or [ ] key to select [Active], and then press the [OK] key.8. Press the [Menu] key to return to the initial screen.9. If you are requested to restart the machine, turn off the machine, and then turn it back on.10. Print the configuration page to check the setting.The IPv4 address setting will appear under "TCP/IP" on the configuration page.Assigning the machine's IPv4 address manually• The IPv4 address assigned to the machine must not be used by any other device on the samenetwork.1. Turn on the machine.2. Press the [Menu] key.CER4083. Press the [ ] or [ ] key to select [Host Interface], and then press the [OK] key.4. Press the [ ] or [ ] key to select [Network Setting], and then press the [OK] key.5. Press the [ ] or [ ] key to select [IPv4 Config.], and then press the [OK] key.6. Press the [ ] or [ ] key to select [DHCP], and then press the [OK] key.7. Press the [ ] or [ ] key to select [Inactive], and then press the [OK] key.8. Press the [ ] or [ ] key to select [IP Address], and then press the [OK] key.The current IPv4 address is shown.9. Enter the machine's IPv4 address using the [ ] or [ ] key.• To go to the next field, press the [OK] key.• To go back to the previous field, press the [Escape] key.10. Press the [OK] key.11. Press the [ ] or [ ] key to select [Subnet Mask], and then press the [OK] key.The current subnet mask is shown.1. Getting Started30](https://usermanual.wiki/Ricoh/PRSPC252DN1.BBP-PRSPC252DN1-User-Manual-1/User-Guide-2134301-Page-32.png)
![12. Enter the subnet mask using the [ ] or [ ] key.• To go to the next field, press the [OK] key.• To go back to the previous field, press the [Escape] key.13. Press the [OK] key.14. Press the [ ] or [ ] key to select [Gateway Address], and then press the [OK] key.The current gateway address is shown.15. Enter the gateway address using the [ ] or [ ] key.• To go to the next field, press the [OK] key.• To go back to the previous field, press the [Escape] key.16. Press the [OK] key.17. Press the [Menu] key to return to the initial screen.18. If you are requested to restart the machine, turn off the machine, and then turn it back on.19. Print the configuration page to check the setting.The IPv4 address setting will appear under "TCP/IP" on the configuration page.• If [DHCP] is enabled, manually configured IPv4 address settings are not used.Specifying settings to receive an IPv6 address automatically• DHCP server is required on the network for the machine to receive an IPv6 address automatically.1. Turn on the machine.2. Press the [Menu] key.CER4083. Press the [ ] or [ ] key to select [Host Interface], and then press the [OK] key.4. Press the [ ] or [ ] key to select [Network Setting], and then press the [OK] key.5. Press the [ ] or [ ] key to select [IPv6 Config.], and then press the [OK] key.Configuring Network Settings31](https://usermanual.wiki/Ricoh/PRSPC252DN1.BBP-PRSPC252DN1-User-Manual-1/User-Guide-2134301-Page-33.png)
![6. Press the [ ] or [ ] key to select [IPv6], and then press the [OK] key.7. Press the [ ] or [ ] key to select [Active], and then press the [OK] key.8. Press the [ ] or [ ] key to select [DHCP], and then press the [OK] key.9. Press the [ ] or [ ] key to select [Active], and then press the [OK] key.10. Press the [Menu] key to return to the initial screen.11. If you are requested to restart the machine, turn off the machine, and then turn it back on.12. Print the configuration page to check the setting.The IPv6 address setting will appear under "IPv6 Configuration" on the configuration page.Assigning the machine's IPv6 address manually• The IPv6 address assigned to the machine must not be used by any other device on the samenetwork.1. Turn on the machine.2. Press the [Menu] key.CER4083. Press the [ ] or [ ] key to select [Host Interface], and then press the [OK] key.4. Press the [ ] or [ ] key to select [Network Setting], and then press the [OK] key.5. Press the [ ] or [ ] key to select [IPv6 Config.], and then press the [OK] key.6. Press the [ ] or [ ] key to select [IPv6], and then press the [OK] key.7. Press the [ ] or [ ] key to select [Active], and then press the [OK] key.8. Press the [ ] or [ ] key to select [DHCP], and then press the [OK] key.9. Press the [ ] or [ ] key to select [Inactive], and then press the [OK] key.10. Press the [ ] or [ ] key to select [Manual Address], and then press the [OK] key.11. Press the [ ] or [ ] key to select [Manual Address], and then press the [OK] key.1. Getting Started32](https://usermanual.wiki/Ricoh/PRSPC252DN1.BBP-PRSPC252DN1-User-Manual-1/User-Guide-2134301-Page-34.png)
![12. Enter the machine's IPv6 address using the [ ] or [ ] key.• To go to the next field, press the [OK] key.• To go back to the previous field, press the [Escape] key.13. Press the [OK] key.14. Press the [ ] or [ ] key to select [Prefix Length], and then press the [OK] key.15. Enter the prefix length using the [ ] or [ ] key, and then press the [OK] key.16. Press the [ ] or [ ] key to select [Gateway Address], and then press the [OK] key.17. Enter the gateway address using the [ ] or [ ] key.• To go to the next field, press the [OK] key.• To go back to the previous field, press the [Escape] key.18. Press the [OK] key.19. Press the [Menu] key to return to the initial screen.20. If you are requested to reboot the machine, turn off the machine, and then turn it back on.21. Print the configuration page to check the setting.The IPv6 address setting will appear under "IPv6 Configuration" on the configuration page.Sharing the Printer on a NetworkThis section explains how to configure this machine as a Windows network printer.The network printer setting can be configured to enable network clients to use the machine.• To change printer properties, you need access privileges for printer management. Log on using theaccount for the Administrator group members.• The following procedure is based on Windows 7. If you are using another operating system, theprocedure might differ slightly.1. On the [Start] menu, click [Devices and Printers].If you are using a computer that is running Windows 8 or Windows Server 2012, click [Search] onthe Charm Bar, and then click [Control Panel]. When the [Control Panel] window appears, click[View devices and printers].2. Right-click the icon of the printer you want to use, and then click [Printer properties].The printer properties dialog box appears.3. On the [Sharing] tab, click [Share this printer].• To share this printer with users using a different version of Windows, continue with thisprocedure.• If you have installed an alternative driver by selecting [Share this printer] during the printerdriver installation, proceed to Step 8.Configuring Network Settings33](https://usermanual.wiki/Ricoh/PRSPC252DN1.BBP-PRSPC252DN1-User-Manual-1/User-Guide-2134301-Page-35.png)
![4. Click [Additional Drivers...].5. Select the version of Windows with which you want to share the printer, and then click[OK].6. Click [Browse...], select the driver file, and then click [Open].7. Click [OK].8. On the [Advanced] tab, click the [Printing Defaults...] button.Specify the default values for the printer driver to be used by client computers, and then click [OK].9. Click [Apply].10. Click [OK].Wireless LAN SetupThis section explains how to configure the wireless LAN settings manually using the control panel. Foreasy setup using WPS (Wi-Fi Protected Setup), see Wi-Fi Settings Guide.• If [Inactive] is specified for the [Wi-Fi] setting, you cannot use the [Setup Wizard]. Specify [Active]for the [Wi-Fi] setting first. If you change the [Wi-Fi] setting, the machine must be restarted.• Ensure that the router, access point, or device equipped with a wireless LAN, etc., is turned on.• Check the authentication method and the name of the router, access point, or device equippedwith a wireless LAN (SSID/IBSS) in advance.• First, configure the wireless LAN setting, and then install the driver. For details about installing thedriver, see the Driver Installation Guide.Infrastructure modeUse the following procedure to connect to the wireless LAN router or access point manually.1. Turn on the machine.2. Press the [Menu] key.3. Press the [ ] or [ ] key to select [Host Interface], and then press the [OK] key.4. Press the [ ] or [ ] key to select [Network Setting], and then press the [OK] key.5. Press the [ ] or [ ] key to select [Wi-Fi Config.], and then press the [OK] key.6. Press the [ ] or [ ] key to select [Setup Wizard], and then press the [OK] key.7. Press the [ ] or [ ] key to select [Infrastructure], and then press the [OK] key.8. Press the [ ] or [ ] key to select the destination SSID, and then press the [OK] key.If you cannot find the destination SSID, check if the device is turned on.1. Getting Started34](https://usermanual.wiki/Ricoh/PRSPC252DN1.BBP-PRSPC252DN1-User-Manual-1/User-Guide-2134301-Page-36.png)
![When entering the SSID, select [Input SSID], and then press the [OK] key.The SSID entry screen appears. Enter the SSID using the [ ] or [ ] key, and then press the [OK]key.• To move to the next character, press the [OK] key.• To return to the previous character, press the [Escape] key.9. Press the [ ] or [ ] key to select the authentication method, and then press the [OK] key.Select the same method that the router or access point is using.If you have selected [WPA2-PSK] or [Mixed Mode], proceed to Step 11.10. Press the [ ] or [ ] key to select the encryption method, and then press the [OK] key.Select the same method that the router or access point is using.11. Enter the encryption key, and then press the [OK] key.• To move to the next character, press the [OK] key.• To return to the previous character, press the [Escape] key.If you selected [Shared Key] or [Open System] in Step 9, it is necessary to enter the ID. Enter the IDusing the [ ] or [ ] key, and then press the [OK] key.The ID is used for identifying the encryption key. You can register four encryption keys (ID 1 to 4).12. Press the [OK] key.After connecting to the network, the Wi-Fi screen is displayed.13. Press the [ ] or [ ] key to select [Wi-Fi Status], and then press the [OK] key.When "Connected" is displayed, the connection has been established.When "Disconnected" is displayed, the connection has not been established. Start again from thebeginning.Ad Hoc modeThis section explains how to connect directly to devices equipped with a wireless LAN, such computerson a peer-to-peer network.• In Ad Hoc network, every device must be manually assigned an IP address for TCP/IP if there is noDHCP server.• In Ad Hoc mode, only Open System or WEP encryption is supported. WPA2-PSK and Mix ModeWPA2/WPA authentication methods are not supported.1. Turn on the machine.2. Press the [Menu] key.3. Press the [ ] or [ ] key to select [Host Interface], and then press the [OK] key.Configuring Network Settings35](https://usermanual.wiki/Ricoh/PRSPC252DN1.BBP-PRSPC252DN1-User-Manual-1/User-Guide-2134301-Page-37.png)
![4. Press the [ ] or [ ] key to select [Network Setting], and then press the [OK] key.5. Press the [ ] or [ ] key to select [Wi-Fi Config.], and then press the [OK] key.6. Press the [ ] or [ ] key to select [Setup Wizard], and then press the [OK] key.7. Press the [ ] or [ ] key to select [Ad-Hoc], and then press the [OK] key.8. Press the [ ] or [ ] key to select a communication channel, and then press the [OK] key.Select a channel that corresponds to the device that you are going to connect with.9. Press the [ ] or [ ] key to select the destination device name (IBSS), and then press the[OK] key.If you cannot find the destination, check that the device is turned on.When entering the device name, select [Input SSID], and then press the [OK] key. The SSID entryscreen appears. Enter the device name using the [ ] or [ ] key, and then press the [OK] key.• To move to the next character, press the [OK] key.• To return to the previous character, press the [Escape] key.10. Press the [ ] or [ ] key to select the authentication method, and then press the [OK] key.11. Press the [ ] or [ ] key to select the encryption method, and then press the [OK] key.12. Enter the encryption key using the [ ] or [ ] key, and then press the [OK] key.• To move to the next character, press the [OK] key.• To return to the previous character, press the [Escape] key.13. Enter the ID using the [ ] or [ ] key, and then press the [OK] key.The ID is used for identifying the encryption key. You can register four encryption keys (ID 1 to 4).14. Press the [OK] key.After connecting to the network, the Wi-Fi screen is displayed.15. Press the [ ] or [ ] key to select [Wi-Fi Status], and then press the [OK] key.When "Connected" is displayed, the connection has been established.When "Disconnected" is displayed, the connection has not been established. Start again from thebeginning.1. Getting Started36](https://usermanual.wiki/Ricoh/PRSPC252DN1.BBP-PRSPC252DN1-User-Manual-1/User-Guide-2134301-Page-38.png)
![Restricting Machine Functions According toUserYou can configure settings to require a user code when someone tries to use certain machine functions.To enable this setting, you must first configure the machine settings via Web Image Monitor.• This function is available for the Type 2 model only.• To print jobs that require authentication you can use only the PCL printer driver. Printing such jobsfrom the PostScript 3 printer driver is not possible.• For details about using Web Image Monitor, see page 101 "Using Web Image Monitor".Enabling the User Restriction SettingsThis section explains how to configure settings to permit only authorized users to use certain machinefunctions.Using Web Image Monitor, enable user restriction for all or some of the functions listed below, and thenregister users who can use those functions.• PictBridge printing• Printing (both color and black-and-white)• Color printingYou can specify functions available to each user upon authentication. Up to 30 users can be registered.1. Start the Web browser, and access the machine by entering its IP address.2. Click [Restrict Available Functions].3. Enter the administrator password if required.4. Click [Apply].Restricting Machine Functions According to User37](https://usermanual.wiki/Ricoh/PRSPC252DN1.BBP-PRSPC252DN1-User-Manual-1/User-Guide-2134301-Page-39.png)
![5. Under "Available Functions", select [Restrict] for the functions you want to restrict, andthen click [Apply].Select [Do not Restrict] for the functions you do not want to restrict.The user restriction setting is enabled for the selected function. Proceed to the following steps toregister users.6. Click [Available Functions per User].A list of currently registered user entries appears.7. Select a user entry, and then click [Change].The following window appears.8. Enter the user name in [User Name] using up to 16 alphanumeric characters.9. Enter the user code in [User Code] using up to 8 digits.The user code will be used to authenticate users when they try to use a restricted function.10. Select the functions you want to make available to the user upon authentication.Unselected functions will be unavailable to users authenticated under this user code.11. Click [Apply].1. Getting Started38](https://usermanual.wiki/Ricoh/PRSPC252DN1.BBP-PRSPC252DN1-User-Manual-1/User-Guide-2134301-Page-40.png)
![12. Close the Web browser.• You must enter both the user name and user code to register a user entry.• Make sure that different user entries do not share the same user name or user code.Modifying user entriesThis section explains how to modify user entries.1. Start the Web browser, and access the machine by entering its IP address.2. Click [Restrict Available Functions].3. Enter the administrator password if required.4. Click [Apply].5. Click [Available Functions per User].A list of currently registered user entries appears.6. Select the entry to modify, and then click [Change].7. Modify settings as necessary.8. Click [Apply].9. Close the Web browser.Deleting user entriesThis section explains how to delete user entries.1. Start the Web browser, and access the machine by entering its IP address.2. Click [Restrict Available Functions].3. Enter the administrator password if required.4. Click [Apply].5. Click [Available Functions per User].A list of currently registered user entries appears.6. Select the entry to delete, and then click [Delete].7. Confirm that the entry you have selected is the entry that you want to delete.8. Click [Apply].9. Close the Web browser.Restricting Machine Functions According to User39](https://usermanual.wiki/Ricoh/PRSPC252DN1.BBP-PRSPC252DN1-User-Manual-1/User-Guide-2134301-Page-41.png)
![When Machine Functions are RestrictedRestricted functions can be used only by authorized users.Depending on the restricted function, users will be authenticated from the machine's control panel or inthe printer driver.• This function is available for the Type 2 model only.• To print jobs that require authentication you can use only the PCL printer driver. Printing such jobsfrom the PostScript 3 printer driver is not possible.• The procedure in this section is an example based on Windows 7.The table below shows the functions that can be restricted, and how users can be authenticated to usethem.Restricted Function Authentication method• PictBridge printing The machine requests for a user code when a digital camera isconnected to the machine.The user must enter a valid user code from the control panel.• Printing (both color andblack-and-white)• Color printingThe user must enter a valid user code in the printer driver beforeexecuting a print command.Authentication using the control panel1. If the printer requests for a user code, enter a user code using the [ ] or [ ] key.If you enter a wrong user code, the printer denies further attempts of authentication.2. Press the [OK] key.Authentication using the printer driver1. Open the file you want to print on your computer.2. On the [File] menu, click [Print...].3. In the [Select Printer] area, select the name of this machine, and then click [Preferences].4. Click the [Valid Access] tab.5. Enter the user code using 1 to 8 digits, and then click [OK].6. Execute a print command.If an incorrect user code is entered, the job will be canceled automatically (without any errormessage).1. Getting Started40](https://usermanual.wiki/Ricoh/PRSPC252DN1.BBP-PRSPC252DN1-User-Manual-1/User-Guide-2134301-Page-42.png)
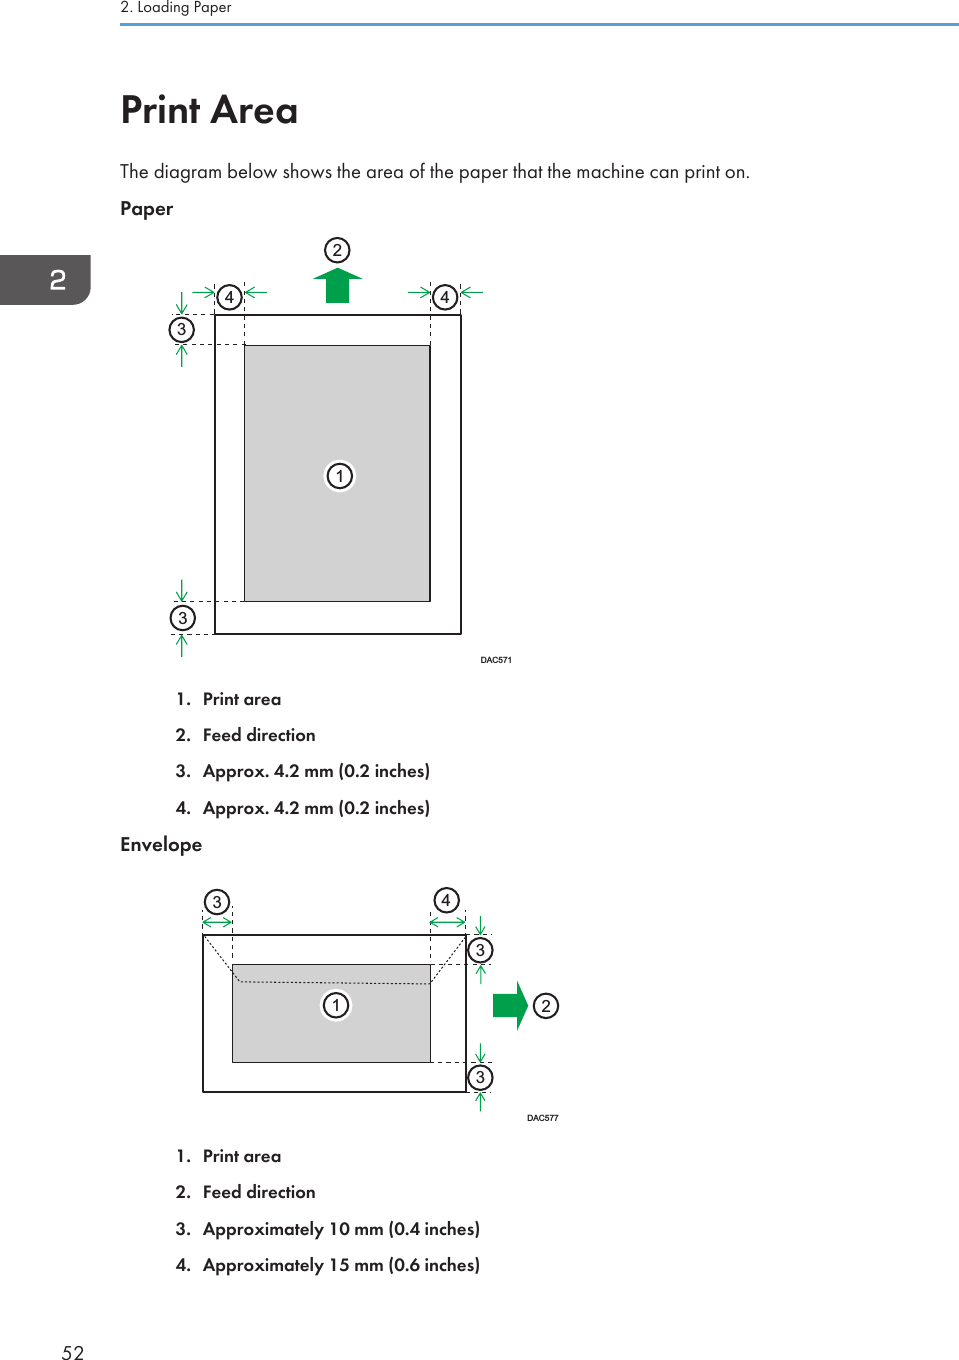
![Bypass trayType Size Weight CapacityThin paperPlain paperMiddle thick paperThick paper 1, 2Recycled paperColor paperPrepunched paperLetterheadBond paperCardstockLabel paperEnvelopeA4B5 JISA5B6 JISA6Legal (81/2 × 14 inches)Letter (81/2 × 11 inches)Half Letter (51/2 × 81/2 inches)Executive (71/4 × 101/2inches)8 × 1381/2 × 13Folio (81/4 × 13 inches )16K (195 mm × 267 mm)Com 10 (41/8 × 91/2 inches)Monarch (37/8 × 71/2 inches)C5 Env (162 × 229 mm)C6 Env (114 × 162 mm)DL Env (110 × 220 mm)Custom size:90 to 216 mm in width,148 to 356 mm in length(3.54 to 8.50 inches in width,5.83 to 14.0 inches in length)60 to 160 g/m2(16 to 43 lb.)1• You cannot print on Legal size paper in the following cases:• PCL printer driverWhen [Gradation:] in [Print Quality] is set to [Fine]• PostScript 3 printer driverWhen [Print Quality] in [Printer Features] is set to [Best Quality]Supported Paper43](https://usermanual.wiki/Ricoh/PRSPC252DN1.BBP-PRSPC252DN1-User-Manual-1/User-Guide-2134301-Page-45.png)
![Thin paperItem DescriptionPaper thickness 60 to 65g/m2 (16 to 17 lb.)Supported paper tray Can be used with any of the paper trays.Duplex supported size A4, B5 JIS, Legal (81/2 × 14 inches), Letter (81/2 × 11 inches), Executive(71/4 × 101/2 inches), 8 × 13, 81/2 × 13, Folio (81/4 × 13 inches), 16K(195 mm × 267 mm)Plain paperItem DescriptionPaper thickness 66 to 74 g/m2 (18 to 20 lb.)Supported paper tray Can be used with any of the paper trays.Duplex supported size A4, B5 JIS, Legal (81/2 × 14 inches), Letter (81/2 × 11 inches), Executive(71/4 × 101/2 inches), 8 × 13, 81/2 × 13, Folio (81/4 × 13 inches), 16K(195 mm × 267 mm)Recycled paperItem DescriptionPaper thickness 75 to 90 g/m2 (20 to 24 lb.)Supported paper tray Can be used with any of the paper trays.Duplex supported size A4, B5 JIS, Legal (81/2 × 14 inches), Letter (81/2 × 11 inches), Executive(71/4 × 101/2 inches), 8 × 13, 81/2 × 13, Folio (81/4 × 13 inches), 16K(195 mm × 267 mm)Notes If the paper thickness is outside the specified range, select [Thin Paper],[Plain Paper], [Thick Paper 1], or [Thick Paper 2].Color paperItem DescriptionPaper thickness 75 to 90 g/m2 (20 to 24 lb.)Supported paper tray Can be used with any of the paper trays.Supported Paper45](https://usermanual.wiki/Ricoh/PRSPC252DN1.BBP-PRSPC252DN1-User-Manual-1/User-Guide-2134301-Page-47.png)
![Item DescriptionDuplex supported size A4, B5 JIS, Legal (81/2 × 14 inches), Letter (81/2 × 11 inches), Executive(71/4 × 101/2 inches), 8 × 13, 81/2 × 13, Folio (81/4 × 13 inches), 16K(195 mm × 267 mm)Notes If the paper thickness is outside the specified range, select [Thin Paper],[Plain Paper], [Thick Paper 1], or [Thick Paper 2].Preprinted paperItem DescriptionPaper thickness 75 to 90 g/m2 (20 to 24 lb.)Supported paper tray Tray 1 and tray 2Duplex supported size A4, B5 JIS, Legal (81/2 × 14 inches), Letter (81/2 × 11 inches), Executive(71/4 × 101/2 inches), 8 × 13, 81/2 × 13 inches, Folio (81/4 × 13inches), 16K (195 mm × 267 mm)Notes If the paper thickness is outside the specified range, select [Thin Paper],[Plain Paper], [Thick Paper 1], or [Thick Paper 2].Prepunched paperItem DescriptionPaper thickness 75 to 90 g/m2 (20 to 24 lb.)Supported paper tray Can be used with any of the paper trays.Duplex supported size A4, B5 JIS, Legal (81/2 × 14 inches), Letter (81/2 × 11 inches), Executive(71/4 × 101/2 inches), 8 × 13, 81/2 × 13, Folio (81/4 × 13 inches), 16K(195 mm × 267 mm)Notes If the paper thickness is outside the specified range, select [Thin Paper],[Plain Paper], [Thick Paper 1], or [Thick Paper 2].LetterheadItem DescriptionPaper thickness 75 to 90 g/m2 (20 to 24 lb.)Supported paper tray Can be used with any of the paper trays.2. Loading Paper46](https://usermanual.wiki/Ricoh/PRSPC252DN1.BBP-PRSPC252DN1-User-Manual-1/User-Guide-2134301-Page-48.png)
![Item DescriptionDuplex supported size A4, B5 JIS, Legal (81/2 × 14 inches), Letter (81/2 × 11 inches), Executive(71/4 × 101/2 inches), 8 × 13, 81/2 × 13, Folio (81/4 × 13 inches), 16K(195 mm × 267 mm)Notes Paper that has a thickness outside the specified range cannot be printedonto.Bond paperItem DescriptionPaper thickness 106 to 160 g/m2 (28 to 43 lb.)Supported paper tray Tray 1 and bypass trayDuplex supported size NoneNotes • The number of sheets that can be printed in one minute isapproximately half that of middle thick paper.• If the paper thickness is outside the specified range, select [Thick Paper1].CardstockItem DescriptionPaper thickness 106 to 160 g/m2 (28 to 43 lb.)Supported paper tray Tray 1 and bypass trayDuplex supported size NoneNotes • The number of sheets that can be printed in one minute isapproximately half that of middle thick paper.• Paper thicker than 160 g/m2 cannot be printed onto.Label paperItem DescriptionSupported paper tray Tray 1 and bypass trayDuplex supported size NoneSupported Paper47](https://usermanual.wiki/Ricoh/PRSPC252DN1.BBP-PRSPC252DN1-User-Manual-1/User-Guide-2134301-Page-49.png)
![• You may not be able to perform duplex printing on 8 × 13, 81/2 × 13, Folio (81/4 × 13 inches),or 16K (195 mm × 267 mm) size paper in the following cases:• PCL printer driverWhen [Gradation:] in [Print Quality] is set to [Fine]• PostScript 3 printer driverWhen [Print Quality] in [Printer Features] is set to [Best Quality]2. Loading Paper50](https://usermanual.wiki/Ricoh/PRSPC252DN1.BBP-PRSPC252DN1-User-Manual-1/User-Guide-2134301-Page-52.png)
![• For prints from the bypass tray or Tray 1, you can select to print according to either the printerdriver settings or the control panel settings with [Bypass Priority] or [Tray1 Priority] under [PaperInput]. For details about [Bypass Priority] or [Tray1 Priority], see page 83 "Paper Input Menu".• If [Auto Continue] under system menu is enabled, printing stops temporarily if a paper type/sizeerror is detected. The printing restarts automatically with the settings made with the control panelafter about ten seconds. However, if the size of paper specified on the control panel and that of thepaper loaded in the paper tray or the paper size specified for the print job do not match whenprinting restarts, it may cause a paper jam. For details about [Auto Continue], see page 89"System Menu".Specifying the paper typeThis section explains how to specify the paper type.1. Press the [Menu] key.CER4082. Press the [ ] or [ ] key to select [Paper Input], and then press the [OK] key.3. Press the [ ] or [ ] key to select [Paper Type], and then press the [OK] key.4. Press the [ ] or [ ] key to select the paper type setting for the desired tray, and thenpress the [OK] key.5. Press the [ ] or [ ] key to select the desired paper type, and then press the [OK] key.6. Press the [Menu] key to return to the initial screen.Specifying the standard paper sizeThis section explains how to specify the standard paper size.2. Loading Paper62](https://usermanual.wiki/Ricoh/PRSPC252DN1.BBP-PRSPC252DN1-User-Manual-1/User-Guide-2134301-Page-64.png)
![1. Press the [Menu] key.CER4082. Press the [ ] or [ ] key to select [Paper Input], and then press the [OK] key.3. Press the [ ] or [ ] key to select [Paper Size], and then press the [OK] key.4. Press the [ ] or [ ] key to select the paper size setting for the desired tray, and then pressthe [OK] key.5. Press the [ ] or [ ] key to select the desired paper size, and then press the [OK] key.6. Press the [Menu] key to return to the initial screen.Specifying a custom paper sizeThis section explains how to specify a custom paper size.• Custom size paper cannot be loaded in tray 2.• When you perform printing, make sure that the paper size specified with the printer driver matchesthe paper size specified with the control panel. If a paper size mismatch occurs, a messageappears on the display. To ignore the error and print using mismatched paper, see page 67 "If aPaper Mismatch Occurs".1. Press the [Menu] key.CER4082. Press the [ ] or [ ] key to select [Paper Input], and then press the [OK] key.Loading Paper63](https://usermanual.wiki/Ricoh/PRSPC252DN1.BBP-PRSPC252DN1-User-Manual-1/User-Guide-2134301-Page-65.png)
![3. Press the [ ] or [ ] key to select [Paper Size], and then press the [OK] key.4. Press the [ ] or [ ] key to select the paper size setting for the desired tray, and then pressthe [OK] key.5. Press the [ ] or [ ] key to select [Custom Size], and then press the [OK] key.6. Press the [ ] or [ ] key to select [mm] or [inch], and then press the [OK] key.7. Enter the width using the [ ] or [ ] key, and then press the [OK] key.8. Enter the length using the [ ] or [ ] key, and then press the [OK] key.9. Press the [Menu] key to return to the initial screen.2. Loading Paper64](https://usermanual.wiki/Ricoh/PRSPC252DN1.BBP-PRSPC252DN1-User-Manual-1/User-Guide-2134301-Page-66.png)
![3. Printing DocumentsBasic OperationThis section explains the basic printing procedure.1. Open the [Printing Preferences] dialog box in your document's application.For details about each setting, click [Help]. You can also click the information icons to displayconfiguration information.2. Configure printing option settings as necessary, and then click [OK].The printer properties dialog box closes.3. Click [OK].• If a paper jam occurs, printing stops after the current page has been printed out. After the jammedpaper is removed, printing restarts from the jammed page automatically. For details about how toremove the jammed paper, see page 151 "Removing Printing Jams".• After printing on envelopes, make sure to pull up the levers for printing on envelopes back to theiroriginal positions. For details about the levers for printing on envelopes, see page 59 "LoadingEnvelopes".Canceling a Print JobYou can cancel print jobs using either the machine's control panel or your computer, depending on thestatus of the job.65](https://usermanual.wiki/Ricoh/PRSPC252DN1.BBP-PRSPC252DN1-User-Manual-1/User-Guide-2134301-Page-67.png)
![Canceling a print job before printing has startedWindows1. Double-click the printer icon on the task tray of your computer.2. Select the print job you want to cancel, click the [Document] menu, and then click[Cancel].Mac OS X1. From the Apple menu, select [System Preferences...].2. Under "Hardware", click [Print & Fax] or [Print & Scan].3. Double-click the machine from "Printers".4. Select the print job you want to cancel, and then click [Delete].• If you cancel a print job that has already been processed, printing may continue for a few pagesbefore being canceled.• It may take a while to cancel a large print job.Canceling a print job while printing1. Press the [Job Reset] key.DAC5823. Printing Documents66](https://usermanual.wiki/Ricoh/PRSPC252DN1.BBP-PRSPC252DN1-User-Manual-1/User-Guide-2134301-Page-68.png)
![If a Paper Mismatch OccursThe machine reports an error if:• The paper size or type does not match the print job's settings when [Input Tray:] is set to [Auto TraySelect].There are two ways to resolve these errors:Continue printing using mismatched paperUse the form-feed function to ignore the error and print using mismatched paper.Reset the print jobCancel printing.Continuing Printing Using Mismatched PaperIf the paper is too small for the print job, the printed image will be cropped.1. While an error message is displayed on the control panel, press the [Stop/Start] key.DAC583If a Paper Mismatch Occurs67](https://usermanual.wiki/Ricoh/PRSPC252DN1.BBP-PRSPC252DN1-User-Manual-1/User-Guide-2134301-Page-69.png)
![Resetting the Print Job1. While an error message is displayed on the control panel, press the [Job Reset] key.DAC5823. Printing Documents68](https://usermanual.wiki/Ricoh/PRSPC252DN1.BBP-PRSPC252DN1-User-Manual-1/User-Guide-2134301-Page-70.png)
![Printing Confidential DocumentsBy the Locked Print function, you can password-protect print jobs.This means that your job is printed only after you enter the password using the machine's control panel.This function prevents unauthorized users from seeing sensitive documents at the machine.• This function is available for the Type 2 model only.• This function is only available when using the PCL printer driver, and printing from a computerrunning a Windows operating system.• The procedure in this section is an example based on Windows 7.Storing a Locked Print fileThis section explains how to store a Locked Print file in the machine using the printer driver.1. Open the file you want to print on your computer.2. On the [File] menu, click [Print...].3. In the [Select Printer] area, select the name of this machine, and then click [Preferences].4. Click the [Setup] tab, and then select [Locked Print].The [Password:] and [User ID:] text boxes become available.The [User ID:] text box contains the login user name of your computer account or the user codeused for the previous Locked Print job.5. Type the password (containing 4 to 8 digits) and user ID (containing 1 to 9 alphanumericcharacters), and then click [OK].The user code will be used to identify your Locked Print file on the machine's control panel.6. Execute a print command.The print job is stored in the machine as a Locked Print file. You can print the file by entering thepassword using the control panel.• The Locked Print file is automatically erased from the machine's memory when it is printed out, orwhen the machine's power is turned off.• The machine can store up to 5 jobs or 5 MB of Locked Print data at a time.• Even if the printer cannot store any more Locked Print files, the printer holds a new Locked Print filefor the period of time specified in [Timeout:LockPrt] under [Host Interface] before canceling the job.Within this time, you can print or delete the new Locked Print file. You can also print or delete anexisting Locked Print file so that the new Locked Print file can be stored in the machine.Printing Confidential Documents69](https://usermanual.wiki/Ricoh/PRSPC252DN1.BBP-PRSPC252DN1-User-Manual-1/User-Guide-2134301-Page-71.png)
![• When a Locked Print job is canceled, the machine automatically logs the cancellation. You can usethis log to identify which Locked Print jobs have been canceled.Printing a Locked Print FileWhen there is a Locked Print file stored in the printer, "Locked Print Job Press OK" appears on theprinter's control panel display.Use the following procedure to unlock and print the Locked Print file.1. When the Locked Print message is displayed, press the [OK] key.2. Press the [ ] or [ ] key to select the file you want to print, and then press the [OK] key."HH:MM" is the time when the Locked Print file was stored, and "User ID" is the user ID enteredusing the printer driver.3. Press the [ ] or [ ] key to select [Print Job], and then press the [OK] key.4. Enter the password using the [ ] or [ ] keys.• Press the [OK] key to confirm the entry of each digit.• Press the [Escape] key to discard the current digits and exit to the previous level of the menutree.5. Press the [OK] key.The Locked Print file is printed.Deleting a Locked Print FileWhen there is a Locked Print file stored in the printer, "Locked Print Job Press OK" appears on theprinter's control panel display.3. Printing Documents70](https://usermanual.wiki/Ricoh/PRSPC252DN1.BBP-PRSPC252DN1-User-Manual-1/User-Guide-2134301-Page-72.png)
![Use the following procedure to delete a Locked Print file. You do not need to enter a password to deletea Locked Print file.1. When the Locked Print message is displayed, press the [OK] key.2. Press the [ ] or [ ] key to select the file you want to delete, and then press the [OK] key.3. Press the [ ] or [ ] key to select [Delete Job], and then press the [OK] key.4. Press the [ ] or [ ] key to select [Execute], and then press the [OK] key.The Locked Print file is deleted.If there are Locked Print files/logs remaining in the printer, the display returns to the list of LockedPrint files/logs. If there are none remaining, the display returns to the initial screen.Checking which Locked Print File Jobs Have Been CanceledWhen a Locked Print job is canceled, the printer automatically logs the cancellation. If the printer hascreated a cancellation log, "Locked Print Job Deleted" will appear on the control panel display.Use the following procedure to check which Locked Print file jobs have been canceled.1. When the Locked Print message is displayed, press the [OK] key.2. Press the [ ] or [ ] key to find a file whose name starts with an "!" mark.The "!" mark indicates that the job has been canceled."HH:MM" is the time when the Locked Print file was stored, and "User ID" is the user ID enteredusing the printer driver.To delete the log entry, proceed to the following steps.3. Press the [OK] key.4. Confirm that the log entry you want to delete is selected, and then press the [OK] key.Printing Confidential Documents71](https://usermanual.wiki/Ricoh/PRSPC252DN1.BBP-PRSPC252DN1-User-Manual-1/User-Guide-2134301-Page-73.png)
![5. Press the [ ] or [ ] key to select [Execute], and then press the [OK] key.The log is deleted.If there are Locked Print logs/files remaining in the printer, the display returns to the list of LockedPrint logs/files. If there are none remaining, the display returns to the initial screen.3. Printing Documents72](https://usermanual.wiki/Ricoh/PRSPC252DN1.BBP-PRSPC252DN1-User-Manual-1/User-Guide-2134301-Page-74.png)
![Using ICM (Image Color Matching)You can use Windows ICM function to reproduce colors that appear on the computer screen asclose as they are on printed paper.To use this function, the color profile must be added to the computer. You can find the color profilein the ICM folder stored on the provided printer driver CD-ROM. For information about adding acolor profile, search Windows Help for "color profile", and then see the appropriate topic.• Some of the functions described above might not be available depending on the printer driver oroperating system. For details, see the printer driver Help.Print Output FunctionsYou can specify the form of print outputs according to your purposes. This section briefly describes someof the settings that you can specify.Printing multiple sets of a documentYou can print multiple sets of the same document.Collating the output in document batchesYou can print complete sets of a multiple-page document one set at a time (P1, P2, P1, P2 ...). If thisfunction is not used when printing multiple sets, prints will be output in page batches (P1, P1, P2,P2 ...). This function is useful when, for example, making presentation materials.Changing orientation or rotating the imageYou can change the orientation of an image to portrait or landscape. You can also rotate theimage by 180 degrees. Use rotation to prevent an image from being printed upside down whenusing paper with a predefined top and bottom (such as letterhead paper).Printing multiple pages per sheetYou can print multiple pages onto one sheet of paper.When using this function, a suitable reduction ratio is selected automatically based on the papersize and the number of pages you want to fit on each sheet.Printing on both sides of paper (duplex printing)You can print on both sides of paper.Reducing or enlarging the documentYou can reduce or enlarge documents by a specific ratio, from 25% to 400% in 1% increments.You can also reduce or enlarge documents automatically to fit a specific paper size. This function isuseful, for example, when printing Web pages.If the [Enable Large Papers] option is selected, A3/11 × 17/B4/8K documents can be scaled toa size that the machine supports, so that it can then be printed out.3. Printing Documents78](https://usermanual.wiki/Ricoh/PRSPC252DN1.BBP-PRSPC252DN1-User-Manual-1/User-Guide-2134301-Page-80.png)
![Not printing of blank pagesIf a print job contains blank pages, they can be prevented from being printed.Note that this setting has higher priority than [Blank Pg. Print] under the system menu of the controlpanel.Printing with a cover pageYou can add a cover page to the print job.You can select to leave the cover page blank, or print the first page of the document on the coverpage. If a cover page is inserted into a duplex job, you can print on its back side also.Paper for the cover page can either be the same as or different from the remaining pages.Printing on custom size paperYou can print using non-standard size paper by specifying the size of the paper as custom size.To specify the custom paper size, select [Custom Paper Size] from the [Document Size:] list, andthen click the [Custom Paper Size...] button in the lower part of the dialog box to configure thepaper size.Superimposing text on prints (watermark)You can superimpose watermark text on prints. Various predefined watermarks are provided. Youcan also create your own watermarks.• Some of the functions described above might not be available depending on the printer driver oroperating system. For details, see the printer driver Help.Using Various Print Functions79](https://usermanual.wiki/Ricoh/PRSPC252DN1.BBP-PRSPC252DN1-User-Manual-1/User-Guide-2134301-Page-81.png)

![4. Configuring the Machine Using theControl PanelBasic Operation1. If you want to configure the machine's system settings, press the [Menu] key.CER4082. Press the [ ] or [ ] key to select the settings you want to use.3. To confirm setting items and values displayed, press the [OK] key.4. To go back to the previous item, press the [Menu] key.81](https://usermanual.wiki/Ricoh/PRSPC252DN1.BBP-PRSPC252DN1-User-Manual-1/User-Guide-2134301-Page-83.png)
![Menu ChartThis section lists the parameters included in each menu.For details about configuring the machine using Web Image Monitor, see page 101 "Configuring theMachine Using Web Image Monitor".• Some items might not appear depending on the model type or machine's configuration.• Some items can also be configured using Web Image Monitor.Paper Input[Paper Size], [Paper Type], [Tray Priority], [Bypass Priority], [Tray1 Priority]List/Test Print[Config. Page], [Menu List], [Test Page], [PCL Font List], [PS Font List], [Maintenance Pg.]Maintenance[Color Dens/Reg], [TonerAlmstEmpty], [Anti-Humid Lvl]System[Auto Continue], [Copies], [Sub Paper Size], [Def Ppr Size], [Duplex], [Blank Pg. Print], [EnergySaver 1], [Energy Saver 2], [B&W Page Detect], [Restore Default], [Prt. Err.Report], [BW PrtPriority] [Auto Cleaning], [PCL6 Mode]Host Interface[Timeout:LockPrt], [Timeout: USB], [Timeout: NW], [Network Setting], [Fixed USB Port]PCL Menu[Orientation], [Form Lines], [Font Number], [Point Size], [Font Pitch], [Symbol Set], [Courier Font],[Ext.A4 Width], [Append CR to LF], [Resolution]PS Menu[Resolution], [Color Profile]Language[English], [French], [German], [Italian], [Spanish], [Dutch], [Swedish], [Norwegian], [Danish],[Finnish], [Portuguese]4. Configuring the Machine Using the Control Panel82](https://usermanual.wiki/Ricoh/PRSPC252DN1.BBP-PRSPC252DN1-User-Manual-1/User-Guide-2134301-Page-84.png)
![Paper Input MenuPaper Size: Tray 1Specifies the paper size for Tray 1.Default: (mainly Europe and Asia) [A4], (mainly North America) [8 1/2 x11]• A4, B5 JIS, A5, 8 1/2 × 14, 8 1/2 × 11, 7 1/4 × 10 1/2, 8 ×13, 8 1/2 × 13, 8 1/4 ×13, 16K, Custom Size, 4 1/8 × 9 1/2, 3 7/8 × 7 1/2, C5 Env, C6 Env, DL Env, 5 1/2 × 81/2, B6 JIS, A6Paper Size: Tray 2Specifies the paper size for Tray 2.This setting appears only when the optional paper feed unit is installed.Default: (mainly Europe and Asia) [A4], (mainly North America) [8 1/2 x11]• A4, 8 1/2 x 11Paper Size: Bypass TraySpecifies the paper size for the bypass tray.Default: (mainly Europe and Asia) [A4], (mainly North America) [8 1/2 x11]• A4, B5 JIS, A5, 8 1/2 × 14, 8 1/2 × 11, 7 1/4 × 10 1/2, 8 ×13, 8 1/2 × 13, 8 1/4 ×13, 16K, Custom Size, 4 1/8 × 9 1/2, 3 7/8 × 7 1/2, C5 Env, C6 Env, DL Env, 5 1/2 × 81/2, B6 JIS, A6Paper Type: Tray 1Specifies the paper type for Tray 1.Default: [Plain Paper]• Thin Paper, Plain Paper, Middle Thick, Thick Paper 1, Recycled Paper, Color Paper,Letterhead, Preprinted, Prepunched, Label Paper, Bond Paper, Cardstock, Envelope, ThickPaper 2Paper Type: Tray 2Specifies the paper type for Tray 2.This setting appears only when the optional paper feed unit is installed.Default: [Plain Paper]• Thin Paper, Plain Paper, Middle Thick, Thick Paper 1, Recycled Paper, Color Paper,Letterhead, Preprinted, PrepunchedPaper Type: Bypass TraySpecifies the paper type for the bypass tray.Paper Input Menu83](https://usermanual.wiki/Ricoh/PRSPC252DN1.BBP-PRSPC252DN1-User-Manual-1/User-Guide-2134301-Page-85.png)
![Default: [Plain Paper]• Thin Paper, Plain Paper, Middle Thick, Thick Paper 1, Recycled Paper, Color Paper,Letterhead, Prepunched, Label Paper, Bond Paper, Cardstock, Envelope, Thick Paper 2Tray PrioritySpecifies the tray that the printer uses first for printer jobs from Tray 1 or tray 2.If automatic tray selection is specified for the print job and both tray 1 and Tray 2 contain paperthat matches the print job, the printer starts to print from the specified tray. If that tray runs out ofpaper, the printer automatically switches to the other tray to continue printing.[Tray 2] appears only when the optional paper feed unit is installed.Default: [Tray 1]• Tray 1• Tray 2Bypass PrioritySpecifies how print jobs using the bypass tray are handled.Default: [Driver/Command]• Machine SettingThe paper settings configured on the machine's control panel are applied to all print jobs. Anerror occurs when the paper settings specified by the printer driver or the print command donot match the machine's settings.• Driver/CommandWhen executing a print job specifying the paper tray, the paper settings specified in theprinter driver or in the print command are applied regardless of the machine's settings.• Any Size/TypePrinting proceeds even if the paper size/type settings of the printer and printer driver do notmatch. However, if the paper is too small for the print job, the printed image will be cropped.• Any Custom S/TThe printer prints custom size print jobs according to the printer driver’s settings and printsstandard size print jobs according to the printer's settings.For custom size print jobs, printing proceeds even if the paper size/type settings of the printerand printer driver do not match. However, if the paper is too small for the print job, the printedimage will be cropped.For standard size print jobs, an error will occur if the paper size/type settings of the printerand printer driver do not match.Tray1 PrioritySpecifies how print jobs using the Tray 1 are handled.Default: [Machine Setting]4. Configuring the Machine Using the Control Panel84](https://usermanual.wiki/Ricoh/PRSPC252DN1.BBP-PRSPC252DN1-User-Manual-1/User-Guide-2134301-Page-86.png)
![List/Test Print MenuPrinting the Configuration Page1. Press the [Menu] key.CER408The menu screen appears.2. Press the [ ] or [ ] key to select [List/Test Print], and then press the [OK] key.3. Press the [ ] or [ ] key to select [Config. Page], and then press the [OK] key.The configuration page is printed. The [List/Test Print] screen appears on completion of printing.Types of Lists/Reports• The lists will be printed using the tray set for [Tray Priority] in paper input settings on A4 or Lettersize paper.Config. PagePrints general information and the current configurations of the printer.Menu ListPrints the machine's function menus.Test PagePrints a test page for checking the single-sided printing condition. The test page contains networksettings.PCL Font ListPrints installed PCL font list.PS Font ListPrints installed PostScript font list.4. Configuring the Machine Using the Control Panel86](https://usermanual.wiki/Ricoh/PRSPC252DN1.BBP-PRSPC252DN1-User-Manual-1/User-Guide-2134301-Page-88.png)
![Maintenance MenuThis section explains about parameters that can be set on the Maintenance menu.Color Dens/RegAdjusts color density and registration automatically.TonerAlmstEmptySpecifies the low toner level notification timing.Default: [Normal]• NormalLow toner level notification will be made when the number of pages that can be printed withthe remaining toner is approximately 200.• Notify LaterLow toner level notification will be made when the number of pages that can be printed withthe remaining toner is approximately 100.• Notify SoonerLow toner level notification will be made when the number of pages that can be printed withthe remaining toner is approximately 300.Anti-Humid LvlYou can set the printer to produce prints in consistent quality even when humidity is high.Default: [Off]• Off• Level 1Select this mode if printouts are blurred.• Level 2Select this mode if printouts are curled and/or blurred. Note that if you select this mode, thefirst print takes longer than subsequent prints.• Level 3Select this mode if printouts are still curled and/or blurred even when prints are made in[Level 2]. Note that this mode requires more time to produce the first print than [Level 2].4. Configuring the Machine Using the Control Panel88](https://usermanual.wiki/Ricoh/PRSPC252DN1.BBP-PRSPC252DN1-User-Manual-1/User-Guide-2134301-Page-90.png)
![System MenuAuto ContinueSets the printer to ignore an error with paper size or type and continue printing. The printing stopstemporarily when an error is detected, and restarts automatically after about ten seconds using thesettings made on the control panel. However, if the size of paper specified on the control paneland that of the paper loaded in the paper tray or the paper size specified for the print job do notmatch when printing restarts, it may cause a paper jam.Default: [Off]• Off• OnCopiesSets the machine to print the specified number of sets.This setting is disabled if the number of pages to print is specified by command or the printer driver.Default: "1"• 1 - 999Sub Paper SizeSets the printer to print onto paper of another size if the specified paper is not loaded in any tray.Alternative sizes are preset to A4 and Letter.Default: [Off]• Off• AutoDef Ppr SizeSpecifies the paper size to be used when the paper size is not specified in the print job.Default: (mainly Europe and Asia) [A4], (mainly North America) [8 1/2 ×11]• A4, B5 JIS, A5, B6 JIS, A6, 8 1/2 × 14, 8 1/2 × 11, 5 1/2 × 8 1/2, 7 1/4 × 10 1/2, 8 ×13, 8 1/2 × 13, 8 1/4 × 13, 16K, 4 1/8 × 9 1/2, 3 7/8 × 7 1/2, C5 Env, C6 Env, DLEnvDuplexSets the printer to print on both sides of paper according to the specified binding method.Default: [Off]• Off• Short Edge Bind• Long Edge BindSystem Menu89](https://usermanual.wiki/Ricoh/PRSPC252DN1.BBP-PRSPC252DN1-User-Manual-1/User-Guide-2134301-Page-91.png)
![Blank Pg. PrintSets the printer to print blank pages.Note that this setting has lower priority than the printer driver's blank page setting.When cover sheet printing is enabled from the printer driver, cover sheets are inserted even if youselect [Off].Default: [On]• On• OffEnergy Saver 1The machine enters Energy Saver mode 1 if the machine has been idle for about 30 seconds. Ittakes less time to recover from Energy Saver mode 1 than from power-off state or Energy Savermode 2, but power consumption is higher in Energy Saver mode 1 than in Energy Saver mode 2.Default: [Off]• Off• On (30 seconds)Energy Saver 2The machine enters Energy Saver mode 2 after the period of time specified for this setting ispassed. The machine consumes less power in Energy Saver mode 2 than in Energy Saver mode 1,but it takes longer to recover from Energy Saver mode 2 than from Energy Saver mode 1.Default: [On] (1 minutes)• On (1 to 240 minutes, in 1 minute increments)• OffB&W Page DetectSets the printer to print all monochrome pages in monochrome mode even if color printing isspecified.Default: [On]• On• OffRestore DefaultResets the printer settings to their factory-set defaults.Prt. Err.ReportSets the printer to print an error page when the printer detects a printer or memory error.Default: [Off]• On• Off4. Configuring the Machine Using the Control Panel90](https://usermanual.wiki/Ricoh/PRSPC252DN1.BBP-PRSPC252DN1-User-Manual-1/User-Guide-2134301-Page-92.png)
![BW Prt PrioritySets the printer to suppress the consumption of color toner when printing black-and-white pages.Also, the amount of color toner consumed during warm-up time for maintenance will also belowered.Default: [Off]• Off• OnAuto CleaningSets the machine to execute periodic cleaning of the interior. You may hear some noise whilecleaning is being executed. This noise does not indicate a malfunction.Default: [On]• On• OffPCL6 ModeSet this to [Universal] when using the Universal Driver and to [SP C250/C252] when using thenormal driver.Default: [SP C250/C252]• Universal• SP C250/C252System Menu91](https://usermanual.wiki/Ricoh/PRSPC252DN1.BBP-PRSPC252DN1-User-Manual-1/User-Guide-2134301-Page-93.png)
![Host Interface MenuTimeout:LockPrtSpecifies how many seconds the printer holds a new Locked Print file, when the printer cannot storeany more Locked Print files. Within this time, you can print or delete the new Locked Print file. Youcan also print or delete an existing Locked Print file so that the new Locked Print file can be stored inthe printer.This setting appears only for the Type 2 model.Default: "60" seconds• 0 to 300 seconds, in increments of 1 secondTimeout: USBSpecifies how many seconds the printer should wait before ending a print job that is receiving viaUSB. If printing is frequently interrupted by data from other ports, increase the timeout period.Default: [60 sec.]• 60 sec.• 300 sec.• 15 sec.Timeout: NWSpecifies how many seconds the printer should wait before ending a print job that is receiving viaEthernet. If printing operation is frequently interrupted by data from other ports, you can increasethe timeout period.Default: [60 sec.]• 60 sec.• 300 sec.• 15 sec.Network Setting• Ethernet SpeedDisplays the current Ethernet speed setting.Default: [Auto Select]• Auto Select• 10Mbps Half D.• 10Mbps Full D.• 100Mbps Half D.• 100Mbps Full D.• IPsec4. Configuring the Machine Using the Control Panel92](https://usermanual.wiki/Ricoh/PRSPC252DN1.BBP-PRSPC252DN1-User-Manual-1/User-Guide-2134301-Page-94.png)
![Selects whether to enable or disable IPsec.Default: [Inactive]• Inactive• Active• MAC AddressDisplays the machine's MAC address.• Wi-Fi Config.• Wi-FiSelect whether to enable or disable Wireless LAN.Default: [Inactive]• Inactive• ActiveIf [Inactive] is set, [Wi-Fi Status], [MAC Address], [Currnt Connectn], [Setup Wizard],and [WPS] are not displayed.• Wi-Fi StatusDisplays the current connection status.• MAC AddressDisplays the machine's MAC address.• Currnt ConnectnDisplays detailed information about the connection, such as the SSID and the wirelesssignal strength.• Setup WizardDisplays the procedure for manually connecting to a wireless LAN. It leads you step-by-step through configuring the settings for connecting with a wireless LAN.• WPSConnects with one touch using WPS (Wi-Fi Protected Setup). For details, see Wi-FiSettings Guide.• IPv4 Config.• DHCPSets the machine to receive its IPv4 address, subnet mask, and default gateway addressautomatically from a DHCP server.Default: [Active]• Active• InactiveHost Interface Menu93](https://usermanual.wiki/Ricoh/PRSPC252DN1.BBP-PRSPC252DN1-User-Manual-1/User-Guide-2134301-Page-95.png)
![• IP AddressSpecifies the machine's IPv4 address when DHCP is not used.Use this menu to check the current IP address when DHCP is used.Default: XXX.XXX.XXX.XXXThe numbers represented by "X" vary according to your network environment.• Subnet MaskSpecifies the machine's subnet mask when DHCP is not used.Use this menu to check the current subnet mask when DHCP is used.Default: XXX.XXX.XXX.XXXThe numbers represented by "X" vary according to your network environment.• Gateway AddressSpecifies the machine's default gateway address when DHCP is not used.Use this menu to check the current default gateway address when DHCP is used.Default: XXX.XXX.XXX.XXXThe numbers represented by "X" vary according to your network environment.• IP Addr. MethodDisplays the IP address acquisition method.• DHCP• Auto IP• Manual Config.• Default IP• IPv6 Config.• IPv6Selects whether to enable or disable IPv6.Default: [Active]• Active• Inactive• DHCPSets the printer to receive its IPv6 address from a DHCP server.When DHCP is used, you cannot specify the IPv6 address manually.Default: [Inactive]• Inactive• Active4. Configuring the Machine Using the Control Panel94](https://usermanual.wiki/Ricoh/PRSPC252DN1.BBP-PRSPC252DN1-User-Manual-1/User-Guide-2134301-Page-96.png)
![• IP Ad. (DHCP)Displays the IPv6 address obtained from a DHCP server.• Manual Address• Manual AddressSpecifies the machine's IPv6 address when DHCP is not used. Can contain up to 39characters.• Prefix LengthSpecifies the prefix length, using a value between 0 and 128.• Gateway AddressSpecifies the IPv6 address of the default gateway. Can contain up to 39 characters.• Stateless Ad.Displays the IPv6 stateless addresses obtained from a Router Advertisement.• Address 1• Address 2• Address 3• Address 4• Link-local Ad.Displays the IPv6 link local address.Fixed USB PortSpecifies whether the same printer driver can be used for multiple printers or not under USBconnection.Default: [Off]• OnThe same printer driver you have installed in your computer can be used with any printer otherthan the one originally used for installation, if the printer is of the same model.• OffYou must install the printer driver separately for individual printers, because the printer otherthan the original will be recognized as a new device upon USB connection.• Contact your network administrator for information about the network configuration.Host Interface Menu95](https://usermanual.wiki/Ricoh/PRSPC252DN1.BBP-PRSPC252DN1-User-Manual-1/User-Guide-2134301-Page-97.png)
![PCL MenuOrientationSelects the page orientation.Default: [Portrait]• Portrait• LandscapeForm LinesSpecifies the number of lines per page between 5 and 128.Default: (mainly Europe and Asia) [64], (mainly North America) [60]Font NumberSpecifies the ID of the default font you want to use between 0 and 89.Default: "0"Point SizeSpecifies the point size you want to use for the default font between 4.00 and 999.75 in 0.25increments.Default: [12.00 points]Font PitchSpecifies the number of characters per inch you want to use for the default font between 0.44 and99.99 in 0.01 increments.This setting is effective only for fixed-space fonts.Default: [10.00 pitch]Symbol SetSpecifies the character set for the default font. Available sets are as follows: PC-8, PC-8 D/N,PC-850, PC-852, PC-858, PC8-TK, Win L1, Win L2, Win L5, Desktop, PS Text, VN Intl, VN US,MS Publ, Math-8, PS Math, VN Math, Pifont, Legal, ISO 4, ISO 6, ISO 11, ISO 15, ISO 17, ISO21, ISO 60, ISO 69, Win 3.0, MC Text, ISO L6, ISO L9, PC-775, PC-1004, Win Balt, Roman-8,Roman-9, ISO L1, ISO L2, ISO L5Default: [PC-8]Courier FontSpecifies a courier-type font.Default: [Regular]• Regular• Dark4. Configuring the Machine Using the Control Panel96](https://usermanual.wiki/Ricoh/PRSPC252DN1.BBP-PRSPC252DN1-User-Manual-1/User-Guide-2134301-Page-98.png)
![Ext.A4 WidthSets the printer to extend the width of the printable area of A4 size paper, reducing side marginwidth.Default: [Off]• Off• OnAppend CR to LFSets the printer to append a CR code to each LF code to print text data clearly.Default: [Off]• Off• OnResolutionSpecifies the print resolution in dots per inch.Default: [600 x 600 1bit]• 600 x 600 1bit• 600 x 600 2bit• 600 x 600 4bitPCL Menu97](https://usermanual.wiki/Ricoh/PRSPC252DN1.BBP-PRSPC252DN1-User-Manual-1/User-Guide-2134301-Page-99.png)
![PS MenuResolutionSpecifies the print resolution in dots per inch.Default: [600 x 600 1bit]• 600 x 600 1bit• 600 x 600 2bit• 600 x 600 4bitColor ProfileSpecifies the color profile.Default: [Solid Color]• Solid Color• Presentation• Photographic• Off4. Configuring the Machine Using the Control Panel98](https://usermanual.wiki/Ricoh/PRSPC252DN1.BBP-PRSPC252DN1-User-Manual-1/User-Guide-2134301-Page-100.png)
![Language MenuYou can set language displayed on the menu.Changing the Language MenuUse the following procedure to change the language.1. Press the [Menu] key.CER4082. Press the [ ] or [ ] key to select [Language], and then press the [OK] key.3. Press the [ ] or [ ] key to select the language, and then press the [OK] key.The selected item is displayed for two seconds with an asterisk, and then the [Language] screenappears.4. Press the [Menu] key to return to the initial screen.You can select the language you want to use. Available languages are as follows:English, French, German, Italian, Spanish, Dutch, Swedish, Norwegian, Danish, Finnish, Portuguese.Language Menu99](https://usermanual.wiki/Ricoh/PRSPC252DN1.BBP-PRSPC252DN1-User-Manual-1/User-Guide-2134301-Page-101.png)
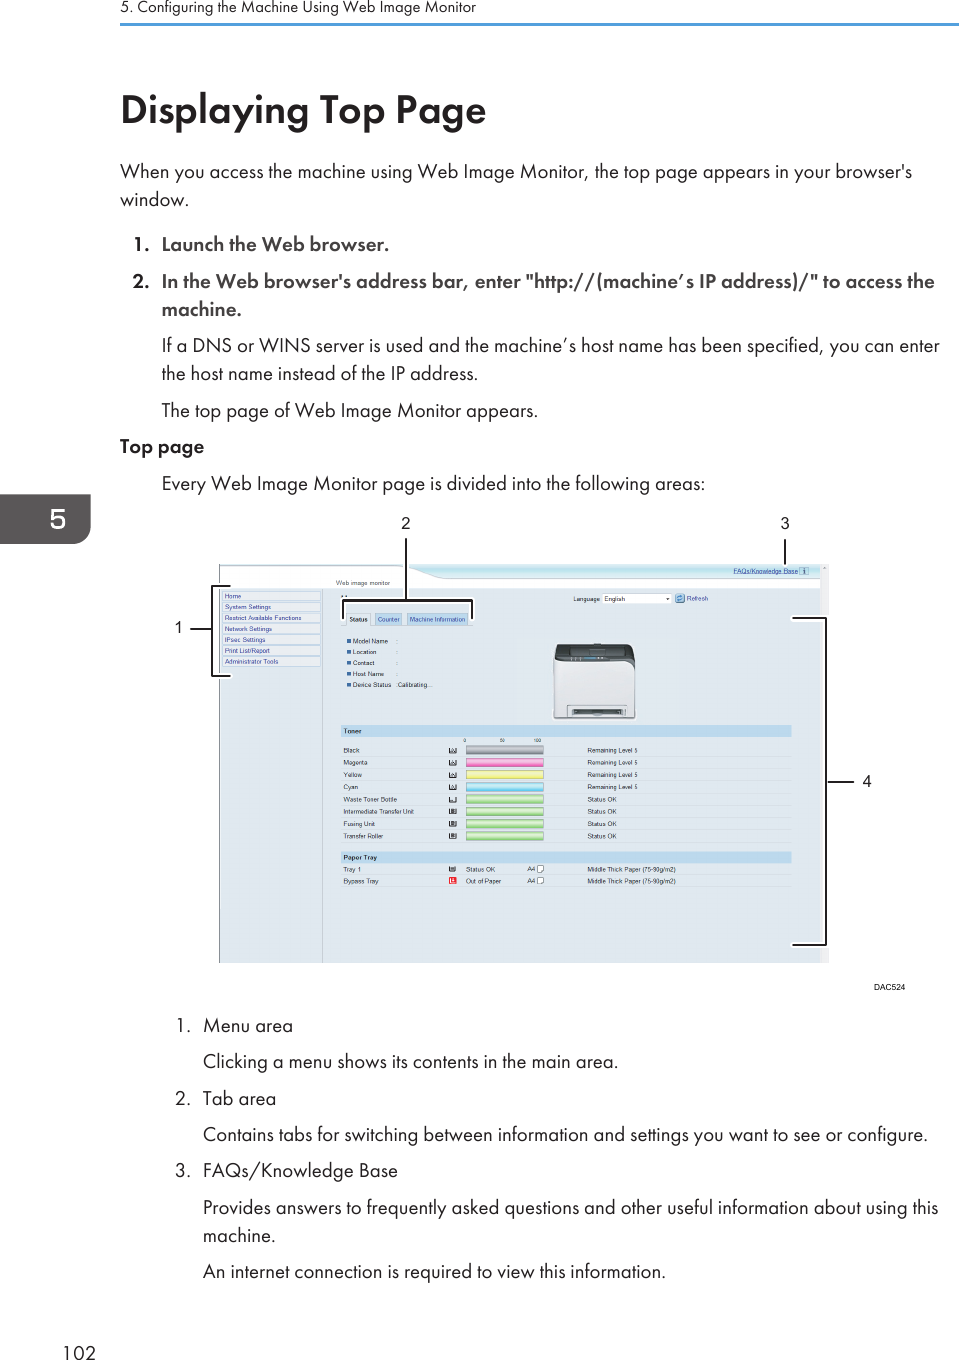
![4. Main areaDisplays the contents of the item selected in the menu area.Information in the main area is not automatically updated. Click [Refresh] at the upper-right inthe main area to update the information. Click the Web browser's [Refresh] button to refreshthe entire browser screen.• If you use an older version of a supported Web browser or the Web browser has JavaScript andcookies disabled, display and operation problems may occur.• If you are using a proxy server, configure the Web browser settings as necessary. For details aboutthe settings, contact your network administrator.• The previous page may not appear even if the back button of the Web browser is clicked. If thishappens, click the refresh button of the Web browser.• The FAQs (Frequently Asked Questions)/Knowledge Base are not available in certain languages.Changing the Interface LanguageSelect the desired interface language from the [Language] list.Displaying Top Page103](https://usermanual.wiki/Ricoh/PRSPC252DN1.BBP-PRSPC252DN1-User-Manual-1/User-Guide-2134301-Page-105.png)
![Checking the System InformationClick [Home] to display the main page of Web Image Monitor. You can check the current systeminformation on this page.This page contains three tabs: [Status], [Counter], and [Machine Information].Status TabItem DescriptionModel Name Shows the name of the machine.Location Shows the location of the machine as registered on the [SNMP] page.Contact Shows the contact information of the machine as registered on the [SNMP]page.Host Name Shows the host name specified in [Host Name] on the [DNS] page.Device Status Shows the current messages on the machine's display.TonerItem DescriptionBlack Shows the amount of black toner remaining.Magenta Shows the amount of magenta toner remaining.Yellow Shows the amount of yellow toner remaining.Cyan Shows the amount of cyan toner remaining.Waste Toner Bottle Shows the remaining life of the waste toner bottle, as "Status OK", "AlmostFull" or "Full".Intermediate TransferUnitShows the remaining life of the intermediate transfer unit, as "Status OK","Replacement Required Soon" or "Replacement Required".For replacing, contact your sales or service representative.Fusing Unit Shows the remaining life of the fusing unit, as "Status OK", "ReplacementRequired Soon" or "Replacement Required".For replacing, contact your sales or service representative.5. Configuring the Machine Using Web Image Monitor104](https://usermanual.wiki/Ricoh/PRSPC252DN1.BBP-PRSPC252DN1-User-Manual-1/User-Guide-2134301-Page-106.png)
![Configuring the System SettingsClick [System Settings] to display the page for configuring the system settings.This page contains the following tabs: [Tray Paper Settings], [B&W Print Priority] and [I/O Timeout].Tray Paper Settings TabTray 1Item DescriptionPaper Size Select the paper size for Tray 1 from the following:A4, B5 JIS, A5, B6 JIS, A6, 8 1/2 × 14, 8 1/2 × 11, 5 1/2 × 8 1/2, 71/4 × 10 1/2, 8 × 13, 8 1/2 × 13, 8 1/4 × 13, 16K, 4 1/8 × 9 1/2, 37/8 × 7 1/2, C5 Env, C6 Env, DL Env, Custom SizePaper Type Select the paper type for Tray 1 from the following:Thin Paper (60-65g/m2), Plain Paper (66-74g/m2), Middle Thick Paper(75-90g/m2), Thick Paper 1 (91-105g/m2), Recycled Paper, ColorPaper, Letterhead, Preprinted Paper, Prepunched Paper, Label Paper, BondPaper, Cardstock, Envelope, Thick Paper 2 (106-160g/m2)Tray 2Item DescriptionPaper Size Select the paper size for Tray 2 from the following:A4, 8 1/2 × 11Paper Type Select the paper type for Tray 2 from the following:Thin Paper (60-65g/m2), Plain Paper (66-74g/m2), Middle Thick Paper(75-90g/m2), Thick Paper 1 (91-105g/m2), Recycled Paper, ColorPaper, Letterhead, Preprinted Paper, Prepunched PaperBypass TrayItem DescriptionPaper Size Select the paper size for the bypass tray from the following:A4, B5 JIS, A5, B6 JIS, A6, 8 1/2 × 14, 8 1/2 × 11, 5 1/2 × 8 1/2, 71/4 × 10 1/2, 8 × 13, 8 1/2 × 13, 8 1/4 × 13, 16K, 4 1/8 × 9 1/2, 37/8 × 7 1/2, C5 Env, C6 Env, DL Env, Custom Size5. Configuring the Machine Using Web Image Monitor108](https://usermanual.wiki/Ricoh/PRSPC252DN1.BBP-PRSPC252DN1-User-Manual-1/User-Guide-2134301-Page-110.png)
![I/O Timeout TabI/O TimeoutItem DescriptionFixed USB Port Specifies whether the same printer can be used for multiple machines or notunder USB connection.If this setting is enabled, the same printer driver you have installed in yourcomputer can be used with any machine other than the one originally usedfor installation, if the machine is of the same model.If disabled, you must install the printer driver separately for individualmachines, because the machine other than the original will be recognizedas a new device upon USB connection.Locked Print Timeout(seconds)Specifies how many seconds the machine holds a new Locked Print file,when the machine cannot store any more Locked Print files (0 to 300seconds). Within this time, you can print or delete the new Locked Print file.You can also print or delete an existing Locked Print file so that the newLocked Print file can be stored in the machine.• [Locked Print Timeout (seconds)] appears only for the Type 2 model.Black-and-White Print Priority TabB&W Print PriorityItem DescriptionB&W Print Priority Enable this setting to suppress the consumption of color toner when printingblack-and-white pages. Also, amount of color toner consumed duringwarm-up time for maintenance will also be lowered.Configuring the System Settings111](https://usermanual.wiki/Ricoh/PRSPC252DN1.BBP-PRSPC252DN1-User-Manual-1/User-Guide-2134301-Page-113.png)
![Configuring the Network SettingsClick [Network Settings] to display the page for configuring the network settings.This page contains the following tabs: [Network Status], [IPv6 Configuration], [Network Application],[DNS], [Auto E-mail Notification], [SNMP], [SMTP], [POP3], and [Wireless].• Depending on the settings you change, the machine might need to be restarted.• Depending on the model you are using, some items might not appear.Network Status TabGeneral StatusItem DescriptionEthernet Speed Shows the type and speed of the network connection.IPP Printer Name Shows the name used to identify the machine on the network.Network Version Shows the version of the machine's network module (a part of the machinefirmware).Ethernet MAC Address Shows the Ethernet MAC address of the machine.Active Interface Shows the active communication method.TCP/IP StatusItem DescriptionDHCP Select whether the machine should receive a dynamic IPv4 addressautomatically using DHCP. To use DHCP, select [Active]. When enabled,the items below cannot be configured.IP Address Enter the IPv4 address for the machine.Subnet Mask Enter the subnet mask of the network.Gateway Enter the IPv4 address of the network gateway.Configuring the Network Settings113](https://usermanual.wiki/Ricoh/PRSPC252DN1.BBP-PRSPC252DN1-User-Manual-1/User-Guide-2134301-Page-115.png)
![IPv6 Configuration TabIPv6Item DescriptionIPv6 Select whether to enable or disable IPv6. You cannot disable IPv6 usingWeb Image Monitor if the machine is currently in use in an IPv6environment. In this case, use the control panel to disable [IPv6] undernetwork settings.When disabled, [DHCP], [Manual Configuration Address], [Prefix Length],and [Gateway Address] below cannot be configured.IPv6 AddressItem DescriptionDHCP Select whether or not the machine obtains its IPv6 address from a DHCPserver.IP Address (DHCP) Displays the IPv6 address obtained from the DHCP server when [DHCP] isset to [Active].Stateless Address Displays up to four stateless auto addresses.Gateway Address Displays the machine's default gateway address.Link-local Address Displays the link local address of the machine. The link local address is anaddress that is valid only inside the local network (local segment).Manual ConfigurationAddressEnter the machine's IPv6 address. Can contain up to 39 characters.Prefix Length Enter the prefix length, using a value between 0 and 128.Gateway Address Enter the default gateway's IPv6 address. Can contain up to 39 characters.Network Application TabNetwork Print SettingItem DescriptionIPP Select to enable network printing using Internet Print Protocol (via TCP port631/80).5. Configuring the Machine Using Web Image Monitor114](https://usermanual.wiki/Ricoh/PRSPC252DN1.BBP-PRSPC252DN1-User-Manual-1/User-Guide-2134301-Page-116.png)
![Item DescriptionFTP Select to enable network printing using an embedded FTP server in themachine (via TCP port 20/21).RAW Select to enable network raw printing.Port No. Enter the TCP port number to use for raw printing. The valid range is 1024to 65535, except 53550 and 49999 (default is 9100).LPR Select to enable network printing using LPR/LPD (via TCP port 515).mDNS SettingItem DescriptionmDNS Select to enable Multicast DNS (via UDP port 5353). If disabled, the itembelow cannot be configured.Printer Name Enter the name of the machine. Can contain up to 32 characters.DNS TabDNSItem DescriptionDNS Method Select whether to specify domain name servers manually or receive DNSinformation from the network automatically. When set to [Auto-Obtain(DHCP)], [Primary DNS Server], [Secondary DNS Server], and [DomainName] below become unavailable.Primary DNS Server Enter the IPv4 address of the primary DNS.Secondary DNS Server Enter the IPv4 address of the secondary DNS.Domain Name Enter the IPv4 domain name for the machine. Can contain up to 32characters.IPv6 DNS Method Select whether to specify the domain server manually or have the machineobtain its DNS information automatically.When set to [Auto-Obtain (DHCP)], [Primary IPv6 DNS Server],[Secondary IPv6 DNS Server], and [IPv6 Domain Name] below becomeunavailable.Configuring the Network Settings115](https://usermanual.wiki/Ricoh/PRSPC252DN1.BBP-PRSPC252DN1-User-Manual-1/User-Guide-2134301-Page-117.png)
![SNMP TabSNMPItem DescriptionSNMP Select whether to enable the machine to use SNMP services.TrapItem DescriptionTarget Trap Select whether to enable the machine to send traps to the management host(NMS).When disabled, [SNMP Management Host 1] and [SNMP ManagementHost 2] below become unavailable.SNMP ManagementHost 1Enter the IP address or host name of a management host. Can contain up to64 characters.SNMP ManagementHost 2Enter the IP address or host name of a management host. Can contain up to64 characters.CommunityItem DescriptionGet Community Enter the community name to use for authentication of Get requests. Cancontain up to 32 characters.Trap Community Enter the community name to use for authentication of Trap requests. Cancontain up to 32 characters.SystemItem DescriptionLocation Enter the location of the machine. The location entered here is displayed onthe main page. Can contain up to 64 characters.Contact Enter the contact information of the machine. The contact informationentered here is displayed on the main page. Can contain up to 64characters.Configuring the Network Settings117](https://usermanual.wiki/Ricoh/PRSPC252DN1.BBP-PRSPC252DN1-User-Manual-1/User-Guide-2134301-Page-119.png)
![SMTP TabSMTPItem DescriptionPrimary SMTP Server Enter the IP address or host name of the SMTP/POP3 server. Can containup to 64 characters.Port No. Enter the port number for SMTP (1 to 65535).Authentication Method Select an authentication method from the following:[Anonymous]: The user name and password are not necessary.[SMTP]: The machine supports NTLM and LOGIN authentication.[POP before SMTP]: The POP3 server is used for authentication. Whensending e-mails to an SMTP server, you can enhance the SMTP serversecurity level by connecting to the POP server for authentication.User Name Enter the user name for logging in to the SMTP server. Can contain up to 32characters.Password Enter the password for logging in to the SMTP server. Can contain up to 32characters.Device E-mail Address Enter the machine’s e-mail address.This address is used as the sender's address of e-mail messages sent fromthis machine, such as notification e-mails. Can contain up to 64 characters.Server Timeout(seconds)Enter the number of seconds the machine waits before considering anSMTP operation to have timed out (1 to 999).POP3 TabPOP3 SettingsItem DescriptionPOP3 Server Enter the IP address or host name of the POP3 server for e-mail reception.The POP3 server specified here will be used for [POP before SMTP]. Cancontain up to 64 characters.User Account Enter the user name for logging in to the POP3 server. Can contain up to 32characters.5. Configuring the Machine Using Web Image Monitor118](https://usermanual.wiki/Ricoh/PRSPC252DN1.BBP-PRSPC252DN1-User-Manual-1/User-Guide-2134301-Page-120.png)
![Item DescriptionUser Password Enter the password for logging in to the POP3 server. Can contain up to 32characters.Authentication Select an authentication method from the following:[None]: Password will not be encrypted.[APOP Authentication]: Password will be encrypted.[Auto]: Password will be encrypted or not encrypted according to the POP3server’s settings.Wireless TabWireless LAN StatusItem DescriptionWireless LAN Status Displays the status of the connection to the wireless LAN.MAC Address Displays the MAC address.Communication Mode Displays the communication mode that the machine is connecting in.SSID Displays the SSID of the access point that the machine is connected to.Channel Displays the channel information of the current wireless LAN settings if [Ad-Hoc] is selected for [Communication Mode].Wireless Signal Status Displays the strength of the wireless signal that is being received.Wireless Specifies whether or not to use the wireless LAN.Wireless LAN SettingsItem DescriptionSSID Enter the SSID of the access point.The SSID can contain up to 32 characters.When you click [Scan List], a list of available access points is displayed.You can select the SSID from the list.Configuring the Network Settings119](https://usermanual.wiki/Ricoh/PRSPC252DN1.BBP-PRSPC252DN1-User-Manual-1/User-Guide-2134301-Page-121.png)
![Item DescriptionCommunication Mode Select the mode to connect in.If the machine will be connected to a wireless router or access point, select[Infrastructure]. If the machine will be connected to a device equipped witha wireless LAN directly, select [Ad-Hoc].Ad-Hoc Channel If [Ad-Hoc] is selected for [Communication Mode], select a channel.Authentication Select an authentication method.If [Ad-Hoc] is selected for [Communication Mode], you can select only[Open System] and [Shared Key].Encryption Select an encryption method.If [Ad-Hoc] is selected for [Communication Mode], you can select only[None] and [WEP].WPA Passphrase If [WPA2-PSK] or [Mixed Mode WPA/WPA2] is selected for[Authentication], enter the WPA encryption key.WEP Key Length If [WEP] is selected for [Encryption], select 64 bits or 128 bits for the lengthof the encryption key.WEP Transmit Key ID Select an ID number to identify each WEP key in case multiple WEPconnections are configured.WEP Key Format Select a format for entering the WEP key.WEP Key Enter the WEP key. The number and type of characters you can enter varydepending on the length and format selected for the key. See the following:• WEP key length: [64bit], Format: [Hexadecimal]WEP key max length: 10 characters (0-9, A-F, a-f)• WEP key length: [64bit], Format: [ASCII]WEP key max length: 5 characters (0x20-0x7e)• WEP key length: [128bit], Format: [Hexadecimal]WEP key max length: 26 characters (0-9, A-F, a-f)• WEP key length: [128bit], Format: [ASCII]WEP key max length: 13 characters (0x20-0x7e)• If you are configuring the connection settings manually, check the SSID, authentication method, orencryption key of the access point or wireless router in advance.5. Configuring the Machine Using Web Image Monitor120](https://usermanual.wiki/Ricoh/PRSPC252DN1.BBP-PRSPC252DN1-User-Manual-1/User-Guide-2134301-Page-122.png)
![Configuring the IPsec SettingsClick [IPsec Settings] to display the page for configuring the IPsec settings.This page contains the following tabs: [IPsec Global Settings] and [IPsec Policy List].• This function is available only when an administrator password is specified.IPsec Global Settings TabItem DescriptionIPsec Function Select whether to enable or disable IPsec.Default Policy Select whether to allow for the default IPsec policy.Broadcast andMulticast BypassSelect the services that you do not want to apply IPsec from the following:[DHCPv4], [DHCPv6], [SNMP], [mDNS], [NetBIOS], [UDP Port 53550]All ICMP Bypass Select whether to apply IPsec to ICMP packets (IPv4 and IPv6) from thefollowing:[Active]: All ICMP packets will be bypassed without IPsec protection."ping" command (echo request and echo reply) is not encapsulated byIPsec.[Inactive]: Some ICMP message types will be bypassed without IPsecprotection.IPsec Policy List TabItem DescriptionNo. IPsec policy number.Name Displays the name of the IPsec policy.Address Settings Displays the IP address filter of the IPsec policy as below:Remote address/Prefix lengthAction Displays the action of the IPsec policy as "Allow", "Drop", or "RequireSecurity".Configuring the IPsec Settings121](https://usermanual.wiki/Ricoh/PRSPC252DN1.BBP-PRSPC252DN1-User-Manual-1/User-Guide-2134301-Page-123.png)
![Item DescriptionStatus Displays the status of the IPsec policy as "Active" or "Inactive".To configure IPsec policies, select the desired IPsec policy, and then click [Change] to open the "IPsecPolicy Settings" page. The following settings can be made on the "IPsec Policy Settings" page.IP Policy SettingsItem DescriptionNo. Specify a number between 1 and 10 for the IPsec policy. The number youspecify will determine the position of the policy in the IPsec Policy List. Policysearching is performed according to the order of the list. If the number youspecify is already assigned to another policy, the policy you areconfiguring will take the number of the earlier policy, and the earlier policyand any subsequent policies will be renumbered accordingly.Activity Select whether to enable or disable the policy.Name Enter the name of the policy. Can contain up to 16 characters.Address Type Select IPv4 or IPv6 as the type of IP address to be used in IPseccommunication.Local Address Displays the IP address of this printer.Remote Address Enter the IPv4 or IPv6 address of the device with which to communicate.Can contain up to 39 characters.Prefix Length Enter the prefix length of the Remote Address, using a value between 1 and128. If this setting is left blank, "32" (IPv4) or "128" (IPv6) will beautomatically selected.Action Specify how the IP packets are processed from the following:• [Allow]: IP packets are both sent and received without IPsec applied tothem.• [Drop]: IP packets are discarded.• [Require Security]: IPsec is applied to IP packets that are both sent andreceived.If you have selected [Require Security], you must configure [IPsec Settings]and [IKE Settings].5. Configuring the Machine Using Web Image Monitor122](https://usermanual.wiki/Ricoh/PRSPC252DN1.BBP-PRSPC252DN1-User-Manual-1/User-Guide-2134301-Page-124.png)
![IPsec SettingsItem DescriptionEncapsulation Type Specify the encapsulation type from the following:• [Transport]: Select this mode to secure only the payload section ofeach IP packet when communicating with IPsec compliant devices.• [Tunnel]: Select this mode to secure every section of each IP packet.We recommend this type for communication between securitygateways (such as VPN devices).Security Protocol Select the security protocol from the following:• [AH]: Establishes secure communication that supports authenticationonly.• [ESP]: Establishes secure communication that supports bothauthentication and data encryption.• [ESP&AH]: Establishes secure communication that supports both dataencryption and authentication of packets, including packet headers.Note that you cannot specify this protocol when [Tunnel] is selectedfor [Encapsulation Type].AuthenticationAlgorithm for AHSpecify the authentication algorithm to be applied when [AH] or [ESP&AH]is selected for [Security Protocol] from the following:[MD5], [SHA1]Encryption Algorithmfor ESPSpecify the encryption algorithm to be applied when [ESP] or [ESP&AH] isselected for [Security Protocol] from the following:[None], [DES], [3DES], [AES-128], [AES-192], [AES-256]AuthenticationAlgorithm for ESPSpecify the authentication algorithm to be applied when [ESP] is selectedfor [Security Protocol] from the following:[MD5], [SHA1]Life Time Specify the life time of the IPsec SA (Security Association) as a time periodor data volume. The SA will expire when the time period you specifyelapses or the volume of data you specify reaches the volume carried.If you specify both a time period and a data volume, the SA will expire assoon as either is reached, and a new SA will then be obtained bynegotiation.To specify the life time of the SA as a time period, enter a number ofseconds.To specify the life time of the SA as a data volume, enter a number of KBs.Configuring the IPsec Settings123](https://usermanual.wiki/Ricoh/PRSPC252DN1.BBP-PRSPC252DN1-User-Manual-1/User-Guide-2134301-Page-125.png)
![Item DescriptionKey Perfect ForwardSecrecySelect whether to enable or disable PFS (Perfect Forward Secrecy).IKE SettingsItem DescriptionIKE Version Displays the IKE version.Encryption Algorithm Specify the encryption algorithm from the following:[DES], [3DES], [AES-128], [AES-192], [AES-256]AuthenticationAlgorithmSpecify the authentication algorithm from the following:[MD5], [SHA1]IKE Life Time Specify the life time of the ISAKMP SA as a time period. Enter a number ofseconds.IKE Diffie-HellmanGroupSelect the IKE Diffie-Hellman Group to be used in the generation of the IKEencryption key from the following:[DH1], [DH2]Pre-Shared Key Specify the PSK (Pre-Shared Key) to be used for authentication of acommunicating device. Can contain up to 32 characters.Key Perfect ForwardSecrecySelect whether to enable or disable PFS (Perfect Forward Secrecy).5. Configuring the Machine Using Web Image Monitor124](https://usermanual.wiki/Ricoh/PRSPC252DN1.BBP-PRSPC252DN1-User-Manual-1/User-Guide-2134301-Page-126.png)
![Printing Lists/ReportsClick [Print List/Report] to display the page for printing reports. Then, select an item and click [Print] toprint out information for that item.Print List/ReportItem DescriptionConfiguration Page Prints general information about the machine and its current configuration.Test Page Prints a test page for checking the printing condition.PCL Font List Prints the current configuration and installed PCL font list.PS Font List Prints the current configuration and installed PostScript font list.Maintenance Page Prints the maintenance page.• Reports cannot be printed via Web Image Monitor if other jobs are printing. Before printingreports, confirm that machine is not printing.• Reports will be printed on A4 or Letter size paper. Load one of these sizes of paper into the traybefore printing reports.Printing Lists/Reports125](https://usermanual.wiki/Ricoh/PRSPC252DN1.BBP-PRSPC252DN1-User-Manual-1/User-Guide-2134301-Page-127.png)
![Configuring the Administrator SettingsClick [Administrator Tools] to display the page for configuring the administrator settings.This page contains the following tabs: [Administrator], [Reset Settings], [Backup Setting], [RestoreSetting], [Energy Saver Mode], and [PCL6 Mode].Administrator TabAdministrator SettingsItem DescriptionNew Password Enter the new administrator password. Can contain up to 16 characters.Confirm New Password Enter the same password again, to confirm.Reset Settings TabReset SettingsItem DescriptionReset Network Settings Select to restore settings configured under the [Network Settings] and[Administrator Tools].Reset Menu Settings Select to restore settings that are not related to the network to their defaults.Reset Settings ofAvailable FunctionsSelect to clear the user restriction settings.Reset IPsec Settings Select to clear the IPsec settings.• [Reset IPsec Settings] appears only when the administrator password is specified.Backup Setting Tab• When sending the machine for repair, it is important that you create backup files in advance. Themachine's settings are returned to the default after repair.5. Configuring the Machine Using Web Image Monitor126](https://usermanual.wiki/Ricoh/PRSPC252DN1.BBP-PRSPC252DN1-User-Manual-1/User-Guide-2134301-Page-128.png)
![Backup SettingItem DescriptionBack up NetworkSettingsBacks up settings configured under the [Network Settings] and[Administrator Tools].Back up Menu Settings Backs up settings that are not related to the network.Back up Settings ofAvailable FunctionsBacks up user restriction settings to a file.Back up IPsec Settings Backs up the IPsec settings to a file.Follow the procedure below to create configuration backup files.1. Select the radio button for the type of data you wish to back up.2. Enter the administrator password if required.3. Click [OK].4. Click [Save] in the confirmation dialog box.5. Navigate to the location to save the backup file.6. Specify a name for the file, and click [Save].• [Back up IPsec Settings] appears only when the administrator password is specified.Restore Setting Tab• When the machine is returned from repair, it is important that you restore the machine's settingsfrom the backup files. The machine's settings are returned to the default after repair.Restore SettingItem DescriptionFile to Restore Enter the path and name of the file to restore, or click [Browse...] to selectthe file.Follow the procedure below to restore configuration backup files.1. Click [Browse...].2. Navigate to the directory containing the backup file to restore.3. Select the backup file, and click [Open].Configuring the Administrator Settings127](https://usermanual.wiki/Ricoh/PRSPC252DN1.BBP-PRSPC252DN1-User-Manual-1/User-Guide-2134301-Page-129.png)
![4. Enter the administrator password if required.5. Click [OK].• If the settings are not restored successfully, an error message appears. Try again to restore the filecompletely.Energy Saver Mode TabEnergy Saver ModeItem DescriptionEnergy Saver Mode 1 Select [Active] to set the machine to enter Energy Saver mode 1 if themachine has been idle for about 30 seconds.It takes less time to recover from Energy Saver mode 1 than from power-offstate or Energy Saver mode 2, but power consumption is higher in EnergySaver mode 1 than in Energy Saver mode 2.Energy Saver Mode 2 Select [Active] to set the machine to enter Energy Saver mode 2 after theperiod of time specified for [Waiting Time (1 min. - 240 min.)] is passed (1to 240 minutes).The machine consumes less power in Energy Saver mode 2 than in EnergySaver mode 1, but it takes longer to recover from Energy Saver mode 2than from Energy Saver mode 1.• The printer recovers from Energy Saver mode when it receives a print job or when any key on themachine is pressed.PCL6 ModePCL6 ModeItem DescriptionPCL6 Mode Set this to [Universal] when using the Universal Driver and to [SP C250/C252] when using the normal driver.5. Configuring the Machine Using Web Image Monitor128](https://usermanual.wiki/Ricoh/PRSPC252DN1.BBP-PRSPC252DN1-User-Manual-1/User-Guide-2134301-Page-130.png)
![6. Maintaining the MachineReplacing the Print Cartridge• Store print cartridge in a cool dark place.• Actual printable numbers vary depending on image volume and density, number of pages printedat a time, paper type and size, and environmental conditions such as temperature and humidity.Toner quality degrades over time. Early replacement of the print cartridge might be necessary.Therefore, we recommend you always keep a new print cartridge ready.• For good print quality, the manufacturer recommends that you use genuine toner from themanufacturer.• The manufacturer shall not be responsible for any damage or expense that might result from the useof parts other than genuine parts from the manufacturer with your office products.• When the toner runs out, pressing the [Stop/Start] key allows you to print a few more pages, butthe print quality of those pages may be lower.Messages on the screen• Replace the indicated print cartridge when any of the following messages appear on thescreen:"Replace Toner:" (X)("X" indicates the toner color)• Prepare the indicated print cartridge when any of the following messages appear on thescreen:"Repl Tnr soon:" (X)("X" indicates the toner color)• Do not allow paper clips, staples, or other small objects to fall inside the machine.• Do not expose the print cartridge without its cover to direct sunlight for a long time.• Do not touch the print cartridge's photo conductor unit.129](https://usermanual.wiki/Ricoh/PRSPC252DN1.BBP-PRSPC252DN1-User-Manual-1/User-Guide-2134301-Page-131.png)
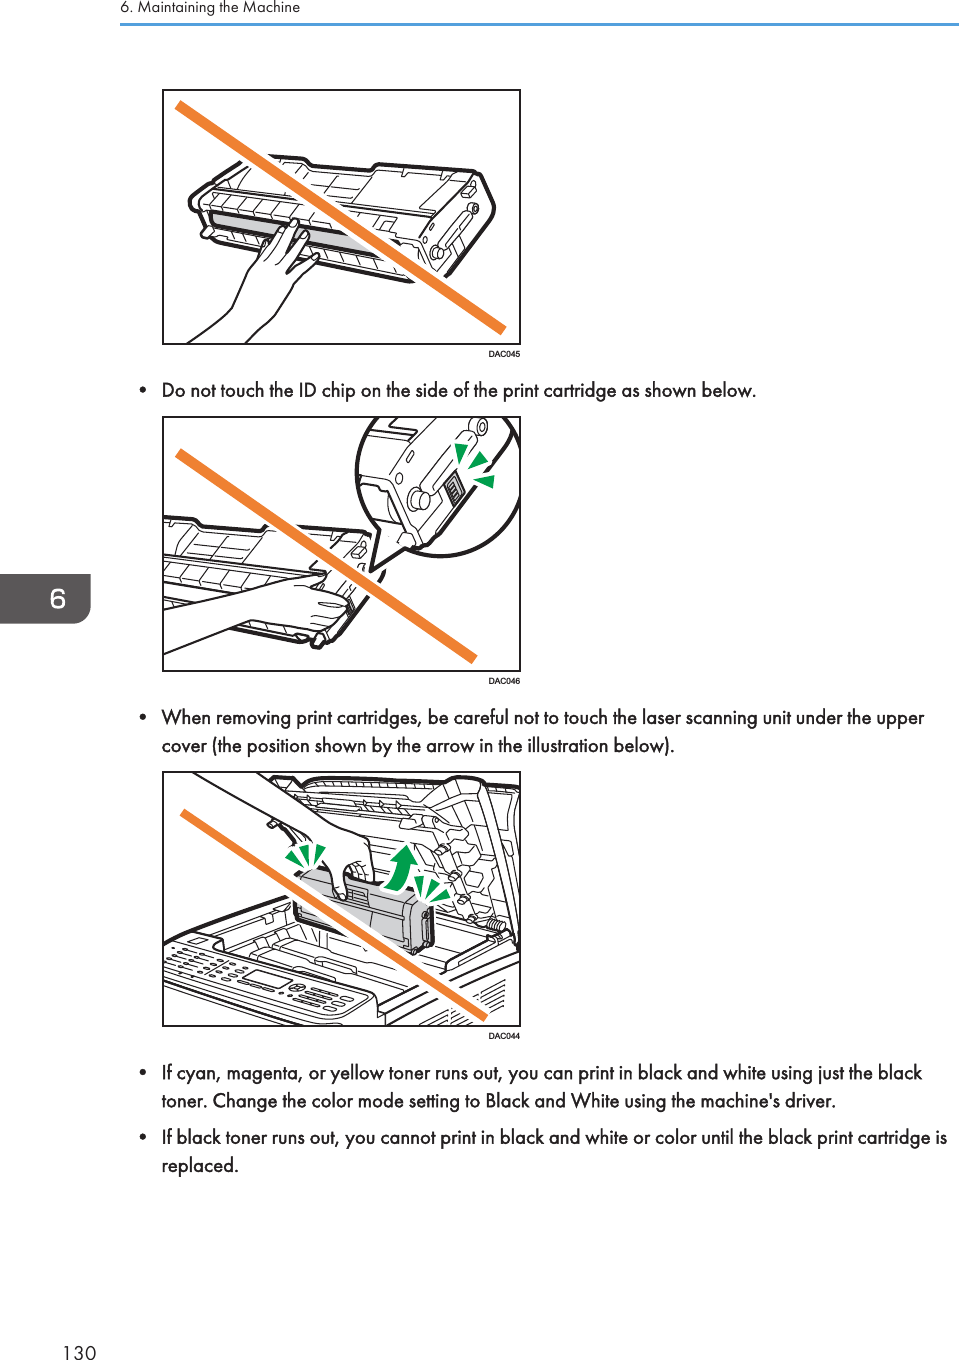
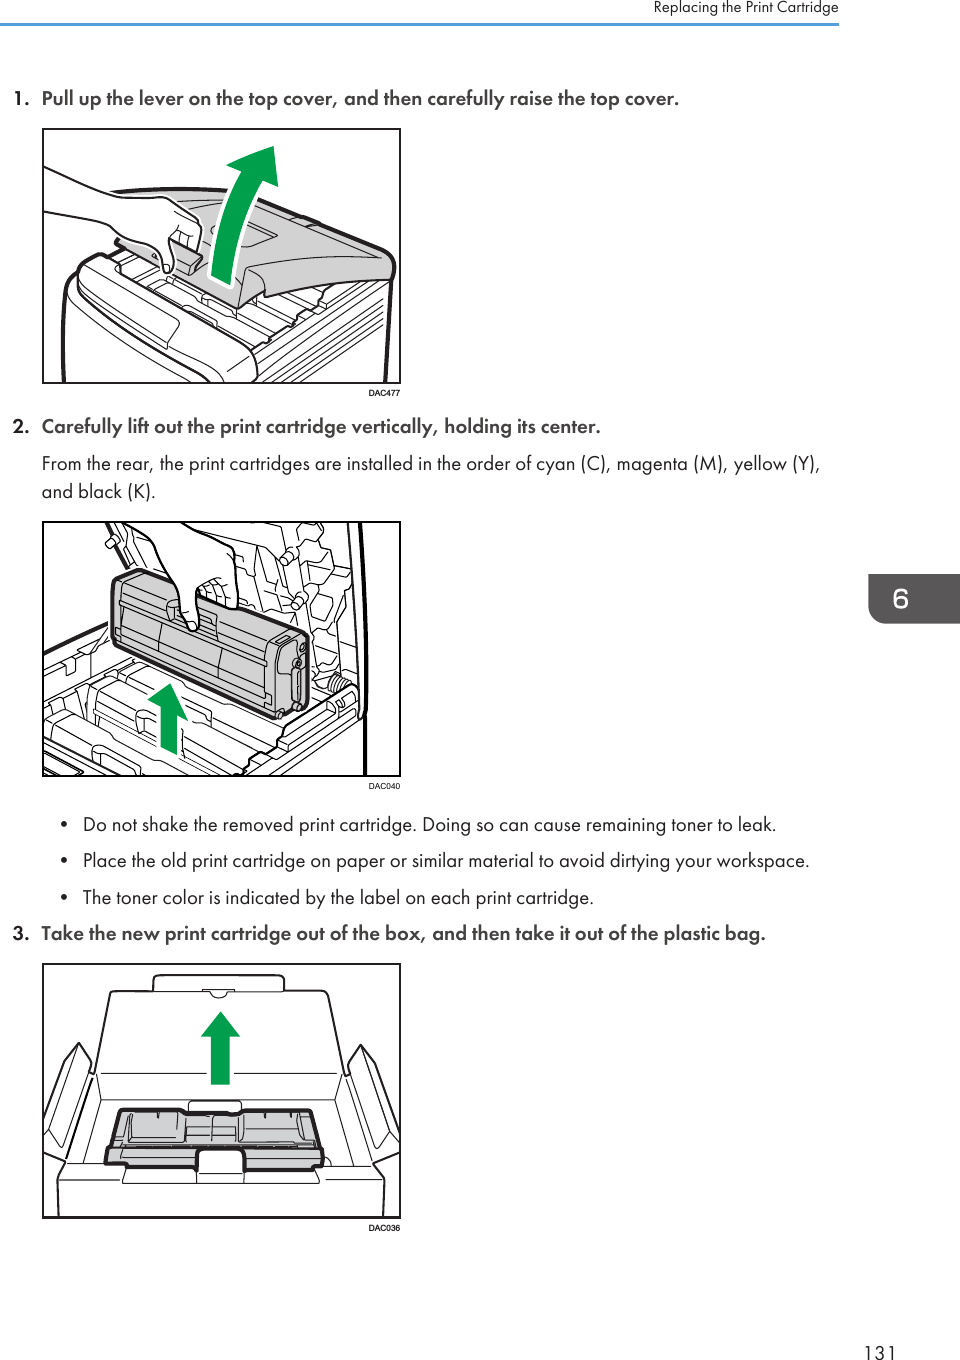
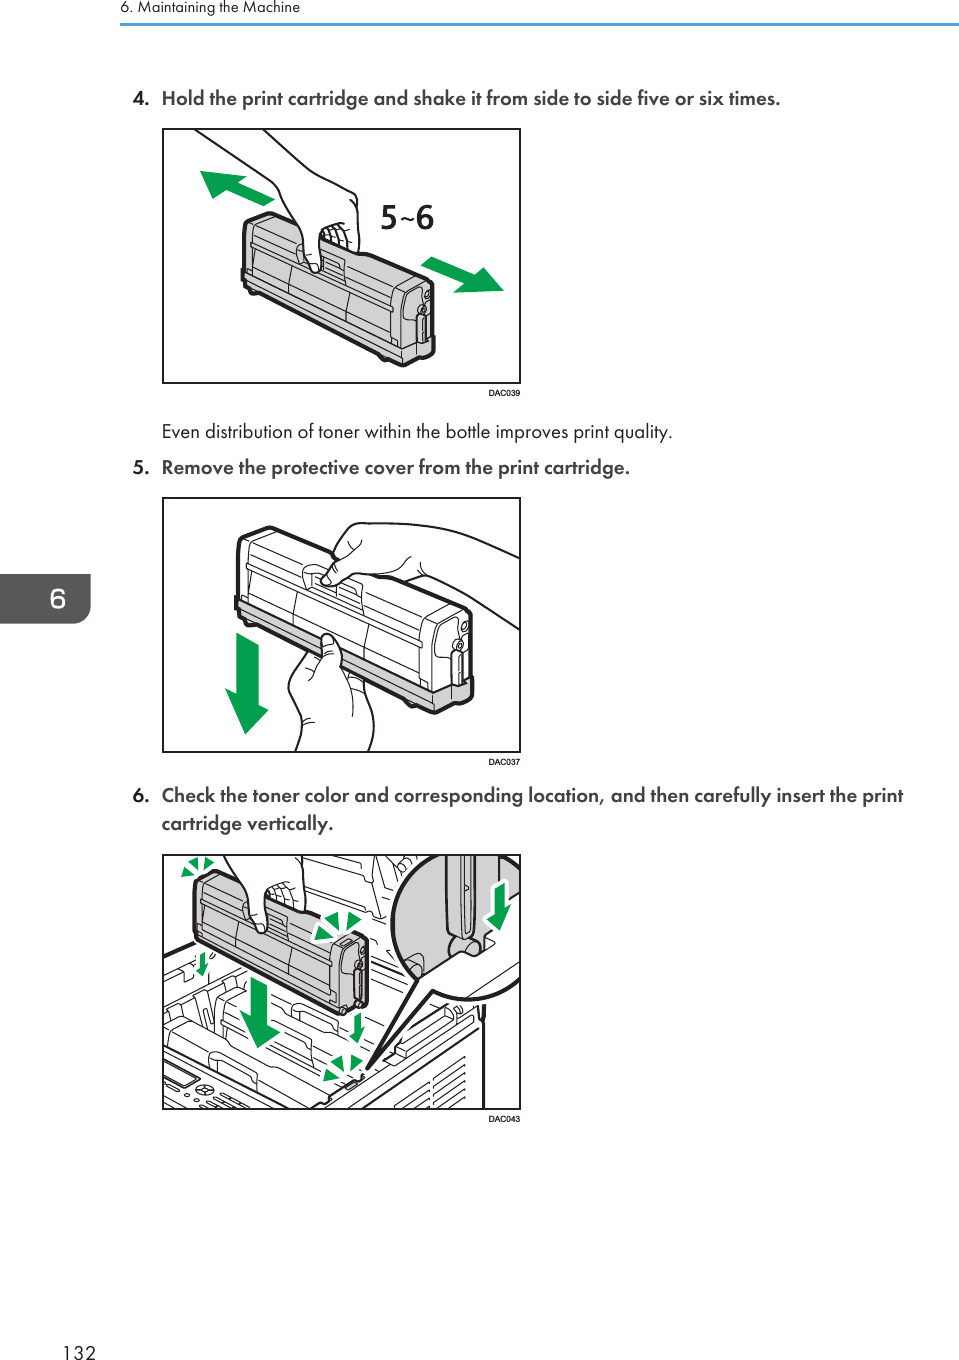
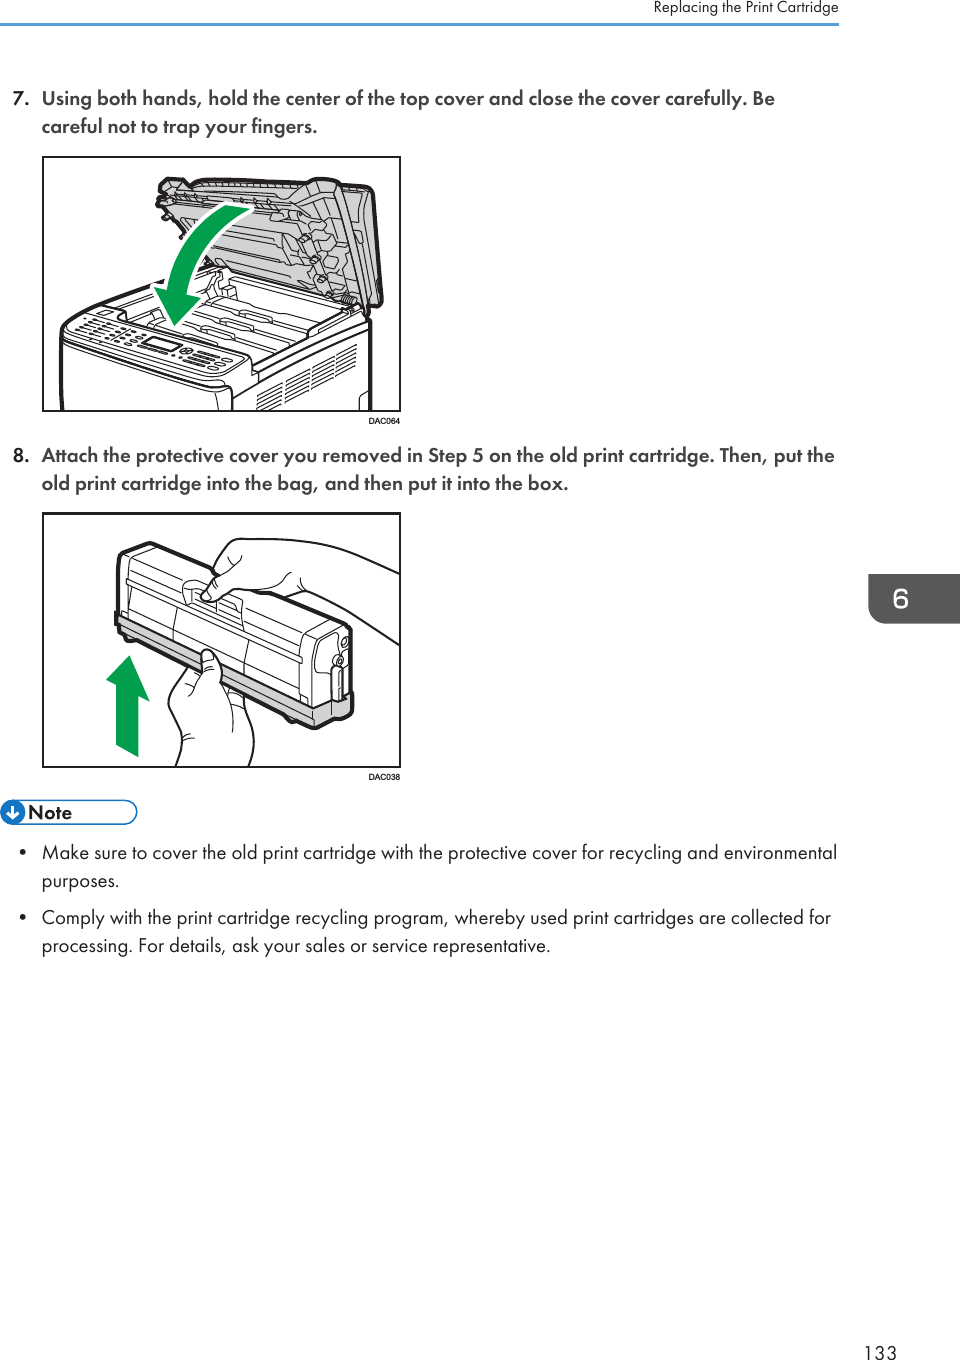
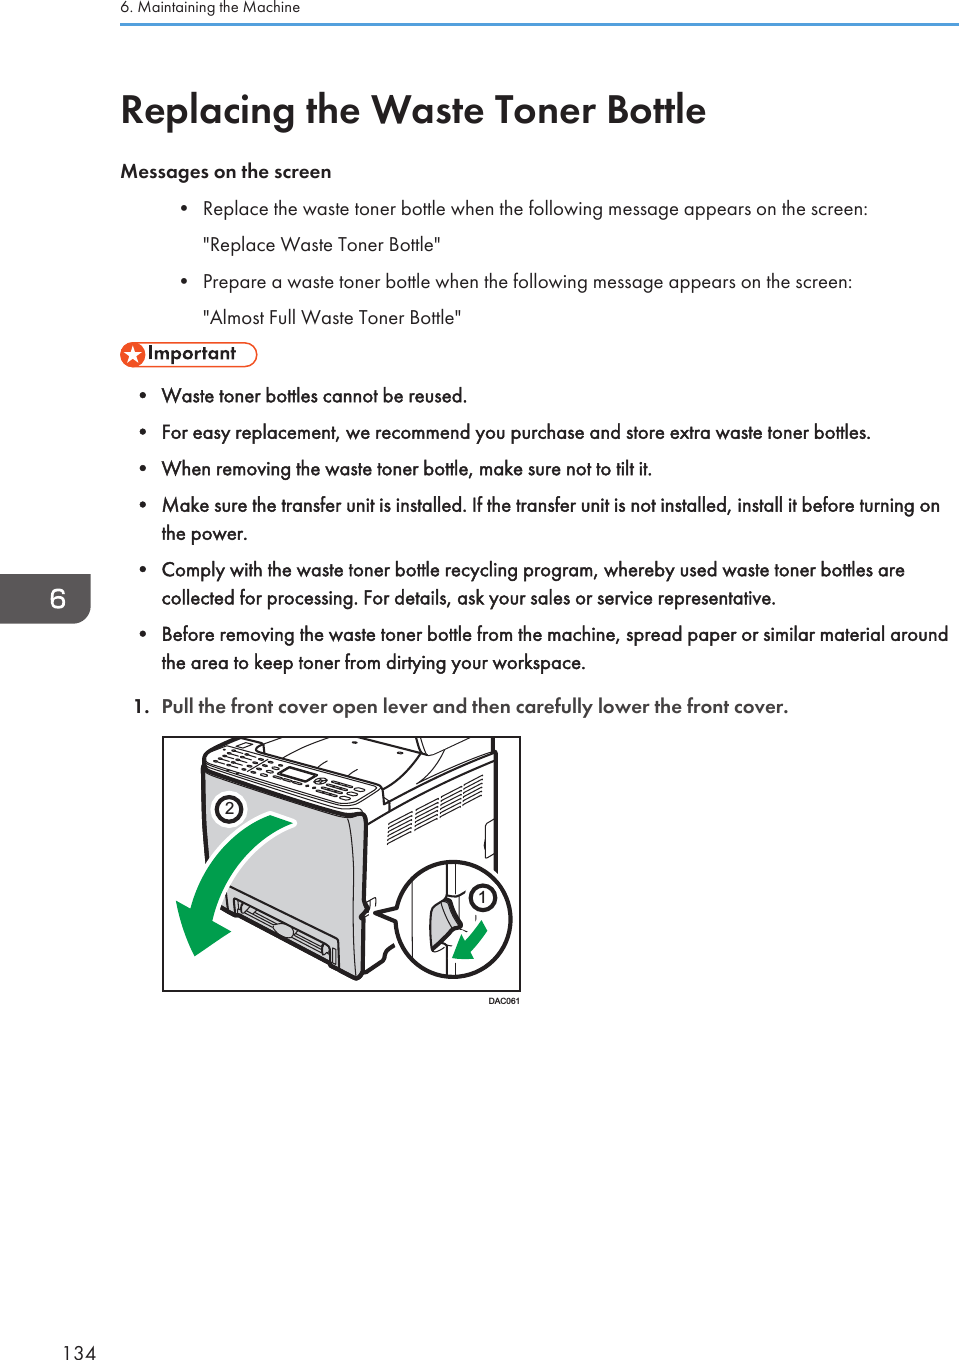
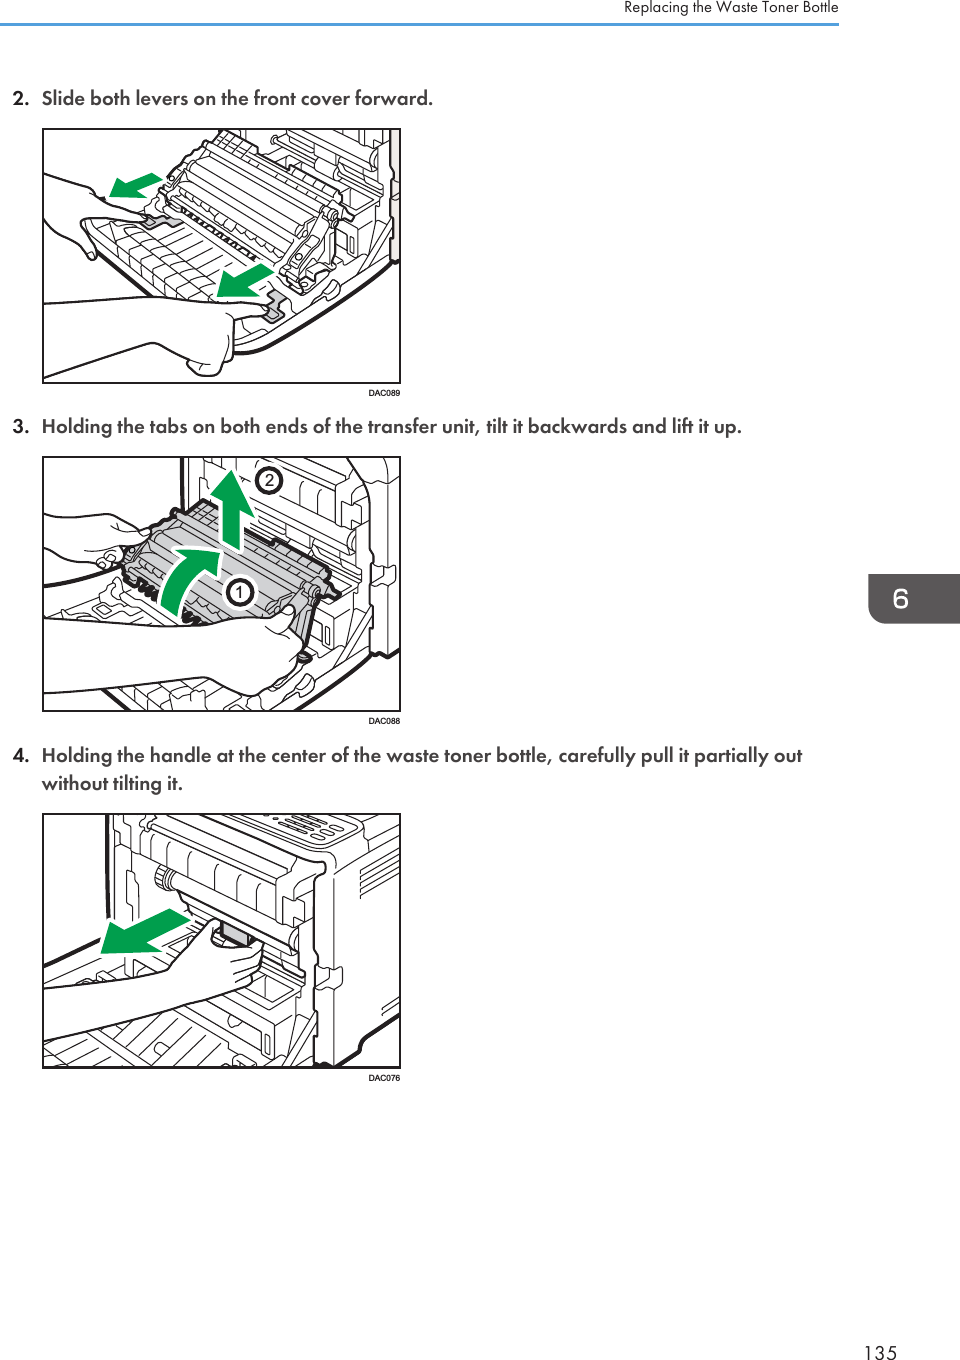
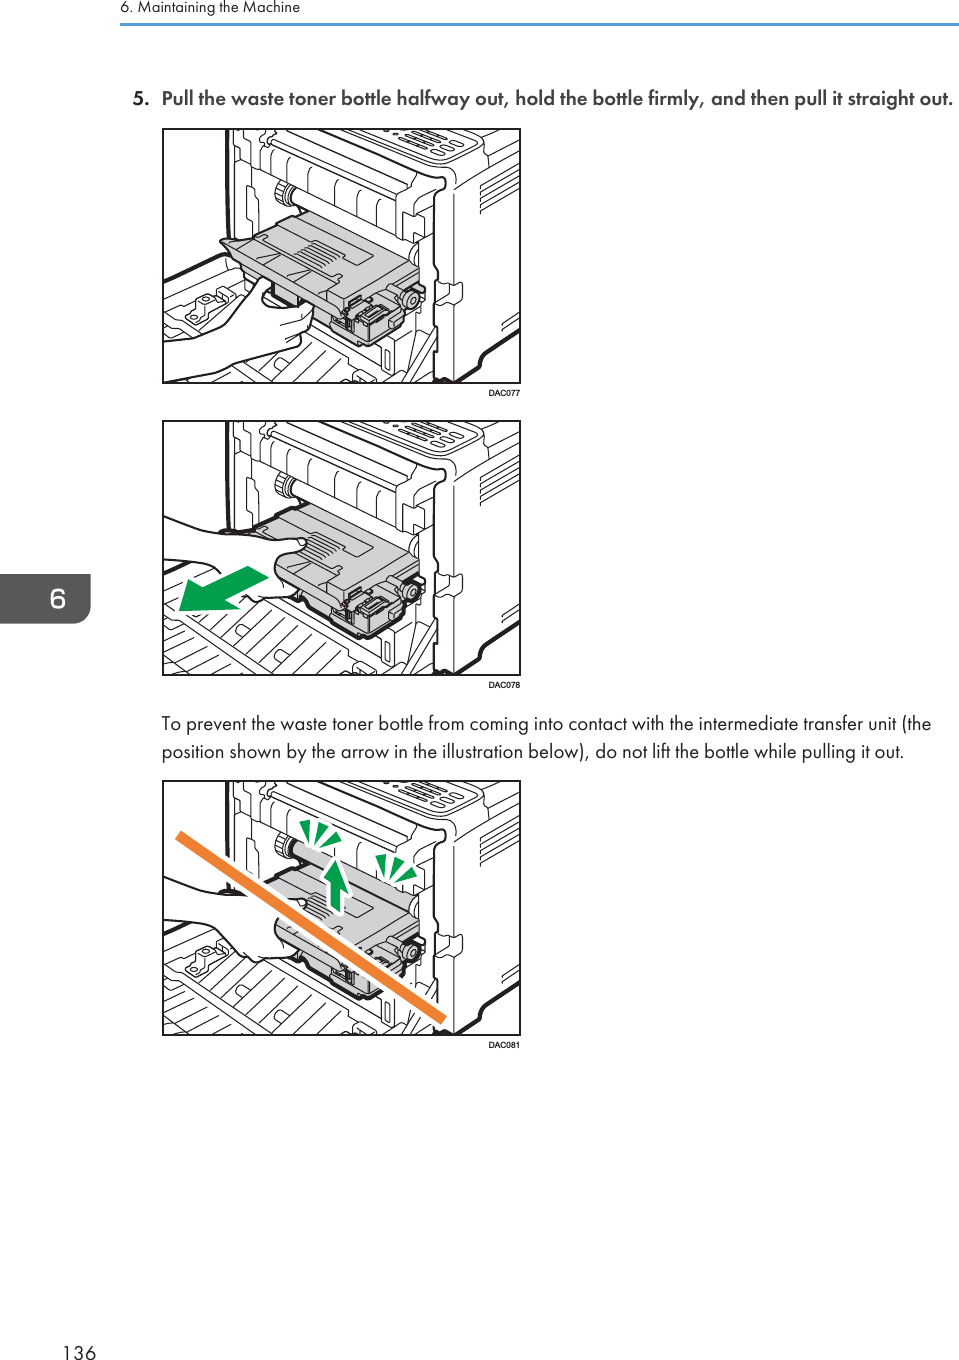
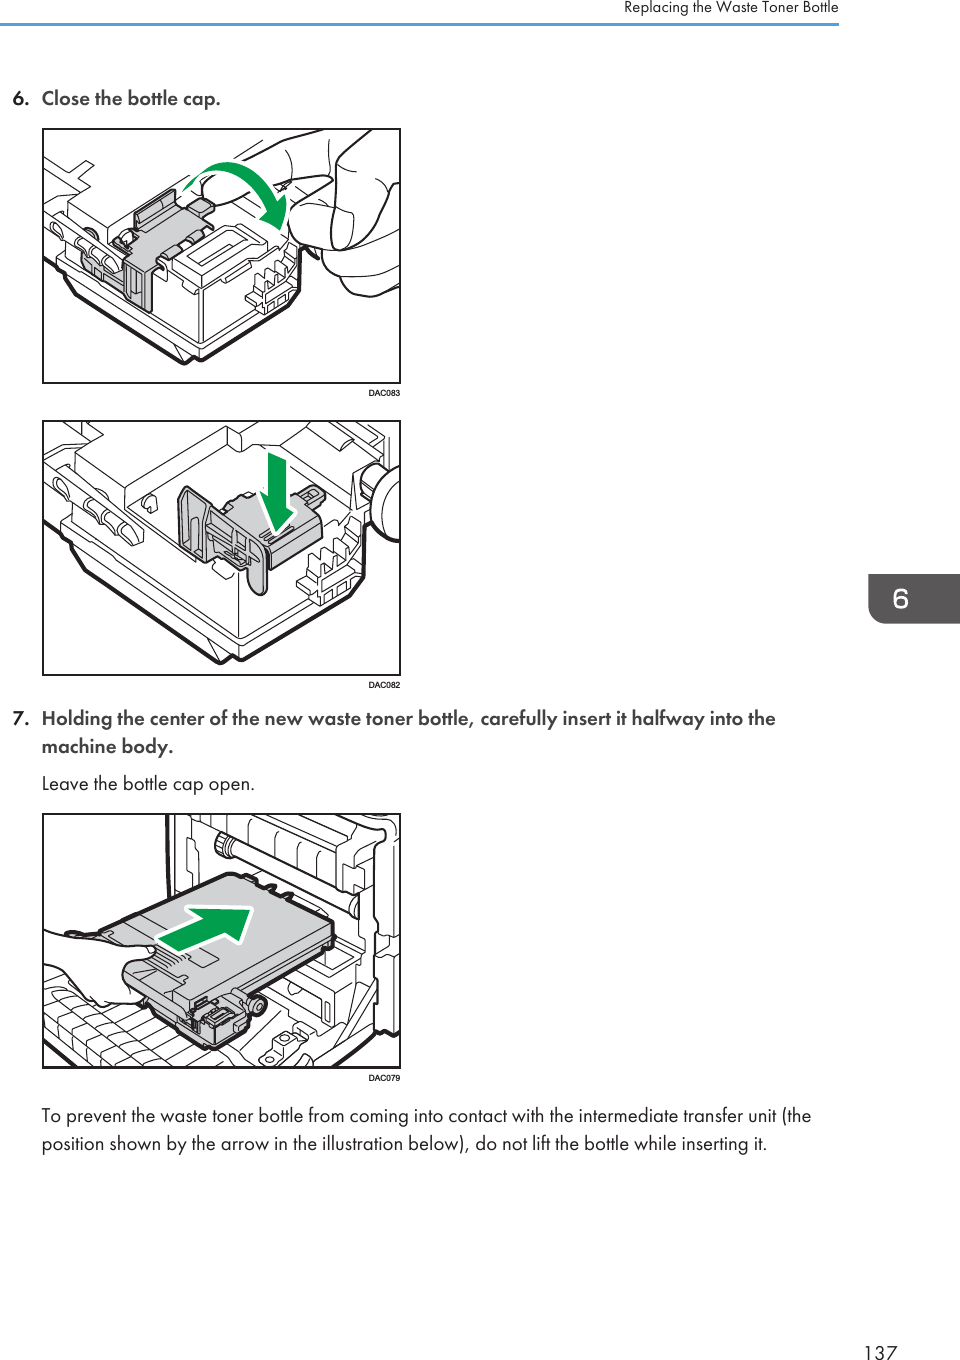
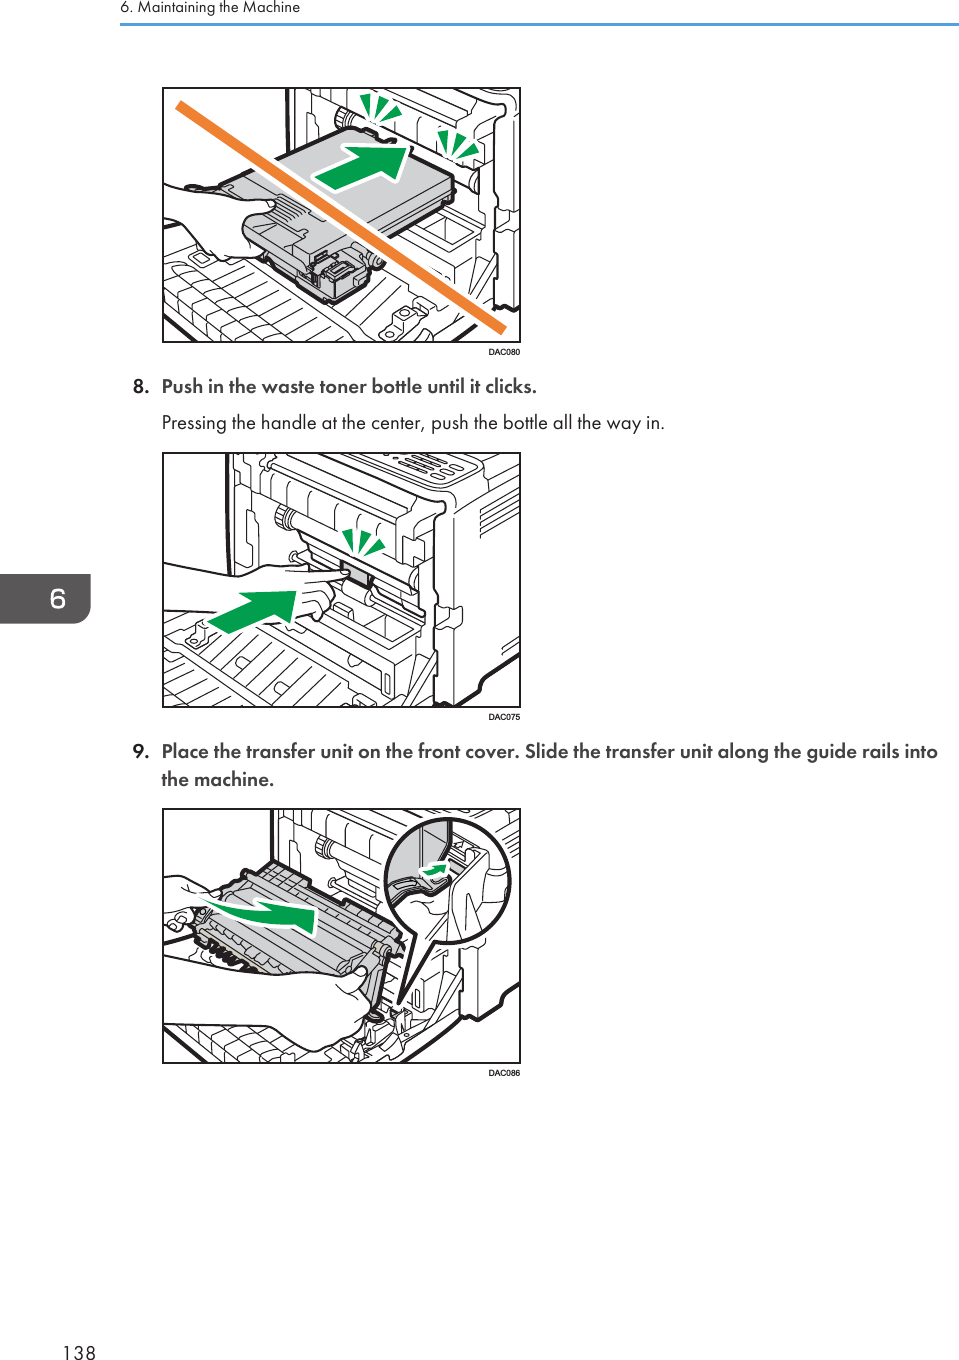
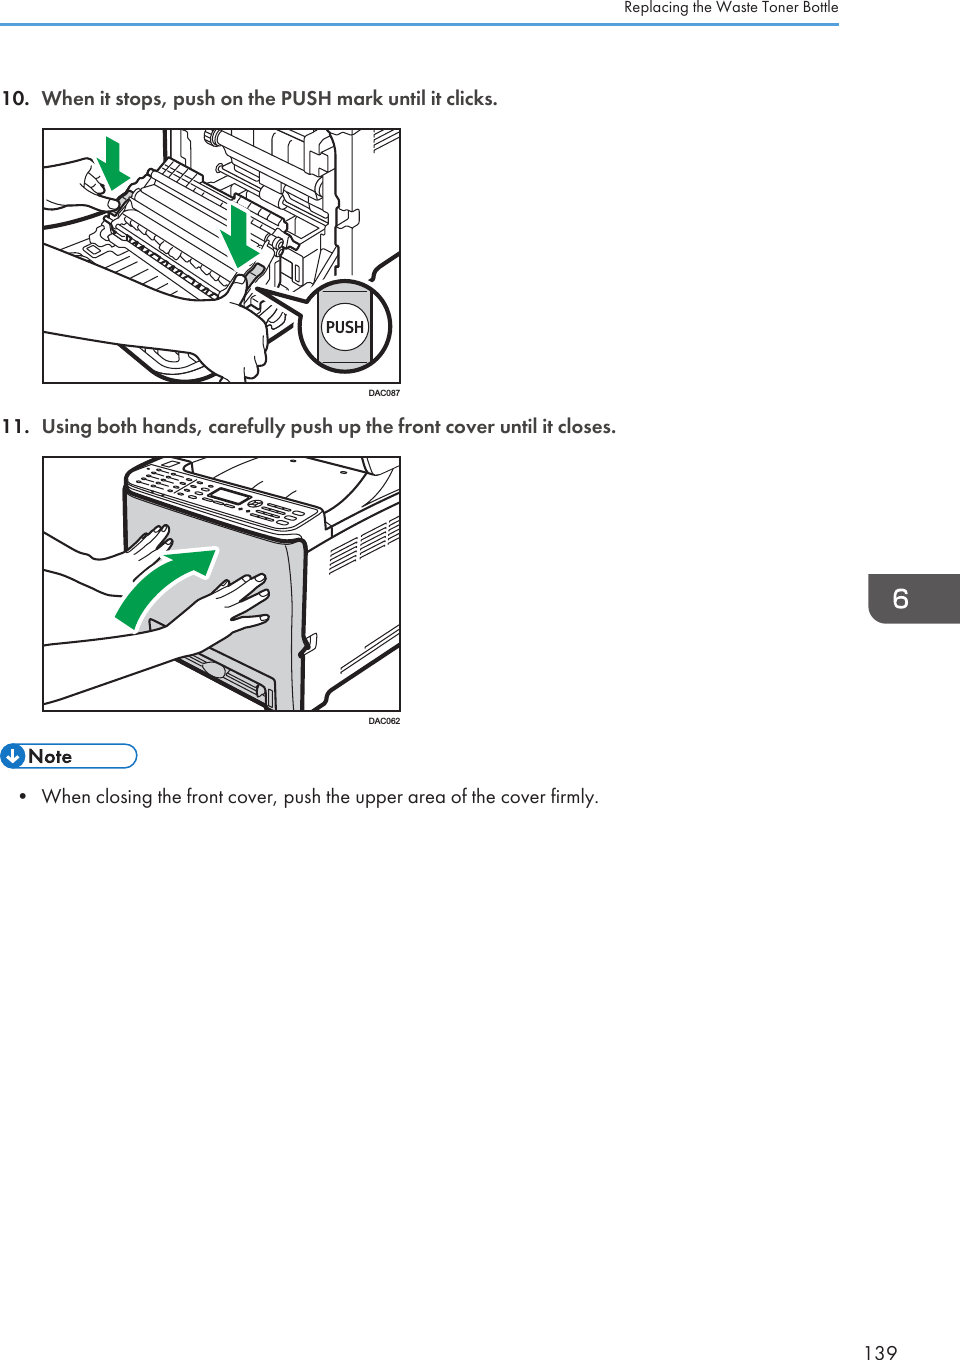
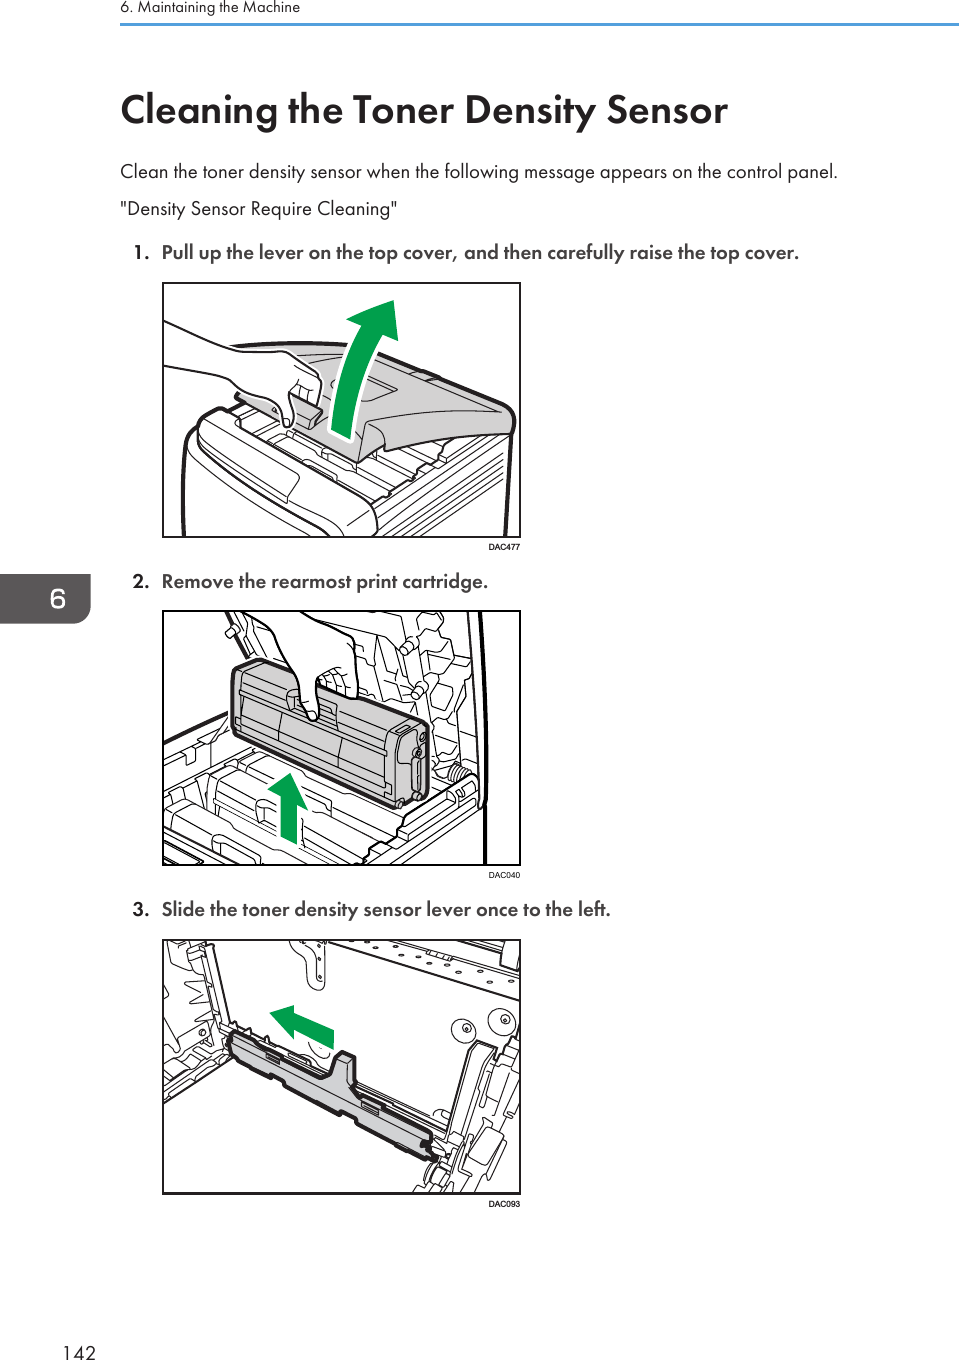
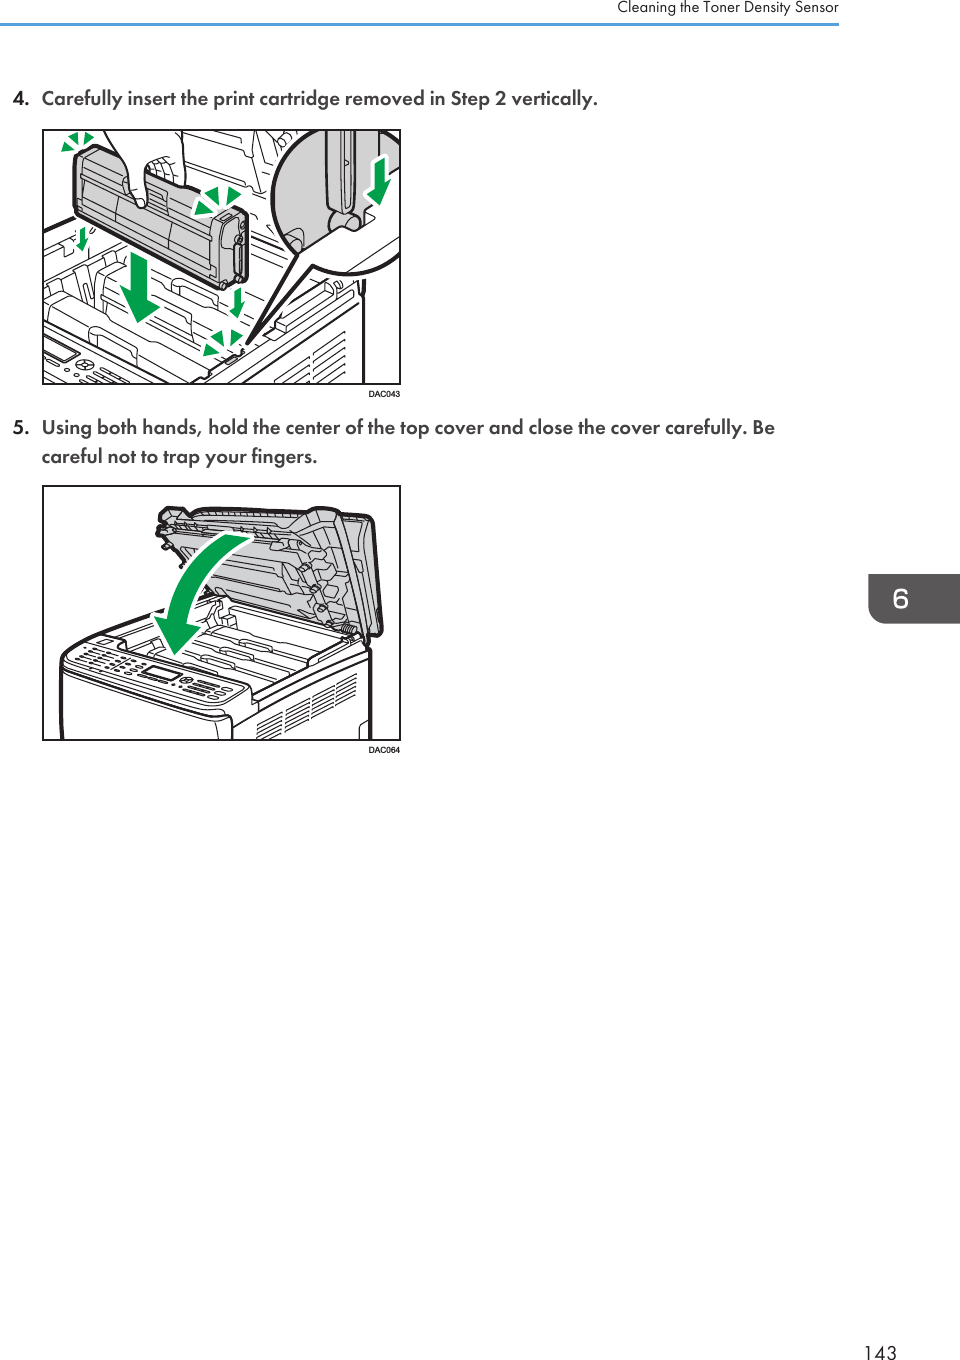
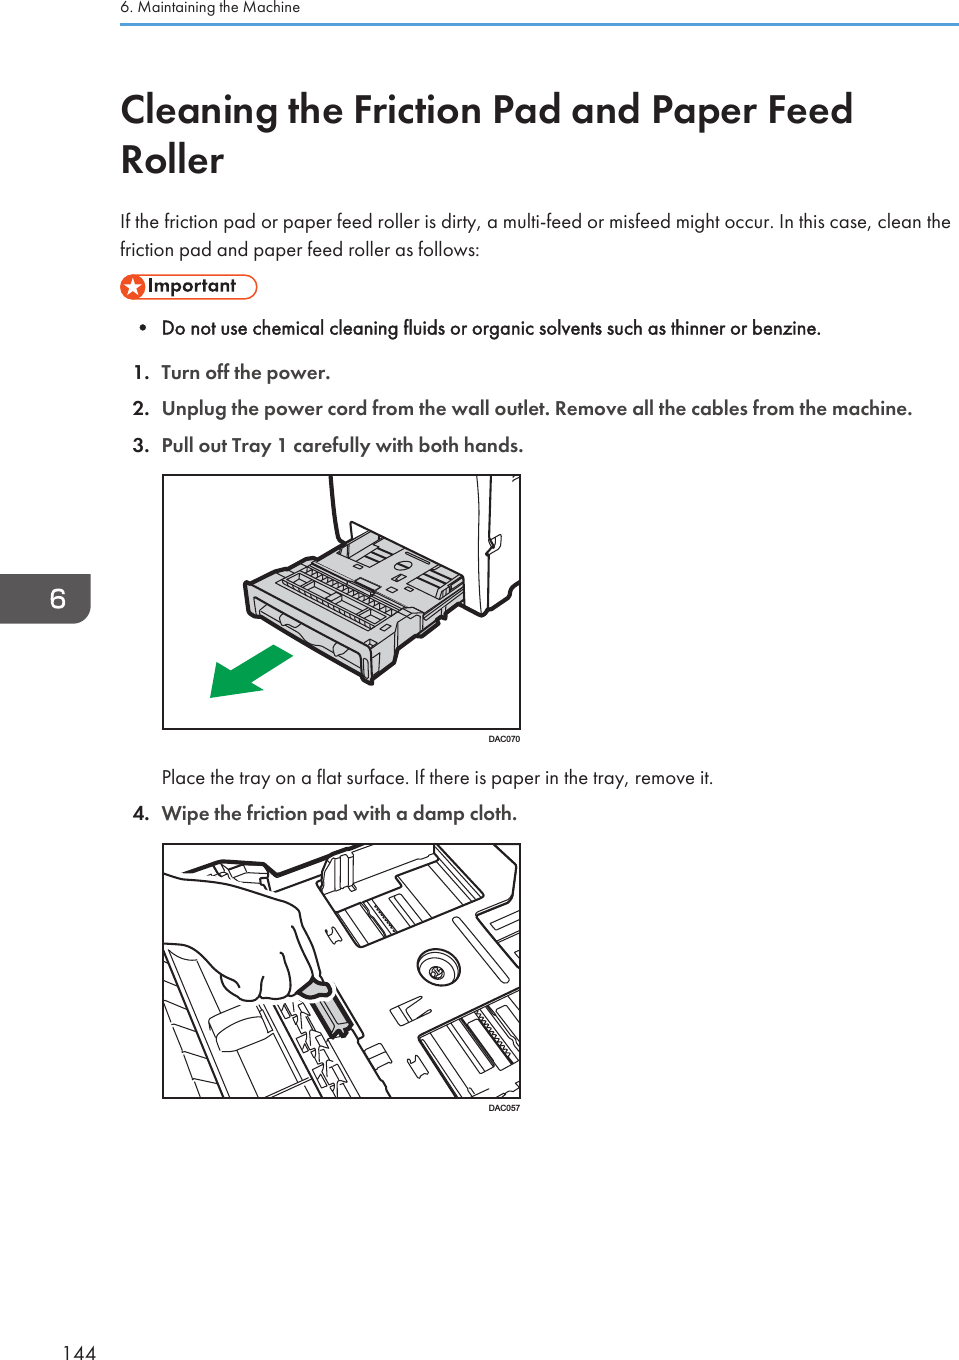
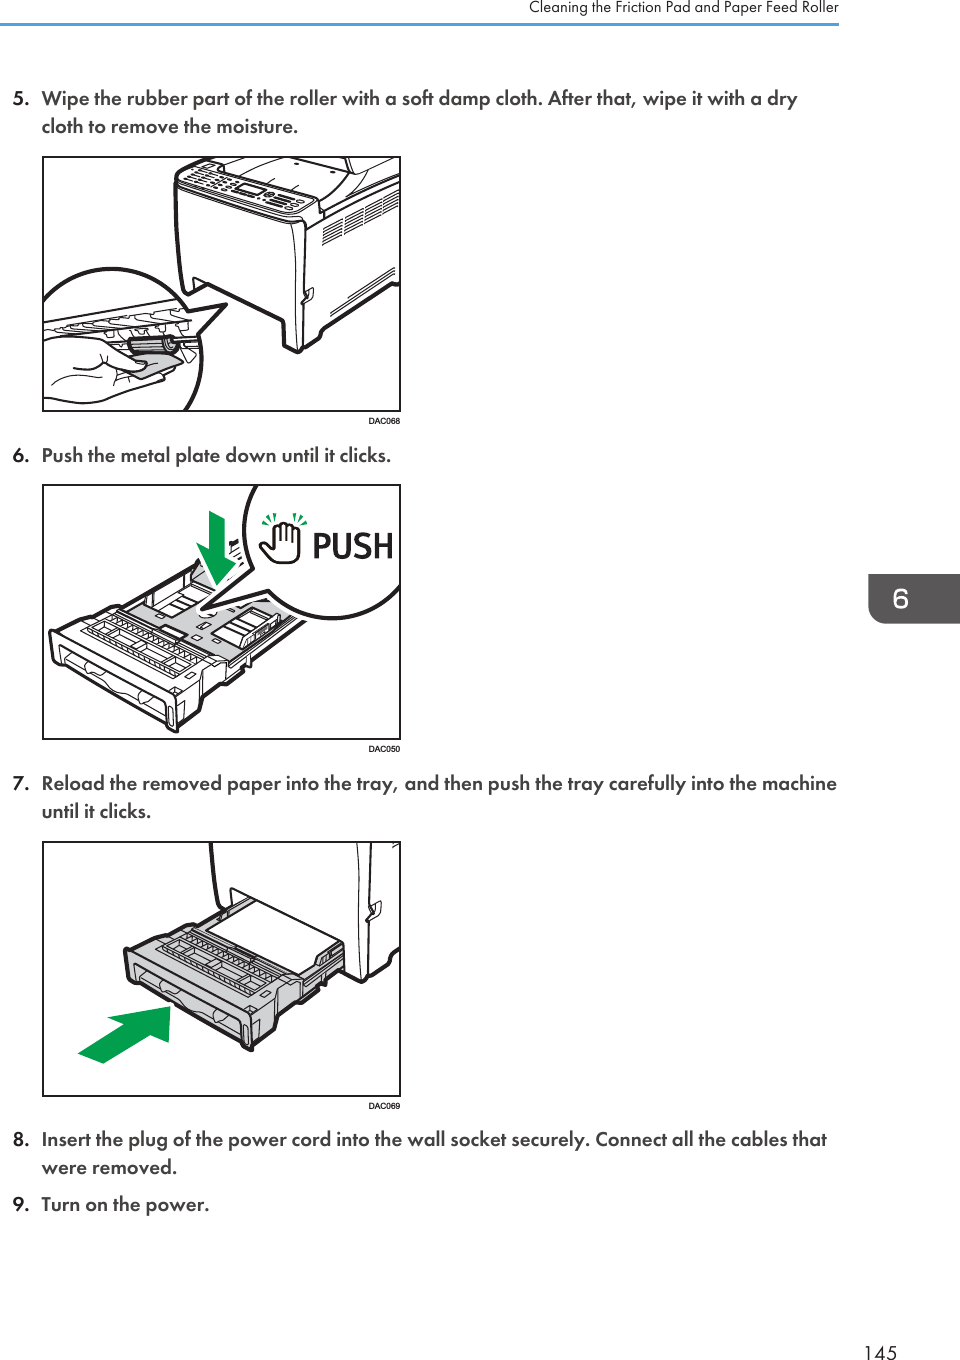


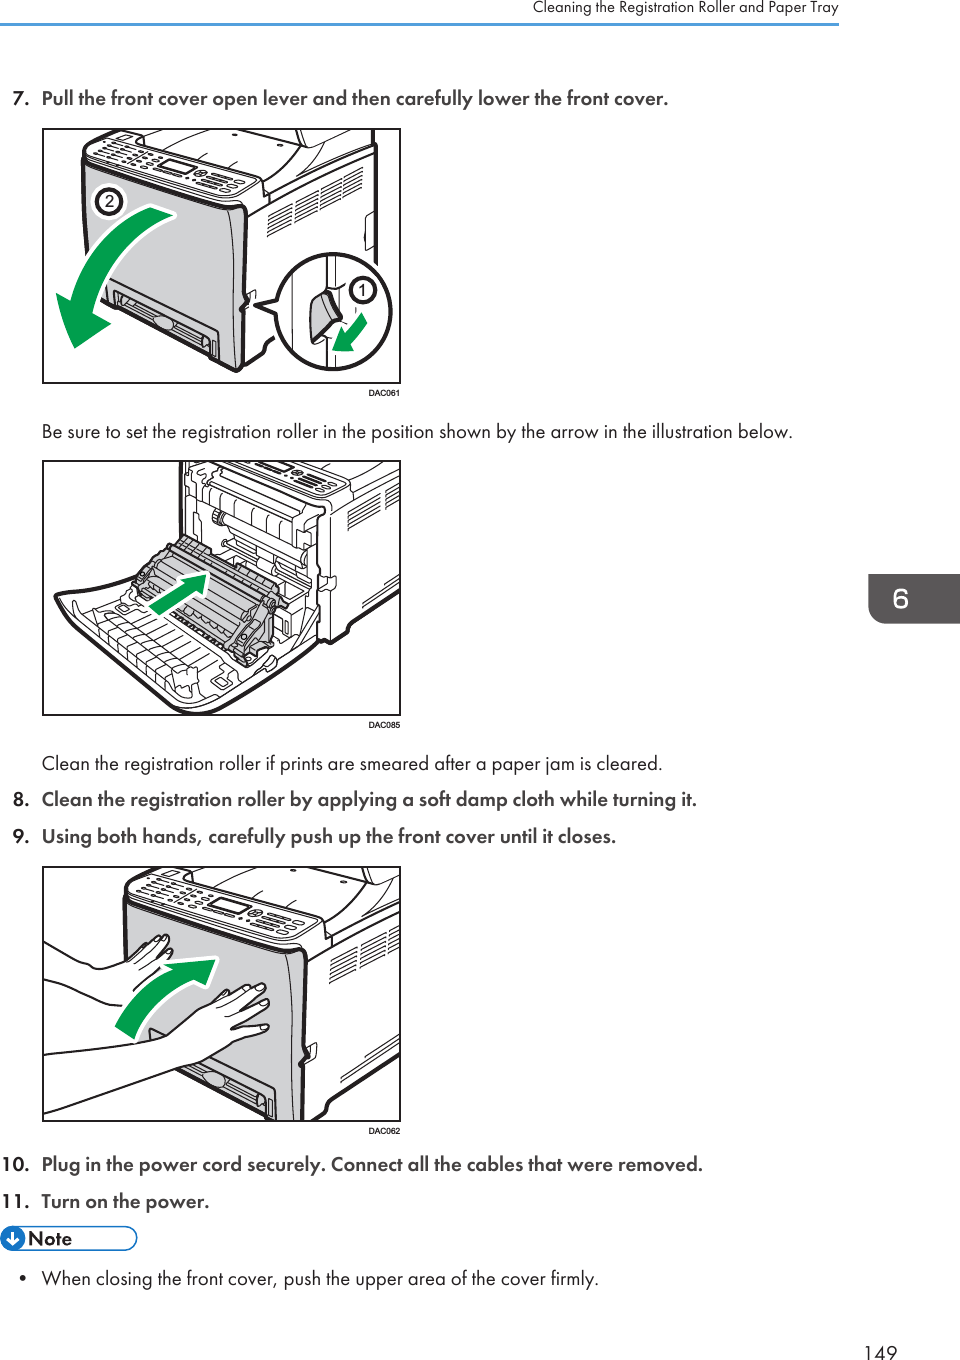

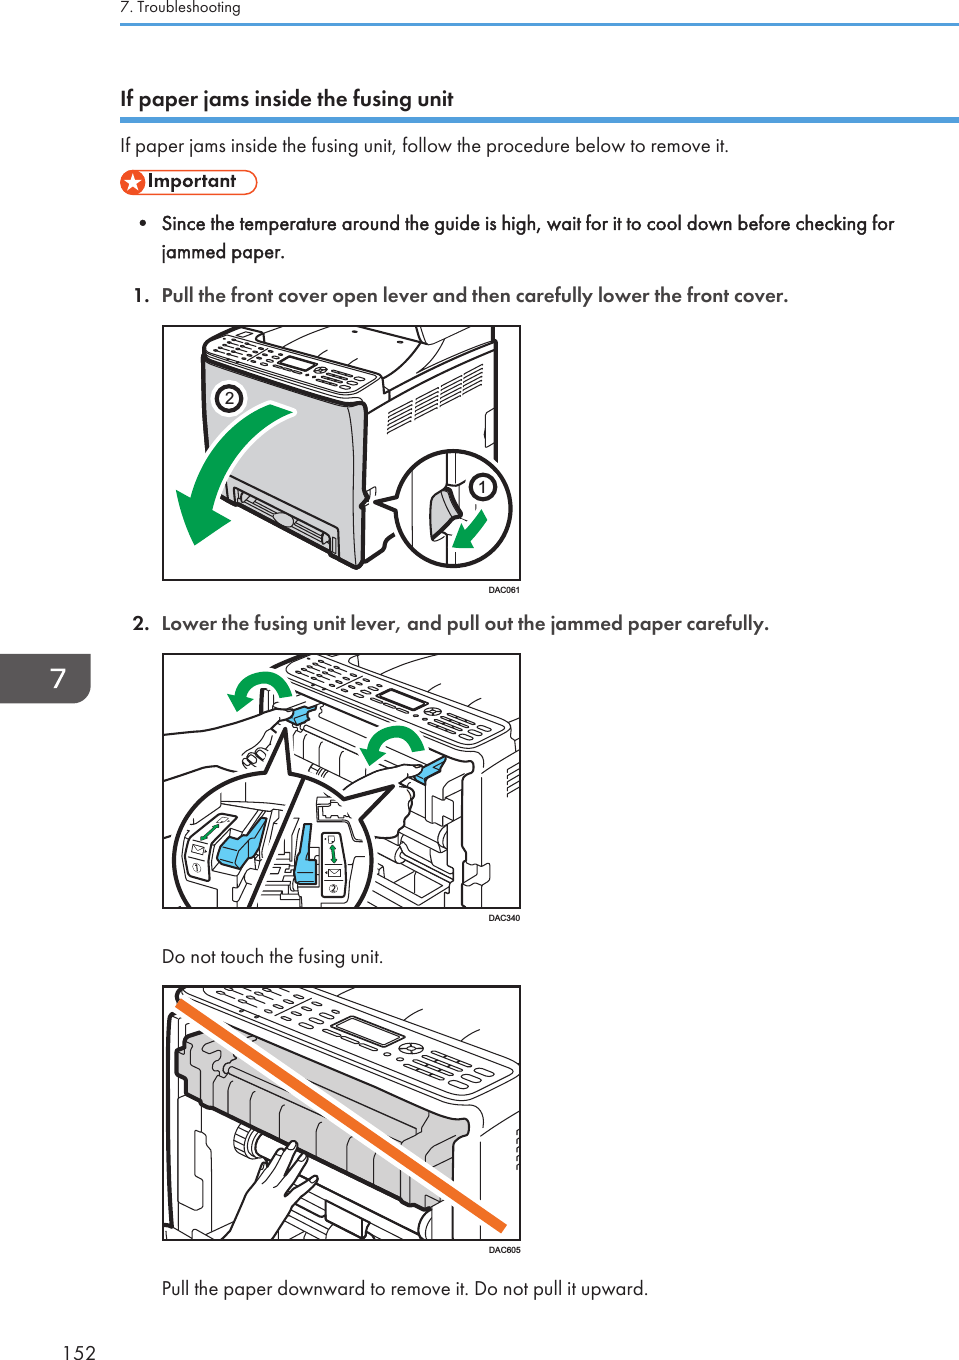
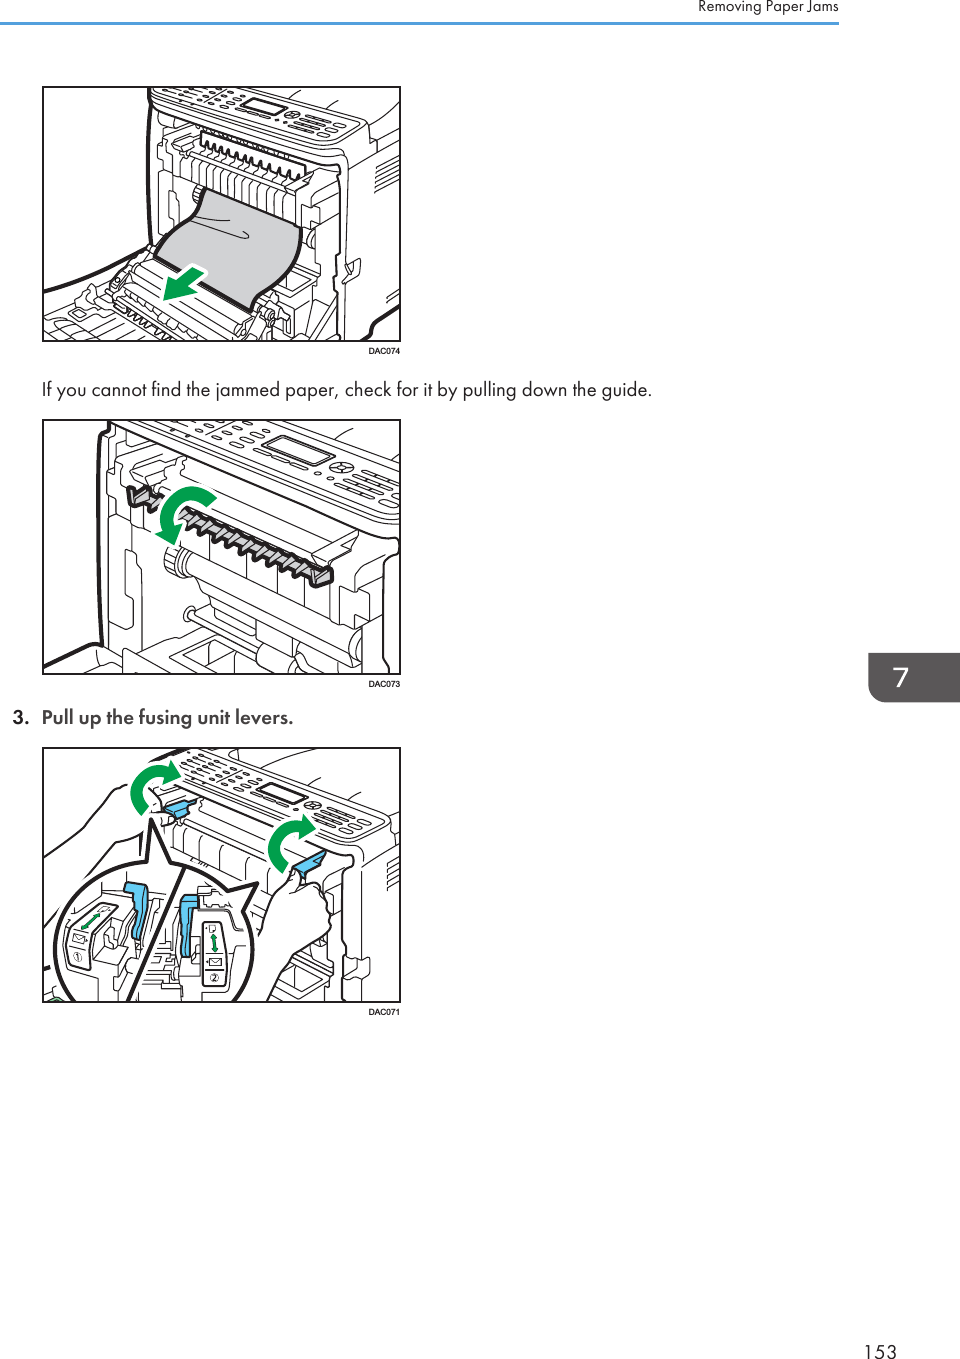
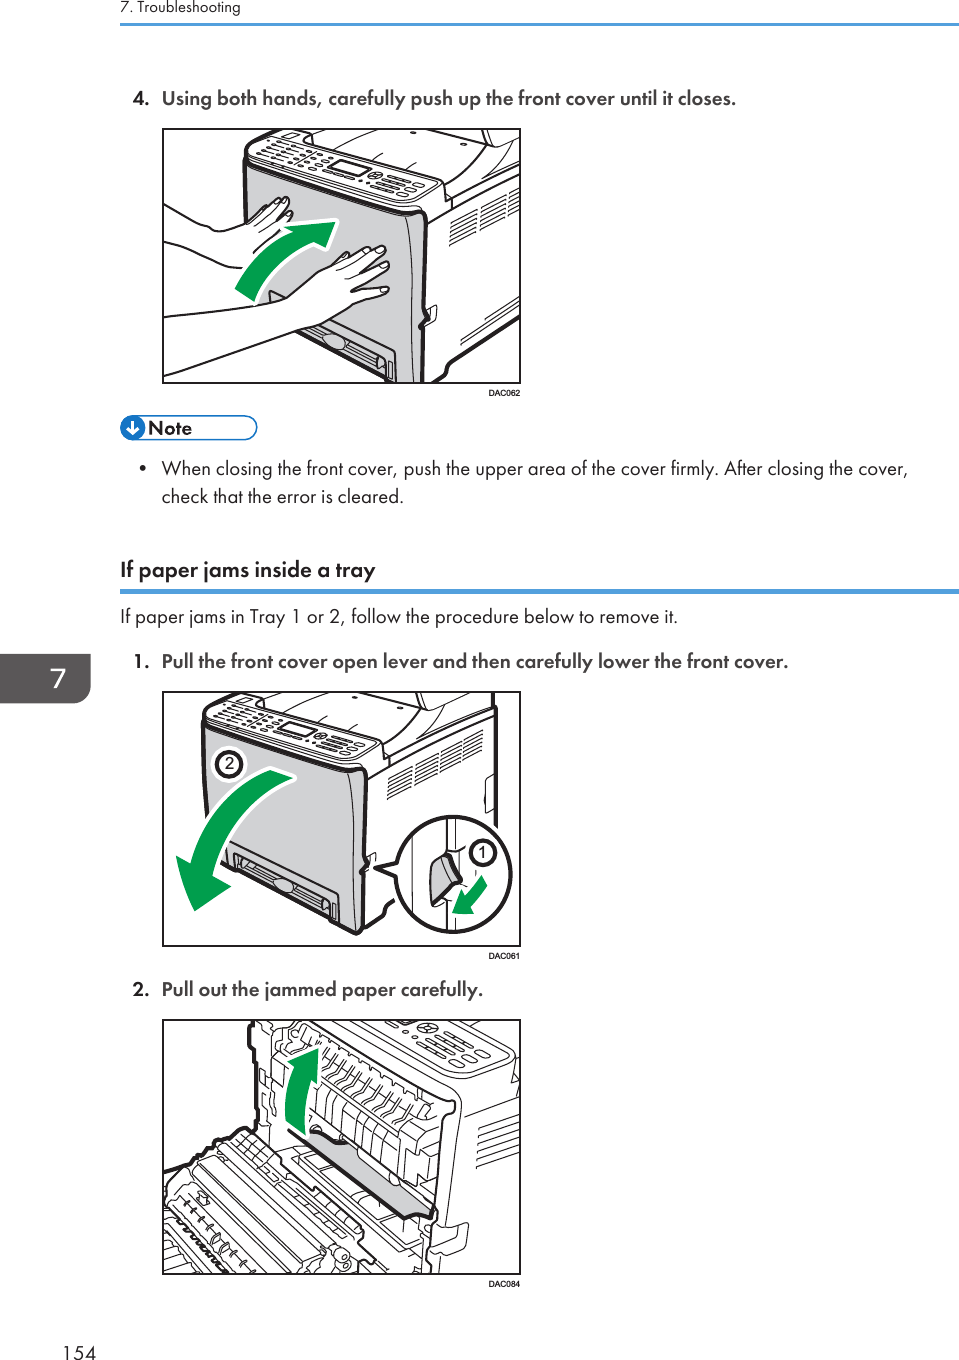
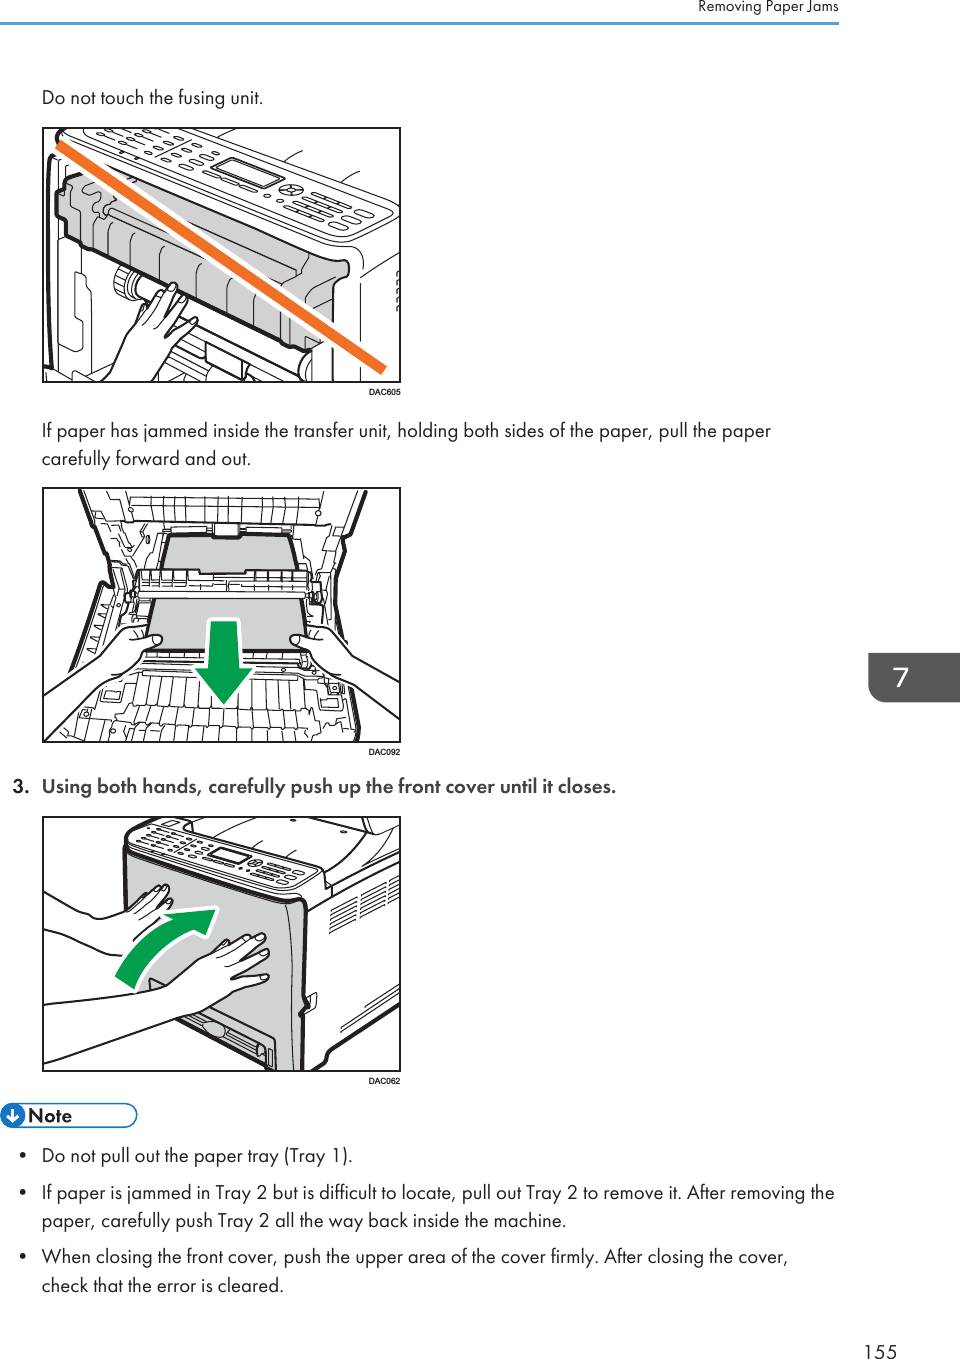
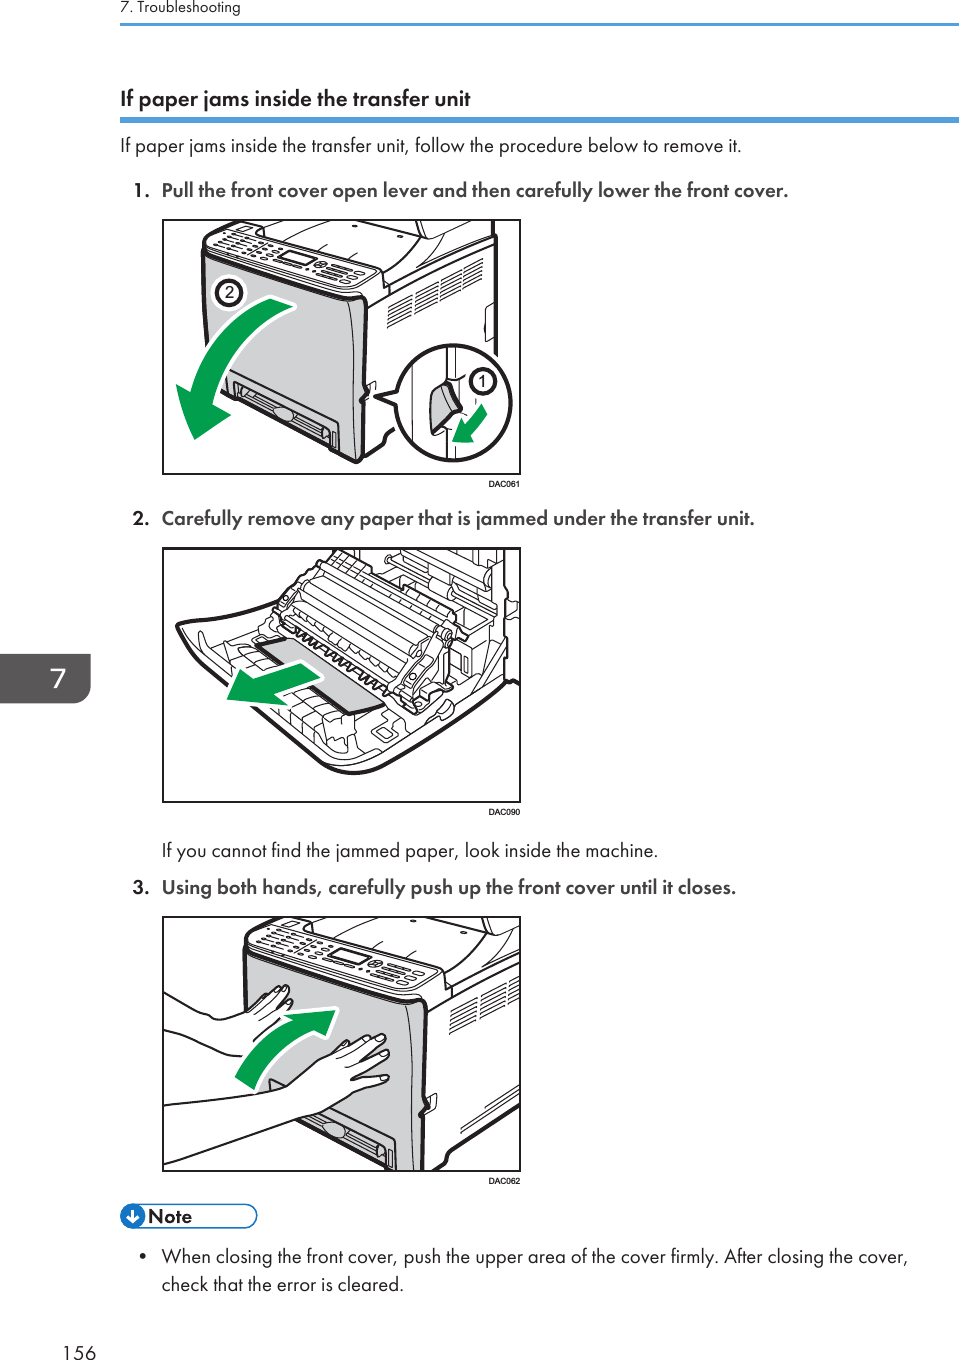
![Common ProblemsThis section explains how to troubleshoot common problems that may occur while operating themachine.Problem Possible cause SolutionThe machine does not turn on. The power cord is notconnected properly.• Make sure that the powerplug is firmly inserted intothe wall outlet.• Make sure that the walloutlet is not defective byconnecting anotherworking device.An error message appears onthe machine's screen.An error has occurred. See page 172 "Error & StatusMessages on the ControlPanel".The red indicator is lit. An error has occurred. See page 176 "PanelIndicator".Pages are not printed. The machine is warming up orreceiving data.Wait until "Printing..." appearson the screen. If "Processing..."is displayed on the screen, themachine is receiving data.Pages are not printed. The interface cable is notconnected correctly.• Reconnect the cable.• Check that the interfacecable is the correct type.Strange noise is heard. • The supplies or options arenot properly installed.• The machine executesperiodic cleaning of theinterior when [AutoCleaning] in [System] is setto [On].Check if the supplies or optionsare properly installed.The noise does not indicate amalfunction. Wait until thecleaning is complete.• If any of these problems persist, turn off the power, pull out the power cord, and contact your salesor service representative.Common Problems157](https://usermanual.wiki/Ricoh/PRSPC252DN1.BBP-PRSPC252DN1-User-Manual-1/User-Guide-2134301-Page-159.png)
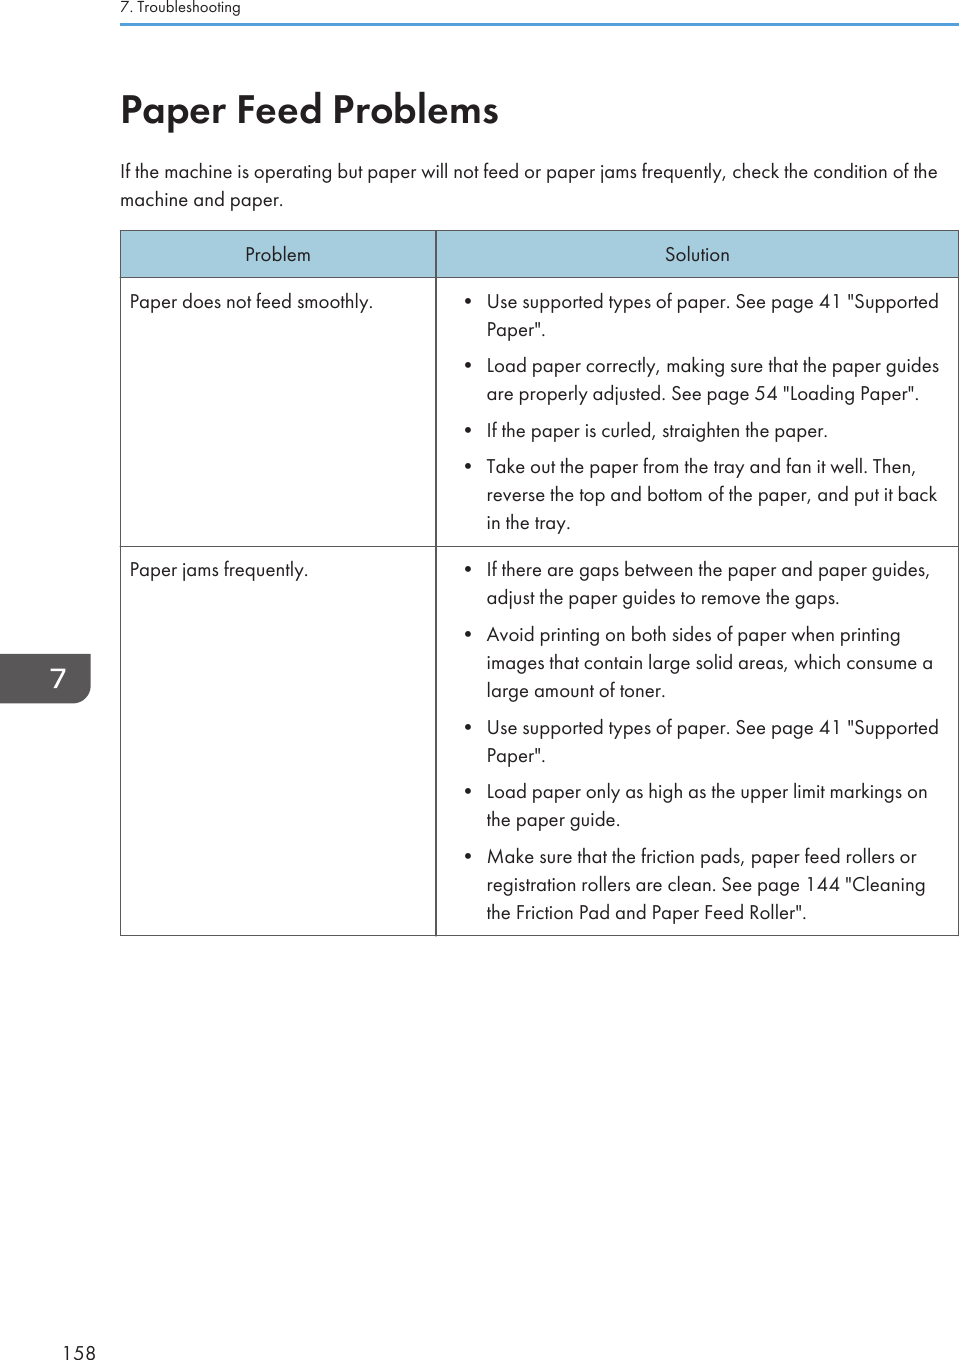
![Problem SolutionMultiple sheets of paper are fed atonce.• Fan the paper well before loading. Also make sure thatthe edges are aligned by tapping the stack on a flatsurface such as a desk.• Make sure that the paper guides are in the right position.• Use supported types of paper. See page 41 "SupportedPaper".• Load paper only as high as the upper limit markings onthe paper guide.• Make sure that the friction pads, paper feed rollers orregistration rollers are clean. See page 144 "Cleaningthe Friction Pad and Paper Feed Roller" and page 147"Cleaning the Registration Roller and Paper Tray".• Check that paper was not added while there was stillsome left in the tray.Only add paper when there is none left in the tray.The printed paper is wrinkled. • The paper being used may be damp. Use paper that hasbeen stored properly. See page 41 "Supported Paper".• Paper is too thin. See page 41 "Supported Paper".• If there are gaps between the paper and the paperguides, adjust the paper guides to remove the gaps.• Check that both the left and right fusing unit levers havebeen raised to the plain paper mark.The printed paper is curled. • Load the paper upside down in the paper tray.• If the paper curl is severe, retrieve prints from the outputtray more frequently.• The paper being used may be damp. Use paper that hasbeen stored properly. See page 41 "Supported Paper".• Select [Level 2] or [Level 3] in [Anti-Humid Lvl] under[Maintenance]. Note that if you select [Level 2] or [Level3], the first print takes longer than subsequent prints.Paper Feed Problems159](https://usermanual.wiki/Ricoh/PRSPC252DN1.BBP-PRSPC252DN1-User-Manual-1/User-Guide-2134301-Page-161.png)
![Print Quality ProblemsChecking the Condition of the MachineIf there is a problem with the print quality, first check the condition of the machine.Problem SolutionThere is a problem with themachine's location.Make sure that the machine is on a level surface. Place themachine where it will not be subject to vibration or shock.Unsupported types of paper is used. Make sure that the paper being used is supported by themachine. See page 41 "Supported Paper".The paper type setting is incorrect. Make sure that the paper type setting of the printer drivermatches the type of paper loaded. See page 41 "SupportedPaper".A non-genuine print cartridge isbeing used.Refilled or non-genuine print cartridge reduces print qualityand may cause malfunctions. Use genuine print cartridge only.See page 187 "Consumables".An old print cartridge is being used. Print cartridge should be opened before their expiration dateand used within six months after being opened.The machine is dirty. See page 129 "Maintaining the Machine", and clean themachine as required.Color degradation has occurred. Color degradation may occur in color printing after themachine is moved or a large number of pages are printed. Inthis case, adjust color registration by executing [Color Dens/Reg] in [Maintenance].Print Quality Problems161](https://usermanual.wiki/Ricoh/PRSPC252DN1.BBP-PRSPC252DN1-User-Manual-1/User-Guide-2134301-Page-163.png)
![Checking the printer driver settingsProblem SolutionThe printed image is smudged. PCL 5c/6On the printer driver's [Paper] tab, select [Bypass Tray] inthe "Input Tray:" list. In the "Paper Type:" list, select aproper paper type.PostScript 3On the printer driver's [Paper/Quality] tab, select[Bypass Tray] in the "Paper Source" list. In the "Media"list, select a proper paper type.Images smudge when rubbed.(Toner is not fixed.)PCL 5c/6On the printer driver's [Paper] tab, select a proper papertype in the "Paper Type:" list.PostScript 3On the printer driver's [Paper/Quality] tab, select aproper paper type in the "Media" list.The printed image is different fromthe image on the computer's display.Only when using PCL 5c/6On the printer driver's [Print Quality] tab, select [Raster]in the "Graphics Mode" list.When printing graphics, the outputand the screen are different.To print accurately, specify the printer driver setting to printwithout using the graphics command. For details aboutspecifying the printer driver setting, see the printer driver Help.Images are cut off, or excess isprinted.Use the same size paper selected in the application. If youcannot load paper of the correct size, use the reductionfunction to reduce the image, and then print. For details aboutthe reduction function, see the printer driver Help.Photo images are coarse. Use the application's or printer driver's settings to specify ahigher resolution.For details about the printer driver's settings, see the printerdriver Help.A solid line is printed as a dashedline or appears blurred.Change the dithering settings on the printer driver. For detailsabout the dithering settings, see the printer driver Help.7. Troubleshooting162](https://usermanual.wiki/Ricoh/PRSPC252DN1.BBP-PRSPC252DN1-User-Manual-1/User-Guide-2134301-Page-164.png)
![Printer ProblemsThis section describes printing problems and possible solutions.When You Cannot Print ProperlyProblem SolutionAn error occurs. If an error occurs when printing, change the computer orprinter driver settings.• Check the printer icon name does not exceed 32alphanumeric characters. If it does, shorten it.• Check whether other applications are operating.Close any other applications, as they may be interferingwith printing. If the problem is not resolved, closeunneeded processes too.• Check that the latest printer driver is being used.A Locked Print file is canceled. • The machine already has 5 jobs or 5 MB of Locked Printdata. Print or delete an existing Locked Print file. Fordetails, see page 69 "Printing Confidential Documents".• Even if the machine cannot store any more Locked Printfiles, the machine holds the new Locked Print file for theperiod of time specified in [Timeout:LockPrt] under [HostInterface] before canceling that file. Within this time, youcan print or delete the new Locked Print file. You can alsoprint or delete an existing Locked Print file so that the newLocked Print file can be stored in the machine.For details about [Timeout:LockPrt], see page 92 "HostInterface Menu".Only when using PCL 5c/6The Locked Print file has too many pages or it is too large.Reduce the number of pages to print, or print with alower setting for [Gradation:] in [Print Quality]. Fordetails, see the printer driver Help.7. Troubleshooting164](https://usermanual.wiki/Ricoh/PRSPC252DN1.BBP-PRSPC252DN1-User-Manual-1/User-Guide-2134301-Page-166.png)
![Problem SolutionImages are cut off, or excess pagesare printed.If you are using paper whose size is smaller than the papersize selected in the application, use the same size paperselected in the application. If you cannot load paper of thecorrect size, use the reduction function to reduce the image,and then print.See the printer driver Help.The color of the printout is differentfrom the color on the computer'sdisplay.• The colors made using color toner may be different fromcolors displayed on the display due to the difference ofmethods to reproduce colors.Only when using PCL 5c/6• Color gradation might appear differently if [On] isselected for [Economy Color] on the [Print Quality]tab in the printer driver's dialog box.See the printer driver Help.• Turn off the main power, and then turn it back on. If thecolor still appears different on the printout, perform the[Color Dens/Reg] under [Maintenance]. For details, seepage 88 "Maintenance Menu".If this procedure fails to resolve the problem, contact yoursales or service representative.Color changes extremely whenadjusted with the printer driver.Only when using PCL 5c/6Do not make extreme settings for the color balance underthe [Print Quality] tab in the printer driver's dialog box.See the printer driver Help.Color documents are printed inblack and white.• The printer driver is not set up for color printing.See the printer driver Help.• Some applications print color files in black and white.7. Troubleshooting166](https://usermanual.wiki/Ricoh/PRSPC252DN1.BBP-PRSPC252DN1-User-Manual-1/User-Guide-2134301-Page-168.png)
![When You Cannot Print ClearlyProblem SolutionThe whole printout is blurred. • The paper being used may be damp. Use paper that hasbeen stored properly. See page 41 "Supported Paper".• Select [Level 2] or [Level 3] in [Anti-Humid Lvl] under[Maintenance]. Note that if you select [Level 2] or [Level3], the first print takes longer than subsequent prints.• If you select [On] for [Economy Color] in the [PrintQuality] tab (PCL printer driver) or under [PrinterFeatures] (PostScript 3 printer driver), print will be atlower density. For details, see the printer driver Help.• The print cartridge is almost empty. If "Replace Toner: X"("X" indicates the toner color) appears on the screen,replace the indicated print cartridge.• Condensation may have occurred. If rapid change intemperature or humidity occurs, use this machine onlyafter it has acclimatized.The toner is powdery and comesaway from the paper, or the printedimage has a matt appearance.Check if the fusing unit levers are properly set. Pull up thefusing unit levers.Toner smears appear on the printside of the page.• The paper setting may not be correct. For example,although you are using thick paper, the setting for thickpaper may not be specified.Check the printer driver's paper settings.See the printer driver Help.• Check that the paper is not curled or bent. Envelopes canbe curled easily. Flatten out the paper before loading it.See page 54 "Loading Paper".Printer Problems167](https://usermanual.wiki/Ricoh/PRSPC252DN1.BBP-PRSPC252DN1-User-Manual-1/User-Guide-2134301-Page-169.png)
![Problem SolutionWhite lines appear.DAC607The intermediate transfer belt is dirty.Follow the procedure below to clean the belt:1. Open the top cover while the power is on.2. Remove all print cartridges from the printer.3. Close the top cover with both hands carefully.4. When cleaning finishes, open the top cover and attachall the print cartridges again.If this procedure does not resolve the problem, contact yoursales or service representative.Horizontal lines appear on theprinted paper.• Impact can cause lines to appear on printed paper andother malfunctions.Protect the printer from impact at all times, especiallywhile it is printing.• If lines appear on prints, turn the printer off, wait a fewmoments, and then turn it back on again. Then, performthe print job again.The print color is different from thecolor specified.If a specific color is missing, turn the power switch off and on.If this does not resolve the problem, contact your sales orservice representative.Photo images are coarse. Some applications lower the resolution for making prints.A color is missing or a printed imageis partially blurred.• The paper being used may be damp. Use paper that hasbeen stored properly.See page 54 "Loading Paper".• Toner is almost empty. If the following message appearson the control panel, replace the print cartridge:"Replace Toner: X". ("X" indicates the toner color)See page 129 "Replacing the Print Cartridge".• Condensation may have occurred. If rapid change intemperature or humidity occurs, use this printer only afterit has acclimatized.Color shift occurs. Perform the [Color Dens/Reg] under [Maintenance].For details, see page 88 "Maintenance Menu".7. Troubleshooting168](https://usermanual.wiki/Ricoh/PRSPC252DN1.BBP-PRSPC252DN1-User-Manual-1/User-Guide-2134301-Page-170.png)
![Problem SolutionWhite spots appear. The surrounding registration roller or paper tray can becomedirty with paper dust if you use paper other than standardpaper.Wipe any paper dust off both the paper tray and registrationroller.See page 147 "Cleaning the Registration Roller and PaperTray".Colorless dots appear on solid colorprintouts.Change the paper type currently selected in the Paper Typesettings, and then print.Eg. [Recycled Paper] to [Thin Paper] to [Plain Paper].See page 54 "Loading Paper".White streaks or color streaksappear.Toner is almost empty. If an error message appears on thecontrol panel, replace the print cartridge of the colorindicated.See page 129 "Replacing the Print Cartridge".The backs of printed sheets areblemished.• When removing a jammed sheet, the inside of the printermay have become dirty. Print several sheets until theycome out clean.• If document size is larger than paper size, e.g. A4document on B5 paper, the back of the next printed sheetmay become dirty.The Data In indicator is not flashingor lit.If the Data In indicator is not flashing or lit, the data is notbeing sent to the printer.If the printer is connected to the computer using the interfacecable.Check the port connection setting is correct.Network ConnectionContact your network administrator.Black gradation is not natural. Only when using PostScript 3Select [CMY + K] for [Gray Reproduction] in the printerdriver's dialog box.See the printer driver Help.Printer Problems169](https://usermanual.wiki/Ricoh/PRSPC252DN1.BBP-PRSPC252DN1-User-Manual-1/User-Guide-2134301-Page-171.png)
![Problem SolutionSolid lines are printed as brokenlines.Only when using PostScript 3Change the [Dithering] setting in the printer driver'sdialog box.See the printer driver Help.Fine dot patterns do not print. Only when using PostScript 3Change the [Dithering] setting in the printer driver'sdialog box.See the printer driver Help.Solid areas, lines or text are shiny orglossy when created as a mixture ofcyan, magenta, yellow.Only when using PostScript 3Select [Black by K] for [Gray Reproduction] in the printerdriver's dialog box.See the printer driver Help.Speckling occurs in areas of solidblack print.Only when using PostScript 3Select [CMY + K] for [Gray Reproduction] in the printerdriver's dialog box.See the printer driver Help.If rubbed with your finger, the printsmears.The setting of the paper may not be correct. For example,although thick paper is used, the setting for thick paper maynot be specified.• Check the paper settings of this printer.See page 54 "Loading Paper".• Check the paper settings of the printer driver.See the printer driver Help.When Paper Is Not Fed ProperlyProblem SolutionPrints fall behind the machine whenthey are delivered.Pull up the appropriate stop fence (forward fence for A4/Letter, rear fence for Legal size prints). See page 17 "Guide toComponents".7. Troubleshooting170](https://usermanual.wiki/Ricoh/PRSPC252DN1.BBP-PRSPC252DN1-User-Manual-1/User-Guide-2134301-Page-172.png)
![Problem SolutionPrints do not stack properly. • The paper being used may be damp. Use paper that hasbeen stored properly. See page 41 "Supported Paper".• Select [Level 2] or [Level 3] in [Anti-Humid Lvl] under[Maintenance]. Note that if you select [Level 2] or [Level3], the first print takes longer than subsequent prints.• Pull up the appropriate stop fence (forward fence forA4/Letter, rear fence for Legal size prints). See page 17"Guide to Components".The printed paper is curled. • Load the paper upside down in the paper tray.• If the paper curl is severe, retrieve prints from the outputtray more frequently.• The paper being used may be damp. Use paper that hasbeen stored properly.• Select [Level 1], [Level 2] or [Level 3] in [Anti-Humid Lvl]under [Maintenance]. Note that if you select [Level 2] or[Level 3], the first print takes longer than subsequentprints.Printed envelopes come out creased. Check if the fusing unit levers are properly set. Lower the fusingunit levers.Other Printing ProblemsProblem SolutionThe toner has run out and printinghas stopped.When the toner runs out, pressing the [Stop/Start] key allowsyou to print a few more pages, but the print quality of thosepages may be lower.Printer Problems171](https://usermanual.wiki/Ricoh/PRSPC252DN1.BBP-PRSPC252DN1-User-Manual-1/User-Guide-2134301-Page-173.png)
![Error & Status Messages on the Control PanelThis section explains what the messages that appear on the control panel mean and what to do when aparticular message appears.Status messagesMessage Explanation Recommended ActionOffline The machine is Offline. To start printing, switch themachine to online by pressingthe [Stop/Start] key on thecontrol panel.Processing... The machine is printing. Wait a while.Ready This is the default readymessage.The machine is ready for use.No action is required.Calibrating... The machine is calibrating. Wait a while.Printing... The machine is printing. Wait a while.Please wait The machine is waiting for thenext data to print.Wait a while.Warming up... The printer is warming up ortoner is being supplied.Wait until "Ready" appears onthe display.MessagesMessage Explanation Recommended ActionSizeMsmtch:#Start/JobReset The paper size setting in the tray# (1, 2, bypass) differs fromthat of actual paper size in thetray.Load paper of the selected sizein the tray, and then press the[Stop/Start] key to continueprinting.Press the [Job Reset] key tocancel printing.TypeMsmtch:#Start/JobReset The paper type setting in thetray # (1, 2, bypass) differsfrom that of actual paper type inthe tray.Load paper of the selected typein the tray, and then press the[Stop/Start] key to continueprinting.Press the [Job Reset] key tocancel printing.7. Troubleshooting172](https://usermanual.wiki/Ricoh/PRSPC252DN1.BBP-PRSPC252DN1-User-Manual-1/User-Guide-2134301-Page-174.png)
![Transmission Using IPsecFor securer communications, this machine supports the IPsec protocol. When applied, IPsec encryptsdata packets at the network layer using shared key encryption. The machine uses encryption keyexchange to create a shared key for both sender and receiver. To achieve even higher security, you canalso renew the shared key on a validity period basis.• IPsec is not applied to data obtained through DHCP, DNS, or WINS.• IPsec compatible operating systems are Windows XP SP2, Windows Vista/7, Windows Server2003/2003 R2/2008/2008 R2, Mac OS X 10.6 and later, Red Hat Enterprise Linux WS 4.0,and Solaris 10. However, some setting items are not supported depending on the operatingsystem. Make sure the IPsec settings you specify are consistent with the operating system's IPsecsettings.• If you cannot access Web Image Monitor due to IPsec configuration problems, disable IPsec under[Host Interface] on the control panel, and then access Web Image Monitor.• For details about specifying the IPsec settings using Web Image Monitor, see page 101"Configuring the Machine Using Web Image Monitor".• For details about disabling IPsec using the control panel, see page 92 "Host Interface Menu".Encryption and Authentication by IPsecIPsec consists of two main functions: the encryption function, which ensures the confidentiality of data,and the authentication function, which verifies the sender of the data and the data's integrity. Thismachine's IPsec function supports two security protocols: the ESP protocol, which enables both of theIPsec functions at the same time, and the AH protocol, which enables only the authentication function.ESP ProtocolThe ESP protocol provides secure transmission through both encryption and authentication. Thisprotocol does not provide header authentication.• For successful encryption, both the sender and receiver must specify the same encryptionalgorithm and encryption key. The encryption algorithm and encryption key are specifiedautomatically.• For successful authentication, the sender and receiver must specify the same authenticationalgorithm and authentication key. The authentication algorithm and authentication key arespecified automatically.8. Appendix178](https://usermanual.wiki/Ricoh/PRSPC252DN1.BBP-PRSPC252DN1-User-Manual-1/User-Guide-2134301-Page-180.png)
![AH ProtocolThe AH protocol provides secure transmission through authentication of packets only, includingheaders.• For successful authentication, the sender and receiver must specify the same authenticationalgorithm and authentication key. The authentication algorithm and authentication key arespecified automatically.AH Protocol + ESP ProtocolWhen combined, the ESP and AH protocols provide secure transmission through both encryptionand authentication. These protocols provide header authentication.• For successful encryption, both the sender and receiver must specify the same encryptionalgorithm and encryption key. The encryption algorithm and encryption key are specifiedautomatically.• For successful authentication, the sender and receiver must specify the same authenticationalgorithm and authentication key. The authentication algorithm and authentication key arespecified automatically.• Some operating systems use the term "Compliance" in place of "Authentication".Security AssociationThis machine uses encryption key exchange as the key setting method. With this method, agreementssuch as the IPsec algorithm and key must be specified for both sender and receiver. Such agreementsform what is known as an SA (Security Association). IPsec communication is possible only if thereceiver's and sender's SA settings are identical.The SA settings are auto configured on both parties' machines. However, before the IPsec SA can beestablished, the ISAKMP SA (Phase 1) settings must be auto configured. When this is done, the IPsec SA(Phase 2) settings, which allow actual IPsec transmission, will be auto configured.Also, for further security, the SA can be periodically auto updated by applying a validity period (timelimit) for its settings. This machine only supports IKEv1 for encryption key exchange.Multiple settings can be configured in the SA.Settings 1-10You can configure ten separate sets of SA details (such as different shared keys and IPsecalgorithms).IPsec policies are searched through one by one, starting at [No.1].Transmission Using IPsec179](https://usermanual.wiki/Ricoh/PRSPC252DN1.BBP-PRSPC252DN1-User-Manual-1/User-Guide-2134301-Page-181.png)
![Encryption Key Exchange Settings Configuration FlowThis section explains the procedure for specifying encryption key exchange settings.Machine PC1. Set the IPsec settings on Web Image Monitor. 1. Set the same IPsec settings as the machine onPC.2. Enable IPsec settings. 2. Enable IPsec settings.3. Confirm IPsec transmission.• After configuring IPsec, you can use "ping" command to check if the connection is establishedcorrectly. Because the response is slow during initial key exchange, it may take some time toconfirm that transmission has been established.• If you cannot access Web Image Monitor due to IPsec configuration problems, disable IPsec onthe control panel, and then access Web Image Monitor.• For details about disabling IPsec using the control panel, see page 92 "Host Interface Menu".Specifying Encryption Key Exchange Settings• [IPsec Settings] appears only if the administrator password has been configured.Specify it using Web Image Monitor.1. Start the Web browser, and access the machine by entering its IP address.2. Click [IPsec Settings].3. Click the [IPsec Policy List] tab.4. Select the number of the setting you want to modify in the list, and then click [Change].5. Modify the IPsec related settings as necessary.6. Enter the administrator password, and then click [Apply].7. Click the [IPsec Global Settings] tab, and then select [Active] in [IPsec Function].8. If necessary, specify [Default Policy], [Broadcast and Multicast Bypass], and [All ICMPBypass] also.9. Enter the administrator password, and then click [Apply].8. Appendix180](https://usermanual.wiki/Ricoh/PRSPC252DN1.BBP-PRSPC252DN1-User-Manual-1/User-Guide-2134301-Page-182.png)
![Specifying IPsec Settings on the ComputerSpecify exactly the same settings for IPsec SA settings on your computer as are specified for the IPsecSettings on the machine. Setting methods differ according to the computer's operating system. Thefollowing procedure is based on Windows 7 in an IPv4 environment as an example.1. On the [Start] menu, click [Control Panel], [System and Security], and then click[Administrative Tools].2. Double-click [Local Security Policy], and then click [IP Security Policies on LocalComputer].3. In the "Action" menu, click [Create IP Security Policy...].The IP Security Policy Wizard appears.4. Click [Next].5. Enter a security policy name in "Name", and then click [Next].6. Clear the "Activate the default response rule (earlier versions of Windows only)." checkbox, and then click [Next].7. Select "Edit properties", and then click [Finish].8. In the "General" tab, click [Settings...].9. In "Authenticate and generate a new key after every", enter the same validity period (inminutes) that is specified on the machine in [IKE Life Time], and then click [Methods...].10. Confirm that the Encryption Algorithm ("Encryption"), Hash Algorithm ("Integrity"), andIKE Diffie-Hellman Group ("Diffie-Hellman Group") settings in "Security methodpreference order" all match those specified on the machine in [IKE Settings].If the settings are not displayed, click [Add...].11. Click [OK] twice.12. Click [Add...] in the "Rules" tab.The Security Rule Wizard appears.13. Click [Next].14. Select "This rule does not specify a tunnel", and then click [Next].15. Select the type of network for IPsec, and then click [Next].16. Click [Add...] in the IP Filter List.17. In [Name], enter an IP Filter name, and then click [Add...].The IP Filter Wizard appears.18. Click [Next].Transmission Using IPsec181](https://usermanual.wiki/Ricoh/PRSPC252DN1.BBP-PRSPC252DN1-User-Manual-1/User-Guide-2134301-Page-183.png)
![19. In [Description:], enter a name or a detailed explanation of the IP filter, and then click[Next].You may click [Next] and proceed to the next step without entering any information in this field.20. Select "My IP Address" in "Source address", and then click [Next].21. Select "A specific IP Address or Subnet" in "Destination address", enter the machine's IPaddress, and then click [Next].22. For the IPsec protocol type, select "Any", and then click [Next].23. Click [Finish], and then click [OK].24. Select the IP filter that you have just created, and then click [Next].25. Click [Add...] in the Filter Action.The Filter Action Wizard appears.26. Click [Next].27. In [Name], enter a Filter Action name, and then click [Next].28. Select "Negotiate security", and then click [Next].29. Select one of options for computers allowed to communicate with, and then click [Next].30. Select "Custom" and click [Settings...].31. When [ESP] is selected for the machine in [Security Protocol] under [IPsec Settings], select[Data integrity and encryption (ESP)], and configure the following settings:Set the value of [Integrity algorithm] to the same value as the [Authentication Algorithm for ESP]specified on the machine.Set the value of [Encryption algorithm] to the same value as the [Encryption Algorithm for ESP]specified on the machine.32. When [AH] is selected for the machine in [Security Protocol] under [IPsec Settings], select[Data and address integrity without encryption (AH)], and configure the followingsettings:Set the value of [Integrity algorithm] to the same value as the [Authentication Algorithm for AH]specified on the machine.Clear the [Data integrity and encryption (ESP)] check box.33. When [ESP&AH] is selected for the machine in [Security Protocol] under [IPsec Settings],select [Data and address integrity without encryption (AH)], and configure the followingsettings:Set the value of [Integrity algorithm] under [Data and address integrity without encryption (AH)] tothe same value as [Authentication Algorithm for AH] specified on the machine.Set the value of [Encryption algorithm] under [Data integrity and encryption (ESP)] to the samevalue as [Encryption Algorithm for ESP] specified on the machine.8. Appendix182](https://usermanual.wiki/Ricoh/PRSPC252DN1.BBP-PRSPC252DN1-User-Manual-1/User-Guide-2134301-Page-184.png)
![34. In the Session key settings, select "Generate a new key every", and enter the samevalidity period (in [Seconds] or [Kbytes]) as that specified for [Life Time] on the machine.35. Click [OK], and then click [Next].36. Click [Finish].If you are using IPv6 under Windows Vista or a newer version of Windows, you must repeat thisprocedure from Step 12 and specify ICMPv6 as an exception. When you reach Step 22, select[58] as the protocol number for the "Other" target protocol type, and then set [Negotiate security]to [Permit].37. Select the filter action that you have just created, and then click [Next].38. Select one of options for an authentication method, and then click [Next].39. Click [Finish], and then click [OK] twice.The new IP security policy (IPsec settings) is specified.40. Select the security policy that you have just created, right click on it, and then click[Assign].IPsec settings on the computer are enabled.• To disable the computer's IPsec settings, select the security policy, right click, and then click [Un-assign].Enabling and Disabling IPsec Using the Control Panel1. Press the [Menu] key.2. Press the [ ] or [ ] key to select [Host Interface], and then press the [OK] key.3. Press the [ ] or [ ] key to select [Network Setting], and then press the [OK] key.4. Press the [ ] or [ ] key to select [IPsec], and then press the [OK] key.5. Press the [ ] or [ ] key to select [Active] or [Inactive], and then press the [OK] key.6. Press the [Menu] key to return to the initial screen.Transmission Using IPsec183](https://usermanual.wiki/Ricoh/PRSPC252DN1.BBP-PRSPC252DN1-User-Manual-1/User-Guide-2134301-Page-185.png)